Clarion Max983Hd Users Manual NAVI ENG
MAX983HD MAX983HD-NAVI-ENG,13
MAX983HD to the manual a8809d4d-5e69-4e3e-9d05-88d3dbf230e0
2015-02-02
: Clarion Clarion-Max983Hd-Users-Manual-411173 clarion-max983hd-users-manual-411173 clarion pdf
Open the PDF directly: View PDF ![]() .
.
Page Count: 187 [warning: Documents this large are best viewed by clicking the View PDF Link!]

Owner’s manual (Navigation)
Mode d’emploi (Navigation)
Benutzerhandbuch (Navigation)
Manuale dell’utente (Navigazione)
Gebruikershandleiding (Navigatie)
Guía de usuario (Navegación)
Ägarhandbok (Navigation)
Manual do utilizador (Navegação)
Brugervejledning (Navigation)
HDD NAVIGATION SYSTEM
SYSTEME DE NAVIGATION HDD
HDD-NAVIGATIONSSYSTEM
SISTEMA DI NAVIGAZIONE HDD
HDD-NAVIGATIESYSTEEM
SISTEMA DE NAVEGACIÓN HDD
NAVIGATIONSSYSTEM MED HÅRDDISK
SISTEMA DE NAVEGAÇÃO COM HDD
(UNIDADE DE DISCO RÍGIDO)
HDD-NAVIGATIONSSYSTEM
QY-5003E-B
2008/5(Y-YI)
MAX983HD
MAX983HD
Clarion Co., Ltd.
All Rights Reserved.Copyright © 2008: Clarion Co., Ltd.
Printed in Hungary / Imprimé en Hongrie / Gedruckt in Ungarn /
Stampato in Ungheria / Gedrukt in Hongrarije / Impreso en Hungría /
Tryckt i Ungern / Impresso na Hungria / Trykt i Ungarn
3
MAX983HD
English
1. Preface
Safety Precautions
When using this navigation system, follow the precautions listed below. After reading this manual, be
sure to keep it in a handy place (such as the glove box of your car).
CAUTION
Cautions
•While driving, set the volume so that sound
from outside the vehicle can be heard.
Driving without hearing sound from the
outside of the vehicle may cause a traffic
incident.
Warnings
•This navigation system should not be used as a substitute for your own judgment. Any route
suggestions made by this navigation system may never override any local traffic regulations,
your own judgment, and/or knowledge of safe driving practices. Disregard route suggestions
by the navigation system if such suggestions would: cause you to perform a hazardous or
illegal maneuver, place you in a hazardous situation, or route you into an area you consider
unsafe.
•The advice provided by the navigation system is to be regarded only as a suggestion(s)/
There may be situations where the navigation system displays the vehicle’s location
incorrectly, fails to suggest the shortest course, and/or fails to direct you to your desired
destination. In such situations, rely on your own driving judgment, taking into account
current driving conditions.
•Do not use the navigation system to route you to emergency services. The database does
not contain a complete listing of locations of emergency service providers such as police,
fire stations, hospitals and clinics. Please use your judgment and your ability to ask for
directions in these situations.
•As a driver you are solely responsible for your road safety.
•In order to avoid a traffic accident or traffic offence, remember that actual road conditions
and traffic regulations take precedence over the information contained in the navigation
system.
•Accordingly, the software may contain inaccurate or incomplete information due to the
passage of time, changing circumstances, and due to the nature of the sources used.
Please observe the actual traffic circumstances and regulations at all times while driving.
•The navigation system does not provide, or account for in any way; information regarding
traffic and road laws; vehicle specifications including weight, height, width, load, and/or
speed restrictions; road conditions including road slope, grade, and/or surface
conditions; obstruction information including bridge and tunnel height and width, and/or
other prevailing driving and/or road conditions. Always rely on your own driving
judgment, taking into account current driving conditions.
•Minimize the amount of time spent viewing the screen while driving.
•The driver should not operate this unit while driving.
Be sure to stop the vehicle in a safe place when the driver is operating this unit. For safety,
some of the navigation functions are prohibited if the vehicle is not stopped with the parking
brake engaged.

4MAX983HD
English
About This Manual
The following two manuals are provided to this system:
●Owner’s Manual (Audio, Visual, General & Installation)
This manual (hereinafter referred to as “Audio Manual”) explains the functions and operation procedures
of the AV features. In addition, the general precautions and other information on using this system are
also explained in this manual.
●Owner’s Manual (Navigation) (This Book)
This manual (hereinafter referred to as “Navigation Manual”) explains the functions and operation
procedures of the navigation features.
Note:
•This manual is described on the assumption that the default Skin data has been applied. When the other Skin
data is applied, the screen design and shapes of icons will be different from the contents listed in this manual.
•Please be aware that the device may be different from the manual according to the changes of the
specifications.
Symbols used in this manual
Notes on Handling
• In no event shall Clarion be liable for any incidental damage (including, but not limited to, loss of the
business profit or change/loss of the data) caused from use or inability to use of this product.
Note:
•When using this unit first time after purchasing, or not used for long periods of time, it might take about 5 to
15 minutes until the current location is determined using GPS. Moreover, even when using it often, it may take
about 2 to 3 minutes until the current location is determined according to the GPS measuring situation.
•Provided RDS TMC information about traffic incidents may not be up to date. Use the provided RDS TMC
information as a reference only.
•When the route (path) cannot be calculated, move desired destination to a nearby main road and perform
calculation again. It may be impossible to find a route in case the car location is too close to the desired
destination.
Note: : Lists what should be noted when operating or referential information.
[ ] button : Indicates a button on this unit.
[ ] key : Indicates a menu item on the screen.
➜: Indicates a title and page number on which recommended reference information is
described.

5
MAX983HD
English
Contents
1. Preface .......................................................................................................................... 3
Safety Precautions ......................................................................................................... 3
About This Manual ......................................................................................................... 4
Notes on Handling.......................................................................................................... 4
Contents ......................................................................................................................... 5
2. Basic Operations.......................................................................................................... 6
Switching the Operation Mode ....................................................................................... 6
Menu Types and Operation............................................................................................ 6
Map Screen Features................................................................................................... 10
Manipulating the Map Screen....................................................................................... 16
Outline of Destination Entering Procedures ................................................................. 19
3. Entering the Destination............................................................................................ 22
Searching Your Destination from the Destination Menu............................................... 22
Searching Your Destination from the Map Screen ....................................................... 26
Searching for POI Using the Quick POI Function......................................................... 26
Searching Your Destination from the Favourite/Frequent List...................................... 27
Setting the Destination and Starting the Route Guidance............................................ 28
4. Route Guidance.......................................................................................................... 30
Route Guidance Screen Features................................................................................ 30
About the Voice Guidance............................................................................................ 32
Changing/Editing the Route Settings ........................................................................... 32
Notes on the Route Guidance ...................................................................................... 36
Notes on the Voice Guidance....................................................................................... 37
5. Traffic Information...................................................................................................... 38
Displaying the Traffic Information................................................................................. 38
Notes on the Traffic Information ................................................................................... 41
6. System Settings ......................................................................................................... 42
General Settings........................................................................................................... 43
Navigation Settings ...................................................................................................... 44
Audio Settings .............................................................................................................. 48
Adjusting the Monitor.................................................................................................... 48
User Settings................................................................................................................ 48
Registering/Editing the Data......................................................................................... 49
Importing Data Using the SD Card............................................................................... 51
Service Options............................................................................................................ 52
Setting Safety Camera ................................................................................................. 53
7. Favourite/Frequent List Operations.......................................................................... 54
What is Favourite/Frequent List?.................................................................................. 54
Using Favourite/Frequent List ...................................................................................... 54
8. Voice Command Operations ..................................................................................... 57
Voice Command Features............................................................................................ 57
List of the Voice Commands (Navigation Features)..................................................... 59
Notes on the Voice Command Operations................................................................... 61
9. Others.......................................................................................................................... 62
Troubleshooting............................................................................................................ 62
Error Messages ............................................................................................................ 62
About the Positioning Error .......................................................................................... 63
6MAX983HD
English
2. Basic Operations
See the Audio Manual for the procedure to turn the power on/off and the details of controls on the
Operation Panel.
Switching the Operation Mode
To switch between the Navigation screen and Audio screen, press the [ NAVI] (Navi/AV) button.
Menu Types and Operation
This section explains the types of the typical menu screens on the touch panel and their operation.
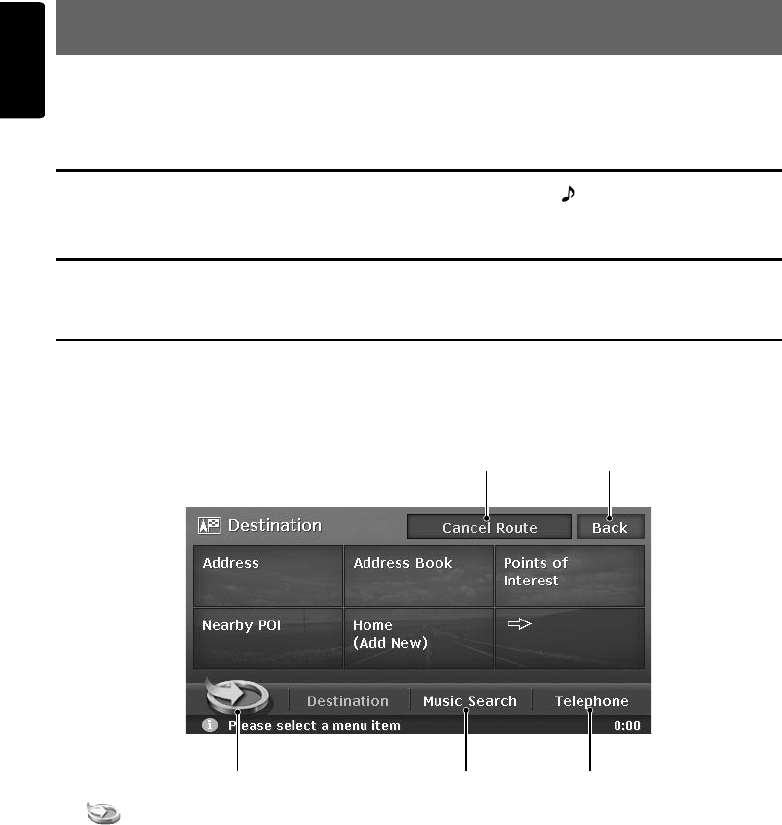
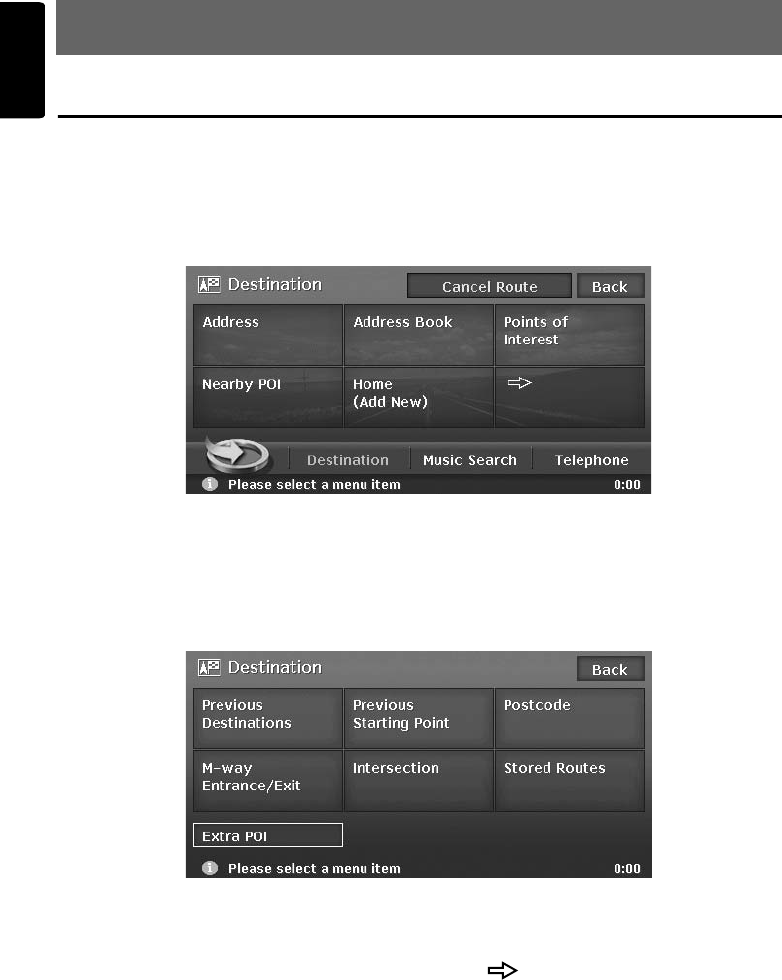
Destination menu
Pressing the [MENU] button displays the Destination menu screen. By touching the desired menu item,
you can display menu screens and perform operations of entering a destination.
Touching the menu item on the lower part of the screen displays each menu screen.
For the entering procedure of the destination, see “Outline of Destination Entering Procedures”
(P. 19), and “3. Entering the Destination” (P. 22).
1 [] key
Displays the Favourite list menu screen.
➜ “Favourite/Frequent menu” (P. 7), “7.
Favourite/Frequent List Operations” (P. 54)
2 [Music Search] key
Displays the Music Search menu screen.
➜ “Music Catcher Operations” (Audio Manual)
3 [Telephone] key
Displays the Telephone menu screen.
➜ “Telephone Operations” (Audio Manual)
4 [Back] key
Returns to the previous screen.
5 [Cancel Route] key
Terminates the route guidance during the route
guidance mode.
➜ “Cancelling the route guidance” (P. 33)
1 2 3
45
Menu Types and Operation
7
MAX983HD
English
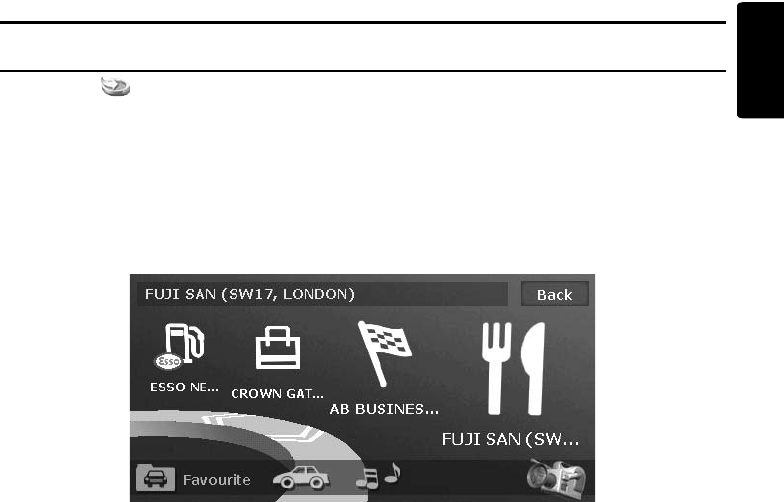
Favourite/Frequent menu
Touching the [ ] key in the Destination menu or in the Navi Shortcut menu displays the Favourite list
menu screen.
Your favourite places can be registered in the Favourite list, and places often visited are automatically
registered in the Frequent list.
From the 3D List screen of the Favourite/Frequent list menu, you can enter a destination by an easy
operation. From the 2D List screen, you can edit the list items by drag-and-drop operations.
For details, see “7. Favourite/Frequent List Operations” (P. 54).
Menu Types and Operation
8MAX983HD
English
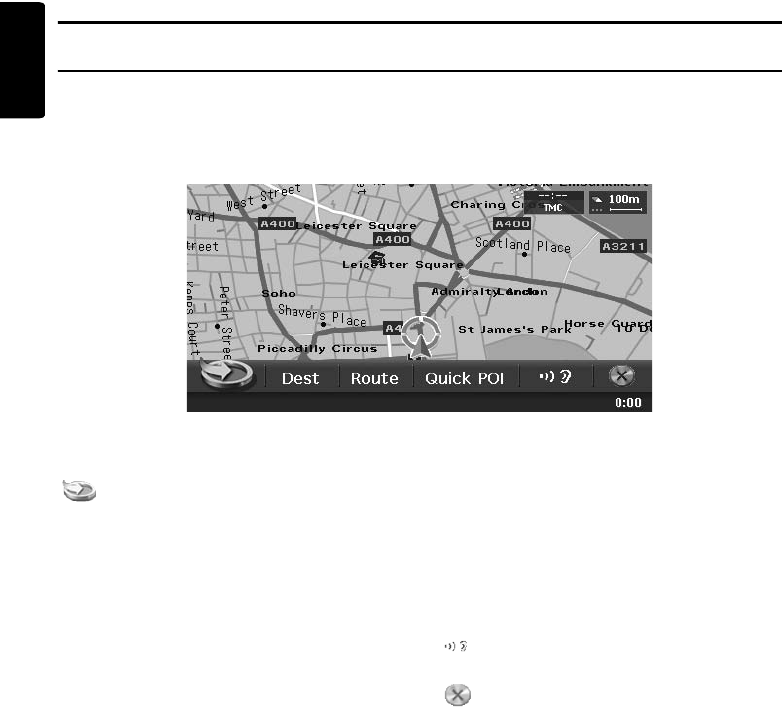
Navi Shortcut menu
Touching the [NAVI] key from the Current Location Map screen displays the Navi Shortcut menu on top
of the Map screen. Operate by touching the desired menu items or icons.
[ ] key:
Displays the Favourite list menu screen.
[Dest] key:
Displays the Destination menu screen of the
navigation system.
[Route] key:
Displays the Route menu screen.
[Quick POI] key:
Displays the Quick POI screen for searching
nearby POI or POI on the route with five
categories. You can customise the categories by
touching the [Setting] key on the Quick POI
screen. The five categories can also be
customised from the Setting menu. ➜ “Quick
POI Settings” (P. 46)
[ ] key:
Repeats the current voice guidance.
[ ] key:
Hides the Navi Shortcut menu.
Menu Types and Operation
9
MAX983HD
English
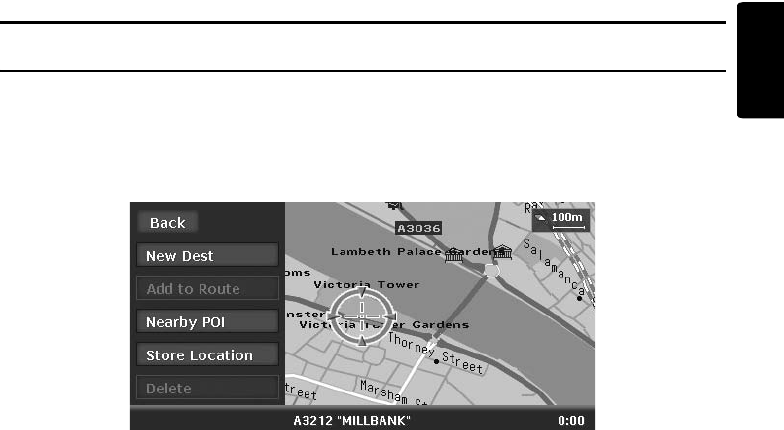
Location menu (Menu on scrolled map)
After scrolling the map by touching the Map screen, touch the [OK] key on the screen to display the
Location menu at the left side of the screen. You can set the location under the cursor at the centre of
the screen as the destination or store it to the Address Book.
[Back] key:
Returns to the scrolled Map screen before
touching the [OK] key.
[New Dest] key:
Sets the location under the cursor as the
destination. When a destination is already set,
the old destination is cancelled as soon as the
new destination is set.
[Add to Route] key:
When another location is already set as the
destination, you can set the location under the
cursor as a waypoint. Touching this key displays
the Edit Route screen. Specify the desired order
of passing to set the location as a waypoint. ➜
“Editing the route” (P. 33)
[Nearby POI] key:
Displays the Category screen of the POIs in the
vicinity of the location under the cursor.
[Store Location] key:
Registers the location under the cursor in the
Address Book.
[Delete] key:
When the cursor points at a stored location,
pressing this key deletes this location from the
Address Book.
10 MAX983HD
English
Map Screen Features
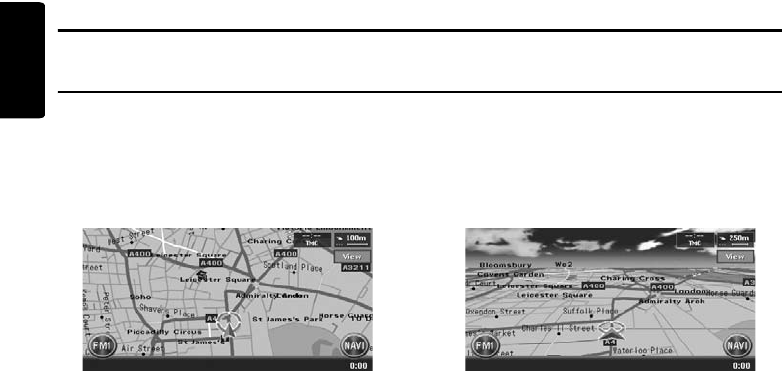
Types of the map
There are two types of map: the 2D map and the 3D map. Such as the method of scrolling the map,
some operation are different depending on the map types. Moreover, you can display two types of maps
at the same time on the divided screen, and can change the map orientation. Change the map
appearance according to your preferences. ➜ “Scrolling the Map” (P. 16), “Changing the map
appearance” (P. 16)
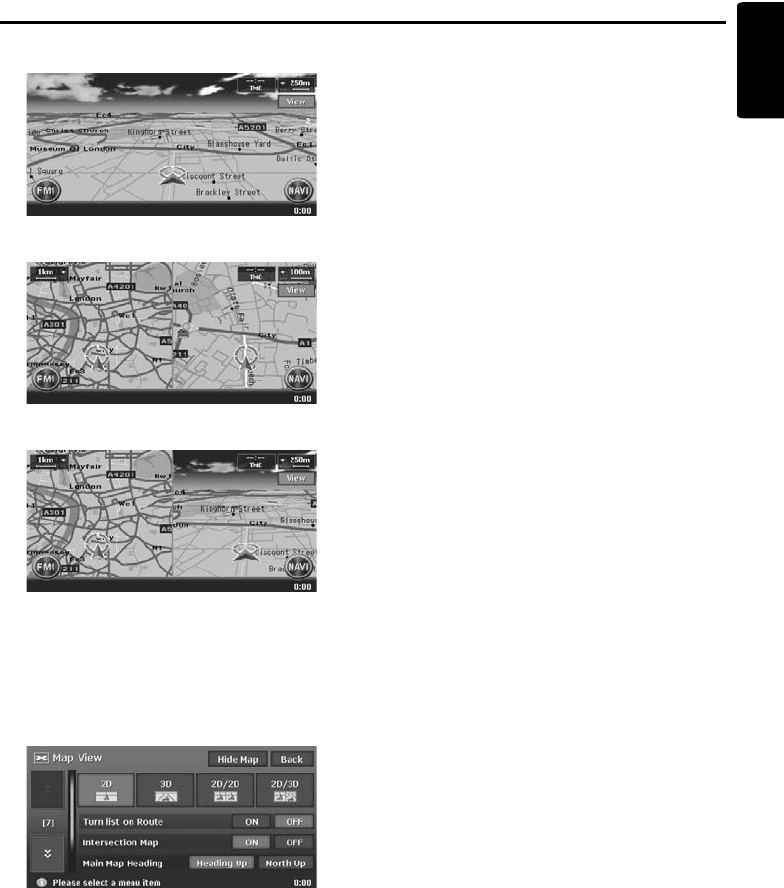
●2D Map
The 2D map is a map screen represented to the
plane just like the map of atlases. It is suitable for
searching a destination and confirming the road
or route.
●3D Map
The 3D map is a map screen using a viewing
position above the vehicle while looking in the
direction of the car heading. It is suitable for
understanding the image of the direction,
because the perspective of the travelling
direction can be adjusted as required.
Map Screen Features
11
MAX983HD
English
Indicators on the map
Indicators displayed on the Map screen are different according to the conditions at that time. This section
explains the main indicators displayed on the Map screen.
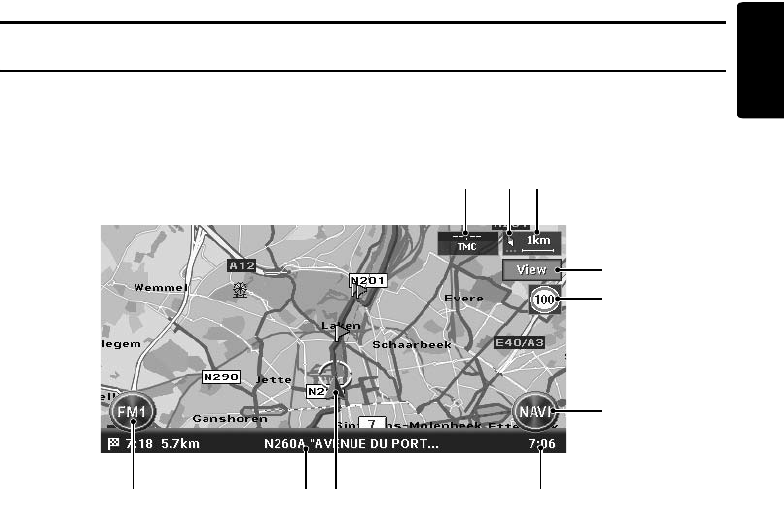
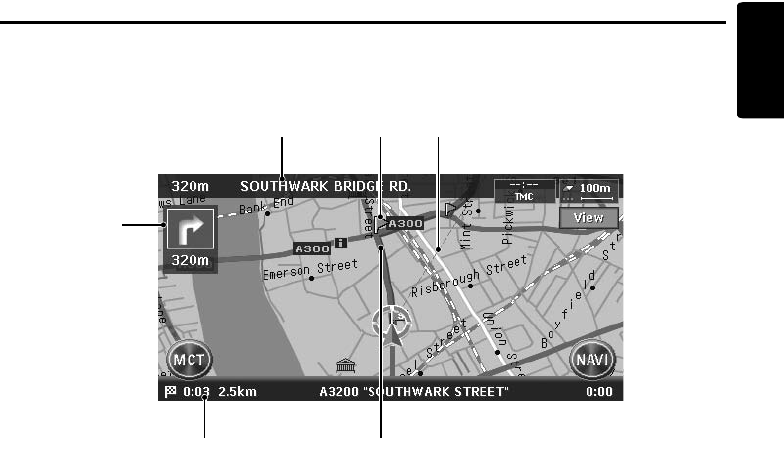
Indicators on the map of the current location
1 AV Shortcut key
Displays the AV Shortcut menu.
Letters displayed on the key vary to indicate the
current mode of the AV feature.
2 Current street name
Shows the name of the current street.
3 Vehicle mark
Indicates the current location and direction of
your vehicle. You can change this mark. ➜
“Vehicle Icon” (P. 45)
4 Clock
Displays the current time.
5 [NAVI] key
Displays the Navi Shortcut menu.
6 Speed Limit Icon
Generally the icon shows the speed limit of the
current main road where a speed data is supplied
by a map database.When a speed data was
changed, the numerals on the icon are changed
and the indication blinks for a few seconds. ➜
“
Changing the map appearance
” (P. 16)
7 [View] key
Touch this for changing the appearance of the
map.
➜
“
Changing the map appearance
” (P. 16)
8 Map scale
Indicates the scale of the map currently
displayed.
9 Map bearing mark/GPS receiving
status
Indicates the map orientation. You can switch the
map orientation between Heading Up and North
Up by touching this icon. ➜ “Changing the map
appearance” (P. 16)
In addition, the receiving status of the GPS signal
is indicated by coloured three dots under the
bearing mark.
Blue:
Receiving in 3D
Yellow:
Receiving in 2D
Grey:
No signal received
0 TMC indicator
The TMC indicator turns to green and the time
that data was received in last is indicated in the
upper area while receiving TMC information.
➜ “5. Traffic Information” (P. 38)
1 2 3 4
5
7
80 9
6
Map Screen Features
12 MAX983HD
English
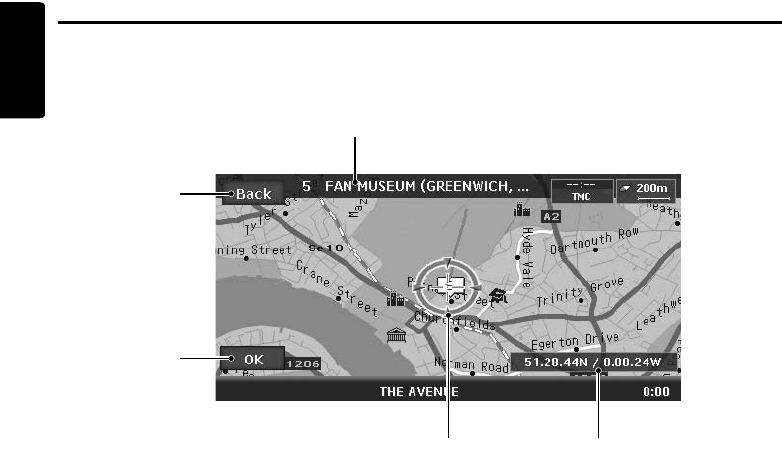
Indicators on the scrolled map
Indicators are displayed after scrolling the map. During scrolling, only the scroll cursor is displayed on
the map.
1 [Back] key
Returns to the map of current location.
2 [OK] key
Displays the Location menu. You can set the
location under the cursor as the destination or
store this location. ➜ “Location menu (Menu on
scrolled map)” (P. 9)
3 Scroll cursor
Displayed when scrolling the map.
4 Latitude/longitude information
Displays the latitude/longitude information of the
location under the cursor. Whether this is
displayed or not can be set. ➜ “Map Scrolling
Information” (P. 47)
5 Location information
When moving the cursor on a Stored Location,
destination, or waypoint, the place name will be
displayed.
If the TMC icon is put together to the cursor, the
TMC information is displayed.
3 4
5
1
2
Map Screen Features
13
MAX983HD
English
Indicators displayed during the route guidance mode
After a destination is set and travelling is started, the guidance route and various guidance information
are displayed on the map. ➜ “Route Guidance Screen Features” (P. 30)
1 Small Turn by Turn Arrow display
Displays the turning direction and distance to the
next guidance point. Whether it is displayed or
not can be set. ➜ “Map Guidance Settings”
(P. 44)
2 Expected arrival time and distance to
the destination
The expected time of arrival to the destination
and the distance from the current location to the
destination are displayed. The remaining time
and distance to the next waypoint are displayed
additionally, if at least one waypoint is existing.
3 Guidance route
The guidance route to the destination is
displayed. The colour of the route can be
changed. ➜ “Route Colour” (P. 45)
4 Destination direction
Indicates the direction to the destination from the
current location.
5 Guidance point
Indicates the guidance point.
6 Next intersecting Road name and
distance
The distance to the next guidance intersection
and the name of the next intersecting road will be
displayed when you get near to approx. 600 m or
600 yd (2 km or 1.4 mile for a motorway) to the
intersection.
2 3
5 46
1
Map Screen Features
14 MAX983HD
English
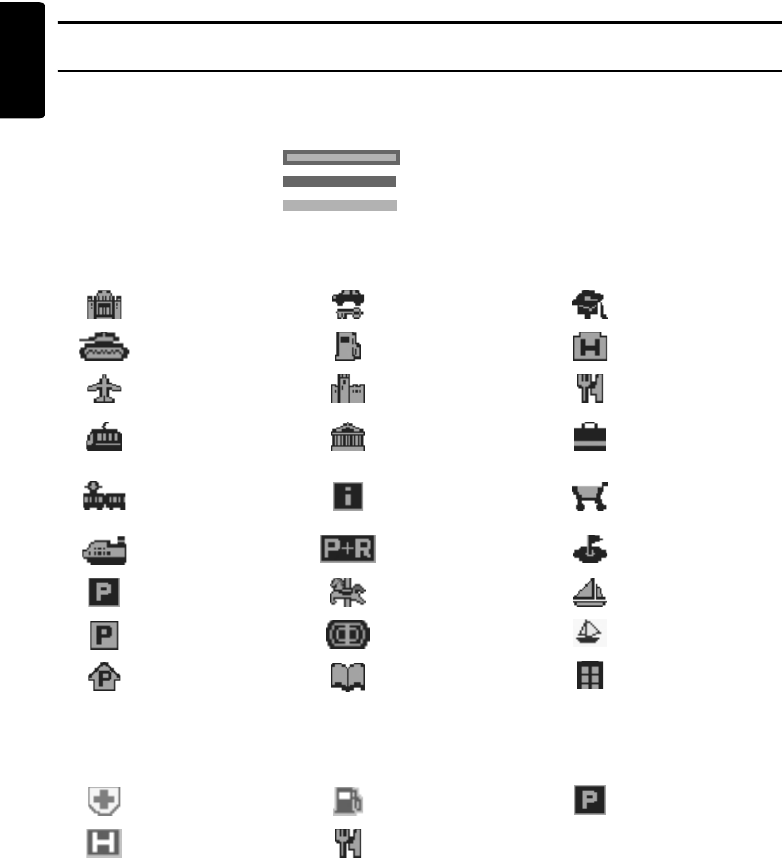
Map symbols
This navigation system indicates information such as roads and facilities using symbols and colours.
Colour of the roads
Map symbols (examples)
The following map symbols are displayed on the map.
Landmark icons
Landmark icons are displayed on the Intersection map screen, etc. Whether they are displayed or not
can be set. ➜ “Landmark Icon display” (P. 45)
Motorways : (Yellow with red border)
Main roads : (Red)
Minor roads : (Yellow)
Municipal Office Rental Car Company University or College
Military Base Petrol Station Hotel
Airport Historical Site Restaurant
Main Station Science Museum·
Art Museum Shopping Centre
Station Tourist Information
Centre Supermarket
Ferry Terminal Park & Ride Golf Course
Car Park Recreation Ground Marina
Parking Lot Sports Complex Marina
Parking Garage Library Other Facilities
Hospital Petrol Station Car Park
Hotel Restaurant
Map Screen Features
15
MAX983HD
English
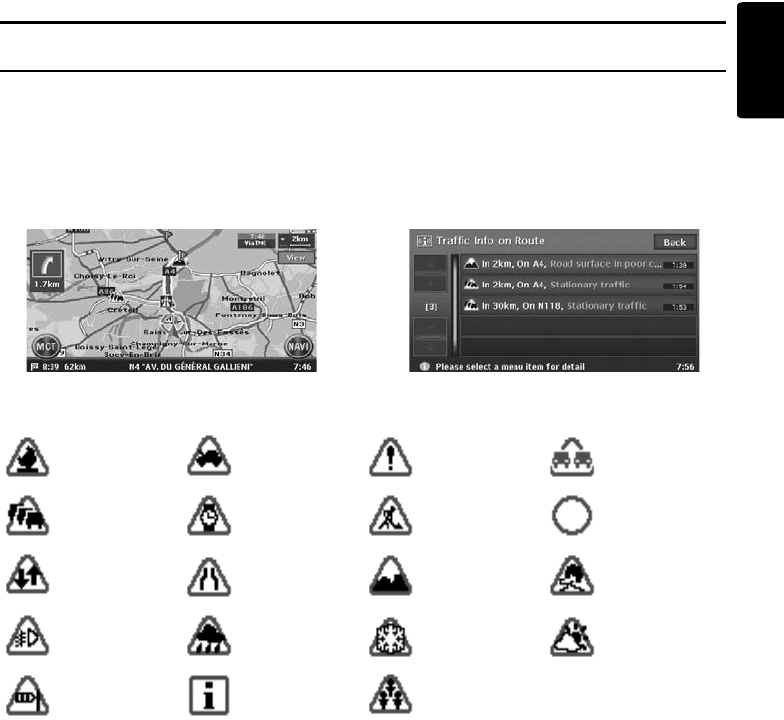
TMC traffic information symbols
When the system receives RDS-TMC traffic information, detailed TMC traffic information on the route
are displayed on the map. TMC traffic information is displayed on the map with symbols and congestion
information colour. ➜ “5. Traffic Information” (P. 38)
Example of TMC traffic information displayed
●Current location map screen with traffic
information
●Screen of TMC traffic information on route
Symbols used for TMC traffic information
Congestion information colour
Accident Broken vehicle Danger Vehicle on wrong
carriage way
Traffic
congestion Delay Roadworks Closed road
Contra flow Lane restrictions Road surface in
poor condition Slippery road
Fog reduced
visibility Rain Snow Weather
Wind Information Major events
Closed : Purple
Jammed :Red
Moderate : Yellow
Free flow : Green
No data (unknown): Not displayed (no colour)
16 MAX983HD
English
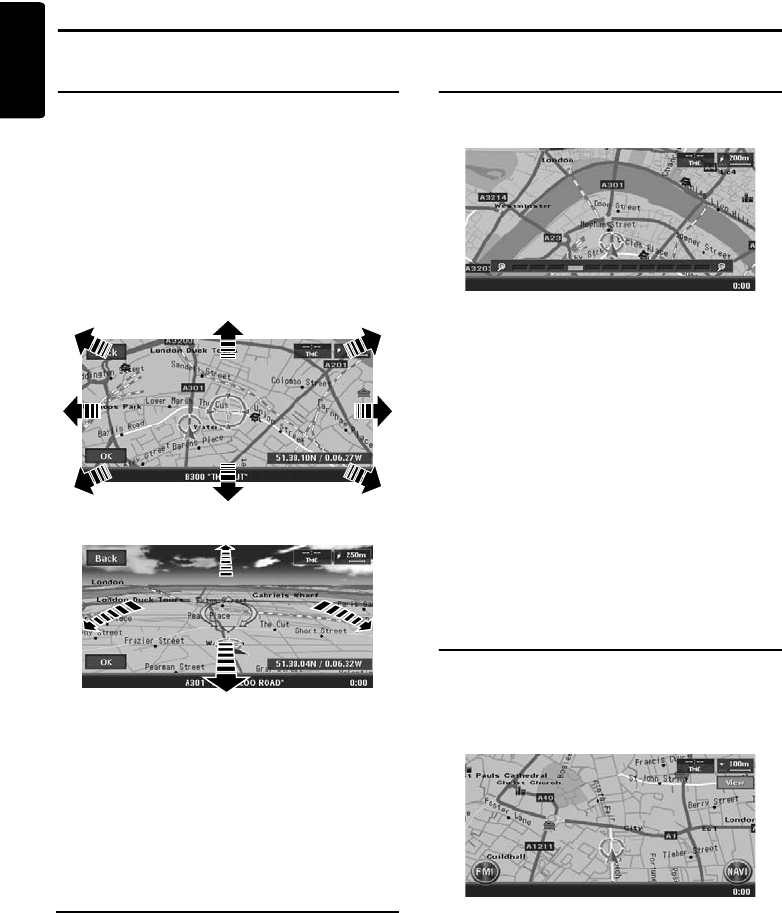
Manipulating the Map Screen
Scrolling the Map
Touching the Map screen displays a cursor at the
centre of the screen, and you can scroll the map.
For the 2D map, touch the map to move the map
to the touched position, and keep touching the
map to scroll the map towards the touched
direction.
For the 3D map, touch the upper part of the map
to scroll the map toward the touched direction,
and touch the left or right part to rotate the map
while touching.
2D Map
3D Map
Displaying the map of the
current car location
When the [MAP] button is pressed, the map
around the current location is displayed with the
vehicle in the centre of it. When the vehicle runs,
the behaviour is the same.
Zooming IN/OUT the map
Press the [OUT] (Zoom Out) or [IN] (Zomm In)
button to change the map scale.
The 2D map can be adjusted in 11 steps, and the
3D map in 10 steps.
Note:
For the 2D/2D or 2D/3D map, these buttons work
upon the right map. To adjust the left map, touch the
left map, and then use these buttons.
Changing the map
appearance
The Map screen can be adjusted regarding
orientation or appearance of the map.
Screen examples
•2D Map
[Back] key:
Returns to the current location map screen.
[OK] key:
You can set the location under the cursor as the
destination or store the location to the Address
Book. ➜ “Location menu (Menu on scrolled
map)” (P. 9)
[IN] (Zoom In) button:
Increases the map scale, and shows a more
detailed map. Keep touching it to enter the Free
Zoom mode.
[OUT] (Zoom Out) button:
Decreases the map scale, and shows the map of
a wider area. Keep touching it to enter the Free
Zoom mode.
Manipulating the Map Screen
17
MAX983HD
English
•3D Map
•2D/2D Map
•2D/3D Map
Touch the [View] key on the Map screen of the
current vehicle location. The Map View menu is
displayed.
Note:
You can also adjust these settings from
[Navigation] of the Setting menu. ➜ “Map View
settings” (P. 44)
[D]/[d] key:
Scrolls the Map View menu screen up or down.
[2D] key:
Changes to the map represented to the plane just
like the map of atlases.
[3D] key:
Changes to the 3D map using a viewing position
above the vehicle while looking in the direction of
the car heading.
Note:
To change the 3D angle, set the “3D Map Angle” as
mentioned below.
[2D/2D] key:
Displays two 2D maps right and left on the
divided screen. This is convenient to view two
maps with different scales.
Note:
To change the orientation or scale of the left map,
set the “Left Map Heading” or “Left Map Scale” as
mentioned below.
[2D/3D] key:
Displays a 2D map at the left and a 3D map at the
right on the divided screen.
Note:
To change the orientation or scale of the left map,
use the “Left Map Heading” or “Left Map Scale” as
mentioned below.
“Turn list on Route”:
During the route guidance mode: Set to ON to
display the list of the name, distance, and turning
direction of the guidance intersections at the left
of the screen.
•[ON]
Displays the Turn List screen.
•[OFF]
Hides the Turn List screen.
“Intersection Map”:
Changes the setting of the Intersection Close-up
display which displays the turning direction of the
next guidance intersection.
•[ON]
Displays the Intersection Close-up display.
•[OFF]
Hides the Intersection Close-up display.
“Main Map Heading”:
Changes the orientation of the map. This control
is available when the main map or the right map
is set to 2D mode.
•[Heading Up]
The map is displayed with the travelling
direction pointing up.
•[North Up]
The map is displayed with north pointing up.
“Left Map Scale”:
Changes the scale of the left map. This control is
available when a divided map mode is selected.
•[+]
Increases the map scale, and shows a more
detailed map.
•[–]
Decreases the map scale, and shows the map
of a wider area.

Manipulating the Map Screen
18 MAX983HD
English
CAUTION
Cautions
•The actual speed limit may change due to
hours or other circumstances. Be sure to
observe the actual traffic circumstances
and regulations at all times while driving.
•When the actual speed exceeds the speed
limit data, the icon blinking and a beep
sounding will not work.
“Left Map Heading”:
Changes the orientation of the left map. This
control is available when the divided map screen
is displayed.
•[Heading Up]
The map is displayed with the travelling
direction pointing up.
• [North Up]
The map is displayed with north pointing up.
“3D Map Angle”:
Changes the angle of the 3D map. This control is
available when the 3D map is displayed.
•[Adjust]
The angle control keys are displayed. You can
raise the angle by touching the [E] key, and
lower the angle by touching the [e] key.
“Speed Limit Icon”:
Changes the function of the Speed Limit icon.
•[ ]
The icon blinks and a beep sounds when the
speed limit information in the map database is
changed.
•[ ]
The icon blinks when the speed limit information
in the map database is changed.
•[OFF]
This function is disabled.
[Hide Map] key:
Hides the map, and displays the screen
containing only the next guidance point (Turn-by-
Turn screen). This screen can also be displayed
by keep pressing the [MAP] button. When the
navigation system is not in the route guidance
mode, the screen with the compass showing the
direction is displayed.
19
MAX983HD
English
Outline of Destination Entering Procedures
To start route guidance, operate the navigation system with the following procedure:
●Select the method of searching destination from the Destination menu screen, then search for
the desired destination.
Select a suitable searching method according to the place to search.
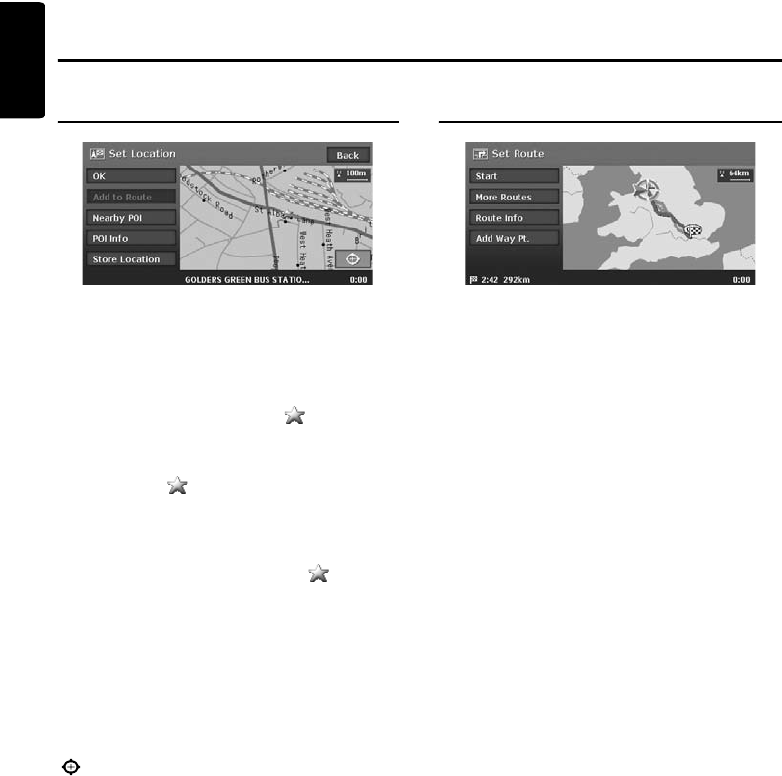
●Confirm the position of the place found with the Set Location menu screen or Place menu
screen, then set the destination.
You can store the place found to the Address Book, or can confirm the information according to the
place, as well as set it as destination.
●Start the route guidance from the Set Route menu screen.
You can also display other suggested routes, or confirm information of the route.
Other than the above procedure, you can also enter the destination by scrolling the map or from the
Favourite/Frequent menu.
Setting destination by entering the address
This section explains the basic operation procedure to set the destination in detail, using the example to
specify the destination by entering the address from the Destination menu. Read this explanation
thoroughly because this procedure is similar to other destination entering methods.
For other destination entering methods, see “3. Entering the Destination” (P. 22).
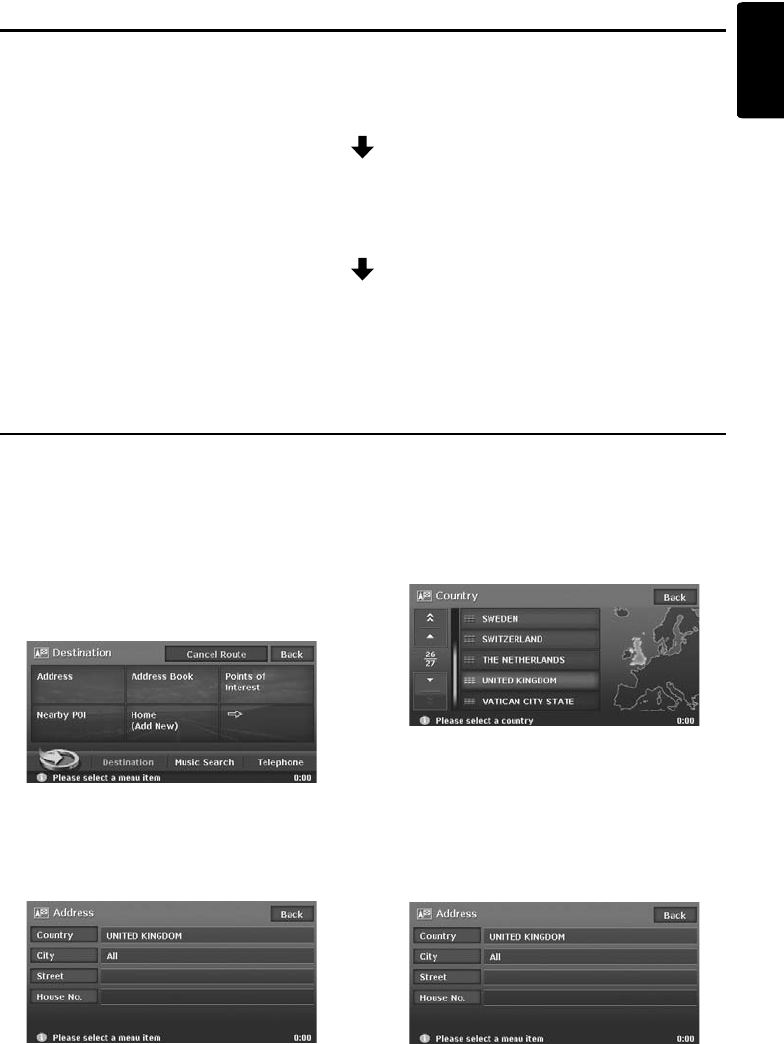
1. Press the [MENU] button.
The Destination menu of the navigation
system is displayed.
2. Touch the [Address] key.
The Address input screen is displayed.
3. Confirm the displayed country name (the
previous country name is displayed). If the
country name you wish to go to is not
displayed, touch the [Country] key, otherwise
proceed to the step 5.
4. Touch the country name you wish to go.
The specified country name is displayed.
[I] / [i]
Scrolls the list up or down by one item.
[D] / [d]
Scrolls the list by one page.
5. Touch the [City] key.
Note:
You can omit the city name entry and directly enter
a road name.
Outline of Destination Entering Procedures
20 MAX983HD
English
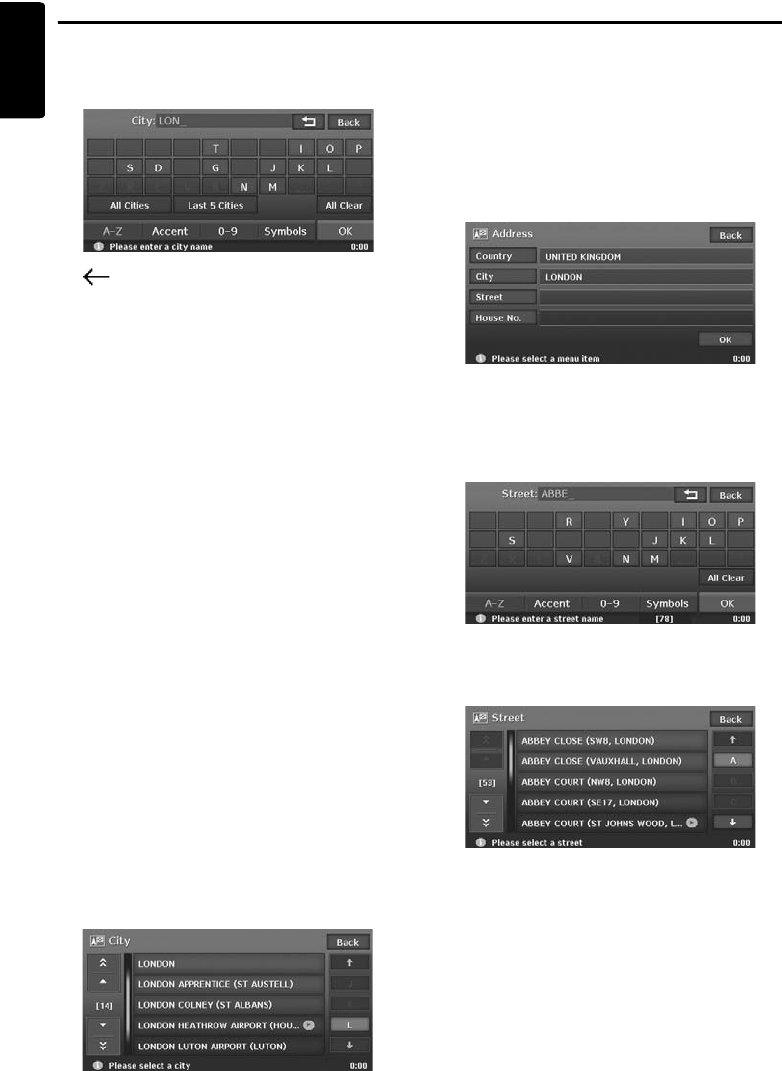
6. Enter the city name you wish to go to by
touching the characters on the screen, then
touch the [OK] key.
[]
Deletes the last entered character.
[Back]
Returns to the previous screen.
[All Cities]
Specify all cities of the specified country for
the search.
[Last 5 Cities]
Displays the list of five city names recently
used. Touch desired city name you wish to go
to.
[All Clear]
Deletes all characters entered so far.
[A-Z]
Displays the alphabetic input keyboard.
[Accent]
Displays the accent characters input
keyboard.
[0-9]
Displays the number input keyboard.
[Symbols]
Displays the symbol characters input
keyboard.
[OK]
Searches the map database using entered
characters, and proceeds to the city name
List.
Note:
•By touching the [OK] key, the city name list is
displayed even if you do not enter all characters.
•During the character entry, the system shows the
city name list automatically when the amount of
matching cities is five or less.
7. Touch the city name you wish to go to.
Then, the system returns to the Address input
screen.
[(Alphabet)]
Scrolls the list to each initial letter.
The total number of list items is displayed at
the left of the screen.
8. Touch the [Street] key.
The Street input screen is displayed.
Note:
You can omit the street name entry. By touching the
[OK] key, proceed to step 13.
9. Enter the street name you wish to go to by
touching characters on the screen, then touch
the [OK] key.
Enter by the same way as the city name entry.
The street name list is displayed.
10.Touch the street name you wish to go to.
Then, the system returns to the Address input
screen.
Outline of Destination Entering Procedures
21
MAX983HD
English
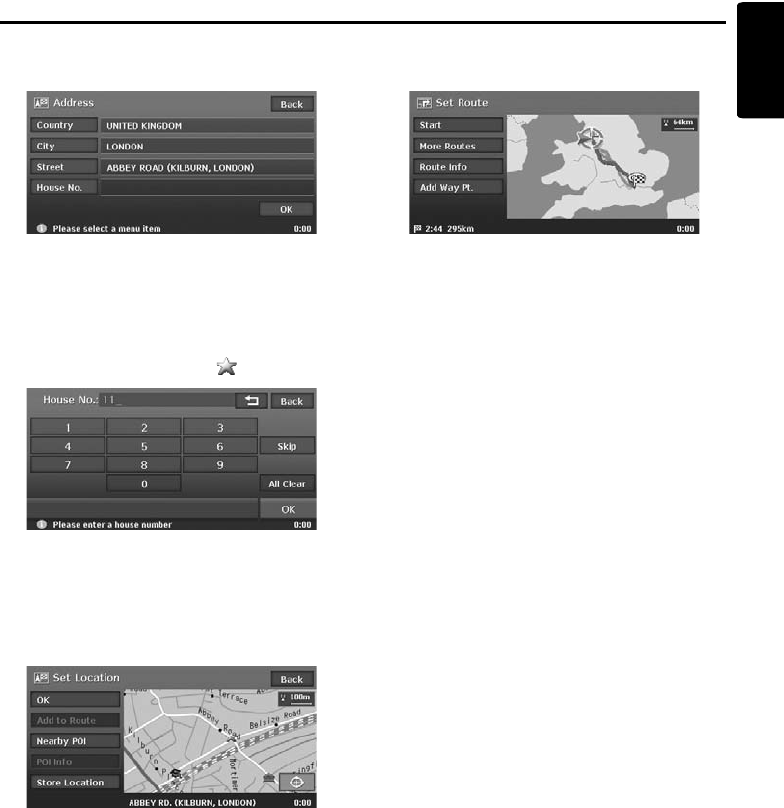
11.Touch the [House No.] key.
The house number input screen is displayed.
Note:
You can omit the house number entry. By touching
the [OK] key proceed to step 13.
12.Enter the house number by touching numbers
on the screen, then touch the [OK] key.
The Set Location menu is displayed. The
place found is shown with “ ” on the map.
Note:
The range of house numbers you can enter is
displayed at the bottom of the screen.
13.Confirm the location, then touch the [OK] key.
The Set Route menu is displayed with the
map around the place selected.
Note:
With this screen, you can register the place found or
can search facilities (POI) around the place. ➜ “Set
Location menu” (P. 28)
14.Touch the [Start] key.
The route guidance will be started.
Note:
In this screen, you can also select among other
suggested routes with a different routing priority
condition, obtain additional route information, and
set waypoints. ➜ “Set Route menu” (P. 28)
22 MAX983HD
English
3. Entering the Destination
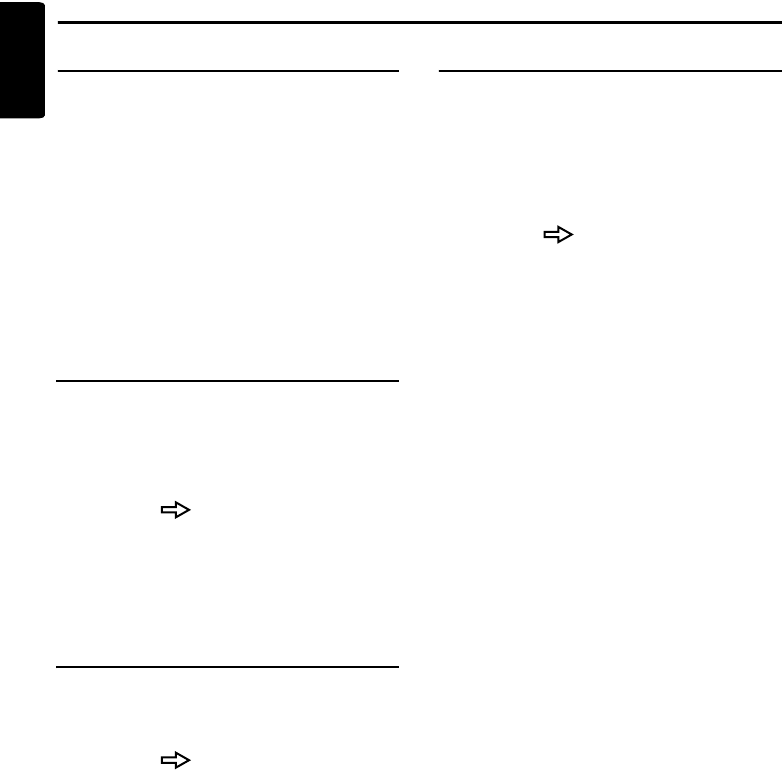
Searching Your Destination from the Destination Menu
You can search for a destination from the Destination menu by using various methods. Use a suitable
searching method according to the place you wish to go to.
Destination menu screen 1
Destination menu screen 2
1. Press the [MENU] button.
The Destination menu screen is displayed. Touching the [ ] (Next) key displays the next menu
screen.
Note:
You can also display the Destination menu screen by touching the [Dest] key from the Navi Shortcut menu
which is displayed by touching the [NAVI] key on the Map screen.
2. Touch the desired searching method.
For the operation procedure hereafter, see the explanation of each section.

Searching Your Destination from the Destination Menu
23
MAX983HD
English
By Address
For the operation procedure using the [Address],
see “Setting destination by entering the
address” (P. 19)
By Address Book
Specifies a place registered in the navigation
system as the destination.
Note:
To use this function, register places beforehand. ➜
“Address Book” (P. 49)
1. Touch the [Address Book] key.
2. From the displayed Address Book list, touch
the stored location you wish to go.
[Sort]
You can select the sorting method.
•[by Number]: Displayed by the registered
order.
•[by Name]: Displayed by the alphabetical
order of the name.
•[by Icon]: Displayed the list classified by
icon type.
•[by Group]: Displayed the list classified by
groups.
Note:
•You can store a new location by touching the
[None (Add New)] key.
•For storing or editing procedure, see “Address
Book” (P. 49).
3. Confirm the location of the destination, then
touch the [OK] key.
4. Touch the [Start] key.
By Points of Interest (POI)
Select the category of the place, narrow down the
data by specifying the area or entering the name,
and then select the place you wish to go to.
By touching the [by Name] key, you can also
search a place by simply entering the name.
1. Touch the [Points of Interest] key.
2. Touch your desired category.
When a additional category list is displayed,
touch a category again to select one.
3. Enter the city name and place name.
4. From the displayed place list, touch the place
you wish to go to select it.
[by Dist.]
The list is sorted by nearby order after
pressing this key. This key is displayed when
the list is set to the alphabetical order.
[by Name]
The list is sorted by alphabetical order after
pressing this key. This key is displayed when
the list is set to the nearby order.
5. Confirm the location of the destination, then
touch the [OK] key.
6. Touch the [Start] key.
By Nearby POI
Select the category of the place, then search for
places around the current location.
1. Touch the [Nearby POI] key.
2. Touch your desired category.
When an additional category list is displayed,
touch a category again to select.
3. From the displayed place list, touch the place
you wish to go to select it.
4. Confirm the location of the destination, then
touch the [OK] key.
5. Touch the [Start] key.
Searching Your Destination from the Destination Menu
24 MAX983HD
English
Going Home
When your home address is registered, you can
start route guidance to your home by a simple
operation.
Note:
When your home address is not registered, register
it by touching the [Home (Add New)] key. When the
list of searching methods appears, register your
home address by the desired method. You can also
register your home from the [Stored Data] of the
Setting menu. ➜ “Home Location” (P. 49)
1. Touch the [Home] key.
2. Touch the [Start] key.
The route to your home is automatically
calculated and the route guidance is started.
By Previous Destination
The destinations previously used are registered
in the previous destination list (up to 100
locations). You can enter a destination by
selecting it from this list. When the previous
destination list exceeds 100 items, the oldest
entries are automatically deleted.
1. Touch the [ ] (Next) key.
2. Touch the [Previous Destinations] key.
3. From the displayed previous destination list,
touch the place you wish to go.
4. Touch the [OK] key.
5. Touch the [Start] key.
By Previous Starting Point
You can set the last start location as the
destination. In case you want to set a return route
from the reached destination, you can enter the
new destination quickly using this method.
1. Touch the [ ] (Next) key.
2. Touch the [Previous Starting Point] key.
3. Confirm the location of the destination, then
touch the [OK] key.
4. Touch the [Start] key.
By Postal Code
You can search for destinations by entering the
country name and the postal code of the place
you wish to go to.
Note:
•In some countries or districts, it may be hard to
search specific places. In such cases, use postal
code search as a subsidiary function of searching
addresses.
1. Touch the [ ] (Next) key.
2. Touch the [Postcode] key.
3. Touch the [Country] key, and touch the
desired country name.
4. Touch the [Postcode] key.
The postal code input screen is displayed.
5. Enter the postal code by touching number
keys on the screen.
6. Touch the [OK] key.
For the rest of the procedure, read the
sections that apply to the country of your
residence.
●When the [Country] is set to the United
Kingdom or the Netherlands
1. Touch the [Pinpoint Search] key.
[Area Search]
Displays the City name list that corresponds
to the input postal code. Search a place by the
same way of searching by address.
2. Confirm the location of the destination, then
touch the [OK] key.
If a different place from where you wish to go
to is displayed, touch the [Back] key to return
to the previous screen, then perform the
procedure of “When the [Country] is set to an
other than the United Kingdom and the
Netherlands” listed below.
3. Touch the [Start] key.
●When the [Country] is set to an other than
the United Kingdom and the Netherlands
1. Touch the [Area Search] key.
2. Touch the desired City name to select.
The Address input screen is displayed.
3. If required, enter the Street name and House
No., then touch the [OK] key.
4. Touch the [Start] key.
Searching Your Destination from the Destination Menu
25
MAX983HD
English
By Motorway Entrance/Exit
You can search an entrance or exit of a motorway
to set as the destination.
1. Touch the [ ] (Next) key.
2. Touch the [M-way Entrance/Exit] key.
3. Touch the [Country] key, then touch the
country name, if necessary.
4. Touch the [Motorway] key.
5. Enter the name of the motorway, then touch
the [OK] key.
6. From the displayed Motorway list, touch the
desired motorway to select.
7. Select the [Entrance] or [Exit] key.
8. From the displayed Entrance list or Exit list,
touch the place you wish to go to select it.
[by Dist.]
The list is sorted by nearby order after
pressing this key. This key is displayed when
the list is set to the order along the road.
[on the Way]
The list is sorted by order along the road after
pressing this key. This key is displayed when
the list is set to the nearby order.
9. Confirm the location of the destination, then
touch the [OK] key.
10.Touch the [Start] key.
By Intersection
You can specify an intersection as destination by
entering the two crossing street names, and set
them as destination.
1. Touch the [ ] (Next) key.
2. Touch the [Intersection] key.
3. Touch the [Country] key, then touch the
country name, if necessary.
4. Touch the [City] key, enter the city name, then
touch the [OK] key.
The city name entry can be omitted.
5. From the displayed City list, touch the city to
select it.
6. Touch the [1st Street] key, enter the street
name, then touch the [OK] key.
7. From the displayed Street list, touch the street
to select it.
8. Select the 2nd Street by a similar procedure
as for the 1st Street.
9. Confirm the location of the destination, then
touch the [OK] key.
10.Touch the [Start] key.
By Stored Routes
Selects a route previously registered, then set it
as the new route.
Note:
To use this function, one or more registered routes
are required. When a route is currently set, you can
register this route by touching the [None (Add New)]
key in case the route contains at least one waypoint.
You can also register the current route using the
Route menu. ➜ “Stored Route” (P. 50)
1. Touch the [ ] (Next) key.
2. Touch the [Stored Routes] key.
3. From the displayed stored route list, touch the
route you wish to set.
4. Touch the [Start] key.
By Extra POI
You can set the downloaded data from website
as a destination. For more information about the
setting method, see the Clarion homepage.

26 MAX983HD
English
Searching Your Destination from the Map Screen
You can search for a place by scrolling the map, and set it as the destination.
1. Scroll the map by touching the Map screen,
and move the cursor to the place you wish to
go to. Touch the [OK] key. ➜ “Scrolling the
Map” (P. 16)
2. Confirm the location of the destination, then
touch the [New Dest] key.
3. Touch the [Start] key.
Note:
When you search a place far from the current location, change the map scale to search more quickly.
Searching for POI Using the Quick POI Function
By using the Navi Shortcut menu, you can enter a destination by searching a place near the current
position or along the route quickly from five POI categories specified before in the Setting menu.
When the destination has been set, you can specify POIs that you want to visit along the route as
waypoints, and you can search them quickly.
You can customise the five categories in the Setting menu. ➜ “Quick POI Settings” (P. 46)
1. Touch the [NAVI] key on the Map screen.
The Navi Shortcut menu is displayed.
2. Touch the [Quick POI] key.
The Quick POI screen is displayed.
3. Select a category by touching it.
The list of the nearby places or along the route
of the selected category is displayed.
When the destination is already set, the
following keys are displayed at the top of the
screen.
[by Dist.]
The list of nearby POI ordered by the distance
from the current location is displayed after
pressing this key. This key is displayed when
displaying the list screen of POI along the
route.
[along the Route]
The list of POI along the route ordered by the
distance from the current location is displayed
after pressing this key. This key is displayed
when displaying the list screen of nearby POI.
4. Select the desired place you wish to go to by
touching it.
5. Touch the [Start] key.
The route guidance to the destination will
start. In case a route existed before the
selected POI will be added as waypoint.
27
MAX983HD
English
Searching Your Destination from the Favourite/
Frequent List
You can enter a destination by selecting from the list of the registered favourite places or the places often
visited.
For detailed usage of the Favourite/Frequent list, see “Using Favourite/Frequent List” (P. 54)
By Favourite
You can enter a destination by selecting a place
from the Favourite list registered beforehand.
1. From the Destination menu or the Navi
Shortcut menu, touch the [ ] key.
The Favourite list screen is displayed.
When your desired icon is not displayed,
touch the [N] or [n] key to scroll the list.
2. Touch the desired icon you wish to set as
destination.
The Set Location menu screen is displayed.
3. Confirm the location of the destination, then
touch the [OK] key.
4. Touch the [Start] key.
By Frequent
You can enter a destination by selecting a place
from the Frequent list. The places entered as the
destination are registered to the Frequent list
automatically.
1. From the Destination menu or the Navi
Shortcut menu, touch the [ ] key.
The Favourite list screen is displayed.
2. Touch the [ ] (Frequent) key.
The Frequent list screen is displayed.
When your desired icon is not displayed,
touch the [N] or [n] key to scroll the list.
3. Confirm the location of the destination, then
touch the [OK] key.
4. Touch the [Start] key.
28 MAX983HD
English
Setting the Destination and Starting the Route
Guidance
Set Location menu
From the Set Location menu displayed when
setting the searched place as the destination,
you can perform the following operations
according to the conditions:
Note:
•The name of the road close to the cursor is
displayed at the bottom of the screen.
•For the 2D maps, the road that will be set as
destination blinks when the map scale is 200 m(1/
8 mile) or smaller. When you set the following
places as the destination, confirm the position of
the blinking road:
• Place where roads of ascending and
descending have diverged
• Place near the intersection of overpass
• Place where no road exists in the vicinity
Set Route menu
When you enter the destination, the Set Route
menu is displayed with the map showing the
suggested routes. You can perform the following
operations from this screen according to the
situation:
Note:
If approx. 30 seconds pass without touching any key
after this screen is displayed, the route guidance will
be automatically started.
[Start] key:
Starts the route guidance to the destination.
[More Routes] key:
You can change to other suggested routes with a
different priority condition. You can also set this
from the Route menu. ➜ “Selecting another
route” (P. 35)
•[Shortest Time]
Shows the route of which the required driving
time is shortest.
•[Minimize M-way]
Shows the route of which motorways are not
used as much as possible.
•[Shortest Distance]
Shows the route of which the distance is
shortest.
•[OK]
Changes to the specified route.
[Route Info] key:
Shows the information of the suggested route
selected on the screen.
•[Preview]
You can confirm the route from the map.
Touching the [F] key scrolls the map so that
the cursor moves along the travelling direction
of the suggested route. Touching the [R] key
scrolls the map so that the cursor moves to the
opposite direction of travelling along the
suggested route. Touching the [G] key stops
scrolling temporarily.
[OK] key:
Sets the location shown by the “ ”on the map
as the destination.
[Add to Route] key:
When a destination is already set, you can set the
location of the “ ” as a waypoint. Specify the
order of passing when setting the location as a
waypoint. ➜ “Editing the route” (P. 33)
[Nearby POI] key:
You can search for a place of the specified
category around the location of the “ ”, and set
it as the destination. The searching procedure is
similar to the procedure for POI search. ➜ “By
Nearby POI” (P. 23)
[POI Info] key:
When the navigation system has information
concerning the searched location, you can
display this information by pressing the [POI Info]
key.
[Store Location] key:
Register the location found to the Address Book.
[ ] key:
Touching this key changes the map to the map
scrolling screen. You can adjust the location of
the searched place.

Setting the Destination and Starting the Route Guidance
29
MAX983HD
English
•[Simulation]
Starts the simulation of the route guidance with
moving the vehicle mark automatically.
Touching the [G] key stops the simulation
temporarily, and the [P] key restarts the
simulation. Touching the [p] key stops the
simulation, and returns to the previous screen.
[Add Way Pt.] key:
Adds waypoints to the suggested route displayed
on the map. After the list of the place search
method is displayed, search and select places
you wish to set as waypoints by using similar
methods as for entering a destination. After the
Edit Route screen is displayed, touch the [Add
way Point] key. Up to five waypoints can be
specified.
You can also set waypoints after starting the
route guidance.➜ “Editing the route” (P. 33)
30 MAX983HD
English
4. Route Guidance
After you have entered the destination and started the route guidance, you will be guided along the route
by screen display and by voice.
Route Guidance Screen Features
As well as the Map screen, various guidance screens are displayed during the route guidance mode
according to the situation.
Press the [MAP] button to switch the screen among the following guidance screens.
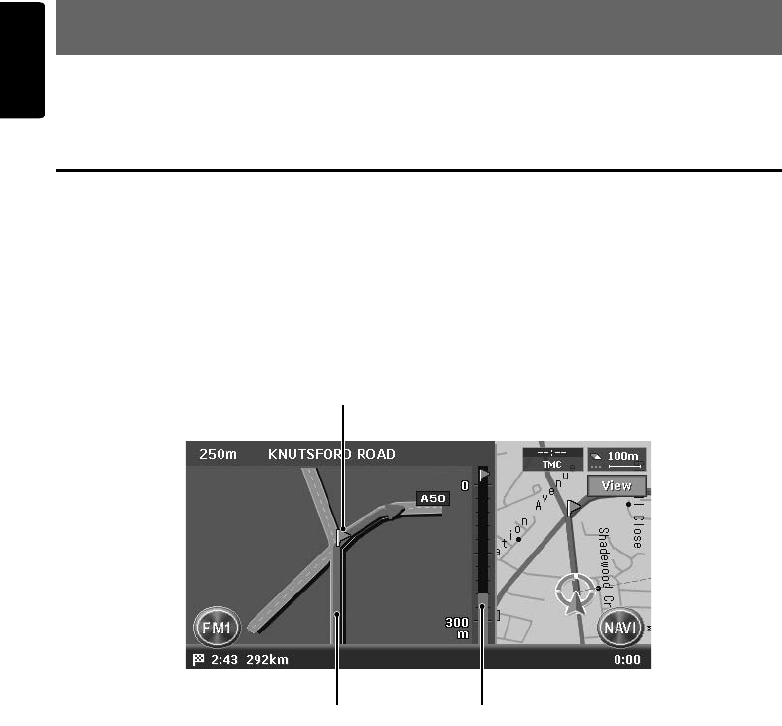
Intersection Map
When you get near to approx. 300 m or 300 yd (1 km or 1 mile for a motorway) from the next guidance
point, the screen will be divided into two displays and the Intersection Map will be displayed on the left
display.
You can set whether to display the Intersection Map screen or not. The factory setting is ON.➜
“Changing the map appearance” (P. 16)
1 Guidance point
Indicates the next guidance point.
2 Guidance route
Indicates the direction to travel.
3 Remaining distance indication
Indicates the remaining distance to the next
guidance point with the bar gauge.
2 3
1
Route Guidance Screen Features
31
MAX983HD
English
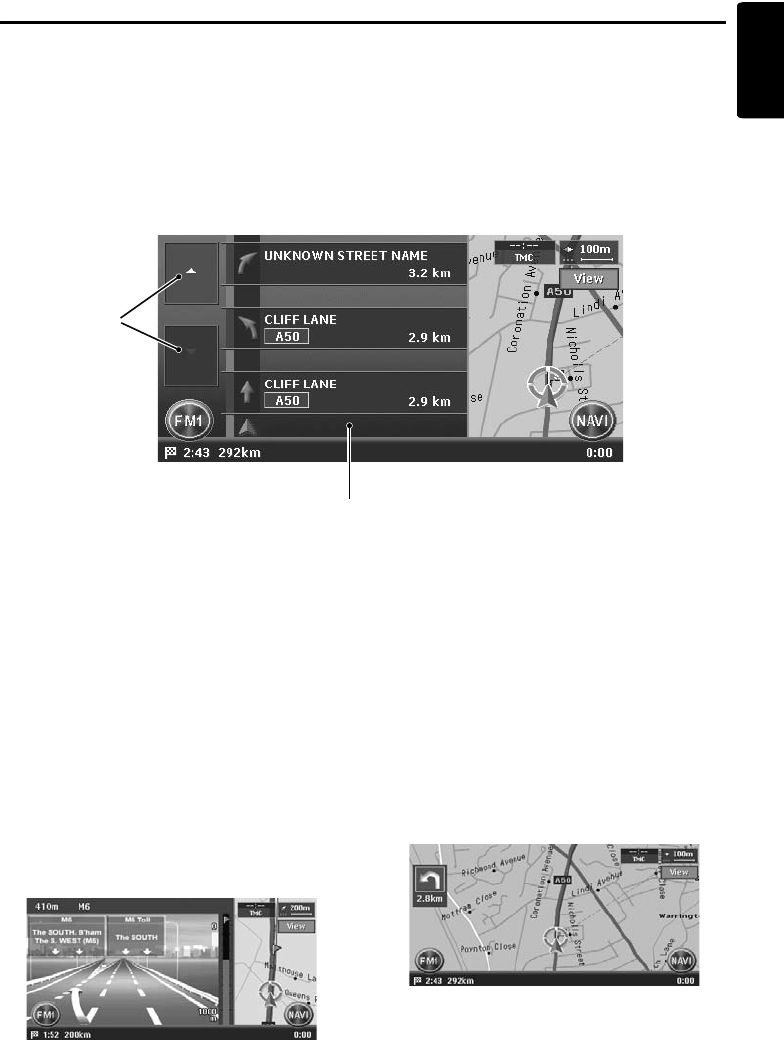
Turn list on Route
The screen is always divided into two displays and the Turn List on Route is displayed on the left display
if Turn list on Route is activated. The Turn List contains the guidance points next to the vehicle position,
and will change while travelling.
When you get near to the next guidance point, the left display is automatically changed to the
Intersection Map.
You can set whether to display the Turn List screen or not. The factory setting is OFF.➜ “Changing the
map appearance” (P. 16)
1 [I] / [i] key
Scrolls the Turn List on Route screen. Touching
the [I] key displays the Turn List of the
subsequent guidance points.
2 Turn List
The list of the guidance points and turning
directions are displayed from the items near to
the vehicle position, and it will change while
travelling.
Other guidance screens
From the Map Guidance settings menu of the Navigation Setting, you can set other functions such as
displaying the small turn arrow or the intersection map. ➜ “Map Guidance Settings” (P. 44)
●3D Junction View
While travelling on the motorway, when you get
near to approx. 1 km or 1 mile from the next
guidance point with junctions, the screen will be
divided into two displays and the information of
the junction with a 3D image will be displayed on
the left display.
●Small Turn Arrow on Map
The turning direction and distance of the next
guidance point is displayed at the upper left of the
screen.
2
1
32 MAX983HD
English
About the Voice Guidance
After starting the route guidance, not only guidance by screen but also guidance by voice, such as the
turning direction or the distance to the guidance point, will be given when you get near to the guidance
point.
You can set whether to use the voice guidance or not, and set the volume to be changed according to
the vehicle speed. ➜ “Guidance Voice Settings” (P. 44)
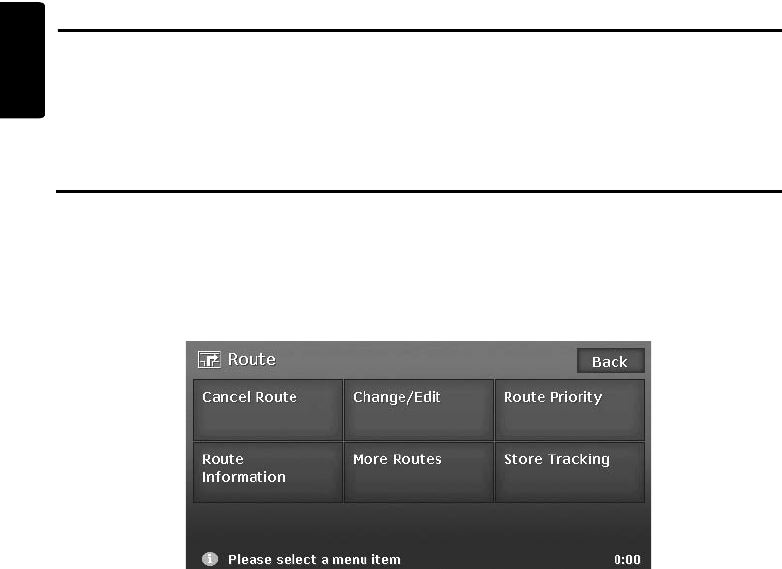
Changing/Editing the Route Settings
From the Route menu, editing the current route, confirming the route information, setting the conditions
of the route calculation, etc. can be performed.
Route menu screen
1. Touch the [NAVI] key on the Map screen to display the Navi Shortcut menu.
2. Touch the [Route] key.
The Route menu screen is displayed.
3. Touch the desired menu item.
For the operation procedure hereafter, see the explanation of each section.
Changing/Editing the Route Settings
33
MAX983HD
English
Cancelling/restarting the
route guidance
Cancelling the route guidance
Terminates the route guidance during the route
guidance mode.
1. Touch the [Cancel Route] key.
A confirmation message is displayed.
This key is also provided on the Destination
menu screen.
2. Touch the [Yes] key.
The route guidance will be terminated, and
the destination and route will be deleted.
Resuming the cancelled route
guidance
Restores the previous route, and restarts the
cancelled route guidance.
1. Touch the [Resume Route] key.
A confirmation message is displayed.
2. Touch the [Yes] key.
The route guidance will be restarted.
Changing/editing the route
Changes or edits the route currently specified.
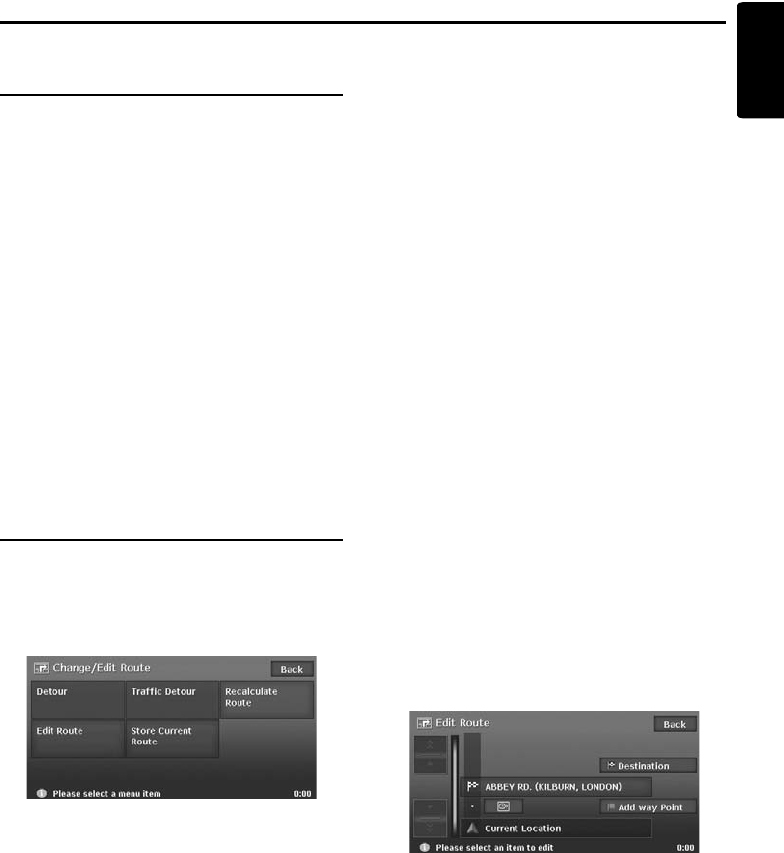
1. Touch the [Change/Edit] key.
The Change/Edit Route menu screen is
displayed.
2. Touch the desired menu item to select it.
Setting the diverting distance
Searches for a diverted route where the section
from the current location up to the specified
distance is avoided.
1. Touch the [Detour] key.
2. Touch the distance you want to avoid.
The route where the section of selected
distance is avoided is automatically
calculated, and the route guidance will be
restarted.
Setting a diverted route using traffic
information
You can change the route based on traffic
information.
1. Touch the [Traffic Detour] key.
The diverted route is displayed with TMC
traffic information taken into account.
When no diverted route is found, a message
is displayed.
2. Confirm the diverted route, then touch the
[OK] key.
The route with traffic information considered
is automatically calculated, and the route
guidance will be restarted.
Recalculating the route
After changing the conditions of the route
calculation or when the status of the route is
changed, you can recalculate the route if you
want.
1. Touch the [Recalculate Route] key.
The route is automatically recalculated, and
the Set Route screen is displayed.
2. Touch the [Start] key.
The route guidance will be restarted.
Editing the route
You can edit the current route.
1. Touch the [Edit Route] key.
The Edit Route screen is displayed.
2. Change settings by touching the desired
setting item.
The route is recalculated with added or edited
conditions.
[Destination]
You can enter a new destination.
[Add way Point]
Up to 5 waypoints can be specified. The
specified waypoints are displayed by marks
with the ordinal number for visiting.
[(Current destination name/Waypoint
name)]
The edit screen is displayed. Only the
destination/waypoints that have not been
passed can be edited.
Changing/Editing the Route Settings
34 MAX983HD
English
•[Delete]: Displays a confirmation screen. If
you touch the [Yes] key, the destination/
waypoint is deleted.
• [ ]: You can adjust the location of the
destination/waypoint by scrolling the map.
[(Route calculation condition icon)]
You can change the conditions of route
calculation. When you change a condition, the
route is recalculated with the specified
condition. When waypoints are specified, you
can set the condition for each section of the
route.
•[ ]:
Calculates the route of which the required
time is shortest.
•[ ]:
Calculates the route of which motorways
are not used as much as possible.
•[ ]:
Calculates the route of which the distance is
shortest.
Storing the current route
Stores the current route as the Stored Route. ➜
“Stored Route” (P. 50)
1. Touch the [Store Current Route] key.
A confirmation screen is displayed. Touching
the [Yes] key stores the current route.
Note:
To register the current route, at least one waypoint is
required.
Setting the conditions of the
route calculation
You can customise the conditions of the route
calculation.
Note:
The conditions set in the Route Priority menu screen
are applied to the current route, the recalculation is
performed automatically.
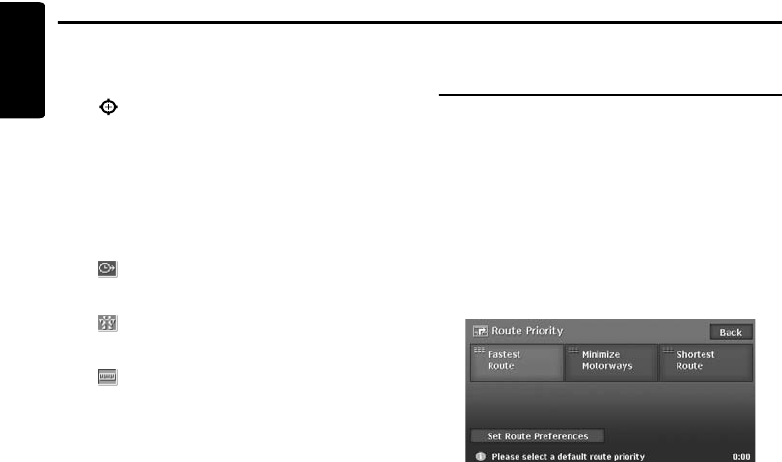
1. Touch the [Route Priority] key.
The Route Priority menu screen is displayed.
2. Touch the condition you wish to use.
Touching the [Back] key returns to the
previous screen.
[Fastest Route]
Calculates the route of which the required
time is shortest.
[Minimize Motorways]
Calculates the route of which motorways are
not used as much as possible.
[Shortest Route]
Calculates the route of which the distance is
shortest.
[Set Route Preferences]
Sets the detailed condition of the route
calculation.
•[Minimize Toll Roads]: Minimises the use
of toll roads.
•[Use Time Restricted Roads]: Uses roads
with restricted usage time.
•[Use RDS-TMC information]: Considers
the RDS-TMC information for routing.
•[Use Avoid Area Settings]: Takes a detour
to avoid the registered Avoid Area.
•[Use Ferries]: Uses car ferries for routing.
•[Auto Reroute]: When leaving the
suggested route during the route guidance
mode, a new route is automatically
recalculated.
Changing/Editing the Route Settings
35
MAX983HD
English
Confirming the route
information
Confirms various information of the current route.
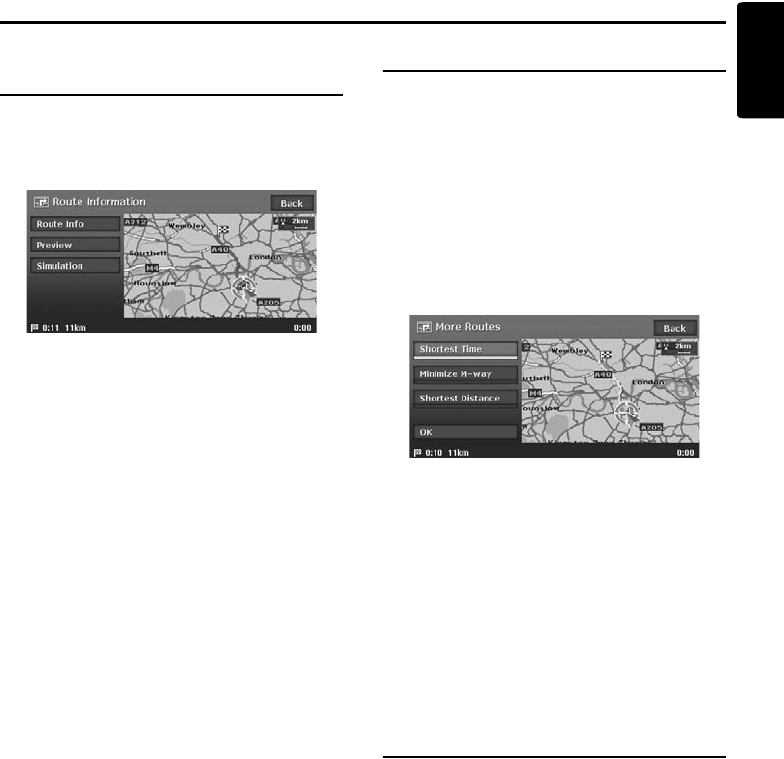
1. Touch the [Route Information] key.
The Route Information menu screen is
displayed.
[Route Info]
Displays the list of route information. The
main guidance points from the current
location to the destination are displayed by
the list format. When there is a lot of
information items, you can scroll the list by
touching the [D], [I], [i], [d] keys.
[Preview]
Confirms the suggested route by scrolling
with the cursor on the map.
[Simulation]
Simulates the route guidance with moving the
vehicle mark automatically.
Note:
Refer to the [Route Info] key in “Set Route menu”
(P. 28) for details of [Preview] and [Simulation].
Selecting another route
Changes the current route to another suggested
route with different priority conditions.
Note:
When waypoints are set, this operation is disabled.
1. Touch the [More Routes] key.
If a confirmation screen is displayed, touch
the [Yes] key.
The More Route menu screen is displayed.
2. Touch the desired priority condition you wish
to confirm.
The route of the specified priority condition is
highlighted on the map.
[Shortest Time]
Shows the route of which the required time is
shortest.
[Minimize M-way]
Shows the route of which motorways are not
used as much as possible.
[Shortest Distance]
Shows the route of which the distance is
shortest.
3. Touch the [OK] key.
The Set Route menu screen is displayed.
Touching the [Start] key starts the route
guidance with the route you have selected.
Storing the track travelled
You can register the track which is the travelled
path on the vehicle up to the current car position.
Note:
The track is automatically recorded from the place of
departure up to 100 km, and the current tracking
from the current location up to 20 km can be
registered for up to five tracks. You can select
whether to display track traveled or not, and you can
also register/edit it from the [Navigation] or the
[Stored Data] of the Setting menu. ➜ “Tracking
Display Settings” (P. 46).
1. Touch the [Store Tracking] key.
A confirmation screen is displayed. Touching
the [Yes] key stores the current track.

36 MAX983HD
English
Notes on the Route Guidance
• When you enter the destination, be sure to stop
the vehicle in a safe place.
• The displayed route is only a suggested route.
• Roads can change every day, and may have
changed in geometries and traffic regulations
from the date the map data is created. Be sure
to follow the actual traffic regulations.
• It may take a little time until the suggested route
is displayed according to the situation.
• Even when the destination is entered by the
Stored Routes, the current location map screen
is displayed. When the starting point is set to a
remote position from the vehicle position, the
route may not be displayed on the screen.
• Roads and places where the vehicle cannot
pass, such as roads in housing areas, site or in
installations, and roads under construction may
be included in the suggested route.
• The passed waypoints are not included for
route recalculation.
• When you set waypoints, the system calculates
the routes between every point. Therefore, the
following notes apply:
• If a route between certain waypoints is not
found, no route may be displayed.
• The route may not be connected in the
vicinity of a waypoint.
• A U-turn may be required at a waypoint.
• The route calculation may not be completed in
the following cases:
• If there is no main road within a range of
approx. 5 km (3 miles) from the current
location.
• If there is no main road within a range of
approx. 5 km (3 miles) from the destination
(or waypoints).
• If the vehicle is too close to the destination.
In this case, a message to inform you about
this will be displayed.
• If it is impossible to reach the destination or
waypoints because of traffic regulations,
etc.
• If the map database does not contain the
area data of the selected locations.
• If only an extremely roundabout route is
available to reach the destination or
waypoints.
• When displaying a route, the followings may
occur:
• Even if a route calculation is requested on a
main road, the start point of the suggested
route may not exactly match the current
vehicle location.
• If a route calculation is requested on a main
road, the end point of the suggested route
may not exactly match the destination.
• If a route calculation is requested on a main
road, the system may suggest a route
starting from another main road.
In this case, park the vehicle in a safe
location and adjust the current location
using Setting menu, or continue driving until
the vehicle icon appears on a main road. If
either of these methods are not successful,
request a route calculation again.
• Ferry lines are stored in this system. Take
into consideration the travel time required
and operational condition before deciding
whether to use them or not.
• The current location or the travelling direction
may shift according to the travelling condition.
It is not a malfunction, and will return to a
normal display when keeping travelling for a
while.
• Though the vehicle position may shift in places
other than the road such as in the parking lot,
etc., it is not a malfunction. It will return to a
normal display when travelling on an actual
road for a while.
• In the current location display, a representative
name of the place which is nearest to the
vehicle position in the map database is
displayed, it may be different from the actual
place name.

37
MAX983HD
English
Notes on the Voice Guidance
• The voice guidance may not match the actual
roads or regulations. The cause of this can be
that the actual roads and the data in the map
database are different, or the vehicle speed.
• If the content of the voice guidance does not
match the actual roads or regulations, follow
the information acquired from the actual traffic
or road signs.
• The voice guidance is activated only for
intersections with certain conditions. There
may be cases that the vehicle has to turn, but
the voice guidance is not activated.
• The content of the voice guidance may vary,
depending on the direction of the turn and the
type of the intersection.
• The voice guidance timing will vary depending
on the situation.
• The voice guidance is not available when the
voice guidance function is not set to ON.
Moreover, even when the voice guidance
function is set to ON, if the voice guidance
volume is set to a very low value, the voice
guidance may not be audible. ➜ “Guidance
Voice Settings” (P. 44)
• The voice guidance will start when the vehicle
enters the suggested route. Before entering the
route, refer to the map screen for directions.
• When the vehicle approaches a waypoint, the
voice guidance will say “You have arrived at
waypoint <1 to 5>”. The voice guidance will
switch to the next route section. Please refer to
the map screen for directions until the next
voice guidance is started.
• When the vehicle approaches a destination,
the voice guidance will say “You have arrived
at the destination”. For the remainder of the
way, please refer to the map screen for
directions.
38 MAX983HD
English
5. Traffic Information
The RDS-TMC (Radio Data System-Traffic Message Channel) provides various information useful for
driving using FM radio transmission. The system can receive RDS-TMC information, and can display
the information on traffic conditions, congestion forecasts, and weather forecasts, etc. on the screen and
on the map.
By using RDS-TMC, you can obtain or confirm event information on congestions, road works, and
suspension of traffic, etc. around the route and the vehicle position.
When information is received from the RDS-TMC, the latest receiving time is displayed in the upper part
of TMC indicator on the Map screen.
Note:
•You can set the system to calculate routes that avoid the traffic incidents and congestions, etc. by using
received RDS-TMC information.
•When the TMC provider name is included in the received data, the TMC indicator on the map contains the
TMC provider name.
•For the symbols used for the TMC, see “Symbols used for TMC traffic information” (P. 15).
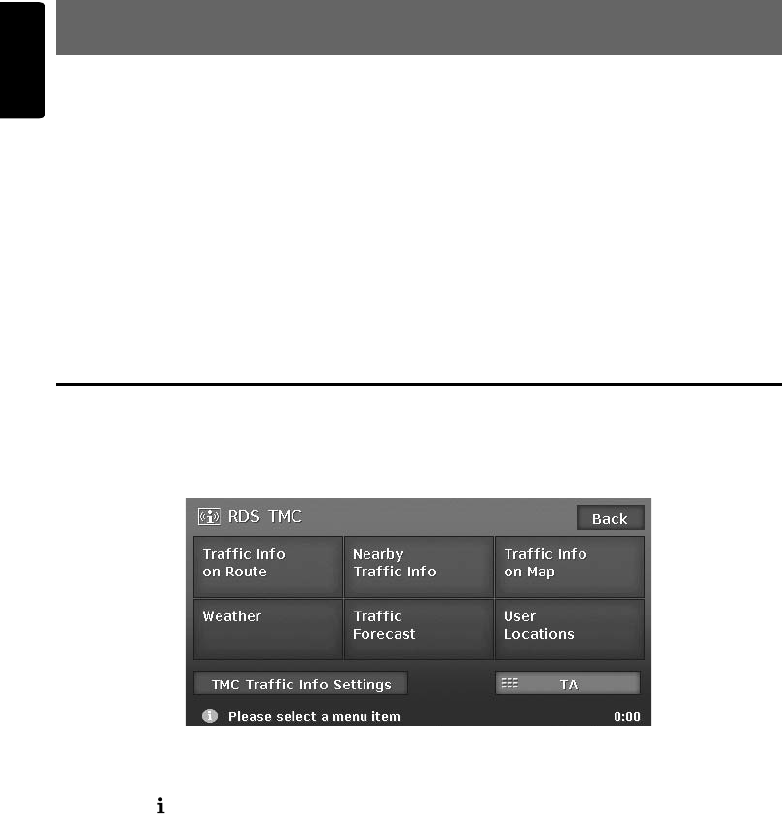
Displaying the Traffic Information
RDS TMC menu screen
1. Press the [ INFO] button.
The RDS TMC menu screen is displayed.
2. Touch the desired item, and confirm the information.
Note:
•By touching the [TMC Traffic Info Settings] key, you can change the settings for the TMC information
indicators and the TMC provider. ➜ “Setting TMC traffic information” (P. 40)
Displaying the Traffic Information
39
MAX983HD
English
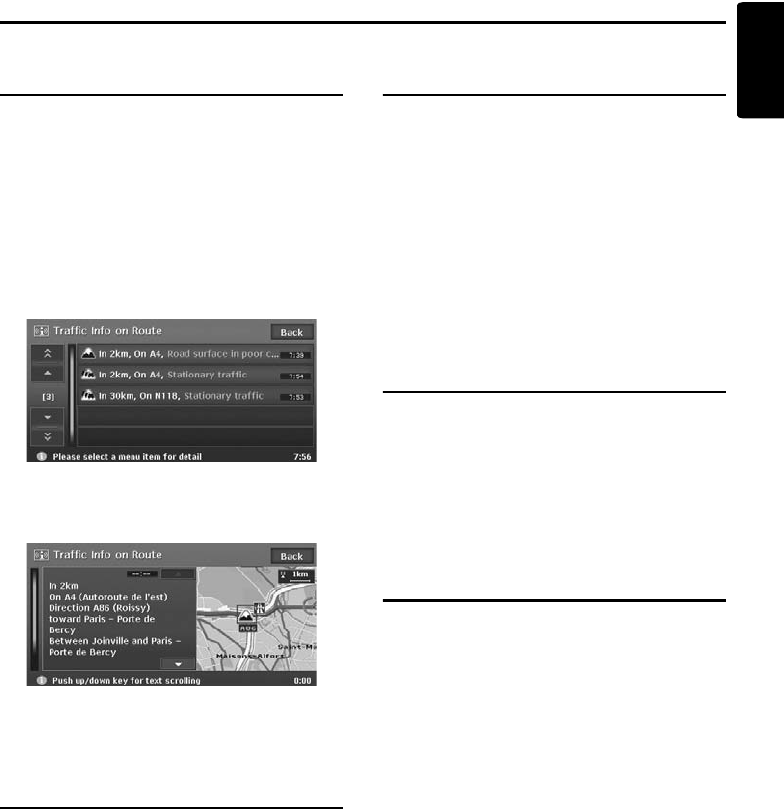
Displaying traffic information
on the route
Confirms the traffic information on the current
route.
1. Touch the [Traffic Info on Route] key.
The TMC event list is displayed in order of
distance from the current location on the
current route. The time of the event received
is displayed on the right side of the list.
2. Touch the desired event.
Detailed information of the event is displayed.
Touch the [I] / [i] key to Scroll the detailed
information screen.
The position and the TMC traffic information
symbol of the selected event information are
displayed on the map.
Touch the [Back] key to return to the previous
screen.
Displaying nearby traffic
information
You can confirm all the traffic information that are
within 50 km in the radius of the current location.
1. Touch the [Nearby Traffic Info] key.
The TMC event list is displayed in order of
distance from the current location. You can
confirm the detailed information by a similar
way as for the [Traffic Info on Route] key.
Displaying traffic information
on the map
You can confirm the information of all the TMC
traffic information symbols displayed on the map.
1. Touch the [Traffic Info on Map] key.
[J] / [j]
Moves the TMC traffic information symbol on
the map, and switches to detailed information
of other events.
Note:
•To display the TMC traffic information on the map,
touch the [TMC Traffic Info Settings] key, and set
the “Traffic Info on Map” to ON.➜ “Setting TMC
traffic information” (P. 40)
Displaying TMC information
on the weather
1. Touch the [Weather] key.
The TMC event list about weather is displayed
in order of distance from the current location.
You can confirm the detailed information by a
similar way as for the [Traffic Info on Route]
key. Detailed information is not displayed for
events without information about the weather.
Displaying congestion
forecast information
1. Touch the [Traffic Forecast] key.
The TMC event list with congestion forecast
information is displayed. You can confirm the
detailed information by a similar way as for the
[Traffic Info on Route] key.
Displaying the Traffic Information
40 MAX983HD
English
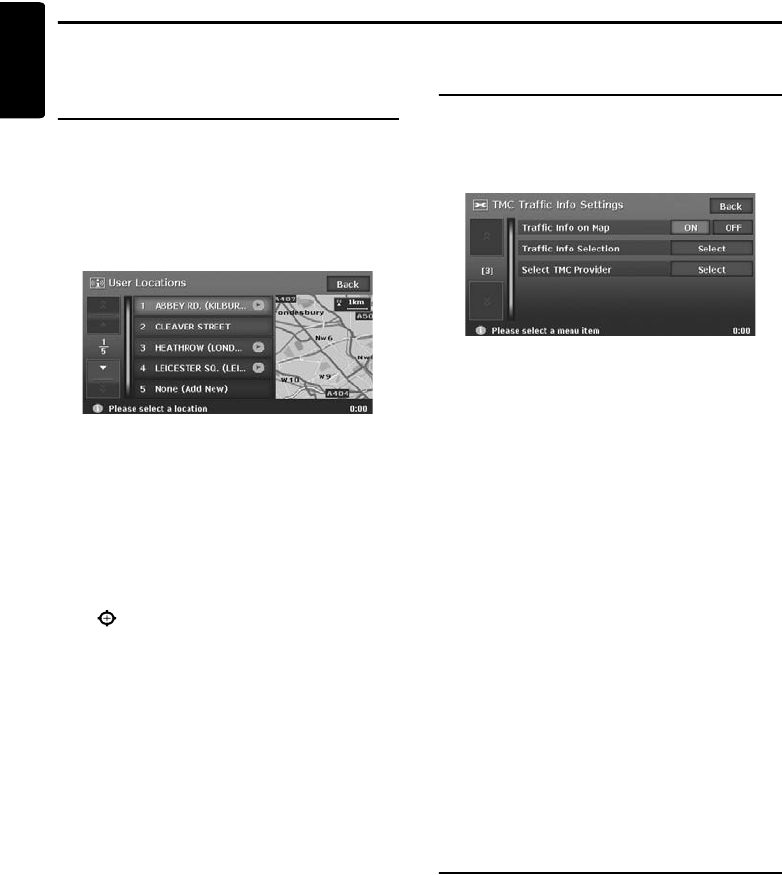
Displaying traffic information
on the registered user
location
1. Touch the [User Locations] key.
The User Locations list and the map around
the User Location is displayed.
2. Touch the desired User Location.
The map moves, and you can identify the
TMC event by the TMC traffic information
symbol.
You can edit/register a User Location by
touching the desired list item.
[(User Location name)]
The Edit User Location screen is displayed.
You can edit a registered User Location.
•[Rename]: Changes the User Location
name.
•[Delete]: Deletes the User Location.
•[OK]: Terminates the editing, then returns to
the previous screen.
• [ ]: Changes the location of the User
Location by scrolling the map.
[None (Add New)]
You can register a new User Location by the
procedures similar to entering the destination.
Setting TMC traffic
information
1. Touch the [TMC Traffic Info Settings] key.
The TMC Traffic Info Settings menu screen is
displayed.
2. Touch the desired key on the screen to set it.
“Traffic Info on Map”
Switches ON and OFF the TMC traffic
information display on the map. The factory
setting is ON.
“Traffic Info Selection”
Switches ON and OFF the event information
icon display for each event type. The factory
settings are all ON.
You can set this for the following types of TMC
traffic information event symbols:
[All Traffic Information], [Accident &
Incident], [Traffic Status], [Roadworks],
[Closure & Restrictions], [Weather & Road
Info], [Information], [Traffic Forecast],
[Weather]
“Select TMC Provider”
You can select the TMC provider you want to
use.
•[Automatic]: Uses the provider
automatically selected.
•[Manual]: Uses the provider you select from
the list of providers.
Note:
For the TMC provider setting, we recommend to set
to [Automatic].
Setting TA (Traffic
Announcement) mode
1. Touch the [TA] key.
“TA” will be displayed at the bottom of the
screen, and the system enters the TA standby
mode. For the detailed information on the TA
standby mode, see “Radio Operations”
(Audio Manual).
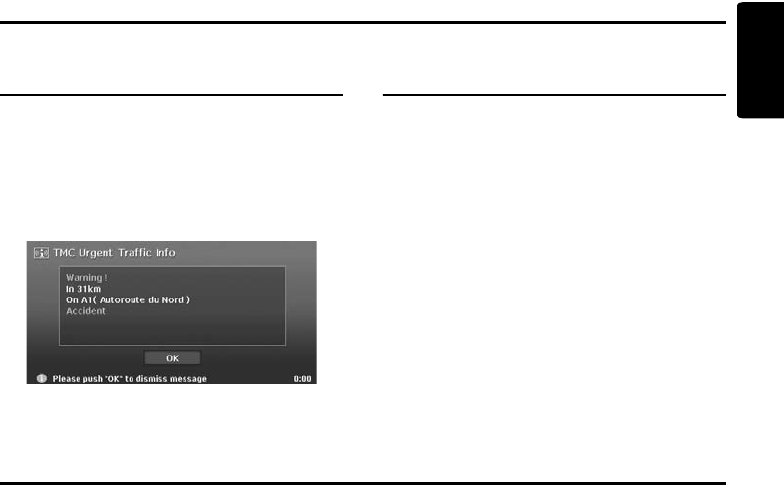
Displaying the Traffic Information
41
MAX983HD
English
TMC urgent information
indication
When the system receives a TMC information of
high urgency located within 10km from the
vehicle position or within 50km on the route, the
system displays the high urgency information
automatically, with a priority higher than any
other screen.
To return to the Map screen, touch the [OK] key.
Diverted routes with traffic
information considered
When a TMC event is found on your route, a
diverted route with traffic information considered
is automatically displayed.
Confirm or cancel the diverted route, and touch
the [OK] key to start the route guidance. If you do
not do anything, the diverted route will not be
used.
Notes on the Traffic Information
The information given by RDS-TMC is only a reference, it may not match the actual traffic conditions. Be
sure to follow the actual traffic regulations and traffic conditions.
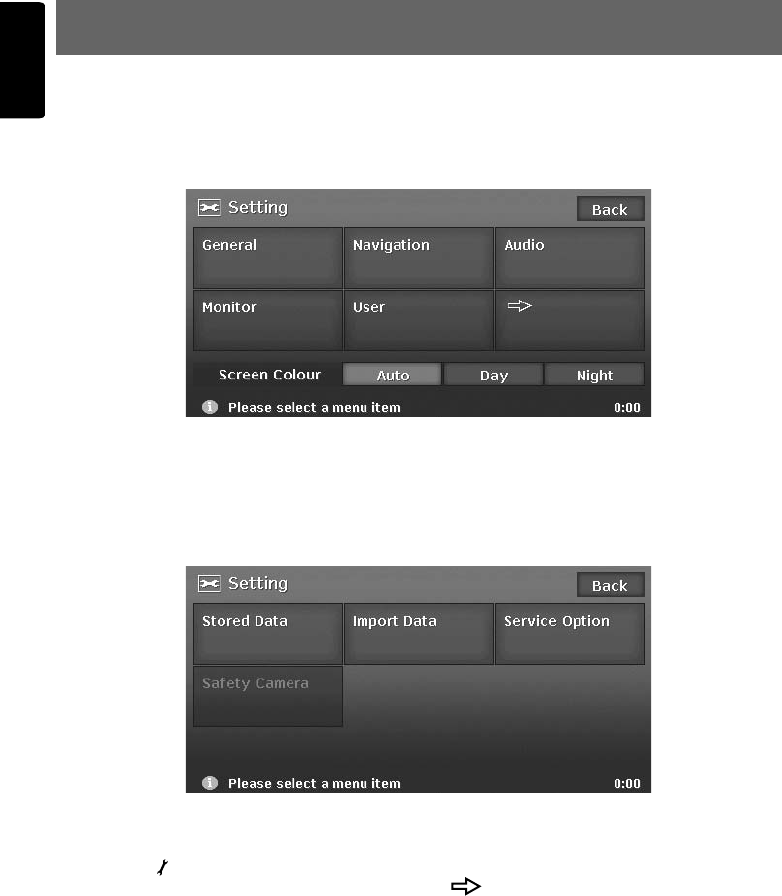
42 MAX983HD
English
6. System Settings
You can set various settings of the navigation system from the Setting menu.
Setting menu screen 1
Setting menu screen 2
1. Press the [ ] (Set) button.
The Setting menu screen is displayed. Touching the [ ] (Next) key displays the additional Setting
menu screen.
2. Touch the desired menu item.
For the operation procedure hereafter, see the explanation of each section.
Note:
•For details about the Screen Colour item, see “Setting the Screen Colour mode” (P. 48)

43
MAX983HD
English
General Settings
When you touch the [General] key from the Setting menu, you can set various settings concerning the
general features.
Language setting
You can change the language used by the
system. As for “English”, you can also select the
unit of distance (km/mile).
“Language”:
You can select the language from the following
language keys:
[English (mile)] key
[English (km)] key
[Français] key
[Deutsch] key
[Español] key
[Italiano] key
[Nederlands] key
[Português] key
[Svenska] key
[Dansk] key
Note:
For the languages other than English, distances are
displayed using the metric system.
Clock settings
You can set various settings concerning the
clock.
1. Touch the [Setting] key of the “Clock” item.
The Clock menu screen is displayed.
2. Touch the desired menu item to set.
“On-Screen Clock”:
Shows/hides the clock display on the screen.
“Clock Format”:
Changes the clock format to 12-hour/24-hour
system.
“Daylight Saving Time”:
Selects whether to apply the daylight saving
time or not.
“Offset Adjust”:
Adjusts the current time manually. The
adjustment is applied as offset value related
to the time signal received via GPS. Touching
the [+] or [–] key shifts the time by 1 minute.
Normally, it is not necessary to adjust
because the time is received from the GPS
signals automatically.
“Time Zone”:
Sets the time zone. You can select from the
list of 74 regions including the [Auto] key.
When you select the [Auto] key, the clock is
automatically switched to the time zone of the
country at the vehicle position.
Changing Skin
You can change the screen design by using the
skin data stored in the hard disk drive.
Note:
This operation is disabled while recording a CD or
loading/ejecting a disc.
1. Touch the [Select] key of the “Skin Change”
item.
2. Touch the desired item key you wish to set.
Beep Sound
You can turn ON/OFF the beep sounds and
menu operation sounds.
Keyboard Type
You can change the keyboard layout used for
name entry.
1. Touch the item key of the “Keyboard” item.
2. Select the keyboard type by touching one of
the following keys:
[ABCDEF] key
[QWERTY] key
[QWERTZ] key
[AZERTY] key
Voice Recognition
You can turn ON/OFF the voice recognition
feature (optional). When you touch the [OFF]
key, the voice recognition is not available.
Voice Feedback
You can turn ON/OFF the voice feedbacks which
are responded when using voice commands.
System Information
You can confirm the version number of the map
data and the system software here.
1. Touch the [Info.] key.
The system information is displayed.
Other General Settings
See the Audio Manual for the details of the
following settings:
“Blinking LED”
“Security Mode”
“System Check”
“System Information”
“Antenna”

44 MAX983HD
English
Navigation Settings
When you touch the [Navigation] key from the Setting menu, you can set various settings or confirm the
information concerning the navigation function.
Map Guidance Settings
You can change settings concerning the screen
route guidance.
1. Touch the [Map Guidance Settings] key.
The Guidance Settings menu screen is
displayed.
2. Touch the desired menu item to set.
“Route Guidance”
Turns ON/OFF the route guidance. When you
touch the [OFF] key, the route guidance is not
available.
“3D Junction View”
Shows/hides the 3D Junction guidance
screen.
“Small Turn Arrow on Map”
Shows/hides the Small Turn Arrow displayed
at the upper left of the Map screen.
“Interrupt AV”
You can set the interrupt of the route guidance
screen while displaying the audio screen.
•[OFF]: The audio screen is not interrupted.
• [ ]: Displays the small turn arrow on the
information pane. You can hide the arrow by
touching it.
• [ ]: The Route Guidance screen
interrupts the audio screen, and returns to
the main audio screen when the interrupt
finishes.
“Set Average Speeds”
When you set “Auto” to “OFF”, you can set
the average speed of the vehicle for each
road type. The time required to the destination
will be calculated in consideration of the
speed set.
•“Auto”: When you touch the [ON] key, the
time required is automatically calculated. To
set the average speeds manually, touch the
[OFF] key.
•“(Name of road type)”: Touching the [+] /
[–] key increases/decreases the average
speed by 5 km/h.
•“Reset”: Touching the [Reset] key resets
the average speeds to the factory settings.
Guidance Voice Settings
You can change settings concerning the voice
guidance.
1. Touch the [Guidance Voice Settings] key.
The Guidance Voice Settings menu screen is
displayed.
2. Touch the desired menu item to set.
“Guidance Voice”: Sets whether to activate
the voice guidance.
“Vol: Normal Speed”: Adjusts the volume of
the voice guidance when the vehicle speed is
normal.
“Vol: High Speed”: Adjusts the volume of the
voice guidance when the vehicle speed is
high.
“Voice Announcements”: Sets the number
of repetitions of the voice guidance per
guidance point.
Map View settings
You can change settings concerning the map
appearance.
1. Touch the [Map View] key.
The Map View menu screen is displayed.
2. Touch the desired menu item to set.
For details of the setting items, see
“Changing the map appearance” (P. 16).
However, the [Hide Map] key is not displayed
on this screen.
Navigation Settings
45
MAX983HD
English
Map Design settings
You can change the map appearance, such as
the colours of the map, type of vehicle mark, etc.
Map Colour
Selects the colours of the map for the Day mode
(when illumination is turned OFF) and for the
Night mode (when illumination is turned ON).
“Map Colour (Day)” / “Map Colour (Night)”:
Touch the item key, then touch one of the [Map
Colour 1] to [Map Colour 4] keys you wish to set.
Vehicle Icon
Selects the type of the vehicle mark from 2 types.
“Vehicle Icon”:
Touch the desired mark you wish to use.
Route Colour
Selects the colour of the suggested route
displayed on the Map screen.
“Route Colour”:
Touch the desired colour you wish to set.
Landmark Icon display
Switches ON and OFF Landmark icon display for
each type.
1. Touch the [Landmark Icons] key.
The list of the Landmarks is displayed.
2. Touch the [ON] or [OFF] key of the desired
icon type you wish to change the setting for.
The types of Landmarks that can be set are
the following five types. The factory settings
are all OFF.➜ “Landmark icons” (P. 14)
“Petrol Station”
“Restaurant”
“Car Park”
“Hotel”
“Hospital”
Avoid Area Settings
You can register areas you do not want to pass
or areas that often get congested as an Avoid
Area. When you register the Avoid Areas, you
can set the system to calculate routes avoiding
the registered areas. ➜ “Setting the conditions
of the route calculation” (P. 34)
Up to 10 Avoid Areas can be registered. You can
edit the registered Avoid Areas.
Note:
You can also register/edit them from the [Stored
Data] of the Setting menu. ➜ “Avoid Area” (P. 50)
To register an Avoid Area
1. Touch the [Avoid Area Settings] key.
The list screen of Avoid Areas is displayed.
2. Touch the [None (Add New)] key.
3. Search the area to avoid by a similar way as
for entering a destination.
The setting screen of the Avoid Area is
displayed with the map of area found.
4. Touch the desired menu item to set.
[Rename]
You can change the name of the Avoid Area.
Enter the name, then touch the [OK] key.
[Resize Area]
You can change the size of the Avoid Area in
5 steps. Touch the [Large], [I], [Medium],
[i], or [Small] key.
[M-way]
You can set whether to avoid motorways
passing the Avoid Area.
•[included]: Avoided.
•[not included]: Not avoided.
[Delete]
Delete the current Avoid Area.
[]
You can correct the location of the Avoid Area
by moving the cursor on the map.
5. Touch the [OK] key.
To edit an Avoid Area
1. Touch the [Avoid Area Settings] key.
2. Touch the Avoid Area you wish to edit.
3. Touch the desired menu item to set, and set it
by a similar way as for registering Avoid
Areas. ➜ Step 4 above
4. Touch the [OK] key.

Navigation Settings
46 MAX983HD
English
TMC Traffic Information
Settings
1. Touch the [TMC Traffic Info Settings] key.
The TMC Traffic Info Setting menu screen is
displayed.
For details of the TMC settings , see “Setting
TMC traffic information” (P. 40).
Tracking Display Settings
The system can display track data for one trip
(from ACC ON to OFF) from the place of
departure up to a distance of 100 km on the map.
The track from the current location up to 20 km
can be registered for up to five tracks, and can be
edited. The tracks on the map are displayed
using the colour of the mark displayed left of the
registered name.
You can also set the system to always display the
current track.
Note:
You can also register/edit them from the [Stored
Data] of the Setting menu. ➜ “Stored Tracking”
(P. 50)
1. Touch the [Tracking Display Settings] key.
The list of track data is displayed.
2. Touch the desired menu item.
To register a track
Registers the current track data.
1. Touch the [ON] key of the [None (Add New)]
item.
2. On the displayed confirmation screen, touch
the [Yes] key.
To show/hide track
1. Touch the [ON] or [OFF] key from the list
screen of track data.
The setting of the track data display is
changed. To set to always display the current
track, touch the [ON] key of the “Current
Tracking”.
To edit a registered track
1. Touch the [Edit] key of “(Registered name)”
from the list of track data.
For the “Current Tracking”, only the [Map]
and [Delete] key are displayed.
[Map]
You can confirm the registered track data on
the map.
[Rename]
You can change the name of the registered
track data.
[Replace]
Deletes the registered track data, and register
the current track data.
[Delete]
Deletes the registered track data.
[OK]
Terminates the editing, and returns to the list
of track data.
Quick POI Settings
Note:
You can also set the categories of the Quick POI
from the Navi Shortcut menu. ➜ “Navi Shortcut
menu” (P. 8)
You can customise the 5 categories of the Quick
POI. In the factory settings, the following
categories are registered:
“Item 1”: [PETROL STAION]
“Item 2”: [RESTAURANT]
“Item 3”: [CAR PARK]
“Item 4”: [HOTEL]
“Item 5”: [HOSPITAL]
1. Touch the [Quick POI Settings] key.
The Item list of Quick POI is displayed.
2. Touch the desired Item of Quick POI you wish
to change.
3. Touch the desired main category of Quick
POI.
4. Touch the desired sub category of the Quick
POI.
The system returns to the Item list of Quick
POI.

Navigation Settings
47
MAX983HD
English
Map Scrolling Information
You can set the information displayed on the
scrolled map screen.
1. Touch the [Map Scrolling Information] key.
The Map Scrolling Information menu screen is
displayed.
2. Touch the [ON] or [OFF] key of each item.
“Address Book Icons”
Shows/hides detail information display for
icons of locations registered in the Address
Book while scrolling.
“TMC Traffic Icons”
Shows/hides detail information display for
icons of TMC traffic information while
scrolling.
“Destination/Waypoint Icons”
Shows/hides detail information display for
destination and waypoints icons while
scrolling.
“Latitude/Longitude Info”
Shows/hides the latitude/longitude
information displayed at the bottom right of
the screen.
Adjusting Current Location
You can correct the vehicle position on the Map
screen.
1. Touch the [Adjust Current Location] key.
2. Scroll the map so that the cursor points to the
location you want to set as the vehicle
position.
3. Touch the [OK] key.
4. Touch the [ ] or [ ] key to turn the
arrowhead according to the direction of the
vehicle.
5. Touch the [OK] key.
Resetting All Settings to
Factory Defaults
You can reset all settings to return to the factory
settings.
Note:
Though all the settings are reset, the registered data
such as the Address Book, Stored Routes, stored
track data, and Avoid Area, are not erased.
1. Touch the [Reset All Settings to Default]
key.
2. From the displayed confirmation screen,
touch the [Yes] key.
Navigation System Check
You can check the conditions of the navigation
system.
1. Touch the [Navigation System Check] key.
The Navigation System Check screen is
displayed, and the conditions of GPS and
various sensors are shown.
The detailed situation of GPS is displayed by
touching the [GPS State] key.
“GPS”
“GPS Antenna”
“Speed Pulse”
To check the Speed Pulse connection, move
the vehicle a little.
“Reverse Signal”
To check the Reverse Signal connection,
once move the gear lever to the back position.
“Gyro Sensor”
“Parking Brake”
To check the Parking Brake connection, once
engage the parking brake.
“Illumination”
To check the Illumination connection, once
turn the lights on.
“RDS-TMC”

48 MAX983HD
English
Audio Settings
When you touch the [Audio] key from the Setting menu, you can set various setting concerning the
audio features. For details, see the Audio Manual.
Adjusting the Monitor
Setting the Screen Colour mode
The system has two Screen Colour mode: the Day mode and the Night mode. Each Screen Colour mode
has the own dimmer level setting.
To switch to the Day mode or Night mode manually, touch the [Day] or [Night] key of the “Screen
Colour” item on the Setting menu.
When the [Auto] key is selected, the Screen Colour mode is automatically switched according to
whether the illumination of the vehicle is turned off or on.
When you touch the [Monitor] key from the Setting menu, you can adjust the dimmer level of the monitor
screen.
Monitor settings
When you touch the [Monitor] key from the Setting menu, you can adjust the dimmer level of the monitor
screen.
• The dimmer level adjustment operates upon the current Screen Colour mode.
1. Touch the [Monitor] key to display the Monitor menu screen.
2. Touch the [+] or [–] key to adjust the dimmer level.
[+]: Touch to make image brighter.
[–]: Touch to make image dimmer.
User Settings
When you touch the [User] key from the Setting menu, you can register the User Profiles to personalise
the Favourite/Frequent/Recent Album list data. For details, see the Audio Manual.

49
MAX983HD
English
Registering/Editing the Data
From the Stored Data menu, you can register the home address, addresses of facilities and places,
routes, track data, and Avoid Areas. You can also edit the data registered.
The registered places or routes can be set as the destination or as the current route.
1. Touch the [ ] (Next) key from the Setting menu.
2. Touch the [Stored Data] key to display the Stored Data menu.
Home Location
Registers your home address. You can edit the
registered home address.
To register the Home Location
The Home Location can be registered when the
[Home Location (Add New)] key is displayed.
1. Touch the [Home Location (Add New)] key.
2. Search the location of your home by a similar
way as for entering destinations.
3. Confirm the searched location, edit items if
required, then touch the [OK] key to register it.
[Edit]
Edits the registered Home Location.
•“Show Icon on Map”: Shows/hides the
home icon on the map.
•“Icon”: Changes the icon for the Home
Location.
•“Image”: Specifies the image data for the
Home Location.
•“Sound”: Selects the sound heard when
you get near the Home Location.
•“Direction”: Sets the approach direction for
locations along roads with separated lanes
for each direction.
•“Distance”: Sets the distance for locations
along roads with separated lanes for each
direction.
•“Phone No.”: Registers the telephone
number of your home.
[Store to Favourite]
Registers the Home Location to the Favourite
list.
To edit the Home Location
1. Touch the [Home Location] key.
2. Touch the desired Item, then edit it.
[Edit]
Edits data by a similar way as for registering
the Home Location. ➜ “To register the Home
Location” as Step 3 above.
[Delete]
Deletes the registered Home Location data.
[Store to Favourite]
Registers the Home Location to the Favourite
list.
[OK]
Terminates the editing, then returns to the
previous screen.
[]
Adjust the location by scrolling the map.
Address Book
Registers locations. You can register up to 200
locations, and can also edit the registered
locations.
To register Locations
1. Touch the [Address Book] key.
2. Touch the [None (Add New)] key.
3. Search for the location you wish to register by
a similar way as for entering destinations.
4. Confirm the location found, edit items if
required, then touch the [OK] key to register it.
[Edit]
Edits the Stored Location.
•“Show Icon on Map”: Shows/hides the
Stored Location icon on the map.
•“Name”: Changes the name of the Stored
Location.
•“Icon”: Changes the icon type for the Stored
Location.
•“Image”: Specifies the image data for the
Stored Location.
•“Sound”: Selects the sound heard when
you get near the Stored Location.
•“Direction”: Sets the approach direction for
locations along roads with separated lanes
for each direction.
•“Distance”: Sets the distance at which the
Sound is heard.
•“Phone No.”: Registers the telephone
number of the Stored Location.
•“Group”: Sets the group the Stored
Location belong to.
•“Swap Numbers”: Changes the registration
number of an Address Book entry. The
number of the order of registration is initially
specified automatically. In order to avoid
that entries need to be deleted while
changing the registration number, numbers
can only be swapped with other entries.

Registering/Editing the Data
50 MAX983HD
English
[Store to Favourite]
Registers the Stored Location to the
Favourite list.
Note:
The Address Book can sorted by the registration
number, name, icon, or group. So we recommend
you set these items for your convenience.
To edit a Stored Location
1. Touch the [Address Book] key.
2. Touch the name of the Stored Location you
wish to edit.
By touching the [Sort] key, you can change
the listing order of the Address Book list.
Edit data by a similar way as for registering
data.
➜ “To register Locations” Step 3 (P. 49)
Stored Route
Registers the current route. You can register up
to 5 routes, and can also edit the registered
routes.
To register the current route
Note:
To register the current route, at least one way point
is required.
1. Touch the [Stored Route] key.
2. Touch the [None (Add New)] key.
3. On the displayed confirmation screen, touch
the [Yes] key.
To edit the Stored Route
1. Touch the [Stored Route] key.
2. Touch the name of the Stored Route you wish
to edit.
3. Touch the desired item, then edit it.
[Rename]
Changes the name of the Stored Route.
[Replace]
Replaces the Stored Route with the current
route.
[Delete]
Deletes the Stored Route.
[OK]
Terminates the editing, then returns to the
previous screen.
4. Touch the [OK] key.
Stored Tracking
By touching the [Stored Tracking], you can
register/edit the Stored Tracking, or change
settings for show/hide of the Stored Tracking.
The operation procedures are the same as for
the Tracking Display Settings of the Navigation
settings. ➜ “Tracking Display Settings” (P. 46)
Avoid Area
By touching the [Avoid Area] key, you can set an
Avoid Area. The operation procedures are the
same as for the Avoid Area Settings of the
Navigation settings. ➜ “Avoid Area Settings”
(P. 45)
Deleting registered data
You can delete various data stored in the
navigation system.
1. Touch the [Delete Stored Items] key.
2. Touch the item to delete.
[Home Location]
[All Stored Locations]
[All Stored Routes]
[Current Tracking]
[All Stored Trackings]
[All Avoid Areas]
[All Previous Destinations]
[Previous Starting Point]
[All Favourite items]
[All Frequent items]
3. From the displayed confirmation screen,
touch the [Yes] key.
51
MAX983HD
English
Importing Data Using the SD Card
From the [Import Data] menu, you can import the downloaded data from the website. For more
information about the installation method and the function, see the Clarion homepage.
1. Touch the [ ] (Next) key from the Setting menu.
2. Touch the [Import Data] key to display the Import Data menu.
Note:
When you perform the operation of data import, confirm that the SD card on which the relevant data is stored
has been set to the SD card slot.
To use the SD card
1. Press the [7OPEN/CLOSE] button to open
the operation panel.
2. Confirming the orientation of the SD card,
insert the SD card surely to the SD card slot
until it stops.
Note:
For the detailed information on using SD cards, see
the Audio Manual.
CAUTION
CAUTION
Data may be broken when using SD cards in
the following situation:
When disconnecting the SD card or turning
the power off during writing or reading data.
When affected by static electricity or electric
noises.
It is recommended that you back up your
important data to a personal computer by
using the SD card.
Skin
You can import the Skin data stored in the SD
card into the hard disk drive.
Touch the [Import] key of the “Skin” item, then
operate according to the displayed messages.
To delete the data imported to the hard disk drive,
touch the [Delete] key.
Extra POI
You can import the Extra POI data stored in the
SD card into the hard disk drive.
Touch the [Import] key of the “Extra POI” item,
then operate according to the displayed
messages.
To delete the data imported to the hard disk drive,
touch the [Delete] key.
Safety Camera
You can import the location database of Safety
Cameras stored in the SD card to the hard disk
drive. Touch the [Import] key of “Safety
Camera”, then operate according to the
displayed messages. To delete the data imported
to the hard disk drive, touch the [Delete] key.
Note:
•This function displays the locations of Safety
Cameras on the map using the imported location
database of the Safety Camera on the hard disk
drive, and warns that the vehicle approaches the
location. For details, see the Clarion’s homepage.
•Be sure to import the location database of Safety
Cameras while the vehicle is stopped. The
message “Reading Safety Camera data.”
disappears when the import is finished. If the
vehicle starts to move before the message
disappears, the import will be cancelled.
Other data
You can also import the following data:
• Image data
• Album Infromation data
For the detailed information on importing these
data, see the Audio Manual.

52 MAX983HD
English
Service Options
From the [Service Option] menu, you can perform the operation such as displaying a demonstration of
the navigation system, backup or restore of stored data, and resetting to the factory settings.
1. Touch the [ ] (Next) key from the Setting menu.
2. Touch the [Service Option] key to display the Service Option menu.
Demonstration
Displays the demonstration of the route
guidance.
“Demo”:
Touch the [Select] key, then touch the desired
demonstration course to play.
Backing up User Data
You can back up the data currently stored in the
navigation system to SD card.
Note:
•This function saves the following data: the data of
the Stored Locations, the route data, the data
registered in Favorite/Frequent list, the setting
data of the Settings menu.
•The recorded music data, Playlist data, and data
imported using SD cards (Skin, Extra POI, etc.)
cannot be backed up.
“Backup User Data”:
When touching the [Backup] key, a screen with
a confirmation message appears. Operate
according to the guidance on the screen
displayed.
Restoring User Data
You can restore data backed up using SD card.
Note:
When you perform backup/restore of data of two
different navigation systems, the stored data on the
restored system will be lost. Be sure to back up data
of the system to restore to before performing the
restore operation.
“Restore User Data”:
When touching the [Restore] key, a screen with
confirmation message appears. Operate
according to the guidance on the screen.
Resetting to the Factory
Settings
You can return the navigation system to the
status after purchase.
Note:
When the system is reset to the factory settings, all
stored data is erased (including the music data in the
Music Catcher). It is recommended that you backup
all data you want to keep.
“Reset to Factory Setting”:
When touching the [Reset] key, a screen with
confirmation message appears. Operate
according to the guidance on the screen.
Software & Map Update
You can update the software and the map data.
“Software & Map Update”:
When touching the [Start] key, a screen with a
message prompting to insert the update disc
appears. Operate according to the guidance on
the screen.
Screen Adjustment
The position and sharpness of the screen can be
adjusted.
“Screen Adjustment”:
After touching the [Adjust] key, adjust the screen
position by touching the [J], [K], [j] and [k] key.
Touch the [1] or [2] key to select a setting at
which the screen is displayed clearly.

53
MAX983HD
English
Setting Safety Camera
From the Safety Camera menu, you can set the Safety Camera.
1. Touch the [ ] (Next) key from the Setting menu.
2. Touch the [Safety Camera] key to display the Safety Camera menu.
3. Touch the desired menu item to set.
“Show Icon on Map”:
Turns ON/OFF the Safety Camera Icon display on the map.
“Warning & Sound”:
Turns ON/OFF both of the warning indication and alarm sound when the vehicle gets near a Safety
Camera location.
“Camera Location”:
Touch the [List] key to display the list of the Safety Camera locations. Touching an item of the list
displays the icon at the location of the Safety Camera on the right map.
Note:
These settings are enabled when the Safety Camera data is stored in the hard disk. ➜ “Safety Camera” (P. 51)
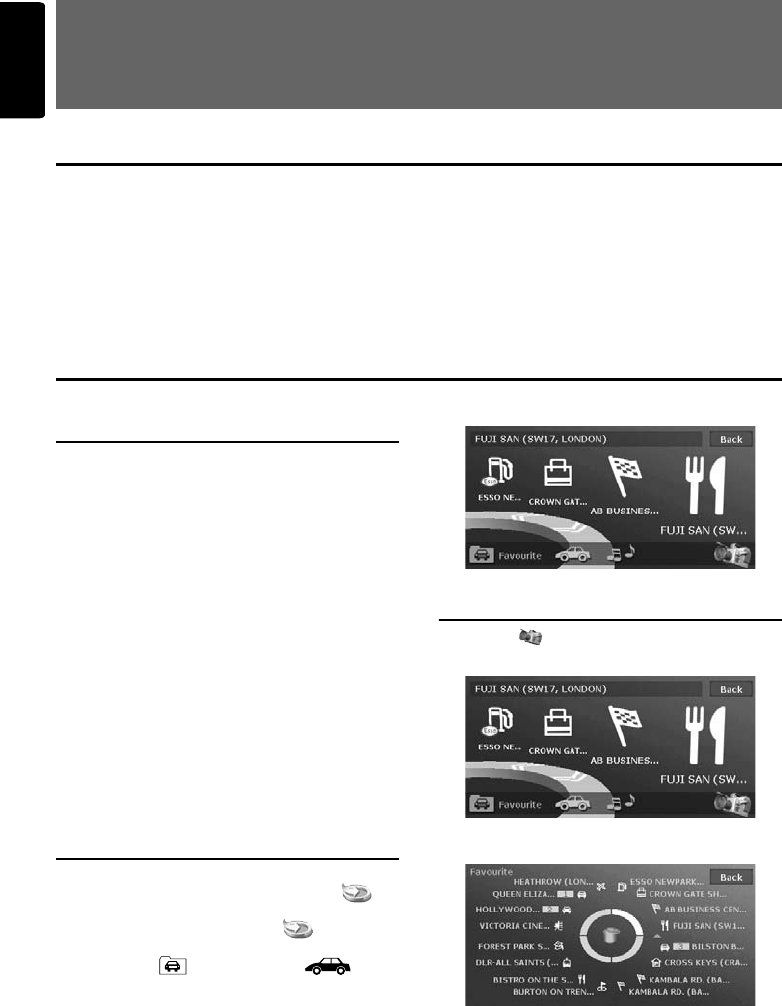
54 MAX983HD
English
7. Favourite/Frequent List
Operations
What is Favourite/Frequent List?
The system has the following 3 shortcut lists:
•Favourite list: You can register your favourite places.
•Frequent list: Destinations frequently entered are automatically registered.
•Recent Album list: Albums recently selected from the Music Search are automatically registered (see
the Audio Manual for details).
You can display these lists by easy operation, and can specify your desired item to set as the destination
or to be played back.
You can also customise these lists when its Angle is set to 2D list screen.
Using Favourite/Frequent List
Favourite/Frequent list
Favourite
You can register up to 16 favourite places. The
favourite places can be registered from the
Frequent by moving icons (drag and drop). In
addition, you can register your home address
from the [Home Location] key of the [Stored
Data] key in the Setting menu, or places from
[Address Book]. ➜ “Home Location” (P. 49),
“Address Book” (P. 49)
Frequent
The system automatically registers the places
entered as the destinations in the past.
Up to 16 places, where the number of times you
entered as destination is higher than others and
the date is newer than others, are registered and
sorted automatically. ➜ “2D List screen” (P. 56)
Displaying Favourite/
Frequent list
To display the Favourite/Frequent list screen,
press the [MENU] button and touch the [ ]
key, or press the [MAP] button and touch the
[NAVI] key, and then touch the [ ] key from
the Navi Shortcut menu.
Touching the [ ] (Favourite) or [ ]
(Frequent) key switches the screen. Large icons
which indicate the category of registered places
are displayed in each screen.
Switching Angle
Touch the [ ] key to switch the viewing angle.
•3D List screen
•2D List screen
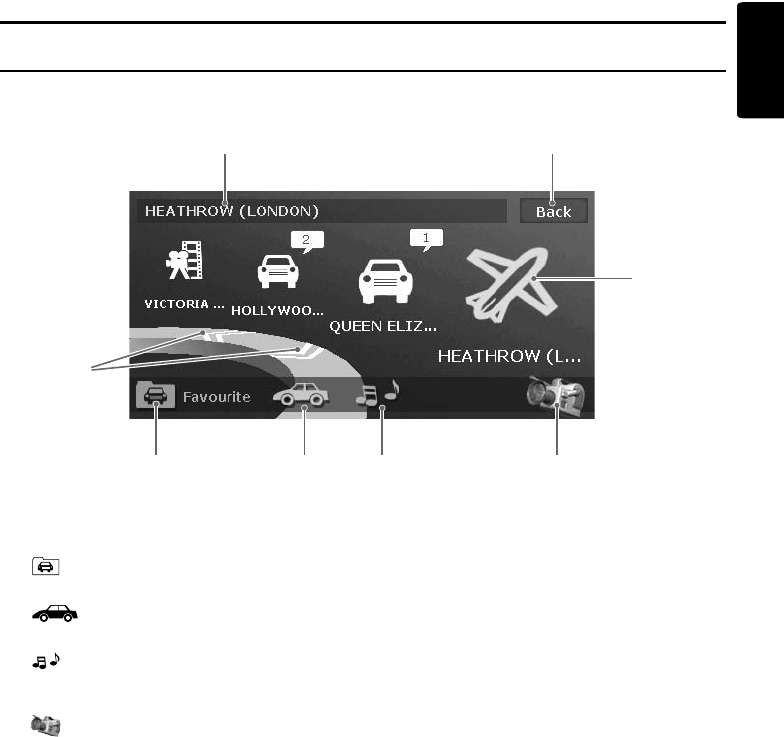
Using Favourite/Frequent List
55
MAX983HD
English
Favourite/Frequent menu
3D List screen
1 [N] [n] key
Scrolls the list to display other icons. Up to 5
icons are displayed on the screen.
2 [ ] (Favourite) key
Switches to the Favourite list screen.
3 [ ] (Frequent) key
Switches to the Frequent list screen.
4 [ ] (Recent Album) key
Switches to the Recent Album list screen.
See the Audio Manual for details.
5 [ ] key
Changes the viewing angle of the screen by
switch to the 2D screen.
6 Icon
Indicates the category of each registered place.
For the rotating icon, the registered name is
displayed at the upper left of the screen. By
touching the desired icon, you can set the
registered place as the destination. ➜
“Searching Your Destination from the
Favourite/Frequent List” (P. 27)
For the Favourite/Frequent list items registered
from the Stored Locations, the name and number
in the Address Book are displayed together with
the icon. If an image data is registered, the image
is displayed instead of the icon.
7 [Back] key
Returns to the previous screen.
8 Registered name/Place name
Displays the registered name, place name, or
facility name of the place which is selected
(rotating icon).
1
2 3 4 5
6
87

Using Favourite/Frequent List
56 MAX983HD
English
2D List screen
1 Icon
Indicates the category of a registered place. The
icon can be moved by touching and dragging it.
Thus, you can change the location of the desired
icon in the list, or drop the desired icon to the
Trash icon to discard it or to the Folder icon to
store it to the Favourite list.
2 [] key
Displayed only on the Frequent list screen.
Touching this key displays the following keys:
“Delete Item”
Changes the Folder icon to the Trash icon. You
can discard the desired icon.
“Sort by Date”
Changes the sorting method of the list to the
order of the registered date.
3 [Back] key
Returns to the 3D List screen.
4 Trash/Folder
In the Favourite list screen, the Trash icon is
displayed. You can discard the desired icon by
dragging and dropping it to the Trash icon.
In the Frequent list screen, the Folder icon is
displayed. You can move the desired icon to the
Favourite list by dragging and dropping it to the
Folder icon.
5 Registered name/Place name
Displays the registered name, place name, or
facility name of the place which is selected.
1
453
2
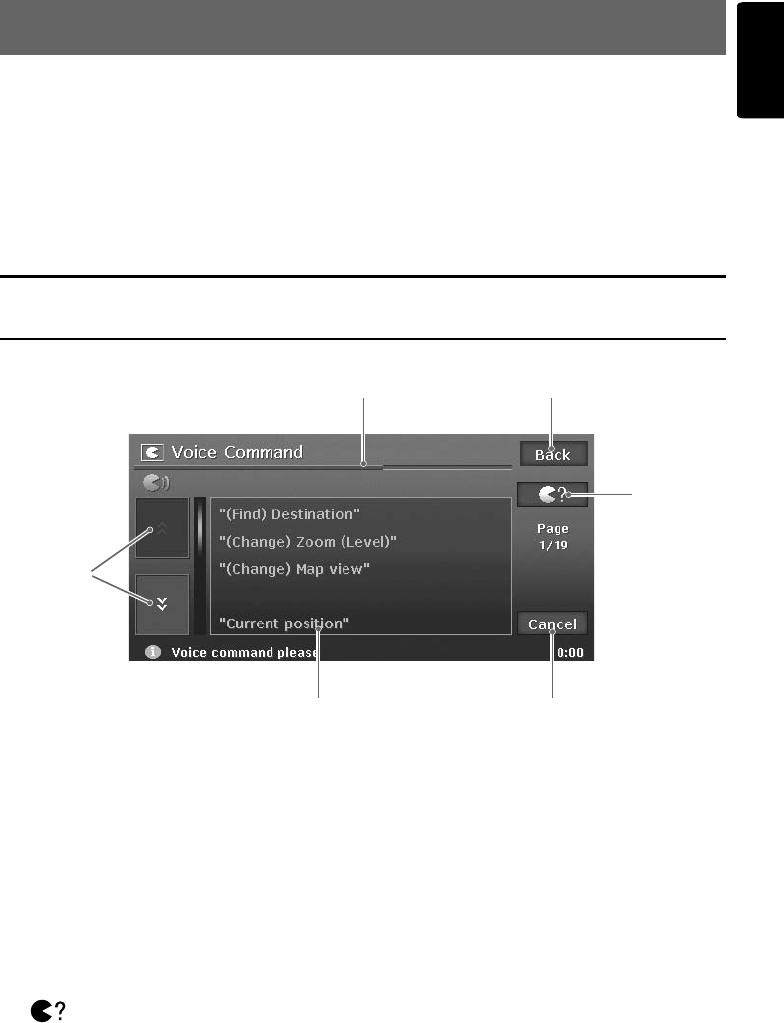
57
MAX983HD
English
8. Voice Command Operations
This system has a built in voice recognition function. You can perform fundamental operations by saying
the corresponding voice commands.
Note:
•The supported languages by the voice command function are English, French, German, Italian, Dutch and
Spanish. You can perform voice command operations after switching to a supported language.
For details of switching languages, please see the “Language setting” (P. 43).
•When the language setting is set to Swedish, Portuguese, or Denmark, the voice command function is not
available.
Voice Command Features
Voice Command menu
Pressing the [VOICE] button displays the following screen.
1 [D]/[d] key
Displays the previous page or next page of the
Voice Command list. You can also operate by
saying “Previous page” or “Next page”.
2 Voice Command list
This is the list of the commands for voice
operation. The available commands at that time
are displayed in yellow. You cannot operate by
touching this list.
3 [Cancel] key
Cancels the voice recognition, and returns to the
previous screen. You can also achieve this by
saying “Cancel”.
4 [ ] key
Suspends the voice input waiting mode, and
displays the available command list. Touching
this again returns to the voice input waiting mode.
5 [Back] key
Returns to the previous screen. When the voice
command operation is suspended, returns to the
voice input waiting mode.
6 Voice input waiting time indication
bar
Indicates the time remaining of the voice input
waiting mode. Say the desired command during
the blue bar is displayed. The system returns to
the previous screen when the blue bar runs out.
Note:
Various operation advices are displayed according
to the status at the bottom of the screen. You can
refer to them while operating the voice recognition.
2 3
4
56
1

Voice Command Features
58 MAX983HD
English
Example of voice command
operation
This section provides an example of the
destination entry by inputting the location stored
in the Address Book by voice.
1. Press the [VOICE] button.
The Voice Command menu screen is
displayed, and the announcement for the user
to say the desired command and a beep
sound are heard. The system enters the voice
input waiting mode.
2. Say “Address book”.
When the voice command is recognised, the
system will respond with a feedback
message, display the list screen of the
Address Book, then enter the voice input
waiting mode again.
Note:
If you say the voice command before a beep sound
is heard, the voice command cannot be recognised.
3. Say the number of the desired list entry.
The registered place of the number said will
be set as the destination.
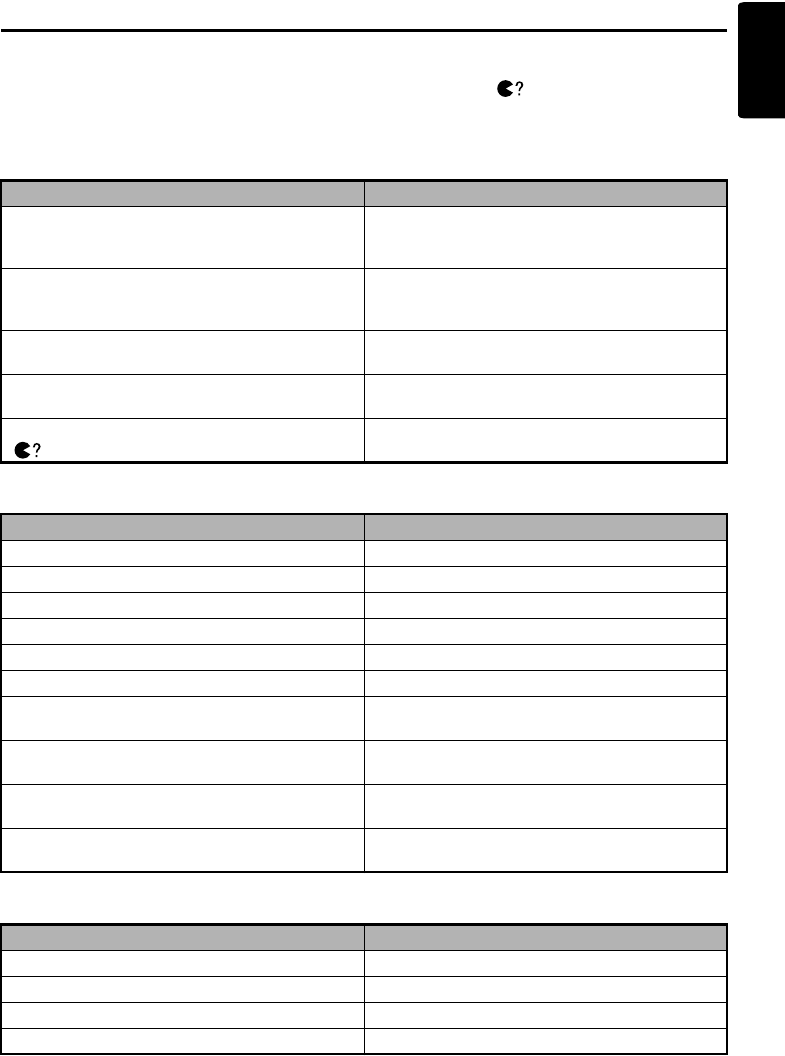
59
MAX983HD
English
List of the Voice Commands (Navigation Features)
The following table lists the fundamental
command examples which can be input during
the voice input wait mode entered by pressing
the [VOICE] button, classified by the usage.
Note:
•You can omit the term enclosed by ( ).
•Touching the [ ] key displays the voice
commands usable at that operating condition. You
can refer to them.
●Common voice commands available anytime during voice input
These are the commonly usable commands in any condition during the voice input operation.
●Voice commands for changing the map appearance
Say “(Change)map view”➜ then say the following command.
●Voice commands for changing the map scale
Say “(Change)zoom (level)”/“(Change)scale”➜ then say the following command.
Operation Command
Terminates the voice operation, and displays the
current location map screen. “Map”
“Current Position”, “Display/Show Map”, “Go to
Map”, “(Show me) Where am I”, “Current Location”
Cancels the immediately precedent voice
operation, and returns to the previous voice input
wait mode.
“Back”
Displays the next page of voice command list
displayed on the screen. “Next (page)”
Displays the previous page of voice command list
displayed on the screen. “Previous (page)”
Displays the screen displayed when touching the
[ ] key (Voice Help screen). “(Voice)Help”
“What can I say?”
Operation Command
Displays the 2D map. “2D”
Displays the 3D map. “3D”
Displays the 2D/2D maps on the split screen. “(split screen)2D (and)2D”
Displays the 2D/3D maps on the split screen. “(split screen)2D (and)3D”
Changes the map orientation to heading up. “Heading up”
Changes the map orientation to North up. “North up”
Displays the turn list. “Turn list on”
“Show turn list”
Hides the turn list. “Turn list off”
“Hide turn list”
Turns on the traffic information display on the map
screen. “Show traffic information”
“Traffic information on”
Turns off the traffic information display on the map
screen. “Hide traffic information”
“Traffic information off”
Operation Command
Increases/decreases the map scale by one step. “Zoom in/out”
Changes to the specified map scale. “XX m (scale)” “XX mile (scale)”
Changes the map scale to minimum. “Minimum (scale)”
Changes the map scale to maximum. “Maximum (scale)”
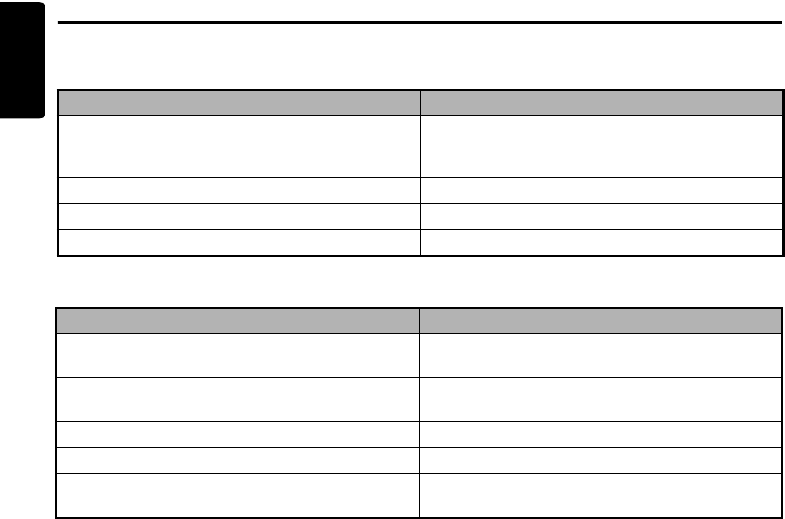
List of the Voice Commands (Navigation Features)
60 MAX983HD
English
●Voice commands for entering destination
Say “(Find) Destination”➜ then say the following command.
●Voice commands for setting voice guidance
These are the commands to change settings of the voice guidance during route guidance.
Operation Command
Sets the home address as the destination. “(My)Home”
“(Go/Return to) (my) home”, “Set destination to
(my) home”
Enters from the Address Book. “(From)Address Book”
Enters from the Nearby POI. “(From)Nearby POI”
Enters from the Previous Destinations. “(From)Previous destination”
Operation Command
Sets the route guidance voice setting to ON. “Voice guidance on”
“Activate (the) voice guidance”
Sets the route guidance voice setting to OFF. “Voice guidance off”
“Deactivate (the) voice guidance”
Increases the volume of the guidance voice. “Voice guidance Volume up”
Decreases the volume of the guidance voice. “Voice guidance Volume down”
Repeats the immediately previous voice
guidance. “Repeat (voice)guidance”

61
MAX983HD
English
Notes on the Voice Command Operations
• When operating the system by voice, it is
necessary to reduce the surrounding noises to
be recognised correctly. Follow the following
guidelines.
• Close the windows.
• Say commands clearly and correctly toward
the microphone.
• Refrain from other conversations while
voice input.
• After the announcement request to say
commands is heard, say commands during the
blue bar is displayed on the voice input
listening time indication bar. The system
returns to the previous screen when the blue
bar runs out.
• Voice commands may not be recognised
correctly. Use it as an assistance for the
system operation only.
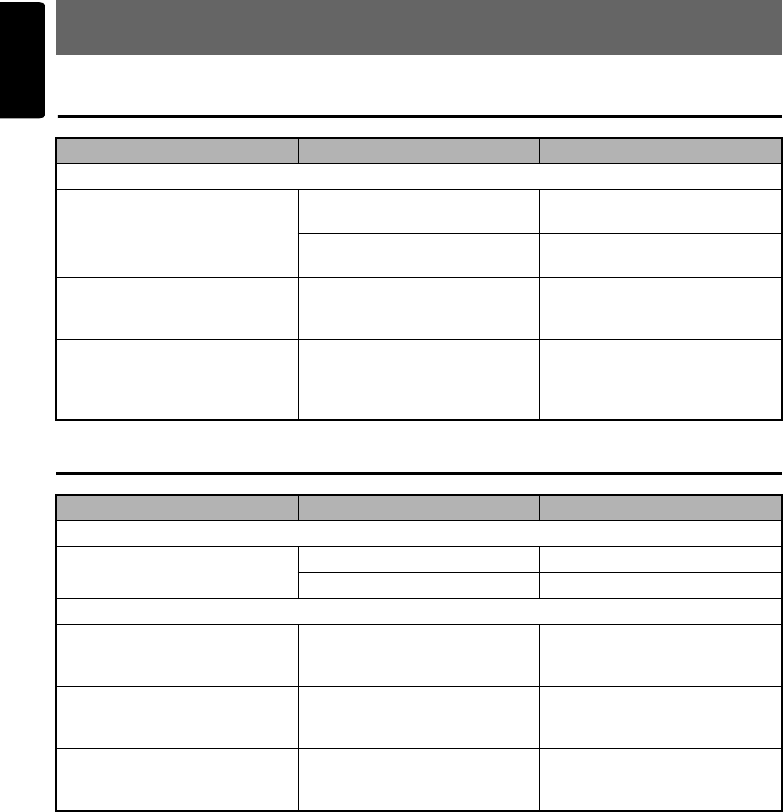
62 MAX983HD
English
9. Others
Troubleshooting
Error Messages
Problem Cause Remedy
RDS-TMC
The provider of RDS-TMC is not
automatically selected. The aerial is not connected. Confirm the connection of the
aerial.
[Manual] is selected on the
Select TMC Provider screen. Select [Automatic].
The menu screen is not
displayed. Certain keys/functions are not
available for your safety during
driving.
Menu is displayed again when
the vehicle is stopped in a safe
place.
Too many landmark icons are
displayed on the map. According to system settings,
many landmark icons are
displayed according to the
current location.
You can set the system not to
display landmark icons.
“Landmark Icon display”
(P. 45)
Error Message Cause Remedy
SD Card
ACCESS ERROR
Memory Card access failed The SD card is not set correctly. Set the SD card again.
The SD card is not recognised. Set another SD card.
Hard Disk Drive
HIGH TEMP ERROR
Please wait until the temperature
becomes normal
The HDD cannot be accessed
because the temperature in the
vehicle is extremely high.
Please wait until the temperature
becomes appropriate.
LOW TEMP ERROR
Please wait until the temperature
becomes normal
The HDD cannot be accessed
because the temperature in the
vehicle is extremely low.
Please wait until the temperature
becomes appropriate.
HDD ACCESS ERROR
Please consult a dealer The HDD cannot be accessed.
The sectors or clusters of the
HDD may be damaged.
Please consult you nearest
dealer.

63
MAX983HD
English
About the Positioning Error
Error of the vehicle position
When the vehicle travels, this system learns the
distance and the direction advanced on the map
from the travelling data and corrects the position
accordingly. (distance coefficient/learning
function). Therefore, some initial travelling data is
required for proper operation. According to the
travelling situation and condition of the GPS
satellites, the position of the vehicle position
mark and the actual vehicle position may be
different, but this is not a malfunction.
Effective method to avoid the
positioning error
When you use the system for the first time,
dislocation may appear as the travelling data is
few. Though, after travelling for a while on a road
where the signal from the GPS satellites can be
received well (such as national roads, principal
main roads, and principal minor roads), the
vehicle position mark will be displayed accurately
on the map. It is possible to train the system in a
short time when applying the following method:
Travel about 15 to 20 km on a smooth road where
there is no barrier in the sky like tall buildings or
forests (GPS signals can be received well) at a
constant speed of 25 km/h or more (try to avoid
frequent acceleration and moderation).

Owner’s manual (Navigation)
Mode d’emploi (Navigation)
Benutzerhandbuch (Navigation)
Manuale dell’utente (Navigazione)
Gebruikershandleiding (Navigatie)
Guía de usuario (Navegación)
Ägarhandbok (Navigation)
Manual do utilizador (Navegação)
Brugervejledning (Navigation)
HDD NAVIGATION SYSTEM
SYSTEME DE NAVIGATION HDD
HDD-NAVIGATIONSSYSTEM
SISTEMA DI NAVIGAZIONE HDD
HDD-NAVIGATIESYSTEEM
SISTEMA DE NAVEGACIÓN HDD
NAVIGATIONSSYSTEM MED HÅRDDISK
SISTEMA DE NAVEGAÇÃO COM HDD
(UNIDADE DE DISCO RÍGIDO)
HDD-NAVIGATIONSSYSTEM
QY-5003E-B
2008/5(Y-YI)
MAX983HD
MAX983HD
Clarion Co., Ltd.
All Rights Reserved.Copyright © 2008: Clarion Co., Ltd.
Printed in Hungary / Imprimé en Hongrie / Gedruckt in Ungarn /
Stampato in Ungheria / Gedrukt in Hongrarije / Impreso en Hungría /
Tryckt i Ungern / Impresso na Hungria / Trykt i Ungarn

560 MAX983HD
Käyttöturvallisuusohjeet
VAROITUS
•Tätä navigointijärjestelmää ei saa käyttää korvaamaan omaa harkintaasi. Mitkään
navigointijärjestelmän antamat reittiehdotukset eivät koskaan saa ohittaa paikallisia
liikennesääntöjä, omaa harkintaasi ja/tai turvallisen ajokäyttäytymisen tapoja. Jätä
noudattamatta navigointijärjestelmän ehdottamia reitityksiä mikäli ne; johtaisivat vaarallisen
tai lainvastaisen ajoliikkeen tekemiseen, saattaisivat sinut vaaralliseen tilanteeseen tai
toimimaan vastoin liikennesääntöjä tai opastaisivat sinut ei-turvalliseksi pitämällesi alueelle.
•Navigointijärjestelmän antamia ohjeita tulee pitää ainoastaan ehdotuksena (ehdotuksina).
Navigointijärjestelmää käytettäessä saattaa syntyä tilanteita joissa; navigointijärjestelmä
ilmoittaa ajoneuvosi sijainnin virheellisesti, jättää ehdottamatta lyhyintä reittiä päämäärääsi
ja/tai se ei anna opastusta haluamaasi määränpäähän. Tällaisissa tilanteissa sinun tulee
tukeutua omaan harkintaasi ajamisessasi ja sinun tulee huomioida kullakin hetkellä
vallitsevat ajo-olosuhteet.
•Älä käytä navigointijärjestelmää hätäpalveluiden reitittämiseen. Järjestelmän tietokanta ei
sisällä täydellistä tiedostoa hätäpalveluiden suorittajista. Tällaisia hätäpalveluiden
suorittajia ovat mm. poliisi, palolaitokset, sairaalat ja ensiapuasemat. Muista käyttää omaa
harkintaasi ja mahdollisuutta kysyä tällaisissa tilanteissa muilta ajo-ohjeita.
•Ajoneuvon kuljettajana vastaat aina itse liikenneturvallisuudestasi.
•Liikenneonnettomuuksien taikka liikennerikkomusten välttämiseksi sinun tulee muistaa,
että vallitsevat liikenneolosuhteet ja liikennesäännöt ovat ensisijaisia
navigointijärjestelmän sisältämään tietoon verrattuna.
•Tästä seuraa, että ohjelmisto saattaa sisältää epätarkkaa tai puutteellista tietoa, joka
johtuu ajan kulumisesta, muuttuneista olosuhteista ja ohjelmiston luomiseen käytettyjen
tietolähteiden luonteesta. Muista aina ajaessasi huomioida vallitsevat liikenneolosuhteet
ja liikennesäännöt.
•Tämä navigointijärjestelmä ei sisällä saatika vastaa millään muodoin; tiedoista, jotka
koskevat tieliikennelainsäädäntöä, nopeusrajoituksia, tieolosuhteita, mukaan lukien tien
kaltevuutta, luokitusta ja/tai tien pinnan olosuhteita, liikennöintiä haittaavien/rajoittavien
tietojen mukaan lukien siltojen ja tunneleiden korkeus- ja leveystietoja ja/tai muita
kulloinkin vallitsevia liikennöinti- ja/tai tieolosuhteista. Muista aina luottaa ajaessasi
omaan harkintaasi ja huomioi kulloinkin vallitsevat ajo-olosuhteet.
•Minimoi ajon aikana järjestelmän näytön katselemiseen käyttämäsi aika.

561
MAX983HD
Sikkerhetsregler
Advarsel
•Dette navigasjonssystemet bør ikke benyttes som en erstatning til Deres egne vurderinger
og veivalg. Navigasjonssystemets anbefaling av rute må aldri benyttes dersom denne er i
strid med eller tilsidesetter lokale trafikkreguleringer, deres egne vurderinger eller skjønn og/
eller gjeldende regler og praksis for sikker kjøring. Se bort fra ruteanbefalinger fra
navigasjonssystemet hvis slike anbefalinger enten skulle medføre at De måtte utføre en
farlig eller ulovlig manøver, sette Dem eller noen i en farlig situasjon, eller dirigere Dem inn
i et område De vurderer som usikkert.
•Anbefalinger som navigasjonssystemet gir må bare anses som forslag. Det kan oppstå
situasjoner hvor navigasjonssystemet feil oppgir kjøretøyets lokasjon, mislykkes med å
foreslå det korteste veivalget og/eller mislykkes i å dirigere Dem til Deres ønskede mål. I slike
situasjoner må De derfor basere Dem på Deres egne vurderinger under hensyn til rådende
kjøreforhold.
•Aldri bruk navigasjonssystemet til å dirigere Dem til nødhjelp og lignende tjenester.
Databasen inneholder ikke en fullstendig oversikt over politistasjoner, brannstasjoner,
sykehus, klinikker eller lignende steder hvor nødhjelp finnes. Vennligst forhold Dem til Deres
egne vurderinger og Deres evne til å spørre om veien ved behov for nødhjelp og lignende
situasjoner.
•Som fører av kjøretøy er De alene ansvarlig for Deres sikkerhet i trafikken.
•For å unngå en trafikkulykke eller en overtredelse av trafikkreglene; husk at de rådende
veiforholdene og trafikkreglene gjelder foran informasjon som finnes i
navigasjonssystemet.
•Programvaren kan inneholde unøyaktig eller ufullstendig informasjon som følge av tidens
løp, endrede forhold, eller som følge av den aktuelle kildens art. Vennligst iaktta de
rådende trafikkforhold og trafikkregler ved all kjøring.
•Navigasjonssystemet tar verken hensyn til eller gjør rede for, på noen som helst måte,
informasjon vedrørende lover og trafikkregler, fartsrestriksjoner, veiforhold inklusive
helling, dosering og/eller veidekke, informasjon om veihinder inklusiv bro- og
tunnelhøyder og – bredder, og/eller andre rådende kjøre- og/eller veiforhold. Baser Dem
derfor alltid på Deres egen vurdering og skjønn under hensyn til rådende kjøreforhold.
•Bruk minst mulig tid til å se på skjermen mens De kjører.

562 MAX983HD
Bezpečnostní opatření
Varování
•Tento navigační systém by neměl nahrazovat váš vlastní úsudek. Bez ohledu na to, jakou
trasu tento navigační systém navrhne, musíte vždy dodržovat dopravní předpisy, řídit se
vlastním úsudkem a dodržovat zásady bezpečného řízení vozidla. V případě, že navigační
systém navrhne trasu, na které byste museli provést riskantní manévr nebo manévr v
rozporu s dopravními předpisy, dostali se do nebezpečné situace nebo by vás trasa zavedla
do oblasti, kterou považujete za nebezpečnou, takovou trasou se neřid’te.
•Trasu navrženou navigačním systémem považujte pouze za doporučení. Může se totiž stát,
že navigační systém nezobrazí správnou polohu vozidla, nenavrhne nejkratší trasu nebo vás
nedovede k požadovanému cíli. V takovém případě se spoléhejte na vlastní úsudek a
zkušenosti a přihlížejte k aktuálním podmínkám jízdy.
•Nepoužívejte navigační systém k navržení trasy k nejbližší nouzové službě. Databáze totiž
neobsahuje kompletní seznam poskytovatelů nouzových služeb (policie, hasičů, nemocnic a
zdravotnických zařízení). V těchto situacích se řid’te vlastním úsudkem a případně se
zeptejte na cestu kolemjdoucích.
•Za bezpečnost na silnici nesete jakožto řidič výhradní odpovědnost.
•Aby nedošlo k dopravní nehodě nebo dopravnímu přestupku, mějte vždy na paměti, že
před informacemi uloženými v navigačním systému mají vždy přednost aktuální podmínky
na silnicích a dopravní předpisy.
•Z důvodu zastarání databáze, změny okolností nebo povahy zdrojů dat může software
také obsahovat nepřesné nebo neúplné informace. Sledujte proto po celou dobu jízdy
aktuální dopravní podmínky a dopravní značení a dodržujte dopravní předpisy.
•Navigační systém neobsahuje ani žádným způsobem nenahrazuje informace o
dopravních předpisech, specifikacích vozidla včetně váhy, výšky, šířky a nákladu a/nebo
omezeních rychlosti, podmínkách na silnicích včetně sklonu, stoupání a stavu vozovky,
informace o překážkách na cestě, například výšku a šířku mostů a tunelů, ani žádné další
obecné informace o podmínkách jízdy a silnic. Vždy se proto spoléhejte na vlastní úsudek
a řidičské zkušenosti a respektujte aktuální dopravní situaci.
•Snažte se sledovat displej za jízdy co nejméně.
563
MAX983HD
Bezpečnostné pokyny
Varovanie
•Tento navigačný systém by nemal nahrádzat’ váš vlastný úsudok. Bez ohl’adu na to, akú
trasu tento navigační systém navrhne, musíte vždy dodržiavat’ dopravné predpisy, riadit’ sa
vlastným úsudkom a dodržiavat’ zásady bezpečného riadenia vozidla. V prípade, že
navigačný systém navrhne trasu, na ktorej by ste museli urobit’ riskantný manéver alebo
manéver v rozpore s dopravnými predpismi, dostali sa do nebezpečnej situácie alebo by vás
trasa zaviedla do oblasti, ktorú považujete za nebezpečnú, takouto trasou sa neriad’te.
•Trasu navrhnutú navigačným systémom považujte iba za odporúčanie. Môže sa totiž stat’,
že navigačný systém nezobrazí správnu polohu vozidla, nenavrhne najkratšiu trasu alebo vás
nedovedie k požadovanému ciel’u. V takomto prípade sa spoliehajte na vlastný úsudok a
skúsenosti a prihliadajte k aktuálnym podmienkam jazdy.
•Nepoužívajte navigačný systém k navrhnutiu trasy k najbližšej núdzovej službe. Databáza
totiž neobsahuje kompletný zoznam poskytovatel’ov núdzových služieb (polície,
požiarnikov, nemocníc a zdravotníckych zariadení). V týchto situáciách sa riad’te vlastným
úsudkom a prípadne sa spýtajte na cestu okoloidúcich.
•Za bezpečnost’ na ceste nesiete ako vodič výhradnú zodpovednost’.
•Aby nedošlo k dopravnej nehode alebo dopravnému priestupku, majte vždy na pamäti, že
aktuálne podmienky na cestách a dopravné predpisy majú vždy prednost’ pred
informáciami uloženými v navigačnom systéme.
•Z dôvodu zastarania databázy, zmeny okolností alebo povahy zdrojov dát môže software
tiež obsahovat’ nepresné alebo neúplné informácie. Sledujte preto po celú dobu jazdy
aktuálne dopravné podmienky a dopravné značenie a dodržiavajte dopravné predpisy.
•Navigačný systém neobsahuje ani žiadnym spôsobom nenahrádza informácie o
dopravných predpisoch, špecifikáciách vozidla vrátane váhy, výšky, šírky a náklade,
obmedzeniach rýchlosti, podmienkach na cestách vrátane sklonu, stúpania a stavu
vozovky, informácie o prekážkach na ceste, napríklad výšku a šírku mostov a tunelov, ani
žiadne d’alšie bežné informácie o podmienkach jazdy a ciest. Vždy sa preto spoliehajte
na vlastný úsudok a skúsenosti s riadením vozidla a rešpektujte aktuálnu dopravnú
situáciu.
•Snažte sa čo najmenej sledovat’ displej za jazdy.
564 MAX983HD
Mjere opreza
Upozorenje
•Ovaj navigacijski sustav ne može se koristiti kao zamjena za vlastitu procjenu. Bilo kakvi
smjerovi koje ovaj navigacijski sustav predloži ne mogu ni u kojem slučaju imati prednost
pred lokalnom prometnom regulacijom, Vašom vlastitom procjenom i/ili znanjima o sigurnoj
vožnji. Zanemarite smjerove koje navigacijski sustav predloži ukoliko biste zbog takvih
prijedloga: morali poduzeti opasnu ili nezakonitu radnju, doveli sebe u opasnu situaciju, ili
bili usmjereni u područje koje smatrate nesigurnim.
•Upute koje daje navigacijski sustav treba smatrati isključivo prijedlozima. Moguće su
situacije kad navigacijski sustav pogrešno pokazuje lokaciju vozila, ne predlaže najkraći put
i/ili Vas ne usmjerava prema željenom odredištu. U takvim situacijama oslonite se na Vašu
vozačku procjenu uzimajući u obzir trenutne uvjete za vožnju.
•Ne koristite navigacijski sustav za usmjeravanje prema hitnim službama. Zbirka podataka ne
sadrži cjelovit popis lokacija hitnih službi kao što su policija, vatrograsne stanice, bolnice i
klinike. Molimo koristite vlastitu procjenu i mogućnost da u takvim situacijama zatražite
upute.
•Kao vozač, Vi ste isključivo odgovorni za Vašu sigurnost na cestama.
•Kako biste izbjegli prometne nesreće odnosno prometni prekršaj, imajte na umu kako
uvjeti na cesti te prometna regulacija imaju prednost pred informacijama sadržanim u
navigacijskom sustavu.
•Slijedom navedenog, program (software) može sadržavati netočne ili nepotpune
informacije uslijed proteka vremena, promijenjenih okolnosti i zbog prirode korištenih
izvora. Molimo motrite stvarne prometne okolnosti i regulaciju za čitavo vrijeme dok
vozite.
•Navigacijski sustav ne daje niti na bilo koji način uzima u obzir prometne i cestovne
propise; specifikacije vozila uključujući masu, visinu, širinu, nosivost i/ili ograničenja
brzine; uvjete na cestama uključujući strminu, uspon i/ili stanje podloge/kolinka; podatke
o preprekama uključujući visinu i širinu mosta ili tunela, i/ili druge značajne uvjete vožnje
i/ili uvjete na cesti. Uvijek se oslanjajte na vlastitu vozačku procjenu uzimajući u obzir
trenutne uvjete vožnje.
•Vrijeme u kojem promatrate ekran za vrijeme vožnje svedite na najmanje moguće.

565
MAX983HD
Varnostne informacije
Opozorilo
•Ta navigacijski sistem ne nadomešča presoje uporabnika. Katerokoli usmeritveno
priporočilo, vsebovano v tem navigacijskem sistemu, ne more nikoli imeti prednosti pred
lokalnimi prometnimi predpisi, pred osebno presojo uporabnika in/ali pred pravili varne
vožnje. V primeru, da bi usmeritvena priporočila, vsebovana v tem navigacijskem sistemu, od
uporabnika zahtevale tvegano ali nezakonito ravnanje, ali bi ga pripeljala v tvegano situacijo
ali na območje, za katerega meni da je nevarno, se usmeritvenih priporočil, vsebovanih v tem
navigacijskem sistemu, ne sme uporabljati.
•Napotek, vsebovan v navigacijskem sistemu, se šteje le kot priporočilo(a). Lahko pride do
situacije, ko navigacijski sistem uporabnika vozila ne postavi na pravo lokacijo, mu ne
pokaže najkrajše možne poti in/ali uporabnika vozila ne usmeri do željenega cilja potovanja.
V takih primerih naj se uporabnik zanese na svojo osebno presojo, pri tem pa naj upošteva
trenutne razmere na cesti.
•Uporabnik ne sme uporabljati navigacijskega sistema za usmerjanje v primeru iskanja
storitev nujne službe. Podatkovna baza ne vsebuje popolnega seznama vseh lokacij nujnih
služb, kot so npr. policija, gasilci, bolnice in klinike. V takšnih primerih naj uporabnik uporabi
lastno presojo in sposobnost, ter v takih primerih prosi za pomoč pri usmeritvah.
•Kot voznik je uporabnik sam odgovoren za svojo prometno varnost.
•Da se izogne nastanku prometne nesreče ali storitvi prometnega prekrška, naj uporabnik
upošteva, da imajo dejanske razmere na cesti in prometni predpisi, prednost pred
informacijami, vsebovanimi v navigacijskem sistemu.
•V tej zvezi, programska oprema lahko vsebuje netočne ali nepopolne podatke zaradi
poteka časa, sprememb okoliščin in glede na vire, ki jih uporablja. Prosimo uporabnika,
da ves čas vožnje upošteva dejanske prometne okoliščine in predpise.
•Navigacijski sistem v nobenem primeru ne zagotavlja in/ali ne vsebuje: informacij, ki se
nanašajo na prometne in cestne predpise; podatkov o vozilu, vključno z maso, višino,
širino, nosilnostjo in/ali hitrostnimi omejitvami; podatkov o razmerah na cesti, vključno s
podatki o naklonu, strmini in/ali cestišču; informacij o ovirah na cesti, vključno z višino in
širino tunelov ter mostov in/ali drugimi obstoječimi voznimi razmerami in razmerami na
cesti. Uporabnik se mora vedno zanesti na lastno presojo, pri tem pa naj upošteva
trenutne razmere na cestah.
•Uporabnik mora znižati čas gledanja na ekran med vožnjo na minimum.

566 MAX983HD
Zasady bezpieczenstwa
Ostrzeżenie
•System nawigacyjny nie powinien stanowić dla użytkownika substytutu jego indywidualnej
oceny sytuacji. Jakiekolwiek wskazówki dotyczące drogi generowane przez system
nawigacyjny nie powinny nigdy zastępować użytkownikowi lokalnych przepisów
drogowych, indywidualnej oceny sytuacji i/lub znajomości zasad bezpiecznej jazdy. Nie
należy brać pod uwagę wskazówek systemu nawigacyjnego, w przypadku gdy miałyby one:
zmusić użytkownika do wykonania niebezpiecznego lub niezgodnego z prawem manewru,
postawić użytkownika w niebezpiecznej sytuacji lub zalecić jazdę na obszarze, który
użytkownik uważa za niebezpieczny.
•Porady generowane przez system nawigacyjny powinny być traktowane wyłącznie jako
sugestie. Mogą zdarzyć się sytuacje, kiedy system nawigacyjny będzie wskazywał
niepoprawną pozycję pojazdu, kiedy nie przedstawi propozycji najkrótszej trasy, i/lub nie
pokieruje użytkownika do wybranego przez niego celu. W takich sytuacjach, użytkownik
powinien opierać się na własnej ocenie sytuacji, biorąc pod uwagę warunki panujące na
drodze.
•Nie należy korzystać z systemu nawigacyjnego w przypadku konieczności dotarcia do
instytucji oferujących pomoc w nagłych wypadkach. Baza danych nie zawiera pełnej listy
instytucji oferujących pomoc w nagłych wypadkach, takich jak: placówki policji i straży
pożarnej, szpitale i przychodnie. Użytkownik musi polegać w tych sytuacjach na własnej
ocenie sytuacji i możliwości uzyskania wskazówek.
•Jako kierowca, użytkownik ponosi wyłączną odpowiedzialność za swoje bezpieczeństwo na
drodze.
•W celu uniknięcia wypadku lub wykroczenia na drodze, użytkownik powinien pamiętać,
że rzeczywiste warunki na drodze i przepisy ruchu drogowego mają pierwszeństwo przed
informacjami zawartymi w systemie nawigacyjnym.
•Tym samym, z powodu upływu czasu, zmieniających się okoliczności oraz ze względu na
naturę wykorzystanych źródeł oprogramowanie może zawierać niedokładne lub niepełne
informacje. W trakcie jazdy należy zawsze mieć na uwadze rzeczywiste warunki na
drodze i przepisy ruchu drogowego.
•System nawigacyjny nie zapewnia, ani w żadnym zakresie nie stanowi, informacji na
temat: przepisów dotyczących ruchu drogowego; właściwości pojazdu, w tym: wagi,
wysokości, szerokości, ładowności, i/lub ograniczeń prędkości; warunków na drodze, w
tym spadku, nachylenia, i/lub jakości nawierzchni; informacji o przeszkodach, w tym o
wysokości i szerokości mostów i tuneli, ani żadnych innych informacji dotyczących
warunków jazdy i/lub warunków drogowych. Użytkownik powinien zawsze polegać na
swojej własnej ocenie sytuacji, uwzględniając panujące warunki na drodze.
•Użytkownik powinien zmniejszyć do minimum czas poświęcany na spoglądanie na ekran
w trakcie jazdy.

567
MAX983HD
Biztonsági óvintézkedések
Figyelmeztetés
•A jelen navigációs rendszer nem helyettesíti az Ön ítélőképességét. A navigációs rendszer
által adott bármilyen útvonaljavaslat nem pótolja a helyi közlekedési szabályokat, az Ön
megítélését és/vagy az Ön biztonságos vezetését. A navigációs rendszer útvonaljavaslatát
hagyja figyelmen kívül, amennyiben az arra vezetne, hogy: önnek veszélyes vagy
szabálysértő manővert kellene végrehajtania, önt veszélyes helyzetbe hozza, illetve önt a
megítélése szerint nem biztonságos helyre vezeti.
•A navigációs rendszer által adott utasítás kizárólag javaslatnak minősül. Előfordulhat, hogy
a navigációs rendszer a jármű helyzetét nem pontosan jelöli, nem vagy nem pontosan
mutatja a legrövidebb útvonalat és/vagy nem vezet a kijelölt célállomásra. Ezekben az
esetekben az adott útviszonyok figyelembevétele mellett hagyatkozzon saját vezetési
tapasztalatára.
•Ne használja a navigációs rendszert arra, hogy az Önt segélyszolgálati helyekre vezesse. A
rendszer nem tartalmaz teljes listát a segélyszolgálatokról, mint amilyen a rendőrség,
tűzoltóság, kórházak és klinikák. Ebben az esetben intézkedjen legjobb belátása szerint és
kérjen tájékoztatást az útirányról.
•A vezető kizárólag saját maga felel a közúti biztonságáért.
•A közlekedési balesetek és szabálysértések elkerülése érdekében mindig tartsa szem
előtt, hogy az aktuális út- és közlekedési viszonyok, közlekedési szabályok elsőbbséget
élveznek a navigációs rendszeren található információkkal szemben.
•Így a szoftver pontatlan vagy hiányos információkat adhat az útvonal idejéből, a változó
körülményekből és az információk természetéből adódóan, ezért az aktuális közlekedési
körülményeket a vezetés teljes időtartama alatt vegye figyelembe.
•A navigációs rendszer nem veszi figyelembe és nem nyújt információt a közlekedési
szabályokra, a gépjárművek súlyára, magasságára, szélességére, rakományára
vonatkozóan, az út viszonyokra, beleértve az emelkedőket, kanyarokat és/vagy útfelületi
viszonyokat.; az akadályokra vonatkozó információk a hidak és alagutak hosszát és
szélességét és/vagy egyéb jellemző közlekedési és/vagy útviszonyokat tartalmazzák.
Vezetés közben mindig saját döntésére hagyatkozzon, figyelembe véve az aktuális
közlekedési viszonyokat.
•Vezetés közben lehetőség szerint a legrövidebb ideig nézze a képernyőt.

568 MAX983HD
PLEASE READ THIS END USER LICENSE AGREEMENT CAREFULLY
BEFORE USING THE NAVTEQ DATABASE
NOTICE TO THE USER
THIS IS A LICENSE AGREEMENT - AND NOT AN AGREEMENT FOR SALE - BETWEEN YOU AND
NAVTEQ B.V. FOR YOUR COPY OF THE NAVTEQ NAVIGABLE MAP DATABASE, INCLUDING
ASSOCIATED COMPUTER SOFTWARE, MEDIA AND EXPLANATORY PRINTED
DOCUMENTATION PUBLISHED BY NAVTEQ (JOINTLY “THE DATABASE”). BY USING THE
DATABASE, YOU ACCEPT AND AGREE TO ALL TERMS AND CONDITIONS OF THIS END USER
LICENSE AGREEMENT (“AGREEMENT”). IF YOU DO NOT AGREE TO THE TERMS OF THIS
AGREEMENT, PROMPTLY RETURN THE DATABASE, ALONG WITH ALL OTHER ACCOMPANYING
ITEMS, TO YOUR SUP-PLIER FOR A REFUND.
OWNERSHIP
The Database and the copyrights and intellectual property or neighboring rights therein are owned by
NAVTEQ or its licensors. Ownership of the media on which the Database is contained is retained by
NAVTEQ and/or your supplier until after you have paid in full any amounts due to NAVTEQ and/or your
supplier pursuant to this Agreement or similar agreement(s) under which goods are provided to you.
NAVTEQ grants you a non-exclusive license to use the Database for your personal use or, if applicable,
for use in your business’ internal operations. This license does not include the right to grant sub-licenses.
LICENSE GRANT
NAVTEQ grants you a non-exclusive license to use the Database for your personal use or, if applicable,
for use in your business’ internal operations. This license does not include the right to grant sub-licenses.
LIMITATIONS ON USE
The Database is restricted for use in the specific system for which it was created. Except to the extent
explicitly permitted by mandatory laws (e.g. national laws based on the European Software Directive (91/
250) and the Database Directive (96/9)), you may not extract or reutilize substantial parts of the contents
of the Database nor reproduce, copy, modify, adapt, translate, disassemble, decompile, reverse
engineer any portion of the Database. If you wish to obtain interoperability information as meant in (the
national laws based on) the European Software Directive, you shall grant NAVTEQ reasonable
opportunity to provide said information on reasonable terms, including costs, to be determined by
NAVTEQ.
TRANSFER OF LICENSE
You may not transfer the Database to third parties, except when installed in the system for which it was
created or when you do not retain any copy of the Database, and provided that the transferee agrees to
all terms and conditions of this Agreement and confirms this in writing to NAVTEQ. Multi-disc sets may
only be transferred or sold as a complete set as provided by NAVTEQ and not as subset thereof.
LIMITED WARRANTY
NAVTEQ warrants that, subject to the warnings set out below, for a period of 12 months after acquisition
of your copy of the Database, it will perform substantially in accordance with NAVTEQ’s Criteria for
Accuracy and Completeness existing on the date you acquired the Database; these criteria are available
from NAVTEQ at your request. If the Database does not perform in accordance with this limited warranty,
NAVTEQ will use reasonable efforts to repair or replace your non-conforming copy of the Database. If
these efforts do not lead to performance of the Database in accordance with the warranties set out
herein, you will have the option to either receive a reasonable refund of the price you paid for the
Database or to rescind this Agreement. This shall be NAVTEQ’s entire liability and your sole remedy
against NAVTEQ. Except as expressly provided in this section, NAVTEQ does not warrant nor make any
representations regarding the use of results of the use of the Database in terms of its correctness,
END USER LICENSE AGREEMENT
569
MAX983HD
accuracy, reliability, or otherwise. NAVTEQ does not warrant that the Database is or will be error free.
No oral or written information or advice provided by NAVTEQ, your supplier or any other person shall
create a warranty or in any way increase the scope of the limited warranty described above. The limited
warranty set forth in this Agreement does not affect or prejudice any statutory legal rights that you may
have under the legal warranty against hidden defects.
If you did not acquire the Database from NAVTEQ directly, you may have statutory rights against the
person from whom you have acquired the Database in addition to the rights granted by NAVTEQ
hereunder according to the law of your jurisdiction. The above warranty of NAVTEQ shall not affect such
statutory rights and you may assert such rights in addition to the warranty rights granted herein.
LIMITATION OF LIABILITY
The price of the Database does not include any consideration for assumption of risk of consequential,
indirect or unlimited direct damages which may arise in connection with your use of the Database.
Accordingly, in no event shall NAVTEQ be liable for any consequential or indirect damages, including
without limitation, loss of revenue, data, or use, incurred by you or any third party arising out of your use
of the Database, whether in an action in contract or tort or based on a warranty, even if NAVTEQ has
been advised of the possibility of such damages. In any event NAVTEQ’s liability for direct damages is
limited to the price of your copy of the Database.
THE LIMITED WARRANTY AND LIMITATION OF LIABILITY, SET FORTH IN THIS AGREEMENT, DO
NOT AFFECT OR PREJUDICE YOUR STATUTORY RIGHTS WHERE YOU HAVE ACQUIRED THE
DATABASE OTHERWISE THAN IN THE COURSE OF A BUSINESS.
WARNINGS
The Database may contain inaccurate or incomplete information due to the passage of time, changing
circumstances, sources used and the nature of collecting comprehensive geographic data, any of which
may lead to incorrect results. The Database does not include or reflect information on - inter alia -
neighborhood safety; law enforcement; emergency assistance; construction work; road or lane closures;
vehicle or speed restrictions; road slope or grade; bridge height, weight or other limits; road or traffic
conditions; special events; traffic congestion; or travel time.
GOVERNING LAW
This Agreement shall be governed by the laws of the jurisdiction, in which you reside at the date of
acquisition of the Database. Should you at that moment reside outside the European Union or
Switzerland, the law of the jurisdiction within the European Union or Switzerland where you acquired the
Database shall apply. In all other cases, or if the jurisdiction where you acquired the Database cannot
be defined, the laws of the Netherlands shall apply. The courts competent at your place of residence at
the time you acquired the Database shall have jurisdiction over any dispute arising out of, or relating to
this Agreement, without prejudice to NAVTEQ’ right to bring claims at your then current place of
residence.

570 MAX983HD
WICHTIG - BITTE LESEN SIE DIESEN LIZENZVERTRAG FÜR ENDBENUTZER VOR
DER VERWENDUNG DER NAVTEQ DATENBANK SORGFÄLTIG DURCH.
HINWEIS FÜR DEN BENUTZER
DAS VORLIEGENDE DOKUMENT IST EIN LIZENZVERTRAG UND KEIN KAUFVERTRAG
ZWISCHEN IHNEN UND NAVTEQ B.V. FÜR IHRE KOPIE DER NAVIGATIONSKARTENDATENBANK
VON NAVTEQ, EINSCHLIESSLICH ZUGEHÖRIGER COMPUTERSOFTWARE, MEDIEN UND VON
NAVTEQ HERAUSGEGEBENER SCHRIFTLICHER UNTERLAGEN ZUR ERLÄUTERUNG
(GEMEINSAM "DIE DATENBANK"). MIT DER VERWENDUNG DER DATENBANK ERKLÄREN SIE
SICH MIT ALLEN BESTIMMUNGEN DIESES LIZENZVERTRAGES FÜR ENDBENUTZER
("VERTRAG") EINVERSTANDEN. FALLS SIE MIT DEN BESTIMMUNGEN DIESES VERTRAGES
NICHT EINVERSTANDEN SIND, GEBEN SIE DIE DATENBANK MIT ALLEN ZUGEHÖRIGEN
MATERIALIEN GEGEN RÜCKERSTATTUNG DES KAUFPREISES BITTE AN IHREN HÄNDLER
ZURÜCK.
EIGENTUMSRECHT
Die Datenbank sowie sämtliche Urheberrechte, geistige Eigentumsrechte oder verwandte Schutzrechte
an der Datenbank stehen im Eigentum von NAVTEQ oder deren Lizenzgebern. Das Eigentumsrecht an
den Medien, auf denen sich die Datenbank befindet, verbleibt bei NAVTEQ und/oder Ihrem Händler, bis
Sie alle Forderungen beglichen haben, die Sie NAVTEQ und/oder Ihrem Händler entsprechend diesem
Vertrag oder ähnlichen Verträgen, unter denen Ihnen Waren bereitgestellt werden, schulden.
LIZENZGEWÄHRUNG
NAVTEQ gewährt Ihnen eine nicht-exklusive Lizenz, die Datenbank zur persönlichen Verwendung oder,
soweit anwendbar, zur internen Verwendung in Ihrem Unternehmen einzusetzen. Die vorliegende
Lizenz berechtigt nicht zur Vergabe von Unterlizenzen.
NUTZUNGSBESCHRÄNKUNGEN
Die Verwendung der Datenbank ist nur in dem spezifischen System gestattet, für das sie entwickelt
worden ist. Soweit durch zwingendes Recht nicht ausdrücklich gestattet (z.B. nationale Gesetze auf
Grundlage der europäischen Software-Richtlinie (91/250/EWG) oder der Datenbank-Richtlinie (96/9/
EG), sind Sie weder berechtigt, wesentliche Teile des Inhalts der Datenbank zu extrahieren oder weiter
zu verwenden, noch Teile der Datenbank zu vervielfältigen, zu kopieren, zu modifizieren, anzupassen,
zu übersetzen, zu zerlegen, zu dekompilieren oder mittels Reverse Engineering zurückzuentwickeln.
Falls Sie Informationen über Interoperabilität gemäß den nationalen Gesetzen, die auf Grundlage der
europäischen Software-Richtlinie erlassen worden sind, erhalten möchten, sind Sie verpflichtet,
NAVTEQ angemessene Gelegenheit zu geben, Ihnen diese Informationen zu angemessenen, von
NAVTEQ festzulegenden Bedingungen und Kosten zur Verfügung zu stellen.
LIZENZÜBERTRAGUNG
Sie sind zu einer Übertragung der Datenbank an Dritte nicht berechtigt. Dies gilt nicht, wenn die
Datenbank auf dem System, für das sie entwickelt worden ist, installiert ist oder wenn Sie keinerlei
Kopien der Datenbank zurückbehalten, vorausgesetzt, dass der Empfänger der Datenbank sich
schriftlich gegenüber NAVTEQ mit sämtlichen Bestimmungen dieses Vertrages einverstanden erklärt.
Die CD-Sätze dürfen nur als kompletter Satz, wie von NAVTEQ bereitgestellt, nicht aber in Teilen
weitergegeben oder verkauft werden.
BESCHRÄNKTE GEWÄHRLEISTUNG
NAVTEQ gewährleistet vorbehaltlich der unten aufgeführten Warnungen für die Dauer von 12 Monaten
ab dem Tag, an dem Sie Ihre Kopie der Datenbank erworben haben, dass die Datenbank im
Wesentlichen in Übereinstimmung mit den am Tag Ihres Erwerbes der Datenbank gültigen Kriterien für
Genauigkeit und Vollständigkeit von NAVTEQ funktioniert; diese werden auf Anfrage von NAVTEQ zur
Verfügung gestellt. Falls die Datenbank nicht entsprechend dieser beschränkten Gewährleistung
funktioniert, wird sich NAVTEQ angemessen darum bemühen, Ihre mangelhafte Kopie der Datenbank
zu reparieren oder zu ersetzen. Sollten diese Bemühungen keine Verbesserung der Performance der
Datenbank bewirken, haben Sie die Möglichkeit, eine angemessene Erstattung des von Ihnen
geleisteten Kaufpreises für die Datenbank zu erhalten oder von diesem Vertrag zurückzutreten. Diese
LIZENZVERTRAG FÜR ENDBENUTZER
571
MAX983HD
Möglichkeiten stellen Ihr einziges Rechtsmittel gegen NAVTEQ dar. Soweit in diesem Abschnitt nicht
ausdrücklich anderweitig festgelegt, macht NAVTEQ im Hinblick auf Richtigkeit, Genauigkeit,
Zuverlässigkeit oder in anderer Hinsicht keine weiteren Gewährleistungen oder Zusicherungen
bezüglich der Nutzung der Ergebnisse, die durch die Verwendung der Datenbank erzielt werden.
NAVTEQ gewährleistet nicht, dass die Datenbank ohne jeglichen Fehler ist oder sein wird. Die
vorstehende beschränkte Gewährleistung wird durch mündliche oder schriftliche Informationen oder
Ratschläge seitens NAVTEQ, Ihrem Händler oder anderen Personen in keinem Fall ergänzt oder
erweitert. Soweit Sie gesetzliche Gewährleistungsrechte für versteckte Fehler haben, werden diese
durch die in diesem Vertrag festgelegte beschränkte Gewährleistung nicht berührt.
Falls Sie die Datenbank nicht direkt von NAVTEQ erworben haben, haben Sie möglicherweise
zusätzlich zu den von NAVTEQ laut dem vorliegenden Vertrag gewährten Rechten nach nationaler
Rechtsprechung Ihres Landes weitere gesetzliche Gewährleistungsrechte gegenüber der Person, von
der Sie die Datenbank erworben haben. Die vorstehende Gewährleistung von NAVTEQ lässt derartige
gesetzliche Gewährleistungsrechte unberührt, und Sie sind berechtigt, derartige Rechte zusätzlich zu
den nach diesem Vertrag gewährten Gewährleistungsrechten geltend zu machen.
HAFTUNGSBESCHRÄNKUNG
Der Preis für die Datenbank umfasst nicht die Übernahme des Risikos von Folgeschäden, mittelbaren
Schäden oder unbegrenzten unmittelbaren Schäden, die in Zusammenhang mit Ihrer Verwendung der
Datenbank entstehen können. NAVTEQ haftet daher in keinem Fall für Folgeschäden oder mittelbare
Schäden, einschließlich - aber nicht beschränkt auf - Gewinnverlust, Datenverlust oder Nutzungsausfall,
die durch Sie oder Dritte in Folge der Verwendung der Datenbank entstehen können, selbst wenn
NAVTEQ auf die Möglichkeit solcher Schäden hingewiesen worden ist. Die vorstehende
Haftungsbeschränkung besteht für sämtliche Ansprüche aus sämtlichen Rechtsgründen, gleich ob aus
Vertrag, unerlaubter Handlung oder Gewährleistung. Darüber hinaus ist die Haftung von NAVTEQ für
unmittelbare Schäden in jedem Fall auf die Höhe des von Ihnen für Ihre Kopie der Datenbank bezahlten
Kaufpreises beschränkt.
SOWEIT SIE DIE DATENBANK NICHT IM RAHMEN EINER GESCHÄFTSTRANSAKTION
ERWORBEN HABEN, LÄSST DIE IN DIESEM VERTRAG FESTGELEGTE BESCHRÄNKTE
GEWÄHRLEISTUNG UND HAFTUNGSBESCHRÄNKUNG IHRE GESETZLICHEN RECHTE
UNBERÜHRT.
WARNUNG
Die Datenbank gibt die Wirklichkeit wieder, wie sie vor Ihrem Erwerb der Datenbank bestanden hat, und
enthält Daten und Informationen von staatlichen und anderen Quellen, die Fehler oder Auslassungen
aufweisen können. Die Datenbank kann daher wegen Änderungen, die im Lauf der Zeit eingetreten sind,
wegen geänderter Umstände oder der Art der genutzten Quellen ungenaue oder unvollständige
Informationen enthalten. Die Datenbank enthält keinerlei Informationen über - unter anderem - die
Sicherheit der Umgebung, Verfügbarkeit und Anwesenheit der Polizei, Hilfe im Notfall, Bauarbeiten,
Absperrungen von Straßen und Spuren, Fahrzeugtyp- oder Geschwindigkeitsbeschränkungen,
Straßengefälle oder Straßenneigungen, Brückenhöhen, Gewichts- oder andere Beschränkungen,
Straßen- oder Verkehrsbedingungen, besondere Ereignisse, Verkehrsstaus oder Reisezeiten.
GELTENDES RECHT
Dieser Vertrag unterliegt jener Rechtsprechung, in der Sie zum Zeitpunkt des Erwerbs der Datenbank
Ihren Wohnsitz haben. Haben Sie zu diesem Zeitpunkt Ihren Wohnsitz außerhalb der Europäischen
Union oder der Schweiz, gilt das Recht jenes Landes innerhalb der Europäischen Union oder der
Schweiz, in dem Sie die Datenbank erworben haben. In allen übrigen Fällen oder in Fällen, in denen die
Rechtsprechung, in der Sie die Datenbank erworben haben, nicht festgestellt werden kann, gilt das
niederländische Recht. Für Rechtsstreitigkeiten im Zusammenhang mit diesem Vertrag gilt die
Zuständigkeit jenes Gerichts, an dem Sie zum Zeitpunkt des Erwerbs der Datenbank Ihren Wohnsitz
haben; NAVTEQ ist darüber hinaus berechtigt, Klagen auch an dem Gericht Ihres damaligen
Wohnsitzes einzureichen.

572 MAX983HD
VEUILLEZ LIRE ATTENTIVEMENT CE CONTRAT DE LICENCE A L’USAGE DE
L’UTILISATEUR FINAL AVANT D’UTILISER LA BASE DE DONNEES NAVTEQ
NOTE POUR L’UTILISATEUR
CECI EST UN CONTRAT DE LICENCE – ET NON UN CONTRAT DE VENTE – ENTRE VOUS ET LA
SOCIETE NAVTEQ B.V. POUR VOTRE COPIE DE LA BASE DE DONNEES NAVIGABLE DE NAVTEQ
Y COMPRIS LE LOGICIEL QUI Y EST ASSOCIE, LE SUPPORT ET LA DOCUMENTATION IMPRIMEE
EXPLICATIVE PUBLIEE PAR NAVTEQ (COLLECTIVEMENT DESIGNES PAR “LA BASE DE
DONNEES”). EN UTILISANT LA BASE DE DONNEES, VOUS ACCEPTEZ LES TERMES ET
CONDITIONS DE CE CONTRAT DE LICENCE POUR L’UTILISATEUR FINAL (“CONTRAT”). SI VOUS
N’ACCEPTEZ PAS LES TERMES DE CE CONTRAT, VEUILLEZ RETOURNER À VOTRE
FOURNISSEUR, DANS LES MEILLEURS DELAIS, LA BASE DE DONNEES AINSI QUE TOUS LES
ELEMENTS QUI L’ACCOMPAGNENT AFIN D’EN OBTENIR LE REMBOURSEMENT.
PROPRIETE
La Base de données ainsi que les droits de propriété intellectuelle et les droits d’auteur ou les droits
voisins qui y sont attachés sont détenus par NAVTEQ ou par ses concédants de licences. La propriété
du support contenant la Base de données est conservée par NAVTEQ et/ou votre fournisseur jusqu’à
ce que vous ayez intégralement payé les sommes dues à NAVTEQ et/ou à votre fournisseur
conformément au présent Contrat ou à tout autre contrat similaire aux termes duquel les biens vous ont
été remis.
CONCESSION DE LICENCE
NAVTEQ vous concède une licence non exclusive d’utilisation de la Base de données pour votre usage
personnel ou, le cas échéant, pour un usage professionnel interne. Cette licence ne comprend pas le
droit de concéder des sous-licences.
LIMITES SUR L’UTILISATION
L’utilisation de la Base de données est limitée au système spécifique pour lequel elle a été créée. A
l’exception des dispositions expressément prévues par la loi (par exemple, les dispositions des
législations nationales transposant les Directives européennes 91/250 portant sur les logiciels et 96/9
portant sur les Bases de données), vous n’êtes pas autorisé à extraire ou à réutiliser une ou plusieurs
parties substantielles du contenu de la Base de données, ni à reproduire, copier, modifier, adapter,
traduire, désassembler, décompiler, pratiquer l’ingénierie inverse d’une quelconque partie de la Base de
données. Si vous souhaitez obtenir des informations nécessaires à l’interopérabilité conformément aux
dispositions (du Code de la propriété intellectuelle après transposition) de la Directive européenne sur
les logiciels, vous devrez laisser à NAVTEQ la possibilité de vous fournir lesdites informations, dans des
délais et conditions raisonnables, y compris au regard des frais, qui seront déterminés par NAVTEQ.
TRANSFERT DE LICENCE
Vous n’êtes pas autorisé à transférer la Base de données à des tiers, sauf lorsqu’elle est installée dans
le système pour lequel elle a été créée ou dans le cas où vous ne conserveriez aucune copie de la Base
de données et à condition que le cessionnaire accepte les termes et conditions du présent Contrat et
confirme cette acceptation par écrit à NAVTEQ. Les coffrets de disques ne peuvent être transférés ou
vendus que complets, tels que fournis par NAVTEQ, et non en disques séparés.
GARANTIE LIMITEE
NAVTEQ garantit que, sous réserve des Avertissements prévus ci-dessous, pour une période de 12
mois à compter de la date d’acquisition de votre copie de la Base de données, cette dernière
fonctionnera pour l’essentiel conformément aux Critères de précision et d’exhaustivité de NAVTEQ en
NAVTEQ sur votre demande. Si la Base de données ne fonctionne pas conformément à cette garantie
limitée, NAVTEQ s’efforcera, dans une limite raisonnable, de réparer ou de remplacer votre copie non
conforme de la Base de données. Si ces efforts ne permettent pas d’obtenir que la Base de données
fonctionne conformément aux garanties prévues aux présentes, vous aurez la possibilité, soit d’obtenir
un remboursement raisonnable du prix que vous avez payé pour la Base de données, soit de résilier le
présent Contrat. Ceci constitue le seul engagement de responsabilité de NAVTEQ et votre seul recours
à l’encontre de NAVTEQ. A l’exception des dispositions expresses du présent paragraphe, NAVTEQ ne
CONTRAT DE LICENCE POUR L’UTILISATEUR FINAL
573
MAX983HD
donne aucune garantie et ne fait aucune déclaration concernant l’utilisation ou les résultats de
l’utilisation de la Base de données en ce qui concerne son exactitude, sa précision, sa fiabilité ou toute
autre qualité. NAVTEQ ne garantit pas que la Base de données est ou sera exempte de toute erreur.
Aucune information ou conseil oral ou écrit fournis par NAVTEQ, votre fournisseur ou une quelconque
autre personne ne saurait constituer une garantie ni engager NAVTEQ ou accroître le champ de la
garantie limitée décrite ci-dessus. La garantie limitée prévue dans le présent Contrat est sans préjudice
des droits dont vous pouvez bénéficier en vertu de la garantie légale contre les vices cachés.
Si vous n’avez pas directement acquis la Base de données auprès de NAVTEQ, vous pouvez bénéficier,
selon les textes en vigueur dans votre pays, de droits à l’égard de la personne auprès de laquelle vous
avez acquis la Base de données en plus des droits ci-dessus concédés par NAVTEQ. La garantie de
NAVTEQ prévue ci-dessus n’affectera pas ces droits. Vous êtes autorisé à vous prévaloir de tels droits
en plus de ceux accordés par la présente garantie.
LIMITE DE RESPONSABILITE
Le prix de la Base de données n’inclut aucune considération relative à la contrepartie d’un quelconque
risque lié à des dommages indirects ou consécutifs ou à des dommages directs illimités pouvant survenir
à l’occasion de votre utilisation de la Base de données. Par conséquent, NAVTEQ ne sera en aucun cas
responsable des dommages consécutifs ou indirects y compris, notamment, la perte de profit, de
données ou l’impossibilité d’utiliser la Base de données, subis par vous ou tout tiers, résultant de votre
utilisation de la Base de données, et ceci, que l’action soit intentée sur un fondement contractuel ou
délictuel ou fondée sur une garantie, même si NAVTEQ a été avisé de l’éventualité de tels dommages.
En tout état de cause, la responsabilité de NAVTEQ pour tout dommage direct sera limitée au prix de
votre copie de la Base de données.
LA GARANTIE LIMITEE AINSI QUE LA LIMITATION DE RESPONSABILITE PREVUES DANS LE
PRESENT CONTRAT SONT SANS PREJUDICE DE VOS DROITS SI VOUS AVEZ ACQUIS LA BASE
DE DONNEES DANS UN CADRE AUTRE QUE PROFESSIONNEL.
AVERTISSEMENTS
La Base de données reflète la réalité telle qu’elle existait avant que vous ne receviez la Base de
données. Elle contient des données et informations provenant de services publics administratifs et
d’autres sources qui peuvent contenir des erreurs ou des omissions. Par consé-quent, la Base de
données peut contenir des informations rendues incomplètes ou inexactes au cours du temps ou en
raison des circonstances et de la nature des sources utilisées.
La Base de données ne contient ou ne reflète aucune information sur, notamment, la sécurité du
voisinage, la proximité de services de police ou d’assistance d’urgence, les travaux de construction, la
fermeture de routes ou de voies de circulation, les limitations de vitesse et autres restrictions concernant
les automobiles, la déclivité ou le degré d’inclinaison des routes, les limitations de hauteur, de poids ou
autres restrictions concernant les ponts, les conditions de circulation routière, les événements
particuliers, les embouteillages routiers ou les durées de voyage.
LOI APPLICABLE
Ce contrat est régi par le droit du pays dans lequel vous résidez lors de l’acquisition de la Base de
données. Si à ce moment vous résidez en dehors de l’Union européenne ou de la Suisse, le droit
applicable sera celui en vigueur dans le pays de l’Union européenne ou en Suisse si vous avez acquis
la Base de données dans l’un de ces pays. Dans tous les autres cas, ou si le pays dans lequel vous avez
acquis la Base de données ne peut être déterminé, le droit des Pays-Bas sera applicable. Le tribunal
compétent du ressort dans lequel vous résidez le jour où vous avez fait l’acquisition de la Base de
données sera seul compétent pour tout litige découlant de ou en relation avec ce contrat, sans préjudice
pour NAVTEQ du droit d’intenter une action devant le tribunal du lieu de votre résidence au moment du
litige.

574 MAX983HD
LEGGERE ATTENTAMENTE IL PRESENTE CONTRATTO DI LICENZA PER L’UTENTE
FINALE PRIMA DI UTILIZZARE IL DATABASE NAVTEQ
NOTA PER L’UTENTE
QUESTO È UN CONTRATTO DI LICENZA – E NON UN CONTRATTO DI VENDITA – FRA LEI
(UTENTE FINALE) E LA NAVTEQ B.V. PER LA SUA COPIA DEL DATABASE DELLA MAPPA DI
NAVIGAZIONE NAVTEQ, COMPRENDENTE IL RELATIVO SOFTWARE PER COMPUTER, I
SUPPORTI E LA DOCUMENTAZIONE STAMPATA ESPLICATIVA PUBBLICATA DA NAVTEQ (NEL
PROSIEGUO COLLETTIVAMENTE DENOMINATI “IL DATABASE”). IN SEGUITO ALL’UTILIZZO DEL
DATABASE, LEI CONVIENE E ACCETTA TUTTE LE CLAUSOLE E LE CONDIZIONI DEL PRESENTE
CONTRATTO DI LICENZA PER L’UTENTE FINALE (“CONTRATTO”). QUALORA LEI NON SIA
D’ACCORDO CON LE CLAUSOLE DI QUESTO CONTRATTO, RESTITUISCA SENZA INDUGIO IL
DATABASE, UNITAMENTE A TUTTO IL MATERIALE E ALLA DOCUMENTAZIONE CHE LO
ACCOMPAGNANO, AL SUO FORNITORE PER IL RIMBORSO.
DIRITTI DI PROPRIETÀ
Il Database nonché i diritti di autore e di proprietà intellettuale o diritti connessi che vi sono collegati sono
di proprietà della NAVTEQ o dei Suoi licenziatori. La proprietà dei supporti nei quali il Database è
contenuto resta in capo alla NAVTEQ e/o al Suo fornitore, fino a che Lei non abbia pagato integralmente
ogni somma dovuta alla NAVTEQ e/o al Suo fornitore in base al presente contratto o in base a contratti
simili, in esecuzione dei quali i beni Le sono stati forniti.
CONCESSIONE DELLA LICENZA
NAVTEQ Le concede una licenza non esclusiva per l’uso personale del Database o, se del caso, per
l’uso nell’ambito delle attività interne della Sua impresa. Questa licenza non include il diritto di concedere
sublicenze.
LIMITAZIONI ALL’USO
L’uso del Database è limitato al sistema specifico per il quale è stato creato. Ad eccezione di quanto
esplicitamente permesso da leggi obbligatorie (per esempio, leggi nazionali basate sulla Direttiva
Europea in materia di software n. 91/250, e la Direttiva sui Database, n. 96/9), Lei si impegna a non
estrarre o riutilizzare parti sostanziali del contenuto del Database, né a riprodurre, copiare, modificare,
adattare, tradurre, disassemblare, decompilare, deingegneri-zzare qualsiasi parte del Database.
Qualora Lei desideri ottenere informazioni sulla interoperabilità nel significato attribuito dalla (legge
nazionale basata sulla) Direttiva Comunitaria sul software, Lei dovrà offrire alla NAVTEQ una
opportunità ragionevole di fornirle tali informazioni a condizioni ragionevoli, inclusi i costi, quali
determinate da NAVTEQ.
CESSIONE DELLA LICENZA
Le è fatto divieto di trasferire il Database a terzi, tranne nel caso in cui esso sia installato nel sistema per
il quale è stato creato o quando Lei non abbia trattenuto alcuna altra copia del Database e, a condizione
che il cessionario accetti tutte le clausole e le condizioni di questo contratto e lo confermi per iscritto a
NAVTEQ. I set di CD possono essere venduti o ceduti esclusivamente come set completi e come forniti
da NAVTEQ. I CD che li compongono non possono essere venduti separatamente.
GARANZIA LIMITATA
NAVTEQ garantisce che, salvo quanto stabilito nell’avvertenza di cui in calce, per un periodo di dodici
mesi dalla data di acquisto della Sua copia del Database, le prestazioni dello stesso saranno conformi
ai criteri di accuratezza e completezza di NAVTEQ in vigore alla data in cui Lei ha acquistato il Database;
questi criteri Le saranno messi a disposizione da NAVTEQ a Sua richiesta. Se le prestazioni del
Database non corrispondono a questa garanzia limitata, NAVTEQ farà ogni ragionevole sforzo per
prestazione del Database in conformità alle garanzie qui assunte, Lei avrà l’opzione tra ricevere una
restituzione ragionevole del prezzo pagato per il Database oppure risolvere questo contratto. Ciò
costituirà l’intera respons-abilità di NAVTEQ e il Suo unico rimedio contro NAVTEQ. Ad eccezione di
quanto esplicitamente previsto in questa clausola, NAVTEQ non garantisce né fa alcuna affermazione
riguardo l’uso o i risultati dell’uso del Database in termini di correttezza, accuratezza, affidabilità od altro.
NAVTEQ non garantisce che il Database sia o sarà senza errori. Nessuna informazione orale o scritta
CONTRATTO DI LICENZA ALL'UTENTE FINALE
575
MAX983HD
e nessun consiglio fornito da NAVTEQ, dal Suo fornitore o da qualsiasi altra persona costituiranno una
garanzia o in qualsiasi modo un ampliamento dell’ambito della garanzia limitata sopra descritta. La
garanzia limitata accordata in questo contratto non incide né pregiudica alcun diritto derivante dalla
legge, che Lei possa vantare in relazione alla garanzia legale contro i difetti occulti.
Se Lei non ha acquistato il Database direttamente da NAVTEQ, Lei può avere un diritto, se previsto dalla
legge, nei confronti della persona dalla quale Lei ha acquistato il Database, in aggiunta ai diritti concessi
da NAVTEQ con questo contratto, secondo il diritto della giurisdizione in cui Lei risiede. Questa garanzia
di NAVTEQ non inciderà su tali pretese legali e Lei potrà far valere tali diritti in aggiunta ai diritti di
garanzia qui riconosciuti.
LIMITAZIONE DELLA RESPONSABILITÀ
Il prezzo del Database non comprende alcun compenso per la copertura del rischio relativo a danni
conseguenti, indiretti o diretti illimitati, che possano derivare in relazione all’uso che Lei fa del Database.
Di conseguenza, in nessun caso NAVTEQ sarà responsabile per alcun danno conseguente o indiretto,
inclusa senza tassatività la perdita di profitto, di dati o dell’utilizzo, subìti da Lei o da qualsiasi terzo e
derivanti dall’uso da Lei fatto del Database, fatti valere con una azione contrattuale od extra contrattuale
oppure basati su una azione in garanzia, anche qualora NAVTEQ sia stata avvertita della possibilità di
tali danni. In ogni caso la responsabilità di NAVTEQ per i danni diretti è limitata al costo dalla Sua copia
del Database.
LA GARANZIA LIMITATA E LA LIMITAZIONE DELLA RESPONSABILITÀ STABILITE IN QUESTO
CONTRATTO NON INCIDONO NÉ PREGIUDICANO I SUOI DIRITTI LEGALI, QUALORA LEI ABBIA
ACQUISITO IL DATABASE NON NELL’ESERCIZIO DI UNA ATTIVITÀ PROFESSIONALE.
AVVERTENZA
Il Database rispecchia le condizioni esistenti prima che Lei abbia ricevuto il Database e comprende dati
ed informazioni dagli organismi pubblici od altre fonti, che possono contenere errori od omissioni. Di
conseguenza il Database può contenere informazioni non accurate od incomplete a causa del
trascorrere del tempo, di mutate circostanze e della natura delle fonti utilizzate. Il Database non
comprende né rispecchia – tra l’altro – informazioni sulla sicurezza del territorio; l’applicazione della
legge; assistenza di emergenza; lavori di costruzioni; chiusura di strade o corsie; limitazioni relative al
tipo di veicolo o alla velocità; pendenze stradali o declivi; altezza, larghezza od altri limiti dei ponti;
condizioni delle strade o del traffico; eventi speciali; congestioni del traffico o durata del viaggio.
DIRITTO APPLICABILE
Questo contratto sarà disciplinato dalle leggi della giurisdizione in cui Lei risiede all’acquisto del
Database. Se in quel momento Lei risiede al di fuori dell’Unione Europea o della Svizzera si
applicheranno le norme dello Stato membro dell’Unione o della Svizzera dove Lei ha acquistato il
Database. In tutti gli altri casi, o se non può essere stabilito lo Stato nel quale Lei ha acquistato il
Database, si applicheranno le norme del diritto olandese. I Tribunali competenti nel luogo della Sua
residenza al momento dell’acquisto del Database avranno giurisdizione su ogni questione che sorga dal
o relativa a questo contratto, senza pregiudizio al diritto di NAVTEQ di iniziare l’azione nel Suo luogo di
residenza attuale.

576 MAX983HD
LEES DEZE GEBRUIKSRECHTOVEREENKOMST GOED DOOR VOORDAT U DE
NAVTEQ DATABASE GEBRUIKT
KENNISGEVING AAN DE GEBRUIKER
DIT IS EEN GEBRUIKSRECHTOVEREENKOMST - EN GEEN KOOPOVEREENKOMST – TUSSEN U
EN NAVTEQ B.V. MET BETREKKING TOT UW EXEMPLAAR VAN DE NAVTEQ
WEGENKAARTDATABASE, INCLUSIEF VERWANTE COMPUTERSOFTWARE, DRAGERS EN
BIJBEHOREND SCHRIFTELIJK MATERIAAL TER UITLEG ZOALS DIT DOOR NAVTEQ WORDT
UITGEGEVEN (TEZAMEN ‘DE DATABASE’). DOOR HET GEBRUIK VAN UW EXEMPLAAR VAN DE
DATABASE, STEMT U IN MET ALLE BEPALINGEN VAN DEZE GEBRUIKSRECHTOVEREENKOMST
(‘OVEREENKOMST’). INDIEN U NIET INSTEMT MET DE BEPALINGEN VAN DEZE
OVEREENKOMST, DIENT U UW EXEMPLAAR VAN DE DATABASE ONMIDDELLIJK TE
RETOURNEREN AAN UW LEVERANCIER, TEGEN RESTITUTIE VAN DE LICENTIEVERGOEDING.
EIGENDOM
U erkent dat de Database, alsmede de auteursrechten en intellectuele eigendom, naburige rechten of
soortgelijke rechten daarop, berusten bij NAVTEQ of haar licentieverleners. De eigendom van de fysieke
dragers waarop de Database is vastgelegd berust bij NAVTEQ en/of uw leverancier, tot het moment dat
u de volledige vergoeding aan NAVTEQ of uw leverancier hebt betaald die u bent verschuldigd uit
hoofde van deze Overeenkomst of vergelijkbare overeenkomst(en) op basis waarvan u zaken hebt
ontvangen.
VERLENING VAN HET GEBRUIKSRECHT
NAVTEQ verleent u een niet-exclusief recht tot gebruik van de Database, voor uw eigen gebruik of,
indien van toepassing, voor intern gebruik binnen uw bedrijf. Het is u niet toegestaan ter zake van het
aan u verleende gebruiksrecht sublicenties te verlenen.
BEPERKINGEN OP HET GEBRUIK
De Database is uitsluitend bedoeld voor gebruik op het specifieke systeem waarvoor de Database
ontwikkeld is. Behoudens voor zover uitdrukkelijk toegestaan op grond van dwingendrechtelijke
wetgeving (zoals nationale wetgeving gebaseerd op de Europese Software Richtlijn (91/250/EEG) en
de Europese Databanken Richtlijn (96/9/EG)), zult u substantiële onderdelen van de inhoud van de
Database niet opvragen of hergebruiken, noch enig deel van de Database verveelvoudigen, kopiëren,
veranderen, aanpassen, vertalen, aan reverse engineering onderwerpen, decompileren of
disassembleren. Indien u de in (nationale wetgeving gebaseerd op) de Software Richtlijn bedoelde
informatie die vereist is om interoperabiliteit te bewerkstelligen wenst te verkrijgen, dient u NAVTEQ
redelijkerwijs in de gelegenheid te stellen u de bedoelde informatie te verschaffen, op redelijke
voorwaarden, waaronder begrepen een redelijke vergoeding.
OVERDRACHT VAN HET GEBRUIKSRECHT
Het is u niet toegestaan de Database over te dragen aan derden, behoudens wanneer de Database is
geïnstalleerd op het systeem waar het voor ontwikkeld is of wanneer u geen kopie van de Database
behoudt na de overdracht, en in ieder geval alleen indien degene aan wie wordt overgedragen alle
bepalingen van deze OVEREENKOMST aanvaardt, en dit schriftelijk aan NAVTEQ bevestigt. CD-sets
mogen uitsluitend worden overgedragen of verkocht als complete set zoals geleverd door NAVTEQ en
niet in delen daarvan.
BEPERKTE GARANTIE
NAVTEQ garandeert, met inachtneming van de waarschuwingen zoals hieronder uiteengezet, dat de
Database gedurende een periode van 12 maanden na verkrijging van uw exemplaar van de Database,
Volledigheid’ van NAVTEQ, geldend op de datum waarop u uw exemplaar van de Database hebt
verkregen; deze ’Criteria voor Nauwkeurigheid en Volledigheid’ worden u op uw verzoek ter beschikking
gesteld door NAVTEQ. Indien de Database niet functioneert in overeenstemming met deze beperkte
garantie, zal NAVTEQ zich redelijkerwijs inspannen om uw niet-werkende exemplaar van de Database
te repareren of te vervangen. Indien de Database na deze inspanningen niet functioneert in
overeenstemming met de garantie zoals hierboven beschreven, hebt u de keuze tussen het verkrijgen
van een redelijke vergoeding van de prijs die u hebt betaald voor de Database of ontbinding van deze
GEBRUIKSRECHTOVEREENKOMST MET EINDGEBRUIKERS
577
MAX983HD
Overeenkomst. Het voorgaande is NAVTEQ’s totale aansprakelijklheid en uw enige
verhaalsmogelijkheid jegens NAVTEQ. Behoudens voorzover uitdrukkelijk bepaald in dit artikel, verleent
NAVTEQ geen enkele garantie met betrekking tot het gebruik van de Database of de resultaten die u
met behulp van de Database kunt verkrijgen, in de zin van foutloosheid, nauwkeurigheid,
betrouwbaarheid of anderszins. NAVTEQ garandeert niet dat de Database foutloos is of zal zijn.
Mondelinge of schriftelijke informatie of adviezen die u door NAVTEQ, uw leverancier of door enige
andere persoon worden verstrekt, houden geen garanties in, binden NAVTEQ in geen enkel opzicht en
houden geen uitbreiding van de hierboven omschreven beperkte garantie in. De in deze Overeenkomst
omschreven beperkte garantie laat rechten die u kunt ontlenen aan eventueel toepasselijke bepalingen
van dwingend recht met betrekking tot verborgen gebreken onverlet.
Indien u de Database niet rechtstreeks van NAVTEQ hebt afgenomen, is het mogelijk dat u naast de
rechten aan u verleend door NAVTEQ in deze Overeenkomst, wettelijke verhaalsmogelijkheden hebt
tegen de persoon van wie u de Database hebt verkregen op grond van het toepasselijke recht in uw
jurisdictie. De beperkte garantie van NAVTEQ tast deze wettelijke verhaalsmogelijkheden niet aan en u
mag deze verhaalsacties uitoefenen naast een beroep op de garantie uit deze Overeenkomst.
BEPERKING VAN AANSPRAKELIJKHEID
De prijs van de Database is niet berekend op dekking van risico’s van gevolgschade, indirecte schade
of onbeperkte directe schade als gevolg van uw gebruik van de Database. Derhalve zal NAVTEQ in
geen geval jegens u aansprakelijk zijn wegens gevolgschade of indirecte schade, waaronder begrepen
maar niet beperkt tot schade in de vorm van gederfde inkomsten, verlies van gegevens of van gebruik
voor u of een derde voortvloeiend uit het gebruik van de Database, hetzij in een onrechtmatige
daadsactie, hetzij in een contractuele actie hetzij gebaseerd op een garantie, ook al was NAVTEQ op
de hoogte gesteld van de mogelijkheid van het intreden van zulke schade. In ieder geval is de
aansprakelijkheid van NAVTEQ voor directe schade beperkt tot het bedrag dat u hebt betaald voor het
verkrijgen van de Database.
DE BEPERKTE GARANTIE EN DE BEPERKING VAN AANSPRAKELIJKHEID, ZOALS OPGENOMEN
IN DEZE OVEREENKOMST LATEN ONVERLET ALLE RECHTEN DIE U KUNT ONTLENEN AAN
EVENTUEEL TOEPASSELIJKE DWINGENDRECHTELIJKE WETGEVING WANNEER U DE
DATABASE ANDERS DAN IN DE UITOEFENING VAN EEN BEDRIJF HEBT VERKREGEN.
WAARSCHUWINGEN
De Database is een weergave van de realiteit zoals die bestond voordat u de Database verkreeg en
deze is opgebouwd uit gegevens en informatie van de overheid en andere bronnen, die onjuist of
onvolledig kunnen zijn. Door verloop van tijd, gewijzigde omstandigheden of vanwege de aard van de
bronnen is het derhalve mogelijk dat de Database onjuiste of onvolledige gegevens of informatie bevat.
De Database bevat of geeft onder meer geen van de volgende categorieën informatie weer: veiligheid
van de omgeving; beschikbaarheid of nabijheid van politie; hulp in noodgevallen;
constructiewerkzaamheden; weg- en rijstrookafsluitingen; voertuig- en snelheidsbeperkingen;
helling(shoek) van de weg; beperkingen met betrekking tot onder andere maximale hoogte van
viaducten of maximaal gewicht op bruggen; weg- of verkeersomstandigheden; bijzondere
gebeurtenissen; verkeersopstoppingen of reistijd.
TOEPASSELIJK RECHT
Deze Overeenkomst wordt beheerst door het recht van het land waar u woont op de dag van verkrijging
van de Database. In het geval dat u op dat moment buiten de Europese Unie of Zwitserland woont, is
het recht van het land binnen de Europese Unie of Zwitserland waar u de Database hebt verkregen van
toepassing. In alle andere gevallen, of in het geval dat de plaats waar u de Database hebt aangeschaft
niet bepaalbaar is, is Nederlands recht van toepassing. De bevoegde rechter in uw woonplaats op de
dag van verkrijging van de Database is bevoegd geschillen die voortvloeien uit of samenhangen met
deze Overeenkomst te beoordelen, onverminderd het recht van NAVTEQ vorderingen voor te leggen
aan de rechter van de plaats waar u ten tijde van het desbetreffende geschil woont.

578 MAX983HD
ANTES DE UTILIZAR LA BASE DE DATOS NAVTEQ LEA DETENIDAMENTE EL
PRESENTE CONTRATO DE LICENCIA PARA USUARIOS FINALES
NOTIFICACIÓN PARA EL USUARIO
EL PRESENTE ES UN CONTRATO DE LICENCIA - Y NO UN CONTRATO DE COMPRAVENTA -
ENTRE USTED Y NAVTEQ B.V. POR SU EJEMPLAR DE LA BASE DE DATOS DE MAPAS DE
NAVEGACIÓN NAVTEQ, CON INCLUSIÓN DE LOS PROGRAMAS DE SOFTWARE
CORRESPONDIENTES, LOS MEDIOS PORTADORES DE INFORMACIÓN Y LA DOCUMENTACIÓN
ACLARATORIA IMPRESA PUBLICADA POR NAVTEQ B.V. (A DENOMINAR, EN CONJUNTO, “LA
BASE DE DATOS”). AL HACER USO DE SU EJEMPLAR DE LA BASE DE DATOS, ACEPTA Y ESTÁ
DE ACUERDO CON TODAS LAS CLAUSULAS DE ESTE CONTRATO DE LICENCIA PARA
USUARIOS FINALES (“CONTRATO”). SI NO ESTÁ DE ACUERDO CON LAS CLÁUSULAS DE ESTE
CONTRATO, DEVUELVA INMEDIATAMENTE A SU PROVEEDOR SU EJEMPLAR DE LA BASE DE
DATOS, JUNTO CON TODOS LOS ELEMENTOS QUE LO ACOMPAÑAN, PARA SU REEMBOLSO.
PROPIEDAD
La Base de datos y sus correspondientes derechos de autor, propiedad intelectual o derechos afines
son propiedad de NAVTEQ o de sus licenciadores. La propiedad de los medios portadores de la Base
de datos será conservada por NAVTEQ y/o por su proveedor hasta la fecha en que usted haya pagado
completamente el importe que adeude a NAVTEQ y/o a su proveedor en virtud del presente Contrato o
de un(os) contrato(s) similar(es) mediante el(los) cual(es) hubiese recibido los productos.
CONCESIÓN DE LICENCIA
NAVTEQ le concede una licencia no exclusiva de utilización de la Base de datos para su uso propio o,
si procede, para uso en las operaciones internas de su empresa. Esta licencia no incluye el derecho a
conceder sublicencias.
RESTRICCIONES DE USO
La Base de datos está restringida para uso en el sistema específico para el cual ha sido desarrollada.
Salvo en la medida en que las leyes obligatorias así lo permitan explícitamente (p.ej. las leyes
nacionales basadas en la Directiva europea sobre software (91/250) y la Directiva sobre bancos de
datos (96/9)), no podrá extraer ni reutilizar partes sustanciales del contenido de la Base de datos, ni
reproducir, modificar, adaptar, traducir, desensamblar, descompilar, ni usar técnicas de ingeniería
inversa en ninguna parte de la Base de datos. Si desea obtener la información de interoperabilidad a
que alude (la legislación nacional en la que se basa) la Directiva sobre software, deberá conceder a
NAVTEQ el plazo adecuado para suministrarle dicha información en un término razonable, incluidos los
costes, a determinar por NAVTEQ.
TRANSFERENCIA DE LA LICENCIA
No podrá transferir la Base de datos a terceros, salvo que ésta haya sido instalada en el sistema para
el cual ha sido desarrollada, o si no conserva ninguna copia de la Base de datos y, siempre que el
beneficiario de la transferencia se declare conforme con todos los términos y condiciones de este
Contrato y lo notifique por escrito a NAVTEQ. Los paquetes multidisco podrán ser transferidos o
vendidos únicamente como un paquete completo, tal como los suministra NAVTEQ, y no como un
subpaquete del mismo.
LIMITACIÓN DE LA GARANTÍA
Sujeto a lo dispuesto en el apartado Advertencias que se expone más adelante, NAVTEQ garantiza que
durante los doce meses siguientes a la adquisición de su copia de la Base de datos, ésta funcionará
sustancialmente de acuerdo con los Criterios de Precisión e Integridad de NAVTEQ vigentes a la fecha
en que usted ha adquirido dicho ejemplar de la Base de datos; a solicitud suya, la presente limitación
de garantía, NAVTEQ, dentro de los términos razonables, tomará las medidas pertinentes para reparar
o sustituir dicho ejemplar defectuoso de la Base de datos. Si las medidas tomadas no conducen al
funcionamiento de la Base de datos en conformidad con la garantía aquí descrita, usted podrá elegir
entre obtener una devolución razonable del precio pagado por la Base de datos o rescindir este
Contrato. Lo anterior constituye la responsabilidad total de NAVTEQ y su único recurso contra ella.
Salvo que haya sido dispuesto explícitamente en este artículo, NAVTEQ no concederá ninguna
CONTRATO DE LICENCIA PARA USUARIOS FINALES
579
MAX983HD
garantía, ni hará representaciones con respecto al uso de resultados o al uso de la Base de datos en
términos de perfección, exactitud, fiabilidad u otros conceptos. NAVTEQ no garantiza la perfección
presente ni futura de la Base de datos. Ninguna información o recomendación, oral o escrita, que haya
sido suministrada por NAVTEQ, por su proveedor o por cualquier otra persona, constituirá garantía ni,
en ninguna otra forma, contemplará una ampliación de la limitación de garantía anteriormente expuesta.
La limitación de garantía dispuesta en este Contrato no afecta o perjudica ningún derecho legal
estatutario que usted pueda derivar de la garantía legal con respecto a defectos ocultos.
Si no ha adquirido la Base de datos directamente de NAVTEQ es posible que, además de los derechos
concedidos por NAVTEQ en virtud del presente contrato, obtenga derechos legales estatutarios de la
persona de quien ha obtenido su Base de datos de acuerdo con la legislación vigente en su jurisdicción.
La anterior garantía de NAVTEQ no afectará dichos derechos legales y usted podrá mantener tales
derechos en adición a los derechos de garantía concedidos aquí.
LIMITACIÓN DE LA RESPONSABILIDAD
El precio de la Base de datos no incluye la cobertura por riesgo de daños consecuenciales, indirectos
o daños directos ilimitados derivados del uso que usted hace de la Base de datos. Por tanto, en ningún
caso, NAVTEQ asumirá responsabilidad alguna por daños consecuenciales o indirectos incluyendo, sin
limitación, los perjuicios por lucro cesante, pérdida de datos o falta de uso, derivados del uso de la Base
de datos en que incurra usted o un tercero ya sea en acción contractual, ilícita o en virtud de una
garantía, incluso si NAVTEQ hubiese sido notificada de la posibilidad de que ocurriesen dichos
perjuicios. En cualquier caso, la responsabilidad de NAVTEQ por daños directos estará limitado al
precio de su ejemplar de la Base de datos.
LA LIMITACIÓN DE LA GARANTÍA Y LA LIMITACIÓN DE LA RESPONSABILIDAD TAL COMO
CONSTAN EN EL PRESENTE CONTRATO, NO AFECTAN O PERJUDICAN SUS DERECHOS
LEGALES ESTATUTARIOS EN CASO DE HABER ADQUIRIDO LA BASE DE DATOS EN FORMA
DIFERENTE A LA EXPLOTACIÓN DE UNA EMPRESA.
ADVERTENCIAS
La Base de datos reproduce la realidad tal como ésta existía previa a la fecha en que usted la ha
adquirido y comprende información y datos provenientes de la administración pública y de otras fuentes
los cuales pueden contener errores u omisiones. En consecuencia, la Base de datos puede incluir
información incorrecta e incompleta debido al paso del tiempo, la alteración de las circunstancias y a la
naturaleza de las fuentes empleadas. La Base de datos no contiene ni refleja información sobre, por
ejemplo, la seguridad de la zona, el cumplimiento de la ley, la asistencia en casos de emergencia, obras
en construcción, cierres de vías o carriles, restricciones de velocidad o de vehículos, declive de la vía y
grado de la pendiente, limitaciones con respecto a la altura o peso permitido en puentes, condiciones
viales o de tráfico, acontecimientos especiales, atascos o duración del viaje.
LEGISLACIÓN APLICABLE
El presente Contrato se regirá por las leyes de la jurisdicción donde usted resida en la fecha de
adquisición de la Base de datos. Si en la citada fecha reside fuera de la Unión Europea o de Suiza, se
aplicará la legislación de la jurisdicción de la Unión Europea o de Suiza donde haya adquirido la Base
de datos. En todos los demás casos, o si no es posible establecer la jurisdicción donde ha adquirido la
Base de datos, se aplicará la legislación de los Países Bajos. El juez competente en su lugar de
residencia en la fecha de adquisición de la Base de datos deberá estar facultado para pronunciarse
sobre cualquier conflicto derivado del presente Contrato o relacionado con él, sin detrimento del
derecho de NAVTEQ a presentar reclamaciones judiciales en el lugar donde usted resida en dicho
momento.

580 MAX983HD
LÆS VENLIGST DENNE SLUTBRUGERLICENSAFTALE OMHYGGELIGT INDEN DU
BEGYNDER AT BRUGE NAVTEQ DATABASE
MEDDELELSE TIL BRUGEREN
DETTE ER EN LICENSAFTALE - OG IKKE EN SALGSAFTALE- MELLEM DIG OG NAVTEQ B.V.
VEDRØRENDE DIN KOPI AF NAVTEQ NAVIGABLE MAP DATABASE HERUNDER TILKNYTTET
COMPUTERSOFTWARE, MEDIER OG SUPPLERENDE TRYKT MATERIALE UDGIVET AF NAVTEQ
(”DATABASEN”). VED AT BRUGE DATABASEN, ACCEPTERER DU ALLE VILKÅR OG
BETINGELSER I DENNE SLUTBRUGERLICENSAFTALE (”SLUTBRUGERLICENSAFTALEN”).
SÅFREMT DU IKKE KAN ACCEPTERE BETINGELSERNE I NÆRVÆRENDE
SLUTBRUGERLICENSAFTALE, SKAL DU STRAKS RETURNERE DATABASEN SAMMEN MED
ALLE TILKNYTTEDE EMNER TIL FORHANDLEREN MOD REFUNDERING AF KØBESUMMEN.
EJENDOMSRET
Databasen samt ophavsrettigheder og intellektuelle ejendomsrettigheder eller naborettigheder deri ejes
af NAVTEQ eller dennes licensgivere. Ejendomsretten til de medier, der indeholder Databasen,
bibeholdes af NAVTEQ og/eller leverandøren, indtil du har betalt alle i henhold til nærværende
slutbrugerlicensaftale eller lignende aftale(r), og efter hvilke varerne er leveret til dig, de fulde beløb der
skal betales til NAVTEQ og/eller leverandøren.
LICENSUDSTEDELSE
NAVTEQ udsteder dig en ikke-eksklusiv licens til at bruge Databasen til personligt brug, eller hvis
relevant, til brug i din virksomheds interne drift. Denne licens indbefatter ikke retten til at udstede
underlicenser.
BEGRÆNSNINGER I BRUGEN
Databasen er begrænset til brug i det pågældende system, for hvilket den blev oprettet. Med undtagelse
af det i de præceptive love (dvs. nationale love baseret på Rådets direktiv 91/250 om retlig beskyttelse
af edb programmer og Europa-Parlamentets og Rådets direktiv 96/9 om retlig beskyttelse af databaser)
udtrykkeligt tilladte omfang, må du ikke uddrage eller genanvende væsentlige dele af Databasen indhold
ej heller duplikere, kopiere, modificere, justere, oversætte, demontere, dekompilere, foretage reverse
engineering af nogen del af Databasen. Dersom du ønsker interoperabilitet, som defineret i (nationale
love der er baseret på) direktivet om retlig beskyttelse af edb programmer, skal du give NAVTEQ rimelig
lejlighed til at frembringe nævnte informationer på rimelige betingelser herunder også omkostninger,
som skal fastsættes af NAVTEQ.
OVERDRAGELSE AF LICENS
Du har ikke ret til at overdrage Databasen til tredjepersoner, undtagen hvis den er installeret på det
system, for hvilket den var oprettet, eller hvis du ikke tilbageholder nogen kopi af Databasen og forudsat
at erhververen accepterer alle vilkår og betingelser i denne slutbrugerlicensaftale og skriftligt bekræfter
dette over for NAVTEQ. Multi-disk sæt kan kun overdrages eller sælges som de af NAVTEQ leverede
komplette sæt og ikke som undersæt deraf.
BEGRÆNSET GARANTI
Med forbehold for nedenstående advarsler garanterer NAVTEQ, for en periode af 12 måneder efter du
har købt en kopi af Databasen, at den i det væsentlige vil yde i overensstemmelse med NAVTEQ’s
kriterier for nøjagtighed og fuldstændighed, der eksisterede på købsdatoen for Databasen. Du kan få
udleveret disse kriterier efter anmodning. Dersom Databasen ikke yder i overensstemmelse med
nærværende begrænsede garanti, vil NAVTEQ gøre alle rimelige bestræbelser for at reparere eller
udskifte din uoverensstemmende kopi af Databasen. Dersom disse bestræbelser ikke fører til, at
Databasen yder i overensstemmelse med de heri anførte garantier, har du valget mellem enten at
slutbrugerlicensaftale. Dette udgør NAVTEQ’s samlede ansvar og dit eneste retsmiddel mod NAVTEQ.
Med undtagelse af hvad der udtrykkeligt er anført i nærværende afsnit, garanterer NAVTEQ ikke eller
fremsætter nogen anbringender med hensyn til brugen af resultaterne af brugen af Databasen ud fra
dennes rigtighed, korrekthed, pålidelighed eller på anden vis. NAVTEQ garanterer ikke, at Databasen
er eller vil være fejlfri. Ingen mundtlige eller skriftlige informationer eller henstillinger givet af NAVTEQ,
leverandøren eller nogen anden person danner nogen garanti eller på nogen måde udvider rammerne
SLUTBRUGERLICENSAFTALE
581
MAX983HD
af den herover beskrevne begrænsede garanti. Den i slutbrugerlicensaftalens anførte begrænsede
garanti har ingen indflydelse på eller skader nogen lovfæstede rettigheder, du måtte have i henhold til
den lovfæstede garanti mod skjulte mangler.
Hvis du ikke købte Databasen direkte fra NAVTEQ, har du måske lovfæstede rettigheder mod den
person, fra hvilken du købte Databasen, udover de herunder af NAVTEQ afgivne rettigheder i
overensstemmelse med bestemmelserne i din jurisdiktion. NAVTEQ’s ovenstående garanti har ingen
indflydelse på sådanne lovfæstede rettigheder, og sådanne rettigheder kan du gøre gældende foruden
de heri givne garantirettigheder.
BEGRÆNSNING AF ANSVAR
Databasens pris indbefatter ikke nogen betaling for accept af risiko for sekundære, indirekte eller
ubegrænsede indirekte skader, der måtte opstå i forbindelse med din brug af Databasen. I
overensstemmelse hermed påtager NAVTEQ sig intet ansvar for sekundære eller indirekte skader
herunder også og uden begrænsning tab af indtægt, data eller brug du eller nogen tredjemand måtte
lide, som følge af din brug af Databasen, enten det er søgsmål inden for kontrakt eller uden for kontrakt
baseret på en garanti, selv om NAVTEQ er blevet oplyst om muligheden for sådanne erstatningskrav.
Under alle omstændigheder er NAVTEQ’s ansvar for direkte skader begrænset til købsprisen for din kopi
af Databasen.
DEN BEGRÆNSEDE GARANTI OG DET BEGRÆNSEDE ANSVAR ANFØRT I NÆRVÆRENDE
SLUTBRUGERLICENSAFTALE HAR INGEN INDFLYDELSE PÅ ELLER ER TIL SKADE FOR DINE
LOVFÆSTEDE RETTIGHEDER, HVIS DU HAR KØBT DATABASEN PÅ ANDEN VIS END I ET
FORRETNINGSFORLØB.
ADVARSLER
Databasen reflekterer virkeligheden, som den var, inden du modtog Databasen, og den indeholder data
og informationer fra offentlige myndigheder og andre kilder, som kan indeholde fejl og udeladelser. Som
følge deraf kan Databasen indeholde fejlagtige eller ufuldstændige informationer, på grund af tidens
gang, ændrede forhold og arten af de anvendte kilder. Databasen indeholder ikke eller reflekterer
informationer om bl.a. nabolagssikkerhed, retshåndhævelse, nødhjælp, byggearbejde, gade- eller
vejlukninger, køretøjs eller hastighedsrestriktioner, gade-/vejhældning eller niveau, brohøjde, vægt eller
andre begrænsninger, vej- eller trafikforhold, særlige begivenheder, trafikpropper eller rejsetid.
GÆLDENDE LOV
Lovene i den jurisdiktion, hvori du bor på købstidspunktet af database, gælder for nærværende aftale.
Hvis du på det tidspunkt opholder dig uden for Den Europæiske Union eller Schweiz, er det loven i den
jurisdiktion inden for Den Europæiske Union eller Schweiz, hvor du købte Databasen, der gælder. I alle
andre tilfælde, eller hvis jurisdiktionen på det sted, du købte Databasen, ikke kan defineres, er det lovene
i Holland der gælder. De kompetente retter på dit bopælssted på det tidspunkt, du købte Databasen, har
jurisdiktion over enhver tvist, der måtte opstå som følge af eller vedrørende nærværende aftale uden
skade for NAVTEQ’s ret til at rejse krav på dit nuværende bopælssted.

582 MAX983HD
QUEIRA POR FAVOR LER ATENTAMENTE ESTE ACORDO DE LICENÇA DO
UTILIZADOR FINAL ANTES DE UTILIZAR A BASE DE DADOS NAVTEQ
AVISO PARA O UTILIZADOR
O PRESENTE DOCUMENTO É UM ACORDO DE CONCESSÃO DE LICENÇA - E NÃO UM ACORDO
PARA EFEITOS DE VENDA - ENTRE O UTILIZADOR E A NAVTEQ B.V., NO QUE RESPEITA À CÓPIA
ADQUIRIDA DA BASE DE DADOS DE NAVEGAÇÃO E CARTOGRAFIA DA NAVTEQ, INCLUINDO O
PROGRAMA DE COMPUTADOR E O MEIO DE SUPORTE QUE LHE ESTÃO ASSOCIADOS, BEM
COMO A DOCUMENTAÇÃO EXPLICATIVA PUBLICADA PELA NAVTEQ (CONJUNTAMENTE
DESIGNADOS POR “A BASE DE DADOS”). AO UTILIZAR A BASE DE DADOS, EM QUALQUER
CIRSCUNSTÃNCIA, O CLIENTE ESTARÁ A MANIFESTAR A SUA ACEITAÇÃO E CONCORDÂNCIA
RELATIVAMENTE A TODOS OS TERMOS E CONDIÇÕES DO PRESENTE ACORDO DE LICENÇA
DO UTILIZADOR FINAL (DORAVANTE DESIGNADO POR “ACORDO”). CASO NÃO CONCORDE
COM OS TERMOS CONSTANTES DESTE ACORDO, QUEIRA DE IMEDIATO EFECTUAR A
DEVOLUÇÃO DA BASE DE DADOS, JUNTAMENTE COM TODOS OS OUTROS ARTIGOS QUE A
ACOMPANHAM, AO SEU FORNECEDOR, PARA QUE SE PROCEDA AO REEMBOLSO.
PROPRIEDADE
A Base de Dados, assim como os direitos de autor e de propriedade intelectual, ou os direitos conexos sobre
a mesma, são propriedade da NAVTEQ ou dos seus licenciantes. A propriedade dos meios de suporte que
contêm a Base de Dados é retida pela NAVTEQ e/ou pelo seu fornecedor até que tenham sido pagas, na
sua totalidade, quaisquer quantias devidas à NAVTEQ e/ou ao seu fornecedor em conformidade com o
presente Acordo ou qualquer outro acordo semelhante ao abrigo do qual os produtos lhe sejam fornecidos.
CONCESSÃO DE LICENÇA
A NAVTEQ concede-lhe uma licença não exclusiva de utilização da Base de Dados para fins pessoais
ou, caso tal se aplique, para uma utilização no âmbito das operações levadas a cabo internamente pela
sua empresa. Na presente licença não está incluído o direito à concessão de sublicenças.
RESTRIÇÕES DE UTILIZAÇÃO
A utilização da Base da Dados é limitada ao sistema específico para o qual foi criada. Excepto na
medida em que tal seja expressamente permitido pelas disposições legais de aplicação obrigatória (por
exemplo, legislação nacional baseada na Directiva n° 91/250/CE relativa ao regime de protecção
jurídica dos programas de computador e na Directiva n° 96/9/CE relativa à protecção jurídica das Bases
de Dados), o utilizador não deverá extrair ou reutilizar partes significativas do conteúdo da Base de
Dados, nem reproduzir, copiar, modificar, adaptar, traduzir, desmontar ou decompor, nem efectuar
operações de inversão de engenharia de qualquer parte da Base de Dados. Se desejar obter
informação sobre a sua interoperabilidade nos termos a que se refere a Directiva Europeia relativa a
Programas de Computador (Directiva em cuja legislação nacional está baseada), deverá, pois,
conceder à NAVTEQ a oportunidade de facultar a referida informação segundo os meios considerados
razoáveis, incluindo os custos, que serão determinados pela NAVTEQ.
TRANSFERÊNCIA DE LICENÇA
Não é permitida a transferência da Base de Dados a terceiros, excepto nos casos em que a mesma se
encontre instalada no sistema para o qual foi criada ou em que o cliente não conserve qualquer cópia
da Base de Dados para si, e na medida em que o transmissário expresse o seu consentimento em
relação a todos os termos e condições do presente Acordo e o confirme por escrito à NAVTEQ. Os
conjuntos de multi-discos somente poderão ser transferidos ou vendidos como um conjunto completo,
tal como fornecidos pela NAVTEQ, e não como um subconjunto daquele.
GARANTIA LIMITADA
A NAVTEQ oferece a garantia de que, sujeita às Advertências abaixo descritas e por um período de 12
meses após ter adquirido a sua cópia da Base de Dados, a mesma irá funcionar substancialmente de
acordo com os Critérios de Exactidão e Integralidade da NAVTEQ existentes à data de aquisição da
Base de Dados, sendo que estes critérios podem ser disponibilizados pela NAVTEQ mediante
solicitação do utilizador. No caso de a Base de Dados não funcionar de acordo com a presente garantia
limitada, a NAVTEQ realizará os esforços que se afigurem adequados para proceder à reparação ou
ACORDO DE LICENÇA DO UTILIZADOR FINAL
583
MAX983HD
substituição da cópia da Base de Dados que não esteja a funcionar devidamente. Se os referidos
esforços não conduzirem a um desempenho da Base de Dados que esteja em consonância com as
garantias aqui explicitadas, o utilizador poderá optar entre receber uma quantia racional a título de
reembolso pelo preço pago pela Base de Dados ou rescindir o presente Acordo. As opções
mencionadas constituem responsabilidade integral da NAVTEQ o único meio de recurso do utilizador
em relação à NAVTEQ. Salvo em caso de indicação expressa nesse sentido na presente secção, a
NAVTEQ não proporciona garantias nem realiza quaisquer representações no que se refere à utilização
ou aos resultados da utilização da Base de Dados em termos da sua correcção, exactidão, fiabilidade,
ou quaisquer outras. A NAVTEQ não garante que a Base de Dados se encontre presentemente, ou
futuramente, isenta de erros. Nenhuma informação ou conselho prestado, oralmente ou por escrito, pela
NAVTEQ, pelo seu fornecedor ou por qualquer outra pessoa, deverá ser de molde a constituir uma
garantia ou, de qualquer outra forma, alargar o âmbito da garantia limitada acima descrita. A garantia
limitada constante do presente Acordo não deverá considerar-se como afectando ou prejudicando
quaisquer direitos que, nos termos previstos pela lei, o utilizador possa invocar em virtude da garantia
legal contra defeitos ocultos.
Caso não tenha adquirido a Base de Dados directamente à NAVTEQ, poderá ter direitos estatutários a
serem exercidos contra o intermediário junto do qual adquiriu a Base de Dados, complementarmente
aos direitos que pela presente lhe são conferidos pela NAVTEQ, em conformidade com a lei da sua
jurisdição. A garantia da NAVTEQ, supracitada, não deverá afectar os referidos direitos estatutários,
pelo que o utilizador poderá reivindicar tais direitos para além dos direitos que lhe assistem ao abrigo
da garantia concedida no presente Acordo.
LIMITAÇÃO DE RESPONSABILIDADE
O preço da Base de Dados não inclui qualquer valor relativo à suposição de risco de danos directos
ilimitados, indirectos ou consequenciais, que possam advir da sua incorrecta utilização da Base de
Dados. Do mesmo modo, sob nenhuma circunstância deverá a NAVTEQ ser responsável por quaisquer
danos indirectos ou consequenciais, nestes se incluindo, e não se limitando, por perdas de rendimento,
dados, ou utilização, em que incorra o cliente ou um terceiro, em resultado da sua utilização da Base
de Dados, quer seja no quadro de uma acção contemplada no contrato ou extra-negocial, ou baseada
numa garantia, mesmo no caso de a NAVTEQ ter sido informada acerca da possibilidade de ocorrência
de tais danos. Em quaisquer circunstâncias, a responsabilidade por danos directos imputável à
NAVTEQ é limitada ao preço da sua cópia da Base de Dados.
A GARANTIA LIMITADA E A LIMITAÇÃO DE RESPONSABILIDADE, DESCRITAS NO PRESENTE
ACORDO, NÃO AFECTAM NEM PREJUDICAM OS SEUS DIREITOS ESTATUTÁRIOS NO CASO DE
TER ADQUIRIDO A BASE DE DADOS DE OUTRA FORMA QUE NÃO NO DECURSO DE UMA
TRANSACÇÃO COMERCIAL.
ADVERTÊNCIAS
A Base de Dados reflecte a realidade tal como existia até ao momento em que a recebeu e é composta
por dados e informações provenientes de entidades governamentais e outras fontes, podendo conter
erros e omissões. Assim sendo, a Base de Dados poderá conter informação inexacta ou incompleta
devido à passagem do tempo, à alteração de circunstâncias, bem como à natureza das fontes utilizadas.
A Base de Dados não inclui ou incide sobre informações referentes, entre outros aspectos, ao grau de
segurança nas imediações, à execução da lei, à assistência em situações de emergência, obras de
construção, estradas ou ruas vedadas à circulação, restrições de velocidade ou relativas a veículos,
declive ou nivelamento de estradas, bem como altura, peso ou outros limites relativos a pontes, condições
de estradas ou de trânsito, eventos especiais, congestionamento do tráfego, ou tempo de viagem.
LEI VIGENTE
O presente Acordo deverá ser regido pelas leis da jurisdição do local de residência do utilizador à data
de aquisição da Base de Dados. Caso resida, de momento, fora da União Europeia ou Suíça, será
aplicável a lei da jurisdição, pertencente à União Europeia ou Suíça, na qual tenha adquirido a Base de
Dados. Nos restantes casos, ou perante a impossibilidade de definir a jurisdição do local onde foi
adquirida a Base de Dados, será aplicável a legislação em vigor nos Países Baixos. Aquando da
aquisição da Base de Dados, serão as instâncias competentes no seu local de residência que deverão
exercer a sua jurisdição relativamente a qualquer litígio decorrente do presente Acordo, ou com este
relacionado, sem prejuízo do direito da NAVTEQ a intentar uma acção judicial naquele que seja então
o seu local de residência.

584 MAX983HD
LÄS DETTA LICENSAVTAL FÖR SLUTANVÄNDARE NOGGRANT INNAN NI
ANVÄNDER NAVTEQ DATABAS
MEDDELANDE TILL ANVÄNDARE
DETTA ÄR ETT LICENSAVTAL - OCH INTE ETT AVTAL FÖR FÖRSÄLJNING - MELLAN ER OCH
NAVTEQ B.V. FÖR ERT EXEMPLAR AV NAVTEQ NAVIGABLE MAP DATABAS, INKLUDERANDE
TILLHÖRANDE PROGRAMVARA, MEDIA OCH TRYCKT MANUAL UTGIVEN AV NAVTEQ
(GEMENSAMT BENÄMNDA "DATABASEN"). GENOM ATT ANVÄNDA DATABASEN, ACCEPTERAR
NI OCH SAMTYCKER TILL ALLA VILLKOR OCH BESTÄMMELSER I DETTA LICENSAVTAL FÖR
SLUTANVÄNDARE ("AVTAL"). OM NI INTE SAMTYCKER TILL VILLKOREN I DETTAAVTAL,
RETURNERA OMGÅENDE DATABASEN, TILLSAMMANS MED ALLA ANDRA ÅTFÖLJANDE
ARTIKLAR TILL ER LEVERANTÖR FÖR ÅTERBETALNING.
ÄGANDERÄTT
Databasen och upphovsrätter, immateriell egendom eller närliggande rättigheter däri ägs av NAVTEQ
eller dess licensgivare. Äganderätten till de media som innehåller Databasen kvarligger hos NAVTEQ
och/eller Er leverantör till dess att Ni erlagt samtliga belopp som skall erläggas till NAVTEQ och/eller Er
leverantör i enlighet med detta Avtal eller liknande avtal enligt vilka varor tillhandahålls Er.
BEVILJANDE AV LICENS
NAVTEQ beviljar Er en icke-exklusiv licens att använda Databasen för Ert personliga bruk, eller om
tillämpligt, för användande inom Ert företags interna verksamhet. Denna licens omfattar inte rätten att
bevilja underlicenser.
BEGRÄNSNING AV ANVÄNDNING
Databasen får endast användas i det specifika system för vilket den framställts. Förutom till den del det
uttryckligen tillåts av tvingande lag (t ex nationella lagar baserade på det Europeiska
Datorprogramdirektivet (91/250) och Databasdirektivet (96/9)), får Ni ej göra utdrag ur eller återanvända
betydande delar av innehållet i Databasen och ej heller reproducera, kopiera, modifiera, anpassa,
översätta, demontera, dekompilera eller tillbakaassemblera någon del av Databasen. Om Ni önskar
erhålla samkörbarhetsinformation såsom avses i (den natio-nella lagen baserad på) det Europeiska
Datorprogramdirektivet, skall Ni ge NAVTEQ skälig möjlighet att tillhandahålla sagda information på
skäliga villkor, inkluderande kostnader, vilka fastställs av NAVTEQ.
ÖVERLÅTELSE AV LICENS
Ni får inte överlåta Databasen till tredje part, förutom som installerad i det system för vilket den skapades
eller under förutsättning att Ni inte behåller någon kopia av Databasen och förutsatt att mottagaren
samtycker till alla villkor och bestämmelser i detta Avtal och skriftligen bekräftar detta till NAVTEQ. Set
med flera skivor får endast överföras eller säljas som ett komplett set så som det levereras av NAVTEQ
och inte som delar av ett set.
BEGRÄNSAD GARANTI
NAVTEQ garanterar, med förbehåll för Varningarna nedan, för en tidsperiod på 12 månader efter
anskaffandet av Ert exemplar av Databasen, att den fungerar väsentligen i enlighet med NAVTEQs
exakthets- och fullständighetsnorm i dess lydelse vid det datum då Ni anskaffade Databasen; dessa
normer kan ni på begäran få av NAVTEQ. Om Databasen inte fungerar i enlighet med denna
begränsade garanti kommer NAVTEQ att vidta skäliga försök att reparera eller byta ut Ert icke
överensstämmande exemplar av Databasen. Om dessa försök inte leder till att Databasen fungerar i
enlighet med garantierna uppställda i detta avtal, kan Ni välja att antingen erhålla skälig återbetalning av
den köpeskilling Ni betalade för Databasen eller att häva detta Avtal. Detta är NAVTEQs hela
ansvarsskyldighet och Er enda rätt till gottgörelse från NAVTEQ. Förutom såsom uttryckligen är
föreskrivet i detta avsnitt, garanterar NAVTEQ inte eller gör någon utfästelse beträffande användandet
av resultaten från nyttjandet av Databasen vad avser riktighet, exakthet, tillförlitlighet eller annorledes.
NAVTEQ garanterar inte att Databasen är eller kommer att vara felfri. Ingen muntlig eller skriftlig
information tillhandahållen eller råd tillhandahållet av NAVTEQ, Er leverantör eller någon annan person
ger upphov till en garanti eller ökar på något sätt omfattningen av den ovan beskrivna begränsade
garantin. Den begränsade garantin enligt detta Avtal påverkar eller begränsar inte någon lagstadgad
LICENSAVTAL FÖR SLUTANVÄNDARE
585
MAX983HD
rättighet som Ni kan ha enligt i lag föreskriven garanti mot dolda fel.
Om Ni inte anskaffade Databasen direkt från NAVTEQ kan Ni ha ytterligare lagstadgade rättigheter
gentemot den person från vilken Ni anskaffade Databasen, utöver de rättigheter som Ni erhållit från
NAVTEQ enligt denna bestämmelse, i enlighet med lagen i Er jurisdiktion. NAVTEQs ovanstående
garanti påverkar inte sådana lagstadgade rättigheter och Ni kan utöva sådana rättigheter i tillägg till
garantierna i detta avtal.
ANSVARSBEGRÄNSNING
Priset för Databasen inkluderar inte någon ersättning för övertagande av risken för följdskador, indirekta
eller obegränsade direkta skador vilka kan uppstå i samband med Ert användande av Databasen.
Följaktligen skall NAVTEQ inte i något fall vara ansvarigt för några följdskador eller indirekta skador,
inkluderande utan begränsning, förlust av inkomst, data eller användning som åsamkats Er eller tredje
part härrörande från Ert användande av Databasen, vare sig avseende inomobligatoriska eller
utomobligatoriska anspråk eller baserade på garanti, även om NAVTEQ har underrättats om möjligheten
av sådana skador. NAVTEQs ansvar för direkta skador är i samtliga fall begränsat till priset för Ert
exemplar av Databasen.
DEN BEGRÄNSADE GARANTIN OCH ANSVARSBEGRÄNSNINGEN ENLIGT DETTA AVTAL
PÅVERKAR ELLER BEGRÄNSAR INTE ERA LAGSTADGADE RÄTTIGHETER OM NI HAR
ANSKAFFAT DATABASEN ANNORLEDES ÄN VID UTÖVANDE AV FÖRETAGSVERKSAMHET.
VARNING
Databasen återger verkligheten såsom den existerade innan Ni erhöll Databasen och den innehåller
data och information från myndigheter och andra källor, vilka kan innehålla fel och utelämnanden.
Följaktligen kan Databasen innehålla oriktig och ofullständig information på grund av tidens gång,
förändrade omständigheter och beroende på beskaffenheten hos de använda källorna. Databasen
inkluderar eller återger inte information om - bland annat - traktens säkerhet; upprätthållande av lag och
ordning; hjälp i nödsituationer; byggnadsarbeten; väg- eller gatuavstängningar; fordons- eller
hastighetsbegränsningar; väglutning eller grad; brohöjd; vikt eller andra begränsningar; väg- eller
trafikförhållanden; särskilda evenemang, trafikstockning eller restid.
GÄLLANDE LAG
Detta Avtal skall lyda under lagarna i den jurisdiktion i vilken Ni är bosatt vid det datum då Ni anskaffade
Databasen. Skulle Ni vid denna tidpunkt vara bosatt utanför den Europeiska Unionen eller Schweiz skall
lagen i den jurisdiktion inom den Europeiska Unionen eller Schweiz där Ni anskaffade Databasen gälla.
I alla andra fall, eller om den jurisdiktion där Ni anskaffade Databasen inte kan bestämmas, skall
nederländsk lag gälla. Behörig domstol på Er hemort vid tidpunkten då Ni anskaffade Databasen skall
ha jurisdiktion över tvist härrörande från eller i samband med detta Avtal, utan förfång för NAVTEQs
rättigheter att framställa krav på Er då tillämpliga hemort.

586 MAX983HD
VENNLIGST LES DENNE LISENSAVTALEN FOR SLUTTBRUKERE NØYE FØR DU TAR
DATABASEN NAVTEQ I BRUK
MERKNAD TIL BRUKEREN
DETTE ER EN LISENSAVTALE - OG IKKE EN AVTALE OM SALG - MELLOM DEG OG NAVTEQ B.V.
FOR DIN KOPI AV 'THE NAVTEQ NAVIGABLE MAP DATABASE', INKLUDERT TILKNYTTET
DATAPROGRAMVARE, MEDIER OG FORKLARENDE TRYKT DOKUMENTASJON UTGITT AV
NAVTEQ (SAMLET KALT “DATABASEN”). VED Å BRUKE DATABASEN, GODTAR DU ALLE
VILKÅRENE I DENNE LISENSAVTALEN FOR SLUTTBRUKERE (“AVTALEN”). HVIS DU IKKE
GODTAR VILKÅRENE I DENNE AVTALEN, MÅ DU SNAREST SENDE DATABASEN OG ALLE
ELEMENTER SOM FØLGER MED DEN TILBAKE TIL LEVERANDØREN FOR Å FÅ DEN
REFUNDERT.
EIERSKAP
Databasen samt opphavsretter og åndelige eiendomsrettigheter eller underliggende rettigheter i disse
tilhører NAVTEQ eller deres rettighetsinnehavere. Mediene Databasen ligger på forblir NAVTEQs og/
eller din leverandørs eiendom inntil du har betalt hele beløpet som tilfaller NAVTEQ og/eller din
leverandør i overensstemmelse med denne Avtalen eller tilsvarende avtale(r) om levering av varen til
deg.
TILDELING AV LISENS
NAVTEQ tildeler deg en lisens uten enerett for din personlige bruk av Databasen eller, hvis relevant, for
intern bruk av den i ditt foretak. Denne lisensen omfatter ikke noen rett til å tildele underlisenser.
BRUKSBEGRENSNINGER
Databasens bruk er begrenset til det bestemte systemet den ble opprettet for. Unntatt i den utstrekning
det eksplisitt tillates av de regelverk man er pålagt å forholde seg til (dvs. nasjonale lovverk basert på
det europeiske programvaredirektivet (91/250) og Databasedirektivet (96/9)), har du ikke rett til å trekke
ut eller gjøre ny bruk av vesentlige deler av innholdet i Databasen og heller ikke reprodusere, kopiere,
endre, tilpasse, oversette, demontere eller dekompilere den eller ta fra hverandre programkoden i noen
del av Databasen. Hvis du ønsker å oppnå samspillinformasjon i den betydningen som fremgår av (de
nasjonale lover basert på) det europeiske programvaredirektivet, skal du gi NAVTEQ rimelig anledning
til å fremskaffe slik informasjon på fornuftige vilkår, inkludert priser, som skal fastsettes av NAVTEQ.
OVERFØRING AV LISENS
Du har ikke rett til å overføre Databasen til tredjeparter, unntatt når den er installert i det systemet den
ble opprettet for eller når du selv ikke beholder noen kopi av Databasen og under forutsetning av at den
du overfører den til godtar alle vilkår i denne Avtalen og bekrefter dette skriftlig til NAVTEQ. Sett med
flere disker kan kun overføres eller selges som ett komplett sett slik det ble levert av NT, og ikke som
noe delsett av dette.
BEGRENSET GARANTI
NAVTEQ garanterer at, med forbehold for advarslene angitt nedenfor, over et tidsrom på 12 måneder
etter at du har kjøpt din kopi av Databasen, vil denne i alt vesentlig ha den ytelse som fremgår av
NAVTEQs 'Kriterier for nøyaktighet og fullstendighet' i kraft på den datoen du kjøpte Databasen. Disse
kriteriene er tilgjengelige fra NAVTEQ på forespørsel. Skulle Databasen ikke gi den ytelsen som
overensstemmer med denne begrensede garantien, skal NAVTEQ gjøre sitt beste innen rimelighetens
grenser for å reparere eller skifte ut din uoverensstemmende kopi av Databasen. Hvis disse forsøkene
ikke fører til at Databasen gir den ytelsen som tilsvarer garantiene i dette dokumentet, vil du ha valget
mellom enten å motta en rimelig refusjon av beløpet du betalte for Databasen eller å oppheve denne
Avtalen. Dette skal være NAVTEQs fulle ansvar og ditt eneste rettsmiddel mot NAVTEQ. Med unntak
bruk av resultatene av bruken av Databasen hva angår dennes korrekthet, nøyaktighet, pålitelighet eller
på annen måte. NAVTEQ garanterer ikke at Databasen er eller kommer til å være feilfri. Ingen muntlig
eller skriftlig informasjon eller rådgivning gitt av NAVTEQ, din leverandør eller noen annen part skal
anses å utgjøre en garanti eller på noen måte utvide omfanget av den begrensede garantien beskrevet
ovenfor. Den begrensede garantien gitt i denne AVTALEN påvirker ikke og er uten noen prejudise for
de eventuelle lovfestede juridiske rettigheter du måtte ha under den juridiske garantien mot skjulte
LISENSAVTALE FOR SLUTTBRUKERE
587
MAX983HD
defekter.
Hvis du ikke kjøpte Databasen direkte fra NAVTEQ, kan du ha lovfestede rettigheter i forhold til den
personen du kjøpte Databasen fra, i tillegg til de rettigheter NAVTEQ har gitt deg med dette dokumentet,
i henhold til lovverket i din rettskrets. Ovenstående garanti fra NAVTEQ skal ikke påvirke slike lovfestede
rettigheter og du skal ha rett til å gjøre dem gjeldende i tillegg til de garantirettigheter du har fått i dette
dokumentet.
ANSVARSBEGRENSNING
Prisen på Databasen inkluderer ingen hensyntagen til overtagelse av erstatningsansvar for følgeskader,
indirekte skader eller ubegrensede direkte skader som måtte oppstå i forbindelse med din bruk av
Databasen. Følgelig skal NAVTEQ under ingen omstendigheter ha erstatningsansvar for noen
følgeskader eller indirekte skader, inkludert uten begrensning tap av inntekt, data eller bruk, som måtte
ramme deg eller en eventuell tredjepart som følge av bruken av Databasen, det være seg i
kontraktsmessige eller ikke-kontraktsmessige forhold (uaktsomhet) eller basert på en garanti, selv om
NAVTEQ er blitt informert om muligheten for et slikt skadeansvar. I alle fall er NAVTEQs
erstatningsansvar begrenset til prisen på din kopi av Databasen.
DEN BEGRENSEDE GARANTIEN OG ANSVARSFRASKRIVELSEN UTTRYKT I DENNE AVTALEN
PÅVIRKER IKKE OG ER UTEN PREJUDISE FOR DINE LOVFESTEDE RETTIGHETER HVIS DU HAR
KJØPT DATABASEN PÅ EN ANNEN MÅTE ENN VED EN FORRETNINGSTRANSAKSJON.
ADVARSLER
Databases gjenspeiler virkeligheten slik den var før du mottok Databasen og omfatter data og
informasjon fra statlige og andre kilder som kan inneholde feil og utelatelser. Følgelig kan Databasen
inneholde uriktig eller ufullstendig informasjon på grunn av tidsforløp, endrede omstendigheter og de
anvendte kildenes art. Databasen inkluderer eller gir ikke informasjon om - blant annet - sikkerhet i
nærmiljøet, lovhåndheving, nødhjelp, konstruksjonsarbeider, stengte veier og gater, kjøretøy- eller
fartsbegrensninger, veibanens fall eller stigning, brohøyde, vekt- eller andre begrensninger, vei- eller
trafikkforhold, spesielle hendelser, trafikkorker eller reisetid.
GJELDENDE LOV
Denne avtalen skal rette seg etter lovene i rettskretsen der du bor på den datoen Databasen blir kjøpt.
Skulle du på dette tidspunkt bo utenfor den Europeiske Union eller Sveits, er det loven i den rettskretsen
innenfor den Europeiske Union eller Sveits hvor du kjøpte Databasen som kommer til anvendelse. I alle
andre tilfeller, eller hvis den rettskrets hvor du kjøpte Databasen ikke kan defineres, skal loven i
Nederland anvendes. De kompetente domstoler på ditt hjemsted på det tidspunkt du kjøpte Databasen
skal ha domsmakt i eventuelle tvister som måtte oppstå på grunn av eller i forbindelse med denne
avtalen, uten prejudise for NAVTEQs rett til å reise krav mot deg på ditt den gang gjeldende hjemsted.

588 MAX983HD
PROSÍME, PŘEČTĚTE SI PEČLIVĚ TUTO SMLOUVU O LICENCI KONCOVÉHO
UŽIVATELE ŘRED TÍM, NEŽ POUŽIJETE DATABÁZI NAVTEQ
OZNÁMENÍ UŽIVATELI
TOTO JE SMLOUVA O LICENCI – A NIKOLI SMLOUVA O PRODEJI – MEZI VÁMI A SPOLEČNOSTÍ
NAVTEQ B.V. NA VAŠI KOPII DATABÁZE NAVIGOVATELNÝCH MAP NAVTEQ, VČETNĚ
SOUVISEJÍCÍHO PROGRAMOVÉHO VYBAVENÍ, NOSIČŮ A VYSVĚTLUJÍCÍ TIŠTĚNÉ
DOKUMENTACE PUBLIKOVANÉ SPOLEČNOSTÍ NAVTEQ (SOUHRNNĚ „DATABÁZE“). POUŽITÍM
DATABÁZE PŘIJÍMÁTE A SOUHLASÍTE SE VŠEMI PODMÍNKAMI TÉTO SMLOUVY O LICENCI
KONCOVÉHO UŽIVATELE (DÁLE „SMLOUVA“) A SOUHLASÍTE S NIMI. NESOUHLASÍTE-LI S
PODMÍNKAMI TÉTO SMLOUVY, NEPRODLENĚ VRAŤTE DATABÁZI SPOLU SE VŠEMI DALŠÍMI
DOPROVODNÝMI POLOŽKAMI SVÉMU DODAVATELI K REFUNDACI.
VLASTNICTVÍ
Databáze a vlastnická práva a duševní vlastnictví nebo hraničící práva v nich jsou ve vlastnictví
společnosti NAVTEQ nebo osob, které jí poskytují licence. Vlastnictví nosičů, na nichž je obsažena
Databáze, si ponechává NAVTEQ a/nebo Váš dodavatel, dokud plně neuhradíte společnosti NAVTEQ
a/nebo Vašemu dodavateli jakékoli dlužné částky podle této Smlouvy nebo podobné smlouvy
(podobných smluv), podle níž (nichž) je Vám poskytováno zboží.
UDĚLENÍ LICENCE
Společnost NAVTEQ Vám uděluje nevýlucnou licenci k užívání Databáze pro Vaše osobní užití nebo,
připadá-li to v úvahu, k internímu použití ve Vašem podnikání. Tato licence nezahrnuje právo udělit
sublicence.
OMEZENÍ UŽÍVÁNÍ
Databáze je omezena na užití v konkrétním systému, pro který byla vytvořena. S výjimkou rozsahu
výslovně povoleného závaznými právními předpisy (například národními zákony založenými na
Evropské směrnici o software (91/250) a Směrnici o Databázích (96/9)) nesmíte vyjímat nebo znovu
používat podstatné části obsahu Databáze, ani reprodukovat, kopírovat, upravovat, přizpůsobovat,
převádět, rozebírat, rozčleňovat, obráceně konstruovat jakoukoli část Databáze. Přejete-li si získat
informace o vzájemné provozuschopnosti /interoperabilitě/, jak je míněna v (národních zákonech
založených na) Evropské směrnici o software, musíte dát společnosti NAVTEQ odpovídající příležitost,
aby poskytla řečené informace za přiměřených podmínek, včetně nákladů, které určí NAVTEQ.
PŘEVOD LICENCE
Databázi nesmíte převést na třetí strany s výjimkou případu, kdy je instalována v systému, pro který byla
vytvořena, nebo když si neponecháte žádnou kopii Databáze a za předpokladu, že nabyvatel souhlasí
se všemi podmínkami této Smlouvy a potvrdí to písemně společnosti NAVTEQ. Soubory o více discích
mohou být převáděny nebo prodávány pouze jako úplný soubor, jak jej dodal NAVTEQ, a nikoli jako
jejich dílčí soubor.
OMEZENÁ ZÁRUKA
Společnost NAVTEQ zaručuje, že, s výhradou Varování uvedených níže, po období 12 měsíců po nabytí
Vaší kopie Databáze bude tato fungovat podstatně v souladu s Kritérii společnosti NAVTEQ pro
přesnost a úplnost, existujících k datu, kdy jste Databázi nabyli; tato kritéria můžete na svou žádost od
NAVTEQ získat. Nefunguje-li Databáze v souladu s touto omezenou zárukou, společnost NAVTEQ
vynaloží přiměrené úsilí k opravě nebo výměně Vaší nevyhovující kopie Databáze. Nepovede-li toto úsilí
k fungování Databáze v souladu se zárukami zde uvedenými, budete mít možnost bud’ obdržet
přiměřenou náhradu ceny, kterou jste zaplatili za Databázi, nebo odstoupit od této Smlouvy. Toto je
úplná odpovednost spolecnosti NAVTEQ a Váš jediný opravný prostredek proti NAVTEQ. S výjimkou
toho, co je výslovně stanoveno v tomto oddíle, společnost NAVTEQ nezaručuje ani nečiní žádná
prohlášení ohledně užití výsledků užívání Databáze co do správnosti, přesnosti, spolehlivosti nebo
jinak. Společnost NAVTEQ nezaručuje, že Databáze je nebo bude bez chyb. Žádné ústní nebo písemné
informace nebo rady poskytnuté ze strany NAVTEQ, Vašeho dodavatele nebo jakékoli jiné osoby
netvoří záruku ani žádným způsobem nerozšiřují rozsah omezené záruky výše popsané. Omezená
záruka stanovená v této Smlouvě se nedotýká, ani není k újmě jakýchkoli statutárních zákonných práv,
SMLOUVA O POSKYTNUTÍ LICENCE KONCOVÉMU UŽIVATELI
589
MAX983HD
která můžete mít ze zákonného ručení proti skrytým vadám.
Pokud jste nenabyl(a) Databázi od NAVTEQ přímo, můžete mít zákonná statutární práva vůči osobě, od
níž jste Databázi nabyl(a), dodatkem ke zde uvedeným právům zaručovaným společností NAVTEQ,
podle zákona Vaší jurisdikce. Výše uvedená záruka společnosti NAVTEQ se nedotkne takových
zákonných práv a můžete taková práva uplatňovat dodatkem k záručním právům zde uděleným.
OMEZENÍ ODPOVĚDNOSTI
Cena Databáze nezahrnuje žádné protiplnění za uvažovaná rizika následných, nepřímých nebo
neomezených přímých škod, které mohou vzniknout v souvislosti s Vaším užíváním Databáze.
Společnost NAVTEQ tudíž v žádném případě nenese odpovědnost za jakékoli následné nebo nepřímé
škody, zejména ušlé příjmy, údaje nebo užití, utrpěné Vámi nebo jakoukoli třetí stranou, které vyplývají
z Vašeho užívání Databáze, at již při žalobě ze smlouvy nebo deliktu nebo na základě záruky, a to i
tehdy, byla-li společnost NAVTEQ vyrozuměna o možnosti takových škod. V každém případě je
odpovědnost spolecnosti NAVTEQ za přímé škody omezena cenou Vaší kopie Databáze.
OMEZENÁ ZÁRUKA A OMEZENÍ ODPOVĚDNOSTI UVEDENÉ V TÉTO SMLOUVĚ SE NEDOTÝKÁ ANI
NENÍ K ÚJMĚ VAŠICH ZÁKONNÝCH PRÁV V PŘÍPADĚ, KDY JSTE NABYL(A) DATABÁZI JINAK NEŽ
V PRŮBĚHU PODNIKÁNÍ.
VAROVÁNÍ
Databáze odráží skutečnost existující předtím, než jste obdržel(a) Databázi, a zahrnuje údaje a
informace od státních orgánů a jiných zdrojů, které mohou obsahovat chyby a opomenutí. Databáze
tudíž může obsahovat nepřesné nebo neúplné informace následkem uplynutí času, měnících se
okolností, a rovněž vzhledem k povaze užívaných zdrojů. Databáze nezahrnuje ani neodráží informace
o - mimo jiné - bezpečnosti blízkého okolí; vymáhání práva; pomoci při stavu nouze; stavebních
pracech; uzávěrách silnic nebo jízdních pruhů; omezeních týkajících se vozidel nebo rychlosti; stoupání
nebo sklonu vozovky; výšce mostů, hmotnosti nebo jiných omezeních; silničních nebo dopravních
podmínkách; zvláštních událostech; dopravních zácpách; nebo jízdní době.
ROZHODNÉ PRÁVO
Tato Smlouva se řídí zákony jurisdikce, v níž máte pobyt k datu pořízení Databáze. Pokud byste v té
době měl(a) pobyt mimo Evropskou unii nebo Švýcarsko, uplatní se právo jurisdikce v rámci Evropské
unie nebo Švýcarska, kde jste si pořídil(a) Databázi. Ve všech dalších případech, nebo nemůže-li být
definována jurisdikce, kde jste si pořídil(a) Databázi, uplatní se zákony Nizozemska. Soudy kompetentní
v místě Vašeho pobytu v době, kdy jste si pořídil(a) Databázi,

590 MAX983HD
TÄMÄ KÄYTTÖOIKEUSSOPIMUS ON LUETTAVA HUOLELLISESTI ENNEN NAVTEQ-
TIETOKANNAN KÄYTTÖÄ
TIEDOKSI KÄYTTÄJÄLLE
TÄMÄ ON KÄYTTÄJÄN JA NAVTEQ B.V:N VÄLINEN KÄYTTÖOIKEUSSOPIMUS - EI
MYYNTISOPIMUS - JOKA KOSKEE KÄYTTÄJÄN HANKKIMAA TIEKARTTATIETOKANNAN
KOPIOTA, MUKAAN LUKIEN SIIHEN KUULUVA TIETOKONEOHJELMISTO, TIETOVÄLINEET JA
NAVTEQIN JULKAISEMA KIRJALLINEN OPASTUSAINEISTO (YHDESSÄ ”TIETOKANTA”).
KÄYTTÄMÄLLÄ TIETOKANTAA KÄYTTÄJÄ HYVÄKSYY KAIKKI TÄMÄN LOPPUKÄYTTÄJÄN
KÄYTTÖOIKEUSSOPIMUKSEN (”SOPIMUS”) EHDOT. JOS KÄYTTÄJÄ EI HYVÄKSY TÄMÄN
SOPIMUKSEN EHTOJA, HÄNEN ON VÄLITTÖMÄSTI PALAUTETTAVA TIETOKANTA
KOKONAISUUDESSAAN JÄLLEENMYYJÄLLE HYVITYSTÄ VASTAAN.
OMISTUSOIKEUS
Tietokanta sekä siihen liittyvät tekijänoikeudet ja immateriaalioikeudet tai muut lähioikeudet ovat
NAVTEQin tai sen lisenssinantajien omaisuutta. Tietovälineet, jotka sisältävät tietokannan, pysyvät
NAVTEQin ja/tai ohjelmistotoimittajan omistuksessa, kunnes käyttäjä on suorittanut NAVTEQille ja/tai
ohjelmistotoimittajalle koko summan, jonka tämä sopimus tai muut vastaavat sopimukset, joiden
perusteella hän on vastaanottanut tuotteet, velvoittaa hänet maksamaan.
KÄYTTÖOIKEUDEN MYÖNTÄMINEN
NAVTEQ myöntää käyttäjälle ei-yksinomaisen oikeuden tietokannan henkilökohtaiseen käyttöön tai
soveltuvissa tapauksissa käyttäjän yrityksen sisäiseen käyttöön. Tämä käyttöoikeus ei sisällä oikeutta
myöntää alilisenssejä.
KÄYTÖN RAJOITUKSET
Tietokanta on tarkoitettu käytettäväksi vain siinä tietyssä järjestelmässä, jota varten se on tehty. Ellei
pakottavasta lainsäädännöstä (esimerkiksi EU:n ohjelmistodirektiiviin (91/250/ETY) ja
tietokantadirektiiviin (96/9/EY) perustuvista kansallisista laeista) muuta seuraa, käyttäjä ei saa kopioida
tai käyttää uudelleen tietokannan sisällön olennaisia osia eikä toisintaa, kopioida, muuttaa, muuntaa,
kääntää, palauttaa assembler- tai lähdekielelle tai aukikoodata mitään tietokannan osaa. Jos käyttäjä
haluaa saada EU:n ohjelmistodirektiivissä (tai siihen perustuvassa kansallisessa lainsäädännössä)
tarkoitettuja yhteentoimivuustietoja, hänen tulee antaa NAVTEQille riittävä tilaisuus toimittaa kysytyt
tiedot kohtuullisin, NAVTEQin määräämin ehdoin, joihin sisältyy kohtuullinen korvaus.
KÄYTTÖOIKEUDEN SIIRTÄMINEN
Käyttäjä ei saa siirtää tietokantaa kolmannelle osapuolelle, paitsi kun se on asennettuna järjestelmään,
jota varten se on tehty, tai kun käyttäjälle ei jää siirron jälkeen yhtään tietokannan kopiota, ja joka
tapauksessa edellyttäen että siirronsaaja hyväksyy kaikki tämän sopimuksen ehdot ja vahvistaa tämän
kirjallisesti NAVTEQille. Useita CD-ROM-levyjä sisältävät sarjat saa siirtää tai myydä vain kokonaisena
sarjana, kuten NAVTEQ on ne toimittanut, ei osina.
RAJOITETTU TAKUU
NAVTEQ takaa jäljempänä esitettyjen varoitusten sisältämin varauksin, että tietokanta toimii 12
kuukauden ajan siitä, kun käyttäjä on hankkinut oman kopionsa, täyttäen olennaisin osin NAVTEQin
tarkkuus- ja täydellisyyskriteerit, sellaisina kuin kriteerit ovat voimassa hankintapäivänä. NAVTEQ
toimittaa kriteerit käyttäjälle pyynnöstä. Jos tietokanta ei toimi tämän rajoitetun vastuun edellyttämällä
tavalla, NAVTEQ pyrkii mahdollisuuksien mukaan korjaamaan tai vaihtamaan tietokannan
puutteellisesti toimivan kopion. Jos nämä toimet eivät johda siihen, että tietokanta toimisi esitetyn takuun
mukaisesti, käyttäjä voi valintansa mukaan joko saada kohtuullisen korvauksen maksamastaan
hankintahinnasta tai purkaa tämän sopimuksen. NAVTEQin vastuuvelvollisuus rajoittuu tähän eikä
nimenomaisesti annettua takuuta lukuun ottamatta NAVTEQ ei anna mitään takuita tietokannan tai sen
avulla saatavien tulosten virheettömyydestä, tarkkuudesta, luotettavuudesta tai muista ominaisuuksista.
NAVTEQ ei takaa että tietokanta on tällä hetkellä tai tulevaisuudessa virheetön. Mikään NAVTEQin,
ohjelmistotoimittajan tai muun henkilön antama suullinen tai kirjallinen informaatio tai ohje ei luo mitään
takuuta eikä laajenna millään lailla edellä kuvatun rajoitetun takuun kattavuutta. Tässä sopimuksessa
esitetty rajoitettu takuu ei vaikuta piilovikoja koskeviin oikeuksiin, joita pakottava lainsäädäntö
LOPPUKÄYTTÄJÄN KÄYTTÖOIKEUSSOPIMUS
591
MAX983HD
mahdollisesti takaa käyttäjälle.
Jos käyttäjä ei ole hankkinut tietokantaa suoraan NAVTEQilta, hänellä saattaa olla NAVTEQin
takaamien oikeuksin lisäksi kansallisen lainsäädännön takaamia oikeuksia siihen henkilöön nähden,
jolta hän on hankkinut tietokannan. Edellä esitetty NAVTEQin takuu ei vaikuta näihin lakisääteisiin
oikeuksiin ja käyttäjä voi vedota niihin edellä myönnettyjen takuuoikeuksien lisäksi.
VASTUUNRAJOITUKSET
Tietokannan hintaan ei sisälly mitään katetta sellaisten välillisten tai seurannaisvahinkojen tai
rajoittamattomien välittömien vahinkojen varalta, jotka ovat seurausta tietokannan käytöstä. Tästä
seuraa, että NAVTEQ ei missään tapauksessa vastaa välillisistä tai seurannaisvahingoista, mukaan
lukien muun muassa liikevaihdon, tietojen tai käyttömahdollisuuden menetykset, jotka kohdistuvat
käyttäjään tai kolmanteen osapuoleen ja aiheutuvat tietokannan käytöstä, riippumatta siitä tapahtuvatko
vahingot sopimuksen piirissä, sopimusta loukaten tai takuuseen perustuen, vaikka NAVTEQille olisi
etukäteen ilmoitettu tällaisten vahinkojen mahdollisuudesta. Kaikissa tapauksissa NAVTEQin
korvausvastuu välittömien vahinkojen tapauksessa rajoittuu käyttäjän hankkiman tietokannan hintaan.
TÄSSÄ SOPIMUKSESSA ESITETTY RAJOITETTU TAKUU JA VASTUUVELVOLLISUUDEN
RAJOITUS EIVÄT VAIKUTA KÄYTTÄJÄN LAKISÄÄTEISIIN OIKEUKSIIN, JOS TIETOKANTA ON
HANKITTU MUUTA TARKOITUSTA KUIN AMMATINHARJOITUSTA VARTEN.
VAROITUKSIA
Ajan tuomista muutoksista, olosuhteiden muuttumisesta, käytetyistä lähteistä ja kattavan
maantieteellisen tiedon keruun luonteesta johtuen tietokanta saattaa sisältää epätarkkoja tai
epätäydellisiä tietoja ja antaa virheellisiä tuloksia. Tietokanta ei sisällä tietoja muun muassa
tieympäristön turvallisuudesta, poliisin saatavillaolosta, avunannosta hätätapauksissa, tietöistä, teiden
tai kaistojen sulkemisesta, ajoneuvo- tai nopeusrajoituksista, teiden jyrkkyydestä ja kaltevuudesta,
alikulkukorkeuksista, paino- tai muista rajoituksista, tie- tai liikenneolosuhteista, erikoistapahtumista,
ruuhkista tai matkustusajoista.
SOVELLETTAVA LAKI
Tähän sopimukseen sovelletaan sen maan lakia, jossa käyttäjällä on kotipaikka tietokannan
hankintapäivänä. Jos käyttäjän kotipaikka on sillä hetkellä Euroopan unionin tai Sveitsin ulkopuolella,
sovelletaan sen maan lakia, jossa käyttäjä hankki tietokannan. Muissa tapauksissa, tai jos tietokannan
hankintapaikkaa ei voida määritellä, sovelletaan Alankomaiden lakia. Tästä sopimuksesta aiheutuvat tai
siihen liittyvät erimielisyydet ratkaistaan siinä tuomioistuimessa, joka on toimivaltainen käyttäjän
kotipaikassa tietokannan hankintahetkellä, tämän rajoittamatta NAVTEQin oikeutta nostaa kanne
käyttäjän kulloisenkin kotipaikan tuomioistuimessa.
592 MAX983HD
This system contains software that is licensed to Manufacturer by an affiliate of
Microsoft Corporation pursuant to a license agreement. Any removal, reproduction,
reverse engineering or other unauthorized use of the software from this system in
violation of the license agreement is strictly prohibited and may subject you to legal
action.
Microsoft, Windows, and the Windows Logo are registered trademarks or trademarks of Microsoft
Corporation in the United States and/or other countries.
Copyright© 2006 Arex Co.,Ltd.Japan. All rights reserved.
This product is loaded with MatrixEngine® of NETDIMENSION CORPORATION for the 3D contents
drive.
©2006 NETDIMENSION CORPORATION
Austria “Der Location- und Event-Code wurde von der ASFINAG und dem BMVIT zur
Verfügung gestellt”
Belgium “Traffic Information is provided by the Ministerie van de Vlaamse Gemeenschap and the
Ministèrie de l´Equipement et des Transports”
Croatia ©EuroGeographics
France “source: Géoroute ®IGN France & BD Carto ®IGN France”
Germany “Die Grundlagendaten wurden mit Genehmigung der zuständigen Behörden
entnommen”
Great Britain “© Based upon Crown Copyright material.”
Hungary “Copyright ©2003; Top-Map Ltd.”
Italy “La Banca Dati Italiana è stata prodotta usando quale riferimento anche cartografia
numerica ed al tratto prodotta e fornita dalla Regione”
Norway “Copyright ©2000; Norwegian Mapping Authority”
Poland ©EuroGeographics
Portugal “Source: IgeoE - Portugal”
Slovenia ©EuroGeographics
Spain “Información geográfica propiedad del CNIG”
Sweden “Based upon electronic data © National Land Survey Sweden”
Switzerland “Topografische Grundlage: © Bundesamt für Landestopographie”
Publisher / Clarion Co., Ltd. http://www.clarion.com
Manufacturer / ZENRIN CO., LTD.
ZENRIN EUROPE B.V.
©2007 ZENRIN CO., LTD. ALL Rights Reserved.
©1993-2007 NAVTEQ All rights reserved.
©Geographia Corporation

593
MAX983HD
Map Coverage
07Q4
Country Detailed
Coverage
(%)
Western
Europe
Austria 100.0%
Belgium, Netherlands, Luxemburg 100.0%
Denmark 100.0%
Finland 100.0%
France, Andorra, Monaco 100.0%
Germany 100.0%
Ireland 100.0%
Italy, San Marino, Vatican city state 100.0%
Norway 100.0%
Portugal 100.0%
Spain 100.0%
Sweden 100.0%
Switzerland, Liechtenstein 100.0%
United Kingdom 100.0%
Eastern
Europe
Croatia 41.0%
Czech Republic 54.0%
Bulgaria 14.0%
Estonia 29.0%
Greece 43.0%
Hungary 42.0%
Latvia 32.0%
Lithuania 16.0%
Poland 32.0%
Romania 11.0%
Slovakia 13.0%
Slovenia 24.0%
as of December 2007

Owner’s manual (Audio, Visual, General & Installation)
Mode d’emploi (Audio, vidéo, fonctionnement général et installation)
Benutzerhandbuch (Lyd visuel, generelt og installation)
Manuale dell’utente (Audio, video, generali e installazione)
Gebruikershandleiding (Audio, visueel, algemeen en installatie)
Guía de usuario (Imagen, sonido, general e instalación)
Ägarhandbok (Ljud, Sikt, Allmänt & Installation)
Manual do utilizador (Áudio, Visual, Geral e Instalação)
Brugervejledning (Audio, Video, Allgemein und Installation)
HDD NAVIGATION SYSTEM
SYSTEME DE NAVIGATION HDD
HDD-NAVIGATIONSSYSTEM
SISTEMA DI NAVIGAZIONE HDD
HDD-NAVIGATIESYSTEEM
SISTEMA DE NAVEGACIÓN HDD
NAVIGATIONSSYSTEM MED HÅRDDISK
SISTEMA DE NAVEGAÇÃO COM HDD
(UNIDADE DE DISCO RÍGIDO)
HDD-NAVIGATIONSSYSTEM
QY-5003E-B
2008/5(Y-YI)
MAX983HD
MAX983HD
Clarion Co., Ltd.
All Rights Reserved.Copyright © 2008: Clarion Co., Ltd.
Printed in Hungary / Imprimé en Hongrie / Gedruckt in Ungarn /
Stampato in Ungheria / Gedrukt in Hongrarije / Impreso en Hungría /
Tryckt i Ungern / Impresso na Hungria / Trykt i Ungarn
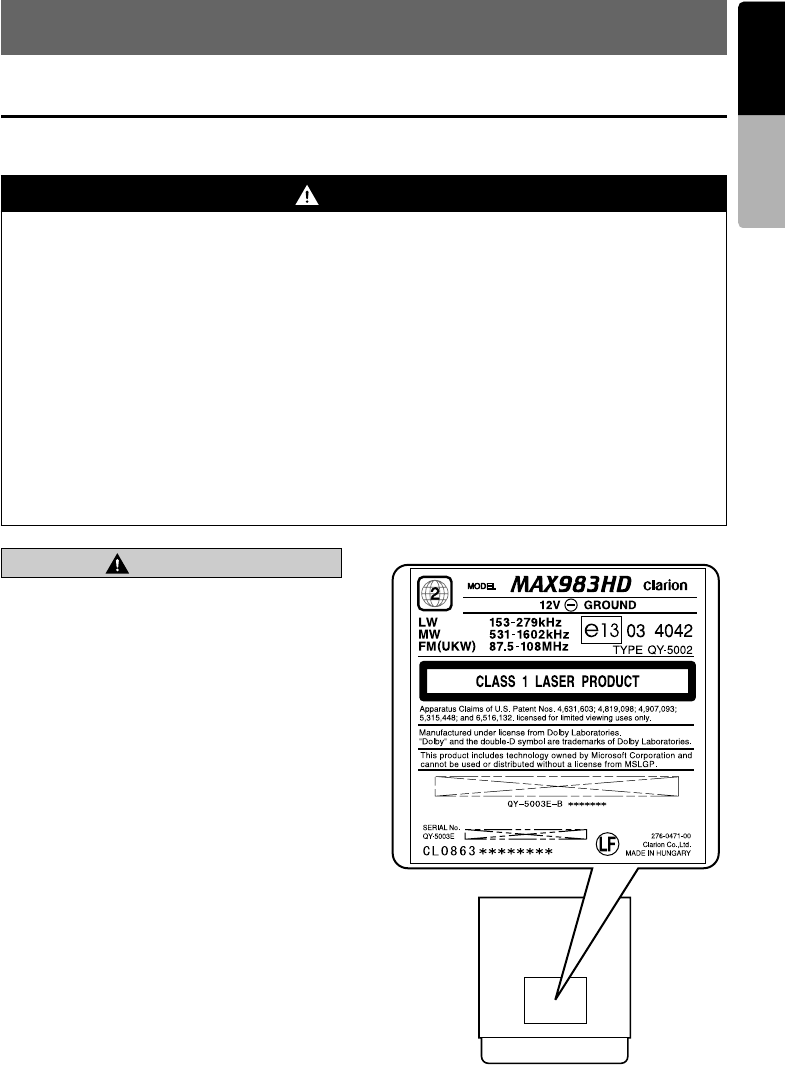
3
MAX983HD
English Owner’s manual
1. Preface
Safety Precautions
When using this system, follow the precautions listed below. After reading this manual, be sure to keep
it in a handy place (such as the glove box of your car).
CAUTION
•Do not use this unit without installing in the
vehicle properly. It may cause an injury or
electric shock.
•This appliance contains a laser system and
is classified as a “CLASS 1 LASER
PRODUCT”.
To use this model properly, read this
Owner’s Manual carefully and keep this
manual for your future reference. In case of
any trouble with this player, please contact
your nearest “AUTHORIZED service
station”. To prevent direct exposure to the
laser beam, do not try to open the
enclosure.
•While driving, set the volume so that sound
from outside the vehicle can be heard.
Driving without hearing sound from the
outside of the vehicle may cause a traffic
incident.
INFORMATION FOR USERS
CHANGES OR MODIFICATIONS TO THIS
PRODUCT NOT APPROVED BY THE
MANUFACTURER WILL VOID THE
WARRANTY.
WARNING
•For your safety, the driver should not watch the DVD video/TV/VTR or operate the controls
while driving. Please note that watching and operating the DVD video/TV/VTR while driving
are prohibited by law in some countries. Also, while driving, keep the volume to a level at
which external sounds can be heard.
•Do not disassemble or modify this unit.
It may cause an accident, fire, or electric shock.
•Do not use this unit when a trouble exists, such as no screen content appears or no sound
is audible. It may cause an accident, fire, or electric shock. For that case, consult your
authorised dealer or a nearest service centre.
•In case of a problem, such as foreign materials have entered in the unit, the unit gets wet, or
smoke or strange smells come out of the unit, etc., stop using this unit immediately, and
consult your authorised dealer or a nearest service centre. Using it in that condition may
cause an accident, fire, or electric shock.
•Use a fuse with the same specification only when replacing the fuse. Using a fuse with a
different specification may cause a fire.
•For the installation of this unit or a change in the installation, ask your authorised dealer or
a nearest service centre for safety. Professional skills and experiences are required to do so.

4MAX983HD
English Owner’s manual
About This Manual
The following two manuals are provided to this system:
●Owner’s Manual (Audio, Visual,
General&Installation) (This Book)
This manual (hereinafter referred to as “Audio
Manual”) explains the functions and operation
procedures of the AV features. In addition, the
general precautions and other information on
using this system are also explained in this
manual.
●Navigation System Operation Manual
This manual (hereinafter referred to as
“Navigation Manual”) explains the functions and
operation procedures of the navigation features.
Note:
•This manual is described on the assumption that
the default Skin data has been applied. When the
other Skin data is applied, the screen design and
shapes of icons will be different from the contents
listed in this manual.
•Please be aware that the device may be different
from the manual according to the changes of the
specifications.
Symbols used in this manual
Notes on Handling
• In no event shall Clarion be liable for any incidental damage (including, but not limited to, loss of the
business profit or change/loss of the data) caused from use or inability to use of this product.
About this system
●Important
• To prevent discharge of the car battery, use
this system with the engine of the vehicle
running.
• The housing of this unit may become hot
because this unit has a high-speed CPU. Be
careful to handle the unit during navigating or
immediately after turning the power off.
• Turn off the power of the vehicle when
connecting or disconnecting wires. Doing this
while the power of the vehicle is turned on may
cause a trouble or malfunction.
• This unit uses a precision mechanism. Even in
the event that trouble arises, never open the
case, disassemble the unit, or lubricate the
rotating parts.
Note:
•When using this unit first time after purchasing, or
not used for long periods of time, it might take
about 5 to 15 minutes until the current location is
determined using GPS. Moreover, even when
using it often, it may take about 2 to 3 minutes until
the current location is determined according to the
GPS measuring situation.
•For vehicles equipped with an intelligent key, do
not bring the intelligent key close to this unit. This
system may not operate correctly.
•If electrical equipment that generates a strong
electrical noise is used near this unit, the screen
may be disturbed and noise may be generated. In
this case, keep away such electrical equipment or
refrain from using it.
•When the inside of the car is very cold and the
player is used soon after switching on the heater,
moisture may form on the disc (DVD/CD) or the
optical parts of the player and proper playback may
not be possible. If moisture forms on the disc
(DVD/CD), wipe it off with a soft cloth. If moisture
forms on the optical parts of the player, do not use
the player for about one hour. The condensation
will disappear naturally allowing normal operation.
•Driving on extremely bumpy roads which cause
severe vibration may cause the sound to skip.
•TV broadcast reception (when the optional TV
tuner is connected)
When receiving the TV broadcast, the strength of
the signals changes since the car is moving, so in
some cases it may not be possible to receive clear
pictures.
•TV signals are strongly linear, so reception is
affected by buildings, mountains and other
obstacles.
•External factors such as electric train lines, a
high voltage lines, and signal devices may
disturb the picture or cause noise.
*If the reception is poor, switch to a station with
good reception.
Note: : Lists what should be noted when
operating or referential information.
[ ] button : Indicates a button on this unit.
[ ] key : Indicates a menu item on the
screen.
➜: Indicates a title and page number
on which recommended reference
information is described.

Notes on Handling
5
MAX983HD
English Owner’s manual
About the hard disk drive
●Important
• Data saved to the hard disk drive may get lost
in case of a breakdown, malfunction, or other
trouble of this unit. It is recommended that you
back up your important data to a personal
computer by using SD cards*1.➜ “Backing up
User Data” (P. 72)
• Never detach the hard disk drive by yourself. In
case data*1 stored on the hard disk drive gets
erased or destroyed due to this action, no
repair covered by warranty can be granted.
• Operation of this system may be limited to
protect the hard disk drive if the temperature is
extremely high or low. In such a case, please
wait until temperature becomes normal again.
• Though certain buzzing can be heard when the
hard disk drive is working, this is not a
malfunction.
*1: You can back up the following data: the data
of the Stored Locations, the route data, the
data registered in Favourite/Frequent list, the
setting data of the Settings menu.
The recorded music data, Playlist data, and
data imported using SD cards (Skin, Image,
Album Information, Extra POI) cannot be
backed up.
About the liquid crystal panel
For a longer service life, be sure to read the
following notes.
●Important
• The operation panel will operate properly in a
temperature range of 0 to 60°C.
• Do not allow any liquids on the set from drinks,
umbrellas, etc. Doing so may damage the
internal circuitry.
• Do not disassemble or modify the set in any
way. Doing so may result in damage.
• Subjecting the operation panel to shocks may
result in breakage, deformation or other
damage.
• Do not let cigarettes burn the display. Doing so
may damage or deform the cabinet.
• If a problem should occur, have the set
inspected at your store of purchase.
• Do not insert objects or poke in the space
between the operation panel and the main unit
when the panel is tilted.
• In extremely cold weather, the display
movement may slow down and the display may
darken, but this is not a malfunction. The
display will work normally when the
temperature increases.
• Small black and shiny spots inside the liquid
crystal panel are normal for LCD products.
• The touchkeys on the display operate when
slightly touched. Do not press the touchkey
screen with strong force.
• Do not push the case surrounding the touchkey
panel with strong force. This may cause
malfunctioning of the touchkeys.
Cleaning the unit
●Cleaning the cabinet
Use a soft, dry cloth and gently wipe off the dirt.
For tough dirt, apply some neutral detergent
diluted in water to a soft cloth, wipe off the dirt
gently, then wipe again with a dry cloth.
Do not use benzene, thinner, car cleaner, etc., as
these substances may damage the cabinet or
cause the paint to peel. Also, leaving rubber or
plastic products in contact with the cabinet for
long periods of time may cause stains.
●Cleaning the liquid crystal panel
The liquid crystal panel tends to collect dust, so
wipe it off occasionally with a soft cloth. The
surface is easily scratched, so do not rub it with
hard objects.

6MAX983HD
English Owner’s manual
Notes on Data Stored in This System
If you transfer or resell this unit to a third party or abandon this unit, note the following matters, deal with
them under your own appropriate management.
●For your privacy protection
Initialize (delete) all data (address data, etc.)
including private information stored in the hard
disk and the memory by the procedures
described in this manual. For details, see
“Resetting to the Factory Settings” (P. 72).
About the registered marks etc.
• This product incorporates copyright protection technology that is protected by U.S. patents and other
intellectual property rights. Use of this copyright protection technology must be authorised by
Macrovision, and is intended for home and other limited viewing uses only unless it is authorised by
Macrovision. Reverse engineering or disassembly is prohibited.
• Manufactured under licence from Dolby Laboratories. “Dolby” and the double-D symbol are
trademarks of Dolby Laboratories.
• Music recognition technology and related data are provided by Gracenote®. Gracenote is the industry
standard in music recognition technology and related content delivery. For more information, please
visit www.gracenote.com.
CD and music-related data from Gracenote, Inc., copyright © 2000-2008 Gracenote. Gracenote
Software, copyright © 2000-2008 Gracenote. This product and service may practice one or more of
the following U.S. Patents: #5,987,525; #6,061,680; #6,154,773, #6,161,132, #6,230,192, #6,230,207,
#6,240,459, #6,330,593, and other patents issued or pending. Some services supplied under licence
from Open Globe, Inc. for U.S. Patent: #6,304,523.
Gracenote and CDDB are registered trademarks of Gracenote. The Gracenote logo and logotype,
and the “Powered by Gracenote” logo are trademarks of Gracenote.
•“iPod” is for legal or rightholder-authorised copying only. Do not steal musics.
• Windows Media™, and the Windows® logo are trademarks, or registered trademarks of Microsoft
Corporation in the United States and/or other countries.

About the registered marks etc.
7
MAX983HD
English Owner’s manual
Gracenote® End User Licence Agreement
Version 20061005
This application or device contains software from Gracenote, Inc. of Emeryville, California
(“Gracenote”). The software from Gracenote (the “Gracenote Software”) enables this application to
perform disc and/or file identification and obtain music-related information, including name, artist,
track, and title information (“Gracenote Data”) from online servers or embedded databases
(collectively, “Gracenote Servers”) and to perform other functions. You may use Gracenote Data
only by means of the intended End-User functions of this application or device.
You agree that you will use Gracenote Data, the Gracenote Software, and Gracenote Servers for
your own personal non-commercial use only. You agree not to assign, copy, transfer or transmit the
Gracenote Software or any Gracenote Data to any third party. YOU AGREE NOT TO USE OR
EXPLOIT GRACENOTE DATA, THE GRACENOTE SOFTWARE, OR GRACENOTE SERVERS,
EXCEPT AS EXPRESSLY PERMITTED HEREIN.
You agree that your non-exclusive licence to use the Gracenote Data, the Gracenote Software, and
Gracenote Servers will terminate if you violate these restrictions. If your licence terminates, you
agree to cease any and all use of the Gracenote Data, the Gracenote Software, and Gracenote
Servers. Gracenote reserves all rights in Gracenote Data, the Gracenote Software, and the
Gracenote Servers, including all ownership rights. Under no circumstances will Gracenote become
liable for any payment to you for any information that you provide. You agree that Gracenote, Inc.
may enforce its rights under this Agreement against you directly in its own name.
The Gracenote service uses a unique identifier to track queries for statistical purposes. The purpose
of a randomly assigned numeric identifier is to allow the Gracenote service to count queries without
knowing anything about who you are. For more information, see the web page for the Gracenote
Privacy Policy for the Gracenote service.
The Gracenote Software and each item of Gracenote Data are licensed to you “AS IS”. Gracenote
makes no representations or warranties, express or implied, regarding the accuracy of any
Gracenote Data from in the Gracenote Servers. Gracenote reserves the right to delete data from the
Gracenote Servers or to change data categories for any cause that Gracenote deems sufficient. No
warranty is made that the Gracenote Software or Gracenote Servers are error-free or that
functioning of Gracenote Software or Gracenote Servers will be uninterrupted. Gracenote is not
obligated to provide you with new enhanced or additional data types or categories that Gracenote
may provide in the future and is free to discontinue its services at any time.
GRACENOTE DISCLAIMS ALL WARRANTIES EXPRESS OR IMPLIED, INCLUDING, BUT NOT
LIMITED TO, IMPLIED WARRANTIES OF MERCHANTABILITY, FITNESS FOR A PARTICULAR
PURPOSE, TITLE, AND NON-INFRINGEMENT. GRACENOTE DOES NOT WARRANT THE
RESULTS THAT WILL BE OBTAINED BY YOUR USE OF THE GRACENOTE SOFTWARE OR
ANY GRACENOTE SERVER. IN NO CASE WILL GRACENOTE BE LIABLE FOR ANY
CONSEQUENTIAL OR INCIDENTAL DAMAGES OR FOR ANY LOST PROFITS OR LOST
REVENUES.
© Gracenote 2008

8MAX983HD
English Owner’s manual
Contents
1. Preface................................................................................................................................... 3
Safety Precautions ...........................................................................................................................3
About This Manual ...........................................................................................................................4
Notes on Handling............................................................................................................................4
Notes on Data Stored in This System ..............................................................................................6
About the registered marks etc. .......................................................................................................6
Contents...........................................................................................................................................8
2. Basic Operations.................................................................................................................. 9
Name and Function of the Controls..................................................................................................9
Menu Types and Operation............................................................................................................11
Turning the Power ON/OFF ...........................................................................................................12
Opening the Operation Panel and Adjusting the Angle..................................................................13
Switching the Operation Mode .......................................................................................................14
Turning the Audio OFF...................................................................................................................14
Turning the Monitor OFF ................................................................................................................14
Adjusting the Volume .....................................................................................................................14
Setting/Ejecting a Disc ...................................................................................................................15
Setting/Ejecting an SD Card...........................................................................................................17
Selecting Media Source .................................................................................................................18
2Zone Function ..............................................................................................................................19
3. Operations of Basic Features............................................................................................ 20
Radio Operations ...........................................................................................................................20
DVD Video Operations ...................................................................................................................25
MP3/WMA Operations....................................................................................................................33
Audio CD Operations .....................................................................................................................37
Music Catcher Operations..............................................................................................................40
Using Recent Album List ................................................................................................................46
4. Operations of Accessories................................................................................................ 47
TV Tuner Operations......................................................................................................................47
AUX Operations .............................................................................................................................50
iPod Operations..............................................................................................................................51
Telephone Operations....................................................................................................................56
CCD Camera Operations ...............................................................................................................59
Rear Monitor Operations ................................................................................................................60
Remote Control Operations............................................................................................................61
5. System Setting.................................................................................................................... 63
General Settings.............................................................................................................................63
Navigation Settings ........................................................................................................................66
Audio Settings ................................................................................................................................66
Adjusting the Monitor......................................................................................................................67
User Settings..................................................................................................................................68
Setting Stored Data ........................................................................................................................70
Importing Data Using the SD Card.................................................................................................70
Service Options ..............................................................................................................................72
Setting Safety Camera ...................................................................................................................73
6. Others.................................................................................................................................. 74
Voice Command Operations ..........................................................................................................74
Troubleshooting..............................................................................................................................75
Error Messages..............................................................................................................................77
Specification...................................................................................................................................78
INSTALLATION AND WIRE CONNECTION MANUAL ............................................................ 79
Safety Precautions .........................................................................................................................79
Package Contents..........................................................................................................................81
Contents in the Accessory Bag (No. 1) 8....................................................................................81
Contents in the Accessory Bag (No. 2) 9....................................................................................81
Installing the Main Unit ...................................................................................................................82
Installing the GPS Antenna ............................................................................................................85
Installing the Microphone for Voice Control....................................................................................86
Connecting the Speed Sensor .......................................................................................................86
Wire Connection.............................................................................................................................87
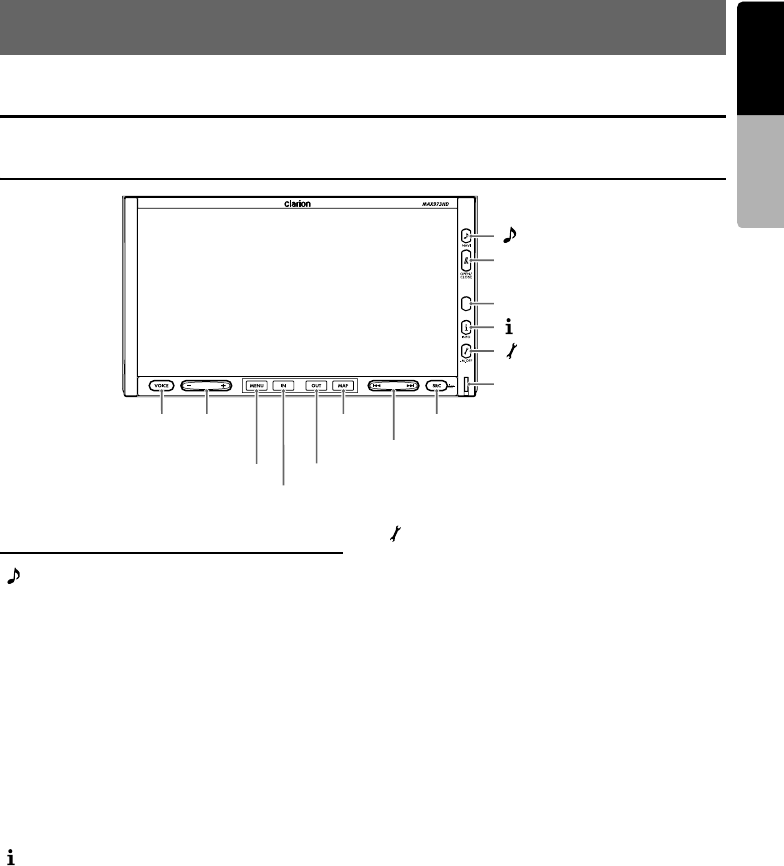
9
MAX983HD
English Owner’s manual
2. Basic Operations
Name and Function of the Controls
Name of the Controls
Function of the Controls
[ NAVI] (Navi/AV) button
• Press this button to switch the screen between
the Navigation mode screen and AV mode
menu screen.
[7 OPEN/CLOSE] button
• Press this button to open/close the operation
panel.
• Keep pressing this button more than 2 seconds
to adjust the angle of the operation panel. The
angle of the operation panel is adjustable in the
range of 0° to 30°.
Sensor
• Receives the infrared signals sent from the
optional remote control unit (operating range:
30° in all directions).
[ INFO] button
• Press this button to display/hide the RDS TMC
menu screen in any mode.
• When the Antenna function is set to “Auto
Antenna” from the General menu in the Setting
mode, keep pressing this button more than 2
seconds to extend/collapse the antenna. Be
sure to collapse the antenna before entering in
a place with low ceiling such as a multistory car
park.
[ ] (Set) button
• Press this button to enter/exit the Setting mode
to perform the system setting.
• Keep pressing this button more than 1 second
to turn off the monitor (Monitor OFF).
Blinking LED
• When the Blinking LED function is set to “ON”
from the General menu in the Setting mode,
blinks when the power is turned off.
[SRC] (Source) button
• Press this button to display/hide the Source
menu screen.
• Keep pressing this button more than 1 second
to turn off the AV feature (Audio Off).
[R], [F] (Search) buttons
• In the Tuner and TV Tuner modes, use these
buttons to change to the previous/next preset
station.
• In the DVD Video mode, use these buttons to
select a chapter to be played.
Keep pressing a button during playback
performs the fast-backward/fast-forward
operation.
Keep pressing the [F] button during pausing
performs the slow playback.
• In the Audio CD, MP3/WMA, Music Catcher,
and iPod modes, use these buttons to select a
track to be played.
Keep pressing a button during playback
performs the fast-backward/fast-forward
operation.
[NAVI]
[7OPEN/CLOSE]
[INFO]
[ ]
[SRC]
[VOICE][+], [–]
[OUT][MENU]
[IN]
[MAP]
[R], [F]
Sensor
Blinking LED
(Set)
(Source)
(Search)
(Zoom Out)
(Zoom In)
(Volume)
(Navi/AV)

Name and Function of the Controls
10 MAX983HD
English Owner’s manual
[MAP] button
• Press this button to display the Map screen of
the current location in any mode.
• Keep pressing this button more than 1 second
to display the Turn-by Turn/Compass screen in
any mode.
[OUT] (Zoom Out) button
• Press this button to decrease the map scale
and to show a wider area of the map when the
map is displayed. Keep pressing this button to
enter the Free Zoom mode.
[IN] (Zoom In) button
• Press this button to increase the map scale and
to show a more detailed map when the map is
displayed. Keep pressing this button to enter
the Free Zoom mode.
[MENU] button
• Press this button to display/hide the
Destination menu screen in any mode.
[+], [–] (Volume) buttons
• Use these buttons to increase/decrease the
volume.
[VOICE] button
• Press this button to display the Voice
Command menu screen and activate the voice
command function.
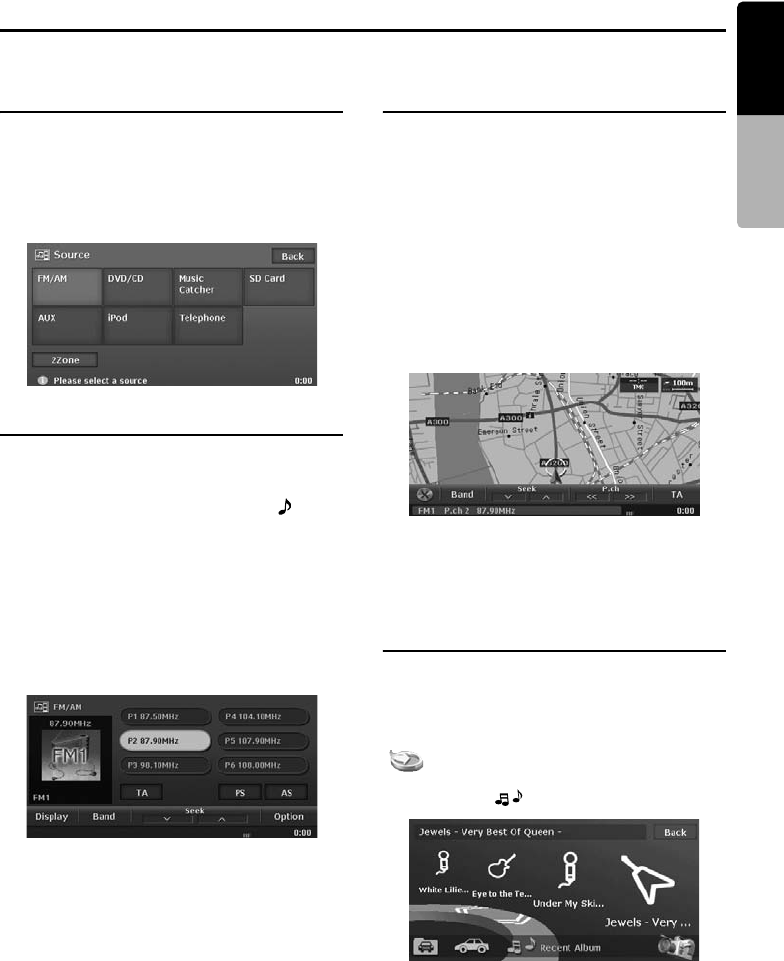
11
MAX983HD
English Owner’s manual
Menu Types and Operation
This section explains the types of the typical menu screens on the touch panel and their operation.
Source menu
Pressing the [SRC] (Source) button when the AV
feature is turned on displays the Source menu
screen. You can change the media sources or
control the 2Zone function by touching the
desired menu item. ➜ “Selecting Media
Source” (P. 18), ➜ “2Zone Function” (P. 19).
AV mode menus
Selecting a media source from the Source menu
screen displays the AV mode menu screen of the
selected source mode. When the Navigation
mode screen is displayed, pressing the [ NAVI]
(Navi/AV) button displays the AV mode menu
screen of the current source mode.
Each source mode has the own AV mode menu,
and its menu items and their functions differ
depending on the source mode. For detailed
explanation on the AV mode menu of each
source mode, see the corresponding section.
As an example, the AV mode menu screen of the
Tuner mode is shown below.
AV Shortcut menus
When the Map screen of the current location is
displayed, touching the AV key displayed at
bottom left of the screen displays the AV Shortcut
menu of the current source mode on top of the
Map screen.
Each source mode (except for the AUX mode)
has the own AV Shortcut menu, and its menu
items and their functions differ depending on the
source mode. For detailed explanation on the AV
mode menu of each source mode, see the
corresponding section.
As an example, the AV Shortcut menu screen of
the Tuner mode is shown below.
When an AV operation is performed in the
Navigation mode, audio information concerning
the selected station, chapter, track, etc. is
displayed for a while at the bottom of the screen.
Recent Album menu
The recorded Albums recently selected from the
Music Search are displayed on the Recent Album
menu, and you can play them back by an easy
operation.
To display the Recent Album menu, touch the
[ ] key on the Music Search screen, the
Destination menu or the Navi Shortcut menu,
then touch the [ ] (Recent Album) key.
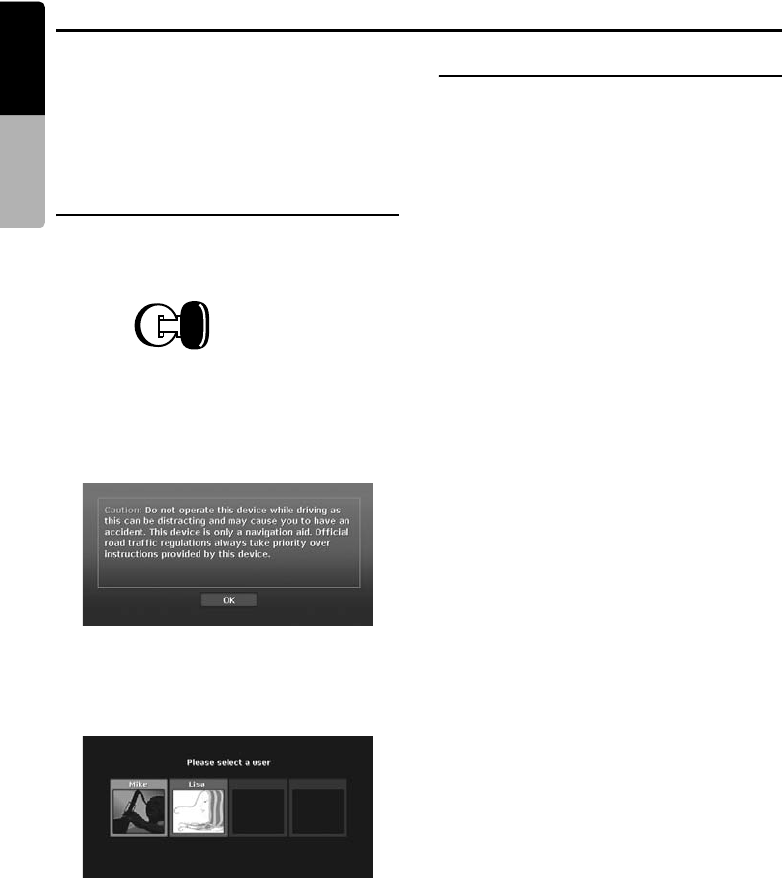
12 MAX983HD
English Owner’s manual
Turning the Power ON/OFF
Note:
•Start the engine before using this unit.
•Be careful about using this unit for a long time
without running the engine. If you drain the car’s
battery too far, you may not be able to start the
engine and this can reduce the service life of the
battery.
Turning the power on
1. Start the engine. The illuminations on this unit
light up and the power is automatically turned
on.
Note:
•The power will be turned on even when the ignition
switch is set to ACC ON position.
●When the following Caution screen is
displayed
Touch the [OK] key. The system will resume the
last status when the power was turned off.
●When the following User Profile
screen is displayed
Touch your Profile key. The system will resume
the last status when the power was turned off.
• This screen is displayed when the “Select on
Opening” item is set to “ON” from the User
menu in the Setting mode.
Turning the power off
1. Turn the ignition switch to OFF position.
Note:
•Do not turn off the power while recording an audio
CD or importing/exporting/deleting data. The data
processed may be broken.
Engine ON
position
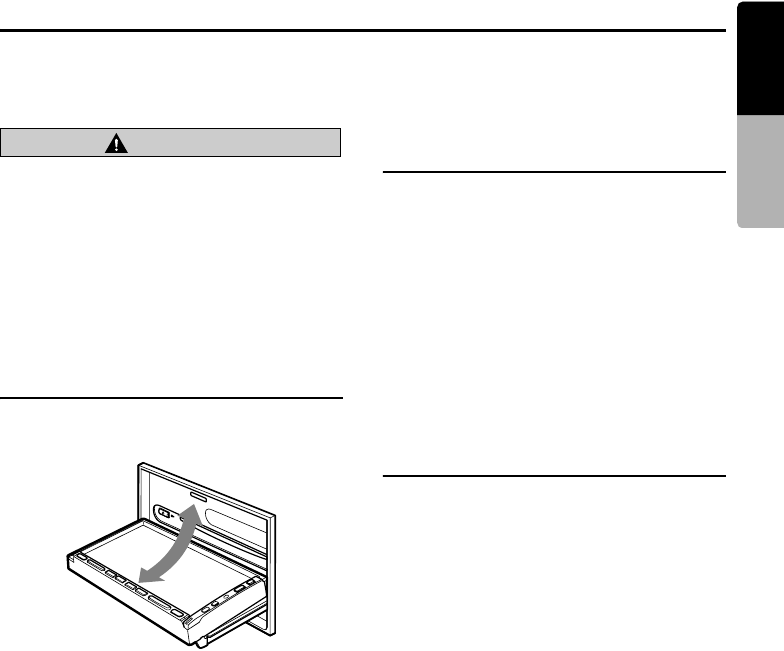
13
MAX983HD
English Owner’s manual
Opening the Operation Panel and Adjusting the Angle
Open the operation panel when setting/ejecting a disc or SD card.
The angle of the operation panel can be adjusted depending on the mounting angle of the unit or light
coming into the car.
CAUTION
•Do not move the operation panel forcibly or
do not apply strong force to the operation
panel.
•When the operation panel is operating, be
careful not to get your hand or finger caught
between the operation panel and main unit
or its mechanical parts.
•The driver should not operate the operation
panel while driving.
Opening/closing the
operation panel
1. Press the [7OPEN/CLOSE] button.
The operation panel will be opened or closed.
Note:
•The operation panel will close automatically when
leaving it open for a while.
•When the operation panel is open, the touch panel
cannot be operated.
Adjusting the angle of the
operation panel
The angle of the operation panel can be adjusted
in the range of 0° to 30°.
1. Keep pressing the [7OPEN/CLOSE] button
more than 2 seconds.
Beeps will sound twice and the operation
panel will start moving.
2. When the operation panel is moved to your
desired angle, release the button.
The operation panel will stop.
*Once you adjust the angle of the operation
panel, the operation panel will return to the
adjusted angle even after it is open/closed.
Returning the operation panel
to the original angle
1. Keep pressing the [7OPEN/CLOSE] button.
It will move, and stop at 30°.
2. Keep pressing the [7OPEN/CLOSE] button
again.
It will move, and stop at 0°.
14 MAX983HD
English Owner’s manual
Switching the Operation Mode
To switch between the Navigation screen and Audio screen, press the [ NAVI] (Navi/AV) button.
Turning the Audio OFF
You can turn off all of the AV features.
1. Keep pressing the [SRC] (Source) button
more than 1 second.
The AV features are turned off.
●Turning the AV features on
1. Press the [SRC] (Source) button.
The AV features are turned on, and the
system resumes the last status of the AV
features.
Turning the Monitor OFF
You can turn off the monitor screen, and change it to a black screen.
1. Keep pressing the [ ] (Set) button more than
1 second.
The monitor screen is turned off.
●Turning the monitor on
1. Touch the monitor screen.
The monitor screen is turned on, and resumes
the last screen.
• You can also turn on the monitor by
pressing any button except for the
[7OPEN/CLOSE] and [+]/[–] (Volume)
buttons.
Adjusting the Volume
1. Press the [+]/[–] (Volume) buttons to adjust
the volume.
[+]: Increases the volume.
[–]: Decreases the volume.
• The volume level indicated at the bottom of
the screen is in a range from 0 (min.) to 33
(max.).
CAUTION
•When the system is turned on, starting and
stopping the engine with its volume raised
to the maximum level may harm your
hearings. Be careful about adjusting the
volume.
•While driving, keep the volume level at
which external sounds can be heard.
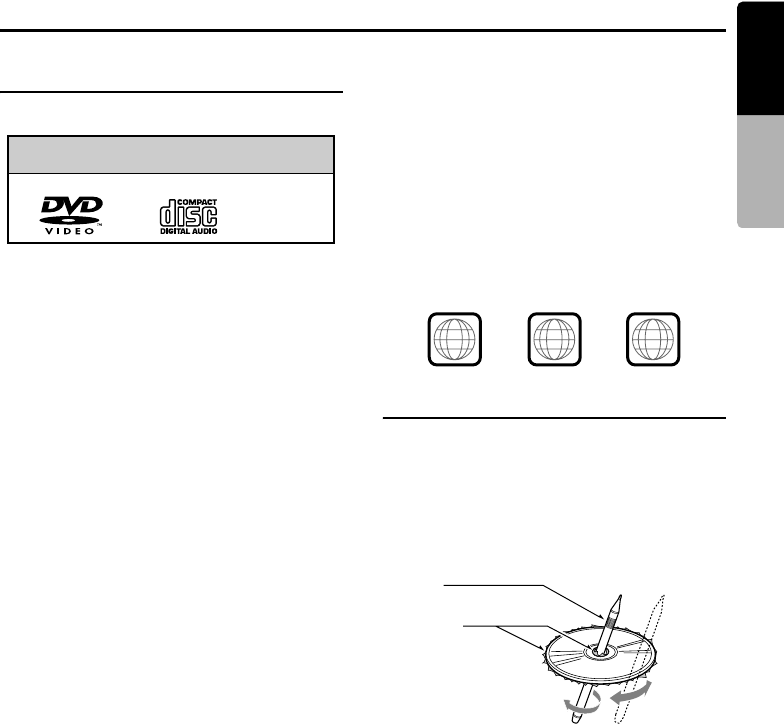
15
MAX983HD
English Owner’s manual
Setting/Ejecting a Disc
Playable discs
This DVD player can play the following discs.
About CD Extra discs
A CD Extra disc is a disc in which a total of two
sessions have been recorded. The first session is
Audio session and the second session is Data
session.
Your personally-created CDs with more than
second data sessions recorded cannot be played
on this DVD player.
Note:
•When you play a CD Extra disc, only the first
session will be recognised.
About playing a CD-R/RW disc
This player can play CD-R/RW discs previously
recorded in Audio CD format or format with MP3/
WMA files.
About playing a DVD-R/RW or
DVD+R/RW disc
This player can play DVD-R/RW and DVD+R/RW
discs previously recorded in DVD video format or
format with MP3/WMA files.
Discs that cannot be played back
This player cannot play DVD Audio, DVD-RAM,
Video CDs, Photo CDs, etc.
Note:
•It may not be possible to play back discs recorded
on some CD/DVD drive units. (Cause: disc
characteristics, cracks, dust/dirt, dust/dirt on
player’s lens, etc.)
•If a CD-R/RW, DVD-R/RW, or DVD+R/RW disc
that has not been finalised is played, it will take a
long time to start playing. Also, it may not be
possible to play depending on its recording
conditions.
•You cannot play Super Audio CDs. Playback of the
CD player is not supported even if it is a hybrid
disc.
About MP3/WMA playback
This unit can play back CD-R/RW, DVD-R/RW
and DVD+R/RW discs on which MP3/WMA
music data have been recorded. ➜ “MP3/WMA
Operations” (P. 33).
Note on region numbers
The DVD video system assigns a region number
to DVD video players and DVD discs by sales
area.
The DVD video region number is marked on the
disc jacket as shown below.
Notes on handling discs
Handling
• New discs may have some roughness around
the edges. If such discs are used, the player
may not work or the sound may skip. Use a
ball-point pen or the like to remove any
roughness from the edge of the disc.
• Never stick labels on the surface of the disc or
mark the surface with a pencil or pen.
• Never play a disc with any cellophane tape or
other glue on it or with peeling off marks. If you
try to play such a disc, you may not be able to
get it back out of the DVD player or it may
damage the DVD player.
• Do not use discs that have large scratches, are
misshapen, cracked, etc. Use of such discs
may cause malfunction or damage.
• To remove a disc from its storage case, press
down on the centre of the case and lift the disc
out, holding it carefully by the edges.
• Do not use commercially available disc
protection sheets or discs equipped with
stabilizers, etc. These may damage the disc or
cause breakdown of the internal mechanism.
Playable discs
DVD video discs Audio CDs
ALL
246
2
Ball-point pen
Roughness
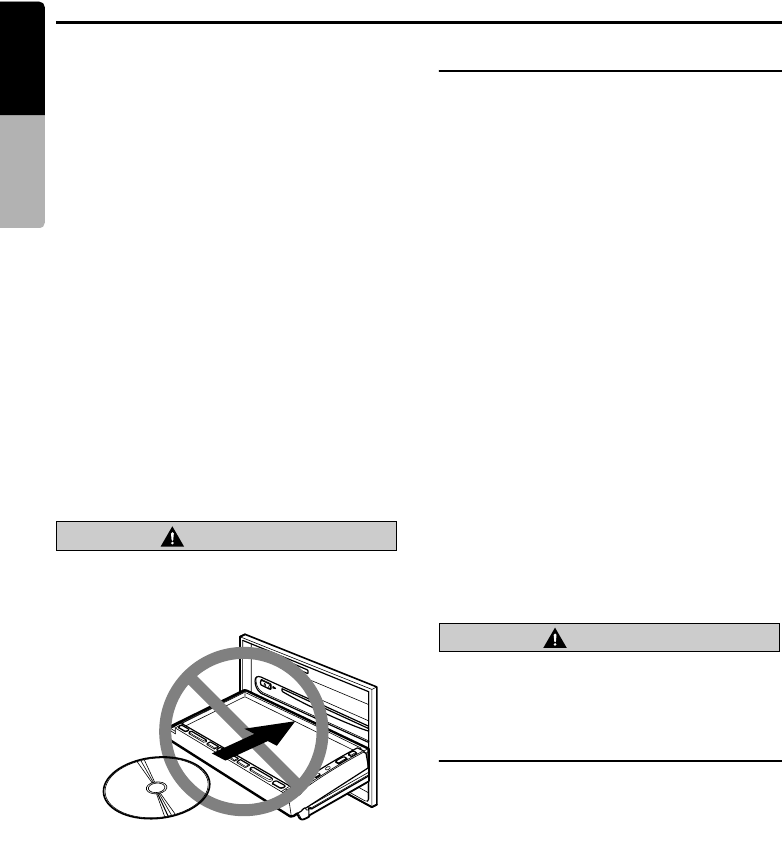
Setting/Ejecting a Disc
16 MAX983HD
English Owner’s manual
Storage
• Do not expose discs to direct sunlight or any
heat source.
• Do not expose discs to excess humidity or
dust.
• Do not expose discs to direct heat from
heaters.
Cleaning
• To remove finger marks and dust, use a soft
cloth and wipe in a straight line from the centre
of the disc to the circumference.
• Do not use any solvents, such as commercially
available cleaners, anti-static spray, or thinner
to clean discs.
• After using special disc cleaner, let the disc dry
off well before playing it.
On Discs
• Exercise a good precaution when loading a
disc. The operation panel will close
automatically when leaving it open for a while.
• Never turn off the power and remove the unit
from the car with a disc loaded.
CAUTION
For your safety, the driver should not insert
or eject a disc opening the operation panel
while driving.
Setting a disc
1. Press the [7OPEN/CLOSE] button to open
the operation panel.
2. Insert a disc into the centre of the insertion
slot with the label side facing up.
The disc will automatically be drawn into the
DVD player, and the operation panel will
automatically be closed.
●After setting a disc
The system will automatically be switched to the
relevant source mode according to the disc, and
start playing back the disc.
When a DVD video disc is set:
The system is switched to the DVD Video mode.
See “DVD Video Operations” (P. 25).
When an Audio CD is set:
The system is switched to the CD mode. See
“Audio CD Operations” (P. 37).
When a CD/DVD with MP3/WMA files is set:
The system is switched to the MP3/WMA mode.
See “MP3/WMA Operations” (P. 33).
Note:
•Never insert foreign objects into the disc insertion
slot.
•If the disc is not inserted easily, there may be
another disc in the mechanism or the unit may
require service.
•8 cm (single play) discs cannot be used.
CAUTION
For your safety, the driver should not insert
or eject a disc opening the operation panel
while driving.
Ejecting the disc
1. Press the [7OPEN/CLOSE] button to open
the operation panel.
2. Press the [o] (EJECT) button to eject the
disc.
“
EJECT
” appears in the display, and the
source mode then switches to the Tuner mode.
• If a disc is left in the ejected position for 15
seconds, the disc is automatically reloaded
(Auto reload). In this case, however, the
source mode will remain set to the Tuner
mode.
Note:
•Do not eject the disc while recording the audio CD.
Eject the disc after the recording is completed or
after cancelling the recording.
•If you force a disc into the insertion slot before auto
reloading, this can damage the disc.
No/Non
17
MAX983HD
English Owner’s manual
Setting/Ejecting an SD Card
In this system, SD cards are used for playing back MP3/WMA music data, importing/exporting data
(Skin, Image, Album Information, Extra POI), and backing up/restoring the user data (Stored Locations,
system settings, etc.).
Note:
•Use the SD memory cards formatted in FAT16 or VFAT format. The SDHC cards are cannot be used.
Setting an SD card
1. Press the [7OPEN/CLOSE] button to open
the operation panel.
2. Confirming the orientation of the SD card,
insert the SD card surely into the SD card slot
until it stops.
3. Press the [7OPEN/CLOSE] button to close
the operation panel.
Note:
•Never insert foreign objects into the SD card slot.
•If the SD card is not inserted easily, there may be
another card in the mechanism or the unit may
require service.
CAUTION
For your safety, the driver should not insert
or eject an SD card opening the operation
panel while driving.
Ejecting the SD card
Note:
•Do not eject the SD card until the operation panel
is completely opened. Data in the SD card may be
broken.
1. Press the [7OPEN/CLOSE] button to open
the operation panel.
When playing back music data in the SD card,
the “Stop” message will appear in the display
when the operation panel is completely
opened.
2. Push the head of the SD card slightly to eject
the SD card.
The SD card will be stuck out, and “NO
MEMORY CARD” will appear in the display.
3. Remove the SD card, then press the
[7OPEN/CLOSE] button to close the
operation panel.
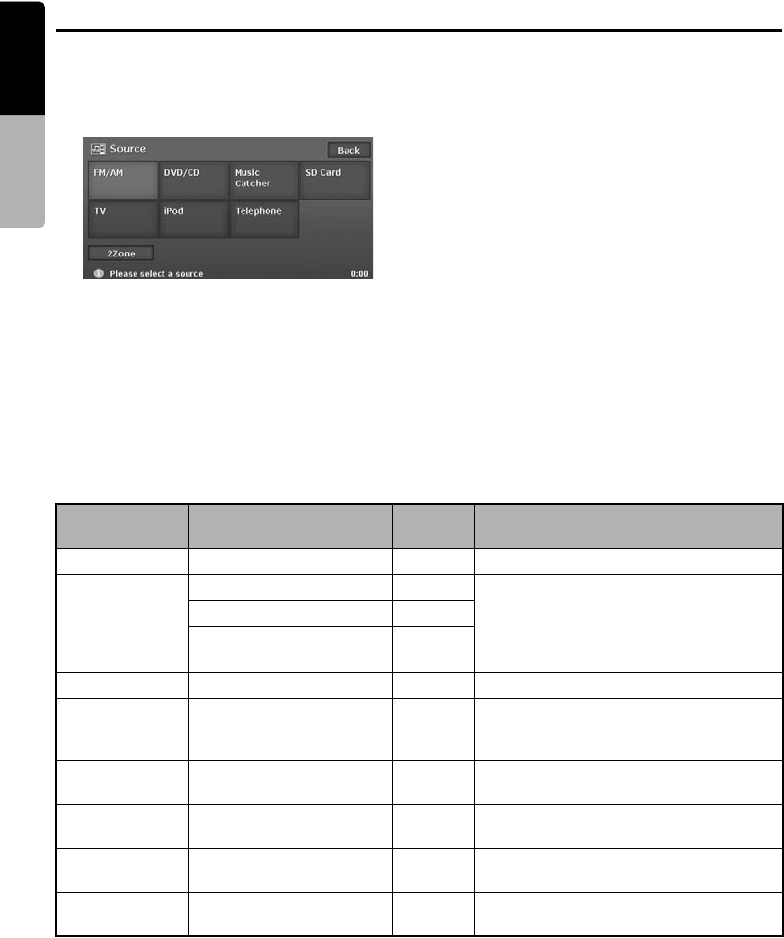
18 MAX983HD
English Owner’s manual
Selecting Media Source
You can change the media source to be played from the Source menu screen.
1. Press the [SRC] (Source) button to display the
Source menu screen.
2. Touch the desired Source key you wish to
change to.
The system is switched to the corresponding
source mode.
When you pressed the [SRC] (Source) button
from the AV mode, the corresponding AV
mode menu screen will be displayed.
When you pressed it from the Navigation
mode, the previous screen will be displayed.
Available media sources
*1: These Source keys are displayed only when the corresponding device is connected to this unit.
Key name Corresponding source
mode Refer to Description
FM/AM Tuner mode ➜ P. 20 —
DVD/CD DVD Video mode ➜ P. 25 The source mode differs depending on the
data format of the disc set in the DVD
player.
When no disc is set in the DVD player,
“NO DISC” will be displayed.
Audio CD mode ➜ P. 37
MP3/WMA mode ➜ P. 33
Music Catcher Music Catcher mode ➜ P. 40 —
SD Card SD Card mode
(MP3/WMA mode)
➜ P. 33 When no SD card is set in the SD card
slot, “NO MEMORY CARD” will be
displayed.
TV*1 TV Tuner mode ➜ P. 47 Available only when the TV tuner unit is
connected via CeNET.
AUX AUX mode ➜ P. 50 Available only when the TV tuner is not
connected via CeNET.
iPod*1 iPod mode ➜ P. 51 Available only when the iPod is
connected.
Telephone*1 Telephone mode ➜ P. 56 Available only when the Bluetooth
Interface Box is connected via CeNET.

19
MAX983HD
English Owner’s manual
2Zone Function
About the 2Zone Function
The 2Zone function is a function that assigns
separate source output to the Front zone (this
unit) and Rear zone (the optional rear monitor) by
simultaneously playing two sources in this
system. Therefore, the rear passengers are
allowed to enjoy a different video source from the
source played on the monitor of this unit.
• The source sounds of the Front zone are
output from the speakers of the vehicle side,
and those of the Rear zone are from the
optional infrared headphone systems.
• Controlling a source assigned to the Rear zone
can be made by using the optional remote
control unit. To control it from this unit, once
assign the same source to the Front zone, then
control it.
Note:
•When a voice interrupt of the navigation system
arises during the 2Zone function is turned on, the
sound of the Front zone is muted, and the sound of
the Rear zone is output normally.
When it arises during the 2Zone function is turned
off, the audio signals to the 4ch speakers are
attenuated, and the voice from the navigation
system is output from the front two speakers.
•You cannot operate the 2Zone function during the
voice interrupt of the navigation system.
•When the same source is assigned for Front and
Rear zone, operations in a zone are also applied
for another zone.
•The 2Zone function is disabled when the
Telephone mode is selected.
•When a telephone interrupt arises while the 2Zone
function is turned on, the 2Zone function is
automatically turned off, and it does not resume
the 2Zone ON status even when the interruption is
finished (only when the TV tuner is connected).
Assignable media sources for Front/
Rear zone
●For Front zone
All the sources except for the Telephone mode
can be assigned for the Front zone.
●For Rear zone
The following sources can be assigned:
• DVD video mode
• TV Tuner mode
•AUX mode
Setting the 2Zone function
• The factory default setting is off.
1. Press the [SRC] (Source) button to display the
Source menu screen.
2. Touch the [2Zone] key to turn the 2Zone
function on.
The zone select keys are displayed at right of
the [2Zone] key.
3. Touch the desired Source key you wish to
assign for the Rear zone, and perform
operations for the source mode.
4. Touch the [Rear] key to switch to the Rear
zone, and touch the same Source key
previously selected.
5. Touch the [Front] key to switch to the Front
zone, and touch the desired Source key you
wish to assign for the Front zone.
6. To turn the 2Zone function off, press the
[SRC] (Source) button and touch the [2Zone]
key.
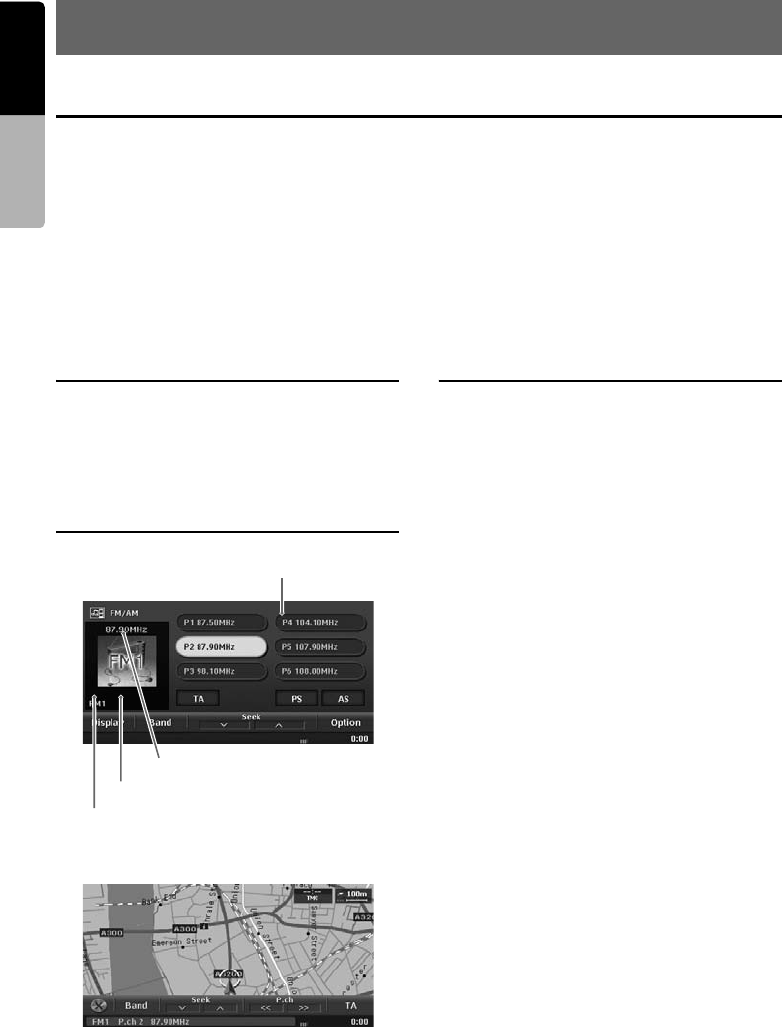
20 MAX983HD
English Owner’s manual
3. Operations of Basic Features
Radio Operations
In addition to the ordinal tuner functions, this unit has a built-in RDS decoder system that supports
broadcast stations transmitting RDS data.
Using this system, the following functions are available:
• TA (Traffic Announcement) function
• AF (Alternative Frequency) function
• REG (Regional Programme) function
• PTY (Programme Type) function
Note:
•When you store a station without broadcasting RDS data to the preset memory, store the station after
receiving more than 10 seconds. If you store such a station within 10 seconds, it will be stored as an RDS
station, and the RDS tracking function will work when tuning in.
Selecting the Tuner mode
1. Press the [SRC] (Source) button to display the
Source menu screen.
2. Touch the [FM/AM] key to select the Tuner
mode.
The Tuner mode screen is displayed.
Tuner mode screen
●AV Shortcut menu on the Map screen
Radio operations
Listening to the radio
1. Touch the [Band] key to select the radio band.
Each time touching this key, the radio
reception band changes in the following
order:
FM1 ➜ FM2 ➜ AS ➜ AM (MW/LW) ➜
FM1 ...
2. Touch the desired Preset key on the Preset
key pane to tune in the preset station.
• The “AS” is a special FM band used by the
Auto Store function.
• Press the [R] or [F] (Search) button to
tune in the previous or next preset station.
• From the AV Shortcut menu, touch [P.ch]
keys to tune in the previous or next preset
station.
Seek tuning
There are 2 types of seek tuning: DX Seek and
LO Seek.
The DX Seek can tune in to receivable broadcast
stations, and the LO Seek can tune in to only
broadcast stations with a good reception
condition.
1. Select the desired band by touching the
[Band] key.
2. Tune in to a station.
•If “TA” is displayed on the screen, TP
stations are automatically sought.
Frequency
Preset key pane
Information pane
Band

Radio Operations
21
MAX983HD
English Owner’s manual
DX Seek:
Touch the [k] or [K] key to automatically
seek a station.
When the [K] key is touched, the station is
sought in the direction of higher frequencies;
if the [k] key is touched, the station is sought
in the direction of lower frequencies.
• When the DX Seek tuning starts, “DX Seek”
appears on the Information pane.
LO Seek:
If you keep touching the [k] or [K] key more
than 1 second, the Local Seek tuning is
carried out.
The broadcast stations with good reception
sensitivity are automatically selected.
• When the Local Seek tuning starts, “LO
Seek” appears on the screen.
Manual tuning
There are 2 ways available: Quick tuning and
step tuning.
When you are in the step tuning mode, the
frequency changes one step at a time. In quick
tuning mode, you can quickly tune the desired
frequency.
1. Select the desired band by touching the
[Band] key.
2. Touch and hold the [Band] key for more than
1 second to switch to the manual tuning
mode.
“Manual” appears on the screen, and the
manual tuning is now available.
3. Tune into a station.
Quick tuning:
Touch and hold the [K] or [k] key for more
than 1 second to tune in a station.
Step tuning:
Touch the [K] or [k] key to manually tune in
a station.
Recalling a preset station
There are total of 24 preset positions (6 FM1, 6
FM2, 6 AS, 6 AM) to store individual radio
stations in memory.
There are 3 ways available to recall the preset
station.
●From the Tuner mode screen
1. Select the desired band by touching the
[Band] key.
2. Touch the desired Preset key on the Preset
key pane to recall the preset station.
●From the AV Shortcut menu
1. Select the desired band by touching the
[Band] key.
2. Touch [P.ch] keys to tune in the previous or
next preset station.
• You can also use the [R] and [F]
(Search) buttons instead of the [P.ch] keys.
Manual memory
1. Select the desired band by touching the
[Band] key.
2. Select the desired station with the seek
tuning, manual tuning, or preset tuning.
3. Touch and hold one of the Preset key for more
than 2 seconds to store the current station into
the preset memory.

Radio Operations
22 MAX983HD
English Owner’s manual
Preset scan
The Preset Scan receives the stations stored in
the preset memory in order. This function is
useful when searching for the desired station in
memory.
1. Touch the [PS] key to start the Preset Scan.
The unit starts scanning each station for 7
seconds sequentially.
2. When the desired station is tuned in, touch the
[PS] key again to continue receiving that
station.
Auto store
The Auto Store is a function for storing up to 6
stations that are automatically tuned in
sequentially. If 6 receivable stations cannot be
received, a previously stored station remains
unoverwritten at the memory position.
1. Select the desired band by touching the
[Band] key.
2. Touch and hold the [AS] key for more than 2
seconds.
A beep sounds and the stations with good
reception are stored automatically to the
preset channels.
Even if you select FM1 or FM2, the received
stations are stored into the memory for AS.
Displaying radio text
When the station receiving broadcasts text data,
you can display the data on the screen.
1. Touch the [Display] key on the Tuner mode
screen.
The received radio text is displayed on the
screen.
TA (Traffic Announcement)
function
In the TA standby mode, when a traffic
announcement broadcast starts, the traffic
announcement broadcast is received as top
priority regardless of the function mode, so you
can listen to it. The Traffic Programme (TP)
automatic tuning is also available.
Setting TA standby mode
1. Touch the [TA] key.
“TA” will be displayed at the bottom of the
screen, and the system will automatically
search for a TP station (TP SEEK). When an
RDS broadcast station with traffic
announcement programmes is received, “TP”
will be displayed at the bottom of the screen.
The [TA] key is also provided on the RDS
TMC menu screen displayed by pressing the
[INFO] button.
Note:
•If no TP station is received, this system continues
the search operation. Performing the above
procedure again makes the “TA” go off, and stops
TP station searching.
●When a Traffic Announcement
broadcast starts
“TA” indication displayed at the bottom of the
screen will blink If you touch the [TA] key while a
Traffic Announcement broadcast is being
received, the Traffic Announcement broadcast
reception is cancelled, and the system goes into
the TA standby mode.
Cancelling TA standby mode
1. When “TA” is displayed on the screen, touch
the [TA] key.
“TA” on the screen goes off, and the TA
standby mode is cancelled.
The [TA] key is also provided on the RDS
TMC menu screen displayed by pressing the
[INFO]button.
Auto store function for TP stations
You can automatically store up to 6 TP stations
into the preset memory. If the number of TP that
can be received is less than 6, the broadcast
stations already stored in memory are left without
being overwritten.
1.
When “
TA
” is displayed on the screen, touch
and hold the [
AS
] key for more than 2 seconds.
The TP stations with a good reception
condition are stored into the preset memory.
• Even if you select FM1 or FM2, TP stations
are stored into the memory for AS.
Radio Operations
23
MAX983HD
English Owner’s manual
AF (Alternative Frequency)
function
The AF function switches to a different frequency
on the same network in order to maintain
optimum reception.
Switching ON/OFF the AF function
1. Touch the [Option] key.
2. Touch the [ON] or [OFF] key of the AF item to
turn the function on or off.
• When the AF function is ON, “AF” will be
displayed at the bottom of the screen.
• If the reception of the current broadcast
station deteriorates durably, “PI Searching”
is displayed on the screen, and this unit
searches for the same programme on
another frequency.
REG (Regional Programme)
function
When the REG function is ON, the optimum
regional station can be received. When this
function is OFF, if the regional station area is
switched as you drive, a regional station for that
region is received.
Note:
•This function is disabled when a national station
such as BBC R2 is being received.
•The REG function ON/OFF setting is enabled only
when the AF function is ON.
Switching ON/OFF the REG function
1. Touch the [Option] key.
2. Touch the [ON] or [OFF] key of the REG item
to turn the function on or off.
Manually tuning a regional station in
the same network
Note:
•This function can be used when a regional
broadcast of the same network is received.
•This function is enabled only when the AF function
is ON and the REG function is OFF.
1. Touch your desired Preset key to call out a
regional station.
2. Each time you touch the same Preset key, this
unit switches from a local station to the other
on the same network.
PTY (Programme Type)
function
This function enables you to listen to a broadcast
of the specified programme type when the
broadcast starts, even if the system operates in a
mode other than the Tuner mode.
• Some countries do not yet have PTY
broadcast.
• In the TA standby mode, a TP station has
priority over a PTY broadcast station.
Selecting PTY
1. Touch the [Option] key.
2. Touch the [Preset] key of the PTY Select
item.
The system enters into the PTY select mode.
3. Touch your desired PTY item key to select the
programme type.
• The following table shows the factory
default settings stored for the Preset keys:
4. Touch the [Back] key to return to the previous
screen.
●Cancelling PTY standby mode
1. Touch the [Option] key.
2. Touch the [OFF] key of the PTY item.
“PTY” goes off, and the PTY standby mode is
cancelled.
●Cancelling PTY interrupt broadcast
1. Touch the [
TA
] key during receiving the PTY
interrupt broadcast. The PTY interrupt is
cancelled, and the system returns to PTY
standby mode. The [
TA
] key is also provided
on the RDS TMC menu screen displayed by
pressing the [ INFO] button.
Preset
number
PTY item
ENGLISH Contents
1 News News
2 Info Information
3 Pop M Pop music
4 Sport Sport
5 Classics Classics
6 Easy M Easy listening
music

Radio Operations
24 MAX983HD
English Owner’s manual
PTY seek
1. Touch the [Option] key.
2. Touch the [Preset] or [Item] key of the PTY
Select item.
3. Touch your desired Programme Type key.
4. Touch a Seek key.
If you touch the [K] key or [x] button, this unit
seeks a PTY broadcast moving up the
frequencies.
If you touch the [k] key or [X] button , it
seeks moving down the frequencies.
• If no station with the selected PTY
broadcast can be received, the unit returns
to the previous mode.
PTY preset memory
1. Touch the [Option] key.
2. Touch the [Item] key of PTY Select item.
The PTY select mode is turned on.
3. Touch your desired Programme Type key to
select.
4. Touch the [Preset] key to display the Preset
screen.
Keep touching your desired Preset key on the
Preset screen more than 2 seconds to store
the selected programme type into the preset
channel memory.
• The 29 types of PTY listed below can be
selected.
Emergency broadcast
If an emergency broadcast is received, all the
function mode operations are stopped. “Alarm”
appears on the screen and the emergency
broadcast can be heard.
●Cancelling an emergency broadcast
1. Touch the [TA] key. The emergency
broadcast reception is cancelled.
Volume setting of TA,
emergency broadcast (Alarm)
and PTY
The volume for TA, Alarm and PTY interrupts can
be set during TA, Alarm or PTY interrupt.
• The factory default setting is “15”.
1. Use the [+] and [–] (Volume) buttons to set the
volume to the desired level (00 to 33) during a
TA, Alarm or PTY interrupt.
• When the TA, Alarm, or PTY interrupt ends,
the volume returns to the level before the
interrupt.
PTY item
ENGLISH Contents
News News
Affairs Current Affairs
Info Information
Sport Sport
Educate Education
Drama Drama
Culture Culture
Science Science
Varied Varied
Pop M Pop Music
Rock M Rock Music
Easy M Easy Listening Music
Light M Light Classical Music
Classics Serious Classical
Music
Other M Other Music
Weather Weather
Finance Finance
Children Children’s
Programmes
Social Social Affairs
Religion Religion
Phone In Phone In
Travel Travel
Leisure Leisure
Jazz Jazz Music
Country Country Music
Nation M National Music
Oldies Oldies Music
Folk M Folk Music
Document Documentary
PTY item
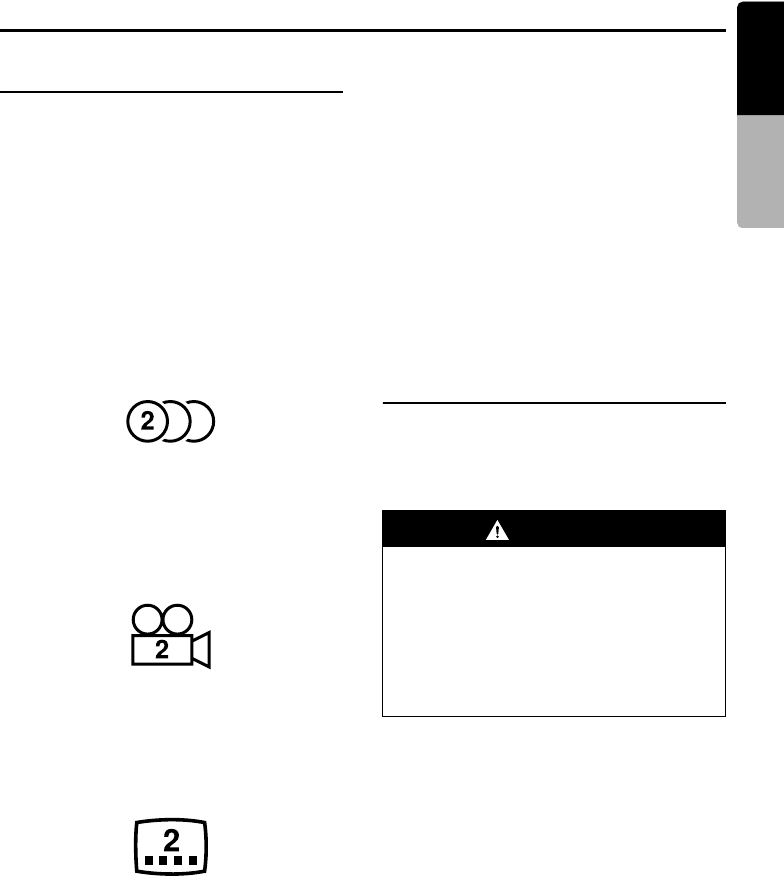
25
MAX983HD
English Owner’s manual
DVD Video Operations
About the DVD video features
This unit provides the following functions in
addition to the high image quality and sound
quality of DVD video.
Note:
•The functions described in this section differ
depending on the DVD video disc. Refer to the
instructions provided with the DVD video.
•Some disc functions may operate differently from
those described in this manual.
Multi-sound function
DVD video can store up to 8 languages for one
film; select the language of your preference.
• The languages stored on the disc are indicated
by the icon shown below.
Multi-angle function Multi-sound
function
A DVD video that is recorded from multiple
angles allows you to select the angle of choice.
• The number of recorded angles is indicated by
the icon shown below.
Subpicture (subtitles) function
A DVD video can record subtitles for up to 32
languages and you can select the language of
the subtitles you wish to see.
• The number of recorded subtitle languages is
indicated by the icon shown below.
Multi-story function
When a DVD video contains more than one story
for a film, you can select the story you wish to
enjoy. The operation procedures vary with the
disc; observe the instructions for selecting a story
provided during playback.
Dolby
Manufactured under licence from Dolby
Laboratories. “Dolby” and the double-D symbol
are trademarks of Dolby Laboratories.
Menu screens
Menus can be called up during DVD video
playback to perform menu selection.
Selecting the DVD Video mode
1. Set a DVD video disc to the DVD player.
The system will automatically read the disc
data, change to the DVD Video mode, and
start playback after a while.
➜ “Setting/Ejecting a Disc” (P. 15)
Note:
•For your safety, this system has a safety function
which turns off the picture when the car is moving,
so only the audio can be heard. The picture can
only be watched when the car is stopped and the
parking brake is applied.
WARNING
•Some videos may be recorded at a higher
volume level than desired. Increase the
volume gradually from the minimal
setting after the video has started.
•For your safety, the driver should not
watch the video or operate the controls
while driving. Please note that watching
and operating the video while driving are
prohibited by law in some countries.
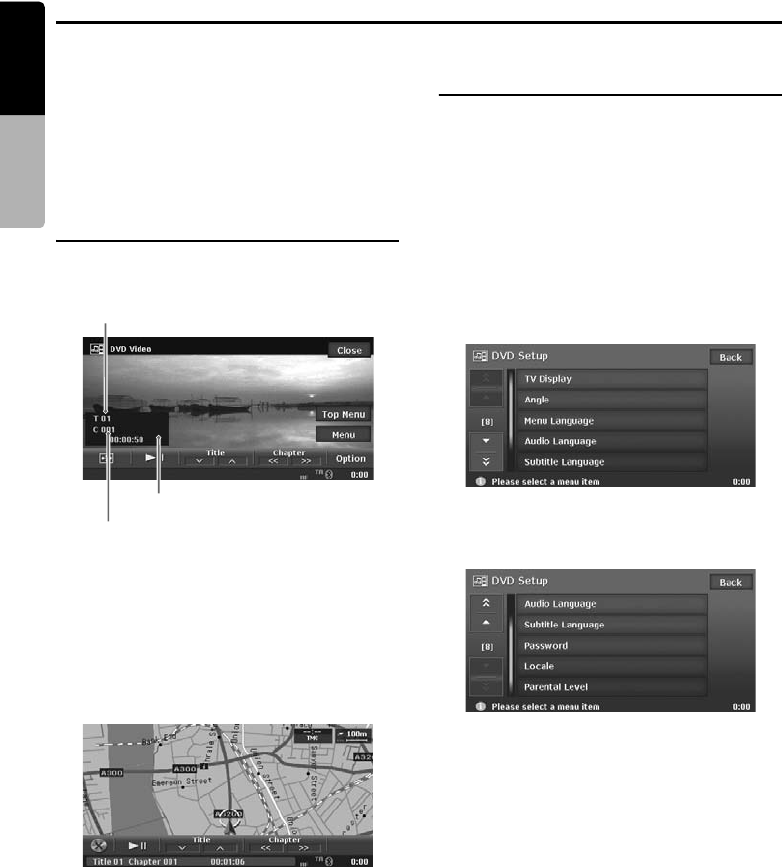
DVD Video Operations
26 MAX983HD
English Owner’s manual
●When a DVD video disc is already set
1. Press the [SRC] (Source) button to display the
Source menu screen.
2. Touch the [DVD/CD] key to select the DVD
Video mode.
The system changes to the DVD Video mode,
and starts playback from the previous
position.
DVD Video mode screen
Touching the screen during the playback
displays the following DVD Video mode screen.
• If you do not operate the menu for 5 seconds,
the DVD Video mode screen will automatically
be hidden, and it returns to the playback
screen.
• To close the DVD Video mode screen within 5
seconds, touch the [Close] key.
●AV Shortcut menu on the Map screen
Changing the DVD System
Settings
Note:
•If the Setup operation is performed in the middle of
DVD video play, the disc will restart from the
beginning.
Selecting the DVD Setup menu
1. Touch the screen to display the DVD Video
mode screen.
2. Touch the [Option] key to display the Option
menu.
3. Touch the [Setup] key to display the DVD
Setup menu.
Touch the [C] key to display the next menu.
Touch the [c] key to return to the previous
menu.
4. Perform setting for the desired setting items.
See the following sections for detail.
• In the following sections, only the details of
settings are described, the procedures to
select items are skipped.
5. Touch the [Back] key.
Information pane
Chapter No.
Title No.
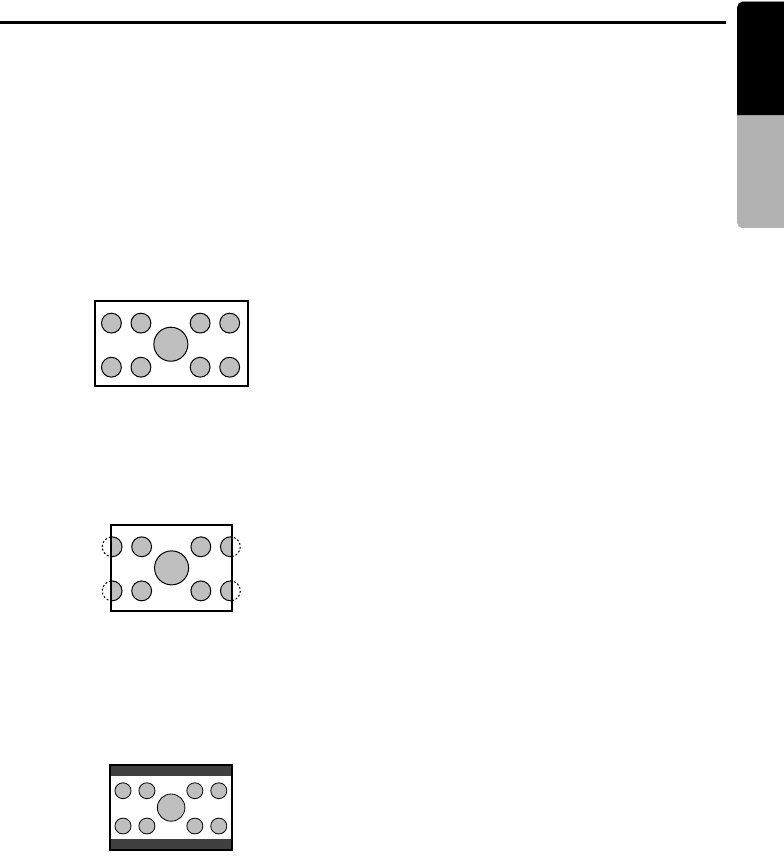
DVD Video Operations
27
MAX983HD
English Owner’s manual
Setting up the screen size
Set the screen size according to the optional rear
monitor which is connected to this unit.
1. Touch the [TV Display] key.
2. Touch the [Wide], [NPS], or [NLB] key to
change the screen size to “Wide”, “NPS”, or
“NLB”.
• The factory default setting is “Wide”.
3. Touch the [Back] key.
●When watching through a wide type of
the rear view monitor (16:9)
Wide:
●When watching through a
conventional type of the rear view
monitor (4:3)
NPS:
The leftmost and rightmost areas of the screen
are cut off.
This function allows displaying the important
part of image fully on the screen. In some
cases, image is displayed while being panned
(scrolled).
NLB:
A black zone is created in the top and bottom
areas of the screen.
This method displays Cinema Scope and Vista
Vision images without cutting them off by
creating a black zone on the top and bottom
gaps.
Setting up the angle mark display
You can set up so that the angle mark appears on
scenes where the angles can be switched.
1. Touch the [Angle] key.
2. Touch the [ON] or [OFF] key to turn the Angle
function “ON” or “OFF”.
• The factory default setting is “OFF”.
3. Touch the [Back] key.
Setting up the disc menu language
1. Touch the [Menu Language] key.
2. Touch the desired Language key you wish to
set.
• The factory default setting is “English”.
3. Touch the [Back] key.
Setting up the audio language
1. Touch the [Audio Language] key.
2. Touch the desired Language key you wish to
set.
• The factory default setting is “English”.
3. Touch the [Back] key.
Setting up the subtitle language
1. Touch the [Subtitle Language] key.
2. Touch the desired Language key you wish to
set.
• To turn off the subtitle, select the [OFF] key.
• The factory default setting is “English”.
3. Touch the [Back] key.
Setting up the password for setting
up of the parental level
1. Touch the [Password] key.
2. Touch the ten-key (0 to 9) to input a 4-digit
password.
• Input the old password, and touch the [OK]
key.
• The factory default setting is “0000”.
• Input a new password, and touch the [OK]
key.
• Input the same new password again, and
touch the [OK] key.
Note:
•When a disc with view restrictions is inserted, you
will be prompted to input a password. The disc will
not be viewable until the correct password is
entered.
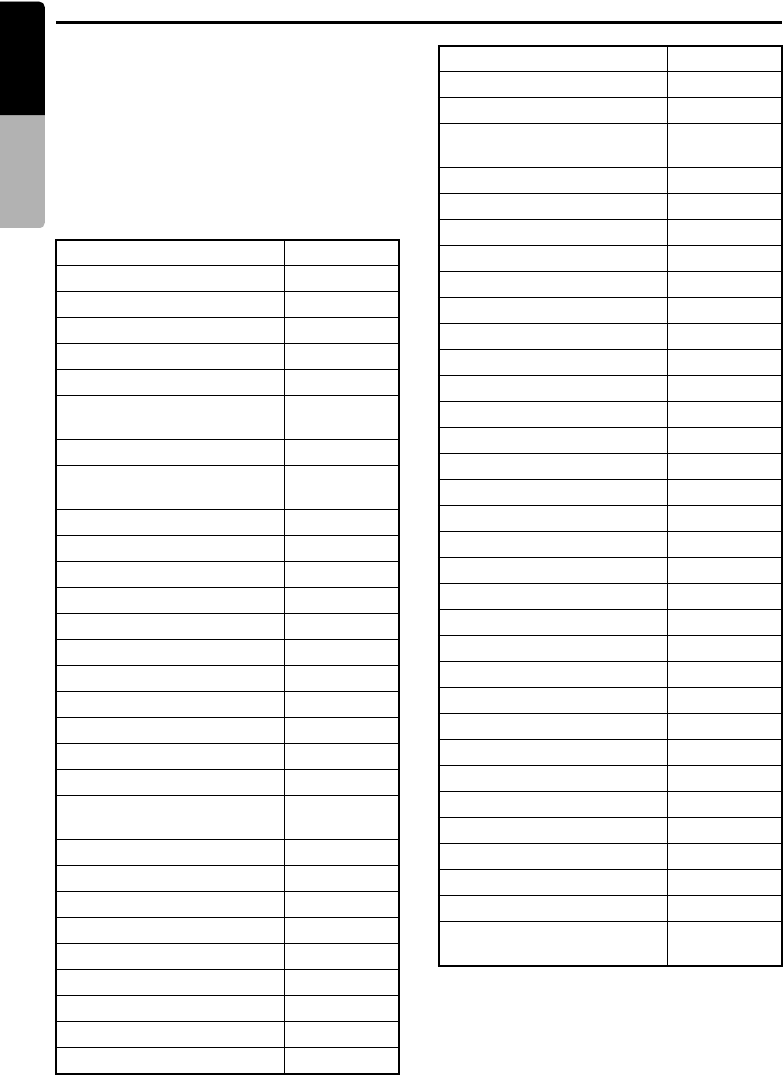
DVD Video Operations
28 MAX983HD
English Owner’s manual
Setting up the country code
Set up the country number for setting up of the
parental level.
1. Touch the [Locale] key.
2. Touch the ten-key (0 to 9) to input a 4-digit
country code (see the following table).
• The factory default setting is “7166” (U.K.).
3. Touch the [OK] key.
●Country code list
Country Input code
ALBANIA 6576
ANDORRA 6568
AUSTRIA 6584
BAHRAIN 6672
BELGIUM 6669
BOSNIA AND
HERZEGOVINA 6665
BULGARIA 6671
CROATIA (local name:
Hrvatska) 7282
CYPRUS 6789
CZECH REPUBLIC 6790
DENMARK 6875
EGYPT 6971
FINLAND 7073
FRANCE 7082
(FRANCE, METROPOLITAN) 7088
GERMANY 6869
GREECE 7182
HUNGARY 7285
ICELAND 7383
IRAN (ISLAMIC REPUBLIC
OF) 7382
IRAQ 7381
IRELAND 7369
ISRAEL 7376
ITALY 7384
JAPAN 7480
JORDAN 7479
KUWAIT 7587
LEBANON 7666
LESOTHO 7683
LIECHTENSTEIN 7673
LUXEMBOURG 7685
MACEDONIA, THE FORMER
YUGOSLAV REPUBLIC OF 7775
MALTA 7784
MONACO 7767
NETHERLANDS 7876
(NETHERLANDS ANTILLES) 6578
NORWAY 7879
OMAN 7977
POLAND 8076
PORTUGAL 8084
QATAR 8165
ROMANIA 8279
SAN MARINO 8377
SAUDI ARABIA 8365
SLOVAKIA (Slovak Republic) 8375
SLOVENIA 8373
SOUTH AFRICA 9065
SPAIN 6983
SWAZILAND 8390
SWEDEN 8369
SWITZERLAND 6772
SYRIAN ARAB REPUBLIC 8389
TURKEY 8482
UNITED ARAB EMIRATES 6569
UNITED KINGDOM 7166
Vatican City State 8665
YEMEN 8969
YUGOSLAVIA 8985
FAROE ISLANDS 7079
GIBRALTAR 7173
GREENLAND 7176
SVALBARD AND JAN
MAYEN ISLANDS 8374
Country Input code
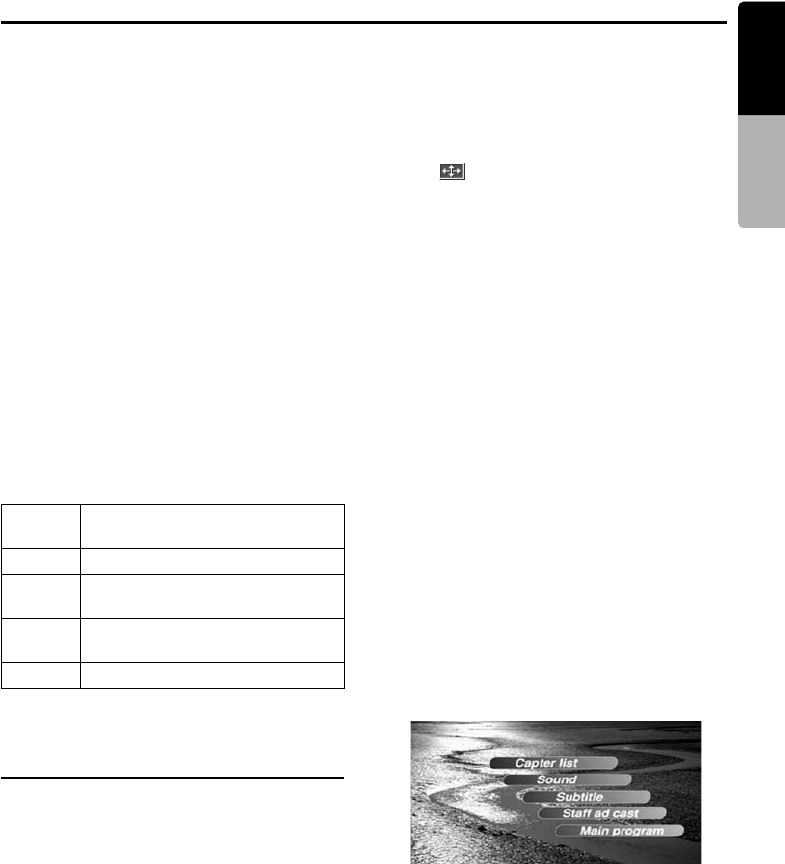
DVD Video Operations
29
MAX983HD
English Owner’s manual
Setting up the parental level
You can change the level of parental lock
(audiovisual restriction).
This function allows cutting scenes that are
unfavourable for children or replacing them
automatically with other scenes prepared in
advance. For example, by replacing scenes of
radical violence or portrayals of sex with safe
scenes, you can make a trouble-free story as if it
were so from the beginning.
1. Touch the [Parental Level] key.
The Password input screen is displayed.
2. Touch the ten-key (0 to 9) to input a 4-digit
password, and touch the [OK] key.
• The factory default setting of the password
is “0000”.
3. Touch the desired Level key to select level 1
to 8, or “No Parental”.
• The factory default setting is “No Parental”.
4. Touch the [Back] key.
The relationship between DVD video category
codes and parental level are shown in the table
below. Use this table when setting the parental
level.
• The contents that the parental level restricts
vary with the country code.
DVD Video Operations
Watching a DVD Video
After disc loading, the play mode is automatically
engaged.
• When playback is not started, touch the [6]
key.
• Operations may differ depending on the story
of the disc.
●When the menu screen is displayed
For general DVD-Video discs, the DVD menu
screen may appear.
After the DVD menu screen is displayed, select
an item in the operations described as follows.
Selecting the screen size
You can change the screen size to suit to the
playback film.
• This operation cannot be performed from the
AV Shortcut menu screen.
1. Showing the DVD Video mode screen, touch
the [ ] key.
2. Touch the [Wide], [Cinema], or [Normal] key
to set the desired screen size.
• The factory default setting is “Wide”.
Wide:
The image is expanded so that the rectangle
of the image fits to the screen. The aspect
ratio of the image may be changed.
Cinema:
The image is expanded so that the left and
right edges of the image fit to the screen. The
top and bottom areas of the image may be cut
off.
Normal:
The image is expanded so that the top and
bottom edges of the image fit to the screen.
DVD menu operations
• These operations cannot be performed from
the AV Shortcut menu screen.
●Showing the DVD menu
1. Showing the DVD Video mode screen, touch
the [Top Menu] or [Menu] key during
playback.
The DVD menu appears.
• The displayed contents for each key differ
depending on the DVD software.
• An example shown below is the DVD menu
display:
●Operating the DVD menu (Direct
Touch)
1. Touch the desired menu item displayed on the
screen.
The function assigned to the menu item will be
activated.
LEVEL7 NC-17 (NO ONE 17 AND UNDER
ADMITTED)
LEVEL6 R (RESTRICTED)
LEVEL4 PG-13 (PARENTS STRONGLY
CAUTIONED)
LEVEL3 PG (PARENTAL GUIDANCE
SUGGESTED)
LEVEL1 G (GENERAL AUDIENCES)
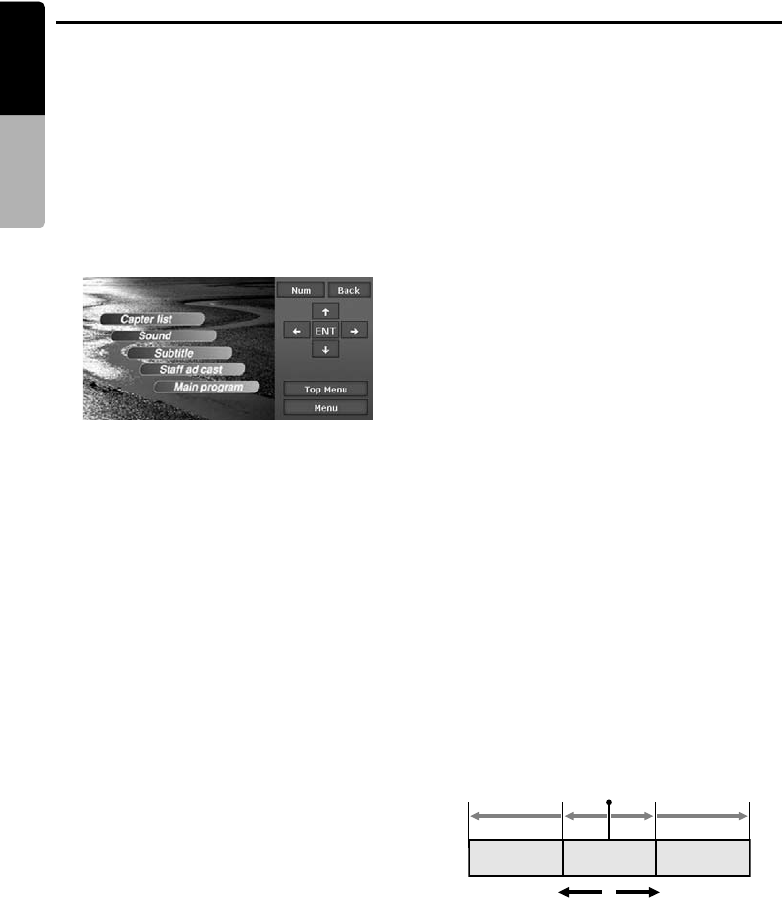
DVD Video Operations
30 MAX983HD
English Owner’s manual
●Operating the DVD menu (Key Pad)
When the menu items are hard to select
correctly, you can also operate them by
displaying the Key Pad panel.
• When the Key Pad is displayed, Direct Touch
operation of the button items is disabled.
1. Press the [OUT] (Zoom Out) or [IN] (Zoom In)
button.
The Cursor-Key Pad panel is displayed on the
screen.
• Touching the [Num] key changes the panel
to the Numeric-Key Pad.
2. Select the desired menu item using either the
Cursor-Key or the Num-Key according to the
menu contents.
3. Touch the [ENT] key to specify the selected
menu item.
4. Touch the [Back] key to hide the Key Pad
panel.
Stopping playback
1. Showing the DVD video mode screen, touch
and hold the [6] key for more than 1 second
during playback.
Playback is stopped.
2. To resume playback, touch the [6] key.
Playback resumes from the scene where
playback is stopped.
Pausing playback
1. Showing the DVD video mode screen, touch
the [6] key during playback.
Playback pauses.
2. To resume playback, touch the [6] key
again.
Playback resumes.
Slow playback
1. Touch the [6] key during playback to pause
playback, then touch and hold the [Chapter]
key.
While touching the key, slow playback
continues at 1/3 speed.
Releasing the key resumes the normal
playback.
• The [F] (Search) button can also be used
instead of the [Chapter] key.
• Slow playback cannot be performed in the
backward direction. In addition, audio
cannot be reproduced during slow
playback.
Fast forward and fast backward
1. Touch and hold a [Chapter] key during
playback.
[x] key: Fast forward
[X] key: Fast backward
The playback speed becomes 5-times faster
at first and then 10-times faster 3 seconds
later.
Releasing the key resumes the normal speed
playback.
• The [R] and [F] (Search) buttons can
also be used instead of the [Chapter] keys.
• No audio is reproduced during fast forward
and fast backward operation.
• The fast forward and fast backward speed
may differ depending on the disc.
Skipping chapters (searching)
“Chapter” means a small segment to divide the
“Title” (film) which is recorded on the disc.
1. Touch a [Chapter] key during playback.
Chapters are skipped as many as the times
touching the key, and playback starts.
• Touching the [x] key starts playback from
the beginning of the next chapter.
• Touching the [X] key starts playback from
the beginning of the current chapter.
When touching this key again within about 3
seconds, playback starts from the
beginning of the previous chapter.
• The [R] and [F] (Search) buttons can
also be used instead of the [Chapter] keys.
xX
Chapter Chapter Chapter
updown
Current
location

DVD Video Operations
31
MAX983HD
English Owner’s manual
Skipping titles (searching)
1. Showing the DVD video mode screen, touch
the [Title] key during playback.
Titles are skipped as many as the times
touching the key, and playback starts.
• Touching the [K] key starts playback from
the beginning of the next title.
• Touching the [k] key starts playback from
the beginning of the previous title.
Searching with a chapter/title
number
You can locate the beginning of a scene using
the chapter numbers or title numbers recorded
on the DVD Video disc.
• This operation cannot be performed from the
AV Shortcut menu screen.
1. Showing the DVD video mode screen, touch
the [Option] key.
2. Touch the [Search] key.
The Key Pad screen appears with the chapter
number input mode. Touching the [Title] key
turns the Key Pad to the title number input
mode.
Title:
A large segment to divide the data area of the
disc.
Chapter:
A small segment to divide the data area of the
Title.
3. Input the number of the title/chapter that you
want to play back with the [0] to [9] key.
4. Touch the [OK] key.
Playback starts from the scene of the input
title number or chapter number.
• If the input title/chapter number does not
exist or searching with a title/chapter
number is not allowed, the screen image will
not change.
Scan playback
Scans and plays back all chapters recorded on
the disc, the first 10 seconds for each.
• This operation cannot be performed from the
AV Shortcut menu screen.
1. Showing the DVD video mode screen, touch
the [Option] key.
2. Touch the [Chapter] key of the Scan item,
then touch the [Back] key.
The “C.SCN” will be displayed.
After scan playback of all chapters on the
disc, chapter scanning through the same disc
is performed again.
Depending on the disc, the menu may appear
again after scan playback of all chapters
within the title.
3. To return to the normal playback at the
currently played chapter, touch the screen to
show the DVD video mode screen, and touch
the [X] key.
Repeat playback
This operation plays back the current chapter
repeatedly.
• This operation cannot be performed from the
AV Shortcut menu screen.
1. Showing the DVD video mode screen, touch
the [Option] key.
2. Touch the [Chapter] key of the Repeat item,
then touch the [Back] key.
The “C.RPT” will be displayed.
3. Perform the same operation to turn off the
repeat playback.
Switching among languages
On discs in which two or more audios or audio
languages have been recorded, you can switch
among the audio languages during playback.
• This operation cannot be performed from the
AV Shortcut menu screen.
1. Showing the DVD video mode screen, touch
the [Option] key.
2. Touch the [Audio] key during playback.
• Each time you touch the key, you can switch
among audio languages.
• Depending on the disc, up to 8 audios may
be recorded. For details, see the mark of the
disc ( : Indicates that 2 audios have
been recorded).
• When the power is turned on and the disc is
changed to a new one, the language set as
the factory default is selected. If that
language has not been recorded, the
language is specified on the disc.
2
DVD Video Operations
32 MAX983HD
English Owner’s manual
• Depending on the disc, switching may be
completely impossible or impossible on
some scenes.
• It may take time to switch among audios.
3. Touch the [Back] key to return to the previous
screen.
Switching subtitles
On DVD discs in which two or more subtitle
languages have been recorded, you can switch
among the subtitle languages during playback.
• This operation cannot be performed from the
AV Shortcut menu screen.
1. Showing the DVD video mode screen, touch
the [Option] key.
2. Touch the [Subtitle] key during playback.
Each time you touch the key, you can switch
among subtitles.
• Depending on the disc, up to 32 kinds of
subtitles may be recorded. For details, see
the mark of the disc ( : Indicates that 2
kinds of subtitles have been recorded).
• Depending on the disc, switching may be
completely impossible or impossible on
some scenes.
• It may take time to switch among subtitles.
3. Touch the [Back] key to return to the previous
screen.
●To turn off subtitles
1. Repeat touching the [Subtitle] key until “0/X
OFF” is displayed on the screen.
Subtitles are turned off.
Switching angles
On DVD discs in which video images have been
recorded in two or more angles, you can switch
among the angles during playback.
This operation can be performed when the
“Setting up the angle mark display” function
(see page 27) is set to “ON”.
• This operation cannot be performed from the
AV Shortcut menu screen.
1. Touch the [ ] (Angle) key during playback.
Each time you touch the key, you can switch
among angles.
• Depending on the disc, up to 9 angles may
be recorded. For details, see the mark of the
disc ( : Indicates multi-angle).
• Depending on the disc, angles may switch
smoothly or switch with a momentary still
image.
• When the power is turned on and the disc is
changed to a new one, the language set at
the time of factory shipment is selected. If
that language has not been recorded, the
language is specified on the disc.
• Depending on the disc, switching may be
completely impossible or impossible on
some scenes.
• It may take time to switch among angles.
• Depending on the disc, scenes recorded in
two or more angles may be played back.
2

33
MAX983HD
English Owner’s manual
MP3/WMA Operations
This system can play MP3/WMA data recorded on a disc or saved in an SD card.
About the MP3/WMA files
What is MP3/WMA?
MP3 and WMA are the audio compression
methods which have penetrated into PC users
and become a standard format.
MP3 is an audio compression method and
classified into audio layer 3 of MPEG standards.
WMA is an audio compression method
developed by Microsoft Corporation.
These features compress the original audio data
to about 10 percent of its initial size with a high
sound quality. This means that about 10 music
CDs can be recorded on a CD-R/RW disc to
allow a long listening time without having to
change CDs.
Displaying MP3/WMA Tag titles
Tag information such as title, artist and album
title can be displayed for an MP3/WMA file
containing the Tag information.
Note:
•This system does not completely support the ID3
version 2.x tag format. These tags may not be
displayed.
Precautions on the MP3/MWA data
• Files other than MP3/WMA data cannot be
played. In addition, some files may not be
played because of the encoding format. When
a file cannot be played, the next file is played
instead.
• Some noise may occur depending on the type
of encoder software used to encode the data.
• You can apply the VBR (variable bit rate)
format when encoding, but setting the value of
VBR to within ranges from 32 kbps to 320 kbps
is recommended. In case of data recorded in
VBR, the displayed play time may be slightly
different from the actual play time.
• Tag information entered with 2-byte characters
may not be displayed properly on the display.
• Files that the DRM (Digital Rights
Management) function is set cannot be played.
• Add a file extension “.MP3” or “.mp3” to an
MP3 file, and “.WMA” or “.wma” to a WMA file
using single byte characters. If you add other
file extension or forget to add the file extension,
the file cannot be played.
Precautions when preparing a disc/
SD card
●Logical format (File system)
Specify the following formats as the file system.
Otherwise, normal playback may not be possible.
For a disc:
Specify “ISO9660 level 1” or “level 2” (without
including expansion format) as the writing format
when writing MP3/WMA files on a disc.
For an SD card:
Use the SD cards formatted in FAT16 or V-FAT
format to store MP3/WMA files.
●Folder structure
• The folder hierarchy must be within 8
hierarchical levels. Otherwise, playback will be
impossible.
• You can store the MP3 files and WMA files
together in a folder.
●Number of files or folders
For a disc:
• The maximum allowable number of folders is
255 (including root directory).
• The maximum allowable number of files in a
disc is 512.
• The maximum allowable number of files in a
folder is 255.
For an SD card:
• The maximum allowable number of folders is
99 (including root directory).
• The maximum allowable number of files in a
card is 255.
• The maximum allowable number of files in a
folder is 99.
●Folder representation in the Folder list
• Only folders containing MP3/WMA files (1 to
4 in illustration) are displayed on the list.
Folders containing no MP3/WMA file are not
displayed.
• Folder hierarchy is ignored, and unified into 1
level.
• Folders are arranged in the order of the folder
creation.
1
2
1
2
3
4
3
4
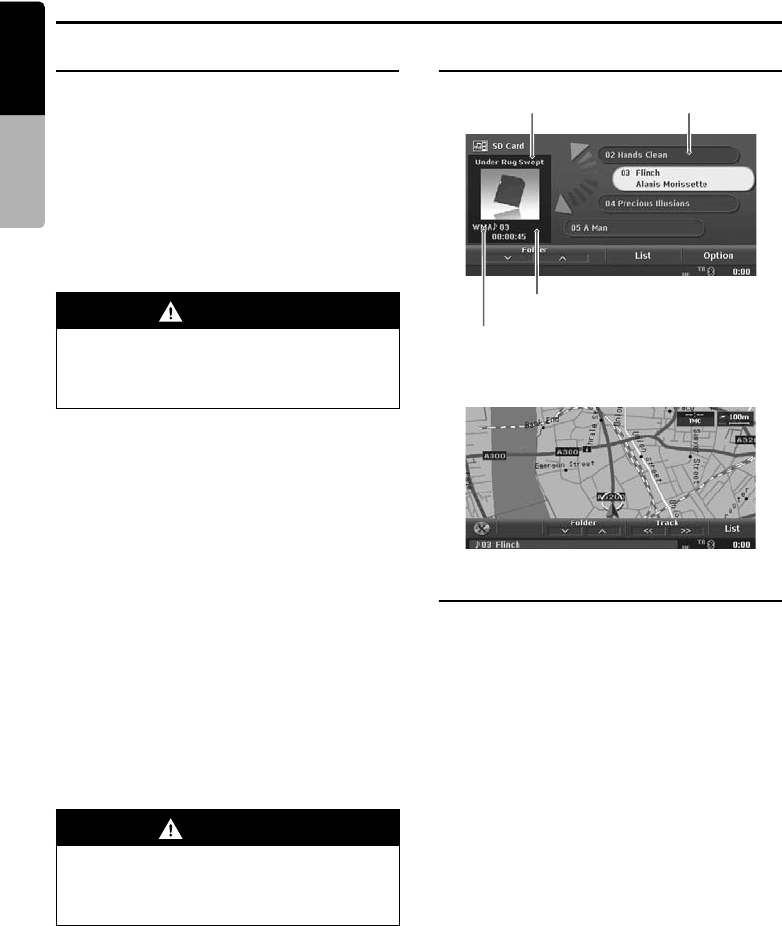
MP3/WMA Operations
34 MAX983HD
English Owner’s manual
Selecting the MP3/WMA mode
The MP3/WMA mode is actually separated in CD
mode or SD Card mode, and the selecting
methods differ depending on the media source.
Selecting the CD mode
1. Set a disc which the MP3/WMA data is
recorded to the DVD player.
The system will automatically read the disc
data, change to the CD mode (MP3/WMA
mode), and start playback after a while.
➜ “Setting/Ejecting a Disc” (P. 15)
●When a disc is already set
1. Press the [SRC] (Source) button to display the
Source menu screen.
2. Touch the [DVD/CD] key to select the CD
mode.
The system changes to the CD mode (MP3/
WMA mode), and starts playback from the
previous position.
Selecting the SD Card mode
1. Set an SD card which the MP3/WMA data is
stored to the SD card slot.
➜ “Setting/Ejecting an SD Card” (P. 17)
2. Press the [SRC] (Source) button to display the
Source menu screen.
3. Touch the [SD Card] key to select the SD
Card mode.
The system changes to the SD Card mode
(MP3/WMA mode), and starts playback after
a while.
Note:
•When the operation panel is opened while playing
back music data in the SD card, the playback will
be stopped and the “Stop” message will appear in
the display.
MP3/WMA mode screen
●AV Shortcut menu on the Map screen
MP3/WMA operations
Selecting a track to play
• This operation cannot be performed from the
AV Shortcut menu screen.
1. Display the desired Track key on the Track list
pane by touching the [{] or [}] key, touch the
Track key to play back the track.
Playback of the specified track starts.
WARNING
•Some tracks may be recorded at a higher
volume level than desired. Increase the
volume gradually from the minimal
setting after the playback has started.
WARNING
•Some tracks may be recorded at a higher
volume level than desired. Increase the
volume gradually from the minimal
setting after the playback has started.
Folder name Track list pane
Information pane
File type
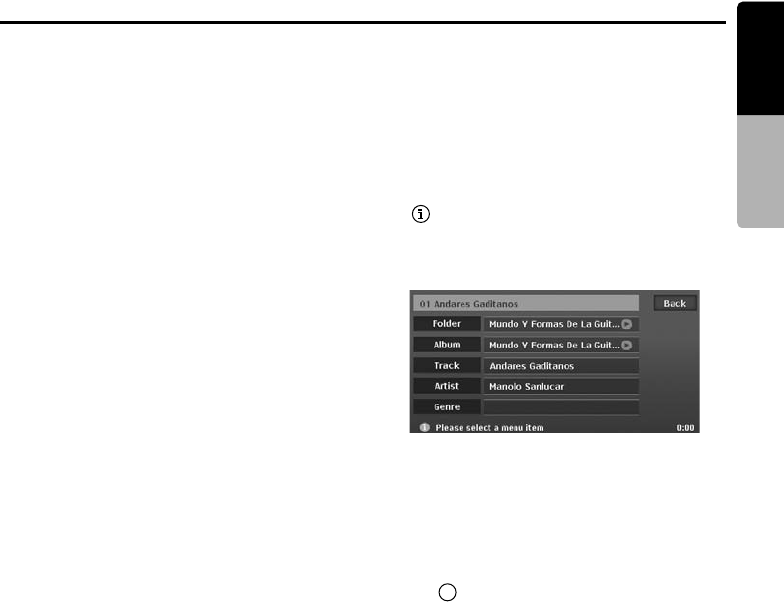
MP3/WMA Operations
35
MAX983HD
English Owner’s manual
Skipping a track (searching)
1. Press the [R] or [F] (Search) button
during playback.
Tracks are skipped, as many as the times
pressing the button, and playback starts.
• Pressing the [F] button starts playback
from the beginning of the next track.
• Pressing the [R] button starts playback
from the beginning of the current track.
When pressing this button again within
about 2 seconds, playback starts from the
beginning of the previous track.
• To perform this operation from the AV
Shortcut menu screen, use the [Track] keys
instead of the [R] and [F] (Search)
buttons.
• These functions perform in the current
folder only.
Fast forward and fast backward
1. Keep pressing the [R] or [F] (Search)
button during playback.
The playback speed becomes 10-times
faster.
Releasing the button resumes the normal
speed playback.
• To perform this operation from the AV
Shortcut menu screen, use the [Track] keys
instead of the [R] and [F] (Search)
buttons.
Skipping the current folder
1. Touch a [Folder] key during playback.
The tracks of the current folder are skipped
and playback starts from the first track of the
next or previous folder.
Selecting a folder/track from the List
screen
1. Touch the [List] key.
The Folder list screen is displayed.
2. When the desired folder is not displayed,
touch the [c] or [C] key to scroll the list.
3. Touch the desired Folder key.
The Track list screen appears.
4. Touch the [c] or [C] key to scroll the list, and
touch the desired Track key.
The corresponding track is started playback.
5. Touch the [Back] key.
Displaying Tag information of a
track
1. Touch the [List] key to display the Folder list
screen.
2. Touch the desired Folder key.
The Track list screen appears.
3. Touch the desired track key you wish to
display the Tag information, then touch the
[ ] key displayed at the right of the Track
key.
The Tag information of specified track is
displayed.
4. Touch the [Back] key.
Scrolling titles
When a title or other information displayed on the
screen is longer than the text area, you can
confirm the entire text by scrolling it.
1. Displaying the text you wish to scroll, touch
the [ ] key displayed at the right of the text
area.
The text will scroll once.
t
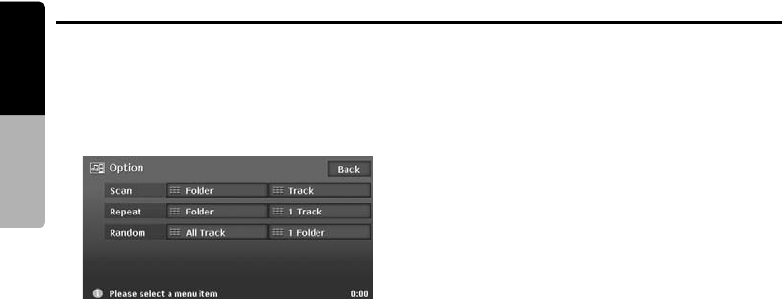
MP3/WMA Operations
36 MAX983HD
English Owner’s manual
Other various play functions
• This operation cannot be performed from the
AV Shortcut menu screen.
1. Touch the [Option] key.
The Option menu screen is displayed.
2. Touch a touch key of the function you want to
play.
Folder scan playback:
Touch the [Folder] key of the Scan item.
• This operation scans and plays back the
first tracks of all folders in the disc/card, the
first 10 seconds for each.
•“F.SCN” is displayed on the information
pane.
Track scan playback:
Touch the [Track] key of the Scan item.
• This operation scans and plays back all
tracks recorded in the disc/card, the first 10
seconds for each.
•“T.SCN” is displayed on the information
pane.
Folder repeat playback:
Touch the [Folder] key of the Repeat item.
• This operation plays back tracks in the
current folder repeatedly.
•“F.RPT” is displayed on the information
pane.
1 track repeat playback
Touch the [1 Track] key of the Repeat item.
• This operation plays back the current track
repeatedly.
•“T.RPT” is displayed on the information
pane.
All track random playback:
Touch the [All Track] key of the Random
item.
• This operation plays back tracks recorded
in the disc/card in no particular order.
•“T.RDM” is displayed on the information
pane.
1 folder random playback:
Touch the [1 Folder] key of the Random item.
• This operation plays the tracks in the
current folder in a random order.
•“F.RDM” is displayed on the information
pane.
3. To cancel the play, touch the same touch key
to cancel the function.
4. Touch the [Back] key to return to the previous
screen.
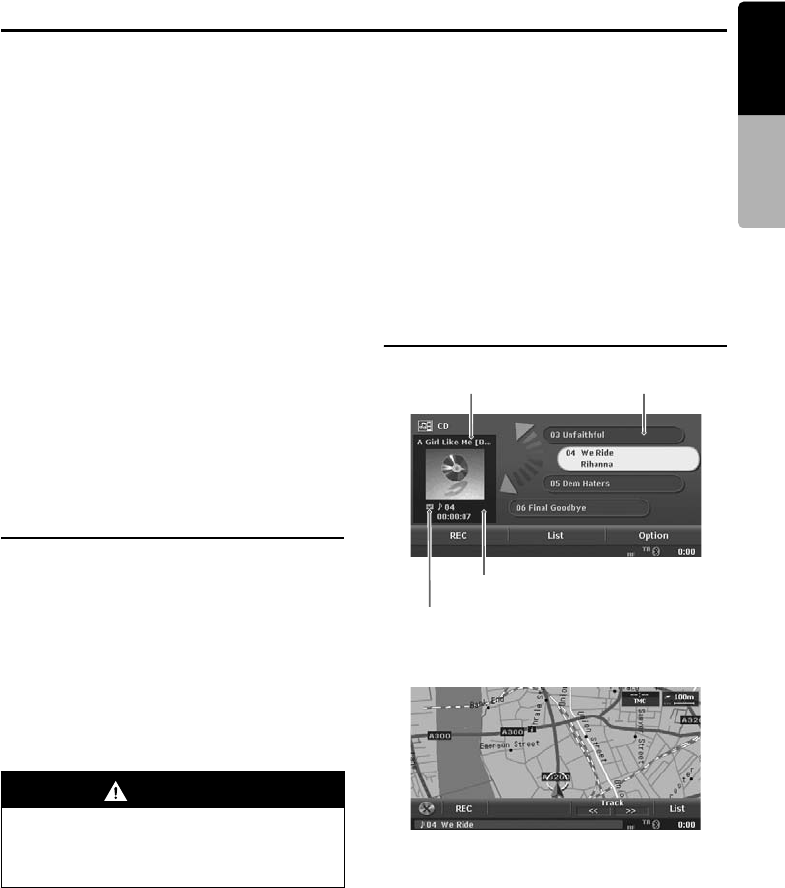
37
MAX983HD
English Owner’s manual
Audio CD Operations
This system can display the track information (Album title, Track title, Artist name, and Genre) of the
currently played disc by using the Album Information data stored in this system.
In addition, this system can record the audio data of the disc by compressing into ATRAC3 format, and
store them as the Music Catcher data. ➜ “Recording tracks from a CD” (P. 39), ➜ “Music Catcher
Operations” (P. 40)
●About the track information of the
recorded data
When the track information can be obtained from
the Album Information data, this data is used as
the track information. If not, the album title is
named using the recording date and a
consecutive number (such as “2008. 6. 10-001”),
and the track title is named such as “Track 01”.
You can edit this information in the Music
Catcher mode. ➜ “Editing album/track
information” (P. 42)
Note:
•This system can play back/record the CDDA discs,
and cannot play back/record the DTS CD discs.
Some discs with CCCD or the other format may be
able to play back.
•The Gracenote Media Database can be imported
into the hard disk drive by using the SD card. ➜
“Importing Data Using the SD Card” (P. 70)
Selecting the Audio CD mode
1. Set an audio CD to the DVD player.
The system will automatically read the disc
data, change to the Audio CD mode, and start
playback after a while. ➜ “Setting/Ejecting a
Disc” (P. 15)
And also, recording data into the Music
Catcher will be automatically started when the
CD is not recorded in the Music Catcher.
• You can change the setting so that the
recording is not performed automatically but
performed manually. ➜ “Switching the CD
Recording mode” (P. 66)
Note:
•While recording the CD, no operation for the disc
can be made unless cancelling the recording. If
you cancel recording, you can restart the recording
by the manual operation. ➜ “Recording tracks
from a CD” (P. 39)
●When an audio CD is already set
1. Press the [SRC] (Source) button to display the
Source menu screen.
2. Touch the [DVD/CD] key to select the Audio
CD mode.
The system changes to the Audio CD mode,
and starts playback from the previous
position.
Audio CD mode screen
●AV Shortcut menu on the Map screen
WARNING
•Some CDs may be recorded at a higher
volume level than desired. Increase the
volume gradually from the minimal
setting after the playback has started.
Album title Track list pane
Information pane
Track title/Recording status
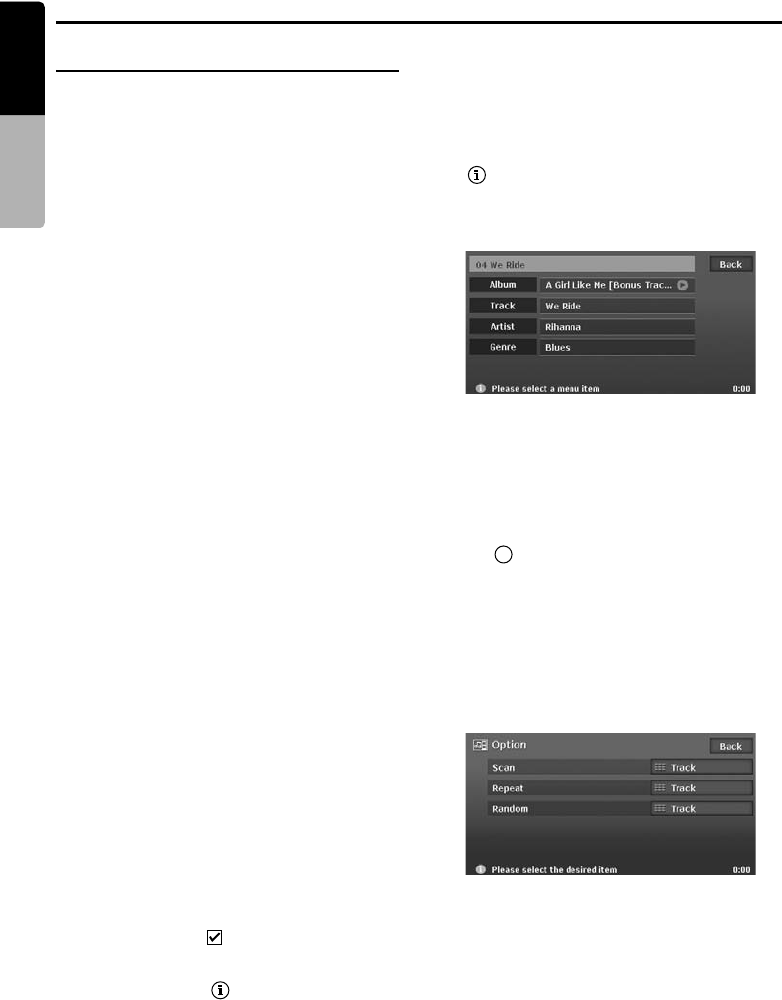
Audio CD Operations
38 MAX983HD
English Owner’s manual
Audio CD operations
Selecting a track to play
• This operation cannot be performed from the
AV Shortcut menu screen.
1. Display the desired Track key on the Track list
pane by touching the [{] or [}] key, then
touch the Track key to play back the track.
Playback of the specified track starts.
Skipping a track (searching)
1. Press the [R] or [F] (Search) button
during playback.
Tracks are skipped, as many as the times
pressing the button, and playback starts.
• Pressing the [F] button starts playback
from the beginning of the next track.
• Pressing the [R] button starts playback
from the beginning of the current track.
When pressing this button again within
about 2 seconds, playback starts from the
beginning of the previous track.
• To perform this operation from the AV
Shortcut menu screen, use the [Track] keys
instead of the [R] and [F] (Search)
buttons.
Fast forward and fast backward
1. Keep pressing the [R] or [F] (Search)
button during playback.
The playback speed becomes 5-times faster at
first and then 20-times faster 3 seconds later.
Releasing the button resumes the normal
speed playback.
• To perform this operation from the AV
Shortcut menu screen, use the [Track] keys
instead of the [R] and [F] (Search)
buttons.
Selecting a track from the List
screen
1. Touch the [List] key.
The Track list screen appears.
2. Touch the [c] or [C] key to scroll the list, and
touch the desired Track key.
The corresponding track is started playback.
• Tracks with the icon indicate that the
track has been recorded in the Music
Catcher.
• Tracks with the [ ] key indicate the track
information can be displayed using the
Album Information data or logged data in
the Music Catcher.
3. Touch the [Back] key to return to the previous
screen.
Displaying track information of a
track
1. Touch the [List] key to display the Track list
screen.
2. Touch the desired track key you wish to
display the track information, then touch the
[ ] key displayed at the right of the Track
key.
The track information of specified track is
displayed.
3. Touch the [Back] key.
Scrolling titles
When a title or other information displayed on the
screen is longer than the text area, you can
confirm the entire text by scrolling it.
1. Displaying the text you wish to scroll, touch
the [ ] key displayed at the right of the text
area.
The text will scroll once.
Other various play functions
• This operation cannot be performed from the
AV Shortcut menu screen.
1. Touch the [Option] key.
The Option menu screen is displayed.
t
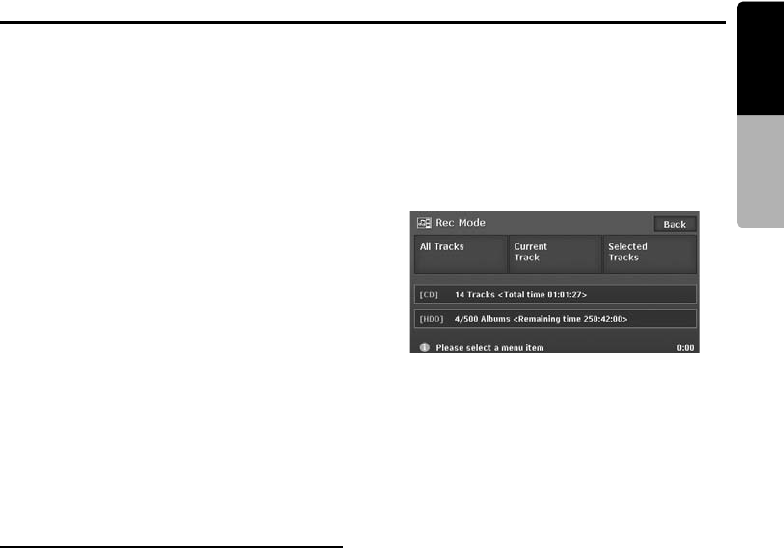
Audio CD Operations
39
MAX983HD
English Owner’s manual
2. Touch a touch key of the function you want to
play.
Track scan playback:
Touch the [Track] key of the Scan item.
• This operation scans and plays back all
tracks recorded in the disc, the first 10
seconds for each.
•“T.SCN” is displayed on the information
pane.
Track repeat playback:
Touch the [Track] key of the Repeat item.
• This operation plays back the current track
repeatedly.
•“T.RPT” is displayed on the information
pane.
Track random playback:
Touch the [Track] key of the Random item.
• This operation plays back tracks recorded
in the disc in no particular order.
•“T.RDM” is displayed on the information
pane.
3. To cancel the play, touch the same touch key
to cancel the function.
4. Touch the [Back] key to return to the previous
screen.
Recording tracks from a CD
With the factory default setting, all tracks on a CD
are automatically recorded when the first time
setting the disc into the DVD player. You can also
change this setting to the setting of which the
recording is not performed automatically, but it is
performed manually.
●Recordable number of albums or
tracks
• Up to 500 albums can be recorded.
• Up to 99 tracks can be included in an album.
• Up to 4000 tracks can be recorded.
• Up to 16 GB HDD space can be used for audio
data.
●Setting the manual recording mode
For the setting operation, see “Switching the CD
Recording mode” (P. 66).
●Recording tracks
• This operation cannot be performed when all
the tracks on the CD is already recorded.
1. Set the audio CD you wish to record into the
DVD player.
The Audio CD mode screen is displayed.
2. Touch the [REC] key.
The Rec Mode screen is displayed.
3. Touch the desired key you wish to perform.
[All Tracks]:
Start recording of all the tracks in the CD.
[Current Track]:
Start recording of the track currently played
back.
[Selected Tracks]:
The Select Track screen is displayed. Touch
the desired Track keys you wish to record,
then touch the [OK] key to start recording of
the specified track.
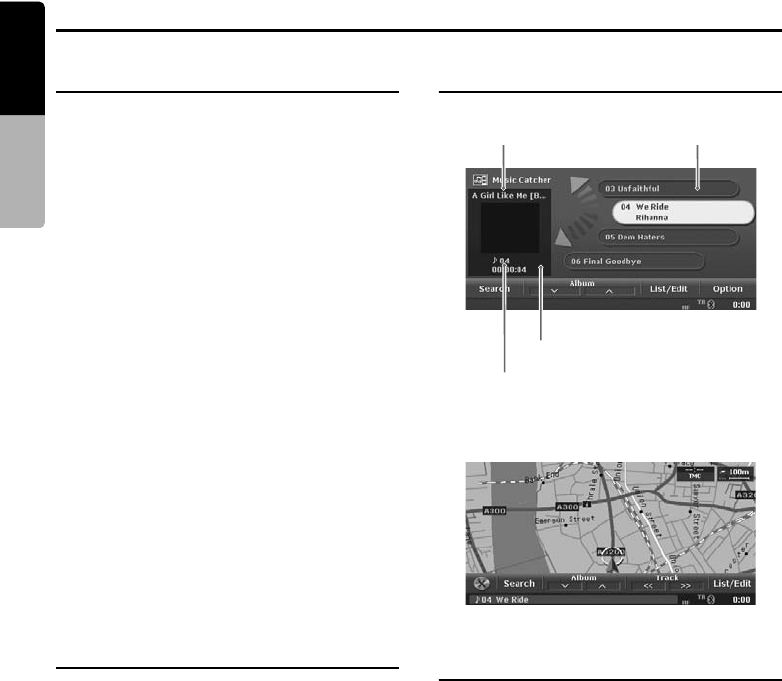
40 MAX983HD
English Owner’s manual
Music Catcher Operations
What is the Music Catcher?
The audio data recorded from the audio CDs are
stored in the Music Catcher. By selecting the
Music Catcher mode, you can manage the great
number of recorded audio data efficiently, and
can play back these data.
●Recordable number of albums or
tracks
• Up to 500 albums can be recorded.
• Up to 99 tracks can be included in an album.
• Up to 4000 tracks can be recorded.
• Up to 16 GB HDD space can be used for audio
data.
About the Music Search function
You can search the audio data to be played back
narrowing by the Album title, Artist name, Genre,
Album image, and/or Playlist title selected from
the list screens.
About the Playlist
Playlist is a list of tracks to be played back. You
can create a playlist collecting your favourite
numbers.
• You can create up to 100 playlists.
• Up to 99 tracks can be listed in a playlist
selecting the tracks at random.
Selecting the Music Catcher
mode
1. Press the [SRC] (Source) button to display the
Source menu screen.
2. Touch the [Music Catcher] key to select the
Music Catcher mode.
The system changes to the Music Catcher
mode, and starts playback from the previous
position.
Music Catcher mode screen
●AV Shortcut menu on the Map screen
Basic operations of the Music
Catcher
Note:
•The operations described in this section operate
only upon the selected albums/playlists by using
the Music Search function. ➜ “Searching tracks
(Music Search)” (P. 43)
Selecting a track to play
• This operation cannot be performed from the
AV Shortcut menu screen.
1. Display the desired Track key on the Track list
pane by touching the [{] or [}] key, touch the
Track key to play back the track.
Playback of the specified track starts.
Album/Playlist title Track list pane
Information pane
Track name
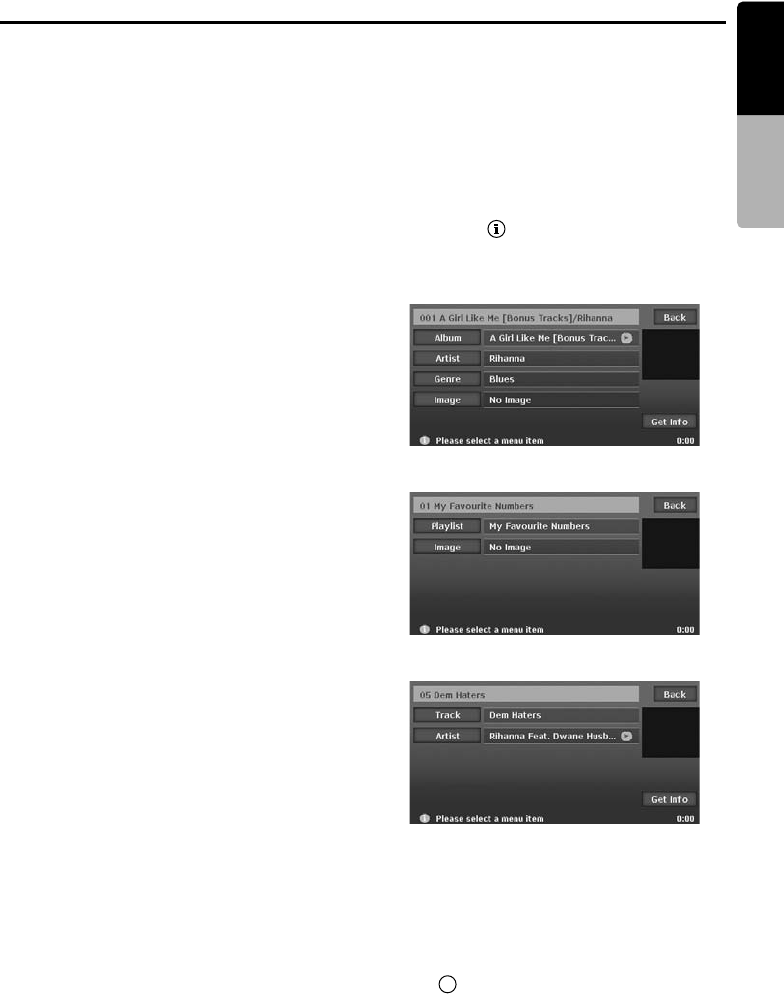
Music Catcher Operations
41
MAX983HD
English Owner’s manual
Skipping a track (searching)
1. Press the [R] or [F] (Search) button
during playback.
Tracks are skipped as many as the times
pressing the button, and playback starts.
• Pressing the [F] button starts playback
from the beginning of the next track.
• Pressing the [R] button starts playback
from the beginning of the current track.
When pressing this button again within
about 2 seconds, playback starts from the
beginning of the previous track.
• To perform this operation from the AV
Shortcut menu screen, use the [Track] keys
instead of the [R] and [F] (Search)
buttons.
• These functions perform in the current
album/playlist only.
Fast forward and fast backward
1. Keep pressing the [R] or [F] (Search)
button during playback.
The playback speed becomes 5-times faster
at first and then 10-times faster 3 seconds
later.
Releasing the button resumes the normal
speed playback.
• To perform this operation from the AV
Shortcut menu screen, use the [Track] keys
instead of the [R] and [F] (Search)
buttons.
Skipping the current album/playlist
1. Touch a [Album] or [Playlist] key during
playback.
The tracks of the current album/playlist are
skipped and playback starts from the first
track of the next or previous album/playlist.
Selecting an album/playlist or track
from the List screen
1. Touch the [List/Edit] key.
The Album list screen or Playlist list screen is
displayed.
2. When the desired album/playlist is not
displayed, touch the [c] or [C] key to scroll the
list.
3. Touch the desired Album/Playlist key.
The Track list screen appears.
4. Touch the [c] or [C] key to scroll the list, and
touch the desired Track key.
The corresponding track is started playback.
Touch the [Back] key.
Displaying information registered
for the album/playlist/track
1. Display the item key of the album/playlist/
track you wish to display information.
• Touch the [List/Edit] key to display the
Album list screen or Playlist screen.
• Moreover, touch desired Album/Playlist key
to display the Track list screen.
• Touch the [c] or [C] key to scroll the list.
2. Touch the [ ] key displayed at the right of
the desired item key.
The information of specified item is displayed.
Album information screen:
Playlist information screen:
Track information screen:
3. Touch the [Back] key.
Scrolling titles
When a title or other information displayed on the
screen is longer than the text area, you can
confirm the entire text by scrolling it.
1. Displaying the text you wish to scroll, touch
the [ ] key displayed at the right of the text
area.
The text will scroll once.
t
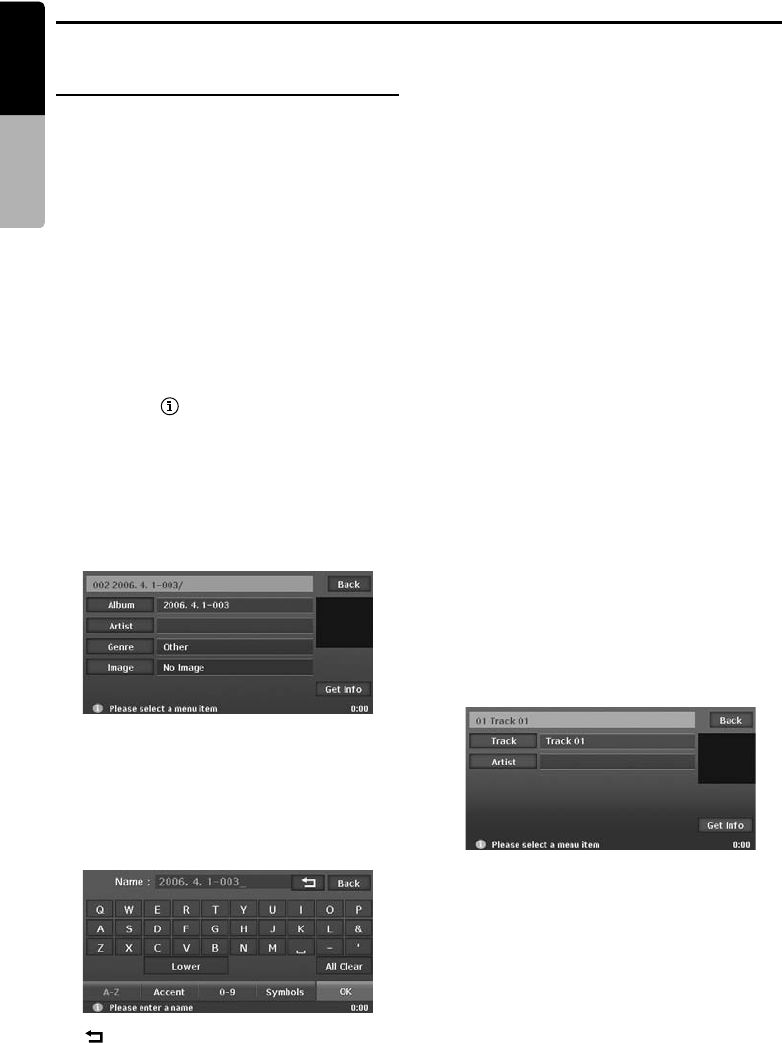
Music Catcher Operations
42 MAX983HD
English Owner’s manual
Editing album/track
information
You can edit album/track information from the
information screens. ➜ “Displaying information
registered for the album/playlist/track” (P. 41)
Note:
•This operation is disabled while recording a CD or
loading/ejecting a disc. To edit the information of
the album/tracks currently recording, once exit the
Music Catcher mode, then enter again after the
recording completes.
1. Display the item key of the album/track you
wish to edit information.
• Touch the [List/Edit] key to display the
Album list screen.
• Moreover, touch desired Album key to
display the Track list screen.
• Touch the [c] or [C] key to scroll the list.
2. Touch the [ ] key displayed at the right of
the desired item key.
The information of specified item is displayed.
3. Perform the edit operation described below
according to the specified item.
4. When the setting is completed, touch the
[Back] key to return to the previous screen.
●Editing Album information
• By touching the [Get Info] key, you can obtain
these information automatically from the Album
Information data stored in the hard disk drive if
they are listed.
1. Touch the [Album] key, edit the displayed
album title by touching the characters on the
screen, then touch the [OK] key.
[]
Deletes the last entered character.
[Back]
Returns to the previous screen.
[Lower]
Displays lower case characters input
keyboard.
[Upper]
Displays upper case characters input
keyboard.
[All Clear]
Deletes all characters entered so far.
[A-Z]
Displays the alphabetic input keyboard.
[Accent]
Displays the accent characters input
keyboard.
[0-9]
Displays the number input keyboard.
[Symbols]
Displays the symbol characters input
keyboard.
[OK]
Fixes the entered characters, and returns to
the previous screen.
2. Touch the [Artist] key, enter/edit the artist
name by touching the characters on the
screen, then touch the [OK] key.
Edit by the same way as the Album title entry.
3. Touch the [Genre] key, touch the desired
Genre key you wish to specify, then touch the
[Back] key.
4. Touch the [Image] key, touch the desired
image key, then touch the [Back] key.
• You can assign your imported image data
by touching the [User] key.
●Editing Track information
• By touching the [Get Info] key, you can obtain
these information automatically from the Album
Information data stored in the hard disk drive if
they are listed.
1. Touch the [Track] key, edit the track title by
touching the characters on the screen, then
touch the [OK] key.
Edit by the same way as the Album title entry.
2. Touch the [Artist] key, enter/edit the artist
name by touching the characters on the
screen, then touch the [OK] key.
Edit by the same way as the Album title entry.
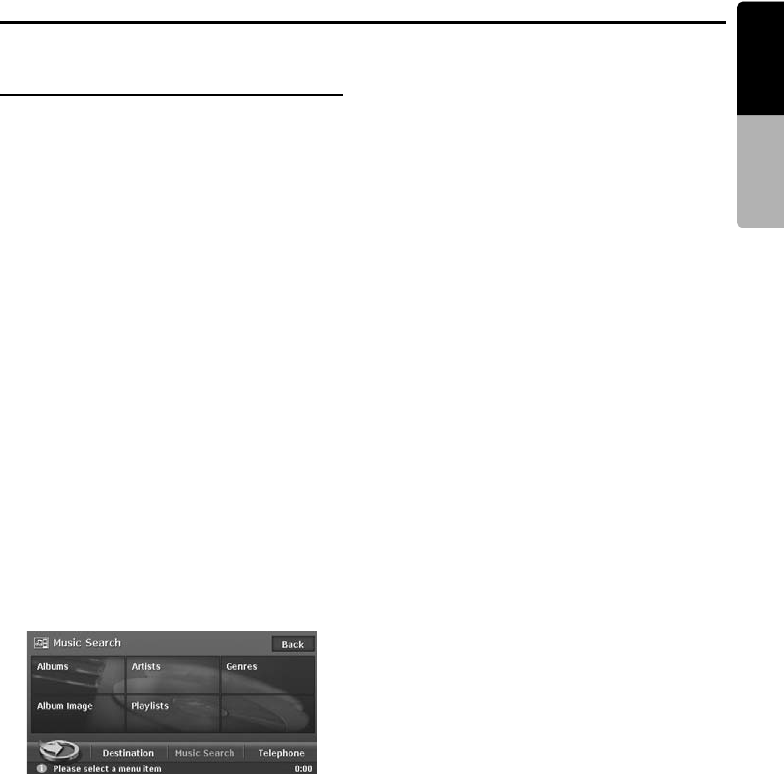
Music Catcher Operations
43
MAX983HD
English Owner’s manual
Searching tracks (Music
Search)
You can search albums/playlists to play
narrowing by the following categories:
Albums:
The Album list of all the recorded albums is
displayed. You can select all the albums or a
desired album.
Artists:
You can narrow the listed album title by
specifying the artist name.
Genres:
You can narrow the listed album title by
specifying the genre and artist name.
Album Image:
The Album list with the assigned image is
displayed. You can select a desired album by
looking the image.
Playlists:
The list of all the playlists registered is displayed.
You can select all the playlists or a desired
playlist.
Displaying the Music Search screen
1. Touch the [Search] key.
The Music Search screen is displayed.
• This screen can also be opened by touching
[Music Search] key from the Destination
menu screen.
Note:
•This operation is disabled while recording the first
track of a CD or loading/ejecting a disc.
Searching by Album
1. Touch the [Albums] key on the Music Search
screen.
The Album list is displayed with the order of
recorded date.
2. Touch the desired Album key you wish to play
back.
• Selecting [All Albums] key specifies all the
album data recorded in this system. You
can change the album to play by the album
skip operation.
• Touching the [by Name] key sorts the list by
the alphanumerical order of the album title.
In this list, touching the alphabet key
displayed at the right of the screen scrolls
the list to the first item of which the initial
character of the album title matches to the
specified key character.
• Touch the [c] or [C] key to scroll the list.
Searching by Artist
1. Touch the [Artists] key on the Music Search
screen.
The Artist list is displayed with the
alphanumerical order.
2. Touch the desired Artist key you wish to
search data.
The Album list of the specified artist is
displayed with the order of recorded date.
• Touching the alphabet key displayed at the
right of the screen scrolls the list to the first
item of which the initial character of the
artist name matches to the specified key
character.
• Touch the [c] or [C] key to scroll the list.
3. Touch the desired Album key you wish to play
back.
• Selecting [All Albums] key specifies all the
album data of the specified artist. You can
change the album to play by the album skip
operation.
• Touching the [by Name] key sorts the list by
the alphanumerical order of the album title.
In this list, touching the alphabet key
displayed at the right of the screen scrolls
the list to the first item of which the initial
character of the album title matches to the
specified key character.
• Touch the [c] or [C] key to scroll the list.
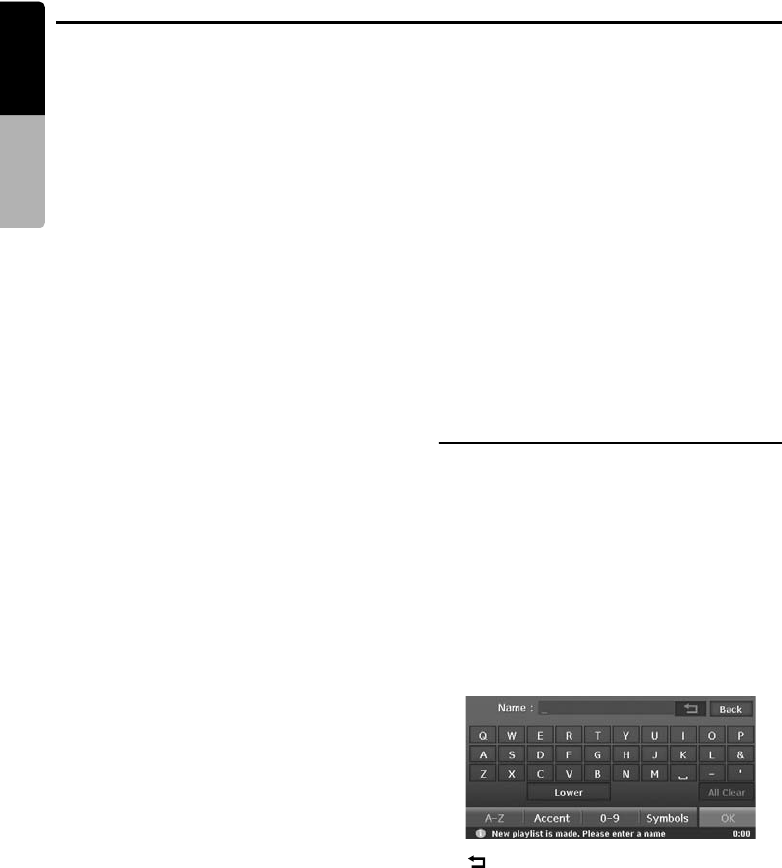
Music Catcher Operations
44 MAX983HD
English Owner’s manual
Searching by Genre
1. Touch the [Genres] key on the Music Search
screen.
The Genre list is displayed.
2. Touch the desired Genre key you wish to
search data.
The Artist list of the specified genre is
displayed.
• Touch the [c] or [C] key to scroll the list.
3. Touch the desired Artist key you wish to
search data.
The Album list of the specified artist is
displayed with the order of recorded date.
• Selecting [All Artists] key specifies all the
artists of the specified genre.
• Touching the alphabet key displayed at the
right of the screen scrolls the list to the first
item of which the initial character of the
artist name matches to the specified key
character.
• Touch the [c] or [C] key to scroll the list.
4. Touch the desired Album key you wish to play
back.
• Selecting [All Albums] key specify all the
album data of the specified artist. You can
change the album to play by the album skip
operation.
• Touching the [by Name] key sorts the list by
the alphanumerical order of the album title.
In this list, touching the alphabet key
displayed at the right of the screen scrolls
the list to the first item of which the initial
character of the album title matches to the
specified key character.
• Touch the [c] or [C] key to scroll the list.
Searching by Album Image
1. Touch the [Album Image] key on the Music
Search screen.
The Album Image list is displayed.
2. Touch the desired Album key you wish to play
back.
• Touch the [c] or [C] key to scroll the list.
Searching by Playlist
1. Touch the [Playlists] key on the Music
Search screen.
The Playlist list is displayed with the order of
created date.
2. Touch the desired Playlist key you wish to
play back.
• Selecting [All Playlists] key specifies all the
playlists created in this system. You can
change the Playlist to play by the Playlist
skip operation.
• Touching the [by Name] key sorts the list by
the alphanumerical order of the playlist
name. In this list, touching the alphabet key
displayed at the right of the screen scrolls
the list to the first item of which the initial
character of the playlist name matches to
the specified key character.
• Touch the [c] or [C] key to scroll the list.
Creating a Playlist
You can create a playlist collecting your favourite
numbers.
1. Touch the [Search] key to display the Music
Search screen.
2. Touch the [Playlists] key to display the
Playlist list.
3. Touch the [New] key.
The name entry screen is displayed.
4. Enter the playlist name by touching the
characters on the screen, then touch the [OK]
key.
The Add Track screen is displayed.
[]
Deletes the last entered character.
[Back]
Returns to the previous screen.
[Lower]
Displays lower case characters input
keyboard.
[Upper]
Displays upper case characters input
keyboard.
[All Clear]
Deletes all characters entered so far.

Music Catcher Operations
45
MAX983HD
English Owner’s manual
[A-Z]
Displays the alphabetic input keyboard.
[Accent]
Displays the accent characters input
keyboard.
[0-9]
Displays the number input keyboard.
[Symbols]
Displays the symbol characters input
keyboard.
[OK]
Fixes the entered characters, and proceed to
the Add Track screen.
5. Touch the [Album], [Artist], or [Genre] key to
specify the search category, select an album
by the similar operation as the Music Search
function.
The Add Track list screen is displayed.
6. Touch the desired Track keys you wish to add
to the playlist, then touch the [Add] key.
The specified tracks are added to the playlist,
and the display returns to the Add Track
screen.
• Touching the [OK] key adds the specified
tracks and completes creating the Playlist.
7. Repeat the operation of step 5 and 6 to add all
the tracks you wish to be included in the
playlist.
8. When adding tracks is completed, touch the
[Back] key to return to the previous screen.
Editing a Playlist
You can edit the playlist from the information
screens. ➜ “Displaying information registered
for the album/playlist/track” (P. 41)
1. Select the playlist you wish to edit information
using the Music Search function.
2. Touch the [List/Edit] key to display the
Playlist list screen.
From this screen, you can perform the
following operations.
●Deleting Playlists
3. Touch the [Delete] key.
The Playlist Delete screen is displayed.
4. Select the playlists you wish to delete by
touching the Playlist keys.
• Touching the [Select All] key selects all the
listed Playlist keys.
5. Touch the [OK] key.
A confirmation screen is displayed.
6. Touch the [Yes] key to delete the selected
playlist.
●Editing information of a Playlist
3. Touch the [ ] key displayed at the right of
the desired Playlist key.
The information screen of the specified
playlist is displayed.
4. Touch the [Playlist] key, edit the displayed
playlist name by touching the characters on
the screen, then touch the [OK] key.
• Edit by the same way as the Playlist name
entry.
5. Touch the [Image] key, touch the desired
Image key, then touch the [Back] key.
• You can assign your imported image data
by touching the [User] key.
6. Touch the [Back] key to return to the previous
screen.
●Editing track list of a Playlist
3. Touch the desired Playlist key you wish to edit
tracks.
The track list screen of the specified playlist is
displayed.
4. Touch the [Delete] key to delete desired
tracks.
• Delete tracks by the same way as deleting
playlists.
5. Touch the [Add] key to add tracks.
• Add tracks by the same way as creating a
playlist.
6. Touch the [Move] key, change the order of the
listed tracks, then touch the [OK] key.
• To move a track, touch the Track key you
wish to move, then specify the position to be
inserted by touching the corresponding
[Move] key.
• Touching the [Back] key cancels the
changes and returns to the previous screen.
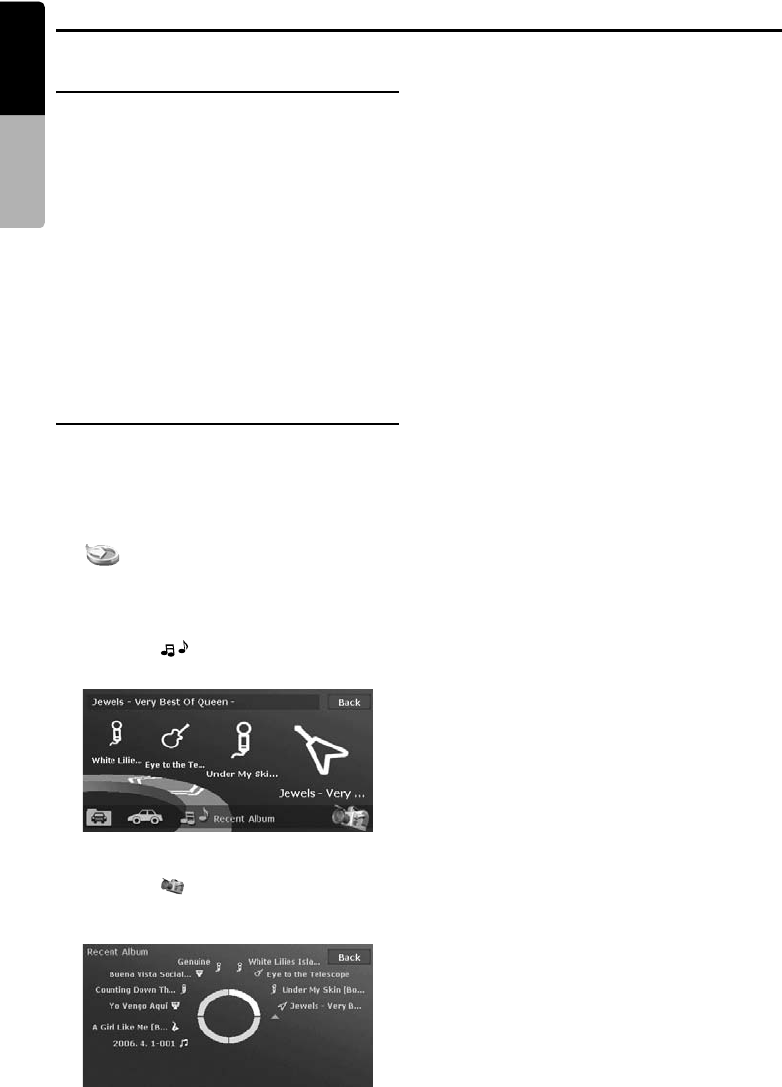
46 MAX983HD
English Owner’s manual
Using Recent Album List
What is Recent Album list?
The Recent Album list is one of the following 3
shortcut lists: (see the Navigation Manual for
details of the Favourite list and Frequent list)
•Favourite list: You can register your favourite
places.
•Frequent list: Destinations frequently entered
are automatically registered.
•Recent Album list: Albums recently selected
from the Music Search are automatically
registered.
You can display these lists by easy operation,
and can specify your desired item to set as the
destination or to be played back.
You can also customise these lists when its
Angle is set to 2D list screen.
Using the Recent Album list
Note:
•The Recent Album list is disabled when no music
data is recorded in the Music Catcher.
Displaying the Recent Album list
1. Press the [MENU] button, then touch the
[] key.
The Favourite list screen is displayed.
• The same operation can be made from the
Music Search screen or Navi Shortcut
menu.
2. Touch the [ ] (Recent Album) key to
display the Recent Album list (3D List screen).
Switching Angle
1. Touch the [ ] key to switch the viewing
angle of the list.
The 2D List screen is displayed.
Playing back albums
1. Touch the desired Album key you wish to
play.
The source mode is changed to the Music
Catcher mode, then playback starts from the
first track of the specified album.
• Touch the [N] or [n] key on the quarter
circle to scroll the list of the 3D List screen.
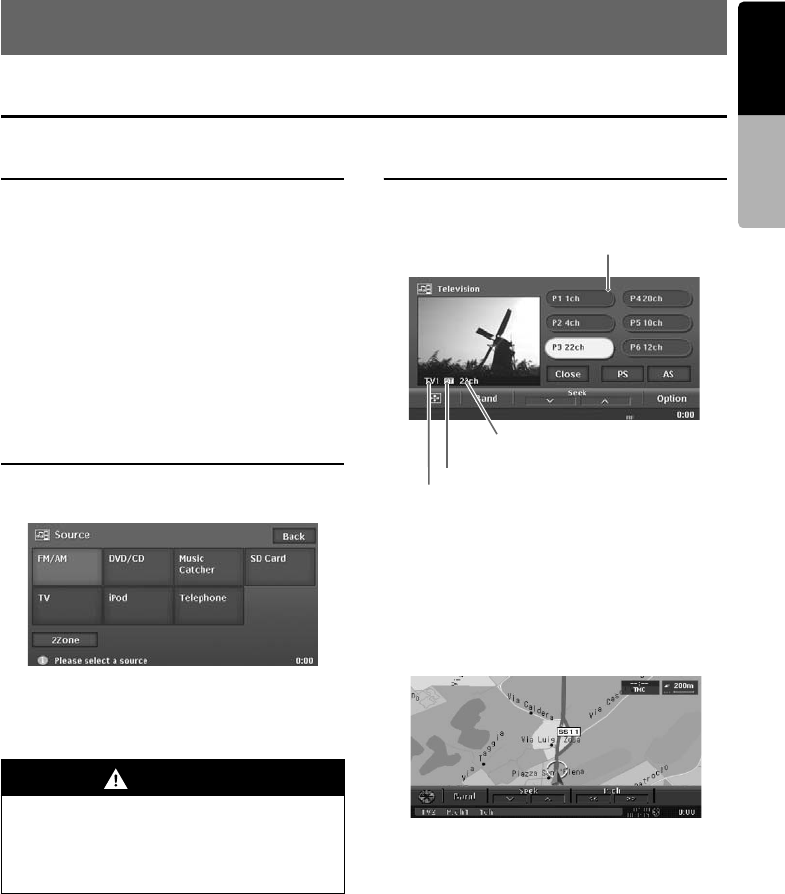
47
MAX983HD
English Owner’s manual
4. Operations of Accessories
TV Tuner Operations
About the TV tuner
Watching TV requires a TV tuner. When an
optional TV tuner is connected through the
CeNET cable, this unit controls all TV tuner
functions.
●About the VTR input terminal
The TV tuner has a VTR input terminal to which
1 external device can be connected. Connect a
12V video cassette player (VCP) or video
cassette recorder (VCR) to the TV tuner input
terminal. Changing the TV tuner to the VTR
mode, you can display the VTR data on the
monitor of this unit.
Selecting the TV Tuner mode
1. Press the [SRC] (Source) button to display the
Source menu screen.
2. Touch the [TV] key to select the TV Tuner
mode.
The system changes to the TV Tuner mode,
and the TV screen is displayed.
TV Tuner mode screen
Touching the TV screen displays the following TV
Tuner mode screen.
• If you do not operate the menu for 5 seconds,
the TV Tuner mode screen will automatically
be hidden, and it returns to the playback
screen.
• To close the TV Tuner mode screen within 5
seconds, touch the [Close] key.
●AV Shortcut menu on the Map screen
WARNING
•For your safety, the driver should not
watch the TV or operate the controls
while driving. Please note that watching
and operating the TV while driving are
prohibited by law in some countries.
Channel No.
Preset key pane
Information pane
Band

TV Tuner Operations
48 MAX983HD
English Owner’s manual
Basic operations
Watching TV
Note:
•For your safety, this system has a safety function
which turns off the picture when the car is moving,
so only the audio can be heard. The picture can
only be watched when the car is stopped and the
parking brake is applied.
1. Touch the screen to display the TV Tuner
mode screen.
2. Touch the [Band] key to select the desired TV
band (TV1 or TV2).
Every touching this key toggles the TV band
between TV1 and TV2.
3. Touch the desired Preset key on the Preset
list pane to tune in the preset TV station.
Watching a video
1. Touch the screen to display the TV Tuner
mode screen, then touch the [Option] key.
2. Touch the [VTR] key of the TV/VTR item to
change to the VTR mode.
• To return to the TV mode, perform the same
operation again.
Seek tuning
1. Touch the screen to display the TV Tuner
mode screen.
2. Touch the [Band] key to select the desired TV
band (TV1 or TV2).
3. Touch a [Seek] key to automatically seek a
station.
• Touching the [K] key to tune up the channel
to the next available TV station, and the [k]
key to tune down.
Manual tuning
There are 2 ways available: Quick tuning and
step tuning. When you are in the step tuning
mode, the channel changes one step at a time. In
quick tuning mode, you can quickly tune the
desired frequency.
1. Touch the screen to display the TV Tuner
mode screen.
2. Touch the [Band] key to select the desired
band (TV1 or TV2).
3. Touch and hold the [Band] key for more than
1 second. “Manual” appears and manual
tuning is now available.
4. Tune into a station.
Quick tuning:
Touch and hold a [Seek] key for more than 1
second to tune in a station.
Step tuning:
Touch a [Seek] key to manually tune in a
station.
Recalling a preset station
A total of 12 TV stations can be stored (6-TV1
and 6-TV2).
There are 3 ways available to recall the preset
station.
●Using the Preset keys on the Preset
list pane
1. Touch the screen to display the TV Tuner
mode screen.
2. Touch the [Band] key to select the desired TV
band (TV1 or TV2).
3. Touch the desired Preset key to recall a
stored TV station.
●From the AV Shortcut menu
1. Touch the [Band] key to select the desired TV
band (TV1 or TV2).
2. Touch a [P.ch] key to tune in the previous or
next preset station.
• You can also use the [R] and [F]
(Search) buttons instead of the [P.ch] keys.

TV Tuner Operations
49
MAX983HD
English Owner’s manual
Manual memory
1. Touch the screen to display the TV Tuner
mode screen.
2. Touch the [Band] key to select the desired TV
band (TV1 or TV2).
3. Tune in the desired TV station to be stored.
4. Touch and hold the desired Preset key for
more than 2 seconds to store the current
station into the preset memory.
Auto store
Auto store selects 6 TV stations automatically
and stores each one into a preset memory. If 6
stations cannot be received with good reception,
previously stored stations remain and only the
strong stations are stored into memory.
1. Touch the screen to display the TV Tuner
mode screen.
2. Touch the [Band] key to select the desired TV
band (TV1 or TV2).
3. Touch and hold the [AS] key for more than 2
seconds.
A beep sounds and the stations with good
reception are stored automatically to the
preset channels.
Preset scan
Preset scan shows each preset channel before it
automatically advances to the next preset. This
function is useful for searching for desired TV
station in memory.
1. Touch the screen to display the TV Tuner
mode screen.
2. Touch the [PS] key to start preset scan. The
unit starts scanning each station for 7
seconds sequentially.
3. When the desired channel is received, touch
the [PS] key again.
Setting the TV functions
• These operations cannot be performed from
the AV Shortcut menu screen.
Selecting the screen size
You can change the TV screen size to suit to the
screen panel.
1. Showing the TV Tuner mode screen, touch
the [Wide] key.
2. Touch the [Wide], [Cinema], or [Normal] key
to set the desired screen size.
• The factory default setting is “Wide”.
Wide:
The image is expanded so that the rectangle
of the image fit to the screen. The aspect ratio
of the image may be changed.
Cinema:
The image is expanded so that the left and
right edges of the image fit to the screen. The
top and bottom areas of the image may be cut
off.
Normal:
The image is expanded so that the top and
bottom edges of the image fit to the screen.
Setting the TV diver
You can change the reception setting for the TV
antenna connected to the TV tuner.
• Normally use the TV diver with the “ON”
position.
1. Touch the screen to display the TV Tuner
mode screen, then touch the [Option] key.
2. Touch the [ON] or [OFF] key of the TV DIVER
item to turn this function on and off.
[ON] :
Sets reception emphasising the visual.
[OFF] :
Sets the diver setting to OFF.
3. Touch the [Back] key to return to the previous
screen.
Setting the TV area
When you select the TV area (TV reception
area), the TV tuner area setting changes.
1. Touch the screen to display the TV Tuner
mode screen, then touch the [Option] key.
2. Touch the Area key of the TV Area item to
display a list of country name.
3. Touch the desired Country Name key to
select a country.
• Touch the [c] or [C] key to scroll the list.
4. Touch the [Back] key to return to the previous
screen.

50 MAX983HD
English Owner’s manual
AUX Operations
This function is available when the TV tuner is not connected via CeNET, and a visual device, such as
VTR, is connected to this unit by using the RCA pin lead.
Selecting the AUX mode
Note:
•For your safety, this system has a safety function
which turns off the picture when the car is moving,
so only the audio can be heard. The picture can
only be watched when the car is stopped and the
parking brake is applied.
1. Press the [SRC] (Source) button to display the
Source menu screen.
2. Touch the [AUX] key to select the AUX mode.
The screen of the connected visual device is
displayed.
• The black screen is displayed when no
visual device is connected.
Selecting the screen size
You can change the displayed screen size to suit
to the screen panel.
1. Touch the screen to display the menu, then
touch the [ ] key.
2. Touch the [Wide], [Cinema], or [Normal] key
to set the desired screen size.
• The factory default setting is “Wide”.
Wide:
The image is expanded so that the rectangle
of the image fits to the screen. The aspect
ratio of the image may be changed.
Cinema:
The image is expanded so that the left and
right edges of the image fit to the screen. The
top and bottom areas of the image may be cut
off.
Normal:
The image is expanded so that the top and
bottom edges of the image fit to the screen.
Changing the audio input level
The input audio level of AUX terminal can be
changed.
• The factory default setting is “High”.
1. Touch the screen to display the menu, then
repeat touching the [Sens] key to select the
level.
High: 16.25 dB
Mid: 3.75 dB
Low: 0 dB
WARNING
•For your safety, the driver should not watch the VTR, etc. or operate the controls while
driving. Please note that watching and operating the VTR, etc. while driving are prohibited by
law in some countries.
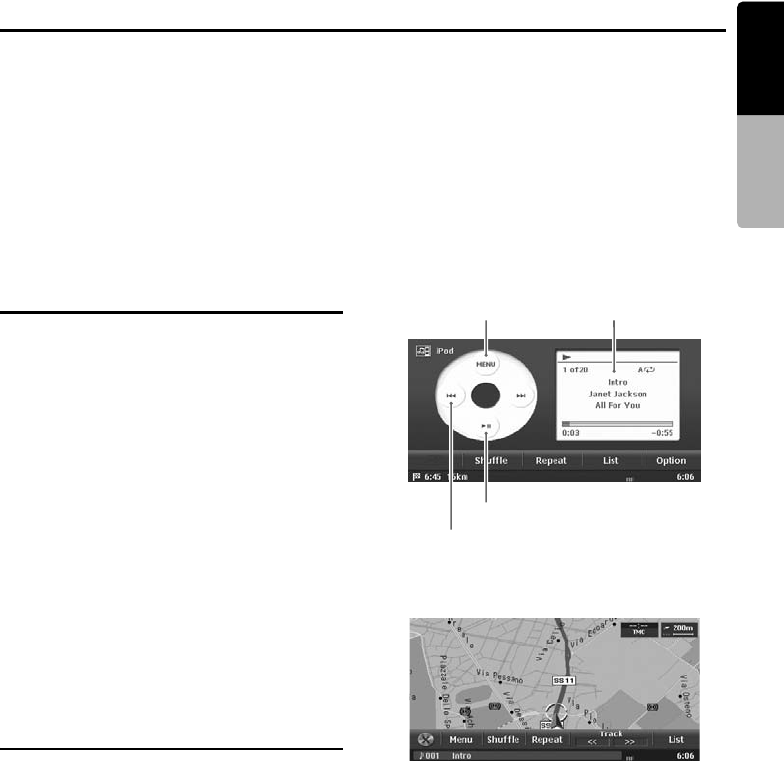
51
MAX983HD
English Owner’s manual
iPod Operations
This unit can be used to control a connected Apple iPod (for the information on the compatible models,
see the Clarion homepage (http://www.clarion.com)). Use the optional connector cable to connect the
iPod.
Note:
•The unit will not operate, or may operate improperly with unsupported versions.
•For the information on the compatible models to the iPod video mode operations, see the Clarion homepage
(http://www.clarion.com).
•Some functions may not operate properly depending to the software version of the iPod. Use the iPod updated
with latest software downloaded from the Apple's website.
•When you connect the iPod which a great number of tracks are stored, it may take a long time to establish
the connection with the iPod or to control the iPod features.
Notes regarding use of Apple
iPod
• After the iPod has been connected to this unit,
the iPod’s buttons are disabled for operation.
• When the iPod mode has been selected with
2Zone function OFF, the following screen is
output to the rear monitor:
When audio data is played: black screen
When video data is played: video image
• The remote control unit cannot be used to
perform scan, repeat or random play.
• This unit can display the Podcast titles*1, Artist
names, Album titles, Song titles, Genre names,
Playlist titles, Composer names, and
Audiobooks titles*1 registered on the iPod.
When no data is present, the title display will
remain blank.
*1: Whether these functions are available or not
depends on the iPod version.
• The iPod is used with the equalizer function
turned OFF.
• Do not connect an iPod to this unit with a
headset connected to the iPod.
Selecting the iPod mode
1. Connect your iPod to this unit using the
optional connecter cable.
2. Press the [SRC] (Source) button to display the
Source menu screen.
3. Touch the [iPod] key to select the iPod mode.
The system changes to the iPod mode, and
the iPod mode screen is displayed.
iPod mode screen
●AV Shortcut menu on the Map screen
[6] key
Information pane
[R], [F] key
[MENU] key
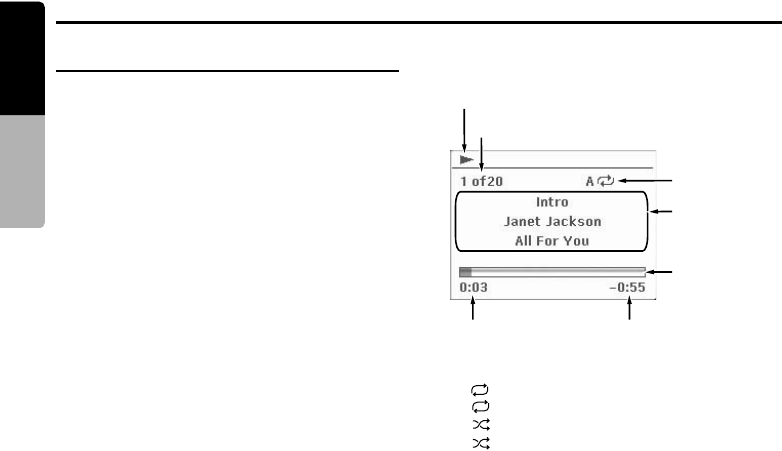
iPod Operations
52 MAX983HD
English Owner’s manual
Controlling the iPod
Operation keys
[MENU] key ([Menu] key on the AV Shortcut
menu)
• Displays the iPod Menu screen which is used
to access to the list screens of the Albums,
Tracks, Artists, Genres, Playlists, Podcasts,
Composers, and Audiobooks stored in the
iPod.
[R], [F] key ([X], [x] key on the AV
Shortcut menu)
• Use to perform track search operation. Touch
and hold the key to enable fast-forward or fast-
backward.
[6] key
• Use to perform playback and pause.
[Shuffle] key
• Use to switch the shuffle mode, in the order:
➜ Song Shuffle ➜ Album Shuffle ➜ Shuffle
OFF.
When the “Song Shuffle” is enabled, the
tracks in the current track list are played back
in random order, regardless of the order in
which they are recorded.
When the “Album Shuffle” is enabled, all of
the albums recorded in the iPod are selected in
random order, and tracks in the albums are
played back in the recorded order.
[Repeat] key
• Use to switch the repeat mode:
➜ 1-track Repeat ➜ All Repeat.
When “1-track Repeat” is enabled, the track
currently played back is played back
repeatedly.
When “All Repeat” is enabled, tracks in the
current track list are played back repeatedly.
[List] key
• Use to display the list of tracks currently
selected.
Note:
•This key is disabled while a shuffle mode is
specified.
[Option] key
• Use to change the playback speed while
playing the Audiobooks.
Information pane
*1: Displays status of Repeat, Shuffle play.
: 1-track Repeat
: All Repeat
: Song Shuffle
: Album Shuffle
*2: The title display shows, from top level down,
the Song title, Artist name, and Album title.
When a Podcast or Audiobooks which has
two or more chapters is played back, the
chapter title and chapter number are
displayed.
When the text is too long to be displayed, it
can be scrolled by touching the Information
pane.
Pausing playback
• This operation cannot be performed from the
AV Shortcut menu screen.
1. Touch the [6] key during playback.
Playback pauses.
2. To resume playback, touch the [6] key
again.
Playback resumes.
Play/Pause icon (6) display
Track No.
Play mode(*1)
Song title/
Artist name/
Album title(*2)
Progress/
Volume
indicator
Play time Remaining time
1
A
1
A
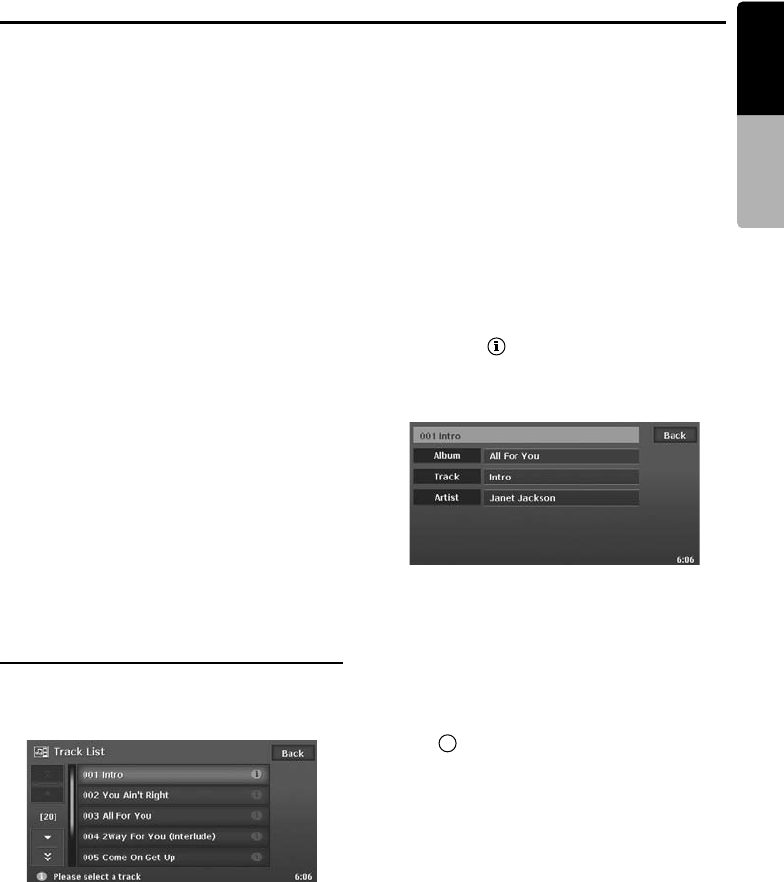
iPod Operations
53
MAX983HD
English Owner’s manual
Skipping a track (searching)
1. Touch the [R] or [F] key during playback.
Tracks are skipped, as many as the times the
button is pressed, and playback starts.
• Touching the [F] key starts playback from
the beginning of the next track.
• Touching the [R] key starts playback from
the beginning of the current track.
When this key is touched again within about
2 seconds, playback starts from the
beginning of the previous track.
• When a Podcast or Audiobooks which has
two or more chapters is played back,
touching the [R] or [F] key while
pausing moves the current location to the
beginning of the previous or next chapter.
• You can also use the [R] and [F]
(Search) buttons or the [Track] keys on the
AV Shortcut menu screen instead of the
[R] and [F] keys.
Fast forward and fast backward
1. Touch and hold the [X] or [x] key during
playback.
The playback speed becomes faster.
Releasing the key resumes the normal speed
playback.
• You can also use the [R] and [F]
(Search) buttons or the [Track] keys on the
AV Shortcut menu screen instead of the
[R] and [F] keys.
Track List operation
Touching the [List] key displays the following
Track List screen. The tracks to be played back
are listed in this screen.
Selecting the track of starting
playback
1. Displaying the Track List screen, touch the
desired Track key you wish to play.
The system starts playback from the specified
track.
• Touch the [c] or [C] key to scroll the list.
2. Touch the [Back] key to return to the previous
screen.
Displaying the track information
1. Displaying the Track List screen, touch the
desired Track key you wish to display
information.
• Touch the [c] or [C] key to scroll the list.
2. Touch the [ ] key displayed at the right of
the Track key.
The track information of specified track is
displayed.
3. Touch the [Back] key to return to the previous
screen.
Scrolling titles
When a title or other information displayed on the
screen is longer than the text area, you can
confirm the entire text by scrolling it.
1. Displaying the text you wish to scroll, touch
the [ ] key displayed at the right of the text
area.
The text will scroll once.
t
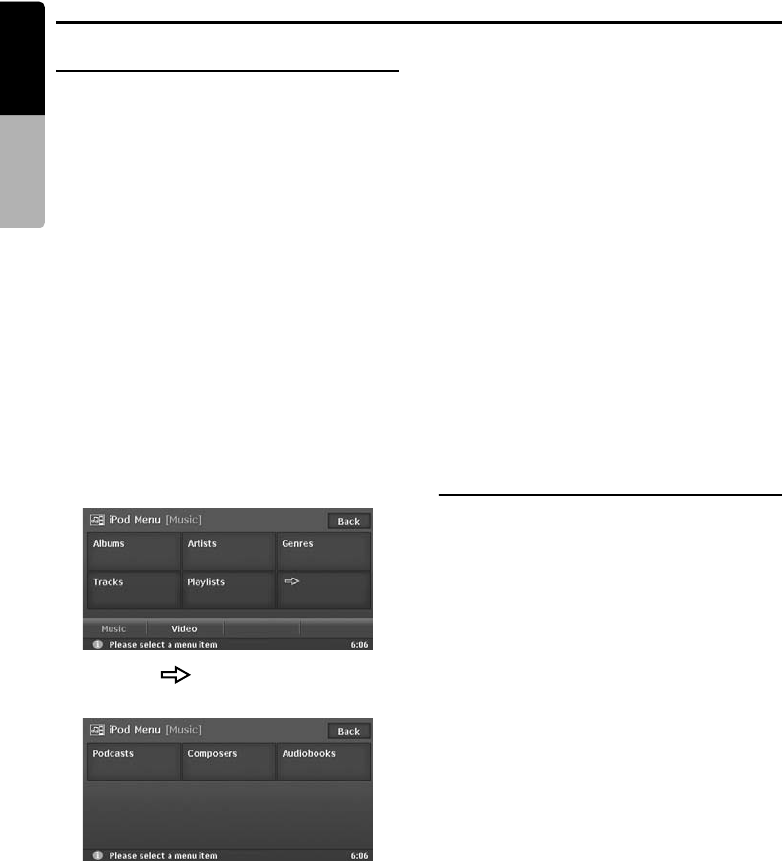
iPod Operations
54 MAX983HD
English Owner’s manual
iPod Menu operation
You can specify the album to play by narrowing
the following categories:
Albums:
The album list of all the albums recorded in the
iPod is displayed.
Artists:
You can narrow the albums to be listed by
specifying the artist name.
Genres:
You can narrow the albums to be listed by
specifying the genre and artist name.
Composers:
You can narrow the albums to be listed by
specifying the composer name.
In addition to the above, you can specify the
playlist, podcast, or audiobook to be played back.
Displaying the iPod Menu screen
1. Touch the [MENU] key.
The following iPod Menu screen is displayed.
2. Touch the [ ] (Next) key to display the
next menu screen.
Selecting a list item from the list
screen
1. Touch the desired Category key from the iPod
Menu screen to display the corresponding list
screen.
2. Touch the desired list item on the screen to
specify it.
• When an album list or playilst is specified,
the screen returns to the iPod mode screen
and playback starts from the first track of the
specified album/playlist.
• When a list of podcasts or audiobooks is
specified, the screen returns to the iPod
mode screen and the specified track is
played back.
• When another list is specified, the next list
appears. Repeat this operation until you
select the album to be played back.
• Touch the [c] or [C] key to scroll the list.
iPod video mode operation
(only for the iPod with video
features)
When you connect an iPod with video features by
using the optional connector cable for iPod with
video, you can enjoy the video data and
slideshow data stored in the iPod showing them
on the display of this unit.
Note:
•For the information on the compatible models to
the iPod video mode operations, see the Clarion
homepage (http://www.clarion.com).
•Do not connect the iPod to this unit when a Video
Playlists item is selected on the iPod.
•Set the Video Settings of the iPod to “TV Out: On”
and “TV Signal: PAL” before playing the visual data
stored in the iPod.
1. Touch the [MENU] key to display the iPod
Menu screen.
2. Touch the [Video] key to change to the Video
mode. The screen will be changed to the iPod
mode screen with the small video screen
displayed on the information pane.
In this condition, the iPod is turned into the
normal operation mode, and you can control
the iPod using the original controls of the iPod
(iPod operation mode).
• In the iPod operation mode, the following
buttons on this unit and its remote control
unit are operative as well: [R], [F],
[6] (this unit), [R], [F], [6] (remote
control unit)

iPod Operations
55
MAX983HD
English Owner’s manual
Note:
•The [Video] key is displayed only when a fifth
generation iPod is connected to the unit.
3. Play back your desired video data or
slideshow data from the iPod.
The specified video data will be displayed on
the information pane.
4. Touch the information pane.
The video data will be displayed on the whole
screen.
Note:
•“Audio Only” is displayed when the motorcar is
moving.
5. To return to the iPod mode screen, touch the
screen.
6. To terminate the Video mode, touch the
[MENU] key, then touch the [Music] key.
The video playback is terminated, and the
system returns to the audio playback mode.
Note:
•Video data may not be played back according to
the status of the iPod.
Selecting the screen size
When in the Video mode, you can change the
screen size of the video image to suit to the
screen panel.
1. Touch the screen to display the iPod mode
screen, then touch the [ ] key.
2. Touch the [Wide], [Cinema], or [Normal] key
to set the desired screen size.
• The factory default setting is “Wide”.
Wide:
The image is expanded so that the rectangle
of the image fits to the screen. The aspect
ratio of the image may be changed.
Cinema:
The image is expanded so that the left and
right edges of the image fit to the screen. The
top and bottom areas of the image may be cut
off.
Normal:
The image is expanded so that the top and
bottom edges of the image fit to the screen.
3. Touch the information pane to display the
video image on the whole screen.
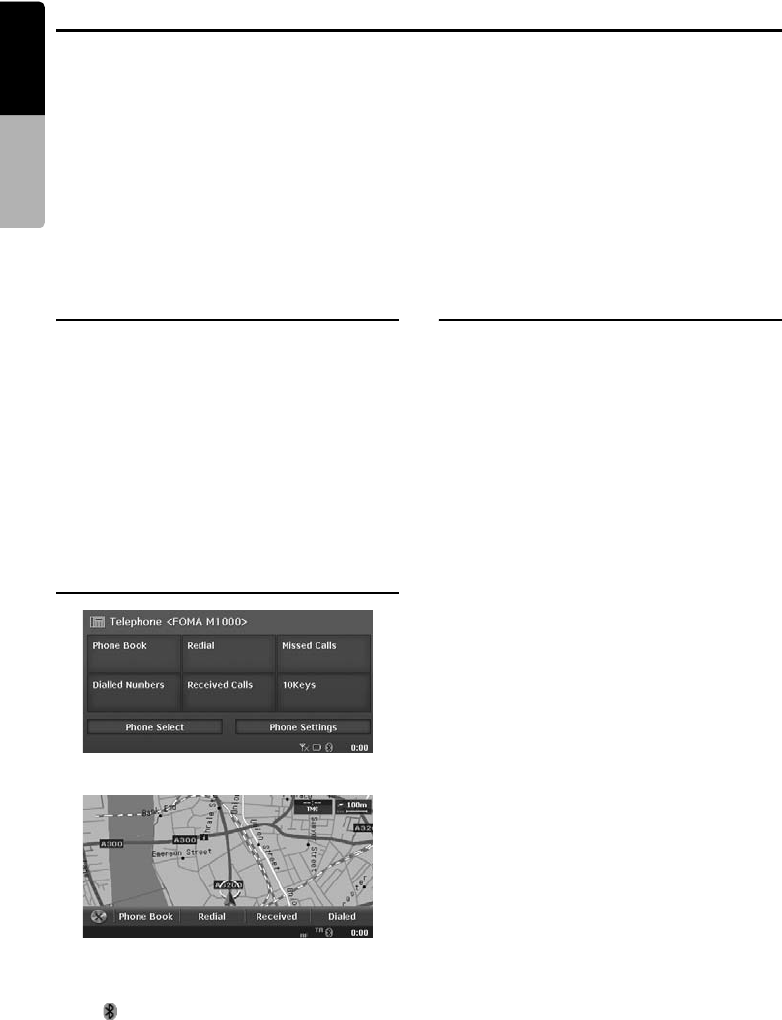
56 MAX983HD
English Owner’s manual
Telephone Operations
This function is enabled when the optional Bluetooth Interface Box is connected to this unit via CeNET.
The following functions are available:
• Listening to your telephone calls on the car speakers.
• Making a call using the Ten-Key pad screen, or using the Phone Book or Dialled/Received/Missed
calls records in the selected mobile phone.
• Making a call from the POI Information screen or from the Edit screen of the Address Book if the
telephone number is registered.
Note:
•Depending on a mobile phone, you may need to perform the operation of the Object Push transfer on the
mobile phone.
•Some mobile phones may not be able to transfer the Phone Book and record data.
•The Phone Book and record data transmission may take a long time. The operations of sending calls are
disabled during the data transmission.
Selecting the Telephone mode
1. Press the [SRC] (Source) button to display the
Source menu screen.
2. Touch the [Telephone] key to select the
Telephone mode.
The system changes to the Telephone mode,
and the Telephone mode screen is displayed.
• You can also select the Telephone mode
from the Destination menu screen by
touching the [Telephone] key.
Note:
•When the 2Zone function is turned on, touching the
[Telephone] key cancels the 2Zone function.
Telephone mode screen
●AV Shortcut menu on the Map screen
Note:
•The keys to make a call are disabled when no
connection with a mobile phone is established.
•The [] icon is displayed at the bottom of the
screen when the connection with a mobile phone is
established. (It blinks during the connection
operation.)
Telephone settings
Registering your mobile phone
(Pairing)
You can register up to 5 mobile phones.
1. Turn on the power of the mobile phone you
wish to register.
2. Touch the [Phone Select] key to display the
Phone Select screen.
3. Touch the [Add] key to display the Add New
Device screen.
4. Touch one of item keys to specify the device
type.
• Touch the [c] or [C] key to scroll the list.
•
When the device type of your mobile phone
is not listed, select the [
General Device
] key.
5. Touch the [Search] or [Wait] key.
[Search]: The Interface Box starts searching
a mobile phone.
[Wait]: The Interface Box waits to be detected
by a mobile phone.
When mobile phones are detected, the
Device Select screen is displayed.
6. Touch the desired device key you wish to
register, then enter the Pass key code on your
specified mobile phone.
• For the Pass key code, see the operation
manual of the Bluetooth Interface Box. You
can also confirm the Pass key code by the
Bluetooth Device Information screen under
the Phone Settings menu.
• Perform the Object Push transfer operation
when your mobile phone requires it. For
details of the operation, see the operation
manual of your mobile phone.
When the pairing operation completes, the
registered mobile phone is set as the current
telephone, and the display returns to the
Phone Select screen.
• You can delete the registered mobile phone
by touching the [Delete] key on the Phone
Select screen.

Telephone Operations
57
MAX983HD
English Owner’s manual
Selecting the mobile phone
1. Touch the [Phone Select] key to display the
Phone Select screen.
2. Touch the desired Telephone key you wish to
use.
The corresponding mobile phone is set as the
current telephone.
3. Touch the [Back] key to return to the previous
screen.
Setting the telephone features
1. Touch the [Phone Settings] key to display
the Phone Settings screen.
2. Perform setting for the desired item. See the
following sections for detail.
3. Touch the [Back] key to return to the previous
screen.
●Setting Automatic Connection
The Interface Box automatically reconnects the
mobile phone after the connection is lost or the
system is restarted.
• The factory default setting is “ON”.
1. Touch the [ON] or [OFF] key of the Automatic
Connection item to set the function ON or
OFF.
●Setting Auto Answer
When a call comes in, the Interface Box
automatically connects the call approx. 8
seconds after the calling starts.
• The factory default setting is “ON”.
1. Touch the [ON] or [OFF] key of the Auto
Answer item to set the function ON or OFF.
●Setting Microphone Gain
You can adjust the input level of the microphone
in 3 levels.
1. Touch the [–] or [+] key of the Microphone
Gain item to adjust the input level.
●Setting Ring Tone Volume
This system can generate a ring tone if the ring
tone of the mobile phone cannot be used.
You can adjust the volume of the ring tone in 8
levels.
• The factory default setting is “0”(OFF)
1. Touch the [–] or [+] key of the Ring Tone
Volume item to adjust the volume level.
Note:
•Normally,set to “0” to use the ring tone of the
mobile phone, and adjust the volume from the
mobile phone.
●Confirming information of Interface
Box
You can confirm the various information
concerning the Bluetooth Interface Box.
1. Touch the [Info] key of the Bluetooth Device
Information item to display the information on
the screen.
●Setting Phone Speaker
You can select the output speaker of telephone
calls.
• The factory default setting is “Right”.
1. Touch the [C] key to display the next screen.
2. Touch the [Left] or [Right] key of the Phone
Speaker item to select the speaker.
[Left]: Telephone calls are heard from the
front left speaker.
[Right]: Telephone calls are heard from the
front right speaker.
Telephone operations
Making a call using the Ten-Key pad
1. Touch the [10Keys] key to display the Ten-
Key pad screen.
2. Enter the telephone number by using the Ten-
Key pad displayed on the screen.
3. Touch the [ ] key to call the entered
number.
• The following Telephone Interrupt screen is
displayed during phone call.
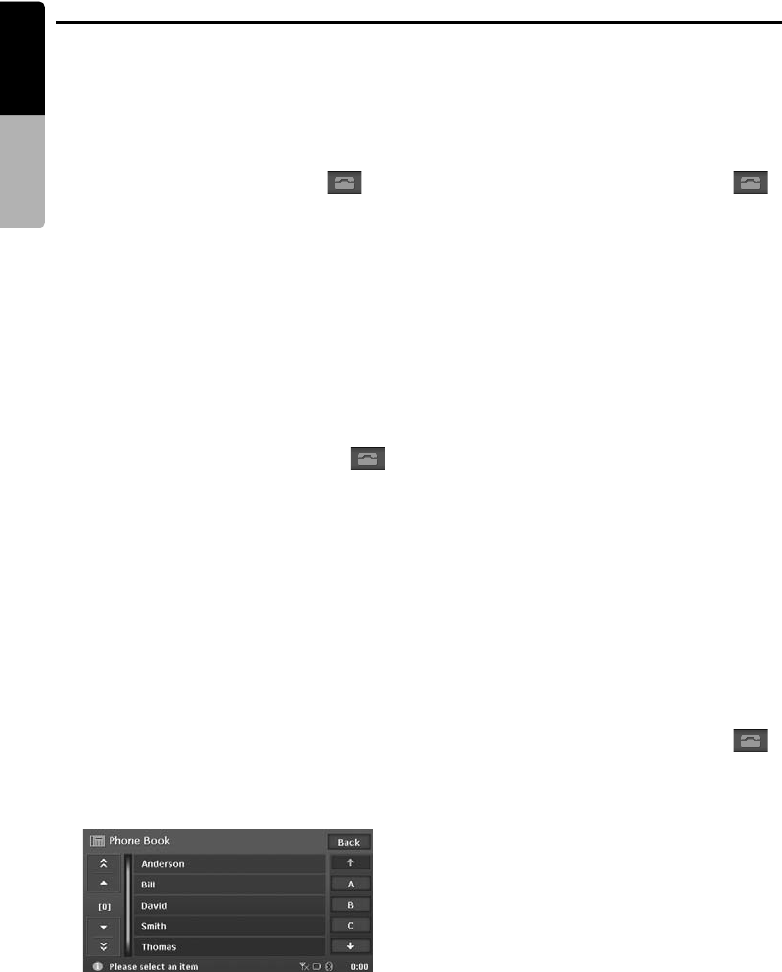
Telephone Operations
58 MAX983HD
English Owner’s manual
• Touch the [Private] key to talk using the
mobile phone cancelling the hands-free
function. To return to the hands-free mode,
touch the [HFS] key.
• Touch the [Mic Mute] key to turn off the
microphone so that the sound does not be
heard by the partner.
4. When the call is finished, touch the [ ] key
to hang up.
The display returns to the Telephone mode
screen.
Note:
•Depending on the mobile phone, the Telephone
Interrupt screen may be closed and the connection
with the Interface Box may be disconnected when
entering the Private mode.
Redialling
1. Touch the [Redial] key to call the last dialled
number.
The Telephone Interrupt screen is displayed,
and calling starts.
• When the call is finished, touch the [ ]
key to hang up.
Note:
•When the dialed telephone number cannot be
transfered from the mobile phone, “Unknown” is
displayed instead of the number.
Using the Phone Book
The system will capture the phone book data
registered in the selected mobile phone. You can
use it to make a call from this unit.
Note:
•Some mobile phones may not be able to transfer
the Phone Book data.
•Only the Phone Book items with at least one
telephone number registered in the captured
Phone Book data are displayed on the Phone Book
screen.
1. Touch the [Phone Book] key to display the
Phone Book screen.
2. Touch the desired Name key you wish to dial.
• Touch the [c] or [C] key to scroll the list.
• When you touch the alphabet key at the
right of the screen, the list scrolls to the item
which starts with the specified character.
3. Touch the desired Number key you wish to
dial.
The confirming message will appear.
4. Touch the [Yes] key to call the specified
number.
The Telephone Interrupt screen is displayed,
and calling starts.
• When the call is finished, touch the [ ]
key to hang up.
Using Dialled/Received/Missed
Calls records
The system will capture the Dialled/Received/
Missed calls record data in the selected mobile
phone. You can confirm it and use it to make a
call from this unit.
Note:
•Some mobile phones may not be able to transfer
the record data.
•Depending on the mobile phone, the record data
may not be updated correctly when a call is made
in the Private mode.
1. Touch the [Dialled Numbers], [Received
Calls], or [Missed Calls] key according to the
type of record list you wish to display.
The corresponding record list screen is
displayed.
• Touch the [c] or [C] key to scroll the list.
• Touch the [Back] key to return to the
previous screen.
2. Touch the desired Record key you wish to
dial.
The confirming message will appear.
3. Touch the [Yes] key to call the specified
number.
The Telephone Interrupt screen is displayed,
and calling starts.
• When the call is finished, touch the [ ]
key to hang up.

59
MAX983HD
English Owner’s manual
CCD Camera Operations
If the optional CCD rear camera is installed in this system, the rear view image is displayed on the screen
when the gear lever is put in the reverse gear position. In addition, this system can display guidelines on
the camera image, which helps you to perceive the size of the vehicle.
Note:
•The CCD camera image is not displayed on the
rear monitor.
Displaying the Guidelines on
the camera image
1. Touch the screen when the rear view image is
displayed.
The [Guide line] key is displayed.
• The [Guide line] key will disappear 3
seconds later.
2. Touch the [Guide line] key.
A confirmation screen is displayed.
3. Touch the [OK] key.
The guidelines are displayed on the screen
image.
• Touching the [Guide line] key turns the
guidelines display on/off.
Adjusting the guidelines
position
You can adjust the position of the guidelines so
that the size of the vehicle is represented.
1. Display the guidelines by the procedure
previously described.
2. Touch the [Setting] key.
The four control point appears on the
guidelines, and the control keys appear at the
bottom of the screen.
3. Select the control point you wish to adjust the
position by touching it, then move the control
point by using the [e], [E], [ ], or [ ] key.
[e], [E], [], []:
Touching these keys moves the selected
control point by 1 dot.
Touching and holding these keys moves the
selected control point by 5 dots.
[Camera]:
Hides/displays the camera image.
[Grid]:
Displays/hides the grid on the screen.
4. When the adjustment completes, touch the
[Back] key to quit the adjustment mode.
e
e
e
e

60 MAX983HD
English Owner’s manual
Rear Monitor Operations
By installing the optional rear monitor in this system, the rear passengers can enjoy visual sources
played on the main unit (this unit). Moreover, they can enjoy the visual sources different from the media
sources played on the main unit by using the 2Zone function. ➜ “2Zone Function” (P. 19)
Note:
•When 2Zone function is turned on, use the optional
infrared headphone systems to listen to the Rear
zone sound.
●Media sources displayed on the rear
monitor
The following media sources played on the main
unit can be displayed on the rear monitor:
• DVD video
• TV Tuner
•AUX
Operations on the rear
monitor
Note:
•See also the operation manual of the rear monitor.
1. Turn on the power of the rear monitor.
2. Switch the Source modes of the rear monitor
so that the video image output from the main
unit is displayed.
3. Play your desired visual source on the main
unit.
• Control the visual source from the main unit
or using the optional remote control unit.
➜ “Remote Control Operations” (P. 61)
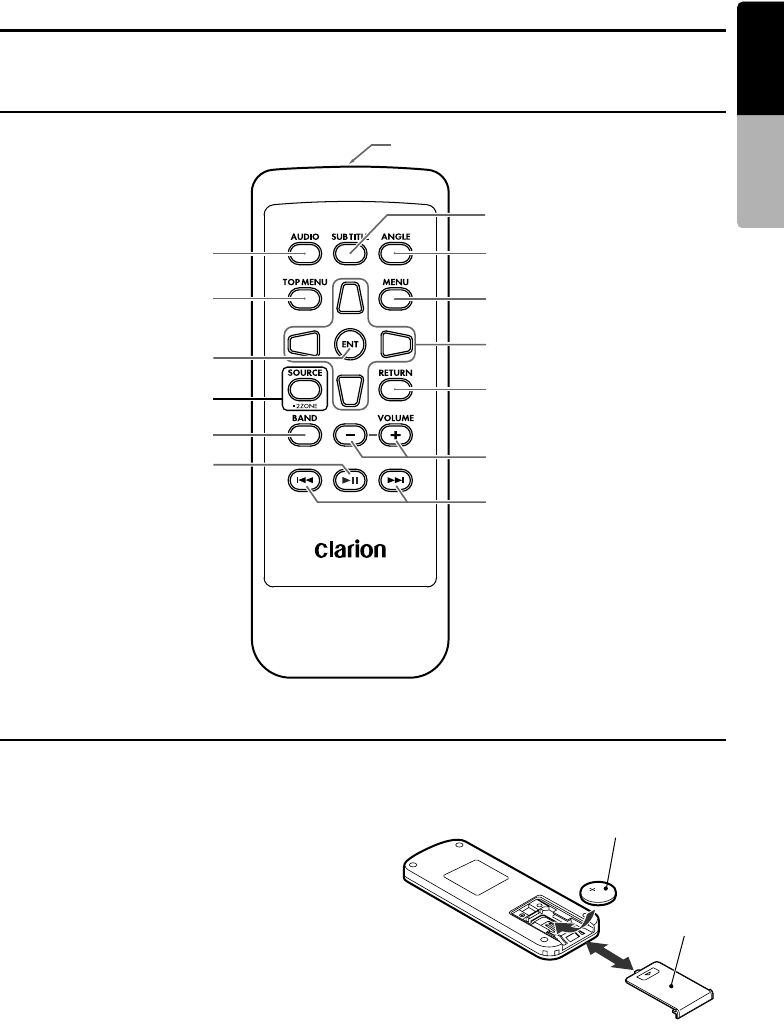
61
MAX983HD
English Owner’s manual
Remote Control Operations
You can use the optional remote control unit to control the AV features of this unit.
Name of the Buttons
Inserting the Battery
1. Slide the rear cover in the direction of the
arrow, and remove it.
2. Insert the CR2025 battery bundled with the
remote control unit in the directions shown in
the figure, then close the rear cover.
Note:
Using battery improperly can cause it to explode.
Take note of the following points:
•Do not short-circuit, disassemble or heat battery.
•Do not dispose of battery into fire or flames.
•Dispose of spent battery properly.
[AUDIO]
[SUBTITLE]
[ANGLE]
[MENU]
[E], [e], [T], [t]
[RETURN]
[–], [+]
[R], [F]
[TOP MENU]
[ENT]
[SOURCE]
[BAND]
[6]
Signal transmitter
Operating range: 30° in all
directions
CR2025 battery
Rear side
Rear cover

Remote Control Operations
62 MAX983HD
English Owner’s manual
Functions of the Buttons
• When the 2Zone function is ON, the controls
work upon the Rear zone only.
[AUDIO] button
• Press to set the Audio language. (in DVD Video
mode)
[SUB TITLE] button
• Press to display subtitles. (in DVD Video mode)
[ANGLE] button
• Press to set the Angle function of the DVD
video when the Angle mark is displayed. (in
DVD Video mode)
(Available only when the Angle function on the
DVD Setup menu is set to ON.)
[TOP MENU] button
• Press to display the Top Menu screen stored
on DVD video disc. Some discs are not
displayed the top menu screen. (in DVD Video
mode)
[MENU] button
• Press to display the Menu screen stored on
DVD video disc. (in DVD Video mode)
[ENT] button
• Press to fix the selected button item on the
Menu screen of a DVD video. (in DVD Video
mode)
[E], [e], [T], [t] buttons
• Press to select button items displayed on the
Menu screen of a DVD video. (in DVD Video
mode)
[SOURCE] button
• Press to switch the source modes such as FM/
AM mode, DVD/CD mode, etc. (in any mode;
only DVD Video, TV Tuner, and AUX modes
are selectable when 2Zone ON)
[RETURN] button
• Press to switch to the previous screen while the
Menu screen of a DVD video is being
displayed. However, it may occur that this
button operation dose not work on some discs.
(in DVD Video mode)
[BAND] button
• Switches reception bands. (in Tuner/TV Tuner
modes; disabled in Tuner mode when 2Zone
ON)
[–], [+] buttons
• Decreases or increases the volume. (in any
mode; disabled when 2Zone ON)
[6] button
• Press to play or pause video and audio media.
(in DVD Video/iPod modes; disabled in iPod
mode when 2Zone ON)
• Keep pressing more than 1 second to stop
video playback. (in DVD Video mode)
[R], [F] buttons
• Press to select the next lower or higher preset
station. (in Tuner/TV Tuner modes; disabled in
Tuner mode when 2Zone ON)
• Keep pressing more than 1 second to seek
down or up. (in Tuner/TV Tuner modes;
disabled in Tuner mode when 2Zone ON)
• Press to select the next lower or higher chapter
number. (in DVD Video mode)
• Press to select the next lower or higher track.
(in CD, MP3/WMA, Music Catcher, and iPod
modes; disabled when 2Zone ON)
• Keep pressing to perform fast-backward or
fast-forward playback. (in DVD Video, CD,
MP3/WMA, Music Catcher, and iPod modes;
enabled only in DVD Video mode when 2Zone
ON)
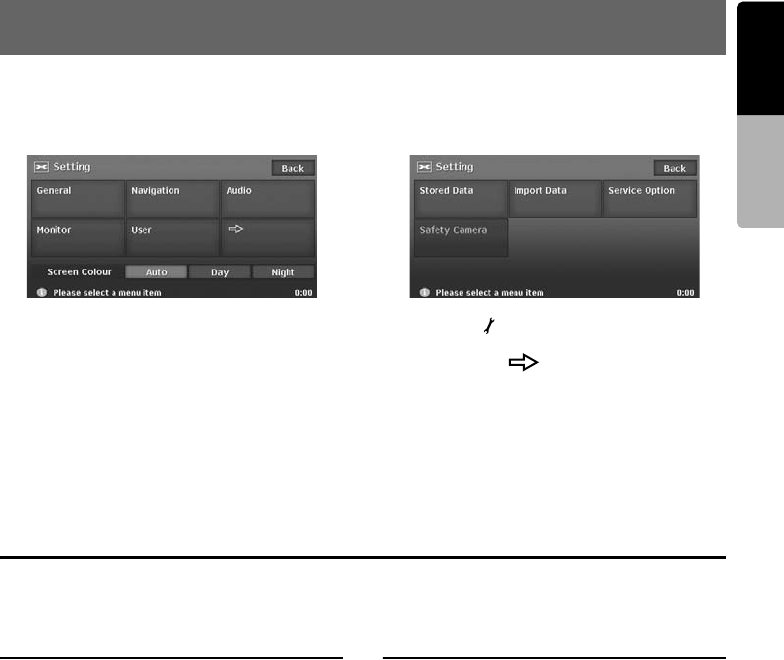
63
MAX983HD
English Owner’s manual
5. System Setting
You can set various settings of this system from the Setting menu.
Setting menu screen 1 Setting menu screen 2
1. Press the [ ] (Set) button.
The Setting menu screen is displayed.
Touching the [ ] (Next) key displays the
additional Setting menu screen.
2. Touch the desired menu item.
For the operation procedure hereinafter, see
the explanation of each section.
Note:
•For details about the Screen Colour item, see
“Setting the Screen Colour mode” (P. 67)
General Settings
When you touch the [General] key from the Setting menu, you can set various settings concerning the
general features.
Language setting
You can change the language used by the
system. As for “English”, you can also select the
unit of distance (km/mile).
“Language”:
You can select the language from the following
language keys:
[English (mile)] key
[English (km)] key
[Français] key
[Deutsch] key
[Español] key
[Italiano] key
[Nederlands] key
[Português] key
[Svenska] key
[Dansk] key
Note:
•For the languages other than English, distances
are displayed using the metric system.
Clock settings
You can set various settings concerning the
clock.
1. Touch the [Setting] key of the “Clock” item.
The Clock menu screen is displayed.
2. Touch the desired menu item to set.
“On-Screen Clock”:
Shows/hides the clock display on the screen.
“Clock Format”:
Changes the clock format to 12-hour/24-hour
system.
“Daylight Saving Time”:
Selects whether to apply the daylight saving
time or not.
“Offset Adjust”:
Adjusts the current time manually. The
adjustment is applied as offset value related
to the time signal received via GPS. Touching
the [+] or [–] key shifts the time by 1 minute.
Normally, it is not necessary to adjust
because the time is received from the GPS
signals automatically.

General Settings
64 MAX983HD
English Owner’s manual
“Time Zone”:
Sets the time zone. You can select from the
list of 74 regions including the [Auto] key.
When you select the [Auto] key, the clock is
automatically switched to the time zone of the
country at the vehicle position.
Changing Skin
You can change the screen design by using the
skin data stored in the hard disk drive.
1. Touch the [Select] key of the “Skin Change”
item.
2. Touch the desired item key you wish to set.
Note:
•This operation is disabled while recording a CD or
loading/ejecting a disc.
Beep Sound
You can turn ON/OFF the beep sounds and
menu operation sounds.
Keyboard Type
You can change the keyboard layout used for
name entry.
1. Touch the item key of the “Keyboard” item.
2. Select the keyboard type by touching one of
the following keys:
[ABCDEF] key
[QWERTY] key
[QWERTZ] key
[AZERTY] key
Voice Recognition
You can turn ON/OFF the voice recognition
feature (optional). When you touch the [OFF]
key, the voice recognition is not available.
Voice Feedback
You can turn ON/OFF the voice feedbacks which
are responded when using voice commands.
Blinking LED
When this function is set to “ON”, the Blinking
LED indicator will blink when the power is turned
off.
Antenna
Select the [Auto Antenna] when your vehicle
has the auto antenna.
Note:
•When the “Auto Antenna” is selected, you can
extend/collapse the antenna by keeping pressing
the [ INFO] button more than 2 seconds. Be sure
to collapse the antenna before entering in a place
with low ceiling such as a multistory car park.
•Select [Others] for the vehicle equipped with no
auto antenna. Otherwise, the radio reception may
be disturbed extremely.
Security Mode
To set this function ON, setting a PIN code
(called as “Personal Code”) is required. When
you set your Personal Code, a theft is prevented
by disabling the operation of the unit.
In addition, set the Blinking LED function to “ON”
to improve the effect of this function.
Setting the Security Mode
1. Touch the [ON] key of the Security Mode item.
The Set Code screen appears.
2. Enter your desired 4-digit Personal Code by
using Ten-Key pad displayed on the screen,
then touch the [OK] key.
• Touch the [ ] key when you make a
mistake in entering.
3. Enter the same Personal Code again for
confirmation, then touch the [OK] key.
The entered Personal Code will be set, and it
will return to the previous screen.
Resetting the Security Mode
1. Touch the [OFF] key of the Security Mode
item.
The Erase Code screen appears.
2. Enter your 4-digit Personal Code by using
Ten-Key pad, then touch the [OK] key.
The message “Code erased” appears, and it
will return to the previous screen.
Personal Code entry
The Personal Code screen will be displayed
when turning the power on after performing the
following operations:
• The car battery was replaced.
• The backup power was cut off.
• The Reset button was pressed.
Note:
•If you forgot your Personal Code, please consult
your dealer or an authorized service centre.

General Settings
65
MAX983HD
English Owner’s manual
1. Enter your Personal Code currently set.
When the correct Personal Code is entered,
the unit will restart from the initial startup
screen.
Note:
•When you enter a wrong Personal Code, the
message “Code incorrect” is displayed and the
Personal Code entry is prohibited for a while. This
prohibited time is changed according to the
number of times of wrong code entry as follows:
•1 to 6 times: 15 seconds
•7 times or more: 15 minutes
System Check
You can check the connection status of the iPod
and Bluetooth Interface Box.
Note:
•This operation is disabled while recording a CD or
loading/ejecting a disc.
1. Touch the [Check] key of the System Check
item.
The System Check screen is displayed, and
connection statuses are shown.
2. Touch the [Check] key to perform system
check.
A confirmation screen appears.
3. Touch the [Yes] key.
The system will be restarted.
System Information
You can confirm the version number of the map
data and the system software. In addition, you
can confirm the remaining capacity for the Music
Catcher here.
1. Touch the [Info.] key.
The system information is displayed.

66 MAX983HD
English Owner’s manual
Navigation Settings
When you touch the [Navigation] key from the Setting menu, you can set various setting concerning the
navigation system. For details, see the Navigation Manual.
Audio Settings
When you touch the [Audio] key from the Setting
menu, you can set various settings concerning
the audio features.
Adjusting the balance/fader
1. Touch the [Edit] key of the BAL/FAD item.
2. Touch the [E] or [e] key to adjust the fader
level.
• The factory default setting is “0”.
• Adjustment range: front 12 to rear 12
• You can also adjust the level by directly
touching the desired position of the
coordinate.
[E]: Emphasises the sound from the front
speakers.
[e]: Emphasises the sound from the rear
speakers.
3. Touch the [ ] or [ ] key to adjust the
balance level.
• The factory default setting is “0”.
• Adjustment range: left 13 to right 13
• You can also adjust the level by directly
touching the desired position of the
coordinate.
[]: Emphasises the sound from the left
speakers.
[]: Emphasises the sound from the right
speakers.
Adjusting the BASS
The bass gain, bass frequency (centre
frequency) and bass Q can be adjusted.
1. Touch the [Edit] key of the BASS item.
2. Touch the [–] or [+] key for the desirable type
to adjust to a desirable level.
Gain:
–6 to 8 (The factory default setting is “0”.)
FREQ:
50Hz, 80Hz, 120Hz (The factory default
setting is “50Hz”.)
Q:
1, 1.25, 1.5, 2 (The factory default setting is
“1”.)
Adjusting the MID
The MID gain, MID frequency (centre frequency)
and MID Q can be adjusted.
1. Touch the [Edit] key of the MID item.
2. Touch the [–] or [+] key for the desirable type
to adjust to a desirable level.
Gain:
–6 to 6 (The factory default setting is “0”.)
FREQ:
700Hz, 1kHz, 2kHz (The factory default
setting is “1kHz”.)
Q:
1.5, 2 (The factory default setting is “2”.)
Adjusting the TREBLE
The treble gain and treble frequency (centre
frequency) can be adjusted.
1. Touch the [Edit] key of the TREBLE item.
2. Touch the [–] or [+] key for the desirable type
to adjust to a desirable level.
Gain:
–6 to 6 (The factory default setting is “0”.)
FREQ:
8kHz, 12kHz (The factory default setting is
“12kHz”.)
Turning on/off the Magna
Bass EX
The Magna Bass EX does not adjust the low
sound area like the normal sound adjustment
function, but emphasises the deep bass sound
area to provide you with a dynamic sound.
• The factory default setting is “OFF”.
Switching the CD Recording
mode
You can set the CD Recording mode to [Auto] or
[Manual]. When the [Auto] is set, recording CD
is automatically performed when a CD is set into
the DVD player.
• The factory default setting is “Auto”.
e
e
e
e

67
MAX983HD
English Owner’s manual
Adjusting the Monitor
Setting the Screen Colour
mode
The system has two Screen Colour modes: the
Day mode and the Night mode. Each Screen
Colour mode has the own dimmer level setting.
To switch to the Day mode or Night mode
manually, touch the [Day] or [Night] key of the
Screen Colour item on the Setting menu.
When the [Auto] key is selected, the Screen
Colour mode is automatically switched according
to whether the illumination of the vehicle is turned
off or on.
Monitor settings
When you touch the [Monitor] key from the
Setting menu, you can adjust the Dimmer, Bright,
Colour, Hue, and Contrast level of the monitor
screen.
Note:
•Adjusting the Bright, Colour, Hue, and Contrast
level is enabled only when a video image is played
on this system.
•The dimmer level adjustment operates upon the
current Screen Colour mode.
1. Touch the [Monitor] key to display the
Monitor menu screen.
2. Touch the [Dimmer], [Bright], [Colour],
[Hue], or [Contrast] key to select adjustment
type.
3. Touch the [+] or [–] key to adjust the level.
“Bright”: Adjusts the brightness of the
display.
[+]: Press to make image brighter.
[–]: Press to make image dimmer.
“Colour”: Adjusts the colour saturation.
[+]: Press to increase colour depth.
[–]: Press to decrease colour depth.
“Hue”: Adjusts the tone of colour (red is
emphasised or green is emphasised).
[+]: Press to increase green.
[–]: Press to increase red.
“Contrast”: Adjusts the contrast of the
display.
[+]: Press to increase the contrast.
[–]: Press to decrease the contrast.
“Dimmer”: Adjusts the panel brightness.
[+]: Press to make image brighter.
[–]: Press to make image dimmer.
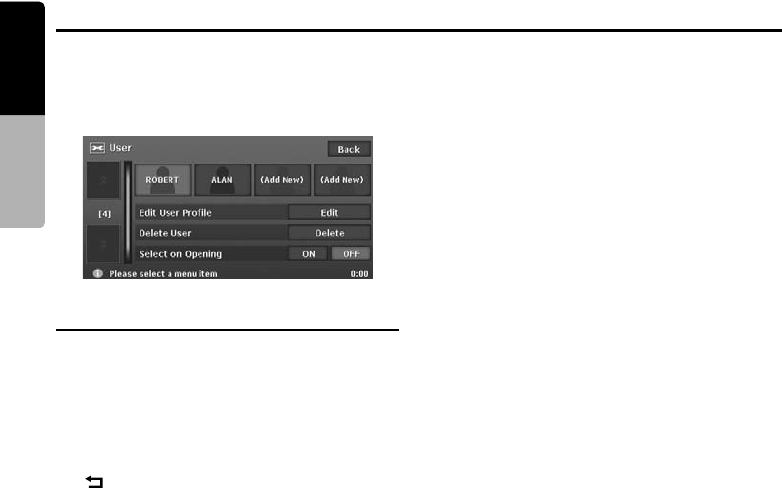
68 MAX983HD
English Owner’s manual
User Settings
When you touch the [User] key from the Setting menu, you can register User Profiles to personalise
Favourite/Frequent/Recent Album list data.
• Up to 4 User Profiles can be registered.
Registering the User Profile
1. Touch the desired [(Add New)] key you wish
to register.
A confirmation screen is displayed.
2. Touch the [Yes] key.
The Name entry screen is displayed.
3. Enter desired name of the User Profile by
touching the characters on the screen.
[]
Deletes the last entered character.
[Back]
Returns to the previous screen.
[Lower]
Displays lower case characters input
keyboard.
[Upper]
Displays upper case characters input
keyboard.
[All Clear]
Deletes all characters entered so far.
[A-Z]
Displays the alphabetic input keyboard.
[Accent]
Displays the accent characters input
keyboard.
[0-9]
Displays the number input keyboard.
[Symbols]
Displays the symbol characters input
keyboard.
[OK]
Fixes the entered characters, and proceeds to
the next step.
4. When the name entry completes, touch the
[OK] key.
The new user profile is created, and a
confirmation screen is displayed.
5. Touch the [No] key to return to the previous
screen.
• Touching the [Yes] key restarts the system
with the new User Profile activated.
6. Edit the new User Profile by the following
procedures.
Editing the User Profile
You can edit the details of the registered User
Profile by the following procedure.
1. Touch the [Edit] key of the Edit User Profile
item.
The Edit User Profile screen is displayed.
2. Touch the desired User Profile key you wish
to edit.
The User Profile screen is displayed.
• You can also register the new User Profile
by touching [(Add New)] key. ➜
“Registering the User Profile” (P. 68)
3. Touch the [Name] key if you wish to edit the
name.
Edit the name, then touch the [OK] key to
return to the User Profile screen.
4. Touch the [Birthday] key if you wish to enter.
Enter the birthday information using the Ten-
Key pad displayed on the screen, then touch
the [OK] key to return to the User Profile
screen.
• Once you enter the Birthday information,
you cannot leave the entry field in blank.
5. Touch the [Image] key if you wish to assign an
image.
Touch the desired image displayed on the
screen you wish to assign to, then touch the
[OK] key to return to the User Profile screen.
• Once you assign an image, you cannot
leave the entry field in blank.
• Touch the [User] key to assign an image
imported by using SD cards.
6. Touch the [Memo] key if you wish to enter.
Enter the desired text information using the
keyboard displayed on the screen, then touch
the [OK] key to return to the User Profile
screen.
• Once you enter the Memo information, you
cannot clear it.

User Settings
69
MAX983HD
English Owner’s manual
7. When editing User Profile completes, touch
the [Back] key to return to the previous
screen.
Deleting the User Profile
Note:
•You cannot delete the current User Profile. Delete
it after switching to another User Profile.
1. Touch the [Delete] key of the Delete User
item.
The Delete User screen is displayed.
2. Touch the desired User Profile key you wish
to delete.
A confirmation screen is displayed.
3. Touch the [Yes] key to delete the selected
User Profile.
The selected User Profile is deleted, then
returns to the previous screen.
Switching the User Profile
Note:
•This operation is disabled while recording a CD or
loading/ejecting a disc.
1. Touch the desired User Profile key you wish
to switch to.
A confirmation screen is displayed.
2. Touch the [Yes] key to switch to the selected
User Profile.
The system will be restarted with the selected
User Profile.
Setting Select on Opening
Touch the [ON] or [OFF] key of the Select on
Opening item.
When this setting is set to “ON”, the User Profile
screen to select the User Profile is displayed
when turning on the power of this unit. ➜
“Turning the power on” (P. 12)
70 MAX983HD
English Owner’s manual
Setting Stored Data
From the Stored Data menu, you can register/edit various data used in the navigation system. For
details, see the Navigation Manual.
Importing Data Using the SD Card
From the Import Data menu, you can import the downloaded data from the website. For more information
about the installation method and the function, see the Clarion homepage.
1. Touch the [ ] (Next) key from the Setting
menu.
2. Touch the [Import Data] key to display the
Import Data menu.
Note:
•When you perform the operation of data import,
confirm that the SD card on which the relevant data
is stored has been set to the SD card slot.
To use the SD card
1. Press the [7OPEN/CLOSE] button to open
the operation panel.
2. Confirming the orientation of the SD card,
insert the SD card surely to the SD card slot
until it stops.
Note:
•For the detailed information on using SD cards,
see “Setting/Ejecting an SD Card” (P. 17).
CAUTION
Data may be broken when using SD cards in
the following situation:
When disconnecting the SD card or turning
the power off while writing or reading data.
When affected by static electricity or electric
noises.
It is recommended that you back up your
important data to a personal computer by
using the SD card.
Skin
You can import the Skin data stored in the SD
card into the hard disk drive.
Touch the [Import] key of the “Skin” item, then
operate according to the displayed messages.
To delete the data imported to the hard disk drive,
touch the [Delete] key.
Image
You can import the image data stored in the SD
card into the hard disk drive.
Touch the [Import] key of the “Image” item, then
operate according to the displayed messages.
To delete the data imported to the hard disk drive,
touch the [Delete] key.
Note:
•A special application is required for preparing
image data used in this system. You can download
this application from the Clarion homepage (http://
www.clarion-eu.com/).
Album Information
You can import/export the Album Information
data into/from the hard disk drive.
The Gracenote Media Database has the album/
track information data used in the Music Catcher
mode. Exporting the data to a PC, you can obtain
the latest information from the Gracenote Media
Database.
“Import”
Touch the [Import] key of the “Album
Information” item, then operate according to the
displayed messages.
“Export”
Touch the [Export] key of the “Album
Information” item, then operate according to the
displayed messages.
Note:
•A special application is required for obtaining the
information. You can download this application
from the Clarion homepage (http://www.clarion-
eu.com/).

Importing Data Using the SD Card
71
MAX983HD
English Owner’s manual
Extra POI
You can import the Extra POI data stored in the
SD card into the hard disk drive.
Touch the [Import] key of the “Extra POI” item,
then operate according to the displayed
messages.
To delete the data imported to the hard disk drive,
touch the [Delete] key.
Safety Camera
You can import the location database of Safety
Cameras stored in the SD card to the hard disk
drive. Touch the [Import] key of “Safety
Camera”, then operate according to the
displayed messages. To delete the data imported
to the hard disk drive, touch the [Delete] key.
Note:
•This function displays the locations of Safety
Cameras on the map using the imported location
database of the Safety Camera on the hard disk
drive, and warns that the vehicle approaches the
location. For details, see the Clarion's homepage.
•Be sure to import the location database of Safety
Cameras while the vehicle is stopped. The
message “Reading Safety Camera data.”
disappears when the import is finished. If the
vehicle starts to move before the message
disappears, the import will be cancelled.
72 MAX983HD
English Owner’s manual
Service Options
From the Service Option menu, you can perform the operation such as displaying a demonstration of the
navigation system, backup or restore of stored data, and resetting to the factory settings.
1. Touch the [ ] (Next) key from the Setting
menu.
2. Touch the [Service Option] key to display the
Service Option menu.
Demonstration
Displays the demonstration of the route
guidance.
“Demo”:
Touch the [Select] key, then touch the desired
demonstration course to play.
Backing up User Data
You can back up the data currently stored in this
system to an SD card.
Note:
•This function saves the following data: the data of
the Stored Locations, the route data, the data
registered in Favourite/Frequent list, the setting
data of the Settings menu.
•The recorded music data, Playlist data, and data
imported using SD cards (Skin, Image, Album
Information, Extra POI) cannot be backed up.
“Backup User Data”:
When touching the [Backup] key, a screen with
a confirmation message appears. Operate
according to the guidance on the screen.
Restoring User Data
You can restore data backed up by using an SD
card.
Note:
•When you perform backup/restore of data of two
different systems, the stored data on the restored
system will be lost. Be sure to back up data of this
system to restore to before performing the restore
operation.
“Restore User Data”:
When touching the [Restore] key, a screen with
confirmation message appears. Operate
according to the guidance on the screen.
Resetting to the Factory
Settings
You can return this system to the status after
purchase.
Note:
•When the system is reset to the factory settings, all
stored data is erased (including the music data in
the Music Catcher). It is recommended that you
backup all data you want to keep.
“Reset to Factory Setting”:
When touching the [Reset] key, a screen with
confirmation message appears. Operate
according to the guidance on the screen.
Software & Map Update
You can update the system software and the
map data.
“Software & Map Update”
When touching the [Start] key, a screen with
message prompting to insert the update disc
appears. Operate according to the guidance on
the screen.
Screen Adjustment
The position and sharpness of the screen can be
adjusted.
“Screen Adjustment”:
After touching the [Adjust] key, adjust the screen
position by touching the [J], [K], [j], and [k] key.
Touch the [1] or [2] key to select a setting at
which the screen is displayed clearly.

73
MAX983HD
English Owner’s manual
Setting Safety Camera
From the Safety Camera menu, you can set the Safety Camera.
1. Touch the [ ] (Next) key from the Setting menu.
2. Touch the [Safety Camera] key to display the Safety Camera menu.
3. Touch the desired menu item to set.
“Show Icon on Map”:
Turns ON/OFF the Safety Camera Icon display on the map.
“Warning & Sound”:
Turns ON/OFF both of the warning indication and alarm sound when the vehicle gets near a Safety
Camera location.
“Camera Location”:
Touch the [List] key to display the list of the Safety Camera locations. Touching an item of the list
displays the icon at the location of the Safety Camera on the right map.
Note:
•These settings are enabled when the Safety Camera data is stored in the hard disk. ➜ “Safety Camera”
(P. 71)
74 MAX983HD
English Owner’s manual
6. Others
Voice Command Operations
This system has built in voice recognition function. You can perform fundamental operations by saying
the corresponding voice commands.
• For details of the operations, see the Navigation Manual.
List of the Voice commands (AV features)
The following table lists the fundamental command examples available to control the AV features.
Note:
•You can omit the term enclosed by ( ).
•Touching the [] key displays the voice commands usable at that operating condition. You can refer to
them.
●Common voice commands available anytime during voice input
These are the commonly usable commands in any condition during the voice input operation.
●Voice commands for changing the operation modes
●Voice commands for controlling Tuner features
Operation Command
Terminates the voice operation, and displays the
current location map screen. “Map”
“Current Position”, “Display/Show Map”, “Go to
Map”, “(Show me) Where am I”, “Current Location”
Cancels the immediately precedent voice
operation, and returns to the previous voice input
wait mode.
“Back”
Displays the next page of voice command list
displayed on the screen. “Next (page)”
Displays the previous page of voice command list
displayed on the screen. “Previous (page)”
Displays the screen displayed when touching the
[ ] key (Voice Help screen). “(Voice)Help”
“What can I say?”
Operation Command
Turns on the AV features. “Audio On”
Turns off the AV features. “Audio Off”
Switches to the Tuner mode. “Radio”
Switches to the DVD/CD mode. “DVD Player” or “CD Player”
Switches to the Music Catcher mode. “Music catcher”
Switches to the SD Card mode. “SD card player”
Switches to the AUX mode. “AUX”
Switches to the iPod mode. “iPod”
Operation Command
Performs seek tuning. “Seek up/down”
Recalls a preset station. “Preset 1/2/3/4/5/6”
“Preset up/down”
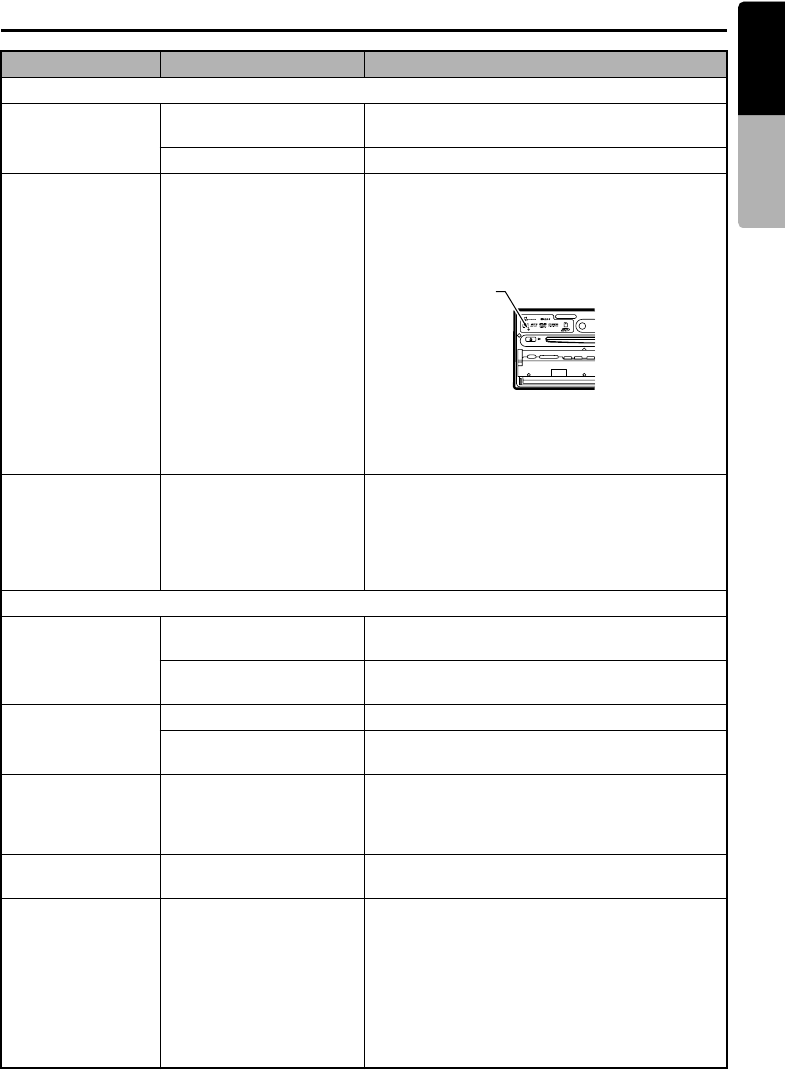
75
MAX983HD
English Owner’s manual
Troubleshooting
Problem Cause Remedy
General
Power does not turn
on. (No sound is
produced.)
Fuse is blown. Replace with a fuse of the same amperage. If the
fuse blows again, consult your store of purchase.
Incorrect wiring. Consult your store of purchase.
Nothing happens
when buttons are
pressed.
Display is not
accurate.
The microprocessor has
malfunctioned due to
noise, etc.
Turn off the power and open the operation panel.
Press the Reset button with a thin rod.
Note:
•When the Reset button is pressed, the system is
restarted with the Audio feature OFF.
• When the Reset button is pressed, frequencies
of radio stations, titles, etc. audio setting data
stored in memory are cleared.
There are red,
green, or blue points
in the display. —
This is not a failure, but a phenomenon peculiar to
a liquid crystal panel (The liquid crystal panel is
produced according to technology with very high
precision. Note that, though there are effective
pixels of 99.99% or more, pixel missing or
normally lit pixels account for 0.01%.)
DVD Player
Disc cannot be
loaded. Another disc is already
loaded. Eject the disc before loading the new one.
There is a foreign matter
already in place. Eject the foreign matter forcibly.
Sound skips or is
noisy. The disc is dirty. Clean the disc with a soft cloth.
The disc is heavily
scratched or warped. Replace with a disc with no scratches.
Sound is bad directly
after power is turned
on.
Water droplets may form
on the internal lens when
the car is parked in a humid
place.
Let dry for about 1 hour with the power on.
The image is not
displayed. The parking brake is not
engaged. Check that the parking brake is engaged.
Disc cannot play with
the display
“PARENTAL
CONTROL
Please change the
parental access
level to playback
the current disc.”
shown.
The view is limited. Release the view limitation or change the parental
level. ➜ “Setting up the parental level” (P. 29)
Reset button

Troubleshooting
76 MAX983HD
English Owner’s manual
TV Tuner (When the optional TV tuner is connected)
The image is not
displayed. The parking brake is not
engaged. Check that the parking brake is engaged.
The display is dark. The brightness control is
too low. Adjust the brightness properly.
The operating condition is
not good. The temperature inside the vehicle may be 0°C or
lower. Set to an appropriate temperature (25°C or
so) and check it again.
The headlight of the vehicle
is lit. The display is made dark at night to prevent the
glare (When the headlight of the vehicle is lit in the
daytime, the display gets dark).
The colour of the
display is light or a
shade of colour is
not good.
The colour is not adjusted
adequately. Check that Colour and Hue are adjusted properly.
When the VTR is
connected, the
image is disturbed.
Improper NTSC/PAL
setting Set the VTR to output the PAL signals.
When the TV tuner is
connected, the
image gets unclear.
Bad receiving condition A radio wave may not reach sufficiently due to
obstruction of mountains or buildings. Check it
again at a place where a radio wave can be
received properly.
The TV tuner has a
double or triple
image.
Bad receiving condition It may be under the influence of radio wave
reflected by mountains or buildings. Check it again
after changing place or direction.
The TV tuner has
spots or stripes in
the image.
Presence of jamming It may be under the influence from motorcars,
streetcar, power cable, neon sign, and so forth.
Check it again after changing place.
Mobile Phone (When the optional Bluetooth Interface Box is connected)
The mobile phone
cannot be
connected.
The relevant profile is not
selected on the mobile
phone.
When selecting profiles is available, select a
profile with hands-free feature. Otherwise, register
the mobile phone again after deleting it from the
Phone Select screen.
The Interface Box is trying
to restore the connection
with the previous mobile
phone.
Turn off the Automatic Connection function, then
register the mobile phone again.
The system does not
operate correctly. There is no response from
the mobile phone. Turn off the power of the mobile phone, then turn
it on again.
Strange noise is
heard from the
speakers.
The remaining battery level
of the mobile phone is low. Charge the battery of the mobile phone.
Problem Cause Remedy
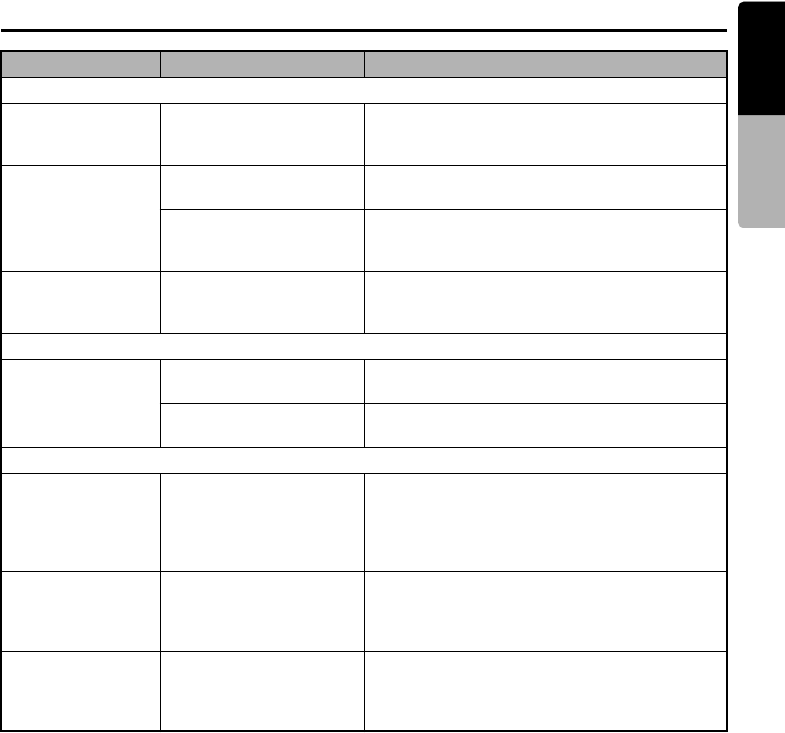
77
MAX983HD
English Owner’s manual
Error Messages
If an error display other than the ones described above appears, press the Reset button. If the problem
persists, turn off the power and consult your store of purchase.
• When the Reset button is pressed, frequencies of radio stations, titles, etc. stored in memory are
cleared.
Problem Cause Remedy
DVD Player
MECHANISM
ERROR A disc is caught inside the
DVD player and is not
ejected.
This is a failure of DVD player’s mechanism.
Please consult your store of purchase.
DISC ERROR A disc cannot be played
due to scratches, etc. Replace with a non-scratched, non-warped disc.
A disc is loaded up-side-
down inside the DVD
player and does not play.
Eject the disc then reload it properly.
INCORRECT FILE
FORMAT WMA files not supported by
this unit are played. Perform the operation such as skipping a file.
(Scan, repeat and random playback mode may be
cancelled.)
SD Card
ACCESS ERROR
Memory Card
access failed
The SD card is not set
correctly. Set the SD card again.
The SD card is not
recognised. Set another SD card.
Hard Disk Drive
HIGH TEMP
ERROR
Please wait until the
temperature
becomes normal
The HDD cannot be
accessed because the
temperature in the vehicle
is extremely high.
Please wait until the temperature becomes
appropriate.
LOW TEMP ERROR
Please wait until the
temperature
becomes normal
The HDD cannot be
accessed because the
temperature in the vehicle
is extremely low.
Please wait until the temperature becomes
appropriate.
HDD ACCESS
ERROR
Please consult a
dealer
The HDD cannot be
accessed.
The sectors or clusters of
the HDD may be damaged.
Please consult your nearest dealer.

78 MAX983HD
English Owner’s manual
Specification
GPS aerial
Mode: Microstrip flat aerial
Dimension: 30.4 (W) u 11.7 (H) u 35.5 (D) mm
Impedance: 50 Ohm
Navigation System
GPS receiving frequency: 1575.42 MHz, C/A
Code
Sensibility: –130 dBm or better
Number of GPS channels: 15 channels
FM Tuner
Frequency Range: 87.50 MHz to 108.00 MHz
Usable Sensitivity: 9 dBf
50dB Quieting Sensitivity: 15 dBf
Alternate Channel Selectivity: 70 dB
Stereo Separation (1 kHz): 32 dB
Frequency Response (r3 dB): 30 Hz to 15 kHz
AM Tuner
Frequency Range:
MW: 531 kHz to 1602 kHz
LW: 153 kHz to 279 kHz
Usable Sensitivity: 28 dBPV
DVD Player
System: Digital Versatile Disc System with CDDA
capable
Usable discs: DVD video disc, Compact disc
Frequency Response: 20 Hz to 20 kHz (CD)
(+1 dB/–2 dB)
Signal to Noise Ratio: 80 dB (1 kHz)
Dynamic Range: 80 dB (1 kHz)
Distortion: 0.05%
Audio Amplifier
Maximum power output: 200 W (50 W u 4)
Output Power: 4 u 31 W
(DIN 45324, +B = 14.4 V)
Speaker impedance: 4 : (4 to 8 : allowable)
Input
Audio input:
130 r60mVrms
(input impedance 10 k: or more)
Video input: 1.0 ±0.2 Vp-p
(input impedance 75 :)
Video Output
Video output: 1.0 r0.2 Vp-p
(output impedance 75 :)
LCD Monitor
Screen Size: 7-inch wide type
156.2 mm Width u 82.3 mm Height
Display method: Transmission type TN liquid
crystal display
Drive method: TFT (thin-film transistor) active
matrix driving
Pixels: 336,960 (480 u 3 (RGB) u 234)
General
Power source voltage: 14.4 V DC
(10.8 to 15.6 V allowable)
Earth: Negative
Current consumption: 4.3 A (1 W)
Auto Antenna Rated Current: 500 mA less
Dimensions of the Main Unit: 178 mm Width u
100 mm Height u 162 mm Depth
Weight of the Main Unit: 3.0 kg
Note:
•Specifications comply with JEITA Standards.
•Specifications and design are subject to change
without notice for further improvement.
171 mm
178 mm
25mm 162mm
100 mm
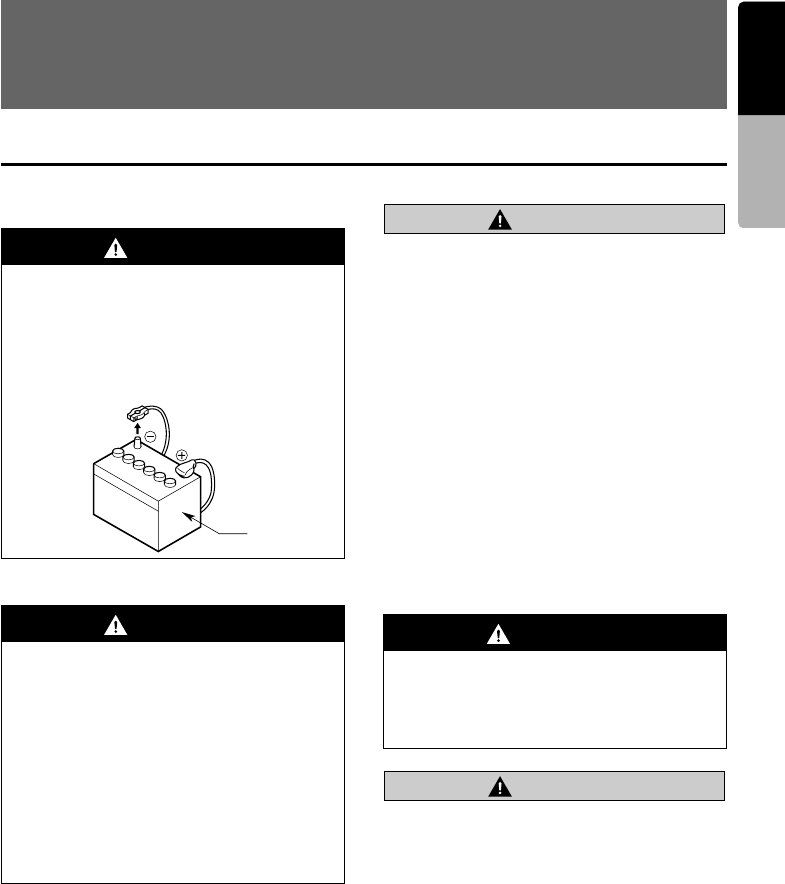
79
MAX983HD
English
INSTALLATION AND WIRE
CONNECTION MANUAL
INSTALLATION AND WIRE
CONNECTION MANUAL
Safety Precautions
Before use
Notes on the place to install to
CAUTION
•Do not install the system in the locations
described below. This may cause a fire,
accident or electrical shock:
• A location exposed to rain or dust.
• A location interfering with the driver's visual
range or operation of the vehicle.
• An unstable location, or where the system
may fall.
•Do not install this unit in a place exposed to
direct sunlight or heat, or a place where the
vent holes or heat radiation holes are
covered.
•When you install the antenna, mount it in a
place where the elements of the antenna do
not protrude beyond the edge of the front,
back, left and right of the vehicle. If it comes
in contact with pedestrians, it may cause an
accident.
Installation notes
CAUTION
•Use only the supplied parts. If unspecified
parts are used, they may cause damage.
•Any holes made in the body of the vehicle
should be sealed with a silicon adhesive. If
exhaust fumes or water penetrates into the
vehicle, this may cause an accident.
•Fasten the bolts securely when installing
the unit. If the bolts are loose, an accident
or malfunction may occur.
WARNING
•Confirm the battery voltage of the vehicle
to be installed. This unit is designed only
for vehicles with DC 12V power supply.
•Disconnect the negative terminal of the
battery before connecting wires,
otherwise an electric shock, injury by
short circuit may occur.
WARNING
•When installing the unit to a vehicle with
an airbag system, never install it in a
place where it may interfere with the
operation of the airbag.
•Do not install this unit in the following
locations:
• A location interfering with the driver's
visual range or operation.
• A location where the gear lever or brake
pedal operation is hindered.
• A location where passengers are at risk.
• An unstable location, or where the
system may fall.
Car battery
WARNING
•Please note the position of pipes, tanks
and electrical wirings before installing
the unit into the vehicle. Failure in
avoiding these may cause a fire or
malfunction.
Safety Precautions
80 MAX983HD
English
INSTALLATION AND WIRE
CONNECTION MANUAL
Wire connection notes
CAUTION
•Connect cables appropriately. If a wrong
connection is made, this may cause a fire or
accident.
•When passing cables through the body of
the vehicle, use non-conductive grommets.
•If the coatings of the cables are worn out by
rubbing, this may cause an accident, fire or
a short circuit.
•After wiring cables, fix them with insulation
tape.
•Be sure to switch off the vehicle when
connecting or disconnecting cables to/from
the unit, otherwise an electric shock, injury
or accident may occur.
WARNING
•Loom all cables according to the
instruction manual so as not to hinder
operation.
•Wire the connecting cables away from
high temperature areas. If the coatings of
the cables melt, it may cause an accident/
fire by a short circuit. Take care when
wiring in the engine compartment.
•When wiring the connecting cables in a
vehicle with an airbag system, never feed
the cables through a place where it may
interfere with the operation of the airbag.
If the airbag not operating correctly in an
emergency, it may cause increased
injury.
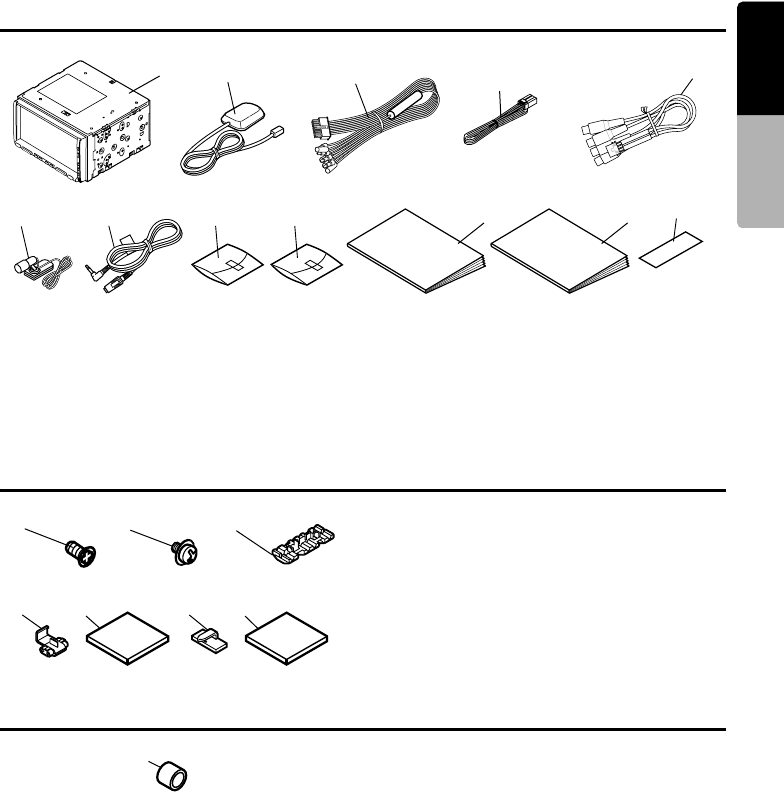
81
MAX983HD
English
INSTALLATION AND WIRE
CONNECTION MANUAL
Package Contents
1Main unit. . . . . . . . . . . . . . . . . . . . . . . . . . . 1
2GPS antenna . . . . . . . . . . . . . . . . . . . . . . . 1
3Power supply lead . . . . . . . . . . . . . . . . . . . 1
4Vehicle signal lead . . . . . . . . . . . . . . . . . . 1
5RCA pin lead . . . . . . . . . . . . . . . . . . . . . . . 1
6Microphone for voice control . . . . . . . . . . 1
7Microphone extension lead . . . . . . . . . . . 1
8Accessory bag (No. 1). . . . . . . . . . . . . . . . 1
9Accessory bag (No. 2). . . . . . . . . . . . . . . . 1
0Owner’s Manual (this book) . . . . . . . . . . . 1
!Navigation System Operation Manual . . . 1
@Warranty card . . . . . . . . . . . . . . . . . . . . . . 1
Contents in the Accessory Bag (No. 1) 8
1. Flat head screw (M5 u 8) . . . . . . . . . . . . . . 8
2. Sems hexagonal screw (M5 u 8). . . . . . . . 8
3. Electro tap . . . . . . . . . . . . . . . . . . . . . . . . . 2
4. Electro tap for speed sensor . . . . . . . . . . 1
5. Double-sided tape for fastening
antenna. . . . . . . . . . . . . . . . . . . . . . . . . . . . 1
6. Lead holder . . . . . . . . . . . . . . . . . . . . . . . 10
7. Double-sided tape for microphone . . . . . 1
Contents in the Accessory Bag (No. 2) 9
8. Rubber cap for RCA pin lead . . . . . . . . . . 6
2
1345
68 97 0!@
3
2
1
45 7
6
8
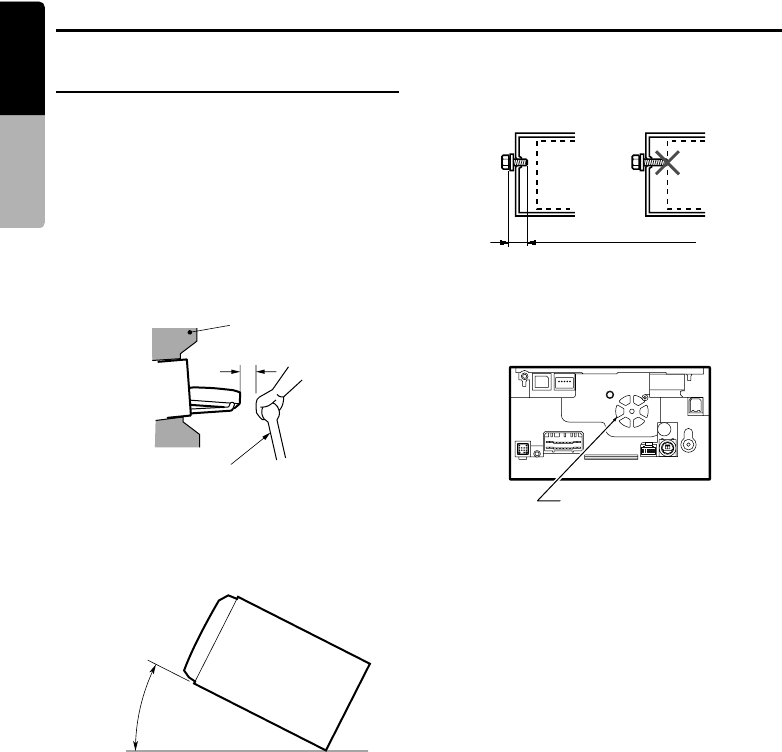
82 MAX983HD
English
INSTALLATION AND WIRE
CONNECTION MANUAL
Installing the Main Unit
Cautions on Installation
1. Prepare all parts necessary for installing the
main unit before starting.
2. This model features an operation panel that
slides forward. On some types of cars, the
operation panel may make contact with the
dashboard or gear lever, in which cause it
cannot be installed.
Before installing, check that the unit will not
hamper operation of the gear lever or obstruct
your view before selecting the installation
location.
3. Install the main unit within 30° of the
horizontal plane.
4. If you have to do any modification on the car
body, such as drilling holes, consult your car
dealer beforehand.
5. Use the included screws for installation. Using
other screws may cause damage.
6. This unit has a fan motor in the back of the
main unit. When the fan motor vent is covered
with leads or mounting bracket, it may cause
a malfunction. Be sure not to cover it when
wiring leads.
Dashboard
Gear lever
(check that it does not
touch the operation panel.)
Max. 30°
Max. 8 mm (M5 screw)
Chassis
Damage
Chassis
Fan motor vent
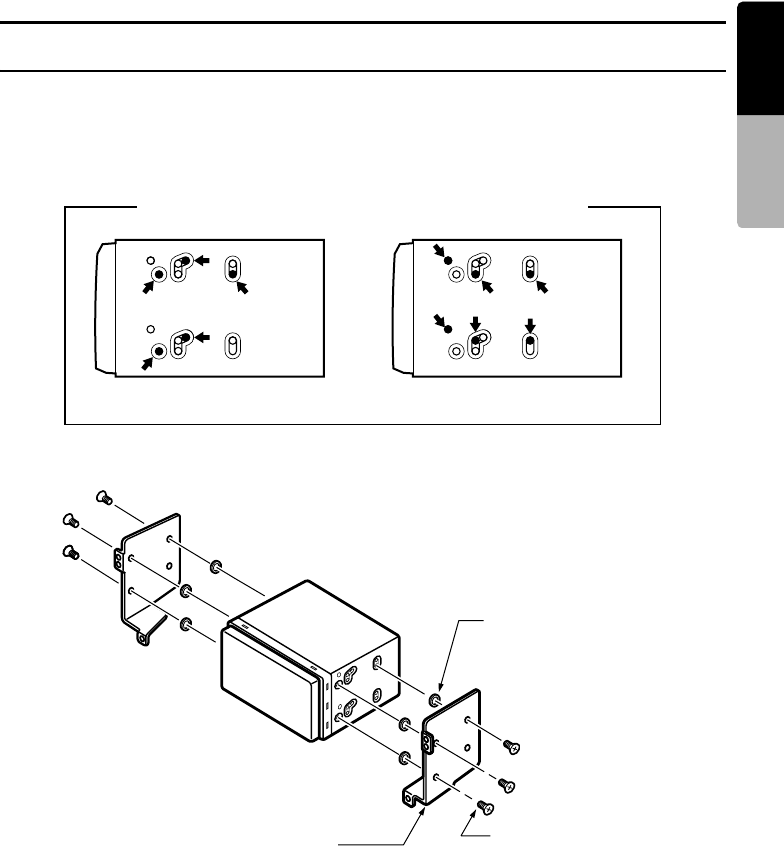
Installing the Main Unit
83
MAX983HD
English
INSTALLATION AND WIRE
CONNECTION MANUAL
Installing the Main Unit
This unit is designed for fixed installation in the dashboard.
1. When installing the main unit in NISSAN vehicles, use the parts attached to this unit.
When installing the main unit in TOYOTA vehicles, use the parts attached to the vehicle.
2. Wire as shown in the section “Wire Connection”.
3. Reassemble and secure the unit in the dashboard and set the face panel and centre panel.
Installing the main unit in a NISSAN Vehicle
Mounting Screw Holes (Side View of the Main Unit)
For NISSAN vehicle For TOYOTA vehicle
Main Unit 6-Spacer (thickness: 1 mm)
6-Flat head screw
(M5 u 8)
(attached to the main unit)
Mounting bracket
(1 pair for the left and right sides)
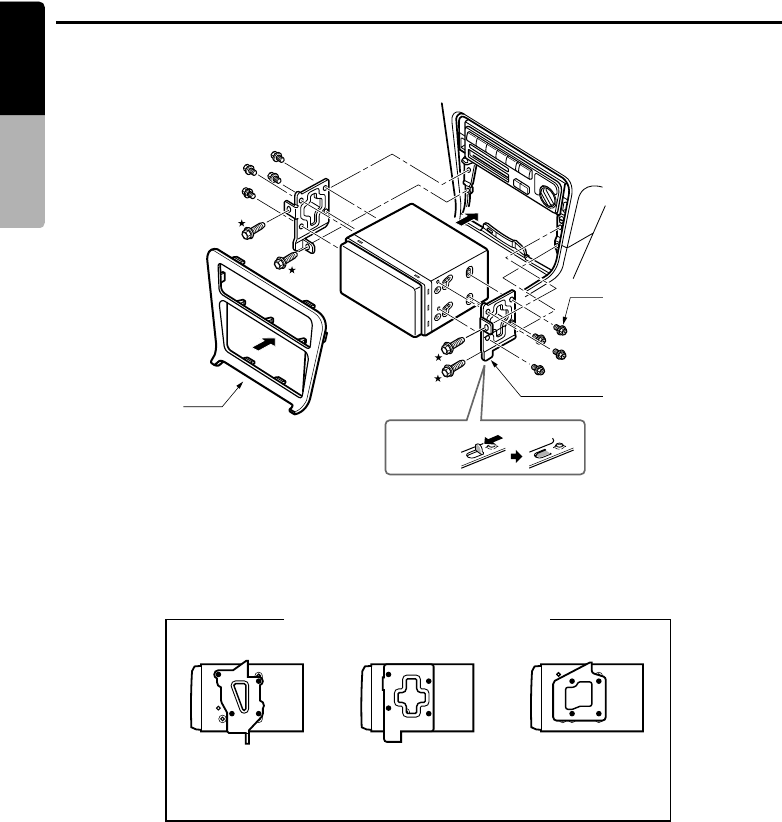
Installing the Main Unit
84 MAX983HD
English
INSTALLATION AND WIRE
CONNECTION MANUAL
Installing the main unit in a TOYOTA Vehicle
Install by using parts attached to the vehicle. (Screws marked ★ are attached to the vehicle.)
Note:
*1: Some panel openings are too small for the unit
depending on the vehicle type and model. In
such a case, trim the upper and lower sides of the
panel frame by about 0.5 to 1.5 mm so the unit
can be inserted smoothly.
*2: If a hook on the installation bracket interferes
with the unit, bend and flatten it with a nipper or
similar tool.
Vehicles other than NISSAN and TOYOTA
In some cases the centre panel may require modification. (Trimming, filing, etc.)
Removing the main unit
When the main unit is to be removed, disassemble it in the reverse of the order listed in this section.
Mounting bracket
(1 pair for the left
and right sides)
8–Hexagonal screw
(M5 u 8)
Centre Panel
(* 1)
Main Unit
(* 2)
Affix the screws to the ● marks.
Example 1
Typical Mounting Brackets
Example 2 Example 3
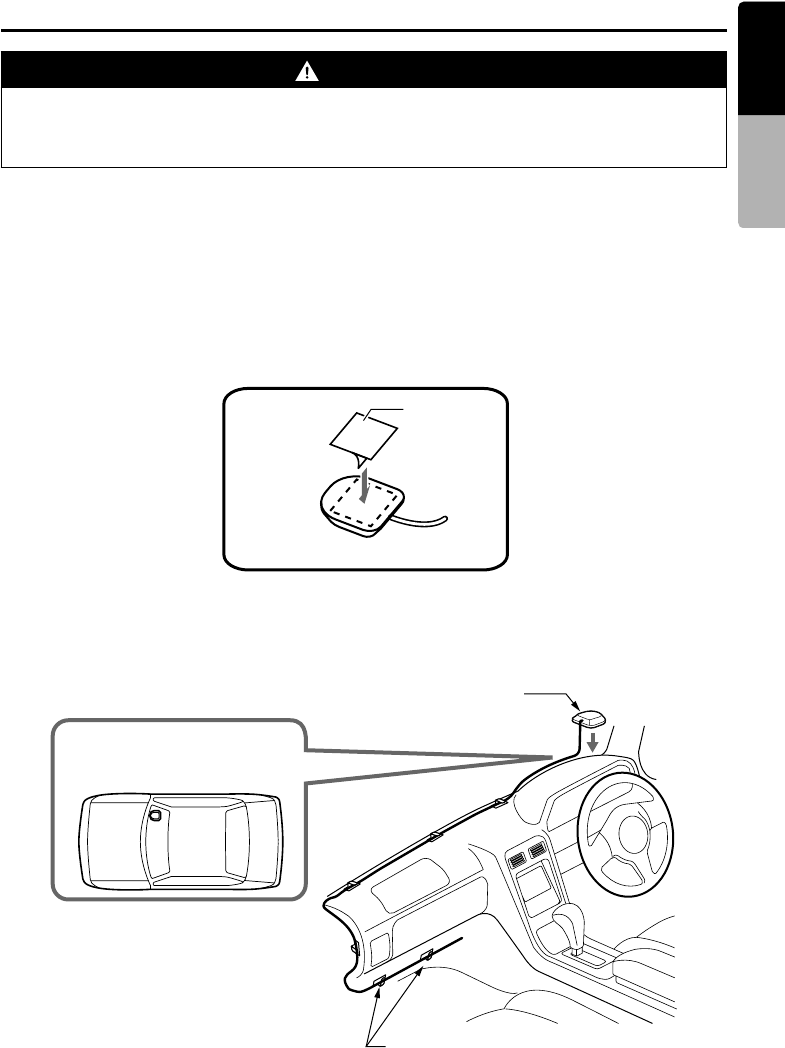
85
MAX983HD
English
INSTALLATION AND WIRE
CONNECTION MANUAL
Installing the GPS Antenna
Note:
•The supplied GPS antenna is for installing inside the vehicle. Do not install it outside the vehicle.
•Install the GPS antenna more than 50 cm away from the main unit, other audio devices such as CD player,
and a radar detector. If it is installed near these devices, GPS reception may be impaired.
•It is recommended that the GPS antenna is sited towards the centre of the road where GPS signal interruption
is minimised.
•To improve the GPS signal reception, install the GPS antenna horizontally on a flat plane.
•Do not wax or paint the cover of the GPS antenna. This may reduce the performance of the GPS antenna.
•Install the GPS antenna at least 10 cm away from the windshield.
•Wipe off the dirt of the mounting surface before installing the GPS antenna.
1. Stick the double-sided tape to the bottom face of the GPS antenna.
2. Mount the GPS antenna.
Stick it surely on a flat plane of the dashboard towards the centre of the road where GPS signal
interruption is minimised.
3. Wire the GPS antenna lead.
Fasten the lead using the lead holders.
(Shows an example in case of the left-hand traffic.)
WARNING
•Do not install the GPS antenna in a place where it may interfere with the operation of the
airbag hinder the driver’s visual range.
•Do not use this system with the GPS antenna lead cut off. The power cables in the lead may
be short-circuited.
Double-sided
tape
Bottom face of the GPS antenna
GPS antenna
Stick it on a horizontal place of
the dashboard towards the
centre of the road.
Lead holder
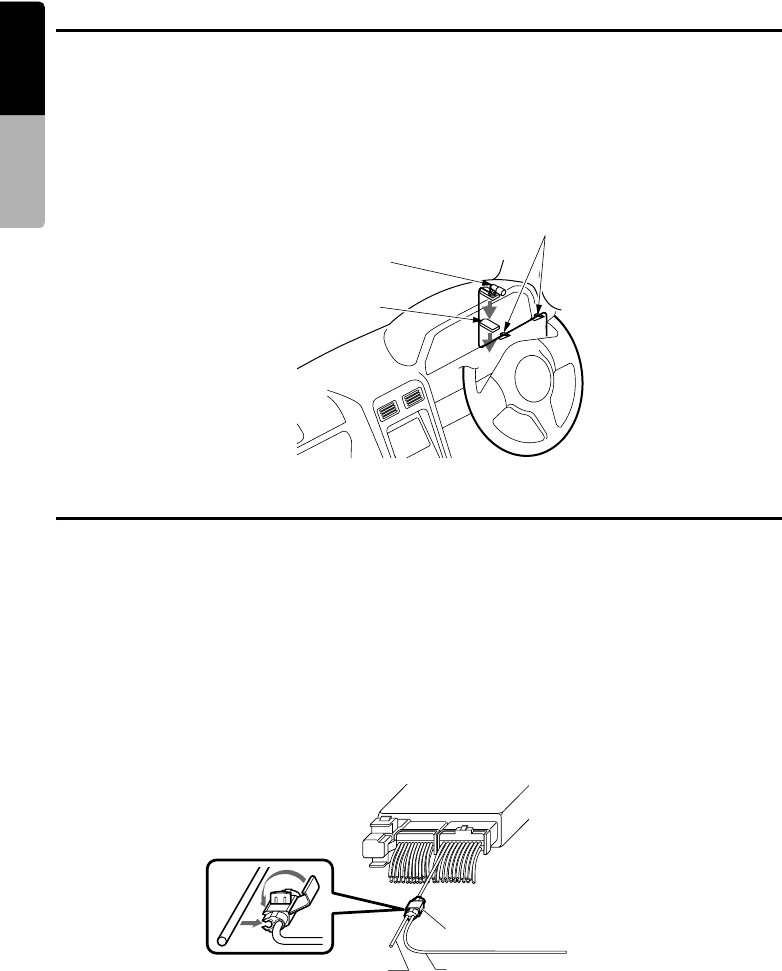
86 MAX983HD
English
INSTALLATION AND WIRE
CONNECTION MANUAL
Installing the Microphone for Voice Control
Note:
•Wipe off the dirt of the mounting surface before installing the microphone.
1. Stick the double-sided tape to the bottom face of the microphone.
2. Attach the microphone on a flat surface of the steering column or dashboard close to the driver.
3. Turn the microphone towards the mouth of the person who operates the system.
4. Connect the microphone extension lead to the microphone as required.
5. Fasten the lead using the lead holders.
Connecting the Speed Sensor
Note:
•Take care when connecting to the EC (Engine Control Computer) vehicle speed signal line.
1. Confirm the position of the EC (Engine Control Computer) and the vehicle speed signal line referring
to your car make/model.
2. Remove the vehicle parts, and confirm the position of the vehicle speed signal line of the EC.
3. Connect the vehicle speed signal line and the speed sensor connection lead of the vehicle signal lead
of this unit using the electro-tap for speed sensor.
4. Connect the negative terminal of the battery and start the engine.
Drive the vehicle slowly and check that the signals are proportional to the vehicle speed and are
correctly detected by displaying the connection check screen (see the “Navigation System Check”
section of the Navigation Manual).
6 Microphone for voice control
6. Lead holders
7. Double-sided tape for microphone
Engine control computer (EC)
EC vehicle speed signal cable
Vehicle speed harness
4. Electro-tap for speed sensor
Speed sensor connection lead
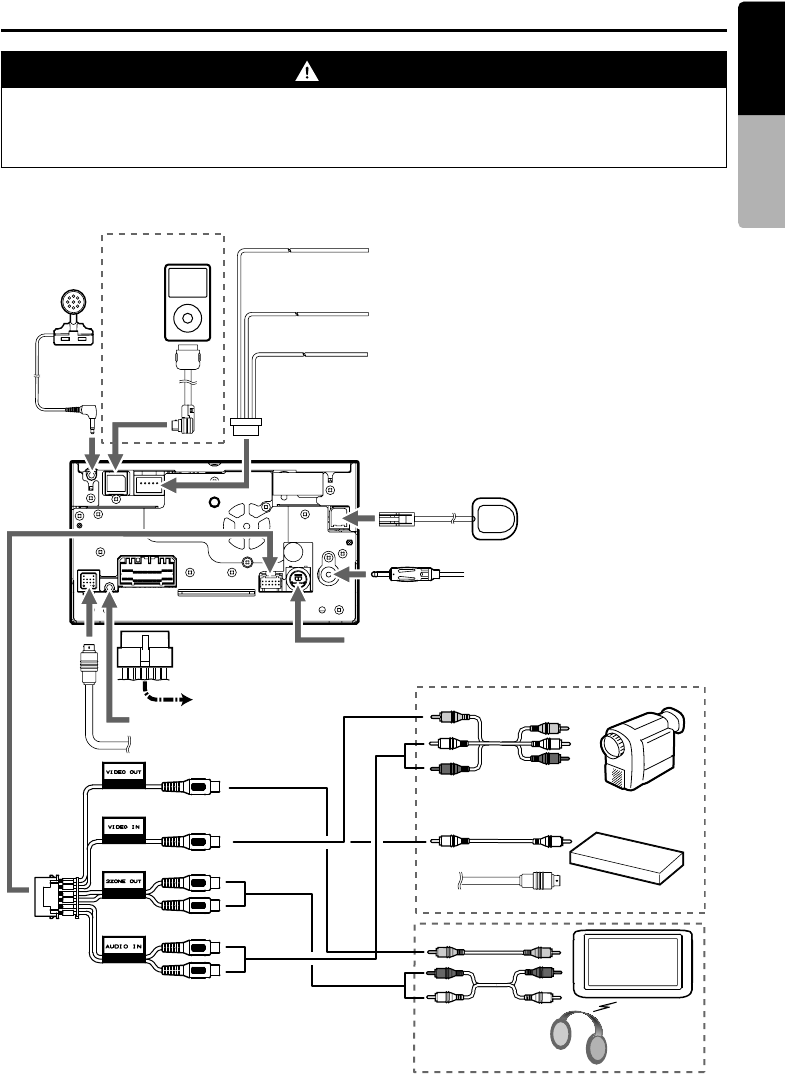
87
MAX983HD
English
INSTALLATION AND WIRE
CONNECTION MANUAL
Wire Connection
Note:
•For the optional devices, use the RCA pin cable and other connector cables sold separately.
WARNING
•Disconnect the negative terminal of the battery before connecting wires, otherwise an
electric shock, injury by short circuit may occur.
•Be sure to read the section "Wire Connection Notes" before installation or connection
operations.
Microphone
for voice
control
iPod
connector
cable
Speed sensor lead
Connect to the EC (Engine Control Computer)
vehicle speed signal line.
Parking brake signal lead
Connect to the parking brake signal line.
Reverse gear signal lead
Connect to the + terminal for the reverse gear
lamp that is only fed when the transmission is
put in reverse.
Vehicle signal lead
GPS antenna
CeNET terminal
IR remote controller sensor
RCA pin
lead
Refer to the following figure.
Audio
input for
AUX
Video output for rear monitor
Video input for TV tuner/AUX
Audio output for rear monitor
TV tuner
VTR etc.
Rear
monitor
CCD camera terminal
RDS-TMC antenna terminal
or
Power supply
lead
Pink
Grass-green
Purple/White
CeNET cable
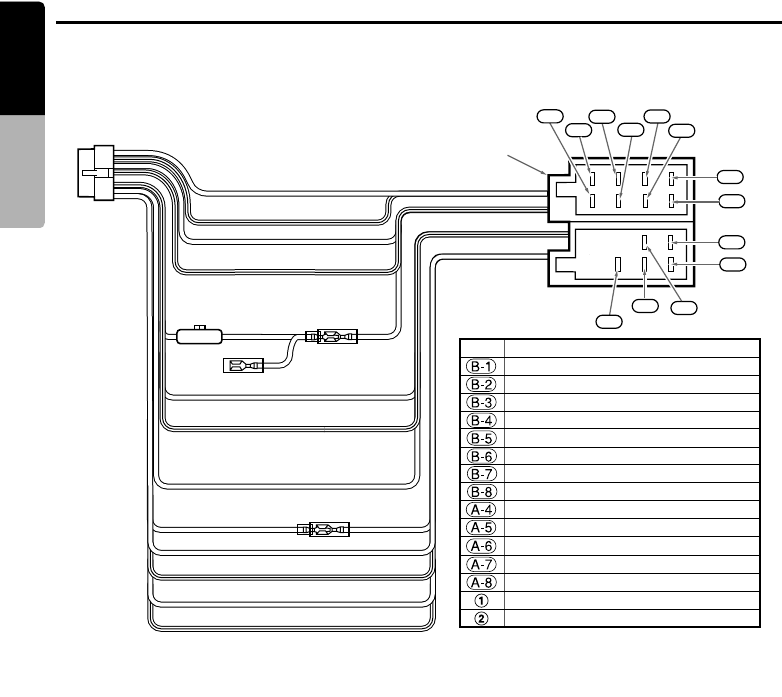
Wire Connection
88 MAX983HD
English
INSTALLATION AND WIRE
CONNECTION MANUAL
Power supply lead
Note:
*1: In certain vehicles - Volkswagen/Opel/Vauxhall - it is necessary to exchange the accessory <Red> and the
main power <Yellow> connection, to avoid overload and loss of memory.
Notes on installing the RDS-TMC antenna
• For vehicles that do not allow radio wave penetration such as heat reflection glass, heat insulation
glass or radio wave interception glass, the receiver sensitivity may decrease. For details, speak to the
dealer where you purchased the unit.
• The receiver sensitivity may weaken by interference from other antennas within the vehicle, therefore
try to install it away from other antennas.
• To prevent noise, wire the antenna cable separately from the power supply lead, speaker leads and
the other cables of the vehicle.
2
B-1 B-6
B-5
B-7
B-8
B-4
B-3
B-2
A-4
A-6
A-8
A-7
1
A-5
∗1
∗1
10A No. Description
REAR RIGHT+
REAR RIGHT-
FRONT RIGHT+
FRONT RIGHT-
FRONT LEFT+
FRONT LEFT-
REAR LEFT+
REAR LEFT-
+12 V MAIN POWER (∗1)
TUNER +B
ILLUMINATION
+12 V ACCESSORY (∗1)
EARTH
ISO CONNECTOR
Spare terminal (Yellow)
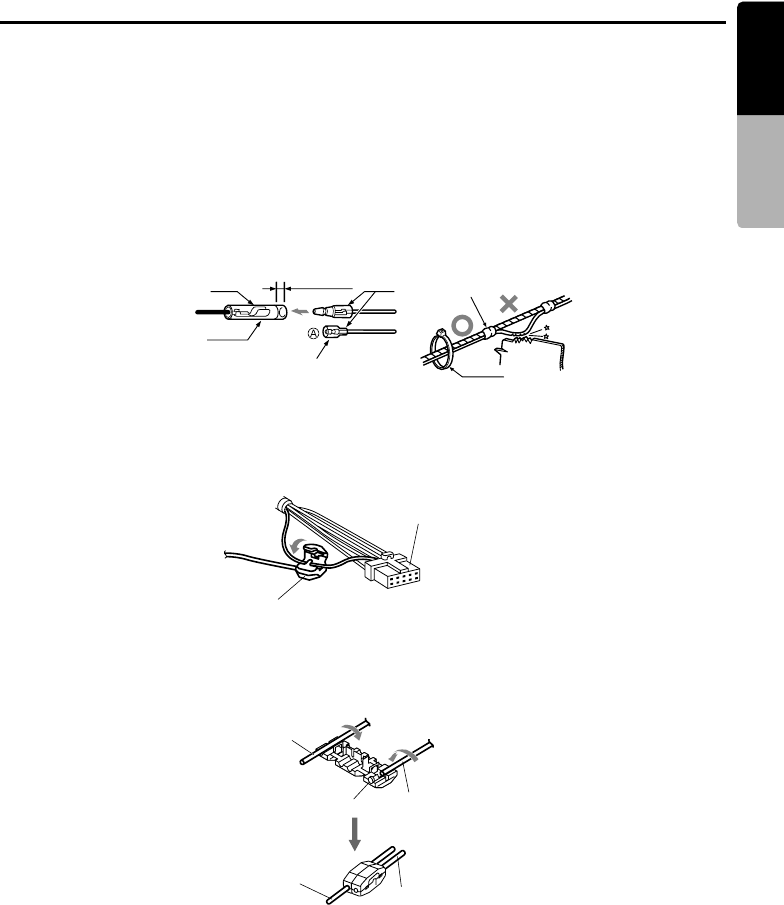
Wire Connection
89
MAX983HD
English
INSTALLATION AND WIRE
CONNECTION MANUAL
Connecting to the CCD camera for vehicle
Connect the CCD camera for vehicle to the CCD camera terminal on the main unit. For detailed
information, refer to the instruction sheet or manual for the CCD camera.
Note:
• A power supply box (sold separately) is required for connection of the main unit and the CCD camera.
• The power supply box for the camera CAA185 cannot be used. Please use the CAA188 instead.
Notes on wire connection
When connecting the plugs and sleeves, be sure to insert the plug until it locks securely. After completing
connections, fasten the leads using lead clamps and tapes.
Connecting the reverse gear or parking brake signal lead
Connect each signal lead using the supplied electro-taps.
1. Place the lead from this unit at the stopper, and fold it back in the direction of the arrow.
2. Pass the vehicle signal lead through, and fold it back in the direction of the arrow.
Note:
•After connecting the parking brake signal lead, pull the parking brake and check that the line falls to ground.
•For your safety, some functions will not operate unless the parking brake signal lead is connected correctly.
Female
Sleeve
If the male knob is in the shape shown at A,
cut the female sleeve about 5 mm.
Tape
Clamp
Male
Cut 5 mm.
Coupler connected to other equipment
From this unit
3. Electro-tap
Power supply lead from this unit
Power supply lead from this unit
Vehicle and main unit signal lead
Vehicle and main unit signal lead
Stopper
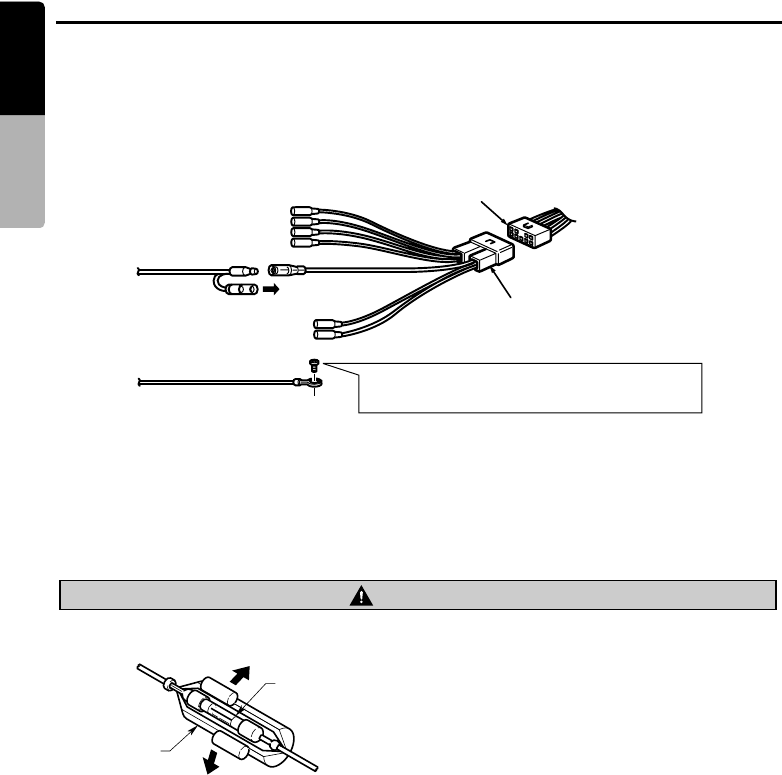
Wire Connection
90 MAX983HD
English
INSTALLATION AND WIRE
CONNECTION MANUAL
Example of relay usage
Use a special installation kit (relay lead kit), sold separately, prepared specifically for your model. For
applicable models, consult the dealer where you purchased this unit.
Note:
•When connecting the main power supply lead (yellow) of the main unit, connect it to a spare terminal of this
unit.
Replacing the fuse
If the fuse should blow, check to see if the wiring is correct. If a fuse is blown, replace it with a new one
of the same amperage rating as the original (10A FUSE).
To replace the fuse, remove the old fuse of the power supply lead and insert the new one.
Note:
•There are various types of fuse holder. Do not let the battery side touch other metal parts.
CAUTION
•After the connection, fix the lead by a clamp or insulation tape for protection.
Vehicle coupler
(Yellow)
Relay lead (Sold separately)
Conforms to EIAJ standard (CP2501)
Ground lead from this unit Tighten with the vehicle side screw and fasten
securely to the vehicle metal part.
To main unit
(Yellow)
Fuse
(10A FUSE)
Fuse holder

Owner’s manual (Audio, Visual, General & Installation)
Mode d’emploi (Audio, vidéo, fonctionnement général et installation)
Benutzerhandbuch (Lyd visuel, generelt og installation)
Manuale dell’utente (Audio, video, generali e installazione)
Gebruikershandleiding (Audio, visueel, algemeen en installatie)
Guía de usuario (Imagen, sonido, general e instalación)
Ägarhandbok (Ljud, Sikt, Allmänt & Installation)
Manual do utilizador (Áudio, Visual, Geral e Instalação)
Brugervejledning (Audio, Video, Allgemein und Installation)
HDD NAVIGATION SYSTEM
SYSTEME DE NAVIGATION HDD
HDD-NAVIGATIONSSYSTEM
SISTEMA DI NAVIGAZIONE HDD
HDD-NAVIGATIESYSTEEM
SISTEMA DE NAVEGACIÓN HDD
NAVIGATIONSSYSTEM MED HÅRDDISK
SISTEMA DE NAVEGAÇÃO COM HDD
(UNIDADE DE DISCO RÍGIDO)
HDD-NAVIGATIONSSYSTEM
QY-5003E-B
2008/5(Y-YI)
MAX983HD
MAX983HD
Clarion Co., Ltd.
All Rights Reserved.Copyright © 2008: Clarion Co., Ltd.
Printed in Hungary / Imprimé en Hongrie / Gedruckt in Ungarn /
Stampato in Ungheria / Gedrukt in Hongrarije / Impreso en Hungría /
Tryckt i Ungern / Impresso na Hungria / Trykt i Ungarn
