Clarion NR1UB Manual
NR1UW NR1UW_Manual Clarion U.S.A | Search Result
NR1UR_Manual Clarion U.S.A | Search Result
User Manual: Clarion Clarion U.S.A | Search Result
Open the PDF directly: View PDF ![]() .
.
Page Count: 141 [warning: Documents this large are best viewed by clicking the View PDF Link!]
- Safety Precautions
- Chapter 1 Preface
- Chapter 2 ClarionMiND Basic Operation
- Chapter 3 Connecting to a Network
- Chapter 4 Registering on the Clarion Portal Site
- Chapter 5 Applications
- Chapter 6 Navigation
- 6-1 Safety Precautions
- 6-2 Basic Operation
- 6-3 Searching for a Destination
- 6-3-1 Scrolling the Map to Specify a Destination
- 6-3-2 Searching for a Destination Based on a City Name
- 6-3-3 Searching for a Destination Based on a Street Name
- 6-3-4 Searching for a Destination Based on its Latitude and Longitude
- 6-3-5 Searching for a Destination Based on its Genre
- 6-3-6 Specifying a Downloaded POI as a Destination
- 6-4 Configuring a Route
- 6-5 Route Information
- 6-6 Configuring Navigation Settings
- 6-7 Quick Menu Settings
- 6-8 Modifying the Map Screen
- Chapter 7 Control Panel
- Chapter 8 Using the Portal Site
- Chapter 9 Troubleshooting
- Chapter 10 Specifications
- Appendix
- Trademark
- Index

Mobile Internet Navigation Device
Owner’s manual
All Rights Reserved.Copyright © 2008: Clarion Co., Ltd.
Printed in China
Clarion Co., Ltd.
QY-3000B
2008/12
NR1UB
NR1UW
NR1UR
No.69792̲E

NR1UB/NR1UW/NR1UR 1
Safety Precautions
Always observe safety precautions!
The following safety precautions provide important information intended to prevent personal injury to
the operator and others, and property damage.
Precaution Icons
Precautions are divided into two types and identified by the icons described below, depending on the
severity of the risk of personal injury or property damage when the unit is used incorrectly. Always be
sure to carefully read and understand each precaution before moving on to the rest of the manual.
Use only the AC adapter or car adapter that
comes with the unit.
Use of another type of AC adapter or car
adapter creates the risk of battery overheating,
combustion, or explosion.
Battery Pack Handling Precautions
Mishandling of the battery pack creates the risk
of fluid leakage, overheating, explosion, and
combustion, creating the risk of fire and
personal injury.
•Never short the positive (+) and negative (-)
terminals of a battery.
•Use only the prescribed method to charge
batteries. Never try to use any other charging
method.
•Never throw batteries into fire or subject them
to heat.
•Never pierce batteries with nails or subject
them to shock, and never try to disassemble or
modify batteries.
•Do not subject batteries to strong impact by
dropping them, etc.
•Never subject the exterior pack to strong
impact that can cause serious damage.
•Do not wipe metal parts with a wet cloth.
•Do not allow batteries to become wet and
never touch them when your hands are wet.
•Never try to disassemble batteries or modify
them in any way.
•Use only the specified battery pack. Never try
to use any other type of battery pack.
•If a battery is leaking, do not touch it with your
bare hands. Should battery fluid get onto your
skin, immediately rinse the affected area with
water.
•Never transport or store batteries together with
necklaces, hair pins, or other metal objects.
•Never charge, use, or leave batteries in areas
subjected to high heat, such as next to a heat
source, under direct sunlight, etc.
If a battery is leaking, do not touch the liquid
with your bare hands.
Battery fluid getting into your eyes creates the
risk of loss of vision. Never rub your eyes, and
immediately flush them thoroughly with water.
Next, consult your physician.
Should battery fluid get into your skin or
clothing, immediately rinse the affected area
with clear water.
WARNING This icon indicates the risk of death or serious personal injury
may result if precautions are ignored.
CAUTION This icon indicates the risk of serious personal injury or material
damage may result if precautions are ignored.
WARNING
AC Adapter and Car Adapter Precautions
Battery Precautions

Safety Precautions
2NR1UB/NR1UW/NR1UR
Never continue to use the unit after a
malfunctioning or abnormality occurs.
Should a malfunction (no images displayed, no
sound output, etc.) or abnormality (foreign
matter gets inside unit, unit becomes wet,
smoke emission, strange noise or odor, etc.)
ever occur, immediately stop using the unit and
go to the Clarion portal site (my.clarion.com.) for
information about who you need to contact.
See the “Support” or “Inquiries” section.
Continued use of the unit creates the risk of fire,
electric shock, and accident.
Never try to disassemble, repair, or modify
the unit.
Never try to disassemble, repair, or modify the
unit, and never cut the cover of the cord in an
attempt to draw power for another device. Doing
so creates the risk of fire, electric shock, and
accident.
Never allow water or foreign matter to get
into the unit.
The unit contains metal parts and highly
combustible items, so water and foreign matter
not only can cause malfunction, they also create
the risk of overheating due to short circuiting
and insulation failure, fire and smoke,
combustion, and electric shock. Should water or
foreign matter ever get into the unit, immediately
turn off the unit and go to the Clarion portal site
(my.clarion.com) for information about who you
need to contact.
See the “Support” or “Inquiries” section.
Whenever using the unit outdoors, avoid any
location where the unit may become wet with
rainwater, seawater, or other moisture, and
any location where there are large amounts
of dust present.
This unit is not water resistant or dust resistant.
Water and dust create the risk of fire and
smoke, combustion, electric shock, and
malfunction.
Never use the unit while walking.
Always stop walking in a safe place before
operating the unit. Using the unit while walking
creates the risk of an accident and personal
injury.
Never touch the AC adapter or car adapter
while your hands are wet.
Plugging in or unplugging the AC adapter or car
adapter with wet hands creates the risk of
electric shock.
Never allow the AC adapter or car adapter
plug to become wet.
Water on the plug creates the risk of fire due to
short circuiting or insulation failure, fire and
smoke, combustion, and electric shock.
Do not share a power source with other
devices.
Plugging multiple devices into a single power
source using an extension cord can cause the
rated current level to be exceeded, creating the
risk of overheating of cord or outlet, fire, and
other problems.
Clean the power plug periodically.
Dust and dirt build up between the power cord
and power outlet can absorb moisture and lead
to short circuiting and create the risk of fire.
Make it a habit to unplug the power cord from
the power outlet periodically and clean any dirt
and dust that have built up with a soft dry cloth.
Keep microSD cards out of the reach of
small children.
A microSD card can be mistakenly swallowed by
young children. If you ever suspect this has
happened, consult your local emergency
services (police, fire or ambulance) immediately.
Use this unit only in applications for which it
is designed: in a motor vehicle, at home, or
while on foot.
• Never try to use this unit on a boat, in an
aircraft, on a bicycle, on a motorcycle, etc.
Using the unit while walking creates the risk of
an accident and personal injury.

Safety Precautions
NR1UB/NR1UW/NR1UR 3
Turn off the unit when you are in an aircraft
or a hospital, or in any other location in the
vicinity of electronic equipment that uses
high-precision control or weak signals.
This unit may cause malfunction that affects
electronic equipment and medical electric
equipment.
* The following are examples of electronic
equipment that may be affected by this unit.
Heart pacemakers and other medical electric
equipment, fire alarms, automatic door
actuators and other automatic control devices,
etc.
•When on a crowded train or in any other
crowded location, turn off the unit to avoid
problems for heart pacemaker wearers who
may be in the vicinity.
•If you are using a heart pacemaker or other
medical electric equipment, be sure to contact
the manufacturer or the retailer of the device
you are using and check about how it is
affected by radio waves.
Do not touch the unit or its plug or USB
cable if there is lightning in your area.
Lightning strikes create the risk of electric
shock.
Use this unit in 12V/24V DC negative ground
vehicles only.
This unit is designed for use in a 12V/24V DC
negative ground vehicle only.
Do not leave this unit on a motor vehicle
dashboard.
Exposing the unit to strong direct sunlight on a
vehicle dashboard or leaving the unit in a car
parked in the sun or any location where it is
subject to high temperature and humidity can
cause batteries to leak or explode, creating the
risk of personal injury.
Always drive in accordance with traffic rules
and regulations.
Even when the unit instructs you to follow a
particular route, it is your responsibility to drive
in accordance with road markings and other
applicable traffic rules and regulations. Failure to
do so creates the risk of a traffic accident and
personal injury.
Never try to operate the unit while operating
a motor vehicle.
Doing so can take your mind off the road and
create the risk of a traffic accident. Always stop
your vehicle in a safe place before operating the
unit.
Do not look at the image produced by the
unit while operating a motor vehicle.
Doing so can take your mind off the road and
create the risk of a traffic accident.
Do not use the unit with the volume level set
too high.
Doing so can make it difficult for you to hear the
sound of other vehicles and create the risk of a
traffic accident.
Never use headphones while operating a
motor vehicle.
Doing so creates the risk of a traffic accident
and may be prohibited by law.
Make sure to install the standard cradle
correctly.
Install the standard cradle in accordance with
the instructions of the Quick Start Guide, which
comes with the unit. Incorrect installation
creates the risk of fire or accident.
Never install the unit in a location where it
will interfere with operation of the motor
vehicle or the vision of the driver, or where it
may endanger passengers.
Installing the unit where it might interfere with
operation by the driver (in the vicinity of the shift
lever, brake pedals, etc.), block front, back, or
side vision, or endanger passengers creates the
risk of a traffic accident and personal injury.
Precautions for Use in a Motor Vehicle
Safety Precautions
4NR1UB/NR1UW/NR1UR
Never install the unit where it can interfere
with deployment of airbags.
Installing the unit in a location that prevents an
airbag from deploying or where deployment of
the airbag cause the unit or its parts to become
projectiles creates the risk of an accident and
personal injury. Install the unit only after
checking installation precautions for your
particular vehicle model.
Make sure to install the standard cradle so it
does not come off or fall down.
Clean off any dirt and wax from the installation
location, and install securely. Reusing two-sided
tape or using commercially available standard
two-sided tape will cause inadequate adhesion,
causing the cradle to come off and fall while
driving, creating the risk of an accident.
Periodically check the adhesion and installation
condition of the cradle.
Install the navigation unit securely onto the
standard cradle.
An insecurely installed navigation unit can fall
off, creating the risk of an accident or personal
injury. After installing the navigation unit onto the
standard cradle, double-check to make sure it is
installed securely.
Be sure to install the navigation unit onto the
standard cradle.
Driving with the navigation unit uninstalled can
cause the unit to fall when brakes are applied,
creating the risk of an accident and personal
injury.
Make sure the car adapter plug is fully
inserted as far as it will go.
Insert the car adapter plug as far as it will go. A
partially inserted plug creates the risk of
overheating and fire.
Periodically inspect and clean the cigarette
lighter socket.
Tobacco ashes or other foreign matter inside the
cigarette lighter can result in poor contact and
create the risk of overheating and fire.
Do not use the cigarette lighter socket to
provide power to multiple devices.
Connecting multiple devices to the cigarette
lighter or the accessory power socket can
exceed the vehicle's rating and create the risk of
fire, accident, blowing of the vehicle's fuse, etc.
Always use fuses of the rated capacity, and
request replacement from a qualified
technician.
Using fuses that exceed the rated capacity
creates the risk of fire and smoke, combustion,
and accident. For information about fuse
replacement and repair, go to the Clarion portal
site (my.clarion.com) for information about who
you need to contact.
See the “Support” or “Inquiries” section.
Run the power cord in an area where people
normally do not walk.
Running the power cord in an area people walk
through can cause people to trip or to become
entangled in the power cord and pull down the
unit, which creates the risk of personal injury.
Do not subject the navigation unit to strong
impact.
Dropping, striking or otherwise subjecting the
unit to strong impact can cause deformation and
deterioration of its interior, creating the risk of
accident or fire.
Unplug the power plug before leaving on a
trip or any other time the unit will be left
unattended for a long time.
Leaving the plug plugged in for long periods can
create the risk of fire.
CAUTION

Safety Precautions
NR1UB/NR1UW/NR1UR 5
Use only the items that come with the unit.
Use of any non-specified item can damage
interior components or result in slippage due to
inability to tighten sufficiently, creating the risk of
accident, malfunction, or fire.
Do not install the unit in a location that is
subject to strong vibration or unstable.
Installing the unit on a surface that is slanted or
sharply curved can cause it to fall, creating the
chance of an accident or personal injury.
Install the unit where it is out of the reach of
small children.
Failure to do so crates the risk of personal injury
due to the unit falling, and other accidents.
Do not install the unit in a location where it
will be splashed by water, or in locations
subjected to large amounts of humidity,
dust, or oil smoke.
Splashing by rain, water used for washing, or
other sources, as well as the invasion of
humidity, dust, oil smoke or other contaminants
creates the risk of smoke, combustion, electric
shock, and accident.
Do not install the unit in a location subjected
to high temperatures.
Direct sunlight and direct exposure to the
heated air from a heater or other source can
raise the interior temperature of the unit,
creating the risk of fire and accident.
Check the temperatures of the navigation
unit and standard cradle before connecting
or disconnecting them.
Leaving the unit in a high-temperature
environment (such as under direct sunlight for a
long time) or continued use of the unit can
cause the standard cradle to become very hot,
creating the risk of burn injury.
Liquid Crystal Display (LCD)
•The LCD scratches easily, so be sure to use
only your finger or the stylus to perform touch
operations.
•Never perform operations using a ballpoint pen
tip or other hard, pointed object, or your
fingernail.
•Affix the protection film that comes with the unit
to protect the LCD against damage.
•Do not use commercially available LCD
protection film. Doing so can interfere with
proper touch panel operation.
•To protect the LCD, ensure that it is not
exposed to direct sunlight while you are not
using the navigation unit. Use a car sunshade
or other means to block the sun.
•Low temperatures can cause failure of video
images to appear or slow response. It also can
cause strange video image movement and
deterioration of images. The operating
temperature range of the unit is 0°C to 45°C.
•The sudden change in temperature within a
vehicle immediately after turning on a heater or
air conditioner can cause the interior of the
LCD to become cloudy due to water vapor or
the formation of condensation, making proper
operation impossible. Should this happen, do
not use the unit for about one hour.
•Do not clean the unit while power is turned on.
When wiping the unit screen or frame, use a
dry soft, lint-free cloth.
•Do not use a paper towel to clean the screen.
Carrying the Unit
•Never pick up the unit while holding the LCD.
•Turn off power and put the unit into a bag or
other holder when carrying it.
•Never sit down with the unit in your pants
pocket.
•Do not put the unit at the bottom of a bag or
anywhere else where it will be subjected to
strong pressure.
Precautions for Use in a Motor Vehicle Precautions During Use

Safety Precautions
6NR1UB/NR1UW/NR1UR
When Not in Use
Store the unit in a location that is not subject to
extremely high or low temperatures.
•Storing the unit in a closed vehicle during
summer months, in a location exposed to direct
sunlight for long periods, in a location exposed
directly to the heated air of a heating device, or
in a location exposed to very low temperatures
creates the risk of deformation, discoloration,
and malfunction.
•When not using the unit, store it in a location
that is normally at room temperature.
Using a Cellphone near the Unit
Depending on where you use it or its
orientation, use of a cellphone can cause static
interference in the unit. When using a cellphone,
do so as far away from the unit as possible.
Precautions during Use Inside a Motor
Vehicle
When using the unit with a car adapter
connection, make sure to keep the vehicle's
engine running.
•Long use of the unit with the engine stopped
creates the risk of running down the vehicle's
battery. Note that idling stops are prohibited in
some geographic areas. Always be sure to use
the unit in accordance with local rules and
regulations.
•Some of the operations of this unit are disabled
while the vehicle is running. Always stop your
vehicle in a safe place before operating the
unit.
General Disclaimer
•As a general rule, you will be charged for repair
of any malfunction or damage due to fire,
earthquake, the actions of third parties, or any
other accident, due to intentional, accidental,
or misuse of the unit by you, or due to any
other use of this unit under abnormal
conditions.
•Clarion shall not be held in any way
responsible for any damages (lost business
profits, corruption or loss of memory contents,
etc.) arising out of the use or the inability to use
this unit.
•The navigation functions and map data of this
unit were created based on traveling on roads
on foot or by motor vehicle. Clarion shall not be
held in any way responsible for any damages
arising out of the use of this unit as a
supplementary navigation device on a boat or
aircraft, or for any other application that
deviates from the original intended purpose of
this unit.
•When transferring ownership of the unit to
another party or when disposing of the unit, the
responsibility for any and all handling and
management (deletion, etc.) related to
securing personal information in unit memory
(registered point names, etc.) lies solely with
you. Clarion shall not be held in any way
responsible for personal information contained
in the unit memory.
•Clarion cannot compensate for any corruption
or loss of map data, basic program data, or any
other data due to misoperation by you or any
third party, or due to the effects of electrostatic
charge or electrical noise.
•Clarion cannot compensate for any corruption
or loss of information stored in unit memory
(registered points, etc.) due to misoperation by
you or any third party, or due to the effects of
electrostatic charge or electrical noise, due to
malfunction or repair, etc.
FCC Notice
This device complies with Part 15 of the FCC Rules. Operation is subject to the following two
conditions: (1) this device may not cause harmful interference, and (2) this device must accept any
interference received, including interference that may cause undesired operation.
IC Notice
This production complies with DHHS Rules 21 CFR subchapter j applicable at date of manufacture.
FCC-ID: HFS-NR1-NH1
IC: 1787B-NR1NH1

NR1UB/NR1UW/NR1UR 7
Contents
Safety Precautions ......................................................................................1
Chapter 1 Preface..........................................................................................................9
1-1 Main Ways to Use ClarionMiND ..................................................................10
1-2 Package Contents .......................................................................................11
1-3 Part Names and Charging ...........................................................................12
1-4 Applying the Protection Film........................................................................15
1-5 Inserting and Removing a microSD Card ....................................................16
1-6 Start Up and Shutdown ...............................................................................17
1-7 Using the Unit Mounted on the Standard Cradle.........................................17
1-8 Selecting a Language..................................................................................18
Chapter 2 ClarionMiND Basic Operation ..................................................................20
2-1 Using the Stylus Pen ...................................................................................20
2-2 One Touch Keys ..........................................................................................20
2-3 Home Screen...............................................................................................23
2-4 Home Screen Display ..................................................................................24
2-5 Using the Quick Information Keys................................................................26
2-6 Customizing Application Icons.....................................................................27
2-7 Software Keyboard ......................................................................................29
Chapter 3 Connecting to a Network ..........................................................................30
3-1 Wi-Fi Connection Settings ...........................................................................30
3-2 Registering a Bluetooth-enabled Cell Phone...............................................35
3-3 Configuring Bluetooth Connection Settings.................................................36
3-4 Establishing a Bluetooth Connection...........................................................39
Chapter 4 Registering on the Clarion Portal Site .....................................................40
4-1 Registering on the Portal Site......................................................................40
4-2 Using the Unit to Register the Unit Only ......................................................41
Chapter 5 Applications ...............................................................................................42
5-1 Browser .......................................................................................................42
5-2 E-Mail ..........................................................................................................46
5-3 Map..............................................................................................................49
5-4 MySpace......................................................................................................52
5-5 YouTube .......................................................................................................56
5-6 PDF Reader.................................................................................................57
5-7 Calculator ....................................................................................................59
5-8 File Manager................................................................................................60
5-9 Contacts ......................................................................................................62
5-10 Note Pad......................................................................................................66
5-11 RealPlayer ...................................................................................................68
5-12 News Key.....................................................................................................71
5-13 Weather Key ................................................................................................73
5-14 MySpace Key...............................................................................................74
5-15 Portal Sync Key ...........................................................................................76

Contents
8NR1UB/NR1UW/NR1UR
Chapter 6 Navigation ..................................................................................................77
6-1 Safety Precautions.......................................................................................77
6-2 Basic Operation ...........................................................................................77
6-3 Searching for a Destination .........................................................................80
6-4 Configuring a Route.....................................................................................86
6-5 Route Information ........................................................................................90
6-6 Configuring Navigation Settings ..................................................................93
6-7 Quick Menu Settings....................................................................................96
6-8 Modifying the Map Screen...........................................................................97
Chapter 7 Control Panel .............................................................................................99
7-1 Power Management...................................................................................100
7-2 LCD Brightness .........................................................................................102
7-3 Date and Time ...........................................................................................103
7-4 Screen .......................................................................................................104
7-5 Sound ........................................................................................................105
7-6 Language...................................................................................................105
7-7 Password ...................................................................................................106
7-8 Car Mode Home Screen............................................................................107
7-9 Application Manager..................................................................................108
7-10 System Information....................................................................................110
7-11 Touch Screen Adjustment..........................................................................110
7-12 Maintenance ..............................................................................................111
Chapter 8 Using the Portal Site ...............................................................................112
8-1 Obtaining Information from the Portal Site ................................................112
8-2 Using the Portal Site..................................................................................113
Chapter 9 Troubleshooting.......................................................................................114
9-1 Troubleshooting .........................................................................................114
9-2 System Reset ............................................................................................120
9-3 System Recovery ......................................................................................120
Chapter 10 Specifications ..........................................................................................121
10-1 Specifications ............................................................................................121
10-2 Indicators State..........................................................................................123
Appendix ..................................................................................................124
Trademark ................................................................................................126
Index .........................................................................................................138

NR1UB/NR1UW/NR1UR 9
Chapter 1 Preface
Thank you for purchasing the ClarionMiND (Mobile Internet Navigation Device).
The ClarionMiND is a mobile terminal that is equipped with various navigation functions and
entertainment functions that are capable of accessing and using the Internet.
It can connect to a network via Wi-Fi or a supported Bluetooth terminal for simple Internet access.
Not merely a car navigation system, the ClarionMiND is a multifunctional mobile terminal you can
enjoy using both inside and outside your vehicle.
Due to ongoing product development, there may be variations in operation between this owner's
manual and the actual software on the unit.

Chapter 1 Preface
10 NR1UB/NR1UW/NR1UR
1-1 Main Ways to Use ClarionMiND
1-1-1 What ClarionMiND Can Do
•A built-in GPS antenna provides a navigation system that can be used in a vehicle or carried along
with you.
•Wi-Fi and Bluetooth connectability for Internet access with a fully functional browser.
•Real-time access to news, weather, and other information using the Internet.
•Simple access using customized applications like YouTube, MySpace, Google Map, etc.
•In addition, use of network-based application services.
•RealPlayer built in for playback of music, movies, images, etc.
•Special Car mode for use in a vehicle.
1-1-2 Portal Site
The Clarion portal site (http://my.clarion.com) provides a variety of different services to enhance the
ClarionMiND experience.
The portal site provides the following information and services. Services available from this site will
continue to expand in terms of available features and applications.
•The latest information about newly available content, services, and software updates.
•Individually targeted promotion messages
•ClarionMiND FAQ
•Downloading of manuals (PDF file)
•Information about how to use ClarionMiND
•Applications that can be installed in addition to preinstalled applications
•Downloading of system recovery software
•Downloading of ClarionMiND special wallpaper and themes
NOTE
In order to use the services available on the Clarion portal site, you will need to register as a user and
register your ClarionMiND unit. For details, see Registering on the Clarion Portal Site (P. 40).

Chapter 1 Preface
NR1UB/NR1UW/NR1UR 11
1-2 Package Contents
First, check to make sure that everything is included with the unit.
aMain unit
bStylus pen
cBattery pack
dAC adaptor
ePlug converter
fCar adapter
Standard cradle (g, h, i)
gSuction plate
hSupport arm
iAttachment
jProtection film
kQuick Start Guide
lWarranty card
Chapter 1 Preface
12 NR1UB/NR1UW/NR1UR
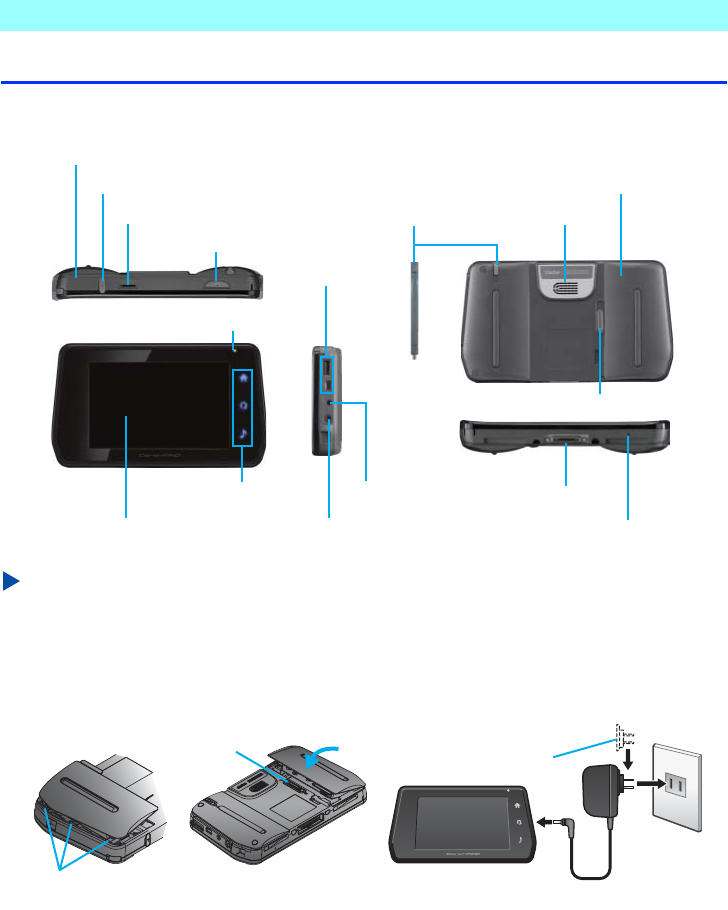
1-3 Part Names and Charging
1-3-1 Part Names
NOTE
The lower USB port is used for the client mode and does not work in this unit.
It will be used for future expansion.
1-3-2 Loading and Charging the Battery Pack
1Slide the battery lock (B) upward, and align the three tabs (A) on the outside of the battery pack
with the unit.
2Press down the inside of the battery pack to securely install it, and slide the battery lock (B) down.
3Plug the AC adapter into the unit's charge jack (C).
GPS antenna (built-in)
Expansion connector
microSD card slot
Power button
Battery indicator
4.8inch LCD touch screen
One touch keys
USB ports
Charge jack
Headphone jack
Stylus pen Speaker
Battery pack
Battery lock
Reset button
Dock connector
(A)
(B)
(C)
(D)
Chapter 1 Preface
NR1UB/NR1UW/NR1UR 13
4Attach the plug converter (D) to the AC adapter and then plug the AC adapter into a household
electrical outlet.
NOTE
•
The battery indicator will light orange while charging is in progress, and change to green when charging
is complete. For details about the battery indicator state, see 10-2 Indicators State (P. 123).
•
It takes approximately two hours to go from full discharge to full charge while unit power is turned off.
•
The battery indicator will blink green when the battery is low.
Precautions when Using Batteries
•Very hot or very cold conditions will make charging impossible. Perform charging in an area where the
temperature is in the range of 10°C to 35°C.
•In order to protect the battery pack, charging may not be possible after the battery pack becomes hot
due to long continuous use or because the battery was left in direct sunlight.
In this case, the battery indicator blinks orange.
•You do not need to completely discharge a battery pack before charging it.
•Excessive discharge of a battery pack can affect its life. Charge a battery pack at least once every two
weeks, even when you do not use it. If you do not plan to use a battery pack for a long time, charge
the battery pack, remove it from the unit, and store it in a cool, dry place. Even when storing a battery
pack outside of the unit, it is recommended that you charge it at least once every six months.
•Do not leave a battery pack fully discharged. Doing so can cause the battery pack to excessively
discharge and become unusable.
•Battery packs are consumable items. Over time, the amount of operating time provided by each
charge will become shorter and it will take progressively longer to charge the battery pack each time.
When the operating time normally provided by a charge becomes about half of what it initially is,
replace the battery pack with a new one.
WARNING
Note the following precautions about the battery pack. Mishandling of the battery pack creates
the risk of fluid leakage, overheating, explosion, and combustion, creating the risk of fire and
personal injury.
• Never leave a battery pack on the dashboard of a vehicle or in any other location exposed to
direct sunlight, in a vehicle parked in the sun, or in any other location where it is subjected
to high temperature and humidity.
• Never short the positive (+) and negative (-) terminals of a battery pack.
• Never throw batteries into fire or subject them to heat.
• Do not subject batteries to strong impact by dropping them, etc.
• Never subject the exterior pack to strong impact that can cause serious damage.
• Do not wipe metal parts with a wet cloth.
• Do not allow batteries to become wet and never touch them when your hands are wet.
• Never try to disassemble a battery pack or modify them in any way.
• Use only the specified battery pack. Never try to use any other type of battery pack.
• If a battery is leaking, do not touch it with your bare hands. Should battery fluid get onto
your skin, immediately rinse the affected area with water.

Chapter 1 Preface
14 NR1UB/NR1UW/NR1UR
Recycling a Battery Pack (Li-ion)
Used battery packs (Li-ion) are valuable recyclable resources.
After covering the terminals with tape, take the battery pack to a participating retailer or contact the
location provided on the Clarion portal site (my.clarion.com) to find out about how to dispose of the
battery pack. See the “Support” or “Inquiries” section.
1-3-3 Replacing the Battery Pack
Battery packs are consumable items. Over time, the amount of operating time provided by each
charge will become shorter and it will take progressively longer to charge the battery pack each time.
When the operating time normally provided by a charge becomes about half of what it initially is,
replace the battery pack with a new one.
This unit supports use of the separately available (large type) battery pack.
1Slide the battery lock (B) upward, and remove the battery pack.
2Align new battery pack with the three tabs (A) on the outside of the unit.
3Press down the inside of the battery pack to securely install it, and slide the battery lock (B) down.
(A)
(B)
Chapter 1 Preface
NR1UB/NR1UW/NR1UR 15
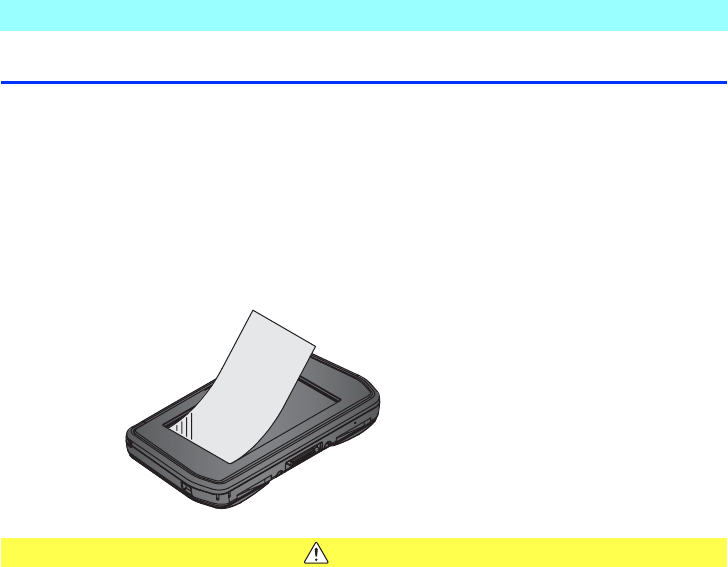
1-4 Applying the Protection Film
1Use a lens cleaning cloth or other soft cloth to wipe the LCD screen clean of dirt and dust.
2Peel off the transparent separator.
3Holding the film along the side edges, carefully apply it starting from one end of the screen making
sure that no air gets between the screen surface and the adhesive surface of the film.
If air does get between the film and the screen, lightly press the film where air bubbles are located
in order to move the air bubbles to the edges of the film so they can be released, or peel the film
from the screen and reapply it.
CAUTION
• The contact surface of the protection film is easily soiled by dirt and dust. Take care not to
touch it.
• Do not crease the protection film.
Chapter 1 Preface
16 NR1UB/NR1UW/NR1UR
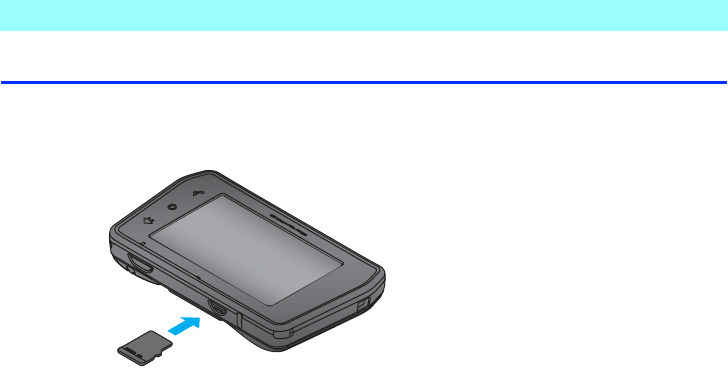
1-5 Inserting and Removing a microSD Card
To use a microSD card, position it with the terminal side facing downwards and the label side facing
upwards as shown below, and slide it into the unit. Take care not to touch the terminals.
To remove the microSD card from the unit, check to make sure that none of the applications are
accessing the card. Clarion recommends closing all applications before removing the microSD card.
To remove, press gently on the card then release.
This will cause the card to come out part way. Taking care not to touch the terminals, remove the card
from the unit.
Chapter 1 Preface
NR1UB/NR1UW/NR1UR 17
1-6
Start Up and Shutdown
1-6-1
Start Up
Press the power button to start up the unit. After
a short while, the Home screen will appear on
the display.
The screen shown above appears when you are
using the unit in its portable configuration. This
is called the Mobile mode.
NOTE
Be sure to check and set the current date and
time the first time you start up the application.
For details about date and time settings, see
7-3 Date and Time (P. 103) in the Control
Panel.
1-6-2
Shutdown
Hold down the power button for about four
seconds to shut down the unit.
This will shut down the unit and turn off power.
NOTE
Pressing the power button momentarily (less
than four seconds) while the unit is on will enter
the standby mode.
1-7
Using the Unit Mounted
on the Standard Cradle
You can mount the unit onto the supplied
standard cradle for use within a motor vehicle.
Mounting the unit onto the standard cradle
automatically starts up the navigation
application and switches the Home screen to
the Car mode. Note that the applications and
functions available for use are limited by law
while the ClarionMiND is in the standard cradle
in accordance with motor vehicle safety
guidelines.
See How to mount the unit onto the standard
cradle (P. 124) for information on how to mount
the unit onto the standard cradle.
1-7-1
Differences from the Mobile Mode
Mounting the unit onto the standard cradle will
cause the unit to operate differently from it does
in the Mobile mode as described below.
•The unit will switch automatically to the Car
mode Home screen.
•Supported applications are Navigation,
MySpace, News, Weather, Contacts,
RealPlayer, Map, Control Panel, Connection,
and Portal Sync only.
NOTE
When in the stand cradle, movies cannot be
played with RealPlayer. Also, use of any
functions related to e-mail and the browser is
not supported.
Chapter 1 Preface
18 NR1UB/NR1UW/NR1UR
1-7-2
Connecting to the Optional Car Dock
The unit can be used while connected to the
optional Car Dock.
For details about operation when connected to
the Car Dock, see the Owner's manual that
comes with the Car Dock.
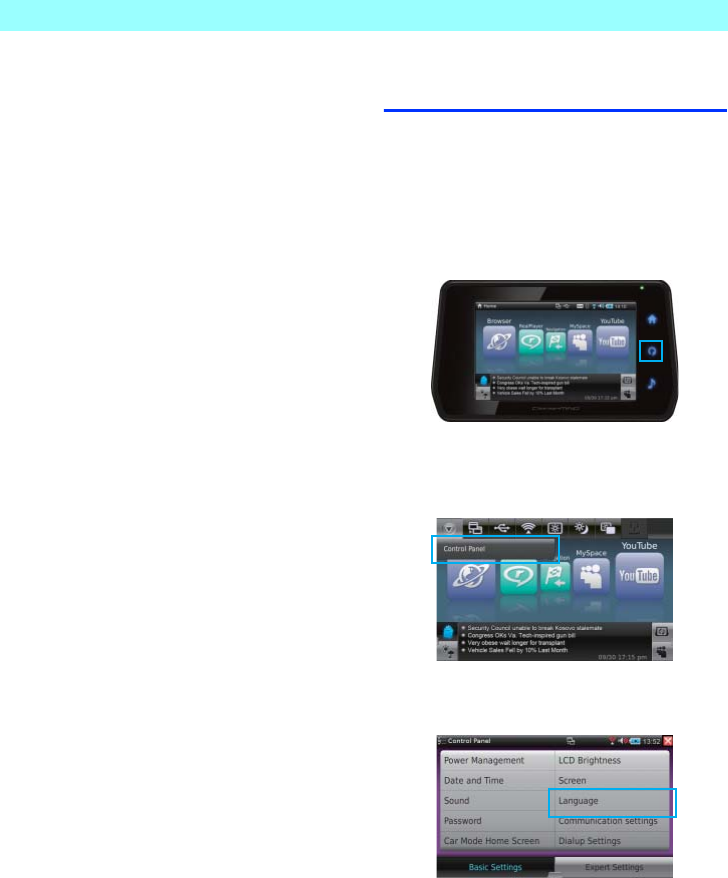
1-8
Selecting a Language
Select the language you want when using the
unit for the first time. After selecting a language,
you will have to restart the unit for the new
selection to take effect. Follow the instructions
that appear on the display to restart the unit.
1Press the unit's control key.
This displays the control bar.
2On the system menu on the left end of the
control bar, select [Control Panel].
This displays the Control Panel screen.
3Tap the [Language] key.
This displays the Language screen.

Chapter 1 Preface
NR1UB/NR1UW/NR1UR 19
4Tap the area where the current language
setting is displayed.
5Tap the check box next to the language you
want to select and then tap the [Back] key.
This displays a confirmation screen.
6Tap the [OK] key.
This restarts the unit and switches to the
display language you specified.
20 NR1UB/NR1UW/NR1UR
Chapter 2 ClarionMiND Basic Operation
2-1
Using the Stylus Pen
You can perform unit operations touching the
screen with the stylus pen or your finger.
The following explains a few of the terms used
in this manual.
Tap:
The act of momentarily touching and
immediately releasing an icon or other
on-screen object with the stylus pen or your
finger.
Drag:
The act of holding the stylus pen or your finger
against the screen and dragging it up, down,
left, right, or diagonally.
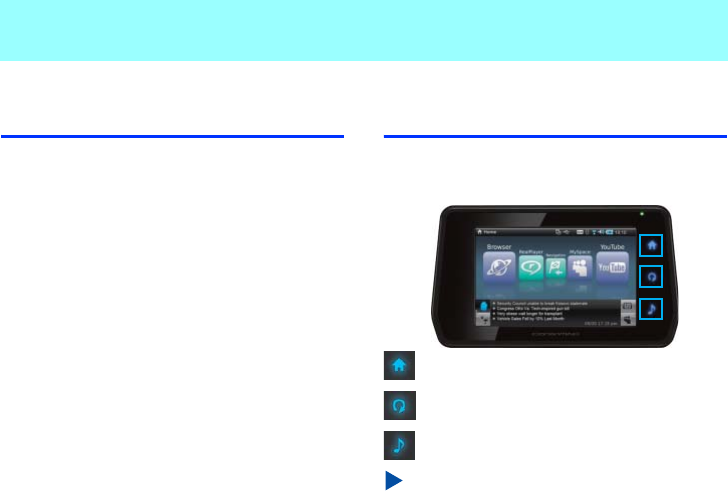
2-2
One Touch Keys
The unit has three one touch keys: the home
key, control key, and audio key.
Home key
Control key
Audio key
NOTE
•
Operate the one touch keys by touching them
with your finger.
•
For indicating state of the one touch keys, see
10-2 Indicators State (P. 123).
2-2-1
Home Key
Touch the home key to return to the Home
screen from any other operation screen.
Touching the home key while the Home screen
is displayed scrolls the application icons to the
left, in sets of five.
Chapter 2 ClarionMiND Basic Operation
NR1UB/NR1UW/NR1UR 21
2-2-2
Control Key
Touching the control key displays the control
bar.
While the control bar is displayed, touch the
control key again to hide it.
The bar will disappear after about five seconds if
you do not perform any operation.
The following describes control bar functions.
2-2-3
Audio Key
Touching the audio key displays the audio bar.
While the audio bar is displayed, touch the
audio key again to hide it. The bar will disappear
after about five seconds if you do not perform
any operation.
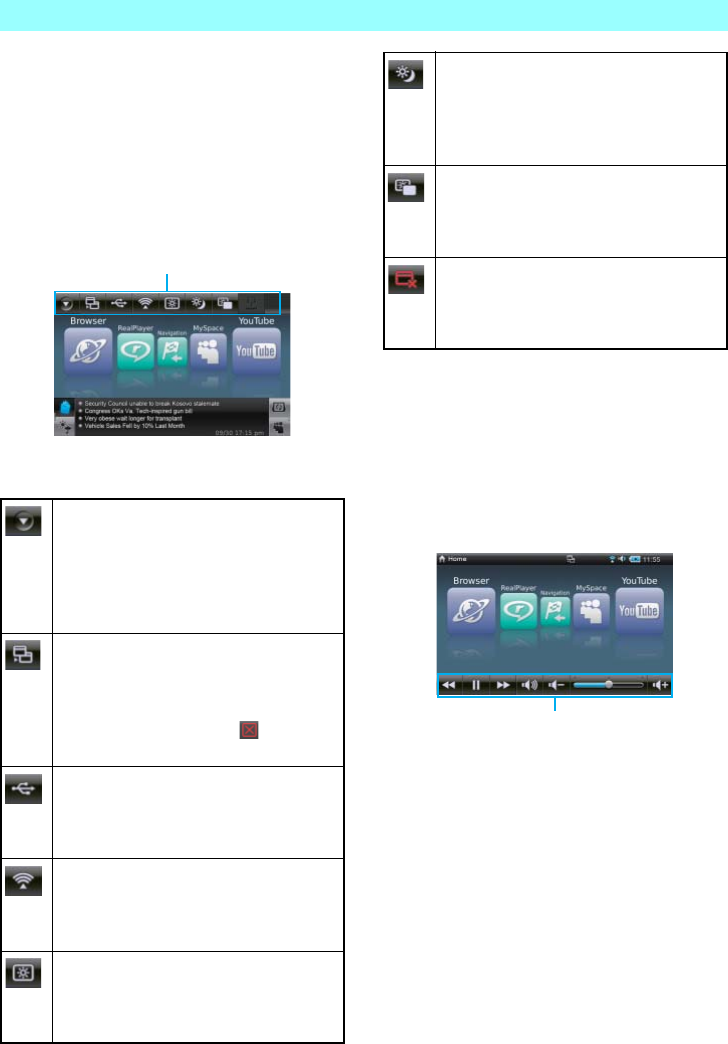
System menu/ Application menu
Tapping this key while the Home screen is
displayed will select the Control Panel.
Tapping it while any application screen is
displayed will display the menu for the
applicable application.
Task navigator menu
Displays a list of currently running
applications, where you can tap the check
box next to an application name to switch
to that application. Tapping quits the
applicable application.
USB notify
Indicates a USB device or microSD card is
connected. A USB device can be removed
by tapping it.
Wireless network
Displays the Connection screen, which can
be used to configure settings for
connecting to a network.
LCD brightness
Displays the LCD Brightness screen,
which can be used to configure display
screen settings.
Control bar
Day/Night mode
Toggles between Day and Night modes.
The screen brightness of each mode can
be specified on the LCD Brightness
screen.
LCD backlight
Turns off the screen. Tapping the touch
screen while the screen is off will turn it
back on again.
Quit
Quits an application. This button appears
only when an application screen is
displayed.
Audio bar
Chapter 2 ClarionMiND Basic Operation
22 NR1UB/NR1UW/NR1UR
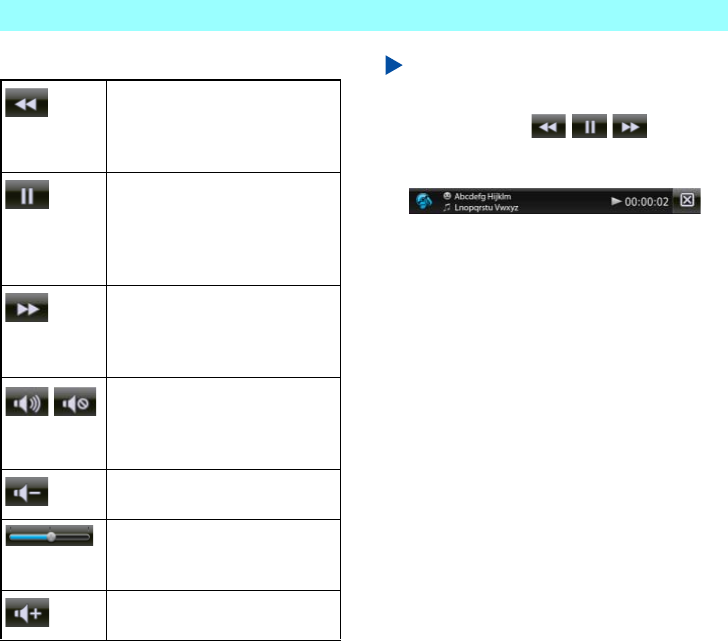
The following describes audio bar functions.
NOTE
•
Tapping any of the following keys while
RealPlayer is running will display the audio
information bar: . The audio
information bar shows the artist name, track
name, play status, and play time.
•
Tapping the audio information bar switches to
RealPlayer.
Track down
Replays the previous track. (This
operation is possible only while
RealPlayer is running.)
Play/Pause
Pauses playback. Tapping again
restarts playback. (This operation
is possible only while RealPlayer
is running.)
Tra ck u p
Plays the next track. (This
operation is possible only while
RealPlayer is running.)
Volume muting
Mutes the unit system volume.
Tapping again returns to the
previous volume level.
Volume down
Lowers the unit system volume.
Volume control bar
Dragging the bar adjusts the
volume level.
Volume up
Raises the unit system volume.

Chapter 2 ClarionMiND Basic Operation
NR1UB/NR1UW/NR1UR 23
2-3
Home Screen
There are two types of Home screen, one for
each mode. The screen that appears when the
unit is being used in a standalone configuration
is the Mobile mode screen, while the screen that
appears while the unit is mounted on the
included standard cradle or the optional Car
Dock is the Car mode screen.
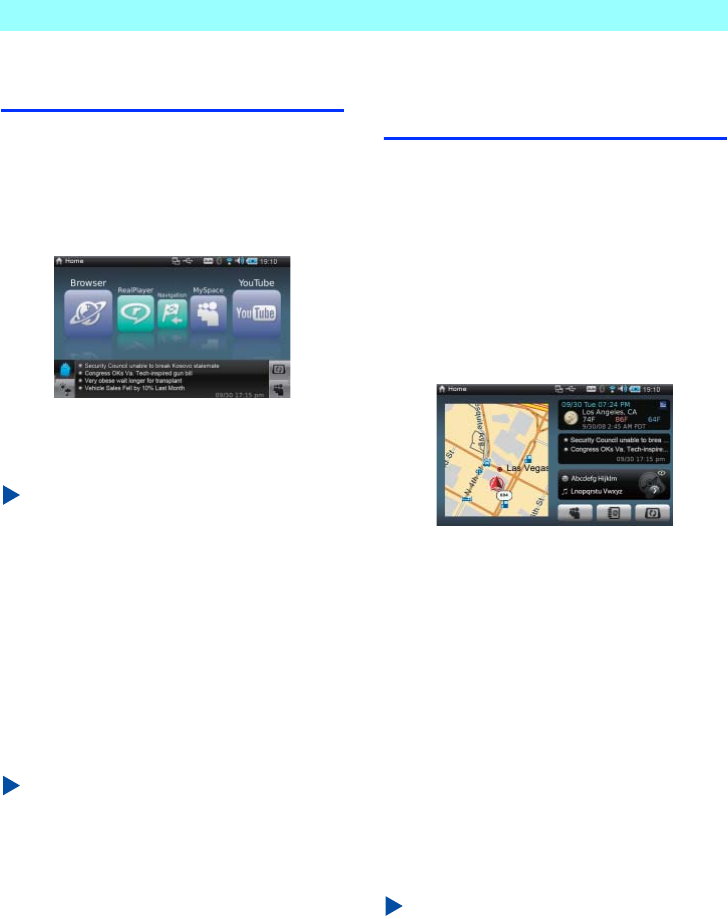
2-3-1
Mobile Mode
Tap an application icon to start up the chosen
application.
Five application icons are displayed at a time.
Dragging the top or bottom of the displayed
icons left or right will scroll the application icons
in the corresponding direction.
Dragging the application in the center of the
Mobile mode Home screen straight upwards will
change the screen layout from the slide view to
the carousel view.
With the carousel view, dragging the stylus pen
or your finger in a circle inside the icon ring will
cause the application icons to rotate. Tapping
the home key will rotate the application icons to
the left, in sets of five.
To return to the slide view, drag the application
icon at the top of the icon ring to the center of
the ring.
Application icon
Chapter 2 ClarionMiND Basic Operation
24 NR1UB/NR1UW/NR1UR
2-3-2
Car Mode
Unlike the Mobile mode screen, the application
icons cannot be moved on the Car mode
screen. Icons for starting up applications and
tap areas are fixed on the screen and cannot be
moved.
Switching to the Car mode will quit all currently
running applications, except for Navigation,
RealPlayer, MySpace, Contacts, Weather, and
News. Switching to the Car mode will always
display the Home screen, regardless of the
applications that are currently in use in the
Mobile mode.
Removing the unit from the standard cradle or
the optional Car Dock will cause the Home
screen to switch automatically to the Mobile
mode screen.
Switching to the Mobile mode will always display
the Home screen, regardless of the applications
that are currently in use in the Car mode.
Running applications will not be exited.
2-4
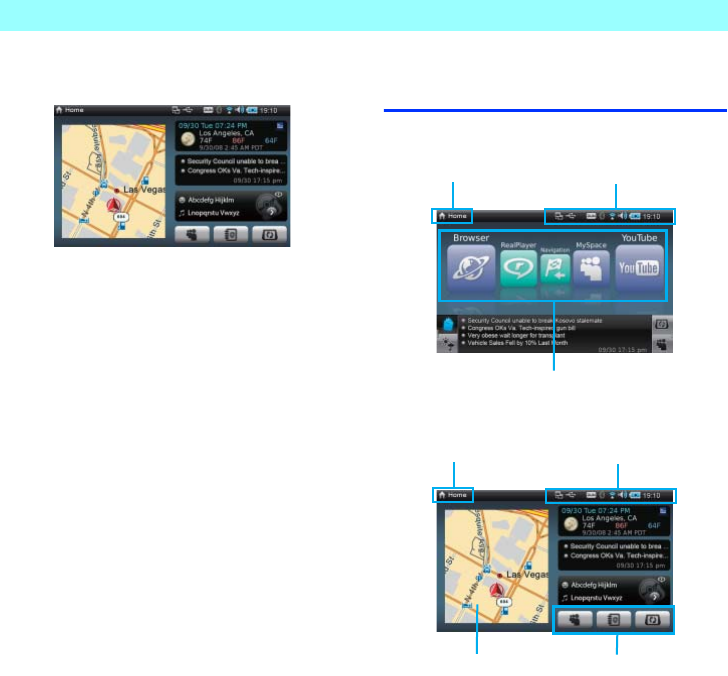
Home Screen Display
•Mobile mode
•Car mode
Application title
Shows the title of the currently selected
application.
Status indicator
Application icon
Application title
Status indicator
Application iconNavigation(half size)
Application title

Chapter 2 ClarionMiND Basic Operation
NR1UB/NR1UW/NR1UR 25
Status indicator
Indicates the current status of the unit using
icons.
Application icon
Tap an application icon to start up the applicable
application.
Three application launcher keys are displayed in
the Car mode. Under the initial default settings,
the applications assigned to the launcher keys
are (left to right): MySpace, Contacts, and Portal
Sync.
NOTE
For information about application icon settings
in the Car mode, see 7-8 Car Mode Home
Screen (P. 107) in Control Panel.
Navigation (Half-size)
Tapping the navigation screen will expand it to
fill the entire display area. You can use the
Control Panel [Car Mode Home Screen] setting
to specify display of the navigation screen on
either the left or right side of the Home screen.
Indicates multiple applications are
running. Tap to switch between
applications.
Indicates a USB device or microSD
card is connected. Tap to disconnect
the USB device or other device.
Indicates a dial-up connection.
Indicates that the [DUN] check box is
selected on the Bluetooth device
setting screen.
Displayed in blue during dial-up
connection with a
Bluetooth-compatible device, and in
grey when there is no connection.
This icon is not displayed when
Bluetooth is disabled on the
Connection screen.
Appears during a Wi-Fi connection,
and indicates the connection level.
Tap to display the Connection screen.
Indicates the volume level. Tap to
change the volume level setting.
Indicates the battery power level. This
icon changes to when the AC
adapter is connected. Tap to display
the battery power level.
Displays the current time. The time
format can be specified on the
Control Panel. Tap to display the time
window.
Chapter 2 ClarionMiND Basic Operation
26 NR1UB/NR1UW/NR1UR
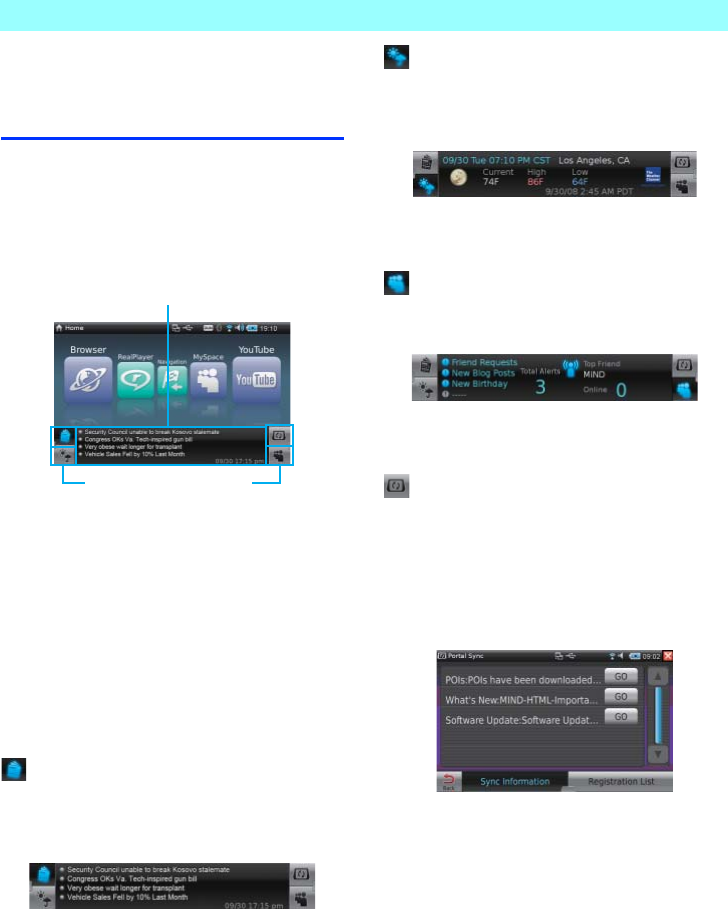
2-5
Using the Quick
Information Keys
Quick information keys control the content in a
sub-display area on the Home screen.
2-5-1
Mobile Mode
There are four quick information keys on the
bottom of the Home screen.
Tapping a key displays the applicable execution
result in the quick information area.
The quick information area can display real-time
information while the Home screen is displayed.
Tapping the quick information area will switch to
the applicable application. Information for the
quick information area requires a connection to
the Internet. Information will not update without
an Internet connection.
News key
Displays four up-to-the-minute news items,
along with a time stamp in the quick information
area. The news is updated periodically.
For details about news, see 5-12 News Key
(P. 71).
Weather key
Displays the current date and time, along with
the current weather report for the selected area
in the quick information area.
For details about weather, see 5-13 Weather
Key (P. 73).
MySpace key
Displays MySpace information in the quick
information area.
For details about MySpace, see 5-4 MySpace
(P. 52).
Portal Sync key
Displays the latest news from the Clarion portal
site.
In order to access information from the portal
site, tap the Portal Sync key and register as a
user. For details about registration, see
Registering on the Clarion Portal Site (P. 40).
Quick information area
Quick information key

Chapter 2 ClarionMiND Basic Operation
NR1UB/NR1UW/NR1UR 27
2-5-2
Car Mode
The right side of the Home screen is divided into
three areas in the Car mode. Tap an area to
start up the applicable application.
Under initial default settings, the three areas
show (from top to bottom): Weather, News, and
RealPlayer.
NOTE
For details about quick information key
settings, see 7-8 Car Mode Home Screen
(P. 107) in Control Panel.
2-6
Customizing Application
Icons
Application icons are grouped and arranged by
category.
Application icons are color coded into three
categories: My favorites, Applications, and
Tools.
Use the following procedure to display icons for
a specific category.
1On the Home screen, tap the area below
the application icons.
This displays the category keys.
Tap a category key to display the
application icons that belong to the
category on the Home screen.
On the carousel view, you can move an
application icon to a different category and
change the order of the icons. Use the following
procedure.
Example: To move MySpace from the My
favorites category to the Applications category
1Display the carousel view and then
tap-and-hold the MySpace icon for at least
two seconds.
This displays a sub-menu.
Quick information area

Chapter 2 ClarionMiND Basic Operation
28 NR1UB/NR1UW/NR1UR
2Tap the check mark next to the Application
category.
MySpace icon moves to the end of the
Application category.
To move an application icon within a
category, tap [Move Forward] or [Move
Back] on the sub-menu.
NOTE
•
[Move Forward] and [Move Back] are possible
only within the selected category.
•
If a category becomes empty due to an
application icon move operation, the
corresponding category key will become
dimmed (cannot be selected).

Chapter 2 ClarionMiND Basic Operation
NR1UB/NR1UW/NR1UR 29
2-7 Software Keyboard
All text input on the unit is performed using a software keyboard. The following describes the basic
input method, which can be used on any of the unit's application screens.
Tap a field that allows text input to display the software keyboard.
Input operations and character type switching are performed as shown below.
NOTE
•
In a field that supports input of multiple lines, tap the [Enter] key to perform a newline operation within
the same text input area.
•
You can change the alphabetic sequence using the Control Panel [Language] setting.
•
To delete a string of characters, drag across them to select and then tap .
Toggles case.
Toggles the keyboard as shown below.
Tapping again returns to the previous keyboard.
Completes the input or returns to the previous screen.
Text input area
Deletes characters
one by one.
Starts a new line.
(Sets the input
characters depending
on the application.)
Moves the cursor.

30 NR1UB/NR1UW/NR1UR
Chapter 3 Connecting to a Network
3-1
Wi-Fi Connection
Settings
Connection to a network is required for the unit
to access the Internet and to use e-mail.
Network connection settings need to be made
only once, the first time you connect. This
section shows how to connect to network using
Wi-Fi.
NOTE
Configure Wi-Fi connection settings in a
location that has a wireless LAN access point.
3-1-1
Searching for an Access Point
1On the Home screen, tap [Connection].
This displays the Connection screen.
The following describes the functions of the keys
on the screen.
2Tap the Wi-Fi key.
3Tap the [Search] key.
This displays a list of access points.
Indicates the Wi-Fi access point
connection status during
connection to a network. The
status indicator also displays an
icon that indicates the connection
level.
WiFi Search: Searches for an access
point.
Profile: Creates, stores, imports,
or exports a profile.
Auto: When using a network,
searches again for a connectable
access point and connects to it
automatically.
: Toggles Wi-Fi connection on
and off.
Bluetooth Select: Displays the Bluetooth
Device screen.
: Toggles Bluetooth connection
on and off.
Airplane mode Turning on this mode temporarily
turns off Wi-Fi and Bluetooth
network connections.
Connection
Info.
Shows information about the
network connection.
Strength and encryption system are displayed.
Network name
is displayed.
Tap to search for
access points.

Chapter 3 Connecting to a Network
NR1UB/NR1UW/NR1UR 31
4Tap the check box next to the access point
to which you want to connect and then tap
the [Connect] key.
This will cause to appear on the right
side of the list and display the key input
screen.
5Tap the “Key” field.
This displays a software keyboard.
6Enter the security key name and then tap
the key.
7Tap the [OK] key.
This displays the save access point
confirmation screen.
If you want to assign a name to the access point
and save it, advance to step 8.
When the name of the found access point is the
way you want, tap [Cancel] key to complete the
connection process.
8Tap the “Profile name” field.
This displays a software keyboard.
9Enter the profile name you want and then
tap the key.
10
Tap the [OK] key.
This will cause the access indicator to light
and establish the Wi-Fi connection.
The name of the currently connected
access point will be displayed at the bottom
of the screen.
3-1-2
Registering an Access Point Manually
When you are unable to find an access point
using the [Search] key, you can register a profile
manually for connection.
1On the Connection screen, tap the [Profile]
key.
This displays the Profile screen.
2On the Profile screen toolbar, tap the [New]
key.
This displays the Add New Profile screen.

Chapter 3 Connecting to a Network
32 NR1UB/NR1UW/NR1UR
The following describes the functions of the keys
on the screen.
3After all of the settings are the way you
want, tap the [Security] key.
This displays the security registration
screen.
The following describes the functions of the keys
on the screen.
4After all of the settings are the way you
want, tap the [IP Configure] key.
This displays the IP Configure screen.
The following describes the functions of the keys
on the screen.
When [ON] is specified for “Use DHCP”,
continue with configuration of DNS settings.
5After all of the settings are the way you
want, tap the [DNS setting] key.
This displays the DNS Setting screen.
Profile name Enter the profile name.
ESSID Enter the ESSID.
Non-Broadcast
Networks
If ESSID is hidden, tap the [ON]
key.
Search Searches for the entered
ESSID.
General Configures general access
point settings.
Security Configures security settings.
IP Configure Configures IP address settings
or DNS settings.
Proxy Configure Configures proxy settings and
specifies the port number.
Security type Specify this type for [None],
[WEP], [TKIP], or [AES].
Key type Specify this type for [ASCII] or
[HEX].
Key Enter the key.
Security mode Specifying [WEP] for “Security
type” will cause [Open] to be
displayed here.
Use DHCP ON: Tap to use information
acquired from the DHCP server.
OFF: Tap not to use the DHCP
server.
IP Address When DHCP is not being used,
enter the IP address.
Netmask When DHCP is not being used,
enter the netmask address.
Gateway When DHCP is not being used,
enter the gateway.
Chapter 3 Connecting to a Network
NR1UB/NR1UW/NR1UR 33
The following describes the functions of the keys
on the screen.
6After all of the settings are the way you
want, tap the [Back] key.
This returns to the Add New Profile screen.
Next are proxy settings.
If proxy settings are not required, advance
to step 10.
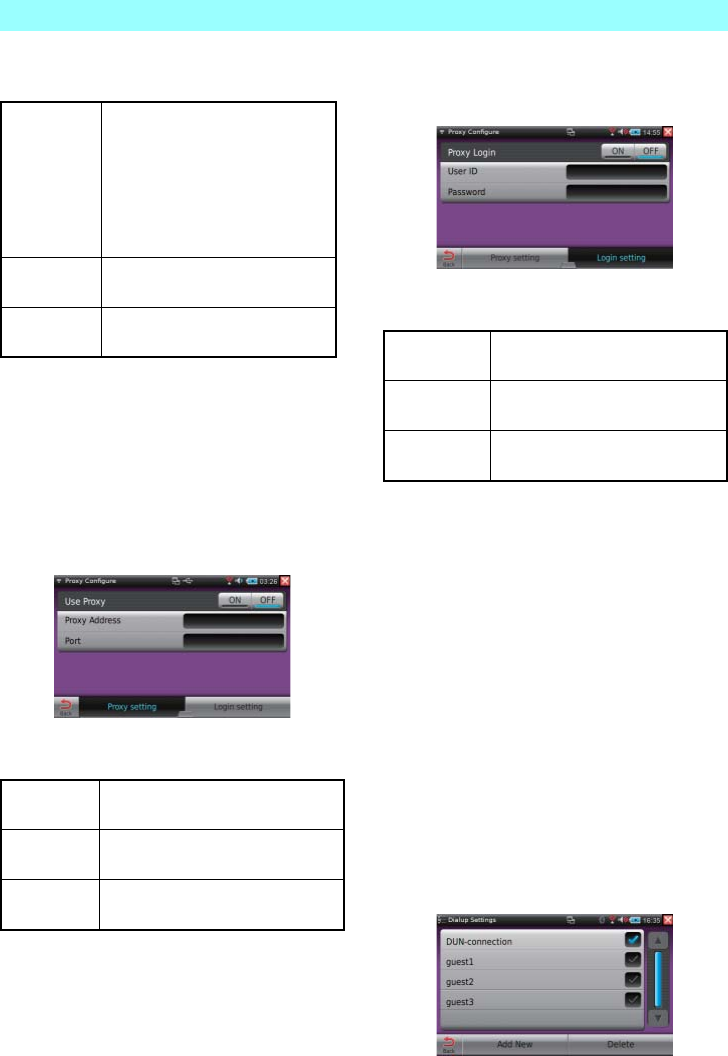
7Tap the [Proxy Configure] key.
This displays the Proxy Configure screen.
The following describes the functions of the keys
on the screen.
8After all of the settings are the way you
want, tap the [Login setting] key.
This displays the Login Setting screen.
The following describes the functions of the keys
on the screen.
9After all of the settings are the way you
want, tap the [Back] key.
This returns to the Add New Profile screen.
10
Tap the [OK] key.
This returns to the Profile screen, which
shows the newly registered profile.
11
Tap the check box next to the profile and
then tap the [Connect] key.
This establishes a Wi-Fi connection.
Use DHCP ON: Tap to use information
acquired from the DHCP
server. This option can be
selected only when [ON] is
selected for “Use DHCP” on the
IP Configure screen.
OFF: Tap not to use DHCP.
Primary DNS If DHCP is not being used,
specify the Primary DNS.
Secondary DNS If DHCP is not being used,
specify the Secondary DNS.
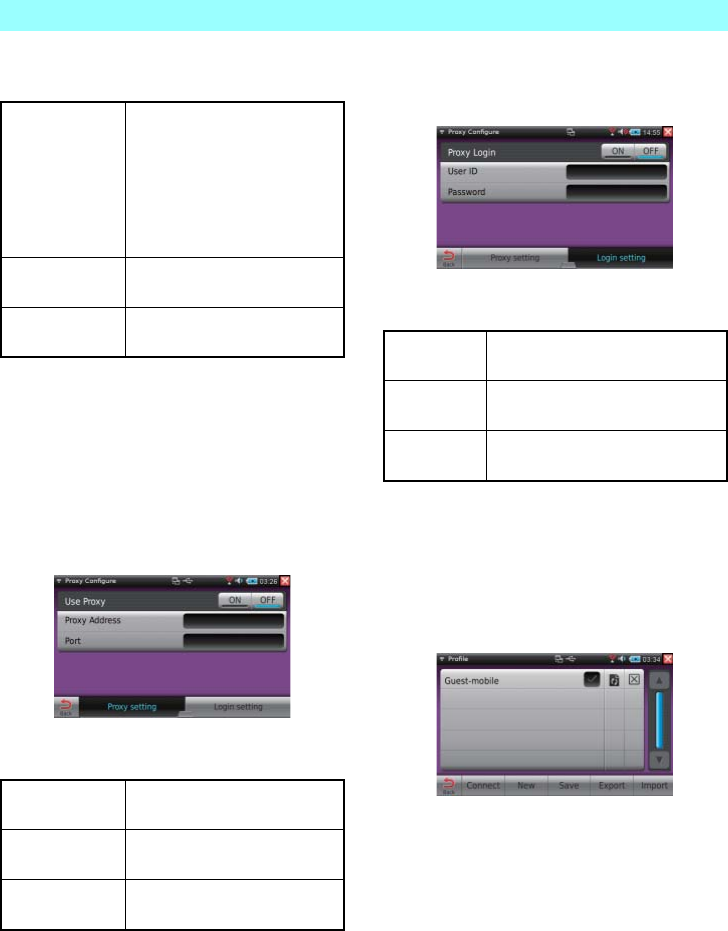
Use Proxy ON: Tap to use proxy.
OFF: Tap not to use proxy.
Proxy Address If a proxy is being used, enter
an address.
Port If a proxy is being used, enter a
port number.
Proxy Login ON: Tap to use proxy login.
OFF: Tap not to use proxy login.
User ID If proxy login is being used, enter a
user ID.
Password If proxy login is being used, enter a
password.

Chapter 3 Connecting to a Network
34 NR1UB/NR1UW/NR1UR
3-1-3
Saving an Access Point
You can use the procedure below to assign a
name to the currently connected access point
and save it. The next time you want to use the
access point to connect to a network, simply
select it on the profile list.
1On the Connection screen, tap the [Profile]
key.
This displays the Profile screen.
The following describes the functions of the keys
on the screen.
2On the toolbar at the bottom of the screen,
tap the [Save] key.
3Tap the “Profile name” field.
This displays a software keyboard.
4Enter the profile name and then tap the
key.
5Tap the [OK] key.
3-1-4
Displaying Network Information
Use the following procedure to display the
information about the configured network
settings.
1On the Connection screen, tap the
[Connection Info.] key.
The following network information is displayed.
•Wi-Fi MAC address
•Bluetooth device address and authorization
PIN code
•TCP/IP
•IP address
•Subnet mask
•Default gateway
•DHCP server
•DNS servers (primary, secondary)
NOTE
Only the Wi-Fi MAC address and Bluetooth
device address are displayed when not
connected to a network.
Tap a check box to select it.
Edits the access point's profile name,
ESSID, etc.
Deletes the access point.
Connect Connects to the currently selected
access point.
New Registers a new access point.
Save Saves the currently selected access
point.
Export Exports the profile of an access point.
Import Imports the profile of an access point.
Chapter 3 Connecting to a Network
NR1UB/NR1UW/NR1UR 35
3-2
Registering a
Bluetooth-enabled Cell
Phone
When you are in an area where Wi-Fi
connection is not possible, you can use a
Bluetooth-enabled cell phone with an Internet
communication plan enabled to establish a
dialup connection. In order to establish a dialup
connection, you must pair the unit with the
Bluetooth-enabled cell phone.
NOTE
Network connection using a Bluetooth-enabled
cell phone is recommended when using the
unit in a motor vehicle, etc.
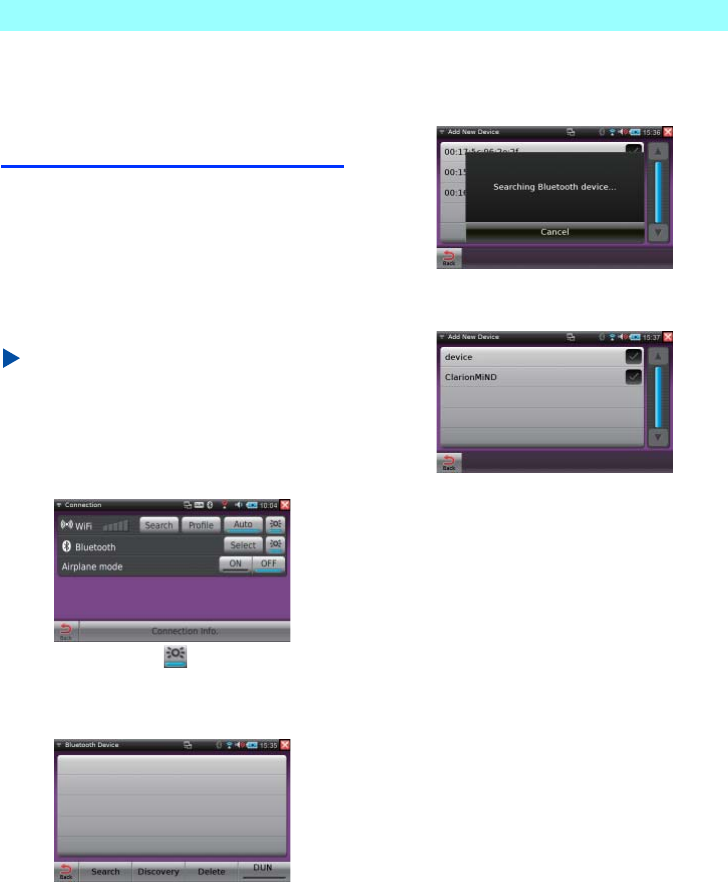
1On the Home screen, tap [Connection].
This displays the Connection screen.
2Tap the Bluetooth key.
3Tap the [Select] key.
This displays the Bluetooth Device screen.
4Put the Bluetooth-enabled cell phone you
want to pair with into connection standby.
5Tap the [Search] key.
This starts a search for Bluetooth-enabled
cell phones.
A peripheral device list will appear on the
display after the search is complete.
6On this list of found cell phones, tap the one
you want to pair with.
7Enter the unit PIN code “1234” on the
Bluetooth-enabled cell phone.
Pairing with the unit will be complete after
the device is certified and registered.
The next time you use a cell phone, tapping
the [Select] key will display paired cell
phones on the Bluetooth Device screen.
Chapter 3 Connecting to a Network
36 NR1UB/NR1UW/NR1UR
NOTE
•
You can perform pairing while the unit is in
standby. In this case, tap the [Discovery] key
on the Bluetooth Device screen, and the cell
phone will search for Bluetooth devices. The
PIN code and device name will be displayed
while the unit stands by, so perform the
certification and connection process on the
cell phone.
•
When [DUN] key is ON, the dialup connection
will be established when the Bluetooth device
is connected. The initial default setting is
“OFF”.
•
To delete a paired Bluetooth device, select it
on the list and then tap the [Delete] key.
•
You can have up to five Bluetooth devices
paired with the unit at one time. To create a
new pairing when there are already five
devices paired, you first need to delete one of
the currently paired devices.
•
If you cancel an ongoing search, all the
Bluetooth devices found up to that point will
be listed on the display.
3-3
Configuring Bluetooth
Connection Settings
After pairing the unit with a Bluetooth-enabled
cell phone, use the procedure below to
configure setting for a dialup connection to a
network.
NOTE
Before configuring dialup connection settings
on the unit, you must first conclude a contract
with an Internet service provider and obtain an
account and password from the provider.
3-3-1
Configuring Connection Destination
Settings
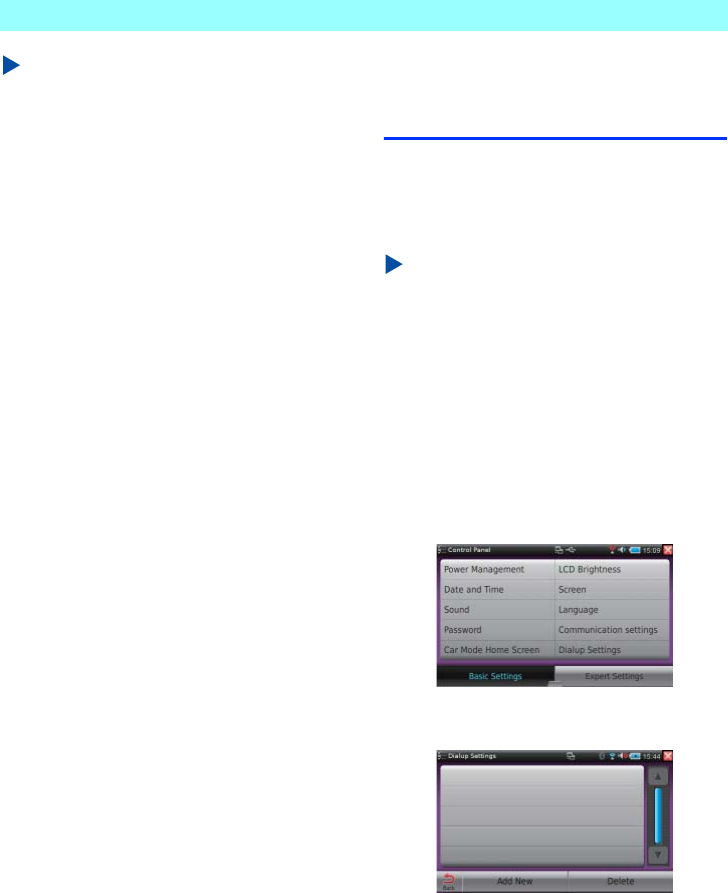
1On the Home screen, tap the [Control
Panel] key.
This displays the Control Panel screen.
2Tap the [Dialup Settings] key.
This displays the Dialup Settings screen.
Chapter 3 Connecting to a Network
NR1UB/NR1UW/NR1UR 37
3Tap the [Add New] key.
This displays the Add New Profile screen.
The following describes the functions of the keys
on the screen.
4Tap the name of each field and enter the
required information.
Next, configure IP address and DNS
settings.
5Tap the [IP Configure] key.
This displays the IP Configure screen.
The following describes the functions of the keys
on the screen.
When [ON] is specified for “Use DHCP”,
continue with configuration of DNS settings.
6After all of the settings are the way you
want, tap the [DNS setting] key.
This displays the DNS Setting screen.
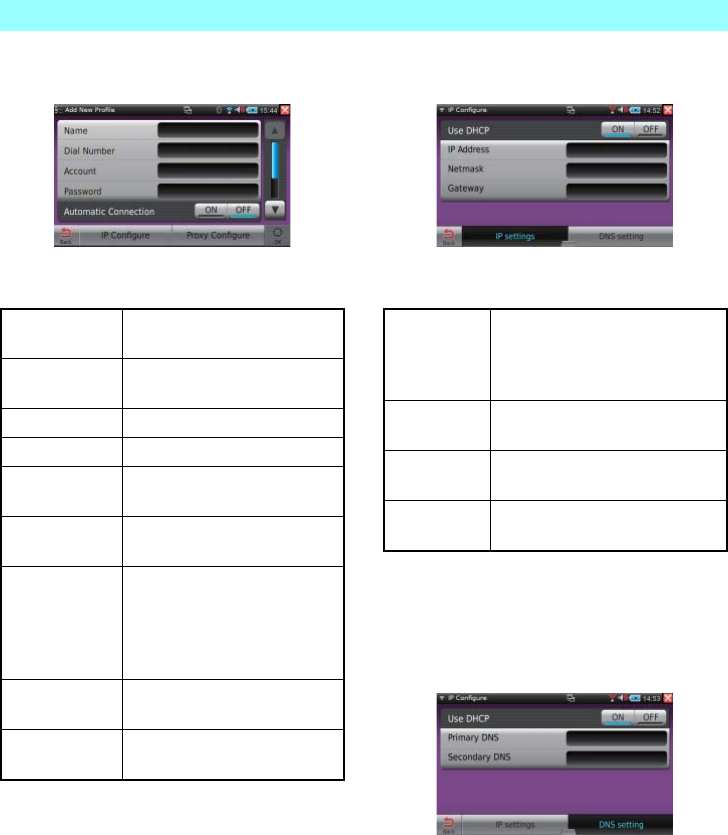
Name Enter the connection name.
(Required)
Dial Number Enter the phone number.
(Required)
Account Enter the account name.
Password Enter the password.
APN Specifies the access point
name.
PDP Select IP or PPP as the packet
data protocol.
Automatic
Connection
ON: Connects to the network
without confirmation.
OFF: Displays a connection
confirmation screen before
connecting to the network.
IP Configure Configures IP address and DNS
settings.
Proxy Configure Configures proxy and login
settings.
Use DHCP ON: Tap to use information
acquired from the DHCP server.
OFF: Tap not to use the DHCP
server.
IP Address When DHCP is not being used,
enter the IP address.
Netmask When DHCP is not being used,
enter the netmask address.
Gateway When DHCP is not being used,
enter the gateway.
Chapter 3 Connecting to a Network
38 NR1UB/NR1UW/NR1UR
The following describes the functions of the keys
on the screen.
7After all of the settings are the way you
want, tap the [Back] key.
This returns to the Add New Profile screen.
Next are proxy settings.
If proxy settings are not required, advance
to step 11.
8Tap the [Proxy Configure] key.
This displays the Proxy Configure screen.
The following describes the functions of the keys
on the screen.
9After all of the settings are the way you
want, tap the [Login setting] key.
This displays the Login Setting screen.
The following describes the functions of the keys
on the screen.
10
After all of the settings are the way you
want, tap the [Back] key.
11
Tap the [OK] key to save the connection
settings.
This completes the procedure for
configuring dialup network connection
settings. Next, proceed to 3-4 Establishing
a Bluetooth Connection (P. 39).
3-3-2
Changing the Connection Destination
Use the following procedure to change the
dialup connection destination by selecting a new
destination from a list.
1On the Dialup Settings screen, tap the
check box next to the connection
destination to which you want to change.
2Tap the [Back] key.
Use DHCP ON: Tap to use information
acquired from the DHCP server.
This option can be selected only
when [ON] is selected for “Use
DHCP” on the IP Configure
screen.
OFF: Tap not to use DHCP.
Primary DNS If DHCP is not being used, enter
the Primary DNS.
Secondary
DNS
If DHCP is not being used, enter
the Secondary DNS.
Use Proxy ON: Tap to use proxy.
OFF: Tap not to use proxy.
Proxy
Address
If a proxy is being used, enter an
address.
Port If a proxy is being used, enter a port
number.
Proxy Login ON: Tap to use proxy login.
OFF: Tap not to use proxy login.
User ID If proxy login is being used, enter
a user ID.
Password If proxy login is being used, enter
a password.
Chapter 3 Connecting to a Network
NR1UB/NR1UW/NR1UR 39
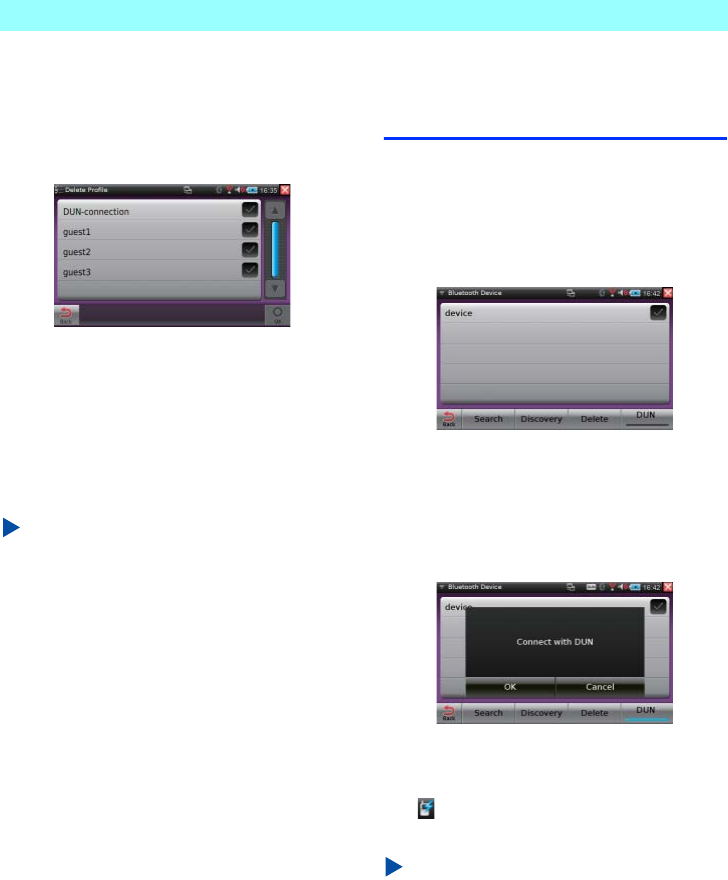
3-3-3
Deleting the Connection Destination
1On the Dialup Settings screen, tap the
[Delete] key.
This displays the Delete Profile screen.
2Tap the check box next to the connection
destination you want to delete and then tap
the [OK] key.
This displays a confirmation screen.
3Tap the [OK] key.
This deletes the selected connection
destination.
NOTE
You can select more than one connection
destination for deletion in the above procedure.
3-4
Establishing a Bluetooth
Connection
Use the following procedure to connect to a
network using a Bluetooth-enabled cell phone.
1On the Home screen, tap [Connection] and
then tap the Bluetooth [Select] key.
This displays the Bluetooth Device screen.
2Tap the [DUN] key and then tap the check
box next to the device to which you want to
connect.
This turns on the dial up network
connection and displays a connection
confirmation screen.
3Tap the [OK] key.
This executes the Bluetooth connection.
The status indicator on the display shows
when the connection is successfully
established.
NOTE
DUN (Dialup Networking Profile) is a profile for
dialup connection to the Internet via a cell
phone.
To terminate the dialup network connection,
tap the [DUN] key to turn it off.
40 NR1UB/NR1UW/NR1UR
Chapter 4
Registering on the Clarion Portal Site
The Clarion portal site is periodically updated
with information required for using this unit and
with other helpful information. After purchasing
this unit, be sure to first visit the portal site and
register as a user.
NOTE
Use the Mobile mode to register on the portal
site. Due to legal limitations concerning
operation while the vehicle is running, you
cannot register while the unit is in the Car
mode.
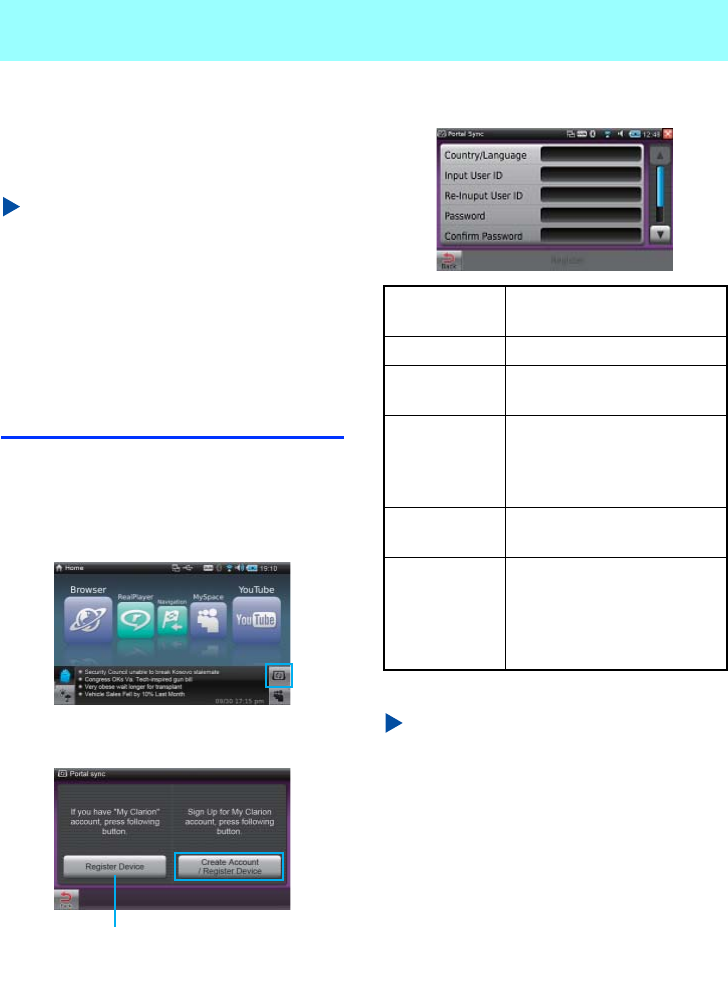
4-1
Registering on the Portal
Site
Use the following procedure to use the unit to
register as a user and to register the unit.
1On the Home screen, tap the Portal Sync
key.
2Tap the [Create Account/Register Device]
key.
3Enter the required information and then tap
the [Register] key.
* Web address is not allowed.
NOTE
The Product ID is the unique ID of your
ClarionMiND unit.
The Product ID appears on the End User
License Agreement.
4After checking everything, tap the [OK] key.
If you already have performed user
registration on a PC, tap this key
and register your unit only.
Country/
Language
Select your country and
language from the list.
Input User ID Enter a valid e-mail address.*
Re-Input User ID Re-enter the e-mail address for
confirmation.
Password Enter a password.
(8 to 32 single-byte
alphanumeric characters or
symbols)
Confirm
Password
Re-enter the password for
confirmation.
NickName Enter the nickname (handle)
you want to use.
(Up to 20 characters, no
double-byte/single-byte
sensitivity)

Chapter 4 Registering on the Clarion Portal Site
NR1UB/NR1UW/NR1UR 41
5When the screen shown below appears, tap
the [OK] key.
When the portal site receives your registration
information, it will temporarily register the user
ID and password you entered in the procedure
above.
After the temporary registration is confirmed, an
e-mail containing the a URL for registration will
be sent to the e-mail address provided as the
user ID.
Within 24 hours after receiving the e-mail,
access the URL and perform final registration of
your user ID, password, and unit.
After completing final registration, you will be
able to access the Clarion member pages and
ClarionMiND owner-only pages on the portal
site. For details about using the portal site, see
Using the Portal Site (P. 112).
NOTE
•
You can use a browser on your PC to perform
user registration on the portal site. For details,
see the membership registration pages at the
Clarion portal site (http://my.clarion.com).
•
Even if you perform user registration on a PC,
you still will need to use the unit to perform
unit registration.
4-2
Using the Unit to Register
the Unit Only
After you finish performing user registration on a
PC, perform the following procedure to finish
registering your ClarionMiND device.
1On the Home screen, tap the Portal Sync
key.
2Tap the [Register Device] key.
This displays the unit registration screen.
3Enter the user ID and password and then
tap the [Register] key.
This displays the screen shown below.
4Tap the [OK] key.
NOTE
To view the units that are currently registered,
tap the [Registration list] key on the Portal Sync
screen.

42 NR1UB/NR1UW/NR1UR
Chapter 5 Applications
5-1
Browser
The Browser application makes it possible for
you to browse websites on the Internet.
NOTE
When you view PDF files in the Browser, save,
print and mail functions on the toolbar cannot
be used.
For details, see Troubleshooting (P. 114).
5-1-1
Displaying the Browser Screen
1On the Home screen, tap the [Browser] key.
This starts up the Browser.
The following describes the functions of the
toolbar at the bottom of this screen.
5-1-2
Using Bookmarks
1On the toolbar, tap the [Bookmark] key.
This displays the bookmark list.
2On the list, tap the bookmark you want.
This displays the applicable web page.
NOTE
You cannot add a bookmark using the toolbar
[Bookmark] key and bookmark list. To add, edit,
or delete a bookmark, see 5-1-3 Editing
Bookmarks (P. 43).
Back Returns to the previous screen.
Forward Advances to the next screen.
STOP Stops loading of the current screen.
Reload Reloads the current page.
Home Displays the web page that is
specified for display whenever the
Browser starts up. The initial default
home setting is “my.clarion.com”.
Bookmark Displays a web page on the
bookmark list.
URL Displays a web page by specifying
its URL.
Search Performs a keyword search using a
selected search engine.
New Tab Adds a new tab page.
Zoom Zooms in or zooms out on the
screen.
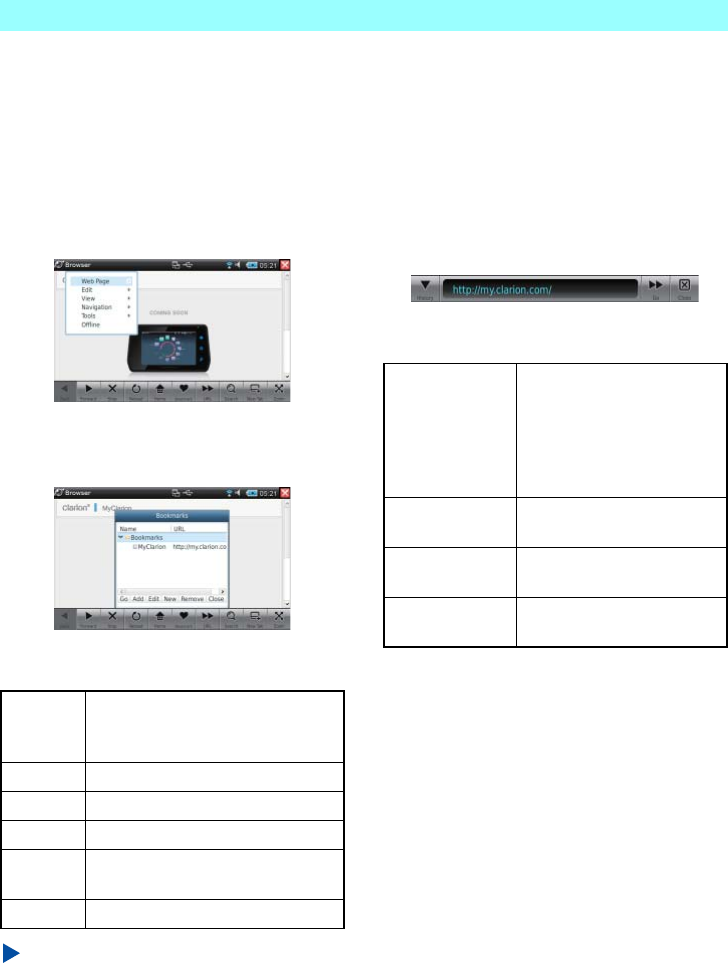
Chapter 5 Applications
NR1UB/NR1UW/NR1UR 43
5-1-3
Editing Bookmarks
Use the procedure below to add a new
bookmark, and to edit or delete an existing
bookmark.
1Tap the application title [Browser] on the left
side of bar at the top of the screen.
This displays the Browser menu.
2On the Browser menu, tap [Navigation] and
then [Bookmarks].
This displays the bookmark editing screen.
The following describes the functions of the keys
at the bottom of the screen.
NOTE
•
If you delete the bookmark or directory, you
need to register it again.
•
A newly created directory does not appear in
the toolbar Bookmark list.
5-1-4
Entering a URL to Display a Website
Tapping the toolbar [URL] key displays a URL
input bar in the toolbar position.
The URL input bar shows the URL of the
currently open web page.
In the URL input area, enter the URL you want
then tap the [Go] key to display the applicable
web page.
The following describes the functions of the URL
input bar.
Go Selecting a bookmark and then
tapping this key displays the
applicable web page.
Add Adds a new bookmark.
Edit Edits the selected bookmark.
New Creates a new directory.
Remove Deletes the selected bookmark or
directory.
Close Closes the bookmark editing screen.
History Displays a history list of past
input URLs. Selecting a URL
in the history list and then
tapping the [Go] key will
display the applicable web
page.
URL input area Tap to display a software
keyboard for input of a URL.
Go Displays the web page of the
URL in the input area.
Close Closes the URL input bar and
displays the toolbar.

Chapter 5 Applications
44 NR1UB/NR1UW/NR1UR
5-1-5
Using a Keyword to Search for a Web
Page
Tapping the toolbar [Search] key displays a
keyword input bar in the toolbar position.
In the keyword input area, enter the keyword of
your search and then tap the [Search] key. This
starts the search using the selected search
engine and displays the search results screen.
Use the [Select] key to select the search engine.
The following describes the functions of the
keyword input bar.
5-1-6
Zooming the Screen
Tapping the toolbar [Zoom] key displays a zoom
bar in the toolbar position.
The following describes the functions of the
zoom bar.
5-1-7
Using the Browser Menu
Tap the application title [Browser] on the left side
of the bar at the top of the screen to display the
Browser menu.
The following describes the functions of the
Browser menu.
Web Page menu
The items on this menu execute processes on a
web page.
Select Displays the search engine list
for selecting a search engine.
The selected search engine is
used for searches.
Keyword input
area
Tap to display a software
keyboard for input of a keyword.
Search Starts a search for the entered
keyword.
Close Closes the keyword input bar
and displays the toolbar.
Out Zooms out from the screen.
Zoom Drag the bar to zoom the screen.
In Zooms in on the screen.
Reset Returns the screen to its original size.
Close Closes the zoom bar and displays the
toolbar.
New Tab Creates a new tab page.
Close Tab Closes the selected tab page.
Close Other
Tabs
Closes all tab pages except the
selected one.
Open... Opens a movie, audio, image,
text or another type of data file.
Save As... Saves the currently displayed
web page.
Set Home Page Makes the currently displayed
web page the home page, which
initially appears when the
Browser is started up.
View Source Displays the HTML source code
of the currently displayed web
page.
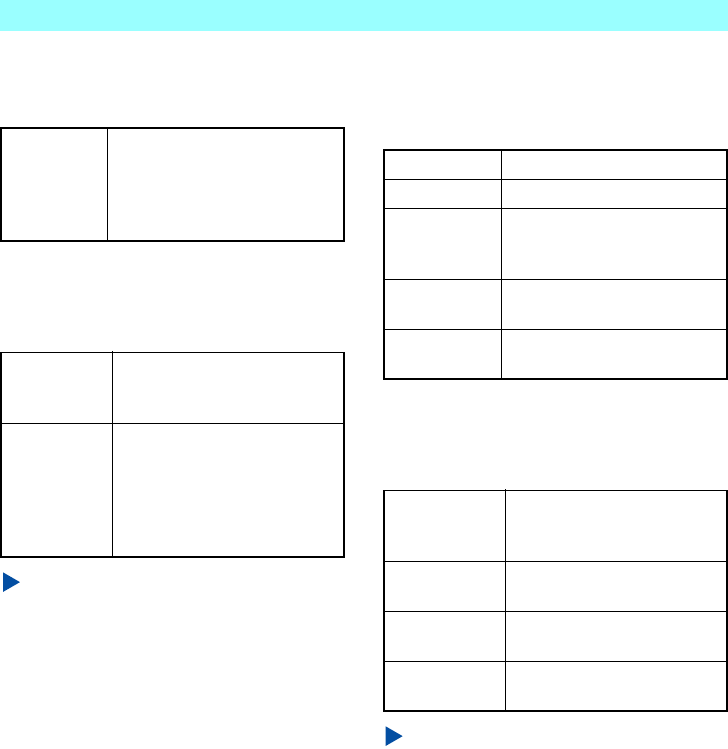
Chapter 5 Applications
NR1UB/NR1UW/NR1UR 45
Edit menu
Use the item on this menu to edit text on the
currently displayed web page.
View menu
Use the items on this menu to configure
Browser display settings.
NOTE
•
You also can toggle full-screen view on and
off by tapping and holding a location on the
screen for at least two seconds.
•
Tapping and holding a location on a Flash
movie (YouTube, etc.) or Flash menu (moving
menu) for more than two seconds may not
switch to the full-screen view.
•
Performing a Flash menu or other moving
menu operation while a movie or audio file is
playing on the browser can cause dropping of
movie frames or skipping of audio. Performing
an operation while another application is
running can cause screen refreshing or
response of other operations to slow down.
Navigation menu
Use the items on this menu to perform the same
functions as those on the toolbar or more
detailed processes.
Tools menu
The items on this menu configure general
Browser settings.
NOTE
•
Popup windows (windows that are displayed
automatically without permission) cannot be
allowed with the unit browser.
•
To permit popup windows, use Popup Window
Manager to add the URL of the site whose
popup windows you want to allow.
•
The default URL setting for popup windows is
“clarion.com”.
Offline menu
Disconnects from the Internet.
Enable Edit
Mode
The following commands are
available by selecting it: [Cut],
[Copy], [Paste], [Select All]. [Find],
[Find Next], [Find Previous] also
are available.
Encoding Configures encoding (language
and character set) display
settings.
Full Screen Displays the Browser in
full-screen view. To exit the
full-screen view, select the
Application menu on the control
bar and then select [View] - [Full
Screen].
Next Tab Selects the next tab to the right.
Previous Tab Selects the next tab to the left.
Back, Forward,
Reload, STOP,
Home
These have the same functions
as their corresponding toolbar.
Bookmarks Creates, edits, and deletes
bookmarks.
History Searches through and delete
history items.
Setting... Configures the initial startup
screen, disk cache size, and
suffix settings.
Enable
Javascript
Enables JavaScript.
Popup Window
Manager
Configures settings for enabling
popups.
Download
Details
Turns off the detailed display
while downloading files.
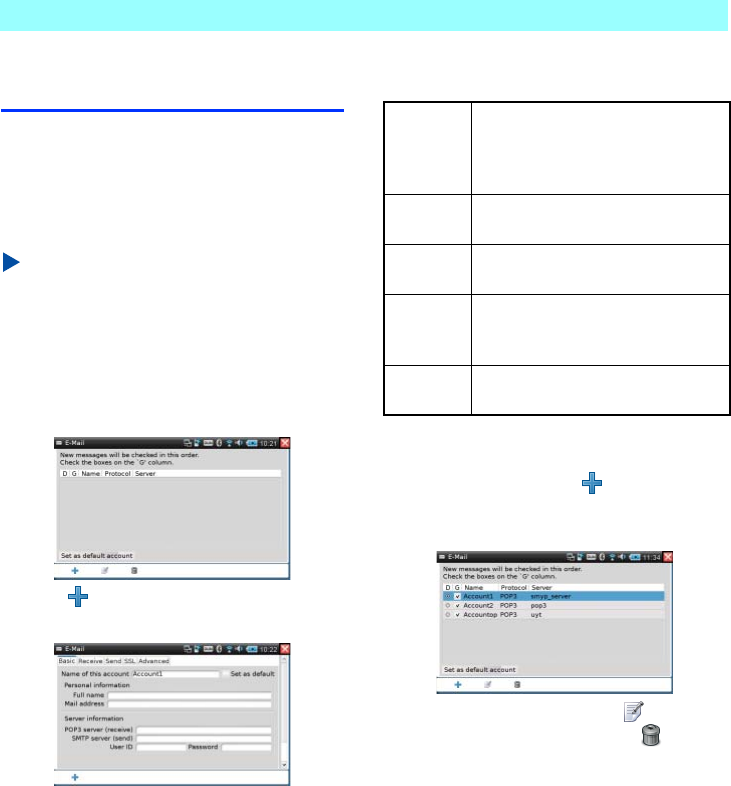
Chapter 5 Applications
46 NR1UB/NR1UW/NR1UR
5-2
E-Mail
The E-Mail application can be used to send and
receive e-mail.
The first time you start up the E-Mail application,
you will need to set up an e-mail account. You
can set up multiple e-mail accounts as required.
NOTE
Only the POP3 protocol is supported.
5-2-1
Setting Up an E-mail Account
1On the Home screen, tap the [E-Mail] key.
This displays a list of accounts.
2Ta p .
This displays the account setup screen.
The following describes the settings on the tabs
of the account setup screen.
3On the [Basic], [Receive], [Send], [SSL],
and [Advanced] tabs, configure the settings
you want and then tap .
This registers account settings and returns
to the account list screen.
To edit account settings, tap .
To delete account settings, tap .
Selecting an account and tapping the [Set
as default account] key will set the selected
account as the default, which is indicated
by “D” to the left of the account on the
account list. This setting is linked to the
“Set as default” setting on the [Basic] tab of
the account setup screen.
Executing a receive all mail operation will
receive mail for accounts for which the
check box in the “G” column is selected in
the account list. Receive is performed for
these accounts in sequence, from top to
bottom.
Basic Configures basic account settings,
such as account name, client
information, provider information, etc.
(Required)
Receive Configures mail message receipt
settings.
Send Configures mail message send
settings.
SSL Configures SSL (Secure Socket
Layer) mail message encryption
settings.
Advanced Specifies the port to be used for send
and receive.

Chapter 5 Applications
NR1UB/NR1UW/NR1UR 47
4Ta p .
This closes the account list screen and
displays the E-Mail screen.
The E-Mail screen will appear the next time
you start up the application.
5-2-2
E-mail Screen
1On the Home screen, tap the [E-Mail] key.
This starts up the E-Mail application.
The E-Mail screen is divided between a
folder view on the left and a summary view
on the right.
Tapping a folder in the folder view will
display a list of mail messages inside the
folder in the summary view. Tapping a mail
message in the summary view twice will
display its contents.
The following describes the folder functions
of the folder view.
The toolbar at the bottom of the screen shows
icons for often-used e-mail functions.
The following describes the functions of the
toolbar icons.
The functions of the toolbar that appears on the
mail message browsing screen are described
below.
Inbox Location for storing received mail
messages.
Outbox Location for storing sent mail
messages.
Draft Location for storing draft mail messages
you still are working on.
Creates a new mail message.
Receives e-mail for all accounts.
Configures general e-mail client settings.
Displays the account list screen.
Displays the selected mail message
contents for browsing.
Deletes the selected mail message.
Starts up the Contacts application. For
details about Contacts, see 5-9 Contacts
(P. 62).
Creates a reply mail message to the
sender of the mail message being
browsed.
Creates a reply mail message to the
sender and all recipients of the mail
message being browsed.
Forwards a received mail message to
another recipient.
Deletes the open mail message.
Displays the previous mail message.
Displays the next mail message.
If a mail message has an attachment, save
the attachment to a specified location.
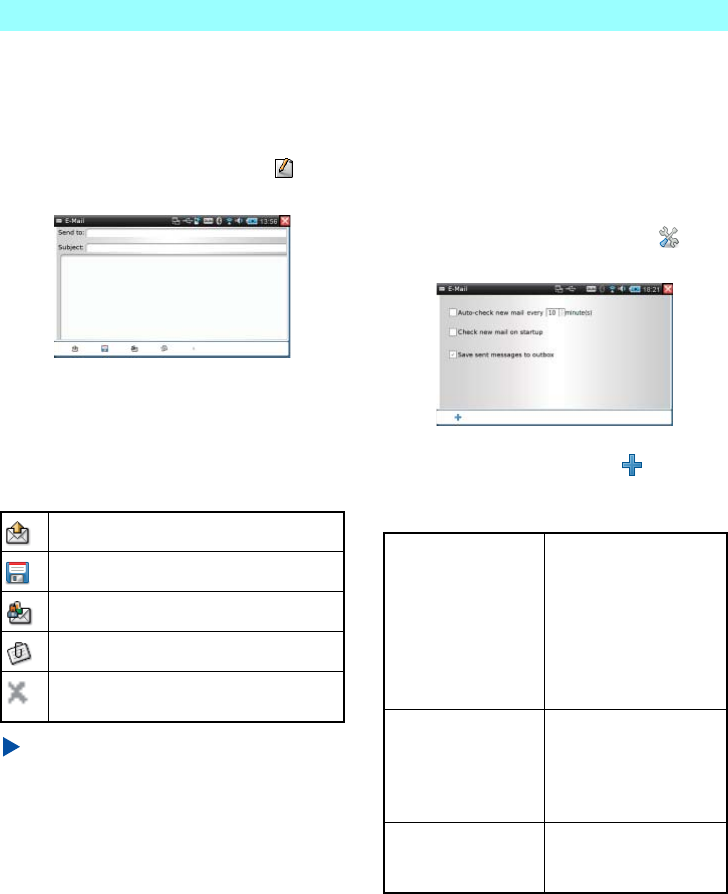
Chapter 5 Applications
48 NR1UB/NR1UW/NR1UR
5-2-3
Creating an E-mail Message
Use the following procedure to create a new
mail message.
1On the E-Mail screen toolbar, tap .
This displays the new mail screen.
Tap [Send to] to enter the address and then
[Subject] to enter the title of the mail message.
Next, tap the body text input area and then enter
the body text of the mail message.
The following describes the toolbar functions of
the new mail screen.
NOTE
Toolbar functions are the same as shown
above when replying to mail and when
forwarding mail.
5-2-4
Configuring General E-mail Client
Settings
You can use the e-mail client general settings
screen to configure send and receive settings
that are applied to all accounts.
1On the E-Mail screen toolbar, tap .
This displays the screen shown below.
2Select the check box next to the item(s) you
want to enable and then tap .
This applies the settings to all e-mail
clients.
Sends the mail message.
Saves a draft of the mail message.
Specifies CC recipients.
Attaches a file to the mail message.
Deletes the file currently attached to the
mail message.
Auto-check new mail
every XX minute(s)
Select this check box to
enable regular automatic
checking for newly arrived
e-mail. You also can
specify how often, in
minutes, the automatic
check should be
performed.
Check new mail on
startup
Select this check box to
enable automatic
checking for new mail
whenever the E-Mail
application is started up.
Save sent messages
to outbox
Select this check box to
save sent mail messages
in the outbox.
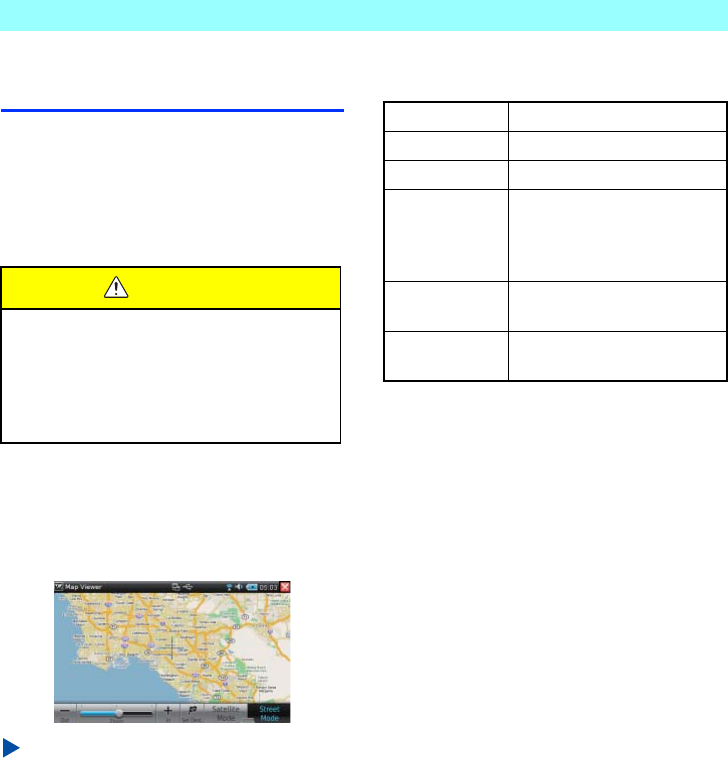
Chapter 5 Applications
NR1UB/NR1UW/NR1UR 49
5-3
Map
The Map application runs the Google Map
application on the unit, which makes it possible
to shift the displayed map simply by scrolling on
the screen. You also can make a specific point
on the Map screen your navigation objective,
and search for routes and obtain guidance to it.
5-3-1
Displaying the Map Screen
1On the Home screen, tap the [Map] key.
This starts up the Map Viewer.
NOTE
If the map screen does not appear, select
[Maps] - [Auto-Download] on the Map menu.
The following describes the functions of the
toolbar at the bottom of this screen.
5-3-2
Setting the Navigation Destination
You can use the procedure below to set a point
as the navigation destination.
1Align the center cursor with the location you
want to use as your destination.
2On the toolbar, tap the [Set Dest.] key.
This starts up navigation and displays the
destination setting screen.
For details about navigation operations, see
Navigation (P. 77).
WARNING
• For safety reasons, do not perform any
operations while driving.
Doing so can take your mind off the road
and create the risk of a traffic accident.
Always stop your vehicle in a safe place
before operating the unit.
Out Zooms out from the map.
Zoom Drag the bar to zoom the map.
In Zooms in on the map.
Set Dest. Sets the location on the map
where the center cursor is
located as the navigation
destination.
Satellite Mode Switches the map display to a
satellite map.
Street Mode Switches the map display to a
street map.

Chapter 5 Applications
50 NR1UB/NR1UW/NR1UR
5-3-3
Using the Map Menu
Tap the application title [Map Viewer] on the left
side of the bar at the top of the screen to display
the Map menu.
The following describes the functions of the Map
menu.
NOTE
With the current version, your current location
cannot be acquired using the built-in GPS
antenna.
Because of this, the items marked with an
asterisk (*) in the menu below are disabled.
These items will be enabled with future version
upgrades of the unit.
For details about version upgrade availability,
visit the Clarion portal site (my.clarion.com).
Track menu
Use the items on this menu to save track data to
a file, to open a track file, and to record data.
Maps menu
Use the items on this menu to download map
screens, etc.
Show menu
Use the items on this menu to configure map
display settings.
Auto-Center menu (*)
Enable GPS menu (*)
The unit's GPS antenna can be enabled or
disabled. The current location is displayed when
the GPS antenna is enabled.
Open... Opens a track data file (gpx only)
and displays the route that was
traveled.
Save... (*) Saves a recorded route as a gpx
file.
Record (*) Records the route traveled.
Insert
Breakpoint (*)
While recording the track of a
route, specifies the current
location as a breakpoint.
Clear (*) Clears the tracks from the map.
Auto-Download Downloads maps
automatically.
Clear Map Cache Deletes maps stored in the
cache, which clears cache
memory.
See Full View Displays a ground panorama.
City Displays major city locations.
Track (*) Displays tracks on the map.
Velocity Vector (*) Displays speed and direction
vectors inside a circle that
indicates the current location.
Nothing is displayed when you
are not moving because speed
is zero.
Lat/Lon Scrolls the map so the current
location (circle) is in the center
of the screen.
Lead Scrolls the map so the
expected location on the map
to be reached based on the
current bearing and speed is in
the center of the screen.
None Shifts the current location
(circle) without auto scroll of
the map.
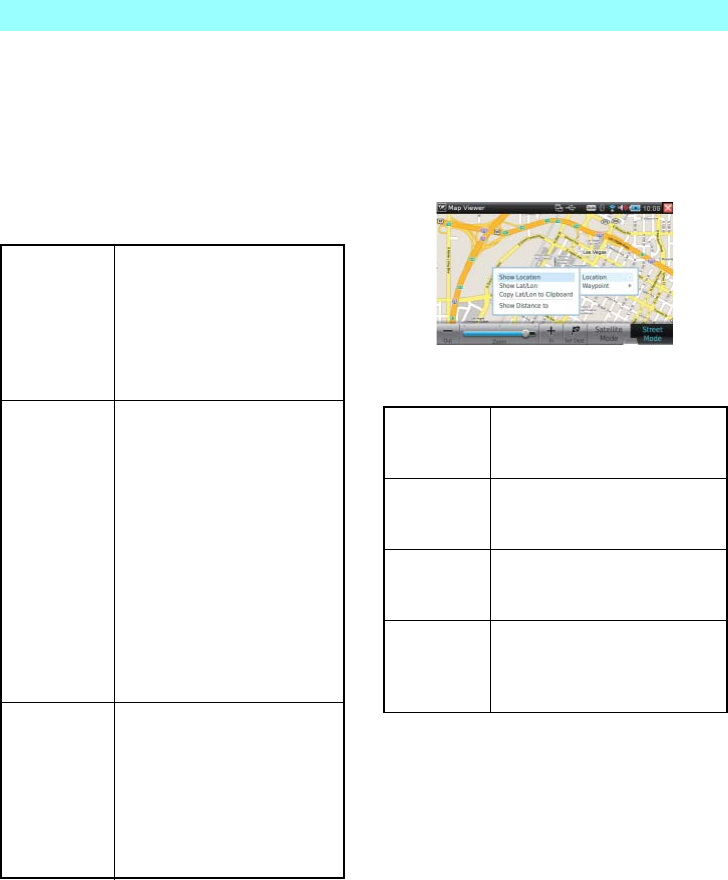
Chapter 5 Applications
NR1UB/NR1UW/NR1UR 51
Full Screen menu
Switches to the full-screen view. To exit the
full-screen view, select [Full Screen] on the
control bar Application menu.
Settings menu
Use the items on this menu to configure general
Map application settings.
Close menu
Tap to exit the Map application.
5-3-4
Obtaining Information about a Point on
a Map
Holding the stylus pen against a point on the
map will display a menu for obtaining point
information.
Location menu
Maps Choose Map: Select to specify
the displayed map type.
Download URL: Select to change
the download URL for map data.
Zoom Steps: Select to specify the
number of zoom in and zoom out
steps.
Auto-Center (*) Sensitivity: Select to specify from
what degree of movement map
scrolling should start. (The more
positive (+) the settings, the more
a map scrolls in response to
movement of the current
location.)
Lead Amount: Select to specify
the percentage of lead amount
for the Sensitivity setting. (The
more positive (+) the setting, the
more distant from the current
location of a point is centered on
the display.)
Misc. (*) Line Width: Select to specify the
thickness of the line indicating
the track.
Units: Select to specify the units
for the “Show Distance to”
distance as kilometers (km),
miles (mi.), or nautical miles
(n.m.).
Show Location Shows the location on a world
map of the point where the stylus
pen was pressed.
Show Lat/Lon Shows the latitude and longitude
of the point where the stylus pen
was pressed.
Copy Lat/Lon
to Clipboard
Copies the latitude and longitude
of the point where the stylus pen
was pressed to the clipboard.
Show
Distance to
Shows the distance between the
current location as obtained by
GPS and the point where the
stylus pen was pressed.
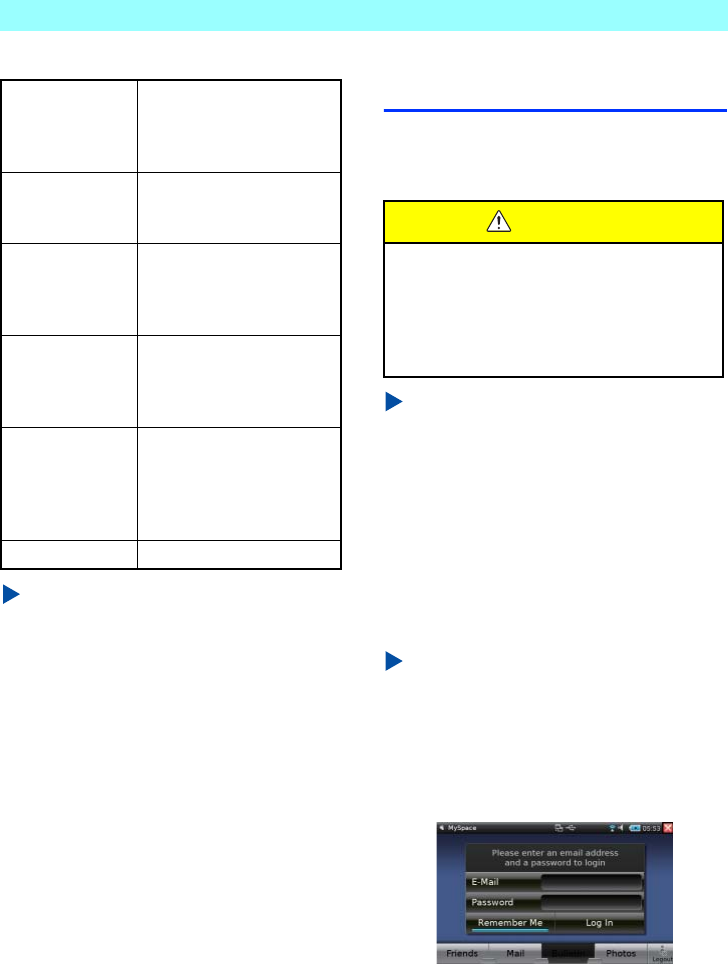
Chapter 5 Applications
52 NR1UB/NR1UW/NR1UR
Waypoint menu (*)
NOTE
•
Data copied to the clipboard can be pasted to
NotePad or another text application.
•
Waypoint menu information is displayed when
you hold down a point on the a traveled route
that is displayed.
5-4
MySpace
With the MySpace application, you can display
information from the MySpace Internet social
network service (SNS).
NOTE
•
Images cannot be submitted from this unit.
•
A login ID and password are required to
access MySpace with this unit. Visit
www.myspace.com on a computer to register
and obtain a valid login ID and password
before trying to perform the procedure below.
1On the Home screen, tap the [MySpace]
key.
This starts up the MySpace application and
displays the user login screen.
NOTE
In the Car mode, tap [MySpace] in the Home
screen quick information area or in Application
launcher.
2Tap the fields next to “E-Mail” and
“Password”, and enter the appropriate
e-mail address and password.
Show Lat/Lon Shows the latitude and
longitude of the waypoint
where the stylus pen was
pressed.
Show Description Shows a description of the
waypoint where the stylus
pen was pressed.
Copy Lat/Lon to
Clipboard
Copies the latitude and
longitude of the waypoint
where the stylus pen was
pressed to the clipboard.
Copy Description
to Clipboard
Copies the description of the
waypoint where the stylus
pen was pressed to the
clipboard.
Show Distance to Shows the distance between
the current location as
obtained by GPS and the
waypoint where the stylus
pen was pressed.
Delete Deletes the waypoint.
WARNING
• For safety reasons, do not perform any
operations while driving.
Doing so can take your mind off the road
and create the risk of a traffic accident.
Always stop your vehicle in a safe place
before operating the unit.
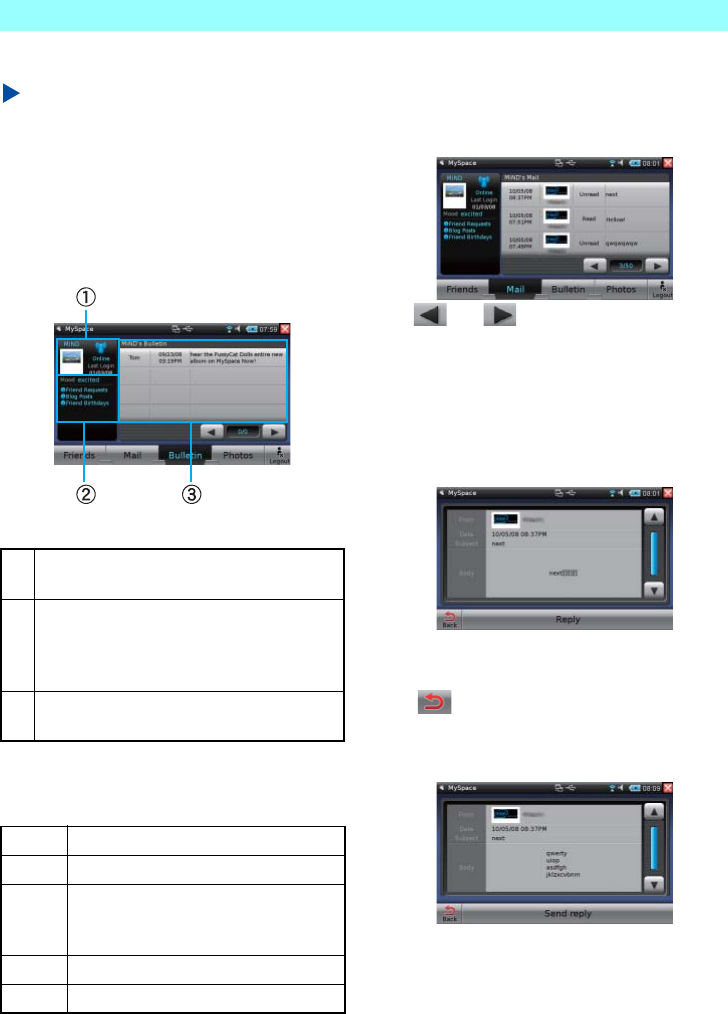
Chapter 5 Applications
NR1UB/NR1UW/NR1UR 53
3Tap the [Log In] key.
NOTE
Enabling the “Remember Me” will enter your
e-mail address and password automatically
from your next login.
The My Screen will appear after you log in.
5-4-1
My Screen
The following describes the My Screen contents.
The following describes the functions of the My
Screen toolbar.
5-4-2
Displaying the Mail List Screen
Tapping the [Mail] key on the My Screen toolbar
will display the Mail list screen.
Tap and to scroll through mail
messages, three at a time.
Tapping a mail message will display its contents.
Use the following procedure to reply to the
displayed mail message.
1Tap the [Reply] key at the bottom of the
screen.
This displays a software keyboard.
2Enter the text you want and then tap the
key.
3Tap the [Send reply] key at the bottom of
the screen.
This sends the mail message.
The Mail list screen will re-appear after the
mail message is sent.
aDisplays the member's photograph and
online status.
bCurrent Alerts Area
Displays messages from your MySpace
friends and messages informing you about
blog updates.
cBulletin list
Tap to view bulletin message details.
Friends Displays your friends list.
Mail Displays your mail list.
Bulletin Displays your bulletin list. When you
display My Screen, the bulletin list is
displayed first.
Photos Displays your photo list.
Logout Logs out and displays the login screen.
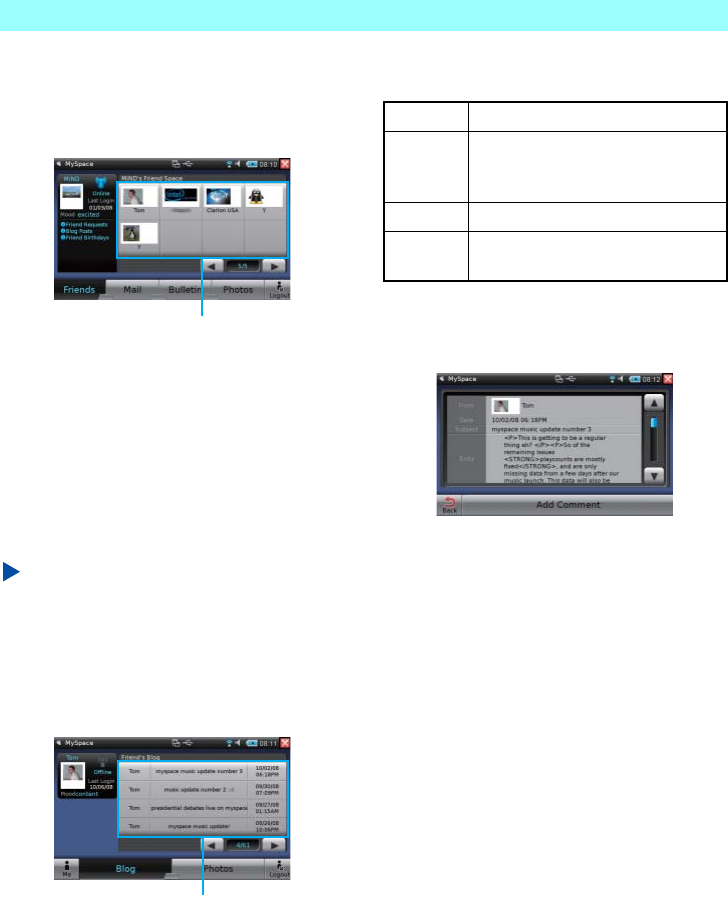
Chapter 5 Applications
54 NR1UB/NR1UW/NR1UR
5-4-3
Displaying the Friends List Screen
Tapping the [Friends] key on the My Screen
toolbar will display the friends list screen.
The friends list shows your registered friends.
Friends who are currently on line are indicated
by the text “Online Now!” under their image
photographs.
You can select a friend on the friends list and
browse the blog or photos submitted that friend.
Use the following procedure to browse the blog
of a friend.
NOTE
To browse photos, tap [Photos] key on the
toolbar at the bottom of the screen.
1On the friends list, tap the friend you want to
select.
This displays the Friend screen, which
shows a blog list on the right side.
The following describes the functions of the
toolbar at the bottom of this screen.
2On the blog list, tap the message you want
to select.
This displays the message detail screen.
Tapping the [Add Comment] key at the
bottom of the screen makes it possible for
you to add a comment to the blog
message.
Friends list
Blog list
Me Returns to My Screen.
Blog Displays the blog list of your friend.
When you display the Friend screen,
the blog list is displayed first.
Photos Displays the photo list of your friend.
Logout Logs out and displays the login
screen.
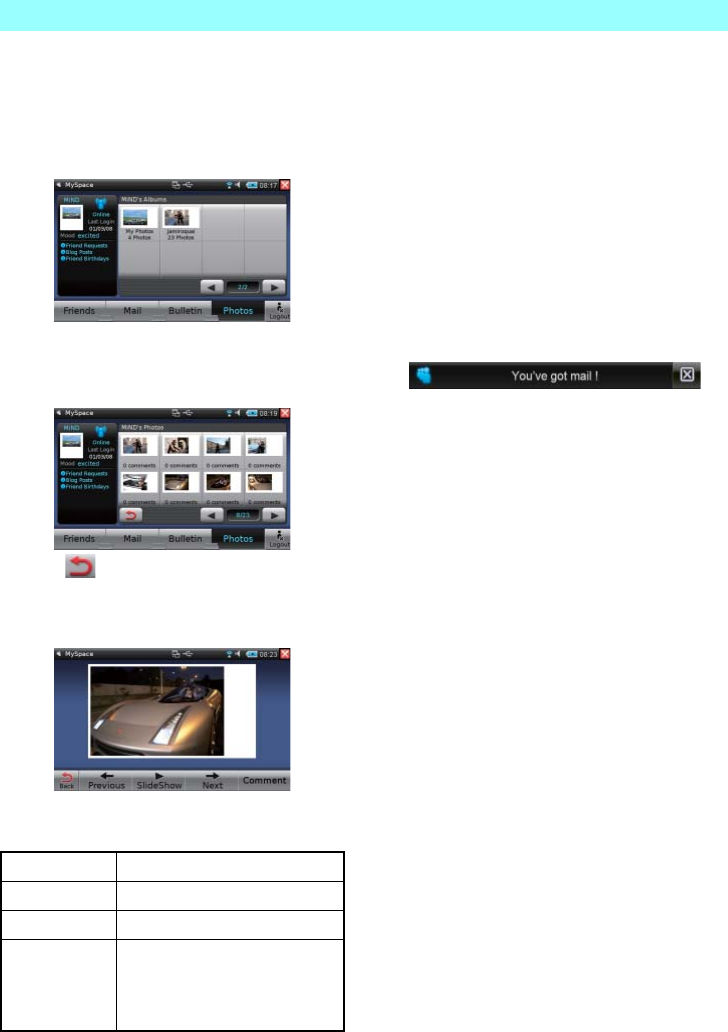
Chapter 5 Applications
NR1UB/NR1UW/NR1UR 55
5-4-4
Displaying the Photo Screen
Tapping the [Photos] key on the toolbar at the
bottom of My Screen or the Friend screen will
display an album list.
1On the album list, select the album you
want.
This displays the photo list screen.
Tap to return to the album list.
2Tap a photo in the album.
This displays the photo.
The following describes the functions of the
toolbar at the bottom of the photo screen.
5-4-5
Displaying a Notification Message
While the MySpace application is running along
with another application, you will be alerted
automatically whenever a new MySpace alert
(New Messages, Friend Requests, Blog
Comments, Picture Comments, etc.) arrives.
A sound effect will sound and a message will
appear in the notification bar at the top of the
screen.
Example: When a mail message arrives in
MySpace
The message “You've got mail” appears in the
notification bar.
Tapping the notification bar while a message is
displayed will switch to the MySpace screen with
the mail contents displayed. The message will
disappear after some time if you do not do
anything.
Previous Displays the previous photo.
Slide Show Starts a slideshow.
Next Displays the next photo.
Comment Registers a comment to a photo
displayed from the Friend screen.
You cannot register a comment
for your own photos.
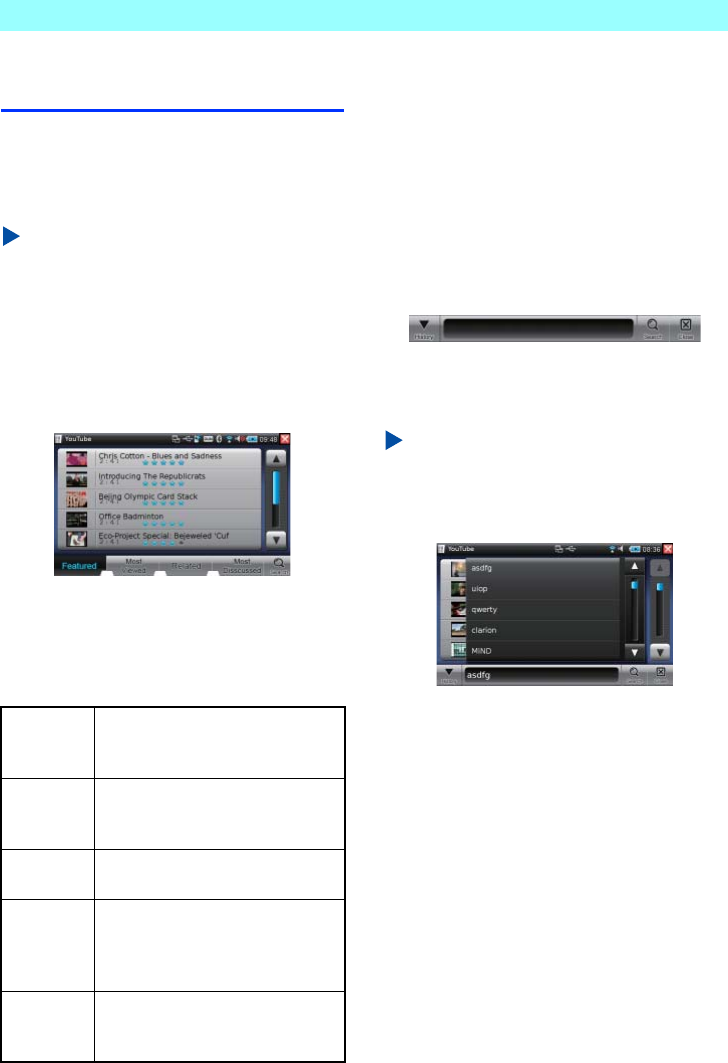
Chapter 5 Applications
56 NR1UB/NR1UW/NR1UR
5-5
YouTube
The YouTube application lets you view the
YouTube video sharing site on the Internet.
Submitted videos are listed by category, and
can be selected for viewing.
NOTE
Videos cannot be submitted from this unit.
5-5-1
Displaying the Video List Screen
1On the Home screen, tap the [YouTube] key.
This starts up the YouTube application and
displays the video list screen.
The video list shows thumbnails of the
videos, as well as the names, play times,
and other information about the videos.
The following describes the functions of the
toolbar at the bottom of this screen.
5-5-2
Searching for a Video
You can use the following procedure to enter a
keyword and search for a video.
1On the toolbar at the bottom of the video list
screen, tap the [Search] key.
This displays a search bar in the toolbar
position.
2Tap the keyword input area and then enter
the keyword.
3Tap the [Search] key.
This starts the search and displays the
search results.
NOTE
Tapping the toolbar [History] key displays a list
of previously searched for keywords. You can
tap a keyword on the history keyword list to
search for it again.
Featured Displays a list of recommended
videos. This list appears first when
you start up the YouTube application.
Most Viewed Displays a list of most viewed
videos. This list shows the videos
that were viewed the most by users.
Related Displays a list of videos that are
related to the last video you played.
Most
Discussed
Displays a list of most discussed
videos. This list shows the videos
that were commented on the most
by users.
Search Changes the toolbar to a search bar,
which can be used to search for a
video.

Chapter 5 Applications
NR1UB/NR1UW/NR1UR 57
5-5-3
Playing a Video
1On the video list screen, select the video
you want to play by tapping it.
This changes to the video playback screen.
2Ta p .
This starts video playback.
The following describes the functions of the
toolbar at the bottom of this screen.
NOTE
Movies are played back while being
downloaded via Wi-Fi.
Because of this, certain network conditions can
cause dropping of movie frames or skipping of
audio.
Playing a movie while other application
software is in use can cause dropping of movie
frames or skipping of audio and slow button
and menu response.
5-6
PDF Reader
You can use the PDF Reader application to
browse PDF files.
There is no PDF Reader application icon on the
Home screen. The PDF Reader application
starts up when you open a PDF file with File
Manager or the Internet Browser application.
For details about using File Manager, see 5-8
File Manager (P. 60).
NOTE
Tapping bookmarks in an open PDF file does
not work.
Bookmark and hyperlink functions of PDF file
are not supported. For details, see
Troubleshooting (P. 114).
5-6-1
Displaying the PDF Reader Screen
1With the File Manager, open the PDF file.
This starts up the PDF Reader application.
NOTE
You can scroll the screen up, down, left, and
right by dragging it.
Tapping the screen will toggle between the
full-screen view and the standard view.
aReturns to the video list screen.
bTap to turn on indicators and enable continual
automatic video playback.
cPauses playback.
dDrag the bar to select the playback position.
eAdjusts the volume level.
fChanges the screen mode.
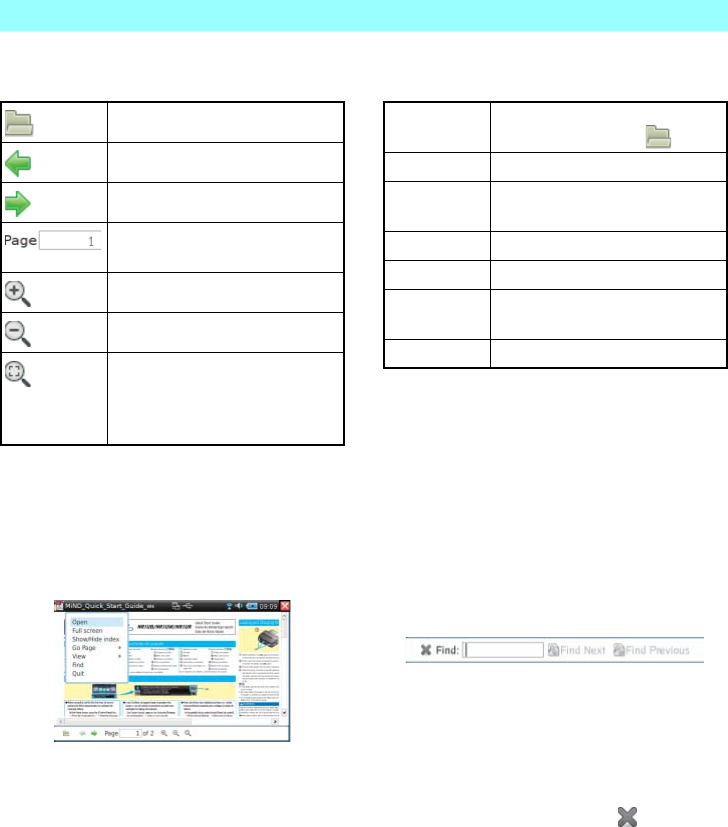
Chapter 5 Applications
58 NR1UB/NR1UW/NR1UR
The following describes the functions of the
toolbar at the bottom of the screen.
5-6-2
Using the PDF Reader Menu
Tap the file name on the left side of the bar at
the top of the screen to display the PDF Reader
menu.
The following describes the functions of the PDF
Reader menu.
5-6-3
Searching for a Text
Use the following procedure to search the PDF
for specific text.
1On the PDF Reader menu, tap [Find].
This displays a search bar at the bottom of
the screen.
2Tap the text input field, enter the text you
want to find, and then tap the [Back] key.
This finds and highlights the first instance
of the search text in the document.
To search for the next instance of the
search text in the document, tap the [Find
Next] key. Tap the [Find Previous] key to
find the previous instance.
To close the search bar, tap .
Opens a PDF file.
Switches to the previous page.
Switches to the next page.
Jumps to the page that
corresponds to the entered value.
Zooms in on the PDF screen.
Zooms out from the PDF screen.
Switches to the full-screen view.
Tap the screen to return to the
original screen from the full-screen
view.
Open Opens a PDF file. This is the same
function as the toolbar key.
Full screen Switches to the full-screen view.
Show/Hide
index
Toggles display of the index on
and off.
Go Page Switches to the specified page.
View Specifies the PDF display size.
Find Use the following procedure to
search the PDF for specific text.
Quit Quits the PDF Reader application.

Chapter 5 Applications
NR1UB/NR1UW/NR1UR 59
5-7
Calculator
Use the procedure below to perform basic
calculations.
5-7-1
Displaying the Calculator Screen
1On the Home screen, tap the [Calculator]
key.
This starts up the Calculator application.
The following are the operations you can
perform on the Calculator screen.
NOTE
The following example of the calculation rules
are applied by the Calculator.
Example: 1+2*3=7
0-9 Enters values.
. Inputs a decimal point.
/ Performs the division function.
* Performs the multiplication function.
+ Performs the addition function.
- Performs the subtraction function.
= Displays the calculation result.
+/- Enters a positive or negative sign. (+
is not displayed for positive values.)
sqrt Performs square root calculation.
% Performs percentage calculation.
MS Saves the displayed value in
memory. Tapping [MS] and then
[save here] saves this value in
memory. If there already is a stored
value, tapping [MS] will display a list
of stored values.
MR Recalls a saved value from memory.
This key is not enabled until a value
is saved using [MS].
M+ Adds the displayed value to memory.
This key is not enabled until a value
is saved using [MS].
<- Deletes the rightmost digit of an
input.
C Deletes the last input value.
AC Deletes everything input up to the
point this key is tapped.

Chapter 5 Applications
60 NR1UB/NR1UW/NR1UR
5-8
File Manager
The File Manager application provides you with
file management capabilities, such as search,
move, copy, delete, rename, etc. You can use
File Manager to manage files within the
on-board memory in the ClarionMiND, on a
microSD card, or on USB memory devices.
5-8-1
Displaying the File Manager Screen
1On the Home screen, tap the [Files] key.
This starts up the File Manager screen.
The left side of the screen shows the
folders immediately under the unit's MID
folder.
Selecting a folder on the left side of the
screen displays the files and folders inside
that selected folder on the right side of the
screen.
The MID folder contains four default folders
named “Audio clips”, “Documents”,
“Images”, and “Video clips”.
Storing music data in the Audio clips folder,
image data in the Images folder, and movie
data in the Video clips folder will make the
data available for playback with RealPlayer.
For details about RealPlayer, see 5-11
RealPlayer (P. 68).
NOTE
•
Connecting a USB device or microSD card
causes the File Manager to start up
automatically, with the devices shown on the
left side of the screen.
•
Before removing a USB device or microSD
card, be sure to tap on the status
indicator. Failure to do so could result in the
loss of data on the removable memory device.
•
No guarantees are made about the operation
of all USB memory devices and microSD
devices with this unit.
•
This unit does not support the use of SDHC
memory cards.
•
Do not start up this unit with the USB memory
connected.
The unit may not start up.
•
Do not start up this unit with the microSD card
connected.
Files in the microSD card may not be read.

Chapter 5 Applications
NR1UB/NR1UW/NR1UR 61
The following describes the functions of the
toolbar at the bottom of the screen.
NOTE
You can use drag-and-drop to copy or move
files and folders on the screen.
5-8-2
Searching for a File or Folder
Use the following procedure to enter the name
of a folder or file and search for it.
1Select the folder whose contents you want
to search, and then tap the toolbar [Search]
key.
This displays a search screen.
2Tap the input area.
This displays a software keyboard.
3Enter the name of the file or folder you want
to search for and then tap the [Search] key.
This displays a list of search results.
NOTE
•
Enter the file name, including the file
extension.
•
Select the file you want on the search results
list and then tap [Show] to display the location
of the file.
Search Searches for a file in the folder
selected.
Open Selects and opens the file
displayed on the right side of the
screen.
All of the selected folder's
subfolders also are opened.
Copy Copies the file or folder displayed
on the right side of the screen.
Cut Cuts the file or folder displayed on
the right side of the screen.
Paste Pastes the file or folder that has
been copied or cut into a specified
location.
Delete Deletes the file or folder displayed
on the right side of the screen.
Rename Renames the file or folder
displayed on the right side of the
screen. Tapping the [Rename] key
displays the Rename screen.
Change the name and then tap
the [OK] key.
Share This key is not used in this unit.
Format Switches the display method of
the file or folder displayed on the
right side of the screen. Each tap
of the [Format] key toggles
between detailed display and icon
display.
Reload Refreshes the File Manager
screen with the latest information.

Chapter 5 Applications
62 NR1UB/NR1UW/NR1UR
5-8-3
Using the File Manager Menu
Tap the application title [File Manager] on the
left side of the bar at the top of the screen to
display the File Manager menu.
The following describes the functions of the File
Manager menu.
5-9
Contacts
The Contacts application provides you with an
address book. Contact information can be used
in the Navigation and E-Mail applications.
5-9-1
Displaying the Summary Screen
1On the Home screen, tap the [Contacts]
key.
This displays the Contacts screen.
NOTE
•
In the Car mode, tap on the Home
screen Application launcher to start up the
Contacts application.
•
Keys will appear at the top of the Contacts
screen if there already are records stored in
the Contacts application. A [more...] key also
will appear if there are more than three
records.
2Enter the characters for the name you want
to find.
The characters you enter will be compared
automatically with the names of the
currently stored records and any matching
candidates will appear at the top of the
screen.
New folder... Creates a new folder inside the
folder selected on the left side
of the screen.
Edit Edits a file or folder. The
operations for this function are
the same as those for the
corresponding toolbar.
Sort Sorts the files and folders
displayed on the right side of
the screen according to the
specified sequence.
Select Toggles the files and folders on
the right side of the screen
between all selected and all
deselected.
Close Exits File Manager.
WARNING
• For safety reasons, do not perform any
operations while driving.
Doing so can take your mind off the road
and create the risk of a traffic accident.
Always stop your vehicle in a safe place
before operating the unit.
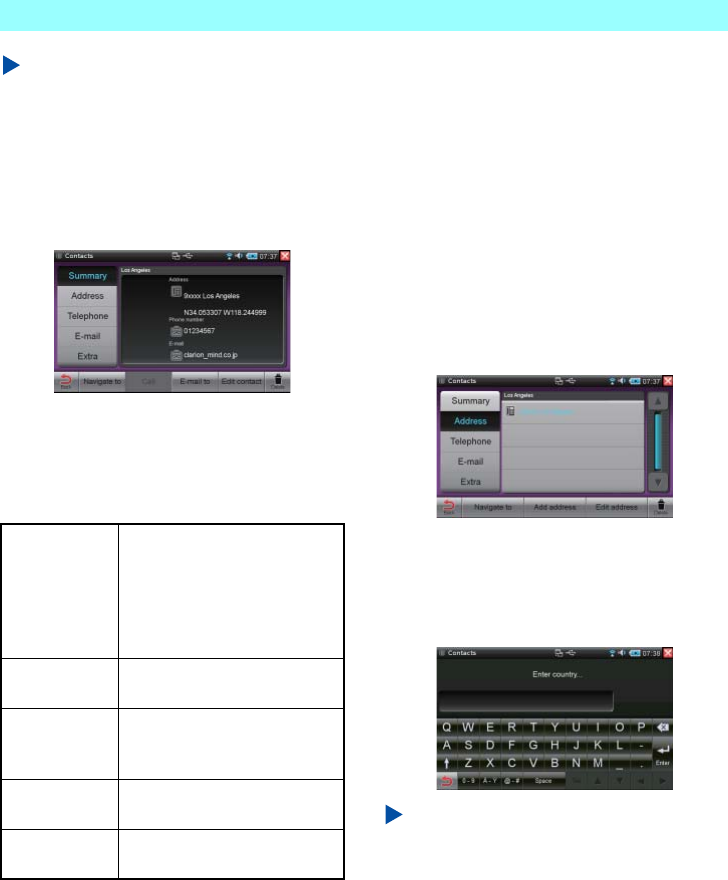
Chapter 5 Applications
NR1UB/NR1UW/NR1UR 63
NOTE
•
Tapping the [more...] key displays a candidate
list.
•
To create a new record, tap the [Add contacts]
key.
3Use the candidate keys or list screen to
select the contact record you want.
This displays the Summary screen.
Contact record information (name, address,
phone number, e-mail address, extra) can
be edited on the Summary screen.
The following describes the functions of the
toolbar at the bottom of this screen.
5-9-2
Editing the Address, Phone, and
E-mail Entries
You can use the procedure below to edit and
add to the Address, Phone, and E-mail entries.
You also can have multiple address, phone, and
e-mail entries in a single record.
The example below shows the address editing
screen.
1On the left side of the Summary screen, tap
the [Address] key.
This displays the address list.
2Tap the [Add address] key to add a new
address. If you want to edit an existing
address, select it and then tap the [Edit
address] key.
This displays a software keyboard.
NOTE
To delete an address, select it and then tap the
[Delete] key.
3Enter the country name and then tap the
[Enter] key.
4Enter information for the city, zip code,
house number, street, latitude, and
longitude.
Navigate to When the record includes a
street address, tap this key to
start up navigation with the
address as the destination, to
search for a route and to obtain
guidance to the objective.
Calling This unit does not use this
function.
Send e-mail When the record includes an
e-mail address, tapping this key
starts up the E-Mail application.
Edit contact Edits the currently displayed
record name.
Delete Deletes the currently displayed
record.
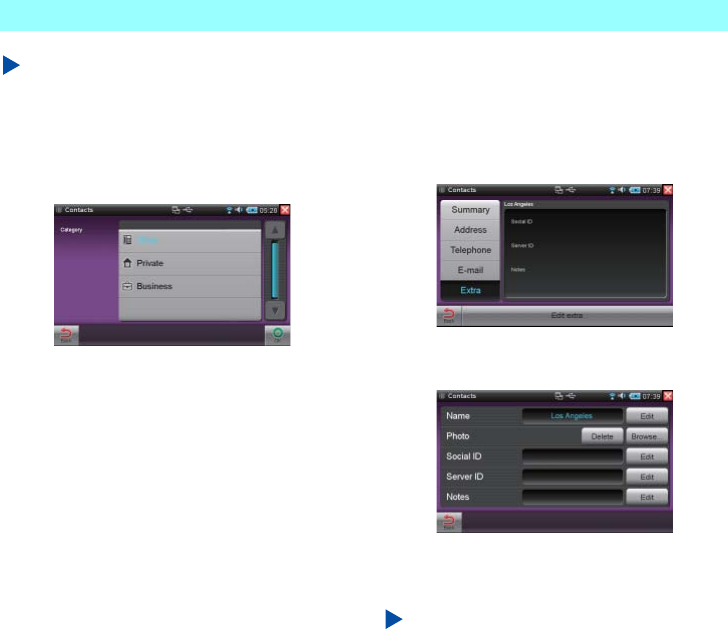
Chapter 5 Applications
64 NR1UB/NR1UW/NR1UR
NOTE
Input for all fields is not required. Tapping the
[Enter] key without entering anything will
display the next screen.
5Select the category you want and then tap
the [OK] key.
6On the confirmation screen that appears,
tap the [OK] key.
5-9-3
Editing Extra Information
1On the left side of the Summary screen, tap
the [Extra] key.
This displays the Extra screen.
2Tap the [Edit extras] key.
This displays the Extra editing screen.
3Tap the [Edit] key next to the item you want
and then edit it.
NOTE
•
Tapping the [Browse] key will display a screen
that lets you preview images for selection. You
can select jpeg or png format images.
•
Use Social ID and Server ID to enter
MySpace information. Use Comment to enter
comment text.
4Tap the [Back] key.
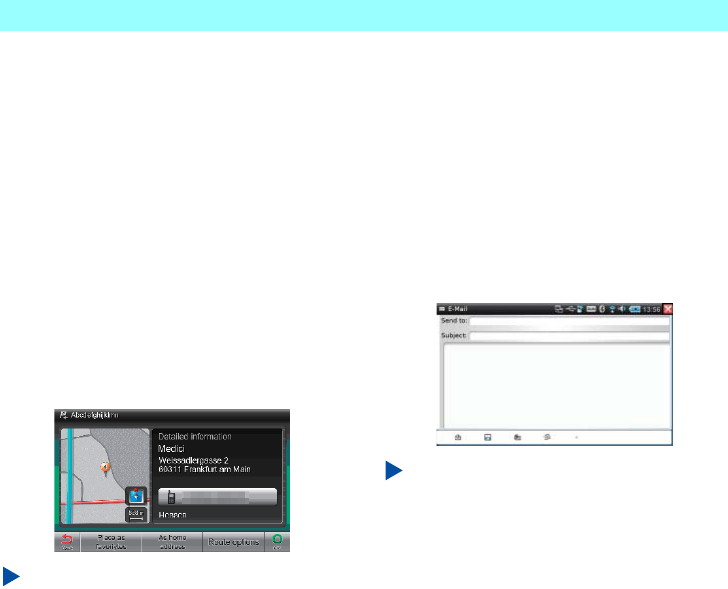
Chapter 5 Applications
NR1UB/NR1UW/NR1UR 65
5-9-4
Starting Up Navigation
You can use the procedure below to start up
navigation from the Contacts application
Summary screen or Address screen.
This will display a screen with the selected
address specified as the destination. For details
about route searching, guidance, and other
navigation operations, see Navigation (P. 77).
1On the Summary screen or Address
screen, tap the [Navigate to] key.
This displays a confirmation screen.
2Tap the [OK] key.
This starts up navigation.
NOTE
•
In the case of the Summary screen, the
displayed address is specified as the
destination.
•
In the case of the Address screen, the
selected address is specified as the
destination.
5-9-5
Sending an E-Mail Message
You can use the procedure below to send e-mail
from the Contacts application Summary screen
or E-Mail screen. For details about e-mail
operations, see 5-2 E-Mail (P. 46).
1On the Summary screen or E-Mail screen,
tap the [Send e-mail] key.
This starts up the E-Mail application and
displays a mail creation screen.
NOTE
•
In the case of the Summary screen, the
displayed e-mail address is specified as the
addressee.
•
In the case of the E-Mail screen, the selected
e-mail address is specified as the addressee.
•
The E-Mail application can be used in the
Mobile mode only.

Chapter 5 Applications
66 NR1UB/NR1UW/NR1UR
5-10
Note Pad
The Note Pad application is a text editor that
you can use to create simple documents.
5-10-1
Displaying the Note Pad Screen
1On the Home screen, tap the [Note Pad]
key.
This starts up the Note Pad application.
Tap the application title on the left side of
bar at the top of the screen to display the
Note Pad menu.
Now you can perform Note Pad operations.
5-10-2
Creating a New File
1Tap the Note Pad screen.
This displays a software keyboard.
2Enter the text you want, and then tap [File]
on the Note Pad menu.
This displays the File menu explained
below.
3Tap [Save] or [Save As...].
This displays a Save file screen.
4Enter the file name you want, specify the
save location and character coding, and
then tap the [OK] key.
The new file is saved in the specified
location.
5-10-3
Opening a File
Use the following procedure to open a file stored
in unit memory, or on a USB devices or microSD
card.
1On the Note Pad menu, tap [File] -
[Open...].
This displays an Open file screen.
2Select the file you want and then tap the
[Select] key.
This opens the selected file.
NOTE
•
[Character Coding] lets you select the
character coding of the file.
•
You can use the Note Pad to open text format
files only.
New Creates a new file.
Open... Opens an exiting Note Pad file.
Save Saves the current file.
Save As... Saves the current file under a
different name.
Quit Exits Note Pad.
Name Enter the name you want for the file.
Location Shows the current location where the
file will be saved. Tapping the current
location will display a Change folder
screen, which you can use to change
the storage location.
Character
Coding
Select the character coding for the
file.
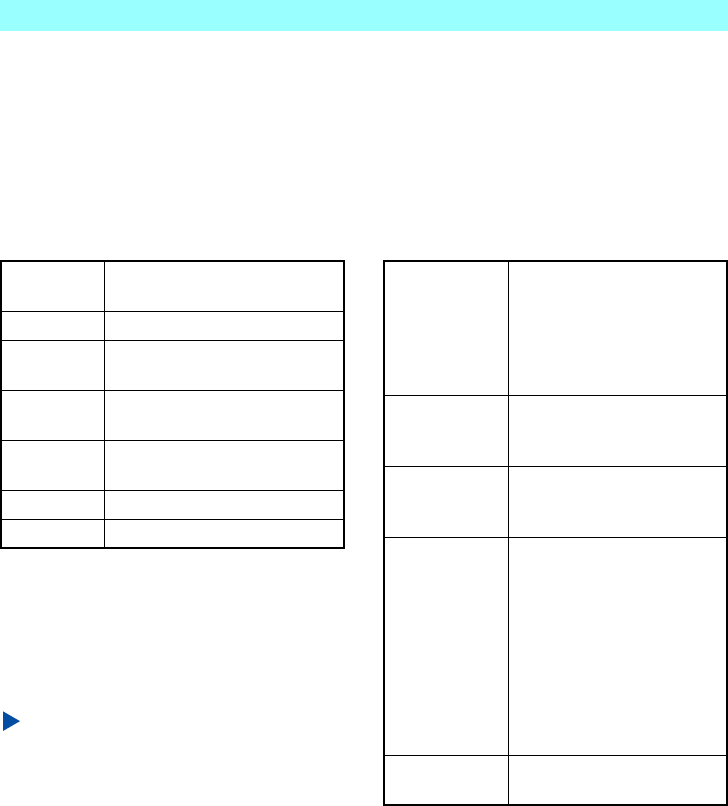
Chapter 5 Applications
NR1UB/NR1UW/NR1UR 67
5-10-4
Editing Text
Use the following procedure to correct, cut,
copy, move, and delete input text, and to
perform other editing operations.
1On the Note Pad menu, tap [Edit].
The following describes the functions of the Edit
menu.
5-10-5
Changing the Display View
1On the Note Pad menu, tap [View] - [Full
Screen]
This switches to the full-screen view.
NOTE
To exit the full-screen view, touch the control
key to display the control bar. Next, on the
Application menu, tap [View] - [Full Screen].
5-10-6
Performing Text Find/Replace
Use the following procedure to search and
replace text, and to jump to a specific location in
the document.
1On the Note Pad menu, tap [Search].
The following describes the functions of the
Search menu.
Undo Undoes the previous editing
operation.
Redo Re-does an editing operation.
Cut Cuts the selected text and stores it
in memory.
Copy Copies the selected text to
memory.
Paste Pastes previously cut or copied
text into a specified location.
Delete Deletes the selected text.
Select All Selects all the text.
Find... Searches a document for text.
Selecting the [Match case]
check box on the search screen
searches the document only for
text whose upper/lower case
matches that of the search text.
Find Next Searches for the next instance
of the search text in the
document.
Find Previous Searches for the previous
instance of the search text in
the document.
Replace... Replaces found search text with
different text. Selecting the
[Match case] check box on the
replace screen replaces only
text whose upper/lower case
matches that of the search text.
Selecting the [Replace all at
once] check box performs the
find and replace operation
without asking.
Jump To... Jumps to a specific line number
in the document.

Chapter 5 Applications
68 NR1UB/NR1UW/NR1UR
5-10-7
Using the Options Menu
Use the following procedure to configure font
settings and to change display settings.
1On the Note Pad menu, tap [Options].
The following describes the functions of the
Options menu.
5-11
RealPlayer
The RealPlayer application can be used to play
music and movies, and to view photographs. It
can playback data stored in the ClarionMiND
internal memory, on a USB memory device, or
on a microSD card.
You can use File Manager to import the data
you want to play. For details about File Manager,
see 5-8 File Manager (P. 60).
NOTE
•
The RealPlayer application supports the
following file formats: mp3, mp4, mpg, mpeg,
rm, ra, rv, rmvb, aac, ogg, wav, wma, wmv,
3gp, jpg, jpeg, png, gif, bmp.
•
Inclusion of a file format above does not
constitute a guarantee that you will be able to
play back a file of that format.
5-11-1
Displaying the RealPlayer Screen
1On the Home screen, tap the [RealPlayer]
key.
This starts up RealPlayer.
NOTE
In the Car mode, tap the [RealPlayer] key in the
Home screen quick information area or the
Application launcher.
Font... Configures font settings. On the
Font screen, use [Family] to
specify the font family, and [Style]
to specify the font style.
Word Wrap Toggles word wrap on and off.
Line Numbers Toggles display of line numbers on
and off.
Auto Indent Toggles auto indent on and off.
WARNING
• For safety reasons, do not perform any
operations while driving.
Doing so can take your mind off the road
and create the risk of a traffic accident.
Always stop your vehicle in a safe place
before operating the unit.
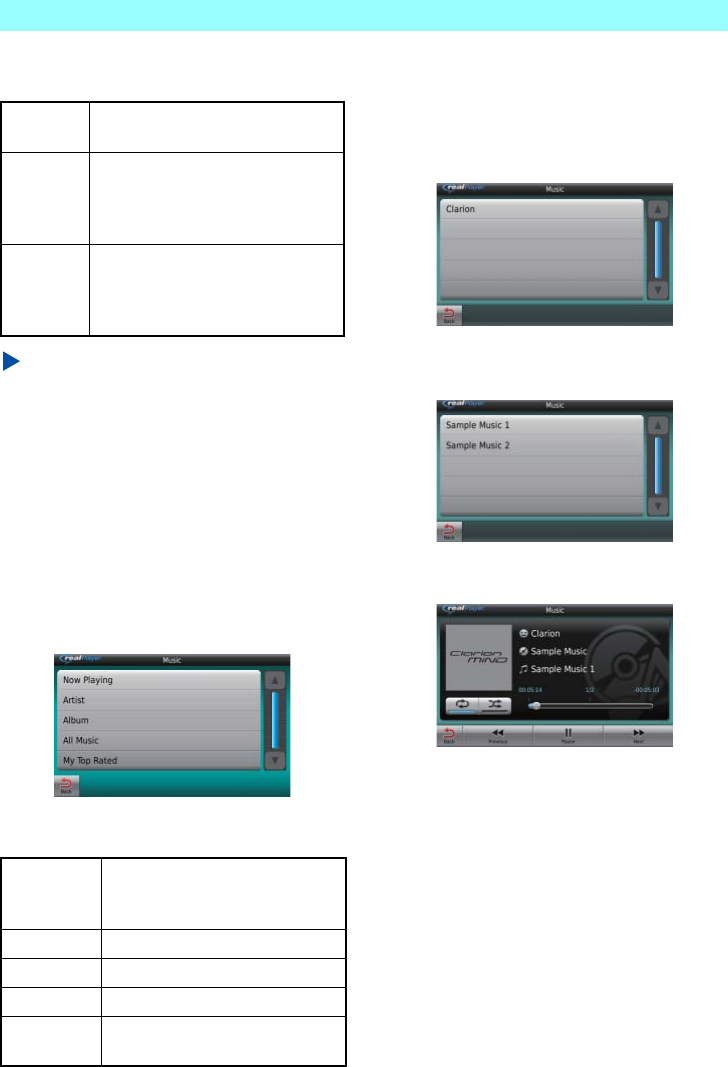
Chapter 5 Applications
NR1UB/NR1UW/NR1UR 69
The following describes the functions of the bar
at the bottom of the screen.
NOTE
With Internal, only files stored in the Audio clips
folder are played.
Files stored in subfolders created inside the
Audio clips folder are not played.
5-11-2
Playing Music
1On the RealPlayer screen, tap the [Music]
key.
This displays a category list.
2Tap the category you want to select.
The following describes the contents of the
category list.
Tapping a category will display the
corresponding category list.
3Tap the category you want to use to select a
file for playback.
•For example, when “Artist” is selected:
A list of files arranged by artist is displayed.
4Tap the file you want to play.
This starts playback of the selected file and
displays the screen shown below.
The playback screen shows the artist
name, album name, and track name. The
progress bar moves from left to right in
accordance with the track play time. You
can drag the progress bar to any position to
continue playback from there.
Internal Plays back data stored in the
ClarionMiND memory.
SD Card Plays back data stored on a microSD
card. This key is enabled when a
microSD card is connected to the
unit.
USB Plays back data stored in USB
memory. This key is enabled when
USB memory is connected to the
unit.
Now Playing Appears during playback. Tap to
display the name of the track being
played.
Artist Displays a list of artist names.
Album Displays a list of album names.
All Music Displays a list of all music files.
My Top Rated Displays a list of files arranged
according to their number of plays.
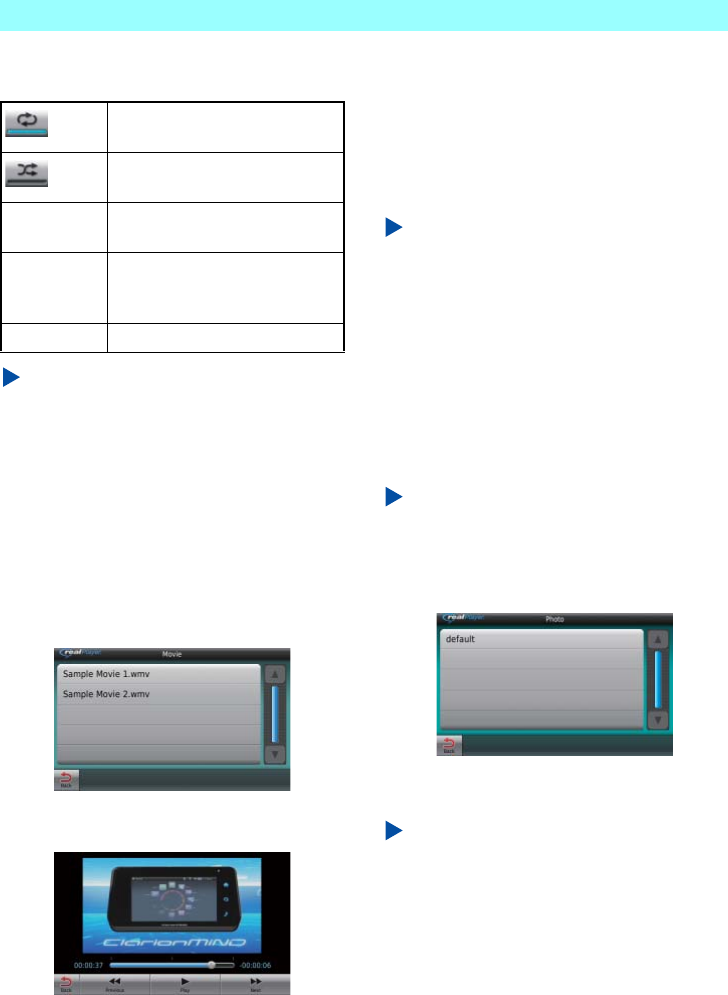
Chapter 5 Applications
70 NR1UB/NR1UW/NR1UR
The following describes the keys and toolbar on
the playback screen.
NOTE
Touching the audio key will display an audio
bar that can be used to select a track and
adjust the volume level.
5-11-3
Playing Movies
1On the RealPlayer screen, tap the [Movie]
key.
This displays a file list.
2Tap the file you want to play.
This starts playback of the selected movie
and displays the screen shown below.
The progress bar moves from left to right in
accordance with the movie play time. You
can drag the progress bar to any position
and continue playback from there.
The toolbar functions on the movie
playback screen are the same as those on
the music playback screen.
NOTE
Movies cannot be played while the navigation
application is running. When you start up the
navigation application while playing the movie,
the movie is paused.
5-11-4
Viewing Images
1On the RealPlayer screen, tap the [Photo]
key.
This displays a folder list.
NOTE
You can include a folder that contains image
files in the folder list by placing it inside of the
Images folder.
2Tap the folder you want to select.
This randomly displays the image inside
the selected folder.
NOTE
•
Tap the [Layout] key to toggle between the
random view and tile view.
•
On the random view, you can drag images
around the display to the position you want.
Enables repeat playback of the
currently playing music file.
Enables random playback of the
currently playing music files.
Previous Jumps to playback of the previous
file.
Pause/Play Pauses file playback. Tapping this
key again will restart playback
from the point it was paused.
Next Jumps to playback of the next file.
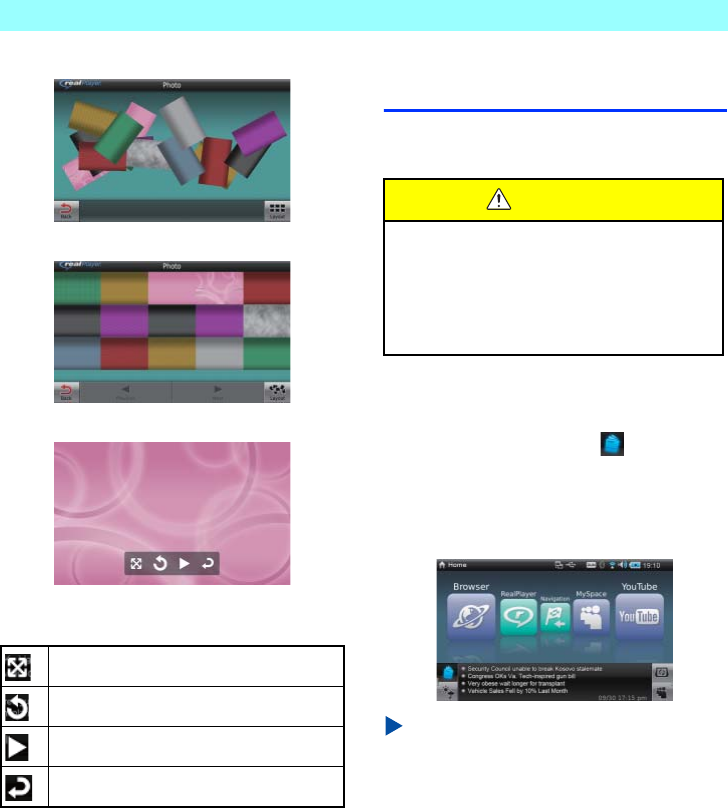
Chapter 5 Applications
NR1UB/NR1UW/NR1UR 71
•Random View
•Tile View
Tapping a image on the tile view will enlarge it.
The icons described below appear on the
enlarged view of a photograph.
5-11-5
Playing Music in the Background
You can continue background music playback in
RealPlayer as you use other applications. When
doing so, you can touch the audio key to display
the audio bar and perform RealPlayer control
operations. For details, see 2-2-3 Audio Key
(P. 21).
5-12
News Key
Tapping the news key displays the News reader
application in the quick information area.
5-12-1
Displaying the News Screen
1On the Home screen, tap at the bottom
of the screen.
This displays the most recent news items in
the quick information area, along with the
last update time.
NOTE
•
In the Car mode, tap [News] in the Home
screen quick information area to display the
news detail screen.
•
The quick information area can show two
news items at a time in the Car mode.
Displays a full-screen view of the image.
Rotates the image 90 degrees left.
Starts a slideshow.
Exits the enlarged view.
WARNING
• For safety reasons, do not perform any
operations while driving.
Doing so can take your mind off the road
and create the risk of a traffic accident.
Always stop your vehicle in a safe place
before operating the unit.

Chapter 5 Applications
72 NR1UB/NR1UW/NR1UR
2Tap the quick information area.
This starts up the RSS news reader
application and displays a news list screen.
News category selection keys will appear at
the bottom of the screen. Tapping a
category key will display a news list for that
category.
NOTE
You also can display the news list screen by
tapping the [News] key on the Home screen.
3To view details about a news item, tap it.
This starts up the browser and displays a
news detail screen.
5-12-2
Configuring News Category Settings
Use the following procedure to configure news
source and news category settings.
1ON the news list screen, tap the [News
Source] key.
This displays the news source list.
2Select the news source whose category
setting you want to configure.
This causes the check box next to the news
source to become selected.
3Tap the [Categories setting] key.
This displays a list of categories that can
be used by the selected news source.
4Select the news category you want to use.
This causes the check box next to the
selected category to become selected.
5Tap the [Back] key twice.
NOTE
•
You can select up to five news categories for a
single news source.
•
Changing news category settings will cause
the category keys that appear on the news list
screen to be updated accordingly.

Chapter 5 Applications
NR1UB/NR1UW/NR1UR 73
5-13
Weather Key
Tapping the weather key displays one day of
weather information for a specified location in
the quick information area.
The weather data is provided by The Weather
Channel Interactive, Inc.
5-13-1
Displaying the Weather Information
Screen
1On the Home screen, tap the key at the
bottom of the screen.
This displays weather information in the
quick information area.
The following describes the information that
appears in the quick information area.
NOTE
In the Car mode, tap [Weather] in the Home
screen quick information area to display the
weather information detail screen.
2Tap the quick information area.
This starts up the Weather application and
displays a detail screen that shows five
days of weather information.
NOTE
•
You also can display the weather information
detail screen by tapping the [Weather] key on
the Home screen.
•
Tap the [The Weather Channel] key to display
the detail of the weather information (Hourly,
36 hours, or 10 days) of the currently selected
city.
WARNING
• For safety reasons, do not perform any
operations while driving.
Doing so can take your mind off the road
and create the risk of a traffic accident.
Always stop your vehicle in a safe place
before operating the unit.
aSpecified location name (country, city)
bCurrent time, date, and day of the week in the
specified location
cCurrent weather in the specified location
dCurrent temperature in the specified location
eHigh and low temperatures in the specified
location
fWeather data acquisition time and date
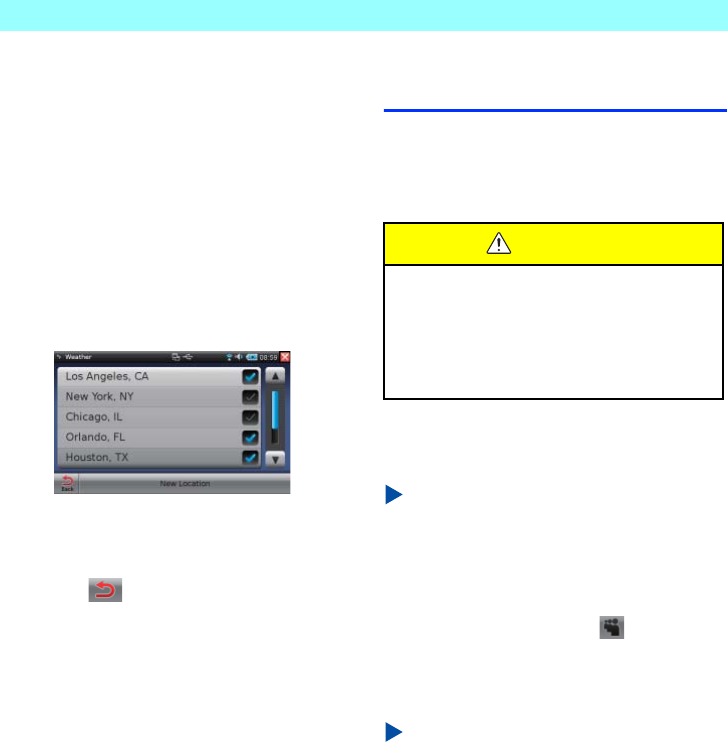
Chapter 5 Applications
74 NR1UB/NR1UW/NR1UR
5-13-2
Registering Cities to Display Keys
Use the procedure below to register cities that
appear as keys at the bottom of the detail
screen. You can register up to four cities.
After you register a city to a display key, you can
view weather information for that city simply by
tapping its key.
1On the weather information detail screen,
tap the [Location] key.
This displays a history list of past
registered cities.
2Tap the [New Location] key.
This displays a software keyboard.
3Enter the city name or Zip code and then
tap the key.
This displays a list of search results.
4Tap the name of the city you want to add.
This causes the check box next to the city
name to become selected.
5Tap the [Back] key.
This returns to the city list screen, with the
new city name added at the bottom.
6On the list, select the city name and then
tap the [Back] key.
This returns to the detail screen, which now
shows a key with the city name you
registered.
5-14
MySpace Key
Tapping the MySpace key displays any new
alerts, the number of your friends that are on
line, and other MySpace application screen
information in the quick information area.
5-14-1
Displaying the Login Screen
NOTE
A login ID and password are required to access
MySpace with this unit. Please visit
www.myspace.com on a computer to register
and obtain a valid login ID and password
before trying to perform the procedure below.
1On the Home screen, tap at the bottom
of the screen and then tap the quick
information screen.
This displays the login screen.
NOTE
•
In the Car mode, tap MySpace key in the
Home screen quick information area or
[MySpace] on the Application launcher to
display the login screen.
•
You also can display the login screen by
tapping the MySpace key on the Home
screen.
WARNING
• For safety reasons, do not perform any
operations while driving.
Doing so can take your mind off the road
and create the risk of a traffic accident.
Always stop your vehicle in a safe place
before operating the unit.

Chapter 5 Applications
NR1UB/NR1UW/NR1UR 75
2Tap the fields next to “E-Mail” and
“Password”, and enter the appropriate
e-mail address and password.
3Tap the [Log In] key.
NOTE
Enabling the “Remember Me” option will enter
your e-mail address and password
automatically from your next login.
This displays the MySpace screen.
For details about MySpace operations, see 5-4
MySpace (P. 52).
5-14-2
Quick Information Area Display
After you display the MySpace screen, the quick
information area will appear as shown below
when you return to the Home screen.
NOTE
Tapping the quick information area will switch
to the MySpace full-screen view. In the Car
mode, tapping the Home screen quick
information area or Application launcher
[MySpace] will switch to the MySpace
full-screen view.
aShows New Mail, Friend Requests, Blog
Comments, Picture Comments, and other
alerts.
bDisplays the total number of alerts.
cIndicates when a friend is on line.
dIndicates the number of friends that are on
line.

Chapter 5 Applications
76 NR1UB/NR1UW/NR1UR
5-15
Portal Sync Key
Tapping the Portal Sync key acquires the latest
news, recommendations, and other information
from the Clarion portal site.
In order to use the Clarion portal site, you will
need to register as a user. Use the Portal Sync
key on the Home screen to start the registration
procedure. For details about registration, see
4-1 Registering on the Portal Site (P. 40).
5-15-1
Displaying the Portal Site Screen
Tapping on the Home screen will access the
portal site and display the Portal Sync screen.
This will not display anything in the quick
information area.
NOTE
In the Car mode, tap the Home screen
Application launcher key to display the
Portal Sync screen.
For details about using the portal site, see
Using the Portal Site (P. 112).
WARNING
• For safety reasons, do not perform any
operations while driving.
Doing so can take your mind off the road
and create the risk of a traffic accident.
Always stop your vehicle in a safe place
before operating the unit.
Portal Sync key

NR1UB/NR1UW/NR1UR 77
Chapter 6 Navigation
The unit has a built-in GPS antenna, which
means it can be used as a portable navigation
unit. It can be used for navigation while walking,
driving, or any other means of transportation.
6-1
Safety Precautions
CAUTION
Be sure to comply with all applicable traffic
laws and regulations when following
navigation route guidance.
6-2
Basic Operation
6-2-1
Starting Up the Navigation Function
Start up the navigation function from the
Mobile mode
1On the Home screen, tap the [Navigation]
key.
This displays a warning screen.
2Read the cautionary warning and then tap
the [OK] key.
This displays the navigation main menu.
WARNING
Never perform search, landmark
registration or other unit operations while
in motion. Be sure to stop in a safe area
before performing operations such as
these. If you are operating a vehicle, set the
parking brake before performing any
operation.
Candidate key
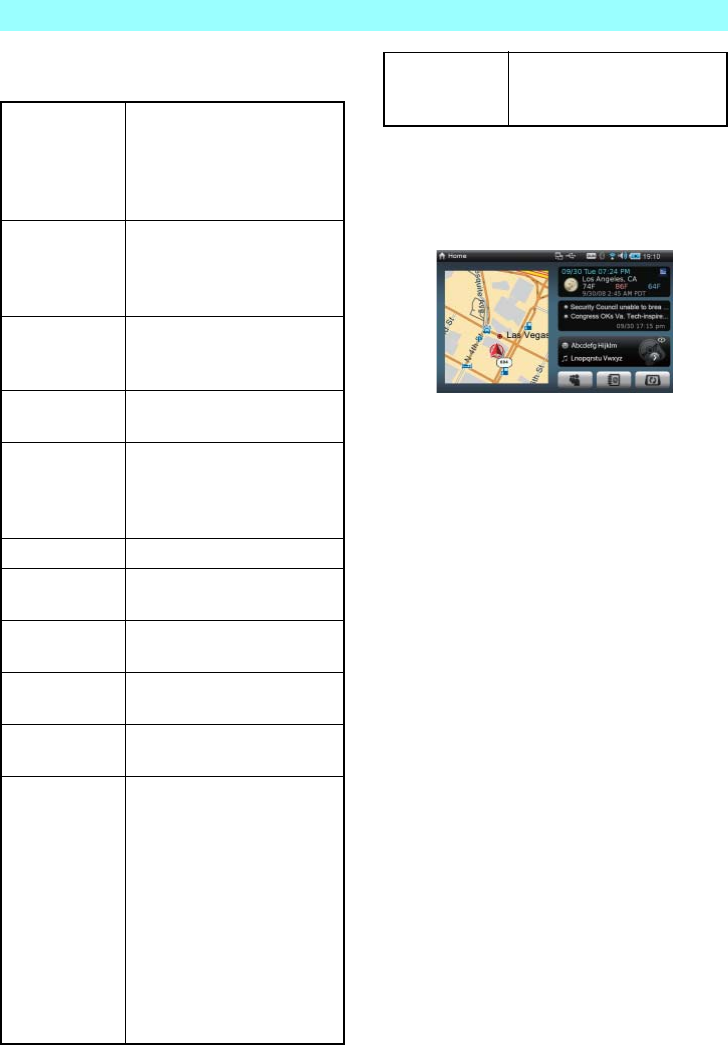
Chapter 6 Navigation
78 NR1UB/NR1UW/NR1UR
The following describes the functions of the keys
on the main menu screen.
Start up the navigation function from the Car
mode
1On the Car mode Home screen, tap the
map area.
This displays a warning screen.
2Tap the [OK] key.
This displays the navigation main menu.
Candidate key If you performed a search
operation that produced
multiple objectives, the last
found objective is displayed
as a key.
Last locations Lists all past destinations.
This key appears when there
are four or more past
destinations.
Enter new dest. Searches for a destination by
address, latitude, and
longitude.
Points of
interest
Searches for a destination by
genre.
Downloaded
POIs
Specifies a destination from a
navigation database of
downloaded points of
interest.
Change route Changes the found route.
Route
information
Displays information about
the route setting.
Back Returns to the current
location screen.
Navigation Displays the navigation main
menu.
Settings Displays the navigation
settings menu.
Start route
Guidance/
Stop route
guide/
Stop simulation
[Stop route guide] key is
displayed while route
guidance is being performed.
Tap the key to stop route
guidance and [Start route
guidance] key is displayed.
Tapping again restarts the
route guidance.
[Stop simulation] key appears
while route simulation is in
progress. Tap this key to stop
route simulation.
Contacts Use information saved with
the Contacts application to
set destination.
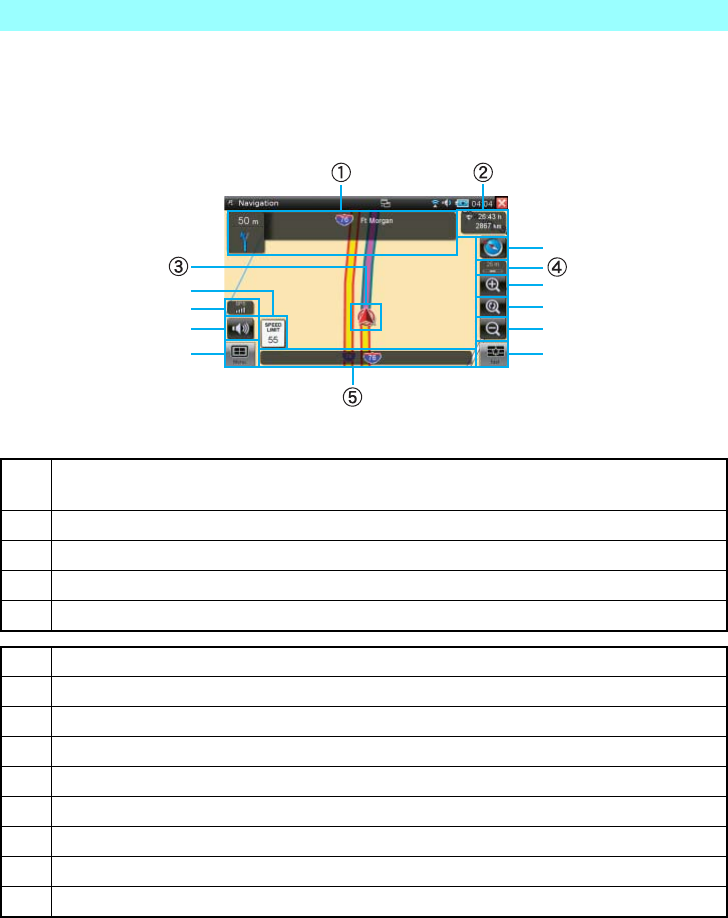
Chapter 6 Navigation
NR1UB/NR1UW/NR1UR 79
6-2-2 Screen Indicators
The map screen includes a variety of different keys, such as the keys to display the menu screen and
Quick menu screen, and keys to adjust the sound output and the navigation screens. Also, status
indicators show current information about the route.
The following describes the function of the keys and indicators on the screen.
aWhen a driving operation approaches, this area shows the required direction, the distance until
the driving operation is required, the road name, etc.
bShows the estimated time of arrival and the distance to the destination.
cShows the current vehicle location.
dShows the current map scale.
eShows the current route.
(A) Shows the route speed limit. Tap to display the speed limit setting screen.
(B) Shows the GPS receive status. Tap to display the compass screen.
(C) Tap to display the navigation sound volume setting screen.
(D) This displays the operation menu screen.
(E) Tap to switch the map screen between the 2D view (heading up, north up) and 3D view.
(F) Tap to zoom in on the map screen.
(G) Tap to return the map screen to its original scale.
(H) Tap to zoom out from the map screen.
(I) Tap to display the Quick menu screen.
(B)
(C)
(D)
(E)
(F)
(G)
(I)
(H)
(A)
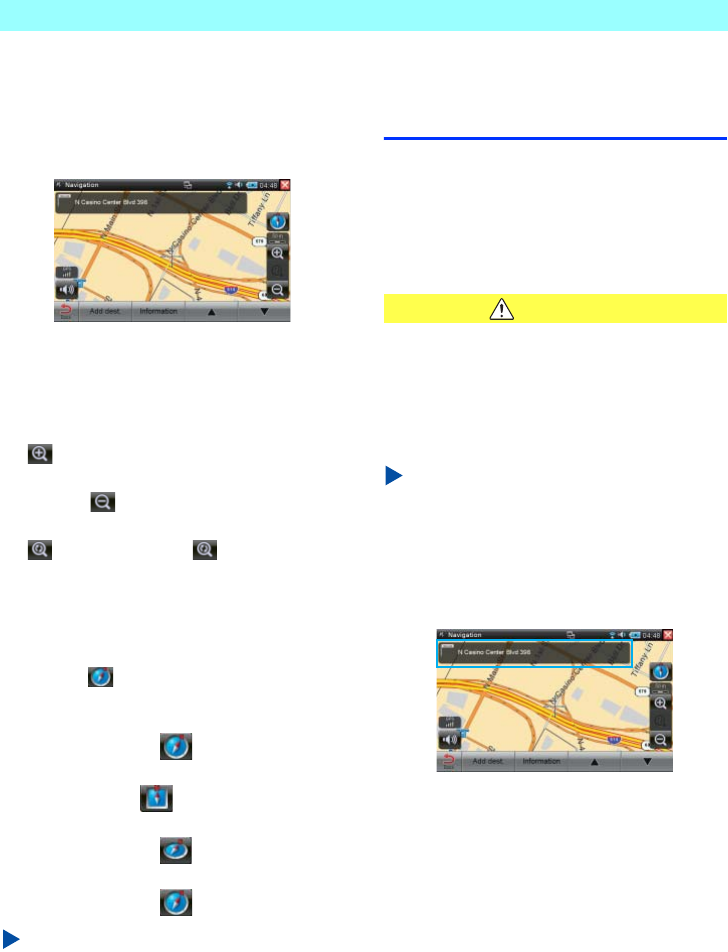
Chapter 6 Navigation
80 NR1UB/NR1UW/NR1UR
6-2-3
Scrolling the Map on the Screen
Tapping a point on the map screen causes the
map to scroll so the tapped point is in the center
of the screen.
6-2-4
Zooming In and Zooming Out on the
Map Screen
To zoom in on the map screen (and enlarge it),
tap .
To zoom out from the map screen (and reduce
its size), tap .
Zooming in or out on the map screen will cause
the key to appear. Tap to return the
map screen to its original (unzoomed) scale.
6-2-5
Switching the Map Screen View
Tapping the key on the map screen cycles
the map and compass screen between the
views shown below.
2D View (Heading Up)
↓
2D View (North Up)
↓
3D View (Heading Up)
↓
2D View (Heading Up)
NOTE
The 2D (North Up) View shows the map with
North oriented upwards.
For details, see 6-6-2 Display (P. 94).
6-3
Searching for a
Destination
6-3-1
Scrolling the Map to Specify a
Destination
Use the procedure below to specify a
destination by scrolling the map.
CAUTION
For safety reasons, never search for a
designation while operating a motor vehicle.
Search for the destination before starting your
drive.
1Tap the map screen.
NOTE
If you need to change the scale of the map, do
so before tapping the screen.
A crosshair symbol (+) will appear at the point
you tapped. The name of the point will appear at
the top of the screen, as the destination.
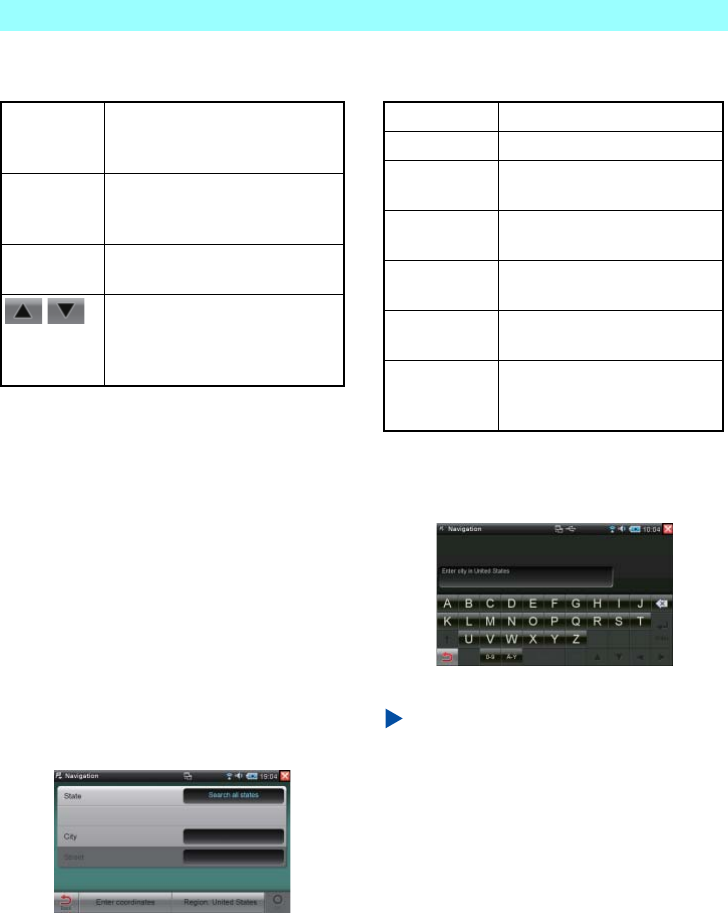
Chapter 6 Navigation
NR1UB/NR1UW/NR1UR 81
The following describes the functions of the keys
at the bottom of the screen.
2Tap the [Add dest.] key.
This starts route calculation to the
destination.
The current location screen will reappear
when route calculation is complete.
6-3-2
Searching for a Destination Based on
a City Name
You can use the procedure below to enter the
city name and search for a destination.
1On the main menu, tap the [Enter new
dest.] key.
This displays the Enter new destination
screen.
The following are the items that you can specify
on the screen.
2On the Enter new destination screen, tap
the [City] key.
This displays a software keyboard.
3Tap the initial characters of the town name.
NOTE
As you enter characters, the software keyboard
will change automatically so only the keys that
correspond to letters that can be used for input
of candidates remain enabled. Keys that do not
correspond to letters for candidate name input
are dimmed and disabled.
Back Exits the scrolling screen and
returns to the current location
screen.
Add dest. Searches for the route to the
destination where the crosshair
symbol (+) is located.
Information Displays the information screen of
the destination.
If there are multiple candidates
because the destination is
uncertain, tap the destination you
want to select it.
State Select a state.
Country Select a country.
Zip Code Enter the zip code of the
destination.
City Enter the city name of the
destination.
Street Enter the street name of the
destination.
Enter
coordinates
Enter the latitude and longitude
of the destination.
Region: Shows the country name of the
current selection. Tap a country
to select it.
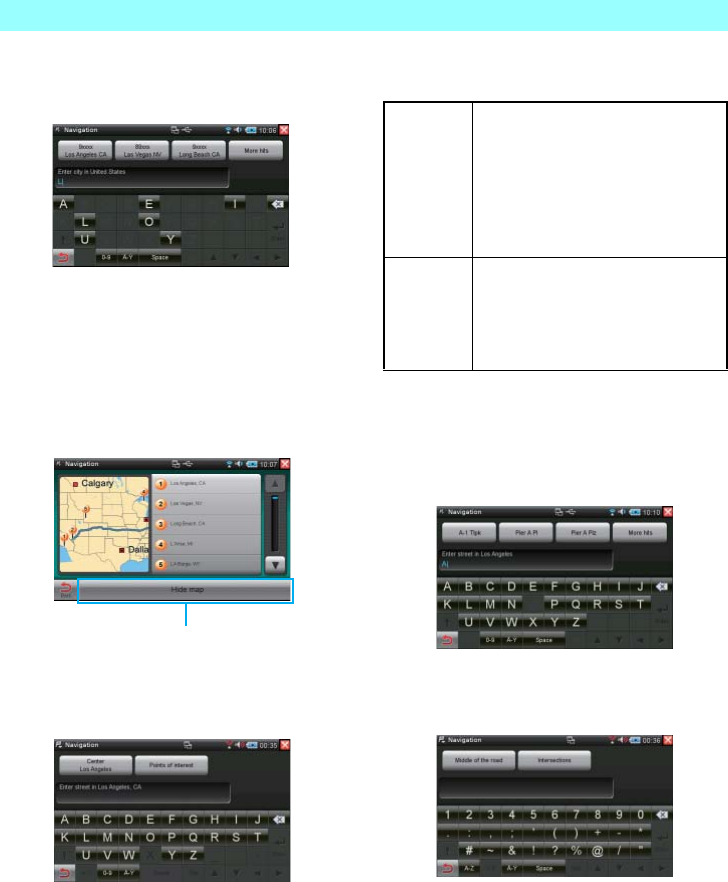
Chapter 6 Navigation
82 NR1UB/NR1UW/NR1UR
As soon as you enter the initial characters, four
destination character keys appear along the top
of the screen.
The three keys to the left are city destination
candidates based on the characters you input.
If a key shows the destination you want, tap it
and advance to step 6 of this procedure.
4Tap the [More hits] key.
This displays a list of all of the destination
candidates.
5Select a destination by tapping it in the list.
This displays the street name input screen.
The following describes the function of the keys
on the screen.
6Enter the street name.
Just as candidates were narrowed down as
you entered a city name, street name
candidates appear at the top of the screen
as you input characters.
7If the destination you want appears as a
candidate, tap its key.
This displays the address input screen.
Tap to show the list
without a map screen.
Center of
the
candidate
Makes the selected city your
destination and starts route guidance
to the center of the city. For details
about the remainder of this process,
see 6-4-1 Configuring Calculation
Condition Settings for Route
Guidance (P. 86).
Points of
interest
Enables genre-specific search. For
details about genre-specific search,
see 6-3-5 Searching for a
Destination Based on its Genre
(P. 84).
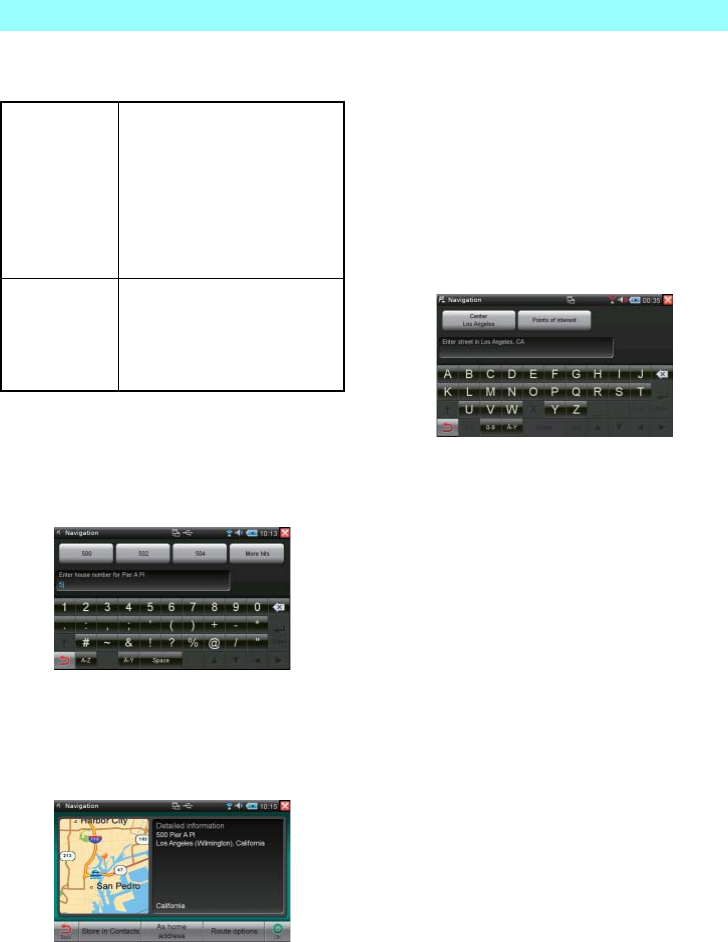
Chapter 6 Navigation
NR1UB/NR1UW/NR1UR 83
The following describes the function of the keys
on the screen.
8Enter the address or the crossroad name.
Just as candidates were narrowed down as
you entered a city name, street or
crossroad name candidates appear at the
top of the screen as you input characters.
9Tap a candidate to select it.
This completes input of the destination.
The address and phone number of the
destination will appear along with a map of
the area.
6-3-3
Searching for a Destination Based on
a Street Name
Use the procedure below to enter the street
name and search for a destination.
1On the Enter new destination screen, tap
the [Street] key.
This displays a software keyboard.
2Tap the initial characters of the street name.
If the destination you want appears as a
candidate, tap its key.
If your destination is not displayed, enter more
characters to narrow down the candidates.
For details about the remainder of this
procedure, see 6-3-2 Searching for a
Destination Based on a City Name (P. 81).
Middle of the
road
Makes the center of the selected
street your destination and starts
route guidance to there. For
details about the remainder of
this process, see 6-4-1
Configuring Calculation
Condition Settings for Route
Guidance (P. 86).
Intersections Displays a list of crossroad
candidates that includes the
selected street. The crossroad
point is specified as the
destination.
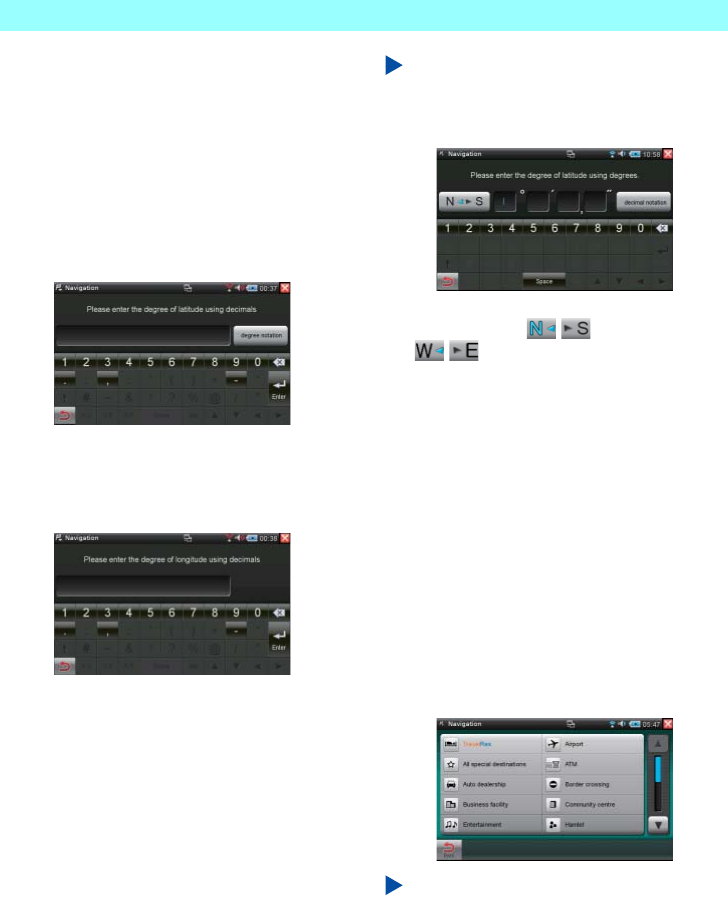
Chapter 6 Navigation
84 NR1UB/NR1UW/NR1UR
6-3-4
Searching for a Destination Based on
its Latitude and Longitude
You can use the procedure below to enter a
latitude and longitude, and search for a
destination.
1On the Enter new destination screen, tap
the [Enter coordinates] key.
This displays a software keyboard.
2Enter the latitude in degrees, including a
decimal part, and then tap the [Enter] key.
This displays the destination longitude input
screen.
3Enter the longitude in degrees, including a
decimal part, and then tap the [Enter] key.
The latitude and longitude of the
destination will appear along with a map of
the area.
NOTE
Tap the [degree notation] key to switch to the
degree, minute, second coordinate input
screen.
Enter the degrees, minutes, and seconds of the
destination. Tap the for latitude input
and for longitude input.
Tap [decimal notation] key to return to the
degree value input screen.
6-3-5
Searching for a Destination Based on
its Genre
You can use the procedure below to search for a
destination from a list grouped by genre. All
points of interest (POIs) usable for navigation
are included in the menu list.
1On the main menu, tap the [Point of
interest] key.
This displays the genre-specific menu
screen.
NOTE
You can search all categories by tapping the
[All special destinations] key.
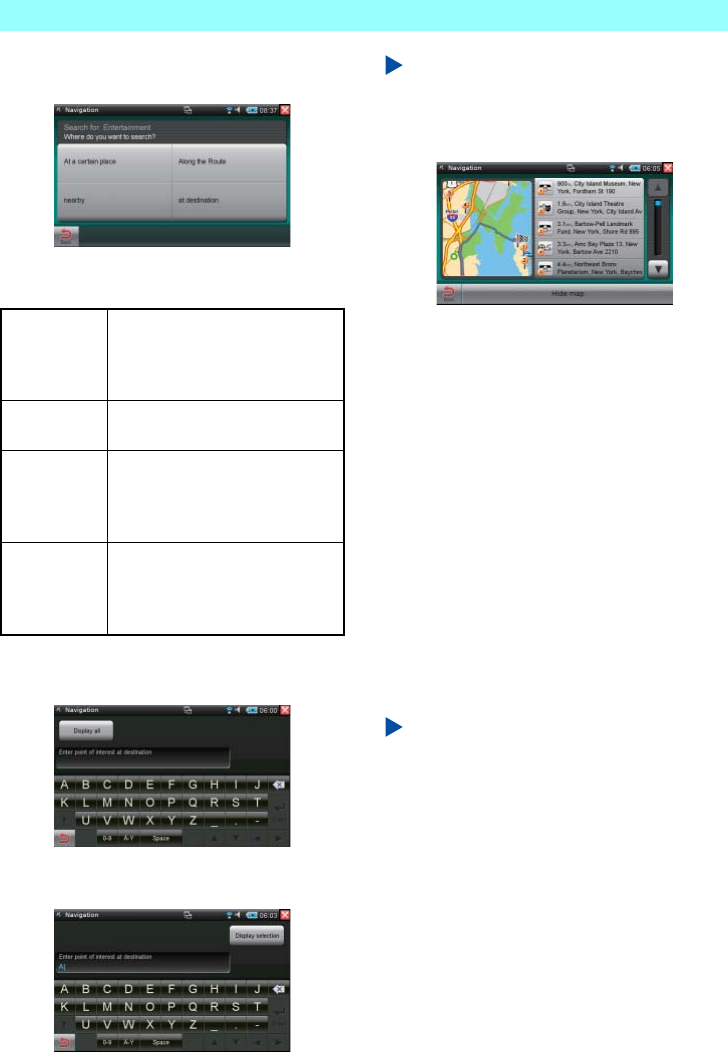
Chapter 6 Navigation
NR1UB/NR1UW/NR1UR 85
2Tap the genre you want.
This displays the search method screen.
The following describes the function of the keys
on the screen.
3Tap the search method you want.
This displays a software keyboard.
4Enter the characters you want to search for,
and then tap the [Display selection] key.
This displays the POI list.
NOTE
Tapping the [Display all xxxx] key displays a list
of all POI for the selected genre.
5Tap the POI you want.
The address and phone number of the
destination will appear along with a map of
the area.
6-3-6
Specifying a Downloaded POI as a
Destination
A POI that you find on Google Map using your
computer or the ClarionMiND browser can be
used as a destination. First, search for the POI
and use the Google Map transfer function to
send it to the Clarion portal site. Then tapping
the Portal Sync key will store the POI you sent
to the Clarion portal site into the navigation
Downloaded POI database automatically. For
details about the Portal Sync key, see Using the
Portal Site (P. 112).
NOTE
•
In order to use a downloaded POI, you must
register as a user and register your unit at the
Clarion portal site.
For details about registering on the Clarion
portal site, see Registering on the Clarion
Portal Site (P. 40).
•
You can store up to 1,000 POIs in the
Downloaded POI database.
•
Go to the address below and see this page in
the Clarion portal site for how to use the
Google Map transfer function.
(http://my.clarion.com/en-us/html/map-guide)
At a certain
place
Select a new destination. For
details, see 6-3-2 Searching for a
Destination Based on a City
Name (P. 81).
nearby Select a POI that is near the
current location.
Along the
route
Displays a list of all destinations
along your current route. This key
is available only after a route is
set.
at destination Select a POI in the vicinity of the
currently selected destination.
This key is available only after a
route is set.
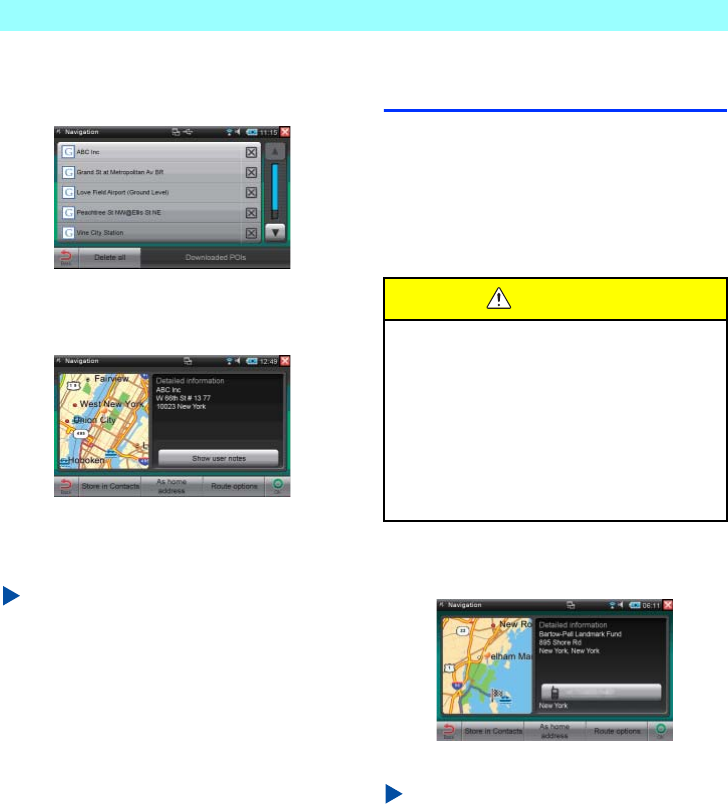
Chapter 6 Navigation
86 NR1UB/NR1UW/NR1UR
1On the main menu, tap the [Downloaded
POIs] key.
This displays the Downloaded POI list.
2Select a destination by tapping it in the
Downloaded POI list.
This displays the destination detail screen.
3Tap the [OK] key.
This starts route calculation and sets the
route.
NOTE
You can store a downloaded POI in the
Contacts application by tapping the [Store in
Contacts] key.
For details about Contacts, see 5-9 Contacts
(P. 62).
6-4
Configuring a Route
6-4-1
Configuring Calculation Condition
Settings for Route Guidance
After you find the destination you want, you can
use this procedure to configure the route to that
destination.
1After specifying the destination, tap the
[Route options] key on the screen.
This displays a route options screen.
NOTE
•
To store the destination you found in the
Contacts application, tap the [Store in
Contacts] key. For details about Contacts, see
5-9 Contacts (P. 62).
•
To store the destination you found as your
home address, tap the [As home address]
key.
WARNING
• For safety reasons, do not perform any
operations while driving.
Doing so can take your mind off the road
and create the risk of a traffic accident.
• Always drive in accordance with traffic
rules and regulations.
Navigation route guidance may
sometimes be inappropriate due to road
conditions or navigation system accuracy.

Chapter 6 Navigation
NR1UB/NR1UW/NR1UR 87
2Configure the various options for
determining the route, and then tap the
[Back] key.
For the items on this screen, see 6-6-1
Route Options (P. 93).
The following are the rules applied for route
calculation under initial default settings.
•The optimal route for a motor vehicle is
calculated.
•The fastest route is calculated.
•In addition to local roads, regular roads, and
main trunk roads, highways also are
considered during route calculation.
•Use of the ferry is considered during route
calculation.
•Toll roads are considered during route
calculation.
3Tap the [OK] key.
The route to the destination will be set in
accordance with the option settings you
configured.
Route guidance starts when the vehicle
starts to move.
Route guidance will stop automatically
when you reach your destination.
A voice will announce that route guidance
is about to stop about 100 yards / 30
meters before the destination or end of the
route is reached.
NOTE
•
Zoom, map screen selection, route
information screen, and other functions all are
possible during route guidance.
•
The map area can be scrolled manually in the
2D view mode by tapping a location on the
map or by dragging in the direction you want.
This operation is not supported in the 3D view
mode.
•
The route that is set is indicated in purple on
the map.
•
The road you are traveling on is shown at the
top of the screen. The distance until the next
required driving operation also is displayed.
•
Your current location is indicated by on the
screen.
•
Current speed, average speed, distance to
destination, remaining driving time, and time
of arrival information are shown in the
information bar at the bottom of the screen.
•
The map zooms automatically to inform the
driver of an upcoming driving operation, and
returns to normal size when the operation is
complete. The zoom can be adjusted using
[Settings]. The map can be zoomed manually
as required by tapping or . The
current scale is indicated on the map.
•
The map screen switches in accordance with
upcoming driving operations. Bearing,
distance until the operation is required, and
turn icons appear at the top of the screen.
The display returns to normal after the driving
operation is complete.
•
Gasoline stations, rest areas, and other POIs
are indicated on the map using symbols.
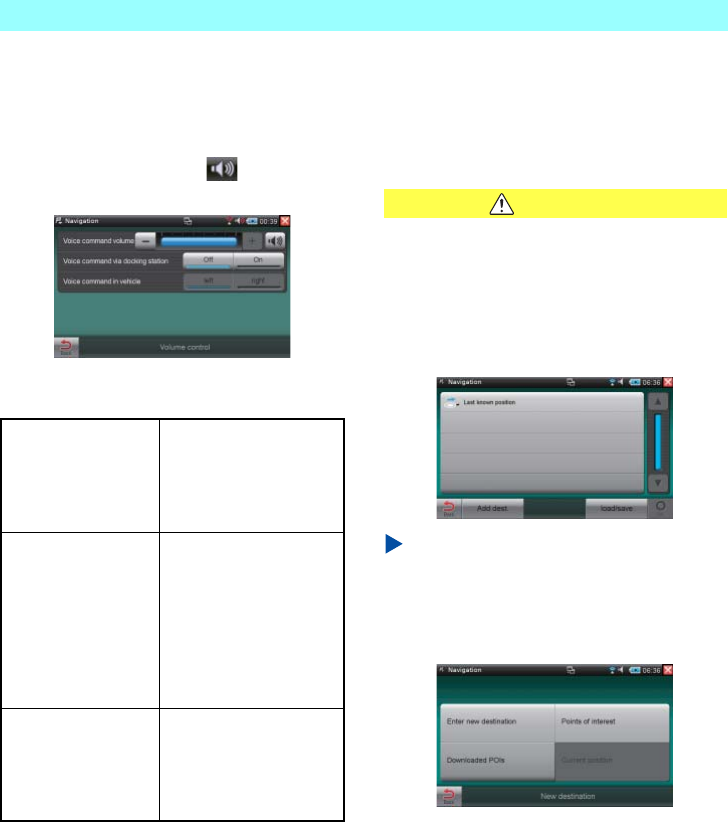
Chapter 6 Navigation
88 NR1UB/NR1UW/NR1UR
6-4-2
Adjusting Audio Guidance
You can use the procedure below to adjust the
voice route guidance.
1On the map screen, tap .
This displays an audio adjustment screen.
The following describes the functions of the keys
on the screen.
6-4-3
Changing the Specified Route
Use the procedure below to alter the options for
the currently specified route in order to make the
route more efficient.
CAUTION
To change the route while driving, first stop
the vehicle in a parking lot or some other
safe location.
1On the main menu, tap the [Change route]
key.
This displays the Route planning screen.
NOTE
The route start point is not saved under initial
factory default settings.
2On the list, tap [Last known position].
This displays the New destination screen.
3Specify the new destination.
This returns to the Route planning screen.
The destination you input will be the route
start point, which will be displayed at the
top of the Route planning screen.
Next, add the destination.
4Tap the [Add dest.] key.
5Specify the new destination.
Voice guidance
volume
Adjusts voice guidance
volume. The settings you
configure here are applied
to navigation voice
guidance only.
Voice command via
docking station
Specifies the audio output
destination.
ON: Outputs audio from
the vehicle's speakers
when the unit is mounted
on the optional Car Dock.
OFF: Outputs audio from
the unit's built-in speaker.
Voice command in
vehicle
Outputs audio from the
vehicle's left or right
speaker when the unit is
mounted on the optional
Car Dock.
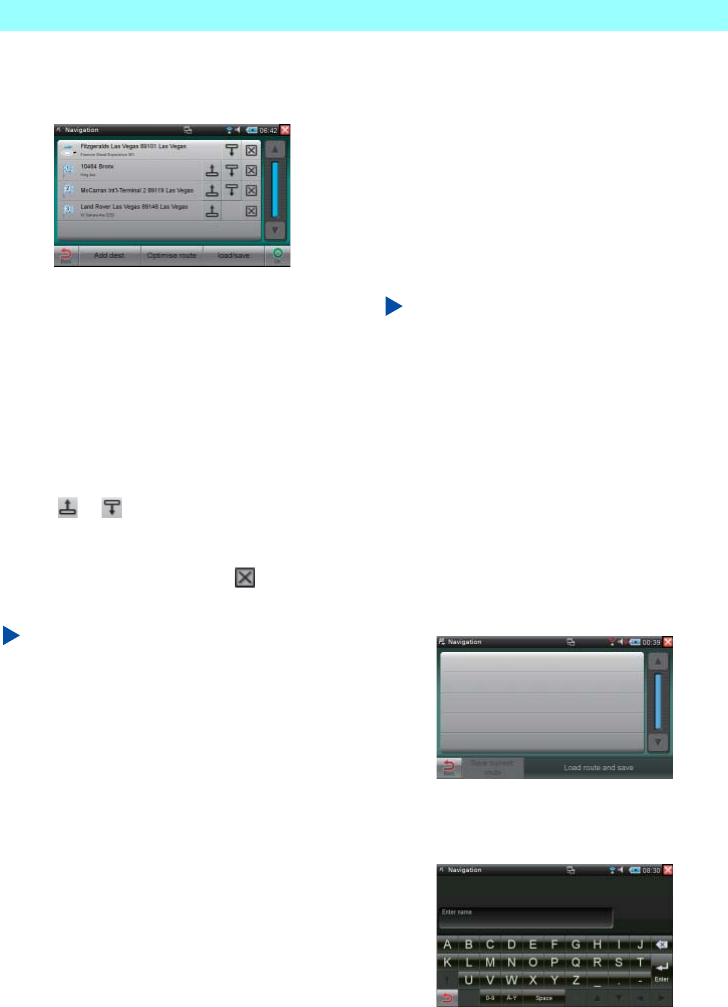
Chapter 6 Navigation
NR1UB/NR1UW/NR1UR 89
Adding the new destination will display it as the
next destination on the Route planning screen
list.
Tapping the destination list will display a map
screen of the destination along with the address
and coordinates.
Repeat these steps to add other destinations.
6Tap the [OK] key.
This will configure the route to the
destinations.
The following describes how to change the
sequence of route list items.
Tap the or key of the destination you
want to move. This will move the list item one
line upwards or downwards on the route list.
To delete a route list item, tap its key. This
will delete the item from the list.
NOTE
Note that a delete cannot be undone. If
required, reconfigure another route.
6-4-4
Optimizing a Route
Tapping the [Optimise route] key on the Route
planning screen checks the currently configured
route and makes adjustments for better
guidance.
Since the same point is set as the route start
point and end point, the sequence of
destinations is adjusted to create the shortest
route.
NOTE
Route optimization is possible only when there
are at least three objectives, including the start
point and end point. Note that optimization
produces the shortest direct route, which may
not necessarily be the optimum route.
6-4-5
Saving a Route
Use the procedure below to save a route you
created to the route list.
1On the Route planning screen, tap the
[load/save] key.
This displays the Edit route screen.
2Tap the [Save current route] key.
This displays a screen for entering a name
for the route.
3Enter the route name and then tap the
[Enter] key.
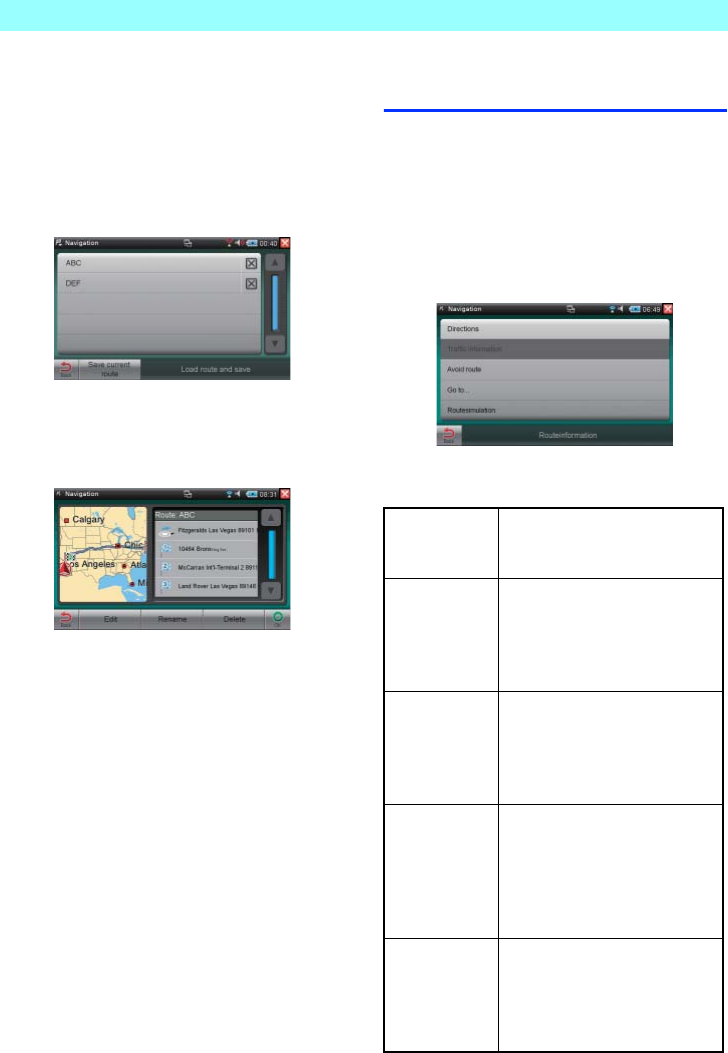
Chapter 6 Navigation
90 NR1UB/NR1UW/NR1UR
6-4-6
Using a Saved Route
Use the procedure below to load a route you
saved on the unit from the route list.
1On the Route planning screen, tap the
[load/save] key.
This displays the Edit route screen.
2On the list, select the route you want to load
by tapping it.
This displays the selected route information
along with a map screen.
3Tap the [OK] key.
This performs route calculation and sets
the route.
6-5
Route Information
Route information shows important information
about the currently set route, and also can be
used to perform a route simulation and to
perform calculations to a different route.
1On the main menu, tap the [Route
information] key.
This displays the Route information screen.
Tap the keys described blow to access route
information.
Directions Views a preview of what roads
you should use to arrive at your
destination.
Traffic
information
Shows a list of current traffic
information received by
navigation. (Enabled when the
unit is mounted on the optional
Car Dock)
Avoid route Performs calculation of a
substitute route over a specific
interval from the current location
along the current route in order
to avoid traffic congestion.
Go to... Displays a general view of the
current route and of the
destination area. Tapping here
also displays the current location
and the start point when setting
the route.
Route
simulation
Performs a simulation of the
route that is set. The driving
condition is displayed visually on
the screen with the voice
guidance along the route.

Chapter 6 Navigation
NR1UB/NR1UW/NR1UR 91
6-5-1
Directions
Starting route navigation (either a new
destination or a saved route) enables the use of
directions, which let you know which roads to
use to arrive at the destination. Street names
and driving distance information is displayed in
a list on the Directions screen.
This provides a preview of the planned route.
1On the Route information screen, tap the
[Directions] key.
This displays the Directions screen.
You can use this screen to check the route
you are traveling.
6-5-2
Avoid Route
You can manually block certain segments on the
upcoming route from your current location, and
have the system produce a substitute detour
route that avoids the blocked segments. Perform
the following procedure to create a detour route
segment.
1On the Route information screen, tap the
[Avoid route] key.
This displays the Avoid route screen.
2On the list, select the distance you want.
Selecting a distance calculates a substitute
route and switches to the map screen
automatically. The map screen navigation
will refresh to show the rerouting. The
symbol on the map screen shows the start
point of the detour route. (Or the symbol
will show the start point of the distance you
selected for the detour route.) Navigation
will return to the planned route and
guidance will continue at the end of the
detour route.
Tap to delete all avoided routes.
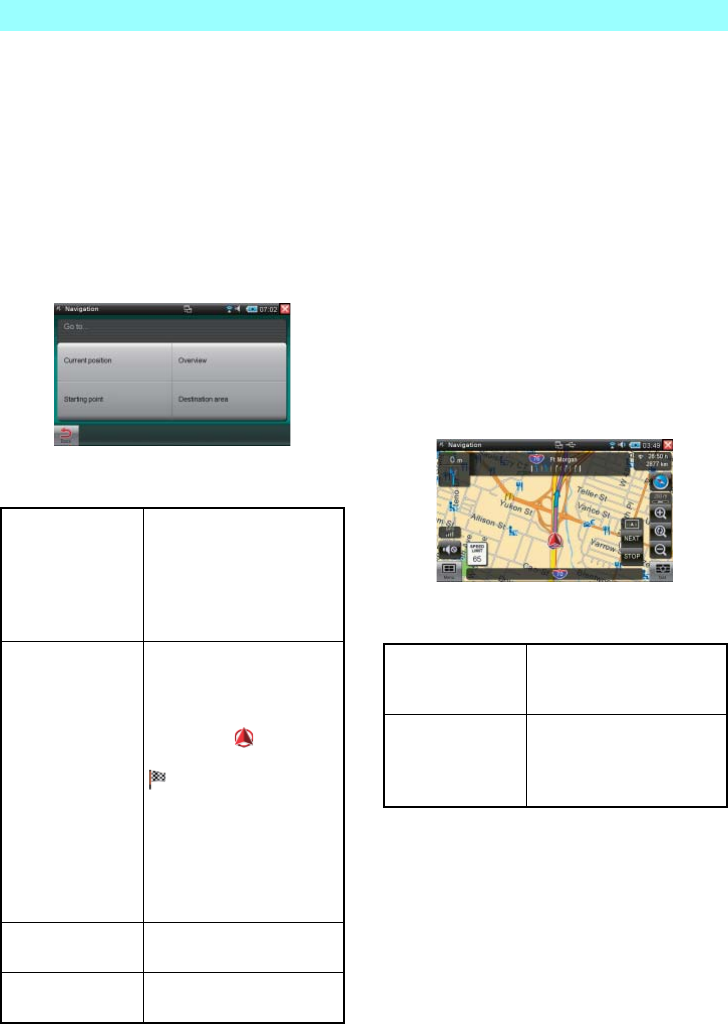
Chapter 6 Navigation
92 NR1UB/NR1UW/NR1UR
6-5-3
Go to
You can use the procedure below while route
guidance or route planning is being performed
to display a route overview and the destination
area, or to display your current location or route
planning start point.
1On the Route information screen, tap the
[Go to...] key.
This displays the Go to screen.
The following describes the function of the keys
on the screen.
6-5-4
Route Simulation
You can use the procedure below to perform a
simulated run of the set route. A simulated run
displays guidance on the map screen, and
simulations of all driving operations are
performed. Route guidance is performed in real
time based on the speed limit in each map area.
Driving operations are provided visually on the
screen, along with audible voice guidance
instructions.
All navigation functions can be used during a
simulation.
1On the Route information screen, tap the
[Route simulation] key.
This displays the Route simulation screen.
The following describes the function of the keys
on the screen.
Current position Displays your current
location on the map screen.
The route is displayed in
purple, and extends off the
currently displayed map
area.
Overview Displays an overview of the
calculated route from the
current location or the start
point. The current location is
displayed as , while the
destination is displayed as
. If there are multiple
destinations, each one is
assigned a number. The
route between the current
location or start point and the
destination is displayed in
purple.
Starting point Displays the route setting
start point.
Destination area This displays a map of the
area around the destination.
STOP Stops the simulation and
returns to the current
location screen.
NEXT Jumps to the next driving
operation, which reduces the
time it takes for the
guidance.
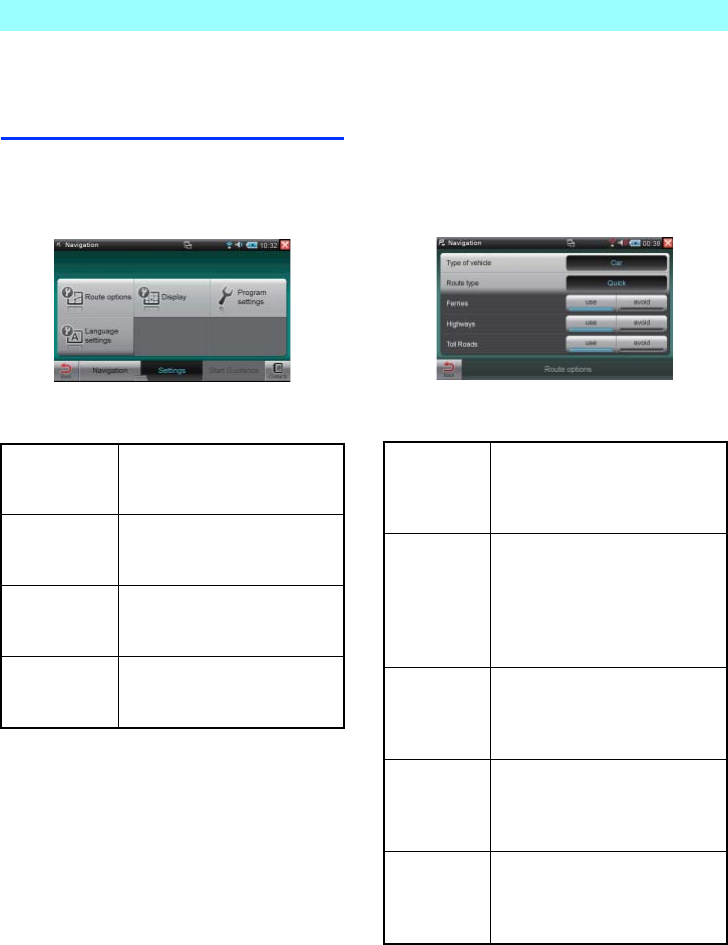
Chapter 6 Navigation
NR1UB/NR1UW/NR1UR 93
6-6
Configuring Navigation
Settings
1On the main menu, tap the [Settings] key.
This displays the navigation settings
screen.
The following describes the functions of the keys
on this screen.
6-6-1
Route Options
You can use the procedure below to configure
route calculation conditions.
1On the navigation settings screen, tap the
[Route options] key.
This displays the Route Options screen.
The following describes the settings and keys on
the screen.
Route options Configures route calculation
settings. For details, see 6-6-1
Route Options (P. 93).
Display Configures navigation screen
settings. For details, see 6-6-2
Display (P. 94).
Program
settings
Configures navigation program
settings. For details, see 6-6-3
Program Settings (P. 94).
Language
settings
Configures navigation language
settings. For details, see 6-6-4
Language Settings (P. 95).
Type of vehicle Select [Car], [Pedestrian],
[Bicycle], or [Motorcycle] as the
vehicle type when navigation is
being used.
Route type Select [Short], [Quick], or
[Economical] as the route type for
route calculation. This setting can
be configured only when [Car] or
[Motorcycle] is selected as the
type of vehicle.
Ferries Specifies whether or not ferries
should be considered for route
calculation. The initial default
setting is [use].
Highways Specifies whether or not
motorways should be considered
for route calculation. The initial
default setting is [use].
Toll Roads Specifies whether or not toll roads
should be considered for route
calculation. The initial default
setting is [use].

Chapter 6 Navigation
94 NR1UB/NR1UW/NR1UR
6-6-2
Display
You can use the procedure below to configure
navigation screen settings.
1On the navigation settings screen, tap the
[Display] key.
This displays the Display screen.
The following describes the settings and keys on
the screen.
6-6-3
Program Settings
You can use the procedure below to configure
navigation program settings.
1On the navigation settings screen, tap the
[Program settings] key.
This displays the Program settings screen.
The following describes the settings and keys on
the screen.
Map display Select [Map only], [Turn icons],
[Splitscreen], [Dyn.map and turn
icons], or [Dyn.map and
splitscreen] as the map screen
display method.
2D map
orientation
Select [Align map to North], [Map
in driving dir.], or [smart].
Align map to North: Orients the
map northwards.
Map in driving dir.: Orients the
map in the driving direction.
smart: Orients the map
northwards for small scales in the
driving direction for large scales.
View type Select [2D View] or [3D View].
Auto zoom Select [nearby], [Medium], or [far].
TMC Configures TMC settings.
(Enabled when the unit is
mounted on the optional Car
Dock)
Speed limit Select a speed limit display
setting.
Do not show: Saves information
about the speed limit of each
route with map data. The speed
limit is not displayed. Navigation
does not output a warning sound
when the speed limit is
exceeded.
Shows without warning: Displays
the route speed limit on the map.
Navigation does not output a
warning sound when the speed
limit is exceeded.
Warning at 5 km/h, Warning at
10 km/h, Warning at 15 km/h,
Warning at 20 km/h, Warning at
25 km/h, Warning at 30 km/h:
Displays the route speed limit on
the map. Navigation outputs a
warning sound when the speed
limit is exceeded by the specified
value.
Select map Select the map to use.

Chapter 6 Navigation
NR1UB/NR1UW/NR1UR 95
6-6-4
Language Settings
You can use the procedure below to configure
navigation language settings.
1On the navigation settings screen, tap the
[Language Settings] key.
This displays the Language Settings
screen.
The following describes the settings and keys on
the screen.
Plot GPS track Select [activated] or
[deactivated]. The current route
is recorded from the moment
that [activated] is selected. The
record is cleared when Trip info
screen information is reset and
when this setting is changed to
deactivated.
Units Select [Metric] or [English].
Metric: Display and guidance are
performed using meters
(kilometers) as the distance unit.
English: Display and guidance
are performed using miles as the
distance unit.
Version Displays the version of the
navigation map.
Language Select the language to use. This
setting is separate from the unit
language setting, and it affects
navigation only.
Keyboard
selection
Select the keyboard type to use.
This keyboard setting is separate
from the unit language setting, and
it affects navigation only.
TTS Turns navigation audio on or off.
Select [activated] or [deactivated].
The initial default setting is
[activated].

Chapter 6 Navigation
96 NR1UB/NR1UW/NR1UR
6-7
Quick Menu Settings
You can use the procedure below to assign
frequently-used navigation functions to the
Quick menu for quick and simple access.
To assign a function, use the Quick menu
screen that appears when you tap the [Quick]
key in the lower right corner of the navigation
screen.
1Tap the [Quick] key in the lower right corner
of the navigation screen.
This displays the Quick menu.
2Tap the [Quick menu settings] key.
A message like the one shown below
appears at the bottom of the screen.
3Tap any one of the Quick menu keys.
This displays a list from which you can
select a process to assign to the Quick
menu.
NOTE
•
TMC settings are enabled when the unit is
mounted on the optional Car Dock.
•
Device settings is not enabled in this unit.
Select
destination
Select [New destination], [City],
[Zip code], [Coordinates], [Last
locations], [Route planning],
[Downloaded POIs], or [Save
current position] as the search
method.
Point of interest Select the POI you want to
assign. For the search method,
select [along the Route], [at
destination], or [nearby].
Route
information
Select [Directions], [Traffic
information], or [Avoid route] for
the route information.
Settings Select [Program settings],
[Device settings], [Display],
[Route settings], or [TMC
settings] for the navigation
settings.
Other views Select [Compass], [Turn icons],
or [Trip info].
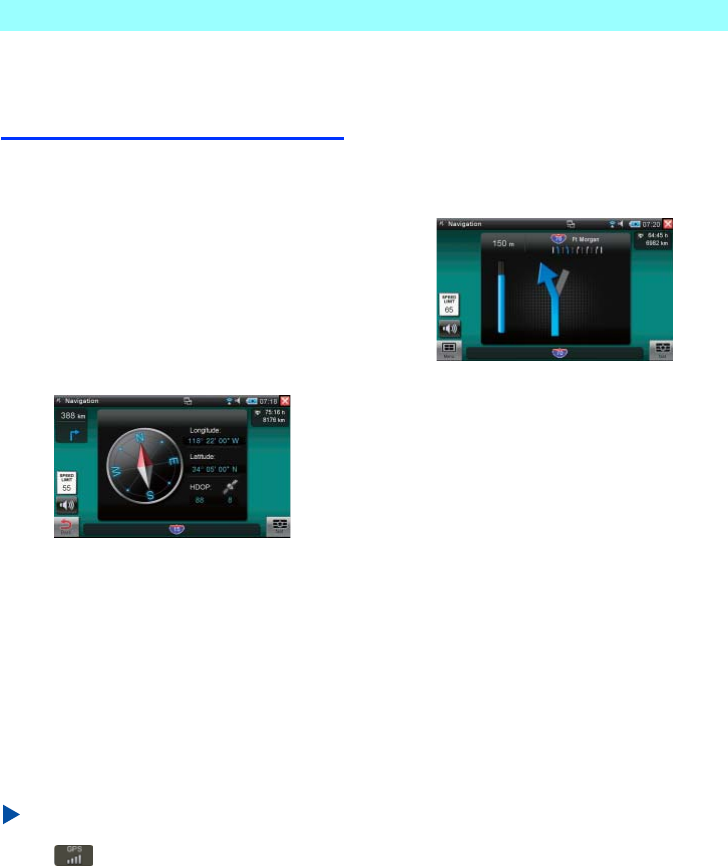
Chapter 6 Navigation
NR1UB/NR1UW/NR1UR 97
6-8
Modifying the Map
Screen
When Compass, Turn icons, or Trip info is
assigned to the Quick menu, you can modify the
map screen that appears during route guidance.
6-8-1
Displaying the Compass Screen
1On the map display, tap the [Quick] key.
2On the Quick menu, tap the [Compass] key.
This displays the Compass screen.
The current location is displayed as a compass
readout, with the bearing, latitude, and longitude
updated in real time in accordance with received
GPS signals. GPS reception quality is converted
to a value and displayed in the HDOP field. The
number of satellites whose signals are currently
being received is shown under the satellite
symbol.
The information bar at the bottom of the screen
shows the road you are traveling on and other
information.
NOTE
The compass screen also appears when you
tap on the map screen.
6-8-2
Displaying the Turn Icon Screen
1On the map display, tap the [Quick] key.
2On the Quick menu, tap the [Turn icons]
key.
This displays the Turn icons screen.
The turn icons shows the current or next driving
operation in real time. The following information
is provided.
•The current bearing is indicated by an arrow
icon. The icon display changes automatically
when the next driving operation is approached.
•The status bar to the left of the arrow icon
indicates the distance until the next driving
operation. The status bar changes as the
driving operation is approached.
•The road you are traveling on is shown at the
top of the screen.

Chapter 6 Navigation
98 NR1UB/NR1UW/NR1UR
6-8-3
Displaying the Trip Information Screen
1On the map display, tap the [Quick] key.
2On the Quick menu, tap the [Trip info] key.
This displays the Trip info screen.
This screen shows the maximum speed,
average speed, travel distance, and driving time.
Tapping the [Reset] key when route guidance
starts will reset the trip information to zero and
restart it. Trip information values are reset
automatically when there is no valid GPS
information acquired within two hours.
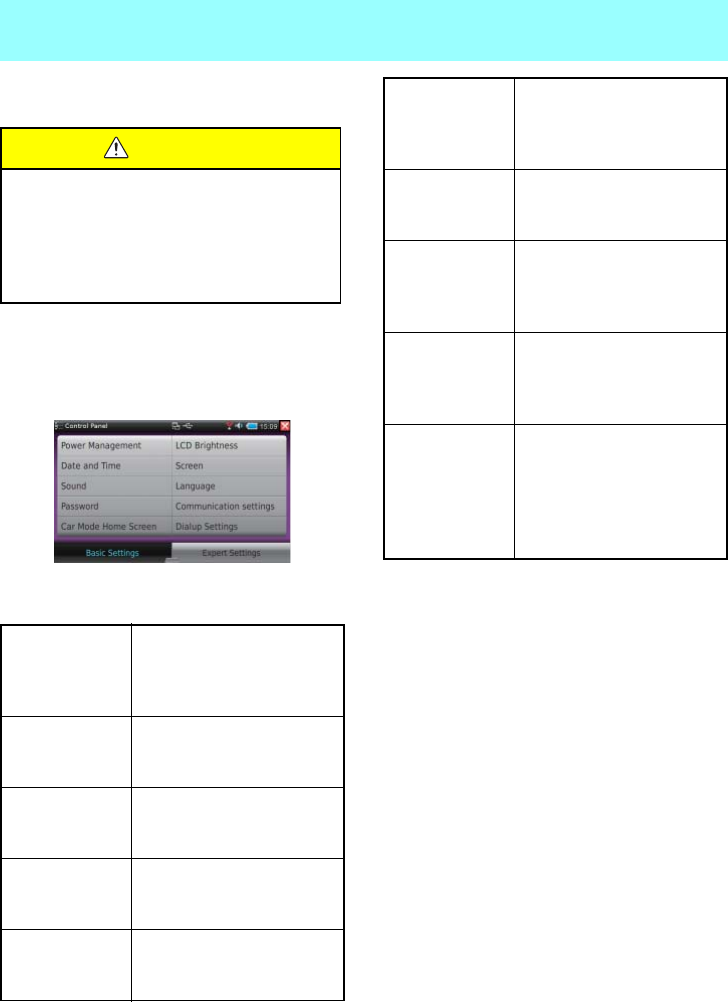
NR1UB/NR1UW/NR1UR 99
Chapter 7 Control Panel
The Control Panel can be used to configure
settings for various unit functions.
1On the Home screen, tap the [Control
Panel] key.
This displays the Control Panel screen.
[Basic Settings] can be used to configure
settings for the following functions.
WARNING
• For safety reasons, do not perform any
operations while driving.
Doing so can take your mind off the road
and create the risk of a traffic accident.
Always stop your vehicle in a safe place
before operating the unit.
Power
Management
Configures power
management settings. For
details, see 7-1 Power
Management (P. 100).
LCD Brightness Configures display brightness
settings. For details, see 7-2
LCD Brightness (P. 102).
Date and Time Configures date and time
settings. For details, see 7-3
Date and Time (P. 103).
Screen Configures screen settings.
For details, see 7-4 Screen
(P. 104).
Sound Configures sound settings. For
details, see 7-5 Sound
(P. 105).
Language Configures display language
and keyboard settings. For
details, see 7-6 Language
(P. 105).
Password Configures password settings.
For details, see 7-7 Password
(P. 106).
Communication
settings
Configures network
connection settings. For
details, see Connecting to a
Network (P. 30).
Car Mode Home
Screen
Customizes the Car mode
Home screen. For details, see
7-8 Car Mode Home Screen
(P. 107).
Dialup Settings Configures Internet connection
settings when using a
Bluetooth-enabled cell phone.
For details, see 3-3
Configuring Bluetooth
Connection Settings (P. 36).

Chapter 7 Control Panel
100 NR1UB/NR1UW/NR1UR
[Expert Settings] can be used to configure
settings for the following functions.
7-1
Power Management
With Power Management, you can configure
settings for the “Power mode”, “LCD turn off
when idle”, and “Standby when idle”.
1On the Control Panel, tap the [Power
Management] key.
This displays the Power Management
screen.
The following describes the functions of the keys
and bar on the screen.
Application
Manager
Adds or deletes applications. For
details, see 7-9 Application
Manager (P. 108).
System
Information
Views system information. For
details, see 7-10 System
Information (P. 110).
Touch Screen
Adjustment
Corrects the tap positions of the
touch screen. For details, see
7-11 Touch Screen Adjustment
(P. 110).
Legal Displays a screen that shows the
license.
Maintenance Performs the unit maintenance.
For details, see 7-12
Maintenance (P. 111).
Battery
capacity
Shows remaining battery power
as a percentage.
Power mode Shows the currently selected
power mode. To change the
power mode setting, tap the [Edit]
key.
The power mode setting cannot
be changed while “Temp
Warning” is displayed.
LCD turn off
when idle
Tap + (increase) or - (decrease)
to change the time until display
power is turned off when idle. You
can set a time in the range of 1 to
60 minutes.
To disable LCD turn off when idle,
select [None].
Standby when
idle
Tap + (increase) or - (decrease)
to change the time until standby
is entered when idle. You can set
a time in the range of 1 to 60
minutes.
To disable standby when idle,
select [None].
Back Saves the settings and exits the
setting screen.

Chapter 7 Control Panel
NR1UB/NR1UW/NR1UR 101
7-1-1
Configuring Advanced Power Mode
Settings
1On the Power Management screen, tap the
[Edit] key.
This displays the screen shown below.
The following describes the functions of the keys
and bar on the screen.
Default Returns settings to their factory
defaults.
Edit Configures advanced power
mode settings.
Power mode Specifies the power source.
Standard: Select when
connected to the charge jack or
optional Car Dock.
Battery: Select when using a
battery pack.
LCD turn off
when idle
Tap + (increase) or - (decrease)
to change the time until display
power is turned off when idle.
You can set a time in the range
of 1 to 60 minutes.
To disable LCD turn off when
idle, select [None].
Standby when
idle
Tap + (increase) or - (decrease)
to change the time until standby
is entered when idle. You can
set a time in the range of 1 to 60
minutes.
To disable standby when idle,
select [None].
CPU Specifies the CPU capacity.
max: Specifies 100% capacity.
middle: Specifies 75% capacity.
min: Specifies 50% capacity.
Event Displays the power source.
DC-in power: charge jack or
optional Car Dock
Battery: Battery pack
Back Saves the settings and exits the
setting screen.
Default Returns settings to their factory
defaults.

Chapter 7 Control Panel
102 NR1UB/NR1UW/NR1UR
7-2
LCD Brightness
Use the LCD Brightness settings to specify the
display brightness of the daytime screen and
nighttime screen.
1On the Control Panel, tap the [LCD
Brightness] key.
This displays the LCD Brightness screen.
The following describes the functions of the keys
and bar on the screen.
NOTE
Tapping on the Control Panel also displays
the LCD Brightness screen. Tapping on the
Control Panel also toggles between the
daytime screen and nighttime screen.
Brightness Specifies the brightness of the
currently selected Brightness
mode display. Tap - (decrease) or
+ (increase) to change the
brightness setting.
Brightness
Mode
Tap the [Day mode] key or [Night
mode] key to switch between the
daytime screen and nighttime
screen.
Mode select by
(This key is not
used in this
unit.)
Specifies how switching between
the daytime screen and nighttime
screen is performed.
Manual: Switching by manual
operation
GPS: Auto switching based on
GPS information
Car Illumi.: Auto switching (When
the unit is mounted on the
optional Car Dock.)
Decrease in
lights when
battery is driven
ON: Decreases display
brightness by 30% when the
power supply is switched from an
external power supply (AC
adapter or car adapter) to the
battery pack only.
OFF: No change in display
brightness even if the power
source is changed.
Back Saves the settings and exits the
setting screen.
Default Setting Returns settings to their factory
defaults.

Chapter 7 Control Panel
NR1UB/NR1UW/NR1UR 103
7-3
Date and Time
Use Date and Time to configure current time,
date, and time zone settings.
1On the Control Panel, tap the [Date and
Time] key.
This displays the Date And Time screen.
The following describes the functions of the bar
on the screen.
7-3-1
Setting the Current Date
1On the Date And Time screen, tap the
[Date] key.
On the calendar that appears, specify the
current date.
NOTE
You can change the year and month by tapping
the and keys on either side of the
applicable setting.
7-3-2
Setting the Current Time
1On the Date And Time screen, tap the
[Time] key.
Set the current time and specify the time
format.
The following describes the functions of the keys
on the screen.
7-3-3
Setting the Time Zone
1On the Date And Time screen, tap the
[Time Zone] key.
This displays a screen for specifying the
time zone where the unit is being used.
Tap a location name to specify it as your
time zone.
Back Saves the settings and exits the
setting screen.
Date Specifies the current date.
Time Specifies the current time.
Time Zone Specifies the time zone where
the unit is being used.
Current Time Specifies the current time.
Tap the Hour, Minute, and
Second + (increase) and -
(decrease) keys to change
the settings.
Adjust by GPS data This key is not used in this
unit.
Time Format Specifies either 24-hour
format or 12-hour format for
time display.

Chapter 7 Control Panel
104 NR1UB/NR1UW/NR1UR
7-4
Screen
Use the Screen settings to specify wallpaper for
the Home screen and the theme.
1On the Control Panel, tap the [Screen] key.
This displays the Screen setting screen.
The following describes the functions of the bar
on the screen.
7-4-1
Specifying the Wallpaper
Use the following procedure to specify the
wallpaper of the Home screen.
1On the Screen setting screen, tap the
[Wallpaper change] key.
2Tap the [Browse] key.
3On the list that appears, select the file you
want to use and then tap the [OPEN] key.
NOTE
The supported file formats for wallpaper are
jpg, png, and bmp.
7-4-2
Setting the Theme
Use the following procedure to specify the unit
theme.
1On the Screen setting screen, tap the
[Theme change] key.
2Tap [Default] next to “Current theme”.
3On the list that appears, select the theme
you want to use and then tap the [Back] key.
NOTE
•
The theme setting is fixed as [Default] as the
factory default. You will be able to download
themes from the portal site for use on the unit.
•
Changing the theme affects the appearance
of wall paper, application icons, bars, and
screens.
Back Saves the settings and
exits the setting screen.
Wallpaper change Specifies the wallpaper.
Theme change Specifies the theme.
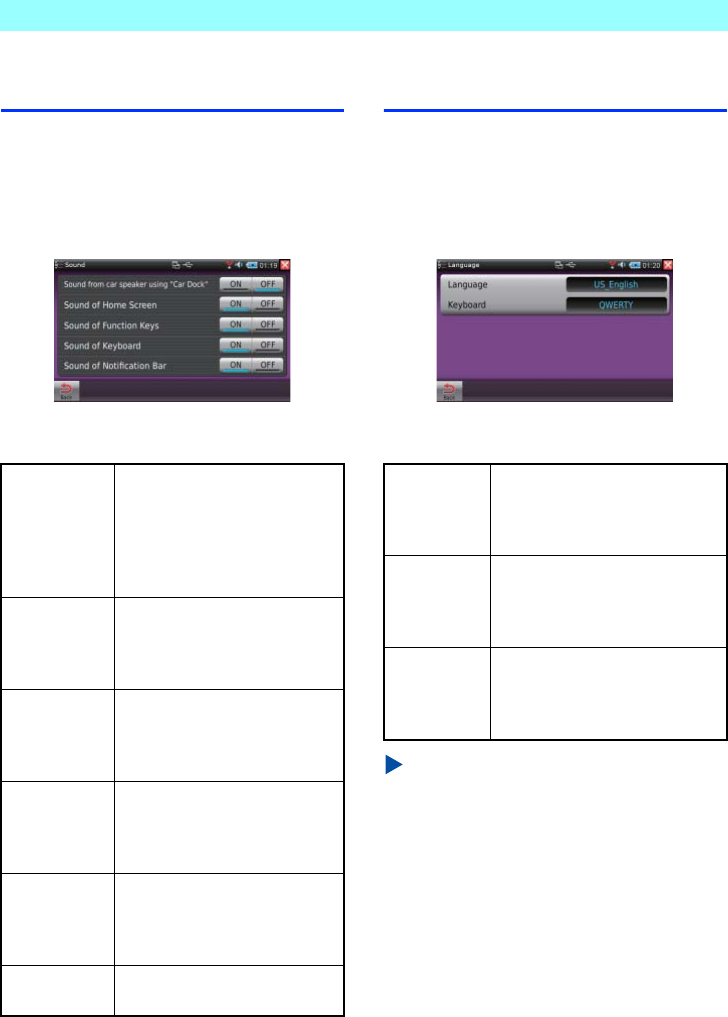
Chapter 7 Control Panel
NR1UB/NR1UW/NR1UR 105
7-5
Sound
Use the Sound settings to specify the sound
effects for unit operations and the speakers
used for sound output.
1On the Control Panel, tap the [Sound] key.
This displays the Sound screen.
The following describes the functions of the keys
on the screen.
7-6
Language
Use the Language settings to specify the display
language and the keyboard layout.
1On the Control Panel, tap the [Language]
key.
This displays the Language screen.
The following describes the functions of the keys
on the screen.
NOTE
Changing the navigation language setting
requires a separate procedure executed in the
navigation application. For details, see 6-6-4
Language Settings (P. 95).
Sound from car
speaker using
“Car Dock”
ON: Outputs sound from the car
speakers when the unit is
mounted on the optional Car
Dock.
OFF: Outputs sound from the
unit's built-in speaker.
Sound of Home
Screen
ON: Turns on Home screen
sound.
OFF: Turns off Home screen
sound.
Sound of
Function Keys
ON: Turns on one touch keys and
screen operation sound.
OFF: Turns off one touch keys
and screen operation sound.
Sound of
Keyboard
ON: Turns on software keyboard
operation sound.
OFF: Turns off software keyboard
operation sound.
Sound of
Notification Bar
ON: Turns on notification bar
display sound.
OFF: Turns off notification bar
display sound.
Back Saves the settings and exits the
setting screen.
Language Specifies the display language.
Tap the Language display area to
display a list of languages, and
then select the one you want.
Keyboard Specifies the keyboard layout.
Tap the Keyboard display area to
display a list of keyboard layouts,
and then select the one you want.
Back Saves the settings and exits the
setting screen. The unit will restart
at this time if you changed the
language setting.
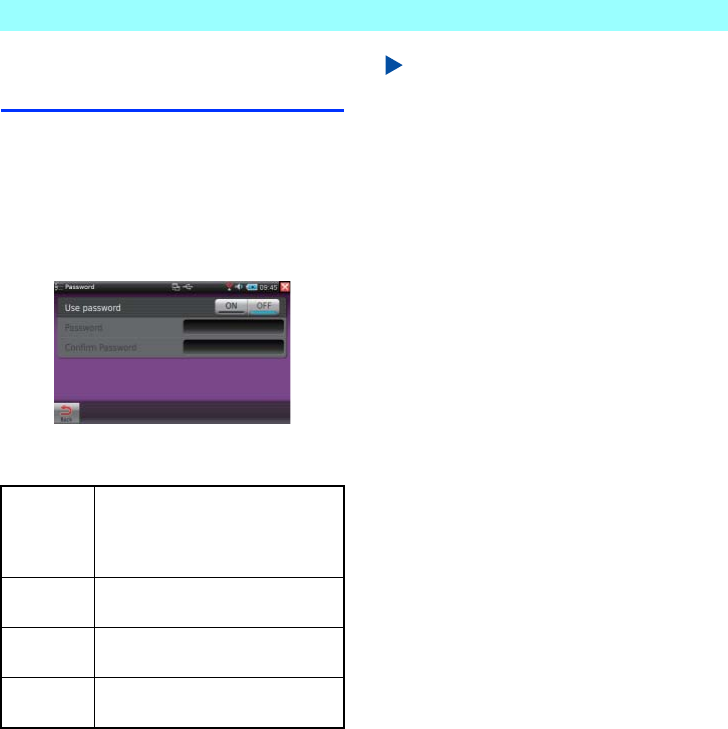
Chapter 7 Control Panel
106 NR1UB/NR1UW/NR1UR
7-7
Password
Use the Password setting to specify whether or
not input of a password is required when
starting up the unit.
1On the Control Panel, tap the [Password]
key.
This displays the Password screen.
The following describes the functions of the keys
on the screen.
After you turn on the password feature, input of
the password will be required from the next time
you start up the unit.
NOTE
•
The password input screen will not appear
when the unit transitions from standby to
startup.
•
After you turn on the password feature,
password input also is required whenever you
tap the [Password] key on the Control Panel.
•
If you forget the password, you can turn off
the password feature by performing system
recovery. Note that system recovery will
return system contents to their initial default
settings.
•
For details about system recovery, visit the
Clarion portal site (my.clarion.com).
Use
password
ON: Require password input for unit
startup.
OFF: Password input not required
for unit startup.
Password Inputs up to four characters for the
password you want to specify.
Confirm
Password
Re-inputs the password you want to
specify. (For confirmation)
Back Saves the settings and exits the
setting screen.

Chapter 7 Control Panel
NR1UB/NR1UW/NR1UR 107
7-8
Car Mode Home Screen
With the Car Mode Home Screen settings, you
can customize the Home screen that appears
when the unit is mounted on the supplied
standard cradle or the optional Car Dock.
1On the Control Panel, tap the [Car Mode
Home Screen] key.
This displays the Car Mode Home Screen
setting screen.
The following describes the functions of the bar
at the bottom of the screen.
NOTE
The unit will restart when the setting is
changed in the Car mode.
7-8-1
Changing Screen Functions
1On the Car Mode Home Screen setting
screen, tap the [Quick Info. Screen] key.
On the [Quick Info. Screen], specify the
functions you want to assign to Screen
Area A, Screen Area B, and Screen Area
C.
The following describes the functions of the keys
on the screen.
The factory default settings are Weather for
Screen Area A, News for Screen Area B, and
RealPlayer for Screen Area C.
2Tap A, B, or C and then select the
application you want to assign there.
NOTE
Due to legal limitations concerning operation
while the vehicle is running, only some of the
applications provided on the unit can be
registered to the Quick Info. Screen.
Back Saves the settings and exits the
setting screen.
Quick Info.
Screen
Changes the functions assigned to
the screen areas.
Application
launcher
Changes the functions assigned to
the application launcher.
Navigation Specifies the position of the
navigation map screen in the Car
mode.
Left: Navigation screen on the left
Right: Navigation screen on the
right
A/B/C Selects the assignments of screen
areas A, B, and C.

Chapter 7 Control Panel
108 NR1UB/NR1UW/NR1UR
7-8-2
Changing Application Launcher
Functions
1On the Car Mode Home Screen setting
screen, tap the [Application launcher] key.
Use Application launcher to specify the
functions assigned to application launcher
keys.
The following describes the functions of the keys
on the screen.
Under factory default settings, MySpace is
assigned to Application Launcher A, Contacts to
Application Launcher B, and Portal Sync to
Application Launcher C.
2Tap A, B, or C and then select the
application you want to assign there.
NOTE
Due to legal limitations concerning operation
while the vehicle is running, only some of the
applications provided on the unit can be
registered to the application launcher keys.
7-9
Application Manager
You can use Application Manager to update,
add, and delete applications.
1On the Control Panel, tap the [Expert
Settings] key and then tap the [Application
Manager] key.
This displays the Application Manager
screen.
The following describes the functions of the bar
on the screen.
NOTE
•
Applications can be updated and added from
the unit portal site (my.clarion.com).
•
Depending on the network environment or the
size of the application being updated or
installed, this process can take a number of
minutes.
A/B/C Selects the application launcher key
names for assigning applications to
A, B, and C.
Back Returns to the previous screen.
Update Updates an application.
Install Installs a new application.
Uninstall Uninstalls an application.
Refresh Obtains the latest application list from
the Clarion portal site and displays it.
OK Executes an operation.
The latest version of
each application that is
available on the portal site
The version currently
installed in this unit
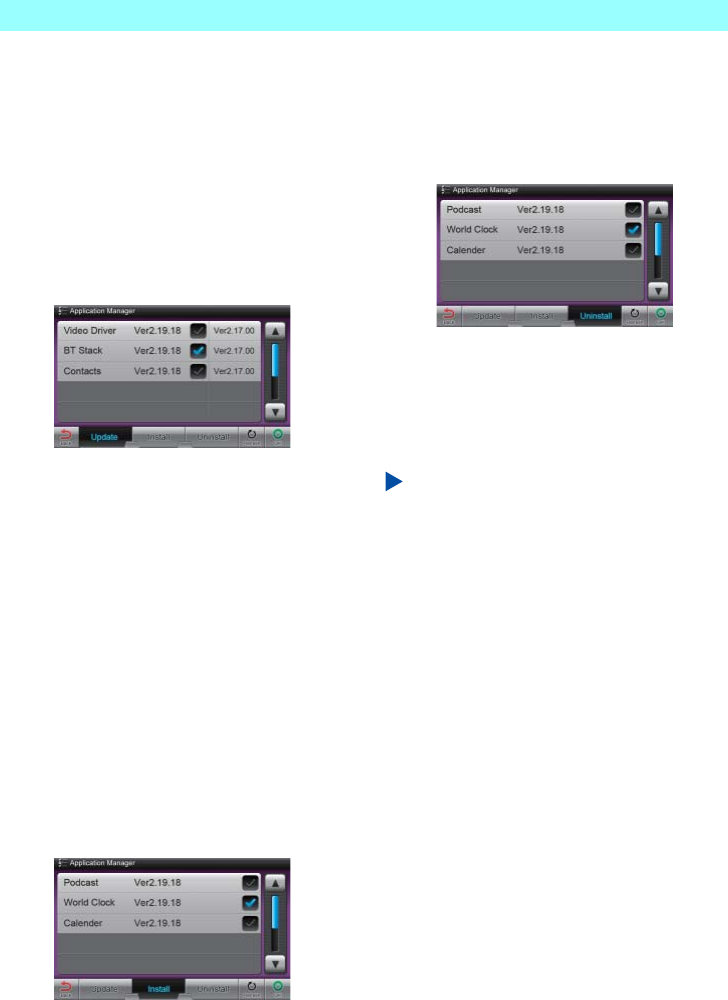
Chapter 7 Control Panel
NR1UB/NR1UW/NR1UR 109
7-9-1
Updating Software
Use the following procedure to update
applications installed on the unit.
1Tap the [Update] key.
2Tap the [Refresh] key.
This displays a list of updatable software.
3On the list, select the software you want to
update and then tap the [OK] key.
4Tap the [OK] key.
5The confirmation message will display.
Then tap the [OK] key.
This will update the software.
After updating is complete, the software
version information screen will be updated
with the new version.
7-9-2
Installing an Application
1Tap the [Install] key.
2Tap the [Refresh] key.
This displays a list of installable software.
3On the list, tap the application you want to
install to select it and then tap the [OK] key.
4The confirmation message will display.
Then tap the [OK] key.
This will install the application.
7-9-3
Deleting an Application
1Tap the [Uninstall] key.
This displays a list of deletable
applications.
2On the list, tap the application you want to
delete to select it and then tap the [OK] key.
3The confirmation message will display.
Then tap the [OK] key.
This will delete the application.
NOTE
The unit's preinstalled applications cannot be
deleted.
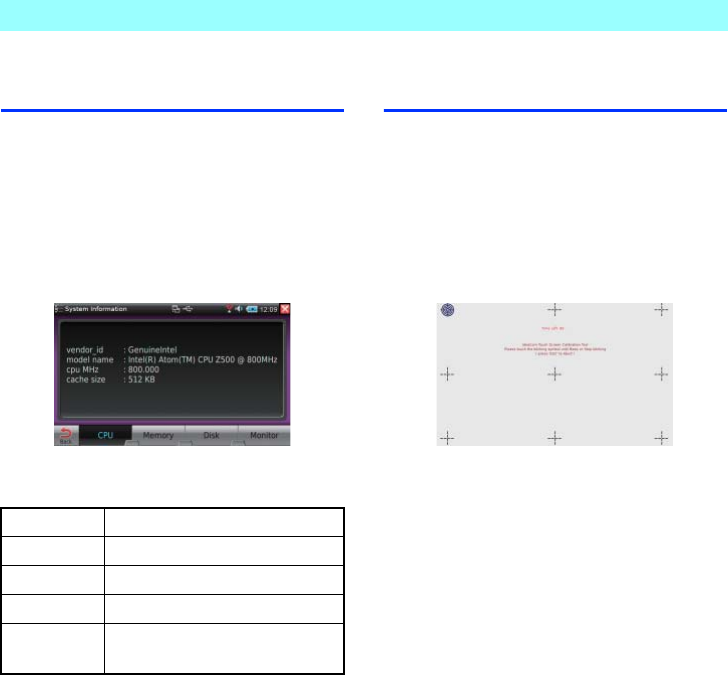
Chapter 7 Control Panel
110 NR1UB/NR1UW/NR1UR
7-10
System Information
Display the System Information screen to view
unit system information.
1On the Control Panel, tap the [Expert
Settings] key and then tap the [System
Information] key.
This displays the System Information
screen.
The following describes the functions of the bar
on the screen.
7-11
Touch Screen Adjustment
Use Touch Screen Adjustment to adjust the
position of the touch screen.
1On the Control Panel, tap the [Expert
Settings] key and then tap the [Touch
Screen Adjustment] key.
This displays the Touch Screen Adjustment
screen.
Starting at the upper left corner of the
screen, sequentially tap each point to
adjust the touch screen position.
Back Returns to the previous screen.
CPU Shows CPU information.
Memory Shows memory information.
Disk Shows disk information.
Monitor Shows the current CPU and
memory status.
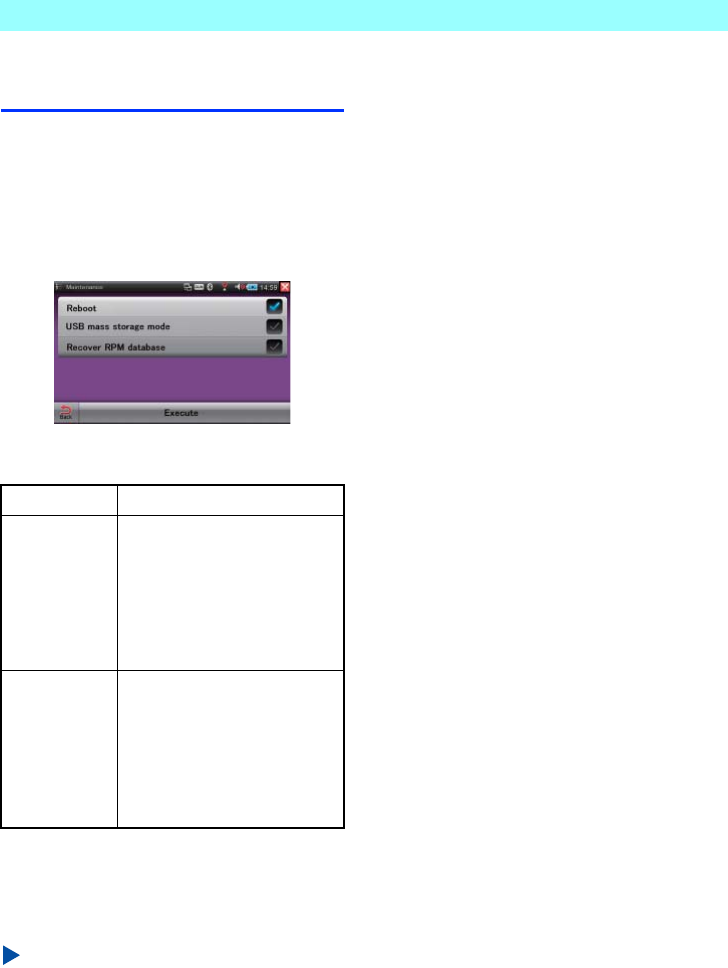
Chapter 7 Control Panel
NR1UB/NR1UW/NR1UR 111
7-12
Maintenance
Use the Maintenance screen to perform unit
system maintenance.
1On the Control Panel, tap the [Expert
Settings] key and then tap the
[Maintenance] key.
This displays the Maintenance screen.
The following describes the functions of the keys
on the screen.
2Tap the check box next to the item you want
to execute and then tap the [Execute] key.
Next, follow the instructions that appear on
the screen.
NOTE
•
Do not execute a [Recover RPM database]
operation unless a problem requiring
execution has occurred.
•
This USB client port is not used in this unit. It
will be used for future expansion.
Reboot Restarts the unit.
USB mass
storage mode
When the unit is connected to a
computer, execute this option to
add, delete, or replace
navigation map data.
For details about map data
updates, visit the Clarion portal
site (my.clarion.com).
Recover RPM
database
Recovers the RPM database
when one of the error messages
below appears during
Application Manager execution.
•Installation or uninstall failed.
•A problem occurred in the
RPM database.
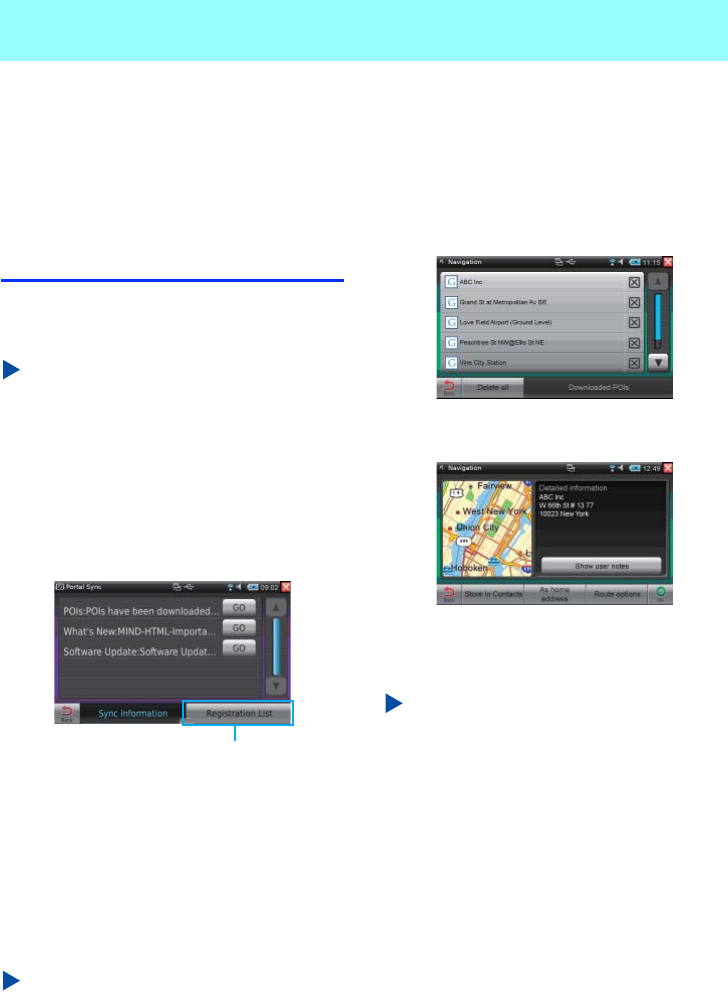
112 NR1UB/NR1UW/NR1UR
Chapter 8 Using the Portal Site
After performing user and unit registration on
the Clarion portal site, you will be able to obtain
bulletins from the portal site in real time on your
unit.
8-1
Obtaining Information
from the Portal Site
1On the Home screen, tap the Portal Sync
key.
NOTE
•
In the Car mode, tap the application launcher
Portal Sync key.
•
The navigation application will start up in the
background when POI information is
received. Sometimes a navigation warning
screen will appear. If this happens, tap the
[OK] key on the warning screen.
This will access the portal site and display
the Portal Sync screen.
Bulletins from the Clarion portal site are listed
on the screen from top to bottom in the
sequence shown below.
•POI download bulletins sent to the portal site
•News bulletins
•Latest software update information
NOTE
Due to legal limitations concerning operation
while the vehicle is running, only POI download
bulletins sent to the portal site can be acquired
while the unit is in the Car mode.
8-1-1
Obtaining POI Information
1Tap the “POIs” [Go] key.
This starts up navigation and displays the
downloaded POI list.
Downloaded POIs are identified by a “G”
mark.
2Tap a POI that has a “G” mark.
This displays the POI detail screen.
3Check the contents of the screen and then
tap the [OK] key.
This executes route calculation.
NOTE
•
Tapping the [Store in Contacts] key will
register the POI name, geographical
coordinates, address, phone number, and
other information as a new Contacts record.
For details about Contacts, see 5-9 Contacts
(P. 62).
•
Transmission of POI information is performed
by the Clarion portal site
(http://my.clarion.com/en-us/html/map-guide).
Note that the URL of Google Maps may be
subject to change without notice.
When there are multiple ClarionMiND units
registered for a single user, tapping this key
will display a list of registered units.
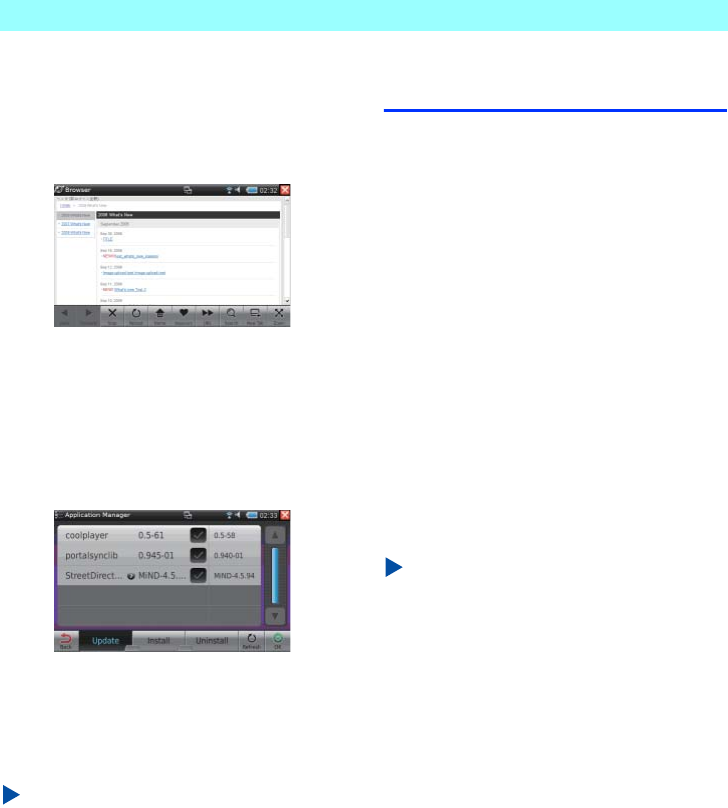
Chapter 8 Using the Portal Site
NR1UB/NR1UW/NR1UR 113
8-1-2
Obtaining News
1Tap the “What's new” [Go] key.
This starts up the Browser and displays the
portal site news page.
8-1-3
Obtaining the Latest Software Update
Information
1Tap the “Software update” [Go] key.
This starts up the Application Manager,
which lists items that are eligible for update.
2After selecting the check box next to the
item you want to update, tap the [OK] key.
The unit will return to the Home screen
after update is complete. Restart the unit
when required.
NOTE
•
For new software, tap the [Install] key to
display a list.
A list will not appear if you tap the [Update]
key or [Install] key when there is no updatable
software or new software available.
•
For details about the software update, see 7-9
Application Manager (P. 108).
•
Exit all running software before updating the
software.
8-2
Using the Portal Site
Accessing the Clarion portal site helps to make
the unit more enjoyable to use and lets you use
its functions to the fullest.
In addition to accessing useful information, the
Clarion portal site provides you with the
following services:
•Content download
•Online store
•Support (Q&A, etc.)
•User manual downloads
•Additional application downloads
Additional services will be added in the future.
Note that the content of these services is
subject to change without notice. For
information about the launch of services, other
service information, and details about available
services, visit the Clarion portal site
(my.clarion.com).
NOTE
•
Installation of software that is obtained from a
source other than the Clarion portal site
(including hosting services) is not covered by
your warranty.
•
Installation of software for this unit on a
computer or other device is not allowed.
114 NR1UB/NR1UW/NR1UR
Chapter 9 Troubleshooting
9-1 Troubleshooting
Check the following items before contacting Clarion for repair.
If these items do not solve your problem, check the “Support” section of the portal site
(my.clarion.com).
General
Problem Cause Required Action
Power does not turn on. When using the car adaptor for power:
There is poor connection between the car
adapter and cigarette lighter socket.
Remove any dirt and rust on the
cigarette lighter socket in the vehicle,
then insert the car adapter power
plug as far as it will go.
When using the battery pack for power:
The battery pack needs to be recharged.
Use the car adapter or AC adapter to
charge the battery pack.
When using the AC adapter for power:
The AC adapter is unplugged from the
power outlet.
Check the connection between the
AC adapter and power outlet.
Confirm the outlet is live with another
device.
When using the optional Car Dock for
power:
There is no connection with the Car Dock.
Make sure the unit clicks securely
into place when you mount it onto the
Car Dock.
You do not press the
power button but the unit
turns on.
You inserted the power plug while the car
adapter is connected.
You started the engine while the car
adapter and the cigarette lighter socket
are connected.
This unit is turned on by the
automatic start function and does not
indicate malfunction.
Chapter 9 Troubleshooting
NR1UB/NR1UW/NR1UR 115
The battery pack will not
charge.
The car adapter, AC adapter, or optional
Car Dock is not connected correctly.
Connect the applicable device
correctly.
The battery indicator is flashing orange. •Check if the battery pack is
installed properly.
•Charge the battery pack within
the charging temperature range
of 50°F to 95°F (10°C to 35°C).
•In order to protect the battery
pack, charging may not be
possible after the battery pack
becomes hot due to long
continuous use or because the
battery was left in direct sunlight
even though the temperature is
within this range. In this case,
turn off the unit and wait until the
interior temperature cools down.
When it cools down, charging
starts. (Indicator lights orange)
•The battery is broken or has
deteriorated due to length of use,
etc. Replace the battery pack.
Contact the service location
indicated on the Clarion portal
site (my.clarion.com). See the
“Support” or “Inquiries” section.
The plug is inserted into the headphone
jack.
Check to make sure that the plug is
inserted securely in the charge jack.
The unit does not start up.
(The message such as
“Disk I/O error...” or “Disk
error” appears on the
screen. The start-up
screen does not appear.)
USB memory is connected. Remove the USB memory and restart
the unit.
The system does not start
up.
There are too many applications running. Use the key on the status
indicator at the top of the screen to
select the applications you are not
using and then tap [x] to exit them.
Nothing works. Press the reset button to restart the
system.
Problem Cause Required Action

Chapter 9 Troubleshooting
116 NR1UB/NR1UW/NR1UR
The screen suddenly goes
blank.
Power management is configured for
power saving.
Select [Control Panel] → [Power
Management] and check the “LCD
turn off when idle” and “Standby
when idle” settings. The screen will
go blank or the unit will go into
standby if no operation is performed
for the times specified by these
settings. When the screen goes
blank, tap the touch panel to turn it
back on. If the unit goes into standby,
press the power button momentarily
to power it back up again.
Ambient temperature is high.
(Continued use of the unit or leaving the
unit in a vehicle parked in the sun or in
any other location where it is subjected to
high temperature.)
The unit will shut down suddenly if
you perform an operation while the
one touch keys are flashing blue.
The unit is shut down by its
temperature protection system and
does not indicate malfunction. Use
the unit in areas that are within the
allowable operating temperature.
When using the battery pack for
power:
The unit also will shut down suddenly
if you perform an operation while the
battery indicator lights orange.
The unit is shut down by the battery
temperature protection system and
does not indicate malfunction. Use
the unit in areas that are within the
allowable operating temperature
range.
A location other than the
one that is tapped
responds.
Settings may be changed by software
updating, etc.
Select [Control Panel] → [Expert
Settings] → [Touch Screen
Adjustment] and then adjust the tap
position.
USB memory or the
microSD card is not
recognized by the system.
The USB memory or microSD card is not
inserted correctly
Try removing and reinserting the USB
memory or microSD card.
The USB memory or the microSD card is
not formatted.
Use a computer to format the USB
memory or microSD card.
The date and time are not
correct.
They return to January,
1st, 2008.
The battery has not been charged for
several days and is dead.
Use the Control Panel [Date and
Time] to set the date and time again.
Problem Cause Required Action
Chapter 9 Troubleshooting
NR1UB/NR1UW/NR1UR 117
Portal Sync
Browser
PDF Reader
Problem Cause Required Action
The “Server certificate has
expired.” error message
appears on the display.
The date and time settings are not
correct.
Use the Control Panel [Date and
Time] to set the date and time
correctly.
“No network” appears on
the screen and connection
to the portal site is not
possible.
Network settings are not configured. You must configure network settings
before you can use Portal Sync to
connect to and communicate with the
portal server.
Problem Cause Required Action
The server certificate has
expired, a message saying
that the server certificate
is no longer valid appears
on the screen, and the
page does not display
properly.
The date and time settings are not
correct.
Use the Control Panel [Date and
Time] to set the date and time
correctly.
Tapping the save icon
while viewing the PDF
displays the incorrect
destination to save.
Save function is not supported. When you save this page, select
[Save As...] on the Browser menu.
Tapping the print icon does
not close the print screen
while viewing a PDF.
Print function is not supported. Tap displayed by touching the
control key, then tap on the
Browser to exit the application.
Tapping the mail icon and
following the steps
disables the key operation.
Mail function is not supported. Turn off the unit and then restart it.
Problem Cause Required Action
Tapping bookmarks in
PDF file does not work.
Bookmark function is not supported. View the PDF file on Browser.
If there are links from the
table of contents or index,
or that point to reference
pages, tapping on them
exits Adobe PDF Reader.
Hyperlink function is not supported. View the PDF file on Browser.

Chapter 9 Troubleshooting
118 NR1UB/NR1UW/NR1UR
RealPlayer
Navigation
Problem Cause Required Action
No sound is produced
from the built-in speaker.
The volume is muted or set to 0 (zero). Press the audio one touch key and
check the mute/volume setting.
When using the Mobile mode,
headphones are plugged into the unit.
Unplug the headphones.
Built-in speaker output is disabled when
using the optional Car Dock.
Tap the [Sound] key on the Control
Panel to check the “Sound from car
speaker using “Car Dock”” setting.
Music files will not play. Only formats supported by the unit can
be played back.
Play files of one of the following
supported formats: RealAudio,
Windows Media 9 (or lower), AAC,
HE-AAC, Ogg, MP3.
Playback is not possible from USB
memory or a microSD card.
After starting up RealPlayer, check if
the USB memory or microSD card is
selected.
Movie files will not play. Only formats supported by the unit can
be played back.
Play files of one of the following
supported formats: RealVideo,
Windows Media 9 (or lower), H.264,
H.263, MPEG4, VC-1.
Playback is not possible from USB
memory or a microSD card.
After starting up RealPlayer, check if
the USB memory or microSD card is
selected.
Navigation application is running. Movies cannot be played while the
navigation application is running.
The unit is in the Car mode. Movies cannot be played in the Car
mode.
Problem Cause Required Action
Cannot receive a GPS
signal.
Some obstacle is interfering with
reception.
Perform reception in a location where
there is a clear, unobstructed path
from the unit to the sky.
Some part of the vehicle is interfering
with the reception of the GPS antenna.
Change the installation location of the
unit.
Chapter 9 Troubleshooting
NR1UB/NR1UW/NR1UR 119
Connection
Application Manager
Problem Cause Required Action
I can't establish a Wi-Fi
connection.
The access point cannot be found. Check to make sure the access point
is turned on.
The encryption and key settings are
wrong.
•Contact the access point
administrator for information
about encryption and the key.
•Make sure you enter upper case
and lower case characters
correctly.
Some obstacle is interfering with
reception.
Move closer to the access point.
The Airplane mode is on. Turn off Airplane mode.
I can't establish a
Bluetooth connection.
The Bluetooth device cannot be found. Check to make sure that the
Bluetooth device is turned on.
You are attempting to connect using an
unsupported profile.
The only profile supported by this unit
is DUN. Check the profile.
Pairing cannot be performed. The unit PIN code is “1234”. Check
the PIN code.
I can't connect with a DUN (DialUp
Networking Profile).
On the Bluetooth Device screen,
check to make sure that the [DUN]
key is ON.
The Airplane mode is on. Turn off Airplane mode.
The DUN connection was broken. On the Dialup Settings screen, check
to make sure that the destination is
configured.
Problem Cause Required Action
•Install or uninstall
failed.
•An error message
appears about an RPM
database error.
A problem occurred in the RPM
database.
Execute [Control Panel] → [Expert
Settings] → [Maintenance] →
[Recover RPM database] to restore
the RPM database.
The “Now Updating.
Please don't turn the
power off.” message stays
on the screen and
download does not end.
The file being installed in very large or the
speed of your connection is slow, which is
causing download to take a long time.
Downloading a very large software
file can take long time to complete.
This is especially true for navigation
software files, which are about 200
MB. Depending on the speed of the
network you are using, download can
take several minutes.

Chapter 9 Troubleshooting
120 NR1UB/NR1UW/NR1UR
9-2
System Reset
Should the unit operate abnormally, press the
reset button to restart the system.
1Use a thin, pointed object to gently press
the reset button.
This will restart the unit.
The reset operation does not initialize the
control panel or other settings.
NOTE
To force the unit to turn off while it is starting
up, hold down the power button for about eight
seconds.
9-3
System Recovery
System recovery is required whenever the
system does not start up for some reason or if
you forget the password you registered on the
system.
Note that system recovery will return system
contents to their initial default settings.
This unit does not come with data or software to
perform system recovery.
Visit the Clarion portal site for information about
how to obtain the required data and software.
For details about the system recovery
procedure, visit the Clarion portal site
(my.clarion.com).

NR1UB/NR1UW/NR1UR 121
Chapter 10 Specifications
10-1
Specifications
Model name
ClarionMiND
CPU
Intel Atom
Storage
4 GB SSD
GPS
32 ch GPS receiver
Built-in antenna
Wi-Fi
IEEE 802.11 b/g
Built-in antenna
USB
USB 2.0*1
microSD
microSD card slot*2
Bluetooth*3
Ver 2.0 + EDR
Built-in antenna
Dimension
167.8 (Width) × 96.0 (Height) × 26.45 (Depth)
mm [6.6" (W) × 3.78" (H) × 1.04" (D)]
* 26.45 (Depth) mm [1.04" (D)] includes the
rubber on the back of the unit.
Weight
325 g (11.46 oz.) (With S battery)
System power
Input voltage: 12 V DC
Input current: 1.5 A (Max)
Operation temp.: 0 - 45 degrees Celsius
Battery
Charging temp.: 10 - 35 degrees Celsius
•S type Standard
Voltage: 7.4 V
Rating capacity: 850 mAh
Operation period: Up to 1.5 hours*4, 5
Recharging period: Up to 2.0 hours*6
•Large Capacity (Optional)
Voltage: 7.2 V
Rating capacity: 2600 mAh
Operation period: Up to 4.5 hours*4, 5
Recharging period: Up to 2.5 hours*6
Display
Size: 4.8" Wide VGA
Resolution: 800 × 480
Contrast: 800:1
Viewing angle: 160/160 degrees
Brightness: 400 cd/m2
Headphone Jack
Diameter: φ3.5 mm
Load: 32 ohm

Chapter 10 Specifications
122 NR1UB/NR1UW/NR1UR
*1 •No guarantees are made about the operation of all USB memory devices with this unit.
•The lower USB port is used for the client mode and does not work in this unit. It will be used for
future expansion.
•Do not start up this unit with USB memory connected. The unit may not start up.
*2 •No guarantees are made about the operation of all microSD devices with this unit. This unit does
not support the use of SDHC memory cards.
•Do not start up this unit with the microSD card connected. Files in the microSD card may not be
read.
*3 No guarantees are made about the Bluetooth connection between all cell phones and this unit.
*4 Measured with the LCD brightness setting at minimum and the screen shown after starting up the
unit.
*5 Battery life varies depending on product configuration, model, settings, loaded applications and
utilized features.
*6 100% recharging under Power off condition.

Chapter 10 Specifications
NR1UB/NR1UW/NR1UR 123
10-2 Indicators State
Indicator Indicator state Main unit state
Battery indicator Lights orange Battery charging in progress
Lights green Battery charge complete
Off Working with battery
Blinks green Battery level lower than 10%
Blinks orange •Battery pack not installed
•Battery charging stopped (temperature protection
system operating)
•Battery malfunction (end of its service life)
* The unit also will shut down suddenly if you use the
battery while the battery indicator blinks orange.
One touch keys Lights blue Working
Blinks blue •Main unit temperature warning (temperature
protection)
* The unit also will shut down suddenly if you perform
an operation while the one touch key lights are blinking.
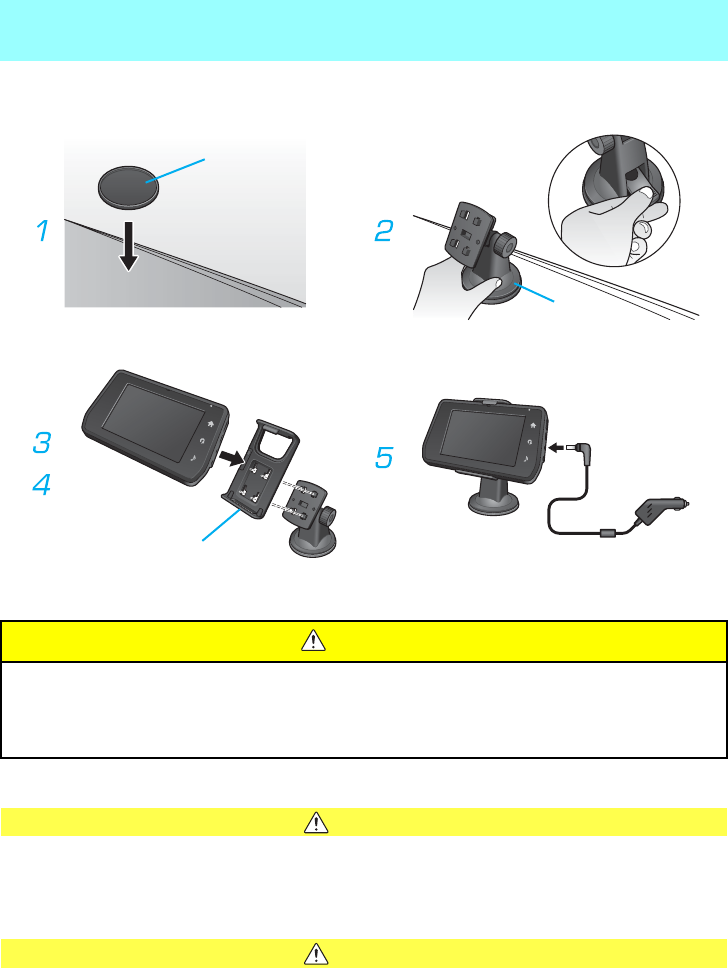
124 NR1UB/NR1UW/NR1UR
Appendix
How to mount the unit onto the standard cradle
Use the standard cradle (A + B + C) to install the unit in a motor vehicle.
1After cleaning the installation location of any oil or other foreign matter, affix the suction plate (A).
CAUTION
• It takes about 24 hours before sufficient adhesion of the suction plate is reached.
2Attach the suction cup of the support arm (B) to the suction plate, and then lower the support arm
lever.
CAUTION
• To maintain suction strength, remove and reinstall the suction cup once a month.
WARNING
• Install the unit in a location where it will not interfere with vehicle operation.
• Install the unit in a location where it will not interfere with air bag deployment and will not
block the driver’s field of view.
• Do not install the unit on a window. Doing so is dangerous and can block driver vision.
(A)
(B)
(C)
Appendix
NR1UB/NR1UW/NR1UR 125
3Insert the attachment (C) into the support arm.
Press the attachment in until you hear it click into place.
4Attach the unit to the attachment, adjusting the angle of the built-in GPS antenna so it is pointed
skywards.
NOTE
It may take a number of minutes before the initial current location reading becomes available from the
GPS.
5Connect the provided car adapter to the unit and plug the other end of the adapter into the
vehicle's cigarette lighter socket (12V/24V).
6Affix the supplied protection film to the LCD screen to protect it against scratching.
CAUTION
• The adhesive side of the protection film is prone to soiling by dirt and dust. Do not directly
touch it.
• Do not crease the protection film.
WARNING NOTE
Always start the vehicle's engine before using the car adapter. Use of the car adapter with the engine
stopped creates the risk of running down the vehicle's battery.
WARNING
Precautions during Car Adapter Use
• This unit is designed for use in a 12V/24V DC negative ground vehicle only.
• Use only the specified car adapter.
• Before plugging the car adapter into a cigarette lighter socket, inspect and clean the lighter
socket. Tobacco ashes or other foreign matter inside the cigarette lighter socket can result
in poor contact and create the risk of overheating of the plug or may cause fire.
• Securely insert the cigarette plug as far as it will go. Incomplete insertion creates the risk of
excessive overheating, fire, etc.

126 NR1UB/NR1UW/NR1UR
Trademark
GNU GENERAL PUBLIC LICENSE
Version 2, June 1991
Copyright (C) 1989, 1991 Free Software Foundation, Inc., 51 Franklin Street, Fifth Floor, Boston, MA 02110-1301
USA Everyone is permitted to copy and distribute verbatim copies of this license document, but changing it is not
allowed.
Preamble
The licenses for most software are designed to take away your freedom to share and change it. By contrast, the GNU
General Public License is intended to guarantee your freedom to share and change free software--to make sure the
software is free for all its users. This General Public License applies to most of the Free Software Foundation's
software and to any other program whose authors commit to using it. (Some other Free Software Foundation
software is covered by the GNU Lesser General Public License instead.) You can apply it to your programs, too.
When we speak of free software, we are referring to freedom, not price. Our General Public Licenses are designed to
make sure that you have the freedom to distribute copies of free software (and charge for this service if you wish),
that you receive source code or can get it if you want it, that you can change the software or use pieces of it in new
free programs; and that you know you can do these things.
To protect your rights, we need to make restrictions that forbid anyone to deny you these rights or to ask you to
surrender the rights.
These restrictions translate to certain responsibilities for you if you distribute copies of the software, or if you modify it.
For example, if you distribute copies of such a program, whether gratis or for a fee, you must give the recipients all
the rights that you have. You must make sure that they, too, receive or can get the source code. And you must show
them these terms so they know their rights.
We protect your rights with two steps: (1) copyright the software, and (2) offer you this license which gives you legal
permission to copy, distribute and/or modify the software.
Also, for each author's protection and ours, we want to make certain that everyone understands that there is no
warranty for this free software. If the software is modified by someone else and passed on, we want its recipients to
know that what they have is not the original, so that any problems introduced by others will not reflect on the original
authors' reputations.
Finally, any free program is threatened constantly by software patents. We wish to avoid the danger that redistributors
of a free program will individually obtain patent licenses, in effect making the program proprietary. To prevent this, we
have made it clear that any patent must be licensed for everyone's free use or not licensed at all.
The precise terms and conditions for copying, distribution and modification follow.

Trademark
NR1UB/NR1UW/NR1UR 127
GNU GENERAL PUBLIC LICENSE
TERMS AND CONDITIONS FOR COPYING, DISTRIBUTION AND MODIFICATION
0. This License applies to any program or other work which contains a notice placed by the copyright holder saying it
may be distributed under the terms of this General Public License. The “Program”, below, refers to any such program
or work, and a “work based on the Program” means either the Program or any derivative work under copyright law:
that is to say, a work containing the Program or a portion of it, either verbatim or with modifications and/or translated
into another language. (Hereinafter, translation is included without limitation in the term “modification”.) Each licensee
is addressed as “you”.
Activities other than copying, distribution and modification are not covered by this License; they are outside its scope.
The act of running the Program is not restricted, and the output from the Program is covered only if its contents
constitute a work based on the Program (independent of having been made by running the Program).
Whether that is true depends on what the Program does.
1. You may copy and distribute verbatim copies of the Program's source code as you receive it, in any medium,
provided that you conspicuously and appropriately publish on each copy an appropriate copyright notice and
disclaimer of warranty; keep intact all the notices that refer to this License and to the absence of any warranty; and
give any other recipients of the Program a copy of this License along with the Program.
You may charge a fee for the physical act of transferring a copy, and you may at your option offer warranty protection
in exchange for a fee.
2. You may modify your copy or copies of the Program or any portion of it, thus forming a work based on the Program,
and copy and distribute such modifications or work under the terms of Section 1 above, provided that you also meet
all of these conditions:
a) You must cause the modified files to carry prominent notices stating that you changed the files and the date of
any change.
b) You must cause any work that you distribute or publish, that in whole or in part contains or is derived from the
Program or any part thereof, to be licensed as a whole at no charge to all third parties under the terms of this
License.
c) If the modified program normally reads commands interactively when run, you must cause it, when started
running for such interactive use in the most ordinary way, to print or display an announcement including an
appropriate copyright notice and a notice that there is no warranty (or else, saying that you provide a warranty)
and that users may redistribute the program under these conditions, and telling the user how to view a copy of
this License. (Exception: if the Program itself is interactive but does not normally print such an announcement,
your work based on the Program is not required to print an announcement.)
These requirements apply to the modified work as a whole. If identifiable sections of that work are not derived from
the Program, and can be reasonably considered independent and separate works in themselves, then this License,
and its terms, do not apply to those sections when you distribute them as separate works. But when you distribute the
same sections as part of a whole which is a work based on the Program, the distribution of the whole must be on the
terms of this License, whose permissions for other licensees extend to the entire whole, and thus to each and every
part regardless of who wrote it.
Thus, it is not the intent of this section to claim rights or contest your rights to work written entirely by you; rather, the
intent is to exercise the right to control the distribution of derivative or collective works based on the Program.
In addition, mere aggregation of another work not based on the Program with the Program (or with a work based on
the Program) on a volume of a storage or distribution medium does not bring the other work under the scope of this
License.

Trademark
128 NR1UB/NR1UW/NR1UR
3. You may copy and distribute the Program (or a work based on it, under Section 2) in object code or executable
form under the terms of Sections 1 and 2 above provided that you also do one of the following:
a) Accompany it with the complete corresponding machine-readable source code, which must be distributed under
the terms of Sections 1 and 2 above on a medium customarily used for software interchange; or,
b) Accompany it with a written offer, valid for at least three years, to give any third party, for a charge no more than
your cost of physically performing source distribution, a complete machine-readable copy of the corresponding
source code, to be distributed under the terms of Sections 1 and 2 above on a medium customarily used for
software interchange; or,
c) Accompany it with the information you received as to the offer to distribute corresponding source code. (This
alternative is allowed only for noncommercial distribution and only if you received the program in object code or
executable form with such an offer, in accord with Subsection b above.)
The source code for a work means the preferred form of the work for making modifications to it. For an executable
work, complete source code means all the source code for all modules it contains, plus any associated interface
definition files, plus the scripts used to control compilation and installation of the executable. However, as a special
exception, the source code distributed need not include anything that is normally distributed (in either source or
binary form) with the major components (compiler, kernel, and so on) of the operating system on which the
executable runs, unless that component itself accompanies the executable.
If distribution of executable or object code is made by offering access to copy from a designated place, then offering
equivalent access to copy the source code from the same place counts as distribution of the source code, even
though third parties are not compelled to copy the source along with the object code.
4. You may not copy, modify, sublicense, or distribute the Program except as expressly provided under this License.
Any attempt otherwise to copy, modify, sublicense or distribute the Program is void, and will automatically terminate
your rights under this License.
However, parties who have received copies, or rights, from you under this License will not have their licenses
terminated so long as such parties remain in full compliance.
5. You are not required to accept this License, since you have not signed it. However, nothing else grants you
permission to modify or distribute the Program or its derivative works. These actions are prohibited by law if you do
not accept this License. Therefore, by modifying or distributing the Program (or any work based on the Program), you
indicate your acceptance of this License to do so, and all its terms and conditions for copying, distributing or
modifying the Program or works based on it.
6. Each time you redistribute the Program (or any work based on the Program), the recipient automatically receives a
license from the original licensor to copy, distribute or modify the Program subject to these terms and conditions. You
may not impose any further restrictions on the recipients' exercise of the rights granted herein.
You are not responsible for enforcing compliance by third parties to this License.
7. If, as a consequence of a court judgment or allegation of patent infringement or for any other reason (not limited to
patent issues), conditions are imposed on you (whether by court order, agreement or otherwise) that contradict the
conditions of this License, they do not excuse you from the conditions of this License. If you cannot distribute so as to
satisfy simultaneously your obligations under this License and any other pertinent obligations, then as a consequence
you may not distribute the Program at all. For example, if a patent license would not permit royalty-free redistribution
of the Program by all those who receive copies directly or indirectly through you, then the only way you could satisfy
both it and this License would be to refrain entirely from distribution of the Program.
If any portion of this section is held invalid or unenforceable under any particular circumstance, the balance of the
section is intended to apply and the section as a whole is intended to apply in other circumstances.

Trademark
NR1UB/NR1UW/NR1UR 129
It is not the purpose of this section to induce you to infringe any patents or other property right claims or to contest
validity of any such claims; this section has the sole purpose of protecting the integrity of the free software distribution
system, which is implemented by public license practices. Many people have made generous contributions to the
wide range of software distributed through that system in reliance on consistent application of that system; it is up to
the author/donor to decide if he or she is willing to distribute software through any other system and a licensee
cannot impose that choice.
This section is intended to make thoroughly clear what is believed to be a consequence of the rest of this License.
8. If the distribution and/or use of the Program is restricted in certain countries either by patents or by copyrighted
interfaces, the original copyright holder who places the Program under this License may add an explicit geographical
distribution limitation excluding those countries, so that distribution is permitted only in or among countries not thus
excluded. In such case, this License incorporates the limitation as if written in the body of this License.
9. The Free Software Foundation may publish revised and/or new versions of the General Public License from time to
time. Such new versions will be similar in spirit to the present version, but may differ in detail to address new
problems or concerns.
Each version is given a distinguishing version number. If the Program specifies a version number of this License
which applies to it and “any later version”, you have the option of following the terms and conditions either of that
version or of any later version published by the Free Software Foundation. If the Program does not specify a version
number of this License, you may choose any version ever published by the Free Software Foundation.
10. If you wish to incorporate parts of the Program into other free programs whose distribution conditions are
different, write to the author to ask for permission. For software which is copyrighted by the Free Software
Foundation, write to the Free Software Foundation; we sometimes make exceptions for this. Our decision will be
guided by the two goals of preserving the free status of all derivatives of our free software and of promoting the
sharing and reuse of software generally.
NO WARRANTY
11. BECAUSE THE PROGRAM IS LICENSED FREE OF CHARGE, THERE IS NO WARRANTY FOR THE
PROGRAM, TO THE EXTENT PERMITTED BY APPLICABLE LAW. EXCEPT WHEN OTHERWISE STATED IN
WRITING THE COPYRIGHT HOLDERS AND/OR OTHER PARTIES PROVIDE THE PROGRAM “AS IS” WITHOUT
WARRANTY OF ANY KIND, EITHER EXPRESSED OR IMPLIED, INCLUDING, BUT NOT LIMITED TO, THE
IMPLIED WARRANTIES OF MERCHANTABILITY AND FITNESS FOR A PARTICULAR PURPOSE. THE ENTIRE
RISK AS TO THE QUALITY AND PERFORMANCE OF THE PROGRAM IS WITH YOU. SHOULD THE PROGRAM
PROVE DEFECTIVE, YOU ASSUME THE COST OF ALL NECESSARY SERVICING, REPAIR OR CORRECTION.
12. IN NO EVENT UNLESS REQUIRED BY APPLICABLE LAW OR AGREED TO IN WRITING WILL ANY
COPYRIGHT HOLDER, OR ANY OTHER PARTY WHO MAY MODIFY AND/OR REDISTRIBUTE THE PROGRAM
AS PERMITTED ABOVE, BE LIABLE TO YOU FOR DAMAGES, INCLUDING ANY GENERAL, SPECIAL,
INCIDENTAL OR CONSEQUENTIAL DAMAGES ARISING OUT OF THE USE OR INABILITY TO USE THE
PROGRAM (INCLUDING BUT NOT LIMITED TO LOSS OF DATA OR DATA BEING RENDERED INACCURATE OR
LOSSES SUSTAINED BY YOU OR THIRD PARTIES OR A FAILURE OF THE PROGRAM TO OPERATE WITH ANY
OTHER PROGRAMS), EVEN IF SUCH HOLDER OR OTHER PARTY HAS BEEN ADVISED OF THE POSSIBILITY
OF SUCH DAMAGES.
END OF TERMS AND CONDITIONS

Trademark
130 NR1UB/NR1UW/NR1UR
GNU LESSER GENERAL PUBLIC LICENSE
Version 2.1, February 1999
Copyright (C) 1991, 1999 Free Software Foundation, Inc. 51 Franklin Street, Fifth Floor, Boston, MA 02110-1301
USA Everyone is permitted to copy and distribute verbatim copies of this license document, but changing it is not
allowed.
[This is the first released version of the Lesser GPL. It also counts as the successor of the GNU Library Public
License, version 2, hence the version number 2.1.]
Preamble
The licenses for most software are designed to take away your freedom to share and change it. By contrast, the GNU
General Public Licenses are intended to guarantee your freedom to share and change free software--to make sure
the software is free for all its users.
This license, the Lesser General Public License, applies to some specially designated software packages--typically
libraries--of the Free Software Foundation and other authors who decide to use it. You can use it too, but we suggest
you first think carefully about whether this license or the ordinary General Public License is the better
strategy to use in any particular case, based on the explanations below.
When we speak of free software, we are referring to freedom of use, not price. Our General Public Licenses are
designed to make sure that you have the freedom to distribute copies of free software (and charge for this service if
you wish); that you receive source code or can get it if you want it; that you can change the software and use pieces
of it in new free programs; and that you are informed that you can do these things.
To protect your rights, we need to make restrictions that forbid distributors to deny you these rights or to ask you to
surrender these rights. These restrictions translate to certain responsibilities for you if you distribute copies of the
library or if you modify it.
For example, if you distribute copies of the library, whether gratis or for a fee, you must give the recipients all the
rights that we gave you. You must make sure that they, too, receive or can get the source code. If you link other code
with the library, you must provide complete object files to the recipients, so that they can relink them with the library
after making changes to the library and recompiling it. And you must show them these terms so they know their
rights.
We protect your rights with a two-step method: (1) we copyright the library, and (2) we offer you this license, which
gives you legal permission to copy, distribute and/or modify the library.
To protect each distributor, we want to make it very clear that there is no warranty for the free library. Also, if the
library is modified by someone else and passed on, the recipients should know that what they have is not the original
version, so that the original author's reputation will not be affected by problems that might be introduced by others.
Finally, software patents pose a constant threat to the existence of any free program. We wish to make sure that a
company cannot effectively restrict the users of a free program by obtaining a restrictive license from a patent holder.
Therefore, we insist that any patent license obtained for a version of the library must be consistent with the full
freedom of use specified in this license.
Most GNU software, including some libraries, is covered by the ordinary GNU General Public License. This license,
the GNU Lesser General Public License, applies to certain designated libraries, and is quite different from the
ordinary General Public License. We use this license for certain libraries in order to permit linking those libraries into
non-free programs.

Trademark
NR1UB/NR1UW/NR1UR 131
When a program is linked with a library, whether statically or using a shared library, the combination of the two is
legally speaking a combined work, a derivative of the original library. The ordinary General Public License therefore
permits such linking only if the entire combination fits its criteria of freedom. The Lesser General Public License
permits more lax criteria for linking other code with the library.
We call this license the “Lesser” General Public License because it does Less to protect the user's freedom than the
ordinary General Public License. It also provides other free software developers Less of an advantage over
competing non-free programs. These disadvantages are the reason we use the ordinary General Public License for
many libraries. However, the Lesser license provides advantages in certain special circumstances.
For example, on rare occasions, there may be a special need to encourage the widest possible use of a certain
library, so that it becomes a de-facto standard. To achieve this, non-free programs must be allowed to use the library.
A more frequent case is that a free library does the same job as widely used non-free libraries. In this case, there is
little to gain by limiting the free library to free software only, so we use the Lesser General Public License.
In other cases, permission to use a particular library in non-free programs enables a greater number of people to use
a large body of free software. For example, permission to use the GNU C Library in non-free programs enables many
more people to use the whole GNU operating system, as well as its variant, the GNU/Linux operating system.
Although the Lesser General Public License is Less protective of the users' freedom, it does ensure that the user of a
program that is linked with the Library has the freedom and the wherewithal to run that program using a modified
version of the Library.
The precise terms and conditions for copying, distribution and modification follow. Pay close attention to the difference
between a “work based on the library” and a “work that uses the library”. The former contains code derived from the
library, whereas the latter must be combined with the library in order to run.
GNU LESSER GENERAL PUBLIC LICENSE
TERMS AND CONDITIONS FOR COPYING, DISTRIBUTION AND MODIFICATION
0. This License Agreement applies to any software library or other program which contains a notice placed by the
copyright holder or other authorized party saying it may be distributed under the terms of this Lesser General Public
License (also called “this License”).
Each licensee is addressed as “you”.
A “library” means a collection of software functions and/or data prepared so as to be conveniently linked with
application programs (which use some of those functions and data) to form executables.
The “Library”, below, refers to any such software library or work which has been distributed under these terms. A
“work based on the Library” means either the Library or any derivative work under copyright law: that is to say, a work
containing the Library or a portion of it, either verbatim or with modifications and/or translated straightforwardly into
another language. (Hereinafter, translation is included without limitation in the term “modification”.)
“Source code” for a work means the preferred form of the work for making modifications to it. For a library, complete
source code means all the source code for all modules it contains, plus any associated interface definition files, plus
the scripts used to control compilation and installation of the library.
Activities other than copying, distribution and modification are not covered by this License; they are outside its scope.
The act of running a program using the Library is not restricted, and output from such a program is covered only if its
contents constitute a work based on the Library (independent of the use of the Library in a tool for writing it). Whether
that is true depends on what the Library does and what the program that uses the Library does.

Trademark
132 NR1UB/NR1UW/NR1UR
1. You may copy and distribute verbatim copies of the Library's complete source code as you receive it, in any
medium, provided that you conspicuously and appropriately publish on each copy an appropriate copyright notice and
disclaimer of warranty; keep intact all the notices that refer to this License and to the absence of any warranty; and
distribute a copy of this License along with the Library.
You may charge a fee for the physical act of transferring a copy, and you may at your option offer warranty protection
in exchange for a fee.
2. You may modify your copy or copies of the Library or any portion of it, thus forming a work based on the Library,
and copy and distribute such modifications or work under the terms of Section 1 above, provided that you also meet
all of these conditions:
a) The modified work must itself be a software library.
b) You must cause the files modified to carry prominent notices stating that you changed the files and the date of
any change.
c) You must cause the whole of the work to be licensed at no charge to all third parties under the terms of this
License.
d) If a facility in the modified Library refers to a function or a table of data to be supplied by an application program
that uses the facility, other than as an argument passed when the facility is invoked, then you must make a good
faith effort to ensure that, in the event an application does not supply such function or table, the facility still
operates, and performs whatever part of its purpose remains meaningful.
(For example, a function in a library to compute square roots has a purpose that is entirely well-defined independent
of the application. Therefore, Subsection 2d requires that any application-supplied function or table used by this
function must be optional: if the application does not supply it, the square root function must still compute square
roots.)
These requirements apply to the modified work as a whole. If identifiable sections of that work are not derived from
the Library, and can be reasonably considered independent and separate works in themselves, then this License, and
its terms, do not apply to those sections when you distribute them as separate works. But when you distribute the
same sections as part of a whole which is a work based on the Library, the distribution of the whole must be on the
terms of this License, whose permissions for other licensees extend to the entire whole, and thus to each and every
part regardless of who wrote it.
Thus, it is not the intent of this section to claim rights or contest your rights to work written entirely by you; rather, the
intent is to exercise the right to control the distribution of derivative or collective works based on the Library.
In addition, mere aggregation of another work not based on the Library with the Library (or with a work based on the
Library) on a volume of a storage or distribution medium does not bring the other work under the scope of this
License.
3. You may opt to apply the terms of the ordinary GNU General Public License instead of this License to a given copy
of the Library. To do this, you must alter all the notices that refer to this License, so that they refer to the ordinary GNU
General Public License, version 2, instead of to this License. (If a newer version than version 2 of the ordinary GNU
General Public License has appeared, then you can specify that version instead if you wish.) Do not make any other
change in these notices.
Once this change is made in a given copy, it is irreversible for that copy, so the ordinary GNU General Public License
applies to all subsequent copies and derivative works made from that copy.
This option is useful when you wish to copy part of the code of the Library into a program that is not a library.

Trademark
NR1UB/NR1UW/NR1UR 133
4. You may copy and distribute the Library (or a portion or derivative of it, under Section 2) in object code or
executable form under the terms of Sections 1 and 2 above provided that you accompany it with the complete
corresponding machine-readable source code, which must be distributed under the terms of Sections 1 and 2 above
on a medium customarily used for software interchange.
If distribution of object code is made by offering access to copy from a designated place, then offering equivalent
access to copy the source code from the same place satisfies the requirement to distribute the source code, even
though third parties are not compelled to copy the source along with the object code.
5. A program that contains no derivative of any portion of the Library, but is designed to work with the Library by being
compiled or linked with it, is called a “work that uses the Library”. Such a work, in isolation, is not a derivative work of
the Library, and therefore falls outside the scope of this License.
However, linking a “work that uses the Library” with the Library creates an executable that is a derivative of the
Library (because it contains portions of the Library), rather than a “work that uses the library”. The executable is
therefore covered by this License.
Section 6 states terms for distribution of such executables.
When a “work that uses the Library” uses material from a header file that is part of the Library, the object code for the
work may be a derivative work of the Library even though the source code is not.
Whether this is true is especially significant if the work can be linked without the Library, or if the work is itself a
library. The threshold for this to be true is not precisely defined by law.
If such an object file uses only numerical parameters, data structure layouts and accessors, and small macros and
small inline functions (ten lines or less in length), then the use of the object file is unrestricted, regardless of whether
it is legally a derivative work. (Executables containing this object code plus portions of the Library will still fall under
Section 6.)
Otherwise, if the work is a derivative of the Library, you may distribute the object code for the work under the terms of
Section 6.
Any executables containing that work also fall under Section 6, whether or not they are linked directly with the Library
itself.
6. As an exception to the Sections above, you may also combine or link a “work that uses the Library” with the Library
to produce a work containing portions of the Library, and distribute that work under terms of your choice, provided
that the terms permit modification of the work for the customer's own use and reverse engineering for debugging such
modifications.
You must give prominent notice with each copy of the work that the Library is used in it and that the Library and its
use are covered by this License. You must supply a copy of this License. If the work during execution displays
copyright notices, you must include the copyright notice for the Library among them, as well as a reference directing
the user to the copy of this License. Also, you must do one of these things:
a) Accompany the work with the complete corresponding machine-readable source code for the Library including
whatever changes were used in the work (which must be distributed under Sections 1 and 2 above); and, if the
work is an executable linked with the Library, with the complete machine-readable “work that uses the Library”,
as object code and/or source code, so that the user can modify the Library and then relink to produce a
modified executable containing the modified Library. (It is understood that the user who changes the contents of
definitions files in the Library will not necessarily be able to recompile the application to use the modified
definitions.)
b) Use a suitable shared library mechanism for linking with the Library. A suitable mechanism is one that (1) uses
at run time a copy of the library already present on the user's computer system, rather than copying library
functions into the executable, and (2) will operate properly with a modified version of the library, if the user
installs one, as long as the modified version is interface-compatible with the version that the work was made
with.
c) Accompany the work with a written offer, valid for at least three years, to give the same user the materials
specified in Subsection 6a, above, for a charge no more than the cost of performing this distribution.

Trademark
134 NR1UB/NR1UW/NR1UR
d) If distribution of the work is made by offering access to copy from a designated place, offer equivalent access to
copy the above specified materials from the same place.
e) Verify that the user has already received a copy of these materials or that you have already sent this user a copy.
For an executable, the required form of the “work that uses the Library” must include any data and utility programs
needed for reproducing the executable from it. However, as a special exception, the materials to be distributed need
not include anything that is normally distributed (in either source or binary form) with the major components (compiler,
kernel, and so on) of the operating system on which the executable runs, unless that component itself accompanies
the executable.
It may happen that this requirement contradicts the license restrictions of other proprietary libraries that do not
normally accompany the operating system. Such a contradiction means you cannot use both them and the Library
together in an executable that you distribute.
7. You may place library facilities that are a work based on the Library side-by-side in a single library together with
other library facilities not covered by this License, and distribute such a combined library, provided that the separate
distribution of the work based on the Library and of the other library facilities is otherwise permitted, and provided that
you do these two things:
a) Accompany the combined library with a copy of the same work based on the Library, uncombined with any other
library facilities. This must be distributed under the terms of the Sections above.
b) Give prominent notice with the combined library of the fact that part of it is a work based on the Library, and
explaining where to find the accompanying uncombined form of the same work.
8. You may not copy, modify, sublicense, link with, or distribute the Library except as expressly provided under this
License. Any attempt otherwise to copy, modify, sublicense, link with, or distribute the Library is void, and will
automatically terminate your rights under this License. However, parties who have received copies, or rights, from you
under this License will not have their licenses terminated so long as such parties remain in full compliance.
9. You are not required to accept this License, since you have not signed it. However, nothing else grants you
permission to modify or distribute the Library or its derivative works. These actions are prohibited by law if you do not
accept this License. Therefore, by modifying or distributing the Library (or any work based on the Library), you
indicate your acceptance of this License to do so, and all its terms and conditions for copying, distributing or
modifying the Library or works based on it.
10. Each time you redistribute the Library (or any work based on the Library), the recipient automatically receives a
license from the original licensor to copy, distribute, link with or modify the Library subject to these terms and
conditions. You may not impose any further restrictions on the recipients' exercise of the rights granted herein.
You are not responsible for enforcing compliance by third parties with this License.
11. If, as a consequence of a court judgment or allegation of patent infringement or for any other reason (not limited
to patent issues), conditions are imposed on you (whether by court order, agreement or otherwise) that contradict the
conditions of this License, they do not excuse you from the conditions of this License. If you cannot distribute so as to
satisfy simultaneously your obligations under this License and any other pertinent obligations, then as a consequence
you may not distribute the Library at all. For example, if a patent license would not permit royalty-free redistribution of
the Library by all those who receive copies directly or indirectly through you, then the only way you could satisfy both
it and this License would be to refrain entirely from distribution of the Library.
If any portion of this section is held invalid or unenforceable under any particular circumstance, the balance of the
section is intended to apply, and the section as a whole is intended to apply in other circumstances.

Trademark
NR1UB/NR1UW/NR1UR 135
It is not the purpose of this section to induce you to infringe any patents or other property right claims or to contest
validity of any such claims; this section has the sole purpose of protecting the integrity of the free software distribution
system which is implemented by public license practices. Many people have made generous contributions to the wide
range of software distributed through that system in reliance on consistent application of that system; it is up to the
author/donor to decide if he or she is willing to distribute software through any other system and a licensee cannot
impose that choice.
This section is intended to make thoroughly clear what is believed to be a consequence of the rest of this License.
12. If the distribution and/or use of the Library is restricted in certain countries either by patents or by copyrighted
interfaces, the original copyright holder who places the Library under this License may add an explicit geographical
distribution limitation excluding those countries, so that distribution is permitted only in or among countries not thus
excluded. In such case, this License incorporates the limitation as if written in the body of this License.
13. The Free Software Foundation may publish revised and/or new versions of the Lesser General Public License
from time to time.
Such new versions will be similar in spirit to the present version, but may differ in detail to address new problems or
concerns.
Each version is given a distinguishing version number. If the Library specifies a version number of this License which
applies to it and “any later version”, you have the option of following the terms and conditions either of that version or
of any later version published by the Free Software Foundation. If the Library does not specify a license version
number, you may choose any version ever published by the Free Software Foundation.
14. If you wish to incorporate parts of the Library into other free programs whose distribution conditions are
incompatible with these, write to the author to ask for permission. For software which is copyrighted by the Free
Software Foundation, write to the Free Software Foundation; we sometimes make exceptions for this. Our decision
will be guided by the two goals of preserving the free status of all derivatives of our free software and of promoting
the sharing and reuse of software generally.
NO WARRANTY
15. BECAUSE THE LIBRARY IS LICENSED FREE OF CHARGE, THERE IS NO WARRANTY FOR THE LIBRARY,
TO THE EXTENT PERMITTED BY APPLICABLE LAW.
EXCEPT WHEN OTHERWISE STATED IN WRITING THE COPYRIGHT HOLDERS AND/OR OTHER PARTIES
PROVIDE THE LIBRARY “AS IS” WITHOUT WARRANTY OF ANY KIND, EITHER EXPRESSED OR IMPLIED,
INCLUDING, BUT NOT LIMITED TO, THE IMPLIED WARRANTIES OF MERCHANTABILITY AND FITNESS FOR A
PARTICULAR PURPOSE. THE ENTIRE RISK AS TO THE QUALITY AND PERFORMANCE OF THE LIBRARY IS
WITH YOU. SHOULD THE LIBRARY PROVE DEFECTIVE, YOU ASSUME THE COST OF ALL NECESSARY
SERVICING, REPAIR OR CORRECTION.
16. IN NO EVENT UNLESS REQUIRED BY APPLICABLE LAW OR AGREED TO IN WRITING WILL ANY
COPYRIGHT HOLDER, OR ANY OTHER PARTY WHO MAY MODIFY AND/OR REDISTRIBUTE THE LIBRARY AS
PERMITTED ABOVE, BE LIABLE TO YOU FOR DAMAGES, INCLUDING ANY GENERAL, SPECIAL, INCIDENTAL
OR CONSEQUENTIAL DAMAGES ARISING OUT OF THE USE OR INABILITY TO USE THE LIBRARY
(INCLUDING BUT NOT LIMITED TO LOSS OF DATA OR DATA BEING RENDERED INACCURATE OR LOSSES
SUSTAINED BY YOU OR THIRD PARTIES OR A FAILURE OF THE LIBRARY TO OPERATE WITH ANY OTHER
SOFTWARE), EVEN IF SUCH HOLDER OR OTHER PARTY HAS BEEN ADVISED OF THE POSSIBILITY OF
SUCH DAMAGES.
END OF TERMS AND CONDITIONS

Trademark
136 NR1UB/NR1UW/NR1UR
MAP DATA END USER TERMS
The data (“Data”) is provided for your personal, internal use only and not for resale. It is protected by copyright, and is
subject to the following terms and conditions which are agreed to by you, on the one hand, and Clarion and its
licensors (including their licensors and suppliers) on the other hand.
© 2008 NAVTEQ. All rights reserved.
TERMS AND CONDITIONS
Personal Use Only. You agree to use this Data together with MiND for the solely personal, non-commercial purposes
for which you were licensed, and not for service bureau, time-sharing or other similar purposes. Accordingly, but
subject to the restrictions set forth in the following paragraphs, you may copy this Data only as necessary for your
personal use to (i) view it, and (ii) save it, provided that you do not remove any copyright notices that appear and do
not modify the Data in any way. You agree not to otherwise reproduce, copy, modify, decompile, disassemble or
reverse engineer any portion of this Data, and may not transfer or distribute it in any form, for any purpose, except to
the extent permitted by mandatory laws. Multi-disc sets may only be transferred or sold as a complete set as provided
by Clarion and not as a subset thereof.
Restrictions. Except where you have been specifically licensed to do so by Clarion, and without limiting the preceding
paragraph, you may not (a) use this Data with any products, systems, or applications installed or otherwise connected
to or in communication with vehicles, capable of vehicle navigation, positioning, dispatch, real time route guidance,
fleet management or similar applications; or (b) with or in communication with any positioning devices or any mobile
or wireless-connected electronic or computer devices, including without limitation cellular phones, palmtop and
handheld computers, pagers, and personal digital assistants or PDAs.
Warning. The Data may contain inaccurate or incomplete information due to the passage of time, changing
circumstances, sources used and the nature of collecting comprehensive geographic data, any of which may lead to
incorrect results.
No Warranty. This Data is provided to you “as is,” and you agree to use it at your own risk. Clarion and its licensors
(and their licensors and suppliers) make no guarantees, representations or warranties of any kind, express or implied,
arising by law or otherwise, including but not limited to, content, quality, accuracy, completeness, effectiveness,
reliability, fitness for a particular purpose, usefulness, use or results to be obtained from this Data, or that the Data or
server will be uninterrupted or error-free.
Disclaimer of Warranty: Clarion AND ITS LICENSORS (INCLUDING THEIR LICENSORS AND SUPPLIERS)
DISCLAIM ANY WARRANTIES, EXPRESS OR IMPLIED, OF QUALITY, PERFORMANCE, MERCHANTABILITY,
FITNESS FOR A PARTICULAR PURPOSE OR NON-INFRINGEMENT. Some States, Territories and Countries do
not allow certain warranty exclusions, so to that extent the above exclusion may not apply to you.
Disclaimer of Liability: Clarion AND ITS LICENSORS (INCLUDING THEIR LICENSORS AND SUPPLIERS) SHALL
NOT BE LIABLE TO YOU: IN RESPECT OF ANY CLAIM, DEMAND OR ACTION, IRRESPECTIVE OF THE
NATURE OF THE CAUSE OF THE CLAIM, DEMAND OR ACTION ALLEGING ANY LOSS, INJURY OR DAMAGES,
DIRECT OR INDIRECT, WHICH MAY RESULT FROM THE USE OR POSSESSION OF THE INFORMATION; OR
FOR ANY LOSS OF PROFIT, REVENUE, CONTRACTS OR SAVINGS, OR ANY OTHER DIRECT, INDIRECT,
INCIDENTAL, SPECIAL OR CONSEQUENTIAL DAMAGES ARISING OUT OF YOUR USE OF OR INABILITY TO
USE THIS INFORMATION, ANY DEFECT IN THE INFORMATION, OR THE BREACH OF THESE TERMS OR
CONDITIONS, WHETHER IN AN ACTION IN CONTRACT OR TORT OR BASED ON A WARRANTY, EVEN IF
Clarion OR ITS LICENSORS HAVE BEEN ADVISED OF THE POSSIBILITY OF SUCH DAMAGES. Some States,
Territories and Countries do not allow certain liability exclusions or damages limitations, so to that extent the above
may not apply to you.
Export Control. You agree not to export from anywhere any part of the Data provided to you or any direct product
thereof except in compliance with, and with all licenses and approvals required under, applicable export laws, rules
and regulations.
Entire Agreement. These terms and conditions constitute the entire agreement between Clarion (and its licensors,
including their licensors and suppliers) and you pertaining to the subject matter hereof, and supersedes in their
entirety any and all written or oral agreements previously existing between us with respect to such subject matter.
Governing Law. The above terms and conditions shall be governed by the laws of [fill in] without giving effect to (i) its
conflict of laws provisions, or (ii) the United Nations Convention for Contracts for the International Sale of Goods,
which is explicitly excluded. You agree to submit to the jurisdiction of [fill in] for any and all disputes, claims and
actions arising from or in connection with the Data provided to you hereunder.
Government End Users. If the Data is being acquired by or on behalf of the United States government or any other
entity seeking or applying rights similar to those customarily claimed by the United States government, NAVTEQ Data
(hereinafter “Data”) is a “commercial item” as that term is defined at 48 C.F.R. (“FAR”) 2.101, is licensed in
accordance with Data License Agreement, and each copy of the Data delivered or otherwise furnished shall be
marked and embedded as appropriate with the following “Notice of Use,” and shall be treated in accordance with
such Notice:

Trademark
NR1UB/NR1UW/NR1UR 137
NOTICE OF USE
CONTRACTOR (MANUFACTURER/ SUPPLIER) NAME: NAVTEQ
CONTRACTOR (MANUFACTURER/SUPPLIER) ADDRESS: 425 West Randolph Street, Chicago, Illinois 60606 USA
This Data is a commercial item as defined in FAR 2.101 and is subject to Data License Agreement under which this
Data was provided.
© 2008 NAVTEQ - All rights reserved.
If the Contracting Officer, federal government agency, or any federal official refuses to use the legend provided
herein, the Contracting Officer, federal government agency, or any federal official must notify NAVTEQ prior to
seeking additional or alternative rights in the Data.
© 2008 NAVTEQ All Rights Reserved

138 NR1UB/NR1UW/NR1UR
Index
A
Access point .................................................. 30
Adjusting audio guidance ............................... 88
Audio bar ....................................................... 21
Audio key ....................................................... 21
B
Bluetooth connection ..................................... 36
Bookmark ....................................................... 42
Browser menu ................................................ 44
C
Calculator screen ........................................... 59
Car mode ....................................................... 24
Category ........................................................ 27
Changing the route ........................................ 88
Clarion portal site ......................................... 112
Control key ..................................................... 21
Creating an e-mail message .......................... 48
Customizing icons .......................................... 27
D
Deleting an application ................................ 109
Displaying the weather information screen .... 73
E
E-mail screen ................................................. 47
F
File Manager menu ........................................ 62
H
Home key ....................................................... 20
Home screen ................................................. 24
I
Inserting and removing a microSD card ........ 16
Installing an application ............................... 109
K
Keyword search ............................................. 44
L
Loading a route .............................................. 90
Loading the battery pack ............................... 12
M
Map menu ...................................................... 50
Mobile mode .................................................. 23
N
Navigation main menu ................................... 78
Navigation map screen .................................. 79
Note Pad menu .............................................. 66
Notification message ..................................... 55
O
Optimizing a route ......................................... 89
P
Pairing ........................................................... 35
PDF Reader menu ......................................... 58
Playing movies .............................................. 70
Playing music ................................................ 69
POI information ............................................ 112
Portal site ....................................................... 10
Precautions when using batteries .................. 13
R
Recycling a battery ........................................ 14
Replacing the battery pack ............................ 14
Route simulation ............................................ 92

Index
NR1UB/NR1UW/NR1UR 139
S
Saving a route ................................................ 89
Scrolling the map ........................................... 80
Scrolling the map to specify a destination ..... 80
Searching for a destination
based on a city name ..................................... 81
Searching for a destination
based on a street name ................................. 83
Searching for a destination
based on its genre ......................................... 84
Searching for a destination
based on its latitude and longitude ................ 84
Setting the current date ............................... 103
Setting the current time ................................ 103
Setting the theme ......................................... 104
Setting the time zone ................................... 103
Setting up an e-mail account ......................... 46
Specifying a downloaded POI
as a destination .............................................. 85
Specifying the wallpaper .............................. 104
Standard cradle ............................................. 17
Status indicator .............................................. 25
T
Toolbar (browser) .......................................... 42
Toolbar (Contacts) ......................................... 63
Toolbar (File Manager) .................................. 61
Toolbar (Map) ................................................ 49
Toolbar (PDF Reader) ................................... 58
U
Unit registration ............................................. 40
Updating software ........................................ 109
URL search .................................................... 43
User registration ............................................ 40
V
Viewing images ............................................. 70
W
What ClarionMiND can do ............................. 10
Wi-Fi .............................................................. 30
Z
Zooming in/out on the map screen ................ 80

Mobile Internet Navigation Device
Owner’s manual
All Rights Reserved.Copyright © 2008: Clarion Co., Ltd.
Printed in China
Clarion Co., Ltd.
QY-3000B
2008/12
NR1UB
NR1UW
NR1UR
No.69792̲E
