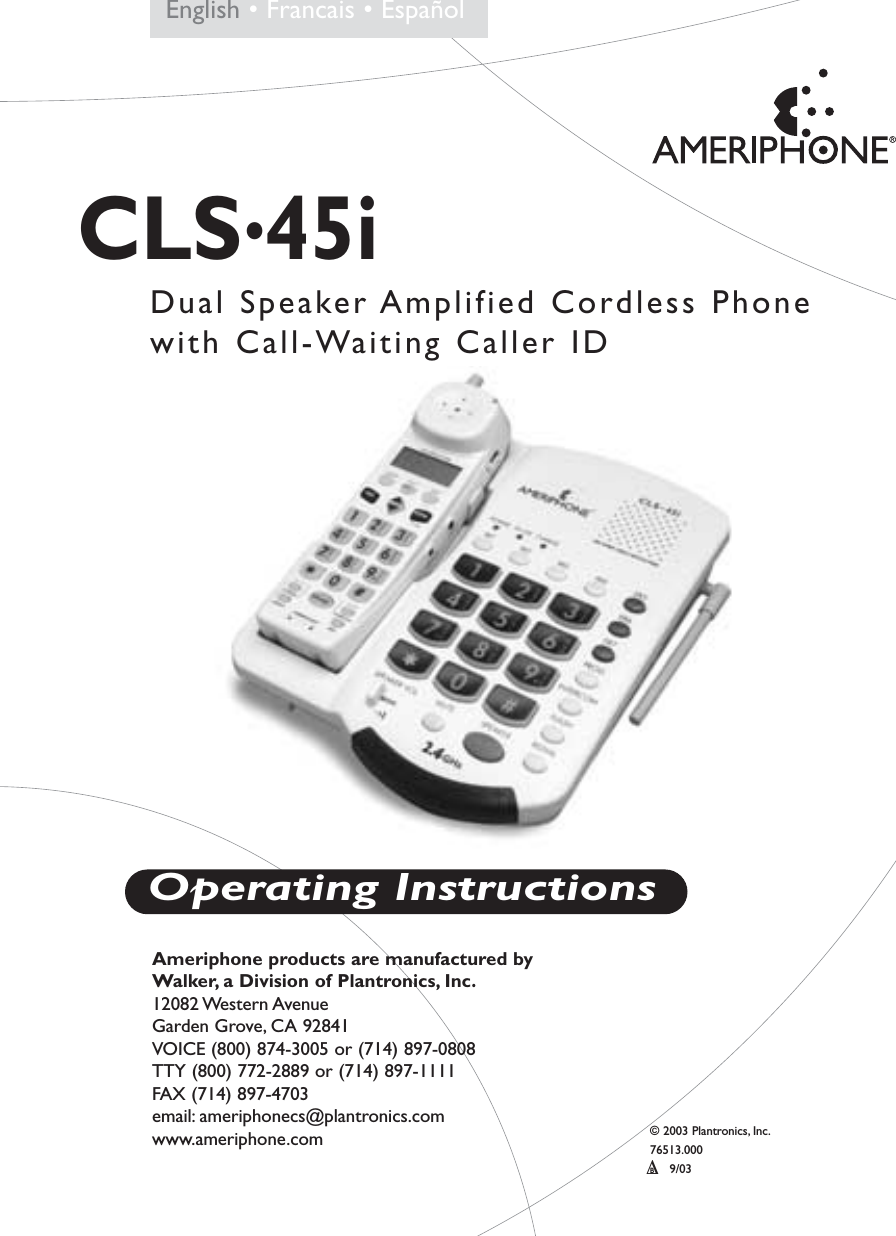
Clarity A Division of Plantronics CLS45I 2.4GHz 40 Channel Analog Modulation Cordless Phone User Manual CLS45iManual

Clarity, A Division of Plantronics, Inc. 2.4GHz 40 Channel Analog Modulation Cordless Phone CLS45iManual

Contents

User Manual

© 2003 Plantronics, Inc.76513.000    B9/03  ∆CLS•45iDual Speaker Amplified Cordless Phonewith Call-Waiting Caller IDAmeriphone products are manufactured by Walker, a Division of Plantronics, Inc.12082 Western AvenueGarden Grove, CA 92841VOICE (800) 874-3005 or (714) 897-0808TTY (800) 772-2889 or (714) 897-1111FAX (714) 897-4703email: ameriphonecs@plantronics.com     www.ameriphone.comOperating InstructionsEnglish • Francais • Español
iiWhen using your telephone equipment,basic safety precautions should always befollowed to reduce the risk of fire, electricshock and injury to persons including thefollowing:1. Read and understand all instructions.2. Follow all warnings and instructionsmarked on the telephone.3. Do not use this telephone near abathtub, wash basin, kitchen sink orlaundry tub, in a wet basement, near aswimming pool or anywhere elsewhere there is water.4. Avoid using a telephone (other than acordless type) during a storm.Theremay be a remote risk of electricalshock from lightning.5. Do not use the telephone to report agas leak in the vicinity of the leak.6. Unplug this telephone from the walloutlets before cleaning. Do not useliquid cleaners or aerosol cleaners onthe telephone. Use a damp cloth forcleaning.7. Place this telephone on a stable surface.Serious damage and/or injury mayresult if the telephone falls.8. Do not cover the slots and openingson this telephone. It should never beplaced near or over a radiator or heatregister.This telephone should not beplaced in a built-in installation unlessproper ventilation is provided.9. Operate this telephone using theelectrical voltage as stated on thebase unit or the owner’s manual. Ifyou are not sure of the voltage inyour home, consult your dealer orlocal power company.10. Do not place anything on the powercord. Install the telephone where noone will step or trip on the cord.11. Do not overload wall outlets orextension cords as this can increasethe risk of fire or electrical shock.12. Never push any objects through theslots in the telephone.They can touchdangerous voltage points or short outparts that could result in a risk of fireor electrical shock. Never spill liquidof any kind on the telephone.13. To reduce the risk of electrical shock,do not take this phone apart. Openingor removing covers may expose youto dangerous voltages or other risks.Incorrect reassembly can causeelectric shock when the appliance issubsequently used.14. Unplug this product from the walloutlets and refer servicing to themanufacturer under the followingconditions:A. When the power supply cord orplug is frayed or damaged.B. If liquid has been spilled into theproduct.C. If the telephone has been exposedto rain or water.D. If the telephone does not operatenormally by following the operatingImportant Safety Instructions
iiiinstructions.Adjust only thosecontrols that are covered by theoperating instructions. Improperadjustment may require extensivework by a qualified technician torestore the telephone to normaloperation.E. If the telephone has been droppedor the case has been damaged.F. If the telephone exhibits a distinctchange in performance.15. Never install telephone wiring duringa lightning storm.16. Never install telephone jacks in wetlocations unless the jack is specificallydesigned for wet locations.17. Never touch un-insulated telephonewires or terminals unless thetelephone line has been disconnectedat the network interface.18. Use caution when installing ormodifying telephone lines.19. Use only the power cord and batteriesindicated in this manual. Do not disposeof batteries in a fire.They mayexplode. Check with local codes forpossible special disposal instructions.Save These  InstructionsADDITIONAL SAFETY NOTES FORCANADIAN USERSThe following items are included as partof the CS-03 Requirements.The standardconnecting arrangement for the equipmentis CA11A.This product meets theapplicable Industry Canada technicalspecifications.NOTICE:The Canadian Department ofCommunications label identifies certifiedequipment.This certification means thatthe equipment meets certain telecommu-nications network protective operationaland safety requirements.The Departmentdoes not guarantee that the equipmentwill operate to the user’s satisfaction.Before installing this equipment, usersshould ensure that it is permissible to beconnected to the facilities of the localtelecommunications company.Theequipment must also be installed using anacceptable method of connection. In somecases, the company’s inside wiring associ-ated with a single line individual servicemay be extended by means of a certifiedconnector assembly (telephone extensioncord).The customer should be aware that com-pliance with the above conditions may notprevent degradation of service in somesituations. Repairs to certified equipment
ivSafety Instructions (continued)should be made by an authorizedCanadian maintenance facility designatedby the supplier.Any repairs or alterationsmade by the user to this equipment, orequipment malfunctions, may give thetelecommunications company cause torequest the user disconnect theequipment.Users should ensure for their ownprotection that the electrical groundconnections of the power utility,telephone lines and internal metallic waterpipe system, if present, are connectedtogether.This precaution may be particu-larly important in rural areas.CAUTION: Users should not attempt tomake such connections themselves, butshould contact the appropriate electricinspection authority, or electrician, asappropriate.The Ringer Equivalent Number is anindication of the maximum number ofterminals allowed to be connected to atelephone interface.The termination onan interface may consist of any combina-tion of devices subject only to therequirement that the sum of the RingerEquivalent Number of all the devices notexceed five.Save These  InstructionsSafety Instructions ForBatteriesRisk of explosion if battery is replacedby an incorrect type. Dispose of usedbattery according to the instructions.Use only the following type and sizebattery pack:Cordless Telephone Battery Pack 3.6V,750mAh 2/3 AA NiMH (Nickel MetalHydride) Battery Pack GP75AAH3BMJZGPI International Ltd.Do not dispose of the battery pack in afire. It may explode. Check with localcodes for possible special disposalinstructions.Do not open or mutilate the batterypack. Released electrolyte is corrosive andmay cause damage to the eyes or skin. Itmay be toxic if swallowed.Exercise care in handling the battery packto prevent shorting the battery with con-ductive materials such as rings, braceletsand keys.The battery pack or conductormay overheat and cause burns.Charge the battery pack provided with oridentified for use with this product only inaccordance with the instructions andlimitations specified in this manual.Observe proper polarity orientationbetween the battery pack and batterycharger.
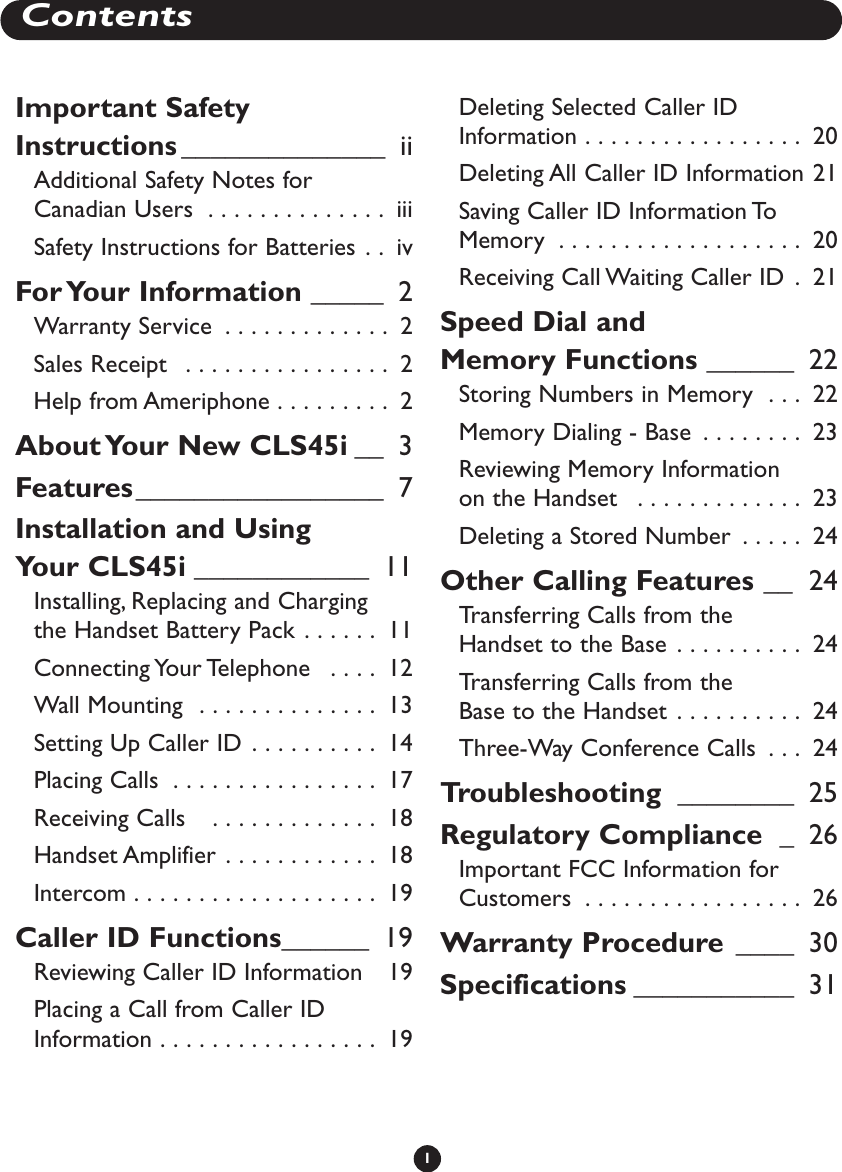
1ContentsImportant SafetyInstructions ______________ iiAdditional Safety Notes forCanadian Users  . . . . . . . . . . . . . . iiiSafety Instructions for Batteries . . ivFor Your  Information _____ 2Warranty Service  . . . . . . . . . . . . . 2Sales Receipt  . . . . . . . . . . . . . . . . 2Help from Ameriphone . . . . . . . . . 2About Your New CLS45i __ 3Features_________________ 7Installation and Using Your CLS45i ____________ 11Installing, Replacing and Charging the Handset Battery Pack . . . . . . 11Connecting Your Telephone  . . . . 12Wall Mounting  . . . . . . . . . . . . . . 13Setting Up Caller ID . . . . . . . . . . 14Placing Calls  . . . . . . . . . . . . . . . . 17Receiving Calls   . . . . . . . . . . . . . 18Handset Amplifier . . . . . . . . . . . . 18Intercom . . . . . . . . . . . . . . . . . . . 19Caller ID Functions______ 19Reviewing Caller ID Information 19Placing a Call from Caller IDInformation . . . . . . . . . . . . . . . . . 19Deleting Selected Caller IDInformation . . . . . . . . . . . . . . . . . 20Deleting All Caller ID Information 21Saving Caller ID Information ToMemory  . . . . . . . . . . . . . . . . . . . 20Receiving Call Waiting Caller ID . 21Speed Dial and Memory Functions ______ 22Storing Numbers in Memory  . . . 22Memory Dialing - Base  . . . . . . . . 23Reviewing Memory Information on the Handset  . . . . . . . . . . . . . 23Deleting a Stored Number  . . . . . 24Other Calling Features __ 24Transferring Calls from the Handset to the Base . . . . . . . . . . 24Transferring Calls from the Base to the Handset . . . . . . . . . . 24Three-Way Conference Calls  . . . 24Troubleshooting ________ 25Regulatory Compliance _26Important FCC Information forCustomers  . . . . . . . . . . . . . . . . . 26Warranty Procedure ____ 30Specifications ___________ 31
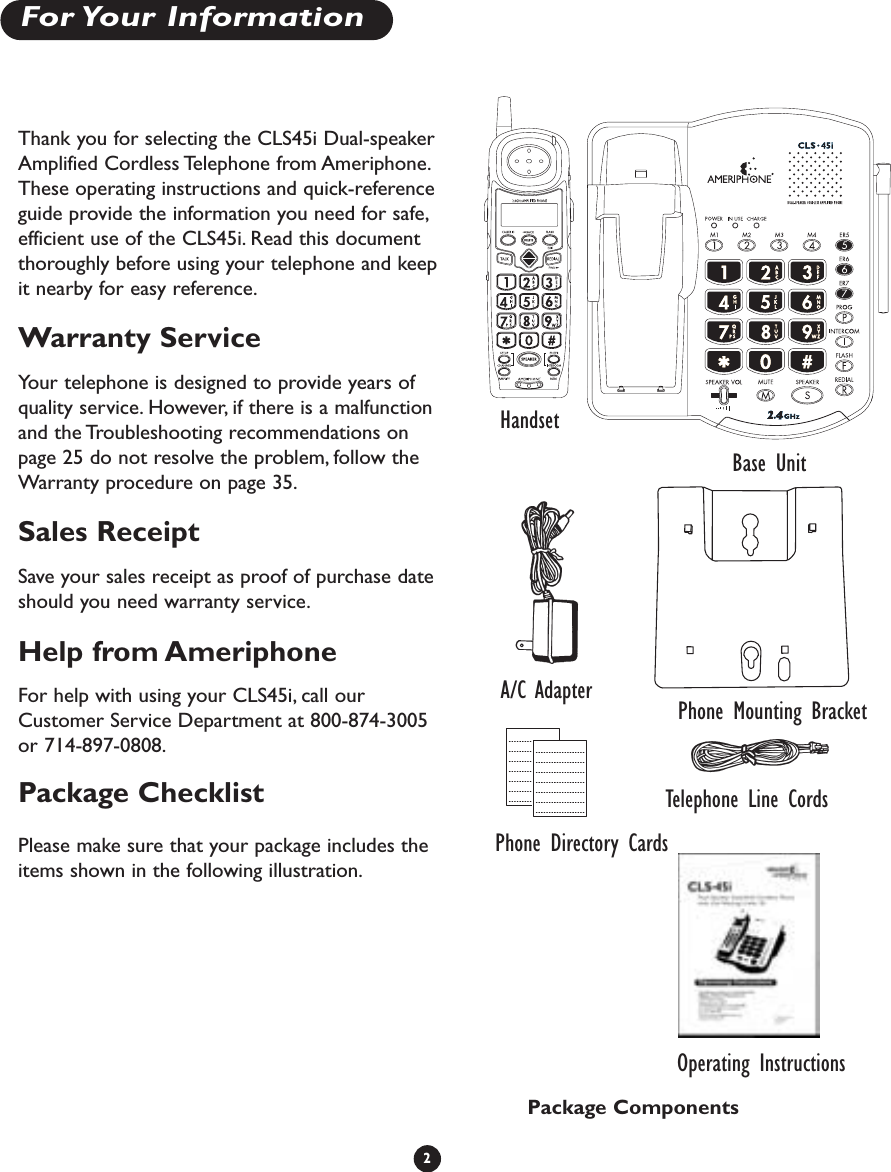
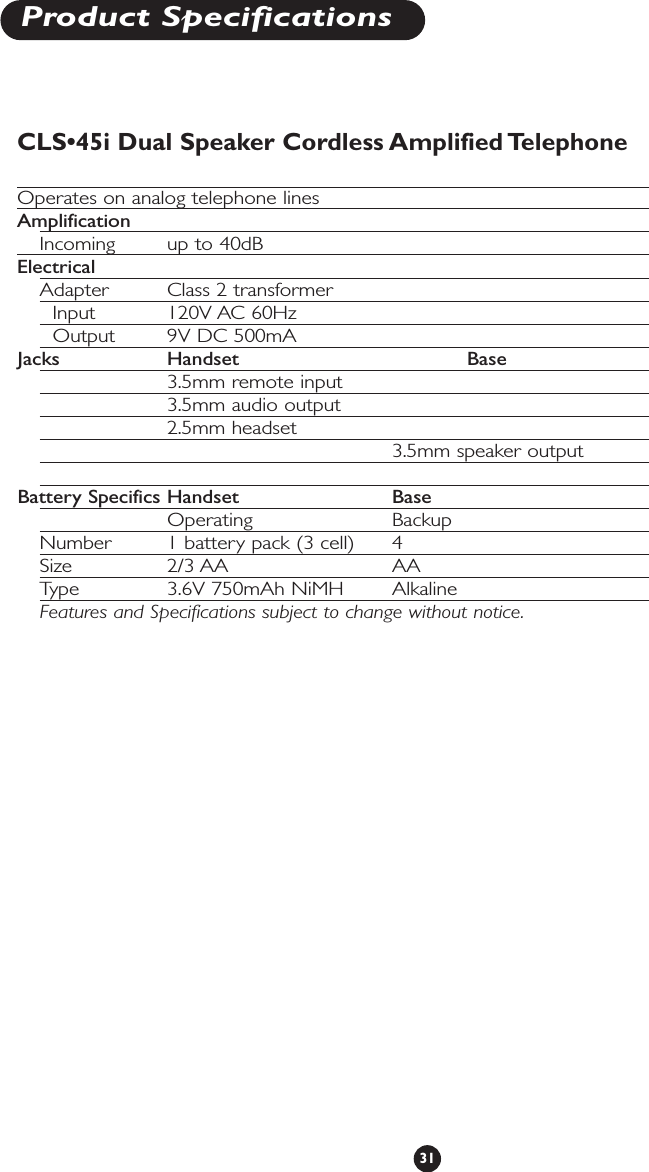
2For Your  InformationThank you for selecting the CLS45i Dual-speakerAmplified Cordless Telephone from Ameriphone.These operating instructions and quick-referenceguide provide the information you need for safe,efficient use of the CLS45i. Read this documentthoroughly before using your telephone and keepit nearby for easy reference.Warranty ServiceYour telephone is designed to provide years ofquality service. However, if there is a malfunctionand the Troubleshooting recommendations onpage 25 do not resolve the problem, follow theWarranty procedure on page 35.Sales ReceiptSave your sales receipt as proof of purchase dateshould you need warranty service.Help from AmeriphoneFor help with using your CLS45i, call ourCustomer Service Department at 800-874-3005or 714-897-0808.Package ChecklistPlease make sure that your package includes theitems shown in the following illustration.HandsetBase UnitTelephone Line CordsPhone Directory CardsA/C AdapterOperating InstructionsPackage ComponentsPhone Mounting Bracket
About your new CLS45i3The CLS45i is the flagship of theAmeriphone® product line. It has beencustom-engineered with an unprecedentedarray of features to provide years of conven-ience and assistance. It is powered by the lat-est technology yet thoughtfully designed forease-of-use, especially for people who havetrouble hearing on the telephone.The CLS45i is a Dual-Speaker AmplifiedCordless Telephone with 2.4GHz technologyfor greatly increased power and extendedoperating range.It is, literally, two-phones-in-one ... two speak-erphones.There are speakers in both thehandset and the base. This means that whenthe handset is either in or out of the base youcan use the base as a standard speakerphone.There are dialing keypads and stored numbermemories in both the handset and the base.And, you can also use the handset independ-ently as another speakerphone in anotherlocation in your home.You can also use it asan intercom between rooms.The CLS45i has a powerful 40dB amplifierwith separate volume and tone controls sothat you can tailor the incoming sounds to theloudness and frequency that best suits yourhearing. Plus, its bright, red ring flashers andsuper-loud ringers in both the base andhandset make sure you know when yourphone is ringing.The CLS45i has both Caller ID and CallWaiting Caller ID capabilities.You will need tosubscribe to the telephone company’s CallerID service to use these features.The LCDscreen on the handset lets you view Caller IDinformation easily. It also guides you throughthe few simple steps to set up the otherSpecial Features of the CLS45i.On the base you’ll find seven (7) one-touchspeed dial memory buttons, including threered buttons specifically designated for emer-gency numbers.You can store other numbersin these memory locations if you wish, butemergency numbers will always be easiest toaccess if you store them in the red memorylocations (ER5, ER6 an ER7).The handset can store frequently callednumbers in ten (10) two-touch buttons.The CLS45i has many other features andfunctions and they are explained in thefollowing pages.We  hope you enjoy using your new CLS45iand that you are pleased with the addedcapability and independence it makes possiblefor you.We  sincerely thank you for your support ofAmeriphone products. If we can be of help toyou, please call our Customer Servicedepartment at 800-874-3005.We would alsoappreciate your feedback.
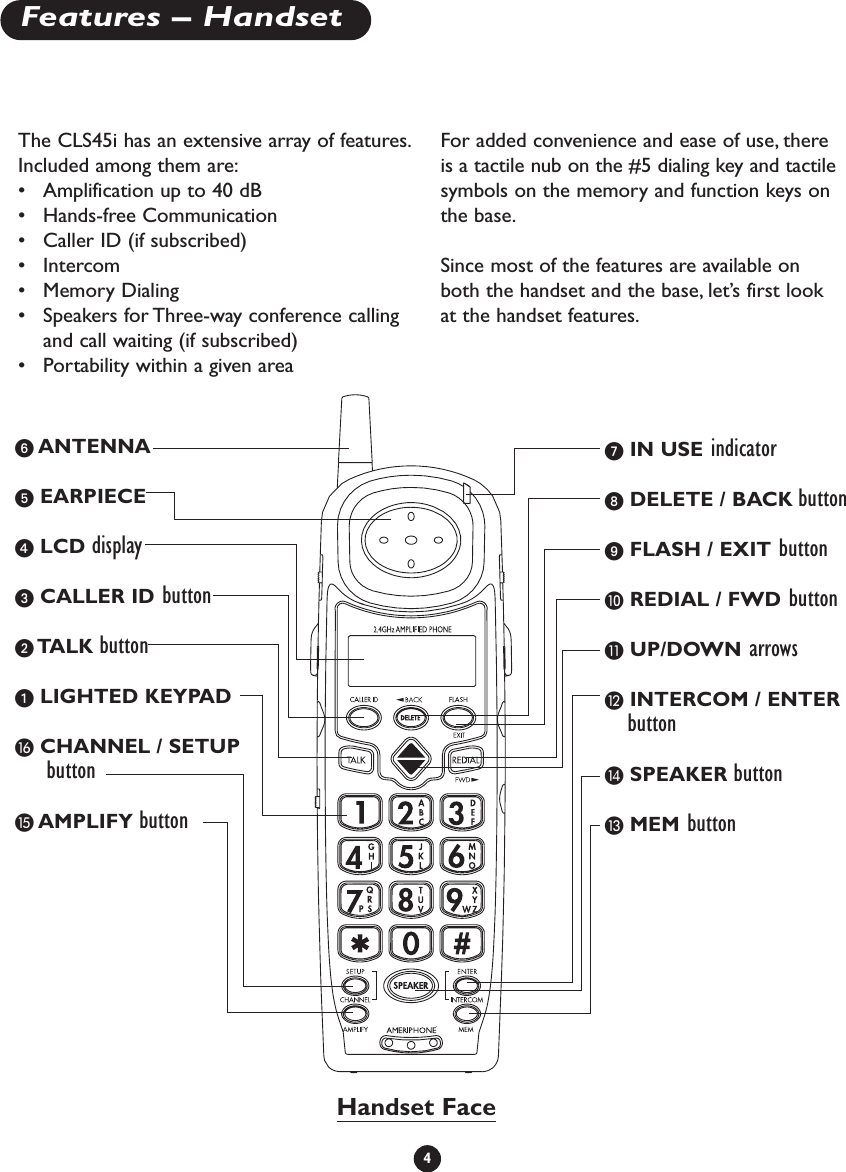
ᕦANTENNAᕥEARPIECEᕤLCD displayᕣCALLER ID buttonᕢTALK buttonᕡLIGHTED KEYPADƻCHANNEL / SETUPbuttonƺAMPLIFY buttonᕧIN USE indicatorᕨDELETE / BACK buttonᕩFLASH / EXIT buttonµREDIAL / FWD button¸UP/DOWN arrows¹INTERCOM / ENTERbuttonƹSPEAKER buttonƸMEM buttonThe CLS45i has an extensive array of features.Included among them are:•Amplification up to 40 dB•Hands-free Communication•Caller ID (if subscribed)•Intercom•Memory Dialing•Speakers for Three-way conference callingand call waiting (if subscribed)•Portability within a given areaFor added convenience and ease of use, thereis a tactile nub on the #5 dialing key and tactilesymbols on the memory and function keys onthe base.Since most of the features are available onboth the handset and the base, let’s first lookat the handset features.4Features – HandsetHandset Face
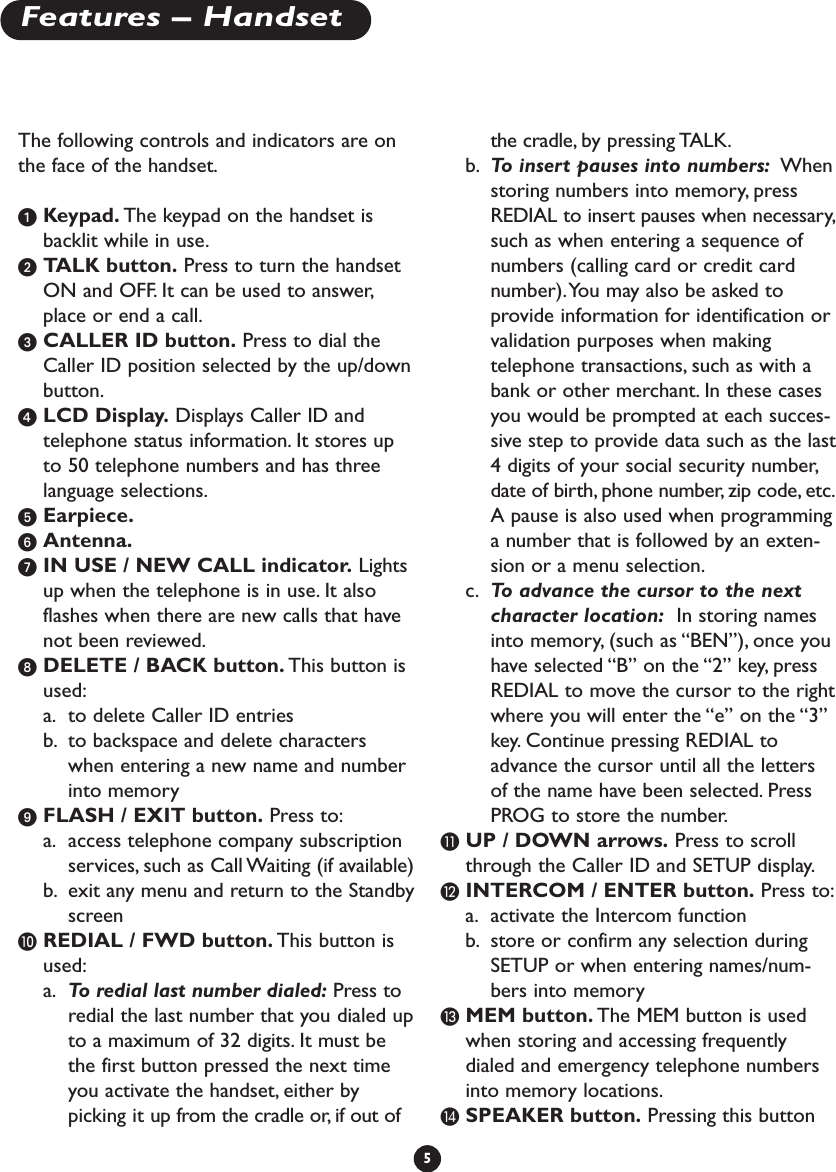
The following controls and indicators are onthe face of the handset.ᕡKeypad. The keypad on the handset isbacklit while in use.ᕢTALK button. Press to turn the handsetON and OFF. It can be used to answer,place or end a call.ᕣCALLER ID button. Press to dial theCaller ID position selected by the up/downbutton.ᕤLCD Display. Displays Caller ID andtelephone status information. It stores upto 50 telephone numbers and has threelanguage selections.ᕥEarpiece.ᕦAntenna.ᕧIN USE / NEW CALL indicator. Lightsup when the telephone is in use. It alsoflashes when there are new calls that havenot been reviewed.ᕨDELETE / BACK button. This button isused:a. to delete Caller ID entriesb. to backspace and delete characterswhen entering a new name and numberinto memoryᕩFLASH / EXIT button. Press to:a. access telephone company subscriptionservices, such as Call Waiting (if available)b. exit any menu and return to the StandbyscreenµREDIAL / FWD button. This button isused:a. To  redial last number dialed: Press toredial the last number that you dialed upto a maximum of 32 digits. It must bethe first button pressed the next timeyou activate the handset, either bypicking it up from the cradle or, if out ofthe cradle, by pressing TALK.b. To  insert pauses into numbers: Whenstoring numbers into memory, pressREDIAL to insert pauses when necessary,such as when entering a sequence ofnumbers (calling card or credit cardnumber).You may also be asked toprovide information for identification orvalidation purposes when makingtelephone transactions, such as with abank or other merchant. In these casesyou would be prompted at each succes-sive step to provide data such as the last4digits of your social security number,date of birth, phone number, zip code, etc.A pause is also used when programminga number that is followed by an exten-sion or a menu selection.c. To  advance the cursor to the nextcharacter location: In storing namesinto memory, (such as “BEN”), once youhave selected “B” on the “2” key, pressREDIAL to move the cursor to the rightwhere you will enter the “e” on the “3”key. Continue pressing REDIAL toadvance the cursor until all the lettersof the name have been selected. PressPROG to store the number.¸UP / DOWN arrows. Press to scroll through the Caller ID and SETUP display.¹INTERCOM / ENTER button. Press to:a. activate the Intercom functionb. store or confirm any selection duringSETUP or when entering names/num-bers into memory ƸMEM button. The MEM button is usedwhen storing and accessing frequentlydialed and emergency telephone numbersinto memory locations.ƹSPEAKER button. Pressing this button5Features – Handset
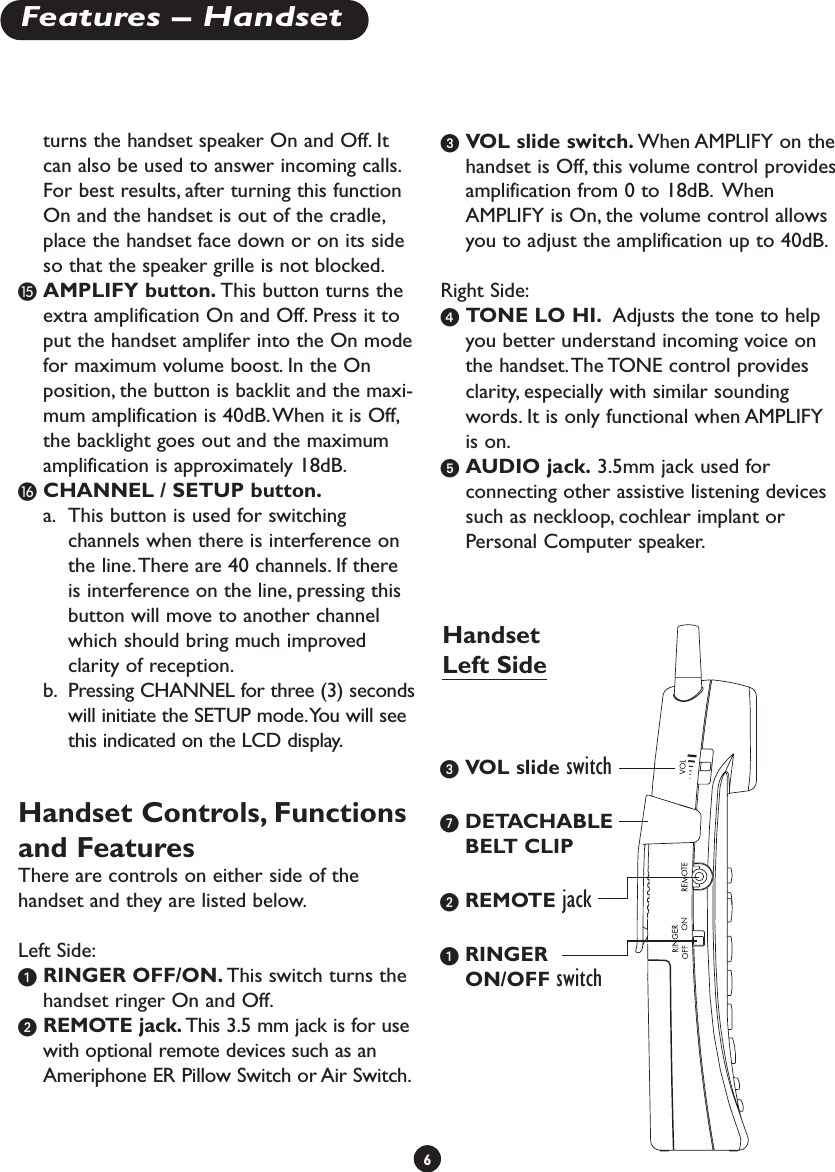
turns the handset speaker On and Off. Itcan also be used to answer incoming calls.For best results, after turning this functionOn and the handset is out of the cradle,place the handset face down or on its sideso that the speaker grille is not blocked.ƺAMPLIFY button. This button turns theextra amplification On and Off. Press it toput the handset amplifer into the On modefor maximum volume boost. In the Onposition, the button is backlit and the maxi-mum amplification is 40dB.When it is Off,the backlight goes out and the maximumamplification is approximately 18dB.ƻCHANNEL / SETUP button.a. This button is used for switchingchannels when there is interference onthe line.There are 40 channels. If thereis interference on the line, pressing thisbutton will move to another channelwhich should bring much improvedclarity of reception.b. Pressing CHANNEL for three (3) secondswill initiate the SETUP mode.You will seethis indicated on the LCD display.Handset Controls, Functionsand FeaturesThere are controls on either side of thehandset and they are listed below.Left Side:ᕡRINGER OFF/ON. This switch turns thehandset ringer On and Off.ᕢREMOTE jack. This 3.5 mm jack is for usewith optional remote devices such as anAmeriphone ER Pillow Switch or Air Switch.ᕣVOL slide switch. When AMPLIFY on thehandset is Off, this volume control providesamplification from 0 to 18dB. WhenAMPLIFY is On, the volume control allowsyou to adjust the amplification up to 40dB.Right Side:ᕤTONE LO HI. Adjusts the tone to helpyou better understand incoming voice onthe handset.The TONE control providesclarity, especially with similar soundingwords. It is only functional when AMPLIFYis on.ᕥAUDIO jack. 3.5mm jack used forconnecting other assistive listening devicessuch as neckloop, cochlear implant orPersonal Computer speaker.6Features – HandsetᕣVOL slide switchᕧDETACHABLEBELT CLIPᕢREMOTE jackᕡRINGERON/OFF switchHandsetLeft Side
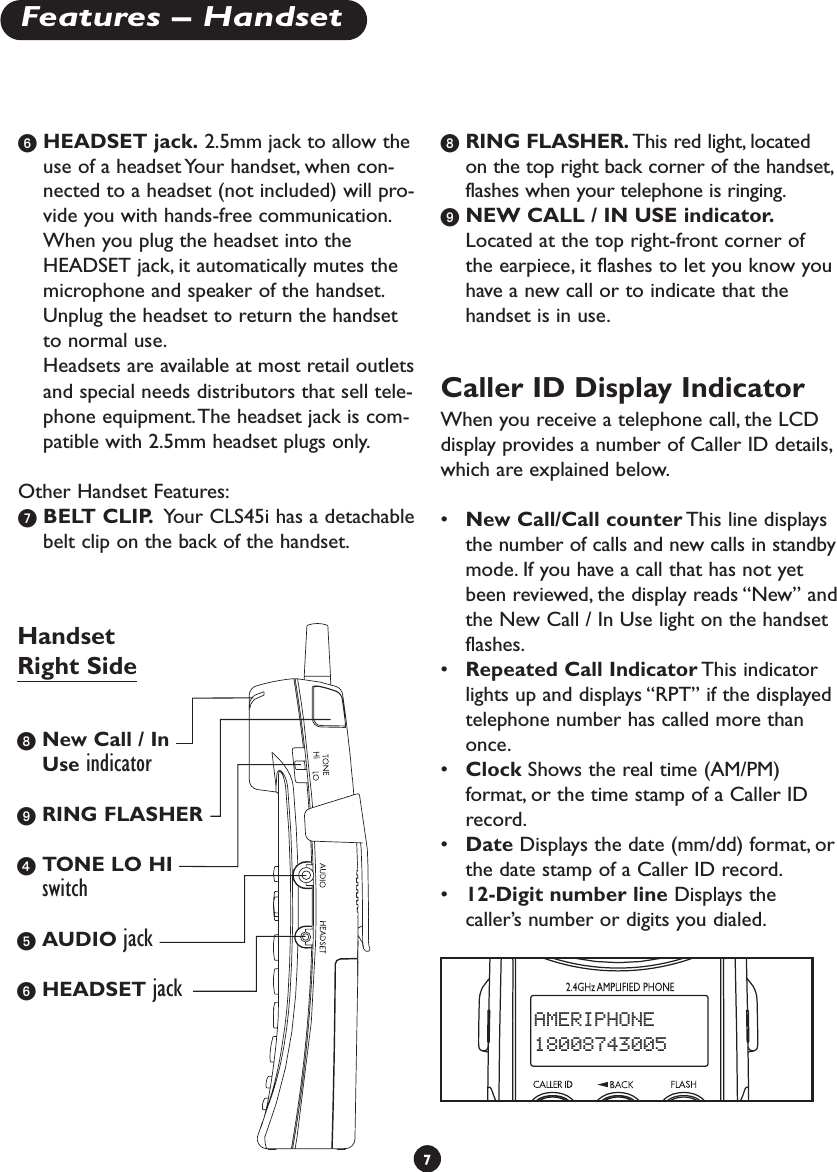
ᕦHEADSET jack. 2.5mm jack to allow theuse of a headset Your handset, when con-nected to a headset (not included) will pro-vide you with hands-free communication.When you plug the headset into theHEADSET jack, it automatically mutes themicrophone and speaker of the handset.Unplug the headset to return the handsetto normal use.Headsets are available at most retail outletsand special needs distributors that sell tele-phone equipment.The headset jack is com-patible with 2.5mm headset plugs only.Other Handset Features:ᕧBELT CLIP. Your CLS45i has a detachablebelt clip on the back of the handset.ᕨRING FLASHER. This red light, locatedon the top right back corner of the handset,flashes when your telephone is ringing.ᕩNEW CALL / IN USE indicator.Located at the top right-front corner ofthe earpiece, it flashes to let you know youhave a new call or to indicate that thehandset is in use.Caller ID Display IndicatorWhen you receive a telephone call, the LCDdisplay provides a number of Caller ID details,which are explained below.•New Call/Call counter This line displaysthe number of calls and new calls in standbymode. If you have a call that has not yetbeen reviewed, the display reads “New” andthe New Call / In Use light on the handsetflashes.•Repeated Call Indicator This indicatorlights up and displays “RPT” if the displayedtelephone number has called more thanonce.•Clock Shows the real time (AM/PM)format, or the time stamp of a Caller IDrecord.•Date Displays the date (mm/dd) format, orthe date stamp of a Caller ID record.•12-Digit number line Displays thecaller’s number or digits you dialed.7Features – HandsetAMERIPHONE18008743005ᕨNew Call / InUse indicatorᕩRING FLASHERᕤTONE LO HIswitchᕥAUDIO jackᕦHEADSET jackHandsetRight Side
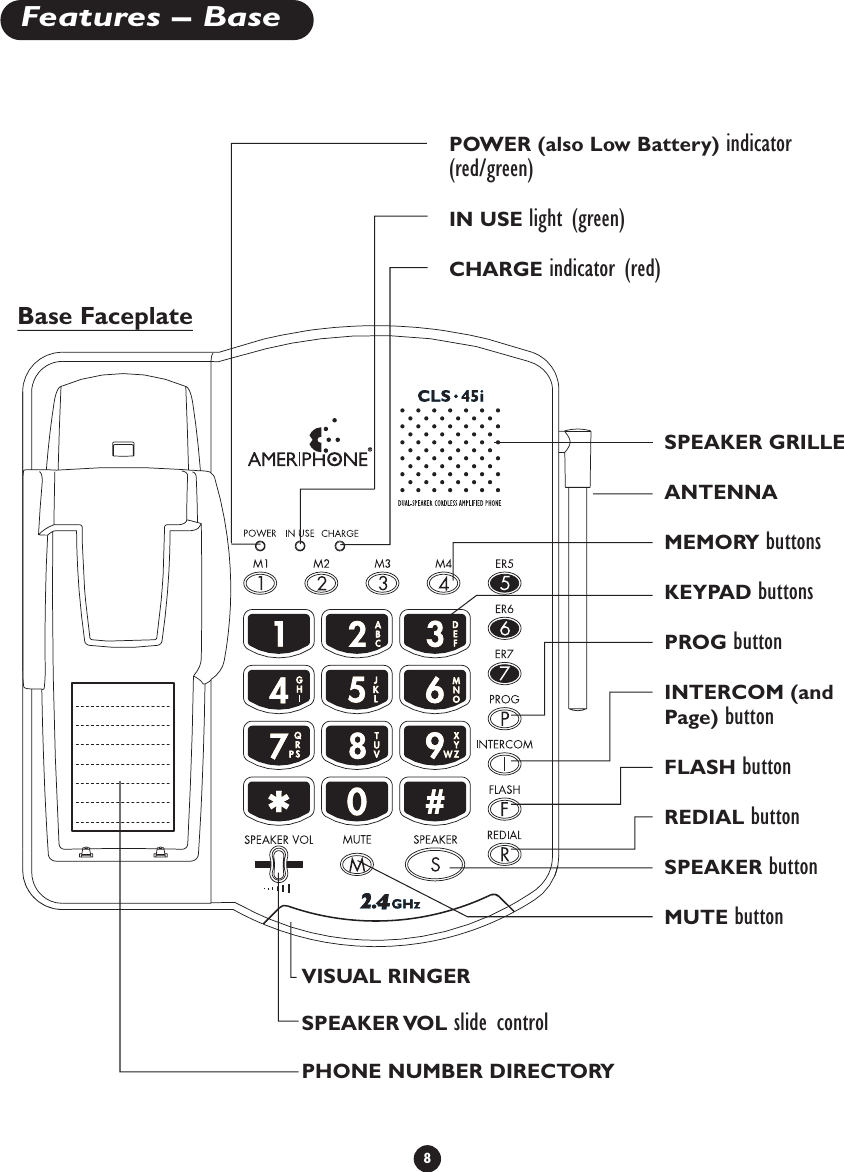
8Features – BaseSPEAKER GRILLEANTENNAMEMORY buttonsKEYPAD buttonsPROG buttonINTERCOM (andPage) buttonFLASH buttonREDIAL buttonSPEAKER buttonMUTE buttonPOWER (also Low Battery) indicator(red/green)IN USE light (green)CHARGE indicator (red)PHONE NUMBER DIRECTORYVISUAL RINGERBase FaceplateSPEAKER VOL  slide control
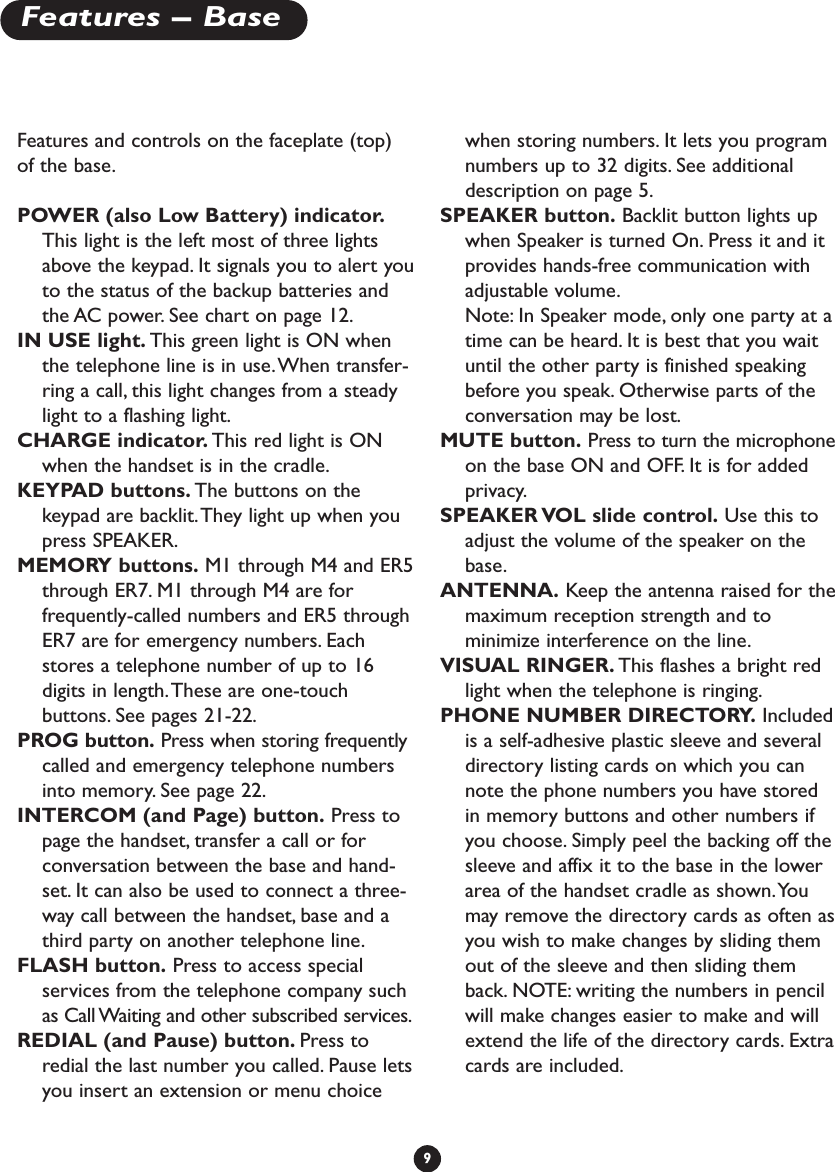
Features and controls on the faceplate (top)of the base.POWER (also Low Battery) indicator.This light is the left most of three lightsabove the keypad. It signals you to alert youto the status of the backup batteries andthe AC power. See chart on page 12.IN USE light. This green light is ON whenthe telephone line is in use.When transfer-ring a call, this light changes from a steadylight to a flashing light.CHARGE indicator. This red light is ONwhen the handset is in the cradle.KEYPAD buttons. The buttons on thekeypad are backlit.They light up when youpress SPEAKER.MEMORY buttons. M1 through M4 and ER5through ER7. M1 through M4 are forfrequently-called numbers and ER5 throughER7 are for emergency numbers. Eachstores a telephone number of up to 16digits in length.These are one-touchbuttons. See pages 21-22.PROG button. Press when storing frequentlycalled and emergency telephone numbersinto memory. See page 22.INTERCOM (and Page) button. Press topage the handset, transfer a call or forconversation between the base and hand-set. It can also be used to connect a three-way call between the handset, base and athird party on another telephone line.FLASH button. Press to access specialservices from the telephone company suchas Call Waiting and other subscribed services.REDIAL (and Pause) button. Press toredial the last number you called. Pause letsyou insert an extension or menu choicewhen storing numbers. It lets you programnumbers up to 32 digits. See additionaldescription on page 5.SPEAKER button. Backlit button lights upwhen Speaker is turned On. Press it and itprovides hands-free communication withadjustable volume.Note: In Speaker mode, only one party at atime can be heard. It is best that you waituntil the other party is finished speakingbefore you speak. Otherwise parts of theconversation may be lost.MUTE button. Press to turn the microphoneon the base ON and OFF. It is for addedprivacy.SPEAKER VOL slide control. Use this toadjust the volume of the speaker on thebase.ANTENNA. Keep the antenna raised for themaximum reception strength and tominimize interference on the line.VISUAL RINGER. This flashes a bright redlight when the telephone is ringing.PHONE NUMBER DIRECTORY. Includedis a self-adhesive plastic sleeve and severaldirectory listing cards on which you cannote the phone numbers you have storedin memory buttons and other numbers ifyou choose. Simply peel the backing off thesleeve and affix it to the base in the lowerarea of the handset cradle as shown.Youmay remove the directory cards as often asyou wish to make changes by sliding themout of the sleeve and then sliding themback. NOTE: writing the numbers in pencilwill make changes easier to make and willextend the life of the directory cards. Extracards are included.9Features – Base
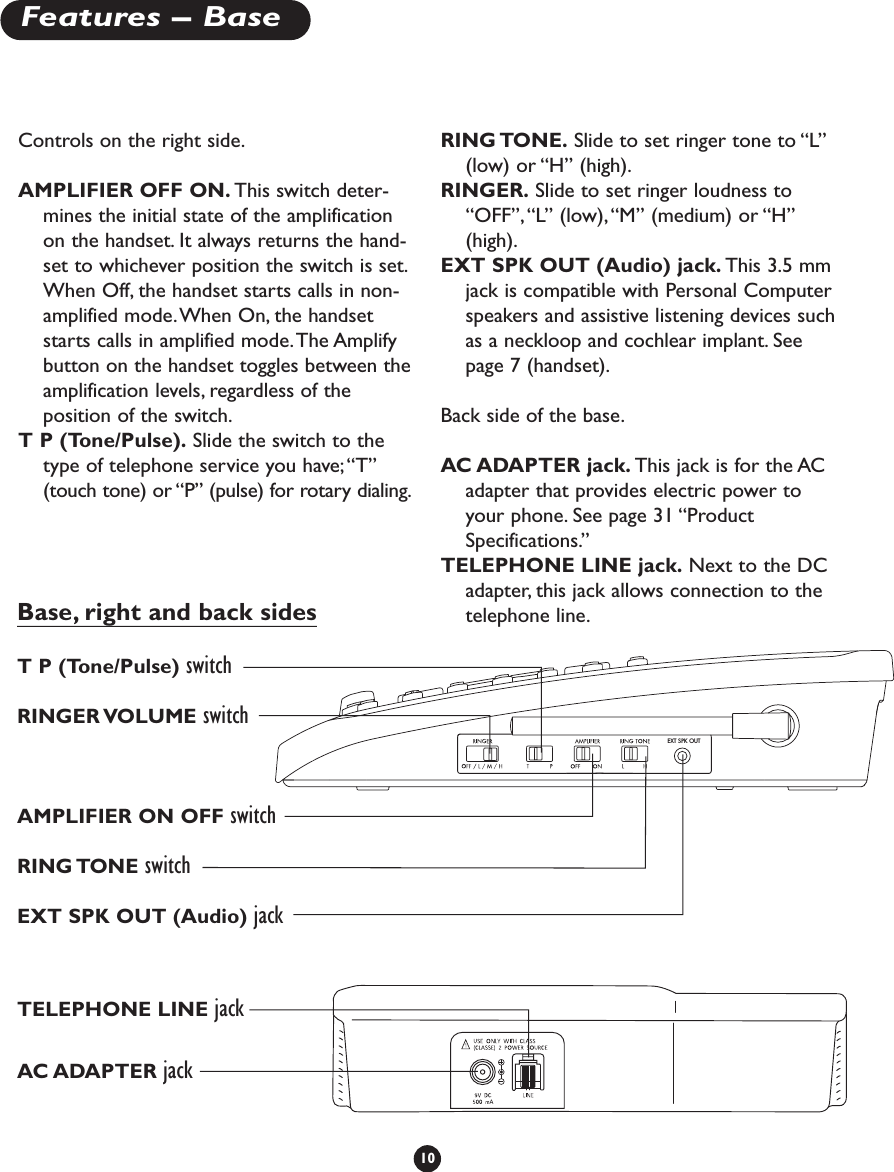
Controls on the right side.AMPLIFIER OFF ON. This switch deter-mines the initial state of the amplificationon the handset. It always returns the hand-set to whichever position the switch is set.When Off, the handset starts calls in non-amplified mode.When On, the handsetstarts calls in amplified mode.The Amplifybutton on the handset toggles between theamplification levels, regardless of theposition of the switch.T P (Tone/Pulse). Slide the switch to thetype of telephone service you have; “T”(touch tone) or “P” (pulse) for rotary dialing.RING TONE. Slide to set ringer tone to “L”(low) or “H” (high).RINGER. Slide to set ringer loudness to“OFF”,“L” (low),“M” (medium) or “H”(high).EXT SPK OUT (Audio) jack. This 3.5 mmjack is compatible with Personal Computerspeakers and assistive listening devices suchas a neckloop and cochlear implant. Seepage 7 (handset).Back side of the base.AC ADAPTER jack. This jack is for the ACadapter that provides electric power toyour phone. See page 31 “ProductSpecifications.”TELEPHONE LINE jack. Next to the DCadapter, this jack allows connection to thetelephone line.10Features – BaseEXT SPK OUTT P (Tone/Pulse) switchRINGER VOLUME  switchAMPLIFIER ON OFF switchRING TONE  switchEXT SPK OUT (Audio) jackTELEPHONE LINE jackAC ADAPTER jackBase, right and back sides
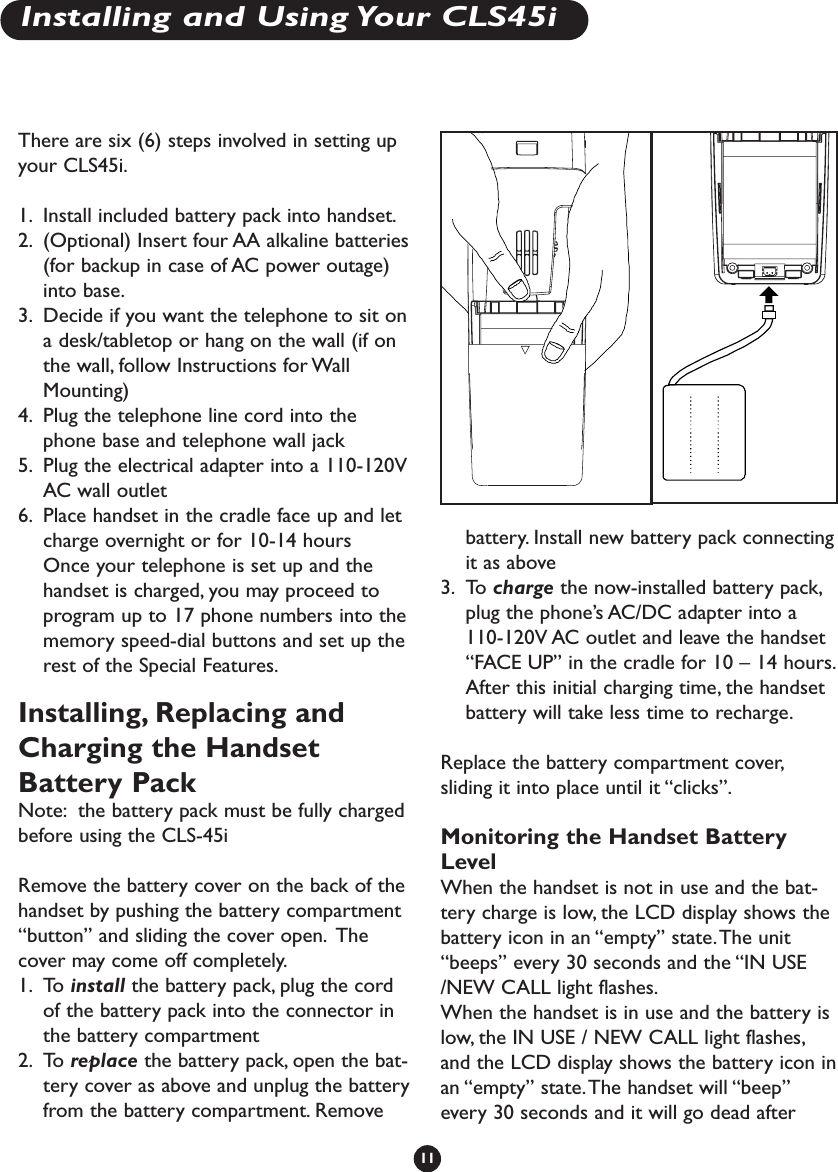
There are six (6) steps involved in setting upyour CLS45i.1. Install included battery pack into handset.2. (Optional) Insert four AA alkaline batteries(for backup in case of AC power outage)into base.3. Decide if you want the telephone to sit ona desk/tabletop or hang on the wall (if onthe wall, follow Instructions for WallMounting)4. Plug the telephone line cord into thephone base and telephone wall jack 5. Plug the electrical adapter into a 110-120VAC wall outlet6. Place handset in the cradle face up and letcharge overnight or for 10-14 hoursOnce your telephone is set up and thehandset is charged, you may proceed toprogram up to 17 phone numbers into thememory speed-dial buttons and set up therest of the Special Features.Installing, Replacing andCharging the HandsetBattery PackNote: the battery pack must be fully chargedbefore using the CLS-45iRemove the battery cover on the back of thehandset by pushing the battery compartment“button” and sliding the cover open. Thecover may come off completely.1. To install the battery pack, plug the cordof the battery pack into the connector inthe battery compartment  2. To replace the battery pack, open the bat-tery cover as above and unplug the batteryfrom the battery compartment. Removebattery. Install new battery pack connectingit as above3. To charge the now-installed battery pack,plug the phone’s AC/DC adapter into a110-120V AC outlet and leave the handset“FACE UP” in the cradle for 10 – 14 hours.After this initial charging time, the handsetbattery will take less time to recharge.Replace the battery compartment cover,sliding it into place until it “clicks”.Monitoring the Handset BatteryLevelWhen the handset is not in use and the bat-tery charge is low, the LCD display shows thebattery icon in an “empty” state.The unit“beeps” every 30 seconds and the “IN USE/NEW CALL light flashes.When the handset is in use and the battery islow, the IN USE / NEW CALL light flashes,and the LCD display shows the battery icon inan “empty” state.The handset will “beep”every 30 seconds and it will go dead after11Installing and Using Your CLS45i
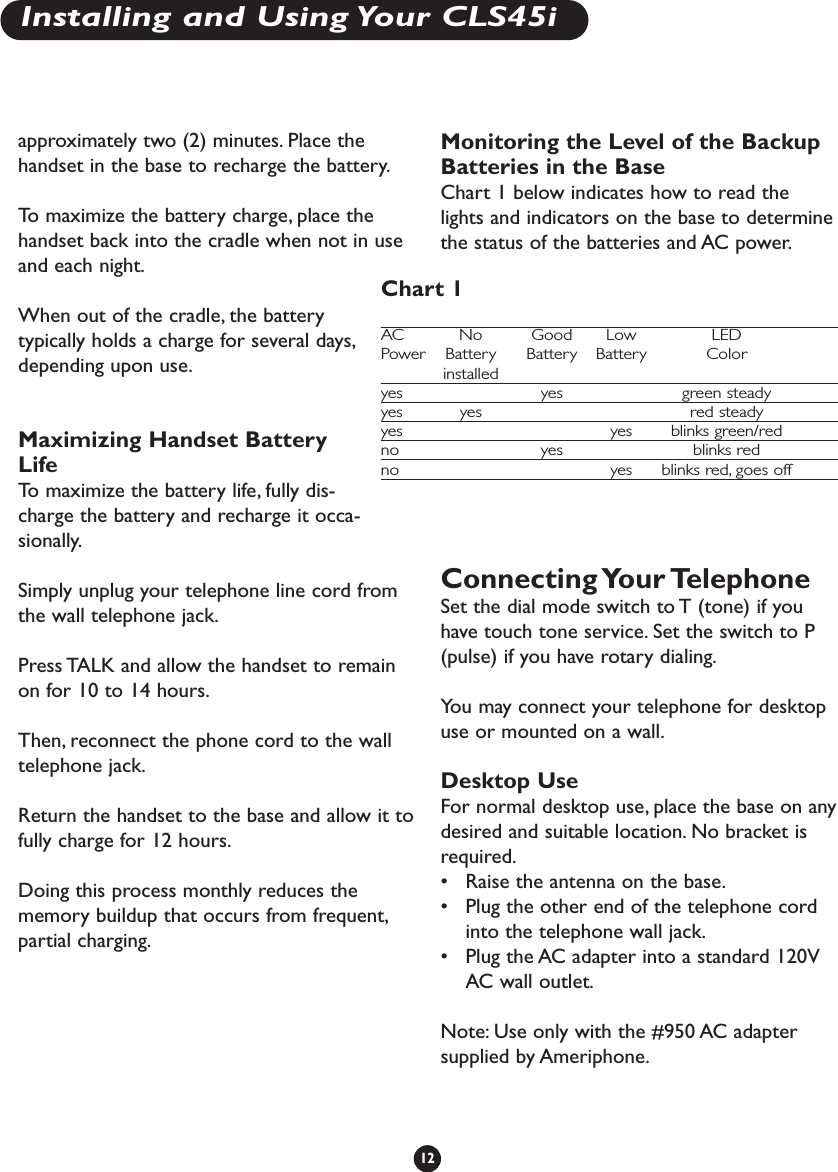
approximately two (2) minutes. Place thehandset in the base to recharge the battery.To   maximize the battery charge, place thehandset back into the cradle when not in useand each night.When out of the cradle, the batterytypically holds a charge for several days,depending upon use.Maximizing Handset BatteryLifeTo   maximize the battery life, fully dis-charge the battery and recharge it occa-sionally.Simply unplug your telephone line cord fromthe wall telephone jack.Press TALK and allow the handset to remainon for 10 to 14 hours.Then, reconnect the phone cord to the walltelephone jack.Return the handset to the base and allow it tofully charge for 12 hours.Doing this process monthly reduces thememory buildup that occurs from frequent,partial charging.Monitoring the Level of the BackupBatteries in the BaseChart 1 below indicates how to read thelights and indicators on the base to determinethe status of the batteries and AC power.Connecting Your TelephoneSet the dial mode switch to T (tone) if youhave touch tone service. Set the switch to P(pulse) if you have rotary dialing.You may connect your telephone for desktopuse or mounted on a wall.Desktop UseFor normal desktop use, place the base on anydesired and suitable location. No bracket isrequired.•Raise the antenna on the base.•Plug the other end of the telephone cordinto the telephone wall jack.•Plug the AC adapter into a standard 120VAC wall outlet.Note: Use only with the #950 AC adaptersupplied by Ameriphone.12Chart 1AC No Good Low LEDPower Battery Battery Battery Colorinstalledyesyes green steadyyesyes red steadyyesyes blinks green/redno yes blinks redno yes blinks red, goes offInstalling and Using Your CLS45i
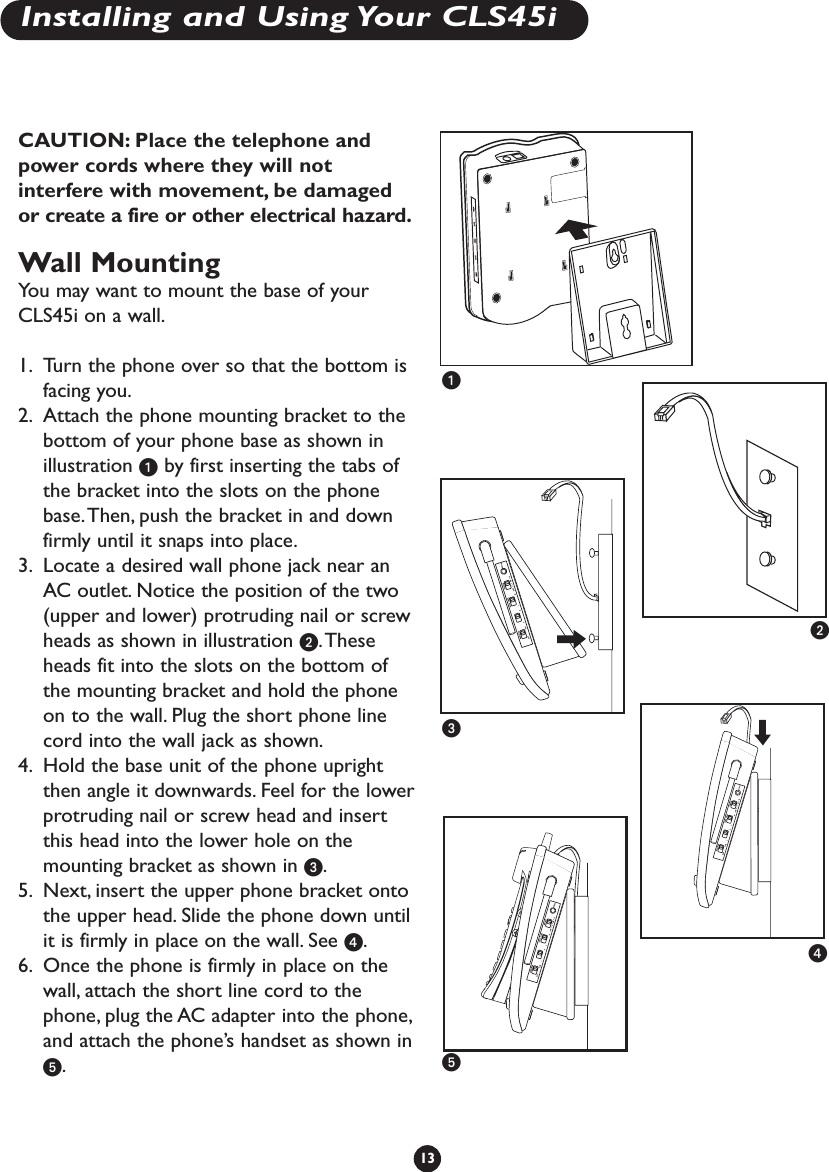
CAUTION: Place the telephone andpower cords where they will notinterfere with movement, be damagedor create a fire or other electrical hazard.Wall MountingYou may want to mount the base of yourCLS45i on a wall.1. Turn the phone over so that the bottom isfacing you.2. Attach the phone mounting bracket to thebottom of your phone base as shown inillustration ᕡby first inserting the tabs ofthe bracket into the slots on the phonebase.Then, push the bracket in and downfirmly until it snaps into place.3. Locate a desired wall phone jack near anAC outlet. Notice the position of the two(upper and lower) protruding nail or screwheads as shown in illustration ᕢ.Theseheads fit into the slots on the bottom ofthe mounting bracket and hold the phoneon to the wall. Plug the short phone linecord into the wall jack as shown.4. Hold the base unit of the phone uprightthen angle it downwards. Feel for the lowerprotruding nail or screw head and insertthis head into the lower hole on themounting bracket as shown in ᕣ.5. Next, insert the upper phone bracket ontothe upper head. Slide the phone down untilit is firmly in place on the wall. See ᕤ.6. Once the phone is firmly in place on thewall, attach the short line cord to thephone, plug the AC adapter into the phone,and attach the phone’s handset as shown inᕥ.13ᕡᕢᕣᕤᕥInstalling and Using Your CLS45i
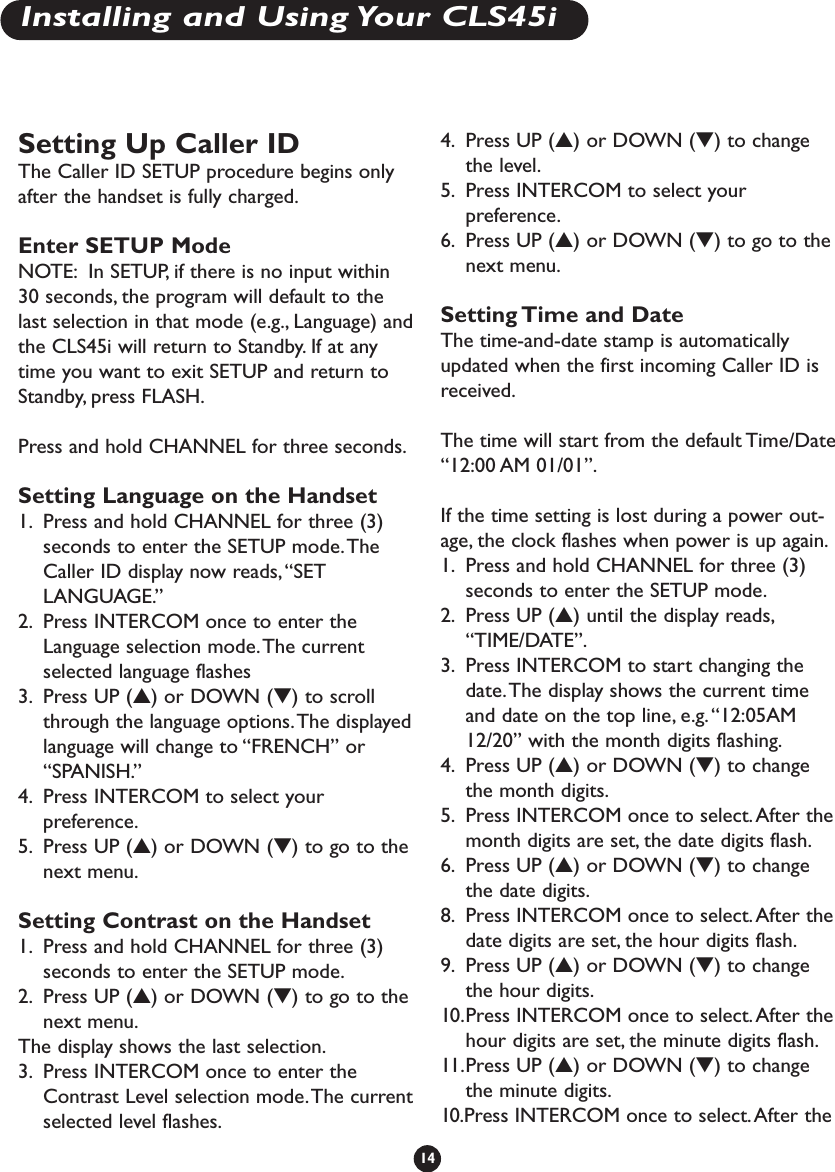
Setting Up Caller IDThe Caller ID SETUP procedure begins onlyafter the handset is fully charged.Enter SETUP ModeNOTE: In SETUP, if there is no input within30 seconds, the program will default to thelast selection in that mode (e.g., Language) andthe CLS45i will return to Standby. If at anytime you want to exit SETUP and return toStandby, press FLASH.Press and hold CHANNEL for three seconds.Setting Language on the Handset1. Press and hold CHANNEL for three (3)seconds to enter the SETUP mode.TheCaller ID display now reads,“SETLANGUAGE.”2. Press INTERCOM once to enter theLanguage selection mode.The currentselected language flashes 3. Press UP (▲) or DOWN (▼) to scrollthrough the language options.The displayedlanguage will change to “FRENCH” or“SPANISH.”4. Press INTERCOM to select yourpreference.5. Press UP (▲) or DOWN (▼) to go to thenext menu.Setting Contrast on the Handset1. Press and hold CHANNEL for three (3)seconds to enter the SETUP mode.2. Press UP (▲) or DOWN (▼) to go to thenext menu.The display shows the last selection.3. Press INTERCOM once to enter theContrast Level selection mode.The currentselected level flashes.4. Press UP (▲) or DOWN (▼) to changethe level.5. Press INTERCOM to select yourpreference.6. Press UP (▲) or DOWN (▼) to go to thenext menu.Setting Time and DateThe time-and-date stamp is automaticallyupdated when the first incoming Caller ID isreceived.The time will start from the default Time/Date“12:00 AM 01/01”.If the time setting is lost during a power out-age, the clock flashes when power is up again.1. Press and hold CHANNEL for three (3)seconds to enter the SETUP mode.2. Press UP (▲) until the display reads,“TIME/DATE”.3. Press INTERCOM to start changing thedate.The display shows the current timeand date on the top line, e.g.“12:05AM12/20” with the month digits flashing.4. Press UP (▲) or DOWN (▼) to changethe month digits.5. Press INTERCOM once to select.After themonth digits are set, the date digits flash.6. Press UP (▲) or DOWN (▼) to changethe date digits.8. Press INTERCOM once to select.After thedate digits are set, the hour digits flash.9. Press UP (▲) or DOWN (▼) to changethe hour digits.10.Press INTERCOM once to select. After thehour digits are set, the minute digits flash.11.Press UP (▲) or DOWN (▼) to changethe minute digits.10.Press INTERCOM once to select.After the14Installing and Using Your CLS45i
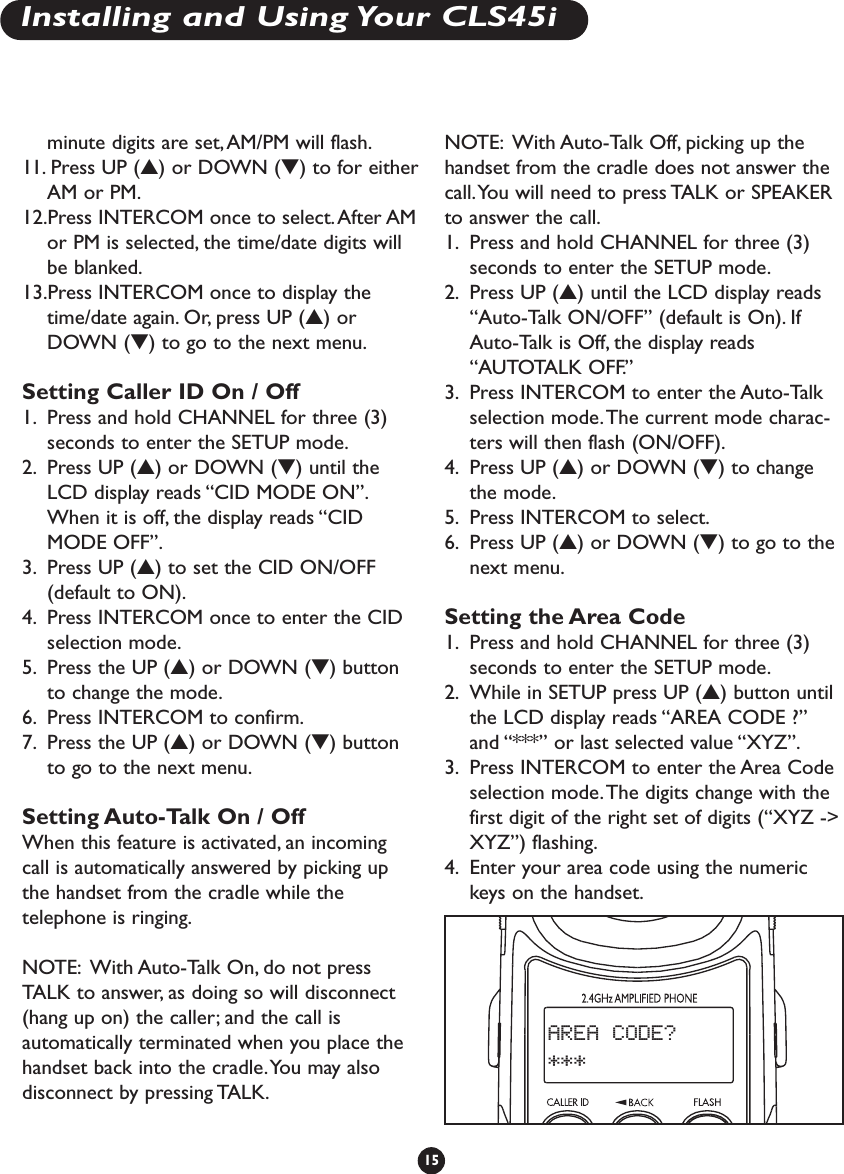
minute digits are set, AM/PM will flash.11.Press UP (▲) or DOWN (▼) to for eitherAM or PM.12.Press INTERCOM once to select.After AMor PM is selected, the time/date digits willbe blanked.13.Press INTERCOM once to display thetime/date again. Or, press UP (▲) orDOWN (▼) to go to the next menu.Setting Caller ID On / Off1. Press and hold CHANNEL for three (3)seconds to enter the SETUP mode.2. Press UP (▲) or DOWN (▼) until theLCD display reads “CID MODE ON”.When it is off, the display reads “CIDMODE OFF”.3. Press UP (▲) to set the CID ON/OFF(default to ON).4. Press INTERCOM once to enter the CIDselection mode.5. Press the UP (▲) or DOWN (▼) buttonto change the mode.6. Press INTERCOM to confirm.7. Press the UP (▲) or DOWN (▼) buttonto go to the next menu.Setting Auto-Talk On / OffWhen this feature is activated, an incomingcall is automatically answered by picking upthe handset from the cradle while thetelephone is ringing.NOTE: With Auto-Talk On, do not pressTALK to answer, as doing so will disconnect(hang up on) the caller; and the call isautomatically terminated when you place thehandset back into the cradle.You may alsodisconnect by pressing TALK.NOTE: With Auto-Talk Off, picking up thehandset from the cradle does not answer thecall.You will need to press TALK or SPEAKERto answer the call.1. Press and hold CHANNEL for three (3)seconds to enter the SETUP mode.2. Press UP (▲) until the LCD display reads“Auto-Talk ON/OFF” (default is On). IfAuto-Talk is Off, the display reads“AUTOTALK OFF.”3. Press INTERCOM to enter the Auto-Talkselection mode.The current mode charac-ters will then flash (ON/OFF).4. Press UP (▲) or DOWN (▼) to changethe mode.5. Press INTERCOM to select.6. Press UP (▲) or DOWN (▼) to go to thenext menu.Setting the Area Code1. Press and hold CHANNEL for three (3)seconds to enter the SETUP mode.2. While in SETUP press UP (▲) button untilthe LCD display reads “AREA CODE ?”and “***” or last selected value “XYZ”.3. Press INTERCOM to enter the Area Codeselection mode.The digits change with thefirst digit of the right set of digits (“XYZ ->XYZ”) flashing.4. Enter your area code using the numerickeys on the handset.15AREA CODE? ***Installing and Using Your CLS45i
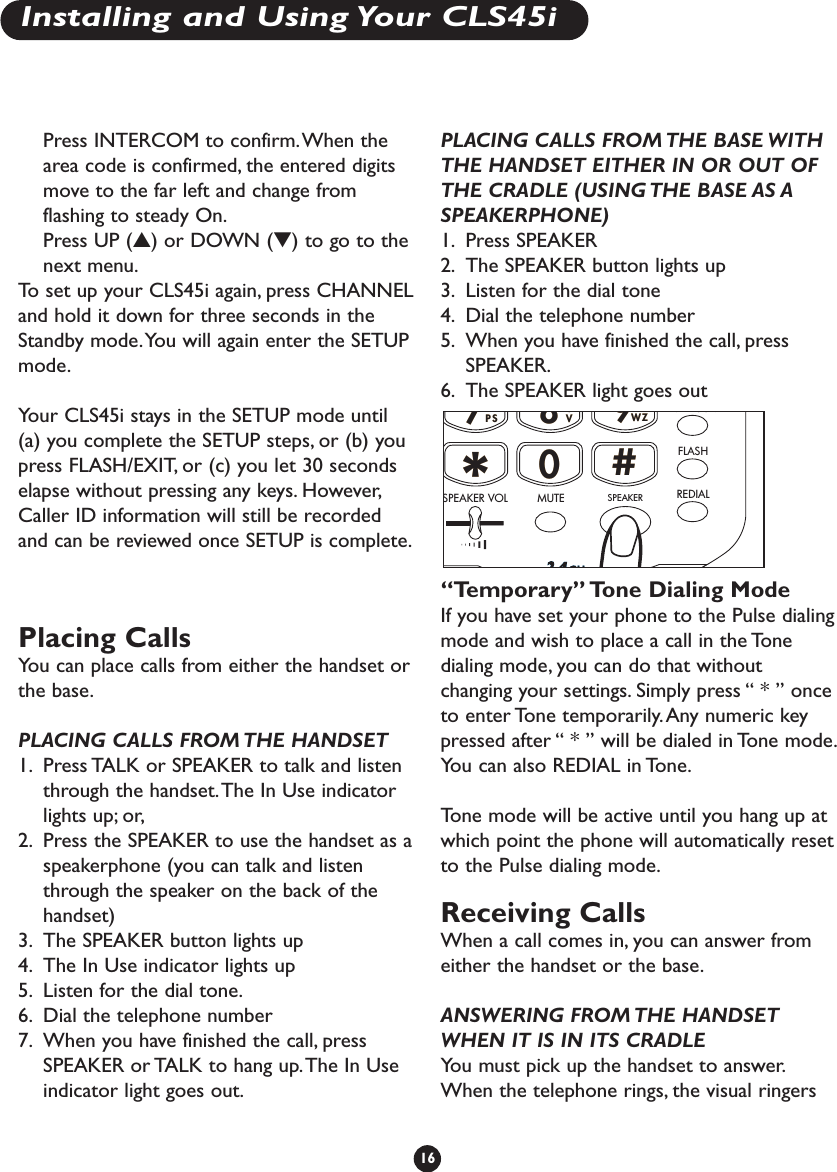
Press INTERCOM to confirm.When thearea code is confirmed, the entered digitsmove to the far left and change fromflashing to steady On.Press UP (▲) or DOWN (▼) to go to thenext menu.To   set up your CLS45i again, press CHANNELand hold it down for three seconds in theStandby mode.You will again enter the SETUPmode.Your CLS45i stays in the SETUP mode until(a) you complete the SETUP steps, or (b) youpress FLASH/EXIT, or (c) you let 30 secondselapse without pressing any keys. However,Caller ID information will still be recordedand can be reviewed once SETUP is complete.Placing CallsYou can place calls from either the handset orthe base.PLACING CALLS FROM THE HANDSET1. Press TALK or SPEAKER to talk and listenthrough the handset.The In Use indicatorlights up; or,2. Press the SPEAKER to use the handset as aspeakerphone (you can talk and listenthrough the speaker on the back of thehandset)3. The SPEAKER button lights up4. The In Use indicator lights up5. Listen for the dial tone.6. Dial the telephone number7. When you have finished the call, pressSPEAKER or TALK to hang up.The In Useindicator light goes out.PLACING CALLS FROM THE BASE WITHTHE HANDSET EITHER IN OR OUT OFTHE CRADLE (USING THE BASE AS ASPEAKERPHONE)1. Press SPEAKER2. The SPEAKER button lights up3. Listen for the dial tone4. Dial the telephone number5. When you have finished the call, pressSPEAKER.6. The SPEAKER light goes out“Temporary” Tone Dialing ModeIf you have set your phone to the Pulse dialingmode and wish to place a call in the Tonedialing mode, you can do that withoutchanging your settings. Simply press “ * ” onceto enter Tone temporarily. Any numeric keypressed after “ * ” will be dialed in Tone mode.You can also REDIAL in Tone.Tone mode will be active until you hang up atwhich point the phone will automatically resetto the Pulse dialing mode.Receiving Calls When a call comes in, you can answer fromeither the handset or the base.ANSWERING FROM THE HANDSETWHEN IT IS IN ITS CRADLEYou must pick up the handset to answer.When the telephone rings, the visual ringersRSRSUVUVYZYZPPWW77**##880099SPEAKERINTERCOMFLASHREDIALMUTESPEAKER VOL16Installing and Using Your CLS45i
will flash on both the base and handset. Notethat when the handset is in the cradle, onlythe base will ring.1. Lift the handset to begin your conversation.a. If Auto-Talk is On, do not press theTALK key.b. If Auto-Talk is Off, you will need topress the TALK key.2. To end your conversation, press TALK orplace the handset back in the cradle.When returning the handset to the cradle,it should be facing up so that you can seethe Caller ID and because it charges auto-matically when it is in the cradle facing up.ANSWERING FROM THE HANDSETWHEN IT IS OUT OF ITS CRADLE Sometimes you may temporarily leave thehandset in another room and you can answerfrom the handset wherever it is. Note: Thehandset’s RINGER switch must be in the ONposition for the ringer to operate.1. When the phone rings, press the TALK orSPEAKER button to answer.2. When you are through talking, press theTALK or SPEAKER button again to hang up.ANSWERING CALLS FROM THE BASEWITH THE HANDSET EITHER IN OROUT OF THE CRADLE (USING THE BASESPEAKERPHONE)1. Press SPEAKER2. The SPEAKER button lights up3. Listen and talk through the speaker fromup to 20 feet away4. Adjust the volume of the speaker bymoving the sliding SPEAKER VOL controlleft or right.5. When you have finished the call, pressSPEAKER.6. The SPEAKER light goes outHandset Amplifier The CLS45i has a powerful amplifier that canprovide up to 40dB of incoming amplificationdepending upon your settings.When AMPLIFY is Off on the handset, thehandset VOL control allows for amplificationup to 18dB.When the handset AMPLIFY button is On, thehandset volume control allows for amplificationto adjust from up to 40dB.A backlight underthe button turns on when the Amplify buttonis activated.To   adjust the volume:1. Press the AMPLIFY button. It lights up.2. Slide the VOL control (on the top left sideof the handset) to select the level of ampli-fication that best suits your hearing needs.CAUTION: Repeated incrementalexposure to amplification levels greaterthan 18dB may be harmful to individualswho do not have hearing disabilities. Donot remove the warning label. If it islikely that a visually impaired person willuse the telephone, securely attach theprovided warning printed in Braille tothe back of the handset.17Installing and Using Your CLS45i
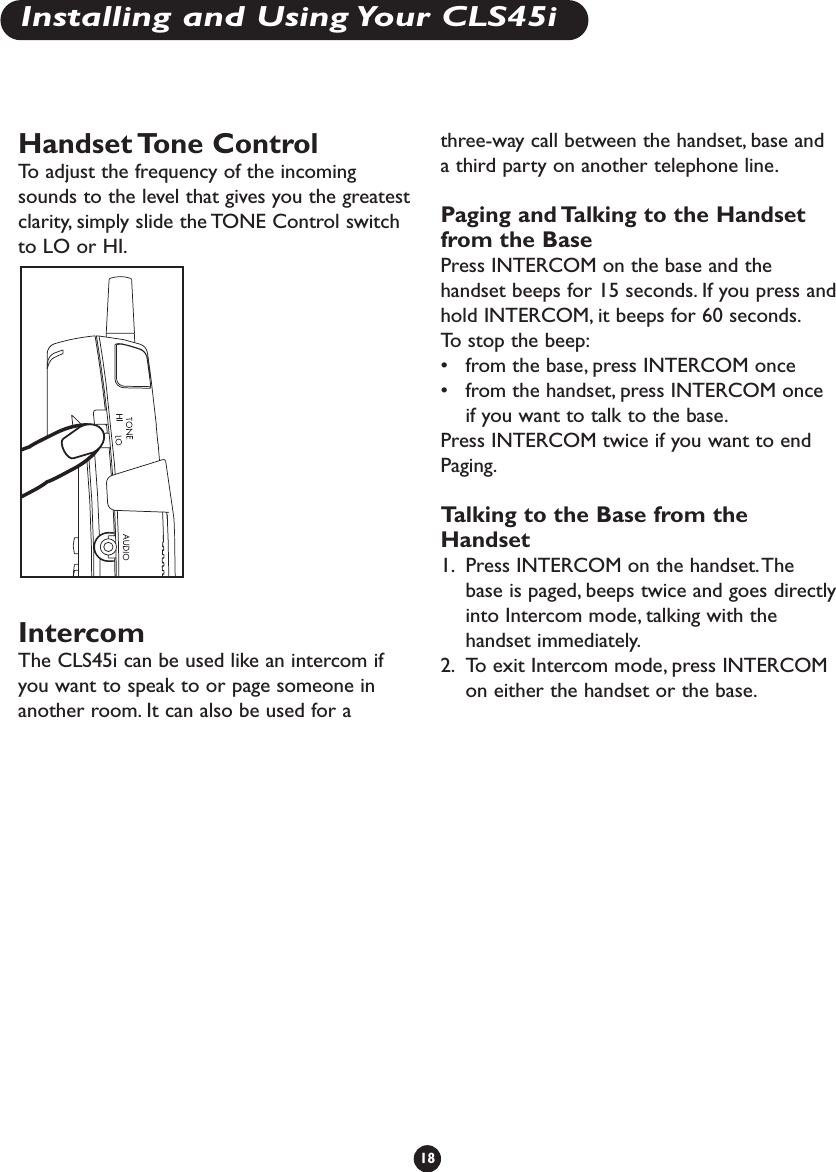
Handset Tone  ControlTo   adjust the frequency of the incomingsounds to the level that gives you the greatestclarity, simply slide the TONE Control switchto LO or HI.IntercomThe CLS45i can be used like an intercom ifyou want to speak to or page someone inanother room. It can also be used for athree-way call between the handset, base anda third party on another telephone line.Paging and Talking to the Handsetfrom the BasePress INTERCOM on the base and thehandset beeps for 15 seconds. If you press andhold INTERCOM, it beeps for 60 seconds.To   stop the beep:•from the base, press INTERCOM once•from the handset, press INTERCOM onceif you want to talk to the base.Press INTERCOM twice if you want to endPaging.Talking to the Base from theHandset1. Press INTERCOM on the handset.Thebase is paged, beeps twice and goes directlyinto Intercom mode, talking with thehandset immediately.2. To exit Intercom mode, press INTERCOMon either the handset or the base.18Installing and Using Your CLS45i
Reviewing Caller IDInformationEach incoming call is stored using up to12characters for the name and up to 16 digitsfor the number.If there is new call information, the New Call /In Use light flashes.1. While in Standby mode, press the UP (▲)or DOWN (▼) button to display the num-ber of new calls and the number of totalcalls.2. Press UP (▲) or DOWN (▼) again toview the Caller ID content.a. Press DOWN (▼) to scroll the CallerID information from the most recentrecord. Or,b. Press UP (▲) button to scroll throughthe Caller ID information from the oldestrecord.If the caller’s number is more than 12 digits,there are two keys you can use as right andleft arrows.1. Press the asterisk (*) to scroll left or 2. Press the pound sign (#) to scroll to theright and view the entire number.While it scrolls over the list,“-END-” displays. If the CID list is empty, thedisplay reads “NO CID.”At any time you can press FLASH once toreturn to Standby mode. Or it will return toStandby automatically after 30 seconds ofinactivity.Placing a Call from Caller IDInformationWhen reviewing the Caller ID List, pressCALLER ID to dial the number with thehandset in handset mode. Pressing CALLER IDtwice adds a “1” before the dialing digits.When you place calls using Caller ID informa-tion, you have 4 dialing options:1. For numbers with 7 digits without a “1”prefix:•if the area code of the Caller ID numbermatches the stored area code, pressCALLER ID button once within 2seconds.This action sends out 7 digitsonly.2. For numbers with an Area Code + 7 digitsbut without a “1” prefix•If the area code of the Caller ID numbermatches the stored area code, pressCALLER ID twice within 2 seconds.Thisaction sends out Area Code + 7 digitsonly.3. For numbers with 10 digits but without a“1” prefix•If the stored area code is different fromthe Caller ID, the memory should storeall 10 digits. Press CALLER ID oncewithin 2 seconds to send out 10 digitswithout a “1” prefix.4. For numbers with10 digits with a “1” prefix•If the stored area code is different fromthe Caller ID, the memory should storeall 10 digits. Press CALLER ID buttontwice within 2 seconds to send out a“1” prefix and 10 digits.19Caller ID Functions
Deleting Selected Caller IDInformation1. While reviewing the Caller ID, pressDELETE to delete the displayed callerinformation.The display flashes “ERASE ?”2. Press INTERCOM to select.The displaybriefly reads “CID ERASED.” The nextCaller ID entry appears automatically orthe display reads,“- NO CALLS -” if the listis empty.Deleting All Caller IDInformation1. While reviewing the Caller ID, hold downDELETE for two seconds.The display flashes“ERASE ALL ?”2. Press INTERCOM to select.The displaybriefly reads “ALL CID” and “ERASED” andthen “— NO CALLS —”.At any time, you can press FLASH one time toreturn to standby mode. Or it will return tostandby automatically when 30 seconds haselapsed without any keys being pressed.Saving Caller ID Informationto Memory1. While reviewing Caller ID, press MEMbutton.The display reads “SAVE TO” and“MEMO?”2. Press INTERCOM to select.Then thedisplay reads “ENTER MEMO” and“LOCATION.”3. Enter location number [X] (0 through 9).a. If the memory location [X] is empty, thedisplay reads “SAVE AT” and “MEMOX?”b. If the memory location [X] is not empty,display flashes “OVERWRITE” and“MEMO X?”4. Press INTERCOM to select. Both thephone number (up to 16 digits) and caller’sname (12 characters) will be stored in thatmemory location. Or press FLASH to exit.20Caller ID FunctionsSAVE TO MEMO?
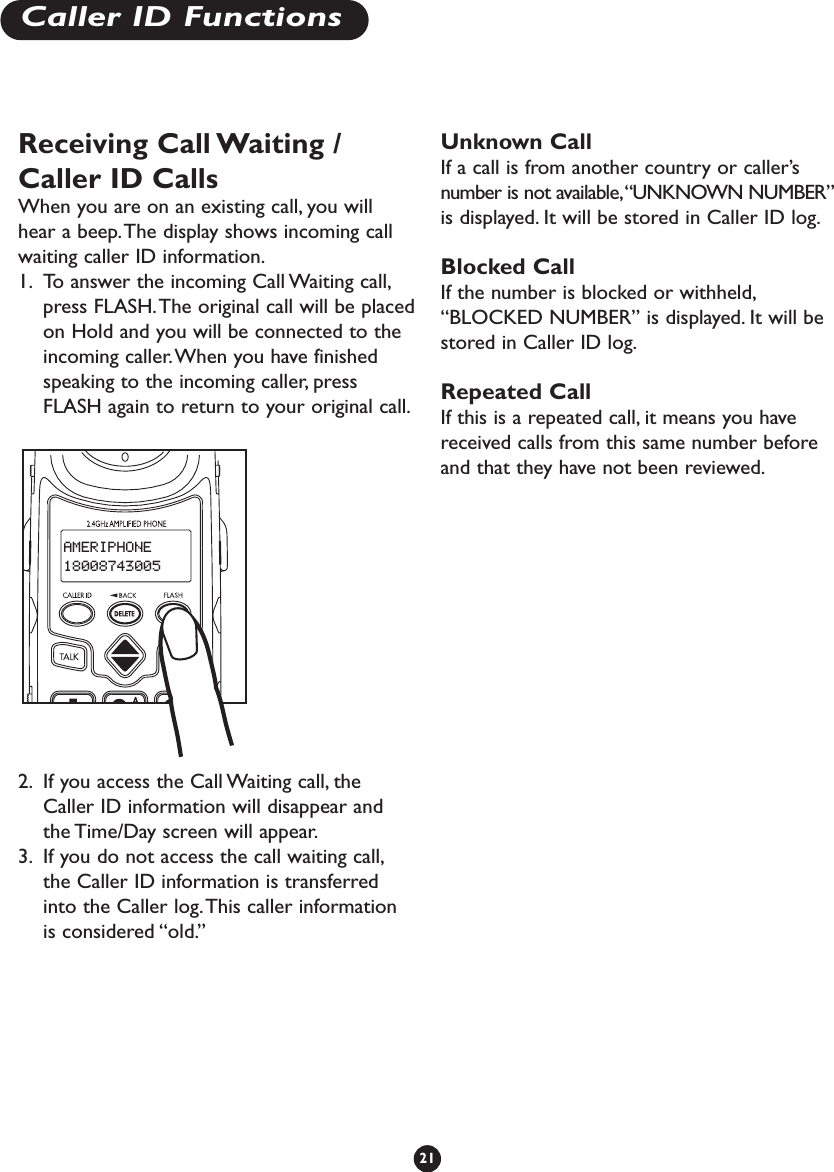
Receiving Call Waiting /Caller ID CallsWhen you are on an existing call, you willhear a beep.The display shows incoming callwaiting caller ID information.1. To answer the incoming Call Waiting call,press FLASH.The original call will be placedon Hold and you will be connected to theincoming caller.When you have finishedspeaking to the incoming caller, pressFLASH again to return to your original call.2. If you access the Call Waiting call, theCaller ID information will disappear andthe Time/Day screen will appear.3. If you do not access the call waiting call,the Caller ID information is transferredinto the Caller log.This caller informationis considered “old.”Unknown CallIf a call is from another country or caller’snumber is not available,“UNKNOWN NUMBER”is displayed. It will be stored in Caller ID log.Blocked CallIf the number is blocked or withheld,“BLOCKED NUMBER” is displayed. It will bestored in Caller ID log.Repeated CallIf this is a repeated call, it means you havereceived calls from this same number beforeand that they have not been reviewed.21Caller ID FunctionsAMERIPHONE18008743005
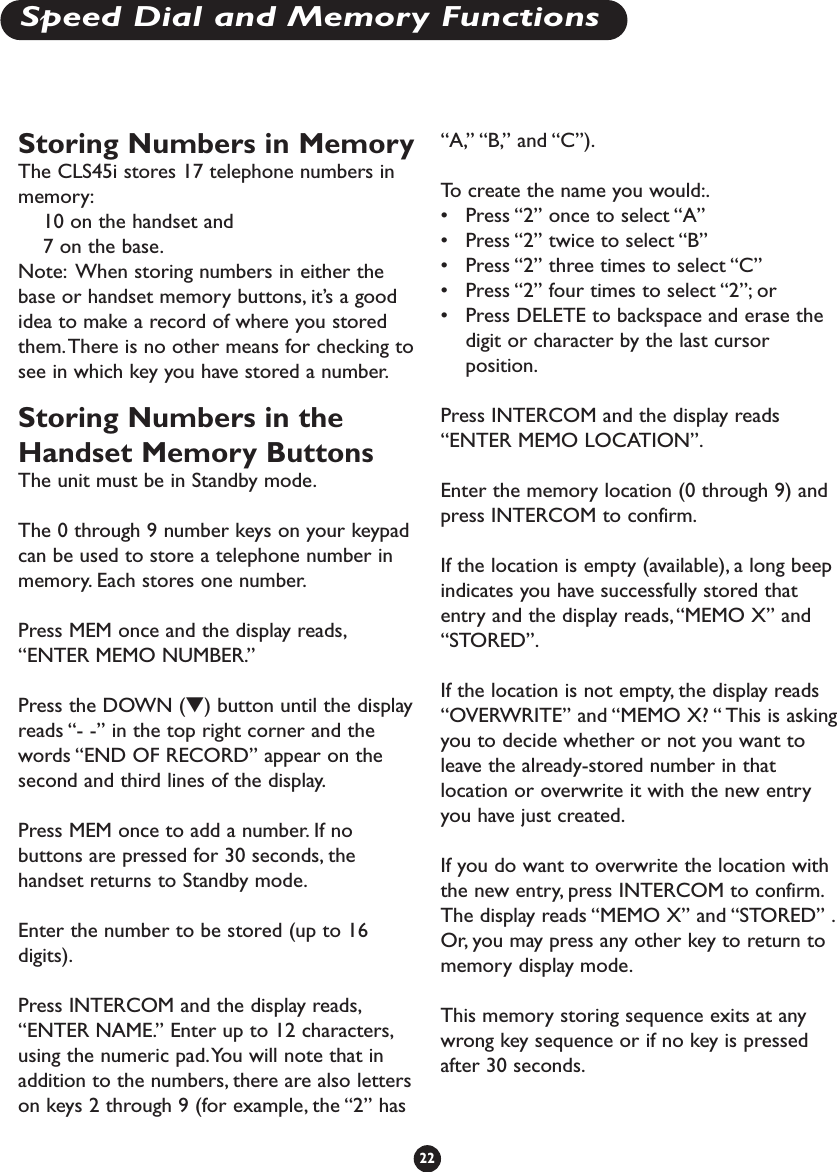
Storing Numbers in MemoryThe CLS45i stores 17 telephone numbers inmemory:10 on the handset and 7 on the base.Note: When storing numbers in either thebase or handset memory buttons, it’s a goodidea to make a record of where you storedthem.There is no other means for checking tosee in which key you have stored a number.Storing Numbers in theHandset Memory ButtonsThe unit must be in Standby mode.The 0 through 9 number keys on your keypadcan be used to store a telephone number inmemory. Each stores one number.Press MEM once and the display reads,“ENTER MEMO NUMBER.” Press the DOWN (▼) button until the displayreads “- -” in the top right corner and thewords “END OF RECORD” appear on thesecond and third lines of the display.Press MEM once to add a number. If nobuttons are pressed for 30 seconds, thehandset returns to Standby mode.Enter the number to be stored (up to 16digits).Press INTERCOM and the display reads,“ENTER NAME.” Enter up to 12 characters,using the numeric pad.You will note that inaddition to the numbers, there are also letterson keys 2 through 9 (for example, the “2” has“A,” “B,” and “C”).To   create the name you would:.•  Press “2” once to select “A”•  Press “2” twice to select “B”•  Press “2” three times to select “C”•  Press “2” four times to select “2”; or•  Press DELETE to backspace and erase thedigit or character by the last cursorposition.Press INTERCOM and the display reads“ENTER MEMO LOCATION”.Enter the memory location (0 through 9) andpress INTERCOM to confirm.If the location is empty (available), a long beepindicates you have successfully stored thatentry and the display reads,“MEMO X” and“STORED”.If the location is not empty, the display reads“OVERWRITE” and “MEMO X? “ This is askingyou to decide whether or not you want toleave the already-stored number in thatlocation or overwrite it with the new entryyou have just created.If you do want to overwrite the location withthe new entry, press INTERCOM to confirm.The display reads “MEMO X” and “STORED” .Or, you may press any other key to return tomemory display mode.This memory storing sequence exits at anywrong key sequence or if no key is pressedafter 30 seconds.22Speed Dial and Memory Functions
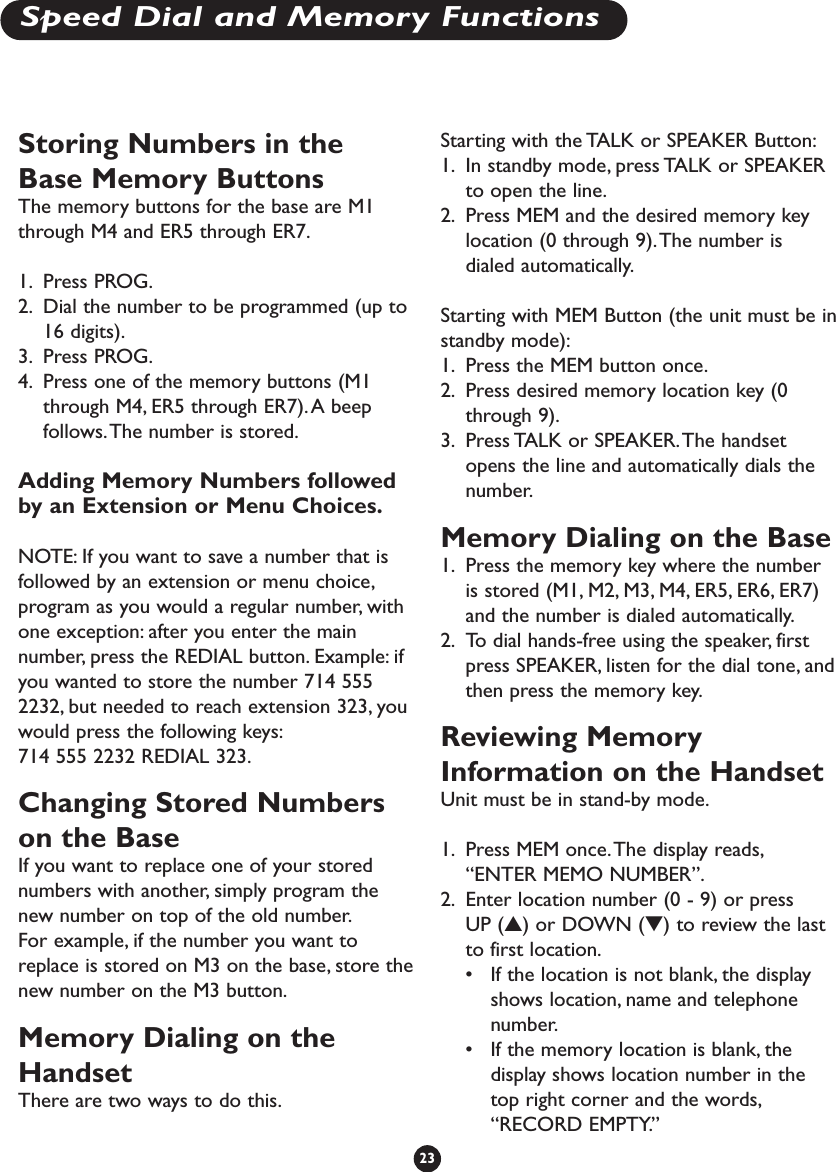
Storing Numbers in theBase Memory Buttons The memory buttons for the base are M1through M4 and ER5 through ER7.1. Press PROG.2. Dial the number to be programmed (up to16 digits).3. Press PROG.4. Press one of the memory buttons (M1through M4, ER5 through ER7).A beepfollows.The number is stored.Adding Memory Numbers followedby an Extension or Menu Choices.NOTE: If you want to save a number that isfollowed by an extension or menu choice,program as you would a regular number, withone exception: after you enter the mainnumber, press the REDIAL button. Example: ifyou wanted to store the number 714 5552232, but needed to reach extension 323, youwould press the following keys:714 555 2232 REDIAL 323.Changing Stored Numberson the BaseIf you want to replace one of your storednumbers with another, simply program thenew number on top of the old number.For example, if the number you want toreplace is stored on M3 on the base, store thenew number on the M3 button.Memory Dialing on theHandsetThere are two ways to do this.Starting with the TALK or SPEAKER Button:1. In standby mode, press TALK or SPEAKERto open the line.2. Press MEM and the desired memory keylocation (0 through 9).The number isdialed automatically.Starting with MEM Button (the unit must be instandby mode):1. Press the MEM button once.2. Press desired memory location key (0through 9).3. Press TALK or SPEAKER.The handsetopens the line and automatically dials thenumber.Memory Dialing on the Base1. Press the memory key where the numberis stored (M1, M2, M3, M4, ER5, ER6, ER7)and the number is dialed automatically.2. To dial hands-free using the speaker, firstpress SPEAKER, listen for the dial tone, andthen press the memory key.Reviewing MemoryInformation on the HandsetUnit must be in stand-by mode.1. Press MEM once.The display reads,“ENTER MEMO NUMBER”.2. Enter location number (0 - 9) or pressUP (▲) or DOWN (▼) to review the lastto first location.•If the location is not blank, the displayshows location, name and telephonenumber.•If the memory location is blank, thedisplay shows location number in thetop right corner and the words,“RECORD EMPTY.”23Speed Dial and Memory Functions
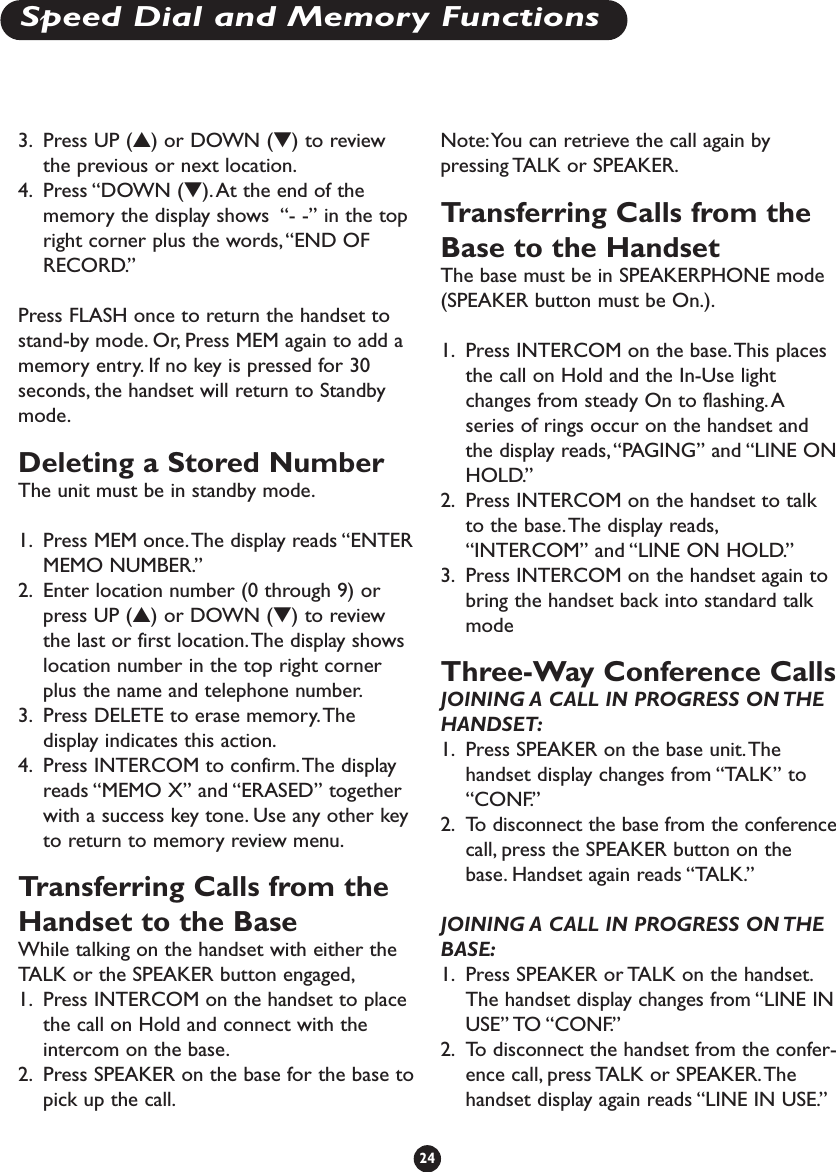
3. Press UP (▲) or DOWN (▼) to reviewthe previous or next location.4. Press “DOWN (▼).At the end of thememory the display shows  “- -” in the topright corner plus the words,“END OFRECORD.”Press FLASH once to return the handset tostand-by mode. Or, Press MEM again to add amemory entry. If no key is pressed for 30seconds, the handset will return to Standbymode.Deleting a Stored NumberThe unit must be in standby mode.1. Press MEM once.The display reads “ENTERMEMO NUMBER.”2. Enter location number (0 through 9) orpress UP (▲) or DOWN (▼) to reviewthe last or first location.The display showslocation number in the top right cornerplus the name and telephone number.3. Press DELETE to erase memory.Thedisplay indicates this action.4. Press INTERCOM to confirm.The displayreads “MEMO X” and “ERASED” togetherwith a success key tone. Use any other keyto return to memory review menu.Transferring Calls from theHandset to the BaseWhile talking on the handset with either theTALK or the SPEAKER button engaged,1. Press INTERCOM on the handset to placethe call on Hold and connect with theintercom on the base.2. Press SPEAKER on the base for the base topick up the call.Note:You can retrieve the call again bypressing TALK or SPEAKER.Transferring Calls from theBase to the HandsetThe base must be in SPEAKERPHONE mode(SPEAKER button must be On.).1. Press INTERCOM on the base.This placesthe call on Hold and the In-Use lightchanges from steady On to flashing.Aseries of rings occur on the handset andthe display reads,“PAGING” and “LINE ONHOLD.” 2. Press INTERCOM on the handset to talkto the base.The display reads,“INTERCOM” and “LINE ON HOLD.”3. Press INTERCOM on the handset again tobring the handset back into standard talkmode Three-Way Conference CallsJOINING A CALL IN PROGRESS ON THEHANDSET:1. Press SPEAKER on the base unit.Thehandset display changes from “TALK” to“CONF.” 2. To disconnect the base from the conferencecall, press the SPEAKER button on thebase. Handset again reads “TALK.”JOINING A CALL IN PROGRESS ON THEBASE:1. Press SPEAKER or TALK on the handset.The handset display changes from “LINE INUSE” TO “CONF.” 2. To disconnect the handset from the confer-ence call, press TALK or SPEAKER.Thehandset display again reads “LINE IN USE.”24Speed Dial and Memory Functions
For your convenience, we have listed somecommon problems that may occur withcordless phones, followed by a list of itemsthat should be checked.Telephone does not work? Check to ensure:•Base is plugged into POWER SOURCE.•Handset is CHARGED.•TONE/PULSE switch is in the right position•TELEPHONE LINE CORD is plugged intoboth he TELEPHONE and the TELEPHONELINE JACK.Range of telephone limited? Check to ensure:•ANTENNA on the base is raised•Base is centrally located in your residence•Base is not located near appliancesNo dial tone? Check to ensure:•Telephone plug is connected to theTELEPHONE LINE•Base is plugged into the POWER SOURCEReceived signal filters or fades? Check to ensure:•Battery pack in HANDSET is fully charged•HANDSET is not too far from the BASE•ANTENNA on BASE is raisedInterference on reception? Check the following:•Noise may be picked up from electricalproducts in the home or electrical storms.Generally, this noise is a minor annoyanceand should not be interpreted as a defectin your system.•Choose an alternate channel usingCHANNEL on the handset.Static? Check to ensure:•That the ANTENNA is not touching anoth-er metal object.•Raise or reposition the ANTENNA on thebase. If, after pressing TALK, you receivethree beeps and no dial tone, check toensure:•Base is plugged into POWER SOURCE.25Troubleshooting
Part 68 of FCC RulesInformationThis CLS45i complies with Part 68 of theFCC rules and the requirements adoptedby the ACTA. On the bottom of thisequipment is a label that contains, amongother information, a product identifier inthe format US:AAAEQ##TXXXX. Ifrequested, this number must be providedto the telephone company.A plug and jack used to connect thisCLS45i telephone to the premises wiringand telephone network must comply withthe applicable FCC Part 68 rules andrequirements adopted by the ACTA.Acompliant telephone cord and modularplug, USOC RJ11C, is provided with thisproduct. It is designed to be connected toa compatible modular jack that is alsocompliant. See installation instructions fordetails.The Ringer Equivalence Number (REN) isused to determine the number of devicesthat may be connected to a telephoneline. Excessive RENs on a telephone linemay result in the devices not ringing inresponse to an incoming call. In most butnot all areas, the sum of RENs should notexceed five (5.0).To be certain of thenumber of devices that may be connectedto a line, as determined by the totalRENs, contact the local telephonecompany. For products approved after July23, 2001, the REN for this product is partof the product identifier that has the for-mat US:AAAEQ##TXXXX.The digitsrepresented by ## are the REN without adecimal point (e.g., 03 is a REN of 0.3).For earlier products, the REN is separatelyshown on the label.If this telephone equipment causes harmto the telephone network, the telephonecompany will notify you in advance thattemporary discontinuance of service maybe required. But if advance notice isn’tpractical, the telephone company willnotify the customer as soon as possible.Also, you will be advised of your right tofile a complaint with the FCC if youbelieve it is necessary.The telephone company may makechanges in its facilities, equipment, opera-tions or procedures that could affect theoperation of the equipment. If this happensthe telephone company will provideadvance notice in order for you to makenecessary modifications to maintain unin-terrupted service.If trouble is experienced with this tele-phone equipment, for repair or warrantyinformation, please contact Ameriphone,800-874-3005. If the equipment is causingharm to the telephone network, the tele-phone company may request that you26Regulatory ComplianceImportant Information for Customers
disconnect the equipment until the problemis resolved.This telephone equipment is not intendedto be repaired and it contains norepairable parts. Opening the equipmentor any attempt to perform repairs willvoid the warranty. For service or repairs,call 1-800-874-3005.Connection to party line service is subjectto state tariffs. Contact the state publicutility commission, public service commis-sion or corporation commission forinformation.If your home has specially wired alarmequipment connected to the telephoneline, ensure the installation of this tele-phone equipment does not disable youralarm equipment. If you have questionsabout what will disable alarm equipment,consult your telephone company or aqualified installer.This telephone equipment is hearing aidcompatible.We recommend the installation of an ACsurge arrester in the AC outlet to whichthis equipment is connected.The telephonecompanies report that electrical surges,typically lighting transients, are verydestructive to customer terminal equip-ment connected to AC power sourcesCustomer-OwnedCoin/Credit Card PhonesTo   comply with state tariffs, the telephonecompany must be given notification priorto connection. In some states, the statepublic utility commission, public servicecommission or corporation commissionmust give prior approval of connection.Part 15 of FCC RulesInformationThis device complies with part 15 of theFCC Rules. Operation is subject to thefollowing two conditions:1. This device may not cause harmfulinterference, and 2. this device must accept any interfer-ence received, including interferencethat may cause undesired operation.Your telephone equipment has beentested and found to comply with thelimits of a Class B digital device, pursuantto Part 15 of FCC rules.These limits aredesigned to provide reasonable protectionagainst harmful interference in residentialinstallation.This equipment generates, uses, and canradiate radio frequency energy and, if notinstalled and used in accordance with theinstructions, may cause harmful interfer-ence to radio communications. However,there is no guarantee that interference27
will not occur in a particular installation; ifthis equipment does cause harmful inter-ference to radio or television reception,which can be determined by turning theequipment off and on, you are encouragedto try to correct the interference by oneof the following measures:1. Where it can be done safely, reorientthe receiving television or radioantenna.2. To the extent possible, relocate thetelevision, radio or other receiverwith respect to the telephone equip-ment. (This increases the separationbetween the telephone equipmentand the receiver)3. Connect the telephone equipmentinto an outlet on a circuit differencefrom that to which the television,radio, or other receiver is connected.4. Consult the dealer or an experiencedradio/TV technician for help.CAUTION: Changes or modificationsnot expressly approved by the manufac-turer responsible for compliance couldvoid the user’s authority to operate theequipment.THE PARTY RESPONSIBLE FOR PROD-UCT COMPLIANCE:Ameriphone Products by Walker®,A Division of Plantronics, Inc.12082 Western AvenueGarden Grove, CA 92841Telephone: 800-874-3005Industry Canada TechnicalSpecificationsThis product meets the applicableIndustry Canada technical specifications.Before installing this equipment, usersshould ensure that it is permissible to beconnected to the facilities of the localtelecommunications company.The equip-ment must also be installed using anacceptable method of connection. In somecases, the company's inside wiring associ-ated with a single line individual servicemay be extended by means of a certifiedconnector assembly (telephone extensioncord).The customer should be aware thatcompliance with the above conditions maynot prevent degradation of service insome situations.Repairs to certified equipment should bemade by an authorized Canadian mainte-nance facility designated by the supplier.Any repairs or alterations made by theuser to this equipment, or equipmentmalfunctions, may give the telecommunica-tions company cause to request the userto disconnect the equipment.Users should ensure for their own pro-tection that the electrical ground connec-tions of the power utility, telephone linesand internal metallic water pipe system, ifpresent, are connected together.This28Regulatory ComplianceImportant Information for Customers (continued)
precaution may be particularly importantin rural areas.CAUTION: Users should not attempt tomake such connections themselves, butshould contact the appropriate electricinspection authority, or electrician, asappropriate.The Ringer Equivalence Number is anindication of the maximum number ofterminals allowed to be connected to atelephone interface.The termination onan interface may consist of any combina-tion of devices subject only to therequirement that the sum of the RingerEquivalence Numbers of all the devicesdoes not exceed five.[The term "IC:" before thecertification/registration number onlysignifies that the Industry Canadatechnical specifications were met.]29
Warranty ProcedureThis warranty applies only to Ameriphone productsthat are purchased and used in the United States orCanada.Ameriphone warrants the CLS45i CordlessAmplified Telephone against any defect in materialsor workmanship for the period of one year fromthe date of purchase.If your Ameriphone telephone is defective andreturned within 30 days of the date of purchase,your Ameriphone dealer will replace it at no charge.If returned after 30 days but within one year fromthe date of purchase, we will repair or replace it atno charge. In the repair of your CLS45i CordlessAmplified Telephone, we may use new or recondi-tioned replacement parts. If we elect to replaceyour CLS45i Cordless Amplified Telephone, we mayreplace it with a new or reconditioned product ofthe same or similar design. Repair or replacementwill be warranted for either 90 days or the remainingtime on the original warranty period, whichever islonger.Implied warranties, including those of fitness for aparticular purpose and merchantability (an unwrit-ten warranty that the product is fit for ordinaryuse), are limited to one year from date of purchase.We  will not pay for loss of time, inconvenience, lossof use of your CLS45i Amplified Telephone, orproperty damage caused by your CLS45i AmplifiedTelephone or its failure to work, or any otherincidental or consequential damages.Some states do not allow limitations on how longan implied warranty lasts or the exclusion ofincidental or consequential damages, so the aboveexclusions or limitations may not apply to you.To   get warranty service for your CLS45i CordlessAmplified Telephone, you must provide proof of thepurchase date.Within 30 days of the date of purchase, return yourCLS45i Cordless Amplified Telephone to the placewhere you purchased it for immediate replacement.After 30 days, call Ameriphone at 800-874-3005voice or 800-772-2889 TTY for the authorizedservice center nearest you.You must prepay allshipping costs.We suggest you save the originalpackage materials in the event you need to ship theCLS45i Cordless Amplified Telephone.When shipping for warranty repair, include yourname, address, phone number, proof of date of pur-chase, and a description of the problem. Afterrepairing the product, we, (or the service center)will ship it back to you at no cost within the UnitedStates and Canada. CANADIAN RESIDENTS: callAmeriphone at 800-874-3005, 800-772-2889 TTYfor instructions.This warranty does not coverdefects resulting from accidents, damage while intransit to our service location, alterations, unautho-rized repair, failure to follow instructions, misuse,use outside the United States or Canada, fire, flood,and acts of God. Nor do we warrant the productto be compatible with any particular telephoneequipment, party line, key telephone systems ormore sophisticated switching systems. If yourCLS45i Cordless Amplified Telephone is not coveredby this warranty, call us at 800-874-3005 voice or800-772-2889 TTY for advice as to whether we willrepair your CLS45i Cordless Amplified Telephoneand other repair information.The repair shall bewarranted for 90 days.30
31Product SpecificationsCLS•45i Dual Speaker Cordless Amplified TelephoneOperates on analog telephone linesAmplificationIncoming up to 40dBElectricalAdapter Class 2 transformerInput 120V AC 60Hz Output 9V DC 500mAJacks Handset Base3.5mm remote input3.5mm audio output2.5mm headset3.5mm speaker outputBattery Specifics Handset BaseOperating BackupNumber  1 battery pack (3 cell) 4Size 2/3 AA AAType 3.6V 750mAh NiMH  AlkalineFeatures and Specifications subject to change without notice.
12082 Western Avenue, Garden Grove, CA  92841(800) 874-3005 VOICE(800) 772-2889 TTY (714) 897-4703 FAXemail:ameriphonecs@plantronics.com website: www.ameriphone.comAmeriphone® products are manufactured by Walker®, a division of Plantronics, Inc.© 2003 Plantronics, Inc.All rights reserved.Ameriphone, Amplifying Your Life, Plantronics and Walker are trademarks orregistered trademarks of Plantronics, Inc.

Navigation menu