Classic Tech Development HP1294-001R Wireless Headphone Receiver User Manual
Classic Tech Development Ltd Wireless Headphone Receiver
User Manual
SP1290
(SP1291 + SP1292 + HP1294)
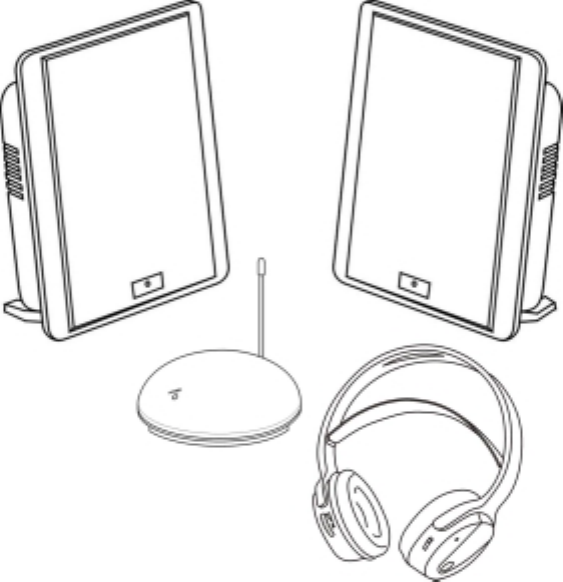
900MHz Wireless Combo Speaker
with Headphone
P.1
User’s Manual
Please read before using the equipment

P.2
INTRODUCTION
This 900 MHz wireless combo speaker system with headphone uses the latest
wireless technology that enables you to enjoy music and TV sound anywhere inside
your home. You can simply connect the system to any audio source such as Radio,
TV, VCR, Hi-Fi and CD/MP3/VCD/DVD player. Without complicated wiring and
installation with your Audio/Video equipments and rear channel amplifier, the
system enables you to enjoy thrilling, lifelike sound in minutes.
FEATURES
1. Automatic Phases Lock Loop (PLL) scanning system on speakers.
2. Automatic Phases Lock Loop (PLL) scanning system on headphone.
3. Phase Lock Loop (PLL) transmission system on transmitter.
4. 900 MHz RF technology.
5. Operating distance up to 150 feet for both speakers and headphone.
6. No line of sight limitation.
7. Virtually interference free audio quality.
8. Auto ON/OFF control on the transmitter.
9. Auto-scan function on speakers.
10. Auto-scan function on headphone
IMPORTANT SAFETY INFORMATION
1. Read and understand all the instructions before using the product.
2. Follow all the warning and instructions.
3. Before placing headphones on head, ensure that the volume is at a comfortable
level.
4. Reduce the volume or discontinue use if you experience a ringing in your ears.
5. Do not use liquid or aerosol cleaners. Use a damp cloth for cleaning. If necessary,
use a mild soap.
6. Do not use this product near water, for example, near a bathtub or laundry tub, in
a wet basement, or near a swimming pool.
7. Avoid exposing this product to high heat from any source.
P.3
8. Do not place this product on an unstable cart, stand or table. The product may fall,
causing serious damage.
9. Do not allow anything to rest on the AC/DC adapter cord or AUDIO IN cable. Do
not place this product where the cord can be abused by animals or people walking
on it.
10. Never push objects of any kind into this product through the cabinet slots as
they may touch dangerous voltage points or short cut parts that could result in a risk
of fire or electric shock. Never spill any kind of liquid on the product.
11. To reduce the risk of electric shock, do not disassemble this product. Opening or
removing covers may expose you to dangerous electric shock when the product is
subsequently used.
12. Do not attempt to repair, or modify the product. Take it to a qualified service
center when service is required.
13. Unplug this product from the wall outlet and refer to qualified service personnel
under the following conditions:
a. If liquid has been spilled into the product.
b. If the product has been exposed to rain or water.
c. If the product does not operate normally by following the operating
instructions. Adjust only the controls that are covered by the operating
instructions because improper adjustment of other controls may result in
damage if the product has been dropped or the cabinet has been
damaged.
P.4
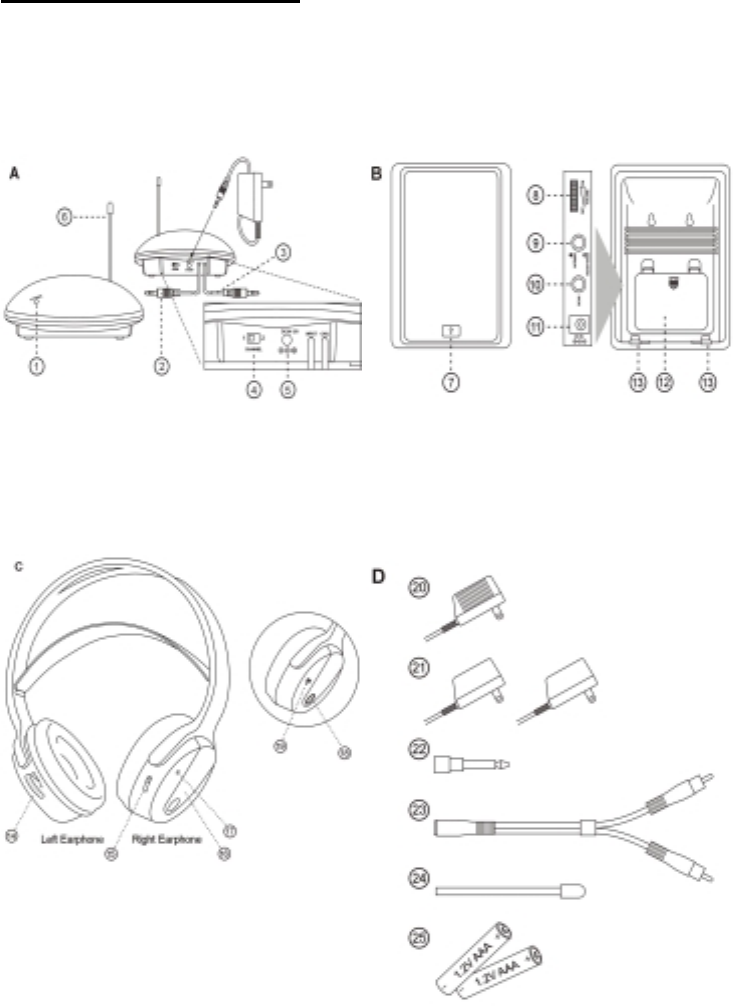
COMBO SYSTEM PART LIST
DIAGRAMS & NUMBERING
A) TRANSMITTER
B) SPEAKER RECEIVER
C) HEADPHONE RECEIVER
D) ACCESSORIES

P.5
COMBO SYSTEM PART LIST IDENTIFICATION
Parts Identification:
A: Transmitter
1. Power On/Off Indicator.
2. Audio cable.
3. Charging cable.
4. Channel selector (channel 2-1)
5. DC IN socket.
6. Antenna.
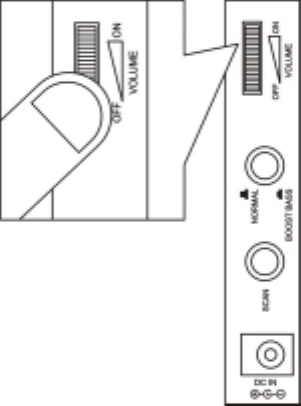
B. Speakers
7. Power ON/Off Indicator.
8. Volume control/ Power ON/OFF.
9. Normal/Boost Bass.
10. Auto Scan Button.
11. DC IN socket.
12. Battery Door.
13. Supporting Stands.
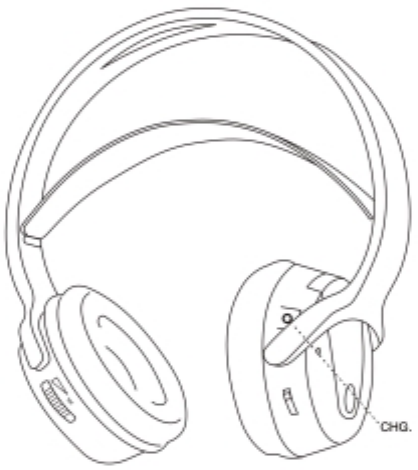
C. Headphone
14. Volume Control.
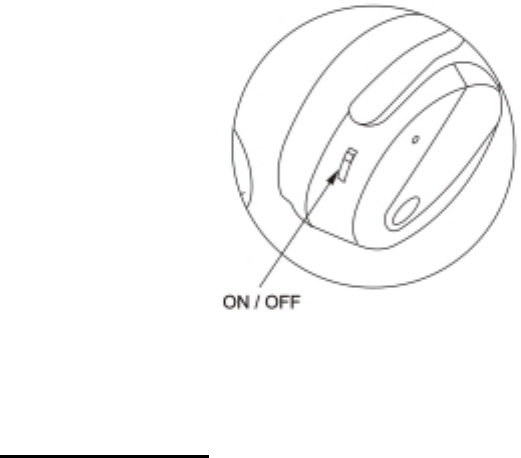
15. ON/OFF Control.
16. Battery compartment.
17. Power LED indicator.
18. Auto-Scan Control.
19. Auto-Scan LED indicator.
20. Charging jack.
D. Accessories
21. AC/DC adapter (1 x 12.5V 150mA for transmitter).
22. AC/DC adapter (2 x 12V 500mA for speakers).
23. 3.5mm to 6.3 mm adapter plug.
24. RCA adapter.
25. Antenna tube.
P.6
26. Two rechargeable batteries (AAA size).
INSTALLATION
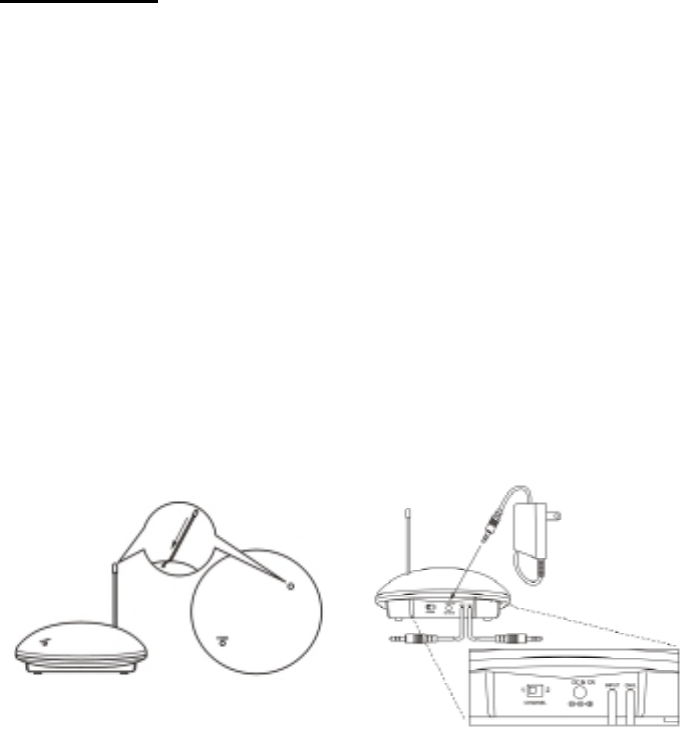
TRANSMITTER
1. Insert the antenna tube into the antenna wire.
2. Connect the supplied AC/DC power adapter to an electrical wall outlet.
3. Plug the AC/DC power adapter in the DC jack located on the rear of the
transmitter.
4. The rear of the transmitter has one audio cord that can be connected to audio
output jack of TV, Monitor, VCR, Radio recorder, CD/MP3/VCD/DVD players or
to headphone/earphone jack with the connector provided.
Plug the adapter in the AC source and connect the audio plug to the audio source.
As soon as the transmitter is receiving the audio signal, it will automatically switch
on and the green LED will light up.
SPEAKER RECEIVER
1. Insert 6 pieces “AA” size ALKALINE battery into the battery compartment with
correct polarity at the rear of the speaker OR connect the 12V power adapters
to the DC input jacks on the rear of each speaker, then plug it to the wall AC
outlet.
2. Press On/Off button and turn the speaker ON. The POWER LED will light up in
red. Switch off the speaker by pressing the ON/OFF button on the speaker, and
the LED will be off.
P.7
WIRELESS HEADPHONE
1. Open the battery compartment cover on the right side of the headphone.
2. Insert 2pcs of AAA size rechargeable batteries (supplied in the package) by
matching the + and – on the battery to the diagram inside the battery
compartment.
3. Close the battery compartment by sliding the battery compartment cover back
into place.
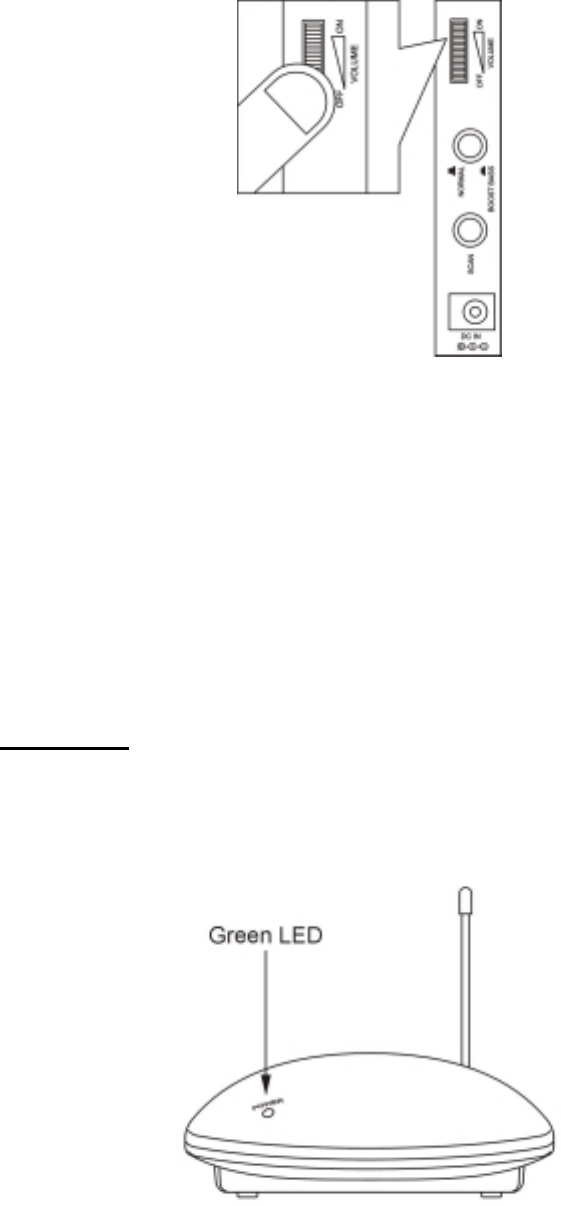
OPERATION
-Turn on the audio source (TV or audio component) to which the transmitter is
connected with. The red LED on the transmitter will light up.
-Select the channel 1 or 2 of the transmitter.
P.8
For Speakers
1. Turn on the ON/OFF button on the speakers. Press the “AUTO-SCAN” button to
get the best tuning reception in the speakers. When the button is pressed,
frequency tuning starts automatically and it stops when a signal is detected.
2. Volume can be adjusted up by tuning the volume knob on the right sides of the
speakers to the desired listening level.
3. Whenever you find frequency jam, move your channel switch from one channel
to the other channel (there are two channels for selection) on the transmitter,
and then press the “AUTO-SCAN” button on the speakers again.
4. Using the Normal/Bass Boost control to amplify the bass sound of the speakers
to your personal preference.
For Headphone
1. Place the headphone On/Off switch in the On/position. The Power LED will
illuminate.
2. Before placing the headphone on your head, make sure the headphone is not at
high volume, as such use can cause serious damage to your hearing. To obtain
the desired sound level, you can adjust the volume control on the headphone.
3. Whenever you find frequency jam, move your channel switch from one channel
to the other channel (there are two channels for selection) on the transmitter,
P.9
and then press the “AUTO-SCAN” button on the headphone again.
4. . Charging the Batteries
a) Move the ON/ OFF switch on the headphones to OFF.
b) Plug the charging cable on one end into the jack marked CHG at the back
of the wireless transmitter (as shown in the picture below). Plug the other
end of the charging cable into the jack marked CHG. on the headphones.
c) The charging process will start automatically and the power LED on the
transmitter will change from red to green.
Important:
1. Only use the included rechargeable AAA batteries. When the headphones are
not in use, ensure the power is switched to the OFF position to avoid damaging
the batteries.
2. Make sure the headphone is turned off when charging the batteries
3. To ensure a long service life, fully charge the rechargeable batteries before
using the headphone for the first time. The initial charge takes 24 hours to
complete.
5. Switching Off
a) For protection of the transmitter and power saving, the transmitter will cut
off automatically if there is no/weak operation input signal from audio
P.10
source for 4 minutes.
If the audio signal comes back, the transmitter will turn on automatically.
b) Turn off the speaker by tuning the volume control the OFF position.
c) Turn off the headphone by switching the On/Off control.
TROUBLE SHOOTING
NO SOUND
- Ensure the AC/DC adapter is fully inserted into the AC outlet and the
power connection input on the transmitter.
- Ensure the speakers/headphone is switch ON.
- Speaker’s battery capacity is low, connect the AC/DC adapter to the
speakers.
- Headphone’s battery is low, recharge the batteries.
- Ensure the TV or audio component is ON.
- The volume of speakers/headphone is too low, adjust the volume to an
appropriate level.
DISTORTED
- Press the “AUTO-SCAN” button on the speakers/headphone until
P.11
matching the frequency of the transmitter.
- Change the position of the channel selector on the transmitter. Press
the “AUTO-SCAN” button on the speaker/headphone.
- Ensure the volume level of speakers/headphone is adjusted properly.
- The speakers/headphone is too far away from the transmitter, move it
closer.
- The audio input level of the audio signal is too low. Turn up the volume
of the audio source equipment.
- The audio input level of the transmitter is too high, lower the volume of
the audio source equipment.

P.12
TECHNICAL SPECIFICATIONS
Transmission Mode : UHF stereo
Carrier Frequency : 900 MHz
Operation Voltage : Transmitter, DC 12.5V 150mA
Speaker, 6 x AA size Alkaline batteries (not
included) or 12V 500mA 2x AC/DC adapters
(included)
Headphones, 2 x AAA size Rechargeable
batteries (included)
Frequency Response : 40Hz – 12KHz
Distortion : 1%
S/N Ratio : 65dB
Operation Distance : Up to 150 feet
WARNING : Changes or modifications to this unit not expressly approved by the
party responsible for compliance could void the user’s authority to
operate the equipment. Operation is subject to the following two
conditions: (1) this device may not cause interference, and (2) this
device must accept any interference, including interference that
may cause undesired operation of the device.
This device must be used with the AC/DC adapters supplied in
the package.