Clicka XCA01 Action Camera User Manual ACTIVEON SOLAR XG UM v1 0 5
Clicka Holdings, Inc. Action Camera ACTIVEON SOLAR XG UM v1 0 5
Clicka >
Users Manual
USER MANUAL
www.activeon.com

1
2
4
5
6
7
8
10
12
14
17
17
18
18
20
21
22
23
96
96
97
98
※ CAUTION
※ FCC RADIO FREQUENCY INTERFERENCE STATEMENT
※ RF Exposure Information (SAR)
※ Warranty
Table of Contents
1. Name of each part
2. How to use
3. Start the camera
4. LCD screen shot
5. Graphical icon description
6. Mode menu
7. Video mode
8. Photo mode
9. Playback mode
10. Setup mode
11. Quick menu
12. Recharging Battery
13. Smart phone control
14. Connect ACTIVEON SOLAR XG to smartphone(using ACTIVEON HUB)
15. Transferring data to computer
16. Firmware update
17. Features and specication
18. Inside the Package
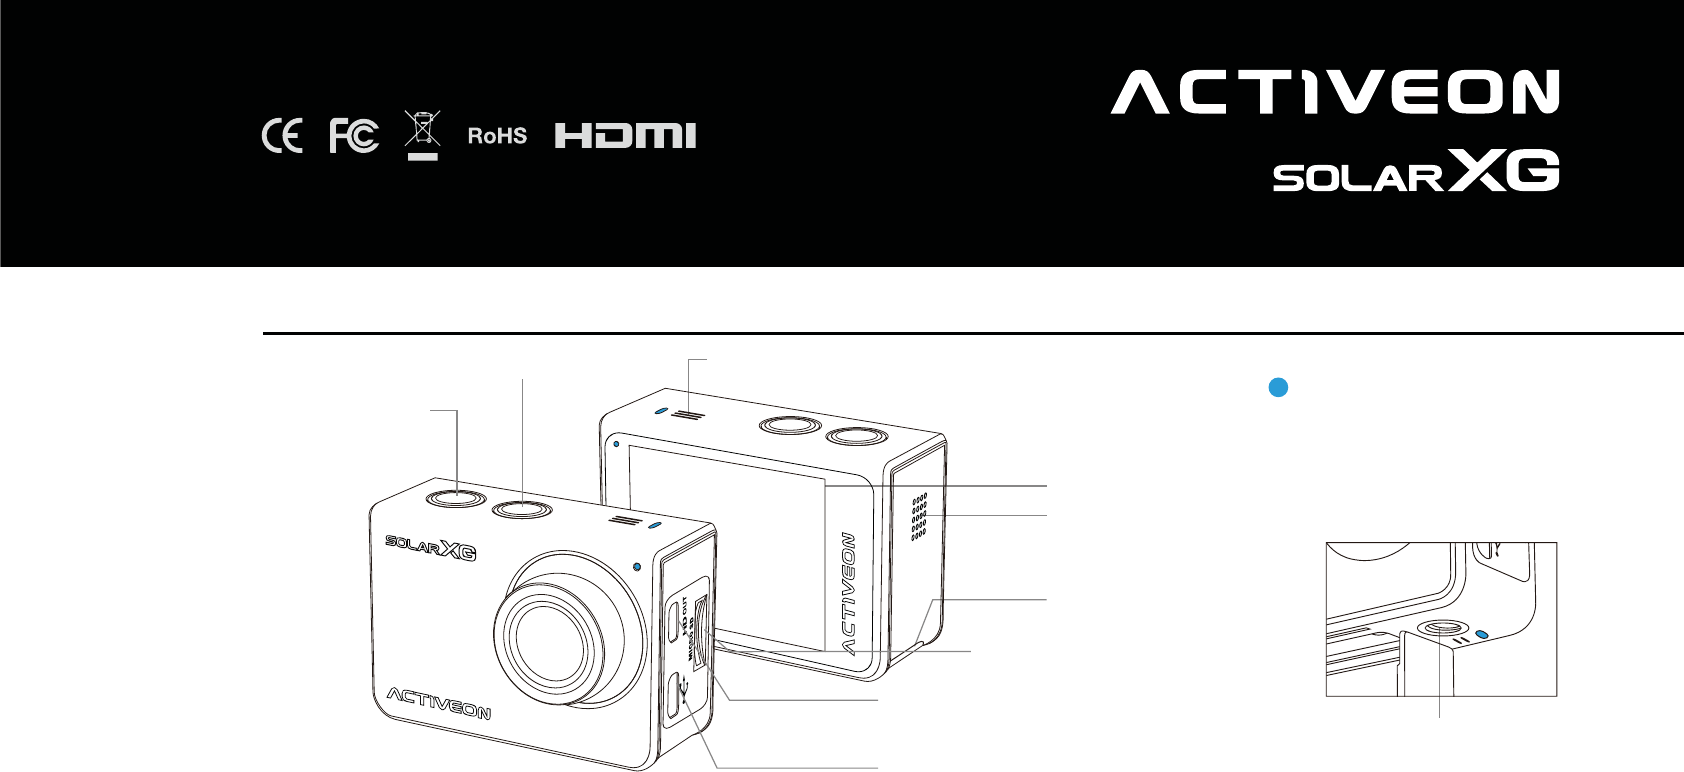
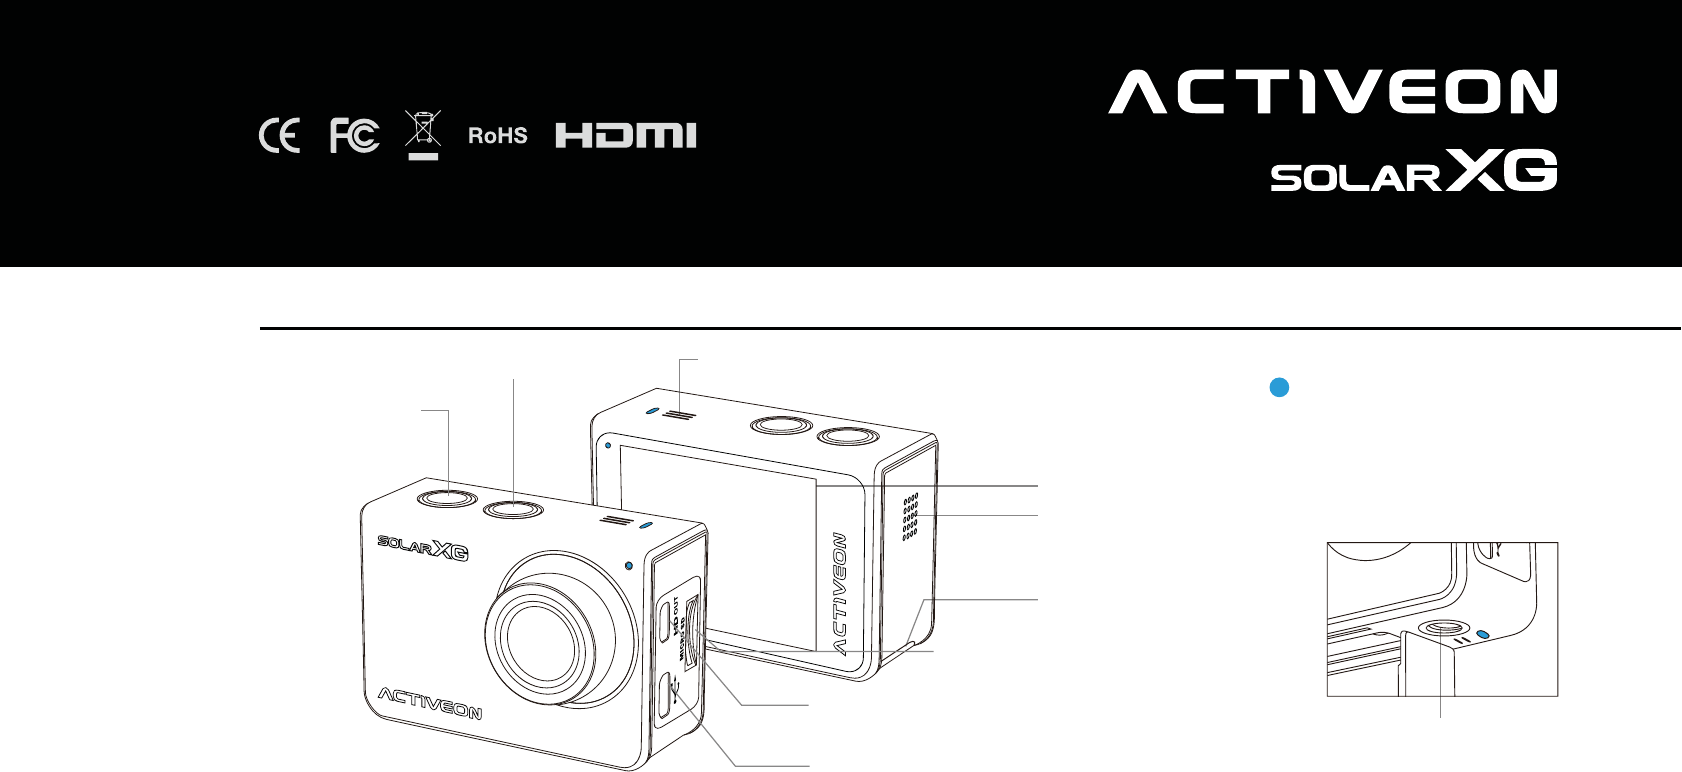
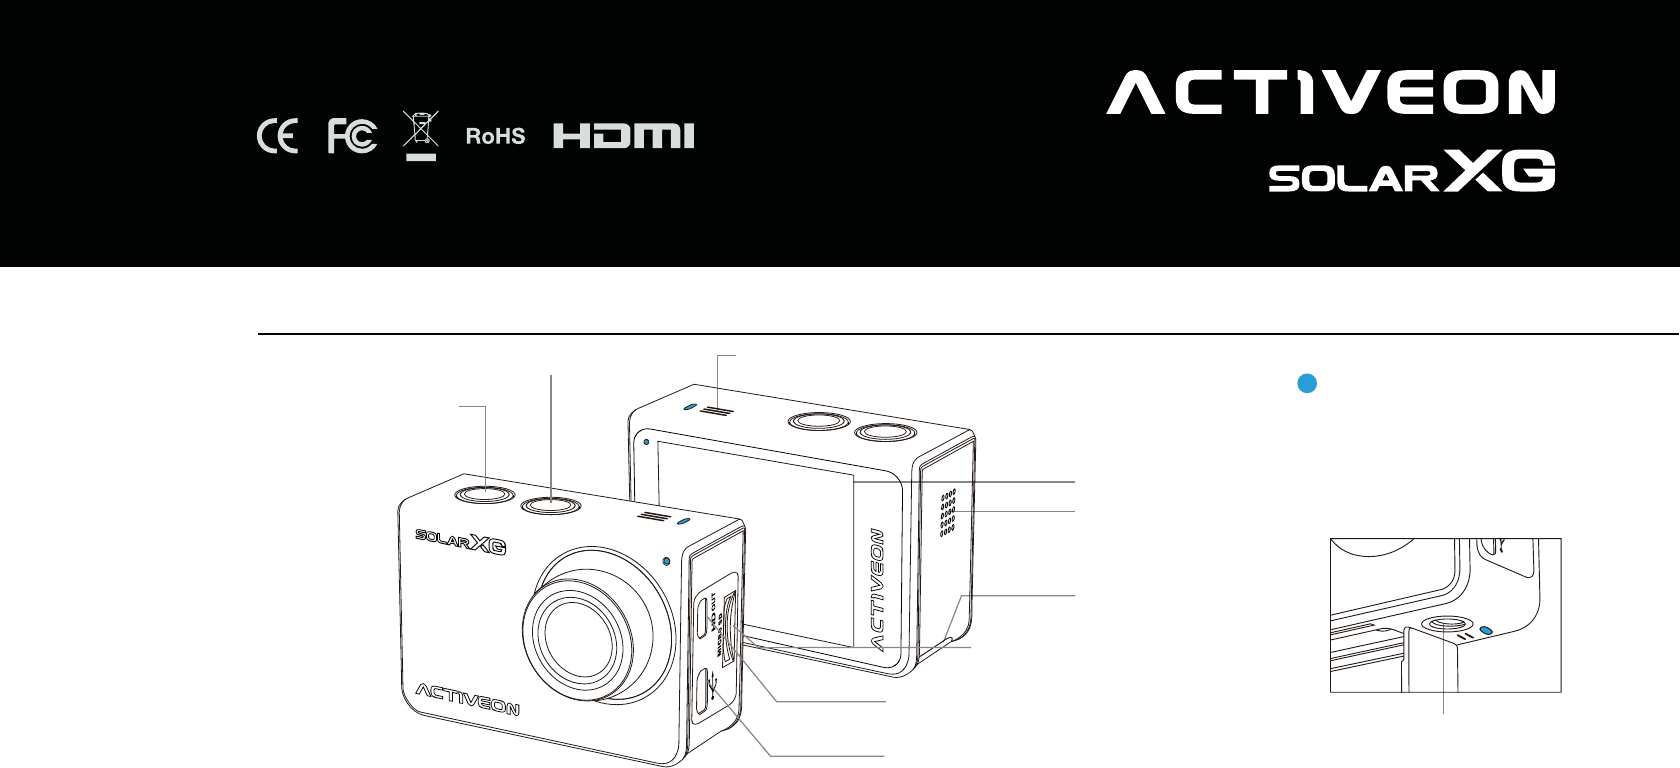
1. Name of each part
1
ENGLISH
LED Indicator
(Top, Bottom, Front, Back)
Tripod hole (Bottom)
Mode / Navigation Internal MIC
Power / Shutter
LCD Screen
Li-ion battery slot
HD OUT
* Please use “Micro HDMI" cable on HD OUT port.
* Cable not included.
Mini-B USB port
microSD Card Slot
Speaker
www.activeon.com
* Please read this manual carefully before use!
2
2. How to use
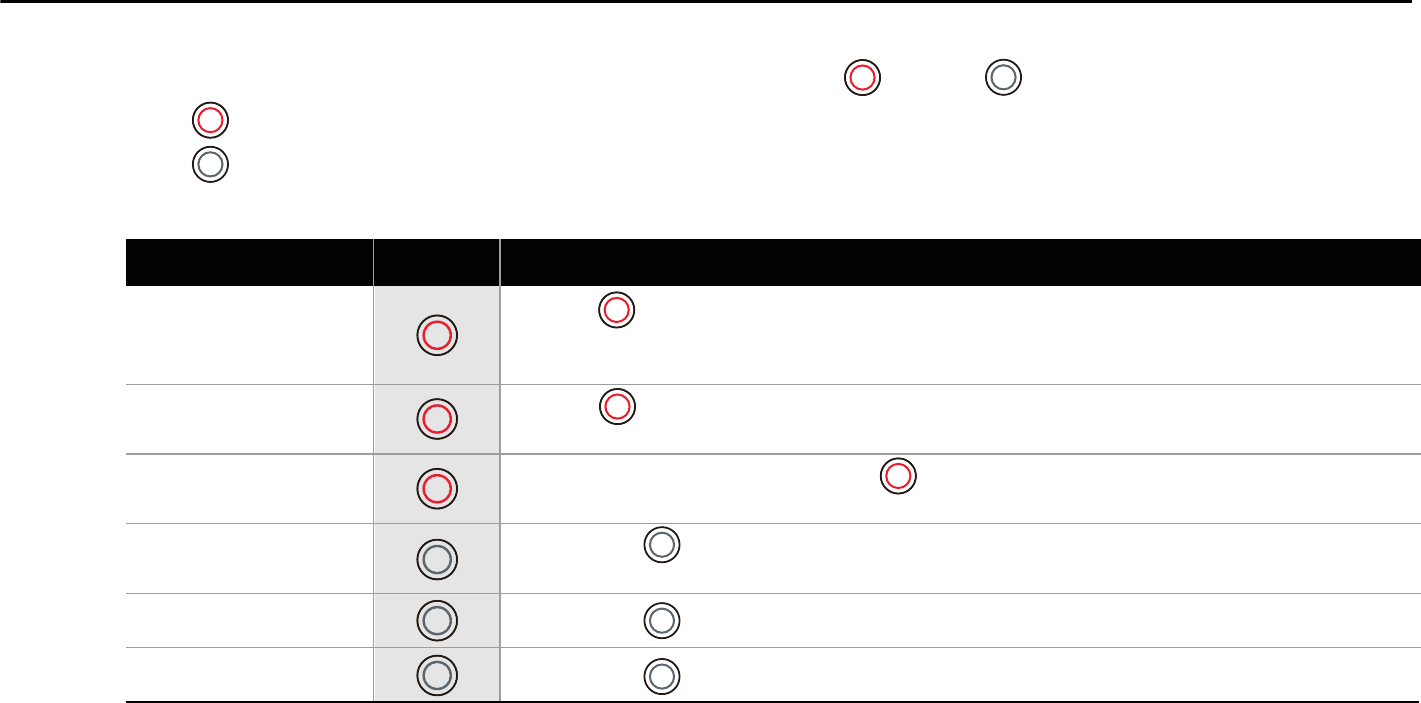
● ACTIVEON SOLAR XG IS OPERATED BY TWO BUTTONS. ( button, button )
● BUTTON FEATURES “ Power, Shutter and Enter”.
● BUTTON FEATURES ” Mode change, Program change and Navigator”.
● The feature of buttons are dened as below table.
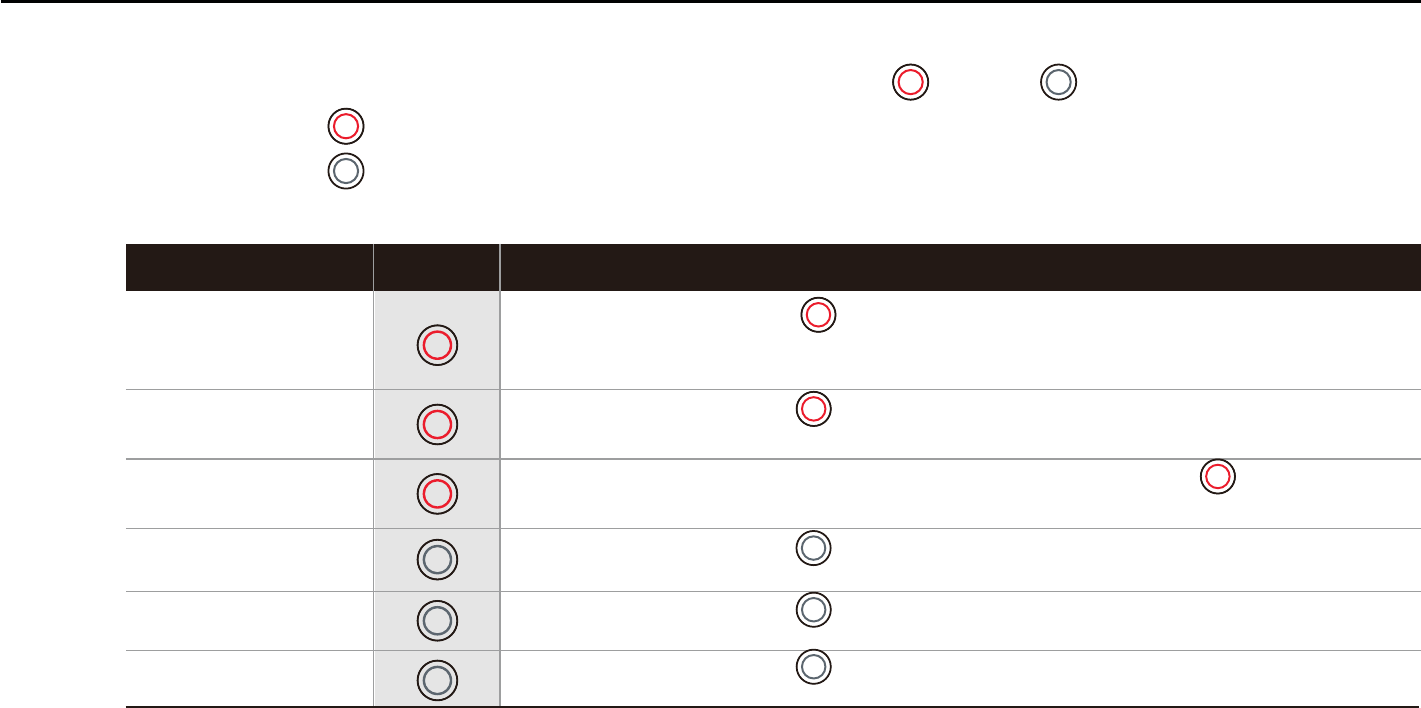
Button operation
Press ( button to start video recording or photo shoot
(Video / Photo / Burst / Timelapse)
Power On / O
REC Start / Stop
Conrm
setting menu
Function Button Description
Within user setup mode, press (button to enter setting
menu in each category
Press ( ) button and hold for 2 seconds
* If Auto Power o is set, the camera will automatically shut down when there is no operation.
(Auto Power O option is O / 5 / 10 / 30mins)
Mode change
Navigator
Program mode
Press the ( ) button to switch modes
(Video> Photo>Playback>Setup)
Press the ( ) button and hold for 2 seconds to enter Program mode
Press the ( ) button to move select bar on OSD menu or change setting

3
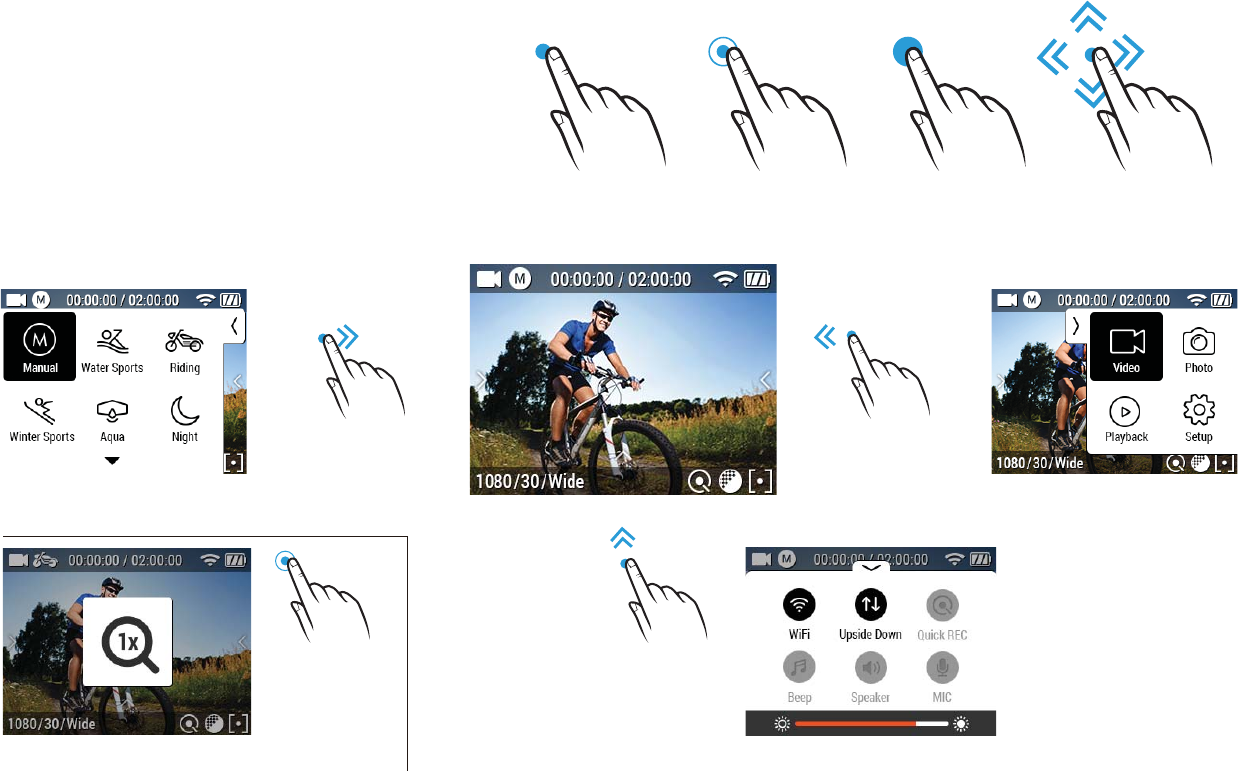
● If you want to use the SOLAR XG display
responds to touch-based gestures like
tapping and swiping.
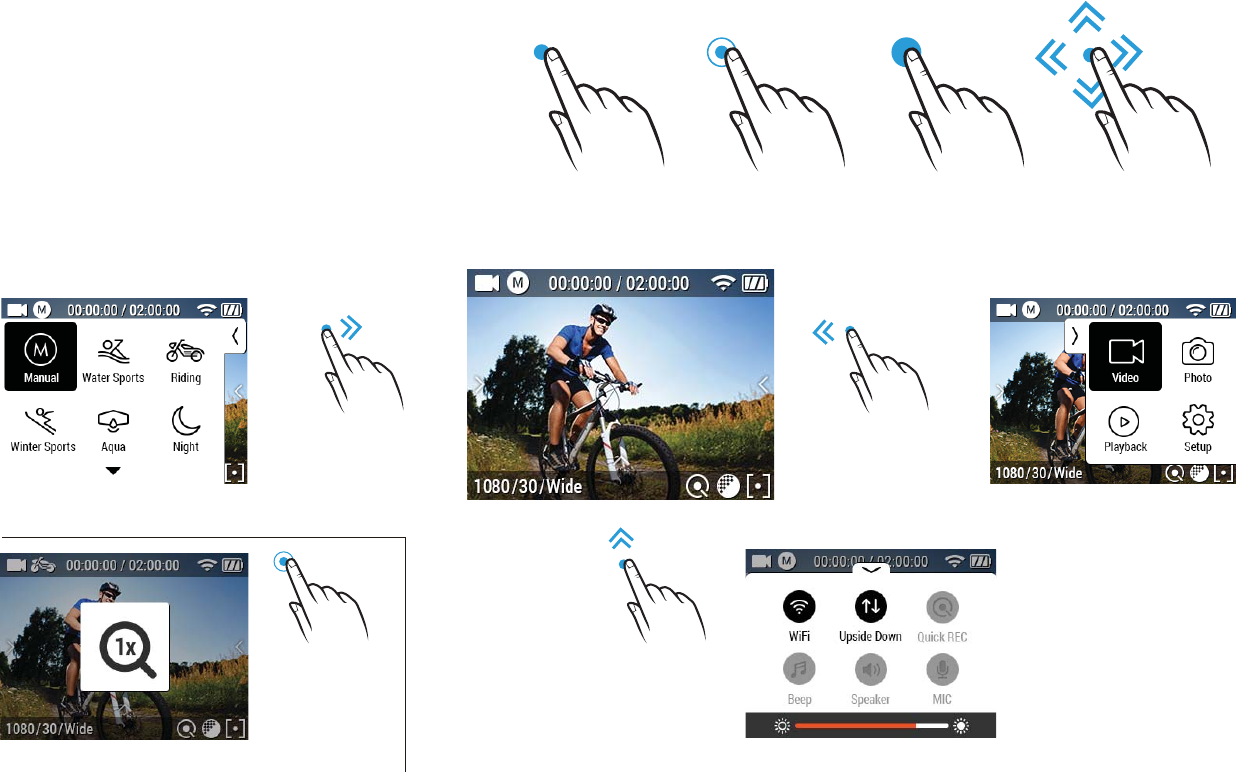
Touch operation
Tap Tap & Hold
Double-Tap Swipe up
Swipe down
Swipe left
Swipe right
Double-Tap
● You can easily access the menu
Swipe Up
Swipe leftSwipe Right
<Program menu>
<Quick menu>
<Mode menu>
<Zoom>
4
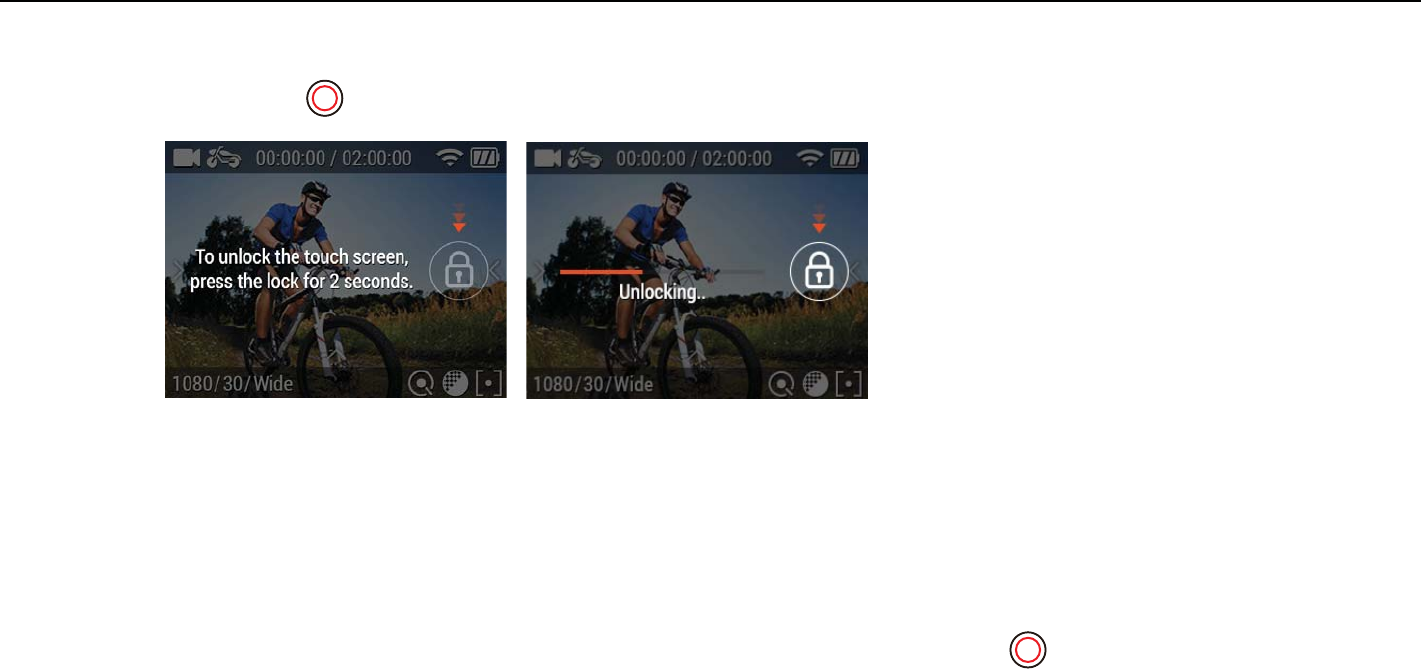
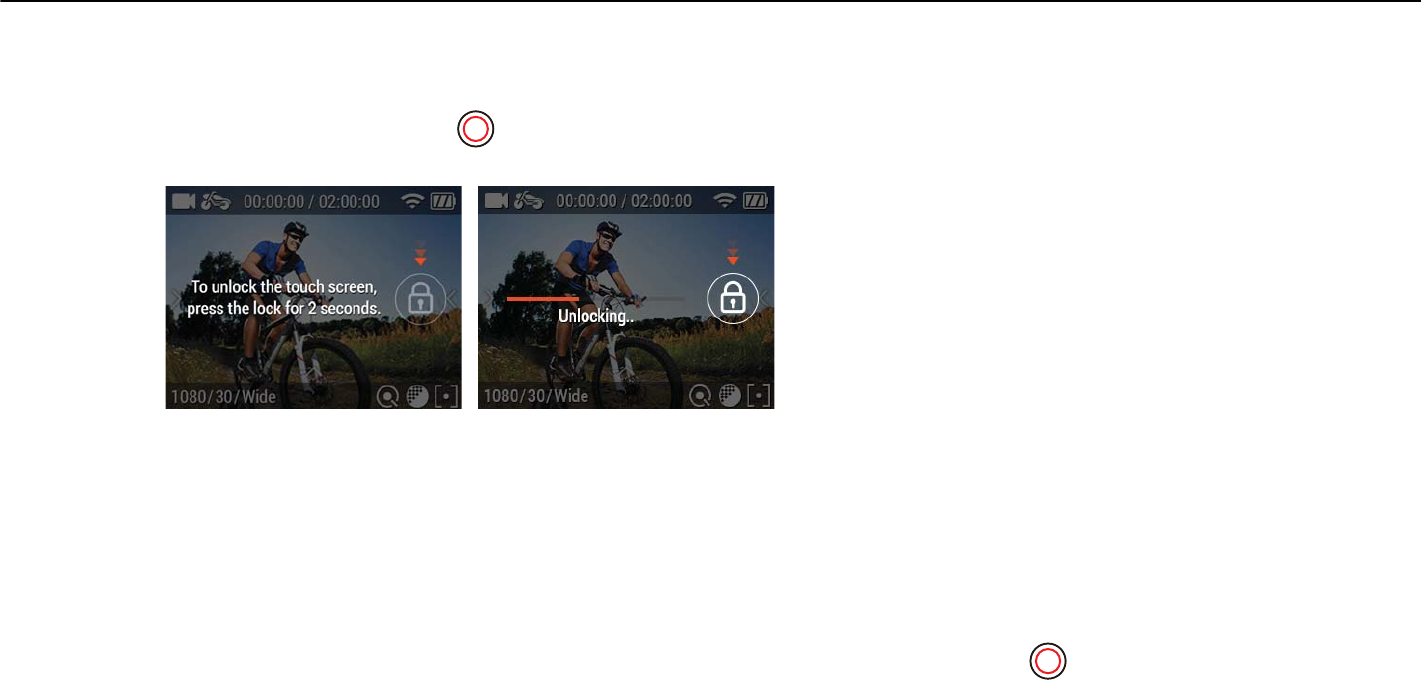
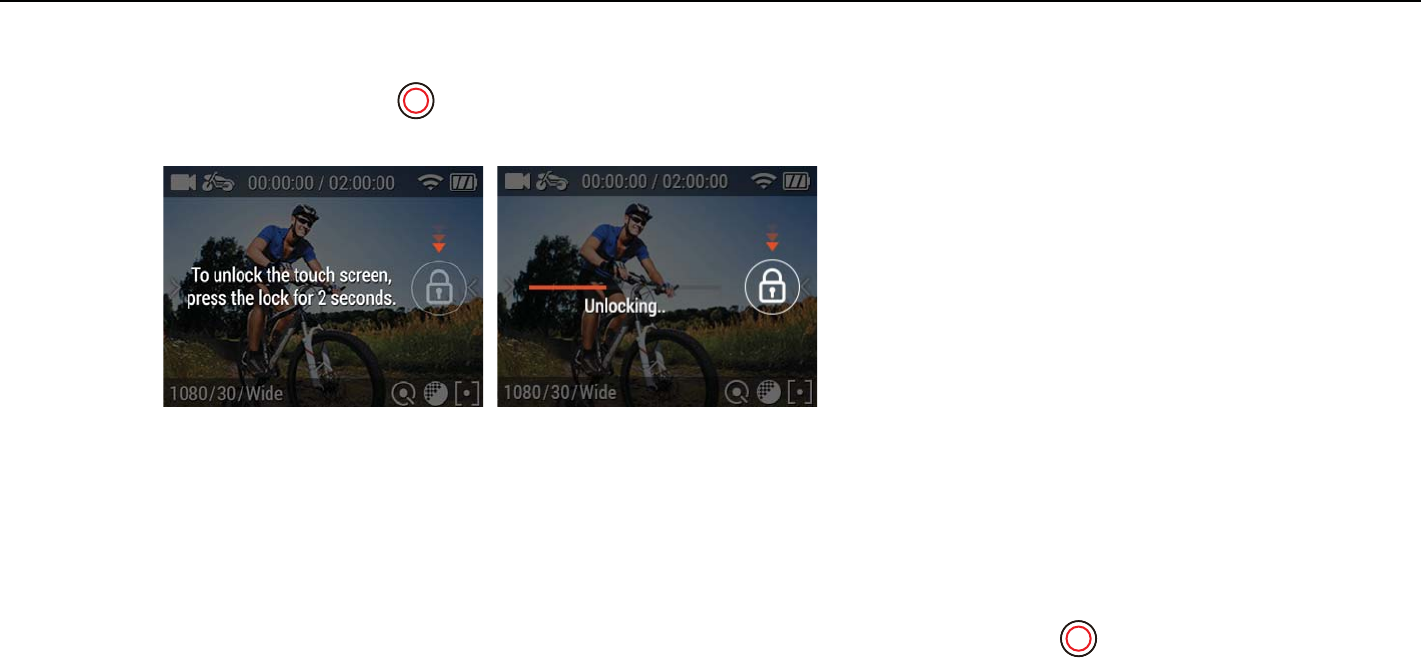
How to unlock the Touch operation
● SOLAR XG includes special power saving features.
1. Auto Backlight Dimming : When you set [Auto LCD O], auto backlight dimming will start at mid-
point of your setting time.
2. Quick LCD OFF : [During video recording] Tap and hold the screen for 2-3 seconds. LCD will go o automatically.
* For turning on the LCD again, please press the ( ) button once.
* If lock image appears, please refer to How-to-Unlock-the-Touch-Operation guide.
Power saving features
● If you want to use touch operation, tap
the screen rst.
And then it will show " Lock image".
Tap and hold the "Lock image" until the
live screen is ready.
3. Getting Started
1. Open the battery cover and insert ACTIVEON SOLAR XG Li-ion battery.
2. Insert microSD Card on the microSD Card slot. (The camera will not record when microSD Card is not inserted.)
3. Press the ( ) button and hold for two seconds. (The camera will turn on and LCD screen will display live screen.)
ⴝ
ⴞ
ⴟ
ⴘ
ⴙ
ⴚ
ⴛ
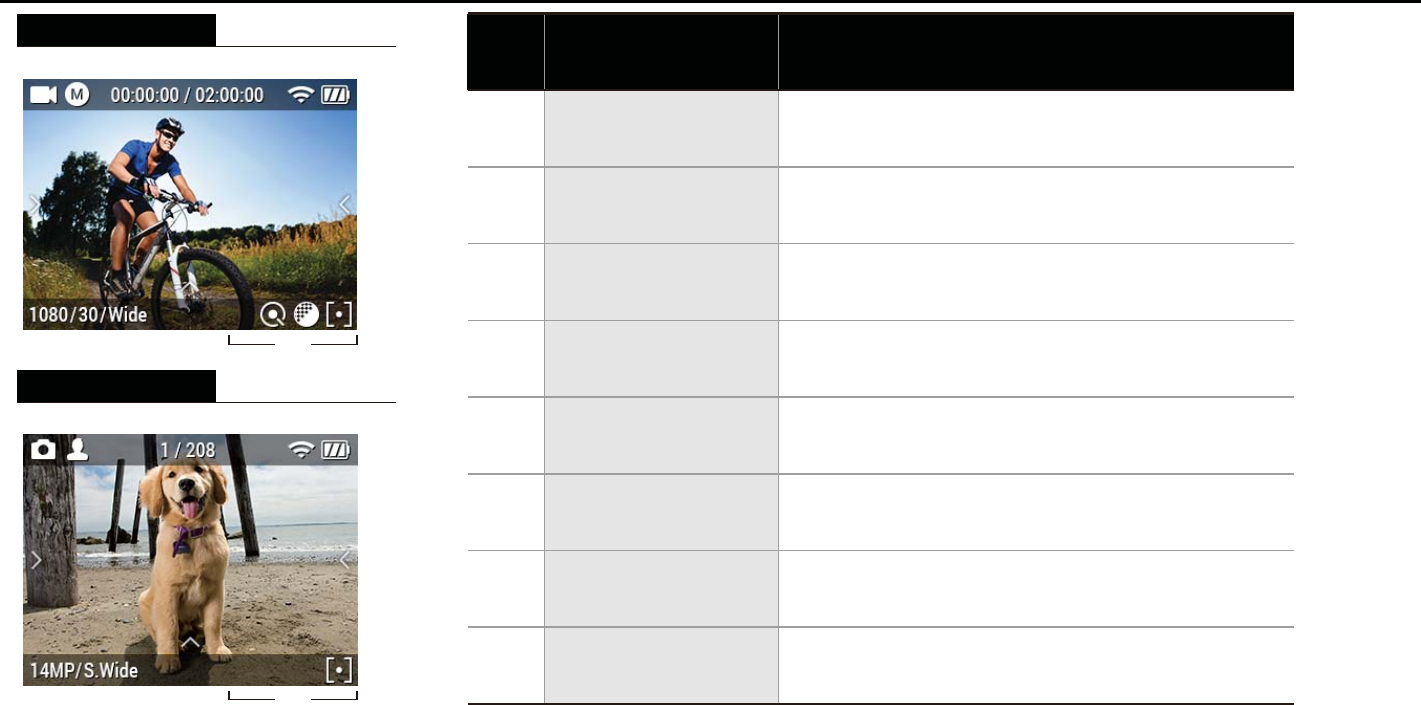
ⴜ
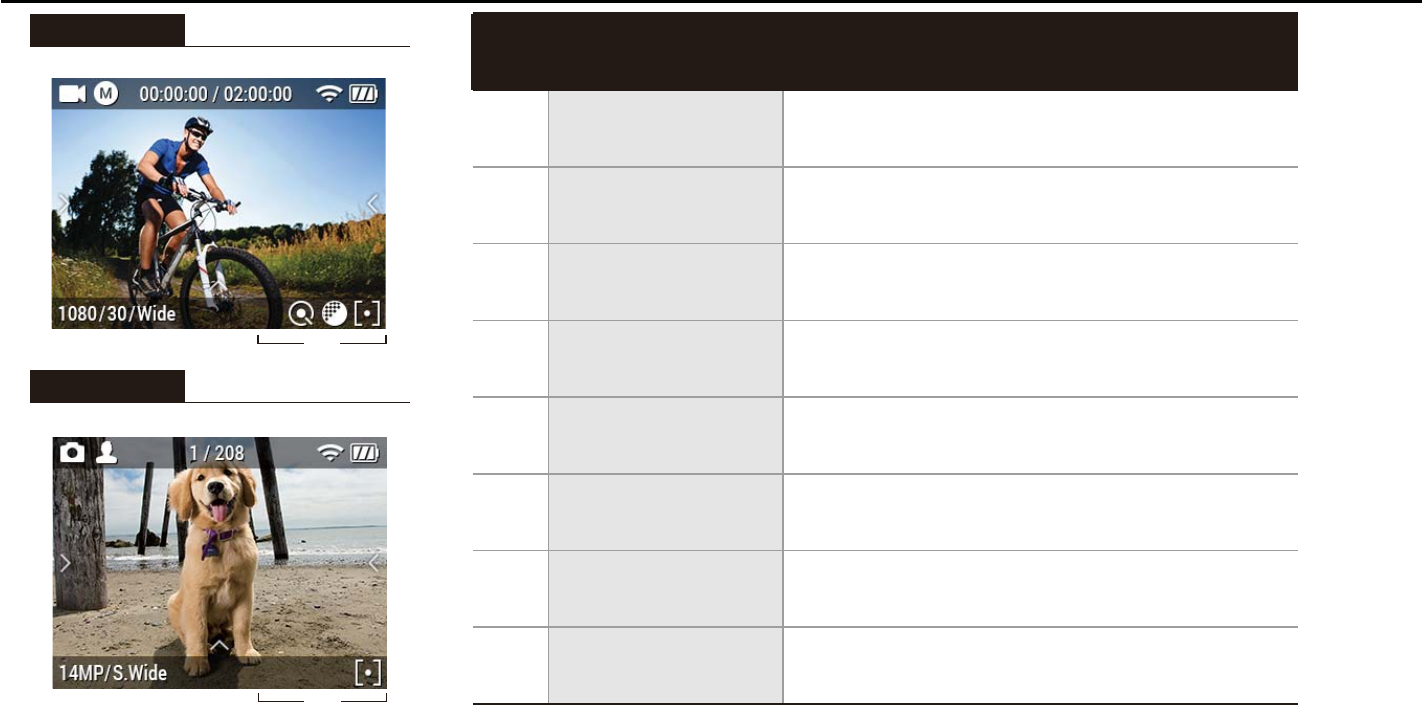
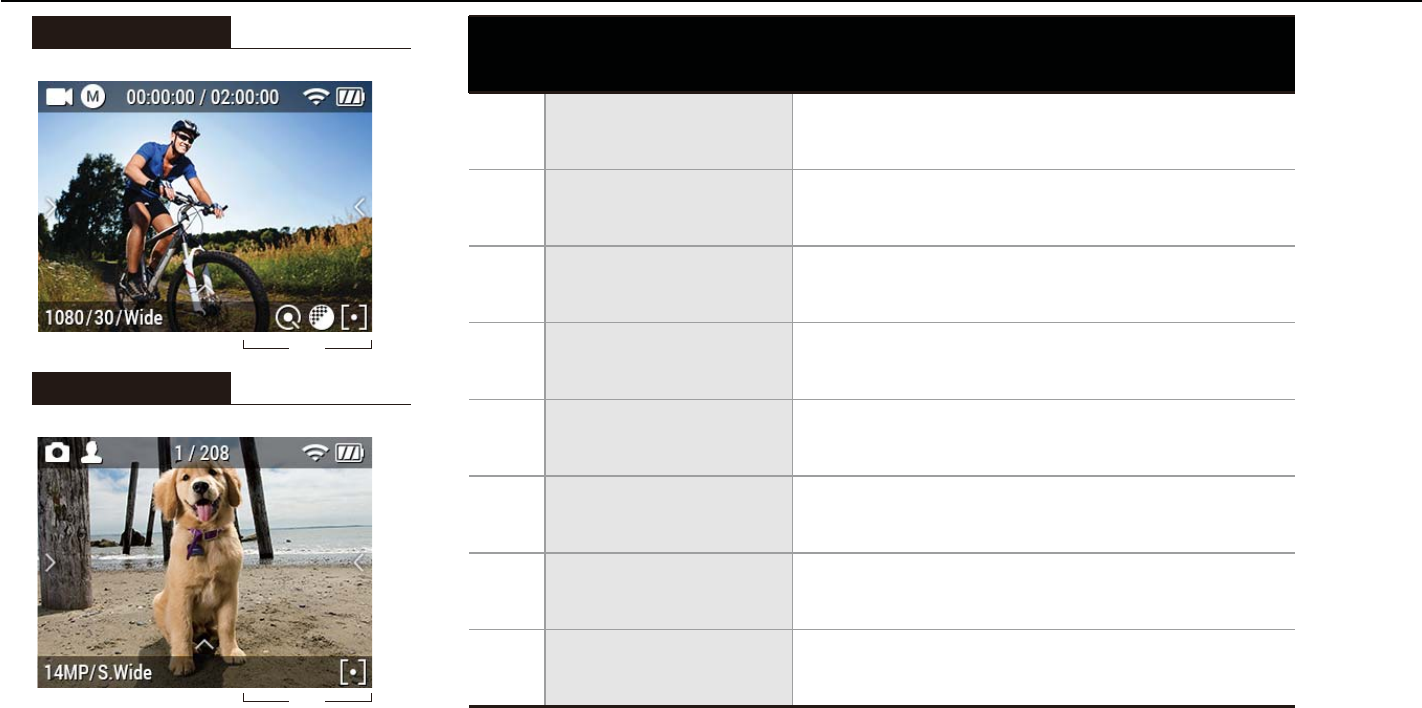
Recording mode/Program status
Recording time information
WiFi status
Battery status
Program/Mode/Quick Mode
Resolution/FPS/FOV/Interval info
Quick REC/Eect Setup/AE/Zoom
Double-tap the screen to activate zoom
function
Recording mode
Recording time
WiFi
Battery
Swipe icon
Recording Info
Function Zone
Zoom
FunctionNo. Description
5
4. LCD screen shot
ⴝ
ⴘⴙⴚⴛ
ⴜⴜ
ⴜ
ⴜ
ⴞ
ⴞ
ⴟ
ⴟ
ⴝ
ⴘⴙⴚⴛ
ⴜⴜ
Photo screen
Video screen
ⴜ
ⴟ

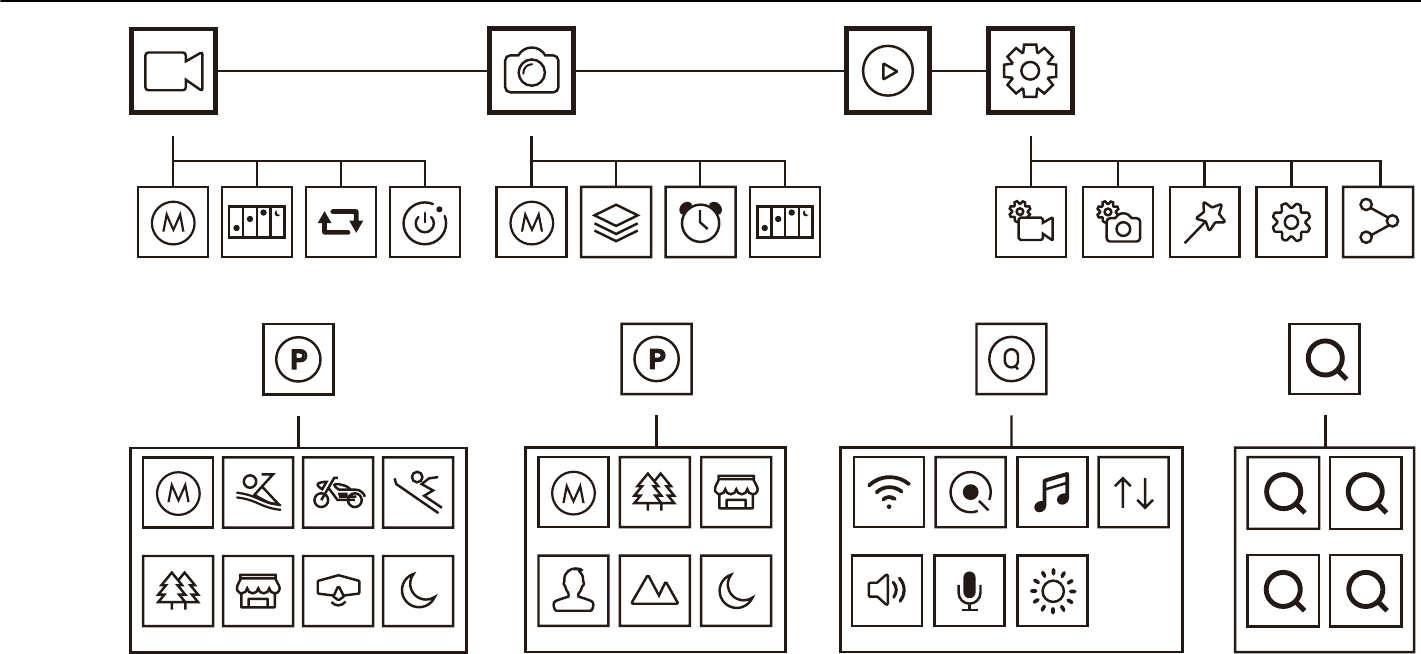
5. Graphical icon description
6
Manual
Video Program
Diving
WinterSportsRiding
Outdoor Indoor Night
WaterSports WiFi Quick REC Beep UpsideDown
Speaker MIC Brightness
Quick menu
1x
1x
2x
2x
3x
3x
4x
4x
Zoom
Manual
Photo Program
Outdoor Indoor
NightPortrait Landscape
Video mode Playback Setup
Time lapse Looping Auto Stop Video Setup Photo Setup Eect Setup General Setup Connection
Photo mode
Time lapseBurst Self-timerManual Manual
7
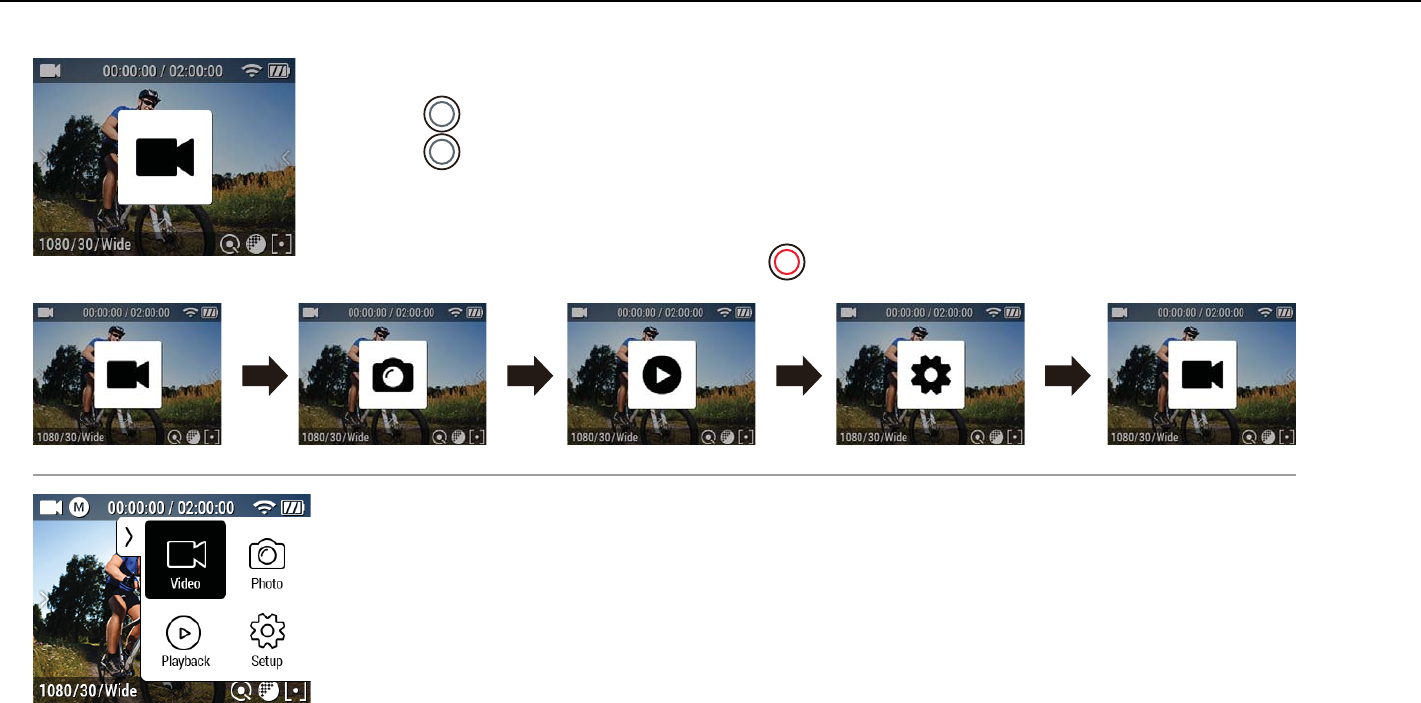
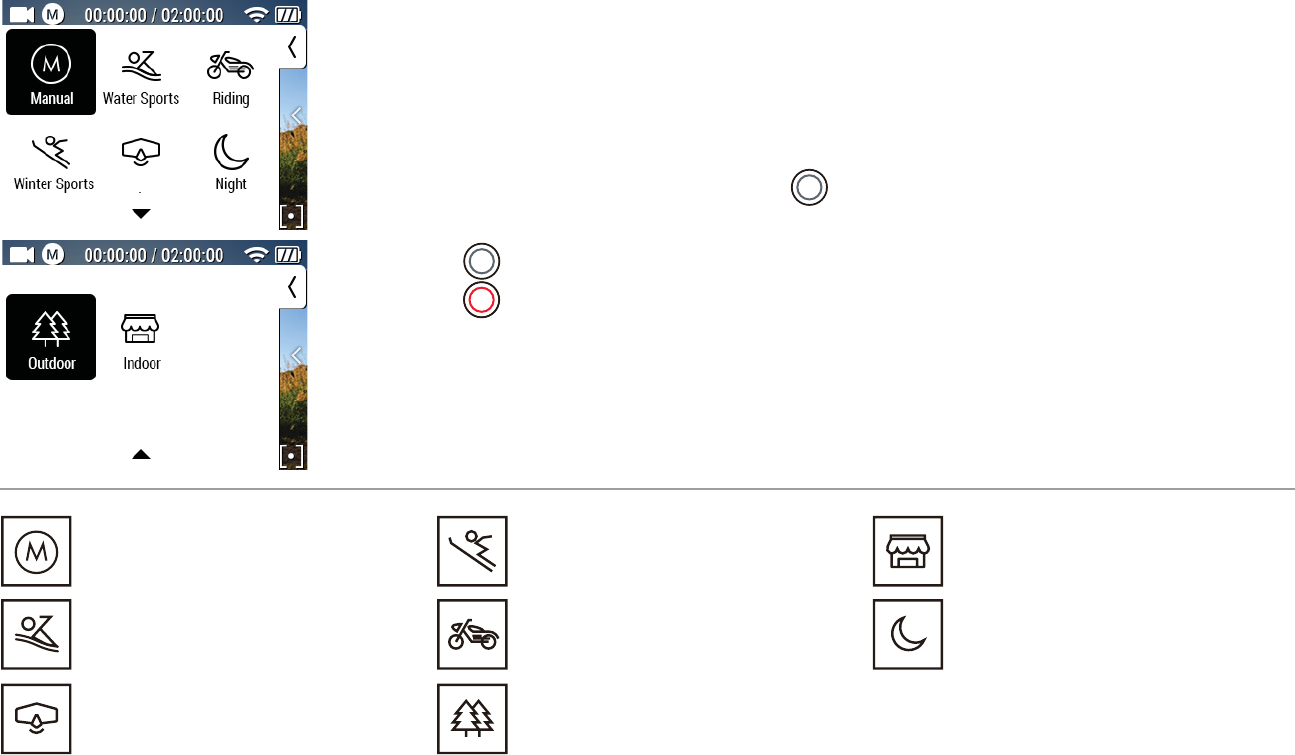
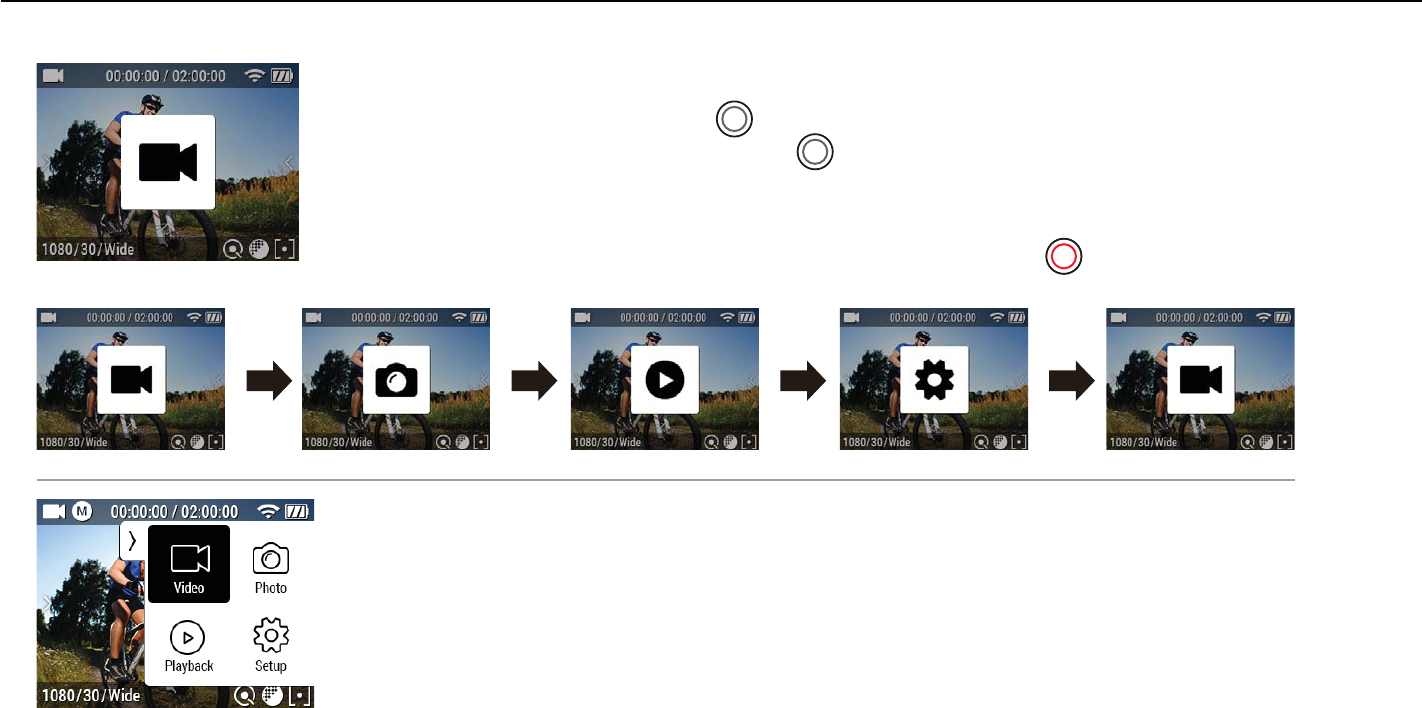
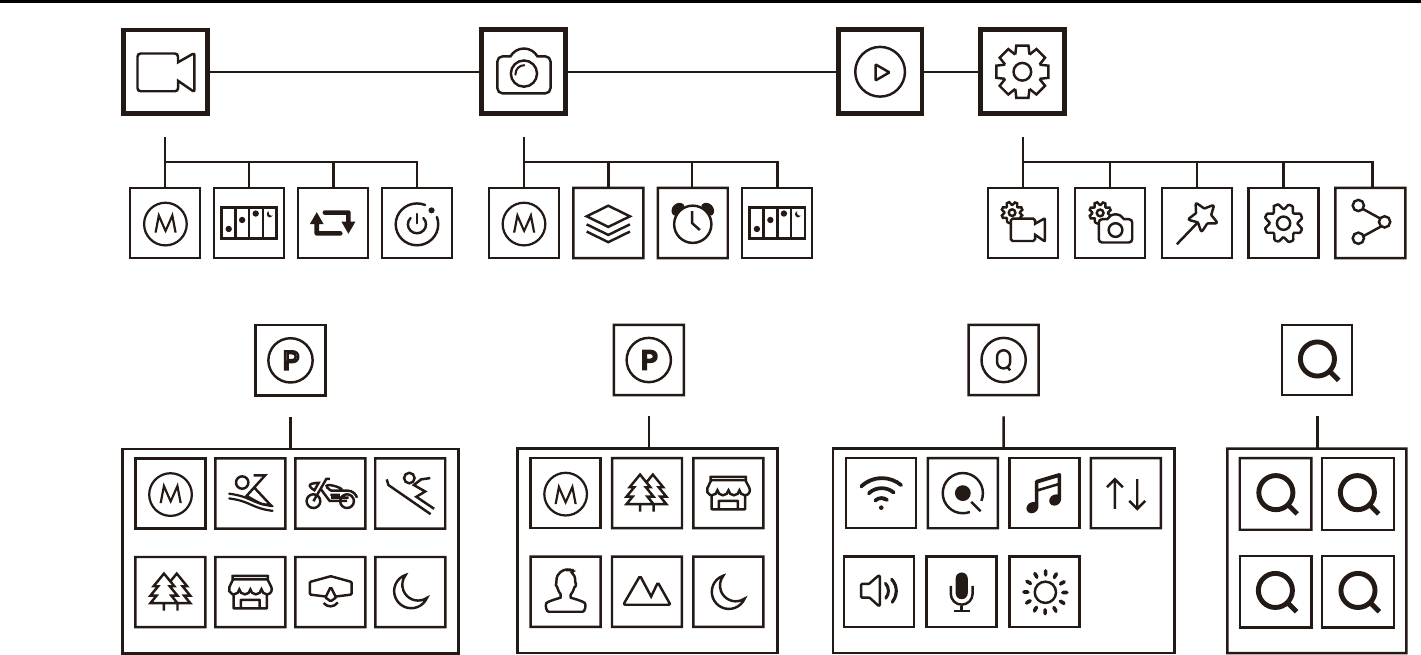
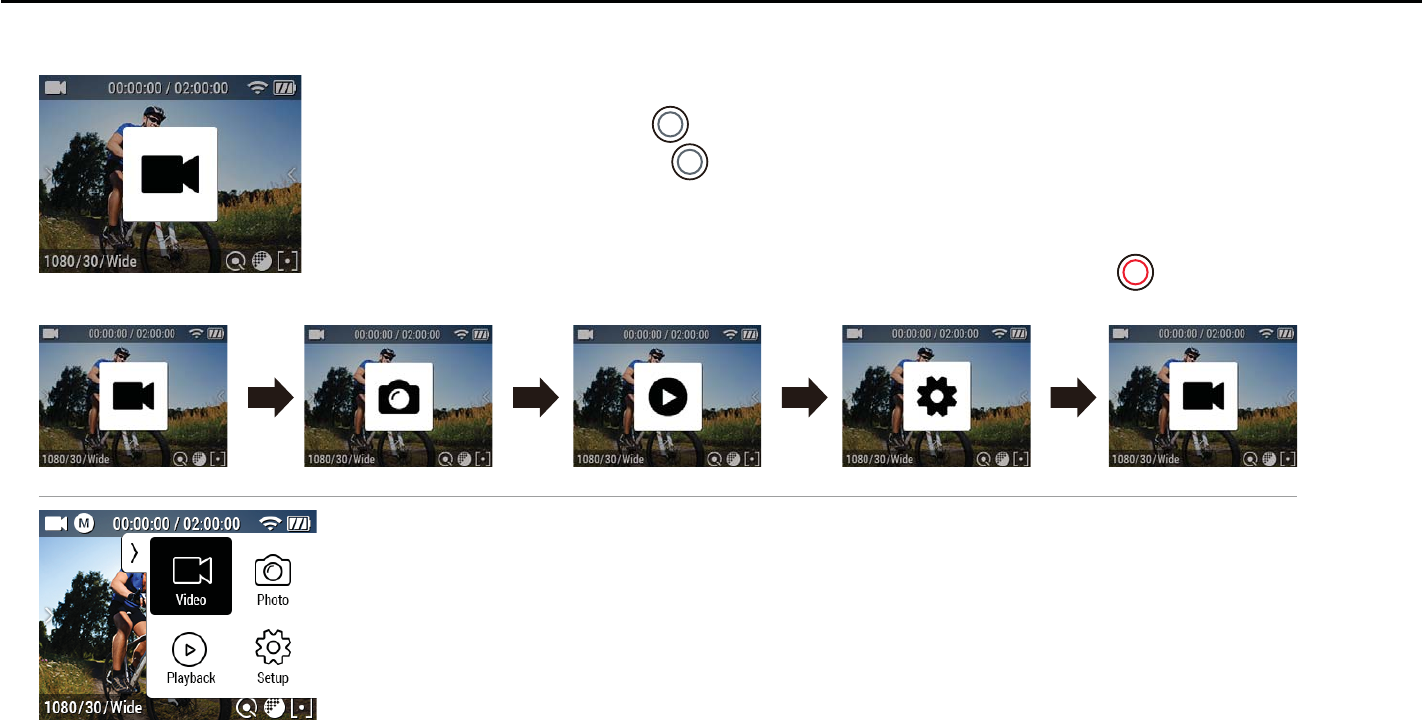
6. Mode menu
For Touch screen
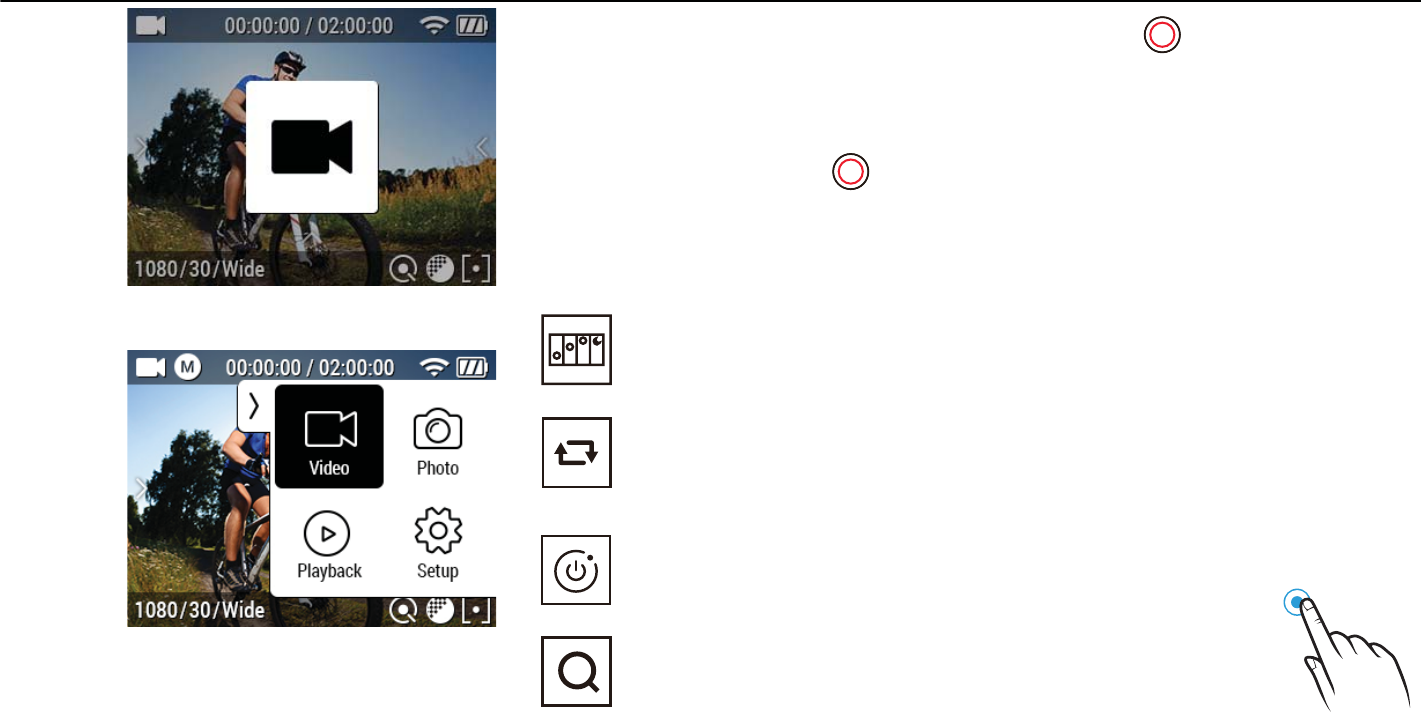
1. Swipe left. Then Mode menu screen will appear.
2. Tap the mode which you wish to enter among Video, Photo, Playback or Setup.
Mode menu is available with both button and touch screen.
For Button : There are 4 modes in “Mode menu” - Video, Photo, Playback and Setup.
1. Press ( ) button once. Then Video mode icon will appear
2. Press ( ) button once again to shift mode you want among Video, Photo,
Playback and Setup.
3. Wait for one second, the selected menu will show up automatically.
4. For Playback and Setup mode, Press ( ) button to see more options.
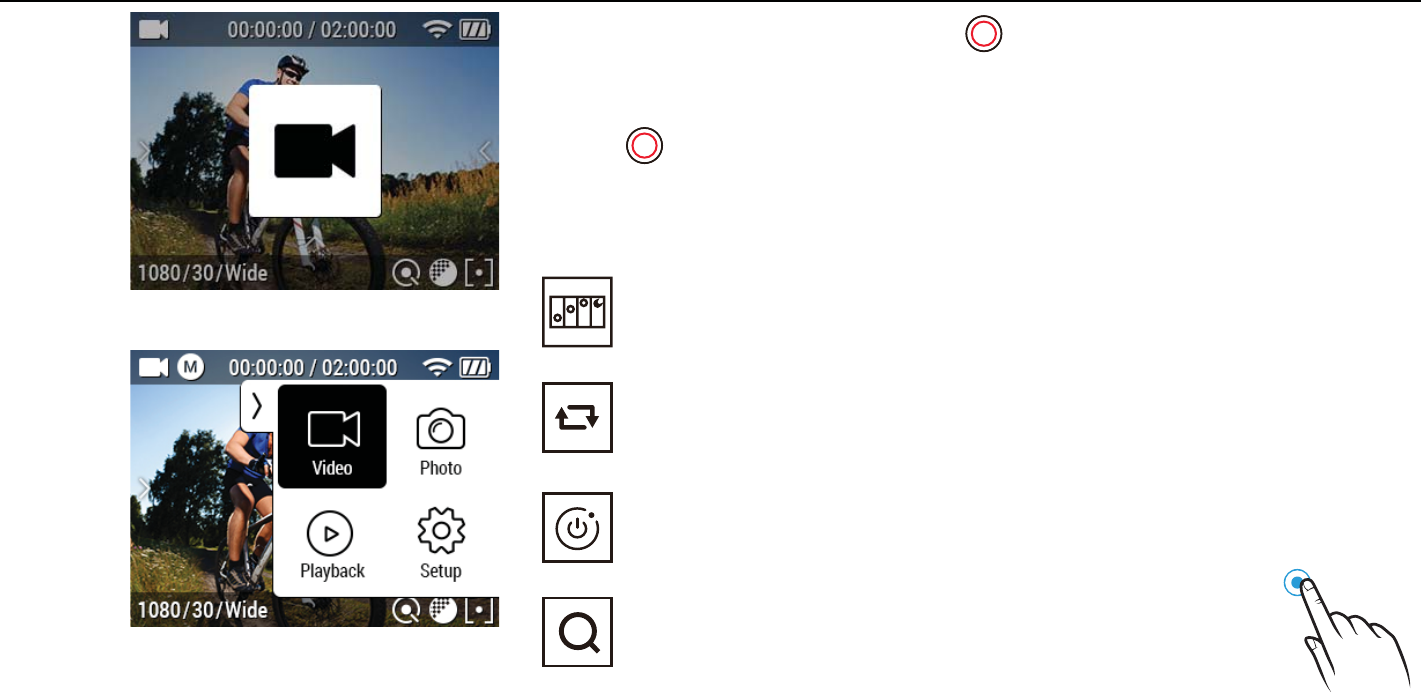
8
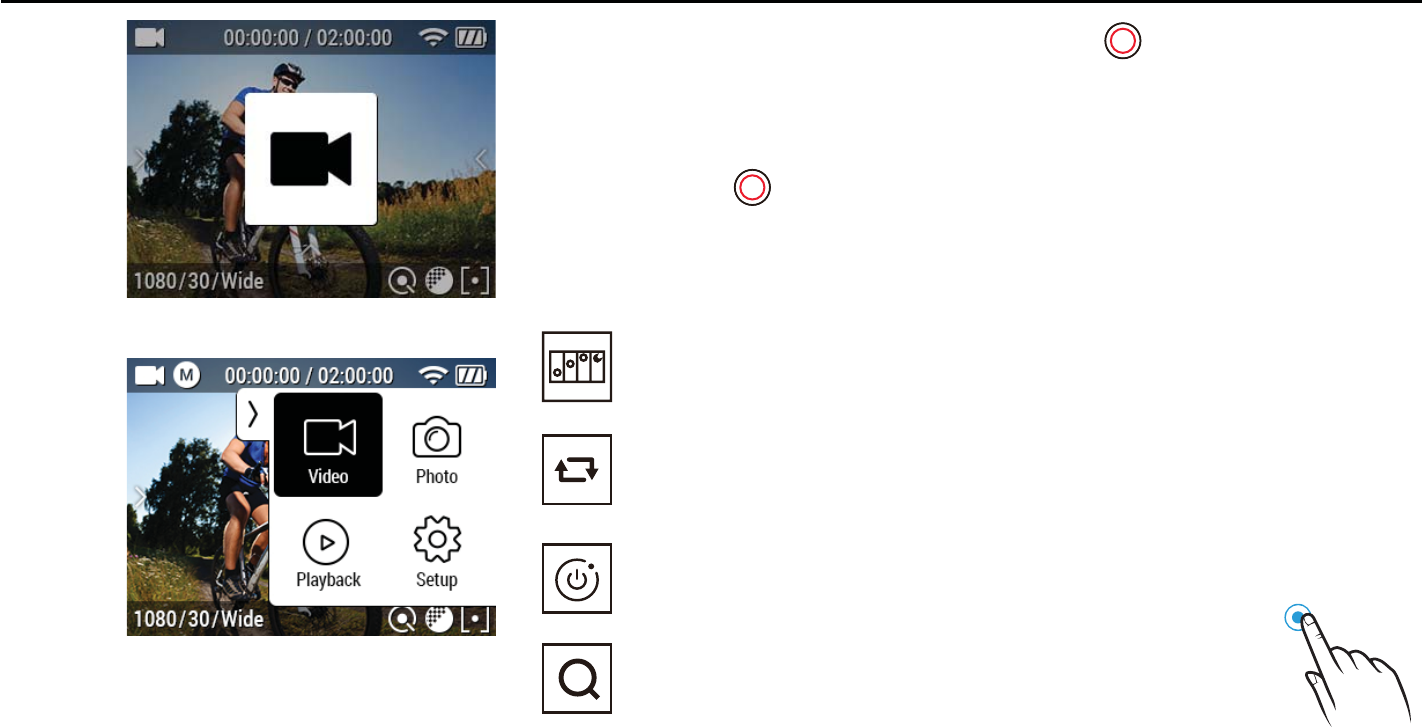
1. After the camera is turned on, Press( ) button to start video recording.
2. When the camera starts to record, LED light blinks* and shows recording
time on the screen.
3. Press( ) button to stop recording.
4. You can adjust video settings in “Video Setup”.
* If LED OFF option is selected in General setup, LED light will not blink.
Screen shot of using button
Screen shot of using touch screen
7. Video mode
Double-Tap
Time Lapse-video
Captures images in set intervals and creates a Time lapse video le.
(0.5 sec / 1 sec / 3 sec / 5 sec / 10 sec / 30 sec / 60 sec)
Looping
Continuously records a video until you stop. (1min / 5min / 10min / 30min)
** Maximum video le capacity is 4GB. If the le size is over the looping space,
the camera will overwrite current recording le.
Zoom
Double-tap shortly on live screen, zoom function will appear.
After 3sec the zoom menu automatically disappear and save value
during recording. (x1/x2/x3/x4)
Auto Stop
Records video until set time.
(1min / 5min / 10min / 30min)
9
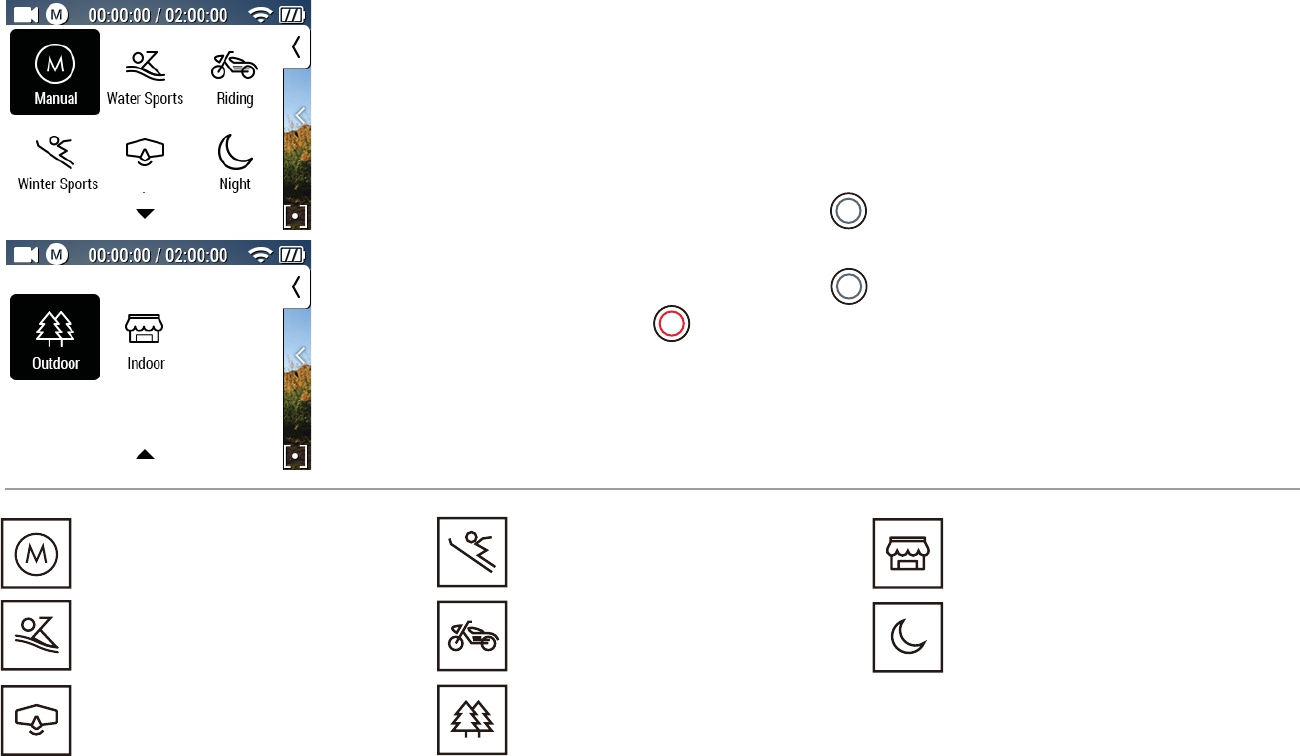
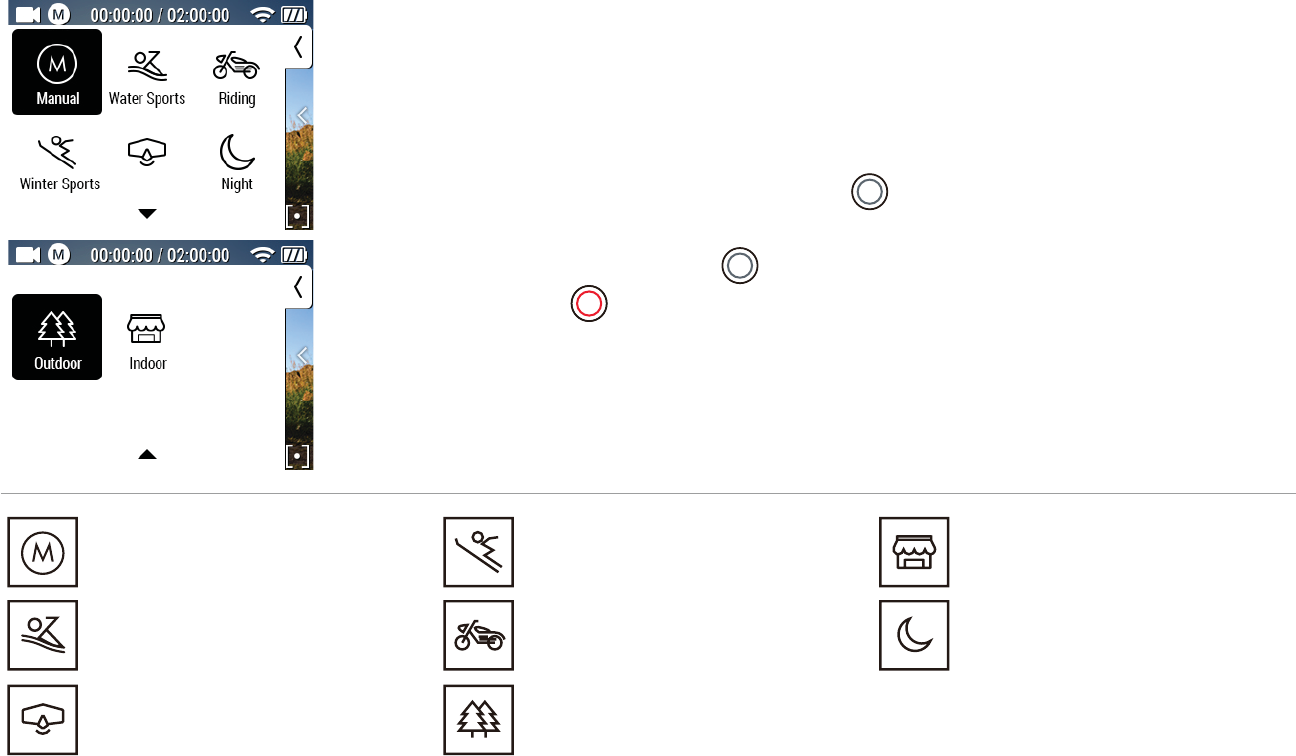
Program menu
Program menu provides fast and simple camera eect settings based on your
environment. Program menu is available with both button and touch screen.
For touch screen
1. At the Video mode, swipe right. Then Program menu screen will appear.
2. Tap the mode you want.
Manual
Rollback to previous setting before
the Program mode
Water sports
For Recording on the water or beach
Diving
For Recording under the Water
Winter sports
For Recording on the Snow
Riding
For Recording Speedy Activity
Outdoor
For Recording Outdoor with strong
shine
Indoor
For Recording Indoor place
Night
For Recording Night time
For button
1. At the Video mode, press and hold ( ) button for two seconds.
Then Program menu icon will appear.
2. Press ( ) button once again to shift the mode you want.
3. Press ( ) button to enter mode in each category.
Diving
10
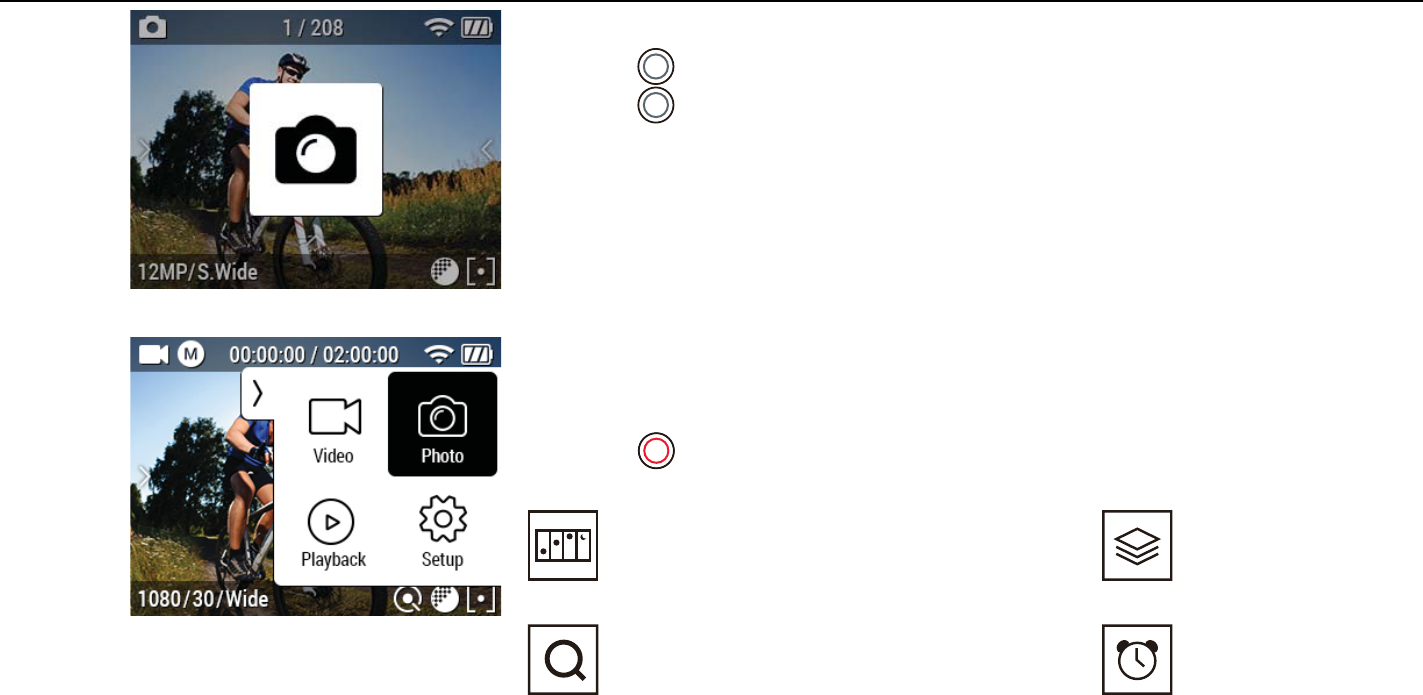
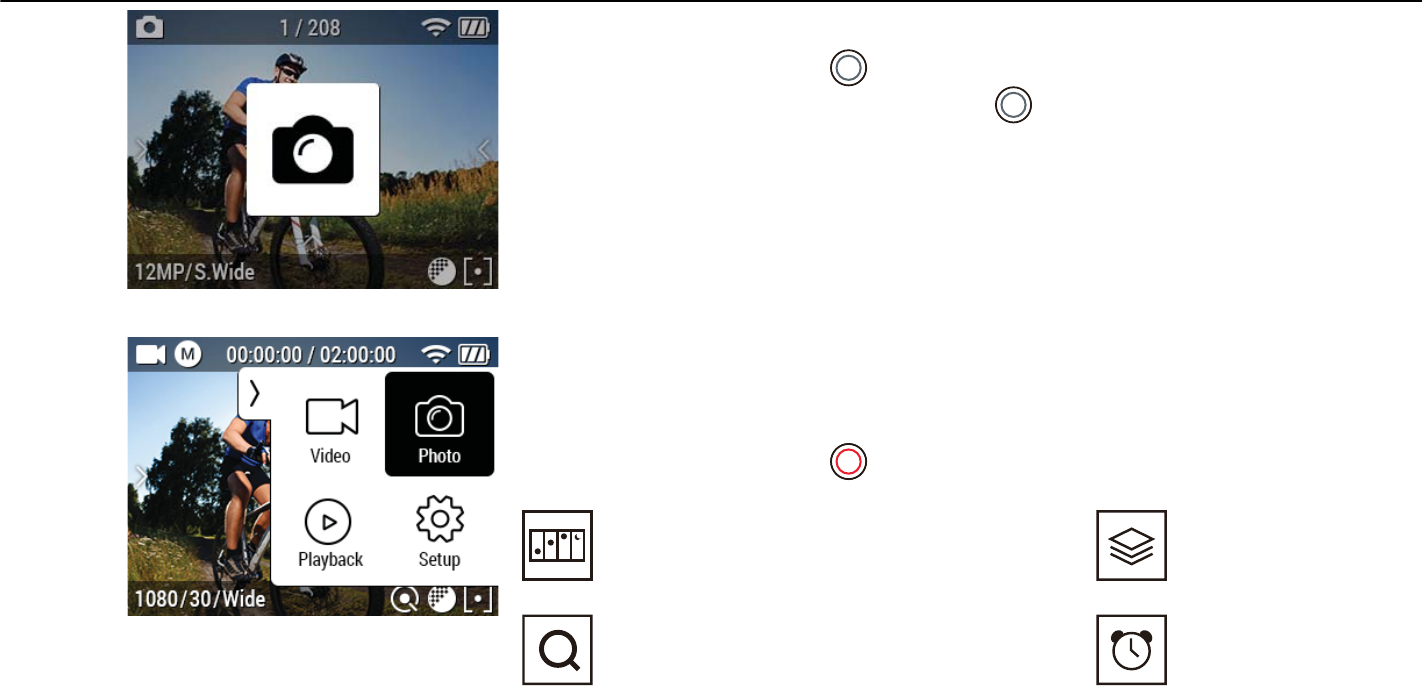
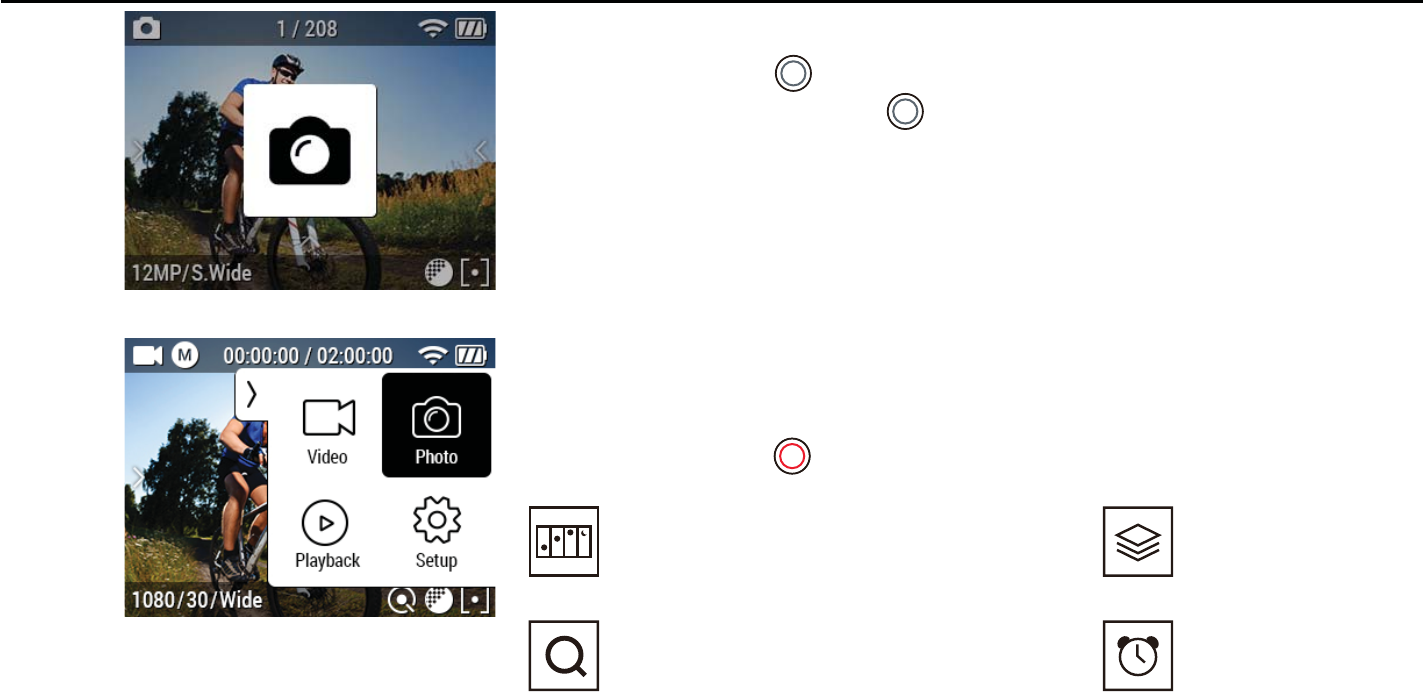
You can also change mode by using touch screen more easily.
1. Swipe left to change mode.
2. Tap Photo icon.
3. Press ( ) button to start photo shooting.
Time Lapse-photo
Captures images in set intervals and creates a
Time lapse photo le.
(0.5 SEC/1 SEC/3 SEC/5 SEC/10 SEC/30 SEC/60 SEC)
Zoom(x1/x2/x3/x4)
Double-tap shortly on live screen, zoom function
will appear. After 3sec the zoom menu automatically
disappear and save zoom setting during recording.
Burst
Photo burst shooting.
(6/1sec)
Self-timer
Captures an image after a
set time.
(5 SEC/10 SEC/15 SEC)
8. Photo mode
Please change your mode into Photo mode.
1. Press ( ) button. The mode menu will appear on your LCD screen.
2. Press ( ) button once again, the camera will change into Photo mode.
3. After 1 sec, the mode menu will disappear from LCD screen automatically.
Then you can start photo shooting.
4. You can adjust detailed photo settings in Setup menu.
Screen shot of using button
Screen shot of using touch screen
11
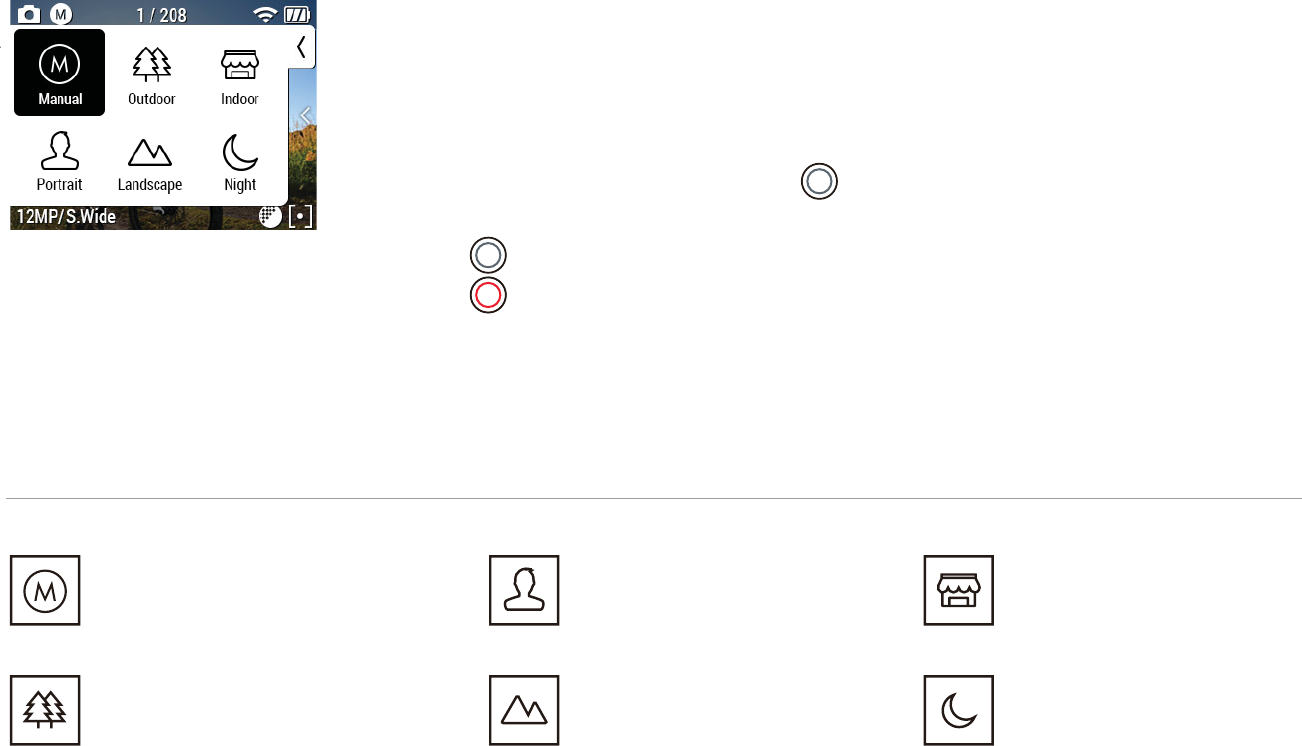
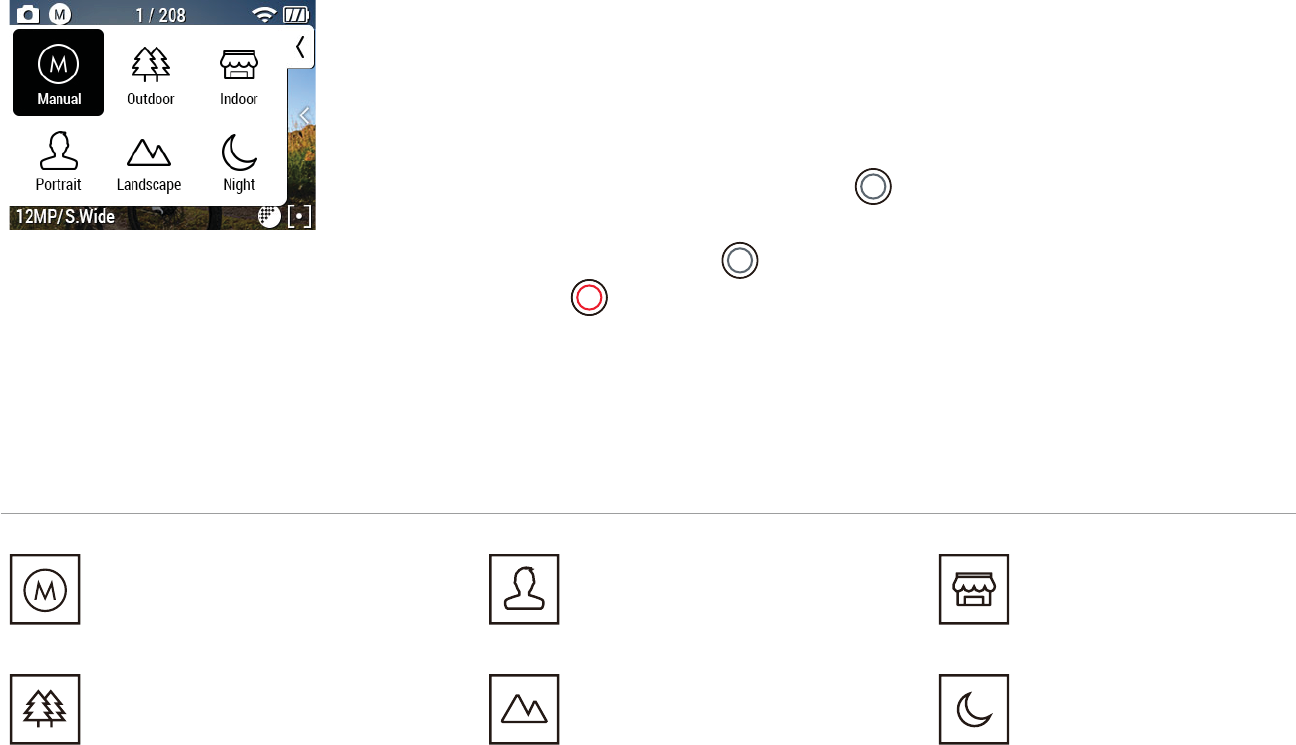
Program menu
Program menu provides fast and simple camera eect settings based on your
environment. Program menu is available with both button and touch screen.
For button
1. At the Photo mode, press and hold ( ) button for two seconds.
Then Program menu will appear.
2. Press ( ) button once again to shift the mode you want.
3. Press ( ) button to enter mode in each category.
For touch screen
1. At the Photo mode, swipe right. Then Program menu screen will appear.
2. Tap the mode you want.
Manual
Rollback to previous setting before
the Program mode
Landscape
For Shooting landsacpe
Outdoor
For Shooting Outdoor with strong
shine
Indoor
For Shooting Indoor place
Portrait
For Shooting Portrait
Night
For Recording Night time
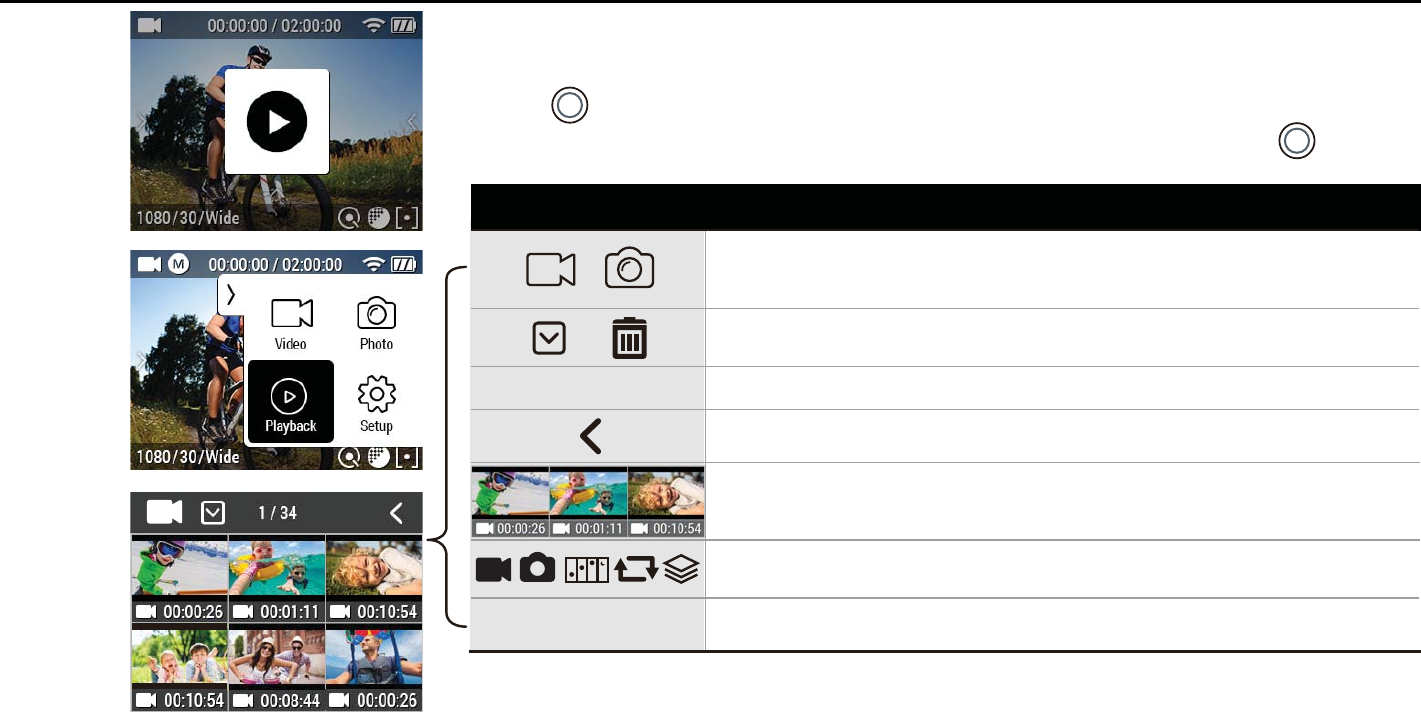
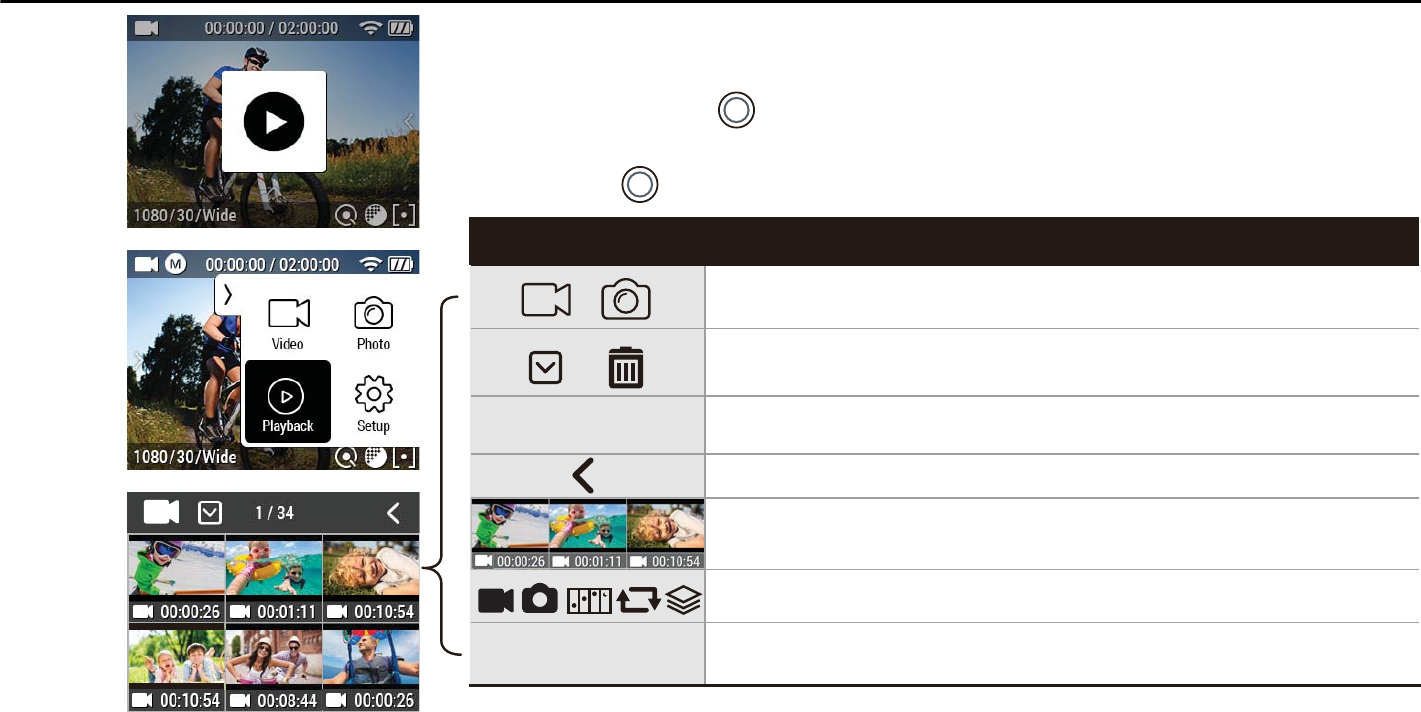
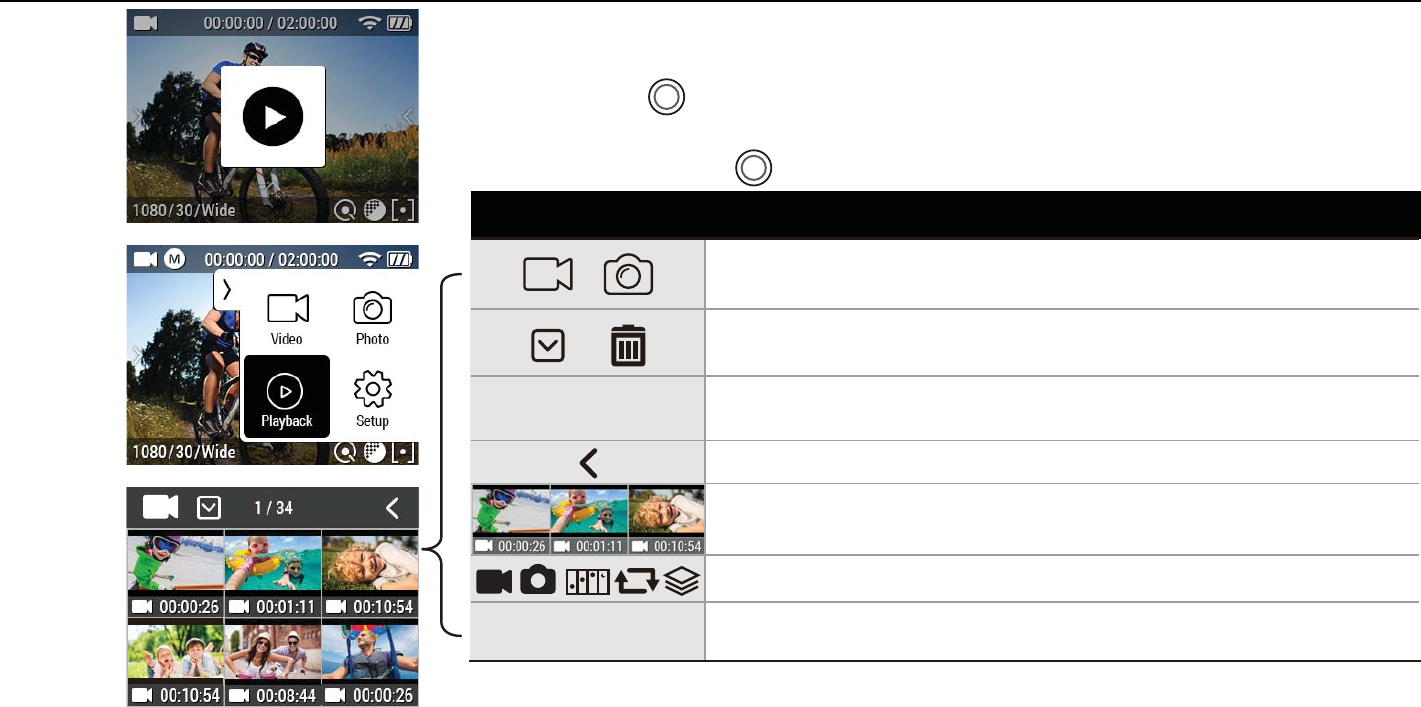
Sorting function provides 2 options :
Video only or Photo only
Select to delete a le. Multiple les can be deleted at once.
File IDX number or Selected le quantity / Total le quantity
Back button
Thumbnail image
File type
Recording Time(For video le) / Picture quantity(For photo le)
*Swipe left or right to go into next page.
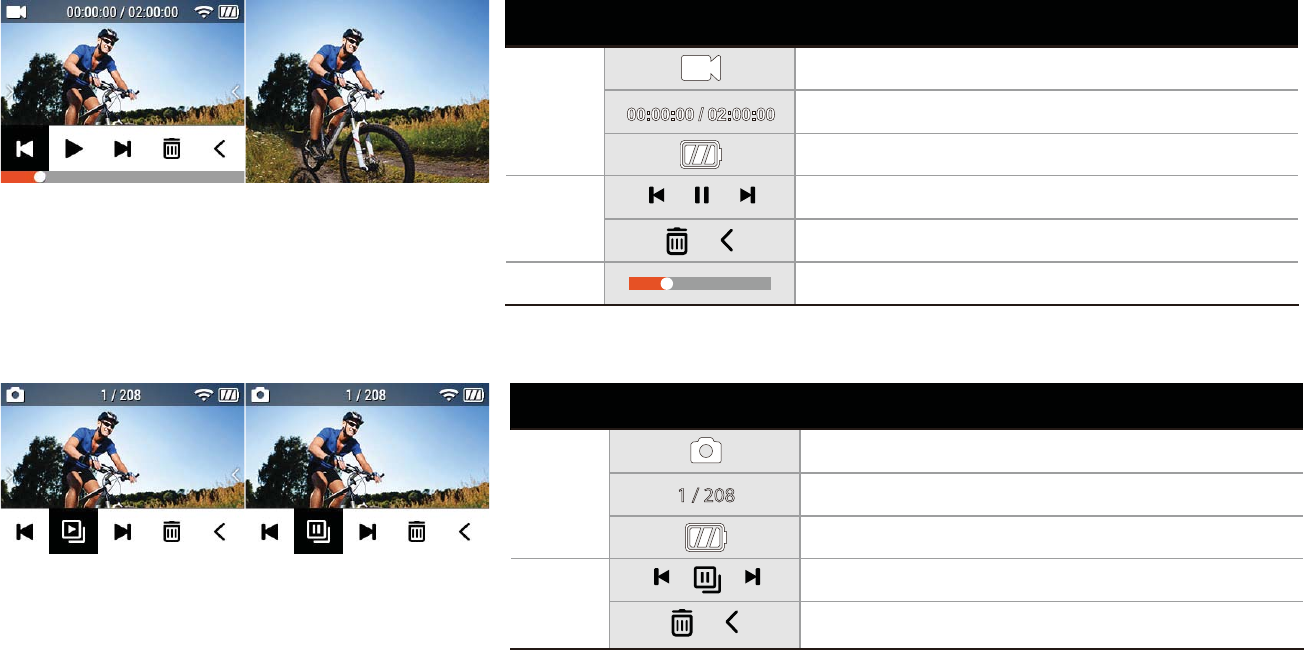
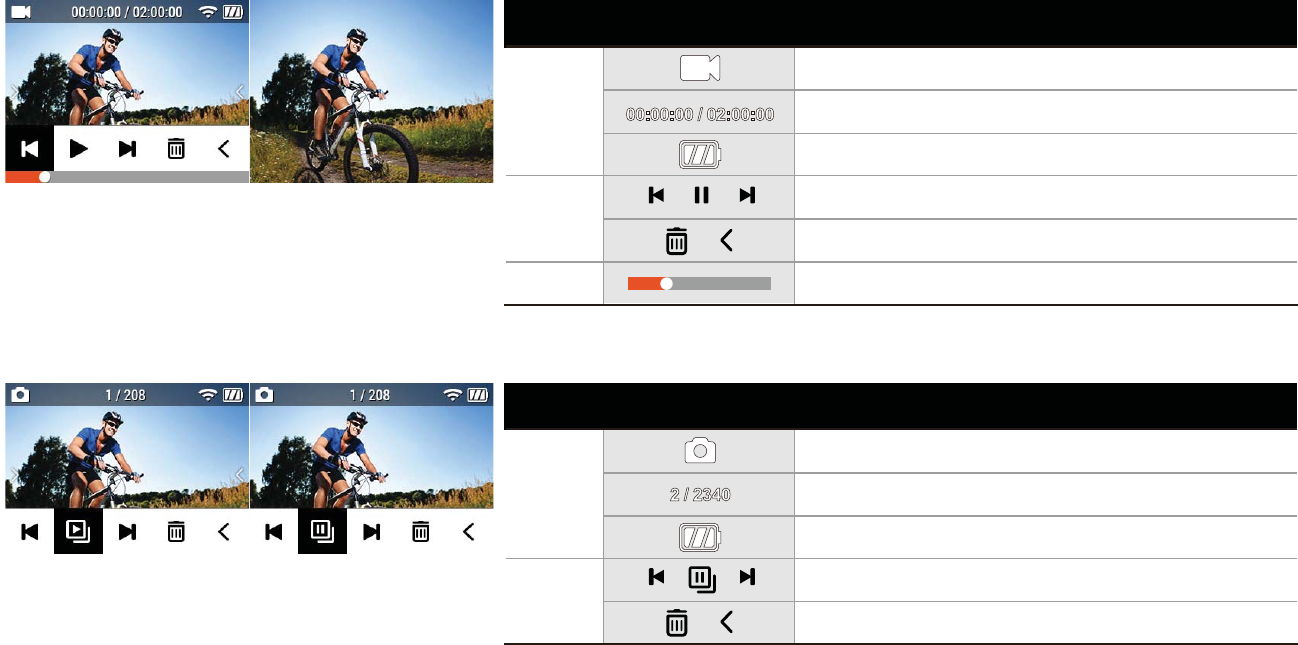
9. Playback mode
Please change the mode into Playback mode.
User can view recorded video or photo on the screen.
Press ( ) button to select control panel on top menu.
While the le is playing, you can call the play control panel by pressing ( ) button.
Icon Description
12
13
PLAYBACK (Photo)
PLAYBACK (Video)
File type
Playback Time / Total time
Battery remaining
Scroll bar
Delete / Back
Prev. le / Pause / Next le
ⴘ
ⴙ
ⴚ
IconNo. Description
With one tap, you can hide the control bar.
When you tap the screen once again,
the control bar will appear.
You can see all photo les with slide
show function.
*Time lapse & burst photo will only show
the rst picture.
File type
Current Photo/ Total Photo
Battery remaining
Delete / Back
Prev. le / Pause / Next le
ⴘ
ⴙ
IconNo. Description
1 / 208
14
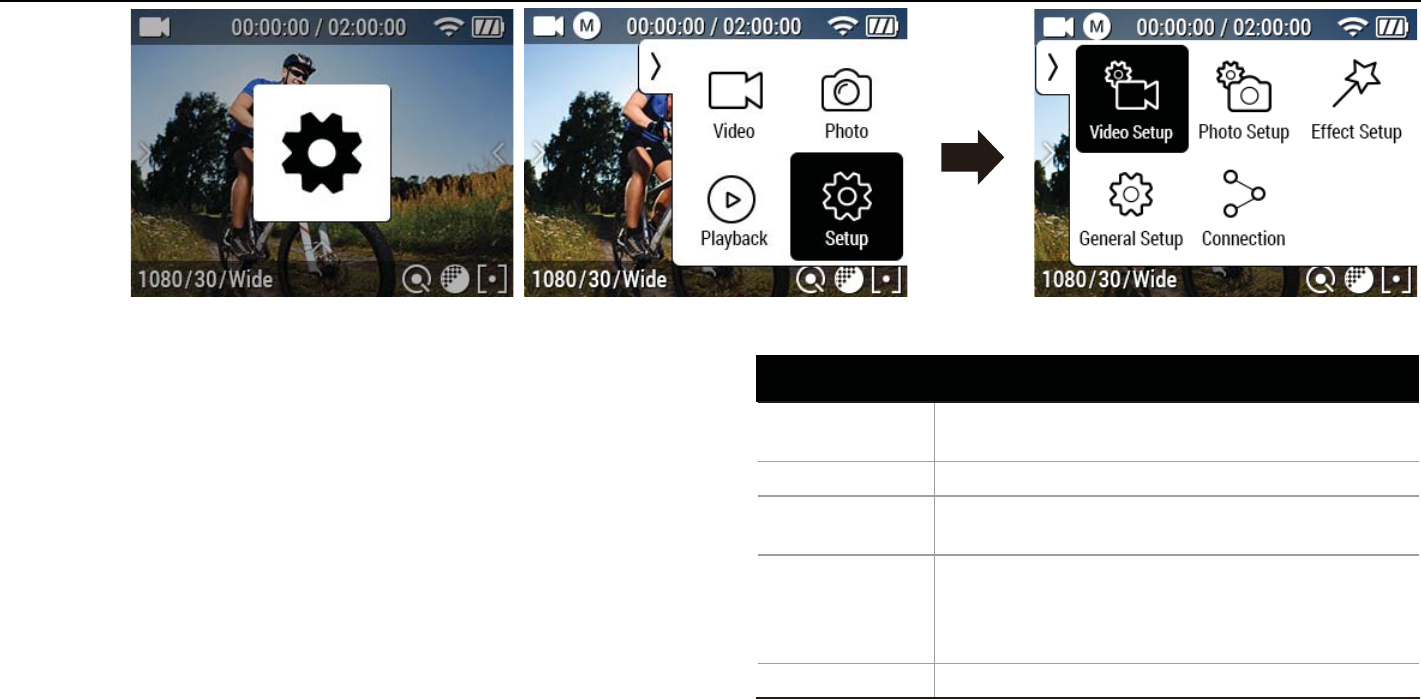
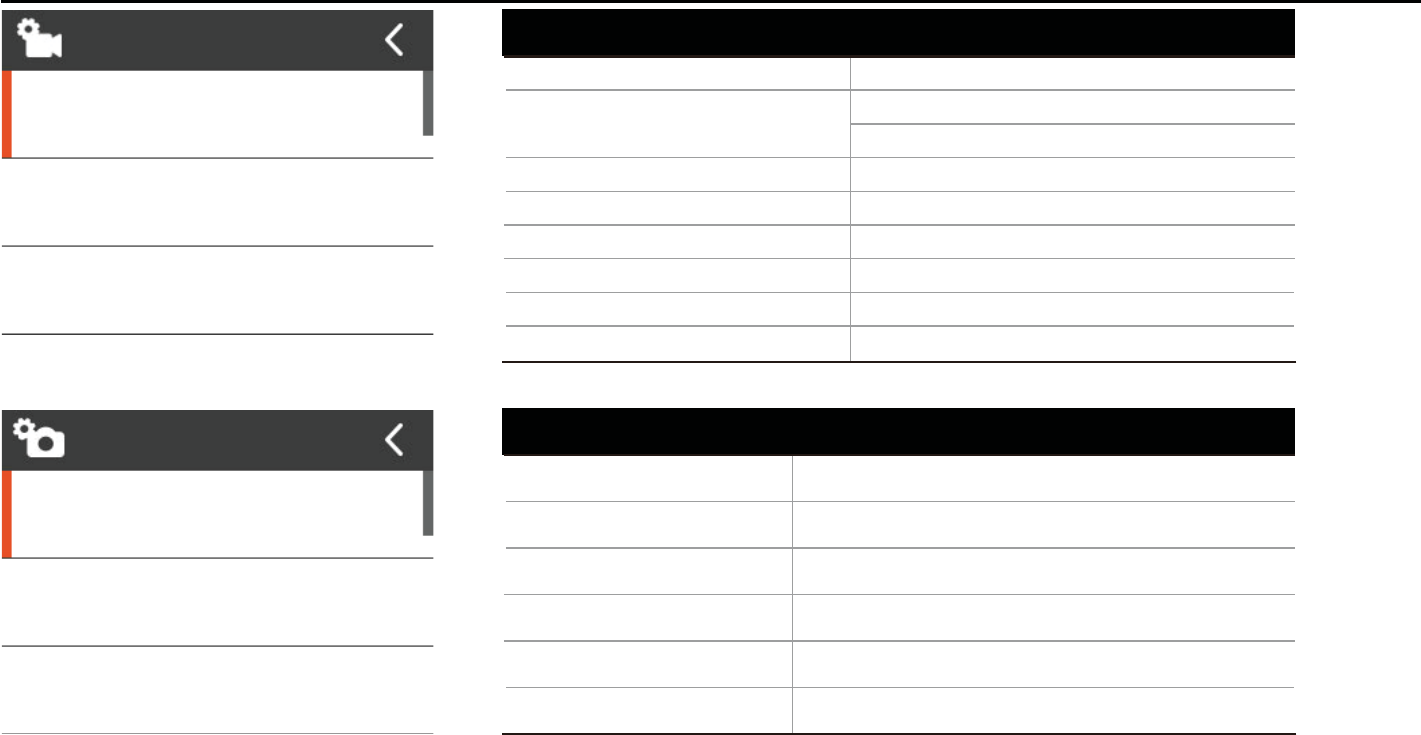
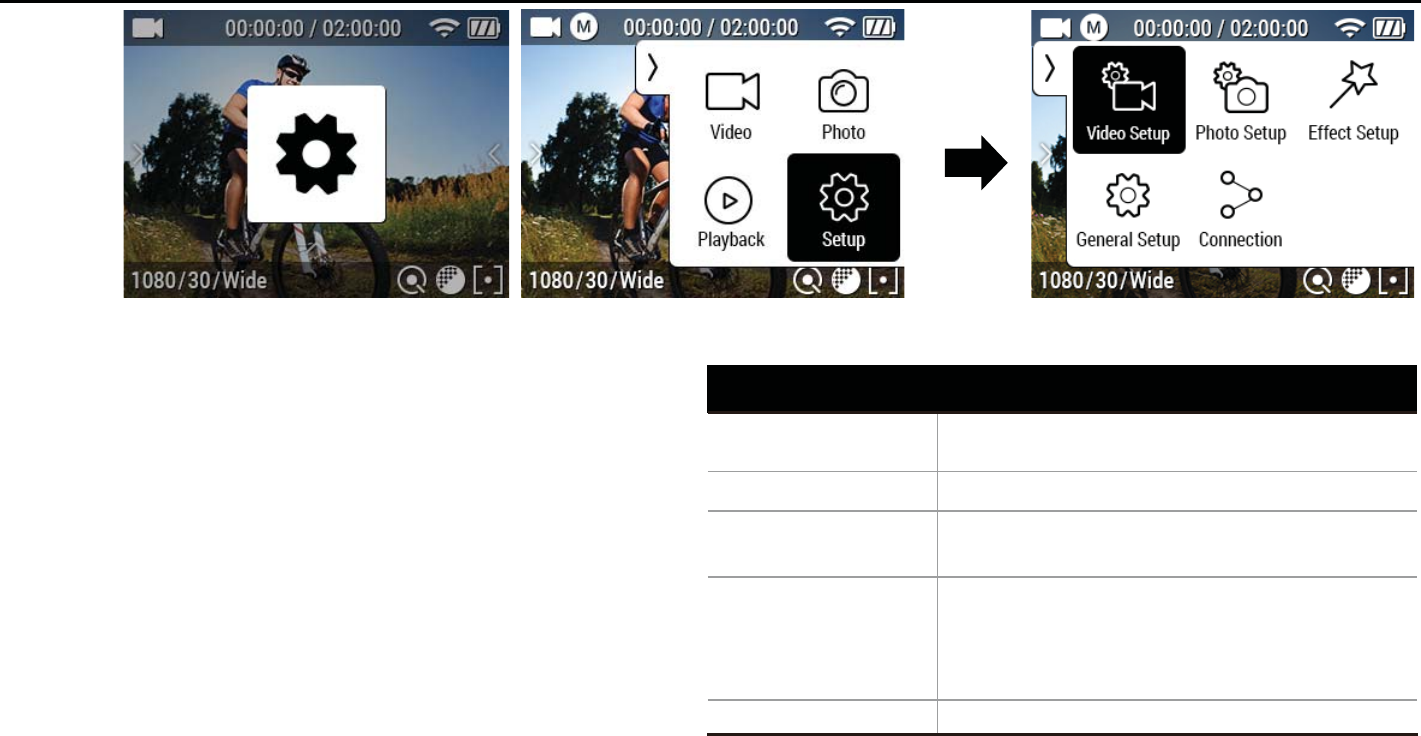
Please change the mode into Setup mode.
● Able to choose more options with Setup mode.
● Video Setup : Provides detailed video recording
options.
● Photo Setup : Provides photo shooting options.
● Eect Setup : Provides eect setup options for
shooting.
● General Setup : Provides general camera setup
options.
● Connection : Provides WiFi function.
10. Setup mode
Screen shots of using button & Touch screen
Video Setup Mode/Resolution/FOV/Video Quality
/Interval/DIS
Mode/Mega Pixel/FOV/Picture Quality/Interval
WiFi/WiFi Info
Control/Beep/LED indicator/Quick REC
/Auto LCD OFF/Auto Power OFF/Screen Lock
/ TV Out/Language/Time Setup
/Memory Format/Default/Software Info
Filter/AE Meter/Zoom/EV/White Balance
/ISO/Upside Down/ Time Stamp
Photo Setup
Eect Setup
General Setup
Connection
Setup Option
15
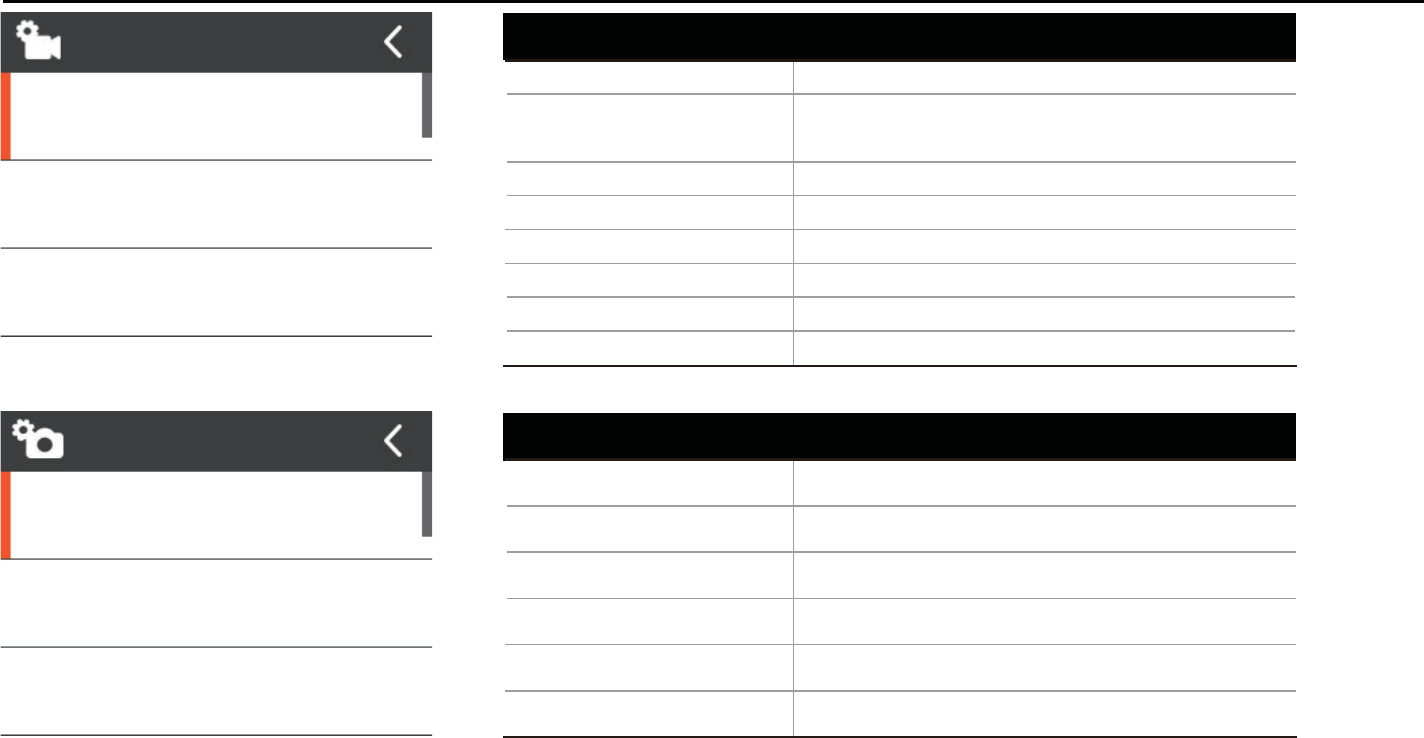
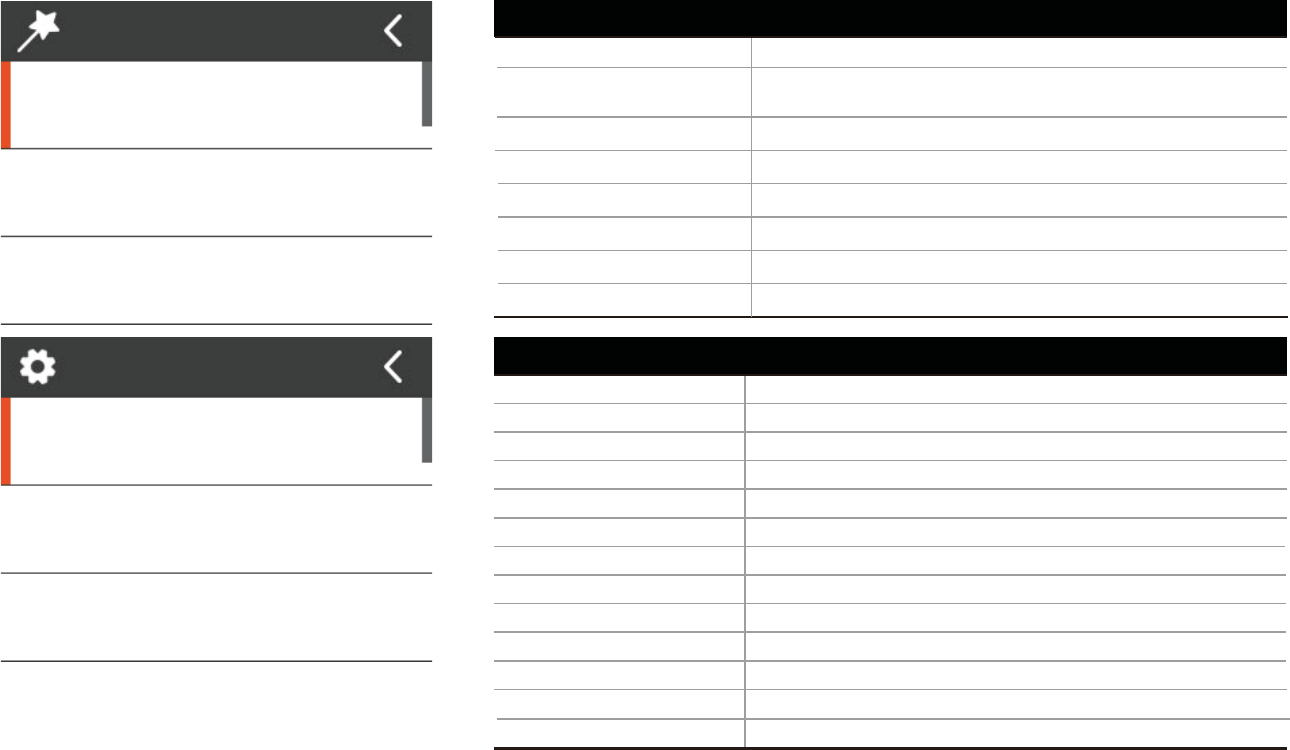
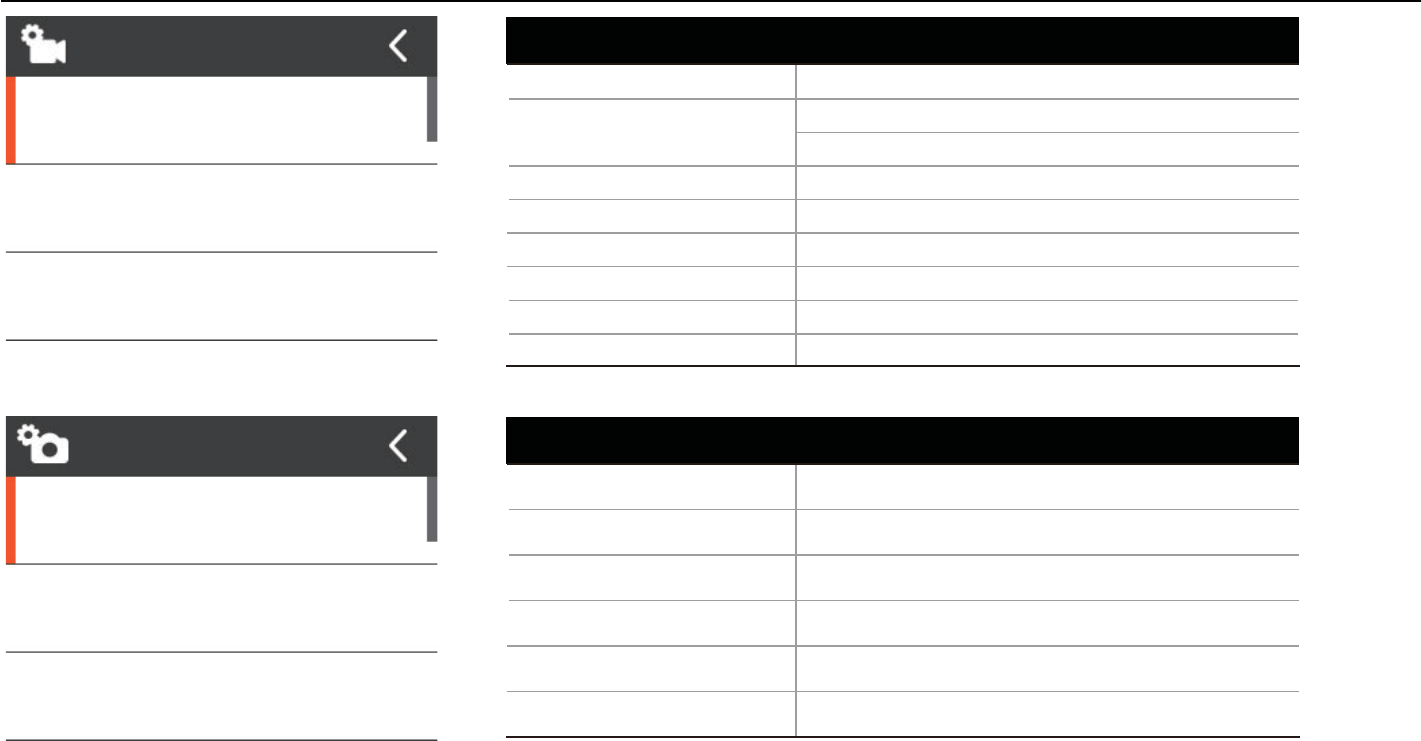
10-1. Setup options
VIDEO SETUP
MODE
RESOLUTION
FOV
Manual
1080P 30FPS
Super Wide
MODE
MEGA PIXEL
FOV
Manual
14MP
Super Wide
PHOTO SETUP
Manual/ Looping/ Auto Stop/ Time Lapse
1080p 30fps / 1080p 60fps / 720p 60fps
720p 120fps / 480p 240fps
Super wide/ Wide/ Medium/ Narrow
MODE
RESOLUTION
1 / 5 / 10 / 30 (min) LOOPING INTERVAL
ON/OFFDIS
1 / 5 / 10 / 30 (min)AUTO STOP INTERVAL
0.5 / 1 / 3 / 5 / 10 / 30 / 60 (sec)T/LAPSE INTERVAL
FOV
S-Fine/ Fine/ NormalVIDEO QUALITY
Function Description
Manual/Time Lapse/Burst/Self Timer
14MP / 12MP / 8.5MP/ 7MP
Super wide/ Wide/ Medium/ Narrow
S-Fine/Fine/Normal
MODE
MEGA PIXEL
FOV
5/ 10 / 15 (sec)Self Timer INTERVAL
PICTURE QUALITY
0.5/ 1 / 3 / 5 / 10 / 30 / 60 (sec)T/LAPSE INTERVAL
Function Description
16
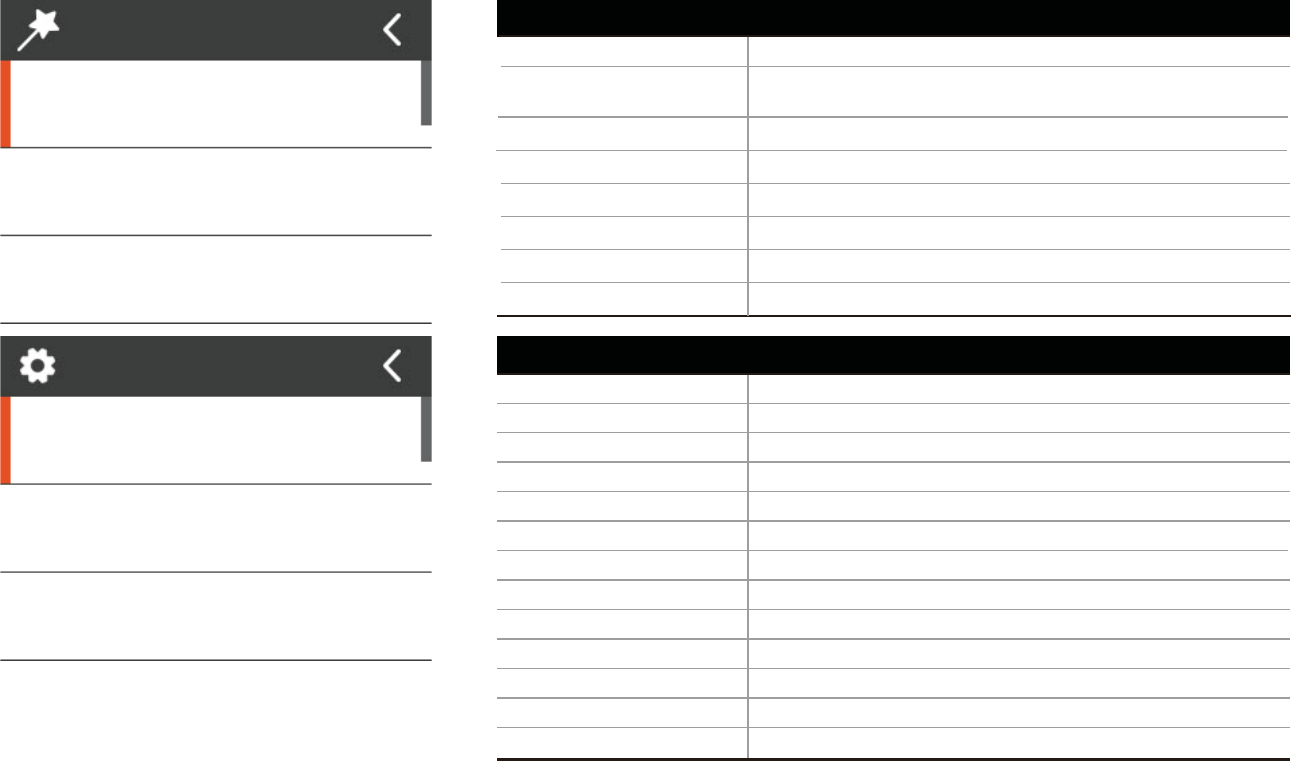
CENTER/AVERAGE/SPOT
x1/ x2/x3/x4
-2.0/-1.0/0/+1.0/+2.0
AUTO/3000K/5500K/6500K
AUTO/100/200/400/800/1600/3200
ON/OFF
ON/OFF
O/Black&White/Sepia/Vivid/Natural/Negative/Warm
/Cool/Red/Green/Blue
FILTER
AE METER
ZOOM
WHITE BALANCE
TIME STAMP
UPSIDE DOWN
ISO
EV
Function Description
EFFECT SETUP
ZOOM
FILTER
AE METER
X1
OFF
Average
CONTROL
BEEP
LED INDICATOR
MIC
ON
FOUR
GENERAL SETUP Mic/Speaker/LCD Brightness
ON/OFF
OFF/TWO/FOUR
OFF/ 0sec/ 3sec/ 5sec
OFF/ 30sec/ 1min/ 5min
OFF/ 5min/ 10min/ 30min
NTSC/PAL
DATE - TIME
English/French/Spanish/German
OFF/ 5sec/ 10sec/ 30sec
YES/NO
CONTROL
BEEP
LED INDICATOR
AUTO LCD OFF
MEMORY FORMAT
SOFTWARE INFO
DEFAULT
SOFTWARE INFO
YES/NO
TIME SETUP
TV OUT
LANGUAGE
SCREEN LOCK
AUTO POWER OFF
QUICK REC
Function Description
17
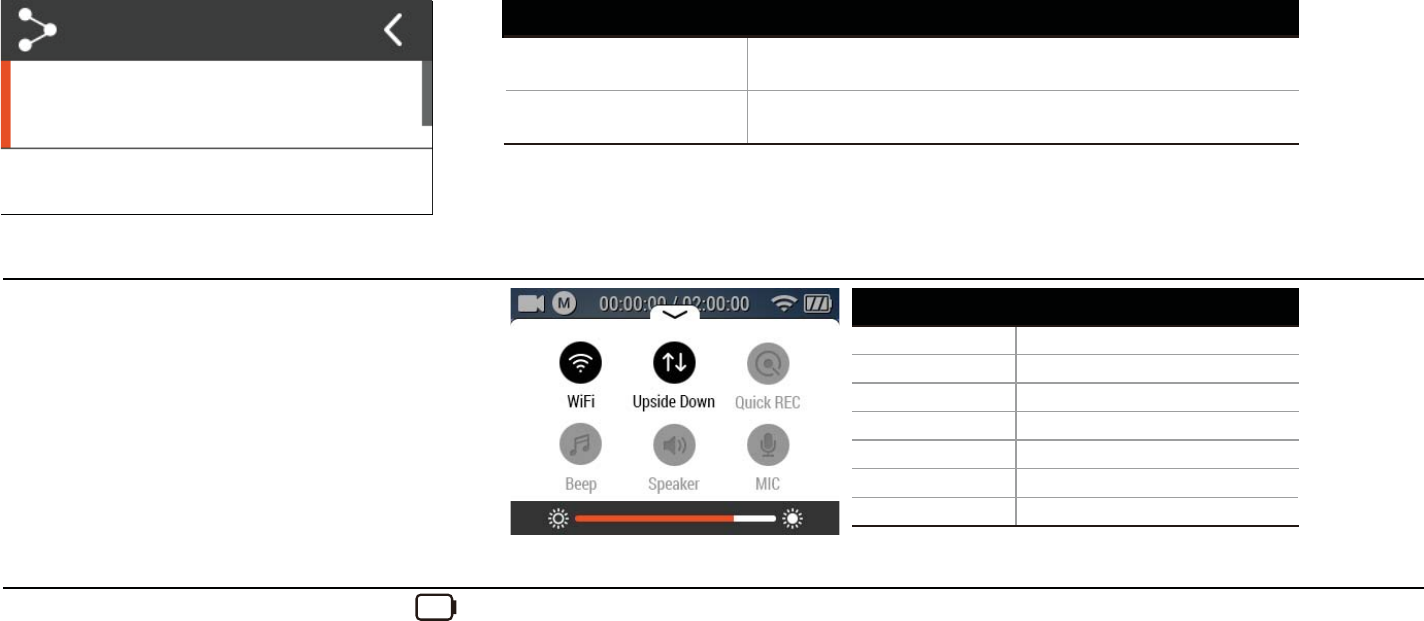
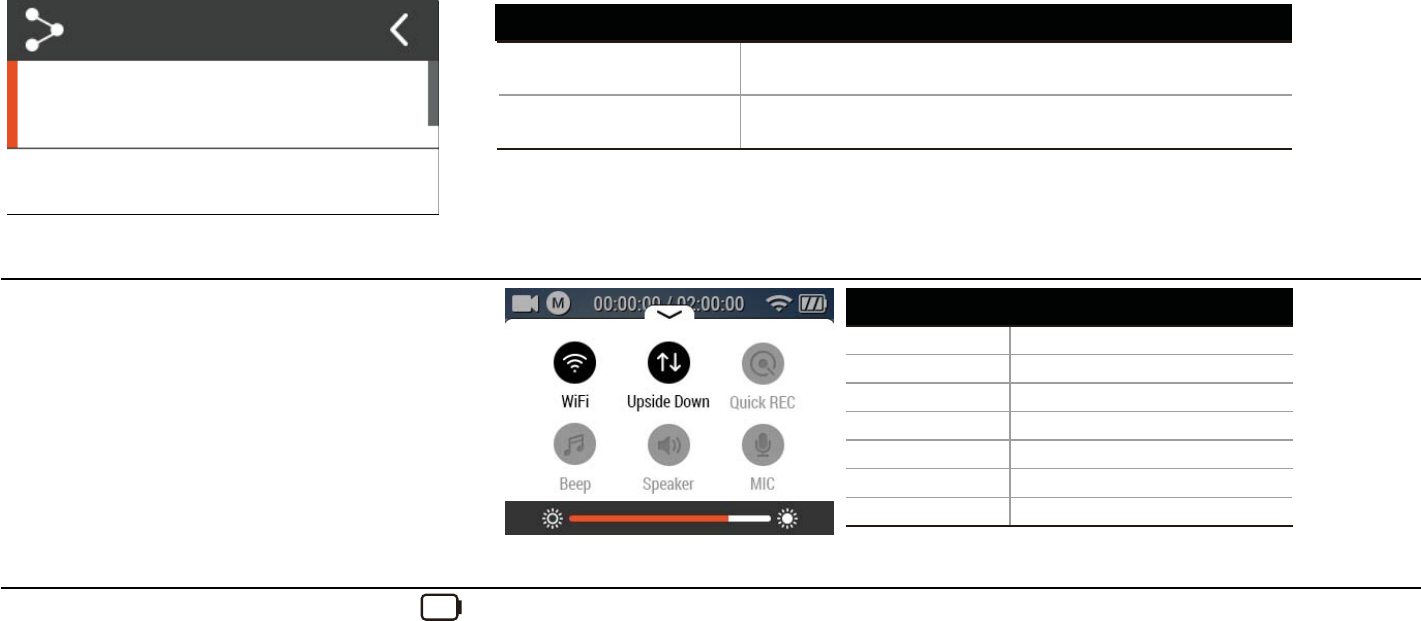
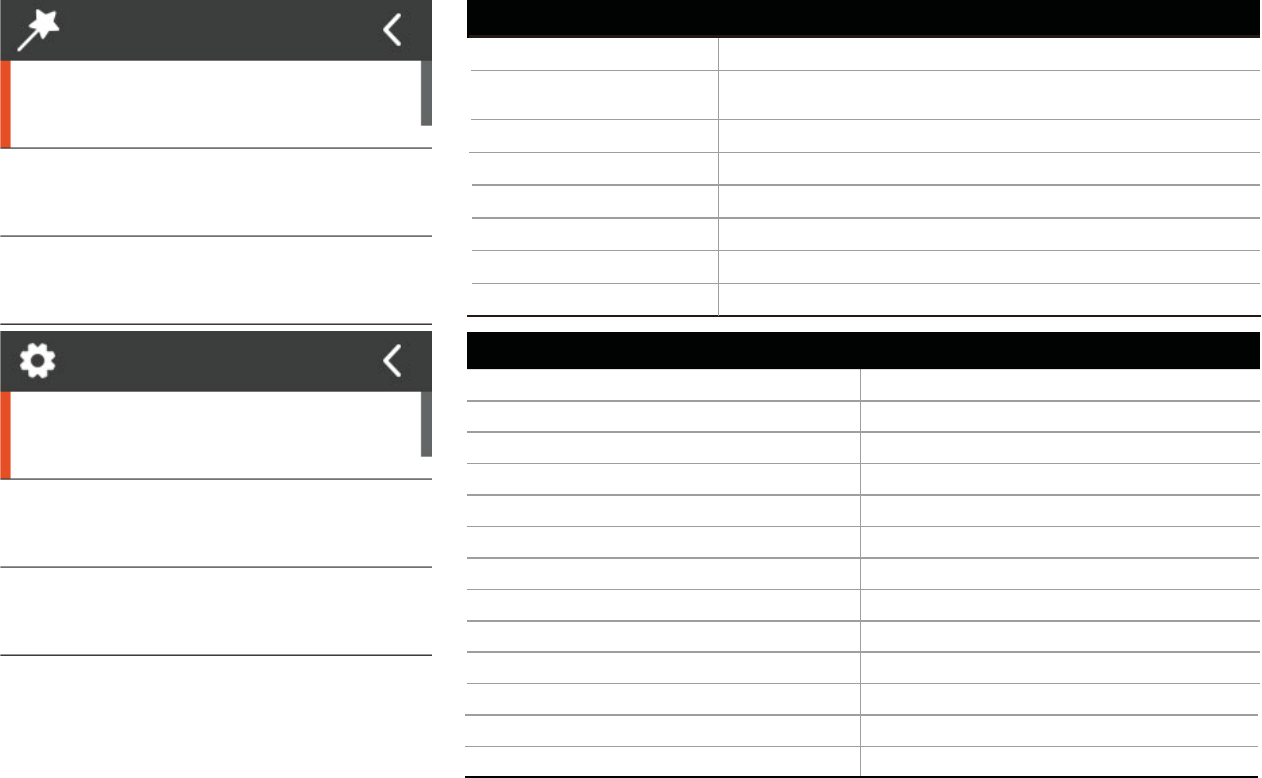
11. Quick Menu
Quick menu provides easy access to your
most often used menu.
Quick menu is only available with touch
screen.
1. Swipe up. Then Quick menu screen will
appear.
2. Tap the menu you wish to enter.
12. Recharging battery
LCD will show the low battery icon( ) when the battery is too low and close to the cut o level.
The camera will save the le automatically until it is turned o. You must recharge your battery to restart.
The camera is built in “Burst Speed Charging” function.
It will take about 1.75 hours for a full charge.
ON/OFF
SSID-PW
WiFi
WiFi INFO
Function Description
ON/OFF
ON/OFF
ON/OFF(last setting value)
ON/OFF
ON/OFF(last setting value)
ON/OFF(last setting value)
CONTROL BAR
WIFI
UPSIDE DOWN
QUICK REC
SPEAKER
Brightness
MIC
BEEP
Function Description
1. Turn o the camera.
2. Connect the camera to your computer via USB cable. 3. LED will turn on indicating battery is being charged.
4. LED will be turned o when it is fully charged.
Wi-Fi
Wi-Fi INFO
OFF
SSID-PW
CONNECTION

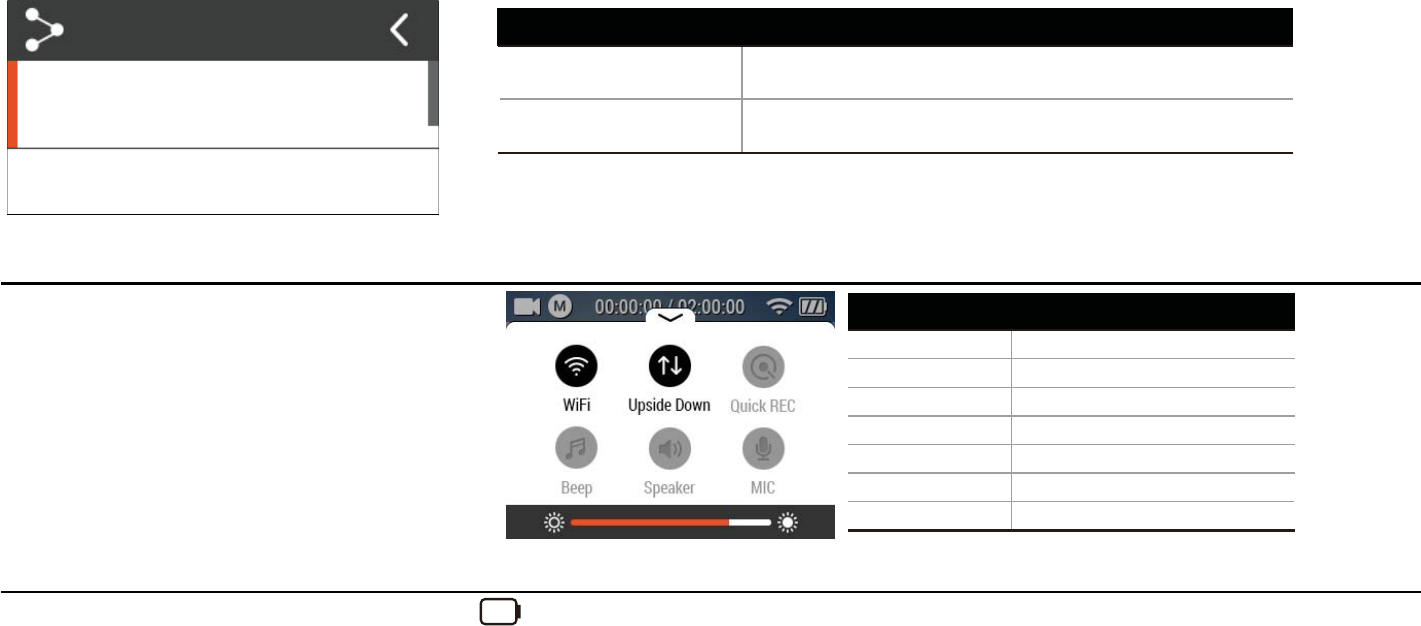
● Utilizing WiFi APP function of ACTIVEON, user can control the camera through smartphone.
● Compatible with iOS and Android OS.
● Before connecting the camera, download ‘ACTIVEON HUB’ application from smartphone app store.
● Search for ‘ACTIVEON HUB’ in Apple App Store or Google Play Store.
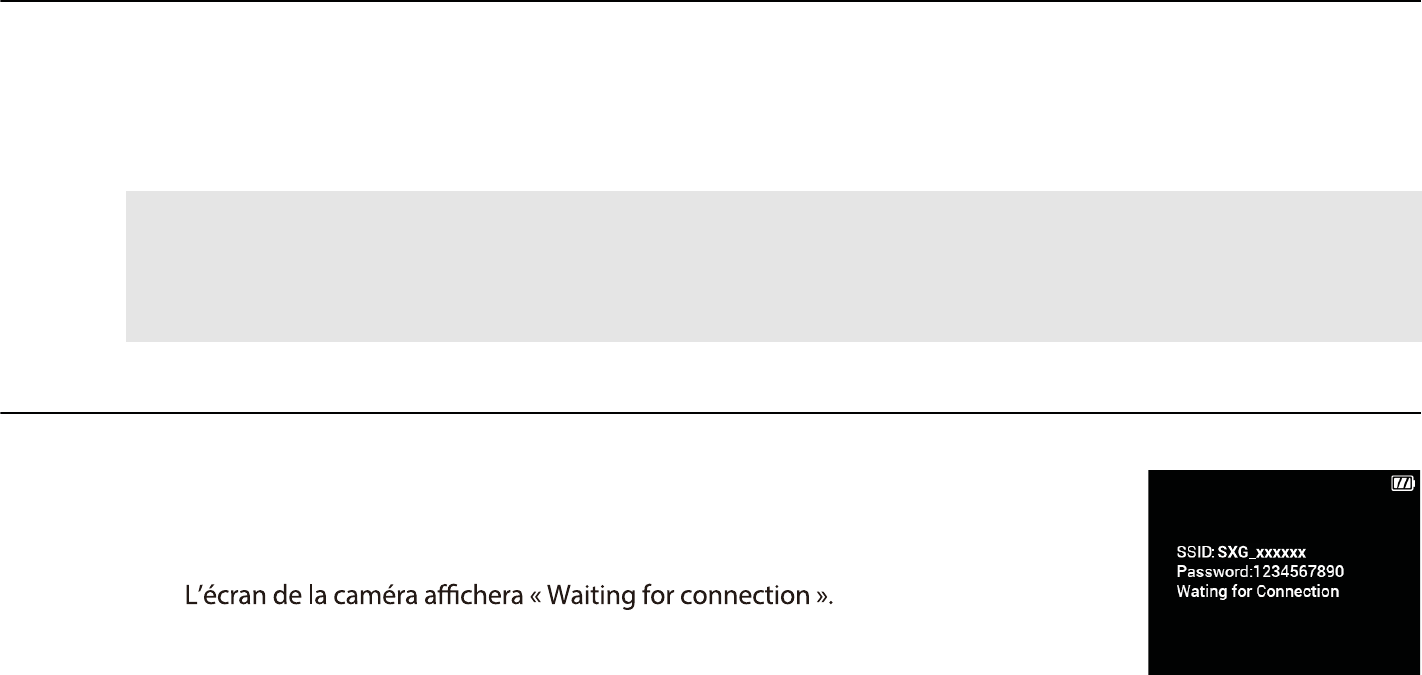
● Turn on ‘WiFi APP’ function in ACTIVEON SOLAR XG.
● The camera screen will display “Waiting for connection”
* While smartphone is connected to the camera, camera button operation will be disabled.
* You can take a video and photo, and adjust camera setting on ‘ACTIVEON HUB’.
* ‘ACTIVEON HUB’ features will be upgraded through application updates on your smartphone.
14. Connect ACTIVEON SOLAR XG to smartphone(using ACTIVEON HUB)
On your camera
13. Smartphone control
18
19
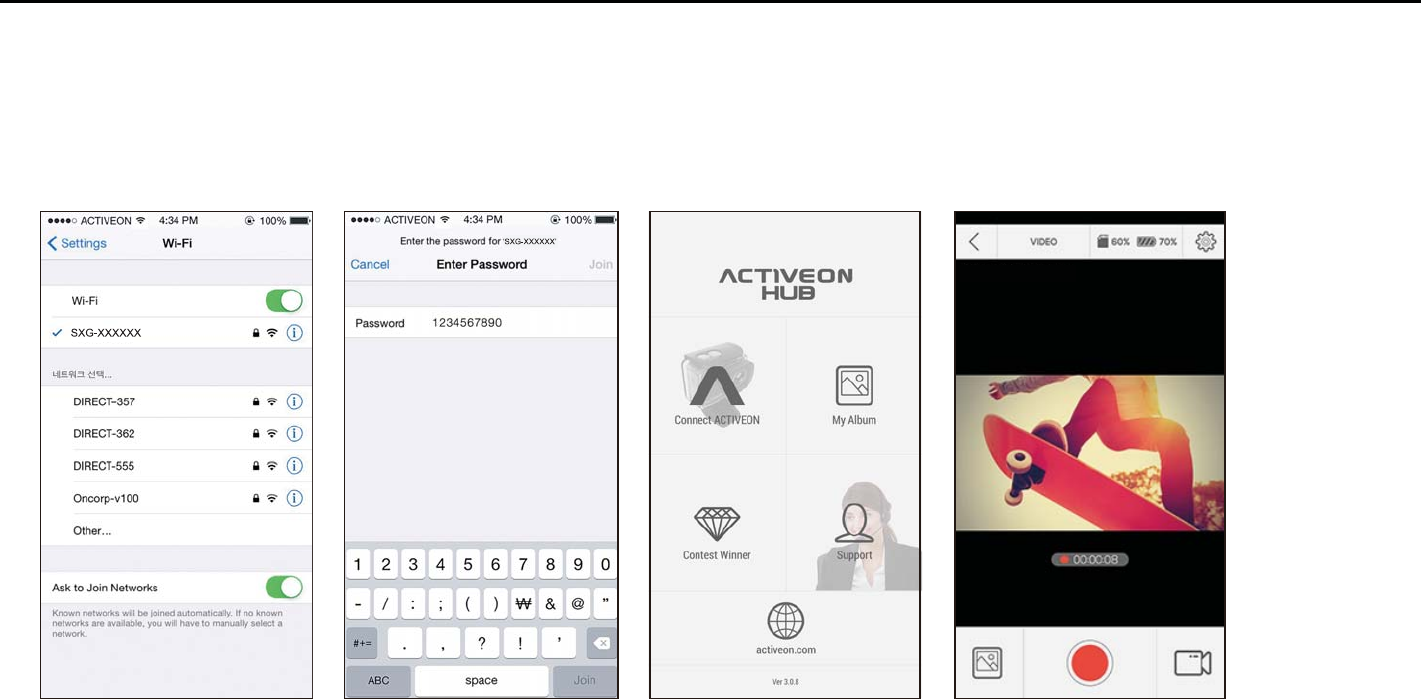
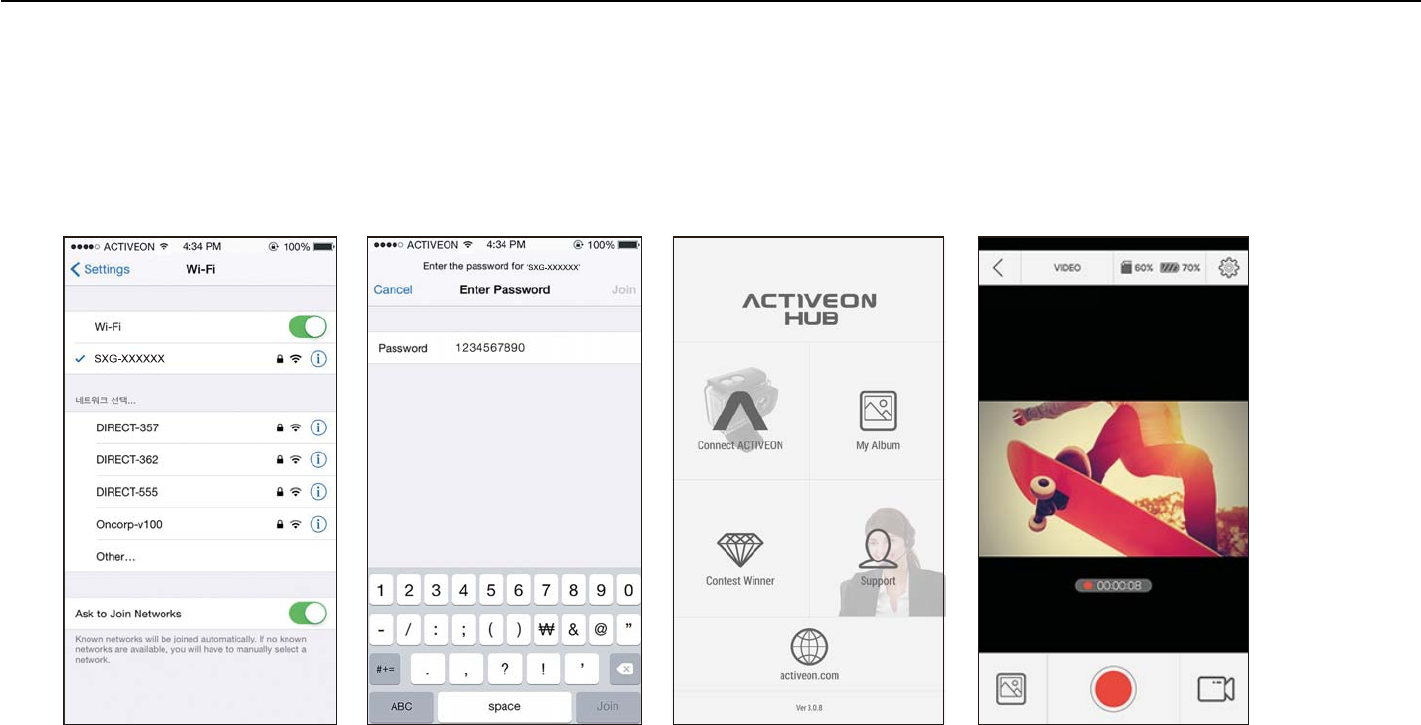
14. Connect ACTIVEON SOLAR XG to smartphone(using ACTIVEON HUB)
● On your smartphone or tablet, turn the WiFi on and select the network SXG-xxxxxx under WiFi setting.
● Default password is ‘1234567890’.
● Run 'ACTIVEON HUB' app on your smartphone or tablet.
● Press ’Connect ACTIVEON HUB’ on the app. You can now control your ACTIVEON camera.
On your Smartphone

20
● If the camera is connected to a computer or battery charger while it is powered o,
the camera starts to recharge the battery.
● If the camera is connected to a computer while it is powered on, the camera changes to le–transfer mode.
● While the camera is connected to a battery charger or car charger for recharge,
the camera can record while it is recharging.
1. Power on ACTIVEON SOLAR XG.
2. Connect the camera to a computer via USB cable.
3. The camera LCD will display as 'USB Ready'.
4. Go to ‘My Computer’ in PC.
5. Search ‘Removable Disk’.
6. Double click ‘Removable Disk’.
7. Video, photo folder are separated.
8. Open the folders to nd video or photo le.
9. Copy and paste les to the computer.
15. Transferring data to computer
(compatible with both Windows OS and Mac OS)
21
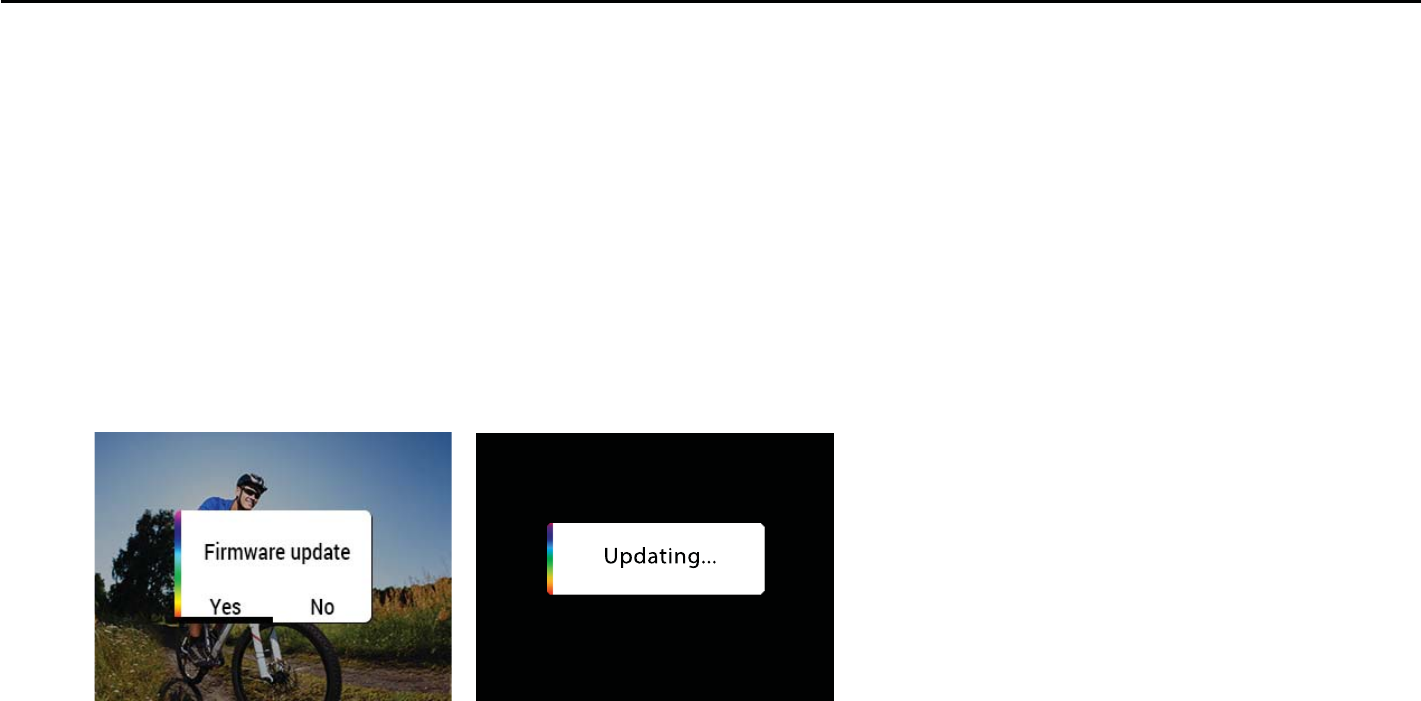
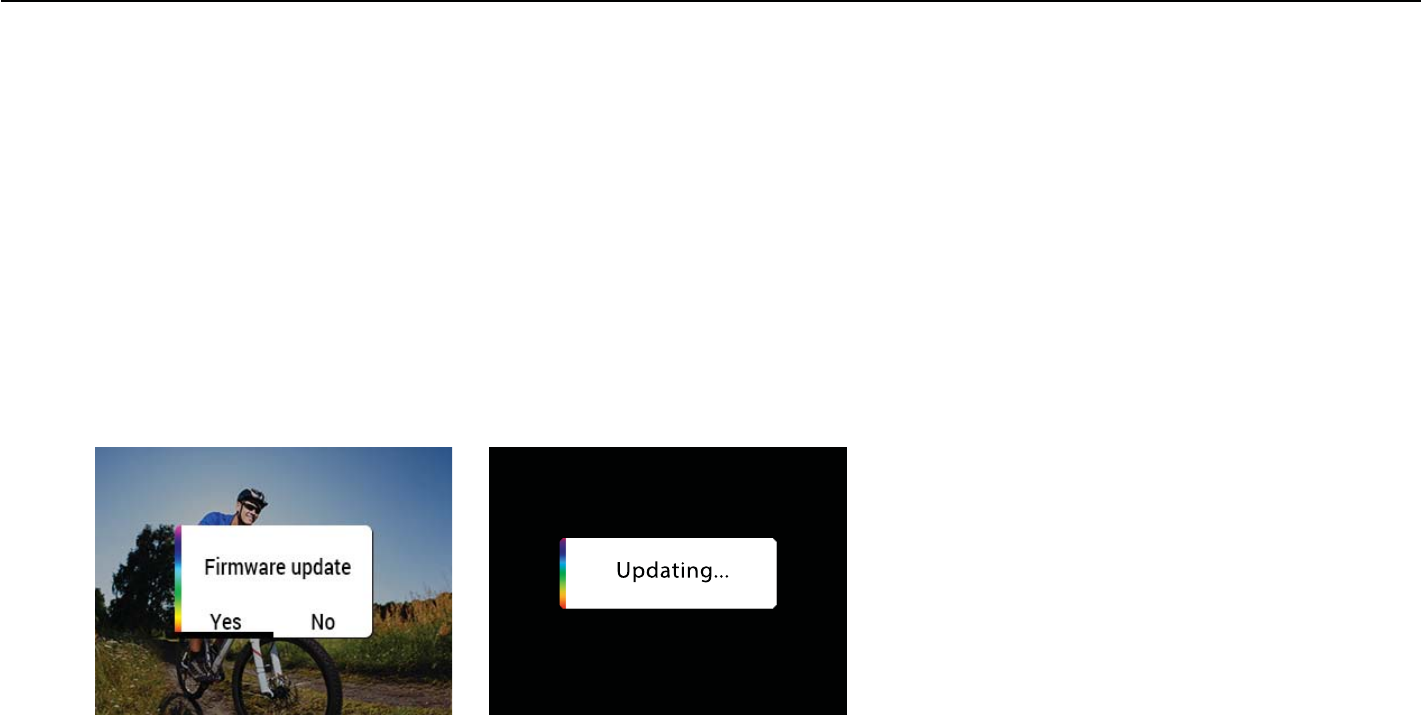
16. Firmware update (Find the latest firmware at www.activeon.com)
● You can always nd the latest rmware updates of ACTIVEON products on the website. (www.activeon.com)
● Firmware upgrade may fail if battery is too low.
● Recharge up to two cells of battery gauge for proper upgrade.
1. Format the memory card, and copy rmware le to the root directory of microSD Card.
2. Insert the microSD to ACTIVEON SOLAR XG and turn on the power.
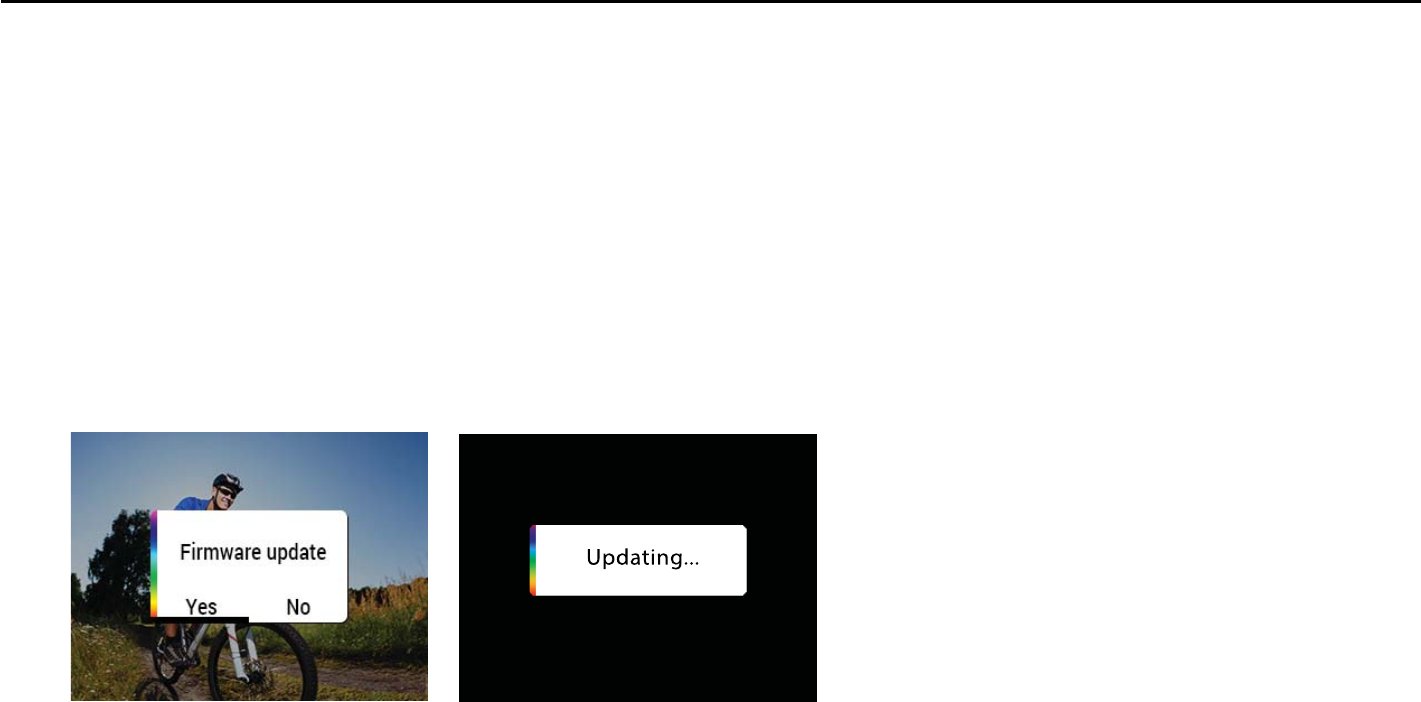
3. Firmware upgrade will automatically start as showing the updating status on the screen.
4. When upgrade is completed, the camera will show ’F/W Updating’ and will automatically turn o.
* Do Not turn o the camera or take out the battery during rmware upgrade.

22
● “ACTIVEON SOALR XG” 1080p 60fps Action Camera.
● FULL HD(1920 x 1080) resolution, 60fps recording.
● 196ft(60m) waterproof housing.
● 14MP PANASONIC 34110 CMOS sensor.
● Easily control camera Eect setting by Program mode.
● Super wide angle eld of view(FOV).
● Built in 2.0” LCD(320x240) with touch panel.
● Built in WiFi.
● Versatile recording resolution(1080p/720p/480p).
● Burst photo-shooting(*6 shots in 1 second).
● H.264 codec, saved as MP4 format.
● Rechargeable Li-ion Battery.
● Battery running time : Approximately 120minutes of continuous recording(1080p 30 fps)
* recording time may vary depending on the condition
● Recharging time : 3.5 hours by USB port/ 1.75 hours by AC adapter(Optional Accessory)
● Quick charging
● Easy graphical user interface
● Full line of accessories
17. Features and specifications

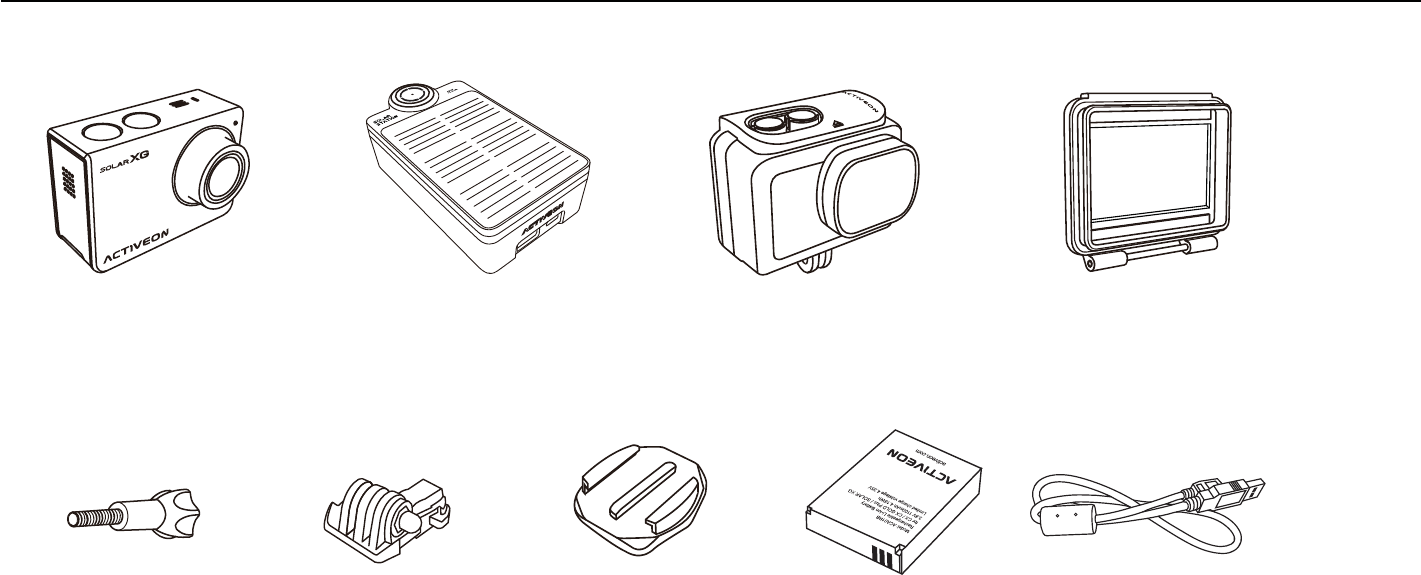
Waterproof
Housing
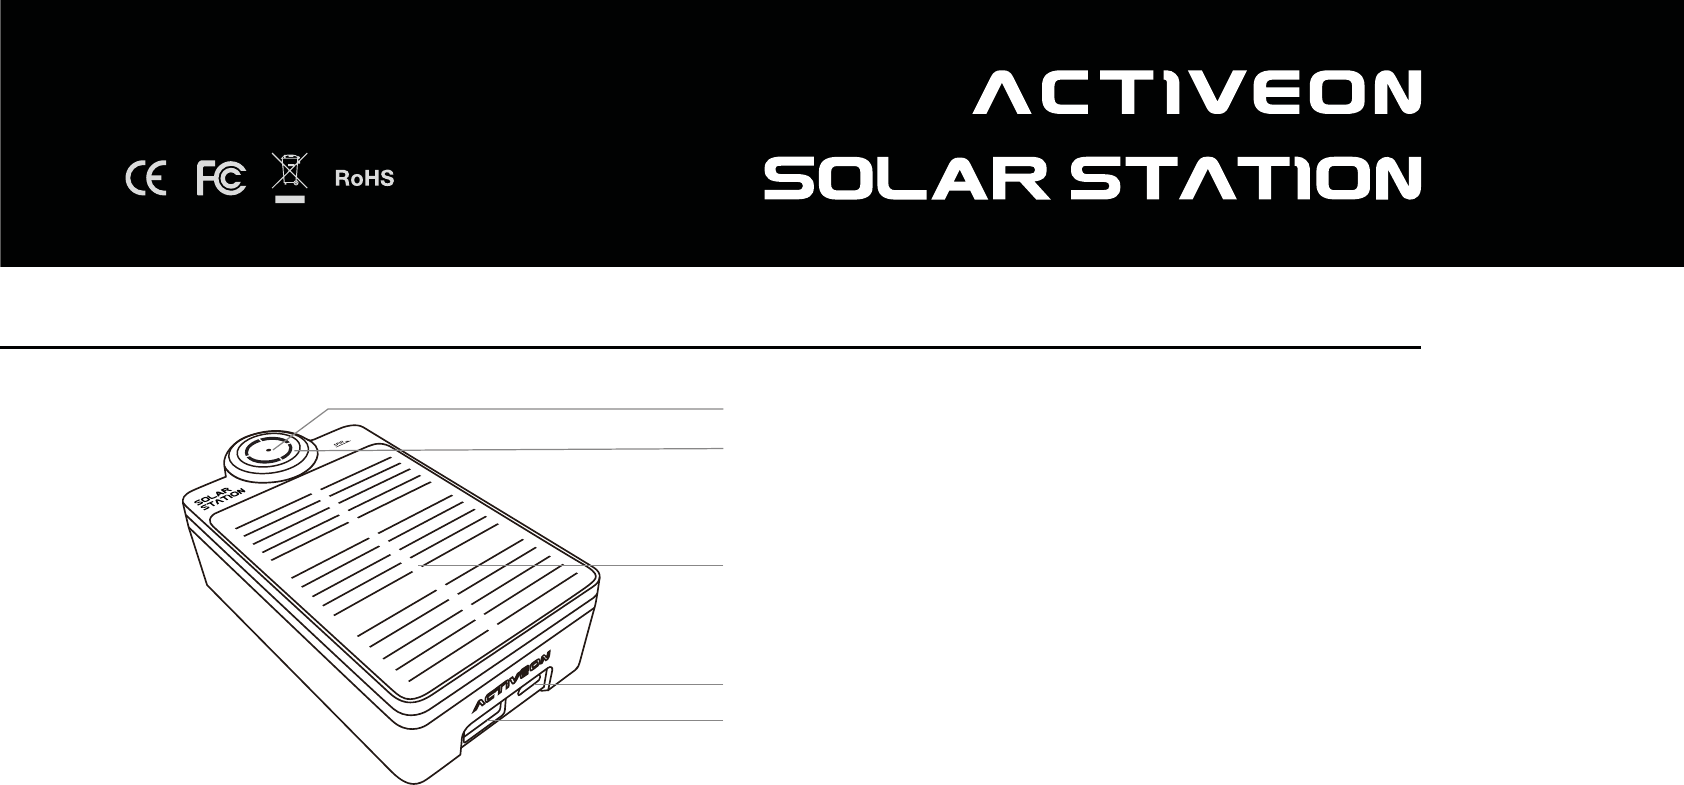
SOLAR STATION
ACTIVEON SOLAR XG
Action camera
23
18. Inside the Package
Curved Adhesive
Mount
Short Connector USB CableRechargeable Li-ion Battery
Connecting Screw
Opened Backdoor
Specification
Dimension 113 x 62 x 33.5mm
Input 5V / 2.1A
Output 5V / 2.1A
Capacity 5600mA
Type Li-Polymer
Solar Panel Monocrystalline
Silicone
www.activeon.com
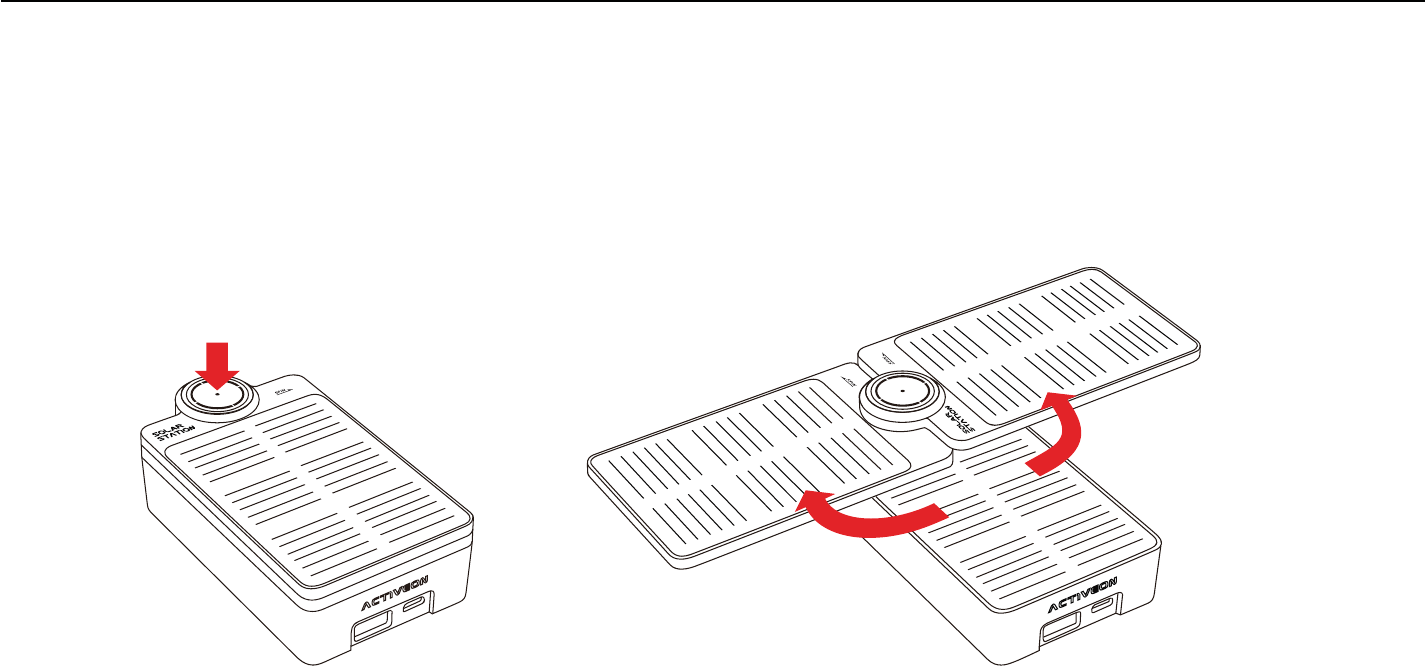
1. Name of each part
Power Button
LED Indicator
Solar Panel
USB Input
USB mini B type output
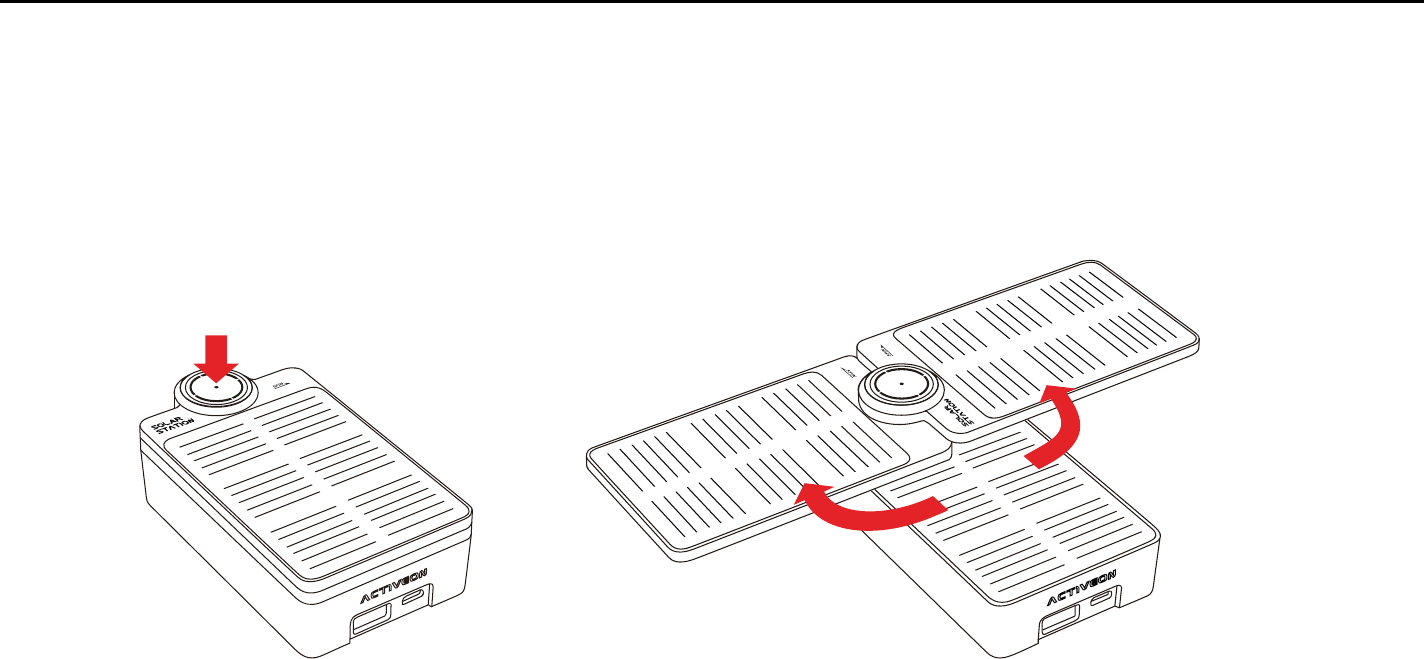
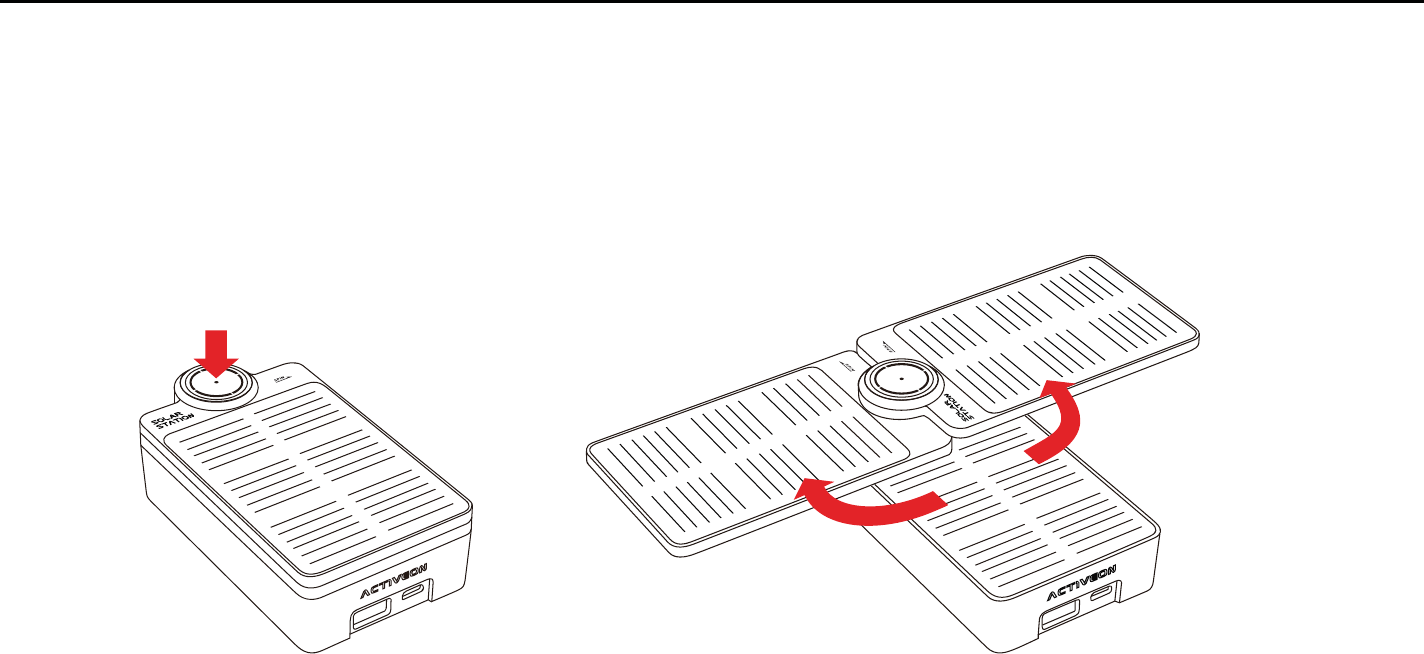
Turn on/off
Press the power button to turn on
The power will be turned on automatically when the device is connected with the cable.
To open Solar panels
Rotate each Solar panels to the right / left side.
25
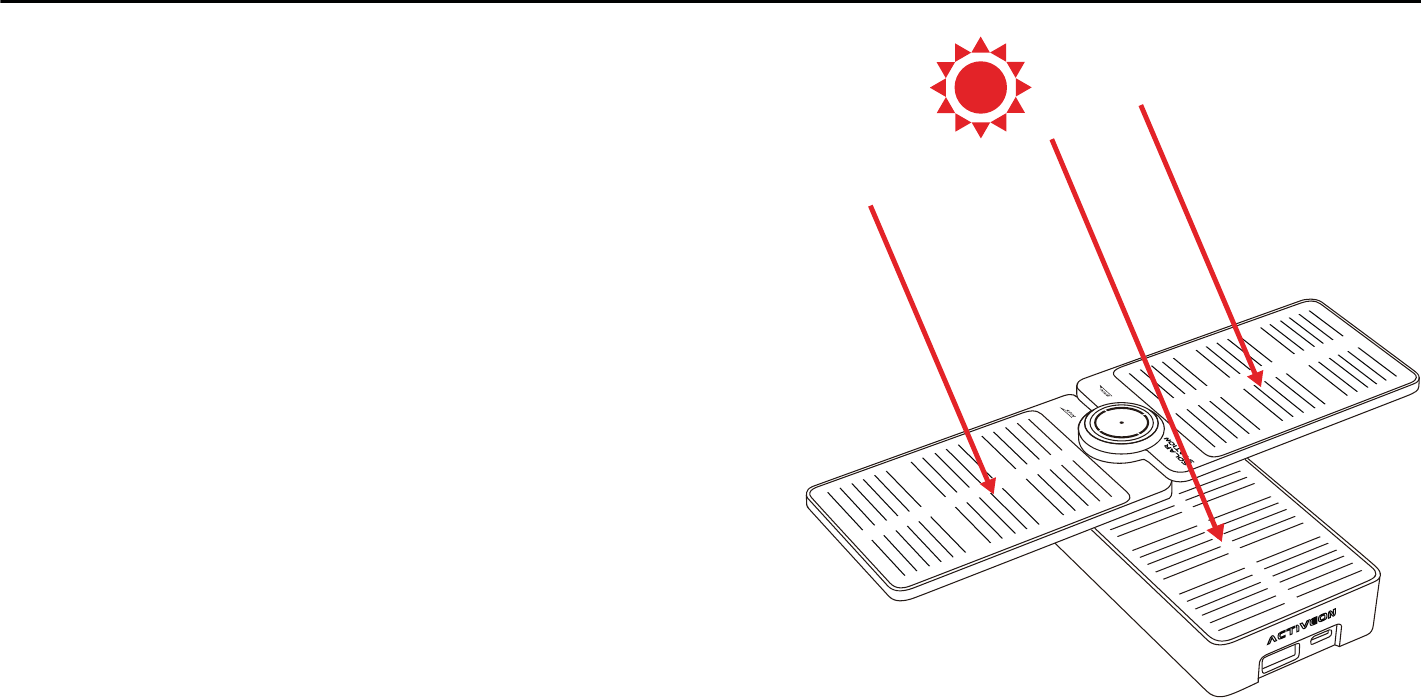
2. Operation (1)
26
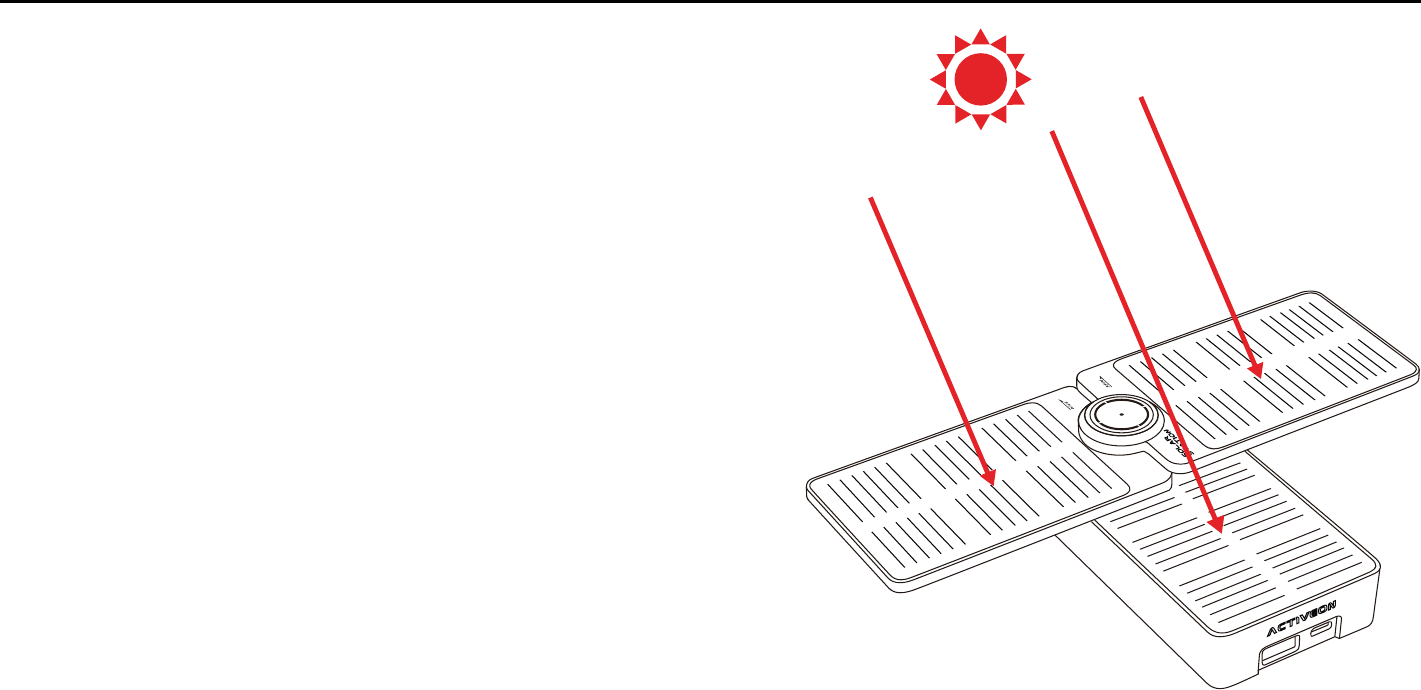
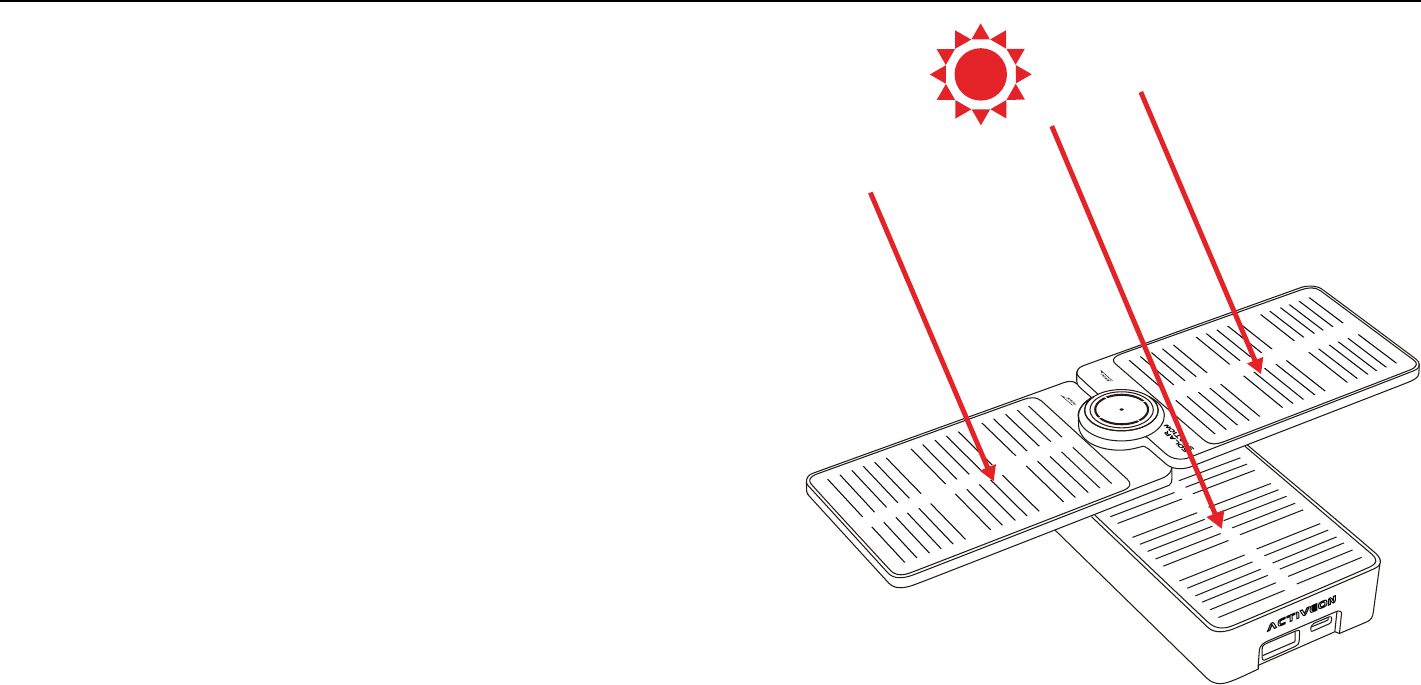
Charging by solar panel
● The battery will be charged automatically when
the solar panel is exposed to sunlight.
● The lights on the button will be ashing when charging.
(Refer to LED indicator page)
● Charge the battery on a sunny day
● Face the solar panel to the sun
● Solar charging eciency depends on weather,
season, temperature etc.
*Use gloves to grab the solar station.
*The solar station can be very hot
under the sun to get harmed.
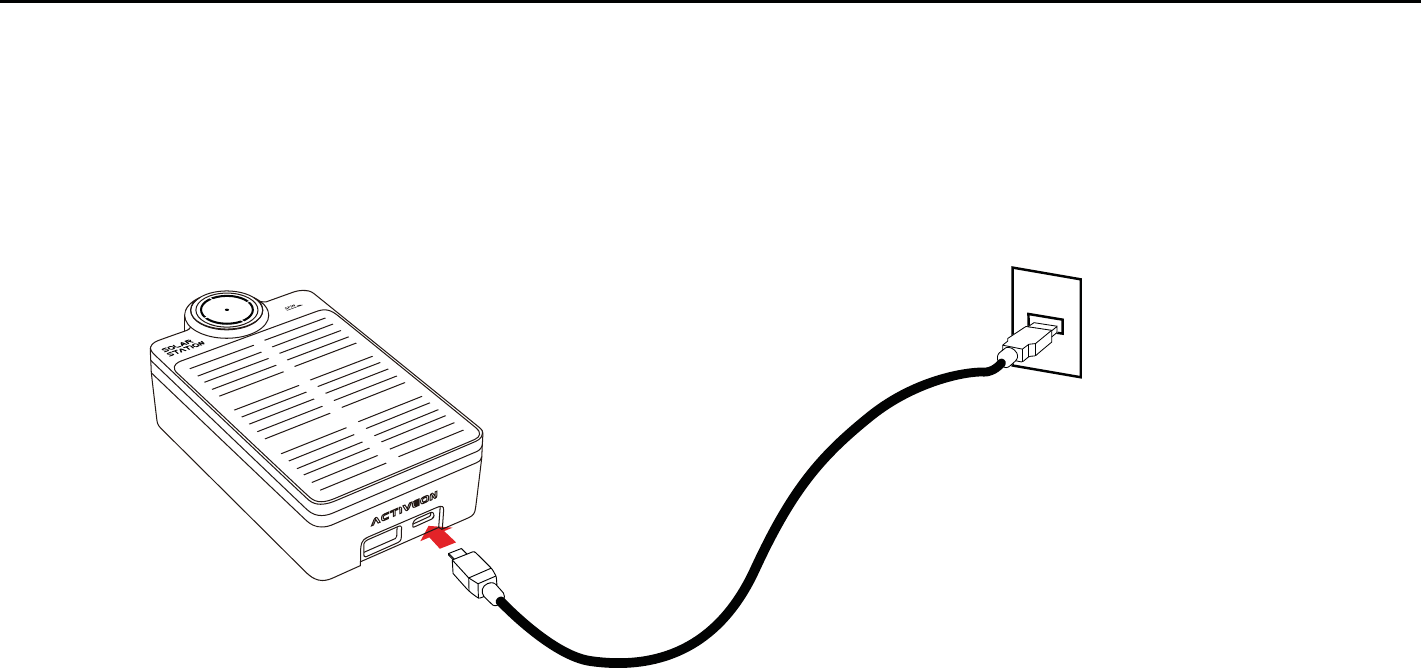
2. Operation (2)
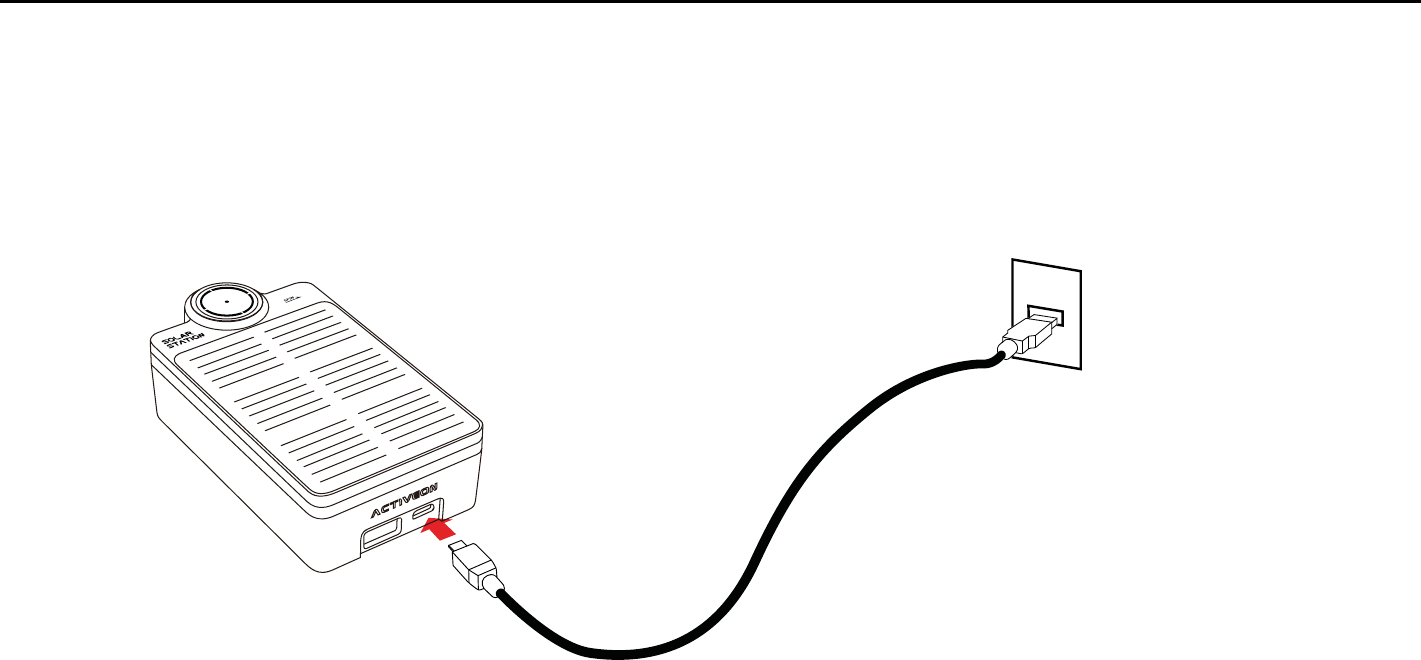
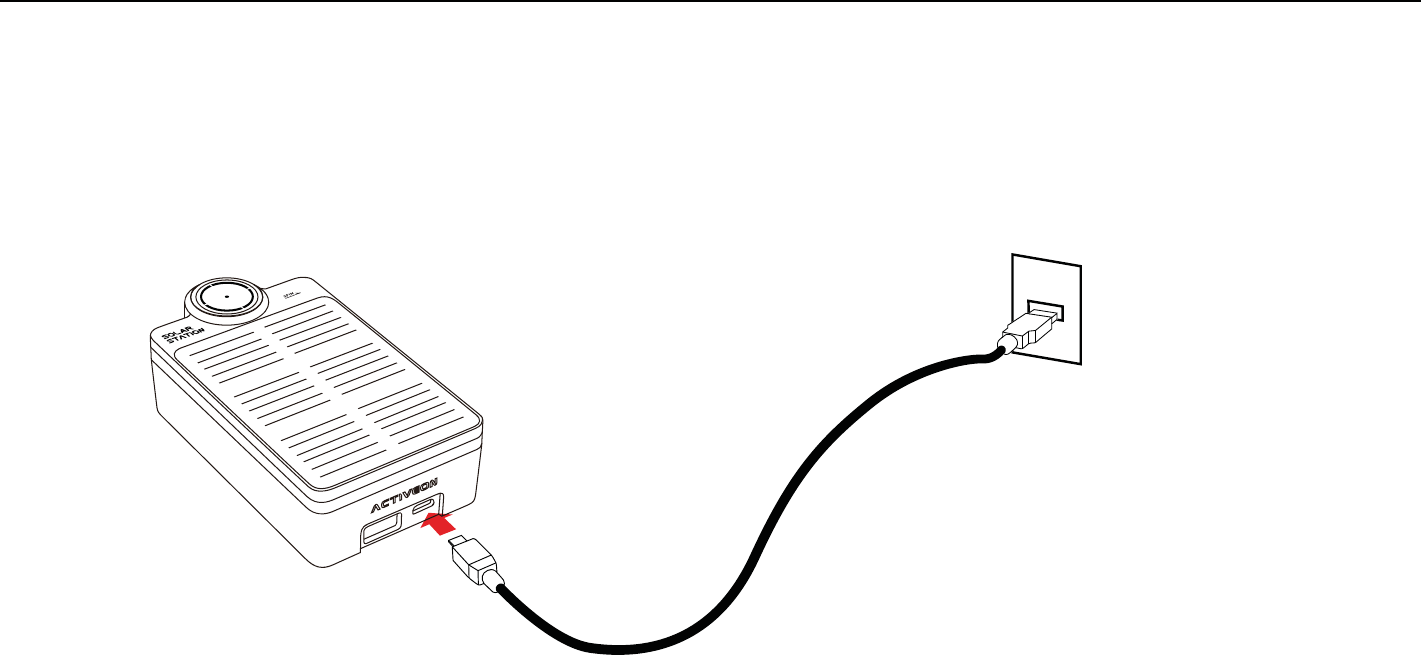
Charging by USB cable
Connect Solar station to a power outlet using the USB cable in a package
The lights on the button will be ashing when charging (Refer to LED indicator page)
27
2. Operation (3)
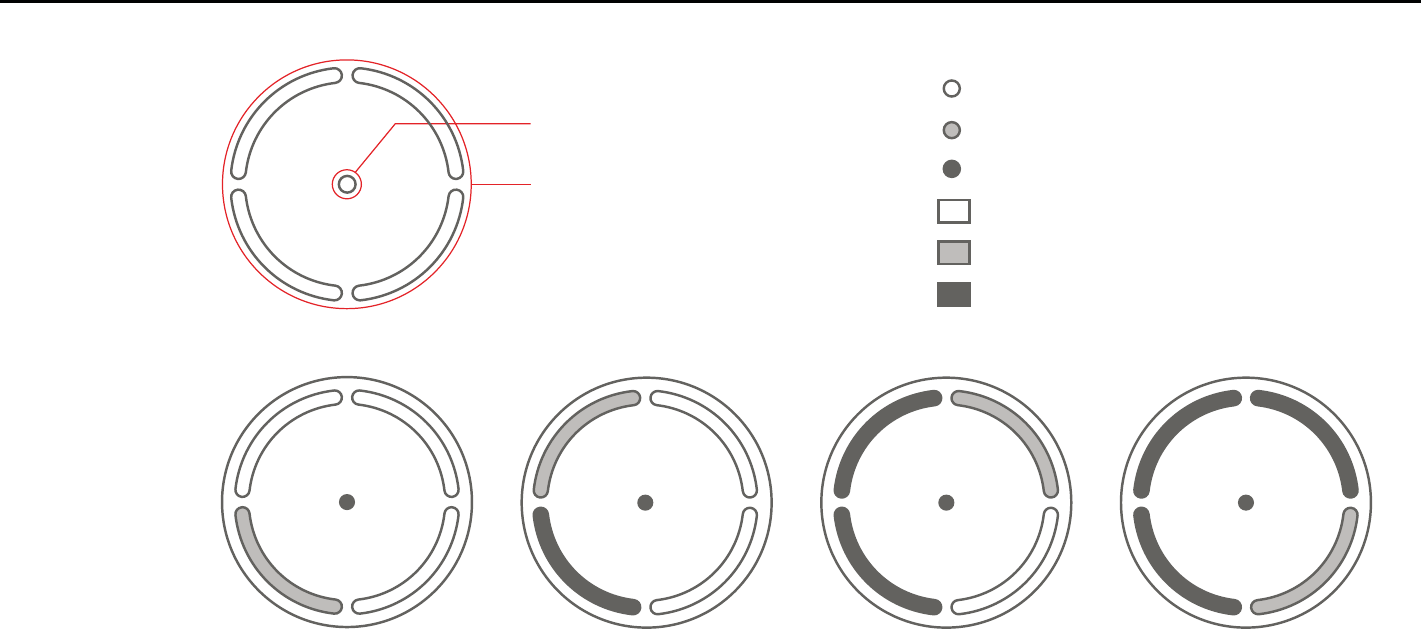
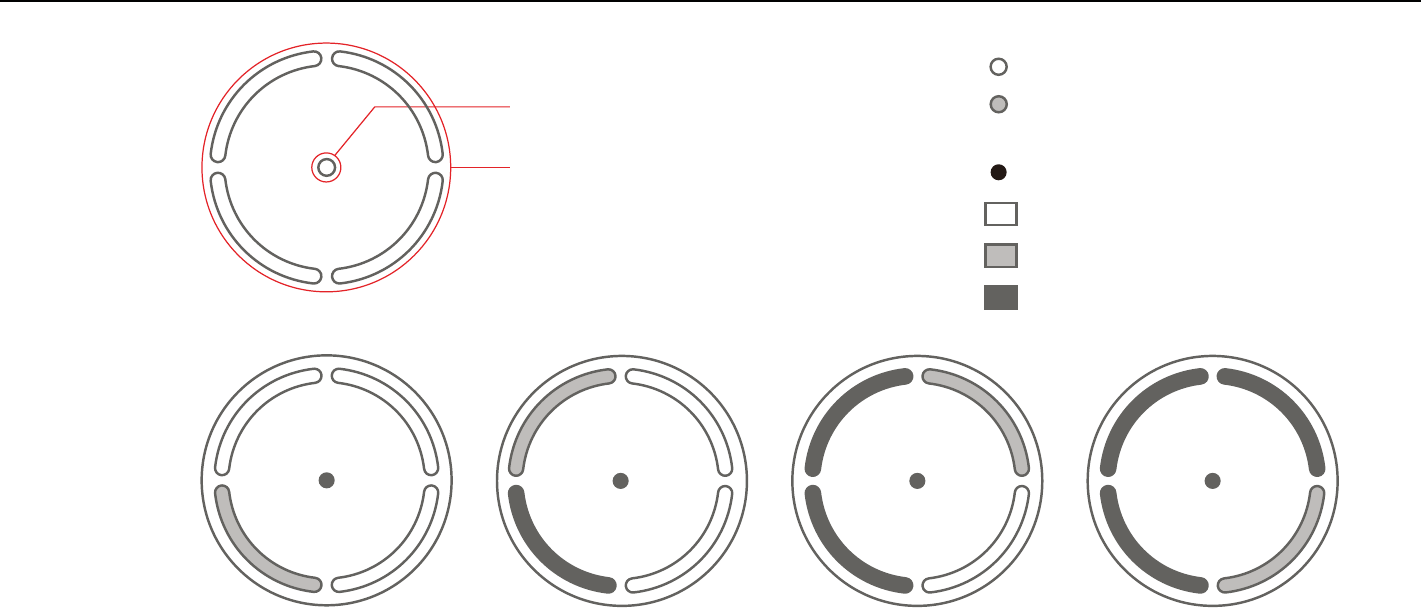
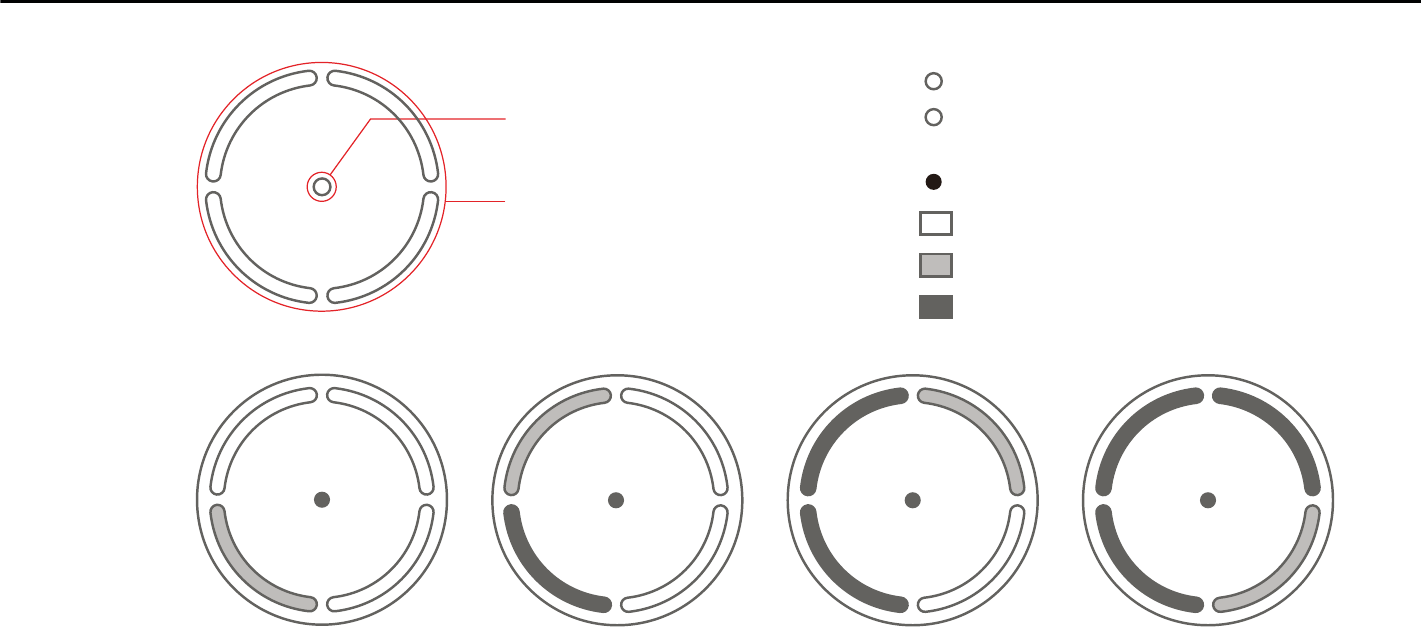
Power ON/OFF Indicator
Charging Indicator
Charging : Blink
Chargeable : No Light
Charged : Solid
Power ON / DC Charging : Solid
SOLAR Charging : LED O after 2sec blinking
Power OFF : No Light
28
2. Operation (4) - LED indicator
0 - 25% (1Light) 25 - 50% (2Lights) 50 - 75% (3Lights) 75 - 100% (4Lights)
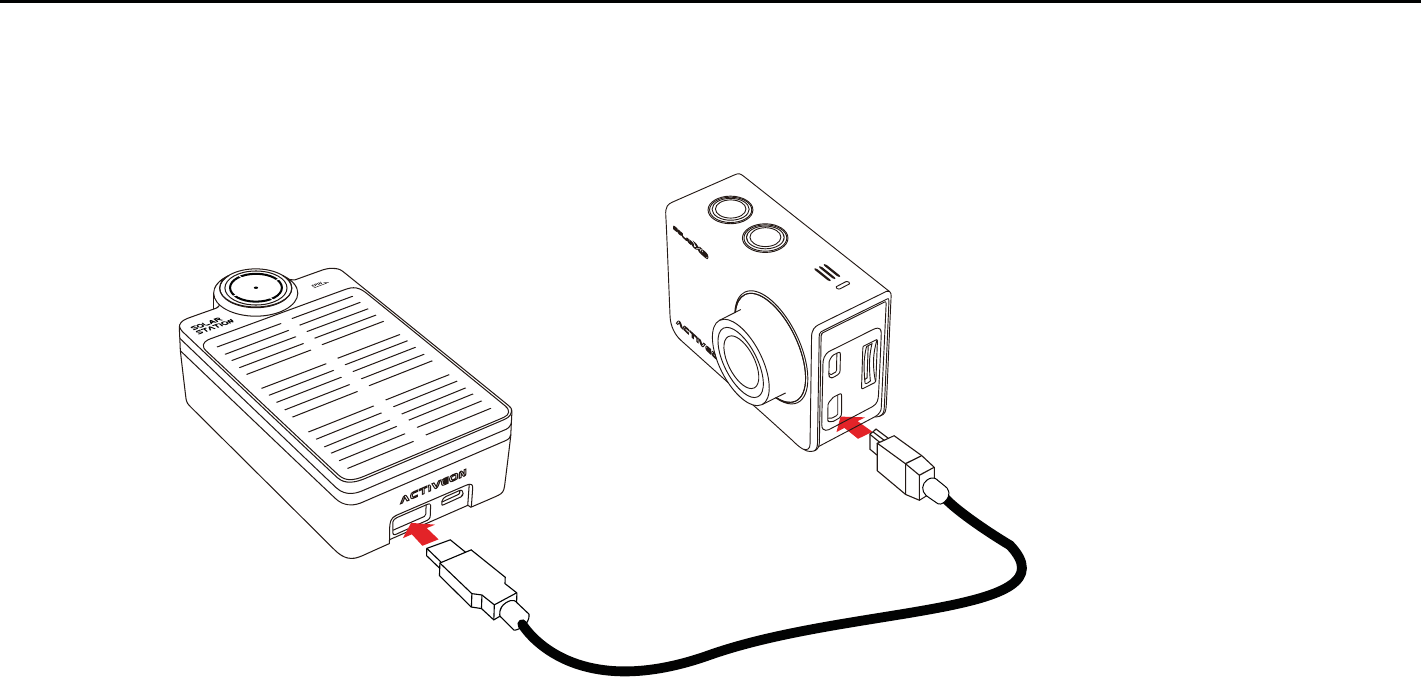
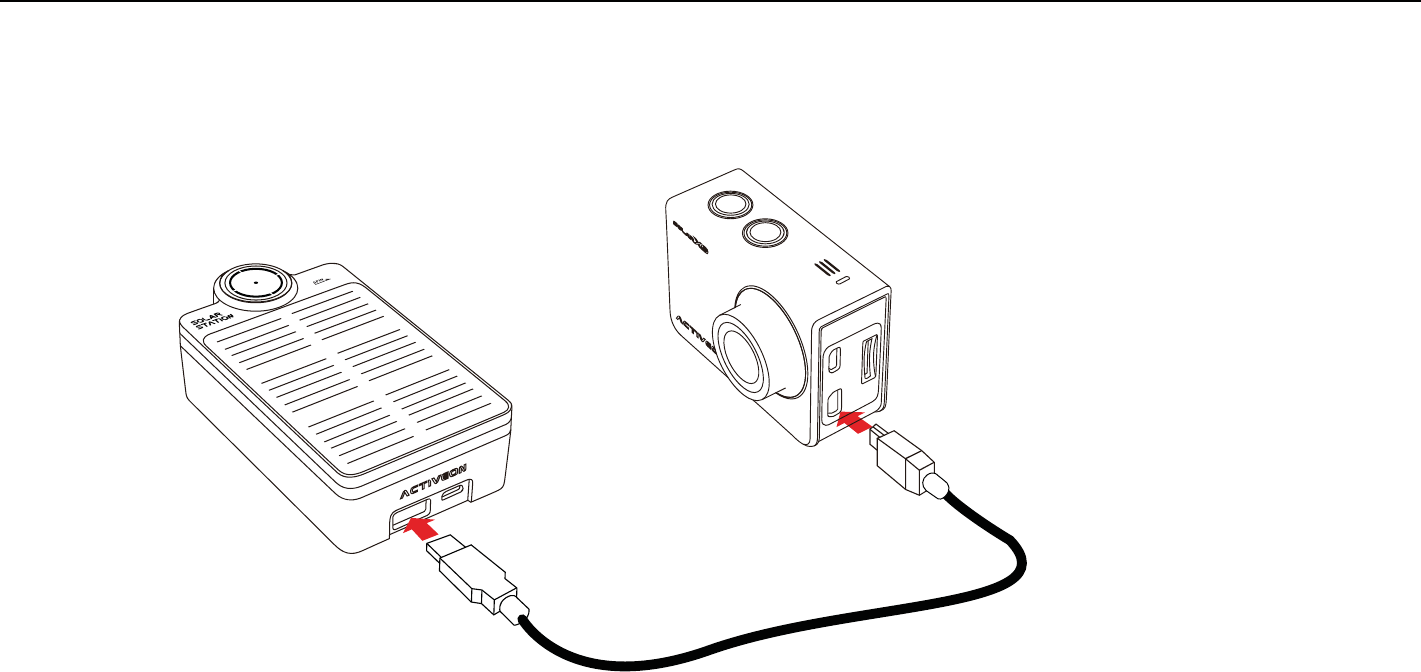
Charging by USB cable
Connect Solar station to the camera using the USB cable in a package.
29
2. Operation (5)

30
● Keep the device away from extreme high and low temperatures.
● Do not disassemble the device.
● Do not crush the battery or throw into re.
● Never throw or drop this product to avoid causing damages.
● Recharge battery at least once every month to maintain its charge properties.
● Do not expose the device to water or high humidity.
● Keep the device out of reach of children or person who have not been instructed in its use.
● Stop using if leakage, overheating or any other unusual conditions occur.
● If there is a problem with the product, please contact your dealer for further assistance.
3. Precautions

MODE D'EMPLOI
www.activeon.com

33
34
36
37
38
39
40
42
44
46
49
49
50
50
52
53
54
55
96
96
97
98
※ ATTENTION
※ DÉCLARATION SUR LES INTERFÉRENCES DE FRÉQUENCE RADIO FCC
※ Informations sur l'exposition aux RF (SAR)
※ GARANTIE
Table des matières
1. Nom de chaque pièce
2. Mode d'emploi
3. Allumez la caméra
4. Capture d'écran LCD
5. Description des icônes graphiques
6. Mode menu
7. Mode vidéo
8. Mode photo
9. Mode playback
10. Mode paramètres
11. Menu rapide
12. Recharge de la batterie
13. Contrôle par Smartphone
14. Connexion de l'ACTIVEON SOLAR XG à un Smartphone (à l'aide de l'app ACTIVEON)
15. Transférer les données vers un ordinateur
16. Mise à jour du rmware
17. Fonctionnalités et spécications
18. Dans l'emballage
FRANÇAIS
www.activeon.com
* Veuillez lire attentivement ce mode d'emploi avant toute utilisation!
1. Nom de chaque pièce
33
Diode d'indication
(Haut, Base, Avant, Arrière)
Trou de vis pour le pied
(Base)
Mode / Navigation MIC Interne
Power / Obturateur
Écran LCD
Li-ion port pour
la batterie
HD OUT
* Veuillez brancher un câble «micro HDMI» dans le port HD out.
* Câble non fourni.
Port mini-B USB
Port pour carte microSD
Haut-parleur
34
2. Mode d'emploi
● L'ACTIVEON SOLAR XG est utilisée à l'aide de deux boutons ( bouton, bouton ).
● Le bouton ( ) pilote la mise en marche, l'obturateur et la saisie.
● Le bouton ( ) permet le changement de mode, de programme et l'accès au navigateur.
● Les fonctionnalités des boutons sont décrites dans le tableau ci-dessous.
Utilisation des boutons
Appuyez sur le bouton ( ) pour lancer l'enregistrement vidéo ou prendre
une photo. (Vidéo/ Photo / Rafale / Timelapse)
Alimentation
On / O
Start / Stop
enregistrement
Conrmer le
paramètre du menu
Fonction Bouton Description
Dans le mode paramètre utilisateur, appuyez sur le bouton ( ) pour saisir
un paramètre menu dans chaque catégorie
Appuyez sur le bouton ( ) et maintenez-le enfoncé pendant 2 secondes.
* Si l'extinction automatique est activée, la caméra s'éteindra automatiquement après
sans opération. (Option Auto Power O est désactivée, 5, 10, 30 minutes)
Changement
du mode
Navigateur
Mode programme
Appuyez sur le bouton ( ) pour alterner entre les modes
(Vidéo > Photo > Rafale > Timelapse)
Appuyez sur le bouton ( ) et maintenez-le enfoncé pendant 2 secondes
pour accéder au mode programme.
Appuyez sur le bouton ( ) pour déplacer la barre de sélection dans le menu
OSD ou modier un paramètre.
35
● L'écran du SOLAR XG est tactile,
et répond aux gestes tels que
tapotements et glissements.
Utilisation tactile
Tap Tap & Hold
Double-Tap Swipe up
Swipe down
Swipe left
Swipe right
Double-Tap
● Vous pouvez aisément accéder au menu.
Swipe up
Swipe leftSwipe right
<Menu programme >
<Menu rapide>
<Mode menu>
<Zoom>
● Pour une utilisation tactile, tapotez l'écran.
L'écran achera ensuite “Lock image”.
Tapotez et maintenez “Lock image” jusqu'à
ce que l'écran soit prêt.
3. Allumez la caméra
1. Ouvrez le compartiment de la batterie et insérez-y la batterie Li-ion ACTIVEON SOLAR XG.
2. Insérez la carte microSD dans le compartiment prévu à cet eet.
(La caméra n'enregistre pas si la carte microSD n'est pas insérée.)
3. Appuyez sur le bouton ( ) et maintenez-le enfoncé pendant 2 secondes.
(La caméra s'allume et l'écran LCD ache l'image visualisée.)
Comment débloquer le fonctionnement tactile
36
● SOLAR XG comprend des caractéristiques spéciales d'économie d'énergie.
1. Auto rétro éclairage par palier : Lorsque vous réglez sur [Arrêt auto LCD], l'auto rétro éclairage par palier débutera au
mileu de votre temps de réglage.
2. Pour éteindre l'écran LCD : [Pendant l'enregistrement vidéo] Appuyez et maintenez l'écran pendant 2-3 secondes.
L'écran LCD s'éteindra automatiquement.
* Pour ré allumer l'écran LCD à nouveau, s'il vous plaît appuyez sur le bouton ( ) une fois.
* Si l'image de cadenas apparaît, s'il vous plaît consulter le guide-du-Touch-Opération How-to-Unlock.
Fonction d'économie d'énergie
37
4. Capture d'écran LCD
Écran photo
Écran vidéo
ⴝ
ⴞ
ⴟ
ⴘ
ⴙ
ⴚ
ⴛ
ⴜ
Mode d'enregistrement
/ Statut du programme
Informations du temps d'enregistrement
Statut du WiFi
État de la batterie
Programme / Mode / Mode rapide
Résolution/FPS/FOV/Infos d'intervalle
Enregistrement rapide
/ Paramètres des eets / AE / Zoom
Tapotez deux fois sur l'écran pour activer la
fonction zoom.
Mode
d'enregistrement
Temps
d'enregistrement
WiFi
Batterie
Icône de balayage
Infos
d'enregistrement
Zone de Fonction
Zoom
FonctionNo. Description
ⴝ
ⴘⴙⴚⴛ
ⴜⴜ
ⴜ
ⴟ
ⴞ
ⴟ
ⴝ
ⴘⴙⴚⴛ
ⴜⴜ
ⴜ
ⴞ
ⴜ
ⴟ
5. Description des icônes graphiques
38
Manual
Video Program
Diving
WinterSportsRiding
Outdoor Indoor Night
WaterSports WiFi Quick REC Beep UpsideDown
Speaker MIC Brightness
Quick menu
1x
1x
2x
2x
3x
3x
4x
4x
Zoom
Manual
Photo Program
Outdoor Indoor
NightPortrait Landscape
Video mode Playback Setup
Time lapse Looping Auto Stop Video Setup Photo Setup Eect Setup General Setup Connection
Photo mode
Time lapseBurst Self-timerManual Manual
39
6. Mode menu
Avec l'écran tactile
1. Balayez vers la gauche. L'écran du mode menu s'ache.
2. Tapotez sur le mode auquel vous souhaitez accéder.
(Vidéo, Photo, Playback, Paramètres).
Le mode menu est disponible avec le bouton et l'écran tactile.
Avec le bouton : Il y a 4 modes en “mode menu” : Vidéo, Photo, Playback et Paramètres.
1. Appuyez une fois sur le bouton ( ). L'icône du mode vidéo s'ache.
2. Appuyez encore une fois sur le bouton ( ) pour passer d'un mode à l'autre
(Vidéo, Photo, Playback et Paramètres).
3. Attendez une seconde, et le menu sélectionné s'ache automatiquement.
4. Pour le mode playback et paramètres, appuyez sur le bouton ( ) pour acher
davantage d'options.
40
1. Une fois la caméra allumée, Appuyez sur le bouton ( ) pour lancer
l'enregistrement vidéo.
2. Lorsque la caméra commence à enregistrer, la diode clignote* et la durée
de l'enregistrement s'ache à l'écran.
3. Appuyez sur le bouton ( ) pour arrêter l'enregistrement.
4. Vous pouvez modier les paramètres vidéo dans ”Paramètres vidéo”.
* Si l'option LED OFF est sélectionnée dans les paramètres généraux,
la diode ne clignotera pas.
Capture d'écran de l'utilisation du bouton
Capture d'écran de l'utilisation de
l'écran tactile
7. Mode vidéo
Vidéo timelapse
Prise d'images à intervalles dénis et création d'un chier vidéo timelapse.
(0.5sec / 1sec / 3sec / 5sec / 10sec / 30sec / 60sec)
Looping
Enregistrement en continu jusqu'à ce que vous arrêtiez. (1min / 5min / 10min / 30min)
** La capacité maximale du chier vidéo est de 4 Gb. Si la taille du chier excède celle de l'espace
looping, la caméra écrasera le chier d'enregistrement en cours.
Zoom
Tapotez brièvement deux fois sur l'écran, la fonction zoom s'ache.
Après 3 secondes, le zoom disparaît automatiquement et enregistre
la valeur pendant l'enregistrement (x1/x2/x3/x4). Double-Tap
Auto-stop
Enregistre la vidéo jusqu'à ce que l'heure soit réglée.
(1min / 5min / 10min / 30min)
41
Menu programme (vidéo)
Le menu programme fournit les paramètres d'eet simples et rapides pour la caméra,
en fonction de votre environnement. Le menu programme est disponible avec le
bouton et l'écran tactile.
Avec l'écran tactile
1. En mode vidéo, balayez vers la droite. L'écran du menu programme s'ache.
2. Tapotez sur le mode souhaité.
Manuel
Retour au paramètre précédent
avant le mode programme
Sports aquatiques
Pour enregistrer sur la plage ou
dans l'eau
Plongée
Pour enregistrer sous l'eau
Sports d'hiver
Pour enregistrer dans la neige
Équitation
Pour enregistrer une activité rapide
Extérieur
Pour enregistrer à l'extérieur avec
une forte lumière
Intérieur
Pour enregistrer à l'intérieur
Nuit
Pour enregistrer la nuit
Avec le bouton
1. En mode vidéo, appuyez sur le bouton ( ) et maintenez-le enfoncé pendant
2 secondes. L'icône du menu programme s'ache.
2. Appuyez encore une fois sur le bouton ( ) pour passer d'un mode à l'autre.
3. Appuyez sur le bouton ( ) pour saisir un paramètre menu dans chaque catégorie.
Diving
42
Vous pouvez également changer de mode en touchant simplement l'écran.
1. Balayez à gauche pour changer de mode.
2. Tapotez l'icône de la photo.
3. Appuyez sur le bouton ( ) pour commencer à prendre des photos.
Photo timelapse
Prise d'images à intervalles dénis et création
d'un chier photo timelapse.
(0.5 SEC/1 SEC/3 SEC/5 SEC/10 SEC/30 SEC/60 SEC)
Zoom(x1/x2/x3/x4)
Tapotez brièvement deux fois sur l'écran,
la fonction zoom s'ache.
Après 3 secondes, le zoom disparaît automatiquement
et enregistre la valeur pendant l'enregistrement
Rafale
Photos en rafale
(6/1 sec)
Auto-Timer
Prise d'une image après
un temps déni.
(5 sec/10 sec/15 sec)
8. Mode photo
Veuillez changer le mode en mode photo.
1. Appuyez sur le bouton ( ). Le mode menu s'achera sur votre écran LCD.
2. Appuyez une fois encore sur le bouton ( ), la caméra passera en Mode photo.
3. Après une seconde, le mode menu disparaît automatiquement de votre
écran LCD. Vous pouvez prendre des photos.
4. Vous pouvez modier les paramètres photo dans le Menu paramètres.
Capture d'écran de l'utilisation du bouton
Capture d'écran de l'utilisation de
l'écran tactile

43
Menu programme (Photo)
Le menu programme fournit les paramètres d'eet simples et rapides pour la caméra,
en fonction de votre environnement. Le menu programme est disponible avec le
bouton et l'écran tactile.
Avec le bouton
1. En mode photo, appuyez sur le bouton ( ) et maintenez-le enfoncé pendant
2 secondes. L'icône du menu programme s'ache.
2. Appuyez encore une fois sur le bouton ( ) pour passer d'un mode à l'autre.
3. Appuyez sur le bouton ( ) pour saisir un paramètre menu dans chaque catégorie.
Avec l'écran tactile
1. En mode photo, balayez vers la droite. L'écran du menu programme s'ache.
2. Tapotez sur le mode souhaité.
Manuel
Retour au paramètre précédent
avant le mode programme
Paysage
Pour une prise de vue à l'extérieur
avec une forte lumière
Extérieur
Pour une prise de vue à l'extérieur
avec une forte lumière
Intérieur
Pour une prise de vue
à l'intérieur
Portrait
Pour prendre un portrait
Nuit
Pour enregistrer la nuit
44
La fonction de tri propose 2 options :
Vidéo uniquement ou Photo seulement
Sélection pour supprimer un chier.
Plusieurs chiers peuvent être supprimés en une fois.
Numéro IDX du chier ou quantité de chiers sélectionnée
/ Nombre total de chiers
Bouton retour
Image en onglet
Type de chier
Temps d'enregistrement (pour chier vidéo)
/ Quantité de photos (pour chier photo)
*Balayez à gauche ou à droite pour passer à la page suivante.
9. Mode playback
Veuillez modier le mode en mode playback.
L'utilisateur peut voir les photos ou les vidéos enregistrées à l'écran.
Appuyez sur le bouton ( ) pour sélectionner le panneau de contrôle dans le haut du menu.
Pendant la lecture, vous pouvez appeler le panneau de contrôle de lecture en appuyant
sur le bouton ( ).
Icon Description
45
Playback (photo)
Playback (vidéo)
Description
D'un tapotement, vous pouvez masquer
la barre de contrôle.
Tapotez à nouveau l'écran, et la barre de
contrôle réapparaît.
Vous pouvez voir tous les chiers photo avec
la fonction diaporama.
* En timelapse et en rafale, seule la première
photo s'ache
Description
Type de chier
Durée du playback / Temps total
Batterie restante
Barre de navigation
Supprimer / Retour
Fichier précédent / Pause / Fichier suivant
ⴘ
ⴙ
ⴚ
IconNo.
Type de chier
Photo courante / Photo totale
Batterie restante
Supprimer / Retour
Fichier précédent / Pause / Fichier suivant
ⴘ
ⴙ
IconNo.

46
Veuillez modier le mode en mode paramètres.
● permet de choisir plus d'options dans le mode paramètres.
● Paramètres vidéo : Fournit des options d'enregistrement
détaillées.
● Paramètres photo : Fournit les options pour la prise de photos.
● Paramètres eets : Fournit les options pour les eets pour les
prises.
● Paramètres généraux : Fournit les paramètres généraux de la
caméra.
● Connexion : Fournit la fonction WiFi.
10. Mode paramètres
Capture d'écran de l'utilisation du bouton et de l'écran tactile
Paramètres vidéo Mode/Résolution/FOV/Video Qualité
/Intervalle/DIS
Mode/Pixel/FOV/Photo Qualité/Intervalle
WiFi/WiFi Info
Contrôle/Bip/Indicateur LED/Quick REC
/Auto LCD OFF/Auto Power OFF/TV Out/la langue
/Verrouillage de l'écran/Réglage de l'heure
/Formater la mémoire/Défaut/Infos Logicielles
Filtre/Compteur AE/Zoom/EV/Balance des blancs
/ISO/Inversé/Estampille temporelle
Paramètres photo
Paramètres eets
Paramètres
généraux
Connexion
Setup Option
47
10-1. Options de réglage
Manuel/Looping/Time Lapse
1080p 30fps / 1080p 60fps
720p 60fps / 720p 120fps / 480p 240fps
Super wide/ Wide/ Medium/ Narrow
Mode
Résolution
ON/OFFDIS
ON/OFFIntervalle d'arrêt automatique
0.5/ 1 / 3 / 5 / 10 /30 / 60 (sec)INTERVALLE T/LAPSE
1 / 5 / 10 / 30 (min)INTERVALLE T/LOOPING
FOV
Super Fin / Fin / NormalVIDÉO Qualité
Fonction Description
Manuel/Time Lapse/Rafale/Self Timer
16MP / 12MP / 8.5MP/ 7MP
Super Large / Large / Medium / Étroit
5/ 10 / 15 (sec)
Super Fin / Fin / Normal
Mode
MEGA PIXEL
FOV
INTERVALLE Self Timer
Photo Qualité
0.5/ 1 / 3 / 5 / 10 /30 / 60 (sec)INTERVALLE T/LAPSE
Fonction Description
VIDEO SETUP
MODE
RESOLUTION
FOV
Manual
1080P 30FPS
Super Wide
MODE
MEGA PIXEL
FOV
Manual
14MP
Super Wide
PHOTO SETUP
48
OFF/Noir&Blanc/Sépia/vif/Naturel/Natif/Chaud/Frais
/Rouge/Vert/Bleu
CENTRE/MOYEN/SPOT
x1/ x2/x3/x4
-2.0/-1.0/0/+1.0/+2.0
AUTO/3000K/5500K/6500K
AUTO/100/200/400/800/1600/3200
ON/OFF
ON/OFF
FILTRE
COMPTEUR AE
ZOOM
BALANCE DES BLANCS
ESTAMPILLE TEMPORELLE
INVERSÉ
ISO
EV
Fonction Description
Mic/Haut-parleur/Luminosité LCD
ON/OFF
OFF/DEUX/QUATRE
OFF/ 0sec/ 3sec/ 5sec
OFF/30sec/ 1min/ 5min
OFF/ 5min/ 10min/ 30min
DATE - HEURE
OUI/NON
NTSC/PAL
OFF/ 5sec/ 10sec/ 30sec
OUI/NON
INFOS LOGICIELLES
CONTRÔLE
BIP
DIODE D'INDICATION
AUTO LCD OFF
DÉFAUT
INFOS LOGICIELLES
FORMATER LA MÉMOIRE
REGLAGE DE L'HEURE
TV OUT
Anglais/Français/Espagnol/AllemandLA LANGUE
VERROUILLAGE DE L'ÉCRAN
AUTO POWER OFF
QUICK REC
Fonction Description
EFFECT SETUP
ZOOM
FILTER
AE METER
X1
OFF
Average
CONTROL
BEEP
LED INDICATOR
MIC
ON
FOUR
GENERAL SETUP
49
11. Menu rapide
Le menu rapide fournit un accès aisé au
menu le plus utilisé.
Le menu rapide n'est accessible qu'avec
l'écran tactile.
1. Balayez vers le haut. L'écran du menu
rapide s'ache
2. Tapotez le menu auquel vous souhaitez
accéder.
12. Recharge de la batterie
L'écran achera l'icône d'une batterie plate ( ) lorsque la batterie est trop faible et proche du niveau d'extinction de l'appareil.
La caméra enregistrera automatiquement jusqu'à ce qu'elle soit éteinte. Vous devez recharger la batterie pour redémarrer.
La caméra est intégrée à la fonction "Burst Speed Charging".
Il faudra environ 1,75 heures pour une charge complète.
ON/OFF
SSID / Mot de passe
WiFi
WiFi INFO
Fonction Description
ON/OFF
ON/OFF
ON/OFF(last setting value)
ON/OFF
ON/OFF(last setting value)
ON/OFF(last setting value)
Barre de navigation
WIFI
Inversé
QUICK REC
Haut-parleur
Luminosité
MIC
BIP
Fonction Description
1. Éteignez la caméra.
2. Connectez le port USB de la caméra à votre ordinateur à l'aide du câble. 3. La diode s'allume lorsque la batterie est en charge.
4. La diode s'éteint lorsque la batterie est chargée.
Wi-Fi
Wi-Fi INFO
OFF
SSID-PW
CONNECTION
● À l’aide de la fonction de l’app WiFi de l’ACTIVEON, l’utilisateur peut contrôler sa caméra avec un Smartphone.
● Compatible avec iOS et Android.
● Avant de connecter la caméra, téléchargez l’app ‘ACTIVEON HUB’ dans l’app store de votre smartphone.
● Dans l’Apple App Store ou dans le Google Play Store, faites une recherche sur ‘ACTIVEON HUB’ .
● Activez la fonction « WiFi App » dans ACTIVEON SOLAR XG.
●
* Une fois le smartphone connecté à la caméra, les boutons de la caméra sont désactivés.
* Vous pouvez prendre une photo ou une vidéo et régler les paramètres sur ‘ACTIVEON HUB’.
* Les fonctionnalités ‘ACTIVEON HUB’ seront actualisées grâce aux mises à jour de l'application via votre Smartphone.
14. Connexion de l'ACTIVEON SOLAR XG à un Smartphone
(Utilisation d'ACTIVE HUB)
Sur votre caméra
13. Contrôle par smartphone
50

51
14. Connexion de l'ACTIVEON SOLAR XG à un Smartphone
(Utilisation d'ACTIVE HUB)
● Sur votre smartphone / tablette, activez le WiFi et sélectionnez le réseau SXG-xxxxxx dans les paramètres WiFi.
● Le mot de passe par défaut est ‘1234567890‘.
● Lancez l’app ‘ACTIVEON HUB’ sur votre Smartphone / Tablette.
● Appuyez sur «Connect ACTIVEON HUB» dans l’app. Vous pouvez maintenant contrôler votre caméra ACTIVEON.
Sur votre Smartphone

52
● Si la caméra est connectée à un ordinateur ou à un chargeur alors qu'elle est sur o,
la caméra commence à recharger sa batterie.
● Si la caméra est connectée à un ordinateur alors qu'elle est sur o, la caméra passe en mode transfert.
● Lorsque la caméra est connectée à un chargeur de batterie ou de voiture, elle peut enregistrer tout en
étant en charge.
1. Allumez l'ACTIVEON SOLAR XG.
2. Connectez le port USB de la caméra à votre ordinateur à l'aide du câble.
3. L'écran de la caméra ache «USB Ready».
4. Allez dans «My computer» sur votre ordinateur.
5. Recherchez «removable disk».
6. Double-cliquez sur «removable disk».
7. Double-cliquez sur le dossier «DCIM».
8. Ouvrez les dossiers pour trouver les chiers photo ou vidéo.
9. Copiez et collez les chiers sur votre ordinateur.
15. Transférer les données vers un ordinateur
(compatible avec Windows et Mac OS)
53
16. Actualisation du firmware (vous trouverez la dernière mise à jour du firmware sur www.activeon.com)
● Vous trouverez toujours la dernière mise à jour du rmware des produits ACTIVEON sur le site.
(www.activeon.com)
● La mise à jour du rmware peut ne pas être possible si la batterie est trop déchargée.
● Il faut deux barres de batterie pour pouvoir faire une mise à jour.
1. Formatez la carte-mémoire, et copiez le chier du rmware dans le répertoire racine de la carte microSD.
2. Insérez la carte microSD dans l'ACTIVEON SOLAR XG et allumez-la.
3. La mise à jour du rmware se fera automatiquement, avec un achage de la progression à l'écran.
4. Une fois la mise à jour terminée, la caméra ache «F/W Updating» et s'éteint.
* N'éteignez pas votre appareil ou n'enlevez pas la batterie pendant la mise à jour.

54
● Caméra d'action « ACTIVEON SOLAR XG » 1080p 60fps
● Résolution FULL HD (1920 x 1080), enregistrement en 60fps.
● Boîtier étanche 196ft (60m)
● 14MP PANASONIC 34110 CMOS sensor.
● Contrôle aisé des eets de la caméra avec le mode programme.
● Champs de vue plus larges (FOV).
● Écran LCD 2.0'' (320x240) intégré.
● Wi-Fi intégré.
● Résolution d'enregistrement variable (1080p/720p/480p)
● Photos en rafale (* 6 photos par seconde)
● Codec H.264, enregistrement au format MP4.
● Batterie li-ion rechargeable.
● Autonomie de la batterie : Environ 120 minutes en enregistrement continu (1080 30 fps)
* Le temps d'enregistrement peut varier en fonction des conditions
● Temps de charge : 3,5 heures par USB / 1,75 heures avec un adaptateur AC (accessoire en option)
● Chargement rapide
● Interface graphique utilisateur conviviale
● Gamme complète d'accessoires
17. Fonctionnalités et spécifications

55
18. Dans l'emballage
Boîtier étanche
SOLAR STATION
ACTIVEON SOLAR XG
CAMÉRA D'ACTION
Support de montage
adhésif courbe
Connecteur court Câble USB
Batterie Li-ion
rechargeable
Vis de connexion
Clapet arrière ouvert

Spécification
Dimension 113 x 62 x 33.5mm
Entrée 5V / 2.1A
Sortie 5V / 2.1A
Capacité 5600mA
Type Li-Polymer
Panneau Solaire Monocrystalline
Silicone
1. Nom de chaque partie
www.activeon.com
Bouton d'alimentation
indicateur LED
Panneau solaire
Entrée USB
Sortie mini USB type B
Allume / éteint
Appuyez sur le bouton d'alimentation pour l'allumer.
L'appareil se met automatiquement sous tension lorsque l'appareil est connecté au câble.
Ouvrir des panneaux solaires
Faites pivoter chaque panneau solaire vers la droite / gauche.
57
2. Opération (1)
58
Pour être chargé par le panneau solaire
● La batterie sera chargée automatiquement quand
le panneau solaire est exposé à la lumière du soleil.
● Les témoins du bouton clignotent pendant le chargement.
(Reportez-vous à la page d'indicateur LED)
● Chargez la batterie sur une journée ensoleillée
Faites face au panneau solaire au soleil
● L'ecacité de charge solaire dépend de la météo,
la saison, la température etc.
*Utilisez des gants pour saisir la station solaire.
*La station solaire peut être très chaud sous
le soleil pour se faire mal.
2. Opération (2)
Pour être rechargé par le câble USB
Connectez la station solaire à une prise de courant en utilisant le câble USB dans un emballage
Les voyants de la touche clignotent pendant la charge (Reportez-vous à la page indicateur LED)
59
2. Opération (3)
60
2. Opération (4) - Indicateur LED
Indicateur de marche / arrêt
Indicateur de charge
Charging : Clignotement
Chargeable : Pas de lumière
Charged : Solide
Allumer / DC Charging : Solide
Éteindre : Pas de lumière
SOLAR Charging : LED éteinte après
2 secondes clignotant
0 - 25%
(1Lumière)
25 - 50%
(2Lumières)
50 - 75%
(3Lumières)
75 - 100%
(4Lumières)
Pour charger le câble USB
Connectez la station solaire à l'appareil photo en utilisant le câble USB dans un emballage.
61
2. Opération (5)

62
● Gardez l'appareil à l'écart de températures extrêmes.
● Ne démontez pas l'appareil.
● Ne pas écraser la batterie ni la jeter au feu.
● Ne jamais jeter ou laisser tomber ce produit pour éviter de causer des dommages.
● Rechargez la batterie au moins une fois par mois pour maintenir ses propriétés de charge.
● N'exposez pas l'appareil à l'eau ou à une humidité élevée.
● Gardez l'appareil hors de la portée des enfants ou d'une personne qui n'a pas été informée de son utilisation.
● Arrêtez l'utilisation en cas de fuite, de surchaue ou de toute autre situation inhabituelle.
● S'il ya un problème avec le produit, veuillez contacter votre revendeur pour obtenir de l'aide.
3. AVERTISSEMENTS

MANUAL DE USUARIO
www.activeon.com

65
66
68
69
70
71
72
74
76
78
81
81
82
82
84
85
86
87
96
96
97
98
※ PRECAUCIÓN
※ DECLARACIÓN DE INTERFERENCIAS DE RADIOFRECUENCIA DE FCC
※ Información sobre exposición a RF (SAR)
※ GARANTÍA
Índice
1. Nombre de cada pieza
2. Modo de empleo
3. Encienda la cámara
4. Vista de la pantalla LCD
5. Descripción de los iconos grácos
6. Menú de modo
7. Menú de vídeo
8. Modo de foto
9. Modo de reproducción
10. Modo de conguración
11. Menú rápido
12. Recargar la batería
13. Control desde smartphone
14. Conecte ACTIVEON SOLAR XG a su smartphone (con la app ACTIVEON)
15. Transferir los datos al ordenador
16. Actualizar el rmware
17. Características y especicaciones
18. Contenido del paquete
1. Nombre de cada pieza
65
ESPAÑOL
www.activeon.com
* Lea este manual detenidamente antes de usar el producto.
Indicador LED
(Parte superior, inferior,
delantera y trasera)
Oricio para trípode
(parte inferior)
Modo/Navegación Interna MIC
De encendido/Disparador
Pantalla LCD
Ranura para batería
de ion litio
Puerto HD OUT
* Utilice un cable “Micro HDMI" en el puerto HD OUT.
* Cable no incluido.
Puerto Mini-B USB
Ranura para tarjeta microSD
Altavoz

66
2. Modo de empleo
● ACTIVEON SOLAR XG se maneja mediante dos botones. ( el botón, el botón )
● funciones del botón “encendido, disparador y aceptar”.
● funciones del botón “cambio de modo, navegación y menú de usuario”.
● Las funciones de los botones se denen en la tabla siguiente.
Funcionamiento del botón
Mantenga pulsado el botón ( ) para iniciar la grabación de vídeo o
captura de fotos. (Vídeo/Foto/Ráfaga/Intervalo)
Activado /
Desactivado
Inicio /
Fin de la grabación
Conrmar
ajustes del menú
Función Botón Descripción
En el modo de conguración del usuario, pulse el botón ( )
para acceder al menú de ajustes en cada categoría.
Mantenga pulsado el botón ( ) durante 2 segundos.
* Si está activado el apagado automático, la cámara se apagará automáticamente después
sin utilizarla. (Opción de apagado automático está desactivado, 5, 10, 30 minutos)
Cambiar de modo
Navigator
Menú de usuario
Pulse el botón ( ) para cambiar de modo. (Vídeo > Fotos > Ráfaga de fotos > Intervalo)
Mantenga pulsado el botón ( ) durante 2 segundos para acceder
al modo de conguración del usuario.
Pulse el botón ( ) para mover la barra de selección en el menú OSD o cambiar el ajuste.
67
● La pantalla SOLAR XG responde a los
gestos táctiles como dar pequeños
golpes o arrastrar.
Operación táctil
Tap Tap & Hold
Double-Tap Swipe up
Swipe down
Swipe left
Swipe right
Double-Tap
● Puede acceder fácilmente al menú.
Swipe Up
Swipe leftSwipe Right
<Program menu>
<Quick menu>
<Mode menu>
<Zoom>
68
Cómo desbloquear el funcionamiento táctil
● SOLAR XG incluye características especiales de ahorro de energía.
1. Atenuación de la Auto-retroiluminación : Cuando se ajusta [ Auto LCD O ] , El nivel de atenuación de la
auto-retroiluminación se iniciará en el punto medio del ajuste de tiempo.
2. Apagado rápido del LCD : [Durante la grabación de vídeo] Toque y mantenga pulsada la pantalla durante 2-3 segundos.
La pantalla LCD se apagará automáticamente.
* Para encender la pantalla LCD de nuevo, por favor, pulse el botón ( ) una vez.
* SI la imagen de bloqueo aparece, por favor, consulte la guía “Como desbloquear la función táctil”.
Función de ahorro de energía
Si desea usar el funcionamiento táctil,
toque primero la pantalla. A continuación
aparecerá "Bloquear imagen".
Pulse y mantenga "Bloquear imagen"
hasta que esté lista la pantalla en directo.
3. Encienda la cámara
1. Abra la tapa de la batería e introduzca la batería de ion litio ACTIVEON SOLAR XG.
2. Inserte la tarjeta microSD en la ranura para tarjetas microSD. (La cámara no grabará sin una tarjeta microSD insertada)
3. Presione el botón ( ) y manténgalo durante 2 segundos.
(La cámara se encenderá y la pantalla LCD mostrará la pantalla en directo)
69
4. Vista de la pantalla LCD
Pantalla de fotos
ⴝ
ⴘⴙⴚⴛ
ⴜⴜ
ⴜ
ⴜ
Pantalla de vídeo
ⴟ
ⴟ
ⴝ
ⴘⴙⴚⴛ
ⴜⴜ
ⴝ
ⴞ
ⴟ
ⴘ
ⴙ
ⴚ
ⴛ
ⴜ
Modo de grabación/Estado del programa
Información sobre el tiempo de grabación
Estado del WiFi
Estado de la batería
Programa/Modo/Modo rápido
Resolución/FPS/Campo de visión/
Información de intervalo
Quick REC/Conguración de efectos/EA/Zoom
Toque la pantalla dos veces para activar
la función del zoom.
Modo de grabación
Tiempo de grabación
WiFi
Batería
Icono de arrastre
Información
de grabación
Zona de función
Zoom
FunciónN.º Descripción
ⴞ
ⴞ
ⴜ
ⴟ
5. Descripción de los iconos gráficos
70
Manual
Video Program
Diving
WinterSportsRiding
Outdoor Indoor Night
WaterSports WiFi Quick REC Beep UpsideDown
Speaker MIC Brightness
Quick menu
1x
1x
2x
2x
3x
3x
4x
4x
Zoom
Manual
Photo Program
Outdoor Indoor
NightPortrait Landscape
Video mode Playback Setup
Time lapse Looping Auto Stop Video Setup Photo Setup Eect Setup General Setup Connection
Photo mode
Time lapseBurst Self-timerManual Manual
71
6. Menú de modo
Para la pantalla táctil
1. Arrastre el dedo hacia la izquierda. Aparecerá la pantalla del modo de menú.
2. Toque el modo en el que desea entrar: vídeo, fotografía, reproducción o conguración.
El menú de modo está disponible con botón y con pantalla táctil.
Botón : El menú de modo tiene 4 modos: vídeo, fotografía, reproducción y conguración.
1. Presione una vez el botón ( ). Aparecerá el icono del modo de vídeo.
2. Presione de nuevo el botón ( ) para cambiar al modo que desea, entre vídeo,
fotografía, reproducción y conguración.
3. Espere un segundo; el menú seleccionado aparecerá automáticamente.
4. Para los modos de reproducción y conguración, presione el botón ( )
para consultar más opciones.
72
1. Después de encender la cámara, pulse el botón ( )
para iniciar la grabación de vídeo.
2. Cuando la cámara empieza a grabar, el indicador LED parpadea
* y muestra el tiempo de grabación en la pantalla.
3. Pulse el botón ( ) para detener la grabación.
4. Puede modicar los ajustes de vídeo en la "conguración de vídeo".
* Si selecciona la opción LED desactivado en la conguración general,
el indicador LED no parpadeará.
Captura de pantalla de uso del botón.
Captura de pantalla de uso de la
pantalla táctil.
7. Modo de vídeo
Vídeo a intervalos
Captura imágenes a intervalos denidos y crea un archivo de vídeo a intervalos.
(0,5 S / 1 S / 3 S / 5 S / 10 S / 30 S / 60 S)
Bucle
Graba un vídeo continuamente hasta que detenga la grabación. (1min / 5min / 10min / 30min)
** La capacidad máxima del archivo de vídeo es de 4 GB. Si el tamaño del archivo es superior
al espacio del bucle, la cámara sobrescribirá el archivo de grabación actual.
Zoom
Toque dos veces brevemente en la pantalla táctil y aparecerá la función del zoom.
Después de 3 segundos, el menú del zoom desaparece automáticamente
y guarda el valor durante la grabación. (x1/x2/x3/x4) Doble toque
Autoestop
Graba video hasta que se je la hora.
(1 min / 5 min / 10 min / 30 min)
73
Menú de vídeo
El menú de vídeo proporciona una conguración de efectos de cámara rápidos y sencillos
basada en su entorno. El menú de programa está disponible con botón y con pantalla táctil.
Para la pantalla táctil
1. En el modo de vídeo, arrastre el dedo hacia la derecha.
A continuación, aparecerá la pantalla del menú de programa.
2. Toque el modo que desea.
Manual
Vuelva a la conguración anterior
antes del modo de programa
Deportes acuáticos
Para grabaciones en el agua o en la playa
Submarinismo
Para grabaciones bajo el agua
Deportes de invierno
Para grabaciones en la nieve
Equitación
Para grabaciones de actividades veloces
Exteriores
Para grabaciones en exteriores con
mucha luz
Interiores
Para grabaciones en interiores
Nocturno
Para grabaciones por la noche
Para botón
1. En el modo de vídeo, presione el botón ( ) y manténgalo pulsado
durante dos segundos. A continuación, aparecerá el icono el menú de programa.
2. Presione de nuevo el botón ( ) para cambiar al modo que desea.
3. Pulse el botón ( ) para acceder al menú de ajustes en cada categoría.
Diving
74
También puede cambiar el modo más fácilmente tocando la pantalla.
1. Arrastre el dedo hacia la izquierda para cambiar el modo.
2. Toque el icono de la fotografía.
3. Presione el botón ( ) para empezar a tomar fotografías.
Fotografía a intervalos
Captura imágenes a intervalos denidos y crea un
archivo de fotografía a intervalos.
(0,5 S/1 S/3 S/5 S/10 S/30 S/60 S)
Zoom(x1/x2/x3/x4)
Toque dos veces brevemente en la pantalla táctil y
aparecerá la función del zoom. Después de 3 segundos,
el menú del zoom desaparece automáticamente y
guarda el zoom durante la grabación.
Ráfaga
Ráfaga de fotografías.
(6/1 s)
Autodisparador
Captura una imagen después
del tiempo establecido.
(5 s/10 s/15 s)
8. Modo de foto
Por favor, cambie el modo a fotografía.
1. Presione el botón ( ). Aparecerá el menú de modo en su pantalla LCD.
2. Presione de nuevo el botón ( ), la cámara cambiará al modo de fotografía.
3. Después de 1 segundo, desaparecerá automáticamente el menú de modo de
la pantalla LCD. Ya puede empezar a tomar fotografías.
4. Puede modicar los ajustes de fotos en detalle en el menú de conguración.
Captura de pantalla de uso del botón.
Captura de pantalla de uso de la
pantalla táctil.
75
Menú de fotografía
El menú de vídeo proporciona una conguración de efectos de cámara rápidos y sencillos
basada en su entorno. El menú de programa está disponible con botón y con pantalla táctil.
Para botón
1. En el modo de photo, presione el botón ( ) y manténgalo pulsado
durante dos segundos. A continuación, aparecerá el icono el menú de programa.
2. Presione de nuevo el botón ( ) para cambiar al modo que dese.
3. Pulse el botón ( ) para acceder al menú de ajustes en cada categoría.
Para la pantalla táctil
1. En el modo de foto, arrastre el dedo hacia la derecha.
A continuación, aparecerá la pantalla del menú de programa.
2. Toque el modo que desea.
Manual
Vuelva a la conguración anterior antes
del modo de programa
Paisaje
Para fotografías en exteriores con
mucha luz
Exteriores
Para fotografías en exteriores con mucha
luz
Interiores
Para fotografías en interiores
Retrato
Para hacer retratos
Nocturno
Para grabaciones por la noche
76
La función de clasicación ofrece 2 opcione:
Sólo vídeo o solamente Photo
Seleccione para borrar un archivo.
Es posible borrar varios archivos de una vez.
Número IDX de archivo o cantidad de archivos seleccionados
/Cantidad de archivos total
Botón para volver
Imagen en miniatura
Tipo de archivo
Tiempo de grabación (para el archivo de vídeo)
/ Cantidad de imágenes (para el archivo de fotografía)
*Arrastre el dedo a la derecha o a la izquierda para ir a la siguiente página.
Por favor, cambie el modo a reproducción.
El usuario puede ver las fotos o el vídeo grabado en la pantalla.
Pulse el botón ( ) para seleccionar el panel de control en el menú superior.
Mientras se reproduce el archivo, puede invocar el panel de control de reproducción
presionando el botón ( ).
Icono
9. Modo de reproducción
Descripción

77
Reproducción (fotografía)
Reproducción (vídeo)
Con un toque puede ocultar la barra de control.
Cuando vuelva a tocar la pantalla, aparecerá
la barra de control.
Puede ver todos los archivos de fotografía con
la función de mostrar diapositivas.
*Intervalo y ráfaga solo mostrarán la primera
fotografía.
Tipo de archivo
Tiempo de reproducción / Tiempo total
Batería restante
Barra de desplazamiento
Borrar / Volver
Archivo anterior / Pausa / Archivo siguiente
ⴘ
ⴙ
ⴚ
IconoN.º Descripción
Tipo de archivo
Foto actual / Foto total
Batería restante
Borrar / Volver
Archivo anterior / Pausa / Archivo siguiente
ⴘ
ⴙ
IconoN.º Descripción
10. Modo de configuración
78
Por favor, cambie el modo a conguración.
● Puede elegir más opciones con el modo conguración.
● Conguración de vídeo: Proporciona opciones
detalladas de grabación de vídeo.
● Conguración de fotografía: Proporciona
opciones de disparo de fotografía.
● Conguración de efectos: Proporciona opciones
de conguración de efectos para el disparo.
● Conguración general: Proporciona opciones de
conguración general de la cámara.
● Conexión : Proporciona función WiFi.
Captura de pantalla de uso de la pantalla táctil y el botón
Conguración de vídeo Modo/Resolución/Campo de visión
/Video Calidad/Intervalo/DIS
Modo/Píxel/FOV/Photo Calidad/Intervalo
WiFi/WiFi Info
Control/Bip/Indicador LED/Quick REC/LCD
automático apagado/Potencia automática
apagada/Bloqueo de pantalla/Salida TV/Idioma
/Conguración de tiempo/Formato de memoria
/Predeterminado/Infomación de Software
Filtro/Medidor EA/Zoom/Exposición/
Equilibrio blanco/ISO/Invertido/Marca de tiempo
Conguración de fotografía
Conguración
de efectos
Conguración general
Conexión
Conguración Opción
79
10-1. Opciones de configuración
VIDEO SETUP
MODE
RESOLUTION
FPS
Manual
1080P
30
MODE
MEGA PIXEL
FOV
Manual
14MP
Super Wide
PHOTO SETUP
Manual/bucle/intervalo
1080p 30fps / 1080p 60fps
720p 60fps / 720p 120fps / 480p 240fps
Súper gran angular/gran angular/normal/teleobjetivo
Modo
Resolución
1 / 5 / 10 / 30 (min)
Intervalo de parada automática
ACTIV./DESACTIV.DIS
1 / 5 / 10 / 30 (min)INTERVALLET/LOOPING
0.5 / 1 / 3 / 5 / 10 / 30 / 60 (sec)INTERVALLE T/LAPSE
Campo de visión
Súper alta /Alta /NormalVÍDEO Calidad
Función Descripción
Manual/Intervalo/Ráfaga/Autodisparo
16MP / 12MP / 8.5MP/ 7MP
Súper gran angular/Gran angular/Normal/Teleobjetivo
Súper alta /Alta /Normal
Modo
MEGA PÍXEL
Campo de visión
5/ 10 / 15 (s)
INTERVALO autodisparo
Photo Calidad
0.5 / 1 / 3 / 5 / 10 / 30 / 60 (s)
INTERVALO
Función Descripción
80
Desactivado/Blanco y negro/Sepia/Vívido/Natural
/Negativo/Cálido/Fresco/Rojo/Vede/Azul
CENTRO/PROMEDIO/PUNTOS
x1/ x2/x3/x4
-2.0/-1.0/0/+1.0/+2.0
AUTOMÁTICA/3000K/5500K/6500K
AUTOMÁTICA/100/200/400/800/1600/3200
ACTIV./DESACTIV.
ACTIV./DESACTIV.
MARCA DE TIEMPO
FILTRO
MEDIDOR DE AE
ZOOM
BALANCE DE BALANCOS
INVERTIDO
ISO
EXPOSICIÓN
Función Descripción
Micrófono/altavoz/brillo LCD
ACTIV./DESACTIV.
DESACTIVADO/DOS/CUATRO
DESACTIVADO/0S/3S/5S
OFF/ 30sec/ 1min/ 5min
OFF/ 5min/ 10min/ 30min
FECHA - HORA
SÍ/NO
NTSC/PAL
OFF/ 5sec/ 10sec/ 30sec
SÍ/NO
INFORMACIÓN DE SOFTWARE
CONTROL
BEEP
INDICADOR LED
LCD AUTOMÁTICO DESACTIVADO
PREDETERMINADO
INFORMACIÓN DE SOFTWARE
FORMATO DE MEMORIA
CONFIGURACIÓN DE TIEMPO
Inglés/Francés/Español/Alemán
IDIOMA
SALIDA TV
BLOQUEO DE PANTALLA
POTENCIA AUTOMÁTICA DESACTIVADA
QUICK REC
Función Descripción
EFFECT SETUP
ZOOM
FILTER
AE METER
X1
OFF
Average
CONTROL
BEEP
LED INDICATOR
MIC
ON
FOUR
GENERAL SETUP
81
11. Menú rápido
El menú rápido proporciona acceso a su
menú más utilizado.
El menú rápido solo está disponible con la
pantalla táctil.
1. Arrastrar hacia arriba. A continuación,
aparecerá la pantalla del menú rápido.
2. Toque el menú en el que desea entrar.
12. Recargar la batería
La pantalla mostrará el icono de batería baja ( ) cuando la batería tenga poca carga y la cámara esté a punto de apagarse.
La cámara grabará el archivo automáticamente hasta que se apague. Debe recargar la batería para reanudar la grabación.
La cámara está integrada en la función "Carga de velocidad de ráfaga".
Tomará alrededor de 1.75 horas para una carga completa.
ON/OFF
SSID-PW
WiFi
WiFi INFO
Función Descripción
ACTIV./DESACTIV.
ACTIV./DESACTIV.
ACTIV./DESACTIV.
ACTIV./DESACTIV.
ACTIV./DESACTIV.
ACTIV./DESACTIV.
Barra de control
WIFI
Invertido
QUICK REC
Altavoz
Brillo
Micrófono
Bip
Función Descripción
1. Apague la cámara.
2. Conecte el puerto USB de la cámara a su ordenador con un cable USB. 3. El indicador LED se encenderá para indicar que la batería está cargándose.
4. El indicador LED se apagará cuando esté completamente cargada.
Wi-Fi
Wi-Fi INFO
OFF
SSID-PW
CONNECTION

● Mediante la función WiFi APP de ACTIVEON, el usuario puede controlar la cámara desde su smartphone.
● Compatible con dispositivos iOS y Android OS.
● Antes de conectar la cámara, descargue la aplicación ‘ACTIVEON HUB’ desde la tienda de aplicaciones de su smartphone.
● Busque ‘ACTIVEON HUB’ en Apple App Store o en Google Play Store.
● Active la función ‘WiFi APP’ en ACTIVEON SOLAR XG.
● La pantalla de la cámara mostrará "Waiting for connection" (“Esperando conexión”)
* Cuando el smartphone está conectado a la cámara, no funcionarán los botones de la cámara.
* Puede grabar vídeos, tomar fotos y modicar los ajustes de la cámara en ‘ACTIVEON HUB’.
* Las funciones de ‘ACTIVEON HUB’ se mejorarán actualizando la aplicación a través de su smartphone.
14. Conecte ACTIVEON SOLAR XG a su smartphone (Uso de ACTIVEON HUB)
En su cámara
13. Control desde smartphone
82
83
14. Conecte ACTIVEON SOLAR XG a su smartphone (Uso de ACTIVEON HUB)
● En su smartphone o tableta, active la conexión WiFi y seleccione la red SXG-xxxxxx en los ajustes de WiFi.
● La contraseña predeterminada es ‘1234567890’.
● Inicie la app 'ACTIVEON HUB' en su smartphone o tableta.
● Pulse 'Connect ACTIVEON HUB' ('Conectar ACTIVEON HUB') en la app; ya puede controlar su cámara ACTIVEON.
En su smartphone

84
● Si la cámara está conectada a un ordenador o cargador de baterías mientras está apagada,
la cámara comienza a recargar la batería.
● Si la cámara está conectada a un ordenador mientras está encendida, la cámara cambia al modo de transferencia.
● Cuando la cámara está conectada a un cargador de baterías o cargador de coche para recargarla,
la cámara puede grabar mientras se recarga.
1. Encienda su ACTIVEON SOLAR XG
2. Conecte la cámara a su ordenador con un cable USB.
3. La pantalla LCD de la cámara indicará 'USB ready' 'USB preparado'.
4. Vaya a ‘Mi PC’ en su ordenador.
5. Busque ‘removable disk’ (‘disco extraíble’).
6. Haga doble clic en ‘removable disk’ (‘disco extraíble’).
7. Haga doble clic en la carpeta ‘DCIM’.
8. Abra las carpetas para ver sus archivos de vídeo o fotos.
9. Copie y pegue los archivos en el ordenador.
15. Transferir datos al ordenador (compatible con sistemas operativos Windows y Mac)
85
16. Actualización del firmware (puede encontrar el firmware más reciente en www.activeon.com)
● Siempre puede encontrar las actualizaciones del rmware más recientes de los productos ACTIVEON
en la página web. (www.activeon.com)
● La actualización del rmware podría no estar disponible si la carga de la batería es demasiado baja.
● Recargue hasta dos celdas del indicador de la batería para realizar la actualización.
1. Formatee la tarjeta de memoria y copie el archivo de rmware en el directorio raíz de la tarjeta microSD.
2. Inserte la tarjeta microSD en su ACTIVEON SOALR XG y encienda la cámara.
3. La actualización del rmware se iniciará automáticamente y se mostrará el estado de la actualización
en la pantalla.
4. Cuando nalice la actualización, la cámara mostrará ‘F/W Updating’ ('Actualizando rmware')
y se apagará automáticamente.
* Do Not turn o the camera or take out the battery during rmware upgrade.

86
● Cámara de acción “ACTIVEON SOLAR XG” 1080p 60 fps.
● Grabación con resolución Full HD (1920 x 1080) a 60 fps.
● Carcasa impermeable de 60m.
● 14MP PANASONIC 34110 CMOS sensor.
● Conguración de efectos de la cámara de fácil control mediante el modo de programa.
● Campo de visión súper gran angular.
● LCD de 2,0” integrada (320x240) con panel táctil.
● Wi integrada.
● Resolución de grabación versátil (1080p/720p/480p)
● Captura de ráfaga de fotos (* 6 tomas en 1 segundo)
● Códec H.264, guardado como formato MP4.
● Batería recargable de ion de litio.
● Autonomía de la batería: aproximadamente 120 minutos de grabación continua (1080p 30 fps)
* el tiempo de grabación puede variar en función de las condiciones
● Tiempo de recarga: 3,5 horas mediante puerto USB/1,75 horas mediante adaptador de CA (accesorio opcional)
● Carga rápida
● Sencilla interfaz de usuario gráca.
● Amplia gama de accesorios.
17. Características y especificaciones
87
18. Contenido del paquete
Cubierta resistente al agua
SOLAR STATION
ACTIVEON SOLAR XG
Cámara de acción
Soporte adhesivo
curvo
Conector corto Cable USBBatería recargable
de ion litio
Tornillo de conexión
Dispositivo abierto

www.activeon.com
Especificación
Dimensiones 113 x 62 x 33.5mm
Entrada 5V / 2.1A
Salida 5V / 2.1A
Capacidad 5600mA
Tipo Li-Polymer
Panel solar Monocrystalline
Silicone
1. Nombre de cada parte
Botón de encendido
Indicador LED
Panel solar
entrada USB
Tipo salida USB miniB
Apagado/ encendido
Pulsa el botón de encendido.
Se encenderá automaticamente cuando el dispositivo se conecte con el cable.
Abrir paneles solares
Girar cada panel solar a la derecha / a la izquierda.
89
2. Operación (1)
90
Será cargado por panel solar
● LA batería será cargada automaticamente cuando
el panel solar sea expuesto a la luz solar.
● Las luces parpadearán cuando esté cargando
(Consulte la página de indicador LED)
● Cargue la batería un día soleado.
● Encare el panel solar hacia el sol.
● La eciencia en la carga solar depende de
la temperatura, la estación del año y el tiempo etc…
*Haga uso de guantes para manipular la estación solar.
*La estación solar puede estar muy caliente
bajo la luz del sol y puede dañarle.
2. Operación (2)
Cargue por cable USB
Conecte la estación solar a la corriente usando el cable USB suministrado en la caja.
Las luces del botón parpadearán cuando esté cargando (consulte la página de indicador LED).
91
2. Operación (3)
92
2. Operación (4) - Indicador LED
Indicador de encendido
/ apagado
Indicador de carga
Cargando : Parpadeante
Debe cargarse : Luz apagada
Cargado : Luz encendida ja
Encendido / DC Cargando : Luz encendida ja
Apagado : Luz apagada
SOLAR Cargando : LED apagado después
de 2 segundos parpadeante
0 - 25%
(1Luz)
25 - 50%
(2Luces)
50 - 75%
(3Luces)
75 - 100%
(4Luces)

Para ser cargado por cable USB
Conecte la estación solar a la cámara usando el cable USB suministrado en la caja.
93
2. Operación (5)

94
● Mantenga alejado el dispositivo de temperaturas altas/bajas extremas.
● No desmonte el dspositivo.
● No rompa la batería o la lance al fuego.
● Nunca tire o deje caer este producto para evitar daños.
● Recargue la batería al menos una vez cada mes para mantener las propiedades de la batería.
● No exponga el dispositivo en agua o alta humedad.
● Mantenga el dispositivo fuera del alcance de los niños o las persona que hayan sido instruido en el
manejo del producto.
● Deje de usar si se producen fugas, sobrecalentamiento o cualquier otra condición inusual.
● Si hay algún problema con el producto, póngase en contacto con su distribuidor para obtener más ayuda.
3. Precauciones

19

96
CAUTION
FCC RADIO FREQUENCY INTERFERENCE STATEMENT
This device complies with Part 15 of the FCC Rules. Operation is subject to the following two conditions:
(1) This device may not cause harmful interference, and
(2) This device must accept any interference received, including interference that may cause undesired operation.
Warning: Changes or modications to this unit not expressly approved by the party responsible for compliance could void the user’s authority to operate the equipment.
Note: This equipment has been tested and found to comply with the limits for a Class B digital device, pursuant to Part 15 of the FCC Rules.
These limits are designed to provide reasonable protection against harmful interference in a residential installation. This equipment generates, uses and can radiate radio frequency energy and, if
not installed and used in accordance with the instructions, may cause harmful interference to radio communications. However, there is no guarantee that interference will not occur in a particular
installation. If this equipment does cause harmful interference to radio or television reception, which can be determined by turning the equipment o and on, the user is encouraged to try to
correct the interference by one or more of the following measures:
● Reorient or relocate the receiving antenna.
● Increase the separation between the equipment and receiver.
● Connect the equipment into an outlet on a circuit dierent from that to which the receiver is connected.
● Consult the dealer or an experienced radio/TV technician for help.
The device has been evaluated to meet general RF exposure requirement.
The device can be used in portable exposure condition without restriction.
FCC ID : 2AKGVXCA01
It could be exploded if the battery is inappropriate type. Please insert proper type of battery according to instructions.
The symbol means that according to local laws and regulations your product should be disposed of separatly from household waste. When this product reaches its end of life, take it to
a collection point designated by local authorities. Some collection points accept products for free. The separate collection and recycling of your product at the time of disposal will help conserve
natural resources and ensure that it is recycled in a manner that protects human health and the environment.

USA Warranty
www.activeon.com
23