Climax Technology Co FPKP1 Frontpoint Keypad User Manual FP KP 20180716 FCC IC
Climax Technology Co Ltd Frontpoint Keypad FP KP 20180716 FCC IC
Users Manual
1
R
RE
EM
MO
OT
TE
E
K
KE
EY
YP
PA
AD
D
(
(F
FP
P-
-K
KP
P)
)
Introduction
KP-FP is a Remote Keypad designed to have quick access control of the system control panel. The Keypad can send wireless
signals to and receive wireless signals from the Control Panel. The Remote Keypad can either be mounted on a flat surface or on
the wall with screws. It also has a tamper protection switch which will be activated upon any unauthorized attempt to open the
back cover.
P
Pa
ar
rt
ts
s
I
Id
de
en
nt
ti
if
fi
ic
ca
at
ti
io
on
n
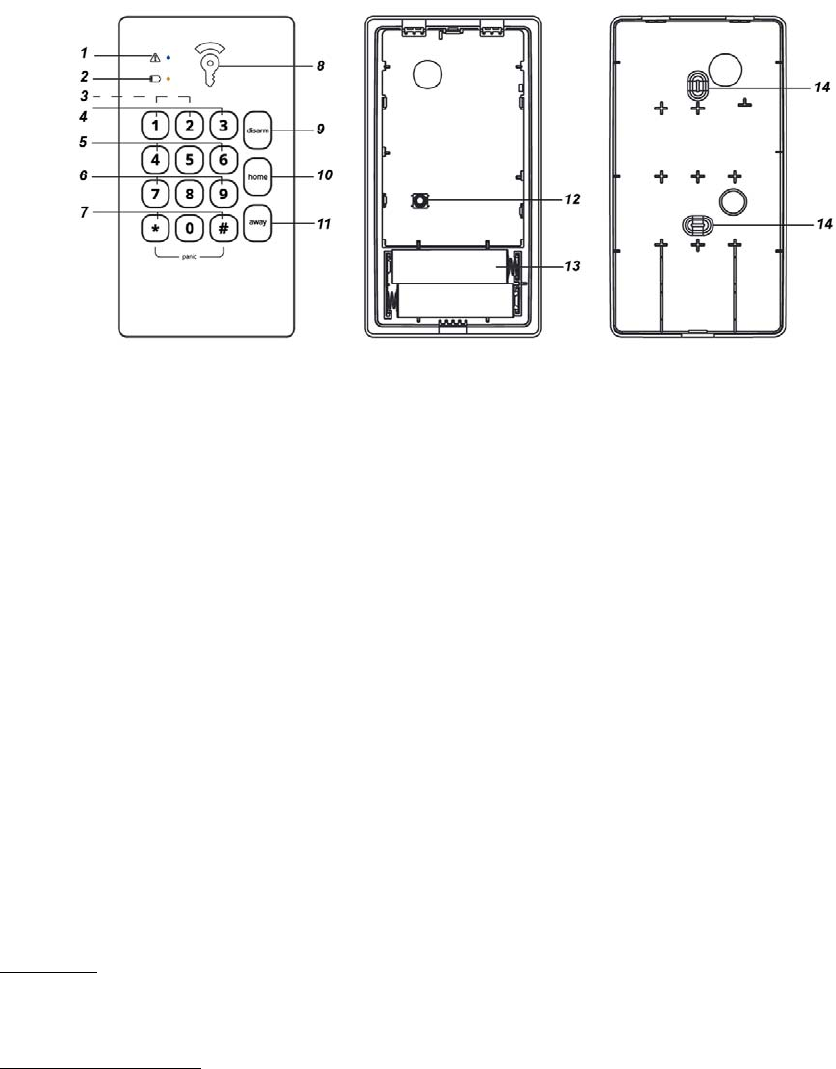
1. Trouble LED (Blue)
- The LED will flash every 5 seconds when fault exists under “Home Armed” or “Home Armed without Exit Delay”
mode.
- The LED will be turned ON for 1 second when there is alarm memory under “System Disarmed” mode.
2. Low Battery LED (Yellow)
- The LED will flash every 5 seconds when the battery voltage is low under “Home Armed” or “Home Armed without
Exit Delay” mode.
3. LED ON/OFF Control
- Press both 1 and 2 keys together to turn on or off the LEDs.
4. Send Learning Code
- Press both 1 and 3 keys together to send a learning code.
5. Fire Alarm
- Press both 4 and 6 keys together to trigger a fire alarm.
6. Medical Alarm
- Press both 7 and 9 keys together to trigger a medical alarm.
7. Panic Alarm
- Press both # and keys together to trigger a panic alarm.
8. Frontpoint Logo LED (Green/Red/Amber)
- Green: activation of Disarm mode.
- Red: the system is in Away Armed mode.
- Amber: the system is in Home Armed mode.
9. Disarm Key
10. Home Key
- This key is used for entering “Home Armed” mode.
Quick Arm:
- Press the Home Arm Key will enter “Home Armed” mode.
- Press and hold the Home Arm Key for over 3 seconds, release the button and the Remote Keypad will enter “Home
Armed without Exit Delay” mode.
Arm with User PIN Code:
- Enter user PIN Code and press the Home Arm Key will enter “Home Armed” mode.
- Enter user PIN Code and press and hold the Home Arm Key for over 3 seconds, release the button the Remote Keypad
will enter “Home Armed without Exit Delay” mode.
11. Away Key
- This key is used for entering “Away Armed” mode.

2
Quick Arm:
- Press the Away Arm Key will enter “Away Armed” mode.
Arm with User PIN Code:
- Enter user PIN Code and press the Away Arm Key will enter “Away Armed” mode.
12. Tamper Switch
- The Tamper Switch protects the Remote Keypad from unauthorized cover opening.
13. Battery Compartment
14. Mounting Holes x 2
Features
LED Indicator
Conditions LED Behavior
Yellow Low Battery LED
Flash every second When the system is counting down with Exit/Entry
Delay under low battery condition.
Flash every 5 seconds When the system is changed to Home Armed or
Away Armed mode under low battery condition.
Blue Trouble LED
Turn on for 1 second: When alarm memory exists in Disarmed mode.
Turn on for 3 seconds
If the Remote Keypad does not receive the
acknowledgement from the Control Panel within 20
seconds after mode change request is submitted.
Flash every 5 seconds When fault condition exists in Home Armed or
Home Armed without Exit Delay mode.
Flash 5 times:
The Remote Keypad does not receive
acknowledgement from the Control Panel within 60
seconds after learning code is sent.
Flash Quickly for 5
times:
When incorrect PIN Code is submitted or when the
system is armed with fault or operation error.
Green Frontpoint Logo LED
(System Disarmed)
Turn on for 5 seconds When the system is changed to System Disarmed
mode.
Flash every second for
3 seconds
When the system is changed to Away Armed
mode with Exit/Entry Beeps.
Amber Fronpoint Logo LED
(Home Armed or Home
Armed without Exit Delay)
Turn on for 5 seconds When system is changed to Home Armed or Home
Armed without Exit Delay mode.
Flash every second Home Armed with Exit/Entry Delay.
Flash every 5 seconds When the system is in Home Armed or Home
Armed without Exit Delay mode.
Red Frontpoint Logo LED
(Away Armed)
Turn on for 5 seconds When the system is changed to Away Armed
mode.
Flash every 0.5 second When the system is alarming.
Flash every second Away Armed mode with Entry/Exit Delay.
Flash every 5 seconds When the system is in Away Armed mode.
Battery and Low Battery Detection
The Remote Keypad uses two AA Alkaline batteries as its power source.
The Remote Keypad can also detect the battery status. When the battery voltage is low, a low battery signal will be sent
along with regular signal transmissions to the Control Panel, and the Low Battery LED (yellow) will light up, flash, or dim
in accordance with the LED of the Frontpoint logo.
Tamper Protection
The Remote Keypad is protected against any unauthorized attempt to open the back cover with a tamper switch. When
the back cover is opened, the tamper switch will be triggered and the Remote Keypad will transmit a tamper open signal
to the system control panel.
After replacing the back cover, the Remote Keypad will transmit a tamper restore signal to the system control panel.

3
Supervision
After installation, the Remote Keypad will automatically transmit Supervision Signals to the Control Panel at an interval
of 30 to 50 minutes.
Power Saving Feature
When idle, Remote Keypad is in stand-by mode and consumes no power. It will wake up when any key is pressed and
the Frontpoint logo will be turned on. Please note the Fronpoint logo color will be displayed based on current system
mode. The logo will be turned off after 10 seconds of key inactivity.
Upon completion of a command input, the Remote keypad will return to stand-by mode.
Press “1 + 2” keys together and the Remote keypad will emit one long beep to turn ON of OFF the LEDs of the keypad
to conserve power.
Getting Started
1. Put the Control Panel into learning mode. Please refer to your Control Panel’s user manual for details.
2. Press 1 & 3 keys together, the Remote Keypad will emit 1 long beep and send a learning code to the Control Panel.
After the Control Panel receives the signal, it will send an acknowledgment back to the Remote Keypad. The Remote
Keypad will emit 3 beeps to indicate.
<
<N
NO
OT
TE
E>
>
If the remote keypad did not sound a long beep, it means the Remote Keypad did not send the learning code to
the Control Panel, please press 1 & 3 keys together again to send the learning code. If the Remote Keypad does
not perform 3 beeps, please restart the learning procedure.
3. If the Remote Keypad does not receive the acknowledgement from the Control Panel within 60 seconds, the Blue
Trouble LED will then flash 5 times to indicate.
4. After the Remote Keypad is learnt-in, hold the Remote Keypad in a desired location and check whether it is within
signal range of the Control Panel. Please refer to your Control Panel’s user manual for details.
5. When you are satisfied with the chosen location, you can proceed to mount the Remote Keypad. Please refer to
Mounting Method section for more details.
Dual Key Functions
The Remote Keypad features dual-key functions. Please refer to the following table for more details.
Function Dual Keys Behavior
LED ON/OFF Control 1 & 2 Press the two keys together to turn ON or OFF the LEDs,
and the Remote Keypad will emit 1 long beep.
Learning Code 1 & 3
Press the two keys together to transmit a learning code, and
the Remote Keypad will emit 1 beep. Please refer to Getting
Started section for more details.
Fire Alarm 4 & 6 Press the two keys together to trigger a fire alarm, and the
Remote Keypad will emit 1 long beep.
Medical Alarm 7 & 9 Press the two keys together to trigger a medical alarm, and
the Remote Keypad will emit 1 long beep.
Panic Alarm & # Press the two keys together to trigger a panic alarm, and the
Remote Keypad will emit 1 long beep.
System Mode Change and Result
Users can use the Remote Keypad to quick arm the system or arm the system with user PIN code. After entering user PIN
code, press the Disarm/Home/Away key to enter System Disarmed/ Home Armed/Away Armed mode.
System Disarmed:
When system changes to “System Disarmed” mode, the Remote Keypad will emit 2 beeps and the Green
Frontpoint logo will be turned on for 5 seconds. If there is alarm memory, the Remote Keypad will emit 5 beeps
and the Blue Trouble LED will be turned on for 1 second, and the Green Frontpoint logo will be turned on
for 5 seconds.
Home Armed: There are two ways to enter Home Armed mode. Users can enter Home Armed mode by pressing
the Home Arm key to directly arm the system, or by entering user PIN Code followed by the Home Arm key.
To enter Home Armed mode:
Enter user PIN code and press the Home key. When system changes to “Home Armed” mode, the Remote Keypad
will emit 3 beeps and the Amber Frontpoint logo will be turned on for 5 seconds.
To enter Home Armed without Exit Delay mode:
Enter user PIN code, and then press and hold the Home key for over 3 seconds and release the button, when
system changes to “Home Armed without Exit Delay” mode, the Remote Keypad will emit 3 beeps and the Amber
Frontpoint logo will be turned on for 5 seconds.
If low battery status is detected in Home Armed or Home Armed without Exit Delay mode, the Yellow Low
Battery LED will flash every 5 seconds.
If fault event exists in Home Armed or Home Armed without Exit Delay mode, the Blue Trouble LED will flash
every 5 seconds.
Away Armed: When system changes to “Away Armed” mode, the Remote Keypad will emit 1 long beep and the
Red Frontpoint logo will be turned on for 5 seconds.
If low battery status is detected in Away Armed mode, the Yellow Low Battery LED will flash every 5 seconds.

4
Operation Error: The Remote Keypad will emit 2 beeps and the Blue Trouble LED will flash 5 times; for instance, if
the Control Panel is in Away Armed mode, you CANNOT activate Home Armed Mode by using the Remote Keypad.
If you do so, the Remote Keypad will emit 2 beeps and the Blue Trouble LED will flash 5 times.
Incorrect PIN Code: When incorrect password is submitted, the Remote Keypad will emit 4 beeps and the Blue
Trouble LED will flash 5 times. If there are 5 incorrect PIN Code attempts within 10 minutes, the Remote Keypad
will be automatically locked up for 5 minutes. During this period, any operation will be invalid. When the lockup time
expires, the Remote Keypad will emit 1 long beep.
Exit/Entry Delay: After mode change request is submitted, the Remote Keypad will count down with the system
when Entry/Exit delay timer begins.
Home Armed with Exit/Entry Delay:
The Amber Fronpoint Logo will flash every second to match exit/entry delay beeps.
Away Armed with Exit/Entry Delay:
The Red Frontpoint logo will flash every second to match exit/entry delay beeps.
<
<N
NO
OT
TE
E>
>
After mode change request is submitted, the Remote Keypad will slow flash for 10 seconds and turn to quick flash
for another 10 seconds when it is waiting for acknowledgement from the Control Panel. If no signal is received from
the Control Panel, the Frontpoint logo will flash for 3 seconds, and the Blue Trouble LED will be turned on for 3
seconds. Please note the Fronpoint logo color will be displayed based on current system mode.
Factory Reset
The Remote Keypad can be reset to clear all learnt-in data and return all settings to default value by following the steps
below:
1. Remove the batteries and release the tamper.
2. Press and hold 3 key while inserting the batteries back.
3. Continue pressing 3 key until three short beeps are emitted to indicate successful reset.
4. Release 3 key, the reset process is complete.
5. After reset, the Remote keypad will need a new learn-in process to start functioning.
Change of Battery
1. Bypass the Remote Keypad’s tamper alarm. Please refer to your Control Panel’s user manual for details.
2. Take out two old batteries and press the tamper switch for more than 3 seconds to fully discharge.
3. Insert two new AA Alkaline batteries. Do not mix new and old batteries.
4. Replace the top cover.
5. Put the Control Panel back to normal operation mode. Please refer to your Control Panel’s user manual for details.
Mounting Method
There are two ways to mount the Door Contact: Self-adhesive mounting or Screw mounting.
Self-adhesive Mounting
1. Clean the surface with a suitable degreaser.
2. Depending on the mounting side, remove the protective covering from one side of the double-sided adhesive pad and
firmly apply to the back of the device.
3. Remove the other cover and firmly press the Remote Keypad onto the desired location.
<
<N
NO
OT
TE
E>
>
Do not use the adhesive pad method of installation on a surface with peeling or cracked paint, or on a rough
surface.
After mounting, please do wait for at least 24 hours for the adhesive tape to totally adhere to the wall.
Screw Mounting
1. Remove the front cover.
2. Using the 2 mounting holes of the back cover as a template, mark off the positions in the most appropriate place.
3. Insert the wall plugs if fixing into plaster or brick surface.
4. Screw the Remote Keypad onto the wall plugs.
5. Replace the front cover.
5
This device complies with Part 15 of the FCC Rules. Operation is subject to the following two conditions:
(1) This device may not cause harmful interference, and
(2) This device must accept any interference received, including interference that may cause undesired
operation.
This device complies with Industry Canada licence-exempt RSS standard.
Operation is subject to the following two conditions:
(1) this device may not cause interference, and
(2) this device must accept any interference, including interference that may cause undesired operation of
the device.
Le présent appareil est conforme aux CNR d'Industrie Canada applicables aux appareils radio exempts de
licence. L'exploitation est autorisée aux deux conditions suivantes : (1) l'appareil ne doit pas produire de
brouillage, et (2) l'utilisateur de l'appareil doit accepter tout brouillage radioélectrique subi, même si le
brouillage est susceptible d'en compromettre le fonctionnement.