Climax Technology Co KPF1 Remote Keypad User Manual
Climax Technology Co Ltd Remote Keypad Users Manual
Users Manual
1
REMOTE KEYPAD (KP-23B-EL / KP-23B-EL-F1) Jul-5-2016
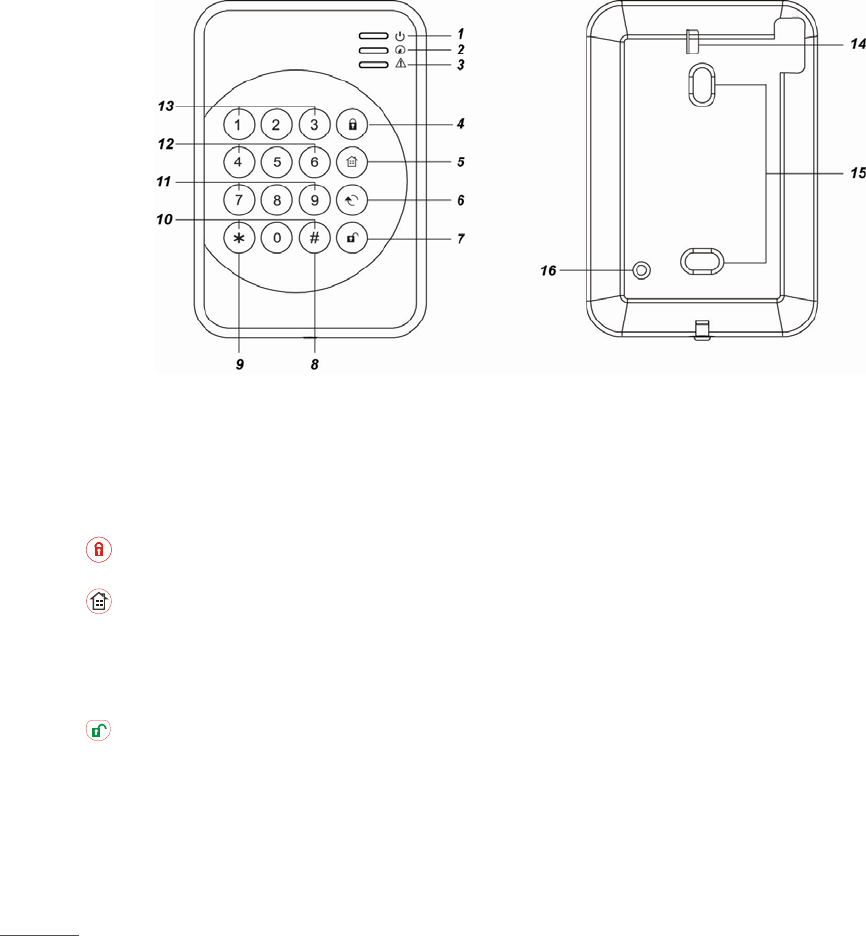
z Identifying the Parts
1. Active LED
2. Status LED
3. Fault Display LED
4. Arm Key
5. Home Key
6. Χ Key
- Check Control Panel Status
7. Disarm Key
- to move back one step
8. # Key
9. ¿ Key
- Enter KP Pin Code + ¿ Key to enter Test Mode
10. Send Learning Code
- Press both # and ¿ keys together to Send Learning
Code
11. Medical Alarm (if enabled)
- press both 7 and 9 to trigger medical alarm
12. Fire Alarm (if enabled)
- press both 4 and 6 to trigger fire alarm
13. Panic Alarm (if enabled)
-press both 1 and 3 to trigger panic alarm
14. Battery Insulator
15. Mounting Holes
16. Tamper Swtich
<NOTE>
& A short beep will sound along with key pressing to indicate that the button pressed is valid.
& 4 continuous beeps will sound indicating mistake and the user should repeat the process again.
z LED Indicator
z Active LED (Blue/Amber):
z Blue LED on 5 seconds: the system is in Normal Operation Mode.
z Blue LED flashes for 5 seconds: low battery in Normal Operation Mode.
z Amber LED on: the system is in Test Mode.
z Amber LED flash: low battery in Test Mode.
z Status LED (Blue/Red):
z Red LED on: the system is in Away Mode
z Red LED flash: the system is in Home Mode.
z Blue LED on: activation of Disarm Mode.
z Blue LED flash: failure due to the following reasons:
¾ No response sent by the control panel within 4 seconds.
¾ Control Panel User PIN code was incorrect.

2
¾ Request for Home mode during Arm mode.
¾ Request for Force arm.
z Fault LED (Amber):
z Flash: system failure (panel tamper, AC fault, sensor temper, sensor out of order, open door)
z On: Alarm Memory (depend on Control Panel).
z Power
z Remote keypad uses one EL123AP 3V Lithium battery as its power source.
z Remote keypad can also detect the battery status. If the battery voltage is low, the Active LED will flash (Amber in Test
mode or Blue in Normal mode) during operation. The Low battery signal will be sent along with regular signal
transmissions to the Control Panel for displaying the status accordingly.
z Before shipment, the battery is pre-installed by the factory. Pull out the battery insulator to activate battery.
z When changing battery, press the tamper switch a couple time after removing old battery to discharge, then insert the
new battery.
z Power Saving Feature
z When idle, Remote keypad is in Stand-by mode and uses no power. It will activate and wake-up for 5 seconds when
any key is pressed.
z After 5 seconds of key inactivity, the power goes off and it returns to Stand-by mode.
z Upon completion of a command input, the power goes off and Remote keypad returns to Stand-by mode.
z Test Mode
z Remote keypad can be put into Test mode by entering the Keypad PIN code (default: 0000) followed by * key. The
Active Amber LED will turn on along with a long beep.
z To exit Test mode, press key twice, Remote keypad will sound a long beep and the Active LED will turn off, then
Remote keypad returns to Normal Operation mode. Otherwise, Remote keypad will automatically exit Test mode after
5 minutes and return to Normal Operation mode.
<NOTE>
& The Test Mode is helpful for bypassing Remote keypad Tamper alarm when installing, replacing low batteries or
removing to different mount site.
& When Remote keypad is in Test mode, it operates as wake-up condition and will NOT disconnect after 5 seconds.
Test Mode Function:
Press * key and then 7 key — Transmit Remote keypad learn signal
Press * key and then 2 key — Enable Dual-key Panic Alarm function
Press * key and then 3 key — Enable Dual-key Fire Alarm function
Press * key and then 4 key — Enable Dual-key Medical Alarm function
Press * key and then 5 key — Disable all Dual Key function (Default)
Press * key and then 6 key — Edit Keypad Pin Code
Enter Old Keypad Pin Code and then press Χ key
Enter New a new 4-digit Keypad Pin Code and then press # key.
Press key twice — to leave the Test Mode.
Press * key and then 8 key — Enable Arm/ Home without PIN Code function
Press * key and then 9 key — Enable Arm/ Home with Control Panel User PIN Code function (Default)
z Tamper Protection
z The keypad is protected against any attempt to open the lid or to detach keypad from its mounting surface.
z Tamper protection is disabled when the keypad is in Test Mode.
z Installation Procedures
Step 1. Put the Control panel into learning mode, .
Step 2. Adding remote keypad into the Control Panel:
Test Mode Learning:
I. Put remote keypad in Test mode by entering KP PIN code (default: 0000), then press * key. The Active
Amber LED will turn on along with a long beep sound.
II. Press * key then 7 key. Remote keypad will sound a long beep.

3
<NOTE>
& If the remote keypad did not sound a long beep, it means the remote keypad did not send the learning
code to the Control Panel, please press * key then 7 key again to send the learning code..
III. If the Control Panel receives the learning code, it will display the info accordingly. Refer to the operation
manual of your Control Panel to complete the learn-in process.
IV. After Control Panel receives the signal from remote keypad, it will send an acknowledgement back to remote
keypad. The remote keypad will then beep 3 times to confirm the acknowledgement has been received.
Dual-Key Learning:
I. Press and both # and * keys together under Normal Operation Mode. Remote Keypad will sound a long
beep.
<NOTE>
& If the remote keypad did not sound a long beep, it means the remote keypad did not send the learning
code to the Control Panel, please press both # and * keys together again to send the learning code.
II. If the Control Panel receives the learning code, it will display the info accordingly. Refer to the operation
manual of your Control Panel to complete the learn-in process.
III. After Control Panel receives the signal from remote keypad, it will send an acknowledgement back to remote
keypad. The remote keypad will then beep 3 times to confirm the acknowledgement has been received.
<IMPORTANT NOTE>
& If remote keypad does not perform 3 beeps, please restart the learning procdeure.
Step 3. After the Remote keypad is learnt-in, put the Control Panel into Walk Test mode, hold the Remote keypad in the
desired location, and send the learning code to the Control Panel to confirm this location is within the signal range
of the Control Panel. To send the learning code, either press the * key then 7 key under Test Mode or press
both # and * keys together under Normal Operation Mode.
Step 4. When you are satisfied that the Remote keypad works in the chosen location, you can proceed with mounting the
Remote keypad following the steps described below (see Mounting Remote keypad).
Step 5. Set your own the KP Pin Code:
I. When the keypad is under Test mode, press * key then 6 key, a long beep will be sound.
II. Enter 0000 (default PIN code)
III. Press Χ key, remote keypad sounds a long beep.
IV. Enter your new 4-digit code.
V. Press # key, remote keypad sounds a long beep. The new PIN code is enabled.
Step 6. Press key twice to leave Test mode and the installation is completed.
z Mounting Remote Keypad
I. Remove the front cover.
II. Using the 2 mounting holes of the back cover as a template, mark off the positions in the most appropriate place.
III. Insert the wall plugs if fixing into plaster or brick surface.
IV. Screw the Remote keypad onto the wall plugs.
V. Replace the front cover.
z How to Set System Mode
You may choose to arm/home arm with/without Control Panel User PIN Code.
Arm/Home with Pin Code
Under Test mode, Pressing * key and then 9 key to enable Arm/ Home with PIN Code function (Default).
¾ Enter Arm Mode: Enter any one of Control Panel user code and press key. If panel has no fault and arming is
successful, the Status Red LED will turn ON alone with a long beep.
¾ Enter Home Mode: Enter any one of Control Panel user cods and key. If panel has no fault and arming is
successful, the Status Red LED will flash 4 times alone with 3 beeps.
¾ Return to Disarm Mode: Enter any one of Control Panel user code and key. If disarm is successful, the
Status Blue LED will turn ON along with 2 beeps.
Arm/Home without PIN Code
In the Test mode, Pressing * key and then 8 key to enable Arm/ Home without PIN Code function
¾ Enter Arm Mode: Press key. If panel has no fault and arming is successful, the Status Red LED will turn ON
alone with one long beep.
¾ Enter Home Mode: Press key. If panel has no fault and arming is successful, the Status Red LED will flash 4
times alone with 3 beeps.
¾ Return to Disarm Mode: Enter any one of Control Panel user code and Key. If disarm is successful, the
Status Blue LED will turn ON along with 2 beeps.

4
z Dual-key Alarm Function
¾ Panic Alarm — Press both 1 and 3 keys to trigger Panic alarm.
¾ Fire Alarm — Press both 4 and 6 keys to trigger Fire alarm.
¾ Medical Alarm — Press both 7 and 9 keys to trigger Medical alarm.
<NOTE>
& The dual-key alarm function is disabled by default. To enable it, please refer to the Test Mode section.
z General Operation
¾ If there is Alarm Memory, the Status Blue LED and fault LED will turn ON with 5 beeps (depending on Control
Panel).
¾ Enter Test mode — Enter Keypad PIN code and then press * key.
¾ Panic Alarm — Press 1 key + 3 key at the same time. (if the function is enabled)
¾ Fire Alarm — Press 4 key + 6 key at the same time. (if the function is enabled)
¾ Medical Alarm — Press 7 key + 9 key at the same time. (if the function is enabled)
¾ Check Control Panel Status — Normal Mode Press Χ key.
z Red LED on: the system is in Away Mode
z Red LED flash: the system is in Home Mode.
z Blue LED on: activation of Disarm Mode.
z Blue flash: failure due to the following reasons:
¾ No response sent by the control panel within 4 seconds.
¾ PIN code was incorrect.
¾ Request for Home mode during Arm mode.
¾ Request for Force arm.
z Fault Conditions
When Remote Keypad is under NORMAL OPERATION MODE,
a) When fault condition exists within Control Panel, if the Keypad is used to arm the panel, the keypad Status Blue and
Fault Amber LED will flash 4 times along with 3 beeps to indicate fault condition.
User can force arm the Control Panel by performing the arm action again.
b) When the Keypad is used to disarm the panel, the Active Blue LED will turn ON alone with two short beeps indicating
normal operation. At a fault situation, it will emit 5 times and turn on both Status Blue and Fault Amber LED for 5
seconds.
c) If the Control Panel is under Arm Mode, you CANNOT activate Home mode with Remote keypad. The Status Blue
LED will flash 4 times to indicate transmission error.
d) If you input incorrect KP Pin code for 4 times, KP will disable the key input for 1 minute, indicated by all LEDs flashing
3 times and 6 beeps. After 1 minute, KP will emit a long beep to indicate that the key function is back to normal.
z Appendix
If you have forgotten the Pin Code or anything wrong happened in the Remote keypad, you can reset the Remote keypad to
factory default and reinitialize it.
Reset to factory default:
Step 1 Remove the batteries and release the tamper.
Step 2 Press & hold 3 key while inserting the battery.
Step 3 Continue pressing 3 until three short beeps to indicate successful reset.
Step 4 Release 3 key, the reset process is complete.
<NOTE>
& After reset, PIN code reverts to factory default values, 0000. Remote keypad will need a new learn-in process to
start functioning.
This device complies with Part 15 of the FCC Rules. Operation is subject to the following two conditions:
(1) This device may not cause harmful interference, and
(2) This device must accept any interference received, including interference that may cause undesired operation.