Cobra Electronics 9906 Sports camera User Manual
Cobra Electronics Corporation Sports camera
Users Manual

Action-Sports Camera
Part # 9906
User Manual
Please read through this user manual before using the product and keep the
manual for future reference. Product appearance and/or specifications are
subject to change without notification.
WASPcam is a division of 636 Distributing Inc.
Ariss, ON
519-822-8400

2
TABLE OF CONTENTS
Safety Precautions 3
System Requirements / Features 4
Accessories 5
Camera Function Quick Guide Diagram 6-7
Button Functions 7
Installing SD Card 8
Using the LED Lights 8
Charging the Battery 8
Turning the Camera On/Off 8
LCD Screen 8
Maintaining Waterproof Seal 9
Recording Functions 9-10
Image Rotation 10
Photos 10-12
Zoom / Playback Mode 11
Deleting / Protecting Files / Slide Show 12
Menu Interface Introduction 12
Video Menu Settings 12-13
System Menu Settings 13
Photo Menu Settings 13-14
Using the Camera’s Wi-Fi 14-16
Installing the WASPcam TACT App 14
WASPcam TACT App Interface 16-17
Remote Control (Functions & Indicators) 18
Connecting to External Devices 19
Technical Specifications 20
Copyright Notice 20
3
Safety Precautions
· Read the following guidelines before using this camera
· Refer to the manual instructions to operate the camera properly. Improper
operation may cause damage to camera internal components
· Do not store the product in dusty, dirty, or sandy areas, as its
components
may be damaged
· Do not leave the camera in places exposed to extremely high temperatures, such
as direct sunlight for extended periods of time. High
temperatures can shorten
the life of electronic devices, damage
batteries and warp or melt certain plastics
· Do not store the product in cold areas. When the product
warms up to its
normal temperature, moisture can form inside,
which may damage the
electronic circuits
· Do not attempt to open the casing or attempt your own repairs.
High-voltage
internal components create the risk of electric
shock when exposed
· Do not drop or knock the product. Rough handling may
damage the
internal components
· Do not use harsh chemicals, cleaning solvents or strong
detergents to
clean the product. Wipe the product with a
slightly damp soft cloth
· Do not open the battery cover while an image is being
recorded. Doing so will
not only make storage of the current
image impossible, it can also corrupt
other image data already
stored on file
· If the product or any of its accessories are not working
properly, please
contact 636 Distributing Inc. and our tech team will assist you and if necessary,
arrange
for the product to be repaired or replaced
· It is recommend to use the camera in temperatures between 0°C to 40°C
· Turn off the camera before removing the memory card, to avoid damaging the
card or storage data
· It is normal for the camera to be warm after long periods of use
· Do not touch the lens while using the camera or it can affect video/picture
quality
· Please use the air blower (special lens blowing equipment) to clean lens or use
special lens-cleaning cloth to clean fingerprint or dust on the surface
· Always test for proper operation before using the camera
· 636 Distributing Inc. is not responsible for any damage or personal injuries
resulting from the use of the WASPcam TACT or for replacing it if lost or stolen
· 636 Distributing is not responsible for any legal repercussions from the use
of the WASPcam TACT or from the sharing of footage
4
System Requirements
The camera requires a PC with the following specifications for full
HD 1080p
30fps and 720p 60fps playback
Windows® 8 /Windows® 7 /Vista / XP (SP2) / MAC OS X 10.5 and later
Intel® / AMD Dual-Core CPU and later
At least 1 GB of RAM or higher
At least DirectX 9 video card, DirectX 10 is recommended
Standard USB 1.1 port and later
At least 2GB or greater available hard disk space
Features
The camera offers a variety of features and functions including
2K 1440P (30fps), Full HD 1080p (60fps.)
H.264 Video Clip
170° Wide Angle Lens
WLAN 802.11 b/g/n
2.4GHz RF remote control
16 Megapixel Photos
Li-ion Rechargeable Battery
Smartphone App Supported – WASPcam TACT App
5
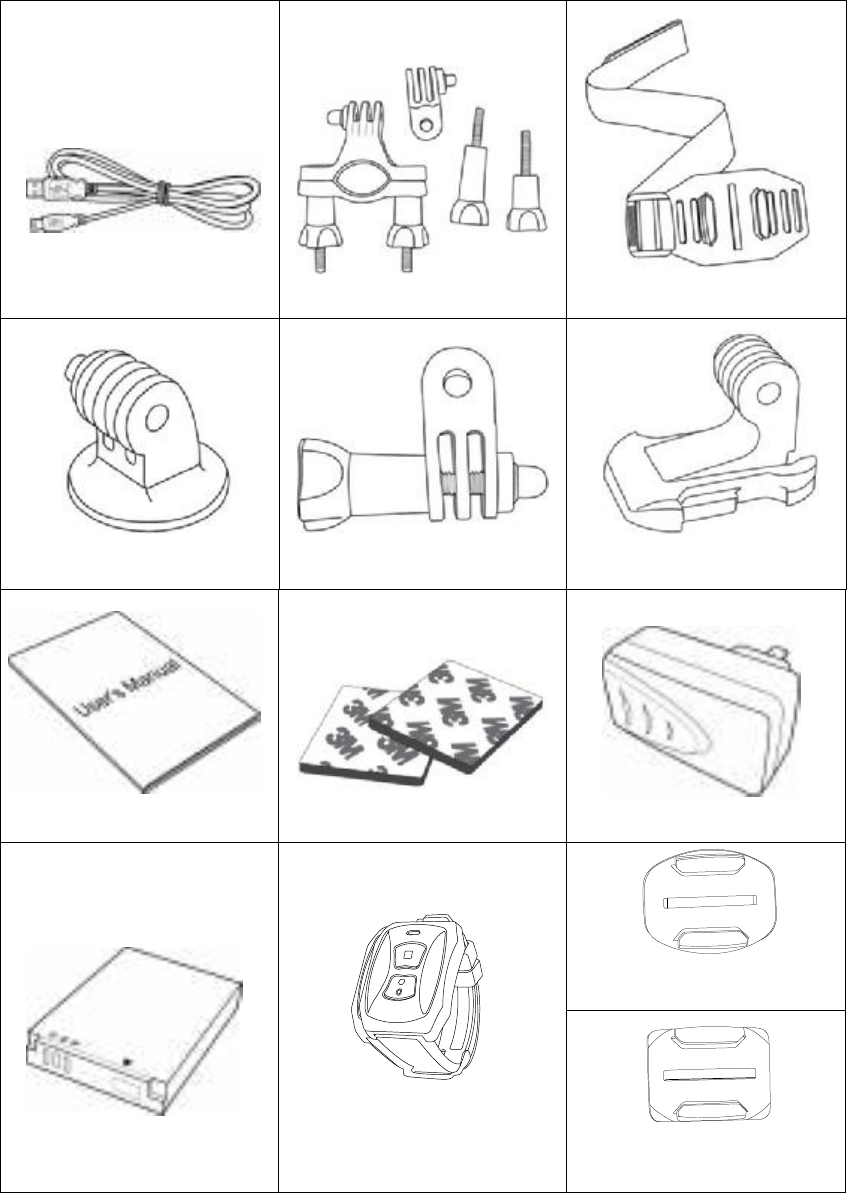
ACCESSORIES
The following items should be in your the package. If any items are missing or
damaged, contact your dealer immediately.
Micro USB Cable
Bar Mount
Helmet Mount
Tripod Mount Adapter
Straight Joint Mount
J-Hook Buckle
User Manual
3M Stickers
Wall Charger
Flat Mount w/3M Tape
Li-Ion Battery
Wrist Remote
Curved Mount w/3M Tape
6
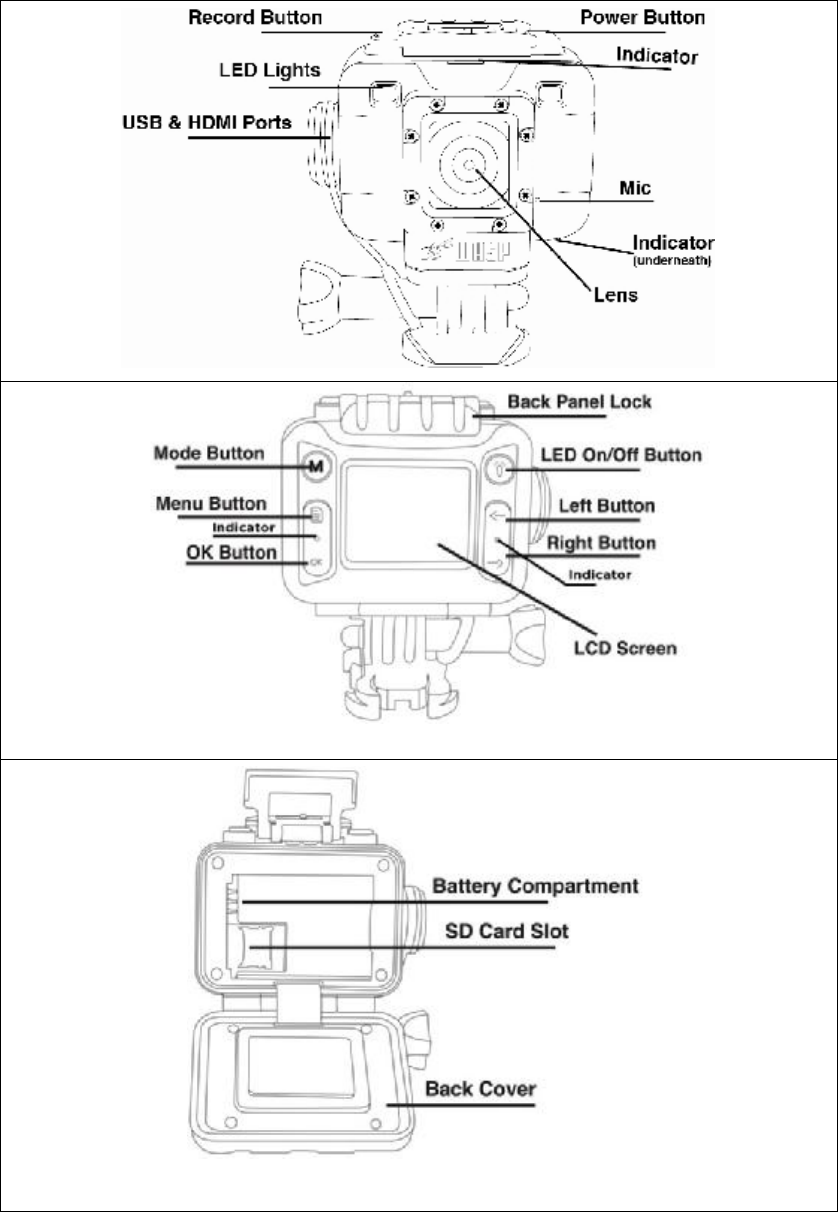
Camera Function Quick Guide Diagram
Refer to the following illustrations to familiarize yourself with the
buttons and
controls of this camera
7
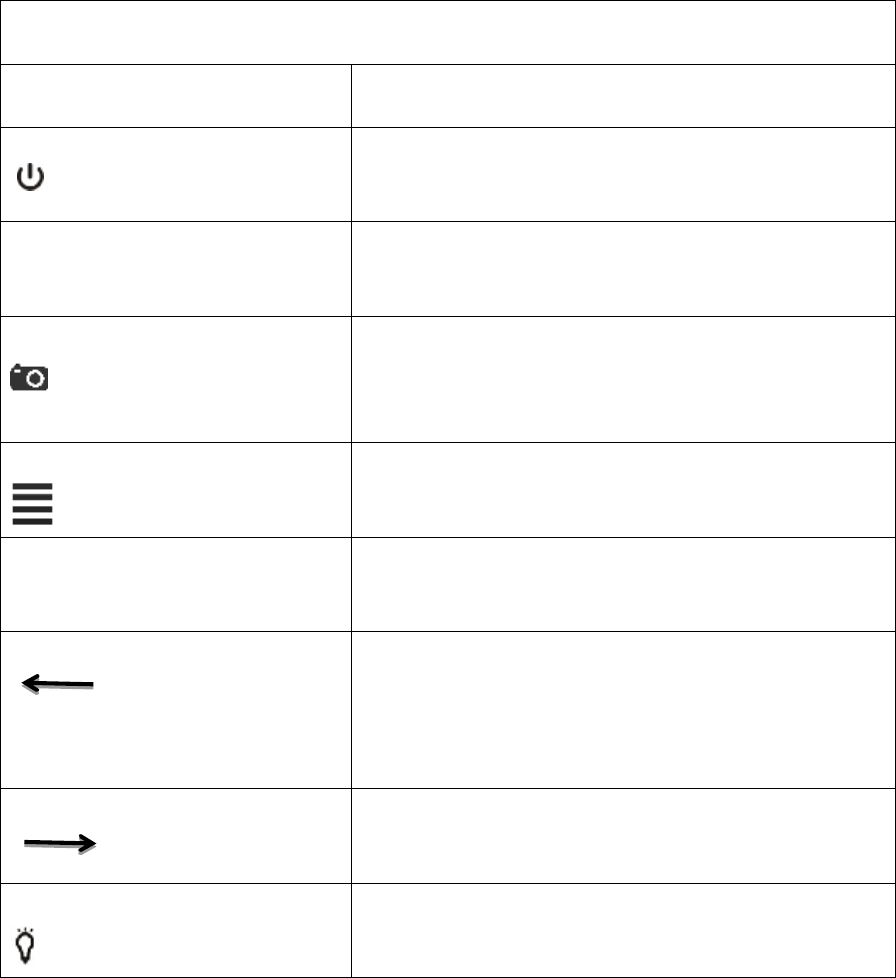
BUTTON FUNCTIONS
Button Function
Power Button (Top Left)
To turn the camera on & off
To capture pictures when recording
Mode Button
M
To switch to picture mode, video mode and playback
mode
Record Button (Top Right)
Start and stop taking photos/videos,
Returns to the photo/video mode when you are in
the menu
Menu Button
To enter / exit menu settings
OK Button
OK
To browse photos and videos, to enter and confirm
settings under setting mode
Left Button
To choose the last menu or file,
To zoom in image.
To Reverse playback under playback mode.
Right Button To choose the next menu or file,
To zoom out image.
To fast forward playback under playback mode.
LED Light On/Off Button
To turn the LED light on and switch between bright,
normal, flashing and off
B
ASIC CAMERA FUNCTIONS

8
Installing the Micro SD Card
1) Inserting the SD card
· With the camera off open the back cover
· Press the card slot to the right
· Place the SD card in the slot
· Close and lock the card slot
· Do the reverse to remove the SD card
**Note - Please ensure that the SD Card is inserted in the right direction or you may
damage the SD card
Using the LED Lights
Press the light bulb button above the arrow buttons to turn on the LED lights in
bright mode, press again for normal mode, press the 3rd time to make the LED lights
flash and press the 4th time to turn them off
Charging the Battery
Connect camera and power supply using USB and charger. The red indicator at the
front of the camera will be on while the camera is charging. Once it is fully charged
the red indicator light will turn off.
**Note - To improve the charging efficiency of the camera, please turn the camera
off while it’s charging
Turning the Camera On/Off
To turn on the camera, press the power button for 3 seconds and a chime will sound,
the WASPcam TACT screen will turn on and the red indicator light at the front of the
camera will also turn on. To turn off the camera, press the power button again for 3
seconds until the chime sounds and the screen goes black
LCD Screen
On the left of the LCD screen the video icon, EV icon, audio record icon are shown.
On the right of the LCD screen the remaining recording time, resolution, SD
card icon, and battery icon are shown. On the bottom of the LCD screen the
date and time are shown.
Maintaining the Waterproof Seal
1. Before entering water, check that the side cap and top lock all are tighten well.
9
2. Do not remove screws and ring around the lens. Doing so will compromise the
waterproof seal of the camera.
3. When changing the battery or MicroSD card, ensure no debris (dust, sand small
rocks, ect.) is on the rubber seal on the camera backing. When finished changing the
battery or MicroSD card, ensure the lock is buckled securely and locked properly.
4. Avoid damaging the screen on the back of the camera. Punctures, scratches or
cracks may compromise the waterproof seal.
5. If you notice the camera’s battery has swelled, replace the battery to avoid
compromising the waterproof seal.
6. After using the USB or HDMI ports, replace the side cap and tighten until a tight
seal forms. (Tighten until the cap cannot be moved in either direction easily.) Round
coins or objects with thin, flat edges are good tools to help tighten the side cap
completely.
7. After using the camera in salt water, wash the camera under regular tap water and
dry completely. Once dry, open the battery compartment and remove the battery.
Place battery in dry ventilated area to ensure battery remains dry. This avoids any
degradation from salt water over a long period of time.
8. Do not remove any screws from the camera. Doing so will compromise the
waterproof seal.
Recording Functions
Normal Recording
Turn on the camera and press the record button once to take video, and the green
LED light between the arrows will flash and the recorded time and recording icon are
displayed on the top of LCD screen
Press the record button again to stop recording and save the file – then remaining
recording time is displayed at the top of LCD screen
Loop recording
1) Turn on the camera, press the menu button and use the right arrow to choose
“Loop recording” to 2 mins (for more options refer to Video Settings), exit the menu
and press the record button once to take a video. The LED light between the 2 arrows
will flash green and at the top of the LCD screen it displays the red flashing recording
icon and the recording time
10
2) After 2 minutes, the camera will stop recording automatically and save the video,
then continue recording
3) When SD card is full, camera will delete the first video footage automatically and
continue recording
4) At anytime during recording, you can press the record button to stop and save the
video. The remaining time will display on the LCD screen at the top right.
**Note – If you power off the camera while the camera is set to loop recording,
when you power the camera on again or connect charger, the camera will remain in
looping mode.
**Note –Loop recording, Time-lapse video, motion detection, only one function can
be work at the same time.
Time-lapse Recording
Turn on the camera, press the menu button and use the right arrow to choose
“Time-lapse Record” to 1 second(for more options refer to Video Settings), press
the REC button once to take video, press the REC button again to stop.
When playback, The video will playback quickly(play faster than normal speed).This
recording function for process of architectural projects, weather changing, flowers
blooming.
To return to normal video, press the REC button again to stop recording. And choose
“Time-lapse Record” to off.
** Note: This feature only suit for a long time recording, example: if set the “Lapse
record” to 1 second, the recording time should not be less than 1 minute.
Also this setting will not work if the Loop Recording is not turned off.
Motion Detection
1) Press menu and use right arrow to choose Motion Detection and choose 30 SEC
for example (for more options refer to Video Settings), press REC to enter Motion
Detection mode. The screen will say Motion Detecting,and auto record for 30sec.
2)If there is movement, the camera will auto record for 30sec (or the time you set)
and stop. If there is no movement, the camera will stop recording automatically. If
there is constant movement, the camera will detect this and the camera will keep
recording at 30sec intervals or the time you have set.
** Note – If you need to pause recording, press the record button once to stop it. If
you need to cancel motion detection – please turn off this setting in the menu. Also
this setting will not work if the Loop recording is not turned off.
Image rotation
Depending on the need, under the system menu "Image Rotation" Select "Open" and
press “OK” button to confirm, the screen will show inverted images. This may be
necessary if you are mounting the camera upside down.
11
Photos
Snap Shots
While you are recording video you can press the power button to take a picture
**Note - when you are taking a snap shot, video is still being recorded continuously.
You can only view the snap shots in browse mode
1) Normal photo
Press Mode button until you see the camera icon in the top left corner. The white
balance, exposure and ISO icons will also show on the LCD screen
At the top right of the LCD screen the display shows the remaining amount of photos,
resolution, quality,SD Card & battery icons. Press the record button to take a photo.
**Note - when taking pictures – please try to hold the camera steady or it may affect
the picture quality.
2) Capture Mode: Single/3s/10s/30s Timer
Press the menu button to enter camera settings, press the left and right arrow
buttons to choose capture mode and select the time, press OK button to confirm,
press the record button and the camera will count down the time you’ve selected
and then take a photo. Press the record button again to stop, or change the capture
mode to single.
3) Auto Photo:off/3/5/10 seconds
Press the menu button to enter camera settings, press the left and right arrow
buttons to choose Auto Photo mode and select the time and press ok. Press menu
to exit. Press the record button once and the camera will take a photo at the
chosen interval continuously. The screen will show the countdown and when the
time is up the camera will take a photo automatically and then save the photo, then
continue photographing according to the time you set. To stop, please turn the
auto photo setting Off
4) Burst: Off/bust 3/bust 10
Press the menu button to enter camera settings, press the left and right arrow
buttons to choose burst(3 or 10 consecutive photos) then turn it on press OK button
to confirm, press Menu to exit. Press the record button and the camera will take
and save 3/10 consecutive photos. To stop, please change the Burst setting Off.
5) Quick Review Off/2seconds/5seconds
Press the menu button to enter camera settings, press the left and right arrow
buttons to choose Quick Review, choose 2 or 5 seconds, press OK button to confirm,
then press Menu to exit. Press the record button and the camera will take 1 photo
and hold it for you to preview it for 2/5 seconds (according to the time you have set),

12
then it will go back to photo standby mode
6) Zoom in/out
While in record or photo mode, you can use the left and right arrow buttons to
zoom in/out(Maximum to 4times)
7) Playback mode
Under standby mode, press the mode button twice to enter into playback mode, the
(„) will be in the top left corer. Press the arrow buttons to choose the file you
want to review, press the OK button to confirm. Press again to pause, then press
“OK” button again to continue playing the file. During Video playback press and
hold the right or left arrow buttons to fast forward or reverse playback. Maximum
speed to 8 times, Press “OK” button to stop.
Deleting / Protecting Files / Slide Show
Deleting Files
Under standby, press the mode button to enter into playback mode. Press the
menu button to enter settings, the press the left/right arrows to select Delete, press
the OK button to confirm. Press the left/right arrows to “Delete all” or “Delete
Current”, then press the OK button to confirm. Press the left/right arrow buttons to
choose “Cancel” or “OK” to deleting the file. Press OK to confirm delete mode will
exit
Protecting Files
Under standby mode, press the Mode button to enter into playback mode. Press
the menu button to enter settings and press the left/right arrow buttons to select the
“protect “setting. Press OK to confirm, and then press the left/right arrow buttons
to select "Lock Current", "Unlock Current”, ”Lock All” , “Unlock All”, then press "OK"
to confirm, Press “Menu” button to exit
Slide Show
Under standby mode, press the Mode button to enter into playback mode. Press
the menu button to enter settings and press the left/right arrow buttons to select
"Slide Show” then press the OK button to confirm. Press left/right arrow buttons to
select “2, 5, or 8 Seconds”,then press the OK button to confirm. Press the menu
button to return
Menu Interface Introduction
When you are in standby mode, press the menu button to enter settings, press the
left/right arrow buttons to choose the options, then press the OK button to confirm,
press menu button again to quit
Video Menu Settings

13
Under Video mode, press the menu button to enter video settings, press the
left/right arrow buttons to choose the options, then press the OK button to confirm,
press menu button again to quit
MENU OPTION SETTINGS
Resolution 1440 30FPS/1080P 60FPS/1080P 30FPS / 720P 120FPS / 720P
60FPS/ VGA 240FPS
Loop recording Off / 2 Minutes / 5 Minutes / 10 Minutes
WDR Off/On
Motion Detection Off / 30 Seconds / 1 Minute / 5 Minutes
Audio Off/On
Date Stamp Off / Date / Date & Time
Time-lapse Record Off/1 Second/3 Seconds/5 Seconds/10 Seconds/30 Seconds/1
Minute
Image rotation Off/On
System Settings
Under standby mode and playback mode, press the menu button twice to enter the
system settings, press the left/right arrow buttons to choose the option, press the OK
button to confirm, press the menu button to exit settings.
MENU OPTION
SETTINGS
WIFI On/Off
WIFI SSID User name setting, the default is WASPcam
WIFI Password Password setting, the default is 12345678
Remote Control
Off / On /Remote Match (for pairing with the camera)
Date / Time YYYY / MM / DD / HH / MM / SS
Auto Power Off Off / 1 minute / 5 minutes/ 10 minutes
Beep Sound Off/30%/60%/100%
Exposure +0.0, -0.5, -1.0, -1.5, -2.0, +2.0, +0.5, +1.0, +1.5
Language English/FRANÇAIS/ESPAÑOL/Portuguese/Deutsch/ Italano/简体中文/繁
體中文/PYCCKЙЙ/日本语/Polski/한국어
TV Out Off / On
TV Mode NTSC/PAL
Frequency 60 HZ / 50HZ
Remove Fisheye
Off / On
Anti-shaking On/Off
Screen saver Off/30Seconds / 1Minute/5Minutes (Length of time before the
screen shuts off)
Format SD Card
Default Setting Cancel / Ok
Version FWVer:X.X /XXXX XX XX
Photo Menu Settings

14
Under Photo mode, press the menu button to enter photo settings, press the
left/right arrow buttons to choose the options, then press the OK button to confirm,
press menu button again to quit.
MENU OPTION SETTINGS
Capture Mode Single / 3s / 10s / 30s Timer
Photo Resolution 16M / 10M
Burst Off / Burst 3/Burst 10
Auto Photo Off / 3 / 5 / 10 seconds
Quality Fine / Normal / Economy
Sharpness Strong / Normal / Soft
White Balance Auto/Daylight/Cloudy/Tungsten/Fluorescent/Underwater
Color Color / B&W / Sepia
ISO Auto / 100 / 200 / 400/800/1600
Quick Review Off / 2 / 5 seconds
Date Stamp Off / Date / Date & Time
Using the Camera’s WIFI
1) Before using this function, download and install the WASPcam TACT App to your
Apple iPhone (iOS system) smartphone or Android smartphone
Installing the WASPcam TACT App
Apple iPhone (iOS system) Smartphone
There are two ways to download the WASPcam TACT App to your iPhone:
1. Download from iTunes Store through your computer`s iTunes program
2. Download from the App store through your iPhone
Note: Before you do the following steps, please confirm that your computer has the
iTunes program installed and you have set up an Apple account. It needs to be the
Apple iOS 6.0 system or above.
Download from iTunes
Click iTunes icon to open iTunes
Click iTunes Store Icon to open the iTunes Store
Enter “WASPcam TACT” into the search bar
Click download under the WASPcam TACT Icon
Once it’s finished the WASPcam TACT icon will show on your
home screen
Download by iPhone
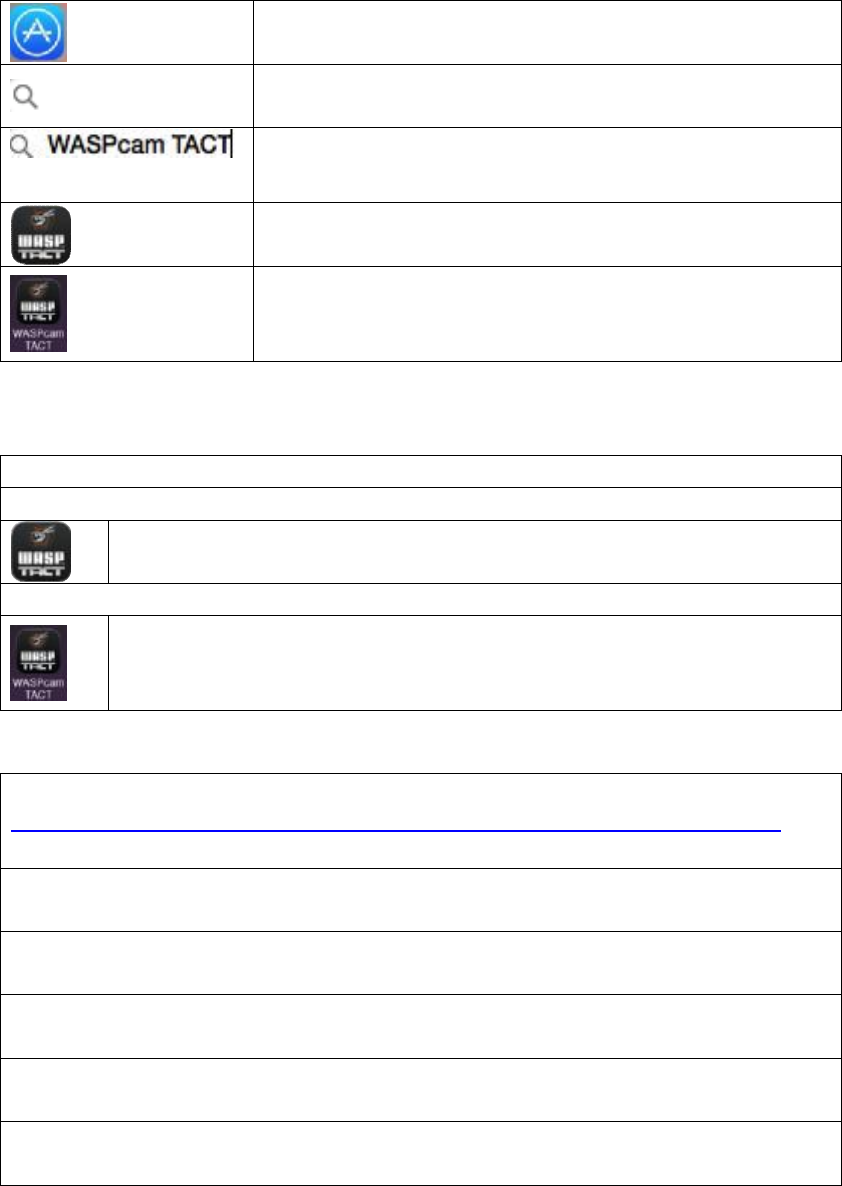
15
Click the App Store icon
Click search icon
Click the search field and enter WASPcam TACT, click the
blue search button
Click the icon and click download
Once it’s finished the WASpcam TACT icon will show on
your home screen
Android Smartphone
Open the Google Play store on your phone
Enter “WASPcam TACT” into the search bar and hit search
Click on the WASPcam TACT icon to view the app page
Click the install button to install the WASPcam TACT app to your phone
Once download is complete, the WASPcam TACT app will appear in your
application menu.
Android by Computer
Open the computer internet and enter this link :
https://www.dropbox.com/sh/mn1ej7bh64dfbsh/AAAdpx7rrdFKtLA6WkTB_bgZa?dl=0
Click download at the pop-up dialog box to download “wasp20150514.apk”
Connect mobile and computer by USB cable
Copy “wasp20150514.apk”to your mobile
Find “wasp20150514.apk” at your mobile
Click “wasp20150514.apk”” to install
Using the Camera’s WIFI Cont.

16
2) Turn the camera on and press the menu button twice to enter system settings,
press the left/right arrow buttons to choose WIFI SSID. Press the OK button to
select then press the menu button to select Del then press the Ok button to delete
the WIFI name. Then you can enter new a new WIFI name. Press the menu button
to select uppercase/lowercase letters or numbers, press the left/right arrow buttons
to choose the letters to spell the word you want then press the Ok button to confirm.
Press the menu button to select and Ok to confirm the setting.
3) Turn the camera on and press the menu button twice to enter system settings,
press the left/right arrow buttons to choose WIFI password. Press the OK button to
select then press the menu button to select Del then press the Ok button to delete
the WIFI password. Then you can enter a new WIFI password. Press the left/right
arrow buttons to choose the letters to spell the word you want then press the Ok
button to confirm. Press the menu button to select and Ok to confirm the setting.
Note: The WIFI name and passwords need to be at least 8 characters comprised of
upper/lower case letters and numbers
4) Turn the camera on and press the menu button twice to enter system settings,
press the left/right arrow buttons to choose WIFI and select open. The WIFI icon
will show on the screen. Search the Wlan using your mobile, find the
network name which you have set, connect and enter the password
XXXXXXXX (whatever you saved) and confirm. Connection is successful when
the LCD screen shows “WIFI connected” then open the WASPcam TACT APP
and preview the camera's view, take video and photos and also change
menu settings directly from your smartphone to your camera, such as video
resolution, photo size etc.
APP Interface Description
17
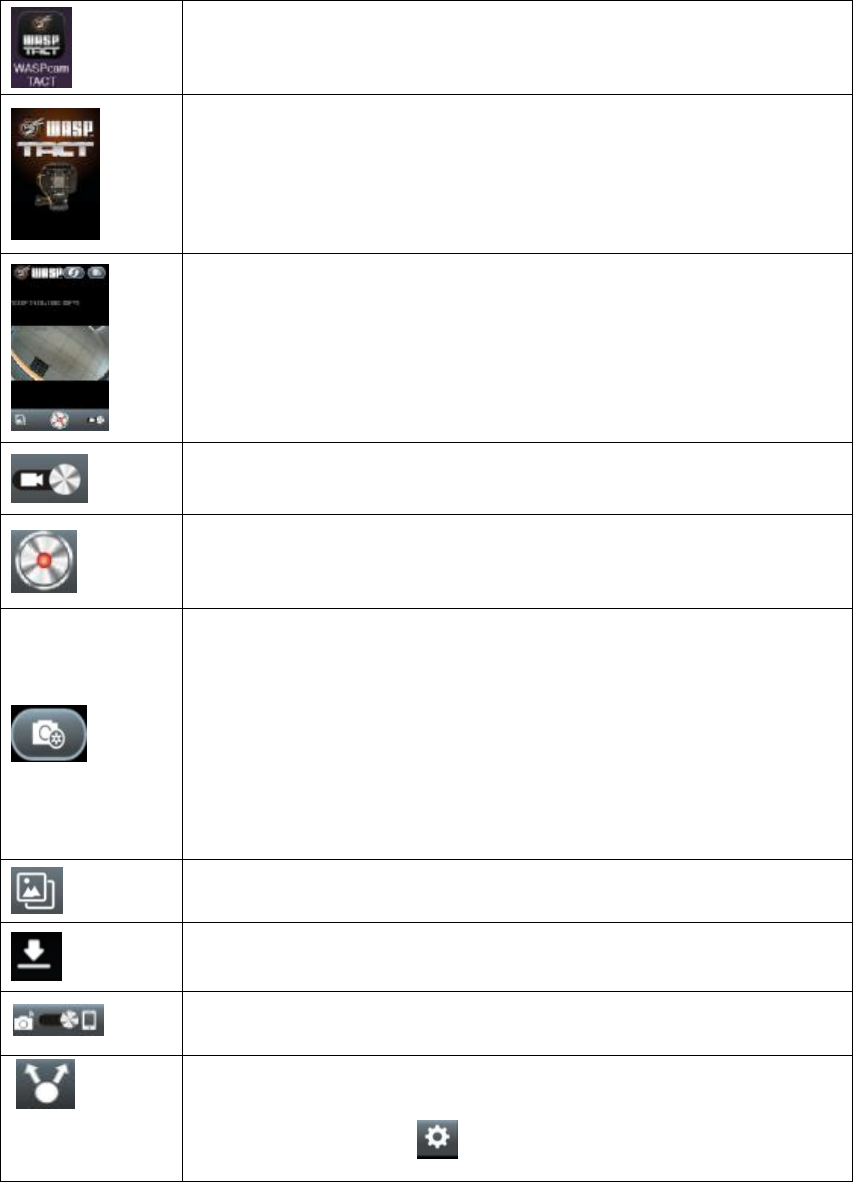
Open WIFI and to connect, click the WASPcam TACT icon to enter
the APP
This will show on your screen when the app is starting up
After connecting, your smartphone will enter standby mode and
live viewing screen will be showing on your phone
Press this icon to switch to recording and photos
Press this icon to record video or photo
Press this icon to enter settings:
Video Resolution
Photo Size
Looping
Record Audio
Auto Off
Clear Cache
Wi-Fi
Press this icon to see all the files
Press this icon to download files from the camera to smartphone
Press this icon to see the files that have been downloaded to your
smartphone
Press this icon to change your WIFI setting. Connect to the
internet network and open the downloaded photo/video on your
smartphone and press to select where to share
18
Remote Control
NOTE**: Before pairing the remote to the camera, format the MicroSD card in the camera.
How To Pair the Remote:
1. When the camera is in standby mode, press the menu button twice to enter
system settings.
2. Press the left/right arrow buttons to scroll through the menu, choose remote
control to enter the remote menu. Then select Remote Match.
3. A message will appear on the LCD Screen “Wait Remote Match”, the camera is
now in pairing mode.
4. At the same time, press both buttons on the remote controller to start
pairing. Pairing is successful when the LCD screen shows “Remote Match
OK”
NOTE**: The 9906 TACT Wireless Wrist Remote can be paired to multiple TACT cameras. You can pair the
cameras to the remote one by one, or pair several cameras to the remote at once.
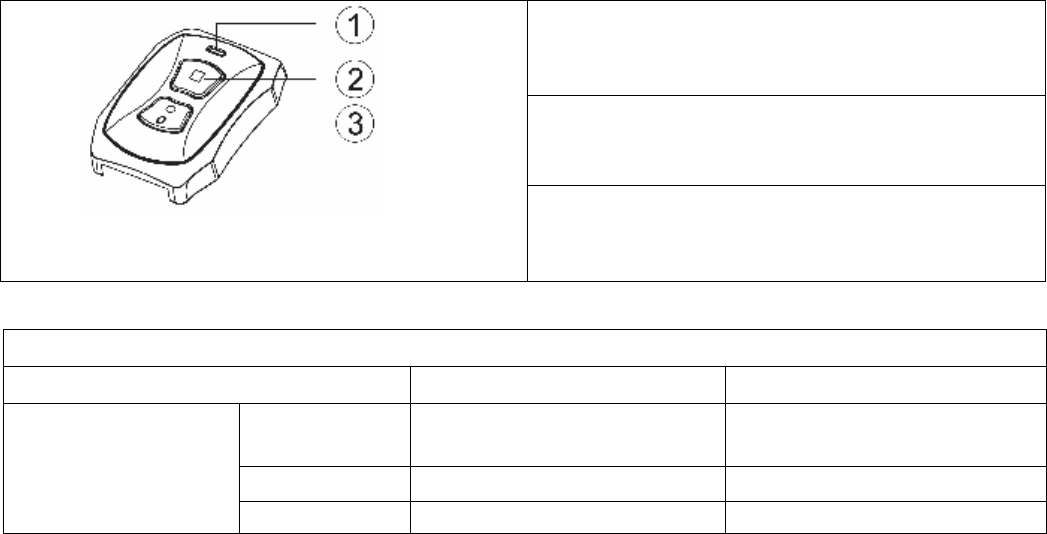
1 - Indicator light
2 – Photo Button - press to take photos,
Press the Inquiry/Record Button (3) and the Photo
button (2) simultaneously to enter Pairing mode
3 – Inquiry/Record Button – press to start/stop
recording, press and hold for 3 seconds to check
the present status of the camera (see below)
Remote Control Indicator Light Status
Status/LED Red LED Light Blue LED Light
Standby 1 time/sec frequently
Flickers about 5sec Off
Recording Off Light on 3 seconds, then off
Status Inquiry
Power off Light on 3 secs, then off Off

19
Connecting to External Devices
Play back on HD TV
Turn the camera on, connect the HDMI port in the camera to the TV via an HDMI
cable (not included) and choose the HDMI mode on TV. The LCD screen on the
camera will turn off automatically and now all operations and functions can be seen
on the TV.
**Note: 720P120fps、VGA240fps resolution cann`t connect HDMI TV.
Play back on TV
Turn the camera on, connect the camera with the AV cable to the TV, choose USB
mode on the TV then go into the camera menu settings and make sure the "TV Out"
is set to open. The LCD screen on the camera will turn off automatically and now all
operations and functions can be seen on the TV.
**Note: TV AV cable is not included and when connected it will only transmit
images/videos but no sound.
’
Pairing Long light Long light
Success Light on 3 secs, then off Light on 3 secs, then off
Pairing Mode Failure Off Off
Start recording 2 times/sec frequent
Flickers about 5sec Off
Stop recording 1 time/sec frequent
Flickers about 5sec Off
Photo Off Flashes once each time you
take a photo

20
Technical Specifications
Sensor 10M CMOS
Video Resolution 1440 30FPS/1080P 60FPS/1080P 30FPS / 720P 120FPS / 720P 60FPS/ VGA 240FPS
Image Size 16M / 10M
Memory Micro SD card up to 32GB – Class 6 or higher
Lens 170°
Video Format .MOV
Image Format JPG
WiFi 802.11b/g/n
Remote 2.4G Remote Control
Audio Built-in Mic, Speaker
Port USB, HDMI, TV OUT
Battery Lithium-ion Rechargeable Battery 1050mAh
Screen 1.5 inch LCD
FCC Statement
This device complies with part 15 of the FCC Rules. Operation is subject to the
following two conditions: (1) This device may not cause harmful interference, and (2)
this device must accept any interference received, including interference that may
cause undesired operation.
This equipment has been tested and found to comply with the limits for a Class B
digital device, pursuant to part 15 of the FCC Rules.
These limits are designed to provide reasonable protection against harmful
interference in a residential installation. This equipment generates uses and can
radiate radio frequency energy and, if not installed and used in accordance with the
instructions, may cause harmful interference to radio communications. However,
there is no guarantee that interference will not occur in a particular installation. If
this equipment does cause harmful interference to radio or television reception,
which can be determined by turning the equipment off and on, the user is
encouraged to try to correct the interference by one or more of the following
measures:

21
—Reorient or relocate the receiving antenna.
—Increase the separation between the equipment and receiver.
—Connect the equipment into an outlet on a circuit different from that to which the
receiver is connected.
—Consult the dealer or an experienced radio/TV technician for help.
Changes or modifications not expressly approved by the party responsible for
compliance could void the user's authority to operate the equipment.
IC Statement
This device complies with Industry Canada’s licence-exempt RSSs. Operation is
subject to the following two conditions:
(1) This device may not cause interference; and
(2) This device must accept any interference, including interfe
The term “IC: “ before the certification/registration number only signifies that the
Industry Canada technical specifications were
met. This product meets the applicable Industry Canada technical specifications.
Le présent appareil est conforme aux CNR d'Industrie Canada applicable aux
appareils radio exempts de licence.
L'exploitation est autorisée aux deux conditions suivantes : (1) l'appareil ne doit pas
produire de brouillage,
et (2) l'utilisateur de l'appareil doit accepter tout brouillage radioélectrique subi,
même si le brouillage est susceptible d'en
compromettre le fonctionnement
© Copyright 2015
All rights reserved. No part of this publication may be reproduced,
transmitted,
transcribed, stored in a retrieval system or translated
into any language or
computer language, in any form or by any
means, electronic, mechanical, magnetic,
optical, manual or
otherwise, without the prior written permission of the
manufacturer.
For manuals in additional languages, please visit www.waspcam.com