Cobra Electronics MRF77 VHF Marine Radio User Manual MRF57 MANL v C
Cobra Electronics Corporation VHF Marine Radio MRF57 MANL v C
Contents
- 1. User Manual I Part 1
- 2. User Manual I Part 2
- 3. User Manual II Part 1
- 4. User Manual II Part 2
User Manual I Part 1
![Currently, the FCC does not require recreational boaters to have a license. The United States Coast Guard recommends that the boat’s registration number and state of registry (e.g., IL 1234 AB) be used as a call sign and be clearly visible on the vessel.You need a Radio Operator’s Certificate if your vessel is operated in Canadian waters. Radio Operator training and certification is available from the Canadian Power Squadron. Visit their website (http://www.cps-ecp.ca/english/newradiocard.html), contact the nearest field office or write: Industry of Canada, Radio Regulatory Branch, Attn: DOSP, 300 Slater Street, Ottawa, Ontario, Canada K1A 0C8.All users are responsible for observing domestic and foreign government regulations and are subject to severe penalties for violations. The VHF frequencies on your radio are reserved for marine use and require a special license to operate from land, including when your boat is on its trailer.NOTE This device complies with part 15 of the FCC Rules. Operation is subject to the following two (2) conditions: (1) This device may not cause harmful interference, and (2) This device must accept any interference received, including interference that may cause undesired operation.FCC Warnings: Replacement or substitution of transistors, regular diodes, or other parts of a unique nature, with parts other than those recommended by Cobra® may cause a violation of the technical regulations of part 80 of the FCC Rules, or violation of type acceptance requirements of part 2 of the rules.VHF Marine Radio Procedures Whenever your boat is underway, the radio must be turned On and be tuned to Channel 16, except when being used for messages.Try 1 watt first if the station being called is within a few miles. Try a second call after waiting two (2) minutes. If there is no answer, switch to a higher power. This will conserve your battery and minimize interference to other users by avoiding repeated calls.Call a coast station on its assigned channel. You may use Channel 16 when you do not know the assigned channel.Call other vessels on Channel 16 or on Channel 9. (Channel 9 is preferred for recreational vessel use.) You may also call on ship-to-ship channels when you know that the vessel is listening on a ship-to-ship channel.The use of Channel 16 is permitted for making initial contact (hailing) with another vessel. The limits on calling must be followed. Be reminded, Channel 16’s most important function is for Emergency Messages. If, for some reason, Channel 16 is congested, the use of Channel 9, especially in U.S. waters, may be used as the initial contact (hailing) channel for non-emergency communication.You must not call the same station for more than 30 seconds at a time. If you do not get a reply, wait at least two (2) minutes before calling again. After three (3) calling periods, wait at least 15 minutes before calling again.After contacting another station on a calling channel, change immediately to a channel which is available for the type of message you want to send.Identify, in English, your station by your FCC call sign, ship name, the state registration number, or other official number at both the beginning and end of each message.You MUST NOT transmit: Q False distress or emergency messages. Q Messages containing obscene, indecent, or profane words or meaning. Q General calls, signals, or messages (messages not addressed to a particular station) on Channel 16, except in an emergency or if you are testing your radio. Q When you are on land. Voice Calling To Call Another Vessel Or A Shore Installation Such As A Lock Or Bridge Tender: Q Make sure your radio is On. Q Select Channel 16 and listen to make sure it is not being used. NOTE Channel 9 may be used by recreational vessels for general-purpose calling. This frequency should be used whenever possible to relieve congestion on Channel 16. Q When the channel is quiet, press the Talk button and call the ship you wish to call. (Hold the microphone a few inches from your face and speak directly into it in a normal tone of voice — clearly and distinctly.) Say “[name of station being called] THIS IS [your vessel’s name or call sign].” Q Once contact is made on the calling channel, you must switch to a proper working channel. See the channel listing on page 66 through 78.](https://usermanual.wiki/Cobra-Electronics/MRF77.User-Manual-I-Part-1/User-Guide-2526488-Page-6.png)

![Speak slowly — clearly — calmly.1. Make sure your radio is On.2. Select VHF Channel 16.3. Press Talk button and say: “MAYDAY — MAYDAY — MAYDAY.” (Or “PAN — PAN — PAN,” or “SECURITE — SECURITE — SECURITE.”)4. Say: “THIS IS [your vessel name or call sign].”5. Say: “MAYDAY (or “PAN” or “SECURITE”) [your vessel name or call sign].6. Tell where you are: (what navigational aids or landmarks are near).7. State the nature of your distress.8. State the kind of assistance needed.9. Give number of persons aboard and conditions of any injured.10. Estimate present seaworthiness of your vessel.11. Briefly describe your vessel (length, type, color, hull).12. Say: “I WILL BE LISTENING ON CHANNEL 16.”13. End message by saying: “THIS IS [your vessel name or call sign] OVER.”14. Release Talk button and listen. Someone should answer. If not, repeat the call, beginning at item 3 above.Keep the radio nearby. Even after your message has been received, the Coast Guard can find you more quickly if you can transmit a signal for a rescue boat to hone in on.“Mayday — Mayday — Mayday” “This is Corsair — Corsair — Corsair” [or “Illinois 1234 AB” three (3) times] “Mayday Corsair (or Illinois 1234 AB)” “Navy Pier bears 220 degrees magnetic — distance five (5) miles” “Struck submerged object and flooding — need pump and tow” “Four adults, three children aboard — no one injured” “Estimate we will remain afloat one-half (1⁄2) hour” “Corsair (or Illinois 1234 AB) is 26 foot sloop with blue hull and tan deck house” “I will be listening on Channel 16” “This is Corsair (or Illinois 1234 AB)” “Over”It is a good idea to write out a script of the message form and post it where you and others on your vessel can see it when an emergency message needs to be sent.Marine Distress Procedure – DSC Digital Selective Calling (DSC) is a semi-automated system that will allow you to press the Distress button from any routine to make a distress call. When the distress button is pressed, all other channels go to Standby mode and allow the digitally encoded “pre-programmed” message to take precedence. Important information such as your MMSI number, position and name will be transmitted on Channel 16. The distress alarm will sound for two (2) minutes or until the alarm is cleared. The DSC system allows you to choose a “pre-programmed” distress call such as: “Man Overboard, Sinking, Collision.” There are many pre-programmed choices to choose from. If a GPS is connected to your radio, your coordinates will also be sent to the Coast Guard as well as to other vessels that are within range of the transmission. DSC calling also allows the user to initiate and receive distress, urgent, safety, routine, position request, position send and group calls between vessels equipped with DSC capable radios.WARNING This radio will generate a digital maritime distress and safety signal to help facilitate search and rescue. This radio must be used only within communication range of a shore based VHF station with a distress and safety watch system. The range of the signal may vary, however, under normal conditions should be approximately 20 nautical miles.](https://usermanual.wiki/Cobra-Electronics/MRF77.User-Manual-I-Part-1/User-Guide-2526488-Page-9.png)
![Call 773-889-3087 for pricing or visit www.cobra.com.For Credit Card Orders Call 773-889-3087 [Press one from the main menu] 8:00 a.m. to 5:30 p.m. Central Time, Monday through Friday.Make Check or Money Order Payable To Cobra Electronics, Attn: Accessories Dept., 6500 West Cortland Street, Chicago, IL 60707 U.S.A.To Order Online Please visit our website: www.cobra.comOptional Accessories Included In This Package](https://usermanual.wiki/Cobra-Electronics/MRF77.User-Manual-I-Part-1/User-Guide-2526488-Page-10.png)
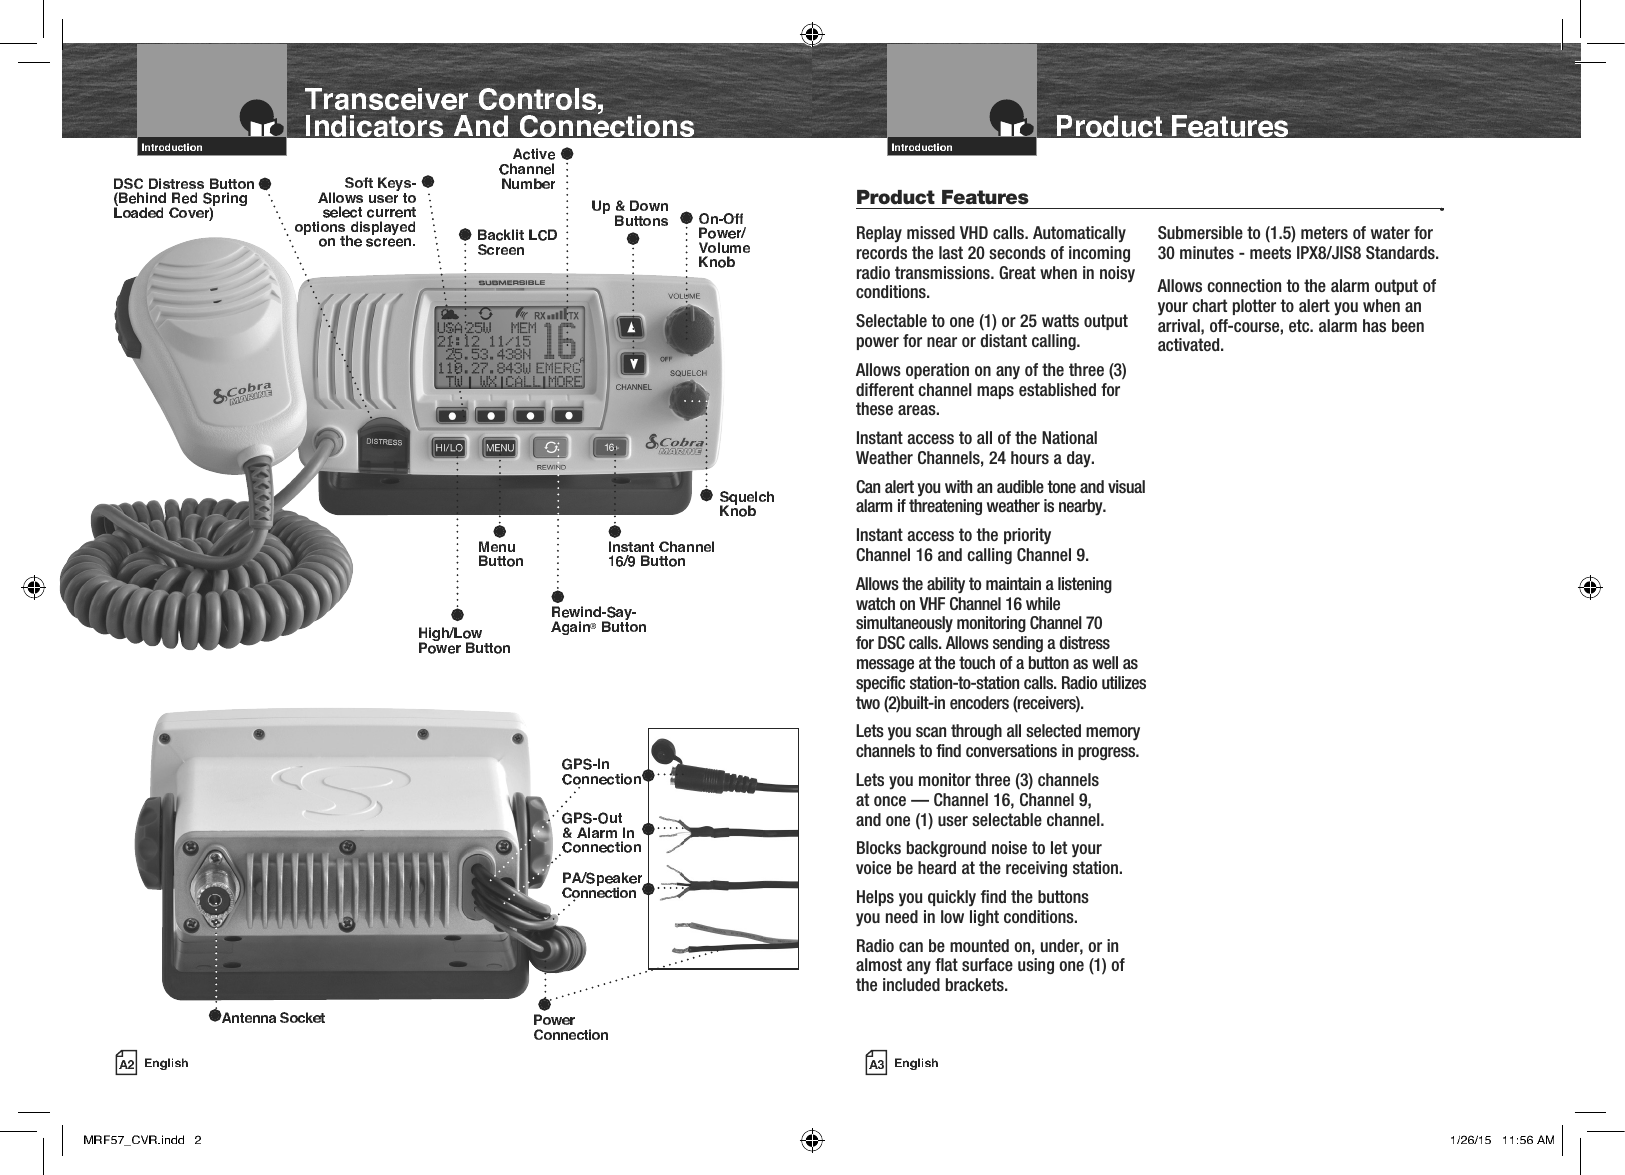
![Getting Started Refer to the foldout on the front cover of this manual to identify the various controls and indicators on your radio. Throughout this manual you will be instructed to press or to press and hold buttons on the transceiver. Press means a momentary press, then release; press and hold means to hold the button.When your CobraMarine VHF radio is On, you can expect to hear the following tones and alarms. The volume of these sounds is controlled by the circuitry in the radio and is not affected by the volume set with the On-Off Power/Volume knob.Confirmation ToneSingle high-pitched beep confirms all button presses except the Talk button. It can be turned On or Off. See set-up routines on page 30.Error Tone Three low-pitched beep indicates an invalid button press.DSC Distress Alarm High—low—high—low—high. Pause, then repeat. The volume of all alarms will increase after 10 seconds. Press any button to turn it Off.NOTE This alarm sounds only for DSC distress calls on Channel 70. It does not sound for voice calls on Channel 16 — you still must listen for those.Distress Acknowledgement AlarmHigh—low—high—low—high. Pause, then repeat. The volume of all alarms will increase after 10 seconds. Press any button to turn it Off.DSC Routine Call AlarmHigh—pause—high—pause—high. Long pause, then repeat. Press any button to turn it Off.DSC Geographical Alarm Loud, continuous, medium-pitched, high-low tones (warble) — sounds when a geographical call is received. Press any button to turn it Off.DSC Position Request AlarmMedium-loud, continuous, low-pitched series of closely spaced, four (4) beeps [three (3) short – one (1) long] groups — sounds when a position request call is received. Press any button to turn it Off.DSC Individual AlarmHigh—pause—high—pause—high. Long pause, then repeat. Press any button to turn it Off.Weather AlarmMedium-loud, continuous, medium-pitched series of one-half (1⁄2) second beeps spaced one-half (1⁄2) second apart — sounds when weather alert is turned On and NOAA sends a 1050 Hz weather alert tone on the selected weather channel. Press any button to turn it Off. Transceiver power can be turned On or Off by the On-Off Power/Volume knob on the transceiver. To Turn Your Radio On Or Off: 1. Rotate the Off Power/Volume knob clockwise to turn on the transceiver. To turn off the transceiver, rotate the Off Power/Volume counter clockwise until a “click” is heard. When the radio is powered On, the confirmation tone will sound. The radio will return to the settings in effect when it was last powered Off, the LCD will show the corresponding information, and all controls will be operative. The radio will then be in Standby mode. The On-Off Power/Volume knob on the transceiver controls the speaker volume. The volume adjustment applies only to what you hear from the speaker and does not affect the volume of your outgoing messages. That is controlled by the circuitry of your radio. The volume bar graph will be shown to indicate the volume setting. 2 seconds after finishing the volume adjustment, the radio will return to the Standby mode. To Increase The Volume: • Turn the On-Off Power/Volume knob clockwise. To Decrease The Volume: • Turn the On-Off Power/Volume knob counter-clockwise. Squelch control filters weak signals and radio frequency noise so that you can more clearly hear the signals you want. You can think of it as a variable barrier that blocks what you don’t want to hear.](https://usermanual.wiki/Cobra-Electronics/MRF77.User-Manual-I-Part-1/User-Guide-2526488-Page-15.png)
![To Squelch Your Radio: 1. With the Squelch knob turned fully counter-clockwise, turn the On-Off/Volume knob clockwise until you hear a hissing (noise) sound. 2. Turn the Squelch knob clockwise until the hissing sound stops. Turning the Squelch knob further clockwise (higher barrier) will filter weak and medium strength signals until only the strongest signal can get through at the highest squelch setting. The Squelch bar graph will be shown to indicate the Squelch setting. 2 seconds after finishing the Squelch adjustment, the radio will return to the Standby mode. To Receive Weaker Signals: 1. Turn the Squelch knob counterclockwise (lower barrier). If the squelch is set so that you can hear a continuous hissing sound, the memory scan and tri-watch functions will be blocked. Standby mode is the usual mode for the radio whenever it is turned On. From Standby Mode, You Can: Q Change your radio’s settings using set-up routines. Q Receive messages on the current channel as well as DSC messages. Q Listen and Receive NOAA alerts if Weather Alert mode is turned On. Q Switch to Transmit mode using the Talk button. While the radio is in Standby mode, the Receive mode is entered whenever a strong enough signal to break squelch is sent to the radio. You will hear the message through whichever speakers are connected to the radio. To Change The Channel You Are Listening To, You Can Choose One Of The Following: a. Press the Up/Down buttons. This will take you to the next higher or lower VHF channel. For rapid advance, press and hold the Up or Down button. b. Press the Channel 16/9 button. This will take you to Channel 16 with one (1) press and to Channel 9 with a second press. Additional presses will toggle between Channels 16 and 9 and the current user selected channel. c. To listen to the Weather Radio press the WX (Weather) soft key. This will activate the weather radio mode. When in the Weather mode, the Up/Down buttons will change the weather channel. d. Press and release the Back softkey to return the radio to Standby Mode. HI/LO Transmit Setting Your radio can Transmit selectively at one (1) or 25 watts of power. Cobra® suggests you maintain the low power setting for short-range communications and to avoid overpowering nearby stations with your signal. Use the high power setting for long-range communications or when you do not receive a response to a signal sent at one (1) watt. To Toggle Between The High And Low Power Modes: 1. Press the High/Low Power button. The LCD will show which mode is in effect. Some channels are restricted to use at a maximum of one (1) watt. Your radio will automatically set the power to Low Power mode when you select those channels. While using the U.S.A. channel map, if, in an emergency, you need to increase the output power on Channel 13 and Channel 67 for your signal to be heard, you can override the Low Power mode by pressing and holding the High/ Low Power button. 1. Check to see that your unit is set to a proper channel for the type of message you plan to send. 2. Toggle to the low power setting. 3. With the microphone about two (2) inches [five (5) cm] from your mouth, press and hold the Talk button and speak into the microphone. Transmit will be indicated on the LCD. 4. Release the Talk button when you are finished speaking. Your unit can only operate in either the Transmit or the Receive mode at any given time. You will not hear the response to your message unless the Talk button is released. NOTE If the Talk button is held down for five (5) minutes, the radio will automatically cease transmitting to prevent unwanted signal generation. As soon as the Talk button is released, it can be pressed again to resume transmission.](https://usermanual.wiki/Cobra-Electronics/MRF77.User-Manual-I-Part-1/User-Guide-2526488-Page-16.png)