Cobra Electronics MRF80 MARINE RADIO User Manual
Cobra Electronics Corporation MARINE RADIO
Contents
- 1. USERS MANUAL 1
- 2. USERS MANUAL 2
- 3. USERS MANUAL 3
USERS MANUAL 2
Nothing Comes Close to a Cobra®39
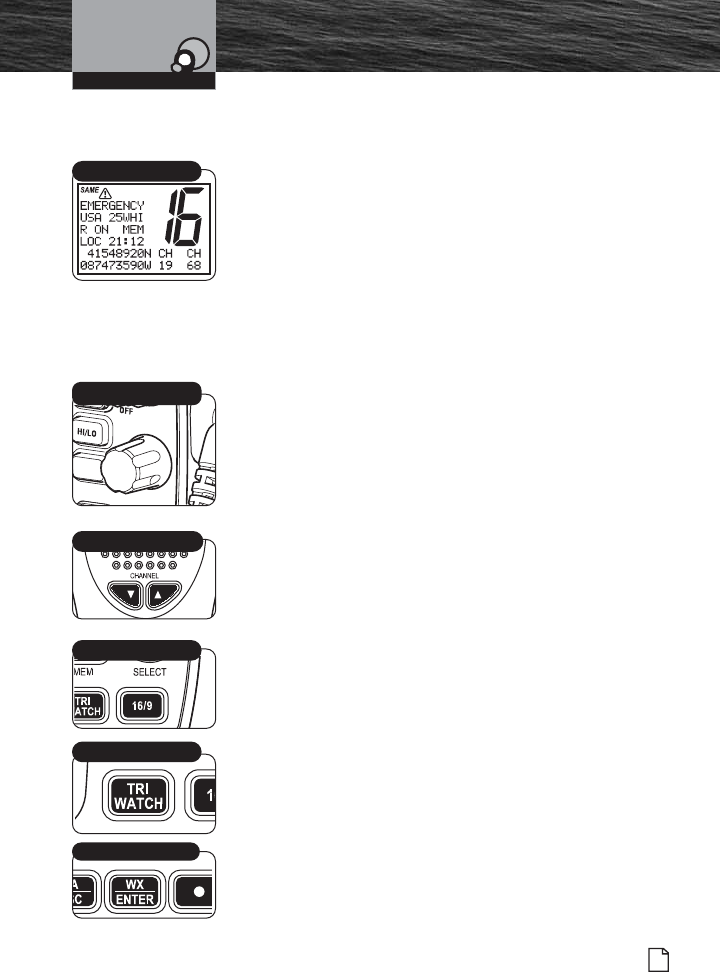
Standby and Receive
Standby mode is the usual mode for the radio whenever it is
turned On.
From Standby Mode, You Can:
Change your radio’s settings using set-up routines.
Receive messages on the current channel as well as DSC
messages.
Receive NOAA alerts if Weather Alert mode is turned On.
Switch to Transmit mode using the Talk button.
While the radio is in Standby mode, the Receive mode is
entered whenever a strong enough signal to break squelch
is sent to the radio. You will hear the message through
whichever speakers are connected to the radio.
To Change the Channel You Are Listening to, You Can
Choose One of the Following:
1. Turn the Channel Select knob clockwise for higher VHF
channel. Turn the Channel Select knob counterclockwise
for lower VHF channel.
2. Press Channel Up/Down buttons on microphone to go to
the next higher or lower VHF channel. For rapid advance,
press and hold the Channel Up/Down button.
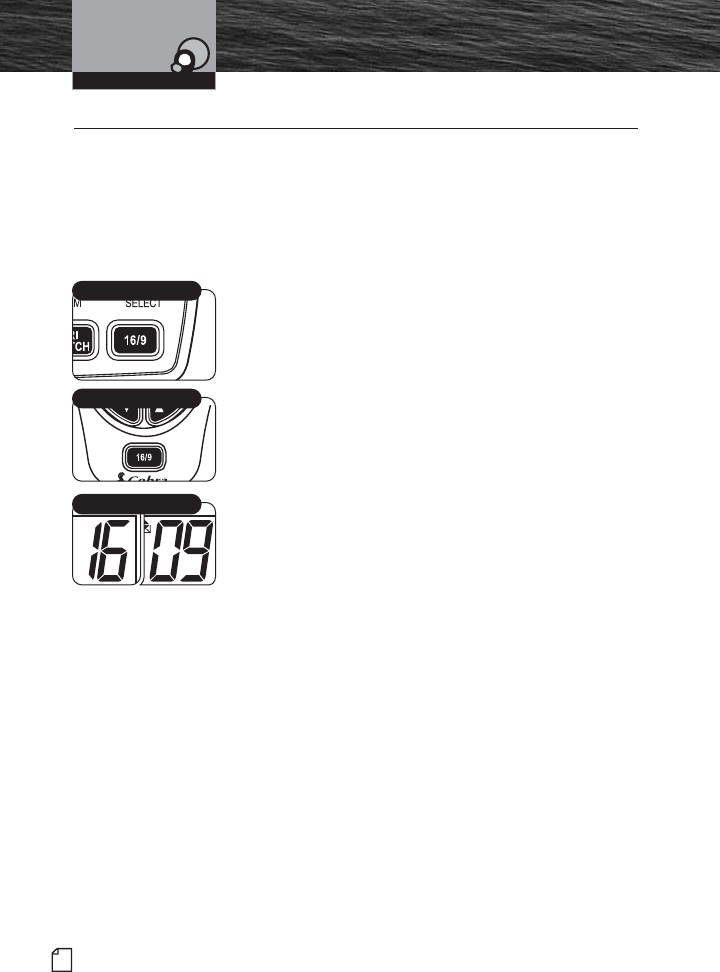
3. Press the Channel 16/9 button. This will take you to
Channel 16 with one (1) press and to Channel 9 with a
second press. Additional presses will toggle between
Channels 16, 9 and original channel.
4. Press the Weather/Enter button. This will allow you
access to the weather channels. Turning the Channel
Select knob or pressing the Channel button on the
microphone allows you to change weather channels.
5. Press the Tri-Watch button to monitor three (3) Channels
16, 9 and one user selectable channel.
6. Select a Favorite Channel by pressing the Function
button on the microphone. This allows you to go to a
pre-selected favorite channel at the touch of a button.
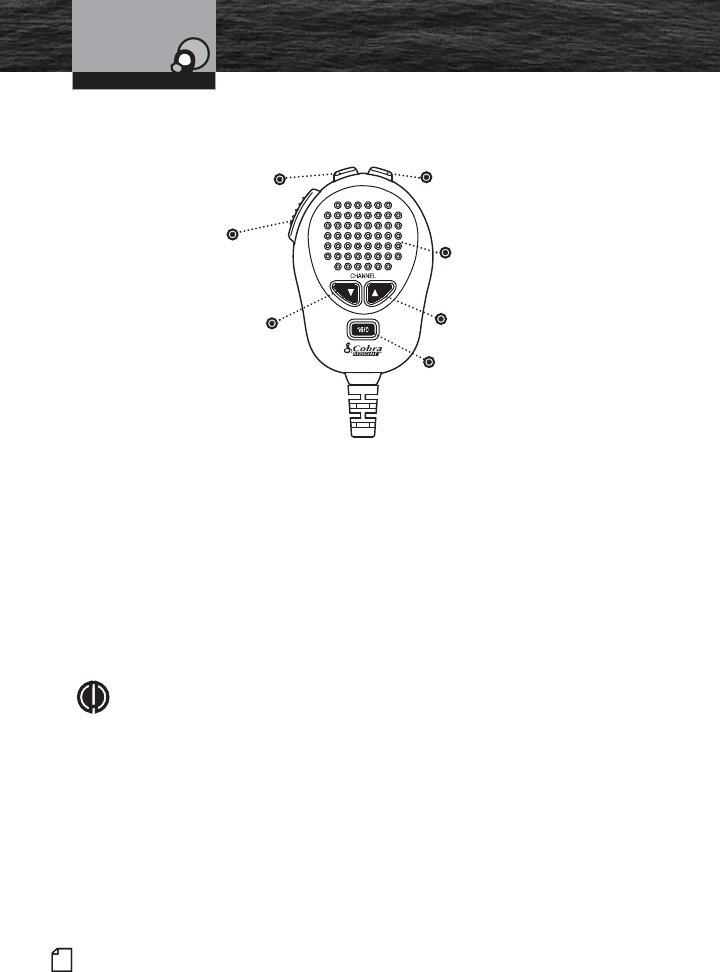
WX/Enter Button
Standby Mode
Getting Started
Operating Your Radio
Channel 16/9 Button
Mic Channel Buttons
SELECT
MEM
Channel Select Knob
Tri-Watch Button
F80 Installation.qxp:QXP-1058720374.qxp 11/3/06 4:19 PM Page 39
40 English
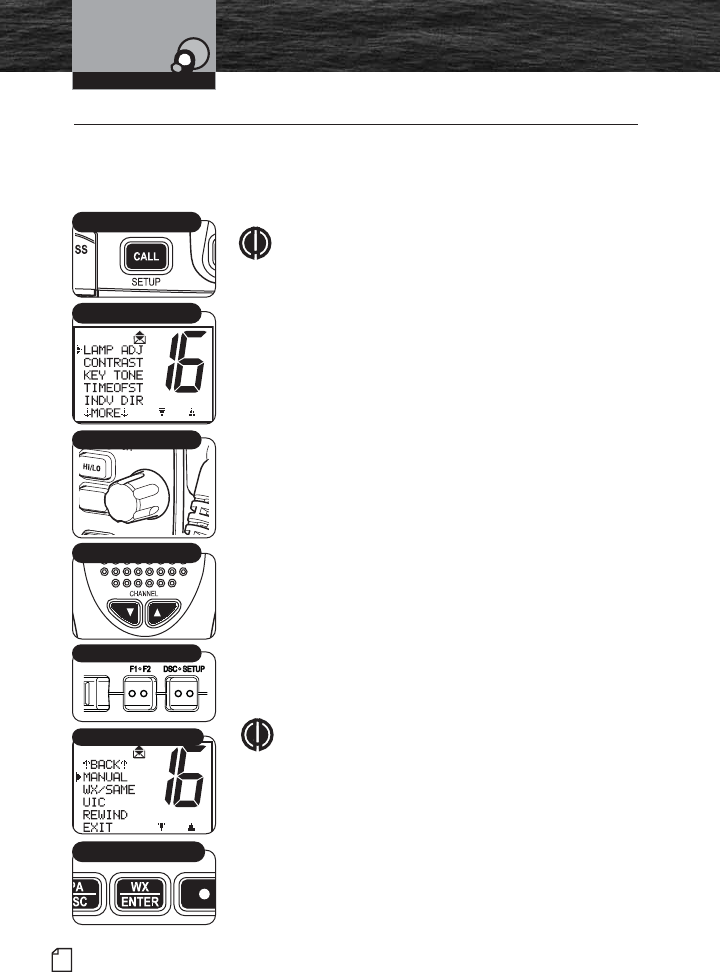
Set-Up Mode Programming
Set-Up Mode Programming •
Setup Menu
Use the Setup menu in the CobraMarine VHF radio to turn On
and Off many features, to adjust feature preferences and enter
a user MMSI number.
NOTE
Basic Setup menu programming is described in this
section. For Setup menu programming that applies to
a specific function refer to that section in this manual.
For example, MMSI information is in the DSC portion
of the manual.
Basic Scrolling in the Setup Menus:
The Channel Select knob on the radio can be used to scroll
through different menus and confirm selections chosen by the
user. Alternately, scrolling selection functions can be made
from the microphone by using the Channel Up/Down or
Function (F1/F2) button.
To Enter the Setup Menu:
Press and hold the Call/Setup button. The Setup menu
appears on the LCD. Scroll up or down through the Setup
menu until the desired function to program is positioned to
the right of the selection arrow.
To Exit any Setup Menu:
Scroll down to “EXIT” at the bottom of the menu. With the
arrow pointing toward “EXIT,” press the Enter button to return
the radio to the Standby mode.
NOTE
The ESC button on the radio (and the F1:F2 button on
the microphone) can also be used universally to
return to the Standby mode.
Operating Your Radio
Call/Setup Button
Mic Function Buttons
Mic Channel Buttons
Exit
Enter Button
Setup Menu
SELECT
MEM
Channel Knob
8187-F80-Operation-8_MMB:F75-Operation-8 11/3/06 4:05 PM Page 40
Nothing Comes Close to a Cobra®
Set-Up Mode Programming
41
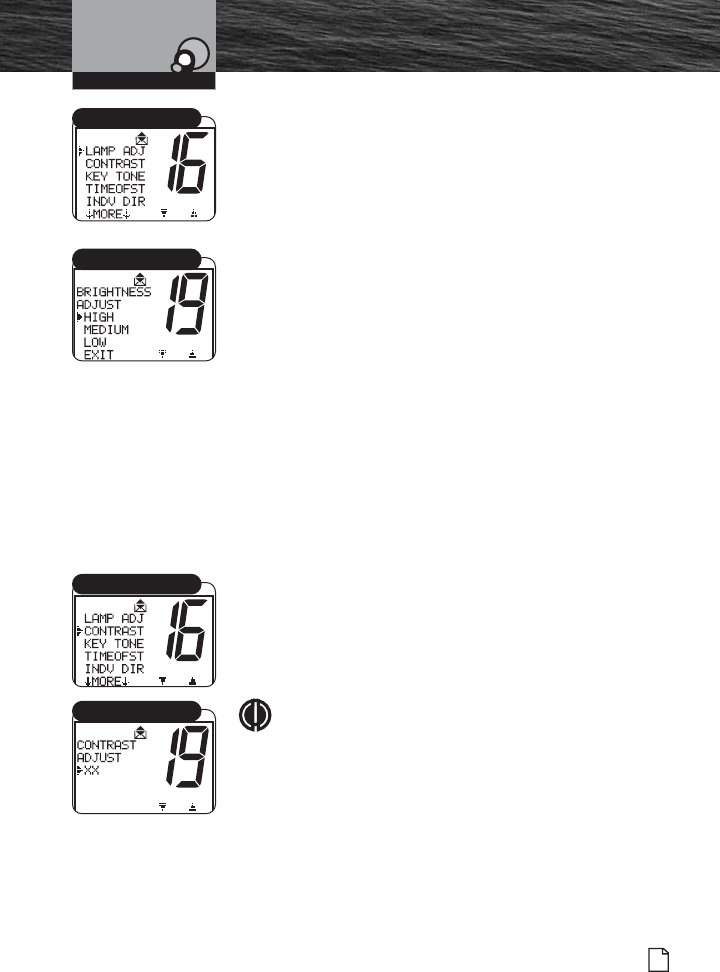
LCD Display Lamp Adjust
The LCD display has a backlight lamp to make it visible in
the dark. The lamp can be adjusted for brightness or turned
off. Make all lamp adjustments in the LAMP ADJ menu.
The lamp will operate at the HIGH level until adjusted to
HIGH, MEDIUM, LOW or OFF.
To Adjust the LCD Display Lamp Level:
1. Enter the Setup menu and scroll to the LAMP ADJ menu.
2. Press the Enter button and observe the current backlight
lamp setting — HIGH, MEDIUM, LOW or EXIT.
3. Move the selection arrow to the required setting.
4. Press the Enter button to select the backlight lamp
setting.
5. When the changes are complete, exit the LAMP ADJ
menu and return to the Setup menu.
When the backlight is turned On, the lamp remains lit
anytime the radio is On.
LCD Contrast
Adjust the LCD display contrast for easy reading in different
lighting. Make all contrast adjustments in the CONTRAST menu.
To Change the Contrast:
1. Enter the Setup menu and scroll to the CONTRAST menu.
2. Press the Enter button and observe the current contrast
setting — a number between 1 and 16.
3. Turn the Channel knob to increase or decrease the
contrast setting.
NOTE
Contrast is lighter at lower number settings and
darker at higher number settings.
4. Press the Enter button to select the contrast setting.
5. When the changes are complete, exit the CONTRAST
menu and return to the Setup menu.
Operating Your Radio
Lamp Adjustment
High/Medium/Low/Exit
Contrast
Contrast Setting
8187-F80-Operation-8_MMB:F75-Operation-8 11/3/06 4:05 PM Page 41
42 English
Set-Up Mode Programming
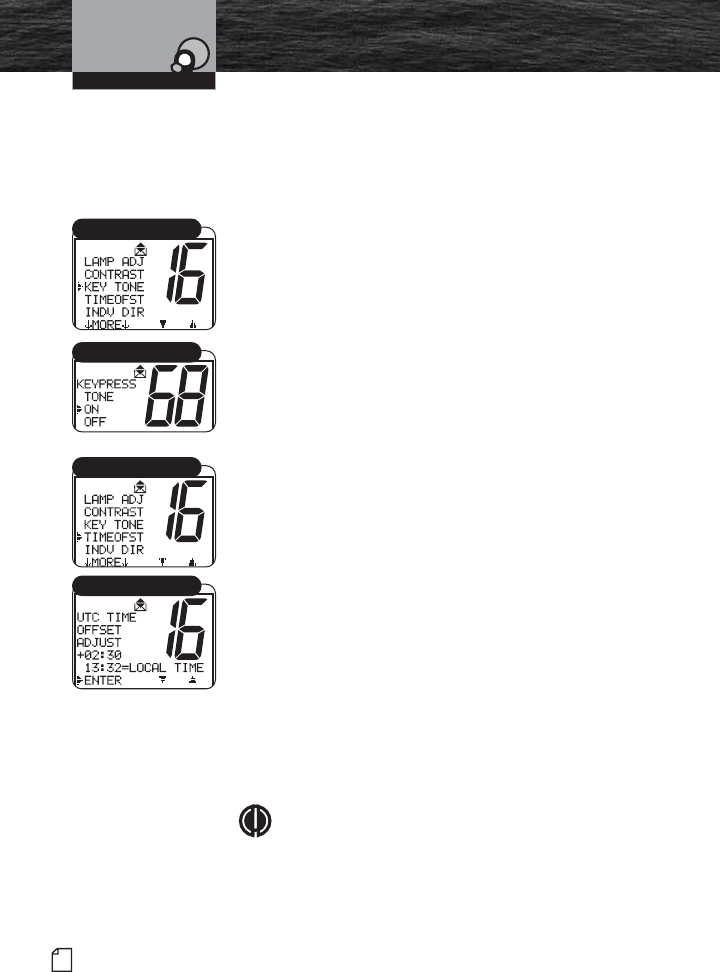
Key Tone
The confirmation key tone sounds when the CobraMarine
VHF radio is turned On and confirms all button presses
except for the Talk button. The confirmation key tone is
easily turned On or Off. Make all confirmation key tone
adjustments in the KEY TONE menu.
To Turn the Confirmation Key Tone On or Off:
1. Enter the Setup menu and scroll to the KEY TONE menu.
2. Press the Enter button and observe the current
confirmation key tone setting — On or Off.
3. Move the selection arrow to turn the key tone On or Off.
4. Press the Enter button to select the key tone setting.
5. When the changes are complete, exit the KEY TONE menu
and return to the Setup menu.
Time Offset
All VHF, DSC, and GPS activities use a 24-hour clock and
Coordinated Universal Time (UTC) formerly known as
Greenwich Mean Time (GMT). Time Offset uses a connected
GPS to gather time inputs. To convert time inputs to local
time, enter the hour offset of the local time zone from the
Time Zone Chart on page 25.
To Change the Time Offset:
1. Enter the Setup menu and scroll to TIMEOFST menu.
2. Press the Enter button and observe the current time
offset setting.
3. Move the selection arrow to the setting for your local
time zone.
4. Press the Enter button to select the local time zone
setting.
5. When the changes are complete, exit the TIMEOFST
menu and return to the Setup menu.
NOTE
When the time offset is at zero (0), the LCD shows the
time as UTC. When a time zone hour offset is entered,
the LCD shows the local time. All DSC messages are
based on UTC.
The radio will also show the local time as the
adjustment is being made.
Operating Your Radio
Key Tone
On/Off
Set Time
Time Offset
8187-F80-Operation-8_MMB:F75-Operation-8 11/3/06 4:05 PM Page 42

Nothing Comes Close to a Cobra®
Set-Up Mode Programming
43
U.S.A./International/Canada (UIC) Channel Maps
There are three (3) sets of VHF Channel Maps for marine
use in the U.S.A., Canada and the rest of the world
(International). Most of the channels are the same for all
three (3) maps, but there are differences (see tables on
pages 16-23). The radio is built with all three (3) channel
maps included and operates correctly in any selected area.
To Set the Radio for the Area Used:
1. Enter the Setup menu and scroll to the UIC menu.
2. Press the Enter button and observe the current channel
map setting.
3. Move the selection arrow to select the desired channel.
4. Press the Enter button to select the channel map setting.
5. When the changes are complete, exit the UIC menu and
return to the Setup menu.
Operating Your Radio
UIC Channel Map
UIC Select
8187-F80-Operation-8_MMB:F75-Operation-8 11/3/06 4:05 PM Page 43
44 English
Special Features
Special Features •
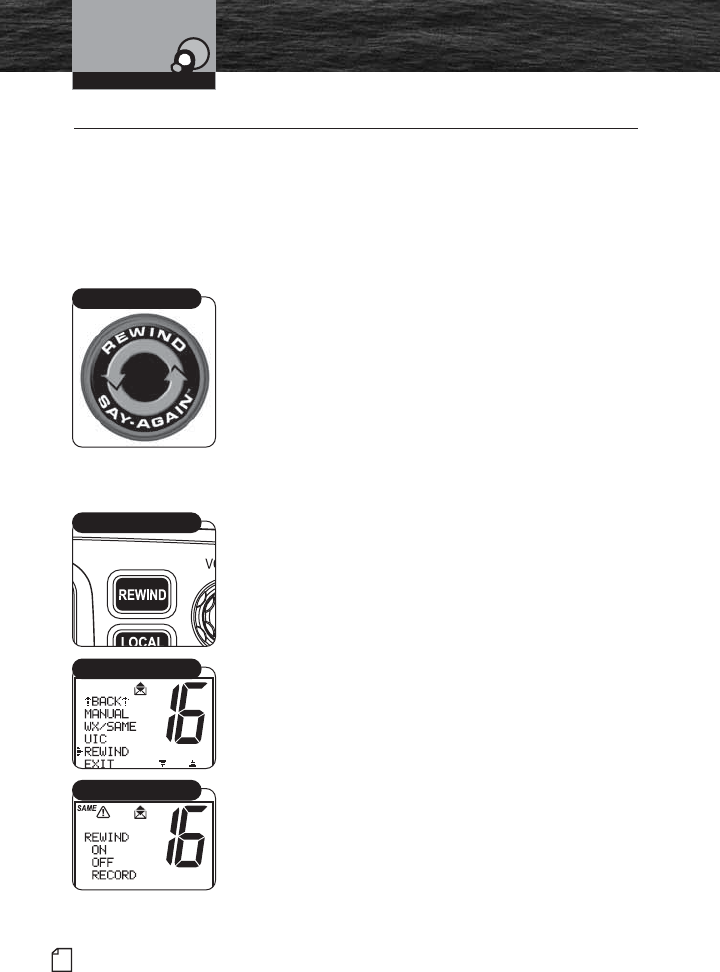
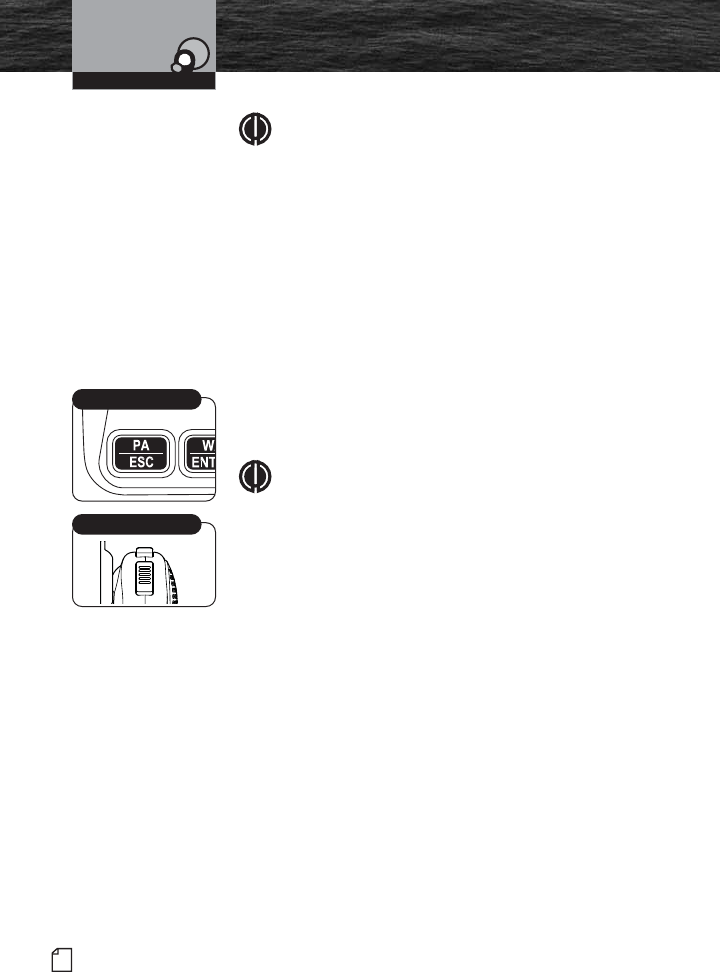
Rewind-Say-Again™ Feature
The MR F80 radio has a Cobra exclusive playback feature,
Rewind-Say-Again™. This feature allows you to replay the
last 20 seconds of an incoming audio transmission. It also
allows you to record call details including position
coordinates, call signs, registration numbers and store details
that will help authorities locate a distressed vessel.
Example 1:
When engine noise, music or conversation creates too much
noise to hear an inbound message clearly, press the Rewind
Say-Again™ button to hear the message a second time. This
feature eliminates asking the sender to repeat the message.
Example 2:
When listening to an urgent distress of an excited caller with
confusing background noise, press the Rewind-Say-Again™
button to hear the message a second time and get lifesaving
information.
Operation of Rewind-Say-Again™
1. Press the Rewind button after the last inbound audio
transmission.
2. The radio automatically replays the last 20 seconds of the
previous audio transmission.
3. Respond to the caller normally, after the message is
replayed.
Setup and Advanced Operation of Rewind-Say-Again™
Change the Record Setting
1. Enter the Setup menu and scroll to the REWIND menu.
You can also enter the REWIND mode by pressing and
holding the REWIND button.
2. Press the Enter button and observe the current rewind
setting — ON or OFF.
3. Select your choice: ON or OFF and press Enter. Choose
ON if you want the F80 to record received transmissions.
Choose OFF if you want to turn off the recording feature.
Operating Your Radio
Rewind-Say-Again™
Rewind Button
Rewind Menu
Rewind On/Off/Record
8187-F80-Operation-8_MMB:F75-Operation-8 11/3/06 4:06 PM Page 44
Introduction
Nothing Comes Close to a Cobra®
Product Features
45
Special Features
Operating Your Radio
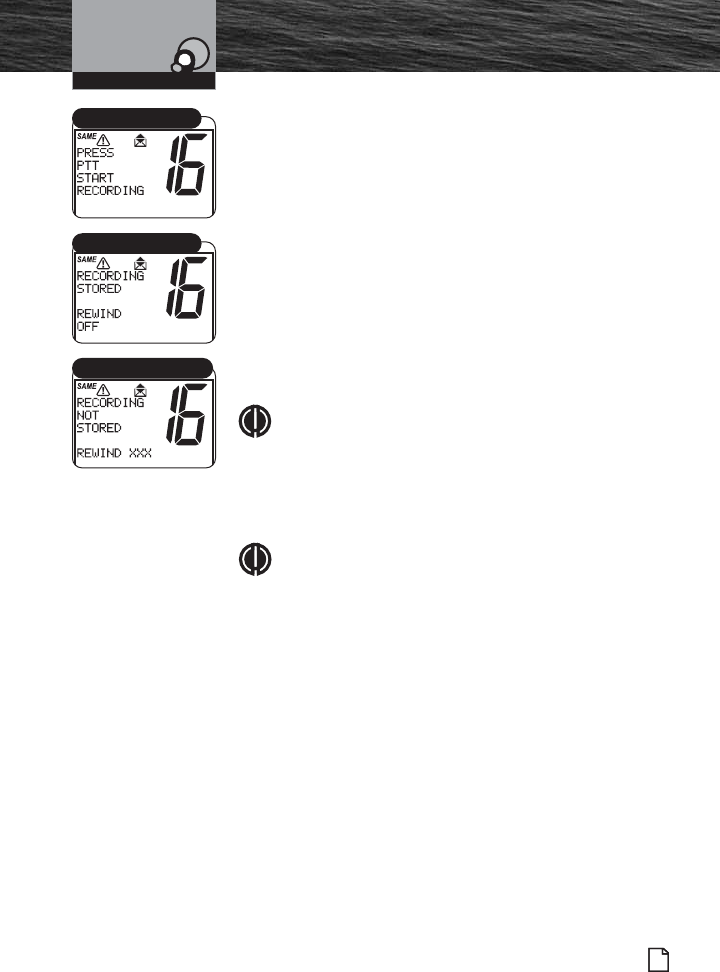
Make Your Own Recording
The recording feature may also be used to store other
important information like fuel consumption, water
conditions, fishing notes (such as thermal cline depths, type
of bait, etc.) and other “On Water” observations.
1. Follow the steps above to get into REWIND mode setup.
2. Select the RECORD function. Press ENTER to start the
recording mode.
3. Press the Push to Talk (PTT) button on the microphone
to begin your recording. A 20-second countdown
displays showing how much time remains for recording.
At the end of 20 seconds, a beep sounds indicating that
the recording time is completed.
NOTE
If the recorded message was less than two seconds
long, the display will then show the message
“RECORDING NOT STORED.”
5. Playback recorded message or select OFF to exit this mode
and keep the recording in memory.
NOTE
The REWIND feature can also be used to permanently
store an incoming message. This could be useful if
you are not able to copy information while underway
such as coordinates, directions and other
complicated information. Once the incoming
transmission (up to 20 seconds) is complete, Follow
the instructions to turn the REWIND feature off. The
last incoming transmission will be recorded to the
unit’s memory.
PTT Menu
Recording Stored Menu
Recording Not Stored Menu
8187-F80-Operation-8_MMB:F75-Operation-8 11/3/06 4:06 PM Page 45
46 English
Voice Transmission
Voice Transmission •
Use the Transmit (TX) mode to communicate with safety
services, other vessels and shore stations. When using this
capability, follow appropriate procedures and observe the
expected courtesies.
Before pressing the Talk button to transmit a message, select
the appropriate channel and transmit power output.
Channels
Voice messages may be transmitted on most VHF channels.
Refer to the VHF marine channel assignments on pages 14-23
to select a channel based on the type of message being
transmitted.
Choose One of the Following Options to Change the
Channel:
■Turn the Channel knob or press the microphone Channel
Up/Down buttons. This moves the channel to the next
higher or lower VHF channel. (When on Channel 88A, the
next higher channel is Channel 1 and vice versa.) For
rapid advance, press and hold the microphone Channel
Up/Down buttons. (The confirmation key tone sounds for
each button press, but not during rapid advance.)
■Press the Channel 16/9 button on the radio or the
microphone. This selects Channel 16 with one press and
Channel 9 with a second press. Additional presses will
toggle between Channel 16 and Channel 9. Press and
hold the Channel 16/9 button to return to Standby mode.
NOTE
The radio will automatically select high power on
channel 16 if you use the 16/9 button to select this
channel. Select 16 manually or save it as a preset if
you would like to routinely use channel 16 on low
power mode.
Operating Your Radio
SELECT
MEM
Channel Knob
Channel 16/9 Button
Microphone
Up/Down Buttons
Microphone 16/9 Button
8187-F80-Operation-8_MMB:F75-Operation-8 11/3/06 4:06 PM Page 46
Introduction
Nothing Comes Close to a Cobra®
Product Features
47
Voice Transmission
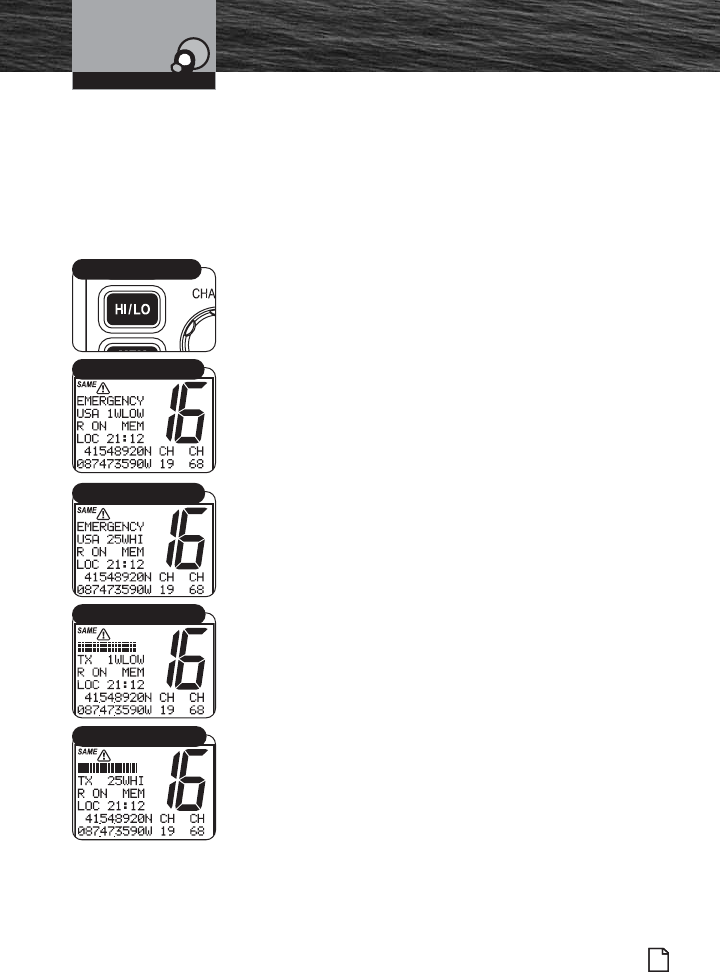
Transmit Power Output
The radio transmits selectively at 1 or 25 watts of power.
Cobra suggests maintaining the low power setting for short-
range communications to avoid overpowering nearby stations
with the signal. Use the high power setting for long-range
communications or when no response is received from a
signal sent at 1 watt.
To Toggle Between the High and Low Power Modes:
Press the HI/LO Power button.
The LCD displays which mode is selected.
Some channels are restricted to be used at a maximum of 1
watt. The radio automatically sets the power to Low Power
mode when a restricted channel is selected.
While using the U.S.A. channel map, if, in an emergency, it is
necessary to increase the output power on Channel 13 and
Channel 67 for the signal to be heard, override the Low
Power mode by pressing and holding the HI/LO Power
button.
Transmit a Message
To Transmit a Message:
1. Check to see that the radio is set to a proper channel for
the type of message being sent.
2. Toggle to the low power setting by pressing the HI/LO
Power button.
3. With the microphone about 2 in. (50 mm) from your
mouth, press and hold the Talk button and speak into the
microphone. TX (Transmit) displays on the LCD display.
4. Release the Talk button when finished speaking. To hear a
response, the Talk button must be released.
Operating Your Radio
HI/LO Power Button
Standby High Power Mode
Standby Low Power Mode
Transmit High Power Mode
Transmit Low Power Mode
8187-F80-Operation-8_MMB:F75-Operation-8 11/3/06 4:06 PM Page 47
48 English
Voice Transmission
NOTE
If the Talk button is held down for five (5) minutes,
the radio automatically ceases transmitting to prevent
unwanted signal generation and a three (3)-beep
error tone sounds. As soon as the Talk button is
released, it can be pressed again to resume
transmission.
Public Address
Use the Public Address (PA) mode of voice transmission to
communicate to other nearby vessels or people. This feature
requires a mounted and connected optional PA speaker.
To Broadcast on the PA Speaker:
1. Press the PA/ESC button on the front of the transceiver.
2. Press the Talk button on the microphone and speak into
the microphone.
NOTE
While in the PA mode:
■ When the Talk button is pressed; the output is
directed to the PA speaker and not transmitted as a
radio signal through the antenna.
■ Received radio messages are directed to the PA
speaker unless the Talk button is pressed.
3. To turn off PA, press PA/ESC button on the front of the
radio again or press the F1:F2 button on the microphone
to ESC.
Operating Your Radio
Talk Button
PA/ESC Button
8187-F80-Operation-8_MMB:F75-Operation-8 11/3/06 4:06 PM Page 48
Introduction
Nothing Comes Close to a Cobra®
NOAA All Hazards/Weather
Radio and Alert, w/SAME
49
NOAA All Hazards/Weather Radio and Alert, w/SAME •
NOAA broadcasts weather information as described in the
NOAA Weather Channels section on page 25 of this manual.
Listen to one of these receive-only channels at any time. The
transceiver also incorporates “Specific Area Message
Encoding (SAME)” and “Emergency Alert System Codes” sent
by NOAA. These codes provide the type of alert, and are listed
on page 52.
NOTE
Usually only one (1) or two (2) of the weather
channels operate in a location. Select the channel
with the strongest signal in your location. The radio
scans this channel for the weather alert signal.
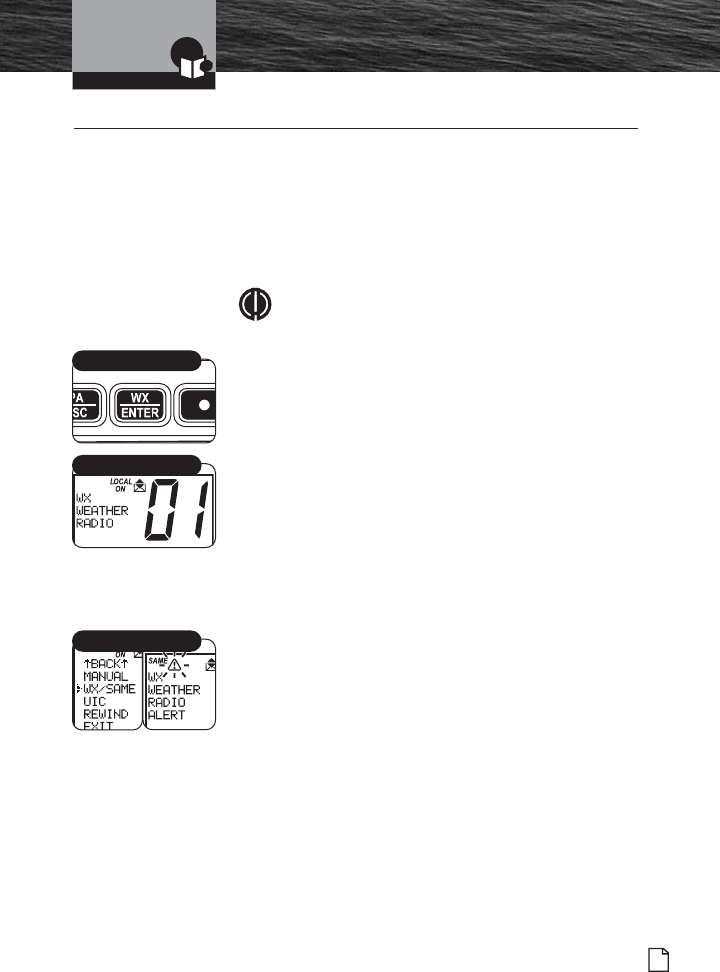
To Listen to the Weather Channels:
1. From Standby mode, press the WX/ENTER button. The
unit enters the Weather mode and displays on the LCD.
2. Turn the Channel knob or press the Channel Up/Down
buttons on the microphone to change the weather
channels.
3. To exit the Weather mode and return to Standby mode,
press the WX/ENTER button again.
Weather Alert Set-Up
The Weather Alert mode must be turned On to receive the
Weather Alert condition signal described in the NOAA weather
channels section on page 25.
To Turn Weather Alert On:
1. Enter the Setup menu and scroll to WX/SAME (weather
alert) menu.
2. Press the Enter button and observe the current weather
alert setting — ON, OFF or EXIT.
3. Move the selection arrow to select the desired weather
alert setting.
4. Press the Enter button to select the weather alert setting.
5. When the changes are complete, exit the WX/SAME menu
and return to the Setup menu.
WX/Enter Button
Weather Mode
WX/SAME Menus
8187-F80-Operation-8_MMB:F75-Operation-8 11/3/06 4:06 PM Page 49
50 English
Product Features
Introduction
NOAA All Hazards/Weather
Radio and Alert, w/SAME
NOTE
The symbol will appear on the top of the display
when the weather alert is turned On.
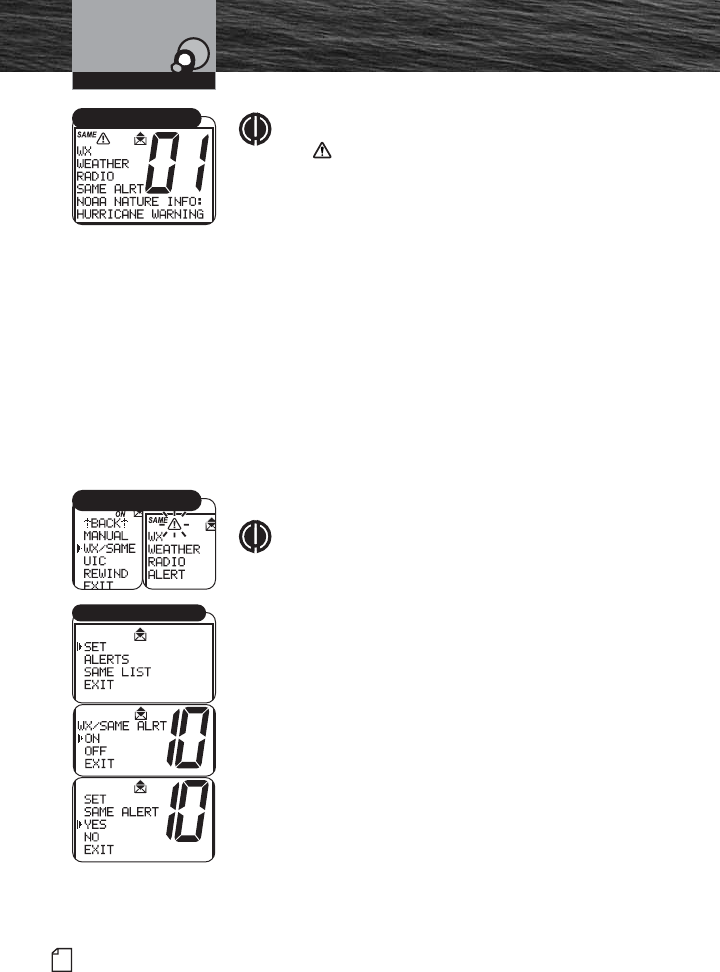
Specific Area Message Encoding (SAME)
The SAME weather alert allows listeners and EAS
(Emergency Alert System) participants to filter the National
Weather Radio (NWR) broadcast of warnings and
emergency alerts to receive only messages and information
for your selected local geographic area.
The Weather Alert must be turned On for the SAME alert
code to be set. The SAME alert requires that a specific six
(6) digit code be programmed into this radio. To program
this SAME receiver with the proper county(s) and marine
areas(s) of choice, you need to know the 6 digit SAME code
number(s) for the county(s). This setting allows up to 10
available channels that may be set up in any combination. Of
the 10 channels, any of the codes may be turned On or Off
for specific weather area information to be listed.
NOTE
You can obtain online information at
http://www.nws.noaa.gov/nwr/same.htm#program or
by telephone at 1-888-NWR-SAME (1-888-697-7263)
to program the SAME alert into this radio.
General SAME Information:
County codes:
http://www.nws.noaa.gov/nwr/index.htm
Marine coverage:
http://www.nws.noaa.gov/om/marine/marsame.htm
To Set the SAME Weather Alert:
1. Enter the Setup menu and scroll to the WX/SAME
(weather alert) menu.
2. Press the Enter button and observe the current weather
alert setting — ON, OFF or EXIT.
3. Move the selection arrow to select the SAME ALRT
setting. Scroll to SAME LIST.
Operating Your Radio
SAME Alert
WX/SAME Menus
SAME Codes and Edit List
8187-F80-Operation-8_MMB:F75-Operation-8 11/3/06 4:06 PM Page 50
Introduction
Nothing Comes Close to a Cobra®
Product Features
51
NOAA All Hazards/Weather
Radio and Alert, w/SAME
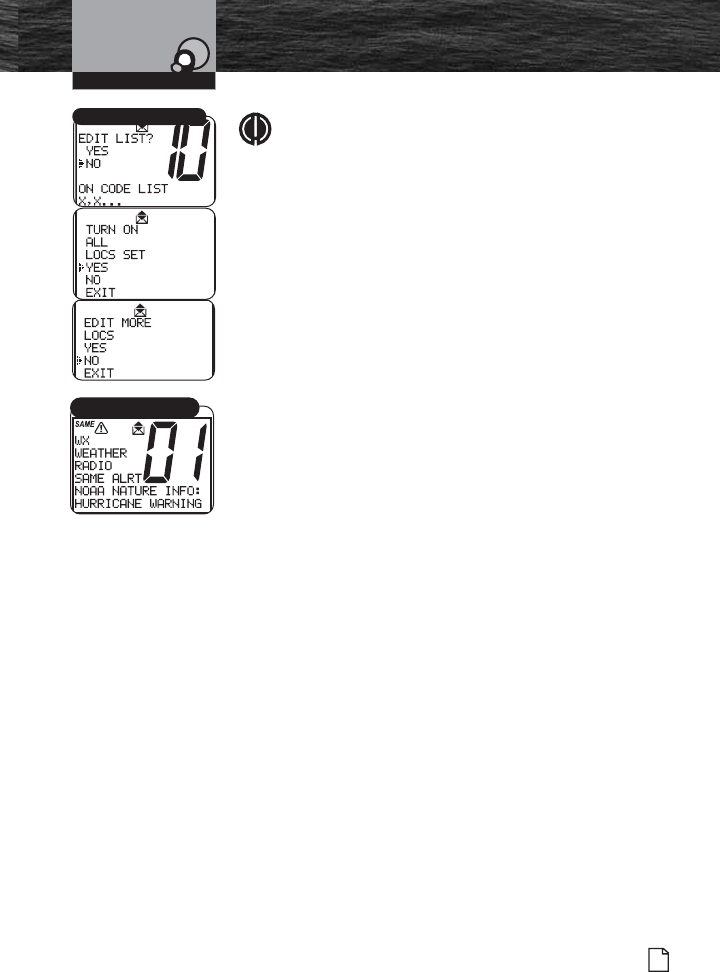
NOTE
The Weather alert channels may be turned Off, while
the SAME area code alerts are On or any combination
of On or Off.
4. Turn the Channel knob or press the Function (F1, F2)
buttons on the microphone to select the SAME alert
channel you wish to program.
5. Turn the Channel knob or press the Channel Up/Down
buttons on the microphone to enter the six (6) digit
SAME code number you want to enter.
6. Scroll to ON, OFF or EXIT. Use the Function (F1, F2)
buttons on the microphone to select ON, OFF or EXIT.
7. Press the Enter button to select the channel setting.
8. Move the selection arrow to select another SAME alert
channel to program, if desired. Ten total channels can be
programmed.
9. When the changes are complete, exit the WX/SAME menu
and return to the Setup menu.
Operating Your Radio
SAME Codes and Edit List
SAME Event Code Alert
8187-F80-Operation-8_MMB:F75-Operation-8 11/3/06 4:07 PM Page 51
52 English
Product Features
Introduction Advanced Operation
Advanced Operation •
There are several features in the CobraMarine MR F80 VHF
radio that provide quick access to the voice calling channels
and allow monitoring more than one (1) channel at a time.
Channel 16/9
This function provides quick access to calling Channel 16 or
Channel 9 from any operational mode.
To Switch to Channel 16 or Channel 9:
1. Press the Channel 16/9 button to change to Channel 16.
2. Press the Channel 16/9 button again to change to
Channel 9.
3. Press the Channel 16/9 key again to go back to the
original working channel.
When on Channel 16 or Channel 9 in the Channel 16/9 mode,
turn the Channel Knob, press the Channel Up/Down button
on the microphone or press the Function (F1/F2) button to
change to other channels.
Operating Your Radio
Channel 16/9 Toggle
Channel 16/9 Button
Microphone 16/9 Button
8187-F80-Operation-8_MMB:F75-Operation-8 11/3/06 4:07 PM Page 52
Operating Your Radio
Nothing Comes Close to a Cobra®
Advanced Operation
53
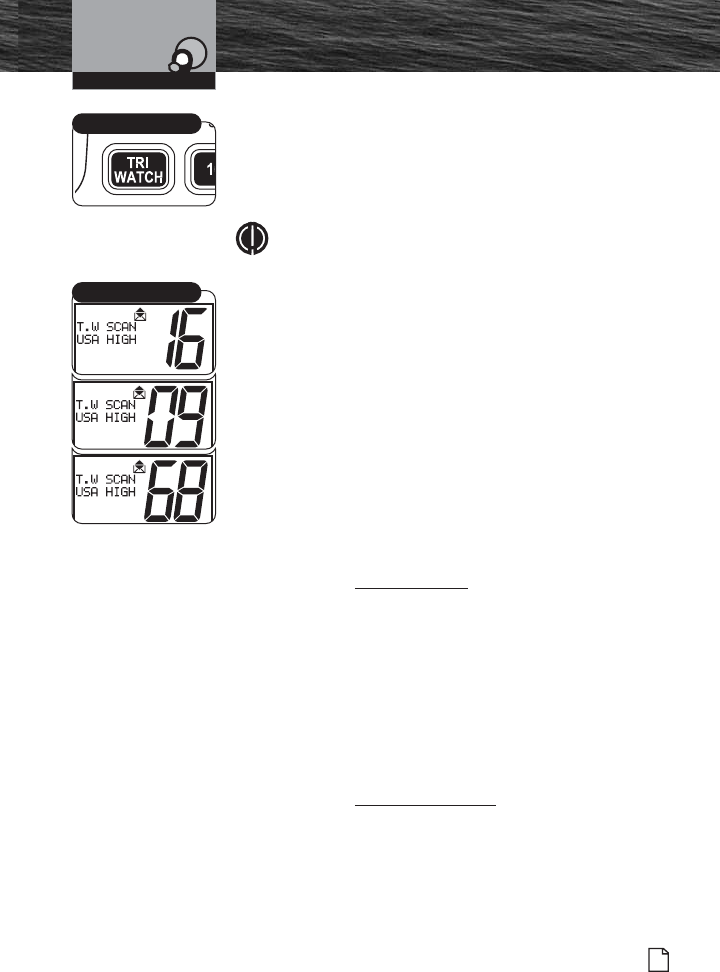
Tri-Watch
Use Tri-Watch one-button access to scan the three (3)
channels of most importance. Channel 16 is always included
as scanned locations. The remaining locations can be set
using the following procedure.
NOTE
The radio must be squelched for the Tri-Watch to
function. See page 37 for the Squelch procedure.To
Set Tri-Watch Channels:
1. In Standby mode, turn the Channel knob or press the
Channel Up/Down buttons on the microphone to select a
2nd or 3rd scanning channel location.
2. Press the Tri-Watch button to set a new Tri-Watch
channel.
The Tri-watch screen will display on the LCD and the radio
will scan amongst Channel 16 and the other two Tri-Watch
locations you’ve selected. A signal on any one (1) of the
three (3) channels stops the scan and transmits traffic on
that channel. The channel number it is paused on displays
on the LCD.
During Tri-Watch When Receiving an Incoming
Transmission:
1. Press the Talk button to remain on that Tri-Watch location
and return to Standby mode.
2. Turn the Channel knob or press the Channel Up/Down
buttons on the microphone to resume scanning Tri-Watch
locations.
If no button is pressed, the radio automatically resumes
scanning Tri-Watch locations when an incoming
transmission is completed.
During Tri-Watch When Not Receiving an Incoming
Transmission:
Press the Talk button to communicate on the last Tri-Watch
location scanned and to return to the Standby mode.
Tri-Watch Button
Tri-Watch Mode
8187-F80-Operation-8_MMB:F75-Operation-8 11/3/06 4:07 PM Page 53
54 English
Product Features
Introduction Advanced Operation
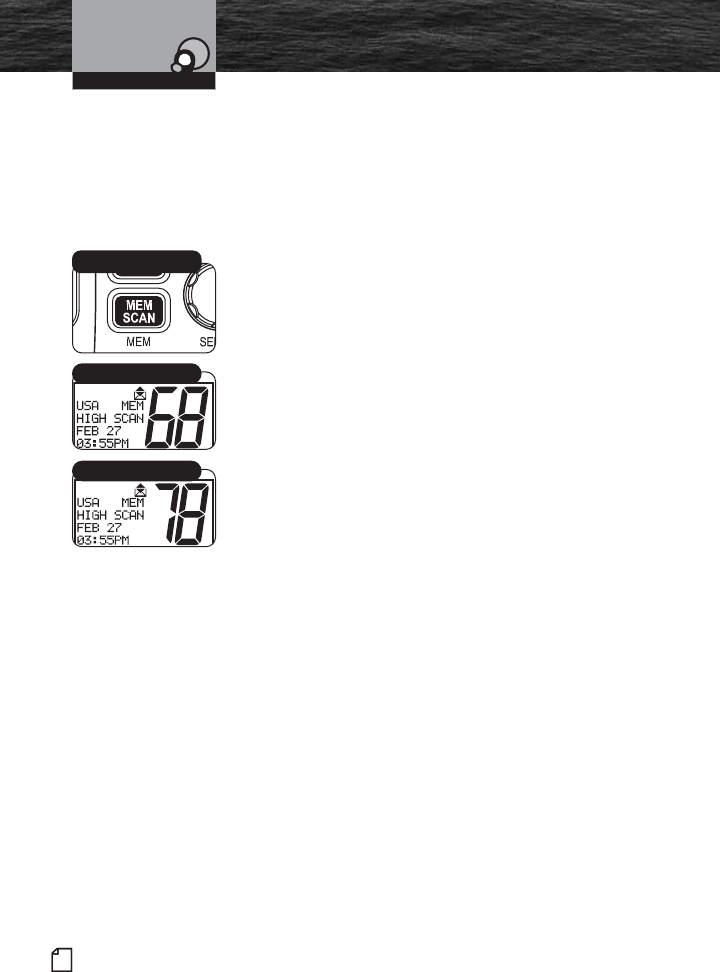
Memory Channels
Program or select an unlimited number of channels for the
Memory Scan mode.
To Program Memory Channels:
1. From Standby mode, select a channel to record using the
Channel Up/Down buttons.
2. Press and hold the Memory Scan/Memory Clear button
for three (3) seconds. The channel is recorded for
scanning and MEM (memory channel) appears on the
LCD when that channel is selected.
3. Press the Memory Scan/Memory Clear button to begin
scanning.
The radio returns to Standby mode when the Memory
Scan/Memory Clear button is pressed again.
4. Repeat steps 1 through 2 to record additional channels.
To Clear Memory Channels:
Repeat the steps above in the “To Program Memory
Channels” section, this time holding the Memory
Scan/Memory Clear button down for three (3) seconds to
clear the memory from the selected channel. Repeat as
necessary to clear additional channels.
Operating Your Radio
Memory Channel
Memory Channel
Memory Scan/
Clear Button
8187-F80-Operation-8_MMB:F75-Operation-8 11/3/06 4:07 PM Page 54
Introduction
Nothing Comes Close to a Cobra®
Product Features
55
Advanced Operation
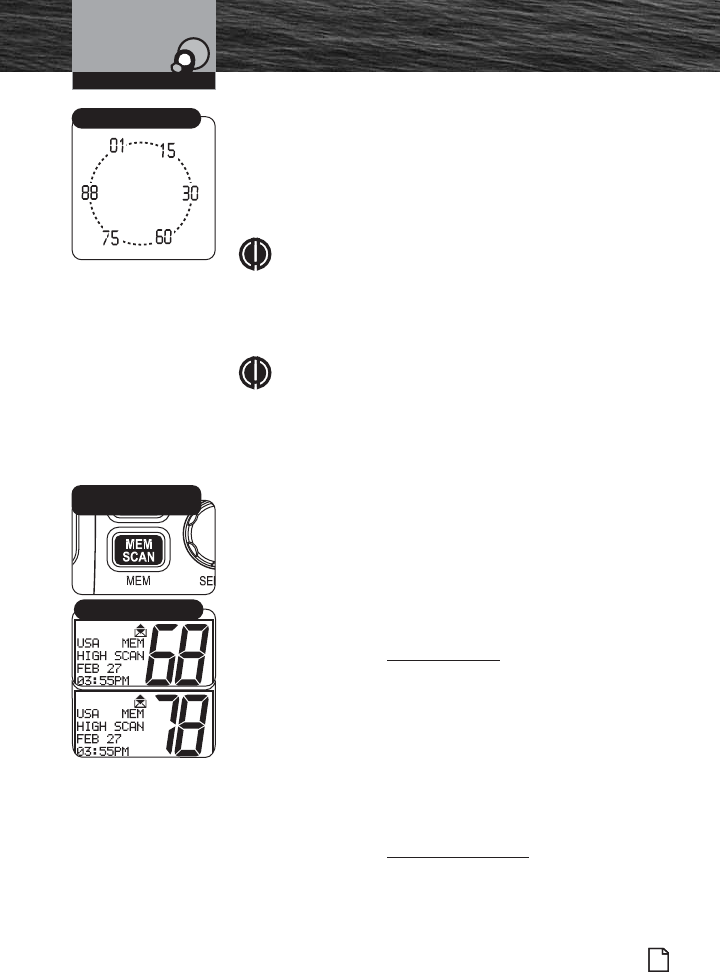
Scanning of Memory Channels
During Memory Scan mode, the radio rapidly switches from
one recorded channel to another. When any activity is
detected, the radio stops the scan for 10 seconds for brief
listening on that channel. The scan continues until the radio
is switched out of the Memory Scan mode.
NOTE
If there are fewer than two (2) channels recorded, the
Memory Scan mode is not available. [For instructions
on recording at least two channels, see Memory
Channels, page 55.
NOTE
The radio must be squelched for the Memory Scan
mode to function. See page 37 for Squelch
procedure.
To Enter Memory Scan:
From Standby mode, press the Memory Scan button.
The radio immediately begins to scan the channels selected
and MEM SCAN (memory scan) shows on the LCD.
To Exit Memory Scan:
From Memory Scan mode, press the Memory Scan button.
The radio returns to Standby mode on the last scanned
memory location.
During Memory Scan When Receiving an Incoming
Transmission:
1. Press the Memory Scan button to remain on that
memory location and end scanning. The radio returns to
Standby mode.
2. Press the Channel Up/Down microphone channel buttons
or turn the Channel knob to resume scanning.
If no button is pressed within 10 seconds, the radio
automatically resumes scanning.
During Memory Scan When Not Receiving an Incoming
Transmission:
Press the Talk button to communicate on the last active
channel scanned and return to Standby mode.
Operating Your Radio
Memory Scan/
Clear Button
Scanning
Memory Channel
8187-F80-Operation-8_MMB:F75-Operation-8 11/3/06 4:07 PM Page 55
56 English
Product Features
Introduction Advanced Operation
Operation from the Microphone
Use the microphone to select operation modes and accomplish approximately 90%
of all radio functions. Microphone features include:
■ Instant Channel 16/9 button is used to access emergency channels.
■ Channel Up/Down button is used to change channels.
■ Push to Talk (PTT) button is used to send or record a radio message.
■ Function (F1/F2) button is used to toggle between preset channels and/or, when
in a menu, it acts as an Escape key.
■ Call/Setup and Enter button is used to enter the routine Digital Selective Calling
(DSC) menu and enter the setup menu for both advanced and basic setup
functions.
NOTE
The microphone and the transceiver radio meet the JIS7 waterproof
standards.
Operating Your Radio
Up
Button
Microphone
DSC and
Call/Setup
Enter Button
Down
Button
Push to
Talk
(PTT)
Button
Function
(F1/F2)
Button
Instant
Channel
16/9 Button
8187-F80-Operation-8_MMB:F75-Operation-8 11/3/06 4:07 PM Page 56

Digital Select Calling (DSC) Setup •
Digital Selective Calling (DSC) uses digital signals to increase messaging range. This
provides the most reliable message delivery per watt of output power. Digital signals
are less susceptible to distortion from noise and atmospheric conditions than analog
signals.
DSC equipped radios also interface with GPS and automate many operations for
sending and receiving messages. This results in compact, accurate messages and
less airwave congestion.
Setup procedures for all DSC features use the Setup menu. Refer to page 40 for
information on entering and exiting the Setup menu.
User MMSI Number
The nine (9) digit MMSI number, similar to a telephone number, is a unique identifier
for a vessel. DSC incorporates this number into every message that is Sent (Tx) or
Received (Rx). Enter the MMSI number as soon as you receive your MMSI number
from the issuing agency listed on page 9.
NOTE
The radio does not operate in the DSC mode until an official MMSI number is
entered. An error tone will sound when attempting to operate in the DSC
mode without an MMSI number.
To Enter an MMSI Number:
NOTICE
Only one correction attempt is allowed during this procedure. An error
message will display the third time an incorrect MMSI number is entered.
Once the error message displays, the radio will still operate in all non-DSC
modes. To prevent constant changes and potential errors, this MMSI number
limitation is on all DSC capable radios. If the MMSI number must be changed
more than once, return the radio to Cobra Electronics for resetting. Once the
radio is reset, another MMSI number may be entered and the radio can then
be used in the DSC mode.
Introduction
Nothing Comes Close to a Cobra®
Product Features
57
Digital Select Calling (DSC)
Setup
Operating Your Radio
8187-F80-Operation-8_MMB:F75-Operation-8 11/3/06 4:07 PM Page 57
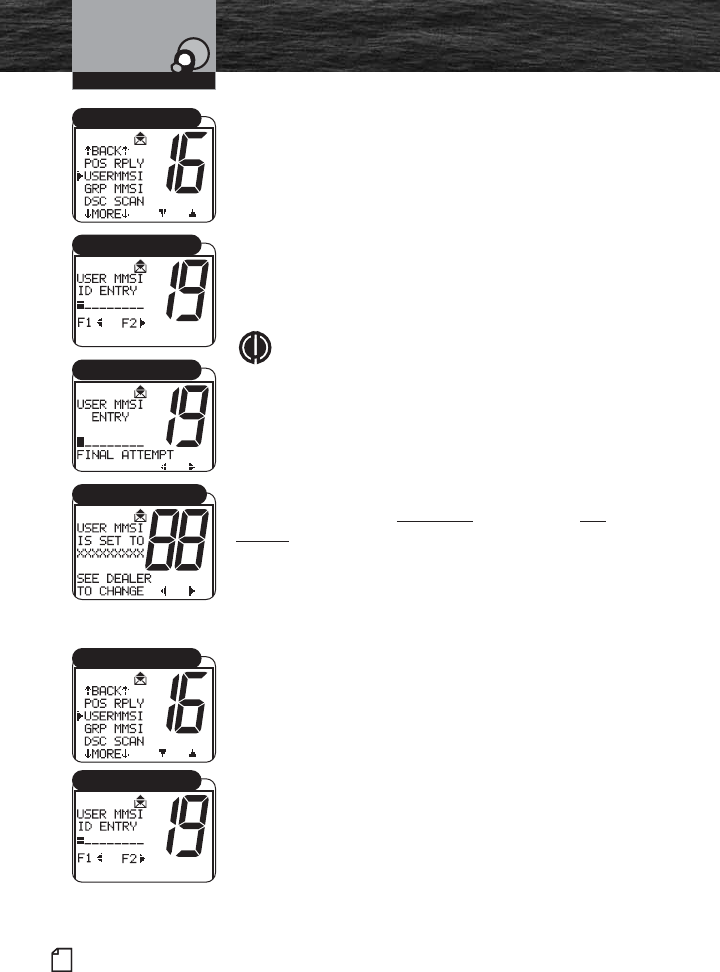
1. Enter the Setup menu and scroll to USERMMSI menu.
2. Press the Enter button. A blinking cursor displays at the
first digit under USERMMSI ID ENTRY.
3. Rotate the Channel knob to scroll through the number
list to the digit of the MMSI number being entered.
4. Press the F1 and F2 Function buttons to select the digit.
The blinking cursor moves to the next digit of the
number.
5. Repeat steps 3 and 4 until all nine (9) digits of the MMSI
number are entered.
NOTE
Press the F1 Function button to backspace and the
F2 Function button to space forward. A new entry
does not automatically erase previous entries.
6. Check that the number is entered correctly.
7. Press the Enter button to return to the Setup menu.
If an MMSI Number is entered incorrectly, repeat steps 1
through 7 until correct. Remember, you only have one
attempt to reset the MMSI number or the radio must be
returned to Cobra Electronics for reset. See Product Service
on page 81 for details on how to return your radio.
Transferring a Radio to a Different Vessel
Contact the agency that issued the MMSI number to change
the vessel information associated with your MMSI number.
To View the Programmed MMSI Number at Any Time:
1. Enter the Setup menu and scroll to USERMMSI.
2. Press the Enter button. A blinking cursor displays the
existing number under USERMMSI ID ENTRY.
3. Press and hold the Enter button to return to the Setup
menu.
58 English
Product Features
Introduction
Digital Select Calling (DSC)
Setup
Operating Your Radio
USERMMSI Menu
USERMMSI ID Entry
MMSI Final Attempt
MMSI Entry Error Message
USERMMSI Menu
USERMMSI ID Entry
8187-F80-Operation-8_MMB:F75-Operation-8 11/3/06 4:08 PM Page 58
Introduction
Nothing Comes Close to a Cobra®
Product Features
59
Digital Select Calling (DSC)
Setup
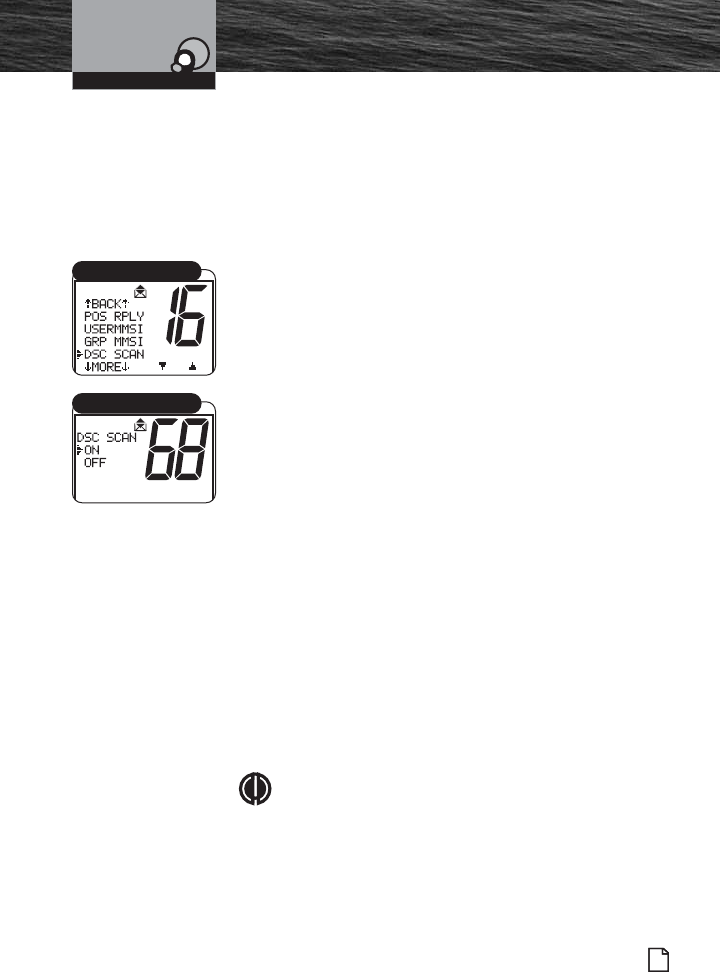
DSC Scanning
Turn DSC Scanning Off to stop the radio from scanning
Channel 70. DSC message transmissions continue but no
DSC alarms sound. No DSC messages are received unless a
distress message is transmitted. Distress message
acknowledgements are received with DSC scanning On or
Off.
To Turn DSC Scanning On or Off:
1. Enter the Setup menu and scroll to DSC SCAN menu.
2. Press the Enter button and observe the current setting —
ON or OFF.
3. Select a setting by turning the Channel knob.
4. Press the Enter button to confirm selected item and
return to the Setup menu.
Group MMSI Number
Nautical organizations like yacht clubs and regatta event
organizers can establish Group MMSI numbers. Messages
can then be automatically transmitted to all members of a
group without making individual calls.
The Group MMSI is established by modifying the MMSI
assigned to one (1) group member. To modify the MMSI
number, drop the last digit of the number and insert a zero
(0) at the beginning.
Example:
Member MMSI number 366123456 becomes Group MMSI
number 036612345.
Group MMSI numbers may be entered and changed any
time without resetting the radio. Each member of a group
must enter the group MMSI number in their radio to receive
group messages.
NOTE
ALL digits must be entered for the display to show
complete.
Operating Your Radio
DSC SCAN Menu
DSC SCAN On/Off
8187-F80-Operation-8_MMB:F75-Operation-8 11/3/06 4:08 PM Page 59