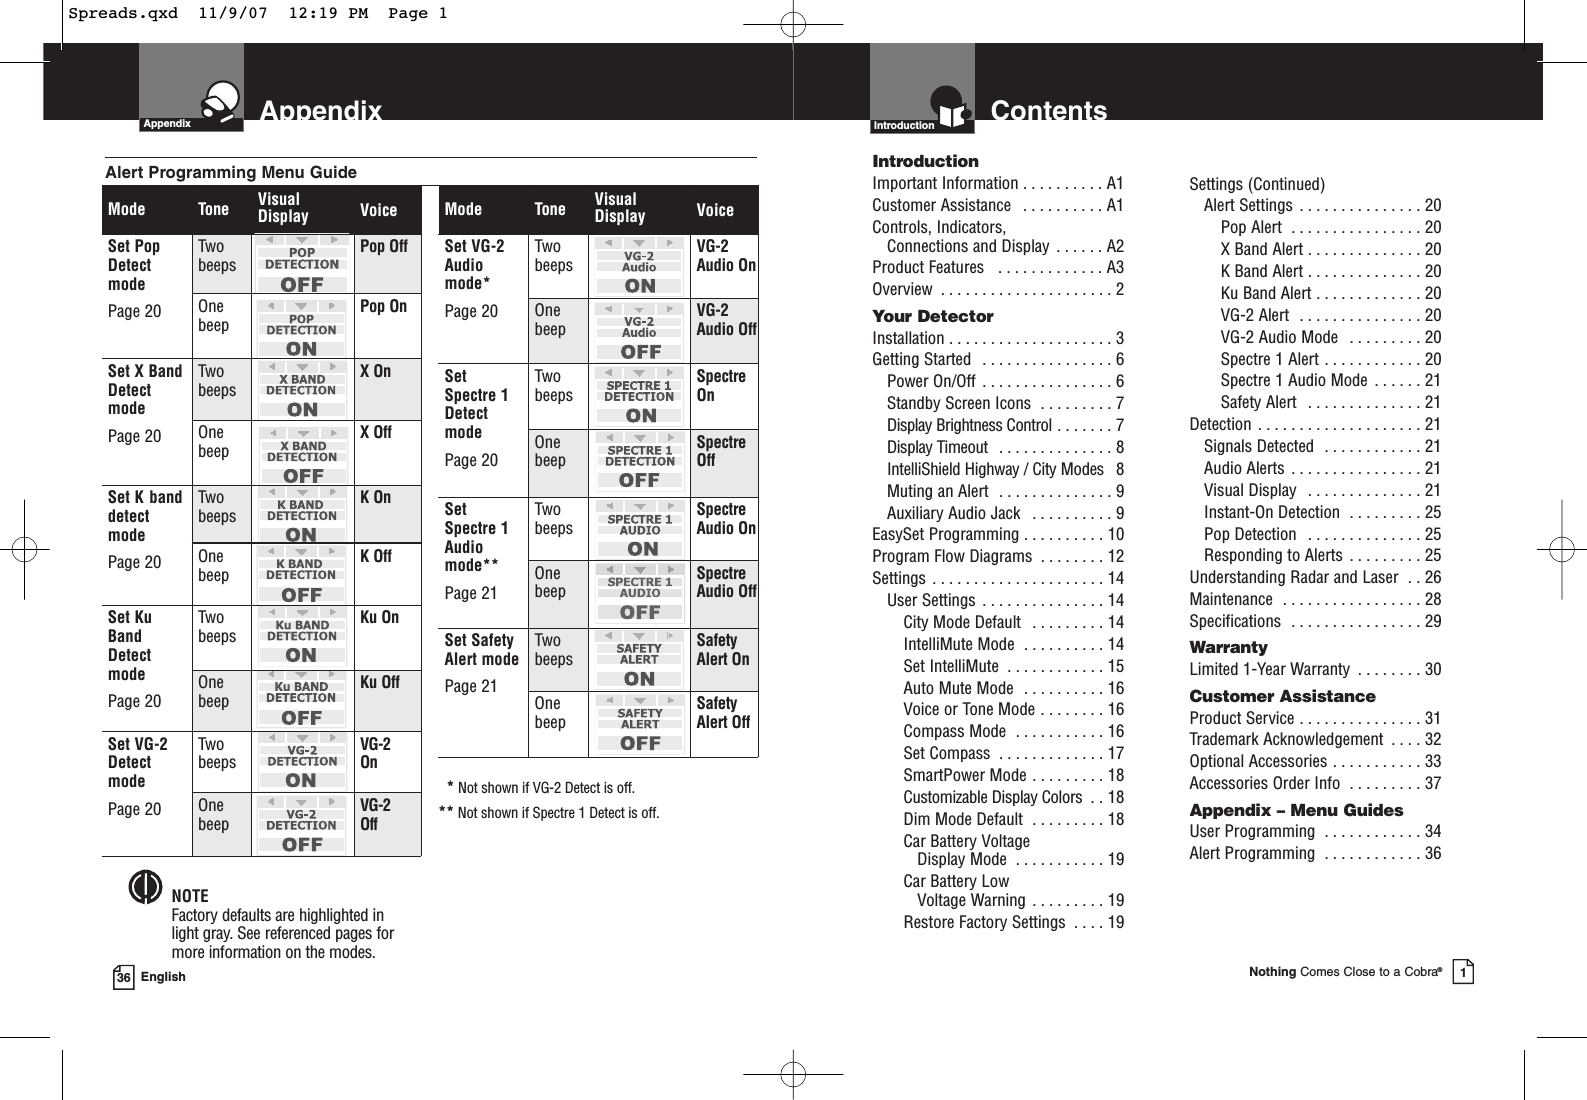
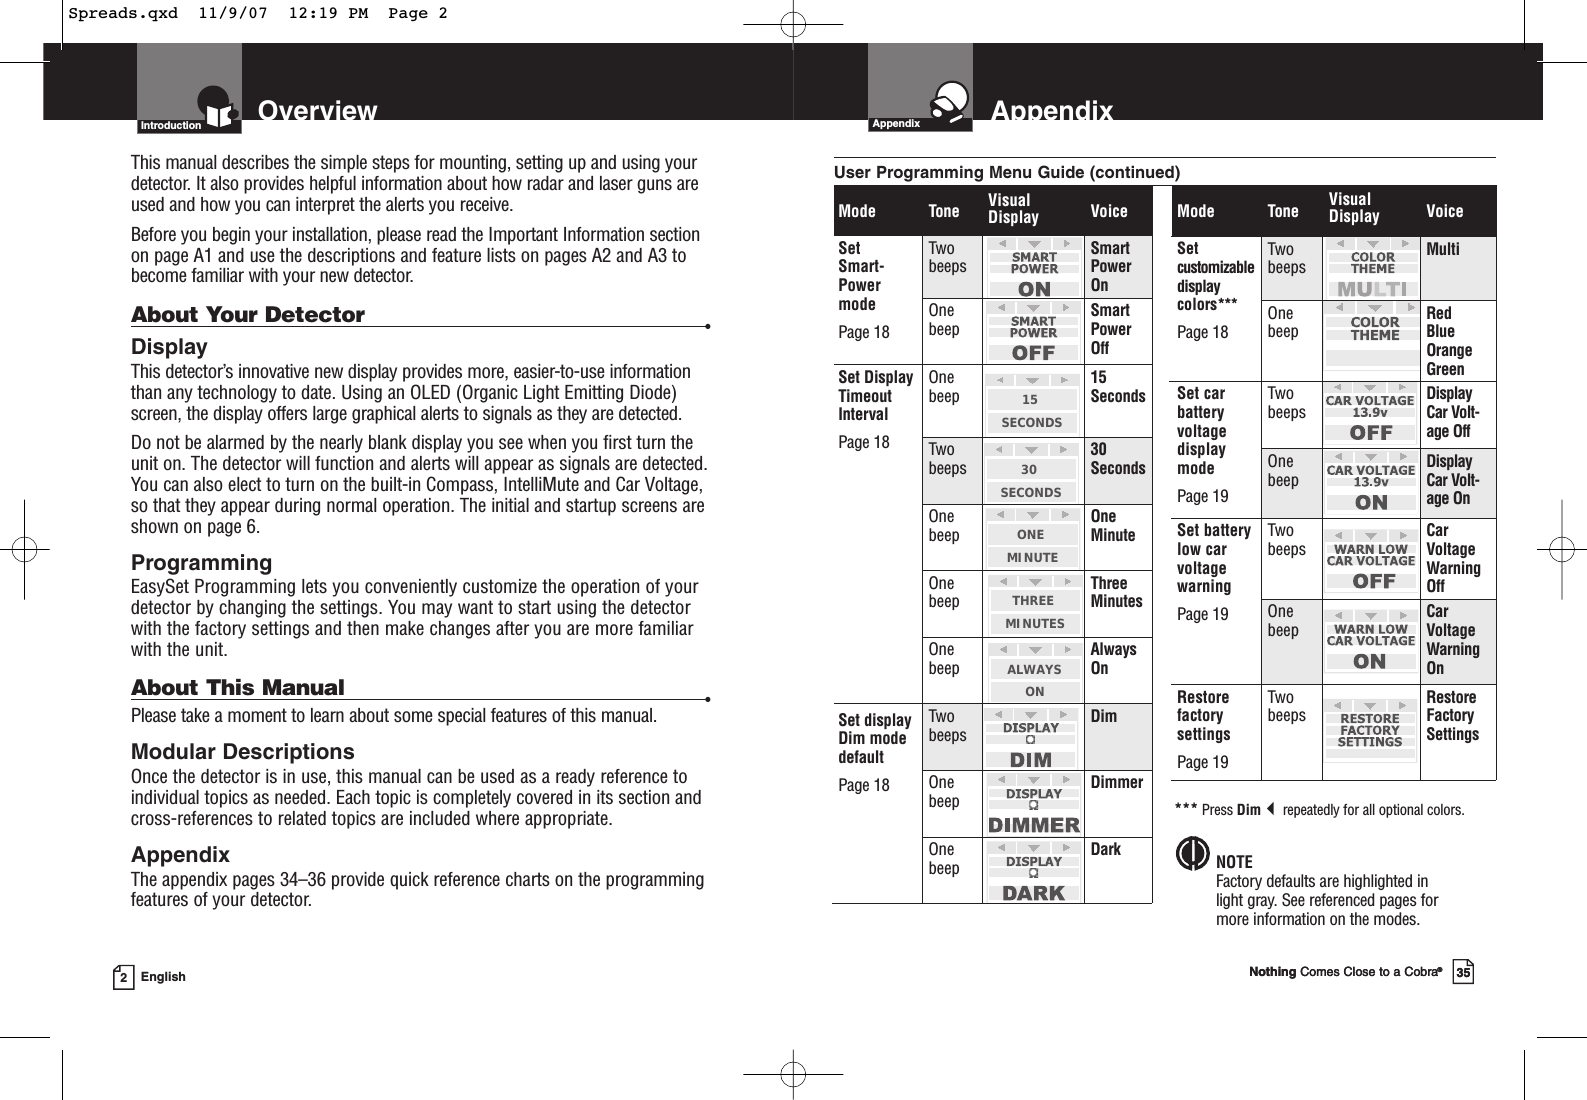
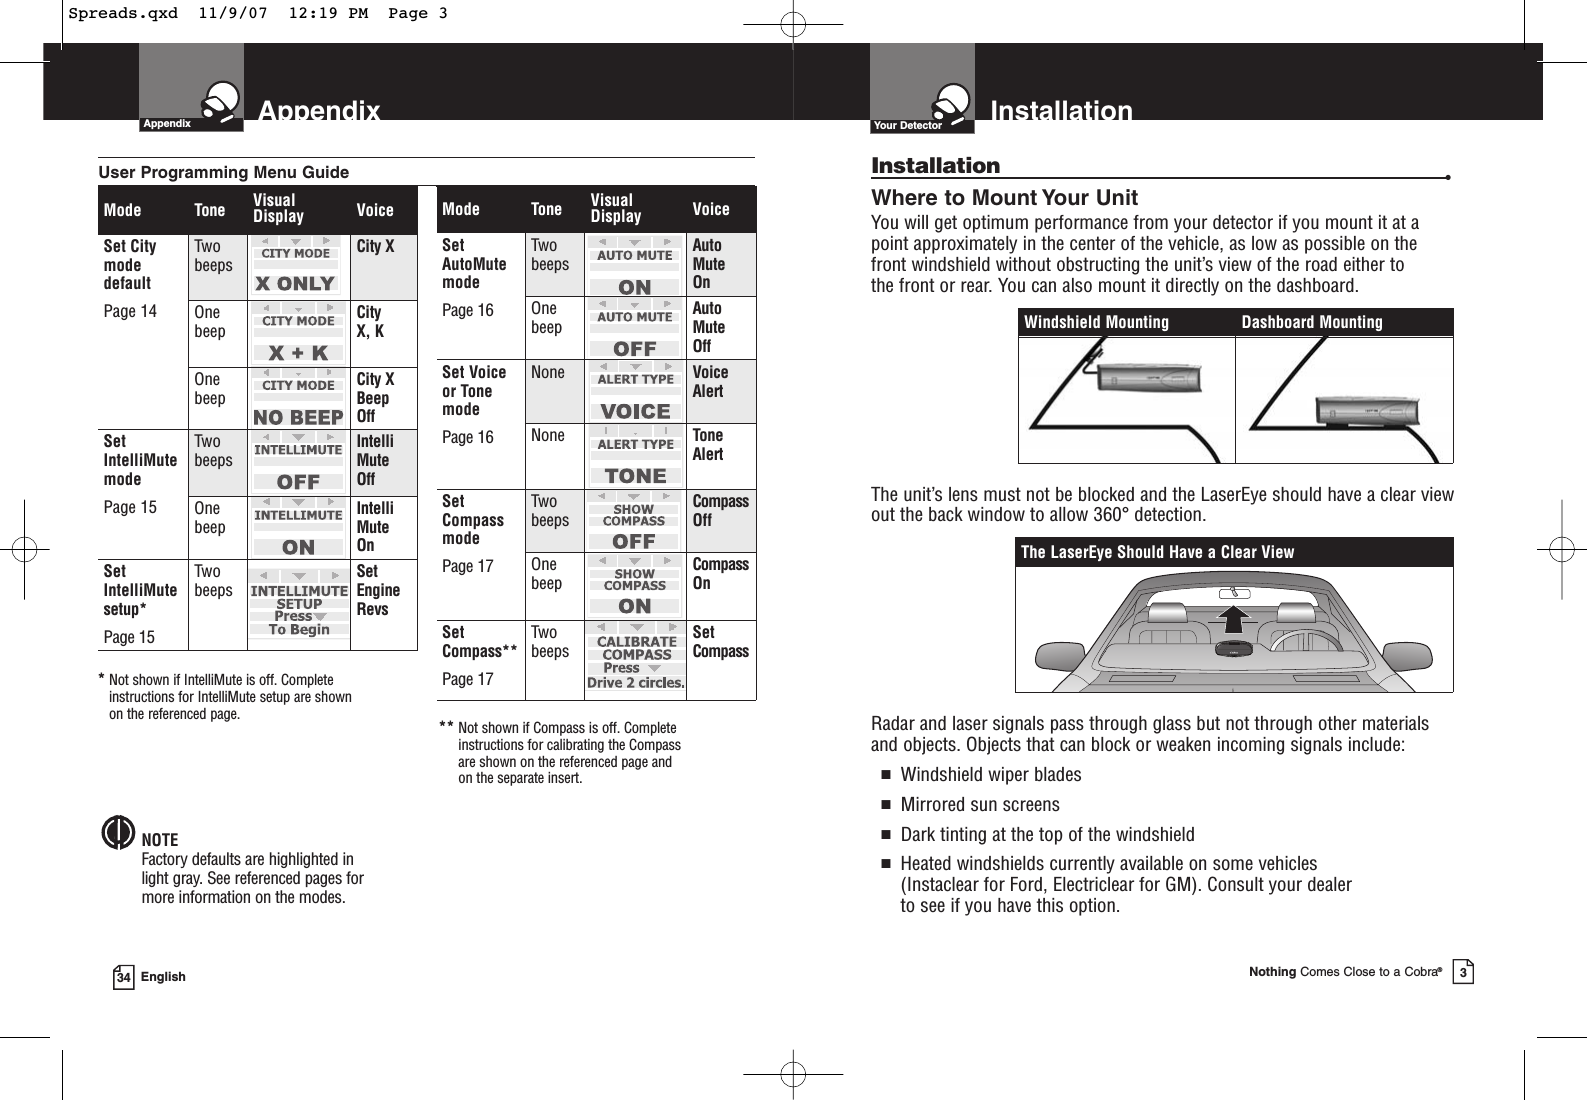
Cobra Electronics XRS9950 RADAR DETECTOR User Manual Print Layout 1
Cobra Electronics Corporation RADAR DETECTOR Print Layout 1
UserManual.wiki
>
Cobra Electronics
>
XRS9950 User Manual
USERS MANUAL
Navigation menu
Upload a User Manual
Namespaces
Wiki Guide
HTML
PDF
Info
Views
User Manual
Discussion / Help
Navigation
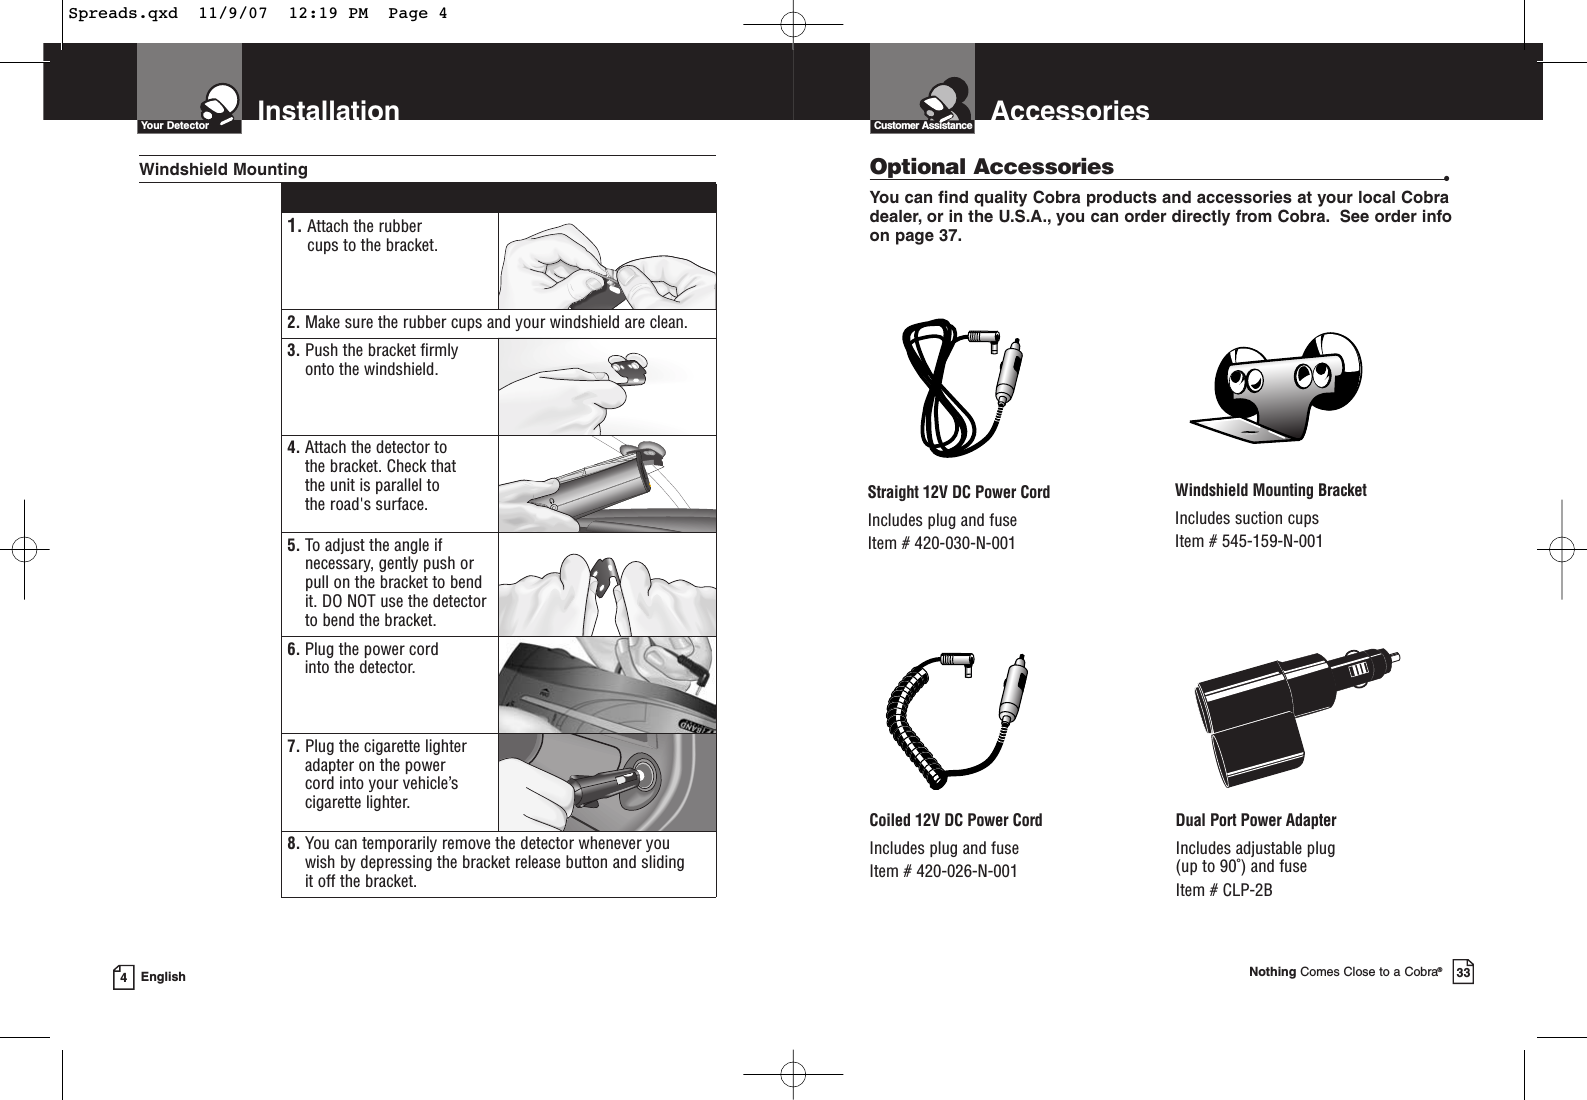
![IntroductionA2 EnglishControls, Indicators,Connections and DisplayIntroductionControls, Indicators, Connections and Display •12V DCPower JackOn-Off/Volume ControlAllows user to adjust the volume of the tone and voice alerts.DimButton Adjusts the display brightness and scrolls through options while programming.Menu/Save ButtonPress once to enterProgram mode. Pressagain to save settings.LaserEye For 360° detection of laser and strobe signals.Windshield Bracket Release ButtonSpeakerAuxiliary Audio JackMuteButtonFor manual mute of audioalerts and to select/adjustoptions while programming.CityButtonChanges between Highway and City modes and scrolls through options while programming.WindshieldBracketMounting SlotExtremeBright DataGrafixTM DisplayFull color and sunlight-readable, the extremely bright display provides intuitive graphical interaction and alert screens.Nothing Comes Close to a Cobra®37Product FeaturesIntroductionNothing Comes Close to a Cobra®A3IntroductionSuper-Xtreme Range Superheterodyne TechnologyWith super-fast sweep circuitry, S-XRSprovides maximum detection range and the best possible advance warning to even the fastest radar gunsMaximum PerformanceProvides advanced warning with maximum detection range for total protection Detection and Separate Alerts For radar signals (X, K, Ka and Ku bands, with signal strength indicated), lasersignals, Safety Alert signals, Strobe Alertsignals, VG-2 signals, Spectre 1 signals8-Point Compass Displays direction of travelLaserEye For 360° detection of laser and strobe signalsInstant-On Ready Detects radar guns with “instant-on” (very fast) speed monitoring capabilitiesPop DetectionDetects the latest super-fast radar guns ofthe instant-on or single-pulse typeVoice or Tone Alert With adjustable volumeExtremeBright DataGrafixTM Display With easy-to-read graphical user interfaceIntelliShield False Signal RejectionReduces falsing in urban areas withHighway mode and three levels of City mode settingsSafety Alert Traffic warning system distinguishesimportant safety alerts from other K band signalsStrobe AlertEmergency vehicle warning systemManual Mute or Auto Mute A mute function of audio alertsIntelliMute A mute function which automatically reducesfalse alerts by sensing engine RPMsSmartPower A timed power saving function that saves your car’s battery EasySet ProgrammingUser-friendly mode selection and setting with visual guidanceCar Battery Voltage DisplayCar battery voltage can be showncontinuously on the displayCar Battery Low Voltage WarningProvides an alert when the car batteryvoltage drops below 11.9 voltsCustomizable Display ColorsCustomize the display colors to matchyour dash illuminationAuxiliary Audio JackFor external speaker connectionMounting Mounts easily on windshield or dashboardProduct Features •Congratulations! You’ve made a smart choice by purchasing an ultra highperformance digital radar/laser detector from Cobra. Just look at some ofthe sophisticated features and capabilities your new unit includes:WARNINGModifications or parts substitutions not approved byCobra Electronics Corporation may violate FCC Rulesand void your authority to operate this equipment.Accessories Order InfoCustomer AssistanceOrdering From U.S.A.Call 773-889-3087 for pricing or visit www.cobra.com.For Credit Card OrdersCall 773-889-3087 [Press one from the main menu] 8:00 a.m. to 6:00 p.m. Central Time,Monday through Friday.Make Check or Money Order Payable ToCobra Electronics, Attn: Accessories Dept., 6500 West Cortland Street, Chicago, IL 60707 U.S.A.To Order OnlinePlease visit our website: www.cobra.comItem # Description420-030-N-001 Straight 12V Power Cord420-026-N-001 Coiled 12V Power Cord545-159-N-001 Windshield Mounting BracketCLP-2B Dual Port Power AdapterXRS9940_MANL_PH3.qxd 11/9/07 10:33 AM Page A2](https://usermanual.wiki/Cobra-Electronics/XRS9950/User-Guide-881130-Page-2.png)