Coby Communications NBPC1022 NetBook User Manual NBPC1022 User Guide
Coby Communications Ltd. NetBook NBPC1022 User Guide
Contents
- 1. PC User Manual Rev1
- 2. PC User Manual Rev 1
PC User Manual Rev1

NBPC1022
Netbook Instruction Manual
Please read this manual carefully before operation

Chapter 2. Getting to Know Your Computer
User Guide
Original Issue: 2009/04
This manual guides you in setting up and using your new notebook
computer. Information in this manual has been carefully checked for
accuracy and is subject to change without notice.
No part of this manual may be reproduced, stored in a retrieval system, or
transmitted, in any form or by any means, electronic, mechanical, photocopy,
recording, or otherwise, without prior written permission.
Please read this manual carefully before using the computer.
The following signs call attention to features and operations that may be
dangerous to the user. Follow the instruction closely to reduce the risk of
physical harm or damage to the equipment.
DANGER: Not following the instruction will result in immediate death or
serious injury.
WARNING: Not following the instruction could result in death or serious
injury.
CAUTION: Not following the instruction could result in minor or moderate
injury and/or damage to the product.
NOTE: Indicates important information that helps you make better use of
your computer.
Trademarks
Product names used herein are for identification purposes only and may be
the trademarks of their respective companies.
Microsoft, Windows XP, Windows MCE, Windows Vista, and Windows
Sound System are trademarks of Microsoft Corporation.
Intel®, Intel® Core TM, Intel® HD Audio (Azalia) are registered trademark of
Intel Corporation.
All other brands or product names mentioned in this manual are trademarks
or registered trademarks of their respective companies.

CONTENTS
I
CONTENTS
CHAPTER 1. IMPORTANT SAFETY INSTRUCTIONS .................................. 1
CHAPTER 2. GETTING TO KNOW YOUR COMPUTER ............................... 9
TOP VIEW ............................................................................................................. 9
LEFT-SIDE VIEW ................................................................................................. 13
BOTTOM VIEW .................................................................................................... 14
CHAPTER 3. USING YOUR COMPUTER ...................................................... 16
USING THE BATTERY PACK AND AC ADAPTER ................................................... 16
TURNING ON YOUR COMPUTER ........................................................................ 21
PUTTING YOUR COMPUTER TO SLEEP OR SHUTTING IT DOWN ........................ 22
USING THE KEYBOARD ....................................................................................... 23
USING THE TOUCH PAD ...................................................................................... 25
USING MEMORY CARDS ..................................................................................... 26
USING THE WEB CAMERA .................................................................................. 27
USING THE INTERNET ......................................................................................... 27
INSTALLING DEVICE DRIVERS ............................................................................ 28
CHAPTER 4. USING EXTERNAL DEVICES ................................................. 30
CONNECTING A UNIVERSAL SERIAL BUS (USB) DEVICE .................................. 30
CONNECTING AN EXTERNAL DISPLAY ................................................................. 31
CONNECTING A HEADPHONE AND AUDIO DEVICE ............................................... 31
CONNECTING AN EXTERNAL MICROPHONE ........................................................ 32
CHAPTER 5. TROUBLESHOOTING ............................................................... 33
DISPLAY PROBLEMS ........................................................................................... 33
KEYBOARD PROBLEMS ...................................................................................... 34
SLEEP OR HIBERNATION PROBLEMS ................................................................. 34
COMPUTER SCREEN PROBLEMS ....................................................................... 35
SOUND PROBLEMS ............................................................................................. 36
BATTERY PROBLEMS ......................................................................................... 37
A HARD DISK DRIVE PROBLEM .......................................................................... 37

CONTENTS
II
OTHER PROBLEMS ............................................................................................. 38
APPENDIX A. SPECIFICATIONS .................................................................... 39
SPECIFICATIONS ................................................................................................. 39
APPENDIX B. NOTICES .................................................................................... 41
GENERAL NOTICES ............................................................................................ 41
WIRELESS RELATED INFORMATION .................................................................... 42
ELECTRONIC EMISSIONS NOTICES .................................................................... 43
EU ROHS COMPATIBLE STATEMENTS ............................................................... 45
WASTE DISPOSAL STATEMENTS ........................................................................ 46

CHAPTER 1. IMPORTANT SAFETY INSTRUCTIONS
1
Chapter 1. Important Safety Instructions
Please read this manual carefully before using the computer.
These safety instructions will ensure many years of safe enjoyment from the
product. Set up your computer on a flat, stable surface. (We are not
responsible for the problems and damages caused by incorrect use of the
computer in an unsafe environment.)
Selecting a place to work
WARNING
Do not operate your computer near water; for example, in a bathroom or
near a swimming pool.
The computer may not function correctly, and there is the risk of electric
shock. Operate the computer within a temperature range of 50 to 95
degrees F (10 to 35 degrees C) and 20 to 80% of relative humidity.
Safely dispose of the packing materials, such as desiccant and plastic bags.
Children may swallow desiccant or suffocate from plastic bags.
CAUTION
Keep your computing environment clean and free of dust. There is a risk of
dysfunction to the computer.
Keep your computer away from electromagnetic fields. Exposure to the
electromagnetic field may result in loss of data in the hard disk drive and/or
damage to the LCD (or LED).

CHAPTER 1. IMPORTANT SAFETY INSTRUCTIONS
2
Do not block the fan louvers and leave enough space around the computer
for ventilation. The computer may overheat and result in fire or injuries.
Using the battery pack
WARNING
Use only a battery pack recommended.
Using a battery pack of a different type may result in explosion.
Keep metallic objects, such as keys and clips, away from the battery pack.
Objects that conduct electricity can short-circuit the battery pack and result
in fire and/or injuries.
Keep the battery pack away from heat.
There is a risk of explosion or fire.
Do not short-circuit battery terminals.
There is a risk of explosion.
Do not subject the battery pack to temperatures above 140 degrees F (60
degrees C).
There is a risk of explosion or fire.
Keep the battery pack away from children and/or pet.
There is a risk of injury and damage to the battery pack.
Do not put the battery pack in the water.
There is a risk of fire or damage to the batter pack.
Be cautious when handling the battery pack’s hooks. It may hurt you.

CHAPTER 1. IMPORTANT SAFETY INSTRUCTIONS
3
Lock the battery catch lock at the bottom surface of the Notebook.
There is a risk of battery damage.
Replacing and disposing of the backup (standby) battery
WARNING
If the backup battery is incorrectly replaced, there is danger of explosion.
The lithium battery contains lithium and can explode if it is not properly
handled or disposed of.
Replace only with a battery of the same type.
Connecting to an AC power source
WARNING
Do not use loose or damaged power plugs.
There is a risk of electric shock or fire.
Use properly grounded outlet.
Connecting the computer to an outlet without proper grounding may result in
electric shock and damages to your computer.
Do not touch or grab the power plug with wet hands.
There is a risk of electric shock.
Hold the plug body when removing the power cord from an outlet.
There is a risk of fire and damages to the computer.
Use your computer at the proper voltage/current level indicated.
Supplying improper levels of voltage/current may result in electric shock, fire,

CHAPTER 1. IMPORTANT SAFETY INSTRUCTIONS
4
and/or damage to the computer.
If you hear a noise from the power cord or outlet, unplug the power cord
immediately, and contact the customer service for help.
There is a risk of fire or electric shock.
Make sure the power plug fits snugly into the electrical outlet.
Loose fit may result in fire.
Do not bend or place a heavy object on top of the power cord.
Keep the children and pets from damaging the power cord.
Damaged power cord may result in electric shock or fire.
Keep the power cord and plug clean and free of dust.
There is a risk of fire.
If an object or liquid enters the computer or an adaptor, remove power cord,
battery, and any other cables from the computer, and contact the customer
service for help.
There is a risk of an electric shock, fire, or damage to the computer.
Before cleaning the computer, disconnect the power cord, battery, and any
other cables from the computer.
There is a risk of electric shock or damage to the computer.
Using the computer
WARNING
For cleaning your computer, use mild detergent or computer cleaning
products.
Be sure to dry completely before using the computer.
Using the computer without completely drying it may result in electric shock

CHAPTER 1. IMPORTANT SAFETY INSTRUCTIONS
5
or fire.
During a lightning storm, disconnect the power cord, telephone line, and
LAN cable from the computer.
There is a risk of electric shock or fire.
Do not place water, chemicals, or liquid of any kind on the computer.
Liquid of any kind entering inside the computer may result in an electric
shock, fire, or damage to the computer.
Do not connect the modem directly to a multi-line telephone.
There is a risk of fire or damage to the computer.
If you drop your computer, remove the power cord and battery pack, and
then contact the customer service for check up.
There is a risk of electric shock or fire.
Do not place a burning candle or cigarette on the computer.
There is a risk of fire.
If you see or smell smoke from the computer or adaptor, turn off the
computer, remove the power cord, and then contact the customer service
for help. There is a risk of fire.
The LCD monitor’s fluorescent lamp include hydrargyrum.
Avoid direct contact with liquid from the broken LCD. If it spills into eyes or
the other parts of your body, wash it out several times with clean water. If
you feel something different, contact a doctor or a health administrator
immediately.
CAUTION:
Do not place an object, such as a pen or clip, on the keyboard.

CHAPTER 1. IMPORTANT SAFETY INSTRUCTIONS
6
If you close the LCD cover with an object on the keyboard, you may damage
or break the LCD.
Do not touch or scratch the LCD with sharp objects.
The LCD may be damaged.
Be sure to turn off the computer before closing the LCD cover.
The computer may overheat, and be damaged or deformed.
Do not exert excessive pressure on the LCD.
LCD is made of glass, and an excessive force can break the LCD.
Follow the instructions in the user's guide.
There is a risk of damage to the computer.
Do not place objects into the PC Card slot.
There is the risk of electric shock or injury.
Upon completion of any service or repairs, ask service technician to perform
safety checks.
Ignoring safety checks may result in electric shock or fire.
Use the Wireless LAN at least 5m away from a microwave oven or plasma
lamp.
When using the Wireless LAN near a plasma lamp, use the channel 11, 12,
or 13, the connection may be unavailable or slow.
Keep the computer away from heat.
The computer may deform and there is the risk of fire.
When attaching an external device, make sure the connector from the
device and the port on the computer are of the same type.
There is a risk of damage to the computer.

CHAPTER 1. IMPORTANT SAFETY INSTRUCTIONS
7
Do not insert a damaged CD-ROM or floppy disk.
There is a risk of damage to the computer.
Carrying and storing the computer
WARNING
Before moving the computer, turn the power off and remove all the cables.
You may trip over the loose cables and fall.
When traveling on an airplane, follow the instruction by flight attendant.
Using the computer on an airplane may result in an airline accident.
Do not travel with LCD monitor open.
Do not expose your computer to the direct sunlight in a closed area such as
inside a car.
Prolonged exposure to high temperatures may deform the computer and
also result in fire.
Preventing data lose (handling hard disk drives)
CAUTION
Be cautious when handling the hard disk drive.
The hard disk drive is very delicate to any physical impact.
Always make backups for your data.
We are not responsible for the data lose caused by users.
The data on the hard disk or the drive itself may be damaged in the following

CHAPTER 1. IMPORTANT SAFETY INSTRUCTIONS
8
situations:
Exposure to a physical shock during the disassembling or installing
process.
The computer is reset (rebooted), for example by power outage, while
the hard disk drive is operating.
Exposure to virus.
The computer is turned off during operation.
Exposure to a physical shock while the hard disk drive is operating.
To prevent data lose due to hard disk drive damages, always backup your
data. We are not responsible for the lost of data.
Ergonomic information
WARNING
Adjust the display position to avoid glare or reflections from overhead
lighting.
The top of the display should be on or below the level of your eyes.
Keep your head and neck in an upright position.
Keep your forearms, wrists, and hands in a horizontal position.
Adjust your chair to keep your arms and hands in a comfortable position.
Using the computer in the same position for a prolonged period of time may
cause discomfort to your body.
Take short frequent breaks from working with your computer. No more than
2 hours of computing per day is recommended.
Stretch periodically to reduce muscular discomfort. Check the volume level
Check if the volume level is too high before using headphones.
Do not use the headphones for a prolonged period of time.

CHAPTER2. GETTING TO KNOW YOUR COMPUTER
9
Chapter 2. Getting to Know Your Computer
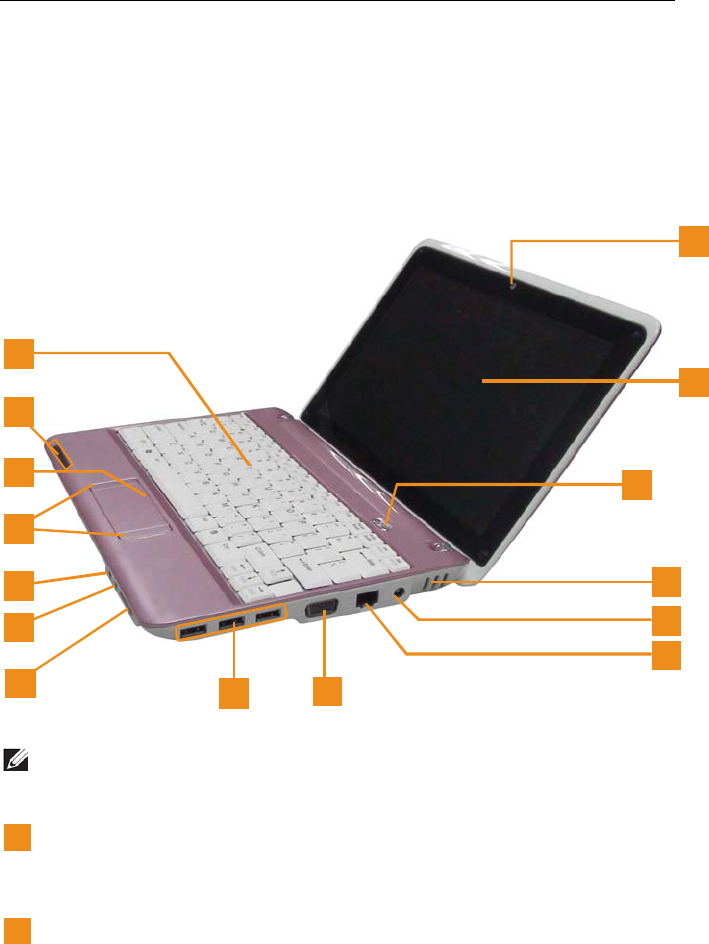
Top View
1
2
4
5
6
7
8
15
13
12
14
11
10
3
9
NOTE:
The illustrations in this manual may differ from the actual product.
1 Web Camera
Built-in camera for video capture, conferencing, and chat.
2 Display Panel
The color display with TFT technology provides clear and brilliant text and
graphics.

CHAPTER2. GETTING TO KNOW YOUR COMPUTER
10
3
Power Button
Use the Power button to turn on the computer.
4
Built-in stereo speakers
5
AC adapter connector
Connects to the AC adapter to power on the computer and charge the
battery when the computer is not in use.
CAUTION:
To prevent damage to the computer and battery pack, use the dedicated AC
adapter only.
6
LAN Connector
If you are using a cabled network signal, this connects your computer to a
network or broadband device.
7
VGA Connector
Connect to a monitor or projector.
8
USB 2.0 connectors
Connect to USB devices, such as a mouse, keyboard, printer, external drive,
or MP3 player.
9
Multi-Media Reader Slot
Provides a fast and convenient way to view and share digital photos, music,
videos, and documents stored on the following digital memory cards:
SD, MMC, MS/MS pro
10
Headphone jack
Connects to a pair of headphones, or sends audio to a powered speaker or
sound system.
CHAPTER2. GETTING TO KNOW YOUR COMPUTER
11
CAUTION:
Lower the volume level before connecting headphones, then gradually
increase the volume for comfortable listening.
Hearing experts advise against the constant use of personal stereos played
at high volume.
Constant high-volume use can lead to hearing loss. If you experience
ringing in your ears or hearing loss, discontinue use immediately and
seek medical advice.
11 Microphone jack
Connects to a microphone or input signal for use with audio programs.
12 Click Button
Provide left- and right-click functions like those on a mouse.
13
Touch inductive panel
Provides the functionality of a mouse to move the cursor, drag or move
selected items, and left-click by tapping the surface.
14
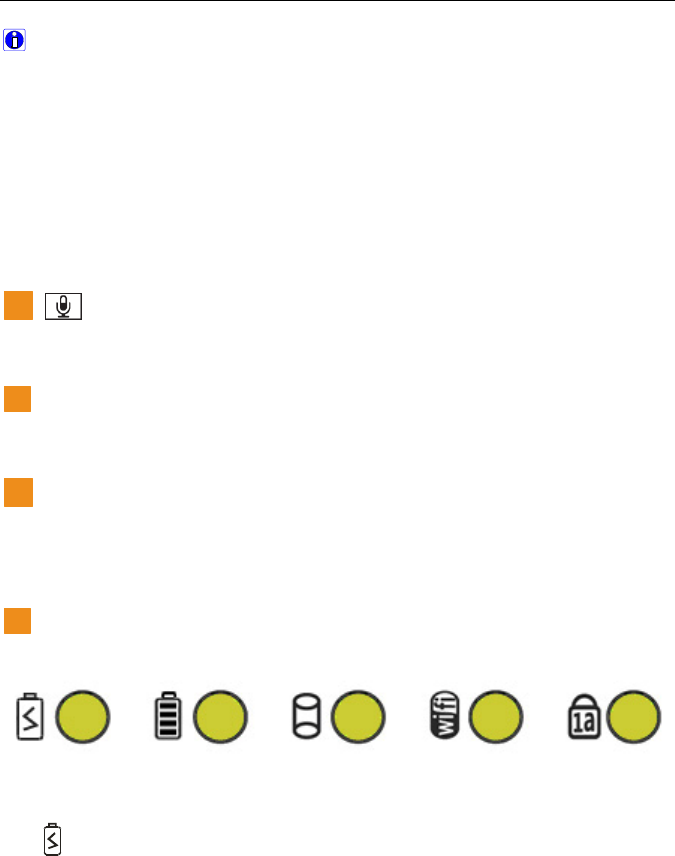
System status indicators
The system status indicators show the current status of your computer.
Power indicator light
The light operates as follows:
Solid Blue: The system is on.
Flashing Blue: The system is in standby mode.
Off: The system is off or in hibernate mode.

CHAPTER2. GETTING TO KNOW YOUR COMPUTER
12
Battery status light
The light operates as follows:
Off: The battery is fully charged.
Solid Red: The battery is charging.
Flashing Red: The battery is low.
HDD Status Light:
Lighting up when data is being written to or read from the hard disk.
Wireless LAN Status Light:
The light operates as follows:
Off: The wireless card does not have the power or RF is off.
Slow Flashing Blue: The wireless client is not associated with the
network. Slow blinking (3-4 seconds interval): the wireless card
powered on and attempting to connect.
Fast Flashing Blue: The wireless card transmitting and/or receiving
data by the rate depending on blinking speed.
Caps & Num Lock Status Light:
The light operates as follows:
Solid Blue: The caps Lock is active.
Solid Red: The numeric keypad is active.
Solid Pink: the Caps Lock and Num Lock are active.
1
5
Keyboard

CHAPTER2. GETTING TO KNOW YOUR COMPUTER
13
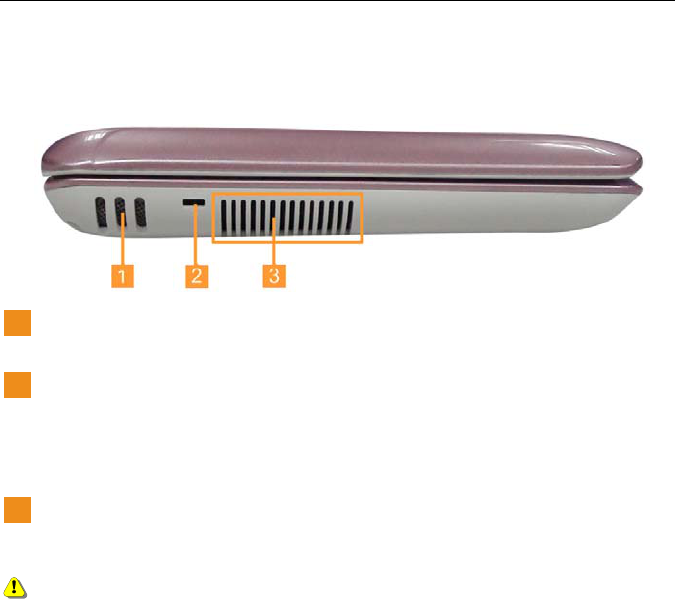
Left-side View
1 Built-in stereo speakers
2 Security Keyhole
Your computer comes with a security keyhole. You can purchase a security
cable and lock to fit this keyhole.
3 Fan Louvers
The fan louvers allow hot air to exhaust from the computer.
WARNING:
Make sure that paper, books, clothing, cables or other objects do not block
any of the fan louvers or else overheating of the computer may occur.

CHAPTER2. GETTING TO KNOW YOUR COMPUTER
14
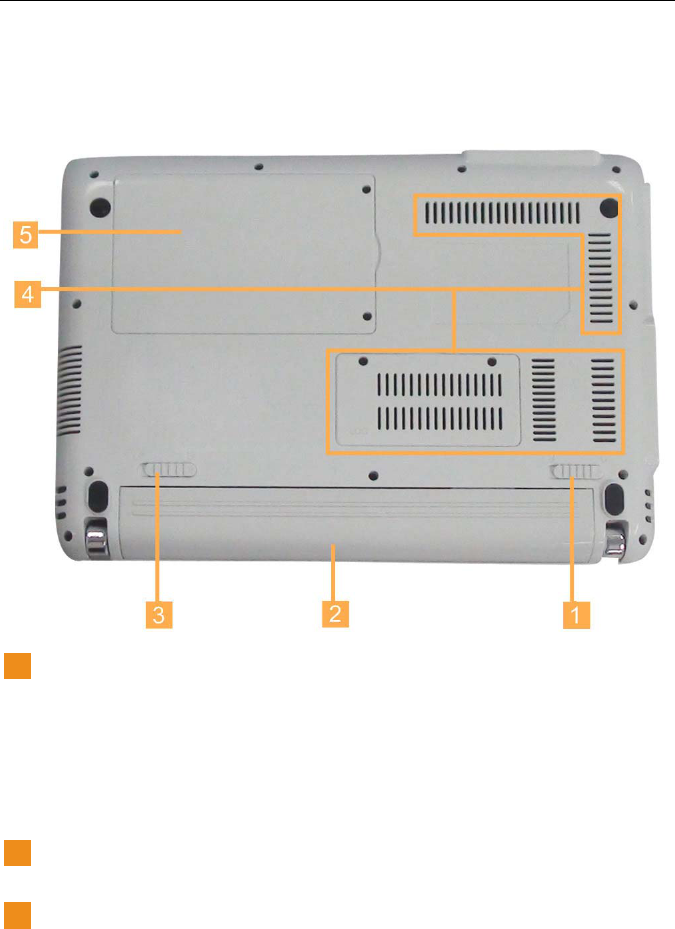
Bottom View
1 Battery Latch - Manual
The manual battery latch is used to keep the battery pack secured. Move
the manual battery latch to the unlocked position to insert or remove the
battery pack. Move the manual latch to the locked position after inserting the
battery pack.
2 Battery Pack
3 Battery Latch - Spring Loaded
The spring-loaded battery latch keeps the battery pack secured in place.
When you insert a battery pack, this latch automatically secures the battery
in place. To remove the battery, hold this latch in the unlocked position.

CHAPTER2. GETTING TO KNOW YOUR COMPUTER
15
4 Thermal Vent
The vents allow hot air to exhaust from the computer.
WARNING:
Make sure that paper, books, clothing, cables or other objects do not block
any of the vents or else overheating of the computer may occur.
5 Hard Disk Drive
The Hard Disk Drive is secured in a compartment.
CAUTION:
Do not disassemble or replace the hard disk drive by yourself! If you do
need to, ask a COBY authorized service center or dealer to disassemble or
replace it.

CHAPTER 3. USING YOUR COMPUTER
16
Chapter 3. Using Your Computer
Using the Battery Pack and AC Adapter
When you need to use your computer away from electrical outlets, you
depend on battery power to keep your computer running. Different computer
components consume power at different rates. The more you use the
power-intensive components, the faster you consume battery power.
Your Computer Batteries
Your computer batteries enable you to do more, save more, and spend
more time unplugged. Mobility has revolutionized business by enabling you
to take your work wherever you go. With your computer batteries, you will
be able to work longer without being tied to an electrical outlet.
NOTE:
The operating system may run slower when using the battery mode.
Removing and Replacing the Battery
WARNING:
Using an incompatible battery may increase the risk of fire or explosion.
This computer should only use a battery purchased from us. Do not use
batteries from other computers.
Before removing the battery, shut down the computer, and remove
external cables (including the AC adapter).
To remove the battery:
① Shut down the computer and turn it over.

CHAPTER 3. USING YOUR COMPUTER
17
② Slide the battery release latch to the unlock position and hold.
③ Slide the battery out.
To replace the battery, slide it into the end until it clicks into place.
Checking Battery Status
You can determine the percentage of battery power remaining by using
Windows Power options.
The rate at which you use battery power determines how long you can use
the battery of your computer between charges. As each computer user has
different habits and needs, it is difficult to predict how long a battery charge
will last. There are two main factors:
The amount of energy stored in the battery when you begin to work.

CHAPTER 3. USING YOUR COMPUTER
18
The way you use your computer: for example, how often you access
the hard disk drive and how bright you make the computer display.
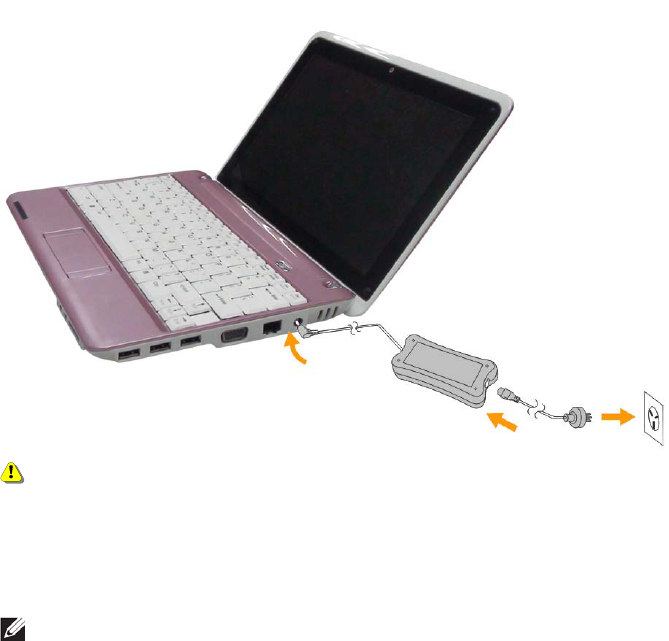
Connecting the AC Adapter
The power to run your computer can come either from the lithium-ion (Li-ion)
battery pack provided with it, or from AC power through the AC adapter.
While you use AC power, the battery charges automatically.
The AC adapter that comes with your computer has two basic components:
① The transformer pack that converts AC power for use with the
computer.
② The power cord that plugs into the AC outlet and into the transformer
pack.
CAUTION:
Using an improper power cord could cause severe damage to your
computer. To use the AC adapter, do the following. Be sure to take these
steps in the order in which they are given here.
③ Connect the power cord to the transformer pack.
④ Plug the power cord into an electrical outlet.
⑤ Connect the AC adapter to the AC power adapter jack of the computer.
CHAPTER 3. USING YOUR COMPUTER
19
WARNING:
The AC adapter works with electrical outlets worldwide. However, power
connectors and power strips vary among countries. Using an incompatible
cable or improperly connecting the cable to a power strip or electrical outlet
may cause fire or equipment damage.
NOTE:
When you do not use the AC adapter, disconnect it from the electrical outlet.
Do not wrap the power cord tightly around the AC power transformer pack
when it is connected to the transformer.
You can charge the battery when the AC adapter is connected to the
computer and the battery is installed. You need to charge it in any of
the following conditions:
When you purchase a new battery
If the battery status indicator (amber) starts blinking
If the battery has not been used for a long time
Before you charge the battery, make sure that its temperature is at least 10
degrees Celsius (50 degrees Fahrenheit).

CHAPTER 3. USING YOUR COMPUTER
20
Charging the Battery
When you check the battery status and find that the battery is low, you need
to charge the battery or replace it with a charged battery.
If an AC outlet is convenient, first, connect the power cord to the transformer
pack; second, plug the power cord into an electrical outlet; and then connect
the AC adapter to the power jack of the computer.
The charging time is affected by the physical environment.
NOTE:
To increase the life of the battery, the computer does not start recharging
the battery if the remaining power is no less than 95 percent.
Handling the Battery
WARNING:
Do not attempt to disassemble or modify the battery pack. Attempting to do
so can cause an explosion or liquid leakage from the battery pack. A battery
pack other than the one specified by us, or a disassembled or modified
battery pack is not covered by the warranty.
WARNING:
If the rechargeable battery pack is incorrectly replaced, there is danger of an
explosion. The battery pack contains a small amount of harmful substances.
To avoid possible injury:
Replace only with a battery of the type recommended by us.
Keep the battery pack away from fire.
Do not expose the battery pack to water or rain.
Do not attempt to disassemble the battery pack.
Do not short-circuit the battery pack.
Keep the battery pack away from children.
WARNING:
Do not put the battery pack in trash that is disposed of in landfills. When

CHAPTER 3. USING YOUR COMPUTER
21
disposing of the battery, comply with local ordinances or regulations and
your company’s safety standards.
Opening and positioning the LCD panel
Open the display panel. Adjust the display panel for comfortable viewing.
Turning On Your Computer
Press the power button to turn on the computer.

CHAPTER 3. USING YOUR COMPUTER
22
Putting Your Computer to Sleep or Shutting It Down
When you finish working with your computer, you can put it to sleep or shut
it down.
Putting your computer to Sleep
If you will be away from your computer for only a short time, put the
computer to sleep. When the computer is in sleep, you can quickly wake it
and bypass the startup process.
To put the computer to sleep, do one of the following.
Click Start and select Sleep from the Start menu.
Press Fn + Esc.
CAUTION:
Wait until the power indicator light starts blinking (indicating that the
computer is in sleep) before you move your computer. Moving your
computer while the hard disk is spinning can damage the hard disk, causing
loss of data.
To wake the computer, do one of the following.
Press the power button.

CHAPTER 3. USING YOUR COMPUTER
23
Shutting Down Your computer
If you are not going to use your computer for a day or two, shut it down.
To shut down your computer, click Start and select Shut down from the
Start menu.
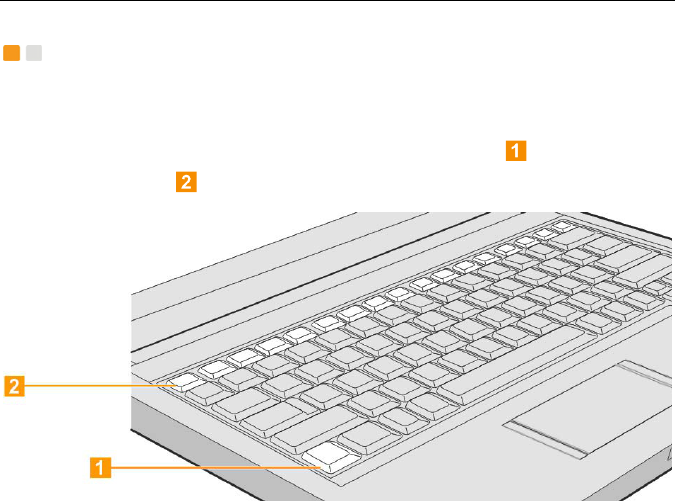
Using the Keyboard
Your computer has a numeric keypad and function keys incorporated in the
standard keyboard.
Numeric Keypad
The keyboard has keys that, when enabled, work as a 10-key numeric
keypad.
To enable or disable the numeric keypad, press Fn+Ins/NumLk.
* The illustrations in this manual may differ from the actual product.
CHAPTER 3. USING YOUR COMPUTER
24
Function Key Combinations
Through the use of the function keys, you can change operational features
instantly. To use this function, press and hold the Fn key ; then press one
of the function keys .
The following describes the features of each function key.
Fn + Esc: Put your computer in sleep mode.
Fn + F1: Enable/disable the built-in wireless device feature
Fn + F3: Mute.
Fn + F4: Enable/disable the touch pad.
Fn + F5: Shift to other connected display devices.
Fn + F6: Decrease display brightness.
Fn + F7: Increase display brightness.
Fn + F8: Decrease computer volume.
Fn + F9: Increase computer volume.
Fn + F10: Turn on/off the LCD screen.
Fn + Ins/NumLk: Enable/disable the Numeric keypad.
CHAPTER 3. USING YOUR COMPUTER
25
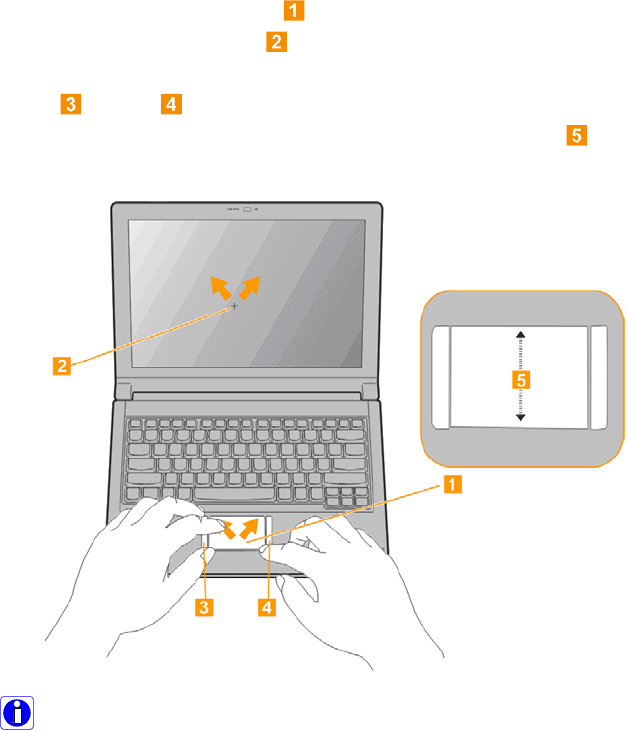
Using the Touch Pad
The touch pad consists of a pad and two click buttons at the bottom of the
keyboard. To move the cursor on the screen, slide your fingertip over the
pad in the direction in which you want the cursor to move. The functions of
the left and right click buttons correspond to those of the left and right
mouse buttons on a conventional mouse. Finger Sliding on area lets you
drag to scroll quickly up, down in the active window.
CAUTION:
Guidelines on using the touch pad
Do not touch the touch pad with a sharp or pointed object as doing so
may damage the touch pad.
Do not remove the cover sheet of the touch pad as doing so may
damage the touch pad.
Do not use the touch pad with two fingers, wearing gloves, or wet hand

CHAPTER 3. USING YOUR COMPUTER
26
as it may not function correctly. Using the touch pad with a dirty or oily
finger may damage the touch pad.
Do not exert too much pressure on the touch pad as doing so may
result in injuries to your finger or wrist.
Using Memory Cards
Your computer comes with one Multi-media Reader slot used to insert a
memory card, such as an SD Card, a Multi-Media Card, a Memory Stick or a
Memory Stick Pro.
Inserting a memory card
Gently slide the memory card with the arrow facing upward and pointing
toward the Multi-media reader slot. Slide until it clicks into place.
Removing a memory card
Gently pull the memory card out of the Multi-media reader slot.

CHAPTER 3. USING YOUR COMPUTER
27
Using the Web Camera
With the built-in web camera, you can take photos or movies and use with
various applications, such as MSN or Yahoo! Messenger, and so on.
NOTE:
If you use Windows Vista, you need to install a separate third party
dedicated application, because Vista does not include a program for taking
pictures or movies with the integrated camera.
Using the Internet
Your computer comes with LAN port for Ethernet connection or local area
network (LAN), and wireless LAN for wireless connection.
Using LAN Port
The LAN port supports a standard RJ-45 connector, and allows you to
connect the computer to an Ethernet connection and local area network
(LAN).

CHAPTER 3. USING YOUR COMPUTER
28
CAUTION:
As the voltage of a telephone connection is higher than that of a network, do
not attempt to connect a telephone cable to the LAN port or else a short
circuit of the computer might occur.
Using wireless LAN
An isotropic antenna system is built into the display for optimal reception,
enabling wireless communication wherever you are.
To enable wireless communications, do the following;
① Press Fn + F1 to enable wireless LAN
② The computer automatic search and connect the suitably network.
Installing Device Drivers
A compatible device driver is a requirement to ensure correct operation and

CHAPTER 3. USING YOUR COMPUTER
29
performance of each component in your computer.
NOTE:
Most installations require a reboot to update the driver, otherwise the
system’s stability and audio or video effect may be compromised, or you
even have to reinstall the operating system.

CHAPTER 4. USING EXTERNAL DEVICES
30
Chapter 4. Using External Devices
Your computer has many built-in features and connection capabilities.
CAUTION:
Do not connect or disconnect any external device cables other than USB
cables while the computer power is on; otherwise, you might damage your
computer. To avoid possible damage to attached devices, wait at least five
seconds after the computer is shut down to disconnect external devices.
Connecting a Universal Serial Bus (USB) Device
Your computer comes with three Universal Serial Bus Ports compatible with
USB 2.0 or USB 1.1 devices such as a keyboard, mouse, camera, hard disk
drive, printer, and scanner. USB allows devices to be connected and
disconnected without rebooting the computer (hot swapping), and allows
specific classes of hardware to be used without requiring individual device
drivers to be installed.
CAUTION:
When using high power consumption USB device such as USB ODD, use

CHAPTER 4. USING EXTERNAL DEVICES
31
an external device power adapter. Otherwise, it will cause the device unable
to be recognized and used, or system shut down.
Connecting an external display
You can connect a VGA monitor by using a VGA port. To connect a VGA
monitor, plug the display cable to VGA port on your computer. To shift to
other connected display devices, press Fn + F5.
Connecting a headphone and audio device
Your computer comes with one headphone jack used for connecting
headphones, speakers, and audio devices.

CHAPTER 4. USING EXTERNAL DEVICES
32
Connecting an external microphone
Your computer comes with one external microphone jack used for
connecting external microphone.

CHAPTER 5. TROUBLESHOOTING
33
Chapter 5. Troubleshooting
This section lists frequently asked questions and tells where you can find
detailed answers.
Display Problems
When I turn on the computer, nothing appears on the screen and the
computer does not beep while starting up.
NOTE:
If you are not sure whether you heard any beeps, turn off the computer; then
turn it on again, and listen again.
If a user password is set, enter the correct password and press Enter.
If the user password prompt does not appear, the brightness level
might be set to minimum brightness. Adjust the brightness level by
pressing Fn +F7.
If the screen still remains blank, make sure that:
- The battery is installed correctly.
- The AC adapter is connected to the computer and the power cord
is plugged into a working electrical outlet.
- The computer power is on. (Press the power button again for
confirmation.)
- The memory is installed correctly.
If these items are properly set, and the screen remains blank, have the
computer serviced.
My screen goes blank while the computer is on.
Your screen saver or power management may be enabled. Do one of the
following to exit from the screen saver or to resume from sleep or
hibernation mode:

CHAPTER 5. TROUBLESHOOTING
34
Touch the touch pad.
Press any key.
Press the power button.
Keyboard Problems
A number appears when you enter a letter.
The numeric lock function is on. To disable it, press Fn + Insert.
All or some of the keys on the external numeric keypad do not work.
Make sure that the external numeric keypad is correctly connected to the
computer.
Sleep or Hibernation Problems
The computer enters sleep mode unexpectedly.
If the processor overheats, the computer automatically enters sleep mode to
allow the computer to cool and to protect the processor and other internal
components. Check the settings for sleep mode.
The computer enters sleep mode (the sleep indicator turns on)
immediately after Power-on self-test (POST).
Make sure that:
The battery is charged.
The operating temperature is within the acceptable range. See
“Appendix A. Specifications”.
If the battery is charged and the temperature is within range, have the
computer serviced.
The critical low-battery error message appears, and the computer
immediately turns off.
The battery power is getting low. Connect the AC adapter to the computer,
or replace the battery with a fully charged one.
The computer does not return from sleep mode, or the sleep indicator
stays on and the computer does not work.
CHAPTER 5. TROUBLESHOOTING
35
If the computer does not return from sleep mode, it may have entered
hibernation mode automatically because the battery is depleted. Check
the sleep indicator.
If the sleep indicator is on, your computer is in sleep mode. Connect
the AC adapter to the computer; then press any key or the power
button.
If the sleep indicator is off, your computer is in sleep/hibernation mode
or power-off state. Connect the AC adapter to the computer; then press
the power button to resume operation.
If the system still does not return from sleep mode, your system has
stopped responding, and you cannot turn off the computer; reset the
computer. Unsaved data may be lost. To reset the computer, press and
hold the Power button for 4 seconds or more. If the computer is still not
reset, remove the AC adapter and the battery.
Computer Screen Problems
The screen is blank.
Do the following:
If you are using the AC adapter, or using the battery, and the battery
status indicator is on (is blue), press Fn +F7 to make the screen
brighter.
If the Power indicator is in blinking blue, press any key or the Power
button to resume from the sleep mode.
If you still have the problem, do the Solution in the following problem
“The screen is unreadable or distorted.”
The screen is unreadable or distorted.
Make sure that:
The display device driver is installed correctly.
The screen resolution and color quality are correctly set.
The monitor type is correct.
To check these settings, do as follows:

CHAPTER 5. TROUBLESHOOTING
36
① Right-click on the desktop and select Personalize from the popup
menu.
② Click Display Settings and check whether the screen resolution
and color quality are correctly set.
③ Click the Advanced Settings button.
④ Click the Adapter tab.
⑤ Make sure that the correct device driver name is shown in the
adapter information window.
NOTE:
The device driver name depends on the video chip that has been installed
on your computer.
⑥ Click the Properties button. If you are prompted for an
administrator password or confirmation, enter the password or
provide confirmation. Check the “Device status” box and make
sure the device is working properly. If not, click the Troubleshoot
button.
⑦ Click the Monitor tab.
⑧ Make sure the information is correct.
⑨ Click the Properties button or the Troubleshoot button.
Incorrect characters appear on the screen.
Did you install the operating system or application program correctly? If they
are installed and configured correctly, have the computer serviced.
Missing, discolored, or bright dots appear on the screen every time
you turn on your computer.
This is an intrinsic characteristic of the TFT technology. Your computer’s
display contains multiple thin-film transistors (TFTs). A small number of
missing, discolored, or bright dots on the screen might exist all the time.
Sound Problems
No sound can be heard from the speaker even when the volume is
CHAPTER 5. TROUBLESHOOTING
37
turned up.
Make sure that:
The Mute function is off.
The headphone jack is not used.
Speakers are selected as a playback device.
Battery Problems
The battery cannot be fully charged by the power-off method in the
standard charge time for your computer.
For details, See “Checking Battery Status” in Chapter 3.
Your computer shuts down before the battery status indicator shows
empty.
-or-
Your computer operates after the battery status indicator shows
empty.
Discharge and recharge the battery.
The operating time for a fully charged battery is short.
For details, See “Handling the Battery” in Chapter 3.
The computer does not operate with a fully charged battery.
The surge protector in the battery might be active. Turn off the computer for
one minute to reset the protector; then turn on the computer again.
The battery does not charge.
For details, See “Handling the Battery” in Chapter 3.
A Hard Disk Drive Problem
The hard disk drive does not work.
In the Boot menu in AMI Setup Utility, make sure that the hard disk drive is
included in the Boot Sequence correctly.

CHAPTER 5. TROUBLESHOOTING
38
Other Problems
Your computer does not respond.
To turn off your computer, press and hold the power button for 4
seconds or more. If the computer still does not respond, remove the AC
adapter and the battery.
Your computer might lock when it enters sleep mode during a
communication operation. Disable the sleep timer when you are
working on the network.
The computer does not start from a device you want.
See the Boot menu of the AMI Setup Utility. Make sure that the startup
sequence in the AMI Setup Utility is set so that the computer starts from the
device you want.
Also make sure that the device from which the computer starts is enabled.
In the Boot menu in the AMI Setup Utility, make sure that the device is
included in the “Boot Device Priority” list.

APPENDIX A. SPECIFICATIONS
39
Appendix A. Specifications
This section provides basic information that you may need when setting up,
updating drivers for, and upgrading your computer.
Specifications
Processor
Intel® Atom™ processor
CAUTION:
The CPU cannot be replaced or upgraded by the user. The computer is
equipped with a different CPU depending on the model type.
Memory
Memory Type: DDR2 SDRAM SO-DIMM (512mb, 1024mb and 2048mb)
Storage devices
2.5-inch hard disk drive (The capacity of the hard disk drive is different
depending on the model type.)
SD, MMC, MS/MS pro
External I/O Interfaces
External monitor connector
Microphone jack

APPENDIX A. SPECIFICATIONS
40
Speaker/Headphone jack
3 Universal Serial Bus (USB) connectors
RJ45 Ethernet connector
LAN
Integrated 10/100 BASE-T Ethernet local area network (LAN) network
interface card (NIC) with RJ-45 jack
AC Adaptor (Free Voltage)
Model: 0335A1865 (UL: E193430)
Input: AC 100 ~ 240V, 50 ~ 60Hz, 1.7A
Output: 18.5V 3.5A
Model: 0335C1965 (UL: E193430)
Input: AC 100 ~ 240V, 50 ~ 60Hz, 1.7A
Output: 19V 3.42A
Supplier: LI SHIN INTERNATIONAL ENTERPRISE CORP.
CAUTION:
Use the correct adaptor for your computer.
Operating Environment
Operating 10 ~ 35 °C (50 ~ 95 °F), 20 ~ 80% relative humidity
Non-operating -10 ~ 60 °C (14 ~ 140 °F), 10 ~ 80% relative humidity

APPENDIX B. NOTICES
41
Appendix B. Notices
General Notices
European Union CE Marking and Compliance Notices
Products intended for sale within the European Union are marked with the
Conformité Européene (CE) Marking, which indicates compliance with the
applicable Directives and European standards and amendments identified.
Shielded Cables Notice
All connections to other computing devices must be made using shielded
cables to maintain compliance with FCC regulations.
Peripheral Devices Notice
Only peripherals (input/output devices, terminals, printers, etc) certified to
comply with Class B limits may be attached to this equipment. Operation
with non-certified peripherals is likely to result in interference to radio and
TV reception.
Optical Disk Drive Notice
The optical disk drive is Class 1 Laser Product.

APPENDIX B. NOTICES
42
Wireless Related Information
Wireless Interoperability
Wireless LAN PCI Express Mini Card is designed to be interoperable with
any wireless LAN product that is based on Direct Sequence Spread
Spectrum (DSSS), Complementary Code Keying (CCK), and/or Orthogonal
Frequency Division Multiplexing (OFDM) radio technology, and is compliant
to:
The IEEE 802.11a/b/g/n Standard on Wireless LANs, as defined and
approved by the Institute of Electrical and Electronics Engineers.
The Wireless Fidelity (WiFi) certification as defined by the Wi-Fi
Alliance.
Usage Environment and Your Health
Wireless LAN PCI Express Mini Card emits radio frequency electromagnetic
energy like other radio devices. However, the level of energy emitted is far
much less than the electromagnetic energy emitted by wireless devices like
for example mobile phones.
Due to the fact that Wireless LAN PCI Express Mini Card operates within
the guidelines found in radio frequency safety standards and
recommendations, We believes the integrated wireless cards are safe for
use by consumers. These standards and recommendations reflect the
consensus of the scientific community and result from deliberations of
panels and committees of scientists who continually review and interpret the
extensive research literature.
In some situation or environment, the use of Wireless LAN PCI Express
Mini Card may be restricted by the proprietor of the building or responsible
representatives of the organization. These situations may for example
include:

APPENDIX B. NOTICES
43
Using the integrated wireless cards on board of airplanes, or in
hospitals
In any other environment where the risk of interference to other devices
or services is perceived or identified as harmful.
If you are uncertain of the policy that applies on the use of wireless devices
in a specific organization (e.g., airport or hospital), you are encouraged to
ask for authorization to use Wireless LAN PCI Express Mini Card prior to
turning on the computer.
Electronic Emissions Notices
European Union Compliance Statement Class B Compliance
European Union - Compliance to the Electromagnetic Compatibility
Directive
This product is in conformity with the protection requirements of EU Council
Directive 2004/108/EC on the approximation of the laws of the Member
States relating to electromagnetic compatibility. We cannot accept
responsibility for any failure to satisfy the protection requirements resulting
from a non-recommended modification of the product, including the
installation of option cards from other manufacturers.
This product has been tested and found to comply with the limits for Class B
Information Technology Equipment according to European Standard
EN55022. The limits for Class B equipment were derived for typical
residential environments to provide reasonable protection against
interference with licensed communication devices.
Properly shielded and grounded cables and connectors must be used in
order to reduce the potential for causing interference to radio and TV

APPENDIX B. NOTICES
44
communications and to other electrical or electronic equipment.
FCC Rules and Regulations - Part 15
This device uses, generates and radiates radio frequency energy. The radio
frequency energy produced by this device is well below the maximum
exposure allowed by the Federal Communications Commission (FCC).
This device complies with the limits for a Class B digital device
pursuant to Part 15 subpart C of the FCC Rules and Regulations.
Operation is subject to the following two conditions:
This device may not cause harmful interference.
This device must accept any interference received, including
interference that may cause undesired operation.
The FCC limits are designed to provide reasonable protection against
harmful interference when the equipment is installed and used in
accordance with the instruction manual and operated in a commercial
environment. However, there is no guarantee that interference will not occur
in a particular commercial installation, or if operated in a residential area.
If harmful interference with radio or television reception occurs when the
device is turned on, the user must correct the situation at the user’s own
expense. The user is encouraged to try one or more of the following
corrective measures:
Re-orient or relocate the receiving antenna.
Increase the separation between the equipment and receiver.
Connect the equipment into an outlet on a circuit different from that on
which the receiver is connected.
Consult the dealer or an experienced radio/TV technician for help.
CAUTION: The Part 15 radio device operates on a non-interference
basis with other devices operating at this frequency. Any changes or
modification to said product not expressly approved by Intel could void the
user's authority to operate this device.

APPENDIX B. NOTICES
45
Declaration of Conformity (PCI Express Minicard Adapter)
Product Descriptions:
Intel® PRO/Wireless 3945ABG Network Connection
(Model WM3945ABG)
802.11b/g Wireless LAN PCIe Minicard
(Model AR5007EG)
EU RoHS Compatible Statements
Parts conform to the requirements of the European Union’s Restriction on
Use of Hazardous Substances in Electrical and Electronic Equipment
(RoHS) Directive 2002/95/EC for the six substances and their respective
maximum limits shown in Table 1 below , and such products are designed to
meet the higher temperature reflow required for lead-free processes.
Table 1
Restricted Substance Maximum Limit (ppm)1
Cadmium (Cd) 100
Lead (Pb) 1000
Mercury (Hg) 1000
Hexavalent Chromium (Cr6+) 1000
Poly Brominated Biphenyls (PBB) 1000
Poly Brominated Diphenyl Ethers (PBDE) 1000
Notes:
1. Maximum limit does not apply to applications covered by RoHS
exemptions
2. Includes requirement that lead not to exceed 0.1% by weight in
homogenous materials.

APPENDIX B. NOTICES
46
NOTES
Changes or modifications not expressly approved by the party responsible
for compliance could void the user’s authority to operate the equipment.
This equipment complies with FCC radiation exposure limits set forth for an
uncontrolled environment. End user must follow the specific operating
instructions for satisfying RF exposure compliance. This transmitter must
not be co-located or operating in conjunction with any other antenna or
transmitter.
NOTE: The mobile device is designed to meet the requirements for
exposure to radio waves established by the Federal Communications
Commission (USA). These requirements set a SAR limit of 1.6 W/kg
averaged over one gram of tissue. The highest SAR value reported under
this standard during product certification for use when properly worn on the
body is 0.515 W/kg.
NOTE: This equipment has been tested and found to comply with the limits
for a Class B digital device, pursuant to Part 15 of the FCC Rules. These
limits are designed to provide reasonable protection against harmful
interference in a residential installation. This equipment generates, uses
and can radiate radio frequency energy and, if not installed and used in
accordance with the instructions, may cause harmful interference to radio
communications. However, there is no guarantee that interference will not
occur in a particular installation.
If this equipment does cause harmful interference to radio or television
reception, which can be determined by turning the equipment off and on, the
user is encouraged to try to correct the interference by one or more of the
following measures:

APPENDIX B. NOTICES
47
-- Reorient or relocate the receiving antenna.
-- Increase the separation between the equipment and receiver.
-- Connect the equipment into an outlet on a circuit different from that to
which the receiver is connected.
-- Consult the dealer or an experienced radio/TV technician for help.
Waste Disposal Statements
Conforming to the Directive 2002/96/EC this appliance
must not be disposed of with other household waste.
This appliance must be disposed by an authorized
waste treatment or collection point for the recycling of
waste electrical and electronic equipment. Incorrect
disposal of this type of waste product can damage the
environment and cause problems to health due to
hazardous substances produced by electrical and
electronic equipments.

APPENDIX B. NOTICES
48
Coby Communications Ltd
Address: Unit C-E, 8/F., Po Shau Centre, 115 How Ming Street, Kwun Tong,
Kowloon, Hong Kong
Factory’s Name: SHENZHEN COBY COMMUNICATIONS LTD.
Factory’s Address: Block 2-3, Taoxia 2nd Industrial Zone, LongHua Town, BaoAn
District, ShenZhen City, China
Contact Person: Ms. Sally Wong
Email: sally_wong@cobyhk.com
Tel: 852-2759 5838
Fax: 852-2759 5887
Coby is a registered trademark of Coby Corporation.
Printed in China.
PC User Manual Rev 1

NBPC1022
Netbook Instruction Manual
Please read this manual carefully before operation

Chapter 2. Getting to Know Your Computer
User Guide
Original Issue: 2009/04
This manual guides you in setting up and using your new notebook
computer. Information in this manual has been carefully checked for
accuracy and is subject to change without notice.
No part of this manual may be reproduced, stored in a retrieval system, or
transmitted, in any form or by any means, electronic, mechanical, photocopy,
recording, or otherwise, without prior written permission.
Please read this manual carefully before using the computer.
The following signs call attention to features and operations that may be
dangerous to the user. Follow the instruction closely to reduce the risk of
physical harm or damage to the equipment.
DANGER: Not following the instruction will result in immediate death or
serious injury.
WARNING: Not following the instruction could result in death or serious
injury.
CAUTION: Not following the instruction could result in minor or moderate
injury and/or damage to the product.
NOTE: Indicates important information that helps you make better use of
your computer.
Trademarks
Product names used herein are for identification purposes only and may be
the trademarks of their respective companies.
Microsoft, Windows XP, Windows MCE, Windows Vista, and Windows
Sound System are trademarks of Microsoft Corporation.
Intel®, Intel® Core TM, Intel® HD Audio (Azalia) are registered trademark of
Intel Corporation.
All other brands or product names mentioned in this manual are trademarks
or registered trademarks of their respective companies.

CONTENTS
I
CONTENTS
CHAPTER 1. IMPORTANT SAFETY INSTRUCTIONS .................................. 1
CHAPTER 2. GETTING TO KNOW YOUR COMPUTER ............................... 9
TOP VIEW ............................................................................................................. 9
LEFT-SIDE VIEW ................................................................................................. 13
BOTTOM VIEW .................................................................................................... 14
CHAPTER 3. USING YOUR COMPUTER ...................................................... 16
USING THE BATTERY PACK AND AC ADAPTER ................................................... 16
TURNING ON YOUR COMPUTER ........................................................................ 21
PUTTING YOUR COMPUTER TO SLEEP OR SHUTTING IT DOWN ........................ 22
USING THE KEYBOARD ....................................................................................... 23
USING THE TOUCH PAD ...................................................................................... 25
USING MEMORY CARDS ..................................................................................... 26
USING THE WEB CAMERA .................................................................................. 27
USING THE INTERNET ......................................................................................... 27
INSTALLING DEVICE DRIVERS ............................................................................ 28
CHAPTER 4. USING EXTERNAL DEVICES ................................................. 30
CONNECTING A UNIVERSAL SERIAL BUS (USB) DEVICE .................................. 30
CONNECTING AN EXTERNAL DISPLAY ................................................................. 31
CONNECTING A HEADPHONE AND AUDIO DEVICE ............................................... 31
CONNECTING AN EXTERNAL MICROPHONE ........................................................ 32
CHAPTER 5. TROUBLESHOOTING ............................................................... 33
DISPLAY PROBLEMS ........................................................................................... 33
KEYBOARD PROBLEMS ...................................................................................... 34
SLEEP OR HIBERNATION PROBLEMS ................................................................. 34
COMPUTER SCREEN PROBLEMS ....................................................................... 35
SOUND PROBLEMS ............................................................................................. 36
BATTERY PROBLEMS ......................................................................................... 37
A HARD DISK DRIVE PROBLEM .......................................................................... 37

CONTENTS
II
OTHER PROBLEMS ............................................................................................. 38
APPENDIX A. SPECIFICATIONS .................................................................... 39
SPECIFICATIONS ................................................................................................. 39
APPENDIX B. NOTICES .................................................................................... 41
GENERAL NOTICES ............................................................................................ 41
WIRELESS RELATED INFORMATION .................................................................... 42
ELECTRONIC EMISSIONS NOTICES .................................................................... 43
EU ROHS COMPATIBLE STATEMENTS ............................................................... 45
WASTE DISPOSAL STATEMENTS ........................................................................ 46

CHAPTER 1. IMPORTANT SAFETY INSTRUCTIONS
1
Chapter 1. Important Safety Instructions
Please read this manual carefully before using the computer.
These safety instructions will ensure many years of safe enjoyment from the
product. Set up your computer on a flat, stable surface. (We are not
responsible for the problems and damages caused by incorrect use of the
computer in an unsafe environment.)
Selecting a place to work
WARNING
Do not operate your computer near water; for example, in a bathroom or
near a swimming pool.
The computer may not function correctly, and there is the risk of electric
shock. Operate the computer within a temperature range of 50 to 95
degrees F (10 to 35 degrees C) and 20 to 80% of relative humidity.
Safely dispose of the packing materials, such as desiccant and plastic bags.
Children may swallow desiccant or suffocate from plastic bags.
CAUTION
Keep your computing environment clean and free of dust. There is a risk of
dysfunction to the computer.
Keep your computer away from electromagnetic fields. Exposure to the
electromagnetic field may result in loss of data in the hard disk drive and/or
damage to the LCD (or LED).

CHAPTER 1. IMPORTANT SAFETY INSTRUCTIONS
2
Do not block the fan louvers and leave enough space around the computer
for ventilation. The computer may overheat and result in fire or injuries.
Using the battery pack
WARNING
Use only a battery pack recommended.
Using a battery pack of a different type may result in explosion.
Keep metallic objects, such as keys and clips, away from the battery pack.
Objects that conduct electricity can short-circuit the battery pack and result
in fire and/or injuries.
Keep the battery pack away from heat.
There is a risk of explosion or fire.
Do not short-circuit battery terminals.
There is a risk of explosion.
Do not subject the battery pack to temperatures above 140 degrees F (60
degrees C).
There is a risk of explosion or fire.
Keep the battery pack away from children and/or pet.
There is a risk of injury and damage to the battery pack.
Do not put the battery pack in the water.
There is a risk of fire or damage to the batter pack.
Be cautious when handling the battery pack’s hooks. It may hurt you.

CHAPTER 1. IMPORTANT SAFETY INSTRUCTIONS
3
Lock the battery catch lock at the bottom surface of the Notebook.
There is a risk of battery damage.
Replacing and disposing of the backup (standby) battery
WARNING
If the backup battery is incorrectly replaced, there is danger of explosion.
The lithium battery contains lithium and can explode if it is not properly
handled or disposed of.
Replace only with a battery of the same type.
Connecting to an AC power source
WARNING
Do not use loose or damaged power plugs.
There is a risk of electric shock or fire.
Use properly grounded outlet.
Connecting the computer to an outlet without proper grounding may result in
electric shock and damages to your computer.
Do not touch or grab the power plug with wet hands.
There is a risk of electric shock.
Hold the plug body when removing the power cord from an outlet.
There is a risk of fire and damages to the computer.
Use your computer at the proper voltage/current level indicated.
Supplying improper levels of voltage/current may result in electric shock, fire,

CHAPTER 1. IMPORTANT SAFETY INSTRUCTIONS
4
and/or damage to the computer.
If you hear a noise from the power cord or outlet, unplug the power cord
immediately, and contact the customer service for help.
There is a risk of fire or electric shock.
Make sure the power plug fits snugly into the electrical outlet.
Loose fit may result in fire.
Do not bend or place a heavy object on top of the power cord.
Keep the children and pets from damaging the power cord.
Damaged power cord may result in electric shock or fire.
Keep the power cord and plug clean and free of dust.
There is a risk of fire.
If an object or liquid enters the computer or an adaptor, remove power cord,
battery, and any other cables from the computer, and contact the customer
service for help.
There is a risk of an electric shock, fire, or damage to the computer.
Before cleaning the computer, disconnect the power cord, battery, and any
other cables from the computer.
There is a risk of electric shock or damage to the computer.
Using the computer
WARNING
For cleaning your computer, use mild detergent or computer cleaning
products.
Be sure to dry completely before using the computer.
Using the computer without completely drying it may result in electric shock

CHAPTER 1. IMPORTANT SAFETY INSTRUCTIONS
5
or fire.
During a lightning storm, disconnect the power cord, telephone line, and
LAN cable from the computer.
There is a risk of electric shock or fire.
Do not place water, chemicals, or liquid of any kind on the computer.
Liquid of any kind entering inside the computer may result in an electric
shock, fire, or damage to the computer.
Do not connect the modem directly to a multi-line telephone.
There is a risk of fire or damage to the computer.
If you drop your computer, remove the power cord and battery pack, and
then contact the customer service for check up.
There is a risk of electric shock or fire.
Do not place a burning candle or cigarette on the computer.
There is a risk of fire.
If you see or smell smoke from the computer or adaptor, turn off the
computer, remove the power cord, and then contact the customer service
for help. There is a risk of fire.
The LCD monitor’s fluorescent lamp include hydrargyrum.
Avoid direct contact with liquid from the broken LCD. If it spills into eyes or
the other parts of your body, wash it out several times with clean water. If
you feel something different, contact a doctor or a health administrator
immediately.
CAUTION:
Do not place an object, such as a pen or clip, on the keyboard.

CHAPTER 1. IMPORTANT SAFETY INSTRUCTIONS
6
If you close the LCD cover with an object on the keyboard, you may damage
or break the LCD.
Do not touch or scratch the LCD with sharp objects.
The LCD may be damaged.
Be sure to turn off the computer before closing the LCD cover.
The computer may overheat, and be damaged or deformed.
Do not exert excessive pressure on the LCD.
LCD is made of glass, and an excessive force can break the LCD.
Follow the instructions in the user's guide.
There is a risk of damage to the computer.
Do not place objects into the PC Card slot.
There is the risk of electric shock or injury.
Upon completion of any service or repairs, ask service technician to perform
safety checks.
Ignoring safety checks may result in electric shock or fire.
Use the Wireless LAN at least 5m away from a microwave oven or plasma
lamp.
When using the Wireless LAN near a plasma lamp, use the channel 11, 12,
or 13, the connection may be unavailable or slow.
Keep the computer away from heat.
The computer may deform and there is the risk of fire.
When attaching an external device, make sure the connector from the
device and the port on the computer are of the same type.
There is a risk of damage to the computer.

CHAPTER 1. IMPORTANT SAFETY INSTRUCTIONS
7
Do not insert a damaged CD-ROM or floppy disk.
There is a risk of damage to the computer.
Carrying and storing the computer
WARNING
Before moving the computer, turn the power off and remove all the cables.
You may trip over the loose cables and fall.
When traveling on an airplane, follow the instruction by flight attendant.
Using the computer on an airplane may result in an airline accident.
Do not travel with LCD monitor open.
Do not expose your computer to the direct sunlight in a closed area such as
inside a car.
Prolonged exposure to high temperatures may deform the computer and
also result in fire.
Preventing data lose (handling hard disk drives)
CAUTION
Be cautious when handling the hard disk drive.
The hard disk drive is very delicate to any physical impact.
Always make backups for your data.
We are not responsible for the data lose caused by users.
The data on the hard disk or the drive itself may be damaged in the following

CHAPTER 1. IMPORTANT SAFETY INSTRUCTIONS
8
situations:
Exposure to a physical shock during the disassembling or installing
process.
The computer is reset (rebooted), for example by power outage, while
the hard disk drive is operating.
Exposure to virus.
The computer is turned off during operation.
Exposure to a physical shock while the hard disk drive is operating.
To prevent data lose due to hard disk drive damages, always backup your
data. We are not responsible for the lost of data.
Ergonomic information
WARNING
Adjust the display position to avoid glare or reflections from overhead
lighting.
The top of the display should be on or below the level of your eyes.
Keep your head and neck in an upright position.
Keep your forearms, wrists, and hands in a horizontal position.
Adjust your chair to keep your arms and hands in a comfortable position.
Using the computer in the same position for a prolonged period of time may
cause discomfort to your body.
Take short frequent breaks from working with your computer. No more than
2 hours of computing per day is recommended.
Stretch periodically to reduce muscular discomfort. Check the volume level
Check if the volume level is too high before using headphones.
Do not use the headphones for a prolonged period of time.
CHAPTER2. GETTING TO KNOW YOUR COMPUTER
9
Chapter 2. Getting to Know Your Computer
Top View
1
2
4
5
6
7
8
15
13
12
14
11
10
3
9
NOTE:
The illustrations in this manual may differ from the actual product.
1 Web Camera
Built-in camera for video capture, conferencing, and chat.
2 Display Panel
The color display with TFT technology provides clear and brilliant text and
graphics.

CHAPTER2. GETTING TO KNOW YOUR COMPUTER
10
3
Power Button
Use the Power button to turn on the computer.
4
Built-in stereo speakers
5
AC adapter connector
Connects to the AC adapter to power on the computer and charge the
battery when the computer is not in use.
CAUTION:
To prevent damage to the computer and battery pack, use the dedicated AC
adapter only.
6
LAN Connector
If you are using a cabled network signal, this connects your computer to a
network or broadband device.
7
VGA Connector
Connect to a monitor or projector.
8
USB 2.0 connectors
Connect to USB devices, such as a mouse, keyboard, printer, external drive,
or MP3 player.
9
Multi-Media Reader Slot
Provides a fast and convenient way to view and share digital photos, music,
videos, and documents stored on the following digital memory cards:
SD, MMC, MS/MS pro
10
Headphone jack
Connects to a pair of headphones, or sends audio to a powered speaker or
sound system.

CHAPTER2. GETTING TO KNOW YOUR COMPUTER
11
CAUTION:
Lower the volume level before connecting headphones, then gradually
increase the volume for comfortable listening.
Hearing experts advise against the constant use of personal stereos played
at high volume.
Constant high-volume use can lead to hearing loss. If you experience
ringing in your ears or hearing loss, discontinue use immediately and
seek medical advice.
11 Microphone jack
Connects to a microphone or input signal for use with audio programs.
12 Click Button
Provide left- and right-click functions like those on a mouse.
13
Touch inductive panel
Provides the functionality of a mouse to move the cursor, drag or move
selected items, and left-click by tapping the surface.
14
System status indicators
The system status indicators show the current status of your computer.
Power indicator light
The light operates as follows:
Solid Blue: The system is on.
Flashing Blue: The system is in standby mode.
Off: The system is off or in hibernate mode.

CHAPTER2. GETTING TO KNOW YOUR COMPUTER
12
Battery status light
The light operates as follows:
Off: The battery is fully charged.
Solid Red: The battery is charging.
Flashing Red: The battery is low.
HDD Status Light:
Lighting up when data is being written to or read from the hard disk.
Wireless LAN Status Light:
The light operates as follows:
Off: The wireless card does not have the power or RF is off.
Slow Flashing Blue: The wireless client is not associated with the
network. Slow blinking (3-4 seconds interval): the wireless card
powered on and attempting to connect.
Fast Flashing Blue: The wireless card transmitting and/or receiving
data by the rate depending on blinking speed.
Caps & Num Lock Status Light:
The light operates as follows:
Solid Blue: The caps Lock is active.
Solid Red: The numeric keypad is active.
Solid Pink: the Caps Lock and Num Lock are active.
1
5
Keyboard
CHAPTER2. GETTING TO KNOW YOUR COMPUTER
13
Left-side View
1 Built-in stereo speakers
2 Security Keyhole
Your computer comes with a security keyhole. You can purchase a security
cable and lock to fit this keyhole.
3 Fan Louvers
The fan louvers allow hot air to exhaust from the computer.
WARNING:
Make sure that paper, books, clothing, cables or other objects do not block
any of the fan louvers or else overheating of the computer may occur.
CHAPTER2. GETTING TO KNOW YOUR COMPUTER
14
Bottom View
1 Battery Latch - Manual
The manual battery latch is used to keep the battery pack secured. Move
the manual battery latch to the unlocked position to insert or remove the
battery pack. Move the manual latch to the locked position after inserting the
battery pack.
2 Battery Pack
3 Battery Latch - Spring Loaded
The spring-loaded battery latch keeps the battery pack secured in place.
When you insert a battery pack, this latch automatically secures the battery
in place. To remove the battery, hold this latch in the unlocked position.

CHAPTER2. GETTING TO KNOW YOUR COMPUTER
15
4 Thermal Vent
The vents allow hot air to exhaust from the computer.
WARNING:
Make sure that paper, books, clothing, cables or other objects do not block
any of the vents or else overheating of the computer may occur.
5 Hard Disk Drive
The Hard Disk Drive is secured in a compartment.
CAUTION:
Do not disassemble or replace the hard disk drive by yourself! If you do
need to, ask a COBY authorized service center or dealer to disassemble or
replace it.

CHAPTER 3. USING YOUR COMPUTER
16
Chapter 3. Using Your Computer
Using the Battery Pack and AC Adapter
When you need to use your computer away from electrical outlets, you
depend on battery power to keep your computer running. Different computer
components consume power at different rates. The more you use the
power-intensive components, the faster you consume battery power.
Your Computer Batteries
Your computer batteries enable you to do more, save more, and spend
more time unplugged. Mobility has revolutionized business by enabling you
to take your work wherever you go. With your computer batteries, you will
be able to work longer without being tied to an electrical outlet.
NOTE:
The operating system may run slower when using the battery mode.
Removing and Replacing the Battery
WARNING:
Using an incompatible battery may increase the risk of fire or explosion.
This computer should only use a battery purchased from us. Do not use
batteries from other computers.
Before removing the battery, shut down the computer, and remove
external cables (including the AC adapter).
To remove the battery:
① Shut down the computer and turn it over.
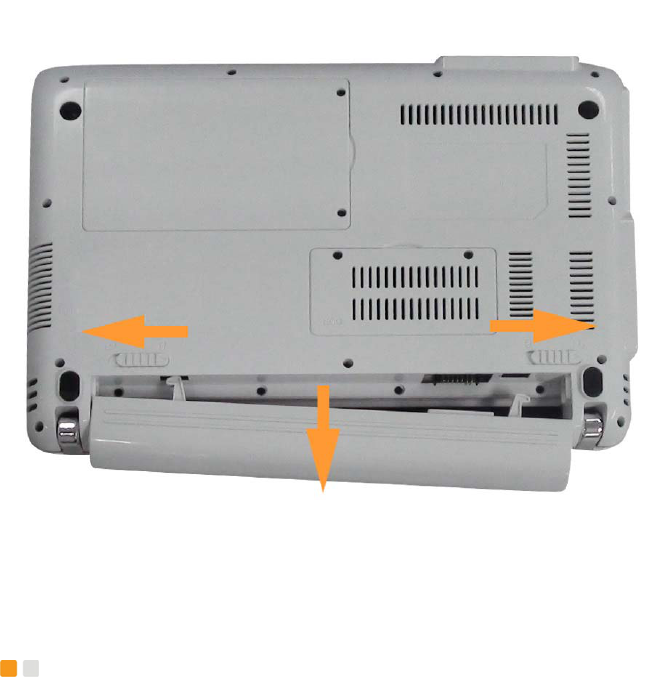
CHAPTER 3. USING YOUR COMPUTER
17
② Slide the battery release latch to the unlock position and hold.
③ Slide the battery out.
To replace the battery, slide it into the end until it clicks into place.
Checking Battery Status
You can determine the percentage of battery power remaining by using
Windows Power options.
The rate at which you use battery power determines how long you can use
the battery of your computer between charges. As each computer user has
different habits and needs, it is difficult to predict how long a battery charge
will last. There are two main factors:
The amount of energy stored in the battery when you begin to work.

CHAPTER 3. USING YOUR COMPUTER
18
The way you use your computer: for example, how often you access
the hard disk drive and how bright you make the computer display.
Connecting the AC Adapter
The power to run your computer can come either from the lithium-ion (Li-ion)
battery pack provided with it, or from AC power through the AC adapter.
While you use AC power, the battery charges automatically.
The AC adapter that comes with your computer has two basic components:
① The transformer pack that converts AC power for use with the
computer.
② The power cord that plugs into the AC outlet and into the transformer
pack.
CAUTION:
Using an improper power cord could cause severe damage to your
computer. To use the AC adapter, do the following. Be sure to take these
steps in the order in which they are given here.
③ Connect the power cord to the transformer pack.
④ Plug the power cord into an electrical outlet.
⑤ Connect the AC adapter to the AC power adapter jack of the computer.

CHAPTER 3. USING YOUR COMPUTER
19
WARNING:
The AC adapter works with electrical outlets worldwide. However, power
connectors and power strips vary among countries. Using an incompatible
cable or improperly connecting the cable to a power strip or electrical outlet
may cause fire or equipment damage.
NOTE:
When you do not use the AC adapter, disconnect it from the electrical outlet.
Do not wrap the power cord tightly around the AC power transformer pack
when it is connected to the transformer.
You can charge the battery when the AC adapter is connected to the
computer and the battery is installed. You need to charge it in any of
the following conditions:
When you purchase a new battery
If the battery status indicator (amber) starts blinking
If the battery has not been used for a long time
Before you charge the battery, make sure that its temperature is at least 10
degrees Celsius (50 degrees Fahrenheit).

CHAPTER 3. USING YOUR COMPUTER
20
Charging the Battery
When you check the battery status and find that the battery is low, you need
to charge the battery or replace it with a charged battery.
If an AC outlet is convenient, first, connect the power cord to the transformer
pack; second, plug the power cord into an electrical outlet; and then connect
the AC adapter to the power jack of the computer.
The charging time is affected by the physical environment.
NOTE:
To increase the life of the battery, the computer does not start recharging
the battery if the remaining power is no less than 95 percent.
Handling the Battery
WARNING:
Do not attempt to disassemble or modify the battery pack. Attempting to do
so can cause an explosion or liquid leakage from the battery pack. A battery
pack other than the one specified by us, or a disassembled or modified
battery pack is not covered by the warranty.
WARNING:
If the rechargeable battery pack is incorrectly replaced, there is danger of an
explosion. The battery pack contains a small amount of harmful substances.
To avoid possible injury:
Replace only with a battery of the type recommended by us.
Keep the battery pack away from fire.
Do not expose the battery pack to water or rain.
Do not attempt to disassemble the battery pack.
Do not short-circuit the battery pack.
Keep the battery pack away from children.
WARNING:
Do not put the battery pack in trash that is disposed of in landfills. When
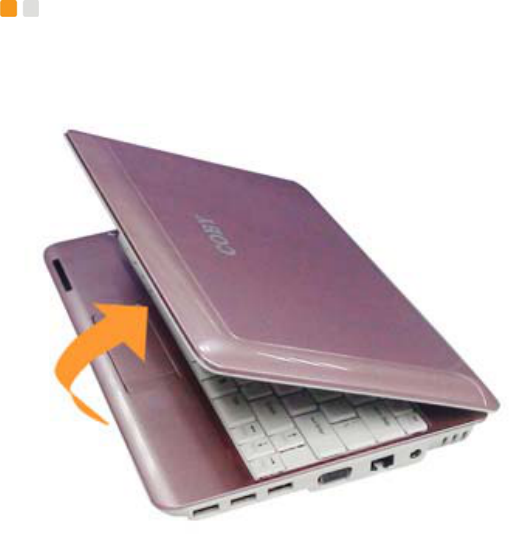
CHAPTER 3. USING YOUR COMPUTER
21
disposing of the battery, comply with local ordinances or regulations and
your company’s safety standards.
Opening and positioning the LCD panel
Open the display panel. Adjust the display panel for comfortable viewing.
Turning On Your Computer
Press the power button to turn on the computer.
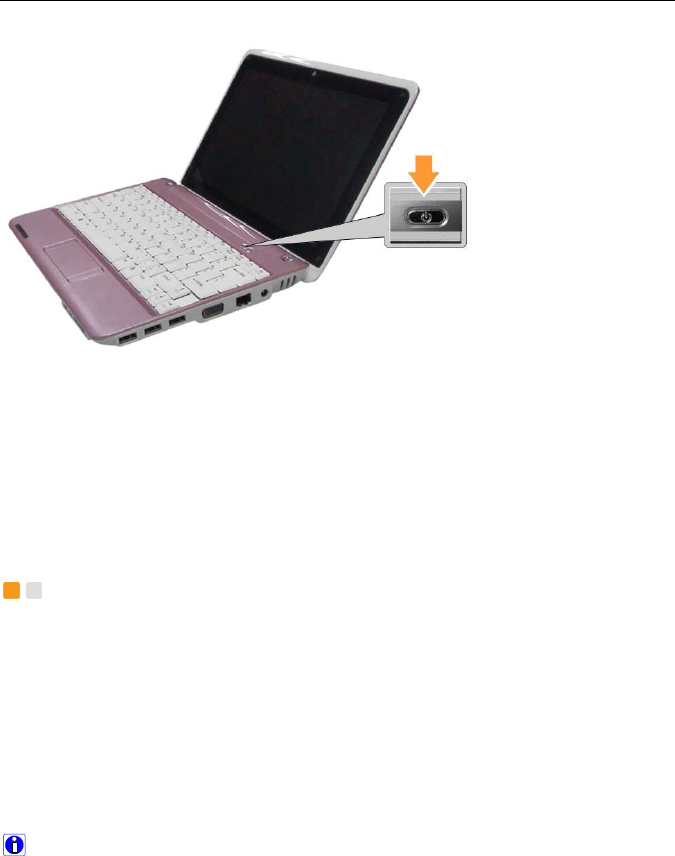
CHAPTER 3. USING YOUR COMPUTER
22
Putting Your Computer to Sleep or Shutting It Down
When you finish working with your computer, you can put it to sleep or shut
it down.
Putting your computer to Sleep
If you will be away from your computer for only a short time, put the
computer to sleep. When the computer is in sleep, you can quickly wake it
and bypass the startup process.
To put the computer to sleep, do one of the following.
Click Start and select Sleep from the Start menu.
Press Fn + Esc.
CAUTION:
Wait until the power indicator light starts blinking (indicating that the
computer is in sleep) before you move your computer. Moving your
computer while the hard disk is spinning can damage the hard disk, causing
loss of data.
To wake the computer, do one of the following.
Press the power button.
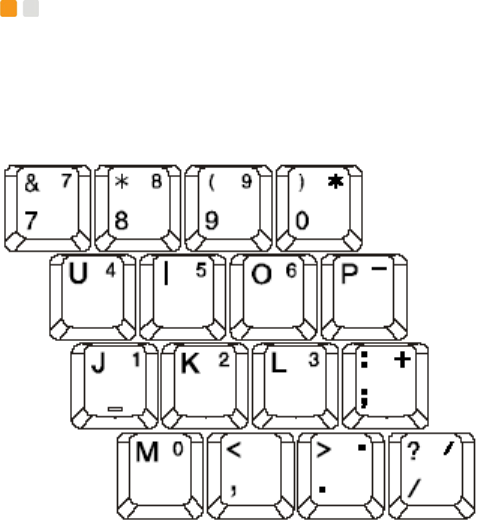
CHAPTER 3. USING YOUR COMPUTER
23
Shutting Down Your computer
If you are not going to use your computer for a day or two, shut it down.
To shut down your computer, click Start and select Shut down from the
Start menu.
Using the Keyboard
Your computer has a numeric keypad and function keys incorporated in the
standard keyboard.
Numeric Keypad
The keyboard has keys that, when enabled, work as a 10-key numeric
keypad.
To enable or disable the numeric keypad, press Fn+Ins/NumLk.
* The illustrations in this manual may differ from the actual product.

CHAPTER 3. USING YOUR COMPUTER
24
Function Key Combinations
Through the use of the function keys, you can change operational features
instantly. To use this function, press and hold the Fn key ; then press one
of the function keys .
The following describes the features of each function key.
Fn + Esc: Put your computer in sleep mode.
Fn + F1: Enable/disable the built-in wireless device feature
Fn + F3: Mute.
Fn + F4: Enable/disable the touch pad.
Fn + F5: Shift to other connected display devices.
Fn + F6: Decrease display brightness.
Fn + F7: Increase display brightness.
Fn + F8: Decrease computer volume.
Fn + F9: Increase computer volume.
Fn + F10: Turn on/off the LCD screen.
Fn + Ins/NumLk: Enable/disable the Numeric keypad.

CHAPTER 3. USING YOUR COMPUTER
25
Using the Touch Pad
The touch pad consists of a pad and two click buttons at the bottom of the
keyboard. To move the cursor on the screen, slide your fingertip over the
pad in the direction in which you want the cursor to move. The functions of
the left and right click buttons correspond to those of the left and right
mouse buttons on a conventional mouse. Finger Sliding on area lets you
drag to scroll quickly up, down in the active window.
CAUTION:
Guidelines on using the touch pad
Do not touch the touch pad with a sharp or pointed object as doing so
may damage the touch pad.
Do not remove the cover sheet of the touch pad as doing so may
damage the touch pad.
Do not use the touch pad with two fingers, wearing gloves, or wet hand
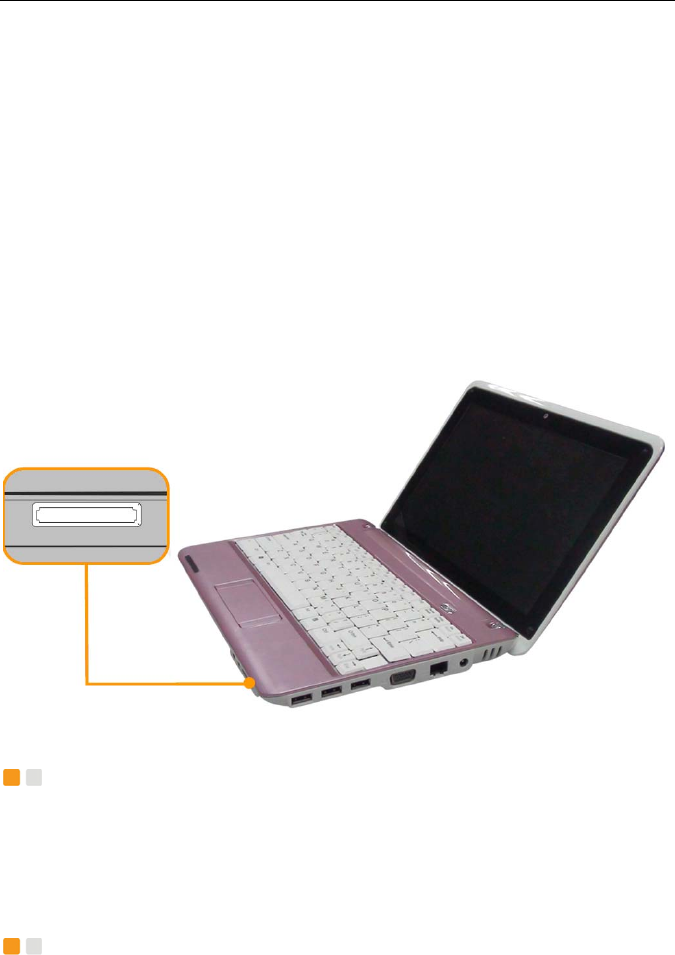
CHAPTER 3. USING YOUR COMPUTER
26
as it may not function correctly. Using the touch pad with a dirty or oily
finger may damage the touch pad.
Do not exert too much pressure on the touch pad as doing so may
result in injuries to your finger or wrist.
Using Memory Cards
Your computer comes with one Multi-media Reader slot used to insert a
memory card, such as an SD Card, a Multi-Media Card, a Memory Stick or a
Memory Stick Pro.
Inserting a memory card
Gently slide the memory card with the arrow facing upward and pointing
toward the Multi-media reader slot. Slide until it clicks into place.
Removing a memory card
Gently pull the memory card out of the Multi-media reader slot.

CHAPTER 3. USING YOUR COMPUTER
27
Using the Web Camera
With the built-in web camera, you can take photos or movies and use with
various applications, such as MSN or Yahoo! Messenger, and so on.
NOTE:
If you use Windows Vista, you need to install a separate third party
dedicated application, because Vista does not include a program for taking
pictures or movies with the integrated camera.
Using the Internet
Your computer comes with LAN port for Ethernet connection or local area
network (LAN), and wireless LAN for wireless connection.
Using LAN Port
The LAN port supports a standard RJ-45 connector, and allows you to
connect the computer to an Ethernet connection and local area network
(LAN).
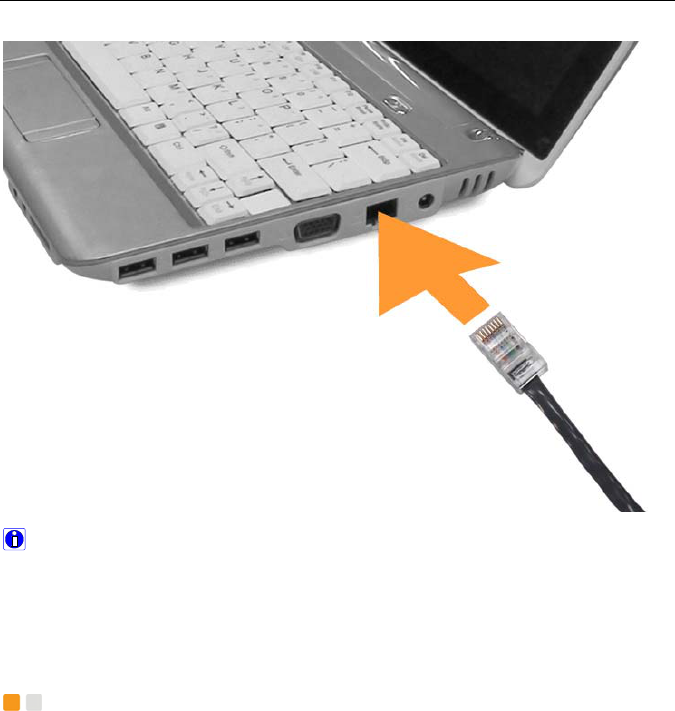
CHAPTER 3. USING YOUR COMPUTER
28
CAUTION:
As the voltage of a telephone connection is higher than that of a network, do
not attempt to connect a telephone cable to the LAN port or else a short
circuit of the computer might occur.
Using wireless LAN
An isotropic antenna system is built into the display for optimal reception,
enabling wireless communication wherever you are.
To enable wireless communications, do the following;
① Press Fn + F1 to enable wireless LAN
② The computer automatic search and connect the suitably network.
Installing Device Drivers
A compatible device driver is a requirement to ensure correct operation and

CHAPTER 3. USING YOUR COMPUTER
29
performance of each component in your computer.
NOTE:
Most installations require a reboot to update the driver, otherwise the
system’s stability and audio or video effect may be compromised, or you
even have to reinstall the operating system.
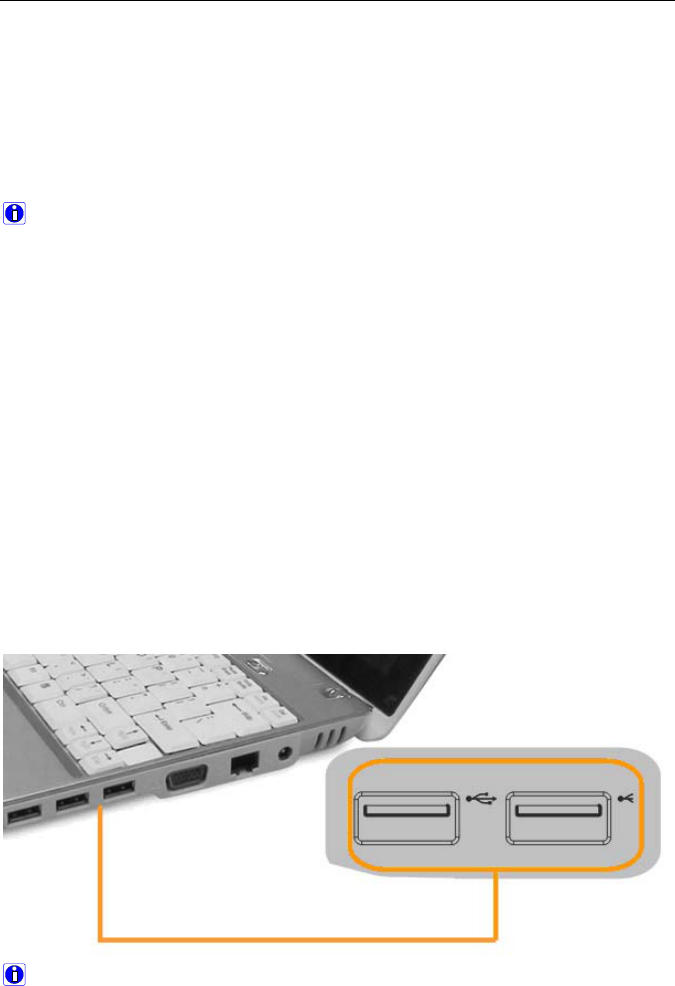
CHAPTER 4. USING EXTERNAL DEVICES
30
Chapter 4. Using External Devices
Your computer has many built-in features and connection capabilities.
CAUTION:
Do not connect or disconnect any external device cables other than USB
cables while the computer power is on; otherwise, you might damage your
computer. To avoid possible damage to attached devices, wait at least five
seconds after the computer is shut down to disconnect external devices.
Connecting a Universal Serial Bus (USB) Device
Your computer comes with three Universal Serial Bus Ports compatible with
USB 2.0 or USB 1.1 devices such as a keyboard, mouse, camera, hard disk
drive, printer, and scanner. USB allows devices to be connected and
disconnected without rebooting the computer (hot swapping), and allows
specific classes of hardware to be used without requiring individual device
drivers to be installed.
CAUTION:
When using high power consumption USB device such as USB ODD, use
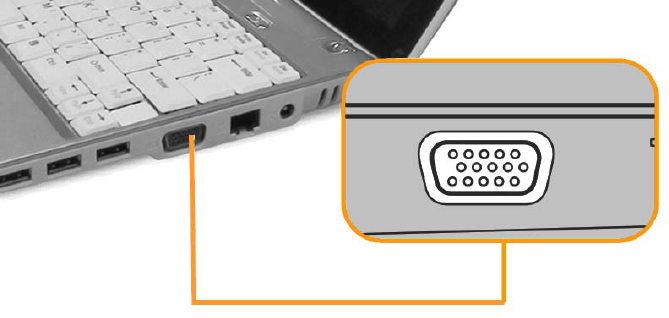
CHAPTER 4. USING EXTERNAL DEVICES
31
an external device power adapter. Otherwise, it will cause the device unable
to be recognized and used, or system shut down.
Connecting an external display
You can connect a VGA monitor by using a VGA port. To connect a VGA
monitor, plug the display cable to VGA port on your computer. To shift to
other connected display devices, press Fn + F5.
Connecting a headphone and audio device
Your computer comes with one headphone jack used for connecting
headphones, speakers, and audio devices.
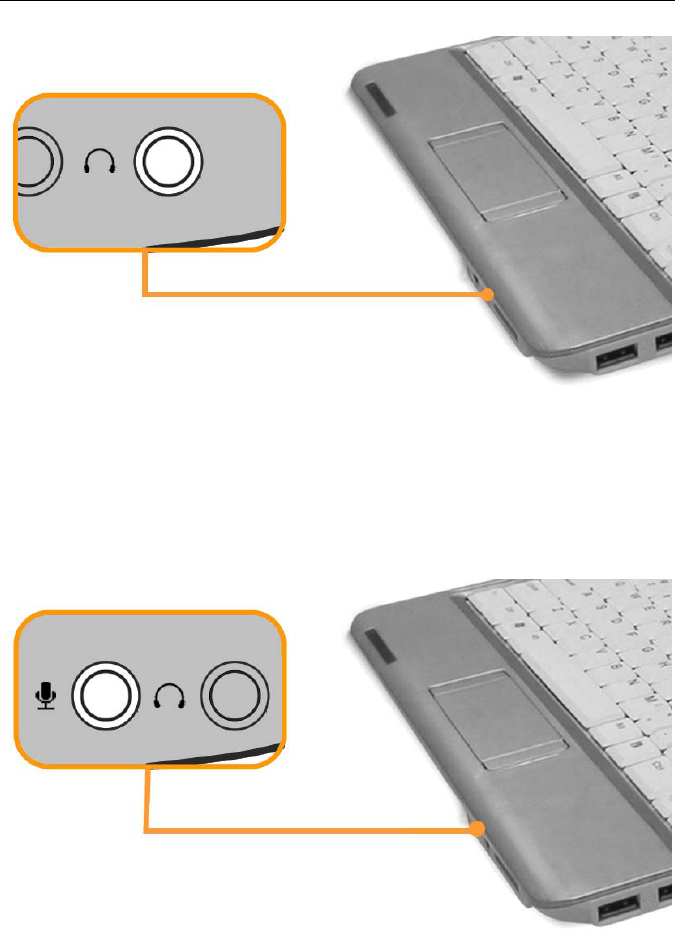
CHAPTER 4. USING EXTERNAL DEVICES
32
Connecting an external microphone
Your computer comes with one external microphone jack used for
connecting external microphone.

CHAPTER 5. TROUBLESHOOTING
33
Chapter 5. Troubleshooting
This section lists frequently asked questions and tells where you can find
detailed answers.
Display Problems
When I turn on the computer, nothing appears on the screen and the
computer does not beep while starting up.
NOTE:
If you are not sure whether you heard any beeps, turn off the computer; then
turn it on again, and listen again.
If a user password is set, enter the correct password and press Enter.
If the user password prompt does not appear, the brightness level
might be set to minimum brightness. Adjust the brightness level by
pressing Fn +F7.
If the screen still remains blank, make sure that:
- The battery is installed correctly.
- The AC adapter is connected to the computer and the power cord
is plugged into a working electrical outlet.
- The computer power is on. (Press the power button again for
confirmation.)
- The memory is installed correctly.
If these items are properly set, and the screen remains blank, have the
computer serviced.
My screen goes blank while the computer is on.
Your screen saver or power management may be enabled. Do one of the
following to exit from the screen saver or to resume from sleep or
hibernation mode:

CHAPTER 5. TROUBLESHOOTING
34
Touch the touch pad.
Press any key.
Press the power button.
Keyboard Problems
A number appears when you enter a letter.
The numeric lock function is on. To disable it, press Fn + Insert.
All or some of the keys on the external numeric keypad do not work.
Make sure that the external numeric keypad is correctly connected to the
computer.
Sleep or Hibernation Problems
The computer enters sleep mode unexpectedly.
If the processor overheats, the computer automatically enters sleep mode to
allow the computer to cool and to protect the processor and other internal
components. Check the settings for sleep mode.
The computer enters sleep mode (the sleep indicator turns on)
immediately after Power-on self-test (POST).
Make sure that:
The battery is charged.
The operating temperature is within the acceptable range. See
“Appendix A. Specifications”.
If the battery is charged and the temperature is within range, have the
computer serviced.
The critical low-battery error message appears, and the computer
immediately turns off.
The battery power is getting low. Connect the AC adapter to the computer,
or replace the battery with a fully charged one.
The computer does not return from sleep mode, or the sleep indicator
stays on and the computer does not work.
CHAPTER 5. TROUBLESHOOTING
35
If the computer does not return from sleep mode, it may have entered
hibernation mode automatically because the battery is depleted. Check
the sleep indicator.
If the sleep indicator is on, your computer is in sleep mode. Connect
the AC adapter to the computer; then press any key or the power
button.
If the sleep indicator is off, your computer is in sleep/hibernation mode
or power-off state. Connect the AC adapter to the computer; then press
the power button to resume operation.
If the system still does not return from sleep mode, your system has
stopped responding, and you cannot turn off the computer; reset the
computer. Unsaved data may be lost. To reset the computer, press and
hold the Power button for 4 seconds or more. If the computer is still not
reset, remove the AC adapter and the battery.
Computer Screen Problems
The screen is blank.
Do the following:
If you are using the AC adapter, or using the battery, and the battery
status indicator is on (is blue), press Fn +F7 to make the screen
brighter.
If the Power indicator is in blinking blue, press any key or the Power
button to resume from the sleep mode.
If you still have the problem, do the Solution in the following problem
“The screen is unreadable or distorted.”
The screen is unreadable or distorted.
Make sure that:
The display device driver is installed correctly.
The screen resolution and color quality are correctly set.
The monitor type is correct.
To check these settings, do as follows:

CHAPTER 5. TROUBLESHOOTING
36
① Right-click on the desktop and select Personalize from the popup
menu.
② Click Display Settings and check whether the screen resolution
and color quality are correctly set.
③ Click the Advanced Settings button.
④ Click the Adapter tab.
⑤ Make sure that the correct device driver name is shown in the
adapter information window.
NOTE:
The device driver name depends on the video chip that has been installed
on your computer.
⑥ Click the Properties button. If you are prompted for an
administrator password or confirmation, enter the password or
provide confirmation. Check the “Device status” box and make
sure the device is working properly. If not, click the Troubleshoot
button.
⑦ Click the Monitor tab.
⑧ Make sure the information is correct.
⑨ Click the Properties button or the Troubleshoot button.
Incorrect characters appear on the screen.
Did you install the operating system or application program correctly? If they
are installed and configured correctly, have the computer serviced.
Missing, discolored, or bright dots appear on the screen every time
you turn on your computer.
This is an intrinsic characteristic of the TFT technology. Your computer’s
display contains multiple thin-film transistors (TFTs). A small number of
missing, discolored, or bright dots on the screen might exist all the time.
Sound Problems
No sound can be heard from the speaker even when the volume is
CHAPTER 5. TROUBLESHOOTING
37
turned up.
Make sure that:
The Mute function is off.
The headphone jack is not used.
Speakers are selected as a playback device.
Battery Problems
The battery cannot be fully charged by the power-off method in the
standard charge time for your computer.
For details, See “Checking Battery Status” in Chapter 3.
Your computer shuts down before the battery status indicator shows
empty.
-or-
Your computer operates after the battery status indicator shows
empty.
Discharge and recharge the battery.
The operating time for a fully charged battery is short.
For details, See “Handling the Battery” in Chapter 3.
The computer does not operate with a fully charged battery.
The surge protector in the battery might be active. Turn off the computer for
one minute to reset the protector; then turn on the computer again.
The battery does not charge.
For details, See “Handling the Battery” in Chapter 3.
A Hard Disk Drive Problem
The hard disk drive does not work.
In the Boot menu in AMI Setup Utility, make sure that the hard disk drive is
included in the Boot Sequence correctly.

CHAPTER 5. TROUBLESHOOTING
38
Other Problems
Your computer does not respond.
To turn off your computer, press and hold the power button for 4
seconds or more. If the computer still does not respond, remove the AC
adapter and the battery.
Your computer might lock when it enters sleep mode during a
communication operation. Disable the sleep timer when you are
working on the network.
The computer does not start from a device you want.
See the Boot menu of the AMI Setup Utility. Make sure that the startup
sequence in the AMI Setup Utility is set so that the computer starts from the
device you want.
Also make sure that the device from which the computer starts is enabled.
In the Boot menu in the AMI Setup Utility, make sure that the device is
included in the “Boot Device Priority” list.

APPENDIX A. SPECIFICATIONS
39
Appendix A. Specifications
This section provides basic information that you may need when setting up,
updating drivers for, and upgrading your computer.
Specifications
Processor
Intel® Atom™ processor
CAUTION:
The CPU cannot be replaced or upgraded by the user. The computer is
equipped with a different CPU depending on the model type.
Memory
Memory Type: DDR2 SDRAM SO-DIMM (512mb, 1024mb and 2048mb)
Storage devices
2.5-inch hard disk drive (The capacity of the hard disk drive is different
depending on the model type.)
SD, MMC, MS/MS pro
External I/O Interfaces
External monitor connector
Microphone jack

APPENDIX A. SPECIFICATIONS
40
Speaker/Headphone jack
3 Universal Serial Bus (USB) connectors
RJ45 Ethernet connector
LAN
Integrated 10/100 BASE-T Ethernet local area network (LAN) network
interface card (NIC) with RJ-45 jack
AC Adaptor (Free Voltage)
Model: 0335A1865 (UL: E193430)
Input: AC 100 ~ 240V, 50 ~ 60Hz, 1.7A
Output: 18.5V 3.5A
Model: 0335C1965 (UL: E193430)
Input: AC 100 ~ 240V, 50 ~ 60Hz, 1.7A
Output: 19V 3.42A
Supplier: LI SHIN INTERNATIONAL ENTERPRISE CORP.
CAUTION:
Use the correct adaptor for your computer.
Operating Environment
Operating 10 ~ 35 °C (50 ~ 95 °F), 20 ~ 80% relative humidity
Non-operating -10 ~ 60 °C (14 ~ 140 °F), 10 ~ 80% relative humidity

APPENDIX B. NOTICES
41
Appendix B. Notices
General Notices
European Union CE Marking and Compliance Notices
Products intended for sale within the European Union are marked with the
Conformité Européene (CE) Marking, which indicates compliance with the
applicable Directives and European standards and amendments identified.
Shielded Cables Notice
All connections to other computing devices must be made using shielded
cables to maintain compliance with FCC regulations.
Peripheral Devices Notice
Only peripherals (input/output devices, terminals, printers, etc) certified to
comply with Class B limits may be attached to this equipment. Operation
with non-certified peripherals is likely to result in interference to radio and
TV reception.
Optical Disk Drive Notice
The optical disk drive is Class 1 Laser Product.

APPENDIX B. NOTICES
42
Wireless Related Information
Wireless Interoperability
Wireless LAN PCI Express Mini Card is designed to be interoperable with
any wireless LAN product that is based on Direct Sequence Spread
Spectrum (DSSS), Complementary Code Keying (CCK), and/or Orthogonal
Frequency Division Multiplexing (OFDM) radio technology, and is compliant
to:
The IEEE 802.11a/b/g/n Standard on Wireless LANs, as defined and
approved by the Institute of Electrical and Electronics Engineers.
The Wireless Fidelity (WiFi) certification as defined by the Wi-Fi
Alliance.
Usage Environment and Your Health
Wireless LAN PCI Express Mini Card emits radio frequency electromagnetic
energy like other radio devices. However, the level of energy emitted is far
much less than the electromagnetic energy emitted by wireless devices like
for example mobile phones.
Due to the fact that Wireless LAN PCI Express Mini Card operates within
the guidelines found in radio frequency safety standards and
recommendations, We believes the integrated wireless cards are safe for
use by consumers. These standards and recommendations reflect the
consensus of the scientific community and result from deliberations of
panels and committees of scientists who continually review and interpret the
extensive research literature.
In some situation or environment, the use of Wireless LAN PCI Express
Mini Card may be restricted by the proprietor of the building or responsible
representatives of the organization. These situations may for example
include:

APPENDIX B. NOTICES
43
Using the integrated wireless cards on board of airplanes, or in
hospitals
In any other environment where the risk of interference to other devices
or services is perceived or identified as harmful.
If you are uncertain of the policy that applies on the use of wireless devices
in a specific organization (e.g., airport or hospital), you are encouraged to
ask for authorization to use Wireless LAN PCI Express Mini Card prior to
turning on the computer.
Electronic Emissions Notices
European Union Compliance Statement Class B Compliance
European Union - Compliance to the Electromagnetic Compatibility
Directive
This product is in conformity with the protection requirements of EU Council
Directive 2004/108/EC on the approximation of the laws of the Member
States relating to electromagnetic compatibility. We cannot accept
responsibility for any failure to satisfy the protection requirements resulting
from a non-recommended modification of the product, including the
installation of option cards from other manufacturers.
This product has been tested and found to comply with the limits for Class B
Information Technology Equipment according to European Standard
EN55022. The limits for Class B equipment were derived for typical
residential environments to provide reasonable protection against
interference with licensed communication devices.
Properly shielded and grounded cables and connectors must be used in
order to reduce the potential for causing interference to radio and TV

APPENDIX B. NOTICES
44
communications and to other electrical or electronic equipment.
FCC Rules and Regulations - Part 15
This device uses, generates and radiates radio frequency energy. The radio
frequency energy produced by this device is well below the maximum
exposure allowed by the Federal Communications Commission (FCC).
This device complies with the limits for a Class B digital device
pursuant to Part 15 subpart C of the FCC Rules and Regulations.
Operation is subject to the following two conditions:
This device may not cause harmful interference.
This device must accept any interference received, including
interference that may cause undesired operation.
The FCC limits are designed to provide reasonable protection against
harmful interference when the equipment is installed and used in
accordance with the instruction manual and operated in a commercial
environment. However, there is no guarantee that interference will not occur
in a particular commercial installation, or if operated in a residential area.
If harmful interference with radio or television reception occurs when the
device is turned on, the user must correct the situation at the user’s own
expense. The user is encouraged to try one or more of the following
corrective measures:
Re-orient or relocate the receiving antenna.
Increase the separation between the equipment and receiver.
Connect the equipment into an outlet on a circuit different from that on
which the receiver is connected.
Consult the dealer or an experienced radio/TV technician for help.
CAUTION: The Part 15 radio device operates on a non-interference
basis with other devices operating at this frequency. Any changes or
modification to said product not expressly approved by Intel could void the
user's authority to operate this device.

APPENDIX B. NOTICES
45
Declaration of Conformity (PCI Express Minicard Adapter)
Product Descriptions:
Intel® PRO/Wireless 3945ABG Network Connection
(Model WM3945ABG)
802.11b/g Wireless LAN PCIe Minicard
(Model AR5007EG)
EU RoHS Compatible Statements
Parts conform to the requirements of the European Union’s Restriction on
Use of Hazardous Substances in Electrical and Electronic Equipment
(RoHS) Directive 2002/95/EC for the six substances and their respective
maximum limits shown in Table 1 below , and such products are designed to
meet the higher temperature reflow required for lead-free processes.
Table 1
Restricted Substance Maximum Limit (ppm)1
Cadmium (Cd) 100
Lead (Pb) 1000
Mercury (Hg) 1000
Hexavalent Chromium (Cr6+) 1000
Poly Brominated Biphenyls (PBB) 1000
Poly Brominated Diphenyl Ethers (PBDE) 1000
Notes:
1. Maximum limit does not apply to applications covered by RoHS
exemptions
2. Includes requirement that lead not to exceed 0.1% by weight in
homogenous materials.

APPENDIX B. NOTICES
46
NOTES
Changes or modifications not expressly approved by the party responsible
for compliance could void the user’s authority to operate the equipment.
This equipment complies with FCC radiation exposure limits set forth for an
uncontrolled environment. End user must follow the specific operating
instructions for satisfying RF exposure compliance. This transmitter must
not be co-located or operating in conjunction with any other antenna or
transmitter.
NOTE: The mobile device is designed to meet the requirements for
exposure to radio waves established by the Federal Communications
Commission (USA). These requirements set a SAR limit of 1.6 W/kg
averaged over one gram of tissue. The highest SAR value reported under
this standard during product certification for use when properly worn on the
body is 0.515 W/kg.
NOTE: This equipment has been tested and found to comply with the limits
for a Class B digital device, pursuant to Part 15 of the FCC Rules. These
limits are designed to provide reasonable protection against harmful
interference in a residential installation. This equipment generates, uses
and can radiate radio frequency energy and, if not installed and used in
accordance with the instructions, may cause harmful interference to radio
communications. However, there is no guarantee that interference will not
occur in a particular installation.
If this equipment does cause harmful interference to radio or television
reception, which can be determined by turning the equipment off and on, the
user is encouraged to try to correct the interference by one or more of the
following measures:

APPENDIX B. NOTICES
47
-- Reorient or relocate the receiving antenna.
-- Increase the separation between the equipment and receiver.
-- Connect the equipment into an outlet on a circuit different from that to
which the receiver is connected.
-- Consult the dealer or an experienced radio/TV technician for help.
Waste Disposal Statements
Conforming to the Directive 2002/96/EC this appliance
must not be disposed of with other household waste.
This appliance must be disposed by an authorized
waste treatment or collection point for the recycling of
waste electrical and electronic equipment. Incorrect
disposal of this type of waste product can damage the
environment and cause problems to health due to
hazardous substances produced by electrical and
electronic equipments.

APPENDIX B. NOTICES
48
Coby Communications Ltd
Address: Unit C-E, 8/F., Po Shau Centre, 115 How Ming Street, Kwun Tong,
Kowloon, Hong Kong
Factory’s Name: SHENZHEN COBY COMMUNICATIONS LTD.
Factory’s Address: Block 2-3, Taoxia 2nd Industrial Zone, LongHua Town, BaoAn
District, ShenZhen City, China
Contact Person: Ms. Sally Wong
Email: sally_wong@cobyhk.com
Tel: 852-2759 5838
Fax: 852-2759 5887
Coby is a registered trademark of Coby Corporation.
Printed in China.