Coby Electronic Dp 5588 Users Manual
DP-5588 to the manual d58c8ec9-6d7c-44f7-9d4c-38face2e1129
2015-02-05
: Coby-Electronic Coby-Electronic-Dp-5588-Users-Manual-532841 coby-electronic-dp-5588-users-manual-532841 coby-electronic pdf
Open the PDF directly: View PDF ![]() .
.
Page Count: 36
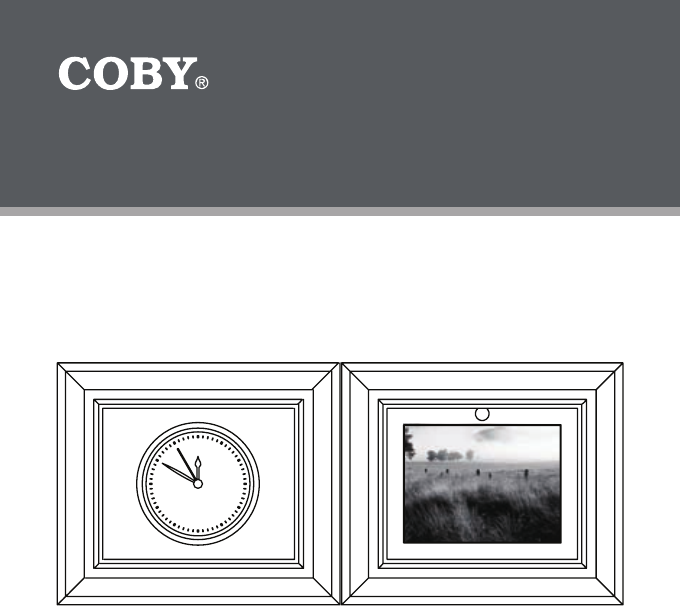
INSTRUCTION MANUAL
Please read this manual carefully before operation
DP-5588
5.6” Widescreen Color TFT LCD Digital Photo Frame
with Analog Clock
QUARTZ
Page 2 Coby Electronics Corporation
Page 2 Coby Electronics Corporation www.cobyusa.com Page 3
Precautions
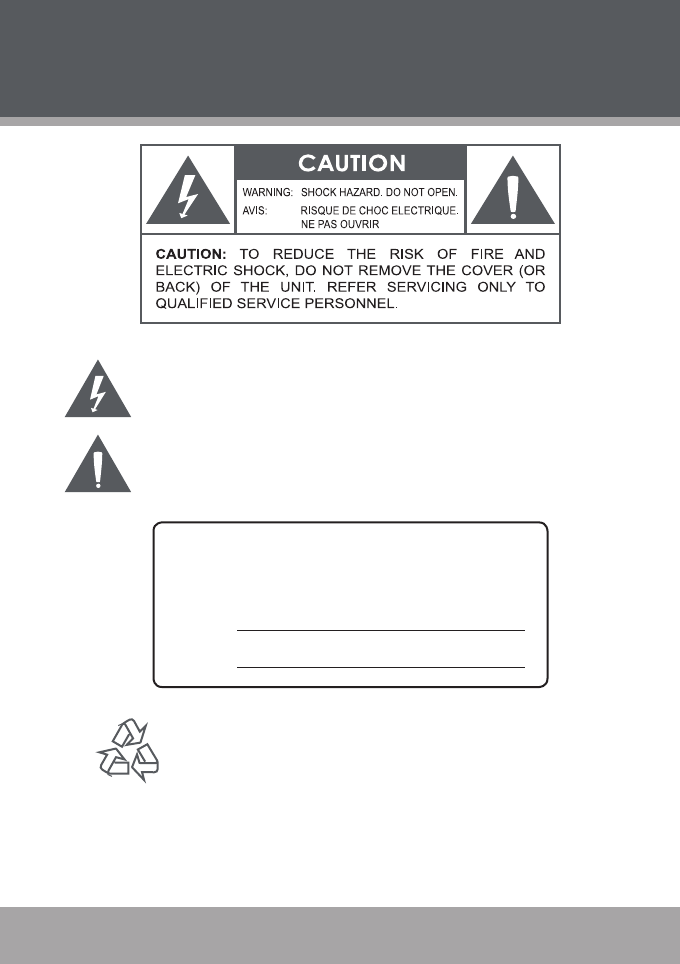
The lightning ash with arrowhead symbol within an equilateral triangle is in-
tended to alert the user to the presence of uninsulated “dangerous voltage”
within the product’s enclosure that may be of sufcient magnitude to constitute
a risk of electric shock.
The exclamation point within an equilateral triangle is intended to alert the
user to the presence of important operation and servicing instructions in the
literature accompanying the appliance.
For Customer Use:
Enter below the serial number that is located on the bottom of
the unit. Retain this information for future reference.
Model No. DP-5588
Serial No.
For recycling or disposal information about this product, please
contact your local authorities or the Electronics Industries Alliance:
www.eiae.org.

Page 2 Coby Electronics Corporation
Page 2 Coby Electronics Corporation www.cobyusa.com Page 3
Precautions
WARNING: To prevent re or shock hazard, do not expose this device to rain or moisture.
Dangerous high voltage is present inside the enclosure. Do not open the cabinet.
CAUTION: To prevent electric shock, match wide blade of plug to wide slot of outlet and fully
insert.
CAUTION: Changes or modications not expressly approved in this manual could void your
authority to operate this equipment.
Protect your hearing: Hearing experts advise against the constant use of personal stereos
played at high volume. Constant exposure to high volumes can lead to hearing loss. If you should
experience ringing in the ears or hearing loss, discontinue use and seek medical advice.
FCC Statement:
this device complies with Part 15 of the FCC Rules. Operation is subject to the following
two conditions:
(1) This device may not cause harmful interference, and
(2) This device must accept any interference received, including interference that may
cause undesired operation.
Note:
This equipment has been tested and found to comply with the limits for Class B digital
devices, pursuant to Part 15 of the FCC rules. These limits are designed to provide
reasonable protection against harmful interference in a residential installation. This
equipment generates, uses and can radiate radio frequency energy and, if not installed
and used in accordance with the instructions, may cause harmful interference to radio
communications. However, there is no guarantee that interference will not occur in a par-
ticular installation. If this equipment does cause harmful interference to radio or televi-
sion reception, which can be determined by turning the equipment off and on, the user is
encouraged to try to correct the interference by one or more of the following measures:
- Reorient or relocate the receiving antenna.
- Increase the separation between the equipment and receiver.
- Connect the equipment into an outlet on a circuit different from that to which the
receiver is connected.
- Consult the dealer or an experienced radio/TV technician for help
Use of shielded cable is required to comply with Class B limits in Subpart B of Part 15 of
the FCC rules.
Do not make any changes or modications to the equipment unless otherwise specied
in the manual. If such changes or modications should be made, you could be required
to stop operation of the equipment.

Page 4 Coby Electronics Corporation
Page 4 Coby Electronics Corporation www.cobyusa.com Page 5
Important Safety Instructions
Read Instructions: All the safety and operating instructions should be read before the
product is operated.
Retain Instructions: The safety and operating instructions should be retained for future
reference.
Heed Warnings: All warnings on the product and in the operating instructions should
be adhered to.
Follow Instructions: All operating and usage instructions should be followed.
Cleaning: Unplug this product from the wall outlet before cleaning. Do not use liquid
cleaners or aerosol cleaners. Use a damp cloth for cleaning.
Attachments: Use only attachments recommended by the manufacturer. Use of other
attachments may be hazardous.
Water and Moisture: Do not use this product near water (e.g., near a bath tub, washbowl,
kitchen sink, laundry tub, in wet basements, or near a swimming pool and the like).
Accessories: Do not place this product on an unstable cart, stand, tripod, bracket, or
table. Use only with carts, stands, tripods, brackets, or tables recommended by the
manufacturer or sold with the product. Any mounting of the product should follow the
manufacturer’s instructions and should use a mounting accessory recommended by
the manufacturer.
A product and cart combination should be moved with care. Quick stops,
excessive force, and uneven surfaces may cause the product and cart
combination to overturn.
Ventilation: Slots and openings in the cabinet are provided for ventilation
to ensure reliable operation of the product and to protect it from overheat-
ing. These openings should never be blocked by placing the product on a bed, sofa,
rug, or other similar surface. This product should not be placed in a built-in installation
such as a bookcase or rack unless proper ventilation is provided or the manufacturer
instructions have been adhered to.
Power Sources: This product should be operated only from the type of power source
indicated on the rating label. If you are not sure of the type of power supply to your home,
consult your product dealer or local power company. For products intended to operate
from battery power or other sources, refer to the operating instructions.
Grounding or Polarization: This product may be equipped with a polarized alternating-
current line plug that has one blade wider than the other. This plug will only t into the
power outlet in one direction. This is a safety feature. If you are unable to insert the plug
fully into the outlet, try reversing the direction of the plug. If the plug should still fail to t,
contact an electrician to replace the obsolete outlet. Do not defeat the safety purpose
of the polarized plug.
Power-Cord Protection: Power supply cords should be routed so that they are not likely
to be walked on or pinched by items placed upon or against them, paying particular
attention to cords at plugs, convenience receptacles, and at the point which they exit
from the product.
1.
2.
3.
4.
5.
6.
7.
8.
9.
10.
11.
12.
13.
Page 4 Coby Electronics Corporation
Page 4 Coby Electronics Corporation www.cobyusa.com Page 5
Protective Attachment Plug: The product may be equipped with an attachment plug with
overload protection. This is a safety feature. See the operating instructions for replace-
ment or directions to reset the protective device. If replacement of the plug is required,
be sure the service technician has used a replacement plug that has the same overload
protection as the original plug as specied by the manufacturer.
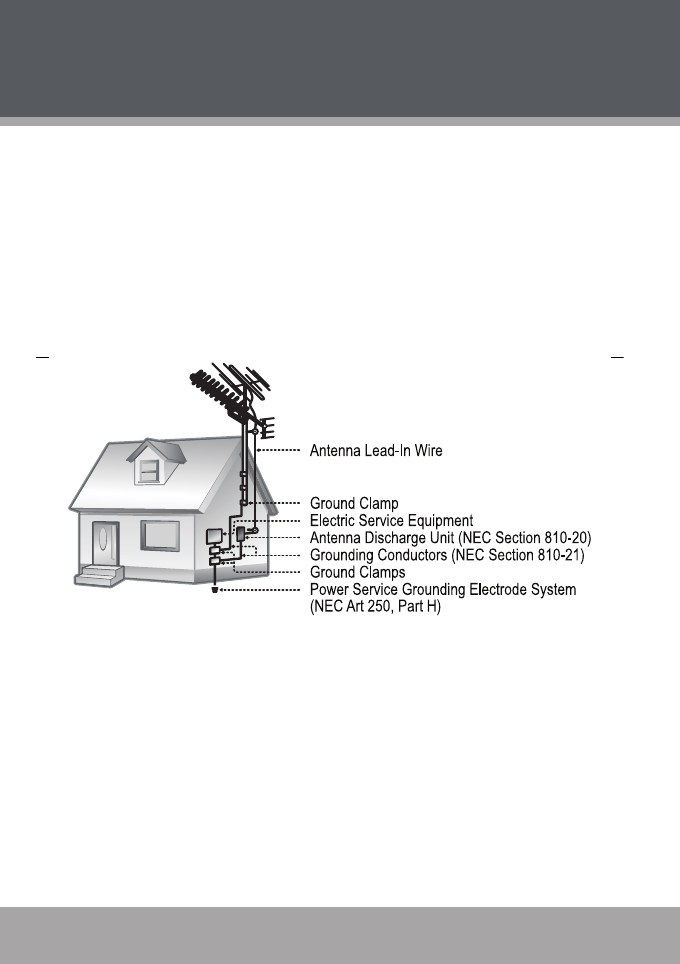
Outdoor Antenna Grounding: If an outside antenna is connected to the product, be sure
the antenna system is grounded so as to provide some protection against voltage surges
and built-up static charges. Article 810 of the National Electrical Code, ANS/NFPA
70 provides information with regard to proper grounding of the mast and supporting
structure, grounding of the lead-in wire to an antenna-discharge unit, size of grounding
conductors, location of antenna- discharge unit, connection to grounding electrodes,
and requirements for the grounding electrode (see gure).
Lightning: For added protection for this product, unplug it from the wall outlet and discon-
nect the antenna or cable system during a lightning storm or when it is left unattended
and unused for long periods of time. This will prevent damage to the product due to
lightning or power-line surges.
Power Lines: An outside antenna system should not be located in the vicinity of over-
head power lines or other electric light or power circuits, or where it can fall into such
power lines or circuits. When installing an outside antenna system, extreme care should
be taken to keep from touching such power lines or circuits, as contact with them might
be fatal.
Overloading: Do not overload wall outlets, extension cords, or integral convenience
receptacles as this can result in a risk of re or electric shock.
Object and Liquid Entry: Never push objects of any kind into this product through open-
ings as they may touch dangerous voltage points or shout-out parts that could result in
a re or electric shock. Never spill liquid of any kind on the product.
14.
15.
16.
17.
18.
19.
Important Safety Instructions

Page 6 Coby Electronics Corporation
Page 6 Coby Electronics Corporation www.cobyusa.com Page 7
Servicing: Do not attempt to service this product yourself as opening or removing covers
may expose you to dangerous voltage or other hazards. Refer all servicing to qualied
service personnel.
Damage Requiring Service: Unplug this product from the wall outlet and refer servicing
to qualied service personnel under the following conditions: a) when the power-supply
or plug is damaged; b) if liquid has been spilled or if objects have fallen into the product;
c) if the product has been exposed to rain or water; d) if the product does not operate
normally by following the operating instructions. Adjust only those controls that are cov-
ered by the operating instructions as improper adjustment of other controls may result
in damage and will often require extensive work by a qualied technician to restore the
product to its normal operation; e) if the product has been dropped or damaged in any
way; f) when the product exhibits a distinct change in performance—this indicates a
need for service.
Replacement Parts: When replacement parts are required, be sure that your service
technician has used replacement parts specied by the manufacturer or have the same
characteristics as the original part. Unauthorized substitutions may result in re, electric
shock, or other hazards.
Safety Check: Upon completion of any service or repairs to this product, ask the service
technician to perform safety checks to ensure that the product is in proper operating
condition.
Wall or Ceiling Mounting: The product should be mounted to a wall or ceiling only as
recommended by the manufacturer.
Heat: The product should be situated away from heat sources such as radiators, heat
registers, stoves, or other products (including ampliers) that produce heat.
20.
21.
22.
23.
24.
25.
Important Safety Instructions

Page 6 Coby Electronics Corporation
Page 6 Coby Electronics Corporation www.cobyusa.com Page 7
PRECAUTIONS .........................................................................................2
IMPORTANT SAFETY INSTRUCTIONS .......................................................4
TABLE OF CONTENTS ...............................................................................7
PACKAGE CONTENTS .............................................................................9
FEATURES ...............................................................................................10
LOCATION OF CONTROLS .................................................................... 11
Top View .................................................................................................................11
Left View ................................................................................................................11
Front View ............................................................................................................. 12
Right View ............................................................................................................. 12
Remote Control ..................................................................................................... 13
GETTING STARTED ................................................................................. 14
Using the Remote Control..................................................................................... 14
Installing a Memory Card ...................................................................................... 15
Powering your Digital Picture Frame .................................................................... 15
Turning Your Photo Frame On/Off ........................................................................ 16
Menu Interface Navigation .................................................................................... 16
Main Menu Screen .................................................................................................17
Available Selected Card ........................................................................................ 18
Music & Video List ................................................................................................ 19
MUSIC & VIDEO MODE ......................................................................... 19
Advanced Settings ................................................................................................ 20
Audio & Video Controls: ........................................................................................ 21
Audio Controls:...................................................................................................... 21
Video Controls ...................................................................................................... 22
To Adjust Screen Brightness, Contrast & Color ................................................... 22
Table of Contents

Page 8 Coby Electronics Corporation
Page 8 Coby Electronics Corporation www.cobyusa.com Page 9
PHOTO MODE ........................................................................................23
Photo List .............................................................................................................. 23
Photo View ............................................................................................................ 23
Zoom ............................................................................................................. 24
Rotate ............................................................................................................ 24
Slideshow .............................................................................................................. 24
SETUP MENU ..........................................................................................25
Language Options ................................................................................................. 25
Photo Options ....................................................................................................... 26
Reset Options ....................................................................................................... 27
CABLE CONNECTION ...........................................................................28
Headphones .......................................................................................................... 28
Audio-Only Output ................................................................................................ 28
Composite Video ................................................................................................... 29
CLOCK ...................................................................................................30
FIRMWARE UPGRADES ..........................................................................31
TROUBLESHOOTING ..............................................................................32
SPECIFICATIONS ...................................................................................34
Table of Contents

Page 8 Coby Electronics Corporation
Page 8 Coby Electronics Corporation www.cobyusa.com Page 9
Please make sure that the items shown below are included in the package. Should
an item be missing, please contact the local retailer from which you purchased this
product.
Package Contents
3
2
1
4
MUTE
QUARTZ
COBY DP-5588
Remote Control
AC Adapter
1.
2.
3.
Manual4.

Page 10 Coby Electronics Corporation
Page 10 Coby Electronics Corporation www.cobyusa.com Page 11
5.6” Widescreen TFT LCD Color Screen
Displays JPEG Photo Files
Plays MP3 and WMA Music Files
Plays most Video Files for Digital Cameras (AVI, MPG, XVID)
AV Output for use with Home Theater Systems
SD, MMC, xD, MS and CF Card Slots
USB port for use with USB Flash Drives
Integrated Stereo Speakers
Detachable Stand
Full Function Remote Control
•
•
•
•
•
•
•
•
•
•
Features
Page 10 Coby Electronics Corporation
Page 10 Coby Electronics Corporation www.cobyusa.com Page 11
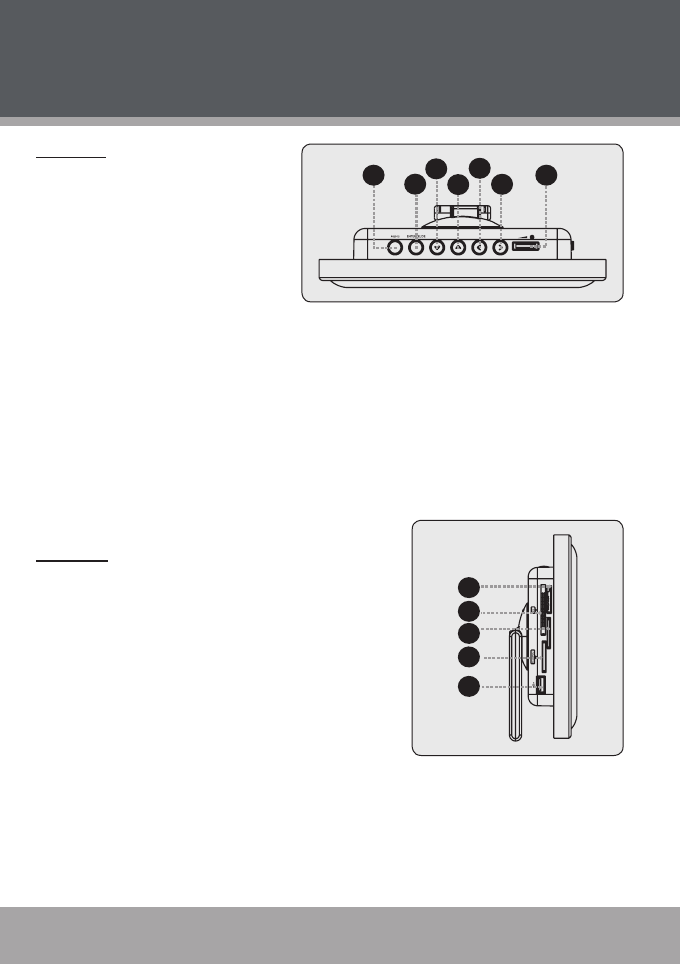
Top View
Menu/Setup
Press once for Menu;
Press and hold for Setup
Enter/Slideshow
Press for Enter
Down
Up
Left / Fast Reverse
Press for Left during selecting.
Press for Fast Reverse during
Audio/Video playback
Right/ Fast Forward
Press for Right during selecting.
Press for Fast Forward during
Audio/Video playback
Volume Level Dial
Left View
Memory Stick (MS)
Compact Flash (CF)
xD-Picture (xD)
Secure Digital (SD) / Multi Media
Card (MMC)
USB Port
(for use with USB ash drives)
1.
2.
3.
4.
5.
6.
7.
8.
9.
10.
11.
12.
Location of Controls
4
26
35
17
9
10
8
11
12
Page 12 Coby Electronics Corporation
Page 12 Coby Electronics Corporation www.cobyusa.com Page 13
Location of Controls
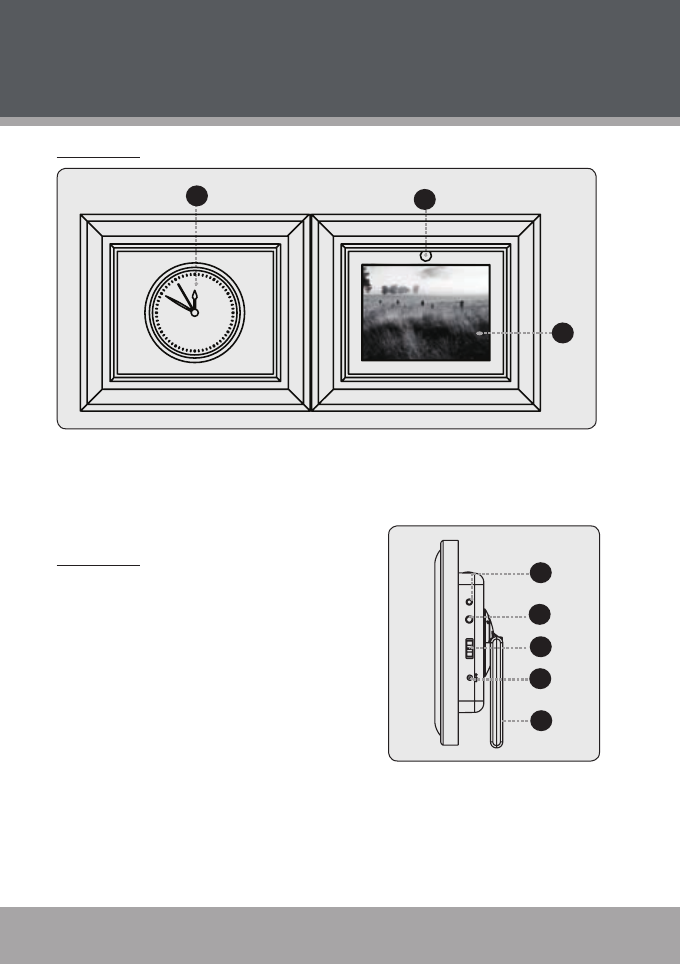
Front View
15 14
13
5.6” TFT LCD
Remote Sensor
Clock
Right View
Video Out
Headphone /
Audio Out
Power Switch
(On / Off)
Power In Jack
Detachable Kickstand
13.
14.
15.
16.
17.
18.
19.
20.
16
19
20
17
18
Page 12 Coby Electronics Corporation
Page 12 Coby Electronics Corporation www.cobyusa.com Page 13
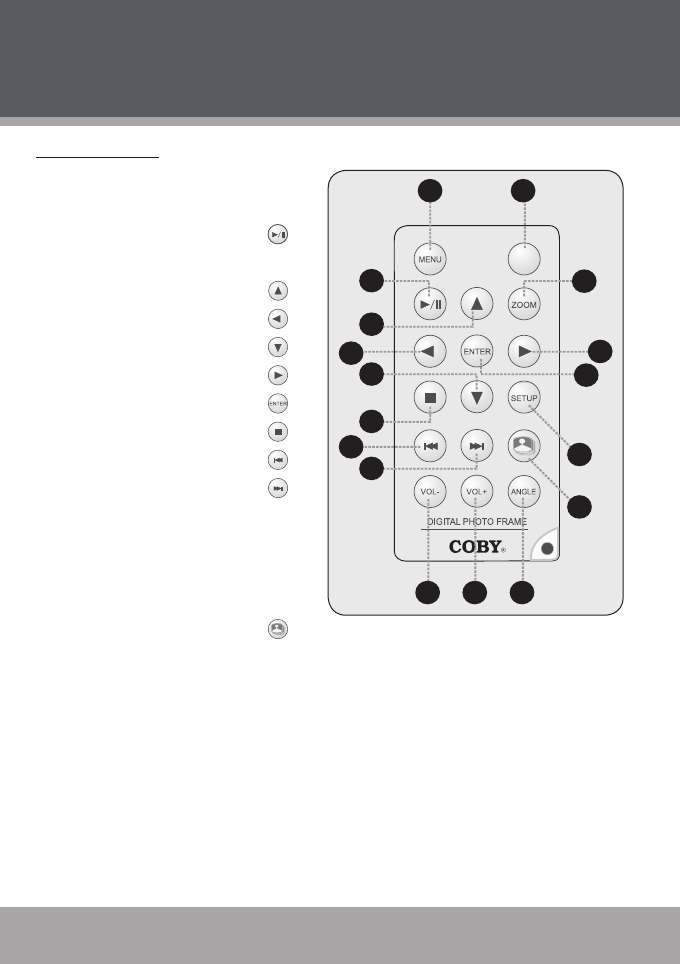
Remote Control
Menu
Mute
Play / Pause
Zoom
Up (Navigation)
Left (Navigation)
Down (Navigation)
Right (Navigation)
Enter
Stop
Previous / Reverse
Next / Forward
Volume Down
Volume Up
Angle
Setup
Slideshow
1.
2.
3.
4.
5.
6.
7.
8.
9.
10.
11.
12.
13.
14.
15.
16.
17.
2
1
4
6
3
5
8
10
11
9
12
13 14 15
16
17
7
MUTE
Location of Controls
Page 14 Coby Electronics Corporation
Page 14 Coby Electronics Corporation www.cobyusa.com Page 15
Using the Remote Control
To load a battery in the remote:
Pull in the direction of the arrow
Slide the compartment out
Place the battery in the compartment with the positive side ( + ) facing up
Push the compartment in to close
2
14
3
To use the remote:
Point the remote at the remote sensor of the photo frame at a distance of no
more than 15’ and at an angle no greater than 60 degrees.
Batteries will last for about one year under typical usage. Replace the batter-
ies if the remote is no longer working.
Do not spill water on the remote control.
Do not use the remote control for other equipment at the same time.
Remove the batteries if the remote control will not be in use for an extended
period of time.
The battery used in this device may present a re or chemical hazard
if mistreated. Do not recharge, disassemble, incinerate, or heat the
batteries.
Used batteries should be disposed of safely and not incinerated. Attention
should be shown to the environment aspects of battery disposal.
Keep batteries out of the reach of children.
1.
2.
3.
4.
•
•
•
•
•
Getting Started
Page 14 Coby Electronics Corporation
Page 14 Coby Electronics Corporation www.cobyusa.com Page 15
Installing a Memory Card
Your photo frame supports the following types of memory cards:
Compact Flash cards (CF)
Secure Digital cards (SD)
MultiMedia Card (MMC)
xD-Picture card (xD)
Memory Stick (MS)
Simply insert the memory card of your choice into its corresponding card slot lo-
cated on the left panel of the photo frame. Take care to orient the card in the proper
direction.
Getting photos and les onto your picture frame for viewing couldn’t be easier!
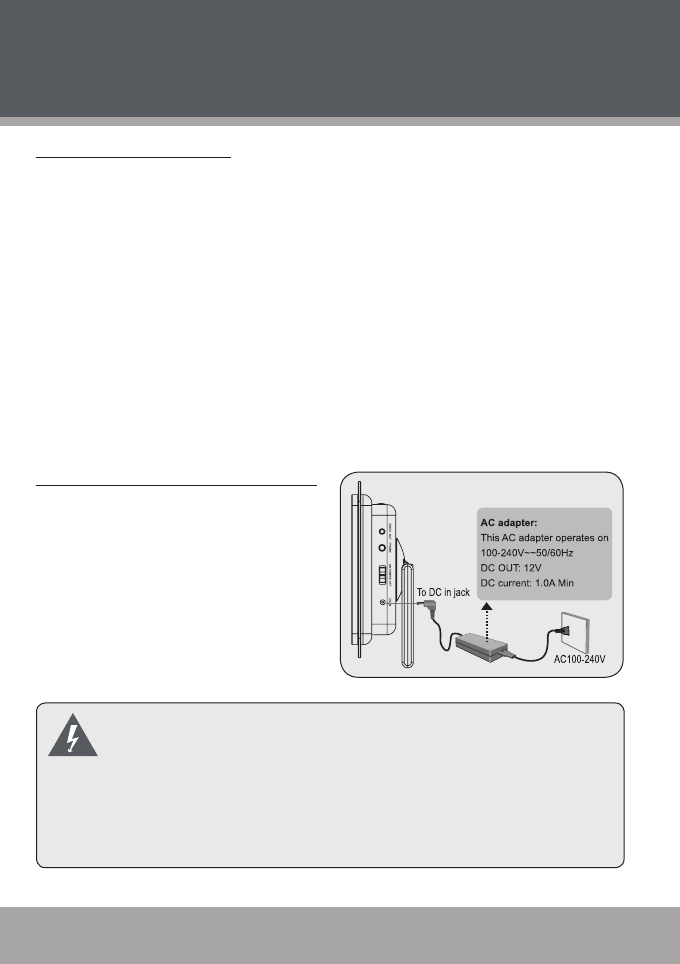
Powering your Digital Picture Frame
Your Photo Frame should be connected to
an AC 100-240V wall outlet.
Using the supplied power adapter,
plug one end of the adapter into
your photo frame’s Power In Jack
and plug the other end into an AC
100-240V wall outlet.
Do not connect the power plug to a power outlet other than that
which is indicated here or on the label as this may result in the risk of
re or electric shock.
Do not handle the power plug with wet hands. Doing so may cause
electric shock.
Use only the AC adapter supplied with the photo frame. Failure to do
so may cause a re or damage the player.
•
•
•
•
•
•
Getting Started

Page 16 Coby Electronics Corporation
Page 16 Coby Electronics Corporation www.cobyusa.com Page 17
Turning Your Photo Frame On/Off
To turn your photo frame on, set the Power Switch to the “On” position.
To turn your photo frame off, set the Power Switch to the “Off” position.
Menu Interface Navigation
To select the different menu options and les of your digital photo frame:
Use the Navigation keys to make a selection:
To move the selection up, press .
To scroll up quickly, press and hold .
To move the selection down, press .
To scroll down quickly, press and hold .
To move the selection left, press .
To scroll left quickly, press and hold .
To move the selection right, press .
To scroll right quickly, press and hold .
Press to conrm the highlighted selection.
To return to Available Selected Card Dialogue Box, press .
Press again to exit.
•
•
•
•
•
•
•
•
•
Getting Started

Page 16 Coby Electronics Corporation
Page 16 Coby Electronics Corporation www.cobyusa.com Page 17
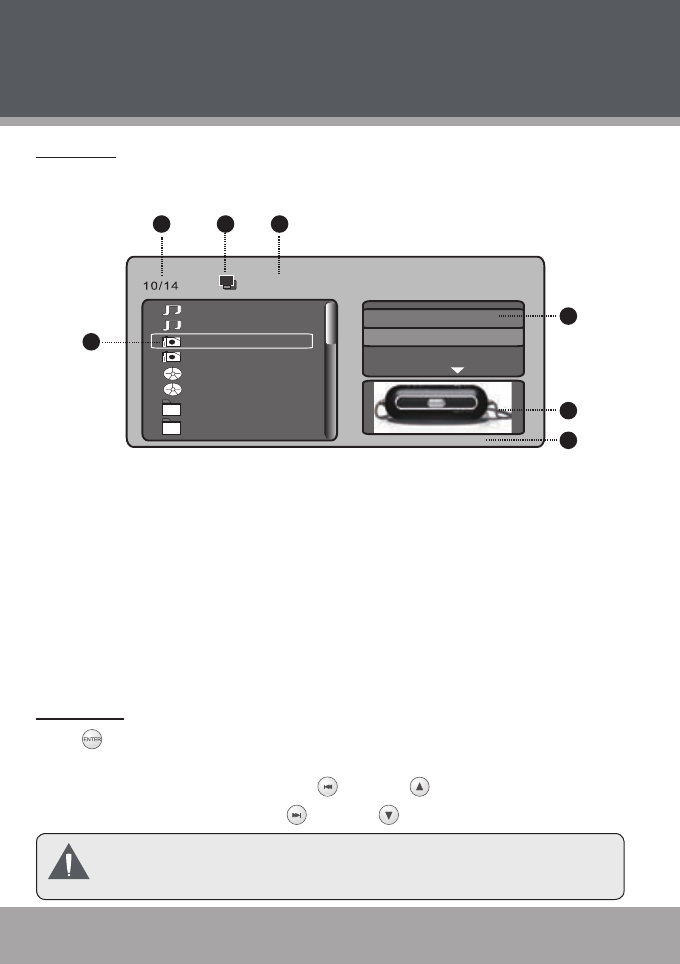
Main Menu Screen
Insert a card to the corresponding slot and turn on the player. Your photo frame will
display the “Main Menu“ screen shown below.
Use the navigation keys to select a desired photo/audio/video le and press
to play.
Main Menu Screen
/
AA
AA.MP3
AA.MP3
BB
CC
DD
EE
FF
GG
HH
123
5
4
6
7
Name:
Filter
Flat Mode
Repeat : off
JPEG Preview
Filename of Current playback le
Current Disk Icon
Current File Number/Total
Number of Files
Current Playback File
1.
2.
3.
4.
Name/Artist/Album/Year/Track/
Comment of current playback le
JPEG Preview (Photos)/Music
Playing (Audio Files)
Advanced Settings
5.
6.
7.
The digital photo frame is equipped with a demo slideshow that will
automatically start after 10 seconds if there is no card inserted.
The demo slideshow will stop when a card is inserted or any button is
pressed.
•
Getting Started
Page 18 Coby Electronics Corporation
Page 18 Coby Electronics Corporation www.cobyusa.com Page 19
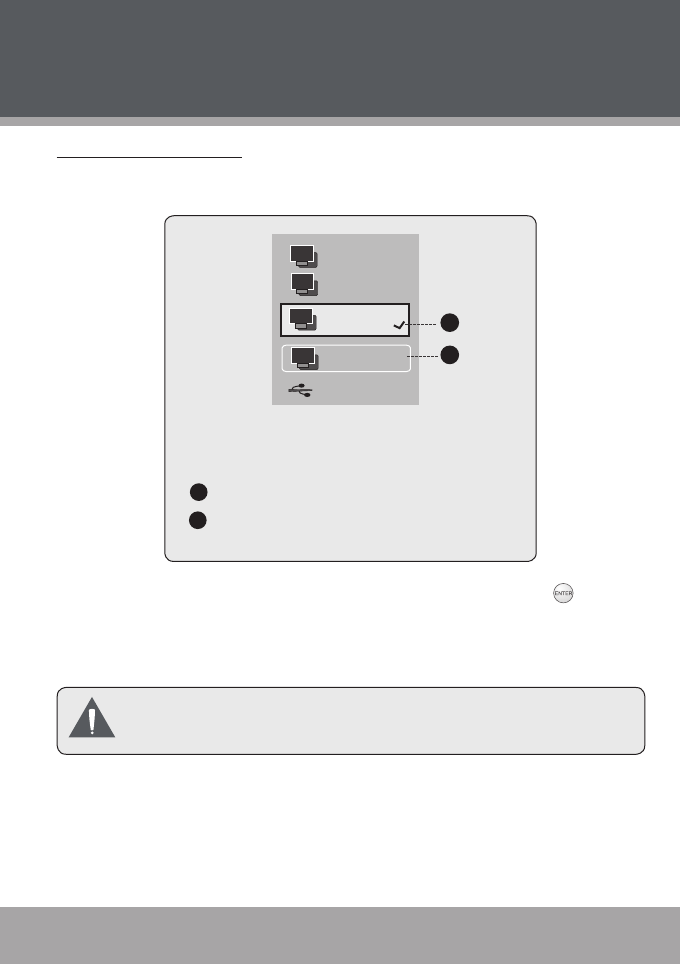
Available Selected Card
When a card has been inserted, press the MENU button. Your photo frame will
display the “Available Selected Card“ dialogue box shown below.
Available Selected Card Dialogue Box
USB
SD
MS
XD
CF
2
1
2
1The card has been selected
The card is being selected (not confirmed)
Use the navigation keys to select a desired card and then press to con-
rm.
The screen will display the main menu of the selected card.
MS and SD cards cannot be installed for use at the same time.
•
•
Getting Started
Page 18 Coby Electronics Corporation
Page 18 Coby Electronics Corporation www.cobyusa.com Page 19
Music & Video Mode
Music & Video List
Upon entering the Main Menu, use the navigation keys to select a desired audio /
video le and press to play.
Music Playback Screen
/
AA
AA.MP3
AA.MP3
BB
CC
DD
EE
FF
GG
HH
2 134
6
5
7
8
Name:
00:00:10
Filter
Flat Mode
Repeat : off
Music Playing
Elapsed time
Filename of Current playback le
Current Disk Icon
Current File Number/Total Number of Files
Current Playback File
Name/Artist/Album/Year/Track/Comment of current playback le
Music Playback Indicator
Advanced Settings (Filter/Flat Mode/Edit Mode)
1.
2.
3.
4.
5.
6.
7.
8.
Page 20 Coby Electronics Corporation
Page 20 Coby Electronics Corporation www.cobyusa.com Page 21
Advanced Settings
Filter
Use the Filter function to hide unwanted Audio/Video/Photo les. Use the Naviga-
tion Keys to select and press to conrm. After conrming the selection, the
unwanted Audio/Video/Photo les will be hidden and playback stopped (if it’s
being played).
Flat Mode
There are several custom settings in Flat Mode. Use the Navigation keys to select
Repeat or Mode, and then press to conrm a setting (see setting list below).
Repeat: Off/Single/Folder/All ( for Audio/Video Files)
Mode : Normal/Shufe/Music Intro (for Audio Files only)
When the Flat Mode is selected, the player will play all les as the
settings. If it’s not selected, the player will only play the audio les as
the settings.
Program
This function helps you to choose your favourite Audio/Video/Photo les to play.
Make sure the Edit Mode is selected during program Editing otherwise some
functions will not be available.
Use the Navigation Keys to select Edit mode in the advanced settings.
Navigate to select any desired le in the main menu and then press . The
selected le will be framed. Press again to cancel.
Select and conrm Add To Program below the Edit Mode.(press to
conrm)
Select and conrm Program View below the Edit Mode to show the pro-
grammed les in the main menu box.
To playback a programmed le, make sure Edit mode is not selected. Select
and conrm a le in the programmed le list. The programmed les will be
played in sequence automatically.
•
•
•
•
•
•
•
Music & Video Mode
Page 20 Coby Electronics Corporation
Page 20 Coby Electronics Corporation www.cobyusa.com Page 21
To add more les in program mode:
Select and conrm Browser View below the Edit Mode to browse les in the
Main Menu, then follow the steps above to add more les.
To Cancel programmed les:
In the Program Screen, select and conrm the unwanted le (which will be
checked), and then select and conrm Clear Program below Edit mode. The
le will be deleted from program le list.
In the Program Mode, Filter function is not available.
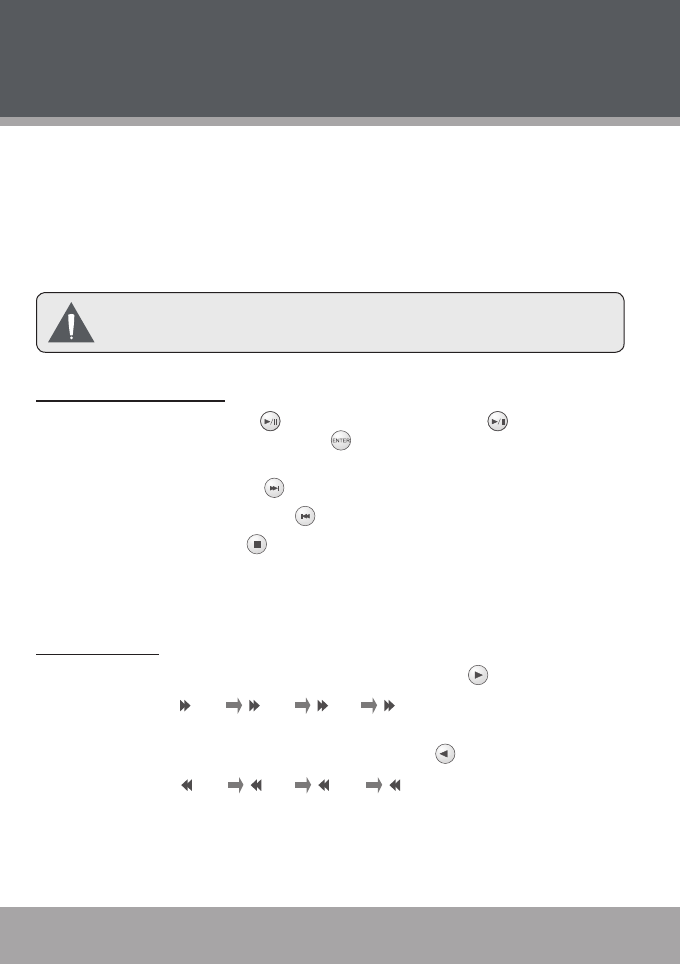
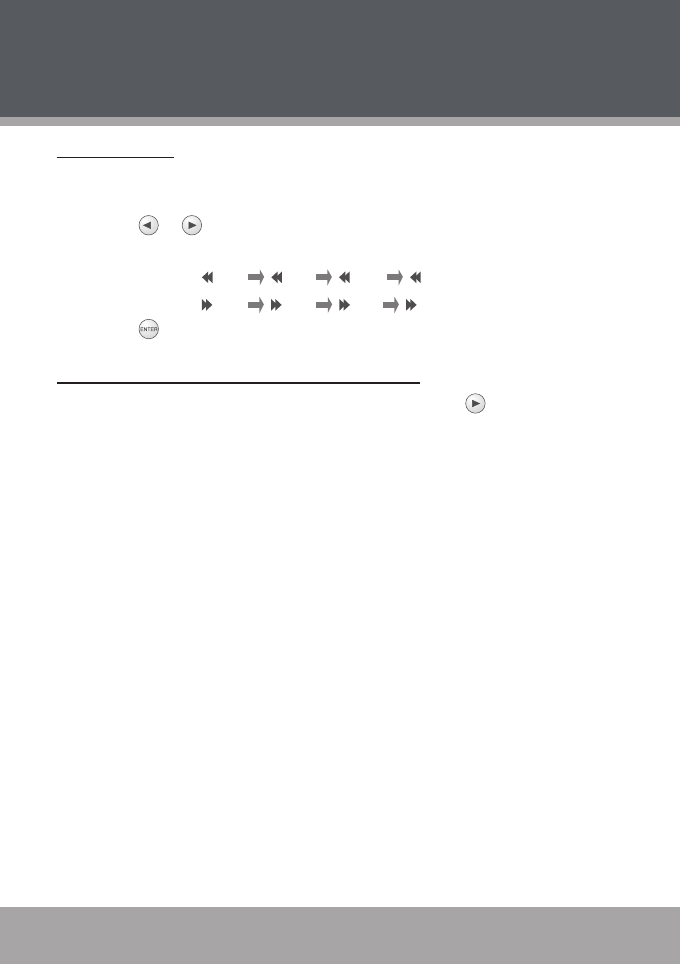
Audio & Video Controls:
To pause playback, press . To resume playback, press again
(In Video Mode, you can also press to pause playback and press again
to play.)
To play the next le, press .
To play the previous le, press .
To stop playback, press .
To adjust the volume level, press VOL- or VOL+
Press MUTE to mute the audio. Press MUTE again to restore.
Audio Controls:
To fast-forward through the current le, press and hold .
Forward:
2
×4
×8
×16
×
To reverse through the current le, press and hold .
Reverse:
2
×4
×8
×16
×
•
•
•
•
•
•
•
•
•
•
Music & Video Mode
Page 22 Coby Electronics Corporation
Page 22 Coby Electronics Corporation www.cobyusa.com Page 23
Video Controls
After conrming an Video le, the screen will display its playback screen in full
size.
Press or icon for fast reverse or fast forward, each successive press
will decrease or increase the speed by:
Reverse:
2
×4
×8
×16
×
Forward:
2
×4
×8
×16
×
Press for normal playback.
To Adjust Screen Brightness, Contrast & Color
To adjust Brightness, Contrast & Color, press and hold to show the dialogue
box. Use the Navigation Keys to adjust the value and conrm Close to save and
exit, or conrm Reset to restore the factory-default settings.
•
•
Music & Video Mode
Page 22 Coby Electronics Corporation
Page 22 Coby Electronics Corporation www.cobyusa.com Page 23
Photo List
Upon entering the Main Menu, use the navigation keys to select a desired photo
le. The photo le selected screen shown below.
Photo File Selected Screen
/
AA
CC.JPG
BB
CC
DD
EE
FF
GG
HH
123
4
6
7
Filter
Flat Mode
Repeat : off
Music Playing
5
W: 960 H:540
Filename of selected le
Current Disk Icon
Current File Number/Total Number of Files
Current selected File
Photo dimension
Photo preview
Advanced settings (Filter/Flat Mode/Edit Mode)
Refer to Audio & Video Mode section for details
Photo View
Press on the selected photo le. Your photo frame will display the photo in
full-screen.
To view the previous photo, press , or press on the photo frame.
To view the next photo, press , or press on the photo frame.
The Photo List will display supported Photo les, only. Your photo
frame can display baseline JPEG les of up to 8MB in size.
1.
2.
3.
4.
5.
6.
7.
•
•
Photo Mode
Page 24 Coby Electronics Corporation
Page 24 Coby Electronics Corporation www.cobyusa.com Page 25
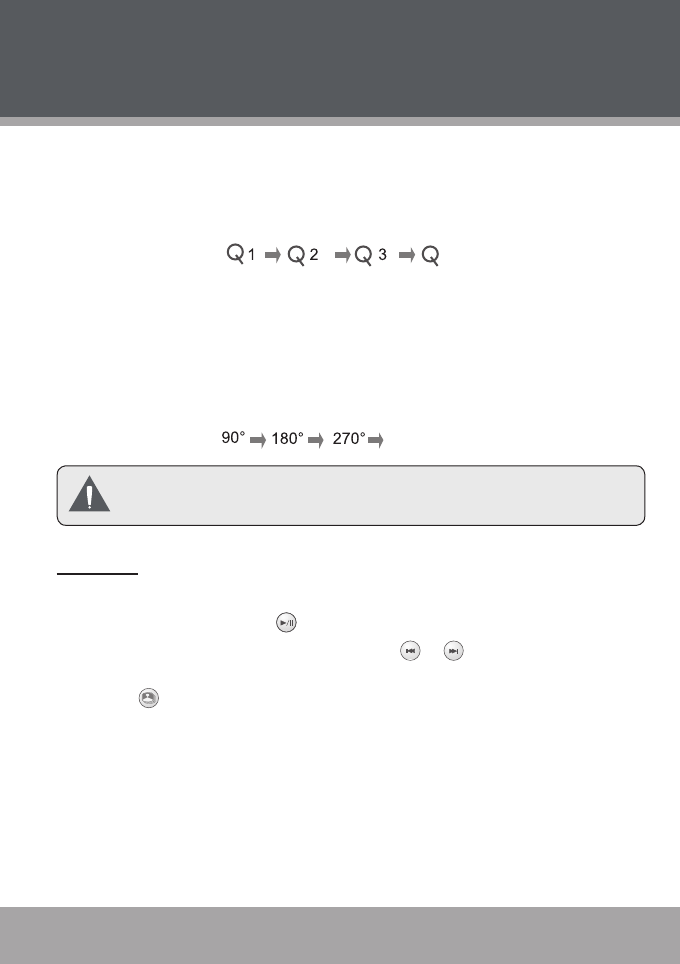
Zoom
To increase the level of magnication, press ZOOM.
Each successive press of ZOOM will change the level of magnication as
shown below.
OFF
To pan around the magnied picture, use the navigation keys.
Rotate
To rotate the picture, press ANGLE.
Each successive press of ROTATE will change the angle of rotation as
shown below.
No Rotation
To adjust the Photo View Mode, JPEG Interval Settings & Transition,
refer to SETUP section for operation details.
Slideshow
The sildeshow will start automatically while displaying photographs.
To pause playback press . Press again to resume.
To display the previous / next photo, press or .
Press Menu to exit.
Press to stop slideshow transition. Press again to restore.
•
•
•
•
•
•
Photo Mode
Page 24 Coby Electronics Corporation
Page 24 Coby Electronics Corporation www.cobyusa.com Page 25
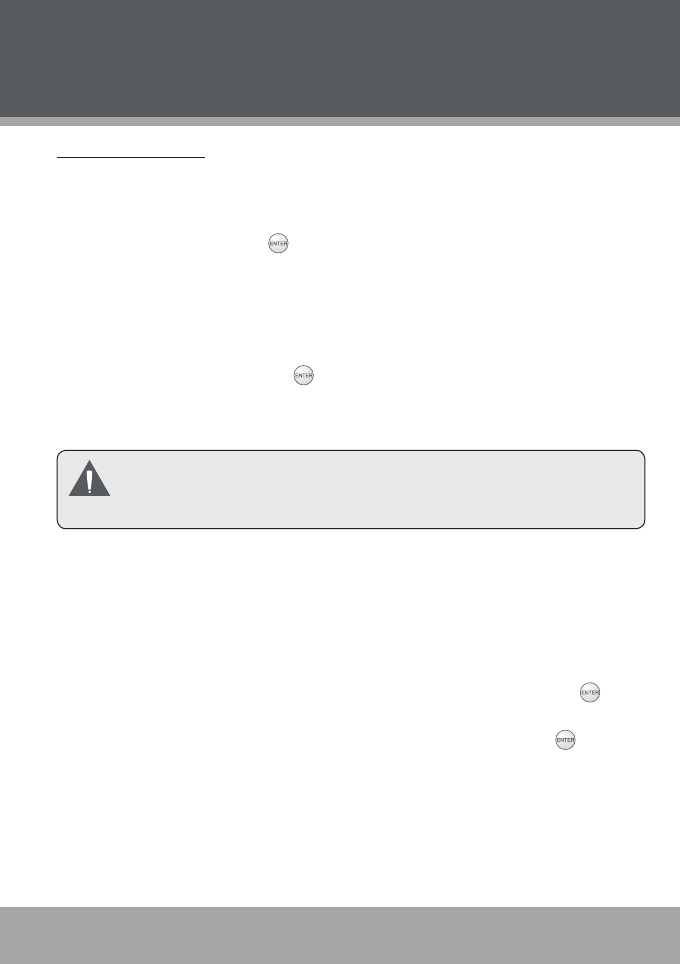
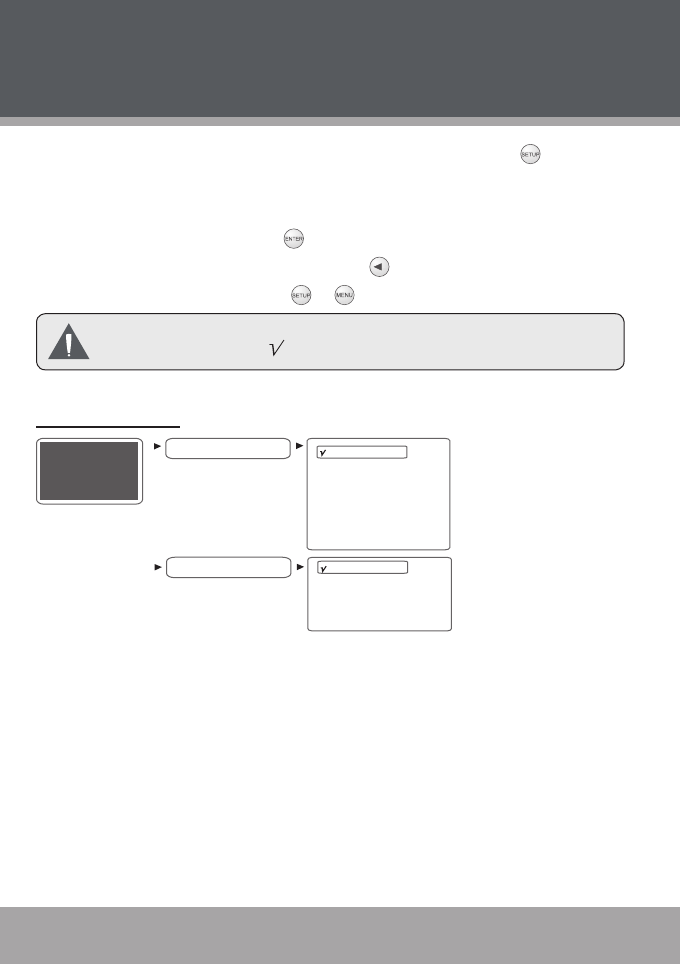
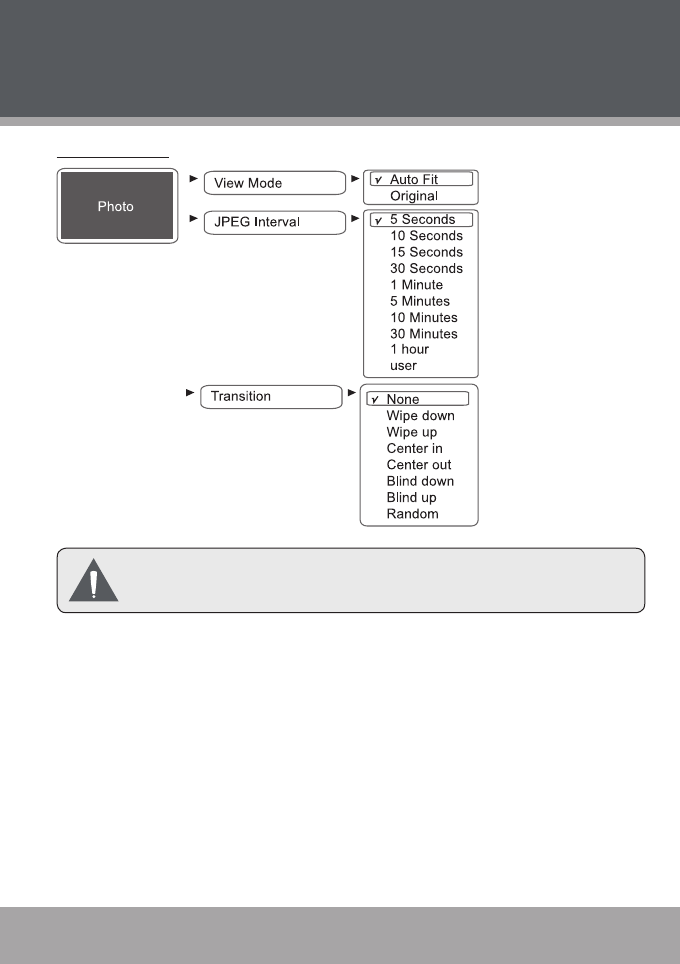
Setup Menu
To adjust the settings and options of your digital photo frame, press . The Setup
Menu be displayed on screen.
Use the navigation keys to highlight and display option / sub-menu.
To conrm a selection, press .
To return to a previous menu level, press .
To exit the Setup Menu, press or .
Please choose your desired settings as shown in the screens below.
The options marked ‘ ” are the default settings.
Language Options
OSD language
DivX subtitle
Language
English
French
Spanish
German
Italian
Dutch
Unicode
Turkish
Central European
Cyrillic
•
•
•
•
Page 26 Coby Electronics Corporation
Page 26 Coby Electronics Corporation www.cobyusa.com Page 27
Photo Options
If USER is selected in JPEG Interval list, the interval of the photo
slideshow will be operated manually.
Setup Menu
Page 26 Coby Electronics Corporation
Page 26 Coby Electronics Corporation www.cobyusa.com Page 27
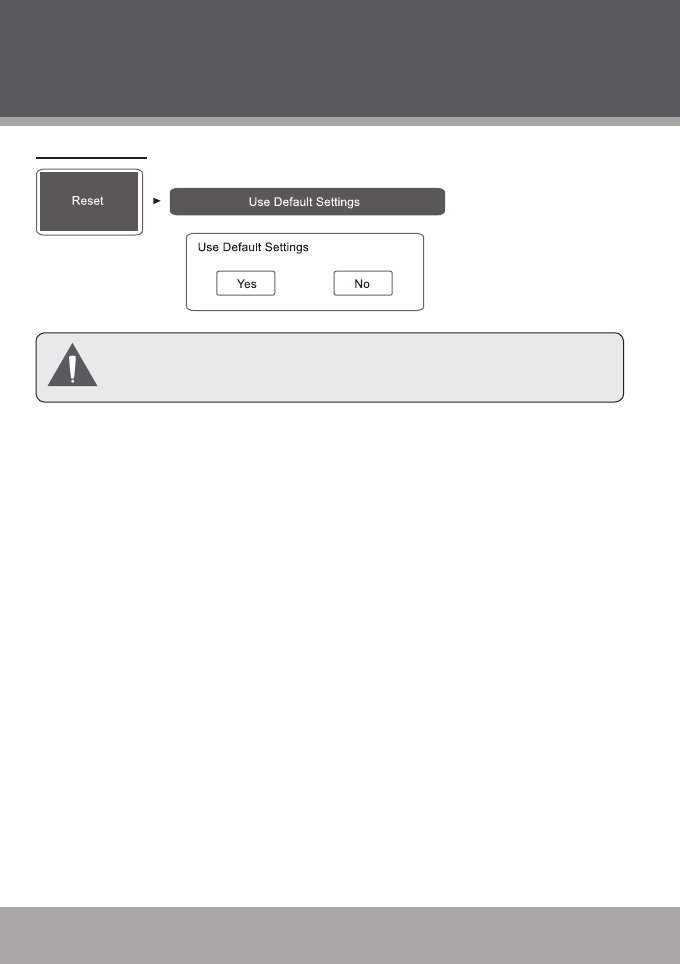
Reset Options
Conrm Yes on Use Default Settings dialogue box, the settings of the
player will change to the default settings.
Setup Menu
Page 28 Coby Electronics Corporation
Page 28 Coby Electronics Corporation www.cobyusa.com Page 29
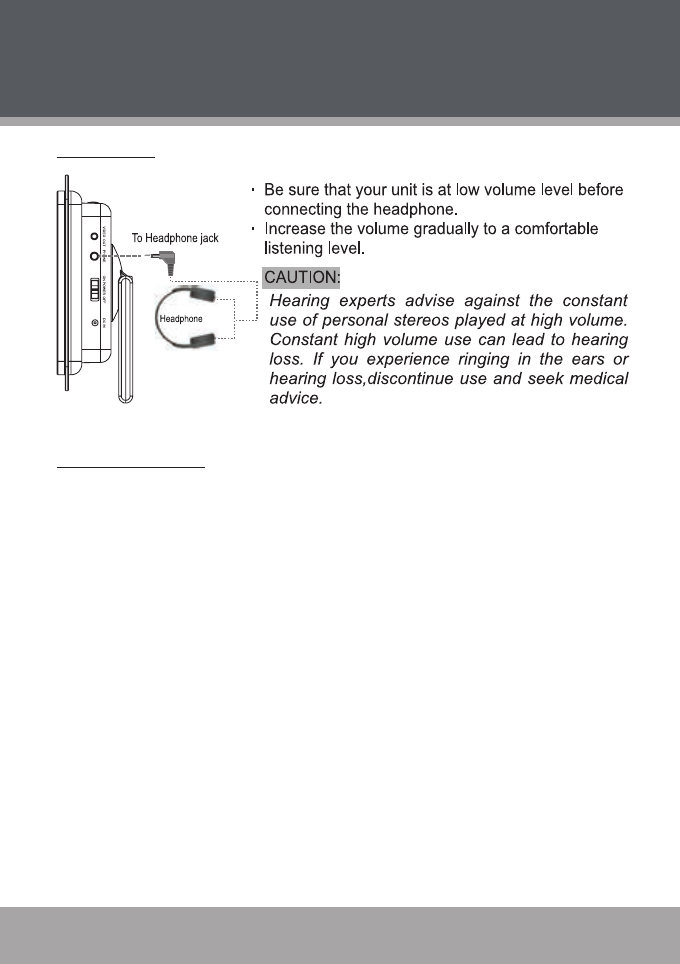
Cable Connection
Headphones
Audio-Only Output
To output audio only, use the AV connection but do not connect the Video cables.

Page 28 Coby Electronics Corporation
Page 28 Coby Electronics Corporation www.cobyusa.com Page 29
Optional Connections
To use your DP-5588 to output audio and video to an external home theater sys-
tem, use the connections diagrammed below.
Composite Video
not
included
Page 30 Coby Electronics Corporation
Page 30 Coby Electronics Corporation www.cobyusa.com Page 31
Clock
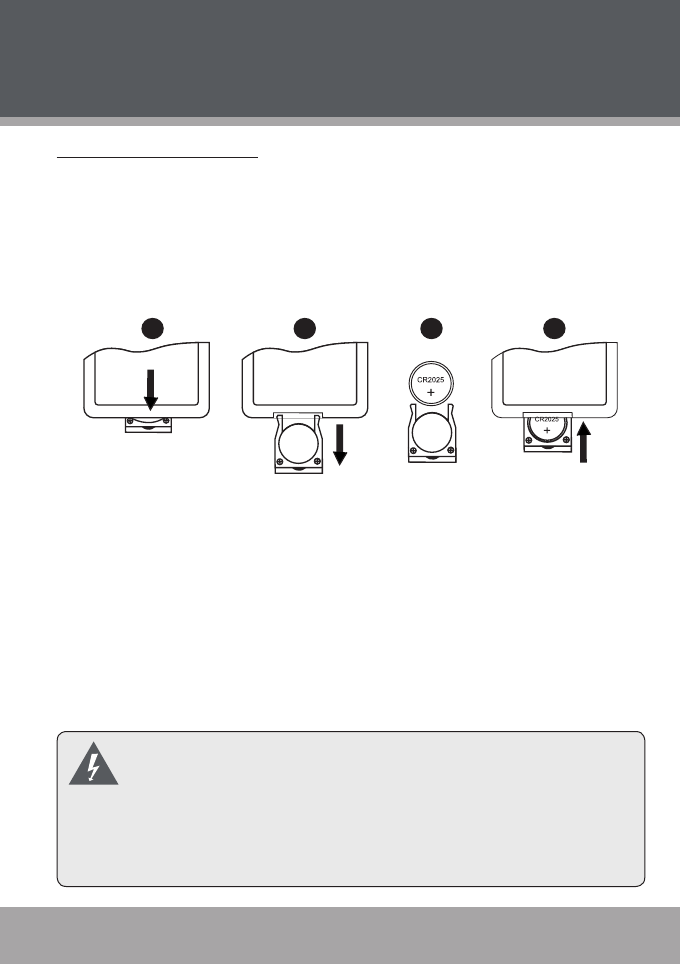
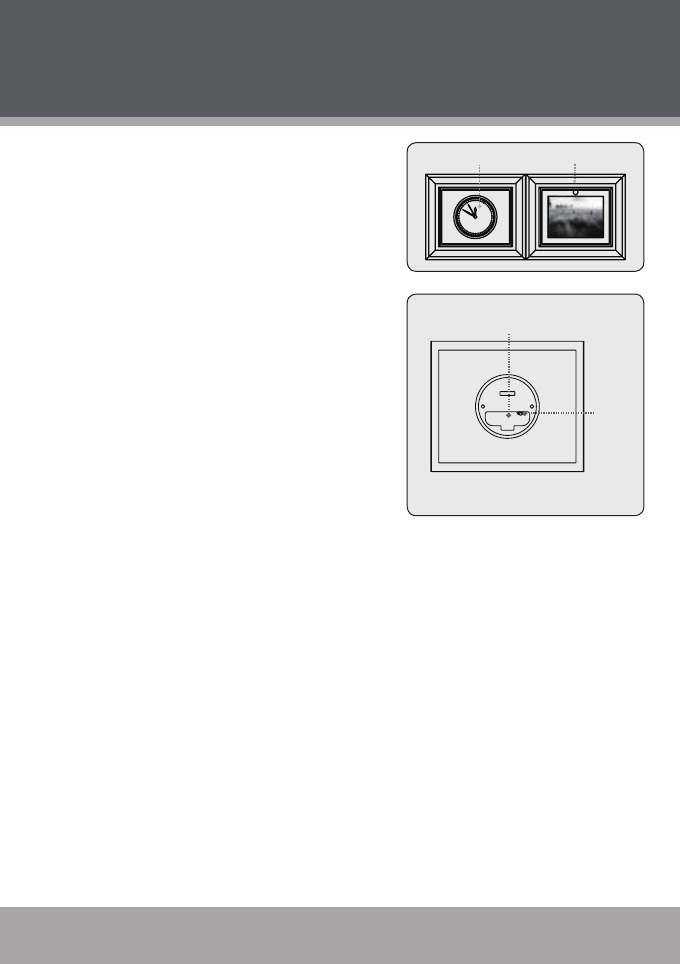
To insert a battery & adjust the time
Push and slide out the battery compart-
ment cover.
To insert a battery: make sure to match
its polarities (+/-) to the markings on the
inside of the compartment.
To adjust the time: turn the knob in the
compartment .
Replace the cover.
a.
b.
c.
d.
Battery Compartment
Back view of the clock
Knob
Faceplate
Clock

Page 30 Coby Electronics Corporation
Page 30 Coby Electronics Corporation www.cobyusa.com Page 31
Firmware Upgrades
From time to time, COBY may release rmware updates to improve the perfor-
mance of the DP-5588 or to add additional features. Please check the COBY web-
site periodically at www.cobyusa.com to see if new rmware has been released for
your photo frame.

Page 32 Coby Electronics Corporation
Page 32 Coby Electronics Corporation www.cobyusa.com Page 33
If you have a problem with this unit, please read the troubleshooting guide below
and check our website at www.cobyusa.com for Frequently Asked Questions
(FAQs) and rmware updates. If these resources do not resolve the problem,
please contact Technical Support.
The player does not turn on.
Make sure the unit has been powered on manually (i.e., the Power Switch has
been physically set to the ON position).
Ensure that the power cord has been properly connected to the power outlet.
The sound quality of the music is poor.
Try playing the le on your computer. If the sound quality is still poor, try
downloading the le again or re-encoding the le yourself.
Ensure that the bit rate of the le is not too low. The higher the bit rate of the
le, the better it will sound. The minimum recommended bitrate is 128kbps
for MP3s and 96kbps for WMAs.
I cannot select a memory card.
Ensure that a memory card has been installed.
Ensure that the memory card is properly installed.
Ensure that the memory card is not defective.
Ensure that the MS and SD cards are not inserted for use at the same time.
•
•
•
•
•
•
•
•
Troubleshooting
COBY Electronics Technical Support
56-65 Rust Street
Maspeth, NY 11378
Email: techsupport@cobyusa.com
Web: www.cobyusa.com
Phone: 800-727-3592 (8:00 AM–11:00 PM EST, seven days a week)
800-681-2629 (8:00 AM–5:30 PM EST, Monday to Friday)
718-416-3197 (8:00 AM–5:30 PM EST, Monday to Friday)

Page 32 Coby Electronics Corporation
Page 32 Coby Electronics Corporation www.cobyusa.com Page 33
The player will not play my music le.
Ensure that the le is in a compatible format (MP3 or WMA).
The le may be copy-protected. This player cannot play copy-protected les.
The player will not play my video le.
Ensure that the video le will play on your computer using Windows Media
Player 10. If the le works on the computer, use the same computer to con-
vert the video to a compatible format.
The picture is noisy or distorted.
Reset the color system of the TV set.
Ensure that the photo frame is connected using an RCA AV cable.
There is no sound.
Ensure that the volume has been set to a reasonable level.
The remote control does not work.
Make sure the unit has been powered on manually (i.e., the Power Switch has
been physically set to the ON position).
Remove any obstacles between the remote control and the frame.
Point the remote control towards the remote sensor on the frame.
Ensure that the battery has been installed correctly in the remote control.
Replace the battery.
The photo frame has malfunctioned.
Turn the photo frame off and let it rest for 30 minutes. After that, turn on the
photo frame -- the restore function should reset the photo frame.
Try updating the player’s rmware. Please refer to the Firmware Upgrade
section of this manual for detailed instructions.
•
•
•
•
•
•
•
•
•
•
•
•
•
Troubleshooting

Page 34 Coby Electronics Corporation
Page 34 Coby Electronics Corporation www.cobyusa.com Page 35
Display Type 5.6” Full-Color TFT LCD
Display Resolution 320 x 3(RGB) x 234
Memory CF Card Slot
SD/MMC Card Slot
xD Card Slot
MS Card Slot
Audio Format Support MP3 (32 - 320kbps, CBR/VBR)
WMA (64 - 192 kbps)
Video Format Support AVI (XviD)
MPG
MPEG
Photo Format Support JPEG (8MB)
USB Host USB 2.0 High-Speed (device)
Audio Output 3.5mm Stereo / Headphone
Integrated Stereo Speakers
Video Output Composite Video
Power Supply DC 12V, 1A
100-240V AC Adapter
Specications and manual are subject to change without prior notice.
Specications

Page 34 Coby Electronics Corporation
Page 34 Coby Electronics Corporation www.cobyusa.com Page 35
Notes

COBY Electronics Corp.
56-65 Rust Street
Maspeth, NY 11378
www.cobyusa.com
www.ecoby.com
