Cochlear Bone Anchored Solutions RC-2 To wirelessly manage your Baha Sound Processor User Manual RC 2 UserMan
Cochlear Bone Anchored Solutions AB To wirelessly manage your Baha Sound Processor RC 2 UserMan
RC-2 UserMan
Intended use
The Remote Control is intended to enable the user to control
a wireless Baha Sound Processor remotely. The essential
purpose of the Remote Control is to transfer signals to a
Baha sound processor in order to adjust volume and select
a program.
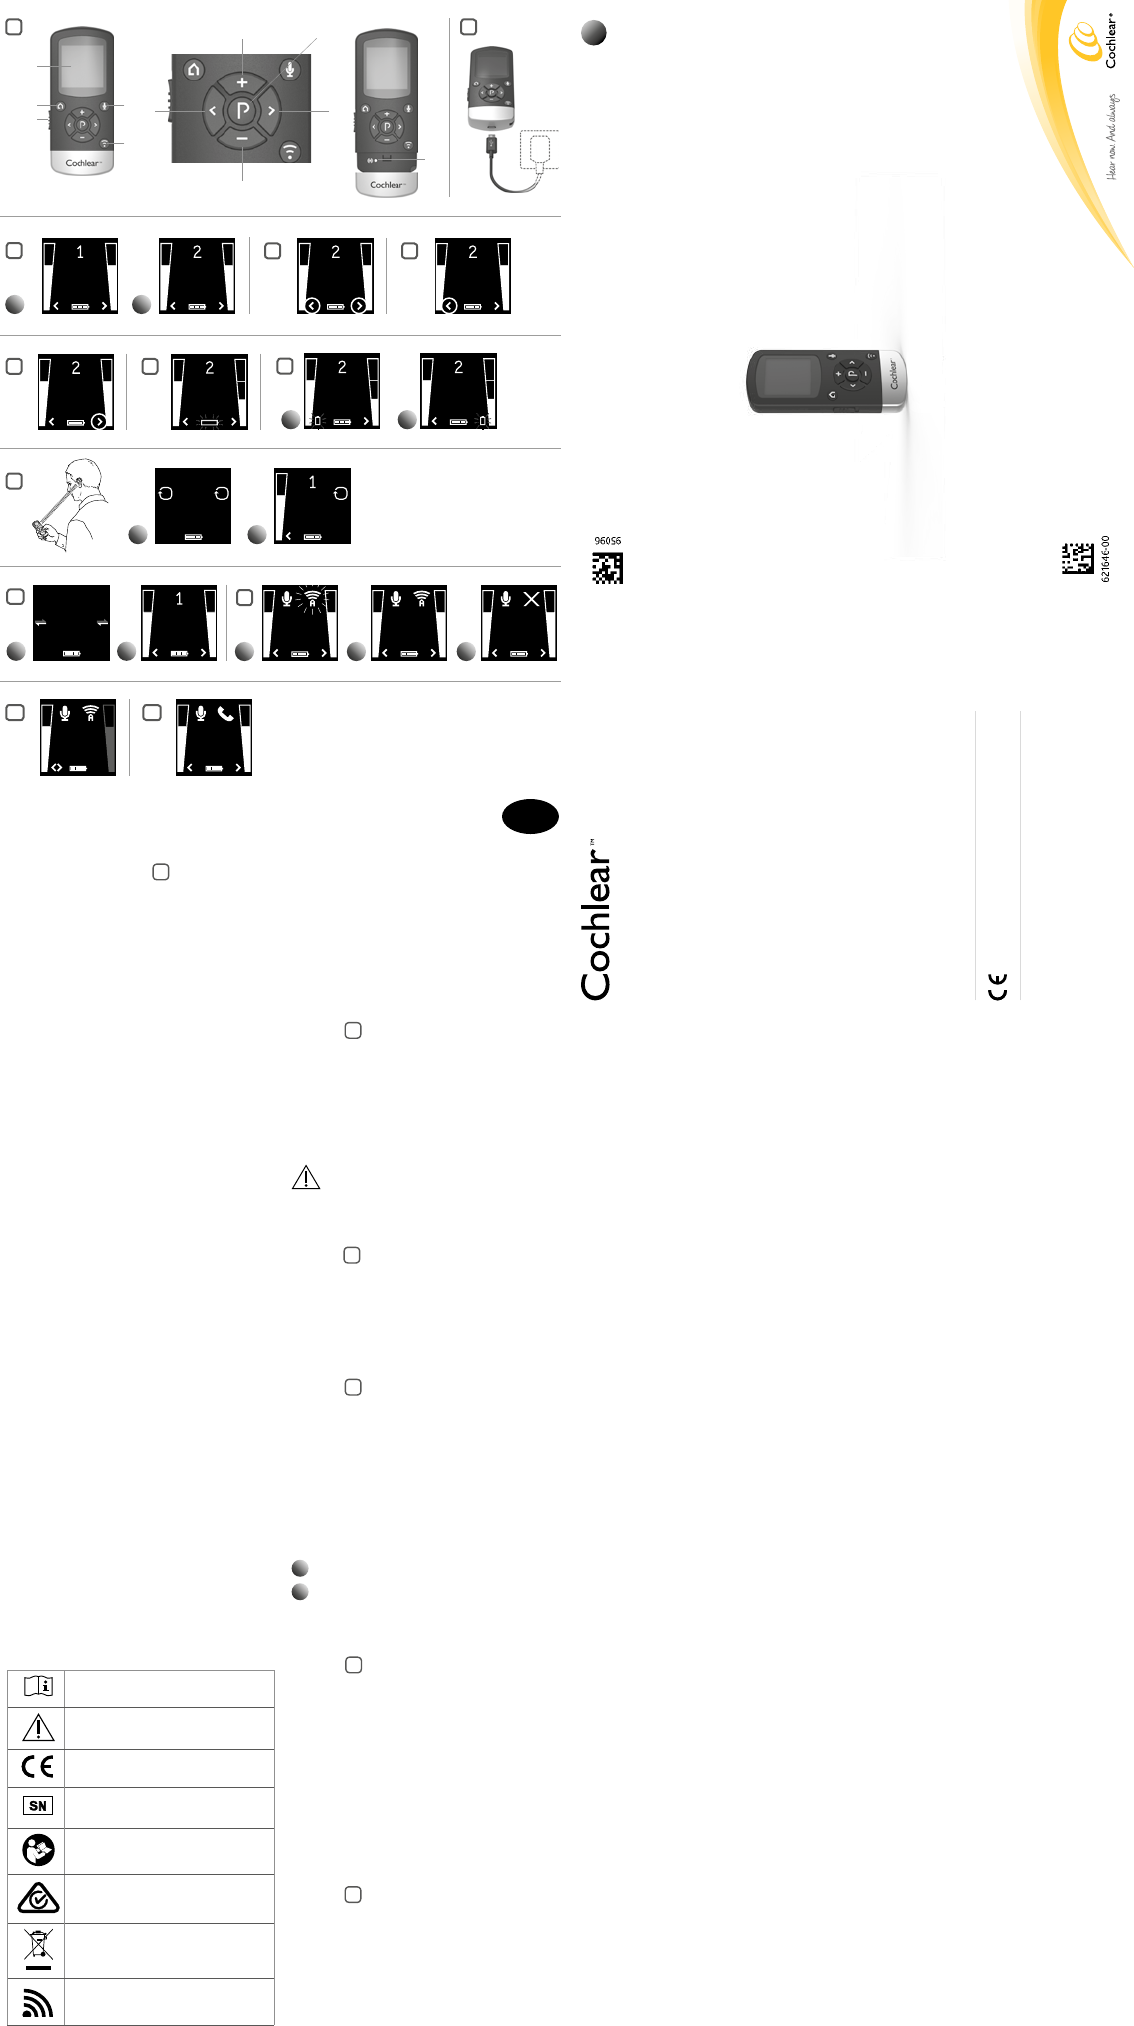
Getting Started
Charging the Battery
See figure 2 2
Before using your Remote Control, the battery must be fully
charged. To do so, plug in the charging cable as shown below.
Then plug the other end into a power outlet. During charging,
the battery meter will display one, two or three bars. When
fully charged, all three bars will be shown continuously.
For safety reasons, recharge the battery only with chargers
supplied by Cochlear.
Caution: Do not charge the Cochlear Remote
Control while it is being worn.
Turning your Remote Control 2 ON
and OFF
See figure 1 1 no. 1
To turn your Remote Control ON slide the ON/OFF control
down to the ON position. A white “I” icon will be visible at
the base of the control and the display will turn on. To turn
your Remote Control OFF, slide the ON/OFF control up to
the OFF position.
Changing program
See figure 3 3
The “P” button [no. 10 in figure 1] is used to change the
programs that your hearing care professional has programmed
into your sound processor. The name of the program displayed
can be configured by your hearing care professional. Each
time you press the “P” button the program advances one step,
returning to program 1 at the end of each cycle (e.g., 1, 2, 3, 1).
Each program change is accompanied by beep tones in both
sound processors and the program currently in use is shown in
the display. For optimal performance it is recommended that
both sound processors be set to the same program.
1Program 1 “Everyday”
2Program 2 “Noise”
Adjusting volume
Adjust volume on two sound processors
See figure 4 4
The “+” and “-” keys are used to adjust volume [no. 6 and 7 in
figure 1]. Volume may be adjusted on both sound processors
simultaneously or on each side independently. By default,
both sound processors are “active,” which is indicated in the
display by two arrowheads (< and >) located next to the
volume bars. Both sound processors can simultaneously be
made louder by pressing the “+” key or softer by pressing the
“-” key. Each adjustment is accompanied by beep tones in the
sound processors as well as a visual change in the volume bars
shown in the display. The default volume level is indicated by a
horizontal green line in the volume bars.
Adjusting volume on the left sound
processor only
See figure 5 5
To adjust volume on the left side only, first press the “<” key
on the keypad [no. 8 in figure 1]. Doing so makes the left sound
processor “active” and the right sound processor “inactive”.
This is indicated by a left arrowhead (<) in the display, with the
right arrowhead turned off. Press “+” or “-” to adjust volume
on the left sound processor only.
Key to device See figure 1 1
1. ON/OFF control
2. Display
3. Streaming (optional TV Streamer or Mini
Microphone)
4. Home button
5. Sound Processor microphone mute
6. Increase volume
7. Decrease volume
8. Select left Sound Processor only
9. Select right Sound Processor only
10. Program change
11. Pairing button
Note: The instructions in this manual describe operation of
the Cochlear Baha Remote Control with one Cochlear Baha
sound processor. If you are a bilateral recipient (using two
Cochlear sound processors), note that one Cochlear Baha
Remote Control can be used with two Baha sound processors.
If this is the case, the same instructions apply to both sound
processors.
Introduction
The Cochlear Baha Remote Control will allow you to operate
your Cochlear Baha wireless sound processors. It is both an
elegant and user-friendly Remote Control as well as a status
indicator that gives you access to other wireless functions
on your sound processor. If you are using two wireless Baha
sound processors, the Cochlear Baha Remote Control can be
used to adjust both of your sound processors simultaneously.
Or you can control both sound processors individually,
allowing you to perfectly fine tune your sound processor to
any specific hearing situation.
Please read this manual carefully to fully benefit from
the Cochlear Baha Remote Control. Ask your hearing
care professional if you have any questions. For further
information you can also visit the www.cochlear.com web
site.
For your safety, carefully read the chapter “Important
Information”.
Warranty
The warranty does not cover defects or damage arising from,
associated with, or related to the use of this product with
any non-Cochlear processing unit and/or any non-Cochlear
implant. See “Cochlear Global Limited Warranty card” for
more details.
Key to symbols
The following symbols will be used throughout the document.
Welcome
Congratulations on your purchase of a Cochlear™ Baha® Remote Control 2*.
GB
“Consult instructions for use” or
“Operating instructions”
“Caution” or “Caution, consult
accompanying documents”
CE-mark
Serial Number
Refer to instructions/booklet
ACMA (Australian Communications and
Media Authority) compliant
Please ask your hearing care professional
concerning disposal of this device.
Wireless enabled
GB
Cochlear, Hear now. And always, Hybrid, Nucleus, SmartSound, the elliptical logo, Nucleus in
Chinese characters and Codacs, are either trademarks or registered trademarks of Cochlear Limited.
Ardium, Baha, Baha Divino, Baha Intenso, Baha PureSound, Baha SoftWear, DermaLock, Vistafix and
WindShield are either trademarks or registered trademarks of Cochlear Bone Anchored Solutions AB.
© Cochlear Bone Anchored Solutions AB 2013. All rights reserved. DEC13.
Manufacturer:
Cochlear Bone Anchored Solutions AB
Konstruktionsvägen 14, SE - 435 33 Mölnlycke, Sweden
Tel: +46 31 792 44 00 Fax: +46 31 792 46 95
Regional offices:
Cochlear Ltd (ABN 96 002 618 073) 1 University Avenue, Macquarie University NSW 2109,
Australia Tel: +61 2 9428 6555 Fax: +61 2 9428 6352
Cochlear Americas 13059 E Peakview Avenue, Centennial, CO 80111, USA
Tel: +1 303 790 9010 Fax: +1 303 792 9025
Cochlear AG EMEA Headquarters, Peter Merian-Weg 4, 4052 Basel, Switzerland
Tel: +41 61 205 0404 Fax: +41 61 205 0405
www.cochlear.com
User Manual
Remote Control 2
Baha®
Cochlear™
1
11
5
3
4
1
2
7
6
98
10 2
45
6 7 8
10
12
1 2
Everyday Noise NoiseNoise
Noise
11
1 2
Everyday
1 2 3
AAA
3
Noise
1 2
NoiseNoise
1 2
Everyday
9
AA
13
The Mini Microphone streams speech and audio signals
directly to your sound processor. To start audio streaming
from the TV Streamer or Mini Microphone, press the
streaming button [no. 3 in figure 1] on the Remote Control.
The sound processor will start searching for your streaming
device.
Activating streaming from the Cochlear TV
Streamer
See figure 11 11
To start audio streaming from the TV, stereo or any other
device connected to your TV Streamer, simply turn on the
audio device and then press the streaming button [no. 3 in
figure 1]. The Remote Control will immediately start searching
for the TV Streamer and connect to it.
1Searching for a TV
2Connected to a TV
3No TV found
You can have up to 3 Cochlear streaming devices set up for
your sound processor. Each Cochlear streaming device is
indicated in the display by the letter A, B or C. If more than
one Cochlear streaming device is in use, press the streaming
button again until the desired audio signal is heard.
Streaming mode volume adjustment
When in streaming mode, both the sound processor’s volume
(left volume bar) and the streamed audio volume (right
volume bar) are by default set to “active”. This is indicated in
the display by the two arrows (< and >) located next to the
volume bars. To adjust both the sound processor and the
streamed audio volume simultaneously, press the “+” or “-”
key [no. 6 or 7 in figure 1] on the Remote Control.
Note: If you are using two sound processors, any volume
adjustments will apply to both of them. It is also possible
to make individual volume adjustments for the sound
processors and the streamed audio signal respectively.
Adjust sound processor volume only
See figure 12 12
To adjust the sound processor volume, press the left “<” key
on the keypad [no. 8 in figure 1] once. The two arrows “<>”
next to the hearing instrument volume bar and the “streamed
audio” volume bar will be dimmed. Press “+” or “-” [no. 6 or
7 in figure 1] to adjust hearing instrument volume. To return
to simultaneous adjustment mode, press the “>” key [no. 9 in
figure 1] on the keypad until one arrow appears next to each
volume bar in the display, indicating that both volume levels
are “active”.
Adjust streamed audio volume only
TV
To adjust the streamed audio volume, press the right “>”
key on the keypad [no. 9 in figure 1] once. The two arrows
“<>” next to the streamed volume bar and the “hearing
instrument” volume bar will be dimmed. Press “+” or “-” [no.
6 or 7 in figure 1] to adjust the streamed audio volume. To
return to simultaneous adjustment mode, press the “<” key
[no. 8 in figure 1] on the keypad until one arrow appears next
to each volume bar in the display, indicating that both volume
levels are “active”.
Sound processor streaming mode volume
adjustments
The volume adjustment will apply to the streamed audio
signal only. If necessary, adjust the volume using the “+” and
“-” keys [no. 6 or 7 in figure 1]. The volume of the streamed
audio signal can also be adjusted individually for the left and
right sound processors by pressing < or > [no. 8 or 9 in figure
1]. To stop streaming and return to the previous program,
press the “P” button [no. 10 in figure 1]. Alternatively, press the
Home button [no. 4 in figure 1], which will reset your sound
processor to its default settings (see the section “Return
to Home settings”) and also reset the Remote Control to
simultaneous adjustment mode.
Cochlear Wireless Phone Clip (optional)
See figure 13 13
The Phone Clip also works with the Remote Control. The
display will indicate when the Phone Clip is in use. Once the
phone call has ended, the sound processor will return to
the previously used program. That program is shown on the
display of the Remote Control. Volume adjustments made
during the phone call will not be transferred to your previously
used program. Phone calls will temporarily interrupt
streaming from your optional streaming devices but streamed
audio will be restored once the phone call has ended.
Appendix: exceptions to normal
operation
If you have been fitted with two sound processors, it
is recommended that both of them be set to the same
program at all times. However, it is possible to have different
programs on the two sound processors, such as Program
1 on the left side and streamed audio on the right. Under
these circumstances, the remote control functions slightly
differently, as the following examples illustrate.
Situation #1: You have started with P1 on both sides but
have changed the right side to P2 by pushing the button on
the right sound processor. If you then press the P button on
the remote control, the left sound processor will advance to
P2, matching the one on the right. Further presses of the P
button will advance both sound processors, thus keeping the
same program on both sides.
Situation #2: You have set the left sound processor
to P1 and the right sound processor to P2. If you then press
the Streaming button, both sound processors will receive
streamed audio from the same source (e.g., the TV). If you
then press the P button on the remote control, streaming will
be cancelled on both sides and both sound processors will
return to their previous programs (P1 and P2).
Situation #3: You have P1 on the left side but have
started streaming on the right side by pressing and holding
the button on the right sound processor. If you then press
the P button on the Remote Control, streaming on the right
side will be cancelled and both sound processors will return
to P1. If you press the Streaming button instead, both sound
processors will be set to the same streamed audio program.
Situation #4: If your sound processors are using different
sound processor programs, only the program numbers for
each sound processor will be shown. No program label/name
will be shown.
Situation #5: If one sound processor is in streaming
mode and the other one is in one of the sound processor
programs, only the streaming display will be shown with no
indication of the sound processor’s program number and
label/name.
Adjusting volume on the right sound
processor only
See figure 6 6
To adjust volume on the right side only, first press the “>” key
on the keypad [no. 9 in figure 1]. Doing so makes the right side
“active” and the left side “inactive”. This is indicated by a right
arrowhead (>) in the display with the left arrowhead turned
off. Press “+” or “-” to adjust volume on the right side only.
To return to simultaneous adjustment mode, press either the
< or > keys on the keypad [no. 8 or 9 in figure 1] until both
arrowheads appear in the display, indicating that both sound
processors are again “active”.
Note: Mute/Unmute: Mute and unmute the sound
processors’ microphones by pressing the mute button [no.
5 in fig 1] on the Remote Control.
Muting or unmuting applies to both sound processors
simultaneously and cannot be selected for the left or right
one separately. When the microphones are muted, the
microphone icon will be replaced by a microphone muted
icon and the volume bars will be dimmed. To unmute the
sound processor microphones, press the mute button again.
TV
Activate streaming
If you are using an optional Cochlear streaming device such
as the Cochlear Wireless TV Streamer** or Cochlear Wireless
Mini Microphone***, input from these devices can be activated
by pressing the streaming button no. 3 in figure 1. See also the
section “Using optional audio streaming devices”.
Return to Home settings
Home settings, i.e., those that apply whenever the sound
processor is first turned on, are activated by pressing the
Home button [no. 4 in figure 1]. Pressing the Home button
will:
1. Activate program 1 in your sound processor
2. Adjust your sound processor to the default volume settings
3. Set the volume to simultaneous adjustment mode
The home button will also terminate any streamed audio
signals from any optional Cochlear streaming device.
Low battery indicator
Remote Control low battery indicator
See figure 7 7
The battery level of the Remote Control is indicated by
a battery meter comprising three bars. As the battery is
gradually depleted the bars will disappear one by one. When
the battery is low on power, the meter will start flashing,
indicating that recharging is needed.
Sound Processor low battery indicator
See figure 8 8
When the sound processor’s battery is almost flat, you may
still be able to use it, but the Remote Control functionality
may be disabled. Should this happen, we recommend you
replace the battery in your sound processor.
1Low battery on left sound processor
2Low battery on right sound processor
Operating range
See figure 9 9
The operating range between the Remote Control and the
sound processor is approximately 1 meter (40”). If the current
status is not displayed on the Remote Control, hold Remote
Control it in front of your chest as shown in the illustration.
If the Remote Control cannot determine the sound
processor’s status, search icons will appear on its display.
Hold the Remote Control as shown above to establish
contact with both sound processors.
1Searching for two sound processors
2Searching for the right sound processor
Connected to the left sound processor
Display
To conserve battery life, the Remote Control has a power
saving feature that automatically turns off the display and
puts the Remote Control in standby mode after 20 seconds
of inactivity. Simply press any button on the keypad to
reactivate the display and then perform the desired action.
Remote control performance
The Remote Control performs best when buttons are pressed
one step at a time rather than in rapid sequence. When
adjusting volume, for example, briefly press a button as
described below and wait for the tone before continuing.
This tip applies to all button use but is especially relevant to
volume adjustments.
Pairing
See figure 10 10
Pairing is the process of establishing communication between
your sound processor and your Remote Control. Your hearing
care professional can help you with this procedure when
fitting your sound processor. Alternatively, you can follow the
steps below to pair your sound processor with the Remote
Control:
1. Make sure the Remote Control is fully charged and is
turned on.
2. Turn off your sound processor.
3. Press the pairing button on the Remote Control once. This
will activate the pairing mode 1which will be active for
20 seconds.
4. While pairing mode is activated, turn on your sound
processor. Successful pairing will be indicated by an audible
melody played in your sound processor and program 1 will
be shown as active in the Remote Control display 2. You
are now ready to use the Remote Control.
Using optional audio streaming devices
The TV Streamer and the Mini Microphone are optional
audio and speech streaming devices available for your sound
processor. The TV Streamer streams audio signals (stereo)
from your TV, stereo, computer, etc., directly to your sound
processor.
Statement
This device complies with Part 15 of the FCC Rules. Operation
is subject to the following two conditions: (1) this device may
not cause harmful interference, and (2) this device must ac-
cept any interference received, including interference that may
cause undesired operation. Note: This equipment has been
tested and found to comply with the limits for a Class B digital
device, pursuant to part 15 of the FCC Rules. These limits are
designed to provide reasonable protection against harmful
interference in a residential installation. This equipment
generates, uses and can radiate radio frequency energy and,
if not installed and used in accordance with the instructions,
may cause harmful interference to radio communications.
However, there is no guarantee that interference will not
occur in a particular installation. If this equipment does cause
harmful interference to radio or television reception, which
can be determined by turning the equipment off and on, the
user is encouraged to try to correct the interference by one or
more of the following measures:
• Reorient or relocate the receiving antenna.
• Increase the separation between the equipment and receiver.
• Connect the equipment into an outlet on a circuit different
from that to which the receiver is connected.
• Consult the dealer or an experienced radio/TV technician
for help.
• Changes or modifications can void the user’s authority to
operate the equipment.
List of countries:
The products are in compliance with the following regulatory
requirements:
• In EU: the device conforms to the Essential Requirements
according to Annex I of Council Directive 93/42/EEC for
medical devices (MDD) and essential requirements and
other relevant provisions of Directive 1999/5/EC (R&TTE).
The declaration of conformity may be consulted at www.
cochlear.com.
• Products with wireless functionality are intended for sale
in countries within the European Economic Area as well as
Switzerland. Specification of restrictions: You are not allowed
to operate the equipment within 20 km of the centre of Ny
Ålesund, Norway.
• In US: FCC CFR 47 Part 15, subpart C, section 15.249.
• Other identified applicable international regulatory
requirements in countries outside the EU and US. Please refer
to local country requirements for these areas.
• Products are in compliance with EN 300 328.
• In Canada the Remote Control is certified under the
following certification number: IC:8039C-RC2.
• This device complies with Industry Canada license exempt
RSS standard(s)
• This Class B digital apparatus complies with Canadian ICES-
003. Cet appareil numérique de la classe B est conforme à la
norme NMB-003 du Canada.
• Operation is subject to the following two conditions: (1)
this device may not cause interference, and (2) this device
must accept any interference, including interference that
may cause undesired operation of the device. L’exploitation
est autorisée aux deux conditions suivantes : (1) l’appareil
ne doit pas produire de brouillage, et (2) l’utilisateur de
l’appareil doit accepter tout brouillage radioélectrique subi,
même si le brouillage est susceptible d’en compromettre le
fonctionnement.
• Equipment includes RF transmitter.
Important information
Maintenance and Care
•Clean the Remote Control using a damp cloth. Never use
household cleaning products (washing powder, soap, etc.)
or alcohol to clean the device.
•When the Remote Control is not in use, turn it off and
store it safely.
•Protect the Remote Control from excessive moisture
(bathing, swimming) and heat (radiator, car dashboard).
•Protect it from excessive shock and vibration.
General warnings
•Keep this device out of reach of children.
•The Remote Control uses low-powered digitally coded
transmissions in order to communicate with other wireless
devices. Although unlikely, nearby electronic devices may
be affected. In such cases, move the Remote Control away
from the affected electronic device.
•When using the Remote Control and it is affected by
electromagnetic interference, move away from the source
of the interference.
General precautions
•Do not use this device in locations where the use electronic
devices are prohibited.
•X-ray radiation (e.g., CT/MRI scans) may adversely
affect the functioning of this device. Switch it off before
undergoing the procedure and keep it outside the room.
•High-powered electronic equipment, larger electronic
installations and metallic structures may impair and
significantly reduce the operating range.
•Your sound processors and this device were given unique
communication codes during fitting. This ensures that the
device will not affect sound processors worn by others.
•Do not alter or modify this device.
•Opening the Remote Control might damage it. If problems
occur that cannot be resolved, consult your hearing care
professional.
•The Remote Control may only be repaired by an authorized
service centre.
•Do not use the Remote Control in areas where RF
transmission is prohibited, e.g., in planes, etc.
•Only connect the Remote Control to connections for
which it is explicitly intended.
Built-in battery care
Please observe the following:
•Your product is powered by a rechargeable battery. A new
battery performs optimally after two or three complete
charge and discharge cycles.
•The battery can be charged and discharged hundreds of
times, but will eventually wear out.
•Unplug the charger from the mains socket and the product
when not in use.
•If left unused, a fully charged battery will lose its charge
over time.
•Leaving the product in hot places will reduce the battery’s
capacity and service life.
•A product with a cold battery may not work temporarily,
even if fully charged. Battery performance is particularly
limited in temperatures well below freezing.
Battery warning
Caution: The battery used in this product may present a risk
of fire or chemical burn if misused.
•The battery in your product cannot be removed or
replaced by the user. Do not attempt to open the product.
Any attempt to do so may result in damage. Using other
batteries may present a risk of fire or explosion and void
the warranty.
•Only recharge the Remote Control with the recharger that
was supplied with the product.
•Dispose of batteries according to local regulations. Please
recycle when possible.
•Do not dispose of the battery as household waste or in a
fire as it may explode.
Charger care
Please observe the following if the product is supplied with
a charger.
•Do not attempt to charge your product with anything
other than the AC adapter provided. The use of other
chargers may damage or destroy the product and could
be dangerous. Use of other chargers may invalidate any
approval or void the warranty.
•For availability of approved accessories, please check with
your hearing care professional.
•Charge the product according to the instructions provided.
Charger warning
•When you disconnect the power cord or any accessory,
grasp and pull the plug, not the cord.
•Never use a charger that is damaged.
•Do not attempt to disassemble the charger because it may
expose you to a dangerous electric shock.
•Incorrect reassembly can cause electric shock or fire when
the product is subsequently used.
•Avoid charging your product in extremely high or low
temperatures and do not use the charger outdoors or in
damp areas.
Technical specifications
Temperature test, transport and storage
information
The product is subject to various tests in temperature and
damp heating cycling between -25 °C and +70 °C according
to internal and industry standards.
Wireless Accessory type designations
for models included in this User
Manual are:
FCC ID QZ3RC-2, IC 8039C-RC2, IC model: RC-2
Operating range Up to 3 meters
Wireless 2,4 GHz
Operating
temperature
0 to 55 °C
Storage
temperature
-20 to 60 °C
* Cochlear™ Baha® Remote Control 2
** Cochlear™ Wireless TV Streamer
*** Cochlear™ Wireless Mini Microphone