Cochlear Bone Anchored Solutions SAS-3 To wirelessly transfer sound from your TV to your Cochlear soundprocessor User Manual SAS 3 UserMan
Cochlear Bone Anchored Solutions AB To wirelessly transfer sound from your TV to your Cochlear soundprocessor SAS 3 UserMan
SAS-3 UserMan

Getting Started
Installing the TV Streamer
Depending on your TV, stereo, computer or other audio
setup, the installation of the TV Streamer may be done in
several ways, which are described in the following section.
The following steps will guide you through the pairing and
connecting process. Start by connecting cables between the
TV Streamer and the audio source and finish by pairing the TV
Streamer to your sound processors.
Note: The TV Streamer supports both analogue and
digital audio input. Please read the following sections for
information about supported audio formats and how to
connect the TV Streamer to audio sources.
Connecting the TV Streamer to an analogue
audio source (e.g. TV or stereo):
See figure 2 2
1. Connect the power supply to the wall socket and insert the
cable into the micro-USB socket on the TV Streamer.
2. Insert the male stereo mini-jack on the audio cable into
the female stereo mini-jack input on the TV Streamer [no.
4 in figure 1].
3. Plug the other end audio cord into the “AUDIO OUT”
terminals on the audio source. The “AUDIO OUT” is usually
marked “L – R” for left and right, and can usually be found
on the back of the audio source.
Note: With this installation, most audio sources will send
sound to both sound processors and additional speakers
connected to the audio source simultaneously. On some
audio sources you can adjust the balance between the
AUDIO OUT and the speakers. Consult your audio source
manual for instructions.
Alternative analogue audio cable
installations:
If it is not possible to connect the TV Streamer to the AUDIO
OUTPUT of the audio source using the red and white plugs,
the following installation alternatives can be used:
Mini-jack adaptor:
See figure 3 3
1. Connect the power supply to the wall socket and insert the
cable into the micro-USB socket on the TV Streamer.
2. Insert the male stereo mini-jack on the audio cable into
the female stereo mini-jack input on the TV Streamer [no.
4 in figure 1].
3. Connect the stereo mini-jack adapter to the red and white
plugs at the other end of the audio cable.
4. Plug the stereo mini-jack adapter into the audio source’s
“HEADPHONE” output terminal or alternatively into your
computer’s audio terminal.
Note: The HEADPHONE output socket is usually located
on the side or front of the audio source. When using the
HEADPHONE socket, usually only the person wearing the
sound processors will hear the sound and audio source
speakers are muted. If muted speakers are not desired,
please refer to the first installation, or the one on the
following page. Your audio source may support speakers
and HEADPHONE being on simultaneously; check your
audio source manual for instructions.
Key to device See figure 1 1
1. Micro-USB power socket
2. Pairing button
3. Mono/stereo switch
4. Analogue mini-jack audio input
5. Optical (Toslink) audio input
6. Coaxial audio input
7. Increase volume
8. Decrease volume
9. Power light (green)
10. Activity light (yellow)
11. Wall plug
12. Mini-USB plug
Introduction
The Cochlear Wireless TV Streamer will provide you with
high quality streamed audio from your TV, stereo, personal
computer or similar device directly to your sound processors.
Please read this manual carefully to fully benefit from
the Cochlear Wireless TV Streamer. Ask your hearing
care professional if you have any questions. For further
information you can also visit the www.cochlear.com web
site.
For your safety, carefully read the chapter “Important
Information”.
Warranty
The warranty does not cover defects or damage arising from,
associated with, or related to the use of this product with
any non-Cochlear processing unit and/or any non-Cochlear
implant. See “Cochlear Global Limited Warranty card” for
more details.
Key to symbols
The following symbols will be used throughout this
document.
Welcome
Congratulations on your purchase of a Cochlear™ Wireless TV Streamer**.
GB
“Consult instructions for use” or
“Operating instructions”
“Caution” or “Caution, consult
accompanying documents”
CE-mark
Serial Number
Refer to instructions/booklet
ACMA (Australian Communications and
Media Authority) compliant
Please ask your hearing care professional
concerning disposal of this device.
Wireless enabled
1
5
7
6
3 4
11
12
8
9
10
7
2 3
6 1 4 5
A
3
1
2
2
Cochlear Baha Remote Control*
GB
Manufacturer:
Cochlear Bone Anchored Solutions AB
Konstruktionsvägen 14, SE - 435 33 Mölnlycke, Sweden
Tel: +46 31 792 44 00 Fax: +46 31 792 46 95
Regional offices:
Cochlear Ltd (ABN 96 002 618 073) 1 University Avenue, Macquarie University NSW 2109,
Australia Tel: +61 2 9428 6555 Fax: +61 2 9428 6352
Cochlear Americas 13059 E Peakview Avenue, Centennial, CO 80111, USA
Tel: +1 303 790 9010 Fax: +1 303 792 9025
Cochlear AG EMEA Headquarters, Peter Merian-Weg 4, 4052 Basel, Switzerland
Tel: +41 61 205 0404 Fax: +41 61 205 0405
www.cochlear.com User Manual
TV Streamer
Wireless
Cochlear™
ACE, Advance Off-Stylet, AOS, AutoNRT, Autosensitivity, Beam, Clinicnet, Cochlear, Codacs, Contour,
Contour Advance, Custom Sound, ESPrit, Freedom, Hear now. And always, Hybrid, inHear, Invisible
Hearing, MP3000, myCochlear, NRT, Nucleus, Nucleus in Chinese characters, Off-Stylet, SmartSound,
Softip, SPrint, the elliptical logo and Whisper are either trademarks or registered trademarks of
Cochlear Limited. Ardium, Baha, Baha Divino, Baha Intenso, Baha PureSound, Baha SoftWear,
DermaLock, Vistafix and WindShield are either trademarks or registered trademarks of Cochlear Bone
Anchored Solutions AB. Dolby and the dolby-D symbol are trademarks of Dolby Lab. © Cochlear Bone
Anchored Solutions AB 2013. All rights reserved. DEC13.
• Equipment includes RF transmitter.
Charger warning
• Use the TV Streamer only with the power supply unit that
was supplied with the product.
• The use of other chargers may damage or destroy the
product and could be dangerous. Use of other chargers may
invalidate any approval or void the warranty.
• When you disconnect the power cord or any accessory, grasp
and pull the plug, not the cord.
• Never use a charger that is damaged.
• Do not attempt to disassemble the charger because it may
expose you to a dangerous electric shock.
• Do not use the charger outdoors or in damp areas.
General precautions
• Your sound processors and this device were given unique
communication codes during fitting. This ensures that the
device will not affect sound processors worn by others.
• High-powered electronic equipment, larger electronic
installations and metallic structures may impair and
significantly reduce the operating range.
• Use only original Cochlear accessories.
• Do not alter or modify this device.
• Opening the Cochlear TV Streamer might damage it. If
problems occur that cannot be resolved, consult your
hearing care professional.
• The Cochlear TV Streamer may only be repaired by an
authorized service centre.
• Do not use the Cochlear TV Streamer in areas where RF
transmission is prohibited, e.g., in planes, etc.
• Only connect the Cochlear TV Streamer to connections for
which it is explicitly intended.
Technical specifications
Temperature test, transport and storage
information
The product is subject to various tests in temperature and
damp heating cycling between -25 °C and +70 °C according to
internal and industry standards.
Wireless Accessory type designations
for models included in this User
Manual are:
FCC ID QZ3SAS-3, IC 8039C-SAS3, IC model: SAS-3
Statement
This device complies with Part 15 of the FCC Rules. Operation
is subject to the following two conditions: (1) this device
may not cause harmful interference, and (2) this device must
accept any interference received, including interference
that may cause undesired operation. Note: This equipment
has been tested and found to comply with the limits for a
Class B digital device, pursuant to part 15 of the FCC Rules.
These limits are designed to provide reasonable protection
against harmful interference in a residential installation. This
equipment generates, uses and can radiate radio frequency
energy and, if not installed and used in accordance with
the instructions, may cause harmful interference to radio
communications. However, there is no guarantee that
interference will not occur in a particular installation. If
this equipment does cause harmful interference to radio or
television reception, which can be determined by turning the
equipment off and on, the user is encouraged to try to correct
the interference by one or more of the following measures:
• Reorient or relocate the receiving antenna.
• Increase the separation between the equipment and receiver.
• Connect the equipment into an outlet on a circuit different
from that to which the receiver is connected.
• Consult the dealer or an experienced radio/TV technician
for help.
• Changes or modifications can void the user’s authority to
operate the equipment.
List of countries:
The products are in compliance with the following regulatory
requirements:
• In EU: the device conforms to the Essential Requirements
according to Annex I of Council Directive 93/42/EEC for
medical devices (MDD) and essential requirements and
other relevant provisions of Directive 1999/5/EC (R&TTE).
The declaration of conformity may be consulted at www.
cochlear.com.
• Products with wireless functionality are intended for sale
in countries within the European Economic Area as well as
Switzerland. Specification of restrictions: You are not allowed
to operate the equipment within 20 km of the centre of Ny
Ålesund, Norway.
• In US: FCC CFR 47 Part 15, subpart C, section 15.249.
• Other identified applicable international regulatory
requirements in countries outside the EU and US. Please refer
to local country requirements for these areas.
• Products are in compliance with EN 300 328.
• In Canada the TV Streamer is certified under the following
certification number: IC:8039C-SAS3.
• This device complies with Industry Canada license exempt
RSS standard(s)
• This Class B digital apparatus complies with Canadian ICES-
003. Cet appareil numérique de la classe B est conforme à la
norme NMB-003 du Canada.
• Operation is subject to the following two conditions: (1)
this device may not cause interference, and (2) this device
must accept any interference, including interference that
may cause undesired operation of the device. L’exploitation
est autorisée aux deux conditions suivantes : (1) l’appareil
ne doit pas produire de brouillage, et (2) l’utilisateur de
l’appareil doit accepter tout brouillage radioélectrique subi,
même si le brouillage est susceptible d’en compromettre le
fonctionnement.
to confirm the presence of streamed audio and a streaming
icon will appear in the display. The streamed sound can now
be heard in your sound processor.
Start streaming on a 2nd or 3rd TV Streamer
unit See figure 7 7
If more than one TV Streamer device is available, you may
press the streaming button [no. 3 in figure 7] on the Baha
Remote Control a 2nd or 3rd time, depending on which TV
Streamer device you want to listen to.
Up to 3 TV Streamer units are initially designated by the
letters A, B or C and the streaming device in use is shown on
the Baha Remote Control display. If you do not have a Baha
Remote Control, press and hold the button on the sound
processor for about 3 seconds a 2nd or 3rd time to access the
2nd or 3rd streaming unit.
Stop streaming
Briefly press the button on either sound processor. This will
cancel streaming on the side pressed and return to the most
recently used program.
With the Baha Remote Control (optional), simply press the
“P” button [no. 2 in figure 7], located in the centre of the
keypad. This will return the sound processors to the most
recently used program. You may also press the home button
[no. 1 in figure 7] to return to your default settings. If you
are using the telephone with the Cochlear Wireless Phone
Clip**** (optional), streaming from the TV Streamer will be
temporarily interrupted. When you have ended your phone
call, streaming will resume.
Note! Your TV Streamer’s range is approximately 7 meters.
If you move out of range and move back into range within 5
minutes, your sound processors will automatically reconnect
and continue streaming.
Controls
Volume control
The TV Streamer is designed to provide a comfortable
listening level from the moment it is activated. However, for
some devices or listening environments, it may be desirable to
adjust the listening volume and doing so can be accomplished
in a variety of ways. Keep in mind that volume adjustments
on the TV Streamer apply to the streamed signal only, not
to the volume of normal environmental sounds. Use the “+”
and “-” keys [no. 7 and 8 in figure 1] to adjust volume to a
comfortable level. Make sure that your sound processors are
comfortably adjusted before you change the settings with
the volume control. In most cases this adjustment should
only be made once since the TV Streamer will store the most
recently set volume level. Use the Baha Remote Control 2
(optional) to adjust both the streaming volume level and the
sound processor microphone volume level. Ask your hearing
care professional for more information about this accessory.
The volume can, in some cases, be further adjusted at the
signal source, for example by turning the TV volume down.
This will adjust the volume of the streamed sound transmitted
wirelessly to the sound processors. Adjusting the TV volume
will affect the listening volume in the room as well.
Adjusting sound processor and streaming volume is only
possible with the Cochlear Baha Remote Control and Cochlear
Baha Sound Processor.
Mono/stereo control
The two-position switch [no. 3 in figure 1] may be used to
set Stereo (two channels) or Mono (one channel) audio
streaming. For binaural fittings, the switch should preferably
be set to the Stereo position. For monaural fitting it should be
set to the Mono position.
Adjustable delay mode
In rare cases there may be a misalignment between the audio
streamed to the sound processors and the sound coming from
the TV speakers (echo) or even a misalignment between the
streamed audio and the TV picture (lip-sync). This may be
evident in more complex audio setups where the TV Streamer
is not connected directly to the TV (e.g. through a set-top
box or other auxiliary unit). To overcome such misalignments
the streaming delay from the TV Streamer can be adjusted
as follows:
1. Make sure that the TV Streamer is turned on and that your
sound processors are receiving the streamed audio.
2. Press and hold the pairing button [no. 2 in figure 1] for 3
seconds. The TV Streamer will then enter the adjustable
delay mode where the green indicator light on the front
of the TV Streamer will flash once every 2 seconds. The
yellow indicator light will be on whenever an audio signal
is present.
3. Use the “+” and “-” key [no. 7 and 8 in figure 1] on the top
of the TV Streamer to increase or decrease the delay of the
streamed signal in 10-ms steps. The streamed signal can be
delayed in the range of 0-250 ms.
4. When the optimal alignment between the audio streamed
to the sound processors and the sound coming from the
TV speakers or alignment between the streamed audio and
the TV picture has been reached, press and hold the paring
button for 3 seconds. Now the TV Streamer will resume
normal operation, indicated by the green indicator light
being constantly on.
The offset set in adjustable delay mode will be stored in the
TV Streamer. If you do not exit the adjustable delay mode by
pressing and holding the pairing button for 3 seconds, the TV
Streamer will automatically resume normal operation after
30 minutes. To reset the delay to 0 ms (factory setting), press
and hold the pairing button while simultaneously powering on
the TV Streamer.
Important Information
Maintenance and Care
• Clean the Cochlear TV Streamer using a damp cloth. Never
use household cleaning products (washing powder, soap,
etc.) or alcohol to clean the device.
• When the TV Streamer is not being used for extended
periods, unplug the power supply from the wall socket.
General warnings
• Keep this device out of reach of children.
• The Cochlear TV Streamer uses low-powered digitally coded
transmissions in order to communicate with other wireless
devices. Although unlikely, nearby electronic devices may
be affected. In such cases, move the Cochlear TV Streamer
away from the affected electronic device.
• When using the Cochlear TV Streamer and it is affected by
electromagnetic interference, move away from the source
of the interference.
Scart adapter:
See figure 4 4
1. Connect the power supply to the wall socket and insert the
cable into the micro-USB socket on the TV Streamer.
2. Insert the male stereo mini-jack on the audio cable into
the female stereo mini-jack input on the TV Streamer [no.
4 in figure 1].
3. Connect the scart adapter to the red and white plugs at the
other end of the audio cable.
4. Plug the scart adapter into the audio source’s scart
terminal. Note: The scart output terminal is usually
located on the back or side of the audio source.
Please consult your audio source’s manual if additional scart
output configuration is needed.
Connecting the TV Streamer to a digital
audio source (e.g. TV or stereo)
Note: The TV Streamer supports both analogue and digital
audio input. When using digital audio input the following
formats are supported:
Stereo PCM
- Sample rate: Up to 192 kHz
- Sample resolution: Up to 32 bit
Dolby Digital
- Channels: Max 5.1
- Bitrate: 32 kbs to 640 kbs
- Sample rate: 32, 44.1 and 48 kHz
Note: Dolby Digital Plus (requiring an HDMI interface),
Dolby True-HD, Dolby Pro Logic, Dolby Digital EX, Dolby
Digital Surround EX, and AAC (Advanced Audio Codec) are
not supported.
Using the optical (Toslink) audio input
See figure 5 5
1. Connect the power supply to the wall socket and insert the
cable into the micro-USB socket on the TV Streamer.
2. Insert one of the plugs on the optical audio cable into
the optical audio input socket [no. 5 in figure 1] on the TV
Streamer.
1. Note: Most optical cables are delivered with a small
protective cap to protect the tip of the cable. Please remove
this protective cap before inserting the cable.
2. Plug the other end of the optical audio cable into the
“Digital Audio Out/Optical” on your audio source.
Using the coaxial audio input
See figure 6 6
1. Connect the power supply to the wall socket and insert the
cable into the micro-USB socket on the TV Streamer.
2. Connect one of the plugs on the coaxial audio cable to the
coaxial plug [no. 6 in figure 1] on the TV Streamer.
3. Plug the other end of the coaxial audio cable into the
“Digital Audio Out/Coaxial” on your audio source.
Pairing with your sound processors
Up to three streaming devices, e.g. two TV Streamers and one
Cochlear Wireless Mini Microphone*** (optional accessory)
can be paired with a given pair of sound processors. Therefore
channel 1, 2 or 3 must be selected when starting the pairing
process.
Pairing the TV Streamer in channel 1
1. Make sure that the TV Streamer power supply is plugged
into a wall socket and that the green light indicator on the
front of the TV Streamer [no. 9 in figure 1] is ON. Your sound
processors must be OFF.
2. Press the pairing button on the TV Streamer [no. 2 in figure
1] once. The yellow indicator light on the front of the TV
Streamer [no. 10 in figure 1] will now flash once every 2
seconds to indicate that the TV Streamer is ready to be
paired in channel 1. Your TV Streamer will remain in pairing
mode for 20 seconds.
3. While pairing mode is activated, close the battery doors
of both sound processors and make sure they are ON.
Successful pairing will be indicated by an audible melody
being played in both sound processors. You are now ready
to use the TV Streamer.
Pairing the TV Streamer in channel 2
1. Press the pairing button twice. The yellow indicator light on
the front of the TV Streamer will now flash twice every 2
seconds to indicate that it is ready to be paired in channel 2.
2. While in pairing mode close the battery doors on the sound
processors.
Pairing the TV Streamer in channel 3
1. Press the pairing button three times. The yellow indicator
light on the front of the TV Streamer will now flash three
times every 2 seconds to indicate that it is ready to be
paired in channel 3.
2. While in pairing mode close the battery doors on the sound
processors.
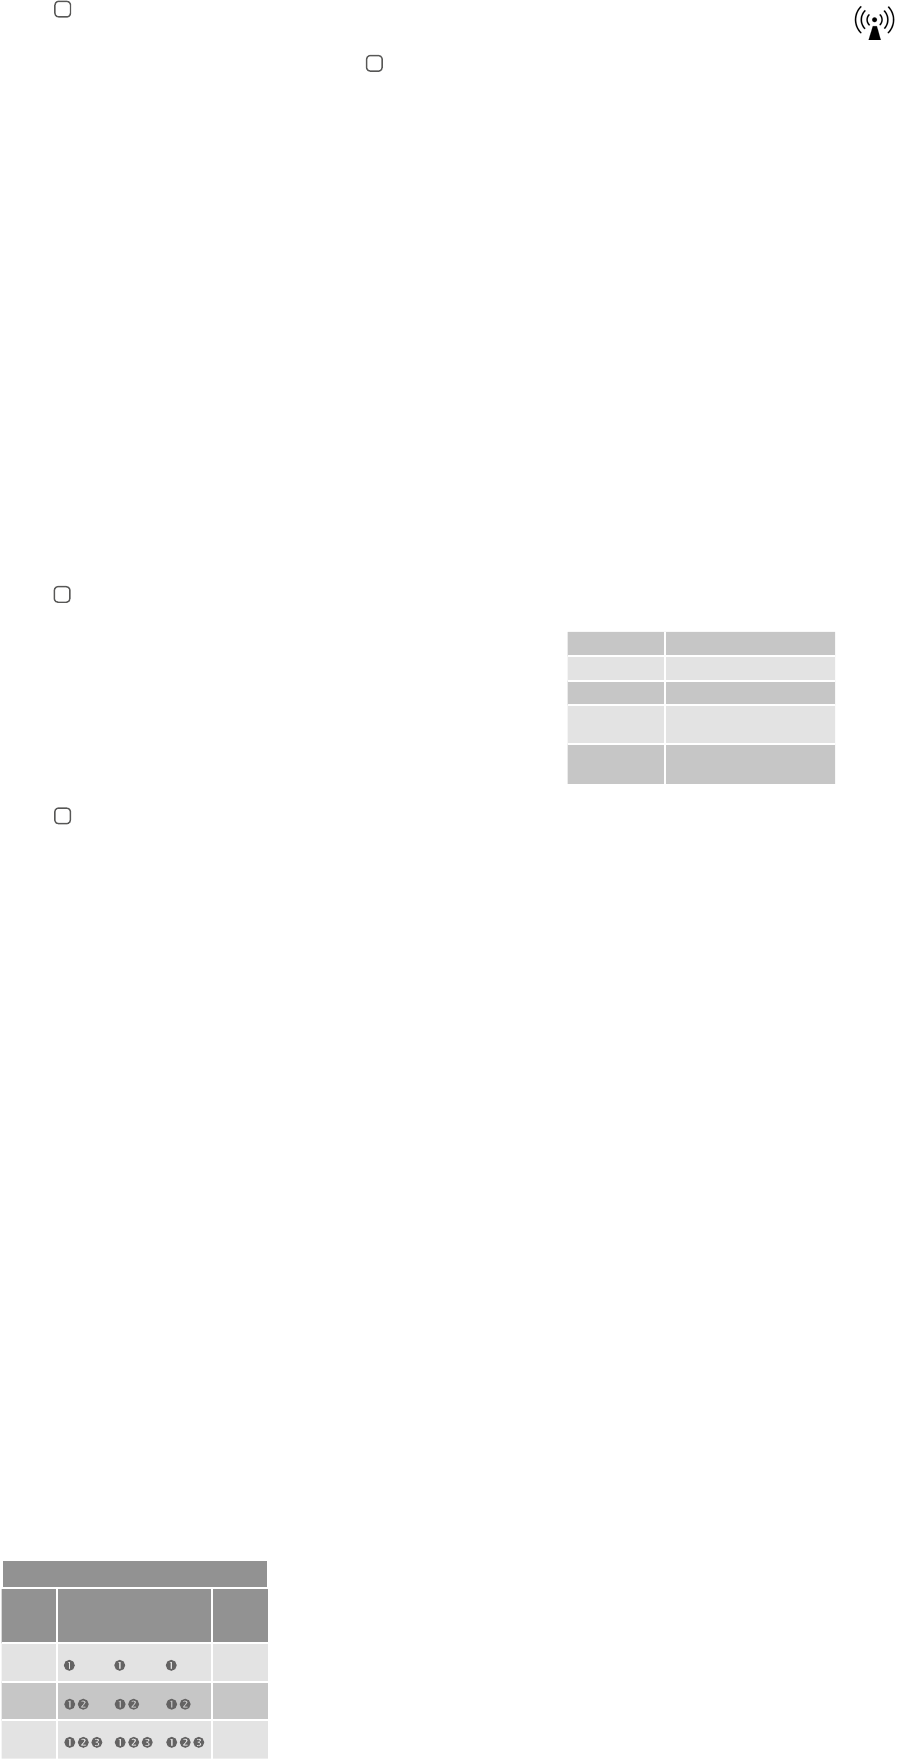
Pairing flashing pattern
Pairing
button
pushes
LED blinking pattern Channel
11
22
33
Start and stop streaming
Turn on the TV, stereo, computer or other audio device
connected to the TV Streamer. Make sure your sound
processors are turned on as well. Streaming may be started in
one of two ways:
1. Press and hold the button on either sound processor for
about three seconds. Once the TV Streamer has been
connected, an audible melody will play in your sound
processor and will be followed by the streamed sound.
2. If you have a Cochlear Baha Remote Control (optional),
simply press the streaming button [no. 3 in figure 7] on this
Remote Control. Once the sound processors connect to
the TV Streamer, an audible melody will play in both ears
Operating range Up to 7 meters
Power supply External wall socket
Wireless 2,4 GHz
Operating
temperature
0 to 55 °C
Storage
temperature
-20 to 60 °C
* Cochlear™ Baha® Remote Control
** Cochlear™ Wireless TV Streamer
*** Cochlear™ Wireless Mini Microphone
**** Cochlear™ Wireless Phone Clip