Code Systems PCMINI-2W2 Part 15 Security / Transceiver User Manual EZ5 Owner s Manual P3 3 4 09 pmd
Code Systems Inc Part 15 Security / Transceiver EZ5 Owner s Manual P3 3 4 09 pmd
Users Manual

F
UJI HEAVY INDUSTRIES LTD., TOKYO, JAPAN
is a registered trademark of FUJI HEAVY INDUSTRIES LTD
.
C
opyright © 2005, FUJI HEAVY INDUSTRIES LTD.
This supplement contains the descriptions and
instructions for the Remote Engine Start System.
Please read this supplement carefully before
using your remote engine start system.
Please keep this supplement with your Owner’s
Manual and leave it in the vehicle at the time of
resale. The next owner will need the information
it contains.
EZ5 RES Owner’s Manual P3 3-4-09
22
22
2
Warning:
•Do not remote start a vehicle in an enclosed environment (e.g. closed garage).
Prolonged operation of a motor vehicle in an enclosed environment can cause a
harmful build-up of Carbon Monoxide. Carbon Monoxide is harmful to your health.
Exposure to high levels of Carbon Monoxide can cause headaches, dizziness or
in extreme cases unconsciousness and/or death.
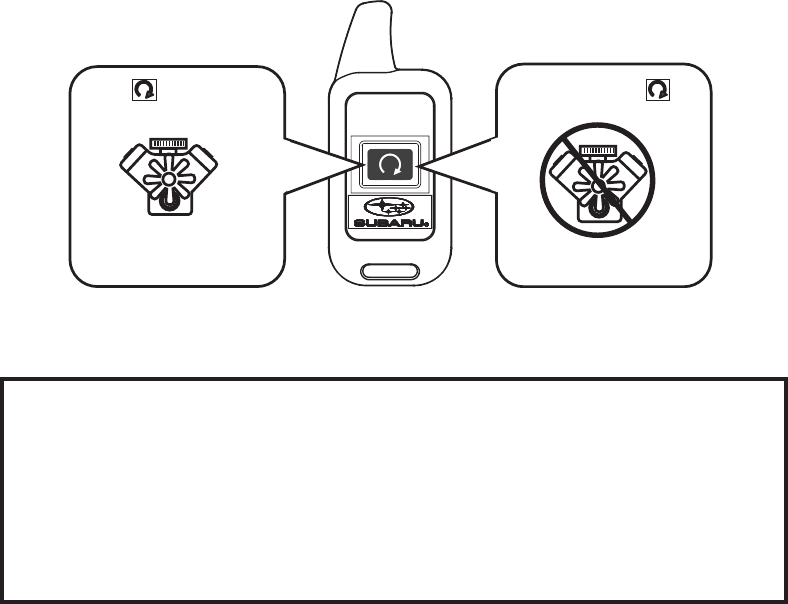
•Before performing any servicing of the vehicle, temporarily place the remote
engine start system in service mode to prevent the system from unexpectedly
starting the engine.
Press Two (2) Times
Within (3) Seconds Press and Hold
For Two (2) Seconds
Remote Start
Activation Remote Start
Shutdown

Starting Your Vehicle
The remote control start function is activated by pressing the “ “ button twice within 3 seconds on your remote control transmitter. Upon successful
activation the remote start confirming transmitter button will flash one (1) time* and the vehicle will honk the horn and flash the parking lights one (1) time.
The system will check certain pre-conditions before starting, and if all safety parameters are correct, the engine will start within 5 seconds. Upon
successful vehicle start, the remote start confirming transmitter button will flash two (2) times every five (5) seconds* and the vehicle will honk the horn
and flash the parking lights one (1) time, then the parking lights will turn on solid, indicating that the vehicle is running. While the vehicle is operating via
remote engine start, the vehicle’s power window features will be disabled. Also, the system has a timer and will shut down after 15 minutes if you do
not operate the vehicle. Press and hold the “ “ button for two (2) seconds to turn the vehicle off. The remote start confirming transmitter button
will flash three (3) times* indicating that the vehicle’s engine has shut down. If the vehicle’s starter cranks but does not start or starts and stalls, the
remote engine start system will power off then attempt to start the vehicle an additional three (3) times unless the remote start system determines that
a vehicle problem is preventing the system from starting. If the vehicle fails to start after the additional attempts, the remote engine start system will
abort and return to a non activated state.
* Provided that the remote start transmitter is within the operating range of the system.
Remote Start Safety Features
For safety and security reasons, the system will fail to start and beep the horn twice or shut down the engine during remote start operation if any of
the following occur:
•The vehicle’s hood is open
•The ignition key is resting in the ignition cylinder (this condition will only prevent the vehicle from starting)
•The transmission shifter is not in the “park” position
•The vehicle’s brake pedal is depressed before the vehicle ignition switch is turned “on”
•The remote start system “Service Mode” is engaged
•The vehicle’s engine idle speed has reached a level over 3,500 RPM (this will cause the vehicle to shutdown)
•The vehicles security system is triggered by opening the door or rear gate (if the security system is armed at the time of remote start activation)
In addition to the items above, if the vehicle’s engine management system determines there is a safety risk due to a vehicle related problem, the vehicle
will shut down and the vehicle’s horn will beep three (3) times.
NOTE:
If the vehicle’s security system is armed at the time of remote start activation (security indicator light on the combination meter is flashing), the security
system will remain armed throughout the remote start run cycle.
If the vehicle’s security system is disarmed at the time of remote start activation (security indicator light on the combination meter is not flashing), the
security system will remain disarmed throughout the remote start run cycle.
Using the Remote Engine Start Function
33
33
3
Using the Remote Engine Start Function (continued)
Entering the Vehicle While it is Running via Remote Start:
1. Unlock the vehicle doors using the remote keyless entry system. If the vehicle’s doors are unlocked manually using the key, the vehicle’s
security system will trigger (if the security system is armed prior to activating the remote start system) and the vehicle’s engine will turn off.
Inserting the ignition key into the ignition cylinder and turning it to the “on” position or pressing the unlock button on the remote keyless entry
transmitter will disarm the security system.
2. Enter the vehicle. Do not depress the brake pedal.
3. Insert the key into the ignition and turn to the “on” position. If the ignition key is accidently turned to the start position, the system’s “starter anti-
grind” feature will prevent the starter from re-cranking.
4. Depress the brake pedal. The remote starter disengages, the vehicle’s power window features are enabled and the vehicle will operate
normally. The remote start confirming transmitter button will flash three (3) times indicating that the remote start system has disengaged.
NOTE: In the event that the ignition key is only inserted into the ignition switch or only turned to the “accessory” position instead of the “on” position,
the vehicle will shut down when the brake pedal is depressed. It will be necessary to remove the key from the ignition switch and re-insert before
the vehicle will restart.
Remote Start Confirming Transmitter Feature
Your remote start transmitter is equipped with a unique bidirectional confirmation feature. This feature will allow the transmitter’s backlit button to
display system status provided the vehicle and transmitter fall within the system’s operational range. Typical transmitter button flash sequences are
outlined below.
ecneuqeShsalFrettimsnarT noitpircseDerutaeF
desserpsinottubnehwhsalF .langisFRnagnittimsnartsimetsysehttahtsetacidnI
tratsetomerg
niwollofsehsalfgnol2 desserpsinottubrettimsnart(noitavitca .)sdnoces3nihtiwsemit2
noitamrifnocnoitavitca
tratsetomereviecertondidrettimsnartehttahtsetacidnI lanoitiddaenodnesyllacitamotualliwrettimsnartehT.m
etsyselcihevehtmorf egnarlanoitarepoehtnehwsruccoyllaususihT.tpmettanoitavitcatratsetomer .dedeecxeneeb
sahrotimils'titasi
noitavitcatratsetomergniwollofhsalf1 semit2desserpsinottubrettimsnart( .)sdnoces3niht
iw
noitamrifnocnoitavitcatratsetomerdeviecersahrettimsnartehttahtsetacidnI .metsyselcihevehtmorf
sdnoces
5yrevesehsalf2 devomsirettimsnartehtfI.tratsetomeraivgninnursielcihevehttahtsetacidnI ehtretfatuoemitlliwecneuqessiht,egnargnitareposmetsysehtfoedistuo .elcycnurelcihevetunim51lamron
sehsalf3 51metsystratset
omeroteudffodenrutsahenignes'elcihevehttahtsetacidnI .revoekatyeknoitingiroretemarapytefaselcihev,tuoe
mitetunim

Using the Remote Engine Start Function (continued)
Pre-Heating or Pre-Cooling the Interior of the Vehicle:
Before exiting the vehicle, set the temperature controls to the desired setting and operation. After the system starts the vehicle, the heater or air-
conditioning will activate and heat or cool the interior to your setting.
Service Mode:
In service mode, the remote start function is temporarily disabled to prevent the system from unexpectedly starting the engine while being
serviced.
To engage or disengage service mode:
1. Enter the vehicle and close all vehicle doors and trunk/rear gate.
2. Verify that the transmission shifter is in the “park” position.
3. Depress and hold the vehicle’s brake pedal.
4. Turn the ignition key to the “on” position.
5. Press and release the remote start transmitter “ “ button three (3) times. The system will honk the vehicle’s horn each time the
button is pressed.
6. The system will pause for 1 second then honk the vehicle’s horn three (3) times to indicate that service mode has been engaged or
honk one (1) time to indicate that service mode has been disengaged.
NOTE
When taking your vehicle in for service, it is recommended that you inform the service personnel that your vehicle is equipped with a remote
engine start system.
Remote Transmitter Programming:
New transmitters can be programmed to the remote engine start system in the event that a transmitter is lost, stolen, damaged or additional
transmitters are desired (the system will accept up to eight (8) transmitters). Remote engine start transmitters can be programmed using the
following procedure.
1. Open the driver’s door (the driver’s door must remain opened throughout the entire process).
2. Turn the ignition to the “on” then “off”, “on” then “off”, then back on and leave on throughout the programming process.
3. The system will flash the parking lights and honk the horn three (3) times, indicating that the system has entered transmitter learn mode.
4. Press and release the “ “ button on the transmitter you wish to program.
5. The system will flash the parking lights and honk the horn one (1) time, indicating that the system has learned the transmitter. Upon
successful programming, the remote start confirming transmitter button will flash one (1) time
6. Repeat step four (4) for any additional transmitters (the system will accept up to eight (8) transmitters).
7. The system will exit transmitter learn mode if the ignition key is turned to the OFF position, the door is closed or after two (2) minutes.
55
55
5
66
66
6
System Maintenance
Vehicle Battery Service Note: In the event that the vehicle’s battery is replaced, discharged or disconnected, it will be necessary to start the
vehicle a minimum of one (1) time using the ignition key prior to activating the remote engine start system. This is required to allow the vehicle
electronic systems to re-synchronize.
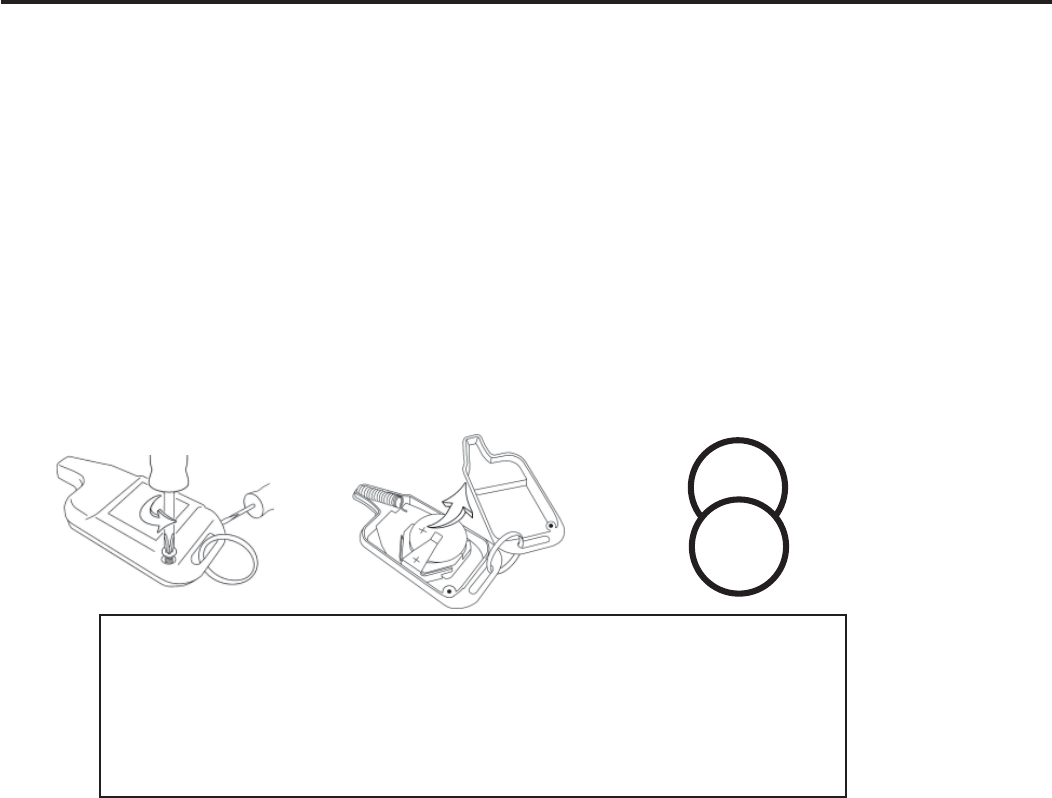
Changing the Remote Transmitter Batteries
The two 3-volt lithium batteries (model CR-2032) supplied in your remote transmitter should last approximately one year, depending on usage. When
the batteries begin to weaken, you will notice a decrease in range (distance from the vehicle that your remote control operates). Follow the
instructions below to change the remote transmitter batteries.
CAUTION!
•Do not let dust, oil or water get on or in the remote engine start transmitter when replacing the batteries.
•Be careful not to damage the printed circuit board in the remote engine start transmitter when replacing the batteries.
•Be careful not to allow children to touch the batteries and any removed parts; children could swallow them.
•There is a danger of explosion if incorrect batteries are used. Replace only with the same or equivalent type of battery.
•Batteries should not be exposed to excessive heat such as sunshine, fire or the like.
1. Locate and remove the small phillips screw located on the back side lower left corner of the transmitter.
2. Carefully pry the remote control halves apart using a small flatblade screwdriver.
3. Remove the circuit board from the bottom half of the case and remove the batteries and replace with new ones. Be sure to observe the (+) sign
on the old batteries before removing them to ensure that the new batteries are inserted properly (battery “+” should be pointed away from the
transmitter circuit board on both batteries).
4. Carefully snap the case halves back together, re-install the phillips screw and test the remote transmitter.
CR-2032
+
CR-2032
+
FCC COMPLIANCE
This device complies with Part 15 of the FCC rules and with RSS-210 of Industry Canada. Operation is subject to the following two conditions:
1. This device may not cause harmful interference.
2. This device must accept any interference received, including any interference that may cause undesired operation.
Notice! Changes or modifications not expressly approved by the party responsible for compliance could void the user’s authority to operate the
equipment and void warranty.
Important Note: To comply with the FCC RF exposure compliance requirements, no change to the antenna or the device is permitted. Any
change to the antenna or the device could result in the device exceeding the RF exposure requirements and void user’s authority to operate the
device.