Cbs2121 User Manual
Cbs2121-User-Manual 0 cbs2121-user-manual_0 cbs2121-user-manual_0 commercial fetco static.prima-coffee.com 3:
Cbs2121-User-Manual 1 cbs2121-user-manual_1 cbs2121-user-manual_1 commercial fetco static.prima-coffee.com 3:
2018-04-26
: Coffee Cbs2121-User-Manual cbs2121-user-manual commercial fetco
Open the PDF directly: View PDF ![]() .
.
Page Count: 10
CONTACT INFORMATION
FETCO®
FOOD EQUIPMENT TECHNOLOGIES COMPANY
600 ROSE ROAD
LAKE ZURICH • IL • 60047-0429 • USA
INTERNET: www.fetco.com
©2016-2018 FOOD EQUIPMENT TECHNOLOGIES COMPANY
PHONE: (800) 338-2699 (US & CANADA)
(847) 719-3000
FAX: (847) 719-3001
EMAIL: sales@fetco.com
techsupport@fetco.com
P155 APRIL 2018
fetco.com
www.fetco.com
User’s Guide and Operator Instructions
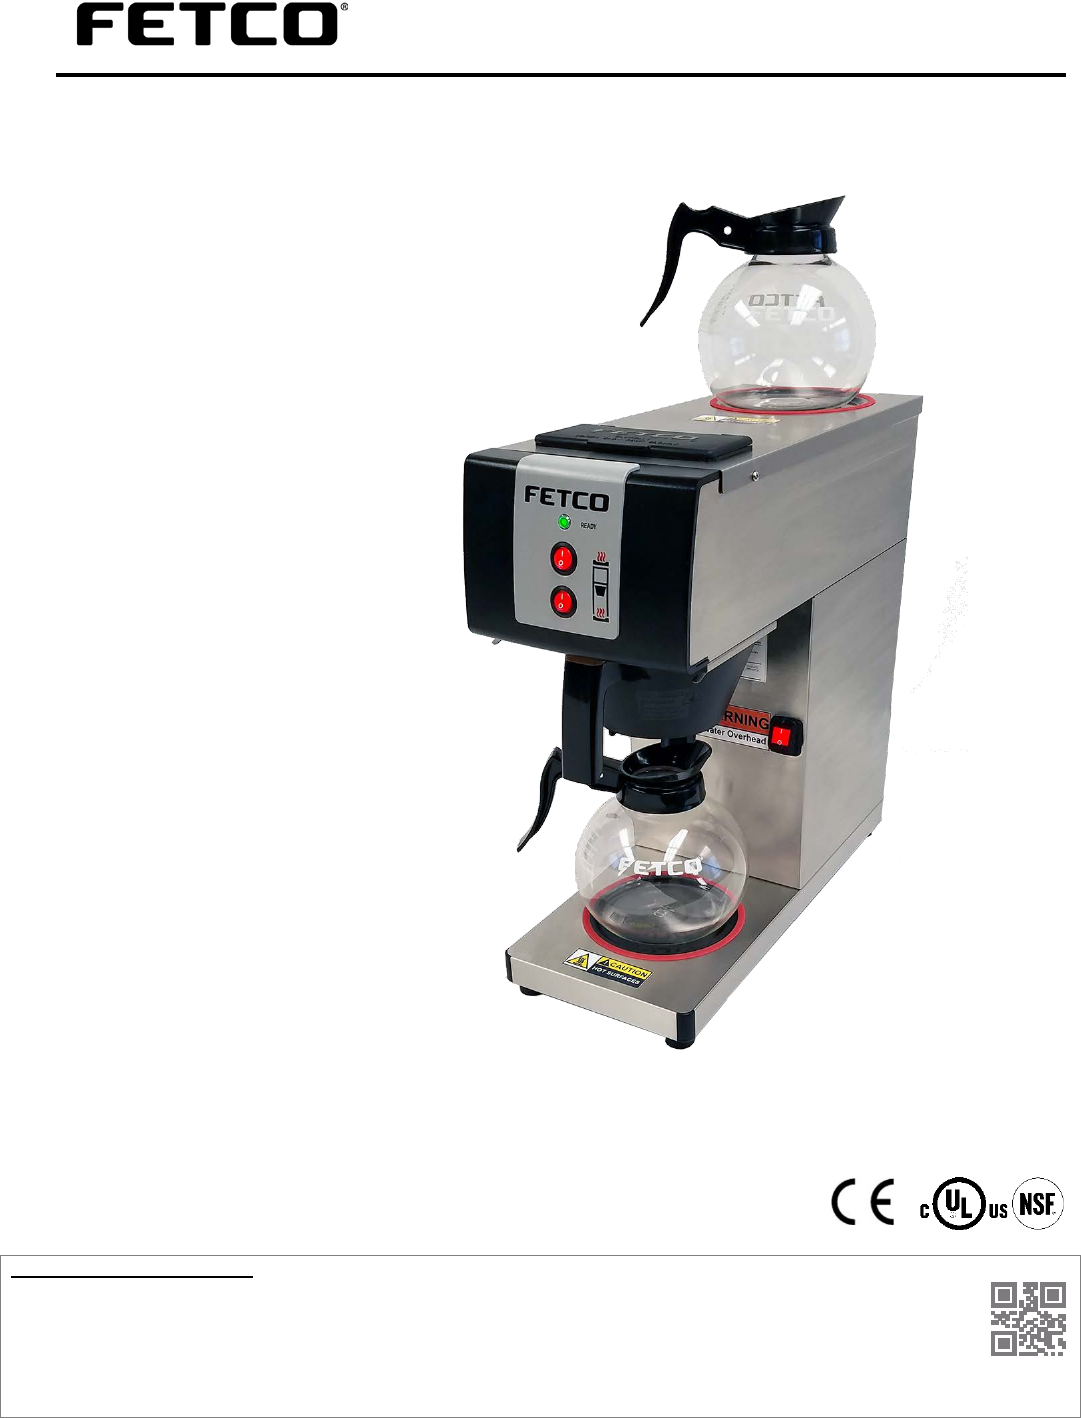
FETCO ZURICH™ pour over coffee brewer model: CBS-2121
FETCO CBS-2121 ZURICH with decanter warmers
P155 APRIL 2018
2
Service Manual – CBS-2121 pour over coffee brewer
Specifications FETCO® pour over coffee brewer
Description & Features
A manually operated coffee brewer-designed for 64 ounce/1.9 liter heated and unheated carafes.
Electrical Configuration CE rated brewers
Configuration Code Warmer Positions Voltage kW Amps Electrical Connection
C212102
None
230
1.93
8.2
CEE7/7 Schuko
C212112
Two
230
2.04
8.6
CEE7/7 Schuko
Electrical Configuration North America and International brewers
Configuration
Code
Warmer
Positions
Voltage kW Amps
Electrical
Connection
C212101
None
100-120 Volts
0.92 - 1.33
9.2 - 11.1
NEMA 5-15P plug
C212111
Two
100-120 Volts
1.11 - 1.60
11.1 - 13.3
NEMA 5-15P plug
C212102
None
200-240 Volts
1.46-2.10
7.1 – 8.5
CEE 7/7 PLUG
C212112
Two
200-240 Volts
1.53-2.20
7.6 – 8.9
CEE 7/7 PLUG
For 64 ounce brew: time to pour in water-approximately one minute
Total brew time with final drip out: five minutes
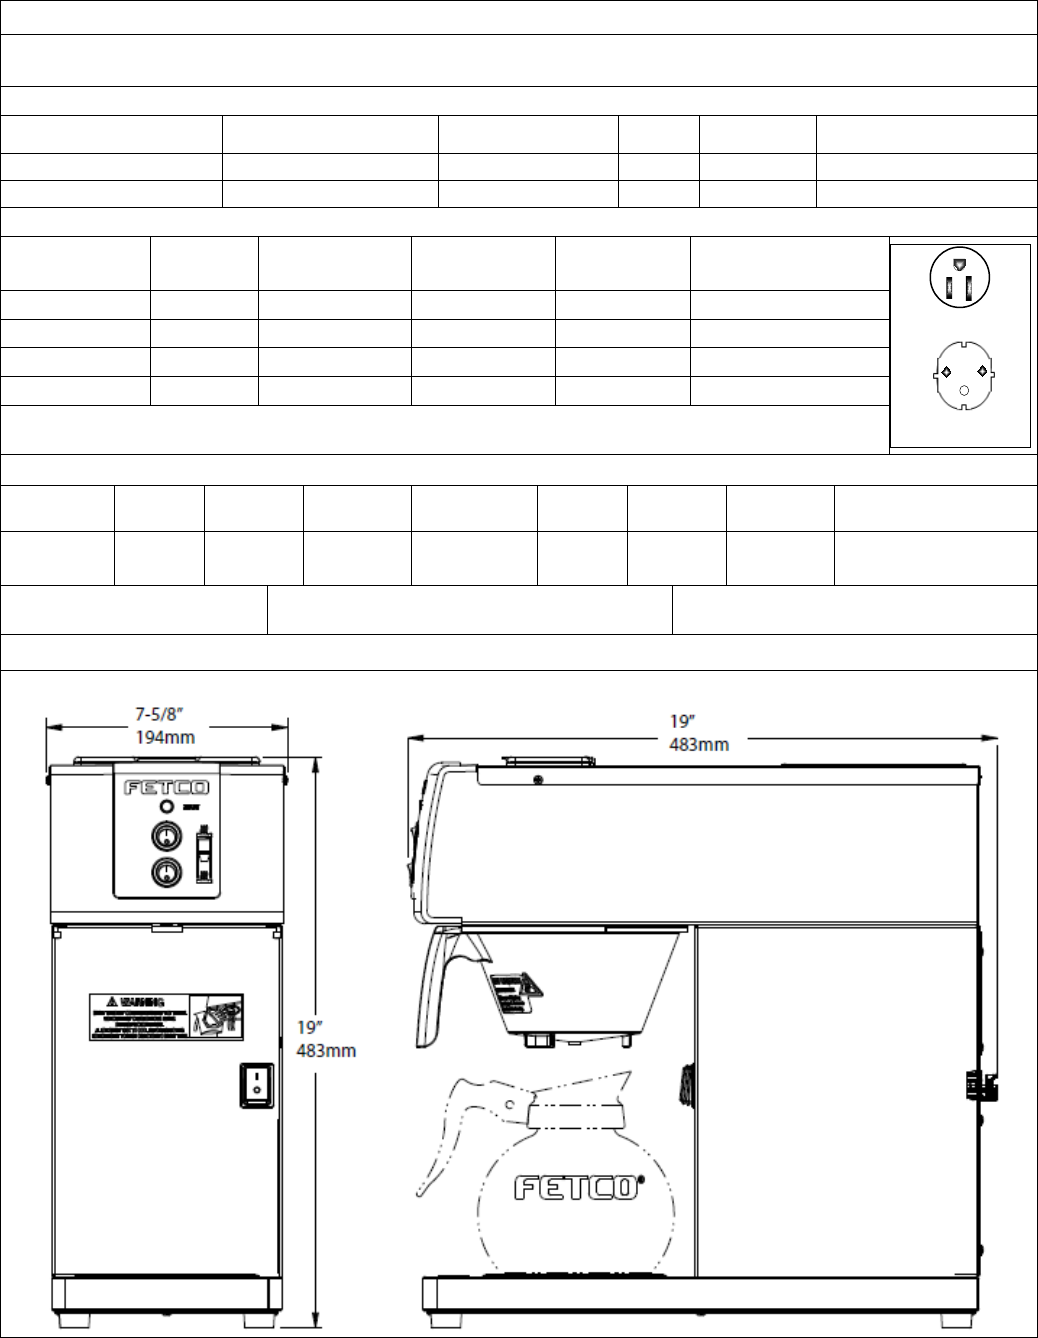
Weights and Capacities
Dispenser
Model
Height Width Depth
Water tank
capacity
Empty
Weight
Filled
Weight
Shipping
Weight
Shipping
Dimensions
C212101
(shown) 19 in
483mm 7 5/8 in
194 mm 19 in
470 mm 1.4 gallon
5.2 liter 17 lbs
7.7 kg 28.4 lbs
12.9 kg 23 lbs
10.4 kg 20¾” X10¾”X 12¼ "
524mmX273X540mm
Calibrated for 64 fl.oz./
1.9 liter carafe
Calibrated for 105g coffee dose
100-115gram 3.5-4 ounce throw
Coffee Filter
FETCO # F003 or 9¾” X 4½”
Allow approximately 30 inch/77cm above counter for access to pour in with standard glass carafe
Dimensions
G
W
NEMA 5-15P
Plug Configuration
Export Only 250V 16 A
“Schuko" CEE 7/7 PLUG
P155 APRIL 2018
3
Installing the CBS-2121 pour over coffee brewer
CAUTION – This brewer is shipped with the thermostat turned ON.
DO NOT plug in unit before pouring 3 pots or 192 oz. of water into the opening until brewer is full
(Note step 5, below); damage to the heating element or thermostat may result if started when dry.
Congratulations on your purchase of the new FETCO CBS-2121!
To start up a new unit:
Remove any protective vinyl film-if present, from the stainless steel enclosure. The protective film pulls off.
1. Place coffee brewer on a solid, level counter top, near an electrical outlet.
Full brewer and dispensers weighs 28.4 pounds
2.Level the brewer: Use a bubble level and check side-to-side and also front-to-back
Do not plug in the power cord at this time.
3. Place an empty glass decanter on the lower warmer deck, under the brew basket.
4. Insert the empty brew basket into the brew rails of the brewer.
5. Slowly fill the tank with room temperature water through the opening on the top cover until water starts running
in a steady stream from the brew basket (3 pots or 192 ounces). This indicates that the tank is full and primed
for brewing.
6. Plug the power cord into the electrical outlet.
7. Allow the brewer to heat up to full temperature, indicated by the “READY” light on front panel.
Heat up may take up to 30 minutes for the first time the coffee brewer is plugged in.
Slight dripping from the brew basket is normal as water expands when heated.
Keep an empty carafe under the brew head to collect any possible drips.
When “READY” light is on.
8. Insert the empty brew basket into the brew rails of the brewer.
9. Place an empty glass decanter on the lower warmer deck, under the brew basket.
10. When “READY” light is on-the CBS-2121 is ready to brew.
For operator safety
This appliance is for commercial use only. Commercial cooking equipment may be unsafe for household use
This appliance is intended for stationary indoor use. Installation and service by professional personnel only.
Brewer is designed for brewing 64 ounces or 1.9 liters of coffee or tea. Pour in water only
Brewer exterior and carafe warmers are hot- keep hands and other items away.
Brewing water is 200°F do not move commercial coffee brewers once installed due to spillage.
WARNING-brew basket contents are hot-use care! Allow brew to complete, usually five minutes
Do not immerse the brewer in water or any other liquid
P155 APRIL 2018
4
Instructions for operating the CBS-2121 pour over coffee brewer
AFTER UNPACKING: DO NOT PLUG IN THE BREWER
See Installing the CBS-2121 pour over coffee brewer on previous page
COFFEE BREWING
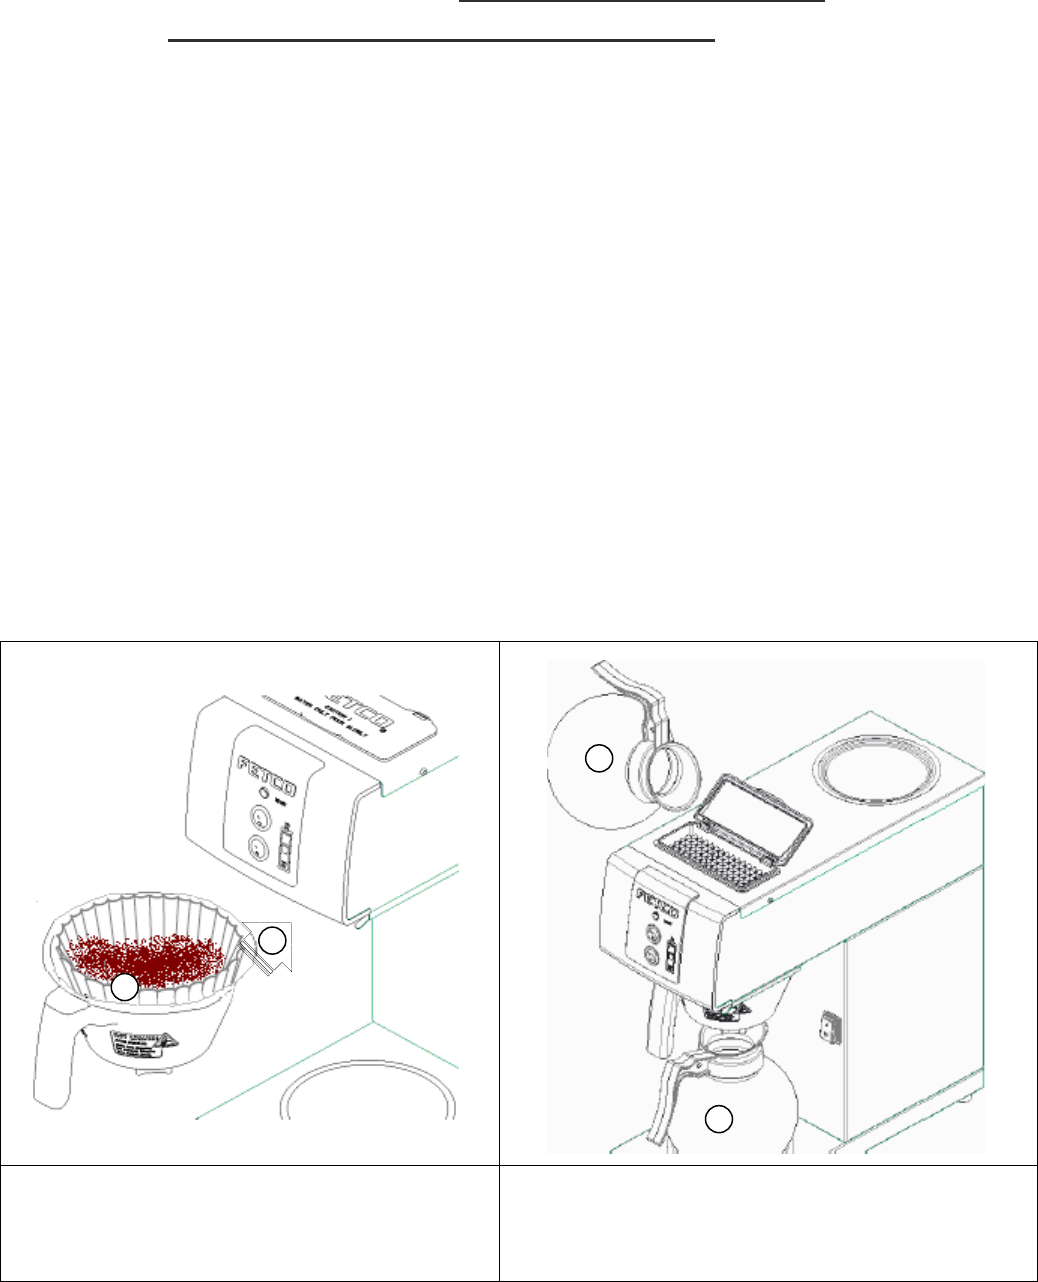
1. Insert a filter into the brew basket
2. Pour fresh ground coffee into the filter-distributing it evenly.
Start with using 1-4 ounces of ground coffee, for a full brew.
(3.5-4.0 ounces regular ground coffee was used for factory calibration)
3. Slide the brew basket into the upper rails.
4. Place an empty dispenser beneath the prepared brew basket.
5. Brewer is prepared to brew when “READY” light is on
6. Pour one pitcher of fresh water into the screened area on top of the brewer.
(pitcher is the measure of a standard serving carafe = 64 fl.oz/1.9L)
7. After brewing is finished: dispose of the used filter and grounds and rinse the brew basket
Typical brew cycle 7 minutes: 1 minute pour in; up to 5 minute drip brew & 1 minute drip out
1. Insert a filter into the basket and pour fresh coffee
into filter. Level the bed of grounds
– Start with using 1-4 ounces of ground coffee
2. Slide the basket into the upper rails.
3. Place an empty dispenser beneath the basket.
4. Pour one pitcher (up to 64 fl.oz/1.9L of fresh water into
the screened area on top of the brewer.
When brewing is completed, dispose of used filter &
grounds and rinse the brew basket.
3
4
1
2
P155 APRIL 2018
5
Installation safety and hygiene directions-For International and CE equipment
1. This appliance is only intended for brewing coffee or tea only.
2. Except for the descaleing procedure: never pour liquid other than water into the appliance, this may damage the heater.
3. Access to the service area is restricted to persons having safety/hygiene knowledge and practical experience of the coffee
brewer. This appliance must be installed in locations where it can be overseen by trained personnel.
4. For proper operation, this appliance must be installed indoors where the temperature is between 10°C/50°F to 35°C/95°F.
Drain and remove all liquid from equipment and lines if exposed to freezing temperatures.
5. All commercial cooking equipment, including this unit, is not intended for use by children or persons with reduced physical,
sensory, or mental capabilities. Ensure proper supervision of children and keep them away from the unit.
6. Children should be supervised to ensure that they do not play hot beverage equipment.
7. This unit must be installed and serviced by qualified personnel only.
8. Installation must conform to all local electrical and plumbing codes. Installation by unqualified personnel will void the unit
warranty and may lead to electric shock or burn, as well as damage to unit and/or its surroundings.
9. If the power cord requires repair or replacement-it must be performed by the manufacturer or authorized service personnel
with the specified cord only from the manufacturer in order to avoid a hazard.
10. The appliance must be disconnected from its power source during service and when replacing parts. During service
an operator must be able to check from any position that the plug remains removed. If this is not possible, an electrical
disconnection with a locking system in the isolated position shall be provided
11. Review the dimensions for the unit and verify that it will fit properly in the space intended for it. Verify that the counter or
table will support the total weight of the brewer and dispensers when filled (See: Technical Data).
Brewers will need a sturdy supported surface for operation. Place the brewer for operation in a horizontal position.
When the brewer is in position-level it front to back as well as side-to-side. Brewer must be leveled to operate correctly.
Do not tilt appliance more than 10° to insure safe operation. Do not move brewers when filled.
12. The A-weighted sound pressure level is below 70 dB.
13. Unit is for protected indoor use only. Do not steam clean or use excessive water on unit
14. This unit is not “jet-proof” construction. Do not pressure wash or use jet spray to clean this unit.
15. The unit is not waterproof -do not submerge or saturate with water.
Equipment exposed to flood and contaminated must not be used due to electrical and food safety.
Do not operate if unit has been submerged or saturated with water.
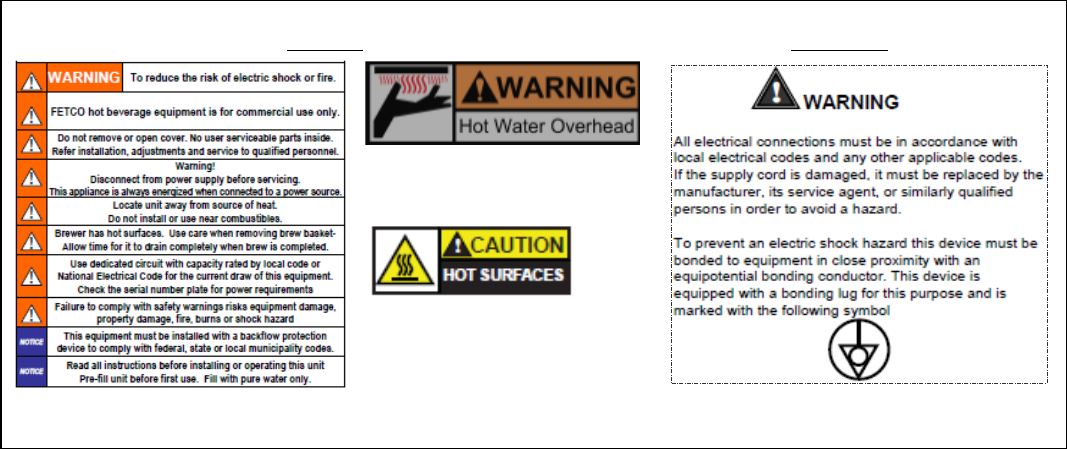
Labels and Warnings for Hot Beverage Equipment
LABELS WARNING
1046.00052.00
Brew Basket Area Warning
1046.00050.00
Optional Carafe Warmers (X2)
1046.00049.00
Back Panel of Equipment
P155 APRIL 2018
6
This section is for professional use only for installation, adjustment and service.
Danger of fire or electric shock, do not open panels. No user serviceable parts inside.
All adjustments and service to be performed by authorized professional personnel
To adjust the temperature for high altitude installation:
Thermostatic control is factory set to the maximum temperature: 200°F and is adjustable to the lowest setting
of 180°F. The capillary thermostat is rated within 5% of this range.
To correct for boiling at high altitudes the thermostat may be adjusted to a lower setting.
1. Unplug the power cord.
2. Remove the back cover.
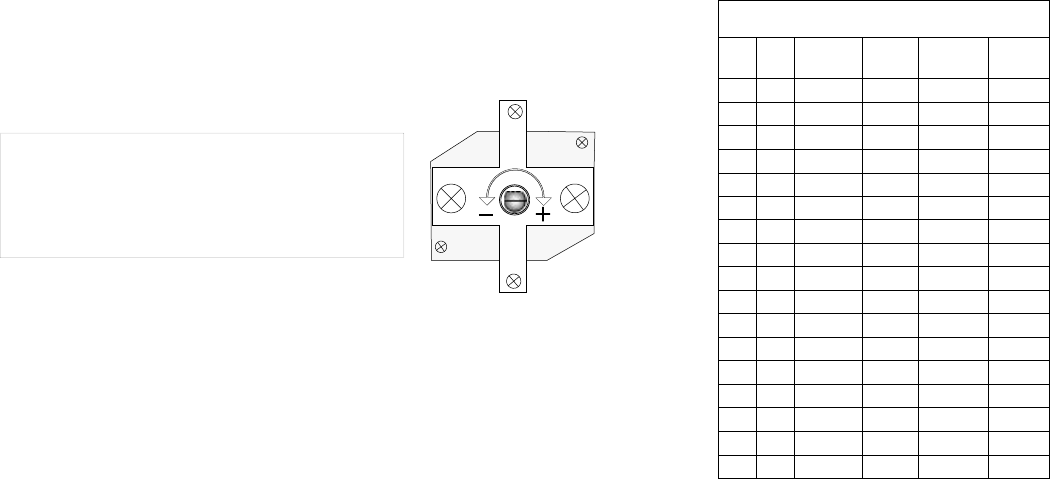
3. Locate the thermostat:
4. Turn the adjustment to the left to decrease the temperature
{Minimum is 180°F/Maximum is 200°F}
5. Reinstall back cover and plug into the power outlet.
6. Brew, refill and re-check the temperature after the “READY” light is on.
NOTE: at some high elevations it may be required to set thermostat all the
way down, and raise it back only slightly to compensate for boiling.
Adjustment is accurate to +/- 5%.
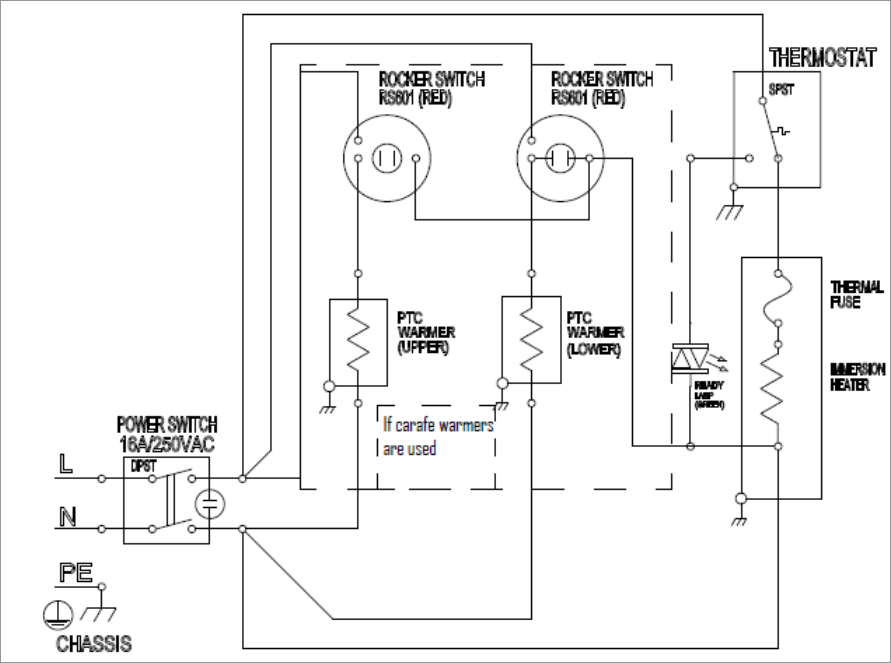
Wiring Diagram CBS-2121 Manual Fill Coffee Brewer
LIMING
To prevent liming problems in tank fittings remove sprayhead and insert deliming spring all the way into the
tank. When inserted into tank properly, no more than ten inches of the spring should be visible at the
sprayhead fitting. Saw back and forth five or six times. This will keep fittings open and clear of lime. In hard
water areas this should be done everyday. This process takes approximately one minute. In all areas the
sprayhead should be cleaned at least once a week. Where bad liming has already occurred, a new complete
tank assembly may be installed. The tank may be changed in approximately 5-10 minutes time.
Chart to correct for altitude for boiling point
in tank water temperature.
[ft] [m] Suggested
Setting[°F]
Boiling
point[°F] Suggested
Setting[°C]
Boiling
point [°C]
0
0
205
212.0
96
100.0
500
152
205
211.0
96
99.5
1000
305
200
210.1
93
98.9
2000
610
200
208.1
93
97.8
2500
762
200
207.2
93
97.3
3000
914
200
206.2
93
96.8
3500
1067
197
205.3
92
96.3
4000
1219
195
204.3
91
95.7
4500
1372
194
203.4
90
95.2
5000
1524
194
202.4
90
94.7
5500
1676
193
201.5
89
94.2
6000
1829
192
200.6
89
93.6
6500
1981
191
199.6
88
93.1
7000
2134
190
198.7
87
92.6
7500
2286
188
197.8
86
92.1
8000
2438
187
196.9
86
91.6
8500
2591
185
196.0
85
91.1
Thermostat adjustment
Left to lower & Right to raise.
Make small, incremental changes.
Check temperature after “READY” light is on.
P155 APRIL 2018
7

P155 APRIL 2018
8
PARTS DIAGRAM

P155 APRIL 2018
9
REF
QTY
PART NUMBER
UNIVERSAL PARTS LIST FOR CBS-2121 POUR OVER COFFEE BREWER
1
1
1111.00075.00
WELDMENT BODY COMPLETE, CBS-2121 POUR OVER COFFEE BREWER
2
2
1023.00268.00
PLASTIC TRAY FOR DECANTER, (ONLY FOR UNITS WITHOUT WARMERS)
2A
2
1102.00322.00
WARMER PLATE ASSY 120VAC (ONLY FOR UNITS WITH 120VAC WARMERS)
2A
2
1102.00355.00
WARMER PLATE ASSY 230VAC (ONLY FOR UNITS WITH 230 VAC WARMERS)
3A
2
1024.00089.00
PTC HEATER MTG. GASKET, BLACK (ONLY FOR UNITS WITHOUT WARMER)
3B
2
1024.00081.00
PTC HEATER MTG. GASKET, RED color (ONLY FOR UNITS WITH WARMERS)
4
2
1003.00312.00
BRACKET, WARMER TRAY HOLDER-ALL MODELS
5
4
1084.00032.00
PUSH NUT (ONLY FOR UNITS WITHOUT WARMERS)
6
8
1083.00009.00
WASHER, #6 INTL TOOTH LOCKWASHER (ONLY FOR UNITS WITH WARMERS)
7
8
1084.00010.00
NUT, HEX, #6-32, UNDERSIZED, ,(ONLY FOR UNITS WITH WARMERS)
8
13
1084.00011.00
NUT, CLIP ON (J-NUT), #6-32, 22-20 GA., BLK-PH FINISH
9
1
1001.00307.00
COVER BASE
10
11
1082.00017.00
SCREW, # 6-32 X 1/2" TRUSS HD PHIL., MACHINE
11
4
1073.00021.00
FOOT-RUBBER, 1/4-20 MOUNT
12
2
1023.00263.00
CORNER INSERT FOR BASE
13
2
1086.00004.00
BUSHING, SNAP, 1" MOUNTING HOLE
14
1
1083.00011.00
WASHER, #8 SCREW SIZE, INTERNAL TOOTH LOCK
15
1
1084.00006.00
NUT, 8-32 18-8 HEX MACHINE SCREW
16
1
1024.00080.00
GASKET, FRONT
17
1
1023.00257.00
FRONT PANEL POUR OVER-ALL MODELS
18
4
1082.00058.00
SCREW, # 8-32 X 5/8, FLAT HD, PH, 18-8 SS
19A
1
1023.00255.00
FRONT PANEL INSERT, (ONLY FOR UNITS WITHOUT WARMER)
19B
1
1023.00256.00
FRONT PANEL INSERT,(ONLY FOR UNITS WITH WARMERS)
20
2
1058.00046.00
ROCKER SWITCH, HY64 SERIES (ONLY FOR UNITS WITH WARMERS)
21A
1
1058.00044.00
LED INDICATOR LIGHT, GREEN-120VAC
21B
1
1058.00053.00
LED INDICATOR LIGHT, GREEN-230VAC
22
2
1025.00118.00
SPACER TUBE, FRONT PANEL
23
4
1082.00115.00
SCREW, #6 x 3/8" LG., SLOTED HEX HD. WASHER
24
1
1058.00045.00
SWITCH, POWER, DP, 16A, ALL MODELS 125/250 VAC, WATERPROOF
25A
1
1402.00092.00
HARNESS, CBS-2121 (ONLY FOR UNITS WITHOUT WARMER)
25B
1
1402.00095.00
HARNESS, CBS-2121 (ONLY FOR UNITS WITH WARMERS)
26
1
1114.00139.00
TANK BODY, All Models
27A
1
1102.00323.00
TANK TOP ASSEMBLY-WITH HEATER, 1320W/120VAC MODELS ONLY
27B
1
1102.00356.00
TANK TOP ASSEMBLY-WITH HEATER, 2100W/230VAC MODELS ONLY
28
1
1024.00084.00
GASKET, HOT WATER TANK-ALL MODELS
29
8
1083.00011.00
WASHER, #8 SCREW SIZE, INTERNAL TOOTH LOCK
30
8
1084.00006.00
NUT, 8-32 18-8 HEX MACHINE SCREW
31
1
1082.00024.00
SCREW, PAN HEAD, PHILLIPS
32
1
1053.00043.00
THERMOSTAT, CBS 2121 POUR OVER-ALL MODELS
33
1
1112.00420.00
WELDMENT, SPRAY CUTTER TUBE FITTING
34
1
1084.00041.00
HEX NUT, 1/8" TH, 7/16 - 20 THREAD
35
1
1005.00028.00
WELDING, SPRAY CUTTER, 8 x 3 HOLES
36
1
1023.00260.00
BODY, FILL TOP TANK
37
1
1024.00054.00
GROMMET, SILICONE PLUG
38
1
1024.00091.00
VENT TUBE
39
1
1001.00308.00
COVER TOP
40
2
1082.00073.00
SCREW # 6-32 X 3/8", PAN HD PH, MACHINE, 18-8 SS
41
1
1086.00046.00
BUSHING, STRAIN RELIEF, .12"-.58" DIA CABLE
42
1
1001.00329.00
BACK COVER, CBS-2121, POUR OVER
43
1
1102.00321.00
ASSEMBLY, LID COVER, FILL TANK, CBS-2121
44
1
1046.00048.00
LABEL, WARNING & STARTUP INSTRUCTION, CBS-2121
45
1
1046.00049.00
LABEL, WARNING "ELECTRIC SHOCK OR FIRE", 4x4
46
1
1401.00137.00
WIRING, CBS-2121 POUR-OVER, (L-N-PE), UNIVERSAL -ALL MODELS
47
2
1046.00050.00
LABEL "CAUTION, HOT SURFACE", CBS-2121 POUR OVER
48
1
1046.00031.00
LABEL, SPRAY HEAD WARNING, 1.5" X 5.0"
49
1
B018200BN2
BREW BASKET ASSEMBLY 0.200" HOLE, BROWN -ALL MODELS
50A
1
1102.00334.00
POWER CORD ASSEMBLY, NEMA 5-15P PLUG 120VAC MODELS ONLY
50B
1
1102.00357.00
POWER CORD ASSEMBLY, CEE7 EU1-16P PLUG 230VAC MODELS ONLY

End of section notes
N
