Collage Investments LT7000STORM Tablet PC User Manual
Collage Investments LLC. Tablet PC
Users Manual

1
2
Overview
1 Introduction
1.1 Acknowledgement
Thanks for y our purchase of our pro duct. This is high definition tablet PC. It s CPU i s MTK8382
quad core, it is based on Android 4.4.2 operation system, and easy to expand the third application
procedure.
The product is designed with various functions, including WIFI, BT, GPS, FM, v oice call and so
on. It is easy to achieve wireless communication and internet, you have access to surf the internet
anytime and anywhere; it is also built with high accuracy GPS module, so t hat it can be used for
navigating through installing map softw are. There are many sensors w hich offer you brand-new
operation and entertainment; besides, it has camera shooting, which leads electronic consumption
to enter into a fresh palm internet entertainment time.
The manual systemically introduces the functions, use techniques and announcements, please read
this manual carefully before your operation.
Note: pictures and content are only used in the tablet as a function of signal, may be related to the
actual product is different, please in kind prevail.
3
1.2 Announcements
Preventive maintainance
Please always keep the MID dry. To avoid the device short trouble, corrosion fault and
electric short, please prevent the device, battery and charger from water and moisture,
and don’t operate the device or charger by wet hand.
To avoid failure of device, battery and charger, please prevent the device, battery,
charger from violent shock or shake.
To avoid failure of device, battery and charger, please prevent the device, battery,
charger of all over heating or too cold circumstance.
Never shock, throw, prod the MID, or drop, extrude, bend the MID.
Never disassemble the device and accessories arbitrarily, otherwise the device and
accessories are not in our company warranty scope.
1.3 Safety Instruction
Before t he operat ion of t he MID, pl ease read t his chapter a nd t each your ki ds about these
information. For further details, please refer to the safety instructions and announcement.
Never use the MID when driving car, in order to ensure safe driving.
In the medical area, please abide by related rules and regulations. Please shut
down the MID when it is near to the medical area.
To avoid the wireless signal to interrupt the plane- controlled signal, please shut
down the MID or using airplane mode when you are boarding a flight,
To avoid electronic equipment failure, please shut down the MID in the vicinage
of high-accuracy electronic equipments.
Please don’t disassemble the MID and accessories. Only authorized agent has
access to service the MID.
Please keep the MID far away from magnetic equipments, the radiation of MID
may erase the data stored in the magnetic equipments.
Never use the MID in the vicinage of high temperature, inflammable gas (gas
station).
1.
4
2.
1
Bat
t
I
f
.
2.
2
Re
m
the
The
n
b
el
o
P
t
h
P
l
e
P
t
o
N
t
h
4
Abbre
v
Abbrevi
a
1
MID
O
t
ery Chargi
n
f
this navig
a
2
MID
m
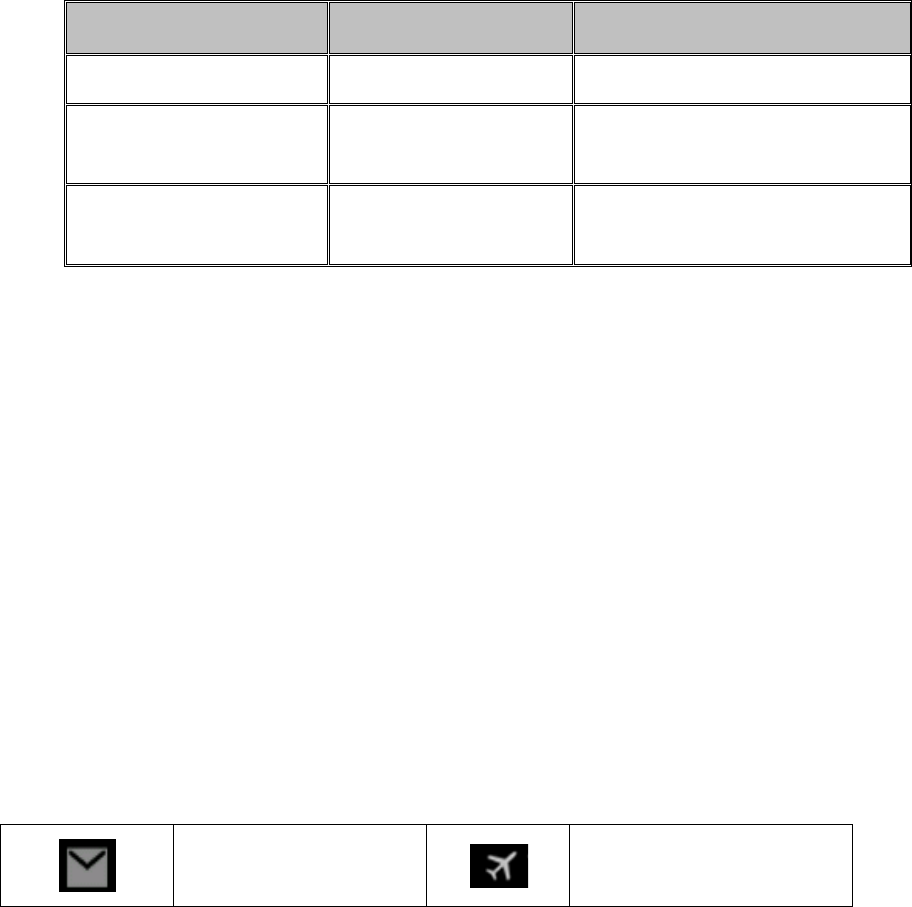
inder icons
When some
screen to op
e
n
you can cl
o
o
w status ico
n
P
rotect the M
I
h
e MID with
o
P
lease compl
y
e
gal rights w
h
P
lease strictly
o
ensure the
s
N
ever use the
h
e MID from
v
iation/
T
a
tion/Termi
n
MID
WIFI
T F
O
peratio
n
n
g
a
tor is first
Status
a
remind mes
s
e
n th e remi
n
o
se the remi
n
n
s:
New e
m
I
D and acces
s
o
ut parents’
s
y
with relate
d
h
ile using th
e
adhere to re
l
s
afety of the
M
MID in bath
r
liquid wash
T
ermino
l
n
ology
Mo
Wi
r
Tr
a
2 M
I
n
and P
r
used, pleas
e
a
nd Re
m
s
age appears
n
der lis t. Ch
o
n
der window
m
ail
4
s
ories from
k
s
upervision.
d
rules and re
g
e
MID.
l
ated instruct
i
M
ID or PC.
r
oom or othe
or wet.
l
ogy
Full Na
m
bile Interne
t
r
eless Fideli
a
nsFlash
I
D In
t
r
eparati
o
e
use AV a
d
m
inder
in your rem
i
o
ose the me
n
through clic
k
k
ids reach sc
o
g
ulations, an
d
i
ons in the m
a
r humid envi
m
e
t
Device
t
y
t
rodu
o
n
d
aptor to fu
l
i
nder windo
w
n
u yo u n eed,
k
ing the col
u
o
pe, and avoi
d
d
respect oth
e
a
nual when
u
ronment, an
d
D
Mobile Inte
r
Base on IE
E
wireless LA
N
Alternative
n
miniature m
e
ction
l
ly charge i
t
w
, please clic
k
and c onfir
m
u
mn to slide
u
Airplane M
o
d
the kids to
u
e
rs’ privacy
a
u
sing USB c
a
d
please prot
e
D
escription
r
net Termin
a
E
E 802.11b
g
N
n
ame Micro
e
mory card
t
.
k
column an
d
m
the inf orm
a
u
p. Please re
f
o
de on
u
se
a
nd
a
ble
e
ct
a
l
g
n standard
SD, super
d
slip
a
tion.
f
er to
Re
m
Re
m
to v
i
Op
e
Wh
e
fing
e
3.
1
Ke
y
m
inder boar
d
m
inder icons
w
i
ew the detai
l
e
n the remin
d
e
n the remin
d
e
r, then the r
e
1
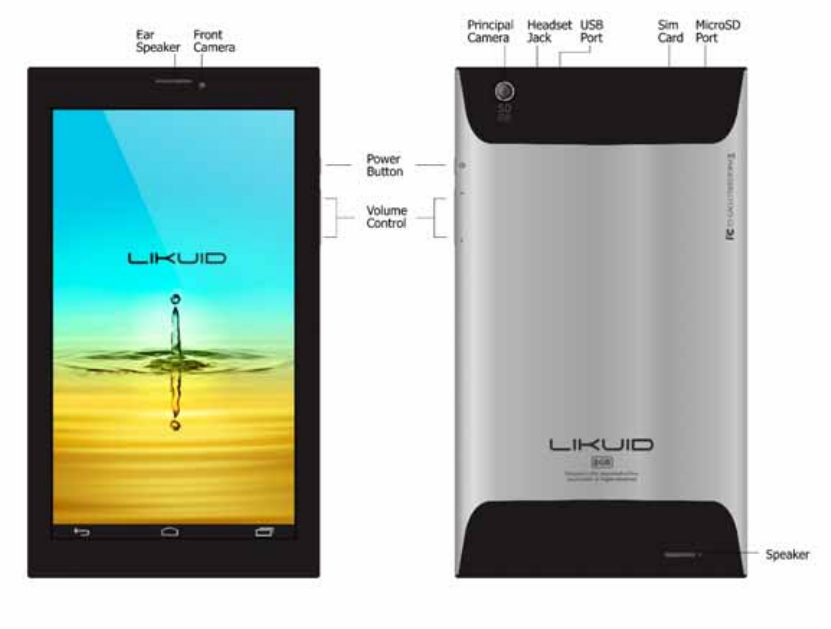
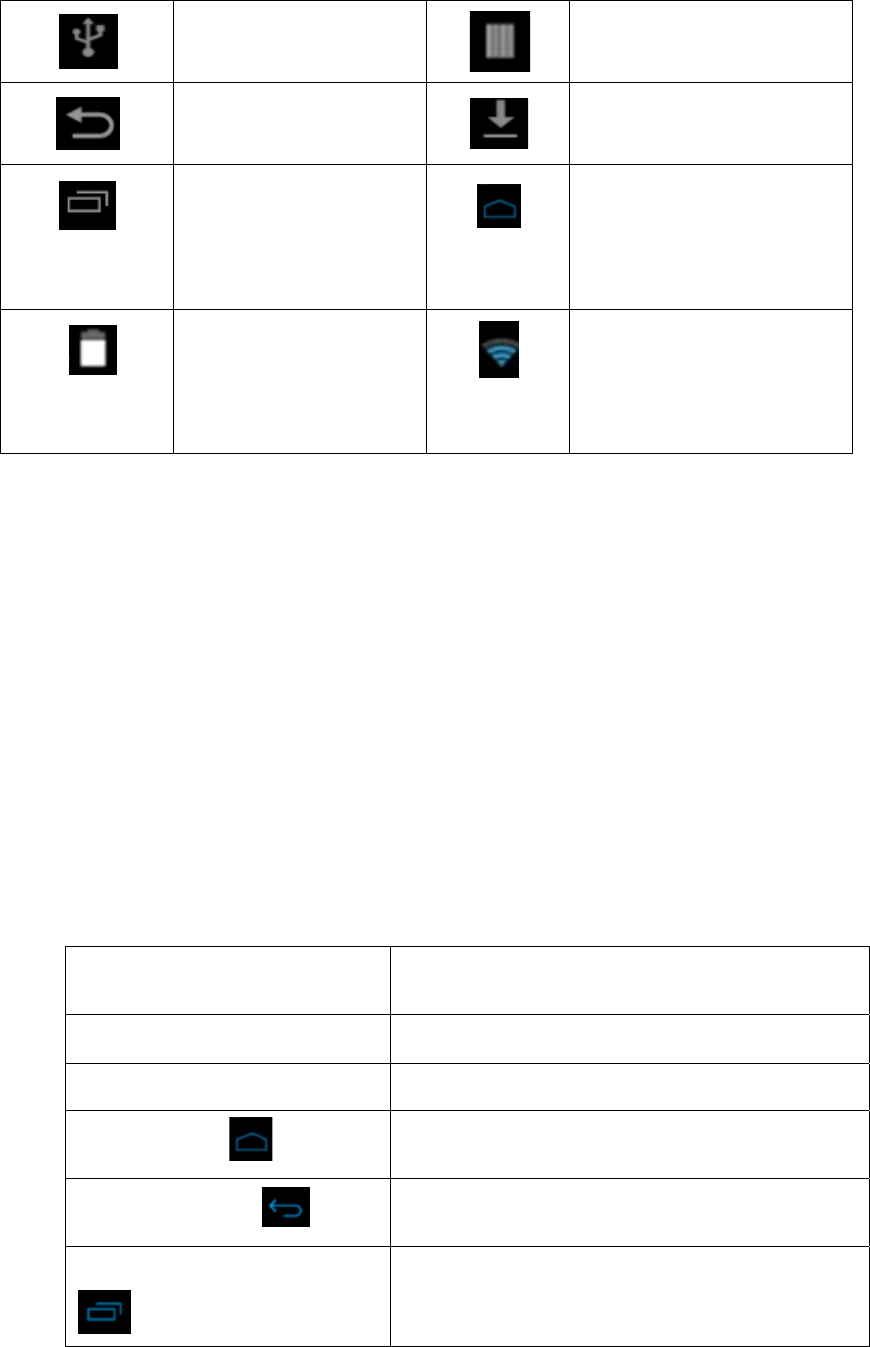
Keys F
y
s Function
D
Power b
u
Vo l u m e
+
Vo l u m e -
HOME
(
Back but
t
Display
USB co
n
Return
b
Displ
a
a
Current
d
w
ill work w
h
l
ed informati
o
d
er board
d
er column s
h
e
minder boa
r
3
Q
unction
D
escription:
u
tton
+
(up)
(down)
(
home)
t
on(back)
recently-use
d
n
nected
b
utton
a
y recently-u
s
a
pplication
electric vo
l
h
ile receiving
o
n.
h
ows new re
m
r
d is opened.
Q
uic
k
d
a pplicatio
5
s
ed
l
ume
emails, WI
F
m
inder icon,
k
Sta
r
Short pr
e
shutdow
n
increase
t
decrease
Click it i
n
click it i
n
n
display r
e
F
I is open, yo
u
please hold
t
r
t Gu
i
e
ss to sleep/
w
n
.
t
he volume
the volume
n
any interfa
c
n
any interfa
c
e
cently brow
USB debug
g
Downloadi
n
Home
b
utto
n
WIFI conn
e
a
v
u
can open t
h
t
he column a
n
i
de
w
ake up, long
c
e will retur
n
c
e will return
sed history
g
ing connect
e
n
g
n
e
cted, intern
e
v
ailable
h
e reminder
b
n
d slip down
press to star
t
n
to main inte
r
to previous
m
e
d
e
t is
b
oard
your
t
up and
r
face.
m
enu
6
Screenshot
Intercept the current picture
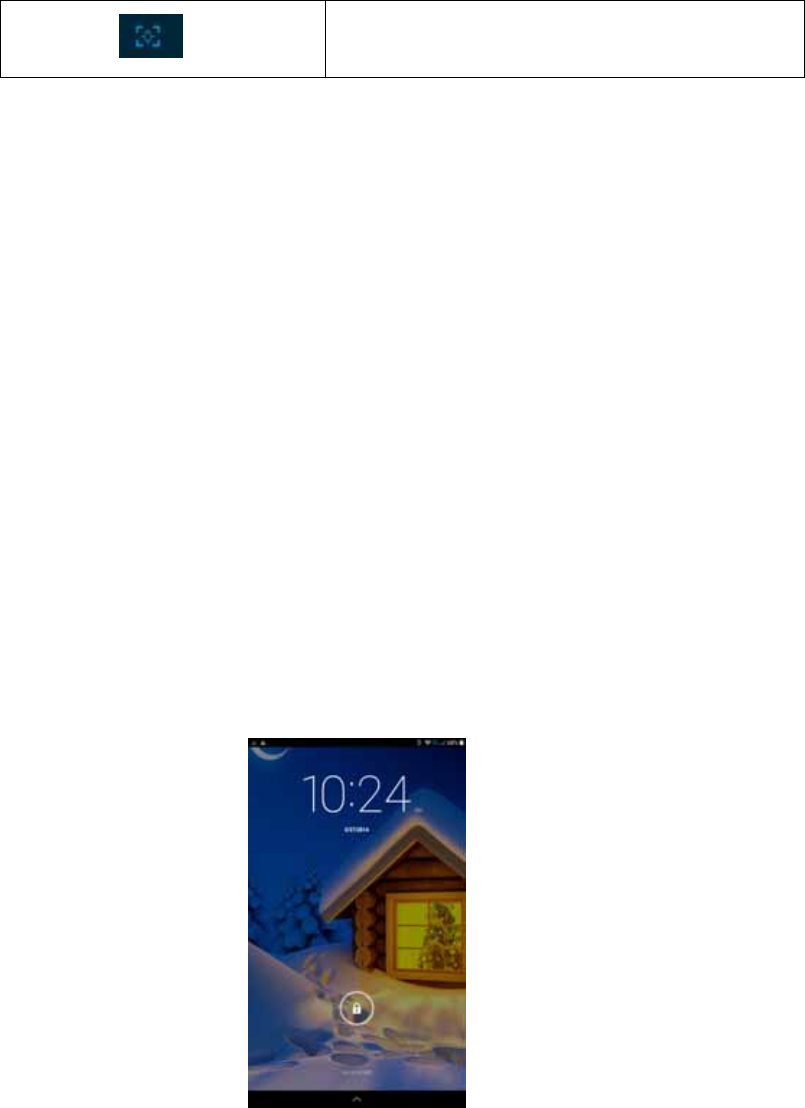
3.2 Startup and Shutdown button
Startup
Long press POWER key for three seconds, you can enter into startup picture. The system enters
into screen lock status, please unlock it
Notice: When the MID has crashed, long press POWER key for eleven seconds to reset.
Shutdown
1. Long press POWER, it will pop-up shutdown window.
2. Shutdown window contains Power off, Airplane mode and Audio profiles three options.
3. Click Power off is the last step.
3.3 Open and Close of the Screen
Screen will be closed on its own when no operation happens.
1. Screen will be closed on its own if no operation happens for some time to save ba ttery
power
2. When screen is open, press POWER key, the screen will be closed immediately.
Open the screen when it is closed.
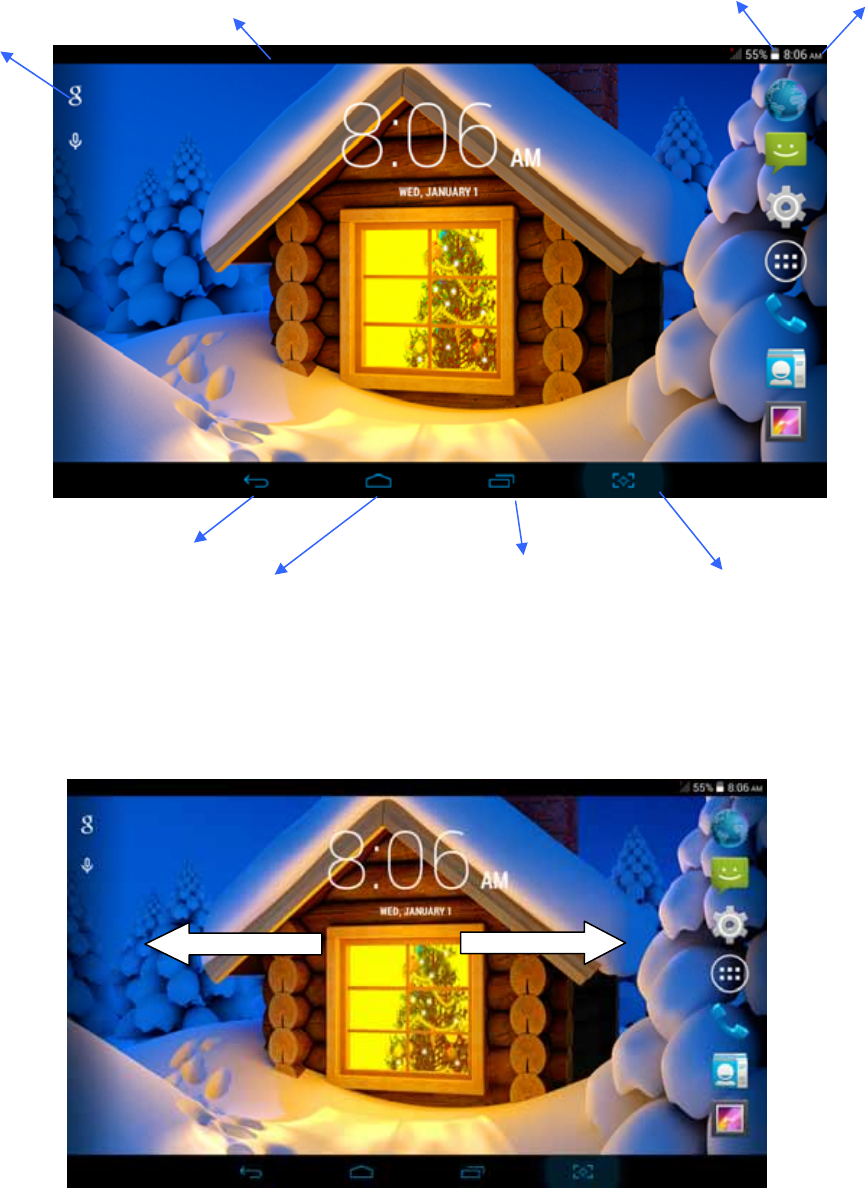
If the screen is closed, short press POWER to open the screen. The screen will be locked open it, it
will show the picture as below picture, slide around to unlock the screen.
=
Picture 3.1
3.4 Home Page
Main i nterface as below p icture 3 .2, l ong press t he blank an d it will popup w indows t o set
wallpaper.
7
Picture 3.2
The extended home page
The home page can be extended beyond the wideness of screen to provide more space, which you
can put new-added shortcuts and wi dgets. Click the blank space in home page then slide right or
left to extend to the right or left of the screen. In the home page, there are two extended pictures,
as Picture 3.3.
Picture 3.3
Change the wallpaper of desktop
1. In home page, long press any blank space in main screen, it will popup a window
to select WALLPAPERS.
2. Click the Pick image or default wallpaper to select the wallpaper.
Search
Screenshot
Home
Time
Battery volume
Notice
column
Return View
recently-used
a
pp
lication
8
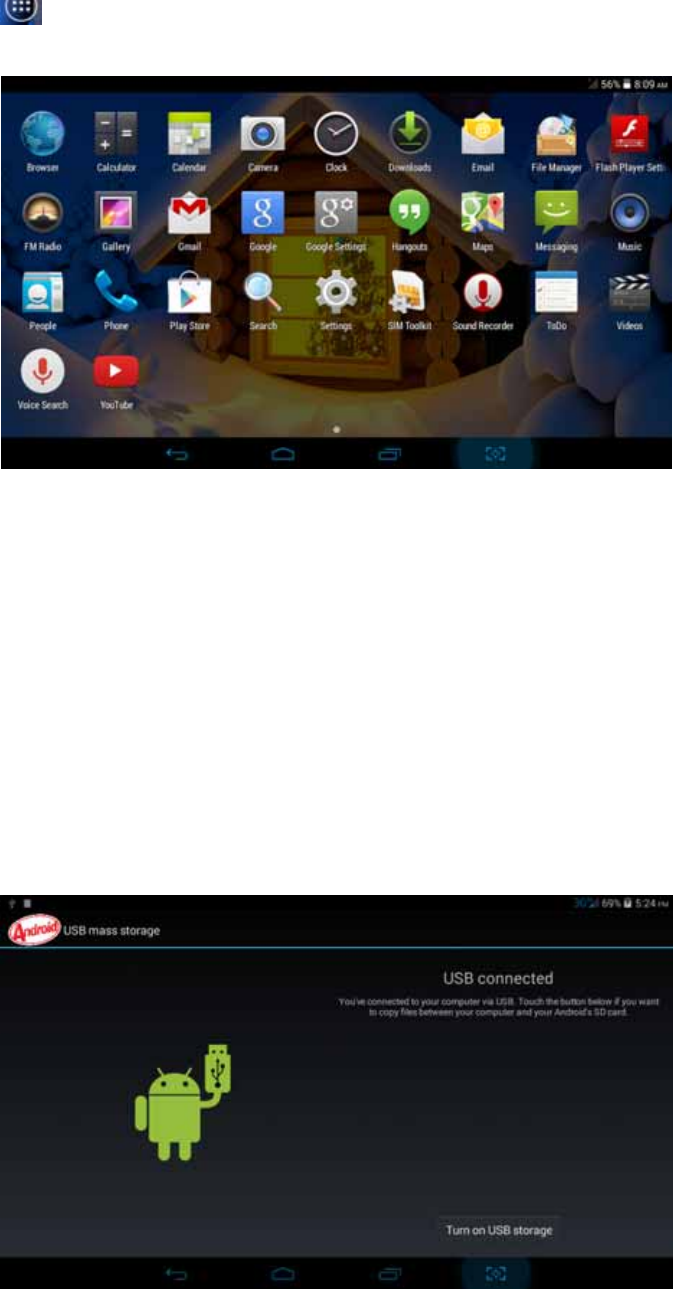
3.5 Visit Application Procedures
Click in the m iddle right of Picture 3.2, enter into main interface, choose t he application
procedure you want to visit.
Picture 3.6
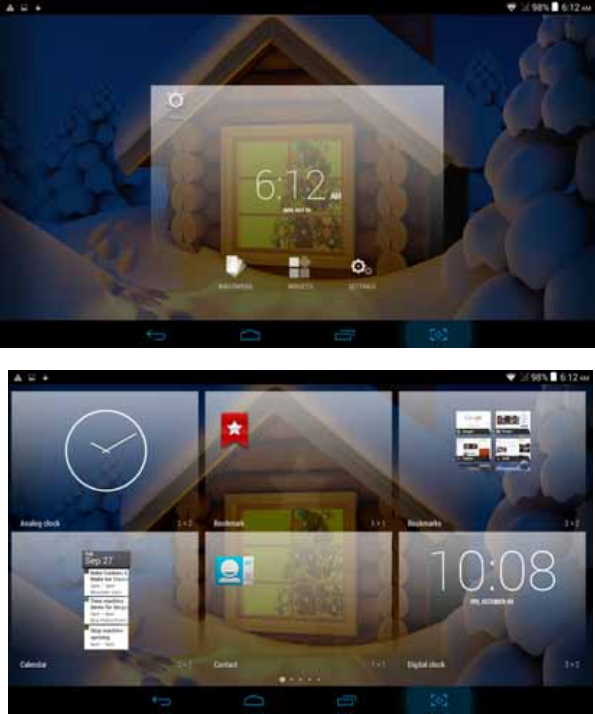
3.6 USB Connection
MID storage configuration
Before transmitting documents, you have to conduct storage configuration for your MID:
1. Co nnect the MID and c omputer by USB cable , t he rem inder col umn will show th e
remind information.
2. Open the reminder board; ple ase view t he MID stat us an d rem inder to learn how to
open the board.
3. In the reminder bo ard, c lick t he “ USB Con nected”, it will as below Picture 3.7, the n
click “open USB storage configuration”.
4. Now the USB is connected successfully.
Picture 3.7
9
Copy the document into memory card
1. Connect the MID to computer with USB cable.
2. As MID storage configuration, it is connected with computer successfully.
3. Open the “My computer” in your computer, check the items in “removable disc”.
4. Copy the documents you need into “removable disc”.
5. After copying finishes, click “shutdown the USB storage configuration” to uninstall.
Notice: Wh en th e MID i s con nected with USB ca ble, and you ope n t he U SB storage
configuration, you can’t view the memory card thro ugh the MID. Only after y ou detach the
USB cable, you can view the memory card in the MID.
3. 7 Operation Technique
Enter widgets interface
In home page, long press a ny blank space in main screen, it will popup a window to
enter widgets. Long press any widget to create its shortcut, then you can enter into the
application through the shortcut icon.
10
Create application shortcut icons in the desktop
In the a pplication int erface or widgets int erface, long press a ny icon t o s witch into
desktop automatically, d rag and hold the icon , yo u can move t o an y po sition i n the
desktop.
Remind: If the tar get posi tion has no s pace, the w idget w on’t be add i n the m ain
screen.
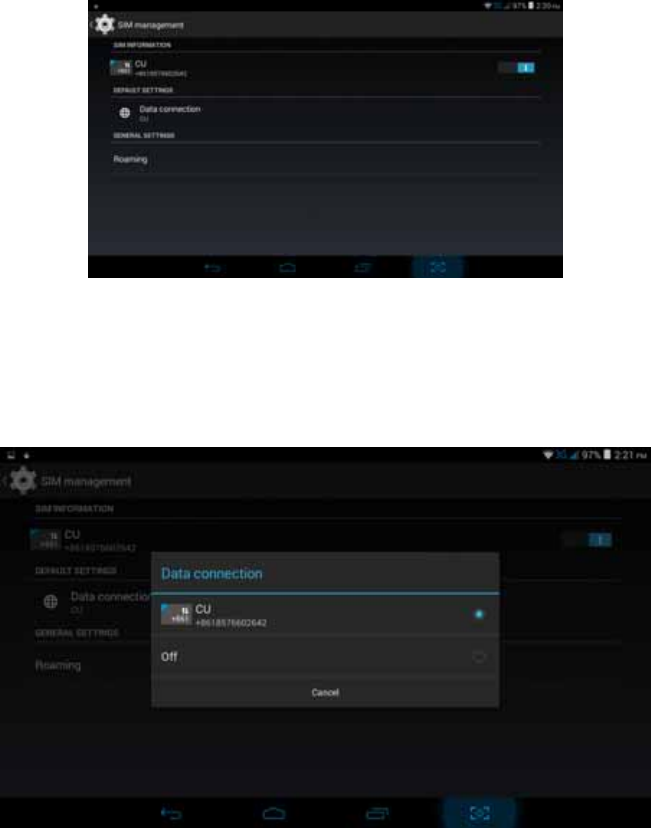
4 Basic Setting
4.1 SIM Management
Click settings in main menu, choose SIM Management, as Picture 4.1
Picture 4.1
Data Connection
Click setting application in main menu, choose SIM management, click data connection, choose
off or on, as Picture 4.2
Picture 4.2
11
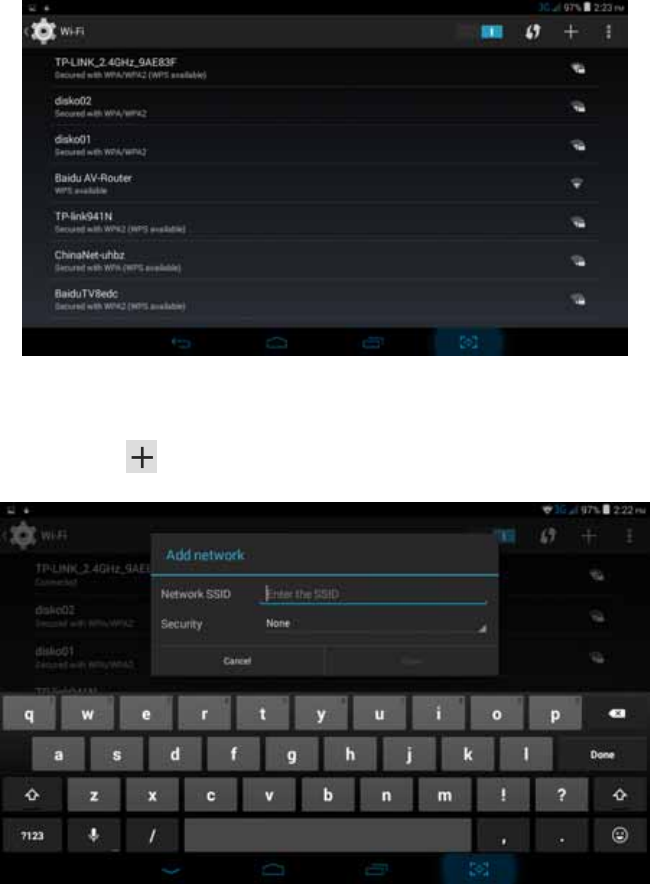
4.2 Wireless and Internet
1. Connect Wi-Fi
1) In the main menu or interface, choose setting application procedure.
2) Cl ick WL AN, ope n wi fi, MID wil l autom atically search the ava ilable W ifi
wireless internet. As Picture 4.3
3) Choose the Wi-Fi internet you want to connect, if it has password, i t will popup the
password window, enter password, click connect.
Picture 4.3
2. Add Network
1) Click icon in right top, as Picture 4.4
Picture 4.4
2) Input network SSID, the wireless network name, click save.
3) Click user name already saved, click connect to use network, as Picture 4.5
12
Picture 4.5
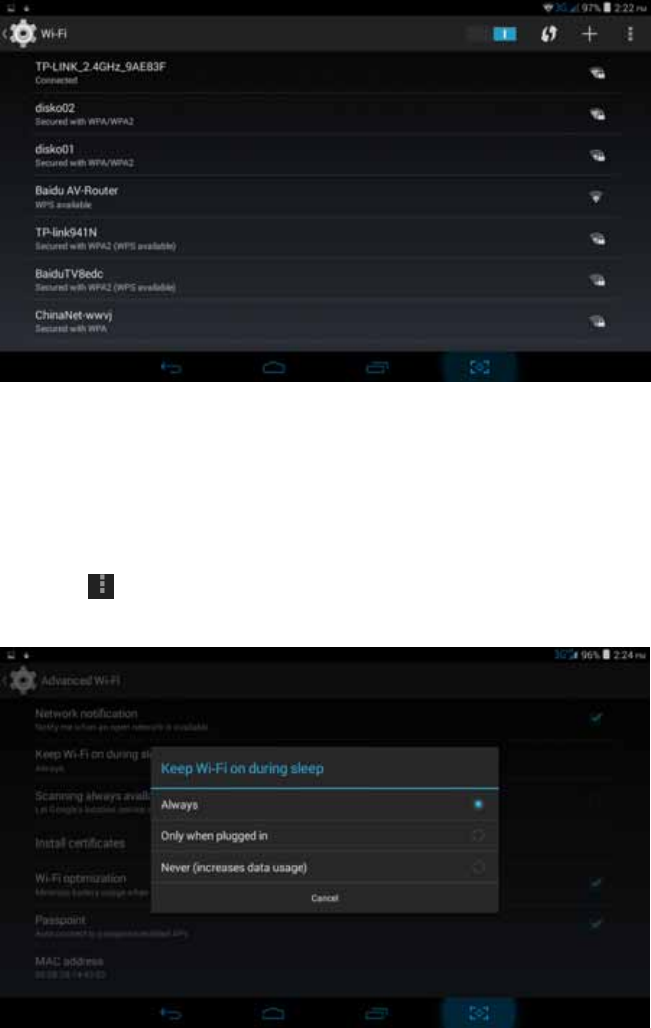
3. Network Notice
If you open Network Notice, when WIFI signal appears, the right bottom will
remind you available WLAN network.
4. Keep WI-FI on during sleep
1. Click icon in right top of Picture 4.5, select advanced.
2. Click Keep WI-FI on during sleep, as Picture 4.6
Picture 4.6
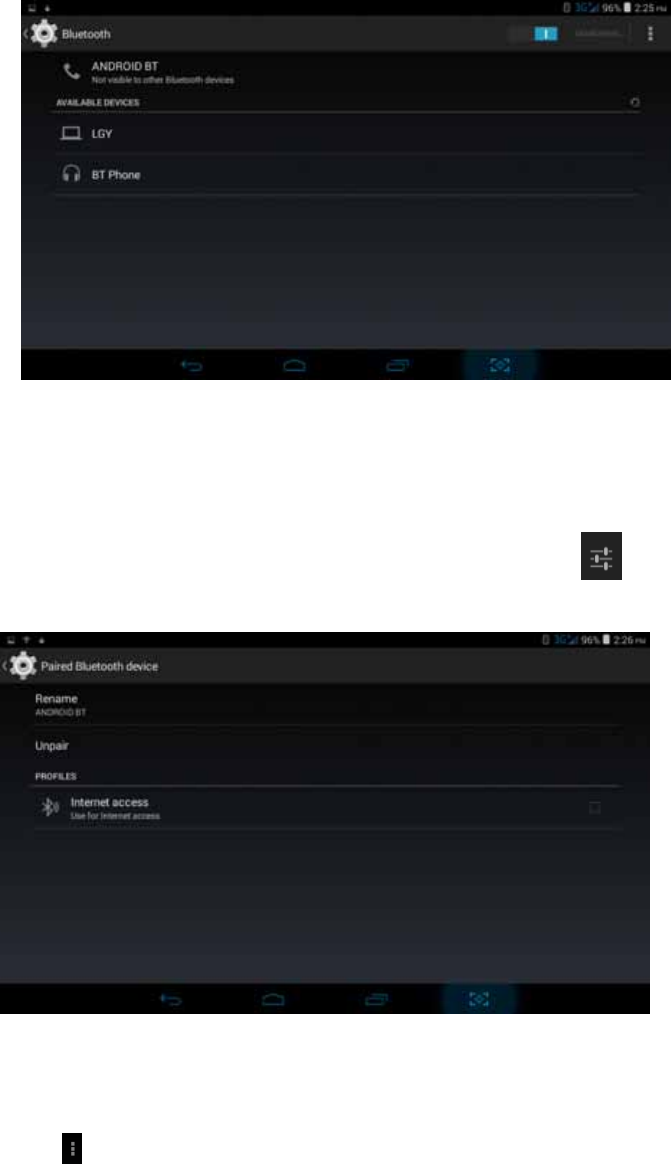
4.3 Bluetooth
Bluetooth function operation
1. Click setting application in main menu interface
2. Click bluetooth and open it.
3. If somebody open bluetooth in y our surroundings, click search device in ri ght above,
then MID will automatically search the bluetooth device nearby. As picture 4.7
13
Picture 4.7
4. Click the available Bluetooth device, it will popup request window, enter into related
password, and match the device to connect.
5. After match successfully, choose the operation you want to, click to enter into
Picture 4.8.
Picture 4.8
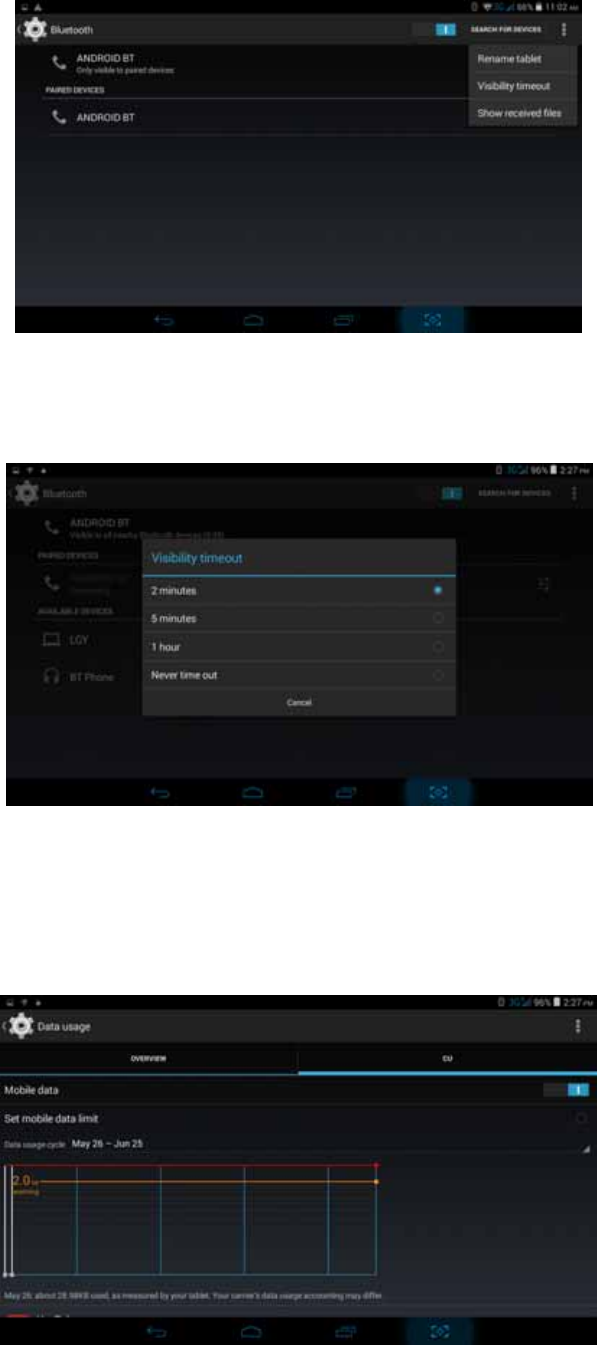
Bluetooth setting
1. Rename tablet
Click icon in right top of Picture 4.7, as Picture 4.9, select rename tablet, you can
rename it as you want
14
Picture 4.9
2. Check visibility timeout
Select visibility timeout setting in Picture 4.9, choose the time you want to set, as Picture
4.10(Note: check overtime setting is the time setting when Bluetooth is checked)
Picture 4.10
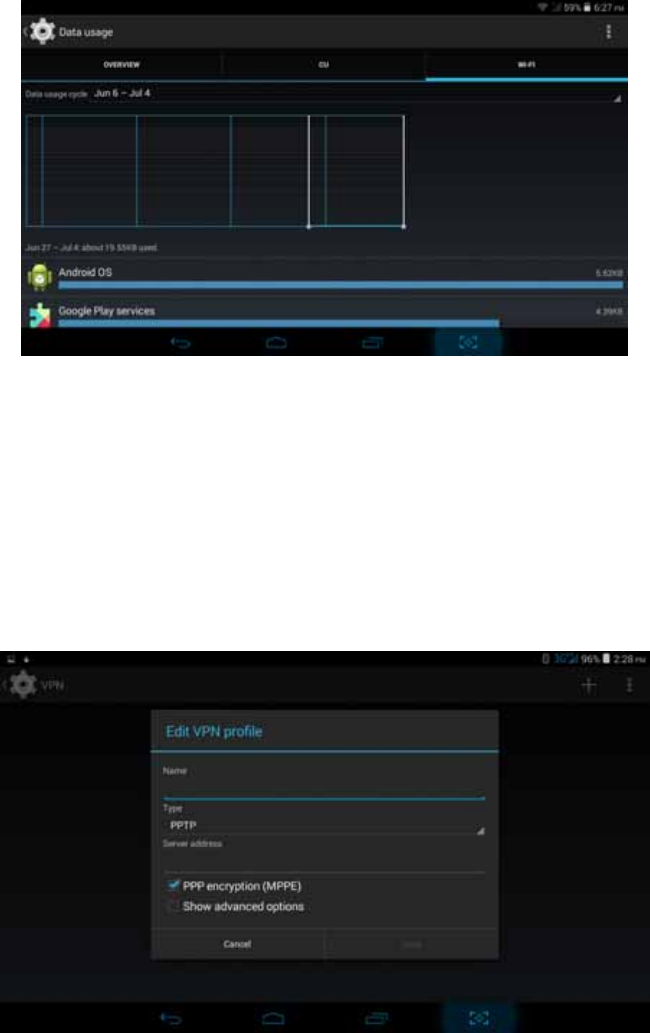
4.4 Data Usage
Check SIM card data usage, as Picture 4.11
Picture 4.11
15
Check WI-FI usage, as Picture 4.12
Picture 4.12
4.5 More
4.5-1 Airplane Mode
Airplane Mode can turn off WIFI and G SM card fu nction quickly, when airplane mode is turn ed
on, WIFI and GSM can’t get any signal, then airplane mode is turned off, WIFI and GSM module
will recover to previous state.
4.5-2 VPN
Open VPN, click add VPN network, as Picture 4.13. Input name and server address, then save.
Picture 4.13
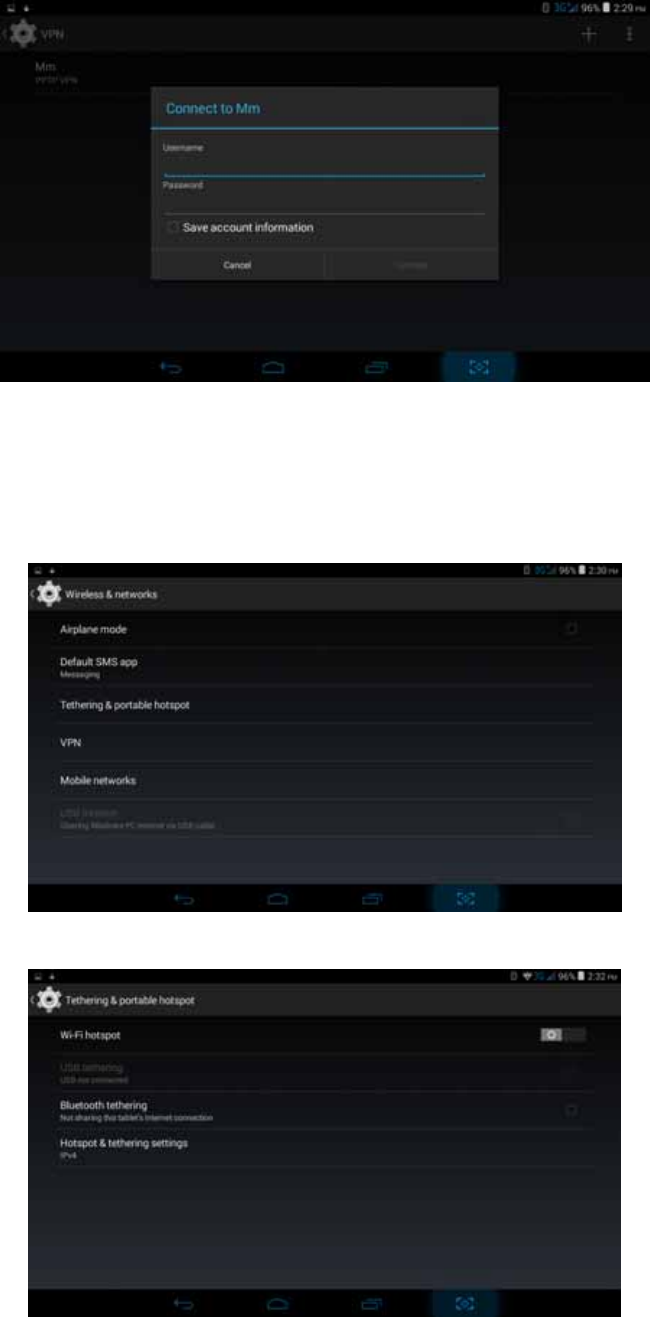
Click VPN, as Picture 4.14, input VPN user name and password, click connect.
16
Picture 4.14
4.5-3 Network sharing and portable hotspots
Portable WI-FI hotspots
1. Click setting application in main menu.
2. Click more when wifi is well connected, open Tethering & portable hotspot
Picture 4.15
Picture 4.16

17
3. Click keep WI-FI hotspots on, choose open time.
4. Return t o pre vious m enu, ope n p ortable WLA N hots pots, cl ick co nfigure WI-FI
hotspots.
Picture 4.17
5. Set passwords you want to, password should be more than 8 numbers.
Picture 4.21
3. Video call ringtone
In Picture 4.19, click video call ringtone to choose video call ringtone, as Picture 4.22
Picture 4.22
(Note: Except general, silent, meet, outdoor are only for selection, they can’t be set.)
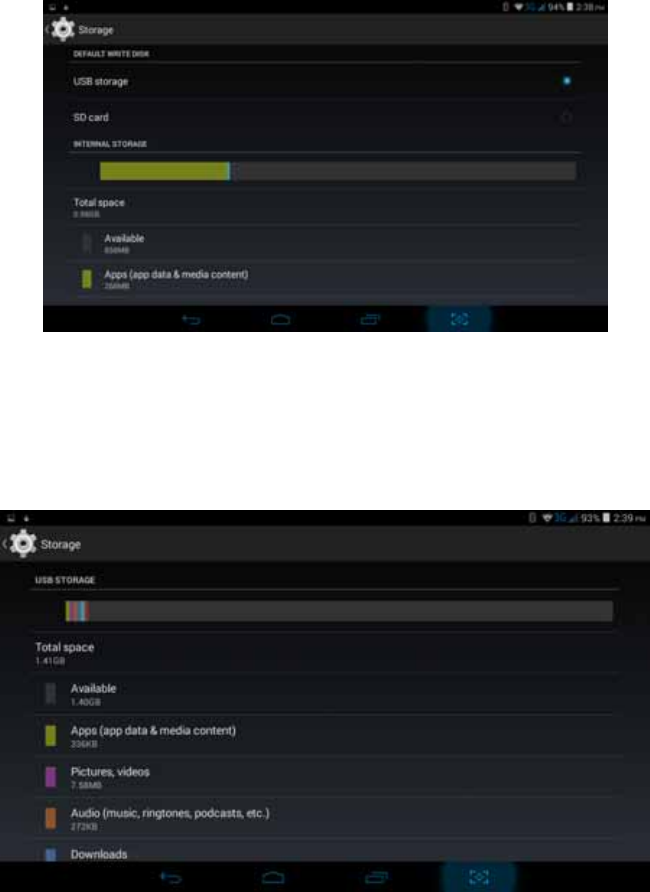
4.6 Storage
Open setting function, click m emory, cl ick preferred insta ll location, you can
choose install new application to choose preferred install location.
18
Check SD card and MID storage space.
1. Enter into setting application.
2. Click s torage, check storage space. Internal storage a)System storage
b)System storage is the space MID leave for system file, as Picture 4.27.
Picture 4.27
(2)Internal storage
Internal sto rage is MID local NAND sto rage, as Pi cture 4.28 , if yo u need to check the sto rage
content, you can check it in main menu.
Picture 4.28
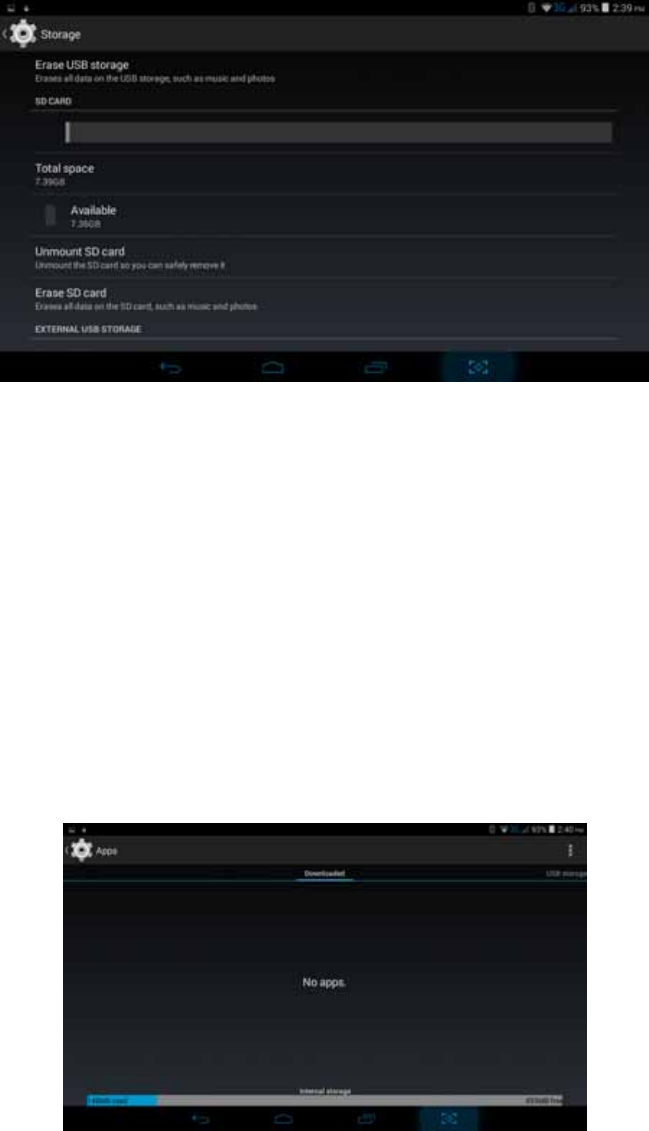
2. SD card
You can check storag e space, SD card avai lable space, un mount SD c ard and erase
SD card, as Picture 4.29
19
Picture 4.29
Safely remove SD card
1. Click setting application.
2. Click memory.
3. Click uninstall SD card.
4. Now you can remove SD card safely.
Note: Removing SD card safely can protect SD card and increase its lifetime.
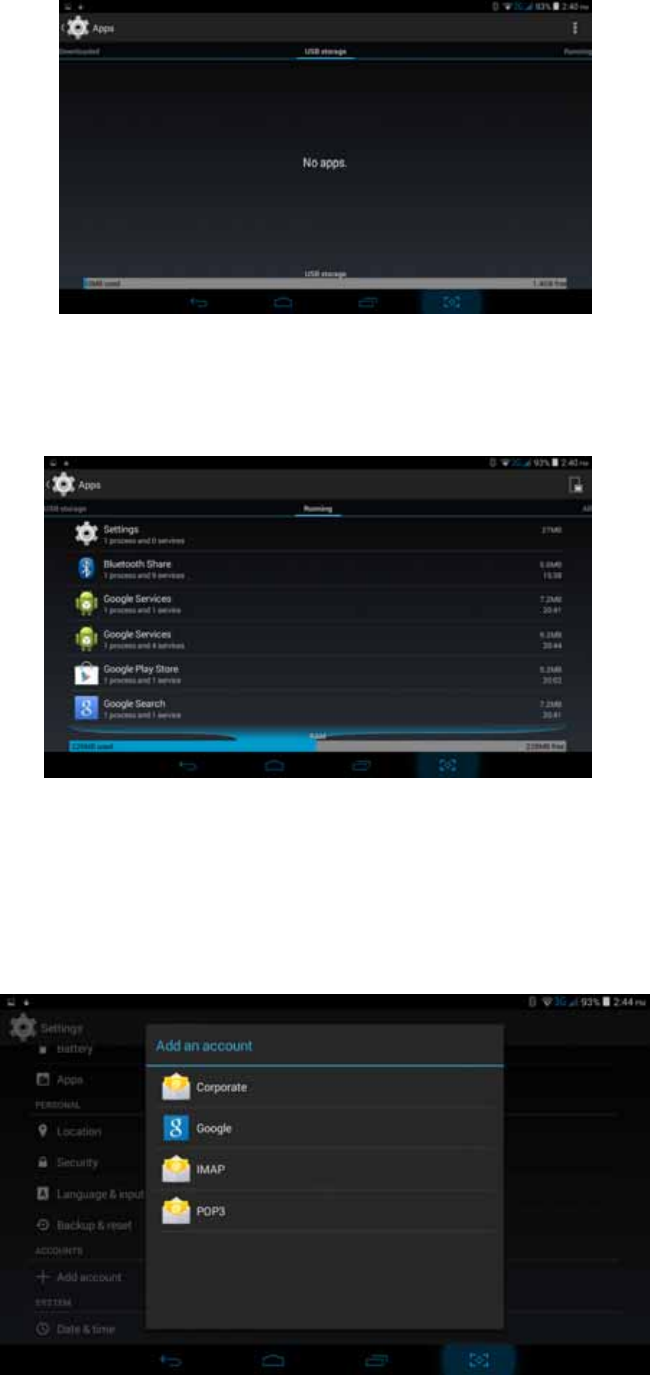
4.7 Application program
1. Click setting application in Apps.
2. Select a pplication, after e nter, y ou can manage a nd d elete i nstalled ap plication
and check system used storage space and left space. (As Picture 4.31)
Picture 4.31
3. View internal storage used space and left space, as Picture 4.32
20
Picture 4.32
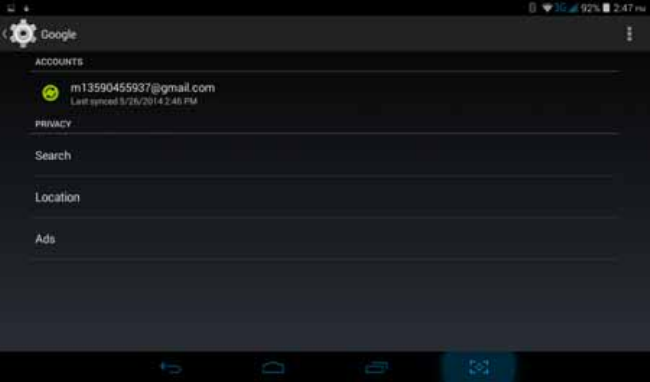
4. View the working device, used space and available space, as Picture 4.33
Picture 4.33
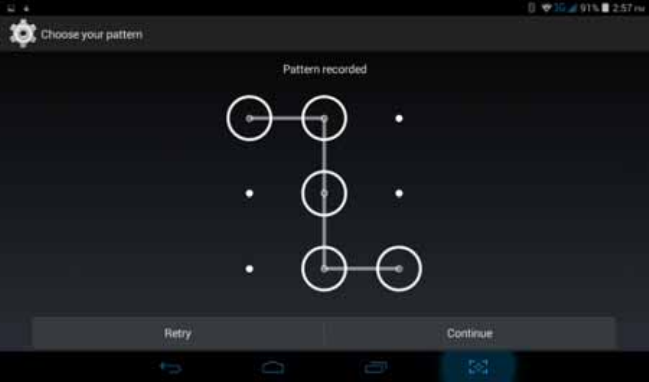
4.8 Add account
1. Click add an account, as Picture 4.34,Select setting application
21
Picture 4.34
2. For exa mple: choose googl e, af ter s uccessfully load, it wi ll open t he syn c fu nction, as
Picture 4.36
Picture 4.35
4.9 Security
Set locked screen
Lock the touch screen by unlock icon, none, slide, face unlock, voice unlock, pattern, pin, password to protect
your MID.
Note: After s etting scre en locked, you should en ter the passcode each time when you startup or
screen is locked
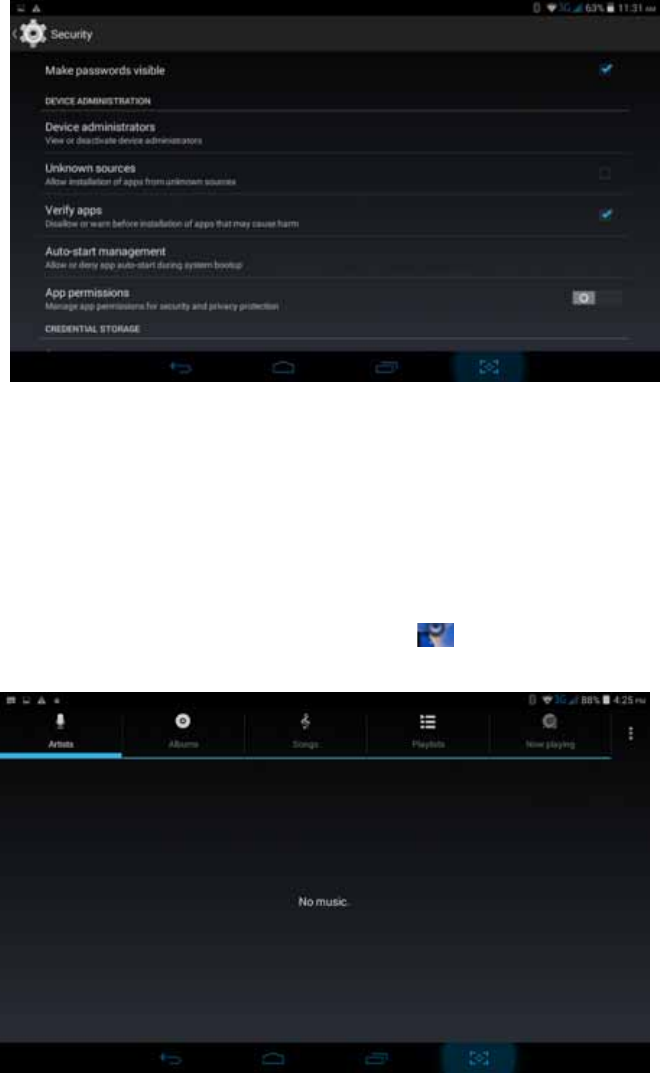
Set unlocked picture
1. Click setting application in main interface.
2. Click security
3. Click locked the screen.
4. Choose picture in text setting area.
5. Click next following the remind message.
6. The u nlocked p attern b oard pop up, there are n ine touch sp ots, c onnect 4
points from vertical, horizontal or diagonal direction. Move your finger from
the screen when finish. The system will record your new unlock pattern.
7. Click continue.
8. When you see the reminder, enter the unlock pattern, then click confirm.
22
Picture 4.37
Set unlock PIN code
1. Click setting application in main interface.
2. Click safe.
3. Click screen locked.
4. Choose PIN in text setting area.
5. Enter new PIN code (numbers) and click continue.
6. Enter new PIN code again and click confirm.
Set unlock password
1. Click setting application in main interface.
2. Click security.
3. Click screen locked.
4. Set password in text setting area.
5. Set new password (letters and numbers) and then click continue.
6. Enter the password again and the click confirm.
Unknown sources
1. In main interface, click setting.
2. Click security
3. Click unknown source, as Picture 4.38
23
Picture 4.38
Note: Manual installing APK files needs to turn on unknown source.
5 Multi-Media
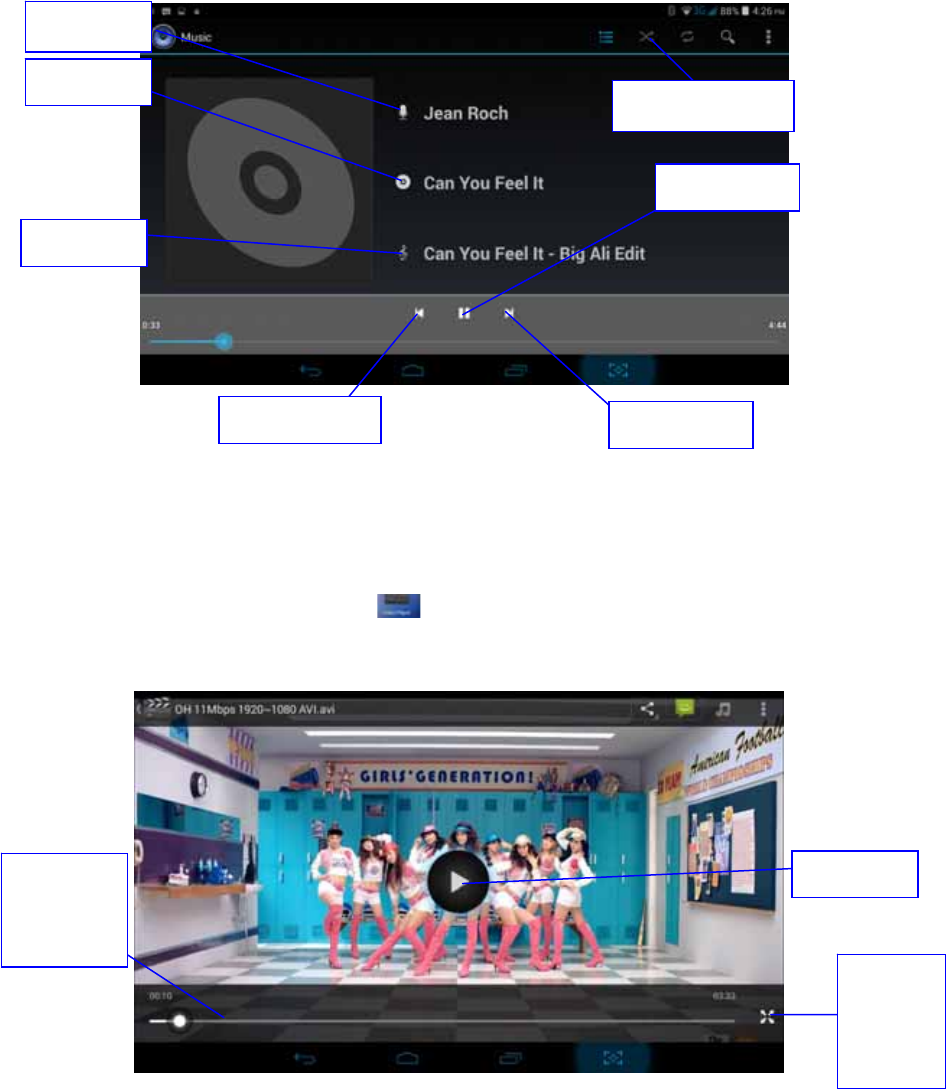
5.1 Music
Enter i nto music p layer: i n menu or des ktop click m usic icon to enter i nto m usic pl ayer,
click the music you want to play, as Picture 5.1:
Picture 5.1
24
Picture 5.2
Drag the progress bar to adjust play progress.
Operation of music player button as Picture 5.2
5.2 Video
Enter video player: choose application in main menu, choose the video you want
to play.
Operation of video player button as Picture 5.3
Picture 5.3
5.3 Photo Gallery
Photo gallery application can auto search photos and video files in SD card, an d photo
gallery will cl assify these p hotos a nd v ideos i n fo lder. You can apply photo gallery to
view and edit photos, set the photos as wallpaper and watch the video.
View pictures
1. Click gallery application in main interface.
Artist
Pause/play
Next song
Previous song
Song name
Album
Random play
Choose
the
screen
mode
Adjust
play
progress
Play/pause
25
2. Enter into gallery, click the folder you want to view.
3. Click the picture you want to view, the system will play it in full screen mode
automatically.
4. The pictures can be zoom in and zoom out, put two fingers on the screen, the
separate t he f ingers(gather up t he fi ngers, the picture will b e z oom in) or
double click the screen.
Note: when you browse the pictures, slide left or right to view more pictures.
Edit and set pictures
When c heck the pic tures in full scre en mode, c lick m enu key t o display m enu
selection, you can choose the selection you need to edit and setting pictures.
Slide Show
1. Open a picture, use virtual key to click menu key, display menu selection.
2. Click slide show, it will auto loop play(or choose button in picture
folder)
Crop
1. Click menu key to display menu selection.
2. Then click crop, click and drag related area to adjust the cropper.
3. Click cropper and drag it inside and outside to adjust the image.
4. After adjust the size you want, click crop.
5. If you wish to give up to crop, click cancel to return to picture browse.
Edit
1. Click menu key, display the menu selection.
2. Click edit.
3. Adjust the brightness, style, color, antialias setting in selection.
4. Click save.
5. If you want to give up edit, click return key, click not to return to picture
browse.
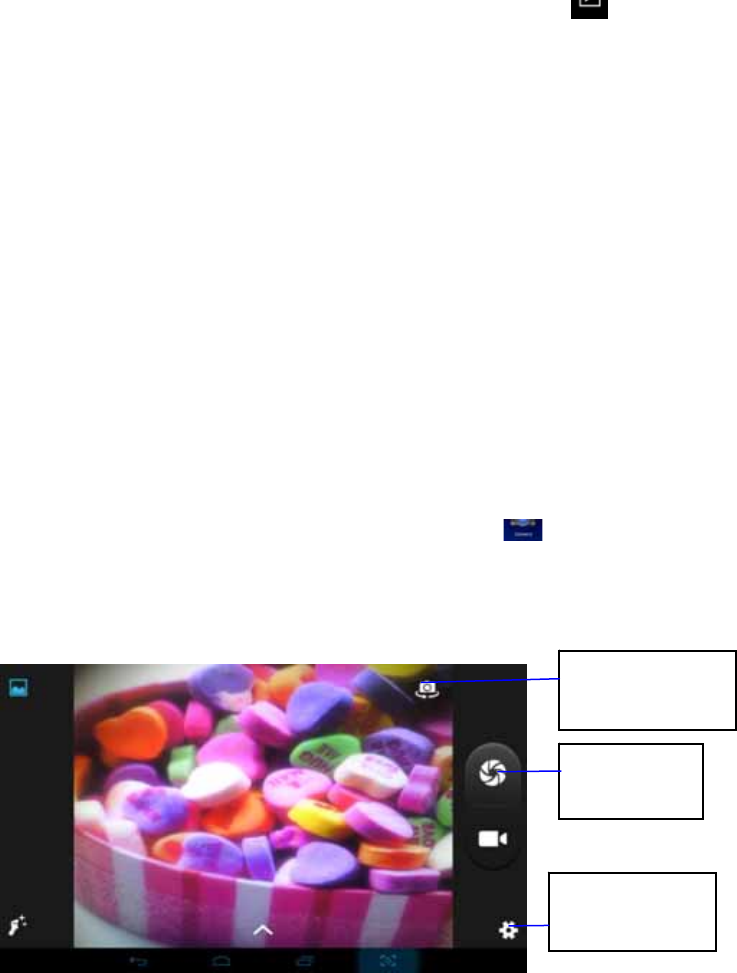
5.4 Camera
In the main interface or desktop, click camera application procedure , enter into camera
Operation of cam era ,Switc h cam era: choose Menu key , c lick switch front/back
camera, as Picture 5.4
Picture 5.4
Click it t o
take
p
ictures
Switch fro nt/back
camera
camera shoot ing
mode
26
6 Communication Function
6.1 Phone
1 Click Phone application procedure
1 Operate as Picture 6.1
Picture 6.1
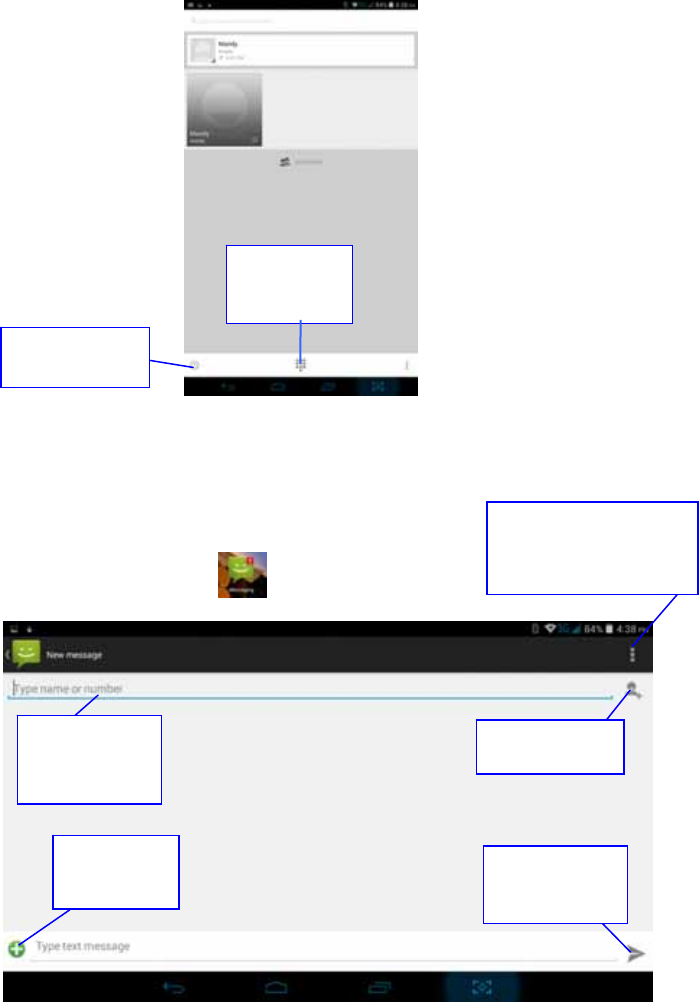
6.2 Text Message
1 Enter into main menu, choose application procedure.
2 Click “Edit new message”
Picture 6.2
The area of
dial phone
Call history
Directly i nput
phone number
Atta ch
some files
Menu(discard, inser t
text and settings)
Add receiver
Send
message
27
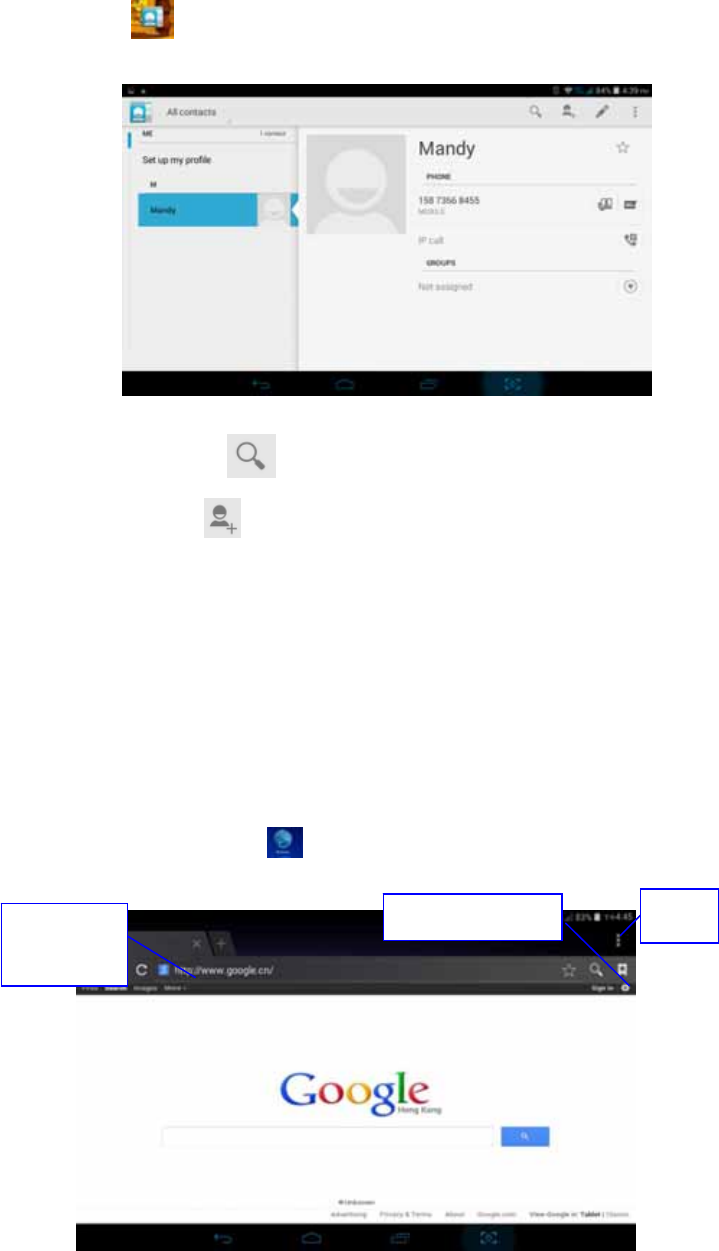
6.3 Contact List
Click Contact list in the main interface, enter into the contact list as Picture 6.3
Picture 6.3
Search contact: click button, enter into search function
Add contact: click button, enter into add contact interface.
7 Internet
7.1 Browser
In case of Wi-Fi or mobile internet is connected well (Please refer to Chapter 4.1 for wireless and
internet setting), click IE browser in the main menu or desktop to enter the IE interface.
Picture 7.1
Address
column
menu
Save bookmark
28
Click address bar to input the website, click start, enter into related webpage, then you can browse
the w ebsite i nformation, a s Picture 7. 2 and y ou can click the menu y ou can ref resh ,sa ve to
bookmarks, share page, bookmarks, history and setting the webpage
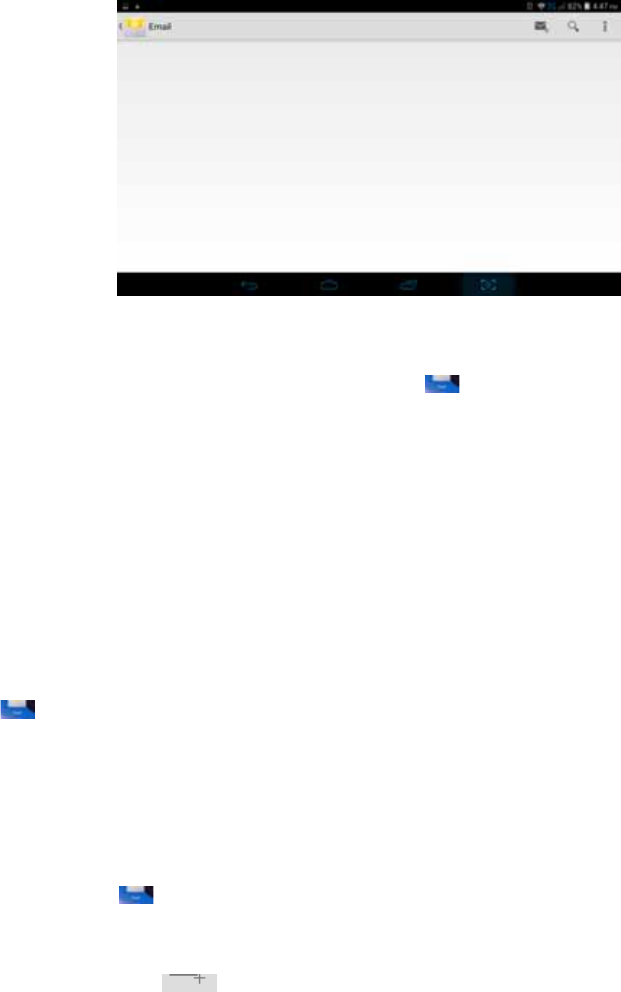
7.2 Email
Email application procedure contains email sett ing gu ide, yo u can ad d th e ex ternal POP3 OR
IMAP email account of normal web email service provider (For instance, Yahoo, Gmail, Hotmail
and 163),as Picture 7.3
Picture 7.3
a. Email Setting
1. After you click the sending email icon , you can see the email setting guide,
which can help you to set.
2. Input your email address and password.
3. Click “Next step” button, choose your email type is POP3 or IMAP.
4. Click “Next Step” b utton to check whether the email box ser vicer ca n rece ive or
send emails
5. Input the email account and display the email subject, and click finish.
6. If the email box is available, you will enter into your mail box automatically.
b. Delete the email account
You can delete setted POP3 or IMAP email account from your MID.
Click .
1. Enter into your mail box.
2. Press Menu key.
3. Click Account
4. Press the account you want to delete.
5. Click confirm to remove.
c. Send E-mail
1. Click to display your mail box.
2. Click the i nbox, it wil l ref resh t he new emails au tomatically; c lick it t o rea d new
email.
3. Press Menu key. Menus will popup.
4. Click Edit to enter into new email editing interface.
5. Input the receiver’s email address.
6. Input the subject and email content.
7. If you want to add attachment, click menu key, the menu popup.
8. Click “Attach file” (photo, music, video, contacts).
9. Click “send” to send the email out.

29
Technical Specifications
Technical Specifications
Weight: 26 1g (Including battery)
Dimensions: 110*191*8.4mm
Band: GSM900MHz / DCS1800MHz / GSM850MHz / PCS1900MHz
WCDMA850MHz / WCDMA1900MHz .WCDMA 2100
Battery Type: Li-Polymer
Battery Capacity: 3000mAH
Talk Time: about 3-5h
Standby Time: about 200-300h
Battery Time (No prior or separate notice is required for capacity changes)
Note: Actual operating co nditions depend on the local network environm ent, SIM, and user
behavior.
Warning: An y consequen ce caused b y m isuse, abuse, or not f ollowing an y and all of the
above-written suggestions and instructions shall not hold the producer in any way responsible
to any degree.
Announcement: The m anufacturer reser ves the right to change or upgrade specifications or
software vers ions without prior or separate no tice. T rademarks mentioned or used i n t his
material belong to their respective owners.

30
SAR
This device complies with Part 15 of the FCC Rules. Operation is subject to the following two
conditions:
(1) This device may not cause harmful interference.
(2) This device must accept any interference received, including
Interference that may cause undesired operation.
NOTE: Changes or m odifications not expressl y approved by the part y responsible f or
compliance could void the user's authority to operate the equipment.
NOTE: This equipm ent has been tested and fo und to com ply with the lim its for a Class B
digital device, pursuant to Part 15 of the FCC Rules. These lim its are designed to provide
reasonable protection against harmful interference in a residential installation. This equipment
generates uses and can radiate radio frequency en ergy and, if not installed and used i n
accordance with the instructions, m ay cause ha rmful interference to radio communications .
However, there is no guarantee that interference will not occur in a particular installation.
If this equipment does cause har mful interference t o radio or television reception, which c an
be determined by turning the equipment off and on, the user is encouraged to try to correct the
interference by one or more of the following measures:
---Reorient or relocate the receiving antenna.
---Increase the separation between the equipment and receiver.
---Connect the equipment into an outlet on a circuit different from that to which the receiver is
connected.
---Consult the dealer or an experienced radio/TV technician for help.
Body-worn Operation
This device was tested for t ypical bo dy-worn o perations. T o com ply W ith RF exposure
requirements, a minimum separation distance of 1.5cm must be maintained between the user’s
body and the handset, including the antenna.
Third-party belt-clips, holsters, and similar including the anten na. Third-par ty belt-clips,
holsters, and sim ilar accessories used by th is device should not contain any m etallic
components. Body -worn accessories th at do not m eet these r equirements may not com ply
with RF exposure requirements and should be
Avoided.
Specific Absorption Rate (SAR) information:
This wireless pho ne meets the g overnment's requirements for exposure to radio waves. Th e
guidelines are based on standards that were developed by independent scientific organizations
through periodic and th orough evalua tion of scien tific studies. The standar ds include a
substantial safety m argin designed to assure the safety of all pe rsons regardless of age or
health.
FCC RF Ex posure Infor mation and Statement the SAR limit of USA (FCC) is 1.6 W/kg
averaged over one gram of tissue. Device types: LT-7000STORM
FCC ID: (GAO-LT7000STORM) has also been tested against this SAR li mit. The highest SAR value
reported under this standard during product certification for use at the ear is 0.77W/kg and
when properly worn o n the body is 1.4 6W/kg. This device was te sted for ty pical body-worn
operations with the back of the handset kept 1.5cm from the body . To maintain co mpliance
with FCC RF exposure r equirements, use acce ssories that maintain a 1.0c m separation
distance between the user's body and the back of the handset. The use of belt clips, holsters
and similar accessories sh ould not contain meta llic components in its assem bly. The use of
accessories that do not satisfy t hese requirements may not com ply with FC C RF exposure
requirements, and should be avoided.
More info visit our website
www.likuidmobile.com