Collage Investments STAR4 MOBILE PHONE User Manual STAR 4 User Manual
Collage Investments LLC. MOBILE PHONE STAR 4 User Manual
User Manual
STAR 4
Manual de Usuario

SAR
This device complies with Part 15 of the FCC Rules. Operation is subject to the following two conditions:
(1) This device may not cause harmful interference.
(2) This device must accept any interference received, including interference that may cause undesired operation.
NOTE: Changes or modifications not expressly approved by the party responsible for compliance could void the
user’s authority to operate the equipment.
NOTE: This equipment has been tested and found to comply with the limits for a Class B digital device, pursuant to
Part 15 of the FCC Rules. These limits are designed to provide reasonable protection against harmful interference in a
residential installation.
This equipment generates uses and can radiate radio frequency energy and, if not installed and used in accordance
with the instructions, may cause harmful interference to radio communications. However, there is no guarantee that
interference will not occur in a particular installation.
If this equipment does cause harmful interference to radio or television reception, which can be determined by turning
the equipment off and on, the user is encouraged to try to correct the interference by one or more of the following
measures:
---Reorient or relocate the receiving antenna.
---Increase the separation between the equipment and receiver.
---Connect the equipment into an outlet on a circuit different from that to which the receive is connected.
---Consult dealer or an experienced radio/TV technician for help.
Body-worn Operation
This device was tested for typical body worn operations. To comply with RF exposure requirements, a minimum
separation distance of 1.5cm must be maintained between the user’s body and the handset, including the antenna.
Third-party belt-clips, holsters, and similar including the antenna.
Third-party belt-clip, holster, and similar accessories used by this device should not contain any metallic components.
Body worn accessories that do not meet these requirements may not comply with RF exposure requirements and
should be avoided.
Specific Absorption Rate (SAR) information:
This wireless phone meets the government’s requirements for exposure to radio waves. The guidelines are based on
standards that were developed by independent scientific organizations through periodic and thorough evaluation of
scientific studies. The standards include a substantial safety margin designed to assure the safety of all persons
regardless of age or health.
FCC RF Exposure Information and Statement the SAR limit of USA (FCC) is 1.6W/kg averaged over one gram of
tissue. Device type: STAR 4 (FCC ID: GAO-STAR4) has also been tested against this SAR limit. The highest reported
SAR values for head, body-worn accessory, and product specific (Hotspot) are 0.52 W/kg, 0.85 W/kg, and 0.87 W/kg
respectively. The Max simultaneous SAR is 1.06 W/kg. This device was tested for typical body-worn operations with
the back of the handset kept 10mm from the body. To maintain compliance with FCC RF exposure requirements, use
accessories that maintain a 10mm separation distance between the user's body and the back of the handset. The use of
belt clips, holsters and similar accessories should not contain metallic components in its assembly. The use of
accessories that do not satisfy these requirements may not comply with FCC RF exposure requirements, and should be
avoided.
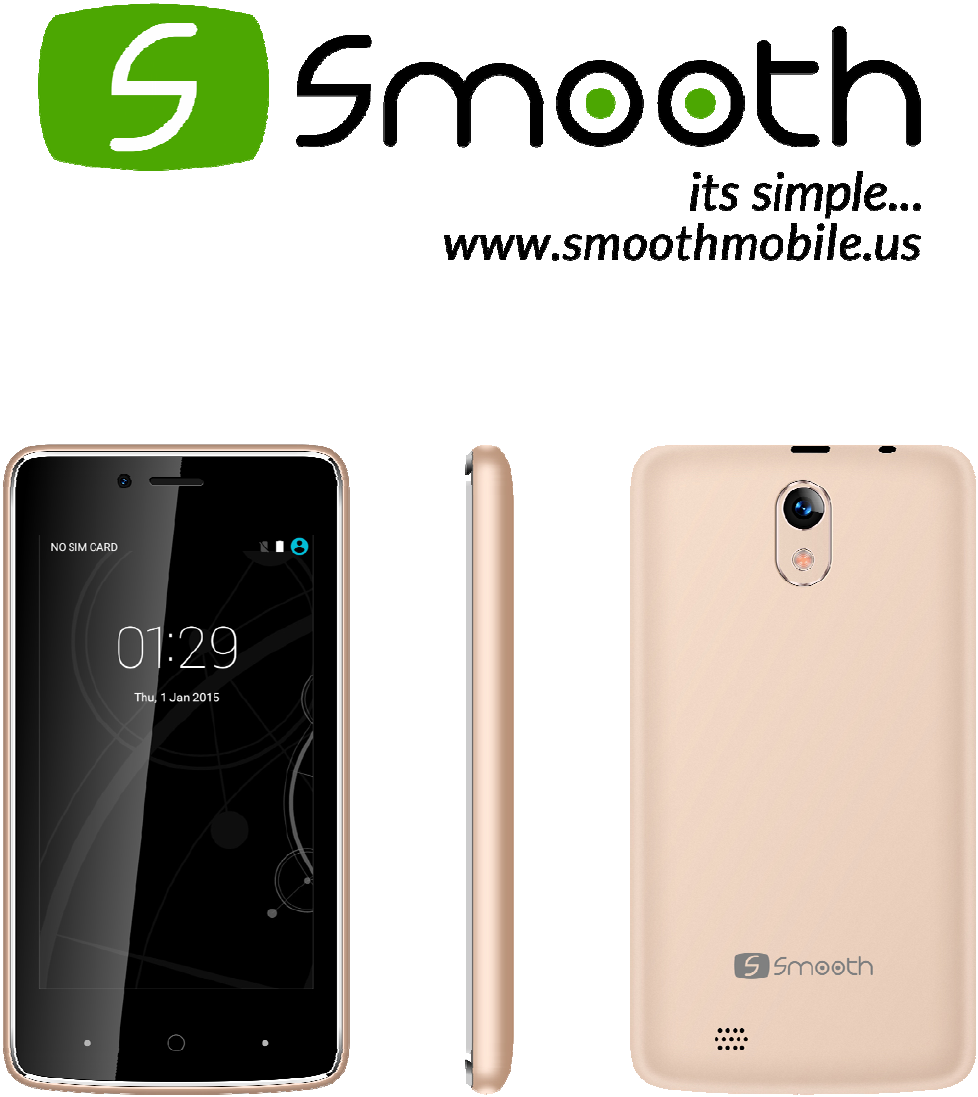
More info visit our website:
www.smoothmobile.us
User Manual
1. APPEARANCE AND KEYPAD OPERATIONS ................................................................................. 3
2. USING MEMORY CARD AS U DISK............................................................................................. 3
3. WIFI ..............................................................................................................................................3
4. BLUETOOTH .............................................................................................................................. 4
5. MAIL ..............................................................................................................................................4
6. DIALLING .................................................................................................................................. 5
7. MESSAGING ............................................................................................................................... 6
8. CONTACTS ................................................................................................................................. 6
9. BROWSER .................................................................................................................................. 6
10. SOUND RECO ........................................................................................................................... 7
11.CLOCK.............................................................................................................................................7
12.CACULATOR ............................................................................................................................. 7
13. CAMERA .................................................................................................................................. 7
14. GALLERY ................................................................................................................................. 8
15. MUSIC.............................................................................................................................................8
16. CALENDAR .............................................................................................................................. 8
17. FM RADIO ............................................................................................................................... 9
18. SETTINGS ................................................................................................................................ 9
19. NOTICES FOR THE USE OF PHONE ........................................................................................... 12
1) Appearance and Keypad Operations
Keys Functions
home 1) Press this button to return home from any application or interface.
2) Press it to open recently opened application window.
menu • Press it to start the menu,which allows you to perform actions in the current interface or options’ menu.
back • Press it to return to the previous interface,or to close dialog box 、options’ menu、notification panel or the keypad.
power • Press it to open the phone’s menu,then you could choose to lock the screen、turn off the phone,or set it to the
silent mode .
up • Press it to increase the volume
• Press it to turn the phone to vibration mode from the silent mode.
down Press it to decrease the volume.
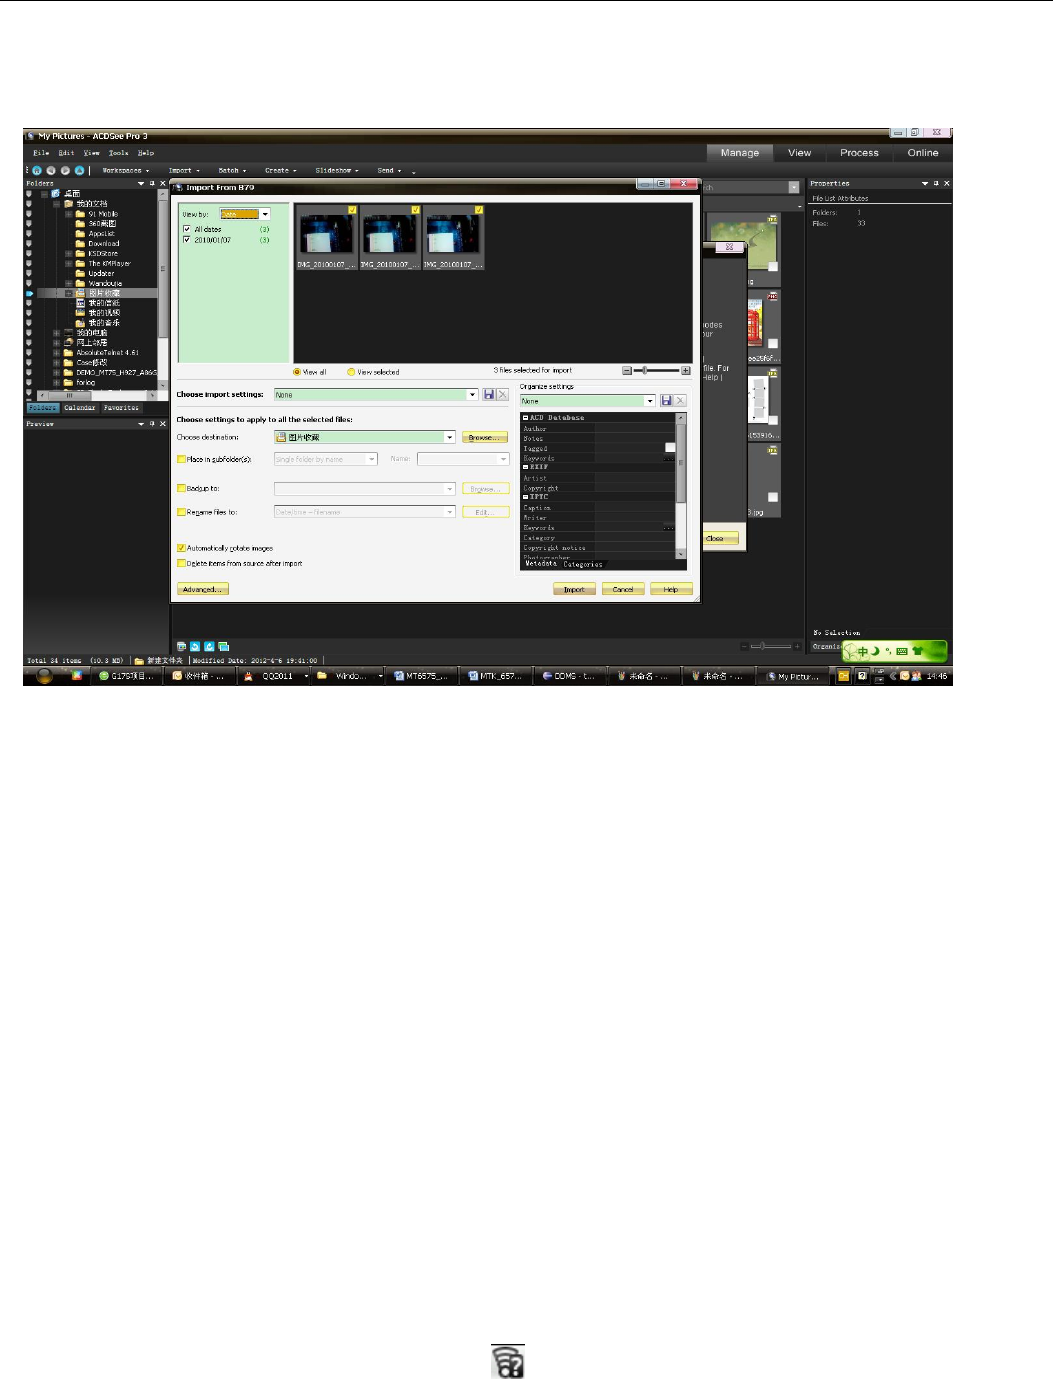
2. Using Memory Card as U Disk
If you want to send music, pictures or other files to the phone’s memory card from the computer,you should set memory card as u disk first. Set
memory card as u disk1〉Connect the phone to the computer with USB cable. The notification icon will appear in the status box. 2〉Open the notification panel.3〉
In the notification panel, touch USB is connected ,then touch “Open the USB Storage Device ”.Notices:If you connect your phone to the computer then choose open
the USB device, the phone can’t read the memory card. You temporarily can’t use some applications, such as camera. Uninstall the U Disk from computer、The
same as the method of connecting it,see the following picture
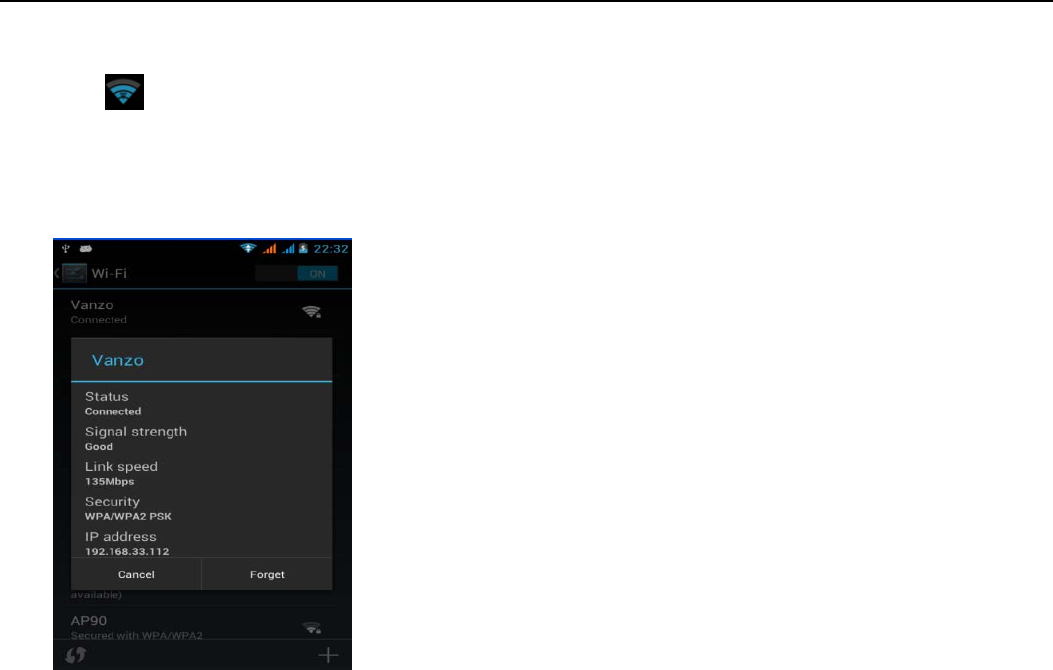
3. WIFI
Wi-Fi provides as far as 300feet (100M) range of wireless network access. If you use cell phone to connect WIFI, you should connect to the
wireless access point or 「hot spots」.Notices:The availability and coverage of Wi-Fi signal depend on the number, infrastructure and other
objects penetrated by the signal. Open Wi-fi and to connect to the wireless network、Press home>menu,then touch settings> WIFI and internet、
Select the wi-fi box,to open Wi-Fi. Phone will automatically scan for available wireless networks. Touch Wi-Fi settings. Then a list of Wi-Fi network will
show the founded network name and security settings. (open network or WEP、WPA/WPA2 with password).If you enable the notification in
WIFI settings, the status box will show this icon ( ) when open available wireless network founded. Touch one of the Wi-Fi choices to
connect the network. When you choose open network, phone will connect to it automatically. If you choose WEP、WPA/WPA2 with password,
you should type the password first, then touch to connect it. Notices:when the phone is connected to the wireless network,
Connect to other Wi-Fi networks、In the interface of wireless and network, touch Wi-Fi settings. The founded Wi-Fi networks will show on the
Wi-Fi network list. Touch other Wi-Fi networks, and then you can connect to this network. Notices:in addition, you can surf the internet via
GPRS. We default that the GPRS in SIM1 is opened after started, users can select manually ,the specific location is “settings>wireless and
internet>data connection”,touch “SIM1、SIN2、no data connection”,when the dot turns green, it’s already opened.
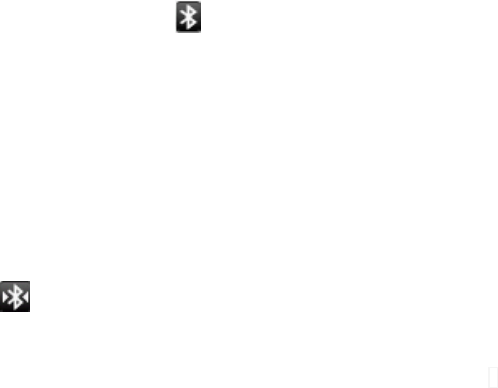
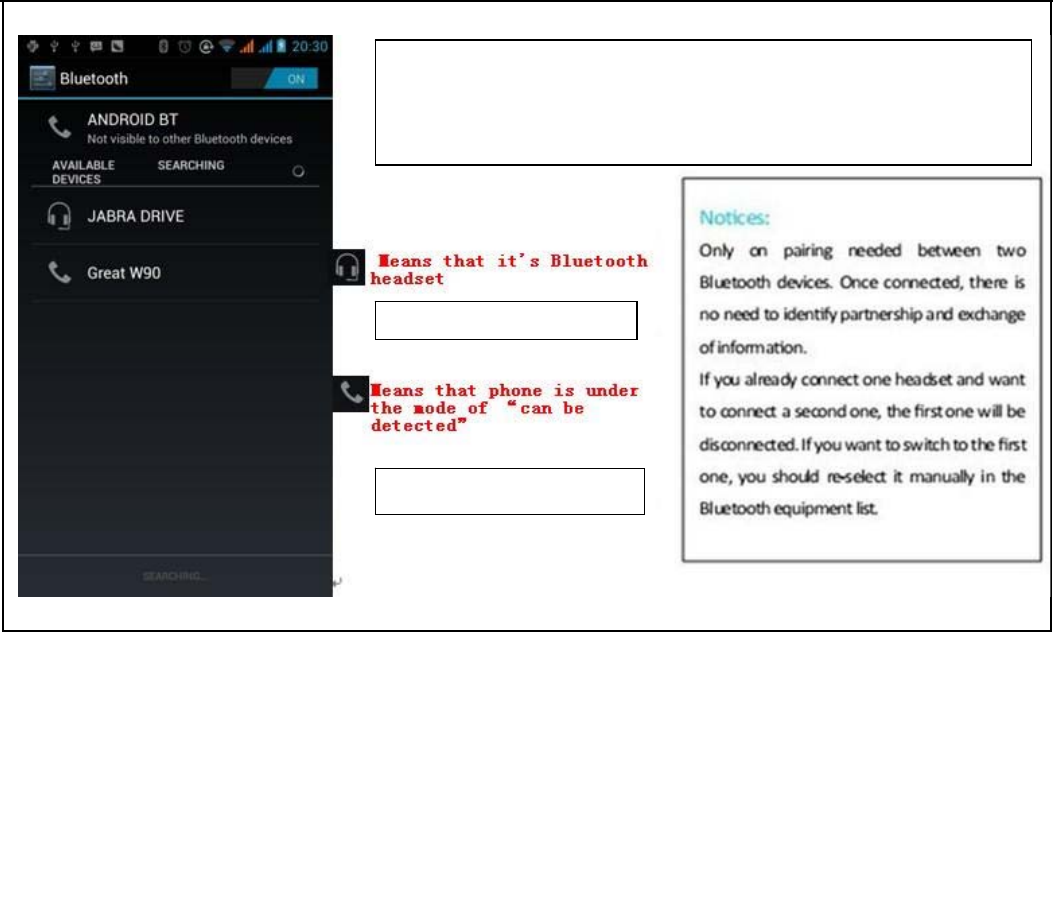
4. Bluetooth
Turn on Bluetooth or set the phone can be detected、 Press home>menu, the touch settings.、 Touch wireless and internet, then choose
Bluetooth box to open the Bluetooth function. After started, the status box will show this icon ( ). Touch “scan for devices” the it starts to scan
for all devices within range. Touch Bluetooth settings, all the devices founded will display in the list under the icon. (select the box “can be
detected”, set it to be detected, the other Bluetooth devices will be able to find the phone.) important:the maximum detecting time of the phone
is 2 minutes. Pairing and connection of Bluetooth headset1) Press home>menu, then touch settings.2)Touch wireless and internet>Bluetooth
settings, then select Bluetooth box, then your phone will scan for the Bluetooth devices within range ,and show the founded devices in the list
under the icon. Tips; If the list can’t find your equipment, touch scanning equipment to re-scan it. Make sure that the devices wanted are under
the detected mode. Touch headset in the equipment list to finish the connection. Notices: generally Bluetooth devices need password to be paired,
often use「0000」as the default password.4)The pairing and connecting status will show under the headset in the Bluetooth devices list. When the
headset connected to your phone, the status box will show this icon()means connected. Then you can use the headset to make or receive
callings.. Cut the connection to the Bluetooth; Press home>menu>settings>wireless; and; internet>Bluetooth settings. In the list of Bluetooth
equipment, touch or tap and hold the connected hand-free headset. Press and select “cancel the pairing” .Bluetooth proximity sensor After
pairing the two device, you can test out the signal is strong or weak by the Bluetooth proximity sensor device
5. Mail
Load Email、Enter the correct address and password >settings correct port and POP server, check the server settings automatically. Set the
correct SMTP server, check the mails server’s sending and receiving settings, then enter the specified account name and displayed name on the
outing e-mail.> Finish. Create and send mails、When creating mails, select mails > create mails. Enter the address(recipient)、theme and contents.
Press MENU you could ‘append’、‘Add Cc/Bcc’, select send or discarded or save as draft.
6. Dialing
When the icon of internet server appears in the screen, you could dial or receive callings. The signal bar on the top right corner show the strength
of network signal (the maximum with 4 signal bars) .Start dialing 、Open application’s main menu>dial. You could choose SIM1 or SIM2 to do
the dialing. Dialing、At the interface of “dialer”,enter the phone number,and then click the dialing key , after that, you should choose one SIM
card or internet call. If needed to call the extension, you could click the “dial pad” in the bottom of the screen to open the interface or press menu
key to select “delay 2 seconds”,and then enter the number of the extension. Telephone calls in the call log、Every telephone number called and
received in“SIM1、SIM2”will reserved in phone’s menu of call log. On the top left of every call record will show “SIM1 or SIM2”All numbers
in the call log can be dialed by clicking the button ”dial” on the right side of the screen.
When number list appearing,click it to catch details;press it for long you could dial via “SIM1 or SIM 2”,meanwhile you can edit, delete, save
the number or do other operations.
Receive callings/When calling comes(top left will show from which SIM card)press“ Answer” and slide towards right until the middle button,
then you can receive callings.
Proximity sensor/According to the distance between phone and human body,it will adjust automatically the switch of the backlight .During the
call, close the phone to the ear, the backlight will turn off automatically,which could save batteries and prevent inadvertently touching.
Refuse to answer the phone/When standby, calling comes,press “refuse” button and slide towards left side until the middle button, then you
could refuse the calling./When using, calling comes, click on the “refuse” button to refuse the calling. Two-way call/multiparty call (conference
call)
Notices:this function needs that SIM card open multiparty call features. Already exist a call in the phone、Click “Add calls”,dial another call
(or receive another call,phone default open “call waiting”(settings–dialing settings–other dialing settings),after both connected,
could view
the status of calling. Select “combine call”– you can combine two calls into one way. after multiparty call connected ,you could separate the
calls or hang up one of them via “the small arrow of conference call”. Telephone recording、During the call,more>start record,you could record
the dialog of the call.

1)settings>set other functions of the call in the dialing settings,for example:Call Transfer– after all the settings finished and turned on,you
could transfer the call to a certain number.2)In settings>dialing settings >other dialing settings,open “call waiting”. After turned on,you can
receive another call when already exist one,The answering and rejecting functions are just like the ordinary phone
7. Messaging
Important: the message title of this phone is the phone number, will be reserved in s similar for of dialog, instead of the usual folder structure.
Messages with blue background are those received, and messages with white background are those sent. Send SMS to certain phone number
Press home>messaging, touch “new messages”. In the interface of “edit” :Click “recipient” box to start input method, you can also click “enter”
box to start input method, in that way you can enter characters. Click the button of “send from SiM1 or SIM2”to start sending. Send MMS to
certain phone number, When creating message it was defaulted as SMS, it will be turned to MMS when following operations were done. You
can send MMS via clicking “send” after editing. In the interface of “edit”, Click the button of “Menu”: Click “append”, you can spend the
following attachments, then it will be turned to MMS automatically. Send messages to multiple numbers Enter multiple numbers in the box of
entering, each number is divided by the comma in English. Notices; For now this phone can mass messages to almost 20 numbers, the correct
number depends on the characters, you can only enter 312 characters in the box of “recipient” .When a message is sent or sent again a little
yellow letter will appear. The number 1 or 2 on the letter refers to SIM1 or SIM2. When message sending failed, a red triangle with exclamation
will appear. when editing information other functions of Menu button
8. Contacts
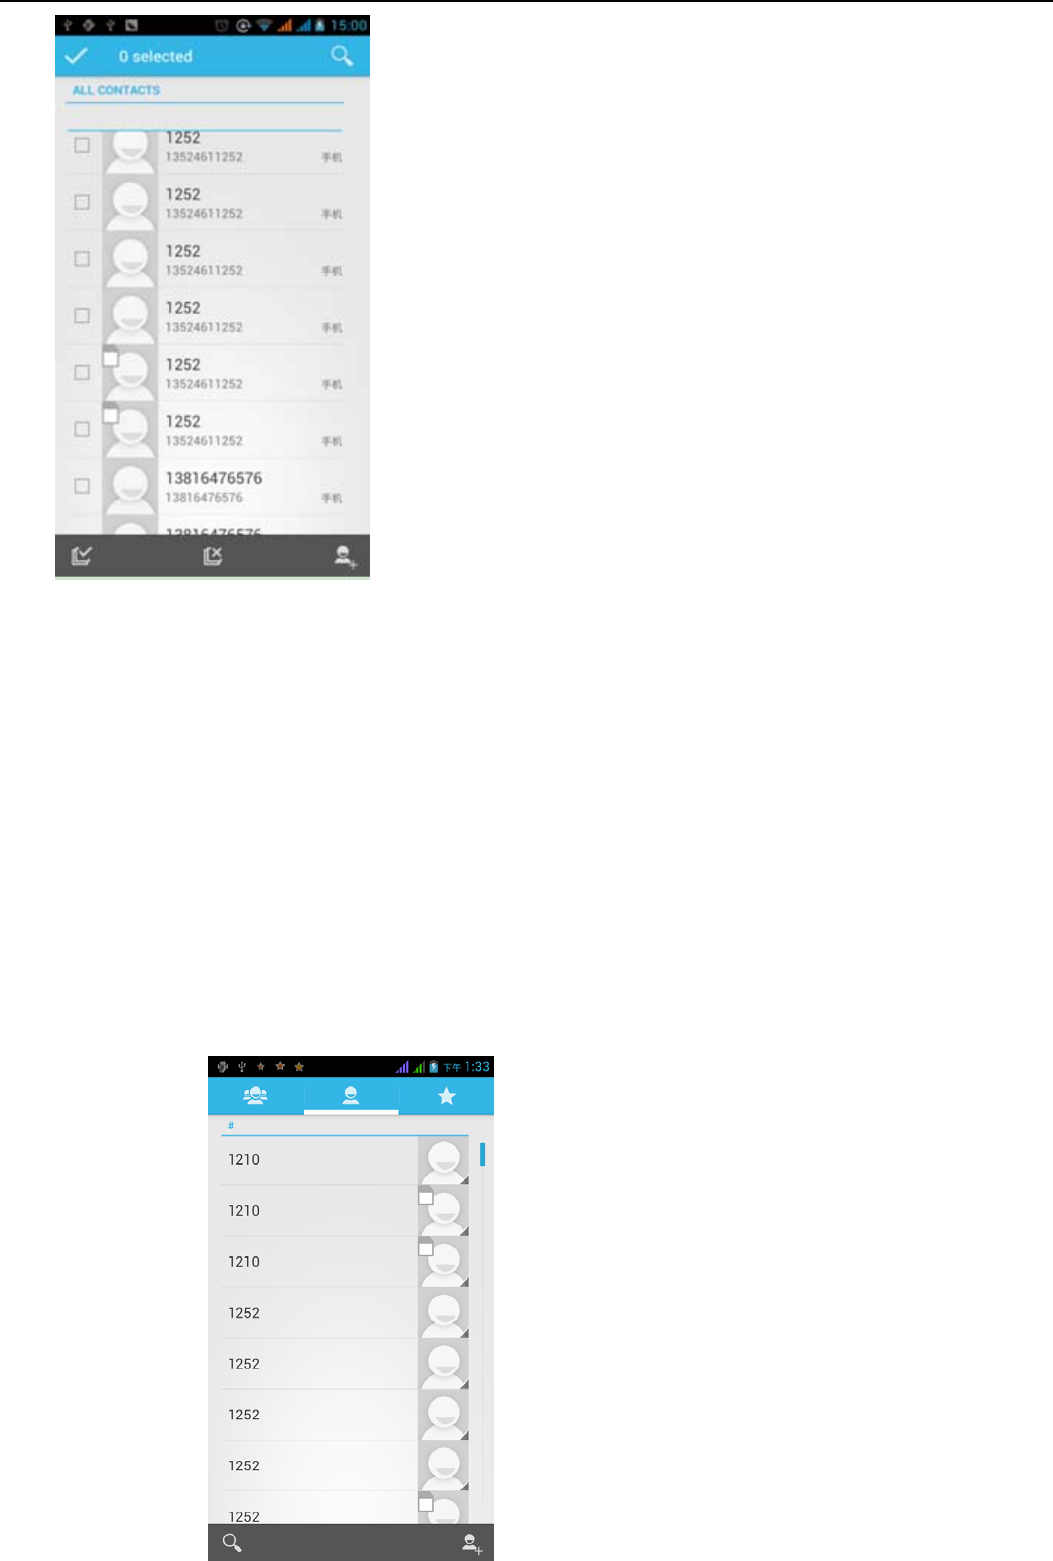
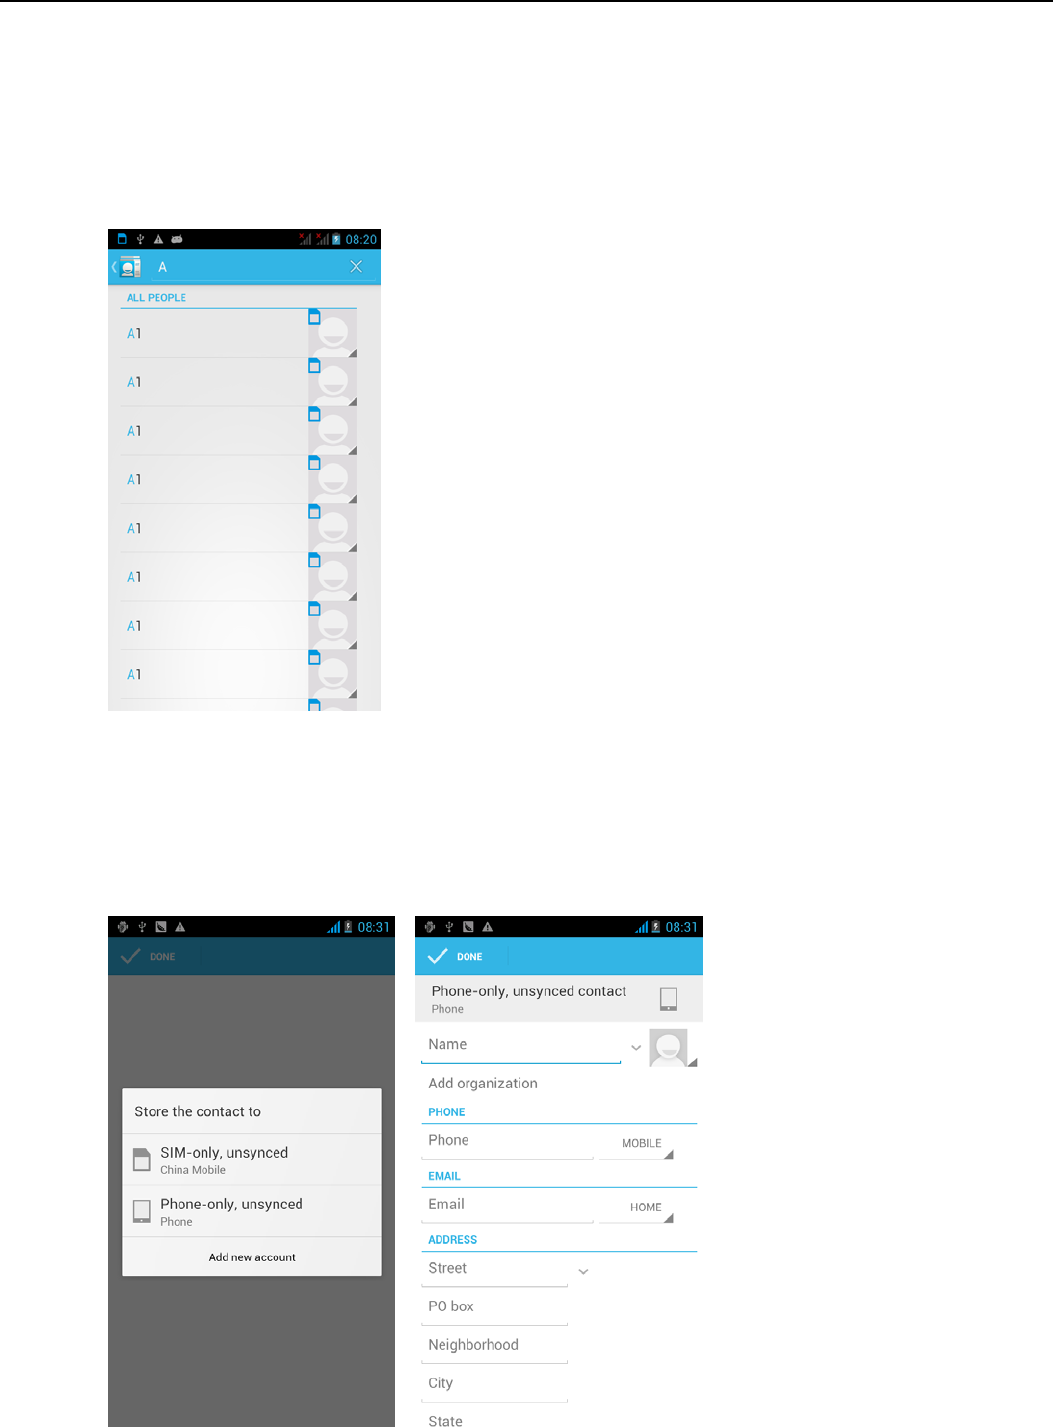
Open the menu of applications>contacts Default display phone contacts and SIM card contacts, sort contacts by first letter of alphabet. Click the
Search icon to enter the contact search interface Click the "+" to create new contact1)contacts>Menu>new contact> Select Save
contacts to phone or SIM card ,then into the interface of editing contacts You can edit the contacts’ picture, name, phone number, e-mail, postal
address, then touch “finish”.2) contacts>Menu>searcher a. Enter numbers or letters, if match with contacts ,they will be displayed in the search
results. If there is no search to match the contacts, the interface will be 'no matching contacts’. 3) contact>Menu>delete contacts a. You can
select all, click the delete button to delete all contacts, including the contacts of phone and SIM card b. You can select one or more individual
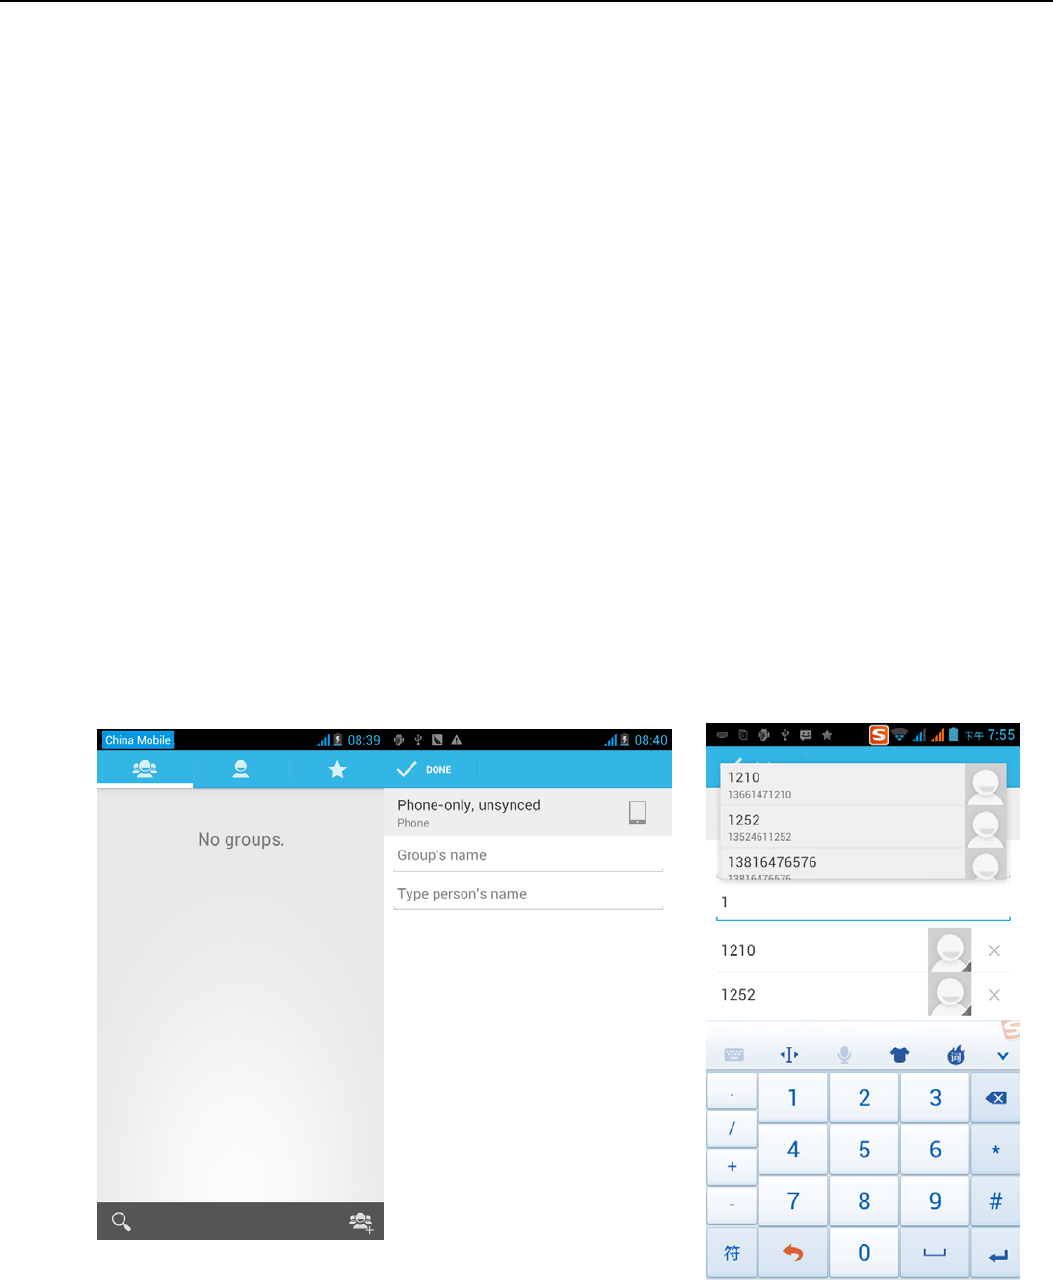
contact, click Delete, delete all the selected contacts. 4) contacts>Menu>groups a. default group include: VIP, Schoolmate, friends ,Family,
Co-worker. b. Select Add Groups, edit the new group name, and go to the contact search interface, you can add the group contact. 5)
contacts>menu>speed dial a. Voicemail b. No.2-9numbers,click”Tap to add speed dial”, select a contact as a speed dial. After successfully
setting the dialer interface, long press the number keys, you can dial the contact number. 6) contacts>more a. click import/export, In the local
phone, SIM card and SD card three copies of each other to achieve contact information. You can select "Copy Source" and then select Next,
select the contacts to copy, so shat complete the copy of contacts. b. Display options, can select the whole or parts contacts in “Only contacts
with phones ”,”Phone Contacts ”or” SIMs Contacts” c. Accounts, can choose the ”Background data” and ”Auto-sync”. d. Share Visible
contacts, all of the contacts can be imported into the SD card, or sharing via Bluetooth ,Text message Gmail. Add common contacts to the
collection interface. 1) Touch contact tab.2) Touch the contact that you want to add to the collection contacts reserved on the SIM card can
not be added).3)In the detailed information of contacts, touch this icon besides the contact.4) Press for long the contact in the pop-up
menu to add it to the collection. The interface of contacts>press Menu button>select search a Enter the first letter of the names in the list(Chinese
or letter) to find the matched contact. b Enter the first number in the searching box to find contacts named under numbers. c Enter the exactly
matched numbers with contacts in the searching box, then press the “search” button. d If there is no matching contact, then the interface will
appear “no contact founded”
9. Browser
Internet explorer1)In the interface of internet explorer,touch address filed and enter the URL.2)Use keypad to enter URL. The appropriate web
sites will appear on the screen. You can touch it directly go to the page or continue to enter URL.
Homepage、Select “homepage”,you could load in the set homepage. If you do not set it, you will use the vendor’s pre-set sites. Functions of
menu、Menu>Backward、After browsing through multiple pages, will return to the previous page the current page. Menu>Forward, After
browsing through multiple pages, will move to a web page after the current page. Menu>Windows、You can view all open windows to the
current .Menu>Bookmarks、Click the “Bookmarks” to make the current URL as a bookmark saved. Click the bookmark under the bookmarks
list, will open the URL. Menu>More
Add bookmarks, save the current URL as bookmark. Find on page, search what you need in current page. Select text, in the text, click and drag
to select a piece of text Page info, display page address and other information of the current browsing.
Share page, select the Bluetooth or SMS to share the current page. Downloads, show all the content downloaded. History, show your browsing
history, and view the most visited pages of information. Setting, contains a variety of browser settings.
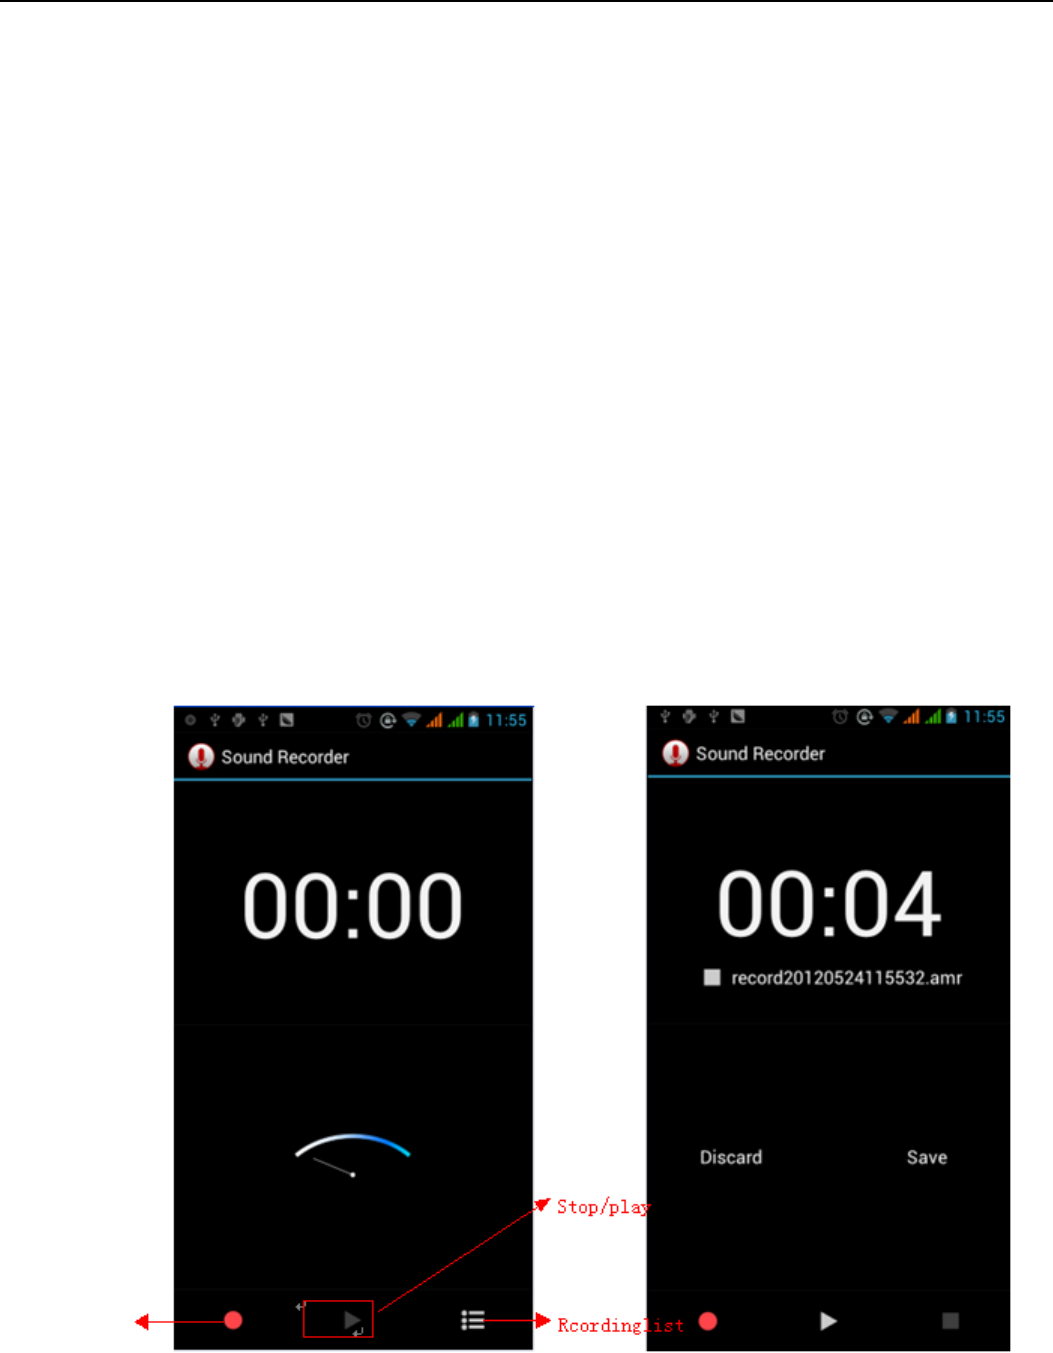
10. Sound Recorder
Recorder can record voice, and send it quickly via Bluetooth or MMS as well as make it as ring tone.Notices:recorder can only save the audio
files as AMR format.1) Click the recorder application.2) Keep the phone’s microphone near the voice source.3) Click recorder to record
voices ,and click to stop or playback.
All recordings save in my recording folder in the default music program.
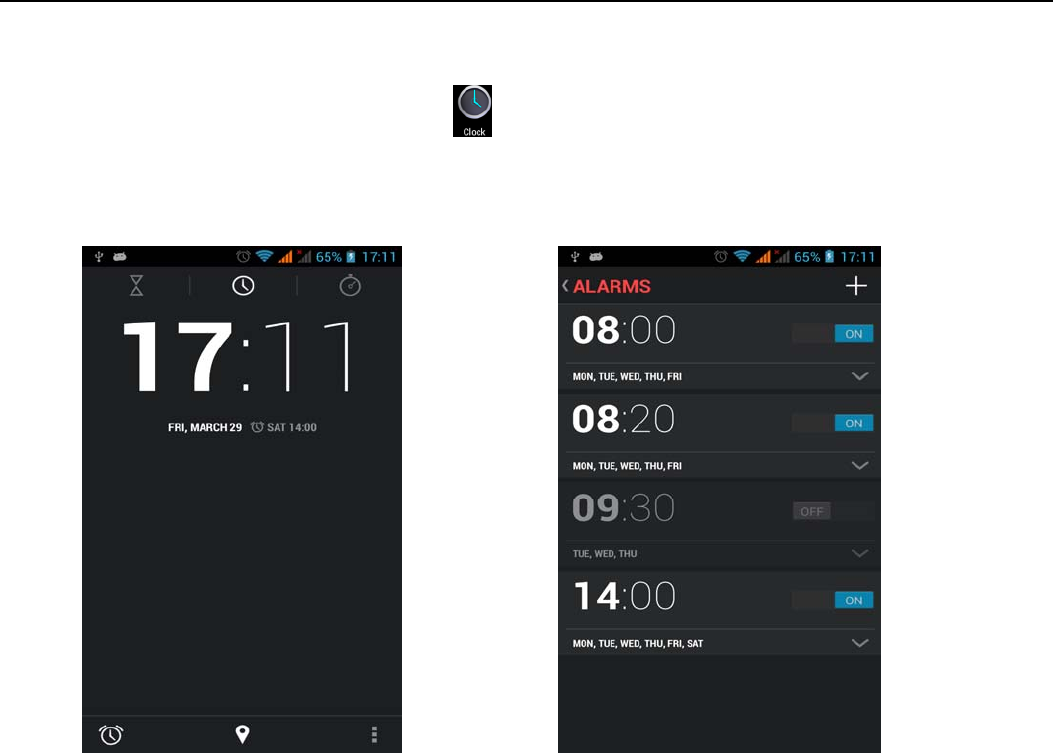
11.Clock
Open the menu of application, click Alarm After functions set,phone will arrives in the setting time to alert you by ringing or vibrating to
achieve it’s function. Press Menu to add alarm,you can also add it from the adding interface. You could set the alarm according to your needs. In
the interface of alarm will show three closed alarms(two alarm clocks are Monday to Friday 8:30,9:00).Edit You can edit the current alarm,
you could edit time、ringing tones、vibration、repeat form and tabs.
Press for long the time you could:stop the alarm、change alarm settings、cancel alarm. In the interface of alarm settings, you could perform the
operations of changing time、repeat 、ring tones、vibration、tabs, etc.
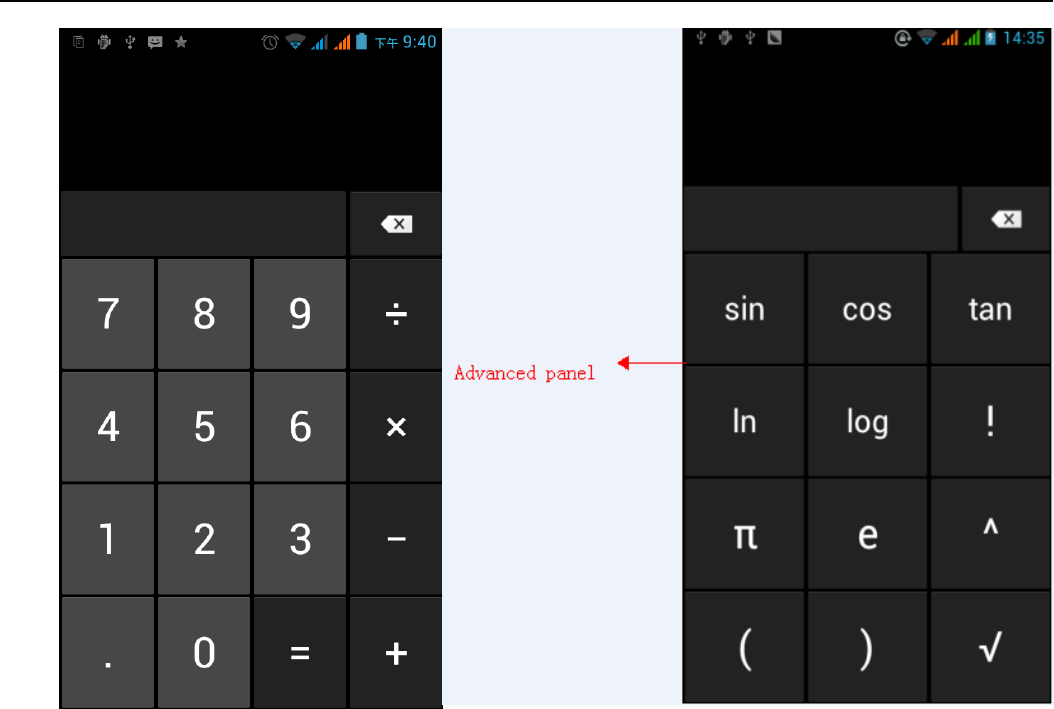
12.Caculator
this function can turn your phone into calculator, it can do some simple calculations. Touch the number keys to make it appear in the blank
box.in the interface of calculator, press MENU button or hold down the screen to the left, then the senior panel appears.
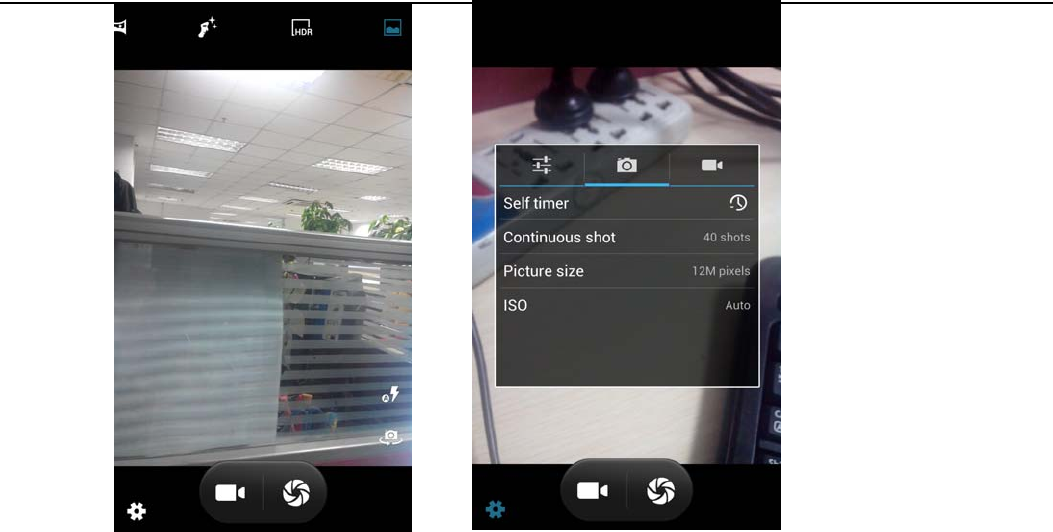
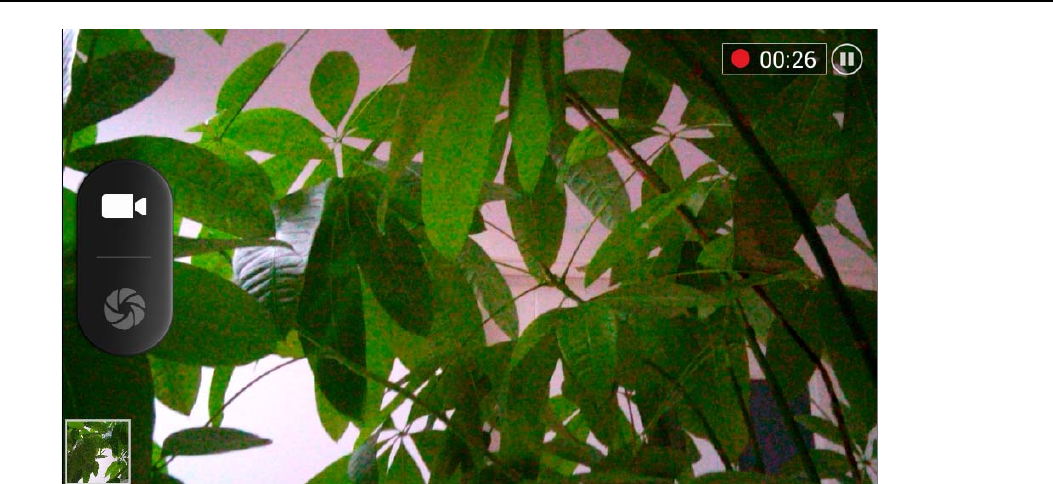
13. Camera
Prior preparation、Install memory card before using the camera or video camera. All your photos or videos taken by the phone are stored in
memory card. Open camera、Press home, touch menu, select camera. Choose the video mode if you want to make videos. The screen will
automatically switch to landscape mode.
Take pictures Aim your object with the screen. Touch the “shutter” button on the screen. After taking,photos will save to the camera’s galley
folder with the name of taking time. You can view the photos by touching the preview box button. Camera settings、You can touch the button of
“set” in the interface of camera to do the settings、Under camera viewfinder mode, press Menu,you can switch to video or photos’ gallery.
On the top right of camera viewfinder mode, display the preview of the previous picture. Touch preview box, the photo display on full screen
and you can enlarge it to view details. Camera settings: button 1:
Focus mode, exposure, framing mode, picture size, picture quality, color effect.
button 2:Camera mode, high-speed continuous shooting, ISO sensitivity, self-timer, focus mode, face recognition, metering mode, to avoid
flicker, sharpness, hue, saturation, brightness, contrast. button 3:Storage location .button 4:White balance. button 5:Flash mode. button 6:
Zoom. Touch “set” button, you can do settings in the camera.
13.2 Video camera、Prior preparation Install memory card before using the camera or video camera. All your photos or videos taken by the
phone are stored in memory card. Open camera Press home, touch menu, select camera. Choose video camera mode. The screen will
automatically switch to landscape mode. Take pictures Aim your object with the screen. Touch the “shutter” button on the screen. After
taking,photos will save to the camera’s galley folder with the name of taking time. You can view the videos by touching the preview box
button. Video camera settings You can touch the button of “set” in the interface of camera to do the settings Under camera viewfinder
mode, press Menu,you can switch to video or photos’ gallery.
On the top right of camera viewfinder mode, display the preview of the previous video. Touch preview box, the video will display on full
screen and you can touch the play button to view it. Video camera settings button 1:Focus mode, anti-focus, exposure, framing mode, video
quality, video length, color effects. button 2:Voice recording, avoiding flicker, sharpness, hue, saturation, brightness, contrast, camera .button 3:
White balance button 4:Flash mode button5:Zoom.
Touch “set” button, you can do settings in the camera.
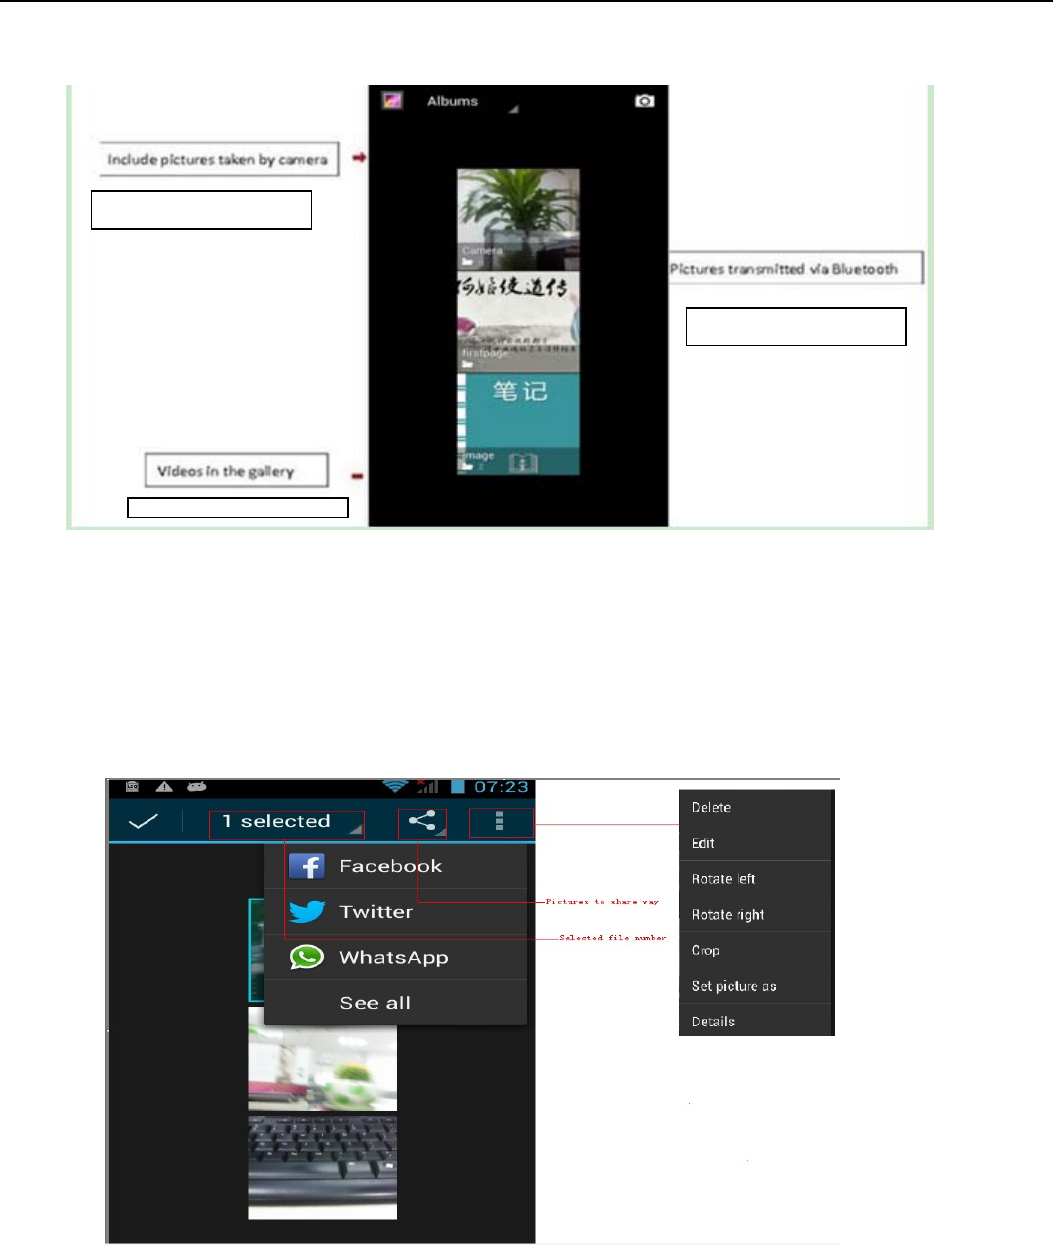
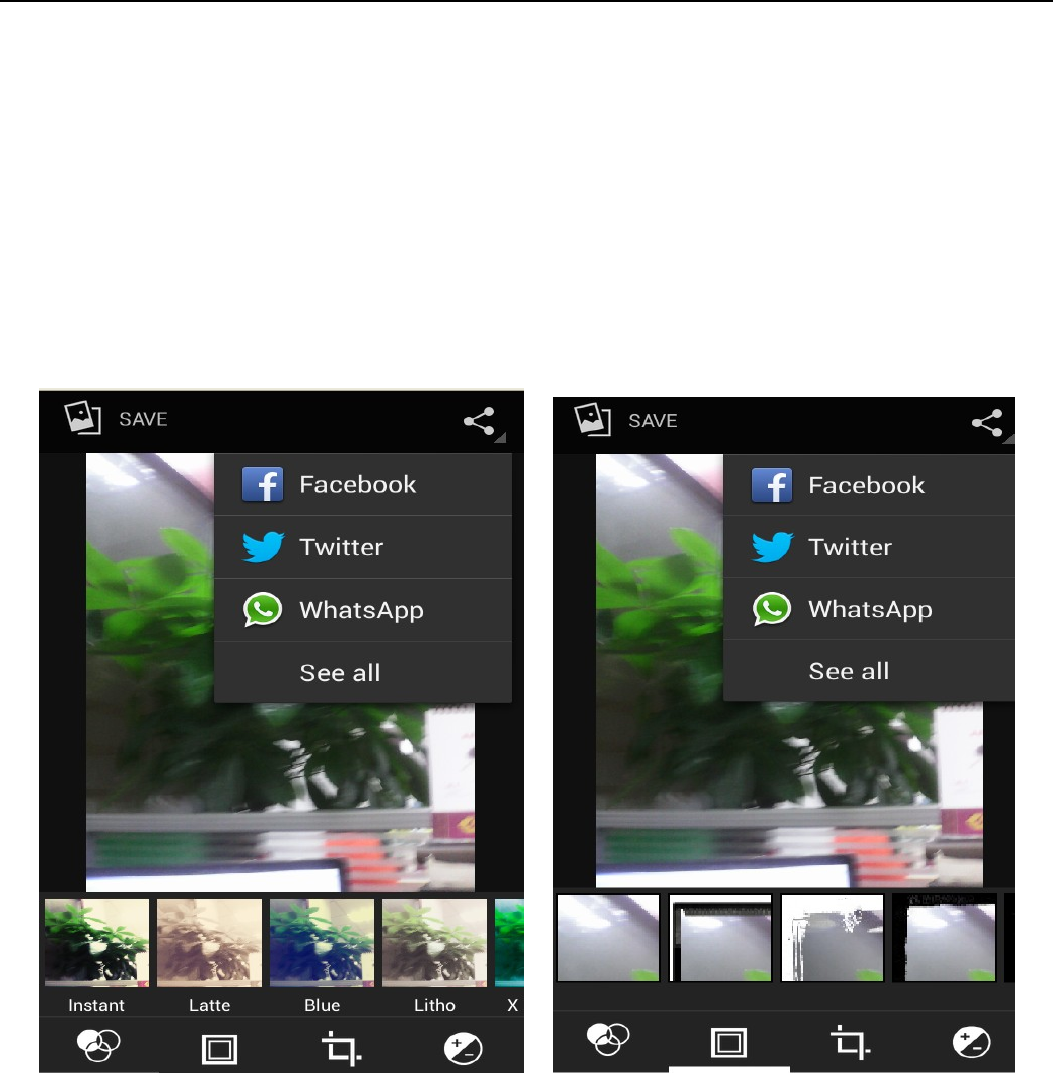
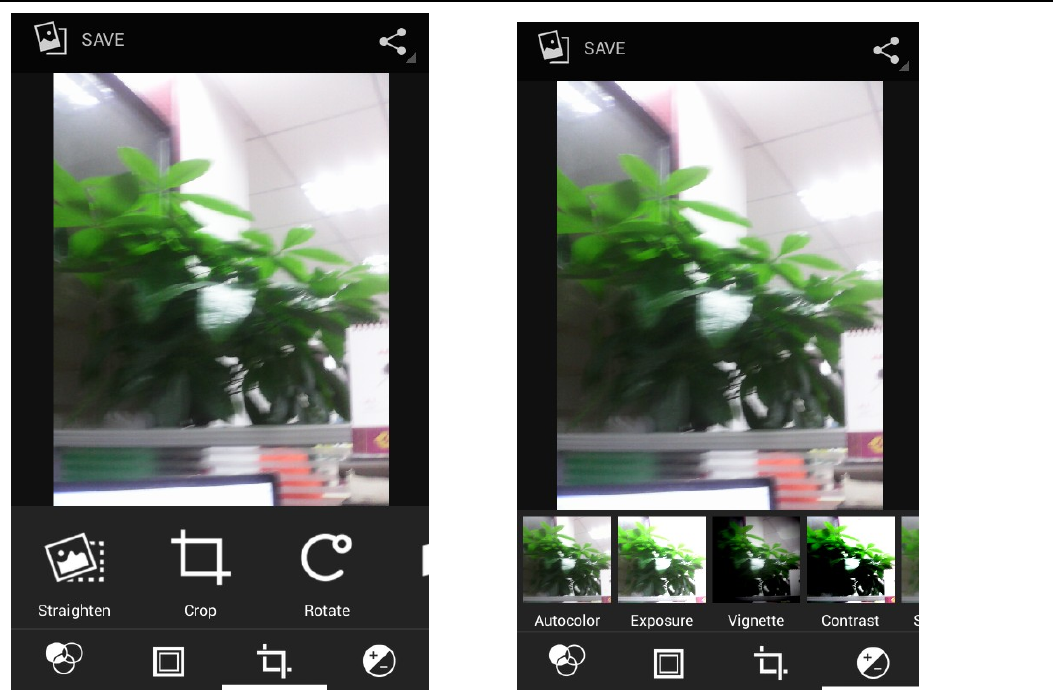
14. Gallery
Open Gallery Press home, touch label of applications, then touch photos’ gallery. In the interface of camera, Press menu to open it, then touch
to operate. Use images After taking pictures, you can view them and share them with your friends. View images1) In the picture interface, touch
photo album to view images.2) Touch the thumbnail to view pictures on full screen. You can choose to display small or large thumbnails. Hold
down the screen towards the left side to view the next photo or towards right to view the previous one. In the photo album or list, press and hold
down the picture towards left to view the next picture, or towards right to view the previous one. Crop images In the photos’ gallery, press the
photo you want to crop, choose menu ‘more’ and ‘crop’, then the instruments of cropping will appear. a. To adjust the trimmer size, press and
hold the edge of cutting tool. After the trimmer arrow appears, drag your finger from the center inward or outward, then you can adjust the
size .b. To keep the ratio of the trimmer, please press any one of the four corners. c. To move the trimmer to other areas of the picture, hold
down the center of cutting device, then drag your finger to certain position. Send images via mails In the images gallery, press the wanted photo,
choose menu, then touch share. Touch Gmail when tips appear. Picture will be automatically attached to e-mail. Edit the mail, then touch send. Send images via
messages In the images gallery, press the wanted photo, choose menu, then touch share. Touch Gmail when tips appear. Picture will be
automatically attached to message. Edit the mail, and then touch send. Use videos After video taken, you can view it or share it with your friends.
Watch movies1) In the interface of photos’ gallery, touch videos album. You can watch movies after touching the wanted video.2) Touch the
screen, then the play control keys appear.
15. Music
The phone can play digital audio files in memory card. The following formats are available :AMR、M4A、MIDI、MP3、WAV、OGG.
Open Music Press home, touch the label of applications, touch music. Then the interface of Music Media appears. Music Media Your music files are classified
according to the following four categories; Artists, albums, songs and play lists. Touch one of these categories; you can view the list inside. Continue the operations,
until your wanted music appears. Such as. if you choose Artists a list of artists sorted by the numbers in English will appear. Choose any on to
open the list, then all the albums and songs will appear. Select one album, then the songs in it will be played. Tips: You can play all of the
songs in the interface of music media, in random sequence . Press Menu, and then touch the Party Shuffle. Then will start playing the first
song randomly selected . To close the Party Shuffle, press Menu, then touch to turn off the Party Shuffle.View lyrics When the corresponding
tracks have lyrics file, the player displays the lyrics sources. Click the up arrow, you can play music, view lyrics at the same time.Create a play
list Touch any category of music media on the screen. In the list, you can press and slide up and down the screen to browse the artist, album or
song that you want to add to the play list. Press the artist, album or song, and then touch the options menu in the play list. In the interface of
adding to the play list window, touch the new play list. Enter the new name of the play list, and then touch to save. Manage the play list Enter the
interface of music media then touch the play list. To play songs of the play list, touch the name of play list. To delete a play list, press and hold
the Play list, and then touch Remove. To refresh the list of songs or remove songs, hold down the play list, and then touch the options menu in
the editor. To delete the list of songs, hold down the songs, and then touch play list to delete it. To rename a play list, press and hold the play list,
then touch Options menu renamed. Enter the new play list name, and then touch “save". If you want to set the song to the ring tones, and then
touch the song as a ring tone. The song will be set as the default ring tone. if you want to use the song as notice ringtone, you can press menu
and touch the song as ringtone. and then touch the Notice ringtone. The song will be set as the notice ringtone .if you want to cut the song to the
ringtone, you can press the menu and select the song as ringtone, and then touch the cut ringtone. As shown, you can choose the start time and
the end time, at last touch the ‘save’, it will be saved to ringtone. It can be set to the default ringtone, can be assigned to the contact as the
ringtone of the contacts.
16. Calendar
Enter the calender application Load Goggles accounts, enter the application, In the interface of month or week will use gray to highlight the day.
Display default the date on the current month.In the interface,press menu,4 display modes will appear:
1) Schedule Intrface shows a certain schedule(click on the initial time and view forward,click the final time to view backwards )
2) day Interface displays a day's schedule (last clicked date),Slide around to turn page accoring day.3) week Interface displays a week's
schedule (last clicked date),Slide around to turn page accoring week.4) today Interface displays a day's schedule, In the interface of month or
week use gray to highlight the day.5) month nterface displays a month's schedule (last clicked date) Slide around to turn page accoring
month.New activities、Press menu, more < touch new activities.Enter the name of activity in the activities’ box.Notices:Such as special occasions such as
birthday or a day with events, set the all-day option to Yes. If the activity is at a certain time period, select the start time and end time.3)Enter the
event location, description, guests, repeat, remind time.4) Click finish to return to calendar.Notices:All-day events appear in the calendar heading. It will not
show the period of calendar. Cancel activities:In the time frame, press for long to delete the activity.
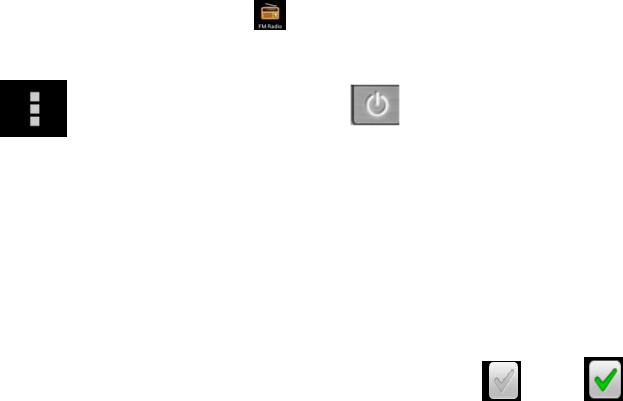
17. FM Radio
FM Radio Through this program, you may listen to FM radio on the device, FM radio use the wired headset as an antenna to receive
signals, before opening this program, you can install the original equipment-headphones, when listening, you can switch it manually to speakers
or the mode with wired headphones. Open FM radio Touch this label to open the application of FM radio.
Click the Back button, the radio program move to the background, and you can still continue to listen to programs and other applications run at
the same time. Press menu and click to select “exit” radio. Collect the channel you are favorite Press the menu button in the FM
interface, click the “search & save”, and then view the channel list, press long one channel, click “Add to Favorite” to rename the channel.
18. Settings
Your service provider may default some device settings, so you may not be able to change these settings.
SIM card management 1) Touch it to choose or to disable the SIM card, the card is grey when disabled, the flight mode displays on status bar.2)
The default SIM card, you can choose Voice call, Video call, Messaging, Data connection.
Wireless and internet Flight mode Touch to open or close. Wi-Fi and Wi-Fi settings Touch Wi-Fi to open . Open Wi-Fi ,it can
search for available networks automatically,networks without password can be used directly, others need to enter the password first. Notice:
Open Wi-Fi then the flight mode,Wi-Fi will close automatically;Open flight mode then connect Wi-Fi,it can be used normally. WPS connection,
wireless AP and mobile phone are needed to support AOSS, you can directly connect without entering a key. Bluetooth and Bluetooth setting.
Tethering & portable hotspot Share your digital data via USB Virtual Private Networks(VPN) Settings. Mobile network enter “mobile
network settings” which include: a Data roaming b Access pint name c Network operators, GPRS transfer prefer Calling settings Voice Call
Voice mail, in the voice settings, you can enter the voice mail number. Call forward, You can set Always forward, Forward when busy, Forward
when un-answer, Forward when unreachable. Call barring Additional settings, Call ID and Call waiting Video Call
Picture for replacing local video, set a picture to display when camera off use. Enable back camera, available to switch cameras if turn off. Peer
video bigger than local video, turn on to make peer video bigger than local video Local video display, to make outgoing video call or incoming
video call. Other settings, include call forward, call barring, additional settings.
Internet Call Can add accounts Other settings, Fixed Dialing Numbers Call cost Cell broadcast Minute reminder
Phone settings TTY settings Extra settings Applications allow application moving or select install location Display animated, rotating, Input
behavior, button Interface adjust interface、cross border
Audio profiles This option gives the phone tones’ settings under the status of receiving calls or notification. Including:Vibration, volume, ring
tones, ring tones notification and feedback(Button operation tone, select Sound, screen lock tone, touch).To adapt every environment. Select
“Standard / Mute / Conference / Outdoor,Touch the spot on the right, when turns green ,it opens. Volume:Including the ring volume and alarm
clock settings, you can manually slide to select. Displays Brightness Adjust the brightness b. Auto rotating screen Rotate phone to change
direction Animation. Choose to display animations d. Screen Timeout Adjust the delay before the screen automatically locks Location Use
wireless Use wireless to find locations in the application(Google map. Touch it to open or close
When using the GPS satellite positioning, set accuracy to street level (cancel it to save battery). Touch it to open or close GPS EPO assistance,
use GPS assistance data(EPO)to speed up GPS positioning
A-GPS Use auxiliary data can accelerate the process of GPS positioning. Open it and remind you“ it produce GPRS flows when using
A—GPS” .safety Set up screen locks Use images、
PIN or password to lock the screen. a. Touch “images”, the first time there will be a simple
unlock instructions and examples, click “next step” to continue the step “make the unlocking image. Touch PIN Enter PIN numbers to unlock
the screen. c. Touch password Set password to unlock the screen Touch “no” Stop this application.2) Set up SIM card lock Enter
(4-8numbers)PIN to set the lock of SIM.SIM card PIN (Personal Identification Number) is to prevent unauthorized use of SIM cards. PIN
code provided with SIM. The service provider gives the initial value. Change a blocked PIN code, you need to open the "SIM Lock ", then go to
Change Password screen, the phone will automatically prompt enter the old PIN code and asked to enter a new PIN code twice, finally the phone
will prompt that change the code successfully. If you enter the PIN with error for three times, SIM card PIN codes will be automatically locked,
PUK codes is usually supplied with SIM card. If no, you should go to the service provider for the codes. If you enter 10 times wrong PUK code,
the SIM card will be permanently locked.
3) Password visible Password visible when enter it4) Select device administration Add or delete device manager.5) Use security
credentials Allow application visit security credentials or other credentials.6) Install from SD card Install the encrypted certificate from
SD card. 7) set password Set or change Certificate store password 8) clear storage Clear all the contents of the certificate store and
reset their passwords Applications 1) Unknown sources Allow to install non-electronic market applications2) Manage applications Manage
and delete the installed applications.3) Running services Touch any of the services listed in> pop up 'to stop the service? 'two-button
operation box, touch the 'Stop 'the service is stopped, and disappear from the "running services" list.4) Storage use you can view the
program of downloaded all, on SD card or running how many memory space they occupy 5) Battery use you can see the using power
situation of cell Standby, phone idle, display and Browser.6) development a. USB debug:USB debug only apply in the develop process. This
function allows copy data in computer and mobile devices. Accounts and Synchronize1) Background data Applications using the
background data synchronization at any time, send and receive data, disable the background data extend battery life and reduce data usage.
However, some applications will use the background data for the connection.2) Automatic synchronization turn on/off Automatic
synchronization, applications Automatically synchronize data or asynchronous data
Privacy Backup My Data Backup my settings and data of other applications. Restoring Automatically The system will restore settings
or other backup data after a certain application is Installed. Resetting to Factory Settings Clear all data stored on the phone. Storage 1)
View SD Card and Phone Memory.2) Uninstall or Format SD Card.
Languages and keyboard 1) Selecting Language District Include all the languages on the phone and totally amount of 12 kinds. 2) User
Dictionary Add words to custom dictionary or delete.3) Keyboard Settings Vibrating when buttons are pressed, playing sound when
buttons are pressed, capitalizing automatically, Speech Input (by microphone on the keyboard), Inputting words (speech can be altered by sliding
finger on space key), Displaying
Tips (activate predictive function when you input words); Auto-Text (Automatically input certain words when press space key or specified
keys)4) Input method you can select Android keyboard or google pinyin input method. Speech Input and Output Settings 1)Voice recognizer
settings、Language select the default language Safe Search only applies to Google search by voice Block offensive words hide recognized
offensive voice results Test-to-Speech Conversion Setting Listen to an example play a short demonstration of speech synthesis Always use
my settings default setting below override application settings Default Engine sets the speech synthesis engine to be used for spoken
text Install voice data install the voice data required for speech synthesis Speech rate speed at which the text is spoken
Language sets the language-specific voice for the spoken text Pico TTS Auxiliary Function
1)End up calling when you press power key on/off 2) Quick boot Date and Time
1) Automation Use date and time provided by Network.2) Setting Date Touch “+” and “-” to set date. 3) Selecting Time Zone
Select Time Zone according to where you are. For China please select “GMT+08:00, China Standard Time”.
4) Setting Time Touch “+” and “-” to set time. 5) Use 24 Hour Time Format ON/OFF
6) Select Date Format There are 3 kinds of formats you can choose from: Month-Day-Year, Day-Month-Year and Year-Month-Day, among
which Year-Month-Day is the default setting. schedule power on/off. You can set time of boot or shut-down by touching it. You may also select
to repeat it or a certain day during a week. about phone You can check the information on status bar and remaining power.
19. Notices for the use of phone、Your phone is a product of superior design and craftsmanship and should be treated with care. The following suggestions can
help you comply with the terms of repair kits, to extend the life of mobile phone.Place the mobile phone and their parts and components out of reach of small
children.Keep the phone dry, rain, humidity and all types of liquids which contain minerals will corrode electronic circuits.Don’t touch the phone with wet hands when
charging, it will cause electric shock or damage the phone.Avoid place the device in high temperature environment. Temperatures will shorten the life of electronic
devices, damage batteries, and warp or melt certain plastics.Avoid place the device in too low temperature environment. When the temperature rises, the phone will
produce water vapor that may damage electronic circuit.Avoid place the phone in dusty, dirty places, otherwise parts may be damaged.To avoid the phone in a lit
cigarette, near open flame or any heat source.Do not open the device, non-professional approach will do damage to the phone.Do not throwit from height, knock or
shake the phone, rough handling can damage internal circuit boards.Do not paint the phone, because the paint will block headphones, microphones or other removable
parts, and lead it not work.Use clean, soft, dry cloth to clean the camera, light sensor lenses. Prohibit the use of harmful chemicals and cleaning agents, cleaning fluids to
clean the phone If mobile phone, battery, charger, or mobile phone accessories are defective, send to the nearest qualified service center for inspection.I f nessary,
Service Centre staff will assist you and will arrange for phone repairs.

The status box will show this Wi-Fi icon( ), and the approximate signal strengthen (the number of lit bars).If touch the connected 、network,
will display the name of Wi—Fi network, status, speed, signal, strength, security, information and IP address. If you want to delete the wireless settings, please touch
“not reserve” as in the right picture. If you want to connect to this network, you、should re-enter these settings. Notices:Unless you choose not to reserve the network,
otherwise, there is no need to re-enter the corresponding password when next time connecting to the previously encrypted wireless network. Wi-Fi will search
automatically, that is, phone needn’t to perform additional steps to connect Wi-Fi networks. Notices:Unless you choose not to reserve the network with password,
otherwise, there is no need to re-enter the corresponding password when next time connecting to the previously encrypted wireless network. Wi-Fi will search
automatically, that is, phone needn’t to perform additional steps to connect Wi-Fi network

Manual de Usuario
12
Contenido
CONTENIDO ............................................................................................ 12
1.APARIENCIA Y OPERACIONES DEL TECLADO ......................................... 13
2.USANDO TARJETA DE MEMORIA Y DISCO USB ........................................ 13
3.WIFI ................................................................................................... 14
4.BLUETOOTH ......................................................................................... 16
5.MAIL ................................................................................................... 17
6.MARCANDO ......................................................................................... 19
7.MENAJES ............................................................................................ 22
8. CONTACTOS ........................................................................................ 24
9.INTERNET EXPLORER ........................................................................... 27
10.GRABADOR ........................................................................................ 28
11.RELOJ ................................................................................................ 29
12.CACULADORA .................................................................................... 29
13.CAMARA ............................................................................................ 30
14.IMAGENES.......................................................................................... 32
15.MUSICA ............................................................................................. 36
16.CALENDARIO ..................................................................................... 38
17.RADIO FM ....................................................................................... 38
18.CONFIGURACIONES ............................................................................ 39
19.CONSEJOS PARA EL USO DEL TELÉFONO .............................................. 42

Manual de Usuario
13
1 . Apariencia y Operaciones de Teclado
Keys Funciones
home Pulse este botón para volver a home desde cualquier aplicación o interfaz.
Pulse para abrir la ventana de aplicaciones recientemente abierta.
menu Pulse para iniciar el menú, lo que le permite realizar acciones en la interfaz actual o el
menú de opciones ".
back Pulse para volver a la interfaz anterior, o para cerrar el cuadro de diálogo, menú de
opciones, el panel de notificación o el teclado.
power Pulse para abrir el menú del teléfono, entonces usted puede optar por bloquear la
pantalla, apagar el teléfono o ponerlo en modo silencioso.
Arriba
Presione para aumentar el volumen
Pulse para pasar a modo vibración de modo silencioso
Abajo Presione para disminuir el volumen.
P-Sensor Cúbralo, y luego la luz de fondo del teléfono se apagará
Cámara frontal Entrando en la interfaz de la cámara, cambiando a cámara frontal puede fotografía a sí
mismo.
2. Usando la Tarjeta de Memoria o el disco USB
Si desea enviar música, imágenes u otros archivos a la tarjeta de memoria del teléfono de la computadora, usted debe configurar la
tarjeta de memoria, disco usb primero.
Fije la tarjeta de memoria como disco USB
1) Conecte el teléfono al ordenador con el cable USB. El icono de notificación aparecerá en el cuadro de estado.
2) Utilizar la línea de transmisión móvil USB para conectar al ordenador
3) En el panel de notificaciones aparece USB conectado, a continuación, pulse "Abrir el dispositivo de almacenamiento USB"
2)Después de que la cámara se conectó al PC, podrá ver directamente las imágenes capturadas por la cámara en el PC。
Manual de Usuario
14
• Nota: los diferentes Sistemas operativos del PC le indicarán como operar normalmente el disco USB.
1) WIN7 puede usar directamente
2) XP actualización de Windows Media Player a 11
3) Instale el driver wpdmtp.inf
4) Vista No confirmado
• Aviso: En la herramienta de asistente operación de la PC como teléfono móvil, debe estar abierta la depuración
USB.
3.WIFI
Wi-Fi ofrece la medida de hasta 300 pies (100 m) Rango de acceso a la red inalámbrica. Si utiliza el teléfono celular para conectar wifi,
debe conectarse al punto de acceso inalámbrico o 「puntos calientes」.
• Avisos: La disponibilidad y cobertura de señal Wi-Fi dependen del número, infraestructura y otros objetos que
atraviesan la señal.
Abra Wi-Fi y conectarse a la red inalámbrica
1) Presione home>menú, luego toque configuración>wifi e internet
2) Seleccione si-fi , para abrirlo. El teléfono buscará automáticamente las redes inalámbricas disponibles.
3) Toque Configuración Wi-Fi. A continuación, una lista de redes Wi-Fi se mostrará el nombre de la red encontrada y
configuración de seguridad. (red abierta o WEP, WPA/WPA2 con contraseña). Si habilita la notificación en la configuración
de Wi-Fi, el cuadro de estado mostrará este icono ( )cuando abra red inalámbrica está disponible.
4) Toque una de las opciones Wi-Fi para conectarse a la red. Cuando usted elige una red abierta, el teléfono se
conectará automáticamente a ella. Si selecciona WEP, WPA/WPA2 con contraseña, debe escribir la contraseña,
luego toque para conectarlo.
Manual de Usuario
15
• Nota:cuando el teléfono está conectado a la red inalámbrica, el cuadro de estado mostrará el icono de Wi-Fi
(), y la intensidad de la señal aproximada (el número de barras iluminadas). Si toca la red conectada, se mostrará el
nombre de la red Wi-Fi , estado, velocidad, señal, fuerza, seguridad, información y dirección IP.
Si desea eliminar la configuración inalámbrica, por favor tocar "no reserva", como en la imagen de la derecha. Si desea conectarse a
esta red, se debe volver a introducir estos ajustes.
• Notas:
A menos que usted elige no reservar la red, de lo contrario, no hay necesidad de volver a introducir la contraseña correspondiente la
próxima vez que desee conectar a la red inalámbrica cifrada previamente. Wi-Fi buscará automáticamente, es decir, no es necesario realizar
pasos adicionales en el teléfono para conectar a las redes Wi-Fi.
• Conectar a otras redes Wi-Fi
1) En la interfaz de la conexión inalámbrica y red, toque Configuración Wi-Fi. Las redes Wi-Fi encontradas se mostrarán en la
lista de redes Wi-Fi.
2) Toque otras redes Wi-Fi, y luego se puede conectar a esta red.
• Aviso: además, se puede navegar por Internet a través de GPRS. Por defecto el GPRS se abre después e iniciado en SIM1 se abre,
los usuarios pueden seleccionar manualmente, la ubicación específica es "Configuración> Conexiones inalámbricas y de
Internet> Conexión de datos", toque "SIM1, SIM2, sin conexión de datos", cuando el punto se vuelve verde, ya está abierto.
Manual de usuario
16
4. Bluetooth
Encienda el Bluetooth o marque visibilidad para que el teléfono pueda ser detectado.
1) Presione home>menú, luego toque configuración.
2) Toque conexiones inalámbricas e Internet, a continuación, elija cuadro de Bluetooth para abrir la función Bluetooth.
Después de iniciado, el cuadro de estado mostrará este icono ( ). Toque "Buscar dispositivos" para que empiece a buscar
todos los dispositivos dentro de su alcance.
3) Toque Ajustes de Bluetooth, todos los dispositivos encontrados se mostrarán en la lista bajo el icono.
(Marque la casilla "Visible" para ser detectado, los demás dispositivos Bluetooth podrán encontrar el
teléfono.)
Importante: el tiempo de detección del teléfono máximo es de 2 minutos.
• Vinculado y conectando un auricular Bluetooth
1) Presione home>menú, luego toque configuración.
2) Toque conexiones inalámbricas e internet>configuración de Bluetooth, luego seleccione Bluetooth, y su
teléfono buscará los dispositivos Bluetooth dentro del rango, y le mostrará los dispositivos encontrados en la lista
bajo el icono.
• Tips:
a. Si no encuentra el equipo en la lista, toque buscar dispositivos para volver a escanear.
b. Asegúrese de que los dispositivos buscados están en modo detección.
3) Toque auricular en la lista de equipos para terminar la conexión.
• Notas:generalmente los dispositivos Bluetooth requieren contraseña para vincularse, suelen utilizar 「0000」
como la contraseña predeterminada.
4) El estado de vinculación y conexión se mostrará de acuerdo con el auricular en la lista de dispositivos
Bluetooth. Cuando el auricular esté conectado al teléfono, el cuadro de estado mostrará este icono()
significa conectado. A continuación, puede utilizar el auricular para realizar y recibir llamados.
Manual de usuario
17
• Cortar la conexión con el Bluetooth
1) Presione home>menú>configuración>conexiones inalámbricas e internet>configuración Bluetooth.
2) En la lista de equipos Bluetooth, toque o toque y mantenga el auricular manos libre conectado.
3) Presione y seleccione “cancelar la vinculación”.
• Sensor de proximidad Bluetooth
Después de vincular los dos dispositivos, puede probar la si la señal es fuerte o débil por el dispositivo sensor de
proximidad Bluetooth
5.Mail
5.1 Gmail
• Crear una cuenta de correo electrónico
Seleccione correo>configuración. Puede activar o editar cuentas de correo electrónico existentes, así como crear una
nueva cuenta de correo electrónico.
a. Seleccione correo, aparece la interfaz de configuración de cuenta Google. Luego toque “próximo paso”> crear
cuenta>ingresar nombre, apellido y cuenta de e-mail.
b. El servidor de Google determinará si el nombre se puede utilizar, de ser así, la interfaz nueva le pide introducir la
contraseña, y luego juzga la seguridad de la contraseña ', los usuarios que no cumplan con los requisitos de
seguridad deberán volver a introducir la contraseña
c. Si el registro a la nueva cuenta de Gmail es exitoso se enviará un mensaje de prueba automáticamente.
• Configurar una cuenta de correo existente
Notas:
Solo la vinculación es necesaria entre dos dispositivos Bluetooth. Una vez conectado no
es necesario identificarse e intercambiar información.
Si ya conectó un auricular y desea conectar un segundo, el primero será desconectado. Si
desea cambiar al primero, deberá re-seleccionarlo manualmente en la lista de equipos
Bluetooth.
Significa que es un auricular
Bluetooth
Significa que el teléfono está en
modo de “puede ser detectado”
Manual de usuario
18
a. Abra Gmail saltee la pantalla de introducción>la interfaz de carga aparece>seleccione configurar
b. Ingrese nombre y contraseña e inicie sesión.
Cuando informe “conexión exitosa” todas las cuentas de Google pueden ser sincronizadas.
• Creando y enviando e-mails
Al crear mensajes, selecciona mail> creación de mails. Introduzca la dirección (receptor), tema y contenido. Pulse
MENÚ puede 'añadir', 'Añadir Cc / CCO', seleccione Enviar o descartar.
• Recibir e-mails
Emite un tono para nuevos correos, en el cuadro de estado mostrará este botón ,pulse Menú> 'refrescar', para
volver a cargar y actualizar el número de correos no leídos de una manera apropiada.
• Borrar e-mails
Cuando se carga una cuenta de correo, si desea eliminarla, es necesario restaurar a la configuración de fábrica. Al
cargar una segunda, puede pulsar el botón de menú para eliminarla.
Aviso: muchas de las funciones dependen de la cuenta de Gmail, por ejemplo: Mercado Electrónico, Google Talk, Sync
contacto y calendario.
5.2 Email
• Configurar Email.
c. Abra la conexión de red.
d. En la interfaz de configuración de cuenta, introduzca la dirección de correo electrónico y la contraseña
correctas y haga clic en siguiente, el teléfono móvil automáticamente completará el envío y recepción de la
configuración del servidor.
e. Para la creación de nombre de cuenta, ingrese el nombre de usuario y haga clic en siguiente. For account
creation name, the editor of the law that email user name, and click next. Al completarse se sincronizará el
buzón de correo.
• Crear y enviar Email
Para crear mails, seleccione mails>crear mail. Ingrese la dirección (receptor), tema y contenido. Pulse MENÚ
puede 'añadir', 'Añadir Cc / CCO', seleccione Enviar o descartar o guardarlo como borrador.
• Verificar los archivos de Email
Haga clic en las opciones de carpeta, listará todas las opciones de carpeta
Manual de usuario
19
6.Marcando
Cuando el icono del servidor de red aparece en la pantalla, se puede marcar o recibir llamados. La barra de señal en la
esquina superior derecha indican la intensidad de la señal de la red (el máximo con 4 barras de señal).
• Comenzar a marcar
Abra el menu principal de la aplicación>marcar. Podrá seleccionar SIM1 o SIM2 para marcar.
Manual de usuario
20
• Marcado
En el teclado de marcación, introduzca el número de teléfono y, a continuación, haga clic en la tecla de marcación,
después de eso, usted debe elegir una tarjeta SIM o llamadas por Internet. Si es necesario llamar a la extensión, puede hacer
clic en el "teclado" en la parte inferior de la pantalla para abrir la interfaz del menú o pulse para seleccionar "retrasar 2
segundos", y luego introduzca el número de la extensión.
• Video llamadas: la llamada de video por lo general se refiere a la Internet e internet móvil basado en (3 G Internet). Esta
función es soportada solo por 3 G. Introduzca el número, haga clic en vídeo llamadas, responderá luego de que ambas
cámaras estén disponibles.
• Registro de llamadas
Cada número de teléfono llamado y recibido en "SIM1, SIM2" se guardará en el registro de llamadas del teléfono.
En la parte superior izquierda de cada registro de llamadas mostrará "SIM1 o SIM2"
Todos los números en el registro de llamadas se pueden marcar haciendo clic en el botón "marcado" en la parte derecha
de la pantalla.
Cuando aparezca la lista de números, haga clic en él que desea para obtener los detalles, presione sostenidamente para
marcar la opción "SIM1 o SIM 2", por su parte, puede editar, eliminar, guardar el número o hacer otras operaciones.
• Recibiendo llamadas
Cuando entra un llamando (arriba a la izquierda mostrará de qué tarjeta SIM procede) pulse "Responder" y deslice
hacia la derecha hasta el botón del medio, entonces usted puede recibir el llamado.
• Sensor de Proximidad
De acuerdo con la distancia entre el teléfono y el cuerpo humano, que se ajustará automáticamente la luz de fondo.
Durante la llamada, al acercar el teléfono al oído, la retroiluminación se apaga de forma automática, lo que podría
ahorrar batería y evitar tocar accidentalmente.

Manual de usuario
21
• Rechazar llamadas
a. Estando en modo espera, al entrar el llamado, presione “rechazar” y deslice el botón hacia la izquierda. De
esa forma rechaza el llamado.
b. Estando en uso, al entrar el llamado, presione el botón “rechazar” para rechazar el llamado.
• Llamada de dos vías / múltiple (multiconferencia)
• Nota:esta función requiere que la tarjeta SIM abra la función de llamado en conferencia.
1) Ya existe la llamada en el teléfono
2) Haga clic en "Agregar llamadas", marque otra llamada (o recibir otra llamada, por defecto el
teléfono abre en "llamada en espera" (Configuración de marcado -las demás configuraciones de
marcación), después de que ambos están conectados, puede ver el estado de la llamada.
3)seleccione “combinar llamada”– podrá combinar las dos llamadas en una vía.
4)después de que se ha conectado la llamada múltiple, puede separar las llamadas o colgar una de ellas
a través de "la pequeña flecha que indica conferencia telefónica”.
• Grabación de conversación telefónica
Durante la llamada, seleccione más>comenzar a grabar, podrá grabar el diálogo de la llamada.
1)Configuración> otras funciones de llamada en la configuración de marcación, por ejemplo: transferencia de
llamadas, después de finalizar todos los ajustes, puede transferir la llamada a un número determinado.
2)En Ajustes> ajustes de Marcación> Otros ajustes, abra "llamada en espera". Después de activado, podrá
recibir una segunda llamada cuando ya existe uno, Las funciones de contestación y rechazo son como el
teléfono normal.

Manual de usuario
22
• Configuración de Llamadas
Llamada de Voz
1)Correo de Voz: Configurar el correo de voz.
2) Número de prefijo IP: Configuración de números de prefijo IP de las diferentes tarjetas SIM.
3)Desvío de llamadas: Puede fijar el desvío de llamadas si la línea está ocupada, o no puede recibir.
3) La restricción de llamadas: Puede fijar, respectivamente, a las dos tarjetas SIM restricciones de llamadas
4) Ajustes adicionales: a. Mi número de teléfono b. Llamada en espera。
Video Llamada
1)Reemplazo de vídeo: establecer una imagen para que aparezca cuando la cámara no está en uso.
2) Display de video peer: establecer una imagen para que aparezca cuando el video peer no está disponible.
3)Reemplazo de video de la otra parte:establecer una imagen para que aparezca cuando el video de la otra parte no está
disponible.
4)Habilitar cámara trasera: Disponible para cambiar cámaras.
5) Video de la otra parte de mayor tamaño:Encienda para hacer el video de la otra parte más grande que el video local.
6)Regreso automático: Regresa automáticamente a la conexión de llamado de voz.
7)Videollamada saliente: Mostrar vídeo local si realizar una videollamada.
8) Videollamada entrante: Mostrar vídeo local si aceptar una videollamada entrante.
9) Otras opciones: a. Desvío de llamadas b. Restricción de llamadas c. Configuración adicional
Llamadas de Internet
1) Cuenta
2) Uso de llamadas de Internet
Otros Ajustes
1) Números de marcación fija
2) Recordatorio de minuto: Encienda el recordatorio a los 50 s de cada minuto.
3) Respuesta rápida: Puede editar los mensajes de texto.
7. Mensajes
• Importante:el título del mensaje de este teléfono es el número de teléfono (o nombre de contacto), será similar
para los diálogos, en lugar de la estructura de carpetas de costumbre. Mensajes con fondo azul son los que reciben,
y son los mensajes que se envían con el fondo blanco.
• Envío de SMS a cierto número de teléfono
1) Presione home>mensaje,toque “nuevo mensaje”.
2) En la interfaz de “editar”:
a. Pulse el recuadro de "receptor" para iniciar el método de entrada, también puede pulsar "enter" para iniciar el
método de entrada, de esa manera se puede introducir caracteres.
b. Haga clic en el botón de "enviar desde SIM1 o SIM2" para iniciar el envío.
• Envío de MMS a cierto número de teléfono
El mensaje por defecto es SMS, puede pasar a MMS cuando se realicen las operaciones siguientes. Usted puede enviar
MMS a través de hacer clic en "enviar" después de editar.
Manual de usuario
23
Notas:
a, si usted quiere enviar MMS con muchas páginas, deberá
seleccionar "Añadir PPT" en la interfaz "añadir".
b, usted puede añadir 10 imágenes, con la forma de GIF, JPEG.
c Haga clic en "añadir temas", la caja de "tema" aparecerá
debajo de la caja de "receptor", por su parte, se pone
automáticamente en MMS.
3) En la interfaz de “edición”,haga Clic en el botón “Menú”:
4) Haga clic en "añadir", se puede pasar a los siguientes datos adjuntos, entonces se convertirá en MMS
automáticamente.
• Enviar mensajes a varios números
Introducir varios números en el cuadro de entrada, cada número se divide por la coma en Inglés.
Seleccione el receptor de los contactos o puede elegir el grupo de contacto en la libreta de direcciones
Manual de usuario
24
• Notas:Por ahora, este teléfono puede enviar mensajes en masa a casi 20 números, el número correcto depende de
los caracteres, sólo puede introducir 312 caracteres en el cuadro de "receptor".
Cuando se envía o se envía un mensaje nuevo, aparecerá un pequeño sobre de carta amarillo. El número 1 o 2 en el sobre se
refiere a SIM1 o SIM2.
Cuando no pueda enviar el mensaje, aparecerá un triángulo rojo con el signo de exclamación.
Para editar información otras funciones de botón Menú.
8. Contactos
• Abra el menú de aplicaciones>contactos
Por defecto muestra los contactos del teléfono y de la tarjeta SIM por orden alfabético.
Manual de usuario
25
2) Haga clic en el Icono Buscar, usted puede entrar en la interfaz de búsqueda de contactos.
a. Para introducir los números o las letras y la lista de nombres, que se muestra en los resultados de la búsqueda
b. Si ninguno coincide con el contacto, la interfaz aparecerá “ningún contacto encontrado”.
3)Haga Clic en el Icono “Agregar Contacto” para crear nuevos contactos
Seleccione guardar los contactos en el teléfono o la tarjeta SIM, en la interfaz de edición de contacto.
Puede editar cabezal de contacto, nombre, número de teléfono, grupo, guardar para y más, y luego haga clic en
"Finalizar".
Manual de usuario
26
4)En la interfaz de contactos, haga clic en el botón Menú
a. Menu >Borrar contactos
Puede seleccionar el icono "todos" , haga clic en el botón de borrar, elimina todos los contactos del teléfono celular y
tarjetas SIM.
Puede marcar uno o más contactos, haga clic en borrar, eliminará los contactos seleccionados.
b. Menu> Mostrar contacto
Usted puede elegir todos los contactos, contactos de una tarjeta SIM, contactos del teléfono
c. Seleccione si desea mostrar o no los contactos del teléfono y también de las tarjetas SIM o no mostrar ninguno.
d. Menu >Importar/exportar
Es posible copiar la información de los contactos tanto del teléfono móvil como de cualquiera de las tarjetas SIM
entre sí.
Primero elija la "fuente de la copia" y después seleccione el siguiente paso, seleccionando copiar contactos de a,
podrá completar la copia de los contactos.
e. Menu >Cuentas
Cuenta y sincronización de ajuste de rutina Configuración síncronos, pueden elegir los Datos de Fondo y la
sincronización automática.
f. Menu >Compartir contactos visibles
Todos los contactos se pueden importar en la tarjeta SD, o por medio de Bluetooth, correo electrónico, mensaje de
texto o MMS
• Abrir la interfaz de la aplicación> Contacto, cambie a grupo.
1)Haga clic en el icono "Agregar grupo" para crear nuevo grupo.
2)En la columna nombre de grupo ingrese "el nombre del grupo" , en la columna "escriba el nombre del contacto" ingrese el
contacto, puede estar en la búsqueda de contactos. Por último, haga clic en "Finalizar".
3) En un grupo, haga clic en el botón Menú, Funciones de menú
Manual de usuario
27
a. Menú>Actualizar
Puede modificar el nombre del grupo, suprimir o añadir grupos de contactos
b. Menú >Borrar
Es posible eliminar el grupo, y no eliminar el contacto en sí.
c. Menú >Enviar mensajes a un grupo.
Añadir el nombre del grupo en el destinatario.
d. Menú >Enviar Email a un grupo
Agregar el nombre del grupo en el destinatario del e-mail.
9. Internet Explorer
Internet explorer
1) En la interfaz de Internet Explorer, toque el campo de dirección e introduzca la URL.
2) Use el teclado para introducir el URL. Los sitios web apropiados van a aparecer en la pantalla. Puede tocar
directamente para ir a la página o seguir entrando URL.
• Página de inicio
Seleccione "página de inicio", se podría fijar la página de inicio. Si no se establece utilizará los sitios predeterminados
del proveedor.
• Funciones del menú
1) Menú>Hacia Atrás
Después de navegar a través de múltiples páginas, regresará a la página anterior la página actual.
2) Menu>Hacia Adelante
Después de navegar a través de varias páginas, se trasladará a una página web después de la página actual.
3) Menu>Ventanas
Puede ver todas las ventanas abiertas actuales.
4) Menu>Favoritos
Manual de usuario
28
a. Haga clic en "Favoritos" para que la URL actual como favorito guardado.
b. Haga clic en el marcador en la lista de favoritos, se abrirá la URL.
5) Menu>Mas
a. Añadir marcadores, guardar la dirección URL actual como favorito.
b. Buscar en la página, busca lo que necesita en la página actual.
c. Seleccione el texto, en el texto, haga clic y arrastre para seleccionar un fragmento de texto.
d. Información de la página, la pantalla dirección de la página y otros datos de la navegación actual.
e. Compartir la página, seleccione el Bluetooth o SMS para compartir la página actual.
f. Descargas, mostrar todo el contenido descargado.
g. Historia, Mostrar el historial de navegación, y ver las páginas más visitadas de la información.
h. Configuración contenidos, una variedad de configuraciones del explorador.
10. Grabador
La grabadora puede grabar voz y enviarla rápidamente a través de Bluetooth o MMS, así como definirla como tono de
llamada.
• Nota:La grabadora sólo puede guardar los archivos de audio como AMR.
1) Haga clic en la aplicación de grabación.
2) Mantenga el micrófono del teléfono cerca de la fuente de voz.
3) Haga clic en la grabadora para grabar las voces, y haga clic para detener o para ir a la Lista grabaciones.
Todas las grabaciones son guardadas en mi carpeta de grabación en el programa de música por defecto.
Manual de usuario
29
11.Reloj
1) Abra el menú de la aplicación, haga clic en
2) Haga Clic en la pantalla sobre el icono, mostrará la hora en fondo negro con números blancos grandes.
3) Haga clic en el botón de alarma para entrar en la interfaz de ajuste de alarma del reloj.
• Alarma
Después de fijada la alarma, al llegar la hora el teléfono avisará por timbre o vibración. Pulse Menú para agregar
alarma, también se puede añadir que desde la interfaz de adición. Usted puede configurar la alarma de acuerdo a sus
necesidades. En la interfaz de la alarma mostrará tres alarmas cerradas (dos relojes de alarma es de lunes a viernes
8:30,9:00).
Editar
Puede editar la alarma actual, puede editar la hora, tonos de timbre, vibración, forma de repetición y pestañas.
12.Caculadora
Calculadora
Con esta función puede convertir su teléfono en una calculadora, puede hacer algunos cálculos sencillos.
·Toque las teclas numéricas para que aparezcan en el cuadro en blanco.
En la interfaz de la calculadora, presione el botón MENU o presione la pantalla hacia la izquierda, luego aparece el panel
principal.
Manual de usuario
30
13.Cámara
13.1 Cámara
• Preparación previa
Instale una tarjeta de memoria antes de utilizar la cámara o cámara de vídeo. Todas sus fotos o videos tomados con el
teléfono se guardan en la tarjeta de memoria.
• Abrir la cámera
Pulse Inicio, toque Menú, seleccione Cámara. Tome fotos
1)Apunte su objeto con la pantalla.
2)Toque el botón "disparador" en la pantalla.
3)Después de tomar fotos se guardarán en la carpeta Galería de la cámara con el nombre de la fecha en que fueron
tomadas.
4)Puede ver las fotos pulsando el botón cuadro de vista previa.
5)Configuración de la cámara
Puede pulsar el botón de "Menú de configuración" en la interfaz de la cámara para hacer los ajustes
En el modo de visor de la cámara, pulse Menú, puede cambiar a la galería de vídeos o fotos.
En la parte superior derecha de modo de visor de la cámara, mostrará la vista previa de la imagen anterior. Toque el
cuadro de vista previa, para la visualización de la foto en pantalla completa, puede ampliarlo para ver los
Manual de usuario
31
detalles.
• Ajustes compartidos de Cámara y Videocámara
1)Modo Flash:Auto、On、off.
2)Balance de blancos: Auto, Incandescente, Luz del día, Fluorescente, Nublado, Crepúsculo, sombra, fluorescente
cálido.
3)Efecto de color: Ninguno, Mono, Sepia, Negativo, Agua, Pizarrón negro, Pizarra blanca.
4)Modo de escena, Auto, Noche, Puesta de sol, Fiesta, Retrato, Paisaje, Retrato nocturno, teatro, Playa, Nieve,
Foto fija, Fuegos artificiales, Deporte, luz de las velas.
5)otros ajustes: ubicación, exposición, Características de la imagen, anti-parpadeo
• Configuración de la Cámara
1) Modo de captura: normal, HDR, Rosto, Panorama
2) Disparador automático: Apagado, 2 segundos, 10 segundos
3) Toma continua: 40 tiros, 90 tiros
4) Tamaño de imagen: QVGA, VGA, 1M píxel, 1.3M píxeles, 2M píxeles, 3M píxeles, 5M píxeles
13.2 Video camera
• Preparación previa
Instale una tarjeta de memoria antes de utilizar la cámara o cámara de vídeo. Todas sus fotos o videos tomados con el
teléfono se guardan en la tarjeta de memoria.
• Tamar video
Manual de usuario
32
1)Apunte su objeto con la pantalla.
2)Toque el botón disparador" en la pantalla.
3) Después de tomar los videos se guardarán en la carpeta Galería de la cámara con el nombre de la fecha en que
fueron tomados.
4)Puede ver los videos pulsando el botón cuadro de vista previa.
5) Configuración de Video cámara
Puede pulsar el botón de "Menú de configuración" en la interfaz de la cámara para hacer los ajustes.
En el modo de visor de la cámara, pulse Menú, puede cambiar a la galería de vídeos o fotos.
En la parte superior derecha de modo de visor de la cámara, mostrará la vista previa del vídeo anterior. Toque el cuadro de
vista previa, el vídeo se mostrará en pantalla completa y se puede tocar el botón de reproducción para poder verlo.
• Ajustes compartidos de Cámara y Videocámara
1) Mood de flash: Auto, On, off.
2) Balance de blancos: Auto, Incandescente, Luz del día, Fluorescente, Nublado, Crepúsculo, Sombra, cálido
fluorescente.
3) Efecto de color: Ninguno, Mono, Sepia, Negativo, Agua, Pizarrón negro, Pizarra blanca.
4) Modo de Escena, Auto, Noche, Puesta de sol, Fiesta, Retrato, Paisaje, Retrato nocturno, teatro, Playa, Nieve,
Foto fija, Fuegos artificiales, Deporte, luz de las velas.
• Configuration de Videos
1) Microphone: off, on
2) Modo de audio: reunión, normal,
3) intervalo de tiempo transcurrido: off, 1 s, 1,5 s, 2 s, 2,5 s, 3s, 5s, 10s
4) Calidad de video: baja, media, alta, fina
14. Imágenes
• Abrir imagenes
Manual de usuario
33
Pulse Inicio, toque etiqueta de aplicaciones, y luego toque galería de fotos.
En la interfaz de la cámara, pulse menú para abrirlo y, a continuación, toque para operar.
1) Interfaz de archivos
a. En la interfaz de la biblioteca, se presentan las diapositivas con en el botón de reproducción, haga clic para
reproducir las diapositivas de todos los archivos de imagen.
b. Haga clic en las imágenes, ingrese en la foto para ver la interfaz.
c. Seleccione los archivos de imagen presionando sostenidamente, operación correspondiente emergerá.
• Uso de imágenes
Después de tomar fotografías, puede verlas y compartirlos con tus amigos.
a. Utilizar el correo electrónico para enviar las imágenes: seleccione Gmail o correo electrónico, las imágenes se
agregan automáticamente a una dirección de correo electrónico. Escriba los datos y haga clic en enviar.
Incluye las imágenes tomadas
por la cámara
Imágenes transmitidas por
Bluetooth
Videos de la galería
Manual de usuario
34
b. Utilice Mensajes para enviar fotos: Seleccionar la información, las imágenes se agregarán a MMS. Escriba los datos y
haga clic en enviar.
C. Use Bluetooth: seleccione el equipo ya vinculado por bluetooth, envíe una imagen.
4)Verificar fotos
En la interfaz de foto, puede ver las fotos hacia adelante o hacia atrás y editarlas.
a. Editar la luz: luz de relleno, Reflejo, Sombras, Auto-Fix.
b. Editar efectos de imagen: Proceso cruzado, Posterizar, Lomo, documental, etc.
c. Efectos de color: Calidez, saturación, Blanco y Negro, Sepia, Negativo, Tinte, Doble tono, Garabato.
d. Recortar: Enderezar, Ojos Rojos, Girar, Dar la Vuelta, Enfocar.
Manual de usuario
35
6)Recortar fotos:
a. Si desea ajustar el tamaño del clip, por favor, pulse el borde de la herramienta de corte. Arrastre con sus dedos
para ajustar al tamaño deseado.
b. Si desea mover el área cortada, por favor mantenga el área cortada y arrastre los dedos para la posición deseada.
• Ver imágenes
1) En la ventanilla de imagen, toque álbum de fotos para ver las imágenes.
2) Toque la miniatura para ver las imágenes a pantalla completa.
Usted puede optar por mostrar las miniaturas pequeñas o grandes. Mantenga pulsada la pantalla hacia la izquierda
para ver la foto siguiente o hacia la derecha para ver la anterior.
En el álbum de fotos o lista, pulse y mantenga pulsada la imagen hacia la izquierda para ver la foto siguiente o hacia
la derecha para ver la anterior.
Manual de usuario
36
15. Música
El teléfono puede reproducir archivos de audio digital en la tarjeta de memoria. Los siguientes formatos están
disponibles: AMR, M4A, MIDI, MP3, WAV, OGG.
• Abrir Música
Presione INICIO, pulse la etiqueta de las aplicaciones, toque música. A continuación, aparece la interfaz de Videos Musicales.
• Music Media
Los archivos de música se clasifican de acuerdo a las siguientes cuatro categorías: artistas, álbumes, canciones y listas de reproducción.
Toque una de estas categorías, para ver la lista que contiene.
Continúe con la operación, hasta que aparezca la música deseada. Por ejemplo, si elige Artistas una lista de artistas ordenados por los
alfabéticamente aparecerá. Escoja cualquiera de la lista abierta, entonces aparecerán todos los discos y canciones. Seleccione un álbum y, a
continuación se reproducen las canciones.
Manual de usuario
37
• Consejos: Puede reproducir todas las canciones en la interfaz de medios de la música, de forma aleatoria. Pulse
Menú, y luego toque Modo aleatorio. A continuación, comenzará a reproducirse la primera canción seleccionada
al azar. Para cerrar el Modo aleatorio, presione Menú, después toque para apagar el Modo aleatorio.
Toque cualquier categoría, luego abra
los archivos de música deseados
Menú de control
Aparece al reproducir música,
toque para entrar en la
interfaz.
Toque para ver la lista de
reproducción
Indica si la mezcla está
encendida o no
Toque para cambiar el modo
de reproducción
Toque rápidamente para
cambiar las canciones o para
la siguiente canción
Duración total del repertorio
Toque para detener la
reproducción
Toque para volver a las
canciones anteriores.
Barra de progreso
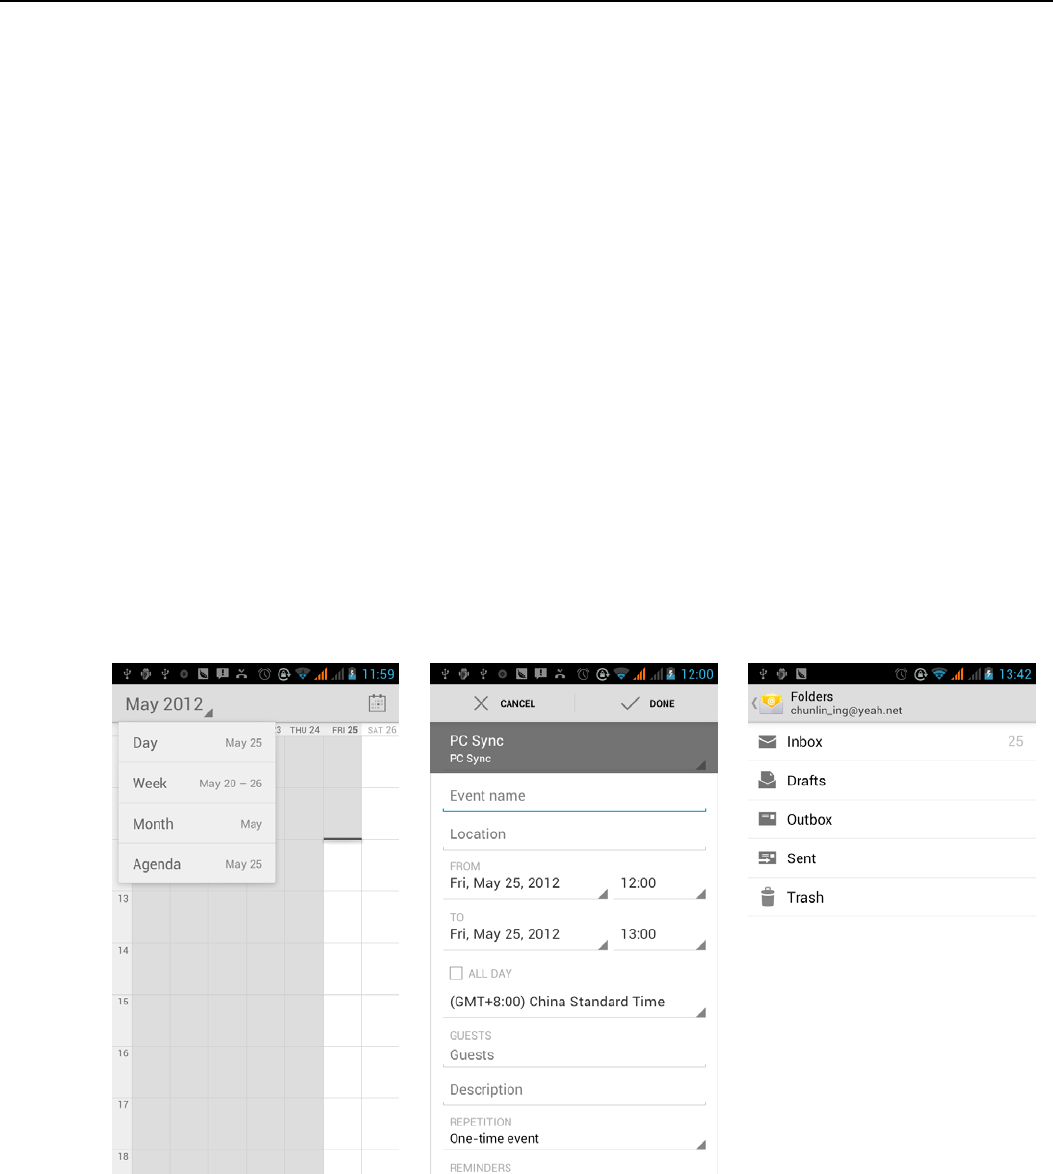
Manual de usuario
38
16. Calendario
Ingrese a la aplicación calendario
Cargue cuentas Google, entre en la aplicación, en la interfaz del mes o de la semana usará gris para resaltar el día. Por
defecto mostrará la fecha en el mes actual.
En la interfaz, presione menú, aparecerán 4 modos de visualización:
1) La interfaz de horario muestra un horario determinado (haga clic en el momento inicial y haga clic en la hora de
finalización)
2) La Interfaz día muestra la programación de un día (última fecha), deslice a la página siguiente para el día deseado.
3) La Interfaz de semana muestra la programación de una semana (última fecha), deslice a la página siguiente para la
semana deseada.
4) La interfaz hoy muestra la programación de un día, en la interfaz del mes o de la semana usa gris para resaltar el día.
5) La interface mes muestra la programación del mes (último dato hecho clic) deslice a la página siguiente para el mes
deseado.
• Nuevas actividades
1) Pulse menú, más <toque nuevas actividades.
2) Introduzca el nombre de la actividad en el cuadro de las actividades.
Avisos: Por ejemplo ocasiones especiales como cumpleaños o un día de eventos, establezca la opción de día completo en Sí. Si la
actividad se encuentra en un período de tiempo determinado, seleccione la hora de inicio y hora de finalización.
3) Introduzca la ubicación del evento, descripción, huéspedes, repetición, tiempo de aviso.
4) Haga clic en Finalizar para volver al calendario.
17. Radio FM
Radio FM
A través de este programa, usted puede escuchar la radio FM en el dispositivo, la radio FM utiliza los auriculares con
cable como antena para recibir señales, antes de abrir este programa, usted puede instalar los equipos-auriculares
originales, al escuchar, se puede cambiar de forma manual para altavoces o el modo de auriculares con cable.
Manual de usuario
39
• Abrir radio FM o
Toque este icono para abrir la aplicación de radio FM.
1) Haga clic en "búsqueda", inicia la búsqueda automática de canales de FM, y se listan todos los canales en la interfaz de lista.
2) Haga clic en "Grabación de FM", se puede grabar la radio que está emitiendo. La grabación será guardada en un nombre de
archivo por defecto
3) Haga clic en "Salir" para cerrar la radio FM, no se puede escuchar en el fondo.
4) Se debe insertar los auriculares de cable como antena, pero haga clic en el botón de la bocina, puede poner la radio FM en
altavoz.
5) Haga clic en icono de estrella sobre la frecuencia, se añadirá el canal a la lista de canales.
• Escuche la radio FM de fondo
Haga clic para volver al teclado, el programa de radio se trasladó a un segundo plano, en este momento todavía se puede
seguir escuchando la radio, y también se puede llevar a cabo cualquier otro programa.
18.Configuraciones
Su proveedor de servicios puede definir algunas configuraciones del dispositivo, por lo que puede no ser capaz de cambiar
esta configuración.
• Manejo de SIM
Salir de FM
Lista de Canales
Haga clic en la
estrella. El canal
actual es agregado a
la lista de canales
Ajuste de frecuencia hacia
atrás
Búsqueda hacia atrás
Búsqueda de canales hacia
adelante
Búsqueda hacia adelante
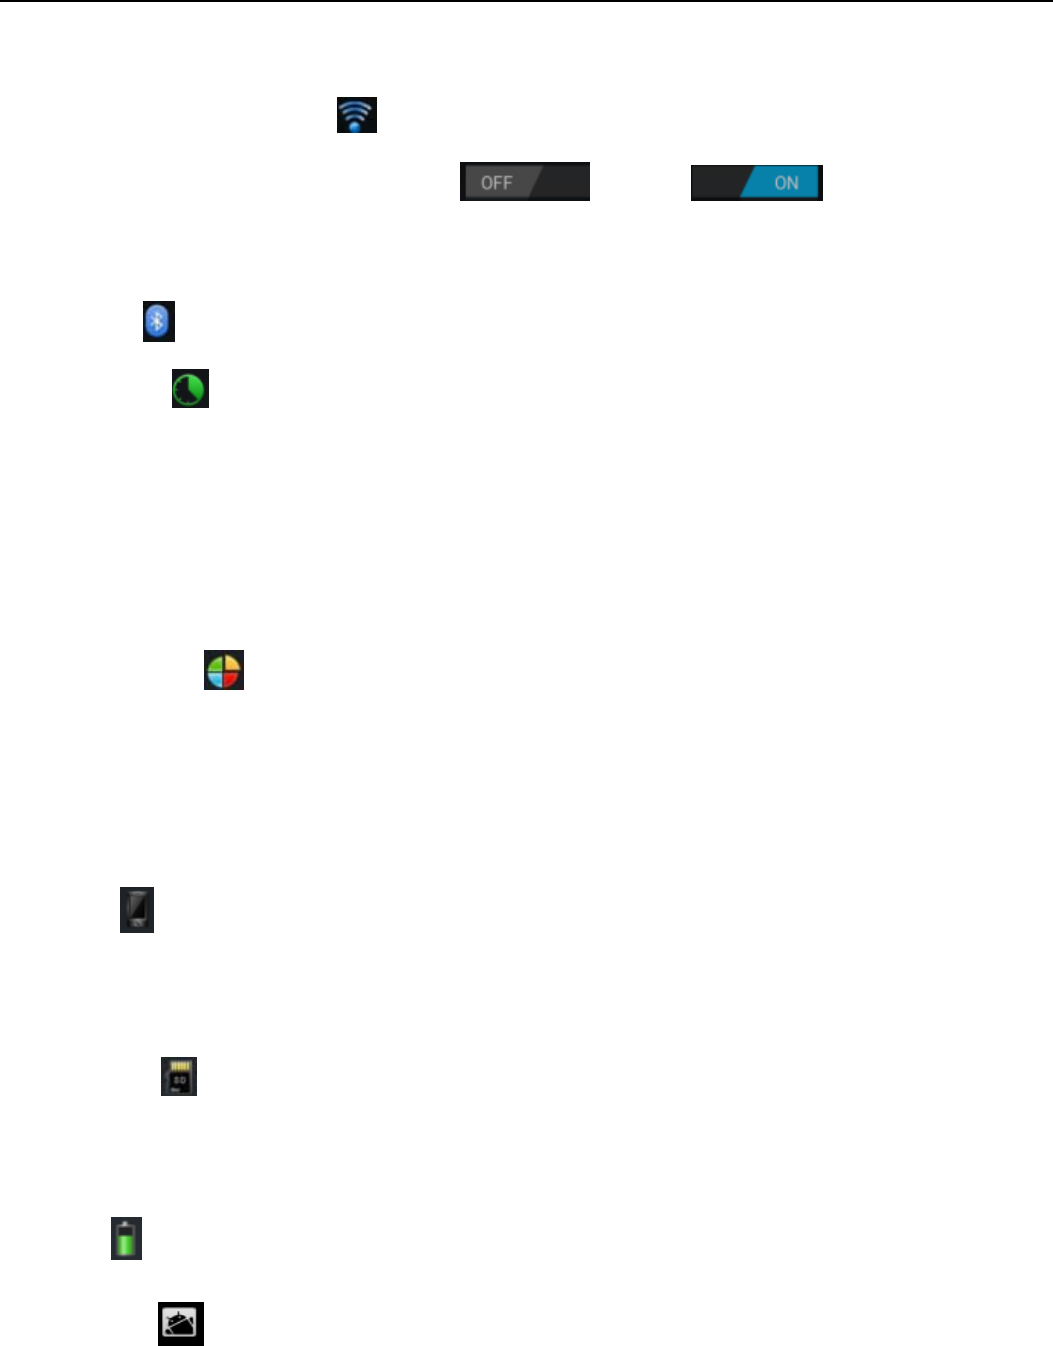
Manual de usuario
40
1) Pulse para seleccionar o deshabilitar la tarjeta SIM, la tarjeta es de color gris cuando está desactivado, el modo
avión aparece en la barra de estado.
2) Una vez definida la tarjeta SIM por defecto, usted puede elegir llamada de voz, llamadas de video, mensajería,
conexión de datos.
• Conexión inalámbrica e Internet
1) Modo avión: toque para abrir o cerrar.
2) Wi-Fi y configuración Wi-Fi : Toque Wi-Fi para abrir . Abra Wi-Fi, puede buscar
las redes disponibles de forma automática, las redes sin contraseña pueden ser utilizadas directamente, otras
necesitan que introduzca la contraseña primero.
Aviso: Al abrir el modo avión el Wi-Fi se cerrará automáticamente, al cerrar el modo avión y abrir la conexión
Wi-Fi, se puede utilizar normalmente.
• Bluetooth
Toque el icono Bluetooth para abrir, automáticamente buscará los dispositivos conectados a bluetooth cerca del equipo.
• Uso de Datos
1. El uso de datos: al crear un límite de tráfico de datos móviles, el flujo más que el límite provocará que el servicio de
datos móviles se cierre.
2. Mas
Conexiones inalámbricas & redes
a. Modo avión
b. VPN
c. Anclaje a red y zona Wi-Fi
d. Redes móviles
e. Modo de transferencia GPRS
• Perfiles de audio
Esta opción permite la configuración de los tonos del teléfono para la recepción de llamadas o la notificación. Incluye:
Vibración, volumen, tonos de llamada, tono de notificación, tonos y retroalimentación (tono de operación de los botones,
sonido de selección, tono de bloqueo de pantalla, táctil). Para adaptarse a todos los ambientes.
1) Seleccione "Estandar / Mudo / Conferencia / Aire Libre, toque el punto de la derecha, cuando se pone verde, se
abre. 2) Volumen: Incluye el volumen del timbre y la configuración del reloj de alarma, que se puede deslizar manualmente
para seleccionar.
• Displays
a. Brillo: Ajusta el brillo
b. Pantalla giratoria automática: Gire el teléfono para cambiar de dirección
c. Animación: Elija mostrar animaciones
d. Tiempo de espera de la pantalla: Ajuste el tiempo para bloquear automáticamente la pantalla
• Almacenaje
a. Puede ver la tarjeta SD y el uso de la memoria del teléfono celular.
b. Puede desmontar la tarjeta SD o Borrar la tarjeta SD.
c. Puede elegir la memoria predeterminada.
• Batería
Tiempo de arranque, y uso de cada modulo, para el uso de la energía en general.
• Aplicaciones
1) Orígenes desconocidos: Permitir la instalación de aplicaciones que no son electrónicos del mercado
2) Administrar aplicaciones: Administrar y eliminar las aplicaciones instaladas.
3) Servicios en ejecución: Toque cualquiera de los servicios enumerados para hacerlos desaparecen de la lista "Servicios en
Manual de usuario
41
ejecución".
4) Uso de almacenamiento: se puede ver el programa de descarga, todo en una tarjeta SD o verificar el espacio de memoria
que ocupan.
5) Uso de la batería: se puede ver la situación de la batería, utilizar celular en Standyby, teléfono inactivo, la pantalla y el
navegador.
6) Desarrollo: a. Depuración USB: USB de depuración sólo se aplica en el proceso de desarrollo. Esta función permite
copiar datos en el ordenador y los dispositivos móviles.
• Acceso a ubicación
1) El uso inalámbrico: Use la conexión inalámbrica para encontrar lugares en la aplicación (Google maps).
Pulse para abrir o cerrar
2) Cuando se utiliza el posicionamiento por satélite GPS, ajuste de precisión a nivel de la calle (cancelarlo para ahorrar
batería). Pulse para abrir o cerrar
3) Asistencia EPO GPS, use los datos de asistencia el GPS (EPO) para acelerar el posicionamiento GPS
4) A-GPS: Usar datos auxiliares puede acelerar el proceso de posicionamiento GPS.
Al abrirlo le recordará "que producen los flujos de GPRS al utilizar A-GPS."
• Seguridad
1) Establecer bloqueos de pantalla: Utilice imágenes, PIN o contraseña para bloquear la pantalla.
a. Toque "imágenes", la primera vez habrá unas sencilla instrucciones de desbloqueo y ejemplos, haga clic en "siguiente
paso" para continuar con el paso de " imagen de desbloqueo".
b. Toque PIN: Introduzca el número PIN para desbloquear la pantalla.
c. Contraseña: Toque establecer contraseña para desbloquear la pantalla.
d. Toque "no" para detener esta aplicación.
2) Configurar el bloqueo de la tarjeta SIM: Ingrese (4-8 números) PIN para activar el bloqueo de SIM.
El PIN (Número de Identificación Personal) de la Tarjeta SIM es para prevenir el uso no autorizado del código de tarjeta
SIM. El PIN es suministrado con el SIM. El proveedor de servicios proporciona el valor inicial.
Para cambiar un código PIN bloqueado, es necesario abrir el "Bloqueo SIM", luego ir a la pantalla Cambiar contraseña, el
teléfono le pedirá automáticamente que introduzca el código PIN antiguo y le pedirá que introduzca un código PIN nuevo
dos veces, finalmente, el teléfono le indicará que el cambio el código es exitoso. Si ingresa el PIN con error por tres veces,
los códigos PIN de la tarjeta SIM se bloqueará de forma automática, el código PUK se suministrará normalmente con la
tarjeta SIM. Si no, hay que ir al proveedor de servicios para solicitarlos.
Si introduce 10 veces mal el código PUK, la tarjeta SIM quedará bloqueada de forma permanente.
3) Contraseña visible: Contraseña visible al entrar.
4) Seleccione Administración del dispositivo: Agregar o eliminar administrador de dispositivos.
5) Utilizar las credenciales de seguridad: Permitir credenciales de seguridad visita aplicación u otras credenciales.
6) Instalar desde la tarjeta SD: Instale el certificado de cifrado de la tarjeta SD.
7) establecer una contraseña: Establecer o cambiar Certificado de la contraseña guardada.
8) Borrar Almacenamiento: borrar todo el contenido del almacén de certificados y restablecer sus contraseñas.
9) Right after the mobile is power on, it will automatically search the network, if authorized network is founded, the
network name and signal strength will be displayed, or you can only use some emergency call 112/911 or other non
communication function
• Lenguajes y teclado
1) Selección de Idioma: Incluir todos los idiomas en el teléfono.
2) Diccionario personalizado: Agregar palabras al diccionario personalizado o eliminar.
3) Configuración del teclado: Vibrar al pulsar los botones, reproducir sonido al pulsar los botones, primera letra en
mayúscula de forma automática, entrada de voz (por el micrófono en el teclado), ingresando palabras (el discurso
puede ser alterado al deslizar el dedo sobre tecla de espacio), mostrando consejos (activar función predictiva al
ingresar palabras), Auto-Texto (Automáticamente ingresara ciertas palabras cuando pulse la tecla espacio o teclas
especificas).
4) Método de entrada: puede seleccionar el teclado Android o método de entrada pinyin google.
• Copia de seguridad y restaurar
2) Copia de seguridad de los datos de aplicaciones, contraseña WLAN, y otras configuraciones en el servidor de
Google.
Manual de usuario
42
3) Restablecer los ajustes de fábrica y borrar todos los datos almacenados en el teléfono
• Agregar cuenta
a. Corporativa
b. Email
c. Google
• Fecha y Hora
1) Automatización: fecha de Uso y hora proporcionada por la red.
2) Ajuste de la fecha: Pulse "+" y "-" para ajustar la fecha.
3) Selección de zona horaria: Seleccione la zona horaria de acuerdo a donde se encuentre.
4) Ajuste de la hora: Pulse "+" y "-" para ajustar la hora.
5) Utilizar 24 horas: Formato de hora ON / OFF
6) Seleccione Formato de fecha: Hay 3 tipos de formatos que puede elegir: Mes-Día-Año, día-mes-año y el
año-mes-día, entre los cuales Año-Mes-Día es el ajuste predeterminado.
• Programación de encendido/apagado
Puede configurar el tiempo de arranque o apagado tocando el icono. También puede optar por repetirlo o repetir un
cierto día durante la semana.
• Accesibilidad
1) Textos grandes
2) El botón de encendido finalize la llamada: con el botón de encendido puede finalizar la llamada sin cerrar la pantalla.
3) Pantalla con auto-giro
4) Contraseñas habladas
5) Retraso en el tiempo de mantener pulsado
6) Instalar web scripts
7) Quick boot, inicio rápido
• Opciones para Desarrolladores
a. Depuración de USB: depuración de USB sólo para el desarrollo y el disco USB.
b. Permanecer activo: Pantalla nunca va a dormir mientras se está cargando.
c. Permitir ubicaciones falsas
d. Contraseña de seguridad de escritorio
e. Modo estricto activado
f. Ubicación del puntero
g. Mostrar detalles
h. Mostrar actualizaciones de pantalla
i. Mostrar uso del CPU
j. Force GPU rendering
k. Escala de animación:
l. Escala animación Transición
m. No mantener las actividades
n. Límite proceso de background
o. Mostrar todos los APRs
* Acerca del teléfono
Puede consultar sobre la información en la barra de estado y la energía restante.
19. Avisos para el uso del teléfono
Su teléfono es un producto de diseño y fabricación excelentes, y debe tratarse con cuidado. Las siguientes sugerencias pueden
ayudarle a cumplir con los términos de los kits de reparación, para extender la vida de la telefonía móvil.
1) Coloque el teléfono móvil y sus partes y componentes fuera del alcance de los niños.
2) Mantenga el teléfono seco , la lluvia , la humedad y los líquidos contienen minerales que corroen los circuitos electrónicos.

Manual de usuario
43
3) No toque el teléfono con las manos mojadas durante la carga , se puede provocar una descarga eléctrica o dañar el teléfono .
4) Evite colocar el dispositivo en entornos de alta temperatura. Las temperaturas acortan la duración de los dispositivos electrónicos,
dañar las baterías y deformar o derretir algunos plásticos.
5) Evite colocar el dispositivo en el entorno de muy baja temperatura. Cuando la temperatura sube , el teléfono va a producir vapor de
agua que pueden dañar el circuito electrónico .
6) Evite colocar el teléfono en lugares sucios o polvorientos , de lo contrario se pueden dañar las piezas .
7) Evite colocar el teléfono cerca de un cigarrillo encendido , cerca de una llama o cualquier fuente de calor.
8) No abra el dispositivo , el enfoque no profesional hará daño al teléfono.
9) No lo tire desde la altura , golpee ni sacuda el teléfono , la manipulación brusca puede dañar los circuitos electrónicos.
10) No pinte el teléfono , ya que la pintura bloqueará auriculares , micrófonos y otras partes removibles , y llevará a que no funcione.
11) Utilice un paño suave, limpio y seco para limpiar la cámara, el sensor de luz. Está prohibido el uso de productos químicos nocivos y
productos de limpieza , líquidos de limpieza para limpiar el teléfono
12) Si el teléfono móvil, batería , cargador o accesorios de telefonía móvil son defectuosos , envíe al centro de servicio autorizado más
cercano para su inspección.
13) De ser necesario , personal del Servicio de Centro le ayudará y hará los arreglos necesarios para las reparación del teléfono.