ColorMaker CUE Transmitter User Manual Owners Manual
ColorMaker, Inc. Transmitter Owners Manual
Owners Manual

ColorCue-PX
User’s Manual
www.ColorMaker.net
Introduction
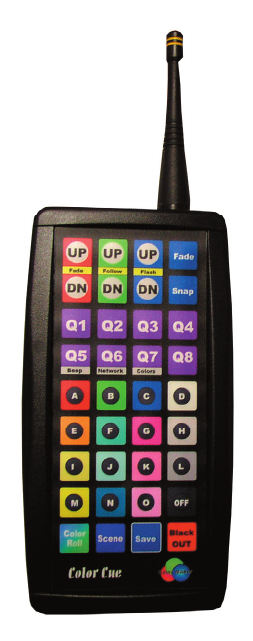
ColorCue is a wireless control for ColorMaker wireless LED xtures designed for both beginners and advanced
users. Fully programmable for advanced users and ready to command out of the box for beginners. The ColorCue
can command 8 individual xtures to control RGB with 16 programmable presets or create custom colors with
RGB Up / Down controls. ColorCue has 1 ColorRoll and 1 Scene button for easy event setup.
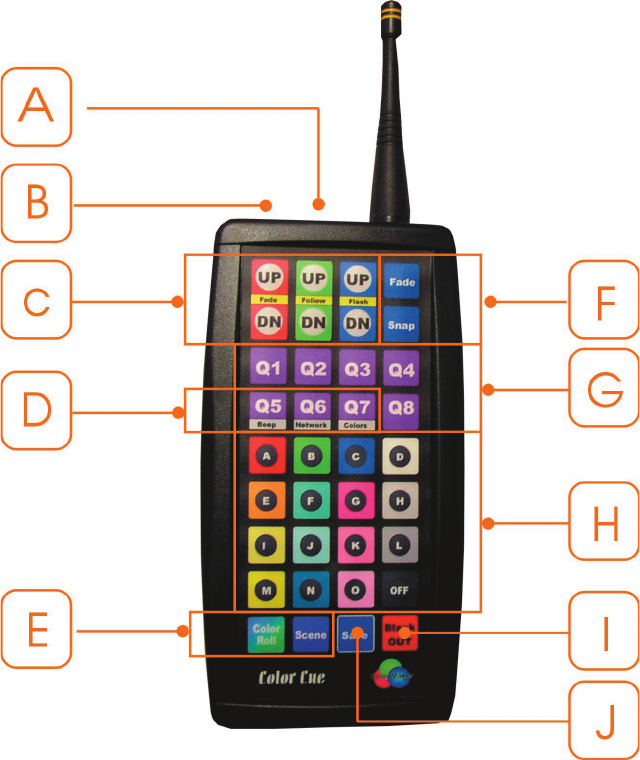
ColorCue Controls
A- Status indicator
B- Power ON-OFF switch
C- RGB Up / Down controls. Also used for ColorRoll timing.
D- Power up function keys. Used to set ColorCue network and restore factory defaults.
E- ColorRoll and Scene activation controls
F- Fade / Snap controls.
G- 8 xture select buttons
H- 16 programmable color presets
I - Blackout button
J- Save button used for ColorRoll, Scene and 16 Presets
Status Indicator identies the remotes status during operation.
Red indicated the maximum intensity has been reached when using the RGB Up buttons.
Green indicates the remote is currently updating a scene. During this time the RGB Up/Down buttons are disabled.
Yellow blink identies the remote has entered Network address edit.
Power switch. This one should be obvious, it turns the remote ON and OFF.
RGB Up / Down used to set the color of the xture by adjusting the red, green and blue intensity levels. When the
maximum level of the current key has been reached the indicator will turn red. The RGB controls also used to set
the roll rate of the ColorRoll which will be covered later during ColorRoll programming.
Fade / Snap controls. These 2 keys set the ColorCue color transition fade time. When set to Snap the selected color
changes the xture instantly hence the word Snap. When set to Fade the colors transition is slow approximately 4
seconds depending on the colors. Then Fade and Snap also sets the fade time for the 1 scene button control. To set
the Snap control press the Snap button to set the Fade press the fade button.
Fixture Select Buttons. Buttons marked with Q1 through Q8 selects the xture. After each xture is selected the
user can set the color by using the RGB UP/DN buttons or press 1 of the 16 presets. The ColorCue stores the color
of each xture so users can edit all 8 colors.
16 Programmable Color Presets keys are used to set the xture to a programmable preset. The keys are color
representation of the colors that are factory programmed. The presets can be edited and saved for custom colors.
Blackout buttons turns all xtures off and terminates all ColorRolls.
Save button is a Press and Hold button to save color presets, Scene and ColorRoll colors.

Play and Save Scene and ColorRoll
Scene and ColorRoll patterns are played and saved in the same way. A scene stores all 8 xture colors and
a ColorRoll stores all 8 xture colors but stores them in a pattern which is then sent to a single xture. The
xture then rolls through all the 8 colors continuous loop until the user stops the ColorRoll. Lets start with
scene Record and Playback.
Scene Record
Set all 8 xture to a desired color by using the RGB Up/Dn keys or 1 of the presets. After all 8 xtures are
set PRESS and HOLD the Save key then press the Scene button. Now released both buttons. The scene is
now saved. Scene is stored in memory, turning off the remote or changing batteries will not affect the stored
data.
Scene Play
To play the scene just press the scene button and all 8 xtures will transition to the previously stored scene.
If the ColorCue is set to Snap the xtures will instantly turn to the saved scene. The indicator will turn green
during the color transition and the RGB UP/DN buttons will be disabled.
When a scene has been sent to the xtures the colors of each of the xtures can be edited by using the RGB
UP/DN buttons or 1 of the 16 presets.
www.ColorMaker.net

Q1 Q2 Q3 Q4 Q5 Q6 Q7 Q8
Example 1: ColorRoll setting that starts with Red then fades through all 10 colors then repeats.
Example 2: ColorRoll process that starts with Red the fades to Green then fades to Blue then repeats.
Q1 Q2 Q3 Q4 Q5 Q6 Q7 Q8
www.ColorMaker.net (407) 862-3363
Record and Play ColorRoll
Record ColorRoll
A ColorRoll is a set of 8 colors that are programmed using Q1 through Q8 on the remote. Once all 8 colors are
programmed set PRESS and HOLD the Save key then press the ColorRoll button. Now released both buttons. The
ColorRoll is now saved. ColorRoll pattern is stored in memory, turning off the remote or changing batteries will not
affect the stored data.
ColorRoll Patterns
Below are 2 examples of ColorRoll patterns. Example 1 shows a complete set of 8 colors. The xture will roll through
all 8 colors then repeat until user presses the blackout key or adjust the xture RGB levels to 0.
Example 2 show a ColorRoll with 3 colors Red, Green and Blue. Note that Q4 through Q8 are set to blue. This will
keep the xture from rolling to OFF before repeating. This technique applies to all patterns regardless of how many
color are in the pattern.
Play ColoRoll
To play a ColorRoll select a xture Q1 through Q8 then press the ColorRoll button. The xture will then start rolling
through the colors stored in the pattern. Roll rate can then be adjusted using the Red (Fade rate) Green (Follow rate)
Blue (Fade / Flash).
* Follow rate only applies to xtures with Enhanced ColorRoll technology see xtures user’s manual for details.
Red (Fade rate) Green (Follow rate) Blue (Fade / Flash) can only be edited after the ColorRoll button has been
pressed. One any of the Q buttons are pressed the Red (Fade rate) Green (Follow rate) Blue (Fade / Flash) are
disabled. Once the ColorRoll rate has been edited the value is stored and the new rates will be used when the
ColorRoll is pressed again.
16 Programmable Color Presets
The ColorCue has 16 programmable preset which can be edited and saved for custom presets. The presets are factory
set to the button color which span the color range from OFF to FULL RGB (White).
Save Color to Preset
To save a color to 1 of the 16 presets PRESS and HOLD the Save key then press the preset color button. Now
released both buttons the new color is now saved. The color presets are stored in memory, turning off the remote or
changing batteries will not affect the stored data.

Restore Factory default Colors
The 16 color presets can be restored to factory defaults by turning off the ColorCue, Press and Hold the Q7 (Colors)
button then turn on the ColorCue and release the Q7 (Colors) button.
ColorCue Network Address
The ColorCue can be set up to transmit 8 different network addresses. This will enable multiple transmitters at the
same location and prevent other users of the ColorMaker products from your lights.
Network setup
Turn off the ColorCue, Press and Hold the Q6 (Network) button then turn on the ColorCue and release the Q6
(Network) button. The indicator light will ash yellow indicating the ColorCue is now in Network setup mode. Now
press one of the Q1 through Q8 to assign a network. The ColorCue will beep 2 times indicating the new network
is now set. The new network will be stored in memory and turning off the remote or changing the batteries will not
affect the network assigned. Network can be set as many times as needed. Q1 is factory default.
Batteries
The ColorCue uses A 9 volt battery. Remove the cover on the back and place the battery with the + plus terminal to
the bottom. Use only quality 9 volts Alkaline or Ni-MH rechargeable. Its a good practice to replace the battery on
each event. Always carry an extra battery just in case.
Factory location:
ColorMaker Inc.
980 Sunshine Lane Suite T
Altamonte Florida 32714
(407) 862-3363
Warranty
ColorMaker Inc. hereby warrants, to the original purchaser, ColorMaker Inc. Electronics products to be free of
manufacturing defects in materials and workmanship for a period of (1 Year) from the date of purchase. This
warranty shall be valid only if product is purchased within the United States of America. It is the owners
responsibility to establish the date and place of purchase by accepting evidence, at the time service is sought.
For warranty service, send the product to the ColorMaker Inc. factory. All shipping charges must be prepaid.
Equipment must be sent in its original package and to include all control devices.
Warrant is void if serial number has been altered or removed, seals have been voided, if the product is
modied in any manner which ColorMaker Inc. concludes, after inspection, affects the reliability of the
product; if the product has been repaired or services by anyone other than ColorMaker Inc. unless prior
written authorization was issued to purchaser.
ColorMaker Inc. reserves the right to make any changes in the designs and/or improvements upon its products
without any obligation to include these changes in any products theretofore manufacture.
This equipment has been tested and found to comply with the limits for a class B digital
device, pursuant to part 15 of the FCC Rules. These limits are designed to provide
reasonable protection against harmful interference in a residential installation. This
equipment generates, uses and can radiate radio frequency energy and if not installed
and used in accordance with the instructions, may cause harmful interference to radio
communications. However, there is no guarantee that interference will not occur in a
particular installation. If this equipment does cause harmful interference to radio or
television reception, which can be determined by turning the equipment off and on, the
user is encouraged to try to correct the interference by one or more of the following
measures:
* Reorient or relocate the receiving antenna.
* Increase the separation between the equipment and receiver.
* Connect the equipment into an outlet on a circuit different from that to which the
receiver is connected.
* Consult the dealer or an experienced radio/TV technician for help.
The user is cautioned that changes and modications made to the equipment without
the approval of manufacturer could void the user’s authority to operate this equipment.