Compal Electronics NAZ10WB NAZ10 User Manual Manual
Compal Electronics Inc NAZ10 Manual
Manual
Chapter 1 Introducon
1.1 Overview
1.2 Front Panel
1.3Right/LePanel
1.4 Back Panel
1.5Top/BoomPanel
1.7 Features
1.1 Overview
CongratulaonsonthepurchaseofyournewadvancedSmartpad.You’reabouttodiscoversomanythingsabout
yoursmartpad,thatwillhelpyoumaximizetheexperienceofitsusage.Readthischaptertolearnmoreaboutthe
funconsofthesmartpad,baery,chargingthebaery,andmore.
1.2 Front Panel
1.3 Right/le Panel
1.4 Back Panel
1.5 Top/Boom Panel
1.7 Features
The smartpadisopmizedforrichinternetandentertainmentexperiencesaswellastomeetyourdailybusiness
needs.Thesmartpadfeatures:
•Touchscreenpanel.
•SupportsWiFinetworkconneconforquickaccesstotheweb.
•SupportsBluetoothconneconstosendandreceivedatatoandfromotherBluetoothdevices.
•Includesbrowserapplicaonsforwebsurngonthego.
•Chatwithfriendsthroughtheinstantmessengerandthebuilt-inwebcam.
•AllowsyoutogetintouchwithpersonalandbusinesscontactsthroughEmailexchange.
•Playmusic,andmovies.
•Built-incameratotakedigitalpicturesandrecordvideoclips.
•Powerfultoolsandoceprogramsforyourbusinessneeds.
•SupportUSBconneconsforexternaldevices.
Chapter 2 Geng Started
2.1 Charging the Baery
2.2 Checking the Baery Status
2.3 Connecng USB device
2.4 Inserng Micro SD card
2.5 Connecng Earphone
2.6 Using the Mouse
2.7 Input informaon
2.8 The Power Switch

2.1 Charging the Baery
The baery which comes along with your device is parally charged. It is recommended to completely discharge
the baery before you operate the Smartpad. Baeries perform best aer being fully charged.
To charge the baery
1. Assemble the power cable as shown.
2. Connect the Smartpad with the power cable.
3. Connect the power cable to an live outlet.
4. Remove the power cable when charging is Done.
Baery Charging Time
Charging while power is o: approx. 3.5 hours.

2.2 Checking the Baery Status
There are two ways to check the baery level of your device:
Power LED Indicator
The Power LED Indicator indicates the charge level status of your baery.
when the Power LED indicator is in orange, it indicates that the baery is charging.
when the Power LED indicator is green, the baery stop charging. Disconnect the charger from the outlet then
from the device.
Baery Icon on the Status Bar
While the device is turned on, you can check the baery level icon located on the Status Bar.
A green icon , indicates that the baery is full .
While the baery is charging, the icon on the status bar starts scrolling on the dispaly. when the baery is fully
charged, the icon stops scrolling and indicates geeen with a ash logo.
System will have the following dened behavior with specic baery %:15%: System will show “Baery low”
warning message. The message will re-appear at boot up or resume from suspend when no AC plug-in and
baery capacity is less than 15%. 6%: System will power o automacally.
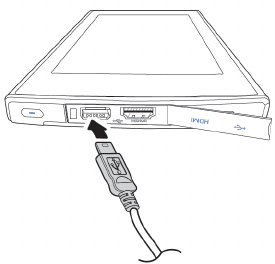
2.3 Connecng USB device
You can connect USB devices such as a keyboard, printer, mouse, external drive, and other devices to your
Smartpad.
To connect USB devices
1. locate the USB port on the top of the Smartpad, See”Right/Le Panel” to locate the USB port.
2. Oper the port cover.
3. Connect the USB cable as shown on the le.
To remove an external drive connected to the USB
1. before removing an external drive, tap the connecon icon to safely remove the device to avoid
data loss.
2. your MID will pop up a message to conrm the removal. Tap the message.
3. Remove the USB connecon.
4. Close the port cover.
Plug and Play devices
Plug and Play (PnP) devices include like keyboards, mouse and other accessories which do not require
installaon or drivers aer connected. Plug the device, then “play” or use it at once. Your can remove the PnP
device form the device anyme.
2.4 Inserng Micro SD card
Smartpad supports Micro SD cards with 2 GB capacity or above.
To insert Micro SD card
1. Locate the Micro SD card slot on the top of the Smartpad. See “Top/Boom Panel“to locate the
Micro SD card slot.
2. Open the slot cover.
3. Slide the Micro SD card gently into the slot with the metallic part facing the back of the MID, unl
you hear a click sound.
4. Close the slot cover.
The Smartpad detects the card and opens the File Manager applicaon.
To remove Micro SD card
1. Before removing the card, tap the connecon icon to safely remove the device to avoid data loss.
2. You Smartpad will pop up a message to conrm the removal. Tap the message.
3. Open the slot cover.
4. Push the card into the slot, unl you hear a click sound, to release the locks.
5. Gently remove the card.
6. Close the slot cover.
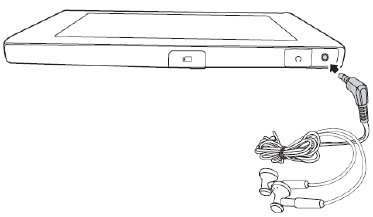
2.5 Connecng Earphone
Use the earphone included in your Smartpad to listen to music, voice recordings and video sounds in your MID.
Other audio output device such as external speakers can be connected through the headphone jack for more
sound surround opons.
1. Find the headphone jack on the top of the Smartpad. See” Top/Boom Panel” to locate the jack.
2. Connect the device as shown below.
3. To listen to audio outputs open an entertainment applicaon.

2.6 Using the Mouse
You can navigate the Smartpad with your finger. See Chapter 2 Connecting USB device on how to connect a
mouse to your Smartpad.
Mouse/Finger Funcon:
Mouse Finger Function
Single click Single-tap Click or single-tap to select or run an item.
Double click Double-tap Double click or double-tap to select or run an item.
Right click Tap and hold Press and hold for more than 3 seconds to display the Pop-up menu.
Click and drag Drag Drag an item to move it.
Flick Flick Flick the pen across the screen in a parcular direcon to scroll up, down, le, or right.
2.7 Input informaon
Built-in Keyboard
To input text with the built-in keyboard.
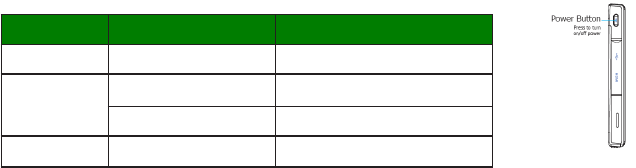
2.8 The Power Switch
The Power Switch is located at the right panel of your device. It is used to power on/o the Smartpad.
1. The Power Buon behaviors
System Status Acon Result
Power o Short press Turn on the power
Power on
Press once Enter suspend mode
Long press(2 seconds) Show power menu
Suspend Press once Resume from suspend mode
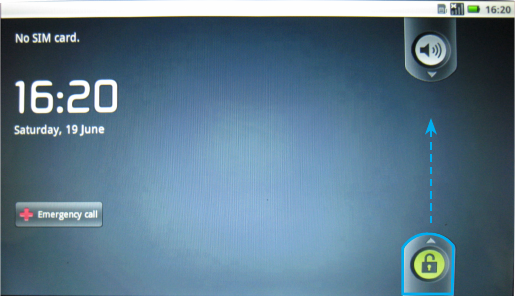
2. To unlock the Smartpad
When you pressed the power buon to open the Smartpad, then you need to move the lock indicate follow the
arrow direcon to enter the system:
Chapter 3 Your Smartpad
3.1 Home Screen
3.2 The Status Bar
3.3 The Smart Key
3.4 The Smart Menu
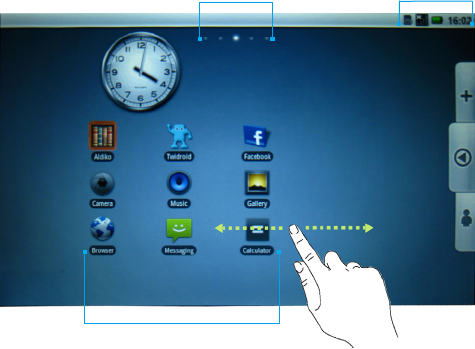
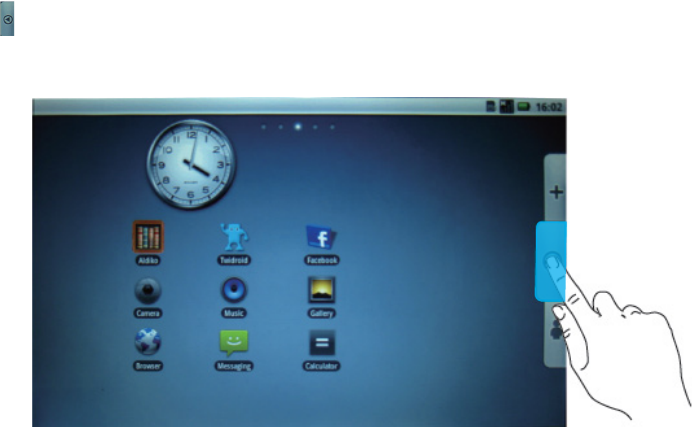
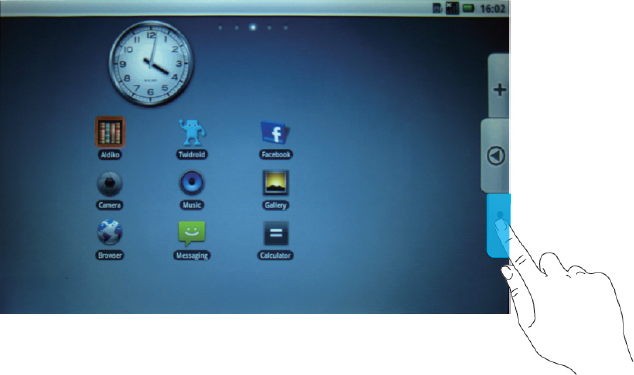
3.1 Home Screen
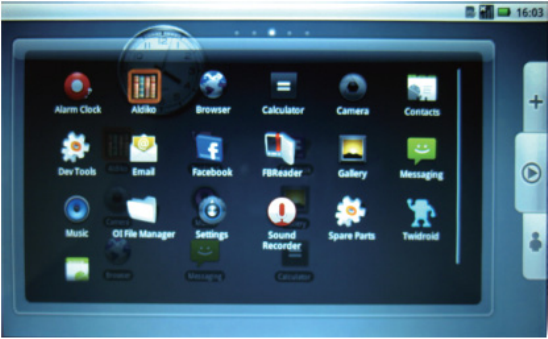
The Home Screen contains 8 applicaon groups.
Flick your nger across the screen to scroll through all the applicaon groups.
Scroll Bar
Tap the le/right arrows to scroll
through the Main Toolbar.
Status Bar
Displays the me, baery,
WiFi,Bluetooth
Quick Menu
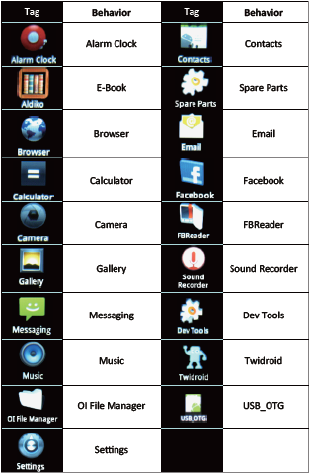
Tap the icon to go directly to the applicaons.
Icons can be changed by user.
Note:
1. You could add desktop shortcut Menu you like by dragging an icon to the Home
Screen.
2. You could delete shortcut Menu by keeping press the icon unll the Recycle Bin appear
in the right of the Home Screen, then remove the icon to Recycle Bin.
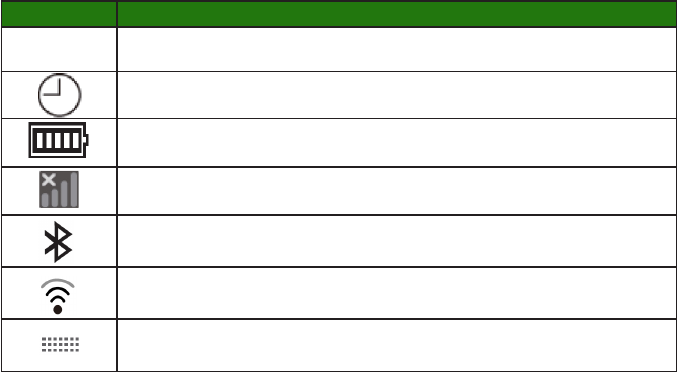
3.2 The Status Bar
The Status Bar appears on top of the Smartpad Screen. it indicates your current mode. it contains Time, Alarm
Clock, Baery Status, WiFi Status,Bluetooth Status.
Icons Descripon
12:00pm Time and Clock
Alarm Clock
Baery Status: Indicates baery level, more bars denotes more power.
WiFi: Indicate the status of the internet connecon.
Bluetooth
WiFi signal
Display current input method.
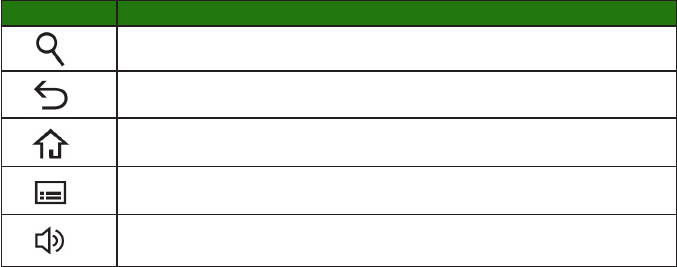
3.3 The Smart Key
The Status Keys appear on the right of the Front Smartpad panel. It contains 5 keys as below:
Icons Descripon
Search: Tap this could open Quick Search Box with internal Keyboard.
Back: Back to the previous page
Home: Back to the Start Menu
Menu: Bring up the related shortcuts
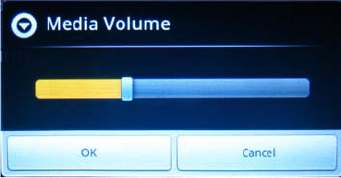
Media Volume: Tap this could bring up a windows to change the Volume.
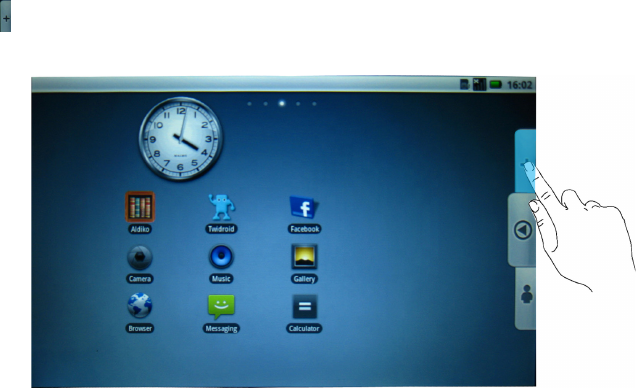
3.4 The Smart Manu
This Status Menu on right of the Smartpad Screen. It contains 3 keys as below:
1. Tap this will bring up the Add to Home Screen windows, you could add 4 type icons: Shortcuts, Widgets,
Folders, Wallpapers.
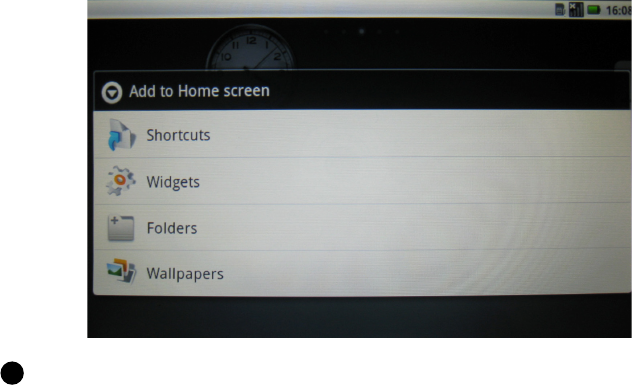
1 Shortcuts contain:
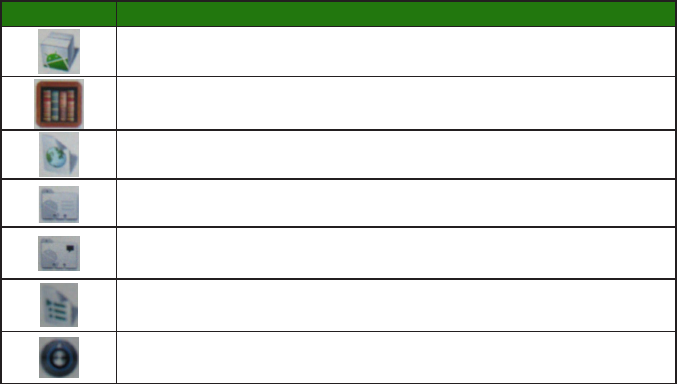
Icons Descripon
Applicaons: add some applicaons to desktop
Aldiko: tap to open the E-book windows
Bookmark: tap to open Web address recently browserd
Contact: tap to create new contact
Direct message: tap to choose a number to send message
Music playlist: tap to open the Music playlist
Sengs: tap to set the Smartpad
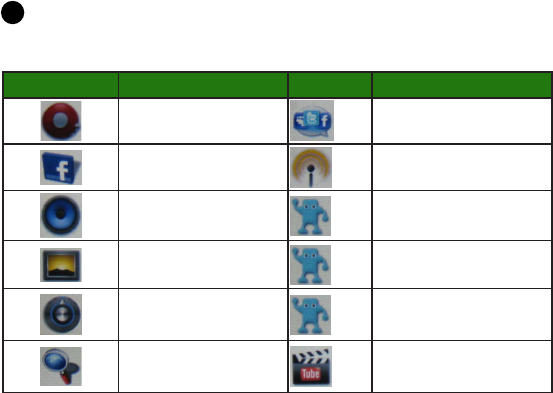
2 The Widgets contains 12 con, you could add some Icons to desktop by tap them, and
add the related widgets by tap and choose you want item to desktop.
Icons Descripon
Analog clock Social Network Widget
Facebook Shoutcast Radio Widget
Music Twidroid
Picture frame Twidroid Large
Power Control Twidroid Small
Search YouTube Widget
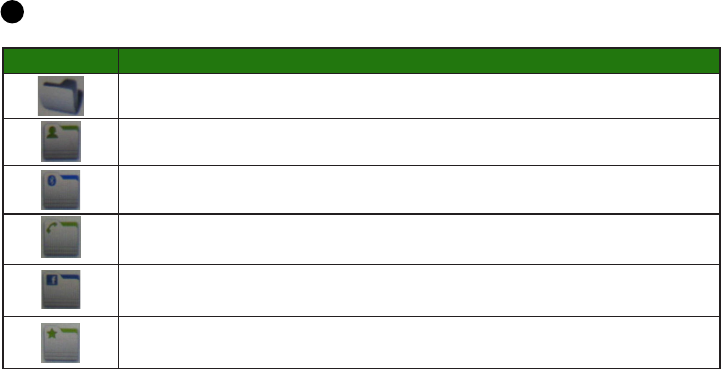
3 The Folders contain 6 icon, you could add the Icons to desktop by tap them.
Icons Descripon
New folder: tap to add new folder to desktop
All contacts: tap to add All contacts folder to desktop
Bluetooth received: Tap to add Bluetooth received to desktop
Contacts with phone numbers
Facebook phonebook
Starred contacts
4 The Wallpapers contain 2 icons: Pictures, Wallpaper gallery, you could tap these to
open the picture base and choose one to set wallpaper.
Icons Descripon
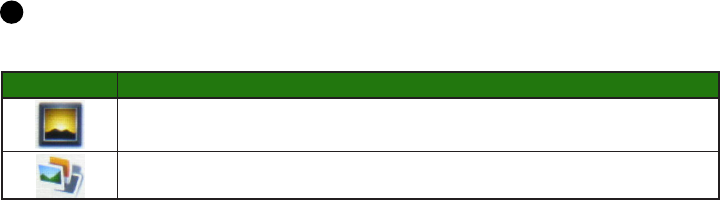
Pictures
Wallpaper gallery
2. Tap this will bring up the Home Menu windows as blow shows:
The Home Menu windows as below:
3. Tap this will bring up the Contacts and Favorites as below shows:
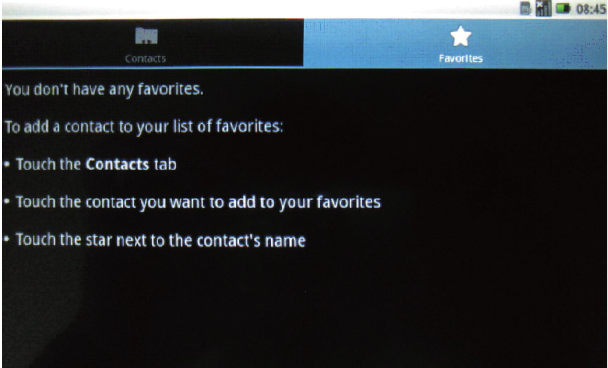
You could add or delete new contacts and Favorites by tap the fourth smart key on the right of bezel to bring
up related shortcut.
Chapter 4 Basic Sengs
4.1 Date and Time
4.2 Language Seng
4.3 Desktop Wallpaper
4. 4 Locaon & security
4.5 Applicaons
4.6 Accounts & sync
4.7 Text-to-speech
4.1 Date and Time
To open the date and me applicaon
From the The Smart Menu, select Sengs>Date & me
When you open the Date &me sengs windows, there are 6 six items: Automac, Set
date, Select me zone, Set me, Use 24-hour format, Select date format. The Set date
and Select me zone and Set me can't be seed when Automac is choosed, so before
you set date and me, be sure the Automac is not choosed.
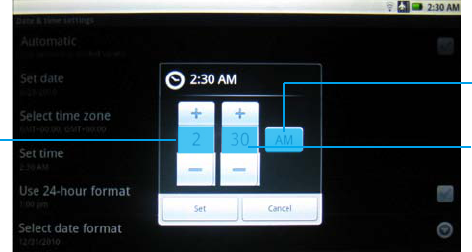
1. To change the me
Select and open Set me seng windows as below:
Click Set to exit application after setting the hour/minute, or Click Cancel to exit
applicaon if you don’t want to change the seng.
Displays the hour, use
the +/- to change, or
tap the hour to open
the build-in keyboard to
keyin hour directly.
Displays the minute, use
th e +/- to change, o r
tap the minute to open
the build-in keyboard to
keyin minute directly.
Displays AM/PM, click
the button to exchange
directly.
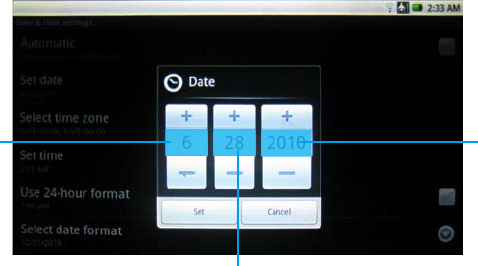
2. To change the date
Select and open Set date seng windows as below:
Click Set to exit applicaon aer seng the month/date/year, or click Cancel to exit
applicaon if you don't want to change the seng.
Displays the month, use
the +/- to change the
month, or tap to open
the build-in keyboard to
keyin month directly.
Displays the year, use the
+/- to change the year,
or tap to open the build-
in keyboard to keyin year
directly.
Displays the date, use the +/- to change
the date, or tap to open the build-in
keyboard to keyin date directly.
3. To set the Time Zone
To select the Select me zone to open all Time Zone in Smartpad, select you want to set the me zone.
4. To set the Time format
To tap the Use 24-hour format to change the me format directly.
Time format:
1:00 pm
13:00
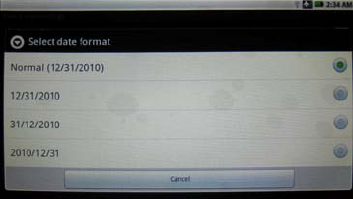
5. To set the date format
To tap the Select date format to open the date format windows, select you want.
Date format:
Normal(month/date/year)
Date/month/year
Year/month/date
4.2 Language Seng
From the Smart Menu, select Sengs> Language & keyboard
There are 3 items in Language and keyboard setting windows: Select locale, Android keyboard, User
diconary.
1. To change the language locale
To Select locale to open all Smartpad language locale list, select you want.
2. To change Android keyboard
To set onscreen keyboard, tap the Android keyboard to open the seng windows, it include 6 items:

1. Vibrate on keypress
Choose this the Smartpad will vibrate while the keyboard be pressed.
2 Sound on keypress
Choose this the Smartpad will sound while the keyboard be pressed.
3 Auto-capitalizaon
Choose this the Smartpad will Auto-capitalizaon while the keyboard be pressed.
4 Quick xes
Choose this the Smartpad will correct commonly typed mistakes while you use the build-in keyboard keyin
informaon.
5 Show suggesons
Choose this the Smartpad will display suggested words while typing.
6 Auto-Complete
Choose this the Smartpad will spacebar and punctuaon automacally insert highlighted word.
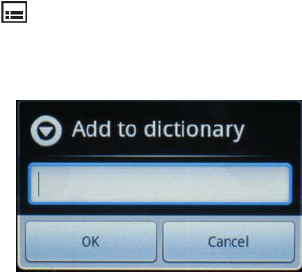
3. User diconary
When you open the user diconary rst me, there have no any words in the user diconary, you could add a
word through the Menu.
You could tap the smart key , then Add buon will appear at the boom of the screen, click the Add buon
will open the below picture, key in the word you want, select OK will save the Adding, select Cancel will exit
the Adding windows.
4.3 Desktop Wallpaper
To change the Desktop wallpaper
1. From the Add to Home screen, select Wallpapers> Wallpaper gallery
2. From Wallpaper gallery select one picture you want
3. Click the Set wallpaper buon.
4.4 Locaon & secuity
1. My Locaon
You could find your location by Wi-Fi and/or mobile networks or see your location in applications(Such as
Maps) using wireless networks.
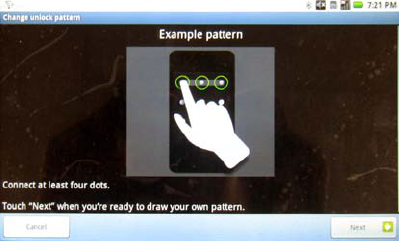
2. Screen unlock paern
You could protect your device from unauthorized use by creang a personal screen unlock paern.
1> On the next screen, watch while an example paern is drawn.
2> When ready, draw your own personal unlock paern. Experiment with dierent paerns but connect at
least four dots.
3> Redraw your paern to conrm.
You could change your paern to unlock screen.
3. Passwords
You could see the passwords as you type by seng the Visible passwords.
4. Credenal storage
Your smartpad allows applicaons to access secure cercates and other credenals by Seng use secure
credenals. You can install encrypted cercates from SD card, and set or change the credenal storage
password.
You could clear credenal storage of all contents and reset its password by Clear storage.
4.5 Applicaon sengs
There are four item could be set for applicaon:
1. Unknown sources: It allows install of non-Market applicaons
2. Manage applicaons: It could manage and remove installed applicaons
3. Running services: It could view and control currently running services
4. Development: It could set opons for applicaon development
4.6 Accounts & sync
1. General sync sengs
You could sync/send/and receive data at any me by seng general sync applicaons
2. Auto-sync
The applicaons could sync data automacally by seng Auto-sync.
You could Add account by two ways: Corporate and Facebook.
4.7 Text-to-speech
1. Listen to an example
Type this your smartpad will play a short demonstraon of speech synthesis.
There are two items Default sengs
1. Speech rate
Type this you could set the speed at which the text is spoken by Very slow/Slow/Normal/Fast/Very fast ve
kinds.
2. Language
Type this you could set the language-specic voice for the spoken text by American English/Brish English/
French/German/Italian/Spanish six kinds.
3. Always use my sengs
Type this the Smartpad will default the two sengs above override applicaon sengs.
Chapter 5 Makeing a Connecon
5.1 Connecng to the Internet via WiFi
5.2 Bluetooth
5.3 Flight Mode
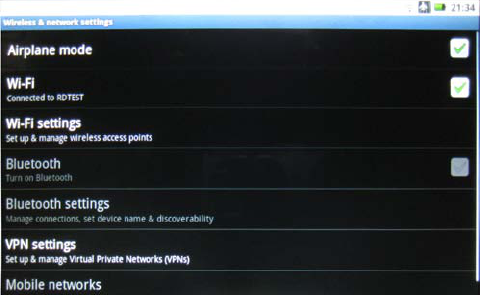
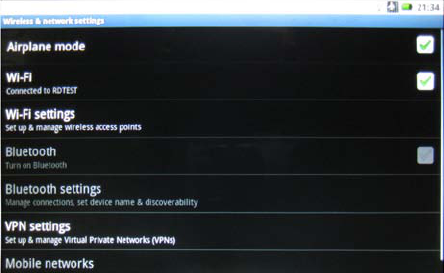
Connecng to the Internet via WiFi
The Wireless & networks applicaon makes Internet connecon for your Smartpad. It
contains four modules: Airplane mode, WiFi, Bluetooth, and VPN. Airplane mode, WiFi,
Bluetooth and VPN are turned o by default. To turn a funcon on, tap the aplicaon's
Selected Buon.
To open Connecon Manager
5.1 Wireless Connecon Sengs
The advantages of a WiFi network include advanced network secruity, enhanced
reliablility, network flexibility, better performance and shared broadband and internet
access.
Internet is a gateway for knowledge, entertainment, business and practically every
informaon that you want to konw can be searched on Internet. The Smartpad features
wireless connecon for your internet needs. Use WiFi when you are in range of a hotpot.
Before you start the setup, contact your network administrator to get the name of the
network(SSID), and the security informaon, such as WEP or WAP keys, and the network
password.
The easiest way to connect to a WiFi network is to automacally scan and connect to a
nearby network.
To automacally scan and connect to a network.
1. Tap Wi-Fi directly or Wi-Fi sengs to open Seng windows to enable WiFi applicaon
if WiFi is turned off, then the Smartpad will scan and list all the available networks
automacallly.
2. Select a network then click Connect.
If the network has security, a popup window will appear, enter the password.
3. Done.
4. Aer WiFi is connected ok, the Wireless signal will appear on the Status Bar.
5.2 Bluetooth
Bluetooth is a short-range wireless communications techonlogy. With Bluetooth
capabilies, devices can exchange informaon within a distance of about 10 meters. Use
Bluetooth to:
1. Transfer les.
2. Share Internet access with the other computer.
3. Connect to Internet through a mobile phone modem funcon.
4. Connect to a bluetooth supported device such as a mouse, a keyboard or a cordless
earphone.
5. Share audio input or output with the other Bluetooth device.
6. Connected to the printer or modem via serial service.
To Open Bluetooth Applicaon
1. Tap the Home Menu, select sengs> Wireless & networks
2. Be sure the Airplane mode is not choosed.
3. Tap the Bluetooth directly or Bluetooth sengs to open the Seng windows.
4. If Bluetooth applicaon had opened, the Bluetooth icon will appear on the Status Bar,
and The Bluetooth is choosed.
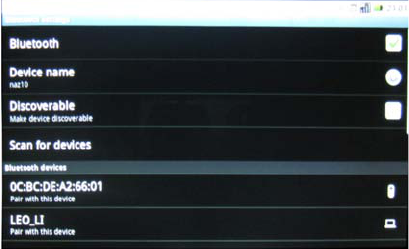
To search remote Bluetooth device:
Aer the Bluetooth applicaon is open, Click Bluetooth sengs> Scan for devices
1. you could modify your device name by click Device name to popup a modify windows.
2. All available devices will list below the Scan for devices, and you could roll the right bar
to select you want device.
To transfer/Receive Files via Bluetooth
Click a scanned device, and then a popup window will appear: Bluetooth pairing request,
you need key in PIN to link the device, then click the File Transfer buon on the up right
corner to open File Transfer window.
5.3 Airphone Mode
Enablling Airphone Mode ensures your safety when using your Smartpad on board an
aircra. All other connecon applicaons, which might interfere aircra operaon, are
automatically disabled. When you power up your device, this module is turned off by
default. To enable, tap the Wireless & network sengs, tap mode buon on the right. A
check mark will appear. To disable, tap the check mark.
Chapter 6 Browsing the Web
6.1 Accessing Websites
You use the internet for so many things: checking email, nding driving direcons, geng
news, and instant messaging among others. Now you can bring the internet with you
almost anywhere you go. Use your Smartpad to make internet connecons and the web
browser opens the entire online world for you. To access the internet, your Smartpad
must be setup properly. See Chapter 5 Making a Connecon.
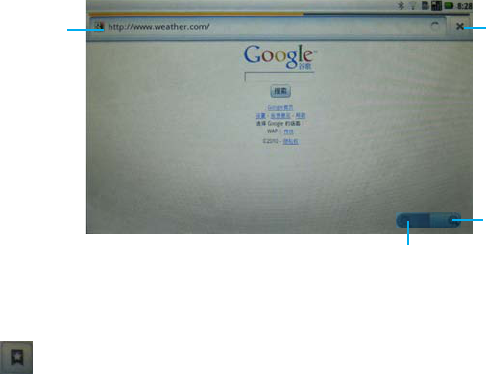
The Smartpad features Google as its internet browser.
To open the browser
From the Home Menu, select Browser.
6.1 Accessing Websites
You can open web pages, navigate through pages and do the same things you can do with
a desktop browser in the Google applicaon.
To view a website
1. Enter the address of the website in the address eld.
2. Tap Go.
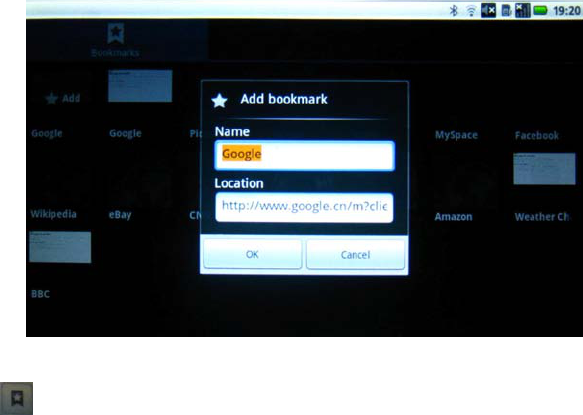
To Add a bookmark
1. Tap to open the bookmark window.
2. Tap Add to open the Add bookmark window:
3. Key in Name and Locaon
4. Click OK to nish Adding or Click Cancel to exit the Adding window.
Address eld.
Type the web
page address
here.
Favorite.
Type to open the
Bookmarks, Most
visited, History.
Large.
Type to large the
windows.
Small.
Type to small the
windows.
To edit a bookmarked web page
1. Tap to open the bookmark window.
2. Keep press the bookmark you want about 2 seconds ll popup a windows as below:
it includes
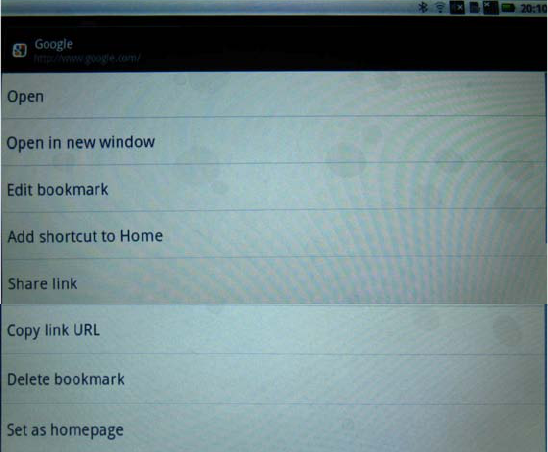

Item Descripon
Open Tap to open the Web.
Open in new window Tap to open the Web in a new window.
Edit bookmark Tap to open the Edit bookmark window, you could reedit the Name and Locaon.
Add shortcut to Home Tap to add the shortcut to Home Screen.
Share link Tap to share link, your Smartpad could share the link by three ways: Facebook, Twidroid, Messaging.
Copy link URL Tap to copy the link URL.
Delete bookmark Tap to open the Delete window, you could select OK to delete the bookmark or Cancel to exit the Delete window.
Set as homepage Tap to set as the homepage.
Chapter 7 Communicaon
7.1 Instant Messenger
7.2 E-mail
Your Smartpad is equipped with Instant Messager, E-mail for communicaon.
Before you start online communication, your Smartpad must have an active internet
connecon. See Chapter 5 Connecng to the Interenet via WiFi for detailed instrucons
on how to connect to the internet.
7.1 Instant Messager
Instant messager allows you to send and reveive instant messages online.
To open Messager,
From mail Menu, select Messaging.
1. Click New message, open the message windows.
2. Select the number you want to pass the message.
3. Key-in the word you want to pass
4. Click Send.
7.2 E-mail
E-mail lets you enjoy the efficiency of staying in touch with personal and business
contacts. Your Smartpad uses Gmail as the default e-mail client. Gmail is a soware that
lets you access email on your Smartpad by an account from an email provider or from
your corporate.
To open Gmail applicaon
From Main Menu, select Email.
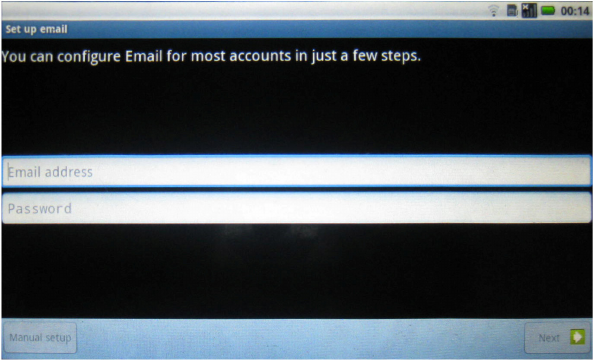
To use gmail, you need to setup an account for the rst me.
To setup an account for the rst me
you can congure Email for most accounts in just a few steps.
1. Aer opening the Gmail, the set up mail window pop-up windows will appear.
2. Enter the email address, password, then tap Next buon.
3. Then it will appear the Checking incoming server sengs windows, it will need to wait
seconds to nish this.
4. If ok, will appear your received mails, you could enter Email by Internet also.
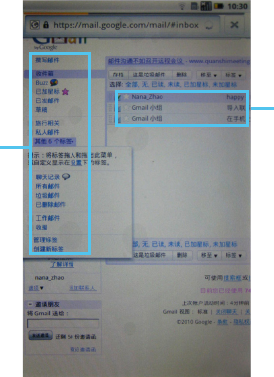
Using Email
Aer seng up your email accounts, you can start sending and receiving emails. There
are some folders in the le of your email windows. You could add or delete some favorite
folders by press and move the folders.
Message windows.
Displays the email
subject, sender,
date and me sent.
Tap th e subject to
view the email.
Displays the foders.
Tap the folder name
to view the content
in the message
window. See folder
informaon below.
Some Folders:
Inbox. Received mails are sent to this folder.
Sent. Sent messages are saved in this folder.
Dras. Composed mails that are not yet sent are saved in this folder.
Trash. Deleted mails are saved in this foler.
Chart list. All chart contents are saved in this folder.
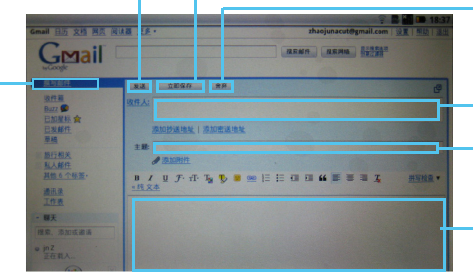
To Send Email
Write email.
Tap to open
the Wring
windows.
Receiver. You
could add
Receiver from
contact list.
Subject.
Content.
Send Buon. Tap to
send out the email.
Save immediately
Buon.
Discard. Tap
to discard the
email.
Chapter 8 Applicaons
8.1 Sound Recorder
8.2 Camera
8.3 E-book Reader

8.1 Sound Recorder
The Sound Recorder allows you to record your voice.
To use the Sound Recorder
From the Main Menu, select Sound Recorder.
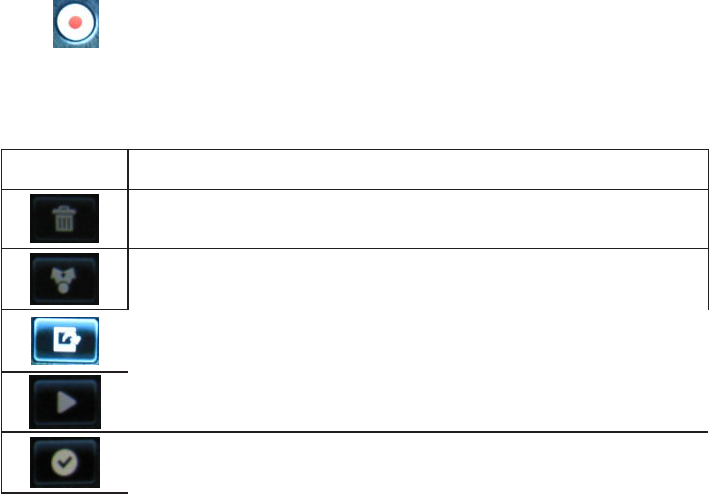
To record your sound
1. Tap to start recording a voice clip.
2. Tap to stop recording.
To save the recording
1. Aer tapping Stop, the system will automacally the Save dialogue box, and ask if you
want to save the sound le.
2. You could choose " Use this recording" to save the sound or "Discard" to discard the
sound.
To play back a recording
1. From the Main Menu, select Music> Playlists>My recordings.
2. Choose which you want to play.
The Sound recorder interface
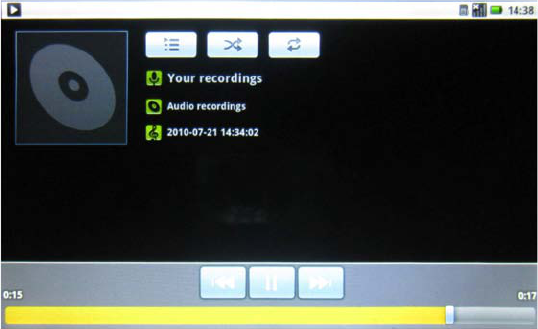
The playing Recording interface

8.2 Camera
Your Smartpad comes with a built-in webcame and a camera to take photos and video
clips.
To acvate the Camera
From the Main Menu, select Camera.
Take a picture
When you open the Camera applicaon, the camera is set to photo capture by default.
1. Focus your camera on the image you want to capture.
2. Tap and hear a crack to capture the image.
3. Tap the photo, there are four icon: Delete, Share, Set As, Done.
You can view video clips in the Gallery, and browse the photo by move your nger in le
and right direcon.
Record a Video Clip
1. Keep press the Buon from boom to up as picture:
2. Tap and hear ckling to start recording.
3. Tap camera to nish the recording.
4. Tap the recording, there are four icon: Delete, Share, Play, Done.
You can view video clips in the Gallery, and browse the photo by move your nger in le
and right direcon.
Icon Descripon
Delete: Tap to delete the photo or video.
Share: Tap to share the photo or video with other by ve style:
Bluetooth, Email, Facebook, Messaging, Twidroid.
Set As: Tap to pop up a windows you could choose Contact icon or
Wallpaper.
Play: Tap to play video.
Done: Tap to open camera applicaon aggin.
8.3 E-Book Reader
Your Smartpad support Aldiko as the default E-book client.
E-Book Reader
From the Main Menu, select Aldiko.
When you open the Aldiko applicaon, it will pop-up some ps windows automacally.
Some Tips:
1. The books you download are saved on you SD card in the eBooks directory.
2. Doing a long press on book will bring up a context menu that allows you to delete the
book, edit the book details, etc.
3. While reading a book, you can adjust the brghtness of the display without leaving the
page by swiping your nger along the le edge of the screen(this can be recongured in
the sengs).
4. When browsing online catalogs, books that you have already downloaded will be
highlighted in green.
5. Some online catalogs provide a search functionality to help you find what you are
looking for. Check the opon menu when browsing a catalog.
6. From any screen, you can quickly get back to the home screen by selecng the 'Home'
menu opon.
7. The search tool displays suggesons as you type. Click on a suggested item to open the
book.
8. Once you start reading a book, it will show up on the home shelf in the 'Current
Reads'list.
9. When viewing your collecon of books, just start typing characters using keyboard to
lter the list.
10. While reading a book, you can navigate forwards and backwards using either ing or
tap gestures (this can be recongured in the sengs).
11. While you stop reading a book, we will remember which page you were reading and
bring you right back to that page the next me you open the book.
12. When viewing your collection of books, rotate your device to landscape mode to
switch to bookshelf view.
13. When you download a book, we will automatically assign tags to it based on its
subject(s)('novel', 'science-con', etc.).
14. Some books include links embedded in the text. Select a link by doing a long press. If
the link is a webpage, it will open in your browser; if the link points to another book, we
will download and import that book to your library.
15. If you add a bookmark to a book and don't specify a tle for that bookmark, we will
put the current posion in the book as default tle(e.g'14%‘)
16. The books you are currently reading are easily accessible from the home screen in
the 'Current Reads'list.
17. Books on the home shelf's 'Current Reads' list will be removed from the shelf when

you nish them. You can also remove them manually by doing a long press on the book
and selecng the 'Remove from reading list' opon.
18. From any screen, you can quickly get back to the home screen by selecng the 'Home'
menu opon.
19. You can dene your own 'Collecons' to help you arrange your books.
Aldiko include two items: Bookshelf, Download Books.
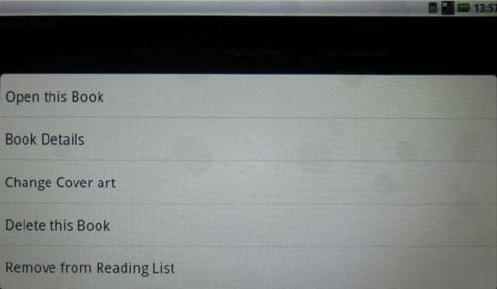
1. Bookshelf. You could click the book on bookshelf to open the E-book you want to read
directly, or keep pressing the book you want unl a dialog includ:
1> Open this Book
2> Book Details
3> Change Cover art
4> Delete this Book
5> Remove from Reading List
2. Down load Books.
Befor you down load books online, be sure the your network connecon is available or the
server is temporarily down.
There are type for you to quickly choose book online.
Chapter 9 Tools
9.1 OI File Manager
9.2 Calculator
9.3 Alarm Clock
9.4 SD Card Manager
9.1 OI File Manager
The OI File Manager lets you browse and manage the contents of your Smartpad.
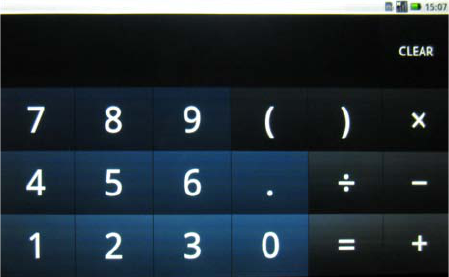
9.2 Calculator
You can do basic calculaons using the Calculator in your device.
To open the Calculator
From the Main Menu, select Calculator.
The Calculator Interface
You can move your nger by le and right to come out other mathemacs.
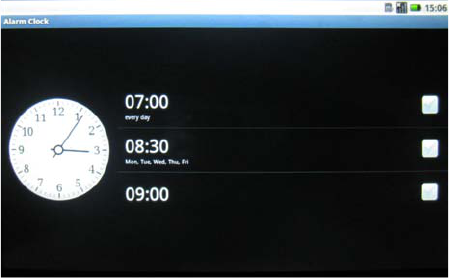
9.3 Alarm Clock
You could set you alarm clock by following belows teps:
To open the Alarm Clock
From the Main Menu, select Alarm Clock.
The Alarm Clock interface
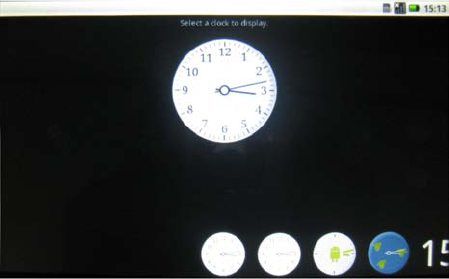
1. You could set specic Clock outlook by tap the clock, then choose you want in pop-up
windows. There are 5types you could choose.
The Alarm Clock outlook Interface
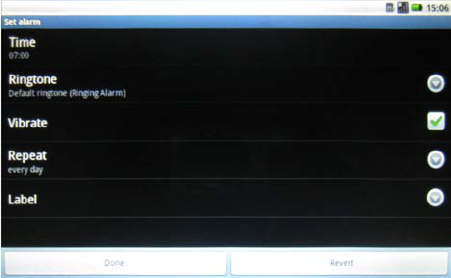
2. You could set alarm clock by ve items: Time, Ringtone, Vibrate, Repeat, Label. Tap
Done or Revert to exit aer seng.
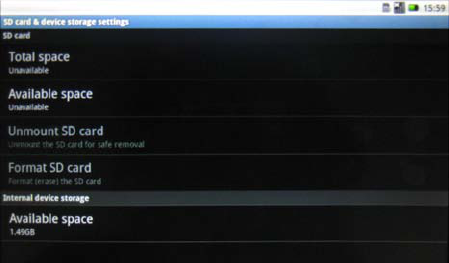
9.4 SD Card & device storage
Check and manage micro SD card contents through the SD card & device storage.
To access SD Card & device storage
From the Main Menu, select Seng>SD Card & device storage.
Note: Format will delete all data in the device, and cannot restore!
Chapter 10 System Seng
10.1 System Informaon
10.2 Volume Seng
10.3 Power Management
10.4 S3 System
10.5 Reboot the Smartpad
10.6 System Restore
You could view your Smartpad's system informaon such as: System updates, Status,
Baery use, Model number, Firmware version, Baseband version and so on.
To view system sengs
From the Main Menu, select Sengs>About device.
10.1 System informaon
Check system informaon such as storage status, Model number, Kernel version through
the system infor applicaon.
10.2 Volume & Display Seng
1. By pressing the volume buons. See Chapter 1 Top Boom Panel for the locaon of
the Volume buons. Tap and slide the sliders to adjust the Volume.
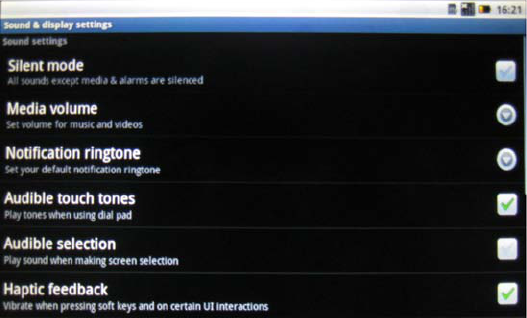
2. You could set system sound and display in Sound & display sengs windows
About Sound sengs, It include: Silent mode, Media Volume, Nocaon ringtone,
Audible touch tones, Audible selecon, Hapc feedback, SD card nocaons.
About Display sengs, It include: Orientaon, Animaon, Brightness, Screen meout.
The Sound & display sengs interface
10.3 Power Manager
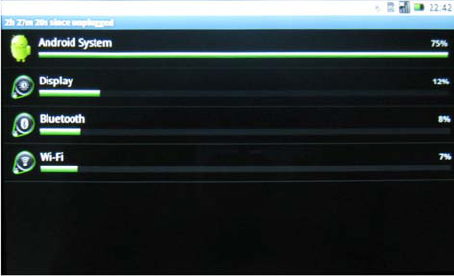
You could view the detail baery using informaon.
To access baery using
From the Main Menu, select Sengs>About device>Baery use.
The Baery use detail interface
1. Android System need to use 75% power.
2. Display need to use 12% power when working, and keep press the Display icon will
pop-up a windows: the display working me, and you could reduce the screen brightness
and/or screen meout.
3. Bluetooth need to use 8% power when working, and keep press the Bluetooth icon
will pop-up a windows: the Bluetooth working me, and to turn o bluetooth when you
aren't using it will reduce power waste.
4. Wi-Fi need to use 7% power when working, and keep press the Wi-Fi icon will pop-up
a windows: the Wi-Fi working me, and to turn o Wi-Fi when not using it or where it is
not available to reduce power waste.
10.4 S3 System
You could set you Smartpad sleep to save power when it isn't working by entering S3
system.
To enter S3 system
Tape the power buon on the le panel, it may enter S3 system with power LED
ickering.
To Exit S3 system
Tape the power buon on the le panel, it may exit S3 system and enter the normal
working state.
10.5 Reboot the Smartpad
If your smartpad stops responding, responds slowly, or freezes, you can reboot it.
Reboot Hole
Insert a clip into the reboot hole on the back of the smartpad to acvate the reboot
swithch.
10.6 System Restore
If you encounter any problems with the smartpad system, you can reset factory data.
Aer the Recovery, smartpad will be set the factory default status and all internal data
might be lost. Therefore, please backup your data before recovery.
To access system restore
From the Main Menu, select Sengs> Privacy> Factory data reset.

Safety Instrucons
Use the following safety guidelines to help protect yourself and your device.
General Warnings
• Donotoperateyourdeviceforalongmewhilethedevicehasdirectcontacttothebody.Thismaycause
overheatattheboomofthedevice.
• Donotaempttodisassemblethedeviceyourself.Alwaysfollowinstallaoninstruconsclosely.
• Toavoidpersonalinjuryfromelectricshockorre:
Do not operate the device close to water, for example, near the bathtub,kitchensink, laundrytub,wet
basement,swimmingpool,orintherain.
Donotconnectordisconnectanycablesorperformmaintenanceorreconfigurationofthisproductduring
thundershower,tempestorstorm
Donotpushobjectsintotheairventsoropeningsofyourinteriorcomponentsandmaycausereorelectric
shock.
Ifthebaerypackleaksandtheinternaluidcontactseyes,donotrub.Washtheeyeswithcleanrunningwater
andimmediatelyseekmedicalaenon.Otherwise,eyeinjurymayberesult.
Ifacidleakingfromthebaerypackcontactsyourskinorclothing,immediatelywashitwithrunningwater.
Otherwise,shininammaoncanoccur.
Operate the deviceattherecommendedtemperaturerangeof +5˚Cto+35˚C(+41˚Cto +95˚C).Store itata
temperatureof-20˚Cto+60˚C(+4˚Cto+140˚C).
Adapter Warnings
Seetheinstallaoninstruconsbeforeconnecngtothepowersupply(refertoChargingthebaeryonpage15)
Makesure that thepower outlet youplugtheadapterintoiseasily accessibleand located as close tothe
equipmentoperatoraspossible.
- Whenusingyouradapter,makesuretoposionitaroundobjectssoitwillnotbecutordamaged.
- UseonlytheACadaptersthatareapprovedforusewiththisdevice.Useofanothertypeofadapter
mayriskreorexplosion.
- Beforeyouconnectthedevicetoapowersource,ensurethatthevoltagerangoftheACadapter
matchesthatoftheavailablepowersource.
- 220V/50HzinChina.
- 115V/60HzinmostofNorthandSouthAmericaandsomeFarEasterncountriessuchasSouthKorea
andTaiwan.
- 100V/50HzineasternJapanand100V/60HzinwesternJapan.
- 230V/50HzinmostofEurope,theMiddleEast,andtheFarEast.
- If you useanextension cablewith your ACadapter, ensurethatthe totalampere ratingofthe
productspluggedintotheextensioncabledoesnotexceedtheampererangoftheextensioncable.
- DonotcovertheACadapterwithpapersorotheritemsthatwillreducecooling;also,donotusethe
ACadapterwhileitisinsideacarryingcase.
- Toremovepowerfromthedevice,turnito,removethebaery,anddisconnecttheACadapterfrom
the electrical outlet.
- Theplugisthedisconnecngdevice
Baery Pack Warning
- Donotcarryabattery inyourpocket,purse,orothercontainerwheremetalobjects (suchascar
keys)couldshort-circuitthebaeryterminals.Theresulngexcessivecurrentowcancauseextremelyhigh
temperaturesandmayresultindamagefromburns.
- Dangerofexplosionifbaeryisincorrectlyreplaced.Replaceonlywiththesameorequivalenttype
baeryrecommendedbythemanufacturer.
- Donotdisposalofbaerypacknearaheatsource.Heatcanmelttheinsulaonanddamageother
safetyfeatures,possiblyleadingittoleakacid,overheat,emitsmoke,burstand/orignite.
- Do notimmerse thebatterypackinwaternor allow it togetwet. Itsprotectivefeaturescanbe
damaged,itcanbechargedwithextremelyhighcurrentandvoltage,abnormalchemicalreaconsmayoccur,
possiblyleadingittoleakacid,overheat,emitsmoke,burstand/orignite.
- Donotcrush,disassemble,puncture,incinerateorshortcircuitexternalcontactsofbaerypack.
- Donotconnectthepositive(+) and negative(-)terminals withametalobjectsuch aswire.Short-
circuingmayoccurleadingthebaerypacktoleakacid,overheat,emitsmoke,burstand/orignite.
- Donotuseanapparentlydeformedordamagedbaerypack,whichmayleakacid,overheat,emit
smoke,burstand/orignite.
- Ifthebaerypackleaks,givesoabadodor,generatesheat,becomesdiscoloredorimmediately
removeitformthedeviceorchargerandstopusingit.
Baery Pack Disposal
- Disposeofthelithiumionbaerypacksonlyatapproveddisposalsites.Tolocateanappropriatesite,
contactthesolidwastedisposalocialswhereyouliveorlookforarechargeablebaeryrecyclingwebsitethat
listsdisposallocaonsnearyou.
- Donotdisposeofbaerypacksinare,throwtheminatrashreceptacle,puttheminarecyclingbin
notintendedfortheirdisposal,orotherwisediscardtheminamannerthatmayresultintheirbeinghazardous
totheenvironment.
Environment
Forhumanhealthandenvironmentprotecon,pleasetakenoceofbelowinformaon.
WEEE NOTICE
- TheDirecve2002/96/EConWasteElectricalandElectronicEquipment(WEEE)whichenteredinto
forceon13thFebruary2003,istoensurethatWEEEarerecycledusingbestavailabletreatment,recoveryand
recyclingtechniquesinordertoprotecthumanhealthandnaturalresources.
- Recycling&disposal:
- DonotdisposeofyourproductwhichhastheWEEElogo(shownasright)onitoronitsboxinthe

generalhouseholdwastebin.
- Be sure to dispose of all your productsinthe designed collection facilities for recycling of such
hazardouswastes.
- SeparatecollectionandproperrecoveryofyourWEEEatthetimeofdisposalwillallowustohelp
conservingnaturalresources. Moreover, proper recyclingofWEEE will ensuresafety of human health and
environment.
- FormoreinformaonaboutWEEEdisposal,recovery,andcolleconpoints,pleasecontactyourlocal
citycenter,householdwastedisposalservice,retailerormanufactureroftheequipment.
RoHS Compliance
ThisproductisincompliancewithDirecve2002/95/ECoftheEuropeanParliamentandoftheCouncilof27
January2003,ontherestriconoftheuseofcertainhazardoussubstancesinelectricalandelectronicequipment
(RoHS)anditsamendments.
AccordingtoManagementMethodsforControllingPolluonCausedbyElectronicProductsandManagement
MethodsforControllingPolluonCausedbyElectronicinformaonProducts,theinformaonreq>uiredbySJ/
T11364-2006islistedinthefollowingtable.
NamesandContentsofToxicorHazardousSubstancesorElementsContainedinProducts.
Federal Communicaons Commission (FCC) Statement
Youarecauonedthatchangesormodicaonsnotexpresslyapprovedbythepartresponsibleforcompliance
couldvoidtheuser’sauthoritytooperatetheequipment.
ThisequipmenthasbeentestedandfoundtocomplywiththelimitsforaClassBdigitaldevice,pursuanttopart
15oftheFCCrules.Theselimitsaredesignedtoprovidereasonableproteconagainstharmfulinterference
inaresidenalinstallaon.Thisequipmentgenerates,usesandcanradiateradiofrequencyenergyand,ifnot
installedandusedinaccordancewiththeinstrucons,maycauseharmfulinterferencetoradiocommunicaons.
However,thereisnoguaranteethatinterferencewillnotoccurinaparcularinstallaon.Ifthisequipmentdoes
causeharmfulinterferencetoradioortelevisionrecepon,whichcanbedeterminedbyturningtheequipment
oandon,theuserisencouragedtotrytocorrecttheinterferencebyoneormoreofthefollowingmeasures:
-Reorientorrelocatethereceivingantenna.
-Increasetheseparaonbetweentheequipmentandreceiver.
-Connecttheequipmentintoanoutletonacircuitdierentfromthattowhichthereceiverisconnected.
-Consultthedealeroranexperiencedradio/TVtechnicianforhelp.
ThisdevicecomplieswithPart15oftheFCCRules.Operaonissubjecttothefollowingtwocondions:
1)thisdevicemaynotcauseharmfulinterference,and
2)thisdevicemustacceptanyinterferencereceived,includinginterferencethatmaycauseundesiredoperaon
of the device.
FCC RF Radiaon Exposure Statement:
ThisequipmentcomplieswithFCCradiaonexposurelimitssetforthforanuncontrolledenvironment.End
usersmustfollowthespecicoperanginstruconsforsasfyingRFexposurecompliance.Thistransmier
mustnotbeco-locatedoroperanginconjunconwithanyotherantennaortransmier.