Compal Electronics PA3190U-1ETC IEEE 802.11b WLAN Module Card User Manual IEEE 802
Compal Electronics Inc IEEE 802.11b WLAN Module Card IEEE 802
Users Manual Revision 3
IEEE 802.11b WLAN Adapter
Users Manual
Version: 1.0 -- January 2002
1
Copyright Statement
No part of this publication may be reproduced, stored in a retrieval system, or transmitted in any
form or by any means, whether electronic, mechanical, photocopying, recording or otherwise
without the prior writing of the publisher. Windows CE is trademark of Microsoft Corp.
All copyright is reserved.

2
1. Overview 4
2. Hardware and Drive Installation 4
3. LED Descriptions 7
4. Wireless LAN Module Power 7
5. Configuration 8
5.1 IP Address Page
IP Address
Subnet mask
Default gateway
5.2 Name Servers Page
DNS, Alt DNS
WINS, Alt WINS
5.3 Link Page
SSID
Channel
TxRate
BSSID
IP Address
Subnet Mask
Gateway
5.4 Configuration Page
Mode
SSID
Channel
Country
Rescan
Radio on/off
Link Quality
5.5 Advanced Page
Wired Equivalent Privacy
Key ID
Key
Transmission Rate
Power Saving
5.6 Scan Page
Rescan
5.7 Info Page
MAC Address
Firmware version
Driver version
Utility version
6. TMU-Traffic Monitoring Utility 17
7. Troubleshooting 20
8. FAQ 21
TABLE OF CONTENTS
3
Federal Communication Commission Interference Statement
This equipment has been tested and found to comply with the limits for a Class B digital
device, pursuant to Part 15 of the FCC Rules. These limits are designed to provide
reasonable protection against harmful interference in a residential installation. This
equipment generates, uses and can radiate radio frequency energy and, if not installed and
used in accordance with the instructions, may cause harmful interference to radio
communications. However, there is no guarantee that interference will not occur in a
particular installation. If this equipment does cause harmful interference to radio or television
reception, which can be determined by turning the equipment off and on, the user is
encouraged to try to correct the interference by one of the following measures:
- Reorient or relocate the receiving antenna.
- Increase the separation between the equipment and receiver.
- Connect the equipment into an outlet on a circuit different from that to which the
receiver is connected.
- Consult the dealer or an experienced radio/TV technician for help.
FCC Caution: To assure continued compliance, (example - use only shielded interface
cables when connecting to computer or peripheral devices) any changes or modifications
not expressly approved by the party responsible for compliance could void the user's
authority to operate this equipment.
This device complies with Part 15 of the FCC Rules. Operation is subject to the following
two conditions: (1) This device may not cause harmful interference, and (2) this device must
accept any interference received, including interference that may cause undesired
operation.
IMPORTANT NOTE:
Caution: FCC Warning Statement:
This equipment complies with FCC RF radiation exposure limits set forth for an uncontrolled
environment. At least 20 cm separation distance should be maintained from the radiator to
the body of the user excluding hands, wrists and ankles. The radiator is prohibited to be
operated when this device is on the user's pocket or belt-clipped on the body.
This device is specific for pocket PC (PDA) host. It is not allowed to be used in laptop
computer which is possible to have a separation distance shorter than 20 cm.
Since this device is seeking authorization of Limited Module Approval, the host
manufacturer has to mark their host with statement that this host contains a wireless module,
it is recommended to label your host by this statement “ Contains Transmitter Module FCC
ID: GKRPA3190U-1ETC”.
4
1. Overview
Thank you for purchasing our product. The IEEE 802.11b WLAN Adapter is a CF™
Interface Wireless LAN Module, which can connect your Pocket PC wirelessly to the existing
IEEE 802.11b wireless networks or form its own Wireless Network. Using the adapter in
the Pocket PC, you can enjoy the complete mobile and high-speed wireless Internet
connectivity wherever you are.
Please read this manual carefully to get familiar with this product. This manual contains
detailed instructions in the operation of this product. Please keep this manual for future
reference.
2. Hardware and Driver Installation
Hardware Installation:
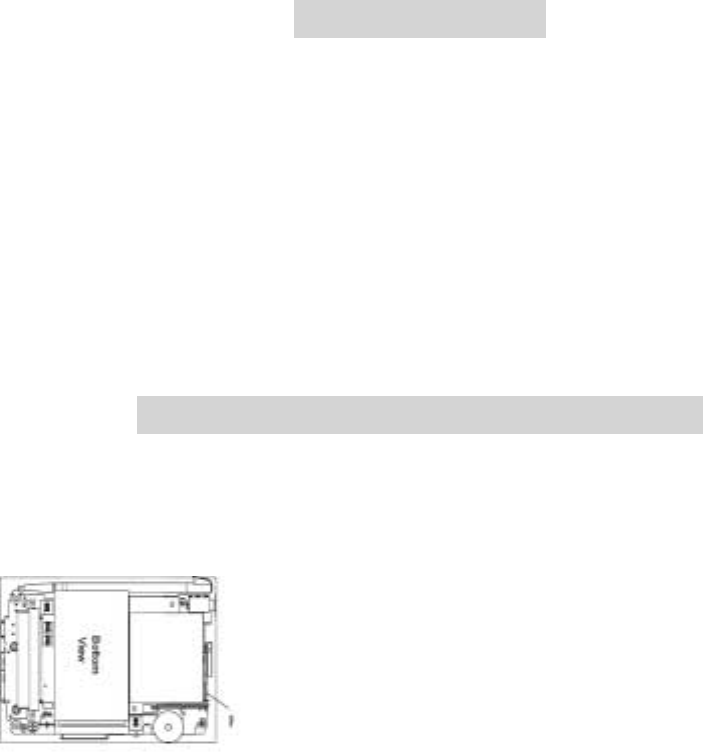
1. Remove the screws to open the PDA back cover
2. Carefully place the module into the module compartment
3. Put the cover back and fasten the screws
Driver Installation:
Step 0: The process below is for install Platform Builder common-line. Please don’t via IDE
interface to process the following step1 through step 3.
Step 1: Please copy the following files to an appropriate folder: EC2NDS.dll, EC2NDS.pdb,
EC2NDS.map
Example: 1. Please copy the file to the designated workspace for building in EC2NDS where
NE2000 exists.
2. Or please copy the file to any folder.
Step 2: Please open the file “ PROJECT.BIB” of the built-in EC2NDS via WordPad,
and follow the process of writing other components . Copy the path of EC2NDS.dll in Step 1
to “PROJECT.BIB” and press “save”.
Example: If the file ” EC2NDS.dll” is placed in
“ c:\wince300\public\common\oak\target\x86\ce\release\..”, you have to put
“EC2NDS.dll” in the following path:
c:\wince300\public\common\oak\target\x86\ce\release\ EC2NDS.dll”into and then save the
file “PROJECT.BIB”.
Step 3: Via WordPad, open the file “ COMMON.REG” which you would like to built-in”EC2NDS”.
Please copy the following two Registries to NE2000, Proxim, Xircom2 opposite position
respectively (Note: There are two registries exist in “COMMON.REG”, “NE2000, Proxim,
5
Xircom2”. Registries of EC2NDS need to be copied to the opposite position separately). Put
“COMMON.REG” into the Registry of EC2NDS and then save the file “COMMON.REG”.
1st. Registry
; @CESYSGEN IF CE_MODULES_EC2NDS
[HKEY_LOCAL_MACHINE\Drivers\PCMCIA\AWLAN-WS8P/IEEE-77DF]
"Dll"="ndis.dll"
"Prefix"="NDS"
"Miniport"="EC2NDS"
; @CESYSGEN ENDIF CE_MODULES_EC2NDS
2nd. Registry
; @CESYSGEN IF CE_MODULES_EC2NDS
[HKEY_LOCAL_MACHINE\Comm\EC2NDS]
"DisplayName"="IEEE 802.11d WLAN Adapter"
"Group"="NDIS"
"ImagePath"="EC2NDS.dll"
[HKEY_LOCAL_MACHINE\Comm\EC2NDS\Linkage]
"Route"=multi_sz:"EC2NDS1"
[HKEY_LOCAL_MACHINE\Comm\EC2NDS1]
"DisplayName"="IEEE 802.11b WLAN Adapter"
"Group"="NDIS"
"ImagePath"="EC2NDS.dll"
[HKEY_LOCAL_MACHINE\Comm\EC2NDS1\Parms]
"BusNumber"=dword:0
"BusType"=dword:8
"NetworkType"=dword:1
"InterruptNumber"=dword:10
"IoBaseAddress"=dword:768
"CardType"=dword:2
"APDensity"=dword:1
"NetworkType"=dword:1
"RTSThresh"=dword:2432
"FragThresh"=dword:2432
"SSID"="ANY"
"StationName"="Client"
"TxRate"=dword:15
"VendorDesc"="AWLAN-WS8P/IEEE"
6
"PSMode"=dword:2
"PSLevel"=dword:0,
"Encapsulation"=dword:1
"WepReq"=dword:0
"DefaultKeyId"=dword:0
"DefaultKeys"=""
"ATIMWindow"=dword:0
"ListenInterval"=dword:3
"DSChannel"=dword:10
"AuthentAlg"=dword:65535
"DecryptInDriver"=dword:1
"EncryptInDriver"=dword:1
"WEPFactor"=dword:0
"PreambleMode"=dword:1
"IBSSInDriver"=dword:0
"BeaconPeriod"=dword:100
"BasicRates"=dword:3
"SupportedRates"=dword:15
"UseAuxPortPatch"=dword:0
"EnableRadio"=dword:1
"AdhocDemoMode"=dword:0
"NumAllocRxBufs"=dword:3
"NumAllocTxBufs"=dword:10
Step 4: In the command menu, click “Build - - Open Release Directory” to get DOS window put
out. Type “makeimg” and press enter. The new file nk.bin is created in the folder “Release
Directory”.
7
3. LED Descriptions
LED indicates the different status of connection:
Status Function
Off Power off
Steady red Connected to Access Point, or, being under 802.11 Ad Hoc mode
(either connected or disconnected).
Flashing red Searching for the Access Point (disconnected)
4. Wireless LAN Module Power
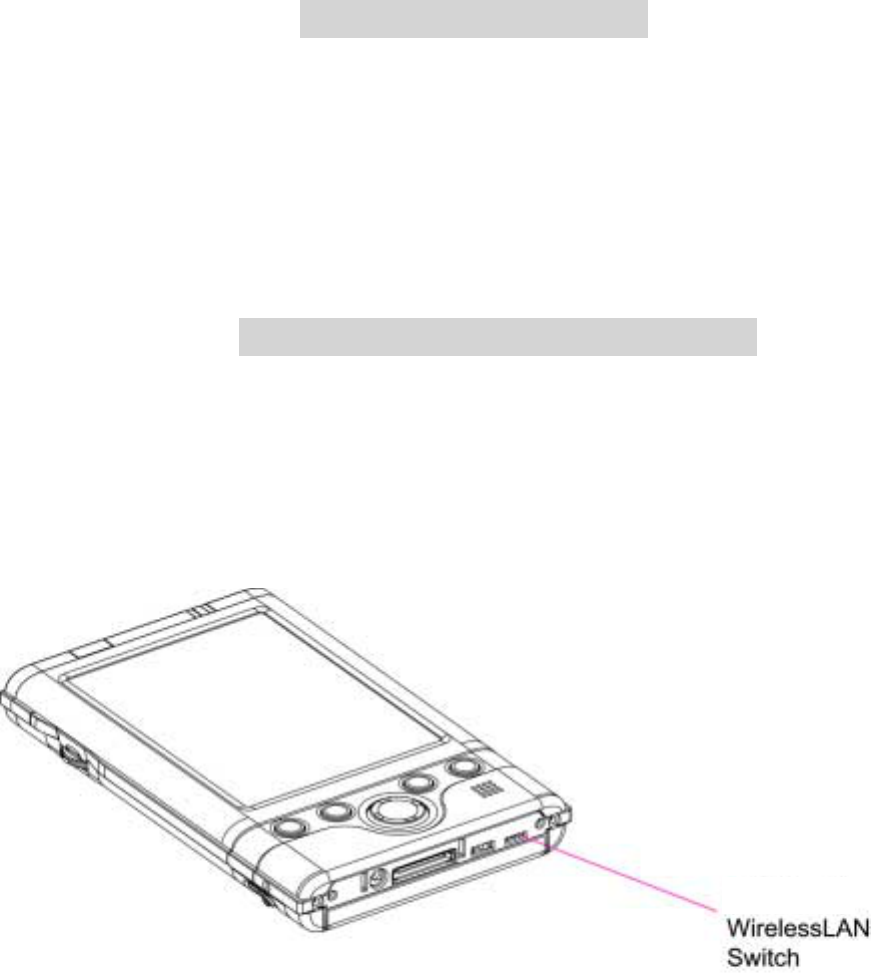
1. To connect to the Wireless Network, make sure the Wireless LAN Switch is turned on.
(The default setting is Power Off. Press the switch to the left to turn the power on.)
2. If this is your first time turning on the switch, IP Address Page will pop up for you to set the
IP address, Subnet mask and Default gateway.
8
5. Configuration
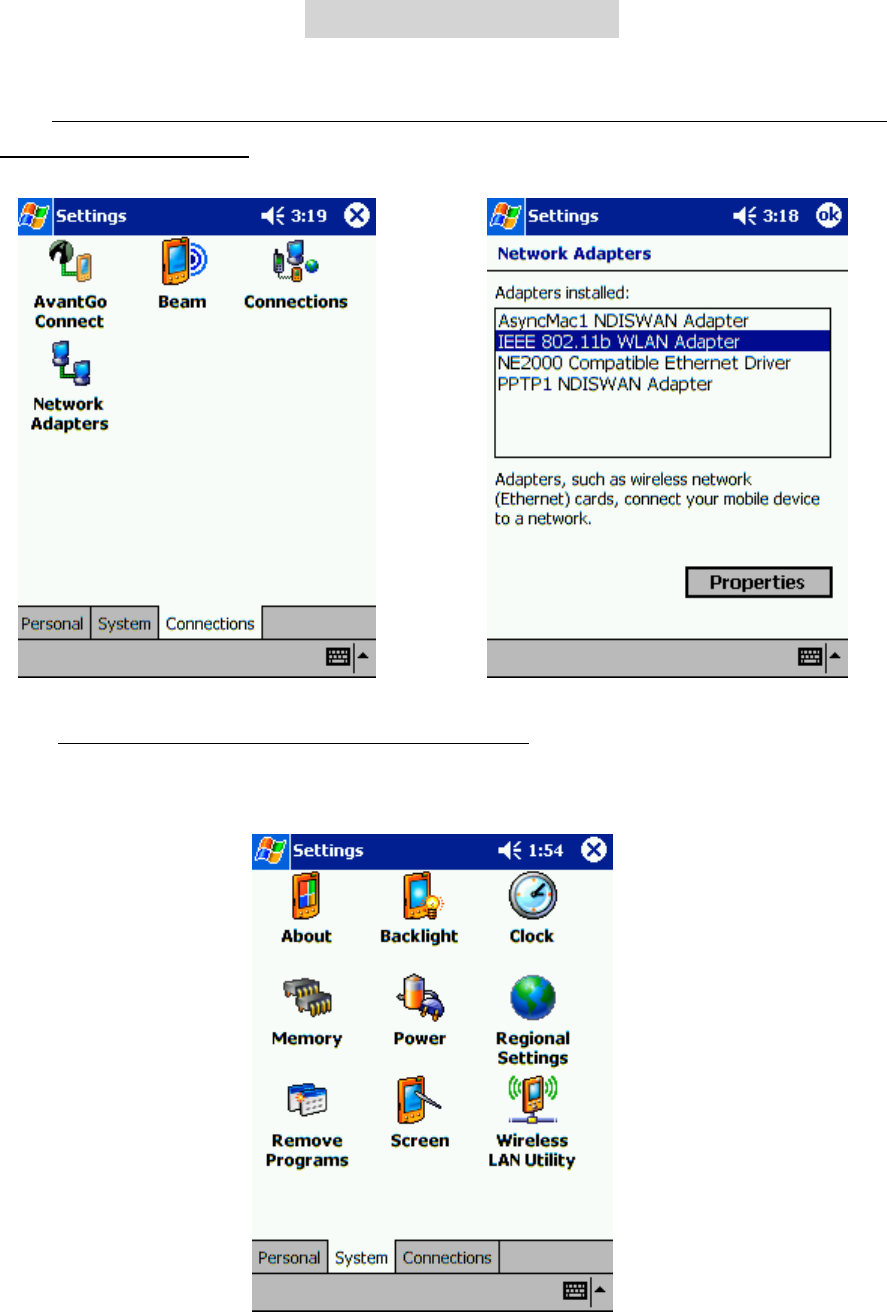
1. Click Start→Settings→Connections→Network Adapters→“IEEE 802.11b WLAN Adapter”
→Properties→IP Address to set IP address, Subnet mask and Default gateway settings if
needed.
2. Click Start→Settings→System→Wireless LAN Utility to view or adjust other configuration
settings, such as Mode and SSID etc. Click “Apply” and “Ok” to save and implement the
settings.
Details of configuration are as follows:
9
5.1 IP Address Page
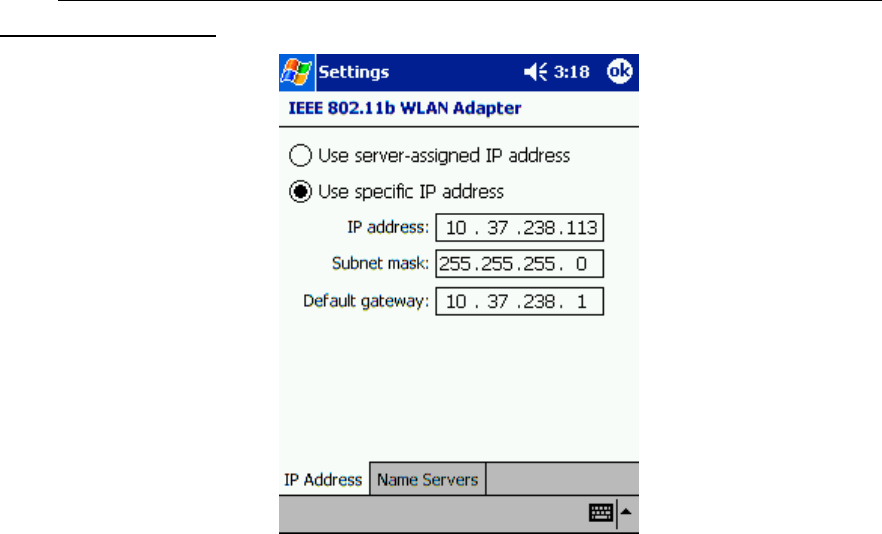
Use IP Address Page to view and edit the IP address, Subnet mask and Default gateway.
Click Start→Settings→Connections→Network Adapters→“IEEE 802.11b WLAN Adapter”→
Properties→IP Address
! IP Address:
IP Address is Internet Protocol Address; a numeric address such as 10.37.238.100 that the
domain name server translates into a domain name. Each node on the IP network should have a
unique IP address.
! Subnet mask:
A number used to identify a subnetwork when multiple networks share an IP address. For
example 255.255.255.0
! Default gateway:
This is a device used to forward IP packets to and from a remote destination.
Note! Please check with your network administrator for these connection settings.
10
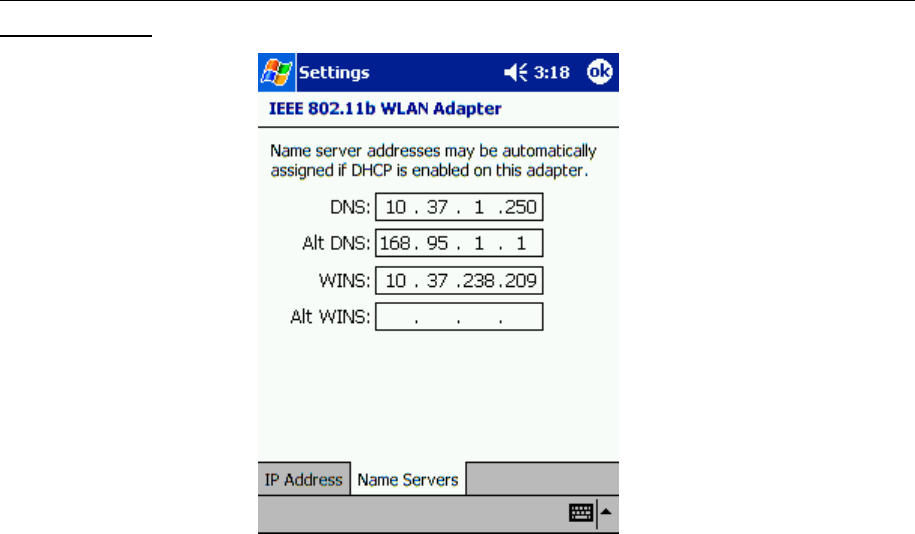
5.2 Name Servers Page
Use Name Servers Page to view and edit DNS, Alt DNS, WINS and Alt WINS.
Start→Settings→Connections→Network Adapters→“IEEE 802.11b WLAN Adapter”→Properties
→Name Servers
! DNS:
Domain Name System is a database system that translates addresses and domain names. For
example, a numeric address like 232.245.021.54 can become something like cba.com. DNS
can also be used to control Internet email delivery.
! WINS:
In Pocket PC, Windows Internet Naming Service has two functions; one is a Microsoft Net
BIO name server that eliminates the broadcasts needed to resolve computer names to IP
addresses by providing a cache or database of translations. The other one is to set the IP
address of the host computer that you already construct the partnership for Network adapter
Active sync purpose. Note! Without setting the host computer’s IP address in the WINS,
you cannot wirelessly synchronize your Pocket PC with your host computer.
! Alt DNS:
Alt DNS stands for Alternative Domain Name System. Used to substitute main DNS when
necessary.
! Alt WINS:
Alt WINS stands for Alternative Windows Internet Naming Service. Used to substitute main
WINS when necessary.
11
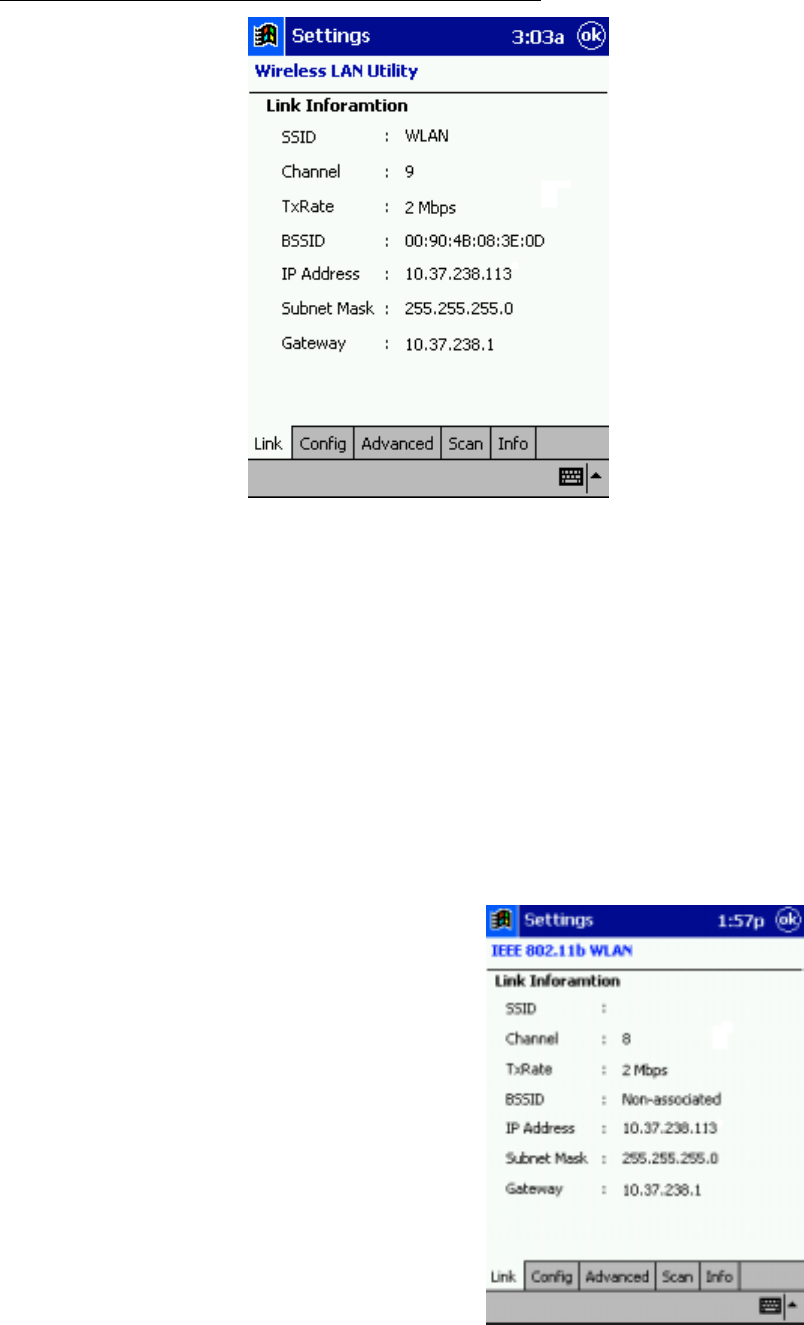
5.3 Link Page
Use the Link page to view SSID, Channel, TxRate, BSSID, IP Address, Subnet Mask and Gateway.
Click Start→Settings→System→Wireless LAN Utility→Link
! SSID: An up to 32 character case sensitive name shared among all devices on a wireless
network. The name been selected from the Scan page will appear in this field. The default
value is “ANY”, which will automatically scan and connect the best performance Access Point
nearby.
! Channel: Indicates the channel currently in use for Access Point or 802.11 Ad Hoc stations.
! TxRate: Indicates the current data transmission rate in use.
! BSSID: Indicates the current Basic Service Set ID of the Access Point or 802.11 Ad Hoc
network been selected. You can check the BSSID list in the Scan page.
! IP Address: Indicates the current Internet Protocol Address of the network in use.
! Subnet Mask: Indicates the Mask of the subnetwork been used currently.
! Gateway: Indicates the IP Address of the gateway been used currently.
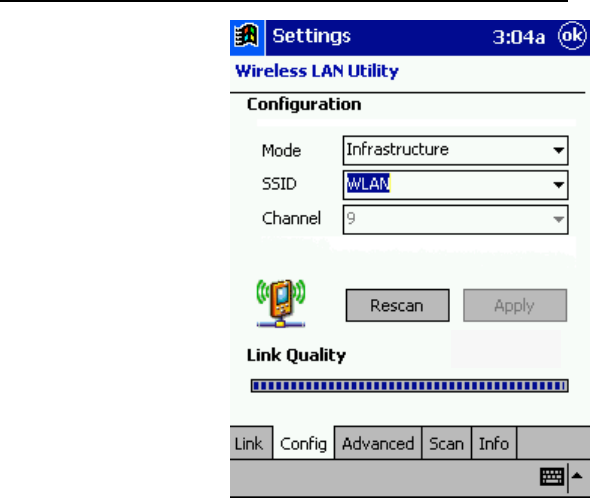
When the adapter is disconnected with
the Access Point or the 802.11 Ad Hoc
network, “Non-associated” will appear
in the BSSID field.
12
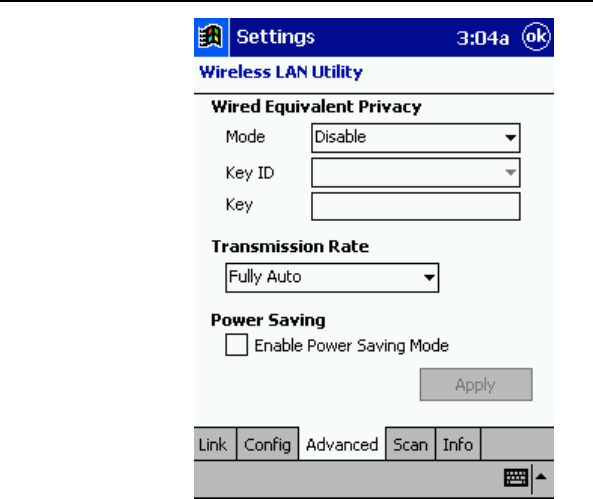
5.4 Configuration Page
Use the Configuration page to set the Mode, SSID, Channel and Country, and to view Link
Quality as well.
Click Start→Settings→System→Wireless LAN Utility→Config
! Mode: Use the Mode pull-down menu to select the operating mode.
Infrastructure – This is a default mode. This mode allows Wireless LAN Module to
transmit and receive data with an Access Point. This mode enables roaming
between AP cells in the network.
802.11 Ad Hoc – This mode allows Wireless LAN Module to form its own local network
where adapters communicate peer-to-peer without Access Points using a
shared SSID.
! SSID: Service Set Identifier is a group name that will be shared by every member of your
wireless network. You will only be able to connect with an Access Point (AP), which has
the same SSID. Note that the SSID will be case sensitive. Under 802.11Ad Hoc mode,
the SSID must be the same among stations so that the Pocket PC can communicate
properly within the Wireless Network.
! Channel: In France, only channel 10 and 11 are available. In USA, Canada, Europe
or Australia, you have 11 options: channel 1~11. Note! If you cannot connect with the
APs or the 802.11 Ad Hoc Network Stations, check if the channel been used is between
1~11. Using channels other than 1~11 will not enable the connection. The channel is
set by the adapter, which starts the 802.11Ad Hoc network. Under 802.11Ad Hoc mode,
the first station forms the 802.11 Ad Hoc network should choose a proper SSID and the
channel for use. Other stations will only have the same SSID set to join the 802.11 Ad
Hoc network automatically.
! Rescan: Used to search the proper Access Point close to the adapter.
! Link Quality: An indicator of how clearly the adapter can hear the Access Point.
13
5.5 Advanced Page
Use Advanced page to view and edit Power Saving Mode, Transmission Rate and Wired
Equivalent Privacy (WEP).
Click Start→Settings→System→Wireless LAN Utility→Advanced
! Wired Equivalent Privacy (WEP)
" Mode:
The default WEP Mode setting is“Disable”. You can choose “64 bits (ASCII)”,
“128 bits (ASCII)”, “64 bits (HEX)” or “128 bits (HEX)” manually to enable the
WEP or choose “Disable” to disable the WEP.
" Disable:
If there is no security issue concerned, choose “Disable” which may increase the Data
Transmission Rate.
" 64 bits (ASCII):
If WEP of the Access Point or Peer site station is set as “64 bits (ASCII)”, in Mode
field, select “64 bits(ASCII)” to connect with the Access Point or the Peer site station
by using the same 5 ASCII characters.
" 128 bits (ASCII):
If WEP of the Access Point or Peer site station is set as “128 bits (ASCII)”, in Mode
field, select “128 bits (ASCII)” to connect with the Access Point or the Peer site
station by using the same 13 ASCII characters.
" 64 bits (HEX):
If WEP of the Access Point or Peer site station is set as “64 bits (HEX)”, in Mode
field, select “64 bits (HEX)” to connect with the Access Point or the Peer site station
by using the same 10 hexadecimal values in the following range: 0~9, A(a) ~F(f).
" 128 bits (HEX):
If WEP of the Access Point or Peer site station is set as “128 bits (HEX)”, in Mode
14
field, choose “128 bits (HEX)” to connect with the Access Point or the Peer site
station by using the same 26 hexadecimal values in the following range: 0~9 and
A(a) ~F(f).
! Key ID:
While enabling “64 bits (ASCII)”, “128 bits (ASCII)”, “64 bits (HEX)” or “128 bits
(HEX)”, the “Key ID” will then be enabled as well. You must choose the same “Key
ID” for connection with the Access Point or the Peer site Station. You can choose
“Key 1” ~ “Key 4” for your own use.
! Key:
While enabling “64 bits (ASCII)”, “128 bits (ASCII)”, “64 bits (HEX)” or “128 bits
(HEX)” WEP Mode, the “Key” will then be enabled. You can key in the “64 bits
(ASCII)”, “128 bits (ASCII)”, “64 bits (HEX)”, or “128 bits (HEX)” WEP Key in the
field manually. The “64 bits (ASCII)” needs 5 ASCII characters with no limitation;
the “128 bits (ASCII)” needs 13 ASCII characters with no limitation; the “64 bits
(HEX)” needs 10 hexadecimal numbers for use and will have the upper limit of 10
Hexadecimal value of 0~9 and a(A)~f(F); the “128 bits (HEX)” needs 26 hexadecimal
value for use and will have the upper limit of 26 Hexadecimal number from range of
0~9 and a(A)~f(F). For “64 bits (HEX)” or “128 bits (HEX)”, if you enter out- of-
range Characters, the Utility will prompt a Warning Message to ask you to enter the
correct characters. If you didn’t enter enough hexadecimal value or ASCII character
in the “Key” field, the “Apply” button will not be able to use. And if you click “OK”
at this time, the Utility will close itself but will not set the incorrect WEP Key.
! Transmission Rate:
Use the Transmission Rate pull-down menu to select one of the transmission rates as
follows: Fixed 1Mbps, Fixed 2Mbps, Fixed 5.5Mbps, Fixed 11Mbps, Auto Select 1 or 2
Mbps, and Fully Auto. For best performance, select Fully Auto to allow the adapter to
automatically adjust the transfer speed.
! Power Saving:
Select or clear the check box to enable or disable the Power Saving Mode.
15
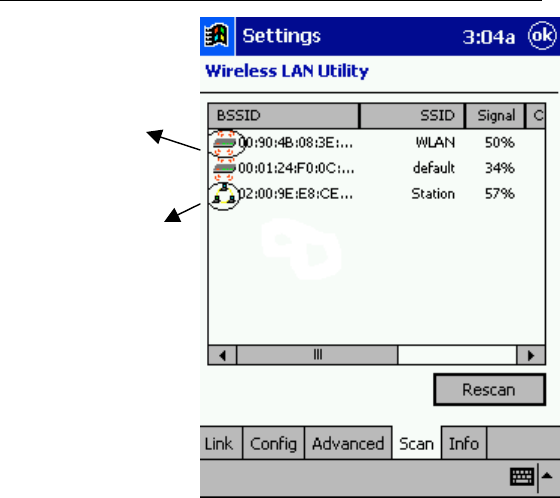
5.6 Scan Page
Use Scan page to scan and select the available Access Points and 802.11 Ad Hoc networks.
Click Start→Settings→System→Wireless LAN Utility→Scan
! Rescan:
The Scan Page displays the available local wireless Access Points and 802.11 Ad Hoc
networks. If you don’t see all the 802.11b networks you are expecting, click “Rescan”
button. Double click the BSSID field to choose the wireless network you want to
connect with. Once the wireless network is chosen, Scan page will disappear and Link
page with current link information will display automatically.
! Network Selection:
Each Access Point is identified by its BSSID and SSID. Double-click on the BSSID to
choose the Access Point/802.11 Ad Hoc group you want to connect with.
! Signal:
Indicates the signal strength of the Access Point.
! Channel:
Indicates what channel the network is set to use.
! Encryption (Scroll to the right):
Indicates whether or not encryption has been enabled.
Access Point Icon
802.11 Ad Hoc Network Icon
16
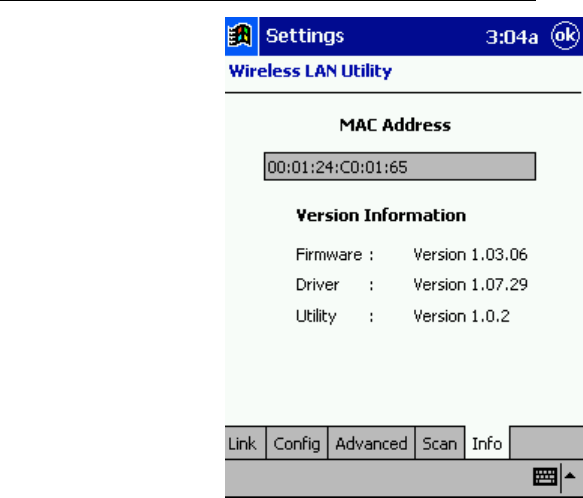
5.7 Info Page
Use Info Page to view MAC Address, Utility version, Driver version and Firmware version.
Click Start→Settings→System→Wireless LAN Utility→Info
! MAC Address:
MAC stands for Media Access Control. The physical address of a device connected to a
network expressed as a 48-bit hexadecimal number. This parameter cannot be changed.
! Versions:
Please verify the versions to ensure optimal functionality.
17
6. TMU-Traffic Monitoring Utility
TMU keeps users updated of current WLAN Module’s activity status.
6.1 Installing TMU
1. Copy TMU into "//Windows/Start Manu/Programs/" folder. Create a TMU short-cut and put it
into "//Windows/Start/" folder.
2. Reset the PDA.
3. The TMU will be automatically launched by the system.
6.2 Uninstalling TMU
1. Delete the TMU short-cut in "//Windows/Start/" folder.
2. Reset the PDA
3. Delete the TMU in the "//Windows/Start Manu/Programs/" folder.
6.3 Icon Specification
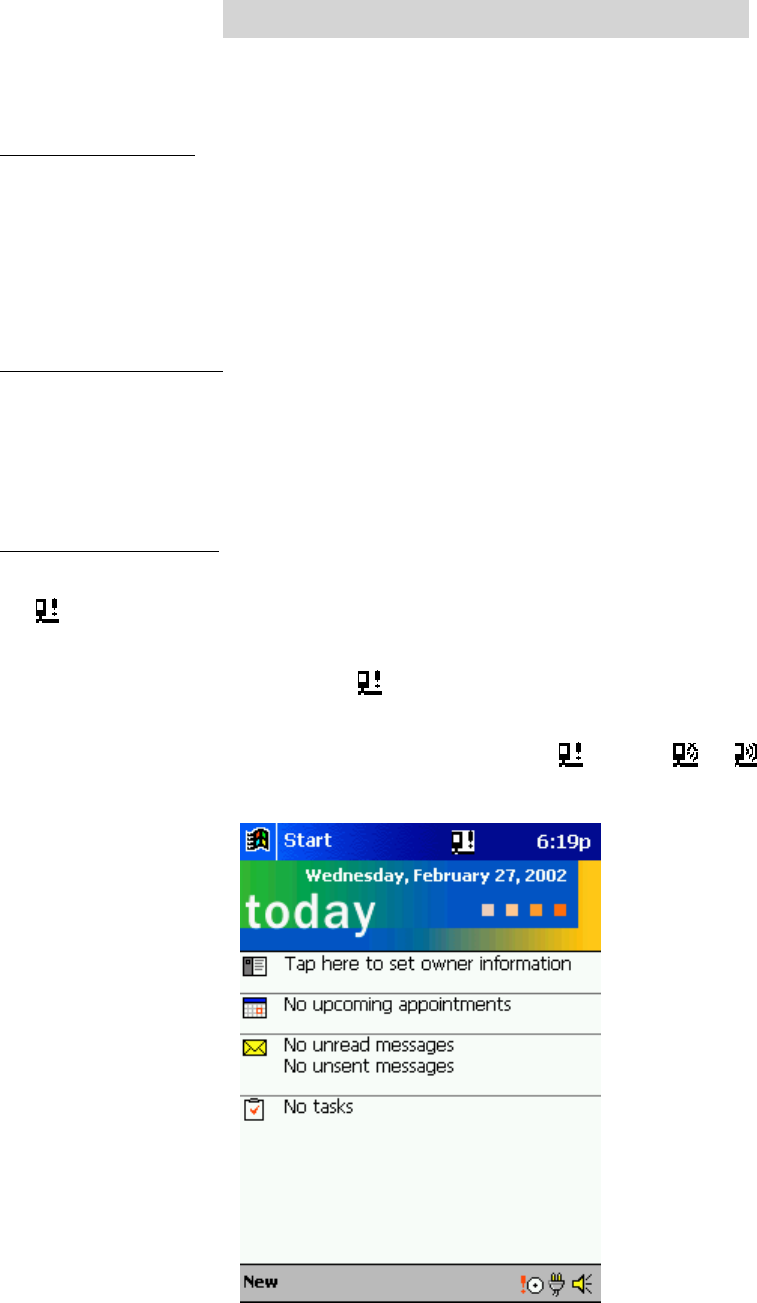
Wireless LAN Switch off:
WirelessLAN Switch, on the bottom of the PDA, is turned off. Clicking
on the icon gives you a warning message, “Please switch on your
WLAN Switch”. Click “OK” to close the Message Box. Turn on the
switch and you will see the icon turns to or , depends on the
original setting for the WLAN Module Power.
18
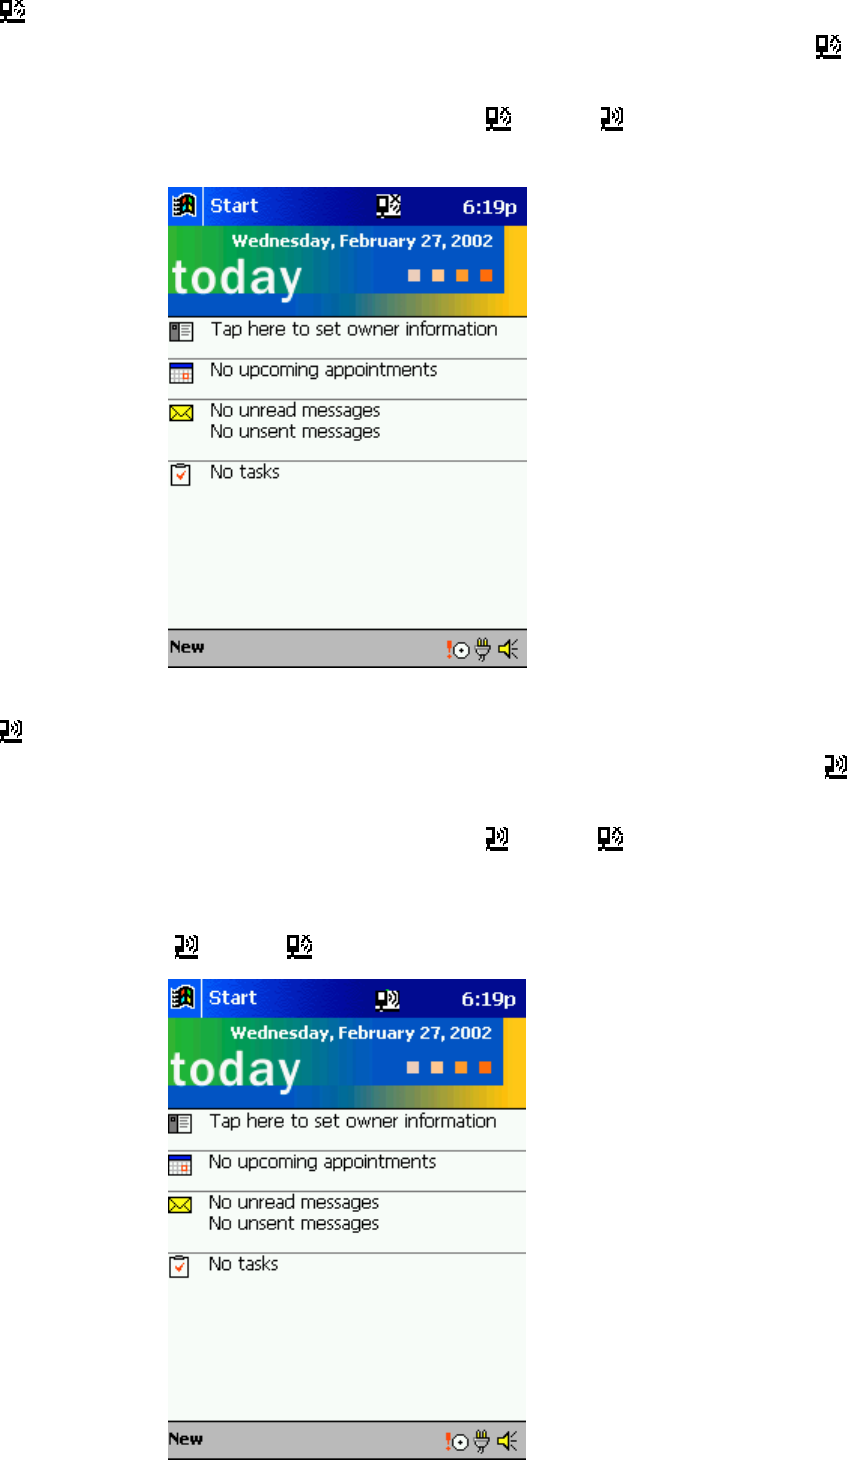
Wireless LAN Power off:
The WLAN Module is at Power Off Status. Clicking on the icon
displays you 2 icons, "On" and "Off". Click "On" to turn on the Wireless
LAN Module, and then the icon turns to . Click "Off" to exit
without turning on the Wireless LAN Module.
Wireless LAN Power on:
The WLAN Module is at Power On Status. Clicking on the icon
displays you 2 icons, "On" and "Off". Click "Off" to turn off the Wireless
LAN Module, and then the icon turns to . Click "On" to exit
without turning off the Wireless LAN Module. To save power, the WLAN
module can automatically switches power off after a period of inactivity
( turns to ).

19
6.4 Important Notice
1. Because of the TMU Short-Cut saved in “//Windows/Start/”, TMU is launched by the system
directly once PDA is turned on.
2. Users are not recommended to close TMU, which is designed to be always active when the PDA
is on. To deactivate TMU, delete the TMU Short-Cut in “//Windows/Start/” and reset the PDA.
3. To keep TMU from being automatically launched once PDA is turned on, skip the step of
creating a short-cut while installing TMU. Double click on TMU to start TMU and reset the
PDA to close TMU.

20
7. Troubleshooting
If you encounter some problems while using our product, please refer to this troubleshooting section.
Problems Solutions
Cannot connect to the network # Make sure the Wireless LAN Switch is turned
on.
# Check if the SSID is correct (note that it is case-
sensitive)
# Check Link Quality in Configuration Page. If
the link quality is poor, rescan and find another
Access Point.
# Check if the operating mode is set properly.
See Chapter 4.4 Configuration Page.
# Check if the WEP key is correctly entered.
# Be sure you are in the range of a working
Access Point.
# Make sure the channel been set is in the range
of 1~11.
The host computer cannot wirelessly
connect with my Pocket PC?
# Make sure you have setup the partnership for
your Pocket PC and your host computer.
# Make sure you are within the range of a
working network.
# Make sure you have entered the IP address of
the host computer as the WINS server on your
Pocket PC.
# Reset your Handheld PC or Pocket PC to make
the TCP/IP settings take effect.
# Make sure the SSID, WEP keys and channel for
all devices in the network are set the same.
# Make sure the channel been set is in the range
of 1~11.
Cannot edit the "Channel" and "Country"
field in "Infrastructure" Mode?
# In Infrastructure mode, country and channel are
decided by the Access Point. You can only
join the existing network formed by the working
Access Point, not to create a new Wireless
Network.
The Pocket PC freezes # Reset the Pocket PC.

21
8. FAQ
A. Compatibility
A1: Should I use the equipments with the same brand with IEEE802.11b WLAN Adapter's to
enable the wireless communication?
Not necessary. IEEE802.11b WLAN Adapter is Wi-Fi certified which means that it will work
well with different branded equipments as long as the equipments are also Wi-Fi certified.
A2: Can I connect IEEE802.11b WLAN Adapter to other devices using Bluetooth?
No, you can only connect IEEE802.11b WLAN Adapter to other IEEE802.11b equipments.
B. Wireless LAN Connectivity
B1: How do I form a wireless network?
Typically, you can form a wireless network by connecting Access Points. Different Access
Points should have different channels. Every devices connected to the network should have the
same SSID. When you are using Access Points, set the mode to "Infrastructure" mode. Without
Access Points, you can still build a network where adapters communicate peer-to-peer using a
shared SSID. When you are not using Access Points, change the operating mode to be "802.11
Ad Hoc". To set the operating mode, click Start→Settings→System→Wireless LAN Utility→
Config.
B2: How can I connect my Pocket PC to the usable Wireless Network?
Please click Start→Settings→System→Wireless LAN Utility→Scan to view Scan Page where
you can find the usable Wireless Network. If you cannot see all the networks you are expecting,
please click "Rescan" to see the list of usable Wireless Networks. Choose one Wireless Network
you want and double click the BSSID to connect to the network. Once the network is chosen,
you need to configure the IEEE802.11b WLAN adapter. Click Start→Settings→Connections→
Network Adapters→IEEE802.11b WLAN Adapter→Properties→IP Address to set IP address,
Subnet mask and Default gateway settings. Click Start→Settings→System→Wireless LAN
Utility to edit other settings, such as Mode and SSID etc. If the WEP Mode of the Wireless
Network you selected is enabled (64bit or 128bit WEP Mode), please choose the proper WEP
KeyID and the proper WEP Key value network.
More Information
B4. What is 802.11 Ad Hoc Network? What should I do to form an 802.11 Ad Hoc Network?
B5. What is the difference between "Infrastructure" and "802.11 Ad Hoc" Network Mode?
How do I choose?
B6. Could I use the 802.11 Ad Hoc Mode to access the LAN resources? How can I access the
LAN resource without an Access Point?

22
B7. What should I do if my host computer cannot wirelessly connect with my Pocket PC?
E1. What is WEP?
E2. How many WEP security service mode does Wireless LAN support?
E3. How to set the WEP security service?
B3: How do I know whether or not my Pocket PC has already connected to an AP
successfully?
1. Check BSSID. When there is a link, the current Basic Service Set ID of the Access Point
been used will be shown in the BSSID field in Link Page. When the adapter is disconnected
with the Access Point, "Non-associated" will appear in the BSSID field. To view BSSID,
from your Pocket PC, click Start→Settings→System→Wireless LAN Utility→Link.
2. Check Link Quality. Link Quality shows how clearly the adapter can hear the Access Point.
If the quality is poor, it's better to rescan and find a better performance Access Point or re-
arrange the AP's position for better performance. To view Link Quality, from your Pocket
PC, click Start→Settings→System→Wireless LAN Utility→Config.
B4: What is 802.11 Ad Hoc Network? What should I do to form an 802.11 Ad Hoc Network?
802.11 Ad Hoc Mode is used to create a peer-to-peer connection without an Access Point. The
SSID must be the same among stations to enable the wireless communication within the local
area network.
Note!
You need to choose a proper SSID and channel for the first 802.11 Ad Hoc station. For other
stations want to join the same SSID group, you could only choose the same SSID as the first
station for connection. The Channel setting for the 802.11 Ad Hoc Network stations to join the
existing 802.11 Ad Hoc Network will automatically be set as the channel number of the
network.
More Information
B5. What is the difference between "Infrastructure" and "802.11 Ad Hoc" Network Mode?
How do I choose?
B6. Could I use the 802.11 Ad Hoc Mode to access the LAN resources? How can I access the
LAN resource without an Access Point?
B7. What should I do if my host computer cannot wirelessly connect with my Pocket PC?
B5: What is the difference between "Infrastructure" and "802.11 Ad Hoc" Network Mode?
How do I choose?
Infrastructure Mode is used to connect your Pocket PC with the Access Point. Usually, to form
a Wireless Network, you can connect your Access Point to the ADSL, Cable Model or LAN
Ethernet and then configure the Access Point base on the User Guide for the Access Point to set
the proper SSID, Channel and WEP security service. After that, configure the IEEE 802.11b
WLAN adapter. Set the same SSID, Channel and WEP as the Access Point's. 802.11 Ad Hoc

23
Mode allows your Pocket PC to form its own local network where devices communicate peer-
to-peer, using a shared SSID, without Access Points. Under 802.11 Ad Hoc mode, the SSID
must be the same among stations so that the devices can communicate properly within the
Wireless Network. If you want to form your network without any Access Points, you should
choose 802.11 Ad Hoc mode.
B6: Could I use the 802.11 Ad Hoc Mode to access the LAN resources? How can I access the
LAN resource without an Access Point?
Yes , you can access the LAN resources without an Access Point . Follow the steps shown
below:
(1) Make sure your host computer already successfully connect to the LAN or Internet
through the LAN Adapter or the Modem.
(2) Install the Wireless LAN Adapter into your Host computer successfully and set 802.11 Ad
Hoc Mode and the proper SSID to form the 802.11 Ad Hoc Network. Install and enable the
ICS (Internet Sharing Software, such as "SyGate"...) function in your host computer. (Note
that the Windows 2K or later version, OS, supports the ICS function in Local Area
Connection Properties→ Sharing)
(3) Set your Pocket PC as 802.11 Ad Hoc Mode and choose the same SSID to join the 802.11
Ad Hoc Network (choose the DHCP to get the IP assigned).
(4) Check and make sure the Wireless LAN Adapter in the 802.11 Ad Hoc Network have the
same IP group. (Please Ping each other to make sure the connection is successful)
(5) Now you can access the LAN resource successfully.
B7: What should I do if my host computer cannot wirelessly connect with my Pocket PC?
(1) Make sure you have setup the partnership for your Pocket PC and your host computer.
(2) Make sure you are within the range of a working network.
(3) Make sure you have entered the IP address of the host computer as the WINS server on
your Pocket PC.
(4) Reset your Handheld PC or Pocket PC to make the TCP/IP settings take effect
(5) Make sure the SSID, WEP keys and channel for all devices in the network are set the
same.
(6) Make sure the channel been set is in the range of 1~11.
C. Application
C1. What should I do to use the ActiveSync Function through Wireless Network?
(1) Make sure you have already setup the partnership for your Pocket PC and your host
computer through USB Interface and the ActiveSync can work properly. (The ActiveSync
connection Interface should also choose the Ethernet interface for Wireless LAN
ActiveSync Connection)
(2) Make sure you are within the range of a working Wireless Network.

24
(3) Make sure you can Ping your Pocket PC from your Host Computer. (Make sure the SSID,
WEP keys and channel for all devices in the network are set the same.)
(4) Make sure you have entered the IP address of the host computer as the WINS server on your
Pocket PC.
(5) Reset your Pocket PC to make the TCP/IP settings take effect and execute the ActiveSync
function in the Pocket PC to enjoy the high speed ActiveSync Wirelessly.
C2. How do I wirelessly browse the Internet?
(1) If your network uses DHCP (Dynamic Host Configuration Protocol), an IP address and
DNS (or WINS) will be assigned automatically. On your Pocket PC, simply click Start→
Setting→Connections→Network Adapters→IEEE802.11b WLAN Adapter→Properties to
set the proper setting for Internet connection.
(2) If your network does not use DHCP, you should enter the IP address, subnet mask, gateway
and DNS (or WINS).
IP Address is Internet Protocol Address; a numeric address such as 10.37.238.100 that the
domain name server translates into a domain name. Each node on the IP network should
have a unique IP address.
Subnet mask is a number used to identify a subnetwork when multiple networks share one
IP address. For example 255.255.255.0Gateway is a device used to forward IP packets to
and from a remote destination.
DNS stands for Domain Name System, a database system, which translates addresses and
domain names. For example, a numeric address like 232.245.021.54 can become something
like cba.com.
WINS stands for Windows Internet Naming Service which has two functions; one is a
Microsoft Net BIO name server that eliminates the broadcasts needed to resolve computer
names to IP addresses by providing a cache or database of translations. The other one is to
set the IP address of the host computer that you already construct the partnership for
Network adapter Active sync purpose.
To set IP address, Subnet mask and Gateway, click Start→Settings→Connections→
Network Adapters→IEEE802.11b WLAN Adapter→Properties→IP Address.
To set DNS or WINS (Windows Internet Naming Service), click Start→Settings→
Connections→Network Adapters→IEEE802.11b WLAN Adapter→ Properties→Name
Servers.
(3) To ping your Pocket PC from your host computer. In the Host Computer, open the DOS
command mode window, type the command "Ping" followed by the IP address, such as
"Ping 140.124.40.112". If you can see the reply from this IP address, the connection is
complete. You are now ready to browse the Internet using Internet Explorer on your Pocket
PC.
C3. How do I wirelessly check my e-mail?
(1) Please make sure that you can use the ActiveSync function through USB Interface at first,

25
and make sure you can use the ActiveSync to receive and send e-mail successfully. For
corporate e-mail received and sent, please check with your network administrator for
necessary connection settings.
(2) Make sure you have entered the IP address of the host computer as the WINS server on your
Pocket PC.
(3) Reset your Pocket PC to make the TCP/IP settings take effect and execute the ActiveSync
function in Pocket PC to enjoy the high speed ActiveSync Wirelessly to receive and send e-
mail.
D. Settings
D1. What is SSID? What should I set in the SSID field?
SSID stands for Service Set Identification, which is the ID to form the Wireless Network. You
can set up to 32 characters in the SSID field. For the Infrastructure Mode, you should set the
SSID the same as the Access Point been connected with. To create a 802.11 Ad Hoc Network,
the SSID must be the same among stations to enable the wireless communication within the
local area network.
Note!
You need to choose a proper SSID and channel for the first 802.11 Ad Hoc station. For other
stations want to join the same SSID group, you could only choose the same SSID as the first
station, but the channel will not take effect. The 802.11 Ad Hoc must enter the proper SSID.
Blank SSID for the 802.11 Ad Hoc Mode is not allowed. The stations want to join the 802.11
Ad Hoc Network must have the same SSID and are suggested to have the same IP Address in
the Network group.
D2. Why can't I choose the "Channel" and "Country" field in "Infrastructure" Mode?
For the Infrastructure Mode, the Country and Channel are decided by the Access Point. You can
only join the existing Access Point formed Wireless Network but not create a new Wireless
Network. That is the reason why you can't set the "Channel" and "Country" settings.
D3. When should I set the IP address, Subnet mask and Default gateway settings?
When the Wireless Network does not have the DHCP server, you should set your own IP
address, Submask and Default gateway for Wireless Network connection. Otherwise, the OS
might set the different Network group IP address for you, which will cause the disconnection
for the Wireless Network.
D4. How can I set the IP address, Subnet mask and Default gateway settings?
Simply click Start→Settings→Connections→Network adapter→IEEE802.11b WLAN Adapter
→Properties→IP Address to set IP address, Subnet mask and Default gateway settings.

26
D5: What Transmit Rate should I choose for Wireless Connection?
Suggest you to use the "Fully Auto" option in the "Transmission Rate" field for full
Transmission Data Rate range to automatically adjust the Best Communication Data Rate and
to be compatible with other Low speed 802.11 Wireless Device.
E. Security
E1: What is WEP?
WEP stands for Wired Equivalent Privacy, a security service, used to prevent the unauthorized
access to your wireless network.
E2: How many WEP security service modes does my Wireless LAN support?
WEP stands for Wired Equivalent Privacy that is the security service for the Wireless Network.
There are three WEP security service modes available for "IEEE 802.11b WLAN Adapter"
formed Wireless Network. The first is "Disable" which will disable the WEP security service;
the second is "64bit" which will support 5 bytes Hexadecimal value WEP security service; the
third is "128bit" which will support 13 bytes Hexadecimal value WEP security service.
E3: How do I set the WEP security service?
Please click Start→Settings→System→Wireless LAN Utility→Advanced to view Advanced
page where you can set the WEP security service. Please choose the proper WEP Key Mode,
WEP KeyID and WEP Key value for the Wireless Network.
Note!
The WEP Mode, WEP KeyID and WEP Key value must be exactly the same as your Wireless
Network's to enable the connection.
Example of setting the WEP:
You can choose
1. WEP Mode "64bit", KeyID "1" and Key "1234567890", or
2. WEP Mode "128bit", KeyID "1" and Key "12345678901234567890123456", or
3. WEP Mode "Disable" for connection
F. Performance
F1: Will IEEE802.11b WLAN Adapter work in the environment where Bluetooth network is
employed?
Yes, IEEE802.11b WLAN Adapter can coexist with Bluetooth environment.
F2: How far is the working range of IEEE802.11b WLAN Adapter?
It depends on the data transmission rate and the condition of the environments. The higher the
data rate, the smaller the range it could cover. At 11 Mbps, the adapter can go up to 300 meter
in an outdoor environment; however, in an indoor environment, it can only go up to 100 meter.

27
Because of the ceilings, higher RF interference, interior walls and reflected signals, indoor
range is usually shorter than outdoor range.
F3: How does the data transmission rate work?
IEEE802.11b WLAN Adapter allows you to choose one of the six data rate options: Fixed
1Mbps, Fixed 2Mbps, Fixed 5.5Mbps, Fixed 11 Mbps, Auto Select 1 or 2 Mbps, and Fully Auto.
The farther the distance between two communicating devices, the slower the data rate should be
used. Basically, with slower data rate, the data delivery will be more reliable. If you don't know
which data rate should be used, simply choose "Fully Auto", and the data rate will
automatically step down from 11 Mbps, 5.5 Mbps, 2 Mbps, to 1 Mbps if you move farther your
Pocket PC away from the Access Point or other connected mobile device.
F4: The Wireless LAN uses lots of power. What should I do to save power?
(1) Please turn off the WirelessLAN Switch if you are not using the Wireless Network currently,
or
(2) You can click the "Radio Off" button on Start→Settings→System→Wireless LAN Utility→
Config page to temperately disable the RF function , or
(3) You can click Start→Settings→System→Wireless LAN Utility→Advanced to get into
Advanced Page and tick the "Enable Power Saving Mode" to enter the Power Saving Mode.
Note!
(1) Turn off the WirelessLAN Switch will cause the disconnection of the Wireless Network,
please make sure to close all the Wireless Connection before you execute this function.
(2) "Radio Off" function will cause the disconnection of the Wireless Network , please make
sure to close all the Wireless Connection before you execute this function.
(3) Enable "Power Saving Mode" will keep the connectivity but will lower down the average
throughput due to longer connection period for the Wireless Network.
(4) If you are in 802.11 Ad Hoc Mode, you are not allowed to enable "Power Saving Mode",
because Ad Hoc Mode doesn't support this function.
F5: How do I make sure that the Wireless LAN SW has been installed successfully and that
Wireless LAN already work properly?
(1) Please check if the "IEEE 802.11b WLAN Adapter" already exist in Start→Settings→
Connections→Network Adapters; if not , the Wireless LAN Driver is not Installed
successfully.
(2) Please check if the Wireless LAN Utility already exist and could be opened successfully by
simply click Start→Settings→System→Wireless LAN Utility.
(3) Click Start→Settings→System→Wireless LAN Utility→Link to check the current Link
information in the Link Page.