Compal Electronics PA3274U-1ETC PDA With 802.11/b WLAN User Manual Revised
Compal Electronics Inc PDA With 802.11/b WLAN Revised
Revised user manual

TOSHIBA Pocket PC e750/e755
User’s Guide

2
Introduction
Thank you very much for your purchase of this Toshiba Pocket PC.
Please be sure to read this user’s guide before using the Toshiba Pocket
PC, and ensure that you are aware of correct the handling procedures.
• Please be sure to read the “Safety precautions” section in this docu-
ment to learn about important safety issues.
• After reading this document, keep it in a convenient place for future
reference.
Copyright Information
© 2003 by Toshiba Corporation. All rights reserved. Under the copyright
laws, this manual cannot be reproduced in any form without the prior
written permission of Toshiba. No patent liability is assumed, with re-
spect to the use of the information contained herein.
Toshiba Pocket PC e750/e755 User’s Guide
First edition March 2003
Trademarks
Microsoft, ActiveSync, Outlook, Pocket Outlook, Windows, Windows CE,
and the Windows logo are either registered trademarks or trademarks of
Microsoft Corporation in the United States and/or other countries. Microsoft
products are licensed to OEMs by Microsoft Licensing, Inc., a wholly owned
subsidiary of Microsoft Corporation.
Safety precautions
• Please carefully read “Safety precautions” before using the Toshiba
Pocket PC and ensure that you are aware of correct handling proce-
dures.
• The precautions provide essential information for the protection of
the user and others from possible injury and property damage. They
also provide information on the safe handling of this product.
• Please check that you fully understand the definition of the following
messages (signs and graphical symbols) before reading the text,
and always follow the instructions provided.

3
Safety instructions
Please carefully read “Safety precautions” before using the Toshiba
Pocket PC and ensure that you are aware of correct handling proce-
dures. The precautions provide essential information for the protection
of the user and others from possible injury and property damage. They
also provide information on the safe handling of this product. Please
check that you fully understand the definition of the following messages
(signs and graphical symbols) before reading the text, and always
follow the instructions provided.
There are two categories of Safety Instructions included in this manual:
Product Warnings, (i.e., what must never be done to assure avoiding
those hazards that could cause bodily injury or property damage); and
User Directions (i.e., what must always be done to assure the safe use of
your Pocket PC).
The Safety Instructions contained in this manual have been categorized
in accordance with the seriousness of the potential hazards through the
use of Signal Words.
Those Signal Words, and their intended meanings, are as follows:
Signal Word Meaning
DANGER Indicates that a failure to observe the Safety
Instructions could result in serious bodily in-
jury.
CAUTION Indicates that a failure to observe the Safety
Instructions could result in minor bodily injury
or property damage.
WARNING Designates important information that relates
to the safe use of your Pocket PC.
Your Pocket PC produces low levels of RF energy due to the generation of
digital timing pulses by its clock oscillator circuits. Your Pocket PC has
been equipped with internal shielding to minimize any stray emissions of
RF energy.
Airlines may nevertheless prohibit the on-board use of all portable PCs
(and all other portable electronic devices that could potentially emit stray
RF energy), particularly during take-offs and landings, to prevent any pos-
sible interference with the reception of signals by airborne electronic navi-
gational devices.
WARNING
Always request and obtain prior consent and approval of an authorized
airline representative before using your Pocket PC aboard an aircraft.
Always follow the instructions of the airline representative whenever us-
ing your Pocket PC aboard an aircraft, to prevent any possible interfer-
ence with airborne electronic equipment.

4
WARNING
Certain locations, such as hospitals, may restrict the use of Pocket PCs
and other devices that emit low-level RF energy.
Always comply was posted prohibitions of the use of RF-emitting de-
vices, such as in hospitals. Failure to follow such directives could result
in the interference with medical equipment and/or devices.
Never come closer than 16cm (6inches) to a person with a heart pace-
maker implant when using this Pocket PC in combination with a mobile
cellular telephone. Failure to do so could result in interference with the
function of the pacemaker.
WARNING
Never use a Pocket PC while driving an automobile or any other moving
vehicle. Always pull out of traffic and come to a stop in a legally permis-
sible and safe location before using your Pocket PC. Failure to do so
could result in serious bodily injury in a traffic accident.
Never use your Pocket PC while walking. Usage while walking could
result in bodily injury caused by inattention to automobile traffic or other
pedestrian hazards.
WARNING
Never allow metallic objects, such as staples and paper clips, to enter
inside your Pocket PC. Metallic objects, such as staples and paper clips,
if allowed to enter your Pocket PC, could cause the generation of excess
heat or fire.
Never connect terminals (metal parts) to metallic objects (such as wires).
Connecting terminals to metal objects could cause excessive heat or fire.
Always immediately turn the battery switch to the “off” position and dis-
connect the AC Adaptor from the power outlet in the event the Pocket PC
emits an unusual odor or sound or generates smoke.
WARNING
Never use or store your Pocket PC in the following locations:
Anywhere it may be exposed to water, such as a bathroom or sauna;
In conditions of high humidity, such as in the rain or fog; Where your
Pocket PC will be exposed to high temperatures, such as near a fire or
equipment that emits high temperatures; In direct sunlight; or In a sealed
automobile left in the sun and subject to high tem peratures.

5
Never drop your Pocket PC or subject it to severe shock. Dropping your
Pocket PC or subjecting it to severe shock could cause the removable
battery to leak, ignite and/or rupture.
Always immediately remove your Pocket PC and its battery from the vicin-
ity of any open flame in the event the removable battery leaks liquid or
emits an unusual odor. Continued use of your Pocket PC under either of
these conditions could cause ignition (i.e., fire) of the leaked battery liq-
uid, or rupture.
Never touch any fluid that might leak from the removable battery. Such
liquid when in contact with the eyes or skin, could cause injury to the skin
or eyes. Should the liquid come into contact with the eyes, irrigate the
eyes thoroughly with clean water and immediately seek medical atten-
tion. In the event the liquid comes into contact with the skin or clothing,
wash it away immediately with clean water.
Never attempt to disassemble, repair or make any modification to your
Pocket PC. Disassembly, modification or any attempt at repair could cause
bodily injury or property damage, as well as damage to the Pocket PC
itself.
Failure to follow the above directions concerning use and storage could
result in damage to your Pocket PC or bodily injury and property damage
due to battery liquid leakage, fire or rupture.
CAUTION
Never raise the sound volume level to high when using your Pocket PC
with earphones. An excessive sound volume level could cause damage
to your hearing.
Never touch the liquid that might leak from a broken liquid crystal display.
Contact with this liquid could cause a skin rash. If the crystal display liquid
should come into contact with the skin or clothing, wash it immediately
with clean water.
Never allow infants or small children within reach of your Pocket PC.
Infants or small children could injure themselves if allowed access to
your Pocket PC.
DANGER
Never attempt to disassemble or repair an AC Adaptor, and never alter
their Power Supply Cables or plugs as exposure to electric shock haz-
ards could result.
Always contact an authorized service provider, if repair or replacement is
required.

6
WARNING
Always use the AC Adaptor that has been provided with your Pocket PC.
Bodily injury or property damage could occur as a result of the use of an
unauthorized and incompatible AC Adaptor in violation of this Warning.
Never connect or disconnect the AC Adaptor with wet hands. Connecting
or disconnecting the AC Adaptor to a power source with wet hands could
cause electric shock.
CAUTION
Never place an AC Adaptor on a wooden surface (or any other surface that
could be marred by exposure to heat) while it is in use, since its surface
temperature increases during normal use. Always rest it on a suitable
heat-insulating material.
Never cover the AC Adaptor with any object while it is in use, and never
place it adjacent to a heat source. An excessive temperature increase
could detrimentally affect its performance.
Never place a Power Supply Cable near a heat source, as damage to the
cord or to its insulation could result.
Always use a surge protector when utilizing the AC Adaptor during an
electrical storm. Otherwise, a power surge could result in the loss of
stored data.
Insert the power plug to a household electric outlet.
When travelling abroad, never plug the AC Adaptor into a power source
that does not correspond to both the voltage and the frequency specified
on the rating plate of the unit, as equipment damage will result.
Never attempt to connect or disconnect the power plug with damp or wet
hands. Connecting or disconnecting the power plug with damp or wet
hands could result in an electric shock.
Never leave an open container, such as a cup or glass, containing a liquid
near the AC Adaptor. Spilled liquid coming in contact with the AC Adaptor
could cause a fire or electric shock.
Always ensure the power plug pins are clean and free of dust or other
foreign material by wiping the pins with a clean dry cloth. Dust or other
foreign material accumulation on the power plug pins could cause fire.
Always unplug the power plug from an outlet by grasping the power plug
itself. Never pull on the Power Supply Cable to disconnect the Power
Supply Cable from an outlet. Pulling on the Power Supply Cable could
cause a fire or electric shock as a result of damage to the Power Supply
Cable.

7
Never use a worn or damaged AC Adaptor Power Supply Cable or plug, or
a worn or damaged extension cord or plug. The use of a worn or dam-
aged Power Supply Cable or plug could result in electric shock or fire.
Always contact an authorized service provider immediately to obtain a
suitable Power Supply Cable replacement.
Never bend or twist a Power Supply Cable, and never pull on a Power
Supply Cable in an attempt to remove a plug from an outlet. Always grasp
the plug directly when unplugging a Power Supply Cable to avoid causing
any damage to the cord.
Never plug the AC Adaptor into an overloaded multiple outlet, power strip
or surge protector to prevent blowing a fuse or tripping a circuit breaker.
Never place heavy objects on a Power Supply Cable, as that could result
in damage to the cord.
Always confirm that the AC Adaptor plug (and the extension cord and
plug, if any) have been fully inserted into the receptacle, to assure a
secure electrical connection.
NOTE
Under certain conditions, data may be lost, including:
Misuse of your Pocket PC; Subjecting the main unit of your Pocket PC to
static electricity and/or noise; Total loss of electric charge in the remov-
able battery; and Servicing of your Pocket PC.
Use your Pocket PC only in locations with the following ambient environ-
mental conditions:
Under normal operational use with temperatures between 0°C and 40°C
(32°F and 104°F); With humidity of 30% to 80%; and When charging the
battery with temperatures between 5°C and 40°C (41°F and 104°F).
Do not store or use your Pocket PC in the following locations:
Those subject to extremely high or low temperatures; Dusty locations;
and Locations or sites subject to strong vibration.
Use or storage in these location, sites or areas can result in product
failure, malfunction or loss of data.
Do not subject your Pocket PC to sudden and severe temperature
changes. This could result in moisture condensation in the Pocket PC
that could cause damage to your Pocket PC, computer function loss, and/
or the loss of data. In the event of moisture condensation, allow your
Pocket PC to dry out completely.
It is normal for the AC Adaptor to become warm when charging.
Disconnect the power plug from the outlet when not in use.

8
Take care not to sit on your Pocket PC when it is located in the back pocket
of trousers, etc. This could cause damage to your Pocket PC or malfunc-
tion of the Pocket PC functions.
Do not place objects on top of your Pocket PC or drop them on top of your
Pocket PC. This could cause damage to your Pocket PC and/or malfunc-
tion.
Clean terminals (metallic parts) on a regular basis with a cotton swab.
Dirty terminals could affect battery charging.
Never use organic solvents such as benzene or paint thinner to clean
your Pocket PC. Use of these solvents can cause deformation or discol-
oration.
Do not wipe the display with a damp or wet cloth or touch the display with
damp or wet hands. Wiping or touching the display under this condition
can cause product failure or malfunction. Always use a soft dry cloth to
wipe the display.
When using the “SD memory card” and/or “ (CF) compact flash card,”
be sure to read the relevant instruction manual and ensure that you
know the proper procedures for their use.
Never subject the card to any severe shock while connected to your Pocket
PC. Such a shock can cause damage to the card and a malfunction.
Do not carry your Pocket PC with the card connected to it. This can result
in the damage or loss of the card.
Never connect cradle terminals with metallic objects, such as wires. Con-
necting these terminals with metallic objects may cause the production
of excess heat, burns and damage to the charger and/or your Pocket PC.
Lithium ion batteries are recyclable. Never dispose of the battery with
ordinary waste.

9
Supplementary Information: “The product complies with the
requirements of the Low Voltage
Directive 73/23/EEC and the EMC
Directive 89/336/EEC.”
Weitere Informationen: “Das Produkt entspricht den
Anforderungender Niederspannungs
Richtlinie 73 23/EG und der EMC-
Richtlinie 89/336/EG.”
Informations complérnentaires: “Ce produit est conforme aux
exigences de la directive sur les
basses tensions 73/23/CEE et de la
directive EMC 89/336/CEE.”
Información complementaria: “El Producto cumple los requistos
de baja tensión de la Directiva 73/23/
CEE y la Directiva EMC 89/336/
CEE.”
Ulteriori informazioni: “Il prodotto é conforme ai requisiti
della direttiva sulla bassa tensione 73/
23/EG e la direttiva EMC 89/336/
EG.”
Ytteligare information: “Produkten uppfyller kraven enligt
lägspänningsdirektiver 73/23/EEC
och EMC-direktiv 89/336/EEC.”

10
Working environment
This product was designed to fulfill the EMC (electromagnetic compatibil-
ity) requirements for “residential, commercial and light industry environ-
ments”.
Toshiba does not approve the use of this product in working environ-
ments other than “residential, commercial and light industry environ-
ments”.
For example, the following environments are not approved:
• Industrial Environments (environments with a main voltage >230V~)
• Medical Environments
• Automotive Environments
• Aircraft Environments
Any consequences resulting from the use of this product in working envi-
ronments that are not approved are not the responsibility of Toshiba Cor-
poration.
The consequences of the use of this product in non-approved working
environments may be:
• Interference with other devices or machines in the nearby surround-
ing area
• Malfunction of, or data loss from, this product caused by disturbances
generated by other devices or machines in the nearby surrounding area
Therefore Toshiba strongly recommends that the electromagnetic com-
patibility of this product be suitably tested in all non-approved working
environments before use. In the case of automobiles or aircraft, the manu-
facturer or airline respectively should be asked for permission before use
of this product.
Furthermore, for general safety reasons, the use of this product in envi-
ronments with explosive atmospheres is not permitted.
CE compliance
This product and the original options are designed to observe the related
EMC (Electromagnetic compatibility) and safety standards. However,
Toshiba cannot guarantee that this product still observes these EMC
standards if options or cables not produced by Toshiba are connected or
implemented. In this case the persons who have connected / imple-
mented those options / cables have to make sure that the system (PC
plus options / cables) still fulfils the required standards. To avoid general
EMC problems, the following advice should be observed:
• Only CE marked options should be connected / implemented
• Only best shielded cables should be connected

11
FCC Notice
“Declaration of Conformity”
This equipment has been tested and found to comply with the limits for a
Class B digital device, pursuant to part 15 of the FCC Rules. These limits
are designed to provide reasonable protection against harmful interfer-
ence in a residential installation. This equipment generates, uses and
can radiate radio frequency energy and, if not installed and used in accor-
dance with the instructions, may cause harmful interference to radio com-
munications. However, there is no guarantee that interference will not
occur in a particular installation. If this equipment does cause harmful
interference to radio or television reception, which can be determined by
turning the equipment off and on, the user is encouraged to try to correct
the interference by one or more of the following measures:
• Reorient or relocate the receiving antenna.
• Increase the separation between the equipment and receiver.
• Connect the equipment into an outlet on a circuit different from that to
which the receiver is connected.
• Consult the dealer or an experienced radio/TV technician for help.
WARNING: Only peripherals complying with the FCC class B limits
may be attached to this equipment. Operation with non-compliant
peripherals or peripherals not recommended by Toshiba is likely to
result in interference to radio and TV reception. Shielded cables
must be used between the external devices and the computer’s
USB ports, external monitor port, PS/2 keyboard port and PS/2
mouse port.Changes or modifications made to this equipment, not
expressly approved by Toshiba or parties authorized by Toshiba
could void the user’s authority to operate the equipment.
This device complies with part 15 of the FCC Rules. Operation is subject
to the following two conditions:
1. This device may not cause harmful interference
2. This device must accept any interference received, including interfer-
ence that may cause undesired operation.

12
Canadian Regulatory Information
(Canada Only)
This digital apparatus does not exceed the Class B limits for radio noise
emissions from digital apparatus as set out in the Radio Interference
Regulation of the Canadian Department of Communications.
Note that Canadian Department of Communications (DOC) regulations
provide, that changes or modifications not expressly approved by TOSHIBA
Corporation could void your authority to operate this equipment.
This Class B digital apparatus meets all requirements of the Canadian
Interference-Causing Equipment Regulations.
Cet appareil numérique de la class B respecte toutes les exgences du
Règlement sur le matériel brouilleur du Canada.
BSMI Notice (Taiwan Only)
¤A
(VCCI graphic here, p12 of E740)
VCCI Notice
(Japan Only) Class BITE
The paragraph below in English should be translated into Japanese
here. (see pg. 12 of E740 u. manual for Japanese text.)
This is a Class B product based on the standard of the Voluntary
Control Council for Interference (VCCI) for information technology
equipment. If this equipment is used near a radio or television receiver
in a domestic environment, it may cause radio interference. Install and
use the equip-ment according to the instruction manual.

13
FCC Class B Digital Devices & Peripheral
Devices (Declaration of Conformity or
Certification Authorization)
Declaration of Conformity Label &
Marking Requirements
• User Manual must provide user information in accordance with
±15.19(a)(3), 15.21, 15.27 and 15.105(b):
Instruction Manual Federal
Communication Commission
Interference Statement
This equipment has been tested and found to comply with the limits for a
Class B digital device, pursuant to Part 15 of the FCC Rules. These limits
are designed to provide reasonable protection against harmful interfer-
ence in a residential installation. This equipment generates, uses and
can radiate radio frequency energy and, if not installed and used in accor-
dance with the instructions, may cause harmful interference to radio com-
munications.
However, there is no guarantee that interference will not occur in a par-
ticular installation. If this equipment does cause harmful interference to
radio or television reception, which can be determined by turning the
equipment off and on, the user is encouraged to try to correct the interfer-
ence by one of the following measures:
• Reorient or relocate the receiving antenna.
• Increase the separation between the equipment and receiver.
• Connect the equipment into an outlet on a circuit different from that to
which the receiver is connected.
• Consult the dealer or an experienced radio/TV technician for help.
FCC Caution: Assure continued compliance (for example, use only
shielded interface cables when connecting to computer or periph-
eral devices). Any changes or modifications not expressly approved
by the manufacturer of this device could void the user's authority to
operate this equipment.
This device complies with Part 15 of the FCC Rules. Operation is
subject to the following two conditions: (1) This device may not cause
harmful interference, and (2) this device must accept any interfer-
ence received, including interference that may cause undesired op-
eration.
Responsible Party:Toshiba America Information Systems, Inc.
9740 Irvine Blvd.
Irvine, CA 92618-1697
Telephone No: 1-800-Toshiba

14
Table of Contents
COPYRIGHT INFORMATION .........................................
TABLE OF CONTENTS ..................................................
CHAPTER 1: GETTING STARTED .................................
CHAPTER 2: BASIC SKILLS .........................................
CHAPTER 3: MICROSOFT ACTIVESYNC ....................
CHAPTER 4: MICROSOFT POCKET OUTLOOK ..........
CHAPTER 5: COMPANION PROGRAMS ......................
CHAPTER 6: POCKET INTERNET EXPLORER .............
CHAPTER 7: GETTING CONNECTED ...........................
CHAPTER 8: IEEE 802.11B WLAN ...............................
CHAPTER 9: OPTIONAL FUNCTIONS .........................
CHAPTER 10: ADDITIONAL INFORMATION ...............

15
Chapter 1:
Getting Started
Welcome
Congratulations on purchasing your Toshiba Pocket PC. Due to the size
and capabilities of this device, you can keep your most important busi-
ness and personal information up-to-date and close at hand. Microsoft®
ActiveSync® increases the power of your device by allowing you to syn-
chronize the information on your desktop or laptop computer with your
device. Picture yourself in the following situations:
• While walking with a colleague, your cell phone rings and your
manager asks if you two are free this afternoon for an emergency
meeting. While your colleague fumbles through his paper
organizer, you press a button on your device and instantly see a
list of today’s appointments and meetings. You are quickly able
to tell your manager your available times. For more information
on scheduling appointments and meetings, see Chapter 4.
• You’re meeting your friends tonight for dinner and a movie. You down-
load the latest movie information from the Internet to your computer
and then synchronize it with your device. At dinner, you pull out your
Toshiba Pocket PC device and review your movie options with your
friends. For more information on downloading Web pages to your
device, see Chapter 6.
• A Calendar reminder alerts you that it is time to catch the bus. You
grab your Toshiba Pocket PC device and catch the bus just in time.
Because ActiveSync keeps the information on your device up-to-date,
you leisurely review your task list, make notes about the new books
and CDs you want to buy, and read and respond to e-mail mes-
sages. When you get back to the office, ActiveSync transfers any
task changes you made, your notes, and your e-mail message re-
sponses to your computer. For more information on ActiveSync, see
Chapter 3.

16
Toshiba Pocket PC e750/e755 User’s Guide
Where to Find Information
This book describes your Pocket PC hardware, provides an overview of
the programs on your Pocket PC, and explains how to connect your
Pocket PC to a desktop computer, a network, or the Internet. For instruc-
tions on setting up your Pocket PC and installing ActiveSync, see infor-
mation to help you use your Pocket PC.
For information on: See this source:
Programs on your Pocket PC This User’s Guide and device Help To view
Help, tap and then Help.
Additional programs that can be The Pocket PC Companion CD.
installed on the Pocket PC
Connecting to and synchronizing The Quick Start Card or Active Sync Help on
with a computer your computer. To view Help, click Help and
then Microsoft Active Sync Help.
Last-minute updates and detailed The Read Me files, located in the Microsoft
technical information Active Sync folder on the desktop computer
and on the Pocket PC Companion CD.
Up-to-date information on your http://www.pda.toshiba.com
Toshiba Pocket PC
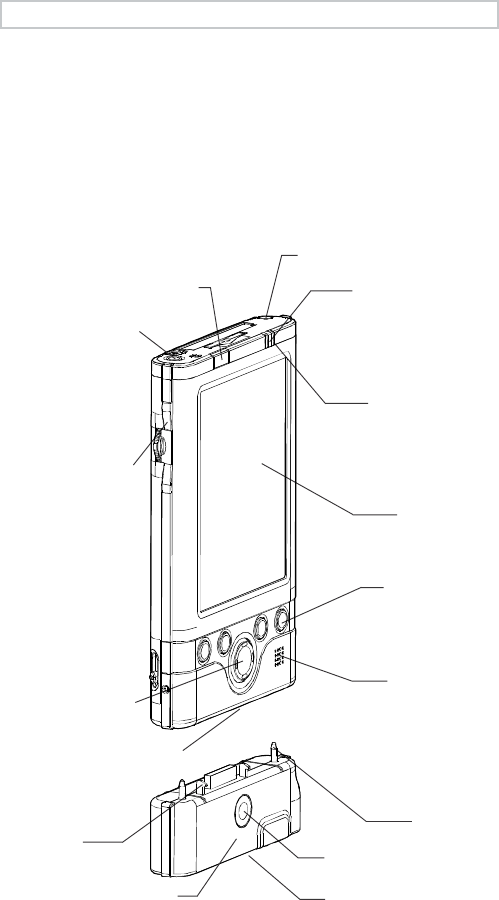
STYLUS
PROGRAM BUTTON 1, 2, 3 & 4
( FROM THE LEFT )
SPEAKER
CURSOR BUTTON /
NAVIGATION BUTTON
TOUCH SCREEN
BATTERY / ALARM LED
RECORDING BUTTON
( PROGRAM BUTTON 5 )
LOCK
CRADLE CONNECTION PORT
GUIDE PIN
RELEASE BUTTON
WIRELESS COMMUNICATION
LED
CRADLE CONNECTION PORT
POWER BUTTON / SCREEN
LIGHT
Chapter 2:
Basic Skills
You can easily learn to use your Toshiba Pocket PC e750/e755. This
chapter describes the use and customization of your Toshiba Pocket PC
e750/e755.
Parts Names and Function
Main unit (front view)
STEREO HEADPHONE
OR MICROPHONE
INPUT
OPTIONAL EXPANSION PACK
18
Toshiba Pocket PC e750/e755 User’s Guide
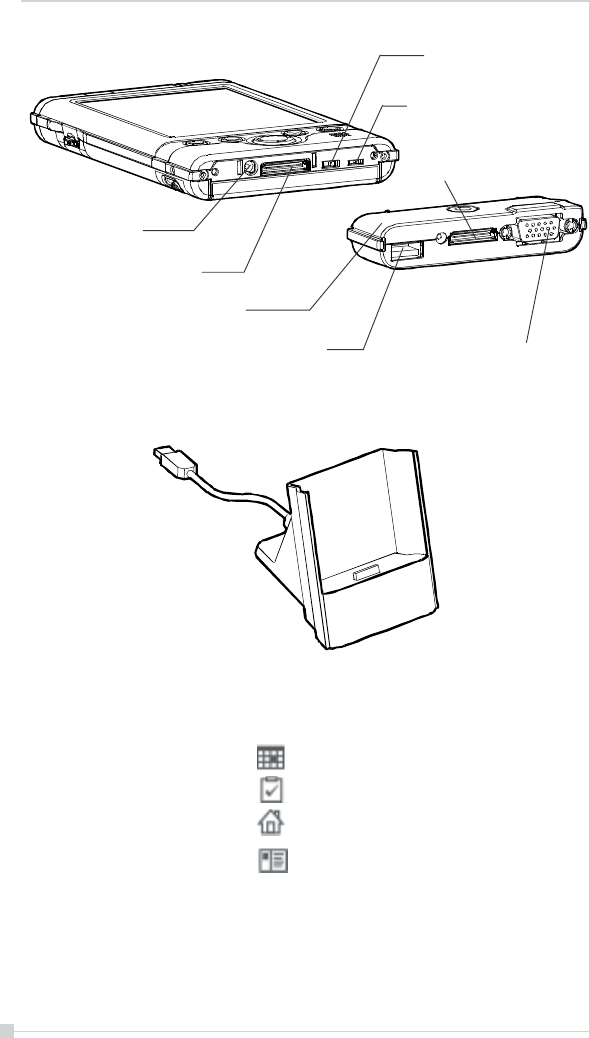
DC-IN SOCKET
BATTERY SWITCH
CRADLE CONNECTION PORT
WIRELESS COMMUNICATION
SWITCH
(WIRELESS LAN MODEL ONLY)
RGB (MONITOR) PORT
USB PORT
CRADLE CONNECTION PORT
OPTIONAL EXPANSION PACK
Cradle
Initial Setting of Program Button
Program button 1 = Calendar
Program button 2 = Tasks
Program button 3 = Home
Program button 4 = Contacts
Program button 5 = Voice recorder
19
Chapter 2: Basic Skills
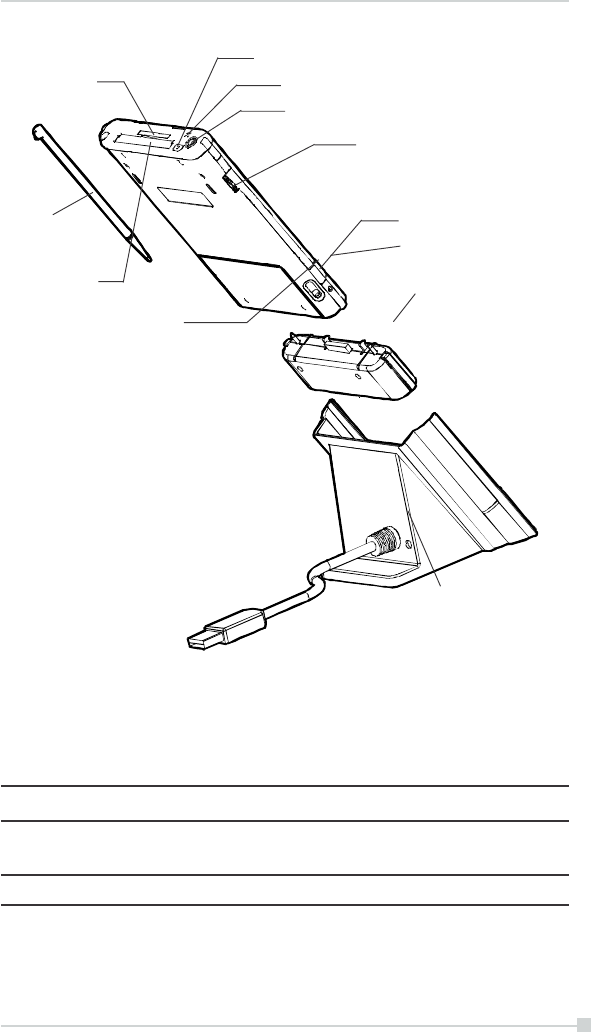
DC-IN SOCKET
MIC
STEREO HEADPHONE OR
MICROPHONE INPUT
TOSHIBA SCROLLER
SD CARD SLOT
CFII CARD SLOT
INFRARED PORT
BATTERY PACK LOCK OPTIONAL EXPANSION PACK
STYLUS
RESET BUTTON
CF RELEASE BUTTON (USE
STYLUS TO EJECT)
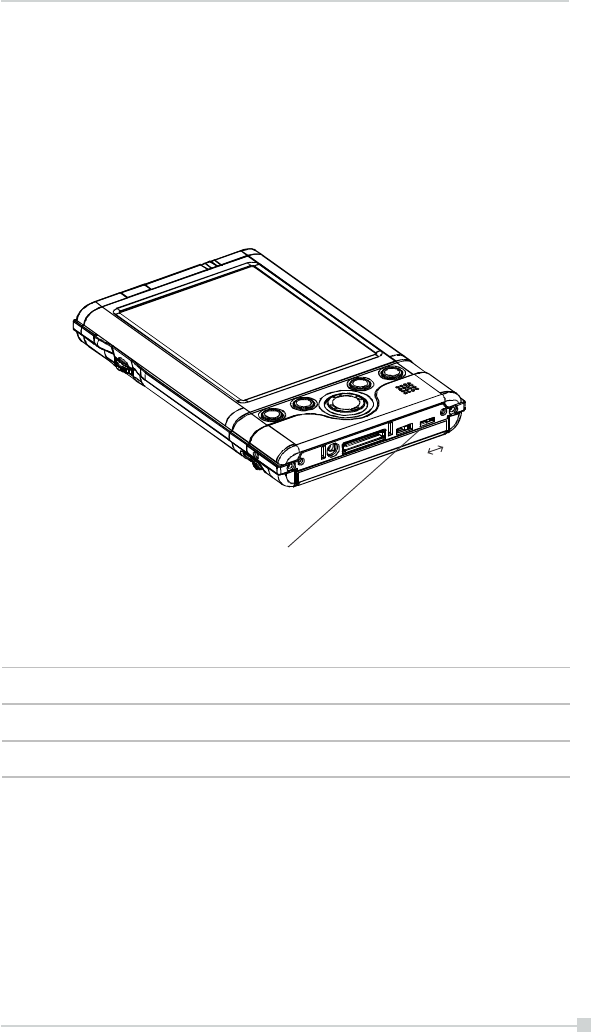
Power button When the power is off When the power is on
Press and hold. The power turns on. The screen light alternately
turns on/off.
Press it quickly. The power turns on. The power turns off.
Main unit ( back view )
Power Button
The power button turns the unit and the screen light on and off.
20
Toshiba Pocket PC e750/e755 User’s Guide
BATTERY SWITCH
SUPPLY STOP
Battery Switch
The battery switch supplies/cuts off the battery power to the Toshiba Pocket
PC e750/e755.
The setting of this switch at shipment is “stop”. When using the Toshiba
Pocket PC e750/e755 for the first time, slide this switch to the left (the
“supply” side) with the stylus.
Switching the battery switch to the “stop” position at any time will
lead to loss of data.
Flashing orange When the preset alarm time, which was set through
Calendar or Tasks, goes off, the lamp starts flashing.
Orange Indicates charging of the battery.
Yellow The battery charging process is stopped due to the
ambient temperature being too high or low. Charge
the batter
y
in an ambient temperature of approx. 41°F
to 104°F.
Green Indicates full charge of the battery.
Battery/Alarm LED
The Battery/Alarm LED indicates the machine condition.
21
Chapter 2: Basic Skills
Wireless Communication Switch
( Wireless LAN model only )
1. To enable Wireless module, make sure the Wireless Communica-
tion Switch is turned on. (The default setting is Power Off. Press the
switch to the left to turn the power on.)
2. Wireless LAN model only: If this is your first time turning on the
switch, the IP Address Page will pop up for you to set the IP address,
Subnet mask and Default gateway.
LED Descriptions
LED indicates the different status:
LED Status
Off Wireless Communication Switch is turned OFF
Orange Wireless Communication Switch is turned ON
ON OFF
WIRELESS COMMUNICATION
SWITCH

22
Toshiba Pocket PC e750/e755 User’s Guide
How to Use the Stylus
The stylus is used for menu selection or data input on the touch-screen of
the Toshiba Pocket PC e750/e755.
Tap: Touch the screen once with the stylus to open items and select
options.
Drag: Hold the stylus on the screen and drag it across to select text
and images. Drag in a list to select multiple items.
Tap and hold: Tap and hold the stylus on an item to see a list of
actions available for that item. On the pop-up menu that appears, tap
the action you want to perform.
When you operate the touch screen of the Toshiba Pocket PC e750/
e755, use the supplied stylus.
If the tip of the stylus is damaged, do not use it. If you operate the
touch screen with a damaged stylus or a ballpoint pen, the touch
screen may be damaged.
When the stylus is damaged, please purchase a new one.
About the Cursor Button
You can move a cursor (selection display) on the screen by pressing the
upper, lower, right or left part of the cursor button.
You can select a program to launch by pressing the center part of the
cursor button.
The cursor movement is different depending on the screen. When
the cursor is at the right or the left side of the screen, it may not
move.
About the Scroller
You can also move the cursor on the screen by moving the scroller up and
down.
You can select a program to launch by pressing the scroller.
23
Chapter 2: Basic Skills
Battery Charging
When using the Toshiba Pocket PC e750/e755 for the first time, set the
battery switch to the supply side, and then charge the removable battery
with the supplied AC adapter.
How to Charge the Battery
You can use two charging methods.
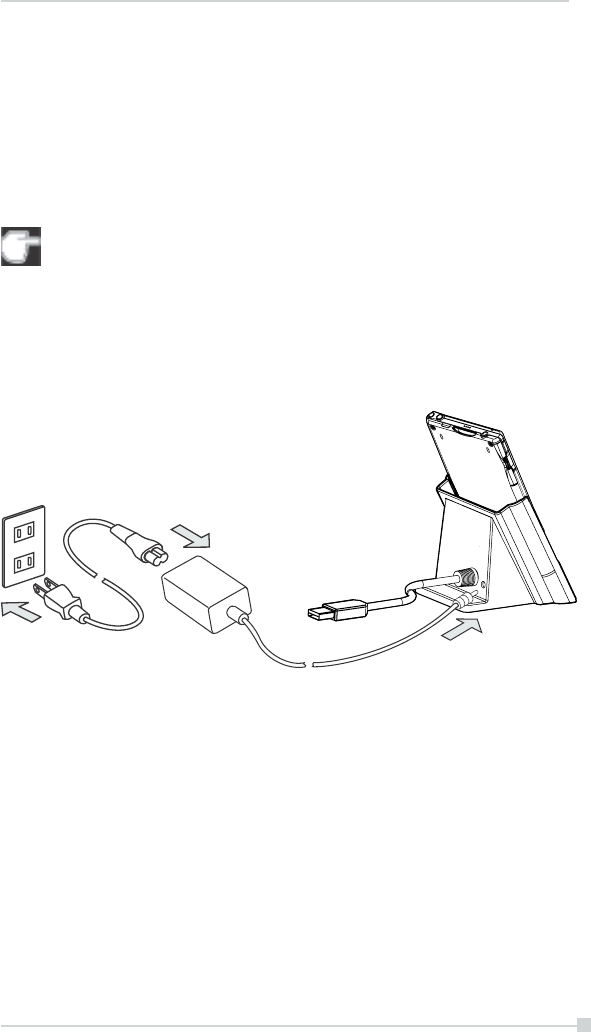
Turn the unit off before connecting the AC Adapter and Pocket PC.
Method1.: Connect the supplied AC adapter and the cradle as shown in
the figure below, and then insert the Toshiba Pocket PC e750/
e755 into the cradle.
24
Toshiba Pocket PC e750/e755 User’s Guide
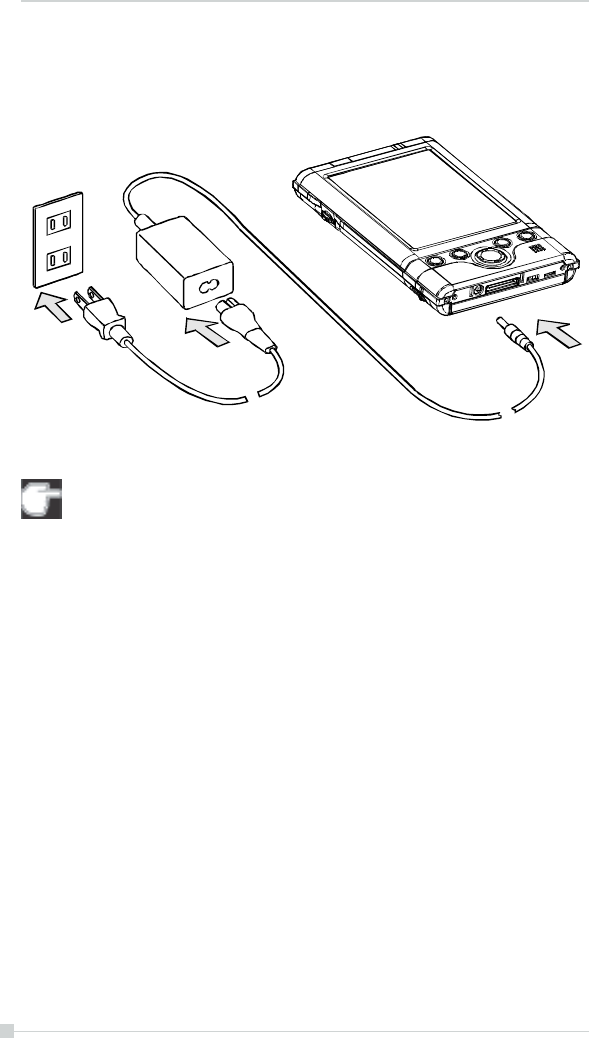
Method 2 :Connect the supplied AC adapter and the Toshiba Pocket PC
e750/e755 as shown in the figure below.
For charging the battery, maintain an ambient temperature from
approx. 41°F to 104°F.
When the lamp is lit in orange during the battery charging, you can
use the Toshiba Pocket PC e750/e755.
When the battery is completely charged, the LED alarm lamp color
will change to green.
25
Chapter 2: Basic Skills
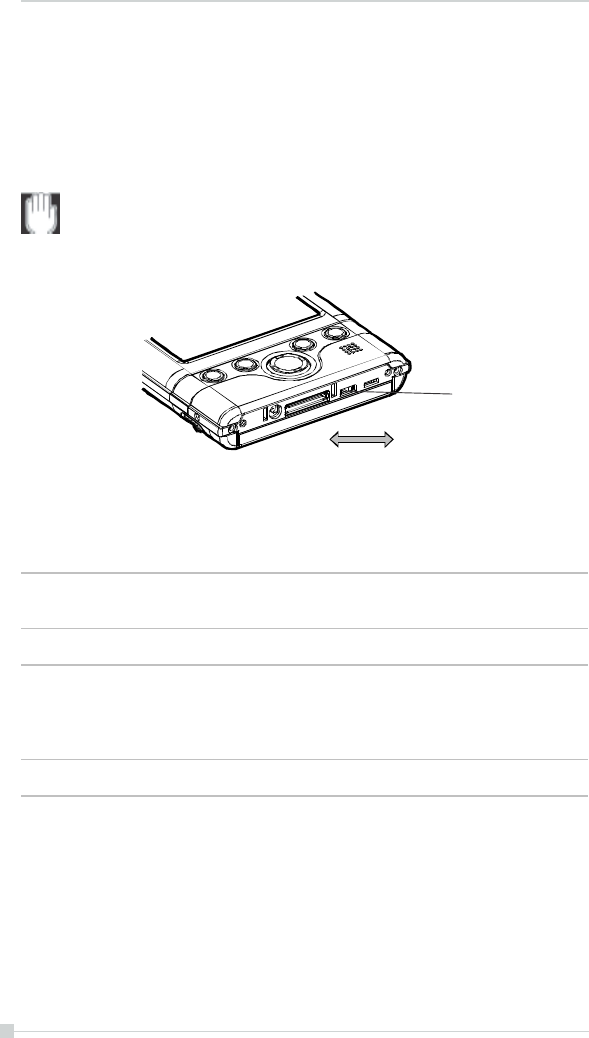
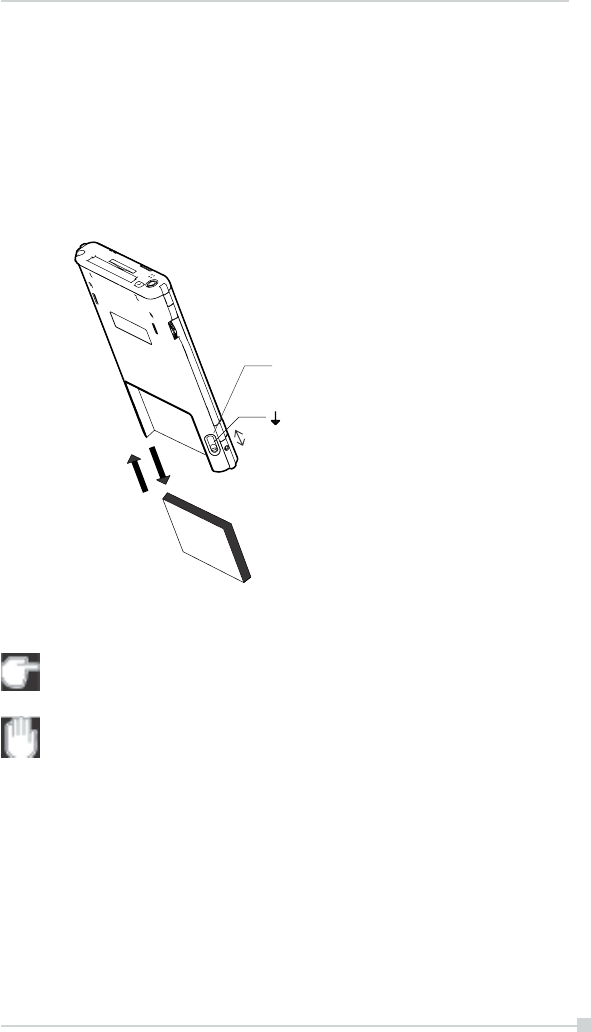
How to Attach / Detach Main Battery Pack
1. Turn off the power.
2. Switch Battery Pack Lock to release the battery pack.
3. Attach / Detach battery from the Pocket PC.
Switch to release battery pack
Battery Pack Lock
Detach
Attach
You cannot turn on the power if Battery Pack Lock is at the Release
side.
You can change the main battery without data loss because Toshiba
Pocket PC e750/e755 has the rechargeable backup battery. But
the capacity ot the backup battery is small. When you change the
main battery, please attach the new main battery and switch the
Battery Pack Lock to the lock side as soon as possible.
Release
Lock

27
Chapter 2: Basic Skills
How to Prolong Battery Life
Use the Toshiba Pocket PC e750/e755 with the AC adapter.
When you use the Toshiba Pocket PC e750/e755 under the following
conditions, the power consumption will be high. Please use the AC
adapter when:
The Toshiba Pocket PC e750/e755 is operated while connected to
your computer.
The Toshiba Pocket PC e750/e755 is operated with storage card or
with any other optional equipment.
Select the short power-off time in the setting menu. This will shorten
the time the unit will remain on if not used. For more information, see
“Customize Your Toshiba Pocket PC e750/e755” in Chapter 2-35.
Turn off the front light.
Set the screen brightness to power saving mode. Also shorten the
light turn-off time. For more information, see “Customize Your Toshiba
Pocket PC e750/e755” in Chapter 2-35.
Use the Toshiba Pocket PC e750/e755 with an ambient temperature
between 59°F and 77°F. This temperature range is the most effective
for the battery.
When you use the Toshiba Pocket PC e750/e755 in high or low tem-
perature environments, the operable time is shortened due to the
decrease of the battery capacity.
You can save power if wireless communication module is off.
Battery Life
The removable battery has a limited life. Repeated charging/discharging
of the battery gradually decreases operable time. When the operable
time has been extremely shortened, it is time to replace the removable
battery with a new one.
Do not leave the Toshiba Pocket PC e750/e755 in a place of high or
low temperature. It may shorten battery life.
If you have not used the Toshiba Pocket PC e750/e755 for several
days, its battery charge level reading may be inaccurate. Fully
recharge the battery before using.

28
Toshiba Pocket PC e750/e755 User’s Guide
Battery Charge Level and Stored Data Protection
If the battery charge level becomes extremely low, or is completely dis-
charged, the memory data stored in the Toshiba Pocket PC e750/e755
could be lost.
When the low battery status icon or the alarm message appears, imme-
diately connect the AC adapter to the Toshiba Pocket PC e750/e755 and
charge the battery.
The removable battery gradually discharges even if the device is not
being used. When the Toshiba Pocket PC e750/e755 is left for a long
time, the removable battery of the Toshiba Pocket PC e750/e755 may
completely discharge.
It is recommended to save the Toshiba Pocket PC e750/e755’s
memory data to your computer or to a storage card.
The manufacturer is not responsible for data change or clearance
due to battery discharge. Please acknowledge that.
29
Chapter 2: Basic Skills
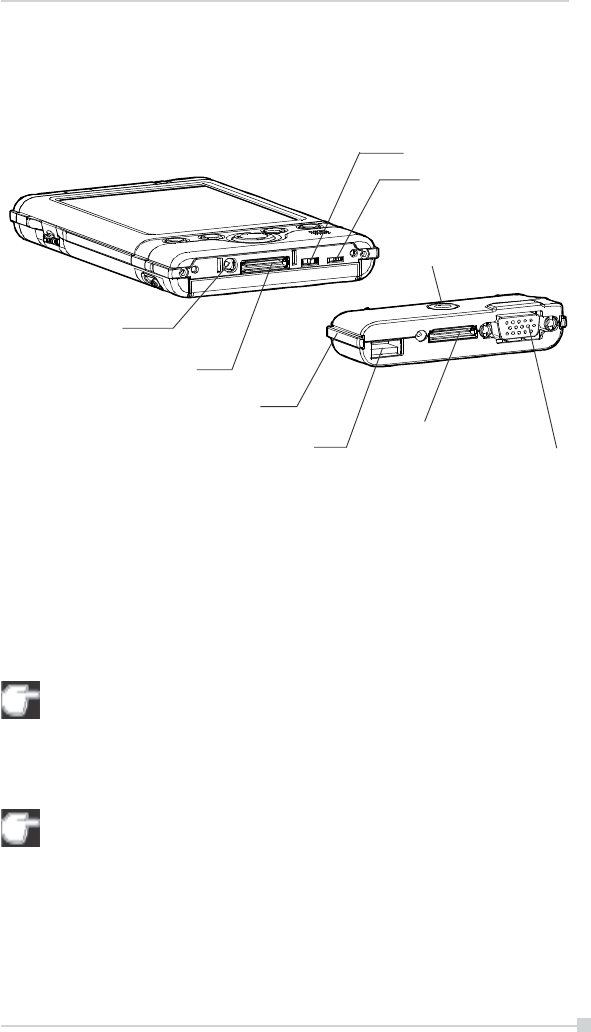
DC-IN SOCKET
BATTERY SWITCH
CRADLE CONNECTION PORT
WIRELESS COMMUNI-
CATION SWITCH
(WIRELESS LAN/
BLUETOOTH MODEL
ONLY)
USB PORT
CRADLE CONNECTION
PORT RGB(MONITOR) PORT
OPTIONAL EXPANSION PACK
RELEASE BUTTON
How to Use the Optional Expansion Pack
You can use the Optional Toshiba Expansion Pack (see 2-2) together with
the Toshiba Pocket PC e750/e755 to additional peripherals.
Parts and Functions of the Expansion Pack
Cradle Connection Port: The Cradle Connection Port allows you to con-
nect the Expansion Pack to the Cradle.
RGB (Monitor) Port: The RGB (Monitor) Port is a standard 15-pin RGB
port for connecting an external display device such as a monitor or projec-
tor.
Only IA-Presenter and IA Screen Mirror (see page 10-18) can output
the image to the external monitor. Other applications cannot output
the image to the external monitor.
USB Port: The USB Port allows you to connect USB keyboard to the
Pocket PC.
Use only a Microsoft Pocket PC compatible keyboard.
Release Button: When being pressed, the Release Button releases the
Expansion Pack from the Toshiba Pocket PC e750/e755.
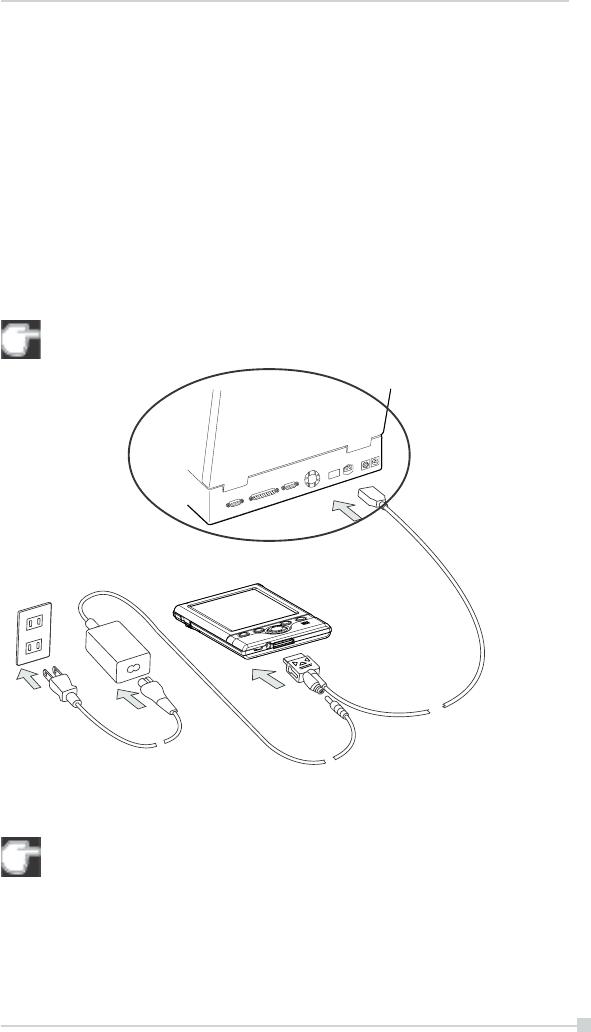
Connecting the Expansion Pack to the Pocket PC
1. Plug the Guide Pins into the corresponding jacks on the Toshiba Pocket PC
e750/e755.

30
Toshiba Pocket PC e750/e755 User’s Guide
2. The locks will give a light click when the Expansion Pack is in place.
The locks are based on foolproof design to help you connect the
Expansion Pack to the Pocket PC with the right face-up, i.e. the face
with the Release Button.
Releasing the Expansion Pack from the Pocket PC
Press the Release Button on the Expansion Pack and gently remove the
Pack from the Toshiba Pocket PC e750/e755.
31
Chapter 2: Basic Skills
How to use the Optional USB Host Cable
The optional USB Host Cable allows you to connect a USB keyboard to
the Pocket PC.
To connect a USB keyboard to the Pocket PC:
1. Turn off the power.
2. Plug the optional USB Host Cable to the Pocket PC.
3. Connect a USB keyboard to the USB Port of the optional USB Host
Cable.
Charging the battery or connect AC adapter if the battery power is
low. You cannot use a USB keyboard if the battery power is less than
15%.
Use only a Microsoft Pocket PC compatible keyboard.
This portion of
graphic to be
removed for
final

32
Toshiba Pocket PC e750/e755 User’s Guide
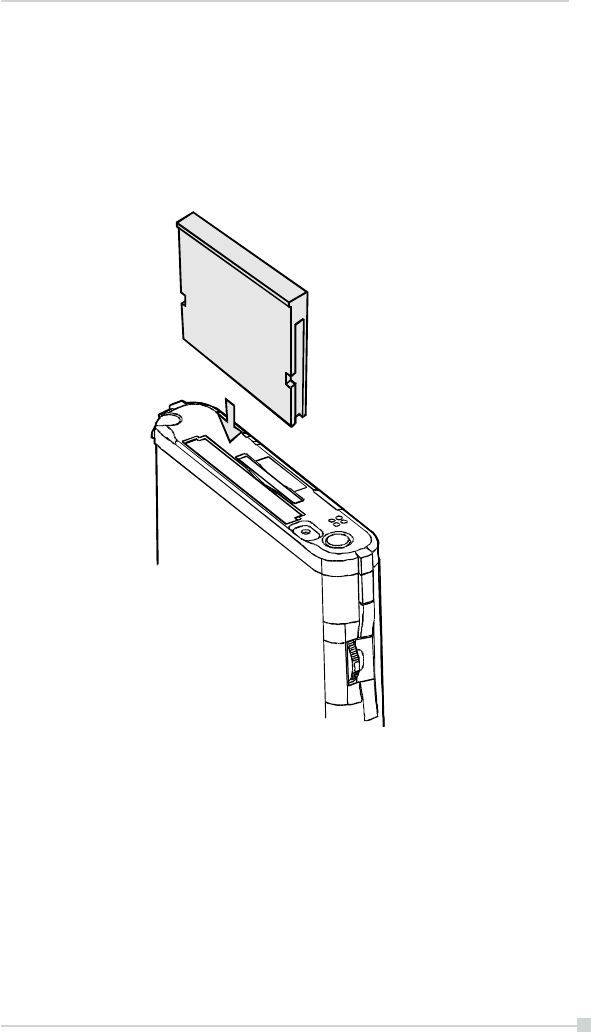
Initial Setup
When using the Toshiba Pocket PC e750/e755 for the first time, carry out
initial setup according to the procedures below after a battery has been
charged.
1. Move the battery switch to the “supply” position. The Toshiba Pocket
PC e750/e755 powers on automatically and the Welcome screen
appears. Tap the screen to start the following setup.
2. Execute touch screen correction.
When the align screen appears, tap the center of the cross target with
the stylus. The next target position changes upon tapping the target.
Five taps completes the positioning correction. The screen then
changes to the Stylus screen.
If a finger or any other object touches the screen during correc-
tion, the correction will be cancelled. Repeat the correction pro-
cedure.
3. Read how to use the stylus.
Read and understand the stylus operation, and then tap NEXT.
For more information on stylus operation, see “How to Use the Sty-
lus” in Chapter 2-5.
4. Learn the pop-up menu operation.
Read the on-screen explanation and then follow the instructions.
Display the pop-up menu, and cut and paste the data according
to the screen instructions.
After you finish the paste operation, this stage is completed. Tap
NEXT.
5. Set the TIME ZONE.
When tapping the right T mark, the city and the time zone lists
appear. Tap the desired city and time zone.
When the setup is completed, tap NEXT.
6. To complete the initial setup.
When the Complete screen appears, the initial setup is com-
pleted.
After tapping the screen, you can use the Toshiba Pocket PC
e750/e755.
When you tap the Complete screen, the Today screen appears. For
more information on the Today screen, see “Today screen” in Chap-
ter 2-19.
33
Chapter 2: Basic Skills
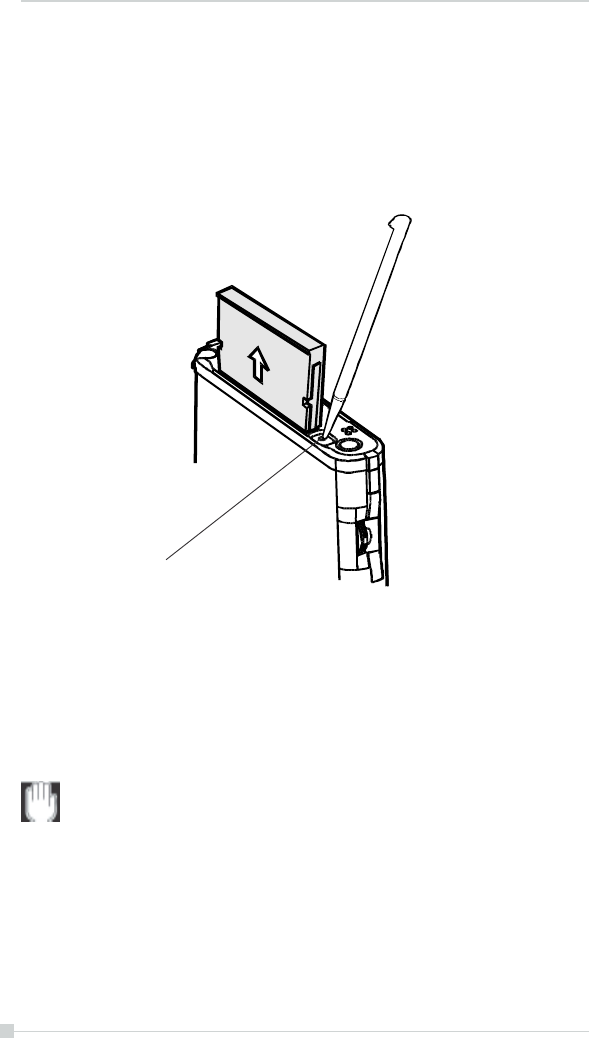
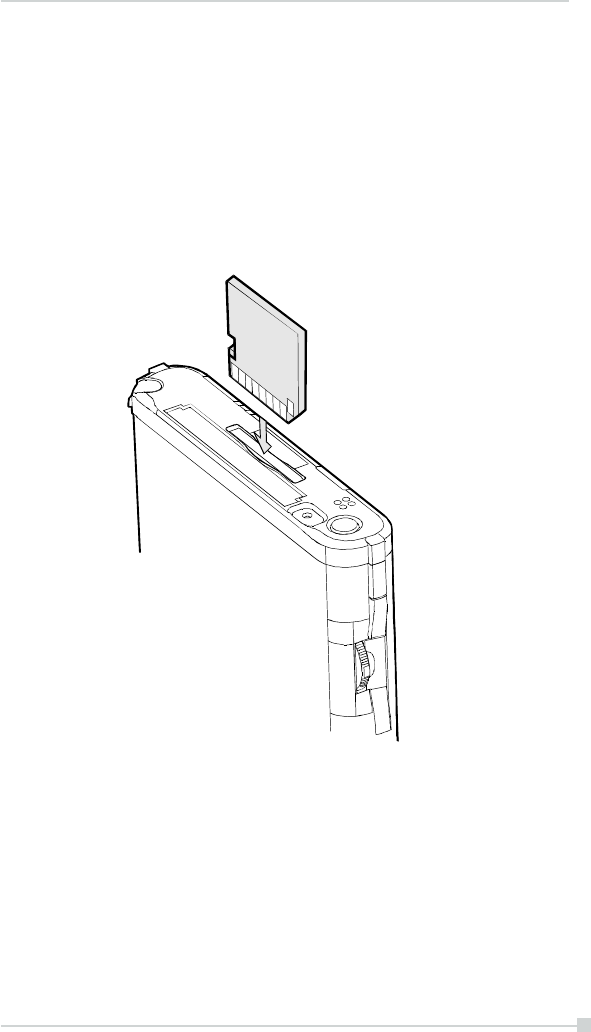
Inserting a CF II Card
1. Turn off the power.
2. Remove the dummy card.
3. Insert the CF II Card.
34
Toshiba Pocket PC e750/e755 User’s Guide
To remove a card:
1. Turn off the power.
2. Lightly press down the release button with the stylus. The button will
pop out. Press down on the release button again. The card will with-
draw slightly from the slot.
3. Pull the card straight up to remove.
Use stylus to release the CF card.
RELEASE BUTTON
35
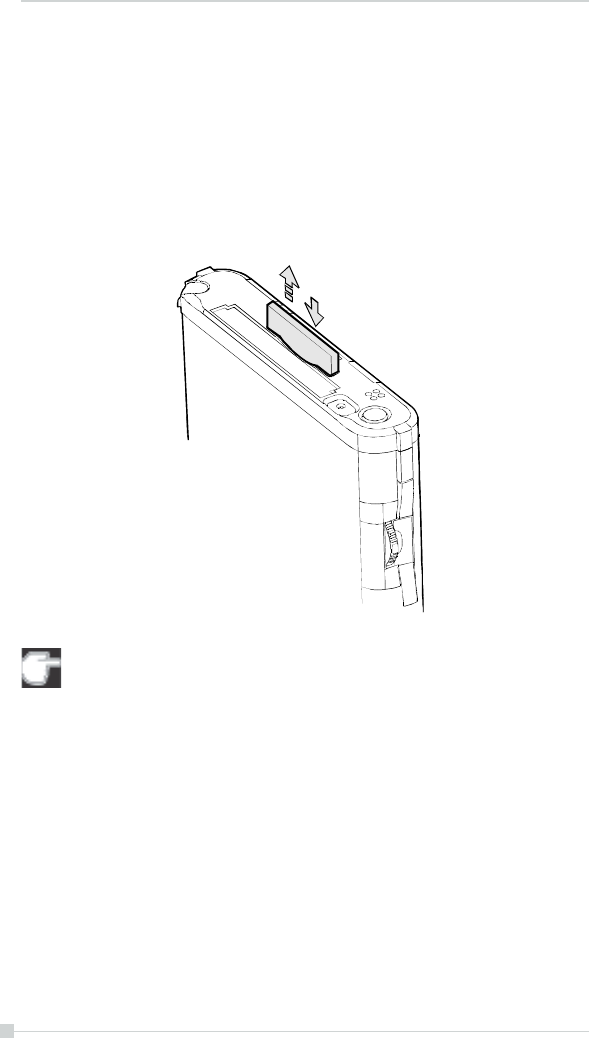
Chapter 2: Basic Skills
Inserting an SD Card
1. Turn off the power.
2. Remove the dummy card.
3. Insert the card with its contact surface (metal contact surface) facing
the back of the Toshiba Pocket PC e750/e755.
4. Press down until it clicks.
36
Toshiba Pocket PC e750/e755 User’s Guide
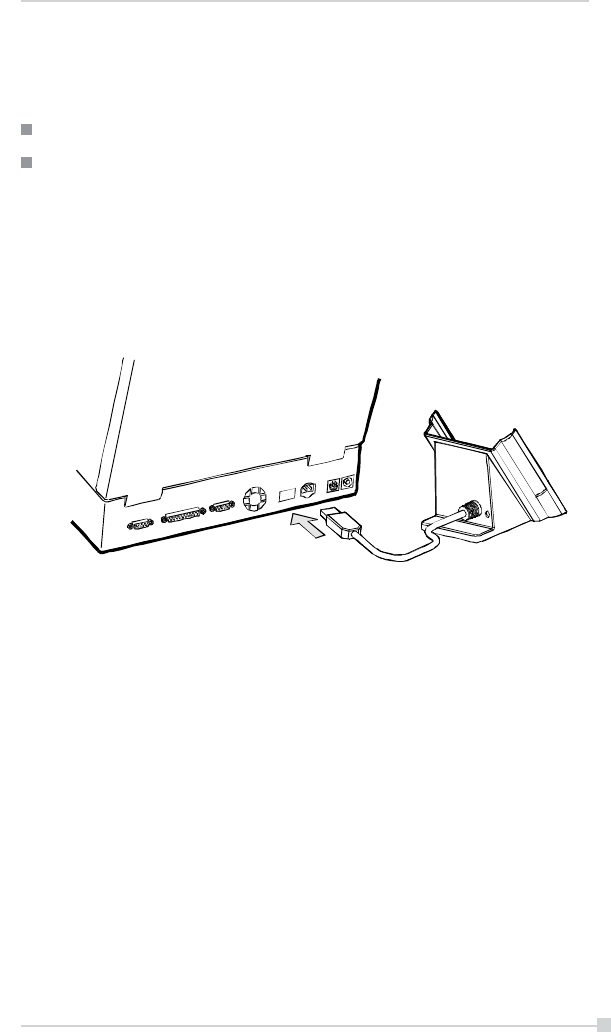
To remove a card:
1. Turn off the power.
2. Lightly press down the card until a clicking sound is heard. The card
will pop out slightly from the slot.
3. Pull the card straight up to remove.
When storage cards are inserted in both the CF and SD card slots,
one of them may only be accessible depending on the application
or the Settings operation (typically, the first storage card inserted is
accessed).
Typical examples:
- Notes of Pocket Outlook.
- Saving the destination selection of the Options item of the Tools
menu of Pocket Word.
37
Chapter 2: Basic Skills
Connecting to a Computer
Before connecting your Toshiba Pocket PC e750/e755 to a computer,
check the following.
ActiveSync has been installed on your computer. (See Chapter 3.)
The position of connecting port on the computer may differ according
to the computer type.
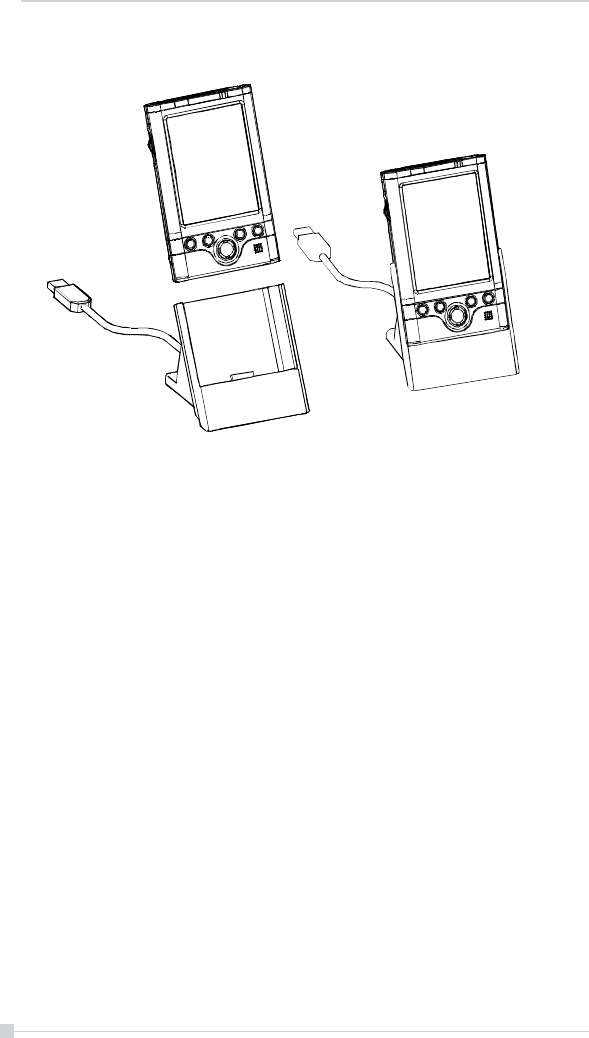
To Connect Using The Supplied Cradle:
1. Connect the USB cradle to your computer as shown in the illustration
below.
38
Toshiba Pocket PC e750/e755 User’s Guide
2. Insert the Pocket PC into the cradle.
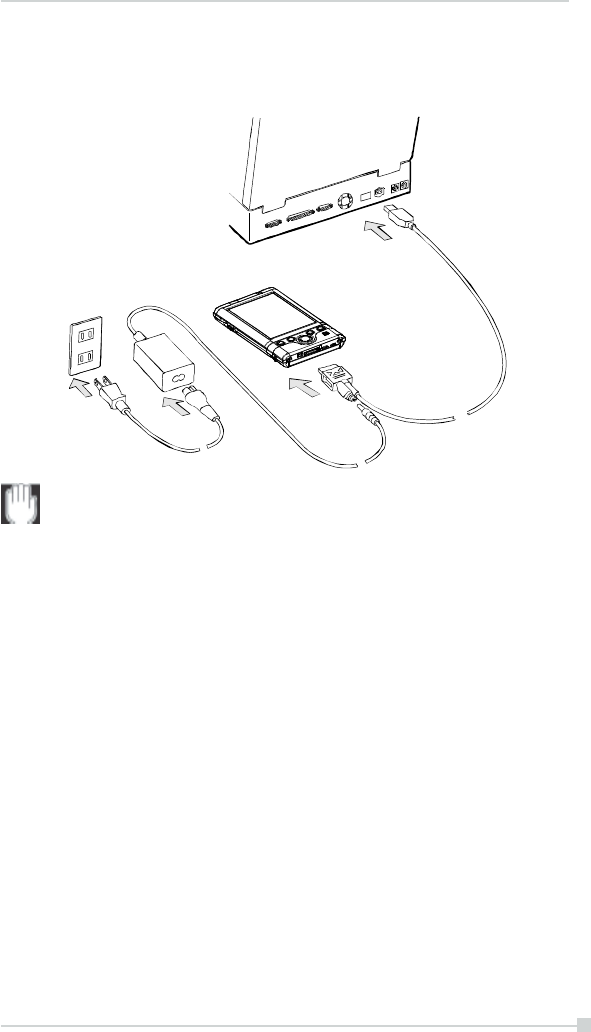
39
Chapter 2: Basic Skills
To connect directly using a connection cable:
Connect the Toshiba Pocket PC e750/e755 directly to your computer us-
ing an optional USB Sync Cable.
When the Toshiba Pocket PC e750/e755 is connected to another
device via a USB Sync Cable do not plug the AC adapter directly
into the Pocket PC as this may lead to interference. Instead, plug the
AC adapter into the port on the USB Client cable connector.
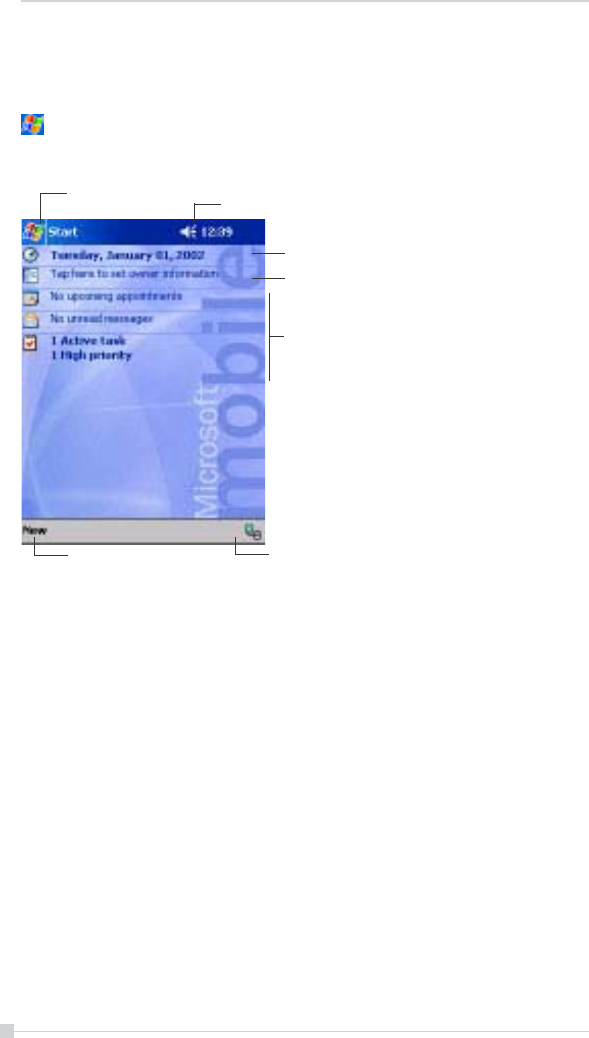
40
Toshiba Pocket PC e750/e755 User’s Guide
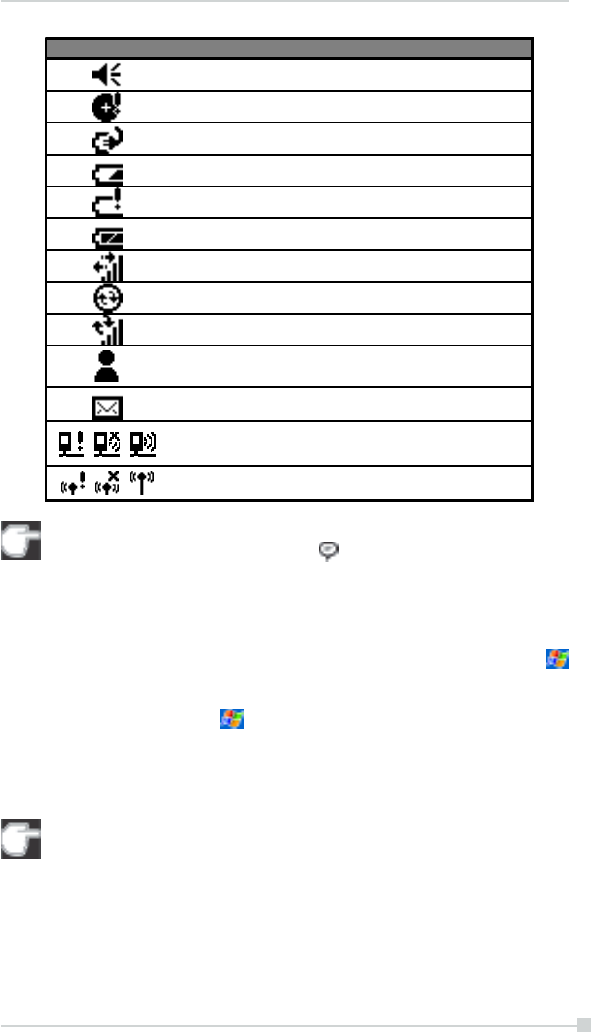
Today Screen
When you turn on your device for the first time each day (or after 4 hours of
inactivity), you’ll see the Today screen. You can also display it by tapping
and then Today. On the Today screen, you can see at a glance impor-
tant information for the day.
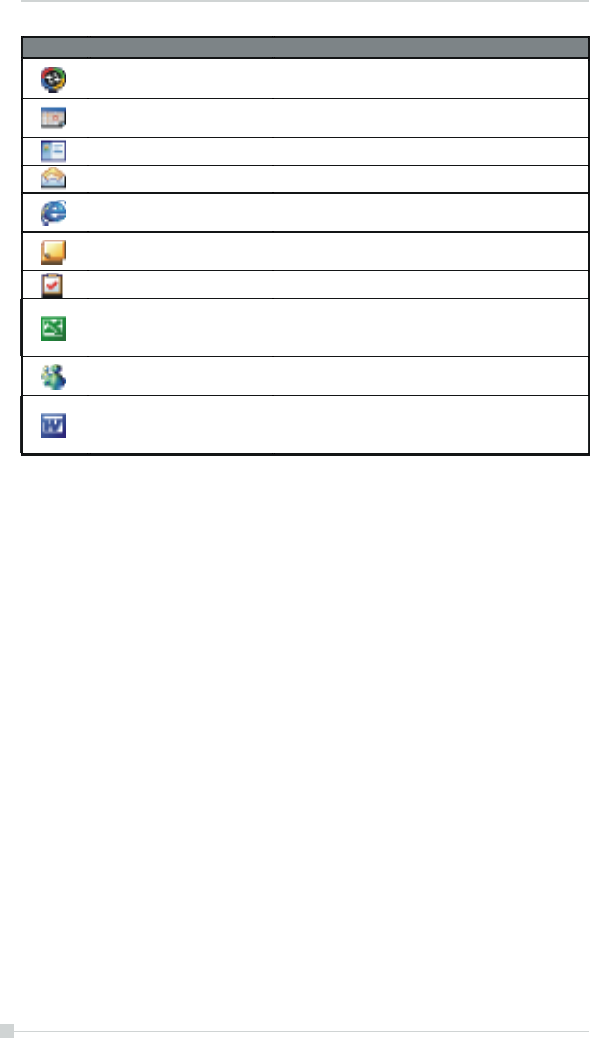
Following are some of the status icons you may see.
Tap to switch
to a program. Tap to change volume or mute all sounds.
Tap to change date and time.
Tap to open an item.
Your day at a
glance.
Tap to view connection
status.
Tap to create a new item.
41
Chapter 2: Basic Skills
If more notification icons need to be displayed than there is room to
display them, the Notification icon, , will display. Tap the icon to
view all notification icons.
Programs
You can switch from one program to another by selecting it from the
menu. (You can customize which programs you see on this menu. For
information, see “Adjusting Settings,” later in this chapter.) To access some
programs, you’ll need to tap , Programs, and then the program name.
You can also switch to some programs by pressing a program button. Your
device has one or more program buttons located on the front or side of the
device. The icons on the buttons identify the programs they switch to.
Some programs have abbreviated labels for check boxes and
drop-down menus. To see the full spelling of an abbreviated
label, tap and hold the stylus on the label. Drag the stylus off the
label so that the command is not carried out.
The following table contains a partial list of programs that are on your de-
vice. Look on the Toshiba Pocket PC Companion CD for additional pro-
grams that you can install onto your device.
Status Icon Meaning
Turns all sounds on and off
Backup battery is low
Main battery is charging
Main battery is low
Main battery is very low
Main battery is full
Connection is active
Synchronization is beginning or ending
Synchronization is occurring
Notification that one or more instant messages were
received
Notification that one or more e-mail messages were
received
Traffic Monitoring Utility(W-LAN model only)
Bluetooth Power Management Utility(BT model only)
42
Toshiba Pocket PC e750/e755 User’s Guide
Navigation Bar and Command Bar
The navigation bar is located at the top of the screen. It displays the active
program and current time, and allows you to switch to programs and close
screens.
Use the command bar at the bottom of the screen to perform tasks in
programs. The command bar includes menu names, buttons, and the In-
put Panel button. To create a new item in the current program, tap New. To
see the name of a button, tap and hold the stylus on the button. Drag the
stylus off the button so that the command is not carried out.
Icon Program Description
ActiveSync Synchronize information between your
device and computer.
Calendar Keep track of your appointments and create
meeting requests.
Contacts Keep track of your friends and colleagues.
Inbox Send and receive e-mail messages.
Pocket Internet Explorer Browse Web and WAP sites, and download
new programs and files from the Internet.
Notes Create handwritten or typed notes, drawings,
and recordings.
Tasks Keep track of your tasks.
Pocket Excel
Create new workbooks or view and edit
Excel workbooks created on your
computer.
MSN Messenger Send and receive instant messages with your
MSN Messenger contacts.
Pocket Word
Create new documents or view and edit
Word documents created on your
computer.
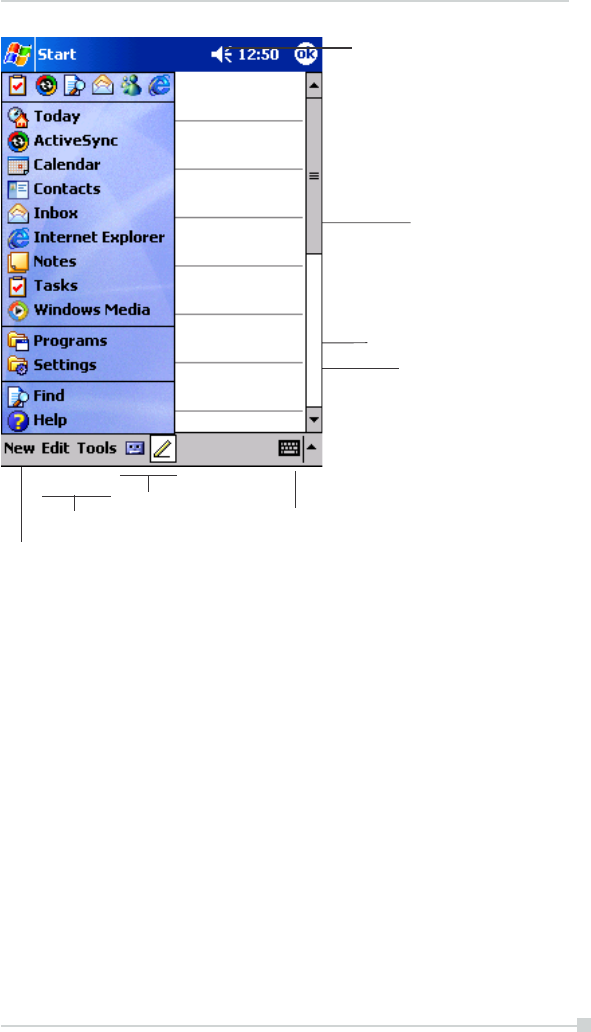
43
Chapter 2: Basic Skills
Tap to change volume to
mute the device.
Tap”Programs” to see
additional programs.
Tap to select a
program.
Tap “Settings” to
customize the device.
Input panel
button.
Newbutton.
Menu
names.
Buttons.
Pop-up Menus
With pop-up menus, you can quickly choose an action for an item. For
example, you can use the pop-up menu in the contact list to quickly delete
a contact, make a copy of a contact, or send an e-mail message to a
contact. The actions in the pop-up menus vary from program to program.
To access a pop-up menu, tap and hold the stylus on the item name that
you want to perform the action on. When the menu appears, lift the stylus,
and tap the action you want to perform. Or tap anywhere outside the menu
to close the menu without performing an action.
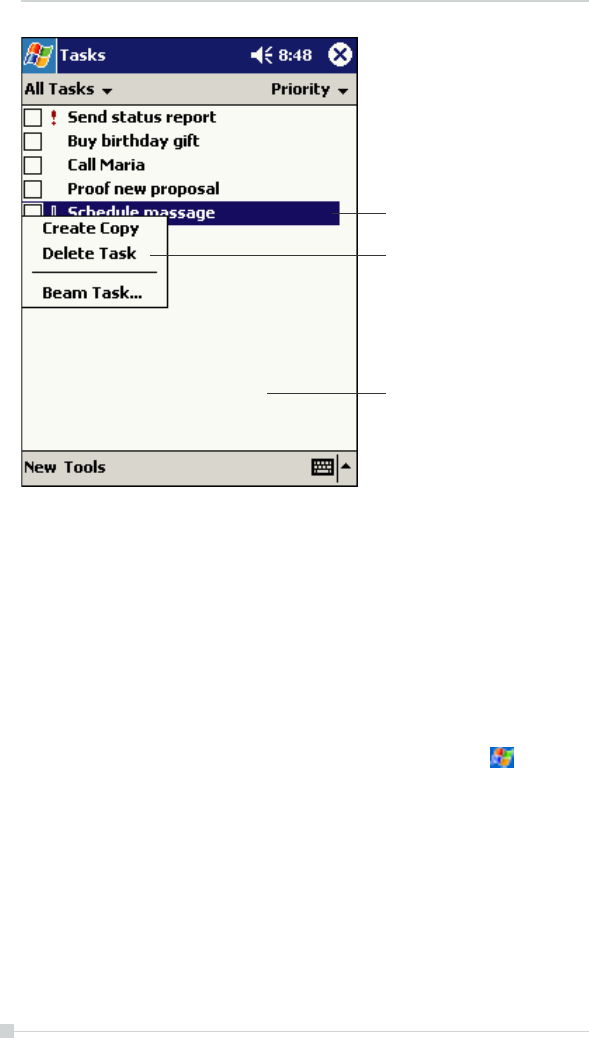
44
Toshiba Pocket PC e750/e755 User’s Guide
Tap and hold to display
the pop-up menu.
Lift the stylus and tap
the action you want.
Tap outside the menu
to close it without performing
an action.
Notifications
Your device reminds you in a variety of ways when you have something to
do. For example, if you’ve set up an appointment in Calendar, a task with a
due date in Tasks, or an alarm in Clock, you’ll be notified in any of the
following ways:
• A message box appears on the screen.
• A sound, which you can specify, is played.
• A light flashes on your device.
To choose reminder types and sounds for your device, tap and then
Settings. In the Personal tab, tap Sounds & Notifications. The options
you choose here apply throughout the device.
45
Chapter 2: Basic Skills
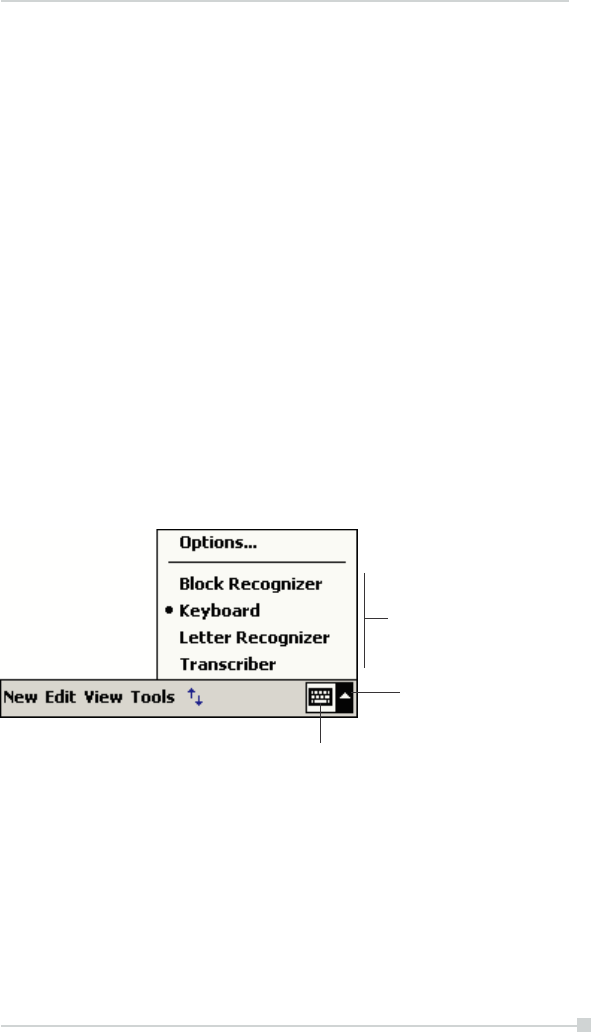
Input Panel button.
Tap to see your choices.
Select an input
method.
Enter Information on Your Toshiba Pocket PC
You have several options for entering new information:
• Use the input panel to enter typed text, either by using the soft key-
board or other input method.
• Write directly on the screen.
• Draw pictures on the screen.
• Speak into your device microphone to record a message.
• Use Microsoft® ActiveSync® to synchronize or copy information from
your computer to your device. For more information on ActiveSync,
see ActiveSync Help on your computer.
Entering Text Using the Input Panel
Use the input panel to enter information in any program on your device.
You can either type using the soft keyboard or write using Letter Recog-
nizer, Block Recognizer, or Transcriber. In either case, the characters
appear as typed text on the screen.
To show or hide the input panel, tap the Input Panel button. Tap the arrow
next to the Input Panel button to see your choices.
When you use the input panel, your device anticipates the word you are
typing or writing and displays it above the input panel. When you tap the
displayed word, it is inserted into your text at the insertion point. The more
you use your device, the more words it learns to anticipate.
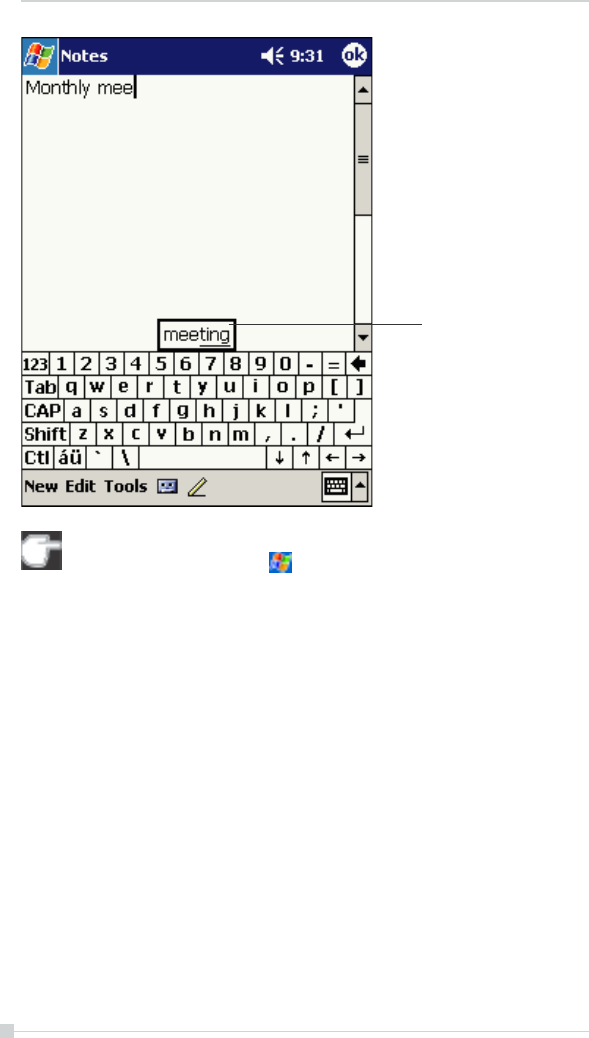
46
Toshiba Pocket PC e750/e755 User’s Guide
Tap here if this is the
right word.
To change word suggestion options, such as the number of words
suggested at one time, tap ,Settings , Personal tab, Input , and
then the Word Completion tab.
To type with the soft keyboard:
1. Tap the arrow next to the Input Panel button and then Keyboard .
2. On the soft keyboard that is displayed, tap the keys with your stylus.
To use Letter Recognizer:
With Letter Recognizer you can write letters using the stylus just as you
would on paper.
1. Tap the arrow next to the Input Panel button and then Letter Recog-
nizer.
2. Write a letter in the box.
When you write a letter, it is converted to typed text that appears on the
screen. For specific instructions on using Letter Recognizer, with Letter
Recognizer open, tap the question mark next to the writing area.

47
Chapter 2: Basic Skills
To use Block Recognizer:
With Block Recognizer you can input character strokes using the stylus
that are similar to those used on other devices.
1. Tap the arrow next to the Input Panel button and then Block Recog-
nizer.
2. Write a letter in the box.
When you write a letter, it is converted to typed text that appears on the
screen. For specific instructions on using Block Recognizer, with Block
Recognizer open, tap the question mark next to the writing area.
To use Transcriber:
With Transcriber you can write anywhere on the screen using the stylus
just as you would on paper. Unlike Letter Recognizer and Block Recog-
nizer, you can write a sentence or more of information. Then, pause and let
Transcriber change the written characters to typed characters.
1. Tap the arrow next to the Input Panel button and then Transcriber.
2. Write anywhere on the screen.
For specific instructions on using Transcriber, with Transcriber open, tap
the question mark in the lower right hand corner of the screen.
To select typed text:
If you want to edit or format typed text, you must select it first.
• Drag the stylus across the text you want to select.
You can cut, copy, and paste text by tapping and holding the selected
words and then tapping an editing command on the pop-up menu, or by
tapping the command on the Edit menu.
48
Toshiba Pocket PC e750/e755 User’s Guide
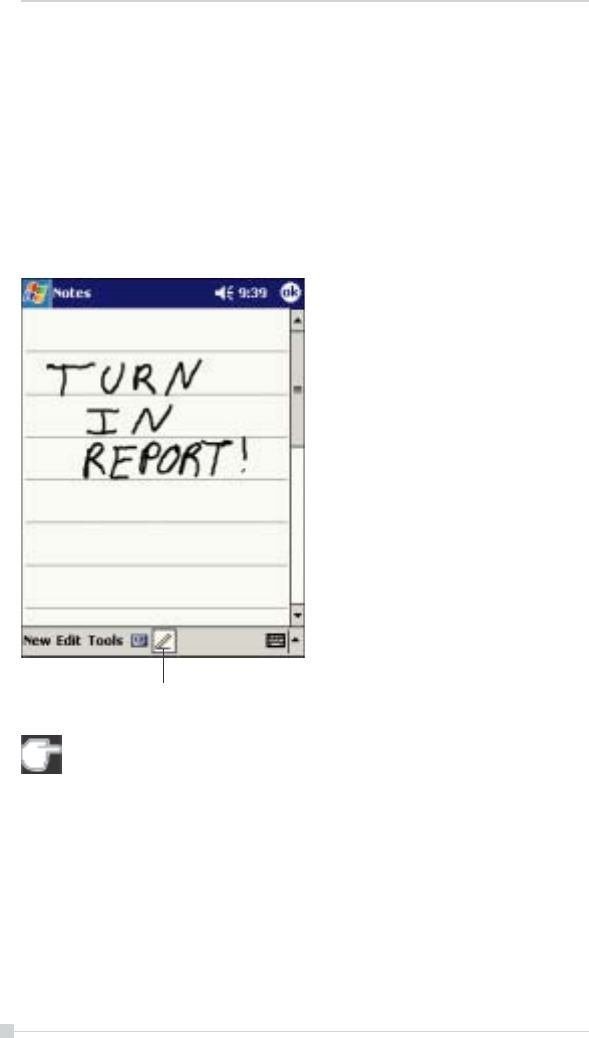
Tap the Pen button and use your stylus like a
pen.
Writing on the Screen
In any program that accepts writing, such as the Notes program, and in
the Notes tab in Calendar, Contacts, and Tasks, you can use your stylus
to write directly on the screen. Write the way you do on paper. You can edit
and format what you’ve written and convert the information to text at a later
time.
To write on the screen:
• Tap the Pen button to switch to writing mode. This action displays lines
on the screen to help you write.
Some programs that accept writing may not have the Pen button.
See the documentation for that program to find out how to switch to
writing mode.
49
Chapter 2: Basic Skills
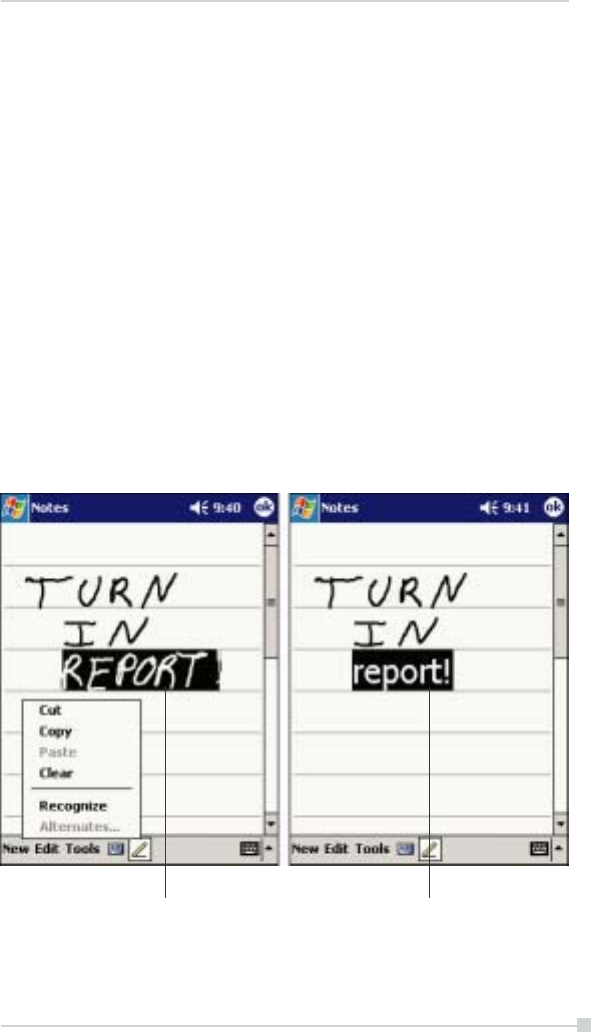
The writing is turned into
text.
Select the text you want to convert
and tap Recognize on the pop-up menu.
To select writing:
If you want to edit or format writing, you must select it first.
1. Tap and hold the stylus next to the text you want to select until the
insertion point appears.
2. Without lifting, drag the stylus across the text you want to select.
If you accidentally write on the screen, tap Tools, then Undo and try again.
You can also select text by tapping the Pen button to deselect it and then
dragging the stylus across the screen.
You can cut, copy, and paste written text in the same way you work with
typed text: tap and hold the selected words and then tap an editing com-
mand on the pop-up menu, or tap the command on the Edit menu.
To convert writing to text:
• Tap Tools and then Recognize.
If you want to convert only certain words, select them before tapping Rec-
ognize on the Tools menu (or tap and hold the selected words and then
tap Recognize on the pop-up menu). If a word is not recognized, it is left
as writing.
50
Toshiba Pocket PC e750/e755 User’s Guide
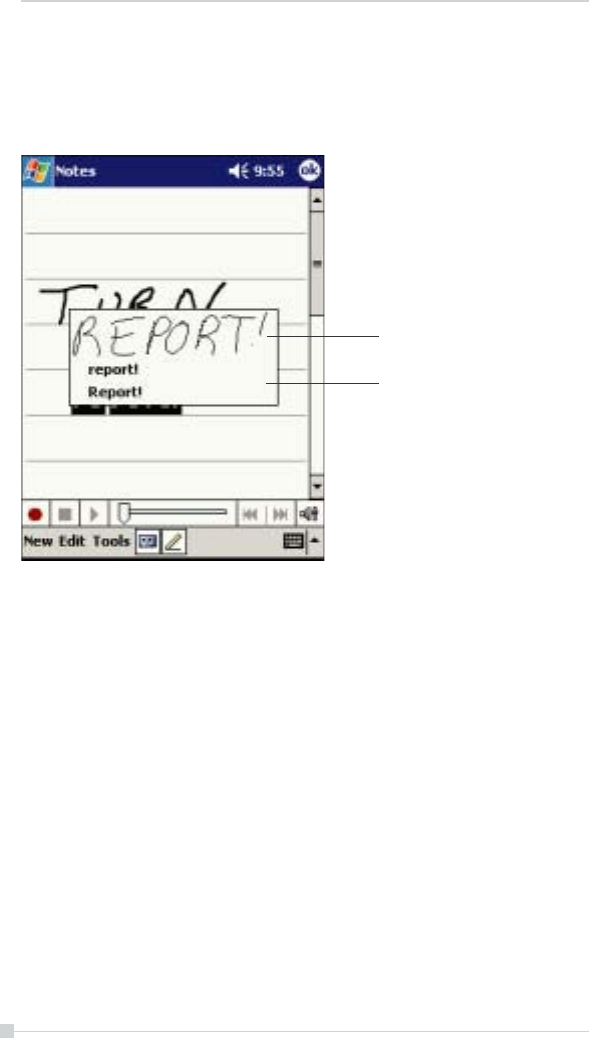
Tap to return to your original
writing.
Or, tap the word you want to use.
If the conversion is incorrect, you can select different words from a list of
alternates or return to the original writing. To do so, tap and hold the incor-
rect word (tap one word at a time). On the pop-up menu, tap Alternates. A
menu with a list of alternate words appears. Tap the word you want to use,
or tap the writing at the top of the menu to return to the original writing.
Tips for getting good recognition:
• Write neatly.
• Write on the lines and draw descenders below the line. Write the
cross of the “t” and apostrophes below the top line so that they are not
confused with the word above. Write periods and commas above the
line.
• For better recognition, try increasing the zoom level to 300% using
the Tools menu.
• Write the letters of a word closely and leave big gaps between words
so that the device can easily tell where words begin and end.
• Hyphenated words, foreign words that use special characters such
as accents, and some punctuation cannot be converted.
• If you add writing to a word to change it (such as changing a “3” to an
“8”) after you attempt to recognize the word, the writing you add will
not be included if you attempt to recognize the writing again.
51
Chapter 2: Basic Skills
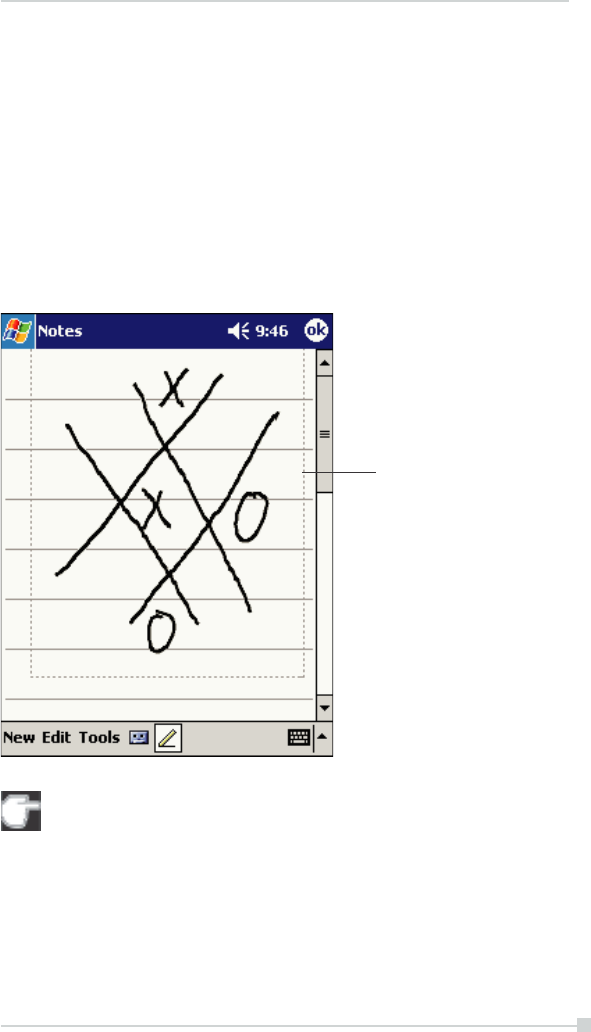
The drawing box indicates
the boundaries of the
drawing.
Drawing on the Screen
You can draw on the screen in the same way that you write on the screen.
The difference between writing and drawing on the screen is how you
select items and how they can be edited. For example, selected drawings
can be resized, while writing cannot.
To create a drawing:
• Cross three ruled lines on your first stroke. A drawing box appears.
Subsequent strokes in or touching the drawing box become part of the
drawing. Drawings that do not cross three ruled lines will be treated as
writing.
You may want to change the zoom level so that you can more easily
work on or view your drawing. Tap Tools and then a zoom level.

52
Toshiba Pocket PC e750/e755 User’s Guide
To select a drawing:
If you want to edit or format a drawing, you must select it first.
• Tap and hold the stylus on the drawing until the selection handle
appears. To select multiple drawings, deselect the Pen button and
then drag to select the drawings you want.
You can cut, copy, and paste selected drawings by tapping and holding
the selected drawing and then tapping an editing command on the pop-
up menu, or by tapping the command on the Edit menu. To resize a
drawing, make sure the Pen button is not selected, and drag a selection
handle.
53
Chapter 2: Basic Skills
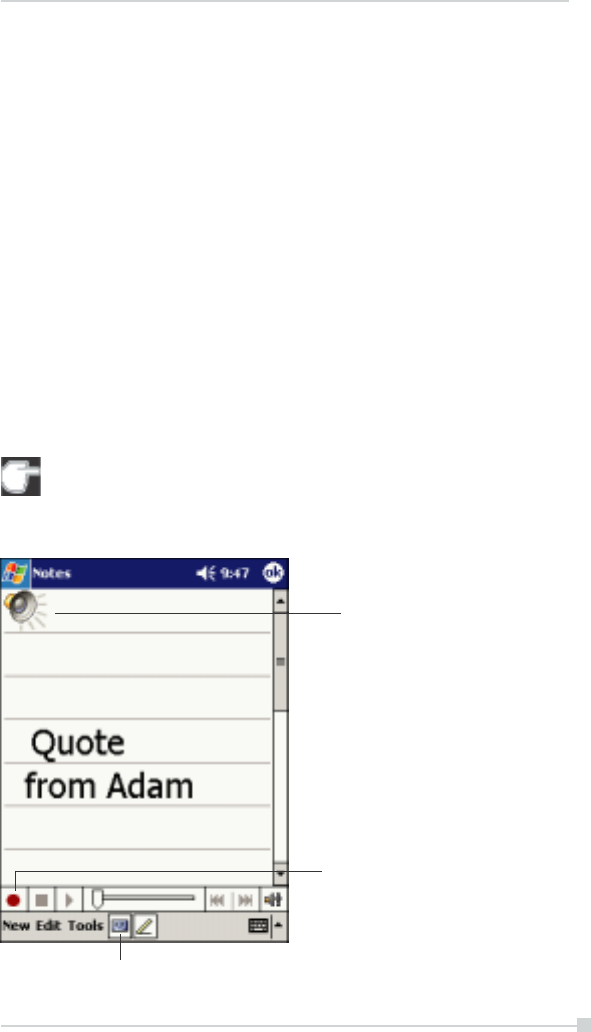
Indicates an embedded
recording.
Tap to show or hide the Recording toolbar.
Tap to begin
recording.
Recording a Message
In any program where you can write or draw on the screen, you can also
quickly capture thoughts, reminders, and phone numbers by recording a
message. In Calendar, Tasks, and Contacts, you can include a recording
in the Notes tab. In the Notes program, you can either create a stand-
alone recording or include a recording in a written note. If you want to
include the recording in a note, open the note first. In the Inbox program,
you can add a recording to an e-mail message.
To create a recording:
1. Hold your device’s microphone near your mouth or other source of
sound.
2. Press and hold the Record hardware button on your device until you
hear a beep.
3. While holding down the Record button, make your recording.
4. To stop recording, release the Record button. Two beeps will sound.
The new recording appears in the note list or as an embedded icon.
You can also make a recording by tapping the Record button on the
Recording toolbar.
To play a recording, tap it in the list or tap its icon in the note.
54
Toshiba Pocket PC e750/e755 User’s Guide
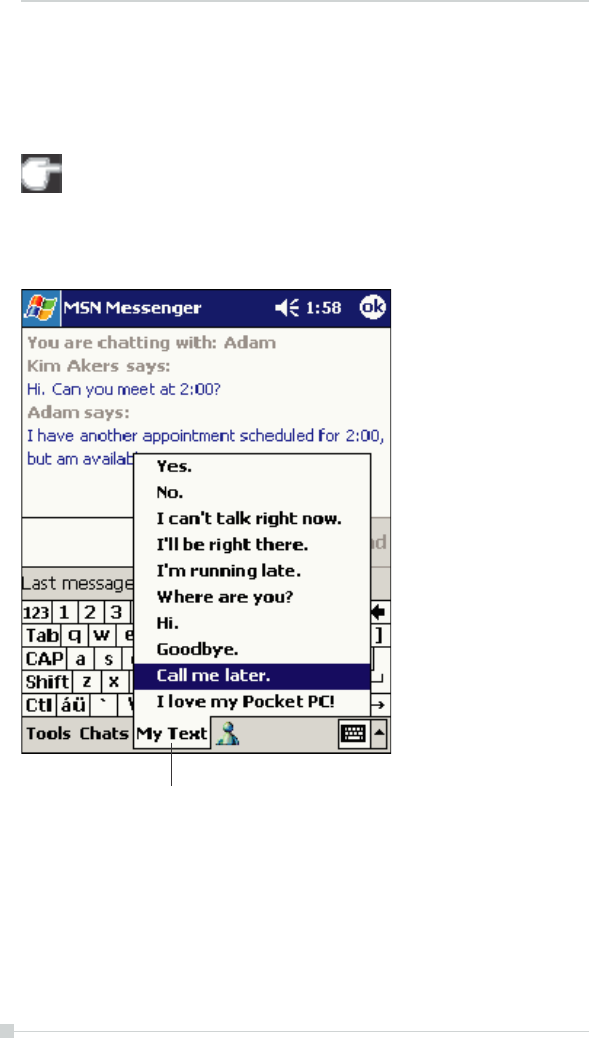
Tap to select a prewritten
message.
Using My Text
When using Inbox or MSN Messenger, use My Text to quickly insert preset
or frequently used messages into the text entry area. To insert a message,
tap My Text and tap a message.
You can add text after inserting a My Text message before sending
it.
To edit a My Text message, in the Tools menu, tap Edit and then tap My
Text Messages. Select the message you wish to edit and make desired
changes.
55
Chapter 2: Basic Skills
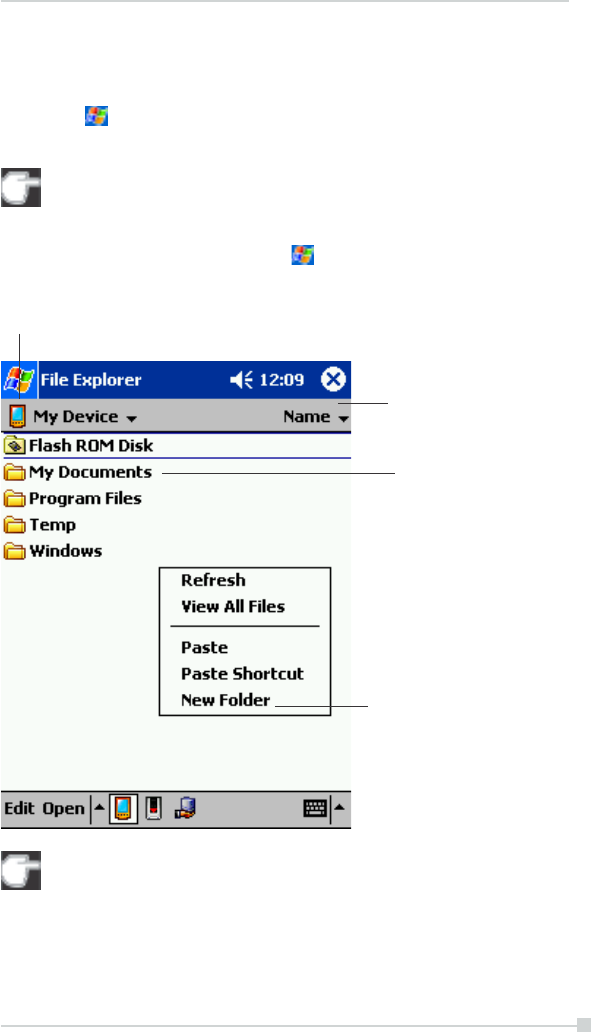
Tap to change folders.
Select the sort order for the
list.
Tap the folder name to open
it.
Tap and hold to create a new
folder.
Find and Organize Information
The Find feature on your device helps you quickly locate information.
• On the menu, tap Find. Enter the text you want to find, select a data
type, and then tap Go to start the search.
To quickly find information that is taking up storage space on your
device, select Larger than 64 KB in Type.
You can also use the File Explorer to find files on your device and to orga-
nize these files into folders. On the menu, tap Programs, and then
File Explorer.
You can move files in File Explorer by tapping and holding the item
you want to move, and then tapping Cut or Copy and Paste on
the pop-up menu.

56
Toshiba Pocket PC e750/e755 User’s Guide
Customize Your Toshiba Pocket PC
You can customize your device by adjusting device settings and installing
additional software.
Adjusting Settings
You can adjust device settings to suit the way you work. To see available
options, tap , Settings, then the Personal or System tab located at
the bottom of the screen.
You might want to adjust the following:
• Clock, to change the time or to set alarms
• Menus, to customize what appears on the menu, and to enable a
pop-up menu from the New button
• Owner Information, to enter your contact information
• Password, to limit access to your device
• Power, to maximize battery life
• Today, to customize the look and the information that is displayed on
the Today screen
Adding or Removing Programs
Programs added to your device at the factory are stored in ROM (read-
only memory). You cannot remove this software, and you’ll never acciden-
tally lose ROM contents. ROM programs can be updated using special
installation programs with a *.xip extension. All other programs and data
files added to your device after factory installation are stored in RAM (ran-
dom access memory).
You can install any program created for your device, as long as your
device has enough memory. The most popular place to find software for
your device is on the Pocket PC Web site (http://www.microsoft.com/mo-
bile/pocketpc).

57
Chapter 2: Basic Skills
To add programs using ActiveSync
You’ll need to install the appropriate software for your device on your
desktop computer before installing it on your device.
1. Determine your device and processor type so that you know which
version of the software to install.
Tap and then Settings. On the System tab, tap About. In the
Version tab, make a note of the information in Processor.
2. Download the program to your computer (or insert the CD or disk that
contains the program into your computer). You may see a single *.xip,
*.exe,, or *.zip file, a Setup.exe file, or several versions of files for
different device types and processors. Be sure to select the program
designed for the Toshiba Pocket PC and your device processor type.
3. Read any installation instructions, Read Me files, or documentation
that comes with the program.
Many programs provide special installation instructions.
4. Connect your device and computer.
5. Double-click the *.exe file.
• If the file is an installer, the installation wizard will begin. Follow
the directions on the screen.
Once the software has been installed on your computer, the in-
staller will automatically transfer the software to your device.
• If the file is not an installer, you will see an error message stating
that the program is valid but it is designed for a different type of
computer. You will need to move this file to your device. If you
cannot find any installation instructions for the program in the
Read Me file or documentation, use ActiveSync Explore to copy
the program file to the Program Files folder on your device. For
more information on copying files using ActiveSync, see
ActiveSync Help.
Once installation is complete, tap ,Programs, and then the program
icon to switch to it.

58
Toshiba Pocket PC e750/e755 User’s Guide
To add a program directly from the Internet
1. Determine your device and processor type so that you know which
version of the software to install.
Tap and then Settings. On the System tab, tap About. In the Ver-
sion tab, make a note of the information in Processor.
2. Download the program to your device straight from the Internet using
Pocket Internet Explorer. You may see a single *.xip, *.exe or *.zip file,
a Setup.exe file, or several versions of files for different device types
and processors. Be sure to select the program designed for the Toshiba
Pocket PC and your device processor type.
3. Read any installation instructions, Read Me files, or documentation
that comes with the program. Many programs provide special installa-
tion instructions.
4. Tap the file, such as a *.xip or *.exe file. The installation wizard will
begin. Follow the directions on the screen.
To add a program to the Start menu
Tap , Settings, Menus , the Start Menu tab, and then the check box for
the program. If you do not see the program listed, you can either use File
Explorer on the device to move the program to the Start Menu folder, or
use ActiveSync on the computer to create a shortcut to the program and
place the shortcut in the Start Menu folder.
•Using File Explorer on the device:Tap ,Programs,File Explorer,
and locate the program (tap the folder list, labeled My Documents by
default, and then My Device to see a list of all folders on the device).
Tap and hold the program and tap Cut on the pop-up menu. Open the
Start Menu folder located in the Windows folder, tap and hold a blank
area of the window, and tap Paste on the pop-up menu. The program
will now appear on the menu. For more information on using File Ex-
plorer, see “Find and Organize Information,” earlier in this chapter.
•Using ActiveSync on the computer:Use the Explorer in ActiveSync
to explore your device files and locate the program. Right-click the
program, and then click Create Shortcut. Move the shortcut to the
Start Menu folder in the Windows folder. The shortcut now appears on
the menu. For more information, see ActiveSync Help.
To remove programs
• Tap and then Settings. On the System tab, tap Remove Pro-
grams .
If the program does not appear in the list of installed programs, use File
Explorer on your device to locate the program, tap and hold the program,
and then tap Delete on the pop-up menu.

59
Chapter 2: Basic Skills
Setting Password
You can protect data or settings from a third person by setting a password
which is requested when turning power on.
1. Tap and then Settings. On the Personal tab, tap Password.
2. Select the type of password you would like to use.
3. Enter a password and tap OK.
4. Tap YES on the confirmation screen. The password is saved and the
screen returns to the Personal tab screen
If you tap YES on the confirmation screen to return to the Personal tab
screen, it becomes necessary to enter the password even for displaying
the Password setting screen.
In case you forget the password, it is necessary to initialize the Pocket
PC. Please note that when initialization is executed, data or settings stored
in the Pocket PC are all deleted.
60
Toshiba Pocket PC e750/e755 User’s Guide
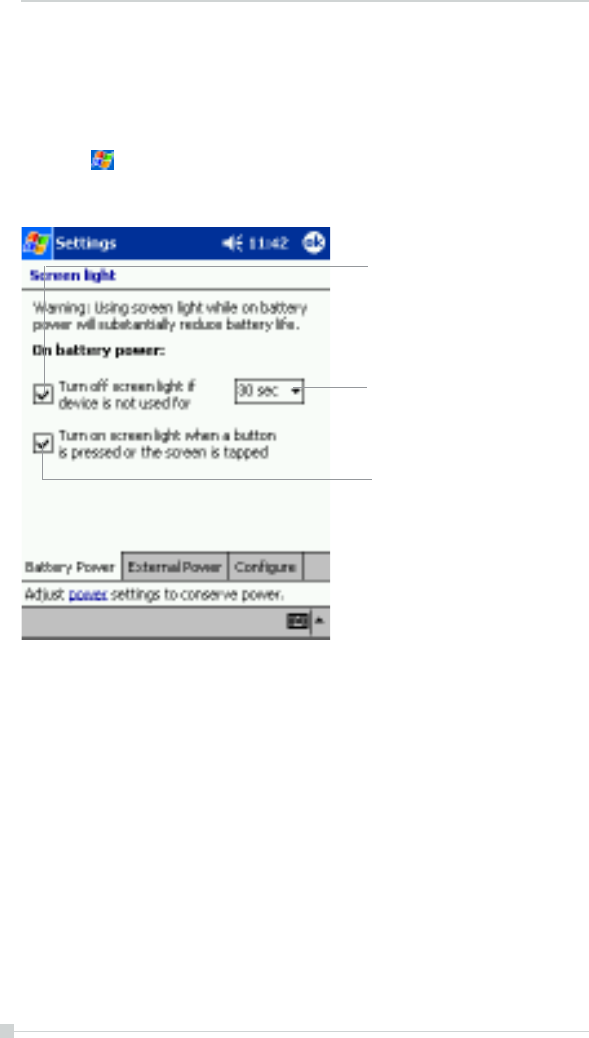
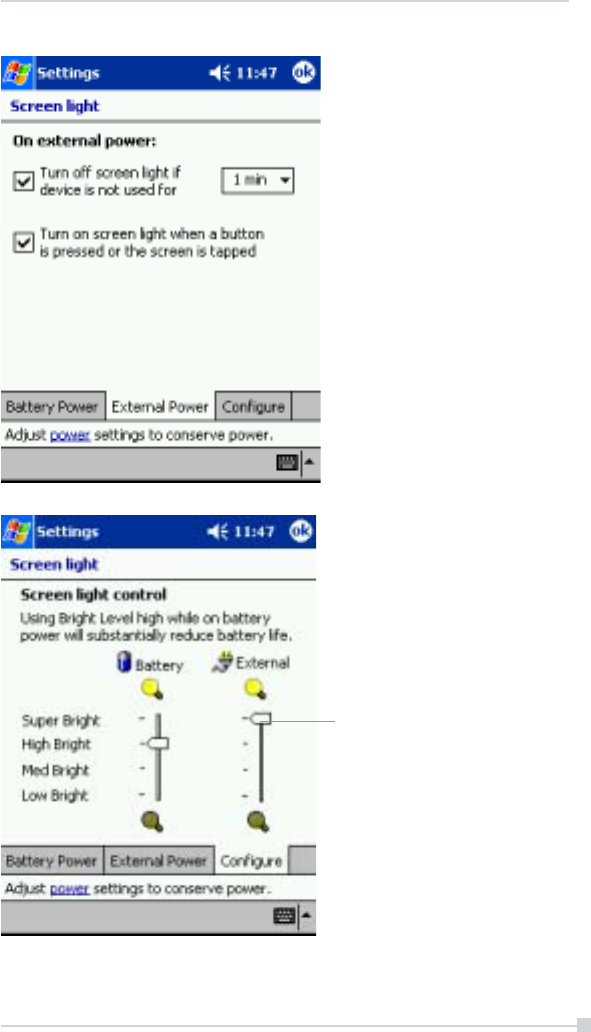
To Set Screen Light
You can set the screen brightness for better sight according to a place of
use. You can also set the time that elapses until the screen light turns off
automatically after the last operation.
1. Tap and then Settings. On the System tab, tap Screen Light.
2. Set the Screen Light on battery power.
Check to active power save
mode.It will make the screen
light turn off automatically when
the Pocket PC has not been
used for a user-set mount of
time.
Set the time that elapses until
the screen light turns off
automatically.
Check to make thescreen light
turn on automatically when a
button is pressed or the screen
is tapped.
61
Chapter 2: Basic Skills
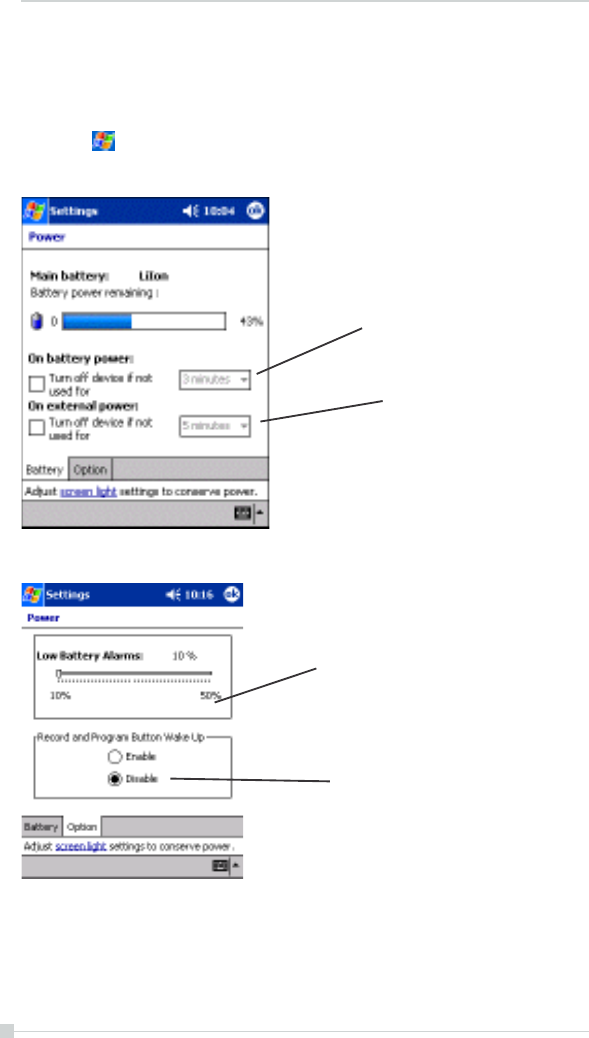
-or set the screen light on External power.
3. Set the Brightness level.
4. When finished, tap OK to return to the System tab screen.
Tap and set the screen light
brightness level by move the cursor
up or down. If Power Save is
activated, the screen light turns
off.
62
Toshiba Pocket PC e750/e755 User’s Guide
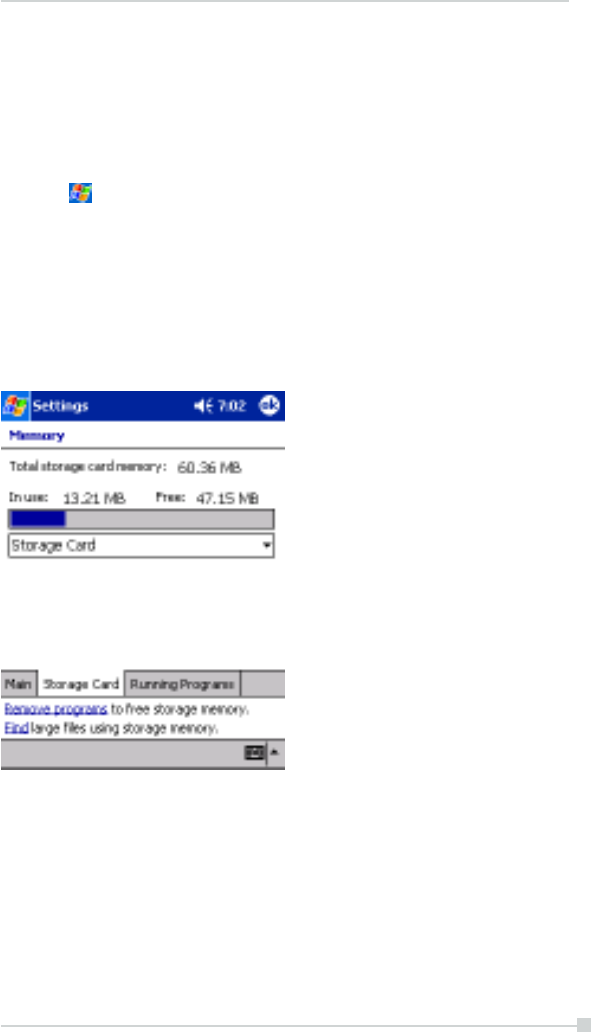
Setting Power
You can set to confirm the battery remaining power and the time that
elapses until the power turns off after the last operation.
1. Tap and then Settings. On the System tab, tap Power.
2. Set the Power.
3. Select Battery tab to adjust when battery alarm will come on, and to
enable/disable Record and Program button wake up.
4. Select CPU speed tab to set the CPU performance. To conserve bat-
tery power, select 200 MHz. Note: this will decrease performance.
5. When finished, tap OK to return to the System tab screen.
Options are 1, 2,3,4, and 5
minutes until device will turn off
in battery-powered mode if not
used. Check box to left to
engage this feature.
Options are 1, 2,3,4, and 5
minutes until device will turn off
in external-powered mode if not
used. Check box to left to
engage this feature.
Battery alarm can be adjusted to
go off from 10% to 50% of full
charge.
Enable or Disable Record and
Program Wake Up
63
Chapter 2: Basic Skills
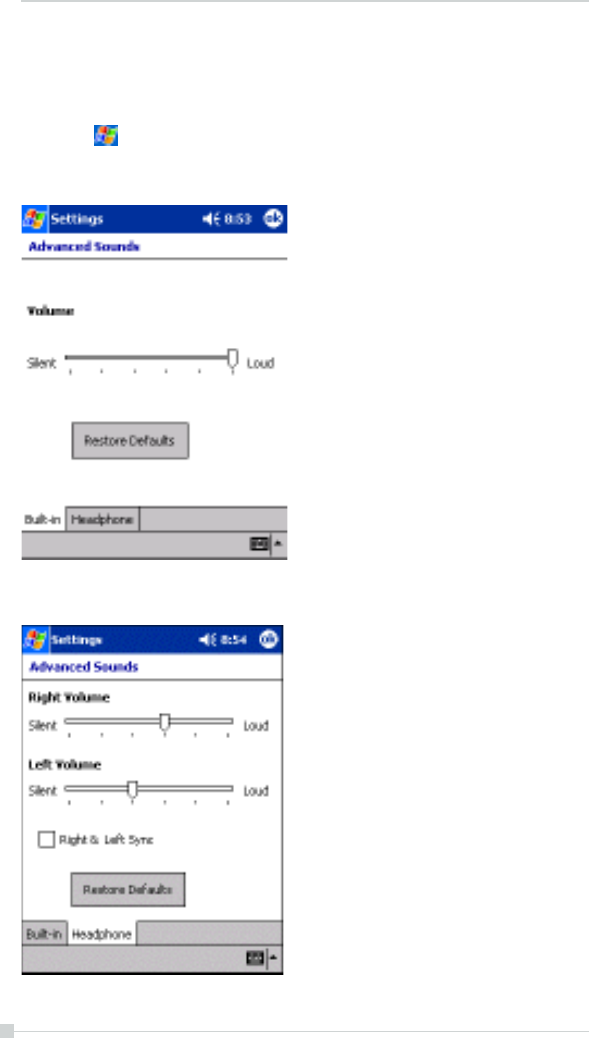
Setting Memory
You can adjust the data storing memory and the program running memory.
You can also confirm the free space of a storage card and so on. Memory
for the Pocket PC is managed automatically.
To change Memory allocation:
1. Tap and then Settings. On the System tab, tap Memory to dis-
play the Memory setting screen.
2. Drag the knob widthwise to adjust the memory allocation between Stor-
age and Program.
3. When finished, tap OK to return to the System tab screen.
To confirm usage status of a storage card:
1. Tap Storage card tab on the Memory setting screen.
2. When finished, tap OK to return to the System tab screen.
64
Toshiba Pocket PC e750/e755 User’s Guide
Setting Volume
This program allows you to adjust the built-in volume and the headphone
volume on the Toshiba PC e750/e755.
I Tap and then Settings. On the System tab, tap Advanced
Sounds.
2 Select the Built-in tab and adjust the Volume as shown below.
3 If using headphones, select the Headphone tab and make adjust-
ments as shown below .
65
Chapter 2: Basic Skills
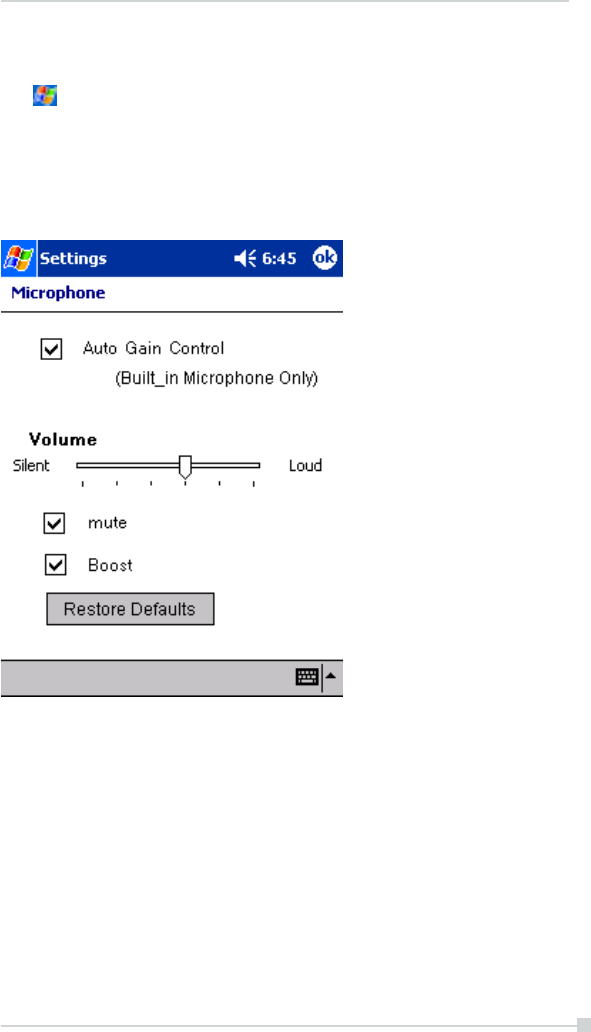
Setting Microphone
Tap and then Settings. On the System tab, tap Microphone.
• This program is setting Automatic Gain Control (AGC) auto or manual.
• If “Auto Gain Control” is chosen, Volume function is suspended.
• If “Auto Gain Control” is not chosen, Volume function is enabled.
Chapter 3:
Microsoft ActiveSync
Using Microsoft® ActiveSync® ,you can synchronize the information on
your desktop computer with the information on your device. Synchroniza-
tion compares the data on your device with your PC and updates both
computers with the most recent information. For example:
• Keep Pocket Outlook data up-to-date by synchronizing your device
with Microsoft Outlook data on your PC.
• Synchronize Microsoft Word and Microsoft Excel files between your
device and desktop computer.
Your files are automatically converted to the correct format.
By default, ActiveSync does not automatically synchronize all types
of information. Use ActiveSync options to turn synchronization on
and off for specific information types.
With ActiveSync, you can also:
• Back up and restore your device data.
• Copy (rather than synchronize) files between your device and desk-
top computer.
• Control when synchronization occurs by selecting a synchronization
mode. For example, you can synchronize continually while connected
to your desktop computer or only when you choose the synchronize
command.
• Select which information types are synchronized and control how
much data is synchronized. For example, you can choose how many
weeks of past appointments you want synchronized.
Before you begin synchronization, install ActiveSync on your PC from the
Toshiba Pocket PC Companion CD. For more information on installing
ActiveSync, see your Quick Start card. ActiveSync is already installed on
your device.
After installation is complete, the ActiveSync Setup Wizard helps you con-
nect your Pocket PC to your PC, set up a partnership so you can synchro-
nize information between your device and your desktop computer, and
67
Chapter 3: Microsoft ActiveSync
customize your synchronization settings. Your first synchronization pro-
cess will automatically begin when you finish using the wizard.
After your first synchronization, take a look at Calendar, Contacts, and
Tasks on your device. You’ll notice that information you’ve stored in
Microsoft Outlook on your PC has been copied to your device, and you
didn’t have to type a word. Disconnect your device from your PC and
you’re ready to go!
Once you have set up ActiveSync and completed the first synchronization
process, you can initiate synchronization from your device. To switch to
ActiveSync on your device, tap , and then tap ActiveSync.
For information about using ActiveSync on your PC, start ActiveSync on
your PC, and then see ActiveSync Help.
For more information about ActiveSync on your device, switch to ActiveSync,
tap , and then tap Help.
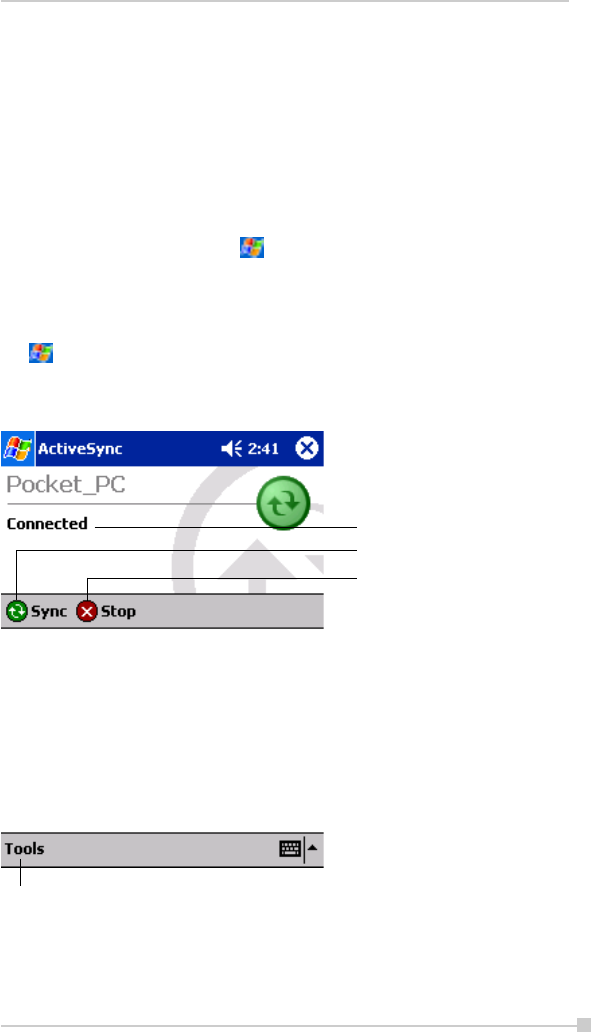
View connection
status.
Tap to connect and
synchronize.
Tap to stop synchronization.
Tap to synchronize via IR or
change synchronization
settings.

Chapter 4:
Microsoft® Pocket Outlook includes Calendar, Contacts, Tasks, Inbox, and
Notes. You can use these programs individually or together. For example,
e-mail addresses stored in Contacts can be used to address e-mail
messages in Inbox.
Using ActiveSync® you can synchronize information in Microsoft Outlook
or Microsoft Exchange on your desktop computer with your device. You
can also synchronize this information directly with a Microsoft Exchange
server. Each time you synchronize, ActiveSync compares the changes
you made on your device and desktop computer or server and updates
both computers with the latest information. For information on using
ActiveSync, see ActiveSync Help on the desktop computer.
You can switch to any of these programs by tapping them on the menu.
Microsoft Pocket Outlook
69
Chapter 4: Microsoft Pocket Outlook
Calendar: Scheduling Appointments and
Meetings
Use Calendar to schedule appointments, including meetings and other
events. You can check your appointments in one of several views (Agenda,
Day, Week, Month, and Year) and easily switch views by using the View
menu.
You can customize the Calendar display, such as changing the first
day of the week, by tapping Options on the Tools menu.
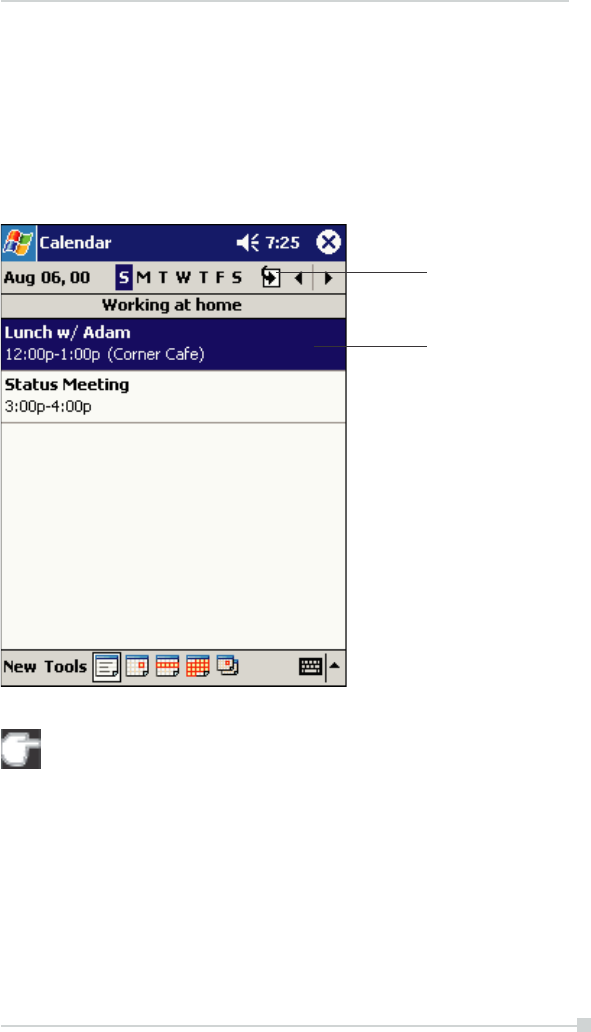
Tap to go to
today.
Tap to display or edit the
appointment details.
70
Toshiba Pocket PC e750/e755 User’s Guide
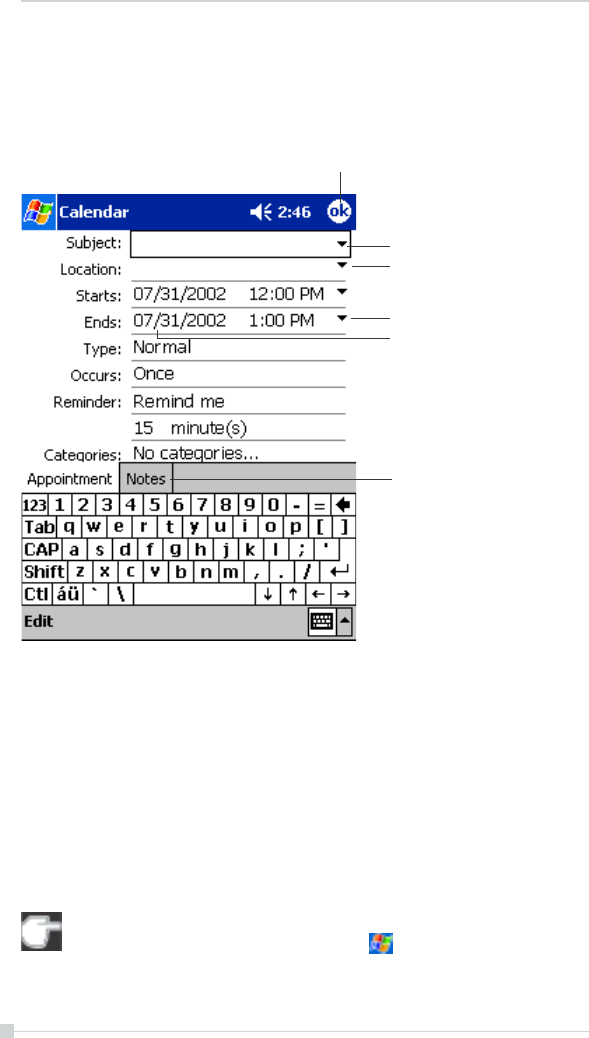
To create an appointment:
1. If you are in Day or Week view, tap the desired date and time for the
appointment.
2. Tap New.
3. Using the input panel, enter a description and a location. Tap first to
select the field.
4. If needed, tap the date and time to change them.
5. Enter other desired information. You will need to hide the input panel
to see all available fields.
6. To add notes, tap the Notes tab. You can enter text, draw, or create a
recording. For more information on creating notes, see “Notes: Cap-
turing Thoughts and Ideas,” later in this chapter.
7. When finished, tap OK to return to the calendar.
If you select Remind me in an appointment, your device will re-
mind you according to the options set in ,Settings,Personal tab,
Sounds & Notifications.
Tap to return to the calendar (the
appointment is saved automatically).
Tap to choose from predefined
text.
Tap to choose from previously
entered locations.
Tap to select a time.
Tap to select a date.
Notes is a good place for
maps and directions.
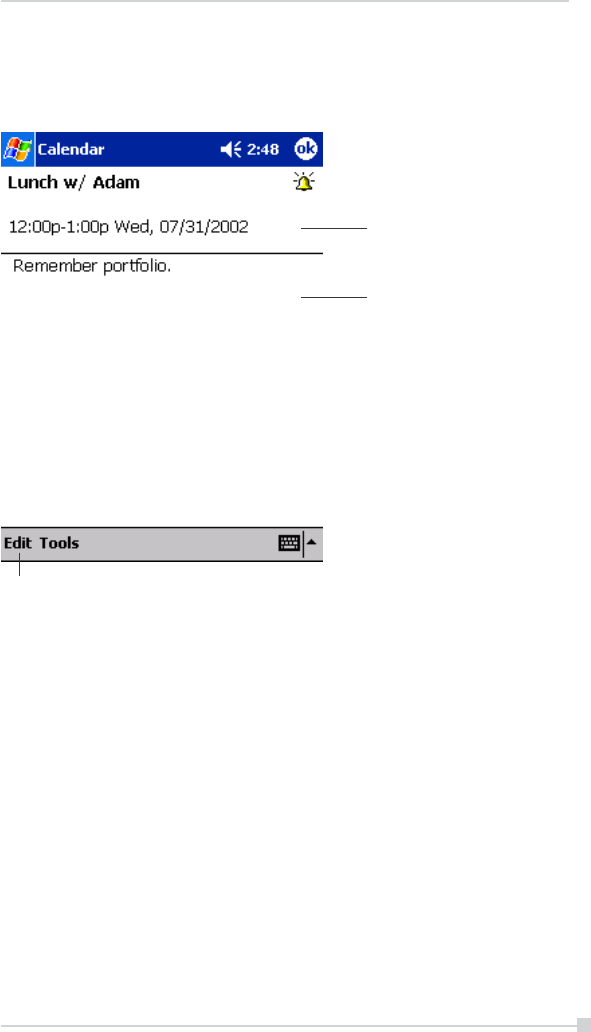
71
Chapter 4: Microsoft Pocket Outlook
Using the Summary Screen
When you tap an appointment in Calendar, a summary screen is dis-
played. To change the appointment, tap Edit.
Creating Meeting Requests
You can use Calendar to set up meetings with users of Outlook or Pocket
Outlook. The meeting request will be created automatically and sent either
when you synchronize Inbox or when you connect to your e-mail server.
Indicate how you want meeting requests sent by tapping Tools and then
Options. If you send and receive e-mail messages through ActiveSync,
select ActiveSync.
To schedule a meeting:
1. Create an appointment by tapping NEW.
2. In the appointment details, hide the input panel, and then tap Attendees.
3. From the list of e-mail addresses you’ve entered in Contacts, select
the meeting attendees.
The meeting notice is created automatically and placed in the Outbox
folder. For more information on sending and receiving meeting requests,
see Calendar Help and Inbox Help on the device.
View appointment
details.
View.
Tap to change appoint-
ment.
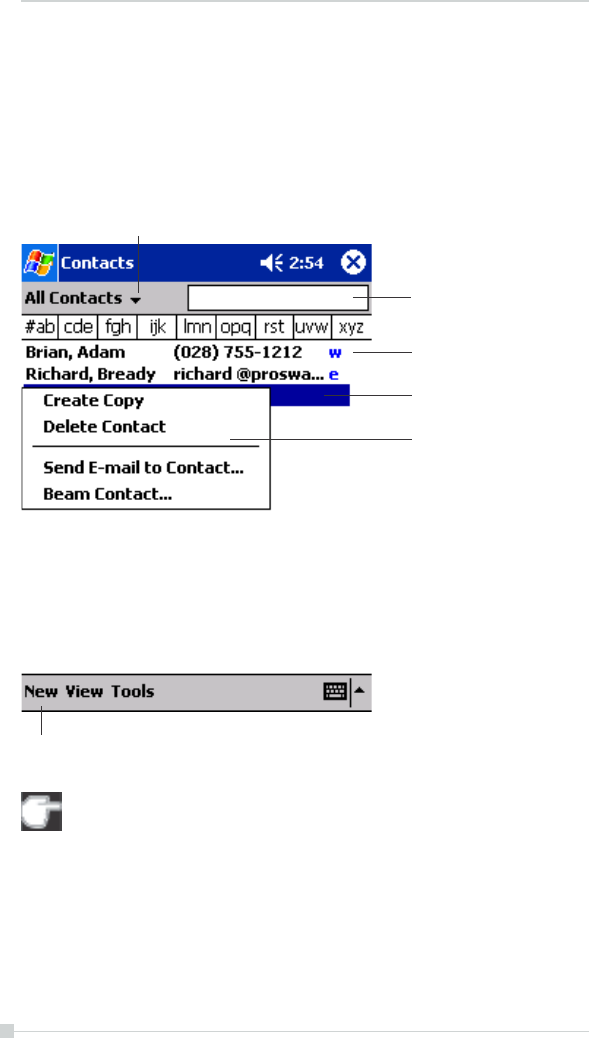
72
Toshiba Pocket PC e750/e755 User’s Guide
Contacts: Tracking Friends and Col-
leagues
Contacts maintains a list of your friends and colleagues so that you can
easily find the information you’re looking for, whether you’re at home or on
the road. Using the device infrared (IR) port, you can quickly share Con-
tacts information with other device users.
To change the way information is displayed in the list, tap Tools and
then Options.
Select the category of contacts you want displayed in
the list.
Tap and enter of a name
to quickly find it in the
list.
Tap and see additional phone
numbers and e-mail
addresses.
Tap to display or edit
the contact details.
Tap and hold to display
a pop-up menu of
actions.
Tap to create a newcontact.
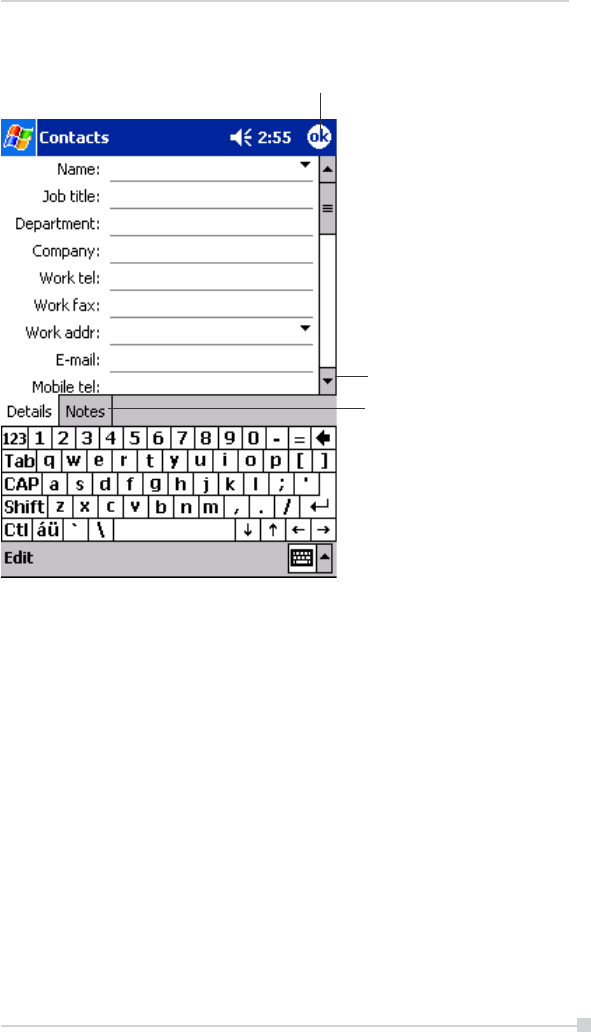
73
Chapter 4: Microsoft Pocket Outlook
To create a contact:
1. Tap New.
2. Using the input panel, enter a name and other contact information.
You will need to scroll down to see all available fields.
3. To assign the contact to a category, scroll to and tap Categories and
select a category from the list. In the contact list, you can display
contacts by category.
4. To add notes, tap the Notes tab. You can enter text, draw, or create a
recording. For more information on creating notes, see “Notes: Cap-
turing Thoughts and Ideas,” later in this chapter.
5. When finished, tap OK to return to the contact list.
Tap to return to the contact list
( the contact is saved automatically).
Scroll to see more fields.
Notes is a good place for
maps and directions.

74
Toshiba Pocket PC e750/e755 User’s Guide
Finding a contact
There are four ways to find a contact:
• In the contact list, enter a contact name in the box under the naviga-
tion bar. To show all contacts again, clear text from the box or tap the
button to the right of the box.
• In the contact list, tap the category list (labeled All Contacts by
default) and select the type of contact that you want displayed. To
show all contacts again, select All Contacts. To view a contact not
assigned to a category, select None.
• To view the names of companies your contacts work for, in the contact
list, tap View > By Company. The number of contacts that work for
that company will be displayed to the right of the company name.
• Tap , Find, enter the contact name, select Contacts for the type,
and then tap Go.
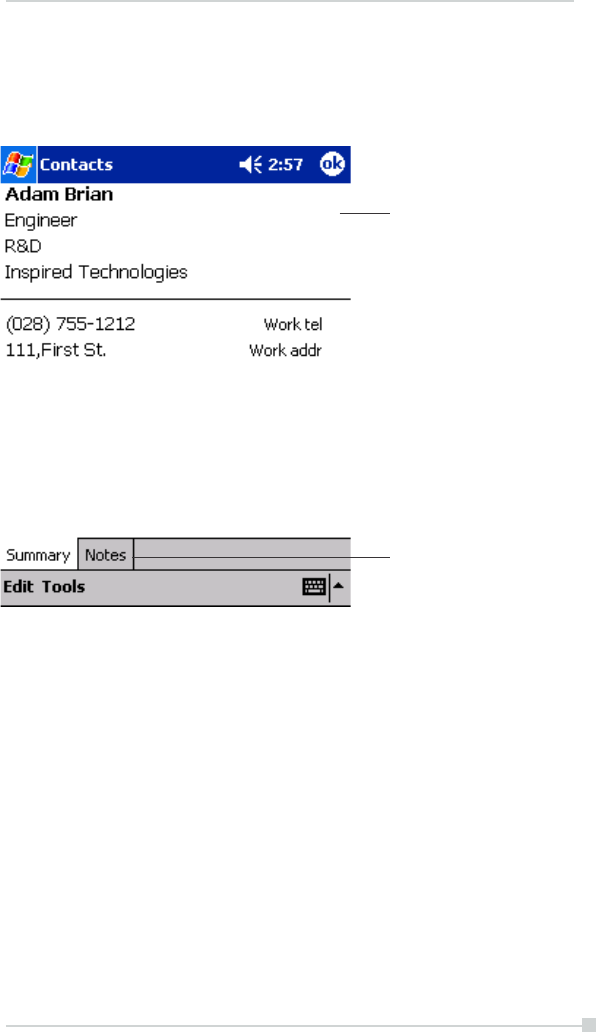
75
Chapter 4: Microsoft Pocket Outlook
Using the Summary Screen
When you tap a contact in the contact list, a summary screen is displayed.
To change the contact information, tap Edit.
View contact details.
Tap to view notes.
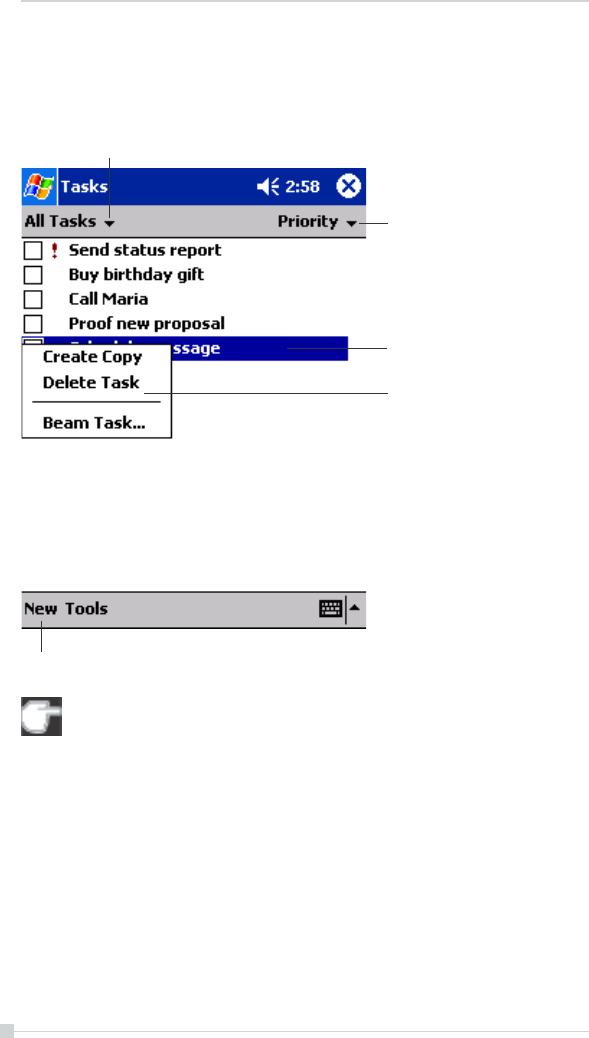
76
Toshiba Pocket PC e750/e755 User’s Guide
Tasks: Keeping a To Do List
Use Tasks to keep track of what you have to do.
To change the way information is displayed in the list, tap Tools and
then Options.
Select the category of tasks you want displayed in
the list.
Select the sort order of the list.
Tap to display or edit the task
details.
Tap and hold to display a pop-up
menu of actions.
Tap to create a new task.
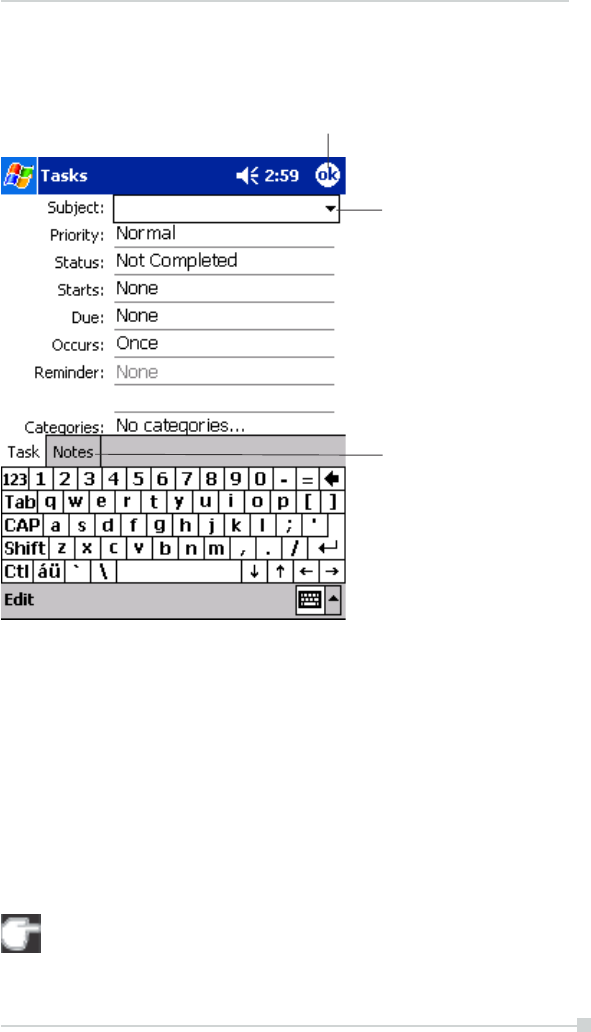
77
Chapter 4: Microsoft Pocket Outlook
To create a task:
1. Tap New.
2. Using the input panel, enter a description.
3. You can enter a start date and due date or enter other information by
first tapping the field. If the input panel is open, you will need to hide
it to see all available fields.
4. To assign the task to a category, tap Categories and select a cat-
egory from the list. In the task list, you can display tasks by category.
5. To add notes, tap the Notes tab. You can enter text, draw, or create a
recording. For more information on creating notes, see “Notes: Cap-
turing Thoughts and Ideas,” later in this chapter.
6. When finished, tap OK to return to the task list.
To quickly create a task with only a subject, tap Entry Bar on the
Tools menu. Then, tap Tap here to add a new task and enter your
task information.
Tap to return to the task list
( the task is saved automactically ).
Tap to choose from
predefined subjects.
Notes is a good place for
maps and drawings.
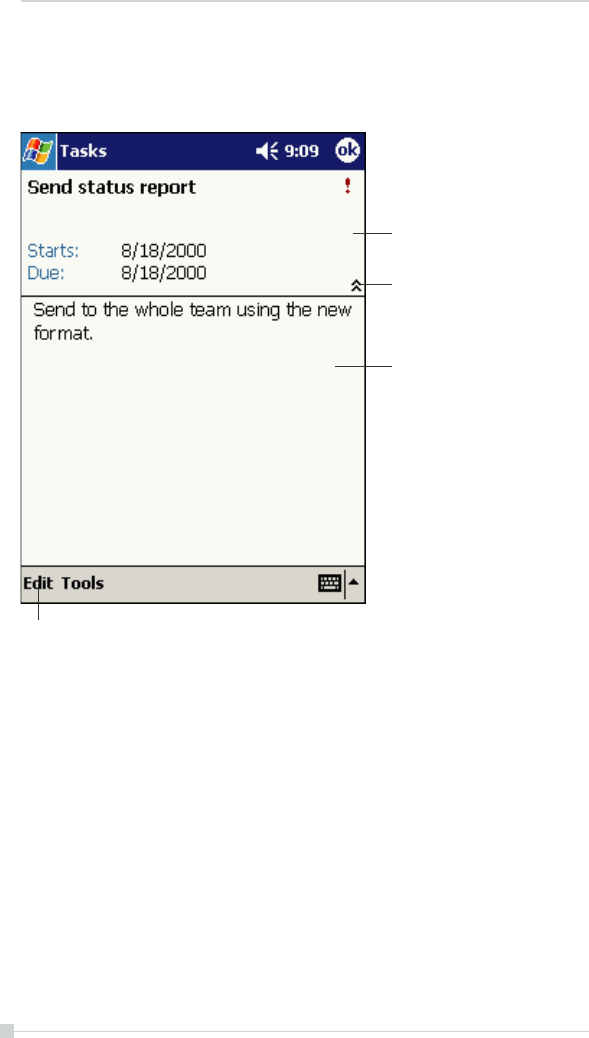
78
Toshiba Pocket PC e750/e755 User’s Guide
Using the Summary Screen
When you tap a task in the task list, a summary screen is displayed. To
change the task, tap Edit.
Tap to change task.
View task details.
Tap to show and hide additional
summary information.
View notes.
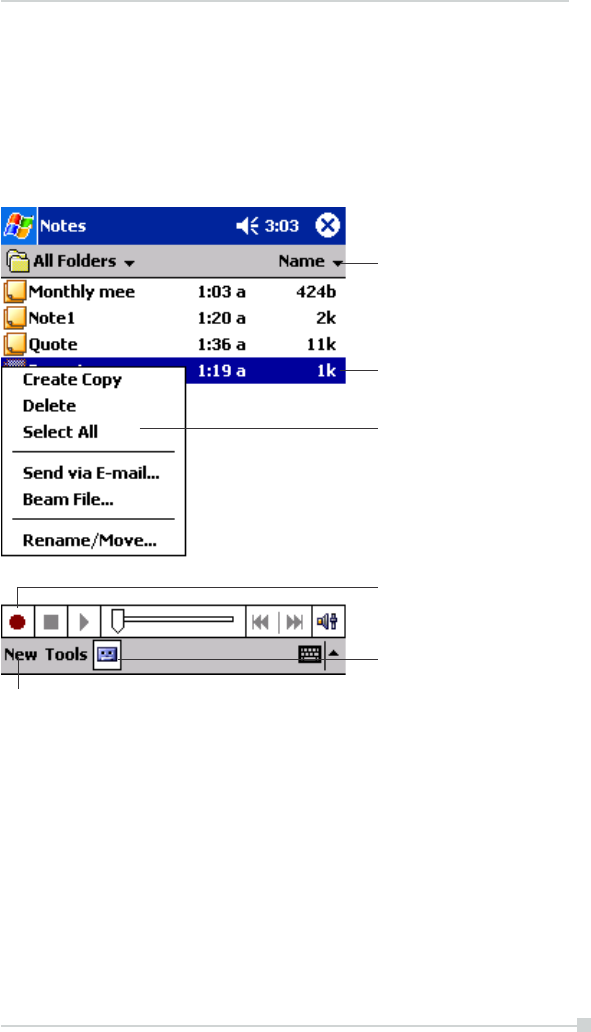
79
Chapter 4: Microsoft Pocket Outlook
Notes: Capturing Thoughts and Ideas
Quickly capture thoughts, reminders, ideas, drawings, and phone num-
bers with Notes. You can create a written note or a recording. You can also
include a recording in a note. If a note is open when you create the record-
ing, it will be included in the note as an icon. If the note list is displayed, it
will be created as a stand-alone recording.
Tap to create a new item.
Tap to show or hide the
Recording toolbar.
Tap to record.
Tap and hold to display a pop-up
menu of actions.
Tap to open a note or play a
recording.
Tap to change the sort order
of the list.
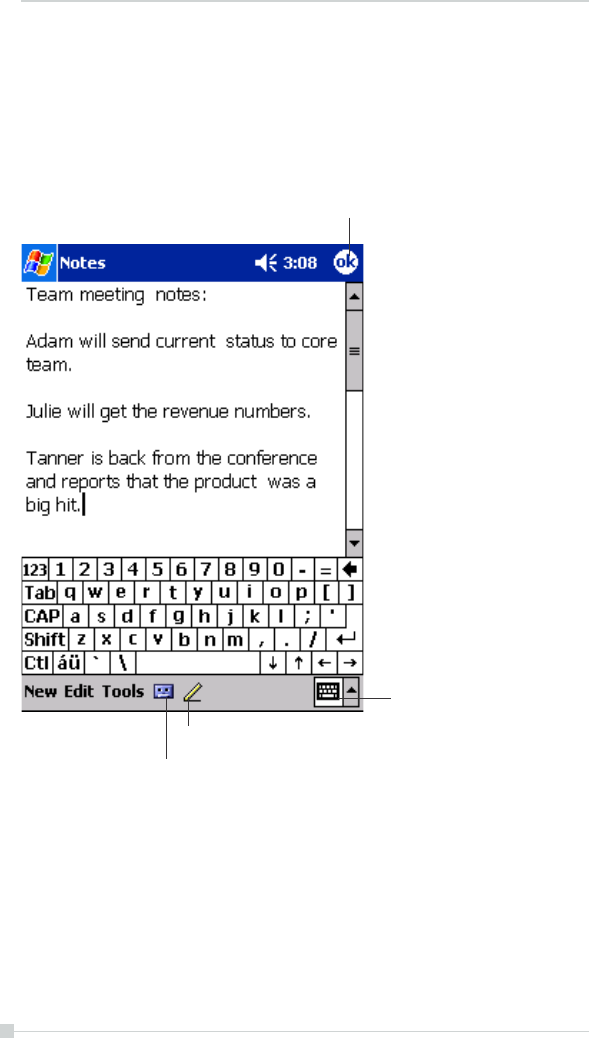
80
Toshiba Pocket PC e750/e755 User’s Guide
To create a note:
1. Tap New.
2. Create your note by writing, drawing, typing, and recording. For more
information about using the input panel, writing and drawing on the
screen, and creating recordings, see Chapter 2.
Tap to return to the note list
( the note is saved automatically ).
Tap to show or hide the input panel.
Tap to write on the screen.
Tap to add a recording to the note.

81
Chapter 4: Microsoft Pocket Outlook
Inbox: Sending and Receiving E-mail Mes-
sages
Use Inbox to send and receive e-mail messages in either of these ways:
• Synchronize e-mail messages with Microsoft Exchange or Microsoft
Outlook on your PC.
• Send and receive e-mail messages by connecting directly to an e-
mail server through an Internet Service Provider (ISP) or a network.
Synchronizing E-mail Messages
E-mail messages can be synchronized as part of the general synchroni-
zation process. You will need to enable Inbox synchronization in ActiveSync.
For information on enabling Inbox synchronization, see ActiveSync Help
on the PC.
During synchronization:
• Messages are copied from the mail folders of Exchange or Outlook
on your desktop computer to the ActiveSync folder in Inbox on your
device. By default, you will receive messages from the past three
days only, the first 100 lines of each message, and file attachments
of less than 100 KB in size.
• E-mail messages in the Outbox folder on your device are transferred
to Exchange or Outlook, and then sent from those programs.
• E-mail messages in subfolders must be selected in ActiveSync on
your desktop computer in order to be transferred.
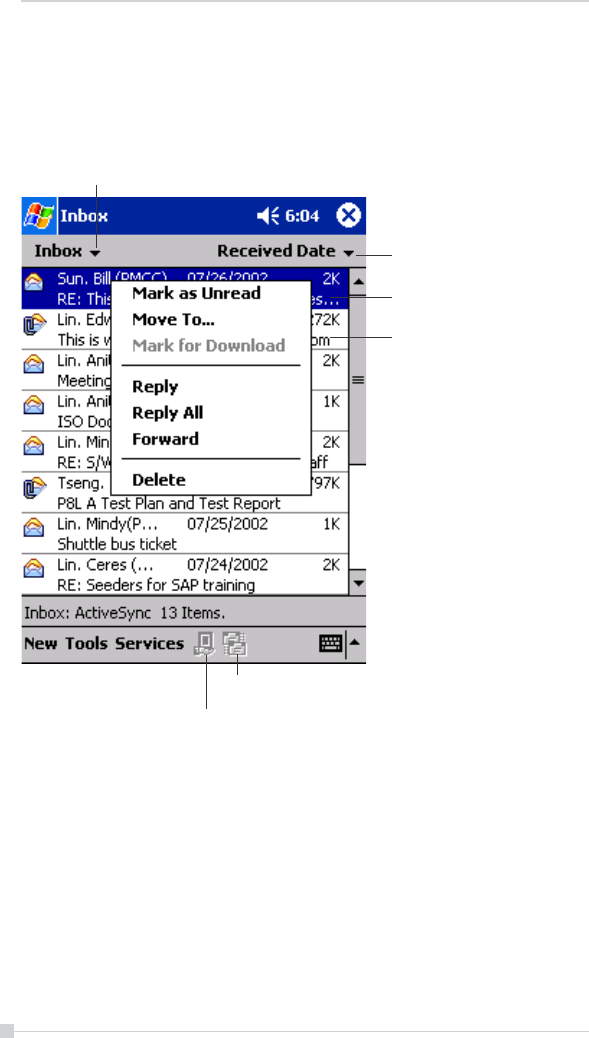
82
Toshiba Pocket PC e750/e755 User’s Guide
Using the Message List
Messages you receive are displayed in the message list. By default, the
most recently received messages are displayed first in the list.
Select the service and folder you want to
display.
Select the sort order for
messages.
Tap to open a message.
Tap and hold to display a pop-up
menu of actions.
Tap to connect and to send and receive e-mail.
Tap to connect to the selected service.
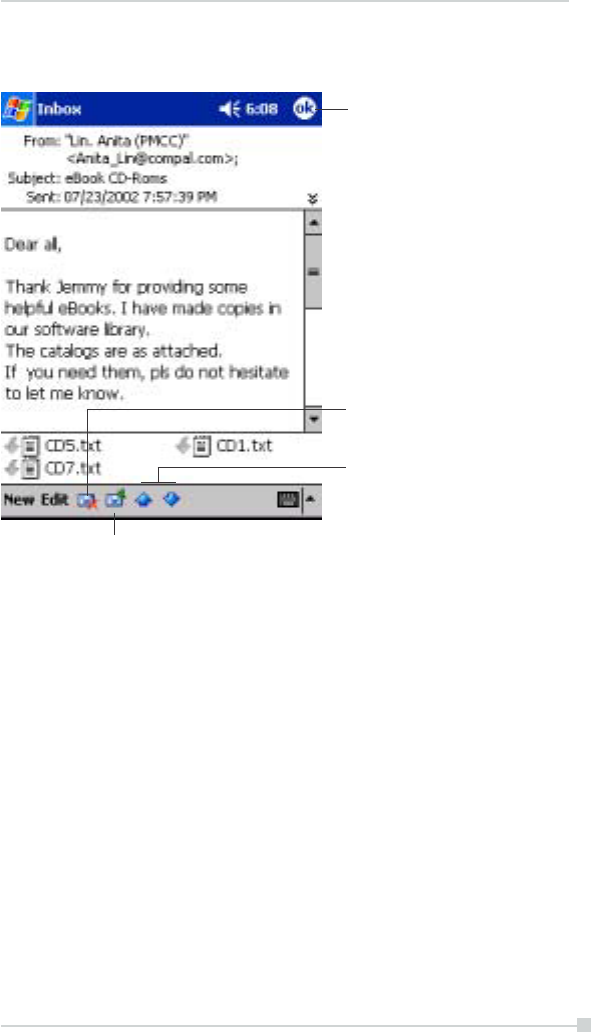
83
Chapter 4: Microsoft Pocket Outlook
When you receive a message, tap it to open it. Unread messages are
displayed in bold.
When you connect to your e-mail server or synchronize with your desktop
computer, by default, you’ll receive messages from the last five days only,
the first 100 lines of each new message, and file attachments of less
than 100 KB in size. The original messages remain on the e-mail server
or your desktop computer.
You can mark the messages that you want to retrieve in full during your
next synchronization or e-mail server connection. In the message list, tap
and hold the message you want to retrieve. On the pop-up menu, tap
Mark for Download. The icons in the Inbox message list give you visual
indications of message status.
You specify your downloading preferences when you set up the service or
select your synchronization options. You can change them at any time:
• Change options for Inbox synchronization using ActiveSync options.
For more information, see ActiveSync Help.
• Change options for direct e-mail server connections in Inbox on your
device. Tap Tools and then tap Options. On the Service tab, tap the
service you want to change. Tap and hold the service and select
Delete to remove a service.
Tap to return to the message list.
Tap to delete this message.
Tap to view the previous or next
message.
Tap to reply to or forward this
message.
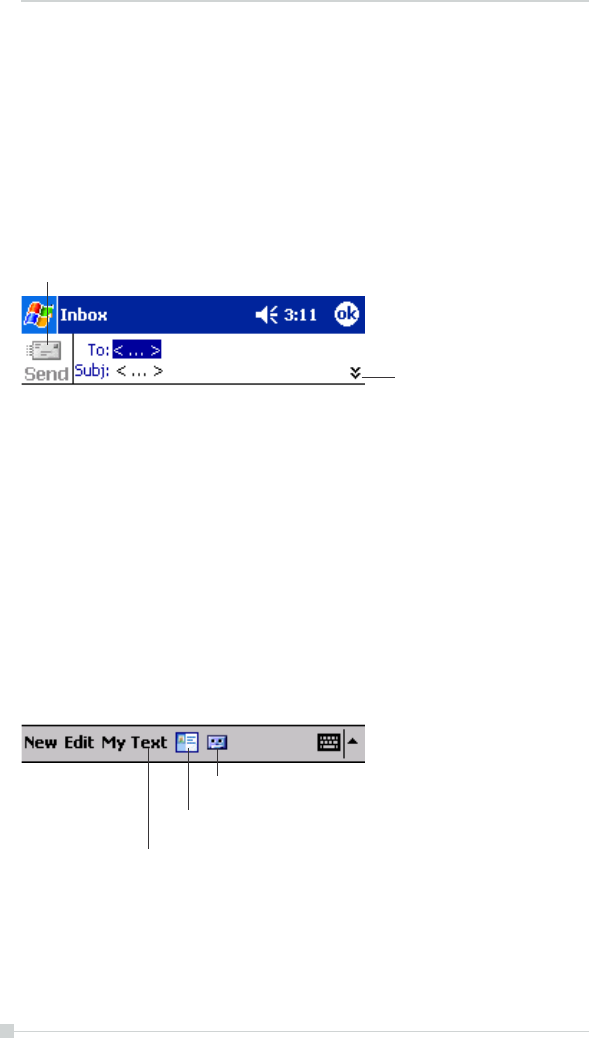
84
Toshiba Pocket PC e750/e755 User’s Guide
Composing Messages
To compose a message:
1. Tap New.
2. In the To field, enter an e-mail or SMS address of one or more
recipients, separating them with a semicolon, or select a name from
the contact list by tapping the Address Book button. All e-mail ad-
dresses entered in the e-mail fields in Contacts appear in the Ad-
dress Book.
Tap to send the message.
Tap to show or hide the complete
header.
Tap to show / hide the recording toolbar.
Tap to display the Address Book.
Tap to insert common messages.

85
Chapter 4: Microsoft Pocket Outlook
3. Compose your message. To enter preset or frequently used mes-
sages, tap My Text and select a message.
4. Tap Send when you’ve finished the message. If you are working
offline, the message is moved to the Outbox folder and will be sent
the next time you connect. If you are working online, it is sent immedi-
ately.
If you are sending an SMS message and want to know if it was received,
tap Edit,Options, and select Request SMS text message delivery noti-
fication before sending the message.

86
Toshiba Pocket PC e750/e755 User’s Guide
Managing E-mail Messages and Folders
By default, messages are displayed in one of five folders for each service
you have created: Inbox, Deleted Items, Drafts, Outbox, and Sent Items.
The Deleted Items folder contains messages that have been deleted on
the device. The behavior of the Deleted and Sent Items folders depends
on the options you have chosen. In the message list, tap Tools and then
Options. On the Message tab, select your options.
If you want to organize messages into additional folders, tap Tools, and
then Manage Folders to create new folders. To move a message to
another folder, in the message list, tap and hold the message and then
tap Move to on the pop-up menu.
Folder behavior with a direct connection to an e-mail server
The behavior of the folders you create depends on whether you are using
ActiveSync, SMS, POP3, or IMAP4.
• If you use ActiveSync, e-mail messages in the Inbox folder in Outlook
will automatically be synchronized with your device. You can select to
synchronize additional folders by designating them for ActiveSync.
The folders you create and the messages you move will then be
mirrored on the server. For example, if you move two messages from
the Inbox folder to a folder named Family, and you have designated
Family for synchronization, the server creates a copy of the Family
folder and copies the messages into that folder. You can then read
the messages while away from your desktop computer.
• If you use SMS, messages are stored in the Inbox folder.
• If you use POP3 and you move e-mail messages to a folder you
created, the link is broken between the messages on the device and
their copies on the mail server. The next time you connect, the mail
server will see that the messages are missing from the device Inbox
and delete them from the server. This prevents you from having dupli-
cate copies of a message, but it also means that you will no longer
have access to messages that you move to folders created from
anywhere except the device.
• If you use IMAP4, the folders you create and the e-mail messages
you move are mirrored on the server. Therefore, messages are avail-
able to you anytime you connect to your mail server, whether it is from
your device or desktop computer. This synchronization of folders oc-
curs whenever you connect to your mail server, create new folders, or
rename/delete folders when connected.
Chapter 5:
Companion Programs
The companion programs consist of Microsoft® Pocket Word, Microsoft®
Pocket Excel, Microsoft® Money, Windows Media™ Player for Toshiba
Pocket PC e750/e755, and Microsoft® Reader.
To switch to a companion program on your device, tap Programs on the
menu, and then tap the program name.
Pocket Word
Pocket Word works with Microsoft Word on your computer to give you
easy access to copies of your documents. You can create new documents
on your device, or you can copy documents from your computer to your
device. Synchronize documents between your computer and your device
so that you have the most up-to-date content in both locations.
Use Pocket Word to create documents, such as letters, meeting minutes,
and trip reports. To create a new file, tap ,Programs,Pocket Word,
and then New. A blank document appears. Or, if you’ve selected a tem-
plate for new documents in the Options dialog box, that template ap-
pears with appropriate text and formatting already provided. You can open
only one document at a time; when you open a second document, you’ll be
asked to save the first. You can save a document you create or edit in a
variety of formats, including Word (.doc), Pocket Word (.psw), Rich Text
Format (.rtf), and Plain Text (.txt).
Pocket Word contains a list of the files stored on your device. Tap a file in
the list to open it. To delete, make copies of, and send files, tap and hold a
file in the list. Then, select the appropriate action on the popup menu.
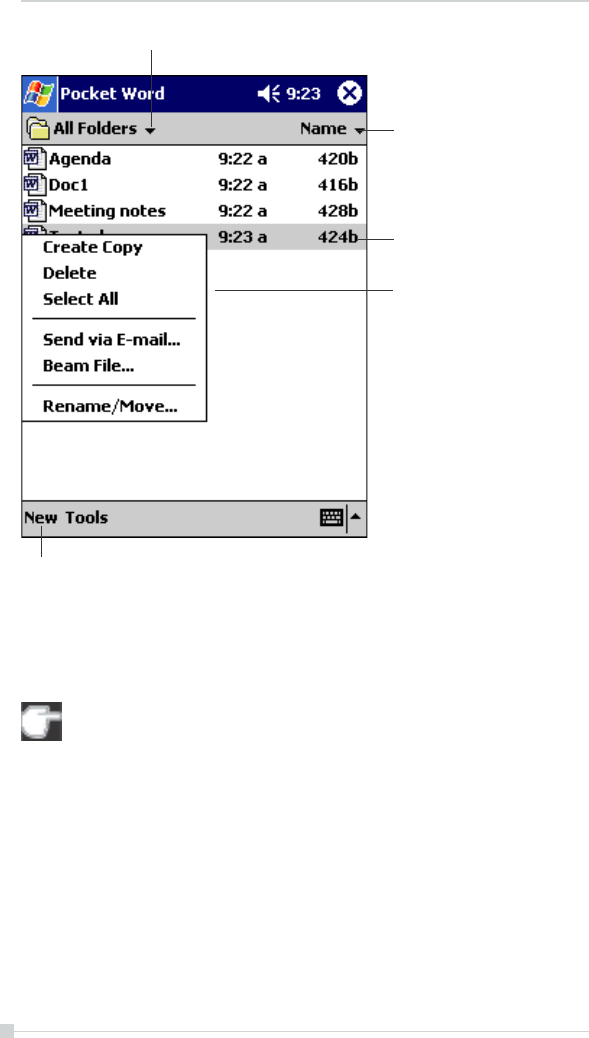
Toshiba Pocket PC e750/e755 User’s Guide
88
You can enter information in Pocket Word in one of four modes (typing,
writing, drawing, and recording), which are displayed on the View menu.
Each mode has its own toolbar, which you can show and hide by tapping
the Show/Hide Toolbar button on the command bar.
You can change the zoom magnification by tapping View and then
Zoom. Then select the percentage you want. Select a higher per-
centage to enter text and a lower one to see more of your document.
If you’re opening a Word document created on a computer, select
Wrap to Window on the View menu so that you can see the entire
document.
Select the type of folder you want displayed in the list.
Tap to change the sort order of
the list.
Tap to open a document.
Tap and hold an item to see a
pop-up menu of actions.
Tap to create a new document.
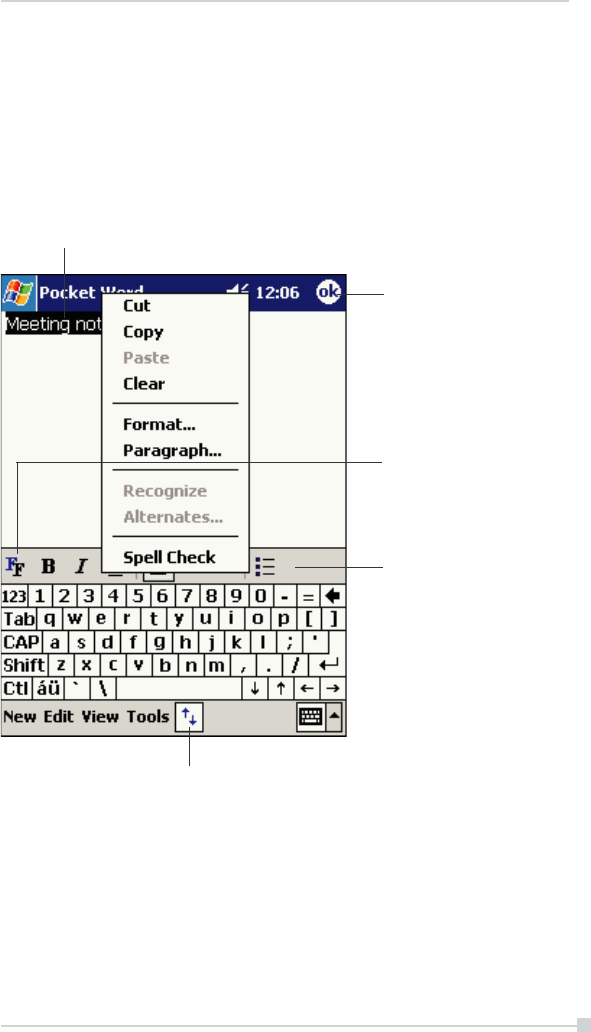
Chapter 5: Companion Programs
89
Typing Mode
Using the input panel, enter typed text into the document. For more infor-
mation on entering typed text, see Chapter 2.
To format existing text and to edit text, first select the text. You can select
text as you do in a Word document, using your stylus instead of the mouse
to drag through the text you want to select. You can search a document to
find text by tapping Edit and then Find/Replace.
Tap and hold to see a pop-up menu of actions.
Tap to return to the document
list ( changes are saved
automatically ).
Tap to change fromatting
options.
Tap to format text.
Tap to show or hide the toolbar.
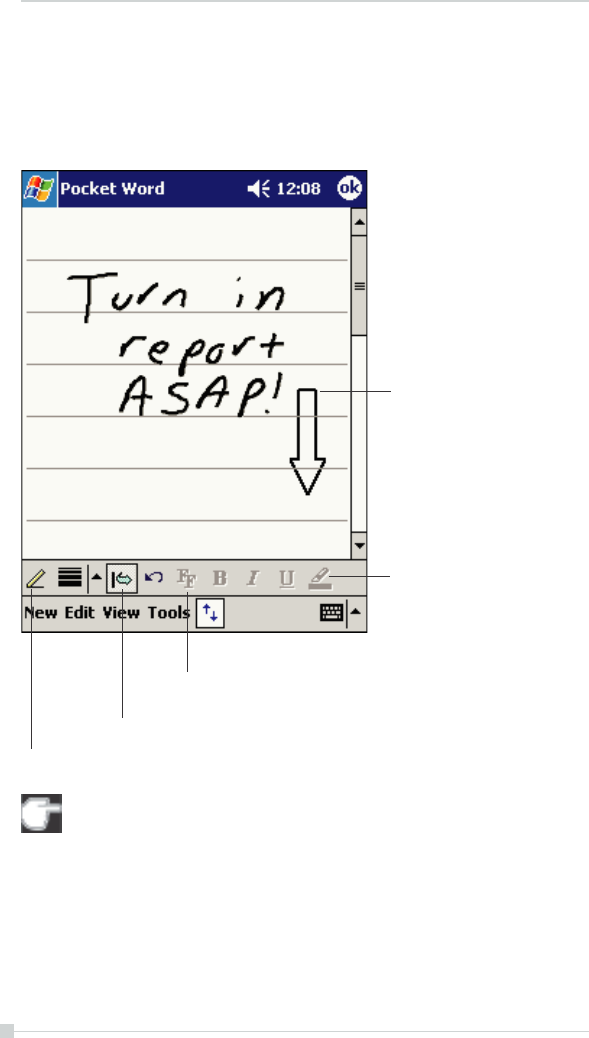
Toshiba Pocket PC e750/e755 User’s Guide
90
Writing Mode
In writing mode, use your stylus to write directly on the screen. Ruled lines
are displayed as a guide, and the zoom magnification is greater than in
typing mode to allow you to write more easily. For more information on
writing and selecting writing, see Chapter 2.
If you cross three ruled lines in a single stylus stroke, the writing
becomes a drawing, and can be edited and manipulated as described
in the following section. Written words are converted to graphics
(metafiles) when a Pocket Word document is converted to a Word
document on your computer.
With Space button selected drag
to insert space.
An arrow appears showing the
space direction and size.
Tap to highlight selected text.
Tap to select formatting options,
such as pen weight and line color.
Space button.
Pen button.
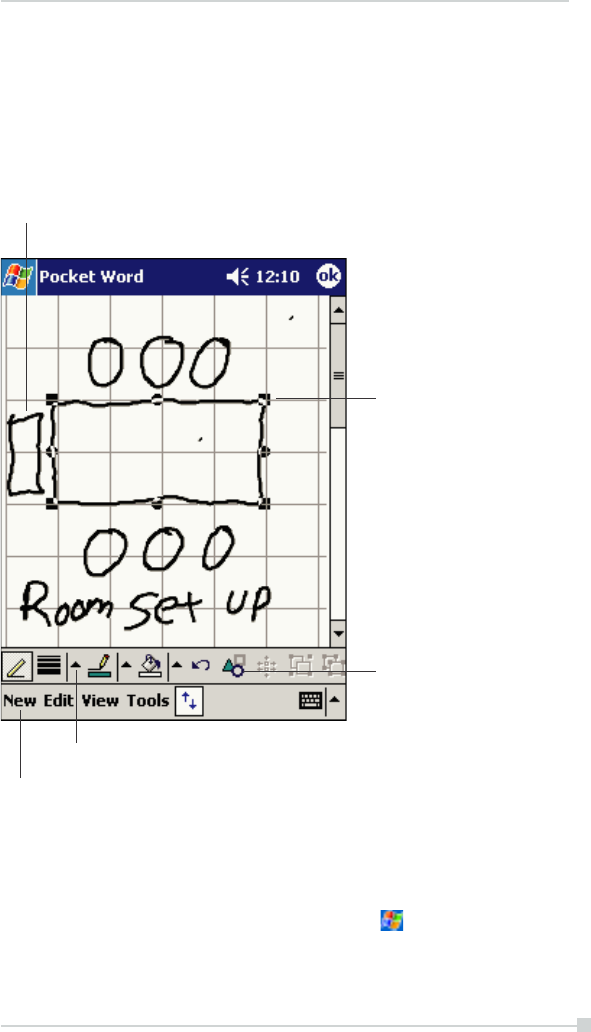
Chapter 5: Companion Programs
91
Drawing Mode
In drawing mode, use your stylus to draw on the screen. Gridlines appear
as a guide. When you lift your stylus off the screen after the first stroke,
you’ll see a drawing box indicating the boundaries of the drawing. Every
subsequent stroke within or touching the drawing box becomes part of the
drawing. For more information on drawing and selecting drawings, see
Chapter 2.
Recording Mode
In recording mode, embed a recording into your document. Recordings
are saved as .wav files. For more information on recording, see Chapter 2.
For more information on using Pocket Word, tap and then Help.
Select Shape on the pop-up menu to convert objects to proper shapes.
Resize an object by dragging the
selection handles.
Tap to select formatting options,
such as pen weight, line/font
color, and fill color.
Tap an arrow to see your choices.
Pen button.

Toshiba Pocket PC e750/e755 User’s Guide
92
Pocket Excel
Pocket Excel works with Microsoft Excel on your computer to give you
easy access to copies of your workbooks. You can create new workbooks
on your device, or you can copy workbooks from your computer to your
device. Synchronize workbooks between your computer and your device
so that you have the most up-to-date content in both locations.
Use Pocket Excel to create workbooks, such as expense reports and mile-
age logs. To create a new file, tap , Programs,Pocket Excel, and
then New. A blank workbook appears. Or, if you’ve selected a template for
new workbooks in the Options dialog box, that template appears with
appropriate text and formatting already provided. You can open only one
workbook at a time; when you open a second workbook, you’ll be asked to
save the first. You can save a workbook you create or edit in a variety of
formats, including Pocket Excel (.pxl) and Excel (.xls).
Pocket Excel contains a list of the files stored on your device. Tap a file in
the list to open it. To delete, make copies of, and send files, tap and hold a
file in the list. Then select the appropriate action from the pop-up menu.
Pocket Excel provides fundamental spreadsheet tools, such as formulas,
functions, sorting, and filtering. To display the toolbar, tap View and then
Toolbar.
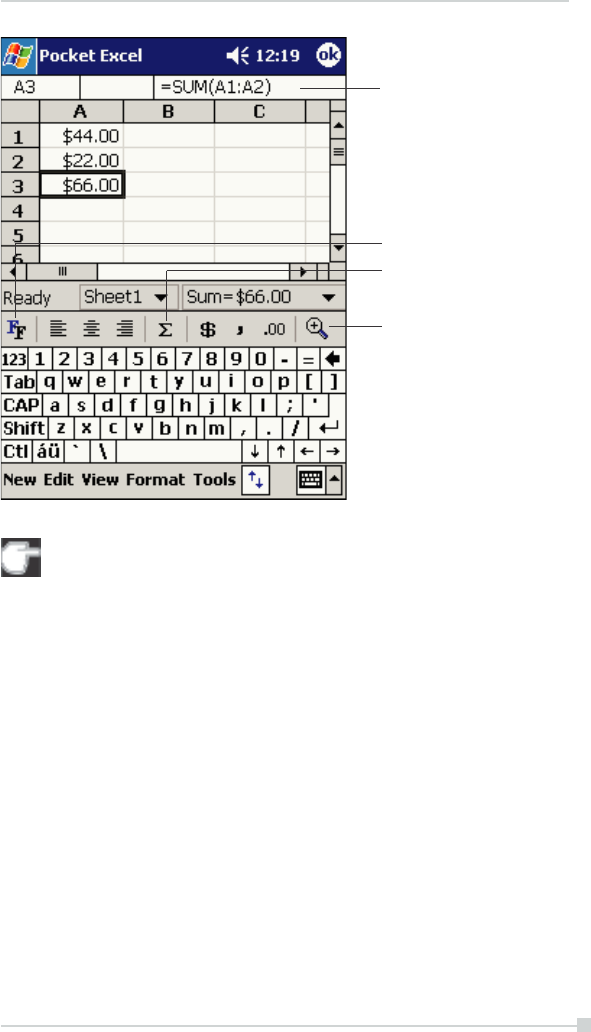
Chapter 5: Companion Programs
93
If your workbook contains sensitive information, you can protect it
with a password. To do so, open the workbook, tap Edit, and then
Password. Every time you open the workbook, you will need to en-
ter the password, so choose one that is easy for you to remember
but hard for others to guess.
Cell contents appear here as
you enter them.
Format button.
Auto Sum button.
Zoom button.

Toshiba Pocket PC e750/e755 User’s Guide
94
Tips for Working in Pocket Excel
Note the following when working in large worksheets in Pocket Excel:
• View in full-screen mode to see as much of your worksheet as pos-
sible. Tap View and then Full Screen. To exit full-screen mode, tap
Restore.
• Show and hide window elements. Tap View and then tap the elements
you want to show or hide.
• Freeze panes on a worksheet. First select the cell where you want to
freeze panes. Tap View and then Freeze Panes. You might want to
freeze the top and leftmost panes in a worksheet to keep row and
column labels visible as you scroll through a sheet.
• Split panes to view different areas of a large worksheet. Tap View
and then Split. Then drag the split bar to where you want it. To re-
move the split, tap View and then Remove Split.
• Show and hide rows and columns. To hide a hidden row or column,
select a cell in the row or column you want to hide. Then tap Format,
then Row or Column, and then Hide. To show a hidden row or col-
umn, tap Tools, then Go To, and then type a reference that is in the
hidden row or column. Then tap Format, then Row or Column, and
then Unhide.
For more information on using Pocket Excel, tap and then Help.

Chapter 5: Companion Programs
95
MSN Messenger
MSN® Messenger on your mobile device is an instant messaging pro-
gram that lets you:
• See who is online.
• Send and receive instant messages.
• Have instant message conversations with groups of contacts.
To use MSN Messenger, you must have a Microsoft Passport™ account
or a Microsoft Exchange e-mail account. You must have a Passport to use
MSN Messenger Service. If you have a Hotmail® or MSN account, you
already have a Passport. Once you have obtained either a Microsoft Pass-
port or a Microsoft Exchange account, you are ready to set up your ac-
count.
Sign up for a Microsoft Passport account at http://www.passport.com.
Get a free Microsoft Hotmail e-mail address at http://www.hotmail.com.
To switch to MSN Messenger, tap , Programs, and then tap MSN
Messenger.
Setting Up
Before you can connect, you must enter Passport or Exchange account
information.
To set up an account and sign in:
1. In the Tools menu, tap Options .
2. In the Accounts tab, enter your Passport or Exchange account infor-
mation.
3. To sign in, tap the sign-in screen and enter your e-mail address and
password.
If you already use MSN Messenger on your computer, your contacts
will show up on your device without being added again.
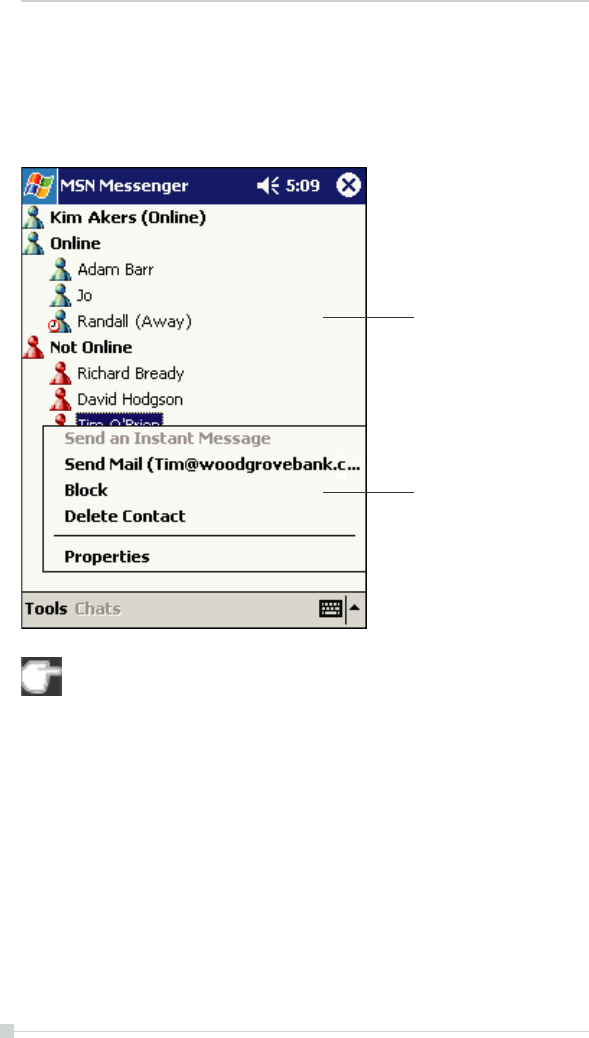
Toshiba Pocket PC e750/e755 User’s Guide
96
Working with Contacts
The MSN Messenger window shows all of your messenger contacts at a
glance, divided into Online and Not Online categories. From this view, while
connected, you can chat, send an e-mail, block the contact from chatting
with you, or delete contacts from your list using the pop-up menu.
To see others online without being seen, in the Tools menu , tap
My Status and select Appear Offline.
If you block a contact, you will appear offline but will remain on the
blocked contact’s list. To unblock a contact, tap and hold the contact,
then tap Unblock on the pop-up menu.
Tap a contact to start a chat.
Tap and hold to display a pop-
up menu of actions.
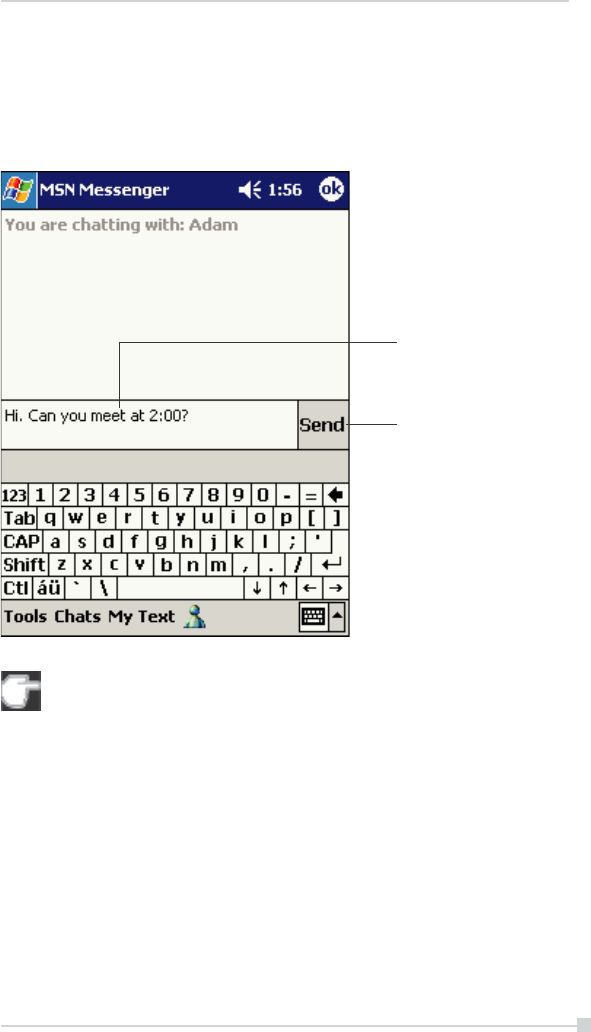
Chapter 5: Companion Programs
97
Chatting with Contacts
Tap a contact name to open a chat window. Enter your message in the text
entry area at the bottom of the screen, or tap My Text to enter a preset
message, and tap Send. To invite another contact to a multi-user chat, in
the Tools menu, tap Invite and tap the contact you want to invite.
To switch back to the main window without closing a chat, tap the
Contacts button. To revert back to your chat window, tap Chats and
select the person whom you were chatting with.
Enter message.
Tap to send message.
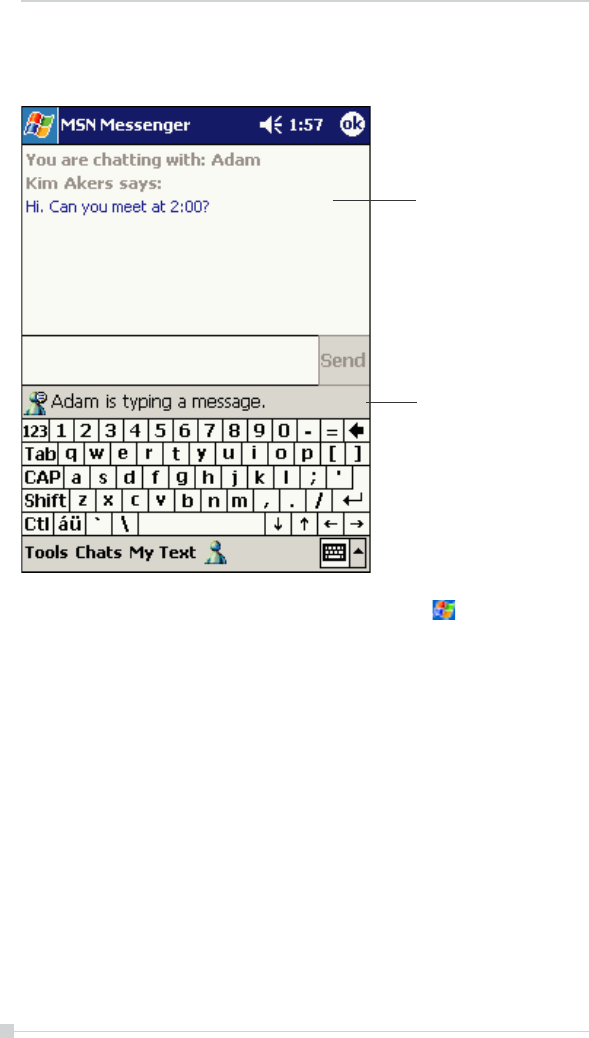
Toshiba Pocket PC e750/e755 User’s Guide
98
To know if the contact you are chatting with is responding, look for the
message under the text entry area.
For more information on using MSN Messenger, tap and then Help.
View full chat.
View status of the chat.
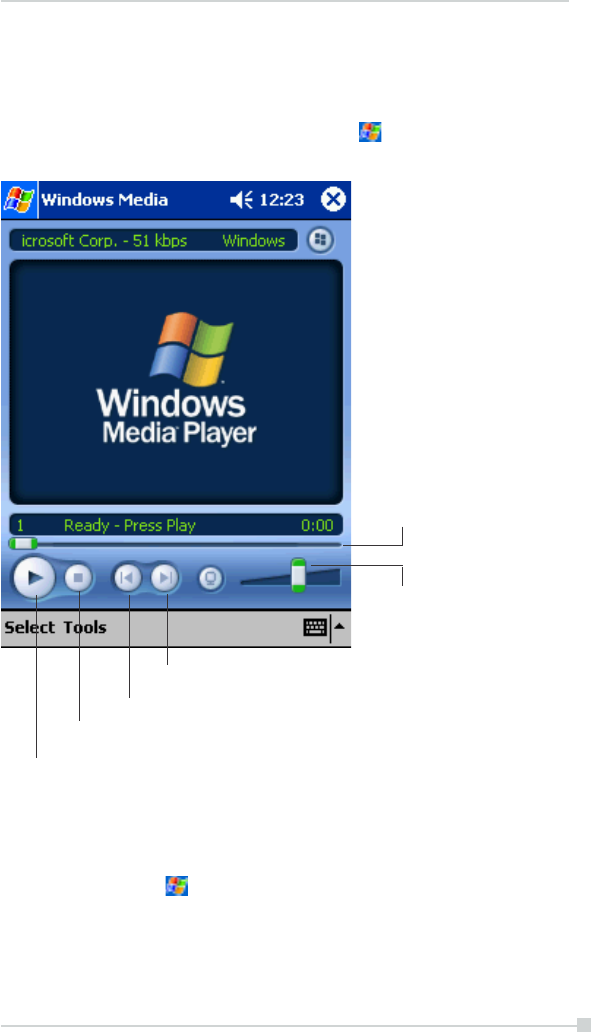
Chapter 5: Companion Programs
99
Windows Media Player
Use Microsoft Windows Media Player to play digital audio and video files
that are stored on your device or on a network. To switch to Windows
Media Player for Toshiba Pocket PC e750, tap and then tap Windows
Media.
Use Microsoft Windows Media Player on your computer to copy digital
audio and video files to your Toshiba Pocket PC e750. You can play Win-
dows Media and MP3 files on your Toshiba Pocket PC e750.
For more information about using Windows Media Player for Toshiba
Pocket PC e750, tap , and then tap Help.
Tap to play or pause.
Tap to stop.
Tap to play a previous song.
Tap to skip to the next song.
Tap to adjust volume.
Indicates the progress of the
current track.

Toshiba Pocket PC e750/e755 User’s Guide
100
Microsoft Reader
Use Microsoft Reader to read eBooks on your device. Download books
to your computer from your favorite eBook Web site. Then, use ActiveSync
to copy the book files to your activated device. The books appear in the
Reader Library, where you can tap them in the list to open them.
Each book consists of a cover page, an optional table of contents, and the
pages of the book. You can:
• Page through the book by using the Up/Down control on your device
or by tapping the page number on each page.
• Annotate the book with highlighting, bookmarks, notes, and drawings.
• Search for text and look up definitions for words.
The Guidebook contains all the information you'll need to use the soft-
ware. To open the Guidebook, tap Help on the Reader command bar. Or,
on a book page, tap and hold on the book title, and then tap Help on the
pop-up menu.
To switch to Microsoft Reader, tap , Programs, and then Microsoft
Reader.
Getting Books on Your Device
You can download book files from the Web. Just visit your favorite eBook
retailer and follow the instructions to download the book files.
Sample books and a dictionary are also included in the MSReader folder
in the Extras folder on the Toshiba Pocket PC e750 Companion CD.
Use ActiveSync to download the files from your computer to your activated
device as described in the Read Me file in the MSReader folder.
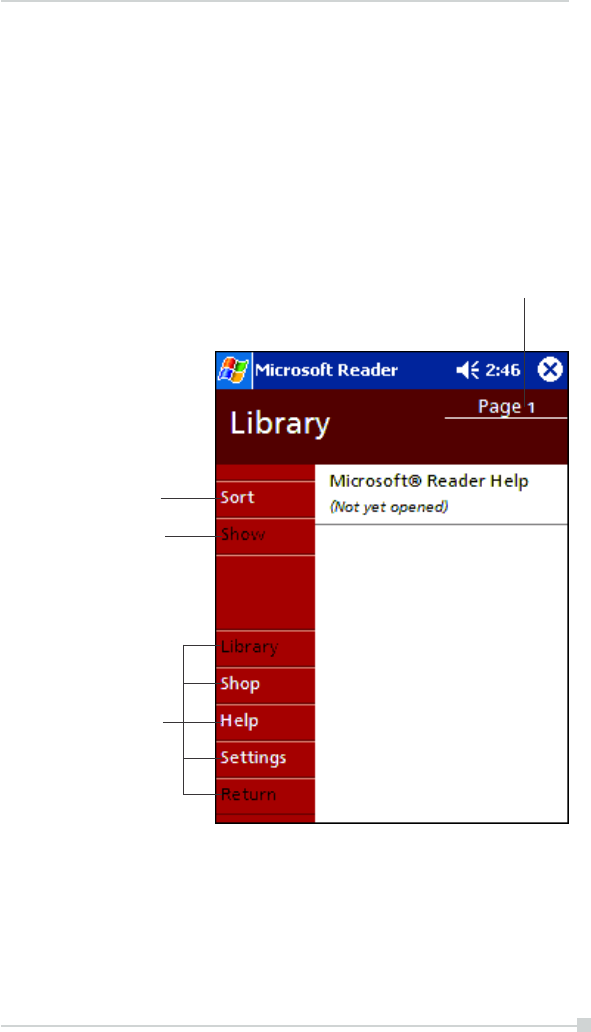
Chapter 5: Companion Programs
101
Using the Library
The Library is your Reader home page; it displays a list of all books
stored on your device or storage card.
To open the Library:
• On the Reader command bar, tap Library.
• On a book page, tap the book title, and then tap Library on the pop-
up menu.
To open a book, tap its title in the Library list.
Tap to select a sort order.
Tap to specify the books you
want to display in the list.
Tap here to navigate to other
parts of the Reader.
Tap to scroll through the Library list.
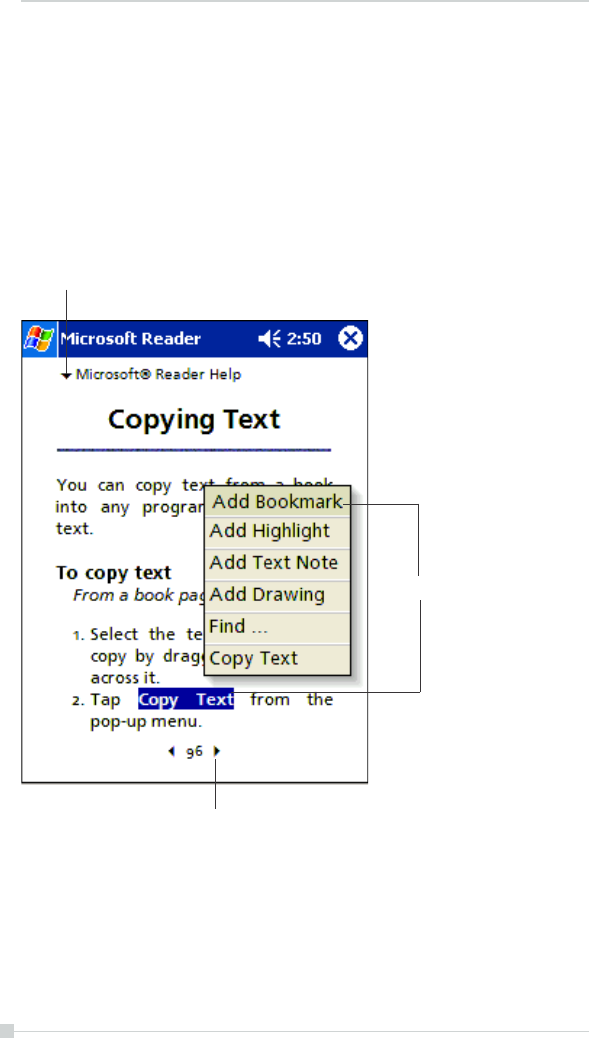
Toshiba Pocket PC e750/e755 User’s Guide
102
Reading a Book
Each book consists of a cover page, an optional table of contents, and the
pages of the book. Navigation options are listed in the bottom portion of
the cover page.
The first time you open a book, you’ll probably want to go to the first page
or to the table of contents, if there is one. Subsequently, whenever you
open the book, you’ll be automatically taken to the last page read.
In addition to the text, each book page includes a page number and book
title.
You can also page through a book by using the Up/Down control on your
device.
Tap to select a navigation option.
Drag to select text and then tap
an option.
Tap arrows to turn the page,
or tap and hold page # to bring up page riffle.

Chapter 5: Companion Programs
103
Using Reader Features
Reading a book electronically gives you several options not available with
paper books. These options are available from any book page.
Select text by dragging across the text on the page. Then, tap an option on
the pop-up menu, as described here:
• Search for Text. Find text in a book by tapping Find on the pop-up
menu. Enter the word you want to search for, and tap the desired Find
option. Reader highlights found text on the page. To close Find, tap
outside the box. To return to your original page, tap the title and then
tap Return on the pop-up menu.
• Copy Text. You can copy text from books that support this feature into
any program that accepts text. On a book page, select the text you
want to copy. Then, tap Copy Text on the pop-up menu. The text can
be pasted into the program of your choice.
• Bookmarks. When you add a bookmark to a book, a color-coded book-
mark icon appears in the right margin. You can add multiple book-
marks to a book. Then, from anywhere in the book, tap the bookmark
icon to go to the bookmarked page.
• Highlights. When you highlight text, it appears with a colored back-
ground.
• Notes. When you attach a note to text, you enter the text in a note pad
that appears on top of the book page. A Note icon will display in the
left margin. To show or hide the note, tap the icon.
• Drawings. When you add a drawing, a Drawing icon appears in the
bottom-left corner of the page, and drawing tools appear across the
bottom of the page. Draw by dragging your stylus.
• To see a list of a book’s annotations, including bookmarks, highlights,
text notes, and drawings, tap Annotations Index on the book’s cover
page. You can tap an entry in the list to go to the annotated page.

Toshiba Pocket PC e750/e755 User’s Guide
104
Removing a Book
When you finish reading a book, you can delete it to conserve space on
your device. If a copy of the book is stored on your computer, you can
download it again at any time.
To remove a book from your device, tap and hold the title in the Library list,
and then tap Delete on the pop-up menu.
Chapter 6:
Pocket Internet Explorer
Use Microsoft® Pocket Internet Explorer to view Web or WAP pages in
either of these ways:
• During synchronization with your desktop computer, download your
favorite links and mobile favorites that are stored in the Mobile Favor-
ites subfolder in Internet Explorer on the desktop computer.
• Connect to an Internet service provider (ISP) or network and browse
the Web. To do this, you’ll need to create the connection first, as
described in Chapter 7.
When connected to an ISP or network, you can also download files and
programs from the Internet or intranet.
To switch to Pocket Internet Explorer, tap and then Internet Explorer.
The Mobile Favorites Folder
Only items stored in the Mobile Favorites subfolder in the Favorites folder
in Internet Explorer on your desktop computer will be synchronized with
your device. This folder was created automatically when you installed
ActiveSync.
Favorite Links
During synchronization, the list of favorite links in the Mobile Favorites
folder on your desktop computer is synchronized with Pocket Internet
Explorer on your device. Both computers are updated with changes made
to either list each time you synchronize. Unless you mark the favorite link
as a mobile favorite, only the link will be downloaded to your device, and
you will need to connect to your ISP or network to view the content. For
more information on synchronization, see ActiveSync Help on the desk-
top computer.

106
Toshiba Pocket PC e750/e755 User’s Guide
Mobile Favorites
If you are using Microsoft Internet Explorer 5.0 or later on your desktop
computer, you can download mobile favorites to your device. Synchroniz-
ing mobile favorites downloads Web content to your device so that you
can view pages while you are disconnected from your ISP and desktop
computer.
Use the Internet Explorer plug-in installed with ActiveSync to create mo-
bile favorites quickly.
To create a mobile favorite:
1. In Internet Explorer on your desktop computer, click Tools and then
Create Mobile Favorite.
2. To change the link name, enter a new name in the Name box.
3. In Update, select a desired update schedule.
4. Click OK. Internet Explorer downloads the latest version of the page
to your desktop computer.
5. If you want to download the pages that are linked to the mobile favor-
ite you just created, in Internet Explorer on the your PC, right-click the
mobile favorite and then click Properties. In the Download tab,
specify the number of links deep you want to download. To conserve
device memory, go only one level deep.
6. Synchronize your device and desktop computer. Mobile favorites that
are stored in the Mobile Favorites folder in Internet Explorer are down-
loaded to your device.
If you did not specify an update schedule in step 3, you will need to
manually download content to keep the information updated on
your desktop computer and device. Before synchronizing with your
device, in Internet Explorer on your desktop computer, click Tools
and then Synchronize. You will see the last time content was down-
loaded to the desktop computer, and you can manually download
content if needed.
You can add a button to the Internet Explorer toolbar for creating
mobile favorites. In Internet Explorer on your desktop computer,
click View,Toolbars, and then Customize.

107
Chapter 6: Pocket Internet Explorer
To save device memory
Mobile favorites take up storage memory on your device. To minimize the
amount of memory used:
• In the settings for the Favorites information type in ActiveSync op-
tions, turn off pictures and sounds, or stop some mobile favorites
from being downloaded to the device. For more information, see
ActiveSync Help.
• Limit the number of downloaded linked pages. In Internet Explorer on
the desktop computer, right-click the mobile favorite you want to change
and then Properties. In the Download tab, specify 0 or 1 for the
number of linked pages you want to download.
Using AvantGo Channels
AvantGo is a free interactive service that gives you access to personalized
content and thousands of popular Web sites. You subscribe to AvantGo
channels directly from your device. Then, you synchronize your device and
desktop computer, or connect to the Internet to download the content. For
more information, visit the AvantGo Web site.
To sign up for AvantGo:
1. In ActiveSync options on the desktop computer, turn on synchroniza-
tion for the AvantGo information type.
2. In Pocket Internet Explorer on your device, tap the Favorites button to
display your list of favorites.
3. Tap the AvantGo Channels link.
4. Tap the Activate button.
5. Follow the directions on the screen. You will need to synchronize your
device with your desktop computer and then tap the My Channels
button to complete the AvantGo setup.
When synchronization is complete, tap the AvantGo Channels link in your
list of favorites to see a few of the most popular channels. To add or
remove channels, tap the Add or Remove link.
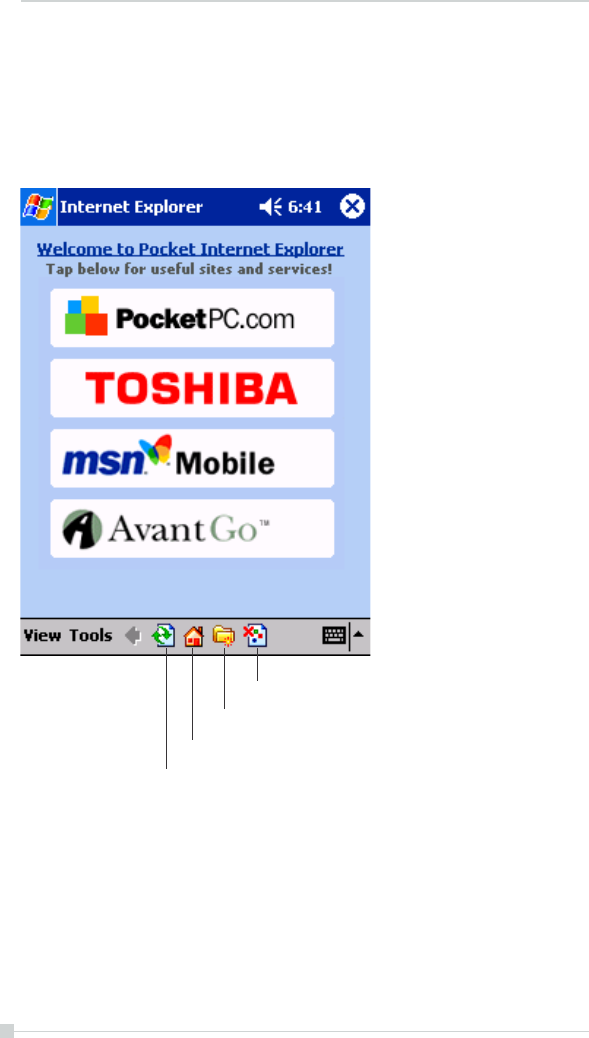
108
Toshiba Pocket PC e750/e755 User’s Guide
Using Pocket Internet Explorer
You can use Pocket Internet Explorer to browse mobile favorites and
channels that have been downloaded to your device without connecting
to the Internet. You can also connect to the Internet through an ISP or a
network connection and browse the Web.
Hide pictures button.
Favorites button.
Home button.
Refresh button.
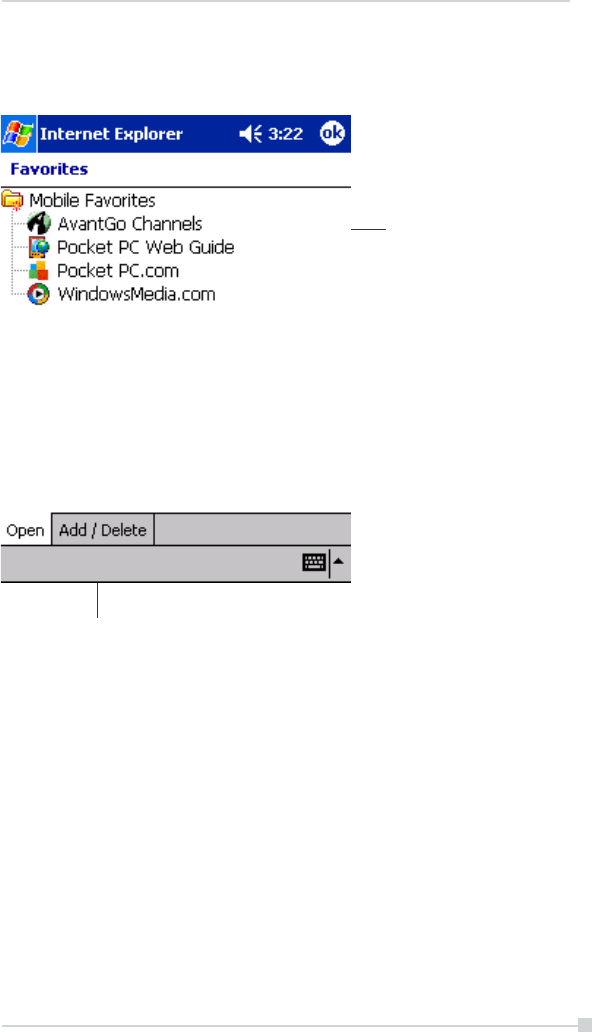
109
Chapter 6: Pocket Internet Explorer
To view mobile favorites and channels:
1. Tap the Favorites button to display your list of favorites.
2. Tap the page you want to view.
You’ll see the page that was downloaded the last time you synchronized
with your desktop computer. If the page is not on your device, the favorite
will be dimmed. You will need to synchronize with your desktop computer
again to download the page to your device, or connect to the Internet to
view the page.
Tap to add or delete a folder or favorite link.
Tap the favorite you want to
view.

110
Toshiba Pocket PC e750/e755 User’s Guide
To browse the Internet:
1. Set up a connection to your ISP or corporate network using Connec-
tions, as described in Chapter 7.
2. To connect and start browsing, do one of the following:
• Tap the Favorites button, and then tap the favorite you want to
view.
• Tap View and then Address Bar. In the address bar that ap-
pears at the top of the screen, enter the Web address you want to
visit and then tap Go. Tap the arrow to choose from previously
entered addresses.
To add a favorite link while using the device, go to the page you want
to add, tap and hold on the page, and tap Add to Favorites.

111
Chapter 7:
Getting Connected
You can use your device to exchange information with other mobile de-
vices as well as your computer, a network, or the Internet. You have the
following connection options:
• Use the infrared (IR) port on your device to send and receive files
between two devices. If this is the method you want to use, see the
following section “Transfer Items Using Infrared.”
• Connect to your Internet service provider (ISP). Once connected, you
can send and receive e-mail messages by using Inbox and view Web
or WAP pages by using Microsoft® Pocket Internet Explorer. The com-
munication software for creating an ISP connection is already installed
on your device. Your service provider will provide software needed to
install other services, such as paging and fax services. If this is the
method you want to use, see “Connect to an Internet Service Pro-
vider” later in this chapter.
• Connect to the network at your company or organization where you
work. Once connected, you can send and receive e-mail messages by
using Inbox, view Web or WAP pages by using Pocket Internet Ex-
plorer, and synchronize with your computer. If this is the method you
want to use, see “Connect to Work” later in this chapter.
• Connect to your computer to synchronize remotely. Once connected,
you can synchronize information such as your Pocket Outlook infor-
mation. If this is the method you want to use, see ActiveSync Help on
your computer or Connections Help on the device.
Transfer Items Using Infrared
Using infrared (IR), you can send and receive information, such as con-
tacts and appointments, between two devices.
To send information:
1. Switch to the program where you created the item you want to send
and locate the item in the list.
2. Align the IR ports so that they are unobstructed and within a close
range.
3. Tap and hold the item, and tap Beam Item on the pop-up menu.

112
Toshiba Pocket PC e750/e755 User’s Guide
You can also send items, but not folders, from File Explorer. Tap and
hold the item you want to send, and then tap Beam File on the pop-
up menu.
To receive information:
1. Align the IR ports so that they are unobstructed and within a close
range.
2. Have the owner of the other device send the information to you. Your
device will automatically receive it.
Connect to the Internet
You can connect to your ISP, and use the connection to send and receive
e-mail messages and view Web or WAP pages.
You can connect to work in one of two ways:
• Create a modem connection. If this is the method you want to use, see
“To create a modem connection to an ISP.”
• Use an Ethernet card and a net tap to connect to the network. If this is
the method you want to use, see “To create an Ethernet connection to
an ISP.”
To create a modem connection to an ISP:
1. Obtain the following information from your ISP: ISP dial-up access tele-
phone number, user name, password, and TCP/IP settings. Some ISPs
require information in front of the user name, such as MSN/username.
2. If your device does not have a built-in modem, install a modem card,
or use or use a NULL modem cable and appropriate adapters to con-
nect an external modem to your device through the serial port.
3. Tap and then Settings. In the Connections tab, tap Connections.
Under The Internet settings, select Internet Settings and tap Modify.
4. In the Modem tab, tap New.
5. Enter a name for the connection, such as “ISP Connection.”
6. In the Select a modem list, select your modem type. If your modem
type does not appear, try reinserting the modem card. If you are using
an external modem that is connected to your device with a cable, se-
lect Hayes Compatible on COM1.
7. You should not need to change any settings in Advanced. Most ISPs
now use a dynamically-assigned address. If the ISP you are connect-
ing to does not use a dynamically-assigned address, tap Advanced
and then the TCP/IP tab, and enter the address. When finished, tap
OK and then Next.

113
Chapter 7: Getting Connected
8. Enter the access phone number, and tap Next.
9. Select other desired options, and tap Finish.
10. In the Dialing Locations tab, specify your current location and phone
type (most phone lines are tone). These settings will apply to all con-
nections you create.
To start the connection, simply start using one of the following programs.
Your device will automatically begin connecting. Once connected, you can:
• Send and receive e-mail messages by using Inbox. Before you can
use Inbox, you need to provide the information it needs to communi-
cate with the e-mail server. For specific instructions, see “Connect
Directly to an E-mail Server,” later in this chapter.
• Visit Web and WAP pages by using Pocket Internet Explorer. For more
information, see Chapter 6.
• Send and receive instant messages with MSN Messenger. For more
information, see “MSN Messenger” in Chapter 5.
To create an Ethernet connection to an ISP:
1. You do not need to create a new connection on your device. Instead,
you must purchase and configure an Ethernet card that is compatible
with your device.
2. Obtain the following information from your ISP: user name, password,
and domain name.
3. Insert the Ethernet card into your device. For instructions on inserting
and using the Ethernet card, see the owner’s manual for the card.
4. The first time you insert the card, Network Settings will appear auto-
matically so that you can configure the Ethernet card. Most networks
use DHCP, so you should not have to change these settings unless
your network administrator instructs you to do so. Tap OK. (If it does
not appear or to change settings later, tap and then Settings. In
the Connections tab, tap Network Adapters, tap the adapter you
want to change, and then tap Properties.)
5. Connect the Ethernet card to the network by using a network cable.
For information, see your owner's manual.
6. Tap , Settings,Connections tab, and then Connections. From
the My network card connects to list, select The Internet.
To start the connection, simply start using one of the programs listed in
the preceding section. Once connected, you can perform the same activi-
ties as listed in the preceding section.

114
Toshiba Pocket PC e750/e755 User’s Guide
Connect to Work
If you have access to a network at work, you can send e-mail messages,
view intranet pages, synchronize your device, and possibly access the
Internet. You can connect to work in one of two ways:
• Create a modem connection by using a RAS account. Before you can
create this modem connection, your network administrator will need to
set up a RAS account for you. If this is the method you want to use,
see “To create a modem connection to a network.” Your network ad-
ministrator may also give you VPN settings.
• Use an Ethernet card and a net tap to connect to the network. If this is
the method you want to use, see “To create an Ethernet connection to
a network.”
To create a modem connection to a network:
1. Get the following information from your network administrator: dial-up
access telephone number, user name, password, domain name, and
TCP/IP settings.
2. If your device does not have a built-in modem, install a modem card.
3. Tap and then Settings. In the Connections tab, tap Connections.
Under The Internet settings, select Internet Settings and tap Modify.
4. In the Modem tab, tap New.
5. Enter a name for the connection, such as “Company Connection.”
6. In the Select a modem list, select your modem type. If your modem
type does not appear, try reinserting the modem card. If you are using
an external modem that is connected to your device with a cable,
select Hayes Compatible on COM1.
7. You should not need to change any settings in Advanced. Most
servers now use a dynamically-assigned address. If the server you
are connecting to does not use a dynamically-assigned address, tap
Advanced and then the TCP/IP tab and enter the address. When
finished, tap OK and then Next.
8. Enter the access phone number, and tap Next.
9. Select other desired options, and tap Finish.
10. In the Dialing Locations tab, specify your current location and phone
type (most phone lines are tone). These settings will apply to all con-
nections you create.
To start the connection, simply start using one of the following programs.
Your device will automatically begin connecting. Once connected, you can:

115
Chapter 7: Getting Connected
• Send and receive e-mail messages by using Inbox. Before you can
use Inbox, you need to provide the information it needs to communi-
cate with the e-mail server. For specific instructions, see “Connect
Directly to an E-mail Server,” later in this chapter.
• Visit Internet or intranet Web or WAP pages by using Pocket Internet
Explorer.
• Send and receive instant messages with MSN Messenger. For more
information, see “MSN Messenger” in Chapter 5.
• Synchronize. For more information, see ActiveSync Help on the com-
puter.
To create an Ethernet connection to a network:
1. You do not need to create a new connection on your device. Instead,
you must purchase and configure an Ethernet card that is compatible
with your device.
2. Get the following information from your network administrator: user
name, password, and domain name.
3. Insert the Ethernet card into your device. For instructions on inserting
and using the Ethernet card, see the owner’s manual for the card.
4. The first time you insert the card, Network Settings will appear auto-
matically so that you can configure the Ethernet card. Most networks
use DHCP, so you should not have to change these settings unless
your network administrator instructs you to do so. Tap OK. (If it does
not appear or to change settings later, tap and then Settings. On
the Connections tab, tap Network Adapter, tap the adapter you want
to change, and then tap Properties.)
5. Connect the Ethernet card to the network by using a network cable.
For information, see your owner's manual.
6. Tap , Settings,Connections tab, and then Connections. From the
My network card connects to list, select Work.
7. If you want to synchronize your device, tap , and then ActiveSync.
In the Tools menu, tap Options. In the PC tab, select Include PC when
synchronizing remotely and connect to, and select your computer's
name. Remote synchronization with a computer will work only if you
have set up a partnership with that computer through ActiveSync and
have set ActiveSync to allow remote connections. Other restrictions
apply. For more information on synchronizing remotely, see ActiveSync
Help on the computer.
To start the connection, simply start using one of the programs listed in
the preceding section. Once connected, you can perform the same activi-
ties as listed in the preceding section.
116
Toshiba Pocket PC e750/e755 User’s Guide
End a Connection
To disconnect, do one of the following:
• When connected via dial-up or VPN, tap the Connection icon, , on
your navigation bar, and then tap End.
• When connected via cable or cradle, detach your device from the cable
or cradle.
• When connected via Infrared, move the device away from the PC.
• When connected via a network (Ethernet) card, remove the card from
your device.
Connect Directly to an E-mail Server
You can set up a connection to an e-mail server so that you can send and
receive e-mail messages by using a modem or network connection and
Inbox on your device.
The ISP or network must use a POP3 or IMAP4 e-mail server and an
SMTP gateway.
You can use multiple e-mail services to receive your messages. For each
e-mail service you intend to use, first set up and name the e-mail service.
If you use the same service to connect to different mailboxes, set up and
name each mailbox connection.
To set up an e-mail service:
• In Inbox on your device, tap Services, and then New Service. Follow
the directions in the New Service wizard.
For an explanation of a screen, tap and then Help. When finished, to
connect to your e-mail server, tap Services and then Connect. For more
information on using the Inbox program, see “Inbox: Sending and Receiv-
ing E-mail Messages” in Chapter 4.
Get Help on Connecting
More information on the procedures described here, as well as information
on additional procedures, can be found in the following locations:
• “Inbox: Sending and Receiving E-mail Messages” in Chapter 4.
• Online Help on the device. Tap and then Help. Tap View,All In-
stalled Help, and then Inbox or Connections.
• ActiveSync Help on the computer. In ActiveSync, click Microsoft
ActiveSync Help on the Help menu.
• For troubleshooting information, see the Pocket PC Web site at: http:/
/www.microsoft.com/mobile/pocketpc

Chapter 8:
Wi-Fi (IEEE 802.11b)
Wireless LAN
Overview
This chapter is valid for WLAN model only.
The IEEE 802.11b WLAN Adapter can connect your Toshiba Pocket PC
e750/e755 wirelessly to the existing IEEE 802.11b wireless networks or
form its own Wireless Network. Using the adapter in the Toshiba Pocket
PC e750/e755, you can enjoy the complete mobile and high-speed wire-
less Internet connectivity while in range of a Wi-Fi compatible access
point.
RF Exposure Warning Statement:
This device has been evaluated for FCC RF exposure compliance as
portable device for lap held position and with 1.5cm separation distance
from the transmitting antenna to the near by person. To comply with
FCC RF exposure compliance requirements, this device and its antenna
must not be co-located or operating in conjunction with any other
antenna or transmitter.
This device has not been investigated for FCC RF exposure compliance
for portable configuration with any other antenna or transmitter except for
the WLAN transmitter installed by Toshiba Corp. CF Card Slot or SD
Card Slot can not be used for adding any other transmitter.
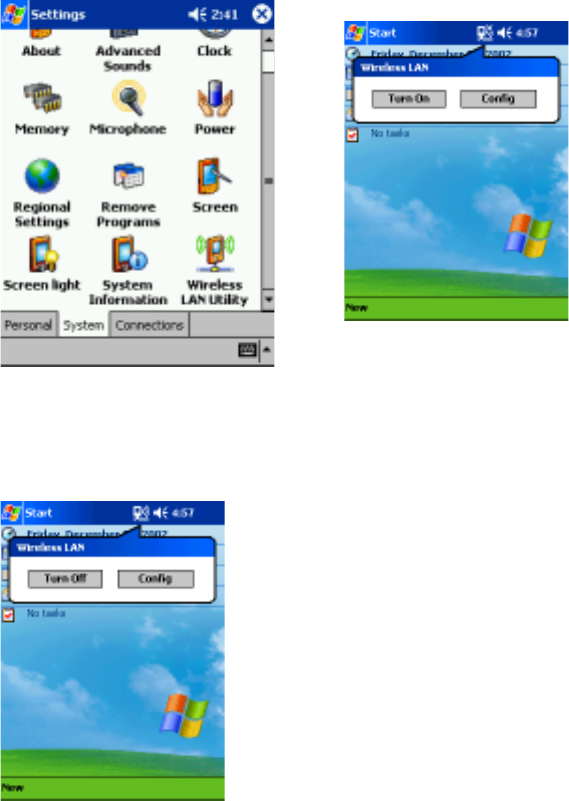
Configuration
To configure your Wireless settings, click the Wireless LAN icon and tap
the “Config” button.
In order to Turn Off your Wireless LAN radio connection, click the Wireless
icon and tap the “Turn Off” button. If the connection is turned off the WLAN
icon will have a cross marked across the icon. Tap the icon to turn on and
configure the Wireless settings.
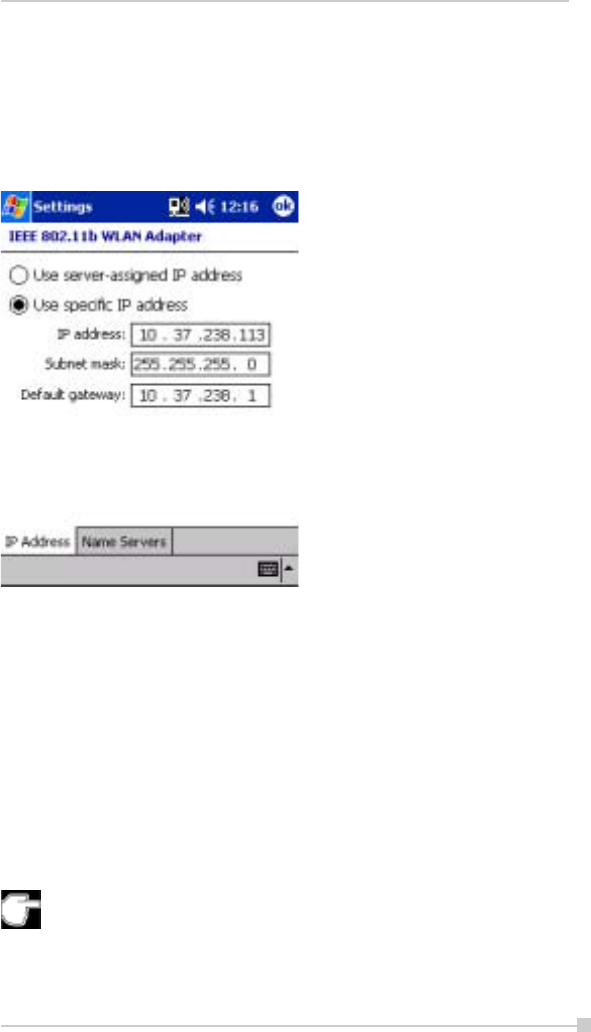
119
Chapter 8: Wi-Fi (IEEE 802.11b) WLAN Adapter
IP Address Page
Use IP Address Page to view and edit the IP address,Subnet mask and
Default gateway.
Click StartJSettingsJConnectionsJNetwork AdaptersJ “IEEE 802.11b
WLAN Adapter”JPropertiesJIP Address
yy
yy
yIP Address:
IP Address is Internet Protocol Address; a numeric address such as
10.37.238.100 that the domain name server translates into a domain
name. Each node on the IP network should have a unique IP address.
yy
yy
ySubnet mask:
A number used to identify a subnetwork when multiple networks share
an IP address. For example 255.255.255.0
yy
yy
yDefault gateway:
This is a device used to forward IP packets to and from a remote
destination.
Please check with your network administrator for these connection
settings.
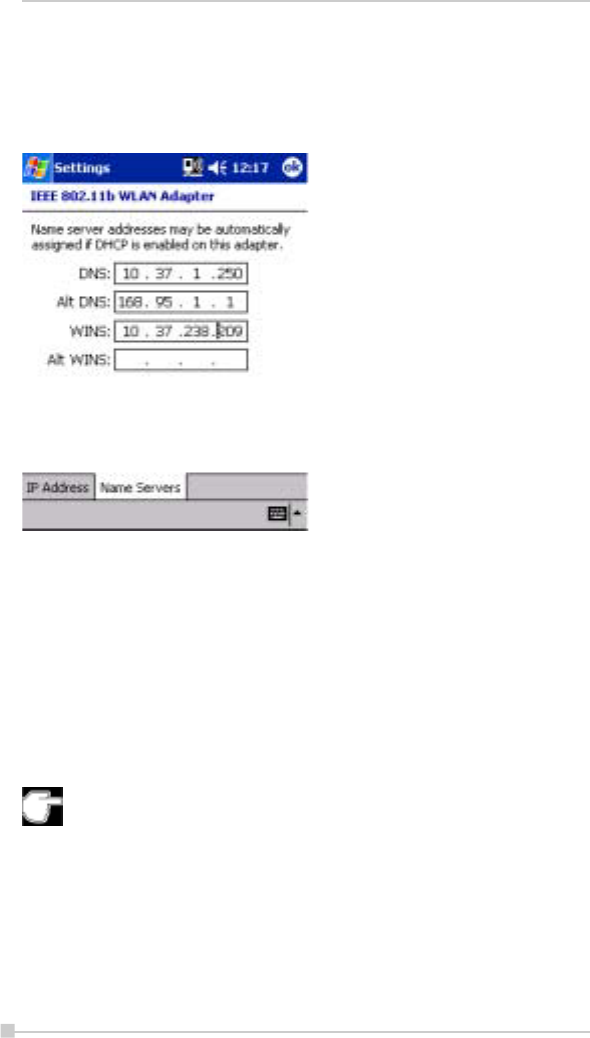
120
Toshiba Pocket PC e750/e755 User’s Guide
Name Servers Page
Use Name Servers Page to view and edit DNS,Alt DNS,WINS and Alt
WINS.
StartJSettingsJConnectionsJNetwork AdaptersJ“IEEE 802.11b WLAN
Adapter” JPropertiesJName Servers
yy
yy
yDNS:
Domain Name System is a database system that translates ad-
dresses and domain names. For example, a numeric address like
232.245.021.54 can become something like cba.com. DNS can also
be used to control Internet email delivery.
yy
yy
yWINS:
In Toshiba Pocket PC e750/e755, Windows Internet Naming Ser-
vice has two functions; one is a Microsoft Net BIO name server that
eliminates the broadcasts needed to resolve computer names to IP
addresses by providing a cache or database of translations. The
other one is to set the IP address of the host computer that you
already construct the partnership for Network adapter Active sync
purpose.
Without setting the host computer’s IP address in the WINS, you
cannot wirelessly synchronize your Pocket PC with your host com-
puter.
yy
yy
yAlt DNS:
Alt DNS stands for Alternative Domain Name System. Used to sub-
stitute main DNS when necessary.
yy
yy
yAlt WINS:
Alt WINS stands for Alternative Windows Internet Naming Service.
Used to substitute main WINS when necessary.
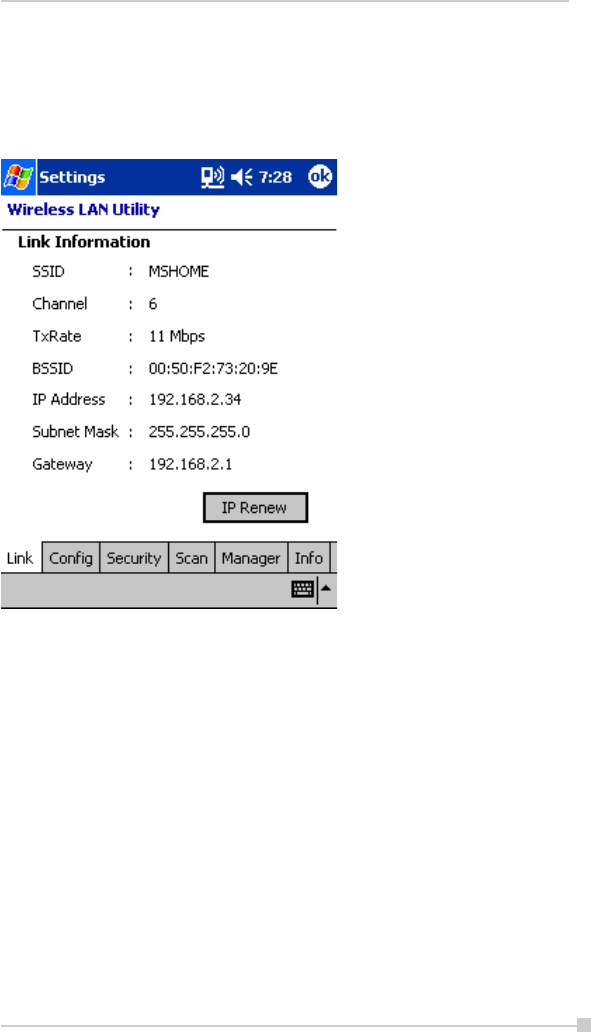
121
Chapter 8: Wi-Fi (IEEE 802.11b) WLAN Adapter
Link Page
Use the Link page to view SSID,Channel,TxRate,BSSID,IP Address,
Subnet Mask and Gateway.
Click StartJSettingsJSystemJWireless LAN UtilityJLink
ySSID: Displays the SSID currently connected to the access point or
802.11 ad hoc network.
yChannel: Indicates the channel currently in use for Access Point or
802.11 Ad Hoc network.
yTxRate: Indicates the current data transmission rate in use.
yBSSID: Displays the BSSID set on the access point or 802.11 ad
hoc network.
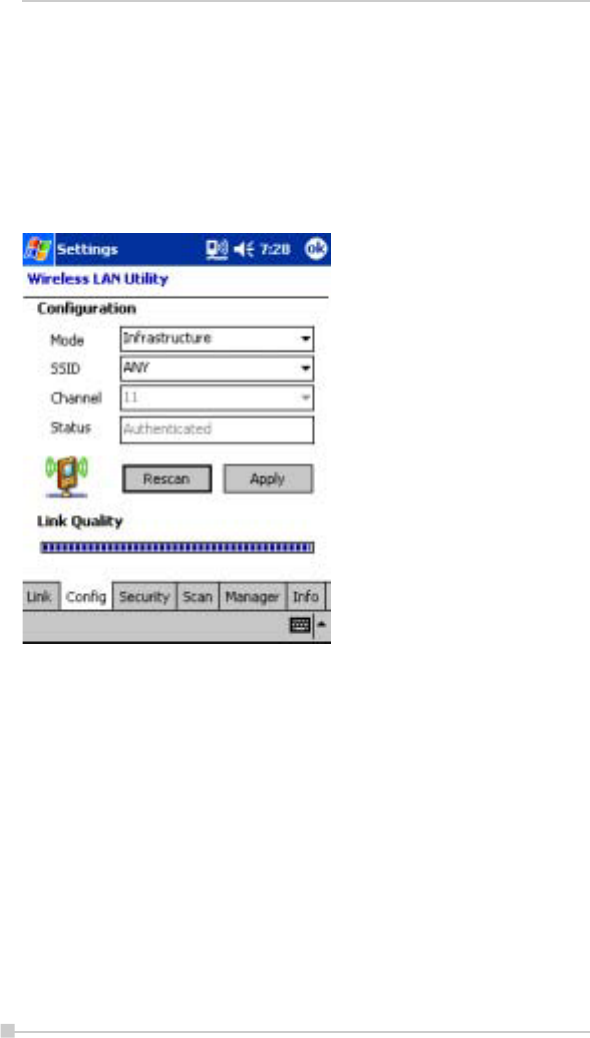
122
Toshiba Pocket PC e750/e755 User’s Guide
yIP Address: Displays the IP address set.
ySubnet Mask: Displays the subnet mask set.
yGateway: Displays the gateway IP address set.
Configuration Page
Use the Configuration page to set the Mode,SSID,Channel and Country,
and to view Link Quality as well.
Click StartJSettingsJSystemJWireless LAN UtilityJConfig
yMode: Use the Mode pull-down menu to select the operating mode.
Infrastructure – can connect to an access point or a network con-
nected to an access point.
802.11 Ad Hoc – This mode allows Wireless LAN Module to form its
own local network where adapters communicate peer-to-peer with-
out Access Points using a shared SSID.
ySSID: Service Set Identifier is a group name given to the groups that
form the wireless LAN network, and up to 32 single-byte English
characters and symbols may be used. With the default setting “ANY”,
it will automatically connect to the highest performance access point
among those it was able to scan.

123
Chapter 8: Wi-Fi (IEEE 802.11b) WLAN Adapter
yStatus: shows whether or not the network is connected. If a connec-
tion has been successful, it shows “Authenticated”. If it has failed, it
displays the reason for this. This authentication concerns connec-
tion only, and does not necessarily indicate that the network is us-
able.
.yChannel: In France, only channel 10 and 11 are available. In USA,
Canada, Europe or Australia, you have 11 options: channel 1~11.
If you cannot connect with the APs or the 802.11 Ad Hoc Network
Stations, check if the channel been used is between 1~11. Using
channels other than 1~11 will not enable the connection.
The channel is set by the adapter, which starts the 802.11Ad Hoc
network. Under 802.11Ad Hoc mode, the first station forms the
802.11 Ad Hoc network should choose a proper SSID and the chan-
nel for use. Other stations will only have the same SSID set to join
the 802.11 Ad Hoc network automatically.
yRescan: Used to search the proper Access Point close to the adapter.
yLink Quality: An indicator of how clearly the adapter can hear the
Access Point.
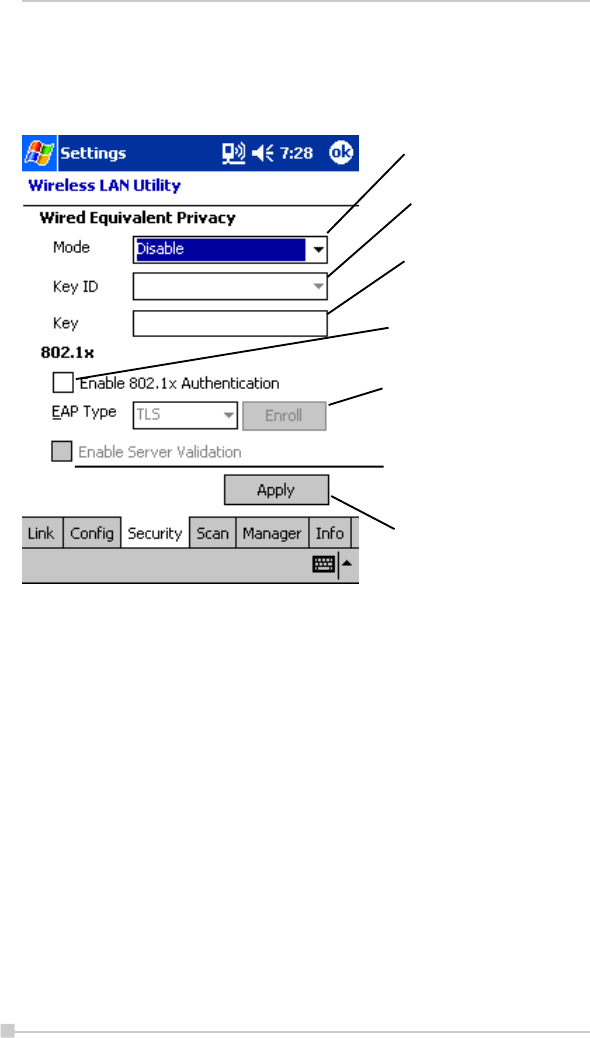
124
Toshiba Pocket PC e750/e755 User’s Guide
yy
yy
yWired Equivalent Privacy (WEP)
Wired Equivalent Privacy. 802.1x validation configuration can be performed.
Mode:
The default WEP Mode setting is “Disable”. You can choose “64 bits
(ASCII)”, “128 bits (ASCII)”, “64 bits (HEX)” or “128 bits (HEX)” manu-
ally to enable the WEP or choose “Disable” to disable the WEP.
Disable:
When in this mode, WEP does not function. When WEP does not
function, there are risks relating to hacking or tapping by external
persons, data loss or destruction. We strongly recommend using
WEP.
64 bits (ASCII):
5-digit ASCII characters or symbols can be entered in “Key”.
Click to set WEP. Default is
“Disable.”
Select Key1 to key4. This
becomes active when WEP
Mode “enabled” is selected.
Enter ASCII characters and
symbols corresponding to the
selected WEP.
Check here if the 802.1 valida-
tion has been enabled.
Activates “Toshiba Enroller.”
Toshiba Enroller is a tool to ob-
tain certificate to allow use of
the 802.1 validation function.
Check here to enable server
validation of the 802.1 valida-
tion function.
Click Apply after completing
new settings

125
Chapter 8: Wi-Fi (IEEE 802.11b) WLAN Adapter
128 bits (ASCII):
13-digit ASCII characters or symbols can be entered in “Key”.
64 bits (HEX):
Hexadecimal 10-digit English letters and numerals can be entered
in “Key”. Letters and numerals that can be entered are 0-9 and A(a)
- F(f).
128 bits (HEX):
Hexadecimal 26-digit English letters and numerals can be entered
in “Key”. Letters and numerals that can be entered are 0-9 and A(a)
- F(f).
Key ID:
This becomes enabled when WEP is selected. Select Key1 - Key4.
Key:
Enter the ASCII characters and symbols that correspond to the mode
selected. Different characters can be entered, depending on the
mode selected. Please refer to Wired Equivalent Privacy above.
If “64 bits (ASCII)” or “128 bits (ASCII)” have been selected, input of
letters or numerals above the upper limit is blocked. If “64 bits (HEX)”
or “128 bits (HEX)” have been selected, a warning prompt appears
if you enter anything other than the permitted numerals/letters.
Enable 802.1x authentication:
Check here to enable 802.1x validation function.
EAP type:
Select protocol for using 802.1x validation function.
TLS (EAP-TLS)
Protocol used by Windows 2000 Server, etc.
PEAP
Protocol use by Windows NET Server 2003, etc.
Enable server validation:
When 802.1x validation is performed, this confirms whether it is
connected to the right server. It should normally be checked for im-
proved security.
Please ask your network administrator for further details.
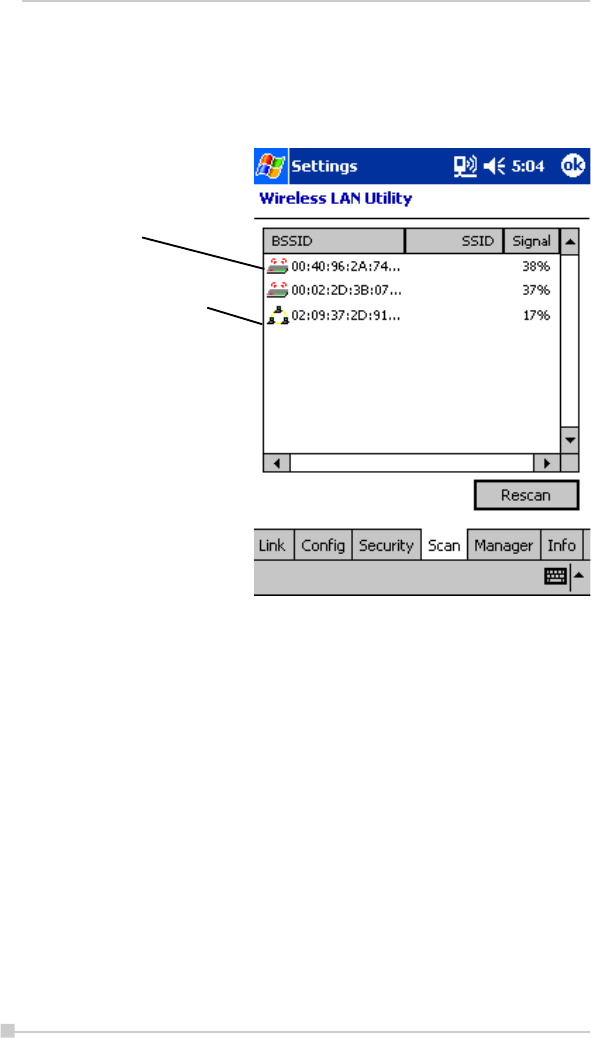
126
Toshiba Pocket PC e750/e755 User’s Guide
Scan Page
Use Scan page to scan and select scannable AP and Ad-hoc devices.
Click StartJSettingsJSystemJWireless LAN UtilityJScan
yy
yy
yRescan:
Rescan scannable Access Point(s) and Ad-hoc connectable
Device(s). If you double tab menu after scanning, you can try to
connect tapped AP or Ad-hoc device. If you are unable to see any
Access points in that menu, check your access point setting. Some
Access Points are set to refuse scanning.
yy
yy
yNetwork Selection:
Each Access Point is identified by its BSSID and SSID. Double-click
on the BSSID to choose the Access Point/802.11 Ad Hoc group you
want to connect with.
yy
yy
ySignal:
Indicates the signal strength of the Access Point.
Access point icon
802.11 Ad Hoc Network Icon
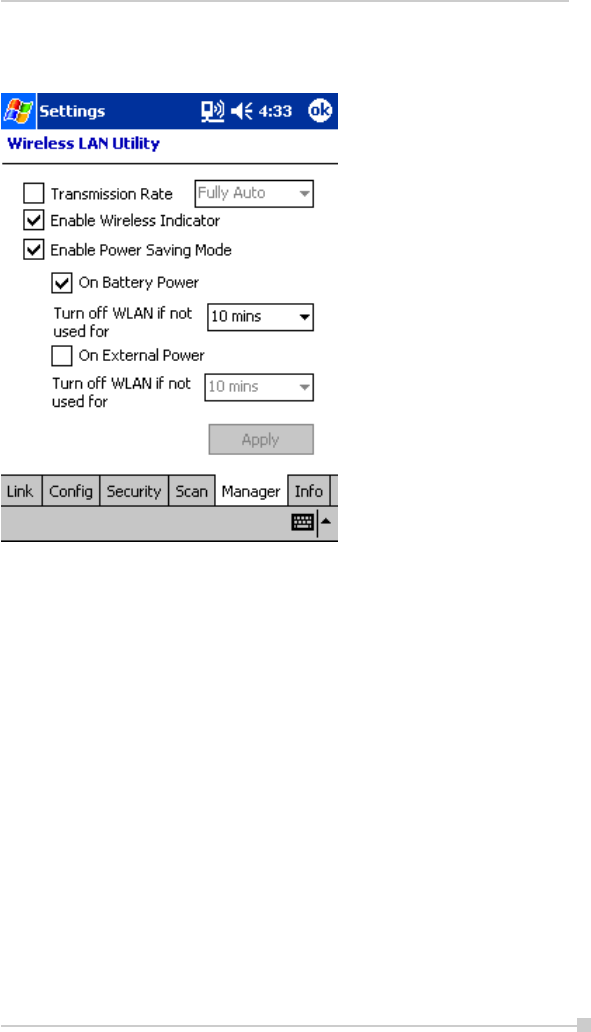
127
Chapter 8: Wi-Fi (IEEE 802.11b) WLAN Adapter
Manager Page
Click StartJSettingsJSystemJWireless LAN UtilityJManager
yy
yy
yTransmission Rate:
Select the transmission rate to be used from the pull-down menu. If
you select “Fully Auto”, the adapter is automatically set to the most
suitable transmission rate.
yy
yy
yEnable Wireless LAN Indicator:
If you check this, the wireless LAN indicator is displayed in the
navigation bar.
yy
yy
yEnable Power Saving Mode: Check to use power saving mode
Battery Power -- Check this to run in power saving mode when
on battery power. Power is turned off if no transmission occurs
during the specified time. Select time length from pull-down
menu.
External Power -- Check this to runin power-saving mode when
on external power. Power is turned off if no transmission
occurs during the specified time. Select time length from pull-
down menu.
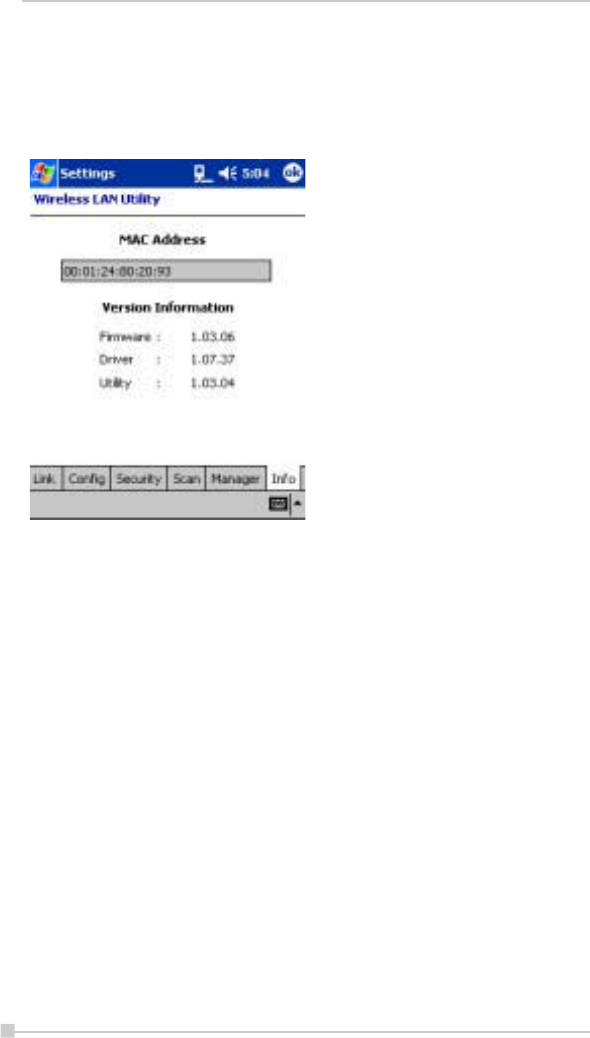
128
Toshiba Pocket PC e750/e755 User’s Guide
Info Page
Use Info Page to view MAC Address,Utility version,Driver version and
Firmware version.
Click StartJSettingsJSystemJWireless LAN UtilityJInfo
yy
yy
yMAC Address:
Displays Wireless LAN MAC Address. MAC (Media Access Control)
Address is a hardware address that uniquely identifies each device
of network.
yy
yy
yVersions:
Firmware -- Display FW version that included Wireless LAN
hardware.
Driver -- Display Wireless LAN Driver version.
Utility -- Display Wireless LAN Driver version.
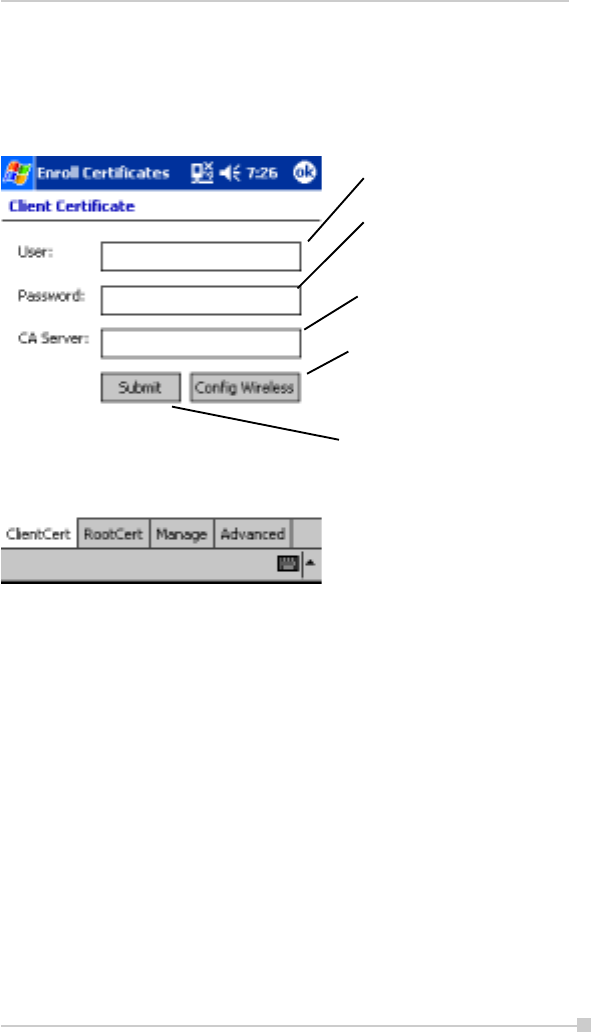
129
Chapter 8: Wi-Fi (IEEE 802.11b) WLAN Adapter
Toshiba Enroller
Configure the “Toshiba Enroller” tool for obtaining and administering
certificates used for 802.1x validation. Please ask your network
administrator for configuration details.
Enter user name of the person
obtaining the certificate.
Enter password of the user ob-
taining certificate. Maximum
length of password is 14 let-
ters.
Enter URL or IP address of the
certifying server (CA server) .
Click here to request a certifi-
cate from the certifying server
(CA server).
Click to activate the Wireless
LAN Utility.
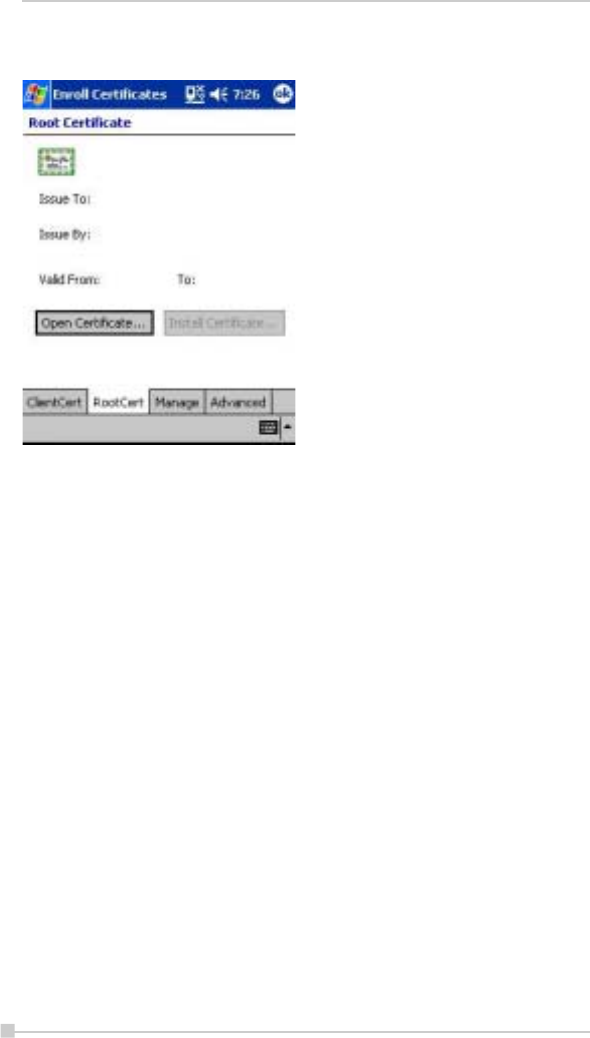
130
Toshiba Pocket PC e750/e755 User’s Guide
Root Page
yy
yy
yOpen Certificate:
Opens the root certificate. When the root certificate is opened,the
person it has been issued to, the persons issued by, and the period
of validity will be displayed. The root certificate is provided by the cer
file.
yy
yy
yInstall Certificate:
Registers the open root certificate in the system. This button is en-
abled when the root certificate is opened.
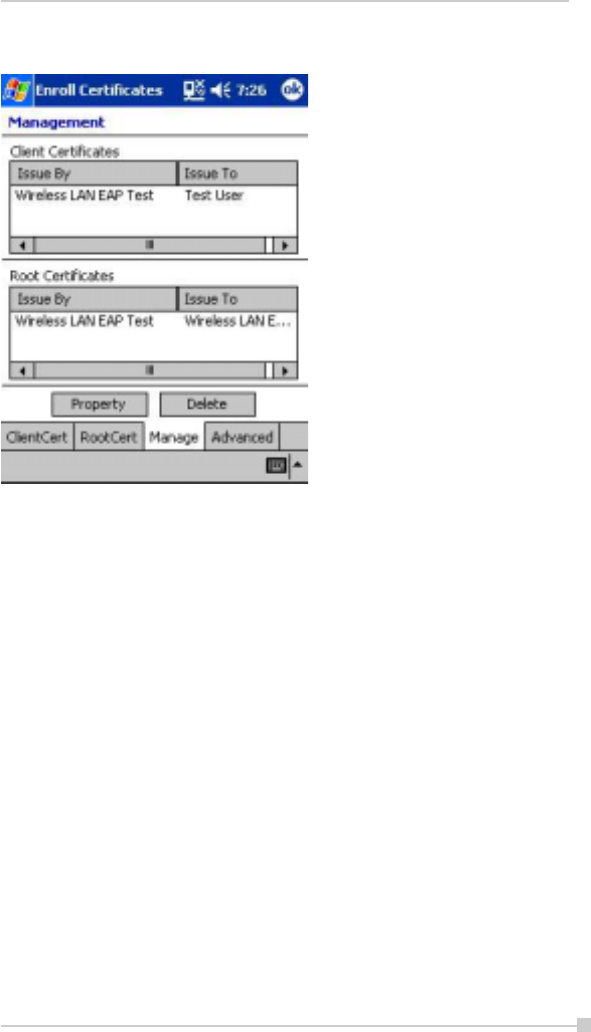
131
Chapter 8: Wi-Fi (IEEE 802.11b) WLAN Adapter
Management Page
yy
yy
yProperty:
Displays Information on certificates obtained.
yy
yy
yDelete:
Deletes certificates. Please exercise caution when deleting certifi-
cates.
One client certificate and on root certificate are required at a minimum
when using EAP-TLS, and one root certificate is required at a mini-
mum when using PEAP.
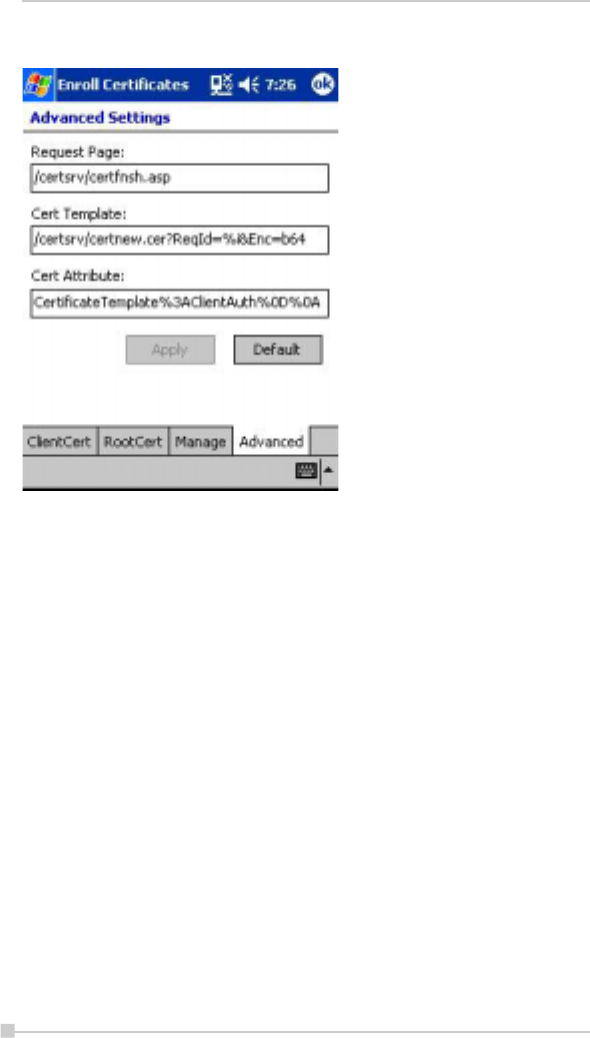
132
Toshiba Pocket PC e750/e755 User’s Guide
Advanced Page
yy
yy
yRequested Page:
Portion of URL to be accessed when obtaining client certificates.
yy
yy
yCert Template:
Template used when obtaining client certificates.
yy
yy
yCert Attribute:
Attribute used when obtaining client certificates.
Under normal circumstances configuration is not needed unless re-
quested by your network administrator.
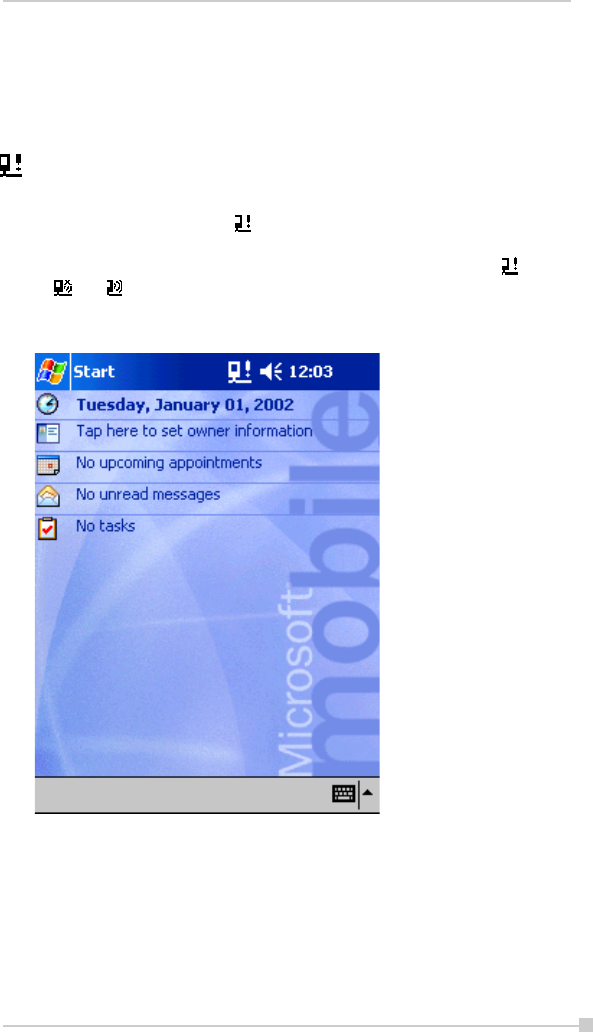
133
Chapter 8: Wi-Fi (IEEE 802.11b) WLAN Adapter
TMU-Traffic Monitoring Utility
TMU keeps users updated of current WLAN Module’s activity status.
Icon Specification
Wireless Communication Switch off:
Wireless Communication Switch, on the bottom of the PDA, is turned
off. Clicking on the icon gives you a warning message, “Please
turn on Wireless communication switch”. Click “OK” to close the
Message Box. Turn on the switch and you will see the icon turns
to or , depends on the original setting for the WLAN Module
Power.
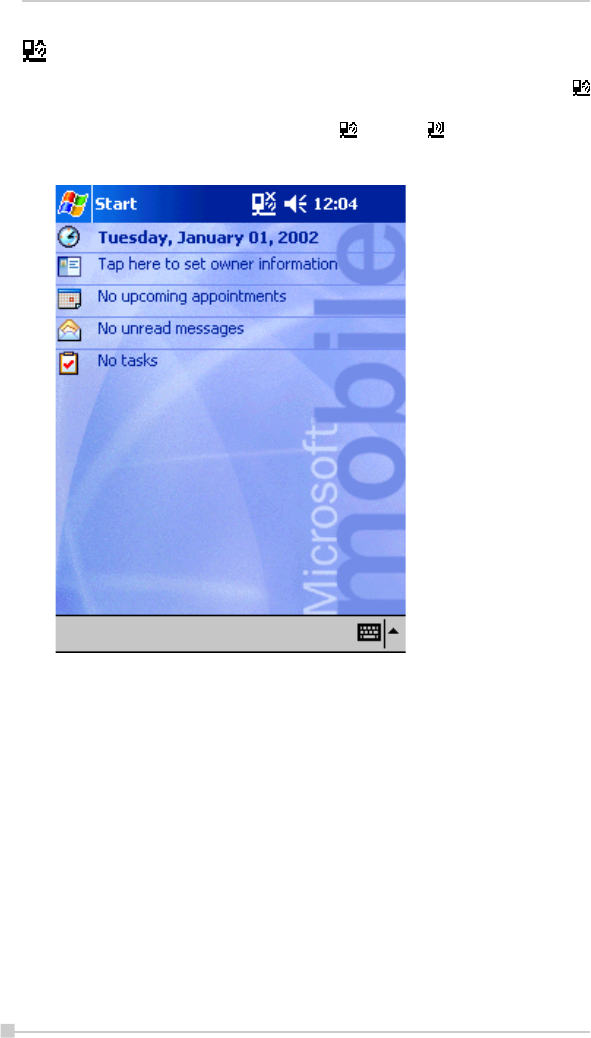
134
Toshiba Pocket PC e750/e755 User’s Guide
Wireless Communication Power off:
The WLAN Module is at Power Off Status. Clicking on the icon
displays you 2 icons, “On” and “Off”. Click “On” to turn on the Wire-
less LAN Module, and then the icon turns to . Click “Off” to exit
without turning on the Wireless LAN Module.
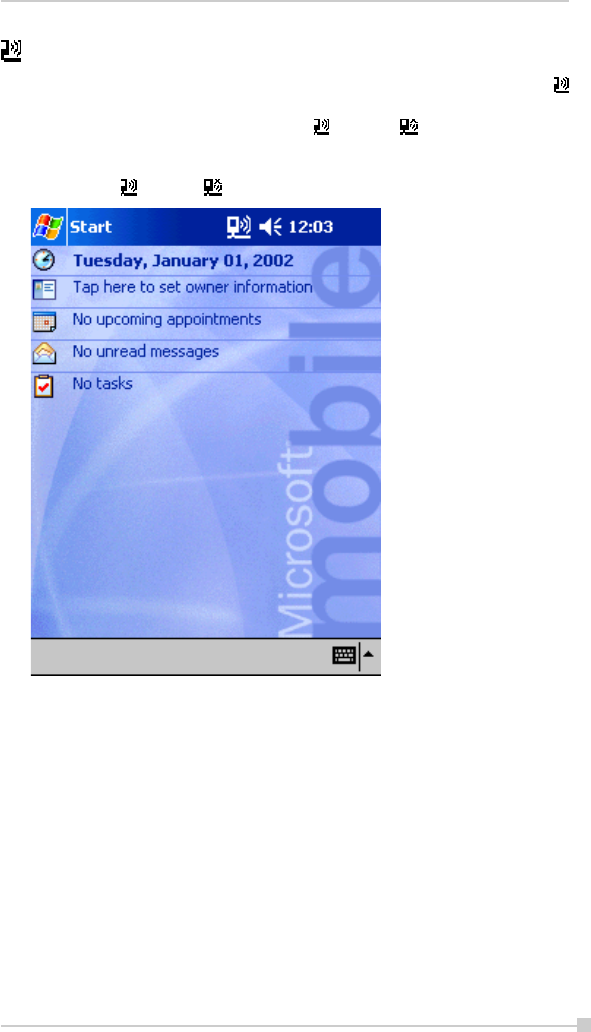
135
Chapter 8: Wi-Fi (IEEE 802.11b) WLAN Adapter
Wireless LAN Power on:
The WLAN Module is at Power On Status. Clicking on the icon
displays you 2 icons, “On” and “Off”. Click “Off” to turn off the Wire-
less LAN Module, and then the icon turns to . Click “On” to exit
without turning off the Wireless LAN Module. To save power, the
WLAN module can automatically switches power off after a period of
inactivity ( turns to ).
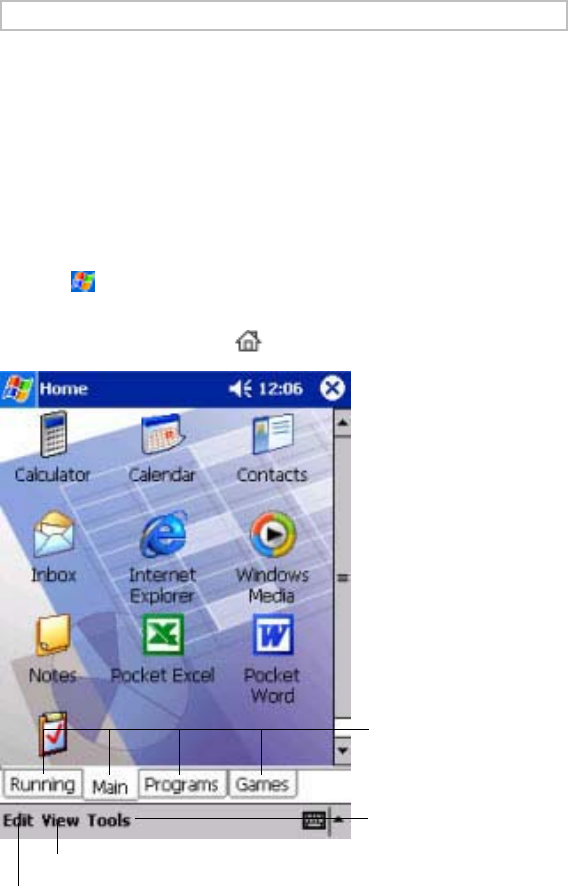
Chapter 10:
Optional Functions
Home
You can launch the built-in or installed applications easily by tapping the
icon displayed on the Home screen. You can also set to display a desired
image on your screen background.
Launching an Application From the Home
1. Tap , Programs, and then Home to display the Home screen.
You can also launch the Home by pressing the Toshiba Pocket PC
e750/e755 Home button .
For initial setting, the
respective application icons are
registered on three tabs: Main,
Programs and Games. In the
Running tab, active
applications are displayed.
Tab.
Tap to select Tab Setting...or
About.
Tap to select Large Icon, Small Icon or Text color...
Tap to select Paste or Add.
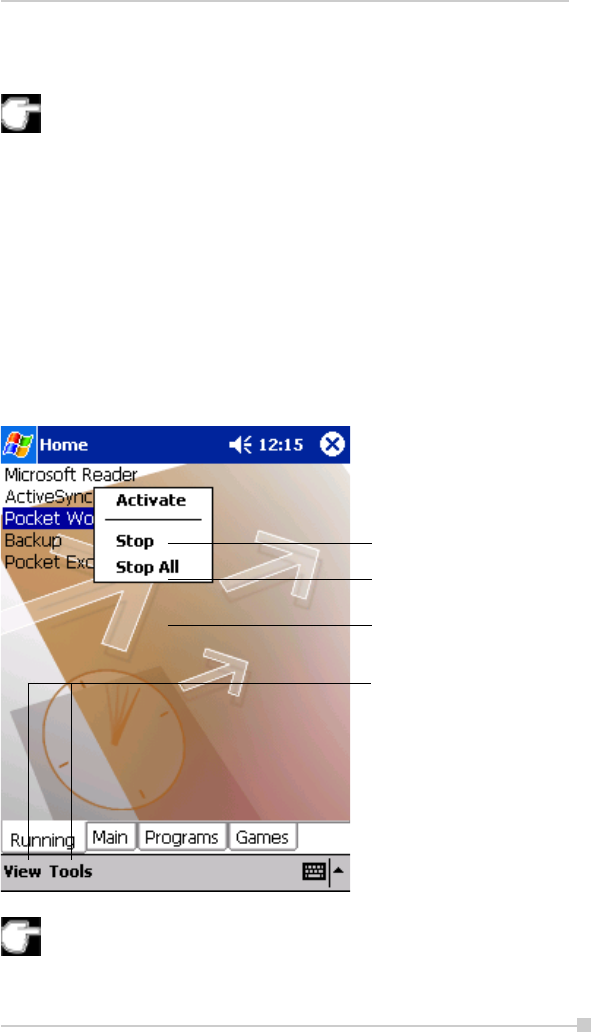
137
Chapter 10: Optional Functions
2. Tap the desired tab, and then tap the application icon you want to
launch. The selected application starts up.
Also, you can launch an application by moving the cursor button or
scroller to select and pressing the center of the cursor button to
confirm.
You can add tabs up to a maximum of 10 kinds and icons up to 18
in a tab.
About Running
In the Running tab, the active application names are displayed.
The icons do not appear.
Application Activate/Stop:
Tap the application name you want to activate. You can also activate the
application from the pop-up menu displayed by tapping and holding the
application name.
You can show a pop-up menu by tapping and holding any portion
other than the application names displayed in the Running tab. In
this case, only the Stop All is selectable.
Tap to activate the selected
application.
Tap to quit the selected
application. When finished, the
application name disappears.
Tap to quit all running
applications displayed in the
Running tab.
You can select the View menu
or the Tools menu on the
Running tab screen. You can
select Text color... from the
View menu, the Tab
Setting...or About from the
Tools menu respectively.
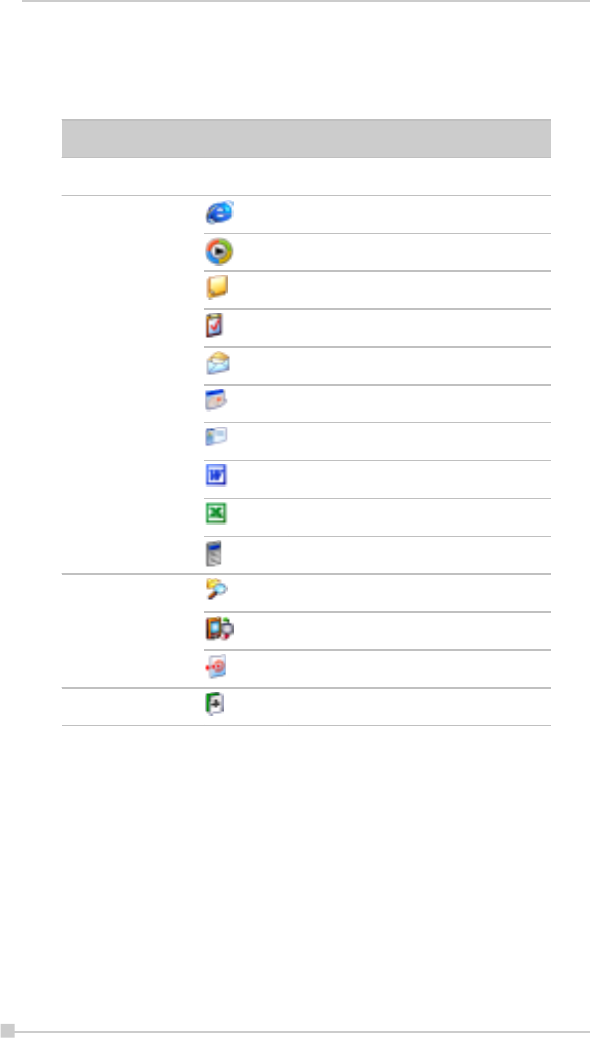
138
Toshiba Pocket PC e750/e755 User’s Guide
Display Icon List
The following list shows the tabs and icons for the initial setup.
Tabs Icons Applications
Running — —
Main Pocket Internet Explorer
Windows Media Player
Notes
Tasks
Inbox
Calendar
Contacts
Pocket Word
Pocket Excel
Calculator
Programs File Explorer
DataBackup
Infrared Receive
Games Solitaire

139
Chapter 10: Optional Functions
Moving an Application Icon into Another Tab
The moved icon is placed next to the last icon on the tab screen. You
cannot move an icon into a tab which already contains 18 icons.
To move using pop-up menu:
1. Tap and hold the icon you want to move to display the pop-up menu.
2. Tap Cut on the pop-up menu.
3. Tap the destination tab, and then tap Paste on Edit menu. The se-
lected icon is pasted on the screen.
You can also select Paste from the pop-up menu displayed by tap-
ping and holding any portion other than the icon.
Deleting an Icon
1. Tap and hold the icon you want to delete to display the pop-up menu.
2. Tap Drop on the pop-up menu. The icon is deleted and the next icon
positioned after the deleted icon automatically shifts to fill the de-
leted icon position. And all icons after the deleted icon likewise shift
to fill the previous icon position.
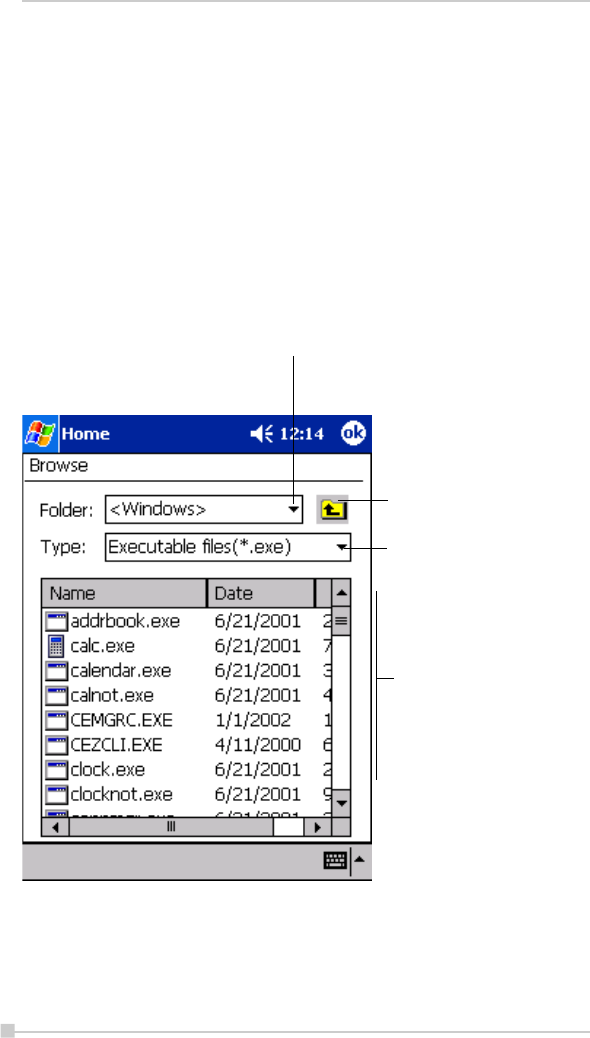
140
Toshiba Pocket PC e750/e755 User’s Guide
Adding an Icon
You can add the application and your file icons to the Home screen.
1. Tap Edit and then Add to display the Add Application screen.
You can also select Add from the pop-up menu displayed by tapping
and holding any portion other than the icon.
2. Tap T of Application file to show the file list. If there is no desired file
on the file list, you can find it by tapping Browse. To refer to all folders
and files, tap Browse to show the Browse Dialog screen. When the
file is selected, its name is displayed in the Application file box.
Tap to designate a folder you want to
browse. When a storage card is inserted,
files or folders contained in the storage
card are displayed from the top directory.
Tap to move up to a directory
folder one level above the
currently displayed one.
Tap to select kinds of
application or file to be
browsed.
If a file is selected from the
list, the screen returns to the
Add Application screen.

141
Chapter 10: Optional Functions
3. Enter an icon name in the Application name box, which is to be dis-
played on the Home screen.
You can enter up to a maximum of 32 characters.
4. When finished, tap OK to close the Add Application screen, and the
new icon is added to the Home screen.
If the Application file is not designated, or if the Application name is
not entered, you cannot add a new icon.
You cannot launch the icon added from the storage card, if the same
card is not inserted in the Toshiba Pocket PC e750/e755.
Tab Setting
You can set to add, delete or rename the tab on the Tab Settings screen.
You can also set to display a desired image on your screen background.
To add a tab:
1. Tap Tools and then Tab Settings to display the Tab Settings screen.
2. Tap Tab Settings and then New to display a box to enter the new tab
name.
3. Enter a new tab name. When finished, tap OK to return to the Tab
Settings screen. You can enter up to a maximum of 10 characters.
4. Tap OK on the Tab Settings screen to return to the Home screen.
To delete a tab:
1. Tap Tools and then Tab Settings.
2. Select the tab name to delete, and then tap Delete, the Delete tab
dialog for confirming appears. Please note that all the icons con-
tained in the same tab will also be deleted.
3. Tap OK on the Delete tab dialog to delete the tab. When finished, the
screen returns to Tab Settings screen.
4. Tap OK on the Tab Settings screen to return to the Home screen.
You cannot delete the Running tab.

142
Toshiba Pocket PC e750/e755 User’s Guide
To change the name of a tab:
1. Tap Tools and then Tab Settings to display the Tab Settings screen.
2. Select the tab name you want to change, and then tap Rename.
3. Enter a new tab name. When finished, tap OK to return to the Tab
Settings screen. You can enter up to a maximum of 10 characters.
4. Tap OK on the Tab Settings screen to return to the Home screen.
You cannot rename the Running tab.
To change a background:
1. Select the background setup tab on the Tab Settings menu, and then
tap Browse to display the Browse Dialog screen.
2. Tap the desired file from the list to return to the Tab Settings screen.
3. Tap OK on the Tab Settings screen to return to the Home screen.
If the selected file is not a designated file type, you cannot set it on
your screen background. The displayable range of the image on
the Home screen is 240(W) x 246(H).
Text Color Setting:
You can set the color of application name for each tab using Text
Color.
1. Tap the tab whose color you want to set to display the selected tab
screen.
2. Tap View and then Text Color to display the color list.
You can set the color of the application name as desired.
3. Tap the color you want to set, and the color of the application name
changes.

143
Chapter 10: Optional Functions
Home Help
Tapping an icon displayed at “Home” launches that application. In addi-
tion to applications, it is also possible to register icons for associated
files here. The Home screen is divided into tabs. There are 4 tab types as
default, and up to 10 types of tab can be registered. As for the icons on the
tab, up to 18 icons per one tab can be registered.
An image can be used as the background for the tab screen.
(1).”Running” tab
The names of currently running applications are displayed at the “Run-
ning” tab.
Applications can be switched or quit here.
“Text Color” can be selected from the “View” menu, and “Tab Settings”
and “About” can be selected from the “Tools” menu.
• To activate applications, tap and hold the name of the application
you want to activate to, then tap “Activate” from the pop-up menu.
• To stop an application, tap and hold the name of the application
you want to stop, then choose “Stop” from the pop-up menu. If
“Stop all” is selected from the pop-up menu, all currently running
applications are stopped.
•“Stop all” can also be selected by tapping and holding on the
“Running” tab screen without selecting an application name.
(2).Launching applications
When an icon on the tab screen is tapped, the application or associated
file registered at the icon is launched.
• Applications can also be launched by selecting them with the
cursor button then pressing on the center of the cursor button.
(3).Switching the icon display
Tap on the “View” menu to display the current display settings. Current
display settings are indicated by check mark at the left. To switch the
display, select “Large Icon” or “Small Icon”.

144
Toshiba Pocket PC e750/e755 User’s Guide
(4).Icon settings
1. Moving icons (using the pop-up menu)
1. Tap and hold the icon you want to move on the tab screen.
2. When the pop-up menu appears, select “Cut” from the menu.
3. Tap on the tab to which you want to move the icon, then tap
“Paste” from the “Edit” menu to move the icon and display it on
the tab screen.
•“Paste” can also be selected from the pop-up menu displayed
when you tap and hold at a position on the screen other than on
icon.
• It is not possible to move icons to tabs already containing 18
icons. When an icon is moved, it is positioned at the very end of
the tab’s icons.
2. Deleting icons
1. Tap and hold the icon you want to delete. A pop-up menu ap-
pears.
2. Tap “Drop” from the pop-up menu to delete the selected icon
from the tab screen.
• When an icon is deleted, subsequent icons are all moved up one
place.
3. Adding icons
1. Tap the tab to which you want to add an icon to select that tab.
2. Tap “Add” from the “Edit” menu to display the “Add Application”
screen.
3. Tap the “Application file” box.
4. From the list, tap the application you want to add. To select a file
not on the list, tap the “Browse” button, then select the file from
the Browse Dialog.
5. Input the name of the icon you want to add (up to 32 characters)
in the “Application name” box.
6. Tap the “OK” button. The new icon is added.

145
Chapter 10: Optional Functions
• Associated files can be specified for added icons.
• If either one of “Application file” or “Application name” is not
filled in, an icon can not be added.
4. Browse Dialog
1. Tap the “Folder” box to select the folder to be browsed.
2. Tap the “Type” box to select the type of file to be browsed.
3. The list of the files of the specified type and in the specified folder
appears on the screen. Select the desired application or file or
the image to be used as the background and tap it. The original
screen reappears.
• If a storage card is inserted into the main unit when adding icons,
icons of applications and files on the storage card are also dis-
played on the browse screen. The folders and files on the stor-
age card can be displayed in the “Folder” box, beginning at the
topmost level.
• If an icon on a storage card is added, that storage card must be
inserted when the icon is tapped or the file will not be launched.
(5).Tab settings
1. Switching tabs
Tap on another tab to switch the tab screen.
Initially four tabs are registered: “Running”, “Main”, “Programs” and
“Games”.
2. Changing tab names
1. Select “Tab Settings” from the “Tools” menu. The “Tab Settings”
screen appears.
2. Tap the “Select tab” box to select the tab to be changed.
3. Tap the “Rename” button. The screen for inputting the new tab
name appears.
4. Input the new tab name (up to 10 characters) into the “Rename
to” box.
5. Tap the “OK” button. The tab name is changed and the “Tab
Settings”screen reappears.
6. Tap “OK” at the upper right to return to the Home screen.

146
Toshiba Pocket PC e750/e755 User’s Guide
3. Deleting tabs
1. Select “Tab Settings” from the “Tools” menu. The “Tab Settings”
screen appears.
2. Tap the “Select tab” box to select the tab to be deleted.
3. Tap the “Delete” button. A dialog asking you to confirm you want
to delete the tab appears.
4. Tap the “Yes” button. The tab is deleted and the “Tab Settings”
screen reappears.
5. Tap “OK” at the upper right to return to the Home screen.
• Note that when a tab is deleted, all the icons on that tab are also
deleted.
•“Delete” cannot be selected if there are only two tabs on the
Home screen.
4. Adding tabs
1. Select “Tab Settings” from the “Tools” menu. The “Tab Settings”
screen appears.
2. Tap the “New” button. An input screen appears.
3. Input the name you want to give the tab (up to 10 characters) into
the “New tab” box.
4. Tap the “OK” button. The new tab is added and the “Tab Settings”
screen reappears.
5. Tap “OK” at the upper right to return to the Home screen.

147
Chapter 10: Optional Functions
5. Setting the background bitmap
1. Select “Tab Settings” from the “Tools” menu. The “Tab Settings”
screen appears.
2. Select the tab whose background you want to set at the “Select
tab” box.
3. Tap the “Browse” button to display the Browse Dialog.
4. Select and tap the image to be used as the background. The “Tab
Settings” screen reappears.
5. Tap “OK” at the upper right to return to the Home screen.
6. Setting the text color
Different colors can be set for the application names at the different tabs.
1. Display the tab whose color you want to set, then select “Text
Color” from the “View” menu.
2. Tap the color you want to set from the list of display colors. That
color is set for the application names.

148
Toshiba Pocket PC e750/e755 User’s Guide
How to Make a Backup
You can make a backup of the Toshiba Pocket PC e750/e755 data in the
storage device. If you have backed up your data on the storage device, you
can restore that data in your Toshiba Pocket PC e750/e755. You can also
delete backup file data from the storage device. Periodical data backup is
recommended.
Data of the following three types can be backed up:
File: Includes a file created by Pocket Word, Pocket Excel, Notes, etc. or an
additionally installed program and so on.
Registry: Setting information on Pocket PC 2002 or Built-in Program.
Database: Database information of Microsoft Pocket Outlook.
1.If you update ROM programs using special installation programs
with a *.xip extension, do not use the backup data which you made
before updating ROM programs.
2.When using the DataBackup, beware of the remaining battery
charge.
3.If you make a backup to the CF/SD card by DataBackup
Utility,please DO NOT remove the CF/SD card nor DO NOT turn off
power of the device until the backup is completed.
4.If you restore the data from the CF/SD card by DataBackup Utility,
please DO NOT remove the CF/SD card nor DO NOT turn off the
power of the device until the restore is completed.
5.Before making a backup, disable the password protection. Tap
Start,Settings,Personal tab,Password, and select No pass-
word.
Failure to follow any of the above procedures may result in the loss
of data.
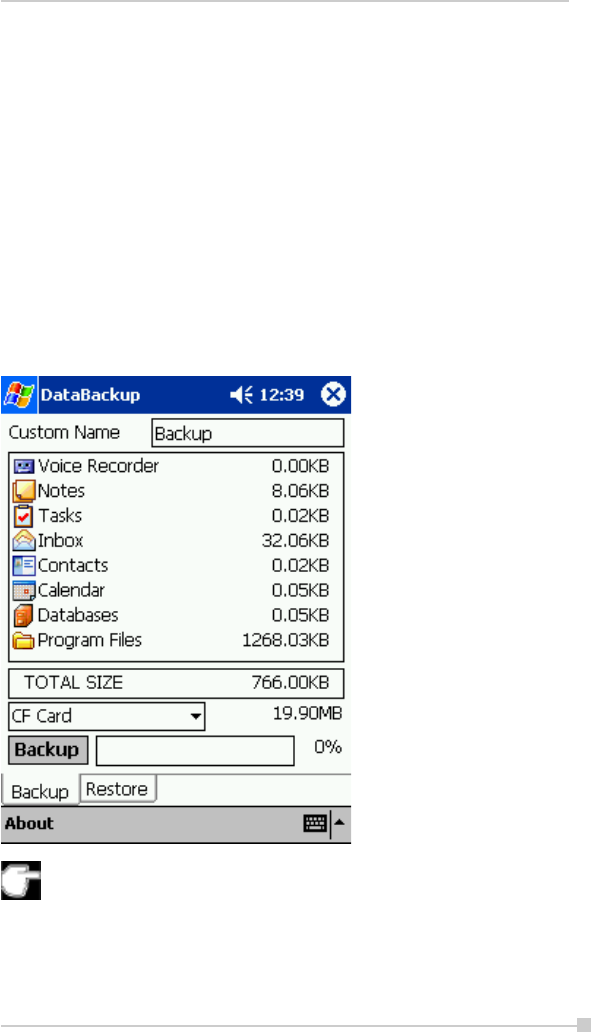
149
Chapter 10: Optional Functions
If the remaining storage device capacity becomes short during
backup, the backup process stops. Check the storage device ca-
pacity before starting the backup.
If the CF/SD card is write protected, you cannot save the backup
data. Cancel the write protection before starting the backup.
Making a Backup
1. If you make a backup to the CF/SD card, insert a CF Card or a SD
Card.
2. Tap Start,Programs, and then DataBackup to display the DataBackup
screen.
3. Setting Custom Name.
4. Select and tap The storage device.
5. Tap Backup to display the Prompt message screen.
6. Tap Yes. The Proceeding message is displayed during the backup
process. When the backup is completed, a backup finished mes-
sage appears.
7. Tap OK to return to the previous screen.
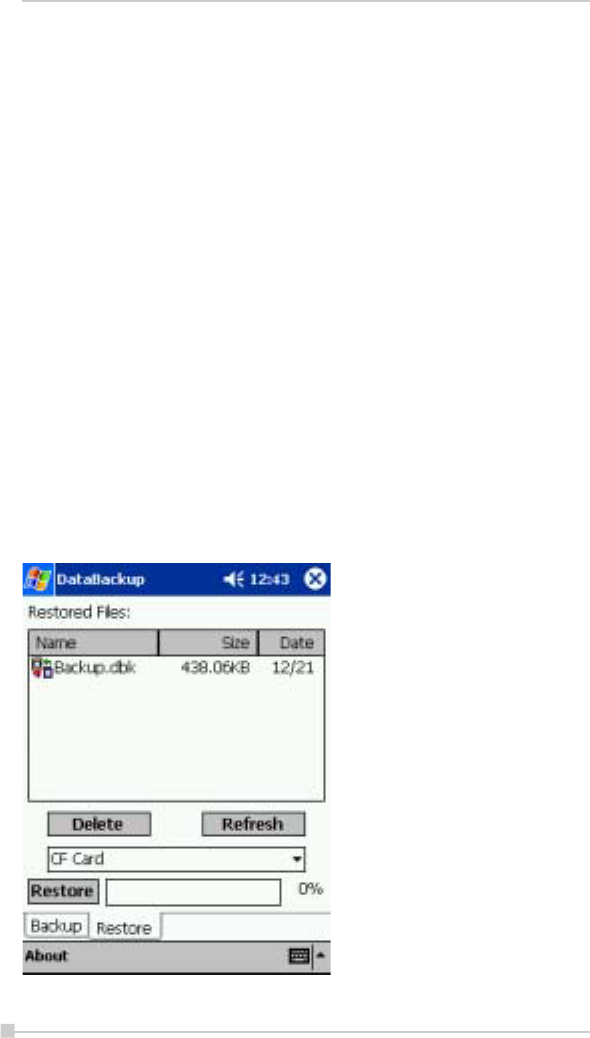
150
Toshiba Pocket PC e750/e755 User’s Guide
Carrying Out Restore Operation
To restore is to overwrite the backed up data from the storage device onto
the main memory of your Toshiba Pocket PC e750/e755.
If the same file name exists in the main memory of your Toshiba Pocket
PC e750/e755, the file data is replaced with the backup data from the
storage device. If files exist in the main memory but not in the backup file,
they will not be overwritten.
1. If you carry out restore from the CF/SD card, insert the CF/SD card,
which contains backup data into your Toshiba Pocket PC e750/e755.
2. Tap Start,Programs, and then DataBackup to display the
DataBackup screen.
3. Select Restore from tab, then select and tap The storage device.
4. Select backup file from restored files list.
5. Tap Delete if want to delete backup file.
6. Tap Refresh if want to refresh the storage device.
7. Tap Restore to display the Prompt message screen.
8. Tap Yes. The Proceeding message is displayed during the restore
process.
When the restore is completed, a restore finished message appears.
9. Tap OK. Your Toshiba Pocket PC e750/e755 is reset and restarts
automatically.
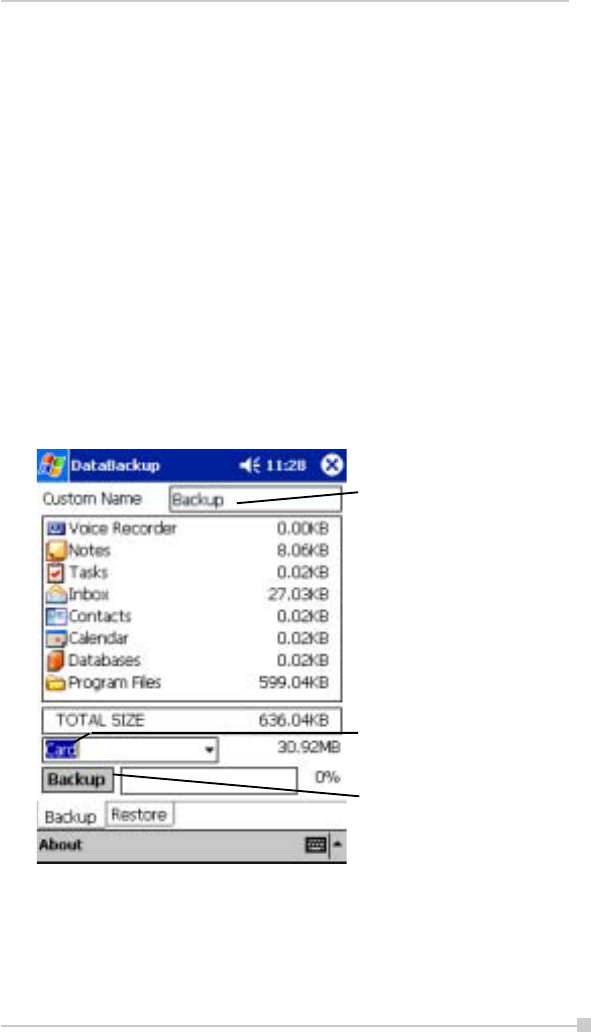
151
Chapter 10: Optional Functions
Data Backup Help
The backup function allows you to back up the data from the main unit to
a storage device. The backed up data can be restored and deleted.
Before performing the backup or restore operation, check that there is
enough space in the main unit’s memory and on the storage device. The
data is saved as a backup file (.dbk) in your storage device.
(1).If you make a backup to the CF/SD card, load the CF/SD
card
• Make sure the main unit’s power is off when loading and unload-
ing the CF/SD card.
• Insert the CF/SD card in the designated card slot, making sure to
do so in the proper direction.
• Save current data in the main unit’s memory before backing it up
on the CF/SD card.
(2).Making backups
1. Select “DataBackup” from “Programs” in the “Start” menu.
2. Once the backup screen appears, tap the “Backup” tab.
3. Select a Custom Name.
4. Select and tap The storage device.
5. Tap the “Backup” button.
Backup tab
Select “Flash ROM Disk”, “CF
Card” or “SD Card”
Enter custom name. Default is
“Backup”.
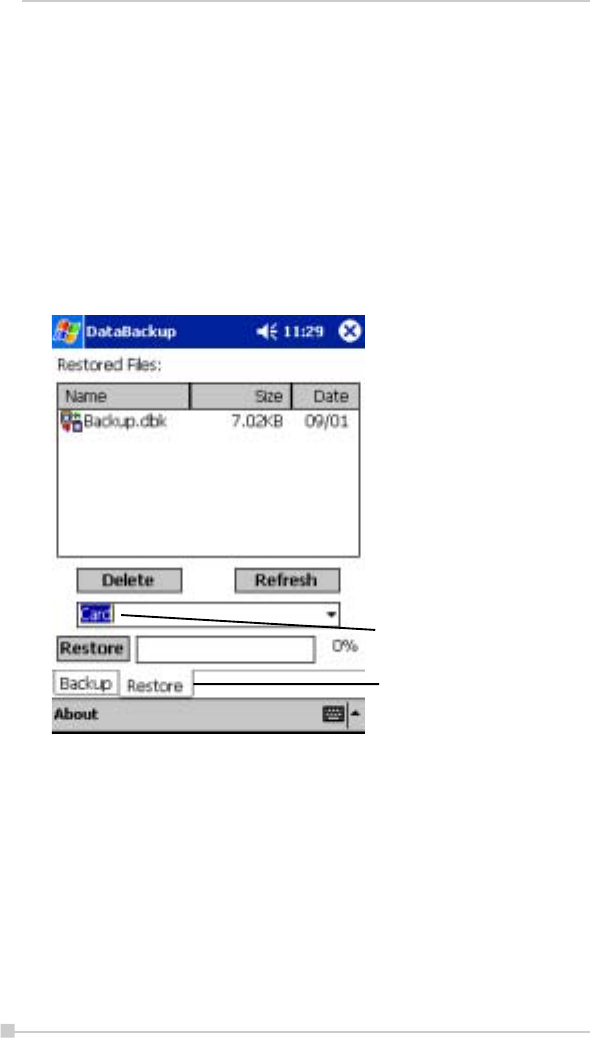
152
Toshiba Pocket PC e750/e755 User’s Guide
6. A message appears once backing up is completed.
7. Tap “OK” at the upper right to return to the previous screen.
(3).Restoring the data
Use this operation to restore the backup data stored on the storage de-
vice into the main unit. The data in the backup file is copied over the data
in the main unit’s memory.
• If a file with the same name already exists in the main unit’s
memory, its data is replaced with the data in the backup file.
• Files in the main unit’s memory not included in the backup file
remain in the main unit’s memory.
1. Select “DataBackup” from “Programs” in the “Start” menu.
2. Once the backup screen appears, tap the “Restore” tab.
3. Select and tap The storage device.
4. Select backup file from restored file list.
5. Tap the “Restore” button.
6. A message appears once the restore operation is completed.
7. Tap “OK” button. The main unit is reset and restarted.
Restore tab
Select “Flash ROM Disk”, “CF
Card” or “CD Card”
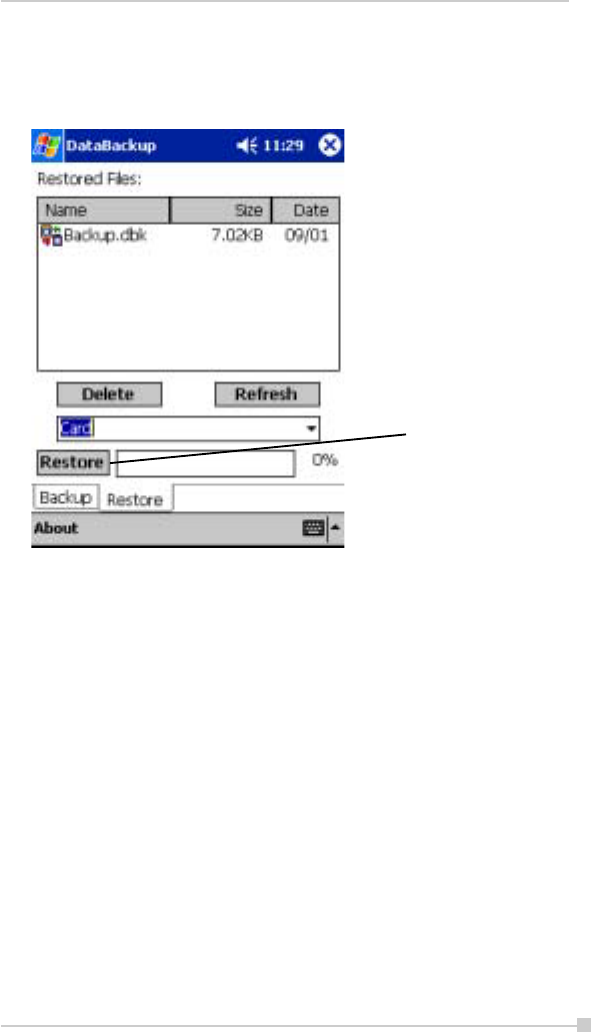
153
Chapter 10: Optional Functions
(4).Deleting the backup file
1. Select “DataBackup” from “Programs” in the “Start” menu.
2. Once the backup screen appears, tap the “Restore” tab.
3. Select and tap The Storage Device.
4. Select backup file from restored file list.
5. Tap the “Delete” button. A message screen asking you to confirm
that you want to delete the backup file appears.
6. Tap the “Yes” button.
The backup data is deleted from the storage device and the pre-
vious screen reappears.
Note: Pressing “About” in the Backup or Restore menus dis-
plays the version of the program being used.
Restore tab
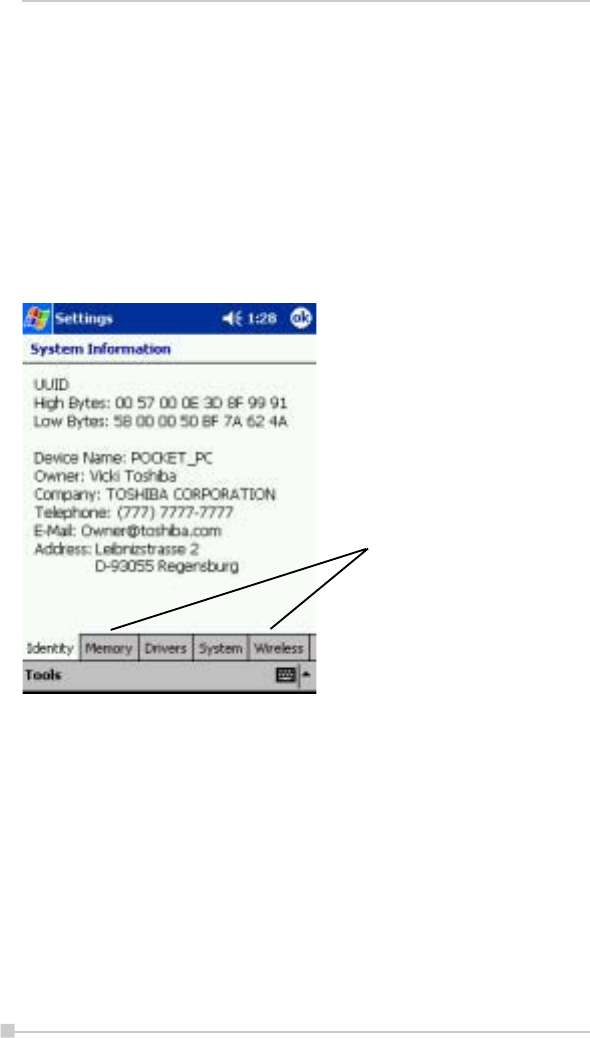
154
Toshiba Pocket PC e750/e755 User’s Guide
System Information
The System Information program displays the system information
such as CPU clock, CPU stepping, Boot Loader Version, OS Version,
PIC Version, MAC address (WirlessLAN model only), and UUID. The
information is displayed by accessing the Identity, Memory, Drivers,
System, and Wireless tabs.
To launch the program, Click Start > Settings > System Information.
The opening menu presents identification information for product
service.
Tabs for accessing information
about Identity, Memory,
Drivers, System, and Wireless
settings.
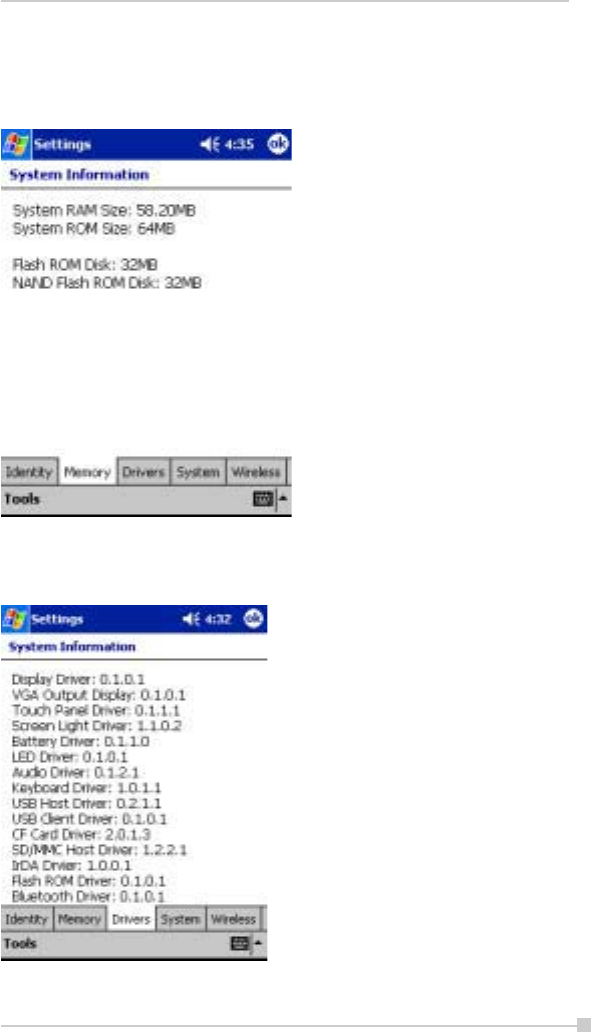
155
Chapter 10: Optional Functions
Memory tab
The Memory tab presents information about the systems RAM, ROM,
and Flash ROM Disk.
Driver tab
The Driver tab displays the drivers used by the system’s software
applications.
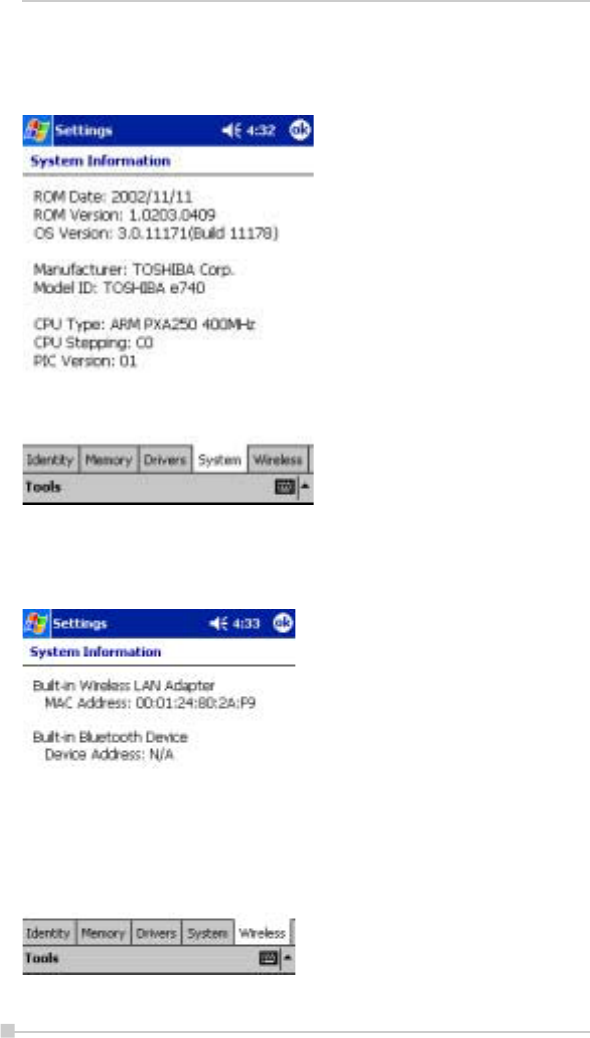
156
Toshiba Pocket PC e750/e755 User’s Guide
System tab
The System tab displays CPU, operating system, and other system
information.
Wireless tab
The Wireless tab displays information about the Wireless LAN adapter.
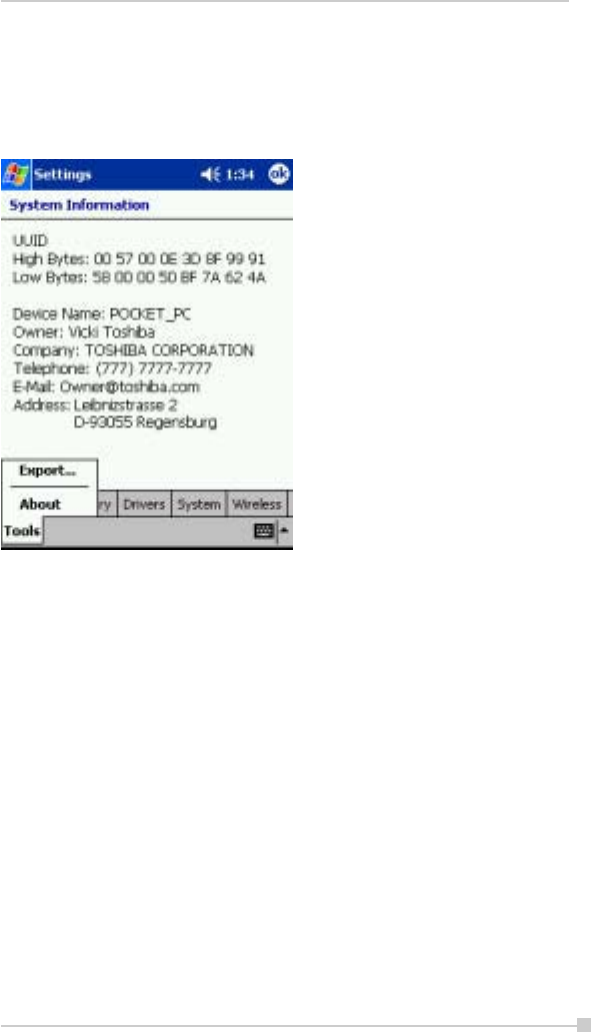
157
Chapter 10: Optional Functions
Tools Menu
The Tools menu displays the system information and allows it to be
exported to a text (*.txt) file. “Export” exports all system information
parameters to a text (*.txt), and “About” displays the system information
version.

158
Toshiba Pocket PC e750/e755 User’s Guide
ATI Presentation Pack
Introduction
The Toshiba Expansion Pack with ATI IMAGEON Dual Display Solution
comes bundled with the ATI Presentation Pack, which includes the IA
Presenter and IA Screen Mirror modules.
IA Presenter
Take your Microsoft Windows PowerPoint slides and use IA Presenter to
run a smooth presentation directly from your Pocket PC. IA Presenter can
run as a standalone mobile PowerPoint player using your portable device’s
LCD screen. But with IA Presenter and the Toshiba Expansion Pack linked
to an LCD projector or a monitor, you can create powerful presentations
from your Pocket PC.
IA Screen Mirror
This module projects the current contents of your Pocket PC’s LCD screen
onto an external projector, or monitor. It can display up to nine different
images from your LCD output at the same time on the second display.
Installing the ATI Presentation Pack
All components of the ATI Presentation Pack are installed together by
doing as follows:
1. Make sure your Pocket PC is connected to your computer and
that an ActiveSync connection has been established.
2. Start the ATI Presentation Pack installation by running the Setup
program.
You can setup ATI Presentation Pack from Companion CD (En-
hance Your Pocket PC
J
Tools
J
AT Presentation Pack
J
Install)
3. After accepting the license agreement, choose the folder to which
you want the ATI Presentation Pack to be installed. Click Next to
accept the default destination folder; click Browse... to specify a
different folder.
4. Check your Pocket PC screen for any additional steps required to
complete the installation.

159
Chapter 10: Optional Functions
On-line Help
This Manual serves as a quick-reference guide. For more details about
any feature, consult the on-line Help. When using IA Presenter, select
ToolsJHelp for the main Help table of contents. In IA Screen Mirror, tap
the Help button in the About tab to access the main Help file. Context-
sensitive Help is also available. If, during some operations, you cannot
open the Tools Menu, you can access the context-sensitive Help mes-
sages via the Windows Start Menu.
A Note about Updates to the ATI Presentation Pack
Your copy of the ATI Presentation Pack contains the latest versions of IA
Presenter and IA Screen Mirror. For updates, please visit the IA Style web
site (www.iastyle.com).

160
Toshiba Pocket PC e750/e755 User’s Guide
ATI Presentation Pack
Introduction
The Toshiba Expansion Pack with ATI IMAGEON Dual Display Solution
comes bundled with the ATI Presentation Pack, which includes the IA
Presenter and IA Screen Mirror modules.
IA Presenter
Take your Microsoft Windows PowerPoint slides and use IA Presenter to
run a smooth presentation directly from your Pocket PC. IA Presenter can
run as a standalone mobile PowerPoint player using your portable device’s
LCD screen. But with IA Presenter and the Toshiba Expansion Pack linked
to an LCD projector or a monitor, you can create powerful presentations
from your Pocket PC.
IA Presenter
Getting Started
After you invoke IA Presenter, the screen lists all the converted PowerPoint
presentations currently in your \My Documents folder. A sample presenta-
tion file is included with the installation, so at least one file will be listed
when you initially invoke IA Presenter.
To receive a presentation file into the \My Documents folder of your Pocket
PC via Infrared beaming, tap Tools in the lower left corner of the screen,
then select Receive via InfraRed... from the menu shown above. To drag-
and-drop a PowerPoint file from your computer to your Pocket PC, see the
section Using IA Presenter’s Desktop Converter on the next page.
The Options... command on the Tools Menu opens the General,File,
Display, and VGA Output tabs. These tabs are explained in the on-line
Help file, which can be accessed from the Tools Menu by tapping Help....
Or, after opening one of the tabs, select Help from the Windows Start
Menu.
Using IA Presenter’s Desktop Converter
When you drag-and-drop a PowerPoint file from your PC to your Pocket
PC, the ActiveSync Converter in the IA Presenter will automatically convert
the PowerPoint file to a special IA Presenter format for your Pocket PC,
using the resolution you specify. The file will be placed in any folder on
your mobile device where you choose to drag-and-drop it.
PowerPoint 97 or PowerPoint 2000 (or greater) is necessary for us-
ing IA Presneter’s Desktop Converter.

161
Chapter 10: Optional Functions
There are two ways to open the “Set ActiveSync Conversion Options”
dialog box:
• 1) Select ATI Presentation Pack from the Start Menu, and then Set IA
Presenter ActiveSync Conversion Options from the submenu. The
dialog box will open, establishing it as your default PowerPoint filter
for your ActiveSync drag-and-drop operations. You can choose a di-
mension and then uncheck the Show this option dialog box next time
checkbox (it is checked by default as shown in the figure above). If you
uncheck it, the dialog box will not open whenever you drag-and-drop
a file from your computer to your mobile device. Instead, the dimen-
sion you specified will be used during each conversion.
• 2) You can set the dimension each time you drag-and-drop a
PowerPoint file from your computer to your mobile device. If the Show
this option dialog box next time checkbox has not been un-checked,
the IA Presenter “Set ActiveSync Conversion Options” dialog box will
open automatically every time you drag-drop a PowerPoint file to your
Pocket PC.
Choosing Dimensions for the Converted .IAP File
The conversion filter supports both PPT and PPS PowerPoint files. The
conversion options are:
¾Pocket PC LCD Size – 320 x 240: Select this option if you only
want to display the presentation on the LCD screen of your Pocket
PC. However, if you have tried the 320 x 240 button and then find
that images on the Pocket PC screen have been “stretched” to fit
the screen, and you do not want this effect, try converting again
using the User-defined button. After selecting User-defined, en-
ter 240 in the first box, and 320 in the second box.
If you want to prepare the file to project the presentation to a VGA screen
or video monitor, select one of these options:
¾VGA – 640 x 480
¾SVGA – 800 x 600
¾User-defined: If you do not want to use one of the pre-defined
dimensions listed above, select the User-defined option and
enter your own value in the fields.
XGA 1024 x768 is not supported.

162
Toshiba Pocket PC e750/e755 User’s Guide
Opening a Presentation and Using View Modes
When you invoke IA Presenter, the first screen that appears lists all the
converted PowerPoint presentations currently in your \My Documents
folder. Tap on the name of the file you want to load. You can then choose
from the following view modes.
Normal View
Normal view allows you to view the current slide in the upper pane, while
still able to navigate slides conveniently using the lower thumbnail pane.
You can drag the Splitter Bar that divides the two panes up or down, to
adjust the screen distribution above and below the splitter. The Normal
View icon is located at the leftmost side of the Toolbar, as shown below.
You can also use the stylus to pan the slide image in the upper pane to
show the part covered by the lower pane. The splitter position will auto-
matically be remembered across multiple application sessions, freeing
you from having to adjust the splitter position again during the current IA
Presenter session.
To display a different slide in the upper pane, simply tap on the desired
thumbnail in the lower pane, or use the Slide Title Bar (unnamed slides
will be represented by a number in the Slide Title Bar drop-down list). The
lower thumbnail pane in Normal view provides slide navigation. If you
want to select multiple slides for further operations, use the Slide Sorter
view, as explained in the next section.
You can project the currently selected slide to VGA Display by activating
the VGA Slide Toggle command on the View Menu, or by tapping the VGA
Slide Output Toggle icon at the rightmost side of the Toolbar. To end the
projection, select the command again to toggle it off.
Slide Sorter
Slide Sorter view fills the entire application space with either large or
small thumbnails, depending on whether Large Thumbnail or Small
Thumbnail is active on the View Menu. You can select:
• One slide by tapping on it, or
• Multiple adjacent slides by dragging your stylus over them, or
• If you select Multiple Select Mode on the Edit Menu, you can tap,
drag, or a combination thereof, to select multiple slides that are
separated.
Selected slides will be highlighted by a different border color.

163
Chapter 10: Optional Functions
You can project an individual slide to the VGA output by activating the VGA
Slide Toggle command on the View Menu, or by tapping the VGA Slide
Output Toggle icon at the rightmost side of the Toolbar. When you activate
this function:
• If one slide is selected at the time you toggle the VGA Slide Out-
put “on,” that slide will be output to the VGA Display.
• If multiple slides happen to be selected, the first selected slide in
the sequence will be output to the VGA Display.
• If no slides are selected, there is no change to the current status
of the VGA Display. That is, if an image is already displayed on
the VGA Display, that image remains until you select a slide on
your LCD screen for projection.
To end the projection and return to viewing the slide only on your mobile
device’s screen, just select the command again (or tap the icon a second
time) to toggle it off.
Indicator Icons under Thumbnails
Under each thumbnail in Slide Sorter view mode, there may be various
small icons displayed which indicate the status/attributes of the slide, as
follows:
- The transition icon indicates that a transition effect has been asso-
ciated with the slide, and tapping the icon will “demo” the transition
effect.
- The shape icon indicates that the slide contains animated shapes.
- If you assigned a transition delay-time to the slide in the Automati-
cally field of the Edit Menu > Slide Transition... screen, the delay-
time will be shown.
- The slide number is always shown at the right. If the slide has been
hidden using the Hide Slide command on the Edit Menu, the slide
number will be enclosed in a red box with a line crossing it out.

164
Toshiba Pocket PC e750/e755 User’s Guide
Notes Page
Notes Page view displays the current slide content in the upper pane,
with the lower pane displaying the speaker notes that were entered for
the original PowerPoint presentation, or entered/edited in IA Presenter.
The upper pane operation is the same as in Normal view. The lower pane
is both a Notes display window and an editing window. After editing a
Note, tap OK in the upper right corner to save it.
When in Notes Page view mode, you can project the currently-selected
slide to VGA output by activating the VGA Slide Toggle command on the
View Menu, or by tapping the VGA Slide Output Toggle icon at the rightmost
side of the Toolbar. To end the projection and return to viewing the slide
only on your mobile device screen, just select the command again to
toggle it off.
Quick Notes
The Quick Notes command on the View Menu (and the Quick Notes View
icon on the Toolbar) gives you a view mode that combines the thumbnail
images of Slide Sorter view with the Notes pane of the Notes Page view.
When you tap on a thumbnail, a border around it indicates it is selected.
You can also use the Up, Down, Left, or Right buttons on your mobile
device to move the selection focus (or the Slide Title Bar, if you chose to
display it).
The lower pane displays the Speaker Notes that were entered for the
original PowerPoint presentation, or entered/edited in IA Presenter. The
lower pane is both a Notes display window and an editing window. Tap in
the lower pane to start editing a Speaker Note. The editing functionality is
the same as for Notes Page view.
If the Cut/Copy/Paste/Clear/Undo/Select All commands are required for
editing the text, press your stylus within the Notes pane to activate the
pop-up editing menu. The Notes-editing operation can be undone by
selecting the multiple-steps Undo command on the Edit Menu, pop-up
menu, or Toolbar.

165
Chapter 10: Optional Functions
Slide Show
The Slide Show command on the View Menu starts a full screen Slide
Show on the Pocket PC’s LCD screen. (If you want to project the slide
show to VGA output, you must use the VGA Slide Show command.) Be-
fore selecting Slide Show or VGA Slide Show, you should select Set Up
Show... from the Tools Menu to set up the desired behavior for your slide
show.
If the Auto-Rotate option is checked in the Tools > Options > Display tab,
the slide will be automatically rotated according to the direction you choose
(Left or Right).
Depending on the slide advancement setting specified in the Slide Tran-
sition dialog box, you can tap to advance the slide (or the next animated
object); use the navigation (arrows) buttons of your Pocket PC to advance/
back play the slides; or, IA Presenter will automatically advance slides
based on the number of seconds (delaytime) you set. Sound effects will
also be played according to your assignment.
Pop-Up Menu for Slide Show Mode
If the Show Popup-Menu Button option is checked in the ToolsJOptions
JDisplay tab, a small transparent icon will be shown in the upper left
corner of the LCD screen. Tapping on the small icon will activate the Slide
Show mode’s pop-up control menu. If this option isn’t checked, you can
always tap-and-hold your stylus during Slide Show mode to activate the
pop-up menu. The commands on the menu are explained below.
Next / Previous
Displays the next or previous slide, or next or previous animated object (if
the animated object display was designed). Hidden slides won’t be
shown.
Go
The Go submenu allows you to jump to the First Slide,Last Slide,Previ-
ously Viewed Slide, or jump to any slide using Navigate by Title.
Trigger
If the Trigger mode is selected, the slide show will advance according to
the mode you set using the ToolsJSet Up Show... command or Set Up
Show icon. For example, if you have specified to advance the slides manu-
ally, they will advance each time you tap on the screen. If the slide show is
set to play automatically, you can use the pop-up menu to put it on pause
or end it immediately. IA Presenter is set to Trigger mode by default.

166
Toshiba Pocket PC e750/e755 User’s Guide
Pen
Select the Pen command to enter Ink annotation mode. During the Ink
annotation mode, you can use the stylus to mark or highlight the presen-
tation elements on the screen. To exit the Ink annotation mode, select the
Trigger,VGA Pointer, or VGA Zoom mode from the pop-up menu.
Use the Pen Color submenu to choose the Ink color, and use the Pen
Width submenu to choose a thickness.
If Pen mode is active when you select Blank from the Screen submenu,
you will be able to draw or write Ink annotation on the projected black
screen. (The Screen submenu also lets you undo the most recent Ink
stroke, or erase all of the Ink strokes.)
VGA Pointer
This mode works only when IA Presenter is in VGA Slide Show view. After
you select the VGA Pointer command, your stylus movements on the
LCD screen will simulate a laser pen light on the VGA screen during
presentations. (To exit the VGA Pointer mode, select Trigger,Pen, or VGA
Zoom from the pop-up menu.)
VGA Zoom
This mode works only when IA Presenter is in VGA Slide Show view. After
you select the VGA Zoom mode, you will be able to specify a portion of the
screen which will be projected to the VGA screen, and also a zoom ratio
for that specific area. (To exit VGA Zoom mode, select Trigger,Pen, or
VGA Pointer from the pop-up menu.)
The message that appears on your screen when you invoke VGA Zoom
mode depends on the value that is currently selected on the VGA Zoom
Size submenu. The message will either tell you to tap-and-drag your
stylus to define an area yourself, or it will tell you to simply tap your stylus
to create a zoom area of pre-defined size. You can specify the zoom ratio
using the VGA Zoom Ratio submenu, accessed from the Slide Show
pop-up menu.
Pen Color
Tapping Pen Color opens a submenu of available colors to use for your
Ink annotation when in Pen mode. Select one of the available colors as
the new pen color. The Reset command resets the pen color to the de-
fault White color.

167
Chapter 10: Optional Functions
Pen Width
Tapping Pen Width opens a submenu of available pen widths to use for
your Ink annotation when in Pen mode. Select a thickness settings as the
new pen width to be used for Ink strokes on the LCD screen (and projec-
tion to VGA output, if desired). The 1 Unit option is the thinnest setting.
Higher values give you thicker widths.
VGA Zoom Size
The VGA Zoom Size command opens a submenu of “zoom area” op-
tions. When you invoke VGA Zoom mode by selecting it on the pop-up
menu, the current setting on the VGA Zoom Size submenu will be acti-
vated.
The Quarter,Large,Medium,Small, and Tiny settings on the submenu
represent pre-defined areas. For example, if Quarter is selected, tapping
on your LCD screen will automatically produce a rectangular area which
is the size of one-quarter of your LCD screen (centered around the spot
where you tapped).
The “zoom area” will be displayed on top of the already-existing projection
of the entire slide on the VGA screen.
After the rectangular zoom area exists on your screen, you can drag it to
any part of the screen you wish. It can also be converted to any of the other
pre-defined sizes by pressing your stylus on the LCD screen to open the
pop-up menu again, then selecting a different value from the VGA Zoom
Size submenu. The size of the existing area will then be changed accord-
ingly.
If you select Drag Select on the submenu, you will be able to drag your
stylus on the LCD screen and freely define any area for zooming. After the
desired area has been specified, you can drag it to any portion of the
screen. You can also resize it by dragging any of its corners. To specify the
zoom ratio for the projected zoom area, use the VGA Zoom Ratio com-
mand.
VGA Zoom Ratio
The VGA Zoom Ratio command opens a submenu of pre-defined “zoom
ratio” options. When you invoke VGA Zoom mode by selecting it on the
pop-up menu, the current setting on the VGA Zoom Ratio submenu will
be activated.
Screen
The Screen submenu contains commands that allow you to pause a
Slide Show (Pause Auto Play), project a blank screen (Blank), undo the
most recent Ink stroke (Clear Last Pen), or erase all Ink strokes (Clear All
Pen).

168
Toshiba Pocket PC e750/e755 User’s Guide
Pause Auto Play
If you have specified that you want slides to advance automatically after a
specified number of seconds (using the Set Up Show... command on the
Tools Menu or the Set Up Show icon on the Toolbar), you can select
Pause Auto Play during the playing of a slide show to pause the show.
When ready to continue the automatic progress of a slide show, tap Re-
sume Auto Play.
Blank
When you select Blank, your LCD screen will become completely black,
and the black screen will also be projected to your VGA screen. (After you
have selected Blank, the command name changes to Restore. Tap Re-
store when you are ready to return to the slide that was previously dis-
played.)
Using the Blank Option with Pen Mode:
When the Blank option is active and IA Presenter is in Pen mode, you can
write or draw digital Ink on the screen, and it will be output to the VGA
device. In effect, this allows you to project an “electronic blackboard” which
you might find useful when giving a presentation to an audience. Be
aware that any Ink strokes you draw on the Blank screen will be lost when
you exit Blank mode. They cannot be retained.
When IA Presenter is in VGA Zoom mode or VGA Pointer mode, the Blank
option is not available.
Clear Last Pen
Erases the last individual Ink stroke. This command can be applied re-
peatedly until there are no more Ink strokes in the current slide.
Clear All Pen
Erases all the pen strokes on the current slide.
Speaker Notes
This command displays the current slide’s Note text (if any) in a pop-up
window, with the slide number also shown, on top of the displayed slide.
To advance the slide or object when the Speaker Notes window is shown,
tap on the underlying slide. When you advance the slides, the Speaker
Notes window remains open and interactively displays the Note text of the
related slide. To close the Speaker Notes window, tap the “X” in the upper
right corner.

169
Chapter 10: Optional Functions
End Show
This command terminates the Slide Show playback mode and returns to
the mode you were using prior to entering Slide Show mode. The Action
button on your Pocket PC can also be used to exit Slide Show mode.
VGA Slide Show
VGA Slide Show mode operates almost identically to the Slide Show
mode, except for the following operational differences:
• You should use the VGA Output tab in the ToolsJOptions... com-
mand to set VGA output-related options. You can also elect to have IA
Presenter perform dithering for your slide if you project your slide to
an external VGA/video device with less color capability (such as only
256 colors available).
• During VGA Slide Show mode, the presentation output will be di-
rected to both the Pocket PC’s LCD screen and the external con-
nected VGA device or video device.
The Pocket PC will always show the reduced size version, while the
VGA/video device will view the original matching dimensions set dur-
ing ActiveSync conversion. Or if your current presentation has a di-
mension specified which is different from the exact dimension of
your selected output dimension, IA Presenter will automatically re-
size the slides to fit the output dimensions.
• The Ink annotation will be projected to both the VGA video device and
the LCD screen.
• You can use VGA Zoom on the pop-up menu to designate an area on
a slide during VGA Slide Show view, and project that specific area to
the VGA screen (on top of the already-existing projection of the entire
slide). Use the VGA Zoom Size command to specify an area of pre-
defined size, or manually drag your stylus on the LCD screen to specify
the desired area of the slide. Then use the VGA Zoom Ratio com-
mand to choose the ratio at which you want the zoomed area to be
projected. After the “zoom window” has been created, it can be dragged
to enclose other portions of the slide on your LCD screen, and this
movement will also be reflected in the projected image on the VGA
output.
• You can use the VGA Pointer command on the pop-up menu to en-
able movements of your stylus on the LCD screen to simulate a laser
pen light on the VGA screen during VGA Slide Show presentations.
• In addition to being able to draw digital Ink annotation on your slides,
you can project a black screen to the VGA output and write or draw
projected Ink on it. To use Ink on the blank screen, make sure you are
in Pen mode on the Slide Show pop-up menu before selecting Blank
from the Screen submenu.

170
Toshiba Pocket PC e750/e755 User’s Guide
In addition, before a VGA Slide Show can be projected to a VGA screen,
you must specify the appropriate settings. Select Options... from the Tools
Menu, then tap VGA Output.
More information about the General,File,Display, and VGA Output tabs
are included in the on-line Help.
Controlling Transition Effects
Any transition effects that were assigned in your original PowerPoint file
will be retained when the IA Presenter Converter converts it to an .iap file
on your Pocket PC.
However, IA Presenter also furnishes many attractive transition effects
that can be assigned to the .iap file. You can assign a particular transition
effect to an individual selected slide, or to all slides in the current file.
After you select one or more slides, tap Slide Transition... on the Edit
Menu or the icon on the Toolbar.
The Slide Transition screen will appear. In it, you can select a transition
effect, a speed for the transition effect, method of slide advancement
during a slide show, and associate a sound (.wav file) to a slide.
Merging Presentations
You can merge the slides of two different presentations into one file. The
new inserted slides will adopt the Master Slide style of the current file.
Therefore, you should first open the presentation whose Master Slide
style you want to adopt to.
The next thing you should do is select Options... from the Tools Menu and
open the File tab. Tap OK to close the tab and save the settings.
If you selected To Current Selection in the File tab as the insertion posi-
tion, use your stylus to tap the desired insertion point in the current file (in
Slide Sorter view). Or, select the slide after which you want the imported
slides to be inserted.
Select the Insert Slides From Files... command from the Tools Menu. A
listing of files will appear. Tap the name of the file whose slides you want
to merge with the current file, and it will be done immediately. This com-
mand can be undone or redone (Edit Menu). You can also use Save
Presentation As... (Tools Menu) if you wish to save a backup copy before
you start the merge operation, if desired.
More information about the General,File,Display, and VGA Output tabs
are included in the on-line Help.

171
Chapter 10: Optional Functions
IA Screen Mirror
IA Screen Mirror projects an exact emulation of your mobile device’s
screen contents (LCD display) onto a connected external VGA output
device or television monitor via the Composite video or S-video terminals.
It allows you to project and display multiple LCD screens on the VGA
screen simultaneously, “freeze” them in the desired state, and maintain
one as the active viewport. Flexible output control options let you control
the allocation of CPU utilization, orientation, resolution, and color optimi-
zation/dithering of projected images.
Getting Started
Tap the IA Screen Mirror icon in your Programs group to start the IA Screen
Mirror program.
1. Use the Layout tab to set up the viewports to which you will project
images.
2. Use the Switch tab to assign a “switching” button on your mobile
device.
3. Use the Refresh tab and VGA tab to customize other parameters
as desired.
4. Tap OK to project the LCD screen contents onto the active viewport.
5. Start and operate the application you want to project (“foreground
application”).
6. To make adjustments to the settings, use the “switching” button
on your mobile device to freeze the active viewport and return to
the IA Screen Mirror control screens. Tap OK to continue the pro-
jecting.
7. Use the Exit Program button to terminate IA Screen Mirror en-
tirely and stop projection to the VGA screen.
For more information please refer to the on-line Help.

172
Toshiba Pocket PC e750/e755 User’s Guide
Copyright and Contact Information
ATI® and IMAGEON® are registered trademarks of ATI Technologies, Inc.
Microsoft®, MS-Windows®, and PowerPoint® are registered trademarks,
and Windows CE™ is a trademark, of Microsoft Corporation in the United
States and other countries.
IA Album®, IA Presenter®, and IA Screen Mirror® are registered trademarks
of IA Style, Inc., and Information In Action™ is a trademark of IA Style, Inc.
The names of other actual companies, products, and brand names men-
tioned herein may be trade names, service marks, trademarks, or regis-
tered trademarks of their respective owners.
This User’s Manual and the programs in the ATI Presentation Pack are
copyrighted. All rights are reserved. Reproduction, adaptation, or trans-
lation of these programs and documents without prior written permission
of IA Style, Inc. is also prohibited.
First Edition March 2002
©2000-2002 IA Style, Inc.
All rights reserved.
Web sites: http://www.iastyle.com
Product support: supportE@iastyle.com
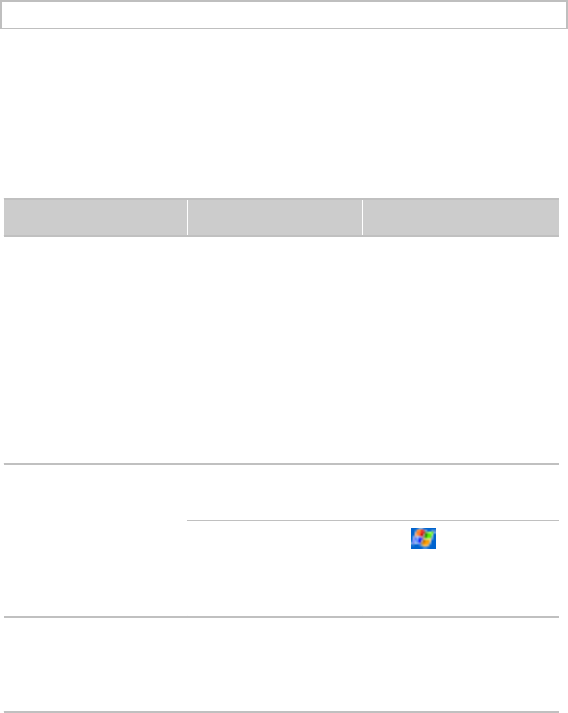
Chapter 11:
Additional Information
Troubleshooting
Check the following guide for the possible cause of a problem and how to
correct it.
Symptom Cause Correction
Even if the power button
is pressed and the power
does not turn on.
The battery power is
exhausted.
Charge the battery.
The main battery or the
High Capacity Battery is
not attached.
Attach the main battery /
High Capacity Battery and
switch Battery Pack Lock to
the Lock side.
Battery Pack Lock is at
the Release side.
Switch Battery Pack Lock to
the Lock side.
The power was suddenly
cut off.
The battery power is
exhausted.
Charge the battery.
Automatic suspend is
active.
Select ,Settings,
System,Power to set to
alter the power shut down
time.
Even if the battery is
completely charged, it
discharges after a short
period of time.
The battery is extinct. Replace the main battery
with a new one.
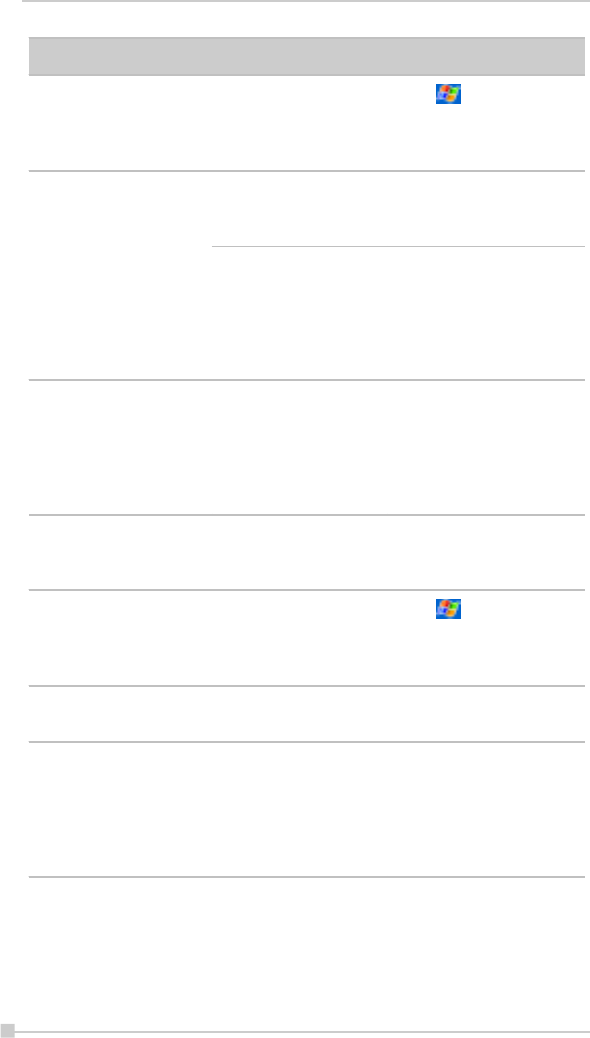
174
Toshiba Pocket PC e750/e755 User’s Guide
Symptom Cause Correction
The screen was tapped,
but the correct action
was not executed.
Touch screen
adjustment is incorrect.
Select ,Settings,
System,Screen, Align
Screen to adjust the touch
screen.
The operation is slow in
response.
Insufficient memory Secure the free memory.
Quit the application if it is
not in use.
Some malfunction.
Reset the system. If no
action is observed after
resetting the system,
initialize the system.
(However, the data will be
deleted.)
The screen was tapped,
but there is no response.
The operation button
does not work either.
Some malfunction. Reset the system. If no
action is observed after
resetting the system,
initialize the system.
(However, the data will be
deleted.)
The screen is dark. The front light is off. Press and hold the power
button until the front light is
turned on.
The screen is hard to
see.
Brightness setting is
incorrect.
Select ,Settings,
System,Front Light to
adjust the screen brightness
for better sight.
Cannot connect to your
computer.
— See Help of ActiveSync.
ActiveSync does not
function when your
Toshiba Pocket PC is
connected to your
computer with a cradle or
USB cable.
The USB driver of your
computer may not be
compatible.
Reselect the USB driver.

175
Chapter 11: Additional Information
Symptom Cause Correction
Cannot access the
Internet.
The connecting using a
specified cellular phone
connection cable was
not correct.
Check whether the
connecting using a specified
cellular phone connection
cable is correct.
Radio waves of a
connected cellular
phone are getting
worse.
Carry out communications
where radio wave conditions
are satisfactory.
Setting is incorrect. Carry out correct setting.
The Battery power is
too low to use USB
devices.
Charge the battery or
connect AC adapter.
Following message is
displayed.
“Not Enough Battery
Power.
There is not enough
battery power to use
USB Device”
The total power
consumption of
connected USB devices
is too large.
This USB port supports total
500mA USB device.
Confirm connected USB
device.
Following message is
displayed.
“USB OVER CURRENT
DETECT USB device is
turned off. Please
disconnect USB device.”
The total power
consumption of
connected USB devices
is too large.
This USB port supports total
500mA USB device.
Confirm connected USB
device.
To enable USB port again,
turn off the power of Pocket
PC and push Reset Switch.
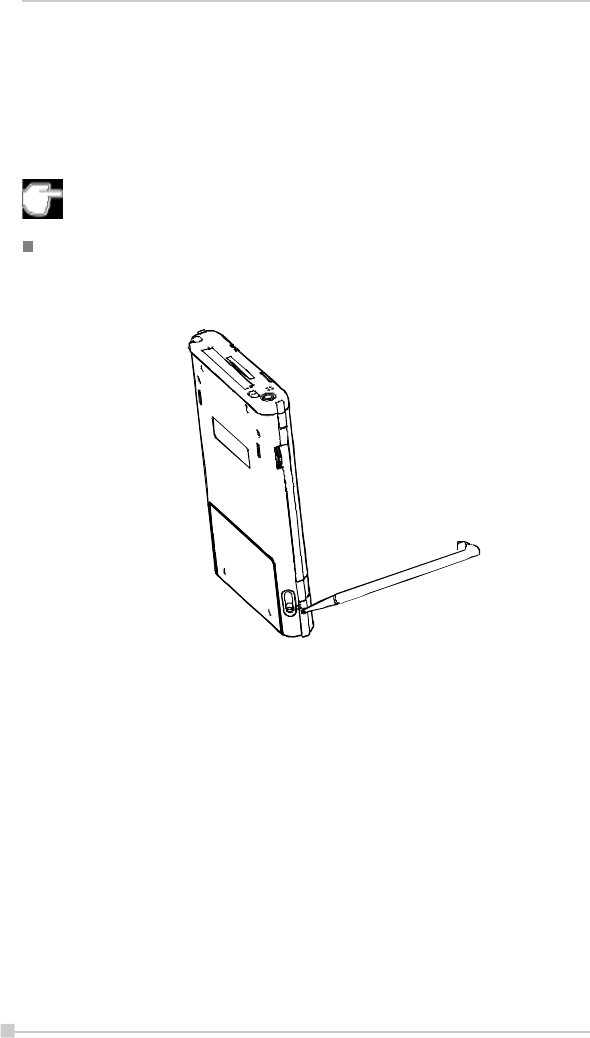
176
Toshiba Pocket PC e750/e755 User’s Guide
Resetting
Reset is equivalent to "Restarting" a computer. Reset the Pocket PC
e750/e755 when a button or tapping the screen does not respond. When
your Toshiba Pocket PC e750/e755 is reset, all data that was not stored
during operation will be deleted.
If the function cannot be restored even if the reset button is pressed,
initialize your Toshiba Pocket PC e750/e755.
When the power is on, press the reset switch with the stylus, then
release.

177
Chapter 11: Additional Information
Clear Memory
When you initialize your Toshiba Pocket PC e750/e755, it returns to the
status when it was purchased.
When you initialize your Toshiba Pocket PC e750/e755, all data
stored in the memory is deleted. Your Toshiba Pocket PC e750/
e755's initially installed programs are not deleted.
Before initialization, remove all CF/SD cards.
1. Turn off the power.
2. Press the power button while pressing and holding the reset switch
with the stylus, and then release the power button.
3. When a screen appears, release the reset switch. When initialization
is completed, the Welcome screen appears. Set up the system ac-
cording to the screen as in the case of startup procedure.

178
Toshiba Pocket PC e750/e755 User’s Guide
Problems Solutions
Cannot connect to the
network
Make sure the Wireless
Communication Switch is turned on.
Check if the SSID is correct (note that
it is case-sensitive)
Check Link Quality in Configuration
Page. If the link quality is poor,
rescan and find another Access Point.
Check if the operating mode is set
properly. See Chapter 4.4
Configuration Page.
Check if the WEP key is correctly
entered.
Be sure you are in the range of a
working Access Point.
Make sure the channel been set is in
the range of 1~11.
The host computer cannot
wirelessly connect with my
Toshiba Pocket PC e740
Make sure you have setup the
partnership for your Toshiba Pocket
PC e740 and your host computer.
Make sure you are within the range of
a working network.
Make sure you have entered the IP
address of the host computer as the
WINS server on your Toshiba Pocket
PC e740.
Reset your Handheld PC or Toshiba
Pocket PC e740 to make the TCP/IP
settings take effect.
Make sure the SSID, WEP keys and
channel for all devices in the network
are set the same.
Make sure the channel been set is in
the range of 1~11.
Cannot edit the "Channel"
and "Country" field in
"Infrastructure" Mode?
In Infrastructure mode, country and channel
are decided by the Access Point. You can
only join the existing network formed by the
working Access Point, not to create a new
Wireless Network.
The Toshiba Pocket PC
e740 freezes
Reset the Toshiba Pocket PC e740.
Troubleshooting for Wi-Fi
If you encounter some problems while using our product, please refer to
this troubleshooting section.

179
Chapter 11: Additional Information
FAQ for Wi-Fi
A. Compatibility
A1: Should I use equipment with the same brand as the IEEE802.11b
WLAN Adapter’s to enable the wireless communication?
This is not necessary. IEEE802.11b WLAN Adapter is Wi-Fi certified
which means that it will work well with different branded equipments
as long as the equipment is also Wi-Fi certified.
A2: Can I connect IEEE802.11b WLAN Adapter to other devices using
Bluetooth?
No, you can only connect the IEEE802.11b WLAN Adapter to other
IEEE802.11b equipment.
B. Wireless LAN Connectivity
B1: How do I form a wireless network?
Typically, you can form a wireless network by connecting Access Points.
Different Access Points should have different channels. Every de-
vices connected to the network should have the same SSID. When
you are using Access Points, set the mode to “Infrastructure” mode.
Without Access Points, you can still build a network where adapters
communicate peer-to-peer using a shared SSID. When you are not
using Access Points, change the operating mode to be “802.11Ad
Hoc”. To set the operating mode, click
StartJSettingsJSystemJWireless LAN UtilityJConfig.
B2: How can I connect my Toshiba Pocket PC e750/e755 to the usable
Wireless Network?
Please click StartJSettingsJSystemJWireless LAN UtilityJScan
to view Scan Page where you can find the usable Wireless Network.
If you cannot see all the networks you are expecting, please click
“Rescan” to see the list of usable Wireless Networks. Choose one
Wireless Network you want and double click the BSSID to connect to
the network. Once the network is chosen, you need to configure the
IEEE802.11b WLAN adapter.
Click StartJSettingsJConnectionsJNetwork AdaptersJIEEE802.11b
WLAN AdapterJPropertiesJIP Address to set IP address, Subnet mask
and Default gateway settings. Click StartJSettingsJSystemJWireless
LAN Utility to edit other settings, such as Mode and SSID etc. If the
WEP Mode of the Wireless Network you selected is enabled (64bit or
128bit WEP Mode), please choose the proper WEP KeyID and the
proper WEP Key value network.

180
Toshiba Pocket PC e750/e755 User’s Guide
More Information
B4. What is 802.11 Ad Hoc Network? What should I do to form an
802.11 Ad Hoc Network?
B5. What is the difference between “Infrastructure” and “802.11 Ad
Hoc” Network Mode?
How do I choose?
B6. Could I use the 802.11 Ad Hoc Mode to access the LAN re-
sources? How can I access the
LAN resource without an Access Point?
B7. What should I do if my host computer cannot wirelessly connect
with my Toshiba Pocket PC e750/e755?
E1. What is WEP?
E2. How many WEP security service mode does Wireless LAN sup-
port?
E3. How to set the WEP security service?
B3: How do I know whether or not my Pocket PC has already con-
nected to an AP successfully?
1. Check BSSID. When there is a link, the current Basic Service
Set ID of the Access Point been used will be shown in the BSSID
field in Link Page. When the adapter is disconnected with the
Access Point, “Non-associated” will appear in the BSSID field.
To view BSSID, from your Toshiba Pocket PC e750/e755, click
StartJSettingsJJSystemJWireless LAN UtilityJLink.
2. Check Link Quality. Link Quality shows how clearly the adapter
can hear the Access Point. If the quality is poor, it’s better to
rescan and find a better performance Access Point or re-arrange
the AP’s position for better performance. To view Link Quality,
from your Toshiba Pocket PC e750/e755, click
StartJSettingsJSystemJWireless LAN UtilityJConfig.
B4: What is 802.11 Ad Hoc Network? What should I do to form an 802.11
Ad Hoc Network?
802.11 Ad Hoc Mode is used to create a peer-to-peer connection
without an Access Point. The SSID must be the same among sta-
tions to enable the wireless communication within the local area
network.
You need to choose a proper SSID and channel for the first 802.11
Ad Hoc station. For other stations want to join the same SSID group,
you could only choose the same SSID as the first station for connec-
tion. The Channel setting for the 802.11 Ad Hoc Network stations to
join the existing 802.11 Ad Hoc Network will automatically be set as
the channel number of the network.

181
Chapter 11: Additional Information
More Information
B5. What is the difference between “Infrastructure” and “802.11 Ad
Hoc” Network Mode?
How do I choose?
B6. Could I use the 802.11 Ad Hoc Mode to access the LAN resources?
How can I access the LAN resource without an Access Point?
B7. What should I do if my host computer cannot wirelessly connect
with my Toshiba Pocket PC e750/e755?
B5: What is the difference between “Infrastructure” and “802.11 Ad
Hoc” Network Mode?
How do I choose?
Infrastructure Mode is used to connect yourToshiba Pocket PC e750/
e755 with the Access Point. Usually, to form a Wireless Network, you
can connect your Access Point to the ADSL, Cable Model or LAN
Ethernet and then configure the Access Point base on the User Guide
for the Access Point to set the proper SSID, Channel and WEP secu-
rity service. After that, configure the IEEE 802.11b WLAN adapter. Set
the same SSID, Channel and WEP as the Access Point’s. 802.11 Ad
Hoc Mode allows your Toshiba Pocket PC e750/e755 to form its own
local network where devices communicate peer-to-peer, using a
shared SSID, without Access Points. Under 802.11 Ad Hoc mode, the
SSID must be the same among stations so that the devices can
communicate properly within the Wireless Network. If you want to
form your network without any Access Points, you should choose
802.11 Ad Hoc mode.
B6: Could I use the 802.11 Ad Hoc Mode to access the LAN resources?
How can I access the LAN resource without an Access Point?
Yes , you can access the LAN resources without an Access Point .
Follow the steps shown below:
(1) Make sure your host computer already successfully connect to
the LAN or Internet through the LAN Adapter or the Modem.
(2) Install the Wireless LAN Adapter into your Host computer suc-
cessfully and set 802.11 Ad Hoc Mode and the proper SSID to
form the 802.11 Ad Hoc Network. Install and enable the ICS
(Internet Sharing Software, such as “SyGate”...) function in your
host computer. (Note that the Windows 2K or later version, OS,
supports the ICS function in Local Area Connection Properties?
Sharing)
(3) Set your Toshiba Pocket PC e750/e755 as 802.11 Ad Hoc Mode
and choose the same SSID to join the 802.11 Ad Hoc Network
(choose the DHCP to get the IP assigned).

182
Toshiba Pocket PC e750/e755 User’s Guide
(4) Check and make sure the Wireless LAN Adapter in the 802.11 Ad
Hoc Network have the same IP group. (Please Ping each other to
make sure the connection is successful)
(5) Now you can access the LAN resource successfully.
B7: What should I do if my host computer cannot wirelessly connect
with my Toshiba Pocket PC e750/e755?
(1) Make sure you have setup the partnership for your Toshiba Pocket
PC e750/e755 and your host computer.
(2) Make sure you are within the range of a working network.
(3) Make sure you have entered the IP address of the host computer
as the WINS server on your Toshiba Pocket PC e750/e755.
(4) Reset your Handheld PC or Toshiba Pocket PC e750/e755 to
make the TCP/IP settings take effect
(5) Make sure the SSID, WEP keys and channel for all devices in the
network are set the same.
(6) Make sure the channel been set is in the range of 1~11.
C. Application
C1: What should I do to use the ActiveSync Function through Wireless
Network?
(1) Make sure you have already setup the partnership for your Toshiba
Pocket PC e750/e755 and your host computer through USB In-
terface and the ActiveSync can work properly. (The ActiveSync
connection Interface should also choose the Ethernet interface
for Wireless LAN ActiveSync Connection)
(2) Make sure you are within the range of a working Wireless Net-
work.
(3) Make sure you can Ping your Toshiba Pocket PC e750/e755 from
your Host Computer. (Make sure the SSID, WEP keys and chan-
nel for all devices in the network are set the same.)
(4) Make sure you have entered the IP address of the host computer
as the WINS server on your Toshiba Pocket PC e750/e755.
(5) Reset your Toshiba Pocket PC e750/e755 to make the TCP/IP
settings take effect and execute the ActiveSync function in the
Toshiba Pocket PC e750/e755 to enjoy the high speed ActiveSync
Wirelessly.
C2: How do I wirelessly browse the Internet?
(1) If your network uses DHCP (Dynamic Host Configuration Proto-
col), an IP address and DNS (or WINS) will be assigned auto-
matically. On your Toshiba Pocket PC e750/e755, simply click
Start
J
Setting
J
Connections
J
Network Adapters
J
IEEE802.11b
WLAN Adapter
J
Properties to set the proper setting for Internet

183
Chapter 11: Additional Information
connection.
(2) If your network does not use DHCP, you should enter the IP ad-
dress, subnet mask, gateway and DNS (or WINS).
IP Address is Internet Protocol Address; a numeric address such
as 10.37.238.100 that the domain name server translates into a
domain name. Each node on the IP network should have a unique
IP address.
Subnet mask is a number used to identify a subnetwork when
multiple networks share one IP address. For example
255.255.255.0Gateway is a device used to forward IP packets to
and from a remote destination.
DNS stands for Domain Name System, a database system, which
translates addresses and domain names. For example, a nu-
meric address like 232.245.021.54 can become something like
cba.com.
WINS stands for Windows Internet Naming Service which has
two functions; one is a Microsoft Net BIO name server that elimi-
nates the broadcasts needed to resolve computer names to IP
addresses by providing a cache or database of translations. The
other one is to set the IP address of the host computer that you
already construct the partnership for Network adapter Active sync
purpose.
To set IP address, Subnet mask and Gateway, click
Start
J
Settings
J
Connections
J
Network
Adapters
J
IEEE802.11b WLAN Adapter
J
Properties
J
IP Ad-
dress. To set DNS or WINS (Windows Internet Naming
Service),click Start
J
Settings
J
Connections
J
Network
Adapters
J
IEEE802.11b WLAN Adapter
J
Properties
J
Name
Servers.
(3) To ping your Toshiba Pocket PC e750/e755 from your host com-
puter. In the Host Computer, open the DOS command mode
window, type the command “Ping” followed by the IP address,
such as “Ping 140.124.40.112”. If you can see the reply from this
IP address, the connection is complete. You are now ready to
browse the Internet using Internet Explorer on your Toshiba Pocket
PC e750/e755.
C3: How do I wirelessly check my e-mail?
(1) Please make sure that you can use the ActiveSync function through
USB Interface at first, and make sure you can use the ActiveSync
to receive and send e-mail successfully. For corporate e-mail
received and sent, please check with your network administrator
for necessary connection settings.
(2) Make sure you have entered the IP address of the host computer
as the WINS server on your Toshiba Pocket PC e750/e755.
(3) Reset your Toshiba Pocket PC e750/e755 to make the TCP/IP
settings take effect and execute the ActiveSync function in Toshiba
Pocket PC e750/e755 to enjoy the high speed ActiveSync
Wirelessly to receive and send e-mail.

184
Toshiba Pocket PC e750/e755 User’s Guide
D. Settings
D1: What is SSID? What should I set in the SSID field?
SSID stands for Service Set Identification, which is the ID to form the
Wireless Network. You can set up to 32 characters in the SSID field.
For the Infrastructure Mode, you should set the SSID the same as the
Access Point been connected with. To create a 802.11 Ad Hoc Net-
work, the SSID must be the same among stations to enable the
wireless communication within the local area network.
You need to choose a proper SSID and channel for the first 802.11
Ad Hoc station. For other stations want to join the same SSID group,
you could only choose the same SSID as the first station, but the
channel will not take effect. The 802.11 Ad Hoc must enter the proper
SSID. Blank SSID for the 802.11 Ad Hoc Mode is not allowed. The
stations want to join the 802.11 Ad Hoc Network must have the same
SSID and are suggested to have the same IP Address in the Net-
work group.
D2: Why can’t I choose the “Channel” and “Country” field in “Infra-
structure” Mode?
For the Infrastructure Mode, the Country and Channel are decided by
the Access Point. You can only join the existing Access Point formed
Wireless Network but not create a new Wireless Network. That is the
reason why you can’t set the “Channel” and “Country” settings.
D3: When should I set the IP address, Subnet mask and Default gate-
way settings?
When the Wireless Network does not have the DHCP server, you
should set your own IP address, Submask and Default gateway for
Wireless Network connection. Otherwise, the OS might set the differ-
ent Network group IP address for you, which will cause the discon-
nection for the Wireless Network.
D4: How can I set the IP address, Subnet mask and Default gateway
settings?
Simply click StartJSettingsJConnectionsJNetwork
adapterJIEEE802.11b WLAN AdapterJPropertiesJIP Address
to set IP address, Subnet mask and Default gateway settings.
D5: What Transmit Rate should I choose for Wireless Connection?
Suggest you to use the “Fully Auto” option in the “Transmission Rate”
field for full Transmission Data Rate range to automatically adjust
the Best Communication Data Rate and to be compatible with other
Low speed 802.11 Wireless Device.

185
Chapter 11: Additional Information
E. Security
E1: What is WEP?
WEP stands for Wired Equivalent Privacy, a security service, used to
prevent the unauthorized access to your wireless network.
E2: How many WEP security service modes does my Wireless LAN
support?
WEP stands for Wired Equivalent Privacy that is the security service
for the Wireless Network. There are three WEP security service modes
available for “IEEE 802.11b WLAN Adapter” formed Wireless Net-
work. The first is “Disable” which will disable the WEP security ser-
vice; the second is “64bit” which will support 5 bytes Hexadecimal
value WEP security service; the third is “128bit” which will support 13
bytes Hexadecimal value WEP security service.
E3: How do I set the WEP security service?
Please click Start?Settings?System?Wireless LAN Utility?Advanced
to view Advanced page where you can set the WEP security service.
Please choose the proper WEP Key Mode, WEP KeyID and WEP Key
value for the Wireless Network.
The WEP Mode, WEP KeyID and WEP Key value must be exactly
the same as your Wireless Network’s to enable the connection.
Example of setting the WEP:
You can choose
1. WEP Mode “64bit”, KeyID “1” and Key “1234567890”, or
2. WEP Mode “128bit”, KeyID “1” and Key
“12345678901234567890123456”, or
3. WEP Mode “Disable” for connection
F. Performance
F1: Will IEEE802.11b WLAN Adapter work in the environment where
Bluetooth network is employed?
Yes, IEEE802.11b WLAN Adapter can coexist with Bluetooth environ-
ment.
F2: How far is the working range of IEEE802.11b WLAN Adapter?
It depends on the data transmission rate and the condition of the envi-
ronments. The higher the data rate, the smaller the range it could cover.
At 11 Mbps, the adapter can go up to 300 meter in an outdoor environ-
ment; however, in an indoor environment, it can only go up to 100 meter.
Because of the ceilings, higher RF interference, interior walls and re-
flected signals, indoor range is usually shorter than outdoor range.

186
Toshiba Pocket PC e750/e755 User’s Guide
F3: How does the data transmission rate work?
IEEE802.11b WLAN Adapter allows you to choose one of the six data
rate options: Fixed 1Mbps, Fixed 2Mbps, Fixed 5.5Mbps, Fixed 11
Mbps, Auto Select 1 or 2 Mbps, and Fully Auto.
The farther the distance between two communicating devices, the
slower the data rate should be used. Basically, with slower data rate,
the data delivery will be more reliable. If you don’t know which data
rate should be used, simply choose “Fully Auto”, and the data rate will
automatically step down from 11 Mbps, 5.5 Mbps, 2 Mbps, to 1 Mbps
if you move farther your Toshiba Pocket PC e750/e755 away from the
Access Point or other connected mobile device.
F4: The Wireless LAN uses lots of power. What should I do to save
power?
(1) Please turn off the WirelessLAN Switch if you are not using the
Wireless Network currently, or
(2) You can click the “Radio Off” button on
StartJSettingsJSystemJWireless LAN UtilityJConfig page to
temperately disable the RF function , or
(3) You can click StartJSettingsJSystemJWireless LAN
UtilityJAdvanced to get into Advanced Page and tick the “En-
able Power Saving Mode” to enter the Power Saving Mode.
(1) Turn off the WirelessLAN Switch will cause the disconnection
of the Wireless Network, please make sure to close all the
Wireless Connection before you execute this function.
(2) “Radio Off” function will cause the disconnection of the Wire-
less Network , please make sure to close all the Wireless Con-
nection before you execute this function.
(3) Enable “Power Saving Mode” will keep the connectivity but will
lower down the average throughput due to longer connection
period for the Wireless Network.
(4) If you are in 802.11 Ad Hoc Mode, you are not allowed to en-
able “Power Saving Mode”, because Ad Hoc Mode doesn’t sup-
port this function.

187
Chapter 11: Additional Information
F5: How do I make sure that the Wireless LAN SW has been installed
successfully and that Wireless LAN already work properly?
(1) Please check if the “IEEE 802.11b WLAN Adapter” already exist in
StartJSettingsJConnectionsJNetwork Adapters; if not , the Wire-
less LAN Driver is not Installed successfully.
(2) Please check if the Wireless LAN Utility already exist and could be
opened successfully by simply click
StartJSettingsJSystemJWireless LAN Utility.
(3) Click Start?Settings?System?Wireless LAN Utility?Link to check
the current Link information in the Link Page.

188
Toshiba Pocket PC e750/e755 User’s Guide
Although the display is manufactured using an extremely high order of
technology, there may be a case that some dots do not light or always
light. It is not a malfunction.
Specifications
External dimensions 125 x 80 x16mm
Weight 180g.
Operating conditions Temperature: 32 F to 104 F, Humidity: 30 to 80% when
only the Toshiba Pocket e750/e755 is operating. Temperature
capable of charging 41 F to 104 F.
Battery Type 1050mAh Li-ion battery
Processor Intel (R) PXA 255 processor at 400 MHz
Memory RAM: 64 MB mobile ram with 32 MB Flash ROM
Display Sharp 3.8”, Trans-reflective LCD screen
Interfaces
RGB
USB Host/Client
SIR
DC-in
Headphone (4 rings)
Microphone (4 rings)
CF card slot Flash type II slot
SD card slot SD slot x 1
cradle connection port
Audio AC 97 Codec, Mono record, Stereo playback, 8.0, 11.025, 22.025,
and 44.1 KHz sample rate. Full Duplex record and playback. On
board microphone. on board speaker. Stereo earphone jack x 1.
software volume control.
Accessories Ac Adaptor, USB client cable, stylus pen, cradle, USB host
cable, battery pack, high capacity battery pack, battery charger.
The security finctionof the SD memory card is not usable.
Data encrypted by the SD memory card security function
- compatible equipment is not usable.