Compal Electronics TGH GSM Mobile Phone User Manual TGH Eng 121304
Compal Electronics Inc GSM Mobile Phone TGH Eng 121304
users manual
1
Contents
MENU MAP ......................................................... 12
FOR YOUR SAFETY ........................................... 22
Traffic Safety......................................................... 22
Do Not Use in Hospitals....................................... 22
Do Not Use in Airplanes....................................... 22
Do Not Use in Gasoline Stations.......................... 22
Do Not Use in Explosive Sites .............................. 23
Operating Environment ........................................ 23
Standard Usage .................................................... 23
Accessories and Batteries..................................... 23
Appropriate Maintenance..................................... 23
Emergency Calls (SOS) ........................................ 23
Use with proper care to reduce electromagnetic
interference (EMI) ......................................................... 24
GETTING STARTED .......................................... 25
PHONE OVERVIEW................................................... 25

2
INSTALLATION & REMOVAL .................................... 26
Installing the battery .............................................. 26
Removing the battery ............................................. 26
Inserting the SIM Card .......................................... 27
Removing the SIM Card......................................... 27
Connecting the Charger......................................... 28
Removing the Charger ........................................... 28
KEYPAD DESCRIPTION ............................................ 28
ALPHANUMERIC MAPPING ...................................... 31
DISPLAY INDICATORS. ............................................. 33
BASIC OPERATION ............................................. 34
Making a Call ........................................................ 34
The SIM Card......................................................... 34
Battery and Charger .............................................. 35
Switching on the Phone.......................................... 35
PIN and PIN2 (4 to 8 digits) .................................. 36
PUK1 and PUK2 (8 digits) .................................... 36
Calling ................................................................... 36
Dialing Emergency Numbers ................................. 37
Correcting an Entry ............................................... 37

3
Answering a Call ................................................... 37
Recent Calls ........................................................... 37
Quick Dial.............................................................. 38
Holding a Call ....................................................... 38
Multiparty Calls..................................................... 38
Input Methods ........................................................ 40
1. Multitap ABC/abc ............................................................... 40
2. Smart ABC/abc (Smart Predictive Text Mode) ................... 41
3. Smart Thai........................................................................... 42
4. Symbols............................................................................... 42
5. Numeric............................................................................... 42
MENU FUNCTION ............................................... 43
PHONE BOOK .......................................................... 43
Quick Search.......................................................... 43
1. View .................................................................................... 43
2. Edit...................................................................................... 44
3. Delete .................................................................................. 44
4. Copy.................................................................................... 44
5. Move ................................................................................... 44
6. Duplicate ............................................................................. 44
Search Entry........................................................... 44
1. Search.................................................................................. 44
Add New Entry....................................................... 45
Copy All ................................................................. 46

4
Delete All ............................................................... 46
1. From SIM............................................................................ 46
2. From Phone......................................................................... 46
3. One by One ......................................................................... 47
Caller Group.......................................................... 47
Extra Number......................................................... 47
Settings................................................................... 47
1. Memory Status .................................................................... 47
2. Preferred Storage................................................................. 47
3. Fields................................................................................... 48
MESSAGES .............................................................. 48
Write Message........................................................ 48
1. Done.................................................................................... 48
2. Use Template....................................................................... 48
3. Insert Object........................................................................ 48
4. Format Text ......................................................................... 49
~ Text Size ............................................................................. 49
~ Text Style ............................................................................ 49
~ Alignment ........................................................................... 49
~ New Paragraph ................................................................... 49
5. Input Methods ..................................................................... 49
Inbox ...................................................................... 49
Outbox.................................................................... 50
Delete..................................................................... 50
~ Delete Inbox ....................................................................... 50
~ Delete Outbox..................................................................... 50
~ Delete All............................................................................ 50

5
Template................................................................. 50
Message Settings.................................................... 50
~ Profile Settings ................................................................... 50
~ Common Settings ............................................................... 51
~ Memory Status.................................................................... 51
~ Preferred Storage ................................................................ 51
Voice Mail Server................................................... 51
Broadcast Message ................................................ 51
~ Receive Mode..................................................................... 52
٭ Off........................................................................................ 52
٭ List Only .............................................................................. 52
٭ All Channels......................................................................... 52
~ Read Message..................................................................... 52
~ Languages........................................................................... 52
~ Channel Settings................................................................. 52
CALL LIST ............................................................... 53
Missed Call ............................................................ 53
1. View .................................................................................... 53
2. Delete .................................................................................. 53
3. Save to Phone book............................................................. 53
4. Dial...................................................................................... 54
5. Edit...................................................................................... 54
Dialed Calls ........................................................... 54
Received Calls........................................................ 54
Delete Call Log...................................................... 54
Call Time................................................................ 54
1. Last Call Time..................................................................... 54

6
2. Total Dialing........................................................................ 54
3. Total Received..................................................................... 55
4. Reset All Time..................................................................... 55
Call Cost ................................................................ 55
1. Last Call Cost...................................................................... 55
2. Total Cost ............................................................................ 55
3. Reset Cost ........................................................................... 55
4. Max Cost............................................................................. 55
5. Price Per Unit ...................................................................... 55
SETTINGS ................................................................ 55
Phone Setup ........................................................... 56
1. Time and Date ..................................................................... 56
~ Set Home City .................................................................... 56
~ Set Time/Date ..................................................................... 56
~ Set Format .......................................................................... 56
2. Schedule Power On/Off....................................................... 56
~ Status .................................................................................. 56
~ Power Settings .................................................................... 56
~ Time Settings...................................................................... 57
3. Language............................................................................. 57
4. Preferred Input Methods...................................................... 57
5. Display Characteristic ......................................................... 57
~ Wallpaper............................................................................ 57
~ Screen Saver ....................................................................... 57
٭ Settings ................................................................................ 57
■ Status................................................................................. 57
■ Waiting.............................................................................. 57
٭ Select ................................................................................... 58
~ Show Date and Time........................................................... 58
~ Show Owner Number ......................................................... 58
~ Show Operator Name ......................................................... 58

7
6. Contrast............................................................................... 58
7. Greeting Text....................................................................... 58
~ Status .................................................................................. 58
~ Greeting Text ...................................................................... 58
8. Speed Dial ........................................................................... 58
~ Enable Speed Dial .............................................................. 58
~ Set Number......................................................................... 59
9. Navigation Key ................................................................... 59
10. Auto Update of Date and Time.......................................... 59
Call Setup............................................................... 59
1. Caller ID.............................................................................. 59
~ Set by Network ................................................................... 59
~ Hide ID............................................................................... 59
~ Send ID............................................................................... 60
2. Call Waiting......................................................................... 60
~ Activate............................................................................... 60
~ Deactivate ........................................................................... 60
~ Query Status ....................................................................... 60
3. Call Divert........................................................................... 60
~ Divert All Voice Calls......................................................... 60
~ Divert If Unreachable ......................................................... 60
~ Divert If No Answer ........................................................... 60
~ Divert If Busy ..................................................................... 61
~ Cancel All Divert................................................................ 61
4. Call Barring......................................................................... 61
~ Outgoing Calls.................................................................... 61
~ Incoming Calls.................................................................... 61
~ Cancel All ........................................................................... 61
~ Change Barring PW............................................................ 61
5. Line Switching .................................................................... 61
6. Call Time Reminder ............................................................ 61
7. Call Time Display ............................................................... 62
8. Auto Redial ......................................................................... 62

8
Network Setup........................................................ 62
1. Network Selection............................................................... 62
2. Preferred Networks ............................................................. 62
~ Add from List ..................................................................... 62
~ Create New ......................................................................... 62
~ Change Priority................................................................... 62
~ Delete.................................................................................. 62
3. Band Selection .................................................................... 63
~ 900...................................................................................... 63
~ 1800.................................................................................... 63
~ Dual Band........................................................................... 63
Security Setup ........................................................ 63
1. SIM Lock ............................................................................ 63
2. Phone Lock ......................................................................... 63
3. Auto Keypad Lock .............................................................. 63
4. Fixed Dial............................................................................ 63
~ Mode................................................................................... 63
~ Fixed Dial List.................................................................... 64
5. Barred Dial.......................................................................... 64
~ Mode................................................................................... 64
~ Barred Dial List .................................................................. 64
6. Change Password ................................................................ 64
~ PIN...................................................................................... 64
~ PIN2.................................................................................... 64
~ Phone Lock Password......................................................... 64
Restore Factory Settings ........................................ 64
FUN & GAMES ........................................................ 65
Game...................................................................... 65
1. F1 Race ............................................................................... 65
~ Start Game .......................................................................... 65

9
~ Best Grades......................................................................... 65
~ Game Help.......................................................................... 65
2. Snake................................................................................... 65
~ Start Game .......................................................................... 65
~ Game Level ........................................................................ 66
~ Best Grades......................................................................... 66
~ Game Help.......................................................................... 66
Game Settings ........................................................ 66
1. Game Audio ........................................................................ 66
2. Game Vibration ................................................................... 66
USER PROFILE......................................................... 66
General .................................................................. 67
1. Activate ............................................................................... 67
2. Customize............................................................................ 67
~ Tone Setup .......................................................................... 67
~ Volume................................................................................ 67
~ Alert Type ........................................................................... 67
■ Ring................................................................................... 67
■ Vibration Only................................................................... 67
■ Vibra and Ring .................................................................. 67
~ Ring Type ........................................................................... 68
~ Extra Tone........................................................................... 68
~ Answer Mode...................................................................... 68
~ LCD Backlight.................................................................... 68
Meeting .................................................................. 69
Outdoor.................................................................. 69
Indoor .................................................................... 69
Headset .................................................................. 69

10
PIM......................................................................... 69
Calendar.......................................................................... 69
Alarm.............................................................................. 70
1. On/Off ................................................................................. 70
2. Time Settings....................................................................... 70
3. Repeat ................................................................................. 70
~ Once.................................................................................... 70
~ Everyday............................................................................. 70
~ Days.................................................................................... 70
World clock ............................................................ 71
Sound Recorder...................................................... 71
STK (SIM TOOL KIT)........................................... 71
SHORTCUTS............................................................. 72
BATTERY ............................................................ 73
CARE AND MAINTENANCE ........................... 74
CONTACT YOUR NEAREST SERVICE STATION IF THE
MOBILE PHONE IS OUT .................................................. 74
OF ORDER. OUR WELL-TRAINED TECHNICIANS WILL
PROVIDE YOU THE BEST ................................................ 74
SERVICE. ........................................................................ 74
FCC REGULATIONS..................................... 75
FCC RF EXPOSURE INFORMATION76
11
Body-worn Operation............................................................. 76

12
Menu Map
Phone Book
zQuick Search
1. View
2. Edit
3. Delete
4. Copy
5. Move
6. Duplicate
zSearch Record
1. View
2. Edit
3. Delete
4. Copy
5. Move
6. Duplicate
zAdd New Record
1. To SIM
~ Name
~ Number
2. To Phone
~ Name
~ Number
~ Home Number
~ Company Name
~ E-mail Address
~ Office Number
~ Fax Number
~ Associate Pictur.
~ Associate Sound
~ Caller Group
13
zCopy All
1.From SIM
2. From Phone
zDelete All
1. From SIM
2. From Phone
3. One by One
zCaller Group
1. Friends
2. Family
3. VIP
4. Business
5. Others
zExtra Number
1. Owner Number
~ Edit
~ Erase
2. Service Dial Number
3. SOS Number
zSettings
1. Memory Status
2. Preferred Storage
~ SIM
~ Phone
3. Fields
~ Home Number
~ Company Name
~ E-mail Address
~ Office Number
~ Fax Number
~ Associate Picture
~ Associate Sound
~ Caller Group

14
Messages
zWrite Messages
zInbox
zOutbox
zDelete
1. Delete Inbox
2. Delete Outbox
3. Delete All
zTe mp la te
zMessages Settings
1. Profile Settings
~ SMSC2
~ SMSC1
~ Profile 3
2. Common Settings
~ Delivery Report
~ Reply Path
3. Memory Status
4. Preferred Storage
~ SIM
~ Phone
zVoice Mail Server
1. VOICE MAIL
~ Edit
~ Erase
~ Connect to Voice
2. Empty
~ Edit
~ Erase
~ Connect to Voice
zBroadcast Message
1. Receive Mode
2. Read Message

15
3. Languages
~ All Languages
~ English
4. Channel Settings
~ Select
~ Add
~ Edit
~ Delete
Call List
zMissed Calls
1. View
2. Delete
3. Save to Phone book
~ To SIM
~ To Phone
4. Dial
5. Edit
zDialed Calls
1. View
2. Delete
3. Save to Phone book
~ To SIM
~ To Phone
4. Dial
5. Edit
zReceived Calls
1. View
2. Delete
3. Save to Phone book
~ To SIM
~ To Phone
4. Dial
5. Edit

16
zDelete Call Log
1. Missed Calls
2. Dialed Calls
3. Received Calls
4. Delete All
zCall Time
1. Last Call Time
2. Total Dialing
3. Total Received
4. Reset All Time
zCall Cost
1. Last Call Cost
2. Total Cost
3. Reset Cost
4. Max Cost
5. Price Per Unit
Settings
zPhone Setup
1. Time and Date
~ Set Home City
~ Set Time/Date
~ Set Format
2. Schedule Power On/Off
~Four Schedule Sets
3. Language
~ English
~ Thai
4. Preferred Input Methods
~ Multitap ABC
~ Multitap abc
~ Numeric
~ Smart ABC
~ Smart abc
17
~ Smart Thai
5. Display Characteristic
~ Wallpaper
~ Screen Saver
~ Show Date and Time
~ Show Owner Number
~ Show Operator Name
6. Contrast
7. Greeting Text
~ Status
~ Greeting Text
8. Speed Dial
~ Enable Speed Dial
~ Set Number
9. Navigation Key
~Up
~Down
~Left
~Right
10. Auto Update of Date and Time
zCall Setup
1. Caller ID
~ Set by Network
~ Hide ID
~ Send ID
2. Call Waiting
~ Activate
~ Deactivate
~ Query Status
3. Call Divert
~ Divert All Voice Calls
~ Divert If Unreachable
~ Divert If No Answer
18
~ Divert If Busy
~ Cancel All Divert
4. Call Barring
~ Outgoing Calls
~ Incoming Calls
~ Cancel All
~ Change Barring PW
5. Line Switching
6. Call Time Reminder
~ Off
~ Single
~ Periodic
7. Call Time Display
8. Auto Redial
zNetwork Setup
1. Network Selection
~ Automatic
~ Manual
2. Preferred Networks
~ Network List
3. Band Selection
~ 900
~ 1800
~ Dual Band
z Security Setup
1. SIM Lock
2. Phone Lock
3. Auto Keypad Lock
~None
~5 sec.
~30 sec.
~1 min.
~5 min.

19
4. Fixed Dial
~ Mode
~ Fixed Dial List
5. Barred Dial
~ Mode
~ Barred Dial List
6. Changed Password
~ PIN
~ PIN2
~ Phone Lock Password
zRestore Factory Settings
Fun & Games
zGame
1. F1 Race
~Start Game
~Best Grades
~Game Help
2. Snake
~Start Game
~Game Level
~Best Grades
~Game Help
zGame Settings
1. Game Audio
2. Game Vibration
User Profile
zGeneral
1. Activate
2. Customize
~ Tone Setup
~ Volume
~ Alert Type
~ Ring Type

20
~ Extra Tone
~ Answer Mode
~ LCD Backlight
zMeeting
zOutdoor
zIndoor
zHandset
PIM
zCalendar
1. Jump to Date
zAlarm
1. On/Off
2. Time Settings
3. Repeat
~ Once
~ Everyday
~ Days
zWorld Clock
zSound Recorder
1. Record
2. Play
3. Append
4. Rename
5. Delete
6. Delete All
STK
Shortcuts
zSearch Record
zInbox
zWrite Message
zMissed Calls
21
zReceived Calls
zTone Setup
zAlarm
zAlert Type
zCall Divert
zAudio Profile

For Your Safety
22
For Your Safety
Only proper operation can ensure your personal safety. Be sure
to carefully read these simple guidelines before you use the
phone. Breaking the rules may be dangerous or illegal. Further
detailed information is given in this user manual.
Traffic Safety
Don’t use a mobile phone while driving. For your safety, you
should park the vehicle before making or answering a call.
Using a handsfree car kit or earpiece is highly recommended.
Do Not Use in Hospitals
The use of mobile phones is prohibited and may cause
interference with the functionality in medical devices in the
hospitals. Check the laws and regulations or posted notices. To
avoid electromagnetic interference (EMI) with medical devices,
please switch off the phone near medical equipment.
Do Not Use in Airplanes
The use of mobile phones in an aircraft may disrupt radio
transmissions and signals. This, therefore, can be dangerous to
the operation of the aircraft. Be sure to switch off the phone
while on board an aircraft. It is highly recommended to detach
the battery pack from the handset to prevent accidentally
switching on the phone by miss-touching the power key.
Do Not Use in Gasoline Stations
It is advisable that users switch off the phone at a refueling point.
The threat mobile phones pose to gas stations and their users
is primarily the result of their ability to produce sparks that can
be generated by the high-powered battery inside the phone.

For Your Safety
23
Do Not Use in Explosive Sites
The use of mobile phones should be restricted near potentially
explosive atmosphere sites such as chemical plants, fuel
storage, or the areas where blasting operations are in process.
Observe restrictions, and follow any posted regulations or rules.
Operating Environment
Mobile radio transmitting equipment, including mobile phones,
may be subject to interference and may cause danger.
Therefore, it is highly recommended that you follow any special
regulations in any area. Switch the phone off whenever the use
is forbidden.
Standard Usage
For the satisfactory operation of the mobile phone, it should be
used only in a normal operating position. Do not touch the
antenna unnecessarily.
Accessories and Batteries
This phone can only be connected to approved accessories and
batteries. Do not connect incompatible products.
Appropriate Maintenance
Only qualified and authorized personnel should service the
phone equipment. Faulty installation or repair may be
hazardous.
Emergency Calls (SOS)
An emergency call (SOS number) can be made with the phone
in any circumstances, and even the phone is locked. When
making an emergency call, you must be sure to give all the

For Your Safety
24
necessary information, such as your name, your mobile phone
number, the location and the emergency situation, as
accurately as possible. In order to deliver the sufficient
information to a rescue institute, do not disconnect your phone
until told to do so.
Use with proper care to reduce
electromagnetic interference (EMI)
This product has passed the inspection of the
Directorate-General of Telecommunications, Ministry of
Transportation and Communication. The highest reported
SAR values which are: Head 0.552 W/kg; Body-worn 0.227
W/kg are lower than the standard value at 1.6 W/kg, maximum.
Basic Operation
25
Getting Started
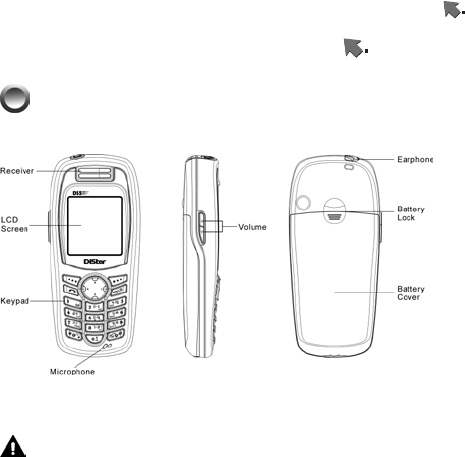
Phone Overview
Figure 1
Warning: Please do not detach any parts of this mobile
phone and only use original manufacturer components to
guaranty the quality of transmission.
Basic Operation
26
Installation & Removal
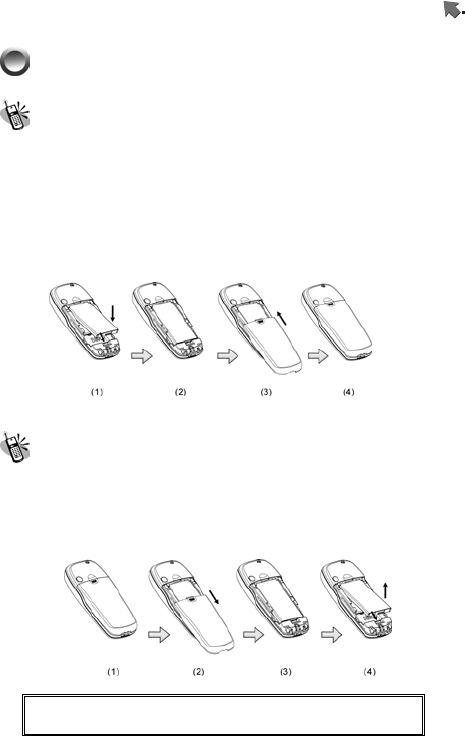
Installing the battery
1. Place the battery pack downward and gently slide its side
corners into this handset’s bottom fillister.
2. Hold and press the battery pack forward until it contacts to
the handset. Make sure that the metallic connector is firmly
facing the built-in hinged-type connectors on the handset.
3. Push and slide the battery cover forward so as to clasp the
latch.
Figure 2
Removing the battery
1. Switch off the handset first and gently pushes the latch of the
battery cover backward to separate it from the handset.
2. Press the battery pack’s latch backward and the uplift the
bottom of the battery pack and remove the battery from
handset.
Figure 3
Important! : Notice the risk of explosion in case of
incorrect use of unfit battery.
Basic Operation
27
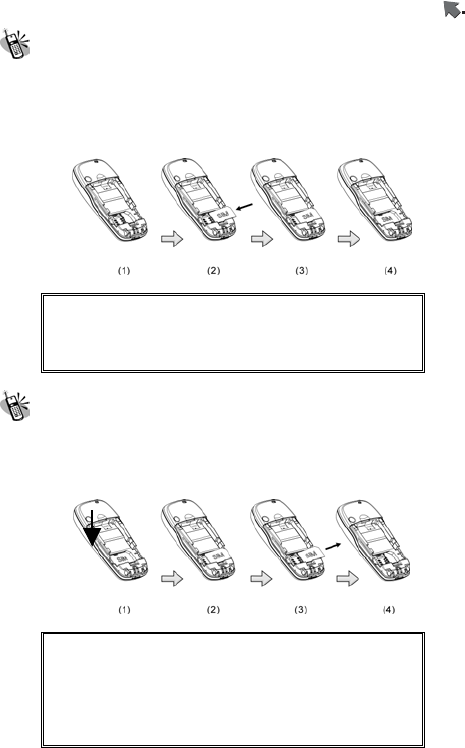
Inserting the SIM Card
1.Find the SIM slot. Place your SIM card golden contact area
downward.
2. Place the SIM card with leaning 30°and gently insert it into
card slot until the card folder firmly clips the card in its place.
Figure 4
Important! : Before removing the cover, always
switch off the power first and
disconnect the handset from the
charger or any other devices.
Removing the SIM Card
Switch off the power first and remove the battery cover. Press
and slide SIM forward so as to remove SIM from the holder and
slot as shown in figure 5.
Figure 5
Important! : Keep all miniature SIM cards out of
the reach of small children. The SIM
card and its contacts can be easily
damaged by scratches or bending,
so be careful when handling,
inserting and removing the cards.
Basic Operation
28
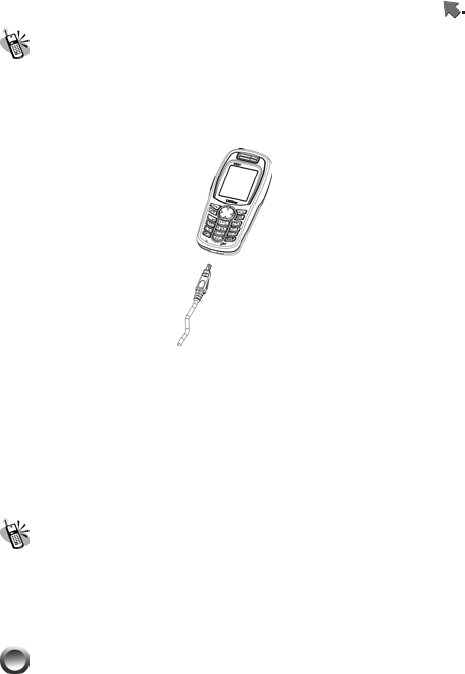
Connecting the Charger
To connect the travel charger to the handset, you should install
the battery first. Follow the travel charger instruction, and plug
the connector with the ∩ sign upside into the handset as shown
in figure 6.
Figure 6
Note:
1. Do not remove your battery or SIM card while charging.
2. Use a compatible or appropriate charger for the handset.
3. Manipulate the charger carefully, or the connector might
be damaged easily.
Removing the Charger
When removing the charger from battery, disconnect the plug
from the electrical outlet. Press the release buttons on two
sides of the connector simultaneously and pull out the
connector from mobile phone.
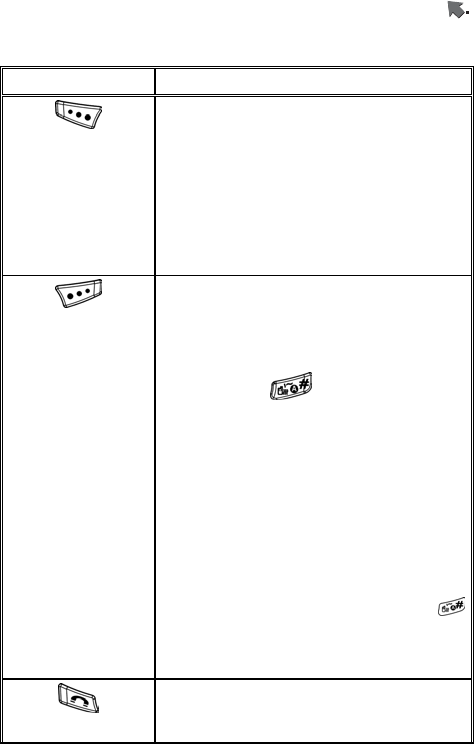
Keypad Description
In the handset, there are two softkeys - left softkey and right
softkey. Key functions are used in main menu / list menu /
function window. The function definition of the handset is made
Basic Operation
29
in screen with let / right softkey. Keypad functions are described
in the diagram as below:
Key Description
★Affirmative inputs: OK, select, call, save
and reply.
★In main menu / submenu mode, press this
key to enter the next submenu
★Press this key to answer an incoming call.
★Press it to put a call in hold; or call
retrieve by pressing the key once again.
★Press this key as “Enter” key to access
function menus, submenus and selection.
★Negative inputs: end, no, return, cancel,
abort, and quit.
★In standby mode, press this key to
instantly access phonebook list. If users
press this key to quickly access phonebook,
they can press to switch input
methods between Multitap abc and 123.
★Press this key to clear single character,
number, or symbol from the right to left.
★Long press this key to clear all texts or
phone numbers that are entered.
★In menu/submenu, press this key to
return the previous level.
★Press this key to activate either earphone
or loud speaker or function for handsfree
use during an incoming call.
★In standby mode, press this key and
to lock / unlock the handset.
★In active mode, press this key to mute
sound.
★Press this key to dial out a call.
★Press this key to answer a call.
★In standby mode, press it to view an
Basic Operation
30
Key Description
overall list of the last phone number records
comprising incoming, outgoing, rejected and
missed calls.
★Press this key to end / reject a call
★Press and hold it to switch on/off phone.
★Press it to return to standby mode while
function menu is in progress.
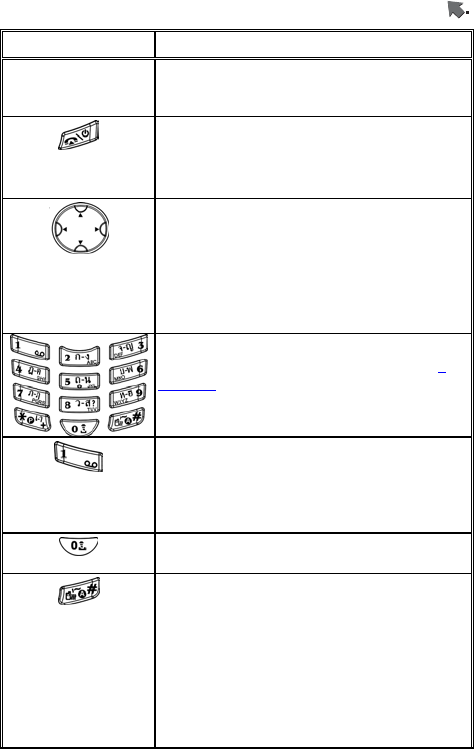
★Four-way Navigation Key.
★Default Shortcut functions setup/selection
in standby mode:
Up –Tone Setup
Down – Shortcuts
Left – SMS Inbox
Right – Alert Type
★The symbols of numerals and letters.
Keypads 2~9 are set as speed dial. on
page 57.
★Press and hold this key for two seconds
to launch voice mailbox function. Access the
voice box number (generally 3 digits) of your
telecom service provider before using this
phone for the first time.
★In editorial mode, press this key to switch
digit “0” and space.
★In standby mode, long press this key to
switch between current activated mode and
silent mode. When users long press this key
to activate silent mode, vibrator function,
meanwhile, is also activated.
★In editorial mode, press the key to switch
entry methods among ABC, abc, 123,
eZiABC, eZiabc and eZiThai.
★At ready window mode, long press this
Basic Operation
31
Key Description
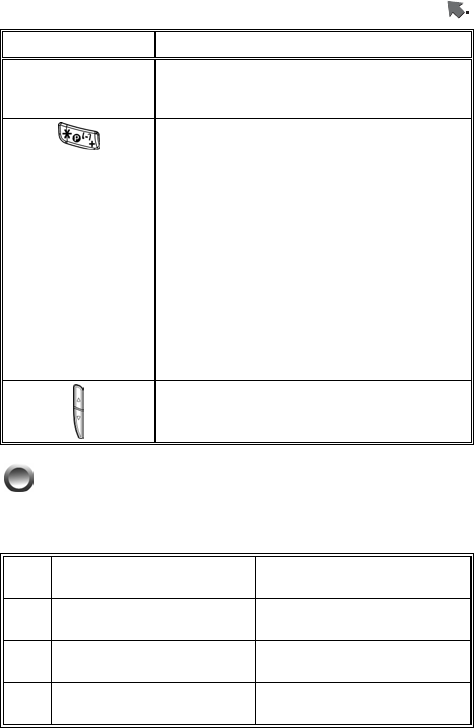
key could silence key tone.
★Press and hold this key to enable or
disable vibration function.
★Press and hold this key for seconds to
automatically display “*”, “+”, “P” and “W” in
sequence in the screen. The symbol “+”
represents an international dial-up code.
★Press and hold this key until the symbol
”+” appears and then dial the rest phone
number for an international call.
★In editorial mode, press this key to select
symbols.
★Input a phone number first and then long
press this key until a pop-up character “P”
shows, and then input extension number
and then press dialing key.
★Press this sidekey to adjust volume in an
idle / active mode.
Alphanumeric Mapping
The alphabetical and numerical keypad mapping relations are
listed on the following table:
Upper Case Mode Lower Case Mode
1 ﹒﹐﹣ ? ! ` @ :﹟$/ _ 1 ﹒﹐﹣ ? ! ` @ :﹟$/ _ 1
2 A B C 2 a b c 2
3 D E F 3 d e f 3
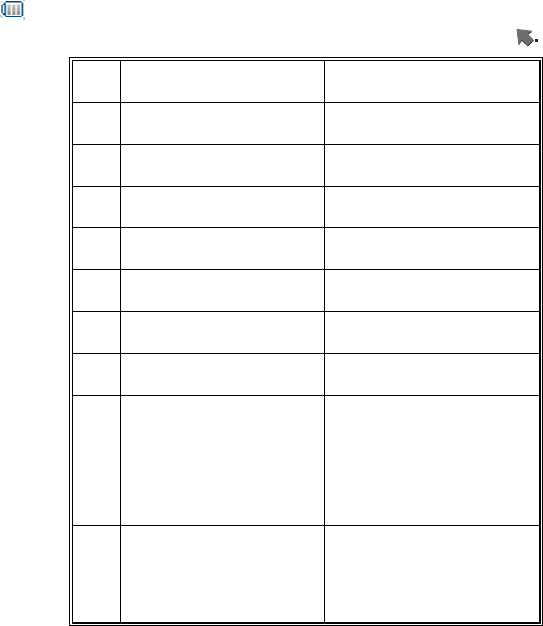
Basic Operation
32
Upper Case Mode Lower Case Mode
4 G H I 4 g h i 4
5 J K L 5 J k l 5
6 M N O 6 m n o 6
7 P Q R S 7 p q r s 7
8 T U V 8 t u v 8
9 W X Y Z 9 w x y z 9
0 space 0 space 0
* Select symbols as below:
﹒﹐? ! ' " ﴾ ﴿ @ \ / :
_ ; + - * = % & <>
£$¥ § € ¤ [ ] { }~ ﹟
space ↵
Select symbols as below:
﹒﹐? ! ' " ﴾ ﴿ @ \ / :
_ ; + - * = % & <>£
$¥ § € ¤ [ ] { }~ ﹟
space ↵
# Switch input methods
among ABC, abc, 123,
eZiABC, eZiabc and
eZiThai.
Switch input methods
among ABC, abc, 123,
ZiABC, Ziabc and
eZiThai.
Note:
1. In editorial mode, press the key to switch inputs methods
among ABC, abc, 123, eZiABC, eZiabc and eZiThai.
2. Pressing a number key in the editing mode will generate
the corresponding character appearing on the display.
3. After releasing the key and wait for a second, the cursor
will move to next spot for new input.
Basic Operation
33
4. If there is any difference between the character sets listed
in the table and on the phone, please refer to the displayed
characters on the phone.
5. In editorial mode, press this key to clear single character,
number, or symbol from the right to left.
6. ★Long press this key to clear all texts or phone numbers
that are entered.
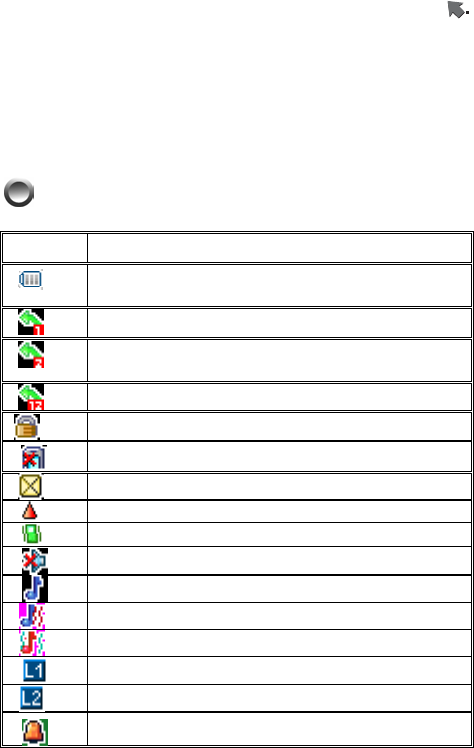
Display Indicators.
Indicator Description
Battery power level indicator. The battery cells
flashes from right and left while being charged.
L1 Call forward is on.
L2 Call forward is on.
L1 and L2 Call forward are both on.
The handset is locked.
The icon of missed call.
New SMS is in mailbox.
The roaming function is activated
The vibration call alert is activated
Mute is active during a call.
Ring is active.
Vibrates then rings.
Vibrates and rings.
L1 is active.
L2 is active.
Alarm is activated.
Basic Operation
34
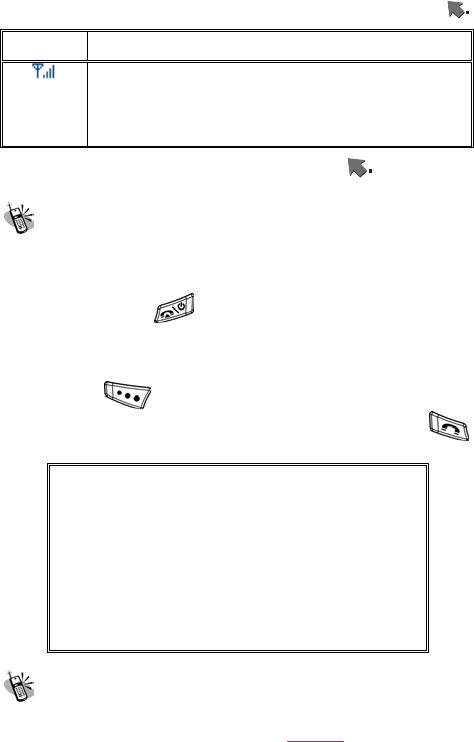
Indicator Description
The signal strength of network connection at
your current location. The more the bars are,
the stronger the signal is received. (The total
is four cells.)
Basic Operation
Making a Call
1. Switch off the power first and properly installs the SIM card.
2. The phone still can be connected with the travel charger and
used normally even when the battery runs out of power,
3. Press and hold for two seconds to switch on the
phone. If the display indicates “Enter PIN ”, please input the PIN
number to unlock your SIM card, (please refer to the Manual
provided by the telecom service provider for more details) and
then press to use this handset.
4. Input the area code and the phone number, and press
to dial the number.
Important! :
Check the signal strength before making a
call. The signal indicator on the left side of
the phone’s screen shows the strength of
the network radio signal. The indicator
scrolls as the signal strength increases
and decreases. To get the strongest
signal, try moving your phone slightly. If
you’re inside a building, move toward a
window.
The SIM Card
Your telecom service provider usually offers the SIM card. For
the SIM installation, please see on to page 26.This phone can

Basic Operation
35
be used only with legally issued SIM cards and receive or send
the calls only within the SIM network service range.
Battery and Charger
The Li-ion battery that comes with this phone is rechargeable.
Please use the charger and the battery provided by the original
manufacturer to ensure safety and a long lifetime for the cellular
phone.
1. Place the charger into an appropriate outlet that meets the
requirements of this phone. The other end is connected to
the phone. While the phone is being recharged, the screen
will automatically show the current power recharge status of
the battery via a flashing signal. The phone that is switched
on can still function normally while being recharged. Once
the recharging process is done, the flashing signal will
terminate.
2. Once the recharging process is done, the charger can be
disconnected from the phone and electrical outlet.
3. This is an international charger (Model is subject to change in
different countries). Read instructions on the charger label
before use.
4. A ‘battery low’ message will display on the screen to alert you
to a battery low condition. The phone will automatically shut
down when the battery is exceptionally low.
5. If the battery totally runs out of power, the battery needs to be
recharged at least ten minutes. Otherwise, this phone may
be difficult to be switched on.
Switching on the Phone
To switch on the phone, please hold for around 2~3
seconds. If the message “Enter PIN:” shows on the screen, the
“PIN:” code of the SIM card must be entered in (please refer to
the Manual provided by the telecom service provider for more
information). Then, press the to switch on the phone.

Basic Operation
36
PIN and PIN2 (4 to 8 digits)
A PIN (Personal Identification Number) code is stored in your
SIM card and is supplied by your SIM card network service
provider. To prevent unauthorized use, you need to enter PIN1
code each time while you switch on your phone. Enter the
correct PIN1 code and press .
Important! :
1. If a wrong PIN code is entered three
consecutive times, the phone becomes
locked or disabled. You must ask for your
network provider to use the PUK code to
unlock or enable the phone again.
2. PIN2 code is for other functions, such as
certain number dialing and barring.
PUK1 and PUK2 (8 digits)
The PUK (Personal Unblocking Key) code is required to change
a blocked PIN code. Check with your network provider for the
code. After getting the PUK1 code and unlocking the PIN1, you
can reset your PIN1.
Calling
Enter the area code and phone number, the press to dial
out a call. The prompt dialing process to reach an extension
number is to enter phone number first, pressing and holding
and until “P” shows on the screen. Then you need to
enter the extension number right this moment and press
to dial out the phone number. Apply the dialing process will
promptly reach the extension number.

Basic Operation
37
Dialing Emergency Numbers
1. Please switch on the phone first. Enter an emergency
number and press to dial out.
2. Most networks allow users to make emergency calls
without inserting a SIM card. In the case of no SIM card,
you’ll see the SOS indicator on the bottom-right corner
after switching on your phone.
3. In the case of SIM card inserted, SOS sign will be
displayed on the bottom-right corner and without enter
SOS number, press or keys to dial out.
Correcting an Entry
Pressing the will erase the last letter or number which
you entered.
Answering a Call
Your phone will ring or/and vibrate when receiving a call. Press
or to answer the call. Press to terminate
the call. If you are using an earpiece, you can press the button
of the earpiece to answer or terminate the call.
Recent Calls
The phone will record all the recent calls in which you received,
dialed, and missed. Press to access “Call logs” and then
scroll to browse all recent calls. The recent calls can
accommodate up to 30 numbers. Moreover, you can scroll
to select a number in this option to dial out by pressing

Basic Operation
38
. There are five options for you to operate: “View”,
“Delete”, “Save to Phonebook”, “Dial” and “Edit”.
Quick Dial
You may quickly search and dial a phone number stored in SIM
card after inputting the number address (SIM Card memory
address: 1~250) and pressing to get the symbol “ # ”
displaying on the screen. Then, press to dial a call.
Notice that the handset memory (NVM) doesn’t support such
function.
Holding a Call
Press to put the on-line call on hold while you make
another call. When the second call is connected, pressing
allows you to switch between these two calls.
Multiparty Calls
The multiparty service provides you with the ability to have a
simultaneous conversation with more than one caller, if your
network service provider supports this feature.
A multiparty call can only be set when you have one active call
and one call on hold, both calls having been answered. Once a
multiparty call is set up, calls may be added, disconnected or
separated (that is, removed from the multiparty call but still
connected to you) by the person who set up the multiparty call.
The maximum callers in a multiparty call are six. Once started,
you are in control of the multiparty call, and only you can add
calls to the multiparty. More to the point, this system allows a
maximum of 6-party call.
Multiparty calls feature several functions including “Swap”,
“Conference”, “Transfer”, “End Single”, “Phone book”, “SMS”,
“Sound Recorder”, “Mute”, and ‘DTMF”. Here we briefly

Basic Operation
39
introduce the multiparty operation steps in common use as
below:
1. Make a call until it is connected first (or when you are
receiving an incoming call). Next, make a second call while you
are already in a call.
2. When the two dialed calls are both connected, you can move
the cursor and press to swap between the two
connected calls. When “Swap” function is activated, one call is
on line and another is on hold.
3. You can connect a call on hold to the currently active call to
form a multiparty call by select “Conference”.
4. When you assign a call and press to select “End
Single”, it means that the handset will terminate the active call.
5. If you want to terminate all active call, press to select
“End All”.
6. When the multiparty call is active, you can press to
select “SMS” to edit and send a short message, or to select
“Phone Book” to view phone book list.
.
7. Press and select “Sound Recorder” allows you to
record the conversation of the active multiparty.
8. The other part in the multiparty can hear your voice when you
turn on “Mute” function.
9. When DTMF tones are turn on during a call, it allows your
handset to make use of an automated switchboard.
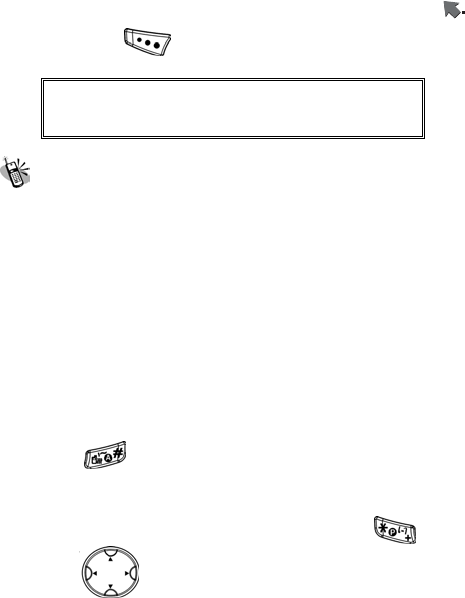
10. To put the multiparty call on hold and only connect one party,
Basic Operation
40
you can press to select “Split”.
Important! :
Make sure that you do not have a call on
hold before making a multi-party call.
Input Methods
Please read the description of input methods below, and that
can apparently help you to skillfully use input methods.
1. This phone supports various input methods. They are
Multitap ABC, Multitap abc, Numeric (123), Smart ABC,
Smart abc, Smart Thai and symbol. Of them, Smart ABC,
Smart abc, and Smart Thai are smart word choosing input
methods.
2. Only in editorial mode, you can enter desired content in
different input methods such as letters, numbers and
symbols. This mobile phone features various input fields
such as name field of Phonebook, entry search, and content
of Message and so forth.
3. Press to switch among various text input methods
including Multitap ABC, Multitap abc, 123, Smart ABC,
Smart abc, and Smart Thai.
4. If you want to add symbols to input area, press and
scroll to select your desired symbols.
5. In editorial mode, press this key to clear single character,
number, or symbol from the right to left.
6. Long press this key to clear all texts or phone numbers that
are entered.
1. Multitap ABC/abc
ABC/abc input methods are described as below:

Basic Operation
41
(1). Press a number key ( - ) repeatedly until
the desired character appears.
(2). If the next letter is located on the same key as the present
one, wait until the cursor appears, and then input the
letter.
(3). Press to change input methods.
(4). Press and then scroll to select your
desired symbols.
2. Smart ABC/abc (Smart Predictive Text
Mode)
Smart ABC/abc input methods are described as below:
(1). You can merely press letter key without selecting particular
one because Smart ABC/abc input methods enable to
smartly predict the words you want.
(2). When the predicted word completely meets your demand,
then you can press to confirm. You can choose
Smart ABC or Smart abc first and use this input methods.
Example:sister
Input Method: Smart abc
Press those keys as below:
Æ Æ Æ Æ Æ
The six input steps will bring about one word “sister” on the
screen. You can press to confirm and obtain this
input consequence. If you find that your desired word
doesn’t appear on the screen, it means that there are
probably two or more predicted word consequences. Then

Basic Operation
42
you need to press button and release it and
press to confirm after your desired word appears on
the screen.
If you want to re-highlight the whole wording, press
down key to recover it.
3. Smart Thai
Please refer “2. Smart ABC/abc” to use this input method.
4. Symbols
(1). The most common punctuation marks are available by
pressing to launch symbol table.
(2). Next, scroll to make the cursor reach the desired
punctuation mark and press to confirm.
(3). In editorial mode, if the symbol “€” is inputted, the sum of
characters to be inputted will be changed from 612 to 268.
5. Numeric
Press the corresponding numeric key to generate a number on
the screen.
Menu Function
Menu Function
Press to enter and use menu functions to meet your needs.
Phone Book
This main menu allows users not only to save names / phone
numbers in the SIM / handset, but also to proceed with the
following submenu functions: Quick Search, Search Record, Add
New Record, Copy All, Delete All, Caller Group, Extra Number,
and Settings. The handset memory module has 10 fields, and
SIM module 2 fields for content editing or new entry. You can
scroll to move cursor to those fields to enter your
desired content and then press to save. If you want to
access the submenu, press left/right key. After entering
the content, press to save or to discard this
record.
Quick Search
1. Press to enter this submenu and you can view a phone
number list.
2. Scroll and then select one record saved in the
phonebook and press execute the following functions:
1. View
Access this function to view a number record’s detailed data
saved in SIM or the handset memory. The saved data In SIM are

Menu Function
name and number and in the handset include name, number,
home number, company name, e-mail address, office number, fax
number, associate picture, associate sound and caller group.
2. Edit
All saved number records’ detailed data are editable. Users can
edit or revise those data and then press to save. For
details on Input Methods, please see page. 39.
3. Delete
When you press to select this option and want to delete a
signal or all , pop-up window will queries if you want to delete the
number record. You can press to delete or press
to cancel.
4. Copy
You can select a single or all number records saved in SIM and
press to copy it to the handset memory and vice versa.
5. Move
You can select one number record saved in SIM and press
to move it to the handset memory and vice versa.
6. Duplicate
You can select one phone record and duplicate it to the same
memory.
Search Entry
1. Search
Aside from quick search, this handset also enables users to
search number records by inputting text to search phone. When

Menu Function
the search entries are implemented, please press to
search or select input methods. And then the handset screen will
display the most similar or the same phone number. Please refer
Quick Search on page 42 to execute the functions in this option.
Add New Entry
1. You need to select SIM or phone as the storage location of
new number records.
2. New entries of a new number record in phone memory include
name, number, home number, company name, e-mail address,
office number, fax number, associate picture, associate sound
and caller group. There are only two new fields to be inputted in
SIM.
3. You will need to enter both the phone number and name since
no data will be saved if you leave any of these two items in
blank. .
4. You can select and switch input methods in the fields of name,
company name and E-mail address. For details on Input
Methods, please see page. 39.
5. You can add or select content in the fields of Home Number,
Company Name, E-mail Address, Office Number, Fax Number,
Associate Picture, Associate Sound and Caller Group. However,
if you leave any of these above fields empty, no data can be
saved.
6. Enter E-mail address into the field. Press to search
underscore ”@”, ”_”, and dot ”.” and input them into E-mail
field.
7. When you want to add an associate picture in a new phone
Menu Function
number as a caller picture, you can scroll to choose
one of the default four pictures. Press to view associate
pictures.
8. You may assign an associate sound to a new phone number,
and so you can identify it next time when it comes in. There are
20 default MIDI sounds accessible for your choice by pressing
.
9. You may assign a caller group to a new phone number so you
can identify it next time when it comes in. There are six default
choices Friend, Family, VIP, Business, Others and None. Scroll
to select one of them as a caller group.
10. When you edit and select all fields, press to save and
set a new phone number record.
Copy All
You may use this function to copy all phone records from SIM or
handset memory. For example, when you select “From SIM”, then
all phone records saved in SIM will be copied to the phone.
Delete All
1. From SIM
Please input password before deleting all saved phone records
from SIM.
2. From Phone

Menu Function
Please input password before deleting all saved phone records
from Phone.
3. One by One
Access this option to delete saved phone records one by one.
Caller Group
In this option, users can select Friends, Family, VIP, Business and
Others as their caller groups. Scroll and select one
caller group and press to set. When you are trying to
change caller groups settings of one certain phone number, its
sequence and content in phone book list won’t be varied.
Extra Number
In this option, you can view Owner Number, Service Dial Number
and SOS Number. Owner Number can be edited and erased..
Settings
1. Memory Status
This option provides inquiry about the total number of records and
the empty spaces left for the phone records in the current SIM and
the memory of the handset. At this stage, a maximum memory
capacity is 250 sets in the handset. Note that the memory
capacity of a SIM card supplied by various telecom service
companies could be different.
2. Preferred Storage
In this option you can select SIM or Phone and press as
your preferred storage of phone records.

Menu Function
3. Fields
The option allows you to enable or disable the following field
coming with Home Number, Company Name, E-mail Address,
Office Number, Fax Number, Associate Picture, Associate Sound
and Caller Group.
Messages
This phone allows you to enjoy sending and receiving a variety of
messages. Please contact with your network and telecom service
provider for more details on which services you can use. Press
to access this menu and further press to access
the submenu’s options as below.
Write Message
1. Done
Press to write a new message. When you have written
the message already, you can press (Done) to choose
the further options including “Send Only”, “Save and Send”,
“Save”, “Send to Many”, and “Send by Group”. For details on
Input Methods, please see page. 39.
2. Use Template
This option provides you with a variety of templates (such as use
of greetings or common expressions). You can simply scroll
and press to select your desired template type,
and then press to confirm.
3. Insert Object

Menu Function
If you would like to make your own message more interesting, you
can scroll and then press to insert objects
(Pictures/ Predefined Animation/ Melody/ Predefined Sound) into
the message. When you select the desired items, press
to confirm.
4. Format Text
Access this option to select and adjust these options below:
~ Te xt Si z e
Three text size options: Small, Medium, and Large.
~ Te xt St y le
Four text style options: Bold, Italics, Underline, and
Strikethrough.
~ Alignment
Four alignment options: Automatic, Left, Center, and Right.
~ New Paragraph
Four new-paragraph options: Automatic, Left, Center, and
Right.
5. Input Methods
The input methods supplied by this handset include Multitap
ABC, Multitap abc, Smart ABC, Smart abc, Numeric, Smart
Thai and Insert Symbols. For details on Input Methods, please
see page. 39.
Inbox
When you access the inbox, you will see a list of all received
messages (saved in the memory of both the phone and the SIM
card) displayed on the screen, including the senders, sent time
and the message content. All unread messages will be indicated
with the” ” icon. Press to select and display the content

Menu Function
of a message on the screen. For multiple-page messages, you
can scroll to read the entire message. Press to
select more message options, including “Reply”, “Delete”, “Edit”,
“Forward”, and “Use Number”.
Outbox
This option functions the same as inbox. After editing a message ,
you can select “send & save” to send and save it to SIM or the
handset at your will. Or you can merely save this message by
selecting “save”.
Delete
In this option, you can select delete messages as below:
~ Delete Inbox
~ Delete Outbox
~ Delete All
Similar to the delete function above, press and you will be
prompted to confirm whether to delete the selected message from
inbox or outbox.
Template
In this option you can select template for use in delivering short
messages.
Message Settings
~ Profile Settings
This option functions as service center (SMSC) that allows you to
select SMSC 1 and SMSC 2. Next, you can enter either of the two
profiles to edit and write the following items:

Menu Function
(1). Profile Name:
You can edit the profile name of the two SMSC and press
to confirm.
(2). SC (Service Center) Address:
You can change the SC address to a new one and press
to confirm.
(3). Valid Period:
You can scroll to select valid period ranging from
1hour, 12 hours, 1 day, 1 week and maximum/
(4). Message Type:
You can select your desired message types including Text, Fax,
Page, and E-mail.
~ Common Settings
In this option you can enable/disable “Delivery Report” and “Reply
Path”. When you enable “Reply Path” function, your SMS receivers
can know the SMS delivering service center as well as a tracking
path and are able to reply your sent messages.
~ Memory Status
This option allows you to check the total percentage of used
message storage currently on both the phone and the SIM card.
Message will be saved into the phone by default, and will be saved
into the SIM card once the phone is full.
~ Preferred Storage
You can assign SIM or phone (NVM) as your preferred message
storage.
Voice Mail Server
There are a default voice mail servers for you to edit, erase, and
connect to voice.
Broadcast Message
Menu Function
The network operator sends broadcast messages to all users in a
certain area. Please contact your network operator for more details
on whether they provide this service.
~ Receive Mode
You can set this option as the following modes:
٭ Off
If you select this menu, your phone will not receive broadcast
messages any more.
٭ List Only
If you select this menu, your phone will receive broadcast
messages sent only by those channels listed on the screen.
٭ All Channels
If you select this menu, your phone will receive broadcast
messages sent by all channels.
~ Read Message
Enter this option to read broadcast message. If there is no
message left, the pop-up window will display “Empty”.
~ Languages
Enter this option to turn on / off all languages. Or you can select
specific languages existing in the SIM card you are using. Please
notice that various SIM cards provide various language options.
~ Channel Settings
Channels are selectable and can be set for users to receive their
broadcast messages. The resources of those broadcast messages
are provided by the telecom service companies themselves or
come from their cooperated companies such as TV, radio stations,
etc.
(1). Select:
You can set all channels or select a certain channel from
channel list as the channel to receive your broadcasting
messages.
(2). Add:

Menu Function
You can add a new channel. Channel title and ID (3 digits)
should be created.
(3). Edit:
You can select one channel you set to edit its title and ID and
press to save.
(4). Delete
You can select one channel you set and press delete
it.
Call List
This menu records the charge info and the length of time or
duration of all incoming and outgoing calls in hours, minutes, and
seconds. Please contact with your telecom service provider for
more charge information.
Missed Call
In this menu, the screen will display all the missed calls. You can
scroll to select missed calls and press to
execute the following optional functions comprising “view”,
“Delete”, “Save to Phone book”, “dial”, and “edit”.
1. View
in this option you can view the miss call info coming with date,
time, phone number, and miss called times.
2. Delete
You can press yes key to delete this missed call or press
to abort deletion.
3. Save to Phone book

Menu Function
Press to save this missed call to SIM or phone. You can
press to edit the info and press again, or press
to save it.
4. Dial
Move cursor to this option and press to dial.
5. Edit
In this option you can edit the info and save it.
Dialed Calls
List all of dial-out calls. The function is the same with above.
Received Calls
List all of answered calls. The functions are the same with above.
Delete Call Log
In this option, you can select and delete call log as below:
Missed Calls, Dialed Calls, Received Calls, Delete All
Call Time
This menu records the charge info and the length of time or
duration of all incoming and outgoing calls in hours, minutes, and
seconds.
1. Last Call Time
This submenu displays the duration of the last call.
2. Total Dialing
This submenu displays the total duration of all dialing calls.

Menu Function
3. Total Received
This submenu displays the total duration of all received calls.
4. Reset All Time
Accesses this option to reset all call time.
Call Cost
1. Last Call Cost
In this option you can view the last call cost info.
2. Total Cost
This submenu displays the total charge of all calls.
3. Reset Cost
You need to input correct PIN2 password number before reset
cost.
4. Max Cost
This allows you to set a maximum limit to your total cost. You can’t
dial any number if you go over your limit until the total charge has
been reset. As similar to total charge, you need to enter PIN2 for
settings.
5. Price Per Unit
This allows you to enter the unit price. After entering your PIN 2
code you can input price and unit. Pressing allows you to
select different entry fields.
Settings

Menu Function
Phone Setup
1. Time and Date
~ Set Home City
Select one city listed in the screen and press to confirm.
~ Set Time/Date
Access this option and input time and date.
~ Set Format
You can set time and date format
Time Format:
12 Hours
24 Hours
Date Format:
DD / MM / YYYY
MM / DD / YYYY
YYYY / MM / DD
YYYY - MM - DD
MMM DD, YYYY
DD – MMM – YYYY
Important! :
A text window will pop up to remind users to
input new time and date when the handset is
powered off for a long time. This pop-up
reminder can show up only when the SIM is
inserted.
2. Schedule Power On/Off
There are four default schedules available to be setup power on
or power off status. Select one schedule and execute the
functions below
~ Status
You can enable or disable the schedule.
~ Power Settings
Menu Function
You can scroll to set up power-on or power-off
schedule.
~ Time Settings
You need to input time and press to confirm the time
settings.
3. Language
Access this option to select English or Thai as the language used
in the handset.
4. Preferred Input Methods
Select your preferred input methods from the list.
5. Display Characteristic
Select and set up the display characteristic as below description:
~ Wallpaper
Scroll to select your desired wallpaper from Image
1-5, analog clock and digital clock.
~ Screen Saver
٭ Settings
■ Status
Scroll to set up screen saver in On or Off status.
■ Waiting
Set up waiting time of 5 Sec., 15 Sec. or 30 Sec.
Menu Function
٭ Select
Select Image 1-5, Analog Clock or Digital Clock as your screen
saver.
~ Show Date and Time
Press to turn On/Off of the function
~ Show Owner Number
Press to turn On/Off of the function
~ Show Operator Name
Press to turn On/Off of the function
6. Contrast
Scroll and press to adjust the shading value of
screen.
7. Greeting Text
In this option, you can setup the greeting text status and edit the
content of the greeting text.
~ Status
Scroll to set up greeting text in On or Off status.
~ Greeting Text
Press to edit greeting text and press again to
select input methods or save it. For details on Input Methods,
please see page. 39.
8. Speed Dial
~ Enable Speed Dial
You need to setup On or Off to enable/disable speed dial

Menu Function
function.
~ Set Number
There are eight default speed dial number settings in this option.
You can assign number keys 2-9 and input phone numbers in
them. When you have assigned and set up the numbers for speed
dial, you can long press one of the assigned number keys and
speedily dial out the number you set in standby mode.
9. Navigation Key
In this option you can scroll Up, Down, Left and Right,
and press to select a total of 29 functions. For example, if
you set audio profile as the up key shortcut, you can press the up
key to promptly enter audio profile in standby mode.
10. Auto Update of Date and Time
You can press to turn On/Off to enable/disable this
function.
Call Setup
1. Caller ID
Caller ID represents your own phone number. You can set “hide
ID” so that your number won’t be seen. Oppositely, ”Send ID”
means your number will appear when you are making a call.
~ Set by Network
When you press to select this option, you can you’re your
phone number depending on two line service such as line 1 and
line 2.
~ Hide ID
Menu Function
You can press to hide your phone ID when you dial.
~ Send ID
You can press to send your phone ID when you dial.
2. Call Waiting
In this option you can scroll and select and set call
waiting function from the following options below:
~ Activate
When activating call-waiting function, you will be alerted by audio
and video signals right after another call is coming in during
making a call.
~ Deactivate
If you deactivate this function, the phone won’t alert you of
another incoming call but directly divert that call to other number
or your voice mailbox.
~ Query Status
It reports current status for Activate or Cancel.
3. Call Divert
~ Divert All Voice Calls
Diverts voice calls unconditionally. You can activate or deactivate
this function. Or you can view the current status for this function.
~ Divert If Unreachable
Diverts voice calls when the phone is switched off or out of
converge. You can activate or deactivate this function. Or you can
view the current status for this function.
~ Divert If No Answer
Diverts voice calls that you do not answer. You can activate or
deactivate this function. Or you can view the current status for this
function.
Menu Function
~ Divert If Busy
Diverts voice calls when the phone is in use. You can activate or
deactivate this function. Or you can view the current status for this
function.
~ Cancel All Divert
You can access this option to cancel all call divert service.
4. Call Barring
~ Outgoing Calls
You can activate or deactivate this function to bar all out calls
(except emergency call) with this function. Or you can view the
current status for this function.
~ Incoming Calls
You can activate or deactivate this function to bar all ingoing calls
with this function. Or you can view the current status for this
function.
~ Cancel All
You can cancel all barred calls in this option.
~ Change Barring PW
When you want to change barring password, remember to press
old password at first and then press a new password. And don’t
forget new password you have set up.
5. Line Switching
L1 and L2 mean there are two available phone numbers that both
support dialing and receiving functions. Some telecom service
companies provide SIM card with dual phone numbers. That is, if
your SIM card has such function, you can enter this option to set
your phone records into two groups (ex. Office and family)
separately located in the two numbers of the same SIM card. And
you can switch line1 or line 2 as your phone dialing line and
answering line.
6. Call Time Reminder

Menu Function
In this option, you can select off, single or periodic as call time
reminder.
7. Call Time Display
In this option you can turn On/Off to enable/disable call time
display.
8. Auto Redial
Turn On/Off to enable/disable auto redial.
Network Setup
1. Network Selection
You can set network selection by automatic or manual function
in this option.
2. Preferred Networks
Network List
~ Add from List
You can add a preferred networking service provide from the list.
~ Create New
When you try to create a new network, you need to input
MCC/MNC number and select priority level shown as below
* MCC/MNC:
Input the MCC/MNC number
* Priority:
Scroll to select priority 1or priority 2.
~ Change Priority
When you have more than one network services, you can select
one and change its priority.
~ Delete

Menu Function
In this option you can press to select one network service.
3. Band Selection
Choose one of the band types below as your phone band.
~ 900
~ 1800
~ Dual Band
Security Setup
1. SIM Lock
You can access this option and input security password to luck
SIM. This feature is designed to prevent somebody else from
using your lost or stolen SIM card(s). When the SIM is locked, you
have to input SIM password and press after pressing
to switch on the handset.
2. Phone Lock
You can press and to manually lock and unlock
the phone.
3. Auto Keypad Lock
Access this option to select auto-keypad-lock modes include
“None”, “5 sec.”, “30 sec.”, “1 min.” and ”5 min.”.
4. Fixed Dial
You can restrict your outgoing calls to selected phone numbers.
The numbers are protected by your PIN2 code.
~ Mode
You need to input the correct PIN2 to set On or Off for this
function. When the Mode is On, only selected fixed phone

Menu Function
numbers can be dialed.
~ Fixed Dial List
The default of the list is empty. You can add a new fixed dial
phone numbers by writing the name and phone number and then
inputting PIN2. You can edit and delete the records in the list. (It
also needs the PIN2 number).
5. Barred Dial
Your SIM needs to support this function.
~ Mode
You need to input the correct PIN2 so as to enable this function.
~ Barred Dial List
There is a barred dial list where your can select one barred-dial
number and dial it out. (It needs the PIN2 number).
6. Change Password
PIN is an abbreviation of Personal Identification Number used to
prevent use by only unauthorized person. You can change the
following passwords when necessary.
~ PIN
Make sure that you have PIN enabled. You need to input original
PIN password first. Next, input new PIN code to verify them, and
input new password again to ensure PIN is changed successfully.
~ PIN2
You need to input original PIN2 password first. Next, input new
PIN2 code to verify them, and input new password again to
ensure PIN2 is changed successfully.
~ Phone Lock Password
Please input old password and then change it to a new one.
Restore Factory Settings
In this option, you may decide whether you want to convert the
settings of your handset to the reset settings. Notice that the

Menu Function
original the original password for this option is “1122”
Fun & Games
Game
1. F1 Race
~ Start Game
Press to start F1 (Formula 1) Race. Press numeric keys
, , , and to carefully steer your race
car to prevent it from hitting others. Moreover, you and press
to enable your race car to fly. During the race you can
press to pause and resume the game with one more
press of this key. Try to beat your opponents to get higher
scores and levels, and be daringly fast but don't lose control of
your super acceleration. The game is over and game scores will
show on the screen right after your race car is hit by other
opponents.
~ Best Grades
Press to view the best score shown on the screen. If you
need to reset the best score, press .
~ Game Help
Please refer to detail info in this handset.
2. Snake
~ Start Game
Press to start Snake. Press numeric keys , ,
Menu Function
, and to carefully steer the snake to prevent from
hitting the wall and try to get the eggs to accumulate scores.
~ Game Level
Scroll and press to select game levels: Easy,
Normal and Hard.
~ Best Grades
Press to view the best score shown on the screen. If you
need to reset the best score, press .
~ Game Help
Please refer to detail info in this handset.
Game Settings
1. Game Audio
Scroll to set the game audio in On/Off status.
2. Game Vibration
Scroll to set the game vibration in On/Off status.
User Profile
There are five profiles (General, Meeting, Outdoor, Indoor and
Headset) to meet your different needs. Select a desired profile
and push “Activate” to enable profile function. If you want to
personalize the profile, launch “Customize” menu and select the

Menu Function
item you want to personalize.
General
You can change the settings of the follow profiles with this
function.
1. Activate
Activate the settings of the profile you want.
2. Customize
~ Tone Setup
(1). The handset provides 20 sets of MIDI sound available to set
in Incoming Call and Alarm.
(2). You can select silent mode or choose tone 1-10 to set Power
On, Power Off and Message Tone.
(3). In Keypad Tone option, there are three modes for your setup
selections: Silent, Click, and Tone.
~ Volume
First scroll and press to select Ring Tone or
Key Tone and then use to adjust volume.
~ Alert Type
Select on of the four alert types below and press to set.
■ Ring
■ Vibration Only
■ Vibra and Ring
■ Vibra Then Ring

Menu Function
~ Ring Type
Select on of the three ring types below and press to set.
■ Single
■ Repeat
■ Crescendo
~ Extra Tone
You can press to set On/Off of the four extra tones below.
These tones can be set On to timely remind users of real
condition of mobile phones. There are four extra tones in the
phone.
■ Warning
Warning tone will sound when remind users of improper action
such as pressing to save a new phone record without
writing the name and inputting phone number in the blank fields.
■ Error
Error tone will sound when an error step was taken, and a pop-on
message with a punctuation mark “ ! “ is displayed on the screen.
■ Camp on
This tone will sound when the handset is successfully connected
to the telecom service company and reach the signal.
■ Connect
This tone will sound when an incoming call comes.
~ Answer Mode
In this option, you can enable or disable Any Key function. When
any key function is enabled, you can press any key to answer an
incoming call.
~ LCD Backlight

Menu Function
■ 5 Sec
■ 15 Sec
■ 30 Sec
■ 45 Sec
Meeting
The default tone of this profile is silence. All further settings and
selections in the option are the same as General. Please refer to
General.
Outdoor
All further settings and selections in the option are the same as
General. Please refer to General.
Indoor
All further settings and selections in the option are the same as
General. Please refer to General.
Headset
Plugging in earpiece can automatically activate “customize” menu
functions.
PIM
A variety of functions are available as your presonal convenient
tools
Calendar
You may scroll until the cursor moves to the desired
Menu Function
date. In addition, you can press to select Jump to Date
and input the date you want to check.
Alarm
There are three sets of alarm for your time settings. Select one
alarm and press and then scroll to execute start
time settings as below:
1. On/Off
Scroll to turn on/off alarm clock function.
2. Time Settings
Input the alarm time from hour (left) to minute(right).
3. Repeat
You can press to select repeats of alarm function as
below.
Then you press done key to set alarm repeat mode.
Press to terminate the function.
~ Once
When you select once, the handset alarm will work only once.
~ Everyday
When you select Everyday, the handset alarm will work everyday.
~ Days
When you select Days, press to set day alarm on/ off
from Sunday to Saturday.

Menu Function
World clock
In this option, you may scroll to browse the current time
in different countries/cities all over the world.
Sound Recorder
After accessing this option, Scroll and press to
select and execute the following functions below:
1. Record
Press to start sound recording. You can press to
pause/continue the record process or press to stop.
2. Play
You can select one saved sound file and press to play it.
3. Append
This function is given for you to do the practice of sound recording.
4. Rename
You can select a file and rename it.
5. Delete
You can select a sound file and delete it.
6. Delete all
You can delete all sound files.
STK (SIM TOOL KIT).
This selection menu can be displayed if your SIM card supports

Menu Function
Value-added Services. Regarding the details as to how to use
SIM services, as well as price and other information, please
contact your telecom service company.
Important:
Your telecom service provider offers the
STK service. Your telecom service provider
defines the name of menu, title, and content.
Due to the content size may be too big to fit
into the screen of your mobile phone; some
of text may not be displayed.
Shortcuts
Enter this function menu to see default shortcut functions in
sequence as below:
Search Entry, Inbox, Write Message, Missed Calls, Received
Calls, Tone Setup, Alarm, Alert Type, Call Divert and Audio Profile.
You can change shortcuts to Add New Entry, Owner Number,
Caller Group, Memory Status, Preferred Storage, Outbox, Voice
Mail Server, Dialed Calls, Schedule Power On/Off, Preferred Input
Methods, Greeting Text, Phone Lock, Auto keypad Lock,
Wallpaper, Screen Saver, Contrast, Calendar, and Browse City.

73
Battery
The battery is rechargeable up to hundreds of times, but its
capacity will reduce. You may need to replace a new battery
when the operation duration (calling and standing duration)
reduces evidently.
Remove charger from the source each time after charging.
Over charging will shorten the life of the battery. Avoid
charging a battery for over 24 consecutive hours.
Use only batteries certified by the mobile phone
manufacturer.
Extreme temperatures will affect charging performance. The
desirable ambient temperature for charging is 0°C-45°C
(32°F-113°F).
Do not use damaged or old batteries.
Avoid contacts of the positive and negative poles of the
battery with metals, such as coins, scissors, and pens. It will
damage or cause short circuit to the battery. Place spare
batteries in a safe place or wrap them up with insulated
materials before putting inside your pocket or handbags.
Extreme temperatures will reduce the capacity or shorten the
life of batteries. Avoid placing batteries in extreme
temperatures, such as inside vehicles or near air-conditioner
outlets. The desirable battery storage temperature is
15°C-25°C (59°F-77°F). Batteries that have been charged
may not work properly in extreme temperatures.
Keep batteries away from water or fire.
Dispose batteries according to local environmental
regulations.

74
Care and Maintenance
Follow the instructions below to take care of your mobile phone.
They will help you to enjoy life with this product.
Keep the mobile phone and its accessories out of children’s
reach.
Keep the mobile phone dry; away from rain, moisture and
liquid contain minerals that will corrode the circuit of the
mobile phone.
Keep the mobile phone away from dirt or dust.
Keep the mobile phone away from heat. Heat will shorten the
lifespan of electronics, damage the batteries, or even deform
or corrode the shell of the mobile phone.
Keep the mobile phone away from coldness. Condensation
takes place and the moisture will damage the circuit board
when the mobile phone resumes normal temperature.
Do not open the mobile phone. Non-professional treatment
may cause damage to the mobile phone.
Avoid falling, impact or vibration of the mobile phone.
Improper external force may damage the circuit of the mobile
phone.
Do not clean the mobile phone with chemical solutions or
detergents. Gently wipe the shell of the mobile phone with a
soft cotton cloth and clear water or mild soap.
Use accessories and batteries from the manufacturer.
Contact your nearest service station if the mobile phone is out
of order. Our well-trained technicians will provide you the best
service.

75
FCC Regulations
Conditions of Use
Operation of this TGH mobile phone is subject to the following two
conditions; (1) this device may not cause harmful interference, and (2)
this device must accept any interference received, including
interference that may cause undesired operation.
This TGH mobile phone generates, uses and can radiate radio
frequency energy and, if not installed and used in accordance with the
instructions, may cause harmful interference to radio communications.
If this device does cause harmful interference to radio or television
reception, which can be determined by turning the device on and off,
the user is encouraged to try to correct the interference by one or more
of the following measures:
1). Reorient or relocate the receiving antenna.
2). Increase the distance between the device and receiver.
3). Connect the device into an outlet on a circuit different from that to
which the receiver is connected.
4). Consult the dealer or an experienced radio/TV technician for help.
The radiated output power of this internal wireless radio is far below
the FCC radio frequency exposure limits. Nevertheless, the wireless
radio shall be used in such a manner that the radio is 1.5 cm or further
from the human body. However, the user of wireless radios may be
restricted in some places or situations, such as aboard airplanes. If
you are unsure of restrictions, you are encouraged to ask for
authorization before turning on the wireless radio. Several restrictions
and cautions of using mobile phone are listed in the Safety.

76
FCC RF Exposure Information
Read this information before using your handset
In August 1996 the Federal Communication Commission (FCC) of
the United States with its action in Report and Order FCC 96-326
adopted an updated safety standard for human exposure to radio
frequency (RF) electromagnetic energy emitted by FCC regulated
transmitters. Those guidelines are consistent with the safety
standard previously set by both U.S and international standards
bodies. The design of this phone complies with the FCC guidelines
and these international standards.
Use only the supplied or an approved antenna. Unauthorized
antennas, modifications, or attachments could impair call quality,
damage the phone, or result in violation of FCC regulations.
Do not use the phone with a damaged antenna. If a damaged
antenna comes into contact with the skin, a minor burn may result.
Please contact your local dealer for replacement antenna.
Body-worn Operation
This device was tested for typical body-worn operations. To comply
with FCC RF exposure requirements, a minimum separation
distance of 1.5 cm must be maintained between the user’s body
and the handset, including the antenna. Third-party belt-clips,
holsters, and similar accessories used by this device should not
contain any metallic components. Body-worn accessories that do
not meet these requirements may not comply with FCC RF
exposure requirements and should be avoided.
For more information about RF exposure, please visit the FCC
website at www.fcc.gov
P/N:HDZL200100