Compaq Deskpro 2000 Users Manual Maintenance & Service Guide
Deskpro 2000 to the manual ba3e155c-cf5b-45a3-9d6d-d3f46935fa5b
2015-02-03
: Compaq Compaq-Deskpro-2000-Users-Manual-468387 compaq-deskpro-2000-users-manual-468387 compaq pdf
Open the PDF directly: View PDF ![]() .
.
Page Count: 269 [warning: Documents this large are best viewed by clicking the View PDF Link!]
- NOTICE
- CONTENTS
- PRODUCT DESCRIPTION
- COMPAQ UTILITIES
- 2.1 Getting Ready
- 2.2 Computer Setup
- 2.3 Computer Checkup (TEST)
- 2.4 View System Information (INSPECT)
- 2.5 Create a Diagnostics Diskette
- 2.6 Managing the Diagnostics Partition
- 2.7 Exiting the Compaq Utilities Menu
- 2.8 Compaq Enhanced Insight Personal Edition (Diagnostics for Windows)
- 2.9 Power-On Self-Test (POST)
- 2.10 ROMPaq
- 2.11 Compaq Intelligent Manageability
- ILLUSTRATED PARTS CATALOG
- REMOVAL AND REPLACEMENT PRELIMINARIES
- REMOVAL AND REPLACEMENT PROCEDURES - DESKTOP
- 5.1 Serial Number
- 5.2 Disassembly Sequence Chart
- 5.3 Preparation for Disassembly
- 5.4 Feet
- 5.5 Cable Lock
- 5.6 System Unit Cover
- 5.7 Speaker
- 5.8 Expansion Board
- 5.9 System Board Components
- 5.10 Riser Board
- 5.11 Riser Brace
- 5.12 Expansion Board Guide
- 5.13 Replacement Battery
- 5.14 Front Bezel Assembly
- 5.15 Power Supply Assembly
- 5.16 Mass Storage Devices
- 5.17 Drive Cage
- 5.18 LED Cable
- 5.19 System Board
- REMOVAL AND REPLACEMENT PROCEDURES - MINITOWER
- 6.1 Serial Number
- 6.2 Disassembly Sequence Chart
- 6.3 Preparation for Disassembly
- 6.4 Feet
- 6.5 Cable Lock
- 6.6 Exposing the Chassis
- 6.7 Riser Brace
- 6.8 Expansion Board
- 6.9 Expansion Board Guide
- 6.10 Riser Board
- 6.11 Speaker
- 6.12 System Board Components
- 6.13 System Board
- 6.14 Replacement Battery
- 6.15 ISA Option Board Retainer
- 6.16 Front Bezel Assembly
- 6.17 Power Supply Assembly
- 6.18 LED Cable
- 6.19 Mass Storage Devices
- JUMPER AND SWITCH INFORMATION
- SPECIFICATIONS
- CONNECTOR PIN ASSIGNMENTS
- POWER CORD SET REQUIREMENTS
- HARD DRIVES
- DIAGNOSTIC ERROR CODES
- POST ERROR MESSAGES
- TROUBLESHOOTING WITHOUT DIAGNOSTICS
- INTEL 440LX CHIPSET MEMORY LIMITATIONS
- INDEX
MAINTENANCE
& SERVICE GUIDE
Compaq Deskpro 2000
Series of Personal Computers
Pentium Processor with MMX Technology
and Pentium II Processor
September 1997 Edition

278041-001
278785-002

Notice
The information in this guide is subject to change without notice.
COMPAQ COMPUTER CORPORATION SHALL NOT BE LIABLE FOR TECHNICAL OR
EDITORIAL ERRORS OR OMISSIONS CONTAINED HEREIN; NOR FOR INCIDENTAL
OR CONSEQUENTIAL DAMAGES RESULTING FROM THE FURNISHING,
PERFORMANCE, OR USE OF THIS MATERIAL.
This guide contains information protected by copyright. No part of this guide may be photocopied
or reproduced in any form without prior written consent from Compaq Computer Corporation.
1997 Compaq Computer Corporation.
All rights reserved. Printed in the U.S.A.
Compaq, Deskpro
Registered U. S. Patent and Trademark Office.
Microsoft, MS-DOS, and Windows are registered trademarks of Microsoft Corporation.
The software described in this guide is furnished under a license agreement or nondisclosure
agreement. The software may be used or copied only in accordance with the terms of the
agreement.
Product names mentioned herein may be trademarks and/or registered trademarks of their
respective companies.
Maintenance and Service Guide
Compaq Deskpro 2000 Series of Personal Computers
Pentium Processor with MMX Technology
and Pentium II Processor
Second Edition (September 1997)
Part Number 278785-002
Spare Part Number 278041-001
Compaq Computer Corporation

CPS

Contents iii
CONTENTS
preface
About this Guide
Symbols and Conventions............................................................................................ ix
Technician Notes........................................................................................................... x
System Serial Number................................................................................................... x
Locating Additional Information .................................................................................. x
chapter 1
Product Description
1.1 Compaq Deskpro 2000 Series of Personal Computer Models...........................1-2
1.1.1 Desktop Models.....................................................................................1-2
1.1.2 Minitower Models.................................................................................1-2
1.2 Features ..............................................................................................................1-3
1.2.1 Pentium System Feature Summary .......................................................1-3
1.2.2 Pentium II System Feature Summary....................................................1-3
1.2.3 Features Common to Both..................................................................... 1-4
1.3 System Design.................................................................................................... 1-5
1.3.1 Design Overview...................................................................................1-5
1.3.2 System Board ........................................................................................1-6
1.3.3 Processor ...............................................................................................1-6
1.3.4 System Memory ....................................................................................1-6
1.3.5 Cache Memory...................................................................................... 1-6
1.3.6 Graphics Controllers ............................................................................. 1-7
1.3.7 Chipsets................................................................................................. 1-7
1.3.8 System I/O............................................................................................. 1-8
1.3.9 System BIOS.........................................................................................1-8
1.3.10 Expansion Slots.....................................................................................1-9
1.3.11 Power Supply ........................................................................................1-9
1.3.12 Diskette Drive Interface ........................................................................1-9
1.3.13 Serial Port.............................................................................................. 1-9
1.3.14 Parallel Port...........................................................................................1-9
1.3.15 System Security................................................................................... 1-10
1.3.16 Keyboard/Mouse Controller................................................................ 1-10
1.3.17 Real-Time Clock and CMOS RAM.................................................... 1-10
1.3.18 Power Supply Fan ...............................................................................1-10
1.3.19 Speaker................................................................................................1-10
1.3.20 Software ..............................................................................................1-10
1.3.21 Ordering Additional Operating System Drivers..................................1-11
1.3.22 Intelligent Manageability .................................................................... 1-12
1.4 Desktop Computer Features............................................................................. 1-14

iv Contents
1.4.1 Front Panel Controls and LEDs ..........................................................1-14
1.4.2 Drive Positions.................................................................................... 1-15
1.4.3 Rear Panel Connectors ........................................................................1-16
1.5 Minitower Computer Features..........................................................................1-17
1.5.1 Front Panel Lights and Controls.......................................................... 1-17
1.5.2 Drive Positions.................................................................................... 1-18
1.5.3 Rear Panel Connectors ........................................................................1-20
1.6 Enhanced Keyboard ......................................................................................... 1-22
1.7 Options ............................................................................................................. 1-24
1.7.1 Cache Upgrade.................................................................................... 1-24
1.7.2 System Memory .................................................................................. 1-24
1.7.3 Audio Upgrade.................................................................................... 1-24
1.7.4 Mass Storage Options.......................................................................... 1-24
1.7.5 Monitor Options.................................................................................. 1-25
1.7.6 Graphics Controllers and Memory Options ........................................ 1-25
1.7.7 Serial/Parallel Interface Board ............................................................1-25
1.7.8 PD-CD Drive....................................................................................... 1-26
1.7.9 Modems............................................................................................... 1-26
chapter 2
Compaq Utilities
2.1 Getting Ready.....................................................................................................2-1
2.1.1 Preparing the Computer ........................................................................2-1
2.1.2 Create a Diagnostics Diskette ..............................................................2-2
2.1.3 Accessing the Compaq Utilities Menu.................................................. 2-2
2.2 Computer Setup.................................................................................................. 2-3
2.2.1 Security Features...................................................................................2-5
2.2.2 QuickLock/QuickBlank ........................................................................ 2-9
2.3 Computer Checkup (TEST) .............................................................................2-10
2.4 View System Information (INSPECT)............................................................. 2-11
2.5 Create a Diagnostics Diskette........................................................................... 2-12
2.6 Managing the Diagnostics Partition ................................................................. 2-12
2.7 Exiting the Compaq Utilities Menu .................................................................2-13
2.8 Compaq Enhanced Insight Personal Edition (Diagnostics for Windows)........2-13
2.9 Power-On Self-Test (POST) ............................................................................2-13
2.10 ROMPaq........................................................................................................... 2-14
2.11 Compaq Intelligent Manageability...................................................................2-15
2.11.1 Asset Management.............................................................................. 2-15
2.11.2 Fault Management............................................................................... 2-16
2.11.3 Security Management..........................................................................2-17
2.11.4 Configuration Management................................................................. 2-18
2.11.5 Integration Management ..................................................................... 2-24
2.12 Protecting Your Software.................................................................................2-26
2.12.1 Ordering Backup Diskettes ................................................................. 2-26
2.12.2 Restoring Your Hard Drive in Windows 95........................................2-27
2.13 Prefailure Warranty..........................................................................................2-27

Contents v
chapter 3
Illustrated Parts Catalog
3.1 System Unit........................................................................................................ 3-2
3.2 Mass Storage Devices ........................................................................................ 3-6
3.3 Cables................................................................................................................. 3-8
3.4 Standard and Optional Boards.......................................................................... 3-10
3.5 Keyboards.........................................................................................................3-14
3.6 Monitors ........................................................................................................... 3-16
3.7 Miscellaneous Hardware Kit............................................................................ 3-19
3.8 Miscellaneous Plastics Kit ...............................................................................3-20
3.9 Miscellaneous Parts.......................................................................................... 3-22
3.10 Shipping Boxes ................................................................................................3-24
3.11 Documentation................................................................................................. 3-25
3.12 Software ........................................................................................................... 3-26
chapter 4
Removal and Replacement Prelinimaries
4.1 Electrostatic Discharge Information...................................................................4-1
4.1.1 Generating Static................................................................................... 4-1
4.1.2 Preventing Electrostatic Damage to Equipment....................................4-2
4.1.3 Personal Grounding Methods................................................................ 4-2
4.1.4 Grounding Workstations .......................................................................4-3
4.1.5 Personal Grounding Equipment ............................................................4-3
4.1.6 Recommended Materials and Equipment..............................................4-3
4.2 Routine Care.......................................................................................................4-4
4.2.1 General Cleaning Safety Precautions.................................................... 4-4
4.2.2 Cleaning the Computer Case................................................................. 4-4
4.2.3 Cleaning the Keyboard..........................................................................4-5
4.2.4 Cleaning the Monitor ............................................................................4-5
4.2.5 Cleaning the Mouse...............................................................................4-5
4.3 Service Considerations.......................................................................................4-6
4.3.1 Tools and Software Requirements ........................................................ 4-6
4.3.2 Screws ................................................................................................... 4-6
4.3.3 Cables and Connectors.......................................................................... 4-6
4.3.4 Hard Drives ...........................................................................................4-7
4.3.5 Plastic Parts ...........................................................................................4-7
4.3.6 Lithium Battery .....................................................................................4-7
chapter 5
Removal and Replacement Procedures - Desktop
5.1 Serial Number .................................................................................................... 5-1
5.2 Disassembly Sequence Chart ............................................................................. 5-2
5.3 Preparation for Disassembly .............................................................................. 5-3
5.4 Feet..................................................................................................................... 5-4
5.5 Cable Lock ......................................................................................................... 5-5
5.6 System Unit Cover .............................................................................................5-6
5.7 Speaker............................................................................................................... 5-7
5.8 Expansion Board ................................................................................................5-9
5.8.1 Inboard Expansion Board.................................................................... 5-10

vi Contents
5.8.2 Outboard Expansion Board................................................................. 5-11
5.9 System Board Components.............................................................................5-12
5.9.1 Memory Modules................................................................................ 5-12
5.9.2 System Board Graphics Memory Module Upgrade............................ 5-13
5.9.3 Microprocessor....................................................................................5-14
5.9.4 Cache Memory (Pentium System Only) ............................................. 5-17
5.10 Riser Board .....................................................................................................5-18
5.11 Riser Brace...................................................................................................... 5-19
5.12 Expansion Board Guide .................................................................................. 5-20
5.13 Replacement Battery....................................................................................... 5-21
5.14 Front Bezel Assembly..................................................................................... 5-23
5.14.1 Front Bezel......................................................................................... 5-23
5.14.2 Power Button...................................................................................... 5-24
5.14.3 Bezel Blank ........................................................................................ 5-25
5.14.4 Compaq Logo..................................................................................... 5-26
5.15 Power Supply Assembly ................................................................................. 5-27
5.15.1 Power Switch Assembly..................................................................... 5-27
5.15.2 Power Supply ..................................................................................... 5-29
5.16 Mass Storage Devices ..................................................................................... 5-30
5.16.1 3.5-Inch Drive Bays ...........................................................................5-30
5.16.2 5.25-Inch Drive Bays .........................................................................5-32
5.16.3 Installing a New Drive ....................................................................... 5-34
5.17 Drive Cage ...................................................................................................... 5-37
5.18 LED Cable....................................................................................................... 5-38
5.19 System Board .................................................................................................. 5-40
chapter 6
Removal and Replacement Procedures - Minitower
6.1 Serial Number ...................................................................................................6-1
6.2 Disassembly Sequence Chart ............................................................................ 6-2
6.3 Preparation for Disassembly ............................................................................. 6-3
6.4 Feet.................................................................................................................... 6-3
6.5 Cable Lock ........................................................................................................ 6-4
6.6 Exposing the Chassis.........................................................................................6-5
6.6.1 Access Panel.........................................................................................6-5
6.6.2 Minitower J Hood................................................................................. 6-6
6.7 Riser Brace ........................................................................................................ 6-7
6.8 Expansion Board ...............................................................................................6-8
6.9 Expansion Board Guide ..................................................................................6-10
6.10 Riser Board .....................................................................................................6-11
6.11 Speaker............................................................................................................ 6-12
6.12 System Board Components............................................................................. 6-13
6.12.1 Memory Module.................................................................................6-13
6.12.2 Microprocessor................................................................................... 6-14
6.12.3 Cache Memory (Pentium System Only) ............................................ 6-17
6.12.4 System Board Graphics Memory Module Upgrade........................... 6-18
6.13 System Board .................................................................................................. 6-19
6.14 Replacement Battery....................................................................................... 6-22
6.15 ISA Option Board Retainer.............................................................................6-24

Contents vii
6.16 Front Bezel Assembly.....................................................................................6-25
6.16.1 Front Bezel.......................................................................................... 6-25
6.16.2 Power Button....................................................................................... 6-26
6.16.3 Bezel Blank ......................................................................................... 6-27
6.16.4 Compaq Logo...................................................................................... 6-28
6.17 Power Supply Assembly................................................................................. 6-29
6.17.1 Power Supply Switch Assembly ......................................................... 6-29
6.17.2 Power Supply ...................................................................................... 6-31
6.18 LED Cable ...................................................................................................... 6-32
6.19 Mass Storage Devices..................................................................................... 6-34
6.19.1 3.5-Inch Drive Bays ............................................................................6-34
6.19.2 5.25-Inch Drive Bays ..........................................................................6-36
6.19.3 Installing a New Drive ........................................................................ 6-38
chapter 7
Jumper and Switch Information
7.1 System Board Switches......................................................................................7-2
7.1.1 Pentium-Based System Boards ............................................................. 7-2
7.1.2 Switch Settings......................................................................................7-5
7.2 System Board Jumpers....................................................................................... 7-6
7.2.1 Setting Power-On Password Jumpers.................................................... 7-7
7.2.2 Clearing Configuration..........................................................................7-8
7.2.3 Changing the Real-Time Clock (RTC) Battery.....................................7-9
7.3 Hard Drives ......................................................................................................7-10
7.3.1 2.1-GB EIDE Hard Drive Jumper Settings .........................................7-10
7.3.2 3.2-GB EIDE Hard Drive Jumper Settings .........................................7-12
7.3.3 Optional Ultra SCSI Hard Drive Jumper Settings............................... 7-14
7.3.4 Optional Ultra ATA Hard Drives Jumper Settings ............................. 7-16
7.4 CD-ROM Drive Jumper Settings ..................................................................... 7-18
7.5 Optional PD-CD Drives ................................................................................... 7-18
7.5.1 SCSI PD-CD Drive Jumper Settings................................................... 7-18
7.6 Diskette Drive .................................................................................................. 7-19
chapter 8
Specifications
8.1 System................................................................................................................ 8-1
8.2 Drives ................................................................................................................. 8-7
8.3 Audio System................................................................................................... 8-14
8.4 Keyboard.......................................................................................................... 8-14
8.5 Mouse............................................................................................................... 8-15
8.6 Supported Graphics Resolutions ...................................................................... 8-15

viii Contents
appendix A
Connector Pin Assignments
......................................................................................................... A-1
appendix B
Power Cord Set Requirements
General Requirements............................................................................................... B-1
Country-Specific Requirements................................................................................ B-2
appendix C
Hard Drives
Device 0/Device 1 Relationship................................................................................ C-1
Cable Select............................................................................................................... C-1
SMART..................................................................................................................... C-2
Automatic Soft-Drive Types..................................................................................... C-2
appendix D
SCSI Guidelines
............................................................................................................................D-1
appendix E
Diagnostic Error Codes
SCSI Error Codes.......................................................................................................E-9
appendix F
POST Error Messages
................................................................................................................... F-1
appendix G
Troubleshooting Without Diagnostics
Checklist for Solving Minor Problems ..................................................................... G-1
Power Problems ........................................................................................................ G-2
Diskette Drive Problems ........................................................................................... G-3
Display Problems ...................................................................................................... G-4
Printer Problems........................................................................................................ G-5
Hard Drive Problems................................................................................................. G-6
Hardware Installation Problems................................................................................ G-7
CD-ROM Drive Problems......................................................................................... G-8
Memory Problems..................................................................................................... G-9
SCSI Problems .......................................................................................................... G-9
Network Problems................................................................................................... G-10
Resolving Audio Hardware Conflicts..................................................................... G-12
appendix H
Intel 440LX Chipset Memory Limitations
.................................................................................... H-1
Index ...............................................................................................................................................
I-1

Preface ix
preface
ABOUT THIS GUIDE
This Maintenance and Service Guide is a troubleshooting and repair guide that can be used for
reference when servicing the Compaq Deskpro 2000 Series of Personal Computers. Only authorized
technicians trained by Compaq should attempt to repair this equipment.
Compaq Computer Corporation reserves the right to make changes to the Compaq Deskpro 2000
Series of Personal Computers without notice.
Symbols and Conventions
The following text and symbols mark special messages throughout this guide:
!WARNING: Text set off in this manner indicates that failure to follow directions in the warning could result
in bodily harm or loss of life.
CAUTION: Text set off in this manner indicates that failure to follow directions could result in damage to
equipment or loss of data.
Text set off in this manner presents commentary, sidelights, clarifying information, or
specific instructions.
The following format conventions distinguish elements of the text throughout this guide:
Drive letters that are not in command lines are presented in uppercase type as shown here:
drive A.
Directory or folder names that are not in command lines are presented in uppercase type as
shown here: DIRECTORY or FOLDER.
The file names are presented in uppercase italic type as shown here: FILENAME.
The names of commands are presented in lowercase as shown here: install or a:\install.
Commands that are to be entered at the system prompt may be shown on a separate line:
a:install
When you need to type information without pressing Enter, you are directed to “type” the
information.
When you need to type the information and press Enter, you are directed to “enter” the
information.
xPreface
Technician Notes
!WARNING: Only authorized technicians trained by Compaq should attempt to repair this equipment. All
troubleshooting and repair procedures are detailed to allow only subassembly/module level repair.
Because of the complexity of the individual boards and subassemblies, no one should attempt to make
repairs at the component level or to make modifications to any printed wiring board, Improper repairs can
create a safety hazard. Any indications of component replacement or printed wiring board modifications
may void any warranty.
CAUTION: To properly ventilate your system, you must provide at least 3-inches (7.62-cm) of clearance at
the front and back of the computer.
CAUTION: The computer is designed to be electrically grounded, To ensure proper operation, plug the AC
power cord into a properly grounded AC outlet only.
System Serial Number
The location of the serial number for the desktop computer is found in Chapter 5 and for the
minitower computer in Chapter 6 in this guide.
For the purpose of AssetControl, the serial number is embedded in the CMOS on the system board.
Locating Additional Information
The following documentation is available to support these products:
User Documentation
Technical Training Guides
Compaq Service Advisories and Bulletins
Compaq QuickFind
Technical Reference Guide
Compaq Service Quick Reference Guide
Compaq SmartStart for Workstations CD online documentation
Compaq Deskpro 2000 Series of Personal Computers 1-1
chapter 1
PRODUCT DESCRIPTION
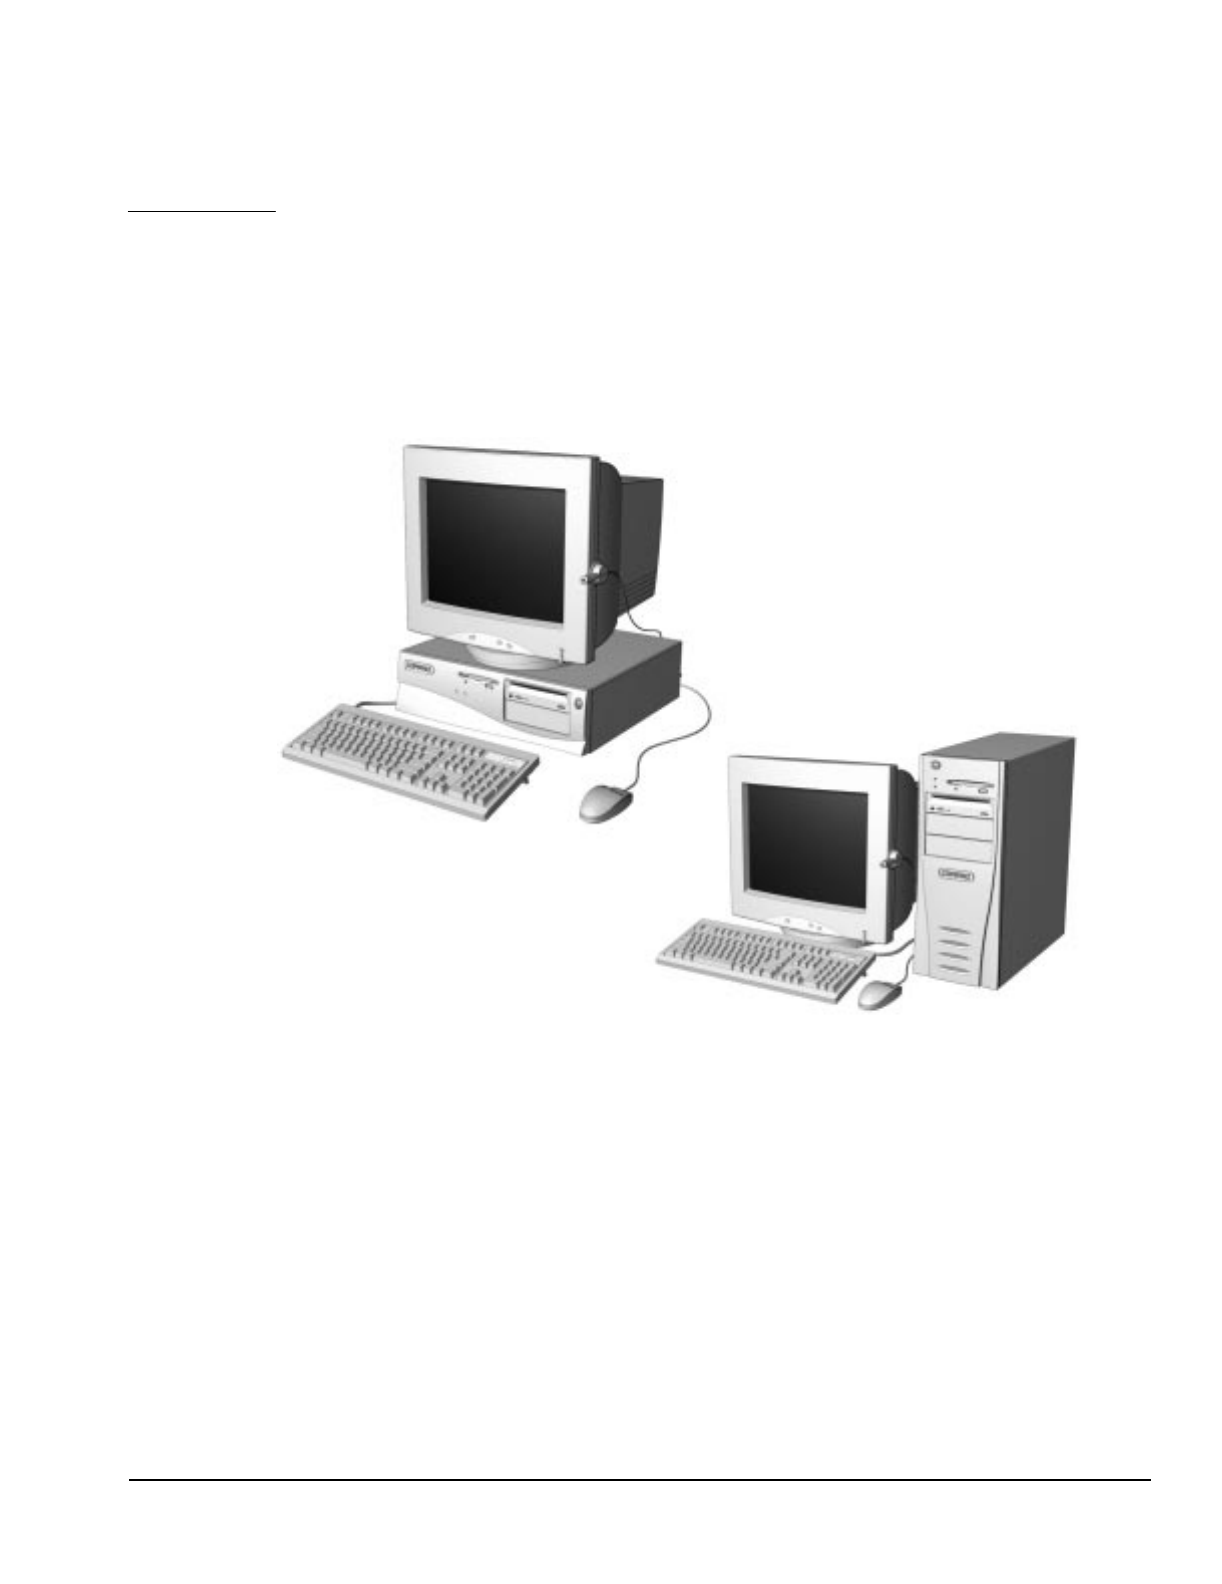
This chapter describes the model offerings and features of the Compaq Deskpro 2000 Series of
Personal Computers.
Figure 1-1. Compaq Deskpro 2000 Series Personal Computer

1-2 Product Description
1.1 Compaq Deskpro 2000 Series of
Personal Computer Models
The Compaq Deskpro 2000 Series of Personal Computers is available in both desktop and minitower
configurations. This series of personal computers uses the Intel family of Pentium processors
consisting of the Intel Pentium processor and the Intel Pentium II processor. Both processors utilize
MMX technology. These configurations are described in the following sections.
1.1.1 Desktop Models
Table 1-1
Desktop Models
Configuration
Code Processor Hard Drive CD-ROM Memory
Maximum
Memory
Internal
Cache Graphics
Pentium Processor
BK52 P55C/166 2.1-GB 16-MB 384-MB 256K S3 Trio64V2/GX
BK53 P55C/166 2.1-GB 16X 32-MB 384-MB 256K S3 Trio64V2/GX
BK54 P55C/166 3.2-GB 32-MB 384-MB 256K S3 Trio64V2/GX
BK55 P55C/166 3.2-GB 16-MB 384-MB 256K S3 Trio64V2/GX
BK62 P55C/200 2.1-GB 16-MB 384-MB 256K S3 Trio64V2/GX
BK63 P55C/200 3.2-GB 16X 32-MB 384-MB 256K S3 Trio64V2/GX
BK64 P55C/200 3.2-GB 32-MB 384-MB 256K S3 Trio64V2/GX
BNT2 P55C/233 3.2-GB 16X 32-MB 384-MB 256K S3 Trio64V2/GX
Pentium II Processor
BMJ2 PII/233 2.1-GB 32-MB 384-MB 512K Matrox MGA-1064SG
BMK2 PII/233 3.2-GB 24X 32-MB 384-MB 512K Matrox MGA-1064SG
BML2 PII/266 3.2-GB 24X 32-MB 384-MB 512K Matrox MGA-1064SG
✎Some models may not be available in all countries.
1.1.2 Minitower Models
Table 1-2
Minitower Models
Configuration
Code Processor Hard Drive CD-ROM Memory
Maximum
Memory
Internal
Cache Graphics
Pentium Processor
BK72 P55C/166 3.2-GB 16X 32-MB 384-MB 256K S3 Trio64V2/GX
BK82 P55C/200 3.2-GB 16X 32-MB 384-MB 256K S3 Trio64V2/GX
Pentium II Processor
BMM2 PII/266 3.2-GB 24X 32-MB 384-MB 512K Matrox MGA-1064SG
BR32 PII/300 3.2-GB 24X 32-MB 384-MB 512K Matrox MGA-1064SG
✎Some models may not be available in all countries.

Compaq Deskpro 2000 Series of Personal Computers 1-3
1.2 Features
The Compaq Deskpro 2000 Series of Personal Computers have the following standard features:
1.2.1 Pentium System Feature
Summary
■ Intel Pentium Processor with MMX technology running at speeds of 166, 200, and 233
megahertz
■ 256-KB (L2) cache secondary standard, expandable to 512-KB
■ 16- or 32-megabyte synchronous dynamic random access memory (SDRAM) standard
depending on the model, expandable to 384 megabytes of SDRAM installed in dual inline
memory modules (DIMMs)
■ One Enhanced IDE (EIDE) SMART II hard drive installed
■ One 16X Max EIDE CD-ROM drive, Compaq Business Pro 16-bit audio board, and an
enhanced speaker installed on select models
■ S3 Trio64V2/GX enhanced 64-bit graphics controller with 1 MB of memory installed on the
system board, expandable to 2 megabytes
■ Microsoft Windows 95 operating system software
1.2.2 Pentium II System Feature
Summary
■ Intel Pentium II Processor with MMX technology running at speeds of 233, 266, and 300
megahertz
■ One Ultra ATA (ultra direct memory access or UDMA) SMART II hard drive installed
■ 32-megabyte SDRAM standard, expandable to 384 megabytes of SDRAM installed in dual
inline memory modules (DIMMs)
■ 512-KB (L2) cache secondary standard, not upgradable
■ One 24X Max EIDE CD-ROM drive, Compaq Business Pro 16-bit audio board, and an
enhanced speaker installed on select models
■ Matrox MGA-1064SG graphics accelerator controller with 2 MB of synchronous graphics
random access memory (SGRAM) installed on the system board, expandable to 4 MB
■ Microsoft Windows NT 4.0 operating system software

1-4 Product Description
1.2.3 Features Common to Both
■ One 1.44-megabyte, 3.5-inch high-density diskette drive installed
■ Peripheral Components Interconnect (PCI) chipset used for PCI/ISA, two USB ports, memory,
and peripheral control
■ Super I/O controller which integrates a serial port, parallel port, diskette drive interface, real-
time clock, CMOS RAM, and mouse and keyboard controller
■ PCI and ISA peripheral connectors on the expansion riser board
■ BIOS in a flash memory device which supports PCI auto-configuration
■ Desktop chassis, including expansion slots for up to five expansion boards
❏ Two dedicated half-length PCI slots
❏ Two dedicated ISA-bus slots (one half-length and one full-length)
❏ One full-length "combination" slot for either a PCI or an ISA expansion board
❏ Surge-tolerant continuous power supply, switch-selectable for 115 and 230 VAC operation
■ Minitower chassis, including expansion slots for up to five expansion boards
❏ Two dedicated full-length PCI slots
❏ Two dedicated full-length ISA-bus slots
❏ One full-length "combination" slot for either a PCI or an ISA expansion board
❏ Surge-tolerant continuous power supply, switch-selectable for 115 and 230 VAC operation
■ One RS-232C compatible 9-pin serial connector
■ One multimode, 25-pin enhanced parallel connector
■ Two Universal Serial Bus (USB) connectors on all models
■ Five drive bays on desktop models:
❏ One external 3.5-inch, one-third height diskette drive bay
❏ One internal 3.5-inch, one-third height drive bay
❏ Two external 5.25-inch, one-half height drive bays or one full-height drive
❏ One internal 5.25-inch one-third height hard drive bay
■ Five drive bays on minitower models:
❏ One external 3.5-inch, one-third height diskette drive bay
❏ One internal 3.5-inch, one-third height drive bay
❏ Three external 5.25-inch, one-half height drive bays
■ Compaq Business Pro 16-bit audio board and an enhanced speaker installed on select models
■ Hard drive fault protection standard on all SMART II hard drives
■ Compaq Enhanced Keyboard, featuring the Microsoft Windows–specific keys

Compaq Deskpro 2000 Series of Personal Computers 1-5
■ Mouse
■ Keyboard and mouse connectors on the back panel
■ Internal piezo speaker mounted on system board
■ Intelligent Manageability and security features, including password and cable lock provision
■ Compaq Diagnostics and Configuration utilities, support software, and device drivers
1.3 System Design
This section presents a design overview and functional descriptions of the key components of the
Compaq Deskpro 2000 Series of Personal Computers. All replaceable components are identified in
Chapter 3, and removal/replacement instructions are presented in Chapters 5 and 6.
1.3.1 Design Overview
The desktop models of the Compaq Deskpro 2000 Series of Personal Computers have a conventional
design that uses a pan-type chassis to house the system board, expansion cards, power supply, and
mass storage devices. The chassis is supplemented by a riser board attached to the riser brace. The
riser board provides a mounting location for the expansion cards.
All internal components are accessible when the hood, held in place by two thumbscrews, is
removed. The front bezel is mounted to the front of the chassis. Torx T-15 screws are used
throughout the system.
The system board is easily removed from the side of the chassis after the hood and riser board are
removed. Details of the disassembly procedure for desktop models are found in Chapter 5, “Removal
and Replacement Procedures.”
The riser board mounts perpendicularly to the system board. Expansion boards are installed
horizontally into the riser board. A single screw attaches each expansion board to the rear panel of the
chassis.
The power supply is mounted in the right rear corner of the chassis. The power supply is held in
place by three Torx screws that are installed through the rear panel of the chassis.
The minitower models have a chassis designed to house the system board, riser board, option cards,
power supply, and mass storage devices. The use of a riser brace to hold the riser board, and any
expansion boards installed, allows for easy access to the system board. The power supply is mounted
in the top of the unit.
All internal components are immediately accessible when the side panel is removed.
The minitower’s tray-mounted system board is easily removed after taking off the side panel and
riser brace. Details of the disassembly procedure for minitower models are found in Chapter 6,
“Removal and Replacement Procedures.”
Detailed descriptions of the system components are presented in the sections that follow.

1-6 Product Description
1.3.2 System Board
The desktop and minitower models of the Compaq Deskpro 2000 Series of Personal Computers have
a single system board configuration. The Pentium system board uses an Intel Pentium processor. The
Pentium II system board uses the Intel Pentium II processor. The processors are designed using
MMX technology. The desktop units of both systems have the I/O panel mounted to the system board
and is spared with the I/O panel. On the minitower, the system board is attached to a sliding tray and
is spared with the tray.
1.3.3 Processor
The Pentium system boards run at processor speeds of 166 MHz, 200 MHz, or 233 MHz depending on
the model. A computer with a processor speed of 166 MHz can be upgraded to a processor speed of
either 200 MHz or 233 MHz. A computer with processor speed 200 MHz can be upgraded to a
processor speed of 233 MHz.
The Pentium II system boards run at speeds of 233 MHz, 266 MHz, or 300 MHz. A Pentium II system
with a processor speed of 233 MHz can be upgraded to a processor speed of either 266 MHz or 300
MHz, and a Pentium II system with a processor speed 266 MHz can be upgraded to a processor speed
of 300 MHz.
Utilizing MMX technology in the design of the processors enhances the systems’ ability to take
advantage of the MMX instructions while preserving compatibility with existing software and
operating systems
1.3.4 System Memory
The system supports base (conventional) and extended memory. Operating systems such as MS-DOS,
OS/2, UNIX, and all application programs use base memory. For better performance, Windows NT,
OS/2, and UNIX, as well as many MS-DOS applications, use extended memory.
For proper system operation, the DIMMs must be industry standard 168-pin, 66-MHz or faster
unbuffered SDRAM DIMMs. The memory modules may also be unbuffered extended data out (EDO)
DIMMs. SDRAM DIMMs must support CAS Latency 2 or 3 (CL = 2 or CL = 3) with a data access
time (clock to data out) of 9.0 ns or less. The DIMMs must also contain Joint Electron Device
Engineering Council (JEDEC) Serial Presence Detect (SPD) information. SDRAMS on DIMMs must
have a data width of x8, x16, or x32; x4 is not supported. The system will not start using unsupported
DIMMs or incompatible DIMM configurations. See Appendix H, “Intel 440LX Chipset Memory
limitations,” for incompatible and unsupported DIMM configurations. Refer to Chapters 5 and 6,
“Removal and Replacement Procedures,” for information on how to upgrade system memory.
1.3.5 Cache Memory
Cache memory is very fast memory used for temporarily storing data for fast access by the processor.
The faster the processor, the more need there is for faster temporary data storage. A 256 KB write-
through, direct-mapped secondary (L2) cache is integrated onto the system board on all Pentium
models. The L2 cache memory for the Pentium models may be increased to 512 KB with the addition
of an optional plug-in module on the system board.

Compaq Deskpro 2000 Series of Personal Computers 1-7
L2 cache memory for all Pentium II models is integrated in the processor module with a capacity of
512 KB and is not upgradable.
1.3.6 Graphics Controllers
The purpose of a graphics controller is to generate the text and graphics images for the monitor
screen. The quality of the picture you see depends on the resolution of the monitor, the number of
colors the graphics controller can display, and the amount of graphics memory available. High
resolution graphics with many colors require that the graphics controller have its own memory
system.
The Pentium computers come with the S3 Trio64V2/GX Enhanced 64-bit graphics controller
integrated onto the system board and have 1 MB of SGRAM installed. Graphics memory on these
models may be upgraded to 2 MB with the addition of an optional memory module.
The Pentium II computer comes with the Matrox MGA-1064SG graphics accelerator integrated onto
the system board and has 2 MB of SGRAM installed. Graphics memory on these models may be
upgraded to 4 MB with the addition of an optional memory module.
Supported screen resolutions for the controller are listed in Chapter 8, “Specifications.”
1.3.7 Chipsets
VIA Chipset
The Pentium system uses the VIA Apollo VP2/AMD-640 chipset. This provides a high-speed, 32-bit
PCI/IDE (EIDE) interface, which supports the following:
■ Up to four PCI/IDE (EIDE) devices on the PCI bus
■ SDRAM and EDO DIMM support
■ ECC DIMM support
440LX Chipset
The Intel 440LX chipset is designed specifically for the Pentium II system. This provides support for
the latest technologies, including the following:
■ Up to four PCI/IDE (EIDE) devices on the PCI bus or four Ultra ATA devices
■ Ultra ATA Mode 2 support
■ SDRAM and EDO DIMM support
■ ECC DIMM support

1-8 Product Description
1.3.8 System I/O
The onboard I/O controller integrates the functions for the serial and parallel ports, diskette drives,
the keyboard and mouse. This component provides support for the following:
■ Multimode bidirectional parallel port
❏ Standard mode: Centronics-compatible operation
❏ High-speed mode with support for an enhanced capabilities port (ECP) and enhanced parallel
port (EPP)
■ One RS-232C compatible 9-pin serial port
■ Integrated real-time clock
■ 242-byte, battery-backed CMOS RAM
■ Integrated 8042-compatible keyboard controller
■ Industry-standard diskette drive controller that supports 360-kilobyte and 1.2-megabyte
5.25-inch drives
1.3.9 System BIOS
The system BIOS provides ISA and PCI compatibility. Contained in a flash memory device on the
system board, the BIOS provides both the Power-On Self-Test (POST) and PCI and EIDE auto-
configuration utilities.
The system BIOS is always “shadowed.” Shadowing allows any BIOS routines to be executed from
fast 64-bit onboard DRAM instead of from the slower 8-bit flash device.
PCI Auto-Configuration
The PCI auto-configuration utility works in conjunction with the Setup program to support using PCI
expansion boards in the system. When you turn on the computer power after installing a PCI board,
the BIOS automatically configures interrupts, I/O space, and PCI devices. If problems arise or you
wish to reconfigure the device, refer to Chapter 2, “Compaq Utilities,” which explains how to use the
Setup program. The PCI auto-configuration program complies with version 2.1 of the PCI BIOS
specification.
IDE/EIDE Auto-Configuration
If you install an IDE/EIDE drive into the computer, the IDE/EIDE auto-configuration utility
automatically detects and configures the drive for operation in the computer. This utility eliminates
the need to run the Setup program after you install an IDE/EIDE drive.
ISA Plug and Play Capability
ISA Plug and Play capability provides auto-configuration of Plug and Play ISA boards and resource
management for legacy (non–Plug and Play) ISA boards when used with Computer Setup or a Plug
and Play–compatible operating system like Microsoft’s Windows 95.

Compaq Deskpro 2000 Series of Personal Computers 1-9
BIOS Upgrades
Because the BIOS is stored in a flash memory device, you can easily upgrade the BIOS without
having to disassemble the system. The flash upgrade process can be accomplished by running a
utility from a diskette, a hard drive, or over a network.
The section on Flash ROM in Chapter 2, “Compaq Utilities,” explains how to run the BIOS upgrade
utility.
1.3.10 Expansion Slots
The computer has two dedicated 16-bit ISA-compatible slots, two dedicated PCI-compatible
expansion slots, and one “combination slot” that can be used by either a PCI or an ISA board. For
more information about expansion slots and installing expansion boards, see Chapters 5 and 6,
“Removal and Replacement Procedures.”
1.3.11 Power Supply
The power supply provides power for system requirements including onboard resources, expansion
boards, and drives. The desktop system supports a maximum of 145-watts of continuous power. The
minitower system supports a maximum of 185-watts of continuous power. The same power supply,
rated at 200-watts maximum output, provides for both system requirements. The power supply has
integrated surge protection to withstand a 2,000 volt power surge. A switch on the computer back
panel sets the power supply to operate at:
■ 115 VAC (in the range of 100-120 VAC)
■ 230 VAC (in the range of 200-240 VAC)
1.3.12 Diskette Drive Interface
The diskette drive interface is 8477 compatible and supports two storage devices (diskette or tape
drive).
1.3.13 Serial Port
The serial port is RS-232C compatible.
1.3.14 Parallel Port
The following parallel support modes are supported:
■ Bidirectional Standard Parallel Port (SPP)
■ Enhanced Parallel Port (EPP)
■ Extended Capabilities Port (ECP)

1-10 Product Description
1.3.15 System Security
The system BIOS provides a power-on password option that is enabled through the Setup program.
The computer includes a cable lock provision that makes it possible to lock the computer cover in
place to prevent unauthorized access to the system jumpers and other internal components (a padlock
is not included). For more information on this and additional security features, refer Chapter 2,
“Compaq Utilities.”
1.3.16 Keyboard/Mouse Controller
The onboard 8042 I/O controller stores the keyboard and mouse controller code. Connectors for the
keyboard and mouse are located on the back panel.
1.3.17 Real-Time Clock and CMOS RAM
The onboard I/O controller provides a real-time clock and CMOS RAM. Chapters 5 and 6, “Removal
and Replacement,” provide information about installing a new battery.
You can set the time for the clock and the CMOS values by using the Setup program described in
Chapter 2, “Compaq Utilities.”
1.3.18 Power Supply Fan
For cooling, a fan is incorporated as part of the power supply at the rear of the computer chassis. The
fan draws air in through the front of the chassis and exhausts air out the rear of the chassis. This
provides adequate air flow across the processor.
To insure that the processor in a Pentium II minitower system receives adequate ventilation, an
internal air duct is installed in the front of the unit.
1.3.19 Speaker
An internal piezo speaker is mounted on the system board. The speaker provides audible error code
information (beep codes) during the Power-On Self-Test (POST) and as required by the software. See
Appendix F, “POST Error Messages,” for beep code information.
1.3.20 Software
The Pentium computer configurations are shipped with Windows 95 installed as the operating
system. The Pentium II configurations ship with Windows NT 4.0 as the operating system.
Preloaded Software
The following Compaq software is preloaded on the computer:
■ Partition-based Compaq Diagnostics utilities
■ Compaq Diagnostics for Windows
■ Compaq Insight Management Agent
■ Desktop Management Interface (DMI) Support

Compaq Deskpro 2000 Series of Personal Computers 1-11
■ Compaq support software and device drivers
■ Online Safety & Comfort Guide
■ Intelligent Manageability
■ Power Management with Energy Saver features
■ Security Management
✎Certain drivers and utilities are available only in select languages.
1.3.21 Ordering Additional Operating
System Drivers
If you plan to run any of the following operating systems on the computer, you must install the
corresponding Compaq device drivers and utilities before attempting to use the computer:
■ IBM OS/2 or NetWare
■ A version of Microsoft Windows 95 or Windows NT Workstation that is different from the
version included with the computer
There are three methods to obtain copies of suitable device drivers and utilities:
■ Order the Support Software CD for Compaq Desktop Products. This compact disc contains the
latest device drivers, utilities, and flashable ROM images needed to run MS-DOS, Windows 95,
Windows NT Workstation 4.0, IBM OS/2, and NetWare on the Compaq commercial desktop
product.
■ Purchase backup diskettes.
■ Access to the World Wide Web at www.compaq.com.
The Support Software CD can be purchased in either of two ways:
■ A single CD-ROM that gives one-time access to the latest support software (North America
only)
■ A yearly subscription that delivers up to 12 monthly CD-ROMs
The annual subscription provides continuous access to the latest Compaq Deskpro software drivers,
utilities, and ROM revisions.
✎When calling Compaq to place an order, be sure to have the serial number of the computer
available. The location of the serial number is shown in Chapters 5 and 6 for the desktop
and minitower computers respectively. This number is necessary for all purchases.

1-12 Product Description
1.3.22 Intelligent Manageability
Intelligent Manageability includes:
■ Asset Management
■ Configuration Management
■ Integration Management
■ Fault Management
■ Security Management
Asset Management
AssetControl is a component of Asset Management that allows a system administrator to view, track,
and store information about the computer. This capability is available locally with the Diagnostics for
Windows utility or remotely with third-party applications. The following information is provided:
■ System serial number
■ Asset tag
■ Monitor serial number (with monitor support)
■ ROM revision levels
■ System board revision level
■ Hard drive model and serial number
■ DIMM serial number, model, and speed
Configuration Management
Compaq has made the task of locating, accessing, evaluating, and installing the latest support
software easier. Configuration Management includes:
■ Remote ROM flash
■ Remote security management
■ Replicated setup
■ Enhanced support software
■ Failsafe boot block ROM

Compaq Deskpro 2000 Series of Personal Computers 1-13
Integration Management
Compaq standardizes system manageability and provides access to PC configuration with its
Integration Management solution. Through hardware and software instrumentation that supports the
Desktop Management Interface (DMI) framework as established by the Desktop Management Task
Force (DMTF), Integration Management delivers:
■ DMI compliance, DMI 2.0 support
■ Insight Management agent
■ Insight Manager support
■ Desktop Management Solution Partners support
Fault Management
Fault management is available locally at power-on or through the Diagnostics for Windows utility.
When this feature is used with the appropriate management software and operating system, system
administrators and users can monitor the computer for impending component or subsystem failure.
This includes:
■ ECC memory fault reporting (with ECC memory only)
■ SMART compatible IDE/EIDE and SCSI (optional) hard drives
■ Monitor fault diagnosis
■ Pentium II fault prediction (Pentium II configuration only)
■ Pentium II Prefailure Warranty (Pentium II configuration only)
Security Management
Security management features are designed into the Compaq Deskpro Personal Computer. The
following features prevent unauthorized access to critical data and prevent theft of the computer:
■ Cable lock provision allows the user to physically secure the computer hardware to protect
against theft.
■ Removable media boot control prevents the computer from being booted from a diskette.
■ Removable media write control prevents unauthorized writing of data to a diskette.
■ Power-on password prevents unauthorized persons from booting up the computer.
■ QuickLock/QuickBlank allows the user to lock the keyboard and/or blank the screen.
■ Setup Password prevents unauthorized changes to the system configuration.
■ I/O port control prevents transfer of data through the I/O connectors.
1-14 Product Description
1.4 Desktop Computer Features
The Compaq Deskpro 2000 Series of Personal Computers ships with a mouse and keyboard. A
Compaq color monitor or other compatible monitor, which is also required to operate the computer,
does not ship with the computer.
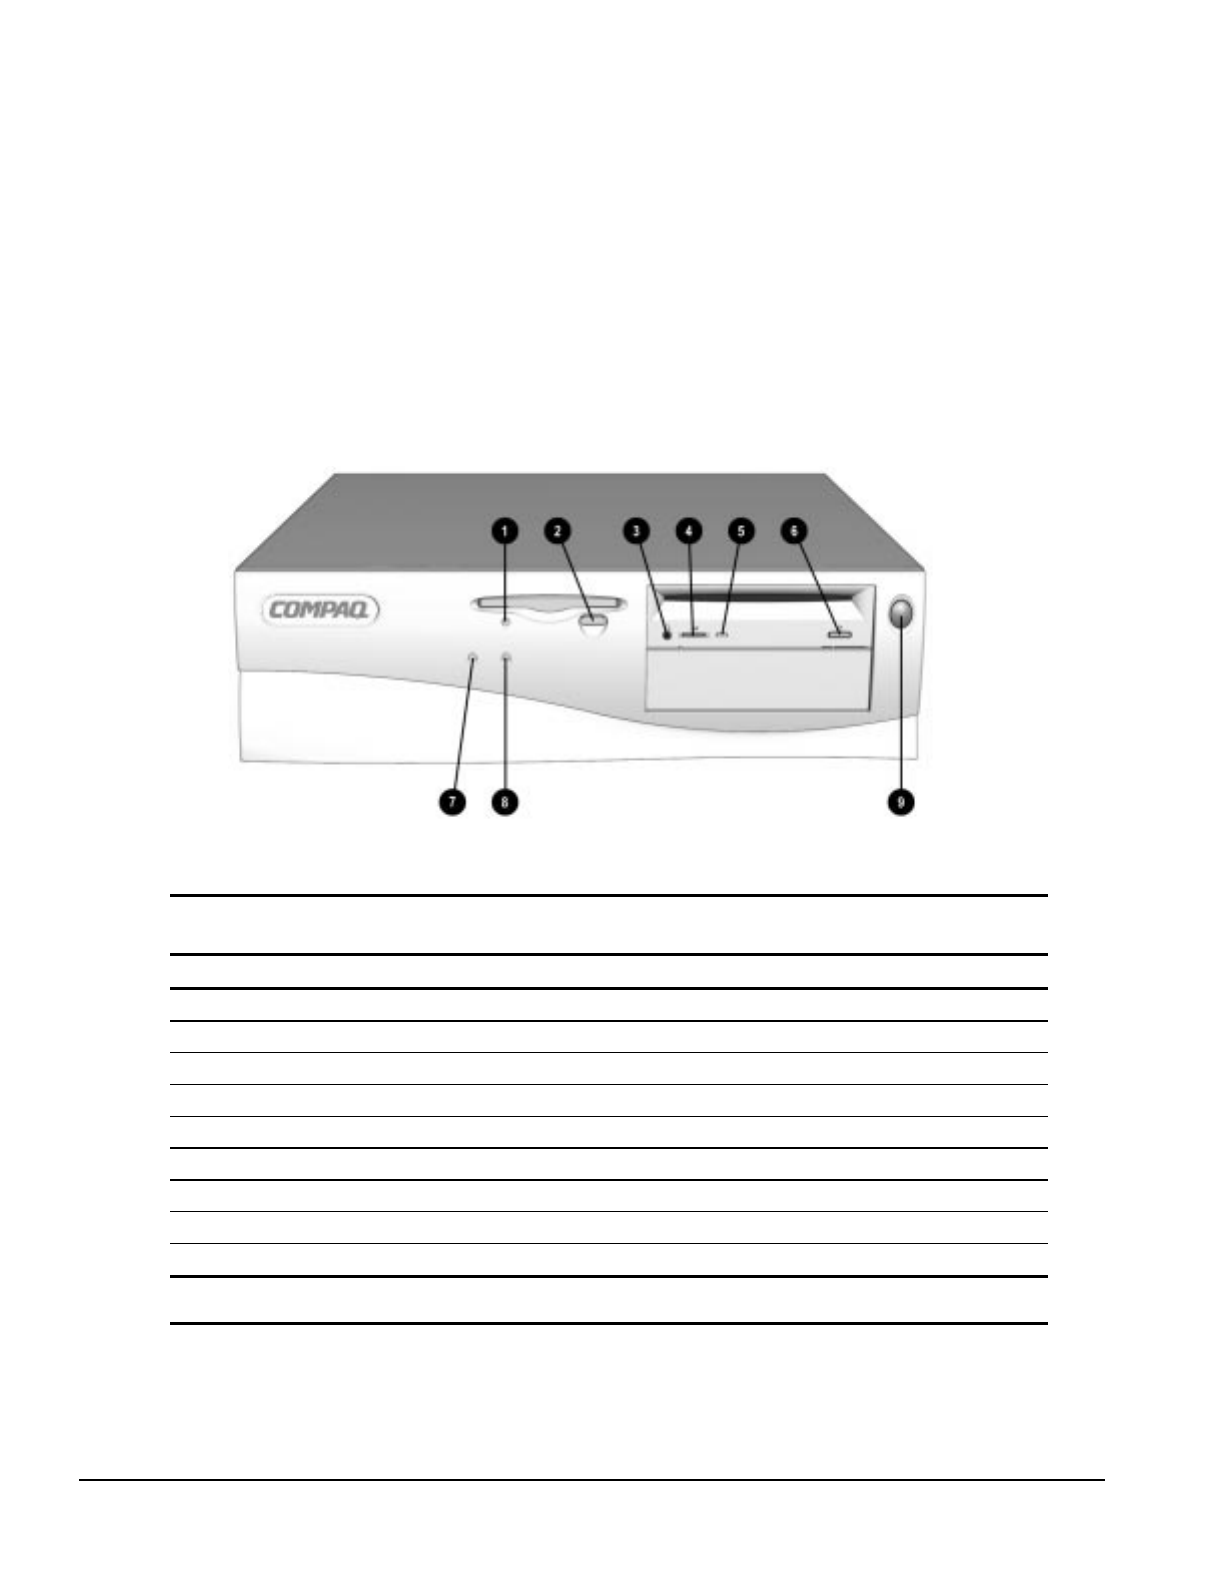
1.4.1 Front Panel Controls and LEDs
The operator controls and LEDs located on the front panel of the computer are identified and
described below.
Figure 1-2. Power Switch and Front Panel Lights
Table 1-3
Lights and Controls
Ref. Component Function
1Diskette Drive Activity Light Turns on when the diskette drive is reading or writing.
2Diskette Eject Button Ejects a loaded diskette.
3CD-ROM Headphone Jack* Connects a headphone to the CD-ROM drive.
4CD-ROM Headphone Volume Control* Increases and decreases the CD-ROM headphone volume.
5CD-ROM Drive Activity Light* Turns on when the CD-ROM drive is reading information from the compact disc.
6CD-ROM Eject Button* Ejects a loaded disc.
7Power-On Light Turns on when the computer is turned on.
8Hard Drive Activity Light Turns on when the hard drive is reading or writing.
9Power Switch Turns the computer on and off.
* Only available on models with CD-ROM.
Compaq Deskpro 2000 Series of Personal Computers 1-15
1.4.2 Drive Positions
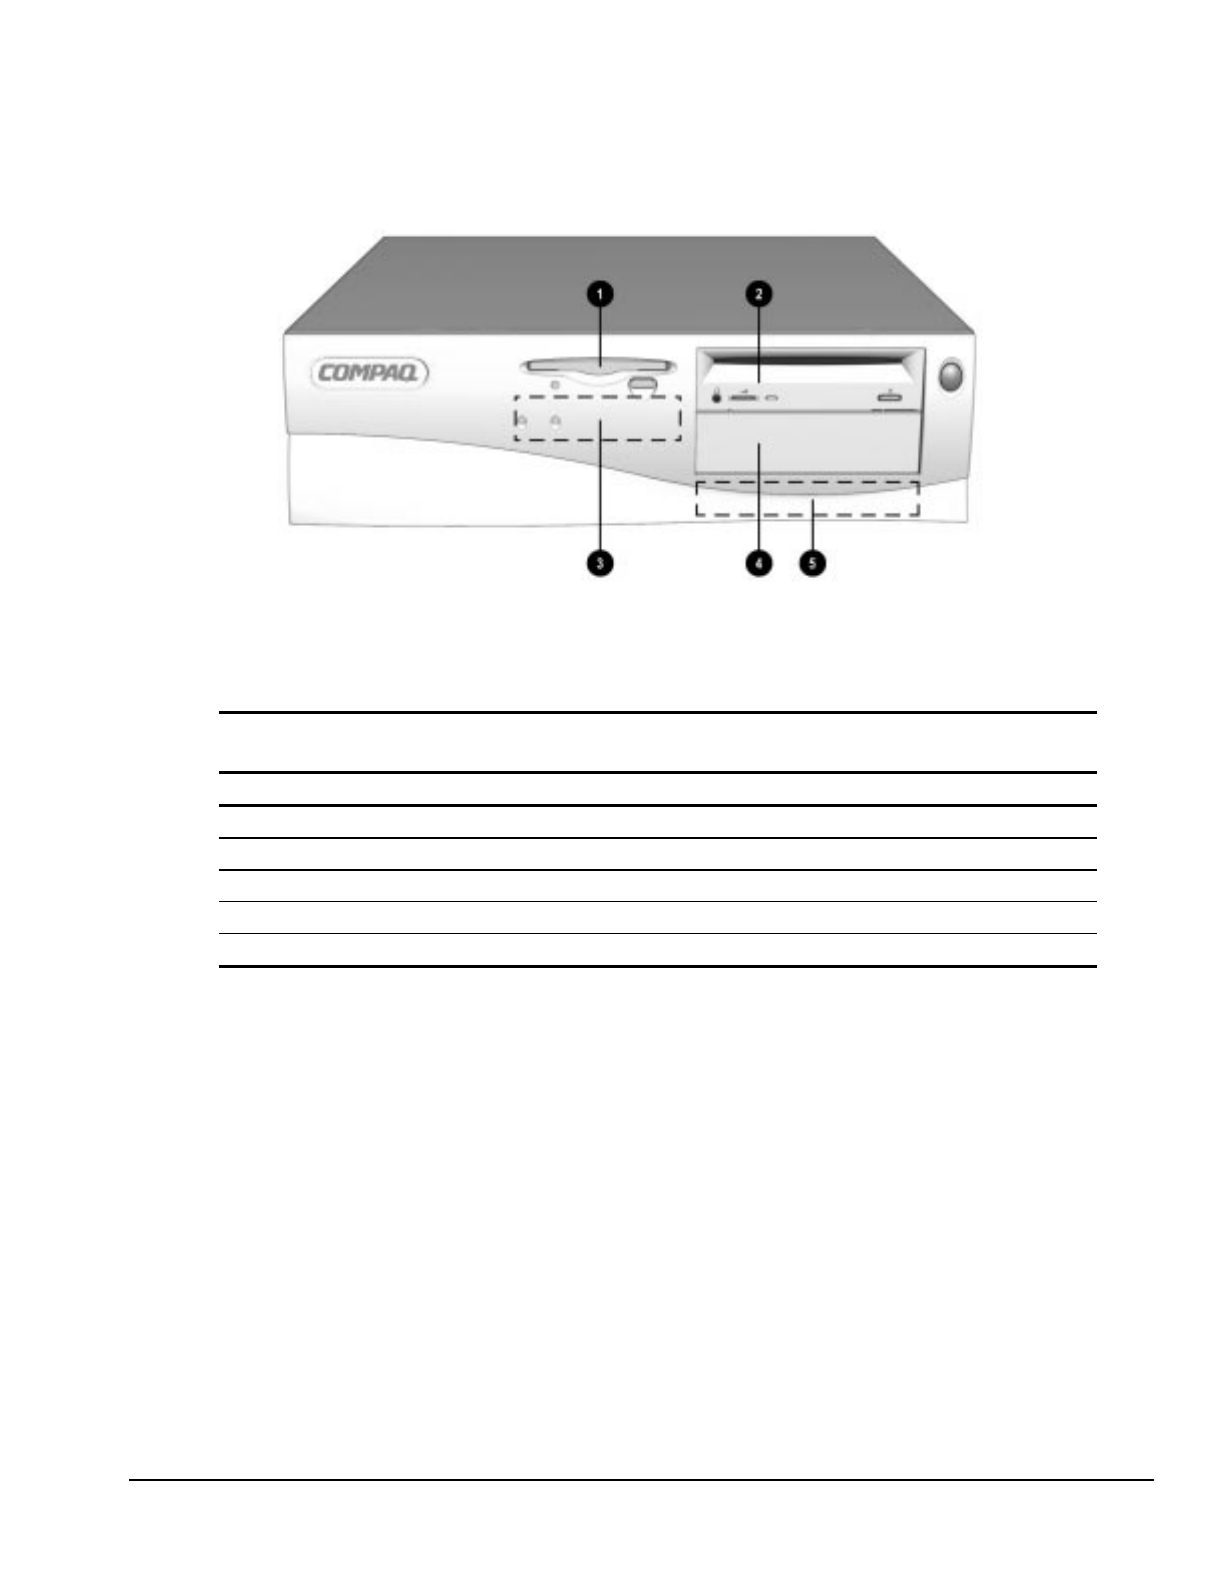
Figure 1-3. Drive Positions on the Compaq Deskpro 2000 Desktop Computer
The computer has space available for up to five mass storage devices. They may be installed in
various configurations, including those shown in the following table.
Table 1-4
Compaq Deskpro 2000 Desktop Computer
Drive Configuration
1Standard 3.5-inch 1.44-MB diskette drive
2Optional diskette drive (5.25-inch), tape drive, hard drive, LS-120 drive, or CD-ROM drive (half-height)
3Primary hard drive bay (3.5-inch, third-height)
4Optional diskette drive (5.25-inch), tape drive, hard drive, LS-120 drive, or CD-ROM drive (half-height)
5Optional hard drive bay (5.25-inch, third-height)
To verify the type, size, and capacity of the mass storage devices installed in the computer, run the
View System Information (INSPECT) utility available at computer startup. Refer to Chapter 2,
"Compaq Utilities," for more information.
1-16 Product Description
1.4.3 Rear Panel Connectors
Rear panel connectors on your desktop computer are color-coded and include icons to help you
identify their functions.
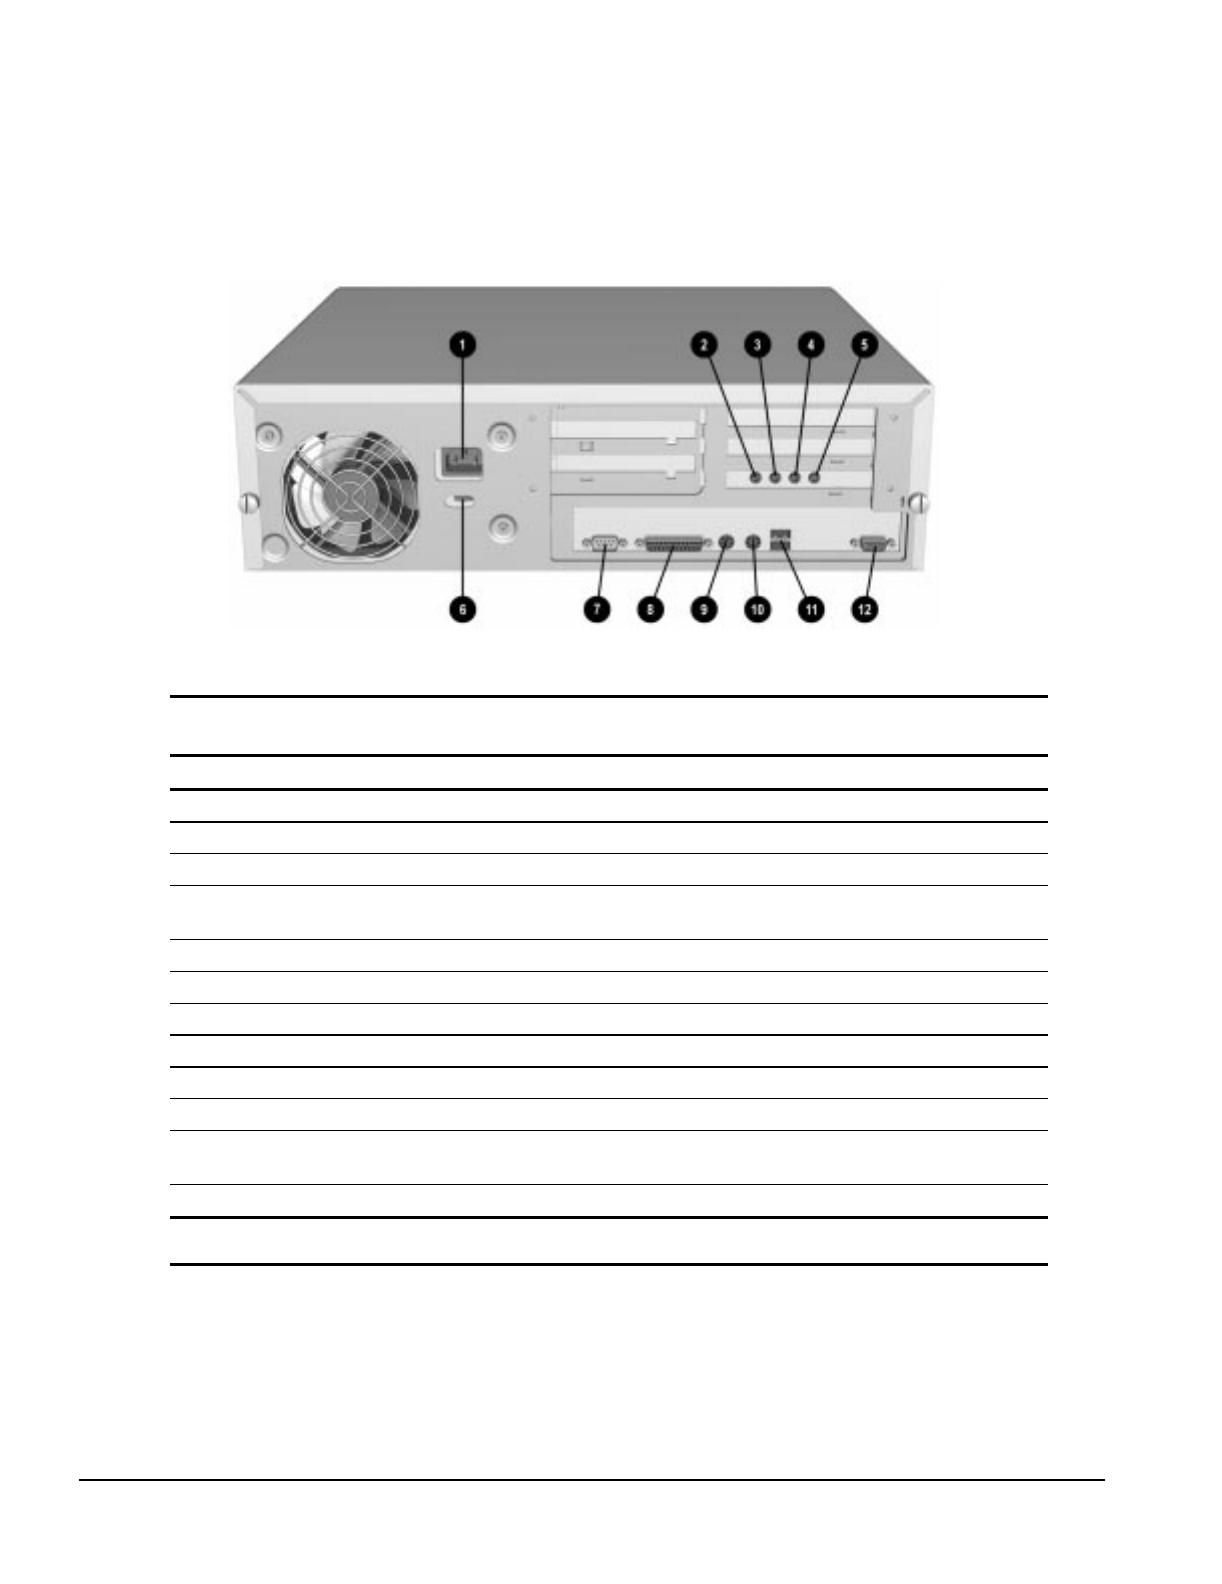
Figure 1-4. Rear Panel Connectors
Table 1-5
Rear Panel Connectors
Ref. Component Function
1Power Cord Connector Connects the computer to an electrical power outlet.
2Microphone Connector* Connects a microphone for recording sound and voice.
3Line-In Audio Connector* Connects an external audio input device.
4Line-Out Audio Connector* Connects an external audio output device, such as powered speakers, or a cassette tape
recorder.
5Headphone Connector* Connects headphones (not suitable for unpowered speakers).
6Voltage Select Switch Switches voltage between 115 V (U.S.) and 230 V to match geographical requirements.
7Serial Connector Connects a serial device, such as a serial printer.
8Parallel Connector Connects a parallel device, such as a parallel printer.
9Keyboard Connector Connects the keyboard.
:Mouse Connector Connects the mouse.
qUniversal Serial Bus
Connector
Connects the computer to any peripheral while the computer is operating. Is a fully
functional Plug and Play connector.
<Monitor Connector Connects a monitor to an embedded graphics controller.
* Audio features are available on select models only.
Compaq Deskpro 2000 Series of Personal Computers 1-17
1.5 Minitower Computer Features
The Compaq Deskpro 2000 Minitower Personal Computer comes with a mouse and keyboard. Not
supplied is a Compaq color monitor or other compatible monitor, which is required to operate your
computer.
1.5.1 Front Panel Lights and Controls
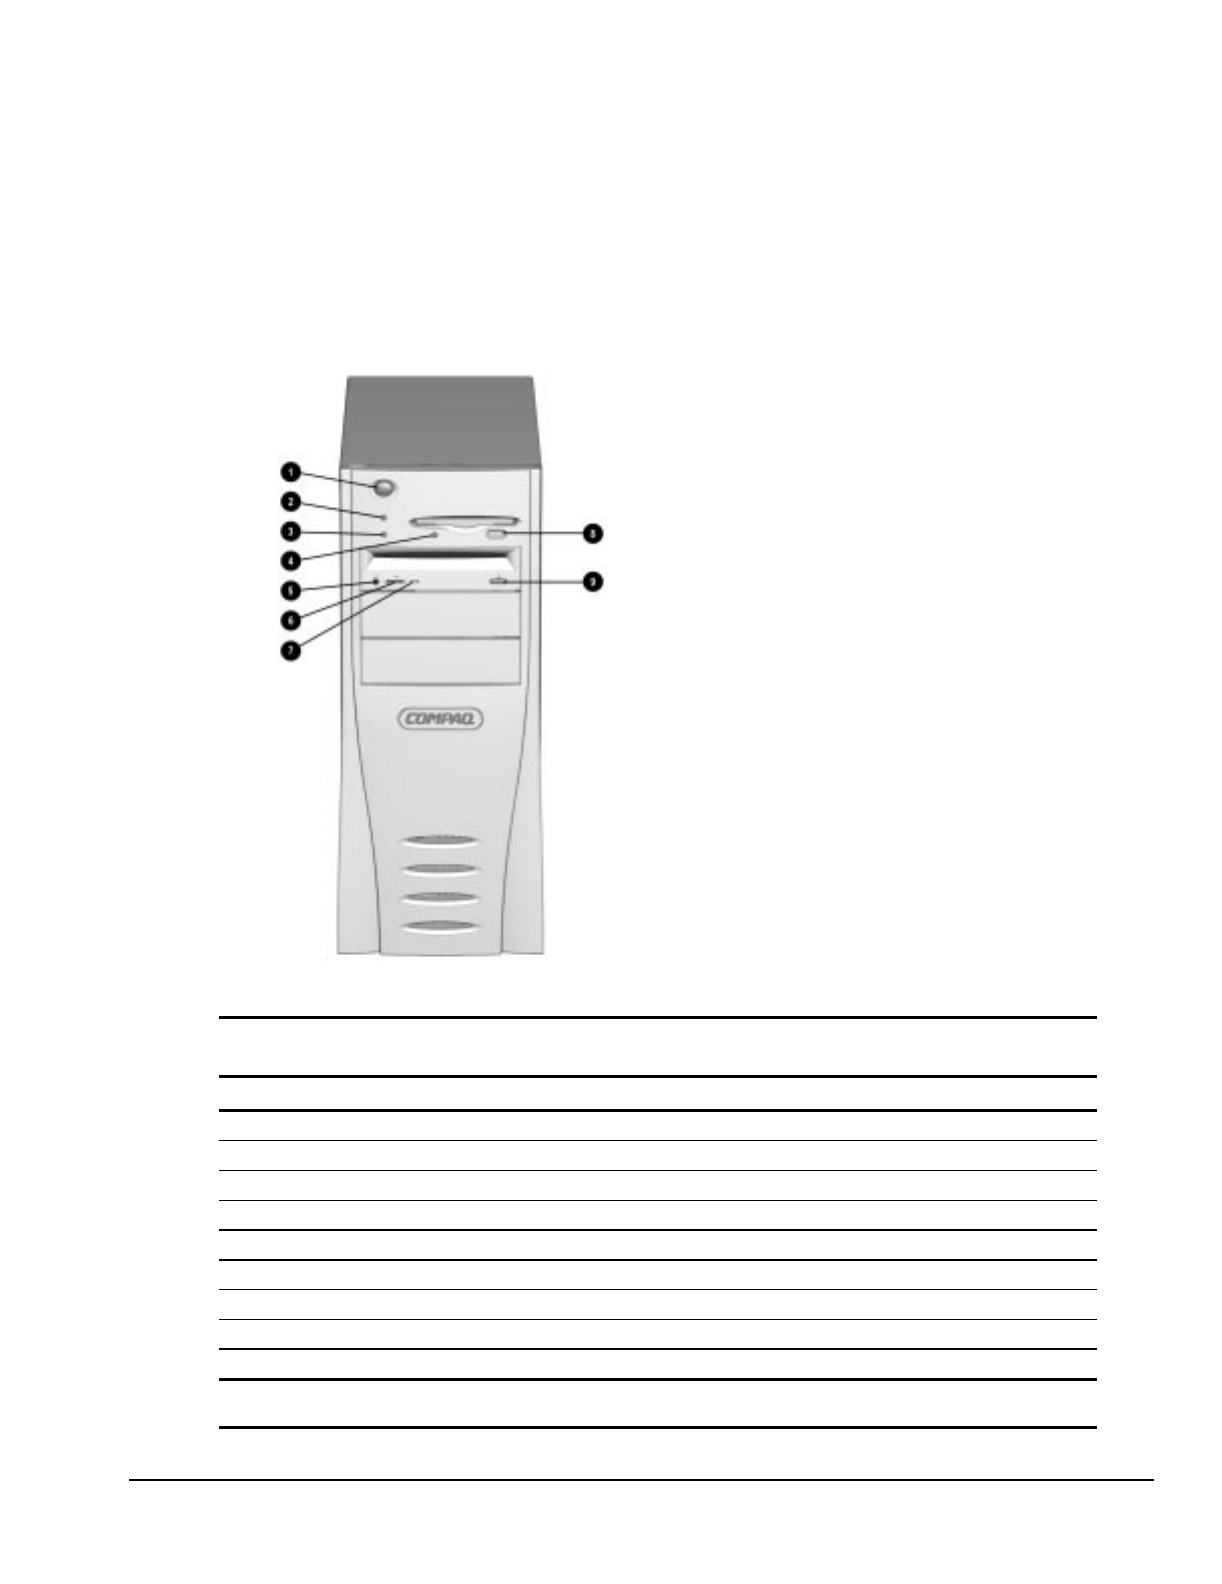
Figure 1-5. Power Switch and Front Panel Lights
Table 1-6
Lights and Controls
Ref. Component Function
1Power Switch Turns the computer on and off.
2Power-On Light Turns on when the computer is turned on.
3Hard Drive Activity Light Turns on when the hard drive is reading or writing.
4Diskette Drive Activity Light Turns on when the diskette drive is reading or writing.
5CD-ROM Headphone Jack* Connects a headphone to the CD-ROM drive.
6CD-ROM Headphone Volume Control* Increases and decreases the CD-ROM headphone volume.
7CD-ROM Drive Activity Light* Turns on when the CD-ROM drive is reading.
8Diskette Eject Button Ejects a diskette.
9CD-ROM Eject Button* Ejects a CD disc.
* Only available on models with CD-ROM.
1-18 Product Description
1.5.2 Drive Positions
The computer has space available up to five mass storage devices. The devices may be installed in
various configurations, including those shown in the table below.
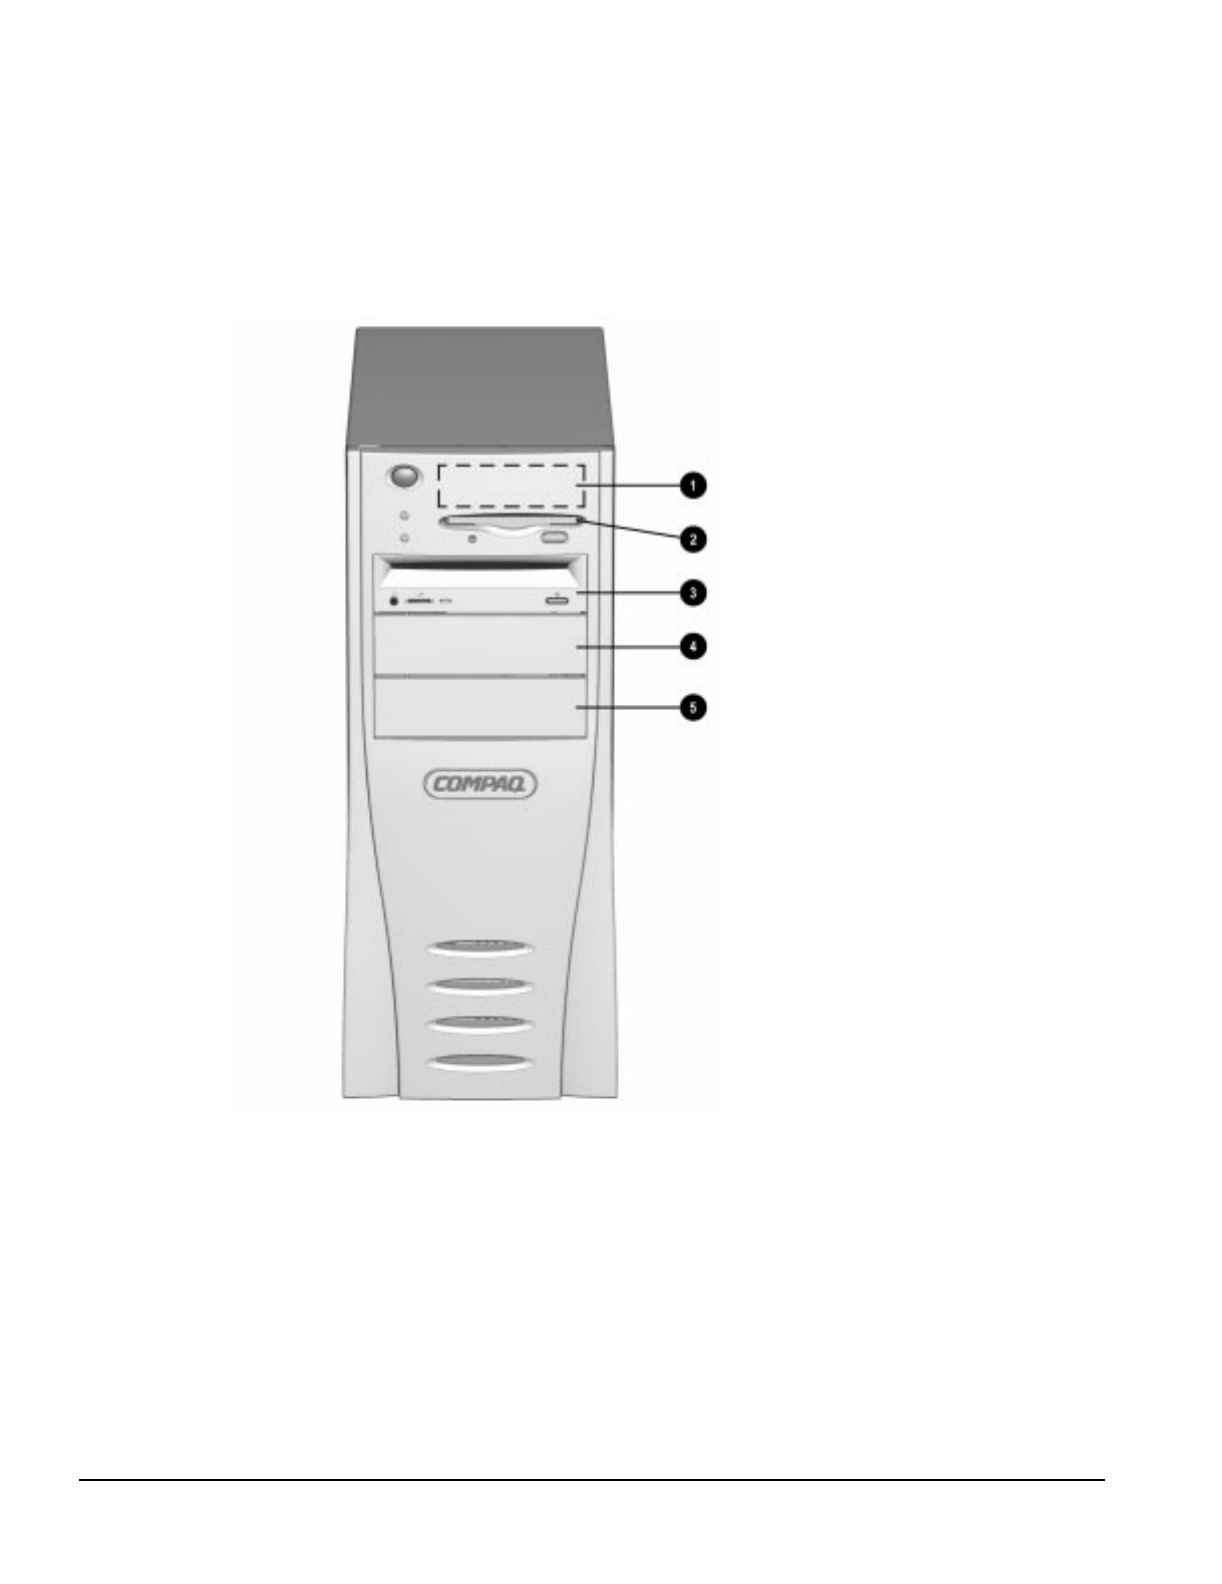
Figure 1-6. Drive Positions on the Minitower Computer

Compaq Deskpro 2000 Series of Personal Computers 1-19
Table 1-7
Compaq Deskpro 2000 Minitower Computer
Drive Configuration
1Primary hard drive bay (3.5-inch, third-height)
2Standard 3.5-inch 1.44-MB diskette drive
3Optional diskette drive (5.25-inch), tape drive, hard drive, LS-120 drive, or CD-ROM drive (half-height)
4Optional diskette drive (5.25-inch), tape drive, hard drive, LS-120 drive, or CD-ROM drive (half-height)
5Optional diskette drive (5.25-inch), tape drive, hard drive, LS-120 drive, or CD-ROM drive (half-height)
To verify the type, size, and capacity of the mass storage devices installed in the computer, run
Compaq Diagnostics for Windows, or run the View System Information (INSPECT) utility available
at computer startup. Refer to Chapter 2, "Compaq Utilities," for more information.

1-20 Product Description
1.5.3 Rear Panel Connectors
The following illustration shows the rear panel connectors of the minitower computer. Each
connector includes an icon to help you identify its function.
Figure 1-7. Rear Panel Connectors

Compaq Deskpro 2000 Series of Personal Computers 1-21
Table 1-8
Rear Panel Connectors
Ref. Component Function
1Voltage Select Switch Switches voltage between 115 V (U.S.) and 230 V to meet geographical requirements.
2Serial Connector Connects a serial device, such as a serial printer.
3Parallel Connector Connects a parallel device, such as a parallel printer.
4Keyboard Connector Connects the keyboard.
5Mouse Connector Connects the mouse.
6Universal Serial Bus Connector Connects the computer to any peripheral while the computer is operating. Is a fully
functional Plug and Play connector.
7Monitor Connector Connects a monitor to an embedded graphics controller.
8Power Cord Connector Connects the computer to an electrical power outlet.
9Microphone Connector* Connects a microphone for recording sound and voice.
:Line-In Audio Connector* Connects an external audio input device.
;Line-Out Audio Connector* Connects an external audio output device, such as powered speakers, or a cassette
tape recorder.
<Headphone Connector* Connects headphones (not suitable for unpowered speakers).
* Audio features are available on select models only.
1-22 Product Description
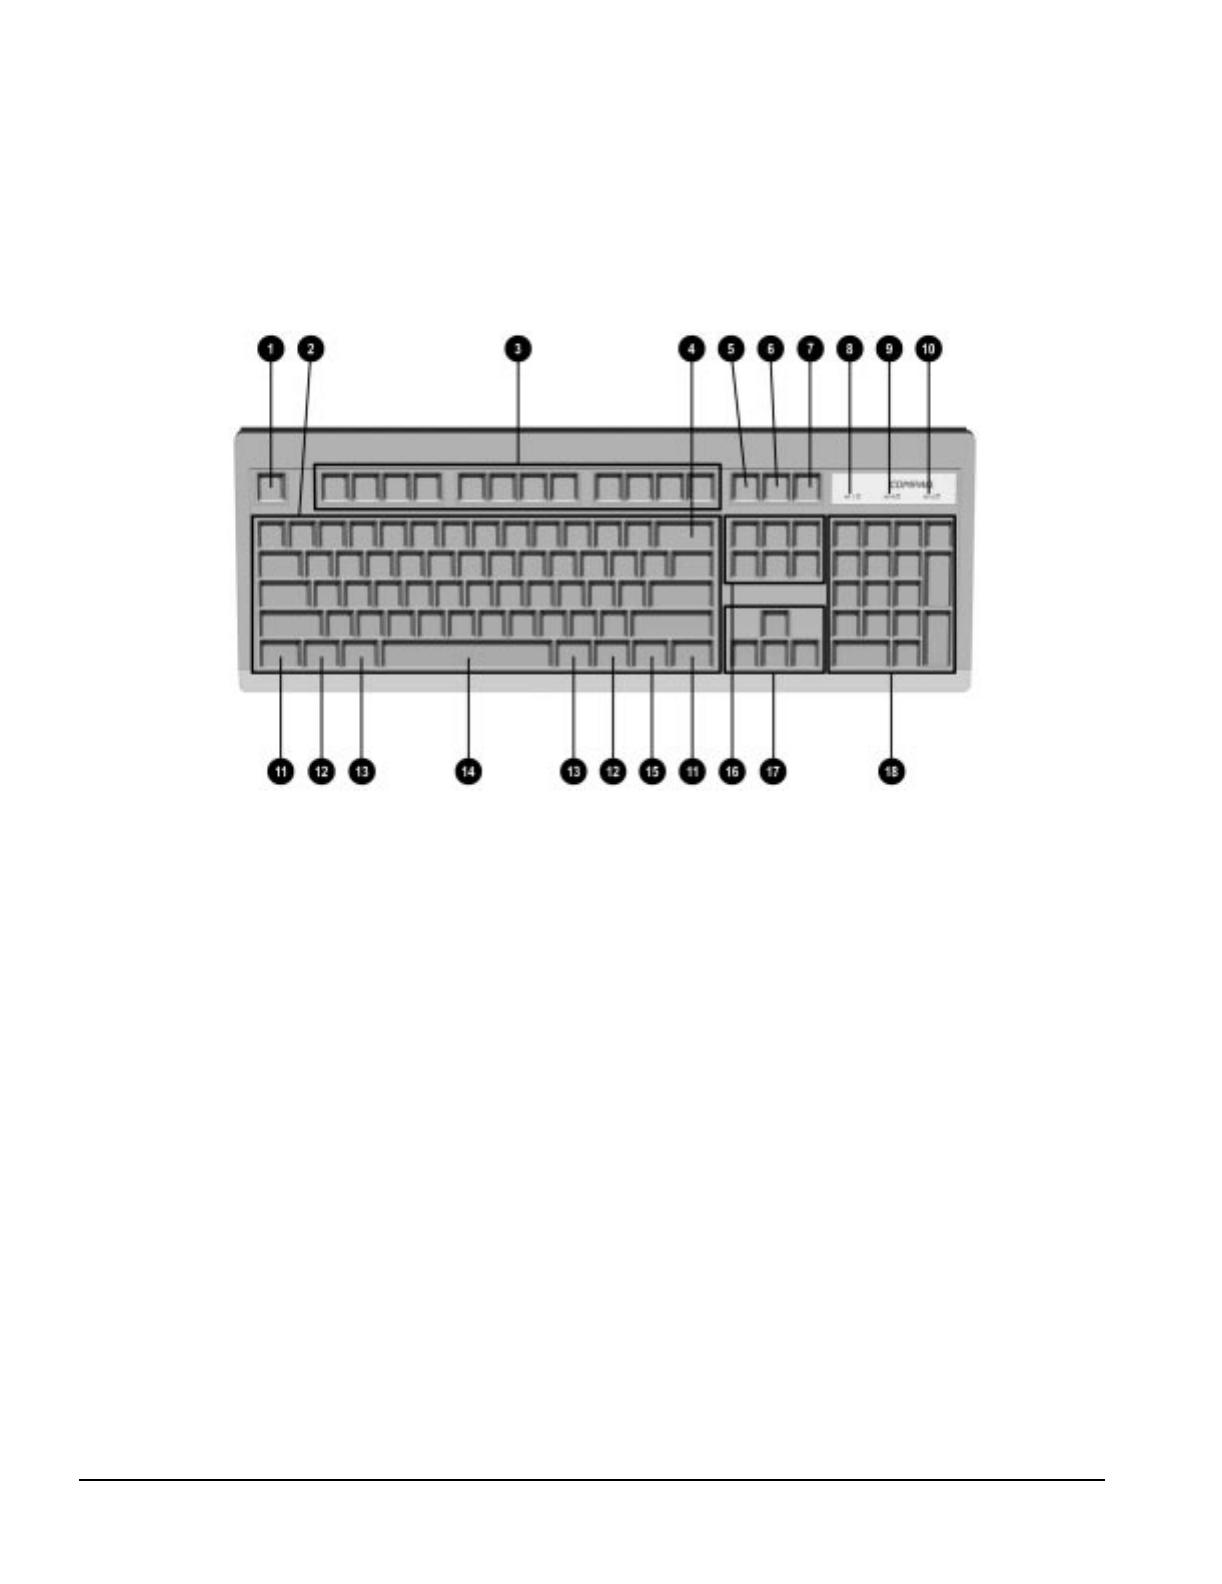
1.6 Enhanced Keyboard
The enhanced keyboard features Windows-specific keys:
✎Keyboard layout may vary by country.
Figure 1-8. Enhanced Keyboard

Compaq Deskpro 2000 Series of Personal Computers 1-23
Table 1-9
Keyboard Features and Functions
Ref. Key Function
1Esc Often assigned a specific task by the application. Frequently used as an exit key (for
quitting an application), for moving back one screen, or for canceling a command.
2Main Typewriter Keypad Provides the same keys in generally the same relative position as a standard
typewriter keyboard.
3F1 - F12 Used for specific effects in applications and operating systems. Refer to the
application software documentation.
4Backspace Moves the cursor left and deletes characters as it moves to the left.
5Print Scrn Depending on the software in use, prints the displayed screen to a printer. Using this
key will not necessarily print the entire file.
6Scroll Lock When the Scroll Lock light is on, it prevents the screen from scrolling in some
spreadsheet applications.
7Pause Temporarily suspends screen scrolling or some operations.
8Num Lock Light When the Num Lock light is on, the numeric keypad is activated and the arrow keys
are deactivated. (The arrow keys to the left of the keypad perform the same functions
as the arrow keys on the keypad.)
9Caps Lock Light When the Caps Lock light is on, all letters typed are capitalized.
:Scroll Lock Light When the Scroll Lock light is on, the display will advance a line at a time.
;Ctrl Used in combination with another key, its effect depends on the software application
you are using.
<Windows Logo Keys Opens the Windows Start menu. Used in combination with another key, its effect
depends on the software application you are using.
=Alt Used in combination with another key, its effect depends on the software application
you are using.
>Space Bar Advances the cursor one character space at a time.
?Windows Application Key Opens a context menu for the software program you are using.
@Editing Keys Insert, Delete, Home, End, Page Up, and Page Down. Pressing the key will perform
the stated function.
AArrow Keys Pressing the left or right arrow keys will move the cursor one character space at a
time in the direction shown. Pressing the up or down arrow key will move the cursor
up or down one line at a time.
BNumeric Keypad These keys act as they do on a calculator style keypad.
;+=+@Ctrl+Alt+Delete Holding down Ctrl and Alt while pressing Delete restarts the computer.

1-24 Product Description
The keyboard has feet on the bottom that enable the user to tilt the keyboard to a more comfortable
typing angle.
Figure 1-9. Keyboard Tilt Foot
1.7 Options
The options that are available from Compaq for the Compaq Deskpro 2000 Series of Personal
Computers are described briefly in the following sections.
1.7.1 Cache Upgrade
The L2 cache on the Pentium system may be upgraded from 256 KB to 512 KB by means of an
optional cache module. The L2 cache on the Pentium II system configuration is fixed at 512 KB.
1.7.2 System Memory
The system memory may be increased to a maximum of 384-MB SDRAM by the addition of
DIMMs to the three DIMM sockets on the system board.
1.7.3 Audio Upgrade
■ Compaq Business Pro Audio ESS 1868
■ Compaq Multimedia Sound System; stereo speakers and microphone for telephony
1.7.4 Mass Storage Options
The following mass storage options are available from Compaq for the Compaq Deskpro 2000 Series
of Personal Computers:
■ LS-120 drive: 1.44-/120-MB, 3.5-inch, external and internal third-height. The LS-120 drive will
also read/write to 720-KB media.
■ EIDE hard drives: 2.1 GB, 2.4 GB, 3.2 GB, and 4.3 GB
■ Ultra SCSI hard drive: 2.1 GB and 4.3 GB (requires a SCSI controller board)

Compaq Deskpro 2000 Series of Personal Computers 1-25
■ Ultra ATA hard drives: 2.1-GB, 3.2-GB, and 4.3-GB
■ EIDE CD-ROM drive: 16X Max Speed and 24X Max Speed
■ Tape drives: 2/8 GB DAT and 4.0 GB
■ SCSI PD-CD drive: 4X speed (requires a SCSI controller board)
■ EIDE PD-CD drive: 8X speed
1.7.5 Monitor Options
The following monitor options are available from Compaq for the Compaq Deskpro 2000 Series of
Personal Computers:
■ Compaq 140 Color Monitor (NA)
■ Compaq P50 Color Monitor
■ Compaq P70 Color Monitor
■ Compaq P110 Trinitron Monitor (NH and SH)
■ Compaq V40 Color Monitor
■ Compaq V50 Color Monitor (NA, GSA, NH, and SH)
■ Compaq V70 Color Monitor (NA, GSA, NH, and SH)
■ Compaq V90 Color Monitor
■ Compaq TFT500 Flat Panel Display
■ Compaq P1610 Color Monitor
1.7.6 Graphics Controllers and Memory
Options
Available from Compaq is a 1-MB SGRAM memory upgrade for the Pentium systems or a 2-MB
SGRAM memory upgrade for the Pentium II systems.
Also available from Compaq is an optional MPEG1 add-on graphics board. The MPEG1 board
allows the user to play MPEG movies and clips with minimal CPU resource usage. Audio for the
MPEG1 is also on the option board.
The Millennium II PCI controller board is also available from Compaq.
1.7.7 Serial/Parallel Interface Board
The serial/parallel interface board option is available from Compaq for the Compaq Deskpro 2000
Series of Personal Computers. This board uses an expansion slot and provides additional serial and
parallel device support to the computer.

1-26 Product Description
1.7.8 PD-CD Drive
The PD-CD drive is a "two drives in one" device in that it is a rewritable optical drive and a
CD-ROM drive. It is a 5.25-inch, half-height, tray-load device that uses phase-change dual
technology to simultaneously erase and write on the media at 2X speed and reads at 4X speed. The
interface is internal SCSI.
Also available from Compaq is a 8X EIDE PD-CD drive. This device is also a 5.25-inch, half-height,
tray-load device that uses phase-change dual technology to simultaneously erase and write on the
media. This device, however, writes at 4X speed and reads at 8X speed.
1.7.9 Modems
The following modem options are available from Compaq for the Compaq Deskpro 2000 Series of
Personal Computers:
■ 33.6-K data/fax modem (NA only)
■ 56-K data/fax modem
■ ISDN modem
■ Compaq Netelligent Corporate Communicator board (NA only)

Compaq Deskpro 2000 Series of Personal Computers 2-1
chapter 2
COMPAQ UTILITIES
This chapter contains descriptions of Compaq utilities that can be helpful when servicing the Compaq
Deskpro 2000 Series of Personal Computer. These utilities include:
■Configuration and Diagnostics
■ROMPaq
■Compaq Intelligent Manageability
■Compaq Insight Manager
■Prefailure Warranty
See Appendices E, F, and G for error codes, error messages, and other troubleshooting techniques.
The Configuration and Diagnostics utilities are located on a hard disk partition on the computer.
These utilities include Create a Diagnostics Diskette, Setup, TEST, and INSPECT.
You can run Configuration and Diagnostics from diskette, or use the Support Software CD to install a
system partition containing Configuration and Diagnostics utilities.
Use the Compaq Configuration and Diagnostics utilities in the following instances:
■When a system configuration error is detected during the Power-On Self-Test (POST).
■To change factory default settings for some of the computer features.
■To change the system configuration, which is sometimes necessary when you add or remove
optional hardware.
■To set system configuration features.
2.1 Getting Ready
2.1.1 Preparing the Computer
If you encounter an error condition, complete the following steps before starting problem isolation
procedures:
1. Ensure proper ventilation. The computer should have a 3-inch (7.6-cm) clearance at the front and
back of the system unit.
2. Turn off the computer and peripheral devices.

2-2 Compaq Utilities
CAUTION: Always ensure that the power is off before disconnecting or reconnecting the mouse, keyboard,
or any other peripheral devices. Disconnecting or connecting any peripheral devices while the unit power is
on can damage the system board.
3. Disconnect any peripheral devices other than the monitor and keyboard. Do not disconnect the
printer if you want to test it or if you want to use it to log error messages.
4. Create a diagnostic diskette (Section 2.1.2).
5. Run the computer PC Diagnostics diskette.
2.1.2 Create a Diagnostics Diskette
Compaq strongly recommends that you make a backup copy of the diagnostic software. Create a
Diagnostics Diskette, described in Section 2.5, is an option from the Compaq Utilities menu. This
utility allows you to back up the diagnostics software preinstalled on your hard drive to diskette.
This utility is not available in Compaq Diagnostics for Windows.
2.1.3 Accessing the Compaq Utilities Menu
You can access the Configuration and Diagnostics utilities at startup from the Diagnostics Partition
on the hard drive or from the diskettes. Procedures for both methods are presented below.
Accessing the Compaq Utilities Menu from the Hard Drive
To access the Compaq Utilities menu at startup from the hard drive, complete the following steps:
1. Turn on or restart the computer. If Windows 95 is running, select Start, Shut Down, Restart the
computer.
2. Press F10 when the message “F10 = Setup” displays in the lower-right corner of the screen.
✎If you do not press the F10 key while the message is displayed, you must reboot the
computer to access the utility.
3. If prompted, select the desired language.
4. Press Enter at the Welcome to Compaq Utilities screen.
5. The Compaq Utilities menu appears. The Compaq Utilities menu offers the options shown
below. Use the Arrow keys to highlight the desired menu item and then press the Enter key to
select the item. You are prompted through any procedure that you select.
❏ Computer Setup
❏ Computer Checkup (TEST)
❏ View System Information (INSPECT)
❏ Create a Diagnostics Diskette (this option requires three diskettes)
❏ Manage a Diagnostics Partition (only available when booting from diskette)
❏ Exit

Compaq Deskpro 2000 Series of Personal Computers 2-3
Accessing the Compaq Utilities Menu from a Diskette
You can load either the Computer Setup or Diagnostics Utilities by completing the following steps:
1. Insert the Diagnostics diskette into drive A.
2. Turn on or restart the computer. If Windows 95 is running, select Start, Shut Down, Restart the
computer.
3. If prompted, select the desired language.
4. Press Enter at the Welcome to Compaq Utilities screen.
5. The Compaq Utilities menu listing is displayed. Use the arrow keys or the mouse to highlight the
desired menu item and then press the Enter key to select the item. You are prompted through any
procedure that you select.
❏ Computer Setup
❏ Computer Checkup (TEST)
❏ View System Information (INSPECT)
❏ Create a Diagnostics Diskette
❏ Manage a Diagnostics Partition
❏ Exit
If you select Computer Setup from this menu, you are prompted to insert the Setup diskette. You
are prompted through any procedure that you select.
2.2 Computer Setup
Computer Setup is used to configure Compaq computers and is selected from the Compaq Utilities
menu. It is preinstalled on the hard drive and is also available on diskette. Setup gives a snapshot of
the computer's hardware configuration, aids in troubleshooting, and allows you to set custom
features. Computer Setup recognizes a newly installed internal or external device and automatically
updates the Computer Setup screen.
To run Setup, complete the following steps:
1. From the Compaq Utilities menu, select the Computer Setup option.
A Setup screen is displayed. It may take a few minutes for the computer to generate this
information.
The screen lists the hardware that is configurable in the configuration memory and that is
currently used by the system with the exception of a tape drive. Alongside each option is a
summary of the current configuration.
You may display or reconfigure any of the detailed information provided.
2. Use the arrow keys or the mouse to highlight menu items, the Tab key to select buttons, and the
Enter key to select the desired items.
3. After making the desired change, select OK to save the change and return to the Computer Setup
menu.

2-4 Compaq Utilities
The Computer Setup screen includes two buttons: Built-In Devices and Add-In Devices. The
following tables list the options available under each of the two buttons:
Table 2-1
Built-In Devices
Sub-Menu Button Configuration Option Sub-Menu Button Configuration Option
Video Driver and Resolution System Information Processor
Storage Diskette Drive System Parameters
Removable Media Bus Priority
IDE Devices Quick Boot
SCSI Devices POST Messages
Boot Order Date/Time
Input devices Keyboard Communications Serial Ports
Mouse Parallel Port
Game Port Power Management Energy Save
Security Management Power-On Password
Setup Password
USB
Quick Boot
Quick Boot allows a faster boot cycle than does Full Boot. Quick Boot, however, does not run all the
diagnostic test that run during Full Boot. Quick Boot can be enabled to:
1. Always Quick Boot (default).
2. Periodically Full Boot (from every 1 to 31 days).
3. Always Full Boot.
Passive Release (Pentium II System)
Version 2.1 of the PCI specification sets limits on the maximum time allowed for a device to
complete transactions on the PCI bus. Passive release addresses the time limits set by the
specification. Passive release is a feature of the Pentium II systems only.
With passive release enabled, slower ISA devices are made to wait until faster PCI devices have
completed their transactions. Disabling passive release gives ISA devices priority over PCI devices.
The units ship with passive release enabled. To enable or disable passive release, use the following
steps:
1. Run Computer Setup (Section 2.2).
2. Under System Information, select the Processor icon.
3. Find “Bus Priority.”
4. Select ISA or PCI.
✎Selecting ISA disables passive release, giving ISA devices priority. Selecting PCI enables
passive release, giving PCI devices priority.

Compaq Deskpro 2000 Series of Personal Computers 2-5
Table 2-2
Add-In Devices
Sub-Menu Button Description or Function
ISA Boards Lists installed ISA boards.
Allows you to Add or Remove boards and to View or Edit board information.
PCI Boards Lists installed PCI boards.
Allows you to View or Edit board information.
2.2.1 Security Features
Table 2-3
Built-In Devices Security Features
Configuration Option Description or Function
Power-On Password Allows you to enable power-on password.
Allows you to specify prompting for power-on password.
Allows you to enable Network Server Mode, which allows for restarting of computer
from hard drive or network when the keyboard is disabled.
Allows you to enable QuickLock/QuickBlank.
(To maintain the security of QuickLock/QuickBlank, you must also disable the USB
ports.)
Setup Password Allows you to enable Setup (administrator) password, controlling access to the
computer.
USB Allows you to disable USB ports.
Table 2-4
Built-In Devices Communications
Configuration Option Description or Function
Serial Ports Lists available serial ports and settings.
Allows you to disable serial ports by selecting Disable from the resources list.
Parallel Port Lists available parallel port and settings.
Allows you to disable serial ports by selecting Disable from the resources list.
Establishing a Password in Windows 95
To establish a password in Windows 95, complete the following steps:
1. Click the My Computer icon.
2. Click the Control Panel folder.
3. Double-click the Passwords icon and follow the instructions to set a new password.

2-6 Compaq Utilities
Establishing a Power-On Password Using Computer Setup
Establishing a power-on password through Computer Setup prevents access to the computer when
power is turned on, unless the password is entered. The password must be entered each time the
computer is turned on, when the key icon ( ) appears on the monitor. To establish a power-on
password through Computer Setup, complete the following steps:
1. Turn on the computer.
2. When the message “F10 = Setup” appears in the lower-right corner of the screen, press F10.
✎The message displays in the lower-right corner of the screen for approximately two seconds.
If you do not press F10 during this time, you must reboot the computer to access the utility.
3. Press Enter to bypass the welcome screens and display the main menu.
4. From the main menu, select Computer Setup, and press Enter.
5. Select Built-In Devices, then select the Security Management feature.
6. Locate the power-on password option and follow the instructions provided to enable it.
7. Save the configuration and exit the utility.
Entering a Power-On Password
To enter the power-on password, complete the following steps:
1. Turn on the computer.
2. When the key icon ( ) appears on the monitor, enter your current password.
✎Type carefully; for security reasons, the characters you type do not appear on the screen.
If you enter the password incorrectly, a broken key icon ( ) appears. Try again. After three
unsuccessful tries, you must turn off the computer, then turn it on again before you can continue.
Changing a Power-On Password
To change the password, complete the following steps:
1. Turn on the computer.
2. When the key icon ( ) appears, type your current password, a slash (/) or alternate delimiter
character, your new password, another slash (/) or alternate delimiter character, and your new
password again as shown:
current password/new password/new password
✎Refer to Table 2-5, “National Keyboard Delimiter Characters,” for information about the
alternate delimiter characters.
For security reasons, the characters you type do not appear on the screen.
Completing this procedure causes the new password to take effect the next time you turn on the
computer.

Compaq Deskpro 2000 Series of Personal Computers 2-7
Deleting a Power-On Password
To delete the password, complete the following steps:
1. Turn on the computer.
2. When the key icon ( ) appears, type your current password followed by a slash (/) or alternate
delimiter character as shown:
current password/
✎Refer to Table 2-5, “National Keyboard Delimiter Characters,” for information about
alternate delimiter characters.
Completing this procedure deletes the password until you establish a new one through Security
Management.
National Keyboard Delimiter Characters
Each keyboard is designed to meet country-specific requirements. The syntax and keys that you use
for changing or deleting your password depend on the keyboard that came with your computer.
To determine the delimiter key required for changing or deleting your password, find your keyboard
in the table below:
Table 2-5
National Keyboard Delimiter Characters
Arabic / Greek - Slovakian -
Belgian = Hungarian - Spanish -
BHCSY* - Italian - Swedish/Finnish /
Brazilian / Japanese / Swiss -
Chinese / Korean / Taiwanese /
Czech - Latin American - Thai /
Danish - Norwegian - Turkish .
French ! Polish - U.K. English /
French Canadian é Portuguese - U.S. English /
German - Russian /
* For Bosnia-Herzegovina, Croatia, Slovenia, and Yugoslavia
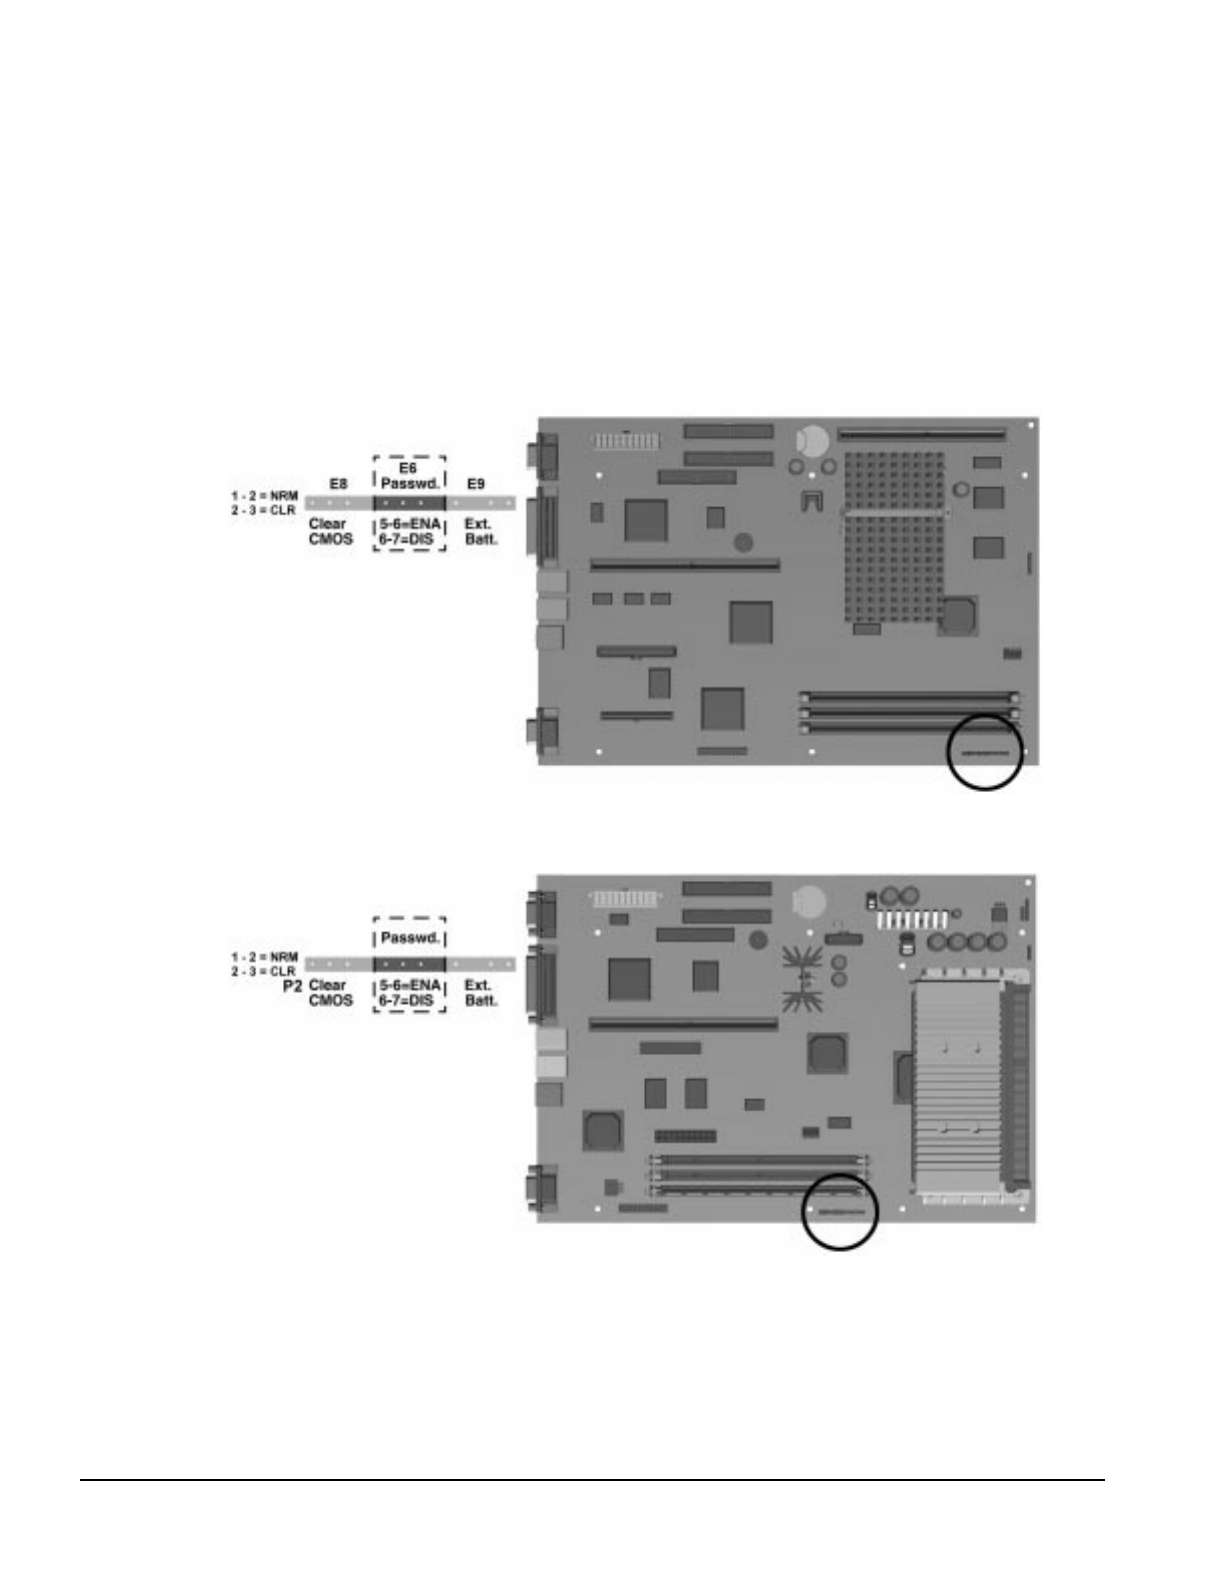
2-8 Compaq Utilities
Clearing the Password
If you do not know the power-on password, you may both clear and disable it by moving the jumper
on the password header located on the system board. The password header is labeled “E6 Password”
on the Pentium system board and labeled “Password” on the Pentium II system board.
The password header has three pins. The power-on password comes enabled by default with the
jumper on pins 5 and 6. To clear or disable the power-on password, move the jumper to pins 6 and 7.
Figure 2-1. Locating the Password Header on the Pentium System Board
Figure 2-2. Locating the Password Header on the Pentium II System Board

Compaq Deskpro 2000 Series of Personal Computers 2-9
2.2.2 QuickLock/QuickBlank
The QuickLock and QuickBlank features can disable the keyboard and mouse interfaces and blank
the screen while an application is open. QuickLock is enabled with a power-on password. If
QuickBlank is also enabled, the screen blanks. When this feature is used, the computer is secure until
you enter the power-on password.
QuickLock and QuickBlank are enabled through Security Management. The keyboard and mouse
interface can be disabled and the screen blanked from within any application. Entering a QuickLock
key combination (Ctrl+Alt+L) disables the keyboard and the mouse interface. If QuickBlank is not
activated, the application remains in view on the screen, but it cannot be accessed.
To enable the QuickLock and QuickBlank features from the Configuration and Diagnostics Menu,
complete the following steps:
1. Turn on the computer.
2. When the message appears in the lower-right corner of the screen, press F10.
✎The message displays in the lower-right corner of the screen for approximately two
seconds. If you do not press F10 during this time, reboot the computer to access the utility.
3. Press Enter to bypass the welcome screens and display the main menu.
4. From the main menu, select Computer Setup and press Enter.
5. Select Built-In Devices and press Enter.
6. Select the Security Management feature, and press Enter.
7. When the steps in the Security Management screen display, select Enable QuickLock of the
Keyboard.
8. Select QuickLock and/or QuickBlank.
9. Select OK to save the configuration.
10. On the Main screen, select Save and exit from the File menu.
To make use of the keyboard and mouse interface, see the information that follows.
Once in an application, enter the QuickLock key combination (Ctrl+Alt+L). The keyboard and mouse
(or other input device connected to the mouse connector) are disabled. The application cannot be
accessed at this time but remains in view unless the QuickBlank feature was also enabled through the
Configuration utility.
To enable the keyboard and input device connected to the mouse connector, enter the password.
✎ For security reasons, the characters you type do not appear on the screen. The application
will not be affected by the characters typed.

2-10 Compaq Utilities
2.3 Computer Checkup (TEST)
Computer Checkup (TEST), the primary diagnostics utility, confirms whether the various computer
devices are recognized by the system and are functioning properly. Use the TEST utility to help set
up tests and to test the computer. You may also use TEST in the following instances:
■To determine if all devices are recognized by the system and functioning properly. Running
TEST is optional, but recommended, after you install or connect a new device.
■To save, print, or display the information generated by TEST. It is recommended that you run
TEST and have the printed report available before placing a call to the Compaq Customer
Support Center.
■To assist your Compaq authorized dealer, reseller, or service provider in analyzing the system by
allowing the service provider to reproduce the same environment on another computer for testing.
To run Computer Checkup (TEST), complete the following steps:
1. Turn on only the external devices that you wish to test. You may wish to leave the printer
connected to log error messages.
2. Access the Compaq Utilities menu.
3. From the Compaq Utilities menu, select Computer Checkup (TEST).
4. When the test option menu appears, select the option to view the device list.
5. Verify that TEST correctly detected the devices installed.
✎This utility will detect all devices manufactured by Compaq; devices from other
manufacturers may not be detected.
❏ If the list is correct, select OK and go on to step 6.
❏ If the list is incorrect, be sure that any new devices are installed properly. If you do not find
an installation problem, call your Compaq authorized dealer, reseller, or service provider.
6. Select one of the following from the test option menu:
❏ Quick Check Diagnostics—This option runs a quick, general test on each device with a
minimal number of prompts. If errors occur, they are displayed when the testing is complete.
❏ Automatic Diagnostics—This option runs unattended, maximum testing of each device with
minimal prompts. You can choose how many times to run the tests, to stop on errors, or to
print or file a log of errors.
❏ Prompted Diagnostics—This option allows maximum control over the device testing
process. You can choose attended or unattended testing, decide to stop on errors, or choose to
print or file a log of errors.
7. Follow the instructions on the screen as the diagnostic tests are run on the devices. When the
testing is complete, the screen displays the test option menu again.
✎When running TEST, record any error message numbers and have them available when
you contact your Compaq authorized dealer, reseller, or service provider for assistance.
8. Exit to the Compaq Utilities menu.

Compaq Deskpro 2000 Series of Personal Computers 2-11
2.4 View System Information (INSPECT)
Use View System Information (INSPECT) in the following instances:
■To view information about the system once it has been configured.
■To save, print, or display the information generated by INSPECT. It is recommended that you run
INSPECT and have the printed report available before placing a call to the Compaq Customer
Support Center.
■To assist your Compaq authorized dealer, reseller, or service provider in analyzing the system by
allowing the service provider to reproduce the same environment on another computer for testing.
INSPECT provides the following information about the system's operating environment:
■Contents of the operating system startup files
■Current memory configuration
■ROM versions
■Type of processor and coprocessor
■Types of drives installed
■Active printer and communications interfaces
■Type of modem installed
■Graphics details
■Windows WIN.INI file details
■Keyboard
■Windows files
■Network status
To run INSPECT, complete the following steps:
1. From the Configuration and Diagnostics menu, select the View System Information (INSPECT)
option.
After the hardware configuration has been identified, the INSPECT menu appears.
2. Use the arrow keys to select the desired option listed below.
❏ Print the INSPECT status.
❏ Save the INSPECT status to a file.
❏ Add comments to a parameter status.
❏ Exit the utility.

2-12 Compaq Utilities
3. When the print or save menu appears, use the arrow keys to move within the menus and select
the desired items using the space bar.
Follow the screen prompts to print or save the information.
4. When the Add Comments menu appears, type in the desired information and follow the screen
prompts.
5. You may view detailed information about any of the devices by using the cursor to highlight any
device and pressing ENTER.
6. Follow the screen prompts to exit the utility.
2.5 Create a Diagnostics Diskette
This option from the Compaq Utilities menu will allow you to create a set of diagnostics and setup
diskettes from the software preinstalled on the hard drive. Three diskettes are required for this option:
two for Setup and one for Diagnostics.
To create the Diagnostics and Setup diskettes, perform the following steps:
1. From the Compaq Utilities Menu, select the Create a Diagnostic Diskette option.
A message screen appears with information about labeling the required diskettes.
2. Label the diskettes and select OK.
3. Follow the screen prompts for changing the diskettes.
After creating the diskettes, follow the screen prompts to exit the application.
2.6 Managing the Diagnostics Partition
This option allows you to create, delete, or upgrade the Diagnostics software on your computer. This
must be performed from a Diagnostics diskette.
A Diagnostics Partition is installed on the primary hard drive at the factory. If the installation is to be
made on a newly installed primary hard drive, it must be done before DOS is installed to make it
bootable during POST.
To perform any diagnostic partition activity, complete the following steps:
1. Insert the Compaq Diagnostics diskette into the diskette drive.
2. Reboot the computer (Ctrl+Alt+Del), or turn the power off and then on. At this point, the
Language Screen appears, listing the languages on the diskette.
3. Select the desired language. The Welcome screen then appears.
4. Follow the screen instructions to get the Configuration and Diagnostics menu.
5. Select the Manage Diagnostics Partition from the menu.
The screen will present the Manage Diagnostics Partition menu.
6. Select the desired partition activity (Create, Upgrade, or Delete) and follow the screen prompts
to complete the tasks.
CAUTION: Creating a Diagnostics Partition involves performing a low-level format on the hard drive. This
is normally only done to add diagnostics to a new replacement hard drive. If the diagnostics software is
deleted, you will no longer be able to access the Compaq Utilities menu.

Compaq Deskpro 2000 Series of Personal Computers 2-13
2.7 Exiting the Compaq Utilities Menu
To exit the Compaq Utilities menu, select the Exit option or press Ctrl+Alt+Delete. Either option
restarts the computer and saves any changes you've made.
2.8 Compaq Enhanced Insight Personal
Edition (Diagnostics for Windows)
Compaq Enhanced Insight Personal Edition (Compaq Diagnostics for Windows) utility contains the
same functionality as the partition-based INSPECT program but in a Windows environment. To use
the Compaq Diagnostics for Windows utility in Windows 95, select the Compaq Diagnostics icon
from the Control Panel.
Once the program is running, you can use the tool bar or the menus to browse through the
information. Some examples of the information you can view are:
■Product name
■CPU information
■Cache size and type
■Mouse driver versions
■COM ports, LPT ports, modems
■ISA and PCI slot information
■Version of certain software
■ROM version
■Storage information
■Power Management settings
■Multimedia devices information
2.9 Power-On Self-Test (POST)
POST is a series of diagnostic tests that run automatically when the system is turned on. After the
computer is turned on, POST checks the following assemblies to ensure that the computer system is
functioning properly:
■Keyboard
■System board
■Memory modules
■Video
■Diskette drives
2-14 Compaq Utilities
■Hard drives
■Power supply
■Controllers
If POST finds an error in the system, an error condition is indicated by an audible and/or visual
message. Refer to Appendix F for POST error messages and recommended courses of action.
2.10 ROMPaq
The Compaq Deskpro 2000 Series of Personal Computer comes with reprogrammable Flash ROM
(Read Only Memory). Flash ROM Lock, set to its default setting of OFF, protects the Flash ROM
from being upgraded and the system BIOS from being updated.
To update the ROM, order the ROMPaq diskette from Compaq. Then complete the following
procedures:
1. Insert the ROMPaq diskette into the diskette drive.
2. Turn on the computer.
CAUTION: If the computer does not have a Setup Password enabled, then the ROM is not write-
protected and unauthorized updates can occur. The Setup Password is disabled when the computer is
shipped from the factory.
3. If prompted, enter the Setup Password.
4. If the Setup Password is entered correctly, the ROMPaq utility takes over and runs the Flash
ROM upgrade.
✎If the Setup Password is entered incorrectly, the procedure terminates and no changes are
made to the ROM.
CAUTION: Do not turn the power off during a firmware upgrade. A loss of power during upgrade might
corrupt the upgrade.
5. When the utility has finished upgrading the ROM, remove the diskette from the diskette drive
and reboot the computer.

Compaq Deskpro 2000 Series of Personal Computers 2-15
2.11 Compaq Intelligent Manageability
Intelligent Manageability combines innovative hardware technology with PC LAN management tools
from Compaq and other leading vendors to make Compaq desktop and portable computers easier to
inventory, troubleshoot, protect, and maintain. Intelligent Manageability features focus on:
Asset Management
Fault Management
Security Management
Configuration Management
Integration Management
2.11.1 Asset Management
Conducting a physical inventory of personal computers, key components, and monitors can be time-
consuming and costly. The Compaq Deskpro Asset Management solution to this problem begins with
AssetControl, hardware designed and built into new Compaq personal computers, key components,
and monitors that support the VESA DDC2B, DIMM SPD, and EDID standards.
AssetControl features make it easy and inexpensive to maintain an accurate, up-to-date inventory.
AssetControl features:
■Provide detailed inventory information about various components, including:
❏ Manufacturer, model, and serial number of Compaq computers, monitors, hard drives, and
dual inline memory modules (DIMMs)
❏ Asset Tag
❏ System board and ROM revision level
❏ DMI BIOS
■Allow you to view, print, or electronically save this data, and other system configuration details,
using:
❏ Enhanced Compaq Insight Personal Edition
❏ Compaq Insight Manager
❏ PC LAN management products from the Compaq Desktop Management Solutions Partners
❏ Management software products supporting the Desktop Management Interface Revision 2.0
(DMI 2.0)
■Simplify and help ensure the accuracy of inventory and accounting procedures
■Streamline service calls by giving the administrator fast access to the Compaq personal computer
configuration and history
■Simplify remote software distribution procedures by allowing the system administrator to identify
software and revision levels remotely

2-16 Compaq Utilities
2.11.2 Fault Management
Fault Management features combine innovative hardware and software technology to prevent the loss
of critical data and minimize unplanned downtime.
When a fault occurs, the computer displays a Local Alert message containing a description of the
fault and any recommended actions. You can then view current system health by using Compaq
Insight Personal Edition. If the computer is connected to a network managed by Compaq Insight
Manager or other simple network management protocol (SNMP)–based management products (e.g.,
HP OpenView or IBM Tivoli TME10 NetView), the computer also sends a fault notice to the
network management application.
SMART II Hard Drive Fault Prediction
The SMART II hard drive monitors hard drive activity to predict failures before they occur. Fault
prediction and failure indication parameters, such as abnormal variations in spinup and seek times, or
non-correctable read and write errors, are tracked to determine the hard drive condition. Should these
errors become significant, the computer displays a warning message. The warning gives you time to
back up the hard drive and replace it prior to experiencing downtime or loss of data. The Prefailure
Warranty for SMART II hard drives allows you to replace these drives, free of charge, before the
drives fail.
SMART II hard drives are compliant with the Small Form Factor Committee Specification for Self-
Monitoring, Analysis, and Reporting Technology (SMART) Version II. SMART is the industry
standard technology, pioneered by Compaq and originally called IntelliSafe, that allows you to
prevent data loss and minimize downtime, in concert with Compaq Insight Management Agents.
ECC Fault Prediction and Prefailure Warranty
When the computer encounters an excessive number of error checking and correcting (ECC) memory
errors, the screen displays a Local Alert message. This message contains detailed information about
the errant memory module, allowing you to take action before you experience non-correctable
memory errors. The Prefailure Warranty for ECC memory modules allows you to replace these
modules, free of charge, before the modules actually fail. ECC memory modules are optional on all
Compaq Deskpro personal computers.
✎To use this feature, you must replace the standard DIMMs with ECC DIMMs.
Monitor Fault Diagnosis
New Compaq monitors detect when the operating temperature exceeds the normal range or when a
hardware fault occurs. Hardware faults may include the following:
■Power voltage out of range
■Power current out of range
■Horizontal deflection
■Vertical deflection
■I/O controller operation failure

Compaq Deskpro 2000 Series of Personal Computers 2-17
If the monitor detects one of these conditions, the computer will send an alert over the network to the
system administrator.
Proactive Backup
Proactive Backup software initiates a tape or PD-CD backup upon receiving notice of an impending
SMART hard drive failure.
The Seagate Backup Exec SMART Client works with Seagate Backup Exec tape backup software on
the server, or with Seagate Backup Exec software supporting the PD-CD drive. Together with the
Insight Management Agents, this software offers a Proactive Backup solution. For instructions on
configuring the Backup Exec SMART Client, contact your systems administrator or refer to the
Seagate Backup Exec documentation.
Cheyenne has also created an agent to support the Proactive Backup solution. The SMART Drive
Agent is the component that recognizes and reacts to the SMART II hard drive fault alerts. This agent
is an extension to the Microsoft Windows 95 tape backup agent for the standalone application
ARCsolo for Windows. This agent works with the SMART II hard drive to ensure that critical data
will be protected in the event of a hard drive failure.
Surge-Tolerant Power Supply
An integrated, surge-tolerant power supply provides greater reliability when the computer is hit with
an unpredictable power surge. This power supply is rated to withstand a power surge of up to 2,000
volts without incurring any system downtime or data loss.
2.11.3 Security Management
As access to a network increases, so does the risk of unauthorized access to critical information and
theft of valuable components. The Compaq personal computer provides a robust set of security
features to protect the computer and data from unauthorized access.
■Physical security features such as the cable lock provision help prevent theft or unauthorized
access to internal components such as processor and memory.
■Setup and Power-On Passwords help prevent unauthorized access to information stored on the
computer or the network.
■DIMM configuration changes will trigger local and remote alert messages, providing timely
notice of unauthorized additions, changes, or removals. (This feature is supported on all Compaq
DIMMs and others that comply with the DIMM SPD standard.)
■The Ownership Tag displays ownership information during system restart. The Ownership Tag
information can be entered or modified in Computer Setup and is protected by the Setup
Password.
■ Drive and media security features control access to the information stored on the computer and
can prevent unauthorized transfer of data to a diskette drive or other removable storage media
(e.g. LS-120, PD-CD). These features can also prevent startup from the removable media drives.
■ Device disabling features can prevent unauthorized transfer of data over fax/modems, serial
ports, parallel ports, or infrared ports.

2-18 Compaq Utilities
■ QuickLock and QuickBlank can be set to lock the keyboard and/or blank the monitor screen
when the PC goes into low power mode.
Security management settings can be viewed locally using Compaq Insight Personal Edition or
remotely using Compaq Insight Manager.
2.11.4 Configuration Management
Configuration Management features include:
■ Remote ROM Flash
■ FailSafe Boot Block ROM
■ Remote Security Management
■ Replicated Setup
■ Power Management
■ Compaq Integrated Software
■ Universal Driver Manager
■Enhanced Support Software CD and World Wide Web Site
✎Use of remote Configuration Management features requires an established Setup Password.
Remote ROM Flash
Your computer comes with reprogrammable flash ROM (Read Only Memory). By establishing a
Setup Password in Security Management, you can protect the ROM from being unintentionally
updated or overwritten. This is important to ensure computer operating integrity. Should you need or
want to upgrade your ROM, you may:
■Order an upgraded ROMPaq diskette from Compaq.
■Order the Support Software CD for Compaq Desktop, Portable, and Workstation Products.
■Download the latest ROMPaq images from the Compaq World Wide Web site
(www.compaq.com).
CAUTION: For maximum ROM protection, be sure to establish a Setup Password. The Setup
Password prevents unauthorized ROM upgrades.

Compaq Deskpro 2000 Series of Personal Computers 2-19
Upgrading Flash ROM
To upgrade the ROM after you receive an upgraded ROMPaq diskette, complete the following steps:
1. Insert the ROMPaq diskette in the diskette drive, enter the correct command, and the computer
will prompt for the Setup Password.
2. Enter the Setup Password.
3. If the Setup Password is entered correctly, the ROMPaq utility will take over and run the flash
ROM upgrade.
✎Do not turn off the power to your computer until the ROMPaq utility has completed the
upgrade process.
If the Setup Password is incorrectly entered, the procedure will terminate and no changes
will be made to the ROM.
4. When the utility finishes upgrading the ROM, remove the diskette from the diskette drive and
restart your computer.
Using Remote ROM Flash
Remote ROM Flash allows the system administrator to safely upgrade the ROM on remote Compaq
Deskpro personal computers, directly from the centralized network management console. Enabling
the system administrator to perform this task remotely, on multiple computers, results in a consistent
deployment of and greater control over Deskpro ROM images over the network. It also results in
greater productivity and lower total cost of ownership.
Compaq created the Remote ROM Flash capability to be secure and fail-safe. All Deskpro ROMPaq
ROM images from Compaq are digitally signed to ensure authenticity and minimize potential
corruption. The ROM firmware includes a Boot Block that is protected during the flash process and
allows the Deskpro to be restarted, in the unlikely event of an unsuccessful ROM flash.
Remote ROM Flash is performed in two stages:
1. System administrator uses the Remote Management Setup software on a centralized
management console to prepare a Deskpro ROMPaq file.
2. System administrator uses a PC LAN management product, such as Microsoft SMS, Intel
LANDesk Manager, or Symantec Norton Administrator for Networks, to distribute and execute
the file over the network to remote Deskpros.
✎Use of Remote ROM Flash requires an established Setup Password.
For more information on enabling Remote ROM Flash, refer to the online Remote Management Help.

2-20 Compaq Utilities
FailSafe Boot Block ROM
The FailSafe Boot Block ROM allows for system recovery in the unlikely event of a ROM flash
failure, for example, if a power failure occurs during a ROM upgrade. The Boot Block is a flash-
protected section of the ROM that checks to validate the system ROM each time power to the system
is turned on.
■If the system ROM is valid, the system starts normally.
■If the system ROM fails the validation check, the FailSafe Boot Block ROM provides enough
support to start the system from a ROMPaq diskette, which will program the system ROM with a
valid image.
Because there is no video or hard drive support from the Boot Block ROM, the keyboard lights
communicate information. When the Boot Block detects an invalid system ROM, the system sounds
a series of beeps (one long and three short) and flashes the three keyboard lights.
To recover the system after hearing the FailSafe Boot Block beeps, complete the following steps:
1. Remove any diskettes from the diskette drive and turn off the power.
2. Insert a ROMPaq diskette into the diskette drive.
3. Turn on power to the system
If a Setup Password has been established, the Caps Lock light will turn on.
4. Enter the Setup Password.
When the system successfully starts from the diskette and reprograms the ROM, the three
keyboard lights will turn on.
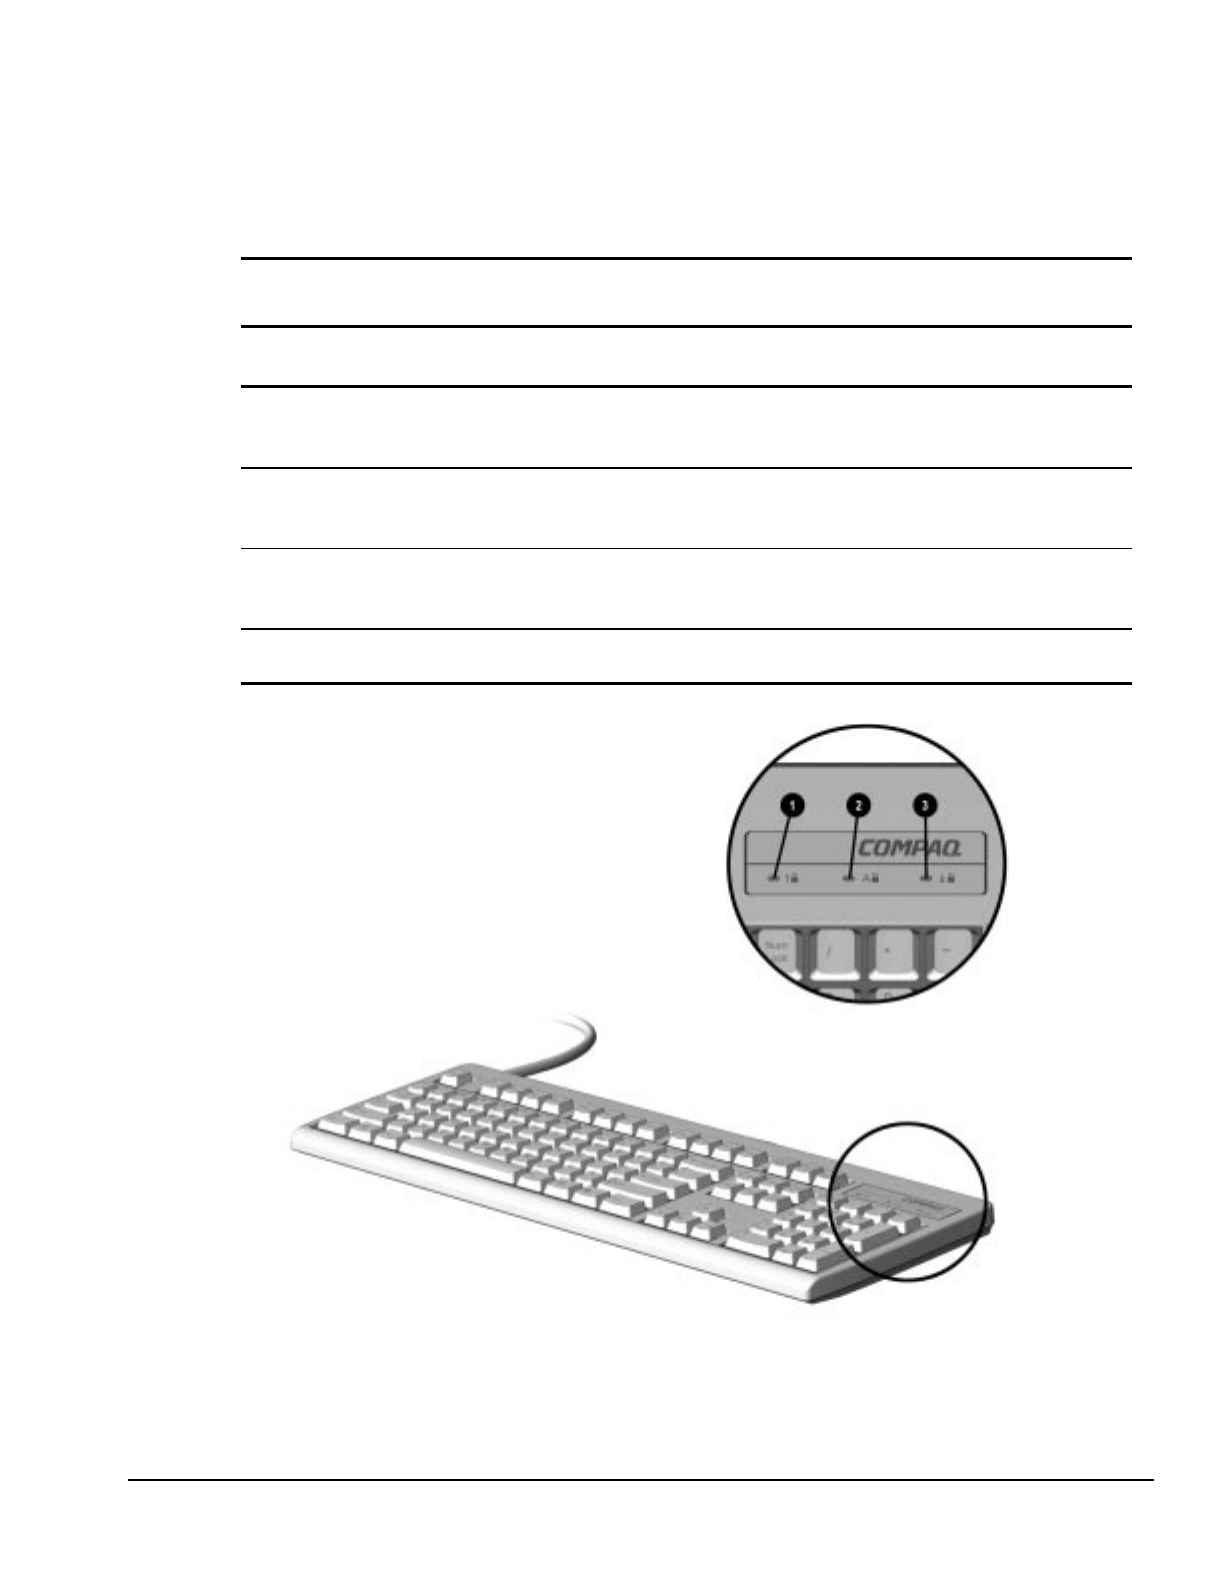
Compaq Deskpro 2000 Series of Personal Computers 2-21
The following table lists the various keyboard light combinations, as well as the meaning and action
associated with each combination.
Table 2-6
Keyboard Light Combinations
Num
Lock 11
Caps
Lock 22
Scroll
Lock 33Meaning and Required Action
OFF ON OFF System requires Setup Password.
Enter the Setup Password. The light remains turned on until you enter a
valid Setup Password.
ON OFF OFF System could not start from diskette because the ROMPaq diskette is not
present, is bad, or the drive is not ready.
Insert a valid ROMPaq diskette, turn the power off, then turn the power on.
OFF OFF ON ROM upgrade failed.
Try another ROMPaq diskette. If the light remains turned on, contact
Compaq customer support.
ON ON ON ROM upgrade successfully completed.
Turn power off and back on to resume normal system operation.
Figure 2-3. Keyboard Lights

2-22 Compaq Utilities
Remote Security Management
Remote Security Management allows the system administrator to safely set or modify security
features on remote Compaq Deskpros, directly from the centralized network management console.
Enabling the system administrator to perform these tasks remotely, on multiple computers, results in
consistent deployment of and greater control over Deskpro security parameters over the network. It
also results in greater productivity and lower total cost of ownership.
✎Use of Remote Security Management requires an established Setup Password.
Remote Security Management is performed in two stages:
1. System administrator uses the Remote Management Setup software on a centralized
management console to define the security parameters.
2. System administrator uses a PC LAN management product to distribute the settings over the
network to remote Compaq Deskpro personal computers.
For more information on enabling Remote Security Management, refer to the online Remote
Management Administrator’s Guide.
Replicated Setup
The Replicated Setup feature gives an administrator the ability to easily copy one Deskpro Setup
configuration to other Deskpro computers of the same model. This allows for faster, more consistent
configuration of multiple Deskpro computers.
Using Replicated Setup
To use Replicated Setup in Computer Setup, complete the following steps:
1. Access Computer Setup from the Compaq Utilities menu.
2. Use Computer Setup to select the settings for the Replicated Setup.
3. Select File, Save System Configuration from the menu bar, and follow the instructions on the
screen.
4. To restore the Replicated Setup, select File, Restore System Configuration from the menu bar,
and follow the instructions on the screen.
For help on specific features provided by the Computer Setup, click Help.
Power Management
Use Computer Setup, accessible through the Compaq Utilities menu, to establish, modify, or disable
Power Management features.
✎Disable monitor timeouts in Computer Setup first, then establish the settings in Windows
95, to avoid potential conflicts.
Use Display Properties to establish, modify, or disable Power Management settings for the monitor.
To access Display Properties, right-click on the Windows Desktop, then choose Properties.

Compaq Deskpro 2000 Series of Personal Computers 2-23
Compaq Integrated Software
Additional support software is available on the Support Software CD for Compaq Desktop, Portable,
and Workstation Products and the Compaq World Wide Web site (www.compaq.com). This software
supplements the installation of off-the-shelf Microsoft operating systems and lets you quickly and
easily install the correct Deskpro device drivers and other software required for top performance.
Universal Driver Manager
Compaq has created a Universal Driver Manager (UDM) release that supports all Compaq QVision,
S3, Cirrus Logic, and Matrox graphics adapters found on Compaq Deskpro products. The UDM
eases graphics driver deployment across all Compaq Deskpro platforms ensuring cross-compatibility
and backward-compatibility. The resulting solution enables customers to manage and control
ongoing software maintenance costs. The UDM is available on the Support Software CD for Compaq
Desktop, Portable, and Workstation Products and the Compaq World Wide Web site
(www.compaq.com).
Enhanced Support Software CD and World Wide Web Site
Compaq engineers rigorously test and debug software developed by Compaq and third-party
suppliers, and develop operating-system specific support software, to ensure the highest level of
performance, compatibility, and reliability for Compaq personal computers.
When making the transition to new or revised operating systems, it is important to implement the
support software designed for that operating system. If you plan to run any of the following operating
systems on your computer, you must install corresponding Compaq device drivers and utilities to
ensure all features are supported and functioning properly:
■Microsoft Windows 3.1
■IBM OS/2
■Microsoft Windows NT Workstation 3.51 or 4.0
■A version of Microsoft Windows 95 that is different from the version included with your
computer
Compaq has made the task of locating, accessing, evaluating, and installing the latest support
software easier. There are three methods you can use to access support software:
■You can order the Support Software CD for Compaq Desktop, Portable, and Workstation
Products. This compact disc contains the latest device drivers, utilities, and flashable ROM
images needed to run MS-DOS, Microsoft Windows 3.1, Windows 95, Windows NT
Workstation, and IBM OS/2 on your Compaq commercial desktop product.

2-24 Compaq Utilities
■You can download the software from the Compaq World Wide Web site (www.compaq.com).
✎Both the CD and the web site include The Locator with Decision Support, a comprehensive
listing of the device drivers, utilities, flashable ROM images, and more, categorized by
operating system, personal computer family, and model for easy retrieval. Decision Support
provides detailed information for each piece of support software, including descriptions,
features, enhancements, dependencies, and update criticalities.
■You can purchase backup diskettes.
If you choose to purchase the Support Software CD, you have two options:
■You can purchase a single CD-ROM that gives you one-time access to the latest support software
(North America only, Compaq part number 272505-001).
■You can purchase a yearly subscription that delivers up to 12 monthly CD-ROMs (Compaq part
number 183426-xxx)
The annual subscription ensures your continuous access to the latest developments.
The CD or backup diskettes can be ordered from Compaq.
✎When calling Compaq to place an order, be sure to have the serial number of your computer
available. The location of the serial number is shown in Chapters 5 and 6 for the desktop
and minitower models respectively. This number is necessary for all purchases.
2.11.5 Integration Management
Integration Management features include:
■Desktop Management Interface
■Compaq Insight Manager and the Insight Management Agents
■Compaq Desktop Management Solutions Partners Program
■Systems Management Partners Program
Desktop Management Interface
The Desktop Management Task Force (DMTF) is an industry body created in 1992 with the goal of
standardizing systems manageability. DMTF established the Desktop Management Interface (DMI)
framework to standardize access to PC configuration data. Compaq, as a Steering Committee and
Technical Committee member of the DMTF, delivers hardware and software instrumentation that
supports the DMI standard.
For more information on configuring the DMI software, refer to the online Intelligent Manageability
Guide.

Compaq Deskpro 2000 Series of Personal Computers 2-25
Compaq Insight Manager and the Insight Management Agents
Using the industry-standard Simple Network Management Protocol (SNMP) found in Microsoft
Windows 95 and Windows NT Workstation, Compaq has continued the migration of management
tools from servers to desktops by enhancing Compaq Insight Manager. Compaq Insight Manager
allows the LAN administrator to remotely view AssetControl data, configuration data, memory
change alerts, NIC performance data, and contact information. The tool also provides access to the
Fault Management features of the Compaq Deskpro Personal Computer.
For more information on integrating with Insight Manager and configuring the Compaq Insight
Management Agents, refer to the online Intelligent Manageability Guide.
Compaq Desktop Management Solutions Partners Program
Compaq delivers desktop management solutions today under Microsoft Windows 3.1, Windows 95,
and Windows NT Workstation through the Compaq Desktop Management Solutions Partners
Program. This Compaq initiative ensures compatibility and integration of AssetControl features with
leading PC LAN management products. These products provide remote access to the AssetControl
features so that LAN and PC administrators can manage Compaq Deskpro Family of Personal
Computers information from a central location. The partnership ensures that the benefits of
Intelligent Manageability are accessible through a broad range of vendors. This allows customers to
use their tools of choice to remotely manage their Compaq Deskpro computers more confidently and
cost effectively.
Compaq Desktop Management Solutions Partners include:
■ASI (AssetPRO)
■BindView (BindView Console)
■Intel (LANDesk Management Suite)
■McAfee Associates (Saber LAN Workstation)
■Microsoft Corporation (Systems Management Server)
■Novell (ManageWise)
■Seagate (LAN Directory)
■Symantec (Norton Administrator for Networks)
■Tally Systems (NetCensus)
For more information on integrating with leading PC LAN management software, refer to the online
Intelligent Manageability Guide.

2-26 Compaq Utilities
Systems Management Partners Program
In addition to integrating Intelligent Manageability features with the PC LAN management
applications highlighted above, Compaq also integrates these features with industry-leading
enterprise management platform applications. This Compaq initiative ensures compatibility and
integration of AssetControl and Fault Management features with tools that manage servers, hubs,
routers, uninterruptible power supplies (UPSs), and other network devices. The result is an end-to-
end solution that enables management of the entire enterprise from single console.
Systems Management Partners include:
■BMC Software (Patrol)
■Boole & Babbage (COMMAND/Post)
■Cabletron (SPECTRUM Enterprise Manager)
■Hewlett Packard (Compaq Insight Manager for OpenView)
■Seagate (NerveCenter)
■Tivoli (TME10)
■Tivoli (Compaq Insight Manager for TME10 NetView)
For more information on integrating with Systems Management Partners, refer to the Compaq World
Wide Web site (www.compaq.com).
2.12 Protecting Your Software
To protect your software from loss or damage, you should keep a backup copy of all system software,
applications, and related files stored on your hard drive. You can order a set of backup diskettes from
Compaq at nominal cost, or you can make your own set.
2.12.1 Ordering Backup Diskettes
You can order backup diskettes from Compaq for all of the software preinstalled on your computer.
You can order all software as a single set, or you can order the various software packages separately.
✎When calling Compaq to place an order, be sure to have the serial number of your
computer available. The location of the serial number is shown in Chapters 5 and 6 for the
desktop and minitower models respectively. This number is necessary for all purchases.
Compaq authorized dealers, resellers, and service providers can tell you what backup software
combinations are currently available for your computer.

Compaq Deskpro 2000 Series of Personal Computers 2-27
2.12.2 Restoring Your Hard Drive in Windows 95
If your hard drive has completely failed and you cannot access Windows 95, you will need to restore
the Windows 95 operating system from your backup system diskettes prior to following the
instructions below.
1. From the Windows desktop, click Start, point to Programs, point to Accessories, then click
System Tools.
2. From the System Tools menu, click Backup. The computer starts the backup program.
3. Read the informational dialogs and click OK to continue.
4. A screen with three tabs (Backup, Restore, and Compare) appears. Click the Restore tab.
5. Insert the first backup diskette into the diskette drive.
6. Select the drive from which to restore files (the diskette drive).
7. Using your mouse, put a check in the box next to the files you want to restore. Putting a check
next to the drive icon automatically selects all the files on that drive. (To deselect a file, click the
box next to it.)
8. Click Next Step.
9. Select the destination drive.
10. Follow the instructions that appear on the screen until the installation is complete.
2.13 Prefailure Warranty
The Prefailure Warranty is standard for select components of all Compaq Monsters Series of Personal
Computers. It extends the Compaq three-year, limited warranty by applying it to critical system
components before they actually fail. The Prefailure Warranty ensures that when you receive
notification of a prefailure condition through Compaq Insight Manager, the component is replaced
under warranty.
The Compaq Monsters Series of Personal Computers components covered by the Prefailure Warranty
are:
■Error Correcting Code (ECC) memory (with ECC memory modules only)
■IDE/EIDE hard drives
■SCSI hard drives
■Ultra ATA hard drives

Compaq Deskpro 2000 Series of Personal Computers 3-1
chapter 3
ILLUSTRATED PARTS CATALOG
This chapter provides an illustrated parts breakdown and a reference for spare parts for the Compaq
Deskpro 2000 Series of Personal Computers.
Figure 3-1. Compaq Deskpro 2000 Series Personal Computer
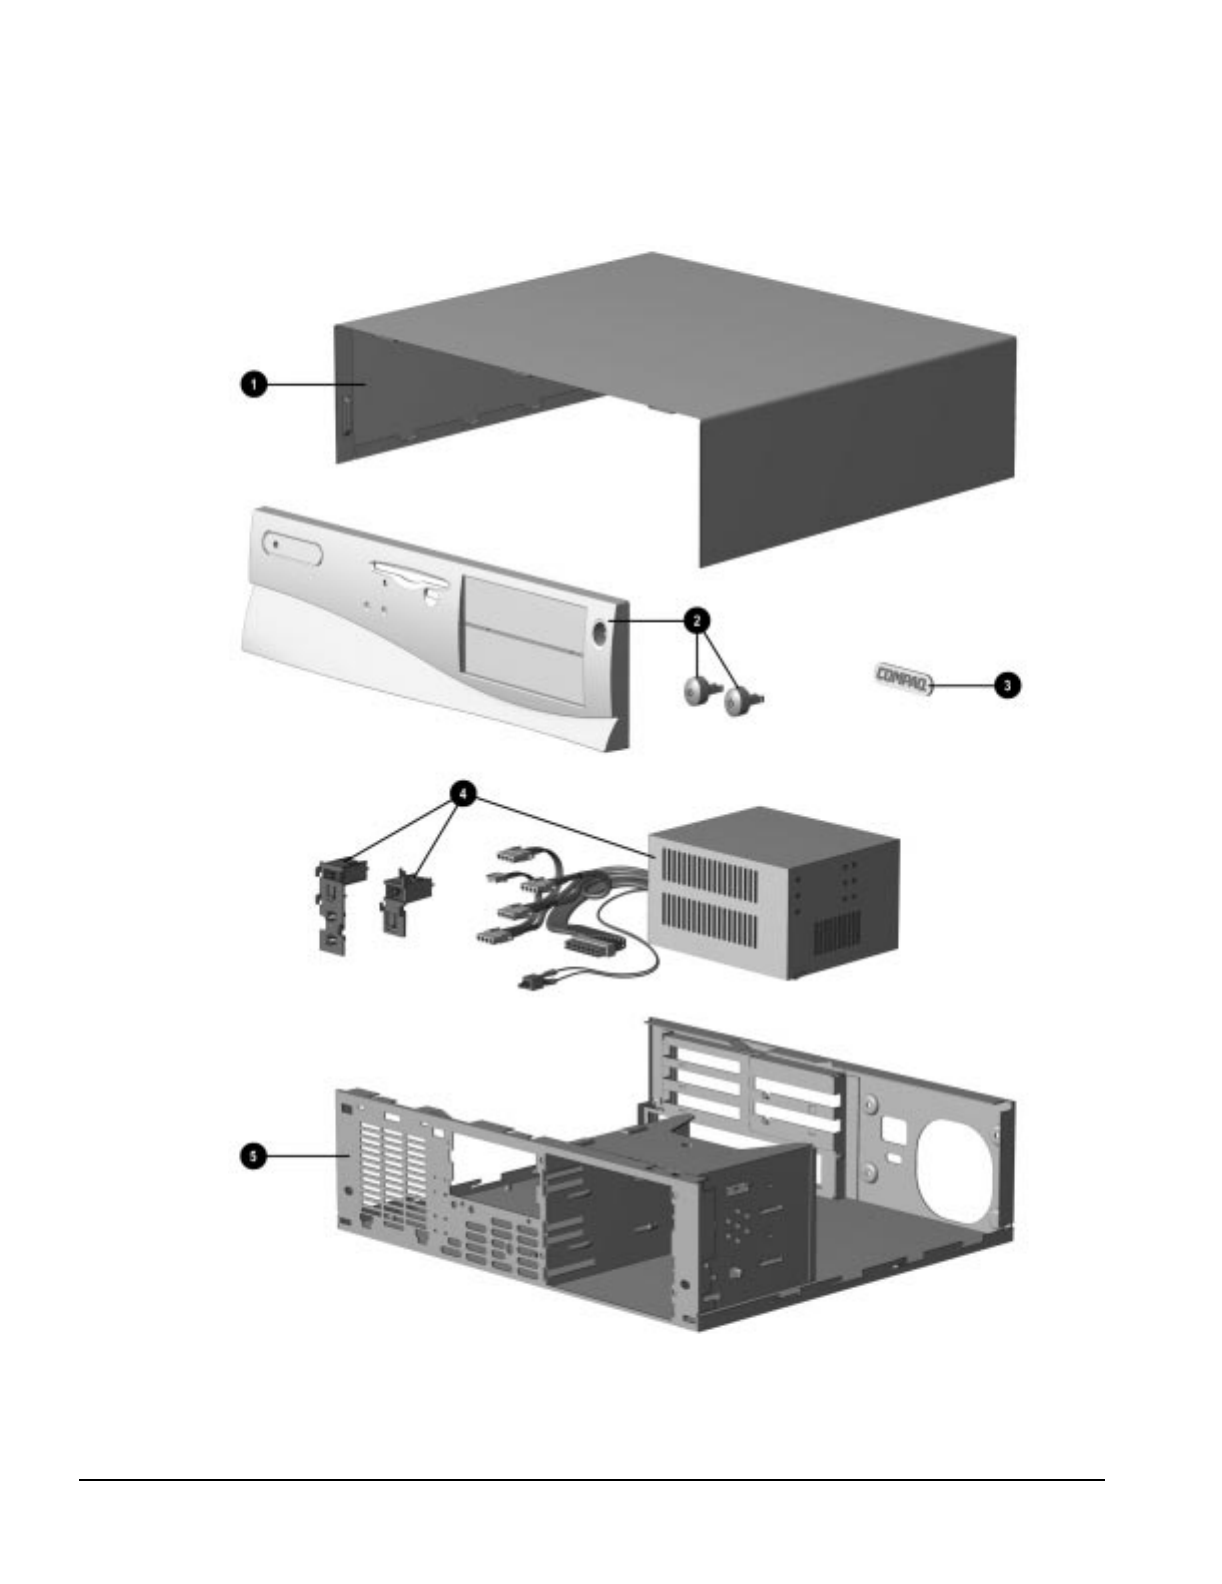
3-2 Illustrated Parts Catalog
3.1 System Unit
Figure 3-2. System Unit, Desktop

Compaq Deskpro 2000 Series of Personal Computers 3-3
Table 3-1
System Unit Spare Parts: Desktop
Description
Spare Part
Number
Warranty
Tier
1. System unit cover, desktop 243089-001 A
2. Front bezel (includes 2 power switch caps and bezel blank; order logo separately) 243088-001 A
3. Logo kit (includes logos for all models) 247525-001 A
4. Power supply (includes fan, power switch, and 2 power switch mounting brackets) 278756-001 A
5. Chassis base pan (shown for reference only)
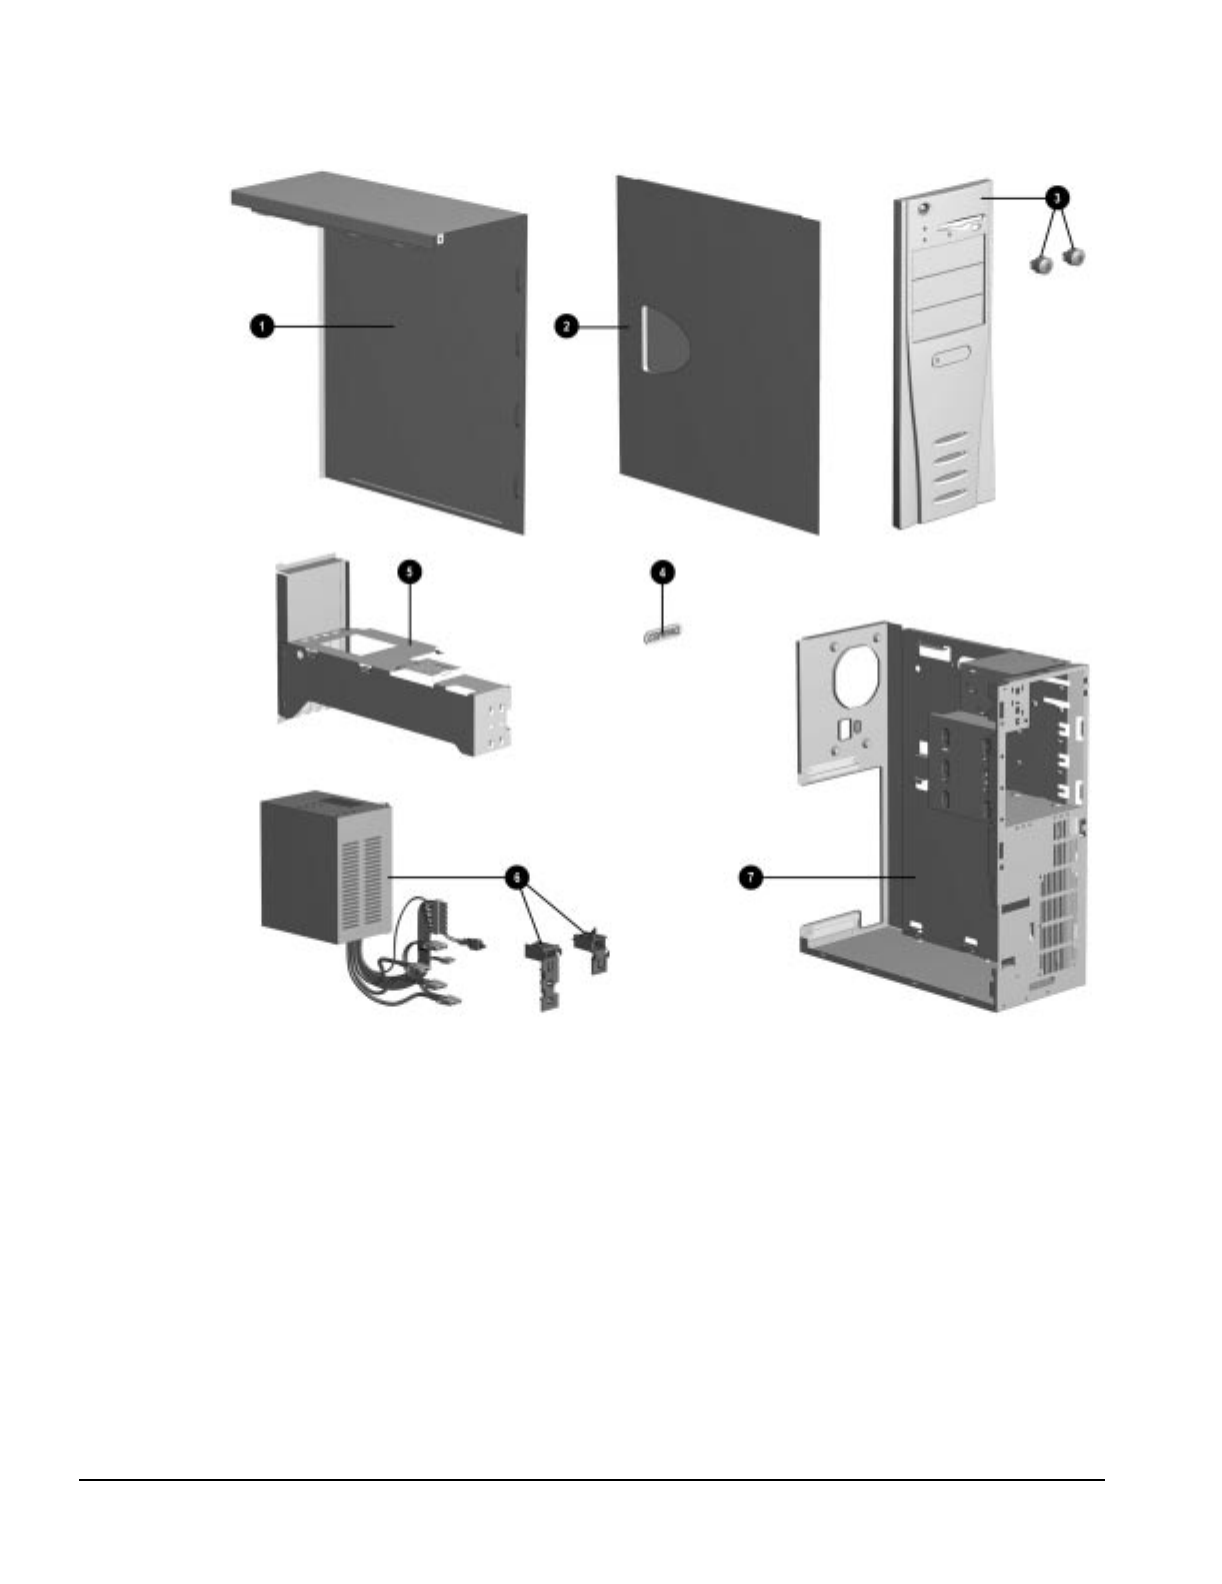
3-4 Illustrated Parts Catalog
Figure 3-3. System Unit, Minitower

Compaq Deskpro 2000 Series of Personal Computers 3-5
Table 3-2
System Unit Spare Parts: Minitower
Description
Spare Part
Number
Warranty
Tier
1. J hood, minitower 185972-001 A
2. Access panel, minitower 185971-001 A
3. Front bezel (includes 2 power switch caps and 2 bezel blanks; order logo separately 247378-001 A
4. Logo kit (includes logos for all models) 247525-001 A
5. Brace, riser, minitower 243190-001 A
6. Power supply (Includes fan, power switch, and 2 power switch mounting brackets) 278756-001 A
7. Chassis base pan (shown for reference only)
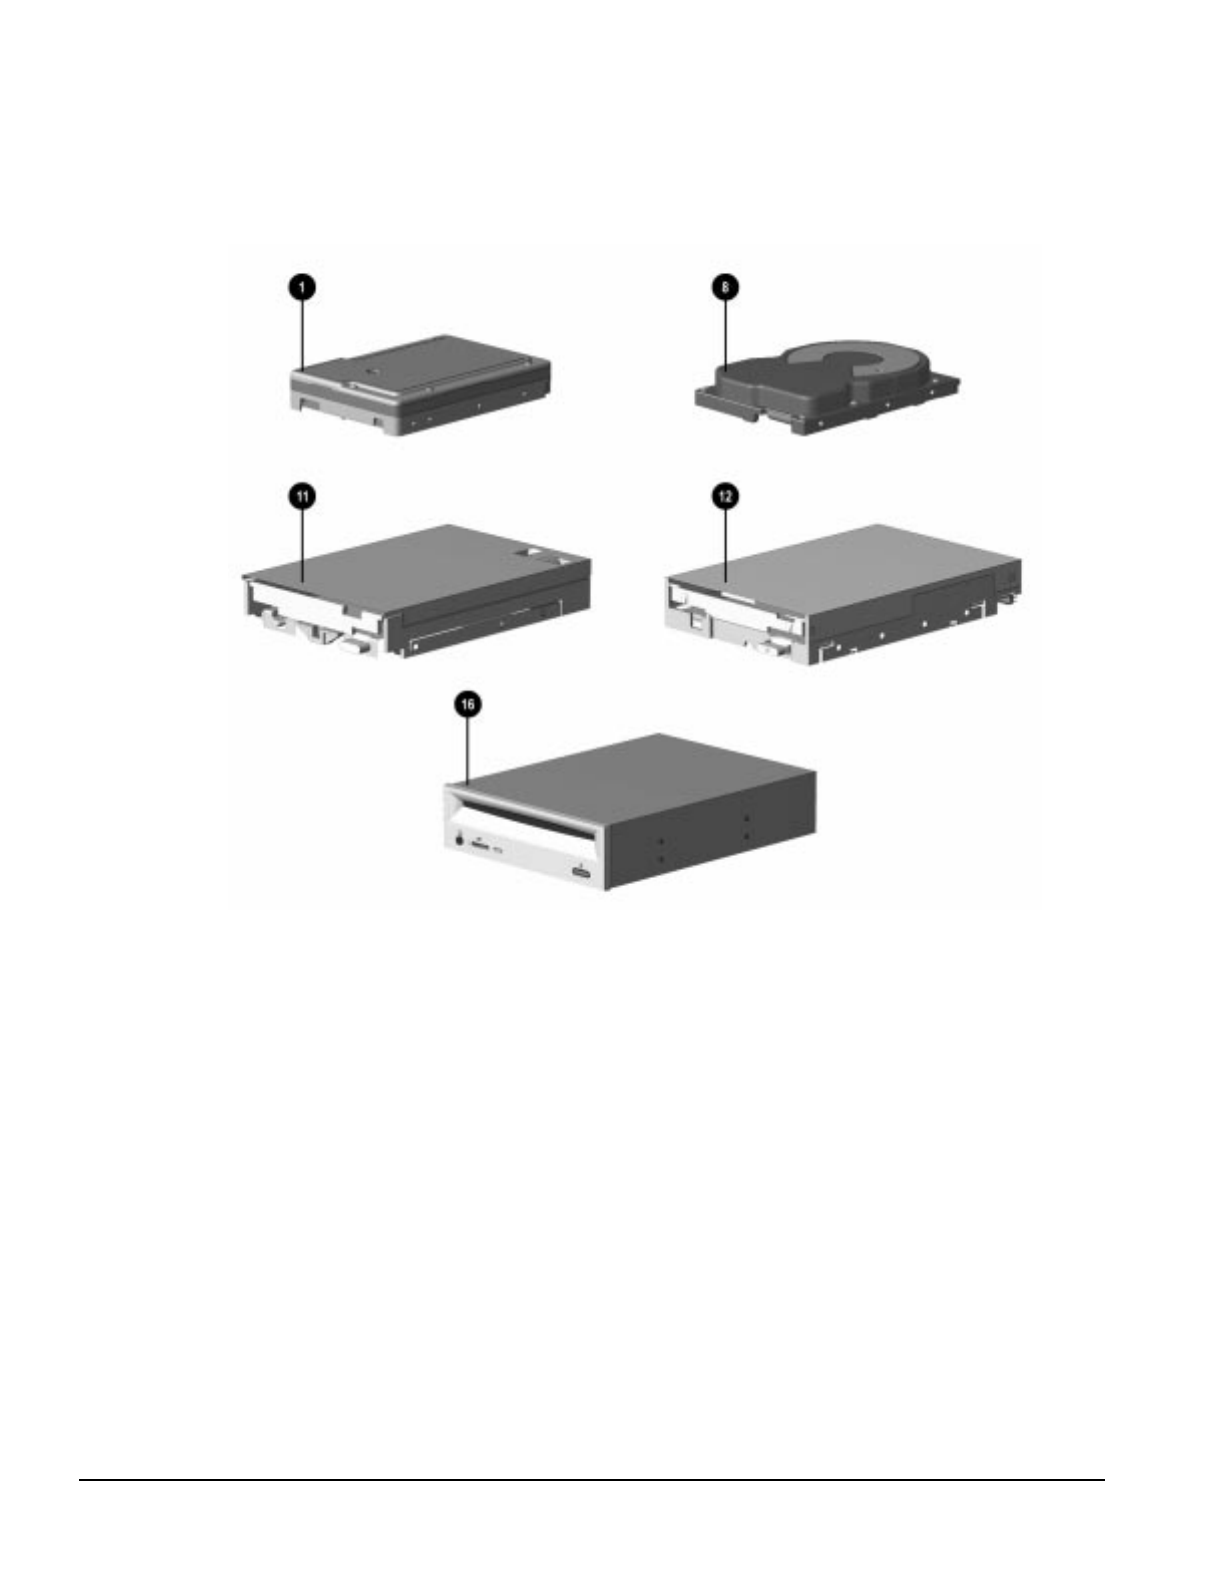
3-6 Illustrated Parts Catalog
3.2 Mass Storage Devices
Figure 3-4. Mass Storage Devices

Compaq Deskpro 2000 Series of Personal Computers 3-7
Table 3-3
Mass Storage Devices
Description Spare Part Number Warranty Tier
1. 2.1 GB EIDE hard drive 278745-001 A
2. 2.4-GB EIDE hard drive* 296679-001 A
3. 3.2-GB EIDE hard drive * 278746-001 A
4. 4.3-GB SCSI hard drive* 166526-001 A
5. 2.1-GB Ultra SCSI hard drive* 247409-001 A
6. 4.3-GB Ultra SCSI hard drive* 247408-001 A
7. 2.1-GB Ultra ATA hard drive* 278287-001 A
8. 2.4-GB Ultra ATA hard drive 296679-001 A
9. 3.2-GB Ultra ATA hard drive* 278288-001 A
10. 3.2-GB Ultra ATA hard drive* 278297-001 A
11. Diskette drive (3.5-in, 1.44-MB, 3-mode, 1/3-height w/o bracket and bezel) 160788-201 A
12. LS-120 drive (3.5-in, 120-/1.44-MB, internal) 263709-002 A
13. LS-120 drive (3.5-in, 120-/1.44-MB, external)* 294158-001 A
14 4X SCSI PD-CD drive* 184691-201 A
15. 8X EIDE PD-CD drive* 185951-001 A
16. 16X max EIDE CD-ROM drive 278791-001 A
17. 24X max EIDE CD-ROM drive* 278026-001 A
18. 2/8-GB DAT tape drive w/compression* 142074-201 A
19. 4.0-GB Travan tape drive* 294126-001 A
20. 1.3-GB DAT tape cartridge* 131167-001 D
21 2.0-GB DAT tape cartridge* 131148-001 D
22. 4.0-GB Travan tape cartridge* 294140-001 D
23. PD-CD media* 186075-001 D
24. LS-120 media* 186076-001 D
*Not shown.
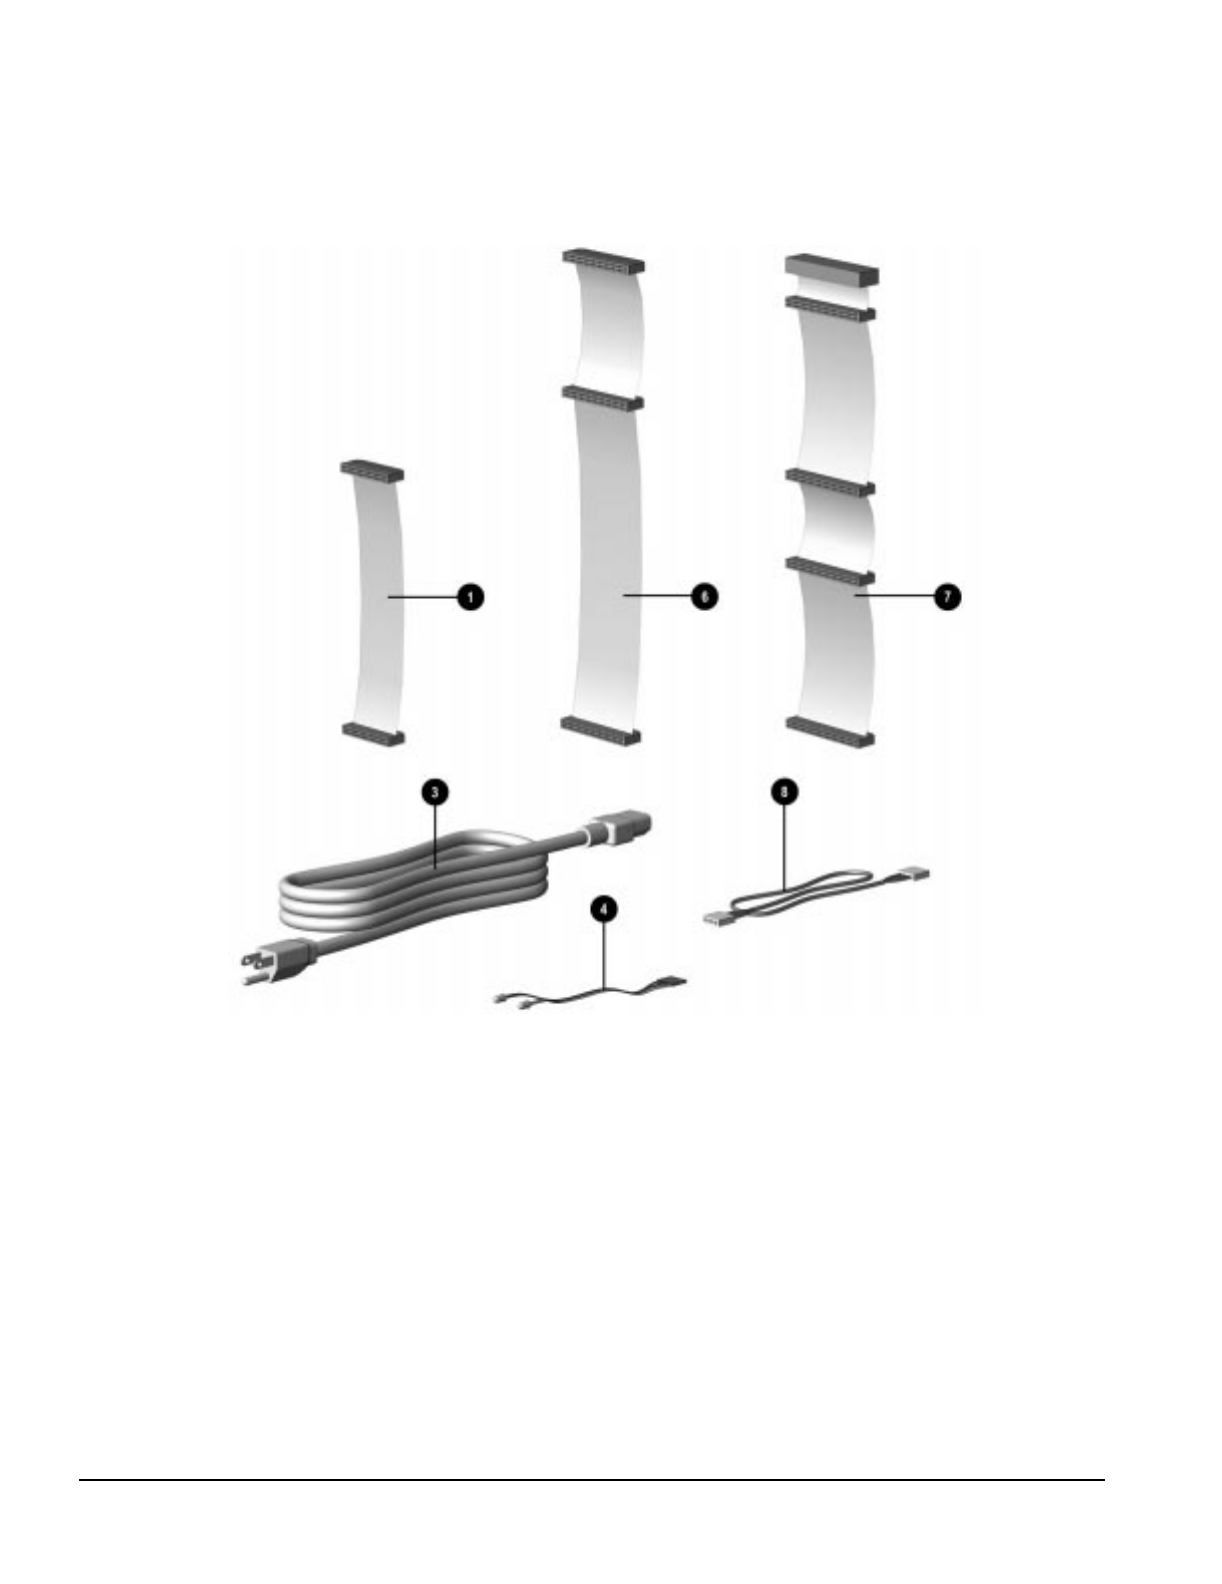
3-8 Illustrated Parts Catalog
3.3 Cables
Figure 3-5. Cables

Compaq Deskpro 2000 Series of Personal Computers 3-9
Table 3-4
Cables
Description Spare Part Number Warranty Tier
1. Cable, diskette drive 243084-001 A
2. Cable, EIDE CD-ROM/hard drive* 243085-001 A
3. Power cord, AC, Gray (US, Canada) 121258-001 A
4. Cable assembly, LED (desktop) 243095-001 A
5. Cable assembly, LED (minitower)* 243110-001 A
6. Cable, Dual IDE 247568-001 A
7. Cable, Ultra SCSI 148259-001 A
8. Cable, CD-ROM audio 171109-001 A
9. Cable, Dual Ultra ATA* 278296-001 A
10. Miscellaneous MPEG1 cable kit 340572-001 A
*Not shown.
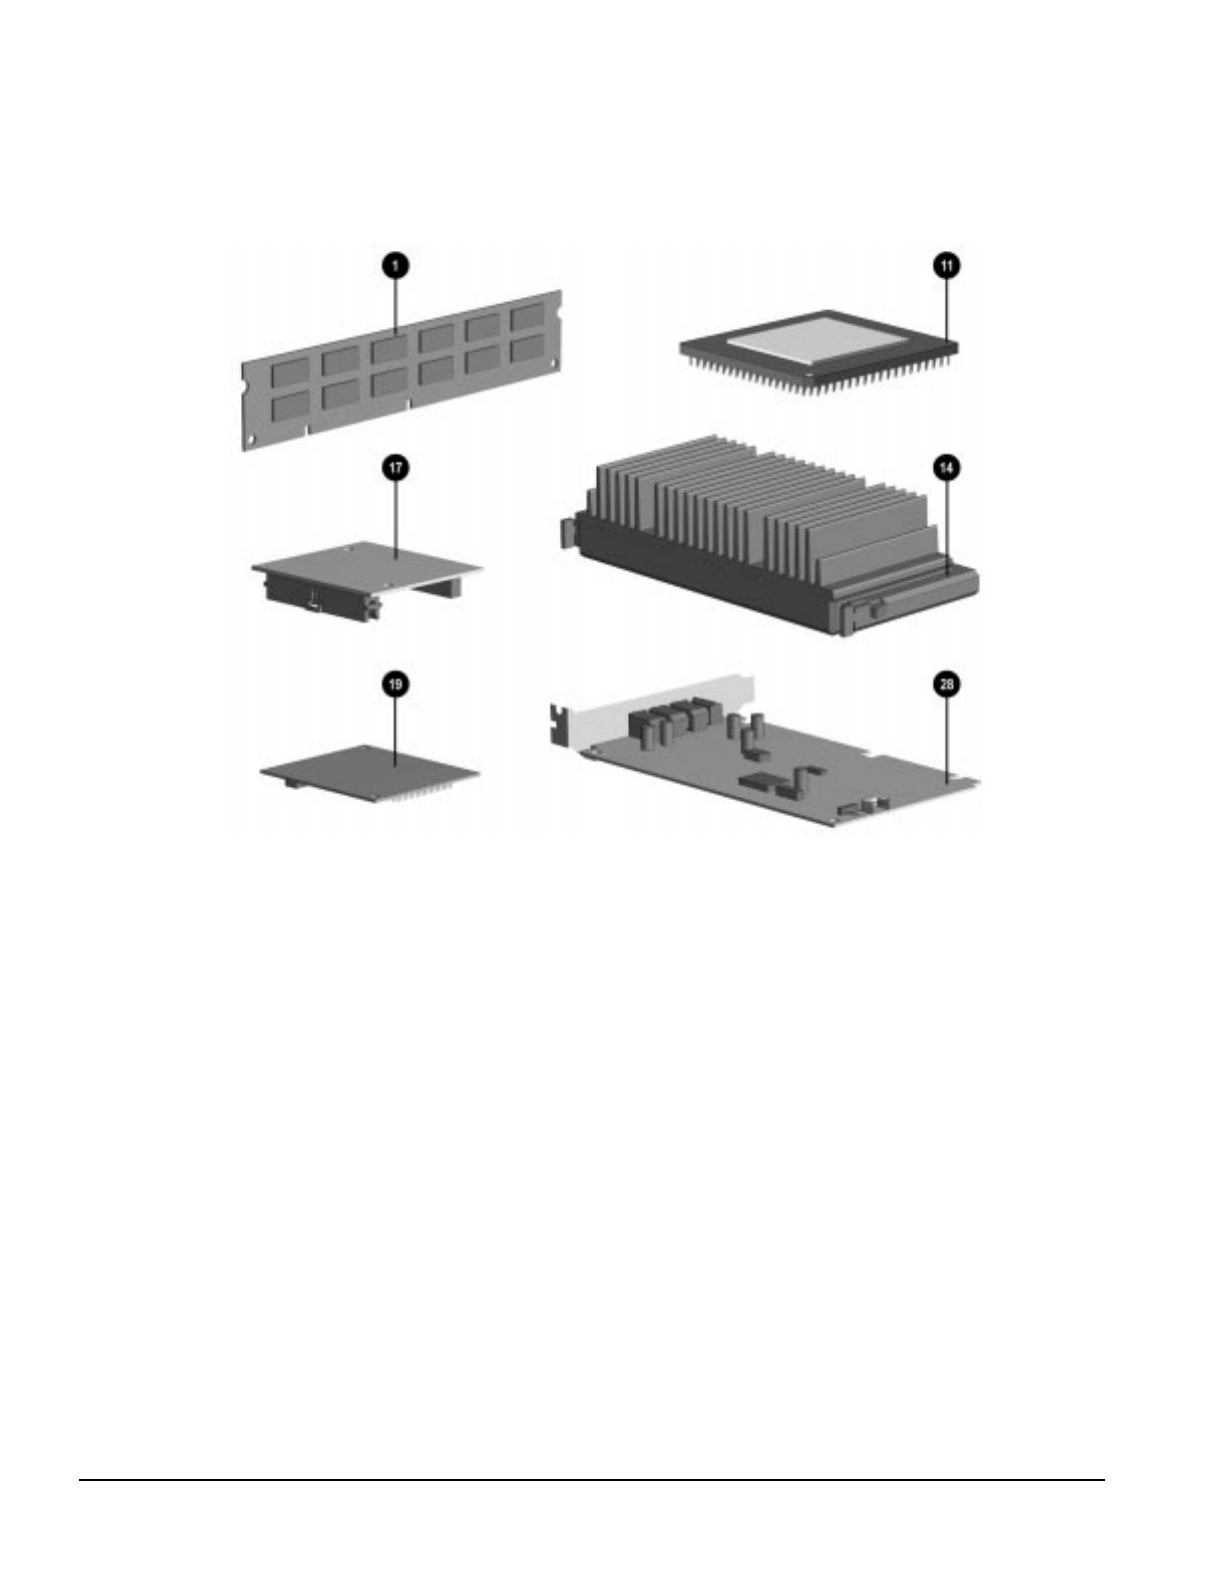
3-10 Illustrated Parts Catalog
3.4 Standard and Optional Boards
Figure 3-6. Optional Boards

Compaq Deskpro 2000 Series of Personal Computers 3-11
Table 3-5
Standard and Optional Boards
Description Spare Part Number Warranty Tier
1. SDRAM memory module kit (DIMM, 8-MB) 288438-001 A
2. SDRAM memory module kit (DIMM, 16-MB)* 278066-001 A
3. SDRAM memory module kit (DIMM, 32-MB)* 278067-001 A
4. SDRAM memory module kit (DIMM, 64-MB)* 278095-001 A
5. SDRAM memory module kit (DIMM, 128-MB)* 278096-001 A
6. SDRAM ECC memory module kit (DIMM, 16-MB)* 278097-001 A
7. SDRAM ECC memory module kit (DIMM, 32-MB)* 166508-001 A
8. SDRAM ECC memory module kit (DIMM, 64-MB)* 278098-001 A
9. SDRAM ECC memory module kit (DIMM, 128-MB)* 278099-001 A
10. Cache memory (L2/256Kb, Pentium system only)* 278017-001 A
11. Pentium processor with MMX technology 166/66 (w/o thermal pad) 240181-001 A
12. Pentium processor with MMX technology 200/66* (w/o thermal pad) 240181-002 A
13. Pentium processor with MMX technology 233/66* (w/o thermal pad) 286258-001 A
14. Pentium II processor with MMX technology 233/66* (w/o thermal pad) 278262-001 A
15. Pentium II processor with MMX technology 266/66* (w/o thermal pad) 278263-001 A
16. Pentium II processor with MMX technology 300/66* (w/o thermal pad) 278289-001 A
17. SGRAM, 1 MB graphics memory upgrade 278093-001 A
18. SGRAM, 2 MB graphics memory upgrade* 278094-001 A
19. WRAM, 4 MB graphics memory upgrade (Pentium Millennium II board) 270260-001 A
20. WRAM, 12 MB graphics memory upgrade (Pentium II Millennium II board)* 166574-001 A
21. MPEG1 video board* 340571-001 A
22. Millennium II PCI video board* 243136-001 A
23. Ultra SCSI controller (PCI)* 247399-001 A
24. Plug and Play SCSI-2 controller (ISA)* 184751-001 A
25. 33.6-K data/fax modem (US)* 259214-002 A
26. Compaq Netelligent Corporate Communicator board (NA only)* 294710-001 A
27. ISDN modem* 273529-001 A
28. Compaq Enhanced Business Pro Audio ESS 1868 278792-001 A
* Not shown.
continued
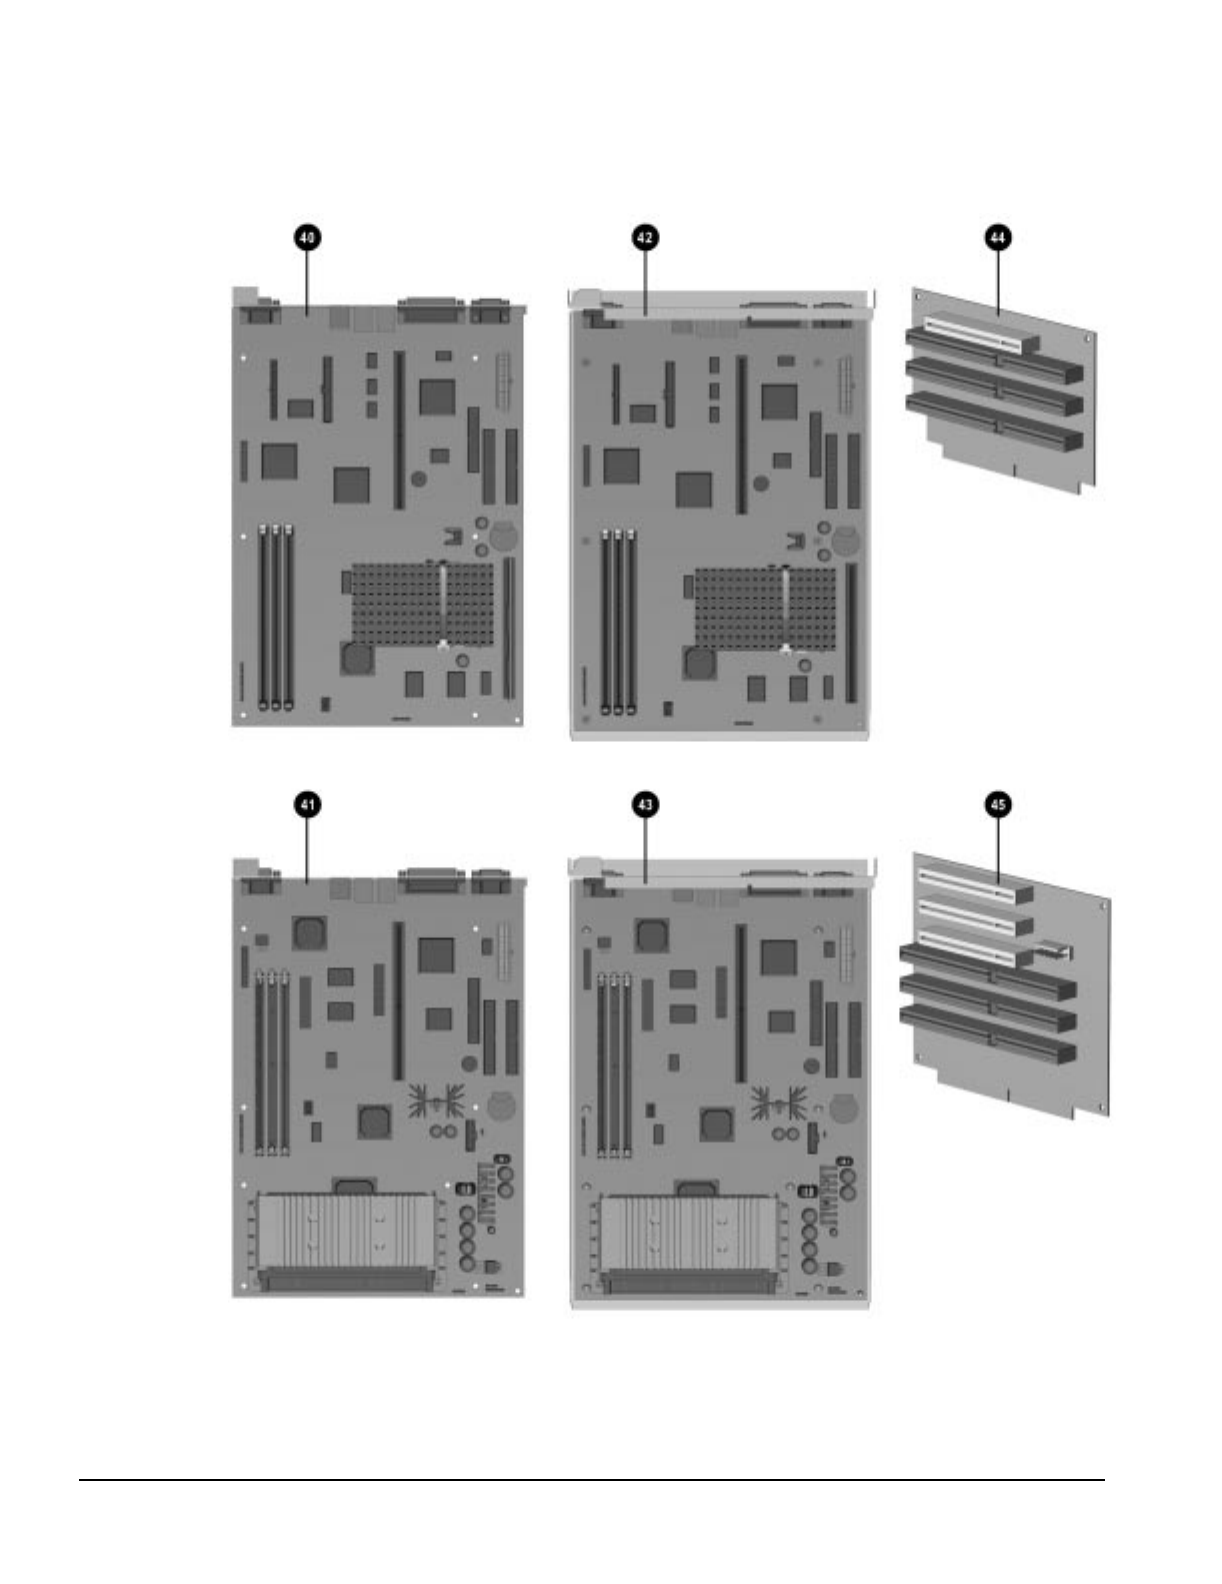
3-12 Illustrated Parts Catalog
3.4 Standard and Optional Boards
Continued
Figure 3-7. System and Riser Boards

Compaq Deskpro 2000 Series of Personal Computers 3-13
Table 3-5
continued
Description Spare Part Number Warranty Tier
29. Serial/Parallel interface board* 106886-002 A
30. Netelligent 10T (ISA UTP)* 265617-001 A
31. Netelligent 10T/2 (ISA UTP/COAX)* 265618-001 A
32. Netelligent 10T (PCI UTP)* 242501-001 A
33. Netelligent 10T/2 (PCI UTP/COAX)* 292857-001 A
34. Netelligent 10/100 TX (PCI UTP)* 169849-001 A
35. Netelligent 4/16 TR (PCI IBM UTP/STP)* 199764-001 A
36. Netelligent 4/16 TR (ISA UTP/STP-S)* 265436-001 A
37. Netelligent 4/16 TR (PCI UTP/STP-S )* 268010-001 A
38. Token Ring controller (ISA, UTP/STP)* 301211-001 A
39. External AUI to BNC adapter* 192768-001 A
40. System board, Pentium, TR3 w/o processor or memory, desktop 278747-001 A
41. System board, Pentium II, w/o processor or memory, desktop 278258-001 A
42. System board, Pentium, TR3, w/o processor or memory, minitower 278799-001 A
43. System board, Pentium II, w/o processor or memory, minitower 278259-001 A
44. Riser board, desktop 278006-001 A
45. Riser board, minitower 243057-001 A
*Not shown.
✎1. Desktop system boards are spared with the I/O panel attached.
2. Minitower system boards are spared mounted in the system board tray.
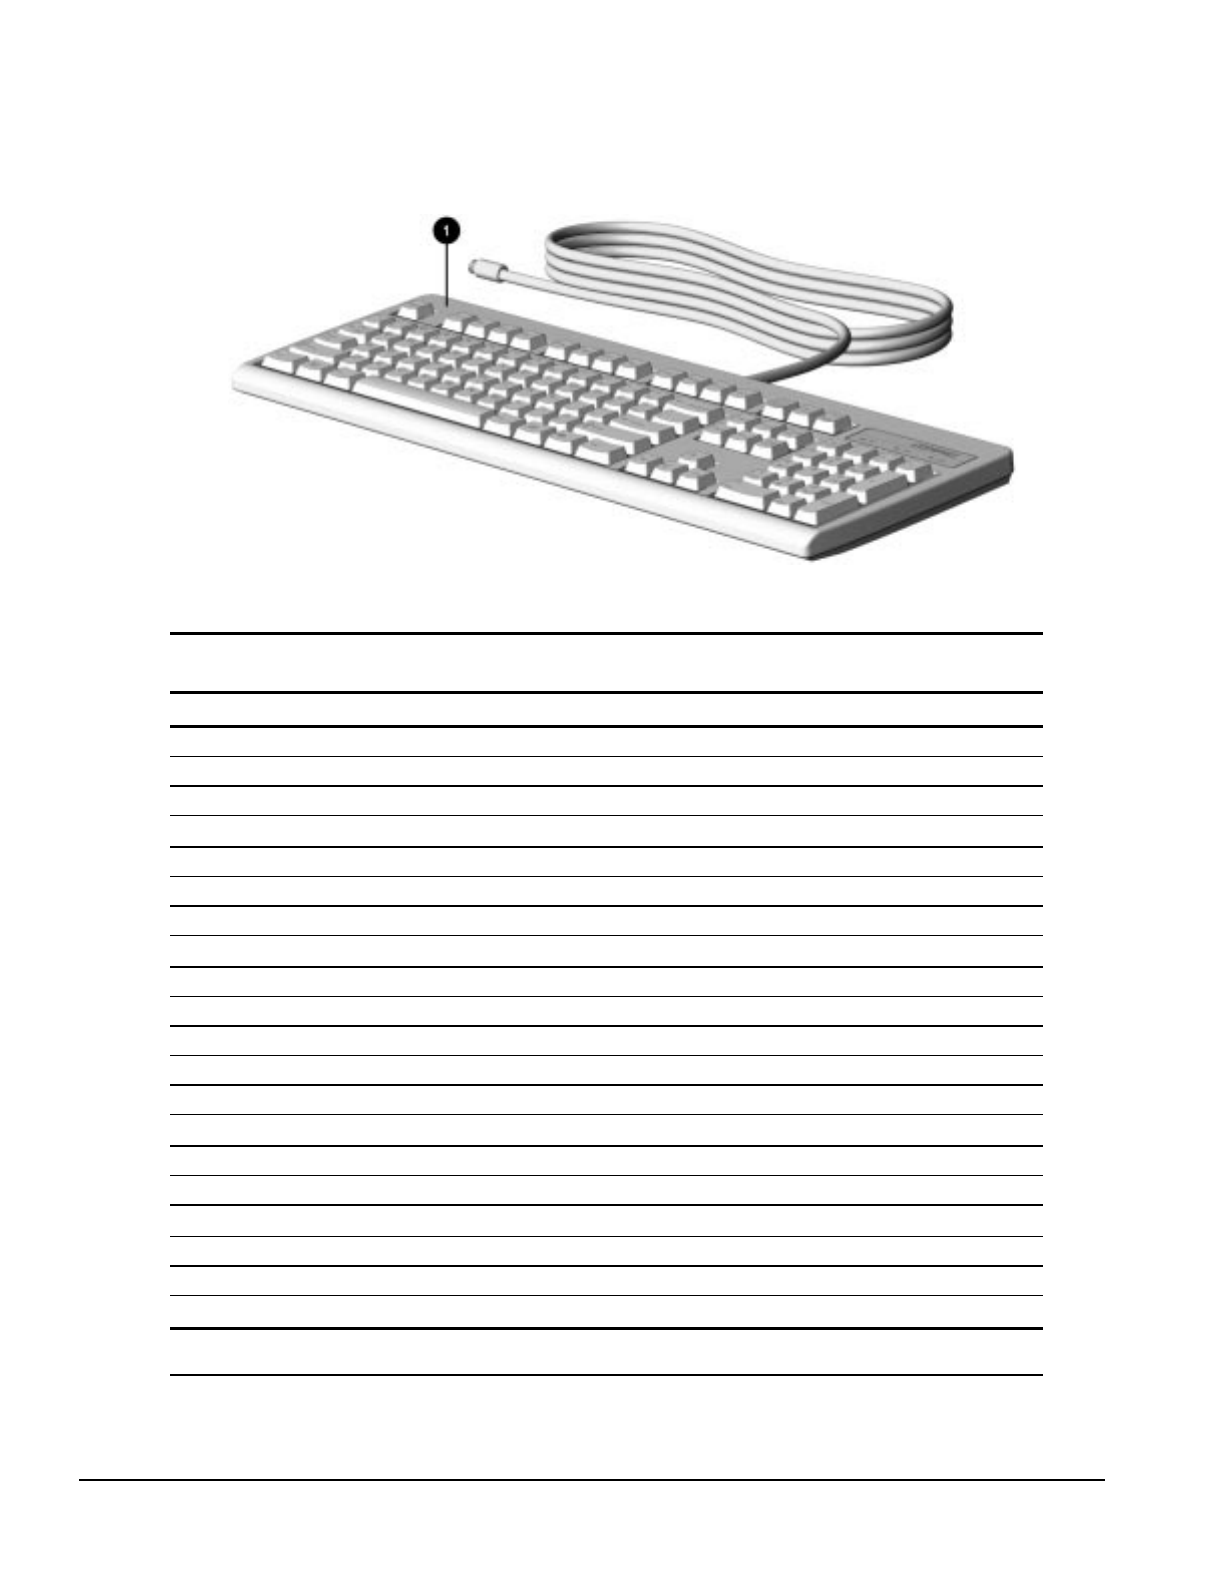
3-14 Illustrated Parts Catalog
3.5 Keyboards
Figure 3-8. Keyboard
Table 3-6
Keyboards
Description Spare Part Number Warranty Tier
1 Keyboard (Domestic)* 166514-001 A
2. Keyboard (Arabic)* 166514-171 A
3. Keyboard (Belgian)* 166514-181 A
4. Keyboard (BHCSY)* 166514-B41 A
5. Keyboard (Brazilian)* 166514-201 A
6. Keyboard (Czech)* 166514-221 A
7. Keyboard (Danish)* 166514-081 A
8. Keyboard (Finnish)* 166514-351 A
9. Keyboard (French Canadian)* 166514-121 A
10. Keyboard (French)* 166514-051 A
11. Keyboard (German)* 166514-041 A
12. Keyboard (Greek)* 166514-151 A
13 Keyboard (Hungarian)* 166514-211 A
14. Keyboard (International)* 166514- B31 A
15. Keyboard (Italian)* 166514-061 A
16. Keyboard (Japanese)* 166514-191 A
17. Keyboard (Korean)* 166514- AD1 A
18. Keyboard (Latin American)* 166514-161 A
19. Keyboard (Norwegian)* 166514-091 A
20. Keyboard (Polish)* 166514-241 A
* Not shown.
continued

Compaq Deskpro 2000 Series of Personal Computers 3-15
Table 3-6
continued
Description Spare Part Number Warranty Tier
21. Keyboard (Portuguese)* 166514-131 A
22. Keyboard (Russian)* 166514-251 A
23. Keyboard (Slovakian)* 166514-231 A
24. Keyboard (Spanish)* 166514-071 A
25. Keyboard (Swedish)* 166514-101 A
26. Keyboard (Swiss)* 166514-111 A
27. Keyboard (Taiwanese)* 166514-AB1 A
28. Keyboard (Thai)* 166514-281 A
29. Keyboard (Turkish)* 166514-141 A
30. Keyboard (UK English)* 166514-031 A
31. Keyboard, Visioneer (Belgium/French)* 185288-318 A
32. Keyboard, Visioneer (Brazilian)* 185288-335 A
33. Keyboard, Visioneer (Domestic)* 185288-301 A
34. Keyboard, Visioneer (French)* 185288-305 A
35. Keyboard, Visioneer (German)* 185288-304 A
36. Keyboard, Visioneer (International*) 185288-302 A
37. Keyboard, Visioneer (Italian)* 185288-306 A
38. Keyboard, Visioneer (Japanese)* 185288-319 A
39. Keyboard, Visioneer (Latin American)* 185288-316 A
40. Keyboard, Visioneer (Spanish)* 185288-307 A
41. Keyboard, Visioneer (Swiss/French, French, Italian)* 185288-311 A
42. Keyboard, Visioneer (UK English)* 185288-303 A
*Not shown.
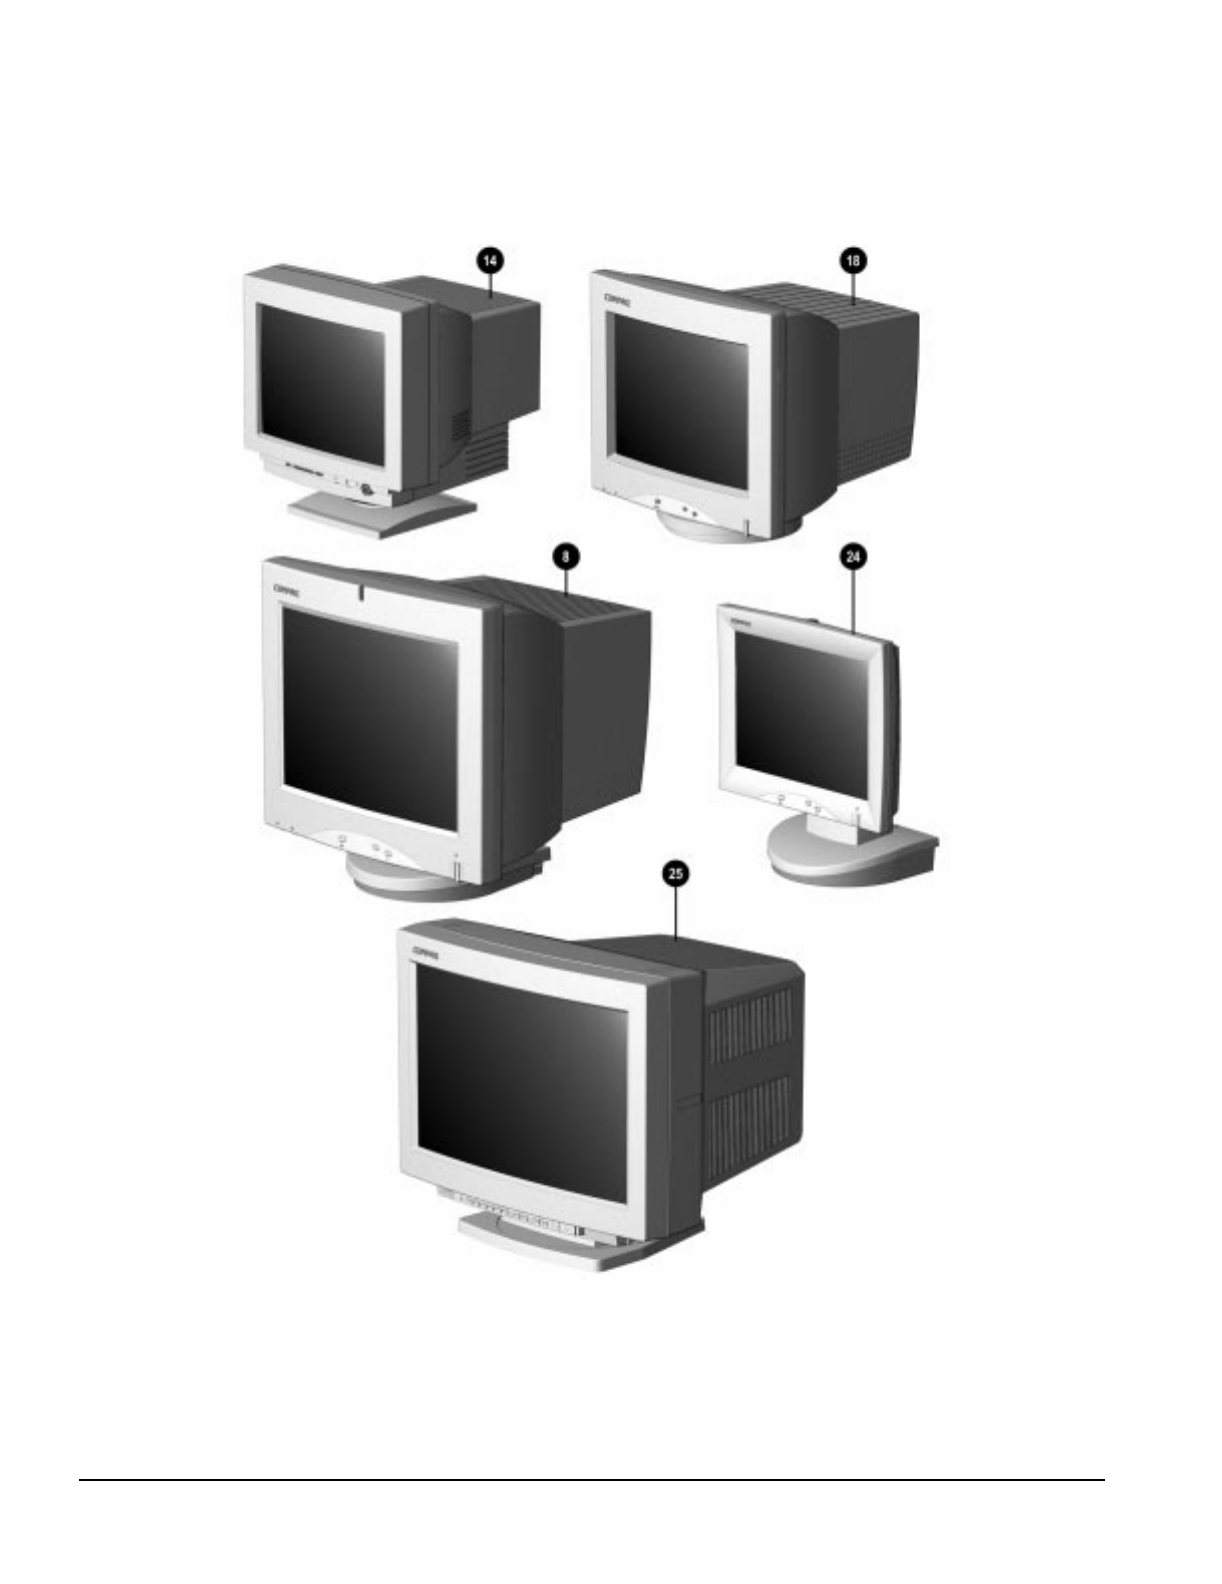
3-16 Illustrated Parts Catalog
3.6 Monitors
Figure 3-9. Monitors

Compaq Deskpro 2000 Series of Personal Computers 3-17
Table 3-7
Monitors
Description Spare Part Number Warranty Tier
1. Compaq 140 VGA Color Monitor (NA)* 210507-601 A
2. Compaq P50 Color Monitor (NA)* 264202-001 A
3. Compaq P50 Color Monitor (GSA)* 264202-004 A
4. Compaq P50 Color Monitor (NH)* 264202-021 A
5. Compaq P50 Color Monitor (SH)* 264202-B21 A
6. Compaq P70 Color Monitor (NH)* 255652-001 A
7. Compaq P70 Color Monitor (SH)* 255652-B23 A
8. Compaq P110 (NH) 284959-001 A
9. Compaq P110 (SH)* 284959-B23 A
10. Compaq V40 Color Monitor (NH)* 307409-001 A
12. Compaq V40 Color Monitor (GSA)* 307409-004 A
13. Compaq V40 Color Monitor (SH)* 307409-B21 A
14. Compaq V50 Color Monitor (NA) 264152-001 A
15. Compaq V50 Color Monitor (GSA)* 264152-004 A
16. Compaq V50 Color Monitor (NH)* 264152-021 A
17. Compaq V50 Color Monitor (SH)* 264152- B21 A
18. Compaq V70 Color Monitor (NA) 255609-001 A
19. Compaq V70 Color Monitor (GSA)* 255609-004 A
20. Compaq V70 Color Monitor (NH)* 255638-021 A
21. Compaq V70 Color Monitor (SH)* 255638-B21 A
22. Compaq V70 Color Monitor (NH)* 255638-B22 A
23. Compaq V70 Color Monitor (SH)* 255638-B23 A
* Not shown.
continued

3-18 Illustrated Parts Catalog
Table 3-7
continued
Description Spare Part Number Warranty Tier
24. Compaq TFT500 15.1-inch Flat Panel (repair parts listed below) A
Power supply* 296473-001 A
Monitor base* 296474-001 A
Cable access cover* 296475-001 A
Rear enclosure* 296476-001 A
Shield/support bracket* 296477-01 A
Controller assembly* 296478-001 A
TFT-LCD panel assembly* 296481-001 A
Backlight bulbs (2 each)* 296480-001 A
Protective cover* 296738-001 A
Front bezel assembly 296479-001 A
Security locking bracket* 296483-001 A
Miscellaneous internal cables* 296482-001 A
Mounting arm* 285041-001 A
VGA cable for mounting arm* 285042-001 A
Power cable for mounting arm* 285043-001 A
Miscellaneous screw kit* 286739-001 A
25. Compaq P1610W Color Monitor 305710-001 A
26. Compaq V90 Color Monitor 305602-001 A
*Not shown.
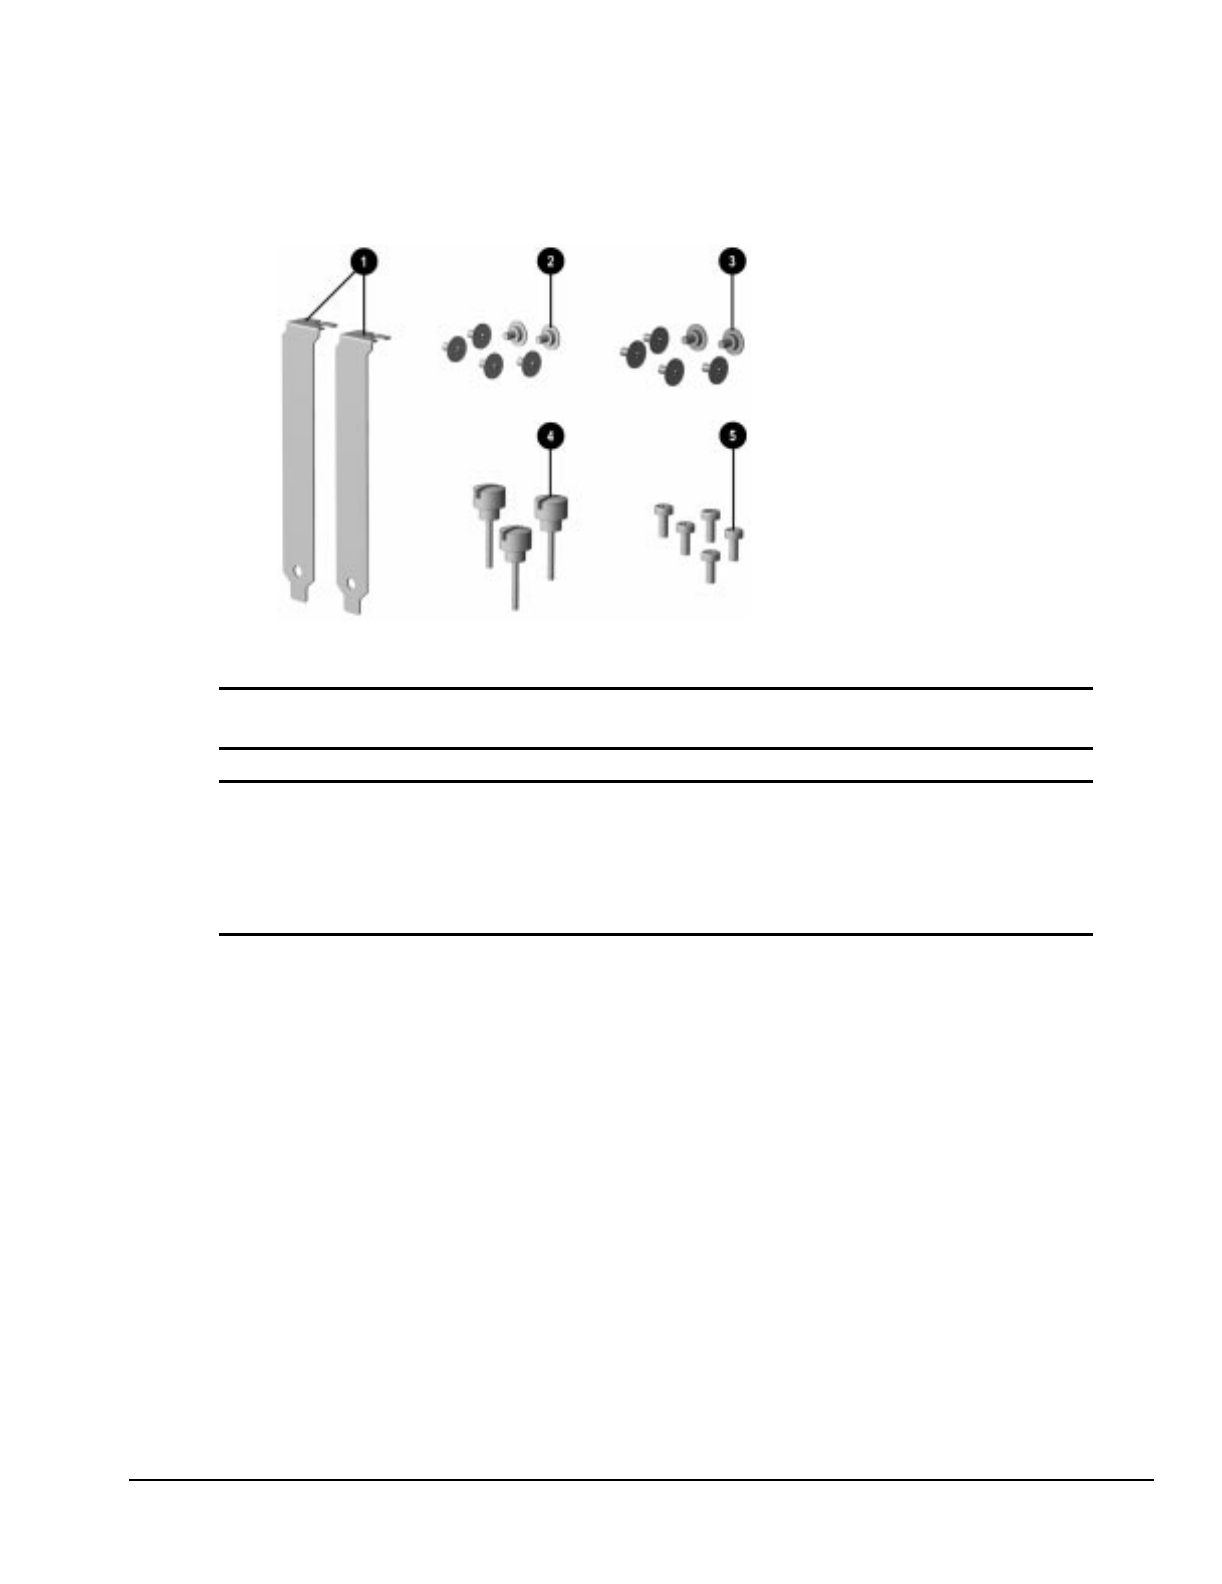
Compaq Deskpro 2000 Series of Personal Computers 3-19
3.7 Miscellaneous Hardware Kit
Figure 3-10. Miscellaneous Hardware Kit
Table 3-8
Miscellaneous Hardware Kit
Description Spare Part Number Warranty Tier
Miscellaneous hardware kit. Includes:
1. Slot cover (2 each)
2. Screw, 6-32, TT, wafer head (6 each)
3. Screw, M3, TT, wafer head (6 each)
4. Thumb screw (3 each)
5. Screw, M3, TT, H/TOP, S151P X 6.5 (5 each)
243087-001 D
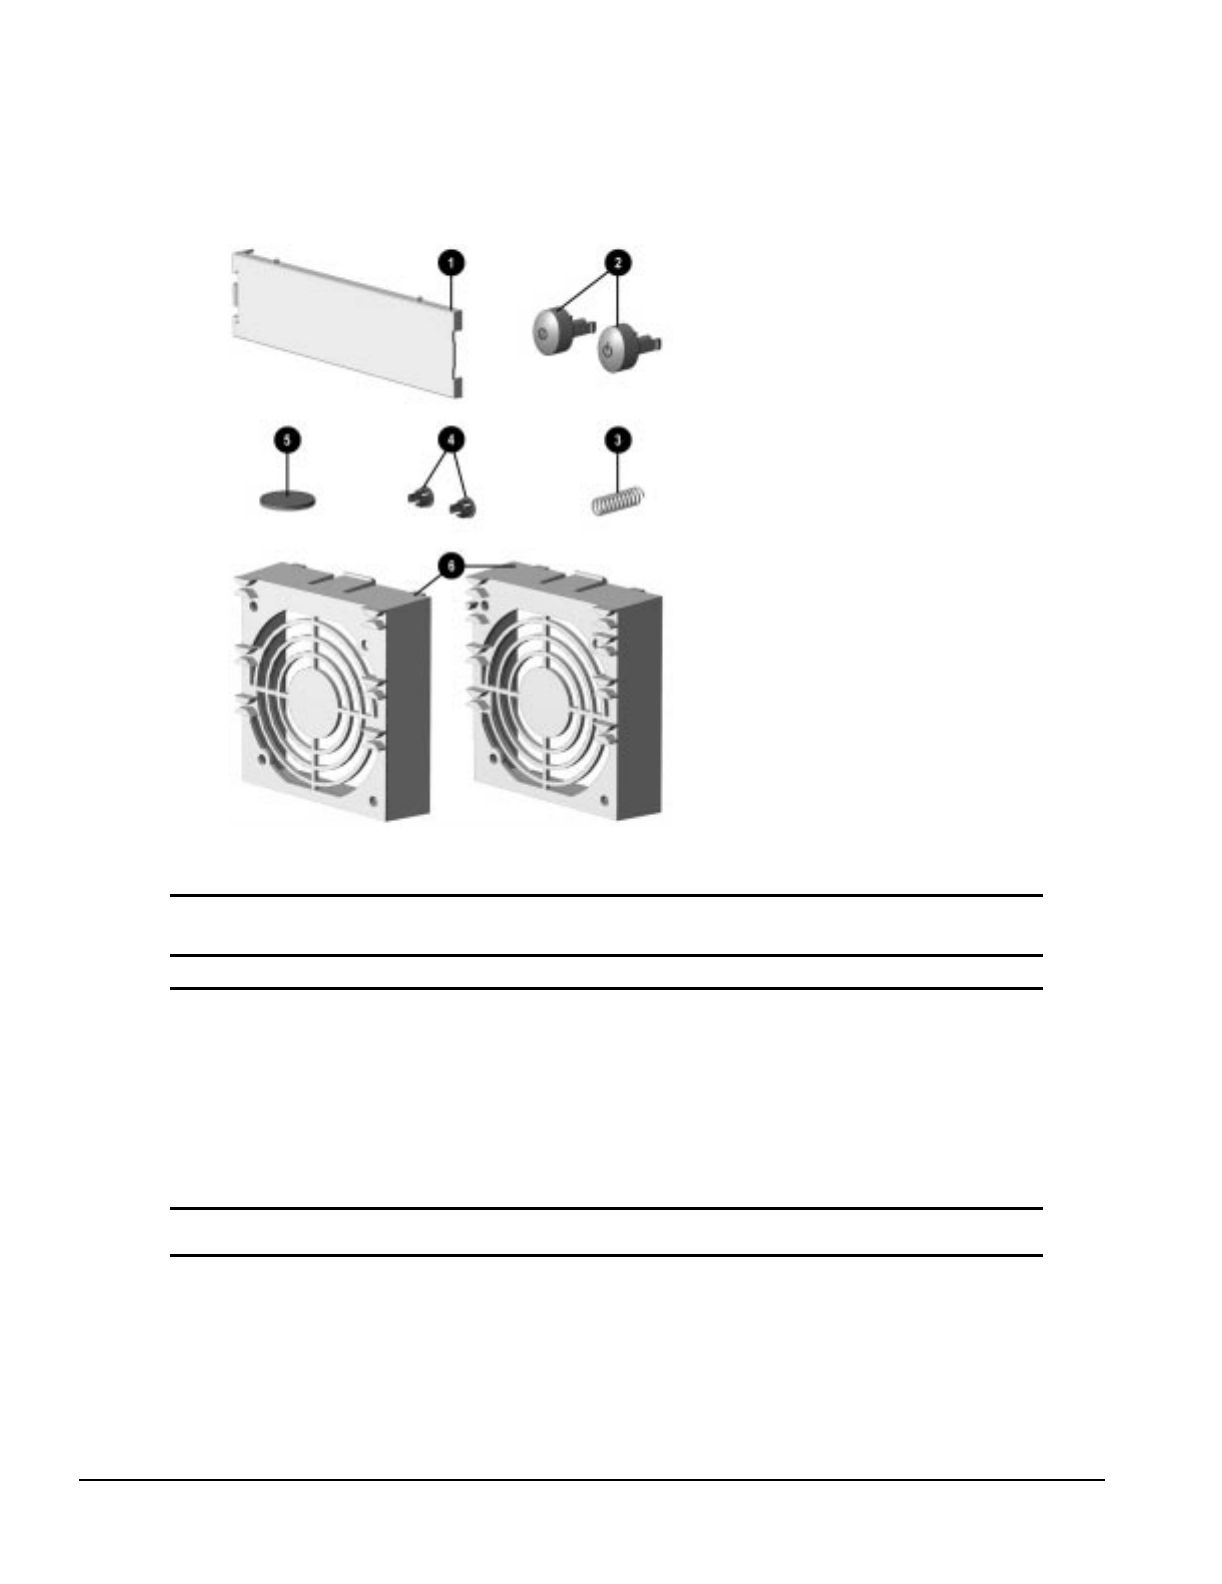
3-20 Illustrated Parts Catalog
3.8 Miscellaneous Plastics Kit
Figure 3-11. Miscellaneous Plastics Kit, Desktops
Table 3-9
Miscellaneous Plastics Kit, Desktops
Description Spare Part Number Warranty Tier
Miscellaneous plastics kit, includes:
1. Bezel blank, 1/2 height (1 each)
2. Power button (2 each: 1 DC, 1 AC)
3. Spring (1 each)
4. Plastic grommets (2 each for LED cable)
5. Rubber feet (4 each)
6. Card guide (2 each; 1 P54C , 1 P55C/Pentium II)
7. AC/DC switch cap RTF card*
8. Card guide RTF card*
243090-001 D
* Not shown.
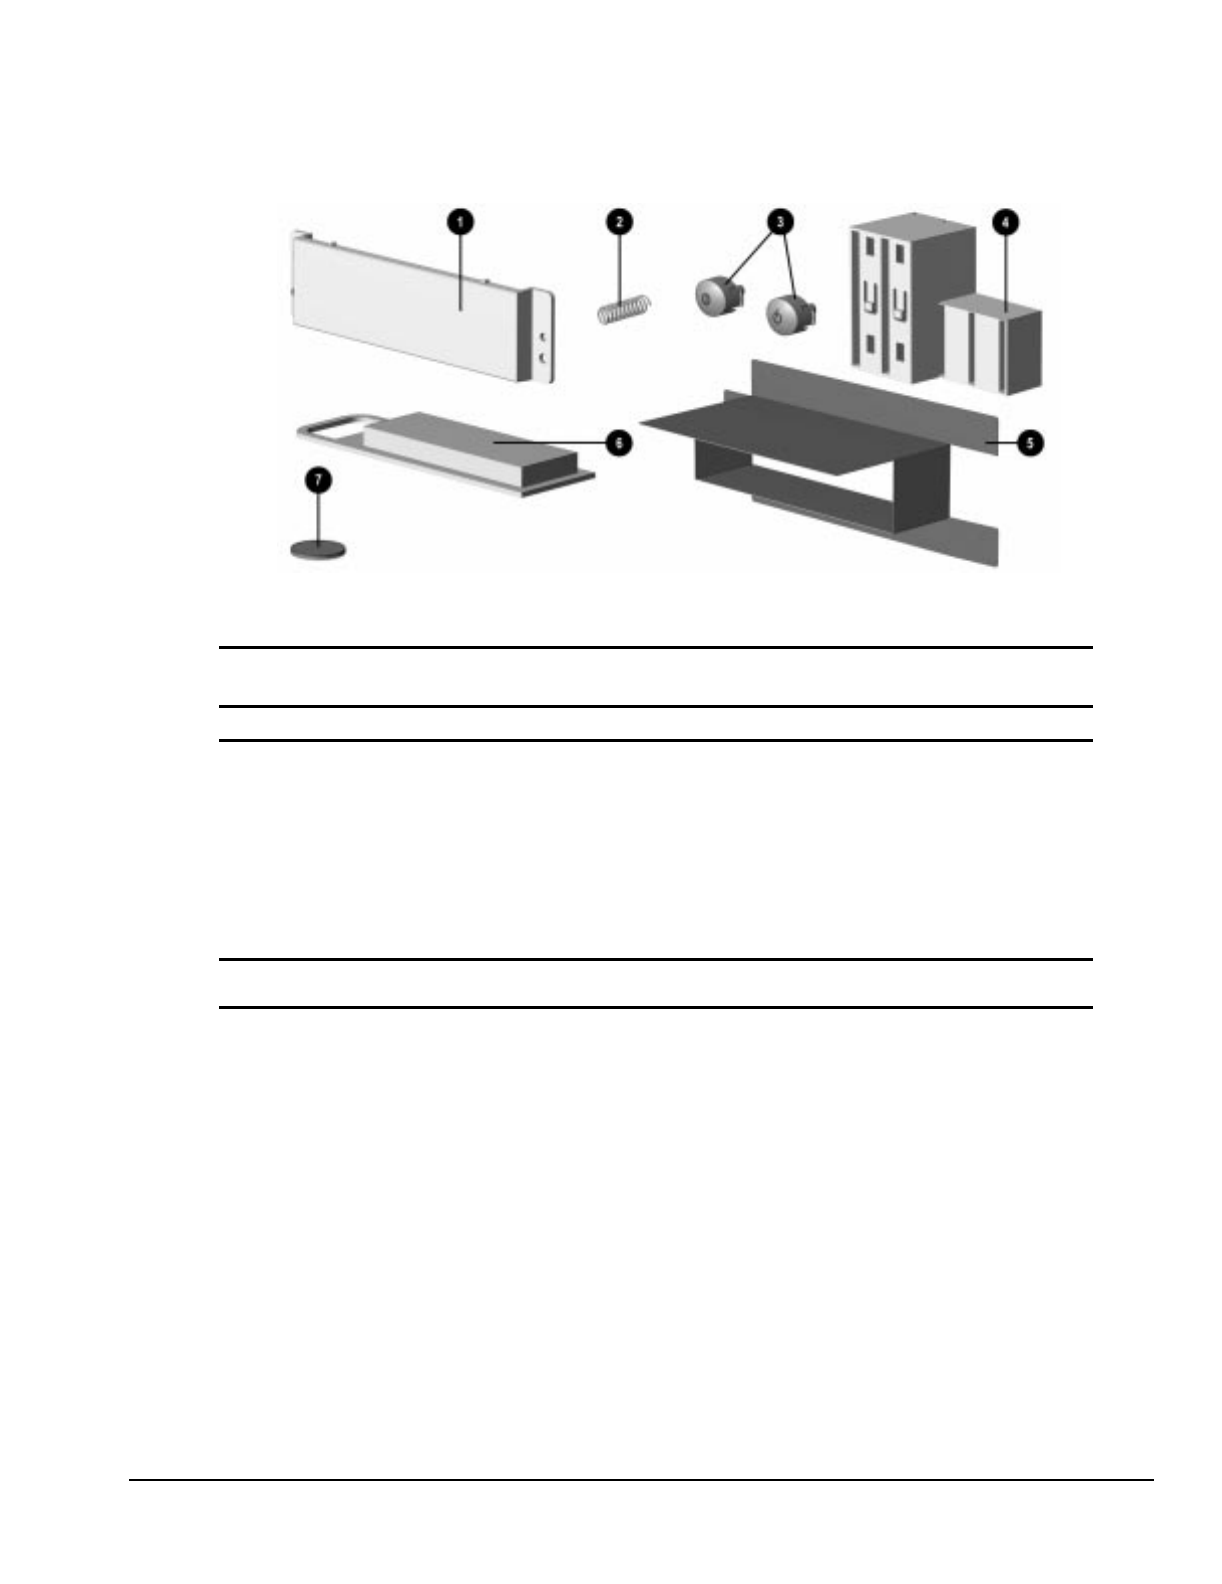
Compaq Deskpro 2000 Series of Personal Computers 3-21
Figure 3-12. Miscellaneous Plastics Kit, Minitowers
Table 3-10
Miscellaneous Plastics Kit, Minitowers
Description Spare Part Number Warranty Tier
Miscellaneous plastics kit, includes:
1. Bezel blank, 1/2 height (1 each)
2. Spring (1 each)
3. Power button (2 each: 1 DC, 1 AC)
4. Retainer, ISA Option Board (1 each)
5. Air duct (for Pentium II minitower systems only)
6. Guide, Option Card (1 each)
7. Rubber feet (4 each)
8. AC/DC switch cap RTF card*
243107-001 D
* Not shown.
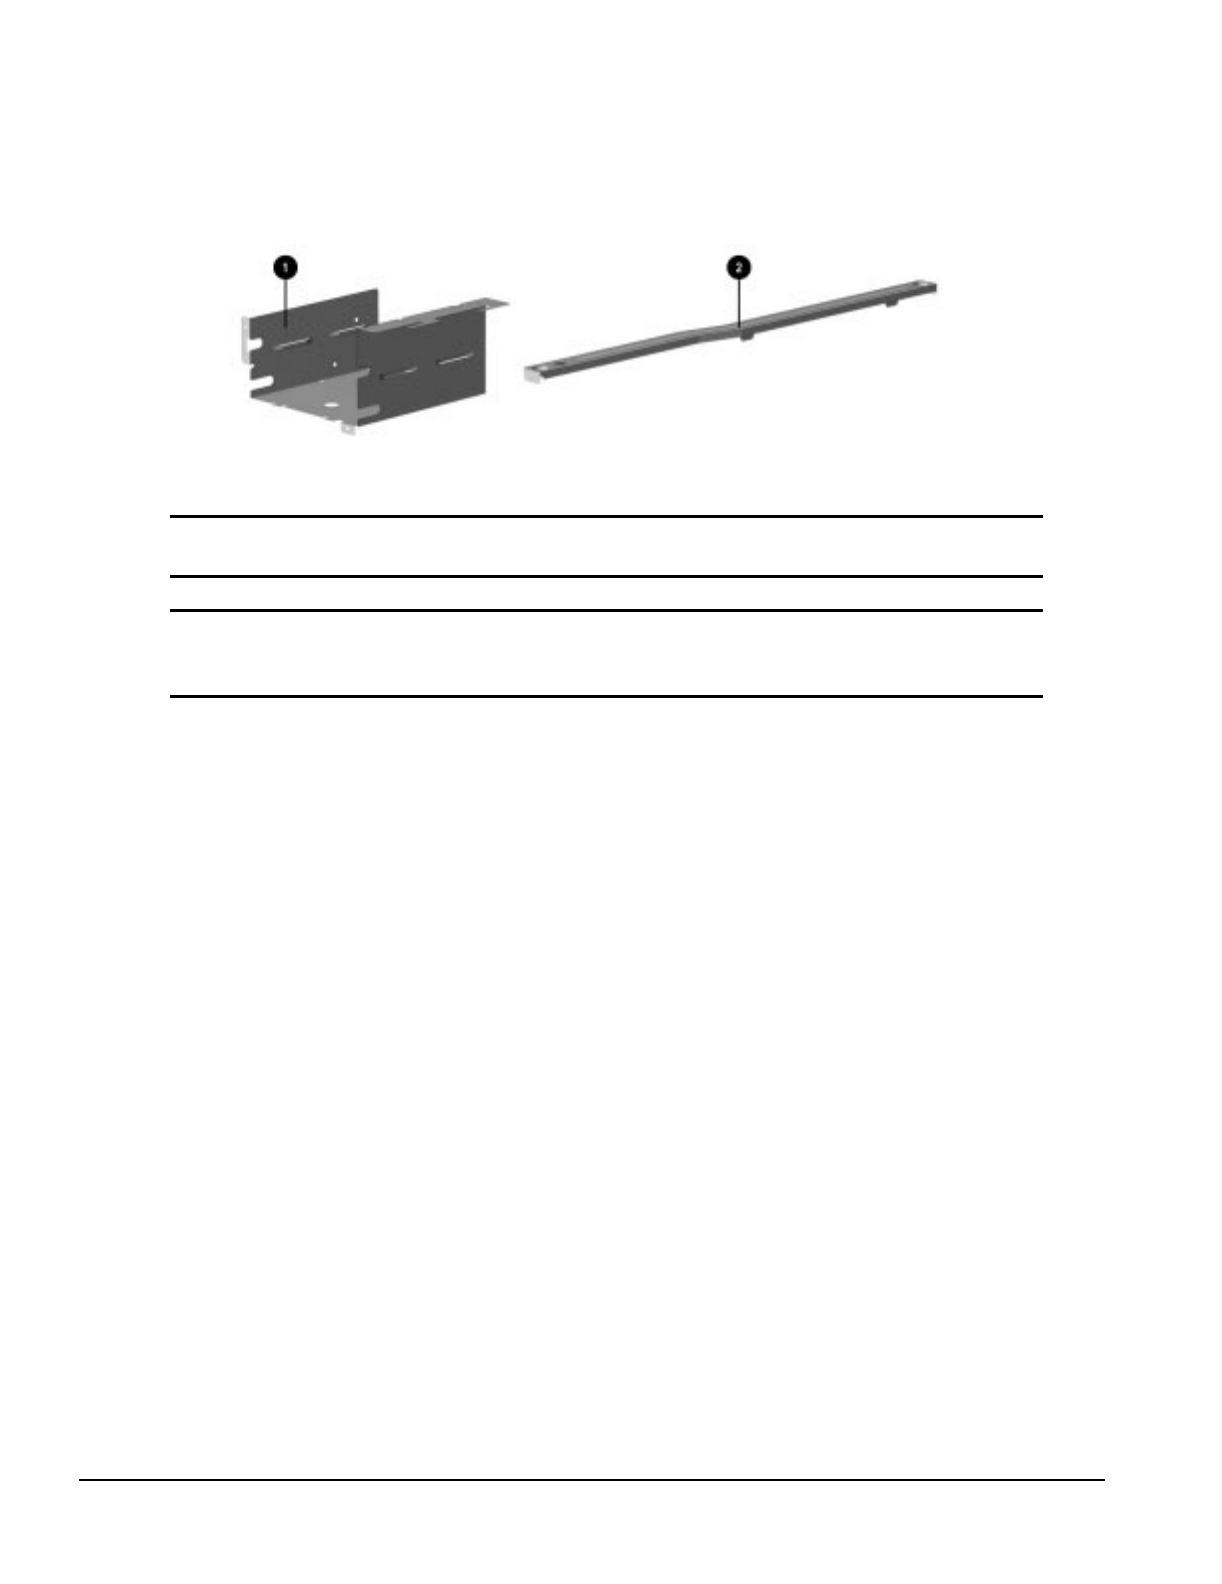
3-22 Illustrated Parts Catalog
3.9 Miscellaneous Parts
Figure 3-13. Miscellaneous Metals Kit, Desktops
Table 3-11
Miscellaneous Metals Kit, Desktops
Description Spare Part Number Warranty Tier
Miscellaneous metals kit, includes:
1. Diskette/hard drive cage
2. Riser brace
243185-001 D
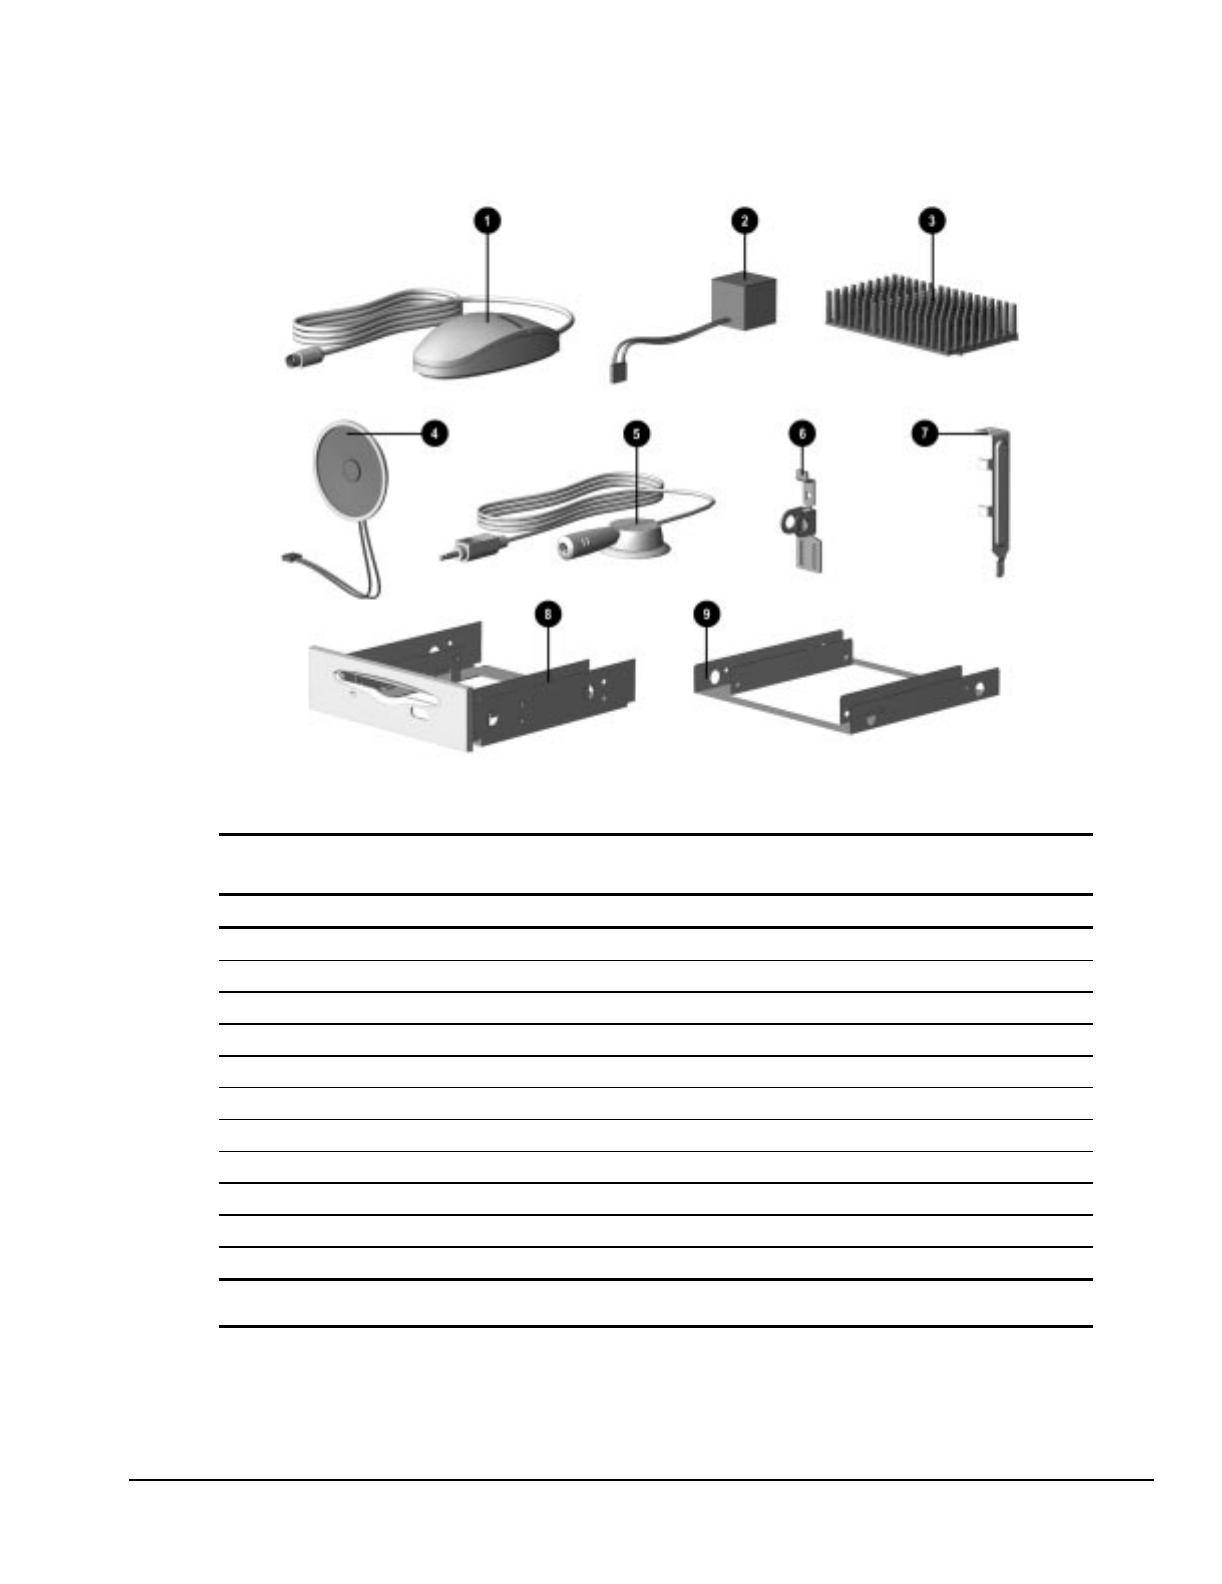
Compaq Deskpro 2000 Series of Personal Computers 3-23
Figure 3-14. Miscellaneous Parts
Table 3-12
Miscellaneous Parts
Description Spare Part Number Warranty Tier
1. Two-button mouse 141189-401 A
2. Battery, real-time clock (external) 160274-001 A
3. Heat sink, Pentium processor (w/ 2 thermal pads) 243128-001 D
4. Speaker, 2.5-in, 0.6 W (audio option kit) 247508-001 D
5. Microphone assembly w/ base (audio option kit) 278266-001 D
6. Security lock bracket with screw 173066-001 D
7. Bracket board retainer 268247-001 A
8. Diskette drive mounting bracket, 3.5-in to 5.25-in 243230-001 D
9. Hard drive mounting bracket, 3.5-in to 5.25-in 243231-001 D
10. Multi-media sound system (U.S.)* 294122-001 D
11. Heat sink, Pentium II processor (w/ 1 thermal pad)* 278264-001 D
* Not shown.
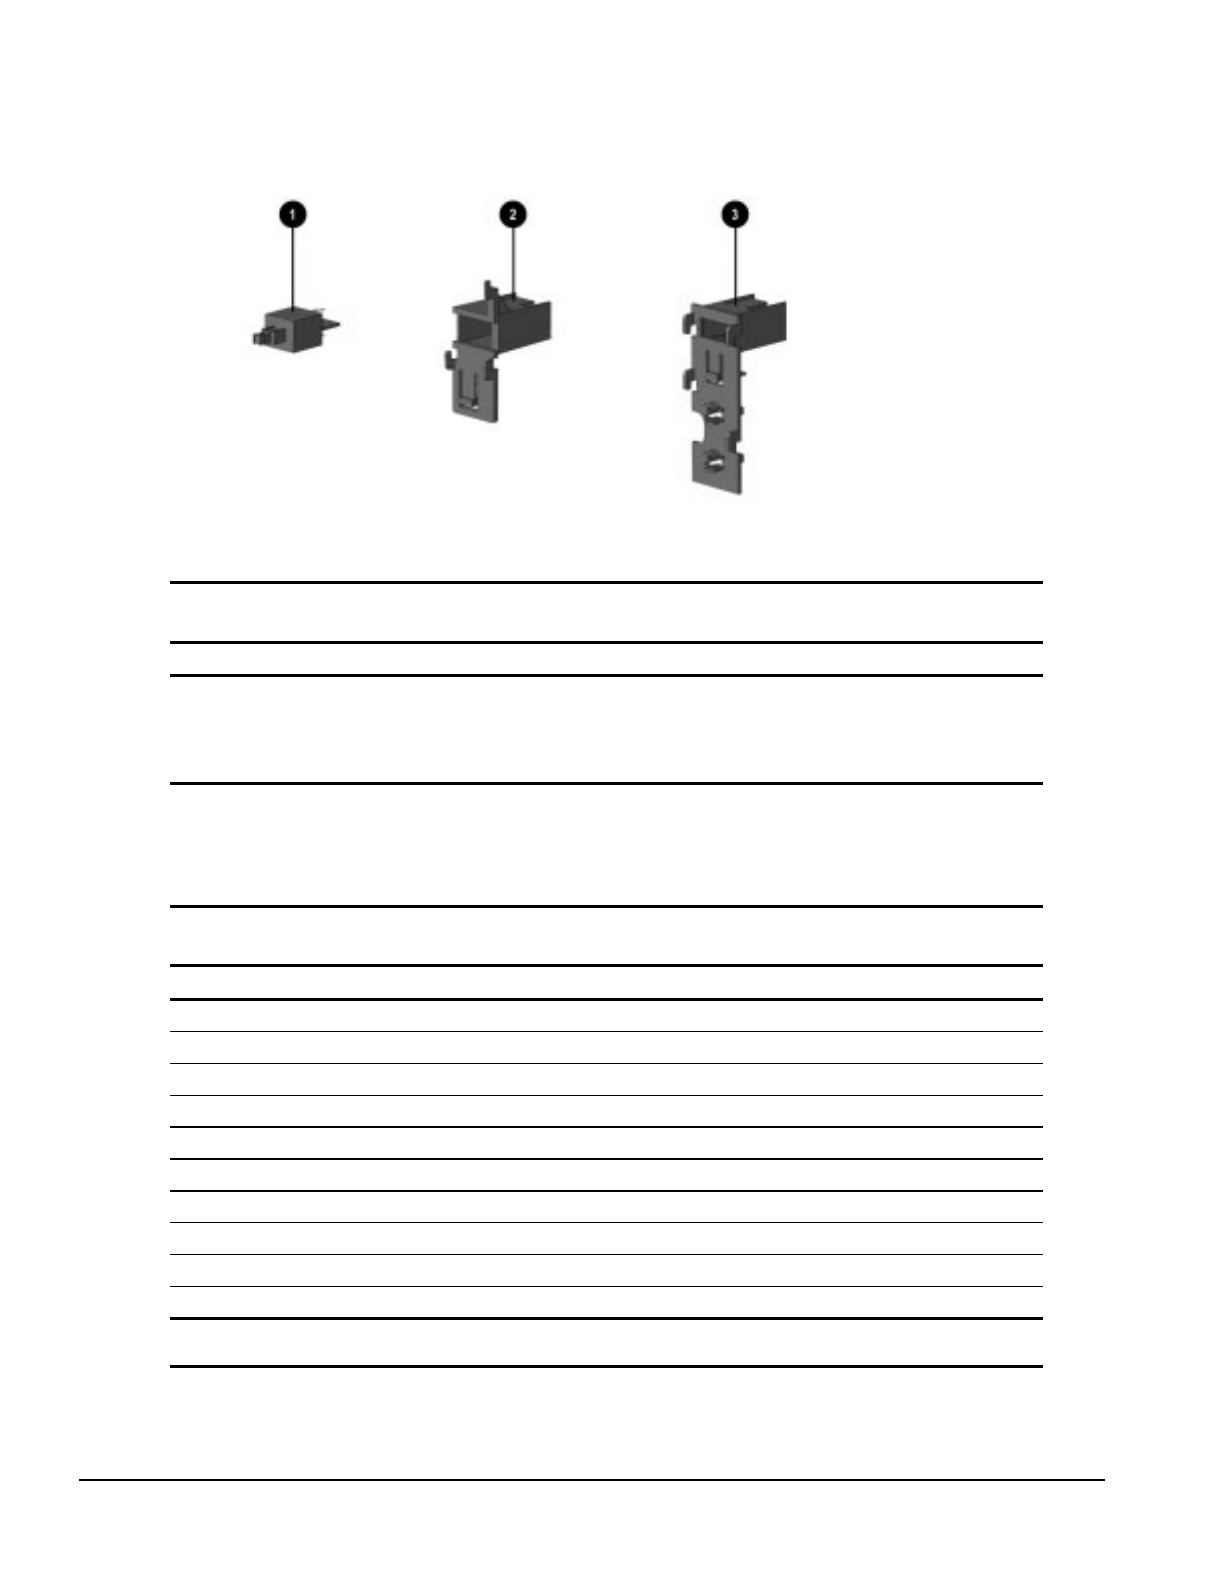
3-24 Illustrated Parts Catalog
Figure 3-15. Power Switch Kit
Table 3-13
Power Switch Kit
Description Spare Part Number Warranty Tier
Power switch kit, includes:
1. Power switch (5 each)
2. Desktop mounting bracket (5 each)
3. Minitower mounting bracket (5 each)
278054-001 D
3.10 Shipping Boxes
Table 3-14
Shipping Boxes
Description Spare Part Number Warranty Tier
Shipping box, final - desktop (5 each)* 278076-001 D
Shipping box, generic - desktop (5 each) 243092-001 D
Shipping box, final - minitower (5 each)* 185968-001 D
Shipping box, generic - minitower (5 each) 243108-001 D
Packing cushion, desktop 243093-001 D
Packing cushion, minitower 243109-001 D
Box and packing, V70 Monitor 255616-001 D
Shipping box, V70 Monitor (5 each) 255617-001 D
Box and packing, QV210 Monitor 210412-001 D
Shipping box, QV210 Monitor (5 each) 210413-001 D
* Not available in U.S.

Compaq Deskpro 2000 Series of Personal Computers 3-25
3.11 Documentation
Table 3-15
Documentation
Description Spare Part Number Warranty Tier
Maintenance & Service Guide (desktop & minitower) 278041-001 D
Illustrated Parts Map (desktop & minitower) 278042-001 D
User’s Guide, Qvision 210 Color Monitor 210414-001 D
User’s Guide, Qvision 200 AssetControl Monitor 143395-001 D
User’s Guide, Qvision 172 AssetControl Monitor 143533-003 D
Documentation kit includes:*
Windows 95 manual
Reference Guide
Program License
Owner’s Registration
Mouse
AC Power Cord
Lock Bracket Assembly
243047-001 D
Windows NT 4.0 Workstation User’s Guide (Danish) 244728-081 D
Windows NT 4.0 Workstation User’s Guide (English) 244728-001 D
Windows NT 4.0 Workstation User’s Guide (Finnish) 244728-351 D
Windows NT 4.0 Workstation User’s Guide (French) 244728-051 D
Windows NT 4.0 Workstation User’s Guide (German) 244728-041 D
Windows NT 4.0 Workstation User’s Guide (Italian) 244728-061 D
Windows NT 4.0 Workstation User’s Guide (Japanese) 244728-191 D
Windows NT 4.0 Workstation User’s Guide (Latin American Spanish) 244728-161 D
Windows NT 4.0 Workstation User’s Guide (Netherlands) 244728-331 D
Windows NT 4.0 Workstation User’s Guide (Norwegian) 244728-091 D
Windows NT 4.0 Workstation User’s Guide (Swedish) 244728-101 D
* English only.

3-26 Illustrated Parts Catalog
3.12 Software
Table 3-16
Software
Description* Spare Part Number Warranty Tier
Diagnostics and Setup Diskettes for Commercial Desktops (Brazilian Portuguese) 275097-201 D
Diagnostics and Setup Diskettes for Commercial Desktops (Danish) 275097-081 D
Diagnostics and Setup Diskettes for Commercial Desktops (Dutch) 275097-331 D
Diagnostics and Setup Diskettes for Commercial Desktops (English) 275097-001 D
Diagnostics and Setup Diskettes for Commercial Desktops (Finnish) 275097-351 D
Diagnostics and Setup Diskettes for Commercial Desktops (French) 275097-051 D
Diagnostics and Setup Diskettes for Commercial Desktops (German) 275097-041 D
Diagnostics and Setup Diskettes for Commercial Desktops (Italian) 275097-061 D
Diagnostics and Setup Diskettes for Commercial Desktops (Japanese) 275097-291 D
Diagnostics and Setup Diskettes for Commercial Desktops (Norwegian) 275097-091 D
Diagnostics and Setup Diskettes for Commercial Desktops (Portuguese) 275097-131 D
Diagnostics and Setup Diskettes for Commercial Desktops (Spanish) 275097-071 D
Diagnostics and Setup Diskettes for Commercial Desktops (Swedish) 275097-101 D
IDE CD-ROM Driver Diskette Kit (Danish) 181456-081 D
IDE CD-ROM Driver Diskette Kit (Dutch) 181456-331 D
IDE CD-ROM Driver Diskette Kit (English) 181456-001 D
IDE CD-ROM Driver Diskette Kit (Finnish) 181456-351 D
IDE CD-ROM Driver Diskette Kit (French) 181456-051 D
IDE CD-ROM Driver Diskette Kit (German) 181456-041 D
IDE CD-ROM Driver Diskette Kit (Italian) 181456-061 D
IDE CD-ROM Driver Diskette Kit (Norwegian) 181456-091 D
IDE CD-ROM Driver Diskette Kit (Portuguese) 181456-131 D
IDE CD-ROM Driver Diskette Kit (Spanish) 181456-071 D
IDE CD-ROM Driver Diskette Kit (Swedish) 181456-101 D
IDE PD-CD Driver Diskette Kit 275940-001 D
Mouse Driver Kit (French) 133421-051 D
Mouse Driver Kit (German) 133421-041 D
Mouse Driver Kit (Italian) 133421-061 D
Mouse Driver Kit (Spanish) 133421-071 D
Mouse Driver Kit (US/UK) 133421-001 D
* International spares are not available from Houston. North American customers can order backup sets of all software on
diskette format from the Compaq Order Center.
continued

Compaq Deskpro 2000 Series of Personal Computers 3-27
Table 3-16
Continued
Description Spare Part Number Warranty Tier
Desktop management 3.0 Agents 274986-001 D
SCO Unix Support Drivers 125873-001 D
OS/2 Support Drivers 196004-001 D
S3 Trio64V2/GX (Brazilian Portuguese) (Pentium system only) 276067-201 D
S3 Trio64V2/GX (Czechoslovakian) (Pentium system only) 276067-221 D
S3 Trio64V2/GX (Danish) (Pentium system only) 276067-081 D
S3 Trio64V2/GX (Dutch) (Pentium system only) 276067-331 D
S3 Trio64V2/GX (English) (Pentium system only) 276067-001 D
S3 Trio64V2/GX (Finnish) (Pentium system only) 276067-351 D
S3 Trio64V2/GX (French) (Pentium system only) 276067-051 D
S3 Trio64V2/GX (German) (Pentium system only) 276067-041 D
S3 Trio64V2/GX (Hungarian) (Pentium system only) 276067-211 D
S3 Trio64V2/GX (Italian) (Pentium system only) 276067-061 D
S3 Trio64V2/GX (Japanese) (Pentium system only) 276067-291 D
S3 Trio64V2/GX (Norwegian) (Pentium system only) 276067-091 D
S3 Trio64V2/GX (Polish) (Pentium system only) 276067-241 D
S3 Trio64V2/GX (Portuguese) (Pentium system only) 276067-131 D
S3 Trio64V2/GX (Russian) (Pentium system only) 276067-251 D
S3 Trio64V2/GX (Spanish) (Pentium system only) 276067-071 D
S3 Trio64V2/GX (Swedish) (Pentium system only) 276067-101 D
S3 Trio64V2/GX (Thai) (Pentium system only) 276067-281 D
Windows NT Support Drivers 196012-001 D
Flash for System ROM 183986-001 D
ESS 1868 Audio Drivers 274987-001 D
QuickFind for Windows CD-ROM Kit (US) 137906-0XX†D
QuickFind for Windows CD-ROM Kit (Outside US) 137907-0XX†D
Matrox Video Drivers (Pentium II system only) 183463-001 D
* International spares are not available from Houston. North American customers can order backup sets of all software on
diskette format from the Compaq Order Center.
†QuickFind is updated monthly. To complete the QuickFind part number add the suffix for the desired month. If you do not
specify the 3-digit suffix, the default is the current month in which the order is placed.
continued

3-28 Illustrated Parts Catalog
Table 3-16
Continued
Description* Spare Part Number Warranty Tier
Remote Service Drivers (Danish) 276068-081 D
Remote Service Drivers (Dutch) 276068-331 D
Remote Service Drivers (English) 276068-001 D
Remote Service Drivers (Finnish) 276068-351 D
Remote Service Drivers (French) 276068-051 D
Remote Service Drivers (German) 276068-041 D
Remote Service Drivers (Italian) 276068-061 D
Remote Service Drivers (Norwegian) 276068-091 D
Remote Service Drivers (Portuguese) 276068-101 D
Remote Service Drivers (Spanish) 276068-071 D
NT Diagnostics (Brazillian Portuguese) 276069-201 D
NT Diagnostics (Danish) 276069-081 D
NT Diagnostics (Dutch) 276069-331 D
NT Diagnostics (English) 276069-001 D
NT Diagnostics (Finnish) 276069-351 D
NT Diagnostics (French) 276069-051 D
NT Diagnostics (German) 276069-041 D
NT Diagnostics (Italian) 276069-061 D
NT Diagnostics (Japanese) 276069-291 D
NT Diagnostics (Norwegian) 276069-091 D
NT Diagnostics (Portuguese) 276069-101 D
NT Diagnostics (Spanish) 276069-071 D
* International spares are not available from Houston. North American customers can order backup sets of all software on
diskette format from the Compaq Order Center.

Compaq Deskpro 2000 Series of Personal Computers 4-1
chapter 4
REMOVAL AND REPLACEMENT
PRELIMINARIES
This chapter provides general service information for the computer. Adherence to the procedures and
precautions described in this chapter is essential for proper service.
4.1 Electrostatic Discharge Information
A sudden discharge of static electricity from your finger or other conductor can destroy static-
sensitive devices or microcircuitry. Often the spark is neither felt nor heard, but damage occurs. An
electronic device exposed to electrostatic discharge (ESD) may not be affected at all and can work
perfectly throughout a normal cycle. The device may function normally for a while, then degrade in
the internal layers, reducing its life expectancy.
Networks built into many integrated circuits provide some protection, but in many cases, the
discharge contains enough power to alter device parameters or melt silicon junctions.
4.1.1 Generating Static
Table 4-1 shows how different activities generate static electricity at different electrostatic voltage
levels.
Table 4-1
Typical Electrostatic Voltages
Relative Humidity
Event 10% 40% 55%
Walking across carpet 35,000 V 15,000 V 7,500 V
Walking across vinyl floor 12,000 V 5,000 V 3,000 V
Motions of bench worker 6,000 V 800 V 400 V
Removing DIPs* from plastic tube 2,000 V 700 V 400 V
Removing DIPs* from vinyl tray 11,500 V 4,000 V 2,000 V
Removing DIPs* from Styrofoam 14,500 V 5,000 V 3,500 V
Removing bubble pack from PCB 26,500 V 20,000 V 7,000 V
Packing PCBs in foam-lined box 21,000 V 11,000 V 5,000 V
*Dual Inline Packaging (DIP) is the packaging around individual microcircuitry. These are then multi-packaged inside plastic
tubes, trays, or Styrofoam.
✎700 volts can degrade a product.

4-2 Removal and Replacement Preliminaries
4.1.2 Preventing Electrostatic Damage to Equipment
Many electronic components are sensitive to ESD. Circuitry design and structure determine the
degree of sensitivity. The following proper packaging and grounding precautions are necessary to
prevent damage to electric components and accessories.
To avoid hand contact, transport products in static-safe containers such as tubes, bags, or boxes.
Protect all electrostatic sensitive parts and assemblies with conductive or approved containers or
packaging.
Keep electrostatic sensitive parts in their containers until they arrive at static-free stations.
Place items on a grounded surface before removing them from their container.
Always be properly grounded when touching a sensitive component or assembly.
Avoid contact with pins, leads, or circuitry.
Place reusable electrostatic-sensitive parts from assemblies in protective packaging or conductive
foam.
4.1.3 Personal Grounding Methods
The method for grounding must include either a wrist strap or a foot strap at a grounded workstation.
When seated, wear a wrist strap connected to a grounded system. When standing, use foot straps and
a grounded floor mat.
Table 4-2
Static Shielding Protection Levels
Method Voltage
Antistatic plastic 1,500
Carbon-loaded plastic 7,500
Metallized laminate 15,000

Compaq Deskpro 2000 Series of Personal Computers 4-3
4.1.4 Grounding Workstations
To prevent static damage at the workstation, use the following precautions:
Cover the workstation with approved static-dissipative material. Provide a wrist strap connected
to the work surface and properly grounded tools and equipment.
Use static-dissipative mats, foot straps, or air ionizers to give added protection.
Handle electrostatic sensitive components, parts, and assemblies by the case or PCB laminate.
Handle them only at static-free workstations.
Turn off power and input signals before inserting and removing connectors or test equipment.
Use fixtures made of static-safe materials when fixtures must directly contact dissipative
surfaces.
Keep work area free of nonconductive materials such as ordinary plastic assembly aids and
Styrofoam.
Use field service tools, such as cutters, screwdrivers, and vacuums, that are conductive.
4.1.5 Personal Grounding Equipment
Use the following equipment to prevent static electricity damage to equipment:
Wrist straps are flexible straps with a minimum of one-megohm +/- 10% resistance in the ground
cords. To provide proper ground, a strap must be worn snug against bare skin. The ground cord must
be connected and fit snugly into the banana plug connector on the grounding mat or workstation.
Heel straps/Toe straps/Boot straps can be used at standing workstations and are compatible with
most types of shoes or boots. On conductive floors or dissipative floor mats, use them on both feet
with a minimum of one-megohm resistance between the operator and ground. To be effective, the
conductive strips must be worn in contact with the skin.
4.1.6 Recommended Materials and Equipment
Other materials and equipment that are recommended for use in preventing static electricity include:
Antistatic tape
Antistatic smocks, aprons, or sleeve protectors
Conductive bins and other assembly or soldering aids
Conductive foam
Conductive tabletop workstations with ground cord of one-megohm resistance
Static-dissipative table or floor mats with hard tie to ground
Field service kits
Static awareness labels

4-4 Removal and Replacement Preliminaries
Wrist straps and footwear straps providing one-megohm +/- 10% resistance
Material handling packages
Conductive plastic bags
Conductive plastic tubes
Conductive tote boxes
Opaque shielding bags
Transparent metallized shielding bags
Transparent shielding tubes
4.2 Routine Care
4.2.1 General Cleaning Safety
Precautions
1. Never use solvents or flammable solutions to clean the computer.
2. Never immerse any parts in water or cleaning solutions; apply any liquids to a clean cloth and
then use the cloth on the component.
3. Always turn off the computer when cleaning with liquids or damp cloths.
4. Always turn off the computer before cleaning the keyboard, mouse, or air vents.
5. Disconnect the keyboard before cleaning it.
6. Wear safety glasses equipped with side shields when cleaning the keyboard.
4.2.2 Cleaning the Computer Case
Follow all safety precautions in Section 4.2.1 before cleaning the computer.
To clean the computer case, follow the procedures described below:
To remove light stains or dirt, use plain water with a clean, lint-free cloth or swab.
For stronger stains, use a mild dishwashing liquid diluted with water. Rinse well by wiping with
a cloth or swab dampened with clear water.
For stubborn stains, use isopropyl (rubbing) alcohol. No rinsing is needed as the alcohol will
evaporate quickly and not leave a residue.
After cleaning, always wipe the unit with a clean, lint-free cloth.
Occasionally, clean the air vents on the computer. Lint and other foreign matter can block the
vents and limit the airflow.

Compaq Deskpro 2000 Series of Personal Computers 4-5
4.2.3 Cleaning the Keyboard
Follow all safety precautions in Section 4.2.1 before cleaning the keyboard.
To clean the tops of the keys or the keyboard body, follow the procedures described in Section 4.2.2.
When cleaning debris from under the keys, review all rules in Section 4.2.1 before following these
procedures:
CAUTION: Use safety glasses equipped with side shields before attempting to clean debris from under the
keys.
Visible debris underneath or between the keys may be removed by vacuuming or shaking.
Canned, pressurized air may be used to clean debris from under the keys. Caution should be used
as too much air pressure can dislodge lubricants applied under the wide keys.
If you remove a key, use a specially designed key puller to prevent damage to the keys. This tool
is available through many electronic supply outlets.
CAUTION: Never remove a wide leveled key (like the space bar) from the keyboard. If these keys are
improperly removed or installed, the keyboard may not function properly.
Cleaning under a key may be done with a swab moistened with isopropyl alcohol and squeezed
out. Be careful not to wipe away lubricants necessary for proper key functions. Use tweezers to
remove any fibers or dirt in confined areas. Allow the parts to air dry before reassembly.
4.2.4 Cleaning the Monitor
Wipe the monitor screen with a clean cloth moistened with water or with a towelette designed for
cleaning monitors. Do not use sprays or aerosols directly on the screen, the liquid may seep into
the housing and damage a component. Never use solvents or flammable liquids on the monitor.
To clean the monitor body, follow the procedures in Section 4.2.2
4.2.5 Cleaning the Mouse
Before cleaning the mouse, ensure that the power to the computer is turned off.
Clean the mouse ball by first removing the retaining plate and the ball from the housing. Pull out
any debris from the ball socket and wipe the ball with a clean dry cloth before reassembly.
To clean the mouse body, follow the procedures in Section 4.2.2.

4-6 Removal and Replacement Preliminaries
4.3 Service Considerations
Listed below are some of the considerations that you should keep in mind during the disassembly and
assembly of the computer.
4.3.1 Tools and Software Requirements
To service the computer, you need the following:
Torx T-15 screwdriver
Flat-bladed screwdriver
Diagnostics software
Tool kit, Compaq part number 100767-001 (includes case utility tool, connector removal tool,
and loop-back plugs)
4.3.2 Screws
The screws used in the computer are not interchangeable. They may have standard or metric threads
and may be of different lengths. The standard screws have a silver finish, while the metric screws
have a black finish. If an incorrect screw is used during the reassembly process, it can damage the
unit. Compaq strongly recommends that all screws removed during disassembly be kept with the part
that was removed, then returned to their proper locations.
✎As each subassembly is removed from the computer, it should be placed away from the
work area to prevent damage.
4.3.3 Cables and Connectors
Most cables used throughout the unit are flat, flexible cables. These cables must be handled with care
to avoid damage. Apply only the tension required to seat or unseat the cables during insertion or
removal from the connector. Handle cables by the connector whenever possible. In all cases, avoid
bending, twisting, or tearing the cables, and ensure that the cables are routed in such a way that they
cannot be caught or snagged by parts being removed or replaced.
CAUTION: When servicing this computer, ensure that cables are placed in their proper location during the
reassembly process. Improper cable placement can damage the computer.

Compaq Deskpro 2000 Series of Personal Computers 4-7
4.3.4 Hard Drives
Handle hard drives as delicate precision components, avoiding all physical shock and vibration.
This applies to failed drives as well as replacement spares.
Use only the packaging provided by Compaq for shipping.
Do not remove hard drives from the shipping package for storage. Keep hard drives in their
protective packaging until they are actually mounted in the CPU.
Avoid dropping drives from any height onto any surface.
4.3.5 Plastic Parts
Plastic parts can be damaged by the use of excessive force during disassembly and reassembly. When
handling the plastic parts, use care. Do not use a screwdriver or similar tool to pry apart the plastic
components; use the case utility tool provided in the Compaq tool kit PN 100767-001.
4.3.6 Lithium Battery
The battery that came with the computer is non-replaceable and is permanently soldered onto the
system board. Do not attempt to remove the lithium battery when installing a replacement battery.
The lithium battery may explode if mishandled.
CAUTION: Never attempt to remove a lithium battery. You can damage the system board in such an
attempt, thereby making it unusable. Do not abuse or disassemble the lithium battery, as it may explode if
mistreated.
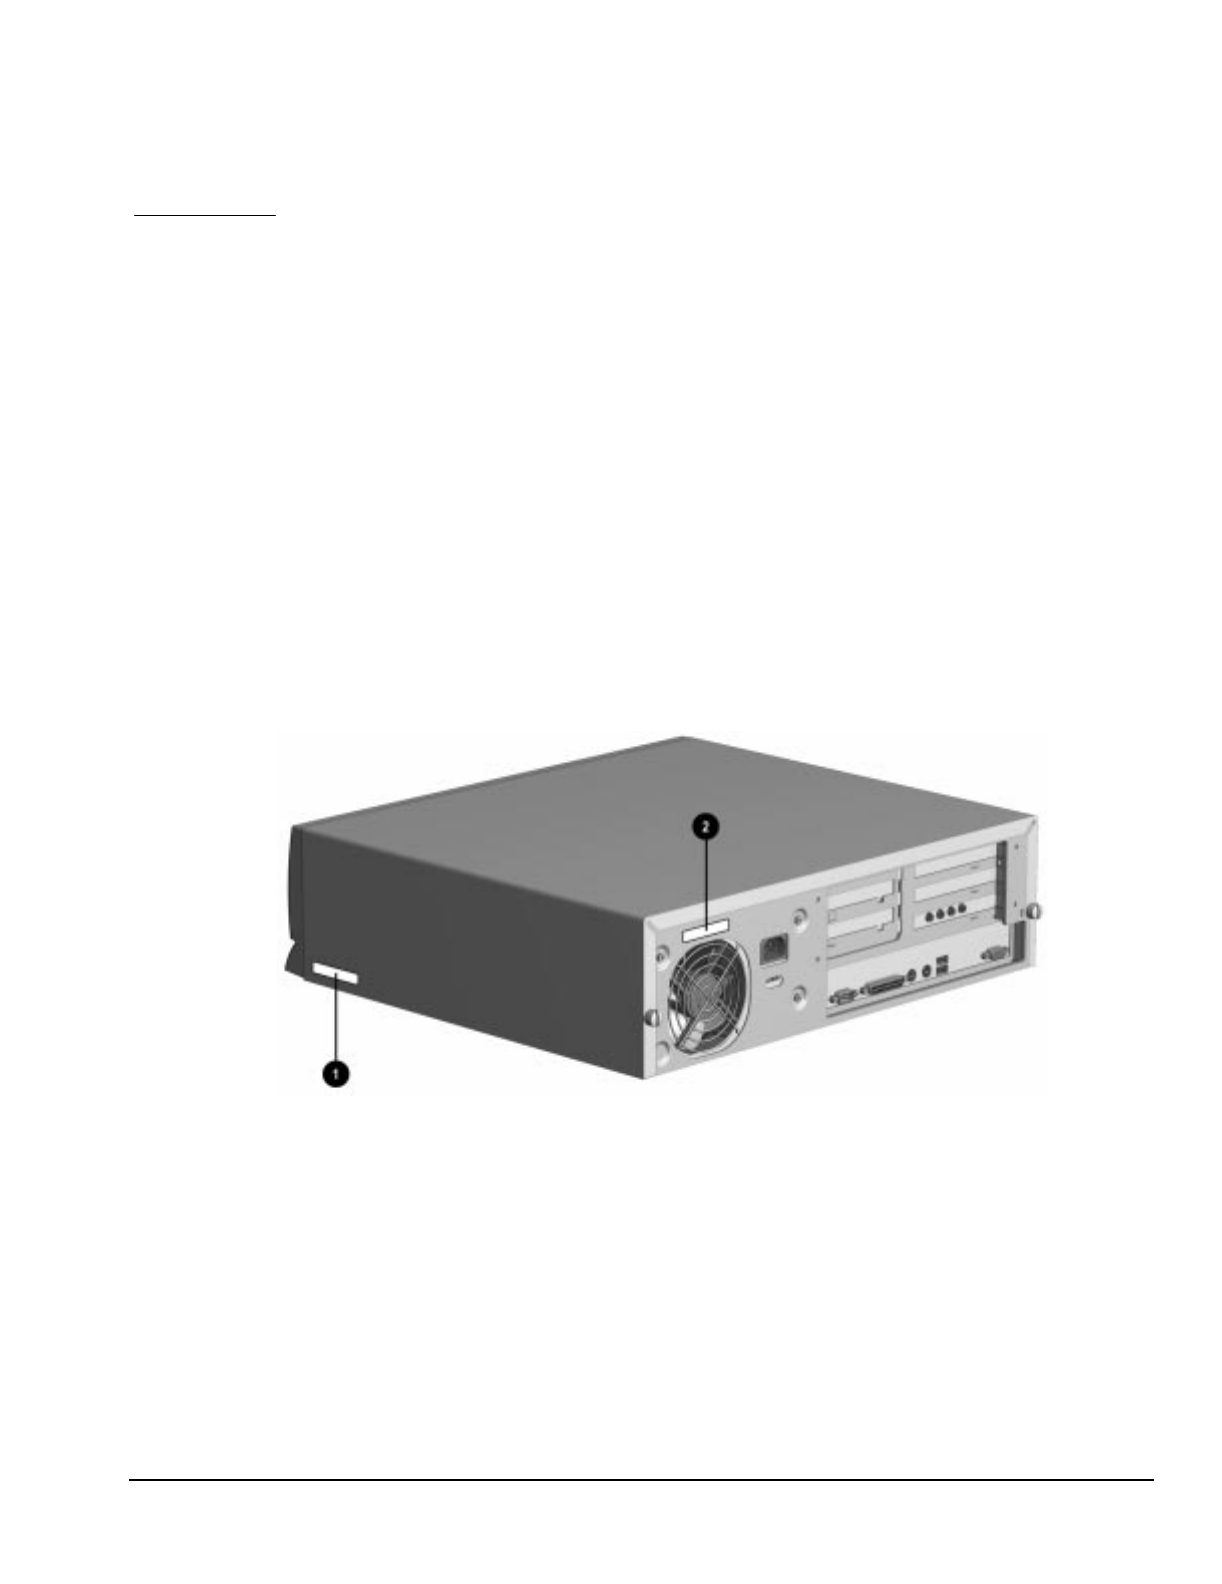
Compaq Deskpro 2000 Series of Personal Computers 5-1
chapter 5
REMOVAL AND REPLACEMENT
PROCEDURES - DESKTOP
This chapter provides subassembly/module level removal and replacement procedures for desktop
models of the Compaq Deskpro 2000 Series of Personal Computers.
After completing all necessary removal and replacement procedures, run the Diagnostics utility to
verify that all components operate properly.
5.1 Serial Number
The computer serial number should be provided to Compaq when requesting information or
ordering spare parts. The serial number is displayed on the right side of the system unit cover
towards the front 1, and also on the rear of the chassis above the fan 2.
Figure 5-1. Serial Number Location
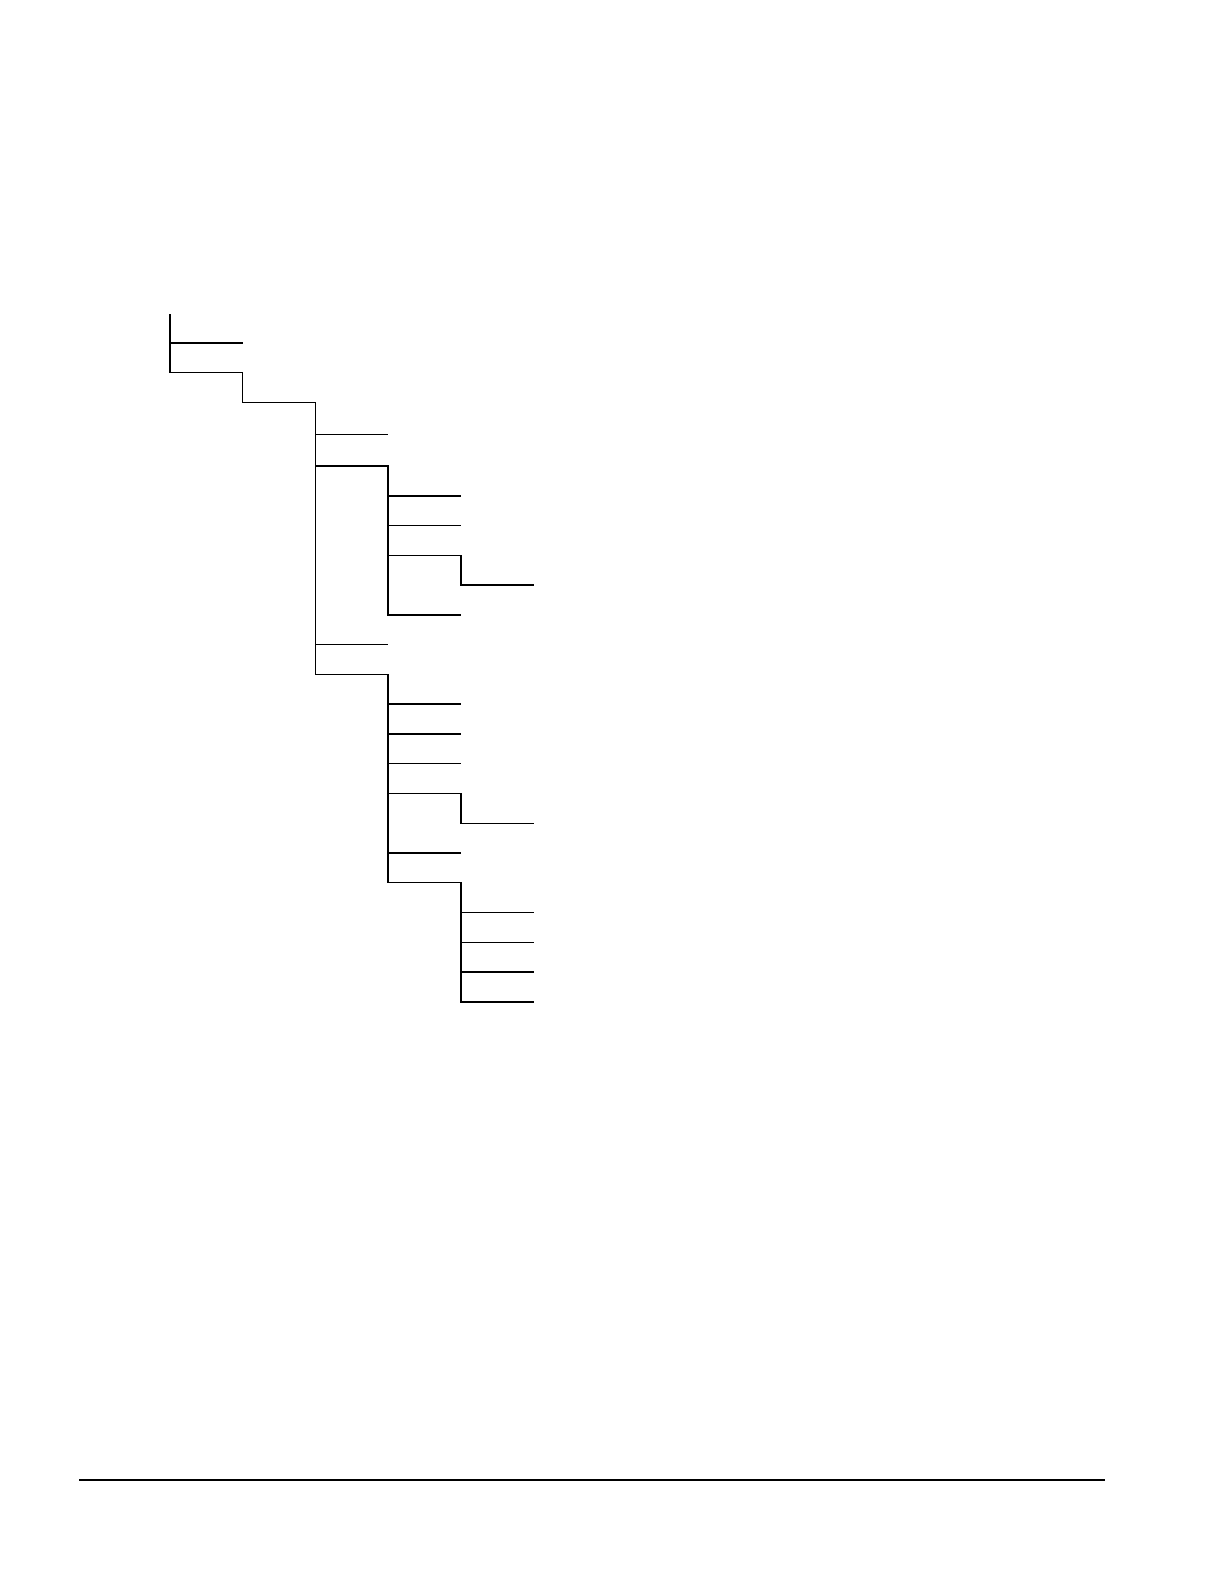
5-2 Removal and Replacement Procedures - Desktop
5.2 Disassembly Sequence Chart
Use the chart below to determine the disassembly sequence for removing components from the
computer.
5.4 Computer Feet
5.5 Cable Lock
5.6 System Unit Cover
5.7 Speaker
5.8 Expansion Board
5.9.1 Memory Module
5.9.2 System Board Graphics Memory Module
5.10 Riser Board
5.11 Riser Brace
5.12 Expansion Board Guide
5.13 Replacement Battery
5.14.1 Front Bezel
5.14.2 Power Button
5.14.3 Bezel Blank
5.14.4 Compaq Logo
5.15.1 Power Switch Assembly
5.15.2 Power Supply
5.16 Mass Storage Devices
5.17 Drive Cage
5.9.3 Microprocessor (for Pentium II, remove expansion boards also)
5.9.4 Cache Memory (Pentium only, remove expansion boards also)
5.18 LED Cable
5.19 System Board (remove Riser Board also)

Compaq Deskpro 2000 Series of Personal Computers 5-3
5.3 Preparation for Disassembly
See Chapter 4, “Removal and Replacement Preliminaries,” for initial procedures.
To prepare the computer for disassembly, complete the following steps:
1. Remove any diskette, compact disc, or tape from the computer.
2. Turn off the computer and any peripheral devices that are connected to it.
CAUTION: Turn off the computer before disconnecting any cables.
3. Disconnect the power cord from the electrical outlet and then from the computer.
4. Disconnect all peripheral device cables from the computer.
✎During disassembly, label each cable as you remove it, noting its position and routing.
Keep all screws with the units removed.
CAUTION: The screws used in the computer are of different thread sizes and lengths; using the wrong
screw in an application may damage the unit.

5-4 Removal and Replacement Procedures - Desktop
5.4 Feet
Four rubber feet are mounted to the underside of the chassis. If necessary, remove the old feet and
scrape the residue of the old feet from the chassis using a small, flat-bladed screwdriver. To attach
replacement feet to the chassis, remove the protective strip from the adhesive on the back of the new
feet and press them into place.
Figure 5-2. Installing the Feet
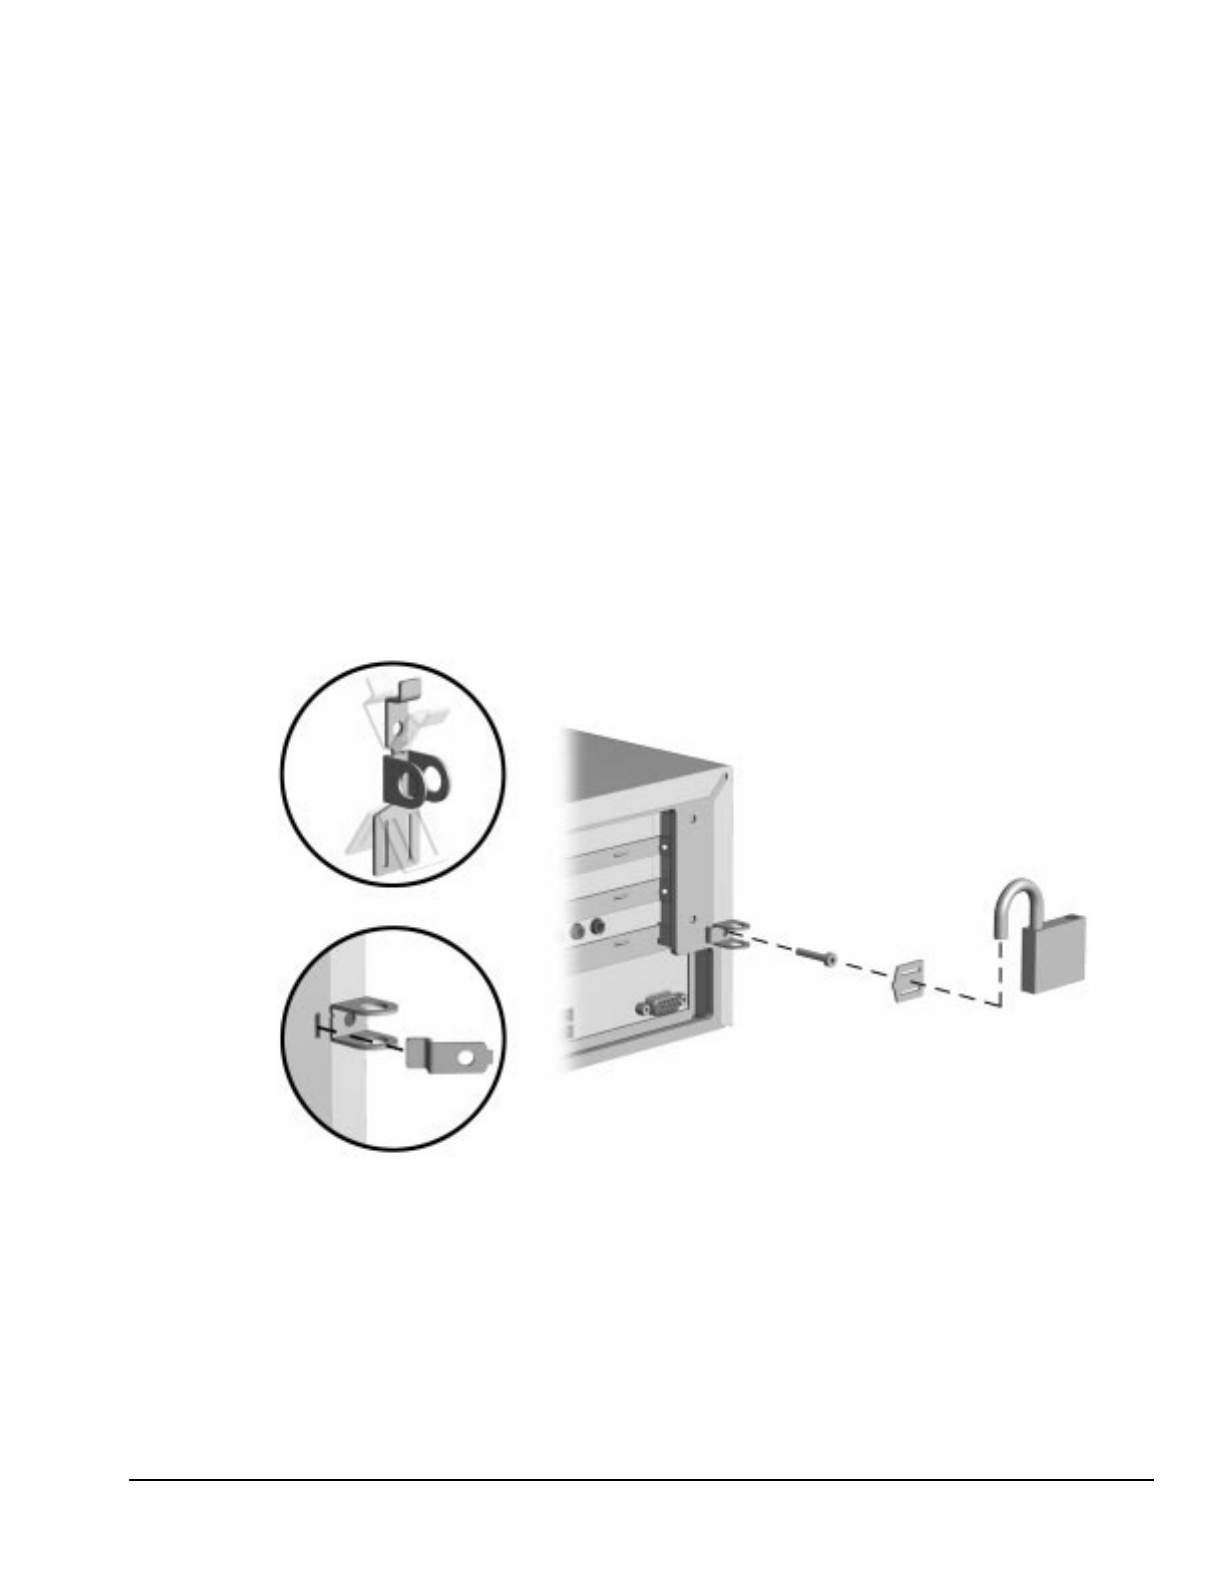
Compaq Deskpro 2000 Series of Personal Computers 5-5
5.5 Cable Lock
To install the cable lock provision, complete the following steps:
1. Remove one thumbscrew from the rear of the computer. Use a flat-bladed screwdriver if needed
to loosen a stubborn screw.
2. Separate the pieces of the security bracket by bending the metal where the three pieces join (see
inset).
3. Insert the tang of the narrow bracket into the slot and slide the U-shaped bracket between the
narrow bracket and the system unit cover (see inset); then, install the self-tapping screw included
in the cable lock kit.
4. Cover the screw with the flat portion of the bracket.
5. Install a lock (not provided) to secure the top part of the security bracket to control access to the
inside of the computer. Install a cable lock (not provided) to secure the computer to an immovable
location.
Figure 5-3. Installing the Cable Lock
To remove the cable lock provision, reverse the above procedure.

5-6 Removal and Replacement Procedures - Desktop
5.6 System Unit Cover
To remove the system unit cover, complete the following steps:
1. Prepare the computer for disassembly (Section 5.3).
2. Remove the thumbscrews at the rear of the computer to release the cover. You may need a flat-
bladed screwdriver to loosen a stubborn screw.
If the computer has a cable lock mechanism installed, refer to Section 5.5 for removal procedures.
3. Slide the computer cover back about 1 inch (2.5 cm); then, lift it up and off of the unit.
Figure 5-4. Removing the System Unit Cover
To replace the cover, reverse the above procedure.

Compaq Deskpro 2000 Series of Personal Computers 5-7
5.7 Speaker
To remove the speaker, complete the following steps:
1. Remove the system unit cover (Section 5.6).
2. Disconnect the speaker cable from the audio expansion board.
Figure 5-5. Disconnecting the Speaker Cable from the Audio Expansion Board
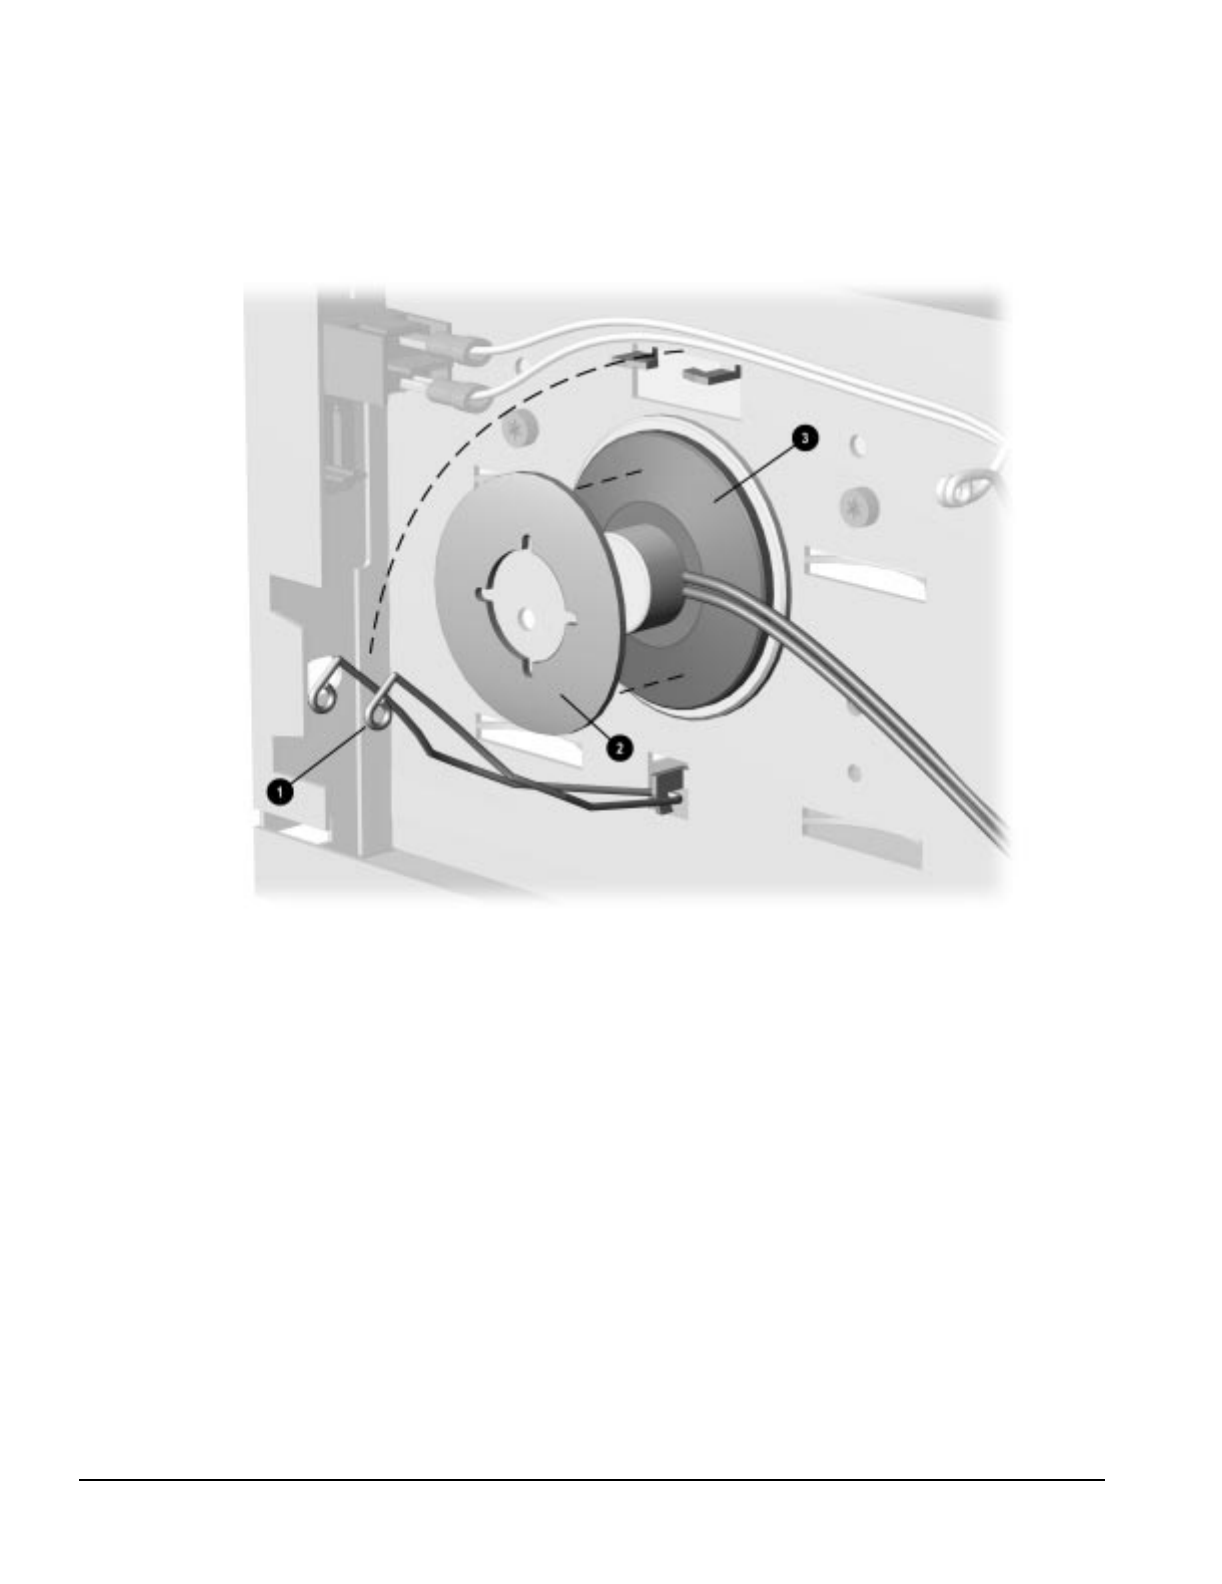
5-8 Removal and Replacement Procedures - Desktop
3. Unsnap the speaker-retaining clip 1 on the right side (from the front of the chassis) of the drive
bay and remove the speaker 3.
Figure 5-6. Removing the Speaker
To replace the speaker, ensure that the cardboard insulator 2 is on the speaker; then, reverse the
above procedure. The cable connector is keyed for proper installation.

Compaq Deskpro 2000 Series of Personal Computers 5-9
5.8 Expansion Board
The desktop versions of the Compaq Deskpro 2000 Series of Personal Computers have five
expansion slots: three on the outboard side of the riser board and two on the inboard side.
Figure 5-7. Five Expansion Slots on the Desktop Computer
1One PCI/ISA expansion slot on the outboard side of the riser board in the uppermost position.
2Two dedicated ISA expansion slots on the outboard side of the riser board.
3Two dedicated PCI expansion slots on the inboard side of the riser board.

5-10 Removal and Replacement Procedures - Desktop
5.8.1 Inboard Expansion Board
To remove an inboard expansion board, complete the following steps:
1. Remove the system unit cover (Section 5.6).
2. Remove the retaining screw and board retainer bracket that secure the board to the rear of the
computer chassis.
3. Remove the expansion board.
Figure 5-8. Removing the Expansion Board from an Inboard Position
To replace the expansion board, reverse the above procedure.
✎If you are installing an expansion board for the first time, remove the slot cover before
installing the board.
The computer should automatically recognize the added Plug and Play board.
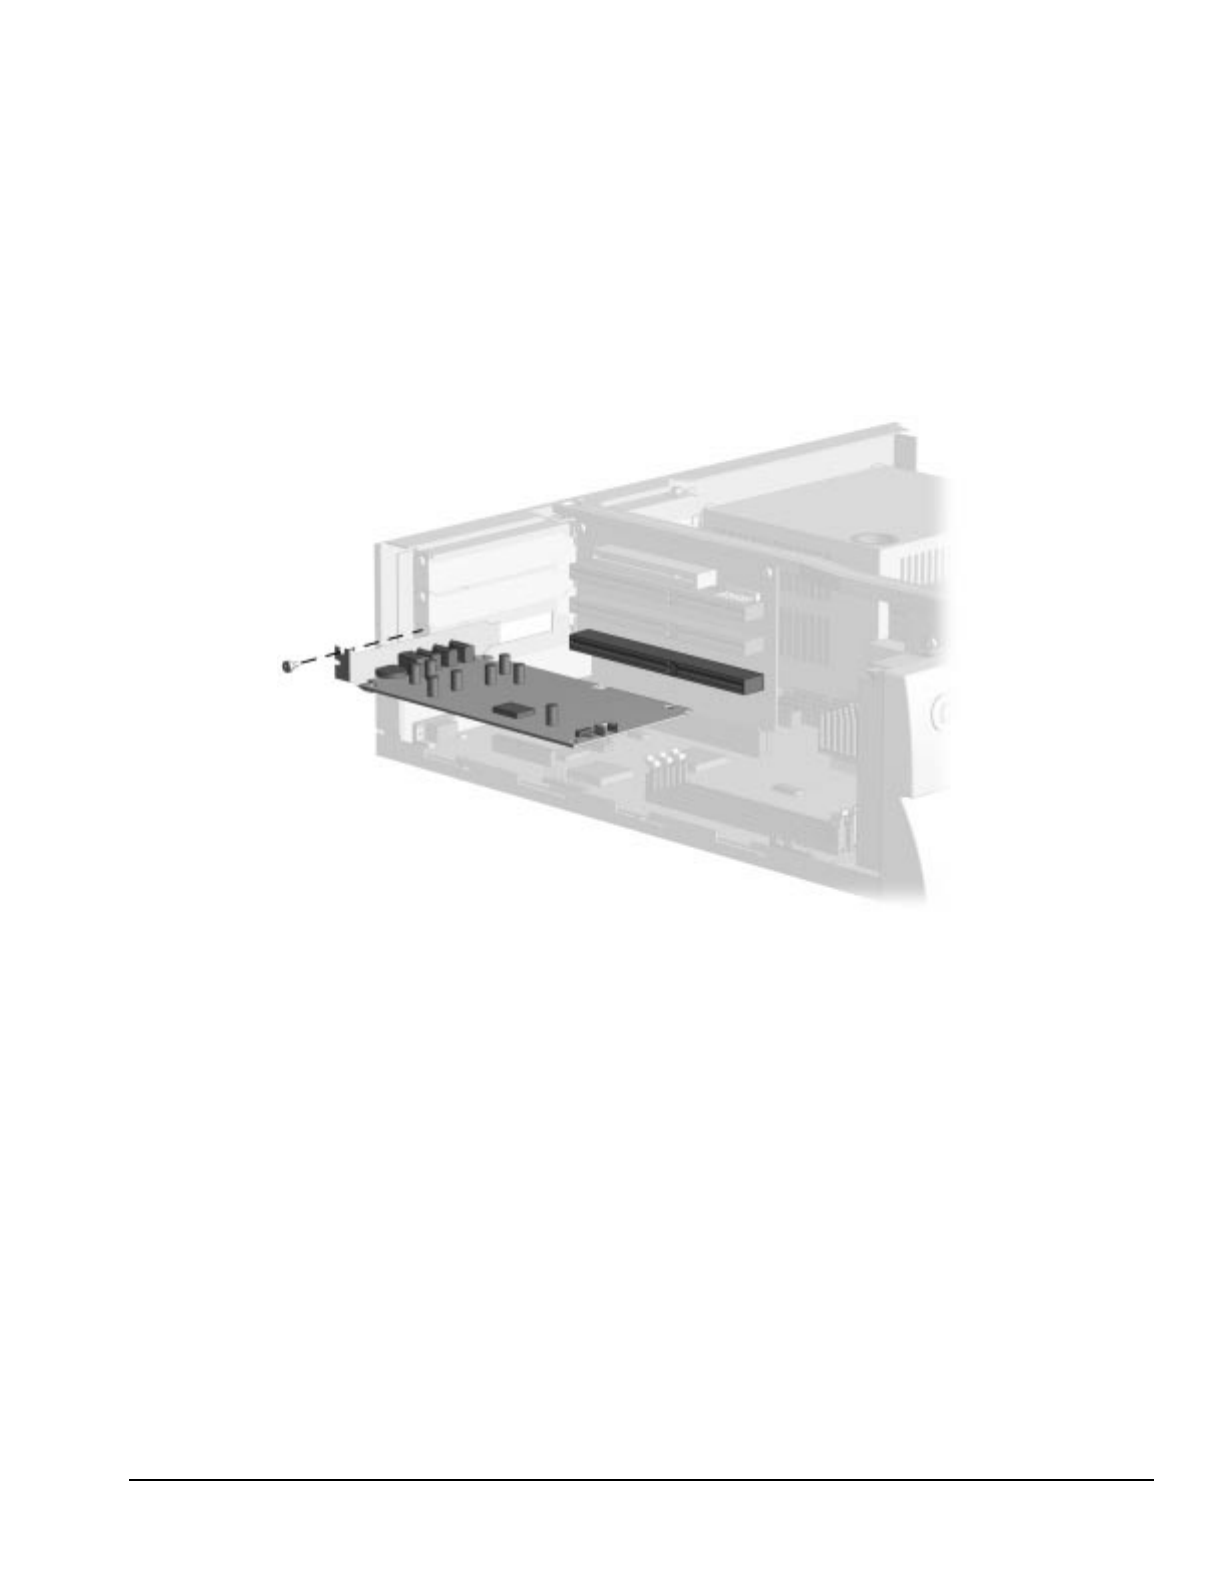
Compaq Deskpro 2000 Series of Personal Computers 5-11
5.8.2 Outboard Expansion Board
To remove an outboard expansion board, complete the following steps:
1. Remove the system unit cover (Section 5.6).
2. Remove the retaining screw that secures the board to the rear of the computer chassis.
3. Remove the expansion board.
Figure 5-9. Removing the Expansion Board from an Outboard Position
To replace the expansion board, reverse the above procedure.
✎If you are installing an expansion board for the first time, remove the slot cover before
installing the board.
When the computer starts, it should automatically recognize the added Plug and Play board.
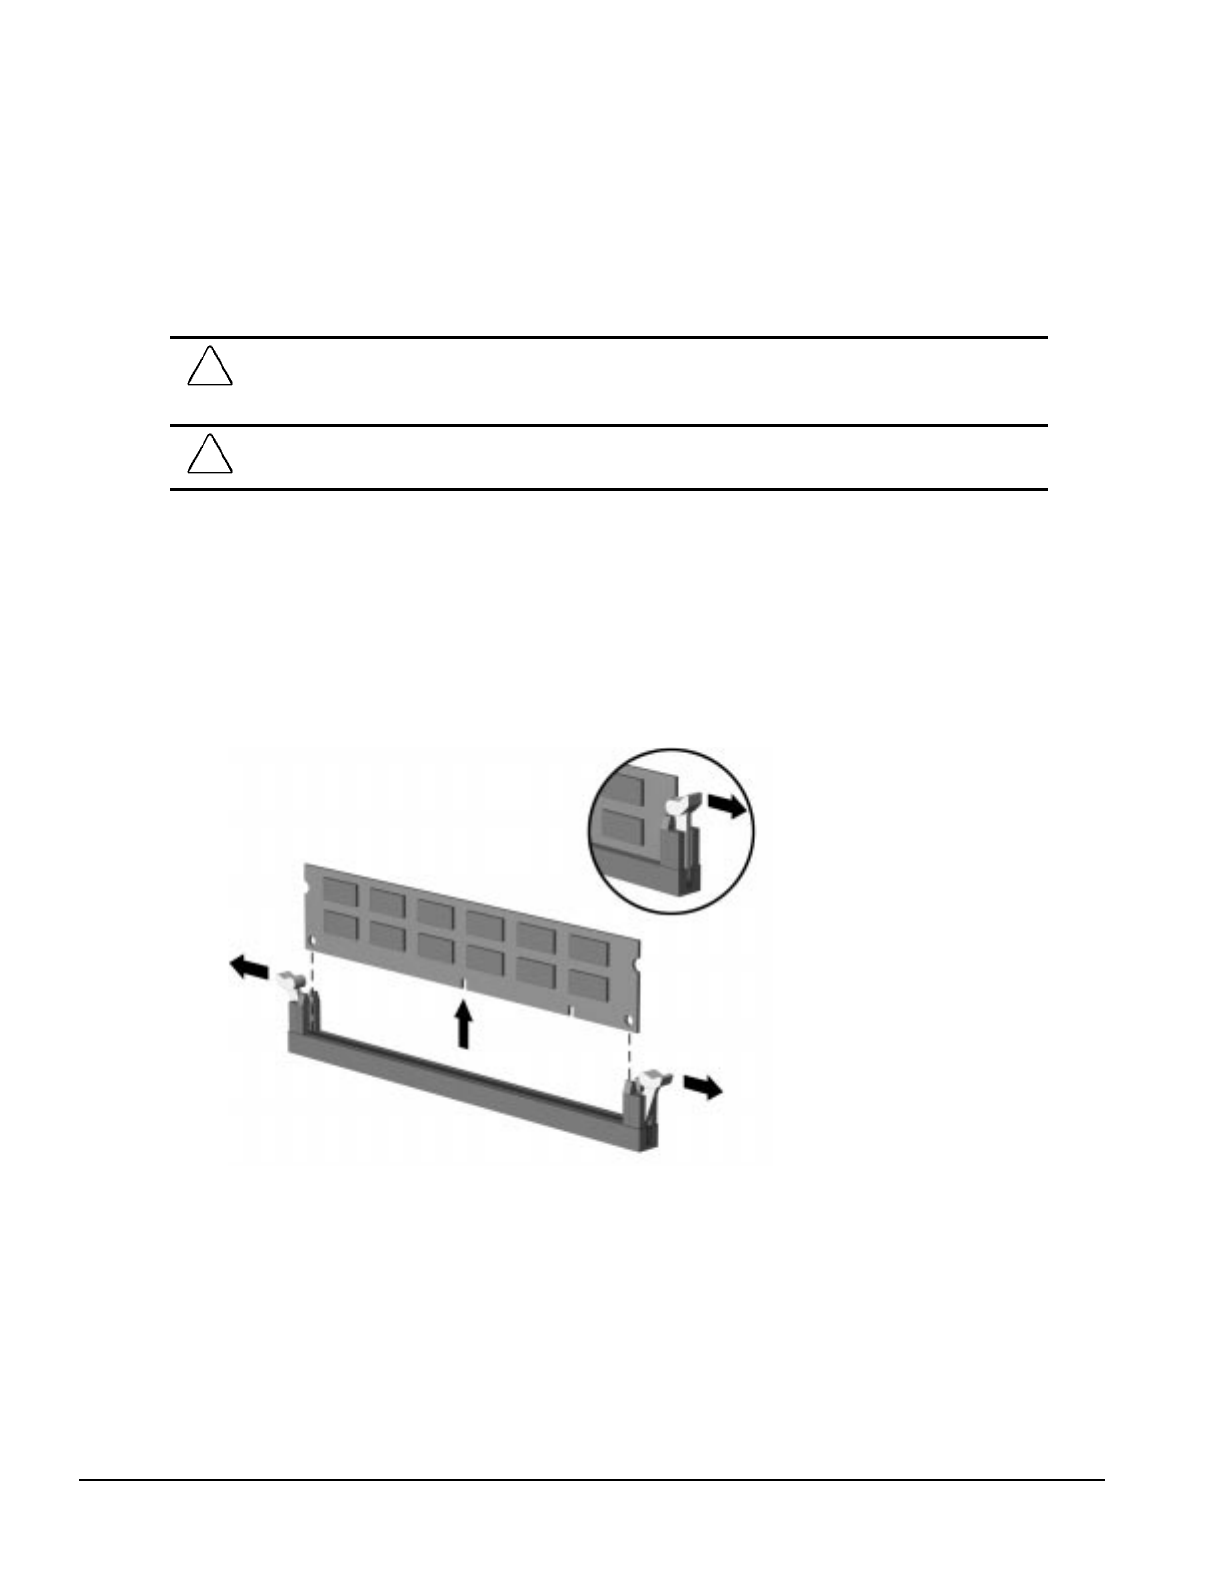
5-12 Removal and Replacement Procedures - Desktop
5.9 System Board Components
5.9.1 Memory Modules
Memory may be expanded by adding one or more DIMMs at a time onto the system board.
CAUTION: Static electricity can damage the electronic components of the computer or optional boards.
Before beginning these procedures, ensure that you are discharged of static electricity by briefly touching
a grounded metal object.
CAUTION: When handling a memory module, be careful not to touch any of the contacts. Doing so can
damage the module.
To remove a memory module, complete the following steps:
1. Remove the system unit cover (Section 5.6).
2. Remove any outboard expansion boards that block the DIMM sockets (Section 5.8.2).
3. Press outward on both latches of the DIMM socket at the same time. This releases the module and
partially pushes it out of the socket.
4. Lift the module from the socket.
Figure 5-10. Removing a Memory Module
✎For the location of the DIMM sockets on the system board, see Chapter 7.
To replace a DIMM, reverse the above steps. Press down firmly on top of the DIMM to seat it. Make
sure that the latches are fully pushed in and locked.
✎When the computer starts up, it will recognize the system memory upgrades and
automatically reconfigure the computer.

Compaq Deskpro 2000 Series of Personal Computers 5-13
5.9.2 System Board Graphics Memory
Module Upgrade
To install a graphics memory module upgrade for the graphics controller that is preinstalled in the
system board, complete the following steps:
1. Remove the system unit cover (Section 5.6).
2. Remove any outboard expansion boards that might block access to the memory connectors
(Section 5.8.2).
3. Install the graphics memory upgrade module onto the system board.
Figure 5-11. Installing the Graphics Memory Upgrade Module on the Pentium System Board
Figure 5-12. Installing the Graphics Memory Upgrade Module on the Pentium II System Board
4. Replace any outboard expansion boards that were removed.
5. Replace the system unit cover.

5-14 Removal and Replacement Procedures - Desktop
6. Turn the computer on and start Windows 95.
7. Select the display icon in Windows 95 and follow the online instructions to take advantage of the
additional display modes available with the upgraded memory.
To remove, reverse the above procedure.
5.9.3 Microprocessor
Pentium System Board
To remove the microprocessor from the system board, complete the following steps:
1. Remove the system unit cover (Section 5.6).
2. Remove any expansion boards that might block access to the microprocessor (Section 5.8.1).
3. Remove the front bezel (Section 5.14.1).
4. Remove the drive cage (Section 5.17).
CAUTION: When replacing the processor, you must release the heat sink retaining clip before you pull the
ZIF socket handle. The clip engages the processor socket to hold the heat sink in place.
!WARNING: To reduce the risk of personal injury from hot surfaces, allow the internal system components
to cool before touching.
5. Remove the heat sink retaining clip 1 by pressing down on the clip’s extended tab until it
releases from the safety catch.
6. Lift the heat sink 2 off the processor.
✎The handle on the ZIF socket in the picture may not look identical to the one on the
computer. All handle types perform the same function.
7. Release the processor from the socket by pulling the handle on the ZIF socket out and upward 4.
8. Lift the processor 5 out of the socket.
Figure 5-13. Removing the Microprocessor from the Pentium System Board
✎For the location of the processor socket on the Pentium system board, see Chapter 7.
Compaq Deskpro 2000 Series of Personal Computers 5-15
CAUTION: When replacing the processor, be sure the clipped corner of the processor (location of pin 1) is
aligned with the triangular area of the ZIF socket (marked * on the system board). Failure to do so could
result in burning out both the processor and the system board.
To install the processor, complete the following steps:
1. Lower the processor 5 into the ZIF socket. Ensure that pin 1 on the processor aligns with pin 1
on the ZIF socket.
The location of pin 1 is indicated by a star (*) on the system board.
✎The handle on the ZIF socket in the picture may not look identical to the one on the
computer. All handle types perform the same function.
2. Push the ZIF handle 4 on the ZIF socket back into place to secure the processor.
3. If the processor has a raised center, install thermal pad number 243226-001 3 on top of the
processor before installing the heat sink.
If the processor has a flat center, install thermal pad number 184616-002 3 on top of the
processor before installing the heat sink.
CAUTION: Using the wrong thermal pad may cause the processor to overheat or short, resulting in failure.
4. Install the heat sink 2 and the heat sink retaining clip 1.
5. Replace the drive cage.
6. Replace the front bezel.
7. Replace any expansion boards that were removed.
8. Replace the system unit cover.
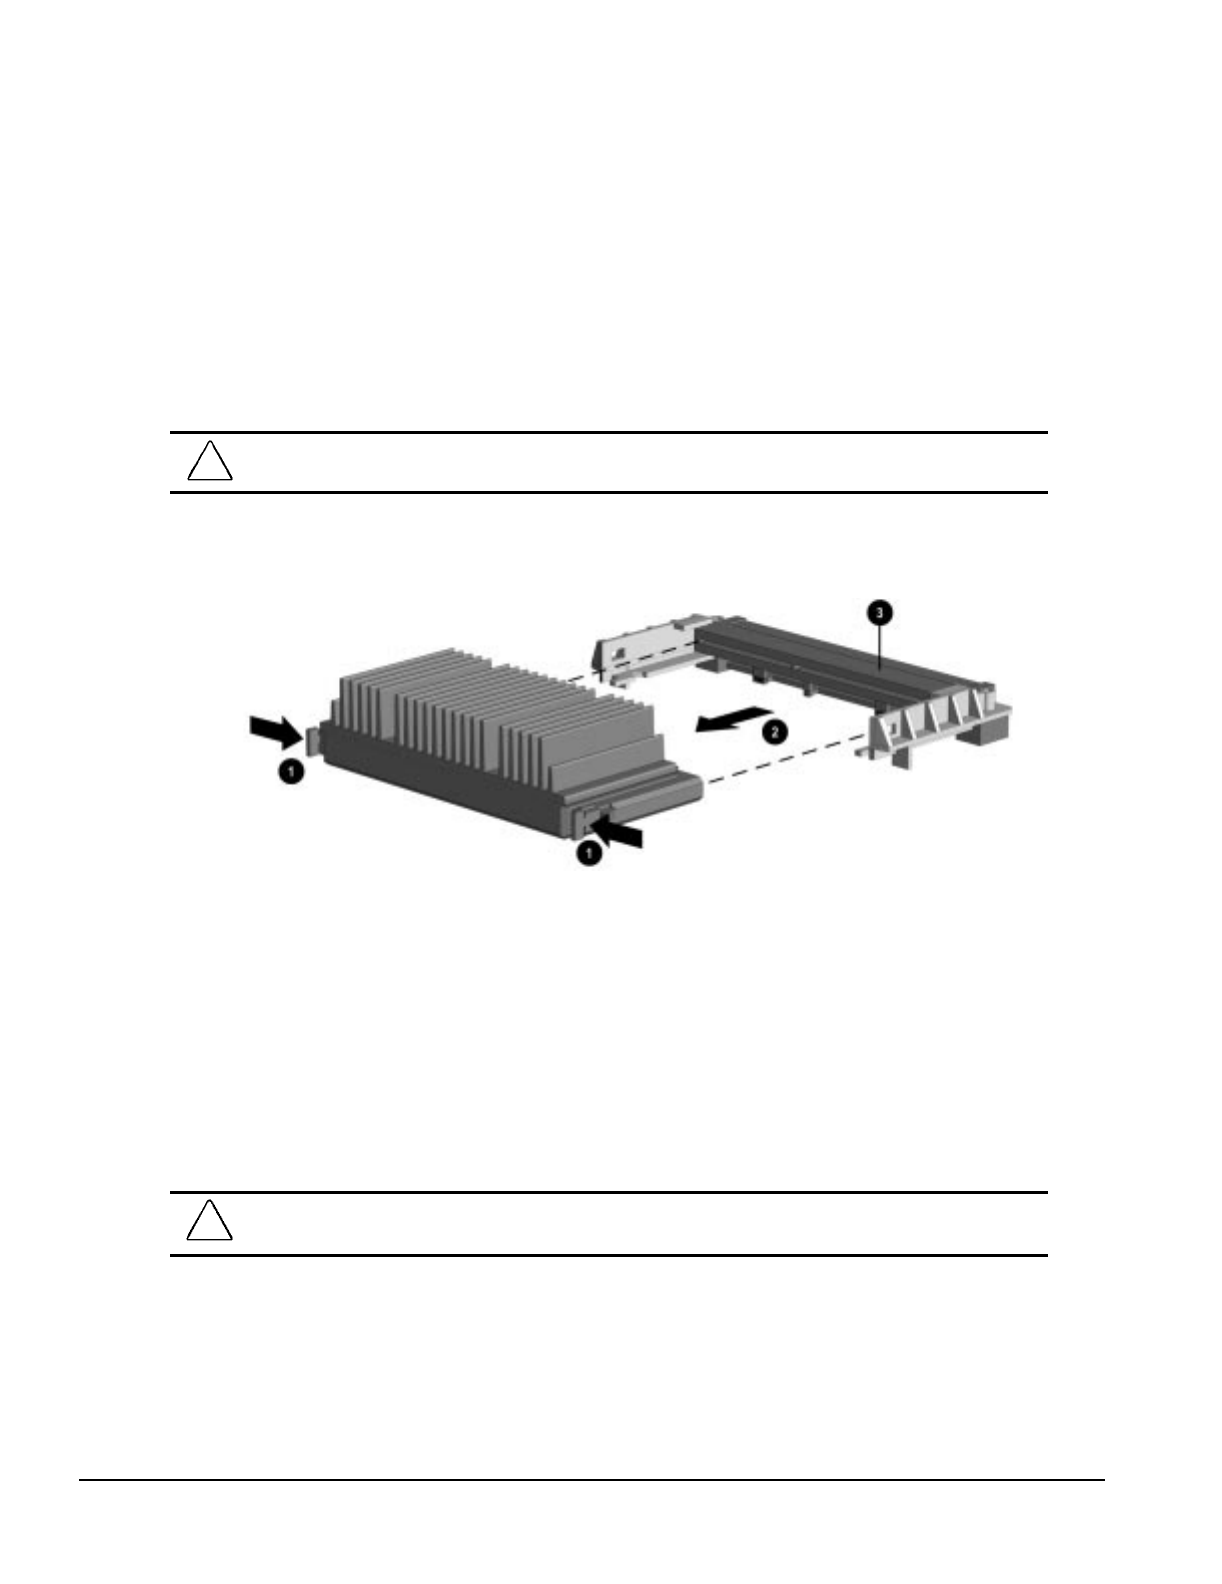
5-16 Removal and Replacement Procedures - Desktop
Pentium II System Board
To remove the microprocessor from the Pentium II system board, complete the following steps: :
1. Remove the system unit cover (Section 5.6).
2. Remove any expansion boards that might block access to the microprocessor (Section 5.8.1
and/or 5.8.2).
3. Remove the front bezel (Section 5.14.1).
4. Remove the drive cage (Section 5.17).
!WARNING: To avoid the risk of personal injury from hot surfaces, allow the internal system components
to cool before touching.
5. Press in on the processor module release latches 1 until they lock in the released position.
6. Pull the processor module away from the connector 2.
Figure 5-14. Removing the Microprocessor from the Pentium II System Board
✎For the location of the processor connector on the Pentium II system board, see Chapter 7.
7. Lift the processor module to remove it from the guide rails and the machine.
To install the Pentium II processor, complete the following steps:
1. Ensure that the release latches are locked in the released position.
2. Set the Pentium II processor on the guide rails.
3. Slide the processor along the rails until it is firmly seated in the connector.
CAUTION: Do not use the connector pins or pin guard 3 as a handle. Even with the guard in place, the
pins could bend, causing shorts that would damage the processor.
4. Pull out on the release latches until they snap into place.
5. Replace the drive cage.
6. Replace the front bezel.
7. Replace any expansion boards that were removed.
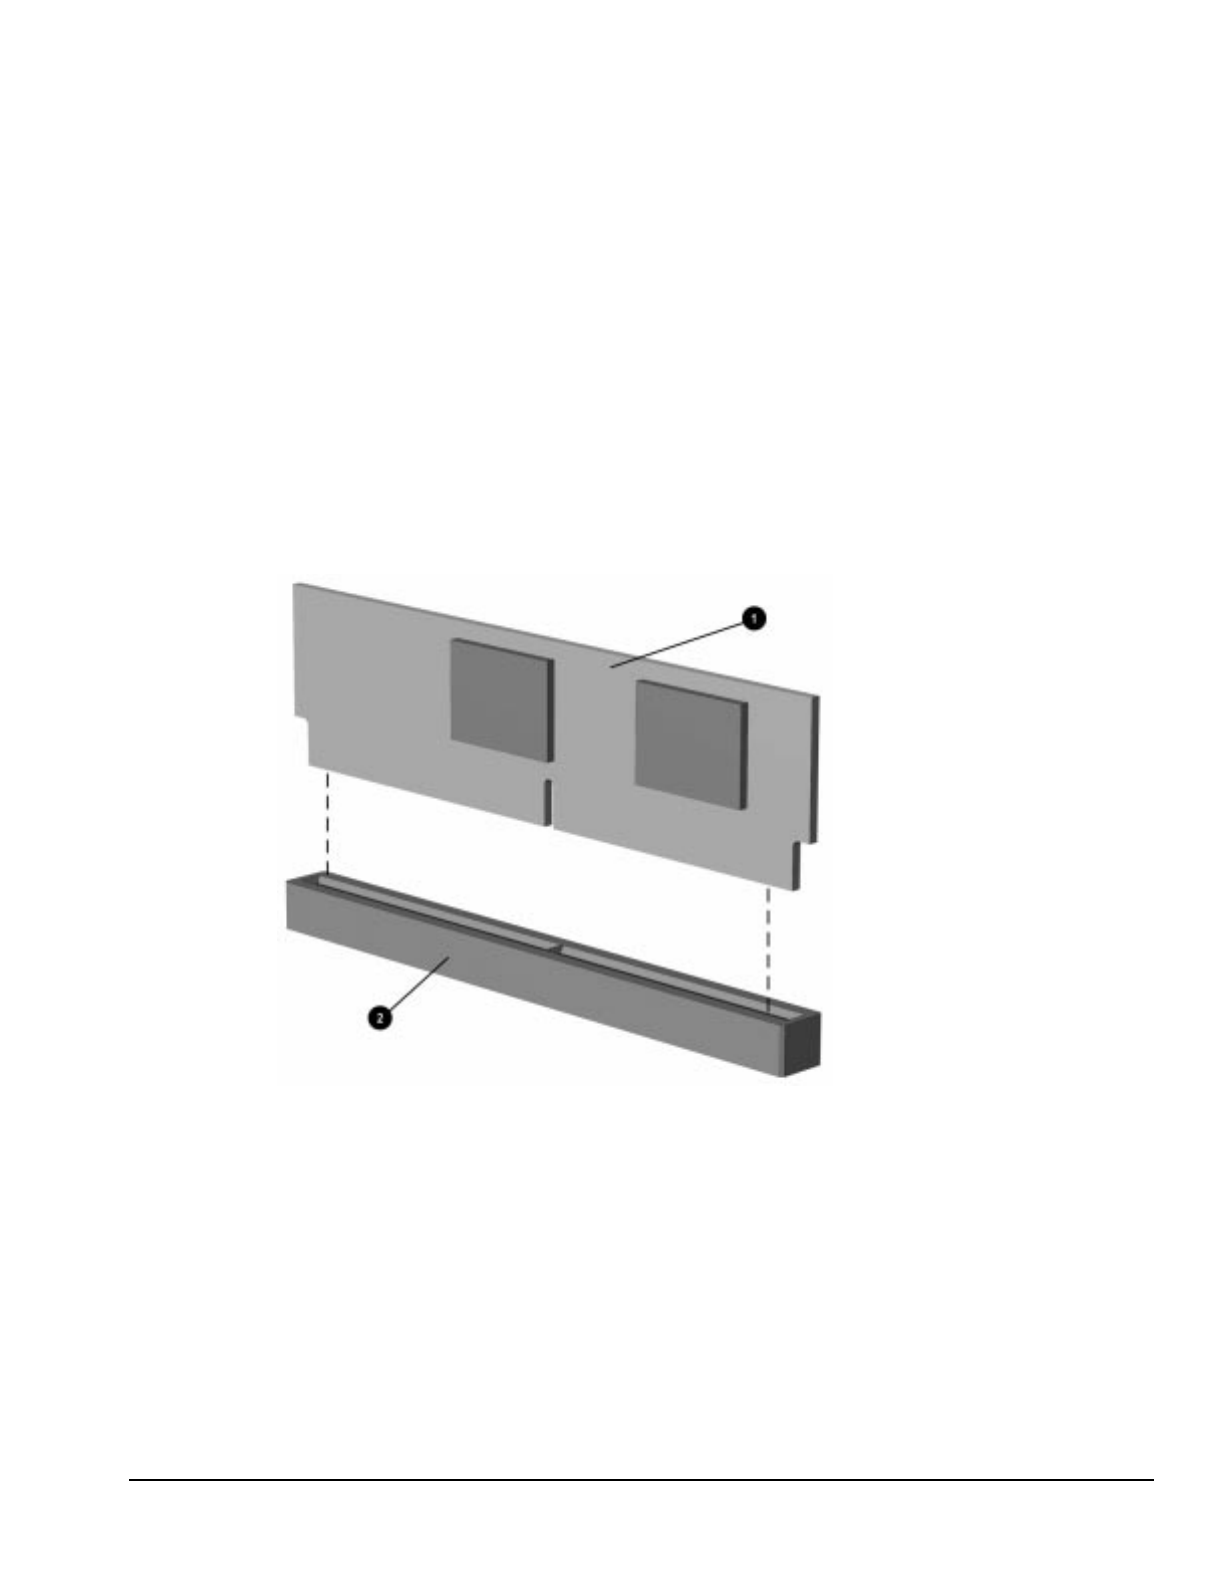
Compaq Deskpro 2000 Series of Personal Computers 5-17
8. Replace the system unit cover.
5.9.4 Cache Memory (Pentium
System Only)
To install an optional cache board onto the system board, complete the following steps:
1. Remove the system unit cover (Section 5.6).
2. Remove the front bezel (Section 5.14.1).
3. Remove the drive cage (Section 5.17).
4. Install the cache memory board 1 into the cache connector 2 on the system board.
✎Only use Compaq spare part number 278017-001.
Figure 5-15. Installing the Cache Memory Board
✎For the location of the cache memory socket on the Pentium system board, see Chapter 7.
5. Replace the drive cage.
6. Replace the front bezel.
7. Replace the system unit cover.
✎When the computer starts up, it will recognize the cache memory upgrade and
automatically reconfigure the computer.
To remove an optional cache board, reverse the above procedure.
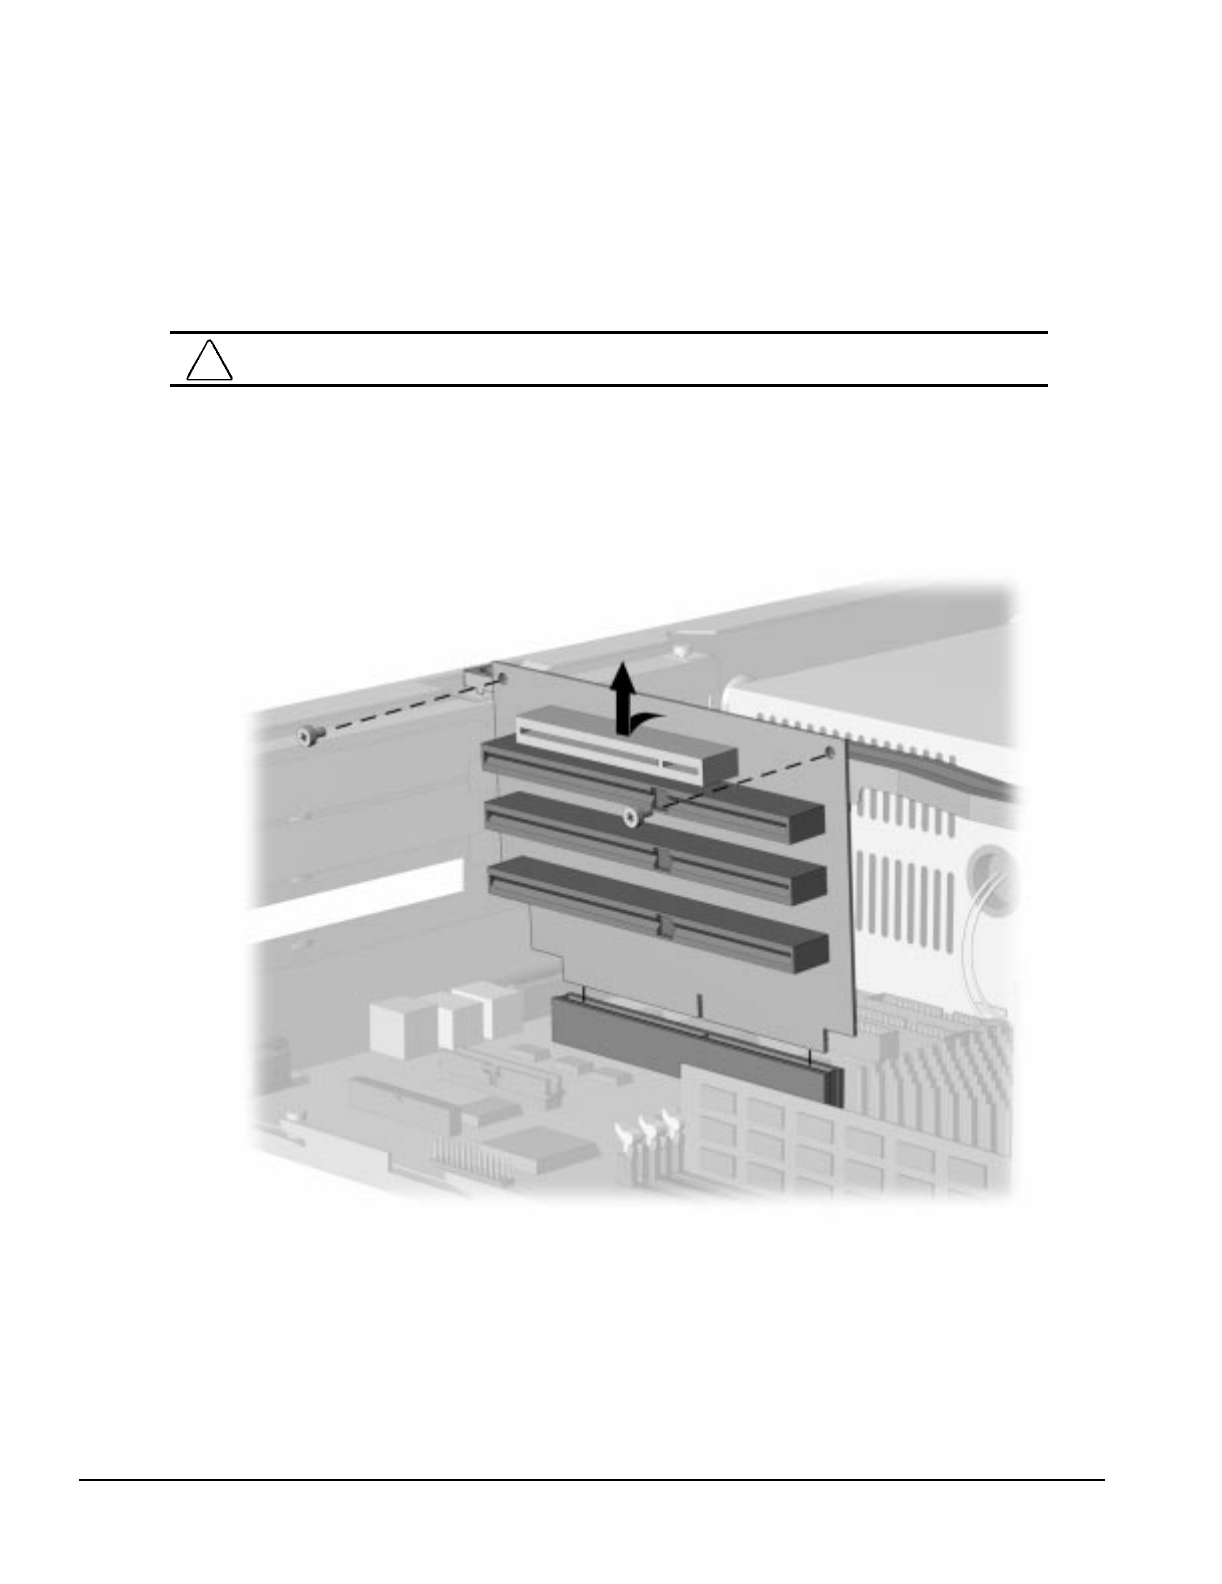
5-18 Removal and Replacement Procedures - Desktop
5.10 Riser Board
To remove the riser board, complete the following steps:
1. Remove the system unit cover (Section 5.6).
CAUTION: Power must be off at least 30 seconds before beginning disassembly.
2. Remove all expansion boards (Section 5.8).
3. Remove the two screws that secure the riser board to the riser brace.
4. Tilt the riser board slightly away from the riser brace and pull up.
Figure 5-16. Removing the Riser Board
To replace the riser board, reverse the above procedure.
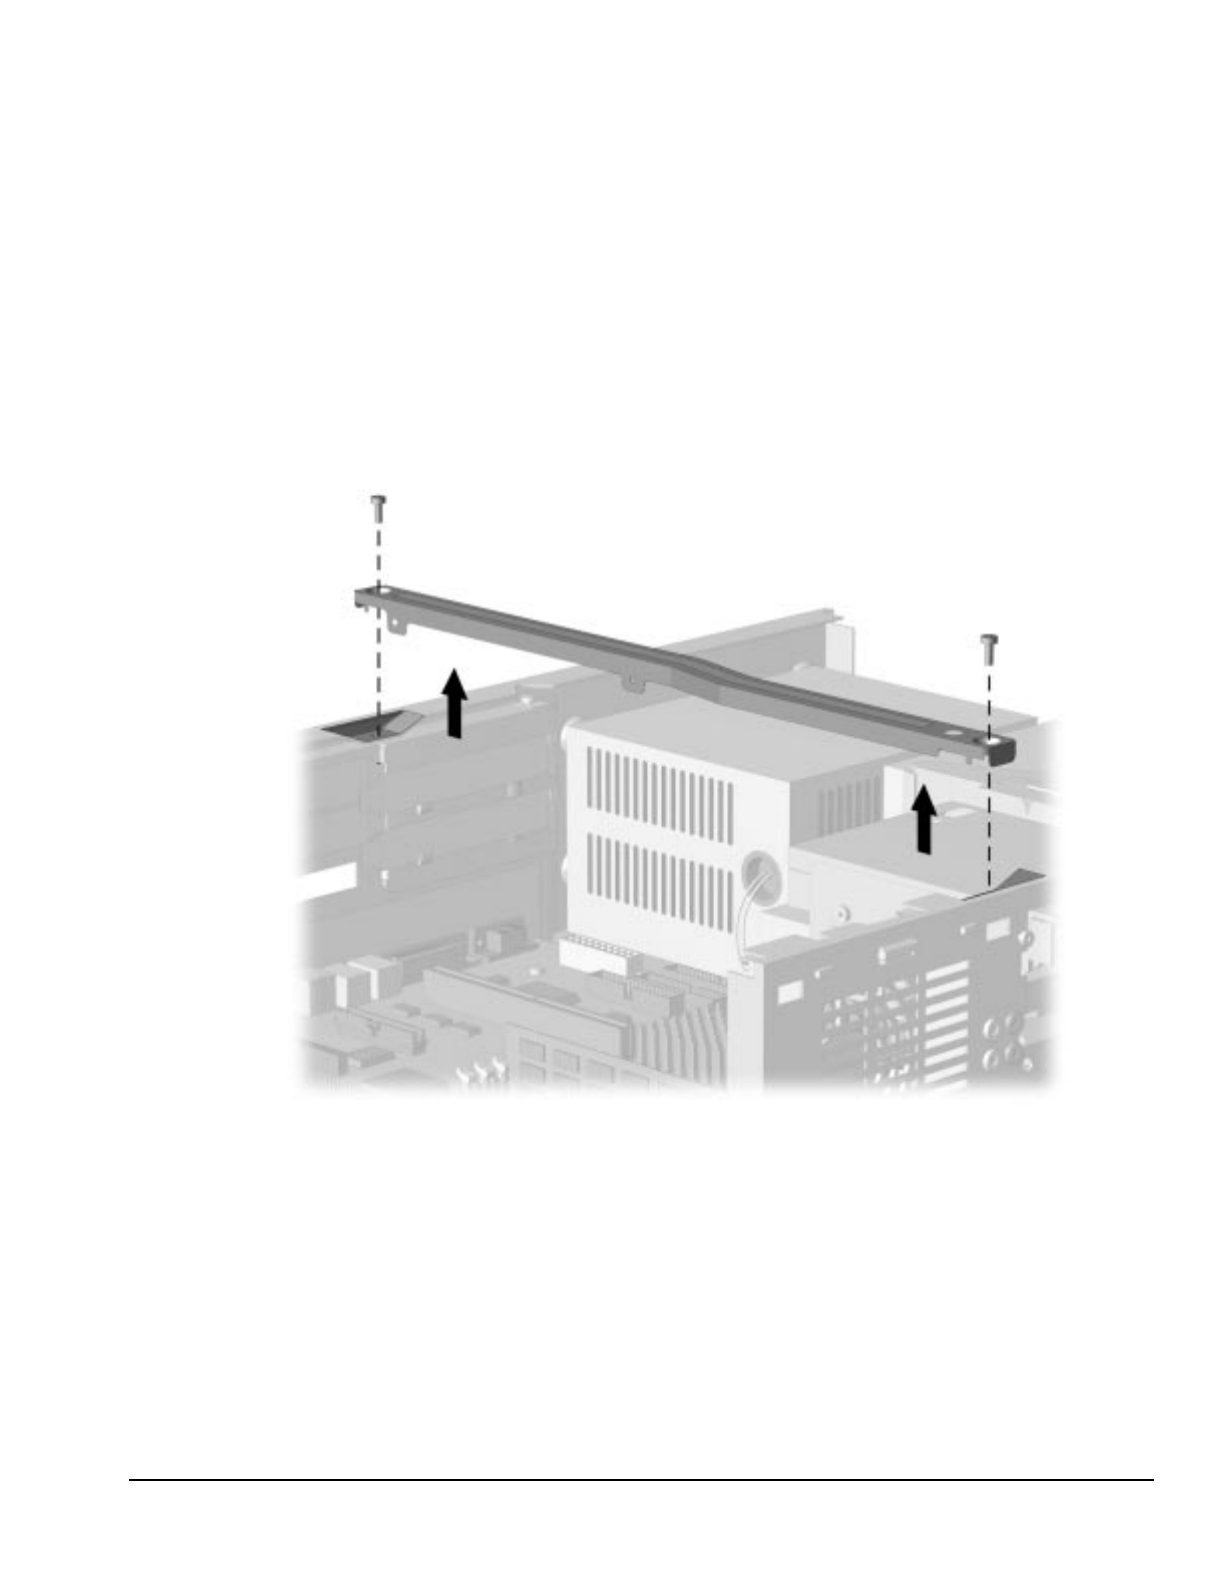
Compaq Deskpro 2000 Series of Personal Computers 5-19
5.11 Riser Brace
The riser brace should only be removed from the computer if it has been damaged.
1. Remove the system unit cover (Section 5.6).
2. Remove the expansion boards (Section 5.8).
3. Remove the riser board (Section 5.10).
4. Remove the two screws that secure the riser brace to the chassis; then, lift the brace straight up.
Figure 5-17. Removing the Riser Brace
To reinstall the riser brace, reverse the above procedure.
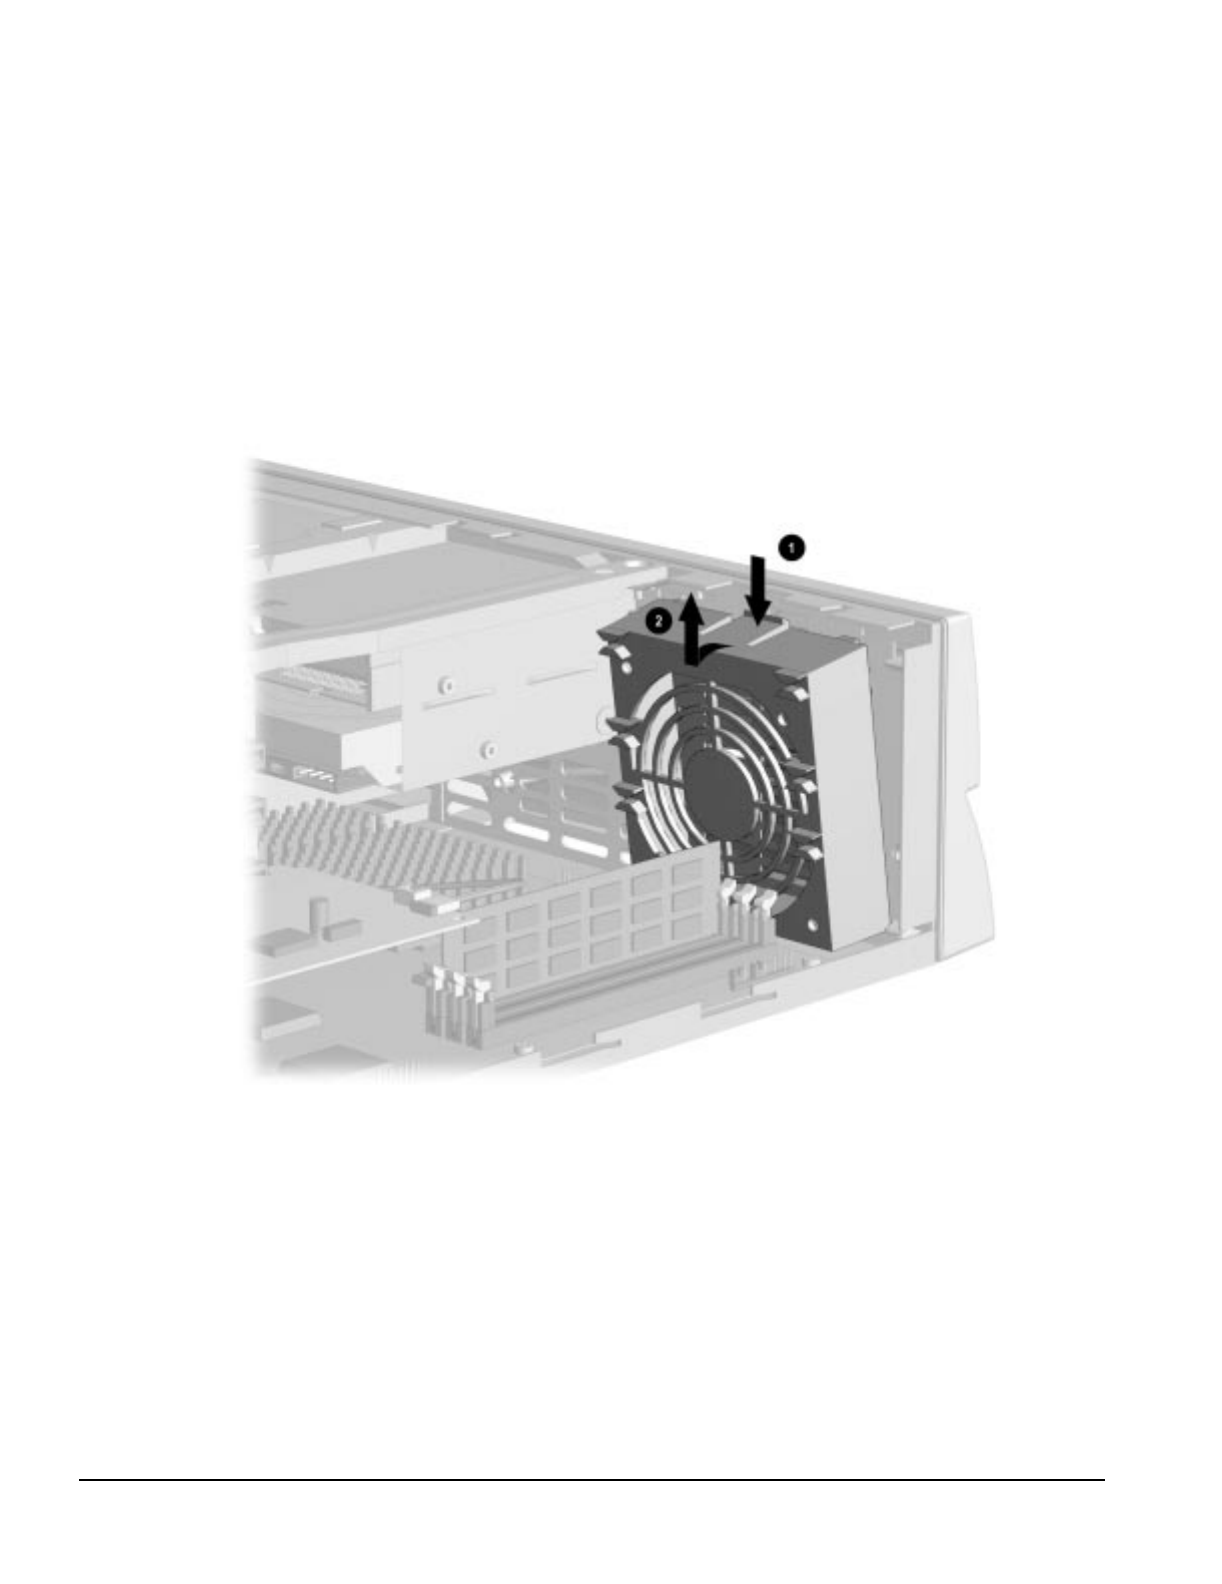
5-20 Removal and Replacement Procedures - Desktop
5.12 Expansion Board Guide
To remove the expansion board guide, complete the following steps:
1. Remove the system unit cover (Section 5.6).
2. Remove all outboard expansion boards that may interfere with this operation (Section 5.8).
3. Push down on the plastic clip 1 on the top of the board guide 2 to release it; then pivot the guide
down 2 and pull it out.
Figure 5-18. Removing the Expansion Board Guide
To replace the expansion board guide, reverse the above procedure. The board guides in the spares kit
are keyed for proper installation.
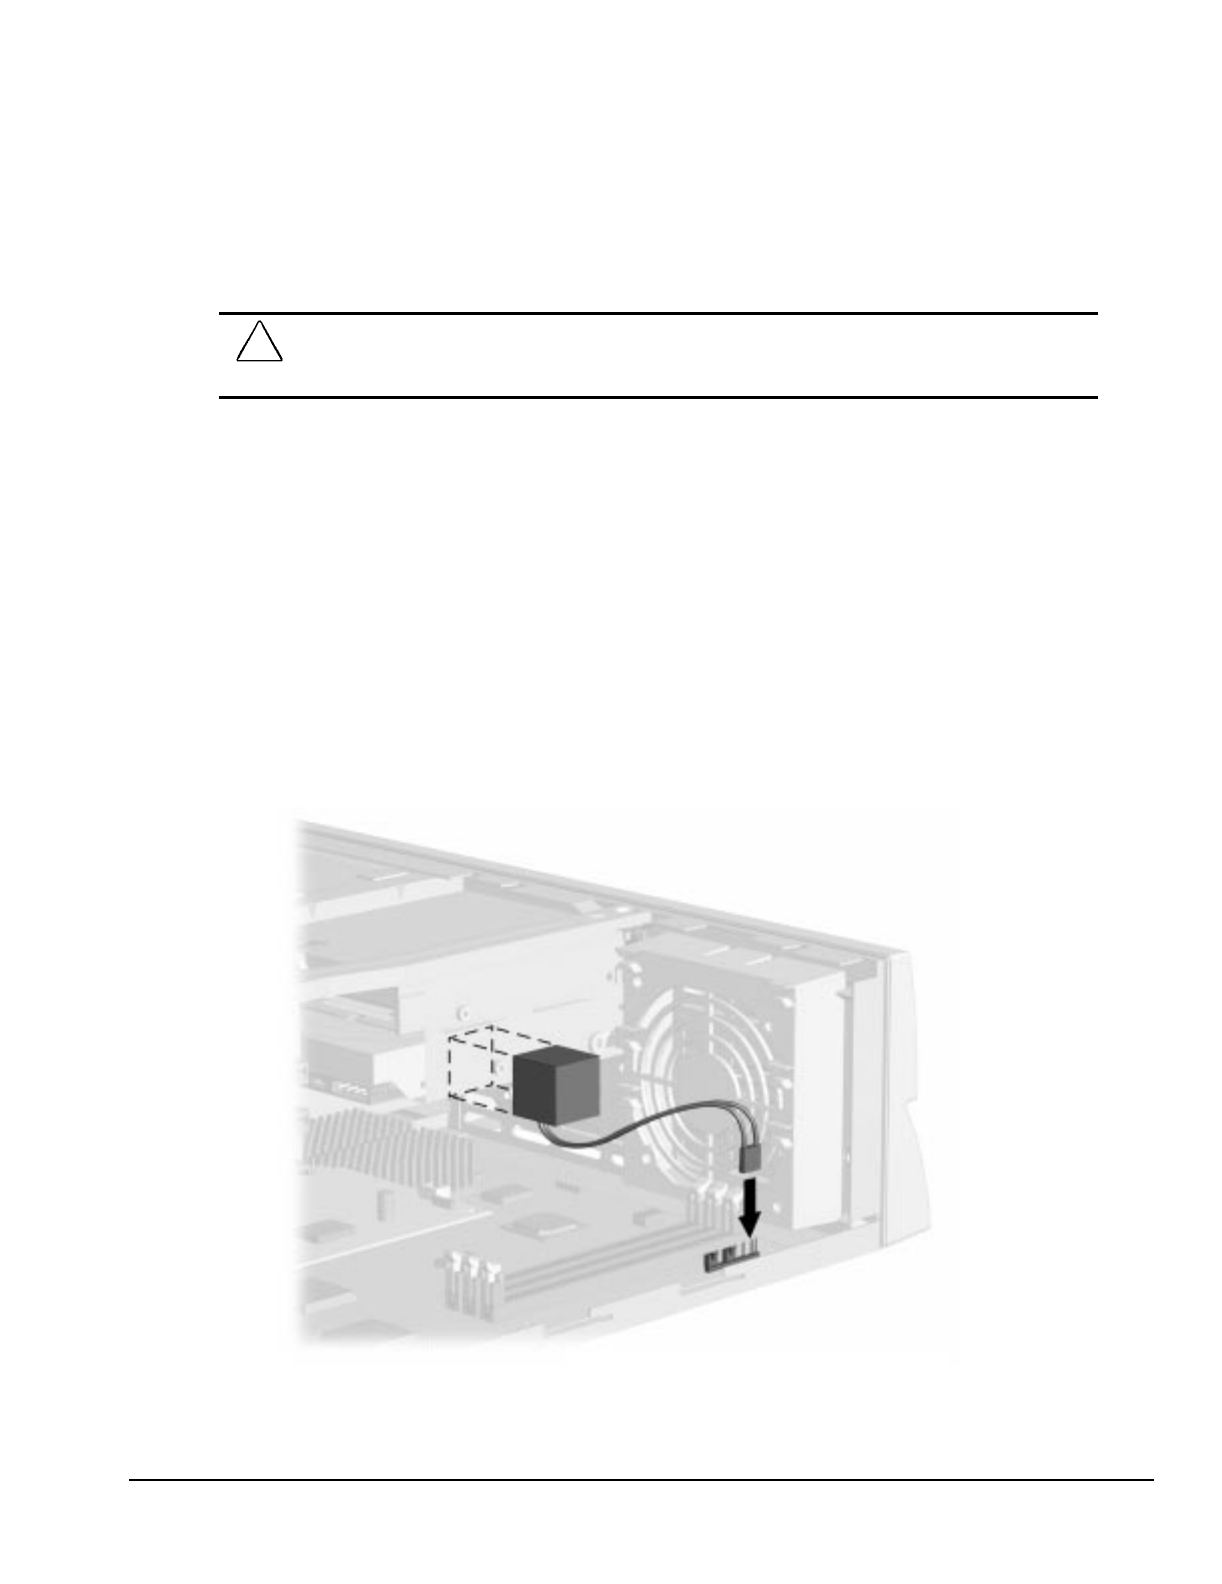
Compaq Deskpro 2000 Series of Personal Computers 5-21
5.13 Replacement Battery
The real-time clock battery that came with the computer is non-replaceable and is permanently
installed on the system board.
!WARNING: The system board contains a clock/CMOS lithium battery. The lithium battery may explode if
mistreated. The battery is soldered into place and may not be removed. Do not abuse or disassemble. Use
only replacement batteries supplied by Compaq Computer Corporation.
✎It is important to make a set of backup diagnostic diskettes before you install a new battery.
To install the external real-time battery, complete the following steps::
1. Remove the system unit cover (Section 5.6).
2. Connect the new battery to the pins on the battery header connector on the system board. The
battery connector is labeled “E9 Ext. Batt.” on the Pentium system board and labeled “Ext. Batt.”
on the Pentium II system board. When this battery is connected, the internal battery is
automatically disconnected.
The battery connector is keyed for proper installation.
3. Remove the backing from the adhesive on the hook-and-loop fastener strip attached to the battery,
and attach the battery as shown.
Figure 5-19. Installing the Battery, Pentium System

5-22 Removal and Replacement Procedures - Desktop
Figure 5-20. Installing the Battery, Pentium II System
4. Replace the system unit cover.
5. Place the sticker contained in the battery kit onto the back of the computer above the power
connector.
6. Reconnect any external devices and plug in the computer.
!WARNING: This equipment is designed for connection to a grounded (earthed) outlet. The grounding type
plug is an important safety feature. To avoid the risk of electrical shock or damage to the equipment, do
not disable this feature.
7. Turn on the computer.
8. Run the computer Setup utility to reconfigure the system. Refer to Chapter 2, “Compaq Utilities.”
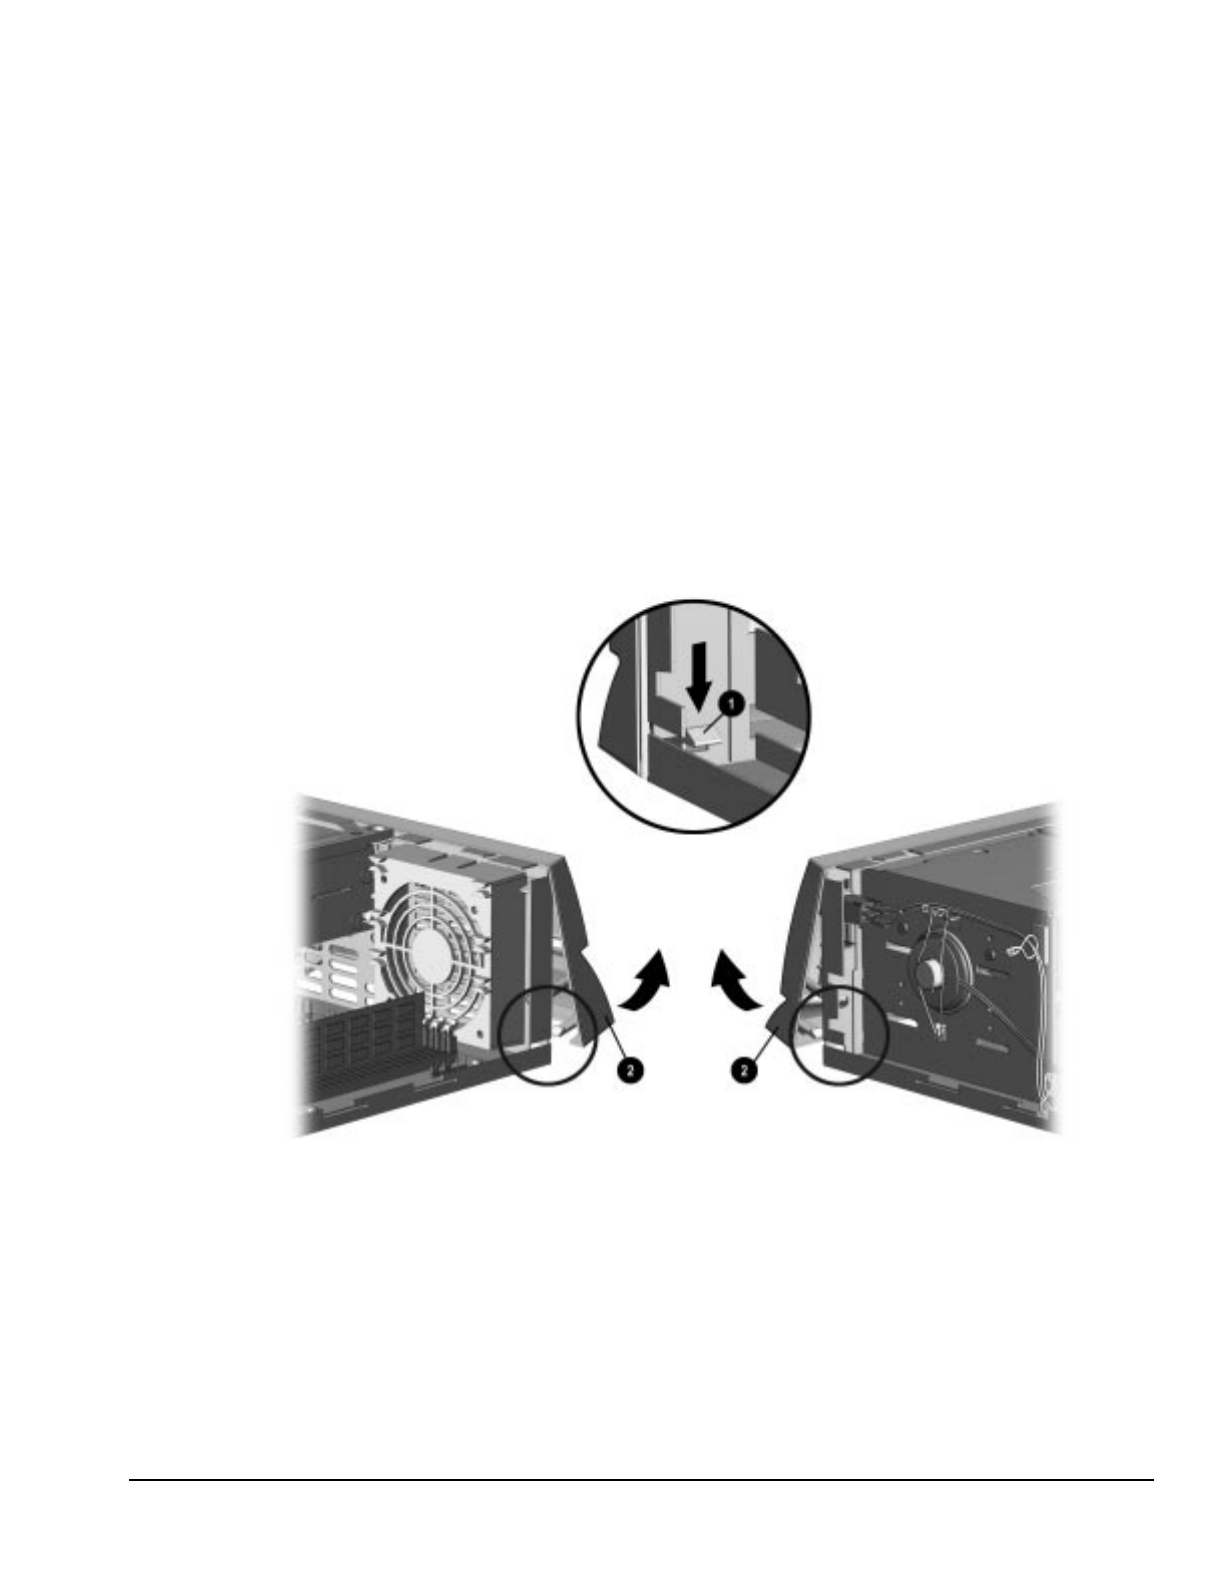
Compaq Deskpro 2000 Series of Personal Computers 5-23
5.14 Front Bezel Assembly
The front bezel assembly consists of the front bezel, the power button, and the bezel blank.
5.14.1 Front Bezel
The front bezel must be removed from the chassis before removing or installing the power supply or
any of the mass storage devices. It is attached to the computer chassis with release latches that are
integrated into it. To remove the front bezel, complete the following steps:
1. Remove the system unit cover (Section 5.6).
2. From the inside of the chassis, push in the release latches 1 and push the bottom of the bezel
out 2 and away from the chassis.
3. Slide the front bezel up to separate it from the chassis.
Figure 5-21. Removing the Front Bezel
To install the front bezel, reverse the above procedure. Ensure that the hinge points at the top of the
bezel and the release latches at the bottom of the bezel are properly positioned before latching the
bezel into place.

5-24 Removal and Replacement Procedures - Desktop
5.14.2 Power Button
To remove the power button, complete the following steps:
1. Remove the system unit cover (Section 5.6).
2. Remove the front bezel (Section 5.14.1).
3. Hold the front bezel in one hand with the inside surface towards you.
4. Pinch the two tabs of the power button together and push the button out of the front bezel. The
spring will follow the button out of the housing.
Figure 5-22. Removing the Power Button
To replace the power button, reverse the above procedure.
✎When replacing the power button, be sure to use the button for a DC application as shown.
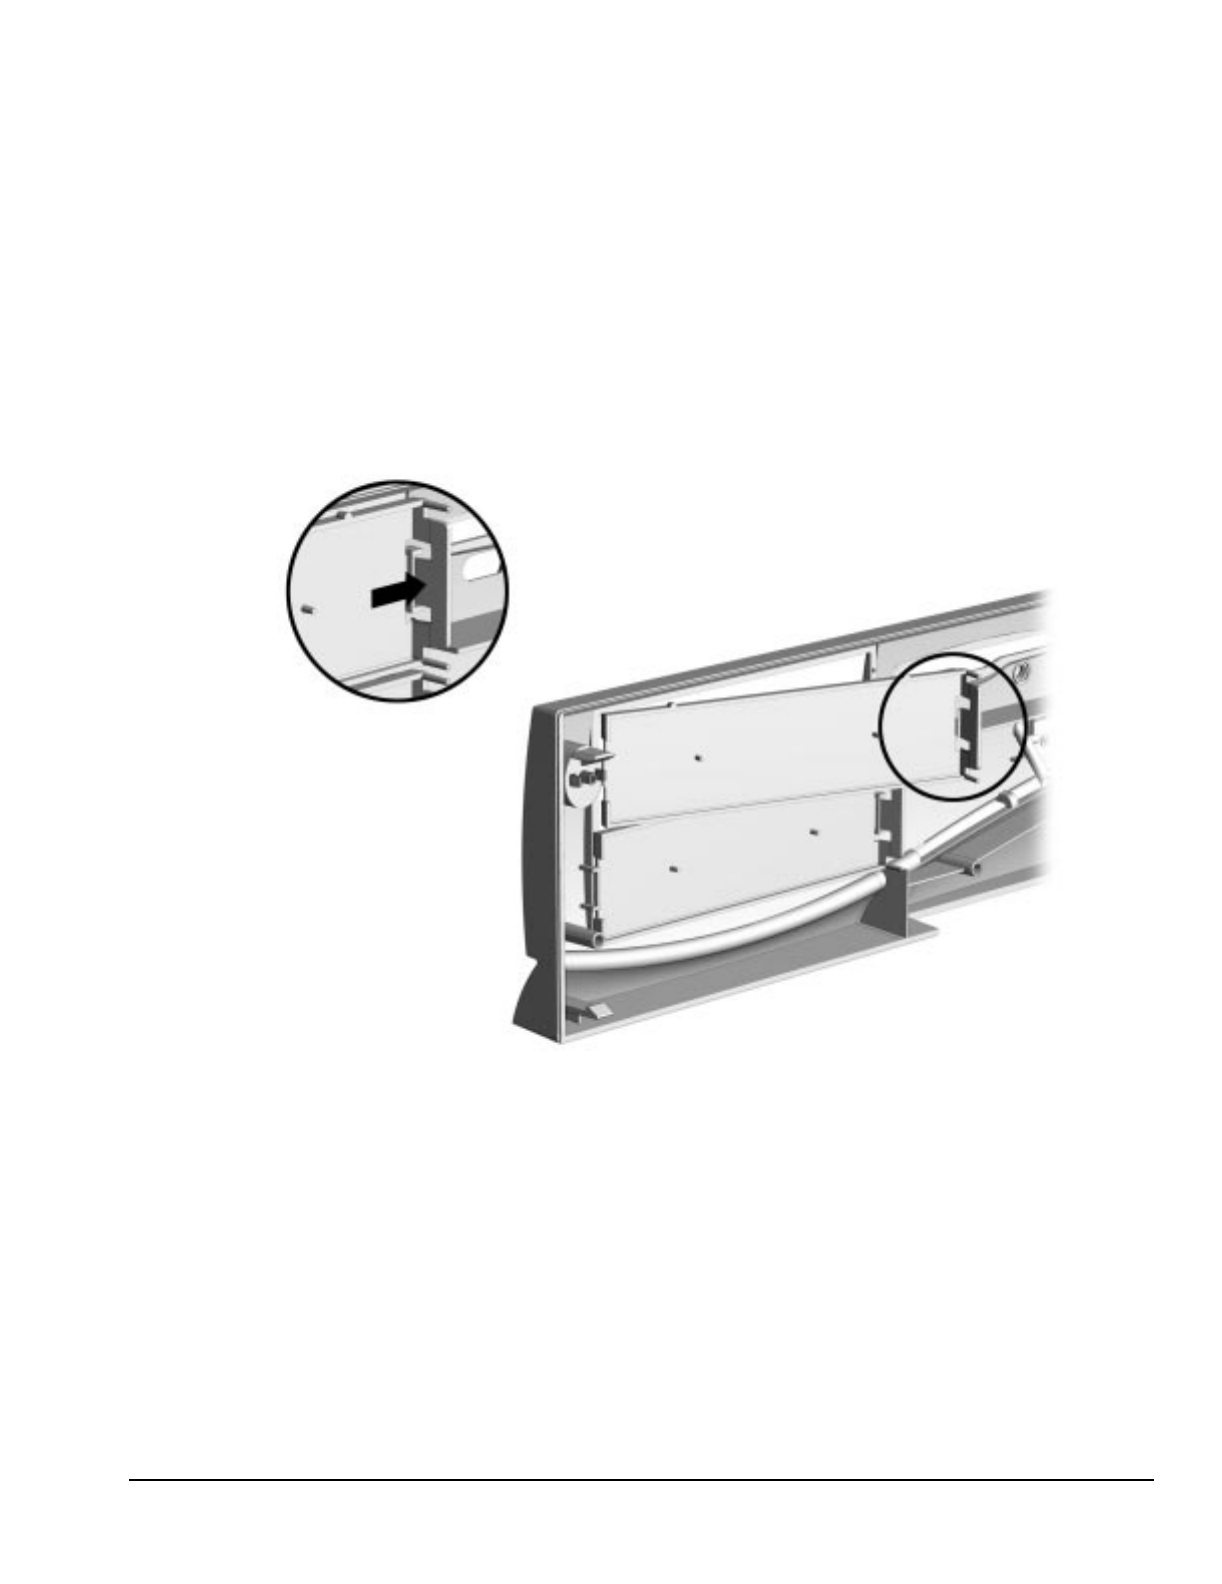
Compaq Deskpro 2000 Series of Personal Computers 5-25
5.14.3 Bezel Blank
To remove a bezel blank, complete the following steps:
1. Remove the system unit cover (Section 5.6).
2. Remove the front bezel (Section 5.14.1).
3. Lay the front bezel face down on a protected work surface. Push the tab that is on the right of the
bezel blank to the right.
4. Rotate the bezel blank up and out of the front bezel.
Figure 5-23. Removing the Bezel Blank
To reinstall the bezel blank, reverse the above procedure.
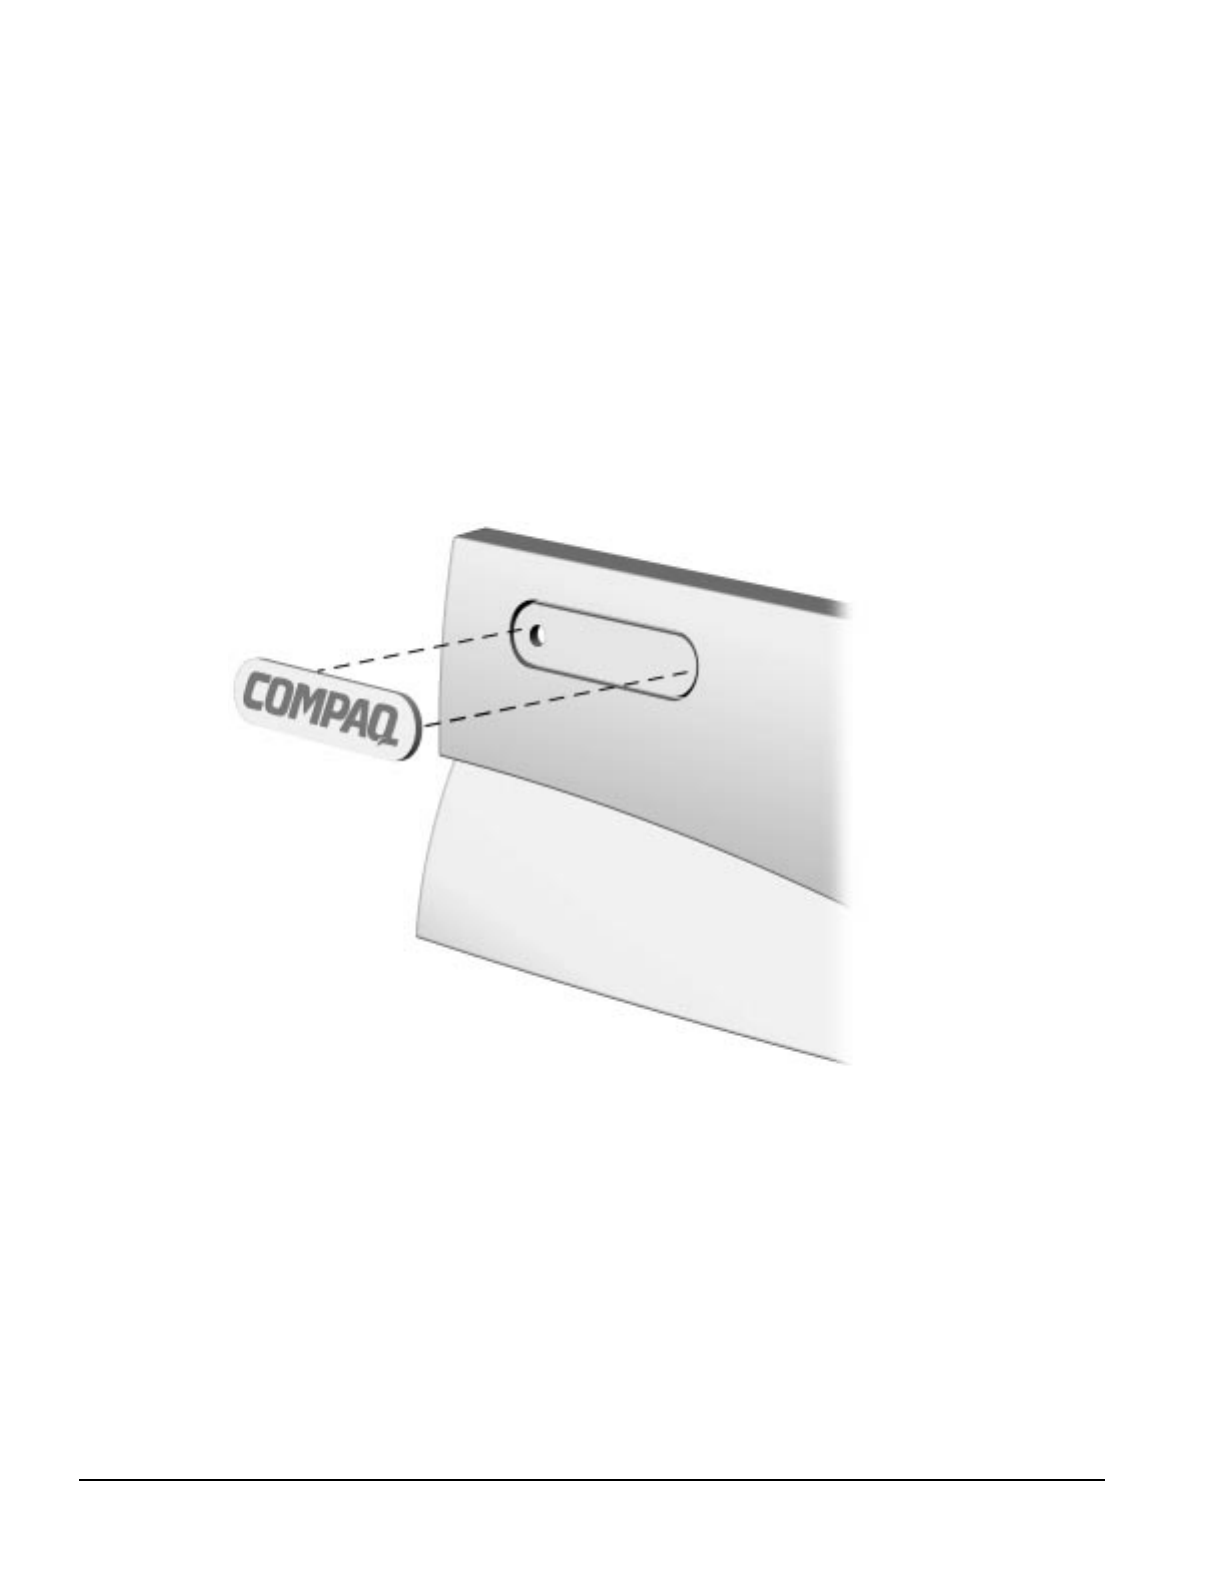
5-26 Removal and Replacement Procedures - Desktop
5.14.4 Compaq Logo
To remove the Compaq logo from the front bezel, complete the following steps:
1. Remove the system unit cover (Section 5.6).
2. Remove the front bezel (Section 5.14.1).
3. From the inside of the front bezel, use a small screwdriver at the hole shown in the figure to push
the logo out of its recess.
4. Clean the recessed area with a clean, dry cloth.
5. Remove the protective paper from the back of the replacement logo and press the logo into place.
Figure 5-24. Replacing the Compaq Logo
If the original logo is missing, complete steps 4 and 5 to install a replacement logo without having to
remove any part of the computer.
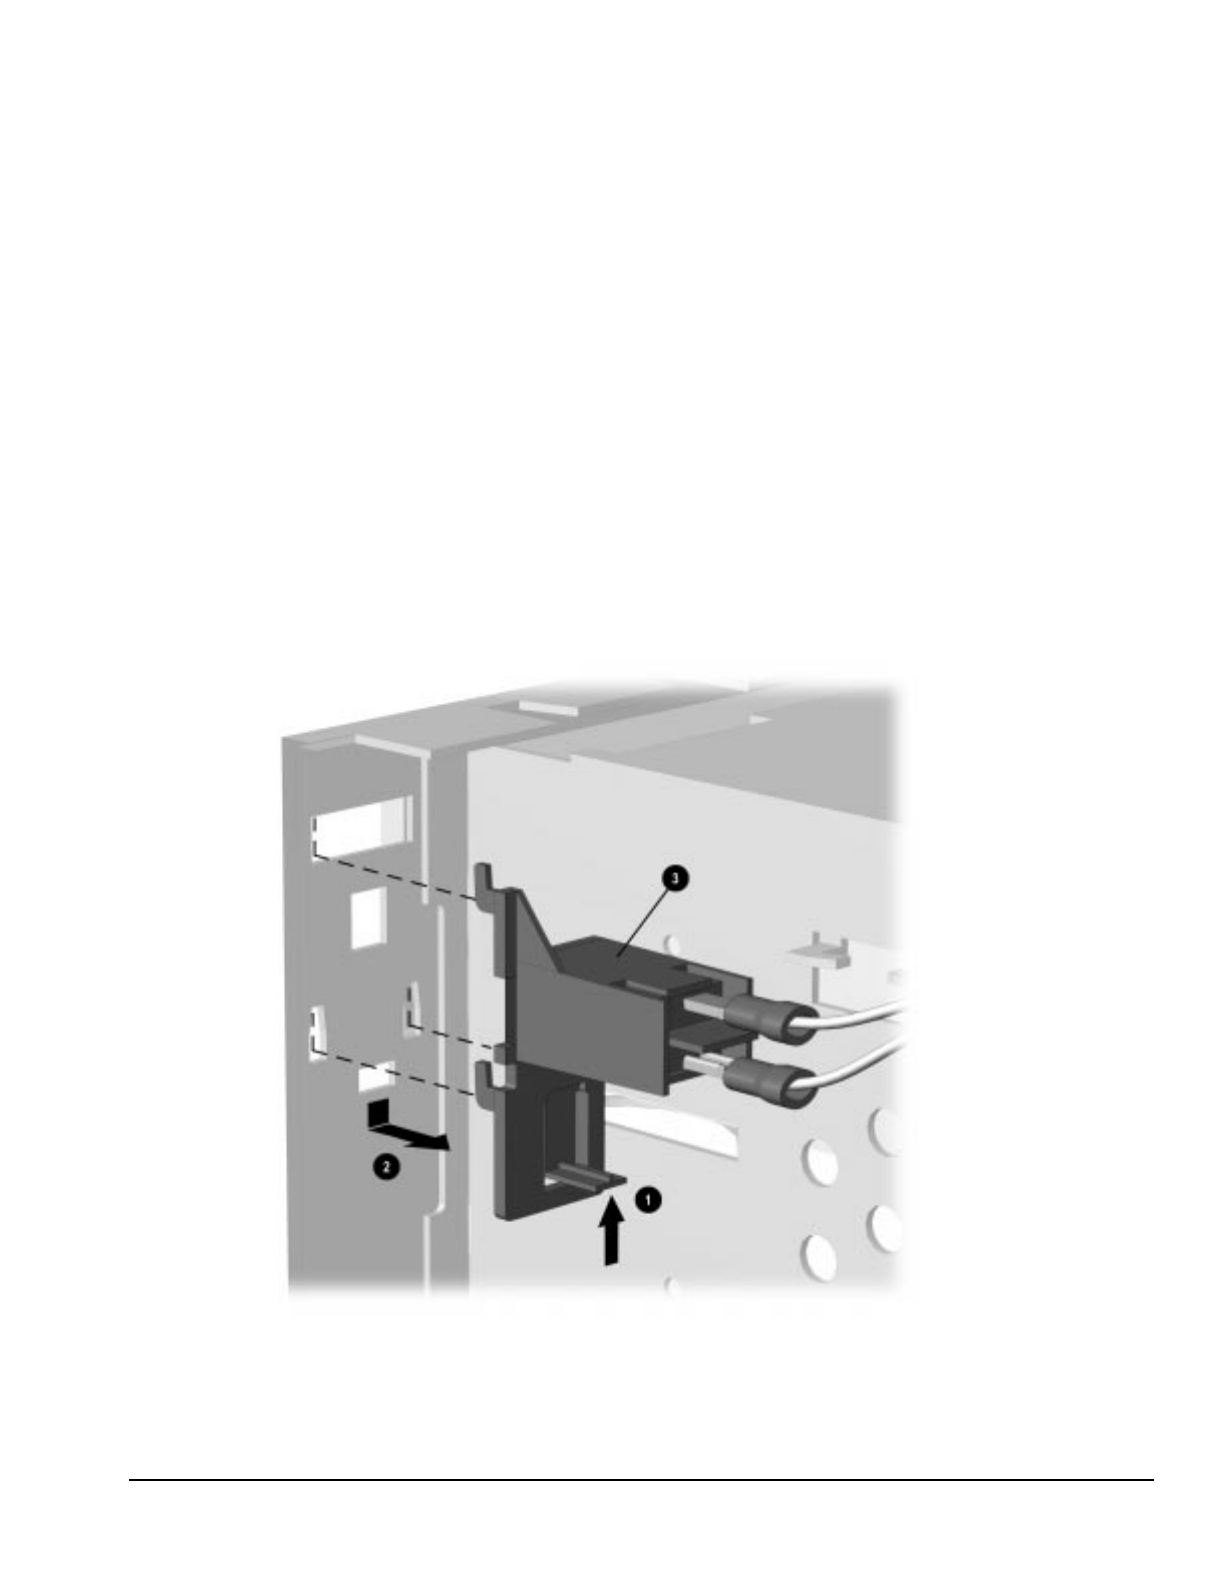
Compaq Deskpro 2000 Series of Personal Computers 5-27
5.15 Power Supply Assembly
The power supply assembly is divided into two sections: one for the power switch assembly and one
for the power supply.
5.15.1 Power Switch Assembly
To remove the power switch assembly, complete the following steps:
1. Remove the system unit cover (Section 5.6).
2. Remove the front bezel (Section 5.14.1).
3. Remove the plastic switch holder from the chassis. To remove the plastic switch holder from the
chassis:
❏ Place your thumb on top of the holder 3 and your index finger on the release tab 1.
❏ Squeeze the tab toward the top of the holder.
❏ While squeezing the tab, push the holder down 2 and out of the chassis.
Figure 5-25. Removing the Power Switch
4. Remove the wires from the switch.
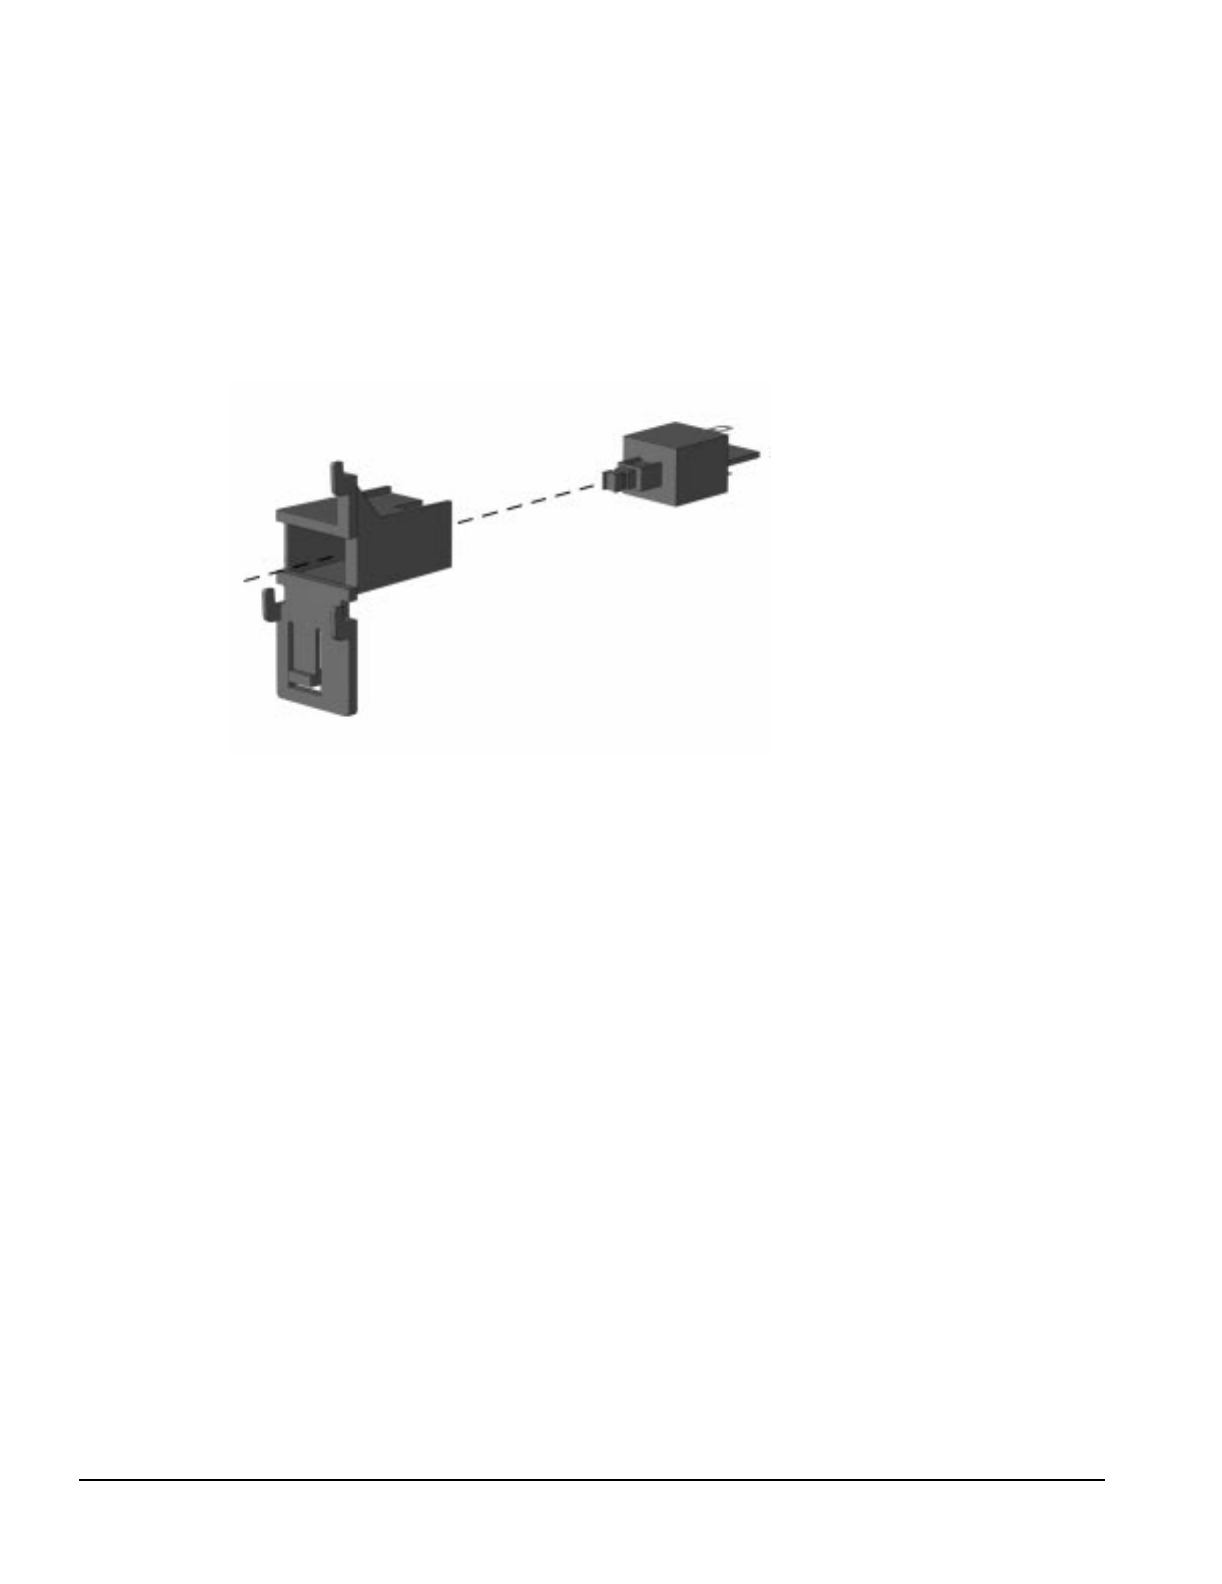
5-28 Removal and Replacement Procedures - Desktop
To install the power switch assembly, complete the following steps.
1. Install a new power switch into a new switch holder. To install the power switch into the switch
holder:
❏ Insert the switch into the back of the holder.
❏ Push the switch until it snaps into place.
Figure 5-26. Installing the Switch into the Holder
2. Install the power switch assembly into the chassis. To insert the power switch assembly into the
chassis:
❏ Insert the prongs of the switch holder into the slots in the chassis.
❏ Pull up on the switch holder to snap the holder into place.
3. Attach the wires to the switch.
4. Replace the front bezel (Section 5.14.1).
5. Replace the system unit cover (Section 5.6).
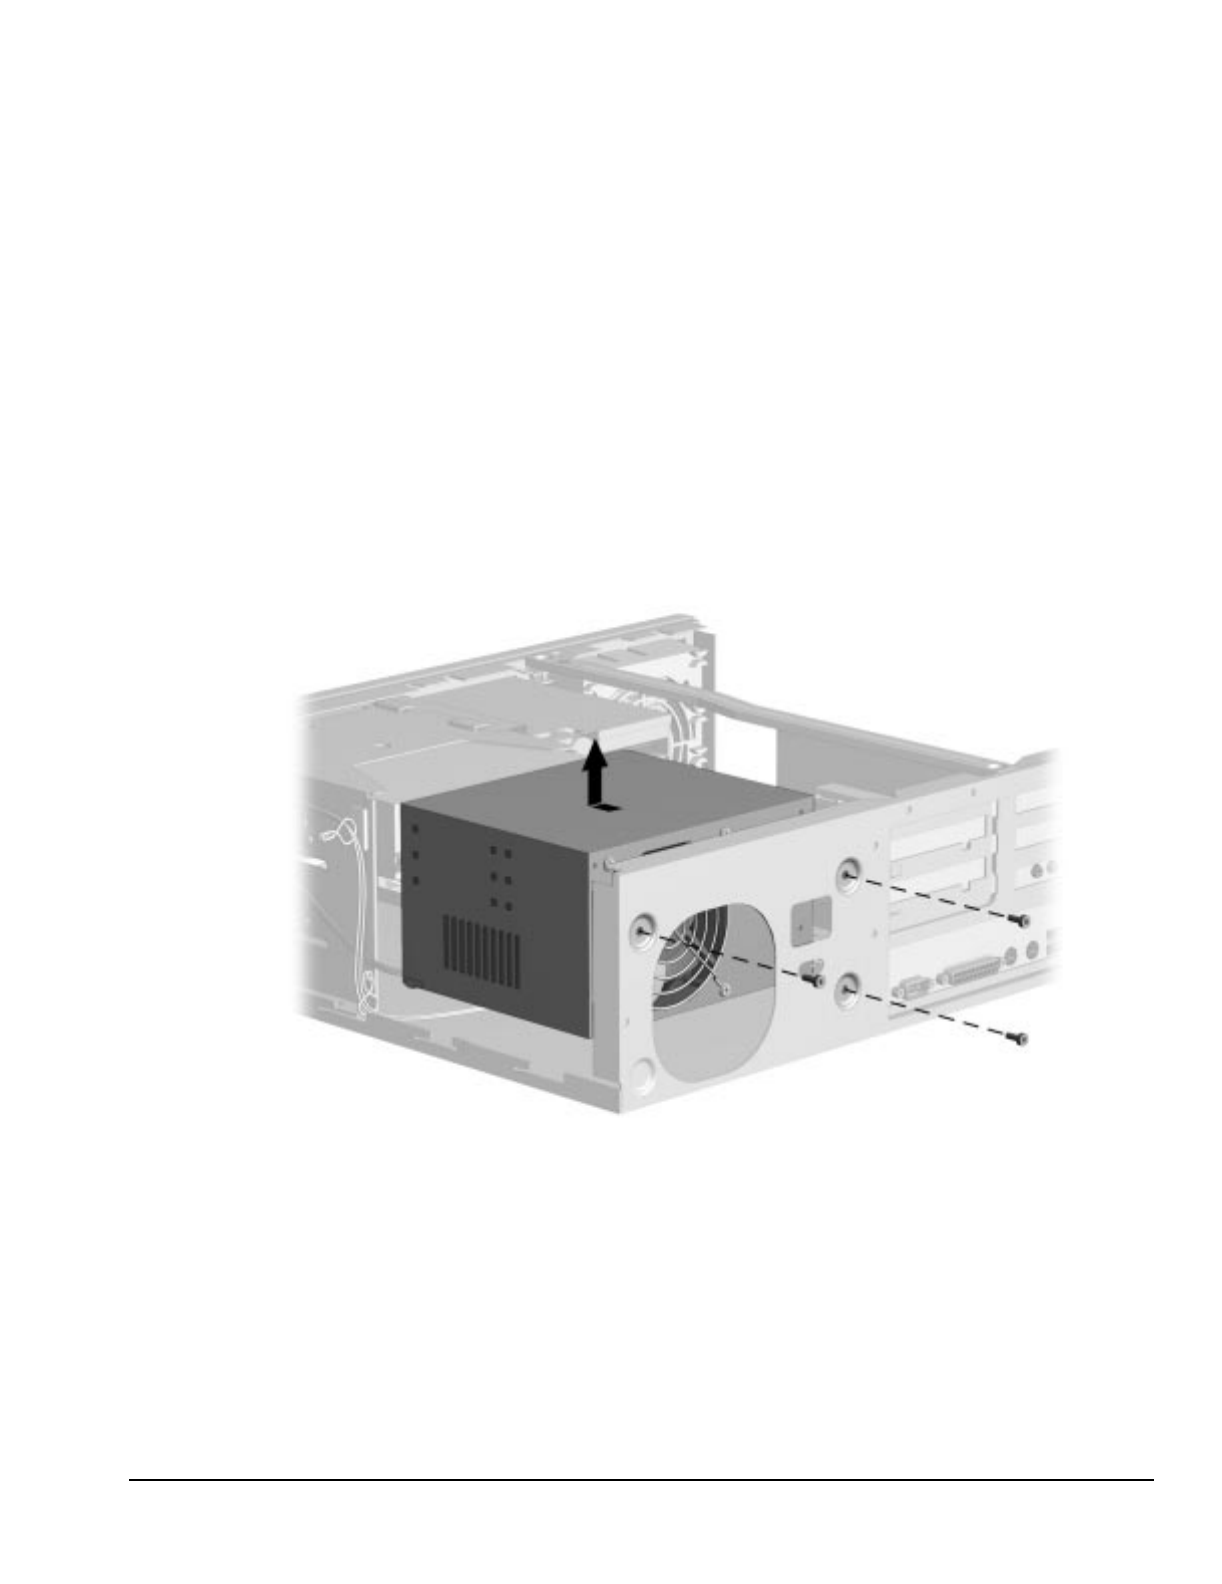
Compaq Deskpro 2000 Series of Personal Computers 5-29
5.15.2 Power Supply
To remove the power supply, complete the following steps:
1. Remove the system unit cover (Section 5.6).
2. Remove the front bezel (Section 5.14.1).
3. Remove the power switch (Section 5.15.1).
4. Disconnect all power cables from the mass storage devices and the system board.
✎All power connectors are keyed for correct installation. Note the orientation of each cable
connector and the routing of the cables to facilitate reassembly.
5. Remove the three screws that secure the power supply to the back of the chassis.
6. Slide the power supply towards the front of the computer and lift up to remove it from the chassis.
Figure 5-27. Removing the Power Supply
To replace the power supply, reverse the above procedure.
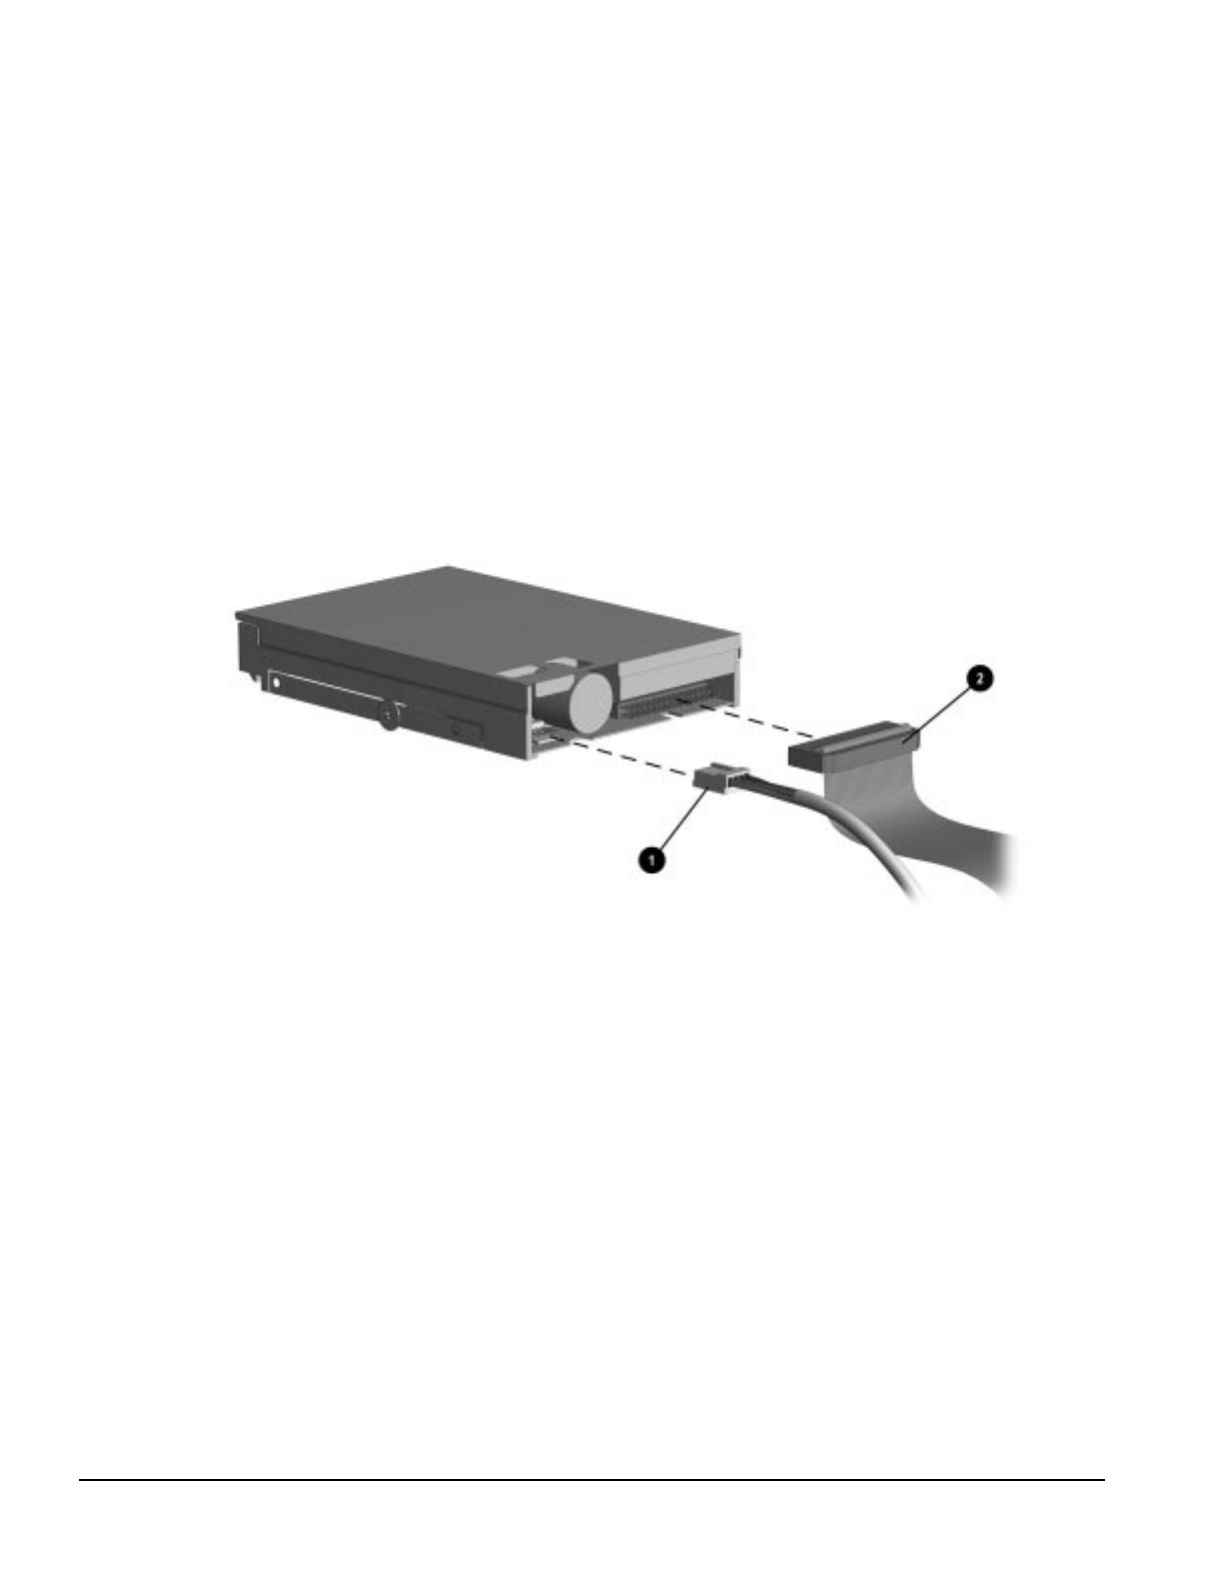
5-30 Removal and Replacement Procedures - Desktop
5.16 Mass Storage Devices
This section discusses the removal and replacement procedures for the mass storage devices that are
supported on the Deskpro 2000 Series of Personal Computers. Refer to Chapter 1, Section 1.4.2,
“Drive Positions.”
5.16.1 3.5-Inch Drive Bays
To remove a 3.5-inch drive from either of the 3.5-inch drive bays, complete the following steps:
1. Remove the system unit cover (Section 5.6).
2. Remove the front bezel (Section 5.14.1).
3. Disconnect the cables from the back of the drive.
Figure 5-28. Disconnecting the Power 1 and Signal 2 Cables from a 3.5-Inch Drive
✎When installing a second diskette drive, it is necessary to configure the computer using
Computer Setup.
Refer to Chapter 7, “Jumper and Switch Information,” for the location of the ribbon cable
connections on the system board.
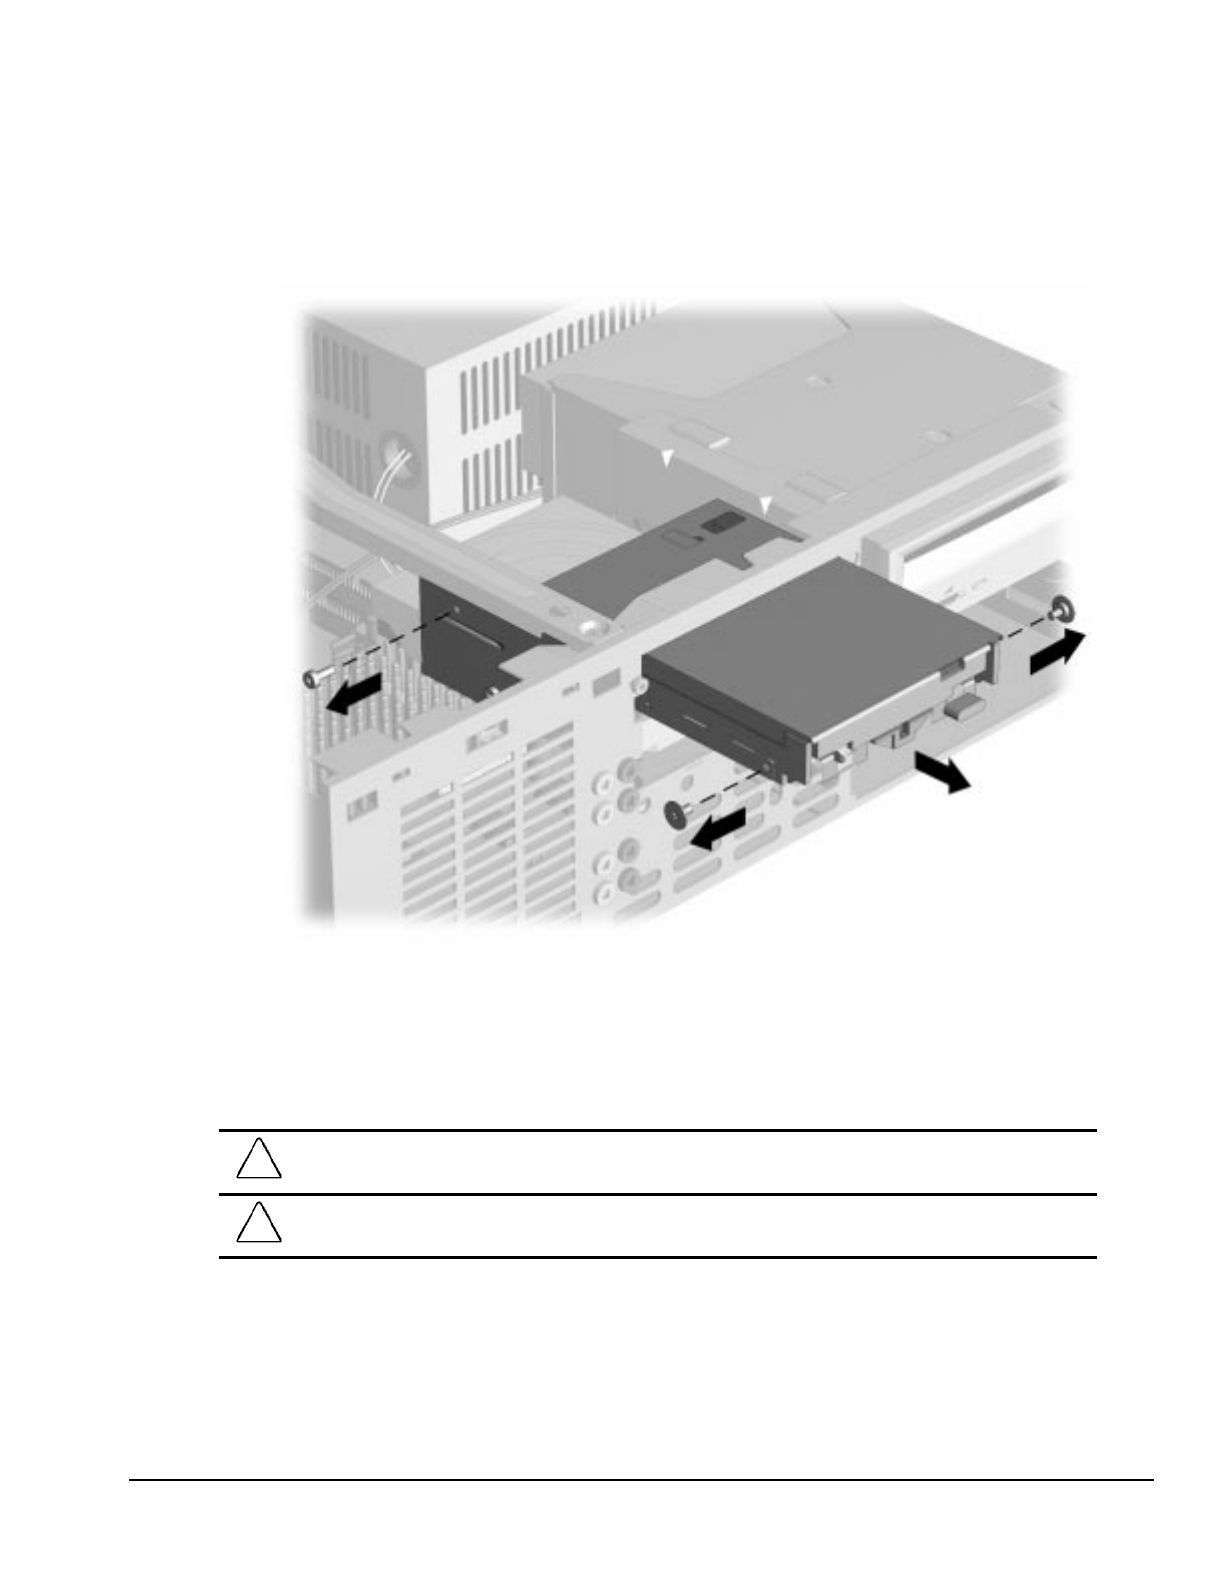
Compaq Deskpro 2000 Series of Personal Computers 5-31
4. Remove the single screw on the left-rear of the drive that secures the drive into the chassis.
5. Pull the drive straight out of the chassis.
Figure 5-29. Removing a 3.5-Inch Drive
When replacing either of these drives, transfer the two wafer screws that take the place of drive rails
from the old drive to the new one. There is one wafer screw on each side of the drive at the front.
To replace the 3.5-inch drive, reverse the above procedure.
CAUTION: When servicing the computer, ensure that cables are placed in their proper locations during the
reassembly process. Improper cable placement can damage the computer.
CAUTION: Use only 3/16-inch or 5-mm long screws as guide screws. Longer screws can damage the
internal components of the drive.

5-32 Removal and Replacement Procedures - Desktop
5.16.2 5.25-Inch Drive Bays
The 5.25-inch drive bays may be occupied by diskette drives, hard drives, CD-ROM drives, PD-CD
drives, LS-120 drives, or tape drives. Removal of a CD-ROM drive is shown.
CAUTION: All removable media should be taken out of the drives before removing the drive from the
computer.
1. Remove the system unit cover (Section 5.6).
2. Remove the front bezel (Section 5.14.1).
3. Disconnect the cables from the back of the drive.
Figure 5-30. Disconnecting the Power 1, the Signal 2, and the Audio 3 Cables from a CD-ROM Drive
and an Optional Audio Board
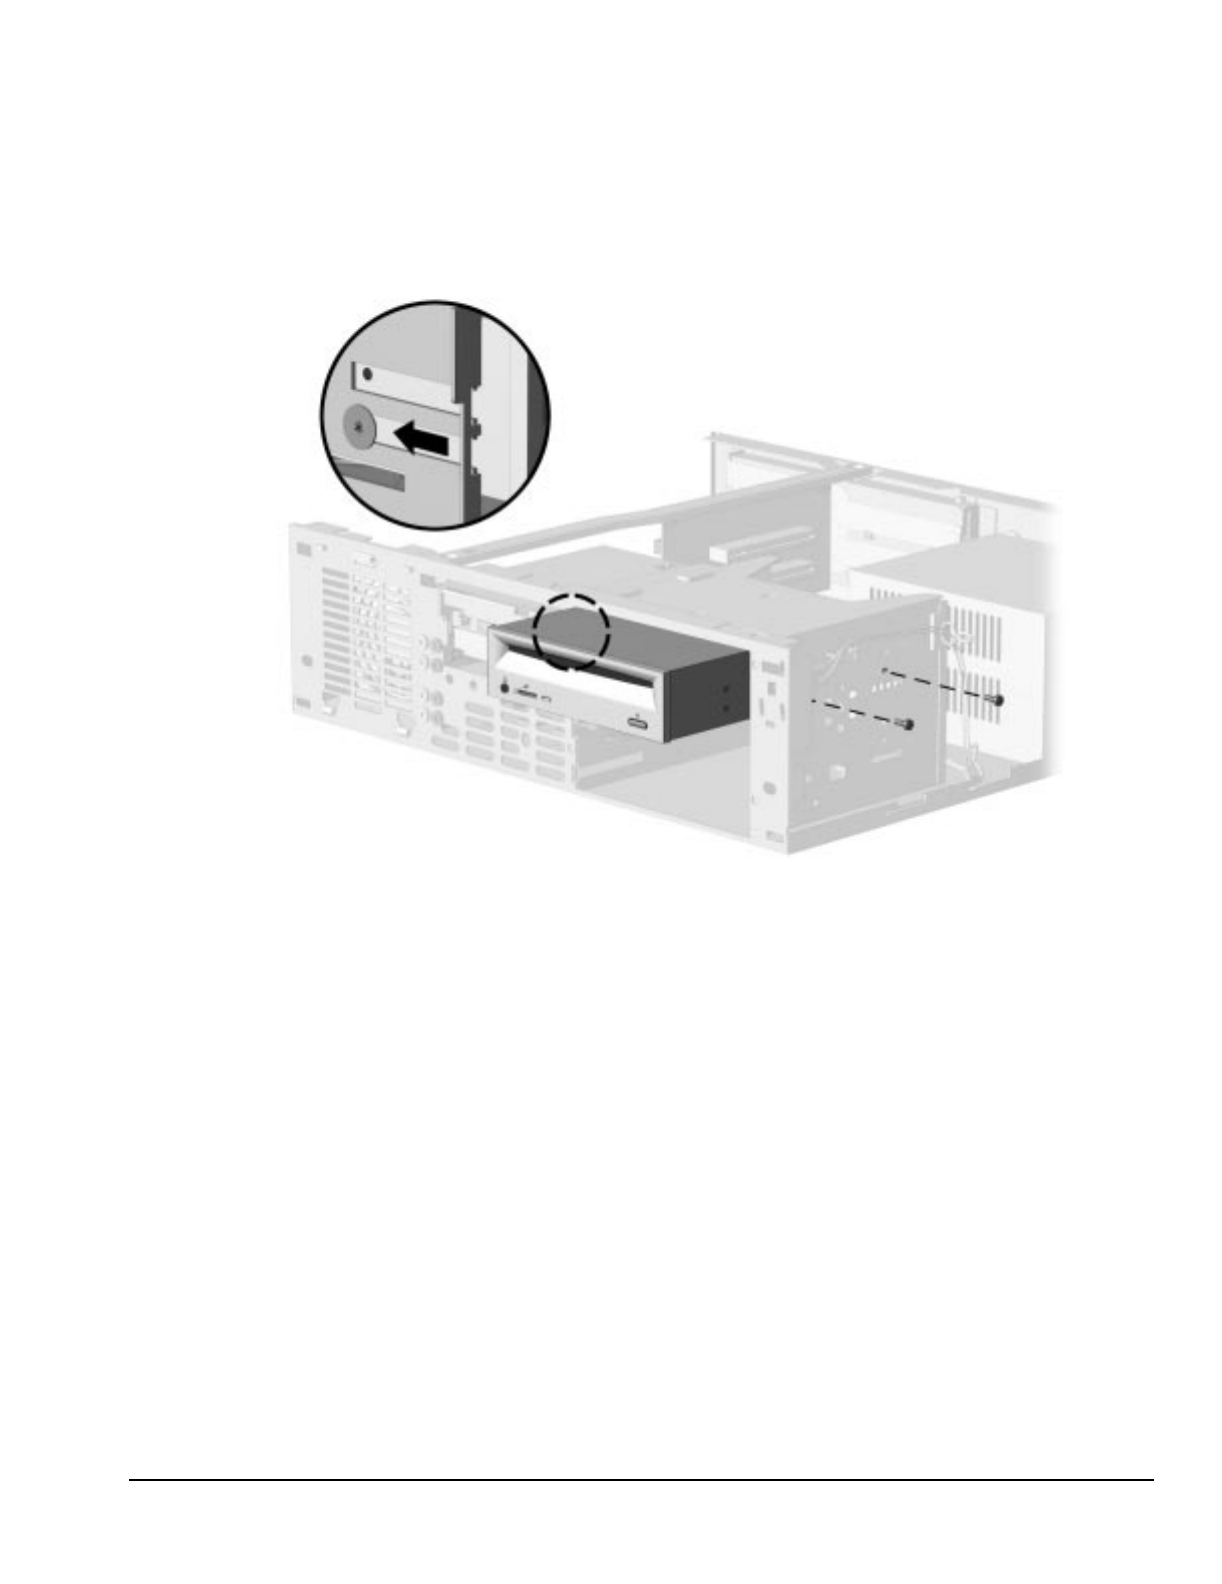
Compaq Deskpro 2000 Series of Personal Computers 5-33
4. Remove the two screws on the right side of the drive bay that secure the drive to the chassis.
5. Pull the drive straight out of the chassis.
Figure 5-31. Removing the CD-ROM Drive
When replacing this drive, transfer the single wafer screw that takes the place of drive rails from the
old drive to the new one. The wafer screw is on the left side of the drive at the front.
To replace the 5.25-inch drive, reverse the above procedures.
✎When installing a second diskette drive, it is necessary to configure the computer using
Computer Setup.
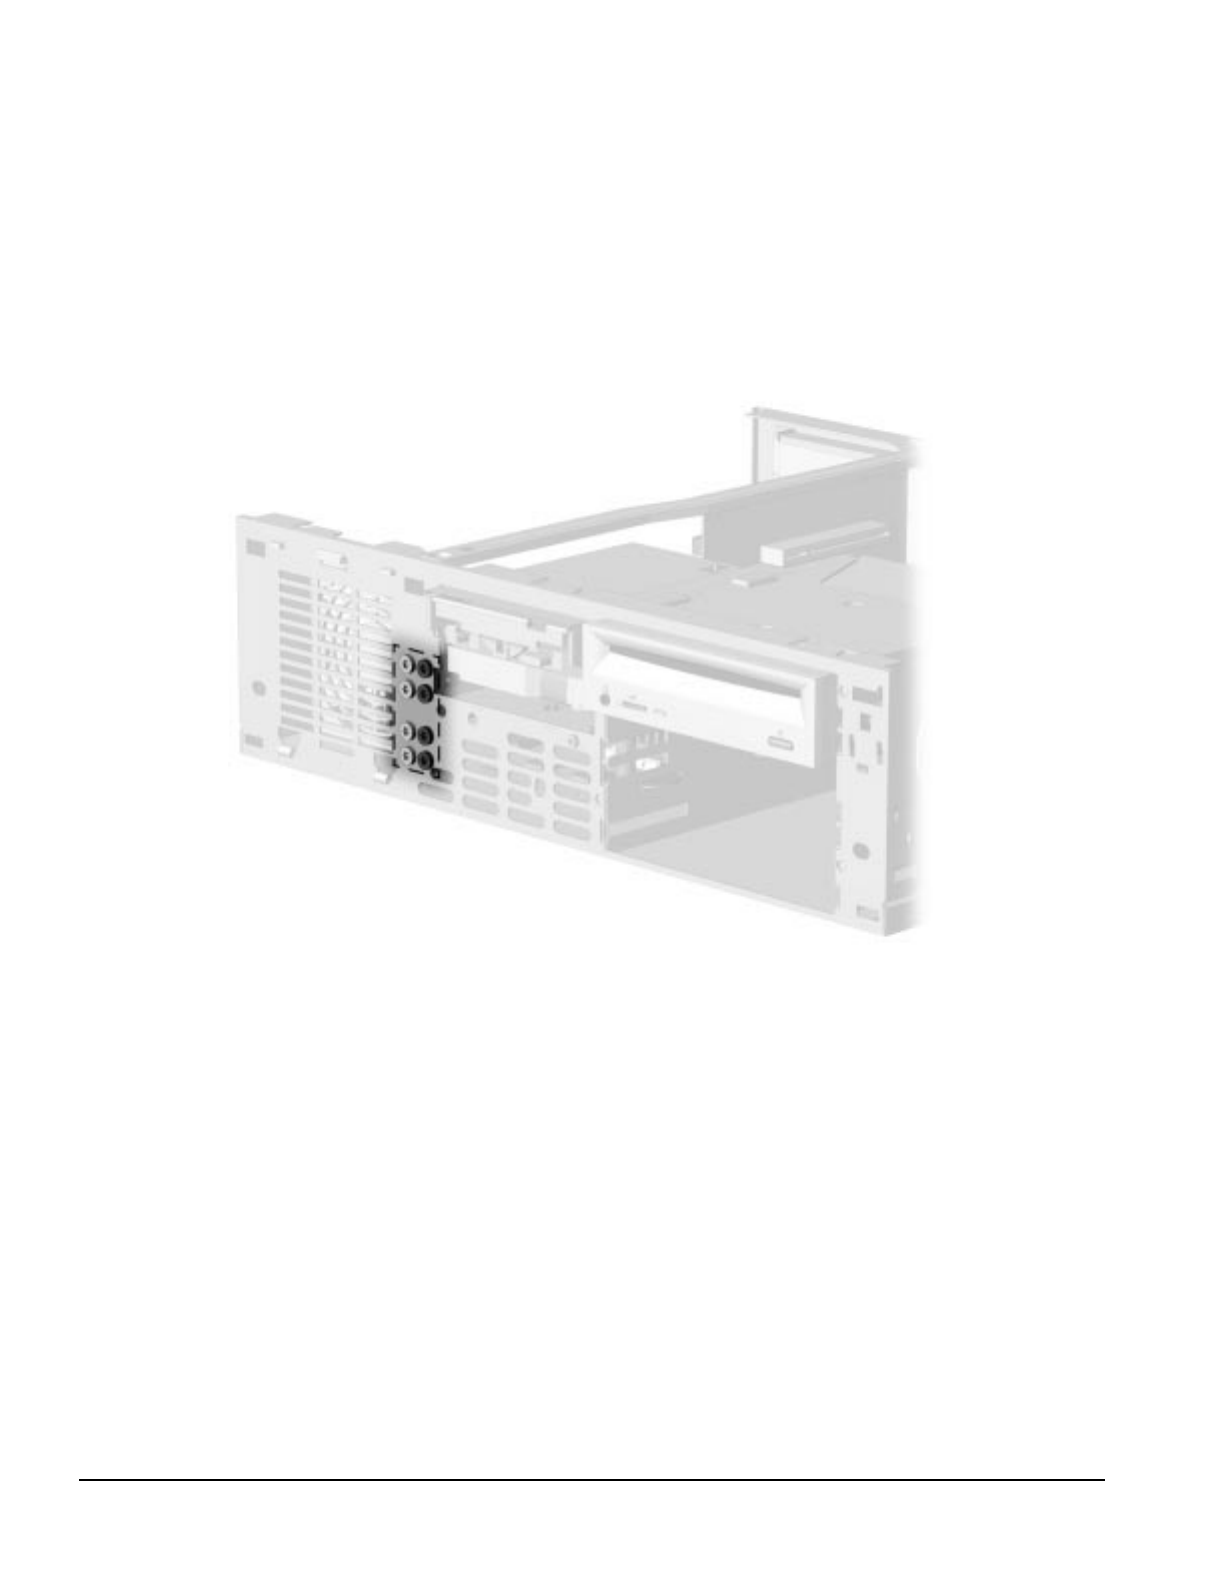
5-34 Removal and Replacement Procedures - Desktop
5.16.3 Installing a New Drive
When installing a new drive, you should use either the wafer screws provided in the option kit or the
extra U.S. or metric screws, both of which types are stored in the front of the computer chassis for
this purpose. The same screws that are used as guide screws are used as retainer screws to secure the
drive in the drive bay. Select the appropriate screws for the application.
✎Metric screws have a black finish while U.S. screws have a silver finish.
Figure 5-32. Locating the Mounting Screws
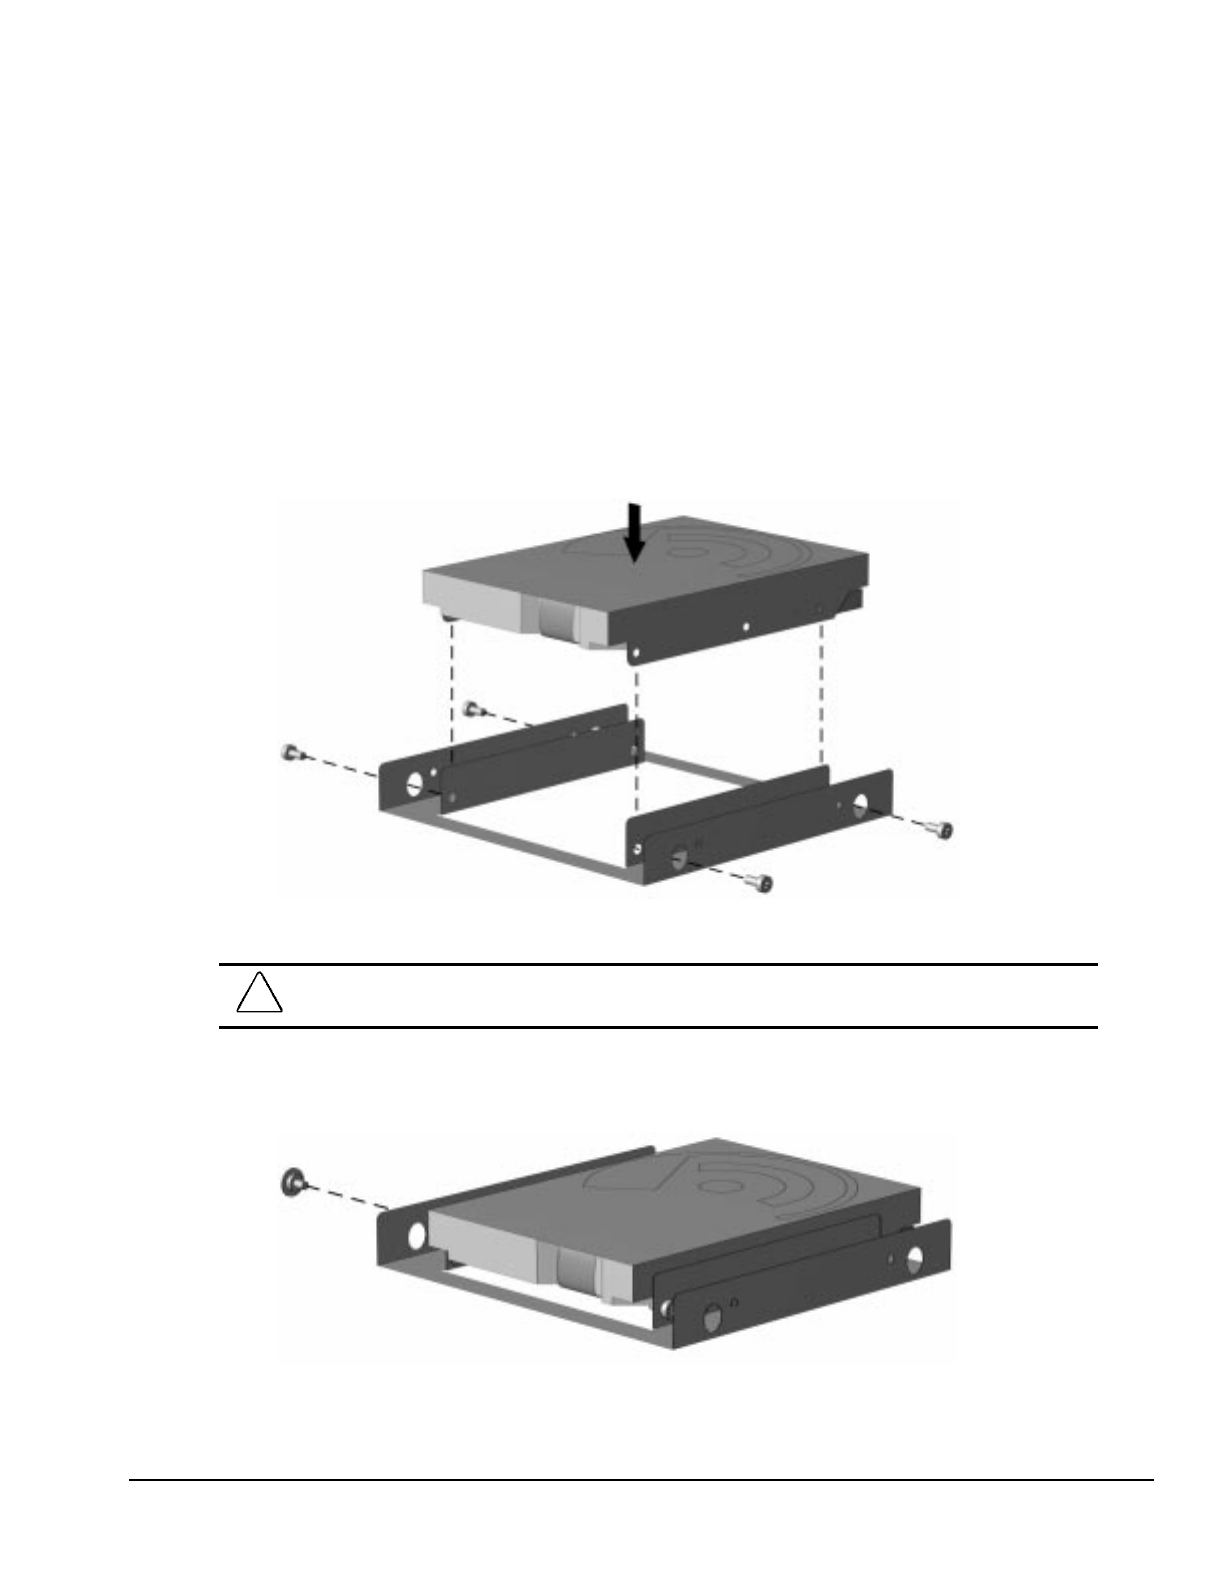
Compaq Deskpro 2000 Series of Personal Computers 5-35
If you are installing a 3.5-inch diskette drive into a 5.25-inch drive bay, use Compaq bracket spare
part number 243230-001, which comes with a preinstalled bezel.
If you are installing a 3.5-inch hard drive into a 5.25-inch drive bay, use Compaq bracket spare part
number 243231-001.
To install a 3.5-inch drive/bracket assembly, begin with step 1.
To install a 5.25-inch drive, begin with step 3.
1. Place the 3.5-inch drive into the bracket.
2. Insert two screws into the bracket holes on each side of the bracket to secure the drive.
Figure 5-33. Installing the Hard Drive into the Mounting Bracket
CAUTION: Use only 3/16-inch or 5-mm long screws as guide screws. Longer screws can damage the
internal components of the drive.
3. Install one wafer screw on the left side of the drive or bracket assembly. This acts as a guide rail
to align the bracket in the drive bay.
Figure 5-34. Inserting the Wafer Screw on the Left Side of the Bracket
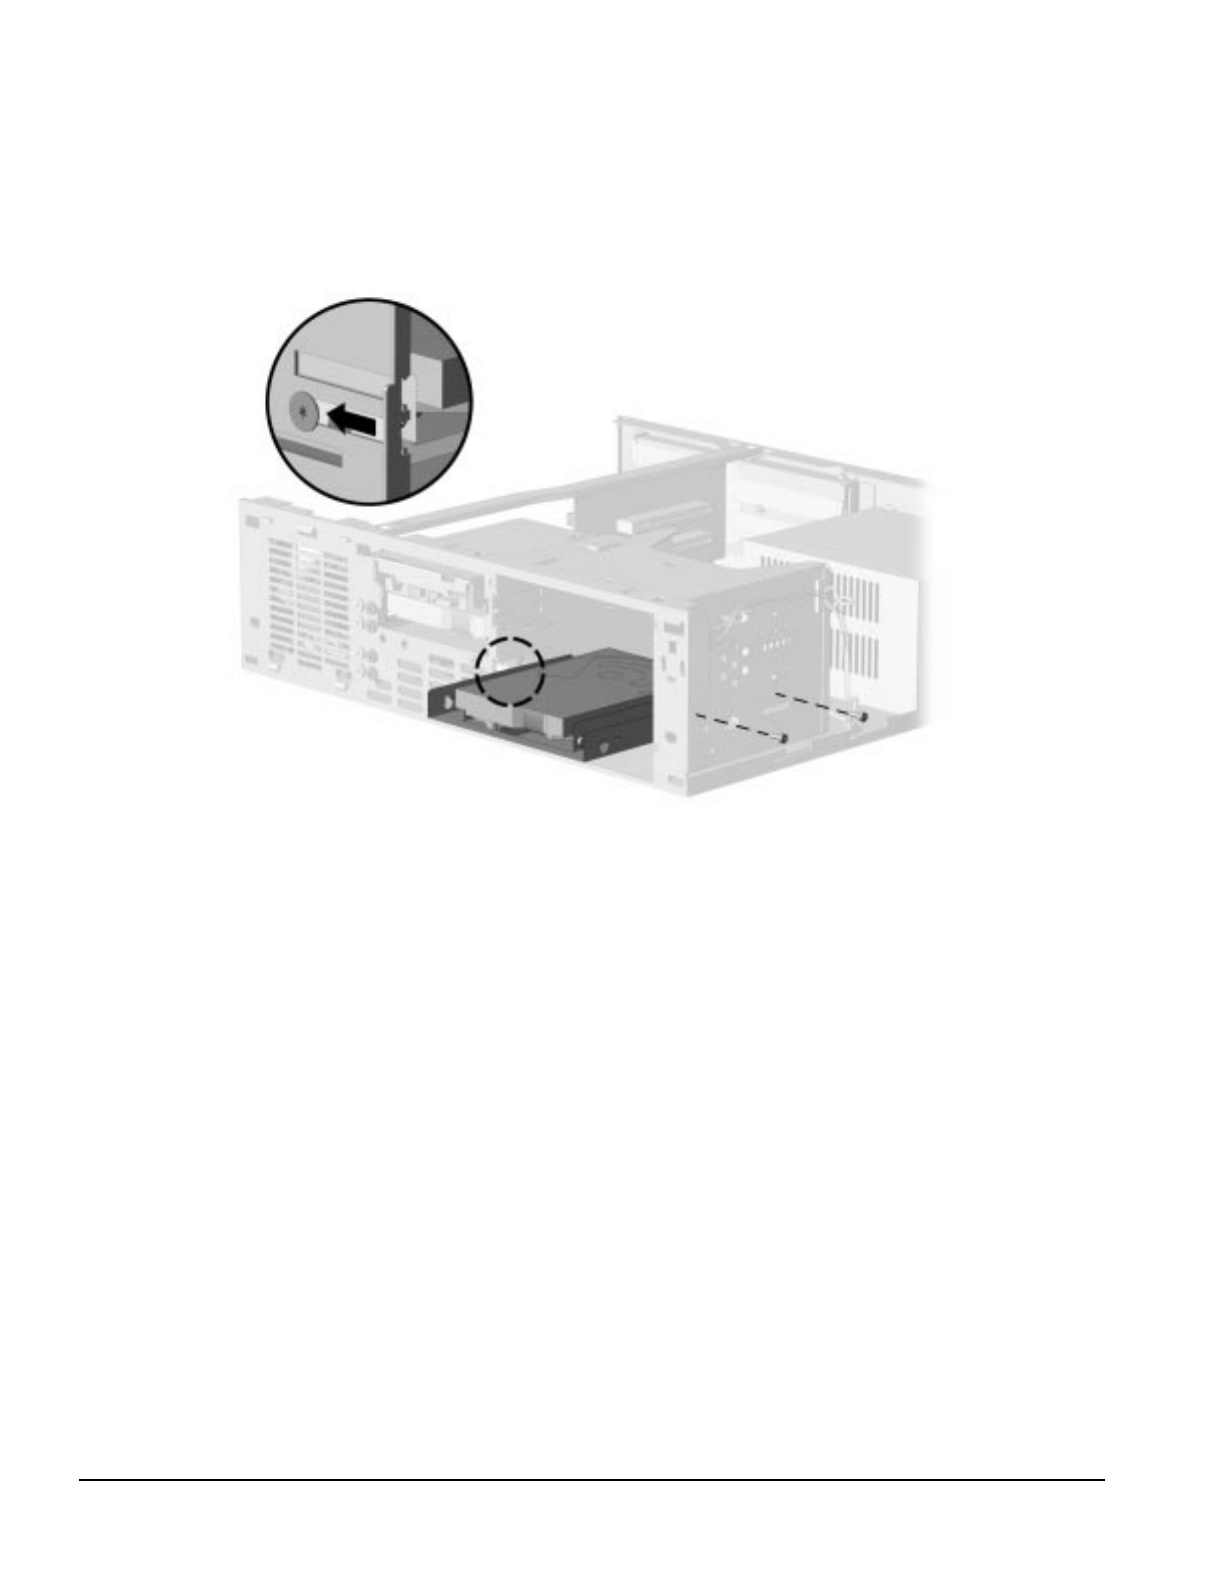
5-36 Removal and Replacement Procedures - Desktop
4. Install the drive assembly into the drive bay. Ensure that the guide screw fits into the tab on the
left side of the bay.
5. Secure the drive with two wafer screws on the right side of the drive bay.
Figure 5-35. Installing the Hard Drive/Bracket Assembly and Securing It with Two Wafer Screws
6. Connect the drive cables. Refer to Section 5.16.1 for a 3.5-inch drive and paragraph 5.16.2 for a
CD-ROM.
7. Remove the bezel blank from the front bezel if necessary (Section 5.14.3).
8. Install the front bezel (Section 5.14.1).
9. Install the system unit cover (Section 5.6).
10. The system will automatically recognize a hard drive sold by Compaq or any other Plug and Play
hard drives and will automatically reconfigure the computer.
If you have installed a third-party hard drive that is not a Plug and Play device, you will need to
run Computer Setup to reconfigure the computer. Refer to Chapter 2, “Compaq Utilities,” for
information on running Computer Setup.
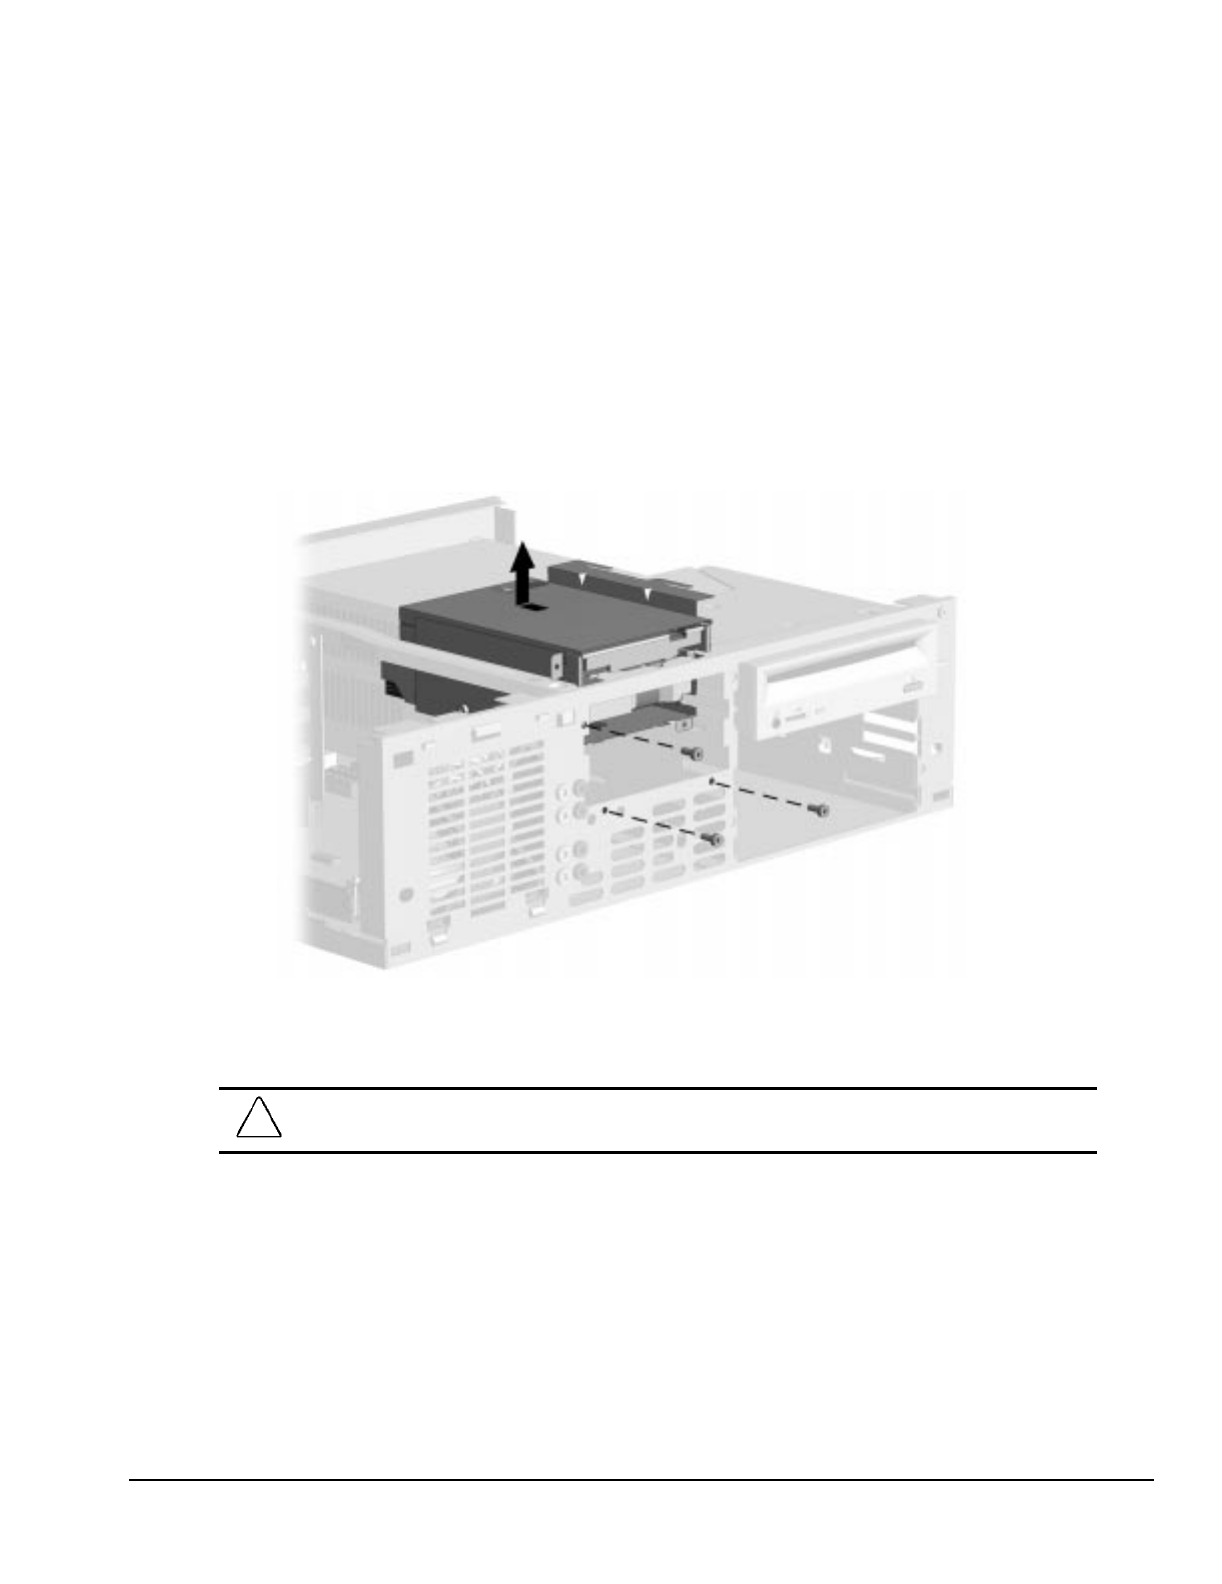
Compaq Deskpro 2000 Series of Personal Computers 5-37
5.17 Drive Cage
To remove the drive cage from the computer chassis, complete the following steps:
1. Remove the system unit cover (Section 5.6).
2. Remove the front bezel (Section 5.14.1).
3. Remove the three screws that secure the drive cage to the chassis.
4. Slide the drive cage back towards the inside of the chassis to release the latches.
5. Lift the assembly up to remove it from the chassis.
Figure 5-36. Removing the Drive Cage
To replace the drive cage, reverse the above procedure.
CAUTION: When replacing the drive cage, be careful that the LED cable does not get caught, pinched,
or otherwise damaged.
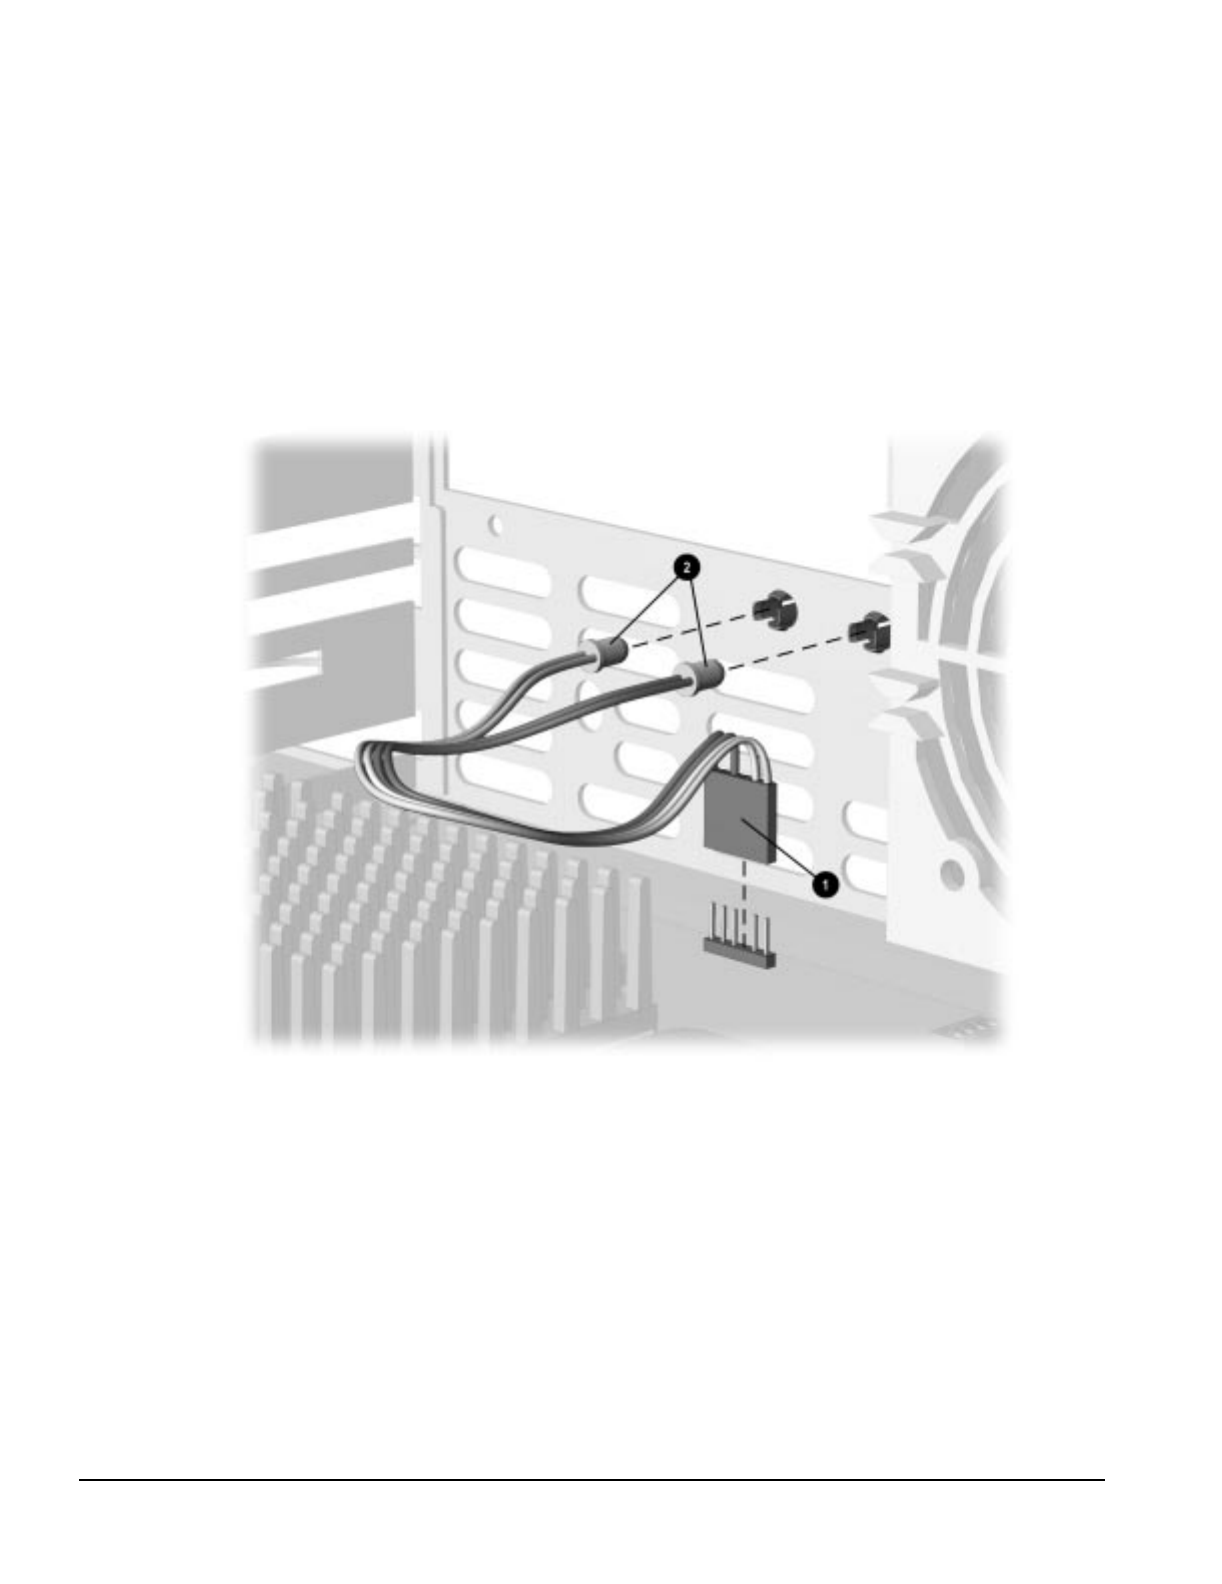
5-38 Removal and Replacement Procedures - Desktop
5.18 LED Cable
To remove the LED cable, complete the following steps::
1. Remove the system unit cover (Section 5.6).
2. Remove the front bezel (Section 5.14.1).
3. Remove the drive cage (Section 5.17).
4. Disconnect the LED cable from the system board 1.
Figure 5-37. Removing the LED Cable, Pentium System
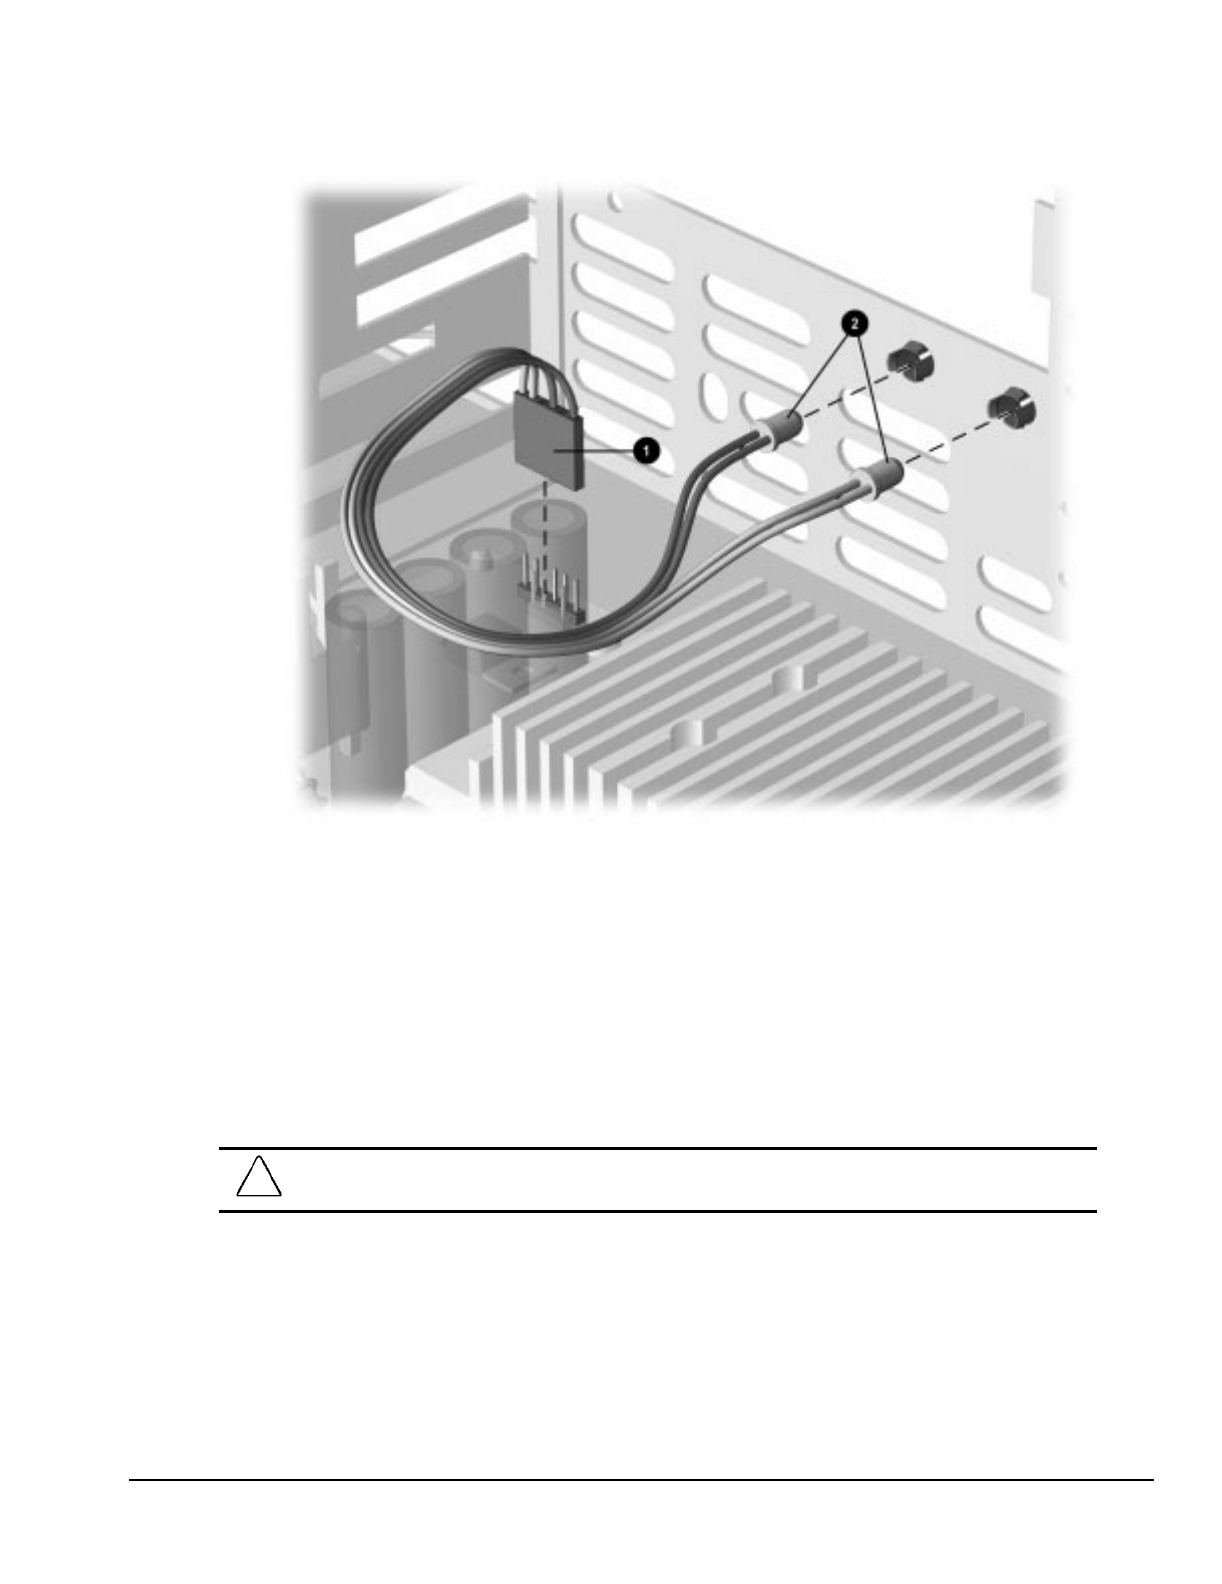
Compaq Deskpro 2000 Series of Personal Computers 5-39
Figure 5-38. Removing the LED Cable, Pentium II System
5. Remove the LED ends 2 of the cable from the front of the chassis by gently pulling on the cable
while at the same time pushing the ends of the LED from the front of the chassis.
To install the LED cable, reverse the above steps. The connector 1 is keyed to ensure proper
installation.
✎When reinstalling the LED ends, note the markings on the front of the chassis for proper
LED placement. From the front of the chassis, the LED with the black wire goes on the
left, and the LED with the white wire on the right.
CAUTION: Ensure that the cable is pushed to the bottom of the chassis to avoid being damaged when
reinstalling the drive cage.

5-40 Removal and Replacement Procedures - Desktop
5.19 System Board
To remove the system board, complete the following steps:
1. Remove the system unit cover (Section 5.6).
2. Remove the expansion boards (Section 5-8).
3. Remove the riser board (Section 5.10).
✎It is not necessary to remove the riser brace in order to remove the system board.
If a replacement external battery is installed on the system board, do not unplug the battery
from the system board connector as that will erase the CMOS. Remove the external battery
from the hook-and-loop fastener on the chassis but leave it electrically connected to the
system board.
4. Disconnect any cables plugged into the system board.
5. Remove the front bezel (section 5.14.1).
6. Remove the drive cage (Section 5.17).
7. Remove the screws securing the system board to the chassis.
❏ Five screws secure Pentium system board.
❏ Seven screws secure Pentium II system board.
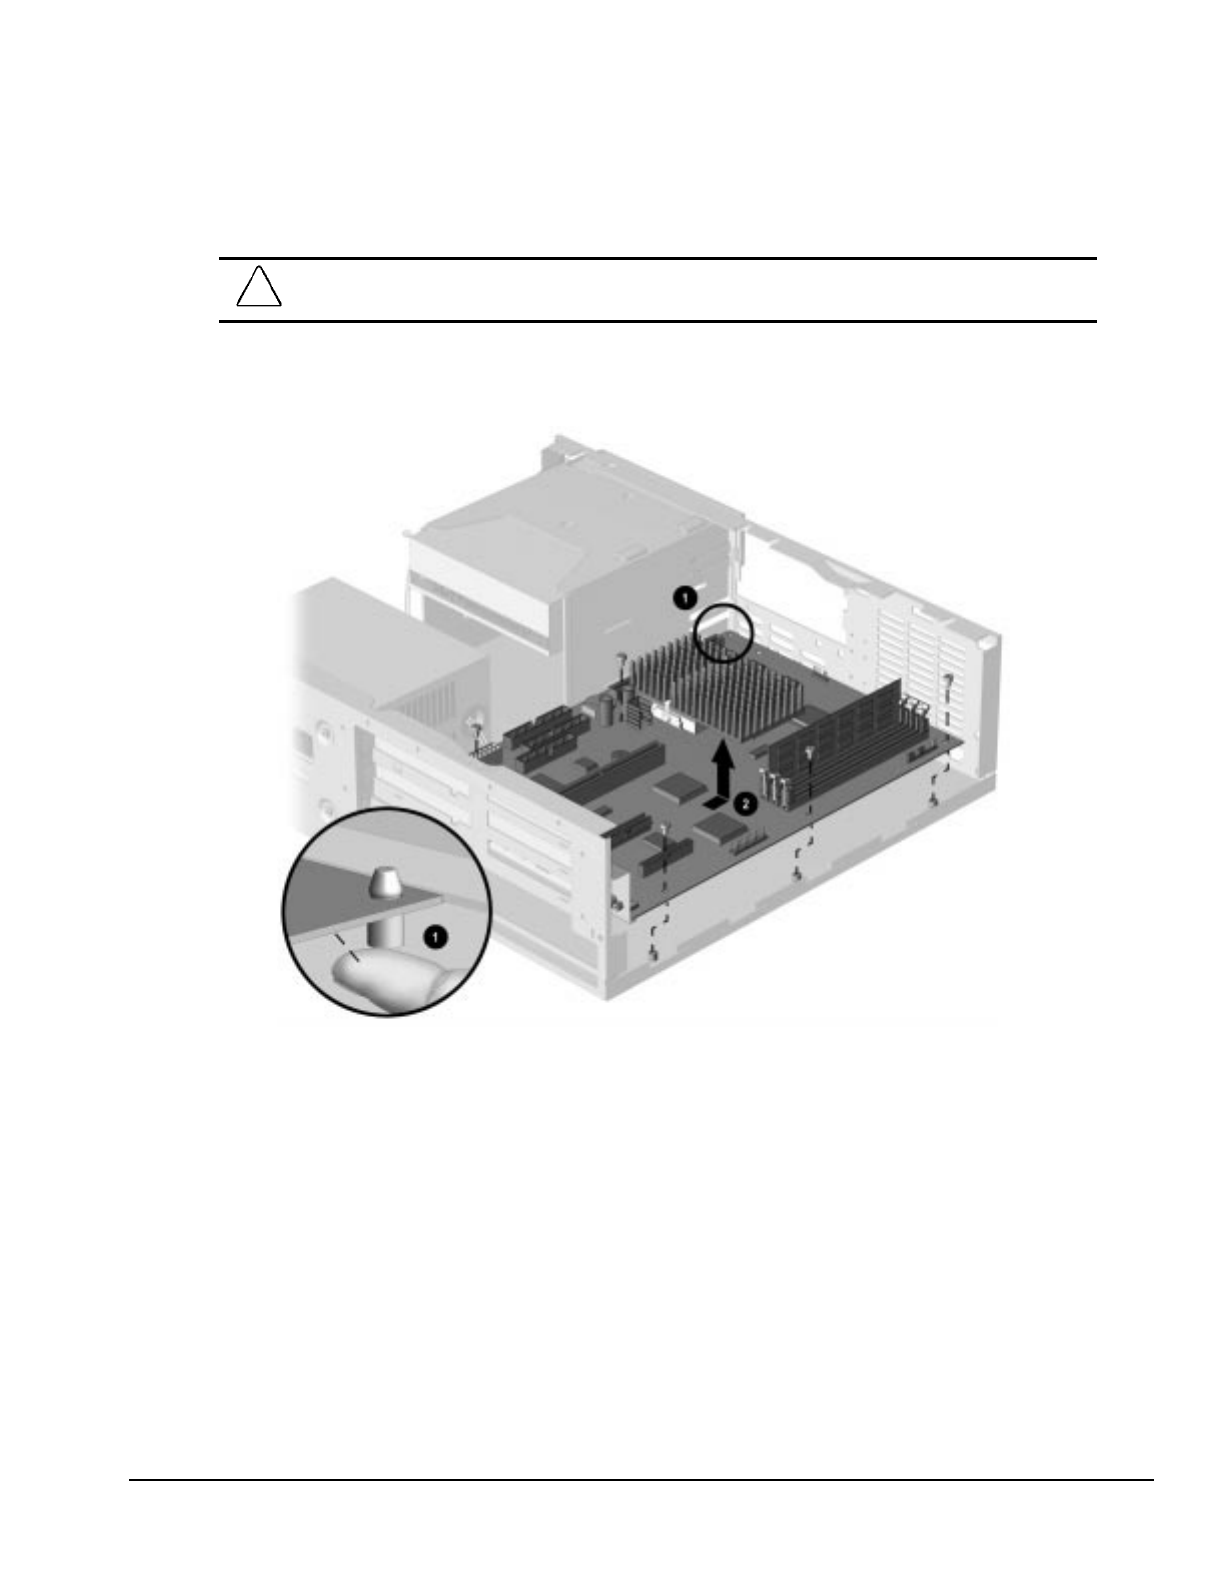
Compaq Deskpro 2000 Series of Personal Computers 5-41
8. Use your fingers to grip the system board at the guide pin 1 area and pull up on the board to
release it from the pin.
CAUTION: Do not use any tools to release the board from the pin. Doing so may damage the system board
electronically.
9. To remove the board from the chassis 2, move the board slightly toward the front of the chassis
and lift up and out.
Figure 5-39. Removing the Pentium System Board
✎The riser brace has been removed for clarity.
To install a new system board, reverse the above procedures.

5-42 Removal and Replacement Procedures - Desktop
Figure 5-40. Removing the Pentium II System Board
✎The riser brace has been removed for clarity.
To install a new system board, reverse the above procedures.
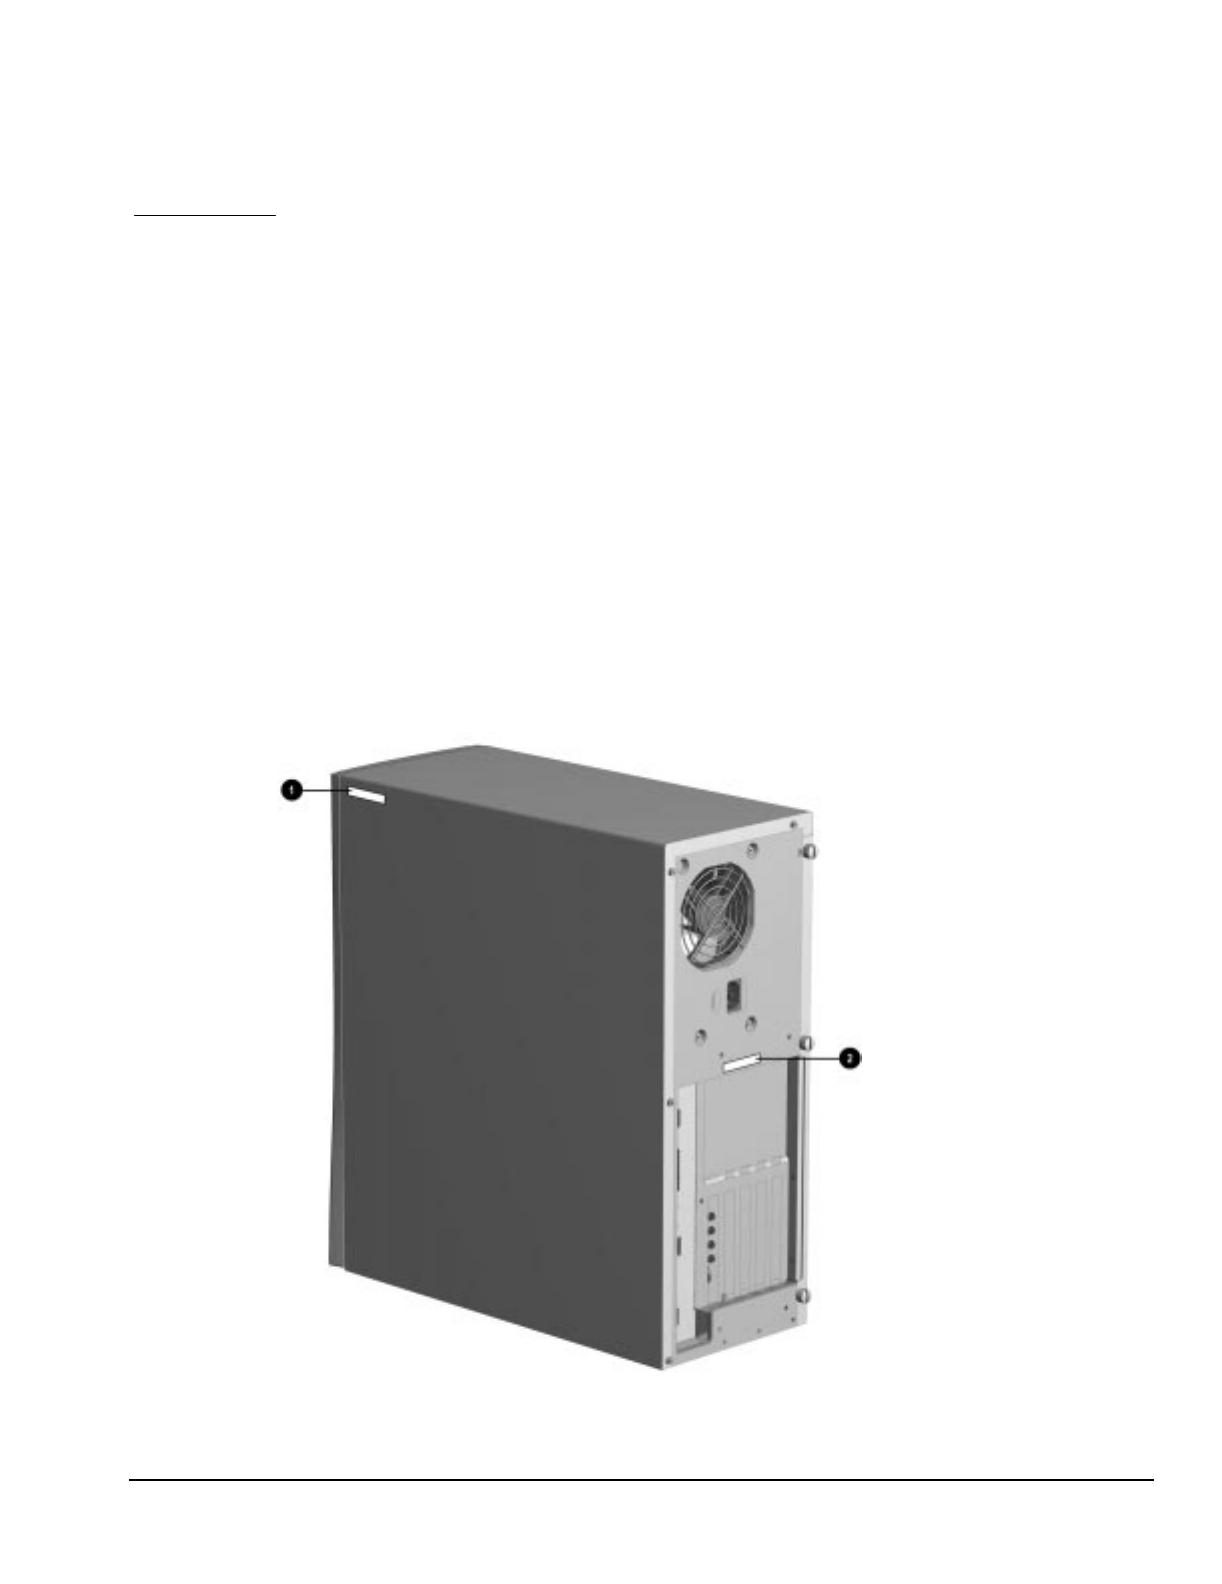
Compaq Deskpro 2000 Series of Personal Computers 6-1
chapter 6
REMOVAL AND REPLACEMENT
PROCEDURES - MINITOWER
This chapter provides subassembly/module level removal and replacement procedures for minitower
models of the Compaq Deskpro 2000 Series of Personal Computers.
After completing all necessary removal and replacement procedures, run the Diagnostics utility to
verify that all components operate properly.
6.1 Serial Number
The computer serial number should be provided to Compaq when requesting information or ordering
spare parts. The serial number is displayed on the right side of the hood toward the front 1 and on
the rear of the chassis above the expansion slots 2.
Figure 6-1. Serial Number Location
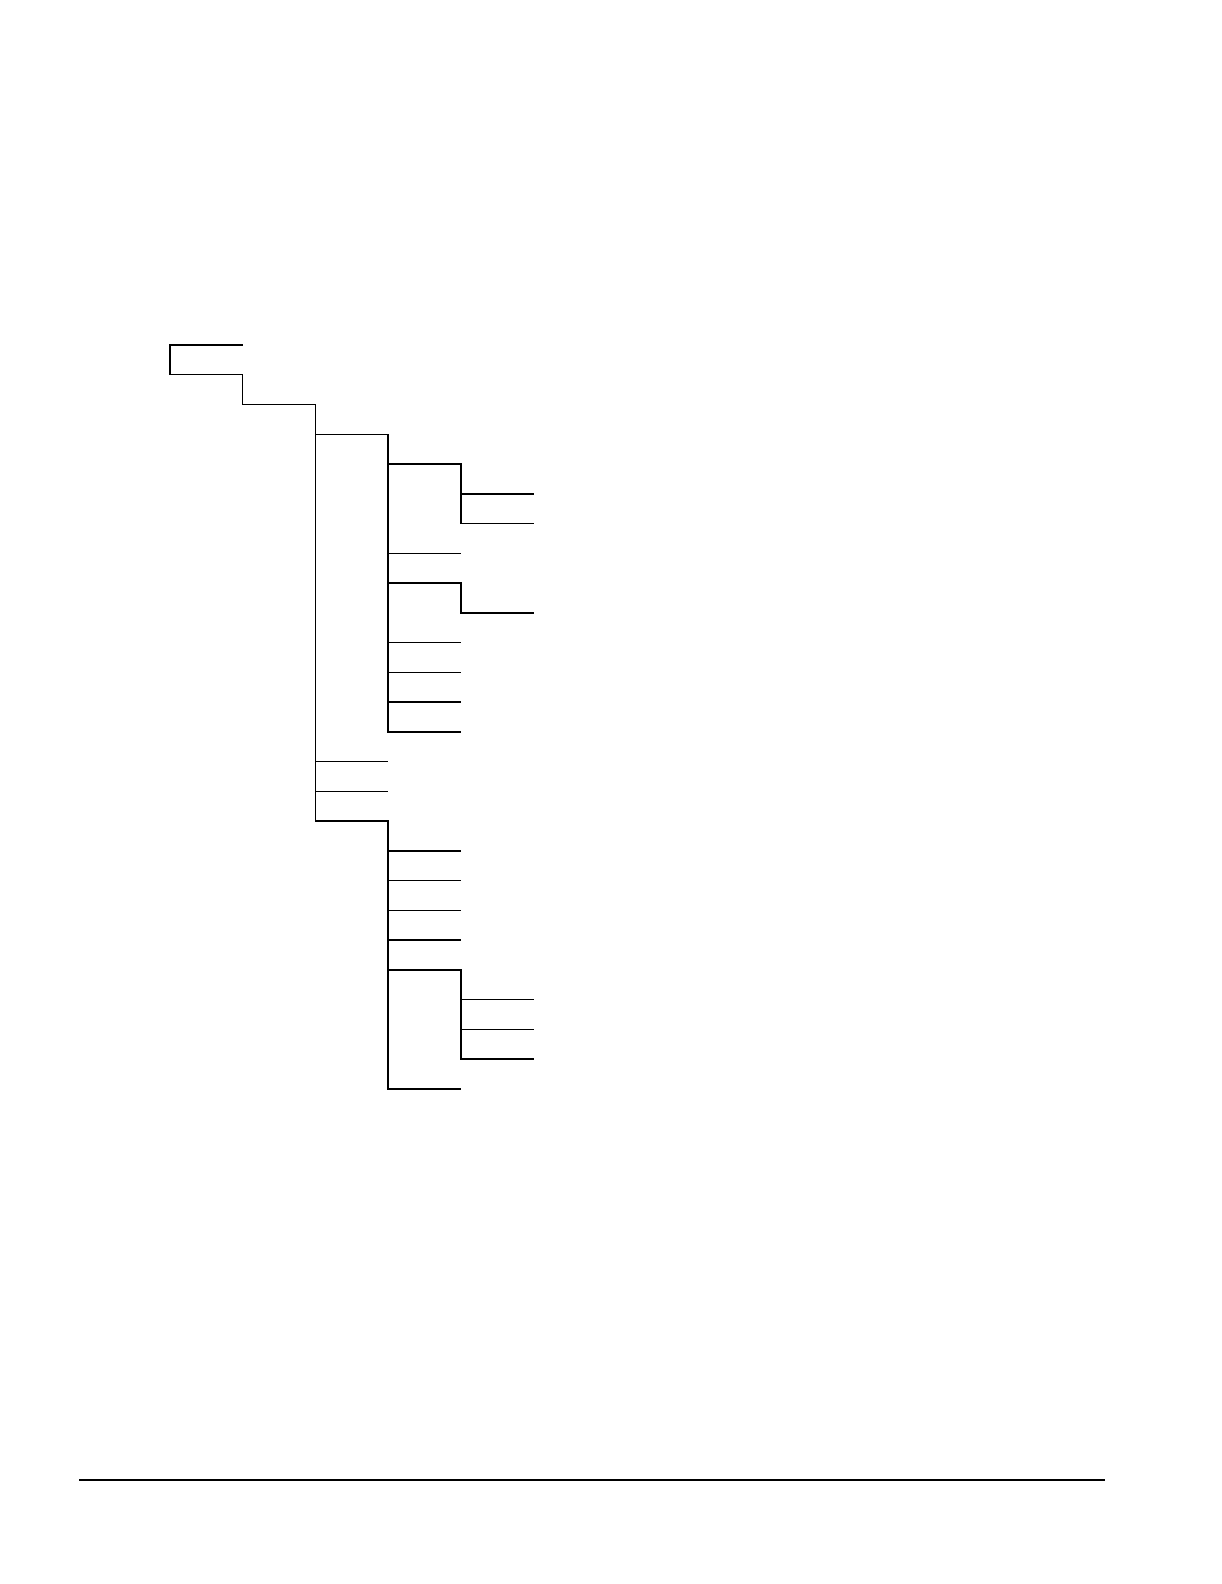
6-2 Removal and Replacement Procedures - Minitower
6.2 Disassembly Sequence Chart
Use the chart below to determine the disassembly sequence for removing components from the
computer.
6.4 Computer Feet
6.5 Cable Lock
6.6.1 Access Panel
6.7 Riser Brace
6.8 Expansion Board
6.9 Expansion Board Guide
6.10 Riser Board
6.11 Speaker
6.12.1 Memory Module
6.13 System Board
6.12.2 Microprocessor
6.12.3 Cache Memory (Pentium only)
6.12.4 System Board Graphics Memory Module Upgrade
6.14 Replacement Battery (if full-length expansion board installed)
6.14 Replacement Battery (if short expansion board installed)
6.15 ISA Option Board Retainer
6.16.1 Front Bezel
6.6.2 J Hood
6.16.2 Power Button
6.16.3 Bezel Blank
6.16.4 Compaq Logo
6.17.1 Power Supply Switch Assembly
6.17.2 Power Supply
6.18 LED Cable
6.19.1 3.5-in Drive Bays
6.19.2 5.25-in Drive Bays
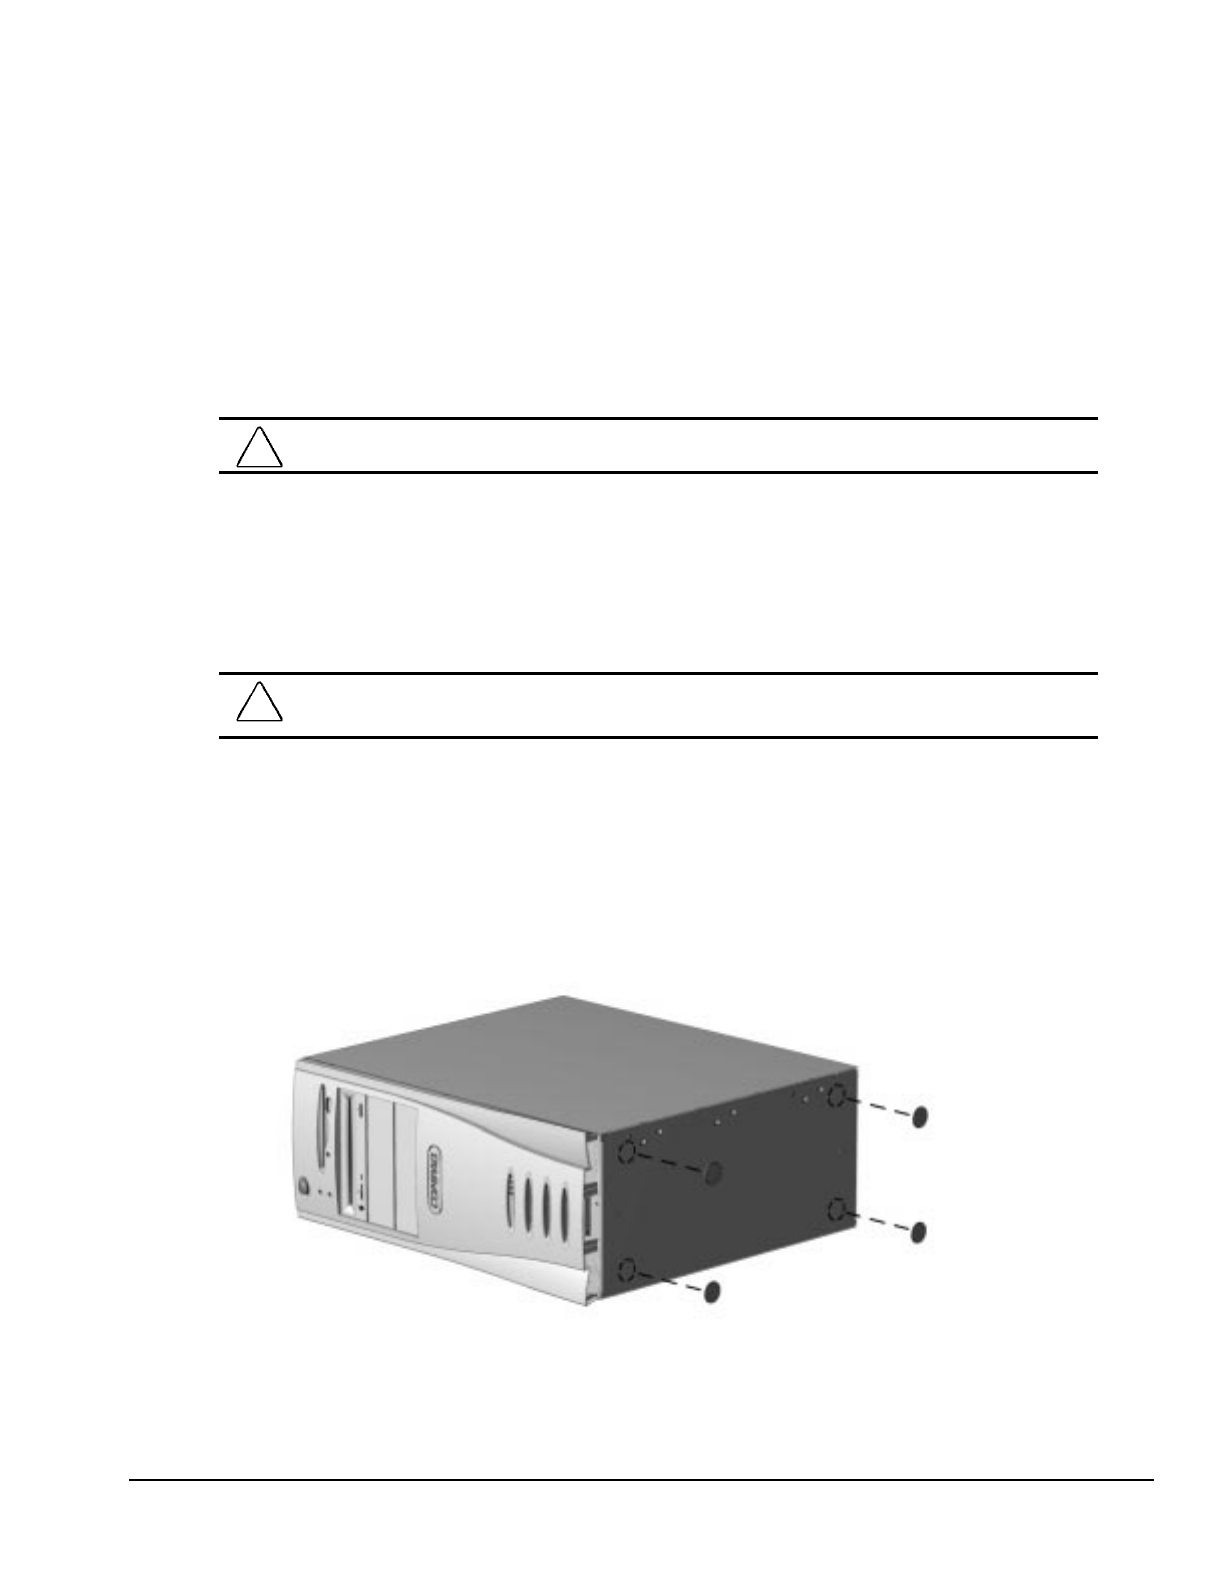
Compaq Deskpro 2000 Series of Personal Computers 6-3
6.3 Preparation for Disassembly
See Chapter 4, “Removal and Replacement Preliminaries,” for initial procedures.
To prepare the computer for disassembly, complete the following steps:
1. Remove any diskette, compact disc, or tape from the computer.
2. Turn off the computer and any peripheral devices that are connected to it.
CAUTION: Turn off the computer before disconnecting any cables.
3. Disconnect the power cord from the electrical outlet and then from the computer.
4. Disconnect all peripheral device cables from the computer.
✎During disassembly, label each cable as you remove it, noting its position and routing.
Keep all screws with the unit removed.
CAUTION: The screws used in the computer are of different thread sizes and lengths; using the wrong
screw in an application may damage the unit.
6.4 Feet
Four rubber feet are mounted to the underside of the chassis. If necessary, remove the old feet and
scrape the residue of the old feet from the chassis using a small, flat-bladed screwdriver. To attach
replacement feet to the chassis, remove the protective strip from the adhesive on the back of the new
feet and press them into place.
Figure 6-2. Installing the Feet

6-4 Removal and Replacement Procedures - Minitower
6.5 Cable Lock
To install the cable lock provision, complete the following steps:
1. Remove one thumbscrew from the rear of the computer. Use a flat-bladed screwdriver if needed.
2. Separate the pieces of the security bracket by bending the metal where the three pieces join.
3. Insert the tang of the narrow bracket into the slot and slide the u-shaped bracket between narrow
bracket and the system unit cover; then, install the self-tapping screw included in the cable lock
kit.
4. Cover the screw with the flat portion of the bracket.
5. Install a lock (not provided) to secure the top part of the security bracket to control access to the
inside of the computer. Install a cable lock (not provided) to secure the computer to an immovable
location.
Figure 6-3. Installing the Cable Lock
To remove the cable lock provision, reverse the above procedure.
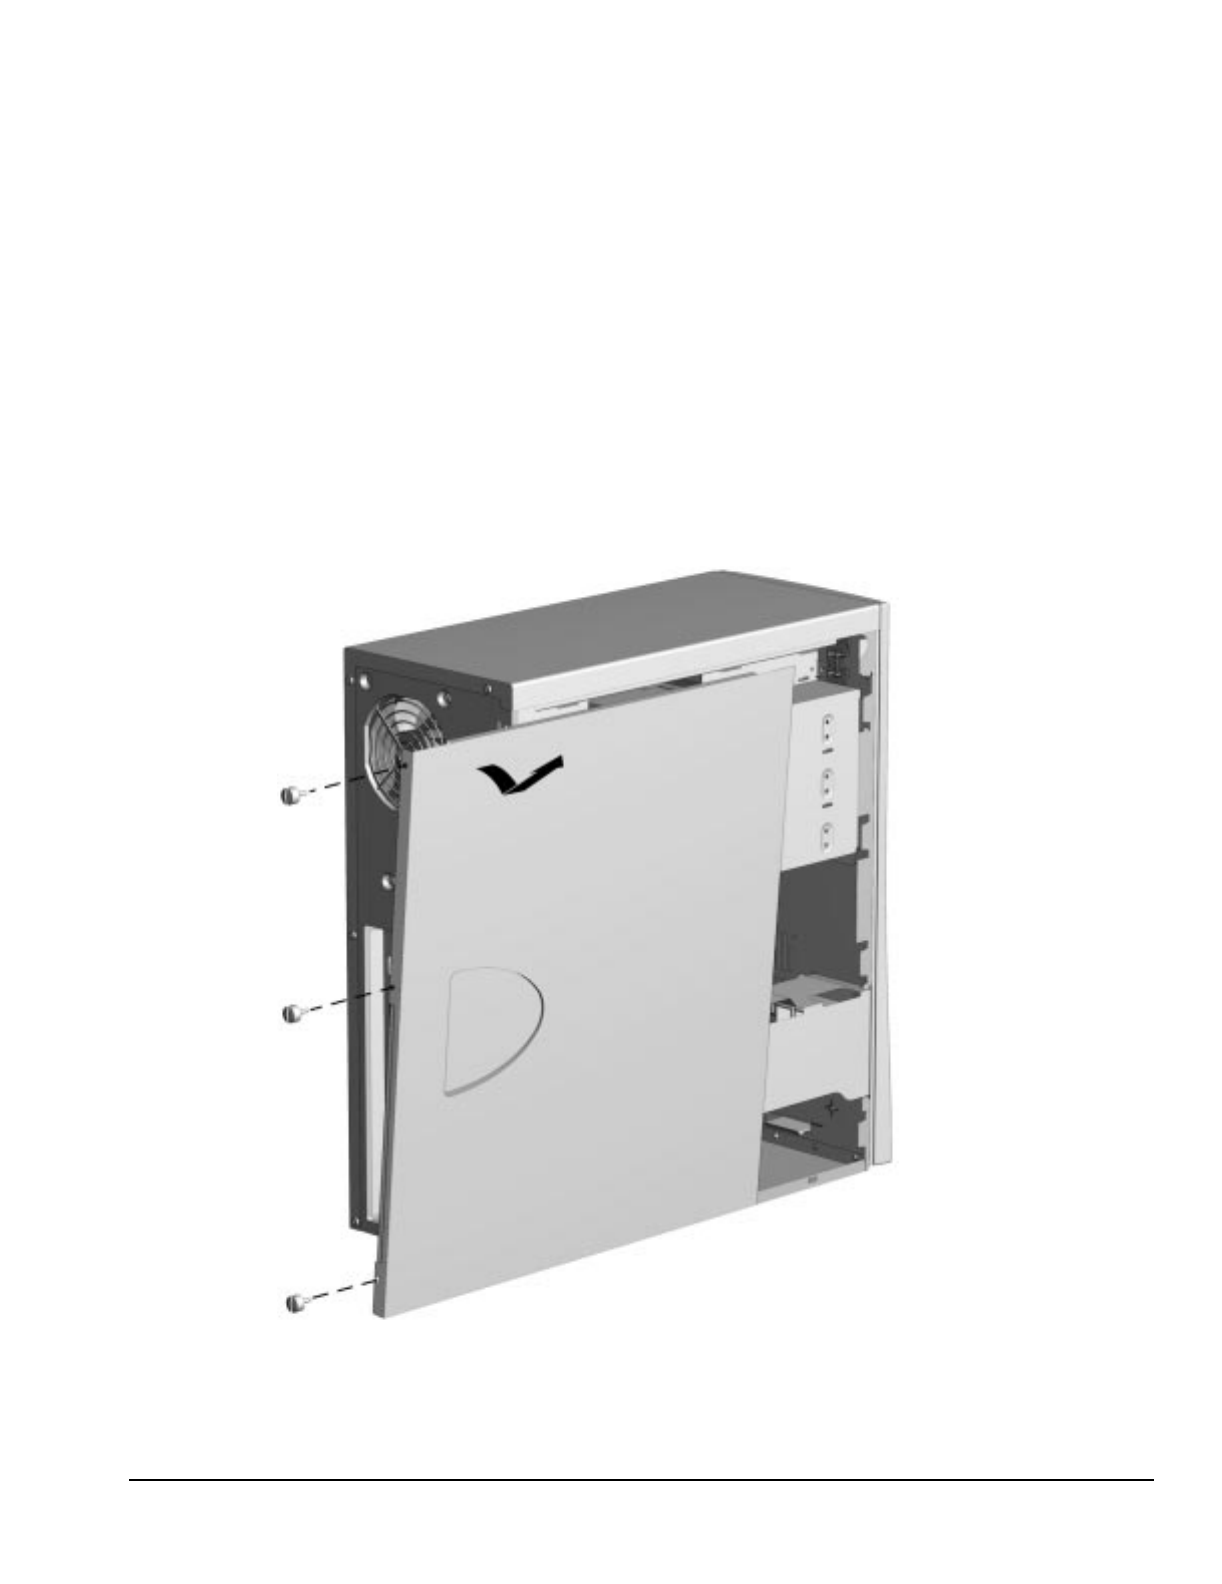
Compaq Deskpro 2000 Series of Personal Computers 6-5
6.6 Exposing the Chassis
6.6.1 Access Panel
To remove the access panel, complete the following steps:
1. Prepare the computer for disassembly (Section 6.3).
2. Remove the thumbscrews at the rear of the computer to release the panel. You may need a flat-
bladed screwdriver to loosen a stubborn screw.
If the computer has a cable lock mechanism installed, refer to Section 6.5 for removal procedures.
3. Grasp the rear of the panel, pull it back about two to three inches (5 to 7 cm), pivot the top of the
access panel out about one inch (2.5 cm), and lift the cover from the computer.
Figure 6-4. Removing the Access Panel
To replace the cover, reverse the above procedure.
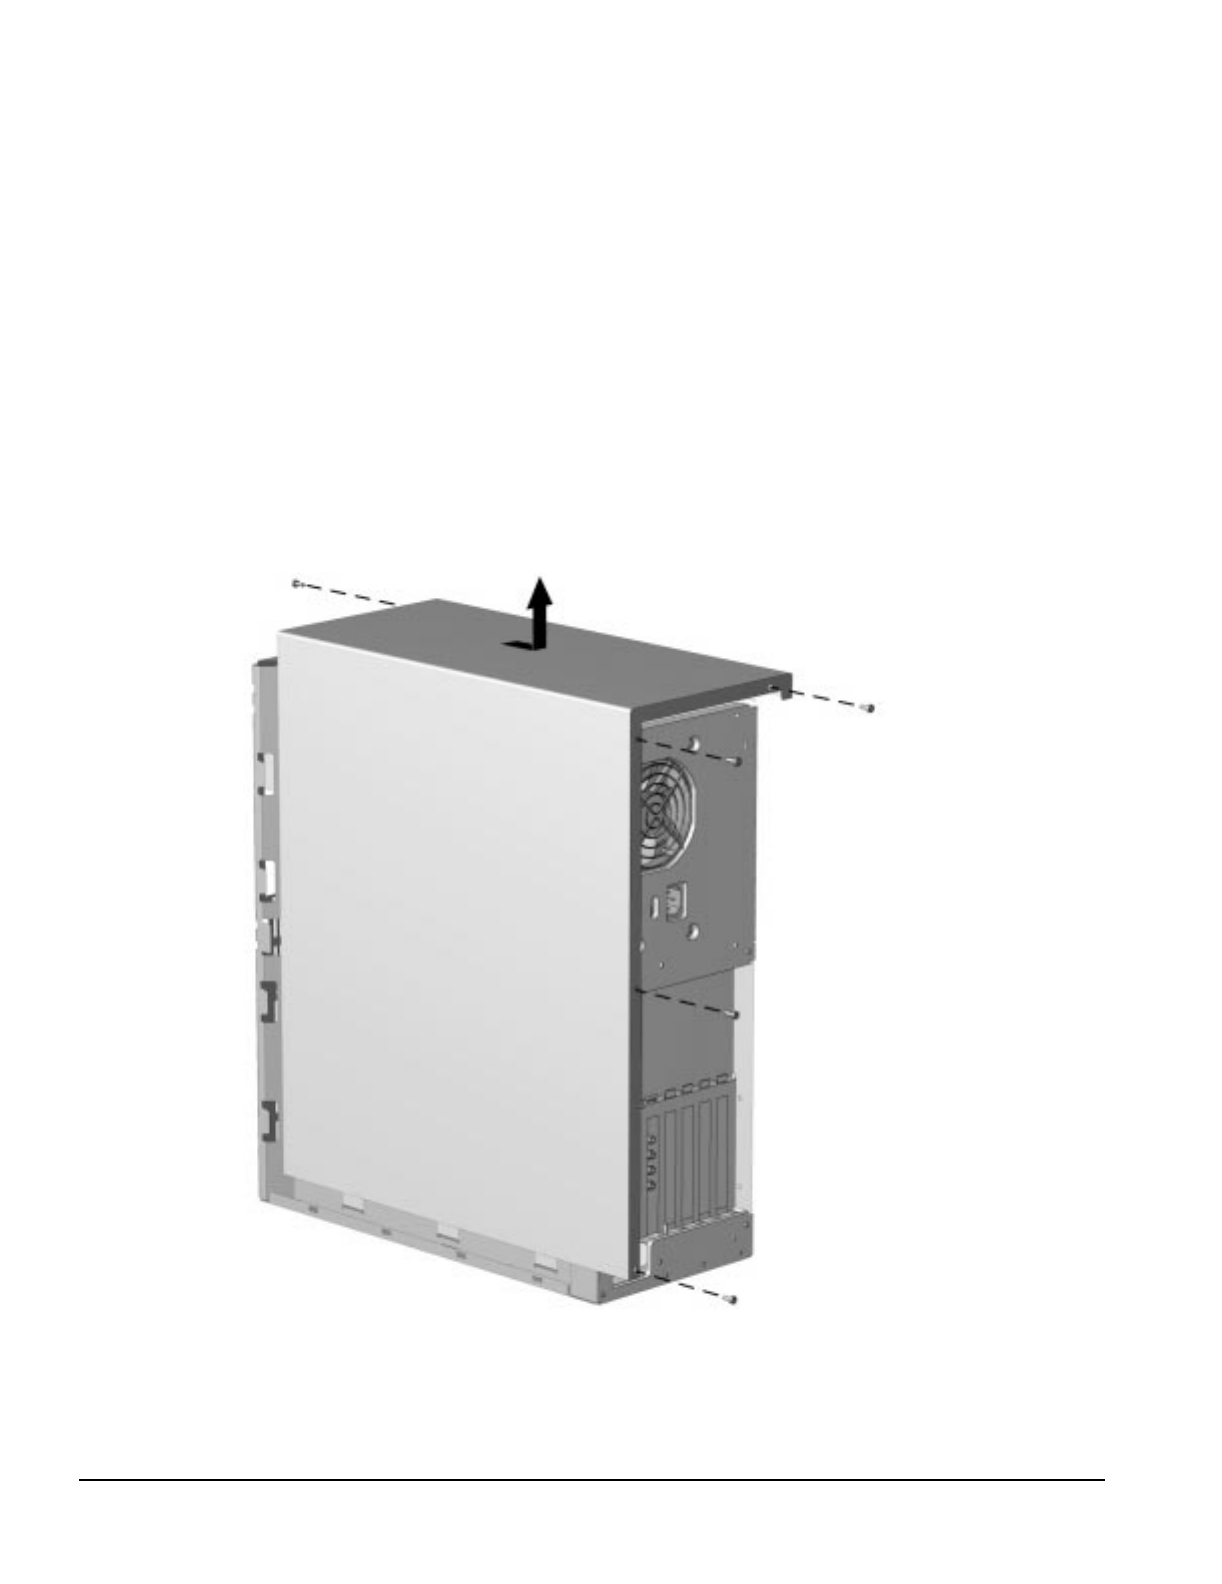
6-6 Removal and Replacement Procedures - Minitower
6.6.2 Minitower J Hood
It is only necessary to remove the J hood if it has been damaged.
To remove the J hood, complete the following steps:
1. Remove the access panel (Section 6.6.1)
2. Remove the front bezel (Section 6.16.1).
3. Remove the four screws at the rear of the computer securing the J hood to the chassis.
4. Remove the single screw at the left front of the computer at the top.
5. Slide the J hood back about one-half inch (1.3 cm), and then lift it up from the chassis.
Figure 6-5. Removing the J Hood
To replace the J hood, reverse the above procedure.
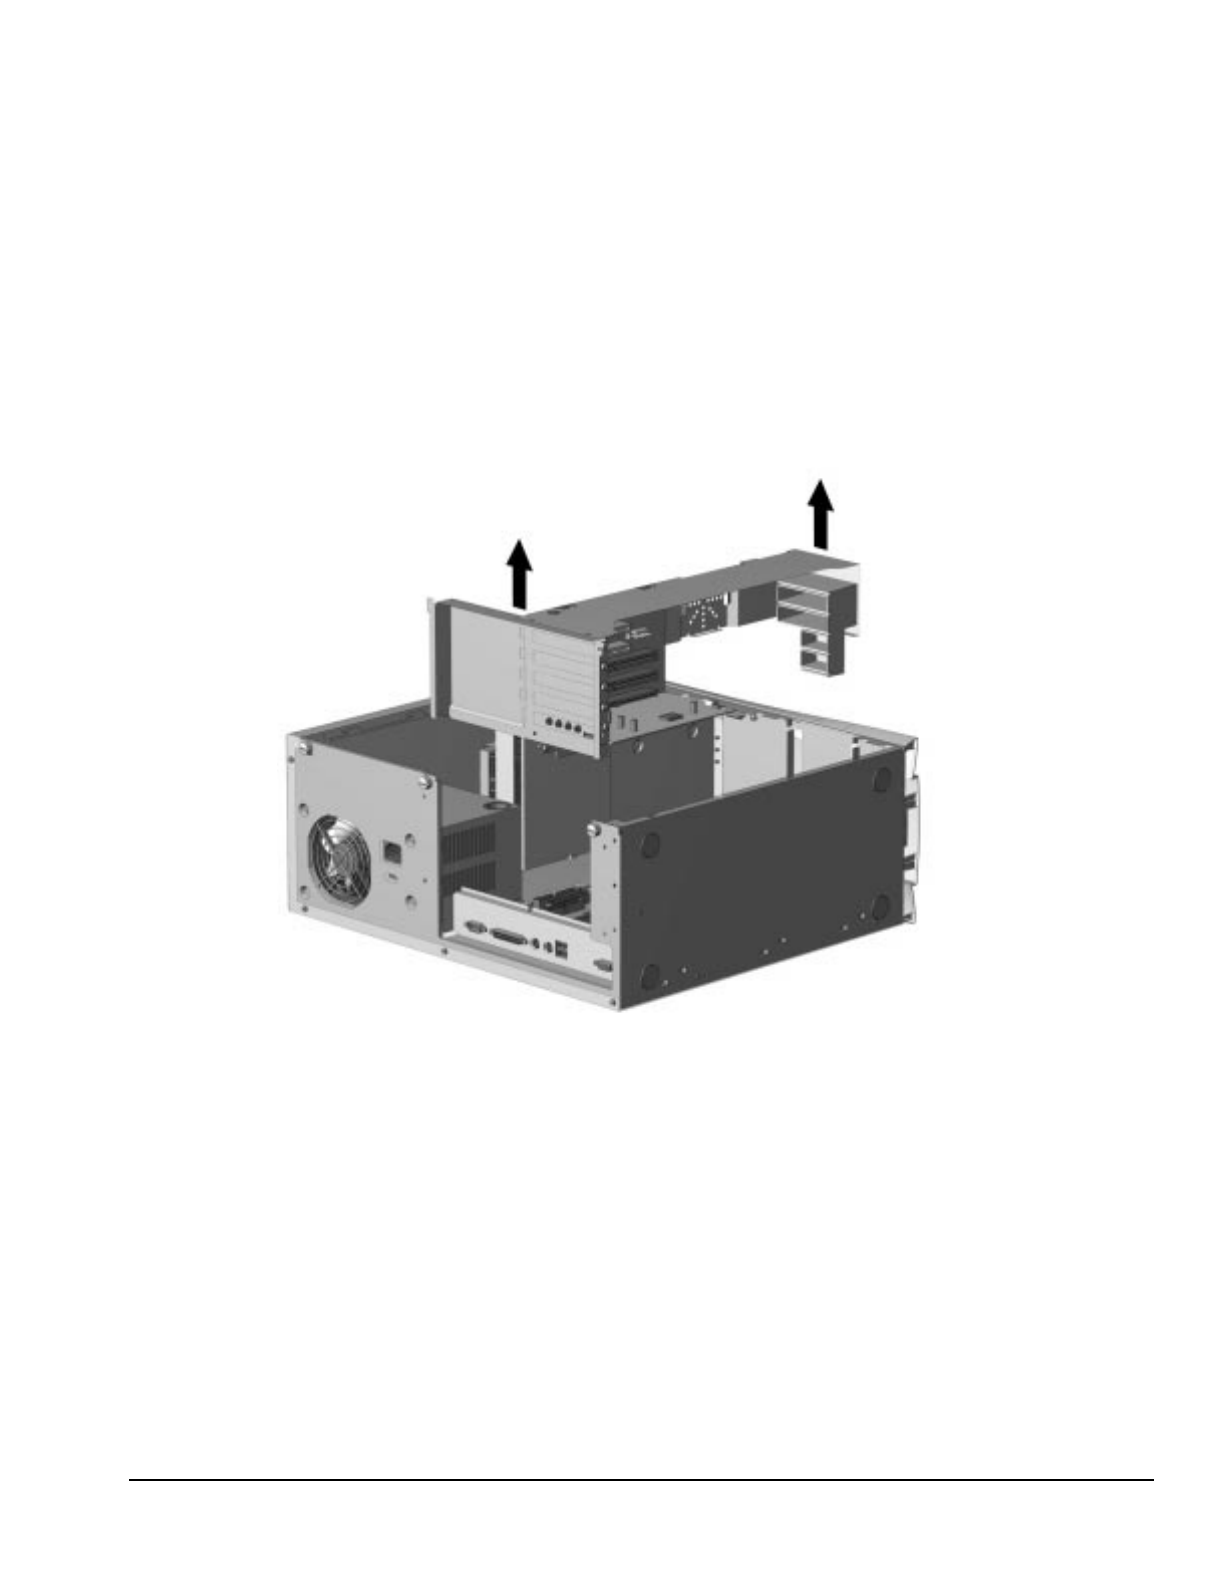
Compaq Deskpro 2000 Series of Personal Computers 6-7
6.7 Riser Brace
Before an expansion board can be installed or replaced, you must remove the riser brace that holds
the expansion boards. Follow these steps to remove the riser brace:
1. Remove the access panel (Section 6.6.1).
2. Disconnect any cables attached to expansion boards on the assembly.
3. Lay the computer on its side, then grasp the riser brace at both ends and pull it out of the
computer chassis. Use care when guiding it out of the unit to prevent damaging the boards.
Figure 6-6. Removing the Riser Brace
To replace the riser brace, reverse the above procedure.
✎When reinstalling the riser brace, fully seat the riser board attached to the case into the
system board socket to ensure complete electrical contact.
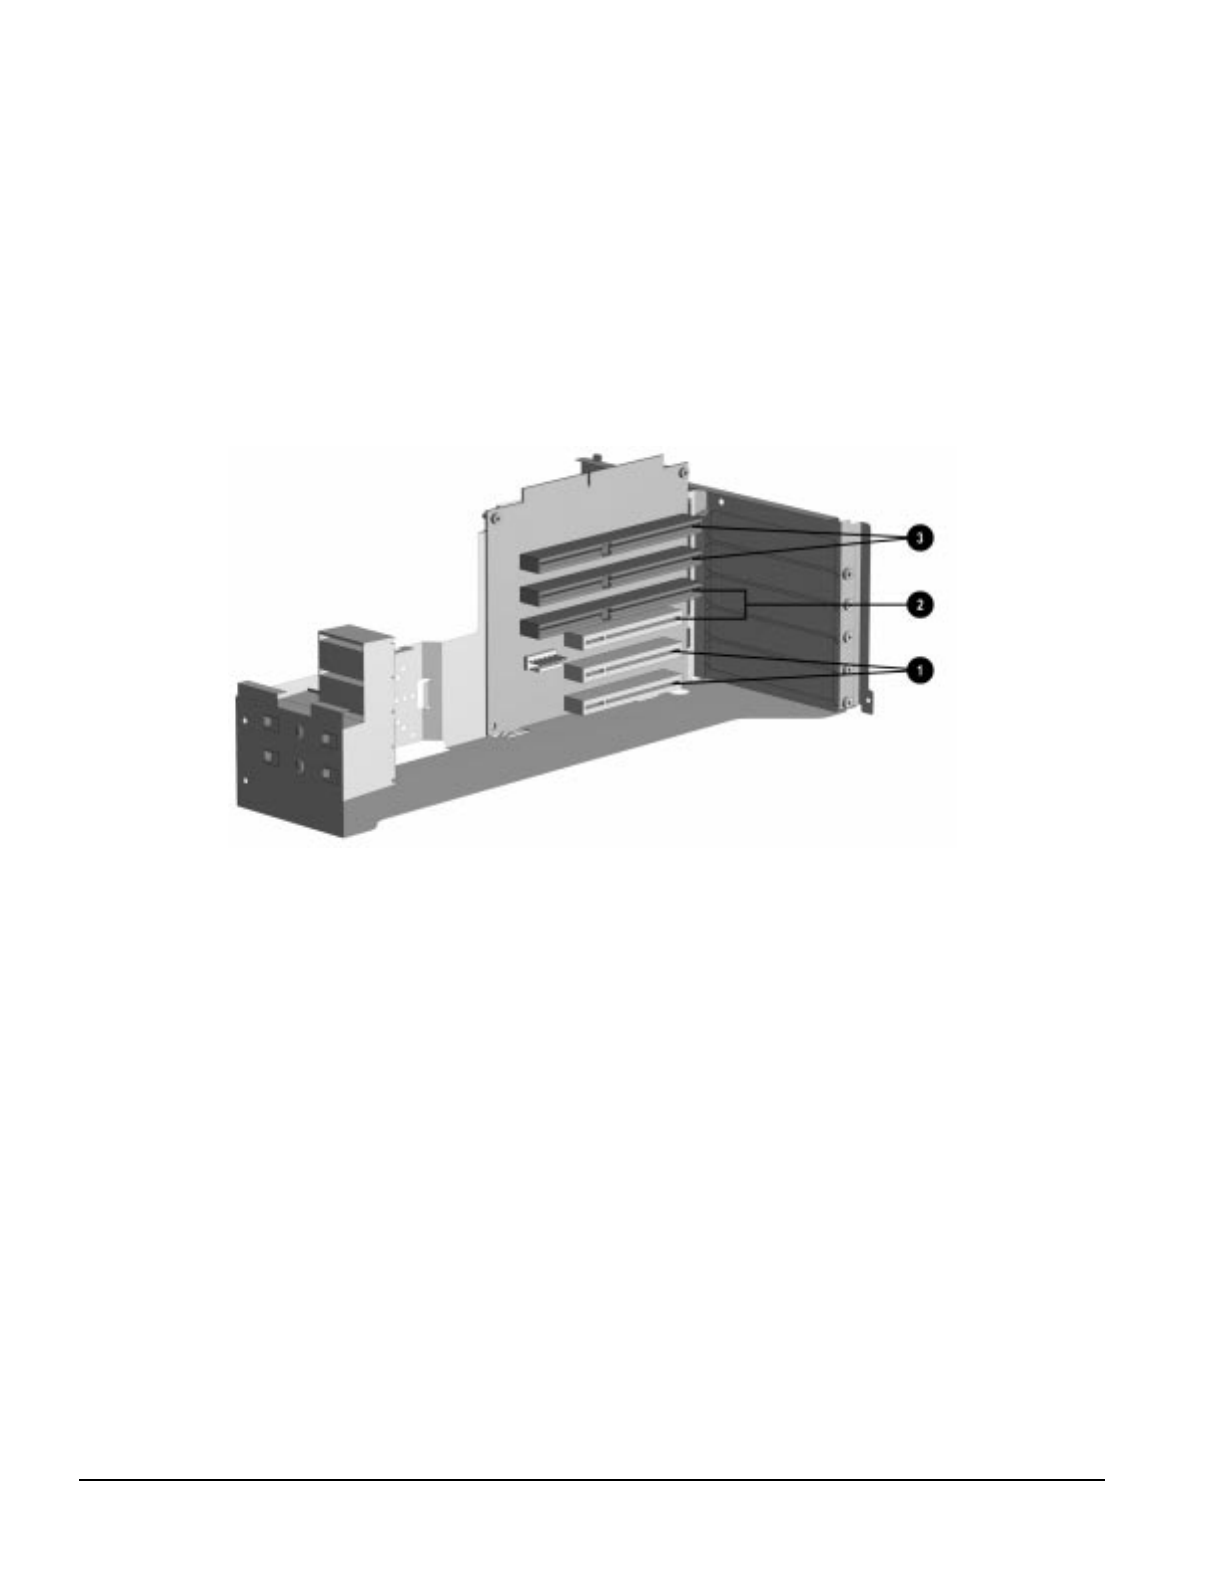
6-8 Removal and Replacement Procedures - Minitower
6.8 Expansion Board
The Compaq Deskpro 2000 Series of Personal Computers contains five expansion slots on the
expansion board.
1Two dedicated PCI expansion slots
2One PCI/ISA shared expansion slot
3Two dedicated ISA expansion slots
Figure 6-7. Five Expansion Slots on the Riser Board
To remove an expansion board, complete the following steps:
1. Remove the access panel (Section 6.6.1).
2. Disconnect any cables attached to the expansion board.
3. Remove the riser brace (Section 6.7).
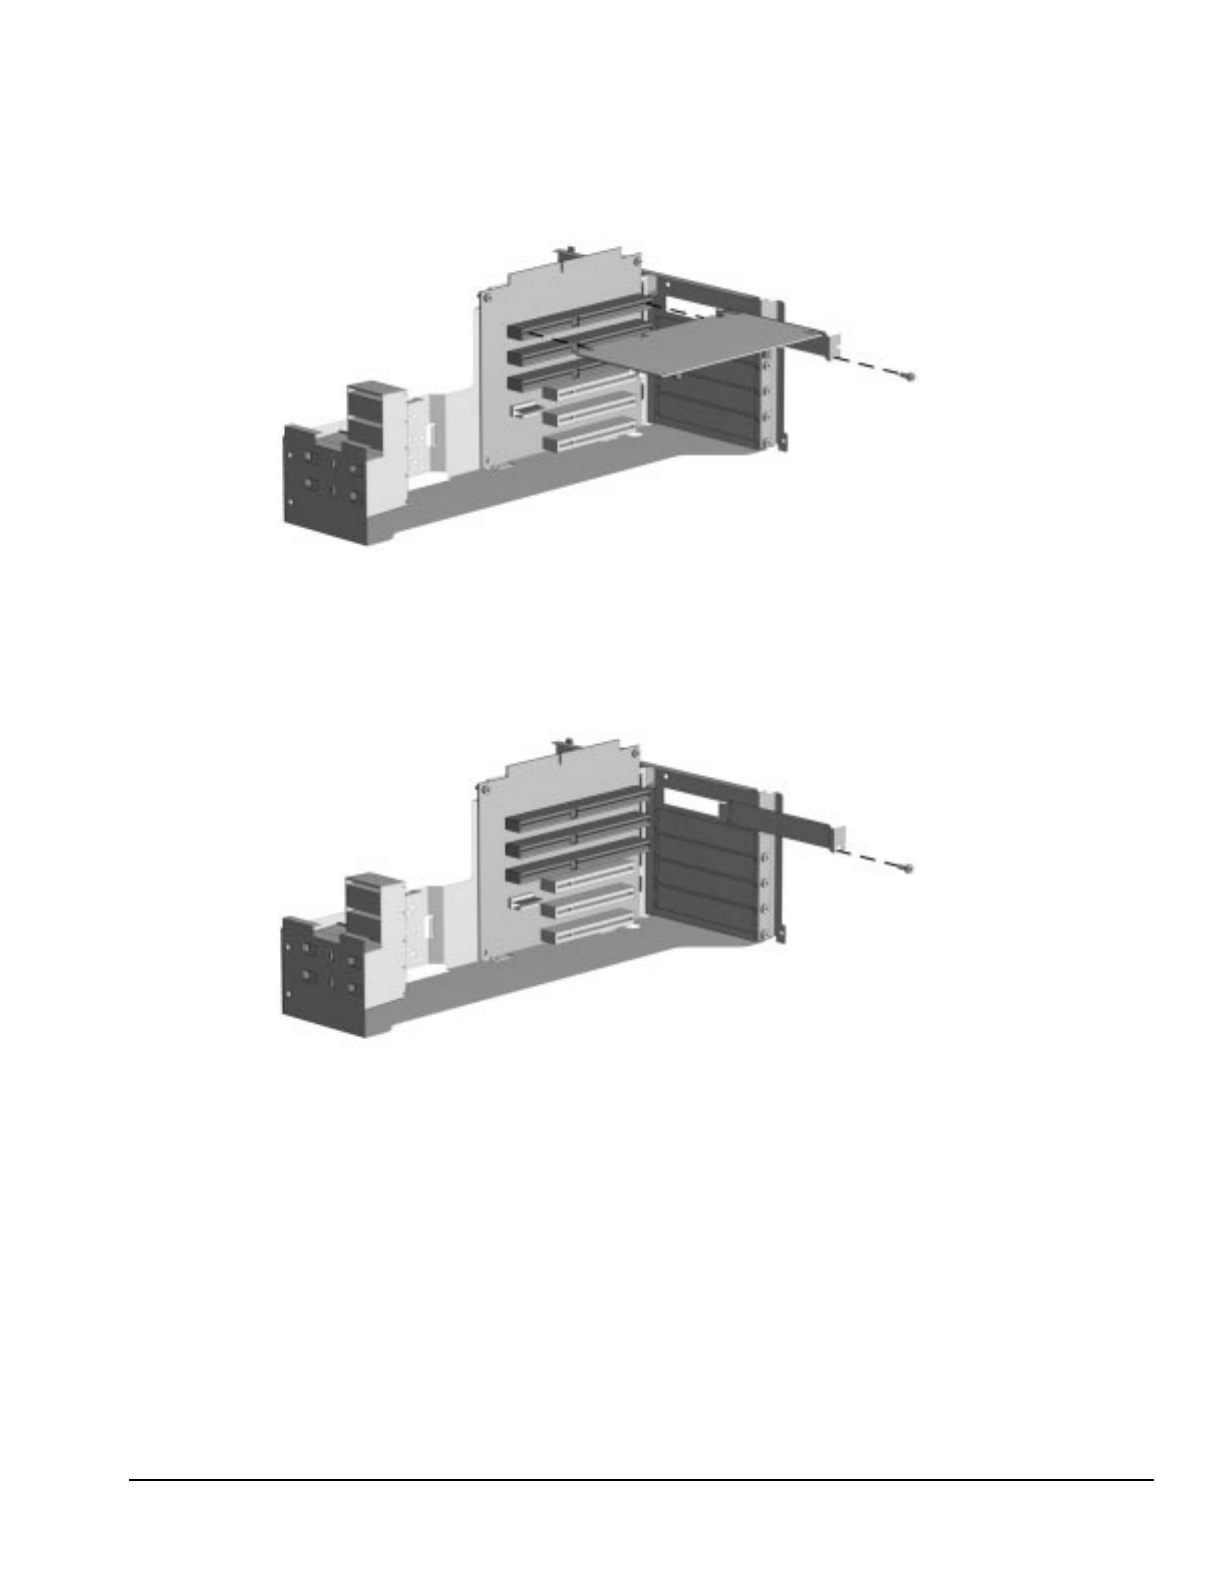
Compaq Deskpro 2000 Series of Personal Computers 6-9
4. Remove the expansion board screw, then slide the expansion board out of the expansion slot.
Figure 6-8. Removing an Expansion Board
To install an expansion board, reverse the above procedure.
✎If you are installing an expansion board for the first time in a slot, remove the retaining
screw and the expansion board slot cover before installing the board.
Figure 6-9. Removing the Expansion Slot Cover

6-10 Removal and Replacement Procedures - Minitower
6.9 Expansion Board Guide
To remove the expansion board guide, complete the following steps:
1. Remove the access panel (Section 6.6.1).
2. Remove the riser brace (Section 6.7).
3. Remove the expansion boards (Section 6.8).
4. Grasp the board guide firmly, press in on the two tabs 1 in the center front of the board guide,
and slide it to the right 2 to unsnap it from the front of the riser brace.
Figure 6-10. Removing the Expansion Board Guide
To replace the expansion board guide, reverse the above procedure.
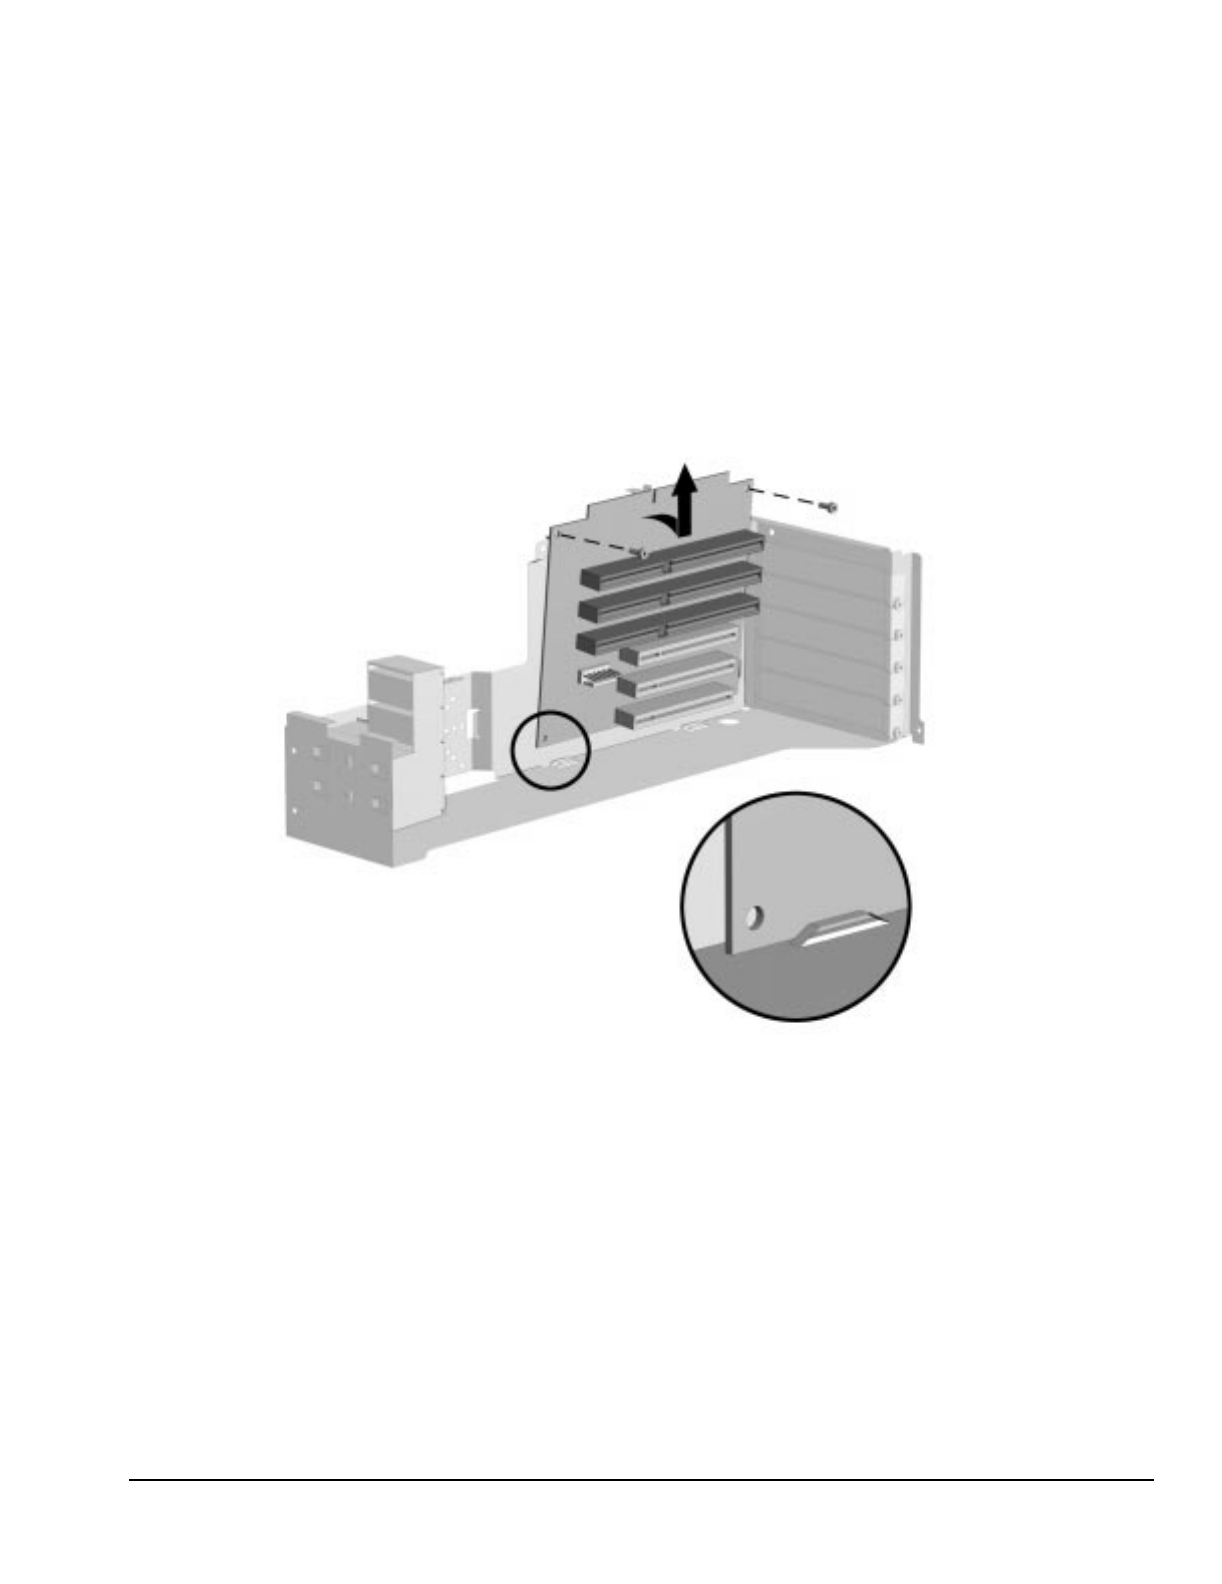
Compaq Deskpro 2000 Series of Personal Computers 6-11
6.10 Riser Board
To remove the riser board, complete the following steps:
1. Remove the access panel (Section 6.6.1).
2. Remove the riser brace (Section 6.7).
3. Remove the expansion boards (Section 6.8).
4. Remove the screws that secure the riser board to the riser brace.
5. Tilt the riser board slightly away from the riser brace and pull up.
Figure 6-11. Removing the Riser Board
To replace the riser board, reverse the above procedure.

6-12 Removal and Replacement Procedures - Minitower
6.11 Speaker
To remove the speaker, complete the following steps:
1. Remove the access panel (Section 6.6.1).
2. Remove the riser brace (Section 6.7).
3. Disconnect the speaker cable from the audio board or the system board.
4. Remove the two speaker retaining screws.
5. Lift the speaker up out of the retaining tabs.
Figure 6-12. Disconnecting the Speaker Cable from the Audio Board
To install the speaker, reverse the above procedure.
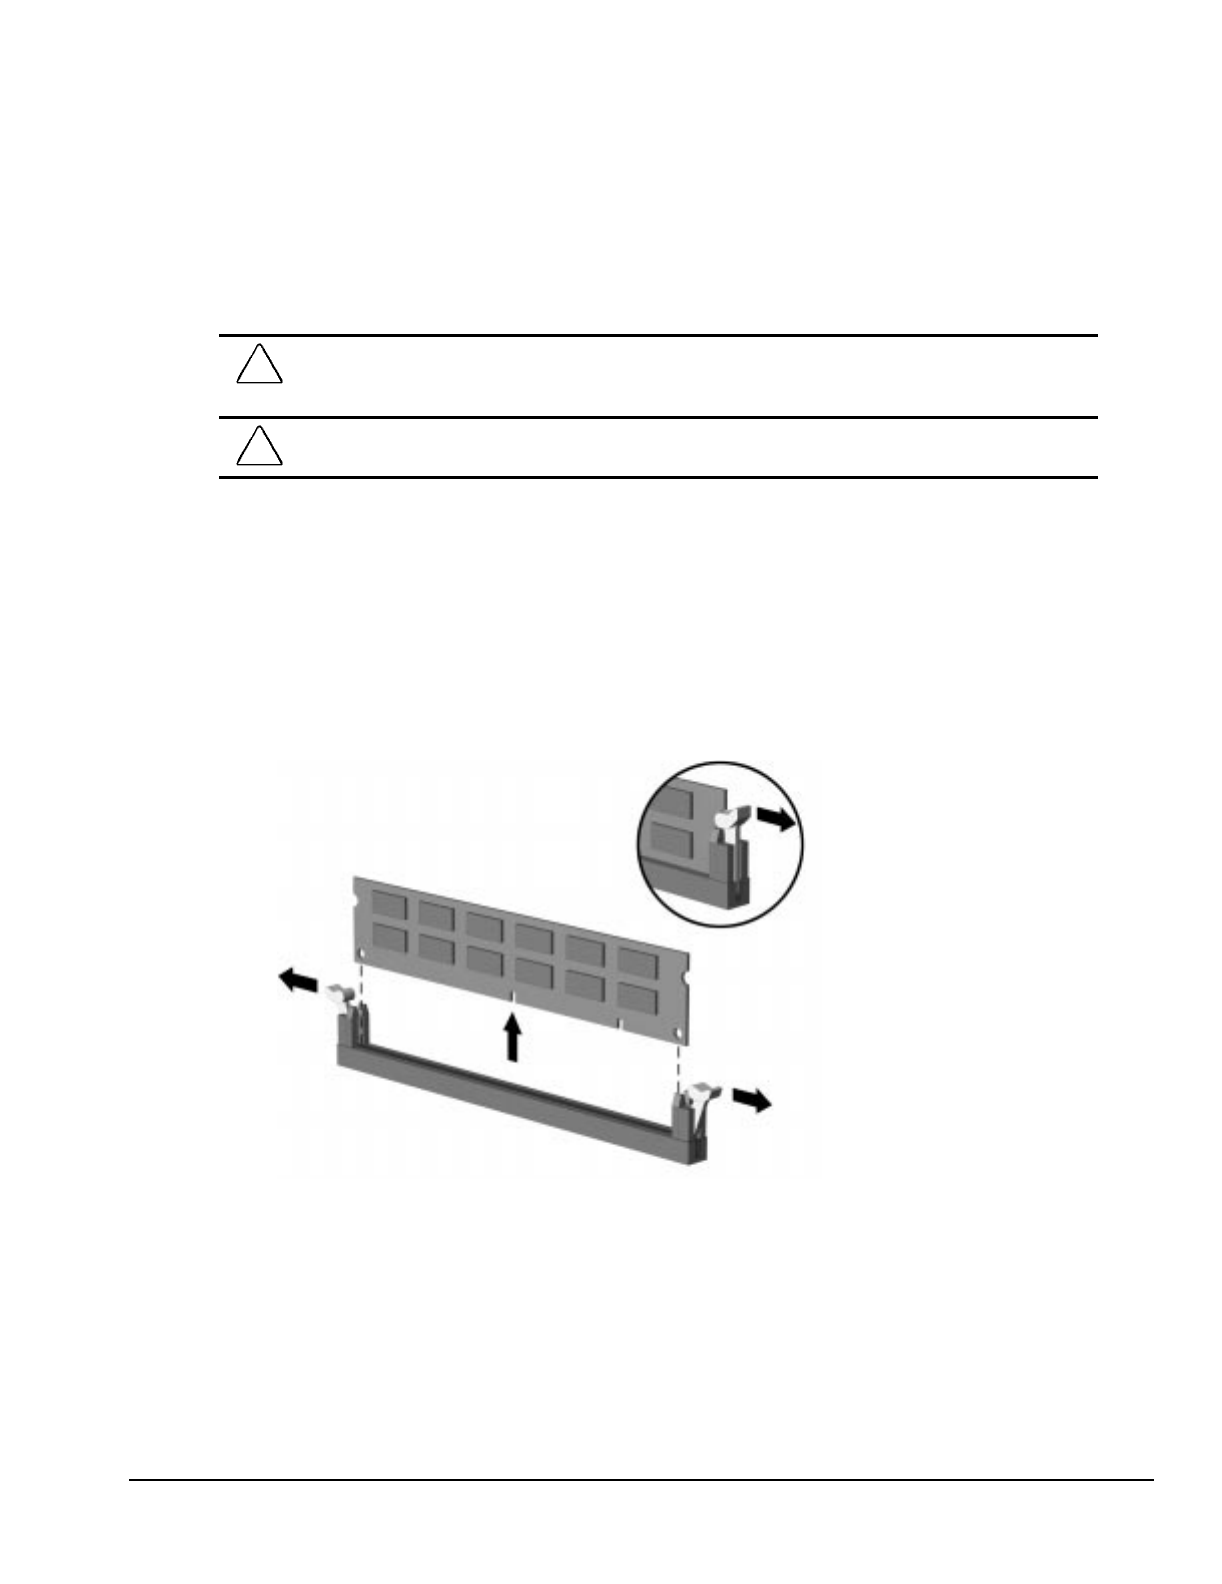
Compaq Deskpro 2000 Series of Personal Computers 6-13
6.12 System Board Components
6.12.1 Memory Module
Memory may be expanded by adding one or more DIMMs at a time onto the system board.
CAUTION: Static electricity can damage the electronic components of the computer or optional boards.
Before beginning these procedures, ensure that you are discharged of static electricity by briefly touching
a grounded metal object.
CAUTION: When handling a memory module, be careful not to touch any of the contacts. Doing so can
damage the module.
To remove a memory module, complete the following steps:
1. Remove the access panel (Section 6.6.1).
2. Remove the riser brace (Section 6.7).
3. Press outward on both latches of the DIMM socket at the same time. This releases the module
and partially pushes it out of the socket.
4. Lift the module from the socket.
Figure 6-13. Removing a Memory Module
✎For the location of the DIMM sockets on the system board, see Chapter 7.
To replace a DIMM, reverse the above steps.
✎When the computer starts up, it will recognize the system memory upgrade and
automatically reconfigure the computer.
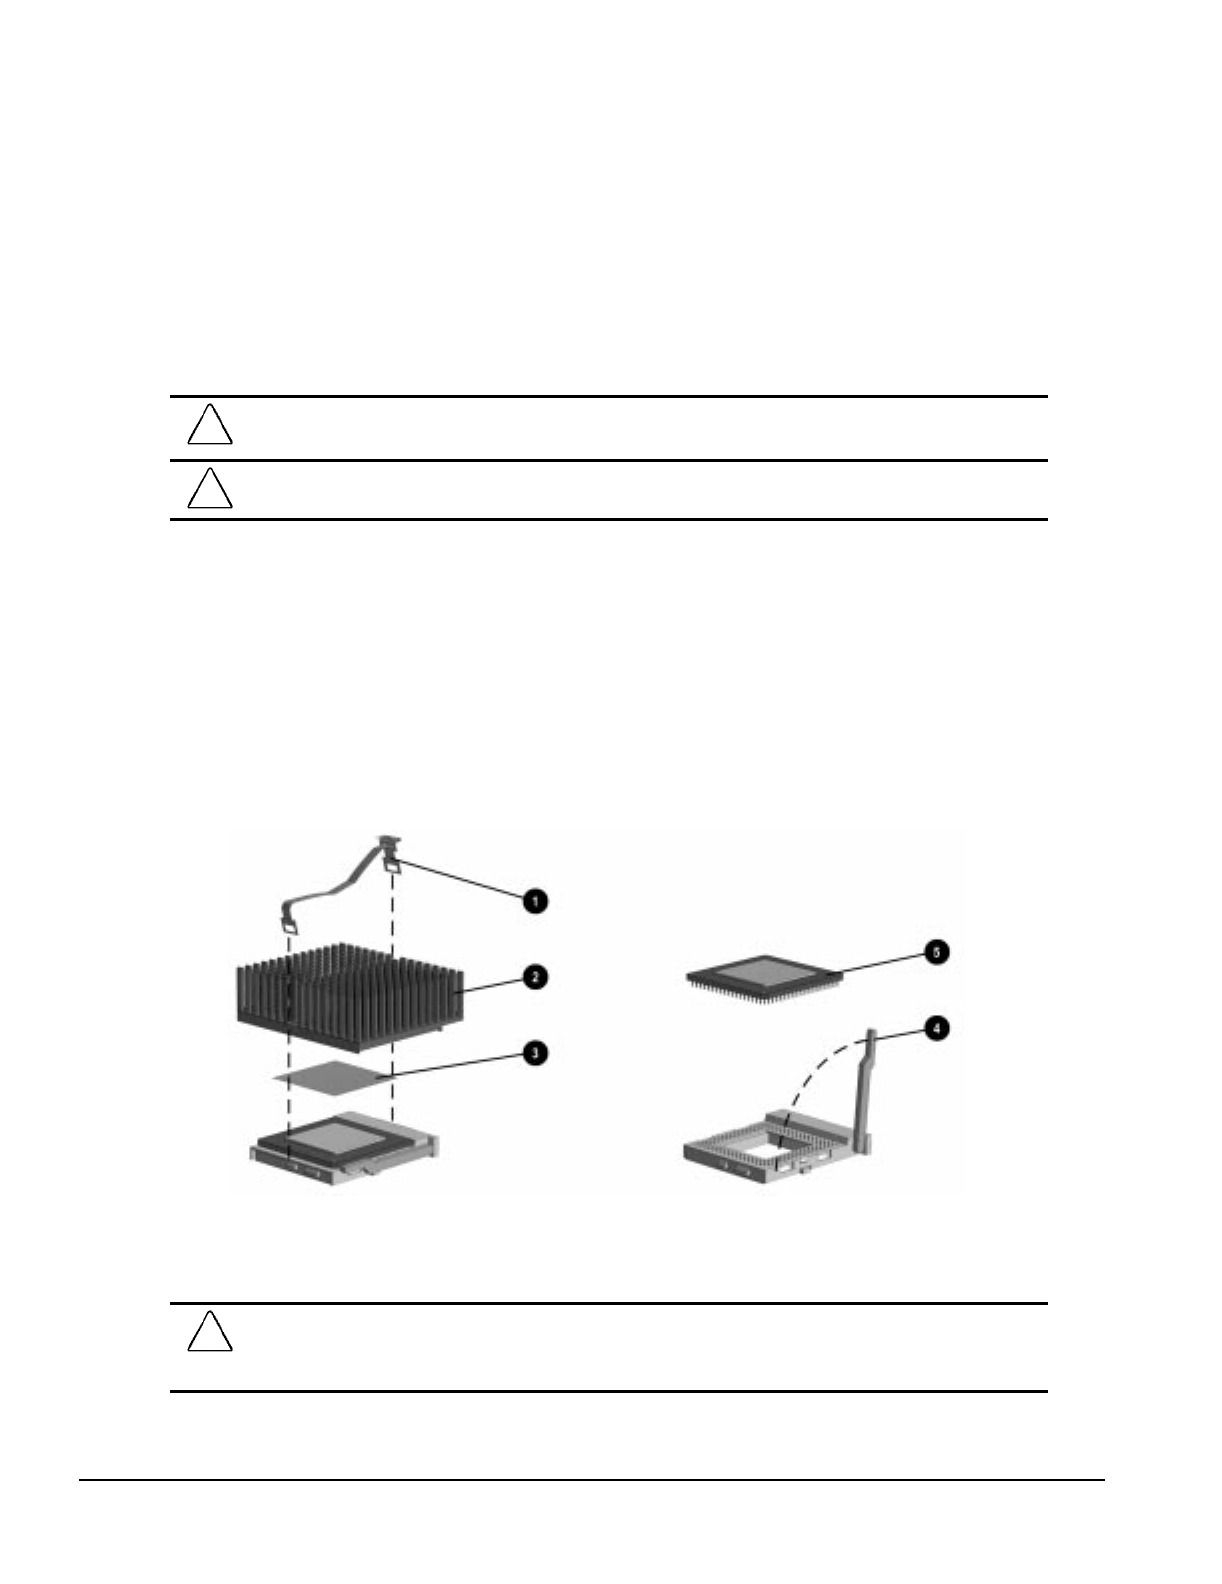
6-14 Removal and Replacement Procedures - Minitower
6.12.2 Microprocessor
Pentium System Board
To remove the microprocessor from the Pentium system board, complete the following steps
1. Remove the access panel (Section 6.6.1).
2. Remove any cables attached to expansion boards on the riser assembly.
CAUTION: When replacing the processor, you must release the heat sink retaining clip before you pull the
ZIF socket handle. The clip engages the processor socket to hold the heat sink in place.
!WARNING: To reduce the risk of personal injury from hot surfaces, allow the internal system components
to cool before touching.
3. Remove the riser brace (Section 6.7).
4. Remove the heat sink retaining clip 1 by pressing down on the clip’s extended tab until it
releases from the safety catch.
5. Lift the heat sink 2 off the processor.
6. Release the processor from the socket by pulling the handle on the ZIF socket out and upward 4.
✎ The handle on the ZIF socket in the picture may not look identical to the one on the
computer. All handle types perform the same function.
7. Lift the processor 5 out of the socket.
Figure 6-14. Removing the Microprocessor from the System Board
✎For the location of the processor socket on the system board, see Chapter 7.
CAUTION: When replacing the processor, be sure the clipped corner of the processor (location of Pin 1) is
aligned with the triangular area of the ZIF socket (marked * on the system board). Failure to do so could
result in burning out both the processor and the system board.
Compaq Deskpro 2000 Series of Personal Computers 6-15
To install the processor, complete the following steps:
1. Lower the processor 5 into the ZIF socket. Ensure that pin 1 on the processor aligns with pin 1
on the ZIF socket.
The location of pin 1 is indicated by a star (*) on the system board.
✎ The handle on the ZIF socket in the picture may not look identical to the one on the
computer. All handle types perform the same function.
2. Push the ZIF handle 4 on the ZIF socket back into place to secure the processor.
3. If the processor has a raised center, install thermal pad number 243226-001 3 on top of the
processor before installing the heat sink.
If the processor has a flat center, install thermal pad number 184616-002 3 on top of the
processor before installing the heat sink.
CAUTION: Using the wrong thermal pad may cause the processor to overheat or short, resulting in failure.
4. Install the heat sink 2 and the heat sink retaining clip 1.
5. Install the riser brace.
6. Replace any cables that were removed.
7. Replace the access panel.
Pentium II System Board
To remove the microprocessor from the Pentium II system board, complete the following steps:
1. Remove the access panel (Section 6.6.1).
2. Remove any cables attached to expansion boards on the riser assembly.
3. Remove the riser brace (Section 6.7).
!WARNING: To reduce the risk of personal injury from hot surfaces, allow the internal system
components to cool before touching.
4. Slide the system board back about 4 inches (10.2 cm) to expose the Pentium II processor.
CAUTION: Do not remove the air duct from the front of the unit. If the air duct is not installed, the
processor will run hot which can cause damage to the processor.
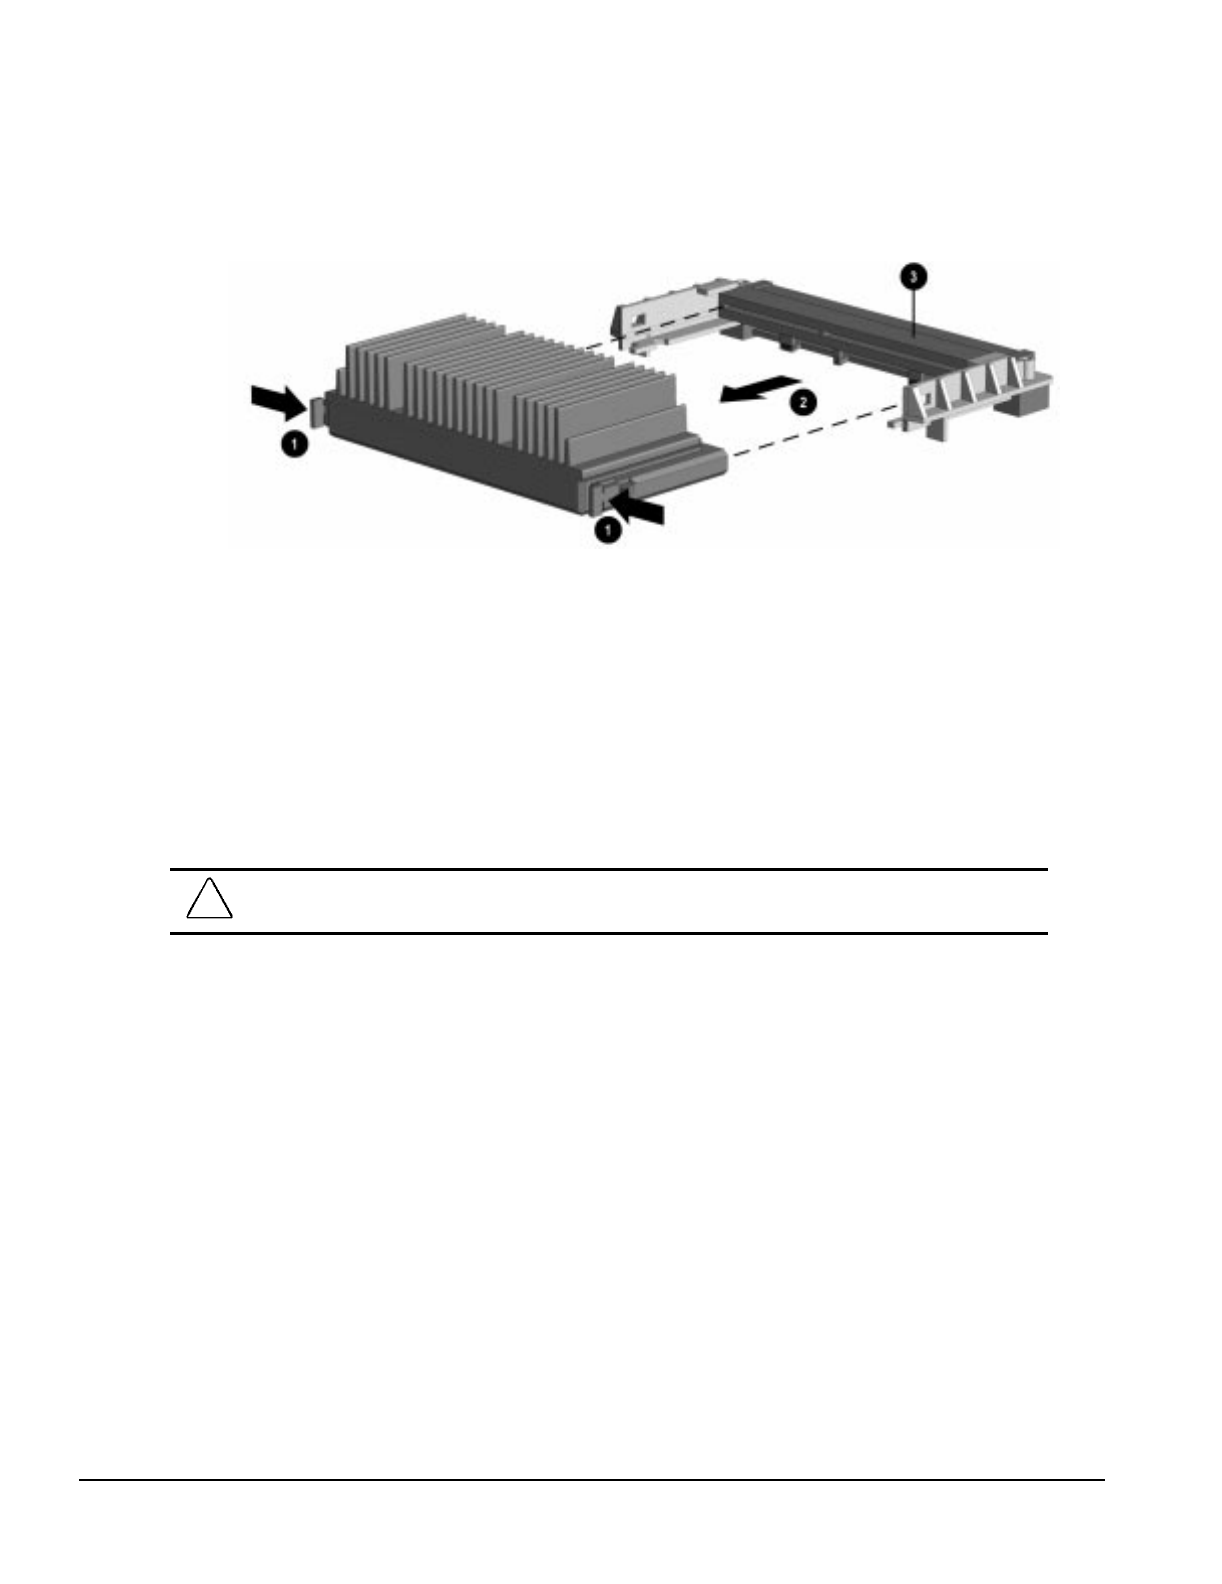
6-16 Removal and Replacement Procedures - Minitower
5. Press in on the processor module release latches 1 until they lock in the released position.
6. Pull the processor module away from the socket 2.
Figure 6-15. Removing the Microprocessor from the Pentium II System Board
✎For the location of the processor on the Pentium II system board, see Chapter 7.
7. Lift the processor module to remove it from the guide rails and the machine.
To install the Pentium II processor, complete the following steps:
1. Ensure that the release latches are locked in the released position.
2. Set the Pentium II processor on the guide rails.
3. Slide the processor along the rails until it is firmly seated in the connector.
CAUTION: Do not use the connector pins or pin guard 3 as a handle. Even with the guard in place, the
pins could bend causing shorts that will damage the processor.
4. Pull out on the release latches until they snap into place.
5. Replace the riser brace.
6. Replace any cables that were removed.
7. Replace the system unit cover.
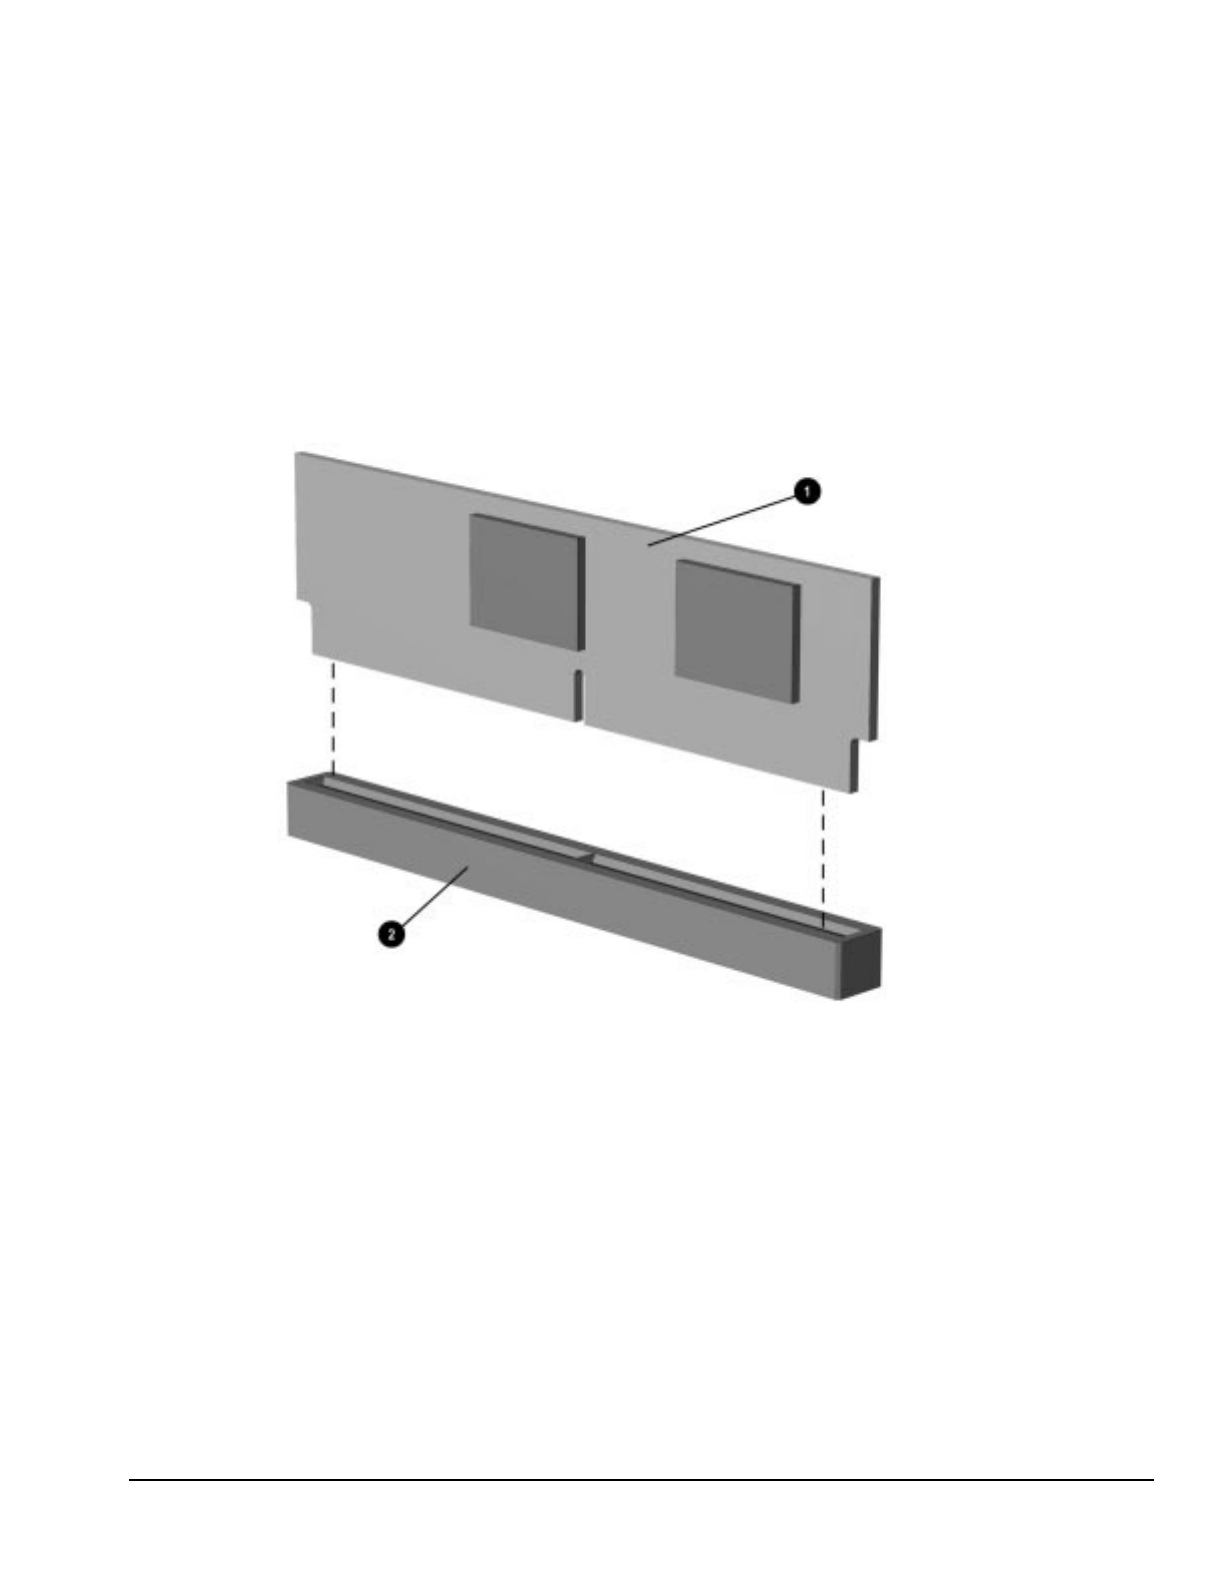
Compaq Deskpro 2000 Series of Personal Computers 6-17
6.12.3 Cache Memory (Pentium System Only)
To install an optional cache board onto the system board, complete the following steps:
1. Remove the access panel (Section 6.6.1).
2. Remove the riser brace (Section 6.7).
3. Install the cache memory board 1 into the cache connector 2 on the system board.
✎Only use Compaq spare part number 278017-001.
Figure 6-16. Installing the Cache Memory Board, Pentium System Board
✎For the location of the cache memory socket on the Pentium system board, see Chapter 7.
4. Install the riser brace.
5. Replace the access panel.
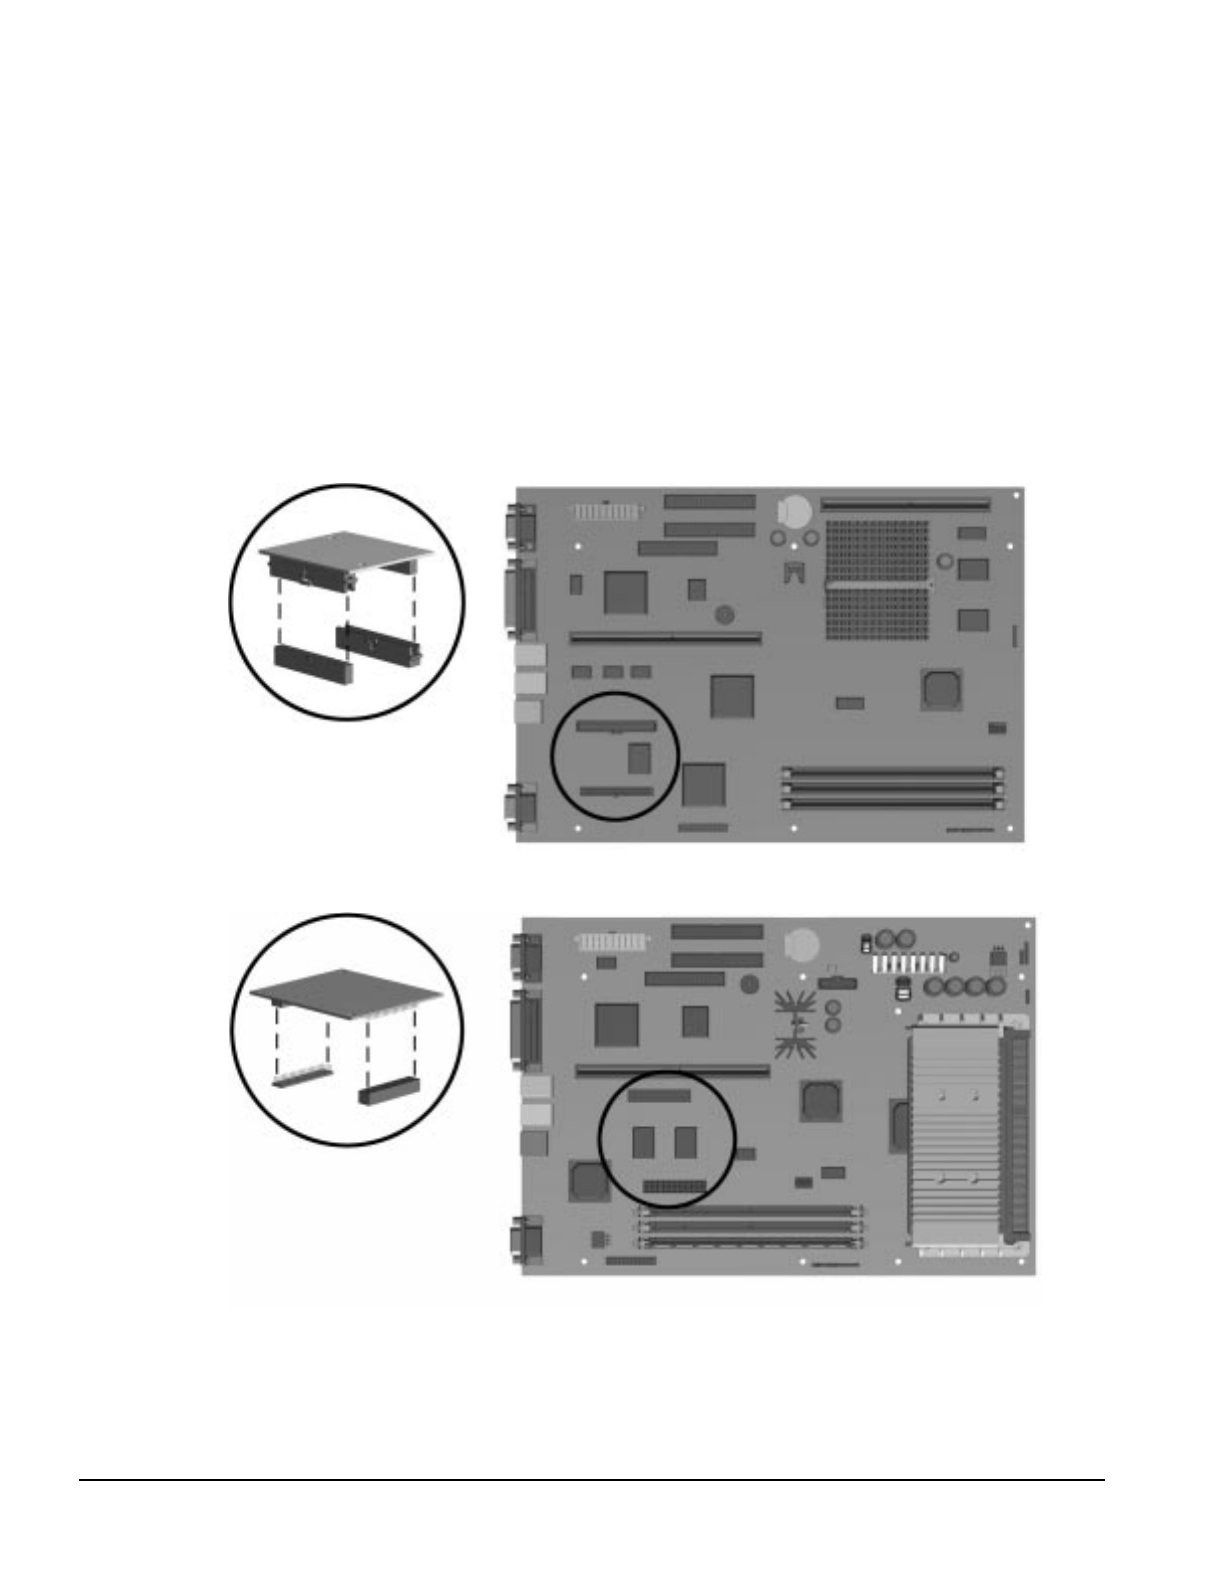
6-18 Removal and Replacement Procedures - Minitower
6.12.4 System Board Graphics Memory
Module Upgrade
To install a graphics memory module upgrade for the graphics controller that is preinstalled in the
system board, complete the following steps:
1. Remove the access panel (Section 6.6.1).
2. Remove the riser brace (Section 6.7).
3. Install the graphics memory upgrade module onto the system board.
Figure 6-17. Installing the Graphics Memory Upgrade Module on the Pentium System Board
Figure 6-18. Installing the Graphics Memory Upgrade Module on the Pentium II System Board
4. Replace the riser brace and access panel.
5. Turn the computer on and start Windows 95.
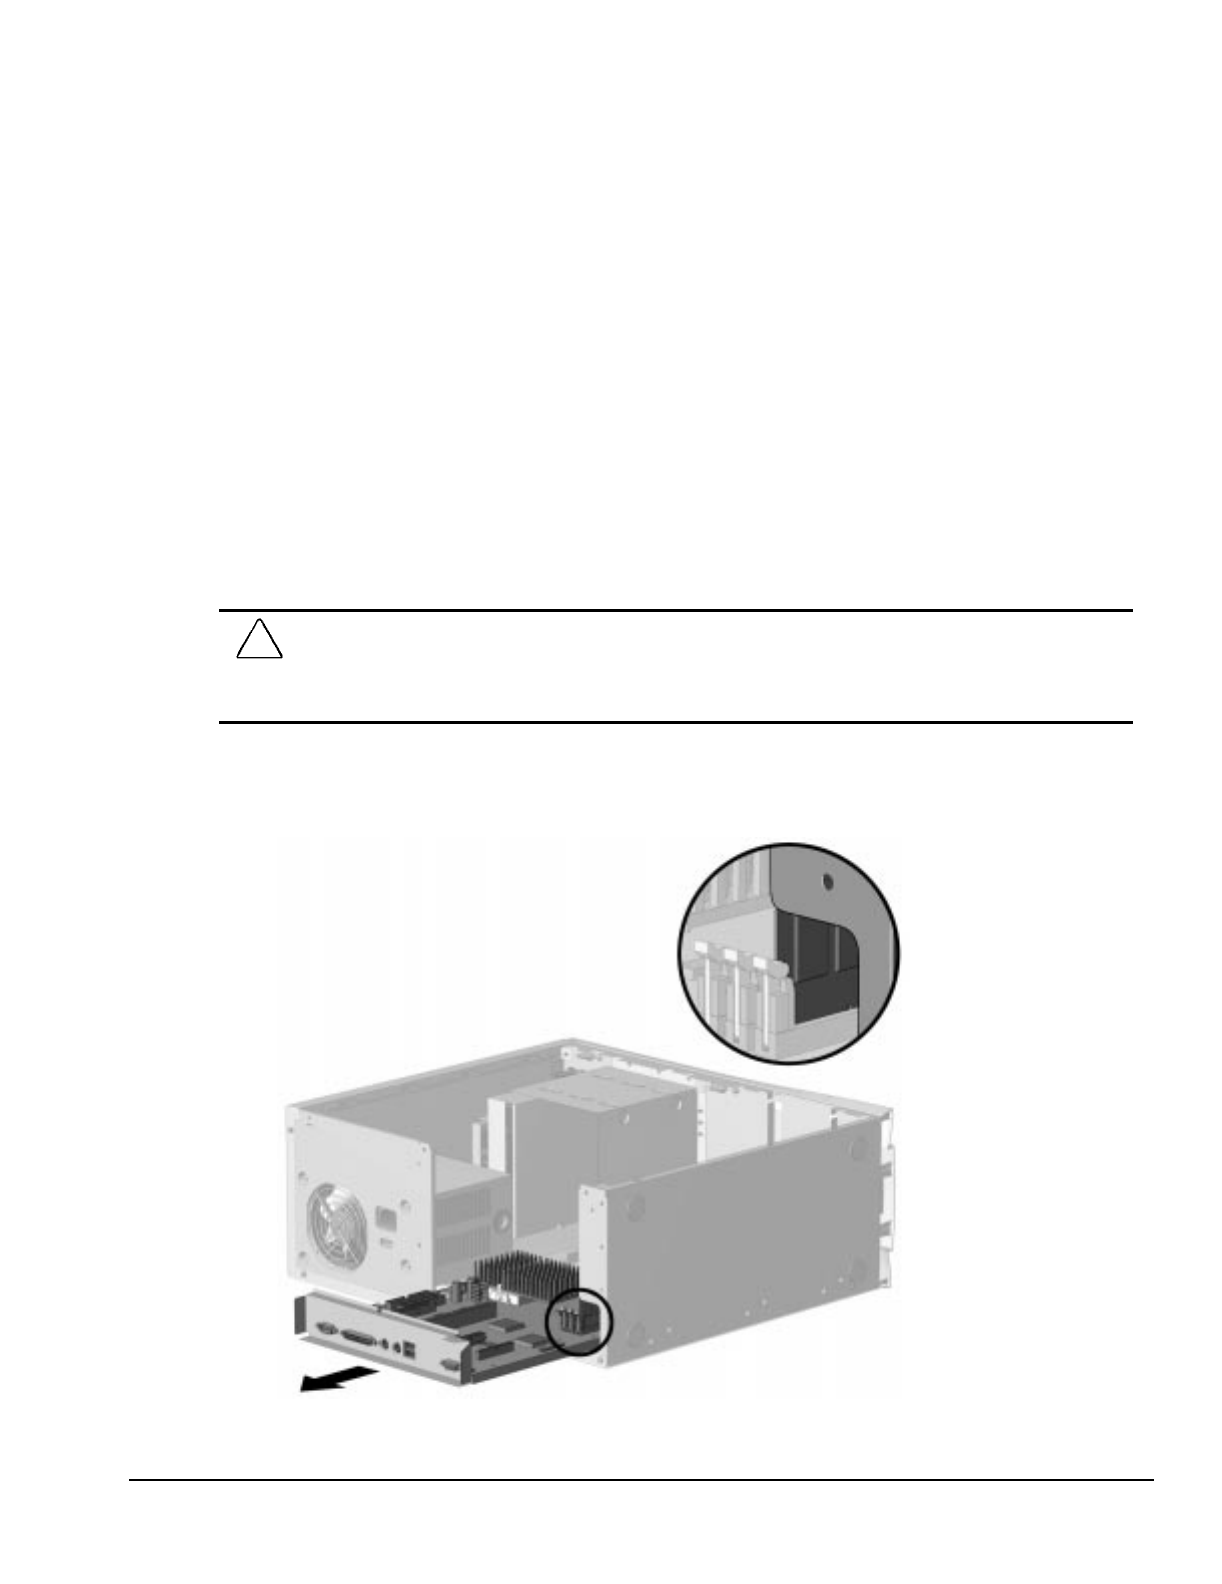
Compaq Deskpro 2000 Series of Personal Computers 6-19
6. Select the display icon in Windows 95 and follow the online instructions to take advantage of the
additional display modes available with the upgraded memory.
To remove the graphics module, reverse the above procedure.
6.13 System Board
To remove the system board, complete the following steps:
1. Remove the access panel (Section 6.6.1).
2. Remove the riser brace (Section 6.7).
✎If a replacement external battery is installed on the system board, do not unplug the battery from
the system board connector as that will erase the CMOS. Remove the external battery from the
hook-and-loop fastener on the chassis but leave it electrically connected to the system board.
3. Disconnect any cables attached to the system board.
CAUTION: If memory has been upgraded with a DIMM taller than 1.25 inches (3.2-cm) in the memory socket
closest to the edge of the board, the DIMM must be removed prior to removing the system board to prevent
damaging the DIMM, the DIMM socket, or the system board. It is not necessary to remove the system board in
order to remove or install the DIMMs.
4. Remove any DIMMs installed on the system board (Section 6.12.1).
5. Slide the system board tray out of the computer.
Figure 6-19. Removing the Pentium System Board
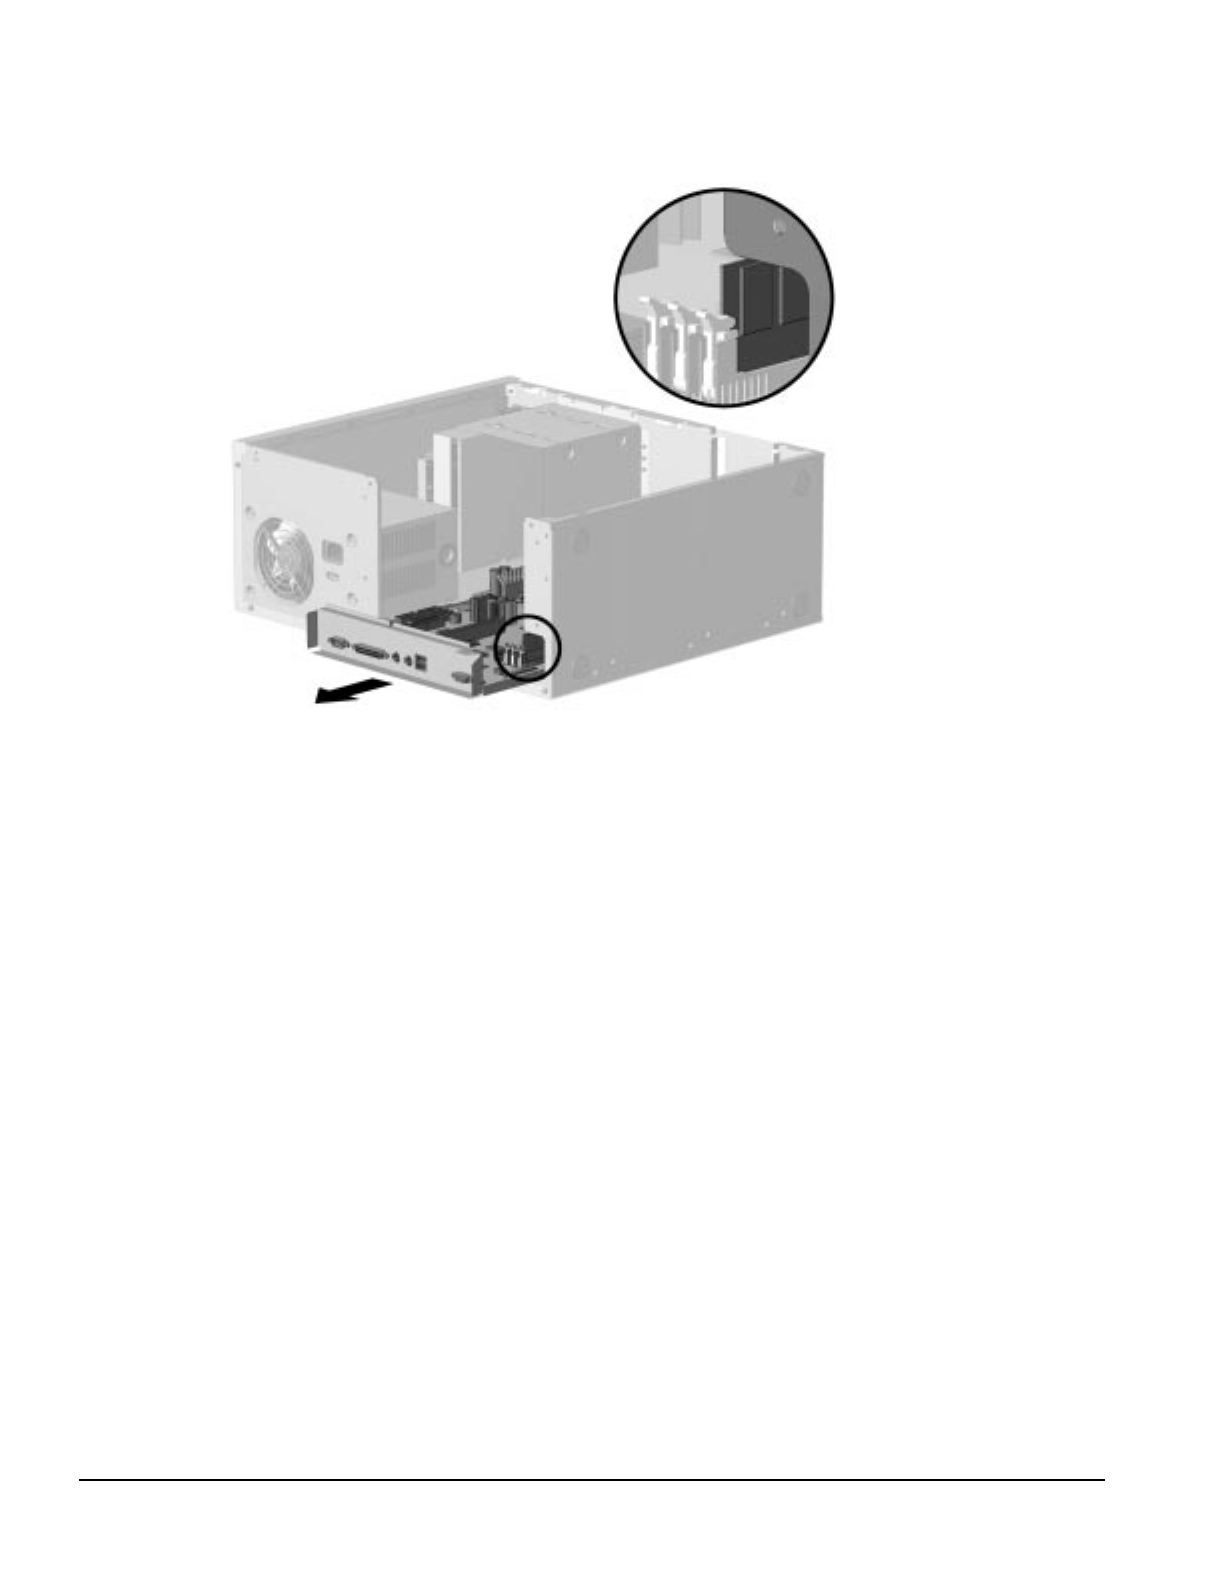
6-20 Removal and Replacement Procedures - Minitower
Figure 6-20. Removing the Pentium II System Board
To replace the system board, reverse the above procedure.

Compaq Deskpro 2000 Series of Personal Computers 6-21
✎When installing the Pentium II system board, ensure that the air duct is mounted in the front
of the chassis with the alignment flaps 3 against the sides. The processor slides under the
top flap of the air duct.
CAUTION: Do not remove the air duct from the front of the unit. If the air duct is not installed or if the
processor is not under the flap of the air duct, the processor will run hot, which can cause damage to the
processor.
Figure 6-21. Pentium II System Board with Processor 1 and Air Duct 2 Installed
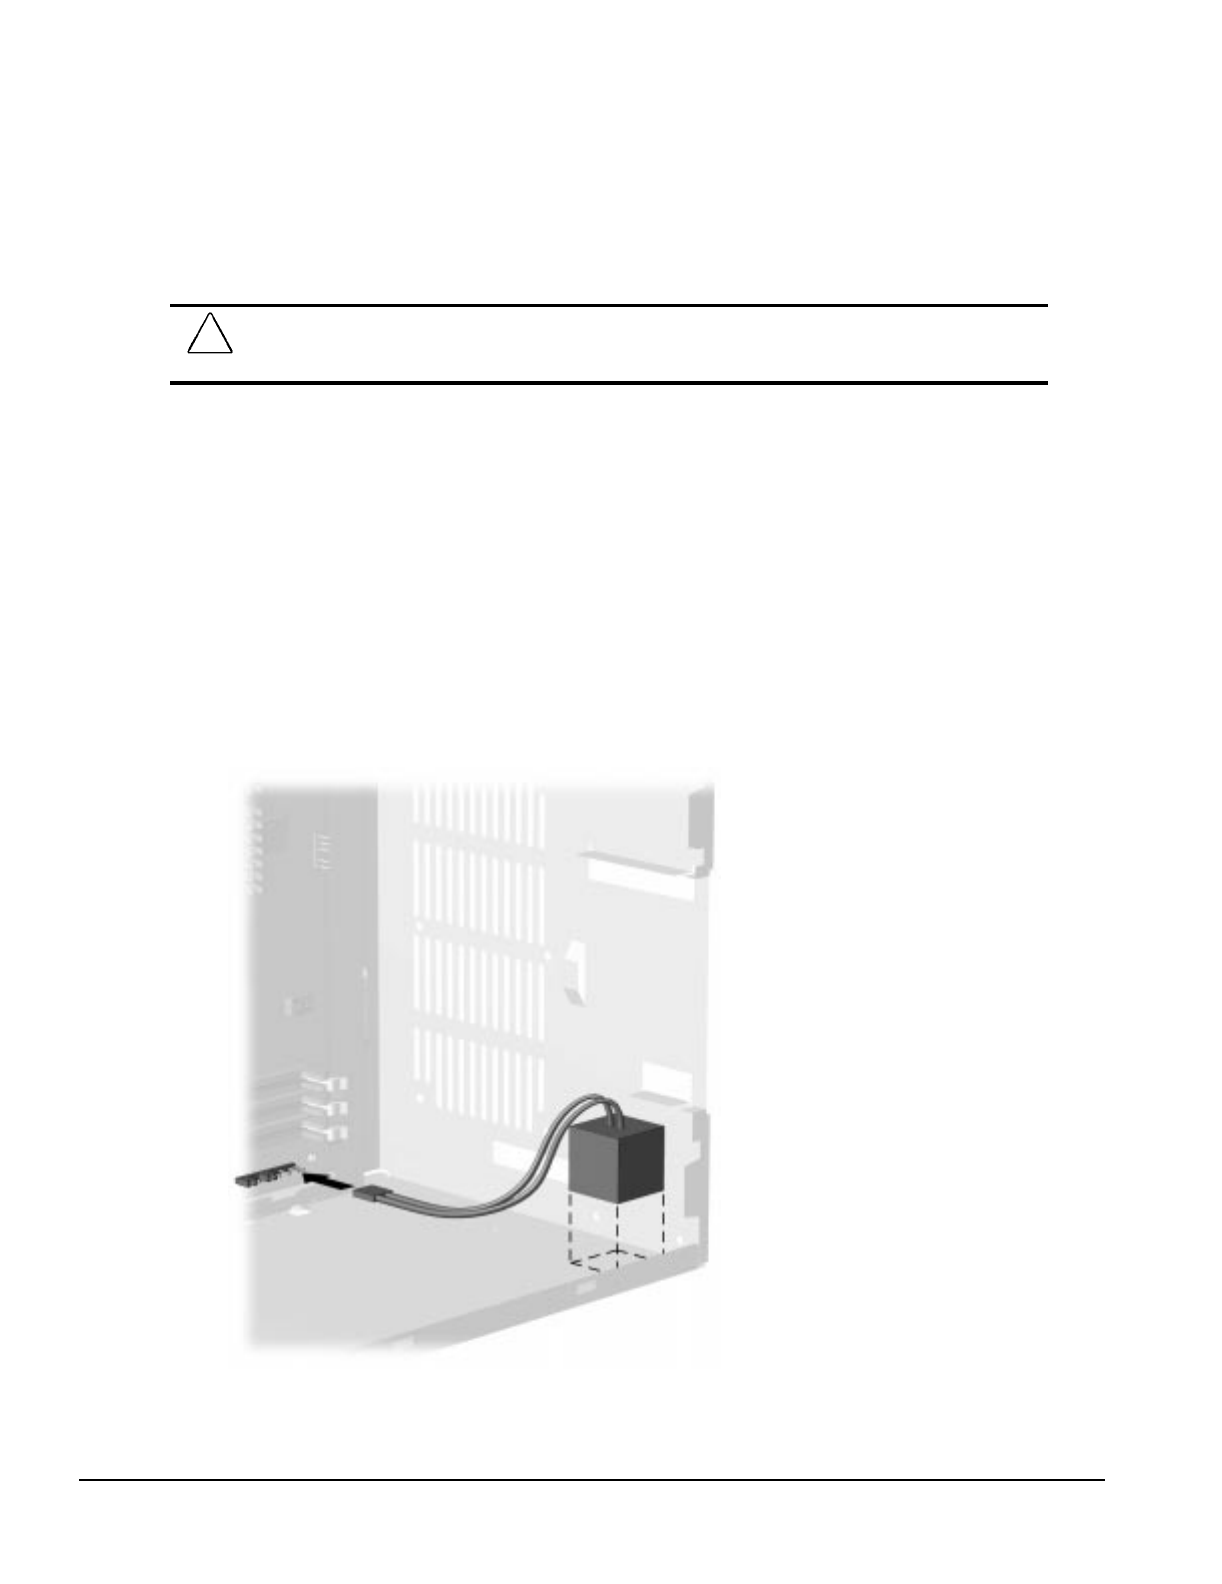
6-22 Removal and Replacement Procedures - Minitower
6.14 Replacement Battery
The real-time clock battery that came with the computer is non-replaceable and is permanently
installed on the system board.
!WARNING: The system board contains a clock/CMOS lithium battery. The lithium battery may explode if
mistreated. The battery is soldered into place and may not be removed. Do not abuse or disassemble. Use
only replacement batteries supplied by Compaq Computer Corporation.
✎ It is important to make a set of backup diagnostic diskettes before you install a new battery.
To install the external real-time battery, complete the following steps:
1. Remove the access panel (Section 6.6.1).
2. Remove the riser brace if a full-length ISA card is present (Section 6.7).
3. Connect the new battery to the pins on the battery header connector on the system board. The
battery connector is labeled “E9 Ext. Batt.” on the Pentium system board and labeled “Ext. Batt.”
on the Pentium II system board. When this battery is connected, the internal battery is
automatically disconnected.
The battery connector is keyed for proper installation.
4. Remove the backing from the adhesive on the hook-and-loop fastener strip attached to the
battery, and attach the battery as shown.
Figure 6-22. Installing the Battery, Pentium System
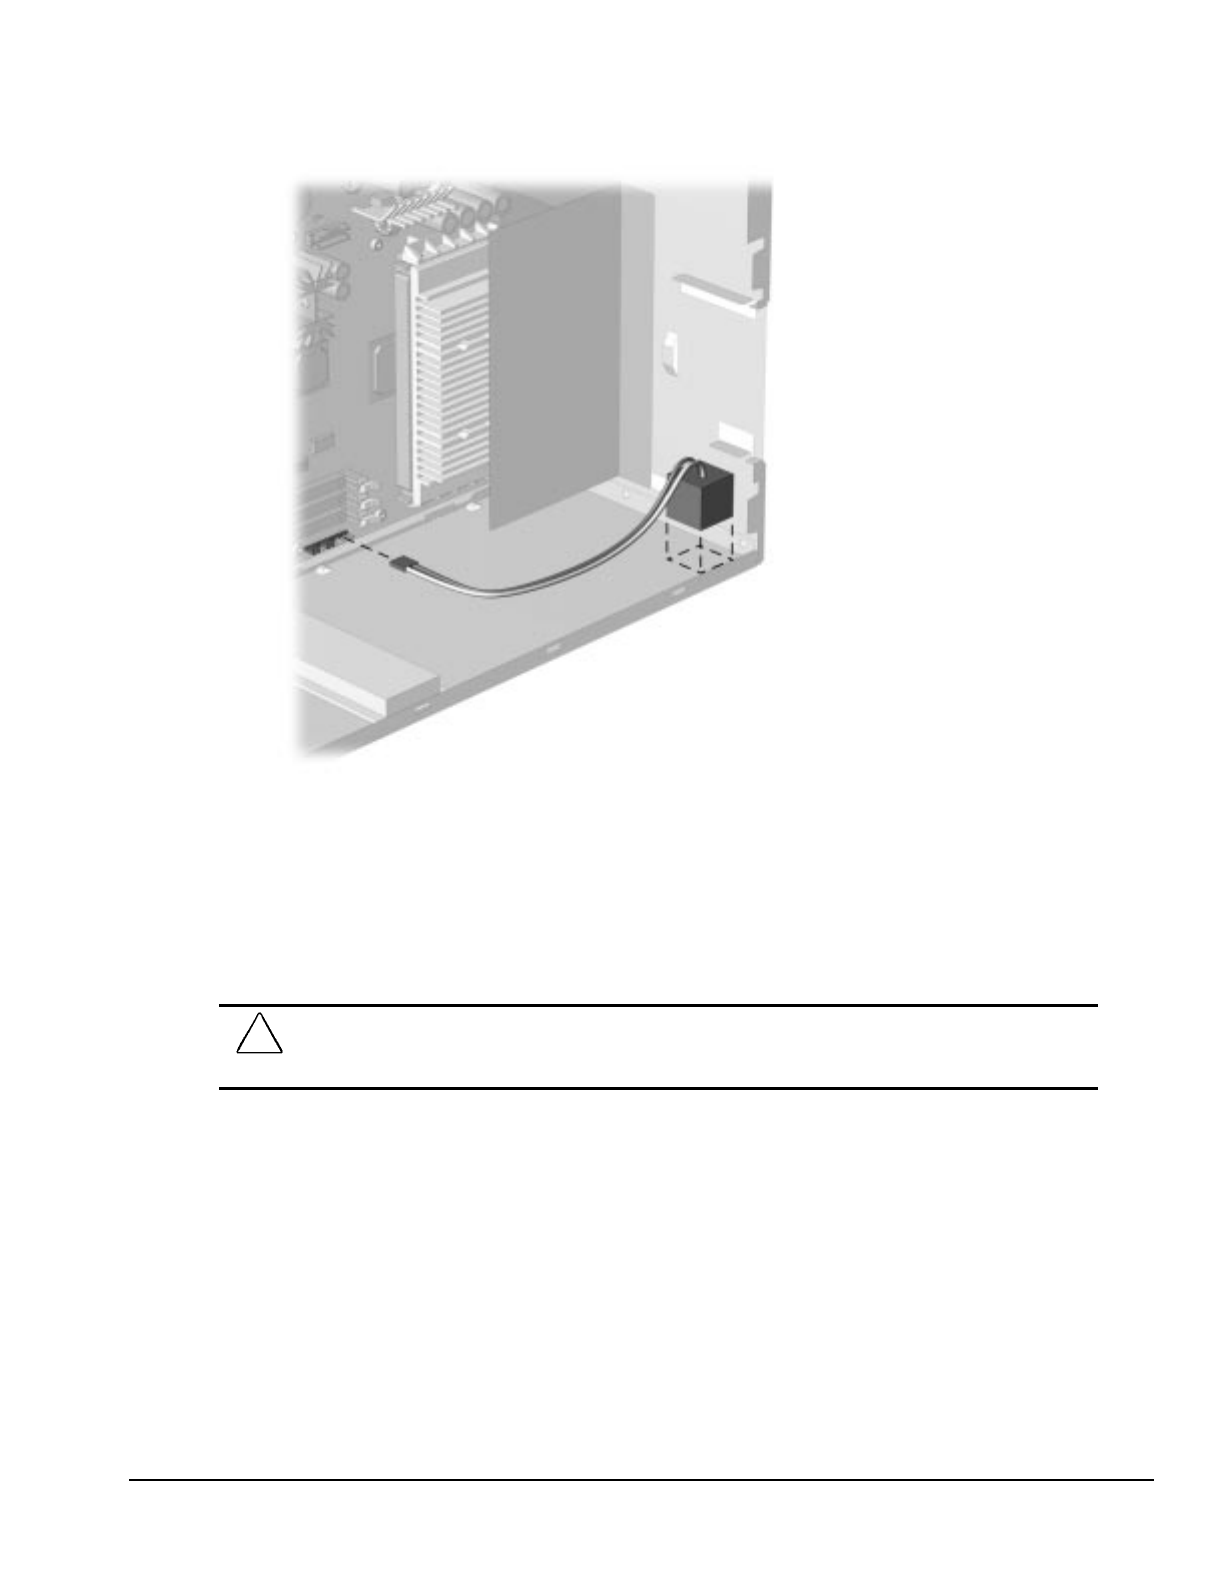
Compaq Deskpro 2000 Series of Personal Computers 6-23
Figure 6-23. Installing the Battery, Pentium II System
5. Replace the riser brace if needed.
6. Replace the access panel.
7. Place the sticker contained in the battery kit onto the back of the computer above the power
connector.
8. Reconnect any external devices and plug in the computer.
!WARNING: This equipment is designed for connection to a grounded (earthed) outlet. The grounding type
plug is an important safety feature. To avoid the risk of electrical shock or damage to the equipment, do
not disable this feature.
9. Turn on the computer.
10. Run the computer Setup utility to reconfigure the system. Refer to Chapter 2, “Compaq Utilities.”
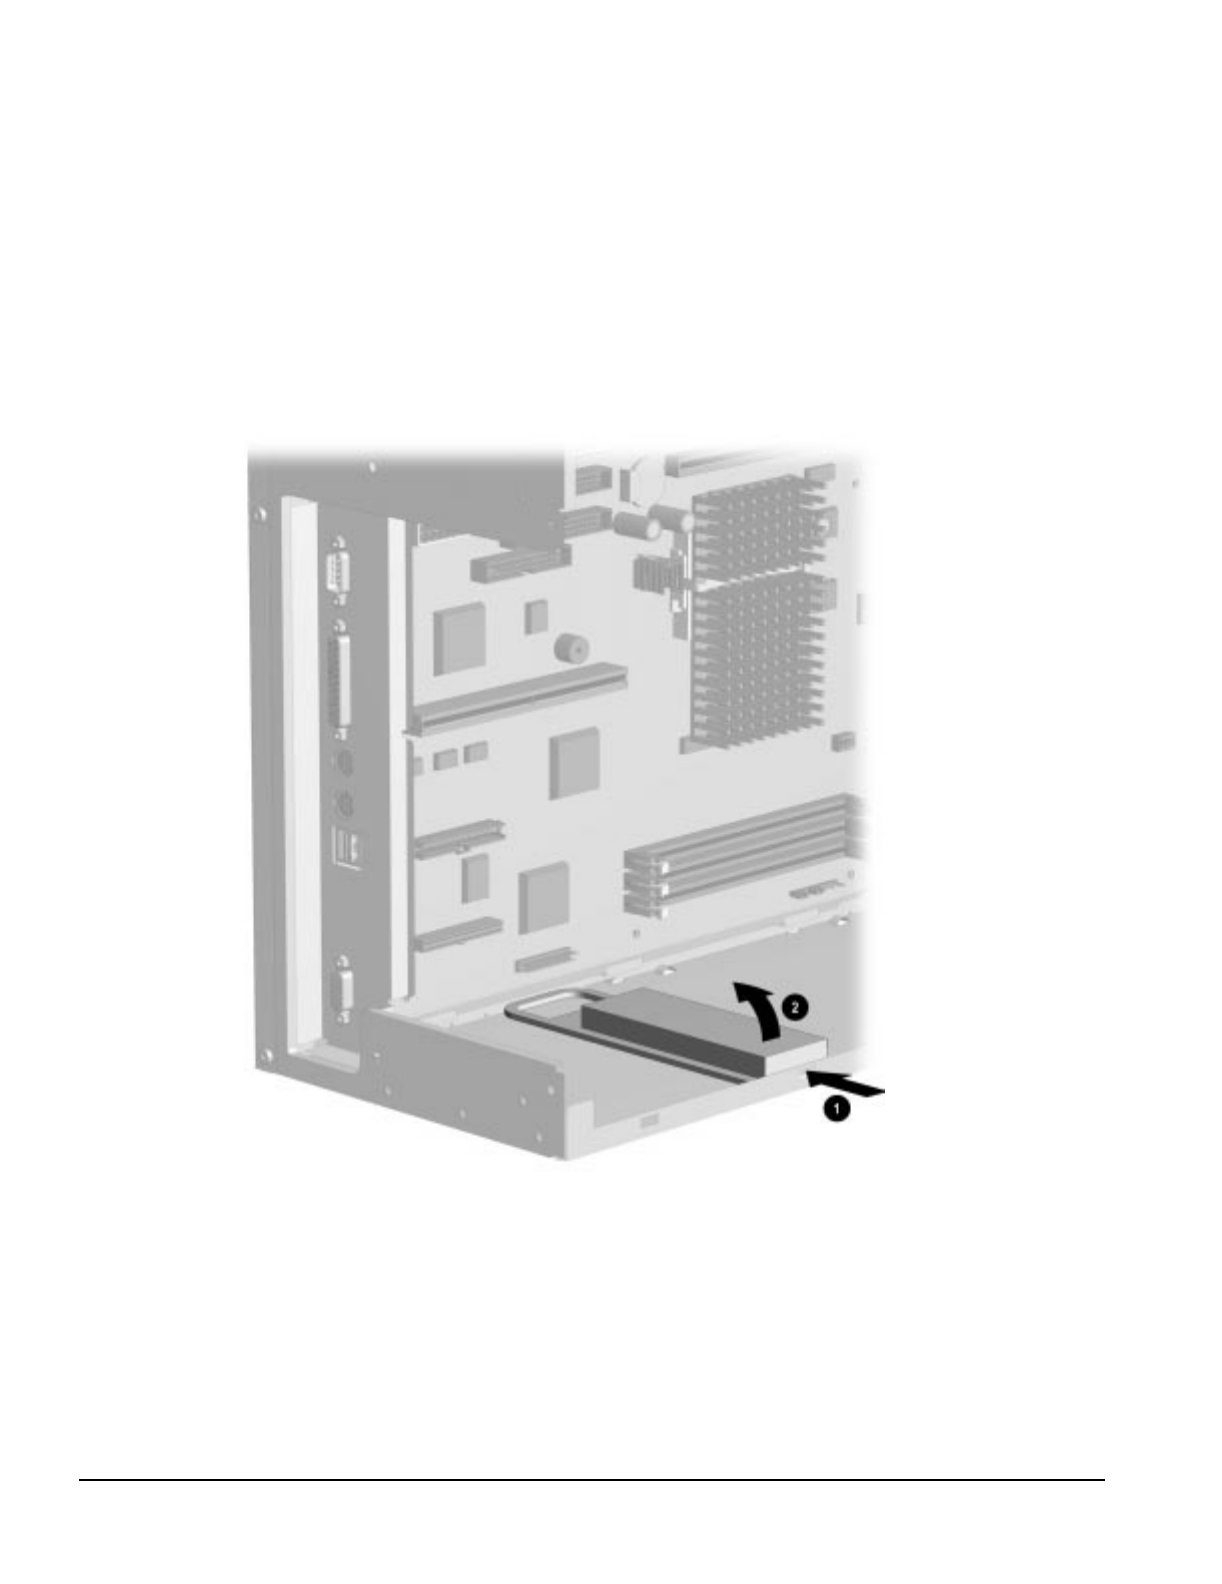
6-24 Removal and Replacement Procedures - Minitower
6.15 ISA Option Board Retainer
To remove the ISA option board retainer, complete the following steps:
1. Remove the access panel (Section 6.6.1).
2. With the computer lying on its side, press down 1 on the end of the retainer, then lift 2 the
retainer to remove it.
Figure 6-24. Removing the ISA Option Board Retainer
To replace the retainer, reverse the above procedure.
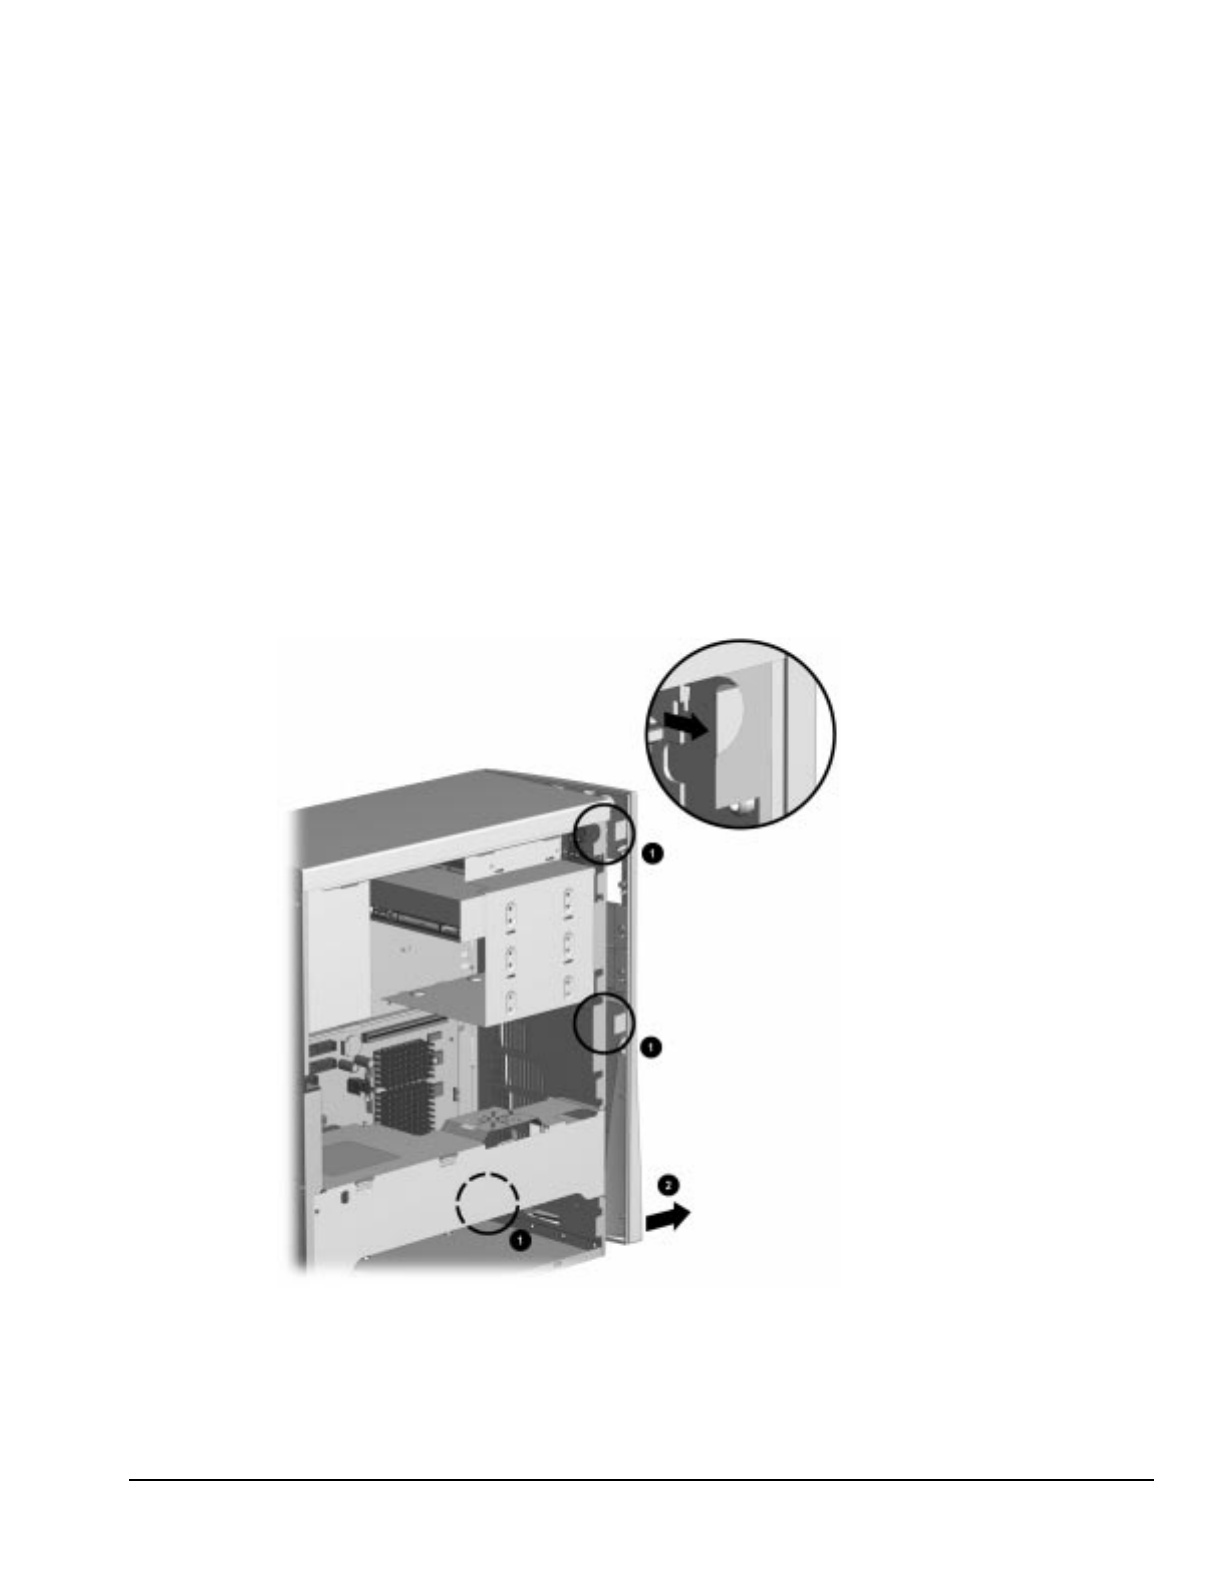
Compaq Deskpro 2000 Series of Personal Computers 6-25
6.16 Front Bezel Assembly
The front bezel must be removed before removing or installing the J hood, the power supply, or any
of the mass storage devices.
6.16.1 Front Bezel
The front bezel is attached to the computer chassis with release latches that are integrated into the
bezel. To remove the front bezel, complete the following steps:
1. Remove the access panel (Section 6.6.1).
2. From the inside of the chassis, push in the release latches 1 and push the side of the bezel out
and away from the chassis 2.
3. Rotate the front bezel out from the chassis, then slide it to the left.
4. Separate the bezel from the chassis.
Figure 6-25. Removing the Front Bezel
To replace the bezel, reverse the above procedure. Ensure that the hinge points at the side of the bezel
and the release latches are properly positioned before latching the bezel into place.
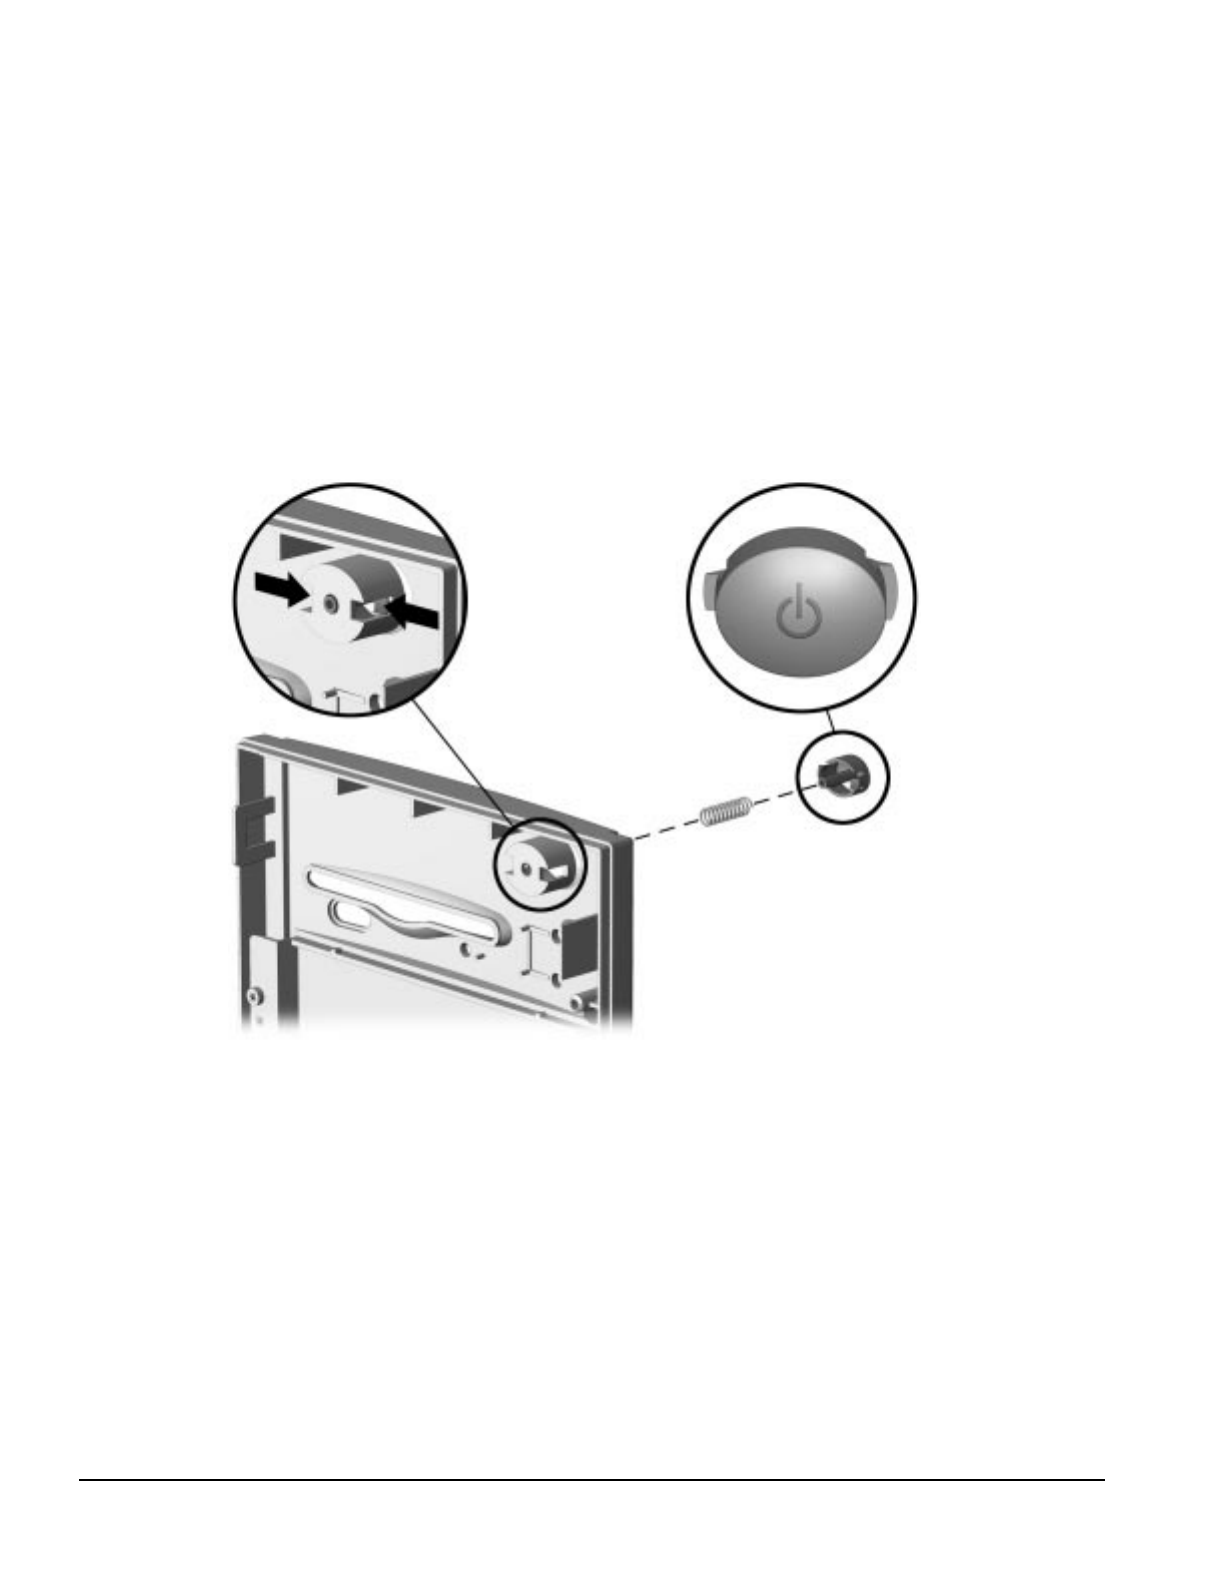
6-26 Removal and Replacement Procedures - Minitower
6.16.2 Power Button
To remove the power button, complete the following steps:
1. Remove the access panel (Section 6.6.1).
2. Remove the front bezel (Section 6.16.1).
3. Hold the front bezel in one hand with the inside surface towards you.
4. Pinch the two tabs of the power button together and push the button out of the front bezel. The
spring will follow the button out of the housing.
Figure 6-26. Removing the Power Button
To replace the power button, reverse the above procedure.
✎When replacing the power button, be sure to use the button for a DC application as shown.
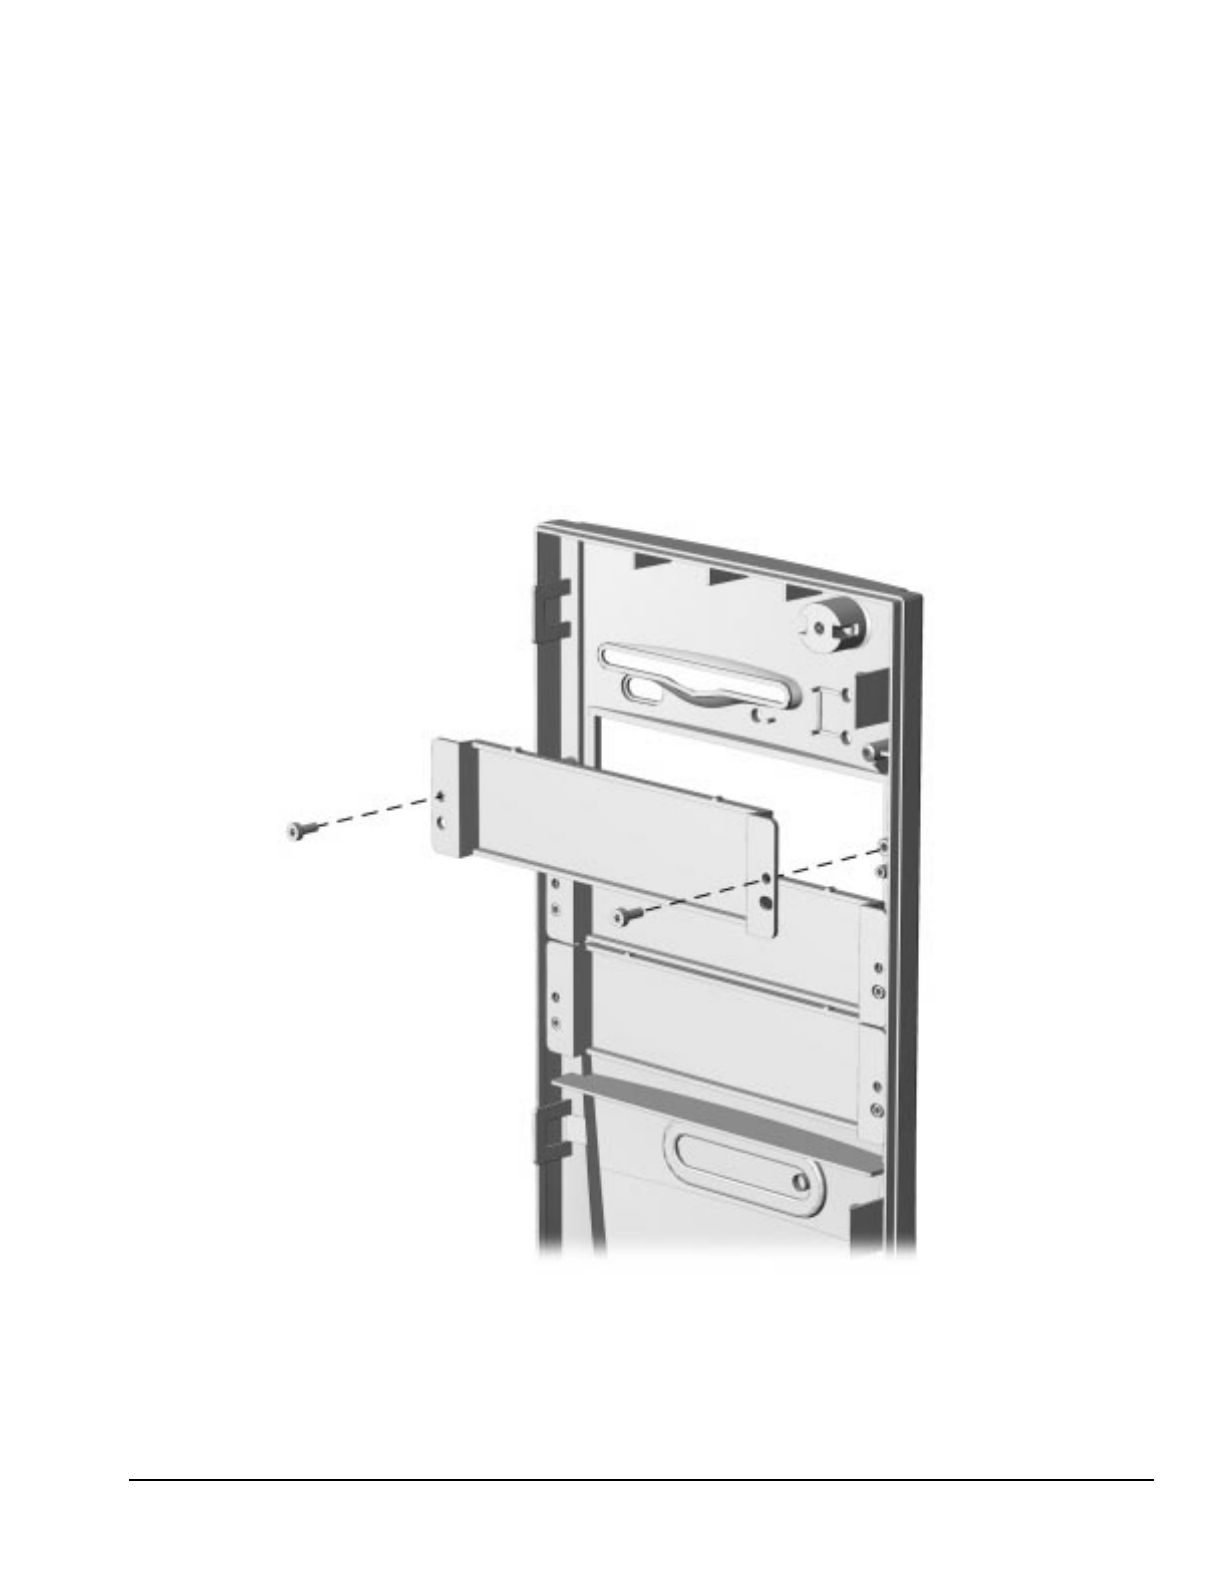
Compaq Deskpro 2000 Series of Personal Computers 6-27
6.16.3 Bezel Blank
To remove a bezel blank, complete the following steps:
1. Remove the access panel (Section 6.6.1).
2. Remove the front bezel (Section 6.16.1).
3. Lay the front bezel face down on a protected work surface and remove the two screws that secure
the bezel blank to the front bezel.
4. Remove the bezel blank from the front bezel.
Figure 6-27. Removing the Bezel Blank
To reinstall the bezel blank, reverse the above procedure.
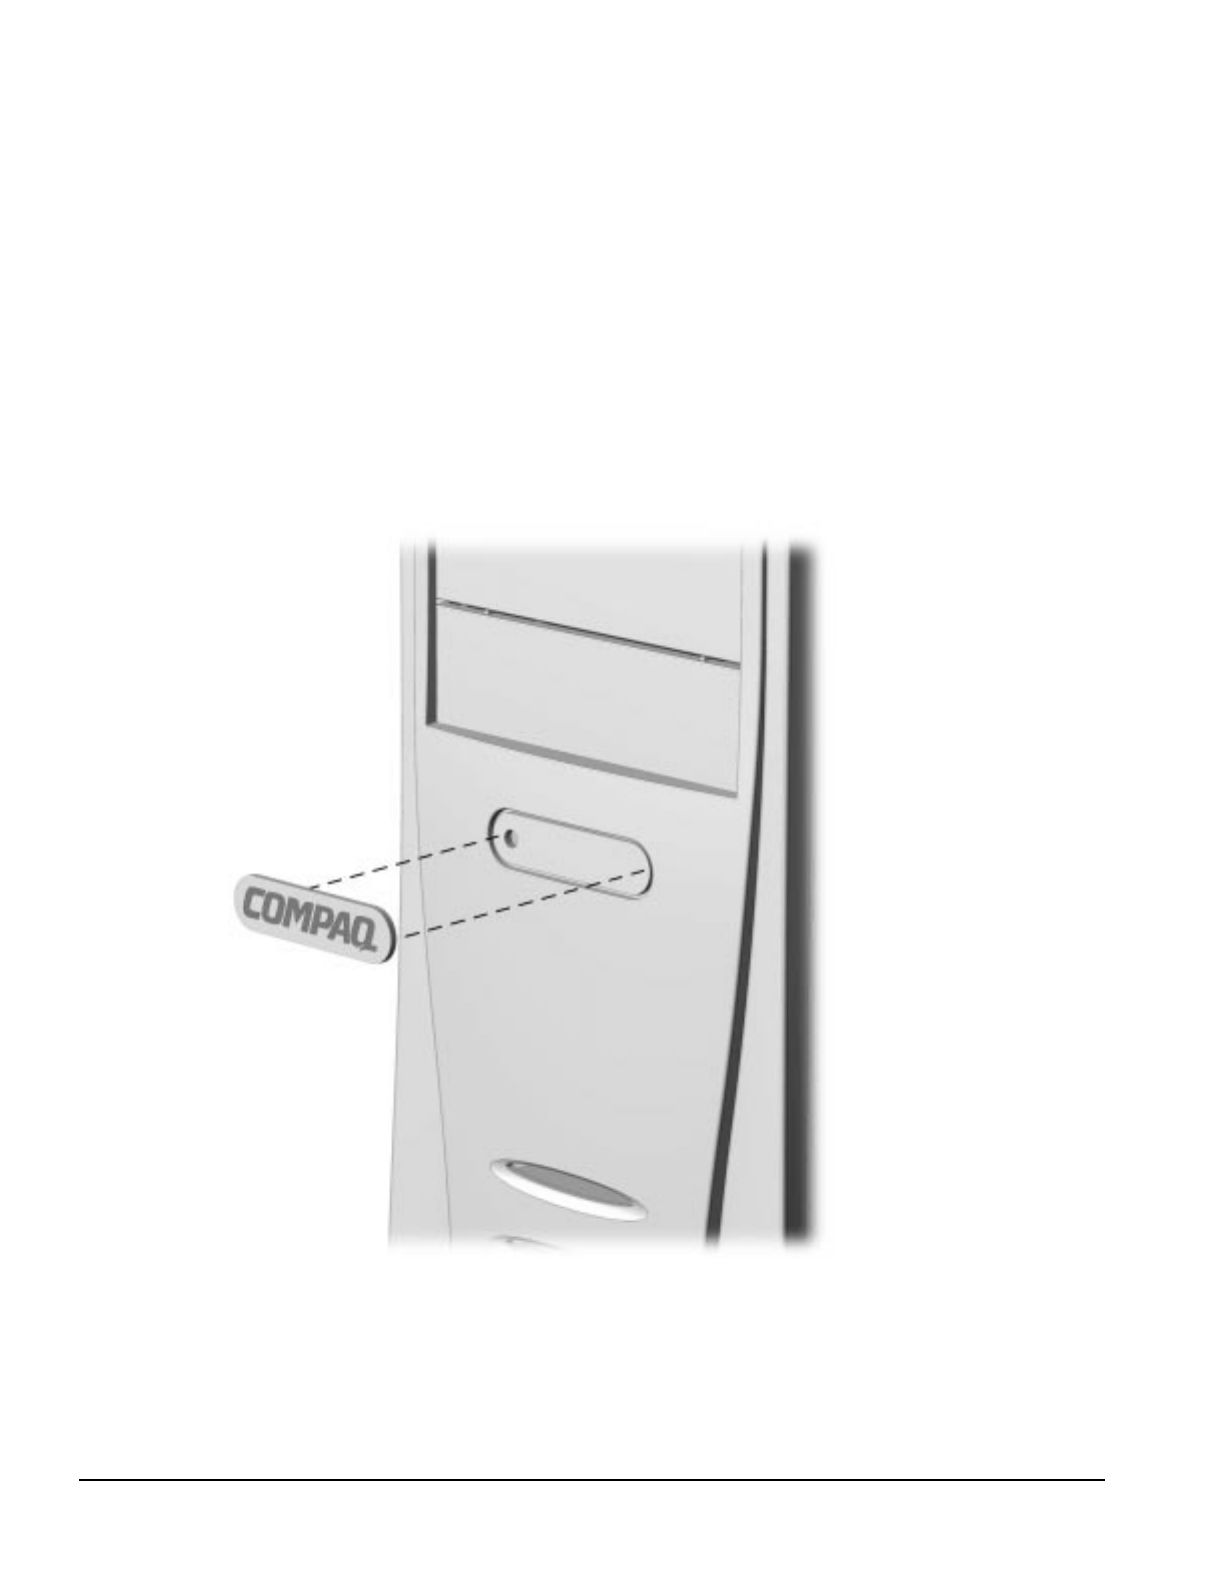
6-28 Removal and Replacement Procedures - Minitower
6.16.4 Compaq Logo
To remove the Compaq logo from the front bezel, complete the following steps:
1. Remove the access panel (Section 6.6.1).
2. Remove the front bezel (Section 6.16.1).
3. From the inside of the front bezel, use a small screwdriver at the hole shown in the figure to push
the logo out of its recess.
4. Clean the recessed area with a clean, dry cloth.
5. Remove the protective paper from the back of the replacement logo and press the logo into place.
Figure 6-28. Replacing the Compaq Logo
If the original logo is missing, complete steps 4 and 5 to install a replacement logo without having to
remove any part of the computer.
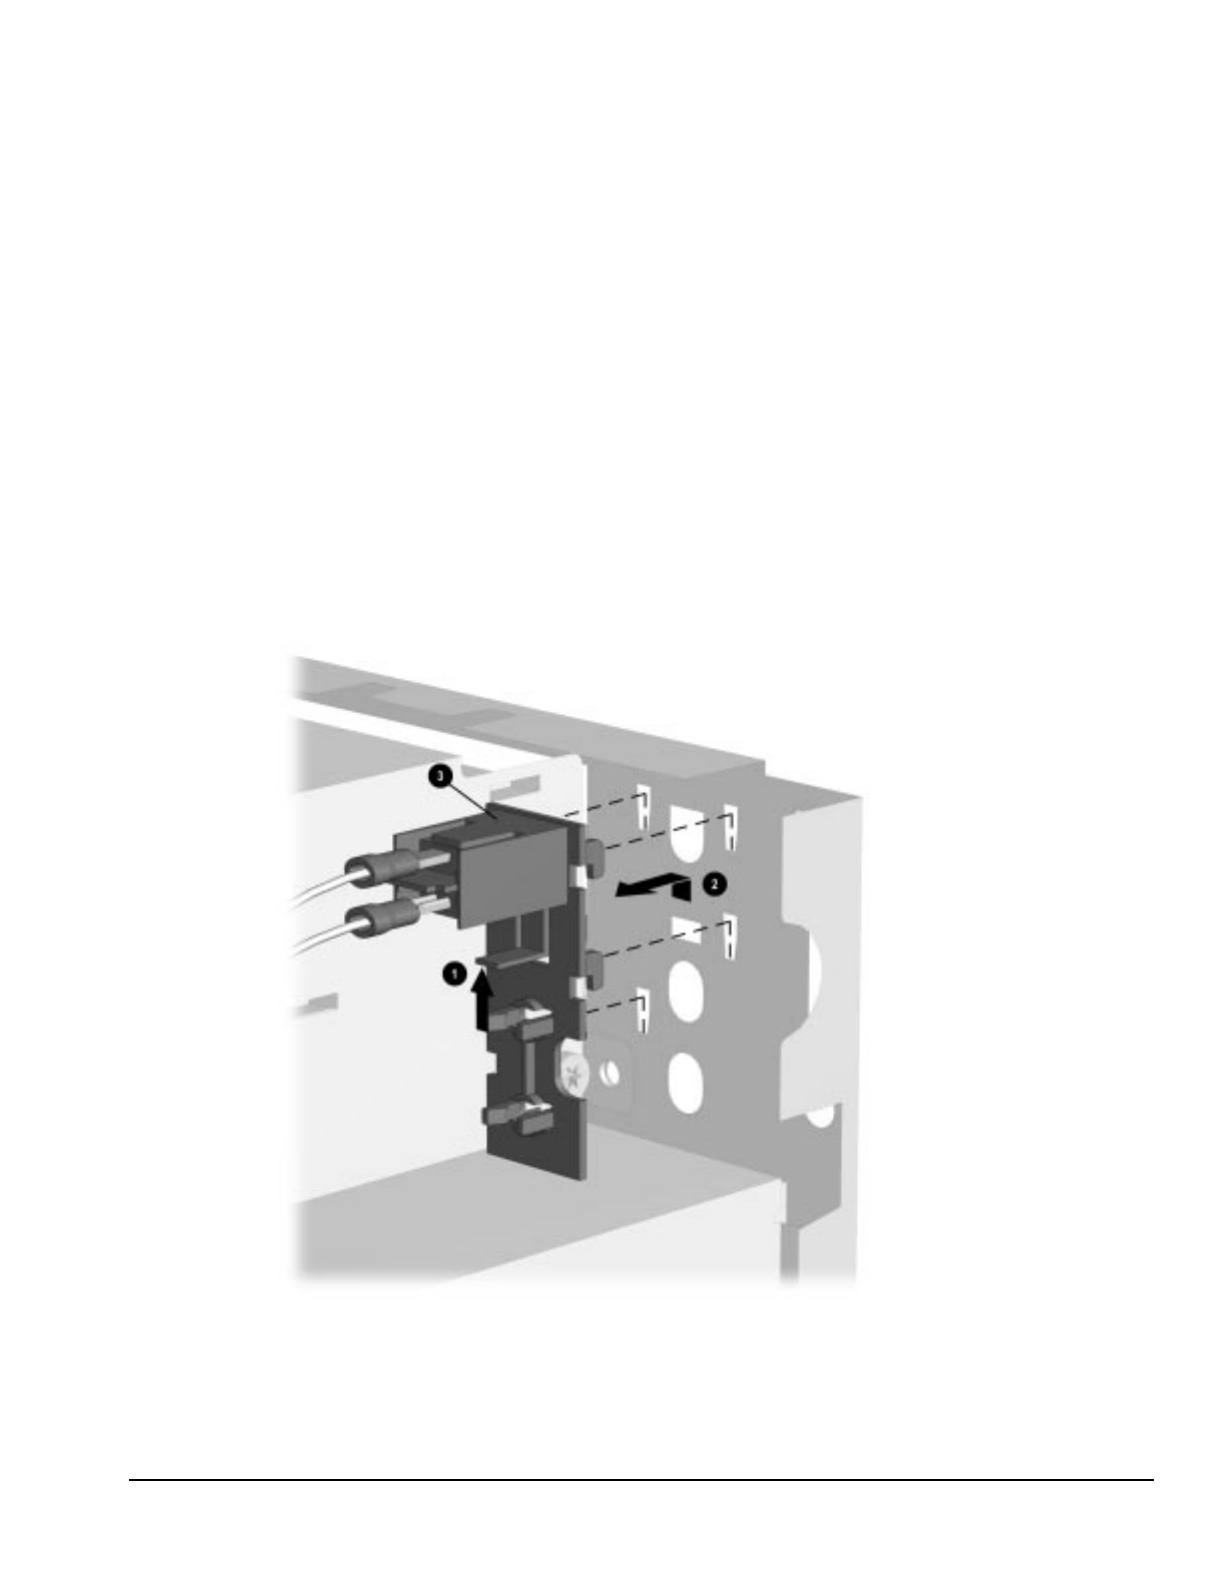
Compaq Deskpro 2000 Series of Personal Computers 6-29
6.17 Power Supply Assembly
6.17.1 Power Supply Switch Assembly
To remove the power supply switch, complete the following steps:
1. Remove the access panel (section 6.6.1).
2. Remove the front bezel (Section 6.16.1).
3. Remove the plastic switch holder from the chassis. To remove the plastic switch holder from the
chassis:
❏ Place your thumb on top of the chassis 3 and your index finger on the release tab 1.
❏ Squeeze the tab toward the top of the chassis.
❏ While squeezing the tab, pull the holder up 2 and out of the chassis.
4. Remove the wires from the switch.
Figure 6-29. Removing the Power Supply Switch and Bracket
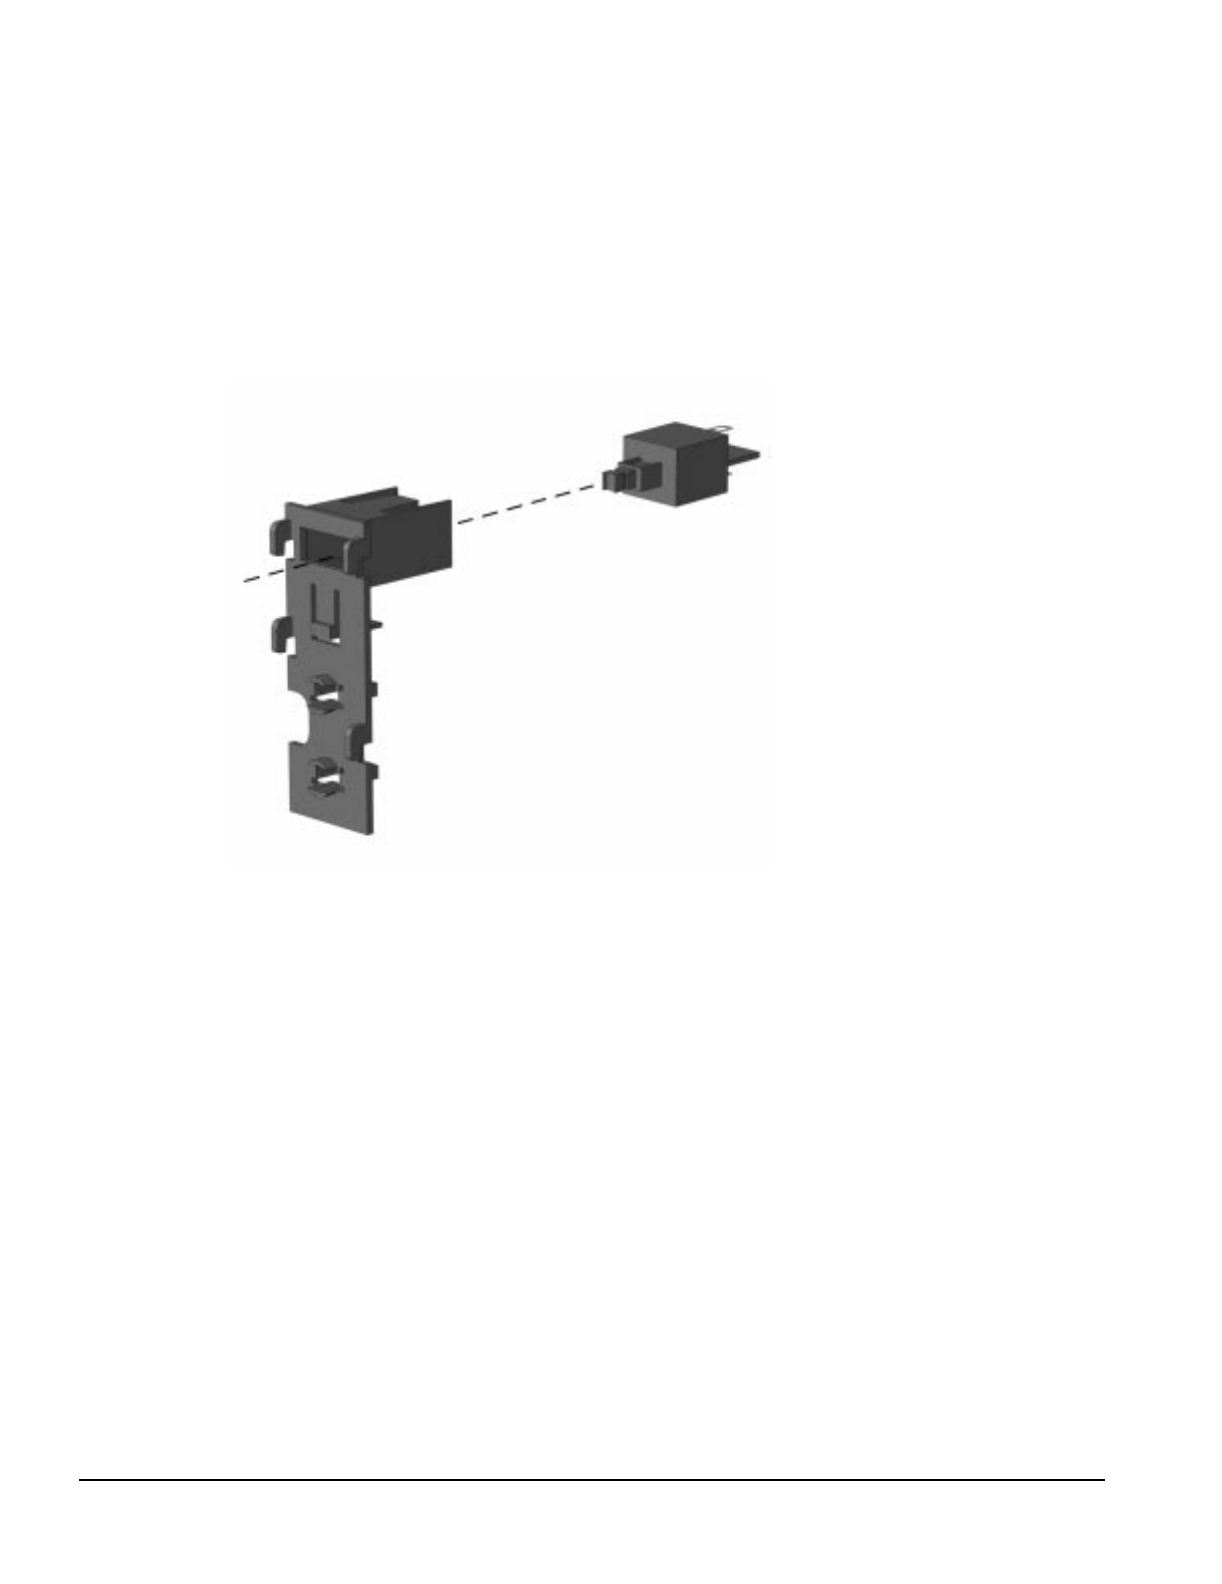
6-30 Removal and Replacement Procedures - Minitower
To install the power switch assembly, complete the following steps.
1. Install a new power switch into a new switch holder. To install the power switch into the switch
holder:
❏ Insert the switch into the back of the holder.
❏ Push the switch until it snaps into place.
Figure 6-30. Installing the Switch into the Holder
2. Install the power switch assembly into the chassis. To insert the power switch assembly into the
chassis:
❏ Insert the prongs of the switch holder into the slots in the chassis.
❏ Push down on the switch holder to snap the holder into place.
3. Attach the wires to the switch.
4. Replace the front bezel (Section 6.16.1).
5. Replace the access panel (Section 6.6.1).
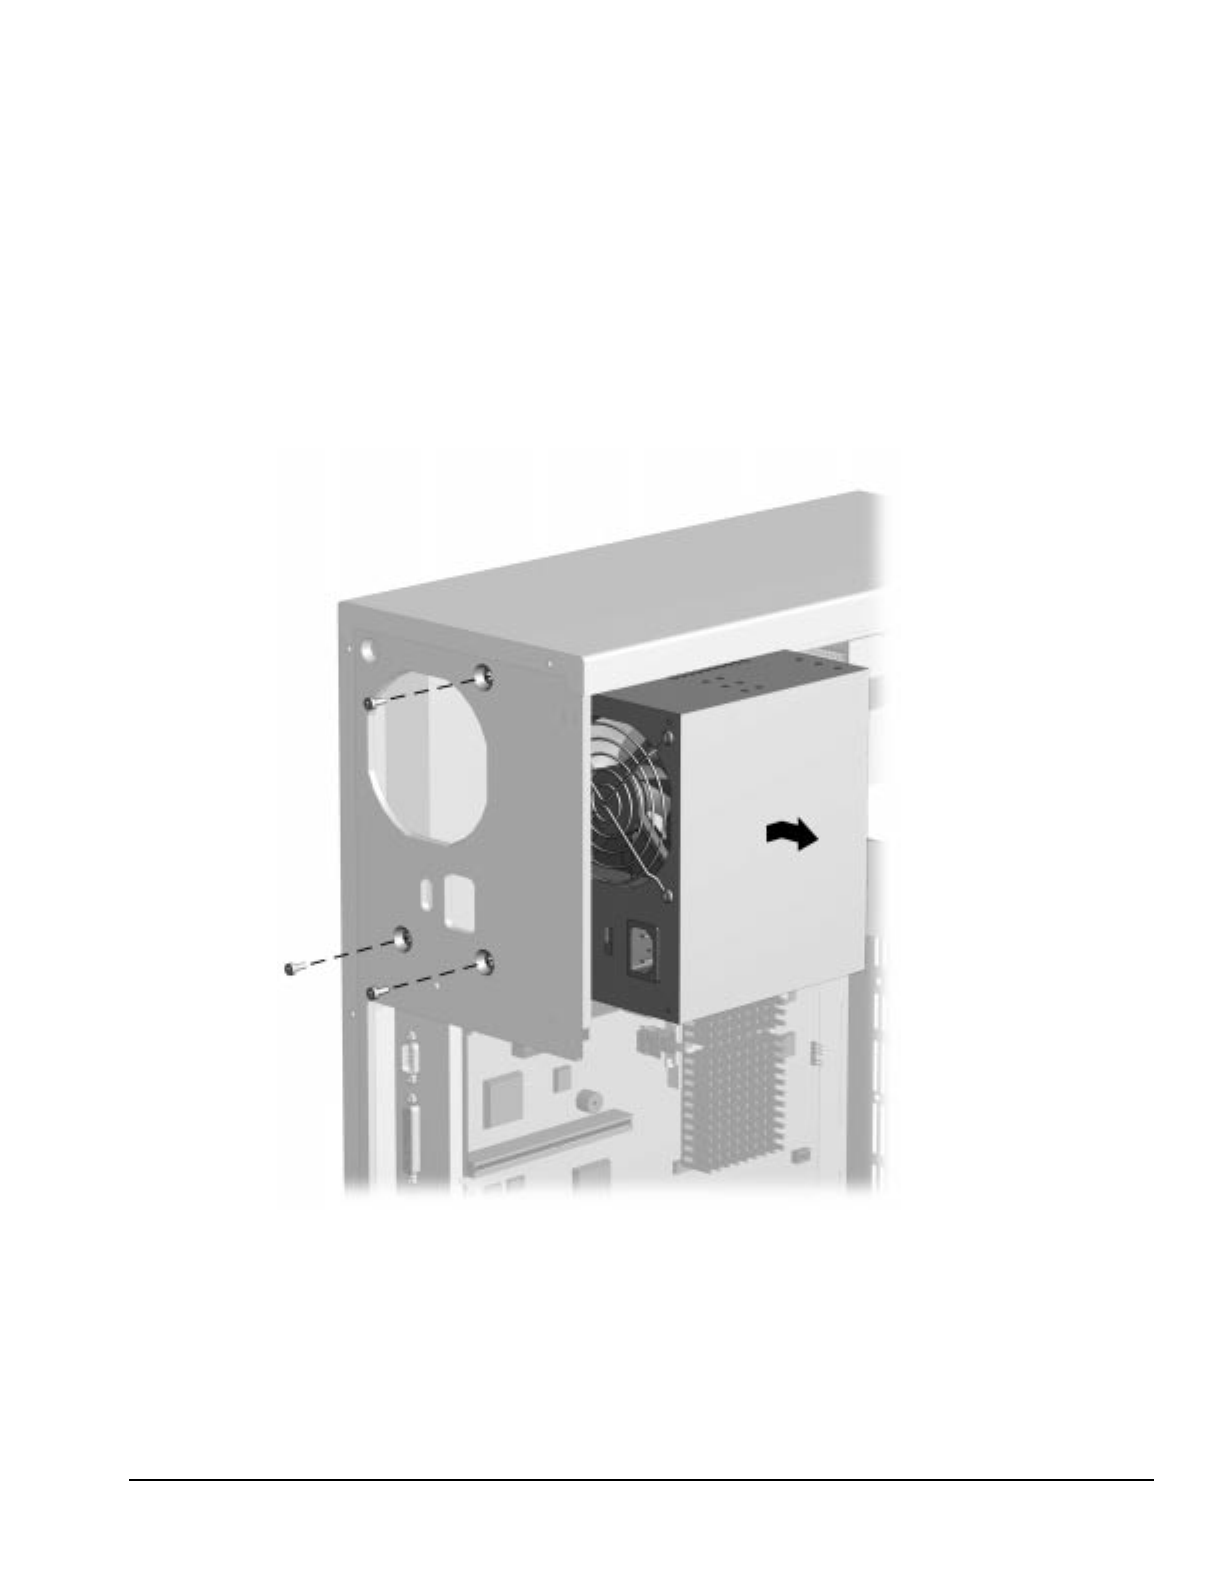
Compaq Deskpro 2000 Series of Personal Computers 6-31
6.17.2 Power Supply
To remove the power supply, complete the following steps:
1. Remove the access panel (Section 6.6.1).
2. Remove the front bezel (Section 6.16.1).
3. Remove the power supply switch (Section 6.17.1).
4. Disconnect all power cables from the mass storage devices and the system board.
Figure 6-31. Removing the Rear Screws and the Power Supply
5. From the outside of the chassis, remove the three screws that secure the power supply to the back
of the chassis.
6. Slide the power supply towards the front of the chassis and lift up to remove it from the chassis.
To replace the power supply, reverse the above procedure.
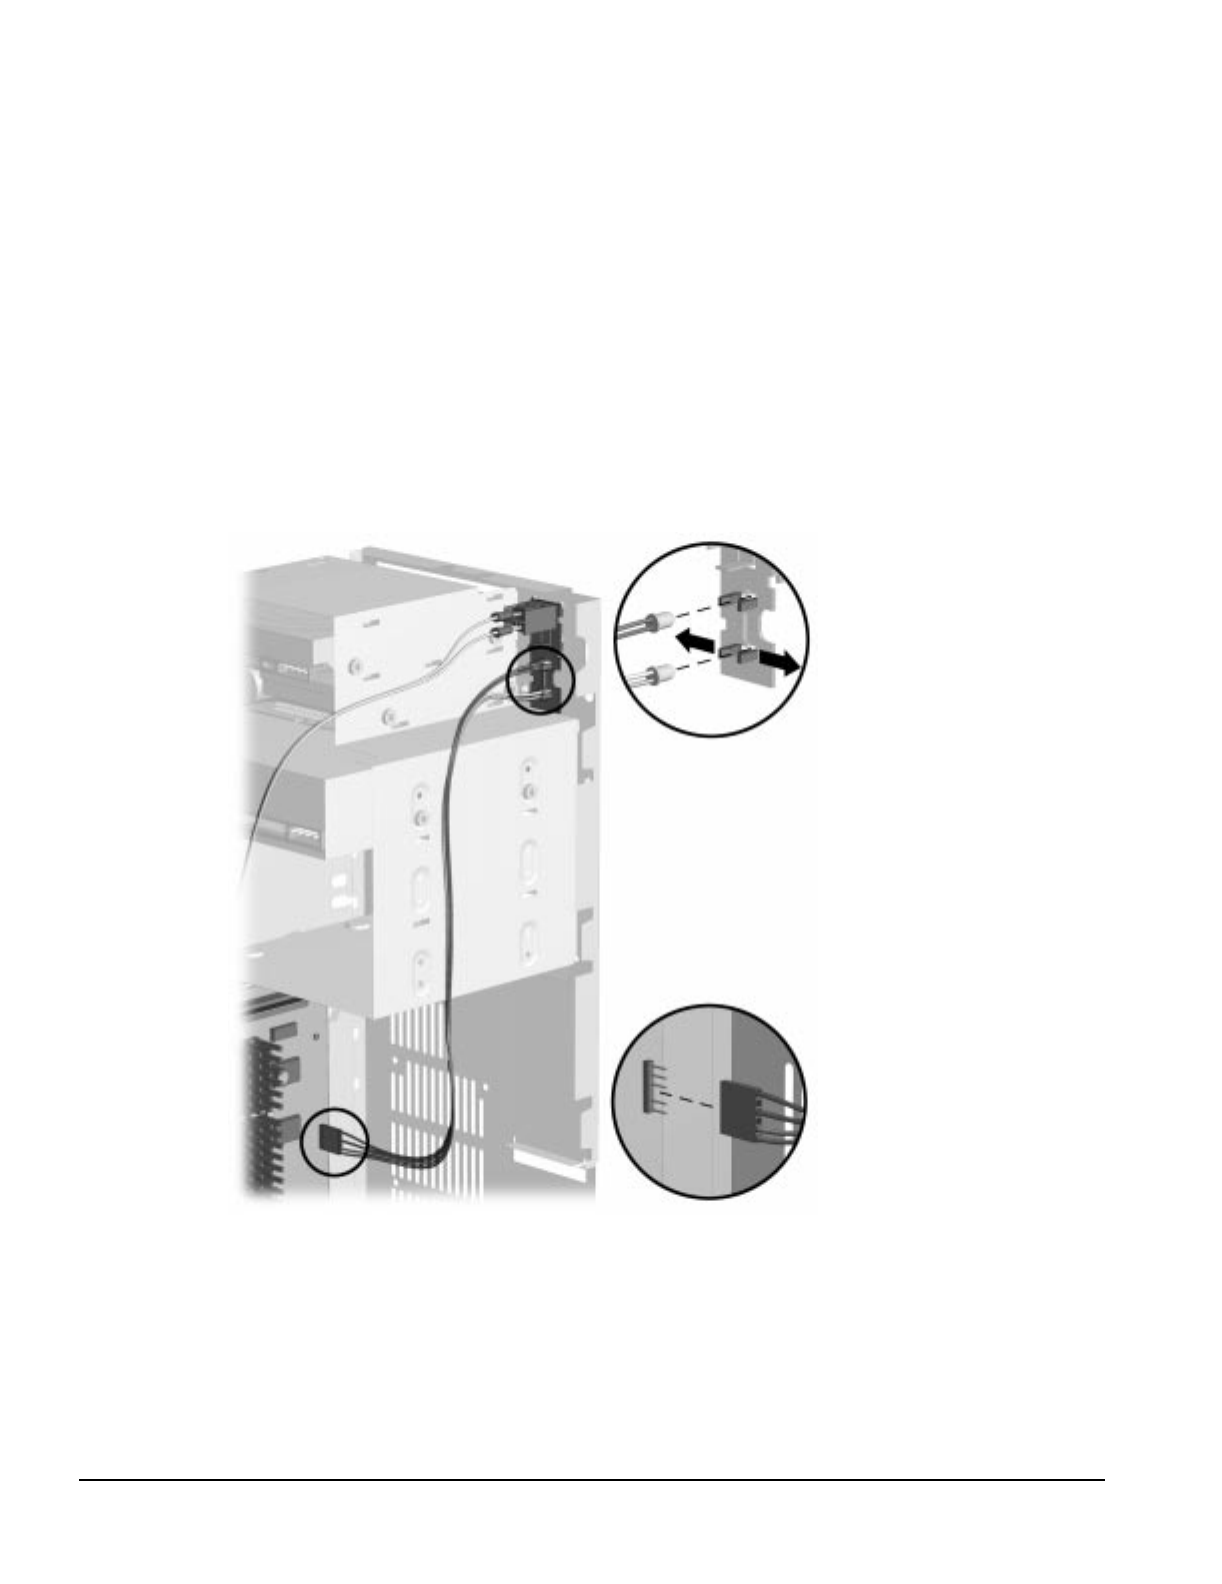
6-32 Removal and Replacement Procedures - Minitower
6.18 LED Cable
To remove the LED cable, complete the following steps:
1. Remove the access panel (Section 6.6.1).
2. Remove the front bezel (Section 6.16.1).
3. Disconnect the cable from the connection on the system board.
4. Remove the power supply switch assembly (Section 6.17.1).
5. To remove the LEDs from the switch bracket, gently pull on the cable while at the same time
spreading the clips of the LED retainers.
Figure 6-32. Removing the LED Cable Assembly, Pentium System
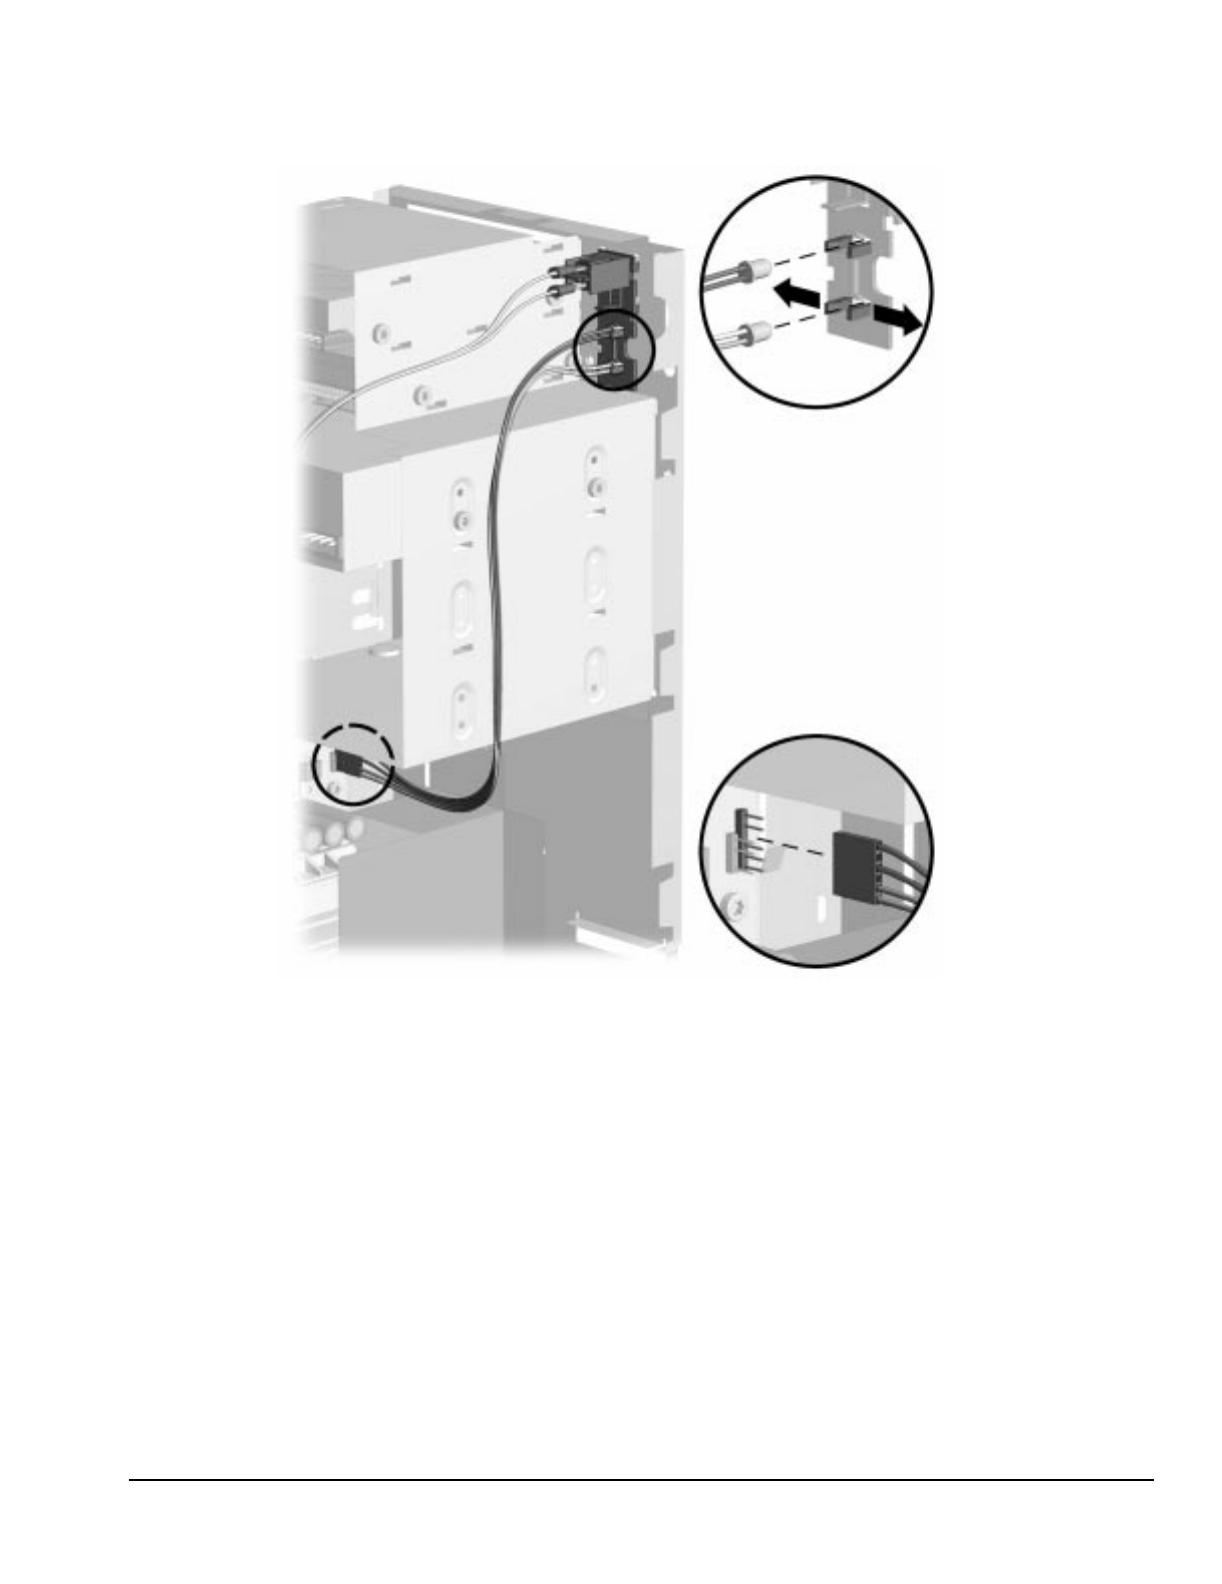
Compaq Deskpro 2000 Series of Personal Computers 6-33
Figure 6-33. Removing the LED Cable Assembly, Pentium II System
To install the LED cable, reverse the above procedure.
✎When reinstalling the LED end, place the LED with the black wire on top and the LED with
the white wire on the bottom. The connector is keyed to ensure proper installation.
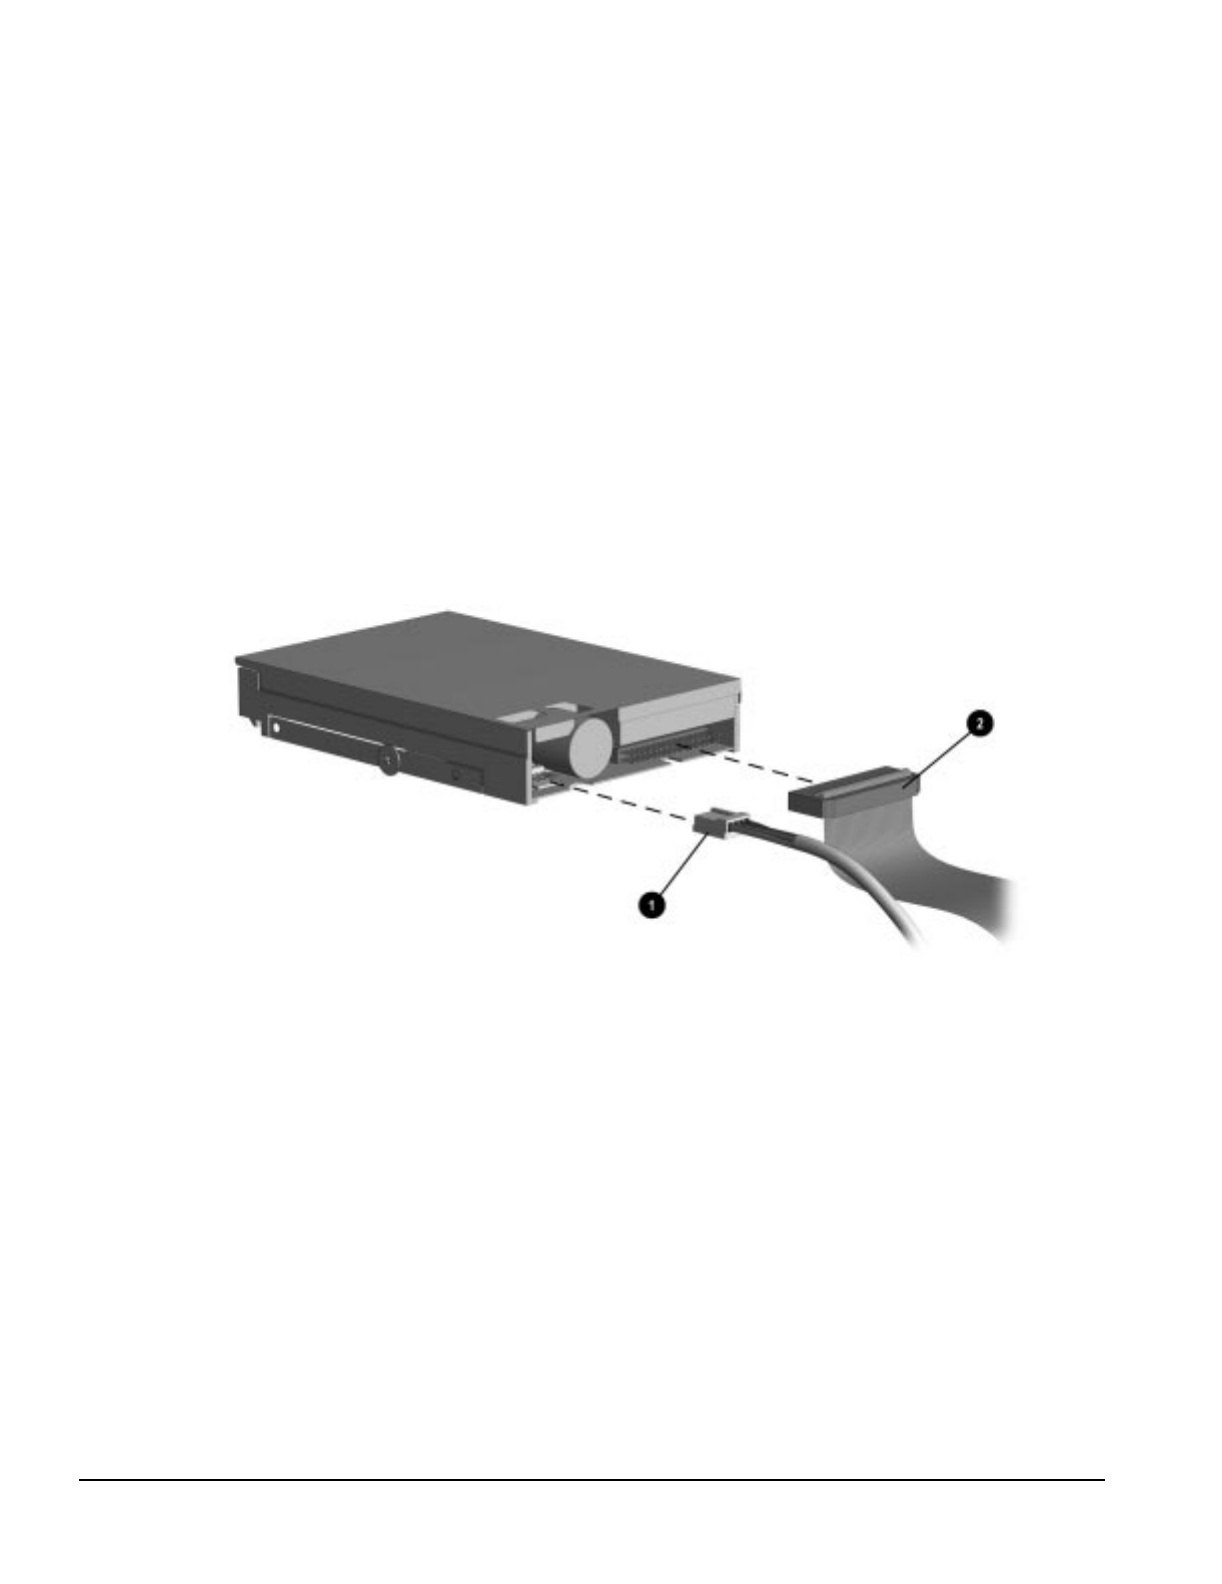
6-34 Removal and Replacement Procedures - Minitower
6.19 Mass Storage Devices
This section discusses the removal and replacement procedures for the mass storage devices that are
supported on the Deskpro 2000 Series of Personal Computers. Refer to Chapter 1, Section 1.5.2,
“Drive Positions.”
6.19.1 3.5-Inch Drive Bays
To remove a 3.5-inch drive from the 3.5-inch drive bay, complete the following steps:
1. Remove the access panel (Section 6.6.1).
2. Remove the front bezel (Section 6.16.1).
3. Remove the power switch assembly (Section 6.17.1).
4. Disconnect the cables from the back of the drive.
Figure 6-34. Disconnecting the Power 1 and Signal 2 Cables from the 3.5-Inch Diskette Drive
✎When installing a second diskette drive, it is necessary to configure the computer using
Computer Setup.
Refer to Chapter 7, “Jumper and Switch Information,” for the location of the ribbon cable
connections on the system board.
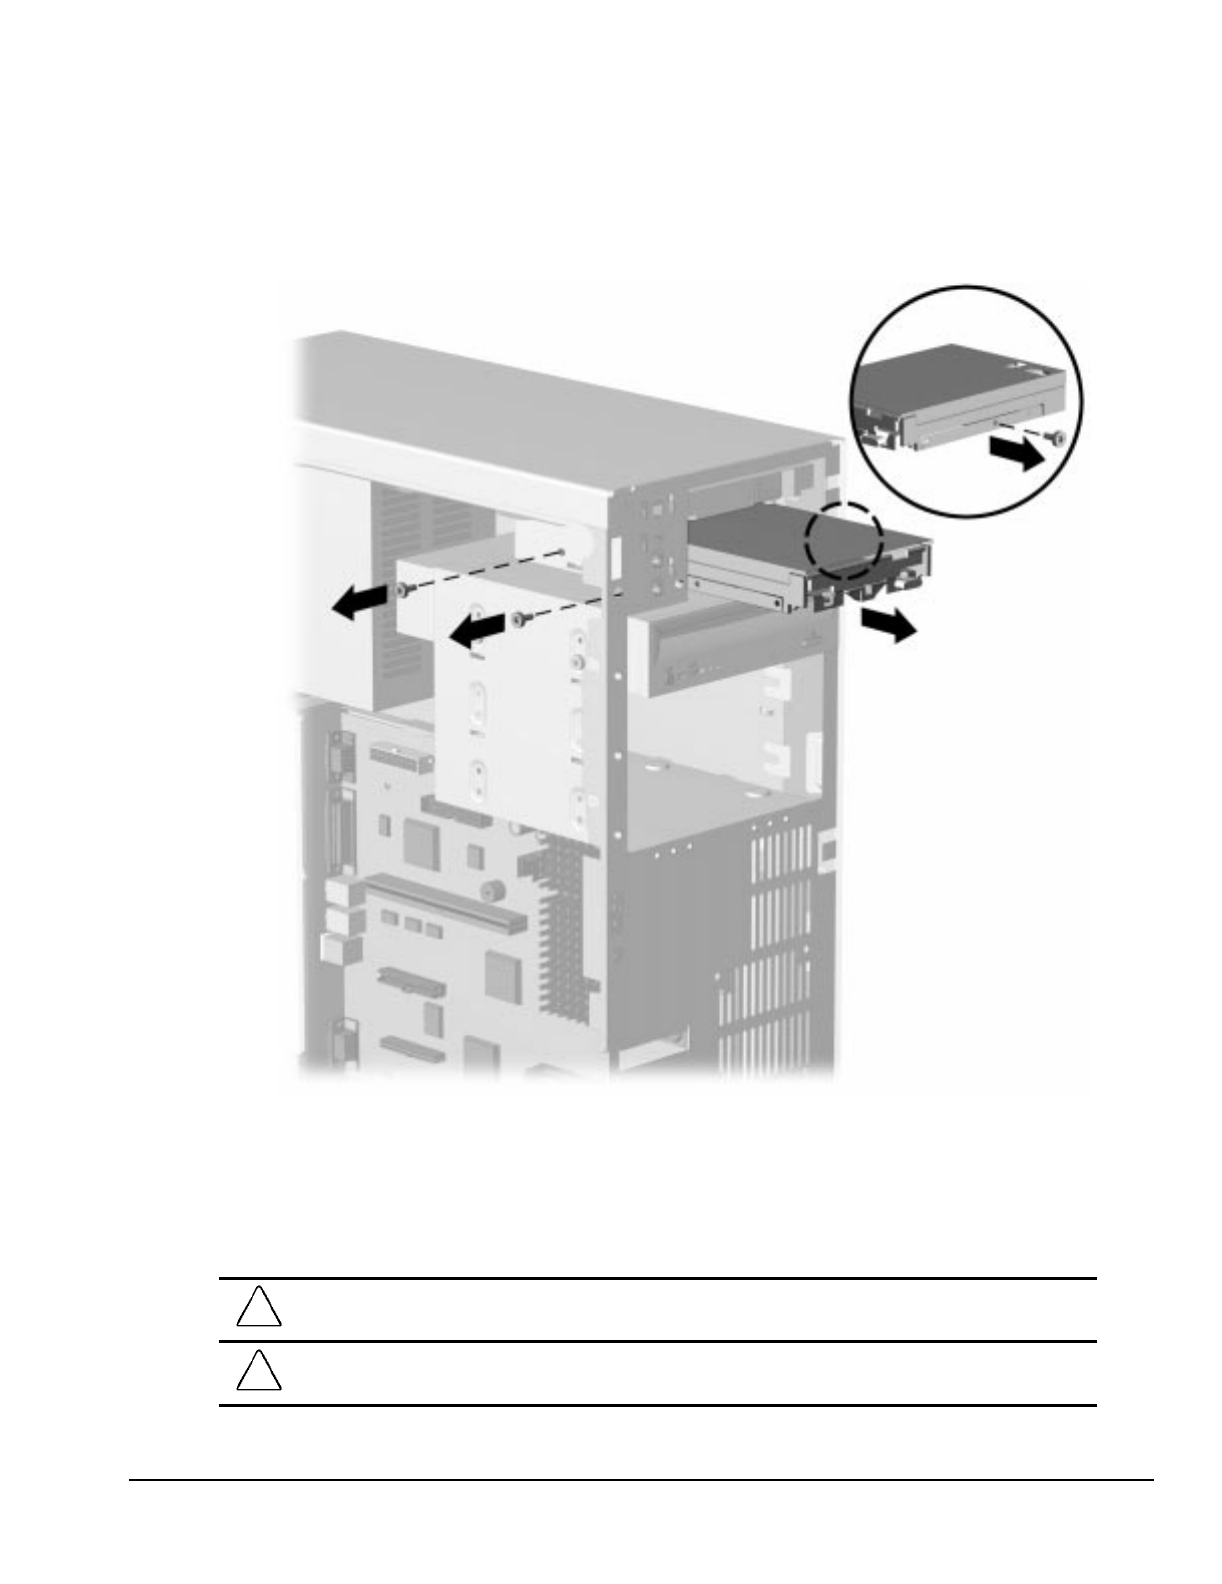
Compaq Deskpro 2000 Series of Personal Computers 6-35
5. Remove the two wafer screws on the left of the drive that secure the drive into the chassis.
6. Pull the drive straight out of the chassis.
Figure 6-35. Removing the 3.5-Inch Diskette Drive
When replacing this drive, transfer the single wafer screw that takes the place of a drive rail from the
old drive to the new one. This screw is located on the right side of the drive in the middle.
To replace the 3.5-inch drive, reverse the above procedure.
CAUTION: When servicing the computer, ensure that cables are placed in their proper locations during
the reassembly process. Improper cable placement can damage the computer.
CAUTION: Use only 3/16-inch or 5-mm long screws as guide screws. Longer screws can damage the
internal components of the drive.
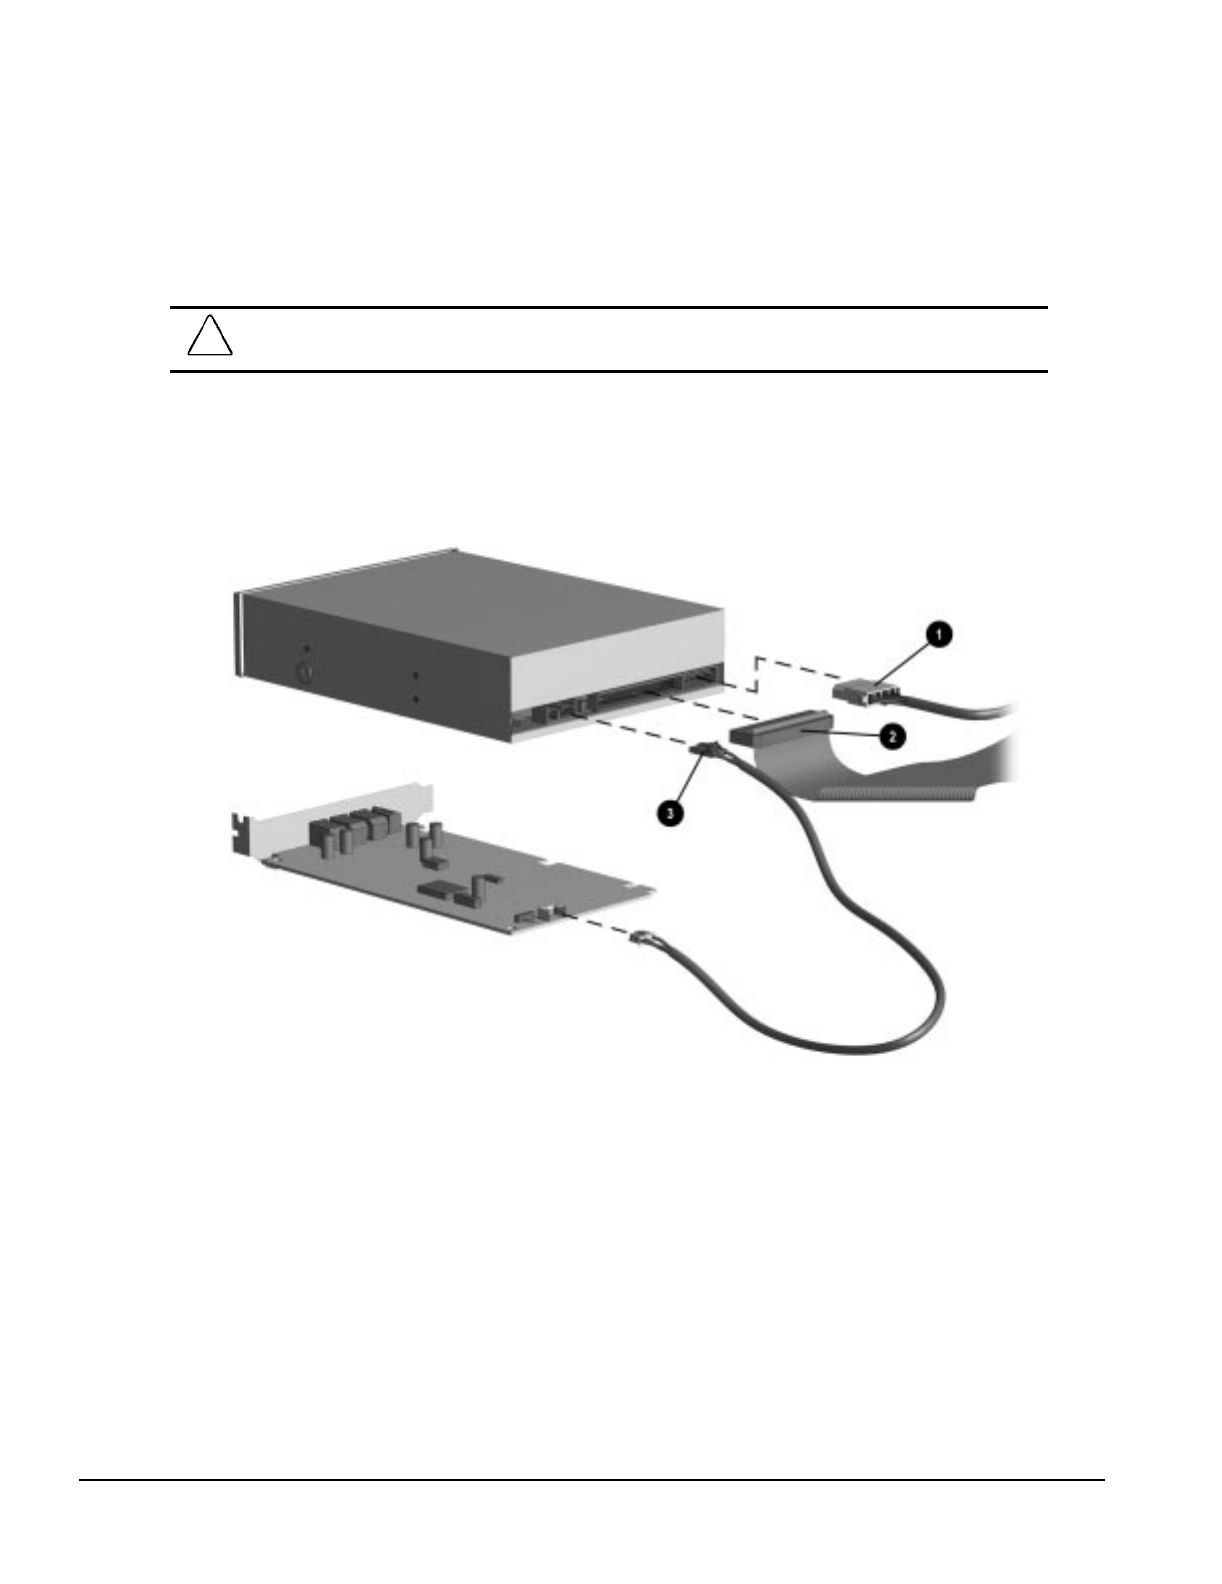
6-36 Removal and Replacement Procedures - Minitower
6.19.2 5.25-Inch Drive Bays
The 5.25-inch drive bays may be occupied by diskette drives, hard drives, CD-ROM drives, PD-CD
drives, LS-120 drives, or tape drives. Removal of a CD-ROM drive is shown.
CAUTION: All removable media should be taken out of the drive before removing the drive from the
computer.
1. Remove the access panel (Section 6.6.1).
2. Remove the front bezel (Section 6.16.1).
3. Disconnect the cables from the back of the drive.
Figure 6-36. Disconnecting the Power 1, the Signal 2, and the Audio 3 Cables from a CD-ROM Drive
and Optional Audio Board

Compaq Deskpro 2000 Series of Personal Computers 6-37
4. Remove the two screws on the left side of the drive bay that secure the drive to the chassis.
5. Pull the drive straight out of the chassis.
Figure 6-37. Removing the CD-ROM Drive
When replacing this drive, transfer the wafer screw that takes the place of a drive rail from the old
drive to the new one. The screw is located on the right side of the drive, in the middle.
To replace the 5.25-inch drive, reverse the above procedures.
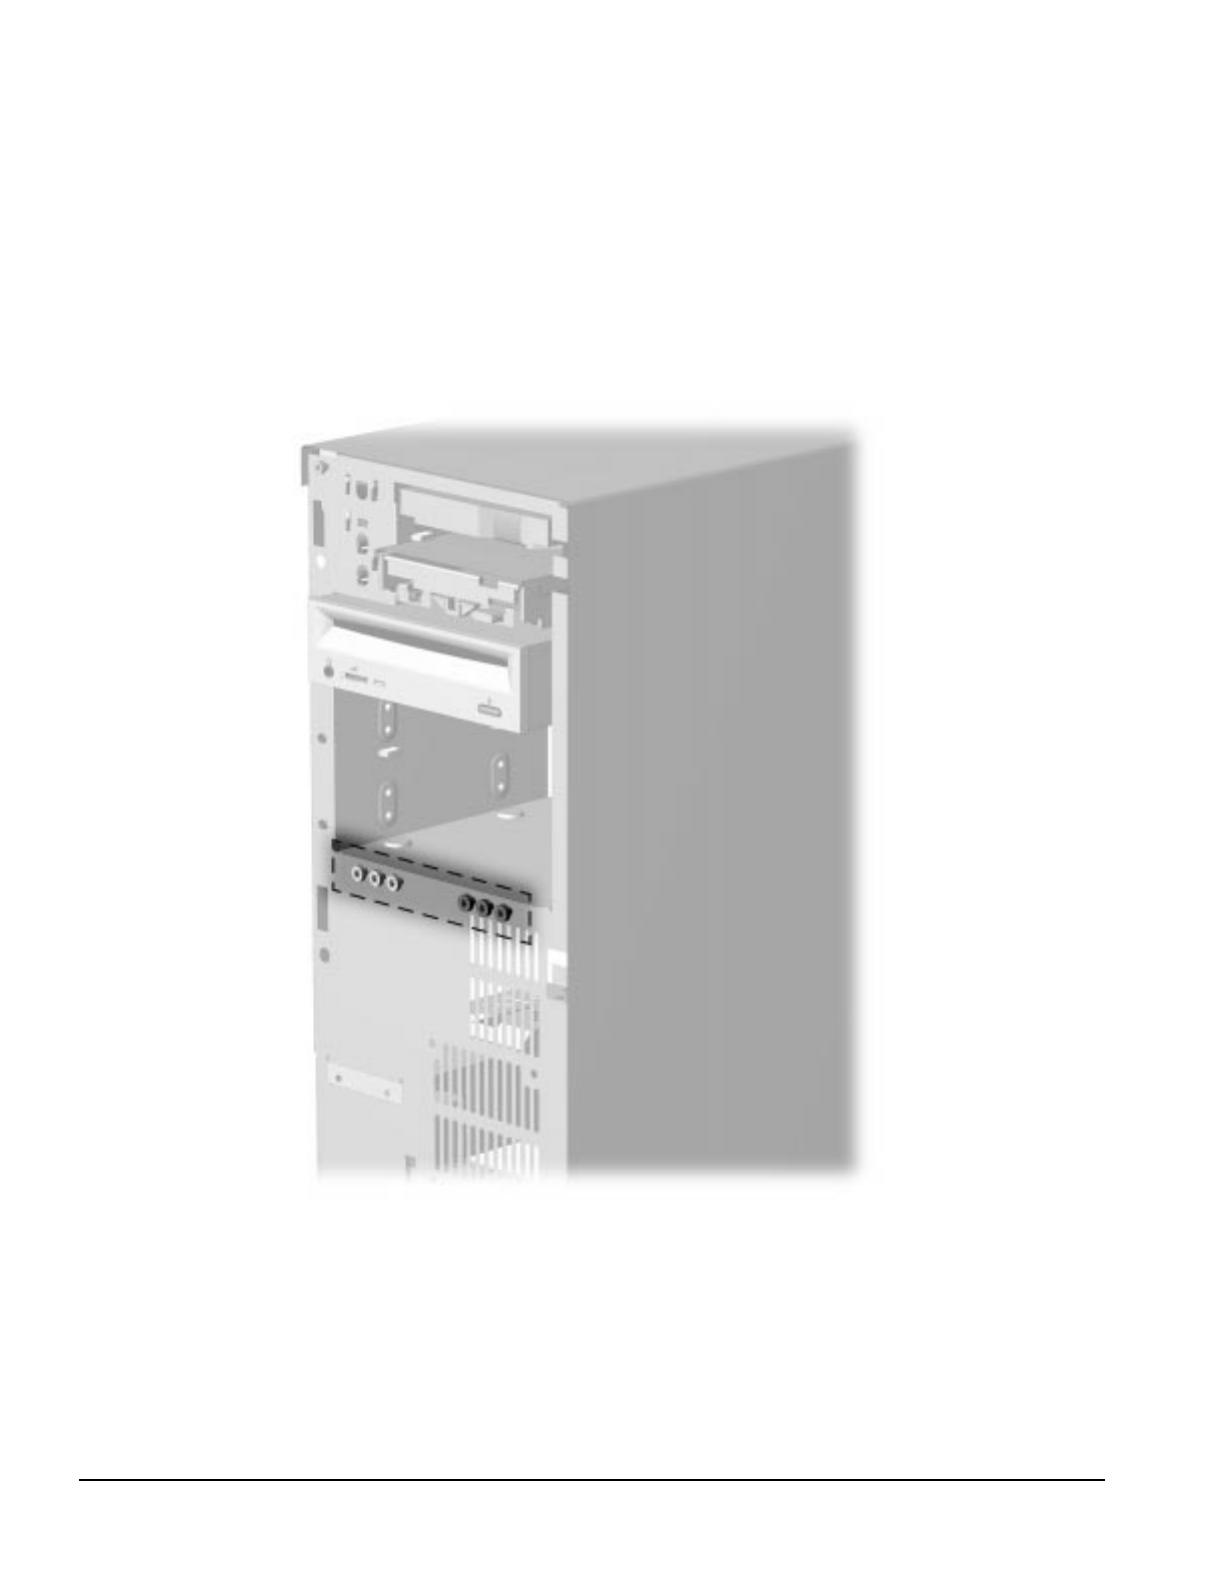
6-38 Removal and Replacement Procedures - Minitower
6.19.3 Installing a New Drive
When installing a new drive, you should use either the wafer screws provided in the option kit or the
extra U.S. or metric screws, both of which are stored in the front of the computer chassis for this
purpose. The same screws that are used as guide screws are used as retainer screws to secure the
drive in the drive bay. Select the appropriate screws for the application.
✎Metric screws have a black finish while U.S. screws have a silver finish.
Figure 6-38. Locating the Mounting Screws
If you are installing a 3.5-inch diskette drive in a 5.25-inch drive bay, use Compaq bracket spare part
number 243230-001, which comes with a preinstalled bezel
If you are installing a 3.5-inch hard drive in a 5.25-inch drive bay, use Compaq bracket spare part
number 243231-001.
To install a 3.5-inch drive into a 5.25-inch drive bay, begin with step 1.

Compaq Deskpro 2000 Series of Personal Computers 6-39
To install a 5.25-inch drive into a 5.25-inch drive bay, begin with step 3.
1. Place the 3.5-inch drive into the bracket.
2. Insert two screws into the two bracket holes on each side of the bracket to secure the drive.
Figure 6-39. Installing the Hard Drive into the Mounting Bracket
CAUTION: Use only 3/16-inch or 5-mm long screws as guide screws. Longer screws can damage the
internal components of the drive.
3. Install one wafer screw on the right side of the drive or bracket towards the front. This acts as a
guide rail to align the bracket in the drive bay.
Figure 6-40. Installing the Wafer Screw on the Right Side of the Bracket
✎Use the screws provided on the front of the unit. These screws may be different from those
illustrated.

6-40 Removal and Replacement Procedures - Minitower
4. Install the drive or bracket assembly into the drive bay. Ensure that the guide screw fits into the
tab on the side of the bay.
5. Secure the drive or bracket assembly with two wafer screws.
Figure 6-41. Installing the Bracket Assembly and Securing It with the Wafer Screws
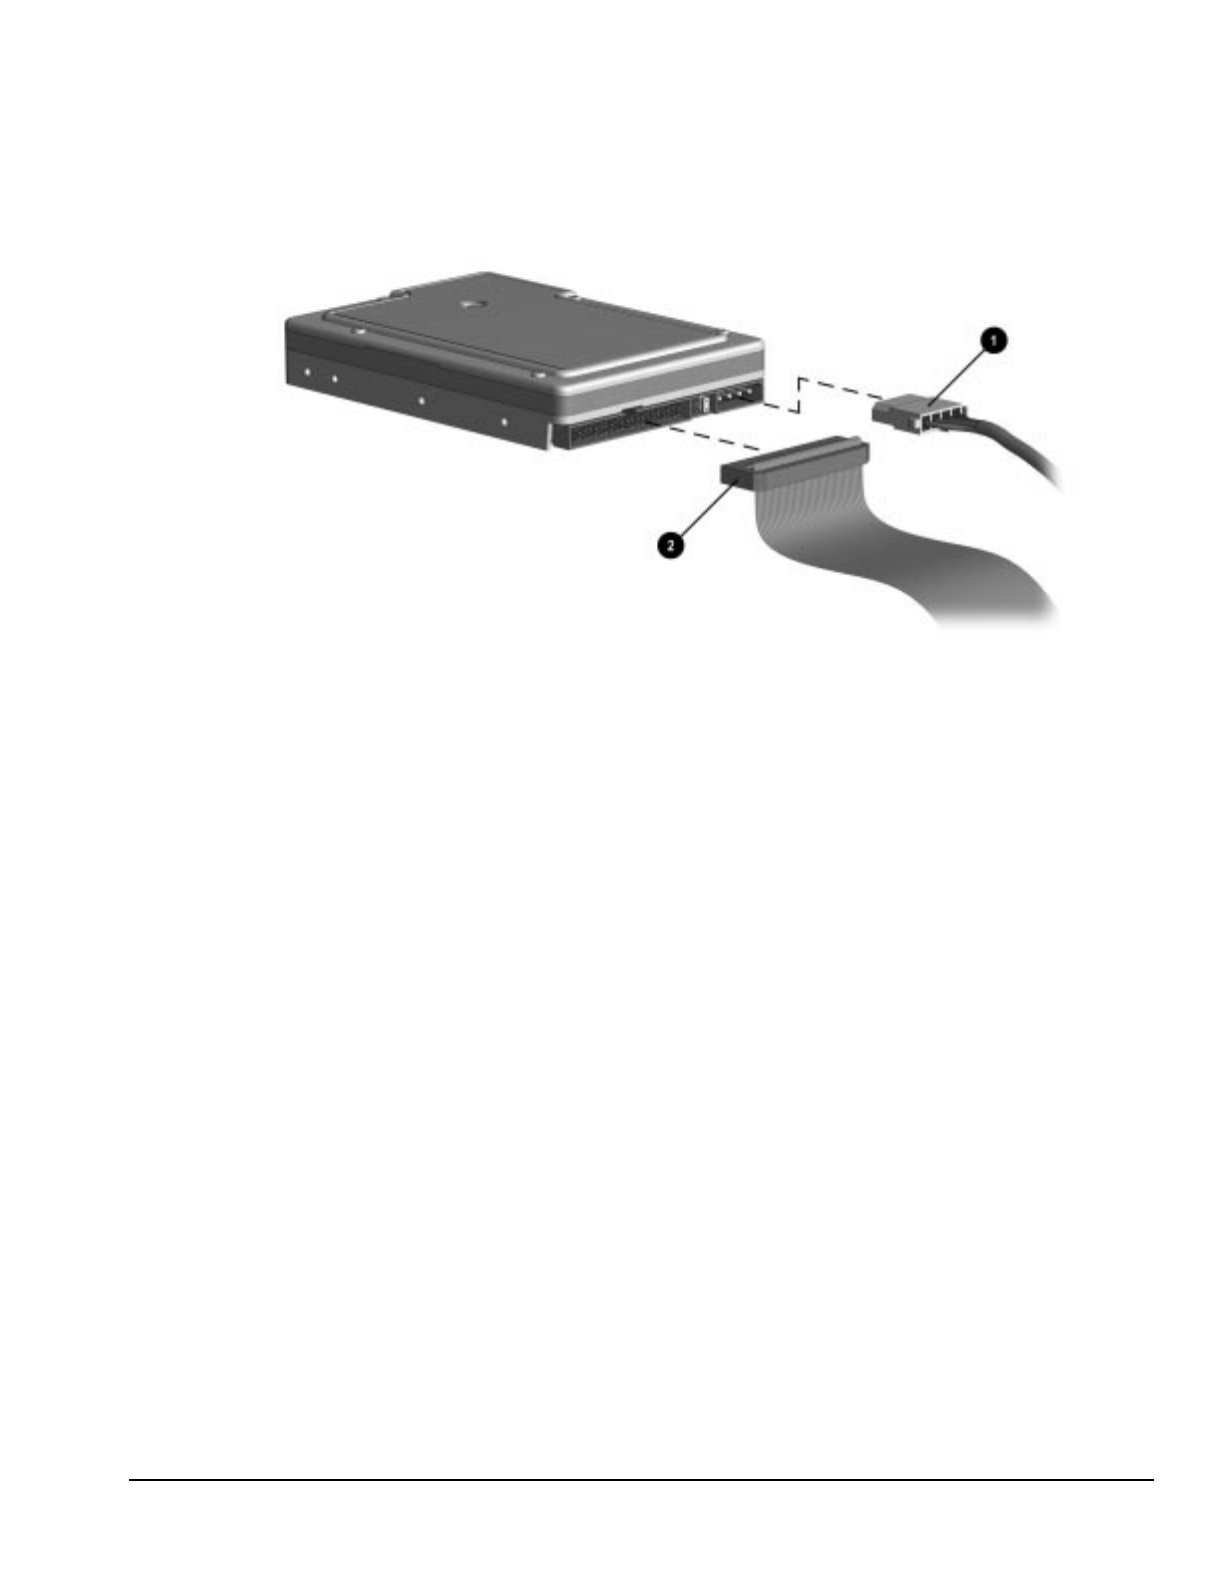
Compaq Deskpro 2000 Series of Personal Computers 6-41
6. Connect the drive cables. Refer to Section 6.19.1 for a diskette drive and Section 6.19.2 for a CD-
ROM drive.
Figure 6-42. Connecting the Power 1 and the Signal 2 Cables to a Hard Drive
7. Remove the bezel blank from the front bezel if necessary (Section 6.16.3).
8. Install the front bezel (Section 6.16.1).
9. Install the access panel (Section 6.6.1).
10. The system will automatically recognize a hard drive sold by Compaq and will automatically
reconfigure the computer. If you have installed a third-party hard drive, you will need to run
Computer Setup to reconfigure the computer. Refer to Chapter 2, “Compaq Utilities,” for
information on running Computer Setup.

Compaq Deskpro 2000 Series of Personal Computers 7-1
chapter 7
JUMPER AND SWITCH
INFORMATION
This chapter provides jumper and switch information for system board jumpers, system I/O board
connectors, and hard drives for the Compaq Deskpro 2000 Series of Personal Computers.

7-2 Jumper and Switch Information
7.1 System Board Switches
7.1.1 Pentium-Based System Boards
The following illustration shows switch, connector, and jumper locations. Table 7-1 gives a
description of them.
Figure 7-1. Pentium System Board Switch, Connector, and Jumper Locations

Compaq Deskpro 2000 Series of Personal Computers 7-3
Table 7-1
Pentium System Board Connectors, Jumpers, and Switches
Device Description
E6 Power-on password enable/disable header
E8 Clear CMOS header
E9 External (replacement) battery
J6 Cache memory connector
J9 Riser board socket
J10 DIMM #1 socket
J11 DIMM #2 socket
J12 DIMM #3 socket
J1001 Graphics memory upgrade socket (used with J1002)
J1002 Graphics memory upgrade socket (used with J1001)
P1 Power connector
P10 Diskette cable socket
P18 LED socket
P20 Primary IDE/EIDE cable socket
P21 Secondary IDE/EIDE cable socket
P1000 VESA socket
SW1 Processor/bus speed selector
XU1 Microprocessor socket

7-4 Jumper and Switch Information
Figure 7-2. Pentium II System Board Switch, Connector, and Jumper Locations
Table 7-2
Pentium II System Board Connectors, Jumpers, and Switches
Device Description
J2 DIMM Slot 1
J4 DIMM Slot 2
J5 DIMM Slot 3
J6 Graphics memory upgrade socket (used with P3)
J10 Riser board socket
J14 Microprocessor connector
P1 Power connector
P2 Clear CMOS header/Power-on password header/External (replacement) battery connector
P3 Graphics memory upgrade socket (used with J6)
P9 Fan connector
P10 Diskette cable connector
P11 LED connector
P20 Primary IDE/EIDE cable connector
P21 Secondary IDE/EDIE cable connector
P22 Alternate fan connector (Intel boxed processor)
SW2 Processor speed selector
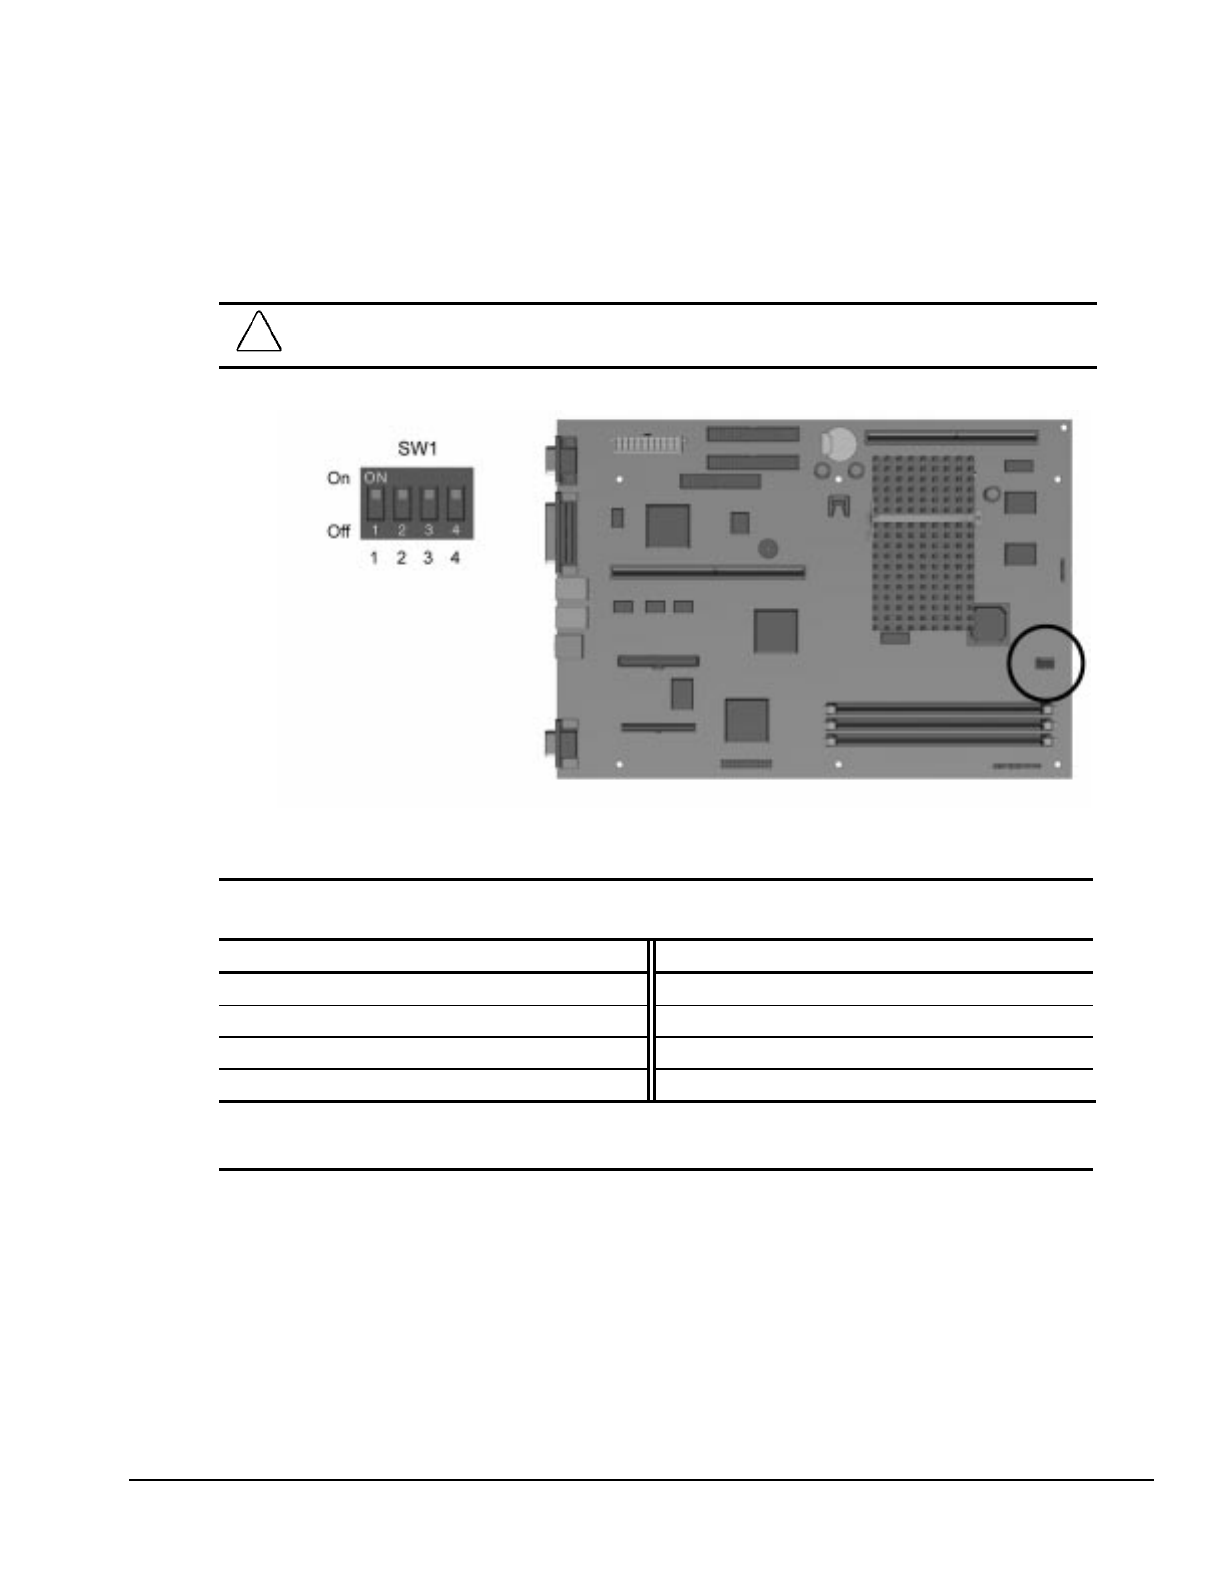
Compaq Deskpro 2000 Series of Personal Computers 7-5
7.1.2 Switch Settings
The following figures and tables identify the switch settings for each processor frequency for the
Pentium and Pentium II system boards.
CAUTION: Do not configure the system board to operate faster than the speed at which the processor is
rated. Doing this could result in unreliable operation or processor damage.
Figure 7-3. SW1 Module Location, Pentium System Board
Table 7-3
Pentium System Board SW1 Settings
S1 S2 Bus Speed S3 S4 Processor Speed**
OFF OFF 60 OFF OFF 233
OFF ON 66* OFF ON 200
ON OFF 50 ON ON 166
ON ON reserved
* Standard bus speed for all Compaq Deskpro 2000 Series of Personal Computers.
** With bus speed set to 66 MHz.

7-6 Jumper and Switch Information
Figure 7-4. SW2 Module Location, Pentium II System Board
Table 7-4
Pentium II System Board Processor Speed Switch Settings
S1 S2 S3 S4 Processor Speed
ON ON OFF OFF 233
ON OFF ON ON 266
ON OFF ON OFF 300
Note: The bus speed is hard wired to 66 MHz.
7.2 System Board Jumpers
This section provides information for setting jumpers for enabling/disabling passwords and clearing
the configuration (CMOS). When you change a security feature, you will need to reset a jumper and
reconfigure the computer to recognize this change. If the system configuration is incorrect, your
computer may not work properly and you may receive error messages on the screen. Setting the
system board jumpers is part of the reconfiguration process, along with running the Computer Setup
utility.
✎To change the system board jumpers, you must remove the system unit cover or access
panel. For procedures on removing the system unit cover or access panel, refer to Chapter 5
for desktop computers and to Chapter 6 for minitower computers.
CAUTION: Be sure to turn off the computer before changing a jumper setting or damage to the system
board can result.
!WARNING: To reduce the risk of personal injury from hot surfaces, allow the internal system components
to cool before touching.

Compaq Deskpro 2000 Series of Personal Computers 7-7
7.2.1 Setting Power-On Password Jumpers
The power-on password feature is enabled or disabled by moving the jumper on the password
header located on the system board. The password header is labeled “E6 Password” on the Pentium
system board and labeled “Password” on the Pentium II system board.
The password header has three pins. The power-on password comes enabled by default with the
jumper on pins 5 and 6. To clear or disable the power-on password, move the jumper to pins 6 and 7.
Figure 7-5. Password Header (E6) Location, Pentium System Board
Figure 7-6. Password Header Location, Pentium II System Board
✎To set a new password, move the password header back to pins 5 and 6, restart the
computer, and reestablish your password through Security Management.
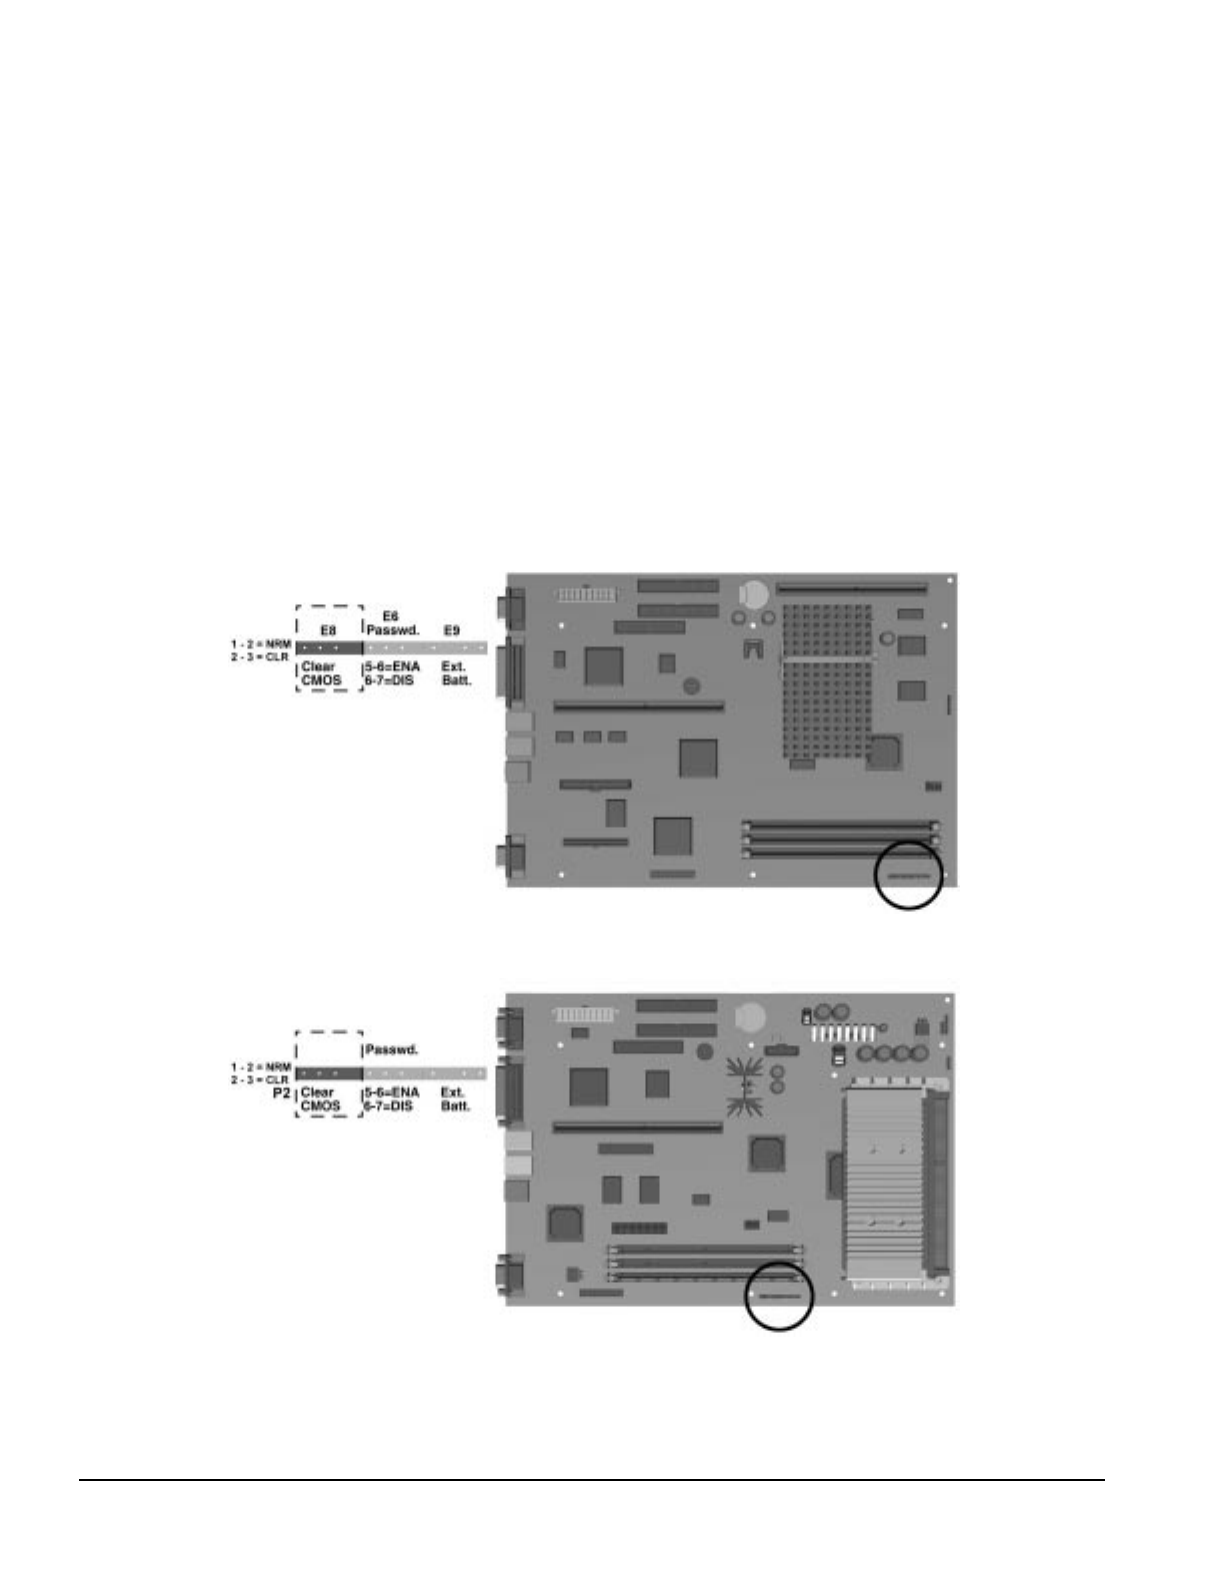
7-8 Jumper and Switch Information
7.2.2 Clearing Configuration
The computer's configuration (CMOS) may occasionally be corrupted. If it does, it is necessary to
clear the CMOS memory. The clear-CMOS header, located on the system board, is used for this
function. The clear-CMOS header is labeled “E8 Clear CMOS” on the Pentium system board and
labeled “Clear CMOS” on the Pentium II system board
To clear and reset the configuration, perform the following procedure:
1. Prepare the computer for disassembly by following the procedures specified in Section 5.3 or 6.3
for desktop or minitower computers, respectively.
2. Remove the hood or access panel (see Section 5.6 or 6.6.1).
3. Move the jumper on clear-CMOS header from pins 1 and 2 to pins 2 and 3 for five seconds; then
replace the jumper on pins 1 and 2.
Figure 7-7. Clear CMOS Header (E8) Location, Pentium System Board
Figure 7-8. Clear CMOS Header Location, Pentium II System Board

Compaq Deskpro 2000 Series of Personal Computers 7-9
4. Replace the cover and tighten the thumbscrews on the rear panel.
5. Turn the computer on.
6. Run the Computer Setup utility to reconfigure the system.
✎When jumper on the clear-CMOS header is removed, the password becomes invalid
because the password is stored in the configuration memory. You will need to reset the
password.
7.2.3 Changing the Real-Time Clock (RTC) Battery
When installing the replacement RTC battery, the battery connector should be connected to the pins
of the battery connector on the system board. The battery connector is labeled “E9 Ext. Batt.” on the
Pentium system board and labeled “Ext. Batt.” on the Pentium II system board. The battery connector
is keyed for proper installation.
Figure 7-9. Battery Connector (E9) Location, Pentium System Board
Figure 7-10. Battery Connector Location, Pentium II System Board
Refer to Chapter 5 or Chapter 6 for complete instructions on installing a replacement RTC battery.
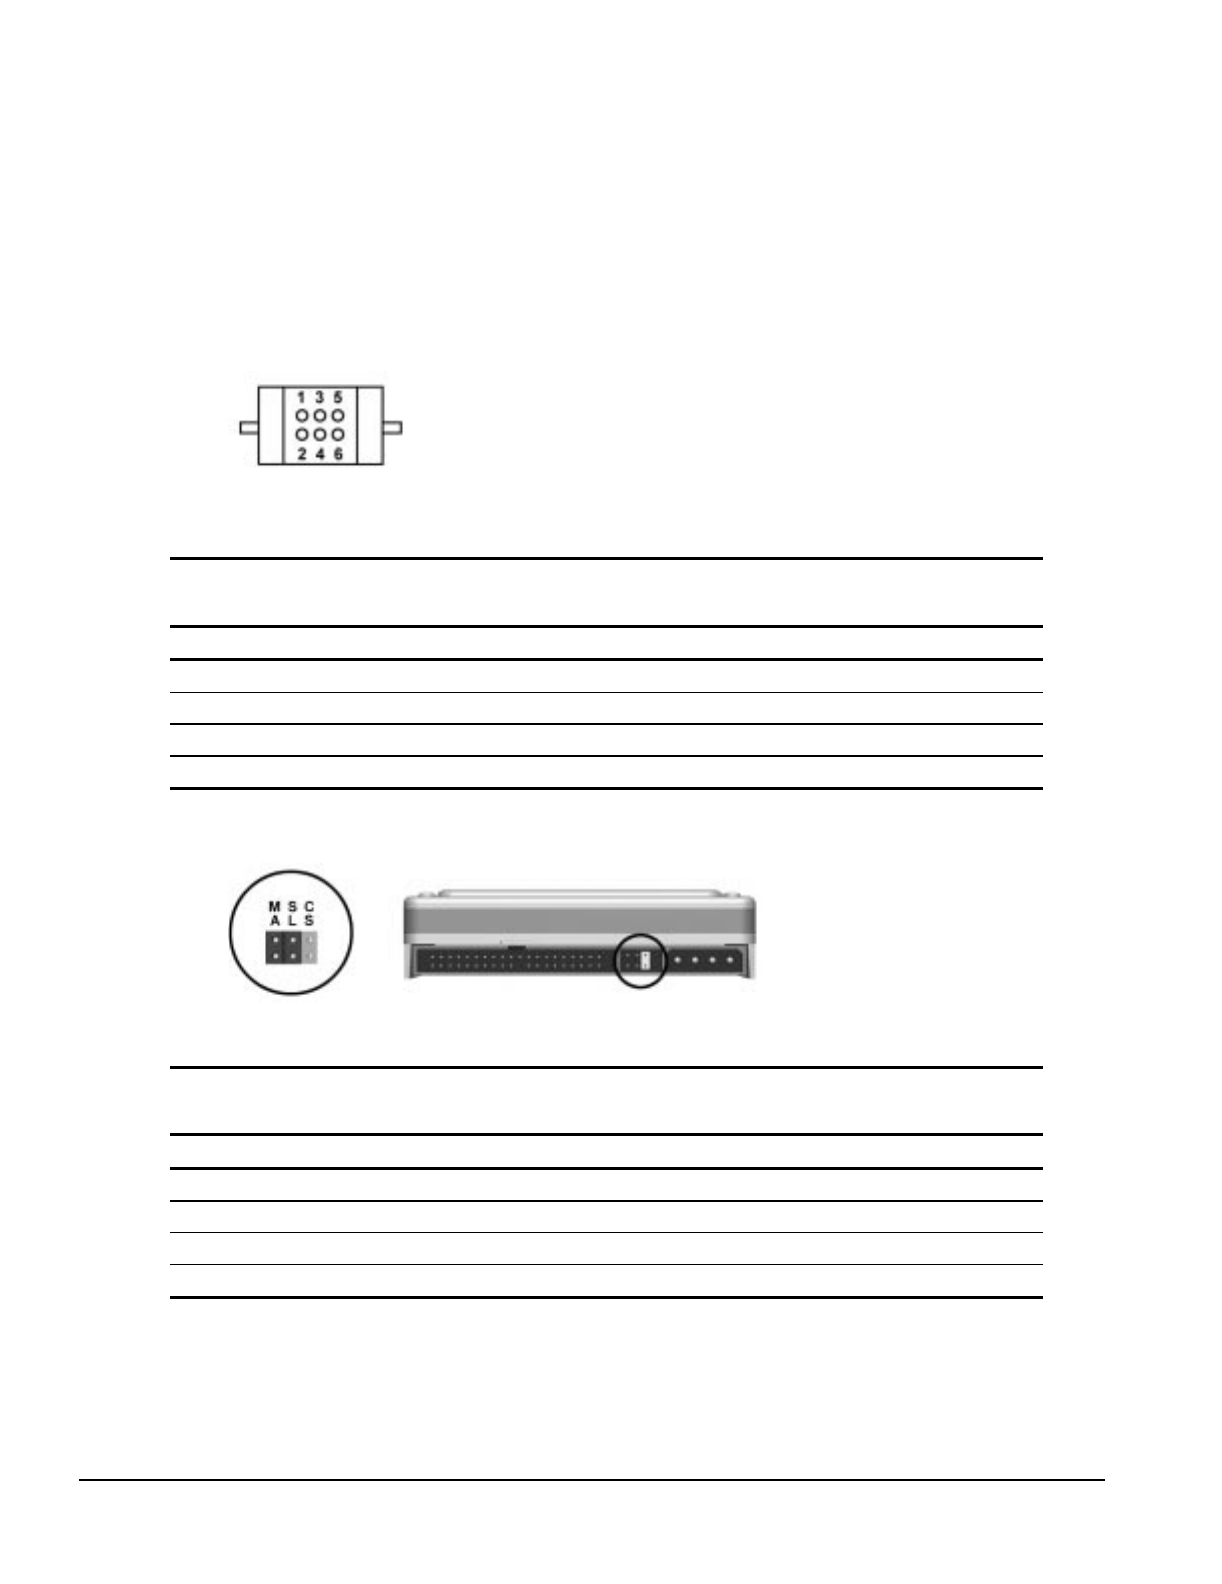
7-10 Jumper and Switch Information
7.3 Hard Drives
For more information about Compaq hard drives, refer to Appendix C in this guide. For more
information about using SCSI devices, refer to Appendix D.
7.3.1 2.1-GB EIDE Hard Drive Jumper Settings
Figure 7-11. 2.1-GB Seagate EIDE Hard Drive Jumper Settings
Table 7-5
Jumper Settings
Definition Jumpers
Single 5 to 6
Primary 5 to 6 and 3 to 4
Secondary No connection
Cable select 3 to 4
Figure 7-12. 2.1-GB Western Digital EIDE hard drive Jumper settings
Table 7-6
Jumper Settings
Definition Jumpers
Single None
Primary MA
Secondary SL
Cable Select CS

Compaq Deskpro 2000 Series of Personal Computers 7-11
Figure 7-13. 2.1-GB Maxtor EIDE Hard Drive Jumper Settings
Table 7-7
Jumper Settings
Description MA CS WC FR CO
Single J
Primary in dual system J
Secondary in dual system O
Cable select J
Write cache enabled J
Reserved O
4032 cylinder option enabled J
J = Jumper. O = No jumper.
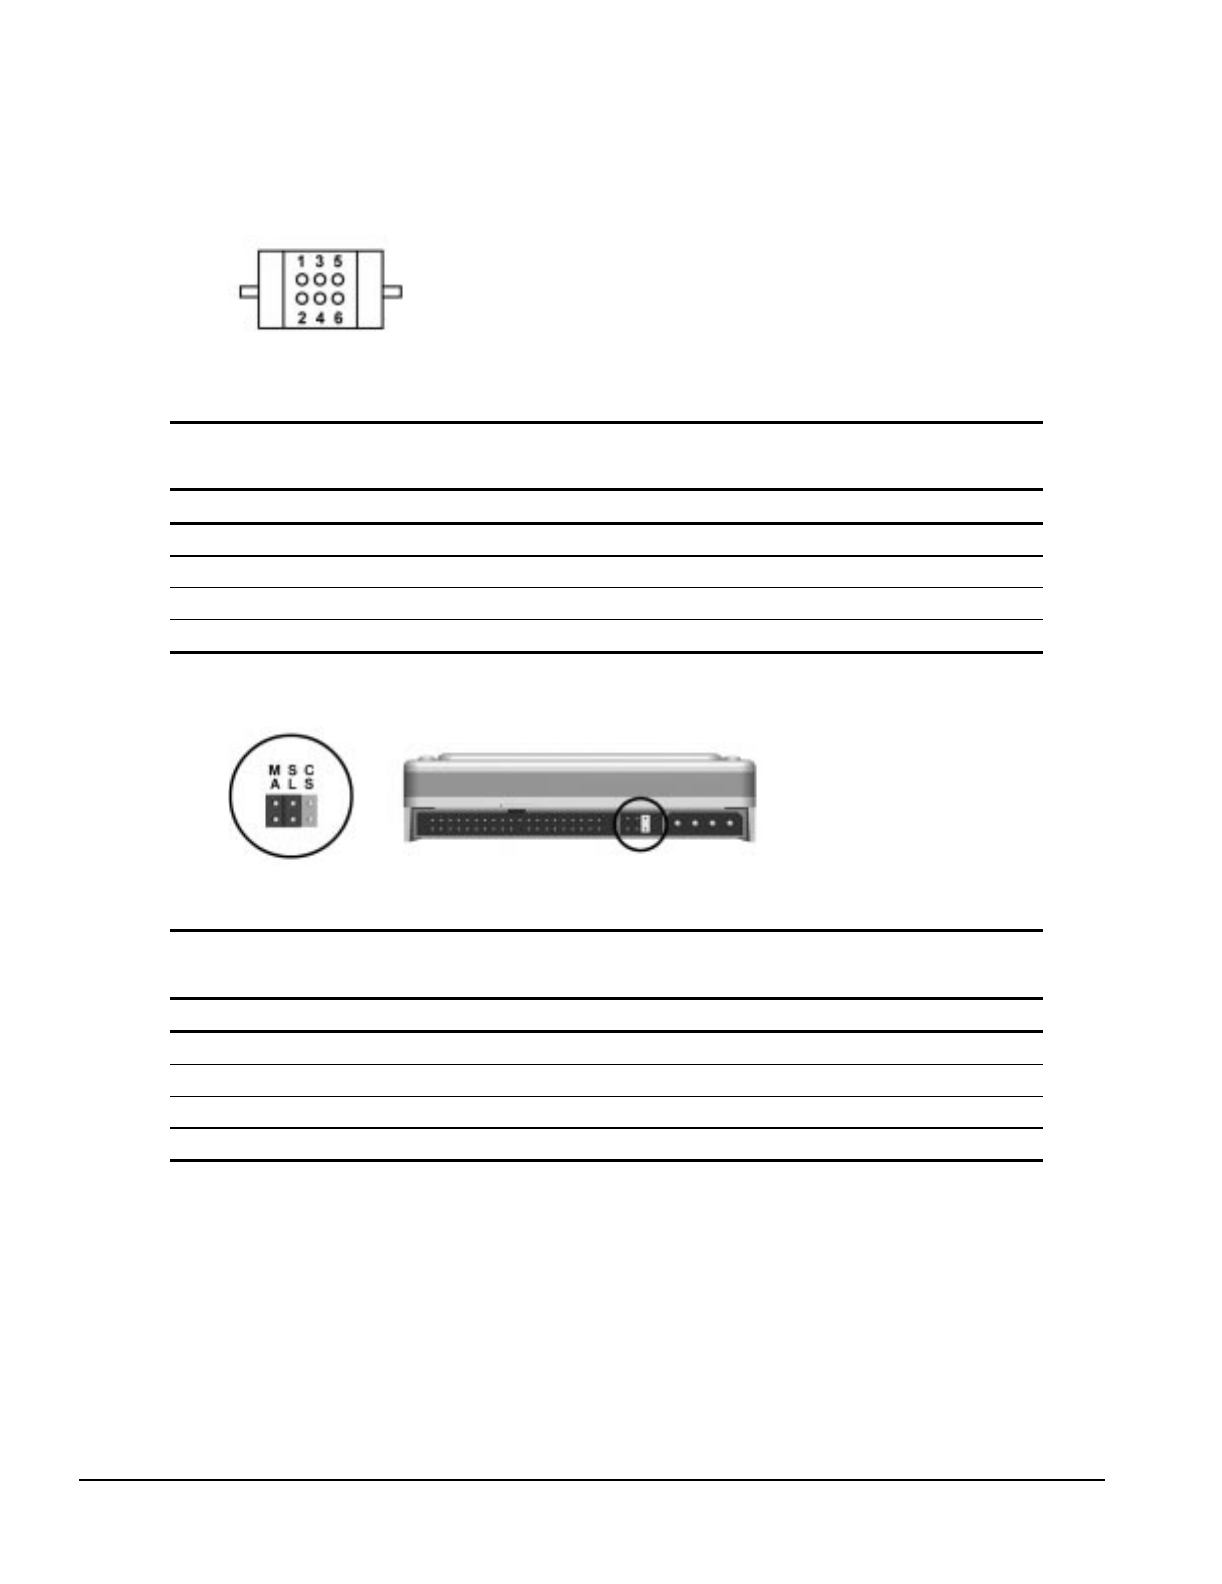
7-12 Jumper and Switch Information
7.3.2 3.2-GB EIDE Hard Drive Jumper Settings
Figure 7-14. 3.2-GB Seagate EIDE Hard Drive Jumper Settings
Table 7-8
Jumper Settings
Definition Jumpers
Single 5 to 6
Primary 5 to 6 and 3 to 4
Secondary No connection
Cable select 3 to 4
Figure 7-15. 3.2-GB Western Digital EIDE Hard Drive Jumper settings
Table 7-9
Jumper Settings
Definition Jumpers
Single None
Primary MA
Secondary SL
Cable Select CS
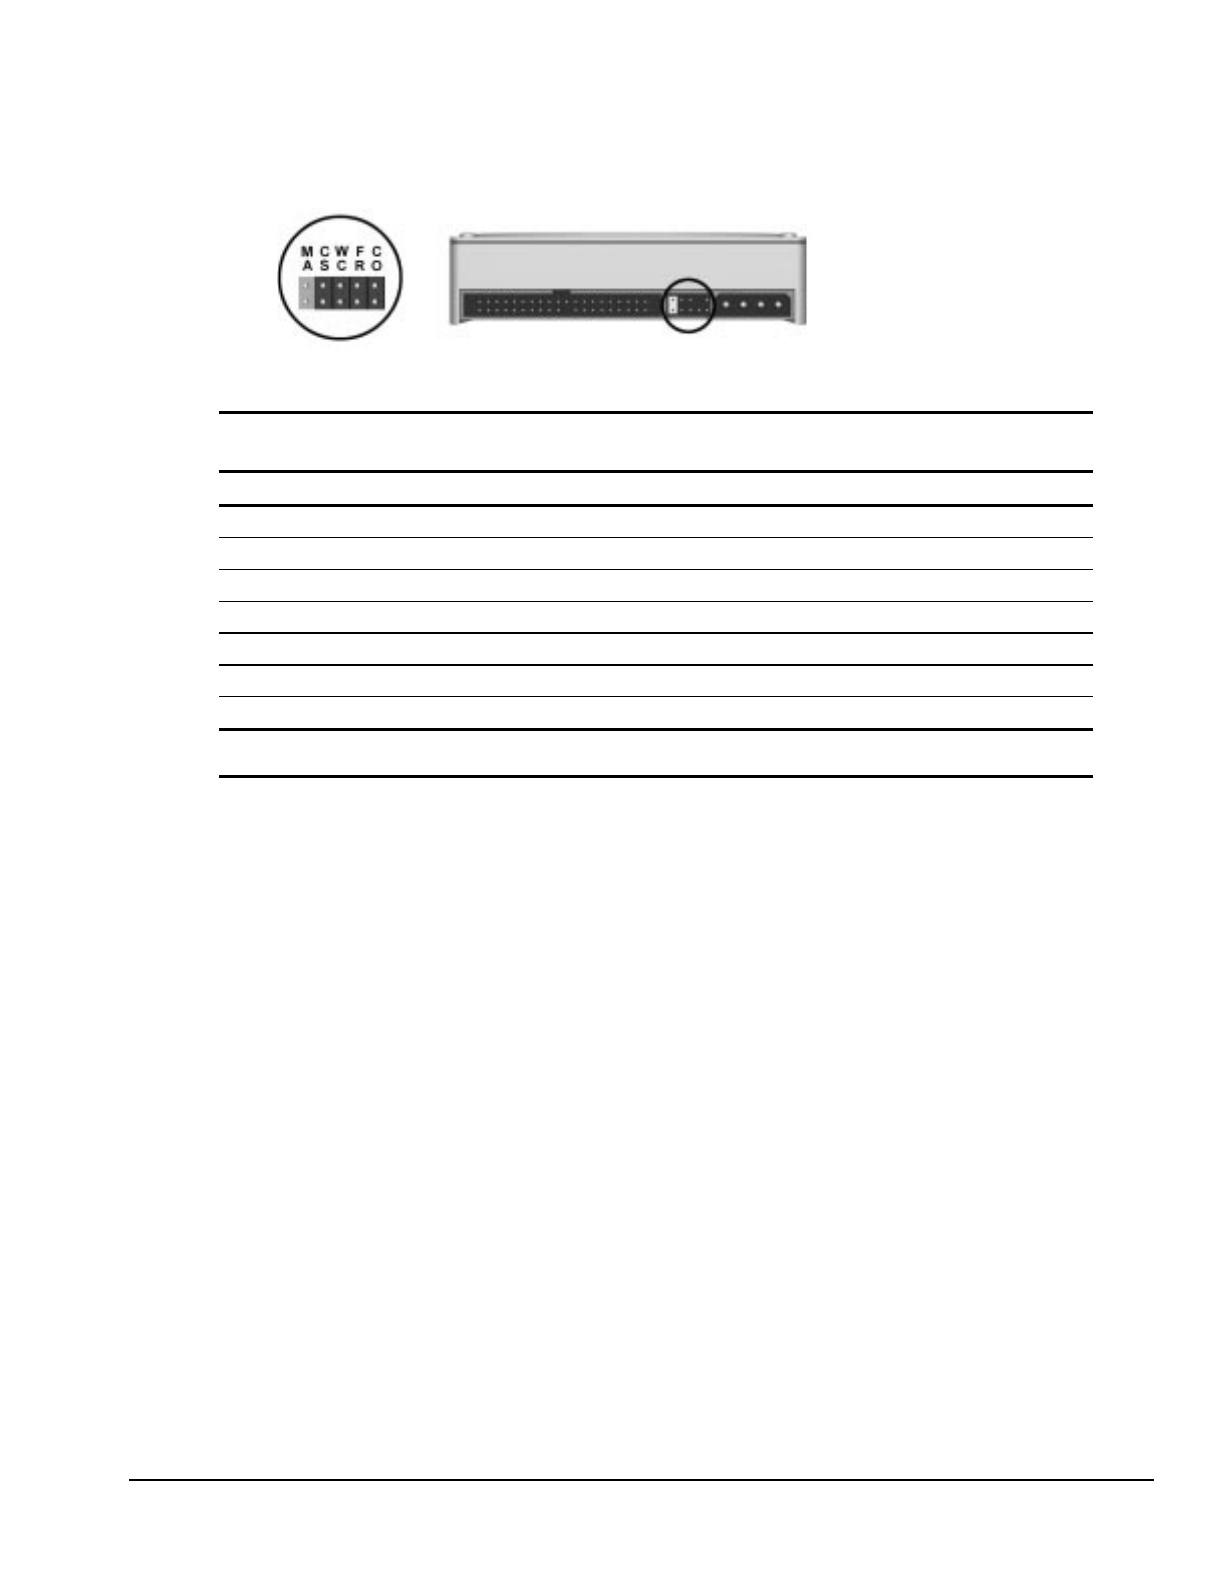
Compaq Deskpro 2000 Series of Personal Computers 7-13
Figure 7-16. 3.2-GB Maxtor EIDE Hard Drive Jumper Settings
Table 7-10
Jumper Settings
Description MA CS WC FR CO
Single J
Primary in dual system J
Secondary in dual system O
Cable select J
Write cache enabled J
Reserved O
4032 cylinder option enabled J
J = Jumper. O = No jumper.
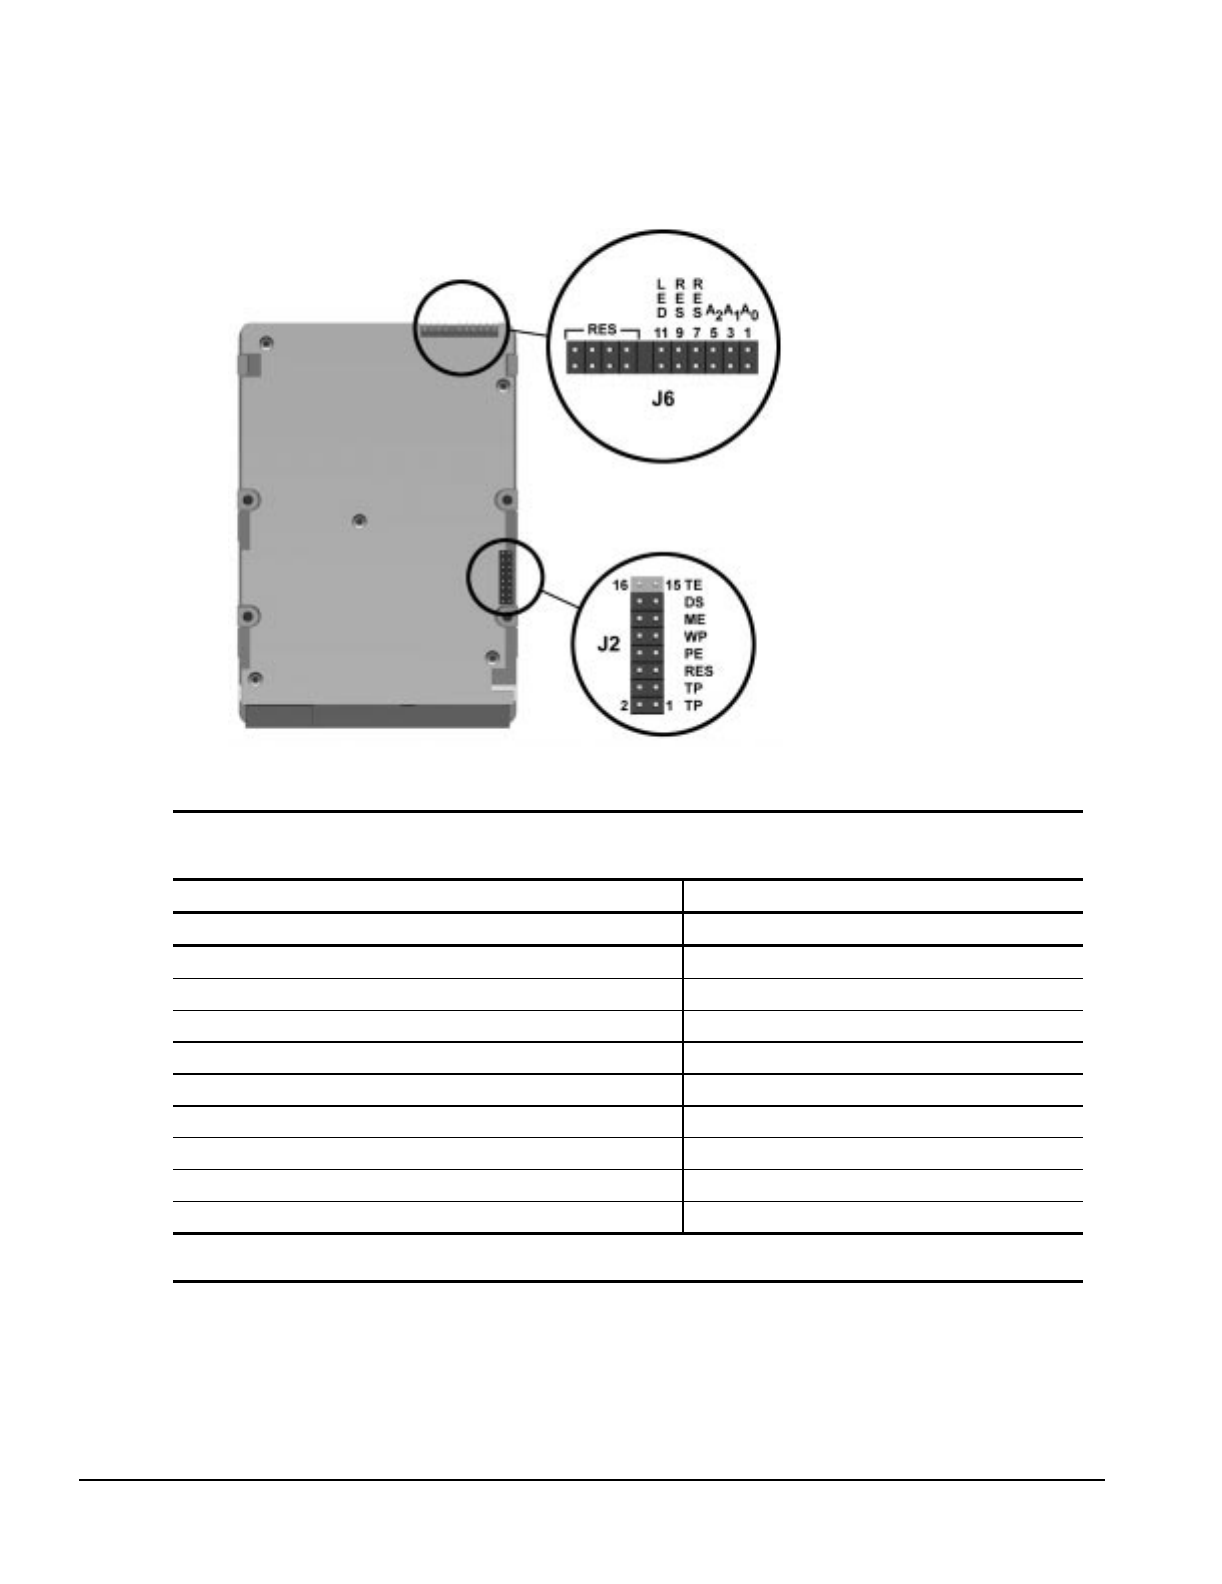
7-14 Jumper and Switch Information
7.3.3 Optional Ultra SCSI Hard Drive
Jumper Settings
Figure 7-17. 2.1-GB Ultra SCSI Hard Drive Jumper Settings
Table 7-11
Jumper Settings
Jumper J2 Jumper J6
Definition Jumper Pins Definition A0 A1 A2
Enable Terminators TE 15 & 16 SCSI ID = 0 Off Off Off
Delay Motor Start DS 13 & 14 SCSI ID = 1 On Off Off
Enable Motor Start ME 11 & 12 SCSI ID = 2 Off On Off
Write Protect WP 9 & 10 SCSI ID = 3 On On Off
Disable Parity PE 7 & 8 SCSI ID = 4 Off Off On
Reserved RES none SCSI ID = 5 On Off On
Termination Power from Drive TP 3 & 4 SCSI ID = 6 Off On On
Termination Power to SCSI Bus TP 1 & 2 SCSI ID = 7 On On On
Termination Power from SCSI Bus 2 & 4
All other pins of Jumper J6 reserved for other uses.

Compaq Deskpro 2000 Series of Personal Computers 7-15
Figure 7-18. 4.3-GB Ultra SCSI Hard Drive Jumper Settings
Table 7-12
Jumper Settings
Jumper J2 Jumper J6
Definition Jumper Definition A0 A1 A2
Enable Terminators TE SCSI ID = 0 Off Off Off
Delay Motor Start DS SCSI ID = 1 On Off Off
Enable Motor Start ME SCSI ID = 2 Off On Off
Write Protect WP SCSI ID = 3 On On Off
Disable Parity PE SCSI ID = 4 Off Off On
Reserved RES SCSI ID = 5 On Off On
Termination Power from Drive TP SCSI ID = 6 Off On On
Termination Power from SCSI Bus TP SCSI ID = 7 On On On
All other pins of Jumper J6 reserved for other uses.
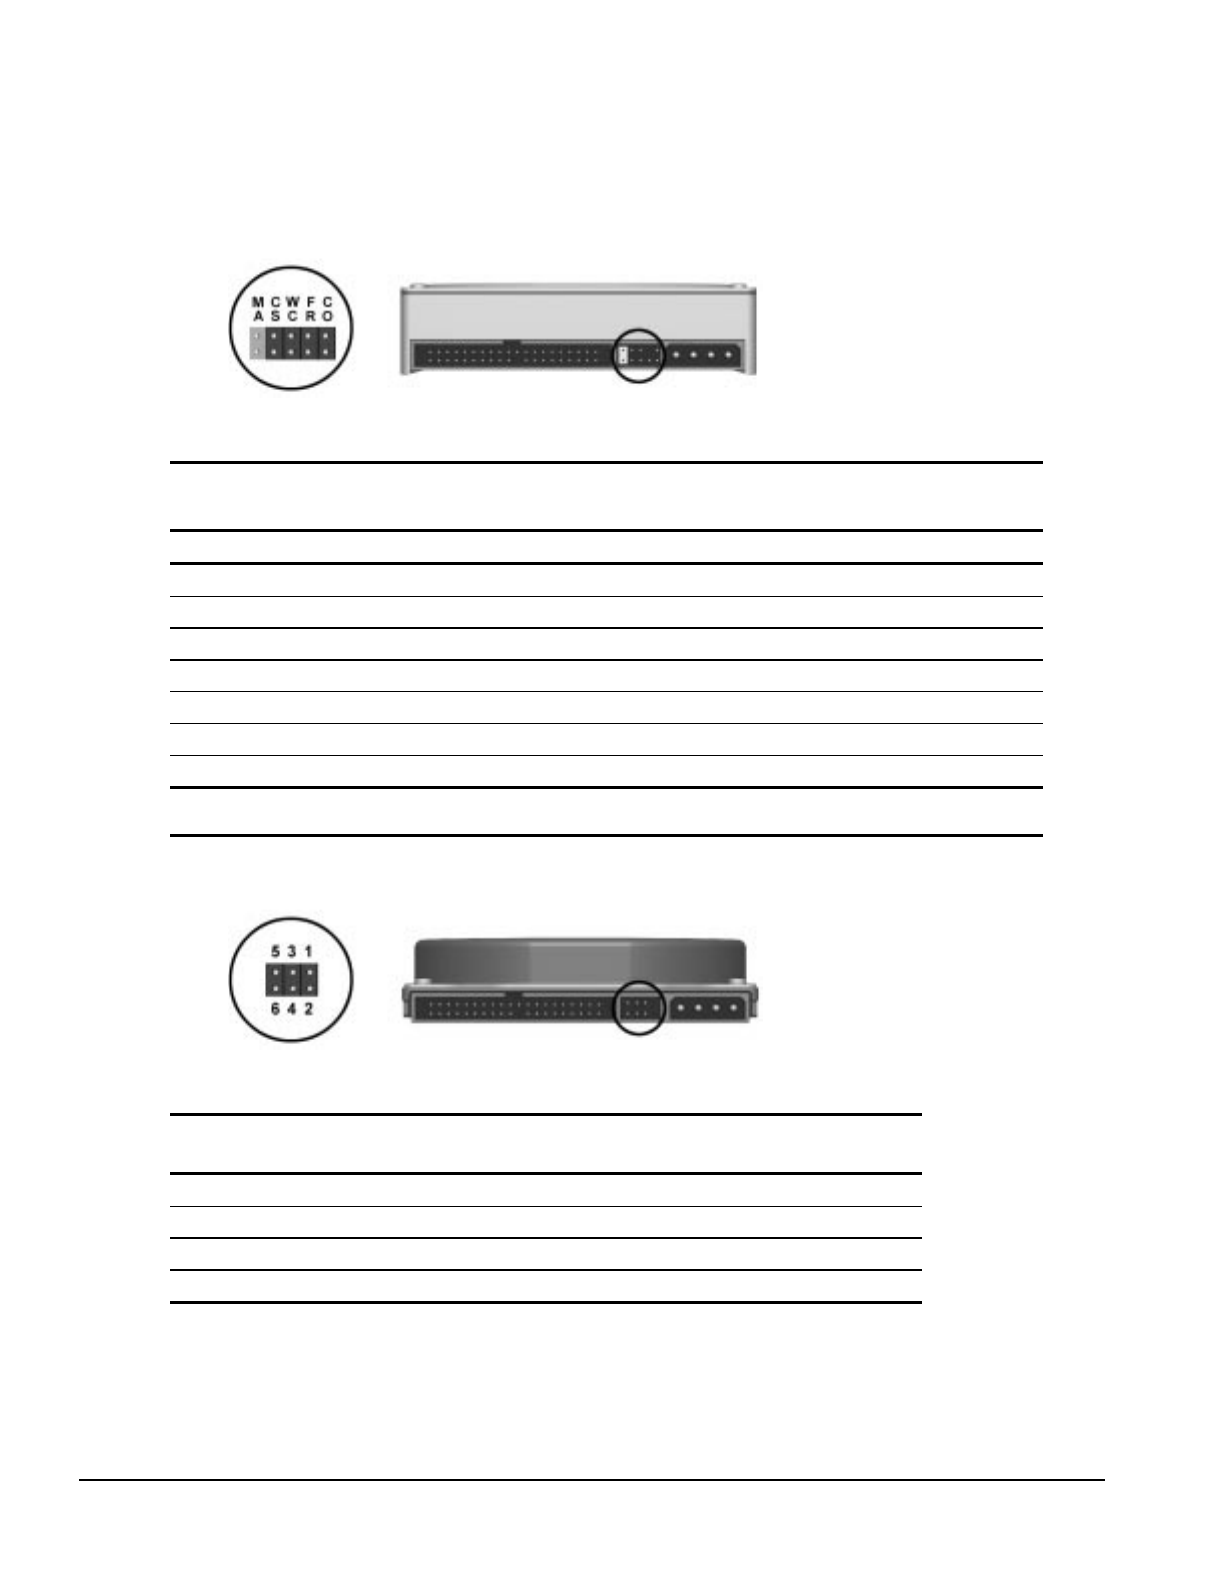
7-16 Jumper and Switch Information
7.3.4 Optional Ultra ATA Hard Drives
Jumper Settings
Figure 7-19. 2.1-GB Maxtor Ultra ATA Hard Drive Jumper Settings
Table 7-13
Jumper Settings
Description MA CS WC FR CO
Single J
Primary in dual system J
Secondary in dual system O
Cable select J
Write cache enabled J
Reserved O
4032 cylinder option enabled J
J = Jumper . O = No jumper.
Figure 7-20. 2.4-GB Ultra ATA Hard Drive Jumper Settings
Table 7-14
Jumper Settings
Definition Pins
Primary 1 to 2 and 3 to 5
Secondary 3 to 5
Cable Select 2 to 4 and 3 to 5

Compaq Deskpro 2000 Series of Personal Computers 7-17
Figure 7-21. 3.2-GB Maxtor Ultra ATA Hard Drive Jumper Settings
Table 7-15
Jumper Settings
Description MA CS WC FR CO
Single J
Primary in dual system J
Secondary in dual system O
Cable select J
Write cache enabled J
Reserved O
4032 cylinder option enabled J
J = Jumper. O = No jumper.
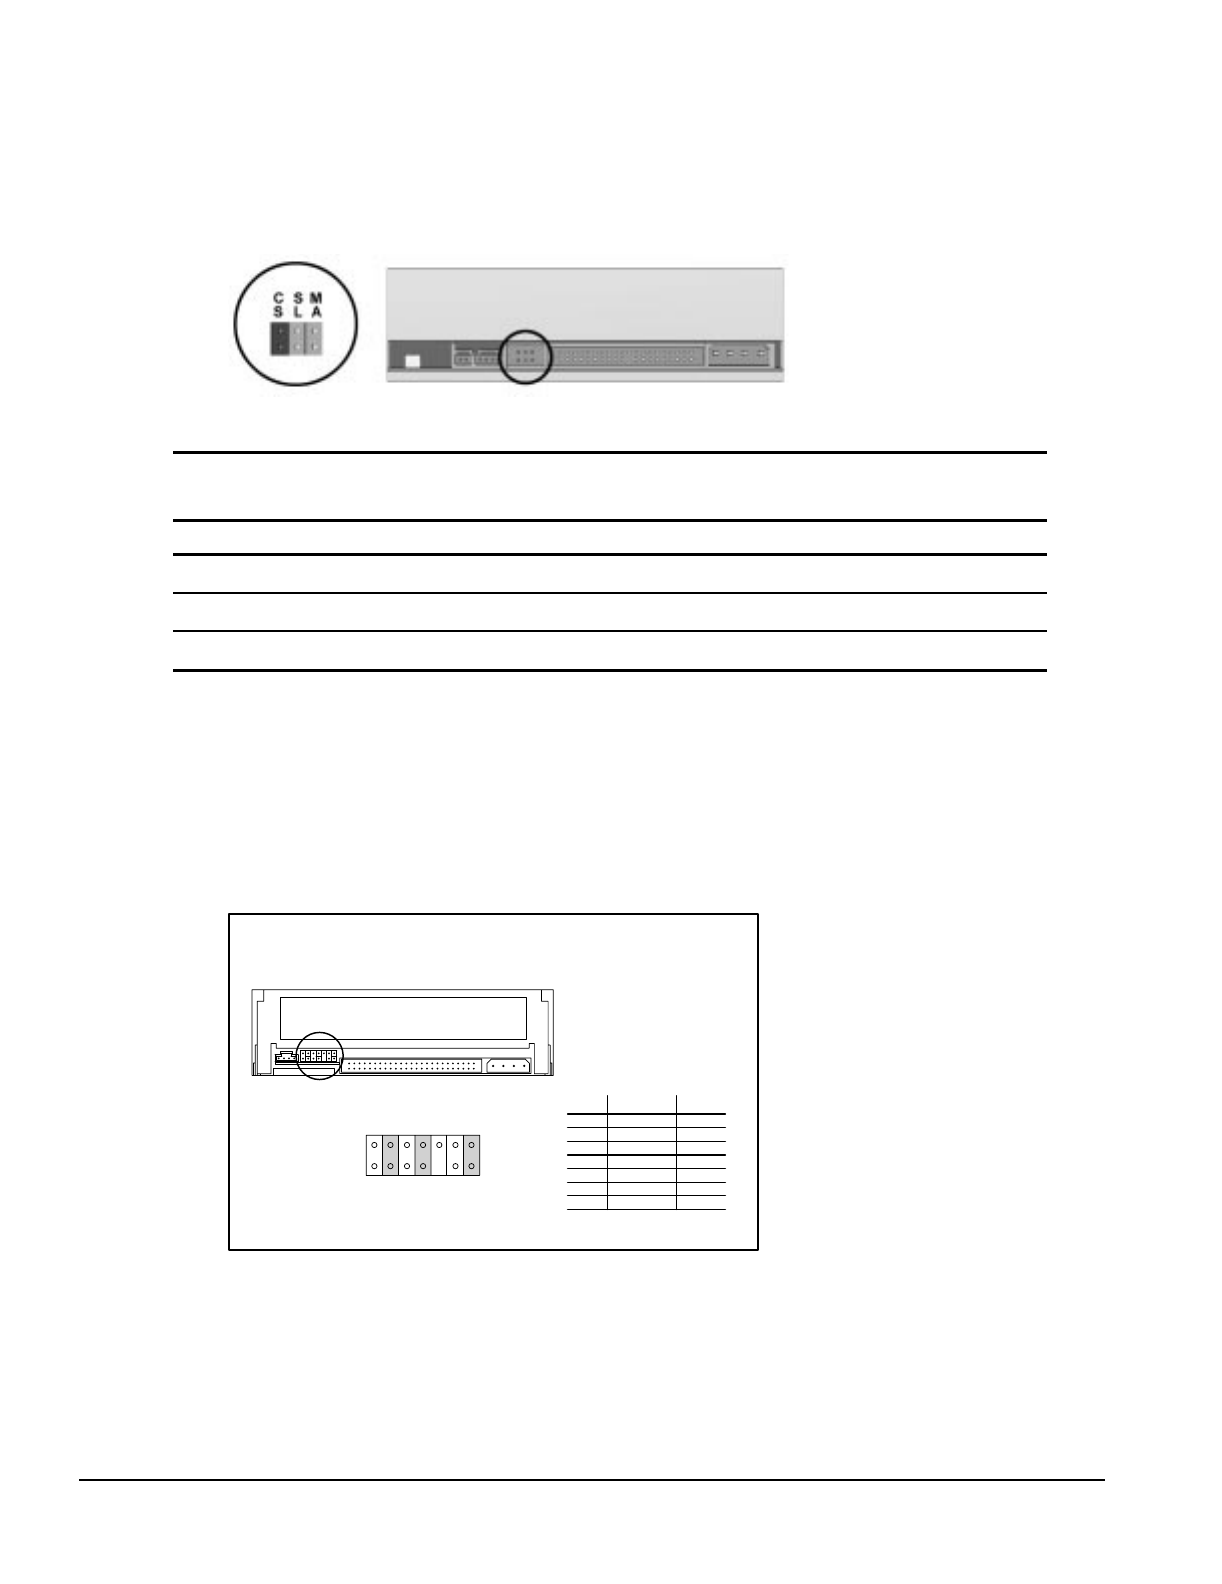
7-18 Jumper and Switch Information
7.4 CD-ROM Drive Jumper Settings
Figure 7-22. Jumper Pins for the 16X max EIDE CD-ROM Drives
Table 7-16
Jumper Settings
Definition Jumper
Primary MA
Secondary SL
Cable select CS
7.5 Optional PD-CD Drives
For more information about SCSI devices, refer to Appendix D.
7.5.1 SCSI PD-CD Drive Jumper
Settings
PD/CDROM - SCSI
Assembly Number 184689-201
1234576
Default Settings Shown
Jumper Description Setting
1
2
3
4
5
6
7
LUN enabled
SCSI ID jumper
Blank
Terminators disabled
Term power enabled
SCSI ID jumper
SCSI ID jumper
Off
On
Off
On
Off
On
Not Used
Figure 7-23. Jumper Pins for the PD-CD Drive
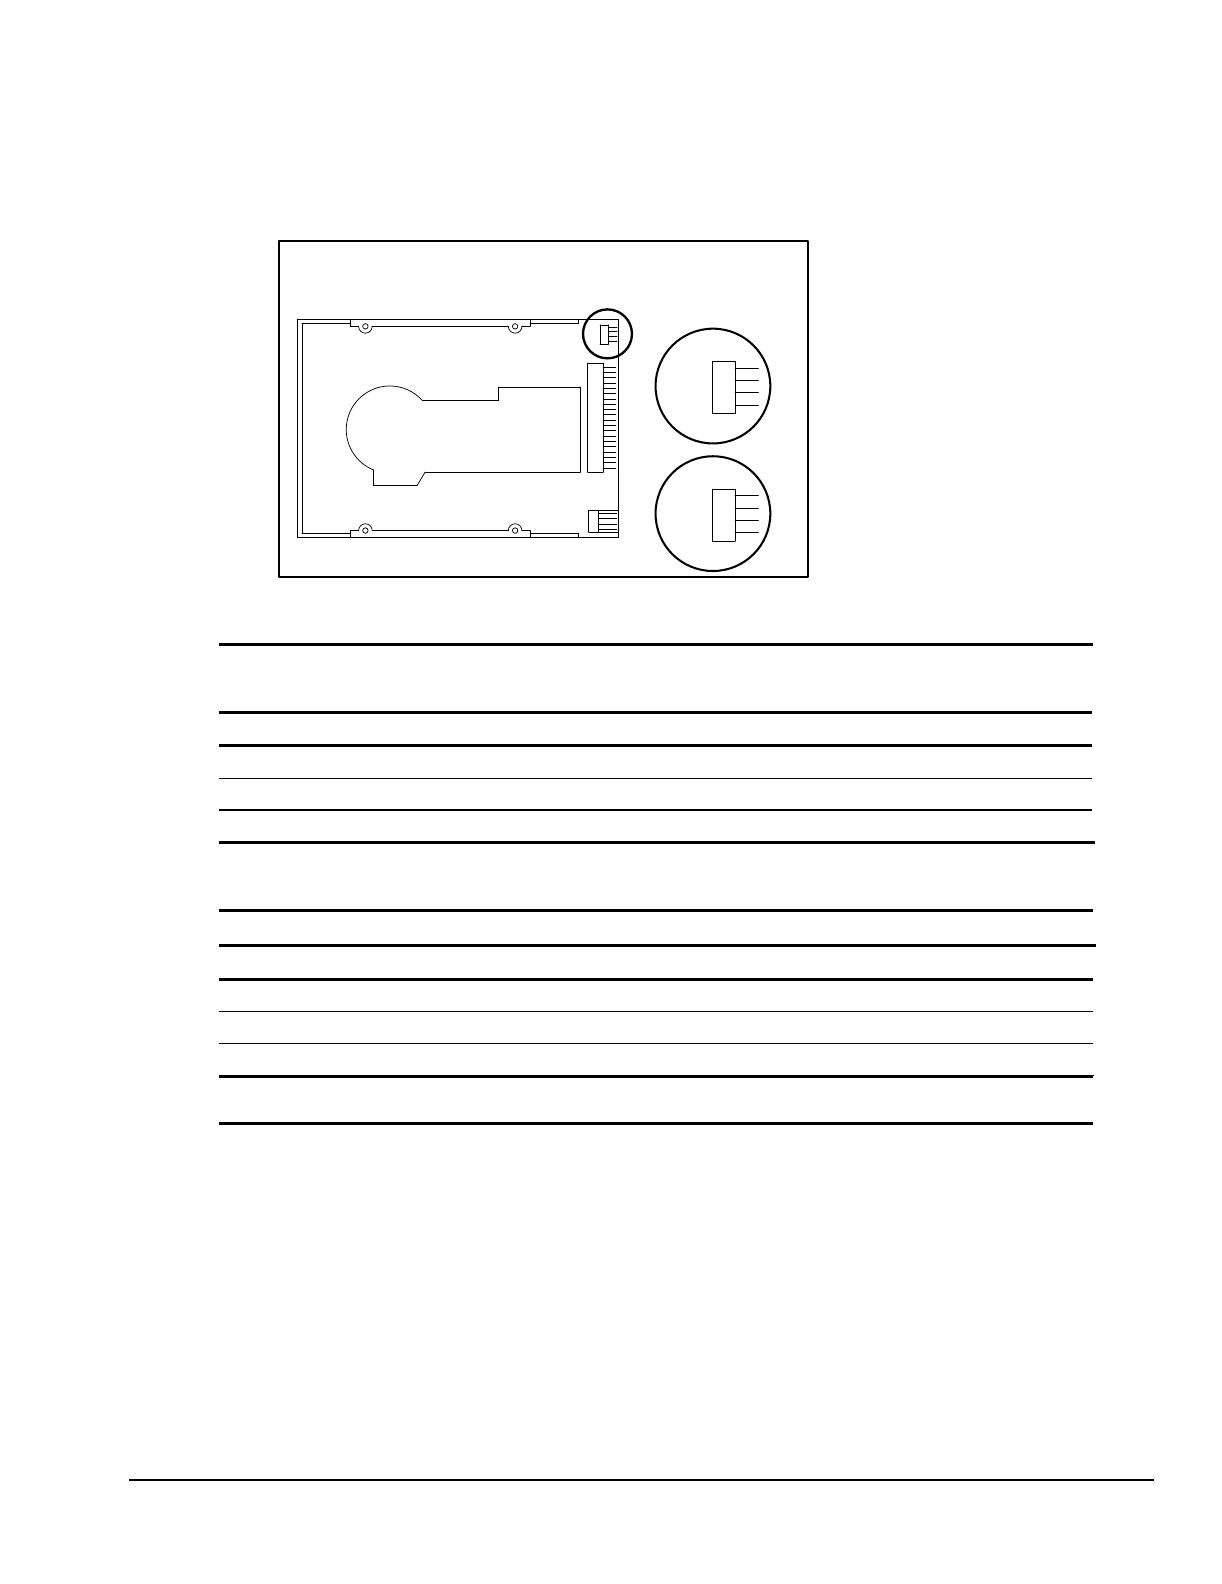
Compaq Deskpro 2000 Series of Personal Computers 7-19
7.6 Diskette Drive
IA
1DRV
2CSL
2MST
CS
MA
SL
MD0
120 MB Floppy Drive
Assembly Number 184932
Figure 7-24. LS-120 Diskette Drive Jumper Settings
Table 7-17
Jumper Settings (Top Insert)
Setting IA 1DRV 2CSL 2MST
Cable Select Off Off On Off
Device 0 (Primary) Off Off Off On
Device 1 (Secondary) Off Off Off Off
Jumper IA is for factory use only.
Jumper 1DRV does not need to be used.
Jumper Settings (Bottom Insert)
Setting MDO CS SL MA
Cable Select Off On Off Off
Device 0 (Primary) Off Off Off On
Device 1 (Secondary) Off Off On Off
Jumper MDO is for factory use only.

Compaq Deskpro 2000 Series of Personal Computers 8-1
chapter 8
SPECIFICATIONS
This chapter provides physical, environmental, and performance specifications for the computer,
keyboard, and mass storage devices.
8.1 System
Table 8-1
Desktop System Specifications
U. S. Metric
Dimensions
Height
Width
Length
5.0 in
17.71 in
16.72 in
12.7 cm
44.98 cm
42.47 cm
Weight 23.7 lb 10.74 kg
System Power Rating 145 W 145 W
Power Supply
Operating Voltage Range
Rated Voltage Range
Rated Line Frequency
Rated Input Current (maximum)
Rated Output Power
90-132 VAC
100-120 VAC
50 - 60 Hz
5.5 A
200 W
180-264 VAC
200-240 VAC
50 - 60 Hz
3 A
200 W
Environmental Requirements
Temperature
Operating 50° to 95°F10
°
to 35°C
Shipping -4° to 140°F -20° to 60°C
Humidity (noncondensing)
Operating 8% to 90% 8% to 90%
Nonoperating 5% to 95% 5% to 95%
Maximum Altitude (unpressurized)
Operating 10,000 ft 3048 m
Nonoperating 30,000 ft 9144 m
Heat Dissipation (nominal) 770 Btu/hr 3.23 kg-cal/min

8-2 Specifications
Table 8-2
Minitower System Specifications
U. S. Metric
Dimensions
Height
Width
Depth
18.49 in
7.31 in
16.89 in
46.96 cm
18.57 cm
42.90 cm
Weight 34.0 lb 15.40 kg
System Power Rating 185 W 185 W
Power Supply
Operating Voltage Range
Rated Voltage Range
Rated Line Frequency
Rated Input Current (maximum)
Rated Output Power
90-132 VAC
100-120 VAC
50 - 60 Hz
5.5 A
200 W
180-264 VAC
200-240 VAC
50 - 60 Hz
3 A
200 W
Environmental Requirements
Temperature
Operating 50° to 95°F 10° to 35°C
Shipping -4° to 140°F -20° to 60°C
Humidity (noncondensing)
Operating 8% to 90% 8% to 90%
Nonoperating 5% to 95% 5% to 95%
Maximum Altitude (unpressurized)
Operating 10,000 ft 3048 m
Nonoperating 30,000 ft 9144 m
Heat Dissipation (nominal) 1060 Btu/hr 4.45 kg-cal/min

Compaq Deskpro 2000 Series of Personal Computers 8-3
Table 8-3
System Interrupts
Hardware IRQ System Function
IRQ 0 Timer Interrupt (Not on ISA Bus)
IRQ 1 Keyboard (Not on ISA Bus)
IRQ 2 Interrupt Controller Cascade (Not on ISA Bus)
IRQ 3 Unused
IRQ 4 Serial Port (COM 1)
IRQ 5 Enhanced Business Audio (Default; Alternate = IRQ 7, IRQ 9, IRQ 10, None)
IRQ 6 Diskette Drive
IRQ 7 Parallel Port (LPT 1)
IRQ 8 Real-Time Clock (Not on ISA Bus)
IRQ 9 Unused
IRQ 10 Unused
IRQ 11 PCI Interrupt
IRQ 12 Mouse
IRQ 13 Coprocessor (Not on ISA Bus)
IRQ 14 IDE Interface (Hard Disk and Primary IDE Drive)
IRQ 15 CD-ROM (Secondary IDE/Drive)
Table 8-4
System DMA
Hardware DMA System Function
DMA 0 Unused
DMA 1 Business Audio (Default; Alternate = DMA 0, DMA 3, None)
DMA 2 Diskette Drive
DMA 3 ECP Parallel Port LPT1 (Default; Alternate = DMA 0)
DMA 4 DMA Controller Cascading (Not on ISA Bus)
DMA 5 Unused
DMA 6 Unused
DMA 7 Unused

8-4 Specifications
Table 8-5
System I/O
I/O Address (Hex) System Function (Shipping Configuration)
000 - 00F DMA Controller # 1
010 - 01F Unused
020 - 03F Interrupt Controller # 1
040 - 043 Counter/Timer
044 - 05F Unused
060 Keyboard Controller
061 Port B
062 - 063 Unused
064 Keyboard Controller
065 - 06F Unused
070 - 071 NMI Enable/Real-Time Clock
072 - 07F Unused
080 - 08F DMA Page Registers
090 - 091 Unused
092 Port A
093 - 09F Unused
0A0 - 0BF Interrupt Controller # 2
0C0 - 0DF DMA Controller # 2
0E0 - 0EB Unused
0EC - 0ED 483 Configuration Index/Data
0EE - 0EF 483 Fast A20/Fast Reset
0F0 - 0F1 Co-Processor Busy Clear/Reset
0F2 - 0F3 Unused
0F4 - 0F5 483 CPU Speed Slow/Fast
0F6 - 0F8 Unused
0F9 483/PGL Configuration Lock
0FA Unused
0FB 483/PGL Configuration Unlock
0FC - 0FF Unused
100 - 12F Unused
130 - 131 Modem PGL Index/Data (Default; Alt = 140h, 260h, 270h)
132 - 16F Unused
170 - 177 Reserved
178 - 1EF Unused
1F0 - 1F7 Fixed Disk Controller
1F8 - 1FF Unused
200 Unused
201 Unused
Continued

Compaq Deskpro 2000 Series of Personal Computers 8-5
Table 8-5
continued
I/O Address (Hex) System Function (Shipping Configuration)
202 - 21F Unused
220 - 22F Business Audio (Default; Alternate = 240h, 260h, 280h)
230 - 277 Unused
278 - 27F Reserved Parallel Port
280 - 2E7 Unused
2E8 - 2EF Reserved Serial Port
2F0 - 2F7 Unused
2F8 - 2FF Modem (COM 2)
300 - 317 Unused
318 - 319 Unused
31A - 36F Unused
370 - 377 Reserved (2nd Diskette Drive)
378 - 37F Parallel Port (Primary)
380 - 387 Unused
388 - 38B FM Synthesizer - OPL3
38C - 397 Unused
398 - 399 Super AI/O Index/Data (Default; Alternate = 26Eh, 15Ch, 02Eh)
39A - 3AF Unused
3B0 - 3BB MDA, EGA/VGA
3BC - 3BF Reserved (Parallel Port)
3C0 - 3DF EGA/VGA
3E0 - 3E7 Unused
3E8 - 3EF Reserved (Serial Port)
3F0 - 3F7 Diskette Controller
3F8 - 3FF Serial Port (Primary)

8-6 Specifications
Table 8-6
System Memory Map
Size Memory Address System Function
256 KB FFFFFFFFh to FFFC0000h System ROM
2,080,512 KB FFFBFFFFh to 81000000h PCI Memory Expansion
16 MB 80FFFFFFh to 80000000h ISA Memory Mapped I/O Devices
1792 MB 7FFFFFFFh to 10000000h PCI Memory Expansion
240 MB 0FFFFFFFh to 01000000h HOST or PCI Memory Expansion
15 MB 00FFFFFFh to 00100000h HOST, PCI, or ISA Memory Expansion
64 KB 00EFFFFFh to 000F0000h System ROM
64 KB 000EFFFFh to 000E0000h Unused
96 KB 000DFFFFh to 000C8000h Unused
6 KB 000C7FFFh to 000C6000h Video ROM
2 KB 000C67FFh to 000C6000h Unused
24 KB 000C5FFFh to 000C6000h Video ROM
128 KB 000BFFFFh to 000A0000h Video RAM
640 KB 0009FFFFh to 00000000h Base Memory
All memory above the first 256 MB is non-cacheable. All PCI memory is non-cacheable.

Compaq Deskpro 2000 Series of Personal Computers 8-7
8.2 Drives
Table 8-7
1.44 MB Diskette Drive
Size and Capacity
Size (in) 3.5
High Density (MB) 1.44
Low Density (KB) 720
Compaq Spare Part Number 160788-201
Light Green
Height One-third
Bytes per Sector 512
Sectors per Track
High Density 18
Low Density 9
Tracks per Side
High Density 80
Low Density 80
Read/Write Heads 2
Average Seek Time (Mb/s)
Track-to-Track (high/low) 3/6
Average (high/low) 94/173
Latency Average (ms) 100

8-8 Specifications
Table 8-8
Hard Drives
IDE/EIDE
2.1-GB 3.2-GB
Formatted Capacity
Physical (MB)
Lo
g
ical
(
MB
)
2111.86
2111.86
3209.0
3209.0
Compa
q
Spare Part Number 278745-001 278746-001
Drive T
y
pe 65 65
Transfer Rate
Interface
(
Mb
y
tes/sec
)
16.7 16.7
Typical Seek Time
(including settling)
Single Track (ms)
Average (ms)
Full Stroke
(
ms
)
3.0
12.0
22.0
2.0
12.0
25.0
Disk Rotational Speed
(
rpm
)
4500 4500
Cylinders
Lo
g
ical 4092 6218
Data Heads
Lo
g
ical 16 16
Sectors per Track
Lo
g
ical 63 63
Buffer Size (KB) 128 128
Ultra ATA (UDMA)
2.1-GB 3.2-GB 3.2-GB
Formatted Capacity
Physical (MB)
Lo
g
ical
(
MB
)
2160.0
2160.0
3240.0
3240.0
3240.0
3240.0
Compa
q
Spare Part Number 278287-001 278288-001 278297-001
Drive T
y
pe 65 65 65
Transfer Rate
Interface
(
Mb
y
tes/sec
)
33.3 33.3 33.3
Typical Seek Time
(including settling)
Single Track (ms)
Average (ms)
Full Stroke
(
ms
)
3.0
12.0
22.0
2.0
12.0
25.0
1.0
9.7
21.0
Disk Rotational Speed
(
rpm
)
4500 4500 5400
Cylinders
Lo
g
ical 4092 6218 6218
Data Heads
Lo
g
ical 16 16 16
Sectors per Track
Lo
g
ical 63 63 63
Buffer Size (KB) 128 128 128
✎Because “Compaq Utilities” is installed on a hidden partition on the hard drive, hard drive
capacity will appear reduced when displayed by the computer.

Compaq Deskpro 2000 Series of Personal Computers 8-9
Table 8-9
Ultra SCSI Hard Drives
2.1 GB 4.3 GB
Formatted Capacity
Physical (MB)
Logical (MB)
2.16
2.10
4.6
4.3
Compaq Spare Part Number 247409-001 247408-001
Transfer Rate
Media (MB/sec)
Interface (MB/sec)
62.5 - 103.4
20.0
83.2 - 139.3
20.0
Typical Seek Time
(including settling)
Single Track (ms)
Average (ms)
Full Stroke (ms)
1.2
8.5
15.0
1.0
8.0
18.0
Disk Rotational Speed (rpm) 5400 7200
Cylinders
Physical 8209 6144
Data Heads
Physical 3 8
Sectors per Track
Physical 132 - 211 126 - 216
Buffer Size (KB) 512 512

8-10 Specifications
Table 8-10
CD-ROM Drives
16X Max 24X Max
Applicable Disc
CD-ROM mode1, mode 2
Mixed mode (audio and data combined)
CD-DA
Photo CD (single and multi-session)
CDi ready
CD-XA ready
CD-ROM mode1, mode 2
Mixed mode (audio and data combined)
CD-DA
Photo CD (single and multi-session)
CDi ready
CD-XA ready
Compaq Spare Part Number 278791-001 278026-001
Disc Diameter 12 cm, 8 cm 12 cm, 8 cm
Capacity 550 MB (Mode 1, 12 cm)
640 MB (Mode 2, 12 cm)
180 MB (8 cm)
550 MB (Mode 1, 12 cm)
640 MB (Mode 2, 12 cm)
180 MB (8 cm)
Center Hole 15 mm diameter 15 mm diameter
Disc Thickness 1.2 mm 1.2 mm
Track Pitch 1.6 µm 1.6 µm
Laser
Beam Divergence
Output Power
Type
Wave Length
53.5 degrees +/- 1.5 degrees
0.14 mW
Semiconductor laser GaAIAs
790 nm +/- 25 nm
53.5 degrees +/- 1.5 degrees
0.14 mW
Semiconductor laser GaAIAs
790 nm +/- 25 nm
Access Time
Random
Full Stroke
100 ms
200 ms
100 ms
150 ms
Audio Output Level 0.7V (RMS) (typical) 0.7V (RMS) (typical)
Cache Buffer 128 KB 128 KB
Data Transfer Rate
Sustained 2400 KB/s 1200 to 3600 KB/s

Compaq Deskpro 2000 Series of Personal Computers 8-11
Table 8-11
PD-CD Drive
4X 8X
Compaq Spare Part Number 184691-201 185951-001
Disc
Application Disc
CD-ROM
CD-XA
CD-I
CD-I Ready
Photo CD
CD-WO
Mode 1 & 2, CD-DA
Mode 2, Form 1 & 2
Mode 2, Form 1 & 2
CD-Bridge
Single & Multi session
Fixed and Variable packets
Mode 1 & 2, CD-DA
Mode 2, Form 1 & 2
Mode 2, Form 1 & 2
CD-Bridge
Single & Multi session
Fixed and Variable packets
Capacity
CD-ROM Mode 1
CD-ROM Mode 2
PD
550 MB (12 cm)
640 MB (12cm), 180 MB (8 cm)
650 MB, ZCAV
550 MB (12 cm)
640 MB (12cm), 180 MB (8 cm)
650 MB, ZCAV
Diameter 12 cm, 8 cm (CD-ROM only) 12 cm, 8 cm (CD-ROM only
Thickness 1.2 mm 1.2 mm
Track Pitch 1.6 ìm (CD) 1.2 ìm (PD) 1.6 ìm (CD) 1.2 ìm (PD)
Laser
Output Power 13.5 mW +/- 2.0 mW 13.5 mW +/- 2.0 mW
Type Semiconductor Laser GaA1As Semiconductor Laser GaA1As
Wave Length 790 +/- 25 nm 790 +/- 25 nm
Access Time
Random
Full Stroke
< 240-ms
< 350-ms (PD mode)
< 150 ms
< 350 ms (PD mode)
Cache/Buffer 256 Kbytes 512 Kbytes
Data Transfer Rate
CD
PD
600 Kb/sec
500-1100 Kb/sec
1200 Kb/sec
500-1100 Kb/sec
Error Rates
Soft error
Hard error
Seek error
10-9
10-12
10-6
10-9
10-12
10-6
Continued

8-12 Specifications
Table 8-11
Continued
Indicators
Busy LED
Mode LED
Green = Drive ready and media is inserted
Amber = Media access
Amber = PD, Green = CD
Green = Drive ready and media is inserted
Amber = Media access
Amber = PD, Green = CD
Reliability 35,000 POH, 25% (MTBF)
30 minutes (MTTR)
5 years (service life)
> 20,000 drawer in/out cycles
> 3 × 10⁶ full stroke seeks
35,000 POH, 25% (MTBF)
30 minutes (MTTR)
5 years (service life)
> 20,000 drawer in/out cycles
> 3 × 10⁶ full stroke seeks
Bus Type SCSI ATAPI
Startup Time < 7 seconds (typical) < 7 seconds (typical)
Stop Time < 3 seconds (typical) < 3 seconds (typical)
Environmental Conditions
Power Requirement +5VD
+12VDC C
Tolerance +/- 10%
Ripple 100 mVp-p
Current 1.2 A (typical)
1.5 A (maximum)
< 250 mA (spun-down)
Tolerance +/- 5%
Ripple 200 mVp-p
Current< 600 mA (hold)
< 1500 mA (seek, spin-up)
< 100 mA (spun-down)
Tolerance +/- 10%
Ripple 100 mVp-p
Current 1.2 A (typical)
1.5 A (maximum)
< 250 mA (spun-down)
Tolerance +/- 5%
Ripple 200 mVp-p
Current< 600 mA (hold)
< 1500 mA (seek, spin-up)
< 100 mA (spun-down)
Physical Characteristics
Dimensions (excluding projections) 5.72-in × 1.69-in × 7.92-in (146 mm ×
42.9 mm × 201 mm) (w/h/d)
5.72-in × 1.69-in × 7.92-in (146 mm ×
42.9 mm × 201 mm) (w/h/d)
Weight < 2.43 lb (< 1100 g) < 2.43 lb (< 1100 g)

Compaq Deskpro 2000 Series of Personal Computers 8-13
Table 8-12
LS-120 Drive
Compaq Spare Part Number
Internal
External
263709-002
294158-001
Physical Characteristics
Height
Width
Length
Weight (w/eject motor)
1.00-in (25.4-mm)
4.00-in, (101.6-mm)
5.91-in (150.0-mm)
1.19-lb (540-gm)
Environmental Factors
Temperature
Relative humidity (non-condensing)
Wet bulb, max
Shock
Vibration
Altitude
Operating
50°F to 68°F (10°C to 45°C)
10% to 80%
84°F (29°C)
6 G, 11 msec, 1/2 sine
0.5 G pk swept sine, 10 Hz to 500 Hz
1,635 yd (1500 M)
Non-Operating
-22°F to 140°F (-30°C to 60°C)
5% to 95%
140 G, 2 msec, 1/2 sine
2.0 G pk swept sine, 10 Hz to 500 Hz
4,905 yd (4500 M)
Physical Configuration
Actuator type
Number of disks
Data surfaces
Data head assemblies
Tracking and positioning
Optical transducers
Single stage, linear voice-coil
1
2
2
Continuous optical
1
Drive Performance
Disk rotational speed
Average latency
Average command overhead
Transfer rate to/from buffer
Load/unload cycles
Buffer size
720 ± 3 revolutions per minute
42 ms
1 ms
4 MB/sec maximum
30,000
4 K
Specified Modes
Track to track seek time
Average seek time
Maximum seek time
Start time (power up)
Stop time
Transfer rate (to/from media)
25 ms
70 ms
150 ms
1 sec
1 sec
3.2 to 5.4 Mbits/sec
Acoustic Noise 47 dBA at 1 meter
Electromagnetic interference 6 Oersteds (max)

8-14 Specifications
8.3 Audio System
Table 8-13
Audio System
Compaq Business Pro Audio Board
Compaq Spare Part Number 278792-001
Sampling Rate 5.51 KHz to 44 KHz (adjustable)
Maximum Voltage (rms)
Microphone-in
Headphone-out
Line-in
Line-out
0.030
n/a
0.7
0.7
Output Power
Headphone-out*
Internal speaker
60 mW (RL = 32 ohms)
1 W (RL = 8 ohms)
Impedance (nominal)
Microphone-in
Headphone-out
Line-in
Line-out
Internal speaker
1-K ohm
16 ohms (min.)
20-K ohms
20-K ohms
8 ohms
Speaker
Frequency response 450 Hz to 4000 Hz
Data Types
alaw
µlaw
mono/stereo
8-/16-bit
8-/16-bit
16-bit
*Not suitable for unpowered speakers.
8.4 Keyboard
Table 8-14
Compaq Enhanced Keyboard
U.S. Metric
Dimensions
Height
Width
Depth
1.3 in
18.3 in
6.4 in
3.3 cm
46.5 cm
16.1 cm
Weight 3.0 lb 1.4 kg

Compaq Deskpro 2000 Series of Personal Computers 8-15
8.5 Mouse
Table 8-15
2-Button Mouse
U.S. Metric
Dimensions
Height
Length
Width
1.34 in
4.45 in
2.36 in
3.4 cm
11.3 cm
6.0 cm
Weight 4.59 oz 130 g
Base Resolution 400 dpi 400 dpi
Tracking Speed (maximum) 10 in/sec 25 cm/sec
Temperature
Operating
Storage
32°F to 104°F
-4°F to 140°F
0°C to 40°C
-20°C to 60°C
Lifetime
Mechanical
Switch
Exceeds 300 miles
Exceeds 1 million operations
Exceeds 483 km
Exceeds 1 million operations
Relative Humidity 10% to 90%, noncondensing 10% to 90%, noncondensing
ESD No soft errors through 10 kV;
No hard errors through 15 kV; specific performance depends on host system
8.6 Supported Graphics Resolutions
Table 8-16
S3 Trio64V2/GX
Resolution Maximum Refresh Rate, Hz
1-MB SGRAM
Colors Supported
2-MB SGRAM
Colors Supported
640 × 480 85 16.7-M 16.7-M
800 × 600 85 65-K 16.7-M
1024 × 768 85 256 65-K
1280 × 1024 75 N/A 256

8-16 Specifications
Table 8-17
MPEG1 Graphics Controller
Resolution Ma×imum Refresh Rate, Hz
1-MB SGRAM
Colors Supported
2-MB SGRAM
Colors Supported
640 × 480 85 16.7-M 16.7-M
800 × 600 85 65-K 16.7-M
1024 × 768 85 256 65-K
1280 × 1024 75 N/A 256
Table 8-18
Matrox MGA-1064SG Embedded Graphics Controller
Resolution
2-MB SGRAM
Colors Supported
4-MB SGRAM
Colors Supported
640 × 480 16.7M 16.7M
800 × 600 16.7M 16.7M
1024 × 768 64K 16.7M
1152 × 864 64K 16.7M
1280 × 1024 256 16.7M
1600 × 1200 256 64K
Table 8-19
Matrox Millennium II PCI Board
Resolution
2-MB WRAM
Colors Supported
4-MB WRAM
Colors Supported
8-MB WRAM
Colors Supported
640 × 480 16.7M 16.7M 16.7M
800 × 600 16.7M 16.7M 16.7M
1024 × 768 64K 16.7M 16.7M
1152 × 864 64K 16.7M 16.7M
1280 × 1024 256 16.7M 16.7M
1600 × 1200 256 64K 16.7M
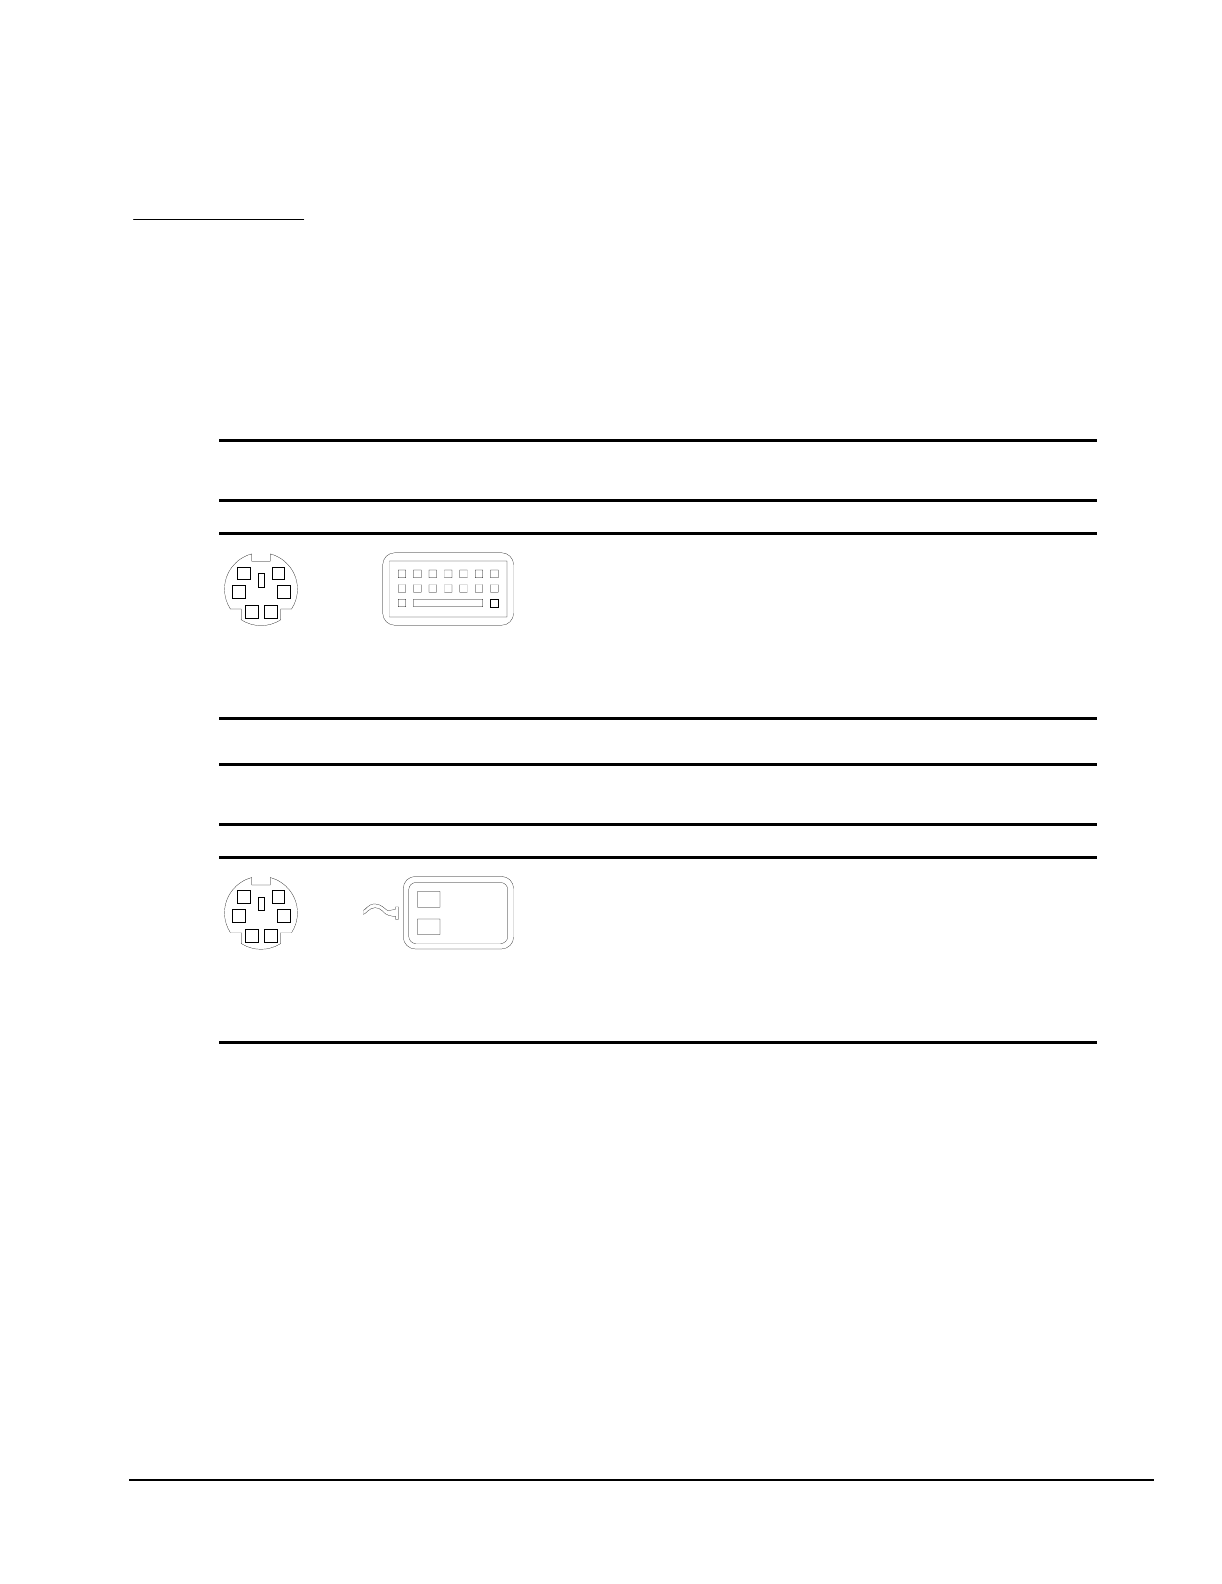
Compaq Deskpro 2000 Series of Personal Computers A-1
appendix A
CONNECTOR PIN ASSIGNMENTS
This appendix contains the pin assignments for all external connectors:
Table A-1
Keyboard
Connector and Icon (Orange) Pin Signal
6
34
5
21
KEY
1
2
3
4
5
6
Data
Unused
Ground
+5 VDC
Clock
Unused
Table A-2
Mouse
Connector and Icon (Green) Pin Signal
6
34
5
21
KEY
1
2
3
4
5
6
Data
Unused
Ground
+5 VDC
Clock
Unused
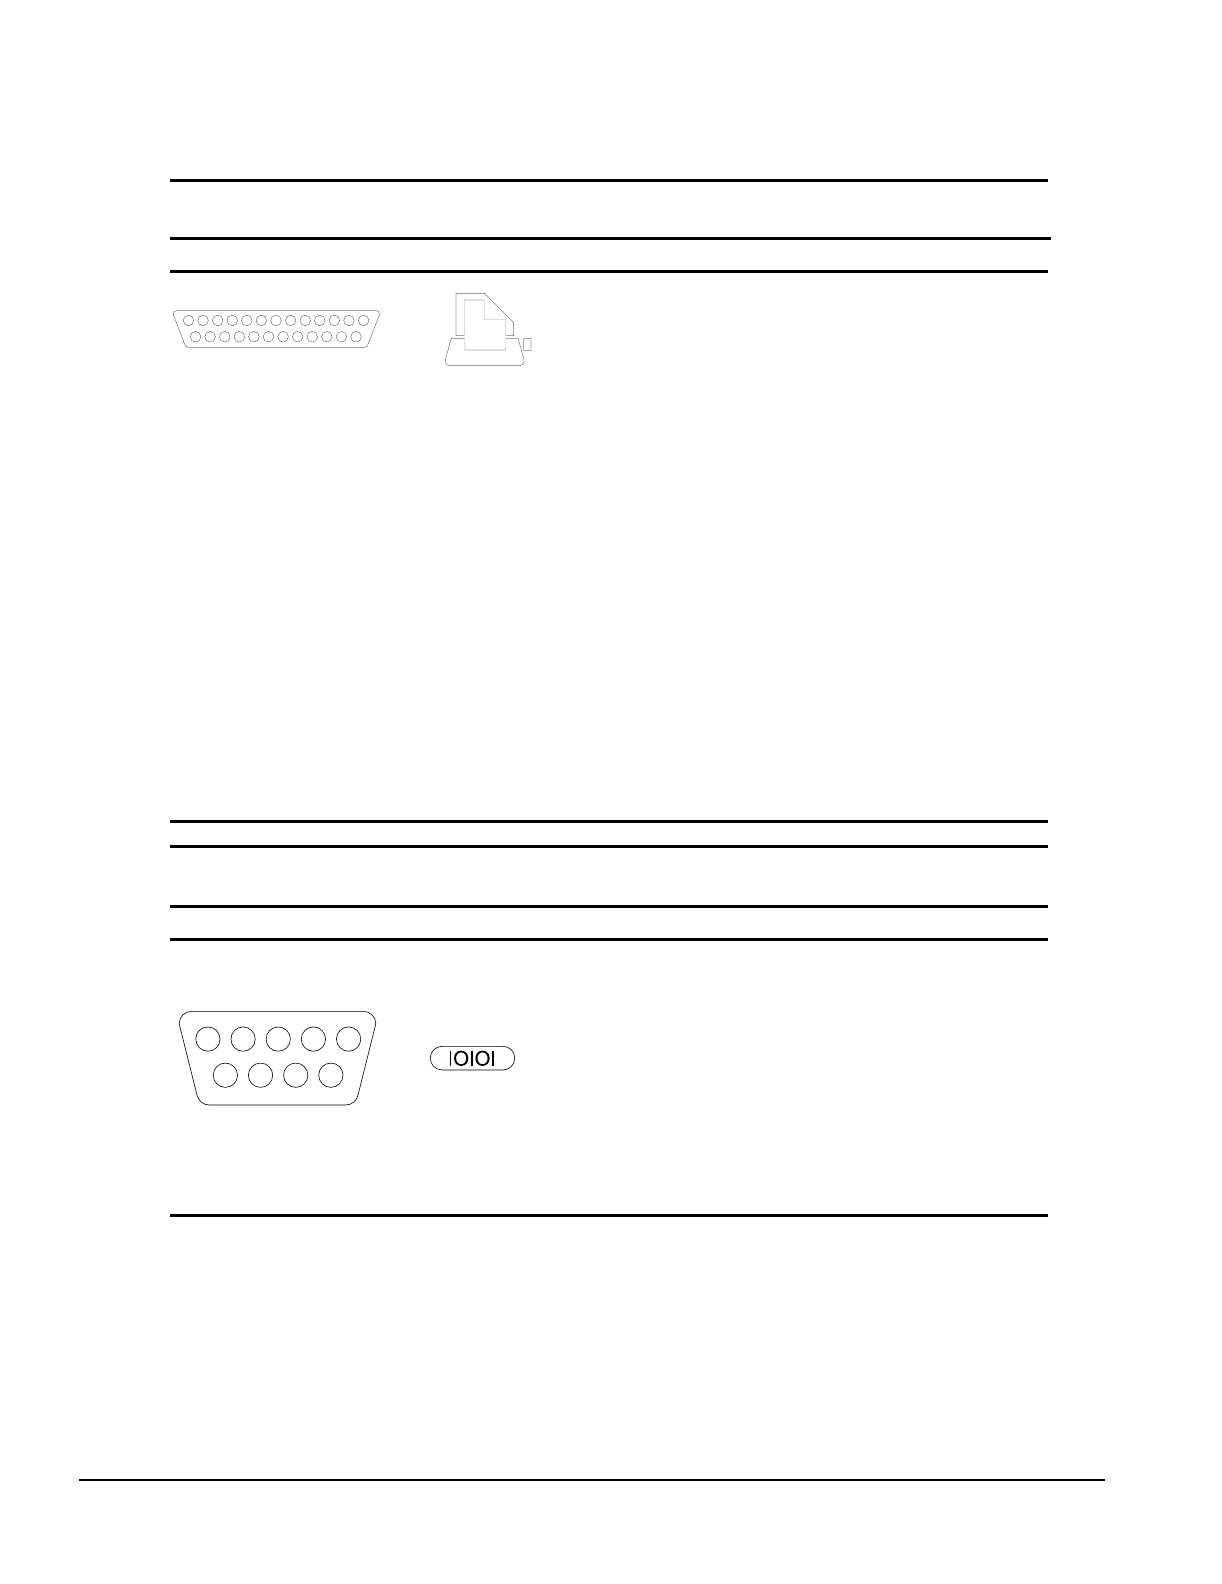
A-2 Connector Pin Assignments
Table A-3
Parallel Interface
Connector and Icon Pin Signal
12345678910111213
141516171819202122232425
1
2
3
4
5
6
7
8
9
10
11
12
13
14
15
16
17
18-25
Strobe
Data Bit 0
Data Bit 1
Data Bit 2
Data Bit 3
Data Bit 4
Data Bit 5
Data Bit 6
Data Bit 7
Acknowledge
Busy
Paper End
Select
Auto Linefeed
Error
Initialize Printer
Select IN
Signal Ground
Table A-4
Serial Interfaces
Connector and Icon Pin Signal
12345
6789
1
2
3
4
5
6
7
8
9
Carrier Detect
Receive Data
Transmit Data
Data Terminal Ready
Signal Ground
Data Set Ready
Request to Send
Clear to Send
Ring Indicator
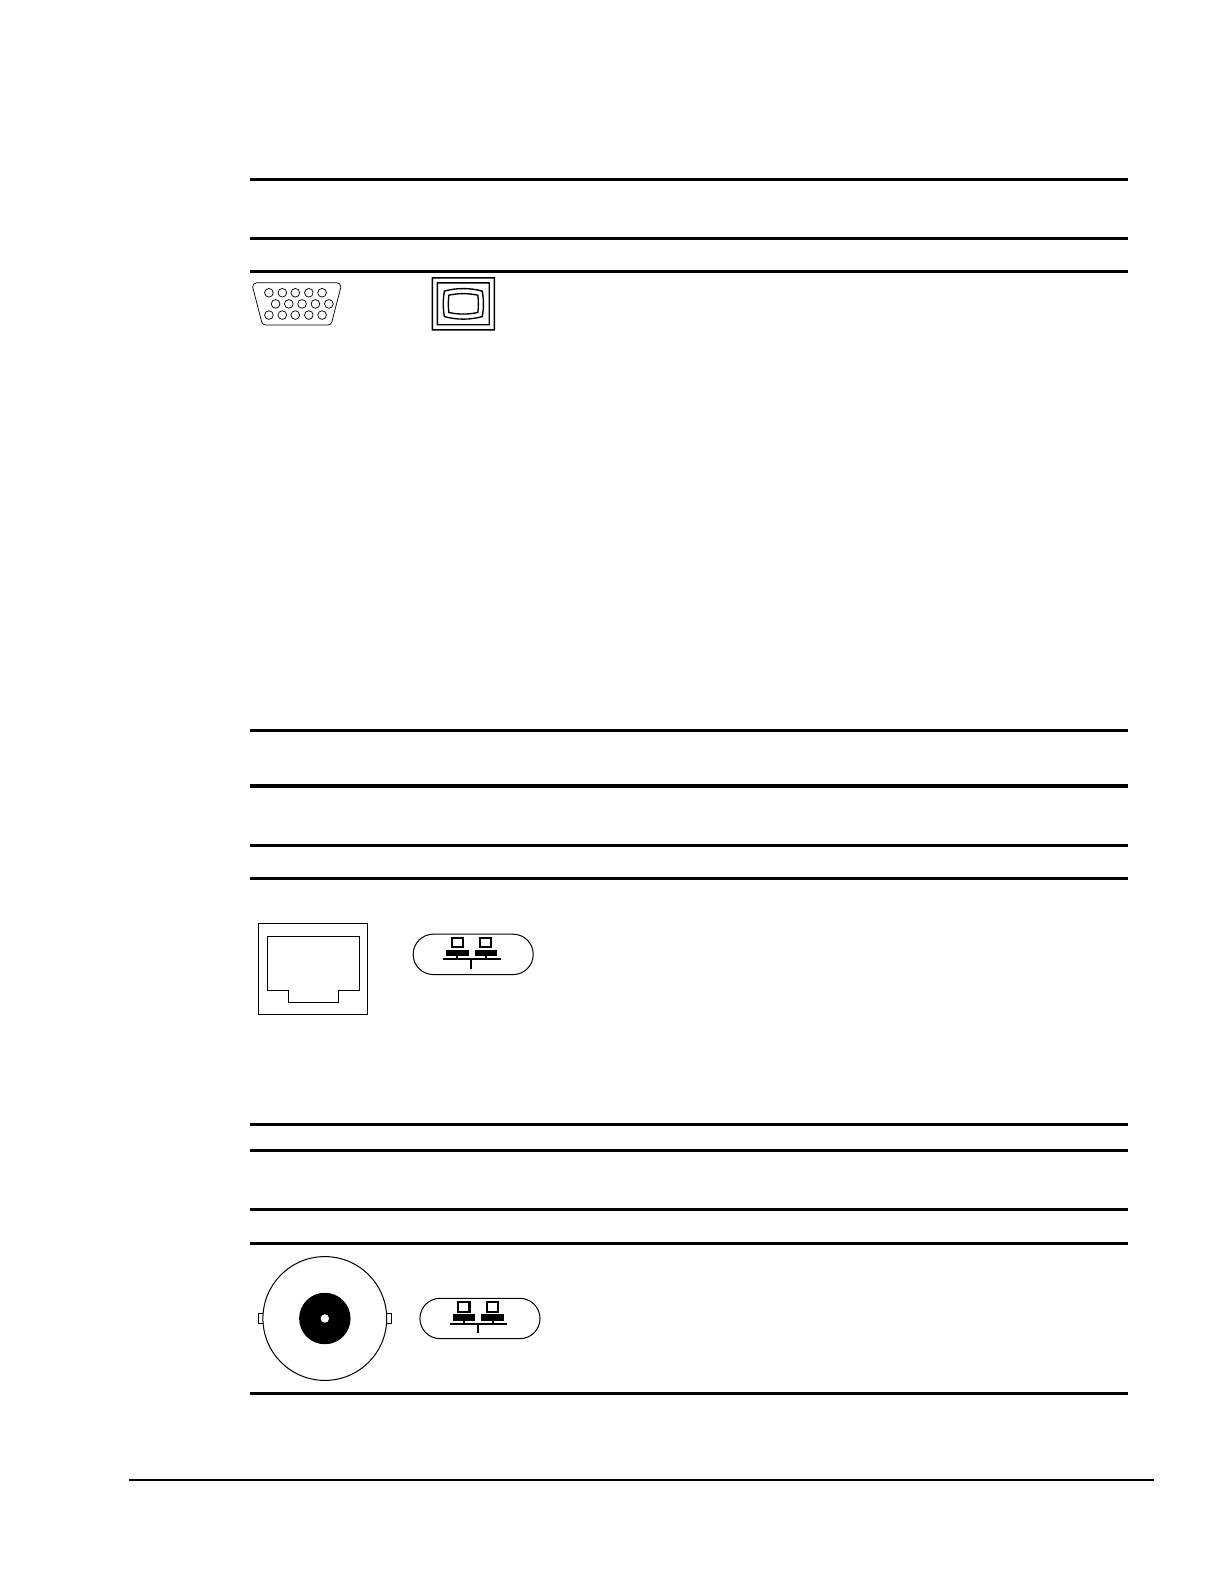
Compaq Deskpro 2000 Series of Personal Computers A-3
Table A-5
Monitor
Connector Pin Signal
78
KEY
10
12345
6
15 14 13 12 11
1
2
3
4
5
6
7
8
9
10
11
12
13
14
15
Red Analog
Green Analog
Blue Analog
Monitor ID Bit2
Ground
Ground Analog
Ground Analog
Ground Analog
Not Connected
Ground
Monitor ID Bit 0
Bidirectional Data (SDA)*
Horizontal Sync
Vertical Sync
Data Clock (SCL)*
*For DDC support (I2C monitors).
Table A-6
Ethernet RJ-45
Connector and Icon Pin Signal
1357
2468
1
2
3
4
5
6
7
8
(+) Transmit Data
(-) Transmit Data
(+) Receive Data
Unused
Unused
(-) Receive Data
Unused
Unused
Table A-7
Ethernet BNC
Connector and Icon Pin Signal
1 (Inside)
2 (Outside)
Data
Ground

A-4 Connector Pin Assignments
Table A-8
Ultra-Wide SCSI Connector
Connector and Icon Pin Signal
1-16
17 - 18
19
20 - 34
35
36
37
38
39
40
41
42
43
44
45
46
47
48
49 - 50
51 - 52
53
54
55
56
57
58
59
60
61
62
63
64
65
66
67
68
Ground
TERMPWR
Reserved
Ground
D12
D13
D14
D15
DP1
D0
D1
D2
D3
D4
D5
D6
D7
DP0
Ground
TERMPWR
Reserved
Ground
ATN
Ground
BSY
ACK
RST
MSG
SEL
C/D
REQ
I/O
D8
D9
D10
D11
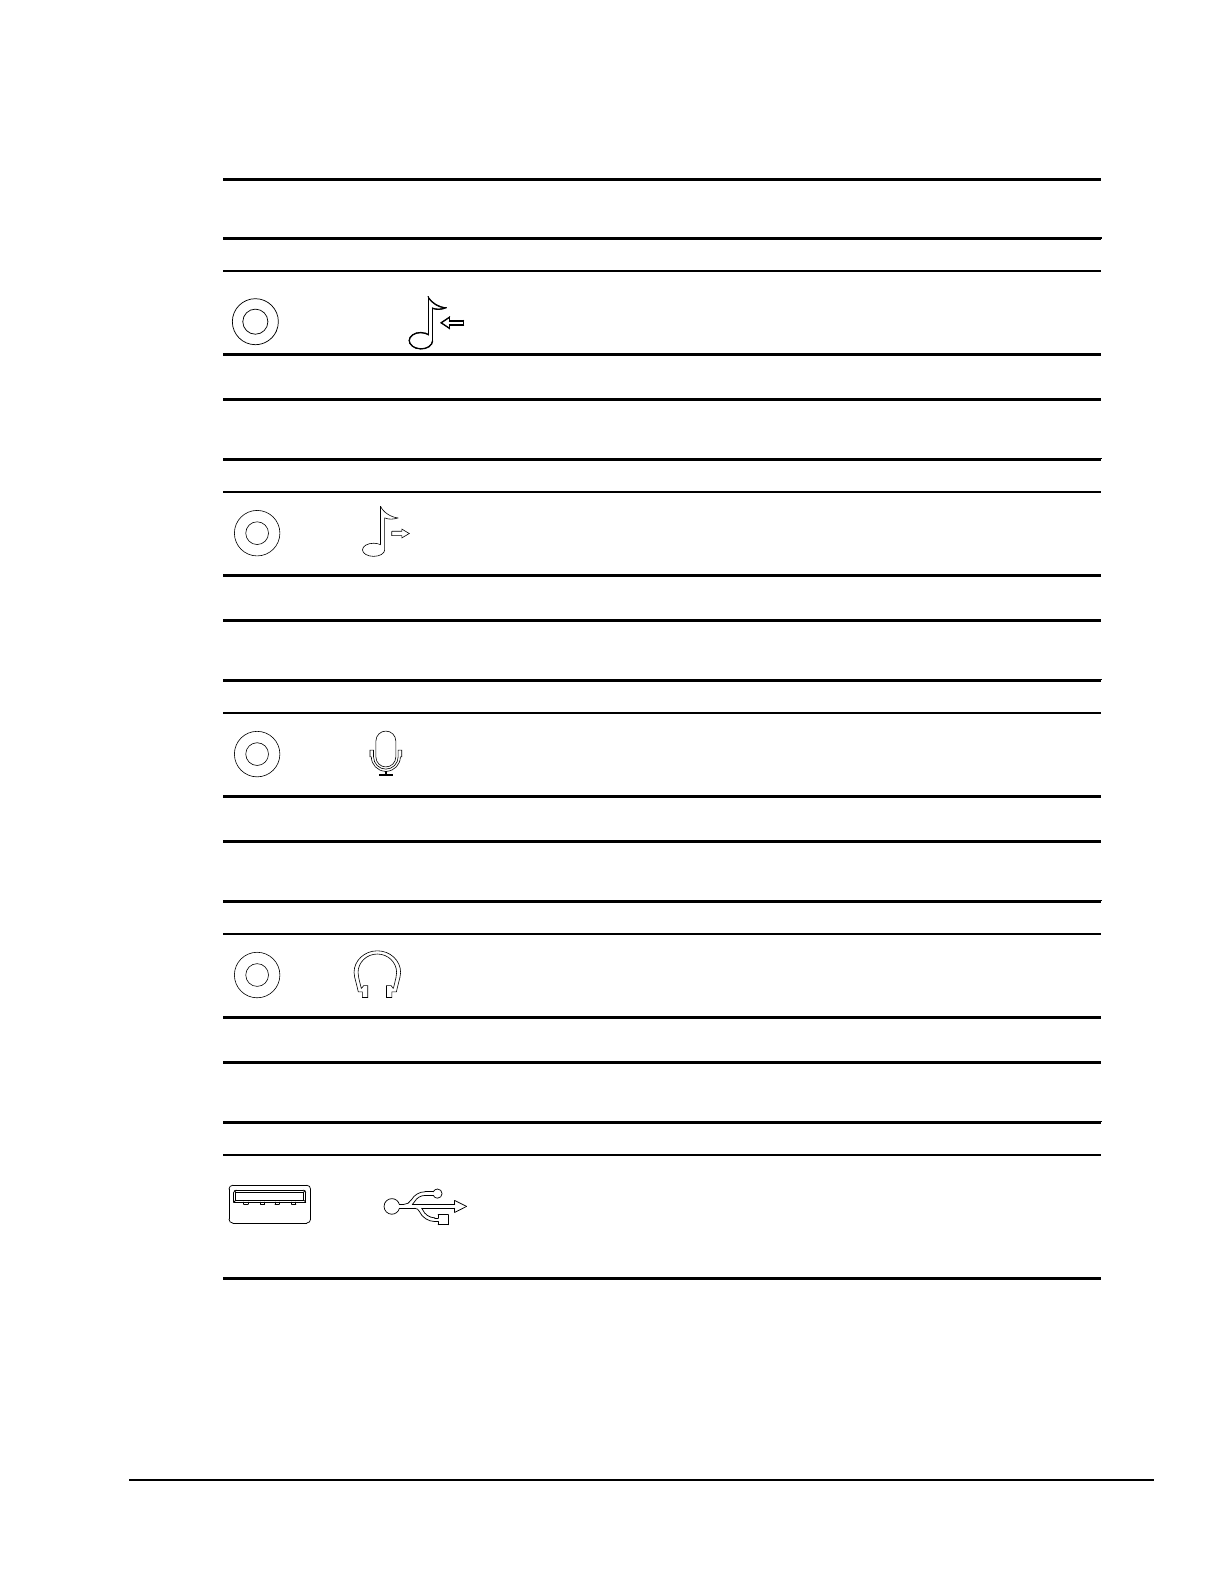
Compaq Deskpro 2000 Series of Personal Computers A-5
Table A-9
Line-In Audio Connector
Connector and Icon Pin Signal
1 (Outside)
2 (Inside)
3 (Inside)
Ground
Left Channel Data
Right Channel Data
Table A-10
Line-Out Audio Connector
Connector and Icon Pin Signal
1 (Outside)
2 (Inside)
3 (Inside)
Ground
Left Channel Data
Right Channel Data
Table A-11
Microphone Connector
Connector and Icon (Blue) Pin Signal
1 (Outside)
2 (Inside)
3 (Inside)
Ground
Left Channel Data
not supported
Table A-12
Headphone Connector
Connector and Icon Pin Signal
1 (Outside)
2 (Inside)
3 (Inside)
Ground
Left Channel Data
Right Channel Data
Table A-13
USB Connector
Connector and Icon Pin Signal
1 2 3 4
1
2
3
4
VCC
- Data
+ Data
Ground

A-6 Connector Pin Assignments
Table A-14
IDE/EIDE Drive Cable
139
240
Pin Signal Pin Signal
1 RESET 21 DREQ
2 GND 22 GND
3 DD7 23 DIOW
4 DD8 24 GND
5 DD6 25 DIOR
6 DD9 26 GND
7 DD5 27 IORDY
8 DD10 28 Cable Select
9 DD4 29 DMACK
10 DD11 30 GND
11 DD3 31 INTRQ
12 DD12 32 IOCS16
13 DD2 33 DA1
14 DD13 34 PDIA6
15 DD1 35 DA0
16 DD14 36 DA2
17 DD0 37 CS1FX
18 DD15 38 CS3FX
19 GND 39 DASP
20 (KEY) 40 GND

Compaq Deskpro 2000 Series of Personal Computers B-1
appendix B
POWER CORD SET
REQUIREMENTS
The voltage select switch feature on the computer permits it to operate from any line voltage between
100-120 or 200-240 volts AC.
The power cord set received with the computer meets the requirements for use in the country where
you purchased the equipment.
Power cord sets for use in other countries must meet the requirements of the country where you use
the computer. For more information on power cord set requirements, contact your authorized
Compaq dealer, reseller, or service provider.
General Requirements
The requirements listed below are applicable to all countries:
1. The length of the power cord set must be at least 6.00 feet (1.8 m) and a maximum of 9.75 feet
(3.0 m).
2. All power cord sets must be approved by an acceptable accredited agency responsible for
evaluation in the country where the power cord set will be used.
3. The power cord set must have a minimum current capacity of 10A and a nominal voltage rating
of 125 or 250 volts AC, as required by each country’s power system.
4. The appliance coupler must meet the mechanical configuration of an EN 60 320/IEC 320
Standard Sheet C13 connector, for mating with appliance inlet on the Switch Box.

B-2 Power Cord Set Requirements
Country-Specific Requirements
Power Cord Set Requirements–By Country
Country Accrediting Agency Applicable Note Numbers
Australia EANSW 1
Austria OVE 1
Belgium CEBC 1
Canada CSA 2
Denmark DEMKO 1
Finland SETI 1
France UTE 1
Germany VDE 1
Italy IMQ 1
Japan JIS 3
Norway NEMKO 1
Sweden SEMKO 1
Switzerland SEV 1
United Kingdom BSI 1
United States UL 2
✎The flexible cord must be <HAR> Type HO5VV-F, 3-conductor, 1.0 mm2 conductor
size. Power cord set fittings (appliance coupler and wall plug) must bear the certification
mark of the agency responsible for evaluation in the country where it will be used.
The flexible cord must be Type SJT or equivalent, No. 18 AWG, 3-conductor. The wall
plug must be a two-pole grounding type with a NEMA 5-15P (15A, 125V) or NEMA 6-
15P (15A 250V) configuration.
The appliance coupler, flexible cord, and wall plug must bear a "T" mark and
registration number in accordance with the Japanese Dentori Law. The flexible cord
must be Type VCT or VCTF, 3-conductor, 0.75 mm2 conductor size. The wall plug
must be a two-pole grounding type with a Japanese Industrial Standard C8303 (15A,
125V) configuration.

Compaq Deskpro 2000 Series of Personal Computers C-1
appendix C
HARD DRIVES
Compaq Computer Corporation uses IDE/EIDE hard disk drives that conform to two different
primary/secondary implementations. These are Conner mode and ATA-compatible mode. These two
modes are incompatible with one another.
Device 0/Device 1 Relationship
A device 0/device 1 relationship exists when there are two hard drives connected to a single port. In
this situation, one drive must be designated as the device 0 (primary) drive and the other as the device
1 (secondary) drive. This designation is necessary because both drives cannot work simultaneously.
Cable Select
The Compaq Deskpro 2000 Series of Personal Computers use cable-select technology for identifying
Device 0 (primary) and Device 1 (secondary) IDE/EIDE hard drives. Check that the jumpers on the
IDE/EIDE hard drives are set properly for cable-select installation. Always check the label on the
drives or check Chapter 7 of this manual when a new drive is added to verify that the jumper settings
are set correctly.
■Cable select may not function properly if drives other than those supported by Compaq are
installed.
■The second drive on a cable-select cable can be a CD-ROM drive. However, the CD-ROM drive
must be installed in the device 1 position if a hard drive is installed on the same cable. Ensure that
both drives are set for cable-select configuration. See Chapter 7 for more information.
■If two drives are already connected to the primary IDE/EIDE controller and an additional drive is
to be installed, the secondary IDE/EIDE controller must be enabled. The secondary IDE/EIDE
controller can be enabled by checking this option after opening the Advanced box in the Mass
Storage group of F10 Computer Setup. See Chapter 2 for more information.
■■When more than two drives are installed, drive performances are best when the two faster drives
are connected to the primary IDE/EIDE controller and the slower drive is connected to the
secondary IDE/EIDE controller.
■■A hard drive is installed and configured more quickly when the jumpers have been configured
first.
■If the new drive includes the cable-select feature, no jumper setting changes are required. Refer to
the documentation supplied with the drive for instructions on using the cable select feature. If you
install a third-party hard drive, you will need to purchase a jumper cable (spare part number
247568-001) from Compaq Computer Corporation.

C-2 Hard Drives
SMART
The hard drives for the Compaq Deskpro 2000 Series of Personal Computers are all SMART
compatible. Drives that are SMART compatible have built-in drive failure prediction that warns the
user or the network administrator of an impending failure or crash of the hard drive.
Automatic Soft-Drive Types
An automatic soft-drive type is a mechanism where the system ROM and Computer Setup provide
support for IDE/EIDE hard drives that are not supported in the hard drive parameter table. Computer
Setup automatically builds a soft-drive type when it finds that a hard drive is not in the hard drive
parameter table.
The soft-drive types assign according to the table below:
Table C-1
Soft-Drive Type Assignments
Drive Hard Drive Type Controller
0 65 Primary
1 66 Primary
0 68 Secondary
1 69 Secondary
For hard drives that are greater than 528 MB, the system automatically translates the hard drive
parameter for DOS by logically halving the cylinders and doubling the heads. This allows DOS to
access greater than 528 MB. The translated hard drive parameters are put into the hard drive
parameter table in the shadow RAM copy of the system ROM. When using any operating system
other than DOS, you must use the Compaq User Setup diskette to set up the hard drive parameter
table without translation.
Ultra ATA (Pentium II System only)
Ultra ATA is also referred to as ultra direct memory access (UDMA) and ATA33. This new protocol
doubles the transfer speed available with IDE/EIDE drives, from 16.7 MB/s to 33 MB/s. The increase
in transfer rates allows the hard drive to keep pace with other hardware improvements.
A significant new feature implemented by Ultra ATA is cyclical redundancy check (CRC). CRC
provides data protection verification that works at the higher speeds. This feature provides even
greater integrity at speeds less than the maximum transfer speed of 33 MB/s.
The Ultra ATA protocol is fully backward compatible with older ATA modes. The protocol allows
drives that support Ultra ATA to also support IDE/EIDE. These drives can be used with existing host
chipsets.
The Ultra ATA drives are SMART II compatible. This compatibility allows the drives to fall under
Compaq’s Prefailure Warranty.

Compaq Deskpro 2000 Series of Personal Computers C-3
In order to take full advantage of the higher transfer rates, the standard 40-conductor cable must be
replaced with an optional 80-conductor cable. The Compaq Deskpro 2000 Series of Personal
Computers will support up to four mass storage devices. The following table shows the transfer rates
available with the various combinations of devices in combination with the 40-conductor cable and
with the 80-conductor cable:
Table C-2
IDE Cable Transfer Rates
Number of Drives 40-Conductor IDE Cable, Length* 80-Conductor IDE Cable**, Length > 14”
Primary Secondary
Primary
Controller
Mode/Speed
Secondary
Controller
Mode/Speed
Primary
Controller
Mode/Speed
Secondary
Controller
Mode/Speed
1 0 2 / 33 MB/s / 2 / 33 MB/s /
2 0 1 / 25 MB/s / 2 / 33 MB/s /
1 1 2 / 33 MB/s 2 / 33 MB/s 2 / 33 MB/s 2 / 33 MB/s
2 1 1 / 25 MB/s 2 / 33 MB/s 2 / 33 MB/s 2 / 33 MB/s
1 2 2 / 33 MB/s 1 / 25 MB/s 2 / 33 MB/s 2 / 33 MB/s
2 2 1 / 25 MB/s 1 / 25 MB/s 2 / 33 MB/s 2 / 33 MB/s
*With 1 drive ≤ 14”; with 2 drives ≤ 18”.
**Ground-signal-ground (GSG) architecture cable.

Compaq Deskpro 2000 Series of Personal Computers D-1
appendix D
SCSI GUIDELINES
This appendix contains helpful guidelines for installing Small Computer System Interface (SCSI)
devices. For more detailed information, refer to the documentation that came with your computer.
Guidelines for Installing
Optional SCSI Devices
When installing and operating SCSI devices, you must adhere to the following guidelines:
■A single SCSI controller allows you to daisy-chain up to seven SCSI devices. These may be
hard drives, CD-ROM drives, scanners, tape drives, and/or other SCSI devices installed in your
computer. Most SCSI controllers have connectors for both internal and external devices.
■Every SCSI device must have a unique identification (ID) number. The SCSI controller
identifies signals to and from a SCSI device by its SCSI ID number rather than its location.
Moving a SCSI device from one position to another on the SCSI chain does not affect the
communication between the controller and the SCSI device. Check the information that came
with your device for the recommended SCSI ID number to be applied. The reserved and
available SCSI ID numbers for Compaq computers are as follows:
❏ 0 is reserved for the primary hard drive and has the lowest device priority.
❏ 1 through 6 are available for use by all SCSI devices.
❏ 7 is reserved for the system board and has the highest device priority.
■Every SCSI chain or circuit must be terminated (closed) at both ends. Termination can be
accomplished in one of several ways:
❏ Use a cable with a built-in terminator.
❏ Use a cable with a terminating resistor plug in the last connector.
❏ Connect a SCSI device, with the termination enabled, into the last connector.
Some systems have both ends of the SCSI cable connected to, and terminated by, the system
board.
■Turn on all external SCSI devices before turning on power to the computer. This enables the
controller to recognize the external SCSI devices and automatically reset. When an external SCSI
device is connected to the external SCSI connector on the rear panel of the computer, that device
becomes the end of the SCSI chain and must be terminated.
■All SCSI hard drives must be either internal or external, but never both. The system does
accommodate a combination of other internal and external SCSI devices, such as SCSI tape and
CD-ROM drives.

D-2 SCSI Guidelines
Termination
1. Every SCSI chain must be terminated at both ends regardless of whether it is an internal SCSI
chain, an external SCSI chain, or a combination internal-external SCSI chain.
2. The PD-CD drive must be terminated by using a SCSI interconnect cable that has a terminating
plug on one of its ends. This drive does not ship with terminating resistors.
3. Compaq SCSI-2 controllers have an automatic terminating device which turns OFF the terminator
when both the external and internal SCSI signal ports connect to SCSI devices.
4. A terminating resistor plug is molded into one end of some internal flat SCSI signal cables. It
may also be a separate electronic device that installs into the SCSI signal port of an external
device, installs into an internal flat SCSI signal cable connector, or installs into the SCSI signal
port of some non-Compaq SCSI-2 controllers.
5. Terminators are generally designated as being active or passive by the voltage limiting method
used. Both types of terminators come in the forms described in 2, 3, and 4 above. The product
documentation usually describes the terminator type.
6. All Compaq SCSI-2 controllers have active terminators. Active terminators more effectively filter
out electronic noise (voltage surges) on the SCSI chain than passive terminators.
7. To ensure the integrity of data transferred faster than 5 megabytes per second, use active
terminators to terminate the SCSI chain.

Compaq Deskpro 2000 Series of Personal Computers E-1
appendix E
DIAGNOSTIC ERROR CODES
Diagnostic error codes occur if the system recognizes a problem while running the Compaq
Diagnostics program. These error codes help identify possibly defective subassemblies.
Table E-1 lists the device codes (AABB-CC) and the subtest range (AABB-CC) covered by Compaq
Diagnostics Tests. Some codes will not apply to the computers described in this manual and will not
be detailed in the tables that follow.
Table E-1
Summary of Test Error Codes
Error Code
Range Device Description
Error Code
Range Device Description
0100 - 0199 Processor (P1) 3113 - 3199 Third Processor (P3)
0200 - 0215 Memory 3206 Audio System
0301 - 0304 Keyboard 3300 - 3333 Multimedia
0401 - 0498 Parallel Port 3400 - 3401 TV Tuner Board
0501 - 0516 Video Display Unit 4113 - 4199 Fourth Processor
0600 - 0699 Diskette Drive 5100 - 5130 Plasma Display System
0802 - 0824 Monochrome Video Board 5234 - 5240 Advanced Color Graphics (AGC)
1101 - 1109 Serial Port 6000 - 6089 Network Card
1201 - 1210 Modem 6500 - 6599 SCSI Hard Drives
1700 - 1799 Hard Drive 6600 - 6699 SCSI CD-ROM Drives
1900 - 1906 Tape Drive 6700 - 6799 SCSI Tape Drives
2113 - 2199 Second Processor (P2) 7000 Server Manager/R Board
2402 - 2480 Enhanced Color Graphics (ECG/VGA) 8601 - 8602 Auxiliary Input Interface
2502 - 2502 Pen/Digitizer 8700 - 8702 Game Port

E-2 Diagnostic Error Codes
Tables E-2 through E-18 list possible error codes, descriptions of each error condition, and actions
required to resolve the error condition.
✎Retest the system after completing each step. If the problem has been resolved, do not
proceed with the remaining steps.
For assistance in the removal and replacement of a particular subassembly, see Chapters 5 and 6,
"Removal and Replacement Procedures."
Table E-2
Microprocessor Test Error Codes
Error
Code Description Recommended Action
0101-xx CPU test failed. Replace the system board and retest.
0102-xx Coprocessor error. 1. Run Computer Checkup or Computer Setup and retest.
2. Replace the system board and retest.
0103-xx DMA controller failed. The following step applies to error codes 0103-xx through 0106-xx:
0104-xx Interrupt controller failed. Replace the system board and retest.
0105.xxx Port error.
0106-xx Keyboard controller self-test failed.
0107-xx CMOS RAM test failed. The following steps apply to error codes 0107-xx through 0109-xx:
0108-xx CMOS interrupt test failed. 1. Replace the battery/clock module and retest.
0109-xx CMOS clock test failed. 2. Replace the system board and retest.
0110-xx Programmable timer test failed. The following step applies to error codes 0110-xx through 0113-01:
0113-01 Protected mode test failed. Replace the system board and retest.
0114-01 Speaker test failed. 1. Verify the speaker connection.
2. Replace the system board and retest.

Compaq Deskpro 2000 Series of Personal Computers E-3
Table E-3
Memory Test Error Codes
Error Code Description Recommended Action
0200-xx Memory machine ID test failed. Reinsert memory modules and retest.
0202-xx Memory system ROM checksum failed. The following steps apply to error codes 0202-xx through 0211-xx:
0203-xx Memory write/read test failed. 1. Remove one memory module at a time until the error message
stops.
0204-xx Memory address test failed. 2. Replace other removed modules one at a time, testing each to
ensure the error does not return.
0205-xx Memory walking 1s test failed. 3. Replace the system board and retest.
0209-xx RAM long test failed.
0211-xx Random pattern test failed.
0212-xx Cache test failed. 1. Replace cache module.
2. Replace system board and retest.
0213-xx Incompatible DIMM error in DIMM
socket(s) x, x, ….*
Replace with a compatible DIMM (see Appendix H).
0214-xx Noise test failed. The following steps apply to error codes 0214-xx through 0215-xx:
0215-xx Random address test failed. 1. Remove one memory module at a time until the error message
stops.
2. Replace other removed modules one at a time, testing each to
ensure the error does not return.
3. Replace memory module that produces error.
4. Replace the system board and retest.
*x,x,… is a list of memory modules affected by the error.
Table E-4
Keyboard Test Error Codes
Error Code Description Recommended Action
0300-xx Keyboard ID test failed. The following steps apply to error codes 0300-xx through 0304-xx:
0301-xx Keyboard self-test/interface test failed. 1. Check the keyboard connection. If disconnected, turn the
computer off and connect the keyboard.
0302-xx Individual key test failed. 2. Replace the keyboard and retest.
0304-xx Keyboard repeat test failed. 3. Replace the system board and retest.

E-4 Diagnostic Error Codes
Table E-5
Parallel Printer Test Error Codes
Error Code Description Recommended Action
0401-xx Printer failed or not connected. The following steps apply to 0401-xx through 0403-xx:
0402-xx Printer port test failed. 1. Connect the printer.
0403-xx Printer pattern test failed. 2. Check power to the printer.
3. Install the loop-back connector and retest.
4. Replace system board and retest.
Table E-6
Diskette Drive Test Error Codes
Error
Code Description Recommended Action
0600-xx Diskette ID drive types test failed. The following steps apply to error codes 0600-xx through 0610-
xx:
0601-xx Diskette format failed. 1. Replace the diskette media and retest.
0602-xx Diskette read test failed. 2. Check and/or replace the diskette power and signal cables and
retest.
0603-xx Diskette write, read, compare test failed. 3. Replace the diskette drive and retest.
0604-xx Diskette random seek test failed. 4. Replace the system board and retest.
0605-xx Diskette ID media test failed.
0606-xx Diskette speed test failed.
0610-xx Diskette change line test failed.
Table E-7
Serial Test Error Codes
Error
Code Description Recommended Action
1101-xx Serial port test failed. 1. Run Computer Setup or Windows NT or Windows 95 utilities.
2. Replace the system board and retest.
Table E-8
Modem Communications Test Error Codes
Error
Code Description Recommended Action
1201-xx Modem internal test failed. The following steps apply to error codes 1201-xx through 1210-
xx:
1203-xx Modem external termination test failed. 1. Disconnect from the phone line and retest.
1204-xx Modem auto originate test failed. 2. Check the phone number.
1205-xx Modem auto answer test failed. 3. Check the modem line.
1210-xx Modem direct connect test failed. 4. Replace the modem and retest.

Compaq Deskpro 2000 Series of Personal Computers E-5
Table E-9
Hard Drive Test Error Codes
Error
Code Description Recommended Action
1701-xx Hard drive format test failed. The following steps apply to error codes 1701-xx through 1736-xx:
1702-xx Hard drive read test failed. 1. Run Computer Setup and verify drive type.
1703-xx Hard drive write/read/compare test failed. 2. Replace the hard drive signal and power cables and retest.
1704-xx Hard drive random seek test failed. 3. Replace the hard drive and retest.
1705-xx Hard drive controller test failed. 4. Replace the system board and retest.
1708-xx Hard drive format bad track test failed.
1710-xx Hard drive park head test failed.
1715-xx Hard drive head select test failed.
1716-xx Hard drive conditional format test failed.
1717-xx Hard drive ECC* test failed.
1719-xx Hard drive power mode test failed.
1724-xx Hard drive network preparation test failed.
1736-xx Hard drive monitoring test failed.
*Error Correction Code.
Table E-10
Tape Drive Test Error Codes
Error
Code Description Recommended Action
1900-xx Tape drive ID test failed. The following steps apply to error codes 1900-xx through 1910-xx:
1901-xx Tape drive servo test failed. 1. Replace the tape cartridge and retest.
1902-xx Tape drive format or format verification test
failed.
2. Check and/or replace the signal cable and retest.
1903-xx Tape drive sensor test failed. 3. Check the switch settings on the adapter board (if applicable).
1904-xx Tape drive BOT/EOT test failed. 4. Replace the tape adapter board (if applicable) and retest.
1905-xx Tape drive read test failed. 5. Replace the tape drive and retest.
1906-xx Tape drive write/read/compare failed. 6. Replace the system board and retest.
1910-xx Tape erase test failed.

E-6 Diagnostic Error Codes
Table E-11
Video Test Error Codes
Error Code Description Recommended Action
2401-xx Graphics controller test failed. 1. Replace the video board and retest.
2. Replace the system board and retest.
2402-xx Video memory test failed. The following steps apply to error codes 2402-xx through
2418-xx:
2403-xx Video attribute test failed. 1. Run Compaq Utilities.
2404-xx Video character set test failed. 2. Replace the monitor and retest.
2405-xx Video 80 × 25 mode 9 × 14 character cell test
failed.
3. Replace the video board and retest.
4. If no video board is present or if video is integrated, replace
system board and retest.
2406-xx Video 80 × 25 mode 8 × 8 character cell test
failed.
2408-xx Video 320 × 200 mode color set 0 test failed.
2409-xx Video 320 × 200 mode color set 1 test failed.
2410-xx Video 640 × 200 mode test failed.
2411-xx Video screen memory page test failed.
2412-xx Video gray scale test failed.
2418-xx ECG/VGC memory test failed.
2419-xx ECG/VGC ROM checksum test failed. 1. Run Compaq Utilities.
2. Replace the monitor and retest.
3. Replace the video board and retest.
4. If no video board is present or if video is integrated, replace
system board and retest.
2420-xx Graphics attribute test failed. 1. Replace the monitor and retest.
2. Replace the video board and retest.
3. Replace the system board and retest.
2421-xx ECG/VGC 640 × 200 graphics mode test failed. The following steps apply to error codes 2421-xx through
2456-xx:
2422-xx ECG/VGC 640 × 350 16 color set test failed. 1. Run Compaq Utilities.
2423-xx ECG/VGC 640 × 350 64 color set test failed. 2. Replace the monitor and retest.
2424-xx ECG/VGC monochrome text mode test failed. 3. Replace the video board and retest.
2425-xx ECG/VGC monochrome graphics mode test failed. 4. If no video board is present or if video is integrated, replace
system board and retest.
2431-xx 640 × 480 graphics test failure.
2432-xx 320 × 200 graphics (256 color mode) test failure.
2448-xx Advanced VGA Controller test failed.
2451-xx 132-column Advanced VGA test failed.
2456-xx Advanced VGA 256 Color test failed.
Continued

Compaq Deskpro 2000 Series of Personal Computers E-7
Table E-11
Continued
Error
Code Description Recommended Action
2458-xx Advanced VGA BitBLT test. The following steps apply to error codes 2458-xx through 2480-xx:
2468-xx Advanced VGA DAC test. 1. Replace the video board and retest.
2477-xx Advanced VGA data path test. 2. Replace the system board and retest.
2478-xx Advanced VGA BitBLT test.
2480-xx Advanced VGA Linedraw test.
Table E-12
Audio Test Error Codes
Error
Code Description Recommended Action
3206-xx Audio System Internal Error. Replace the system board and retest.
When Windows 95 is installed, changes to ESS sound device configuration do not take effect until the computer is restarted
(turned off and on).
Table E-13
Network Interface Test Error Codes
Error
Code Description Recommended Action
6000-xx Network ID test failed. The following steps apply to error codes 6000-xx through 6089-xx:
6014-xx Network configuration test failed.* 1. Run Computer Setup or Windows NT or Windows 95 utilities.
6016-xx Network reset test failed.* 2. Verify test procedures.
6028-xx Network internal test failed.* 3. Replace the network board, if installed.
6029-xx Network external test failed. 4. Replace the system board.
6054-xx Network configuration test failed.**
6056-xx Network reset test failed.**
6068-xx Network internal test failed.**
6069-xx Network external test failed.**
6089-xx Network open test failed.**
*Ethernet only.
**Token Ring only.

E-8 Diagnostic Error Codes
Table E-14
SCSI CD-ROM Test Error Codes
Error
Code Description Recommended Action
6600-xx ID test failed. The following steps apply to error codes error codes 6600-xx
through 6623-xx:
6605-xx Read test failed. 1. Replace the CD media and retest.
6608-xx Controller test failed. 2. Check the jumper settings on the adapter board.
6623-xx Random read test failed. 3. Verify that the speakers are connected.
4. Check and/or replace the power and signal cables and retest.
5. Replace the CD-ROM drive and retest.
Table E-15
Pointing Device Test Error Codes
Error
Code Description Recommended Action
8601-xx Mouse test failed. The following steps apply to error codes 8601-xx through 8602-xx:
1. Replace with a working mouse and retest.
8602-xx Interface test failed. 2. Replace the system board and retest.

Compaq Deskpro 2000 Series of Personal Computers E-9
SCSI Error Codes
This section includes the error codes for the following SCSI devices:
■Hard drives
■CD-ROM drives
■Tape drives
■PD-CD drives
The SCSI error codes are written in the format AABB-CC and can be determined by looking up the
respective parts of the code in the three corresponding tables numbered D-16, D-17, and D-18. AA
(Table E-16) identifies the drive type being tested. BB (Table E-17) identifies the type of test. CC
(Table E-18) identifies the exact error received.
For example, if you received a diagnostic error code of 6523-05, you would look at Table E-16 to
identify the meaning of the first two numbers, 65. This indicates a hard drive problem. The second
set of two numbers, 23, refers to a random read, as shown in Table E-17. The last two numbers, 05,
indicate a seek failure, as listed in Table E-18. When you combine this information, you know that
the diagnostics program was testing the random-read functioning of the hard drive and received a
seek failure. The device is faulty and must be replaced.
Table E-16
SCSI Device Names
65XX-XX Hard drive
66XX-XX CD-ROM Drive and PD-CD drive
67XX-XX Tape drive
Table E-17
SCSI Test Names
XX00-XX ID
XX05-XX Read
XX06-XX SA/Media
XX08-XX Controller
XX09-XX Media erase
XX23-XX Random read
XX28-XX Media load/unload

E-10 Diagnostic Error Codes
Table E-18
SCSI Test Error Codes
Error Code Description Recommended Action
XXXX-02 Drive not installed. Check cable connections.
XXXX-03 Media not in drive. Check for and install DATA CD or write-enabled tape in drive.
XXXX-05 Seek failure. Replace the indicated device.
XXXX-06 Drive timed out. Replace the indicated device.
XXXX-07 Drive busy. Replace the indicated device.
XXXX-08 Drive already reserved. Replace the indicated device.
XXXX-09 Unknown.
XXXX-10 Unknown.
XXXX-11 Media soft error. Replace the indicated device.
XXXX-12 Drive not ready. Replace the indicated device.
XXXX-13 Media error. Replace the indicated device.
XXXX-14 Drive hardware error. Replace the indicated device.
XXXX-15 Illegal drive command. Replace the indicated device.
XXXX-16 Media was changed. Replace the indicated device.
XXXX-17 Tape write-protected. 1. Disable write-protect on tape cartridge.
2. Replace tape drive.
XXXX-18 No data detected. Replace the indicated device.
XXXX-21 Drive command aborted. Replace the indicated device.
65XX-24 Media hard error. 1. Back up data and perform Surface Analysis to reallocate defect.
2. Replace drive.
66XX-24 Media hard error. 1. Replace current DATA CD with different DATA CD.
2. Replace drive.
67XX-24 Media hard error. 1. Ensure correct media type for this tape drive.
2. Replace current tape with new tape.
3. Replace tape drive.
XXXX-25 Unknown.
XXXX-30 Controller timed out. Replace the indicated device.
XXXX-31 Unrecoverable error. Replace the indicated device.
XXXX-32 Controller/drive disconnected. Replace the indicated device.
XXXX-33 Illegal controller command. Replace the indicated device.
XXXX-34 Invalid SCSI bus phase. Replace the indicated device.
XXXX-35 Invalid SCSI bus phase. Replace the indicated device.
XXXX-36 Invalid SCSI bus phase. Replace the indicated device.
XXXX-39 Error status from drive. Replace the indicated device.
XXXX-40 Target timed out. Replace the indicated device.
Continued

Compaq Deskpro 2000 Series of Personal Computers E-11
Table E-18
Continued
Error Code Description Recommended Action
XXXX-41 SCSI bus stayed busy. Replace the indicated device.
XXXX-42 ACK/REQ lines bad. Replace the indicated device.
XXXX-43 ACK did not deassert. Replace the indicated device.
XXXX-44 Parity error. Replace the indicated device.
XXXX-50 Data pins bad. Replace the indicated device.
XXXX-51 Data line 7 bad. Replace the indicated device.
XXXX-52 MSG, C/D, and/or I/O lines bad. Replace the indicated device.
XXXX-53 BSY never went busy. Replace the indicated device.
XXXX-54 BSY stayed busy. Replace the indicated device.
XXXX-60 Controller CONFIG-1 register bad. Replace the indicated device.
XXXX-61 Controller CONFIG-2 register bad. Replace the indicated device.
XXXX-65 Media not unloaded. Replace the indicated device.
XXXX-90 Fan failure. 1. Ensure fan(s) connected.
2. Replace nonfunctional fan(s).
XXXX-91 Over temperature. 1. Ensure proper air flow.
2. Perform required maintenance and cleaning.
XXXX-99 Autoloader reported tapes not
loaded properly.
1. Install tape(s) in autoloader tape drive according to test
instructions.
2. Change autoloader magazine.

Compaq Deskpro 2000 Series of Personal Computers F-1
appendix F
POST ERROR MESSAGES
An error message results if the Power-On Self-Test encounters a problem. This test runs when the
system is turned on, checking assemblies within the computer and reporting any errors found.
Table F-1
Power-On Self-Test Messages
Message Beeps* Probable Cause Recommended Action
101-ROM Error 1L, 1S System ROM checksum. 1. Reflash the ROM using Boot Block.
2. Replace the system board.
101-Option ROM
Checksum Error
1L, 1S Option ROM checksum. Replace the system board.
162-System Options
Not Set
2S Configuration incorrect. Run Computer Setup or Windows NT or
Windows 95 utilities.
163-Time & Date
Not Set
2S Invalid time or date in configuration
memory.
Set the date and time under Control Panel.
164-Memory Size Error 2S Memory configuration incorrect. Run Computer Setup or Windows NT or
Windows 95 utilities.
201-Memory Error None RAM failure. 1. Run Computer Setup or Windows NT or
Windows 95 utilities.
2. Replace the memory module(s) (if any).
3. Replace system board.
203-Memory Address
Error
None RAM failure. 1. Run Computer Setup or Windows NT or
Windows 95 utilities.
2. Replace the memory module(s) (if any).
3. Replace system board.
205-Memory Error None Cache memory error (processor cache). Run Compaq Utilities.
206-Secondary cache
controller failure
None Cache memory controller or RAM
failure.
Run Compaq Utilities.
207-ECC corrected single
bit error in DIMM/SIMM
pair(s) x, x, …**
2S Single bit ECC error. Replace DIMM if error persists.
213-Incompatible DIMM
error in DIMM socket(s) x,
x, …**
2S Incompatible DIMM installed. Replace with a compatible DIMM (see
Appendix H).
301-Keyboard Error None Keyboard failure. Reconnect keyboard with computer turned
off.
* L = Long, S = Short.
** x, x, … is a list of memory modules affected by the error
Continued

F-2 POST Error Messages
Table F-1
Continued
Message Beeps* Probable Cause Recommended Action
301-Keyboard Error or
Test Fixture Installed
None Keyboard failure. Replace the keyboard.
303-Keyboard Controller
Error
None I/O board keyboard controller. 1. Reconnect keyboard with computer turned
off.
2. Replace the system board.
304-Keyboard or System
Unit Error
None Keyboard failure. 1. Replace the keyboard.
2. Replace the system board.
402-Monochrome
Adapter Failure
1L, 2S Monochrome display controller. Replace the monochrome display controller.
404-Parallel Port Address
Conflict Detected
2S Both external and internal ports are
assigned to parallel port X.
Run Computer Setup or Windows NT or
Windows 95 utilities.
501-Display Adapter
Failure
1L, 2S Video display controller. Replace the graphics board.
601-Diskette Controller
Error
None Diskette controller circuitry or floppy
drive circuitry incorrect.
1. Run Setup.
2. Check and/or replace cables.
3. Replace diskette drive.
4. Replace the system board.
602-Diskette Boot Record
Error
None Diskette in drive A not bootable. Replace the diskette.
605-Diskette Drive Type
Error
2S Mismatch in drive type. Run Computer Setup or Windows NT or
Windows 95 utilities.
610-External Storage Drive
Failure
None External tape drive not connected. Reinstall tape drive or press F1 and allow
system to reconfigure without the drive.
611-Primary Floppy Port
Address Assignment
Conflict
2S Configuration error. Run Computer Setup or Windows NT or
Windows 95 utilities.
612-Secondary Floppy Port
Address Assignment
Conflict
2S Configuration error. Run Computer Setup or Windows NT or
Windows 95 utilities.
912-The Computer Cover
Has Been Removed Since
Last System Startup
None No action required.
1151-System Board Comm
Port 1 Address Assignment
Conflict
2S Both external and internal serial ports
are assigned to COM1.
Run Computer Setup or Windows NT or
Windows 95 utilities.
1152-System Board Comm
Port 2 Address Assignment
Conflict
2S Both external and internal serial ports
are assigned to COM2.
Run Computer Setup or Windows NT or
Windows 95 utilities.
1155-System Board COMM
Port Address Assignment
Conflict
2S Both external and internal serial ports
are assigned to the same COMM port.
Run Computer Setup or Windows NT or
Windows 95 utilities.
* L = Long, S = Short
Continued

Compaq Deskpro 2000 Series of Personal Computers F-3
Table F-1
Continued
Message Beeps* Probable Cause Recommended Action
1720-SMART Hard Drive
detects imminent failure
None Hard drive is about to fail. Back up contents and replace hard drive.
1721-SMART SCSI Hard
Drive detects imminent
failure
None Hard drive is about to fail. Back up contents and replace hard drive.
1771-Primary Disk Port
Address Assignment
Conflict
2S Internal and external hard drive
controllers are both assigned to the
primary address.
Run Computer Setup or Windows NT or
Windows 95 utilities.
1772-Secondary Disk
Port Address Assignment
Conflict
2S Internal and external hard drive
controllers are both assigned to
the secondary address.
Run Computer Setup or Windows NT or
Windows 95 utilities.
1780-Disk 0 Failure None Hard drive/format error. 1. Run Compaq Utilities.
2. Replace hard drive.
1781-Disk 1 Failure None Hard drive/format error. 1. Run Compaq Utilities.
2. Replace hard drive.
1782-Disk Controller
Failure
None Hard drive circuitry error. 1. Run Compaq Utilities.
2. Replace hard drive.
1790-Disk 0 Failure None Hard drive error or wrong
drive type.
1. Run Compaq Utilities.
2. Replace hard drive.
1791-Disk 1 Failure None Hard drive error or wrong
drive type.
1. Run Compaq Utilities.
2. Replace hard drive.
1792-Secondary Disk
Controller Failure
None Hard drive circuitry error. 1. Run Compaq Utilities.
2. Replace hard drive.
1793-Secondary Controller
or Disk Failure
None Hard drive circuitry error. 1. Run Compaq Utilities.
2. Replace hard drive.
1800-Temperature Alert None Internal temperature exceeds
specification.
Check that computer air vents are not
blocked and cooling fan is running.
Invalid Electronic
Serial Number
None Electronic serial number has become
corrupted.
Run Computer Setup.
Failsafe Boot Block 1L,3S An invalid system ROM has been
detected.
1. Replace the invalid ROM**.
2. Run ROMPaq
* L = Long, S = Short
** See Section 5.9.1 for the desktop and Section6.12.1 for the minitower.

Compaq Deskpro 2000 Series of Personal Computers G-1
appendix G
TROUBLESHOOTING WITHOUT
DIAGNOSTICS
This section describes some simple, preliminary tests and guidelines for troubleshooting the
computer without using the diagnostics.
Checklist for Solving Minor
Problems
If you encounter some minor problem with the computer or a software application, go through the
following checklist for possible solutions before running any of the diagnostic utilities:
■Is the computer connected to a working power outlet?
■Is the computer turned on and the power light illuminated?
■Are all cables connected properly and seated?
■Is the monitor turned on and the power light illuminated?
■If the monitor is dim, turn up the brightness and contrast controls of the monitor.
■Press and hold any key. If the system beeps, then the keyboard should be operating correctly.
■Are all of the necessary device drivers installed?
■Have all printer drivers been installed for each application?
■Was a nonbootable diskette loaded in the diskette drive at startup?
■Was a bootable compact disc in the CD-ROM drive at startup?
■Are all switch settings correct?
■Have all jumper settings been set as instructed by the configuration utility?
■Was Computer Setup run after non–Plug and Play options?

G-2 Troubleshooting Without Diagnostics
Power Problems
This section identifies some quick checks for power–related problems.
Table G-1
Solutions for Power Problems
Problem Possible Solution
Computer will not turn on. Ensure that the computer is connected to a power source.
Cables to the external power source are unplugged. Ensure that cables
connecting the computer and the external source are plugged in properly.
A PCI or ISA card that has been installed is defective. Remove any adapter
card that was just installed.
Computer does not automatically display the date
and time.
The real-time clock (RTC) battery may need to be replaced. See Chapters 5
and 6 for replacement procedures.
Thermal Problems
This section identifies a thermal problem that could be related to the processor overheating.
Table G-2
Solutions for Thermal Problems
Problem Possible Solution
Computer screen frozen, the power supply fan
continues to run, and the power LED is illuminated.
1. Turn off the computer and let everything cool down.
2. Check to ensure that the air duct is installed and the processor is under
the flap (Pentium II minitower system only).
3. Check for 3 inches of clearance at the front and back of the computer.
4. Resume operation.
5. If lock-up continues, run diagnostics for total system.
6. Look for software or interrupt conflicts.
7. Replace the processor, if necessary. See Chapters 5 and 6 for
replacement procedures.

Compaq Deskpro 2000 Series of Personal Computers G-3
Diskette Drive Problems
This section identifies some quick checks for diskette drive problems.
Table G-3
Solutions for Diskette Drive Problems
Problem Possible Solution
Diskette drive light stays on. 1. Diskette might be damaged. In Windows NT, run Disk Administrator. At the Start
menu, highlight Programs and select Administrator Tools. In Windows 95, run
ScanDisk. At the Start menu, highlight Programs, select Accessories, then select
System Tools.
2. Diskette could be installed incorrectly. Remove the diskette and reinsert.
3. Software program may be damaged. Check the program diskettes.
4. Drive button is not pushed in. Push in drive button.
5. Drive cable is not properly connected. Reconnect drive cable.
Diskette drive cannot write to a diskette. 1. Diskette is not formatted. Format the diskette.
2. Diskette is write-protected. Either use another diskette that is not write-protected or
disable the write protection on the diskette.
3. Writing to the wrong drive. Check the drive letter in the path statement.
4. Not enough space is left on the diskette. Use another diskette to write the
information.
5. Diskette write control is disabled. Check the security feature settings.
Diskette drive cannot read a diskette. 1. Diskette is not formatted. Format the diskette.
2. Using the wrong diskette type for the drive type. Use a diskette that is compatible
with the drive.
3. Reading the wrong drive. Check the drive letter in the path statement.
4. Diskette drive has been disabled by Computer Setup, Windows NT, or Windows 95
utilities. Run Computer Setup and enable the diskette drive.
A problem has occurred with a disk
transaction.
The directory structure is bad, or there is a problem with a file. In Windows NT, run
Disk Administrator. At the Start menu, highlight Programs and select Administrator
Tools. In Windows 95, run Scan Disk. At the Start menu, highlight Programs, select
Accessories, then select System Tools.
Non-system disk message. Remove the diskette from the drive.
Drive not found. 1. Check the cables for loose connections.
2. Was Computer Setup run after installing 2nd diskette drive?

G-4 Troubleshooting Without Diagnostics
Display Problems
This section identifies some quick checks for display–related problems.
Table G-4
Solutions for Display Problems
Problem Possible Solution
Screen is blank. 1. Monitor is not turned on and the monitor light is not on. Turn on the monitor and
check that the monitor light is on.
2. Screen save has been initiated. Press any key or move the mouse to light the
screen.
3. Check the cable connection from the monitor to the computer and check the
electrical outlet.
4. The brightness need adjusting. Adjust the brightness control.
5. The QuickBlank feature has been enabled through Security Management. Run
Computer Setup and disable the QuickBlank feature.
6. The energy saver feature has been enabled. Hit any key or type the password.
7. The RGB (Red, Green, Blue) input switch on the back of the monitor is incorrectly
set. Set the monitor's input switch to 75 ohms and, if there is a sync switch, set it to
External.
8. If a fixed-sync monitor is used, be sure that the monitor can accept the same sweep
rate as the resolution chosen.
Graphics colors are wrong. 1. Ensure that the Red, Green, and Blue BNC cables are connected to the
corresponding monitor connectors.
2. Be sure the monitor's RGB inputs are set to 75 ohms.
Characters are dim. 1. Adjust the monitor's brightness and contrast controls.
2. Check that the video cable is securely connected to the graphics card and monitor.
3. Set the RGB switch (and sync options, if available) to 75 ohms, with the sync set to
External. Refer to the documentation included with the monitor.
Monitor does not function properly when
used with the energy saver features.
Monitor without the energy saver feature is being used with energy saver features
enabled. Disable the monitor energy saver feature.
Blurry display or requested resolution
cannot be set.
If the graphics controller was upgraded, the correct display drivers may not be loaded.
Install the correct display drivers from the diskette included in the upgrade kit.
The picture is broken up; it rolls, jitters,
or blinks.
1. Be sure the monitor cable is securely connected to the computer.
2. In a 2-monitor system or if another monitor is in close proximity, be sure the
monitors are not interfering with each other's magnetic field by moving them apart.
Screen goes blank. A screen blanking utility may be installed or energy saver features are enabled. Press
any key or type password.
Monitor overheats. There is not enough ventilation space for proper airflow. Leave at least 3-inches (7.6-
cm) of ventilation space. Also, be sure there is nothing on top of the monitor to
obstruct air flow.
Cursor will not move using the
arrow keys on the numeric keypad.
The Num Lock key is on. Press the Num Lock key. The Num Lock light should not be
on when you want to use the arrow keys.
Garbled characters on the screen are
mixed with text.
The ANSI.SYS driver is not in the
CONFIG.SYS
file
.
Add the ANSI.SYS driver to the
CONFIG.SYS
file by adding the following line:
DEVICE = C:\CPQDOS\ANSI.SYS

Compaq Deskpro 2000 Series of Personal Computers G-5
Printer Problems
This section identifies some quick checks for printer–related problems.
Table G-5
Solutions for Printer Problems
Problem Possible Solution
Printer will not print. 1. Printer is not turned on and online. Turn the printer on and make sure it is online.
2. The correct printer drivers for the application are not installed. Install the correct
printer drivers for the application.
3. If the computer is on a network, you may not have made the connection to the
printer. Make the proper network connections to the printer.
Printer will not turn on. The cables may not be connected properly. Reconnect all cables and check the power
cord and electrical outlet.
Prints garbled information. 1. The correct printer drivers for the application are not installed. Install the correct
printer driver for the application.
2. The cables may not be connected properly. Reconnect all cables.
Printer is offline. The printer may be out of paper. Check the paper tray and refill it if it is empty. Select
online.

G-6 Troubleshooting Without Diagnostics
Hard Drive Problems
This section identifies some quick checks for hard drive–related problems.
The information provided by the diagnostics test includes: error code, system serial number, drive
serial number, drive model, and drive firmware revision. Specific details of the drive failure are not
included.
When you run the diagnostics, the test results are stored in a log. After completing the test, you can
print this log to a local printer or save it to a file. Alternatively, before running the test, you can
configure the test options to send the results to a local printer or file.
Solutions for some typical hard drive problems are presented in Table G-5.
Table G-6
Solutions for Hard Drive Problems
Problem Possible Solution
Hard drive error occurs. Hard disk has bad sectors or has failed. Use a utility to locate and block usage of bad
sectors. If necessary, reformat the hard disk.
Disk transaction problem. Either the directory structure is bad or there is a problem with a file.
In Windows NT, run Disk Administrator. At the Start menu, highlight Programs and
select Administrator Tools. In Windows 95, run ScanDisk. At the Start menu, highlight
Programs, select Accessories, then select System Tools.
Drive not found. 1. Cable could be loose. Check cable connections.
2. The system may not have automatically recognized a newly installed device. If
Windows NT is installed, run Computer Setup and identify the new device. If
Windows 95 is installed, run Device Manager and identify the device.
3. If the drive is a secondary drive that has just been installed on the same controller
as the primary drive, verify that the jumpers for both drives are set correctly.
Nonsystem disk message. 1. The system is trying to start from a diskette that is not bootable. Remove the
diskette from the diskette drive.
2. The system is trying to start from the hard drive but the hard disk has been
damaged. Insert a bootable diskette into the diskette drive and restart the computer.
3. Diskette boot has been disabled in Computer Setup. Run Computer Setup and
enable diskette boot.

Compaq Deskpro 2000 Series of Personal Computers G-7
Hardware Installation Problems
This section identifies some quick checks for hardware problems.
Table G-7
Solutions for Hardware Installation Problems
Problem Possible Solutions
A new device is not recognized as part
of the computer system.
1. The Computer Setup utility has not been run to configure the new device.* Run the
Computer Setup utility.
2. When the system advised you of changes to the configuration, you did not accept
them. Reboot the computer and follow the instructions for accepting the changes.
3. The system may not have automatically recognized the new device. If Windows NT
is installed, run Computer Setup and identify the new device. If Windows 95 is
installed, run Device Manager and identify the device.
4. A Plug and Play board may not automatically configure when added if the default
configuration conflicts with other devices. Use Computer Setup (Windows NT
installed) or Device Manager (Windows 95 installed) to deselect the automatic
settings for the board and choose a basic configuration that doesn’t cause a
resource conflict.
5. The cables for the new external device are loose or the power cables are unplugged.
Check all cables.
6. The power switch for the new external device is not turned on. Turn off the
computer, turn on the external device, and then turn the computer on to integrate
the new device with the computer.
7. If the drive is a secondary drive that has just been installed on the same controller
as the primary drive, verify that the jumpers for both drives are set correctly.
The computer supports Plug and Play,
but the hardware configuration settings
in Computer Setup do not match the
settings in Windows 95 Device
Manager.
In Windows 95, onboard serial devices that are assigned to ports other than COM1 or
COM2 have their configuration saved statically in CMOS. When the system is
rebooted, the ROM configures the device to the static setting; when Windows 95
loads, it configures the device to the configuration set via Device Manager. In such
cases, the configuration shown when F10 Setup is run does not match what was set
up via Device Manager.
If these devices must be configured a certain way before Windows 95 loads, then the
serial port devices on the system should only be configured to COM1 or COM2
resources. If the system has two serial devices plus a modem, then the first serial
device can be COM1 or COM2 or disabled, the modem can be COM1 or COM2 or
disabled, and the second serial device can be COM4 or disabled.
*Computer Setup must be run after installing 2nd diskette drive.

G-8 Troubleshooting Without Diagnostics
CD-ROM Drive Problems
This section identifies some quick checks for CD-ROM drive–related problems.
Table G-8
CD-ROM Drive Problems
Problem Possible Solution
Cannot read compact disc. 1. CD is not properly seated in the drive. Eject the CD, correctly seat it in the drive,
then reload.
2. CD has been loaded upside down. Eject the CD, turn it over, then reload.
System will not boot from CD-ROM
drive.
1. The CD-ROM boot is not enabled through the Computer Setup utility. Run the
Computer Setup utility and set the drive priorities.
2. Ensure that drive cabling and jumpers are set correctly. To boot a SCSI drive, the
drive ID number must be set to 0.
Cannot eject compact disc. Turn off the computer and reboot. Push the eject button once the system has booted.
If this fails, call an authorized service technician to remove the CD from the drive.
CD-ROM device is not detected;
driver is not loaded.
CD-ROM drive is not connected properly. Open the computer and check to see that
the drive cable is connected properly.

Compaq Deskpro 2000 Series of Personal Computers G-9
Memory Problems
This section identifies some quick checks for memory–related problems.
Table G-9
Memory Problems
Problem Possible Solution
Out of Memory error. 1. In Windows NT, run Performance Monitor. At the Start menu, highlight Programs and
select Administrator Tools. In Windows 95, run Resource Meter. At the Start menu,
highlight Programs, select Accessories, then select System Tools.
2. The computer has run out of memory to run the application. Check the application
documentation to determine the memory requirements.
Memory count during POST is wrong. The memory modules may not be installed correctly. Check that the memory modules have
been installed correctly, then run the Configuration utility.
Insufficient memory error during
operation.
1. Too many Terminate and Stay Resident programs (TSRs) are installed. Delete any
unnecessary TSRs.
2. The computer has run out of memory for the application. Check the memory
requirements for the application or add more memory to the computer.
SCSI Problems
Some common causes and solutions for SCSI device problems are listed in the following table.
Table G-10
SCSI Problems
Problem Cause Solution
System with IDE/EIDE and SCSI
drives will not boot from SCSI
hard drive.
The IDE/EIDE drive is not disabled
through the Configuration Utility.
Run the Configuration Utility and disable the primary
IDE/EIDE drive.
System will not boot from a SCSI
drive.
The SCSI drive is not configured
correctly.
Ensure that drive cabling and jumpers are set correctly. To
boot a SCSI drive, the drive ID number must be set to 0.

G-10 Troubleshooting Without Diagnostics
Network Problems
Some common causes and solutions for network problems are listed in the following table. These
guidelines do not discuss the process of debugging network cabling.
Table G-11
Network Problems
Problem Cause Solution
System does not detect a
network controller.
Possible I/O address conflict
with another expansion board.
Factory default is 300h to 30Fh for Ethernet. Either remove and
reconfigure the conflicting expansion board, or reconfigure the
network controller. If the address is changed, ensure that the drive
parameters match the new I/O address for the network controller.
System Setup utility reports
unprogrammed EPROM.
1. Possible I/O address conflict
with another expansion
board.
2. The network controller is
defective.
3. Network drivers are not
loaded.
1. Factory default is 300h to 30Fh for Ethernet. Either remove and
reconfigure the conflicting expansion board, or reconfigure the
network controller. If the address is changed, ensure that the
drive parameters match the new I/O address for the network
controller.
2. Replace the controller or the system board.
3. Boot the computer without the network drivers, using a system
boot diskette, and reconfigure the network controller.
Diagnostics reports a failure. 1. Possible I/O address conflict
with another expansion
board.
2. The cable is not securely
connected.
3. The cable is attached to the
incorrect connector.
4. There is a problem with the
cable or a device at the other
end of the cable.
5. The network controller is
defective.
6. Network controller interrupt
or memory overlaps the
interrupt or memory of an
expansion board.
1. Factory default is 300h to 30Fh for Ethernet. Either remove and
reconfigure the conflicting expansion board, or reconfigure the
network controller. If the address is changed, ensure that the
drive parameters match the new I/O address for the network
controller.
2. Ensure that the cable is securely attached to the network
connector and that the other end of the cable is securely
attached to the correct device.
3. Ensure that the cable is attached to the correct connector.
4. Ensure that the cable and device at the other end are operating
correctly.
5. Replace the controller or the system board.
6. Run Computer Setup and modify the network controller memory
value.
Diagnostics passes, but
the computer does not
communicate with the
network.
1. Network drivers are not
loaded, or driver parameters
do not match current
configuration.
2. The network controller is not
configured for this computer.
3. The network controller
interrupt or memory overlaps
the interrupt or memory of an
expansion board.
1. Make sure the network drivers are loaded and that the driver
parameters match the configuration of the network controller.
2. In Windows 95 or Windows NT, select the Network icon at the
Control Panel.
Reconfigure the driver if necessary, using the Network Setup
found in the Control Center.
3. Run Computer Setup and modify the network controller memory
value.
Continued

Compaq Deskpro 2000 Series of Personal Computers G-11
Table G-11
Continued
Problem Cause Solution
Network controller stopped
working when an expansion
board was added to the
computer.
1. Network drivers are not
loaded or driver parameters
do not match the current
configuration.
2. The cable is not securely
connected.
3. The network controller
interrupt or memory overlaps
the interrupt or memory of
another expansion board.
4. The network controller
require drivers.
5. The files containing the
network drivers are
corrupted.
1. Make sure that the network drivers are loaded and that the driver
parameters match the configuration of the network controller
using Network Setup found in the Control Center.
2. Ensure that the cable is securely attached to the network
connector and that the other end of the cable is securely
attached to the correct device.
3. Run Computer Setup and modify the network controller memory
value.
4. Verify that the drivers were not accidentally deleted when the
drivers for a new expansion board were installed.
5. Reinstall the network drivers, using the backup diskettes and
then run Computer Setup.
Network controller stopped
working without apparent
cause.
1. The files containing the
network drivers are
corrupted.
2. The cable is not securely
connected.
3. The network controller
is defective.
1. Reinstall the network drivers using the backup diskettes and
then run Computer Setup.
2. Ensure that the cable is securely attached to the network
connector and that the other end of the cable is securely
attached to the correct device.
3. Replace the network controller or system board.

G-12 Troubleshooting Without Diagnostics
Resolving Audio
Hardware Conflicts
Hardware conflicts occur when two or more peripheral devices contend for the same signal lines or
channels. Conflicts between the audio interface and another peripheral device may be due to the
settings of the base I/O addresses, interrupts, or DMA channels. The audio interface typically has the
following settings:
Table G-12
Audio Interface Settings
Item Setting
Base I/O address 220H
OPL III I/O address 388-38Bh
Interrupt IRQ 5
8-bit DMA Channel 1
To resolve hardware conflicts:
1. Change the hardware settings of your audio card or the peripheral card in your system if the
peripheral card is using the audio interface setting. You can change settings for integrated audio
using Computer Setup.
2. If you are unsure of the settings of the peripheral cards, you can isolate the source of the problem
by temporarily removing all optional and essential cards, such as the disk controller. After that,
add the cards back one at a time until the card that is causing the conflict is found.

Compaq Deskpro 2000 Series of Personal Computers H-1
appendix H
INTEL 440LX CHIPSET MEMORY
LIMITATIONS
The Intel 440LX Chipset has many functions, one of which is memory support. The Compaq
Deskpro 2000 Series of Personal Computers with the Intel Pentium II processor comes standard
with three DIMM sockets. Due to inherent architectural limitations, the Intel 440LX chipset does
not support any DIMMs comprised of ×4 (pronounced “by 4”) SDRAMs nor some combinations of
DIMMs with ×8 and ×32 SDRAMs in the 3-socket configuration. Below is a brief explanation of
how to determine whether a DIMM is ×4, ×8, or ×32.
Each SDRAM is essentially a large table of rows and columns. Each row corresponds to one
address. Each column in the row corresponds to a bit of data. When a row is accessed, it will
output all of the data in its columns for that row onto the data bus. The number of columns for
each SDRAM is either 4, 8, 16, or 32. This is referred to as the data width of the SDRAM and is
specified as ×4, ×8, ×16, or ×32.
The SDRAMs that make up a DIMM are built using either 16-megabit (Mb) memory technology or
64-Mb memory technology. This simply means that each chip is capable of storing either 16 × 106
bits of information or 64 × 106 bits of information.
The size of the SDRAM is given by stating the number of rows by the number of columns. When
multiplied together, the number of rows times the number of columns should equal the memory
technology used. Thus, a ×8 SDRAM built using 16 Mb technology has 2 × 10⁶ rows. The total size
of the SDRAM is specified as 2M×8 bits. If the ×8 SDRAM was built using 64 Mb technology,
then there would be 8 × 10⁶ rows and the total size of the SDRAM would be specified as 8M×8. By
knowing the width of each SDRAM, the total number of chips needed for each DIMM can be
determined.
To identify the SDRAM data width, use the total memory of the DIMM, the total number of
SDRAMs, and the information in Table H-1. Not all of the parameters are supported
configurations. The key to identifying unsupported memory configurations is to know the data
width (×4, ×8, ×16, or ×32) of the individual SDRAMs that make up the DIMM. The best way to
do this, although not foolproof, is to use the data presented in Table H-1. By knowing the total size
of the DIMM and how many SDRAMs are per side of the module, the memory technology and
data width of the SDRAMs can be determined.

H-2 Intel 44LX Chipset Memory Limitations
Table H-1
SDRAM Memory Technologies
SDRAM
Size
Address
Locations
SDRAM
Width
Number Of Chips Non-ECC
(64 bits)
Number Of Chips ECC
(72 bits)
DIMM
Size
1M×16 1M ×16 4 chips total, 1 side 5 or 6 chips total -1 side 8 MB
1M×16 1M ×16 8 chips total, 4 per side 10 or 12 chips total, 5 or 6 per side 16 MB
2M×8 2M ×8 8 chips total , 1 side 9 chips total , 1 side 16 MB
2M×8 2M ×8 16 chips total, 8 per side 18 chips total, 9 per side 32 MB
4M×4 4M ×4 16 chips total , 1 side 18 chips total, 1 side 32 MB
4M×4 4M ×4 32 chips total, 16 per side 36 chips total, 18 per side 64 MB
4M×16 4M ×16 4 chips total, 1 side 5 or 6 chips total, 1 side 32 MB
4M×16 4M ×16 8 chips total, 4 per side 10 or 12 chips total, 5 or 6 per side 64 MB
8M×8 8M ×8 8 chips total , 1 side 9 chips total , 1 side 64 MB
8M×8 8M ×8 16 chips total, 8 per side 18 chips total, 9 per side 128 MB
16M×4 16M ×4 16 chips total , 1 side 18 chips total, 1 side 128 MB
16M×4 16M ×4 32 chips total, 16 per side 36 chips total, 18 per side 256 MB
Note: This information is intended to be used as a guide to identifying the memory technology used for SDRAM DIMMs and
may not include all technologies. Some of the configurations may not exist in the marketplace.
For example, a 32-MB DIMM with 8 chips per side for 16 chips total is most likely comprised of
16 Mb (2M×8) technology SDRAMs giving a data width of ×8.
That same 32-MB DIMM with only 4 chips on one side is most likely comprised of 64 Mb (4M×16)
technology SDRAMs with a data width of ×16.

Compaq Deskpro 2000 Series of Personal Computers H-3
Table H-2 shows which configurations of ×8 and ×32 DIMMs are supported.
Table H-2
Supported Memory Configurations
DIMM SLOT Supported
1 2 3 Configuration
×8 ×8 ×8 Yes
×8 ×8 ×32 No
×8 ×32 ×8 Yes
×8 ×32 ×32 No
×32 ×8 ×8 Yes
×32 ×8 ×32 No
×32 ×32 ×8 Yes
×32 ×32 ×32 Yes
None ×32 ×8 Yes
×32 None ×8 Yes
None ×8 ×32 No
×8 None ×32 No
Note: ×4 DIMMs are not supported in any slot or configuration.
With a ×32 DIMM in slot 3, a ×8 DIMM is NOT supported in either slots 1 or 2. All other
combinations of DIMMs (with the exception of the ×4’s) are supported.
If the ROM encounters a ×4 DIMM or any of the unsupported ×8/×32 combinations in the system
during POST, the ROM will issue a “213 – Incompatible DIMM in Slot x,x,x” error message and halt
the processor (the system will not boot). The “x” in the error message equals the slot number(s) of
the incompatible DIMM(s). If an unsupported configuration is found, the solution is to replace the ×4
DIMM or move the ×8/×32 DIMMs into a supported configuration.

Index I-1
Index
A
access panel
illustrated, 3-4
removal and replacement, 6-5
spare part number, 3-5
activity lights, 1-14, 1-17
add-in devices
listing, 2-5
agency requirements
power cord, B-2
Alt key, 1-23
asset management, 1-12,
2-15
AssetControl, 1-12, 2-15
audio
resolving hardware conflicts,
G-12
specifications, 8-14
test error codes, E-7
audio board
illustrated, 3-10
spare part number, 3-11
auto-configuration utility,
1-8
IDE, 1-8
PCI, 1-8
automatic soft drive types,
C-2
B
Backspace key, 1-23
base memory, 1-6
battery
connector installation, 5-21, 6-
-22, 7-9
onboard, 4-7
removal and replacement,
Pentium II system, 5-21,
6-22
removal and replacement,
Pentium system, 5-21,
6-22
bays, 1-4, 1-15, 1-18
beeps, 2-20
bezel blank
removal and replacement,
5-25, 6-27
Bidirectional Standard Parallel
Port (SPP), 1-9
BIOS, 1-4
upgrades, 1-9
boxed processor, Intel, 7-4
boxes, shipping
spare part number, 3-24
broken key icon, 2-6
built-in devices
communications, 2-5
listing, 2-4
security features, 2-5
C
cable lock
removal and replacement, 5-5,
6-4
cable select
description, C-2
jumper cable, for third party
drive, C-1
cables, 4-6
spare part number, 3-9
cache memory, 1-6
removal and replacement,
Pentium system, 5-17,
6-17
Caps Lock light, 1-23
CD-ROM
16X max, 1-3
24X max, 1-3
controls, 1-14, 1-17
drive specifications, 8-10
drivers, 3-26
IDE connector pin
assignments, A-6
SCSI connector pin
assignments, A-4
test error codes, E-8
CD-ROM drive
jumper locations, 7-18
jumper settings, 7-18
troubleshooting without
diagnostics, G-8
CD-ROM/hard drive cable
spare part number, 3-9
chassis
illustrated, desktop, 3-2
illustrated, minitower, 3-4
spare part number, desktop,
3-3
spare part number, minitower,
3-5
checklist for minor problems,
G-1
chipset, 1-7
Intel 440LX memory
limitations, H-1
cleaning
computer case, 4-4
keyboard, 4-5
monitor, 4-5
mouse, 4-5
precautions, 4-4
CMOS RAM, 1-8, 1-10
codes
diagnostic error, E-1
POST error, F-1
combination slot, 1-4, 1-9
Compaq Business Pro audio
board illustrated, 3-10
spare part number, 3-11
Compaq Diagnostics for
Windows, 2-13
computer
connectors, 1-16, 1-21
drive positions, 1-15, 1-18
features, 1-3
computer case cleaning, 4-4
Computer Checkup (TEST),
2-10
Computer Setup, 2-3
configuration, 1-15, 1-19
Configuration and Diagnostics
accessing from diskette, 2-3
accessing from hard drive, 2-2
exiting, 2-13

I-2 Index
location, 2-1
configuration management,
1-12, 2-18
Configuration utilities, 2-1
connector location
keyboard, 1-16, 1-20
monitor, 1-16, 1-20
mouse, 1-16, 1-20
parallel port, 1-16, 1-20
power cord, 1-16, 1-20
rear panel, 1-16, 1-21
serial port, 1-16, 1-20
connectors, 4-6
controller, 1-4
controls
front panel, 1-14, 1-17
country specific requirements
power cord, B-2
create a diagnostic diskette, 2-2
Ctrl key, 1-23
Ctrl+Alt+Delete key
combination, 1-23
D
delimiter characters, 2-7
design overview, 1-5
desktop
specifications, 8-1
desktop management, 2-25
solutions partners program,
2-25
desktop removal and
replacement
battery, Pentium II system,
5-21
battery, Pentium system,
5-21
bezel blank, 5-25
cable lock, 5-5
cache memory, Pentium
system, 5-17
drive cage, 5-37
expansion board guide,
5-20
expansion board, inboard,
5-10
expansion board, outboard,
5-11
feet, 5-4
front bezel, 5-23
graphics memory, Pentium II
system, 5-13
graphics memory, Pentium
system, 5-13
guide, expansion board,
5-20
LED cable, Pentium II system,
5-38
LED cable, Pentium system,
5-38
logo, 5-26
memory module (DIMM),
5-12
power button, 5-24
power supply, 5-29
power switch, 5-27
processor, Pentium II system,
5-16
processor, Pentium system,
5-14
riser board, 5-18
riser brace, 5-19
speaker, 5-7
system board, Pentium II
system, 5-40
system board, Pentium
system, 5-40
system unit cover, 5-6
device 0/device 1 relationship,
3-1
device drivers
ordering, 1-11
devices
add-in, 2-5
built-in, 2-4
diagnostic error codes
audio, E-7
CD-ROM, E-8
diskette drive, E-4
hard drive, E-5
keyboard, E-3
memory, E-3
modem, E-4
mouse, E-8
network, E-7
PD-CD, E-9
pointing device, E-8
printer, E-4
processor, E-2
SCSI, E-9
serial port, E-4
tape drive, E-5
diagnostics
error codes, E-1
for Windows, 2-13
partition, 2-12
Diagnostics Utilities, 2-1
DIMM
compatible type, 1-6
illustrated, 3-10
memory technology, H-2
number of chips, H-3
removal and replacement,
desktop, 5-12
removal and replacement,
minitower, 6-13
spare part number, 3-11
supported configurations, H-3
disassembly chart
desktop, 5-2
minitower, 6-2
diskette drive
controls, 1-14, 1-17
IDE connector pin
assignments, A-6
installed, 1-4
interface, 1-9
jumper locations, 7-19
jumper settings, 7-19
SCSI connector pin
assignments, A-4
specifications, 8-7
test error codes, E-4
troubleshooting without
diagnostics, G-3
diskette drive cable
spare part number, 3-9
display problems
troubleshooting without
diagnostics, G-4
DMA, system, 8-3
documentation, spare part
number, 3-25
drive cage
removal and replacement,
5-37
drive installation, new
desktop, 5-34
drive positions, 1-15, 1-18
drive, new, minitower
installation, 6-38
drivers
CD-ROM, 3-26
Matrox, 3-27
mouse, 3-26
S3 Trio64V2/GX, 3-27
video, 3-27

Index I-3
E
ECC memory
fault prediction, 1-13, 2-16
EIDE. See IDE
electrostatic damage
preventing, 4-2
electrostatic discharge
information, 4-1
enhanced keyboard, 1-22
Enhanced Parallel Port (EPP),
1-9
enhanced support software,
2-23
CD, 2-23
world wide web, 2-23
error code information, 1-10
error messages, POST, F-1
Esc key, 1-23
ESS 1868 audio board
illustrated, 3-10
spare part number, 3-11
Ethernet
BNC connector pin
assignments, A-3
RJ-45 connector pin
assignments, A-3
expansion board
removal and replacement, 6-8
expansion board guide
removal and replacement,
5-20, 6-10
expansion board, inboard
removal and repalcement,
5-10
expansion board, outboard
removal and replacement,
5-11
expansion boards, 1-9
Extended Capabilities Port
(ECP), 1-9
extended memory, 1-6
F
FailSafe Boot Block ROM,
2-20
fan, 1-10
fault management, 1-13, 2-16
features
common, 1-4
Pentium II system, 1-3
Pentium system, 1-3
feet
illustrated, 3-2, 3-4
removal and replacement, 5-4,
6-3
spare part number, 3-3, 3-5
flash ROM, 2-18
front bezel
illustrated, desktop, 3-2
illustrated, minitower, 3-4
removal and replacement,
5-23, 6-25
spare part number, desktop,
3-3
spare part number, minitower,
3-5
front panel controls, 1-14,
1-17
function keys, 1-23
G
general cleaning precautions,
4-4
general requirements
power cord, B-1
generating static, 4-1
graphics
controller options, 1-25
memory options, 1-25
overview, 1-7
resolution, 1-7
graphics memory
illustrated, 3-10
removal and replacement,
desktop, 5-13
removal and replacement,
minitower, Pentium II
system, 6-18
removal and replacement,
minitower, Pentium system,
6-18
spare part number, 3-11
graphics resolutions
Matrox, 8-16
MPEG1 graphics controller,
8-16
S3 Trio64V2/GX, 8-15
grounding
equipment, 4-3
methods, 4-2
workstations, 4-3
guide, expansion board
removal and replacement,
5-20, 6-10
guides
monitor, 3-25
H
hard drive
fault prediction, 1-4, 2-16
IDE connector pin
assignments, A-6
IDE specifications, 8-8
installed, 1-3
jumper locations, 7-10
jumper settings, 7-10
options, 1-24
primary/secondary
designation, C-1
proper handling, 4-7
SCSI connector pin
assignments, A-4
SMART, C-1
soft-drive type assignments,
C-1
test error codes, E-5
troubleshooting without
diagnostics, G-6
Ultra ATA specifications, 8-8
Ultra SCSI specifications, 8-9
hardware installation
troubleshooting without
diagnostics, G-7
headphone connector pin
assignments, A-5
I
I/O, system, 8-4
icon
broken key, 2-6
key, 2-6
ID number, SCSI, D-1
IDE
auto-configuration utility, 1-8
cable, spare part number,
3-9
connector pin assignments,
A-6
devices, spare part number,
3-7
drive installed, 1-3
hard drive, 8-8
interface, 1-7
inboard expansion board
removal and replacement,
5-10

I-4 Index
insight manager, 2-24
agents, 2-24
INSPECT utility, 1-15, 1-19,
2-1
installation
drive, new, desktop, 5-34
drive, new, minitower, 6-38
power switch, 5-28, 6-30
integrated software, 2-22
integration management,
1-13, 2-24
Intel boxed processor
fan connection, 7-4
Intelligent Manageability
asset management, 1-12,
2-15
AssetControl, 1-12, 2-15
configuration management,
1-12, 2-18
fault management, 1-13,
2-16
integration management,
1-13, 2-24
security management, 1-13,
2-17
Intelligent Manageability,
1-12
interface
diskette drive, 1-9
IDE, 1-7
parallel port, 1-9
serial port, 1-9
interrupts, 1-8
interrupts, system, 8-3
ISA option board retainer
removal and replaceement,
6-24
J
J hood
illustrated, 3-4
removal and replacement, 6-6
spare part number, 3-5
jumper cable, for third party
drive, C-1
jumper locations
16X CD-ROM drive, 7-18
2.1-GB EIDE hard drive,
7-10
2.1-GB SCSI hard drive,
7-14
2.1-GB Ultra ATA hard drive,
7-16
2.4-GB Ultra ATA hard drive,
7-16
3.2-GB EIDE hard drive,
7-12
3.2-GB Ultra ATA hard drive,
7-17
4.3-GB SCSI hard drive,
7-15
diskette drive, 7-19
SCSI PD-CD drive, 7-18
jumper settings
16X CD-ROM drive, 7-18
2.1-GB EIDE hard drive,
7-10
2.1-GB SCSI hard drive,
7-14
2.1-GB Ultra ATA hard drive,
7-16
2.4-GB Ultra ATA hard drive,
7-16
3.2-GB EIDE hard drive,
7-12
3.2-GB Ultra ATA hard drive,
7-17
4.3-GB SCSI hard drive,
7-15
diskette drive, 7-19
SCSI PD-CD drive, 7-18
K
key icon, 2-6
keyboard
cleaning, 4-5
connector, A-1
connector location, 1-16,
1-21
enhanced, 1-22
illustrated, 3-14
light combinations, 2-21
national delimiter characters,
2-7
spare part number, 3-14
specifications, 8-14
test error codes, E-3
L
LED cable
illustrated, desktop, 3-8
removal and replacement,
Pentium II system, 5-38,
6-32
removal and replacement,
Pentium system, 5-38,
6-32
spare part number, desktop,
3-9
spare part number, minitower,
3-9
LEDs, 1-14, 1-17
lights
failed ROM flash, 2-21
keyboard combinations,
2-21
lights and controls, 1-14,
1-17
line-in audio connector pin
assignments, A-5
line-out audio connector pin
assignments, A-5
logo
removal and replacement,
5-26, 6-28
logo kit
illustrated, desktop, 3-2
illustrated, minitower, 3-4
spare part number, desktop,
3-3
spare part number, minitower,
3-5
LS-120 drive
specifications, 8-13
M
management
asset, 1-12
configuration, 1-12
fault, 1-13
integration, 1-13, 2-24
security, 1-13
mass storage
devices, 1-15, 1-18
installed, 1-3
options, 1-24
spare part number, 3-7
materials, static preventing, 4-3
Matrox
drivers, 3-27
Matrox graphics controller
graphics resolutions, 8-16
Maxtor
2.1-GB EIDE hard drive
jumper settings, 7-11

Index I-5
2.1-GB Ultra ATA hard drive
jumper settings,
7-16
3.2-GB EIDE hard drive
jumper settings, 7-13
3.2-GB Ultra ATA hard drive
jumper settings,
7-17
memory
base, 1-6
cache, 1-6
chipset limitations, H-1
clear and reset, 7-8
extended, 1-6
supported configurations, H-3
technologies, H-2
test error codes, E-3
troubleshooting without
diagnostics, G-9
memory map, system, 8-6
memory module
removal and replacement,
5-12, 6-13
messages, POST error, F-1
microphone
connector pin assigments, A-5
microprocessor. See processor
minitower
specifications, 8-2
minitower removal and
replacement
access panel, 6-5
battery, Pentium II system,
6-22
battery, Pentium system,
6-22
bezel blank, 6-27
cable lock, 6-4
cache memory, Pentium
system, 6-17
expansion board, 6-8
expansion board guide,
6-10
feet, 6-3
front bezel, 6-25
graphics memory, Pentium II
system, 6-18
graphics memory, Pentium
system, 6-18
ISA option board retainer,
6-24
J hood, 6-6
LED cable, Pentium II system,
6-32
LED cable, Pentium system,
6-32
logo, 6-28
memory module (DIMM),
6-13
power button, 6-26
power supply, 6-31
power switch, 6-29
processor, Pentium II system,
6-15
processor, Pentium system,
6-14
riser board, 6-11
riser brace, 6-7
speaker, 6-12
system board, Pentium II
system, 6-19
system board, Pentium
system, 6-19
minor problems
checklist, G-1
miscellaneous hardware
illustrated, 3-19
spare part number, 3-19
miscellaneous metals
illustrated, 3-22
spare part number, 3-22
miscellaneous parts
illustrated, 3-23
spare part number, 3-23
miscellaneous plastics
illustrated, desktop, 3-20
illustrated, minitower, 3-21
spare part number, desktop,
3-20
spare part number, minitower,
3-21
models, 1-2
modem
options, 1-26
test error codes, E-4
monitor
cleaning, 4-5
connector, A-3
connector location, 1-16,
1-21
fault diagnosis, 2-16
illustrated, 3-16
options, 1-25
spare part number, 3-17
mouse
cleaning, 4-5
connector, A-1
connector location, 1-21
disabling interface, 2-9
drivers, 3-26
specifications, 8-15
test error codes, E-8
MPEG1 graphics controller
graphics resolutions, 8-16
MS-DOS, 1-6
N
network
test error codes, E-7
troubleshooting without
diagnostics, G-10
Num Lock key, 1-23
O
operating system
MS-DOS, 1-6
ordering device drivers,
1-11
OS/2, 1-6
Pentium II system, 1-10
Pentium system, 1-10
UNIX, 1-6
optional boards
illustrated, 3-10
spare part number, 3-11,
3-13
options
cache memory, 1-6, 3-11
graphics memory, 1-25,
3-11
mass storage, 1-24, 3-7
modem, 1-26, 3-11
monitors, 1-25, 3-17
PD-CD drive, 1-26, 3-7
serial/parallel interface board,
1-25, 3-13
system memory, 1-6, 3-11
video board, 1-25, 3-11
ordering backup diskettes,
2-26
OS/2, 1-6
outboard expansion board
removal and replacement,
5-11
P
parallel connector, 1-16
parallel interface connector,
A-2

I-6 Index
parallel port, 1-4, 1-9
parallel support mode, 1-9
partition, diagnostics, 2-12
partners program
desktop management, 2-25
system management, 2-25
password
changing, 2-6
deleting, 2-6
entering, 2-6
power-on, 1-10, 2-6, 7-7
protection, 1-5
Pause key, 1-23
PCI
auto-configuration utility, 1-4,
1-8
chipset, 1-4, 1-7
local bus, 1-7
slots, 1-4
PD-CD drive, 1-26
jumper locations, 7-18
jumper settings, 7-18
specifications, 8-11
test error codes, E-9
Pentium based
processor, 1-6
Pentium II system
air duct, 1-10
battery removal and
replacement, desktop,
5-21
battery removal and
replacement, minitower,
6-22
cache memory, 1-3, 1-7
features, 1-3
graphics controller, 1-3, 1-7
graphics memory removal,
desktop, 5-13
graphics memory removal,
minitower, 6-18
hard drive installed, 1-3
LED cable removal and
replacement, desktop,
5-38
LED cable removal,
minitower, 6-32
operating system, 1-3, 1-10
processor, 1-3, 1-6
processor removal, desktop, 5-
-16
processor removal, minitower,
6-15
system board, 1-6
system board removal,
desktop, 5-40
system board removal,
minitower, 6-19
video drivers, 3-27
Pentium system
battery removal and
replacement, desktop,
5-21
battery removal and
replacement, minitower,
6-22
cache memory, 1-3, 1-6
cache memory removal and
replacement, desktop,
5-17
features, 1-3
graphics controller, 1-3, 1-7
graphics memory removal,
desktop, 5-13
graphics memory removal,
minitower, 6-18
hard drive installed, 1-3
LED cable removal and
replacement, desktop,
5-38
LED cable removal,
minitower, 6-32
operating system, 1-3, 1-10
processor, 1-3, 1-6
processor removal, desktop, 5-
-14
processor removal, minitower,
6-14
system board, 1-6
system board removal,
desktop, 5-40
system board removal,
minitower, 6-19
video drivers, 3-27
personal grounding
equipment, 4-3
methods, 4-2
pin assignments
microphone, A-5
pin assignments
CD- (IDE), A-6
CD-ROM (SCSI), A-4
diskette drive (IDE), A-6
diskette drive (SCSI), A-4
Ethernet BNC connector, A-3
Ethernet RJ-45 connector,
A-3
hard drive (IDE), A-6
hard drive (SCSI), A-6
headphone, A-5
IDE drive, A-6
keyboard connector, A-1
line-in audio connector,
A-5
line-out audio connector, A-5
monitor connector, A-3
mouse connector, A-1
parallel interface connector,
A-2
SCSI drive, A-4
serial interface, A-2
USB, A-5
plastic parts, 4-7
Plug and Play devices, 1-8
pointing device
test error codes, E-8
POST, 1-8
power button
removal and replacement,
5-24, 6-26
power cord
agency requirements, B-2
connector location, 1-16,
1-21
country specific requirements,
B-2
general requirements, B-1
illustrated, 3-8
requirements, B-1
spare part number, 3-9
power management, 2-22
power problems
troubleshooting without
diagnostics, G-2
power supply, 1-4
fan, 1-10
illustrated, desktop, 3-2
illustrated, minitower, 3-4
installed, 1-4
removal and replacement,
5-29, 6-31
spare part number, desktop,
3-3
spare part number, minitower,
3-5
surge-tolerant, 1-4, 1-9,
2-17
switch-selectable voltage, 1-4,
1-9
power switch, 1-14, 1-17
installation, 5-28, 6-30

Index I-7
kit spare part number, 3-24
removal and replacement,
5-27, 6-29
power-on
light, 1-14
password, 1-10, 7-7
Power-on Self-Test (POST)
function, 2-13
messages, F-1
precautions, cleaning, 4-4
Prefailure Warranty, 2-27
preloaded software, 1-10
preparing the computer, 2-1
preventing electrostatic
damage, 4-2
primary/secondary designation,
hard drive, C-1
Print Scrn key, 1-23
printer
test error codes, E-4
troubleshooting without
diagnostics, G-5
proactive backup, 2-17
problems
audio, G-12
CD-ROM drive, G-8
checklist for minor, G-1
diskette drive, G-3
display, G-4
hard drive, G-6
hardware installation, G-7
memory, G-9
network, G-10
power, G-2
printer, G-5
processor ovrheating, G-2
SCSI, G-9
thermal, G-2
processor
illustrated, 3-10
Intel boxed, 7-4
Pentium based, 1-6
removal and replacement,
Pentium II system, 5-16,
6-15
removal and replacement,
Pentium system, 5-14,
6-14
spare part number, 3-11
test error codes, E-2
upgrade, 1-6
processor overheating, G-2
product description, 1-1
protecting your software
ordering backup diskettes,
2-26
restoring your hard drive,
2-27
Q
QuickLock/QuickBlank
enabling, 2-9
R
real-time clock, 1-10
rear panel connectors, 1-16,
1-20
remote ROM flash, 2-18
using, 2-19
Remote Security Management,
2-22
removal and replacement,
desktop
battery, Pentium II system,
5-21
battery, Pentium system,
5-21
bezel blank, 5-25
cable lock, 5-5
cache memory, Pentium
system, 5-17
DIMMs, 5-12
drive cage, 5-37
expansion board guide,
5-20
expansion board, inboard,
5-10
expansion board, outboard,
5-11
feet, 5-4
front bezel, 5-23
graphics memory, Pentium II
system, 5-13
graphics memory, Pentium
system, 5-13
guide, expansion board,
5-20
LED cable, Pentium II system,
5-38
LED cable, Pentium system,
5-38
logo, 5-26
memory module, 5-12
power button, 5-24
power supply, 5-29
power switch, 5-27
processor, Pentium II system,
5-16
processor, Pentium system,
5-14
riser board, 5-18
riser brace, 5-19
speaker, 5-7
system board, Pentium II
system, 5-40
system board, Pentium
system, 5-40
system unit cover, 5-6
removal and replacement,
minitower
access panel, 6-5
battery, Pentium II system,
6-22
battery, Pentium system,
6-22
bezel blank, 6-27
cable lock, 6-4
cache memory, Pentium
system, 6-17
expansion board, 6-8
expansion board guide,
6-10
feet, 6-3
front bezel, 6-25
graphics memory Pentium II
system, 6-18
graphics memory Pentium
system, 6-18
ISA option board retainer,
6-24
J hood, 6-6
LED cable, Pentium II system,
6-32
LED cable, Pentium system,
6-32
logo, 6-28
memory module (DIMM),
6-13
power button, 6-26
power supply, 6-31
power switch, 6-29
processor, Pentium, 6-14
processor, Pentium II, 6-15
riser board, 6-11
riser brace, 6-7
speaker, 6-12
system board, Pentium II
system, 6-19
system board, Pentium
system, 6-19

I-8 Index
replicated setup, 2-22
restoring your hard drive,
2-27
riser board
removal and replacement,
5-18, 6-11
riser brace
illustrated, desktop, 3-22
illustrated, minitower, 3-4
removal and replacement,
5-19, 6-7
spare part number, desktop,
3-22
spare part number, minitower,
3-5
ROM, 2-14, 2-18
ROM upgrade, 2-19
recovery from upgrade failure,
2-20
remote, 2-19
ROMPaq
using, 2-14
ROMPaq diskette, 2-18
routine care, 4-4
computer case, 4-4
general precautions, 4-4
keyboard, 4-5
monitor, 4-5
mouse, 4-5
S
S3 Trio64V2/GX
drivers, 3-27
graphics resolutions, 8-15
screws, 4-6
Scroll Lock key, 1-23
SCSI
cable, spare part number,
3-9
connector pin assignments,
A-4
controller, spare part number,
3-11
device daisy-chain, D-1
device ID number, D-1
devices, spare part number,
3-7
external devices, D-1
hard drives, 1-24
installation guidelines, D-1
startup sequence, D-1
termination, D-1, D-2
test error codes, E-9, E-10
troubleshooting without
diagnostics, G-9
SDRAM data width, H-1
Seagate
2.1-GB EIDE hard drive
jumper settings, 7-10
3.2-GB EIDE hard drive
jumper settings, 7-12
security
management, 1-13
system, 1-10
security management, 1-13,
2-17
remote, 2-22
serial connector, 1-16
serial connector location,
1-21
serial interface
connector, A-2
serial number, 1-11
location, desktop, 5-1
location, minitower, 6-1
serial port, 1-4, 1-9
test error code, E-4
serial/parallel interface
option, 1-25
serial/parallel interface board
spare part number, 3-13
service
software, 4-6
tools, 4-6
service considerations, 4-6
Setup utility
power-on password, 2-6
shipping boxes
spare part number, 3-24
SMART. See SMART II
SMART II
compatibility, 1-3, 1-4,
2-16
hard drive, C-2
soft-drive type assignments,
C-2
software
preloaded, 1-10
service, 4-6
spare part number, 3-26
support, 2-23
spare part number
cables, 3-9
chassis, 3-3, 3-5
documentation, 3-25, 3-26
feet, 3-3, 3-5
front bezel, 3-3, 3-5
keyboard, 3-14
LED cable, 3-9
logo kit, 3-3, 3-5
mass storage, 3-7
miscellaneous hardware,
3-19
miscellaneous metals, 3-22
miscellaneous parts, 3-23
miscellaneous plastics,
3-20, 3-21
monitor, 3-17
power supply, 3-3, 3-5
power switchkit, 3-24
shipping boxes, 3-24
system unit, 3-3, 3-5
system unit cover, 3-3
unit cover, 3-5
speaker, 1-5, 1-10
removal and replacement, 5-7,
6-12
specifications
audio, 8-14
CD-ROM drive, 8-10
desktop, 8-1
diskette drive, 8-7
hard drive, 8-8, 8-9
keyboard, 8-14
LS-120 drive, 8-13
minitower, 8-2
mouse
2-button, 8-15
PD-CD drive, 8-11
standard and optional boards
illustrated, 3-10, 3-12
spare part number, 3-11,
3-13
standard boards
illustrated, 3-12
spare part number, 3-13
standard features, 1-3
static
generating, 4-1
shielding protection levels,
4-2
summary of test error codes,
E-1
support software, 2-23
surge-tolerant power supply,
1-4, 1-9, 2-17
switch settings, 7-5
system
BIOS, 1-8
board, 1-6
design, 1-5

Index I-9
DMA, 8-3
I/O, 8-4
interrupts, 8-3
memory map, 8-6
memory options, 1-6
security, 1-10
serial number, 1-12
specifications, 8-1
system board
removal and replacement,
Pentium II system, 5-40,
6-19
removal and replacement,
Pentium system, 5-40,
6-19
system management, 2-25
partners program, 2-25
system memory
illustrated, 3-10
spare part number, 3-11
system unit
illustrated, 3-2, 3-4
spare part number, 3-3, 3-5
system unit cover
removal and replacement, 5-6
spare part number, 3-3
T
tape drive
test error codes, E-5
terminators, SCSI, D-1, D-2
active, D-2
passive, D-2
test error codes
audio, E-7
CD-ROM, E-8
diskette drive, E-4
hard drive, E-5
keyboard, E-3
memory, E-3
modem, E-4
mouse, E-8
network, E-7
pointing device, E-8
printer, E-4
processor, E-2
SCSI, E-10
serial port, E-4
summary, E-1
tape drive, E-5
video, E-6
Test utility, 2-1
thermal problems
troubleshooting without
diagnostics, G-2
tools, service, 4-6
transfer rates, Ultra ATA,
C-3
troubleshooting
audio conflicts, G-12
CD-ROM drive problems,
G-8
diskette drive problems,
G-3
display problems, G-4
hard drive problems, G-6
hardware installation
problems, G-7
memory problems, G-9
minor problems, G-1
network problems, G-10
power problems, G-2
printer problems, G-5
processor overheating, G-2
SCSI problems, G-9
thermal problems, G-2
typical electrostatic voltages,
4-1
U
UDMA. See Ultra ATA
Ultra ATA, C-2
cable, spare part number,
3-9
devices, spare part number,
3-7
hard drives, 1-3
optional 80-pin cable, C-3
SMART II compatible, C-2
transfer rates, C-3
Ultra ATA hard drive
specifications, 8-8
Ultra SCSI hard drive
specifications, 8-9
Ultra wide SCSI. See SCSI
unit cover
illustrated, 3-2
universal driver manager,
2-23
UNIX, 1-6
upgrade
processor, 1-6
upgrades
ROM, 2-19
USB connector pin
assignments, A-5
V
video board
spare part number, 3-11
video board options, 1-25
video drivers
Pentium II system, 3-27
Pentium system, 3-27
video specifications, 8-15
video test error codes, E-6
voltage select switch, 1-16,
1-21
voltage, switch-selectable,
1-4, 1-9
voltages, typical electrostatic,
4-1
W
Warranty, Prefailure, 2-27
Western Digital
2.1-GB EIDE hard drive
jumper settings, 7-10
3.2-GB EIDE hard drive
jumper settings, 7-12
Windows
Compaq Diagnostics for,
2-13
Logo key, 1-23
Windows 95
restoring hard drive, 2-27
