Compass Systems GB621 Bluetooth GPS Receiver User Manual GB621 V1 4
Compass Systems Corp. Bluetooth GPS Receiver GB621 V1 4
User Manual

GB621 Quick Installation Guide v.1.0
Quick Installation Guide
Bluetooth GPS Receiver
Model: GB621
GB621 Quick Installation Guide v.1.0
Quick Installation Guide
Bluetooth GPS Receiver
Model: GB621
Before You Start
Your new COMPASS Bluetooth GPS allows you to turn any
Bluetooth™ enabled PDAs (Pocket PC) or PCs into a GPS Navigation
System using Bluetooth Technology.
1. Hardware Description………………………………………2
2. State Table of LED……………………………………...….4
3. Pocket PC Setup ……………………………………………6

GB621 Quick Installation Guide v.1.0
Hardware Description
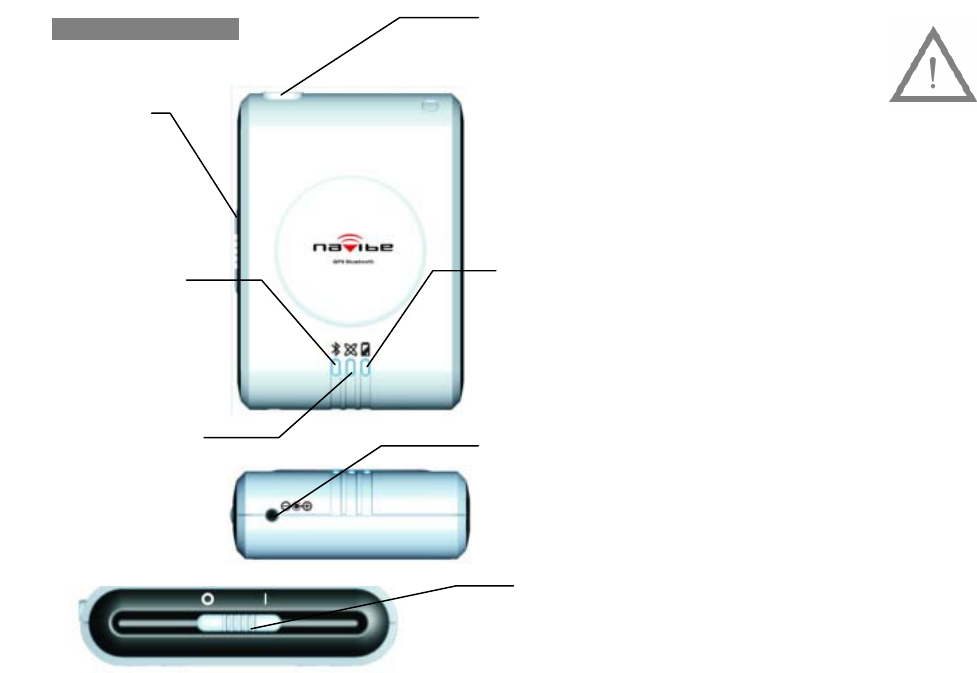
The Bluetooth GPS has three LED indicators. The first is low power
LED indicator that is named LED1. The second is GPS & Charge
status LED that is named LED 2. The third is Bluetooth status LED that
is named LED 3. The status table of LED shows as follows:
External
Antenna
Connector
(
MMCX t
yp
e
)
Power
Switch
DC
Charging
Jack
Low
Power LED
(red color)
(LED1)
GPS (green color) &
Charge (red color)
LED (LED2)
Bluetooth LED
(blue color)
(LED3)
Power
Switch
GB621 Quick Installation Guide v.1.0
PLEASE CHARGE BATTERY FULLY
BEFORE INITIAL USE. (When fully
charged, red color-LED2 will automatically
switch off.)

GB621 Quick Installation Guide v.1.0
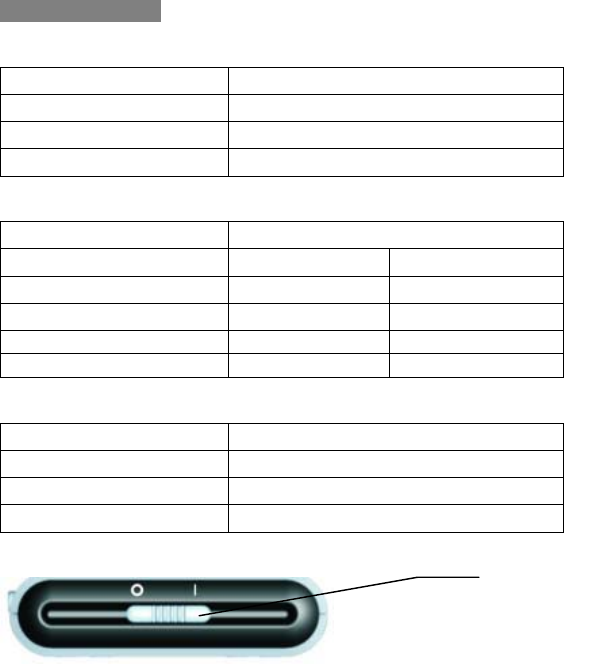
State Table of LED
LED1
Low Power LED Description
LED1 Color and Action Low Power
Red off No
Red on Yes
LED2
GPS & Charge LED Description
LED2 Color and Action Battery Charged Position Fixed
Green on N/A No
Green Flash N/A Yes
Red Flash Charging N/A
Red off OK N/A
LED3
Bluetooth LED Description
LED3 Color and Action Bluetooth Pairing
Blue Flash No
Blue on Yes
Turn on To turn on the receiver, push the power
switch to “I” position. The green LED (LED 2)
indicator will steady on for searching GPS
satellites. The left blue LED (LED 3)
indicator will start flashing for searching
Bluetooth device.
Power
Switch
GB621 Quick Installation Guide v.1.0
Turn off To turn off the receiver, push the power
switch to “O” position. All of the LED
indicators will turn off.
Low Power The right LED (LED 1) indicator will turn
RED when battery power becomes low.
Connect the receiver to a powers source to
continue to recharge the battery.
Charging The second LED (LED 2) red indicator will
flash when the battery is being charged. When
fully charged, the RED indicator will switch
off.
Search for Bluetooth Device
The left LED (LED 3) blue indicator will
flash for pairing Bluetooth signals. When
connected, the left LED (LED3) blue
indicator will become to steady on.
Position Fixed for GPS
The second LED (LED 2) green indicator will
steady on for searching satellites. When fixed,
the second LED (LED2) green indicator will
become to flash.

GB621 Quick Installation Guide v.1.0
Pocket PC Setup
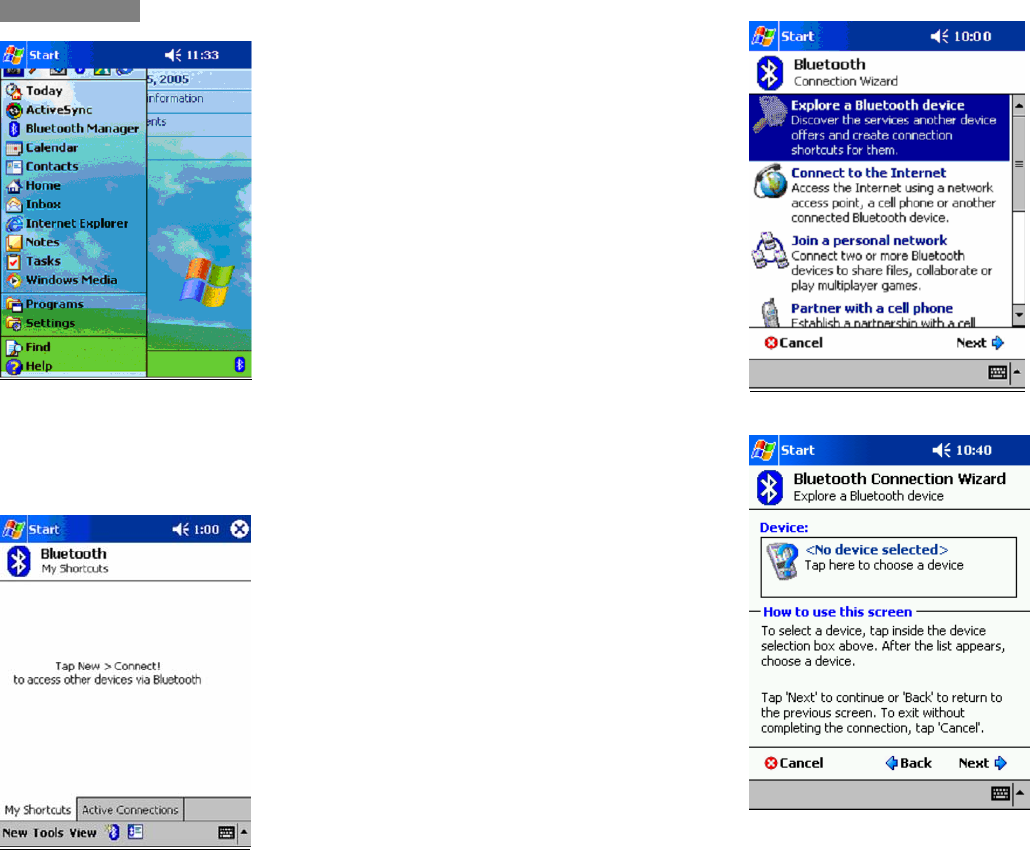
Tap “Bluetooth Manager” from Start Menu
Note: In “Bluetooth: Device Pairing” window you will required to
enter the Passkey number 0000 when opening the port in your GPS
program.
GB621 Quick Installation Guide v.1.0
Tap New > Connect
Tap Explore a Bluetooth device, then tap Next
Tap where indicated to choose a device.
And select the picture marked “BT GPS” to continue

GB621 Quick Installation Guide v.1.0
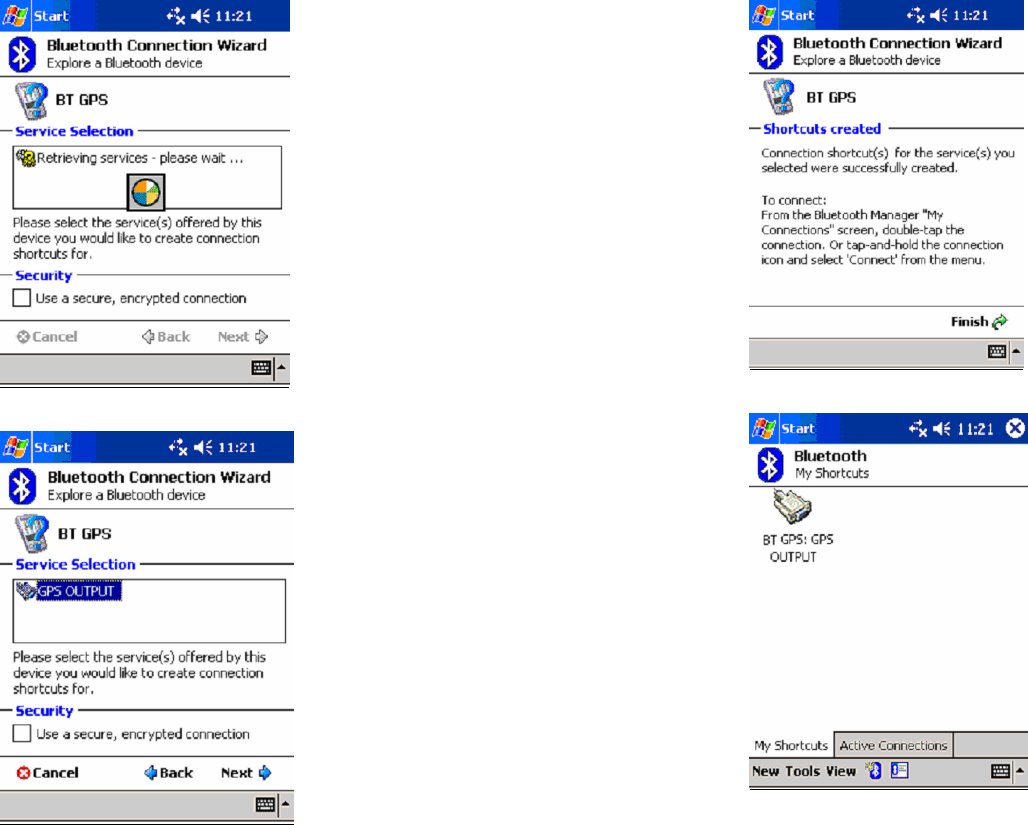
The PDA will begin retrieving services as shown above
Select “GPS OUTPUT” and tap Next
GB621 Quick Installation Guide v.1.0
Tap Finish to establish the BT GPS Bluetooth GPS connection
In the future, you may establish the connection from the shortcut, “BT
GPS: GPS OUTPUT”

GB621 Quick Installation Guide v.1.0
FCC Statement
This equipment complies with FCC radiation exposure limits set forth
for an uncontrolled environment. End users must follow the specific
operating instructions for satisfying RF exposure compliance. This
transmitter must not be co-located or operating in conjunction with any
other antenna or transmitter.
Notice: Any changes or modification not expressly approved by the
party responsible could void the user's authority to operate the device.
Technical Support
If you have any questions or problems installing the Bluetooth GPS,
please contact Technical Support.
Hours: Weekdays 9 a.m. ~ 6 p.m.
Taiwan
http://www.navibe.com
E-mail: service@cpss.com.tw