Computer Access Technology BT005UAA-X Bluetooth Portable Protocol Analyzer User Manual Merlin Mobile User s Manual DRAFT COPY

Computer Access Technology Corporation Bluetooth Portable Protocol Analyzer Merlin Mobile User s Manual DRAFT COPY
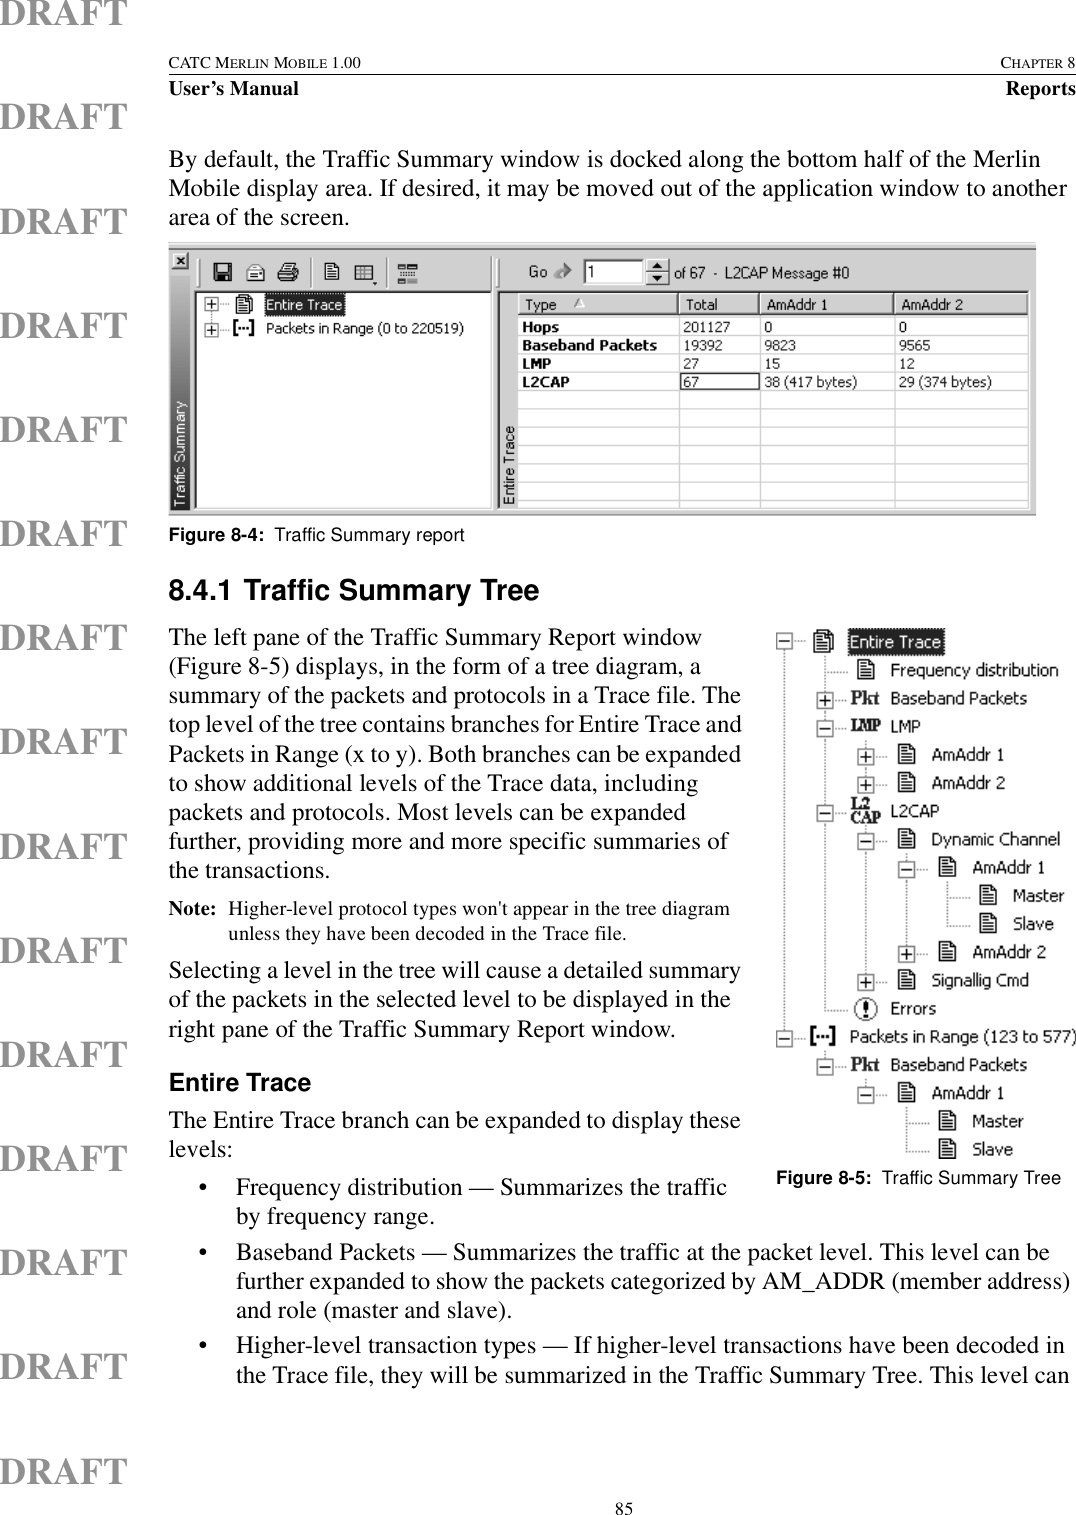
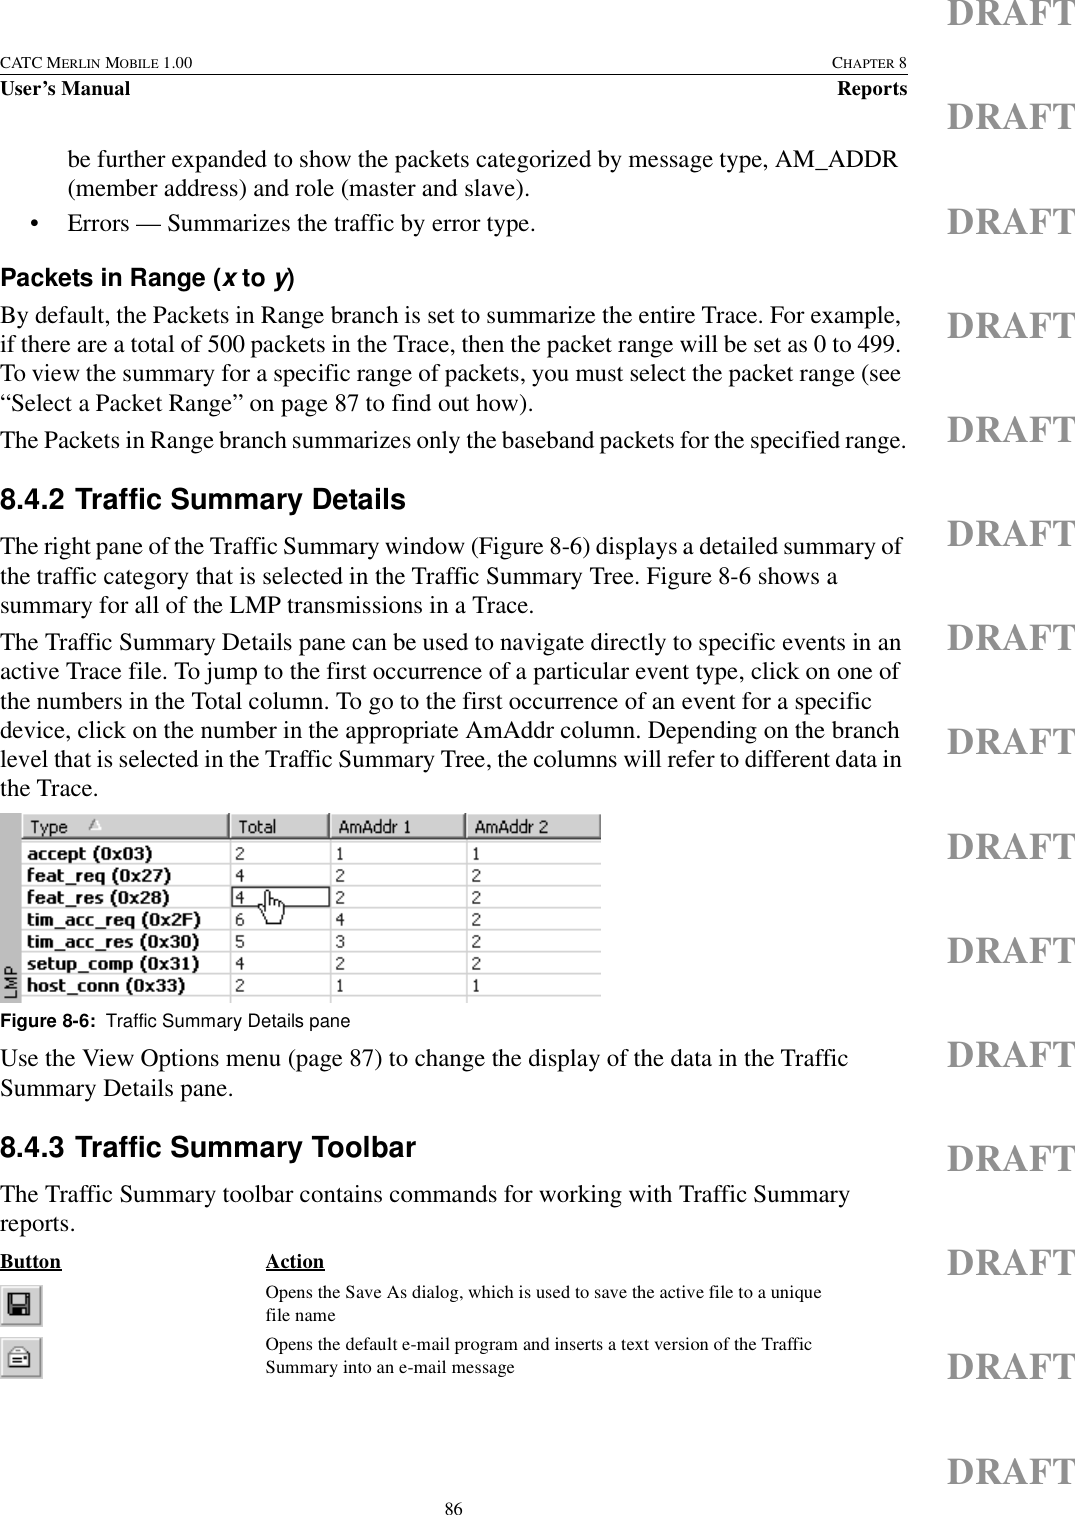
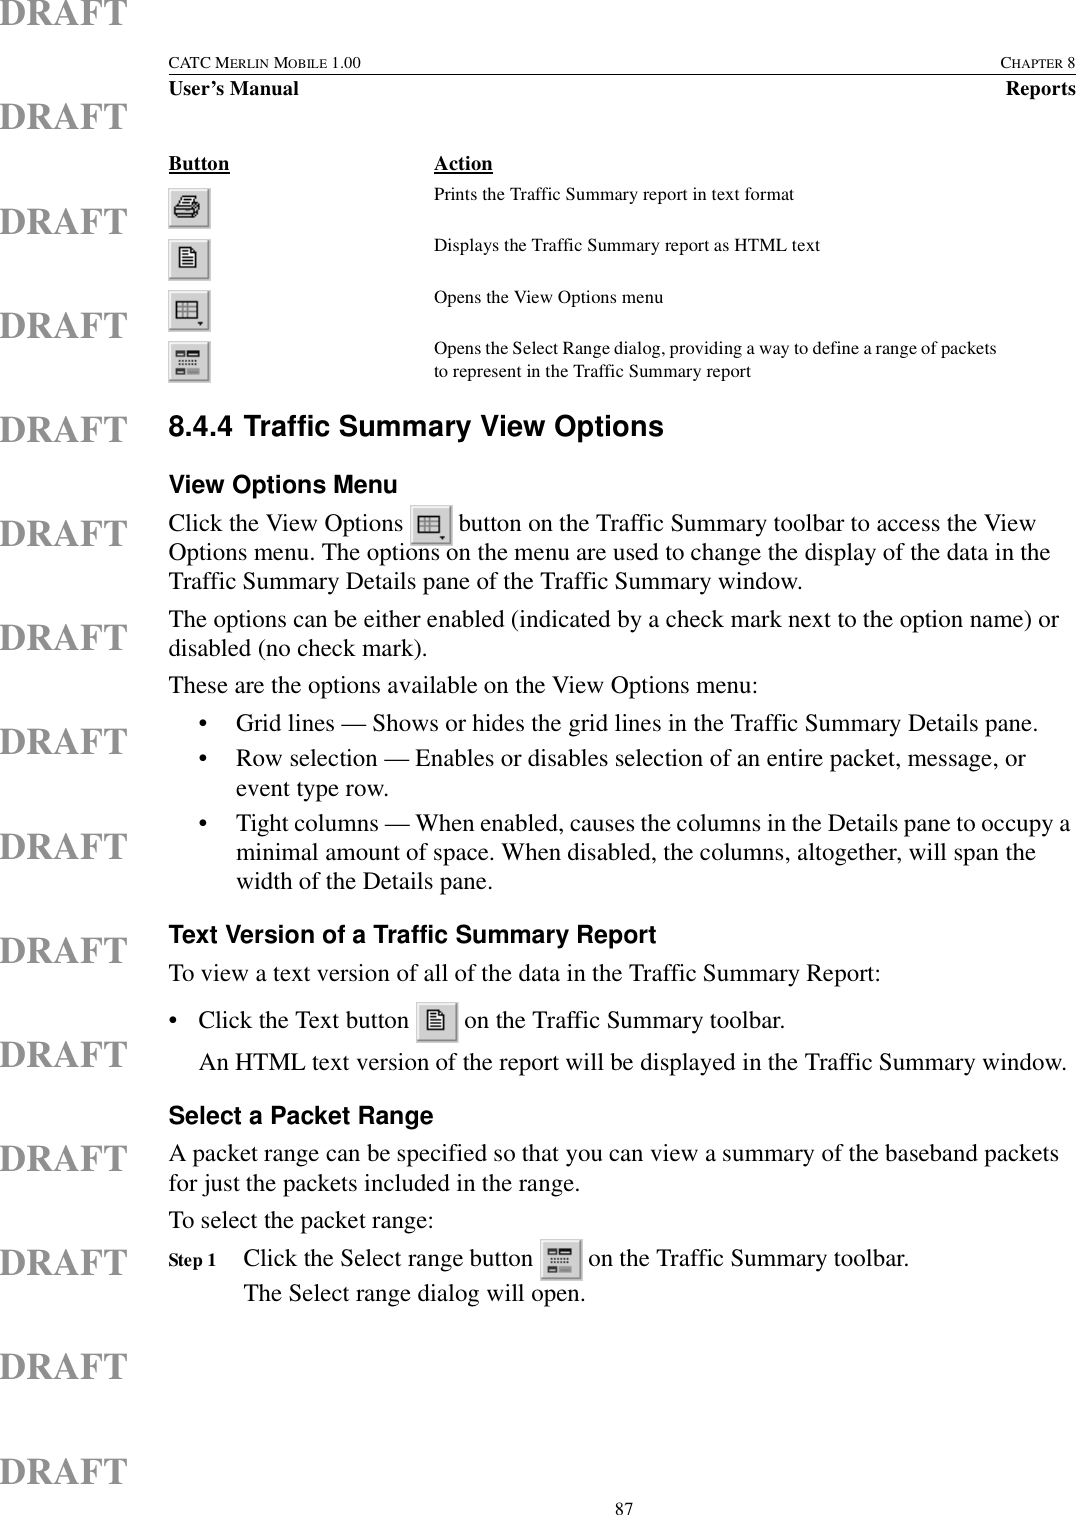
User Manual

2403 Walsh Avenue, Santa Clara, CA  95051-1302  Tel: +1/408.727.6600  Fax: +1/408.727.6622Document Revision 1.00-DRAFTMay 15, 2002 730-0032-00CATC™ Merlin Mobile™ 1.00Bluetooth™ Protocol AnalyzerUser’s Manual
iiCATC MERLIN MOBILE 1.00User’s ManualDRAFTDRAFTDRAFTDRAFTDRAFTDRAFTDRAFTDRAFTDRAFTDRAFTDRAFTDRAFTDRAFTCATC Merlin Mobile 1.00 Bluetooth Protocol Analyzer User’s Manual, Document Revision 1.00-DRAFTPart number: 730-0032-00CopyrightCopyright © 2002, Computer Access Technology Corporation (CATC). Protected as an unpublished work. All Rights Reserved.This document may be printed and reproduced without additional permission, but all copies should contain this copyright notice.Document DisclaimerThe information in this document has been carefully checked and is believed to be reliable. However, no responsibility can be assumed for inaccuracies that may not have been detected.CATC reserves the right to revise the information presented in this document without notice or penalty.Changes or ModificationsAny change or modification not expressly approved by Computer Access Technology Corporation voids the user’s authority to operate this equipment.Trademarks and ServicemarksCATC, Merlin Mobile, Merlin Mobile Automation, Merlin’s Wand, Merlin, Trace, and BusEngine are trademarks of Computer Access Technology Corporation.Bluetooth is a trademark owned by Bluetooth SIG, Inc. and is used by Computer Access Technology Corporation under license.Microsoft, Windows, and Windows NT are either registered trademarks or trademarks of Microsoft Corporation in the United States and/or other countries.Intel, Pentium, and Celeron are trademarks or registered trademarks of Intel Corporation or its subsidiaries in the United States and other countries. AMD, Athlon, Duron, and AMD-K6 are trademarks of Advanced Micro Devices, Inc.All other trademarks are property of their respective companies.
 iiiCATC MERLIN MOBILE 1.00User’s Manual Conformance StatementsDRAFTDRAFTDRAFTDRAFTDRAFTDRAFTDRAFTDRAFTDRAFTDRAFTDRAFTDRAFTDRAFTCONFORMANCE STATEMENTSFCC Conformance StatementEU Conformance StatementThis device complies with part 15 of the FCC Rules. Operation is subject to the following twoconditions: (1) This device may not cause harmful interference, and (2) this device must accept anyinterference received, including interference that may cause undesired operation.INFORMATION TO USER:This equipment has been tested and found to comply with the limits of a Class B digital device,pursuant to Part 15 of the FCC Rules. These limits are designed to provide reasonable protectionagainst harmful interference in a residential installation. This equipment generates, uses and canradiate radio frequency energy and, if not installed and used in accordance with the instructions, maycause harmful interference to radio communications.  However, there is no guarantee that interferencewill not occur in a particular installation; if this equipment does cause harmful interference to radio ortelevision reception, which can be determined by turning the equipment off and on, the user isencouraged to try to correct the interference by one or more of the following measures:1.Reorient / Relocate the receiving antenna.2.Increase the separation between the equipment and receiver.3.Connect the equipment into an outlet on a circuit difference from that to which the receiver is                     connected.4.Consult the dealer or an experienced radio/TV technician for help.IMPORTANT NOTE: To comply with FCC RF exposure compliance requirements, the followingantenna installation and device operating configurations must be satisfied:1.            Only use the antenna supplied with the device.  Change or alter the antenna may void user's                     authorities to operate this equipment.2.            While the device is transmitting, maintain at least 20cm seperation distance between thedevice                  and the body of user  or to any near by personCAUTION: Changes or modifications not expressly approved by the manufacturer responsible forcompliance could void the user's authority to operate the equipment
ivCATC MERLIN MOBILE 1.00User’s Manual ReferencesDRAFTDRAFTDRAFTDRAFTDRAFTDRAFTDRAFTDRAFTDRAFTDRAFTDRAFTDRAFTDRAFTREFERENCESBluetooth SIG. Bluetooth Specification, Version 1.1, Volume 1. 22 February 2001.Bluetooth SIG. Bluetooth Specification, Version 1.1, Volume 2. 22 February 2001.
 vCATC MERLIN MOBILE 1.00User’s Manual Table Of ContentsDRAFTDRAFTDRAFTDRAFTDRAFTDRAFTDRAFTDRAFTDRAFTDRAFTDRAFTDRAFTDRAFTDRAFTDRAFTTABLE OF CONTENTSConformance Statements  . . . . . . . . . . . . . . . . . . . . . . . . . . . . . . . . . . . .iiiFCC Conformance Statement  . . . . . . . . . . . . . . . . . . . . . . . . . . . . . . . . . . . . . . . .  iiiEU Conformance Statement. . . . . . . . . . . . . . . . . . . . . . . . . . . . . . . . . . . . . . . . . .  iiiReferences. . . . . . . . . . . . . . . . . . . . . . . . . . . . . . . . . . . . . . . . . . . . . . . . .ivTable Of Contents . . . . . . . . . . . . . . . . . . . . . . . . . . . . . . . . . . . . . . . . . . v1 Merlin Mobile Overview . . . . . . . . . . . . . . . . . . . . . . . . . . . . . . . . . . . . . 1Bluetooth Specification . . . . . . . . . . . . . . . . . . . . . . . . . . . . . . . . . . . . . . . . . . . . . . . . . 1The Merlin Mobile Analyzer System Components . . . . . . . . . . . . . . . . . . . . . . . . . . . . 2The Merlin Mobile Analyzer Unit . . . . . . . . . . . . . . . . . . . . . . . . . . . . . . . . . . . . . . . . . 2Specifications . . . . . . . . . . . . . . . . . . . . . . . . . . . . . . . . . . . . . . . . . . . . . . . . . . . . . . . . . 2Features of Merlin Mobile . . . . . . . . . . . . . . . . . . . . . . . . . . . . . . . . . . . . . . . . . . . . . . . 2System Requirements. . . . . . . . . . . . . . . . . . . . . . . . . . . . . . . . . . . . . . . . . . . . . . . . . . . 32 Getting Started. . . . . . . . . . . . . . . . . . . . . . . . . . . . . . . . . . . . . . . . . . . . . 5Installing Merlin Mobile  . . . . . . . . . . . . . . . . . . . . . . . . . . . . . . . . . . . . . . . . . . . . . . . . 5Software Installation  . . . . . . . . . . . . . . . . . . . . . . . . . . . . . . . . . . . . . . . . . . . . . . . . 5Install from CD-ROM . . . . . . . . . . . . . . . . . . . . . . . . . . . . . . . . . . . . . . . . . . . . 5Install from installation download . . . . . . . . . . . . . . . . . . . . . . . . . . . . . . . . . . . 5Hardware Installation. . . . . . . . . . . . . . . . . . . . . . . . . . . . . . . . . . . . . . . . . . . . . . . . 5Starting and Stopping Merlin Mobile  . . . . . . . . . . . . . . . . . . . . . . . . . . . . . . . . . . . . . . 6Starting the Application . . . . . . . . . . . . . . . . . . . . . . . . . . . . . . . . . . . . . . . . . . . . . . 6Exiting the Application  . . . . . . . . . . . . . . . . . . . . . . . . . . . . . . . . . . . . . . . . . . . . . . 6Starting the Analyzer Unit . . . . . . . . . . . . . . . . . . . . . . . . . . . . . . . . . . . . . . . . . . . . 6Shutting Down the Analyzer Unit . . . . . . . . . . . . . . . . . . . . . . . . . . . . . . . . . . . . . . 6Displaying Help . . . . . . . . . . . . . . . . . . . . . . . . . . . . . . . . . . . . . . . . . . . . . . . . . . . . . . . 6Updating the BusEngine and Firmware. . . . . . . . . . . . . . . . . . . . . . . . . . . . . . . . . . . . . 6Updating the Driver . . . . . . . . . . . . . . . . . . . . . . . . . . . . . . . . . . . . . . . . . . . . . . . . . . . . 7Updating the Driver on Windows 2000 . . . . . . . . . . . . . . . . . . . . . . . . . . . . . . . . . . 7Updating the Driver on Windows 98 SE . . . . . . . . . . . . . . . . . . . . . . . . . . . . . . . . . 8Updating the Driver on Windows Me . . . . . . . . . . . . . . . . . . . . . . . . . . . . . . . . . . . 9Updating the Driver on Windows XP . . . . . . . . . . . . . . . . . . . . . . . . . . . . . . . . . . . 9License Keys . . . . . . . . . . . . . . . . . . . . . . . . . . . . . . . . . . . . . . . . . . . . . . . . . . . . . . . . 10Update License. . . . . . . . . . . . . . . . . . . . . . . . . . . . . . . . . . . . . . . . . . . . . . . . . . . . 10License Information . . . . . . . . . . . . . . . . . . . . . . . . . . . . . . . . . . . . . . . . . . . . . . . . 10
viCATC MERLIN MOBILE 1.00User’s Manual Table Of ContentsDRAFTDRAFTDRAFTDRAFTDRAFTDRAFTDRAFTDRAFTDRAFTDRAFTDRAFTDRAFTDRAFTDRAFTDRAFT3 Merlin Mobile User Interface  . . . . . . . . . . . . . . . . . . . . . . . . . . . . . . . .11Application Layout . . . . . . . . . . . . . . . . . . . . . . . . . . . . . . . . . . . . . . . . . . . . . . . . . . . .11Menus . . . . . . . . . . . . . . . . . . . . . . . . . . . . . . . . . . . . . . . . . . . . . . . . . . . . . . . . . . . . . .12Toolbars  . . . . . . . . . . . . . . . . . . . . . . . . . . . . . . . . . . . . . . . . . . . . . . . . . . . . . . . . . . . .14Keyboard Shortcuts. . . . . . . . . . . . . . . . . . . . . . . . . . . . . . . . . . . . . . . . . . . . . . . . . . . .184 Gathering Device Information. . . . . . . . . . . . . . . . . . . . . . . . . . . . . . . .19Bluetooth Neighborhood. . . . . . . . . . . . . . . . . . . . . . . . . . . . . . . . . . . . . . . . . . . . . . . .19Device Name Aliases . . . . . . . . . . . . . . . . . . . . . . . . . . . . . . . . . . . . . . . . . . . . . . . . . .195 Recording Bluetooth Traffic  . . . . . . . . . . . . . . . . . . . . . . . . . . . . . . . . .21Assisted Recording with Recording Wizard. . . . . . . . . . . . . . . . . . . . . . . . . . . . . . . . .21Open the Recording Wizard . . . . . . . . . . . . . . . . . . . . . . . . . . . . . . . . . . . . . . . . . .21Record Traffic on a New Piconet with Recording Wizard. . . . . . . . . . . . . . . . . . .21Record Traffic on an Existing Piconet with Recording Wizard . . . . . . . . . . . . . . .23Record Traffic in Bluetooth Test Mode with Recording Wizard . . . . . . . . . . . . . .25Manual Recording with Recording Options . . . . . . . . . . . . . . . . . . . . . . . . . . . . . . . . .26Make a Manual Inquiry Recording. . . . . . . . . . . . . . . . . . . . . . . . . . . . . . . . . . . . .27Make a Manual Page Sync & Record Piconet Recording  . . . . . . . . . . . . . . . . . . .27Make a Manual Sync & Record Piconet Recording . . . . . . . . . . . . . . . . . . . . . . . .28Make a Manual Passive Sync & Record Piconet Recording . . . . . . . . . . . . . . . . .29Passive Sync & Record with an Established Piconet . . . . . . . . . . . . . . . . . . . .30Passive Sync & Record with a Private Device Network  . . . . . . . . . . . . . . . . .31Recording Status. . . . . . . . . . . . . . . . . . . . . . . . . . . . . . . . . . . . . . . . . . . . . . . . . . . . . .32Recording Progress. . . . . . . . . . . . . . . . . . . . . . . . . . . . . . . . . . . . . . . . . . . . . . . . .32Recording State. . . . . . . . . . . . . . . . . . . . . . . . . . . . . . . . . . . . . . . . . . . . . . . . . . . .32Signal Strength and Analyzer State  . . . . . . . . . . . . . . . . . . . . . . . . . . . . . . . . . . . .33Signal Strength . . . . . . . . . . . . . . . . . . . . . . . . . . . . . . . . . . . . . . . . . . . . . . . . .33Analyzer State. . . . . . . . . . . . . . . . . . . . . . . . . . . . . . . . . . . . . . . . . . . . . . . . . .33Uploading Piconet Data . . . . . . . . . . . . . . . . . . . . . . . . . . . . . . . . . . . . . . . . . . . . . . . .34Recording Options Dialog  . . . . . . . . . . . . . . . . . . . . . . . . . . . . . . . . . . . . . . . . . . . . . .34Setting General Recording Options  . . . . . . . . . . . . . . . . . . . . . . . . . . . . . . . . . . . .35Setting Recording Mode Options . . . . . . . . . . . . . . . . . . . . . . . . . . . . . . . . . . . . . .36Inquiry Recording Mode Options. . . . . . . . . . . . . . . . . . . . . . . . . . . . . . . . . . .36Piconet Recording Mode Options. . . . . . . . . . . . . . . . . . . . . . . . . . . . . . . . . . .37Setting Recording Event Options . . . . . . . . . . . . . . . . . . . . . . . . . . . . . . . . . . . . . .40Event Groups  . . . . . . . . . . . . . . . . . . . . . . . . . . . . . . . . . . . . . . . . . . . . . . . . . .41Additional Timeslot Filtering . . . . . . . . . . . . . . . . . . . . . . . . . . . . . . . . . . . . . .43Setting Recording Action Options . . . . . . . . . . . . . . . . . . . . . . . . . . . . . . . . . . . . .43Trigger  . . . . . . . . . . . . . . . . . . . . . . . . . . . . . . . . . . . . . . . . . . . . . . . . . . . . . . .44Filter . . . . . . . . . . . . . . . . . . . . . . . . . . . . . . . . . . . . . . . . . . . . . . . . . . . . . . . . .44Restart . . . . . . . . . . . . . . . . . . . . . . . . . . . . . . . . . . . . . . . . . . . . . . . . . . . . . . . .44
 viiCATC MERLIN MOBILE 1.00User’s Manual Table Of ContentsDRAFTDRAFTDRAFTDRAFTDRAFTDRAFTDRAFTDRAFTDRAFTDRAFTDRAFTDRAFTDRAFTDRAFTDRAFTCount1 and Count2  . . . . . . . . . . . . . . . . . . . . . . . . . . . . . . . . . . . . . . . . . . . . . 44Event to Event Sequencing  . . . . . . . . . . . . . . . . . . . . . . . . . . . . . . . . . . . . . . . 45Saving Recording Options . . . . . . . . . . . . . . . . . . . . . . . . . . . . . . . . . . . . . . . . . . . . . . 45Loading Recording Options. . . . . . . . . . . . . . . . . . . . . . . . . . . . . . . . . . . . . . . . . . . . . 45Bluetooth Encryption . . . . . . . . . . . . . . . . . . . . . . . . . . . . . . . . . . . . . . . . . . . . . . . . . . 46Encryption Setup . . . . . . . . . . . . . . . . . . . . . . . . . . . . . . . . . . . . . . . . . . . . . . . . . . 466 CATC Trace Files . . . . . . . . . . . . . . . . . . . . . . . . . . . . . . . . . . . . . . . . . 49Display Options . . . . . . . . . . . . . . . . . . . . . . . . . . . . . . . . . . . . . . . . . . . . . . . . . . . . . . 49General Display Options . . . . . . . . . . . . . . . . . . . . . . . . . . . . . . . . . . . . . . . . . . . . 50Field Colors . . . . . . . . . . . . . . . . . . . . . . . . . . . . . . . . . . . . . . . . . . . . . . . . . . . . . . 50Colors Dialog . . . . . . . . . . . . . . . . . . . . . . . . . . . . . . . . . . . . . . . . . . . . . . . . . . 51Field Formats . . . . . . . . . . . . . . . . . . . . . . . . . . . . . . . . . . . . . . . . . . . . . . . . . . . . . 51Hiding Fields, Packets, Messages, and Protocols  . . . . . . . . . . . . . . . . . . . . . . . . . 52Saving Display Options . . . . . . . . . . . . . . . . . . . . . . . . . . . . . . . . . . . . . . . . . . . . . 53Loading Display Options . . . . . . . . . . . . . . . . . . . . . . . . . . . . . . . . . . . . . . . . . . . . 53Expandable/Collapsible Rows and Fields . . . . . . . . . . . . . . . . . . . . . . . . . . . . . . . . . . 53Protocol Rows . . . . . . . . . . . . . . . . . . . . . . . . . . . . . . . . . . . . . . . . . . . . . . . . . . . . 54Data Fields . . . . . . . . . . . . . . . . . . . . . . . . . . . . . . . . . . . . . . . . . . . . . . . . . . . . . . . 54Header Fields . . . . . . . . . . . . . . . . . . . . . . . . . . . . . . . . . . . . . . . . . . . . . . . . . . . . . 55Trace File Pop-Up Menus  . . . . . . . . . . . . . . . . . . . . . . . . . . . . . . . . . . . . . . . . . . . . . . 55Cell Context Menu. . . . . . . . . . . . . . . . . . . . . . . . . . . . . . . . . . . . . . . . . . . . . . . . . 55Data Block Dialog . . . . . . . . . . . . . . . . . . . . . . . . . . . . . . . . . . . . . . . . . . . . . . 56Trace View Menu. . . . . . . . . . . . . . . . . . . . . . . . . . . . . . . . . . . . . . . . . . . . . . . . . . 57Decoding Assignment Menus  . . . . . . . . . . . . . . . . . . . . . . . . . . . . . . . . . . . . . . . . 58Assigned to Menu  . . . . . . . . . . . . . . . . . . . . . . . . . . . . . . . . . . . . . . . . . . . . . . 58Decode As Menu . . . . . . . . . . . . . . . . . . . . . . . . . . . . . . . . . . . . . . . . . . . . . . . 58Trace File Comments. . . . . . . . . . . . . . . . . . . . . . . . . . . . . . . . . . . . . . . . . . . . . . . . . . 59Markers  . . . . . . . . . . . . . . . . . . . . . . . . . . . . . . . . . . . . . . . . . . . . . . . . . . . . . . . . . . . . 59Set a marker . . . . . . . . . . . . . . . . . . . . . . . . . . . . . . . . . . . . . . . . . . . . . . . . . . . . . . 59Edit a marker . . . . . . . . . . . . . . . . . . . . . . . . . . . . . . . . . . . . . . . . . . . . . . . . . . . . . 59Clear (delete) a marker. . . . . . . . . . . . . . . . . . . . . . . . . . . . . . . . . . . . . . . . . . . . . . 60All Markers Dialog  . . . . . . . . . . . . . . . . . . . . . . . . . . . . . . . . . . . . . . . . . . . . . . . . 60Saving Trace Files . . . . . . . . . . . . . . . . . . . . . . . . . . . . . . . . . . . . . . . . . . . . . . . . . . . . 60Save a Copy of a Whole Trace. . . . . . . . . . . . . . . . . . . . . . . . . . . . . . . . . . . . . . . . 60Save a Portion of a Trace . . . . . . . . . . . . . . . . . . . . . . . . . . . . . . . . . . . . . . . . . . . . 60Printing Trace Files . . . . . . . . . . . . . . . . . . . . . . . . . . . . . . . . . . . . . . . . . . . . . . . . . . . 61Exporting Trace Files. . . . . . . . . . . . . . . . . . . . . . . . . . . . . . . . . . . . . . . . . . . . . . . . . . 61Export to Text Format . . . . . . . . . . . . . . . . . . . . . . . . . . . . . . . . . . . . . . . . . . . . . . 62Export to Comma Separated Value Format. . . . . . . . . . . . . . . . . . . . . . . . . . . . . . 62Searching Trace Files. . . . . . . . . . . . . . . . . . . . . . . . . . . . . . . . . . . . . . . . . . . . . . . . . . 62Go to Trigger . . . . . . . . . . . . . . . . . . . . . . . . . . . . . . . . . . . . . . . . . . . . . . . . . . . . . 63Go to Packet/Message/Protocol . . . . . . . . . . . . . . . . . . . . . . . . . . . . . . . . . . . . . . . 63
viiiCATC MERLIN MOBILE 1.00User’s Manual Table Of ContentsDRAFTDRAFTDRAFTDRAFTDRAFTDRAFTDRAFTDRAFTDRAFTDRAFTDRAFTDRAFTDRAFTDRAFTDRAFTGo to Marker. . . . . . . . . . . . . . . . . . . . . . . . . . . . . . . . . . . . . . . . . . . . . . . . . . . . . .63Go To  . . . . . . . . . . . . . . . . . . . . . . . . . . . . . . . . . . . . . . . . . . . . . . . . . . . . . . . . . . .63Find. . . . . . . . . . . . . . . . . . . . . . . . . . . . . . . . . . . . . . . . . . . . . . . . . . . . . . . . . . . . .64Find Next  . . . . . . . . . . . . . . . . . . . . . . . . . . . . . . . . . . . . . . . . . . . . . . . . . . . . . . . .65Search Direction . . . . . . . . . . . . . . . . . . . . . . . . . . . . . . . . . . . . . . . . . . . . . . . . . . .657 Decoding Trace Data. . . . . . . . . . . . . . . . . . . . . . . . . . . . . . . . . . . . . . . .67Packet-Level Decoding. . . . . . . . . . . . . . . . . . . . . . . . . . . . . . . . . . . . . . . . . . . . . . . . .67Packet Types. . . . . . . . . . . . . . . . . . . . . . . . . . . . . . . . . . . . . . . . . . . . . . . . . . . . . .67Hop Frequency Packets  . . . . . . . . . . . . . . . . . . . . . . . . . . . . . . . . . . . . . . . . . .67Link Control Packets  . . . . . . . . . . . . . . . . . . . . . . . . . . . . . . . . . . . . . . . . . . . .68Synchronous Connection-Oriented (SCO) Packets  . . . . . . . . . . . . . . . . . . . . .68Asynchronous Connection-Less (ACL) Packets  . . . . . . . . . . . . . . . . . . . . . . .68Undefined Packets  . . . . . . . . . . . . . . . . . . . . . . . . . . . . . . . . . . . . . . . . . . . . . .69Packet Fields. . . . . . . . . . . . . . . . . . . . . . . . . . . . . . . . . . . . . . . . . . . . . . . . . . . . . .69Packet Number Block . . . . . . . . . . . . . . . . . . . . . . . . . . . . . . . . . . . . . . . . . . . .69Access Code Block . . . . . . . . . . . . . . . . . . . . . . . . . . . . . . . . . . . . . . . . . . . . . .69Packet Header Block. . . . . . . . . . . . . . . . . . . . . . . . . . . . . . . . . . . . . . . . . . . . .70Payload Block. . . . . . . . . . . . . . . . . . . . . . . . . . . . . . . . . . . . . . . . . . . . . . . . . .70Acknowledge Status Block. . . . . . . . . . . . . . . . . . . . . . . . . . . . . . . . . . . . . . . .72Idle Time and Time Stamp Block. . . . . . . . . . . . . . . . . . . . . . . . . . . . . . . . . . .72Miscellaneous Packet Display Elements  . . . . . . . . . . . . . . . . . . . . . . . . . . . . . . . .72Protocol-Level Decoding . . . . . . . . . . . . . . . . . . . . . . . . . . . . . . . . . . . . . . . . . . . . . . .73Protocol Fields . . . . . . . . . . . . . . . . . . . . . . . . . . . . . . . . . . . . . . . . . . . . . . . . . . . .74Protocol Assignments . . . . . . . . . . . . . . . . . . . . . . . . . . . . . . . . . . . . . . . . . . . . . . . . . .74L2CAP Channel Decoding Assignments . . . . . . . . . . . . . . . . . . . . . . . . . . . . . . . .75L2CAP Channel Decoding Assignments dialog. . . . . . . . . . . . . . . . . . . . . . . .75Assigned to Menu. . . . . . . . . . . . . . . . . . . . . . . . . . . . . . . . . . . . . . . . . . . . . . .76L2CAP Channel Connection Assignments. . . . . . . . . . . . . . . . . . . . . . . . . . . . . . .76RFCOMM Channel Decoding Assignments  . . . . . . . . . . . . . . . . . . . . . . . . . . . . .77RFCOMM Channel Assignment dialog . . . . . . . . . . . . . . . . . . . . . . . . . . . . . .77OBEX Client/Server Status Decoding Assignments  . . . . . . . . . . . . . . . . . . . . . . .78Decode As Menu  . . . . . . . . . . . . . . . . . . . . . . . . . . . . . . . . . . . . . . . . . . . . . . .78CATC Decoder Scripting Files. . . . . . . . . . . . . . . . . . . . . . . . . . . . . . . . . . . . . . . . . . .78Custom Decoder Scripts . . . . . . . . . . . . . . . . . . . . . . . . . . . . . . . . . . . . . . . . . . . . . . . .798 Reports. . . . . . . . . . . . . . . . . . . . . . . . . . . . . . . . . . . . . . . . . . . . . . . . . . .81File Information . . . . . . . . . . . . . . . . . . . . . . . . . . . . . . . . . . . . . . . . . . . . . . . . . . . . . .81Error Summary . . . . . . . . . . . . . . . . . . . . . . . . . . . . . . . . . . . . . . . . . . . . . . . . . . . . . . .82Timing and Bus Usage Calculator  . . . . . . . . . . . . . . . . . . . . . . . . . . . . . . . . . . . . . . . .83Traffic Summary. . . . . . . . . . . . . . . . . . . . . . . . . . . . . . . . . . . . . . . . . . . . . . . . . . . . . .84Traffic Summary Tree  . . . . . . . . . . . . . . . . . . . . . . . . . . . . . . . . . . . . . . . . . . . . . .85Entire Trace. . . . . . . . . . . . . . . . . . . . . . . . . . . . . . . . . . . . . . . . . . . . . . . . . . . .85
 ixCATC MERLIN MOBILE 1.00User’s Manual Table Of ContentsDRAFTDRAFTDRAFTDRAFTDRAFTDRAFTDRAFTDRAFTDRAFTDRAFTDRAFTDRAFTDRAFTDRAFTDRAFTPackets in Range (x to y) . . . . . . . . . . . . . . . . . . . . . . . . . . . . . . . . . . . . . . . . . 86Traffic Summary Details . . . . . . . . . . . . . . . . . . . . . . . . . . . . . . . . . . . . . . . . . . . . 86Traffic Summary Toolbar  . . . . . . . . . . . . . . . . . . . . . . . . . . . . . . . . . . . . . . . . . . . 86Traffic Summary View Options. . . . . . . . . . . . . . . . . . . . . . . . . . . . . . . . . . . . . . . 87View Options Menu. . . . . . . . . . . . . . . . . . . . . . . . . . . . . . . . . . . . . . . . . . . . . 87Text Version of a Traffic Summary Report. . . . . . . . . . . . . . . . . . . . . . . . . . . 87Select a Packet Range  . . . . . . . . . . . . . . . . . . . . . . . . . . . . . . . . . . . . . . . . . . . 87Display an Event in a Trace . . . . . . . . . . . . . . . . . . . . . . . . . . . . . . . . . . . . . . . 88Traffic Summary Files . . . . . . . . . . . . . . . . . . . . . . . . . . . . . . . . . . . . . . . . . . . . . . 88Save a Traffic Summary Report. . . . . . . . . . . . . . . . . . . . . . . . . . . . . . . . . . . . 88E-mail a Traffic Summary Report . . . . . . . . . . . . . . . . . . . . . . . . . . . . . . . . . . 88Print a Traffic Summary Report. . . . . . . . . . . . . . . . . . . . . . . . . . . . . . . . . . . . 899 Contact and Warranty Information. . . . . . . . . . . . . . . . . . . . . . . . . . . 91Contact Information . . . . . . . . . . . . . . . . . . . . . . . . . . . . . . . . . . . . . . . . . . . . . . . . . . . 91Warranty and License  . . . . . . . . . . . . . . . . . . . . . . . . . . . . . . . . . . . . . . . . . . . . . . . . . 91
xCATC MERLIN MOBILE 1.00User’s Manual Table Of ContentsDRAFTDRAFTDRAFTDRAFTDRAFTDRAFTDRAFTDRAFTDRAFTDRAFTDRAFTDRAFTDRAFTDRAFTDRAFT
 1CATC MERLIN MOBILE 1.00 CHAPTER 1User’s Manual Merlin Mobile OverviewDRAFTDRAFTDRAFTDRAFTDRAFTDRAFTDRAFTDRAFTDRAFTDRAFTDRAFTDRAFTDRAFTDRAFTDRAFTCHAPTER 1: MERLIN MOBILE OVERVIEWThe CATC™ Merlin Mobile™ Bluetooth™ Protocol Analyzer blends powerful piconet traffic recording and analysis abilities with compact, easily transportable PC Card technology. Merlin Mobile is a development and test tool for products using the Bluetooth wireless technology. Merlin Mobile non-intrusively monitors piconet traffic and records and displays captured Bluetooth data.Like its predecessor, the CATC Merlin™ Bluetooth Protocol Analyzer, Merlin Mobile uses CATC's BusEngine™ technology, which incorporates a real-time recording engine with programmable data, state, and error detection, and event triggering, filtering, counting, and sequencing.  This enables users to optimize recording memory usage to capture the data that is most important.The Merlin Mobile system consists of the analyzer hardware unit and the analyzer software.  The Merlin Mobile analyzer unit monitors and captures baseband packets on a piconet in a non-intrusive manner.  The packets can then be viewed and decoded with Merlin Mobile software.  The software displays the piconet data in CATC Trace™ format and is capable of decoding and organizing the data for these Bluetooth protocol levels:  LMP, L2CAP, SDP, TCS, RFCOMM, OBEX, AT, HDLC, PPP, BNEP, and HID.  In addition, users can use the CATC Scripting Language to create custom decoders for specific development purposes.The Merlin Mobile analyzer unit is configured and controlled by the analyzer software.  It can be used with portable computers for field service and maintenance, as well as with desktop units in a development environment.  Furthermore, Merlin Mobile Automation™ and compatibility with the CATC Merlin's Wand™ Bluetooth Test Generator provide the capability for creating a fully-automated testing environment.The Merlin Mobile analyzer includes provisions for on-the-fly detection of, and triggering on, numerous events. Such events include specific packet headers, payload headers, data patterns, and many abnormal (error) traffic conditions. Merlin Mobile continuously records the piconet data in a wrap-around fashion until it is manually stopped or until the trigger event is detected. Upon detection of a triggering event, the analyzer continues, as necessary, to record data until the recording buffer is filled.The Merlin Mobile application may be used with or without the analyzer box. When used without the analyzer box, it functions as a Trace™ viewer. As a Trace viewer, it can be used to view, analyze and print CATC Trace files.1.1 Bluetooth SpecificationPlease refer to the Bluetooth Specification, version 1.1, for details on the Bluetooth wireless technology protocol. The Bluetooth Specification is available from the Bluetooth SIG at its web site: http://www.bluetooth.com.
2CATC MERLIN MOBILE 1.00 CHAPTER 1User’s Manual Merlin Mobile OverviewDRAFTDRAFTDRAFTDRAFTDRAFTDRAFTDRAFTDRAFTDRAFTDRAFTDRAFTDRAFTDRAFTDRAFTDRAFT1.2 The Merlin Mobile Analyzer System ComponentsThe Merlin Mobile analyzer package includes the following items:• One Merlin Mobile analyzer unit• Merlin Mobile software program installation CD• Product documentation including on-line Help1.3 The Merlin Mobile Analyzer Unit1.4 SpecificationsPackageDimensions:Connectors:Weight:Power RequirementsEnvironmental ConditionsOperating Range: 0 to 55 °C (32 to 131 °F)Storage Range: -20 to 80 °C (-4 to 176 °F)Humidity: 10 to 90%, non-condensingRecording Memory Size32 MB DRAM for traffic data capture32 MB DRAM for timing, state & other dataCertification1.5 Features of Merlin Mobile• Sophisticated software analyzes all piconet traffic• Identifies & highlights abnormal bus conditions• Decodes Baseband packets and provides decoding for 12 additional protocol levels• 64 MB of physical data recording memory nets 32 MB of raw Bluetooth traffic• Programmable real-time event triggering and traffic capture filtering
 3CATC MERLIN MOBILE 1.00 CHAPTER 1User’s Manual Merlin Mobile OverviewDRAFTDRAFTDRAFTDRAFTDRAFTDRAFTDRAFTDRAFTDRAFTDRAFTDRAFTDRAFTDRAFTDRAFTDRAFT• CATC Trace graphical presentation of captured data with extensive customization options• Adjustable recording size• Adjustable trigger position• Comprehensive search functions• Accurate timestamping of packets• Field upgradeable firmware and BusEngine™• Software operates as a stand-alone Trace viewer• Connects to the host computer through PC Card slot• One-year warranty and hotline customer support1.6 System RequirementsThe following is the recommended configuration for the host machine that runs the Merlin Mobile Analyzer application and is connected to the Merlin Mobile Analyzer box.• Operating system: Microsoft® Windows® 98 SE, Windows 2000, Windows Me, or Windows XP operating system.• Required setup: Microsoft Internet Explorer 4 or later must be installed.•Processor: For optimum performance, use processors of the Intel® Pentium® III or Pentium 4 family, the AMD® Athlon® or Duron® family, or other compatible proces-sors with clock speed of 500mHz or higher. Must have, as a minimum, a processor from the Intel Pentium II or Celeron® family, AMD-K6® family, or equivalent with clock speed of 300mHz.•Memory: For the best performance, it is recommended to have physical RAM twice the size of the recording buffer setup – minimum of 64 MB of RAM.•Hard disk: At least 20 MB of free hard disk space is required for the installation. Addi-tional disk space is needed for storing the recorded data in files during the recording process (can be as much as 64 MB when recording a full buffer size).•Display: Resolution of 1024 x 768 with at least 16-bit color is recommended (resolution of 800 x 600 with 16-bit color is a minimum).•Connectivity: The host computer must have a PC Card slot in order to connect to the Merlin Mobile analyzer unit. This is not a requirement if the Merlin Mobile application is going to be used only as a Trace viewer.
4CATC MERLIN MOBILE 1.00 CHAPTER 1User’s Manual Merlin Mobile OverviewDRAFTDRAFTDRAFTDRAFTDRAFTDRAFTDRAFTDRAFTDRAFTDRAFTDRAFTDRAFTDRAFTDRAFTDRAFT
 5CATC MERLIN MOBILE 1.00 CHAPTER 2User’s Manual Getting StartedDRAFTDRAFTDRAFTDRAFTDRAFTDRAFTDRAFTDRAFTDRAFTDRAFTDRAFTDRAFTDRAFTDRAFTDRAFTCHAPTER 2: GETTING STARTEDThis chapter describes how to install Merlin Mobile and its software, how to start Merlin Mobile, and how to set up the analyzer unit. 2.1 Installing Merlin MobileMerlin Mobile can be installed on any PC or laptop computer that uses the Windows 98 SE,Windows Me, Windows 2000, or Windows XP operating system and has a functioning PCCard slot. For Windows NT support, please contact CATC.2.1.1 Software InstallationThe Merlin Mobile software can be installed from the installation CD-ROM or from installation files downloaded from the CATC website.Install from CD-ROMStep 1 Insert the Merlin Mobile installation CD-ROM into the CD-ROM drive of the computer that will be connected to the Merlin Mobile analyzer unit.The autorun program should start automatically. If it doesn’t start, use Windows Explorer or My Computer to navigate to the CD-ROM drive directory, double-click the file autorun.exe, and proceed to Step 2. If it still doesn’t start, navigate to the \Software directory on the CD-ROM, double-click the file Setup.exe, and proceed to Step 3.Step 2 Choose Install Software to start the setup program.Step 3 Follow the on-screen instructions to complete the installation.Install from installation downloadStep 1 Select Start > Run... from the Windows taskbar and click the Browse button, then navigate to the Disk 1 directory of the Merlin Mobile installation download. Select the file Setup.exe and click Open.Step 2 Follow the on-screen instructions to complete the installation.2.1.2 Hardware InstallationStep 1 Insert the Merlin Mobile analyzer unit into the PC Card slot on the desktop or laptop computer that will be running the Merlin Mobile software.Step 2 The New Hardware Wizard will automatically detect Merlin Mobile and will guide you through the rest of the installation.
6CATC MERLIN MOBILE 1.00 CHAPTER 2User’s Manual Getting StartedDRAFTDRAFTDRAFTDRAFTDRAFTDRAFTDRAFTDRAFTDRAFTDRAFTDRAFTDRAFTDRAFTDRAFTDRAFT2.2 Starting and Stopping Merlin Mobile2.2.1 Starting the ApplicationUse one of the following procedures to start the Merlin Mobile application:• Select Start > Programs > CATC > CATC Merlin Mobile from the Windows taskbar.• In Windows Explorer or My Computer, navigate to the directory that contains Merlin Mobile, then double-click on the MerlinMobile.exe icon.2.2.2 Exiting the ApplicationAny of the following actions will close the Merlin Mobile application:• Click on the ‘X’ in the upper right corner of the application window.• Select File > Exit from the menu bar.•Press Alt + F4.• Double-click the Merlin Mobile control icon in the upper left corner of the application window.• Click the Merlin Mobile control icon to access the Control menu and choose Close.2.2.3 Starting the Analyzer UnitThe Merlin Mobile analyzer unit is powered on whenever it is connected to the host computer via the PC Card slot and the host computer is on. The analyzer will initialize itself and perform an exhaustive self-diagnostic test that lasts about five seconds.2.2.4 Shutting Down the Analyzer UnitShut down the Merlin Mobile unit by removing it from the PC Card slot or by shutting down the host computer.2.3 Displaying HelpThe Merlin Mobile application has a Help file that is useful as an on-screen reference. Access the Help file by choosing Help > Help Topics... from the menu bar.2.4 Updating the BusEngine and FirmwareThe BusEngine core is the heart of the Merlin Mobile analyzer. Using state-of-the-art PLD technology, it incorporates both the high speed recording engine and the configureable building blocks that implement data/state/error detections, triggering, capture filtering,
 7CATC MERLIN MOBILE 1.00 CHAPTER 2User’s Manual Getting StartedDRAFTDRAFTDRAFTDRAFTDRAFTDRAFTDRAFTDRAFTDRAFTDRAFTDRAFTDRAFTDRAFTDRAFTDRAFTexternal signal monitoring, and event counting and sequencing. Both the BusEngine program and the firmware that manage the internal microcontroller are fully field-upgradeable.The most current BusEngine file and firmware file are included with the Merlin Mobile installation software and are automatically installed when the software is installed.2.5 Updating the DriverIt’s necessary to manually update the driver if you have upgraded to a newer version of Merlin Mobile. However, if Merlin Mobile was not previously installed on the host computer, the analyzer unit should be detected as being new hardware, and the New Hardware Wizard will guide you through the driver installation process.To find out the current driver version number, please consult Merlin Mobile’s Readme.txt file.Note: The Merlin Mobile analyzer unit must be attached to the computer via the PC Card slot before updating the driver.2.5.1 Updating the Driver on Windows 2000Step 1 Select Start > Settings > Control Panel from the desktop taskbar, then double-click on Add/Remove Hardware in the Control Panel window.The Add/Remove Hardware Wizard will open.Step 2 Click Next.Step 3 Choose “Uninstall/Unplug a device” and click Next.Step 4 Choose “Unplug/Eject a device” and click Next.Step 5 Select CATC Merlin Mobile Bluetooth Protocol Analyzer from the list of devices and click the Properties button.The Properties window will open.Step 6 Select the Driver tab in the Properties window and click Update Driver.The Upgrade Device Driver Wizard will open.Step 7 Click Next.Step 8 Choose “Display a list of the known drivers for this device so that I can choose a specific driver.” Then, click Next.Step 9 Choose “Have disk” and click Next.The Install from Disk window will open.Step 10 Install from the Merlin Mobile installation CD-ROM:Make sure that the installation CD is in the computer’s CD-ROM drive, then click Browse and navigate to the \Software directory on the CD, or type the drive letter followed by \Software (e.g., “D:\Software”) in the combo box. Click OK.
8CATC MERLIN MOBILE 1.00 CHAPTER 2User’s Manual Getting StartedDRAFTDRAFTDRAFTDRAFTDRAFTDRAFTDRAFTDRAFTDRAFTDRAFTDRAFTDRAFTDRAFTDRAFTDRAFTInstall from a directory on the computer’s hard drive:Browse or enter the path to the Disk 1 directory of the Merlin Mobile installation, then click OK.The Install from Disk window will close.Step 11 Select CATC Merlin Mobile Bluetooth Protocol Analyzer from the list of devices in the Upgrade Device Driver Wizard and click Next.Step 12 Click Next to install the driver.Step 13 Click Finish to close the Wizard.Step 14 Check the driver version on the Driver tab of the Properties window to make sure that the driver was successfully upgraded.Step 15 Close the remaining open windows.2.5.2 Updating the Driver on Windows 98 SEStep 1 Select Start > Settings > Control Panel from the desktop taskbar, then double-click on System Properties in the Control Panel window.The System Properties window will open.Step 2 Select the Device Manager tab.Step 3 Look in the CATC Analyzers directory and select CATC Merlin Mobile Bluetooth Protocol Analyzer.orLook in the Universal Serial Bus Controllers directory and select CATC Merlin Mobile Bluetooth Protocol Analyzer.Step 4 Click the Properties button.The Properties window will open.Step 5 Select the Driver tab and click on the Update Driver button.The Update Device Driver Wizard will open.Step 6 Click Next.Step 7 Choose “Search for a better driver than the one your device is using now.” and click Next.Step 8 Enter or browse to the location of the driver and click Next.Step 9 Click Next to install the driver.Note: If a message appears saying that Windows cannot locate the driver, click OK to close the message box and then enter or browse to the location of the driver to continue.Step 10 Click Finish.Step 11 Click the Driver File Details button to check the driver version and make sure that the driver was successfully upgraded.Step 12 Close the remaining open windows.
 9CATC MERLIN MOBILE 1.00 CHAPTER 2User’s Manual Getting StartedDRAFTDRAFTDRAFTDRAFTDRAFTDRAFTDRAFTDRAFTDRAFTDRAFTDRAFTDRAFTDRAFTDRAFTDRAFT2.5.3 Updating the Driver on Windows MeStep 1 Select Start > Settings > Control Panel from the desktop taskbar, then double-click on System Properties in the Control Panel window.The System Properties window will open.Step 2 Select the Device Manager tab.Step 3 Look in the CATC Analyzers directory and select CATC Merlin Mobile Bluetooth Protocol Analyzer.orLook in the Universal Serial Bus Controllers directory and select CATC Merlin Mobile Bluetooth Protocol Analyzer.Step 4 Click the Properties button.The Properties window will open.Step 5 Select the Driver tab and click on the Update Driver button.The Update Device Driver Wizard will open.Step 6 Choose “Automatically search for a better driver.” and click Next.The Select Other Driver window will open.Step 7 Select the newest driver and click OK.The driver will install.Step 8 Click Finish.Step 9 Click the Driver File Details button to check the driver version and make sure that the driver was successfully upgraded.Step 10 Close the remaining open windows.2.5.4 Updating the Driver on Windows XPStep 1 Select Start > Control Panel from the desktop taskbar, then double-click Performance and Maintenance.Step 2 Double-click on System.The System Properties window will open.Step 3 Select the Hardware tab and click the Device Manager button.The Device Manager window will open.Step 4 Look in the CATC Analyzers directory and select CATC Merlin Mobile Bluetooth Protocol Analyzer.orLook in the Universal Serial Bus Controllers directory and select CATC Merlin Mobile Bluetooth Protocol Analyzer.Step 5 Select Action > Update Driver... from the Device Manager menu bar.The Hardware Update Wizard will open.
10CATC MERLIN MOBILE 1.00 CHAPTER 2User’s Manual Getting StartedDRAFTDRAFTDRAFTDRAFTDRAFTDRAFTDRAFTDRAFTDRAFTDRAFTDRAFTDRAFTDRAFTDRAFTDRAFTStep 6 Choose “Install from a list or specific location.”Step 7 Choose “Don’t search” then click Have Disk.Step 8 Enter or browse to the location of the driver and click OK.Step 9 Select CATC Merlin Mobile Bluetooth Protocol Analyzer from the list and click Next.The driver will install.Step 10 Click Finish.Step 11 Select Action > Properties from the Device Manager menu bar to check the driver version and make sure that the driver was successfully upgraded.Step 12 Close the remaining open windows.2.6 License KeysA License Key is necessary to enable software maintenance in Merlin Mobile. License Keys must be obtained from CATC.2.6.1 Update LicenseFollow these steps to install a license key:Step 1 Select Help > Update License… from the menu bar.The Update License dialog will come up.Step 2 Enter the path and filename for the License Key or use the Browse button to navigate to the directory that contains the License Key. Select the .lic file, and then click Update Device.2.6.2 License InformationLicensing information for Merlin Mobile may be viewed by selecting Help > Display License Information... from the menu bar. The License Information window will open, displaying the maintenance expiration and features data for Merlin Mobile.
 11CATC MERLIN MOBILE 1.00 CHAPTER 3User’s Manual Merlin Mobile User InterfaceDRAFTDRAFTDRAFTDRAFTDRAFTDRAFTDRAFTDRAFTDRAFTDRAFTDRAFTDRAFTDRAFTDRAFTDRAFTCHAPTER 3: MERLIN MOBILE USER INTERFACEThis chapter introduces you to the Merlin Mobile application’s user interface. It describes the elements of the application window, as well as the commands available via the menus, toolbars, and keyboard shortcuts.3.1 Application LayoutThe Merlin Mobile application window contains the following elements:• Title bar: The title bar is located at the top of the application window. It identifies the window as CATC Merlin Mobile Bluetooth Protocol Analyzer. When there is a Trace file open in the display area, the name of the active file is included on the title bar as well.• Menu bar: The menu bar is located below the title bar, by default. It contains the menu headings. The menu bar can be moved by clicking on a blank area of the bar and then dragging the menu to a new position. It can be docked in another part of the application window or moved outside of the window to become a floating menu.• Toolbars: The toolbars are located below the menu bar, by default. They contain the toolbar shortcuts available in Merlin Mobile. Each toolbar, like the menu bar, can be moved and docked in a new position in the application window or made to float outside of the window.Figure 3-1:  Merlin Mobile application window
12CATC MERLIN MOBILE 1.00 CHAPTER 3User’s Manual Merlin Mobile User InterfaceDRAFTDRAFTDRAFTDRAFTDRAFTDRAFTDRAFTDRAFTDRAFTDRAFTDRAFTDRAFTDRAFTDRAFTDRAFT• Display area: The display area is the main part of the application window. When files are open, they are shown in the display area and the name of the active file is shown on the title bar. Each file is contained in its own window within the display area.• Status bar: The status bar is located at the bottom of the application window. The left end of the status bar displays hints, if available, as you position the mouse pointer over toolbar and menu items. The right end of the bar shows the current search direction set-ting — Fwd (Forward) or Bwd (Backward). During a recording session, the middle por-tion of the status bar displays information about the recording status.3.2 MenusThe Merlin Mobile menu bar contains the following menus of pull-down commands:       Table 3-1: File Menu CommandsCommand FunctionOpen Displays the Open dialog, from which you can select a file to openClose Closes the active fileSave As Opens the Save As dialog, which is used to save the active file to a unique file namePrint Opens a dialog that allows you to print all or part of the contents of the active windowPrint Preview Produces a one-page example of how the data will look when printedPrint Setup Opens the Print Setup dialog, which is used to set up the current or a new printerEdit Comment Opens the Edit Trace File Comment dialog so that you can create or edit the comment field in a Trace file Export > Format Opens an Export dialog to set up export of packets or data from the active Trace fileExit Closes the Merlin Mobile applicationTable 3-2: Setup Menu CommandsCommand FunctionDisplay Options Opens the Display Options dialog, which is used to customize display settingsRecording Options Opens the Recording Options dialog, which is used to customize recording settingsEncryption Options Opens the Encryption Setup dialog, which is used to configure Merlin Mobile to decipher encrypted traffic Recording Wizard Opens the Recording Wizard, an interactive utility for configuring a recording sessionAnalyzer Opens the Analyzer Setup dialog, which can be used to update the BusEngine and firmware
 13CATC MERLIN MOBILE 1.00 CHAPTER 3User’s Manual Merlin Mobile User InterfaceDRAFTDRAFTDRAFTDRAFTDRAFTDRAFTDRAFTDRAFTDRAFTDRAFTDRAFTDRAFTDRAFTDRAFTDRAFTTable 3-3: Record Menu CommandsCommand FunctionStart Starts a recording sessionStop Stops a recording sessionInquiry > Hop Sequence/Inquiry TypeSets the hop sequence and inquiry type for an Inquiry Recording Piconet > Hop Sequence/Sync MethodSets the hop sequence and sync method for a Piconet RecordingTable 3-4: Report Menu Commands*Command FunctionFile Information Displays the File Information window, which provides information about the active file and its recording conditionsError Summary Displays the Error Summary window, which details the errors in a fileTiming Calculations Opens the Timing and Bus Usage calculator dialog, which is used to set up calculation of timing and bus usageTraffic Summary Opens the Traffic Summary window, which displays a detailed, interactive report of all the packets in the active Trace*The Report menu is available only when a Trace (.blt) file is active in the Display Area.Table 3-5: Search Menu Commands*Command FunctionGo to Trigger Jumps to the packet immediately preceding the trigger eventGo to Packet/Message/Protocol Opens the Go to Packet/Message/Protocol dialog, which is used to specify a packet or marker, then jumps to the specified packetGo to Marker > Packet # (marker)Jumps to the specified markerGo to > Event type > Event Jumps to the specified eventFind Opens the Find dialog, which is used to set search parametersFind Next Repeats the previous Find operationSearch Direction Forward/BackwardThe current search direction; selecting it reverses the search direction*The Search menu is available only when a Trace (.blt) file is active in the Display Area.Table 3-6: View Menu CommandsCommand FunctionToolbars > Toolbar name Shows or hides the selected toolbarStatus Bar Shows or hides the Status bar Unhide cells > Field name Reveals the selected field (available only if cells are hidden)Zoom In Increases the display size of the active Trace fileZoom Out Decreases the display size of the active Trace fileWrap Toggles on or off wrapping of displayed packets to fit in the window
14CATC MERLIN MOBILE 1.00 CHAPTER 3User’s Manual Merlin Mobile User InterfaceDRAFTDRAFTDRAFTDRAFTDRAFTDRAFTDRAFTDRAFTDRAFTDRAFTDRAFTDRAFTDRAFTDRAFTDRAFT3.3 ToolbarsThere are four toolbars in Merlin Mobile’s main application window: the Standard toolbar, Frequently Used toolbar, Analysis toolbar, and the View Level toolbar. The Traffic Summary toolbar is found in the Traffic Summary window. The toolbar shortcuts can be BT Neighborhood Causes Merlin Mobile to start recording, perform a general inquiry to detect local Bluetooth devices, then display information about the devices in the Bluetooth Neighborhood window and upload the inquiry traffic data as a TraceDecoding Assignments Opens the L2CAP channel Decoding Assignments dialog, which is used to display current L2CAP channel assignments and to configure protocol assignments for manually assigned channels (this command is available only if the active Trace file contains L2CAP transmissions AND the L2CAP protocol level has been decoded during the current viewing of the Trace)L2CAP Connections Opens the Connections dialog, which is used to display current L2CAP channel connections and to configure connections for manually assigned channels (this command is available only if the active Trace file contains L2CAP transmissions AND the L2CAP protocol level has been decoded during the current viewing of the Trace)RFCOMM channel assignmentsOpens the RFCOMM channel assignment dialog, which is used to display current RFCOMM channel assignments and to configure protocol assignments for manually assigned channels (this command is available only if the active Trace file contains RFCOMM transmissions AND the RFCOMM protocol level has been decoded during the current viewing of the Trace)Levels > Level name Shows or hides the selected protocol level in the active Trace fileTable 3-7: Window Menu Commands*Command FunctionNew Window Opens a new instance of the active fileCascade Cascades the windows in the Merlin Mobile display, not including minimized filesTile Tiles the windows in the Merlin Mobile display, not including minimized filesArrange Icons Arranges the minimized file icons along the bottom of the Merlin Mobile displayWindows Opens the Windows window, which can be used to activate, save, close, cascade, tile horizontally, tile vertically, or minimize a window*The Window menu is available only when a file is open in the Display Area.Table 3-8: Help Menu CommandsCommand FunctionHelp Topics Opens the Merlin Mobile Help fileUpdate License Allows maintenance licenses to be updatedLicense Keys must be obtained from CATCDisplay License Information Displays maintenance expiration and features data for Merlin MobileAbout Merlin Mobile Displays information about Merlin MobileTable 3-6: View Menu Commands (Continued)Command Function
 15CATC MERLIN MOBILE 1.00 CHAPTER 3User’s Manual Merlin Mobile User InterfaceDRAFTDRAFTDRAFTDRAFTDRAFTDRAFTDRAFTDRAFTDRAFTDRAFTDRAFTDRAFTDRAFTDRAFTDRAFTused to access many of the operations supplied on the menus. When you position the mouse cursor over a toolbar button, a tool tip describing the button’s function will appear, and an additional description of its function appears on the left end of the status bar.To show or hide a particular toolbar in the main application window, select View > Toolbars, then click on the name of the toolbar that you want to show or hide. A check mark appears next to the toolbar name if it is currently visible.Standard ToolbarThe Standard toolbar contains shortcuts to common file operations.Button ActionBrings up the Open dialog, from which you can select a file to openOpens the Save As dialog, which is used to save the active file to a unique file nameDisplays a one-page sample of how the active Trace file will look when printedOpens a dialog that allows you to print all or part of the contents of the active windowOpens the Recording Options dialog, which is used to customize recording settingsOpens the Display Options dialog, which is used to customize display settingsOpens the Encryption Setup dialog, which is used to configure Merlin Mobile to decipher encrypted traffic Opens the Recording Wizard, an interactive utility for configuring a recording sessionStarts a recording sessionStops a recording sessionCauses Merlin Mobile to start recording, perform a general inquiry to detect local Bluetooth devices, then display information about the devices in the Bluetooth Neighborhood window and upload the inquiry traffic data as a TraceStarts the Merlin's Wand application, if present on the local machine
16CATC MERLIN MOBILE 1.00 CHAPTER 3User’s Manual Merlin Mobile User InterfaceDRAFTDRAFTDRAFTDRAFTDRAFTDRAFTDRAFTDRAFTDRAFTDRAFTDRAFTDRAFTDRAFTDRAFTDRAFTFrequently Used ToolbarThe Frequently Used toolbar contains shortcuts to commonly used commands.Analysis ToolbarThe Analysis toolbar contains shortcuts to file reports.Button ActionIncreases the display size of the active Trace fileDecreases the display size of the active Trace fileToggles on or off wrapping of displayed packets to fit in the windowHides or shows hop frequency packets in an active Trace fileHides or shows Null packets and Poll packets in an active Trace fileHides or shows devices specified on the Hiding tab of the Display Options dialogHides or shows all unassociated traffic in an active Trace fileOpens the Find dialog, which is used to set search parametersRepeats the previous Find operationButton ActionDisplays the File Information report, which provides information about the active file and its recording conditionsDisplays the Error Summary report, which details the errors in a fileOpens the Timing and Bus Usage calculator dialog, which is used to set up calculation of timing and bus usageOpens the Traffic Summary window, which displays a detailed, interactive report of all the packets in the active Trace
 17CATC MERLIN MOBILE 1.00 CHAPTER 3User’s Manual Merlin Mobile User InterfaceDRAFTDRAFTDRAFTDRAFTDRAFTDRAFTDRAFTDRAFTDRAFTDRAFTDRAFTDRAFTDRAFTDRAFTDRAFTView Level ToolbarThe View Level toolbar contains shortcuts for viewing specific transactions in a Trace display.Button ActionHides all visible transactions and displays just the packets in an active Trace fileShows or hides decoded Link Manager Protocol (LMP) messages in the active Trace fileShows or hides decoded Logical Link Control and Adaptation Protocol (L2CAP) messages in the active Trace fileShows or hides decoded Service Discovery Protocol (SDP Msg) messages in the active Trace fileShows or hides decoded Service Discovery Protocol (SDP Tra) transactions in the active Trace fileShows or hides decoded Telephony Control Protocol Specification (TCS) messages in the active Trace fileShows or hides decoded Serial Cable Emulation Protocol (RFCOMM) commands in the active Trace fileShows or hides decoded Object Exchange Protocol (OBEX) packets in the active Trace fileShows or hides decoded AT commands in the active Trace fileShows or hides decoded High-Level Data Link Control (HDLC) frames in the active Trace fileShows or hides decoded Point-to-Point Protocol (PPP) packets in the active Trace fileShows or hides decoded Bluetooth Network Encapsulation Protocol (BNEP) messages in the active Trace fileShows or hides decoded user-defined protocol transmissions in the active Trace file (only present if user-defined CATC Decoder Scripting files are found in the \Scripts folder of the Merlin Mobile installation directory)Shows or hides decoded Human Interface Device Protocol (HID) transmissions in the active Trace file
18CATC MERLIN MOBILE 1.00 CHAPTER 3User’s Manual Merlin Mobile User InterfaceDRAFTDRAFTDRAFTDRAFTDRAFTDRAFTDRAFTDRAFTDRAFTDRAFTDRAFTDRAFTDRAFTDRAFTDRAFTTraffic Summary ToolbarThe Traffic Summary Toolbar contains commands for working with Traffic Summary reports.  This toolbar is located in the Traffic Summary window, which is accessed by selecting Report > Traffic Summary from the menu bar, or by clicking the Traffic Summary icon on the Analysis toolbar.3.4 Keyboard ShortcutsThese are the keyboard shortcuts available in the Merlin Mobile application:Button ActionOpens the Save As dialog, which is used to save the active file to a unique file nameOpens the default e-mail program and inserts a text version of the Traffic Summary into an e-mail message Prints the Traffic Summary report in text formatDisplays the Traffic Summary report as HTML textOpens the View Options menuOpens the Select Range dialog, providing a way to define a range of packets to represent in the Traffic Summary reportTable 3-9: Keyboard ShorcutsKey Combination Operation Key Combination OperationCtrl + O Open file Shift + N Go to NULL packetCtrl + P Print file Shift + P Go to POLL packetCtrl + F Search forward Shift + R Go to frequency hop packetCtrl + B Search backward Shift + S Search for soft error packetCtrl + Home Jump to first packet Shift + V Go to DV packetCtrl + End Jump to last packet Shift + 1 Go to HV1 packetCtrl + L Search for loss of sync Shift + 2 Go to HV2 packetF3 Find next Shift + 3 Go to HV3 packetShift + A Go to AUX1 packet Shift + 4 Go to DM3 packetShift + E Search for error packet Shift + 5 Go to DH3 packetShift + F Go to FHS packet Shift + 6 Go to DM5 packetShift + H Go to DH1 packet Shift + 7 Go to DH5 packetShift + I Go to ID packet Alt + F4 ExitShift + M Go to DM1 packet
 19CATC MERLIN MOBILE 1.00 CHAPTER 4User’s Manual Gathering Device InformationDRAFTDRAFTDRAFTDRAFTDRAFTDRAFTDRAFTDRAFTDRAFTDRAFTDRAFTDRAFTDRAFTDRAFTDRAFTCHAPTER 4: GATHERING DEVICE INFORMATION4.1 Bluetooth NeighborhoodBluetooth Neighborhood is used to find information about Bluetooth devices in the local area.• Access the Bluetooth Neighborhood window by clicking the Bluetooth Neighborhood  button on the toolbar, or by selecting View > Bluetooth Neighborhood from the menu bar.The Bluetooth Neighborhood command causes Merlin Mobile to start recording, perform a general inquiry to detect local Bluetooth devices, and then display information about the devices in the Bluetooth Neighborhood window.  The information includes the device address (BD_ADDR), clock frequency (in hertz), and class of device (CoD).  Merlin Mobile also uploads the inquiry traffic data as a Trace.If you have created device name aliases, those names will show up in parentheses following the BD_ADDRs. The device addresses or names are also included in the drop-down lists of device addresses in the Recording Options dialog and Recording Wizard.4.2 Device Name AliasesAn alias can be created for any device so that it can be referred to by a name instead of its numeric address.  Device name aliases are displayed in Bluetooth Neighborhood and in drop-down lists of device addresses in the Recording Options dialog and Recording Wizard.The file BTnames.txt (Figure 4-1) is used to associate the device BD_ADDRs with the text names.  This file is located in the directory where the Merlin Mobile application was installed.  There is no limit to the number of aliases that can be added to the file.The names must be 12 characters or less in length.  If the name is longer than this, Merlin Mobile will truncate the name at 12 characters.  The names may contain spaces and any combination of characters.To create a device name alias:Step 1 Open BTnames.txt in a text editor.Step 2 Add a new line at the end of the file and, following the example, place the device address to the left of equal sign and the alias at the right side.Step 3 Save the file.
20CATC MERLIN MOBILE 1.00 CHAPTER 4User’s Manual Gathering Device InformationDRAFTDRAFTDRAFTDRAFTDRAFTDRAFTDRAFTDRAFTDRAFTDRAFTDRAFTDRAFTDRAFTDRAFTDRAFTMerlin Mobile only loads aliases upon initialization, so you will have to restart the application in order for the new device name aliases to be displayed.Figure 4-1:  Device addresses and device name aliases in BTnames.txt
 21CATC MERLIN MOBILE 1.00 CHAPTER 5User’s Manual Recording Bluetooth TrafficDRAFTDRAFTDRAFTDRAFTDRAFTDRAFTDRAFTDRAFTDRAFTDRAFTDRAFTDRAFTDRAFTDRAFTDRAFTCHAPTER 5: RECORDING BLUETOOTH TRAFFICDuring a recording session, Merlin Mobile monitors and records piconet activity according to the specifications set by the user. When the session ends, Merlin Mobile decodes the data, uploads it to the PC, and displays the recorded packets and related information as a CATC Trace file.Merlin Mobile offers two ways to configure and initiate a Bluetooth traffic recording:• Assisted recording, using the Recording Wizard• Manual recording, using the Recording Options along with menu or toolbar commands5.1 Assisted Recording with Recording WizardThe Recording Wizard is an interactive utility that assists you in quickly and easily configuring a recording session in Merlin Mobile. It can be used as an alternative to manually setting up recording parameters in the Recording Options dialog.The Recording Wizard can help you set up three different kinds of Bluetooth recordings:• Record traffic on a new piconet • Record traffic on an existing piconet • Record traffic in Bluetooth test mode 5.1.1 Open the Recording WizardTo open the Recording Wizard, click the Recording Wizard   button on the toolbar, or select Setup > Recording Wizard from the menu bar. The Recording Wizard's welcome screen will be displayed. Press Next to advance to the next screen and begin configuring a recording session.5.1.2 Record Traffic on a New Piconet with Recording WizardThe Recording Wizard can guide you through the process up setting up Merlin Mobile to record Bluetooth traffic on a new piconet using the Page Sync & Record synchronization method. This means that when Merlin Mobile starts recording, the Recording Wizard will prompt you to establish the piconet. When the piconet is established and the master device pages the slave device, Merlin Mobile will attempt to synchronize with it and capture the piconet traffic.Note: In order for this mode to work, the intended master and slave devices must support the inquiry scan substate while connected to other devices.
22CATC MERLIN MOBILE 1.00 CHAPTER 5User’s Manual Recording Bluetooth TrafficDRAFTDRAFTDRAFTDRAFTDRAFTDRAFTDRAFTDRAFTDRAFTDRAFTDRAFTDRAFTDRAFTDRAFTDRAFTTo configure Merlin Mobile to record traffic on a new piconet, open the Recording Wizard and press Next to advance to the second screen. On the second screen, select “I want to establish a new piconet and have Merlin Mobile record traffic on that piconet.” Press Next and go through the following steps to complete the configuration:Step 1 Frequency Hopping Mode: Merlin Mobile supports only the standard 79-frequency hopping mode that is used by most Bluetooth devices. The 79-frequency hopping mode will be used by Merlin Mobile to record the traffic.Step 2 Inquiry Skip/Perform: Choose one of these options:Perform Inquiry Now — This option causes Merlin Mobile to perform a general inquiry to discover local Bluetooth devices. Devices that are discovered will then be listed on the screens for Steps 6 and 7.Skip Inquiry — This option skips the inquiry and takes you straight to Step 6.Step 3 Device Search Type: Choose one of these options:I want to search for all Bluetooth devices within range. — This option causes Merlin Mobile to search for all local Bluetooth devices.I want to search only for devices in the search group corresponding to the following (hexadecimal) DIAC — This option causes Merlin Mobile to search only for devices that use the 24-bit Dedicated Inquiry Access Code (DIAC) that you enter.Step 4 Device Search Duration: Enter a value to set the number of seconds that Merlin Mobile will search for local Bluetooth devices. The value can be set between 1 and 80 seconds.Step 5 General Device Search: Merlin Mobile performs the device search, then gives you two options:Repeat — Press this button to make Merlin Mobile repeat the search.Show Devices Found — Press this button to view the search results in the Bluetooth Neighborhood window.Step 6 Device Address (master device): Select or type the address or device name alias of the intended master device in the combo box on this screen.The combo box lists addresses only for those devices that it has recently encountered via a device search.Step 7 Device Address (slave device): Select or type the address or device name alias of the intended slave device in the combo box on this screen.The combo box lists addresses only for those devices that it has recently encountered via a device search.Step 8 System is Ready: Merlin Mobile now has all of the information that it will need in order to synchronize with the piconet. The scroll box lists the recording parameters that you have set up.
 23CATC MERLIN MOBILE 1.00 CHAPTER 5User’s Manual Recording Bluetooth TrafficDRAFTDRAFTDRAFTDRAFTDRAFTDRAFTDRAFTDRAFTDRAFTDRAFTDRAFTDRAFTDRAFTDRAFTDRAFTAdvanced — Press the Advanced button in order to open the Modes tab of the Recording Options dialog to further configure the recording parameters. Note that the frequency hop sequence and synchronization method have been set by the Recording Wizard and cannot be changed. When you are finished with the dialog, press OK to return to the Recording Wizard.Step 9 Merlin Mobile begins recording and determines whether the conditions are right for it to synchronize with the master device. Subsequent screens may indicate that the Recording Wizard has encountered the following conditions:Synchronizing — Merlin Mobile is able to enter the synchronizing state. At this time you should establish a piconet with the master and slave devices. Once the piconet is established, Merlin Mobile will synchronize and capture the piconet traffic.Recording — Merlin Mobile has synchronized to the piconet and is now recording traffic. Repeat — The recording is complete. When the recording is complete, the captured data will be uploaded to the PC as a CATC Trace. Press Repeat to make another recording using the same configuration.Retry — Merlin Mobile was not able to enter the synchronizing state. Press Retry to try again. Here are some possible problems that can prevent Merlin Mobile from entering the synchronizing state:• The devices do not support the inquiry scan substate while connected to other devices.• The device addresses were not configured correctly.5.1.3 Record Traffic on an Existing Piconet with Recording WizardThe Recording Wizard can guide you through the process up setting up Merlin Mobile to record Bluetooth traffic on an existing piconet using the Sync & Record or Passive Sync & Record synchronization method.To configure Merlin Mobile to record traffic on a new piconet, open the Recording Wizard and press Next to advance to the second screen. On the second screen, select “I want Merlin Mobile to record traffic on a piconet that has already been established.” Press Next and go through the following steps to complete the configuration:Step 1 Frequency Hopping Mode: Merlin Mobile supports only the standard 79-frequency hopping mode that is used by most Bluetooth devices. The 79-frequency hopping mode will be used by Merlin Mobile to record the traffic.Step 2 Inquiry Skip/Perform: Choose one of these options:
24CATC MERLIN MOBILE 1.00 CHAPTER 5User’s Manual Recording Bluetooth TrafficDRAFTDRAFTDRAFTDRAFTDRAFTDRAFTDRAFTDRAFTDRAFTDRAFTDRAFTDRAFTDRAFTDRAFTDRAFTPerform Inquiry Now — This option causes Merlin Mobile to perform a general inquiry to discover local Bluetooth devices. Devices that are discovered will then be listed on the screens for Steps 6 and 8.Skip Inquiry — This option skips the inquiry and takes you straight to Step 6.Step 3 Device Search Type: Choose one of these options:I want to search for all Bluetooth devices within range. — This option causes Merlin Mobile to search for all local Bluetooth devices.I want to search only for devices in the search group corresponding to the following (hexadecimal) DIAC — This option causes Merlin Mobile to search only for devices that use the 24-bit Dedicated Inquiry Access Code (DIAC) that you enter.Step 4 Device Search Duration: Enter a value to set the number of seconds that Merlin Mobile will search for local Bluetooth devices. The value can be set between 1 and 80 seconds.Step 5 General Device Search: Merlin Mobile performs the device search, then gives you two options:Repeat — Press this button to make Merlin Mobile repeat the search.Show Devices Found — Press this button to view the search results in the Bluetooth Neighborhood window.Step 6 Device Address (master device): Select or type the address or device name alias of the intended master device in the combo box on this screen.The combo box lists addresses only for those devices that it has recently encountered via a device search.Step 7 Record Existing Piconet: Choose at least one of these options:My piconet master device will respond to inquiries from other devices while it is in a connected state. ('Sync & record' mode) — The Sync & Record method of recording piconet traffic causes Merlin Mobile to perform an inquiry to obtain synchronization information from the master device. Then, Merlin Mobile can synchronize to the piconet and capture the traffic between the devices. In order for this mode to work, the master device must support the inquiry scan substate while connected to other devices.My piconet master device can establish a piconet consisting of more than one slave device. ('Passive Sync & Record' mode) — Passive Sync & Record is used with master and slave devices that do not support the inquiry scan substate while connected to other devices. This method causes Merlin Mobile to enter the inquiry scan and page scan substates, then wait for the master device to page the address specified for the page target (slave) device. When Merlin Mobile receives the page, it is able to obtain the information necessary for synchronization with the piconet.Note: Selecting both options will cause Merlin Mobile to use the Sync & Record synchronization method.
 25CATC MERLIN MOBILE 1.00 CHAPTER 5User’s Manual Recording Bluetooth TrafficDRAFTDRAFTDRAFTDRAFTDRAFTDRAFTDRAFTDRAFTDRAFTDRAFTDRAFTDRAFTDRAFTDRAFTDRAFTStep 8 Device Address (page target device): Select or type the address or device name alias of the intended slave device in the combo box on this screen.The combo box lists addresses only for those devices that it has recently encountered via a device search.Note: This step is skipped when using the Sync & Record synchronization method.Step 9 System is Ready: Merlin Mobile now has all of the information that it needs in order to synchronize with the piconet after it's established. The scroll box lists the recording parameters that you have set up.Advanced — Press the Advanced button in order to open the Recording Options dialog to further configure the recording parameters. Note that the frequency hop sequence and synchronization method on the Modes tab have been set by the Recording Wizard and cannot be changed. When you are finished with the dialog, press OK to return to the Recording Wizard.Step 10 Merlin Mobile begins recording and determines whether the conditions are right for it to synchronize with the master device. Subsequent screens may indicate that the Recording Wizard has encountered the following conditions:Synchronizing — Merlin Mobile is able to enter the synchronizing state. At this time you should establish a piconet with the master and slave devices. Once the piconet is established, Merlin Mobile will synchronize and capture the piconet traffic.Recording — Merlin Mobile has synchronized to the piconet and is now recording traffic. Repeat — The recording is complete. When the recording is complete, the captured data will be uploaded to the PC as a CATC Trace. Press Repeat to make another recording using the same configuration.Retry — Merlin Mobile was not able to enter the synchronizing state. Press Retry to try again. Here are some possible problems that can prevent Merlin Mobile from entering the synchronizing state:• The devices do not support the inquiry scan substate while connected to other devices (for Sync & Record mode).• The device addresses were not configured correctly.5.1.4 Record Traffic in Bluetooth Test Mode with Recording WizardA Bluetooth test mode recording allows you to limit the frequency hopping range that Merlin Mobile will record. Two test modes are available: Reduced Hopping Mode and Single Frequency Mode. Reduced Hopping Mode limits the traffic capture to the five
26CATC MERLIN MOBILE 1.00 CHAPTER 5User’s Manual Recording Bluetooth TrafficDRAFTDRAFTDRAFTDRAFTDRAFTDRAFTDRAFTDRAFTDRAFTDRAFTDRAFTDRAFTDRAFTDRAFTDRAFTfrequency hops that are described in the Bluetooth Specification. Single Frequency Mode limits the recording to a single frequency range that can be specified in the Recording Wizard.To configure Merlin Mobile to record traffic in Bluetooth test mode, open the Recording Wizard and press Next to advance to the second screen. On the second screen, select “I am using Bluetooth Test Mode and want Merlin Mobile to record traffic on my test piconet.” Press Next and go through the following steps to complete the configuration:Step 1 Frequency Hopping Mode: Select the appropriate frequency hop sequence for your devices.• Reduced Hop — Restricts Merlin Mobile to the five hop frequencies of the Bluetooth test mode, as described in the Bluetooth specification.• Single Frequency — Limits Merlin Mobile to the frequency range specified in the DUT Xmit Freq and DUT Recv Freq boxes.DUT Xmit Freq: When using Single Frequency hop mode, enter the value of the transmit signal (Xmit Freq) for the Device Under Test (DUT).DUT Recv Freq: When using Single Frequency hop mode, enter the value of the receive signal (Recv Freq) for the Device Under Test.Step 2 Device Address (master device): Select or type the address or device name alias of the intended master device in the combo box on this screen.The combo box lists addresses only for those devices that it has recently encountered via a device search.Step 3 System is Ready: Merlin Mobile now has all of the information that it needs in order to synchronize with the piconet after it's established. The scroll box lists the recording parameters that you have set up.Advanced — Press the Advanced button in order to open the Recording Options dialog to further configure the recording parameters. Note that the frequency hop sequence and synchronization method on the Modes tab have been set by the Recording Wizard and cannot be changed. When you are finished with the dialog, press OK to return to the Recording Wizard.Step 4 Merlin Mobile begins recording. When the recording is complete, the captured traffic is uploaded to the PC and displayed as a CATC Trace.Repeat — Press this button when the recording is complete in order to make another recording with the same parameters.5.2 Manual Recording with Recording OptionsA Merlin Mobile Bluetooth recording session can be manually configured and started by the user. To make an assisted recording, use the Recording Wizard.Four different modes of manual recording can be set up in Merlin Mobile:• Inquiry Recording
 27CATC MERLIN MOBILE 1.00 CHAPTER 5User’s Manual Recording Bluetooth TrafficDRAFTDRAFTDRAFTDRAFTDRAFTDRAFTDRAFTDRAFTDRAFTDRAFTDRAFTDRAFTDRAFTDRAFTDRAFT• Page Sync & Record Piconet Recording• Sync & Record Piconet Recording• Passive Sync & Record Piconet Recording5.2.1 Make a Manual Inquiry RecordingThe Inquiry Recording mode causes Merlin Mobile to perform an inquiry to detect Bluetooth devices within range. Additionally, the device addresses that are discovered will be inserted into the Master Address and Page Target drop down lists for Piconet Recording. This makes Inquiry Recording a useful initial step for configuring a Piconet Recording.To manually record inquiry data:Step 1 Set up Recording Options or load a Recording Options file. Note: The Recording Mode must be set to Inquiry Recording on the Modes tab of the Recording Options dialog. For more information, please see “Inquiry Recording Mode Options” on page 36.Step 2 Select Record > Start from the menu bar or press the record button on the standard toolbar. Merlin Mobile records all the inquiry data and then uploads it as a Trace file when the inquiry is complete.To stop the recording before the inquiry is complete, select Record > Stop from the menu bar, press the Stop button on the standard toolbar, or press the Escape (Esc) key on the keyboard. Merlin Mobile will stop recording and will upload the data that was recorded before the recording was interrupted.5.2.2 Make a Manual Page Sync & Record Piconet RecordingPage Sync and Record is the recommended method of recording piconet traffic. With this method, the recording process is started before a piconet is established. Once the piconet is established, Merlin Mobile waits for the master to begin paging the slave devices. When paging begins, Merlin Mobile synchronizes to the piconet and captures the Bluetooth traffic.Note: In order for this mode to work, the intended master and slave devices must support the inquiry scan substate while connected to other devices.The following steps describe the simplest way to set up a Piconet Recording session using the Page Sync & Record method:Step 1 Place both the intended master device and its first intended slave device into inquiry scan mode.Step 2 Perform an Inquiry Recording in order to discover the device addresses.Note: If you already know the device addresses that you want to use, you can skip this step.Step 3 Open the Recording Options dialog, select the Modes tab, and make sure that Piconet Recording is selected in the Recording Mode section.
28CATC MERLIN MOBILE 1.00 CHAPTER 5User’s Manual Recording Bluetooth TrafficDRAFTDRAFTDRAFTDRAFTDRAFTDRAFTDRAFTDRAFTDRAFTDRAFTDRAFTDRAFTDRAFTDRAFTDRAFTIf Piconet Recording wasn't already selected, the options on the Modes tab will change so that you can configure the piconet recording parameters. If an Inquiry Recording was performed, the addresses of all Bluetooth devices that were discovered will appear in the Master Address and Page Target drop-down lists.Step 4 Select Page Sync & Record from the Sync Method drop-down list.Step 5 Enter the address of the intended master device from the Master Address combo box and the address of the intended slave device from the Page Target combo box.If you used Bluetooth Neighborhood or an Inquiry Recording to discover the device addresses, you may select the address or device name alias from the Master Address and Page Target drop-down lists. You may also switch the addresses in the Master address and Page Target lists by pressing the swap  button. Step 6 If necessary, configure the remaining Piconet Recording options (for more information, please see “Piconet Recording Mode Options” on page 37).Step 7 Select Record > Start from the menu bar or press the record button on the standard toolbar. When Merlin Mobile is ready to synchronize with the piconet, the analyzer state portion of the Recording Status display reads “Syncing...”Step 8 Establish the piconet with the intended master and slave devices.Now Merlin Mobile will wait for the master to begin paging the slave device. When paging begins, Merlin Mobile will synchronize to the piconet and capture the traffic between the devices. The analyzer state message in the Recording Status display will change to “Act:”, indicating that Merlin Mobile is fully synchronized to the piconet and is recording traffic.Merlin Mobile records piconet traffic data and then uploads it as a Trace file when the recording session is complete.To stop the recording before the recording session is complete, select Record > Stop from the menu bar, press the Stop button on the standard toolbar, or press the Escape (Esc) key on the keyboard. Merlin Mobile will stop recording and will upload the data that was recorded before the recording was interrupted.5.2.3 Make a Manual Sync & Record Piconet RecordingThe Sync & Record method of recording piconet traffic causes Merlin Mobile to perform an inquiry to obtain synchronization information from the master device. Then, Merlin Mobile can synchronize to the piconet and capture the traffic between the devices.Sync & Record is intended to be used with a piconet that is established before recording begins.
 29CATC MERLIN MOBILE 1.00 CHAPTER 5User’s Manual Recording Bluetooth TrafficDRAFTDRAFTDRAFTDRAFTDRAFTDRAFTDRAFTDRAFTDRAFTDRAFTDRAFTDRAFTDRAFTDRAFTDRAFTNote: In order for this mode to work, the master device must support the inquiry scan substate while connected to other devices.The following steps describe how to set up a Piconet Recording session using the Sync & Record method:Step 1 Open the Recording Options dialog and select the Modes tab and make sure that Piconet Recording is selected in the Recording Mode section.If Piconet Recording wasn't already selected, the options on the Modes tab will change so that you can configure the piconet recording parameters. If an Inquiry Recording was performed, the addresses of all Bluetooth master devices that were discovered will appear in the Master Address drop-down list.Step 2 Select Sync & Record from the Sync Method drop-down list.Step 3 Enter the address of the intended master device in the Master Address combo box.If you used Bluetooth Neighborhood or an Inquiry Recording to discover the device addresses, you may select the address or device name alias from the Master Address drop-down list. You may also switch the addresses in the Master address and Page Target lists by pressing the swap   button. Step 4 If necessary, configure the remaining Piconet Recording options (for more information, please see “Piconet Recording Mode Options” on page 37).Step 5 Select Record > Start from the menu bar or press the record button on the standard toolbar. Now Merlin Mobile will wait for the master to begin paging the slave device. When paging begins, Merlin Mobile will synchronize to the piconet and capture the traffic between the devices. The analyzer state message in the Recording Status display will change to “Act:”, indicating that Merlin Mobile is fully synchronized to the piconet and is recording traffic.Merlin Mobile records piconet traffic data and then uploads it as a Trace file when the recording session is complete.To stop the recording before the recording session is complete, select Record > Stop from the menu bar, press the Stop button on the standard toolbar, or press the Escape (Esc) key on the keyboard. Merlin Mobile will stop recording and will upload the data that was recorded before the recording was interrupted.5.2.4 Make a Manual Passive Sync & Record Piconet RecordingPassive Sync & Record is used with master and slave devices that do not support the inquiry scan substate while connected to other devices. This method causes Merlin Mobile to enter the inquiry scan and page scan substates, then wait for the master device to page the address specified in the Page Target field (described in Step 4 below). When Merlin Mobile receives the page, it is able to obtain the information necessary for synchronization with the piconet.
30CATC MERLIN MOBILE 1.00 CHAPTER 5User’s Manual Recording Bluetooth TrafficDRAFTDRAFTDRAFTDRAFTDRAFTDRAFTDRAFTDRAFTDRAFTDRAFTDRAFTDRAFTDRAFTDRAFTDRAFTPassive Sync & Record is designed to be used with established piconets or private device networks.Passive Sync & Record with an Established PiconetThe following steps describe how to set up a Piconet Recording session using the Passive Sync & Record method for an established piconet:Step 1 Open the Recording Options dialog, select the Modes tab, and make sure that Piconet Recording is selected in the Recording Mode section.If Piconet Recording wasn't already selected, the options on the Modes tab will change so that you can configure the piconet recording parameters.Step 2 Select Sync & Record from the Sync Method drop-down list.Step 3 Enter the address of the intended master device in the Master Address combo box.If you used Bluetooth Neighborhood or an Inquiry Recording to discover the device addresses, you may select the address or device name alias from the Master Address drop-down list. You may also switch the addresses in the Master address and Page Target lists by pressing the swap   button. Step 4 Enter a fake address for Merlin Mobile in the Page Target combo box. Make sure it's different than the address for any other local device. Merlin Mobile uses this address to recognize the master device when it sends a page.Step 5 If necessary, configure the remaining Piconet Recording options (for more information, please see “Piconet Recording Mode Options” on page 37).Step 6 Select Record > Start from the menu bar or press the record button on the standard toolbar. When Merlin Mobile is ready to synchronize with the piconet, the analyzer state portion of the Recording Status display reads “Syncing...”Step 7 Direct the master device to initiate a page to the Page Target address. When Merlin Mobile receives the page, it extracts the information that it needs in order to synchronize with the piconet and capture the Bluetooth traffic.The analyzer state message in the Recording Status display will change to “Act:”, indicating that Merlin Mobile is fully synchronized to the piconet and is recording traffic.Merlin Mobile records piconet traffic data and then uploads it as a Trace file when the recording session is complete.To stop the recording before the recording session is complete, select Record > Stop from the menu bar, press the Stop button on the standard toolbar, or press the Escape (Esc) key on the keyboard. Merlin Mobile will stop recording and will upload the data that was recorded before the recording was interrupted.
 31CATC MERLIN MOBILE 1.00 CHAPTER 5User’s Manual Recording Bluetooth TrafficDRAFTDRAFTDRAFTDRAFTDRAFTDRAFTDRAFTDRAFTDRAFTDRAFTDRAFTDRAFTDRAFTDRAFTDRAFTPassive Sync & Record with a Private Device NetworkSince private device networks do not allow other devices to join the network, Merlin Mobile needs to temporarily assume the identity of a slave in the network in order to obtain the information it needs to synchronize with the devices and capture Bluetooth traffic. The real slave device must be turned off before recording begins.The following steps describe how to set up a Piconet Recording session using the Passive Sync & Record method for a private device network:Step 1 Open the Recording Options dialog, select the Modes tab, and make sure that Piconet Recording is selected in the Recording Mode section.If Piconet Recording wasn't already selected, the options on the Modes tab will change so that you can configure the piconet recording parameters.Step 2 Select Sync & Record from the Sync Method drop-down list.Step 3 Enter the address of the intended master device in the Master Address combo box.If you used Bluetooth Neighborhood or an Inquiry Recording to discover the device addresses, you may select the address or device name alias from the Master Address drop-down list. You may also switch the addresses in the Master address and Page Target lists by pressing the swap   button. Step 4 Enter the slave address for Merlin Mobile in the Page Target combo box.Step 5 If necessary, configure the remaining Piconet Recording options (for more information, please see “Piconet Recording Mode Options” on page 37).Step 6 Before beginning the recording, make sure that the slave device is turned off.Step 7 Select Record > Start from the menu bar or press the record button on the standard toolbar. When Merlin Mobile is ready to synchronize with the piconet, the analyzer state portion of the Recording Status display reads “Syncing...”Step 8 Direct the master device to initiate a page to the Page Target address. When Merlin Mobile receives the page, it extracts the information that it needs in order to synchronize with the piconet and capture the Bluetooth traffic.The analyzer state message in the Recording Status display will change to “Act:”, indicating that Merlin Mobile is fully synchronized to the piconet and is recording traffic.Step 9 Once Merlin Mobile is synchronized to the network, turn the slave device on. When the Master re-pages the Page Target address, the slave will be admitted into the private network. Since Merlin Mobile is passive in this mode, the slave and Merlin Mobile do not conflict over the shared address.Merlin Mobile records piconet traffic data and then uploads it as a Trace file when the recording session is complete.
32CATC MERLIN MOBILE 1.00 CHAPTER 5User’s Manual Recording Bluetooth TrafficDRAFTDRAFTDRAFTDRAFTDRAFTDRAFTDRAFTDRAFTDRAFTDRAFTDRAFTDRAFTDRAFTDRAFTDRAFTTo stop the recording before the recording session is complete, select Record > Stop from the menu bar, press the Stop button on the standard toolbar, or press the Escape (Esc) key on the keyboard. Merlin Mobile will stop recording and will upload the data that was recorded before the recording was interrupted.5.3 Recording StatusWhen Merlin Mobile is recording piconet traffic, information about the recording session is shown in a three-part display on the status bar at the bottom of the Merlin Mobile application window. The first part shows the recording progress, the second part indicates the recording state, and the third part displays the signal strength and analyzer state.5.3.1 Recording ProgressThe recording progress field indicates the recording progress via a progress bar. The vertical black line in the progress field indicates the trigger position. • Pre-Trigger: Prior to a trigger event, the recording progress bar is shown in the color that is desig-nated for pre-trigger packets on the Colors tab of the Display Options dialog. Note: the recording progress bar won't appear until Merlin Mobile has synchronized with the piconet and begun recording.• Post-Trigger: After a trigger event is detected, the progress bar moves past the trigger line and the color of the bar changes to the color designated for post-trigger packets. Note: if the Recording Options are set up for a snapshot recording, the trigger is not used and so the trigger bar appears on the left edge of the progress field, and the progress bar will be shown in the post-trigger packet color. • Uploading: Once the buffer is filled, or the recording is stopped manually, a thin, white bar appears in the progress field, representing the progress of the upload.5.3.2 Recording StateThe recording state field reports one of three recording states:• Trigger?: If Merlin Mobile has not detected a trigger event, the word “Trigger?” flashes in the recording state field.Figure 5-1:  Recording status display on the status bar
 33CATC MERLIN MOBILE 1.00 CHAPTER 5User’s Manual Recording Bluetooth TrafficDRAFTDRAFTDRAFTDRAFTDRAFTDRAFTDRAFTDRAFTDRAFTDRAFTDRAFTDRAFTDRAFTDRAFTDRAFT• Triggered!: When a trigger event is detected, the recording state field flashes the message “Trig-gered!”• Uploading: When the recording is finished and Merlin Mobile begins transferring the Trace data to the computer, the word “Uploading” is shown in the recording state field.5.3.3 Signal Strength and Analyzer StateThe third portion of the recording status display shows both the signal strength (in dBm) that Merlin Mobile is receiving and the analyzer state and recording activity.Signal StrengthThere are five possible values for the signal strength:• < -60 dBm• -60 dBm• -50 dBm• -40 dBm• > -40 dBmAnalyzer State• Inquiring: When Merlin Mobile is performing a general inquiry, the analyzer state is reported as “Inquiring.”• No Sync: When Merlin Mobile is not synchronized to the piconet, the analyzer state is reported as “No Sync.”• Syncing: When Merlin Mobile is ready to synchronize with the piconet, the analyzer state is reported as “Syncing.”• Act: When Merlin Mobile is recording, the amount of activity on the piconet is portrayed by the vertical lines; the more lines there are, the more piconet activity there is.• Uploading: When the recording is finished and Merlin Mobile begins transferring the Trace data to the computer, the percentage of the upload that is complete is shown.
34CATC MERLIN MOBILE 1.00 CHAPTER 5User’s Manual Recording Bluetooth TrafficDRAFTDRAFTDRAFTDRAFTDRAFTDRAFTDRAFTDRAFTDRAFTDRAFTDRAFTDRAFTDRAFTDRAFTDRAFT5.4 Uploading Piconet DataWhen the analyzer has stopped recording, it begins uploading the data to the PC. The upload can be interrupted by selecting Record > Stop from the menu bar, pressing the Stop button on the standard toolbar, or pressing the Escape (Esc) key on the keyboard. The interruption opens the Abort Upload dialog box, which offers the following options:• Stop, but preserve existing upload data.This option will display a Trace that contains the data up to the point that the upload was interrupted.• Continue as if abort not initiated.This option will cause the upload to continue normally.• Flush data and cancel Trace completely.This option will completely void the upload and no Trace file will be created from the data.The uploaded data is displayed as a Merlin Mobile (.blt) Trace file. The file is given the default name specified in the Trace Filename & Path section on the General tab of the Recording Options dialog. If it's not specified, the name defaults to data.blt. The default file is overwritten each time a recording is made. The file should be saved with a unique name if you want to keep it for future reference.5.5 Recording Options DialogYou can customize the way that piconet traffic is recorded by using the Recording Options dialog in Merlin Mobile. These settings can then be saved as a recording options (.rec) file. You can load saved settings to use them at any time.To access the Recording Options dialog:• Click the Recording Options icon on the toolbar.-or-• Select Setup > Recording Options from the menu bar.There are four tabs in the Recording Options dialog:•General: the General tab contains options for generic recording settings, such as the recording type, buffer size, and trigger position.•Modes: the Modes tab is used to define the type of Bluetooth traffic that Merlin Mobile will record, and also to configure the piconet parameters.•Events: the Events tab is used to specify the events that are used on the Actions tab.•Actions: the Actions tab is used to configure what takes place when specified events occur.
 35CATC MERLIN MOBILE 1.00 CHAPTER 5User’s Manual Recording Bluetooth TrafficDRAFTDRAFTDRAFTDRAFTDRAFTDRAFTDRAFTDRAFTDRAFTDRAFTDRAFTDRAFTDRAFTDRAFTDRAFT5.5.1 Setting General Recording OptionsUse the General tab of the Recording Options dialog to define generic recording settings.To set general recording options:Step 1 Open the Recording Options dialog.The General tab is displayed by default.Step 2 Set the Recording Type. Recording Type choices are as follows:• Snapshot — A snapshot recording works similarly to using a tape recorder: recording begins when the Record button is pressed, and it stops when either the Stop button is pressed or the buffer is filled.• Manual Trigger — A manual trigger recording begins when the Record button is pressed.  Recording continues until either the Trigger button or the Stop button is pressed in the application.  If the Trigger button is pressed, recording will stop automatically when the amount of data specified by the Trigger Position  has been collected.• Event Trigger — An event trigger recording begins when the Record button is pressed. Recording continues until either the trigger conditions are met or the Stop button is pressed in the application. If the trigger conditions are met, recording will stop automatically when the amount of data specified by the Trigger Position has been collected.Step 3 (Optional) Select from the following Options:Beep When Trigger Occurs — When this option is selected, a beep will sound when the trigger event is detected.Step 4 Set the Buffer Size. Use the slider or the arrow keys on the keyboard to adjust the buffer size. It can be set anywhere between 100 kilobytes and 32 megabytes. This determines the amount of data that the analyzer will record. Please note that because of the way that packets are stored in the analyzer’s memory, the buffer size doesn’t exactly represent the amount of Bluetooth traffic that will be recorded.Step 5 Set the Trigger Position (for event trigger recordings only). Use the slider or the arrow keys on the keyboard to adjust the trigger position. It can be set anywhere between 1 and 99%. This determines the amount of data that will be recorded before and after the trigger event. For example, if the slider is set at 30% post-triggering, then the first 70% of the data in the recording will be things that happened before the trigger, and the last 30% will be things that occurred after the trigger.Step 6 (Optional) Enter an Options Name. You can use the options name to identify the current set of recording options. If you save the settings, then the next time the options file is loaded, the options name is displayed in this text box.
36CATC MERLIN MOBILE 1.00 CHAPTER 5User’s Manual Recording Bluetooth TrafficDRAFTDRAFTDRAFTDRAFTDRAFTDRAFTDRAFTDRAFTDRAFTDRAFTDRAFTDRAFTDRAFTDRAFTDRAFTStep 7 (Optional) Set the Trace Filename & Path. Use this option to specify a name and location for the Trace file that is generated with the current set of recording options. If not specified, the default name, data.fdb, and the default location, \Merlin Mobile, are used.Step 8 Click OK to use the settings and close the Recording Options dialog-or-Continue configuring the recording options on the Modes, Events and Actions tabs.Note: You may also save the settings as a Recording Options (.rec) file. This will allow you to load the file whenever you want to use those settings.5.5.2 Setting Recording Mode OptionsThe Modes tab in the Recording Options dialog is used to configure the type of Bluetooth traffic that Merlin Mobile will record, and also to configure the piconet parameters.To record Bluetooth traffic, Merlin Mobile needs to synchronize to the piconet under observation. Merlin Mobile behaves as a passive listener, but does not participate in the piconet. However, it needs to communicate briefly with the devices in the piconet to learn the master clock timing and frequency hopping sequences. Once Merlin Mobile has these two pieces of information, it can synchronize with the devices and record the piconet traffic.There are two possible recording modes:• Inquiry Recording • Piconet Recording Inquiry Recording Mode OptionsMaking a recording using Inquiry Recording mode causes Merlin Mobile to perform an inquiry to detect Bluetooth devices within range. Meanwhile, Merlin Mobile records all the inquiry data and uploads it as a Trace file when the inquiry is complete. Additionally, the master and slave device addresses will be inserted into the Master Address and Page Target drop down lists for Piconet Recording. This makes Inquiry Recording a useful tool for setting up a Piconet Recording.To set parameters for an Inquiry Recording:Step 1 Open the Recording Options dialog and select the Modes tab.Step 2 In the Recording Mode section, make sure that Inquiry Recording is selected.If Inquiry Recording wasn't already selected, the options on the Mode tab will change so that you can configure the inquiry parameters.Step 3 Set the hop sequence.Note: Merlin Mobile supports only the standard 79-frequency hopping mode that is used by most Bluetooth devices. The 79-frequency hopping mode will be used by Merlin Mobile to record the traffic.
 37CATC MERLIN MOBILE 1.00 CHAPTER 5User’s Manual Recording Bluetooth TrafficDRAFTDRAFTDRAFTDRAFTDRAFTDRAFTDRAFTDRAFTDRAFTDRAFTDRAFTDRAFTDRAFTDRAFTDRAFTStep 4 Set the inquiry type. The Inquiry Type for an inquiry recording can be set to one of two options: General (Unlimited) or Dedicated (Limited).• General (Unlimited) — Selecting this option causes Merlin Mobile to use the General Inquiry Access Code (GIAC) to perform a general inquiry to search for all Bluetooth devices that are within range.• Dedicated (Limited) — Selecting this option causes Merlin Mobile to use a Dedicated Inquiry Access Code (DIAC) to perform a search for a specific class or group of Bluetooth devices.When this option is selected, the DIAC LAP text box appears so that the user can supply the DIAC that Merlin Mobile should use.Step 5 Set additional settings:• Correlation Value — This value tells Merlin Mobile how many bits of a packet’s sync word must be received correctly in order for the packet to be considered valid. For instance, setting the value to 43 means that at least 43 of the 64 bits available in the sync word need to be correct to qualify as a valid packet. The value must be an integer between 33 and 64. The default value is 57 bits.• Inquiry Timeout — This value specifies how long Merlin Mobile will transmit the inquiry message to look for Bluetooth devices. The value must be an integer between 0 and 80. The default value is 20 seconds. An Inquiry Timeout value of zero will cause Merlin Mobile to perform the inquiry operation continuously, until manually stopped by the user.Step 6 (Optional) Enable CATC debug file. When this option is selected, Merlin Mobile will create a file that can be used by CATC Support to aid in debugging. This option should always be disabled unless otherwise directed by CATC personnel.Step 7 Click OK to use the settings and close the Recording Options dialog-or-Continue configuring the recording options on the General, Events and Actions tabs.Note: You may also save the settings as a Recording Options (.rec) file. This will allow you to load the file whenever you want to use those settings.Piconet Recording Mode OptionsMaking a recording using Piconet Recording mode causes Merlin Mobile to monitor and record piconet traffic. Merlin Mobile records the traffic data as specified in the Recording Options, then uploads the data as a Trace file when the recording is complete.To set parameters for a Piconet Recording:Step 1 Open the Recording Options dialog and select the Modes tab.Step 2 In the Recording Mode section, select Piconet Recording.
38CATC MERLIN MOBILE 1.00 CHAPTER 5User’s Manual Recording Bluetooth TrafficDRAFTDRAFTDRAFTDRAFTDRAFTDRAFTDRAFTDRAFTDRAFTDRAFTDRAFTDRAFTDRAFTDRAFTDRAFTStep 3 Set the hop sequence. For details, please refer to “Frequency Hop Sequences” on page 38.Step 4 Set the synchronization method. Merlin Mobile offers three synchronization methods for piconet recording:• Sync & Record — for more information about this method, please see “Make a Manual Sync & Record Piconet Recording” on page 28.• Passive Sync & Record — for more information about this method, please see “Make a Manual Passive Sync & Record Piconet Recording” on page 29.• Page Sync & Record — for more information about this method, please see “Make a Manual Page Sync & Record Piconet Recording” on page 27.Note: If the hop sequence option is set to Reduced Hop or Single Frequency, then the Sync Method is set to Test Mode and cannot be modified by the user.Step 5 Set additional settings. For details, please see “Additional Settings” on page 39.Step 6 (Optional) Enable CATC debug file. When this option is selected, Merlin Mobile will create a file that can be used by CATC Support to aid in debugging. This option should always be disabled unless otherwise directed by CATC personnel.Step 7 Click OK to use the settings and close the Recording Options dialog-or-Continue configuring the recording options on the General, Events and Actions tabs.Note: You may also save the settings as a Recording Options (.rec) file. This will allow you to load the file whenever you want to use those settings.Frequency Hop SequencesIn order to be able to synchronize with other devices and record piconet traffic, Merlin Mobile needs to know the frequency hopping sequence that the piconet is using.The hopping sequence that is set here is used only for initial synchronization to the piconet. Merlin Mobile can dynamically follow test-mode initiated changes to the hop sequence with one limitation: Merlin Mobile cannot dynamically follow a piconet that changes from a test-mode hop sequence to the 79-hop standard mode. Merlin Mobile supports these hop sequences:• 79 Hops Standard• Reduced Hop — Restricts Merlin Mobile to the five hop frequencies of the Bluetooth test mode, as described in the Bluetooth specification. When it is selected, the Sync Method is set to test mode and cannot be modified by the user.
 39CATC MERLIN MOBILE 1.00 CHAPTER 5User’s Manual Recording Bluetooth TrafficDRAFTDRAFTDRAFTDRAFTDRAFTDRAFTDRAFTDRAFTDRAFTDRAFTDRAFTDRAFTDRAFTDRAFTDRAFT• Single Frequency — Limits Merlin Mobile to the frequency range specified in the DUT Xmit Freq and DUT Recv Freq boxes. When it is selected, the Sync Method is set to test mode and cannot be modified by the user.DUT Xmit Freq: Allows the user to enter the value of the transmit signal (Xmit Freq) for the Device Under Test (DUT).DUT Recv Freq: Allows the user to enter the value of the receive signal (Recv Freq) for the Device Under Test.Additional Settings• Correlation Value: This value tells Merlin Mobile how many bits of a packet’s sync word must be received correctly in order for the packet to be considered valid. For instance, setting the value to 43 means that at least 43 of the 64 bits available in the sync word need to be correct to qualify as a valid packet. The value must be an integer between 33 and 64. The default value is 57 bits.• Inquiry Timeout: This value specifies how long Merlin Mobile will transmit the inquiry message to look for Bluetooth devices. The value must be an integer between 0 and 80. The default value is 20 seconds. An Inquiry Timeout value of zero will cause Merlin Mobile to perform the inquiry operation continuously, until manually stopped by the user.Inquiry Timeout applies only when using the Page Sync & Record method for recording piconet traffic.• Loss-of-sync Timeout: This value specifies the how many seconds Merlin Mobile will wait for piconet traffic before determining that synchronization has been lost. The value must be an integer between 1 and 16. The default value is 1 second.• Sync Window: The Sync Window setting controls the amount of time that Merlin Mobile will wait between receiving an inquiry response and detecting the start of Blue-tooth traffic between the master and slave devices being tested.The default setting is “Narrow” and this is suitable for most recordings. However, if significant drift occurs between Merlin Mobile’s clock and that of the master device, Merlin Mobile may not be able to synchronize properly. In these cases, the time may be increased by moving the slider to the right, toward the “Wide” setting. There are five discrete settings in increasing order from “Narrow” to “Wide”. After Merlin Mobile is synchronized with the devices, it will remain synchronized with them as long as there is piconet traffic.• Initial De-whitening State: This setting controls the initial de-whitening state for syn-chronization with a piconet.•De-Whitening On — When De-Whitening On is selected, Merlin Mobile will use received packets to try to synchronize while performing a de-whitening process that complies with Bluetooth specifications. This is the default setting.
40CATC MERLIN MOBILE 1.00 CHAPTER 5User’s Manual Recording Bluetooth TrafficDRAFTDRAFTDRAFTDRAFTDRAFTDRAFTDRAFTDRAFTDRAFTDRAFTDRAFTDRAFTDRAFTDRAFTDRAFT•De-whitening Off — When De-whitening Off is selected, Merlin Mobile will try to synchronize without de-whitening the received packets, and assume that they were transmitted un-whitened.After Merlin Mobile has synchronized to the piconet, it should follow changes in the whitening scheme and dynamically track whitened and non-whitened traffic.If you stopped a recording and want to start another recording of the same piconet, be aware that Merlin Mobile might still be synchronized to the piconet. Since Merlin Mobile dynamically follows whitening scheme changes, it will not use the initial de-whitening state unless the Force Re-Synchronization option is enabled.• Force Re-Synchronization: When this option is enabled, Merlin Mobile will re-synchro-nize with the piconet at the start of each piconet recording session. When this option is disabled, Merlin Mobile uses the data from the piconet that it last analyzed, thereby bypassing the synchronization process and saving a few seconds from the beginning of the trace. If you know that Merlin Mobile’s data is correct, you can leave this option disabled and Merlin Mobile will try to use the existing data. If the data is incomplete or incorrect, however, Merlin Mobile will automatically perform a refresh.By default, Force Re-Synchronization is disabled.• Follow Master/Slave Switch: If enabled, this option allows Merlin Mobile to follow a role switch between a master and slave device. It is disabled by default.• Match Clock Rate: This option causes Merlin Mobile to do a general inquiry to deter-mine the Page Target's clock rate before attempting to synchronize to the piconet. This is a useful option if the master device's clock is inaccurate. This option only applies for the Page Sync & Record method of piconet recording.• Show Paging Traffic: This option causes Merlin Mobile to capture paging traffic between the master and slave devices. It is available only when using the Page Sync & Record method of piconet recording.5.5.3 Setting Recording Event OptionsUse the Events tab of the Recording Options dialog to define event groups and parameters that will be used for triggering, filtering, and other actions.To define event settings:Step 1 Open the Recording Options dialog.Step 2 Select the Events tab.Step 3 Choose one or more categories from the list of Event Groups and set the parameters, which will appear to the right of the list when you click on an event group name. For details about the categories, see “Event Groups” on page 41.Note: When parameters are set for a selected event, a check mark will appear in the checkbox next to the event's name in the Event Groups list, and the event will be shown on the Actions tab of the Recording Options dialog.
 41CATC MERLIN MOBILE 1.00 CHAPTER 5User’s Manual Recording Bluetooth TrafficDRAFTDRAFTDRAFTDRAFTDRAFTDRAFTDRAFTDRAFTDRAFTDRAFTDRAFTDRAFTDRAFTDRAFTDRAFTStep 4 Select Additional Timeslot Filtering options, if desired. For more information, see “Additional Timeslot Filtering” on page 43.Step 5 Click OK to use the settings and close the Recording Options dialog-or-Continue configuring the recording options on the General, Modes, and Actions tabs.Note: You may also save the settings as a Recording Options (.rec) file. This will allow you to load the file whenever you want to use those settings.Event GroupsThe event group categories are explained in more detail below.Packet HeadersThe Packet Header event allows the user to define packet header field information for up to three headers. • Packet Type — Use the Packet Type drop-down list to select from the following packet types: Don't care, NULL, POLL, FHS, DM1, DH1, HV1, HV2, HV3, DV, AUX1, DM3, DH3, 1100, 1101, DM5, or DH5. Selecting Don’t care causes Merlin Mobile to ignore this field.• AM_ADDR — The AM_ADDR field definition is used to specify the 3-bit active mem-ber address for a slave device.• SEQN — The 1-bit sequence number field definition can be set to 1 or 0. Change the setting by checking or unchecking the checkbox. The SEQN checkbox is activated by unchecking the Don't care checkbox.• ARQN — The 1-bit acknowledge indication field definition can be set to 1 (positive acknowledge ACK) or 0 (negative acknowledge NAK). Change the setting by checking or unchecking the checkbox. The ARQN checkbox is activated by unchecking the Don't care checkbox.• FLOW — The 1-bit flow control field definition can be set to 1 (go) or 0 (stop). Change the setting by checking or unchecking the checkbox. The FLOW checkbox is activated by unchecking the Don't care checkbox.• Don't care — Check the Don't care checkbox to make Merlin Mobile ignore the SEQN, ARQN, and FLOW fields.Payload HeadersThe Payload Header event allows the user to define payload header field information for single-slot packets (#1) and multi-slot packets (#2).• L_CH — Use the L_CH drop-down list to choose the logical channel field contents. The choices are: Don't care, 00 undefined, 01 L2CAP continue, 10 L2CAP start, and 11 LMP message. Selecting Don’t care causes Merlin Mobile to ignore this field.
42CATC MERLIN MOBILE 1.00 CHAPTER 5User’s Manual Recording Bluetooth TrafficDRAFTDRAFTDRAFTDRAFTDRAFTDRAFTDRAFTDRAFTDRAFTDRAFTDRAFTDRAFTDRAFTDRAFTDRAFT• FLOW — The 1-bit flow indication field can be set to 1 (flow-on) or 0 (flow-off). Selecting Don’t care causes Merlin Mobile to ignore this field.• Length — Use the Length field definition to specify the length, in bytes, of the payload body (the payload minus the payload header and CRC code). For single-slot packets, the length value may range from 1 to 29 bytes. For multi-slot packets, the length may be from 1 to 339 bytes. To define the Length field, select an operator (=, >, <, >=, or <=) from the drop-down list and enter a value, in bytes, in the text box.Data PatternThe Data Pattern event allows the user to specify an 8-byte payload data pattern.To specify a data pattern, enter the pattern into the text box or click the Edit button to open the Data Editor dialog.Data Editor dialogThe Data Editor dialog can be used to define the data pattern. Enter bit pattern, Mask, or Match values for data bytes 00 through 07. Bit patterns should be entered in binary (1 or 0); use “X” for irrelevant values. Mask and Match values should be entered in hexadecimal.ErrorsUse the Errors event to set up actions based on one or more of these errors:• CRC Error — A CRC error in the packet data payload of the previous Bluetooth data packet.• HEC Error — An HEC (header error check) error in the packet header for the previous Bluetooth data packet.• FEC Error — An uncorrectable FEC (Forward Error Correction) error in the packet header for the previous Bluetooth data packet.• FEC Threshold Exceeded — Indicates that the number of single-bit FEC errors detected since the current recording started has exceeded the specified value.• Invalid Packet Type — An invalid value was detected in the packet type field of the packet header for the previous Bluetooth data packet.• Header Length Error — Indicates that a Bluetooth data packet was terminated before all bits of the packet header were received.• Payload Length Error — Indicates that the payload of a Bluetooth data packet was either longer than expected, or that a Bluetooth data packet terminated before the expected end of the payload data.• Sync Lost — Indicates that a loss of piconet synchronization occurred during the fre-quency slot prior to this slot.
 43CATC MERLIN MOBILE 1.00 CHAPTER 5User’s Manual Recording Bluetooth TrafficDRAFTDRAFTDRAFTDRAFTDRAFTDRAFTDRAFTDRAFTDRAFTDRAFTDRAFTDRAFTDRAFTDRAFTDRAFTAdditional Timeslot FilteringFilter Empty TimeslotsBy default, Merlin Mobile records frequency hop and timestamp information for all time slots, even if the slot is empty. If the Filter Empty Slots option is selected, Merlin Mobile will exclude empty time slots from the recording. This conserves recording memory and eliminates long sequences of empty packets from the Trace.Note: Even if Filter Empty Slots is checked, some empty time slots will continue to be recorded. Merlin Mobile will record an empty time-slot before every packet in order to provide the packet with a timestamp. Note: Merlin Mobile will record an empty time slot before a packet even if the packet has been filtered from the Trace. These types of empty time slots can be excluded from the Trace by selecting Filter Slots on Packet Filter.Filter Timeslots on Packet FilterThis option prevents Merlin Mobile from recording timeslot packets before packets that are being filtered out of the Trace.By default, Merlin Mobile records an empty slot before every packet in order to provide a timestamp for that packet. Merlin Mobile will record this empty slot even if the packet has been filtered out of the Trace. This can produce long sequences of empty packets in a Trace, each marking the location of an excluded packet. 5.5.4 Setting Recording Action OptionsUse the Actions tab of the Recording Options dialog to set up the sequencing and filtering of the events that you selected on the Events tab. The Actions tab allows you to set complex dependencies and actions for the events.To define event actions and sequencing:Step 1 Open the Recording Options dialog.Step 2 Define event settings on the Events tab.Step 3 Select the Actions tab.By default, all events are set up as triggers.Step 4 Associate events with actions and other events by left-clicking on an event, then moving the mouse pointer to the desired action or event. A thick, black arrow will follow the pointer as you drag the mouse. Complete the connection by clicking on the target action or event.Step 5 Click OK to use the settings and close the Recording Options dialog-or-Continue configuring the recording options on the General, Modes, and Actions tabs.
44CATC MERLIN MOBILE 1.00 CHAPTER 5User’s Manual Recording Bluetooth TrafficDRAFTDRAFTDRAFTDRAFTDRAFTDRAFTDRAFTDRAFTDRAFTDRAFTDRAFTDRAFTDRAFTDRAFTDRAFTNote: You may also save the settings as a Recording Options (.rec) file. This will allow you to load the file whenever you want to use those settings.The following section gives details about event actions and sequencing:TriggerThis action designates an event as a recording trigger. If more than one event is designated as a trigger, the recording will trigger on the first one that is detected.FilterEvents can be filtered in or filtered out of a recording. This allows you to focus on just the packets you're interested in. If Filter Out is selected, packets that match the events associated with the filter action are excluded from the recording. However, if Filter In is selected, only packets that match the events associated with the filter action will be recorded, and all other packets will be excluded.To change the filter polarity:Step 1 Click on the light blue circle in the upper left of the Filter box.A menu will pop up.Step 2 Choose Filter In or Filter Out from the menu.The name on the Filter box will change to reflect your choice.RestartThis action works in conjunction with the counters and/or a sequence of two events. When an event with the Restart action occurs, all the counter values are reset to initial values and the event sequences are restarted to the “wait for the first event in sequence” state.Count1 and Count2The Count action allows the specified events to happen a specified number of times before the trigger is generated. You can connect several events to a counter. Each time one of these events comes across the bus, the value of the counter is decreased by one. When the counter value reaches zero, the trigger is generated. If there are one or more events linked to each counter, then the trigger will be generated by the first event that causes a counter value to reach zero.To change the counter values:Step 1 Click on the light blue circle in the upper left corner of a Count box.A menu will pop up.Step 2 Select Change Counter Value.The Input Counter Value dialog will open.Step 3 Enter a value between 1 and 65535.Step 4 Click OK.The new value will be displayed in parentheses on the Count box.
 45CATC MERLIN MOBILE 1.00 CHAPTER 5User’s Manual Recording Bluetooth TrafficDRAFTDRAFTDRAFTDRAFTDRAFTDRAFTDRAFTDRAFTDRAFTDRAFTDRAFTDRAFTDRAFTDRAFTDRAFTEvent to Event SequencingWhen an event is sequenced to another event, the recording engine waits for the first event to happen and then enables the second event for triggering. Note that an event can be sequenced to another event only if the second event is designated as a trigger, and both are header-type events.5.6 Saving Recording OptionsOnce you have set recording options using the Recording Options dialog, you can save the settings in a Recording Options (.rec) file.•Use the Save... button to access the Save As dialog and save the settings with a unique name.•Use the Save As Default button to save the settings and designate them to be automati-cally loaded the next time the Merlin Mobile software is started. Then, if no other recording options file is loaded in the meantime, the settings will automatically be applied to the next recording session. The settings will be saved with the name default.rec. If you save another set of recording options as default, the file default.rec will be overwritten. 5.7 Loading Recording OptionsRecording options (.rec) files can be loaded and applied via the Recording Options dialog. Recording options files are created by saving recording settings.To load a Recording options file:Step 1 Open the Recording Options dialog.The General tab is displayed by default.Step 2 From any tab, click the Load... button.The Open dialog will appear.Step 3 Navigate to the file that you want to use, then click Open.The Open dialog will close and you'll be returned to the Recording Options dialog. The settings in the dialog will reflect the settings from the file you chose.Step 4 Click OK to use the settings and close the Recording Options dialog-or-Continue configuring the recording options on the General, Modes, Events and Actions tabs.
46CATC MERLIN MOBILE 1.00 CHAPTER 5User’s Manual Recording Bluetooth TrafficDRAFTDRAFTDRAFTDRAFTDRAFTDRAFTDRAFTDRAFTDRAFTDRAFTDRAFTDRAFTDRAFTDRAFTDRAFT5.8 Bluetooth EncryptionBluetooth encryption is a multi-staged process that provides devices with secure, encrypted communications. The process begins with a device prompting the user for a Personal Identification Number (PIN). When the right PIN is entered, the slave begins an encryption setup dialogue with the master. At the beginning of this dialogue, the slave and the master agree on a link key. A link key is a 128-bit value that the two devices use for authentication. When the slave and master agree on a link key, the slave then negotiates for the transfer of the encryption key from the master device. The encryption key is used to encrypt and decrypt messages. Once the encryption key is transferred, both devices use it to encrypt all subsequent communications.In order for Merlin Mobile to decode encrypted traffic, it needs the link key for each master-slave connection for which encryption will be used. If you know the link key, you can enter it into the Encryption Setup dialog. If you do not know it, you give Merlin Mobile the PIN for a device and allow Merlin Mobile to discover the link key on its own. Once Merlin Mobile has the link key, it can capture the rest of what it needs by listening to the master and slave devices as they negotiate for the encryption key.5.8.1 Encryption SetupUse the Encryption Setup dialog to configure Merlin Mobile to decipher encrypted Bluetooth traffic.Note: In order for Merlin Mobile to obtain the encryption key and decode the encrypted traffic, recording needs to be started before the slave device connects to the master device.To define encryption parameters:Step 1 Select Setup > Encryption Options from the menu bar or click the Encryption Options   button on the toolbar.The Encryption Setup dialog will open.Step 2 Click Add Slave Device. The Slave Device Address combo box and PIN Code and Current Link Key text boxes will be activated.Step 3 Select or manually enter the slave device's BD_ADDR in the Slave Device Address combo box.Step 4 Select ASCII or Hex and enter the PIN for the slave device in the PIN Code text box.-OR-Enter the 128-bit link key value in the Current Link Key text box. The link must be entered as a 32-digit hexadecimal value.Note: If the master and slave were previously connected, they may already agree on the link key. In this case, you will need to provide Merlin Mobile with the link key instead of the PIN.
 47CATC MERLIN MOBILE 1.00 CHAPTER 5User’s Manual Recording Bluetooth TrafficDRAFTDRAFTDRAFTDRAFTDRAFTDRAFTDRAFTDRAFTDRAFTDRAFTDRAFTDRAFTDRAFTDRAFTDRAFTStep 5 Click Apply.The encryption parameters will be added to the Encryption Setup dialog display area. The parameters are displayed in this order: slave device address, PIN, link key status, and current link key.Possible link key status values are:• Mstr (Master unit’s Link Key)• Slve (Slave unit’s Link Key)• Comb (Combination Key)• Init (Initialization Key)• Temp (Temporary Key)• User (User-defined Key)The remaining options in the Encryption Setup dialog are described here:• Edit Device: PIN Code and Current Link Key information for devices that are listed in the display area can be edited by selecting a device, then clicking the Edit Device but-ton.• Remove Device: Devices that are listed in the display area can be deleted by selecting a device, then clicking the Remove Device button.• Encrypted Broadcast Packets: Select this option if the master device will be sending encrypted broadcast packets.• OK: Clicking the OK button will apply any changes and close the Encryption Setup dia-log.• Cancel: Clicking the Cancel button will close the Encryption Setup dialog without applying changes.
48CATC MERLIN MOBILE 1.00 CHAPTER 5User’s Manual Recording Bluetooth TrafficDRAFTDRAFTDRAFTDRAFTDRAFTDRAFTDRAFTDRAFTDRAFTDRAFTDRAFTDRAFTDRAFTDRAFTDRAFT
 49CATC MERLIN MOBILE 1.00 CHAPTER 6User’s Manual CATC Trace FilesDRAFTDRAFTDRAFTDRAFTDRAFTDRAFTDRAFTDRAFTDRAFTDRAFTDRAFTDRAFTDRAFTDRAFTDRAFTCHAPTER 6: CATC TRACE FILESMerlin Mobile displays Bluetooth piconet traffic recording (.blt) files — also known as Trace™ files — in CATC Trace graphical format.The CATC Trace display makes extensive use of color and graphics to fully document the captured data. Individual packets (subactions) are shown on separate rows, with every field labeled, numbered, and color-coded. Packet rows also display time stamps, idle times, device roles (master/slave), transmitting frequencies, and the presence of protocol errors. Built-in or customized higher-level protocol decoding can be easily applied to a Trace to reveal protocol-specific information. Like packets, individual protocol data is separated into rows, and labeled, numbered, and color-coded. The Display Options dialog allows you to control the presentation of virtually every aspect of the data, including the colors, number formats, fonts, and visibility of specific fields. Many of these options can also be configured via the Trace file pop-up menus.The Trace file pop-up menus provide access to many display commands, as well as special dialogs that contain more detailed information about field contents. Additional information can also be gleaned from the display’s tooltips.Finally, Merlin Mobile's search capabilities help you to pinpoint exactly what you're looking for, even in a large Trace file.6.1 Display OptionsThe Display Options dialog box in Merlin Mobile allows you to customize the way that the elements in Trace files are displayed. The display of almost everything in a Trace can be defined, from the fonts and colors to the number formats and types of packets and transactions to show. These settings can then be saved to a display options (.opt) file. You can load saved settings and apply them to any Trace file.There are three ways to access the Display Options dialog:• Click the Display Options icon   on the toolbar.-or-• Select Setup > Display Options from the menu bar.-or-•Right-click anywhere in the Trace display window and select Display Options from the pop-up menu.There are four tabs in the Display Options dialog:• General: the General tab contains options for the zoom level, tooltips, wrapping, and fonts.• Colors: the Colors tab is used to customize the color settings for individual fields.
50CATC MERLIN MOBILE 1.00 CHAPTER 6User’s Manual CATC Trace FilesDRAFTDRAFTDRAFTDRAFTDRAFTDRAFTDRAFTDRAFTDRAFTDRAFTDRAFTDRAFTDRAFTDRAFTDRAFT• Formats: the Formats tab is used to configure the way that numeric values are displayed.• Hiding: the Hiding tab is used to suppress the display of certain fields, packets and transactions.6.1.1 General Display OptionsUse the General tab of the Display Options dialog to define generic display settings.To set general display options:Step 1 Open the Display Options dialog.The General tab is displayed by default.Step 2 Configure the following elements to your liking:• Enable Tips: Check this if you want tooltips to be shown when the mouse passes over any header cell that contains a tooltip.• Wrap: Check this if you want the packets to wrap to the width of the display window.• Right click cell context menu: Check this if you want the cell context menus to pop up when you right-click on a cell. By default, the cell context menus are accessed by left-clicking on a field heading cell.• Protocol Levels To Show: Check the protocol levels that you want to be displayed in the Trace. Note that packets are always shown, so the packet option cannot be disabled.• Zoom Level: Use this to set the magnification of the display. The zoom level can be set from 10-200%, in increments of ten.• Fonts: Use the Fields drop-down list to choose a font for field text. Use the Data drop-down list to choose a font for data.• Display Configuration Name: Enter a name here to identify a set of display settings.Step 3 Click OK to apply the changes and close the Display Options dialog-or-Click Apply to apply the changes and leave the Display Options dialog open.Note: You may also save the changes as a Display Options (.opt) file. You can load Display Options files and apply them to any Trace file.6.1.2 Field ColorsUse the Colors tab in the Display Options dialog to customize the field cell colors.To change a field's color:Step 1 Open the Display Options dialog.Step 2 Select the Colors tab.
 51CATC MERLIN MOBILE 1.00 CHAPTER 6User’s Manual CATC Trace FilesDRAFTDRAFTDRAFTDRAFTDRAFTDRAFTDRAFTDRAFTDRAFTDRAFTDRAFTDRAFTDRAFTDRAFTDRAFTStep 3 Select a field on the Colors tab by left-clicking on it.The Colors dialog will open.Note: Define pre- and post-trigger colors using the fields labeled Packet #. The one with a minus sign to its left is the pre-trigger field, and the one with a plus sign is the post-trigger field.Step 4 Choose a new color in the Colors dialog.For more information, please see “Colors Dialog” on page 51.Step 5 Click OK to use the color you've chosen and close the Colors dialog.Step 6 Click OK to apply the changes and close the Display Options dialog-or-Click Apply to apply the changes and leave the Display Options dialog open.Note: You may also save the changes as a Display Options (.opt) file. You can load Display Options files and apply them to any Trace file.Colors DialogThe Colors dialog allows you to customize color settings. The Colors dialog can be accessed via the Colors tab of the Display Options dialog (described on page 50), as well as the Color command on the Trace file cell context menu (described on page 55).Standard TabThe Standard tab of the Colors dialog contains a palette of predefined colors. Left-click on a color in the palette to choose that color.Custom TabThe Custom tab of the Colors dialog contains various controls for creating custom colors.• Colors box — use the mouse pointer to select a color from the spectrum in the Colors box.• Slider — use the slider to the right of the color box to adjust the current color's red, green, blue, and luminance values.• Hue, Saturation, and Luminance values — adjust these values by typing in new values or by using the controls.• Red, Green and Blue values — adjust these values by typing in new values or by using the controls.6.1.3 Field FormatsUse the Formats tab in the Display Options dialog to customize the presentation of numeric values in a Trace file.To change a field's number format:Step 1 Open the Display Options dialog.
52CATC MERLIN MOBILE 1.00 CHAPTER 6User’s Manual CATC Trace FilesDRAFTDRAFTDRAFTDRAFTDRAFTDRAFTDRAFTDRAFTDRAFTDRAFTDRAFTDRAFTDRAFTDRAFTDRAFTStep 2 Select the Formats tab.Step 3 Select new number formats for fields by clicking the radio buttons. Possible formats are: hexadecimal, decimal, binary, and ASCII. Not all formats are available for all fields.You may also change the byte order for some fields by selecting or deselecting the checkbox in the MSB -> LSB (Most Significant Byte to Least Significant Byte) column.Step 4 Click OK to apply the changes and close the Display Options dialog-or-Click Apply to apply the changes and leave the Display Options dialog open.Note: You may also save the changes as a Display Options (.opt) file. You can load Display Options files and apply them to any Trace file.6.1.4 Hiding Fields, Packets, Messages, and ProtocolsUse the Hiding tab in the Display Options dialog to prevent certain fields, packets, messages, or protocols from being displayed in Trace view.To hide fields, packets, messages or protocols:Step 1 Open the Display Options dialog.Step 2 Select the Hiding tab.Step 3 If desired, hide individual fields by selecting the checkboxes next to their names in the Hide Fields section in the upper portion of the Hiding tab. The Set All button can be used to select all of the checkboxes; conversely, the Clear All button will remove all of the check marks.Step 4 If desired, hide packets, messages and/or protocols.• Devices To Hide — use this section to define the AM_Addr (member address) and role (master/slave) to hide data for specific devices in the Trace.• Levels To Hide — use this section to select specific protocol levels to hide in the Trace.• Hide HOPs — check this to hide hop frequency packets in the Trace.• Hide POLL/NULLs — check this to hide POLL and NULL packets in the Trace.• Hide ID Pkts — check this to hide ID packets in the Trace.• Hide Unassociated Traffic — check this to hide any traffic that is not associated with the current level of decoding in the Trace.• Hide Voice — check this to hide voice data packets in the Trace.Step 5 Click OK to apply the changes and close the Display Options dialog-or-
 53CATC MERLIN MOBILE 1.00 CHAPTER 6User’s Manual CATC Trace FilesDRAFTDRAFTDRAFTDRAFTDRAFTDRAFTDRAFTDRAFTDRAFTDRAFTDRAFTDRAFTDRAFTDRAFTDRAFTClick Apply to apply the changes and leave the Display Options dialog open.Note: You may also save the changes as a Display Options (.opt) file. You can load Display Options files and apply them to any Trace file.6.1.5 Saving Display OptionsOnce you have set display options using the Display Options dialog, you can save the settings in a Display Options (.opt) file.• Use the Save... button to access the Save As dialog and save the settings with a unique name.• Use the Save As Default button to save the settings and designate them to be automati-cally loaded the next time the Merlin Mobile software is started. Then, the settings will automatically be applied when Trace files are opened, as long as no other display options file is loaded in the meantime. The settings will be saved with the name default.opt. If you save another set of display options as default, the file default.opt will be overwritten. 6.1.6 Loading Display OptionsDisplay options (.opt) files can be loaded and applied via the Display Options dialog. Display options files are created by saving display settings.To load a display options file:Step 1 Open the Display Options dialog.The General tab is displayed by default.Step 2 From any tab, click the Load... button.The Open dialog will appear.Step 3 Navigate to the file that you want to use, then click Open.The Open dialog will close and you'll be returned to the Display Options dialog. The settings in the dialog will reflect the settings from the file you chose.Step 4 Click OK to apply the settings and close the Display Options dialog-or-Click Apply to apply the settings and leave the Display Options dialog open.6.2 Expandable/Collapsible Rows and FieldsProtocol rows, Data fields, and some header fields in Trace files can be expanded and collapsed to show and hide additional data. These rows and fields are identifiable by the small arrows in the upper left corner of the field heading. All rows and fields are initially collapsed by default.There are several ways to expand and collapse the rows and fields:
54CATC MERLIN MOBILE 1.00 CHAPTER 6User’s Manual CATC Trace FilesDRAFTDRAFTDRAFTDRAFTDRAFTDRAFTDRAFTDRAFTDRAFTDRAFTDRAFTDRAFTDRAFTDRAFTDRAFT• Left-click the arrow in the upper left-hand corner of the transaction number field of the row, or the field heading of the field you want to expand or collapse. You can expand or collapse all rows or fields of the same type (e.g., all L2CAP messages or all CAC header fields) by left-clicking on the arrow and long-clicking — holding down the mouse button for about 1 second.• Double-click on the field heading of the row or field.• Left-click* on the field heading to access the cell context menu. The menu provides commands to expand or collapse the row or field, to expand all rows or fields of the same type, and to collapse all rows or fields of the same type. Select a command to per-form the desired operation.*If the option Right click cell context menu is checked on the General tab of the Display Options dialog, then the cell context menu is opened by right-clicking. See “General Display Options” on page 50 for more information.6.2.1 Protocol RowsProtocol rows can be expanded and collapsed in order to show or hide lower protocol levels and packets. 6.2.2 Data FieldsWhen Data fields are collapsed, the value shown is the amount of data that is contained in the field. When Data fields are expanded, the actual data from the field is revealed. Figure 6-1:  Collapsed protocol row — lower-level protocols and packets are hiddenFigure 6-2:  Expanded protocol row — lower-level protocols and packets are visibleFigure 6-3:  Collapsed data field — amount of data is shown
 55CATC MERLIN MOBILE 1.00 CHAPTER 6User’s Manual CATC Trace FilesDRAFTDRAFTDRAFTDRAFTDRAFTDRAFTDRAFTDRAFTDRAFTDRAFTDRAFTDRAFTDRAFTDRAFTDRAFT6.2.3 Header FieldsHeader fields can be expanded and collapsed to show or hide additional header data. 6.3 Trace File Pop-Up MenusThe Trace file pop-up menus contain the commands that are most frequently used while viewing Trace files. This makes it easy to make changes to the display and quickly find the information you are looking for.There are three types of pop-up menus in Trace files:• Cell Context Menu • Trace View Menu • Decoding Assignment Menus 6.3.1 Cell Context MenuThe Trace file cell context menu contains packet- and protocol-specific commands. The menu may change, depending upon what packet or field it is accessed from. Not every packet and field contains the cell context menu.To access the cell context menu in a Trace file:• Left-click on a packet or field header. The cell context menu will pop up, if available.Note: If the option Right click cell context menu is checked on the General tab of the Display Options dialog, then the cell context menu is opened by right-clicking on a packet header.The Trace file cell context menu may provide any of the following commands:• Set Marker: Sets a marker for the packet and allows you to enter a comment for the marker, if desired. This command only appears when the menu is accessed from the row's number field (the first field in the row) and if there is no marker set for the packet. For more information about markers, please see “Markers” on page 59.Figure 6-4:  Expanded data field — actual data is displayedFigure 6-5:  Collapsed header field — some header data is hiddenFigure 6-6:  Expanded header field — additional header data is displayed
56CATC MERLIN MOBILE 1.00 CHAPTER 6User’s Manual CATC Trace FilesDRAFTDRAFTDRAFTDRAFTDRAFTDRAFTDRAFTDRAFTDRAFTDRAFTDRAFTDRAFTDRAFTDRAFTDRAFT• Edit Marker: Allows you to edit the packet's marker comment. This command only appears when the menu is accessed from the row's number field (the first field in the row) and if a marker has been set for the packet.• Clear Marker: Clears the packet's marker. This command only appears when the menu is accessed from the row's number field (the first field in the row) and if a marker has been set for the packet.• Time From Trigger: Opens the Timing and Bus Usage calculator and displays the total time between the trigger and the packet used to access the command. This command only appears when the menu is accessed from the row's number field (the first field in the row) and if there is a trigger marker in the Trace file.• Time From Marker: Opens the All Markers dialog. Select a marker and then press the Go To button. The Timing and Bus Usage calculator opens and displays the total time between the chosen marker and the packet used to access the command. This command only appears when the menu is accessed from the row's number field (the first field in the row). For more information, see “All Markers Dialog” on page 60.• Format > Numeric Format: Allows you to change the format of the numbers in the Trace. Possible format choices are Hexadecimal, Decimal, Binary, ASCII, and Most Significant Bit (MSB) to Least Significant Bit (LSB) or LSB to MSB.• Color > Color Chart: Allows you to change the field color. Selecting Other at the bot-tom of the chart opens the Colors dialog (described on page 51).• Hide: Hides all occurrences of the field. Note that hidden cells can be revealed using the Trace view menu.• View Data Block: Opens the Data Block dialog. This command only appears when the menu is accessed from a Data field. The Data Block dialog is described on page 56.• Expand/Collapse Field: Expands or collapses the field.• Expand All Field Type: Expands all fields of the current type.• Collapse All Field Type: Collapses all fields of the current type.• OBEX Client or OBEX Server: Toggles between decoding OBEX protocols as client or server. These commands can only be accessed from an OBEX Type field.Data Block DialogThe View Data Block command on the cell context menu provides a way to see the raw numbers that make up the data in a packet. Selecting this command opens the Data Block dialog.There are several viewing options in this dialog:• Format: You can choose to view the data in Hexadecimal, Decimal, ASCII, or Binary format. • Show per one line: Enter a number in the box and choose bytes, words, or dwords from the drop-down list to change the way the data is displayed. Checking “Space out” causes
 57CATC MERLIN MOBILE 1.00 CHAPTER 6User’s Manual CATC Trace FilesDRAFTDRAFTDRAFTDRAFTDRAFTDRAFTDRAFTDRAFTDRAFTDRAFTDRAFTDRAFTDRAFTDRAFTDRAFTthe numbers to be grouped, with spaces between the groups. If unchecked, all the num-bers on one line will run together.• Bit Order: Choose from Most Significant Bit (MSB) or Least Significant Bit (LSB).• Prev/Next buttons: Click Prev or Next to scroll through the raw quadlet data for all the packets in the Trace file.To save the data:Step 1 Click the Save Data Block... button.The Save Data Block As dialog opens.Step 2 Enter a filename.Step 3 Choose a mode for saving the file:• Text saves the data as a text (.txt) file.• Binary saves the data as a binary (.dat) file.Step 4 (Optional) Navigate to a new directory in which to save the file.Step 5 Click Save. 6.3.2 Trace View MenuThe Trace file view menu contains commands for general display and viewing options.To access the view menu in a Trace file:• Right-click anywhere within the Trace display. The view menu will pop up.The Trace file view menu provides the following commands:• Display Options: Opens the Display Options dialog.• Unhide Cells > Field name: Presents a list of the names of fields that are currently hid-den. Selecting a field name from the list will reveal all occurrences of that field. Select-ing Unhide All reveals all hidden cells. Note that cells are hidden via the Hide command on the cell context menu or via the Hiding tab in the Display Options dialog.• Zoom In: Increases the size of the displayed transaction.• Zoom Out: Decreases the size of the displayed transaction.• Wrap: Toggles on or off wrapping of displayed packets to fit in the window.• BT Neighborhood: Causes Merlin Mobile to start recording, perform a general inquiry to detect local Bluetooth devices, then display information about the devices in the Bluetooth Neighborhood window and upload the inquiry traffic data as a Trace.• Decoding assignments: Opens the L2CAP channel Decoding Assignments dialog, which is used to display current L2CAP channel assignments and to configure protocol assignments for manually assigned channels (this command is available only if the active Trace file contains L2CAP transmissions AND the L2CAP protocol level has been decoded during the current viewing of the Trace).• L2CAP connections: Opens the Connections dialog, which is used to display current L2CAP channel connections and to configure connections for manually assigned chan-
58CATC MERLIN MOBILE 1.00 CHAPTER 6User’s Manual CATC Trace FilesDRAFTDRAFTDRAFTDRAFTDRAFTDRAFTDRAFTDRAFTDRAFTDRAFTDRAFTDRAFTDRAFTDRAFTDRAFTnels (this command is available only if the active Trace file contains L2CAP transmis-sions AND the L2CAP protocol level has been decoded during the current viewing of the Trace).• RFCOMM channel assignments: Opens the RFCOMM channel assignment dialog, which is used to display current RFCOMM channel assignments and to configure proto-col assignments for manually assigned channels (this command is available only if the active Trace file contains RFCOMM transmissions AND the RFCOMM protocol level has been decoded during the current viewing of the Trace).• Levels > Level name: Shows or hides the selected protocol level in the active Trace file.6.3.3 Decoding Assignment MenusThe Decoding Assignment menus contains commands for configuring protocol assignments for decoding.There are two Decoding Assignment menus: the Assigned to menu and the Decode As menu.Assigned to MenuThe Assigned to menu is used to assign protocols for decoding L2CAP messages.Access this menu by left-clicking on an A (Assignment) field in an L2CAP row in the Trace.Note: This menu can be accessed only if there are decoded L2CAP messages in the Trace. Additionally, L2CAP messages with CIDs from 0x0000-0x003F do not contain the A field.The top line of the menu shows the current assignment.• To change the assignment, select a different protocol from the menu.• Select Remove All User assignments to return all user-defined protocol assignments to their default settings.Decode As MenuThe Decode As menu is used to assign OBEX client or OBEX server status for decoding OBEX protocols.If the beginning sequence of OBEX traffic is not recorded in a Trace, the client/server status of the transmitting devices will not be preserved in the recording. In this case, you can use the Decode As menu to manually assign the status.Access this menu by left-clicking on a Type field in an OBEX row in the Trace.Note: This menu can be accessed only if there are decoded OBEX protocols in the Trace.The current status setting is the one with a checkmark next to it.If the menu items are greyed out, it means that Merlin Mobile was able to determine the status based on data in the Trace. In this case, you cannot manually change the status.If the menu items are active, it means that Merlin Mobile was unable to determine the status from the Trace data. In this case, you can change the status, if necessary.• To change the status assignment, select a different status from the menu.
 59CATC MERLIN MOBILE 1.00 CHAPTER 6User’s Manual CATC Trace FilesDRAFTDRAFTDRAFTDRAFTDRAFTDRAFTDRAFTDRAFTDRAFTDRAFTDRAFTDRAFTDRAFTDRAFTDRAFT6.4 Trace File CommentsA comment of up to 100 characters can be associated with a Trace file. Comments are included in the File Information report.To create, view, or edit a Trace file comment:   Step 1 Select File > Edit Comment.The Edit Trace File Comment dialog appears.Step 2 You may now create a new comment or edit the existing comment.Press OK to save a new comment or any changes, or press Cancel to exit the dialog without saving.6.5 MarkersA marker is a unique label for a packet. Markers are especially useful as a way of navigating directly to a specific packet by using the Go to Marker command on the Search menu. Setting a marker also allows you to associate a comment with the packet. Marked packets can be identified by the red bar on the left edge of the packet number field.Trigger events are automatically marked by Merlin Mobile. Trigger markers contain the comment “Trigger.”6.5.1 Set a markerStep 1 Left-click in the Packet number field of the packet you want to mark.The cell context Trace file menu will open.Step 2 Select Set Marker.The Packet # dialog will open.Step 3 (Optional) Enter a comment in the dialog. The comment can consist of up to 100 characters.Note: Marker comments can be viewed by positioning the mouse pointer over the red marker bar on the left edge of the Packet number field.Step 4 Click OK to set the marker.6.5.2 Edit a markerStep 1 Left-click in the Packet number field that contains the marker, or left-click the marker bar itself.The cell context Trace file menu or marker menu will open.Step 2 Select Edit Marker.The Packet # dialog will open.Step 3 Edit the comment.
60CATC MERLIN MOBILE 1.00 CHAPTER 6User’s Manual CATC Trace FilesDRAFTDRAFTDRAFTDRAFTDRAFTDRAFTDRAFTDRAFTDRAFTDRAFTDRAFTDRAFTDRAFTDRAFTDRAFTStep 4 Click OK to save the comment.6.5.3 Clear (delete) a markerStep 1 Left-click in the Packet number field that contains the marker, or left-click the marker bar itself.The cell context Trace file menu or marker menu will open.Step 2 Select Clear Marker.The marker will be deleted, and the red marker bar will be removed.6.5.4 All Markers DialogThe All Markers dialog lists all markers in the active Trace file. Marker comments are also displayed.The All Markers dialog allows you to edit, delete, or go to a marker in the Trace file.6.6 Saving Trace FilesThe Save As command allows you to save all or part of a Trace (.blt) file to a new filename and/or location.6.6.1 Save a Copy of a Whole TraceStep 1 Select Save As from the File menu or click the Save As   button on the toolbar.The File Save As dialog will open.Step 2 Enter a new filename and/or browse to a new file location for the copy.Step 3 Make sure that “All” and “Rename original file (faster)” are selected. This combination of options will save all packets in the Trace, regardless of whether they are currently visible or hidden.Step 4 Click Save.6.6.2 Save a Portion of a TraceTo save a range of packets from a Trace file and/or only currently visible packets:Step 1 Select Save As from the File menu or click the Save As   button on the toolbar.The File Save As dialog will open.Step 2 To save a range of packets:
 61CATC MERLIN MOBILE 1.00 CHAPTER 6User’s Manual CATC Trace FilesDRAFTDRAFTDRAFTDRAFTDRAFTDRAFTDRAFTDRAFTDRAFTDRAFTDRAFTDRAFTDRAFTDRAFTDRAFTSelect “Save Range” and enter a starting packet, message, or protocol number on the “From” line, or select a marker from the drop-down list, and enter an ending packet, message, or protocol number on the “To” line, or select a marker from the drop-down list.Note: If there are no markers in the Trace file, the drop-down list of markers will not be available.To exclude hidden packets:Select “Do no save hidden Packets/Messages/Protocols.” This option will cause Merlin Mobile to save only the packets in the Trace that are currently visible.Step 3 Enter a new file name in the File name field. If you wish to change the file’s directory location, use the browse controls at the top of the window.Step 4 Click Save.6.7 Printing Trace FilesUse the Print command to print all or part of a Trace file.Note: To view a one-page sample of how the Trace will look when it's printed, select File > Print Preview from the menu bar, or click the Print Preview button on the toolbar.To print a Trace file:Step 1 Select File > Print from the menu bar or click the Print   icon on the toolbar.The Print Packets/Messages/Protocols dialog will open.Step 2 Enter a starting packet, message, or protocol number on the “From” line, or select a marker from the drop-down list, and enter an ending packet, message, or protocol number on the “To” line of the dialog, or select a marker from the drop-down list. Clicking the Reset Range to Whole Trace button sets the From and To entries to include all of the packets in the Trace.Note: If there are no markers in the Trace file, the drop-down list of markers will not be available.Step 3 Click OK to print specified range.6.8 Exporting Trace FilesMerlin Mobile can export the contents of a traffic recording Trace (.blt) file to two different formats:• Packets to Text (Packet View Format) • Packets to CSV Text
62CATC MERLIN MOBILE 1.00 CHAPTER 6User’s Manual CATC Trace FilesDRAFTDRAFTDRAFTDRAFTDRAFTDRAFTDRAFTDRAFTDRAFTDRAFTDRAFTDRAFTDRAFTDRAFTDRAFT6.8.1 Export to Text FormatThis option saves a Trace (.blt) file as a text (.txt) file in packet view format. This means that the file will contain the text from the fields in the Trace file.To export a Trace file to packet view format:Step 1 Select File > Export > Packets to Text (Packet View Format).The Export Packets/Messages/Protocols to text dialog will appear.Step 2 Enter a starting packet, message, or protocol number on the “From” line, or select a marker from the drop-down list, and enter an ending packet, message, or protocol number on the “To” line of the dialog, or select a marker from the drop-down list. Clicking the Reset Range to Whole Trace button sets the From and To entries to include all of the packets in the Trace.Note: If there are no markers in the Trace file, the drop-down list of markers will not be available.Step 3 Click OK.The Save Packets/Messages/Protocols in Text Format... dialog will appear.Step 4 Enter a file name. You may also browse to a new directory, if desired.Step 5 Click Save to save the data.6.8.2 Export to Comma Separated Value FormatThis option saves a Trace (.blt) file as a comma separated value (.csv) text file.To export a Trace file to comma separated value format:Step 1 Select File > Export > Packets to CSV Text.The Export Packets/Messages/Protocols to csv-text dialog will appear.Step 2 Enter a starting packet, message, or protocol number on the “From” line, or select a marker from the drop-down list, and enter an ending packet, message, or protocol number on the “To” line of the dialog, or select a marker from the drop-down list. Clicking the Reset Range to Whole Trace button sets the From and To entries to include all of the packets in the Trace.Note: If there are no markers in the Trace file, the drop-down list of markers will not be available.Step 3 Click OK.The Save in CSV Format... dialog will appear.Step 4 Enter a file name. You may also browse to a new directory, if desired.Step 5 Click Save to save the data.6.9 Searching Trace FilesThe Search menu in FireInspector offers several ways to efficiently search large quantities
 63CATC MERLIN MOBILE 1.00 CHAPTER 6User’s Manual CATC Trace FilesDRAFTDRAFTDRAFTDRAFTDRAFTDRAFTDRAFTDRAFTDRAFTDRAFTDRAFTDRAFTDRAFTDRAFTDRAFTof transaction data. This makes it easy to quickly locate specific information in a Trace file.6.9.1 Go to TriggerThis command repositions the Trace file so that the packet immediately preceding the trigger event is on the first line of the display. If there is no trigger event in the Trace file, this command has no effect.To go directly to the trigger packet:• Select Search > Go to Trigger from the menu bar.6.9.2 Go to Packet/Message/ProtocolThis command allows you to navigate directly to a specified packet. The chosen packet will be positioned on the first line of the display.To go directly to a packet:Step 1 Select Search > Go to Packet from the menu bar.The Go to Packet/Message/Protocol dialog appears.Step 2 Enter a packet, message, or protocol transaction number or choose a marker from the drop-down list.Step 3 Click OK.If transactions haven't been decoded above the packet level, you will only have the option of entering a packet number.6.9.3 Go to MarkerUse this command to go directly to a specific marked packet. The packet will be positioned on the first line of the display.To go to a marker: Step 1 Select Search > Go To Marker from menu bar.Step 2 Select a marker from the fly-out menu-OR-Select All Markers... to open the All Markers dialog.Note: If you open the All Markers dialog, you should select a marker from the list, then click Go To in order to go to the marker.6.9.4 Go ToUse the Go To command to navigate directly to a specific event in the Trace. This will position the event on the first line of the display.To go to an event:Step 1 Select Search > Go To from the menu bar.
64CATC MERLIN MOBILE 1.00 CHAPTER 6User’s Manual CATC Trace FilesDRAFTDRAFTDRAFTDRAFTDRAFTDRAFTDRAFTDRAFTDRAFTDRAFTDRAFTDRAFTDRAFTDRAFTDRAFTA list of event types will pop up.Step 2 Choose an event group from the list.All occurrences of events from that event group in the Trace are listed.Step 3 Choose an event from the list.The display will be repositioned so that the selected event is on the first line of the display.6.9.5 FindUse Find to perform a search for events that meet certain criteria. The Find dialog provides many options for configuring complex search parameters.To find an event:Step 1 Select Search > Find... from the menu bar or click the Find   button on the toolbar.The Find dialog will open.Step 2 Select an event type in the Search For list.Note: The Search For list contains only those event types that are visible in the active Trace file. Event types that are hidden or not contained in the Trace are grayed out in the list.The Event Groups list will display the event groups for the type of event you have selected.Step 3 Select an event group from the Event Groups list.Parameters for the chosen group will appear to the right of the list when you click on an event group name. If a parameter is grayed out, that means that it isn't visible or doesn't occur in the active Trace file.Step 4 Select the parameter(s) that you want to find in the Trace. When parameters are set for a selected event group, a check mark will appear in the checkbox next to the event group's name in the Event Groups list.Step 5 (Optional) Repeat Steps 3 and 4 until the parameters are set to your liking.Step 6 Choose a direction for the search:• Forward: The search will move forward through the file from the point of origin.• Backward: The search will move backward through the file from the point of origin.Step 7 Set the origin for the search:• Top of the screen: The search will begin with the packet or transaction currently at the top of the display.• Last match: The search will begin at the location of the last match of the last search operation.
 65CATC MERLIN MOBILE 1.00 CHAPTER 6User’s Manual CATC Trace FilesDRAFTDRAFTDRAFTDRAFTDRAFTDRAFTDRAFTDRAFTDRAFTDRAFTDRAFTDRAFTDRAFTDRAFTDRAFT• Start of the file: The search will start at the beginning of the file (only available when search direction is set to Forward).• End of the file: The search will start at the end of the file (only available when search direction is set to Backward).Step 8 (Optional) Check Find All to find all matches for the search. This causes Merlin Mobile to create a new Trace file and display the matches in there.Step 9 (Optional) Check Search In Hidden to include hidden packets and transactions in the search.Step 10 Select a combination definition in the section marked Combining Specified Event Groups:• Union - Packets that match ANY of the specified events: Selecting this serves as the logical OR for the selected event groups.• Intersection - Packets that match ALL of the specified events: Selecting this serves as the logical AND for the selected events.• Exclusion - Packets that DO NOT match (opposite to the intersection or union): Selecting this finds all the packets that DO NOT match the specified search criteria. It must be used in conjunction with either the Union or Intersection option.Step 11 Click OK to perform the search.6.9.6 Find NextSelect Search > Find Next from the menu bar or click the Find Next   button on the toolbar to repeat the most recent Find operation.6.9.7 Search DirectionUse this command to toggle the search direction between backward and forward. The current search direction is always the one listed on the menu. Selecting it reverses the direction.To change the search direction:• Select Search > Search Direction Forward/Backward from the menu bar.The new search direction will be listed on the menu. It will also be shown on the right end of the status bar.
66CATC MERLIN MOBILE 1.00 CHAPTER 6User’s Manual CATC Trace FilesDRAFTDRAFTDRAFTDRAFTDRAFTDRAFTDRAFTDRAFTDRAFTDRAFTDRAFTDRAFTDRAFTDRAFTDRAFT
 67CATC MERLIN MOBILE 1.00 CHAPTER 7User’s Manual Decoding Trace DataDRAFTDRAFTDRAFTDRAFTDRAFTDRAFTDRAFTDRAFTDRAFTDRAFTDRAFTDRAFTDRAFTDRAFTDRAFTCHAPTER 7: DECODING TRACE DATA7.1 Packet-Level DecodingBy default, Merlin Mobile displays all transactions in a Trace file at the baseband packet level, unless the Display Options settings have been configured to do otherwise. Packet-level decoding is a low-level interpretation of the data on a Bluetooth piconet. Merlin Mobile takes the data and separates it into the fields displayed in the Trace. Individual packets are shown on separate rows. If the packets contain higher-level protocol data, that data remains undecoded until you initiate higher-level protocol decoding in the Merlin Mobile application.7.1.1 Packet TypesMerlin Mobile decodes and displays these packet types:Hop Frequency PacketsMerlin Mobile records frequency hop and timestamp information for all time slots, even if the slot is empty. This information shows up in the Trace as hop frequency packets. Note that hop packets are merely a convenient means for showing the empty slot data; they aren’t real packets.Hiding Hop Frequency PacketsIf there are many empty slots in a Trace, this can result in long sequences of hop frequency packets. The hop packets can be hidden to make the Trace more readable.Use one of these methods to hide hop frequency packets in a Trace:• Left-click on the Hop Freq field header. The cell context menu will pop up. Select Hide from the menu. Note: If the option Right click cell context menu is checked on the Gen-eral tab of the Display Options dialog, then the cell context menu is opened by right-clicking on a packet header.• Click the Hide Hops   icon on the toolbar.• Open the Hiding tab of the Display Options dialog (discussed on page 52). Check “Hop Freq” in the Hide Fields section, or check “Hide HOPs” in the Hide Packets/Mes-sages/Protocols” section and press OK.Figure 7-1:  Hop frequency packet
68CATC MERLIN MOBILE 1.00 CHAPTER 7User’s Manual Decoding Trace DataDRAFTDRAFTDRAFTDRAFTDRAFTDRAFTDRAFTDRAFTDRAFTDRAFTDRAFTDRAFTDRAFTDRAFTDRAFTFiltering Hop Frequency PacketsUse the Events tab of the Recording Options dialog to filter hop frequency packets (empty slots) from a recording. There are two options for doing this:Filter Empty SlotsIf the Filter Empty Slots option is selected, Merlin Mobile will exclude empty time slots from the recording. This conserves recording memory and eliminates long sequences of hop frequency packets from the Trace.Note: Even if ‘Filter Empty Slots’ is checked, some empty time slots will continue to be recorded. Merlin Mobile will record an empty time-slot before every packet in order to provide the packet with a timestamp. Note: Merlin Mobile will record an empty time slot before a packet even if the packet has been filtered from the Trace. These types of empty time slots can be excluded from the Trace by choosing selecting Filter Slots on Packet Filter.Filter Timeslots on Packet FilterThis option prevents Merlin Mobile from recording timeslot packets before packets that are being filtered out of the Trace.By default, Merlin Mobile records an empty slot before every packet in order to provide a timestamp for that packet. Merlin Mobile will record this empty slot even if the packet has been filtered out of the Trace. This can produce long sequences of empty packets in a Trace, each marking the location of an excluded packet. Link Control Packets•ID• NULL (0x0)• POLL (0x1)• FHS (0x2)Synchronous Connection-Oriented (SCO) Packets• HV1 (0x5)• HV2 (0x6)• HV3 (0x7)• DV (0x8)Asynchronous Connection-Less (ACL) Packets• DM1 (0x3)• DH1 (0x4)• AUX1 (0x9)• DM3 (0xA)
 69CATC MERLIN MOBILE 1.00 CHAPTER 7User’s Manual Decoding Trace DataDRAFTDRAFTDRAFTDRAFTDRAFTDRAFTDRAFTDRAFTDRAFTDRAFTDRAFTDRAFTDRAFTDRAFTDRAFT• DH3 (0xB)• DM5 (0xE)• DH5 (0xF)Undefined PacketsThese packet types are undefined in version 1.1 of the Bluetooth Specification, but in the event that you are testing devices based on a version of the specification in which these types are defined, they will be included in Traces made by Merlin Mobile. However, they will show up as errors unless the packet types have been defined in a CATC Decoder Scripting file. For more information, please see “CATC Decoder Scripting Files” on page 78.• Reserved (0xC)• Reserved (0xD)7.1.2 Packet FieldsThe fields in packet rows are divided into six distinct blocks.Note: Frequency hop packets don’t contain all these fields, as they are not real Bluetooth packets.Packet Number BlockThe packet number block contains these fields:• Packet number (Packet): All packets in a Trace are numbered, starting at 0, in the order that they were recorded. The packet number field is always first in a row of packet fields.• Transmitting device (T): The value of this field indicates whether a master or slave device transmitted the packet. Possible values are M (master) or S (slave).• Frequency (Freq): This field’s value is the frequency, in megahertz, used by the trans-mitting device. • Bluetooth Clock (BTClock): This field displays the value for the piconet master clock.Access Code BlockThe access code block contains fields from the access code as described in the Bluetooth Specification, version 1.1. The access code block can be expanded and collapsed to show or hide the fields, as explained in Section 6.2.3 on page 55.• Access code type: the first field of the access code block shows the access code type. Possible values are:• CAC — Channel Access Code• DAC — Device Access Code• GIAC — General Inquiry Access Code• DIAC — Dedicated Inquiry Access Code• Preamble (Pre): The value of the preamble of the access code.
70CATC MERLIN MOBILE 1.00 CHAPTER 7User’s Manual Decoding Trace DataDRAFTDRAFTDRAFTDRAFTDRAFTDRAFTDRAFTDRAFTDRAFTDRAFTDRAFTDRAFTDRAFTDRAFTDRAFT• Sync word type (CAC, DAC, GIAC, or DIAC): The value of the sync word of the access code.• Access code trailer (Trail): The value of the trailer of the access code.Packet Header BlockThe packet header block contains fields from the packet header, as described in the Bluetooth Specification, version 1.1. The packet header block can be expanded and collapsed to show or hide the fields, as explained in Section 6.2.3 on page 55.• Header block identifier (HDR): Identifies the block as the packet header block.• AM_ADDR (Addr): The AM_ADDR of the slave device that the transmission was sent to or from.•TYPE (Packet Type): The heading for this field indicates the type of packet; the value is the packet type code.• FLOW (Flow): The value of the flow bit in the packet header. Possible values:•1 = GO•0 = STOP• ARQN (Arqn): The value of the acknowledgment indication bit in the packet header. Possible values:• 1 = ACK (positive acknowledge)• 0 = NAK (negative acknowledge)• SEQN (Seqn): The value of the sequential numbering scheme bit in the packet header.• HEC (HEC): The header-error-check value from the packet header.Payload BlockThe payload block contains the fields from the packet payload, as described in the Bluetooth Specification, version 1.1. Two payload formats are defined for synchronous and asynchronous packets: voice field (SCO packets) and data field (ACL packets). DV packets contain both fields. The NULL, POLL, and ID link control packets do not contain payloads, but FHS packets have their own payload format.SCO Packet Payload Fields• Voice data field (Voice Data): The payload data for a voice field payload format packet. The data field can be expanded and collapsed, as explained in Section 6.2.2 on page 54.ACL Packet Payload Fields• Logical channel (L_CH): The value of the L_CH field of the payload header. Possible values:• NA (00) = undefined• UA/UI (01) = Continuation fragment of an L2CAP message• UA/UI (10) = Start of an L2CAP message or no fragmentation
 71CATC MERLIN MOBILE 1.00 CHAPTER 7User’s Manual Decoding Trace DataDRAFTDRAFTDRAFTDRAFTDRAFTDRAFTDRAFTDRAFTDRAFTDRAFTDRAFTDRAFTDRAFTDRAFTDRAFT• LM (11) = LMP message• Flow indication (L2FL): The value of the flow indication field in the payload header. Possible values:• 1 = flow-on (OK to send)• 0 = flow-off (stop)• Payload length indicator (Len): The payload length, in bytes.• Payload body (Data): The contents of the payload body for a data field payload format packet. The data field can be expanded and collapsed, as explained in Section 6.2.2 on page 54.• Cyclic redundancy check (CRC): The CRC code in the payload. FHS Packet Payload Fields• Parity bits (Parity): The parity bits of the first part of the access code sync word of the transmitting device.• Lower address part (LAP): The lower address part of the transmitting device.• Scan repetition field (SR): The value of the scan repetition field in the payload. Possible values:• 00 = R0• 01 = R1• 10 = R2•11 = reserved• Scan period field (SP): The value of the scan period field in the payload. Possible val-ues:• 00 = P0• 01 = P1• 10 = P2•11 = reserved• Upper address part (UAP): The upper address part of the transmitting device.• Non-significant address part (NAP): The non-significant address part of the transmitting device.• Class of device (COD): The class of device for the transmitting unit.• Member address (Addr): The AM_ADDR to be used by the recipient device.• Native system clock (CLK): The value of the native system clock of the transmitting device.• Page scan mode (PSM): The default page scan mode of the transmitting device. Possible values:• 000 = Mandatory scan mode• 001 = Optional scan mode I
72CATC MERLIN MOBILE 1.00 CHAPTER 7User’s Manual Decoding Trace DataDRAFTDRAFTDRAFTDRAFTDRAFTDRAFTDRAFTDRAFTDRAFTDRAFTDRAFTDRAFTDRAFTDRAFTDRAFT• 010 = Optional scan mode II• 011 = Optional scan mode III• 100, 101, 110, 111 = reserved• Cyclical redundancy check (CRC): The CRC code in the payload.Acknowledge Status BlockThe acknowledge status block indicates whether the payload data of the current packet was successfully transferred to the target device.• Acknowledge status (Ack’d): The value of the ARQN field of the next packet with the same AM_ADDR as the current packet. Possible values:• Yes = positive acknowledge (ACK)• No = negative acknowledge (explicit NAK)• Imp Nak = implicit NAK (acknowledge status not returned by target)• Unknown = unable to determine acknowledge statusIdle Time and Time Stamp BlockThe idle time and time stamp block provides timing information from the Merlin Mobile analyzer’s internal clock.• Idle time (Idle): The Idle field displays the time, in microseconds, between the end of the packet and the beginning of the next packet.• Time stamp (Time Stamp): Packets are timestamped to an accuracy of 100 nanoseconds. Time stamps are formatted as Seconds.Milliseconds Microseconds*10. You can find the elapsed time between two packets by calculating the difference between their Time Stamp values. The Time Stamp field occurs last in the packet row.7.1.3 Miscellaneous Packet Display ElementsThese elements may be found in the display for any type of packet:• Trigger location (if applicable): Merlin Mobile auto-matically indicates the trigger position in a Trace file with a red marker bar on the left edge of the number field of the trigger packet. The marker can be edited or removed, just like any other marker in a Trace file. The packet number field colors can be set so that the pre- and post-trigger packets are different colors, making them easily distinguishable.Figure 7-2:  Trigger packet
 73CATC MERLIN MOBILE 1.00 CHAPTER 7User’s Manual Decoding Trace DataDRAFTDRAFTDRAFTDRAFTDRAFTDRAFTDRAFTDRAFTDRAFTDRAFTDRAFTDRAFTDRAFTDRAFTDRAFT• Filtered packets: If a packet is filtered out of the recording, its location is marked by a grey, horizontal bar.• Errors: If errors occur on the bus or in packets or transac-tions, the fields that contain the errors are highlighted in red. A description of the error can viewed in the field’s tooltip, if it has one.• Warnings: Fields that contain warnings are highlighted in yellow. A description of the warning can viewed in the field’s tooltip, if it has one.7.2 Protocol-Level DecodingProtocol decoding presents a higher-level analysis of Bluetooth data. There are several ways to activate protocol-level decoding in Merlin Mobile:• Click on the button for the desired decoding level on the View Level toolbar.• Use the General tab of the Display Options dialog to set the Protocol Levels to Show.• Select the desired protocol decoding level from the View menu.• Use the Trace View menu (described on page 57) to set the view level.Selecting a protocol decoding level causes Merlin Mobile to look for the selected type of data in the Trace. If any is found, it is decoded and displayed.Protocol transmissions are made of one or more packets. Merlin Mobile displays the transmissions in order of initiation, meaning that the transmission that begins first in a recording is shown nearest the top of the Trace. The one that begins second is next, then the one that begins third, and so on. The order is determined by the position of the protocol’s starting packet; the position of its last packet is irrelevant to the order. Therefore, the packets, or subactions, that make up a protocol transmission will not necessarily be numbered consecutively.Each transmission is shown on a separate row in the Trace. Protocol rows can be expanded and collapsed to in order to show or hide lower protocol levels and packets, as explained in Section 6.2, “Expandable/Collapsible Rows and Fields” on page 53.Merlin Mobile can decode these protocol levels: • Link Manager Protocol (LMP) messages• Logical Link Control and Adaptation Protocol (L2CAP) messages• Service Discovery Protocol (SDP Msg) messages• Service Discovery Protocol (SDP Tra) transactions• Telephony Control Protocol Specification (TCS) messagesFigure 7-4:  Error fields are highlighted in red; warning fields are highlighted in yellowFigure 7-3:  Location of filtered packet is marked by the filter bar
74CATC MERLIN MOBILE 1.00 CHAPTER 7User’s Manual Decoding Trace DataDRAFTDRAFTDRAFTDRAFTDRAFTDRAFTDRAFTDRAFTDRAFTDRAFTDRAFTDRAFTDRAFTDRAFTDRAFT• Serial Cable Emulation Protocol (RFCOMM) commands• Object Exchange Protocol (OBEX) packets• AT commands• High-Level Data Link Control (HDLC) frames• Point-to-Point Protocol (PPP) packets• Bluetooth Network Encapsulation Protocol (BNEP) messages• Human Interface Device (HID) packetsAdditionally, users may create custom decoders for their own specific development needs. For more information about custom decoding, see Section 7.4, “CATC Decoder Scripting Files” on page 78.7.2.1 Protocol FieldsThe fields in protocol rows vary depending on the protocol data that is represented; however, they do all contain the following four fields:• Protocol Number Field (Protocol name): The first field for all protocol-level rows in a Trace is the protocol number field. The field heading displays the protocol name, and the value cell contains the protocol transmission number.• Transmitting Device (T): The value of this field indicates whether the transmission was sent from the master or slave device. Possible values are M (master) or S (slave).• Active Member Address (Addr): The value cell of this field contains the AM_ADDR of the slave device that the transmission was sent to or from.• Time (Time): The value of this field is the starting time for the first packet in the trans-mission, based on the packets’s time stamp. The time is formatted as Seconds.Millisec-onds.7.3 Protocol AssignmentsSometimes further configuration of protocol decoding is necessary in order to give Merlin Mobile the information that it needs to correctly decode the data. Merlin Mobile provides tools for manual configuration of the following information:• L2CAP Channel Decoding Assignments • L2CAP Channel Connection Assignments • RFCOMM Channel Assignments • OBEX Client/Server Status Assignments
 75CATC MERLIN MOBILE 1.00 CHAPTER 7User’s Manual Decoding Trace DataDRAFTDRAFTDRAFTDRAFTDRAFTDRAFTDRAFTDRAFTDRAFTDRAFTDRAFTDRAFTDRAFTDRAFTDRAFT7.3.1 L2CAP Channel Decoding AssignmentsThe L2CAP Channel Decoding Assignments dialog and the Assigned to pop-up menu are used to manually configure L2CAP channel assignments (CIDs) for decoding L2CAP messages.Manual assignments are saved with the Trace, so they will be used the next time the Trace is opened and L2CAP messages are decoded.L2CAP Channel Decoding Assignments dialogThis dialog shows the current L2CAP channel assignments for the active Trace file, and also provides a way to configure unassigned and manually assigned channels. Note that the list will not display data for L2CAP messages with CIDs from 0x000-0x003F.The columns of data in the list contain this information:• From message #: The L2CAP message # for each master or slave transmission in the Trace that first uses the particular CID.• AmAddr: The Active Member Address (AM_ADDR) for the device.• master or slave: The device role.• CID = #: The channel identifier (CID).• Protocol name: The protocol currently assigned for the channel. ‘- ??? -’ indicates that the channel is unassigned.To access the dialog and configure channel assignments:Step 1 Decode L2CAP messages in a Trace by selecting View > Levels > L2CAP Message Level from the menu bar, or by pressing the L2CAP button on the toolbar.L2CAP messages will be decoded by Merlin Mobile.Step 2 Open the L2CAP Channel Decoding Assignments dialog by selecting View > Decoding assignments from the menu bar, or by right-clicking anywhere in the Trace and selecting Decoding assignments from the Trace View pop-up menu.The dialog will open.Step 3 To find out whether a channel assignment was taken from the recording, manually assigned, or is unassigned, click on the row in the list. The assignment source will be shown in the Assignment Info area below the list. Manually assigned and unassigned channels can be configured by the user.Note: To change an assignment that was taken from the data in the recording, use the Assigned to menu, which is described below.Step 4 Change channel assignments by selecting the assignment in the list, then clicking one of the protocol buttons on the right side of the dialog OR selecting a protocol from the File Base Assignments drop-down list and clicking the Set button.
76CATC MERLIN MOBILE 1.00 CHAPTER 7User’s Manual Decoding Trace DataDRAFTDRAFTDRAFTDRAFTDRAFTDRAFTDRAFTDRAFTDRAFTDRAFTDRAFTDRAFTDRAFTDRAFTDRAFTThe Trace will update to reflect the new assignments.Note: Manual channel assignments can be removed all at once using the Remove All User assignments command on the Assigned to menu, which is described below.Assigned to MenuThe Assigned to menu both shows the current channel assignment and is used to change assignments for decoding L2CAP messages.Access this menu by left-clicking on an A (Assignment) field in an L2CAP row in the Trace.Note: This menu can be accessed only if there are decoded L2CAP messages in the Trace. Additionally, L2CAP messages with CIDs from 0x000-0x003F do not contain the A field.The top line of the menu shows the current assignment.• To change the assignment, select a different protocol from the menu.• Select Remove All User assignments to return all user-defined protocol assignments to their default settings.7.3.2 L2CAP Channel Connection AssignmentsThis dialog lists the current L2CAP master/slave channel connection assignments for the active Trace file, and is also used to manually configure L2CAP channel connection assignments for decoding L2CAP messages.Manual assignments are saved with the Trace, so they will be used the next time the Trace is opened and L2CAP messages are decoded.The columns of data in the Master and Slave lists contain this information:• From message #: The L2CAP message # for each master or slave transmission in the Trace that first uses the particular CID.• CID = #: The channel identifier (CID).• Protocol: The currently assigned Protocol/Service Multiplexor (PSM) for the device.• cntd: Indicates that the device is configured as connected for decoding.To access the dialog and configure channel assignments:Step 1 Decode L2CAP messages in a Trace by selecting View > Levels > L2CAP Message Level from the menu bar, or by pressing the L2CAP button on the toolbar.L2CAP messages will be decoded by Merlin Mobile.Step 2 Open the Connections dialog by selecting View > L2CAP connections from the menu bar, or by right-clicking anywhere in the Trace and selecting L2CAP connections from the Trace View pop-up menu.The dialog will open.
 77CATC MERLIN MOBILE 1.00 CHAPTER 7User’s Manual Decoding Trace DataDRAFTDRAFTDRAFTDRAFTDRAFTDRAFTDRAFTDRAFTDRAFTDRAFTDRAFTDRAFTDRAFTDRAFTDRAFTTo find out whether a connection assignment was taken from the recording, manually assigned, or is unassigned, click on an item in the Master list. The assignment source will be shown in the Slave channel information area below the list. Assignments that were not taken from the recording can be configured by the user.Step 3 To change unassigned or manual assignments, select an address from the Am_Addr drop-down list, then choose a master channel from the Master list. Select a slave channel in the Slave list, then click the Connect or Disconnect button.The Trace will update to reflect the new assignments.7.3.3 RFCOMM Channel Decoding AssignmentsThe RFCOMM Channel Assignment dialog is used to manually configure RFCOMM channel assignments (DLCIs) for decoding RFCOMM commands.Manual assignments are saved with the Trace, so they will be used the next time the Trace is opened and RFCOMM commands are decoded.RFCOMM Channel Assignment dialogThis dialog shows the current RFCOMM channel assignments for the active Trace file, and also provides a way to configure unassigned and manually assigned channels.The columns of data in the list contain this information:• From message #: The RFCOMM command row # for each master or slave transmission in the Trace that first uses the particular DLCI.• AmAddr: The Active Member Address (AM_ADDR) for the device.• dlci = #: The Data Link Connection Identifier (DLCI).• Protocol name: The protocol currently assigned for the channel. ‘- ??? -’ indicates that the channel is unassigned.To access the dialog and configure channel assignments:Step 1 Decode RFCOMM commands in a Trace by selecting View > Levels > RFCOMM Message Level from the menu bar, or by pressing the RFCOMM button on the toolbar.RFCOMM commands will be decoded by Merlin Mobile.Step 2 Open the RFCOMM Channel Assignment dialog by selecting View > RFCOMM channel assignments from the menu bar, or by right-clicking anywhere in the Trace and selecting RFCOMM channel assignments from the Trace View pop-up menu.The dialog will open.
78CATC MERLIN MOBILE 1.00 CHAPTER 7User’s Manual Decoding Trace DataDRAFTDRAFTDRAFTDRAFTDRAFTDRAFTDRAFTDRAFTDRAFTDRAFTDRAFTDRAFTDRAFTDRAFTDRAFTStep 3 To find out whether a channel assignment was taken from the recording (determined by protocol decoder), manually assigned, or is unassigned, click on the row in the list. The assignment source will be shown in the Assignment Info area below the list. Manually assigned and unassigned channels can be configured by the user.Step 4 Change channel assignments by selecting the assignment in the list, then clicking one of the protocol buttons on the right side of the dialog OR selecting a protocol from the Protocol Decoder Assignments drop-down list and clicking the Set button.The Trace will update to reflect the new assignments.7.3.4 OBEX Client/Server Status Decoding AssignmentsIf the beginning sequence of OBEX traffic is not recorded in a Trace, the client/server status of the transmitting devices will not be preserved in the recording. In this case, you can use the Decode As menu to manually assign the status.Decode As MenuThe Decode As menu is used to assign OBEX client or OBEX server status for decoding OBEX protocols.Access this menu by left-clicking on a Type field in an OBEX row in the Trace.Note: This menu can be accessed only if there are decoded OBEX protocols in the Trace.The current status setting is the one with a checkmark next to it.If the menu items are greyed out, it means that Merlin Mobile was able to determine the status based on data in the Trace. In this case, you cannot manually change the status.If the menu items are active, it means that Merlin Mobile was unable to determine the status from the Trace data. In this case, you can change the status, if necessary.• To change the status assignment, select a different status from the menu.7.4 CATC Decoder Scripting FilesSeveral CATC Decoder Scripting files are included with the Merlin Mobile software installation. These script-based decoders are tools to decode and display Bluetooth message and protocol data. They can be used as-is or modified by the user. Additionally, you may create custom decoders. The decoder scripts are written in the CATC Scripting Language (CSL). For more information about CSL, please consult CATC Scripting Language (CSL) Reference Manual for Merlin Mobile, available on the CATC website at http://www.catc.com.
 79CATC MERLIN MOBILE 1.00 CHAPTER 7User’s Manual Decoding Trace DataDRAFTDRAFTDRAFTDRAFTDRAFTDRAFTDRAFTDRAFTDRAFTDRAFTDRAFTDRAFTDRAFTDRAFTDRAFTDecoder scripts for Merlin Mobile are distributed in the \Scripts folder in the Merlin Mobile installation directory. They are identifiable by the .dec extension. Merlin Mobile looks in the \Scripts directory and automatically loads all of the .dec files that it finds. To prevent a particular decoder from being loaded, change its extension to something other than .dec or move it out of the \Scripts directory.Note: If you plan to modify any of the scripts that come with Merlin Mobile, it's a good idea to make backups of the original scripts before making changes.7.5 Custom Decoder ScriptsCustom decoders can be created for Merlin Mobile using the CATC Scripting Language (CSL). This allows you to add specialized decoders to suit your own, specific development needs. CSL is used to write and edit the decoder scripts, which should then be placed in Merlin Mobile's \Scripts directory. For your convenience, the \Scripts directory contains a folder labeled User Defined, into which you may place your custom decoders.When Merlin Mobile finds custom decoders in its \Scripts directory, it automatically loads them. It also adds the decoders' icons to the View Level toolbar, and lists the decoders under View > Levels > File Based Decoding Levels on the menu bar. If an icon is not defined in a decoder script, Merlin Mobile uses the default User-Defined   icon.
80CATC MERLIN MOBILE 1.00 CHAPTER 7User’s Manual Decoding Trace DataDRAFTDRAFTDRAFTDRAFTDRAFTDRAFTDRAFTDRAFTDRAFTDRAFTDRAFTDRAFTDRAFTDRAFTDRAFT
 81CATC MERLIN MOBILE 1.00 CHAPTER 8User’s Manual ReportsDRAFTDRAFTDRAFTDRAFTDRAFTDRAFTDRAFTDRAFTDRAFTDRAFTDRAFTDRAFTDRAFTDRAFTDRAFTCHAPTER 8: REPORTSMerlin Mobile offers several tools for compiling specific information from Trace files.8.1 File InformationThe File Information report (Figure 8-1) provides basic information about the active Trace file. Included in the report are the file's name, Trace file comment, recording channel, number of packets recorded, trigger packet, application and analyzer details, number of markers, recording options settings, totals by packet type, and licensing information for the Merlin Mobile unit that was used to make the recording. The report may also include, if applicable, details about whether the file was saved as a portion of another file, and whether the file was converted from an older file format. Reports for converted files don't contain recording options information.To access the File Information report:Step 1 Select Report > File Information from the menu bar or click the File Information   icon on the toolbar.Figure 8-1:  File Information report
82CATC MERLIN MOBILE 1.00 CHAPTER 8User’s Manual ReportsDRAFTDRAFTDRAFTDRAFTDRAFTDRAFTDRAFTDRAFTDRAFTDRAFTDRAFTDRAFTDRAFTDRAFTDRAFTThe File Information report will open.To save a File Information report:Step 1 Click the Save As... button in the File Information report.The Save As dialog will open.Step 2 Enter a file name.Step 3 Click Save.The file will be saved as a text (.txt) file.8.2 Error SummaryThe Error Summary report (Figure 8-2) details errors detected during a recording session for the active file.To access the Error Summary report:Step 1 Select Report > Error Summary from the menu bar or click the Error Report   icon on the toolbar.The Error Summary report will open.Clicking on the packet numbers or the up/down scroll arrows will take you directly to an error in the Trace display. The arrows also allow you to navigate through all the occurrences of a particular error.To save an Error Summary report:Step 1 Click the Save As... button in the Error Summary report.The Save As dialog will open.Figure 8-2:  Error Summary report
 83CATC MERLIN MOBILE 1.00 CHAPTER 8User’s Manual ReportsDRAFTDRAFTDRAFTDRAFTDRAFTDRAFTDRAFTDRAFTDRAFTDRAFTDRAFTDRAFTDRAFTDRAFTDRAFTStep 2 Enter a file name.Step 3 Click Save.The file will be saved as a text (.txt) file.8.3 Timing and Bus Usage CalculatorThe Timing and Bus Usage Calculator (Figure 8-3) calculates the time span, data throughput and bit error rates for a range of packets in a Trace file.To perform timing and bus usage calculations:Step 1 Select Report > Timing Calculations from the menu bar or click the Timing Calculations   icon on the toolbar.The Timing and Bus Usage Calculator will open.Step 2 Set the range of packets that will be used in the calculations by entering a starting packet number in the From packet text box and put an ending packet number in the To packet text box.Step 3 (Optional) Enter an AM_ADDR (active member address) or choose one from the drop-down list in the AM Address combo box to perform calculations for a specific device.Step 4 Press Calculate to perform the calculation.Here are descriptions of the formulas used for the calculations:• Total timeThe total time for a range of packets is the elapsed time between the 'From' and 'To' packets, calculated as the To Packet time minus the From Packet time. • ThroughputFigure 8-3:  Timing and Bus Usage CalculatorTotal Time TimeTo TimeFrom–=
84CATC MERLIN MOBILE 1.00 CHAPTER 8User’s Manual ReportsDRAFTDRAFTDRAFTDRAFTDRAFTDRAFTDRAFTDRAFTDRAFTDRAFTDRAFTDRAFTDRAFTDRAFTDRAFTThe throughput calculation only includes actual payload data bytes. The access code, packet header, payload header, and payload CRC of each packet are not included in the calculation. The result is given in units of bits per second (bps). The throughput is calculated by multiplying the total payload bytes in the packet range by 8, then dividing the product by the total time.• Bit error rate The Bit Error Rate (BER) is displayed in units of parts per million (ppm). Bit errors are calculated by multiplying the uncorrectable payload errors by 2, then taking that product and adding it to the correctable header errors plus the correctable payload errors.The bit error rate is calculated by dividing the bit errors by the total bits and multiplying the quotient by 1,000,000.Note: Since the analyzer can't determine the number of bit errors in packet payloads not protected by FEC, the payloads of these packet types are not included in the bit error rate calculation: DH1, DH3, DH5, AUX1, and HV3.Note: The analyzer can't determine the exact number of bit errors present when an uncorrectable payload error is detected in a packet protected by 2/3 FEC (HV2, DM1, DM3, DM5, FHS). As a statistical approximation, when an uncorrectable payload error is detected in such a packet, it is assumed that there were two bit errors present.8.4 Traffic SummaryThe Traffic Summary report (Figure 8-4) displays a categorized summary of the traffic in the active Trace.To access the Traffic Summary report:• Select Report > Traffic Summary from the menu bar or click the Traffic Summary button   on the toolbar. The Traffic Summary report appears in its own window.Throughput Total  payload bytes in packet range 8×Total Time-------------------------------------------------------------------------------------------------=Bit Errors Correctable header errors Correctable payload errors 2Uncorrectable payload errors×()++=Bit Error Rate Bit errorsTotal bits-----------------------1,000,000×=
 85CATC MERLIN MOBILE 1.00 CHAPTER 8User’s Manual ReportsDRAFTDRAFTDRAFTDRAFTDRAFTDRAFTDRAFTDRAFTDRAFTDRAFTDRAFTDRAFTDRAFTDRAFTDRAFTBy default, the Traffic Summary window is docked along the bottom half of the Merlin Mobile display area. If desired, it may be moved out of the application window to another area of the screen.8.4.1 Traffic Summary TreeThe left pane of the Traffic Summary Report window (Figure 8-5) displays, in the form of a tree diagram, a summary of the packets and protocols in a Trace file. The top level of the tree contains branches for Entire Trace and Packets in Range (x to y). Both branches can be expanded to show additional levels of the Trace data, including packets and protocols. Most levels can be expanded further, providing more and more specific summaries of the transactions. Note: Higher-level protocol types won't appear in the tree diagram unless they have been decoded in the Trace file.Selecting a level in the tree will cause a detailed summary of the packets in the selected level to be displayed in the right pane of the Traffic Summary Report window. Entire TraceThe Entire Trace branch can be expanded to display these levels:• Frequency distribution — Summarizes the traffic by frequency range.• Baseband Packets — Summarizes the traffic at the packet level. This level can be further expanded to show the packets categorized by AM_ADDR (member address) and role (master and slave).• Higher-level transaction types — If higher-level transactions have been decoded in the Trace file, they will be summarized in the Traffic Summary Tree. This level can Figure 8-4:  Traffic Summary reportFigure 8-5:  Traffic Summary Tree
86CATC MERLIN MOBILE 1.00 CHAPTER 8User’s Manual ReportsDRAFTDRAFTDRAFTDRAFTDRAFTDRAFTDRAFTDRAFTDRAFTDRAFTDRAFTDRAFTDRAFTDRAFTDRAFTbe further expanded to show the packets categorized by message type, AM_ADDR (member address) and role (master and slave).• Errors — Summarizes the traffic by error type.Packets in Range (x to y)By default, the Packets in Range branch is set to summarize the entire Trace. For example, if there are a total of 500 packets in the Trace, then the packet range will be set as 0 to 499. To view the summary for a specific range of packets, you must select the packet range (see “Select a Packet Range” on page 87 to find out how).The Packets in Range branch summarizes only the baseband packets for the specified range.8.4.2 Traffic Summary DetailsThe right pane of the Traffic Summary window (Figure 8-6) displays a detailed summary of the traffic category that is selected in the Traffic Summary Tree. Figure 8-6 shows a summary for all of the LMP transmissions in a Trace.The Traffic Summary Details pane can be used to navigate directly to specific events in an active Trace file. To jump to the first occurrence of a particular event type, click on one of the numbers in the Total column. To go to the first occurrence of an event for a specific device, click on the number in the appropriate AmAddr column. Depending on the branch level that is selected in the Traffic Summary Tree, the columns will refer to different data in the Trace. Use the View Options menu (page 87) to change the display of the data in the Traffic Summary Details pane.8.4.3 Traffic Summary ToolbarThe Traffic Summary toolbar contains commands for working with Traffic Summary reports.Figure 8-6:  Traffic Summary Details paneButton ActionOpens the Save As dialog, which is used to save the active file to a unique file nameOpens the default e-mail program and inserts a text version of the Traffic Summary into an e-mail message
 87CATC MERLIN MOBILE 1.00 CHAPTER 8User’s Manual ReportsDRAFTDRAFTDRAFTDRAFTDRAFTDRAFTDRAFTDRAFTDRAFTDRAFTDRAFTDRAFTDRAFTDRAFTDRAFT8.4.4 Traffic Summary View OptionsView Options MenuClick the View Options   button on the Traffic Summary toolbar to access the View Options menu. The options on the menu are used to change the display of the data in the Traffic Summary Details pane of the Traffic Summary window.The options can be either enabled (indicated by a check mark next to the option name) or disabled (no check mark).These are the options available on the View Options menu:• Grid lines — Shows or hides the grid lines in the Traffic Summary Details pane.• Row selection — Enables or disables selection of an entire packet, message, or event type row.• Tight columns — When enabled, causes the columns in the Details pane to occupy a minimal amount of space. When disabled, the columns, altogether, will span the width of the Details pane.Text Version of a Traffic Summary ReportTo view a text version of all of the data in the Traffic Summary Report:• Click the Text button   on the Traffic Summary toolbar.An HTML text version of the report will be displayed in the Traffic Summary window.Select a Packet RangeA packet range can be specified so that you can view a summary of the baseband packets for just the packets included in the range.To select the packet range:Step 1 Click the Select range button   on the Traffic Summary toolbar.The Select range dialog will open.Prints the Traffic Summary report in text formatDisplays the Traffic Summary report as HTML textOpens the View Options menuOpens the Select Range dialog, providing a way to define a range of packets to represent in the Traffic Summary reportButton Action
88CATC MERLIN MOBILE 1.00 CHAPTER 8User’s Manual ReportsDRAFTDRAFTDRAFTDRAFTDRAFTDRAFTDRAFTDRAFTDRAFTDRAFTDRAFTDRAFTDRAFTDRAFTDRAFTStep 2 Enter a starting packet or message number on the “From” line, or select a marker from the drop-down list, and enter an ending packet or message number on the “To” line of the dialog, or select a marker from the drop-down list. Clicking the Reset Range to Whole Trace button sets the From and To entries to include all of the packets in the Trace.Note: If there are no markers set in the Trace file, the drop-down lists of markers will not be available.Step 3 Press OK.The Traffic Summary Tree will refresh, and the Packets in Range branch will show the packet range that you selected.Display an Event in a TraceThe Traffic Summary Details pane of the report window can be used to go directly to the first occurrence of a packet, message, or other event type.• Select the packet, message, or event type total to jump to its first occurrence in the Trace file.Once you have selected a packet, message, or event type total, you can use the Go tool on the Traffic Summary toolbar.• Use the scroll arrows to scroll through all occurrences of the packet, message, or event in the Trace file. • Enter a number in Go text box and press the Go button to jump directly to a specific occurrence in the Trace file.8.4.5 Traffic Summary FilesSave a Traffic Summary ReportTo save a Traffic Summary Report:Step 1 Click the Save As   icon on the Traffic Summary toolbar.The Save As dialog will open.Step 2 Enter a filename and location for the report.Step 3 Press Save.The report will be saved in HTML text format.E-mail a Traffic Summary ReportTo e-mail a Traffic Summary Report:Step 1 Click the E-mail   icon on the Traffic Summary toolbar.Merlin Mobile will insert an HTML text version of the report into an e-mail message in the computer's default e-mail program.Step 1 Fill in message recipient information and send the message.
89CATC MERLIN MOBILE 1.00 CHAPTER 8User’s Manual ReportsDRAFTDRAFTDRAFTDRAFTDRAFTDRAFTDRAFTDRAFTDRAFTDRAFTDRAFTDRAFTDRAFTDRAFTDRAFTPrint a Traffic Summary ReportTo print a Traffic Summary Report:Step 1 Click the Print   icon on the Traffic Summary toolbar.A text version of the report will be printed.
90CATC MERLIN MOBILE 1.00 CHAPTER 8User’s Manual ReportsDRAFTDRAFTDRAFTDRAFTDRAFTDRAFTDRAFTDRAFTDRAFTDRAFTDRAFTDRAFTDRAFTDRAFTDRAFT
 91CATC MERLIN MOBILE 1.00 CHAPTER 9User’s Manual Contact and Warranty InformationDRAFTDRAFTDRAFTDRAFTDRAFTDRAFTDRAFTDRAFTDRAFTDRAFTDRAFTDRAFTDRAFTDRAFTDRAFTCHAPTER 9: CONTACT AND WARRANTY INFORMATION9.1 Contact InformationMailing addressComputer Access Technology CorporationCustomer Support2403 Walsh AvenueSanta Clara, CA 95051-1302USAOnline supporthttp://www.catc.com/E-mail addresssupport@catc.comTelephone support+1/800.909.2282 (USA and Canada)+1/408.727.6600 (worldwide)Fax+1/408.727.6622 (worldwide)Sales informationsales@catc.com9.2 Warranty and LicenseComputer Access Technology Corporation (hereafter CATC) warrants this product to be free from defects in material, content, and workmanship, and agrees to repair or replace any part of the enclosed unit that proves defective under these terms and conditions. Parts and labor are warranted for one year from the date of first purchase.The CATC software is licensed for use on a single personal computer. The software may be copied for backup purposes only.This warranty covers all defects in material or workmanship. It does not cover accidents, misuse, neglect, unauthorized product modification, or acts of nature. Except as expressly provided above, CATC makes no warranties or conditions, express, implied, or statutory, including without limitation the implied warranties of merchantability and fitness for a particular purpose.
92CATC MERLIN MOBILE 1.00 CHAPTER 9User’s Manual Contact and Warranty InformationDRAFTDRAFTDRAFTDRAFTDRAFTDRAFTDRAFTDRAFTDRAFTDRAFTDRAFTDRAFTDRAFTDRAFTDRAFTCATC shall not be liable for damage to other property caused by any defects in this product, damages based upon inconvenience, loss of use of the product, loss of time or data, commercial loss, or any other damages, whether special, incidental, consequential, or otherwise, whether under theory of contract, tort (including negligence), indemnity, product liability, or otherwise. In no event shall CATC's liability exceed the total amount paid to CATC for this product.CATC reserves the right to revise these specifications without notice or penalty.

Navigation menu