Comtec Systems CT-170 LCD Monitor User Manual Introduction Main Features
Comtec Systems Co., Ltd. LCD Monitor Introduction Main Features
users manual

1
USER
USERUSER
USER’S GUIDE
S GUIDES GUIDE
S GUIDE

2
OPERATION.
This equipment has been tested and found to comply with the limits for a Class B digital
device, pursuant to part 15 of the FCC Rules. These limits are designed to provide
reasonable protection against harmful interference in a residential installation. This
equipment generates, uses and can radiate radio frequency energy and, if not installed
and used in accordance with the instructions, may cause harmful interference to radio
communication. However, there is no guarantee that interference will not occur in a
particular installation. If this equipment does cause harmful interference to radio or
television reception, which can be determined by turning the equipment off and on, the
user is encouraged to try to correct the interference by one or more of the following
measures :
- Reorient or relocate the receiving antenna.
- Increase the separation between the equipment and receiver.
- Connect the equipment into an outlet on a circuit difference from that to which
the receiver is connected.
- Consult the dealer of an experienced radio/TV technician for help.
NOTE : The manufacturer is not responsible for any radio or TV interference
caused by unauthorized modifications to this equipment. Such
modifications could void the user’s authority to operate the
equipment.
3
4
How to install …………………………….. 2
How to control the menu on screen …………………………. 4
Pivot
(*option) …………………………….. 8
Power Supply and Power Management System ………………. 9
A Trouble Shooting ……………………………….. 10
Specifications ………………………………. 10
Mode Supported ……………………………….. 12
Analog PC Graphics Port Signal Descriptions ………………….. 13
Base Ass’y Alteration and Installation …………………………… 14
5
vivid screen and crisp color.
• It is easy to control the resolution from SXGA(1280*1024), XGA(1024*768),
SVGA(800*600) to VGA (640*480). It detects and configures automatically
the optimal characteristics of input frequency.
• While receiving the output RGB video signal from computer, the monitor can
display it up to 16 million colors.
• The user can set screen automatically by one-touch pressing. (AUTO key)
• The user can adjust the angle(90°) of the TFT LCD monitor according to
customer’s convenience. It must install Pivot software to make 4:3 frame to
3:4 frame.
• It provides a power saving function (DPMS).
• It provides “Plug-and-Play” so you may install this monitor easily.
• The emission of electromagnetic waves that can be harmful to the human
body has been minimized.

6
• Do not open the inside of the monitor. If needed, contact with A/S center.
2. If the following problem occurs, disconnect the plug and contact our
service center.
• When some or whole part of monitor is exposed to excessive humidity or
moisture.
• In case there is a strange sound, smell, or smoke inside the monitor.
If the power cable is damaged, be extremely careful when disconnecting the
plug.
How to install
1. Attention Point to install
• Do not use this product on an unstable place.
- This product may fall, causing serious damage to the product.
• In the well-ventilated place, it is a good place where it is installed.
• Do not put the monitor in a damp place and close to a heating installation.
- It may be cause of electric shock and breakdown.
• Do not put the metal or heavy goods on this product.
- It may be cause of electric shock, a fire and breakdown.
• Do only install the power cord and adapter in the enclosed box.

7
• Driver Diskette
• Pivot Install CD(*option)
If any of the above items are damaged or missing, please contact your
customer service center as soon as possible.
3. Installing the monitor
3.1 Connecting the LCD monitor with computer
1. Turn off the computer before connecting the monitor
2. Connect the signal cable from PC signal port to Monitor signal port.
3. Connect the audio cable from PC audio port to Monitor audio port.
4. Plug in the AC/DC adapter, and connect the DC connector to the DC
Port on the back of the monitor.
5. Turn on the computer, then “Plug-and-Play” will run automatically. At
this time, you should install the driver in driver diskette.
• Speaker Cable
8
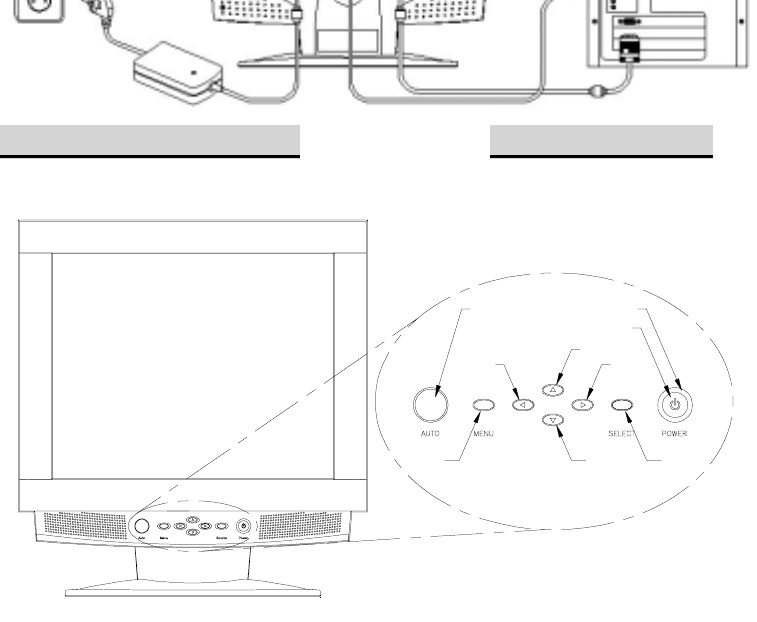
How to control the menu on screen
<Picture 2>
1. Names of front side, and their use
• AUTO Key (AUTO) : Operates AUTO Adjust without opening OSD menu.
• Menu Key (MENU) : Opens the OSD display and closes OSD menu
display.
<Picture 1>
UP
DOWN
RIGHT
LEFT
POWER SWITCH
POWER LED
SELECTMENU
AUTO

9
value of the selected item in submenu.
/ opens Volume menu without opening OSD menu.
• Select Key (SELECT) : Select Icons or functions in OSD menu and
submenu.
• Power Key (POWER) : Turns the monitor on / off.
• Power LED : Green(normal operation). Yellow (DPMS mode).
No MENU on display OSD Main MENU Sub-MENU
AUTO Operates auto -
configuration Directly - -
MENU Opens OSD Main menu Closes OSD main
menu Returns to OSD
main menu
UP Opens Brightness menu - -
DOWN Opens Contrast menu - -
RIGHT Opens Volume menu Moves icon to the
Right in OSD Menu Increases the value
of the selected item
LEFT Opens Volume menu Moves icon to the
Left in OSD Menu Decreases the value
of the selected item
SELECT - Selects item
Selects value and
return to OSD main
Menu
<Picture 3>
10
<Picture 3>
<Picture 4>
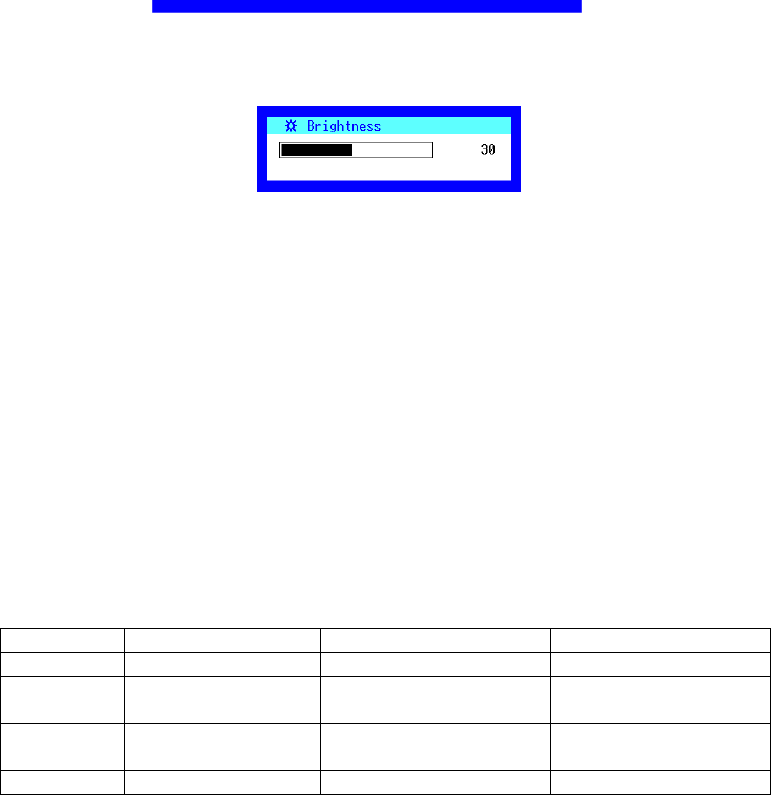
2. How to Control OSD menu
The OSD menu appears when the user presses the OSD calling button(MENU).
The user can select the function and configure the selected function that best fits
the computer environment. If no item is selected after the OSD menu is brought
up, it automatically disappears after 15 seconds.
Moreover, the user can operate directly Brightness Menu, Contrast Menu and
Volume Menu without calling OSD Menu.
ITEM Contents RIGHT LEFT
Brightness Adjusts brightness Gets brighter Gets darker
Contrast Adjusts contrast
Screen color becomes
more vivid Screen color becomes
duller
H-Position Adjusts horizontal
screen position Moves screen to the
right Moves screen to the
left
V-Position Ad
j
usts vertical Moves screen to Moves screen to

11
H-Position position of OSD g
OSD
V-Position Adjusts vertical
position of OSD Moves OSD to upward Moves OSD to
Downward
Reset Recovers the
default value RIGHT : Recovers the
default value LEFT : No change
Auto Adjust Sets to auto -
adjustment RIGHT : Sets to
Auto adjustment LEFT : No change
• The OSD is in English only.
• When the cable is disconnected, the monitor will change into DPMS mode.
Then a “Power Saving Mode” message will appear.
• If you entered a mode that does not support the monitor, the message
“ Input Not Supported” will appear.
Ref.) For the best display quality, select ‘Auto Adjust’ in closing windows screen.
It automatically adjusts vertical, horizontal position and screen noise as optimum.
This ‘Auto Adjust’ does not support motion pictures and works only when the
image fully appears on the screen.
3. Reset Function
The user can use the Reset function on OSD to adjust to the default value.
At this time, color information (Brightness,R,G,B,Contrast) are changed to
factory
default value and Auto Config operates automatically after Reset for optimum
quality.
12
Phase (*1) OSD V-Position 50
(*1) : If you operate auto adjust, only these items will be set automatically.
( Color information will not be affected by auto adjust.)
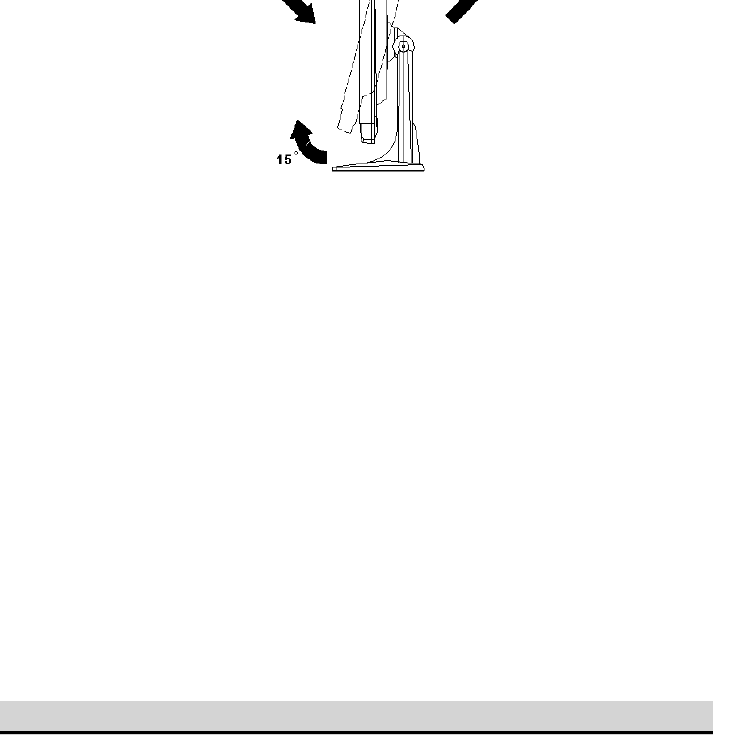
Pivot (*option)
13
<Picture 5>
If you purchase pivot-enable model, you can set your monitor to portrait mode
mechanically. You can rotate the screen to 90°
°°
°for your convenience with simple
procedure.
To rotate monitor, pull the front panel (up to 15°
°°
°) and turn to clock-wise direction.
When you are working with word processor, image editor, web browser for web
surfing , or etc, this pivot-enable can make your job more effective.
Power Supply and Power Management System
< Landscape > < Portrait >

14
Current : 5.0A
2. Power Management System
For the power management system of this monitor, DPMS(Display Power
Management Signaling) of VESA(Video Electronic Standard Association) is
included in the system. This reduces power consumption when the monitor is
not being used. The color or LED lamp varies according to power
consumption mode.
State LED Color Power consumption(AC)
Normal Use Green light Around 44W
Save mode Yellow light Around 4W
Ref.) To use the power saving function, follow the steps described below: Start >
Settings > Control Panel > Display > Screen Saver > Energy Saving Features
> Select “shut off monitor” > and adjust the time.
15
! Check if the power supply is connected.
! The screen is out of focus
or noise occurs.
! Adjust the OSD menu that fits the
computer.
(Use Reset, Auto, Phase keys and so on)
! Check the compatibility between computer
and the monitor.
! Change screen resolution
! Window 98(95): Select control panel ⇒
display ⇒ Setting.
! Setup DPMS mode ! Window 98(95): Select Window Saver or
BIOS-SETUP of computer.
(Refer to Service manual)
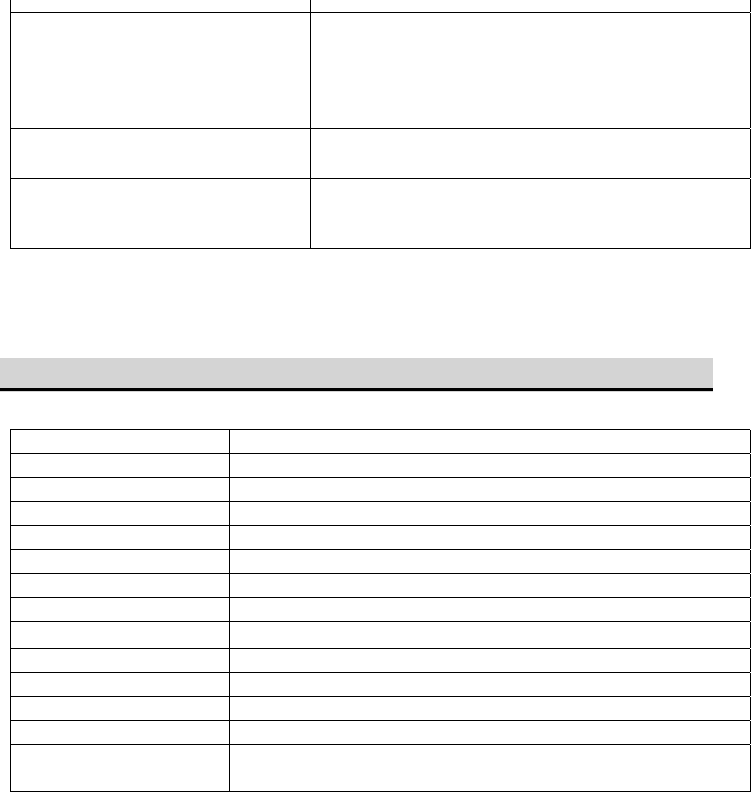
Specifications
SPEC Description
Panel Type TFT
Panel Size 17.0”
Resolution 1280 * 1024
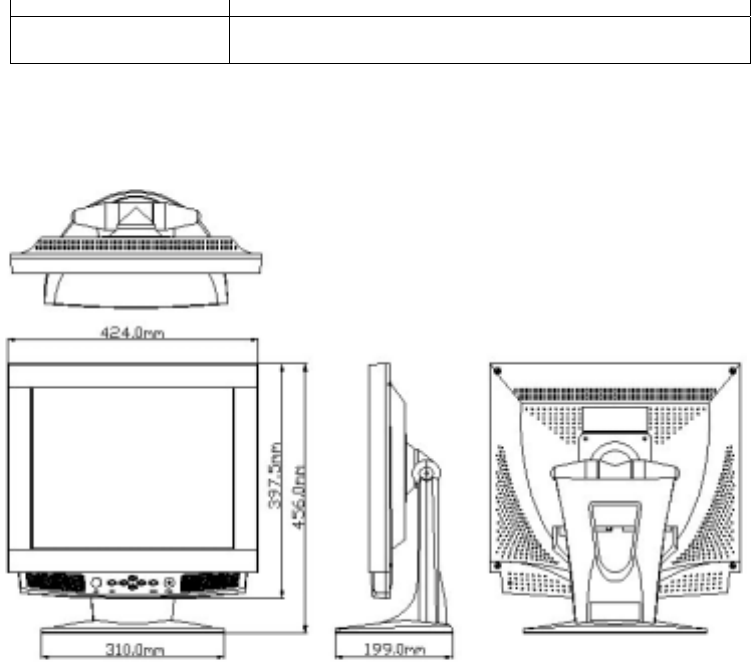
Display Size 337.92(W) * 270.33(H) mm
Dot Pitch 0.264mm * 0.264mm
Color 16.7M colors (24bit color mode)
Contrast TYP : 350 : 1 CR
Brightness TYP : 200 cd/m²
Compatibility IBM, MAC
Input Signal Analog R.G.B (0.7VP-P)
Connection Cable D-sub 15 PIN
Plug-and-Play VESA DDC 1,2B
Power Management
System VESA DPMS (Display Power Management Signaling)
16
Card
User’s Adjustment Brightness, Contrast, H/V Position, OSD H/V Position,
Color RGB, Auto Config, Reset, Clock, Phase,
<Picture 6>

17
800 600@60Hz 37.879 60.317
800*600@72Hz 48.077 72.188
800*600@75Hz 46.875 75.000
1024*768@60Hz 48.363 60.004
1024*768@70Hz 56.476 70.069
XGA
1024*768@75Hz 60.023 75.029
1280*1024@60Hz 63.981 60.020
1280*1024@70Hz 74.620 70.000
1280*1024@72Hz 76.752 72.000
SXG
A
1280*1024@75Hz 79.976 75.025
EGA 640*350@70Hz 31.469 70.086
CGA 640*400@70Hz 31.469 70.086
EGA 720*350@70Hz 31.469 70.086
DOS 720*400@70Hz 31.469 70.806
XGA 1024*768@72Hz 57.515 72.1
IBM
VGA 640*480@67Hz 35.000 66.667
SVGA 832*624@75Hz 49.728 74.551
1024*768@60Hz 48.780 60.001 XGA 1024*768@75Hz 60.241 74.927
MAC

18
5 GND Ground
6 GND-R Ground
7 GND-G Ground
8 GND-B Ground
9 - -
10 GND Ground
11 - -
12 SDA DDC SDA
13 Hsync Horizontal Sync
14 Vsync Vertical Sync
15 SCL DDC SCL
19
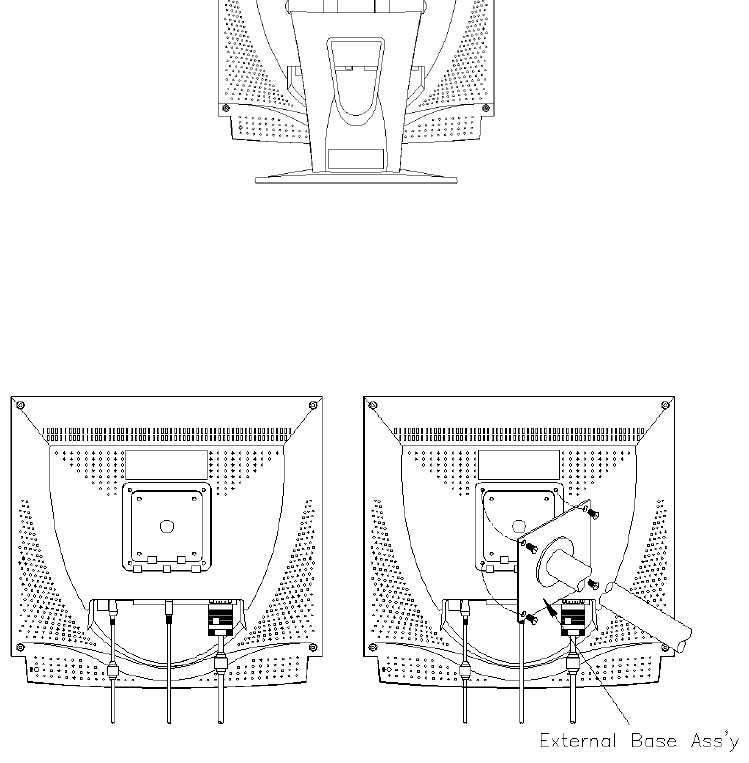
( Monitor back-side )
1. Turn off the monitor power and disconnect power cable from the outlet.
2. Put a safe cloth on a flat floor and place the monitor on it.
3. Disconnect screws and pull the base Ass’y.
20