Contec URC350 REMOTE CONTROL TRANSMITTER User Manual USERS MANUAL
Contec, LLC. REMOTE CONTROL TRANSMITTER USERS MANUAL
UserManual.wiki
>
Contec
>
URC350 User Manual
USERS MANUAL
Navigation menu
Upload a User Manual
Namespaces
Wiki Guide
HTML
PDF
Info
Views
User Manual
Discussion / Help
Navigation
![Model SRC-350 Universal Remote Control Programming and Operating Instructions (Part # 9-542-901) To have a clearer idea of the features and capabilities of your remote control, take a moment to read these instructions. Save for future reference. © 2006 Contec Holdings, LLC, Rev. 08/06 1. Introduction Your SRC-350 remote control is simple to program, easy to use, and can operate two (2) devices, which include: • Residential Gateways (RG) • Televisions The SRC-350 remote control allows access to the features available in your Residential Gateway by using an IR (infrared) and UHF (ultra high frequency) signal, depending on how it is programmed. When the SRC-350 is set to operate in IR mode, you must point it directly at your Residential Gateway in order to operate it. When the SRC-350 is set to operate in UHF mode, it can operate your Residential Gateway from anywhere in your home. Before you can use your SRC-350, it must be programmed (set-up) to operate your Residential Gateway and TV. Programming your remote control is simple following the steps outlined in this manual. 2. Before Getting Started Some of the special features and buttons on your SRC-350 remote control are as follows: Point and Press® Programming Lets you program your TV without codes. For more information, see Sections 7 and 9. Memory Guard® Eliminates reprogramming after battery changes. Time Out If the same button is pressed and held for 30- seconds, your remote control will turn itself off automatically. This extends the battery life should the remote become lodged under or between heavy objects, for example sofa cushions. 3. Installing / Replacing Batteries Install two (2) new “AA” batteries as indicated by the diagram in the battery compartment. When the batteries become low and need to be replaced, the [LED] button will not illuminate normally or at all during use. When this happens, replace the existing batteries with two (2) new “AA” batteries to restore normal operation to the remote control. 4. Setting the Remote Control Operating Mode The SRC-350 remote control operates older as well as newer Residential Gateway models. To allow for this, the remote can be set to operate in either SRC-200 Compatibility Mode (to operate like the older remote control) or SRC-350 Native Mode. The default Operating Mode is SRC-200 Compatibility Mode. Programming the Remote Control Operating Mode using your SRC-350 keypad: 1. In this order, press and hold the [SELECT] button, then the [MUTE] button. Hold both buttons down together until the [LED] button illuminates. Release both buttons as soon as the [LED] button illuminates. 2. Press and release the [D] key. The [LED] button temporarily turns off. Releasing the key causes the [LED] button to light up again. You can now set the correct Operating Mode. 3. Press [0] to select SRC-200 Compatibility Mode or [1] to select SRC-350 Native Mode. The [LED] button will blink three-times and go out. The new Operating Mode is stored in the device. Important! Changing the Operating Mode from [0] to [1] will reset the Gateway ID within the SRC-350 back to [000]. Once changes have been made, the remote control resumes normal operation. If the value entered was not valid (a keypress other than [0] or [1]) the [LED] button indicates the error by turning off immediately,](https://usermanual.wiki/Contec/URC350/User-Guide-696565-Page-1.png)
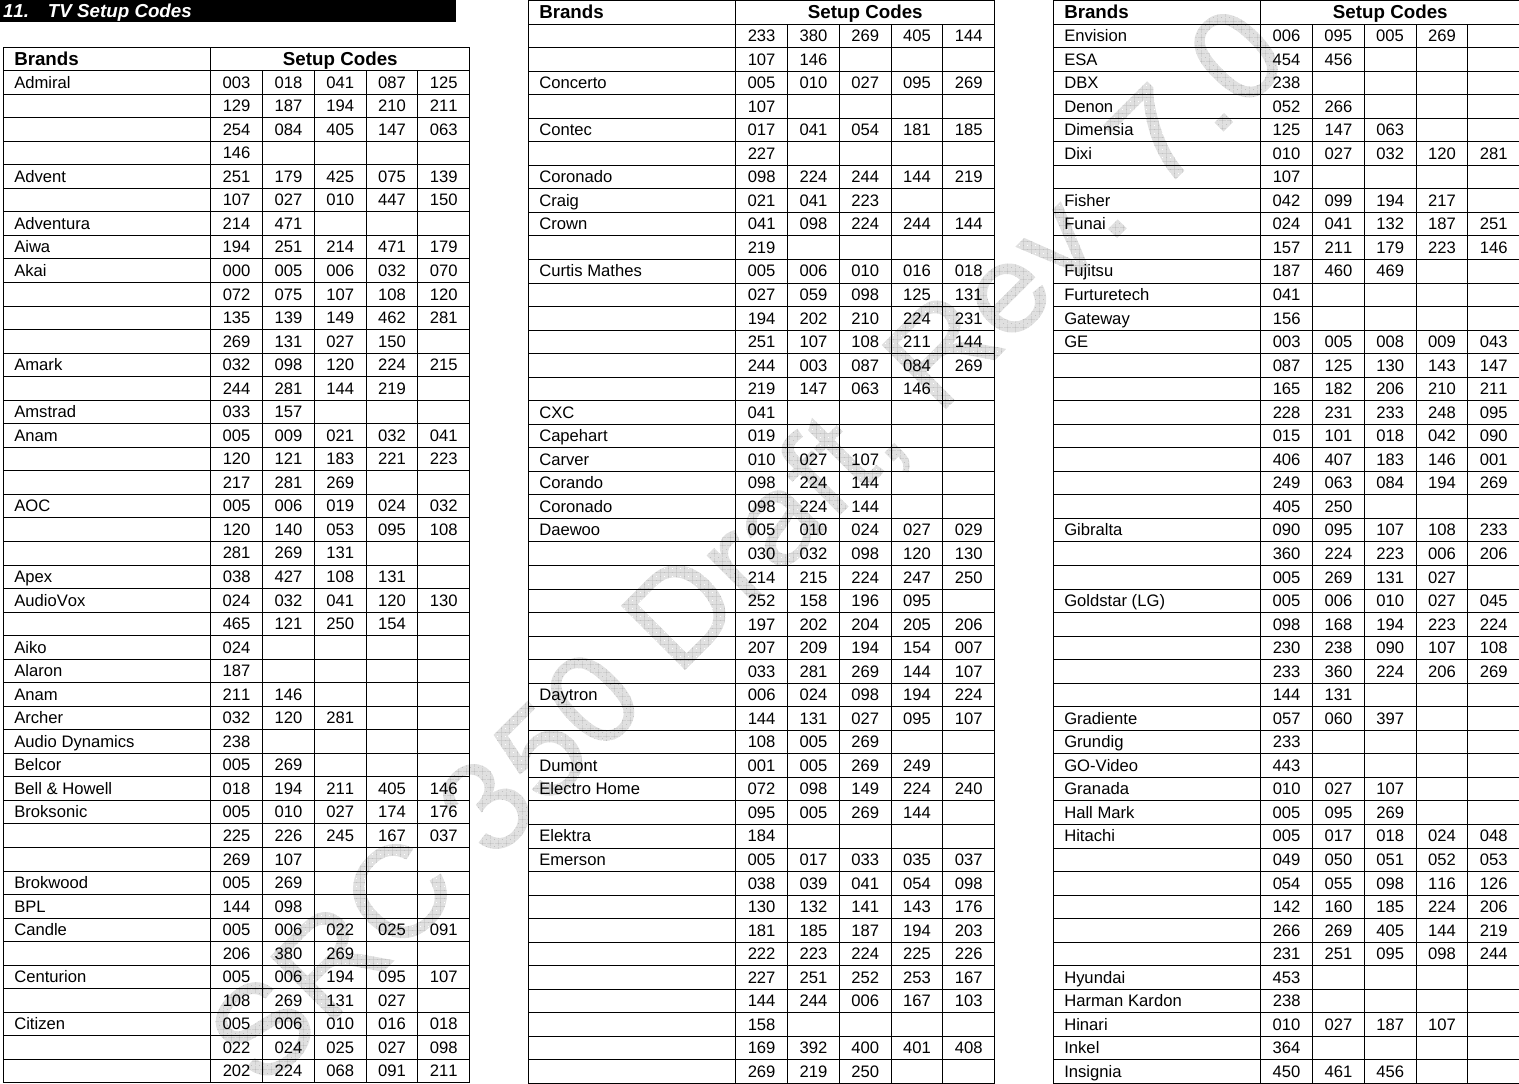
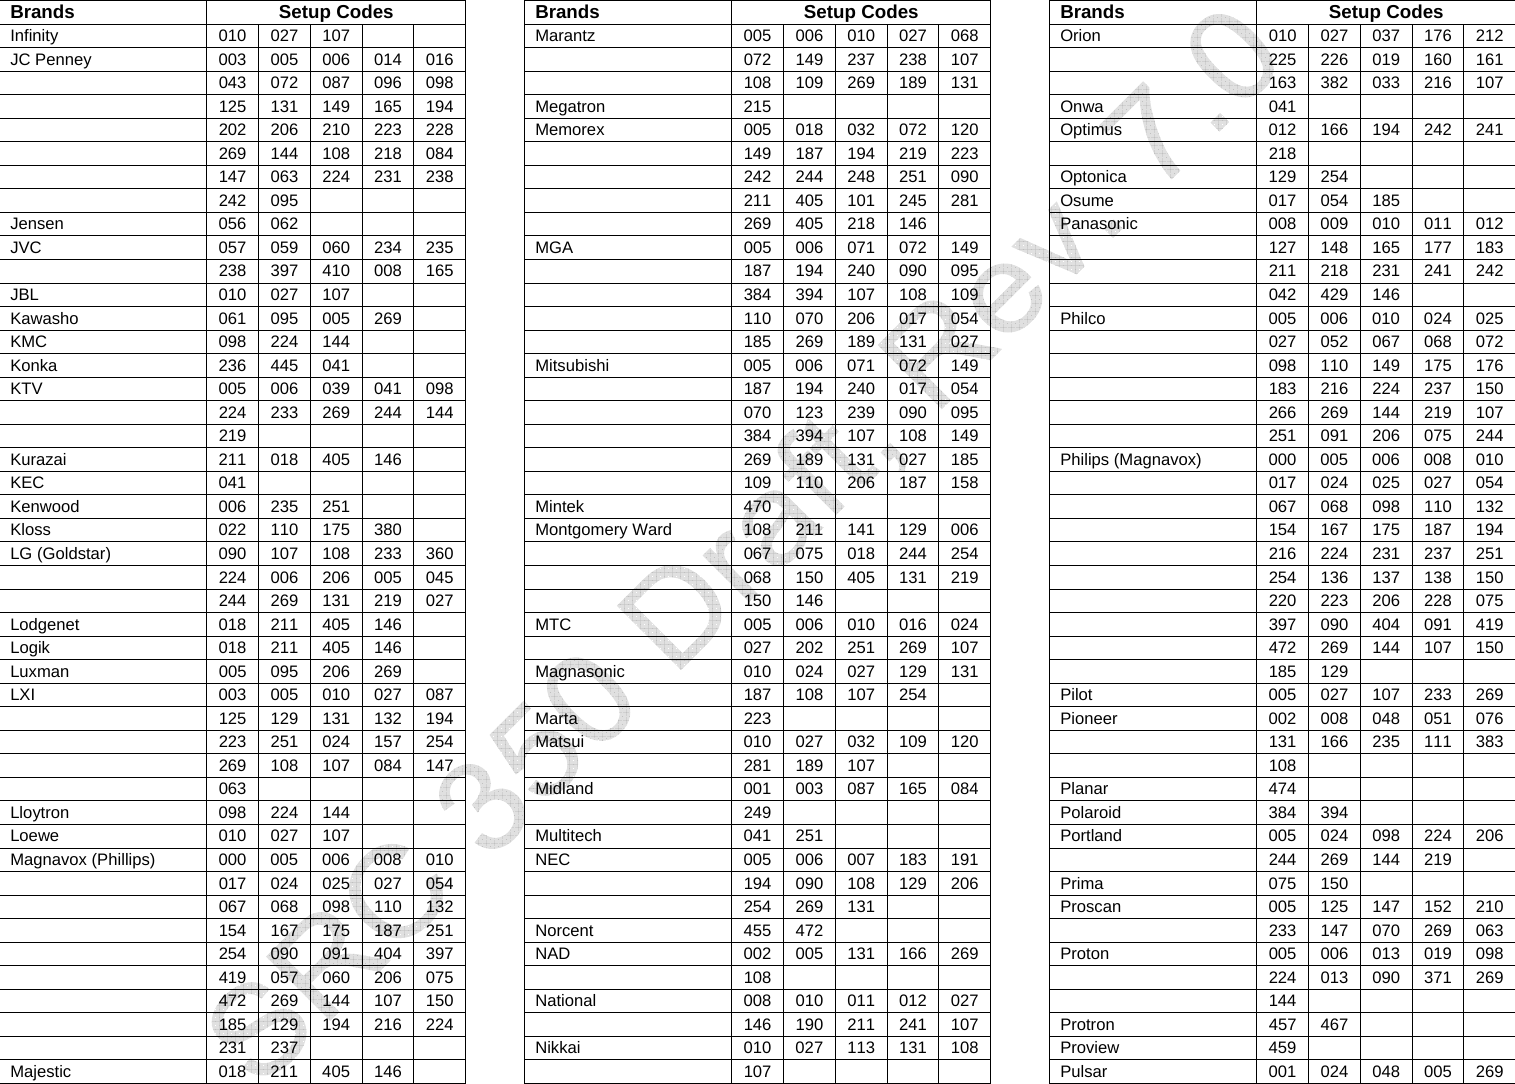
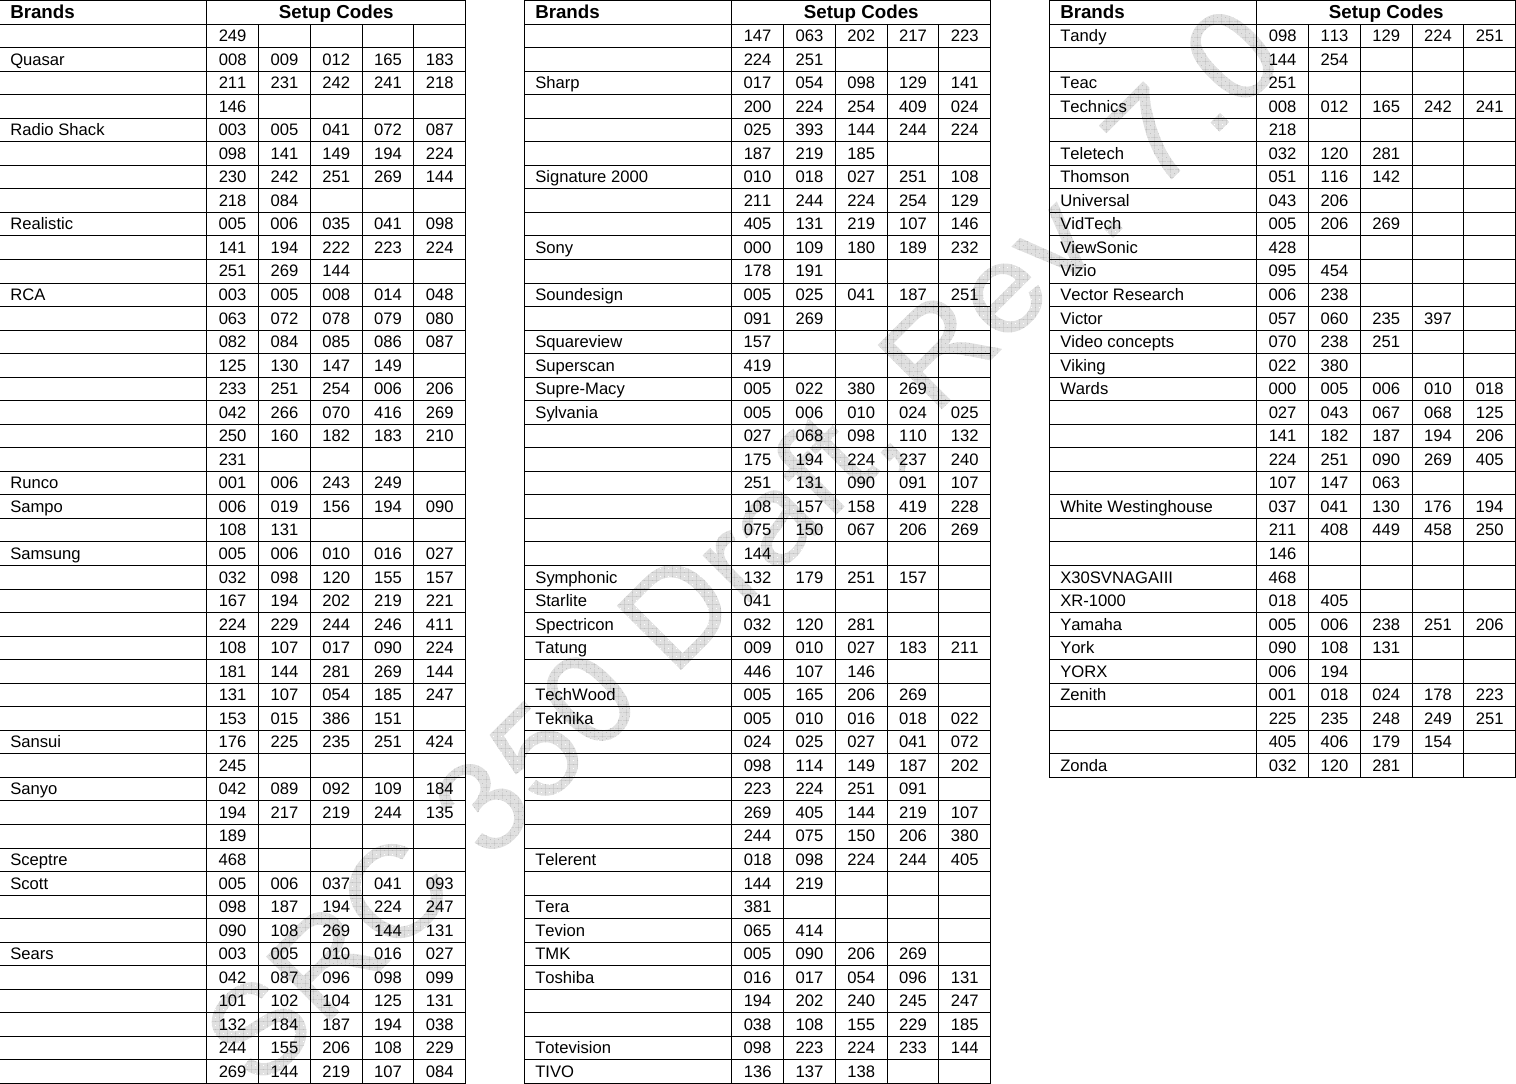
![and the remote returns to normal operation. All values in the device remain unchanged. LED Playback of the Remote Control Operating Mode: 1. In this order, press and hold the [SELECT] button, then the [MUTE] button. Hold both buttons down together until the [LED] button illuminates. Release both buttons as soon as the [LED] button illuminates. 2. Press [INFO], then [D]. The [LED] button will “blink back” the Remote Control Operating Mode. Please note that for the numeric [0], the [LED] button will blink in fast-sequence. 5. Setting The Gateway ID The Gateway ID allows your remote to talk to your Residential Gateway. The Gateway ID that you program into the remote must also be programmed into your Residential Gateway. The Gateway ID programming mode allows you to set the Gateway ID in both. Refer to your Residential Gateway User Guide for instructions on determining the Gateway ID in your Residential Gateway. NOTE: The SRC-350 Remote Control must be pointed at the Residential Gateway to program the Gateway ID in the Residential Gateway. All Remote Controls must be programmed with the same Gateway ID in order to communicate with the Gateway. Programming the Gateway ID using your SRC-350 keypad: 1. In this order, press and hold the [SELECT] button, then the [MUTE] button. Hold both buttons down together until the [LED] button illuminates. Release both buttons as soon as the [LED] button illuminates. 2. Press and release the [B] key. The [LED] button temporarily turns off. Releasing the key causes the [LED] button to light up again. You can now set the correct Gateway ID. 3. Enter the three-digit code assigned to your RG. The valid range is 004 - 999 for SRC-350s set to SRC-350 Native Mode. For SRC-350s set to SRC-200 Compatibility Mode, the valid range is 004 - 255. Enter a three-digit number, even if it contains leading zeroes. Examples of valid values are: 009, 012, 354, or 988. If you entered the Gateway ID correctly, the [LED] button will blink three-times and go out. If the value was not entered successfully, the [LED] button will go off and the remote control will return to normal operation. Repeat the steps above to try again. LED Playback of the Remote Control Gateway ID: 1. In this order, press and hold the [SELECT] button, then the [MUTE] button. Hold both buttons down together until the [LED] button illuminates. Release both buttons as soon as the [LED] button illuminates. 2. Press [INFO], then [B]. The [LED] button will “blink back” the Remote Control Gateway ID. Please note that for the numeric [0], the [LED] button will blink in fast-sequence. 6. Setting The Remote Control ID The Remote Control ID allows you to control your Residential Gateway TV viewing on a specific TV in your home. Your Network Service Provider uses the following table when programming your Remote Control ID to work with each TV in your household: Remote Control ID Operates TV Mode 0 Local TV1 - TV in same room as the RG. Remote is set to operate in IR mode. IR 1 Remote TV1 - TV in a different room than the RG. UHF 2 TV2 (remote TV). UHF 3 TV3 (3-stream models only). UHF Programming the Remote Control ID using your SRC-350 keypad: 1. In this order, press and hold the [SELECT] button, then the [MUTE] button. Hold both buttons down together until the [LED] button illuminates. Release both buttons as soon as the [LED] button illuminates. 2. Press and release the [A] key. The [LED] button temporarily turns off. Releasing the key causes the [LED] button to light up again. You can now set the correct Remote Control ID. 3. Enter the single-digit Remote Control ID from the table above. The [LED] button will blink three-times and go out. The new Remote Control ID is stored in the device. Note: Valid single-digit codes are 0, 1, 2, or 3. If you entered an invalid sequence or a 30-second lapse between button presses occurs, the [LED] button will turn off and the remote control will return to normal operation. LED Playback of the Remote Control ID: 1. In this order, press and hold the [SELECT] button, then the [MUTE] button. Hold both buttons down together until the [LED] button illuminates. Release both buttons as soon as the [LED] button illuminates. 2. Press [INFO], then [A]. The [LED] button will “blink back” the Remote Control ID. Please note that for the numeric [0], the [LED] button will blink in fast-sequence. 7. Programming Your TV Your Network Service Provider programs your remote control to work with your TV by way of a TV Setup Code. The TV Setup Code is a specific code for each brand and model of TV. When a TV Setup Code is set, the remote control is ready to operate the TV. The TV Setup Codes can be programmed manually, or they can be auto-scanned. Each method is described below.](https://usermanual.wiki/Contec/URC350/User-Guide-696565-Page-2.png)
![Code-Entry (Manual) TV Programming using your SRC-350 keypad: 1. Turn on your TV. 2. In this order, press and hold the [SELECT] button, then the [MUTE] button. Hold both buttons down together until the [LED] button illuminates. Release both buttons as soon as the [LED] button illuminates. 3. a. Locate the three-digit code for your brand in the TV Setup Code list (Section 11) and enter it on the keypad of the remote control. Entry of the correct code will cause your TV to turn off. If multiple codes are listed for your brand, you may have to enter several different codes until your TV turns off. b. As soon as you have entered a three-digit code that turns your TV off, press [MUTE]. 1. If the TV turns back on, press [SELECT] to lock in the code. The [LED] button will blink three-times and go out. Or 2. If the TV does not turn back on, enter a different three-digit setup code until your TV turns back on. Then press [SELECT] to lock in the code. The [LED] button will blink three-times and go out. Point and Press® (Auto-Scan) TV Programming using your SRC-350 keypad: This method allows you to program your remote control without codes using the [S] or [T] buttons ("Power" function during programming). For more information on this method as well as other buttons you can program your remote with, see Section 9. 1. Turn on your TV. 2. In this order, press and hold the [SELECT] button, then the [MUTE] button. Hold both buttons down together until the [LED] button illuminates. Release both buttons as soon as the [LED] button illuminates. 3. Press [S] one step at a time until your TV turns off. Each time you press the [S] button, the [LED] button will blink. As soon as your TV turns off, stop pressing the [S] button. 4. Press [MUTE]. If your TV... a. Turns back on, press [SELECT] to lock in this code. The [LED] button will blink three-times and go out. Or b. Does not turn back on, press the [T] button one step at a time until your TV turns back on. Each time you press the [T] button, the [LED] button will blink and remain illuminated. Once you have found a code that turns the device on / off, press [SELECT] to lock in this code. The [LED] button will blink three-times and go out. Note: Given the size of the TV Setup Code library in your remote control, it will take several minutes to cycle through all the codes when using the Point and Press Programming method. 8. TV Code Number Readback To identify the three-digit TV Setup Code stored under the Point and Press® programming method, follow these steps using the remote control keypad… 1. In this order, press and hold the [SELECT] button, then the [MUTE] button. Hold both buttons down together until the [LED] button illuminates. Release both buttons as soon as the [LED] button illuminates. 2. Press [INFO], then [C]. The [LED] button will “blink back” the code numbers, with a 1-second interval between each digit of the code. Please note that for the numeric [0], the [LED] button will blink in fast-sequence. Example: For TV Setup Code “130”, the remote will blink 1 time, then 3 times, then in a fast-sequence for the 0. 9. Additional Programming Information 1. The [LED] button will illuminate while the remote is in a programming mode. In the absence of a keypress entry, the [LED] button will stop illuminating after 30 seconds and the remote will exit the programming mode. 2. The Point and Press® (Auto-Scan) Programming method allows you to program your remote control without using codes. Instead, the remote control automatically finds the correct TV setup code using certain buttons / commands that you select. Once you have found a setup codes that operates your TV, you then lock it in. 3. When using the Point and Press® Programming Method, there are several important points to remember: • There may be several codes that turn your TV on / off (or perform other functions). • It may take several minutes for the remote to find the correct code that turns your TV on / off (or performs another selected function). During this time, the [LED] button will illuminate. 4. When programming the remote control using the [S] or [T] buttons (Power function) under the Point and Press® Programming method, you may find a code that turns your TV off but not back on. If this happens… • The correct TV code has not been found as you may you may have a code that operates some but not all of the functions of your TV. Continue pressing [S] until your TV turns back on. OR • You may have gone past the correct matching code. Try pressing [T] one press at a time until you find a code that turns your TV back on.](https://usermanual.wiki/Contec/URC350/User-Guide-696565-Page-3.png)
![5. When using the Point and Press® Programming method, you can also program your remote using the following buttons: • [VOL S] – to “go forward” through the codes using the “VOL S” function on your TV. • [VOL T] – to “go back” through the codes using the “VOL T“ function on your TV. Note: When you find the correct code, the volume of the TV being programmed will increase or decrease. FCC Warning: This device complies with Part 15 of the FCC Rules. Changes or modifications to this device not expressly approved by the parties responsible for compliance could void the user’s authority to operate this remote control. Rev. 08/06 © 2006, Contec Holdings, LLC Point and Press® and Memory Guard® are registered trademarks of Contec Holdings, LLC MOTOROLA and the stylized M logo are registered in the U.S. Patent and Trademark office](https://usermanual.wiki/Contec/URC350/User-Guide-696565-Page-4.png)
![10. Using Your SRC-350 Remote ControlPower: Powers TV on/off and tunes to default channel. Page up and down: Pages up and down in program guide and menus. Select: Selects highlighted option. Day forward: Moves program guide forward 24 hours. Video on demand fast forward if service is available. Ch: Changes program channel. Last: Tunes to last channel. PPV: Displays pay per view menu. VOD: Launches VOD (video on demand) menu, if provided. Menu: Displays main menu. A, B, C, D and Text: Reserved for Teletext and interactive TV functions, if service is available. Number pad: Selects channels Back: Moves back to the previous screen. [LED]: Lights when any button on the remote is pressed. Guide: Displays interactive program guide. Exit: Exits the current function. Directionals: Moves cursor in program guide and menus. Info: Displays current channel and program guide and menus. Day back: Moves program guide back 24 hours. Video on demand rewind control if service is available. Play, Record, Pause, Stop: Video on demand controls if service is available. Fav: Scans through favorite channels. Vol: Adjusts TV volume. Call ID: Opens caller ID screen. Text: Home: Displays web browser, if provided. Mute: Mutes and unmutes TV sound.](https://usermanual.wiki/Contec/URC350/User-Guide-696565-Page-5.png)