Contec URC550 UNIVERSAL REMOTE CONTROL User Manual USERS MANUAL
Contec, LLC. UNIVERSAL REMOTE CONTROL USERS MANUAL
UserManual.wiki
>
Contec
>
URC550 User Manual
USERS MANUAL
Navigation menu
Upload a User Manual
Namespaces
Wiki Guide
HTML
PDF
Info
Views
User Manual
Discussion / Help
Navigation
![Models IRC 550* / URC 550* Universal Remote Control Programming and Operating Instructions To have a clearer idea of the features and capabilities of your remote control, take a moment to read these instructions. Save for future reference. © 2006 Contec Holdings, LLC, Rev. 05/06 1. Introduction Your IRC550 and URC550 universal remote controls are simple to program, easy to use, and can operate up to five (5) devices, which include: SAT Satellite receivers TV Televisions DVD DVD AUDIO Audio receivers, amplifiers, CD players AUX VCRs, 2nd TV, 2nd DVD, 2nd Audio device * Model IRC550 transmits to each of the above electronic devices using an infrared (IR) signal. Model URC550 transmits both infrared (IR) and radio-frequency (RF) signals to your DSR receiver, but IR-only signals to all your other devices. The RF capability of the URC550 permits it to remotely operate a DSR receiver that’s enclosed in a home-entertainment unit or located where an unobstructed line-of-site between the remote and DSR is not possible. Model URC550 is supplied is with the premium-featured HD / DVR DSR500 series receivers. The remote is ready to use with your Star Choice satellite receiver, but before you can use your remote control to operate the other devices listed above, it must first be programmed (set-up). 2. Before Getting Started Some of the special features and buttons on your remote control are as follows: Point and Press® Programming Lets you program your TV, VCR, DVD, AUDIO devices without codes. For more information, see Sections 5 and 14. Memory Guard® Eliminates reprogramming after battery changes. Time Out If the same button is pressed and held for 30- seconds, your remote control will turn itself off automatically. This extends the battery life should the remote become lodged under or between heavy objects, for example sofa cushions. 3. Installing. Replacing Batteries Install two (2) new “AA” batteries as indicated by the diagram in the battery compartment. When the batteries become low and need to be replaced, the [SAT] button will blink several times and the remote control will not transmit the function for the button that was pressed. When this happens, simply replace the existing batteries with two (2) new “AA” batteries to restore normal operation to the remote control. 4. If You Have More Than One Satellite Receiver Your remote control is set at the factory to control all of the functions on your Motorola satellite receiver. However, if you have more than one satellite receiver, you may want to prevent the remote control in one room from affecting the satellite receiver in another room. To prevent this kind of interference, you must "pair" each remote control with each receiver by assigning a new "address" to each combination. This “address” assignment is made using your remote control as follows: 1. Press the [SAT] button to select the remote control’s SAT mode. 2. Press the [Options] button to display the Options screen on your TV. 3. On the Options screen, use the [▲], [▼], [◄], [►] buttons to highlight the Change System Settings / System Setup option, then press [Enter]. 4. On the Systems Setting / Setup screen, use the [▲], [▼], [◄], [►] buttons to highlight the Change Installation Settings / System Settings (applies to DSR 5xx, 207, 317 receivers) option, then press [ENTER].](https://usermanual.wiki/Contec/URC550/User-Guide-677210-Page-1.png)
![5. On the System Settings (applies to DSR 5xx, 207, 317 receivers) screen, use the [▲], [▼], [◄], [►] buttons to highlight the Installation Settings option, then press [ENTER] 6. On the Installation Settings screen, use the [▲], [▼], [◄], [►] buttons to highlight the Remote Control Address option, then press [ENTER] 7. Once you are on the Remote Control Address screen, disregard the instructions on the screen and follow these steps using the remote control keypad…. a. In this order, press and hold the [MUTE] button, then the [ENTER] button. Hold both buttons down together until the mode buttons illuminate in rotation (i.e. SAT Æ TV Æ DVD Æ AUDIO Æ AUX Æ SAT…). Release both buttons as soon as the mode buttons illuminate. b. Enter any one of the following addresses: [000], [001], [002], [003], [004], [005], [006], [007]. Entry of the 3-digit of each address stores the address automatically and causes the mode buttons to blink and go out. c. Press the [ENTER] button to set the same address in your Satellite Receiver. The new address will be displayed in the upper right corner of your TV screen. d. Exit from the Remote Control Address screen. 5. Programming Your TV, DVD, AUDIO Devices Code-Entry Programming 1. Turn on all the electronic devices (TV, DVD, AUDIO) you want to program the remote to operate. Using the remote control keypad…. 2. In this order, press and hold the [ENTER] button, then the [MUTE] button. Hold both buttons down together until the mode buttons illuminate in rotation (i.e. SAT Æ TV Æ DVD Æ AUDIO Æ AUX Æ SAT…). Release both buttons as soon as the mode buttons illuminate. 3. a. To program your TV, locate the 3-digit code for your brand in the TV Setup Code list and enter it on the keypad of the remote control. Entry of the correct code will cause your TV to turn off. If multiple codes are listed for your brand, you may have to enter several different codes until your TV turns off. b. As soon as you have entered a 3-digit code that turns your TV off, press [MUTE]. 1. If the TV turns back on, press [ENTER] to lock in the code. The mode buttons will blink 3-times and go out. Or 2. If the TV does not turn back on, enter a different 3-digit setup code until your TV turns back on. Then press [ENTER] to lock in the code. The mode buttons will blink 3-times and go out. 4. To program your DVD, refer to the DVD Setup Code lists and repeat steps 2 and 3 above. 5. To program your AUDIO devices, refer to the AUDIO Setup Code list and repeat steps 2 and 3 above. Point and Press® Programming This method allows you to program your remote control without codes using the [S] or [T] buttons ("Power" function during programming). For more information on this method as well as other buttons you can program your remote with, see Section 14. 1. Turn on all the electronic devices (TV, DVD, AUDIO) you want to program the remote to operate. Using the remote control keypad…. 2. In this order, press and hold the [ENTER] button, then the [MUTE] button. Hold both buttons down together until the mode buttons illuminate in rotation (i.e. SAT Æ TV Æ DVD Æ AUDIO Æ AUX Æ SAT…). Release both buttons as soon as the mode buttons illuminate. 3. Press [S] one step at a time until one of your electronic devices turns off. Each time you press [S] button, the mode buttons will illuminate in rotation. As soon as one device turns off, stop pressing the [S] button. 4. Press [MUTE]. If the device that turned off... a. Turns back on, press [ENTER] to lock in this code. The mode buttons will blink 3-times and go out. Or b. Does not turn back on, press [T] one step at a time until that device turns back on. Each time you press the [T] button, the mode buttons will illuminate once in reverse rotation (AUX Æ AUDIO Æ DVD Æ TV Æ SAT Æ AUX). Once you have found a code that turns the device on / off, press [ENTER] to lock in this code. The mode buttons will blink 3-times and go out. 5. Repeat steps 2 to 4 above for each of the remaining electronic devices you wish to program the remote to operate. Note: Given the size of the code libraries in your remote control, it will take several minutes to cycle through all the codes when using the Point and Press Programming method. 6. Programming Your Auxiliary Device – VCR, 2nd TV, 2nd DVD, 2nd Audio Device 1. Turn on the electronic device (VCR, 2nd TV, 2nd DVD, 2nd AUDIO) you want to program as an AUXILIARY device. Using the remote control keypad….](https://usermanual.wiki/Contec/URC550/User-Guide-677210-Page-2.png)
![2. In this order, press and hold the [ENTER] button, then the [MUTE] button. Hold both buttons down together until the mode buttons illuminate in rotation (i.e. SAT Æ TV Æ DVD Æ AUDIO Æ AUX Æ SAT…). Release both buttons as soon as the mode buttons illuminate. 3. Press [ENTER] again. 4. Follow the Code Entry Programming (paragraph 3) or Point and Press Programming® (paragraphs 3 & 4) areas of Section 5 to program your AUX device. 7. Programming Your TV / VCR Combination 1. Turn on your TV / VCR combination device and set it to its TV mode. 2. Program your remote to operate the TV functions. Using the Code Entry Programming method described in Section 5, find a TV Setup Code that operates the TV functions (Power, Vol S/T, Mute, Ch S/T, 0-9) of your TV / VCR unit. 3. Set your combination device to its VCR mode and install a VHS tape. 4. Program your remote to operate the VCR functions. Using the Code Entry Programming method described in Section 5, enter, lock and test each 3-digit VCR Setup Code for your brand until a code is found that operates the transport functions (PLAY, STOP, REW, FWD, PAUSE, REC) of your TV / VCR unit. Before you can test for the correct VCR setup code, you must first press the [VCR] button first to put the remote in its VCR mode. 8. Programming Your TV / DVD or TV / VCR / DVD Combination 1. Turn on your TV / DVD combination device and set it to its TV mode. 2. Program your remote to operate the TV functions. Using the Code Entry Programming method described in Section 5, find a TV Setup Code that operates the TV functions (Power, Vol S/T, Mute, Ch S/T, 0-9) of your TV / DVD unit. 3. Set your combination device to its DVD mode and install a DVD. 4. Program your remote to operate the DVD functions. Using the Code Entry Programming method described in Section 5, enter, lock and test each 3-digit DVD Setup Code for your brand until a code is found that operates the transport functions (PLAY, STOP, REW, FWD, PAUSE, REC) of your TV / DVD unit. Before you can test for the correct DVD setup code, you must first press the [DVD] button to put the remote in its DVD mode. 5. Last, if you have a TV / VCR / DVD combination unit, you need to program your remote to operate the VCR functions. 6. Set your combination device to its VCR mode and install a VHS tape. 7. Using the Code Entry Programming method described in Section 5, enter, lock and test each 3-digit VCR Setup Code for your brand until a code is found that operates the VCR transport functions (PLAY, STOP, REW, FWD, PAUSE, REC) of your TV / DVD / VCR unit. Before you can test for the correct VCR setup code, you must first press the [VCR] button first to put the remote in its VCR mode. 9. Code Number Readback To identify the 3-digit TV setup codes stored under the Point and Press® programming method, follow these steps using the remote control keypad… 1. In this order, press and hold the [ENTER] button, then the [TV] button. Hold both buttons down together until the [TV] button illuminates. Release both buttons as soon as the [TV] button illuminates. 2. Press [INFO]. The mode buttons will “blink back” the code numbers, with a 1-second interval between each digit of the code. Please note that for the numeric “0”, the mode buttons will illuminate blink in fast-sequence. Example: For code “130”, the remote will blink 1 time, then 3 times, then in a fast-sequence for the 0. To identify the 3-digit SAT code, press [ENTER], then [SAT] as defined in step 1 above, then press [INFO]. To identify the 3-digit DVD code, press [ENTER], then [DVD] as defined in step 1 above, then press [INFO]. To identify the 3-digit AUDIO code, press [ENTER], then [AUDIO] as defined in step 1 above, then press [INFO]. To identify the 3-digit AUX code, press [ENTER], then [AUX] as defined in step 1 above, then press [INFO]. 10. Master Power Your remote has a Master Power feature that can be programmed so that a single press of the [POWER] button (in remote’s SAT mode) can turn all of your electronic devices on / off together. To program the Master Power feature, follow these steps using the remote control keypad: 1. In this order, press and hold the [ENTER] button, then the [POWER] button. Hold both buttons down together until the [SAT] button illuminates. Release both buttons as soon as the [SAT] button illuminates. 2. Press [1]. The [SAT] button will blink 3-times and go out. To use the Master Power feature, follow these steps: 1. Press [SAT] to select the remote’s SAT mode.](https://usermanual.wiki/Contec/URC550/User-Guide-677210-Page-3.png)
![2. Press [POWER] – the remote will turn on / off your SAT, TV, DVD, AUDIO an AUX devices with one button press. To reset the Master Power feature to its default setting, follow these steps using the remote control keypad: 1. In this order, press and hold the [ENTER] button, then the [POWER] button. Hold both buttons down together until the [SAT] button illuminates. Release both buttons as soon as the [SAT] button illuminates. 2. Press [0]. The [SAT] button will blink 3-times and go out. 11. Programming Volume Control When you first program your remote, volume / mute are controlled through your TV (except AUDIO which defaults to the AUDIO device). The volume control options in each mode of the remote are: Mode Volume Control Default Volume Control Options SAT TV (#1) SAT AUDIO AUX (2nd TV / Rec / Amp) TV TV (# 1) SAT AUDIO AUX (2nd TV / Rec / Amp) DVD TV (# 1) SAT AUDIO AUX (2nd TV / Rec / Amp) AUDIO - Rec / Amp Rec /Amp SAT TV AUX (2nd Rec / Amp) AUDIO - CD TV (# 1) SAT TV AUX (2nd Rec / Amp) AUX – VCR TV (# 1) SAT AUDIO (Rec / Amp) AUX - TV # 2 TV (# 2) SAT Mode Volume Control Default Volume Control Options AUDIO (Rec / Amp) AUX - DVD # 2 TV (# 1) SAT, AUDIO (Rec / Amp) AUX - Rec # 2 Rec / Amp # 2 SAT, TV AUX - CD #2 CD # 2 SAT , TV To control volume / mute through your Satellite receiver in the remote’s Satellite mode… 1. In this order, press and hold the [ENTER] button, then the [SAT] button. Hold both buttons down together until the [SAT] button illuminates. Release both buttons as soon as the [SAT] button illuminates. 2. Press [VOL S], then [SAT] for Satellite volume. The [SAT] button will blink 3-times and go out. To return volume control to your TV, repeat step 1, then press [VOL S], then [TV] in step 2. To return volume control to your TV, repeat step 1, then press [VOL S], then [TV] in step 2. 12. Operating Your Satellite Receiver To operate your Satellite receiver, press [SAT] to select the Satellite mode. Then refer to Section 15 for the operation of your Satellite receiver. 13. Operating Your Electronic Devices To operate your other electronic devices, press the mode button for the device you wish to operate, then refer to the table below for the available buttons / functions in each mode: Button Label TV Mode DVD Mode AUDIO Mode AUX Mode (VCR) Power Power Power Power Power Vol ▼/▲ Vol ▼/▲ Vol ▼/▲ (TV) Vol ▼/▲ Vol ▼/▲ (TV) Button Label TV Mode DVD Mode AUDIO Mode AUX Mode (VCR) Mute Mute Mute (TV) Mute Mute (TV) Ch ▼/▲ Ch ▼/▲ - Ch ▼/▲ 0 – 9 0 - 9 - 0 - 9 Last Last Ch - - Enter / OK Enter (in Menu) - - Video Source TV Input - TV / VCR Options Menu - - ▲,▼,◄,► ▲,▼,◄,► - - Guide Enter (after Ch entry) - - [] - Play Play – CD Play [] - Stop Stop - CD Stop [] - FF FF – CD FF [] - Rew Rew – CD Rew [] - Pause Pause- CD Pause [ ] - Rec Rec - CD Rec 14. Additional Programming Information 1. The mode buttons will illuminate in rotation (i.e. SAT Æ TV Æ DVD Æ AUDIO Æ AUX Æ SAT...) while the remote is in a programming mode. In the absence of a keypress entry, the mode buttons will stop illuminating after 30 seconds and the remote will exit the programming mode. 2. The Point and Press® (Auto-Scan) Programming method allows you to program your remote control without using codes. Instead, the remote control automatically finds the correct setup code using certain buttons / commands that you select. Once you have found a setup codes that that operates your device, you then lock it in. 3. When using the Point and Press® Programming Method, there are several important points to remember: • The order in which you program your electronic devices is not important.](https://usermanual.wiki/Contec/URC550/User-Guide-677210-Page-4.png)
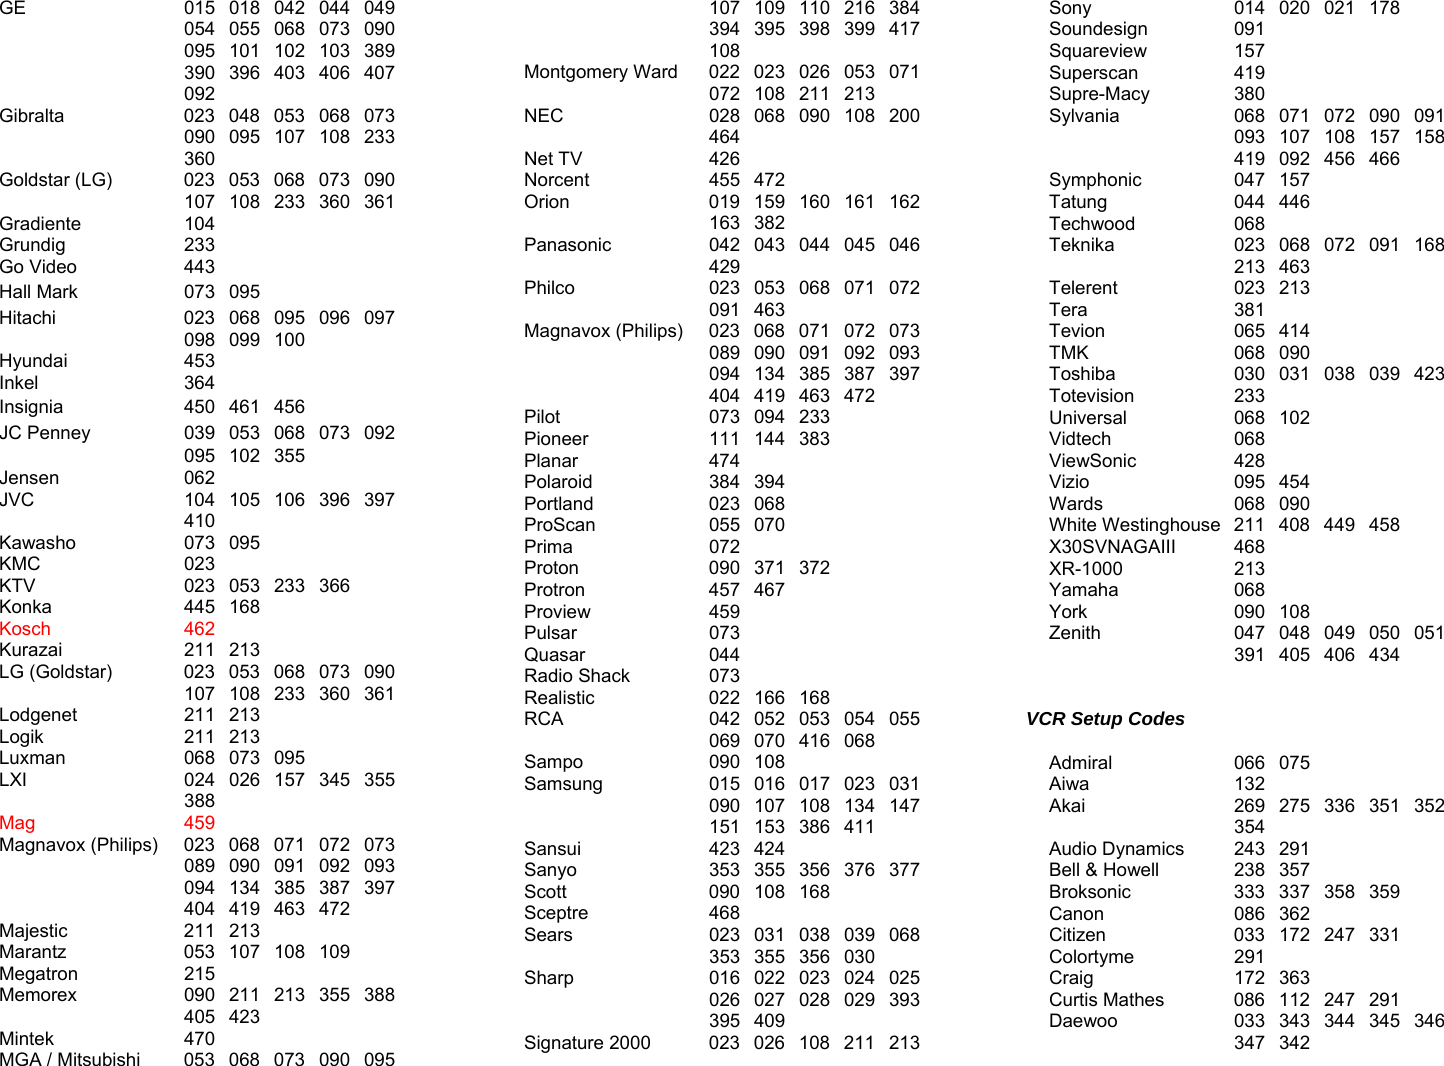
![• There may be several codes that turn your electronic devices on / off (or perform other functions). • While the remote is searching for the correct setup code(s) for your electronic devices, it is possible that other (previously programmed) devices may turn on / off (or perform other functions). If this occurs, continue pressing the [S] or [T] buttons (or the buttons described in this section until you find the correct code for the device you are programming. • It may take several minutes for the remote to find the correct code that turns your device on / off (or performs another selected function). During this time, the mode buttons will illuminate in rotation (i.e. SAT Æ TV Æ DVD Æ AUDIO Æ AUX Æ SAT...). • Once you lock-in a code, be sure to check the available functions for that device (i.e. TV - Vol S/T, Mute, TV Input (TV / VCR button), Ch S/T, 0-9; VCR - Play, Stop, Rew...; DVD - Play, Stop, Rew...; AUDIO - Vol S/T, Mute) to see if they are operating. 4. When programming the remote control using the [S] or [T] buttons (Power function) under the Point and Press® Programming method, you may find a code that turns a device off but not back on. If this happens… • The correct code has not been found as you may you may have a code that operates some but not all of the functions of your device. Continue pressing [S] until your device turns back on. OR • You may have gone past the correct matching code. Try pressing [T] one press at a time until you find a code that turns your device back on. 5. When using the Point and Press® Programming method, you can also program your remote using the following buttons: [VOL S] – to “go forward” through the codes using the “VOL S” function on your devices. • [VOL T] – to “go back” through the codes using the “VOL T“ function on your devices. Note: When you find the correct code, the volume of the device being programmed will increase or decrease. • [CH S] - to “go forward” through the codes using the “CH S” function on your devices. • [CH T] - to “go back” through the codes using the “CH T“ function on your devices. Note: When you find the correct code, the channel of the device being programmed will increase or decrease. • [XX] - to “go forward” through the codes using the “Fast Forward” function on your devices. • [WW] - to “go back” through the codes using the “Rewind” function on your devices. Note: When you find the correct code, the fast-forward or rewind function of the device being programmed will be performed. To simplify programming using these buttons, insert a VHS tape or DVD in the device being programmed. Warning: Changes or modifications to this remote control not expressly approved for by Contec Holdings could void the user's authority to operate this equipment. Rev. 05/06 © 2006, Contec Holdings, LLC Point and Press® and Memory Guard® are registered trademarks of Contec Holdings, LLC MOTOROLA and the stylized M logo are registered in the U.S. Patent and Trademark office TV Setup Codes Admiral 026 054 211 213 Advent 072 094 425 447 463 Adventura 047 Aiwa 214 471 Akai 053 462 473 Amark 023 215 Amstrad 157 Anam 217 218 219 220 221 222 223 AOC 053 073 095 108 APEX 030 038 427 Astar 462 Audiovox 220 191 168 051 451 465 Belcor 073 Bell & Howell 211 213 Broksonic 165 167 Brokwood 073 Candle 068 091 Centurion 095 107 108 Citizen 068 091 211 213 233 Concerto 073 095 Contec 147 Coronado 023 Craig 223 Crown 023 Curtis Mathes 016 054 107 108 211 213 Daewoo 051 068 073 095 158 159 189 191 194 196 197 198 200 202 204 205 206 207 209 Daytron 073 095 107 108 Dell 448 094 072 463 Dumont 073 Electro Home 073 095 Elektra 353 Emerson 016 023 053 064 103 139 158 159 164 165 166 167 168 169 392 400 401 402 408 415 Envision 073 095 ESA 454 456 Fisher 355 356 Funai 047 048 157 168 211 Fujitsu 460 469 Gateway 426](https://usermanual.wiki/Contec/URC550/User-Guide-677210-Page-5.png)
![15. Using Your IRC 550 / URC 550 Remote ControlPower for selected device Displays list of recorded programs (model URC550 only) Exit any menu, display program information Select highlighted item Display detailed program information In guide mode, advances forward in 6-hour increments. Skips recording forward in 30-second (default) intervals. In guide mode, advances guide forward in 24-hour intervals (model URC550 only) Increase or decrease channel Returns to last channel viewed Display pay-per-view programming Display current program title at bottom of screen Display Options menu, exit any menu Displays parental control menu Interactive TV applications Input source to SAT receiver or TV Select Mode of remote. Press … [SAT] - for Satellite mode [TV] - for TV mode [DVD] - for DVD mode [AUDIO] - for Audio mode [AUX] - for Auxiliary mode Changes viewing aspect on TV screen (model URC550 only) Interactive TV applications Return to previous screen Highlight (S,T,W,X)menu screen items, Navigate listings in Browse banner Display Interactive Programming Guide, Press again to remove Skips recording back in 10-second (default) intervals (model URC 550 only) Satellite, VCR, DVD, Audio transport functions Mutes volume Increase or decrease volume Display Interests menu, exit any menu In guide mode, cycles through favorite channel listings, with All Channels as default. While watching TV, steps Up through pre-set favorite channels listing as selected in guide mode Enter channel # - 3 digits Display help screens, press again to remove](https://usermanual.wiki/Contec/URC550/User-Guide-677210-Page-9.png)