Continental Automotive Singapore FASCIA10 GM Holden VE & WM MY11 Series 3 User Manual
Continental Automotive Singapore Pte Ltd GM Holden VE & WM MY11 Series 3
User Manual

2 Infotainment System
Infotainment
System
Introduction .................................... x
Radio .............................................. x
Audio Players ................................. x
CD Player ....................................... x
Auxiliary Devices ............................ x
USB Port ........................................ x
Bluetooth Music .............................. x
Rear Seat Infotainment................... x
Navigation ...................................... x
Personalization ............................... x
Bluetooth® ...................................... x
Phone ............................................. x
Introduction
General information
Read this manual thoroughly to
become familiar with how the
infotainment system operates.
The infotainment system includes
navigation and audio functions.
Keeping your eyes on the road and
your mind on the drive is important
for safe driving.
The infotainment system has built-in
features intended to help keep your
eyes on the road and mind on the
drive.
Some features may be disabled
while driving. Note that these
functions will be grayed-out.
A grayed-out function indicates it
is not available when the vehicle is
moving.
All functions are available when the
vehicle is parked. Do the following
before driving:
• Become familiar with the
infotainment system operation,
hard keys on the faceplate, and
touch-sensitive screen buttons of
the infotainment system.
• Set up the audio by presetting
favourite stations, setting the
tone, and adjusting the speakers.
• Set up the navigation features
before beginning driving, such as
entering an address or a preset
destination.
• Set up your phone numbers in
advance so they can be called
easily with the press of a single
button.
Infotainment System 3
When getting started, set the
navigation system to your preference
or delete information you may have
entered using various options.
Warning
Taking your eyes off the road too
long or too often while using the
navigation system could cause a
crash resulting in injury or death
to you or others. Focus your
attention on driving.
Warning
When driving your vehicle, be
sure to keep the volume of the
unit set low enough to allow you
to hear sounds coming from the
outsides (e.g. aware of the road
and trafc conditions).
Warning
• Do not place beverages close
to the audio system. The audio
system mechanism may be
damaged if you spill them.
• Do not strike or allow anything
to impact the audio system,
damage to the system
mechanisms could occur.
Theft-Deterrent Feature
Your audio system includes an
electronically coded security system.
This electronically links the audio
system to your vehicle. Under
normal circumstances you will
be unaware of its operation and
shouldn’t need to take any action
to enable the audio system to work,
even if the vehicle’s battery has
been disconnected and reconnected.
When the electronic link between
the vehicle and the audio system
is interrupted, the display ‘Security
Lockout Active’ will be shown. In this
case, please contact your
Holden Dealer.

4 Infotainment System
Federal Communications
Commission (FCC) Statement
15.21
You are cautioned that changes
or modications not expressly
approved by the part responsible
for compliance could void the user’s
authority to operate the equipment.
15.105(b)
This equipment has been tested and
found to comply with the limits for
a Class B digital device, pursuant
to part 15 of the FCC rules. These
limits are designed to provide
reasonable protection against
harmful interference in a residential
installation. This equipment
generates, uses and can radiate
radio frequency energy and, if not
installed and used in accordance
with the instructions, may cause
harmful interference to radio
communications. However, there is
no guarantee that interference will
not occur in a particular installation.
If this equipment does cause harmful
interference to radio or television
reception, which can be determined
by turning the equipment off and
on, the user is encouraged to try to
correct the interference by one or
more of the following measures:
-Reorient or relocate the receiving
antenna.
-Increase the separation between
the equipment and receiver.
-Connect the equipment into an
outlet on a circuit different from that
to which the receiver is connected.
-Consult the dealer or an
experienced radio/TV technician for
help.
This device complies with Part 15 of
the FCC Rules.
Operation is subject to the
following two conditions:
1) this device may not cause harmful
interference and
2) this device must accept any
interference received, including
interference that may cause
undesired operation of the device.
FCC RF Radiation Exposure
Statement:
This equipment complies with FCC
radiation exposure limits set forth
for an uncontrolled environment.
End users must follow the specic
operating instructions for satisfying
RF exposure compliance. This
transmitter must not be co-located
or operating in conjunction with any
other antenna or transmitter.
Infotainment System 5
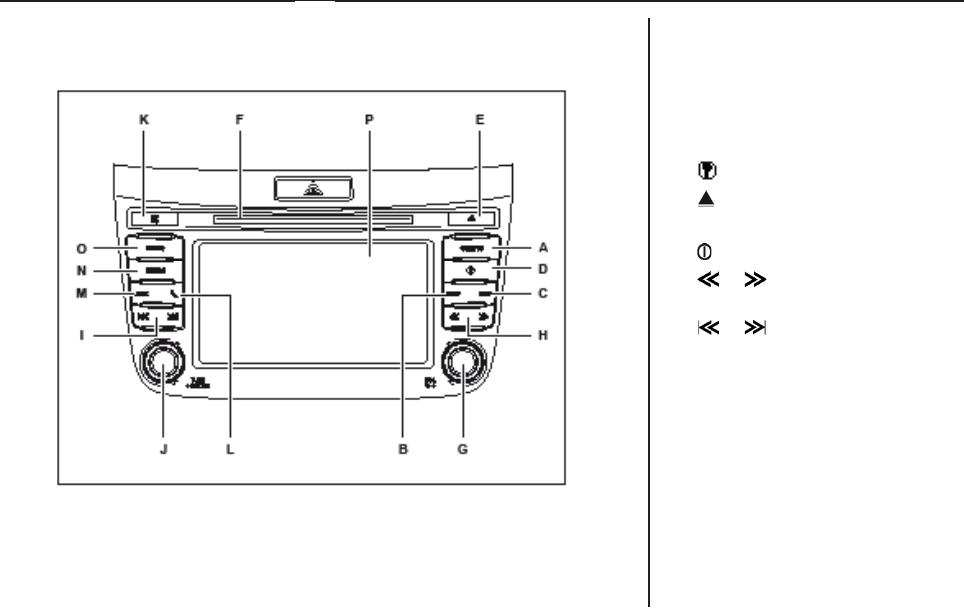
Control Elements Overview
Head Unit Compact
A. CONFIG, Conguration menu
button.
B. MAP (if available), Navigation
Map view button.
C. NAV (if available), Navigation
menu button.
D. , Help menu button.
E. , CD eject button.
F. CD slot.
G. , Power/Volume Knob.
H. or , Folder up/down button
(MP3).
I. or , Continuous seek up/
down button (AM, FM).
Seek next/previous track button
(CD, USB, iPod, BT Audio and
VCDC (if available)).
J. Tune Knob (AM, FM)
Page Up/Page Down (Menu
Control)
Back (Menu Control).
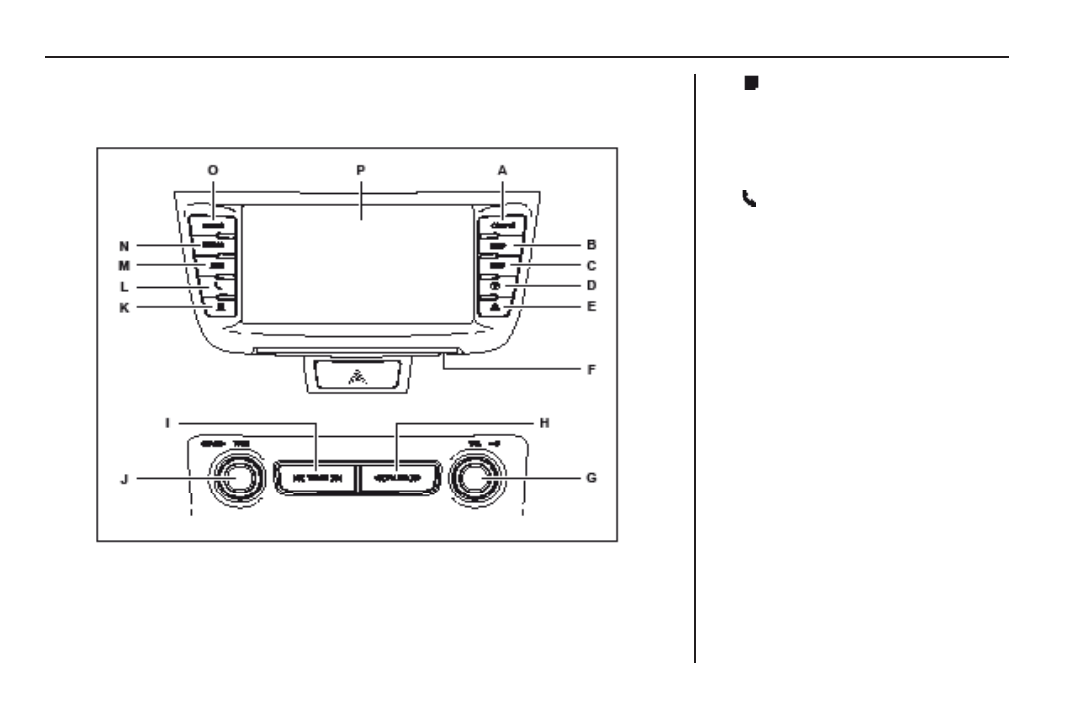
6 Infotainment System
K. , Mute sound button, (AM, FM,
CD, USB, iPod, BT Audio and
VCDC (if available)).
L. AUX, Auxiliary selection button,
Front, Rear, DVD (if available).
M. , Phone button (Bluetooth-
Phone).
N. MEDIA, Media selection button
CD, USB, iPod, BT Audio and
VCDC (if available)).
O. RADIO, Radio Source Selection
button (AM, FM).
P. Touch screen (Radio, Media,
Navigation, Rear View Camera,).
Head Unit Standard
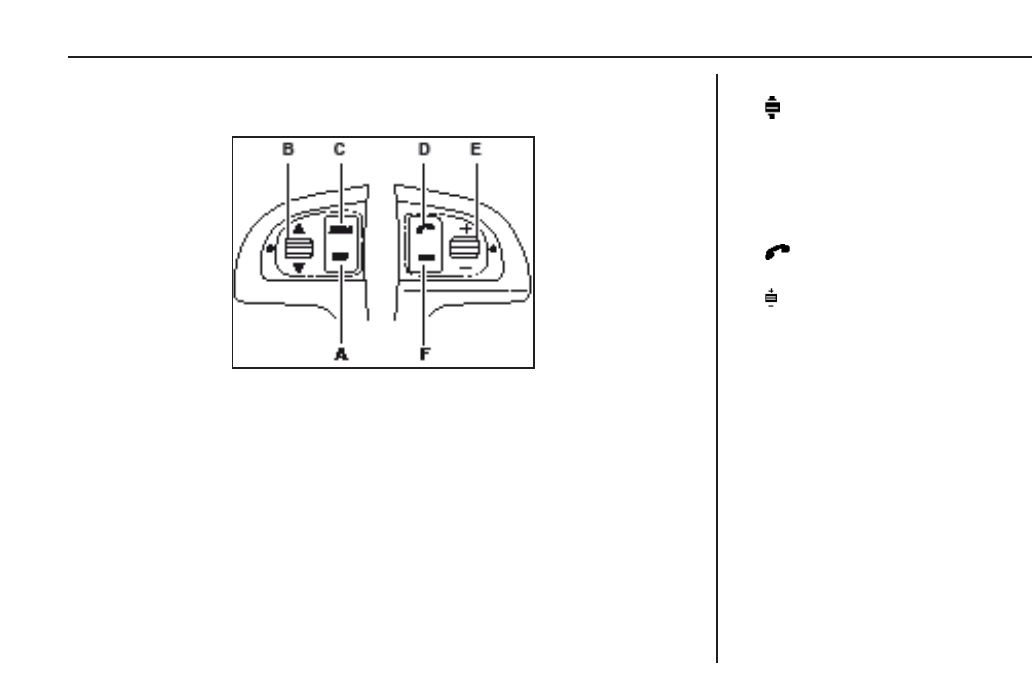
Infotainment System 7
A. TRIP, Trip selection button.
B. , Scroll up/down wheel,
Radio (Next/Previous Favourite
Preset)
Media (Next/Previous track).
C. AUDIO, Audio Source selection
button (Radio and Media).
D. , Bluetooth Phone accept/
reject call button.
E. , Volume scroll wheel (Radio,
Media, Bluetooth Phone).
Mute button (all media except
Navigation, if available).
F. NAV (if available), Navigation
menu selection button.
Steering Wheel Remote Control

8 Infotainment System
Operation
1. Press to turn the infotainment
system on or off.
2. Turn to adjust the volume.
Basic Settings
Clock accuracy
Clock accuracy may drift over
times. Better clock accuracy can be
achieved through synchronization
with RDS clock time (for countries
with RDS clock time), or GPS clock
(for system with navigation).
Setting the Clock
The time and date as well as the
Time and Date Format can be set.
Setting the Date/Time Format
1. Press the CONFIG button.
2. Touch the System tab.
3. Touch Date/Time Format.
4. Touch 12 hr. or 24 hr., the option
selected is indicated by .
5. Touch dd mm yyyy (23/02/2009)
or dd mmm yyyy (23rd February
2009); the option selected is
indicated by .
6. Touch Back to leave the menu.
Setting the Time
1. Press the CONFIG button.
2. Touch the System tab.
3. Touch Set Time to access the
Set Time menu.
4. Touch ▼ or ▲ to set the Hour,
Minute and AM/PM settings.
5. Touch OK to store the settings
6. Touch Back to leave the menu.
OR
1. Touch and hold the TIME and
repeat steps 3 to 6 above.
Setting the Date
1. Press the CONFIG button.
2. Touch the System tab.
3. Touch Set Date to access the
Set Date menu.
4. Touch ▼ or ▲ to set the Day,
Month and Year settings.
5. Touch OK to store the settings
6. Touch Back to leave the menu.
Setting the Display Brightness
In this menu the display brightness
can adjusted.
1. Press the CONFIG button.
2. Touch the System Tab.
3. Touch Display.
4. Touch ◄ or ► to adjust the
display brightness.
5. Touch Back to leave the menu.

Infotainment System 9
Start up Screen
In this menu the start up screen can
be enabled or disabled.
1. Press the CONFIG button.
2. Touch the System Tab.
3. Touch Start Up Screen.
4. Select either Start Up Screen
ON or OFF.
5. Touch Back to leave the menu.
Lockouts
In the Driving Lockouts menu
Lockouts can be switched On or Off.
When selected the text entry into
these features are locked out while
the vehicle is moving.
1. Press the CONFIG button.
2. Touch the System Tab.
3. Touch ▼ or ▲ and select the
second System menu screen.
4. Touch Driving Lockouts.
5. Touch the On or Off option for
Phone and/or NavTextEntry;
the option selected is indicated
by .
6. Touch Back to leave the menu.
Changing the Language
In the Language menu the Display
Language can be changed.
1. Press the CONFIG button.
2. Touch the System Tab.
3. Touch ▼ or ▲ and select the
second System menu screen.
4. Touch the Language option.
5. Touch the language button of the
language you want to select; the
option selected is indicated by
6. Touch Back to leave the menu.
Restore Factory Settings
With this option you can restore the
factory settings.
Note: All Radio and Navigation
favourites will be erased.
1. Press the CONFIG button.
2. Touch the System Tab.
3. Touch ▼ or ▲ and select the
second System menu screen.
4. Touch Restore Factory
Settings.
5. Press OK if you want to restore
the factory setting, press Cancel
to exit without resetting the
factory settings.

10 Infotainment System
Adjusting the Tone (Treble, Bass,
Midrange)
With this option you can adjust the
tone to your personal taste. The
bass, midrange or treble can only
be adjusted while the Equalizer is
set on Custom. Bass, Midrange and
Treble can be adjusted between −12
through +12.
1. Press the CONFIG button.
2. Touch the Audio Tab.
3. Touch the Bass/Treble option.
4. Treble: Touch ◄ or ► and
increase or decrease the treble.
5. Midrange: Touch ◄ or ►
and increase or decrease the
midrange.
6. Bass: Touch ◄ or ► and
increase or decrease the bass.
7. Touch Back to leave the Bass/
Treble menu.
GPS Clock Sync (if available)
With this option you can synchronise
the clock of the Infotainment system
via GPS.
When activated the system clock will
only be able to adjust in 30 minute
increments to account for changes in
time zone.
1. Press the CONFIG button.
2. Touch the System Tab.
3. Touch ▼ or ▲ and select the
second System menu screen.
4. Touch GPS Clock Sync.
5. Touch On or Off and switch
On or Off the option; the option
selected is indicated by ;.
Adjusting Fader and/or Balance
With this option you can adjust the
sound balance between the front
and rear speaker to your personal
taste.
1. Press the CONFIG button.
2. Touch the Audio Tab.
3. Touch Fader/Balance.
4. Fader: Touch or to adjust
the sound balance between the
front and rear speakers.
5. Balance: Touch ◄ or ► to
adjust the sound balance
between the left hand and right
hand speakers.
6. Touch Back to leave the menu.

Infotainment System 11
Setting the Equaliser
The equalizer enables the user to
control the sound of the Infotainment
system.
With Custom you can adjust the
Bass/Midrange/Treble tone to your
personal taste (see Adjusting the
Tone).
1. Press the CONFIG button.
2. Touch the Audio Tab.
3. Touch Equaliser.
4. Touch the option required; the
option selected is indicated by ;.
5. Touch Back to leave the menu.
Setting the Speed Dependent
Volume Control (SDVC)
The SDVC system adjusts the audio
system volume depending on the
vehicle’s speed.
As the vehicle’s speed increases,
the volume of the audio system also
increases to compensate for the
driving noise.
1. Press the CONFIG button.
2. Touch the Audio Tab.
3. Touch Speed Dependent
Volume Control.
4. Touch the option required; the
option selected is indicated by ;.
5. Touch Back to leave the menu.
Setting the Dynamic Distortion
Limiter (DDL)
Your audio system is equipped with
a system that limits the amount of
amplier distortion you can hear.
When the limit is reached the volume
will not be able to be increased.
1. Press the CONFIG button.
2. Touch the Audio Tab.
3. Touch Dynamic Distortion
Limiter.
4. Touch the option required; the
option selected is indicated by ;.
5. Touch Back to leave the menu.

12 Infotainment System
Switching the Loudness On/Off
The Loudness feature automatically
boosts the bass and treble response
at low volume levels.
1. Press the CONFIG button.
2. Touch the Audio Tab.
3. Touch ▲or ▼ to select the
second Audio Settings page.
4. Touch Loudness.
5. Touch On or Off to either switch
Loudness On or Off. The option
selected is indicated by ;.
6. Touch Back to leave the menu.
Setting the Voice Guidance
volume and switching it On or Off
(if available)
This option allows you to adjust the
Navigation Advice Volume and to
turn the Voice Guidance On or Off.
1. Press the CONFIG button.
2. Touch the Audio Tab.
3. Touch ▲ or ▼ to select the
second Audio Settings page.
4. Touch Voice Guidance Volume.
5. Voice Guidance:
Touch On or Off to either switch
Voice Guidance On or Off; the
option selected is indicated by ;.
6. Voice Guidance Volume: Touch
▲ or ▼ to adjust the voice
guidance volume.
7. Touch Back to leave the menu.
Selecting the Voice Guidance
Output Speakers (if available)
This option allows you to select the
Voice Guidance Output Speakers
via which the Voice Guidance can
be heard.
1. Press the CONFIG button.
2. Touch the Audio Tab.
3. Touch ▲ or ▼ to select the
second Audio Settings page.
4. Touch Voice Guidance
Speakers Output.
5. Touch either Driver, Front or All
to select speakers via which the
Voice Guidance can be heard.
6. Touch Back to leave the menu.

Infotainment System 13
Changing the TA, Phone or
Startup Volume
Via this menu you can adjust the
basic volume settings for either the
TA Announcements, the Phone
Phone conversations and Starting
up your Infotainment system.
1. Press the CONFIG button.
2. Touch the Audio Tab.
3. Touch ▲ or ▼ to select the
second Audio Settings page.
4. Touch Volume.
5. TA: Touch ◄ or ► to adjust the
TA volume.
6. Phone:
Touch ◄ or ► to adjust the
Phone volume.
7. Startup:
Touch ◄ or ► to adjust the Start
up volume.
8. Touch Back to leave the menu.
Switching Surround Sound On or
Off (if available)
This option allows you to switch On
or Off the Surround Sound.
1. Press the CONFIG button.
2. Touch the Audio Tab.
3. Touch ▲ or ▼ to select the
second Audio Settings page.
4. Touch Surround.
5. Touch On or Off to either switch
Surround Sound On or Off. The
option selected is indicated by ;.
6. Touch Back to leave the menu.

Infotainment System 13
General Information
Radio Reception
Frequency interference and static
can occur during normal radio
reception if items such as cell phone
chargers, vehicle convenience
accessories, and external electronic
devices are plugged into the
accessory power outlet. If there is
interference or static, unplug the
item from the accessory power
outlet.
AM-FM Radio
AM Band
The range for most AM stations is
greater than for FM, especially at
night. The longer range can cause
station frequencies to interfere
with each other. For better radio
reception, most AM radio stations
boost the power levels during the
day, and then reduce these levels
during the night.
Static can also occur when things
like storms and power lines interfere
with radio reception. When this
happens, try reducing the treble on
the radio.
FM Stereo Band
FM signals only reach about 16 to 65
km. Although the radio has a built-in
electronic circuit that automatically
works to reduce interference, some
static can occur, especially around
tall buildings or hills.
Radio Settings
Autoseek Sensitivity
With this settings the autoseek
sensitivity can be changed.
When Local is selected, the Radio
will seek strong signal stations.
When Distant is selected, the Radio
will seek weak signal stations.
When Auto is selected the first
sweep of the frequency band will
search Local stations and the
second sweep will search Distant
stations.
1. Press the CONFIG button, then
touch the RADIO tab.
2. Touch Autoseek Sensitivity.
3. Touch either the Local, Distance
or Auto. The option selected is
indicated by ;.
4. Touch Back to leave the menu.

14 Infotainment System
FM Radio Text
With this setting FM Radio Text can
be switched on/off. If additional RDS
information is received from the
currently tuned radio station it then
appears on the touch screen.
1. Press the CONFIG button, then
touch the RADIO tab.
2. Touch FM.
3. Touch either ON or Off to switch
Radio Text On or Off. The
option selected is indicated by ;.
4. Touch Back to leave the menu.
FM Alternate Frequency
If the current FM station becomes
to weak and Alternate Frequency is
switched on, the radio switches to a
stronger RDS capable station with
the same Program Identifier code.
1. Press the CONFIG button; then
touch the RADIO tab.
2. Touch FM.
3. Touch either On or Off to switch
Alternate Frequency On or Off.
The option selected is indicated
by ;.
4. Touch Back to leave the menu.
Manual Tune
With this setting you can switch the
Frequency bar On or Off.
1. Press the CONFIG button, then
touch the RADIO tab.
2. Touch Manual Tune.
3. Touch Off to switch the
Frequency bar Off or touch On
to switch the Frequency bar On.
The option selected is indicated
by ;.
4. Touch Back to leave the menu.
Station Search
Selecting a band
Press the RADIO button or press the
tab to either select AM or FM. The
selected band is shown by the tab
on the touch screen.
Manual seek
With this function you can manually
tune to a radio station.
1. Press the RADIO button to either
select the AM or FM band.
2. Turn the TUNE/ knob
clockwise or anticlockwise, or
press or to tune to the next
available radio station.
Seek
With this function you can
automatically seek for the next or
previous radio station. During seek
Audio is muted.
1. Press the RADIO button to either
select the AM or FM band.
2. Press or on the head unit
or the touch screen.
The radio seeks for the previous
or next strong radio station in the
selected band.

Infotainment System 15
Preset Stations
This Infotainment System offers 3
Favourite Lists and 2 Autostore Lists
(one for AM and one for FM), with 5
presets in each list. The Favourite
Lists are common across AM and
FM.
Storing radio stations in the
Autostore List
This function scans the entire band,
selects the stations with the best
reception quality and stores them in
the AM or FM Autostore List.
1. Press the RADIO button to either
select the AM or FM band.
2. Touch MORE.
3. Touch Show Autostore, AM
or FM Autostore list will now be
enabled.
4. Touch MORE.
5. Press Autostore Search, the
Autostore pop up appears.
AutoStore scans the
corresponding band and stores
the first 5 strongest stations.
When Autostore is completed the
first stored station is selected.
6. To cancel Autostore, press
Cancel on the Autostore pop up.
Storing a radio station in the
Favourite Lists
With this function you can store a
radio station under any Preset.
1. Press the RADIO button to either
select the AM or FM band.
2. Seek for a radio station either
manually or automatically.
3. Press and hold the Preset soft
key you want to store the station.
After the station is stored a beep
sounds.
Recall a favourite station
With this function you can recall a
station from the Favourite Lists.
1. Press the RADIO button to either
select the AM or FM band.
2. Touch the preset key you want to
listen to.
RDS (Radio Data System)
Your vehicle is equipped with an
RDS infotainment system. RDS
stands for Radio Data System, which
encodes information on the system‘s
FM frequency only. When you are
tuned to an RDS station, the station
name appears on the display.
Many radio stations transmit RDS
information but not all, so it is
possible that this feature is not
operable in some regions.
The following data is available on
your infotainment system:

16 Infotainment System
PS (Program Service name):
Allows you to display the Program
Service Name along with the
frequency, if the radio station
provides it.
PTY (Program TYpe):
Allows you to seek only for stations
with the types of programs you want
to listen to.
TA (Traffic Announcement):
Allows you to receive traffic
information.
Radio text:
Allows you to receive and display
messages from radio stations.
PTY Alarm (Program TYpe Alarm):
Allows you to receive
announcements concerning local
and national emergencies.
AF (Alternative frequency):
Automatic re-tuning to the best
alternative frequency.
EON (Enhanced Other Networks):
Automatic fade-in of traffic
announcements of other stations.
Switching TA on (FM only)
With TA switched On and a TA
transmitted from the radio station,
these Traffic Announcements will be
audible via the Radio.
1. Press the RADIO button select
the FM band.
2. Touch the More soft key, then
touch TA On. TP Search pops
up and the Radio searches for
available TP stations.
3. If you want to stop TA Search,
touch Cancel.
4. If no TP station is found, No TP
Station will pop up.
5. If a TP station is found, TA will be
displayed on the Touch Screen.
6. When performing Auto seek only
TP Stations will be searched for.
7. When a Traffic Announcement is
received the corresponding pop
up will be displayed.
Program Type (PTY) Seek (FM
only)
With this function you can to tune to
Program Type based stations rather
than station based on frequencies.
There are 6 categories are available:
Pop, Country, Rock, Classical, Jazz
and Any.
1. Press the RADIO button select
the FM band.
2. Touch the More soft key, then
touch PTY List. The PTY List is
shown.
3. Touch the required Program
Type (e.g. NEWS). 4. The
radio will seek for stations with
the Program Type NEWS. If a
NEWS station is found, NEWS
will be displayed on the Screen
below the corresponding radio
station.
Infotainment System 17
Audio Players
CD Player
Your infotainment system may be
equipped with a CD player or a
virtual CD changer (VCDC).
Compact disc player (CD
player)
If your infotainment system is
equipped with a single CD player
you can only play one CD at a time.
Virtual Compact Disc Changer
(VCDC player)
If your infotainment system is
equipped with a virtual CD player
you can store CD’s in the internal
memory of your infotainment system
and play every single CD like in any
regular CD changer.
Warning
If a label is added to a CD, or more
than one CD is inserted into the slot
at a time, or an attempt is made to
play scratched or damaged CD’s,
the CD player could be damaged.
While using the CD player, use only
CD’s in good condition without any
label, load one CD at a time, and
keep the CD player and the loading
slot free of foreign materials, liquids,
and debris.
MP3
On your CD player you can also play
MP3 files. The total number of files
and folders that can be searched is
limited to a pre-defined value.
● The maximum entries per folder
is 255 (entries can be folders or
files).
● The maximum numbers of
playable files is 999.
● Additional files and folders will be
ignored.
Root Directory
The root directory is treated as
a folder. All .mp3 files in the root
directory are accessed before
folders in the root directory.
Empty Directory or Folder
Empty folders and directories will not
show on the display. The system will
ignore empty directories and folders
and advance to the next directory or
folder that has .mp3 files in it.
No Folder
On a CD that contains only .mp3
files in the root directory the next
and previous folder functions do not
work.

18 Infotainment System
File System and Naming
The infotainment system shows
track names that are shorter than 39
characters, names that are longer
will be shortened. The radio will
show the track name as:
● The song name that is in the ID3
tag.
● The file name without the file
extension if the song name is not
in the ID3 tag.
Infotainment System 19
CD Player
General information
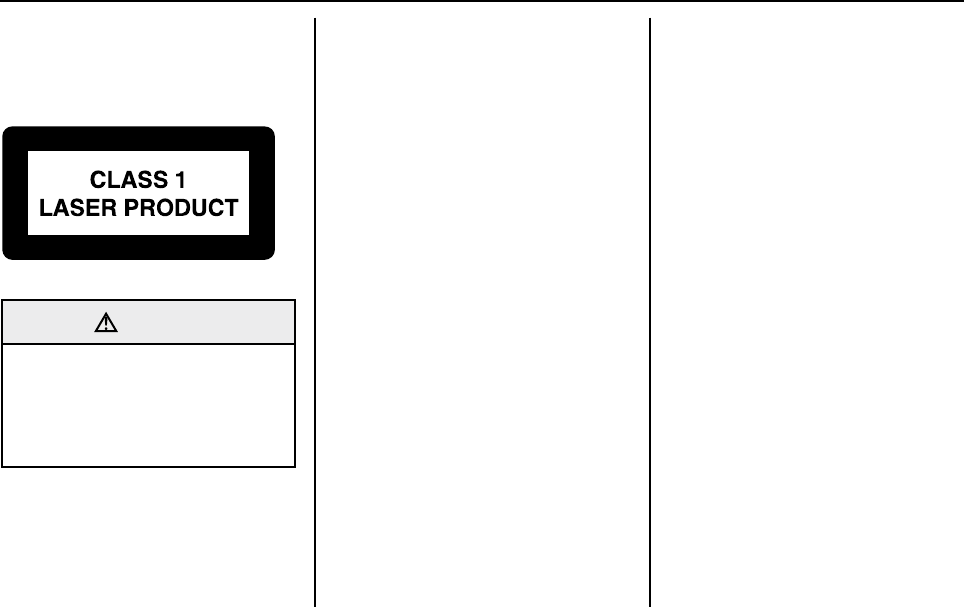
This is a Cass 1 laser product.
Warning
Avoid inserting any foreign
objects into the slot of this player.
Failure to observe this may
cause malfunction due to the
precise mechanism of this unit.
Information on disc formats
The CD player supports the following
kind of discs:
● Mixed Mode CD’s
● Copy Protected CD’s
● CD-Audio (CD-DA)
● CD-R
● CD-RW
The CD player supports the following
media types:
● CD-Audio (CD-DA) according to
the Red Book standard.
CD-R/RW (in accordance with
Orange Book, part 2/3)
Multi-session CD (in accordance
with multi-session CD
specification 1.0).
● MP3
● WMA
Please note:
● Only closed session discs can
be read. Open session discs will
be ignored. The message Disc
Error will be displayed.
● If a disc is erroneous (unreadable
formats, unsupported formats,
no tracks), then Disc Error
message is displayed for 2
seconds and the disc is ejected.
● Depending on the type of CD-
R/CD-RW CDs, certain CDs may
not operate normally according
to manufacturing companies or
making and recording methods.
In such circumstances, if you still
continue to use those CDs, they
may cause the malfunction of
your car audio system.
20 Infotainment System
Playing an incompatible Copy
Protected Audio CD
Some copy protected CDs which
do not comply with the international
audio CD standards (Red Book),
may not play on your car audio.
Please note that if you try to play
copy protected CDs and the CD
player does not perform correctly the
CDs may be defective, not the CD
player.
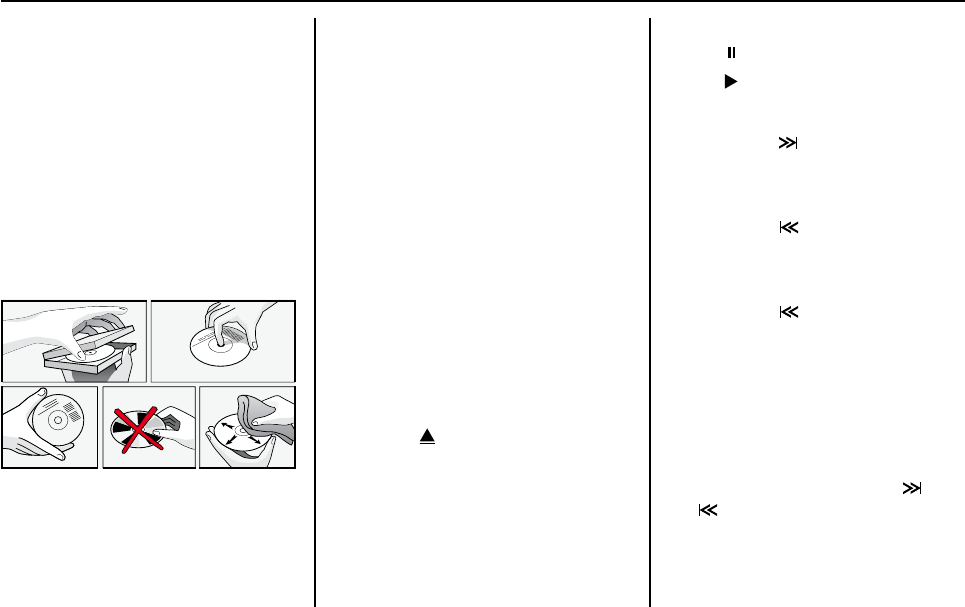
Handling CDs
● Avoid leaving fingerprints on the
CD when removing it.
● Always store any CDs in their
protective covers.
● Always ensure that CDs are
clean and dry before inserting.
● Protect CDs from heat and direct
sunlight.
Cleaning the unit
Do not clean using cleaning fluid,
alcohol or other solvents. Use only a
damp cloth.
Inserting a CD
1. Insert an Audio CD into the CD
slot.
Loading CD appears on the
Screen.
The first track of the CD is played
automatically.
Ejecting a CD
1. Touch to eject a CD from the
CD slot.
Eject CD appears on the Screen.
Pausing/Playing a CD
Touch to pause the CD.
Touch to play the CD.
Go to the next or previous track
1. Press the button or soft key to
go to the next track.
Replay the current track.
1. Press the button or soft key to
replay the current track.
Go to the previous track
1. Press the button or soft key
twice within 5 seconds to select
and play the previous track.
Fast Forward/Backward
With this function you can advance
the track being played forward and
backward.
1. Press and hold either the or
button or soft key to fast-
forward or fast-backward the
current track, or

Infotainment System 21
Scan Track
1. Touch More to open the options
menu.
2. Press Intro Scan to activate the
Scan Track option.
The next track is selected and
played for 10 seconds then the
following track is played for 10
seconds until the starting track is
reached.
Playing an MP3 CD
Browsing the Media List and
playing a Track
With this function you can browse
and navigate through the Media List,
select a track and play it.
1. Insert a MP3 CD into the CD slot.
Loading CD appears on the
Screen.
The first track of the CD is played
automatically, the Song Title,
Artist Name and Album Name
are shown.
2. Touch Browse to open the file
list, MP3 files and folders appear.
3. Touch ▲ or ▼, or rotate the
Tune knob left or right to scroll
the files and folders.
4. Touch the title, to play the title
or touch the folder, to open the
folder.
5. Touch Back to leave the menu.
Repeat current track/folder/Off
With this function you can repeat the
current folder or track, and you can
switch off this function.
1. Touch Repeat to repeat the
current track.
2. Touch Repeat twice to repeat
the current folder.
3. Touch Repeat 3 times to
switch Off the Repeat folder/file
function.
Random Disc ON/OFF
With Random disc ON, all tracks
on the CD are played in a non-
sequential order without the same
track repeated before all other tracks
are played.
1. Touch the CD tab on the Touch
screen.
2. Touch the More soft key,
then touch Random to switch
Random play On or Off.

22 Infotainment System
Virtual CD Changer (if
available) (CD-DA only)
Notes on Virtual CD
● The Infotainment system will only
store audio CD’s into the VCDC.
MP3 and WMA files on a CD
cannot be stored into the VCDC.
● The Infotainment system will stop
CD playback while storing the
audio CD into the VCDC.
● The Infotainment system will
always start playback from the
first track after storing the audio
CD into the VCDC
Storing an Audio CD
With this function you can copy
an entire Audio CD into the flash
memory.
1. Insert an Audio CD in the CD
slot.
The first track of the CD is
played.
2. Touch Store CD.
The currently playing disc will
be stored in a free slot. A pop
up appears that shows the
storage process. The number
of remaining empty slots is also
shown.
3. Touch Stored CDs tab to view all
discs stored in the memory.
Notes on storing CD’s:
● When pressing the Stored CD
tab with no discs stored in the
memory, the information No
stored discs is displayed.
● Playback of the Audio CD will
not be available while the disc is
being stored.
Renaming a disc
1. Touch the Stored CDs tab.
2. Touch the Discs soft key, the list
with memorised CD is shown.
If the disc, you want to rename
is not shown in the list, touch ▲
or ▼, or rotate the TUNE knob
left or right to scroll through the
stored CDs.
3. Touch the disc you want to
rename.
4. Touch Rename and the
keyboard appears.
5. Use the keyboard to enter the
new name.
6. Press OK to confirm the
changes. The pop up Disc
Renamed appears.
7. Press OK.

Infotainment System 23
Deleting a Disc
1. Touch the Stored CDs tab.
2. Touch the Discs soft key, the list
with memorised CD is shown.
If the disc, you want to rename
is not shown in the list, touch ▲
or ▼, or rotate the TUNE knob
left or right to scroll through the
stored CDs.
3. Touch the disc you want to
delete.
4. Press the Delete soft key, the
Delete *** pop up appears.
5. Press OK to confirm the deletion
of that CD title.
After deletion the corresponding
slot shows <No Disc>.
Deleting All Discs
1. Touch the Stored CDs tab on
the Touch screen.
2. Touch the Discs soft key, the list
with memorised CD is shown.
3. Press the Delete soft key.
4. Press the Delete All soft key,
the Delete All Discs ? pop up
appears.
5. Press OK to confirm the deletion
of all CDs.
After deletion all slots show <No
Disc>.
Playing a track from a stored disc
1. Touch the Stored CDs tab on
the Touch screen.
2. Touch the Discs soft key, the list
with memorised CD is shown.
If the disc, you want to view is
not shown in the list, touch ▲
or ▼, or rotate the TUNE knob
left or right to scroll through the
stored CDs.
3. Touch the disc you want to play.
4. Touch the track you want to play.
Playback of the disc will
commence from that track.

24 Infotainment System
AUXILIARY DEVICES
General Information
You can connect auxiliary devices
like an iPod to your infotainment
system. All media types that are
supported by the iPod can be
played.
The Auxiliary Input Connector (3.5
mm plug) is located under the lid of
the centre console, next to the USB
connector.
Warning
The newly introduced iPod with
new firmware may not be 100%
compatible and may not be
supported by the system.
Connecting an iPod
1. Connect the IPod by means of
the USB cable, delivered with
the iPod, to the USB port of your
infotainment system. The iPod
is automatically detected by the
system.
2. The iPod Connected... pop up
appears on the screen.
3. The iPod menu appears on the
screen and the iPod is now the
current source.
4. The Infotainment system plays
the track last played on the iPod.
If there are no playable tracks in
the iPod, the message No songs
in iPod is displayed and the
previously used source will be
selected.
If the connected iPod is not
working or the system is not able
to detect the iPod, the message
iPod ERROR appears and the
previously used source will be
selected.
Disconnecting the iPod
1. Unplug the iPod from the
Infotainment system.
2. The iPod Disconnected... pop
up appears on the screen.
Please connect iPod will appear
for a few seconds and the
previously used source will be
re-selected.
Searching for a Song via the
Playlists
1. Touch Browse, the iPod Music
menu appears, showing:
● Playlists
● Artists
● Albums
● Songs
● Genres
2. Touch the Playlists option.
The playlists appear on the
screen.
3. Touch ▲ or ▼, or rotate the tune
knob left or right to scroll the
playlists.

Infotainment System 25
Searching for a Song via the
Albums list
1. Touch Browse.
2. Touch the Albums option.
The list of Albums appears on
the screen.
3. Touch ▲ or ▼, or rotate the tune
knob left or right to scroll the list
albums.
4. Touch the album name you want
to listen to.
5. To play the first song touch the
first song on the screen or touch
▲ or ▼, or rotate the tune knob
left or right to scroll list of songs
and touch the song you want to
play.
4. Touch the playlist you want to
open.
5. Touch ▲ or ▼, or rotate the tune
knob left or right to scroll this
playlist and touch the track you
want to play.
Searching for a Song via the Artist
list
1. Touch Browse.
2. Touch the Artists option.
The list of Artists appears on the
screen.
3. Touch ▲ or ▼, or rotate the tune
knob left or right to scroll the
artists list.
4. Touch the artist name you want
to listen to.
5. Touch the All Songs soft key.
6. Touch ▲ or ▼, or rotate the tune
knob left or right to scroll list of
songs and touch the song you
want to play.
Searching for a Song via the
Songs list
1. Touch Browse.
2. Touch the Songs option.
The list of Songs appears on the
screen.
3. Touch ▲ or ▼, or rotate the tune
knob left or right to scroll the
Songs list.
4. Touch the Song you want to
play.

26 Infotainment System
Searching for a Song via the
Genres list
1. Touch Browse.
2. Touch the Genres option.
The Genres list appears on the
screen.
3. Touch ▲ or ▼ to scroll the
Genres list.
4. Touch the Genre you want to
play.
5. Touch All Albums.
6. Touch All Songs.
7. To play the first song, touch the
first song on the screen or touch
▲ or ▼, or rotate the tune knob
left or right to scroll the list and
touch the song you want to play.
Playing Songs in Random order
With this option switched On, songs
in the iPod are played in random
order.
1. To switch Random play On/Off
touch Random on the iPod tab.
Playing a Song in Repeat mode
With this option switched On,
the currently played song will be
repeated until this mode is switched
Off.
1. To switch Repeat play On/Off
touch Repeat on the iPod tab.
Pausing/Playing the iPod
1. Touch to pause the iPod.
2. Touch to play the iPod.
Infotainment System 27
USB Devices
General Information
You can connect USB devices like
a USB Stick to your infotainment
system. The USB connector is
located under the lid of the centre
console.
Warning
W e strongly recommend only
using USB sticks (thumb drives)
of well-known manufacturers.
O n no account must other USB
devices such as hard discs or
other digital equipment or multi
plug USB hub be connected to
the USB hub. Connecting other
devices can cause malfunction
or even destroy the audio
equipment.
Avoid using the USB memory
when it might hinder your safety
driving.
●
●
●
Warning
It is possible that noise is heard
during playback when using the
AUX-IN together with the power
outlet due to system-related not
a malfunction. If this happens,
use the power source of the AUX
device.
In rare cases it is possible that
an USB stick (thumb drive)
is not recognized by the unit
or may cause a malfunction.
Please only use USB sticks that
comply with the USB thumb drive
specifications.
●
●
Notes on USB:
Due to constant changes of USB
products in the market and their
respective Software, it can be
possible that some of the USB
devices are not compatible with this
infotainment system.
To ensure good compatibility with
the infotainment system the file
system for the USB devices should
be FAT32.
The following file formats with the
file extension *.mp3 or *.wma are
supported:
● MP3 (MPEG 1 Layer 3)
● WMA (Windows Media Audio)
The total number of files and folders
that can be searched is limited to a
pre-defined value.
The MP3 player is able to read and
play a maximum of:
● The maximum entries per folder
is 255 (entries can be folder or
file).
● The maximum numbers of
playable files is 999.
● Additional files and folders will be
ignored.

28 Infotainment System
Disconnecting the USB device
1. Remove the USB device from
the Infotainment system.
2. The Media Disconnected... pop
up appears on the screen and
previously used source will be
re-selected.
Pausing/Playing a song
1. Touch to pause the song.
2. Touch to continue playing the
song.
Go to next track
1. Touch go to the next track.
Replay the current track.
1. Touch the button or soft key
to replay the current track.
Go to the previous track
1. Touch twice within 5 seconds
to select and play the previous
track.
Connecting a USB device to the
Infotainment system
1. Connect the USB device to the
infotainment system.
The USB device is automatically
detected by the system.
2. The Reading Media .... pop up
appears on the screen.
If there are no playable tracks in
USB device, the message USB
Device Empty appears and the
previously used source will be
selected.
3. The USB menu appears on
the screen and USB is now the
current source.
4. The Infotainment system
plays the first track in the Root
directory.
Fast Forward/Backward
With this function you can advance
the track being played forward and
backward.
1. Touch and hold either or to
fast-forward or fast-backward the
current track, or
Repeat current track/folder/Off
With this function you can repeat the
current track or folder, and you can
switch off this function.
1. Touch Repeat to repeat the
current track.
2. Touch Repeat twice to repeat
the current folder.
3. Touch Repeat 3 times to switch
Off the Repeat track/folder
function.

Infotainment System 29
Random folder/ Random all/
Random off
With this function you can play the
folder or all tracks at random and
you can switch off this function.
1. Touch More to play the tracks in
the current folder at random.
2. Touch More again.
3. Touch Random twice, to play all
tracks at random.
4. Touch More again.
5. Touch Random 3 times to
switch Off the Random folder/
Random all function.
Go to next/previous folder
With the buttons on the infotainment
system you can select the next or
previous folder.
1. Press either the or button
on the infotainment system to
select the next or previous folder.
The first track in the folder will be
played.
Browsing the Media List and
playing a Track
With this function you can browse
and navigate through the Media List,
select a track and play it.
1. Touch Browse in the USB tab.
The folders and tracks available
on the USB device will be shown
in a list.
2. Touch ▲ or ▼, or rotate the
TUNE knob left or right to scroll
through the tracks and folders.
3. Touch the track, to play the track
or touch the folder, to open the
folder.

30 Infotainment System
Bluetooth Audio
General Information
On your infotainment system you
can play audio from your Bluetooth
device. Before you can upload
audio, the Bluetooth device must
paired with the Infotainment system
(see chapter Bluetooth).
Playing/Pausing a song
1. Press the Media button on the
head unit or the AUDIO button
on the SWRC to select BT
Audio.
The BT Audio tab appears on
the touch screen, showing that
Bluetooth Streaming... has
started.
2. After Bluetooth streaming is
completed, the first track will play
automatically.
3. Press the soft key to pause
the song.
4. Press the soft key to continue
playing the song.
Go to the next track
1. Press the button or soft key to
go to the next track.
Replay the current track
1. Press the button or soft key to
replay the current track.
Go to the previous track
1. Press the button or soft key
twice within 5 seconds to select
and play the previous track.
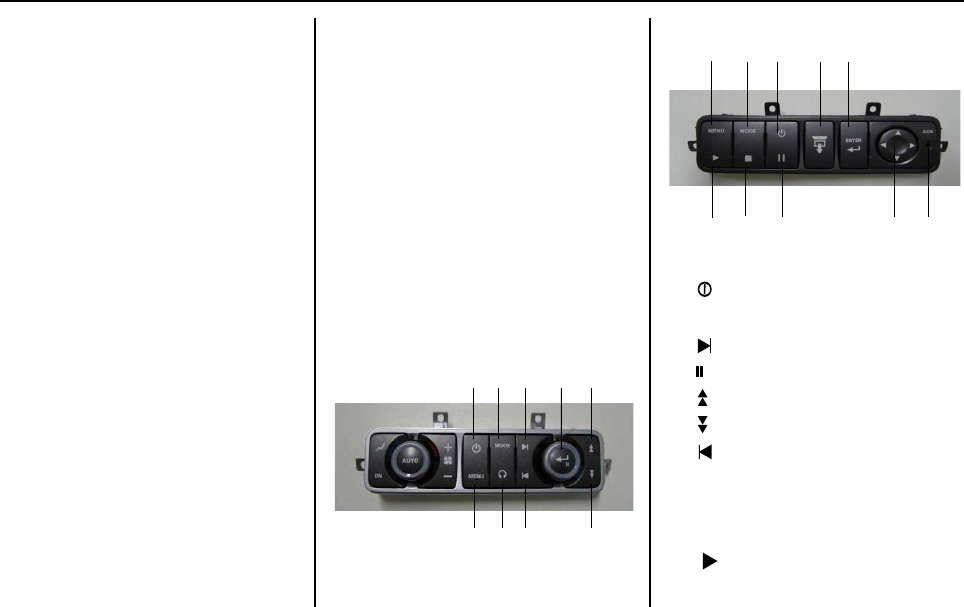
Infotainment System 31
Rear Seat Entertainment/
Audio System (RSE/RSA)
General
Your car may have a CD/DVD Rear
Seat Entertainment/Audio (RSE/
RSA) system. The RSE/RSA system
works with the car’s infotainment
system.
The RSE/RSA system includes a
CD/DVD player, a display screen
AUX-jacks, two headphones, and a
remote control.
Depending on the type of RSE/RSA
in your car, you may have the high
series system with:
• Two adjustable display screens
mounted in back of the front seat
head rests,
• Roof mounted DVD player,
• Rear control panel,
• Aux Video/Audio input jack,
• USB input jack,
• Head phone jacks,
• Remote control,
• Two pairs of IR headphones.
A B C D E
HI G F
A
BD
E
G
H
I
J
K
High series
Low series
Operating Elements RSE/RSA
A. , Power button.
B. MODE button.
C. button.
D. /Eject button
E. button.
F. button.
G. button.
H. Head phone button.
I. MENU button.
J. Stop button.
K. button.
L. AUX connector.
or:
• One single roof mounted fold
down display screen.
• Roof mounted DVD player.
• Rear control panel.
• Remote control.
• Two pairs of IR headphones.
• Aux Video/Audio input jack,
• USB input jack
The RSE/RSA system also has a
Parental Control feature to protect
minors.

32 Infotainment System
Usage
1. Push the release button on the
screen.
2. Place the screen to the desired
position.
Adjusting the DVD Video
Brightness
1. Press the Video Brightness
button.
2. Press the - or + button to adjust
the video brightness.
Playing a DVD
This function starts playback of the
DVD from the RSE DVD.
1. Insert the DVD into the RSE-
DVD drive and press to play
the DVD.
Notes:
● If the DVD is ejected whilst
playing, the system remains on
DVD source until another source
is selected.
● If there is an incoming phone
call when DVD is playing on full
screen size, the system exits the
full DVD screen and switches to
phone view and DVD playback is
paused.
● Viewing a movie on the Front
display is only possible at car
speeds < 3 km/h. When driving
the picture will be replaced
by the information Image not
available while driving.
Pausing a DVD
1. Press , to pause a playing
DVD.
2. Press again, to restart playing
of the DVD.
Stopping a DVD
1. Press on either the RSE unit
or the head unit, to stop playing
the DVD.
Or
2. Press the MEDIA button and
select another source.
If the source is changed whilst
the RSE DVD is played, the DVD
playback stops and the current
play position is remembered.
This will be recalled when the
RSE DVD is selected again.
Selecting the Next/Previous
Chapter
1. Press to select he next
chapter.
2. Press to select the previous
chapter.

Infotainment System 33
Seeking fast forward/backward
You can seek with x2, x4, x8, x16 or
x32 the speed, depending on who
often you press the seek button.
1. Press to seek fast forward.
2. Press to seek fast backward.
Navigating through the DVD Menu
1. Press Menu to select the DVD
Menu.
2. Press the navigating buttons to
navigate within the DVD.
34 Infotainment System
Bluetooth®
General Information
Bluetooth® allows users with a
Bluetooth® enabled mobile phone to
make and receive hands-free calls
using the vehicle’s audio system
and controls.
Bluetooth will also allow users to
stream music files from their device
if available.
The Bluetooth® enabled mobile
phone must be paired with the in-
vehicle Bluetooth® system before it
can be used in the vehicle. Not all
phones will support all functions.
For more information visit:
www.holden.com.au.
Warning
Don‘t use a mobile phone when
you are driving. Make sure
that Bluetooth (if available) is
activated before driving.
If not you must stop at a safe
place to use a mobile phone.
•
•
Pairing
A Bluetooth® enabled mobile phone
must be paired to the in-vehicle
Bluetooth® system first and then
connected to the vehicle before
it can be used. See the mobile
phone manufacturers user guide for
Bluetooth® functions before pairing
the mobile phone.
● Up to five mobile phones can
be paired to the in-vehicle
Bluetooth® system.
● The in-vehicle Bluetooth®
system automatically links with
the first available paired mobile
phone in the order the phone
was paired.
● Only one paired mobile phone
can be connected to the in-
vehicle Bluetooth® system at a
time.
● Pairing should only need to be
completed once, unless changes
to the pairing information have
been made or the phone is
deleted.

Infotainment System 35
Pairing a Bluetooth® Device with
the Infotainment system
1. Switch the Bluetooth® device On
and prepare it for pairing with the
head unit.
2. Press the CONFIG button on the
head unit.
3. Touch the Bluetooth tab on the
touch screen.
4. Touch Pair New Device.
The pop up Searching for
Bluetooth Devices appears.
5. The detected Bluetooth® devices
are shown.
6. Touch the detected Bluetooth®
device. The pop up Enter code
XXXX into device appears.
7. Enter the shown code into the
mobile phone to start pairing.
If pairing failed, the pop up
Pairing Failed appears on the
touch screen.
If pairing was successful, the pop
up Pairing Completed appears
on the touch screen.
Bluetooth® Pairing Initiated via
the mobile phone (In Non Map
View)
1. Enter the Bluetooth menu.
2. Touch Activate Discoverable
Mode.
3. The pop up Discoverable for 5
minutes appears.
4. Use your mobile phone to pair it
with the infotainment system.
The mobile phone generates a
four digit pass code.
5. Enter this code in the pop up
Enter Code.
6. Press the OK soft key to pair the
device.
7. After pairing, the pop up Pairing
Complete will appear.
8. Press OK to confirm pairing.
8. Pairing is now completed. You
can add up to 5 devices to the
Paired Devices list.
Deleting a Bluetooth® Device
1. Press the CONFIG button on the
head unit.
2. Touch the Bluetooth tab on the
touch screen. The list of paired
devices is shown.
3. Touch the mobile phone you
want to delete.
4. Press the Delete soft key to
delete the selected device. The
pop up Delete YYYY Phone
appears.
5. Press the OK soft key to delete
the previously selected device.
The corresponding device will be
deleted from the Paired Devices
list.

36 Infotainment System
Connecting another Bluetooth®
Device
You can connect another Bluetooth®
device and disconnect the currently
paired device without deleting the
device from the Paired Devices list.
1. Switch the new to be paired
Bluetooth® device On and
prepare it for pairing with the
head unit.
2. Press the CONFIG button on the
head unit.
3. Touch the Bluetooth tab on
the touch screen. The Paired
Devices appears on the touch
screen.
If there is a current connection,
the device is marked with an
asterisk on the outer right hand
side.
4. Touch the Device to be paired on
the Paired Devices list.
The pop up Connect “XYXY” ?
appears.
The currently connected device
will be disconnected.
5. Press OK.
The pop up Disconnecting
appears, you might be asked to
enter the code into the mobile
phone.
6. The pop up Connecting of the
new paired device appears.
7. If pairing was successful, the pop
up XYXY is connected. appears
on the touch screen.
8. Pairing of the new device is now
completed.
Auto-connecting a Bluetooth®
Device
1. Switch the Bluetooth® device
On.
2. Switch On the Infotainment
system. Bluetooth® is searching
for an automatic connection with
the device in the Paired Device
list.
3. After pairing is completed,
the pop up Device ‘XXXX’ is
connected. will appear.
Accepting/Rejecting an Incoming
Phone Call
When an incoming call is received,
audio from the infotainment system
is muted and a ring tone sounds via
the car speakers. The callers phone
number appears on the touch screen
in the Bluetooth® Phone tab.
1. Touch the PHONE button on the
screen or press the button
on the Steering Wheel Control to
accept the call.
On the Bluetooth® phone touch
screen the information Call in
Progress, as well as the callers
phone number and the time of
the connection are displayed.
2. If you want to reject the incoming
call, touch the HANG UP button.
Ending a Call
1. Touch HANG UP or press to
terminate a call.

Infotainment System 37
Making a Direct Outgoing Call
1. Press the button on the
infotainment system or the
steering wheel controls to open
the Bluetooth Phone screen.
2. Enter the phone number you
want to call by means of the
numeric key pad.
To enter +, press and hold the 0
button.
3. Touch Send to dial the entered
phone number.
The phone tries to establish
a connection with the entered
phone number, on the Bluetooth
Phone screen Calling ... is
shown.
Making a Call from the Phone’s
Address Book
With this feature you can access you
phone‘s address book through the
infotainment system.
Notes on Bluetooth®
● The infotainment system loads
the address book from the mobile
phone using PBAP profile. It
might take longer than expected
to refresh the address book,
depending on mobile phone.
● For phones that support this
feature, please refer to:
www.holden.com.au/bluetooth
1. Activate the Phone menu
screen.
2. Touch More.
3. Touch Phone book.
The Phone book is shown on the
phone menu screen.
4. Touch the name of the person
you want to dial.
If the name of the person is not
visible in the list, press ▼ or
▲, or rotate the Tune knob left
or right, to select the person
from the Phone book. After the
selection the pop up Call XYX
appears.
6. Touch OK to start dialling.

38 Infotainment System
Making a Call from the Missed
Calls list
With this feature you can access you
phone‘s missed call list through the
infotainment system.
Note: Please refer to
www.holden.com.au/bluetooth
for phones that support this feature.
1. Activate the Phone menu
screen.
2. Touch More.
3. Touch Call History.
The Dialled Calls list is shown
on the phone menu screen.
4. Touch Missed Calls.
5. Touch the name of the person,
who’s call you missed and you
want to call back.
If the name of the person is not
visible in the list, press ▼ or ▲,
or rotate the Tune knob left or
right to select the person from
the Missed Calls list. After the
selection the pop up Call XYX
appears.
6. Touch OK to start dialling.
Making a Call from the Answered
Calls list
With this feature you can access you
phone‘s answered call list through
the infotainment system.
Note: Please refer to:
www.holden.com.au/bluetooth
for phones that support this feature.
1. Activate the Phone menu
screen.
2. Touch More.
3. Touch Call History.
The Dialled Calls list is shown
on the phone menu screen.
4. Press the Answered Calls soft
key.
5. Touch the name of the person
who you want to call back.
If the name of the person is not
visible in the list, press ▼ or ▲,
or rotate the Tune knob left or
right to select the person from
the Answered Calls list. After
the selection the pop up Call
XYX appears.
6. Press OK to start dialling.
Making a Call from the Dialled
Calls list
With this feature you can access you
phone‘s dialled call list through the
infotainment system.
Note: Please refer to:
www.holden.com.au/bluetooth
for phones that support this feature.
1. Activate the Phone menu
screen.
2. Touch More.
3. Touch Call History.
The Dialled Calls list is shown
on the phone menu screen.
4. Touch the name of the person,
you want to call from the Dialled
Calls list.
If the name of the person is not
visible in the list, press the ▼ or
▲, or rotate the Tune knob left
or right to select the person from
the Dialled Calls list. After the
selection the pop up Call XYX
appears.
6. Touch OK to start dialling.

Infotainment System 39
Making a call from voice tag (if
available)
1. Press the button on the
infotainment system or the
steering wheel controls twice to
trigger the voice tag. The Phone
screen appears showing the
message Say Name.
2. Speak the Name of the Contact
you want to call.
3. The phone will proceed to dial
the voice tag requested.
4. After having finished the call
the to the previously selected
source.
Receiving a discrete phone call in
map view
The ring tone is audible via the car
speakers and Voice In appears
Audio Status bar.
1. Press the PHONE button on the
steering wheel controls to accept
the call.

40 Infotainment System
Rear View Cam (if
available)
General Information
Your infotainment system is
connected to a rear view camera.
When you engage the reverse gear
the display shows the image of the
situation behind your car.
Activating/Deactivating the Rear
View Cam
1. Press the CONFIG button.
2. Touch Rear View Camera.
3. Touch On or Off to either switch
the Rear View Camera On or
Off.
4. Touch Back to return to the
previously selected source.

Infotainment System 57
HELP System
General Information
Your infotainment system is
equipped with a Help system to
assist you when operation your
system.
Activating/Deactivating the Help
feature
1. Press the button to open the
Help tab.
2. To get help on Features touch
Feature Help.
3. To get Help on operating
buttons, touch Button Help.
4. To leave the Help feature, touch
Close.
Help on Features
Via Feature Help you can access
help topics on features, These help
topics are subdivided into main and
sub topics.
The main topics are:
● Radio;
● Radio configuration;
● Media:
● Aux;
● Bluetooth Phone;
● Bluetooth Pairing;
● Navigation;
● Navi Configuration
● Traffic,
● Configuration;
● STATUS BAR
Selecting Help on Features
1. Press the button to open the
Help tab.
2. Touch Feature Help.
3. Touch ▲ or ▼, or rotate the
TUNE knob left or right to browse
the main topic list.
4. Touch the main topic you require
information about.
5. Touch ▲ or ▼, or rotate the
TUNE knob left or right to browse
the sub topic list.
6. Touch the sub topic you require
information about.
7. If highlighted, touch ▼, or rotate
the TUNE knob right to select
the second page of this very sub
topic.

58 Infotainment System
8. Touch Back to exit the screen.
Help on Buttons
Via Button Help you can access
help topics on the button functions.
The button functions are:
● MUTE;
● EJECT;
● RADIO;
● MEDIA;
● AUX;
● PHONE;
● HELP;
● NAV;
● MAP,
● BACK;
● POWER;
● LEFT ROTARY;
● RIGHT ROTARY;
● TRACK UP / DOWN;
● FOLDER NEXT / PREV.
Selecting Help on Buttons
1. Press the button to open the
Help tab.
2. Touch Button Help.
3. Touch ▲ or ▼, or rotate the
TUNE knob left or right to browse
the button function list.
4. Touch the button function you
require information about.
5. Touch Back to exit the screen.

Infotainment System 41
Navigation
Your vehicle is equipped with a
Navigation System that allows you
to plan a route and provides map
guidance with voice prompts during
driving.
But it is possible that the information
in the system may not always be
up-to-date. Road conditions, such
as detours, road construction works
and posted speed limits change
frequently. It is important to consider
whether or not you can safely and
legally follow the directions given by
the system.
The system may also interact with
the radio to receive broadcast
announcements on trafc and
emergency alert communications.
General Information
Before you begin to operate this
system, please read this document
thoroughly to familiarize yourself with
the system controls and operation.
That way, you will be able to use
this system with less effort and less
distraction from the road.
If an inoperable function is
selected, the system may display
a message indicating that the
function is not available.
●
Warning
Giving extended attention to
navigation tasks while driving
will greatly increase the risk of a
collision that may cause personal
injury or death.
Road safety has absolute priority!
Only operate this system if the
road and trafc conditions allow
you to do so.
The driver‘s full attention is
always required while driving.
Use voice guidance directions
whenever possible!
42 Infotainment System
Map display
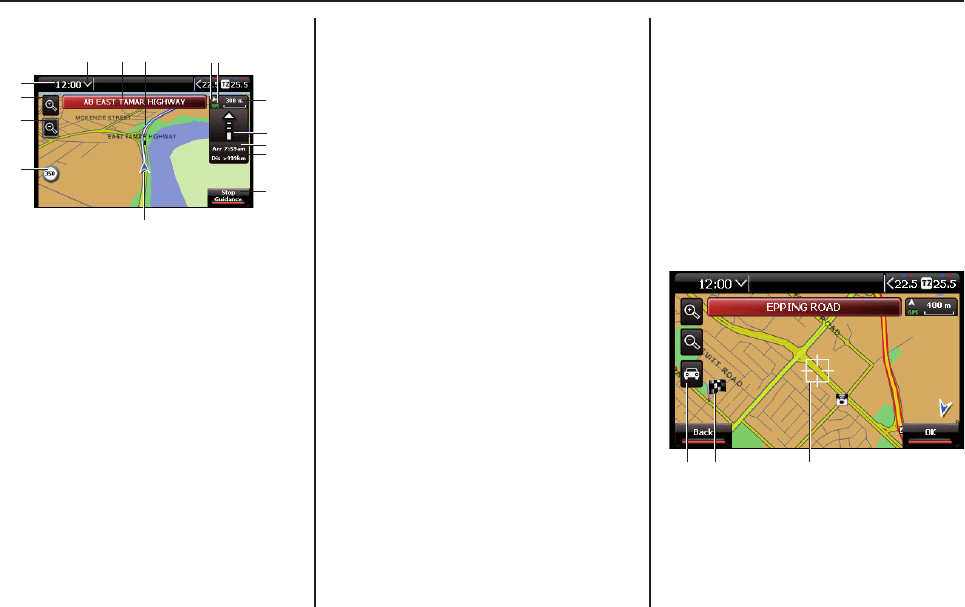
14
5
6
7
8
9
13
12
11
2115
10
3 4
1. Name of the Road to turn into
(next change of direction)
2. The plan route highlighted in
white.
3. Compass : The arrow points
north. Touch this icon to toggle
the map appearance between
North Up, Heading Up or 3D Map
view.
4. GPS : Status of the GPS
reception. Green indicates at
least 4 satellites are available.
Yellow indicates at least 3
satellites are available. Red
indicates no satellite is available.
icon is red in colour. Note: the
documented displayed speed
limit may vary from the current
posted speed limit.
12. Zoom out
13. Zoom in
14. Current time
15. Touch this to switch between
current mode and clock display.
Destination ag
17
16 18
16. Current Position icon: The scroll
map function allows user to view
other part of the map which is not
currently visible. Tap on the point
on the map and the systems
5. Selected map scale. Touch this
to hide or view the graphical
presentation of the direction of
travel.
6. Turn-off prompt: A graphic
display of the next junction or
turn -off. In addition, directional
changes are announced with
voice guidance. Touch this
graphic display to repeat the
voice guidance.
7. Estimated arrival time.
8. Distance to the next change of
direction.
9. Touch to stop the guidance.
10. Vehicle position, arrow indicates
current direction of travel.
11. Road speed limit icon (only when
speed limit data is available on
current road). If vehicle speed
is below the designated road
speed limit, icon is grey in colour.
If vehicle speed is above the
designated road speed limit,

Infotainment System 43
bring that point to the centre
of the screen. Touch the car
position icon to to go back to the
current car position.
17. After a route has been planned
a destination ag (depending on
the scale of the map display) will
appear on the map to show your
destination.
18. Select desination from map: This
function allows you to select any
point on the map and takes the
address of the selected point as
destination address.
Navigation maps
The navigation maps are stored on a
SD-card in the infotainment system.
If you need to update the maps,
please contact your GMH dealer.
Conguring the Navigation
System
You either can change the
Conguration Settings or view
Navigation Information via Nav
Cong. option.
Available are:
Appearance of the map;
Auto Zoom On or Off;
Trafc Management Settings;
Points of Interest;
Alert Points;
Alert Feedback On or Off;
Speed Limit Warnings On or Off;
GPS Status;
System Information
●
●
●
●
●
●
●
●
●
Entering the Navigation
Conguration Menu
1. Press the NAV button.
2. Touch the Nav Cong tab.
3. Touch ▼ or ▲ to select next or
previous page of Navigation
Conguration menu.
Map Appearance
With this setting you can change
the appearance of the map on the
screen.
1. Touch Map Appearance, to
change the appearance of map
according to your personal
needs:
Map Facing: either Heading Up
or North Up.
Map View: either 2D or 3D (not
selectable in North Up view).
Brightness Mode: either Day,
Night or Auto.
2. Touch Back to save the settings
and to return to the previous
screen.

44 Infotainment System
Automatic Zoom
With Automatic Zoom switched
On the navigation system will
automatically zoom in on the
approaching manoeuvre point,
showing the map more detailed.
1. Touch Auto Zoom.
2. Touch either On or Off to switch
Automatic Zoom on or off.
3. Touch Back to save the settings
and to return to the previous
screen.
Viewing the GPS Status
With this option you can look up
the status and accuracy of the GPS
signal.
1. Fix :
- Searching indicates that the
system is searching for satellite.
- Tracking indicates that system
nds less than 3 satellites &
starts to evaluate the signal
quality of the satellites found.
- “2D Fix” indicates that there are
minimum 3 available satellites to
calculate the position.
- “3D Fix” indicates that there are
at least 4 available satellites with
good signal quality.
2. Current No of Satellites : This
indicates the number of available
satellities.
3. HDOP (GPS Accuracy) : This
numeric value indicates the quality
of the satellite reception. The lower
the value, the better is the reception
quality.
4. Current GPS speed: This is the
calculated vehicle speed based on
the GPS satellite tracking signal.
5. Latitude/Longitude: This indicate
the current position of the vehicle
on the globe, this information is also
based on the GPS sattelite signals.
To view this information:
1. Press the NAV button.
2. Touch the Nav Cong tab.
3. Touch GPS Status.
4. Touch Back to exit and to return
to the previous screen.
System Information
With this option you can view the
System Information of the Navigation
System, like Platform, Software
version and Map Database.
1. Press the NAV button.
2. Touch the Nav Cong tab.
3. Touch System Information.
4. Touch Back to exit this and to
return to the previous screen.
Trafc Message Channel (TMC)
Trafc Message Channel (TMC) is
a technology for delivering trafc
and travel information to drivers. It
is digitally coded using the FM-RDS
system on conventional FM radio
broadcasts.
Note: Trafc information is only
available in areas where it is
specically provided by local FM
radio stations, therefore may not be
available on some areas or towns.

Infotainment System 45
Trafc Guidance
This navigation system processess
TMC trafc information and inform
you about the trafc condition
via pop up messages and voice
announcement.
You have the option to adapt the
Trafc Management Settings to your
preferences.
RDS-TMC - Automatic
(default setting)
The Navigation System will
automatically select the best TMC
station.
RDS-TMC - Preferred
(default setting)
You can select a preferred TMC
station from a list of available
TMC stations (only when the area
has more than one radio station
providing trafc information).
Trafc Avoidance - Automatic
(default setting)
The Navigation System will
automatically calculates a more
favourable route than the current
plan route, taking into account of the
trafce events.
Trafc Avoidance - Manual
Dynamic Route Guidance is switch
on to inform you of a trafc event
on the plan route and give you the
option to re-route or to stay on the
current plan route.
Trafc Avoidance - OFF
Dynamic route guidance is switch off
and the system will not process any
TMC trafc information.
Trafc Management Settings
1. Press the NAV button.
2. Touch the Nav Cong tab.
3. Touch Trafc Management
Settings.
Trafc Avoidance
4. Touch either Auto or Manual
to enable Dynamic Route
Guidance.
5 or touch Off to disable Dynamic
Route Guidance
Note: RDS-TMC function is disable
with Trafc Avoidance Off.
RDS-TMC
6 Touch either Automatic or
Preferred accordingly to your
requirements.
7. Touch Back to save the settings
and to return to the previous
screen.
Conguring the Point Of Interest
(POI) Settings
With this setting you can select
POI’s you would like to display on
the map.
1. Press the NAV button.
2. Touch the Nav Cong tab.
3. Touch ▼ to select the second
Navigation Conguration page.

46 Infotainment System
4. Touch POI Selection.
5. Select the Points of Interest you
want to display; the selected POI
is indicated with an *.
6. Touch ▼ or ▲ to select the next
or previous page.
7. After selection, touch Back to
exit and to return to the previous
screen.
Conguring Alert Points and Alert
Feedback
With this setting you can switch the
alert function on/off. This function
warns you about when approaching
an alert point.
With All Screens selected, a
pop-up message together with
audio feedback will alert you on all
infotainment screens.
With Map Screen selected, a pop-
up message together with audio
feedback will alert you on map
screens only.
When Off is selected, no alert
information will be given.
Please note: During a phone call
only a pop-up will appear on the
screen without any audio feedback.
Alert information is available on
Railway Crossings, Speed & Red
Light cameras (Safety cameras)
and School Zones.
Conguring Alert Points
1. Press the NAV button.
2. Touch the Nav Cong tab.
3. Touch ▼ to select the second
Navigation Conguration page.
4. Touch Alert Points.
5. Select the Alert Points as
required.
6. After selection, touch Back to
exit and to return to the previous
screen.
Conguring Alert Point Feedback
(Audio Chime)
1. Press the NAV button.
2. Touch the Nav Cong tab.
3. Touch ▼ to select the second
Navigation Conguration page.
4. Touch Alert Point Feedback.
5. Touch the corresponding button
to switch Alert Point Feedback
On or Off.
5. After selection, touch Back to
exit and to return to the previous
screen.
Conguring Speed Limit Warnings
Where available, the Navigation
system displays the documented
speed limit for the current road.
If the vehicle speed is less than the
documented speed limit, then the
speed icon will be grey.
If the vehicle speed is greater, then
the speed icon will be coloured.
There is no audio alert with this
warning.
Note: the documented displayed
speed limit may vary from the
current posted speed limit.
This feature is available in guidance
and non-guidance modes.

Infotainment System 47
1. Press the NAV button.
2. Touch the Nav Cong tab.
3. Touch ▼ to select the second
Navigation Conguration page.
4. Touch Speed Limit Warnings.
5. Touch the corresponding button
to witch Speed Limit Warnings
On or Off.
6. After selection, touch Back to
exit and to return to the previous
screen.
Navigation
You can enter all navigation
information into the navigation
system by means of the integrated
keyboard.
Entering a Destination Address
With this option you can enter a
destination address.
1. Press the NAV button and touch
the Dest Input tab.
2. Touch Enter Address.
3. Touch Country, then enter the
country’s name or enter the rst
letter(s) and touch List to select
the country from the list.
4. Touch City, then enter the name
of the city or enter the rst letters
and touch List to select the city
from the list.
Hint: You can enter a Suburb name
or a City name (to cover a larger
search area).
5. Touch Street, then enter the
name of the street or enter the
rst letters and touch List to
select the street from the list.
6. Touch Intersection, then enter
the name of the street or enter
the rst letters and touch List to
select the street from the list.
6. Touch Back to exit and to return
to the previous screen.
Entering an Address via its
Geographical Co-ordinates
With this option you can enter an
address using its Latitude and
Longitude. The geographical
coordinates have to be entered in
the corresponding elds.
1. Press the NAV button and touch
the Dest Input tab.
2. Touch Enter Address.
3. Touch More.
4. Touch Input via Co-ords.
5. Enter the geographical
coordinates using the keyboard.
6. If required touch S to switch to N
and vice versa for E to W.
7. Touch Map Route.
8. The Calculating Route pop-up
appears.
9. When the calculation is
completed, the map screen is
shown.
10. Touch Back to exit and to return
to the previous screen.
11. Touch Start Guidance to exit
and to return to the previous
screen. The system is ready for
departure.

48 Infotainment System
Saving an Address as a Favourite
(any Favourite, Home or Work)
You can save an entered destination
address as a general Favourite or
Home or Work address.
1. Press the NAV button and touch
the Dest Input tab.
2. Touch Enter Address to enter
a new or select an existing
address.
3. Touch More.
4. Touch Save as.
5. The Save As pop-up appears
asking you to save this address
under Favourites, Home or
Work.
6. Touch Favourite, to save the
Destination or touch Cancel to
return to the previous screen.
Renaming an Address
With this option you can rename any
destination address in the favourites
list, except <Home> and <Work>.
1. Press the NAV button and touch
the Dest Input tab.
2. Touch Choose Favourites
3. Touch Rename, then touch the
entry you want to rename.
4 Enter the new name by means of
the keyboard.
5. Touch OK, the previous selected
entry will be renamed and will
appear under its new name in
the Favourites List.
Deleting a certain Address from
the Favourites List
With this option you can delete
a destination address from the
favourites list.
1. Press the NAV button and touch
the Choose Favourites tab
2. Touch Delete.
3. Touch the Entry you want to
delete from the Favourites List.
4. The Delete Favourites pop-up
appears.
5. Touch OK, the selected entry will
be deleted from the Favourites
List.
Deleting all Addresses from the
Favourites List
With this option you can delete all
destination addresses from the
favourites list.
1. Press the NAV button and touch
the Choose Favourites tab
2. Touch Delete, then touch Delete
All .
3. The Delete All Favourites pop-
up appears.
4. Touch OK to delete all entries
from the Favourites List.
Viewing a Destination Address on
the Map
With this option you can view the
location of a Destination Address on
the map.
1. Select the Destination Address
you want to view on the map via
the Dest Input tab.
2. Touch Show Address.
The map appears.

Infotainment System 49
history list.
1. Press the NAV button and touch
the Dest Input tab.
2. Touch Choose History.
3. If you want to select an address,
touch the corresponding address.
4. Touch ▼ or ▲ to select next or
previous page if available.
5. If you want to delete all entries
from the history list, touch Clear
All.
6. The Delete All Favourites pop-
up appears.
7. Touch Back to exit and to return
to the previous screen.
Points of Interest
You can select Points of Interest
either by name or by Category near
the current car position or around the
destination or near an address.
By Name: enter the name of the POI
by their known names like Rafes,
Merlion, McDaffys Wine Bar, etc..
By Category: you can browse
The Address is indicated by.
With zoom in/out you can zoom
in or out on the address.
3. Touch Back to exit and to return
to the previous screen..
Selecting an Address from the
Favourites List
With this option you can select
a Destination Address from the
favourites list.
1. Press the NAV button and touch
the Dest Input tab.
2. Touch Choose Favourite.
3. Touch the favourite you want
to select, if the favourite is not
shown on the rst page, touch ▼
to select the next page.
6. Touch Back to return to the
previous screen.
Selecting or deleting an address
from History List
Via the History List you can select
a previously entered destination
address or delete the complete
the POI for ATM, restaurants, Gas
stations, Airport, Pharmacy etc..
Points of Interest near the Current
Position
1. Press the NAV button and touch
the Dest Input tab.
2. Touch Choose POI.
3. Touch Near Current Position.
4. Select the POI either By Name
or By Category
5. Or touch Cancel to exit the pop-
up.
6. Touch Back to return to the
previous screen.
Points of Interest near the
Destination (Available During
Guidance Mode only)
1. Press the NAV button and touch
the Dest Input tab.
2. Touch Choose POI.
3. Touch Near Destination.
4. Select the POI either By Name

50 Infotainment System
or By Category
5. Or touch Cancel to exit the pop-
up.
6. Touch Back to return to the
previous screen.
Points of Interest near an Address
(available during non-guidance
mode only).
1. Press the NAV button and touch
the Dest Input tab.
2. Touch Choose POI.
3. Touch Near an Address.
4. Select the POI either By Name
or By Category
5. Or touch Cancel to exit the pop-
up.
6. Touch Back to return to the
previous screen.
Finding an emergency destination
With this option you can select an
Emergency Destination
1. Press the NAV button and touch
the Choose Favourites tab
2. Touch Emergency.
3. Touch the Emergency
Destination you want to select
from the Emergency List.
- Police Stations
- Hospitals
4. If the Emergency Destination
you require is not displayed,
touch ▲ or ▼ to select the
previous or next page and select
it from the list.
Changing the selected Route
With this option you can insert a
stage into an existing route or a
journy plan. You can Add upto
three stages. During active guidance
every stage entered will be treated
as a new address before the nal
destination. With a journey plan a
stage is integrated into the route and
indicated as an intermediate stage
by means of a symbol on the map.
Adding/Editing/Rearanging stages
With this option you can add to a
journey, edit an existing stage or
reorder entered stages.
1. Press the NAV button and touch
the Route Pref tab
2. Touch Change Route.
3. Touch Add/Edit Stage.
4. Touch Add, the Add/Edit Stage
screen shows the options to
select the stage.
5. Touch the option you would like
to select the stage with or press
Back to return to the previous
screen.
6. If youwant to change the order of
the enterd stages touch Reoder
Stage.
7. If you want to relocate added
stages, touch the stage you
want to move.
8. Then touch eiter Move up or
Move down, depending on the
stages location.
9. Then touch Recalculate Route.
A pop-up appears to inform you
that the selected route is being
recalculated. After recalculation

Infotainment System 51
is nished the Map is shown in
preview mode. Each stage is
indicated by a chequered ag.
10.Touch Back to return to the
previous screen.
11. Touch Start Guidance, guidance
is started and the Navigation
screen with the calculated route
is shown.
12. To cancel Guidance touch Stop
Guidance.
Deleting a Stage
With this option you can delete
a stage from an existing route or
journey plan.
1. Press the NAV button and touch
the Route Pref tab
2. Touch Change Route.
3. Touch Add/Edit Stage.
4. Touch Delete Stage, then touch
the Stage you want to delete
from the list. A popup appears
asking you to conrm the
selection.
5. Touch OK if you want to delete
the selected address or touch
cancel if you do not want to
delete the selection.
6. Touch Back to return to the
previous screen.
Detour
With this option you can set a
distance to detour from the current
plan route. The system automatically
calculates a new route based on the
distance to detour.
1. Press the NAV button and touch
the Route Pref tab
2. Touch Detour.
3. Touch the distance (marked by *)
you wish to detour.
4. Touch Clear Detours to clear all
setting.
5. Touch Back to return to the
previous screen.
Setting Route Options
1. Press the NAV button and touch
the Route Pref tab
2. Touch Route Options.
3. Touch the route option you want
to select:
Shortest (the route is calculated
based on shortest route optimized
in distance)
Optimum (the route is calculated
based on optimized estimated
travel distance and estimated
travel time with a weighting of
50% driving distance and 50%
driving time)
Fastest (the route is calculated
based on fastest route optimized
in time)
4. Then select what you would like
to avoid:
Avoid Ferries
Avoid Toll Road
Avoid Highways
5. Touch Save Options, to conrm
the selections.
6. Touch Back to return to the
previous screen.
●
●
●
●
●
●

52 Infotainment System
Viewing the Route List
With this option you can view details
of the current journey plan in a list
view. This include the addresses of
starting point, nal destination and
all the streets/roads along the way.
If stages are added, they are also
included in the list view.
When navigation is active and any of
the streets have been passed, they
will be removed from the list.
Note: This option is only availabe
when a destination is selected.
1. Press the NAV button and touch
the Route Pref tab
2. Touch Route List.
3. Touch the route option you want
to view in detail:
the Distance to this point. in m
the Length in m
the City:
4. Touch ▼ or ▲ to select next or
previous page if available.
5. Touch Back to return to the
previous screen.
●
●
●
Viewing the Destination on the
map
With this option you can view the
destination selected on the map.
Note: This option is only available in
Guidance mode and with the route
being calculated.
1. Press the NAV button and touch
the Route Pref tab
2. Touch Show Destination, the
map with the destination is
shown.
3. Press the NAV button to return
the Route Pref screen.
Trafc Message Channel
(TMC)
Viewing and Updating TMC
stations
With this option you can view
available TMC stations and update
them if required.
1. Press the NAV button and touch
the Trafc tab
2. Touch TMC Stations, the screen
shows availabe TMC stations.
The currently selected TMC
station is marked with an asterik.
3. Touch Refresh to update the
current list. The pop-up Updating
TMC Stations will appear on the
screen.
4. Touch Cancel if you want to
cancel the TMC Station search.
5. Or touch Back to return to the
previous screen.
Selecting a TMC station
With this option you can select your
favourite TMC station.
1. Press the NAV button and touch
the Trafc tab
2. Touch TMC Stations, the screen
shows availabe TMC stations.
The currently selected TMC
station is marked with an asterik.
3. Touch the TMC Station you want
to select. This TMC station is
now marked with the asterik.
5. Touch Back to return to the
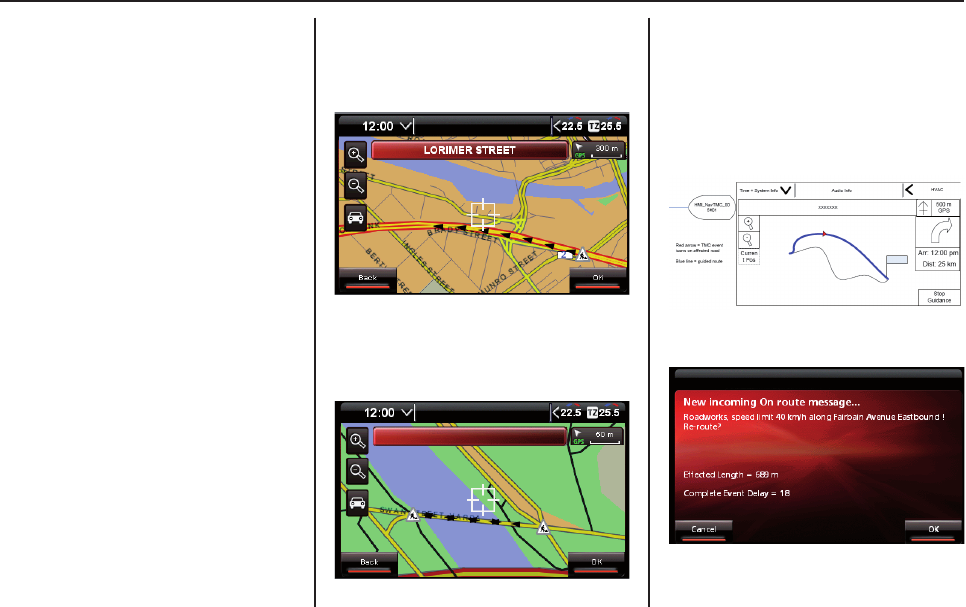
Infotainment System 53
previous screen.
Viewing TMC messages
With this option you can view
available TMC stations and update
them if required.
1. Press the NAV button and touch
the Trafc tab
2. Touch TMC Stations, the screen
shows availabe TMC stations.
The currently selected TMC
station is marked with an asterik.
3. Touch Refresh to update the
current list. The pop-up Updating
TMC Stations will appear on the
screen.
4. Touch Cancel if you want to
cancel the TMC Station search.
5. Or touch Back to return to the
previous screen.
TMC events on the map
TMC events on the map during non
guidance mode for single direction
road.
TMC events on the map during non
guidance mode for dual direction
road.
TMC events on the map during
guidance mode (Trafc avoidance
set to Manual).
When there is road congestion on
the plan road, TMC icon is red in
colour and user can hear voice
announcement.
A pop up message appear and ask
you to re-route.
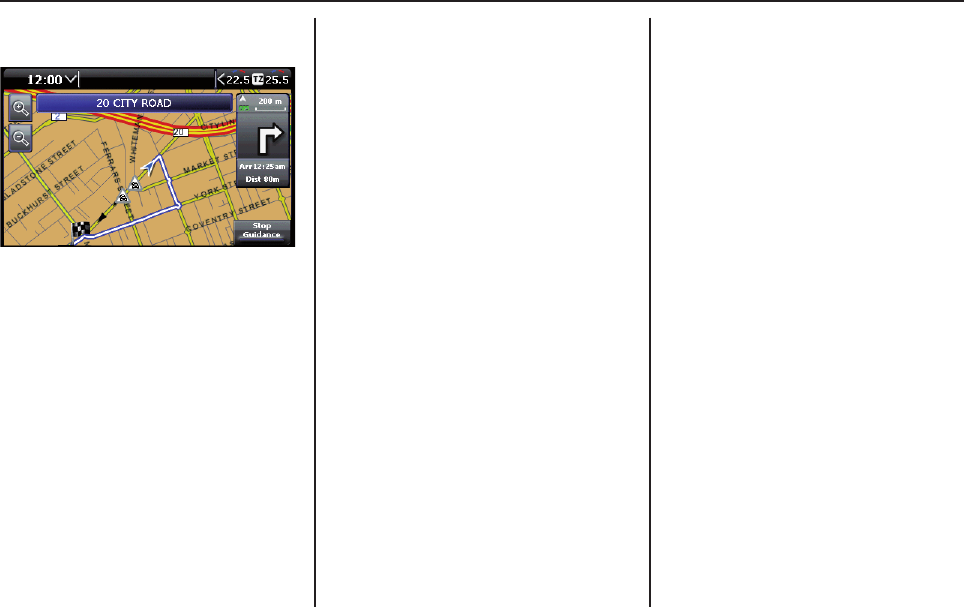
54 Infotainment System
A new road is plan when re-route
is enter. TMC icon change to grey
colour on the non plan route.
Simulating a Trip
With this feature you can simulate
the trip from its current to its nal
position along the entered route. The
calculated route is highlighted on the
map. This function is only available
with the car stationary.
1. Enter the required destination via
the Dest Input tab.
2. Touch More.
3. Touch Simulate Trip.
4. Touch either Current Position or
Choose Start Address to select
the corresponding address; or
touch Cancel the close the pop-
up.
5. When you touch Current
Position, simulation starts
directly.
6. When you touch Choose
Address, you have to enter
the starting point as described
before, then touch OK.
7. A pop-up appears and you will
get some voice feedback that the
simulation will be started.
8. Touch Stop Guidance to cancel
simulation.