Continental Automotive Technologies TR412UB Car CD Player User Manual part 1
Continental Automotive GmbH Car CD Player part 1
Contents
- 1. User manual part 1
- 2. User manual part 2
User manual part 1
www.vdo.com
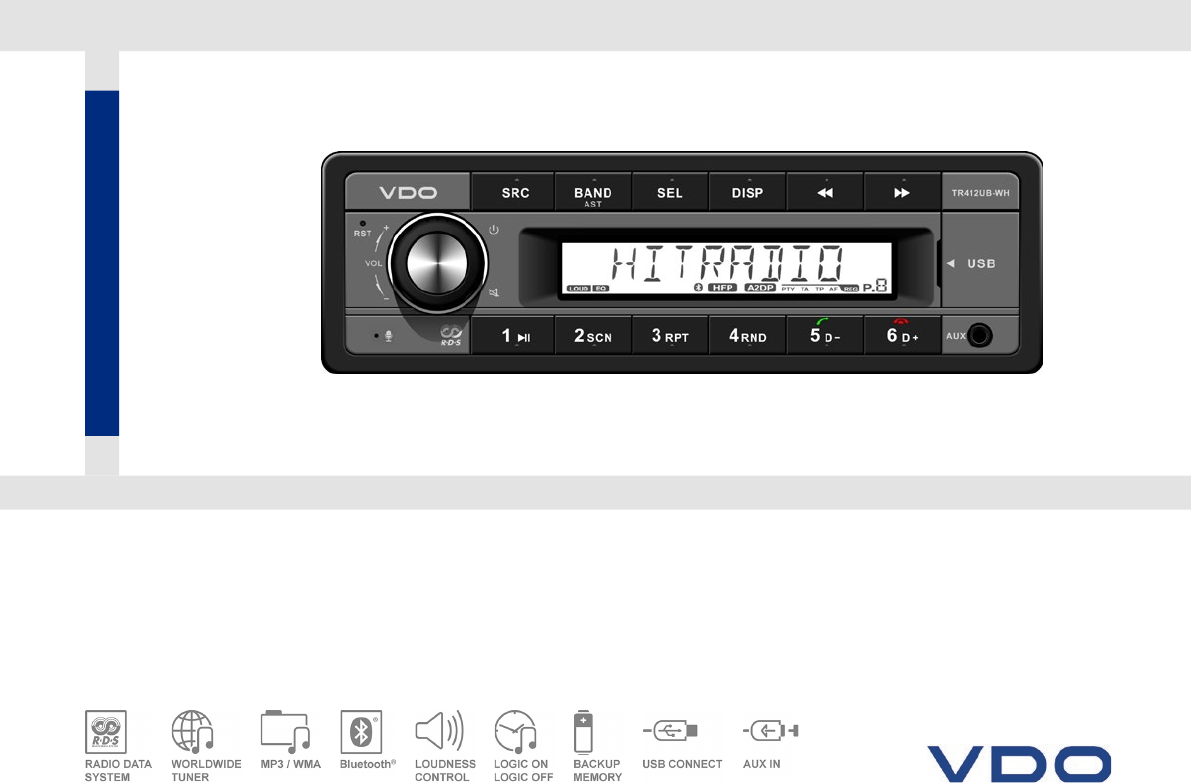
TR412UB-WH
RADIO / USB MP3 / WMA / Bluetooth® 12V
BEDIENUNGSANLEITUNG / OWNER’S MANUAL / MODE D’EMPLOI / MANUALE D’USO
LATAM
ASIAN
JAPAN
N AFRICA
3
© Continental Trading GmbH
DE
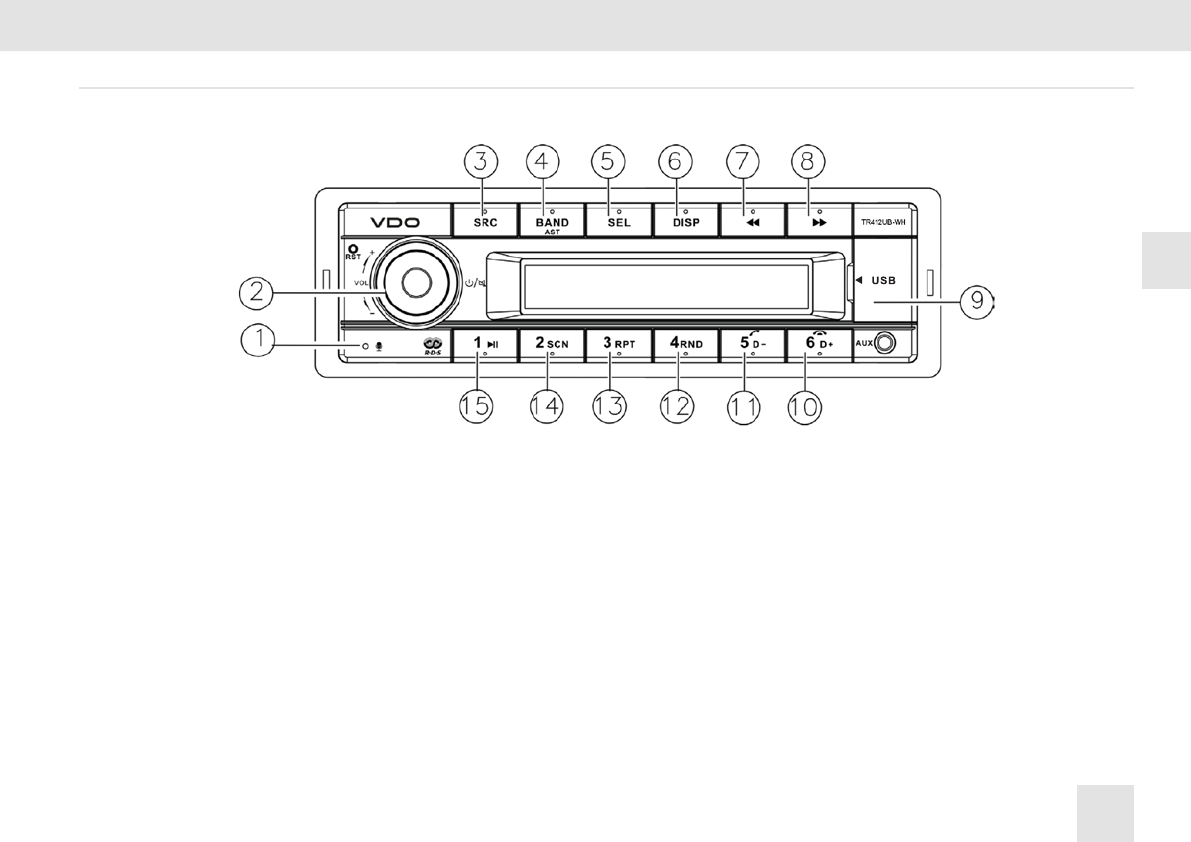
Bedienelemente
nBedienelemente
(1) Mikrofon,
(2) Ein-/Ausschalttaste,
Stummschaltung,
im eingeschalteten Zustand mehr als 2 Sek.
gedrückt halten, um das Gerät.
Zur Lautstärkeregelung den VOL-Knopf drehen.
(3) Quelle
Radio,
USB (bei eingestecktem USB-Medium),
AUX IN,
A2DP,
Mehr als 2 Sek. gedrückt halten zur Auswahl
des PTY-Modus.
(4) Bandwechsel:
FM1 -> FM2 -> FM3 -> MW1 -> MW2-> LW
Gedrückt halten, um automatisch Sender
zu suchen und signalstarke Sender an den
Speicherplätzen 1-6 zu speichern.
(5) SEL drücken und den VOL-Knopf drehen zur
Auswahl des EQ-Voreinstellungsmodus:
EQ OFF-POP-CLASSIC-ROCK-JAZZ
Bei der Auswahl des PTY-Modus durch Drücken
aktivieren
SEL drücken und den VOL-Knopf drehen zur
Einstellung der Uhrzeit im CLOCK-Modus.
(6) Systemuhr anzeigen
Gedrückt halten, um die Uhrzeit einzustellen
Radio-Modus:
Anzeige von PTY-Info/Systemuhr/aktuellem
Kanal,
MP3-Modus:
Drehen für Ordnername/Dateiname/ID3 TAG/
Zeit.
(7) Radio-Modus:
Automatischer Sendersuchlauf in
Abwärtsrichtung
MP3-Modus:
Den vorherigen Titel auswählen
(8) Radio-Modus:
Automatischer Sendersuchlauf in
Aufwärtsrichtung
MP3-Modus:
Den nächsten Titel auswählen
(9) USB-Anschluss
(10) Nächster MP3-Ordner/Auegen
(11) Vorheriger MP3-Ordner/Wählen/Umschaltung
(12) MP3-Zufallswiedergabe
(13) MP3-Wiederholungswiedergabe
(14) Programm-Intro-Wiedergabe (10 Sek.)
(15) Wiedergabe/Pause
(10-15)
1-6 Radiosender-Voreinstellungen
Drücken, um einen voreingestellten Sender zu
wählen.
Mehr als 2 Sek. gedrückt halten, umden
aktuellen Sender zu speichern.
4
TR412UB-WH RADIO / USB MP3 / WMA / Bluetooth® 12V
DE
Drucktasten
nDrucktasten
MP3-Wiedergabe
Titel überspringen
Die Taste [ /] drücken, um zum vorherigen
oder nächsten Titel zu gelangen.
Die Taste gedrückt halten, um den schnellen
Vorlauf oder Rücklauf zu aktivieren.
MP3 schnelle Titelsuche
Die Taste [5D-]/[6D+] drücken, um den vorherigen/
nächsten MP3 Ordner zu.
Einstellen der Uhrzeit
Sollte die RDS-Uhr (CT) nicht funktionieren,
kann die Uhrzeit manuell eingestellt werden.
[DISP]-Taste gedrückt halten, um die Uhrzeit
einzustellen.
Über die Suchtasten [CLOCK] auswählen [ /].
Die [SEL]-Taste drücken und den [VOL]-Knopf
drehen, um die Minuten einzustellen.
Die [SEL]-Taste drücken und den [VOL]-Knopf
drehen, um die Stunden einzustellen.
Die [SEL]-Taste drücken, um den
Zeiteinstellungsmodus zu verlassen.
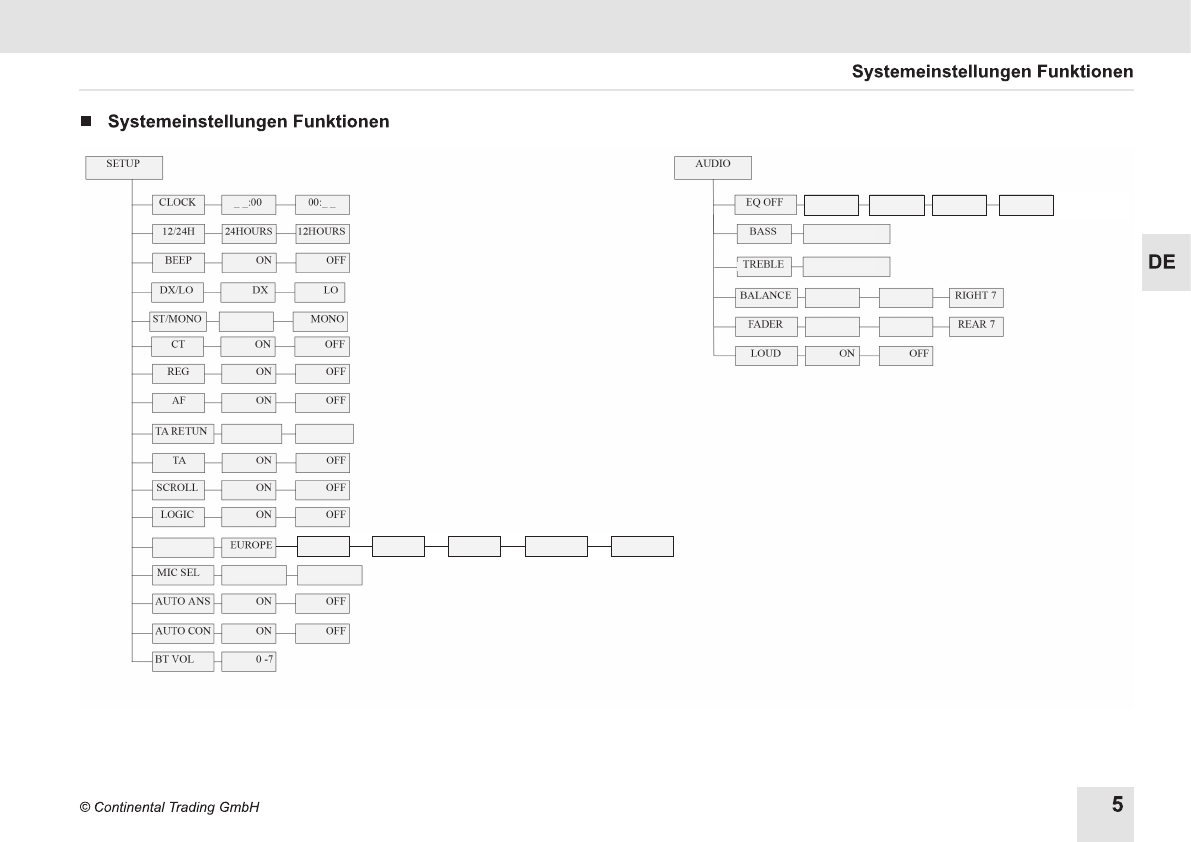
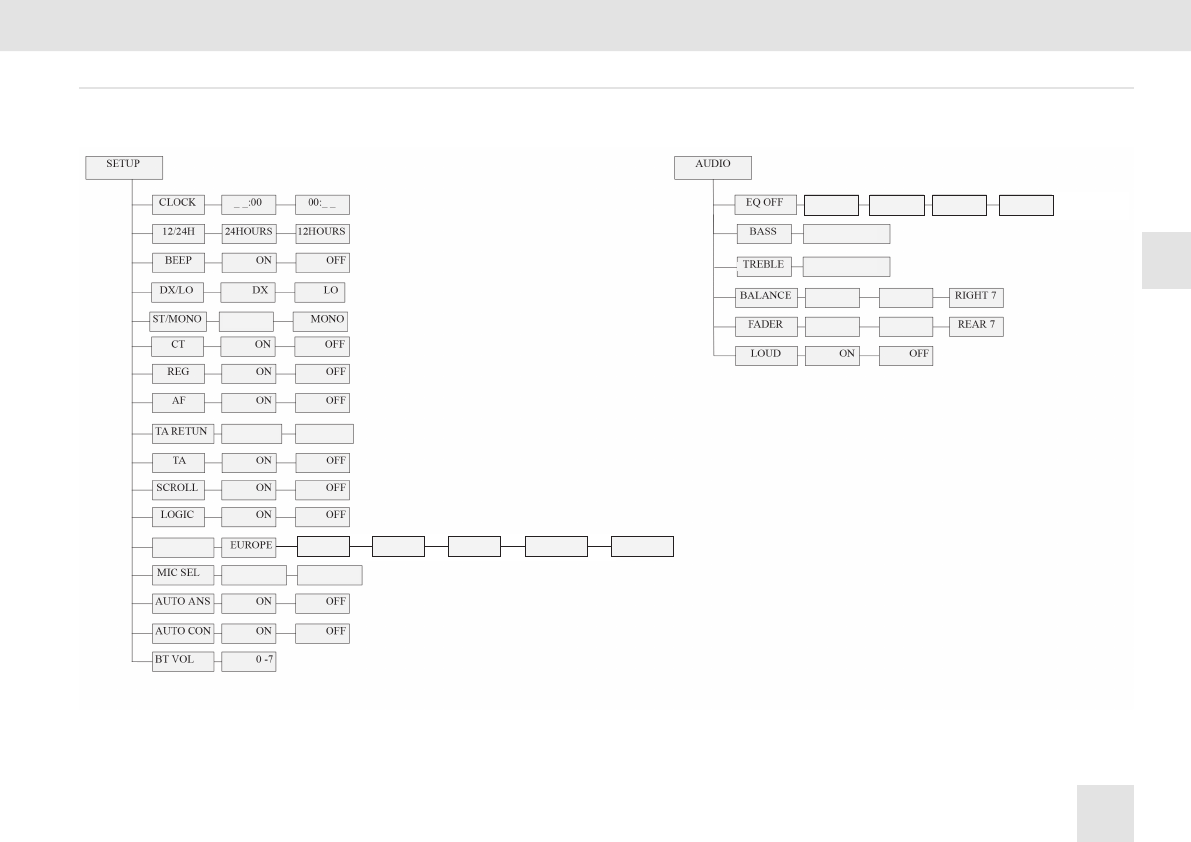
Systemeinstellungen
Im Nicht-Zeitanzeige-Menü:
[DISP] gedrückt halten und [ /]-Taste
drücken, um das Systemeinstellungsmenü zu
aktivieren,
CLOCK TA TA RETURN AF REG
CT DX/LO ST/MONO AUTO ANS
AUTO CON F 12H/24H MIC SEL
REGION LOGIC(ON/OFF) SCROLL
(ON/OFF)
1 Sek. warten, dann den Knopf drehen, um
Systemeinstellungen vorzunehmen.
TA-Einstellung: [VOL]-Knopf drehen, um ON/OFF
einzustellen.
TA RETURN: Im FM-Modus Festlegung des TA-
Infozeitraums bei der automatischen Suche mit
RDS.
Bei Einstellung „LONG” wird der TA-Zeitraum
bei der Auto-Suche auf 180 Sek. festgelegt, bei
Einstellung „SHORT” wird der TA-Zeitraum bei der
Auto-Suche auf 45 Sek. festgelegt.
Region-Einstellung zur Auswahl von EUROPE
(Europa), USA , LATAM , ASIAN (Asien),
JAPAN, N AFRICA.
Die Taste [SEL] drücken, dann die Taste [ /]
drücken, um die Funktion EQ/BAS/TRE/BAL/FAD/
LOUD auszuwählen. Zur Einstellung den Knopf
drehen.
Sendersuche
Automatische Sendersuche
Die Taste [ /] drücken, um den automatischen
Sendersuchlauf in Abwärtsrichtung oder
Aufwärtsrichtung zu starten.
Schrittweise Sendersuche
Taste für mehr als 2 Sekunden gedrückt halten,
in den manuellen Modus wechseln, die Taste
drücken und Sender schrittweise in Aufwärts- oder
Abwärtsrichtung suchen.
Manuelle Speicherung
In den Modi FM1/FM2/FM3/MW1/MW2/LW eine
der Senderstationstasten 1-6 gedrückt halten,
um den aktuellen Sender im entsprechenden
Speicherplatz zu speichern. Sie können insgesamt
36 Sender speichern (18 FM/18 AM).
RDS
Die [DISP]-Taste drücken, um AF/TA/REG
einzustellen, den [VOL]-Knopf drehen, um die AF/
TA-Funktion zu öffnen oder zu schließen.
Die [SRC]-Taste für die PTY-Funktion
gedrückt halten, den [VOL]-Knopf drehen,
die Programmtypen NEWS und POP werden
angezeigt.
Bei Anzeige NEWS den Knopf drehen, um eine
andere Voreinstellung zu wählen.
NEWS-AFFAIRS-INFO-SPORT-EDUCATE-
DRAMA-CULTURE-SCIENCE-VARIED-POP
M-ROCK M-EASY M-LIGHT M-CLASSICS
M-OTHER M-WEATHER -FINANCE-CHILDREN-
SOCIAL -RELIGION-PHONE IN-TRAVEL-
LEISURE-JAZZ-COUNTRY-NATION M-OLDIES-
FOLK M-DOCUMENT-TEST-ALARM
Logic ON/Logic OFF
Logic ON - Verwendung des Geräts bei
ausgeschalteter Zündung auf eine Stunde
begrenzt. Logic OFF, um das Gerät zum Schutz
der Batterie mit der Zündung auszuschalten.
ST
LONG
REGION
FRONT REAR
USA LATAM ASIAN JAPAN
SHORT
BAS -7~+7
TRE -7~+7
LEFT 7
FRONT 7
POP CLASSIC ROCK
N AFRICA
JAZZ
CENTRE
CENTRE
6
TR412UB-WH RADIO / USB MP3 / WMA / Bluetooth® 12V
DE
USB-Funktionen: Zusammenfassung
nUSB-Funktionen:
Zusammenfassung
Auswerfen eines USB-Geräts
1. Ein USB-Gerät einstecken. Das Gerät beginnt
automatisch mit der Klangwiedergabe.
2. Um die Wiedergabe des USB-Geräts zu
beenden, die SRC-Taste auf Nicht-USB-
Modus einstellen und das USB-Gerät
entfernen.
USB-Funktionen (Flash-Speichertyp)
1. Unterstützung von USB-Flashspeicher 2 in 1
2. Formate FAT 12/FAT 16/FAT 32 werden
unterstützt.
3. Unterstützung von USB 1.1 und USB 2.0 (Bei
2.0 ist die Geschwindigkeit gleich zu USB 1.1)
4. Unterstützung von WMA-Dateien.
5. Die maximale Anzahl von MP3-Dateien im
FAT 32-Format beträgt 65535. (Maximale
Anzahl von MP3-Dateien im NTFS-Format
beträgt 1000.)
Die maximale Anzahl von Ordnern beträgt 999.
6. Es werden maximal 32 GB USB-Speicher
unterstützt und die beste Leistung ist bei
maximal 500 Titeln und 30 Ordnern gegeben.
7. Nicht alle USB-Geräte sind mit diesem Gerät
kompatibel.
Bluetooth-Funktion
nBluetooth-Funktion
Pairing
1 Bluetooth-Funktion auf dem Smartphone
aktivieren.
2 Das Smartphone sucht nach dem Bluetooth-
Gerät.
3 Pairing-Code (1234) eingeben, um die Geräte
zu verbinden.
Die [6D+]-Taste für mehr als 2 Sek. gedrückt
halten, um die Verbindung zwischen Mobiltelefon
und Gerät zu trennen.
Bluetooth-Modus auswählen
[SRC]-Taste drücken, um Bluetooth-Modus
auszuwählen.
[DISP]-Taste drücken, um A2DP-Informationen
anzuzeigen.
Rufnummer wählen
1 Mit dem Telefon
Nummer mit dem Mobiltelefon wählen,
Wählinformationen werden im LCD-Display
angezeigt.
2 Mit dem Gerät
[SRC]-Taste drücken, um in den A2DP
(Bluetooth)-Modus zu wechseln.
[5 D-] drücken, um die Funktion DIAL ON
auszuwählen,
[SEL]-Taste / [ /] -Taste drücken und
Ziffern der Rufnummer durch Drehen des
Knopfes eingeben, [5 D-]-Taste drücken, um
die Nummer zu wählen.
Gespräch umschalten
Während des Gesprächs auf dem Mobiltelefon
das Symbol für „Gespräch umschalten‟ berühren
bzw. die Taste [5 D-] drücken, um auf DIAL ON/
PLS PAIR/BT MUSIC umzuschalten.
AUFLEGEN/AM APPARAT BLEIBEN
[5 D-]-Taste drücken, um einen Anruf
anzunehmen,
[6D+]-Taste drücken, um aufzulegen.
A2DP-Modus
Im Musikwiedergabemodus via A2DP [1]-Taste
drücken, um Anhalten/Wiedergabe auszuwählen.

7
© Continental Trading GmbH
DE
FCC
nFCC
FCC-RICHTLINIEN
1. Dieses Gerät erfüllt die Bedingungen von
Abschnitt 15 der FCC-Bestimmungen (FCC =
Federal Communication Commission:
amerikanische Zulassungsbehörde im
Fernmeldewesen).
Der Betrieb erfolgt unter den folgenden beiden
Bedingungen:
(1) Dieses Gerät darf keinerlei gefährliche
Störungen verursachen.
(2) Dieses Gerät muss jegliche Art von Störung
akzeptieren, einschließlich solcher, die
unerwünschte Betriebsfolgen haben können.
2. Bei Änderungen oder Modikationen am
Gerät, die nicht ausdrücklich von der für die
Konformität verantwortlichen Partei genehmigt
wurden, verliert der Benutzer die Berechtigung
zum Betrieb des Gerätes.
BITTE BEACHTEN: Dieses Gerät wurde getestet
und entspricht den Bestimmungen für ein digitales
Gerät der Klasse B gemäß Abschnitt 15 der
FCC-Bestimmungen. Diese Grenzwerte bieten
angemessenen Schutz vor schädlichen Störungen
beim Betrieb des Geräts in Wohngebieten.
Dieses Gerät erzeugt und verwendet
Hochfrequenzenergie und strahlt sie aus.
Wenn es nicht gemäß der Anleitung installiert
und verwendet wird, kann es Funkstörungen
verursachen. Es wird jedoch keinerlei Garantie
dafür übernommen, dass die Störungen bei einer
bestimmten Installation nicht auftreten. Sollte
dieses Gerät den Radio- und Fernsehempfang
stören, was sich durch Ein- und Ausschalten
des Geräts nachprüfen lässt, müssen Sie die
Störungen durch eine oder mehrere der folgenden
Maßnahmen beheben:
Empfangsantenne verlegen oder anders
ausrichten.
Abstand zwischen dem Gerät und dem
Empfänger vergrößern.
Gerät an eine Steckdose eines
Schaltkreises anschließen, der nicht mit dem
Empfangsgerät verbunden ist.
Händler oder erfahrenen Rundfunk-/
Fernsehtechniker zu Rate ziehen.
FCC-Erklärung zur Strahlenbelastung.
Dieses Gerät entspricht den von der
FCC festgelegten Grenzwerten für die
Strahlenbelastung in einer nicht kontrollierten
Umgebung.
Bei der Installation und Verwendung dieses
Geräts sollte ein Abstand von mindestens 20 cm
zwischen der Strahlungsquelle und Ihrem Körper
eingehalten werden.
8
TR412UB-WH RADIO / USB MP3 / WMA / Bluetooth® 12V
DE
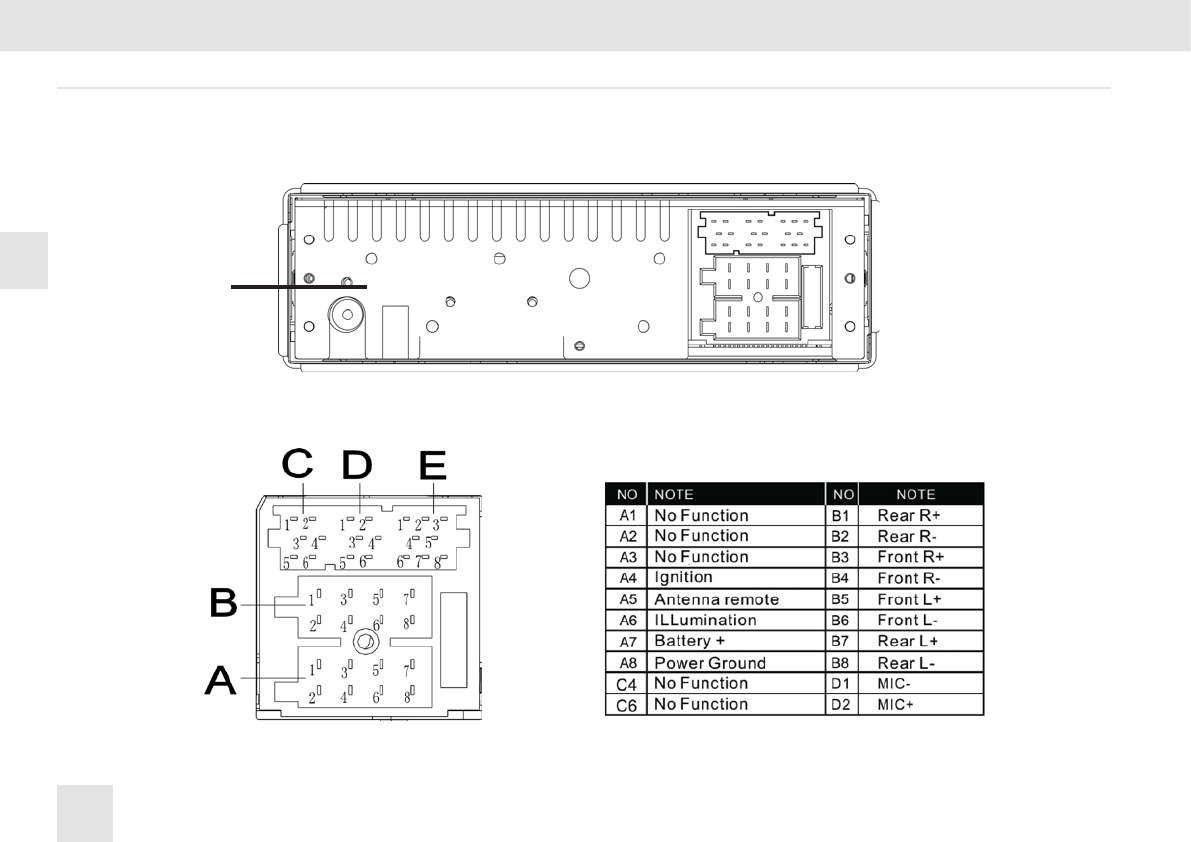
Elektrische Verbindungen
nElektrische Verbindungen
ISO
9
© Continental Trading GmbH
DE
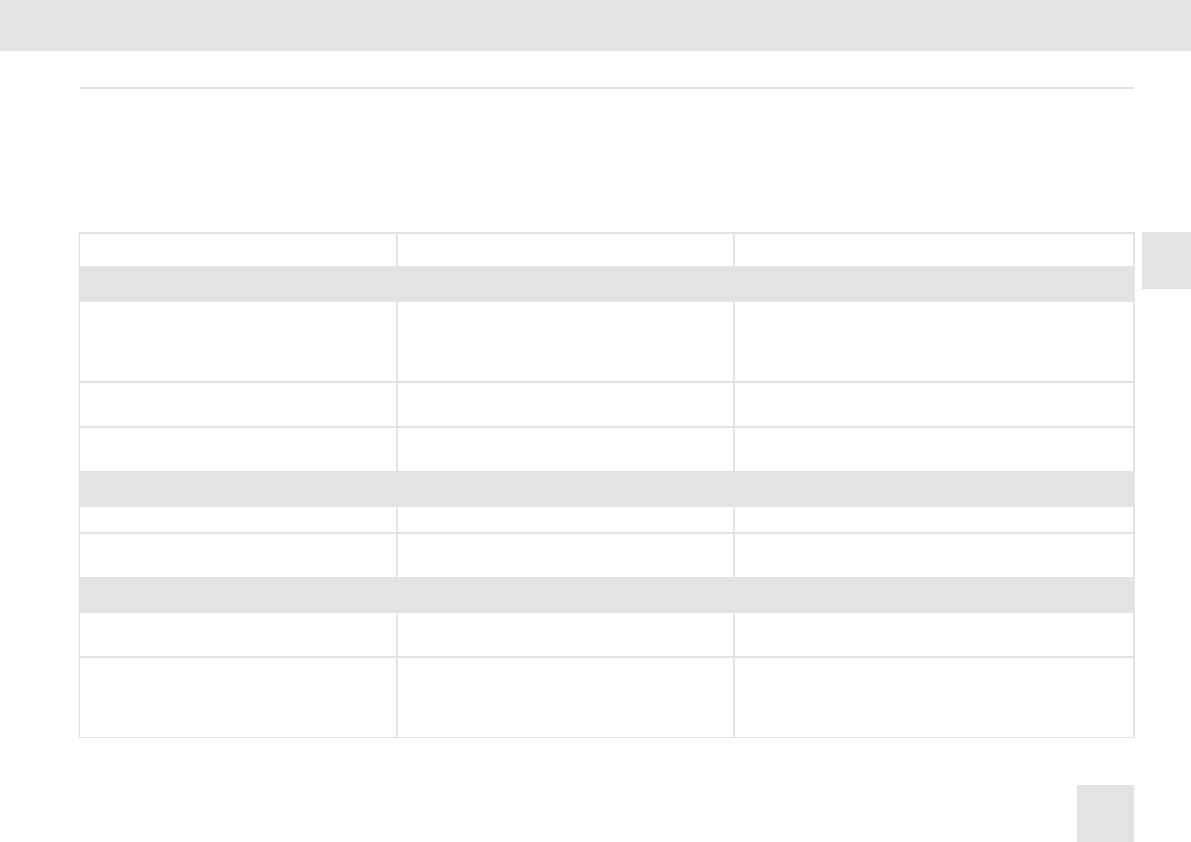
Problembehandlung
nProblembehandlung
Die folgende Checkliste kann Ihnen bei der Lösung von Problemen, die beim Betrieb dieses Gerätes auftreten können, helfen. Bevor Sie die Liste durchgehen,
bitte die Verbindungen prüfen und die Anweisungen der Bedienungsanleitung befolgen. Das Gerät nicht verwenden, wenn kein normaler Betrieb möglich ist,
z. B. wenn keine Klangwiedergabe erfolgt oder sich Rauch oder unangenehmer Geruch bilden; dies kann zu Brand oder Stromschlag führen. Die Verwendung
des Gerätes bitte sofort einstellen und Kontakt mit dem Händler aufnehmen.
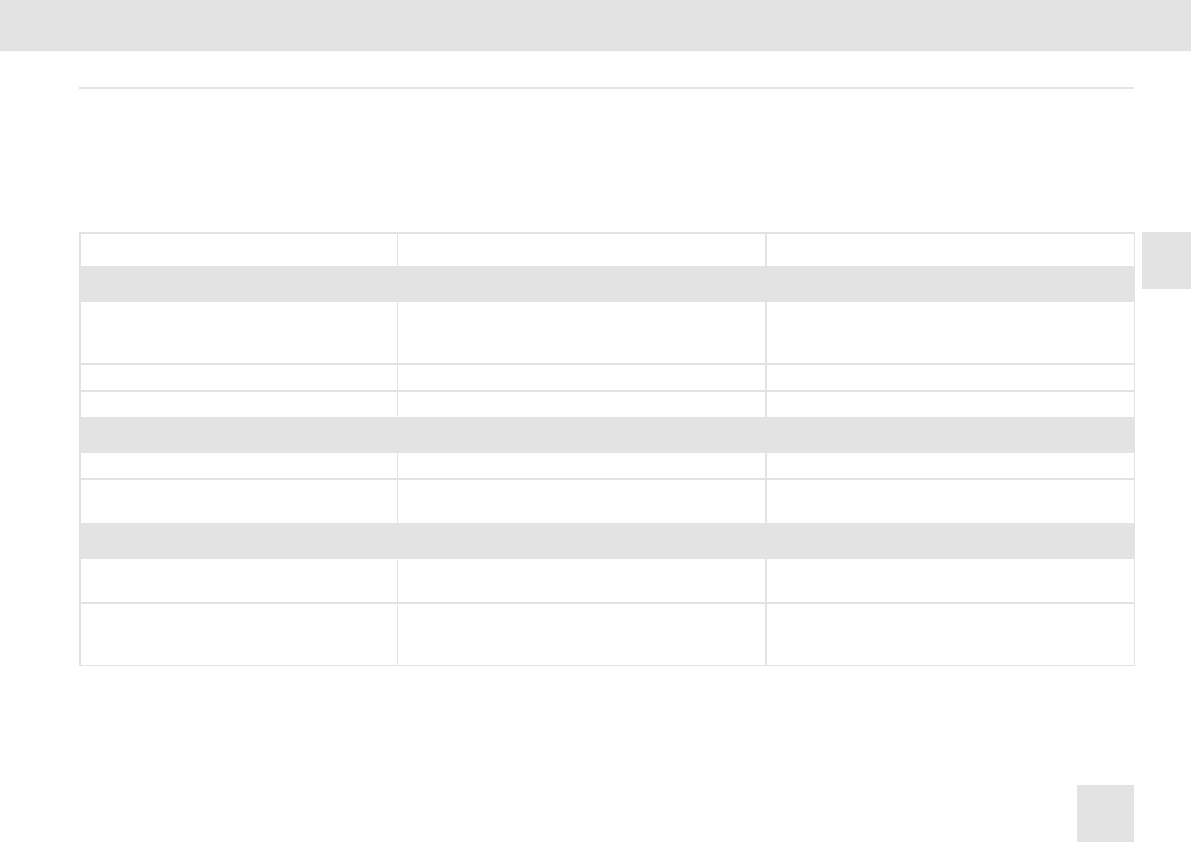
Problem Mögliche Ursache Lösung
Allgemein
Das Gerät lässt sich nicht einschalten. Die Zündung des Autos ist nicht eingeschaltet.
Das Kabel ist nicht richtig verbunden.
Die Sicherung ist durchgebrannt.
Den Zündschlüssel in die Position Zündung stellen.
Die Kabelverbindung prüfen.
Die Sicherung durch eine neue mit gleicher Nennleistung
ersetzen.
Keine Klangwiedergabe. Die Lautstärke steht auf Minimum oder die
Mute-Funktion ist eingeschaltet.
Die Lautstärkeregelung überprüfen oder die Mute-
Funktion ausschalten.
Das Gerät oder die Anzeige funktionieren
nicht ordnungsgemäß.
Das System des Geräts ist instabil. Die RESET-Taste drücken.
Betriebsart TUNER
Empfang von Radiosendern nicht möglich. Die Antenne ist nicht richtig verbunden. Die Antenne richtig verbinden.
Schlechter Empfang von Radiosendern. Die Antenne ist nicht vollständig ausgefahren
bzw.beschädigt.
Die Antenne vollständig ausfahren bzw. die beschädigte
Antenne ersetzen.
USB-Modus
Einstecken eines USB-Geräts nicht möglich. Das USB-Gerät wurde falsch herum
eingesteckt.
Das USB-Gerät anders herum einstecken.
Das USB-Gerät kann nicht gelesen werden. Das NTFS-Format wird nicht unterstützt. Überprüfen Sie, ob das Dateisystem das Format FAT
oder FAT32 hat.Aufgrund unterschiedlicher Formate
können bestimmte Modelle von Speichergeräten oder
MP3-Playern nicht gelesen werden.
10
TR412UB-WH RADIO / USB MP3 / WMA / Bluetooth® 12V
EN
Safety Information
nSafety Information
Thank you for purchasing this product, please
read the manual carefully before operating, and
reserve it for future reference.
iPRECAUTIONS
• Only in a 12-volt DC negative-ground
electrical system.
• Disconnect the vehicle’s negative battery
terminal while mounting and connecting the
unit.
• When replacing the fuse, be sure to use one
with an identical amperage rating.
• Using a fuse with a higher amperage rating
may cause serious damage to the unit.
• Make sure that pins or other foreign objects
do not get inside the unit, they may cause
malfunctions, or create safety hazards such
as electrical shock.
• If you have parked the car for a long time in
hot or cold weather, wait until the temperature
in the car becomes normal before operating
the unit.
• Keep the volume at a level at which you can
hear outside warning sounds (horns sirens,
etc.).
iCAUTION
• DO NOT open covers and do not repair by
yourself. Ask the dealer or an experienced
technician for help.
Specications
nSpecications
iGENERAL
Power supply: 12 V DC (10.8V-16V)
Maximum power output: 4 x 45 W
Suitable speaker impedance: 4 ohm
Fuse spec: 10 A
Weight: 0.7 kg
Dimensions (WxDxH): 188x116.3x58.5 mm
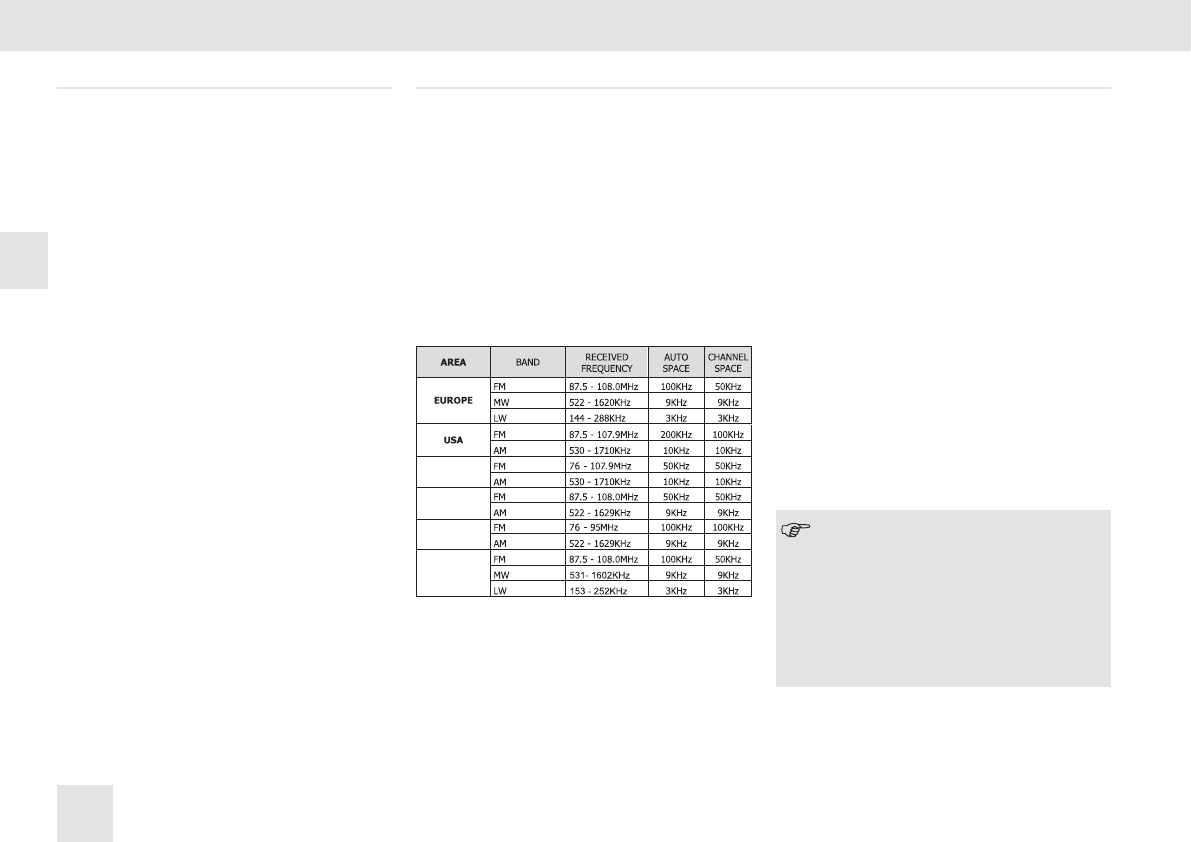
iFREQUENCY TABLE
nContents
Safety Information ..............................................10
Specications .....................................................10
Panel Controls ....................................................11
Button Tips..........................................................12
System Setting Item List .....................................13
Bluetooth Functions ............................................14
USB Function Summarization ............................14
FCC ....................................................................15
Electrical Connections ........................................16
Troubleshooting ..................................................17
iBEFORE OPERATION
• Do not raise the volume level too much, as
this will block outside sounds, making driving
dangerous.
• Stop the car before performing any
complicated operation.
Note:
1 According to models with different
wiring harness to connect the
denition of the specic content,
please refer to the model label.
2 Specications and the design are
subject to change without notice due
to improvements in technology.
LATAM
ASIAN
JAPAN
N AFRICA

11
© Continental Trading GmbH
EN
Panel Controls
nPanel Controls
(1) Microphone
(2) Power on/off
Mute,
when on, hold it more than 2 seconds to
power off.
Rotate the VOL knob to adjust volume.
(3) Source
Radio
USB (when USB inserted)
AUX IN
A2DP
Hold it more than 2 seconds to select PTY
mode.
(4) Band switch:
FM1 -> FM2 -> FM3 -> MW1 -> MW2 -> LW
Hold it Automatically search station and store
the signal strongly station to 1-6 Preset.
(5) Press SEL and rotate VOL knob to select EQ
preset mode:
EQ OFF-POP-CLASSIC-ROCK-JAZZ
Press to enter, when selecting the PTY mode
Press SEL and rotate VOL knob to ajust the
time, when on the CLOCK mode.
(6) Display system clock
Hold it to set clock
Radio mode:
Display PTY info/system clock/current
channel
MP3 mode:
Turn and turn about folder name/le name/
ID3 TAG/Clock.
(7) Radio mode:
Auto search the station from high to low
MP3 mode:
Select the previous track
(8) Radio mode:
Auto search the station from low to high
MP3 mode:
Select the next track
(9) USB slot
(10) MP3 folder ahead/Hang up
(11) MP3 folder back/Dial/Call transfer
(12) MP3 random play
(13) MP3 repeat play
(14) Program intro play (10 sec.)
(15) Play/pause
(10-15)
1-6 radio preset
Press to tune in a preset station.
Hold for more than 2 seconds to store current
station.
12
TR412UB-WH RADIO / USB MP3 / WMA / Bluetooth® 12V
EN
Button Tips
nButton Tips
MP3 Playback
Track skip
Press the [ /] button to go to the previous or
next track.
Hold it to enter fast forward or reverse back mode.
MP3 track fast search
Press the [5D-]/[6D+] button to select MP3 folder
back/ahead.
Set Clock
If RDS clock (CT) doesn’t work, you can adjust
manually the Clock time.
Long press the [DISP] button to set the time.
Select [CLOCK] with the search buttons
[/].
Press [SEL] button and rotate [VOL] knob to
adjust the minutes.
Press [SEL] button and rotate [VOL] knob to
adjust the hours.
Press the [SEL] button to exit the clock setting.
System setting
On the non time display menu:
Hold it [DISP] and press [ /] button to enter
the system setup menu,
CLOCK TA TA RETURN AF REG
CT DX/LO ST/MONO AUTO ANS
AUTO CON F 12H/24H MIC SEL
REGION LOGIC(ON/OFF) SCROLL
(ON/OFF).
Wait for 1s and rotate the knob to set the system.
TA setting: Rotate [VOL] knob toset ON/OFF.
TA RETURN: On the FM mode, set the TA time
space Info of auto search with RDS.
Setting for “LONG”, Auto search the TA time space
for 180 sec,Setting for “SHORT”, auto search the
TA time space for 45 sec.
Region setting to select EUROPE, USA, LATAM,
ASIAN, JAPAN, N AFRICA.
Press [SEL] button,and then press the [ /]
button to choose EQ/BAS/TRE/BAL/FAD/LOUD
function, rotate the konb to adjust.
Tune
Radio seek automatically
Press the [ /] button auto search the station
from high to low or from low to high.
Radio tune by step
Hold it more than 2 second, switch to the manual
mode, press the button step search the station
from high to low or from low to high.
Manual Memory Store
At FM1/FM2/FM3/MW1/MW2/LW mode, press
and hold button 1-6 to store current station in
memory. You can store 36 stations in total.
(18 FM/18 AM).
RDS
Press the [DISP] button to set AF/TA/REG, rotate
the [VOL] knob to open or close AF/TA function.
Hold the [SRC] button to PTY function, rotate the
[VOL] knob,display NEWS and POP program
type.
When display NEWS, rotate the konb to select
opposite preset
NEWS-AFFAIRS-INFO-SPORT-EDUCATE-
DRAMA-CULTURE-SCIENCE-VARIED-POP
M-ROCK M-EASY M-LIGHT M-CLASSICS
M-OTHER M-WEATHER -FINANCE-CHILDREN-
SOCIAL -RELIGION-PHONE IN-TRAVEL-
LEISURE-JAZZ-COUNTRY-NATION M-OLDIES-
FOLK M-DOCUMENT-TEST-ALARM
Logic ON/Logic OFF
Logic ON to limit the use of the set to one hour
when the car ignition is switched off. Logic OFF
to prevent the set from turning on, when the car
ignition is switched off.
13
© Continental Trading GmbH
EN
System Setting Item List
nSystem Setting Item List
ST
LONG
REGION
FRONT REAR
USA LATAM ASIAN JAPAN
SHORT
BAS -7~+7
TRE -7~+7
LEFT 7
FRONT 7
POP CLASSIC ROCK
N AFRICA
JAZZ
CENTRE
CENTRE
14
TR412UB-WH RADIO / USB MP3 / WMA / Bluetooth® 12V
EN
USB Function Summarization
nUSB Function Summarization
Loading/Take out USB equipment
1 Insert a USB device into the connector and
the unit will begin to play automatically.
2 To stop playback of USB device, push the
SRC button to non USB mode and then
remove the USB device.
USB functions (ash memory type)
1 USB ash memory 2 in 1 support.
2 FAT 12/FAT 16/FAT 32 format supported.
3 USB 1.1 support, USB 2.0 support (For 2.0,
speed performance is as USB 1.1).
4 WMA les supported.
5 Maximum number of MP3 les FAT 32 format
supported is 65535 les. (Maximum number
of MP3 les NTFS supported is 1000 les.)
Maximum number of folders is 999.
6 Maximum USB capacity support is cap at
32 GB and best performance with songs not
more than 500, and not exceeding 30 folders.
7 Not all USB devices are compatible with the
unit.
Bluetooth Functions
nBluetooth Functions
Pairing
1 Open the smartphone’s BT function.
2 The smartphone searches the bluetooth
equipment.
3 Enter the pairing code(1234) to pair.
Press [6D+] button more than 2 sec, the mobile
phone and the unit disconnect.
BT mode selecting
Press [SRC] button to choose BT mode.
Press [DISP] button to display the A2DP
information.
Dialing
1 Phone dialing
Mobile phone dialing, LCD screen displays
dialing information.
2 Unit dialing
Press [SRC] button swicth to A2DP(BT)
mode,
press [5D-] to choose the DIAL ON function,
press [SEL] button / [ /] button and rotate
the knob to input dialing numbers,
press [5D-] button to dial.
Voice switch
In the process of the phone,touch the icon to swith
call voice in mobile phones.or press the [5D-]
button to switch to DIAL ON/PLS PAIR/BT MUSIC.
HANG UP/ON
Press [5D-] button to answer a call.
Press [6D+] button to hang up.
A2DP mode
On A2DP music playing mode, press [1] button to
choose pause/play mode.

15
© Continental Trading GmbH
EN
FCC
nFCC
FCC STATEMENT
1. This device complies with Part 15 of the FCC
Rules. Operation is subject to the following two
conditions:
(1) This device may not cause harmful
interference.
(2) This device must accept any interference
received, including interference that may
cause undesired operation.
2. Changes or modications not expressly
approved by the party responsible for
compliance could void the user’s authority to
operate the equipment.
NOTE: This equipment has been tested and
found to comply with the limits for a Class B digital
device, pursuant to Part 15 of the FCC Rules.
These limits are designed to provide reasonable
protection against harmful interference in a
residential installation.
This equipment generates uses and can radiate
radio frequency energy and, if not installed
and used in accordance with the instructions,
may cause harmful interference to radio
communications. However, there is no guarantee
that interference will not occur in a particular
installation. If this equipment does cause harmful
interference to radio or television reception, which
can be determined by turning the equipment off
and on, the user is encouraged to try to correct
the interference by one or more of the following
measures:
Reorient or relocate the receiving antenna.
Increase the separation between the
equipment and receiver.
Connect the equipment into an outlet on a
circuit different from that to which the receiver
is connected.
Consult the dealer or an experienced radio/TV
technician for help.
FCC Radiation Exposure Statement
This equipment complies with FCC radiation
exposure limits set forth for an uncontrolled
environment. This equipment should be installed
and operated with minimum distance 20 cm
between the radiator & your body.

16
TR412UB-WH RADIO / USB MP3 / WMA / Bluetooth® 12V
EN
Electrical Connections
nElectrical Connections
ISO
17
© Continental Trading GmbH
EN
Troubleshooting
nTroubleshooting
The following checklist can help you solve some problems which you may encounter when using the unit. Before consulting it, check the connections and
follow the instructions in the user manual. Do not use the unit in abnormal condition, for example without sound, or with smoke or foul smell can cause re or
electric shock, immediately stop using it and call the store where you purchased it.
Problem Possible cause Solution
General
The unit will not switch on. Car ignition is not on.
Cable is not properly connected.
Fuse is burnt.
Turn your car key in the ignition.
Check cable connection.
Replace fuse with a new fuse of the same capacity.
No sound. Volume is set at minimum or the mute function is on. Check the volume or switch the mute function off.
The unit or screen does not work normally. The unit system is unstable. Press the RESET button.
Mode TUNER
Unable to receive stations. The antenna is not connected properly. Connect the antenna properly.
Poor quality reception of radio station. The antenna is not fully extended or it is broken. Fully extend the antenna and if broken, replace it
with a new one.
Mode USB
Unable to insert USB device. The USB device has been inserted the wrong way
round.
Insert it the other way around.
The USB device cannot be read. NTFS format is not supported. Check that the le system is in FAT or FAT32 format.
Due to different formats, some models of storage
devices or MP3 players may not be read.