Continental Automotive TR7423UB CAR AUDIO User Manual manual
Continental Automotive GmbH CAR AUDIO manual
User manual
TR7423UB-OR
OWNER'S MANUAL
1
Safety Information
Thank you for purchasing this product, please
read the manual carefully before operating,
and reserve it for future reference.
PRECAUTIONS
• Only in a 24-volt DC negative-ground
electrical system.
• Disconnect the vehicle's negative battery
terminal while mounting and connecting
the unit.
• When replacing the fuse, be sure to use
one with an identical amperage rating.
Using a fuse with a higher amperage
rating may cause serious damage to the
unit.
• Make sure that pins or other foreign
objects do not get inside the unit, they
may cause malfunctions, or create safety
hazards such as electrical shock.
• If you have parked the car for a long
time in hot or cold weather, wait until the
temperature in the car becomes normal
before operating the unit.
• Keep the volume at a level at which you
can hear outside warning sounds (horns
sirens, etc.).
CAUTION
• DO NOT open covers and do not
repair by yourself. Ask the dealer or an
experienced technician for help.
BEFORE OPERATION
• Do not raise the volume level too much,
as this will block outside sounds, making
driving dangerous.
• Stop the car before performing any
complicated operation.
General
Power supply: 24V DC (18V-32V)
Maximum power output: 4X15W
Suitable speaker impedance: 4ohm
Fuse spec: 10A
Weight: 0.9kg
Dimensions (WxDxH): 188x131x58.5mm
Note:
1 According to models with different wiring
harness to connect the definition of the
specific content, please refer to the model
label.
2 Specifications and the design are subject to
change without notice due to improvements
in technology.
Specifications Contents
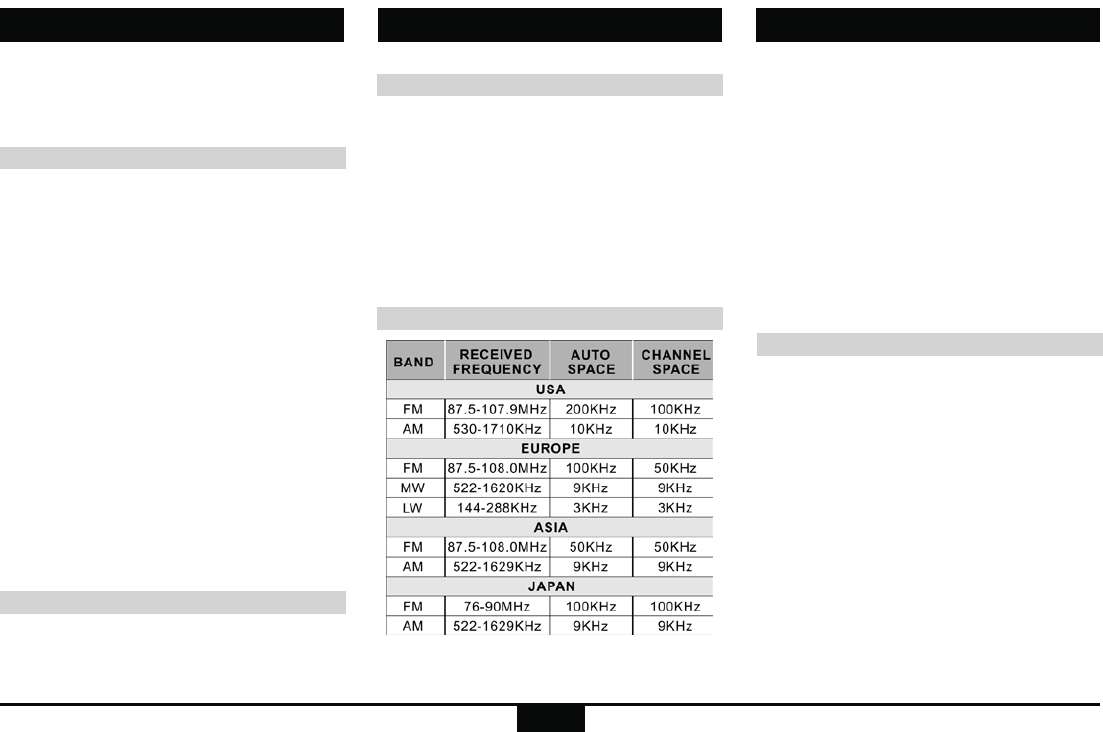
Frequency Table
Safety Information ..................... ..................1
Specifications............................................... 1
Panel Controls..............................................2
Button Tips....................................................3
Bluetooth Functions.......................................4
USB function Summarization.........................4
Electrical connectons.................................5
Troubleshooting............................................6
2
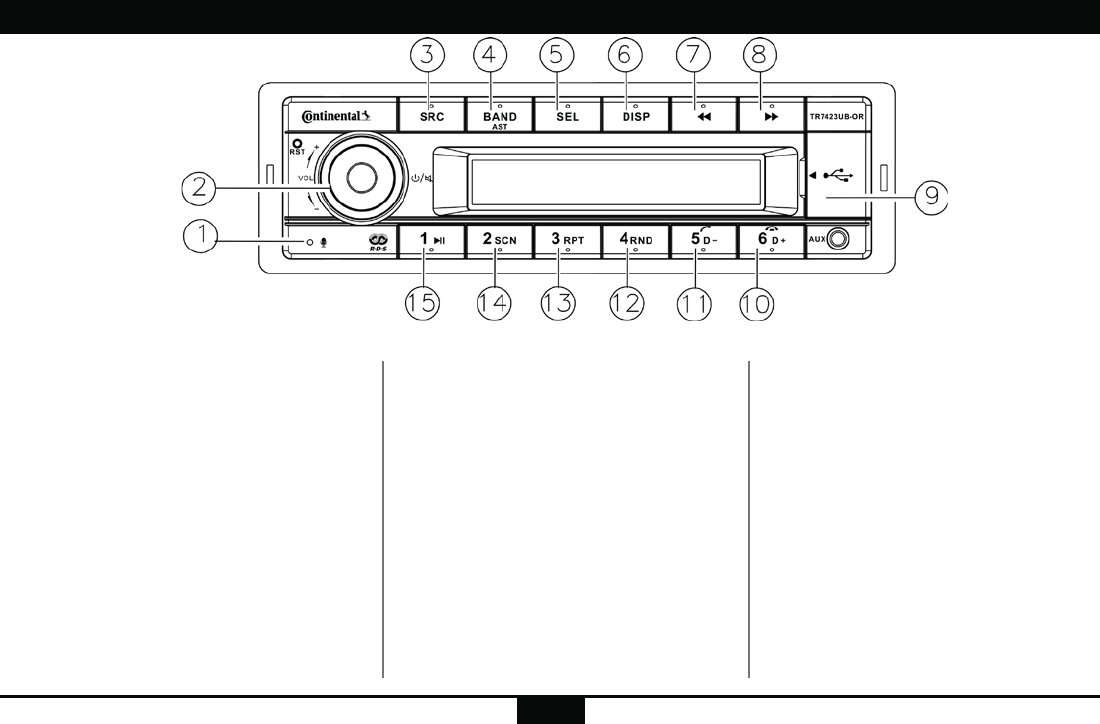
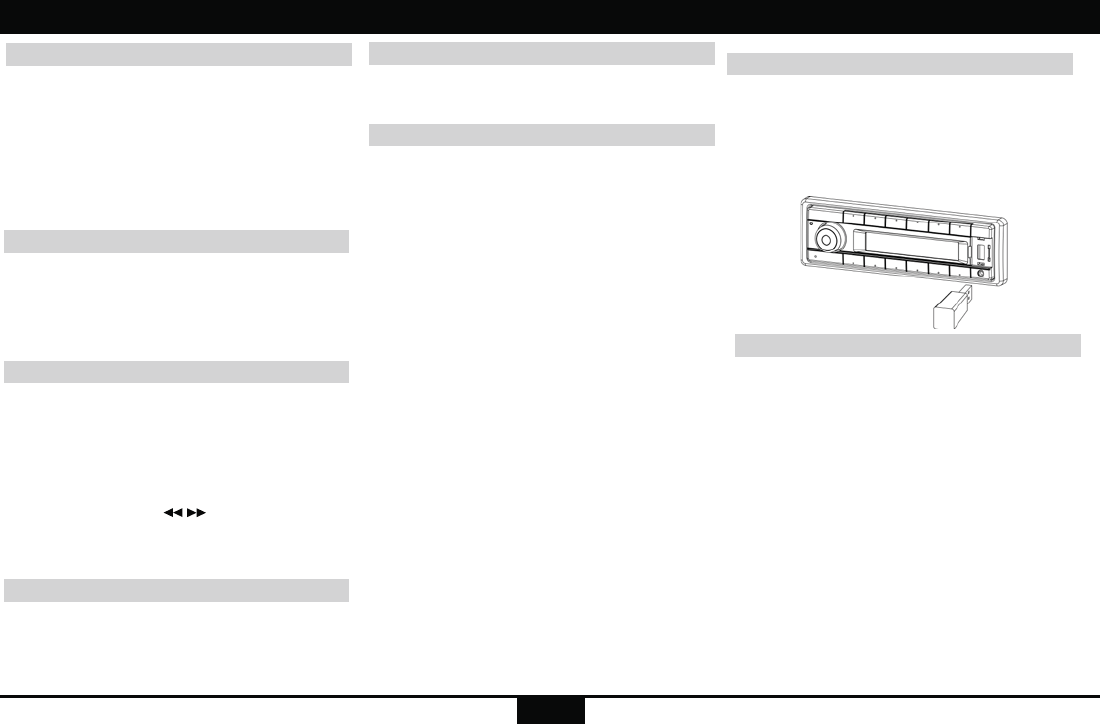
Panel Controls
(1). - Microphone
(2). - Power on/off,
- Mute,
when on,hold it more than 2 seconds to
power off.
- Rotate the VOL knob to adjust volume.
(3). - Source
Radio,
USB (when USB inserted),
AUX IN,
A2DP,
Hold it more than 2 seconds to select PTY
mode.
(4). - Band switch:
FM1 -> FM2 -> FM3 -> MW1 -> MW2-> LW
- Hold it Automatically search station and
store the signal strongly station to 1-6
Preset.
(5). - Press SEL and rotate VOL knob to
select EQ preset mode:
EQ OFF-POP-CLASSIC-ROCK-JAZZ
- Press to enter,when selecting the PTY
mode,
- Press SEL and rotate VOL knob to
ajust the time,when on the CLOCK
mode.
(6). - Display system clock
- Hold it to setting clock
- Radio mode:
display PTY info/system clock/
current channel ,
- MP3 mode:
Turn and turn about folder name/file name/
ID3 TAG/Clock .
(7). - Radio mode
- Auto search the station from high to low
- MP3 mode
Select the previous track
(8). - Radio mode
Auto search the station from low to
high
- MP3 mode
Select the next track
(9). - USB slot
(10). - MP3 folder ahead/Hang up
(11). - MP3 folder back/Contact mode/
Dial/Call transfer
(12). - MP3 random play
(13). - MP3 repeat play
(14). - Program intro play(10 sec.)
(15). - Play/pause
(10-15).
-1-6 radio preset
Press to tune in a preset station.
Hold for more than 2 seconds to
store current station.
3
TA RETURN:On the FM mode ,set the TA time
space Info of auto search with RDS.
Setting for “LONG”, Auto search the TA time
space for 180 sec,Setting for “SHORT”, auto
search the TA time space for 45 sec.
Region setting
to select AMERICAN,EUROPE,ASIA,JAPAN.
Press [SEL] button,and then press the [
/]button to choose EQ/BAS/TRE/BAL/FAD/
LOUD function,rotate the konb to adjust .
Tune
Radio seek automatically
Press the /button auto search the station
from high to low or from low to high.
Radio tune by step
Hold it more than 2 second ,switch to the
manual mode,press the button step search the
station from high to low or from low to high.
Manual Memory Store
At FM1/FM2/FM3/MW1/MW2/LW mode, press
and hold button 1-6 to store current station in
memory. You can store 36 stations in total. (18
FM/ 18 AM)
Button Tips
MP3 Playback
Track skip
Press the /button to go to the previous or
next track.
Hold it to enter fast forward or reverse back
mode.
MP3 track fast search
Press the [5D-]/[6D+]button to select MP3
folder back/ahead
Set Clock
Radio mode:press[DISP]button, Turn and turn
display PTY/Clock/current channel
MP3 playback mode:press[DISP]button,Turn
and turn about folder name/file name/ID3 TAG/
Clock
Then press [DISP]button more than 2 seconds,
‘Clock‘ displayed,press [SEL] button, rotate
the[VOL]knob and press [ /]button to set,
press [SEL] to confirm.
System setting
On the non time display menu:
Hold it [DISP] and press [ /]button to enter
the system setup menu, .
CLOCK TA TA RETURN AF REG
CT DX/LO ST/MONO AUTO ANS
AUTO CON F 12H/24H MIC SEL
REGION SWRC (ON/OFF) LOGIC(ON/
OFF) SCROLL(ON/OFF)
Wait for 1s and rotate the knob to set the
system.
TA setting :Rotate [VOL] knob to set ON/OFF.
RDS
Press the [DISP] button to set AF/TA/REG
,rotate the[VOL]knob to open or close AF/TA
function.
Hold the [SRC]button to PTY function ,rotate
the [VOL]knob,display NEWS and POP
program type.
When display NEWS ,rotate the konb to select
opposite preset
NEWS-AFFAIRS-INFO-SPORT-EDUCATE-
DRAMA-CULTURE-SCIENCE-VARIED-POP
M-ROCK M-EASY M-LIGHT M-CLASSICS
M-OTHER M-WEATHER -FINANCE-
CHILDREN-SOCIAL -RELIGION-PHONE
IN-TRAVEL-LEISURE-JAZZ-COUNTRY-
NATION M-OLDIES-FOLK M-DOCUMENT-
TEST-ALARM
Logic ON/Logic OFF
Logic ON to limit the use of the set to one
hour
when the car ignition is switched off.Logic
OFFto prevent the set from turning on,when
the car ignition is switched off.
4
Loading/Take out USB equipment
1. Insert a USB device into the connector
and the unit will begin to play
automatically.
2. To stop playback of USB device, push
the SRC button to non USB mode and
then remove the USB device.
USB Function Summarization
USB functions (flash memory type)
1. USB flash memory 2 in 1 support
2. FAT 12/FAT 16/FAT 32 format supported.
3. USB 1.1 support, USB 2.0 support (For 2.0,
speed performance is as USB 1.1)
4. WMA files supported
5. Maximum number of MP3 files FAT 32
format supported is 65535 files. (Maximum
number of MP3 files NTFS supported
is 1000 files. )
Maximum number of folders is 999.
6. Maximum USB capacity support is cap at 8
GB and best performance with songs not
more than 500, and not exceeding 30
folders.
7. Not all USB devices are compatible with
the unit.
Bluetooth Functions
Pairing
1.Open the smartphone's BT function,
2.The smartphone searches the bluetooth
equipment.
3.Enter the pairing code(1234) to pair.
Press [6D-] button more than 2 sec,the moblie
phone and the unit disconnect .
BT mode selecting
Press [SRC] button to choose BT mode.
Press [DISP] button to display the A2DP
information.
Dialing
1.Phone dialing
Mobile phone dialing ,LCD screen displays
dialing information.
2.Unit dialing
Press [SRC] button swicth to A2DP(BT) mode,
press [5 D+] to choose the DIAL ON function,
press [SEL] button / [ /] button and rotate
the knob to input dialing numbers,
press [5 D+] button to dial.
Voice switch
In the process of the phone,touch the icon to
swith call voice in mobile phones.or press the
[5D+] button to switch to DIAL ON/PLS PAIR/
BT MUSIC.
HANG UP/ON
Press [5D+] button to answer a call,
Press [6D-] button to hang up.
A2DP mode
On A2DP music playing mode,press [1] button
to choose pause/play mode.

5
FCC STATEMENT
1. This device complies with Part 15 of the
FCC Rules. Operation is subject to the
following two conditions:
(1) This device may not cause harmful
interference.
(2) This device must accept any interference
received, including interference that may
cause undesired operation.
2. Changes or modifications not expressly
approved by the party responsible for
compliance could void the user's authority to
operate the equipment.
NOTE: This equipment has been tested and
found to comply with the limits for a Class
B digital device, pursuant to Part 15 of the
FCC Rules. These limits are designed to
provide reasonable protection against harmful
interference in a residential installation.
This equipment generates uses and can
radiate radio frequency energy and, if not
installed and used in accordance with the
instructions, may cause harmful interference
to radio communications. However, there is
no guarantee that interference will not occur
in a particular installation. If this equipment
does cause harmful interference to radio or
television reception, which can be determined
by turning the equipment off and on, the user
is encouraged to try to correct the interference
by one or more of the following measures:
Reorient or relocate the receiving antenna.
Increase the separation between the
equipment and receiver.
Connect the equipment into an outlet on a
circuit different from that to which the receiver
is connected.
Consult the dealer or an experienced radio/
TV technician for help.
FCC Radiation Exposure Statement
This equipment complies with FCC radiation
exposure limits set forth for an uncontrolled
environment. This equipment should be
installed and operated with minimum distance
20cm between the radiator & your body
FCC
6
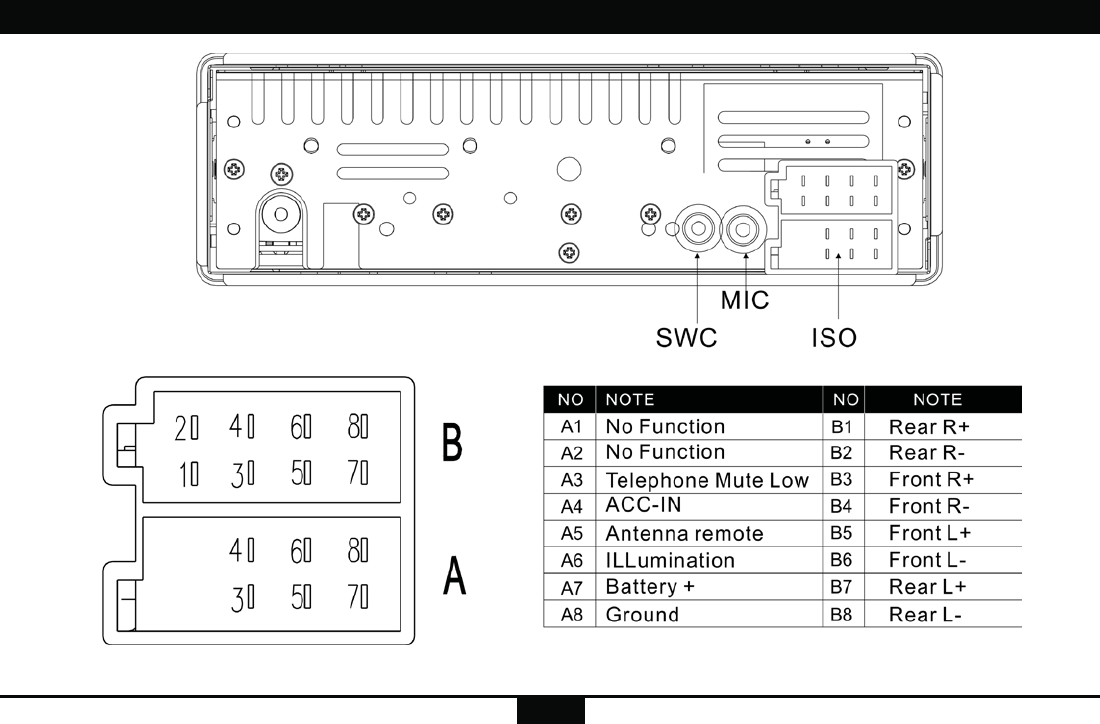
Electrical Connections
7
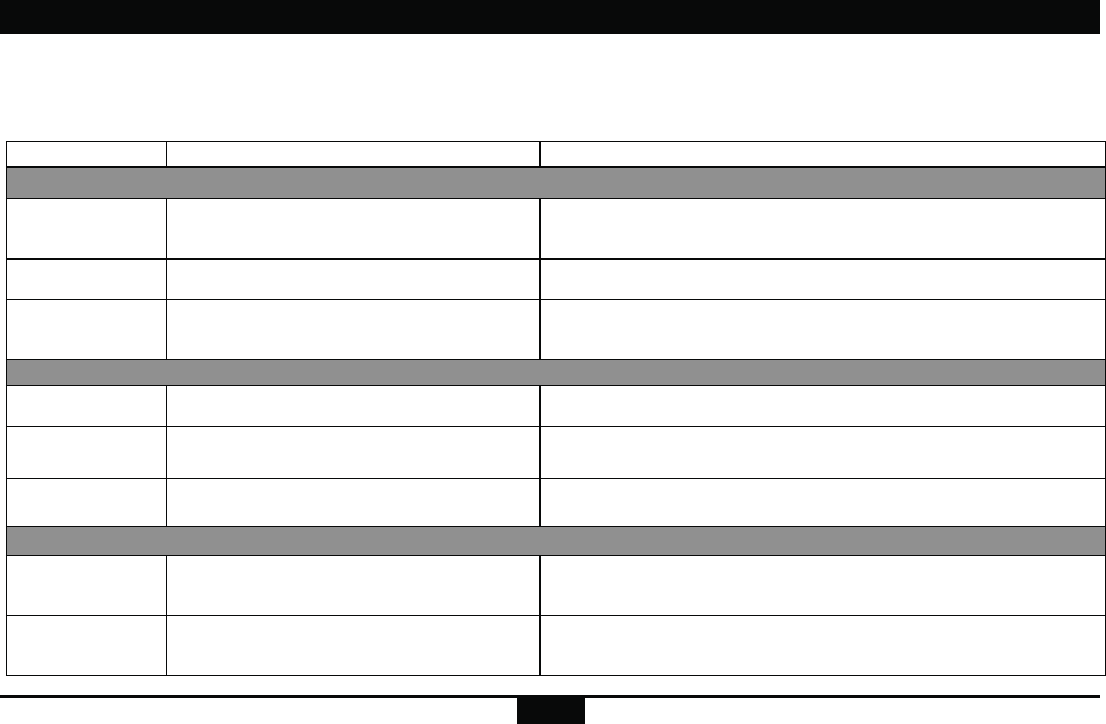
TROUBLESHOOTING
Problem Possible cause Solution
General
The unit will not
switch on.
Car ignition is not on.
Cable is not properly connected.
Fuse is burnt.
Turn your car key in the ignition.
Check cable connection.
Replace fuse with a new fuse of the same capacity.
No sound Volume is set at minimum or the mute
function is on.
Check the volume or switch the mute function off.
The unit or screen
does not work
normally.
The unit system is unstable. Press the RESET button.
Mode TUNER
Unable to receive
stations.
The antenna is not connected properly. Connect the antenna properly.
Poor quality reception
of radio station.
The antenna is not fully extended or it is
broken.
Fully extend the antenna and if broken, replace it with a
new one.
Preset stations are
lost.
The battery cable is not properly connected. Connect the permanent live on the unit to the permanent
live on the vehicle.
Mode USB
Unable to insert USB
device
The USB device has been
inserted the wrong way round.
Insert it the other way around.
The USB device
cannot be read.
NTFS format is not supported. Check that the file system is in FAT or FAT32 format. Due
to different formats, some models of storage devices or
MP3 players may not be read.
The following checklist can help you solve some problems which you may encounter when using the unit. Before consulting it, check the connections
and follow the instructions in the user manual. Do not use the unit in abnormal condition, for example without sound, or with smoke or foul smell can
cause fire or electric shock, immediately stop using it and call the store where youpurchased it.

P/N:127075006195