Continental Automotive TRD7412UB-OR Car Audio User Manual Microsoft PowerPoint CAT Radio Manual 2016 12 12
Continental Automotive GmbH Car Audio Microsoft PowerPoint CAT Radio Manual 2016 12 12
User Manual
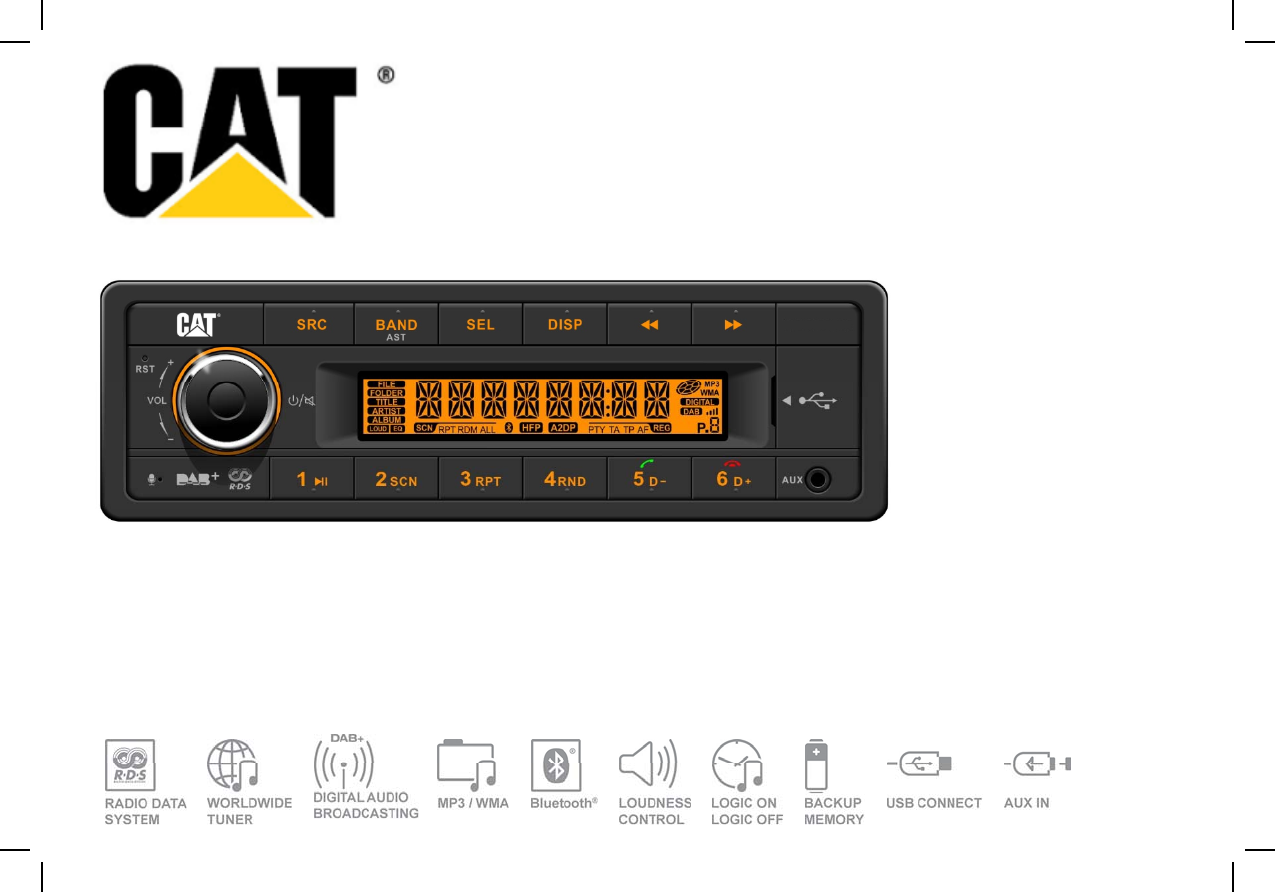
RADIO
/
USB MP3
/
WM
A
/
DAB+ / DMB / Bluetooth®12V
OWNER’S MANUAL

2
Sft If ti
C
S
a
f
e
t
y
I
n
f
orma
ti
on
C
ontents
Safety Information ........................................ 2
PanelControls ............................................... 3
General Operation
........................................ 4
Thank you for purchasing this product,
please read the manual carefull before
operating,andreserveitfor futurereference.
Before operation
Do not raise the volume level too high.Keep
the
volume
at a
level
at which
you can hear
General
Operation
Volume and Sound ........................................4
AM/FMRadio…............................................. 5
DABRadio...................................................... 6
USB/MP3/WMA............................................. 7
the
volume
at
a
level
at
which
you
can
hear
outsidewarningsounds(hornssirens,etc.).
Stopthevehiclebeforeperformingany
complicatedoperations.
Caution
Precaution
USE Only in a 12‐volt DC negative‐
ground electrical system.
Bluetooth………............................................... 8
Dimming.............................................10
SystemSettingsItemsList ...............................11
Electricalconnections...................................14
T
roubleshooting
15
Caution
Do not open the cover and do not repair by
yourself. Ask your authorised dealer for help.
Note:
1
Accordin
g
t
o
model
s
wit
h
differen
t
wiring
Disconnect the vehicle's negative battery
terminal while mounting and connecting
the unit.
When replacing the fuse, be sure to use one
with an identical amperage rating.
T
roubleshooting
............................................
15
Specifications................................................16
FCC ................................................................17
1
Accordin
g
t
o
model
s
wit
h
differen
t
wiring
harness toconnect the definition ofthe
specific content, please refer to the model
label.
2 Specifications and the design are subject to
change without notice due to improvements in
technology.
Using a fuse with a higher amperage rating
may cause serious damage to the unit.
Make sure that pins or obstacel do not get
inside the unit, they may cause malfunctions,
or create safety hazards such as electrical
shock
shock
.
If you have parked the vehicle for a long
time in hot or cold weather, wait until the
temperature in the vehicle becomes normal
before operating the unit.
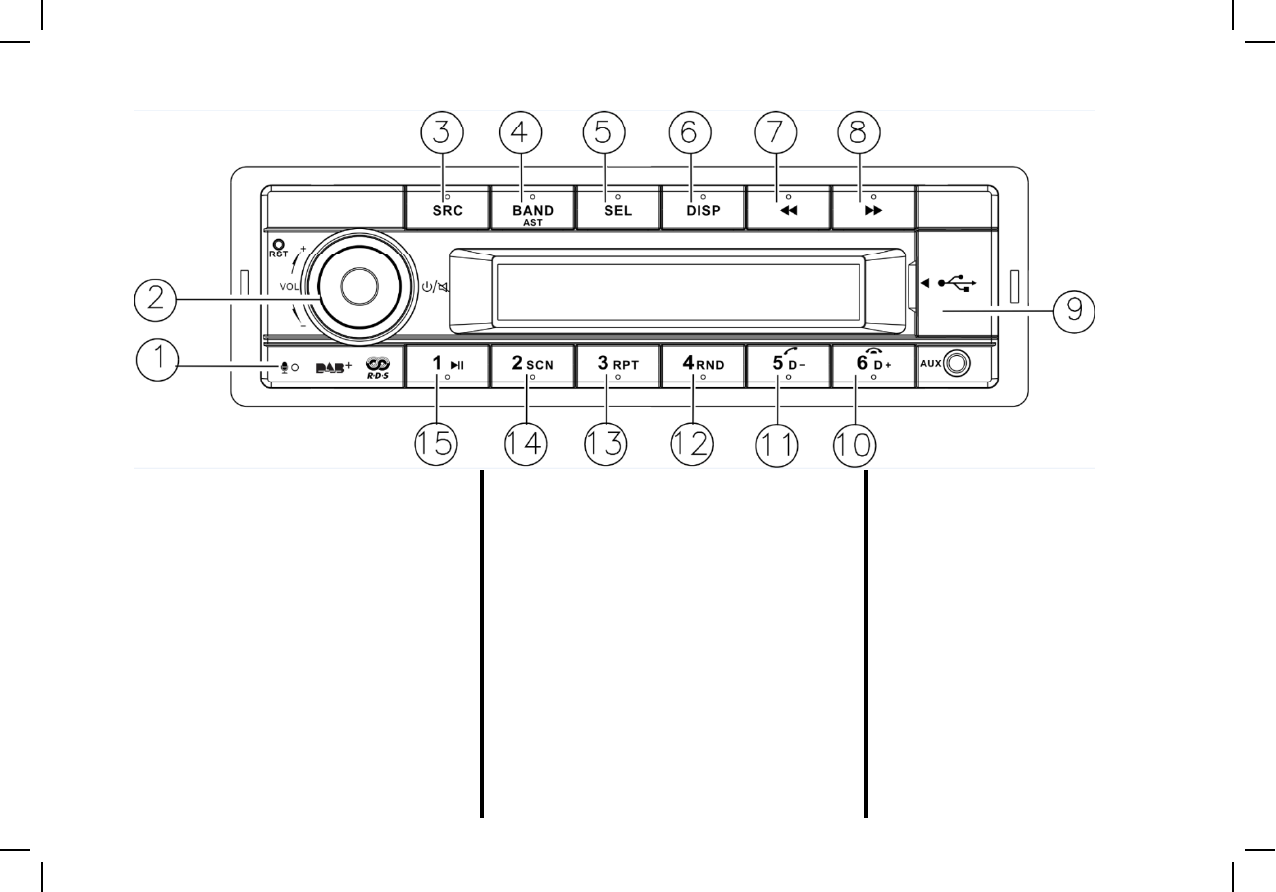
Panel Controls
3
Panel
Controls
(1) Microphone
(6) Display button
(10)
MP3
folder ahead
(2) Powerbutton
‐On/Off(longpress)
‐Mute (shortpress)
‐RotatetheVOLknobtoadjustvolume
(3)SourceButton
Sl tS
(h t )
(6)
Display
button
‐DisplaySystemclock,
‐DisplayPTYInformationinRadiomode
‐DisplayMP3Information(USBMode)
(7)<<Button
PreviousStation/PreviousTrack
(10)
MP3
folder
ahead
Phone:Hangup
(11) MP3folderback
Phone:Contactmode/Dial/Calltransfer
(12) MP3Randomplay
(13)
MP3 repeat play
‐
S
e
l
ec
t
S
ource
(
s
h
or
t
press
)
‐SelectPTYMode (longpress)
(4)Band/ASTButton
‐Bandselect(shortpress)
‐Autostore/DABServiceScan (longpress)
(5)
Select Button
(8)>>Button
NextStation/NextTrack
(9) USBslot
(10– 15)AM/FM, DABFavorites
(13)
MP3
repeat
play
(14) ProgramintroPlay(Scan)
(15)MP3/BluetoothPlay/Pause
(5)
Select
Button
‐ManualandAutomaticEqualizing
‐SelectMenuentryinuserMenu

4
SelectSource
Pressthe[SRC]buttontoswitchbetweenand
select available
sources: TUNER
>USB
>AUX
Volume
ToadjusttheVolumerotatethe[VOL]knob
SwitchingON/OFF,Mute
ToSwitchontheRadiopushthePOWERON/OFF
button
GeneralOperation VolumeandSound
select
available
sources:
TUNER
‐
>USB
‐
>AUX
‐
>Bluetooth‐>DAB.USBandBluetoothisonly
visibleinthemenuwhenconnected.Predefinedsoundeffects
TheRadioprovidesdifferentpredefinedsound
effects.
Pressthe[SEL]buttontoentertheSoundsettings
menu.Rotatethe[VOL]knobtoselectoneofthe
following options: EQ OFF
>POP
ReceptionArea
ThisRadioisdesignedtoworkindifferentregions
withdifferentfre
q
uenc
y
ran
g
es.
button
.
ToswitchoftheRadiopushthePOWERON/OFF
buttonformorethan2sec.
TheRadiowillbemutedbypushingthePOWER
ON/OFFbuttonforlessthat2sec.
following
options:
EQ
OFF
‐
>
POP
‐>ROCK‐>CLASSIC‐>JAZZ‐>CUSTOM.
BALANCE,FADERandLoudness
ToadjustBalance,FaderandLoudnesspressthe
[SEL]buttonandthenpush[<</>>]buttonto
selectBALANCE‐>FADER‐>LOUDNESS.Rotatethe
qyg
TheReceptionareacanbeadjustedviatheSystem
Settingsmenu.Thedefaultsettingis“EUROPE”.
ThefollowingAreasareavailable:
EUROPE/ASIA/JAPAN/NORTHAFRICA/USA
IgnitionLogic
Withignitionlogicactivated(Defaultsetting)the
Radiocanbeswitchedonandoffmanuallyevenif
thevehiclesignitionpinisnotconnected.Toavoid
battery discharge the radio is switched of after 1h
[VOL]knobtoadjustBalance,FaderandLoudness
accordingyourneeds.
ManualSoundAdjustment
FormanualsoundadjustmentfirstselectCUSTOM.
Pushthe[SEL]buttonagainandthenselectBASSor
/
ClockSetting
Theclocktimecanbeadjustmanuallybylong
pressingthe[DISP]buttontosetthetime.
Select[CLOCK]withthesearchbuttons[<</>>].
Press[SEL]buttonandrotate[VOL]knobtoadjust
SystemSettings
Thesystemsettingsmenuisenteredbylong
pressing the [DISP] button To access the available
battery
discharge
the
radio
is
switched
of
after
1h
withoutuseroperation.
TREBLEwiththe[<<
/
>>]button.Rotatethe[VOL]
knobtoadjustBASSandTREBLEaccordingyour
needs.
theminutes.
Presssearchbuttons[<</>>]toselectadjust
hours.Rotate[VOL]knobtoadjustthehours.
Pressthe[SEL]buttontoexittheclocksetting.
pressing
the
[DISP]
button
.
To
access
the
available
menuentriespushthesearchbuttons[<</>>].To
selecttheavailableoptionsofeachmenuentry
rotatethe[VOL]knob.
Fordetailsseechaptersystemsettingsofthis
manual.

5
AM/FMRadio
AM/FMRadioSelection
ToaccessAM/FMRadiopressthe[SRC]button
andselectTuner
ManualStoringFavourites
Thereare3FM,2AMand1LMFavouritebanks
available.
RDS
ManyFMStationsinEuropetransmitRDSdata
(RadioDataSystem)inadditiontotheiraudio
SelectBand
Pressthe[BAND]Buttontoselectoneofthe
availableRadioBands.TheRadiobandswillbe
changedinthefollowingorder:
FM1‐>FM2‐>FM3‐>AM1‐>AM2‐>LW
Selectthefavouritebankwheretostorethestation
andtunethestationthatshallbestored.
Pushthepresetbuttonlongerthan2sec.tostore
thestation
RecallStoredFavourites
Tll dfi h h di
program.WithRDStheuserhasthefollowing
benefits:
Thebestaudiblefrequency(AF)ofaselected
stationistunedautomaticallyforbestreception
quality.
T
o
e
n
ab
l
e
auto
m
at
i
c
se
l
ect
i
o
n
o
f
best
aud
i
b
l
e
AutomaticTuning
ForAutomatictuningpressthe[<</>>]button.
The Radio will search and select the next receivable
TheAMandLWBandscanbedeactivatedbythe
userviathesystemsettingsmenu.
T
oreca
ll
astore
d
f
avour
i
tepus
h
t
h
eaccor
di
ng
presetbutton
AutoMemoryStore
Tosearchforthebestreceivablestationsandstore
them as favourite press the (BAND/AST] button for
oeabeauto at c se ect o obest audbe
frequencyselect“AF=ON”intheSettingsmenu
TheRadiorecognizesTrafficAnnouncements
andcanswitchtoRadioevenifanotherAudio
sourceisselected.
ToenableautomaticTrafficannouncementselect
“TA ON” in the Settings menu
The
Radio
will
search
and
select
the
next
receivable
station.
WhenTrafficAnnouncementisactivated(“TA=
ON”)onlystationsthatbroadcastTraffic
announcementswillbetuned.
l i
them
as
favourite
press
the
(BAND/AST]
button
for
2sec.TheRadiosearchesthebestreceivablestation
andstoresthem.
“TA
=
ON”
in
the
Settings
menu
SomeStationsprovideregionalspecificprograms.
Withtheregional(REG)functiononlythose
frequenciesarefollowedthatbroadcastthe
selectedregionalprogram.Tofollowregional
programsselect“REG=ON”intheSettingsmenu
Manua
l
Tun
i
ng
Formanualstationselectionpressthe[<</>>]
buttonforlongerthan2sec.“MANUAL”isshownin
thedisplay.Pressingthe[<</>>]buttonagainthe
frequencywillbeincrementally
increased/decreased.
Thestationsnamecanbedisplayed
ForfurthersettingsseeSystemMenu

DAB Radio
6
DABServiceList
TogetanoverviewofreceivableDABservicesa
DABServiceListcanbedisplayed.
Push [SEL] for 2sec to open the DAB Service List
DAB
Radio
DABRadioSelection
DAB/DAB+Providesradioprogramsindigital
soundquality.
TDi i l Adi Bd (DAB)
h
PTY
ViatheRDSSystemFMstationsinmanycountries
transmitthetypeofprogram(ProgramType,PTY)
thatisbroadcasted.
Push
[SEL]
for
2
sec
.
to
open
the
DAB
Service
List
.
Rotatethe[VOL]Buttontoscrollthroughthelist
ofreceivablestations.
TotuneaDABservicepush[SEL].“Tuning”is
shownonthedisplay.
T
oaccess
Di
g
i
ta
l
A
u
di
o
B
roa
d
cast
(DAB)
presst
h
e
[SRC]buttonandselectDAB.
TosearchforadesiredProgramtypepush[SRC]for
about2sec.andselecttheProgramtypebyrotating
the[VOL]knob.
TheRadiowillsearchforaRadio‐Programwiththe
selectedProgramtypewhenthe[SEL]buttonis
pushed.“PTYSEEK”isshownintheDisplay.
DABServiceSCAN
TosearchforreceivableDABServicestheDAB
serviceSCANhastobestartedb
y
p
ushin
g
InthecasethataServiceistemporarynot
receivable“NoService”willbeshownonthe
display.
IfnostationwiththeselectedProgramTypecanbe
foundthelasttunedstationwillbeselectedand
“NOPTY”isshownintheDisplay.
Thefollowingprogramtypesareavailable:
ypg
[BAND/AST]for2sec.“SCAN”isshowninthe
display.
SelectDABBand
Pressthe[BAND]Buttontoselectoneof
theavailableDABBands.TheDABbands
StoringDABFavourites
Thereare3DABfavouritebanksavailable.
NEWS,AFFAIRS,INFO,SPORT, EDUCATE,
DRAMA,CULTURE,SCIENCE,VARIED,POP‐M,
ROCK‐M,EASY‐M,LIGHT‐M,CLASSICS‐M,
OTHER‐M,WEATHER,FINANCE,CHILDREN,
SOCIAL,RELIGION,PHONEIN,TRAVEL,LEISURE,
JAZZ,COUNTRY,NATIONAL‐M,OLDIES,FOLK‐M,
DOCUMEN
T
TES
T
ALARM
willbechangedinthefollowingorder:
DAB1‐>DAB2‐>DAB3
TuningaDABService
TotuneaDABservicepush[<</>>]toselectthe
next/previousDABservice.“Tuning”isshownon
Selectthefavouritebankwheretostorethe
stationandtunethestationthatshallbe
stored.
Pushthepresetbuttonlongerthan2sec.to
storethestation
Recall Stored Favourites
DOCUMEN
T
,
TES
T
,
ALARM
theDisplay.
Recall
Stored
Favourites
Torecallastoredfavouritepushtheaccording
presetbutton
SwitchingbetweenDABandFM
WhentheDABsignalqualitydropssignificant
itisreasonabletoswitchandlistentothe
service via FM
service
via
FM
.
SwitchingbetweenDABandFM(DABFMLNK)
canbedisabledviathesystemsettingsmenu
USB/MP3/WMA
7
USB/MP3/WMA
Note on MP3
•MP3 is short for MPEG Audio Layer 3 and refers
to an audio compression technology standard.
USB Notes
USB functions (flash memory type) MP3 music play.
USB flash memory 2 in 1 support
MP3Playback/Pause
TopauseandresumeMP3Playbackpushbutton
[1>].
•This product allows playback of MP3 files.
•The unit can read MP3 files written in the
format compliant with ISO 9660. However it does
not support the MP3 data written by the method
of
packet
write
FAT 12/FAT 16/FAT 32 format supported.
File name: 64 byte/dir name: 64 byte/tag
name: 30 byte.
Tag (id3 tag ver 2.0)
titl / ti t/ lb
32
bt
t
Next/PreviousMP3Track.
Toselectthenext/previoustrackpushthe[<</>>]
button.
Fastforward/fastrewind.
To fast forward/fast rewind the current track push
of
packet
write
.
•The unit can not read an MP3 file that has a file
extension other than ".mp3".
•If you play a non‐MP3 file that has the “.mp3"
extension, you may hear some noise.
‐
titl
e
/
ar
ti
s
t/
a
lb
um:
32
b
y
t
e suppor
t
.
USB 1.1 support, USB 2.0 support
(For 2.0, speed performance is as USB 1.1)
Not all USB devices are compatible with the unit.
USB connector is support maximum work power
To
fast
forward/fast
rewind
the
current
track
push
the[<</>>]buttonlongerthan2sec.
RandomPlay
Toactivaterandomplaypushthebutton[4RND].
Repeat
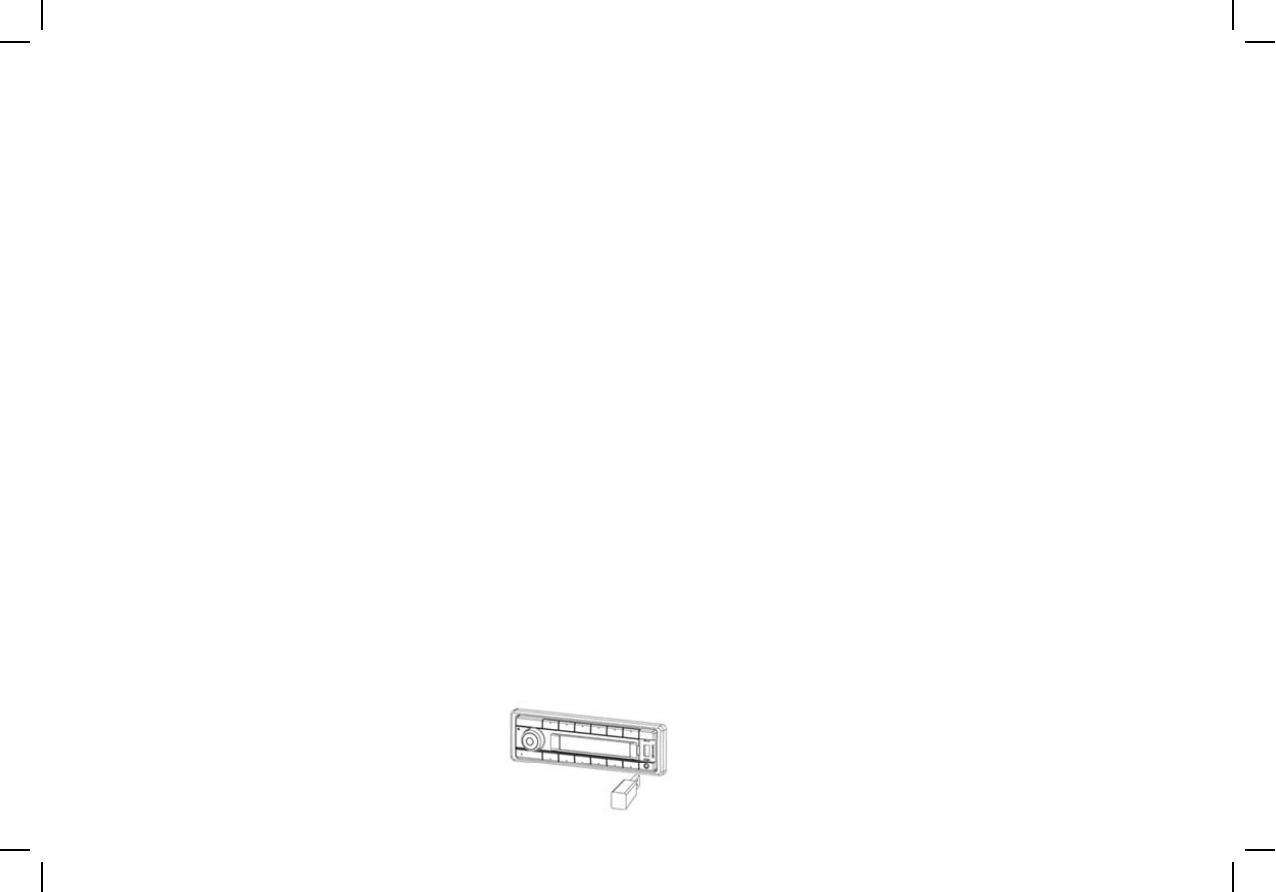
Loading/RemovalofUSBDevice
InsertaUSBdeviceintotheUSB‐slot“Reading”is
shownontheDisplay.MP3Playbackwillstart
immediateafterwards.
•In this manual, we refer to what are called "MP3
file" and "folder " in PC terminology as "track" and
"Album," respectively.
•Maximum number of directory level is
8
,
includin
g
the root director
y
. Maximum
with 500 mA.
Repeat
Pushthe[3RPT]buttontoactivaterepeat
Track/repeatdirectory/repeatall.
SCAN
Toactivate/stopthescanfunctionpushthebutton
[2SCN].Inscanmodealltitlesareplayedfor10
BeforeremovingtheUSBDeviceswitchtoan
otherSourcebypushingthe[SRC]button.
,
g
y
number of files and folders per disc is 256.
•The unit may not play tracks in the order of Track
numbers.
•The unit plays only the audio tracks if a disc
contains
both
audio
tracks
and
MP
3
files
sec.
contains
both
audio
tracks
and
MP
3
files
.

Bl h
d f i
8
Bl
uetoot
h
TheBluetoothallowsyoutoutilizeyourvehicle’s
built‐inaudiosystemforwirelessmobilephone
or music hands free communication. Some
Han
d
s
f
reeOperat
i
ons
Pairing
1.TurnonBluetoothfunctionofyourmobilephone.
2.Entermobilephone’sBluetoothsetupmenu.
3.SearchfornewBluetoothdevices.
Dialed/Missed/Received
YoucansearchanyDialed/Missed/Received.
1.Rotatethe[VOL]knobtoselect
“
DIALED
” “
MISSED
” “
RECEIVED
or
music
hands
free
communication.
Some
Bluetoothmobilephoneshavetheaudio
features,andsomeportableaudioplayers
supportBluetoothfeature.Thissystemcanplay
audiodatastoredinaBluetoothaudiodevice.
ThevehiclestereowithBluetoothwillbeableto
retrievephonebookcontacts,receivedcall,
dialed call missed call incoming calls outgoing
4.SelectBluetoothdevicesfromthepairingliston
themobilephone.
5.Enter“1234”asthepassword(Thepassword
defaultsettingis“1234”).
6.Afterpairingsuccessfully,BTandHPFiconswill
lightup.
A2DP icon will light up after A2DP
DIALED
,
MISSED
,
RECEIVED
2Pressthe[SEL]knobtoentertheselectedcall
history.
3.Rotatethe[VOL]knobtoscrollthecontacts.
4.WhenthecontactnameormobilephoneNo.is
displayed,pressthe[5/]buttontocallthemobile
phoneNo.ofthatcontact.Pressthe[6/]buttonto
dialed
call
,
missed
call
,
incoming
calls
,
outgoing
callandlistentomusic.
Notes:
•DonotleavethemicrophoneofBluetooth
handsfreeintheplaceswithwindpassing
suchasairoutletoftheairconditioner,etc.
This may cause amalfunction
A2DP
icon
will
light
up
after
A2DP
connected
Makingacall
Pressthe[SRC]buttontoswitchthesourceto
Bluetooth.
Pushthe
[
5
/
]
buttonandrotatethe
[
VOL
]
knobto
endthecall.
CallfromPhonebook
Usercansearchthecontactnameinthephonebook
andmakecall.
1.Rotatethe[VOL]knobtoselect“USERPBK”.
2Pressthe
[SEL]
knob to enter the selected
This
may
cause
a
malfunction
.
•Ifleaveitintheplacessubjectedtodirect
sun,hightemperaturecancausedistortion,
discolorationwhichmayresultina
malfunction.
•Thissystemwillnotoperateormayoperate
improperlywithsomeBluetoothaudioplayers.
[ / ] []
selectoneoftheoptions:
DialNumber/UserphoneBook/Received/Dialed
/Missed.
DialNumber
SelectDialNumber
1P h[SEL] kb h f l
2
.
Press
the
[SEL]
knob
to
enter
the
selected
phonebook.
3.Rotatethe[VOL]knobtoscrollthecontacts.
4.Whenthecontactnameisdisplayed,pressthe
[5/]knobtocallthemobilephoneNo.ofthat
contact.
Pressthe[6/]buttontoendthecall.
•Cannotguaranteethecompatibilityofall
mobilephonestogetherwithunit.
•Audioplaybackwillbesettothesame
volumelevelassetduringtelephonecall.This
mightcauseproblems,ifextremevolumelevel
issetduringtelephonecall.
1
.
P
resst
h
e
[SEL]
k
no
b
ont
h
e
f
rontpane
l
tostart
numberinput.
2.Rotatethe[VOL]knobtoselectadigit,pressthe
[SEL]knobtoconfirm.
3.Pressthe[5/]buttontodial.
4.Pressthe[6/]buttontoterminatecall.
Note:
•Somemobilephonesmaynotbeabletotransfer
dataofPhonebook.
AudioStreaming 9
TransferCall
Youcanswitchbetweenhandsfreecallandmobile
phonecall.Pressthe[5/]buttonduringcall.
Answering acall
Whatisaudiostreaming?
Audiostreamingisatechniquefortransferringaudio
datasuchthatitcanbeprocessedasasteadyand
continuousstream.Userscanstreammusicfromtheir
externalaudioplayertotheirvehiclestereowirelessly
Playback/Pause
TopauseandresumePlaybackpushbutton[1>].
Next/PreviousTrack.
To
select
the
next/previous
track
push
the
[
<<
/
>>
]
Answering
a
call
Youcanansweranincomingcallbypressingthe[5/]
button.
Pressthe[6/]buttontorejectanincomingcall.
andlistentothetracksthroughthevehicle’sspeakers.
Pleaseconsultyournearestdealerformoreinformation
ontheproductofwirelessaudiostreamingtransmitter
offered.
To
select
the
next/previous
track
push
the
[/]
button.
Note:
PlayingorderwilldependonBluetoothaudio
player.Whenthe[<</>>]buttonispressed,some
A2DP devices will restart the current track
Pleaseavoidoperatingyourconnectedmobilephone
whileaudiostreamingasthismaycausenoiseor
A2DP
devices
will
restart
the
current
track
dependsonthedurationofplayback.
Duringmusicstreamingplayback,“A2DPandHFP”
willbeshownonthedisplay.WhenA2DPdeviceis
disconnected,“DISCONN”willbeshownonthe
displaySomeBluetoothaudioplayersmaynot
haveplay/pausesynchronizedwiththisunit.
soundchoppyonthesongplayback.
Audiostreamingmayormaynotresumeafter
telephoneinterruptasthisisdependentonmobile
phone.
ThesystemwillalwaysreturntoRadiomodeifaudio
streamingisdisconnected.
Pleasemakesurebothdeviceandmainunitarein
thesameplay/pausestatusinBTMUSICmode.
Note:
Besuretoreadthechapter“Pairing”before
proceeding.

Dimming
10
Dimming
DisplayandButtonDimming
Thisradioallowsmanualorautomaticdimming.
Select
“
DIMMING
”
in the settings menu and
Brightnessadjustment
SelectManualdimmingtoadjustBrightnessofDisplay
and Buttons
ManualMode
ChangebetweenDayandNightModebyselecting
“
DIMDAY
”
or
“
DIMNIGHT
”
Select
DIMMING
in
the
settings
menu
and
selectoneofthefollowingoptions:
Select“OFF”todisableDimming
SelectManualdimmingwhentheradioisnot
connectedtothevehiclesignitionpin.
DAY/NightSelection
SelectDIMMANandchangebetweendaymode
andnightmodebyselecting“DIMDAY“or
“DIMNIGHT”
and
Buttons
DIMDAY
or
DIMNIGHT
AutomaticMode
Inautomaticmodethedisplaywillchange
automaticall
y
betweenda
y
andni
g
htmodewhenthe
SelectAutomaticdimmingwhentheRadiois
connectedcorrecttothevehiclesignition‐pin.
Toadjustyourfavouritebrightness‐settingfor
display‐andbuttonbrightnessselectmanual
mode.
NightBrightnessadjustmentofdisplayand
Buttons
ToadjustNightBrightnessofthedisplayand
buttonsselect“DIMNIGHT”.
Thenselect“LCDMenu”andadjustthebrightness
of the Display accordingly
y y g
radioiscorrectconnectedtothevehiclesillumination
pin.
of
the
Display
accordingly
.
Thenselect“KeyMenu”andadjustthebrightness
oftheButtonsaccordingly.
DayBrightnessadjustmentofdisplayandButtons
ToadjustDayBrightnessofthedisplayand
buttonsselect“DIMDAY”.
Thenselect“LCDMenu”andadjustthebrightness
oftheDisplayaccordingly.
Thenselect“KeyMenu”andadjustthebrightness
oftheButtonsaccordingly
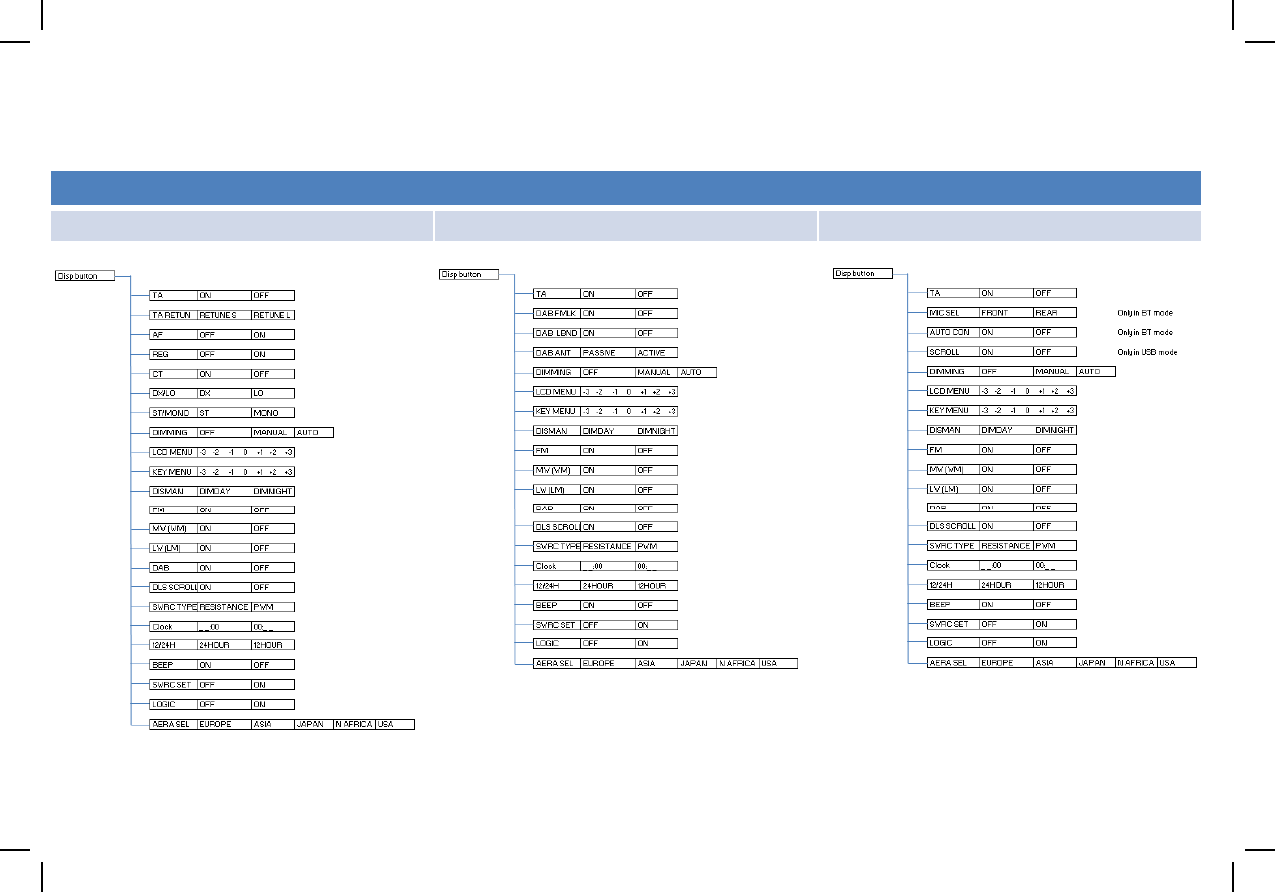
System Setting Item List
11
System
Setting
Item
List
Radioregion:Europe
Tunersource DABsource AUX/USB/BT(A2DP)source
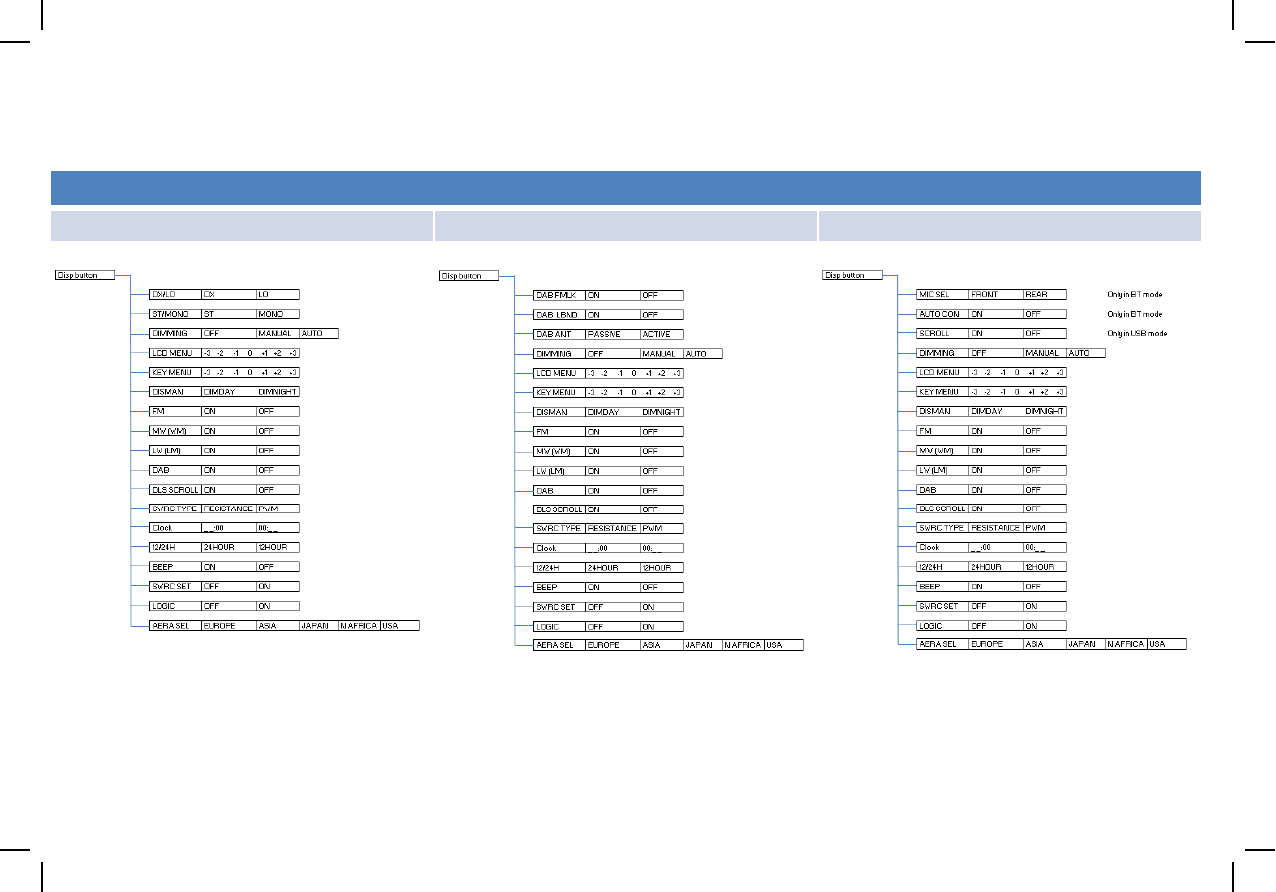
System Setting Item List
12
System
Setting
Item
List
Radioregion:Asia/ Japan/NAfrica/USA
Tunersource DABsource AUX/USB/BT(A2DP)source

System Setting
13
System
Setting
AM/FMTunerOptions
TA
Enable /Disable automatic switching to FM
‐
tuner
DABTunerOptions
DABFMLINK
Enable /Disable automatic switching to FM
tuner
DimmingOptions
DIMMING
T
o
Se
l
ect
Dimmin
g
M
ode
(O
FF
,
M
a
n
ua
l
,
auto
m
at
i
c)
Enable
/Disable
automatic
switching
to
FM
‐
tuner
modeincaseofincomingTrafficannouncements.
TAReturn
SwitchbacktimeinthecasethatAnnouncement‐
Signalcannotbedetectedanymore.
AF
Enable/Disableautomaticselectionofbest
Enable
/Disable
automatic
switching
to
FM
‐
tuner
whenDAB‐Signaldrops.
DABLBND
Enable/DisableL‐BandDecoding
DABANT
SelectionofActiveorPassiveantennais
connected.
oSe ect gode (O , aua,auto at c)
LCDMenu
ToAdjustDisplaybrightness
KEYMenu
ToadjustButtonbrightness
DIMMAN
ToswitchbetweenDAYandNightMode
audiblefrequencyinFM‐TunerMode(RDS).
REG
Enable/Disableautomaticselectionofbetter
audiblefrequenciesthatbroadcastdifferent
regionalcontent.
CT
Automatics
y
nchronizationofClockwithtime
DLSSCROLL
EnabledisplayofArtistandSong
BluetoothOptions
SCROLL
Others
MW
Toenable/disableMWReception
LW
y
receivedviaRDS‐Signal.
DX/LO
SearchLevelofAM/FM‐Tuner.
ST/Mono
SelectionofStereoorMonooutputofFM/AM
tuner
AERA SEL
ON:DisplayID3taginformationcyclic:Track‐
Folder‐File‐Album‐Title‐Artist‐Track
OFF:DisplayTrack
MICSEL
UseofintegratedMicrophoneinfrontpanelor
externalMicrophoneconnectedbyrearconnector
AUTO CON
LW
Toenable/disableLWReception
BEEP
Toenable/disableconfirmationsignal
Logic
Toenable/disableignitionlogic
Clock
d h d
AERA
SEL
ToadjusttheAM/FMtunertoyourregion.
AUTO
CON
Todisable/enableBluetoothconnection Toa
d
just
h
oursan
d
minutes
12/24H
Toselect12/24hClockformat
SteeringWheelControlOptions
SWRCTYPE
SelectionofSteeringWheelcontroltype
(Resistance/PWM)
SWRCSET
Toenable/disablesteeringwheelcontrol
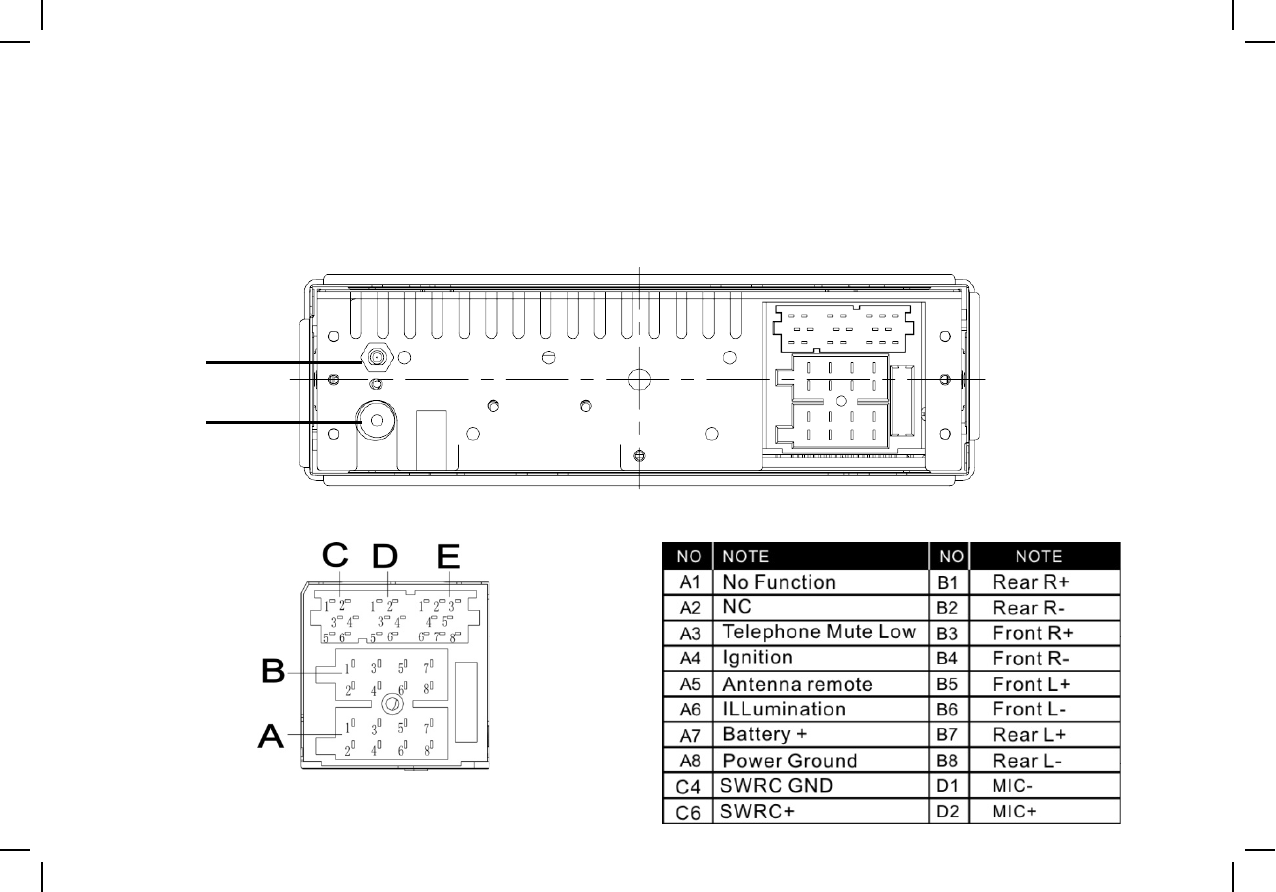
Electrical Connections
14
Electrical
Connections
WiringDiagram
DABSMBconnector
AM/FMISOconnector
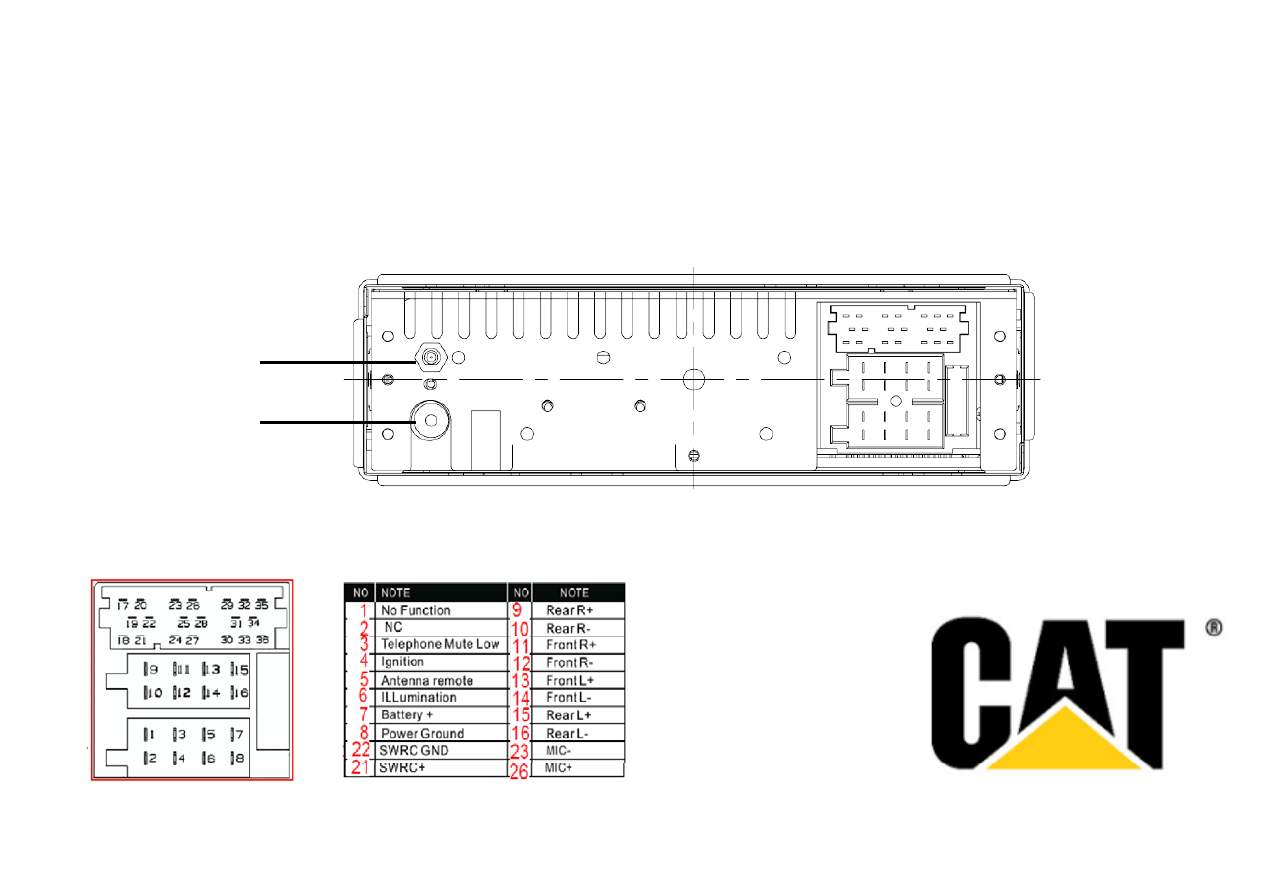
Electrical Connections
14
Electrical
Connections
WiringDiagram
DABSMBconnector
AM/FMISOconnector
T
bl h ti
15
T
rou
bl
es
h
oo
ti
ng
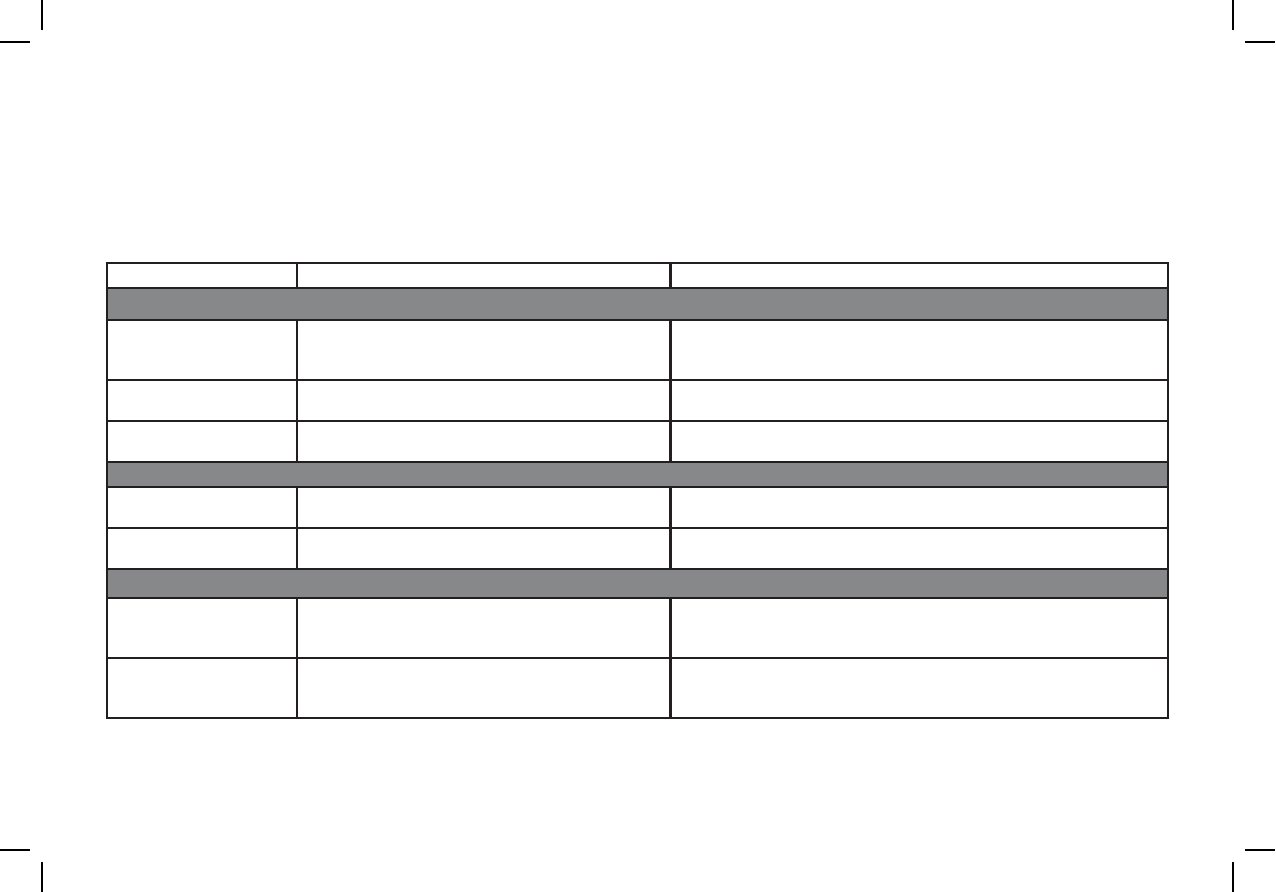
The following checklist can help you solve some problems which you may encounter when using the unit. Before consulting it, check the connections and follow
the instructions in the user manual. Do not use the unit in abnormal condition, for example without sound, or with smoke or foul smell can cause fire or electric
shock, immediately stop using it and call the store where you purchased it.
Problem Possible cause Solution
General
The unit will not switch
on.
vehicle ignition is not on.
Cable is not properly connected.
Fuse is burnt.
Turn your vehicle key in the
ignition. Check cable
connection.
Rl f ith f f
th it
R
ep
l
ace
f
use w
ith
a new
f
use o
f
th
e same capac
it
y
.
No sound Volume is set at minimum or the mute function is
on. Check the volume or switch the mute function off.
The unit or screen does
not work normally.
The unit system is unstable. Press the RESET button.
Mode TUNER
Unable to receive The antenna is not connected properly. Connect the antenna properly.
stations.
Poor quality reception of
radio station.
The antenna is not fully extended or it is broken. Fully extend the antenna and if broken, replace it with a new one.
Mode USB
Unable to insert USB
device The USB device has been inserted the wrong way
round.
Insert it the other way around.
The USB device cannot
be read.
NTFS format is not supported. Check that the file system is in FAT or FAT32 format. Due to different
formats, some models of storage devices or MP3 players may not be
read.
Specifications
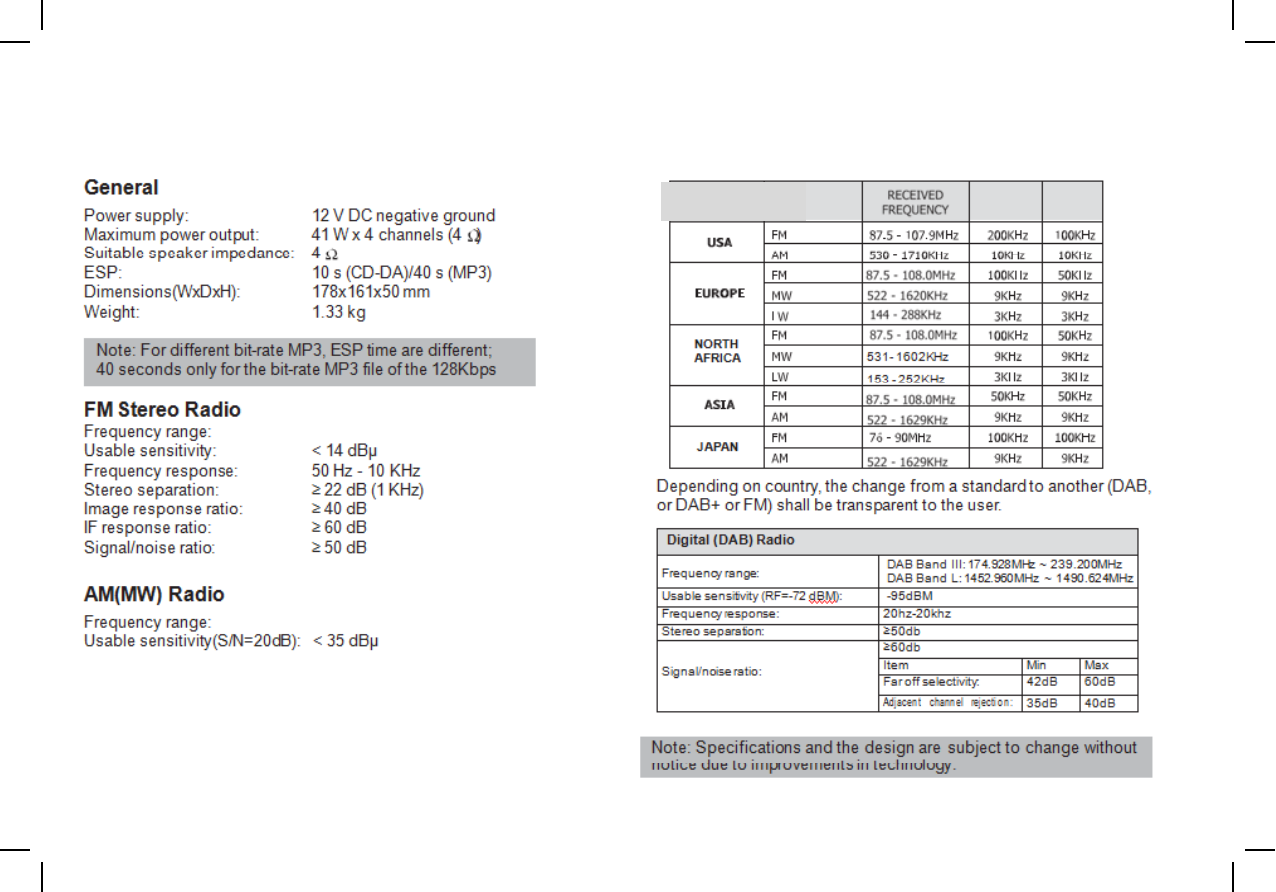
16
Specifications
AM/FMtuner
Refer toAM/FMtunertable
Refer toAM/FMtunertable
USBCharging
Maximum power ouput: 0.5A @5V

FCC
17
FCC
FCCSTATEMENT
This device complies with Part 15 of theFCC
Rules. Operation is subject tothefollowingtwo
di i
television reception, which can be determined
by turning the equipment offand on, the useris
encouraged to try to correct the interferenceby
oneormoreof thefollowingmeasures:
con
di
t
i
ons:
(1)This device may not cause harmful
interference.
(2)This device must accept any interference
received, including interference thatmaycause
undesired operation
Reorientorrelocatethereceivingantenna.
Increasetheseparationbetweenthe
equipmentandreceiver
Connect theequipment into an outlet on a
circuit different from thatto which the receiveris
connected
undesired
operation
.
(3)Changes or modifications not expressly
approvedbythepartyresponsiblefor
compliancecouldvoidtheuser'sauthority to
operatetheequipment.
connected
.
Consultthedealeroranexperiencedradio/TV
technicianfor help.
FCCRadiationExposureStatement
NOTE
:
ThisequipmentcomplieswithFCCradiationexposure
limits setforthfor an uncontrolledenvironment.
This equipment should beinstalled and operated
with minimum distance 20cmbetweentheradiator&
yourbody.
NOTE
:
This equipment has been tested and
found to comply with the limits for a ClassB
digital device, pursuant to Part15 of theFCC
Rules.These limits are designed toprovide
reasonable protection againstharmful
interferenceinaresidentialinstallation.
This equipment generatesuses and can
radiateradiofrequencyenergyand,ifnot
installedandusedinaccordancewiththe
instructions,may cause harmful interferenceto
radio communications. However, there isno
guarantee that interference will not occurin a
particular installation. Ifthis equipmentdoes
cause harmful interference to radio or
18