Continental Automotive TRD7412UBA Car Radio User Manual
Continental Automotive GmbH Car Radio
UserManual.wiki
>
Continental Automotive
>
TRD7412UBA User Manual
User Manual
Navigation menu
Upload a User Manual
Namespaces
Wiki Guide
HTML
PDF
Info
Views
User Manual
Discussion / Help
Navigation
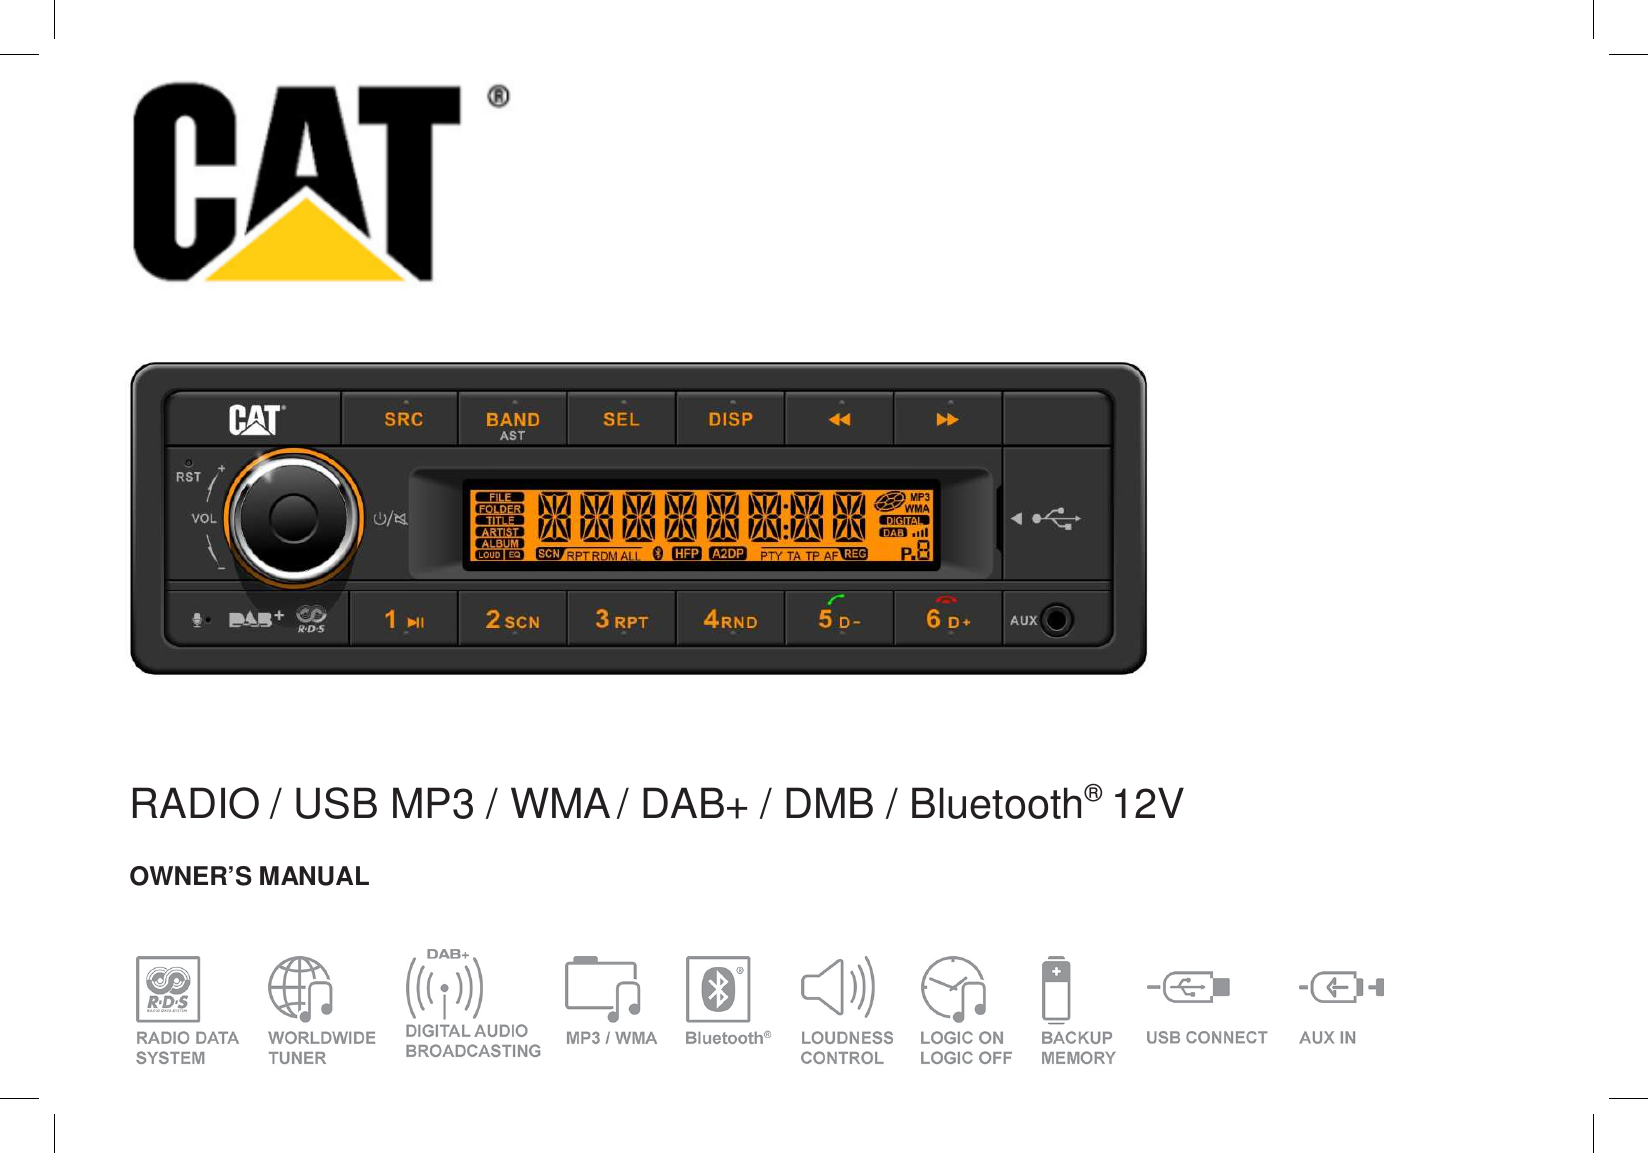
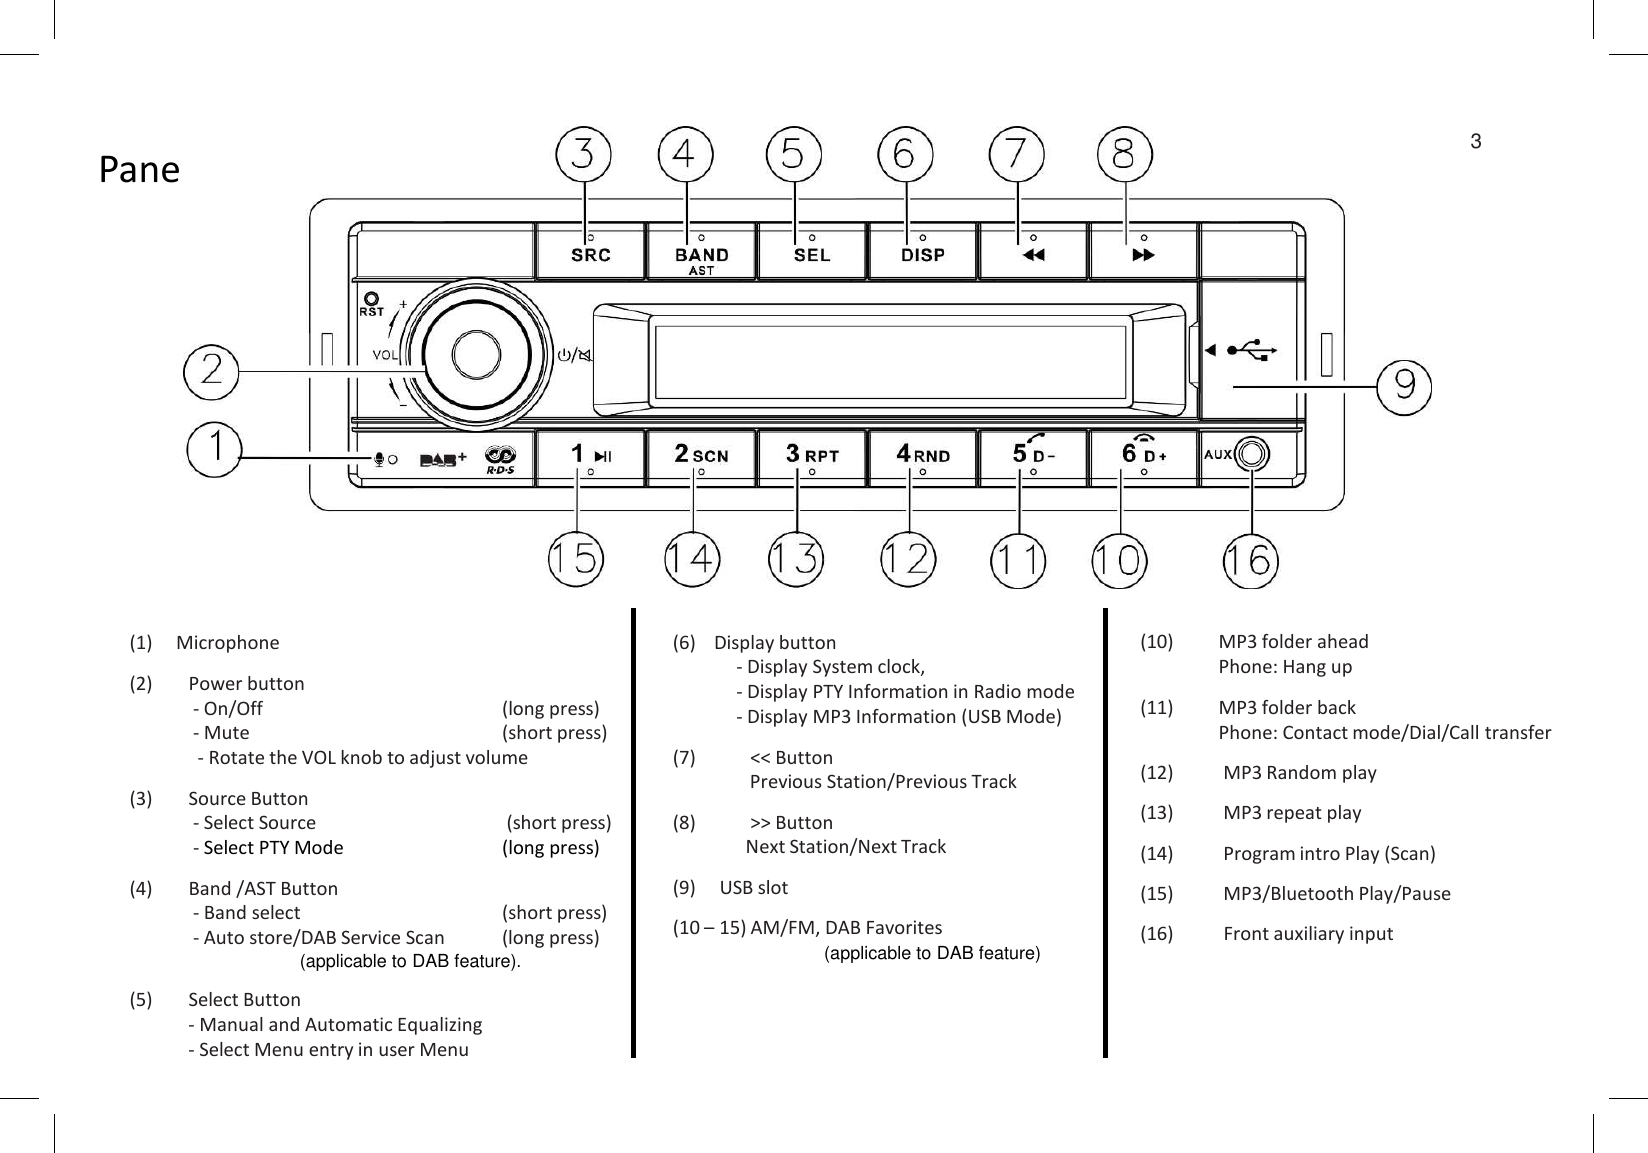
![4Select SourcePress the [SRC] button to switch between and select available sources: TUNER->USB->AUX F->AUX R-> Bluetooth->DAB (applicable to DAB feature). USB and Bluetooth is only visible in the menu when connected. VolumeTo adjust the Volume rotate the [VOL] knobPredefined sound effectsThe Radio provides different predefined sound effects .Press the [SEL] button to enter the Sound settings menu. Rotate the [VOL] knob to select one of the following options: EQ OFF -> POP -> ROCK -> CLASSIC -> JAZZ -> CUSTOM.BALANCE, FADE and LoudnessTo adjust Balance, Fader and Loudness press the [SEL] button and then push [ << / >> ] button to select BALANCE -> FADER -> LOUDNESS. Rotate the [VOL] knob to adjust Balance, Fade and Loudness according your needs.Manual Sound Adjustment For manual sound adjustment first select CUSTOM. Push the [SEL] button again and then select BASS or TREBLE with the [ << / >> ] button. Rotate the [VOL] knob to adjust BASS and TREBLE according your needs.Clock SettingThe clock time can be adjust manually by long pressing the [DISP] button to set the time.Select [CLOCK] with the search buttons [ << />> ].Press [SEL] button and rotate [VOL] knob to adjust the minutes.Press search buttons [ << />> ] to select adjust hours. Rotate [VOL] knob to adjust the hours.Press the [SEL] button to exit the clock setting.System SettingsThe system settings menu is entered by long pressing the [DISP] button. To access the available menu entries push the search buttons [ << />> ]. To select the available options of each menu entry rotate the [VOL] knob.For details see chapter system settings of this manual.Reception AreaThis Radio is designed to work in different regions with different frequency ranges.The Reception area can be adjusted via the System Settings menu. The default setting is “EUROPE”.The following Areas are available:EUROPE/ASIA/JAPAN/NORTH AFRICA/USAPower ON/OFF , MuteTo Switch on the Radio push the Power ON/OFF button.To switch off the Radio push the Power ON/OFF button for more than 2 sec.The Radio will be muted by pushing the Power ON/OFF button for less that 2 sec.General Operation Volume and SoundIgnition LogicWith ignition logic activated (Default setting) the Radio can be switched on and off manually even if the vehicles ignition pin is not connected. To avoid battery discharge the radio is switched off after 1h without user operation.](https://usermanual.wiki/Continental-Automotive/TRD7412UBA/User-Guide-3547312-Page-4.png)
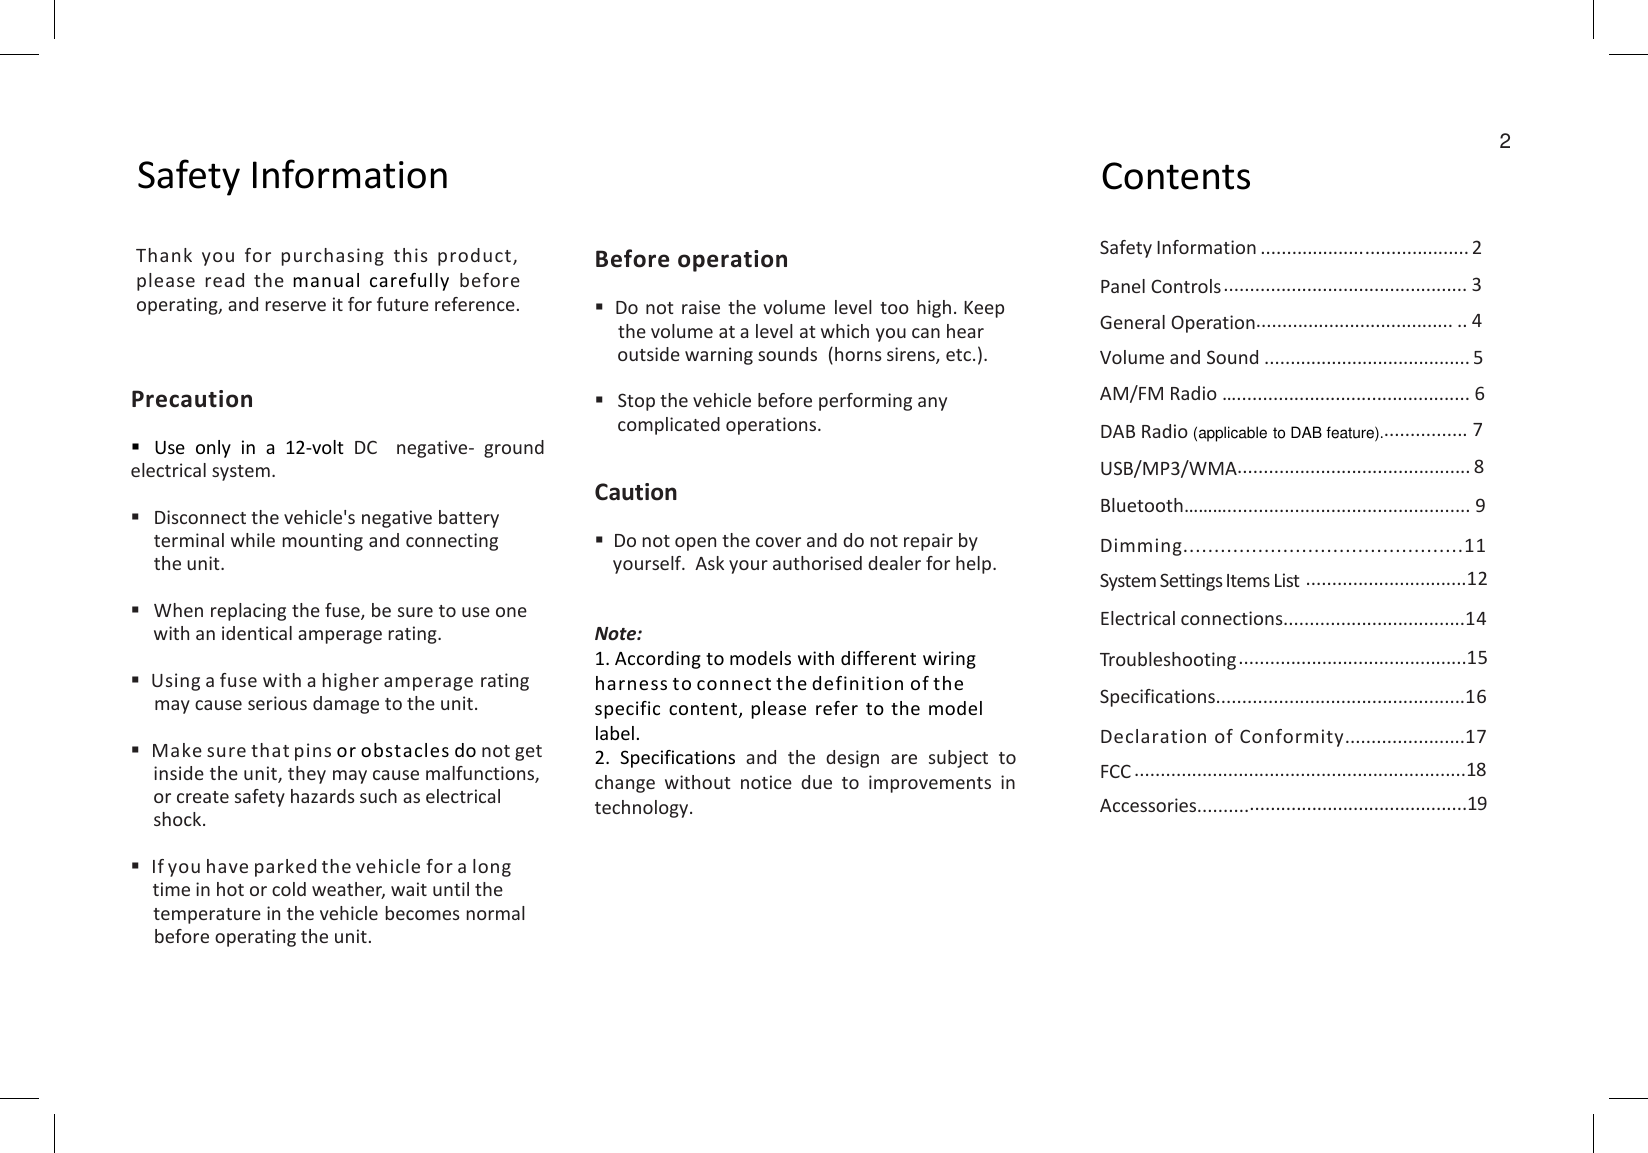
![Automatic TuningFor Automatic tuning press the [ << / >> ] button. The Radio will search and select the next receivable station.When Traffic Announcement is activated (“TA = ON”) only stations that broadcast Traffic announcements will be tuned.Manual TuningFor manual station selection press the [ << / >> ] button for longer than 2 sec. “MANUAL” is shown in the display. Pressing the [ << / >> ] button again the frequency will be incrementally increased/decreased. Select BandPress the [ BAND ] Button to select one of the available Radio Bands. The Radio bands will be changed in the following order:FM1 -> FM2 -> FM3 -> AM1 -> AM2 -> LWThe AM and LW Bands can be deactivated by the user via the system settings menu.AM/FM RadioAM/FM Radio Selection To access AM/FM Radio press the [SRC] button and select TunerManual Storing FavouritesThere are 3 FM , 2 MW and 1 LW Favourite banks available.Select the favourite bank where to store the station and tune the station that shall be stored.Push the preset button longer than 2 sec .to store the stationRecall Stored FavouritesTo recall a stored favourite push the according preset buttonAuto Memory StoreTo search for the best receivable stations and store them as favourite press the (BAND/AST] button for 2 sec. The Radio searches the best receivable station and stores them.RDSMany FM Stations in Europe transmit RDS data (Radio Data System) in addition to their audio program. With RDS the user has the following benefits:The best audible frequency (AF) of a selected station is tuned automatically for best reception quality. To enable automatic selection of best audible frequency select “AF=ON” in the Settings menu The Radio recognizes Traffic Announcementsand can switch to Radio even if an other Audio source is selected. To enable automatic Traffic announcement select “TA=ON” in the Settings menu Some Stations provide regional specific programs. With the regional (REG) function only those frequencies are followed that broadcast the selected regional program. To follow regional programs select “REG=ON” in the Settings menuThe stations name can be displayedFor further settings see System Menu5](https://usermanual.wiki/Continental-Automotive/TRD7412UBA/User-Guide-3547312-Page-5.png)
![DAB Service ListTo get an overview of receivable DAB services a DAB Service List can be displayed. Push [SEL] for 2 sec. to open the DAB Service List.Rotate the [VOL] Button to scroll through the list of receivable stations. To tune a DAB service push [SEL]. “Tuning” is shown on the display.In the case that a Service is temporary not receivable “No Service” will be shown on the display. DAB RadioDAB Radio Selection DAB/DAB+ Provides radio programs in digital sound quality. To access Digital Audio Broadcast (DAB) press the [SRC] button and select DAB.PTYVia the RDS System FM stations in many countries transmit the type of program (Program Type , PTY) that is broadcasted. To search for a desired Program type push [SRC] for about 2 sec. and select the Program type by rotating the[VOL] knob. The Radio will search for a Radio-Program with the selected Program type when the [SEL] button is pushed. “PTY SEEK” is shown in the Display.If no station with the selected Program Type can be found the last tuned station will be selected and “NO PTY” is shown in the Display.The following program types are available:NEWS, AFFAIRS, INFO, SPORT, EDUCATE, DRAMA, CULTURE, SCIENCE, VARIED, POP-M, ROCK-M, EASY-M, LIGHT-M, CLASSICS-M , O T H E R-M , W E AT H E R, F I N A N C E , CHILDREN, SOCIAL, RELIGION, PHONE IN, TRAVEL, LEISURE, JAZZ, COUNTRY, NATIONAL-M, OLDIES, FO LK- M , DOCU M ENT, TE S T, ALARMDAB Service SCANTo search for receivable DAB Services the DAB service SCAN has to be started by pushing [BAND/AST] for 2 sec. “SCAN” is shown in the display.Select DAB BandPress the [ BAND ] Button to select one of the available DAB Bands. The DAB bands will be changed in the following order:DAB1 -> DAB2 -> DAB3Tuning a DAB Service To tune a DAB service push [<< / >> ] to select the next/previous DAB service. “Tuning” is shown on the Display. Storing DAB FavouritesThere are 3 DAB favourite banks available.Select the favourite bank where to store the station and tune the station that shall be stored.Push the preset button longer than 2 sec .to store the stationRecall Stored FavouritesTo recall a stored favourite push the according preset buttonSwitching between DAB and FMWhen the DAB signal quality drops significant it is reasonable to switch and listen to the service via FM.Switching between DAB and FM (DABFMLNK) can be disabled via the system settings menu6(applicable to DAB feature)](https://usermanual.wiki/Continental-Automotive/TRD7412UBA/User-Guide-3547312-Page-6.png)
![Loading/ Removal of USB DeviceInsert a USB device into the USB-slot “Reading” is shown on the Display. MP3 Playback will start immediate afterwards.Before removing the USB Device switch to an other Source by pushing the [SRC] button.USB/MP3/WMANote on MP3•MP3 is short for MPEG Audio Layer 3 and refersto an audio compression technology standard.•This product allows playback of MP3 files.•The unit can not read an MP3 file that has a fileextension other than ".mp3".•If you play a non-MP3 file that has the “.mp3"extension, you may hear some noise.•In this manual, we refer to what are called "MP3file" and "folder " in PC terminology as "track" and"Album," respectively.•Maximum number of directory and files is 65535,including the root directory. Maximum number offiles per folder is 1000.•The unit may not play tracks in the order of Tracknumbers.•Supports bit rate from 8 to 320 kbps and VBR(Variable Bit Rate).Note on WMASupports bit rate from 5 to 384 kbps and VBR(Variable Bit Rate).USB NotesUSB functions (flash memory type) MP3 music play.USB flash memory 2 in 1 supportFAT 12/FAT 16/FAT 32 format supported.File name: 64 byte/dir name: 64 byte/tagname: 30 byte.Tag (id3 tag ver 2.0)- title/artist/album: 32 byte support.USB 1.1 support, USB 2.0 support(For 2.0, speed performance is as USB 1.1)Not all USB devices are compatible with the unit.USB connector is support maximum work powerwith 500 mA.MP3 Playback/PauseTo pause and resume MP3 Playback push button [1>].Next/Previous MP3 Track.To select the next/previous track push the [<</>>] button.Fast forward/fast rewind.To fast forward/fast rewind the current track push the [<</>>] button longer than 2 sec.Random PlayTo activate random play push the button [4 RND].RepeatPush the [3 RPT] button to activate repeat Track/repeat directory/repeat all.SCANTo activate/stop the scan function push the button [2 SCN]. In scan mode all titles are played for 10 sec.7](https://usermanual.wiki/Continental-Automotive/TRD7412UBA/User-Guide-3547312-Page-7.png)
![BluetoothThe Bluetooth allows you to utilize your vehicle’s built-in audio system for wireless mobile phone or music hands free communication. Some Bluetooth mobile phones have the audio features, and some portable audio players support Bluetooth feature. This system can play audio data stored in a Bluetooth audio device. The vehicle stereo with Bluetooth will be able to retrieve phonebook contacts, received call, dialed call, missed call, incoming calls, outgoing call and listen to music.Notes:• Do not leave the microphone on Bluetooth hands free in the places with wind passing such as air outlet of the air conditioner, etc. This may cause a malfunction.• If left in places subjected to direct sun, high temperature can cause distortion, discoloration which may result in a malfunction.• This system will not operate or may operate improperly with some Bluetooth audio players.• Cannot guarantee the compatibility of all mobile phones together with unit.• Audio playback will be set to the same volume level as set during telephone call. This might cause problems, if extreme volume level is set during telephone call.Hands free OperationsPairing1.Turn on Bluetooth function of your mobile phone.2.Enter mobile phone’s Bluetooth setup menu.3.Search for new Bluetooth devices.4.Select Bluetooth devices from the pairing list on the mobile phone.5.Enter “ 1234 ” as the password ( The password default setting is “ 1234 ”).6.After pairing successfully, BT and HPF icons will light up.A2DP icon will light up after A2DP connectedDial Number1. Phone dialingMobile phone dialing, LCD screen displays dialinginformation.2. Unit dialingPress [SRC] button swicth to BT /Audio modepress [5 D+] to choose the DIAL ON function, press [SEL] button / [<</>>] button and rotate the knob to input dialing numbers,8Transfer CallYou can switch between hands free call and mobile phone call. Press the [5 /] button during call.Answering a callYou can answer an incoming call by pressing the [5/] button.Press the [6 /] button to reject an incoming call.](https://usermanual.wiki/Continental-Automotive/TRD7412UBA/User-Guide-3547312-Page-8.png)
![Audio StreamingWhat is audio streaming?Audio streaming is a technique for transferring audio data such that it can be processed as a steady and continuous stream. Users can stream music from their external audio player to their vehicle stereo wirelessly and listen to the tracks through the vehicle ’s speakers. Please consult your nearest dealer for more information on the product of wireless audio streaming transmitter offered.Please avoid operating your connected mobile phone while audio streaming as this may cause noise or sound choppy on the song playback.Audio streaming may or may not resume after telephone interrupt as this is dependent on mobile phone.The system will always return to Radio mode if audio streaming is disconnected.Note:Be sure to read the chapter “Pairing” before proceeding.BT /Audio mode (A2DP)Playback/PauseTo pause and resume Playback push button [1>].Next/Previous Track.To select the next/previous track push the [<</>>] button.Note:Playing order will depend on Bluetooth audio player. When the [<</>>] button is pressed, some A2DP devices will restart the current track depends on the duration of playback.During music streaming playback, “A2DP and HFP” will be shown on the display. When A2DP device is disconnected, “DISCONN” will be shown on the display Some Bluetooth audio players may not have play / pause synchronized with this unit. Please make sure both device and main unit are in the same play/ pause status in BT /Audio mode.9](https://usermanual.wiki/Continental-Automotive/TRD7412UBA/User-Guide-3547312-Page-9.png)