Continental Conair GH3034AT 2.4 GHz 40 Channel Cordless Phone with Caller ID User Manual

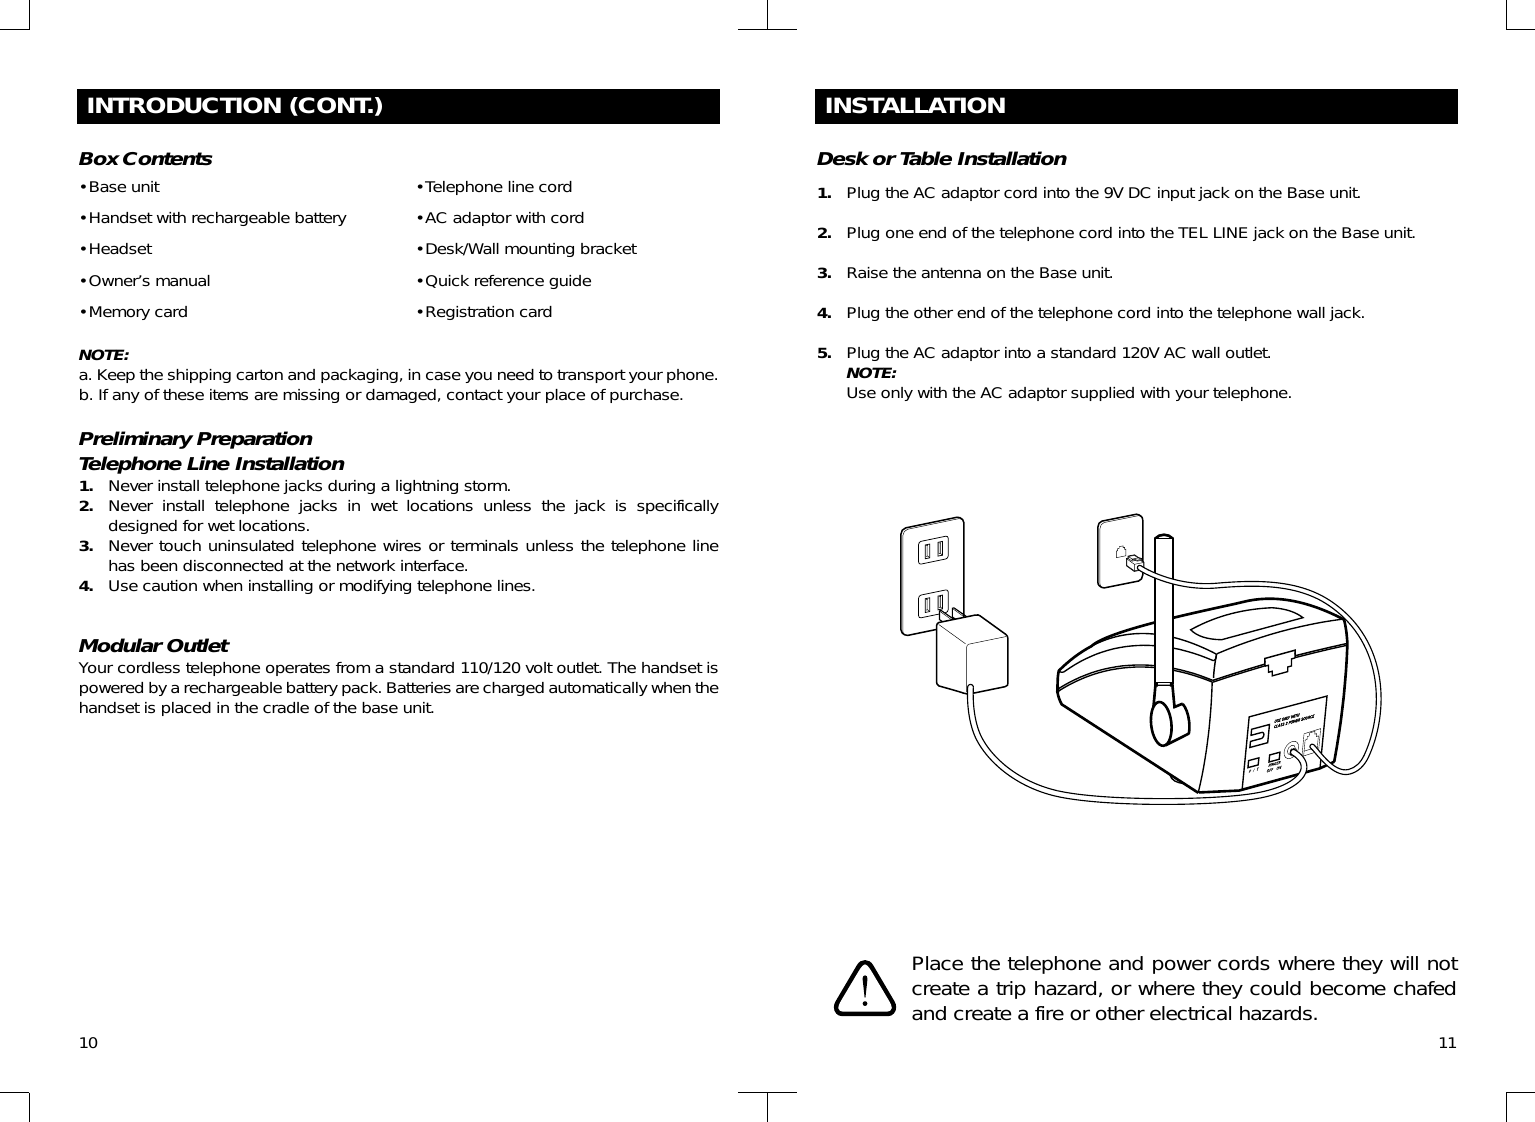
Continental Conair Limited 2.4 GHz 40 Channel Cordless Phone with Caller ID Users Manual

Users Manual

STOP…DON’T TAKE ME BACK TO THE STORE.LOOK…FOR THE TOLL-FREE “HELP” TELEPHONE NUMBER.LISTEN…AS THE EXPERTS TALK YOU THROUGH THE PROBLEM.For immediate answers to your questions regarding operation,missing parts or installation, call theSOUTHWESTERN BELL FREEDOM PHONE® RETAIL SALES HELP LINE AT:1-800-366-0937Monday - Friday 8:30a.m. - 9:00p.m. ESTSaturday 8:30a.m. - 12:30p.m. ESThttp://www.swbfreedomphone.comSOUTHWESTERN BELL FREEDOM PHONE®7475 N. Glen Harbor Blvd., Glendale, AZ 85307GH3034AT        Printed in ChinaSouthwestern BellFreedom Phone®2.4GHz Cordless Telephone with Call Waiting Caller IDGH3034AT Owner’s ManualToll Free Helpline 1-800-366-0937http://www.swbfreedomphone.comIB- XXXX
CONTENTSIMPORTANT SAFETY INSTRUCTIONSSAFETY INSTRUCTIONS FOR BATTERIESNAME OF CONTROLS AND INDICATIONSFCC WANTS YOU TO KNOWINTRODUCTIONFEATURESBOX CONTENTSPREPARATIONOPERATING INSTRUCTIONSINSTALLATIONHANDSET BATTERY CHARGINGCALLER ID SETUPTELEPHONE OPERATIONCALLER ID OPERATIONTROUBLESHOOTINGPRODUCT CARESERVICELIMITED WARRANTY2345891010111213141821232425IMPORTANT SAFETY INSTRUCTIONSBEFORE USING YOUR TELEPHONE EQUIPMENT, BASIC SAFETY PRECAUTIONSSHOULD ALWAYS BE FOLLOWED TO REDUCE THE RISK OF FIRE, ELECTRIC SHOCKAND INJURY TO PERSONS, INCLUDING THE FOLLOWING:1. Read and understand all instructions.2. Follow all warnings and instructions marked on the product.3. Unplug this product from the wall telephone jack and power outlet before cleaning.  Donot use liquid cleaners or aerosol cleaners. Use a damp cloth for cleaning.4. Do not use this product near water, for example, near a bath tub, wash bowl, kitchensink, laundry tub, swimming pool, or in a wet basement.5. Do not place this product on an unstable cart, stand or table.  The product may fall,causing serious damage.6. Slots or openings in the cabinet and the back and bottom are provided for ventilation, toprotect it from overheating.  These openings must not be blocked or covered. The openingsshould never be blocked by placing the product on a bed, or other similar surface.  This productshould never be placed near or over a radiator or heat register.7. This product should be operated only from the type of power source indicated on themarking label.  If you are not sure of the type of power supply to your home, consult yourdealer or local power company.8. Do not allow anything to rest on the power cord. Do not place this product where thecord will be damaged by persons stepping on it. 9. Do not overload wall outlets and extension cords, as this can result in fire or electric shock.10. Never push objects of any kind into this product through cabinet slots, as they maytouch dangerous voltage points or short out parts. This could result in fire or electric shock.Never spill liquid of any kind on the product.11. To reduce the risk of electric shock, do not disassemble this product. Instead, when serviceor repair work is required, take it to a qualified service technician. Opening or removing coversmay expose you to dangerous voltages or other risks. Incorrect reassembly can cause electricshock when the appliance is subsequently used.12. Unplug this product from the wall outlet and refer servicing to qualified service personnelunder the following conditions:a. When the power supply cord or plug is damaged or frayed.b. If liquid has been spilled into the product.c. If the product has been exposed to rain or water.d. If the product does not operate normally, and proper operating instructions have beenfollowed, adjust only those controls that are covered by the operating instructions. Improperadjustment of other controls may result in damage and will often require extensive work by aqualified technician to restore the product to normal operation.e. If the product has been dropped or the cabinet has been damaged.f. If the product exhibits a distinct change in performance.13. Avoid using a telephone (other than a cordless type) during an electrical storm. Theremay be a remote risk of electric shock from lightning.14. Do not use the telephone to report a gas leak in the vicinity of the leak.15. Use only the power cord and batteries indicated in this manual. Do not dispose of batteriesin a fire. They may explode. Check with local codes for possible special disposal instructions.CAUTIONDanger of explosion if battery is incorrectly replaced.Replace only with the same or equivalent type recommended by the manufacturer.Dispose of used batteries according to the manufacturer’s instructions. 3
4SAFETY INSTRUCTIONS FOR BATTERIESSafety Instructions for BatteriesHandset Battery PackCAUTION:Use only a Southwestern Bell Freedom Phone® approved battery pack in the handsetof your Cordless Telephone. To reduce the risk of fire or injury, always do the followingwhen replacing, discarding or charging batteries. When handling the batteries, becareful not to short the battery with conducting materials such as rings, bracelets, andkeys. The battery or conducting material may overheat and cause burns.Use only the following type and size of battery pack:FOR HANDSET UNIT :GP35AAAK3BMX 3.6V 350mAHr, GPI International Ltda. Do not dispose of the battery pack in a fire. The cell may explode.  Check with localcodes for possible special disposal instructions.b. Do not attempt to open or mutilate the battery pack. The chemicals are dangerousand may cause damage to the eyes or skin, and may be toxic if swallowed.c. Follow the charge instructions outlined in this manual.(See page 12)The EPA certified RBRC®* Battery Recycling Seal on the nickel-cadmium (Ni-Cd)battery indicates that Southwestern Bell Freedom Phone® Retail Sales is voluntarilyparticipating in an industry program to collect and recycle these batteries at the end oftheir useful life, when taken out of service in the United States or Canada. The RBRC®program provides a convenient alternative to placing used Ni-Cd batteries into thetrash or the municipal waste stream, which may be illegal in your areas. Please call 1-800-8-BATTERY for information on Ni-Cd battery recycling and disposal bans /restrictions in your area. Southwestern Bell Freedom Phone® Retail Sales’sinvolvement in this program is part of our commitment to preserving our environmentand conserving our natural resources.*RBRC® is a trademark of the Rechargeable Battery Recycling Corporation.Save These InstructionsCONTAINS NICKEL-CADMIUMBATTERY. BATTERY MUST BERECYCLED OR DISPOSED OFPROPERLY.5NAME OF CONTROLS AND INDICATIONSHandset Controls, IndicatorsAntennaEarpieceLCD DisplayNew Call IndicatorFlashes to indicate thereare calls that have notbeen reviewedMemory ButtonUsed to store or recallnumbers in memoryDelete ButtonUsed for deleting CallerID entriesRedial ButtonRedials the last number oradds a pauseFlash ButtonUsed to access callwaiting (if available)MicrophoneReceiver VolumeSwitchTo adjust the receivervolume levelCaller ID ReviewButtonsMemory scroll buttonsCaller ID Calls ButtonUsed to dial the displayednumber Talk ButtonUsed to make or toterminate callsKeypadNumber buttonsChannel ButtonUsed to select anotherchannel for clearerreceptionHeadset Jack
6LCD Display IndicatorNew Call /Call Counter Repeated CallIndicator Clock DateClock Ticker12-digit Number Line 12-character Text Line VIP IndicatorNew Call / Call CounterShows the amount of calls / new calls in standby mode.When there is a new call that has not been reviewed, the display will show “NEWCALL” and the New Call LED on the handset will blink.Repeated Call IndicatorLights up to indicate the displayed phone number called more than once.ClockShows the real time clock (AM/PM) format, or the time stamp of a Caller ID record.Clock TickerBlinks when real time clock is being displayed.DateShows the date (MM/DD) format, or the date stamp of a Caller ID record.12-digit Number LineDisplays the caller’s number, or displays your dialed digits.12-character Text LineDisplays caller’s name, call timer and system prompt (such as RINGING, TALK).VIP IndicatorIndicates that priority ringer has been set for the displayed number.7Base Unit Controls and IndicatorsTelephone Lineconnect the telephoneline cord hereDC Inconnect the ACadaptor cord hereTone / Pulsesets the unit to pulseor tone dialingIn Use/Charge LEDLights when the handset is in Talk mode orthe handset is on the cradle and thebattery is being charged.Flashes when an incoming call is received.Page buttonused to locate thehandsetAntennaRinger On/Offsets the ringer of theunit to on or offCharge Contacts
FCC WANTS YOU TO KNOWThis equipment complies with Part 68 of the FCC rules and ACTA technicalrequirements. On the bottom of the base of this equipment is a label that contains,among other information, the FCC Registration Number and Ringer EquivalenceNumber (REN) for this equipment.  You must, upon request, provide this information toyour telephone company.An FCC compliant telephone cord and modular plug is provided with this equipment.This equipment is designed to be connected to the telephone network or premises wiringusing a compatible modular jack which is TIA/EIA-IS-968 compliant. See InstallationInstructions for details.The REN is useful to determine the quantity of devices you may connect to yourtelephone line and still have all of those devices ring when your telephone number iscalled. In most, but not all areas, the sum of the REN’s of all devices connected to oneline should not exceed five (5.0). To be certain of the number of devices you mayconnect to your line, as determined by the REN, you should contact your localtelephone company to determine the maximum REN for your calling area.If your telephone equipment causes harm to the telephone network, the telephonecompany may discontinue your service temporarily. If possible, they will notify you inadvance. But if advance notice isn’t practical, you will be notified as soon as possible.You will be informed of your right to file a complaint with the FCC.Your telephone company may make changes in its facilities, equipment, operations, orprocedures that could affect the proper functioning of your equipment. If they do, youwill be notified in advance to give you an opportunity to maintain uninterruptedtelephone service. If you experience trouble with this telephone equipment, disconnectfrom the network until the problem has been corrected or until you are sure that theequipment is not malfunctioning.This equipment may not be used on coin service provided by the telephone company.Connection to party lines is subject to state tariffs.The USOC number of the registration jack for the equipment is RJ11C.This equipment is hearing aid compatible.Warning: Changes or modifications to this unit not expressly approved by the partyresponsible for compliance could void the user’s authority to operate the equipment.NOTE: This equipment has been tested and found to comply with the limits for a ClassB digital device, pursuant to Part 15 of the FCC Rules. These limits are designed toprovide reasonable protection against harmful interference in a residential installation.Some cordless telephones operate at frequencies that may cause interference tonearby TV’s and VCR’s. To minimize or prevent such interference, the base of thecordless telephone should not be placed near or on top of a TV or VCR. If interferenceis experienced, moving the cordless telephone farther away from the TV or VCR willoften reduce or eliminate the interference. However, there is no guarantee thatinterference will not occur in a particular installation. If this equipment does causeharmful interference to radio or television reception, which can be determined byturning the equipment off and on, the user is encouraged to try to correct theinterference by one or more of the following measures:• Reorient or relocate the receiving antenna.• Increase the separation between the equipment and receiver.• Connect the equipment into an outlet on a circuit different from that to which the receiver is connected. 9INTRODUCTIONABOUT THE GH3034The GH3034 is a 2.4GHz Cordless Phone with Caller Identifier. It isdesigned and engineered to exacting standards for reliability, long life,and outstanding performance.FEATURES• Caller ID (64 call data memory locations) with call waiting• 40 Channels (auto or manual selection)• LCD on the handset with three-language selection• 10-Number Two-touch Dial Memory• Direct dialing from caller list• Extended battery life• Digital security codingThe GH3034 features include AutoTalk™ and AutoStandby™.AutoTalk™ allows you to answer a call by just removing the Handsetfrom the Base so you don’t have to waste time pushing buttons orflipping switches. AutoStandby™ allows you to hang up by simplyreturning the handset to the Base.The UltraClear Plus™ true compander circuitry virtually eliminatesbackground noise. This innovative technology, together with 40different channels, provides you with the best possible receptionduring all your conversations.TO PROTECT YOU AGAINST MISBILLED CALLS, THE GH3010 HASRANDOM CODE™ DIGITAL SECURITY WHICH AUTOMATICALLYSELECTS ONE OF OVER 65,000 DIGITAL SECURITY CODES FORTHE HANDSET AND BASE UNIT. ALSO, THE AUTOSECURER™FEATURE ELECTRONICALLY LOCKS YOUR PHONE WHEN THEHANDSET IS IN THE BASE. TO GET THE MOST FROM YOURGH3034, PLEASE READ THIS OPERATING GUIDE THOROUGHLY.8
10INTRODUCTION (CONT.)•Base unit•Handset with rechargeable battery•Headset•Owner’s manual•Memory cardPreliminary PreparationTelephone Line Installation1. Never install telephone jacks during a lightning storm.2. Never install telephone jacks in wet locations unless the jack is specificallydesigned for wet locations.3. Never touch uninsulated telephone wires or terminals unless the telephone linehas been disconnected at the network interface.4. Use caution when installing or modifying telephone lines.Box Contents •Telephone line cord•AC adaptor with cord•Desk/Wall mounting bracket•Quick reference guide•Registration cardNOTE:a. Keep the shipping carton and packaging, in case you need to transport your phone.b. If any of these items are missing or damaged, contact your place of purchase.Modular OutletYour cordless telephone operates from a standard 110/120 volt outlet. The handset ispowered by a rechargeable battery pack. Batteries are charged automatically when thehandset is placed in the cradle of the base unit.11INSTALLATIONDesk or Table Installation1. Plug the AC adaptor cord into the 9V DC input jack on the Base unit.2. Plug one end of the telephone cord into the TEL LINE jack on the Base unit.3. Raise the antenna on the Base unit.4. Plug the other end of the telephone cord into the telephone wall jack.5. Plug the AC adaptor into a standard 120V AC wall outlet.NOTE:Use only with the AC adaptor supplied with your telephone.Place the telephone and power cords where they will notcreate a trip hazard, or where they could become chafedand create a fire or other electrical hazards.
INSTALLATION (CONT.)Handset Battery Charging:The battery pack in the handset must be fully charged for about 10-14 hours beforeusing the telephone.After connecting to AC power, leave the handset unused in the cradle for ten tofourteen hours. Later, it will take less time for the battery to recharge. The INUSE/CHARGE LED on the base will be lit when the handset is in the cradle.NOTE:a. When the battery gets low, the LCD display will show “BATTERY LOW”, and theunit will beep every 10 seconds.b. If the battery becomes low while you are on a call, you will be disconnected afterabout 3 minutes. Terminate the call quickly, and put the handset in the base torecharge the battery.c. The battery will hold its charge for several days out of the cradle, depending on use. NOTE:The handset will not ring when the ringer is in the “OFF” position. If the handset is outof the cradle, the LCD display will show “RINGING” during an incoming call.To Replace Batteries:1. Remove battery cover.2. Remove old battery.3. Plug the cord of the battery pack into the handset and placethe battery in the case.4. Slide battery cover until it clicks in place. Charge 10-14 hoursbefore first use.To maximize your battery’s life, we recommend that you periodically fully discharge thebattery, and then recharge it. To do this, unplug your phone line cord from the wallphone jack. Press the TALK button, and allow the handset to remain on for 10 to 12hours. Reconnect the phone cord to the wall phone jack. Return the handset to thebase and allow it to fully charge for 12 hours. If this process is completed monthly, itwill reduce the memory buildup that occurs from frequent partial charging. 13CALLER ID SETUPTo Set Language1. After the Handset battery is fully charged, the LCDdisplay will show “SET LANGUAGE”.2. Press the REVIEW “▲” or “▼” button to selectENGLISH, FRENCH or SPANISH.3. Press the MEM key to confirm the displayedlanguage. The unit will begin to set area code.To Set Area Code1. Simply enter your area code number using thenumber pad on the handset. Press the MEM key toconfirm. 2. The unit will begin to set the contrast.NOTE: If there is no input within 20 seconds, theprogram will go back to the “SET LANGUAGE” step.To Set Contrast1. Press the “▲” or “▼” button to adjust the displaycontrast to the desired level (darker or lighter). Ifthere is no input within 20 seconds, the program willgo back to the “SET LANGUAGE” step.2. Press the MEM key to confirm the displayed contrastlevel. The unit will show the default Time/Date (12:00 A.M.1/01). The time and date will be automatically updatedwhen the first incoming Caller ID call is received.NOTE:1. The Caller ID setup procedure will not begin until the handset is fully charged.2. To set up your telephone again, press and hold the MEM button for 2 seconds inDate/Time screen.3. Your telephone will always stay in setup mode, until you complete the setup steps.However, it will still record the Caller ID information. This information can bereviewed only after set up is complete.4. To adjust the LCD display contrast while in the standby or review mode, press theFLASH button.12
14 15TELEPHONE OPERATIONTone / Pulse OperationYour cordless telephone will operate ontone or rotary (pulse) systems.1. If your house is wired for rotaryservice, move the Tone/Pulse switch tothe Pulse position.2. If your house is wired for ToneService, move the Tone/Pulse switch tothe Tone position.3. If you are unsure of the type ofdialing service you have, set the switchto Tone. On the handset, press the TALKbutton and dial any digit on the keypad.If the dial tone persists, switch to Pulse.To disconnect, press the TALK buttonagain, or set the handset in the cradle.Digital Security SystemYour cordless telephone is equippedwith a digital security coding system toprotect your base unit from beingaccessed by other cordless telephones.The code allows your base and handsetto recognize each other so that othercordless phones will not make calls onyour line.If the AC adaptor is disconnected or aloss of power occurs while the handset isaway from the base unit, the securitycode will be lost and the phone will beinoperable. If this occurs, reconnect theAC adaptor and return the handset to thebase unit so that the security code isreset.When the handset is not in the base, onlya handset having the identical securitycode and operating on the same channelcan access the base and use your phoneline.When the handset is in the base, noother handset, even those having theidentical security code and operating onthe same channel can access the baseand use your phone line.Digital security coding will also eliminatethe “false” ringing associated withcordless telephones not equipped withthis feature.TELEPHONE OPERATION (CONT.)40 Channel AutoScanOperationYour cordless telephone has 40operating channels. The phone willautomatically search and select theclearest channel when you press theTALK button.  If you hear noise or otherinterference during your conversation,you can manually select a clearerchannel by pressing and releasing theCH button on the handset to switch toanother spare channel. Your call will notbe interrupted.NOTE:You must be in usable range to changechannels. If you press the CH buttonwhen you are close to being out ofrange, you may lose the call. If thisoccurs, place the handset back into thebase for a few seconds to reset thesecurity code and then make the callagain.Receiver Volume ControlYour cordless telephone allows you toadjust the handset volume to a morecomfortable listening level. Slide theRECEIVER VOLUME CONTROL on theside of the handset to NORM, MID orHIGH.Making a Call1. Make sure the base antenna is inupright position.2. Lift the handset and press the TALKbutton to be connected to the phoneline. The LCD display will show “TALK”and the TALK timer will start. The IN USE/CHARGE LED on the base will light. 3. After hearing a dial tone, dial thedesired number. Or you may predial the number (withoutpressing the TALK button), then pressthe CALLS button.4. If you misdial, simply press the TALKbutton, wait for a couple of seconds, andpress the TALK button again for a newdial tone.5. After your conversation iscompleted, press the TALK button onceto disconnect the line, or return thehandset to the base.Receiving a CallWhen the phone rings:1. IF THE HANDSET IS OUT OF THECRADLE, press the TALK button. 2. IF THE HANDSET IS IN THECRADLE, lift the handset. DO NOT pressthe TALK button, as you will beconnected automatically.Temporary Tone (*):In Pulse dialing mode, you can accessbank facilities, telephone answeringmachines, etc., by simply pressing theTONE( * ) key to get into the tone modeand input the required tone codes. It willreset automatically after you end your call.
16 17TELEPHONE OPERATION (CONT.)NOTE:If you experience difficulty with placing orreceiving calls, the lost security codemay be the cause of the problem. Whenthis occurs, the handset can no longercommunicate with its base. The loss ofthe code can occur any of the followingways:  if the battery is drained and needsrecharging; the handset is out of rangeof the base unit; the AC adaptor isdisconnected or a power loss hasoccurred; or anything that causeselectrical interference, for examplemultiple cordless telephones, babymonitors, televisions, VCR’s etc. Resetthe security code by placing the handseton the base for 10 seconds.  If that doesnot work, make sure the AC adaptor isconnected. If necessary, unplug the ACadaptor from the power source.Disconnect the battery for 5 seconds andthen reconnect. Place the handset on thebase and then replug the AC adaptor(see Troubleshooting).Ringer ControlIf you do not want the unit to ring, set theRINGER switch on the base to OFF. Thehandset will no longer ring when a call isbeing received. The handset LCDdisplay will show “RINGING” when a callcomes in.Out of RangeIf you try to place a call when you are toofar away from the base, you will hearstatic. If this occurs, move closer to thebase.FlashYou can use your cordless telephonewith special services such as CallWaiting or Three Way Calling (Specialsubscription from your local telephonecompany is required). During atelephone conversation, you may hear atone or click, which indicates that you arereceiving another call. To speak to thesecond caller and put the first caller onhold, press the FLASH button. PressFLASH button again to return to theoriginal call. You may also press theFLASH button to obtain a new dial tone.Page/Handset LocatorYou can send a page signal from thebase to the handset.Press the PAGE button on the base. Thehandset will beep for 3 seconds.Press and hold the PAGE button on thebase for 4 seconds, the handset willbeep for 60 seconds. Press  any key onthe handset to stop paging.TELEPHONE OPERATION (CONT.)Memory FeatureYour cordless telephone is equippedwith 10 memories for programming yourmost frequently dialed telephonenumbers. You can store up to 16 digits ineach of the memory locations 0 through9 by following the steps outlined.A record of the numbers to be speed-dialed may be kept on the memory indexchart on page 23 in this manual. To Program Frequently CalledNumbers 1. Pick up the handset. DO NOTPRESS TALK button.2. Press the MEM button; the LCDdisplay will show the number stored inMEM 0 (zero).3. Press “▲” or “▼” buttons to select anavailable location.4. Dial phone number (up to 16 digits). Each TONE (*) entered uses one of theavailable digits. If you pause more than20 seconds in programming, the unit willexit the memory programming. If youaccidentally press a 17th digit, 3 errortones will sound, press DEL button toerase digits or press CH button to exit.4. Press the MEM button again. theLCD display will show “LOCATION ? x”where “x” is the location you selected.5. Press MEM button again to confirm.The LCD display will show “MEM xSTORED” to confirm the number has beensuccessfully stored in memory.NOTE: Press CH button at any time toexit memory programming.To Retrieve Stored Numbers:1. Pick up Handset.2. Press TALK, and then MEM button.3. Press the desired memory locationnumber. The number you programmedwill be dialed automatically.Or1. Press MEM button, then press “▲” or“▼” buttons to select desired memorylocation.2. Press CALLS button. The numberyou programmed will be dialedautomatically.To Change a Stored Number:1. Press MEM button and “▲” or “▼”buttons to select memory location.2. Press DEL button to erase memory.The LCD display will show “ERASE ?”.3. Press DEL button to confirm.4. Reprogram the new number.RedialYour cordless telephone remembers thelast number dialed. 1. Press the TALK button on thehandset. When you hear a dial tone,press the REDIAL button. Or2. Press the REDIAL button, the lastnumber will be shown on the LCDdisplay. Press the CALLS button.PauseYou can insert a 4-second PAUSE intothe dialing of long distance numbers.Press the REDIAL button on the handsetduring dialing.
18CALLER ID OPERATIONReceiving a CallAfter the first ring, the caller’s name andtelephone number will display on theLCD. The New Call LED will flash untilyou review ALL your new calls.The Caller ID information (of up to 64callers) will be stored in the orderreceived. If the received call informationis the same as any of the new calls, theunit will display the “RPT” icon toindicate a repeat call. If the unit receivesmore than 64 calls, the oldest Caller IDinformation will be erased.NOTE:If you answer your incoming call beforethe second ring, the unit will not displaythe call information.Receiving Call Waiting Caller IDWhen you are on an existing phone call,your telephone will display incoming callwaiting Caller ID information.1. You will hear a beep and thetelephone will be muted momentarilywhile the LCD display shows the CallerID information of the second caller.2. When you access the call waitingcall, the Caller ID information willdisappear and the Time/Day screen willbe displayed.IMPORTANT:You must subscribe to Call Waiting andCall Waiting Caller ID service from yourlocal telephone company in order toreceive Call Waiting Caller IDinformation.Reviewing New Call Records1. When Time/Date screen isdisplayed, pressing the “▲” or “▼”button will display the information for thelast new call received.2. Continue pressing “▲” or “▼”button to review all new call records inthe order the calls were received.When a name received exceeds 12characters, the first 12 characters will beshown first with “▼” showing on the righthand side. Press the “▼” button to viewthe remaining characters.3. After the final call has beendisplayed, press the “▲” or “▼” buttonagain. The New Call LED will stopblinking and the LCD will show “ENDNEW CALL”.NOTE:If you do not review all new calls, theTime/Date screen will display after 20seconds and the new call counter willshow the total number of new callsreceived (including those you justreviewed). 19CALLER ID OPERATION (CONT.)Reviewing All Call Records1. After you have reviewed all of the newcalls, press “▲” or “▼” buttons. The LCDdisplay will show the calls stored in memory.2. After the last call record is reviewed,the LCD will show “-- END --”.Caller ID RedialTHE LOCAL AREA CODE MUST BEPROGRAMMED IN ORDER TO FULLYUTILIZE THE REDIAL FEATURE (SEEPAGE 13). Your telephone allows you toredial a phone number stored in theCaller ID memory.1. Press the “▲” or “▼” button to selectthe Caller ID number that you want to dial.2. Press and release the CALLS buttonwhich activates the handset to dial thedesired number. The number will scrollacross the screen from right to left as it isdialed.With current telecom redialing situations,there are 4 redial options:(1) 7 digits without a 1 prefix(2) 7 digits with a 1 prefix(3) 10 digits without a 1 prefix, and(4) 10 digits with a 1 prefix.(1) 7 digits without a 1 :If the area code of the Caller ID numbermatches to the setting of your GH3010,redial your local call by pressing theCALLS button ONCE.(2) 7 digits with a 1 :If it is necessary to insert a 1 prefix toyour local call, simply press the CALLSbutton TWICE WITHIN 2 SECONDS.(3) 10 digits without a 1 :In some areas of the country, the areacode must be included even whendialing a local call. In this situation, setyour telephone area code to another 3digits not being used in the U.S. i.e.100,etc. Once your area code isprogrammed as above, your telephonewill record all 10 digits for everyincoming call. Since the prefix 1 will beadded automatically when dialing a 10digit number, press the CALLS buttonTWICE WITHIN 2 SECONDS for a local10 digit call without a prefix 1.(4) 10 digits with a 1 :Since the prefix 1 will be addedautomatically when dialing a 10 digitnumber, simply press the CALLS buttonONCE to make your call.NOTE:Use caution when pressing the CALLSbutton. Press and release rapidly. If theCALLS button is pressed and held formore than 2 seconds, the VIP CALLfeature will be activated.To Store a Caller ID Number toMemory:1. Press “▲” or “▼” buttons to selectnumber from Caller ID list.2. Press MEM button. The LCD displaywill show “LOCATION ? x”3. Press the location number. The LCDdisplay will show “MEM x STORED”.
20 21CALLER ID OPERATION (CONT.)Caller ID EraseTo Erase a Single Call1. Press the “▲” or “▼” button toreview the Caller ID records youreceived.2. Press DEL button to erase the calldisplayed; the display will show “ERASE?” on the bottom line.3. Press DEL button again; the Caller IDwill be erased and the display will showthe next message.NOTE:If the current message displayed is thelast message, then the display will returnto standby mode.To Erase All Calls1. Press the “▲” or “▼” button toreview the Caller ID records receivedbefore erasing all calls.2. While the display is in standby mode,press and hold the DEL button for 2seconds. The display will show “ERASEALL ?” on the bottom line.3. Press the DEL button; all VIEWEDcalls will be erased.NOTE:1. If there are messages that have notbeen reviewed, the “Erase All Calls”function cannot be performed.2. VIP calls will not be erased when youerase all calls.VIP CallsYour telephone allows you to create VIPcall records. When a VIP call is received,4 beeps will sound between rings, toalert you this is a VIP call.To Create a VIP Call record :1. Press the “▲” or “▼” button toselect the Caller ID which you want toassign a VIP ringer.2. Press and hold the CALLS button for2 seconds. The “VIP” icon is displayed.NOTE:4 beeps will also sound when theincoming VIP call is a Call Waiting call.To Remove a VIP Call :1. Press the “▲” or “▼” to select thecall you have marked “VIP”.2. Press and hold the CALLS button for2 seconds. The “VIP” icon will disappear.TROUBLESHOOTINGIf your telephone is not performing to your expectations, please try these simple steps :ProblemCharge light won’t come onwhen handset is placed inbase unit.No dial tone.Can’t make outgoing calls.Handset doesn’t ring.Suggestion• Make sure the AC Adapter is plugged intothe base unit and wall outlet.• Make sure the wall outlet is functioning.• Make sure the handset is properly seated inthe base unit.• Make sure the rechargeable battery pack isproperly placed in the handset.• Make sure that the charging contacts onthe handset and on the base unit are clean.• Charge the handset for 10 hours beforeinitial use.• Place the handset back into cradle for 5seconds.• Make sure the handset is fully charged. The IN USE/CHARGE LED should lightwhen the handset is in the cradle.• Make sure the Tone/Pulse switch is set tothe correct setting.  If set to the Tone mode,switch to Pulse. You may have pulse dialingservice.• Make sure the Ringer On/Off switch on thebase is set to the “On” position.• Rechargeable battery pack may be weak ornot fully charged. Charge the battery packfor 4-5 hours.• Make sure the base antenna is in theupright position.• The handset may be too far away from thebase unit.• Make sure the AC adaptor is plugged intothe base unit and wall outlet.• Make sure the wall outlet is functioning.• There may be too many telephonesinstalled on the same line. Contact yourlocal telephone company to determine themaximum number of extensions for yourcalling area.• Place the handset back into cradle for 5seconds.
22 23TROUBLESHOOTING (CONT.)ProblemCaller’s voice is too low.Conversation is interruptedfrequently. OrStatic noise is present duringconversation.When the handset is fullycharged for the first time, thedisplay does not show “SETLANGUAGE”, to begin theCaller ID setup sequence.Handset does not display anyCaller ID messages.The display screen is dim orblank.Unit is not receiving CallWaiting Caller ID calls.Telephone numbers are notdialed correctly from thecaller list.Suggestion• Switch the Receiver Volume Control on thehandset to higher level.• Move closer to the base.• Make sure the base antenna is in theupright position.• Press the CH button to switch to a clearerchannel.• Press the MEM button for 2 seconds in theDate/Time screen. Then the display willshow “SET LANGUAGE”.• If that does not work, reset the handset byunplugging and then replugging in thebattery. Then the display will show “SETLANGUAGE”.• Check with your local telephone companyto make sure Call Waiting Caller ID serviceis being provided on your telephone line.• If you pick up the telephone before the firstcomplete ring, the caller information will notbe completely received.• Adjust the contrast.• Make sure you have subscribed to CallWaiting, Caller ID, and Call Waiting Caller IDservice from your local telephone company.• The Caller ID data may have been affectedby temporary noise or line conditions. Inthese cases, you may see the incorrectinformation on the display, such as NOCALLER ID, CID BLOCKED, ERROR, ablank screen, only the telephone number,or only the name.• Make sure you have set your local areacode.• Make sure the displayed telephone numberreflects the correct dialing situation (i.e. “1”before area code).PRODUCT CAREA. Avoid putting cordless phones nearheating appliances and devices thatgenerate electrical noise (motors,fluorescent lamps, etc.).B. Avoid rough treatment of the phoneby placing the handset gently into thebase when hanging up. Avoid droppingthe handset.C. Clean your cordless telephone onlywith a soft cloth slightly dampened withwater or mild hand soap. Do not use anytype of solvent or abrasive cleaner.Before cleaning, always un-plug thephone from the wall outlet.D. Your cordless phone is not designedto be water resistant. Do not use thehandset in the rain, in the pool or in theshower. Do not install your base unitoutdoors, near a sink, bath tub orshower. Do not expose to direct sunlight.E. Retain the original packaging shouldyou need to ship the phone at a laterdate.Additional InformationA. Connecting this telephone to a coinoperated telephone or party line isprohibited by law.B. If it is determined that your telephoneis malfunctioning, the FCC requires thatit be disconnected from the modularoutlet until the problem has beencorrected.For immediate answers to all yourquestions regarding the operation ofyour Southwestern Bell FreedomPhone® call the Consumer Hotline, tollfree at (800)366-0937.Speed Dialing Numbers IndexLOCATION NUMBER LOCATION NUMBER0123456789
24 25SERVICEAccording to FCC regulations, this equipment, which has been certified and registeredby the FCC, may only be repaired by authorized persons. If repairs or adjustments aremade by an unauthorized person, the FCC certification may be voided.  Should youencounter any problems, please call the Southwestern Bell Freedom Phone® toll-freeCustomer Help Line for assistance:  1-800-366-0937, Monday – Friday between thehours of 8:30 am – 9:00 pm (EST) and Saturday between the hours of 8:30 am - 12:30pm (EST). You can also visit our website at http://www.swbfreedomphone.com.FOR IN-WARRANTY SERVICE:Package your complete unit (including all adapters, line cords, and other accessories)and ship the unit postage prepaid* and insured (for your protection) to:SOUTHWESTERN BELL FREEDOM PHONE®DEPT.: Warranty Repair7475 N. Glen Harbor Blvd., Glendale, AZ 85307Be sure to include your return address, proof of purchase, a daytime phone number,$9.50 for postage and handling*, and a brief explanation of your difficulties.*NOTE: California residents need only provide proof of purchase and should call1-800-366-0937 for shipping instructions.FOR OUT-OF-WARRANTY SERVICE :Call our toll-free Help Line for the price of a replacement before returning your unit.Please follow all instructions for In-Warranty service (above) to return your unit, andmark the package: DEPT.: Out-of-Warranty.If you have called and know the cost of your replacement, please include thisinformation with your unit for prompt service.QUESTIONS?STOP…DON’T TAKE ME BACK TO THE STORE.LOOK…FOR THE TOLL-FREE “HELP” TELEPHONE NUMBER.LISTEN…AS THE EXPERTS TALK YOU THROUGH THE PROBLEM.For immediate answers to your questions regarding operation, missing parts orinstallation, call theSOUTHWESTERN BELL FREEDOM PHONE® HELP LINE AT:1-800-366-0937http://www.swbfreedomphone.comLIMITED WARRANTYThis Southwestern Bell Freedom Phone® is warranted to the original purchaser to be freefrom defects in materials and workmanship under normal installation, use, and service for aperiod of one (1) year from the date of purchase as shown on the purchaser’s receipt.The obligation of Southwestern Bell Freedom Phone® Retail Sales under this warrantyshall be limited to repair or replacement (at our option) during the warranty period of any partwhich proves defective in material or workmanship under normal installation, use, andservice, provided the product is returned to Southwestern Bell Freedom Phone® RetailSales (address below) TRANSPORTATION CHARGES PREPAID (California residents call 1-800-366-0937 for shipping instructions).  Products returned to us or to an Authorized ServiceCenter must be accompanied by a copy of the purchase receipt.  In the absence of suchpurchase receipt, the warranty period shall be one (1) year from the date of manufacture. Toobtain service under this warranty, return the defective product to the service center nearestyou together with your sales slip and $9.50 for postage and handling (California residentsneed only provide proof of purchase).  You may also have other warranty rights which varyfrom state to state. This warranty shall be invalid if the product is damaged as a result of defacement, misuse,abuse, neglect, accident, destruction, or alteration of the serial number, improper electricalvoltages or currents, repair alteration or maintenance by any person or party other than ourown service facility or an Authorized Service Center, or any use violation of instructionsfurnished by us.This warranty is also rendered invalid if this product is removed from the country in which itwas purchased, if it is used in a country in which it is not registered for use, and/or if it is usedin a country for which it was not designed.  Due to variations in telephone systems andcommunications laws, this product may be illegal for use in some countries.  SouthwesternBell Freedom Phone® Retail Sales assumes no responsibility for damages or penaltiesincurred resulting from the use of this product in a manner or location other than that fromwhich it is intended.This one-year limited warranty is in lieu of all other express warranties, obligations, orliabilities.  ANY IMPLIED WARRANTIES, OBLIGATIONS, OR LIABILITIES, INCLUDING BUTNOT LIMITED TO THE IMPLIED WARRANTIES OF MERCHANTABILITY AND FITNESS FORA PARTICULAR PURPOSE, SHALL BE LIMITED IN DURATION TO THE ONE-YEARDURATION OF THIS WRITTEN LIMITED WARRANTY. SOME STATES DO NOT ALLOWLIMITATIONS ON HOW LONG AN IMPLIED WARRANTY LASTS, SO THE ABOVELIMITATIONS MAY NOT APPLY TO YOU.IN NO EVENT SHALL WE BE LIABLE FOR ANY SPECIAL, INCIDENTAL ORCONSEQUENTIAL DAMAGES FOR BREACH OF THIS OR ANY OTHER WARRANTY,EXPRESS OR IMPLIED, WHATSOEVER. Some states do not allow the exclusion or limitation of special, incidental, or consequentialdamages, so the above limitation or exclusion may not apply to you.  This warranty gives youspecific legal rights, and you may also have other rights which vary from state to state.Covered under the following US patent : 5,263,084.SOUTHWESTERN BELL FREEDOM PHONE®7475 N. Glen Harbor Blvd., Glendale, AZ 85307

Navigation menu