Control4 C4WALL5G Touchscreen Display User Manual T3 Series In Wall Touch Screen Installation Guide
Control4 Touchscreen Display T3 Series In Wall Touch Screen Installation Guide
UserManual.wiki
>
Control4
>
C4WALL5G User Manual
11_C4-WALL7_10 User Manual Control4 Edits
Navigation menu
Upload a User Manual
Namespaces
Wiki Guide
HTML
PDF
Info
Views
User Manual
Discussion / Help
Navigation
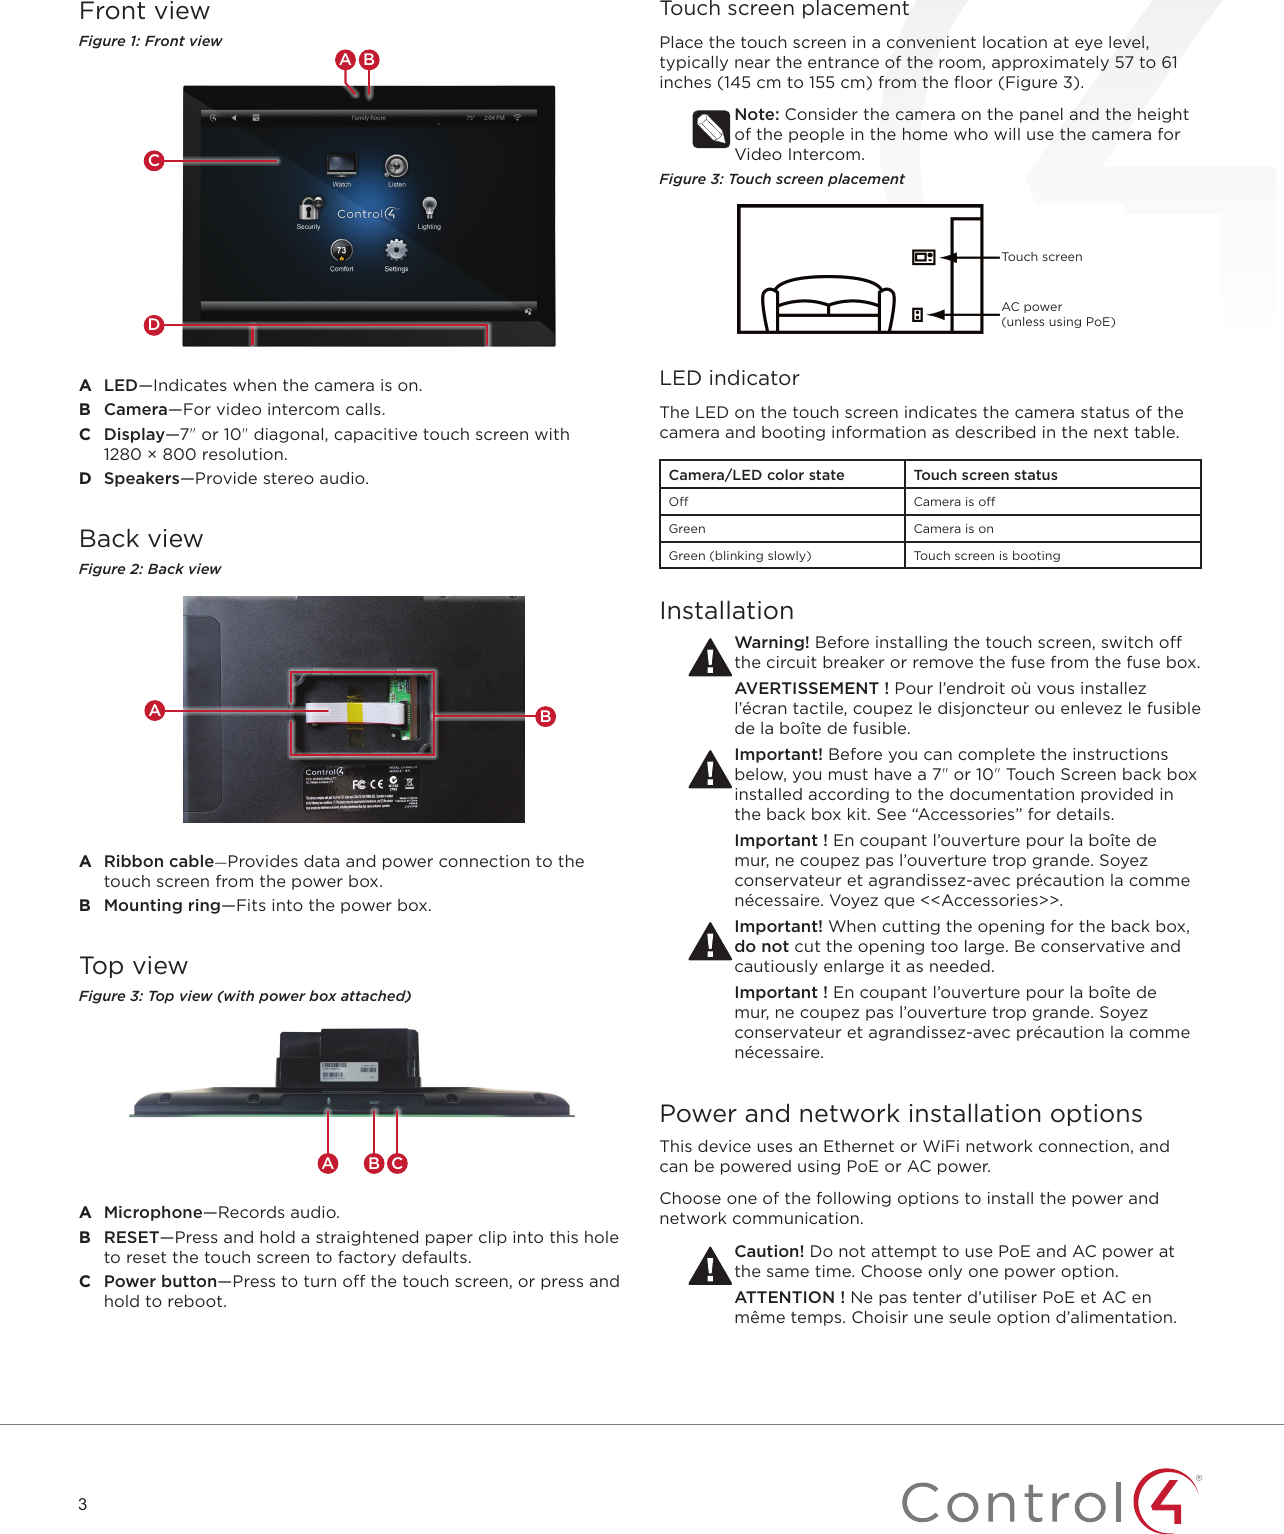
![2WarningsWarning! The touch screen must be protected by an external circuit breaker or a fuse rated at 6A maximum when used in Europe.AVERTISSEMENT ! Pour réduire le risque du feu ou de choc électrique, n’exposez pas cet appareil à la pluie ou à l’humidité.Warning! Do not place the touch screen near sources of heat or expose to direct sunlight for an extended period of time.AVERTISSEMENT ! Ne placez pas l’unité près des sources de chaleur ou exposition pour diriger la lumière du soleil pendant une période prolongée.Warning! Install in accordance with all national, state, and local electrical codes.AVERTISSEMENT ! Installez selon tous les national, état, et codes électriques locaux.Warning! This product generates heat. The room must have adequate ventilation or the ability to dissipate heat eectively.AVERTISSEMENT ! Ce produit produit de la chaleur. La salle doit avoir à ventilation proportionnée ou la capacité d’absorber la chaleur ecacement.Warning! This product must be grounded in accordance with the National Electrical Code (NEC) requirements.AVERTISSEMENT ! Ce produit doit être fondu selon les conditions électriques nationales de code (NEC).Warning! Use this product only in dry locations.AVERTISSEMENT ! Employez ce produit seulement dans des endroits secs.Caution! This product is for residential use only.AVERTISSEMENT ! Ce produit est pour à l’usage résidentiel ou commercial seulement.Caution! Do not use pens or sharp objects to navigate or make selections on the touch screen. To select an item or scroll through a list, use your fingertip.AVERTISSEMENT ! N’employez pas les stylos ou les objets pointus pour diriger ou pour faire des choix sur l’écran. Pour choisir un article ou un rouleau par une liste, employez votre bout du doigt.Caution! Improper use or installation can cause DAMAGE OF PROPERTY.AVERTISSEMENT ! L’utilisation ou l’installation inexacte peut causer DAMAGE DE PROPRIÉTÉ.Important! Using this product in a manner other than outlined in this document voids your warranty. Further, Control4 is NOT liable for any damage incurred with the misuse of this product. See “Warranty.”Important ! Utilisant ce produit en quelque sorte autre que décrit dans ce document vide votre garantie. De plus, Control4 n’est pas responsable d’aucun dommage encouru avec l’abus de ce produit. Voyez que « Warranty. »For more information, visit the Products pages at dealer.control4.com.Specifications and requirementsSpecificationsModel Numbers C4-WALL7-BL, C4-WALL7-WH, C4-WALL10-BL, C4-WALL10-WHScreen Resolution: 1280 × 800Camera: 720pNetworkEthernet or WiFi (802.11b/g/n [2.4 GHz] / (802.11an [5 GHz]Security: WEP, WPA/WPA2 PSK, 801.1x EAP, PEAP Notes: (1) Intercom usage. 802.11b is not recommended for Video Intercom. (2) Wireless-N is recommended for Video Intercom. Even with Wireless-N, broadcasting to several devices will degrade Video Intercom response time and images. Broadcasting to additional devices will further degrade performance. See “Wireless Network Limitations.”Power supply PoE (IEEE802.3af) 13 W peak100-240VAC, 50/60 HzOperating temperature 32 ~ 104˚F (0˚ ~ 40˚C)Storage temperature 4 ~ 158˚F (-20˚ ~ 70˚C)Dimensions (W × H × D)7" model: 6.9" × 5.0" × 0.53" (175 × 127 × 13 mm)10" model: 9.4" × 6.5" × 0.53" (239 × 165 × 13 mm)Back box: 2.7" × 4.1" × 2.4" (68 × 104 × 61 mm)Power box: 2.8" × 4.5" × 1.8" (71 × 114 × 46 mm)Weight (with mid-box) 7" model: 0.9 lbs. (0.41 kg)10" model: 1.5 lbs. (0.68 kg)Shipping Weight 7" model: 1.5 lbs (0.68 kg)10" model: 2.1 lbs (0.95 kg)Requirements• A controller fully installed and configured with Control4OS2.7.0 or later.• Control4 7" or 10" In-Wall Touch Screen custom back boxinstalled. See “Accessories.”• If using Ethernet with PoE power:• Ethernet network installed and available that includes agateway/router/switch• Control4 PoE Injector (model #AC-POE1-B) or anotherthird-party PoE Injector or switch (UL/ANSI certified).• Two Ethernet CAT5/6 cables: (1) one that runs from theEthernet gateway/router/switch to the PoE Injector/switchand (2) one that runs from the PoE Injector/switch to theEthernet connection in the touch screen’s back box.• If using Ethernet with AC power:• Ethernet network installed and available that includes agateway/router/switch• Access to in-wall AC power (neutral connection required)• One Ethernet CAT5/6 cable that runs from the Ethernetgateway/router/switch to the touch screen• A 14-gauge electrical wire long enough to pull betweenthe touch screen and the power source• If using wireless with AC power:• Wireless network (WiFi 802.11b/g/n) installed andavailable with a wireless access point (WAP). Security canbe WEP, WPA/WPA2 PSK, 801.1x EAP, PEAP.• Access to in-wall AC power (neutral connection required)• A 14-gauge electrical wire long enough to pull betweenthe touch screen and the power source](https://usermanual.wiki/Control4/C4WALL5G/User-Guide-4013986-Page-2.png)