ConversDigital AUNNEX-110 AUNNEX Network DAC User Manual 1
ConversDigital Co., Ltd. AUNNEX Network DAC 1
User Manual

CDMCS-110 User Guide
v1.0.0

CDMCS-110 User Guide
Table of Contents
2
Product Interfaces and Components
- - - - - - - - - - - - - - - - - - - - - - -
3
mconnect Control App and PC setup program
- - - - - - - - - - - - - - - - - - - - - - -
4
WiFi and LAN Connection
- - - - - - - - - - - - - - - - - - - - - - -
4
WiFi Connection – Using AP mode
- - - - - - - - - - - - - - - - - - - - - - -
5
WiFi Connection – WPS
- - - - - - - - - - - - - - - - - - - - - - -
7
WiFi Connection – After LAN Connection
- - - - - - - - - - - - - - - - - - - - - - -
7
Device Name Change
- - - - - - - - - - - - - - - - - - - - - - -
8
Static IP Setting
- - - - - - - - - - - - - - - - - - - - - - -
8
Firmware Update
- - - - - - - - - - - - - - - - - - - - - - -
9
Operations of LEDs & KEYs
- - - - - - - - - - - - - - - - - - - - - - -
10
Guide for mconnect Control App
- - - - - - - - - - - - - - - - - - - - - - -
11
CDMCS-110 User Guide
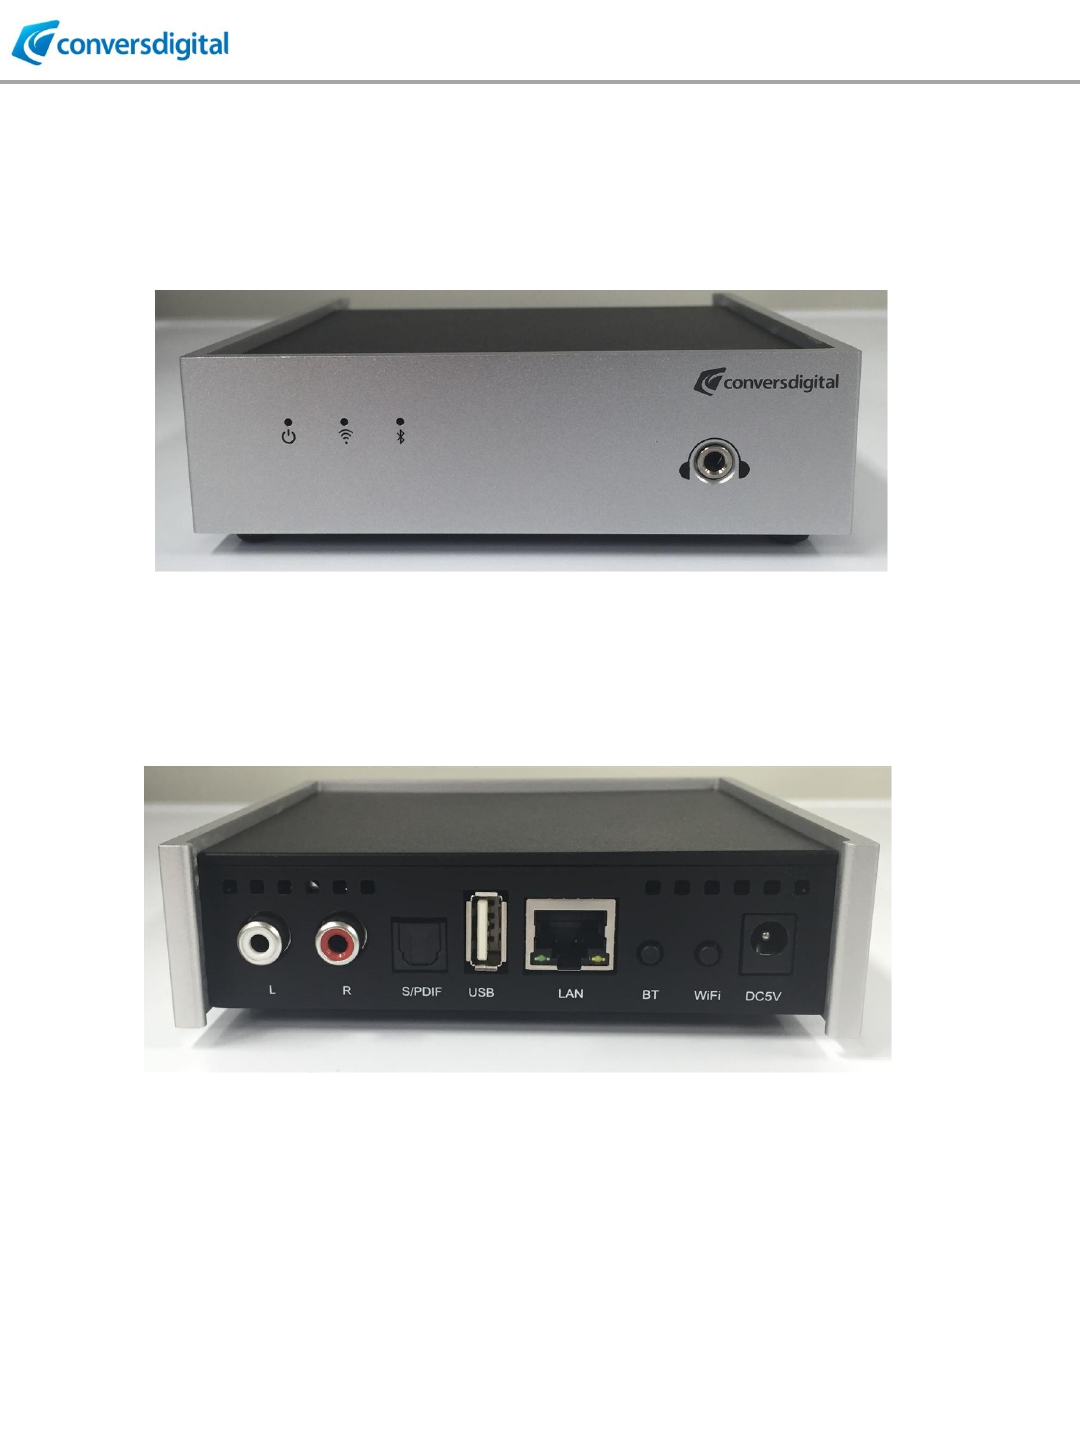
Product Interfaces & Components
3
⑤ RCA Analogue Audio Out
⑥ Optical S/PDIF Digital Out
⑦ USB (For memory stick)
⑧ LAN RJ45
⑨ Bluetooth Key
⑩ WiFi Key
⑪ Power Jack (DC 5V)
① ③ ②
④
⑤ ⑥ ⑦ ⑧ ⑨ ⑩ ⑪
① Power & Ready LED
② WiFi LED
③ Bluetooth LED
④ Headphone Jack (3.5mm)

CDMCS-110 User Guide
4
mconnect Control App and PC setup program
1. “mconnect Control “ is a dedicated control app for cdmcs-110, available on Apple App
Store and Google Play Store.
* cdmcs-110 supports Standard DLNA , so any DLNA apps can be used to control
cdmcs-110. But proprietary control functions, such as device setting and multi-room
control are provided only by mconnect Control app.
2. PC setup program is provided by ConversDigital for setting cdmcs-110.
Setup functions, such as WiFi network connection and firmware update can be done
by PC setup program.
WiFi and LAN Connection
CDMCS-110 supports WiFi and Wired LAN connection.
1. If you want to use LAN, connect EV board to your AP router with LAN cable.
No further steps are required.
(If you want to use Static IP, please refer to IP setup in following pages.)
2. WiFi network connection can be done by below three methods.
① Activate soft AP mode, and then select a WiFi network with control app or PC setup program.
② Use WPS button.
③ Connect LAN cable to your AP router, and then select a WiFi network with control app or PC
setup program.

CDMCS-110 User Guide
5
WiFi Connection – 1-1) Using AP mode with Control app
• Press WiFi button on rear panel for 2~5 seconds to
activate AP mode.
• You will find a WiFi network of “CDSXXXXXXX” in WiFi
list of your mobile device or PC.
• Select the “CDSXXXXXXXX” and connect to it.
• The password is “password”.
[By mconnect Control App]
• Execute mconnect Control app and touch the setup icon on upper left corner.
• Select “Device Setup” and you will find the name of cdmcs-110 in the device list.
• Select the device and the setup screen will be shown.
• At the setup screen, touch “WiFi Network Selection”.
• You will see the list of available WiFi networks. Choose a network you want to connect.
• Type in password of the network.
• Touch “Join this network”, and then cdmcs-110 will be reset to connect to the WiFi network.
• Your mobile device will be disconnected from “CDSxxxxxxxx” network.
• Connect your mobile device to the same WiFi network which the cdmcs-110 is connected.
• You will find the EV board in “Play to” list of mconnect Control app.
• cdmcs-110 will remember the WiFi network .
• When you power OFF and ON the EV board, it will connect to the WiFi network automatically.
• You can remove a WiFi network from saved list. Select the WiFi network and then select “forget
this network”.
CDMCS-110 User Guide
6
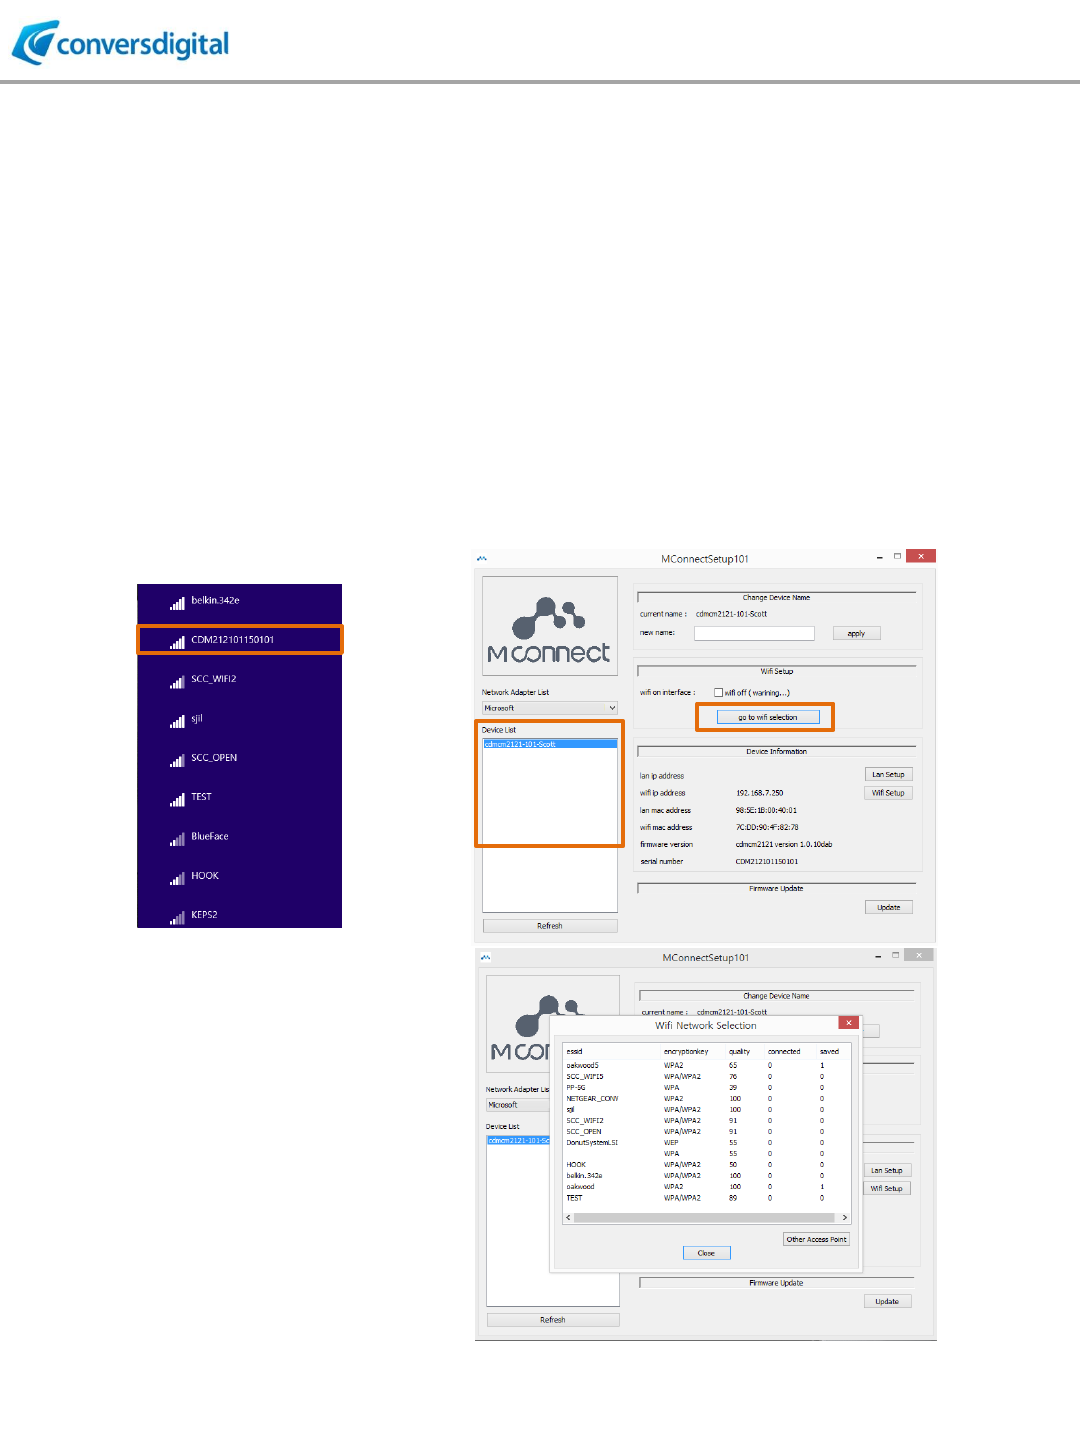
WiFi Connection – 1-2) Using AP mode with PC setup program
[By PC setup program]
• Connect your PC to cdmcs-110’s “CDSxxxxxxxx” network.
• Execute mconnect Setup program.
• You will find the name of EV board in the list at left window of setup program.
• Select the device and the setup screen will be shown.
• At the setup screen, click “go to WiFi selection”.
• You will see the list of available WiFi networks. Choose a network you want to connect.
• Type in password of the network.
• Click “Join this network”, and then cdmcs-110 will be reset to connect to the WiFi network.
• Your PC will be disconnected from “CDSxxxxxxxx” network.
• You will find the EV board in “Play to” list of mconnect Control app or other DLNA control point.
WiFi list on PC
PC Setup Program’s Screen

CDMCS-110 User Guide
7
• Connect cdmcs-110 to your AP router with LAN cable.
• Connect your mobile phone or PC to the same AP router.
• Execute mconnect Control app or PC setup program.
• The rest of procedures are same with “Using AP mode” method.
• After making WiFi connection, disconnect the LAN cable and power OFF and ON cdmcs-110.
* Otherwise, cdmcs-110 has both WiFi and LAN IP, which may cause a problem to communicate
with other devices.
WiFi Connection – 3) After LAN Connection
• Press WPS button on cdmcs-110 for 7~10 seconds. The WPS LED will pulse.
• Press WPS button on your AP router.
• cdmcs-110 will connect to your AP router.
WiFi Connection – 2) Using WPS button

CDMCS-110 User Guide
8
• cdmcs-110’s name on the network can be changed by Control app or PC setup program.
Device Name Change
Static IP Setting
PC Setup Program’s Screen
mconnect Control App’s Screen
• If you want to use static IP, instead of DHCP, it can be done at IP setup screen on Control app or
PC setup program.
Select
IP setup
button

CDMCS-110 User Guide
9
• Firmware update is available via two methods.
1) Download new firmware to your PC and then using PC setup program.
2) Firmware update via Internet from ConversDigital’s server by using mconnect Control app.
* NOTE: Please DO NOT power off when firmware is updating.
Firmware Update
Firmware Update with PC Setup Program
• mconnect Control app will show a notice for firmware update when it is available.
• cdmcs-110 and your mobile phone need to connect Internet accessible network.
• Select “Firmware Update” in the list of setup button.
• Select a device to update firmware.
• New firmware will be downloaded to cdmcs-110 directly from ConversDigital’s server.
• Download new firmware provided by ConversDigital to your PC.
• Execute PC setup program and click “Firmware Update” button.
• Locate and select new firmware in your PC.
Firmware Update via Internet (from ConversDigital’s server)

CDMCS-110 User Guide
10
Operation of LEDs and Keys
KEYs
Operation
WiFi
- 2~5 seconds: Soft AP mode
- 7~10 seconds: WPS mode
BT (Bluetooth)
-2~3 seconds: Disconnect current pairing (or
activated from sleep mode) and go to new
pairing mode.
EVENT
LED
Operation
Power ON
Power LED
Orange until ready
Firmware Booting
Completion
Ready LED
Green steadily
WiFi Connected
WiFi LED
On – steady green
WiFi – Soft AP is
activated
WiFi LED
Blink slowly
WiFi – WPS is
activated
WiFi LED
Blink fast
BT Connected
BT LED ON
ON – steady blue
BT Pairing mode is
activated
BT LED
Blink fast
During Firmware
Update
Power LED & WiFi LED
Both power and WiFi LED blink
CDMCS-110 User Guide
11
Guide for mconnect Control App
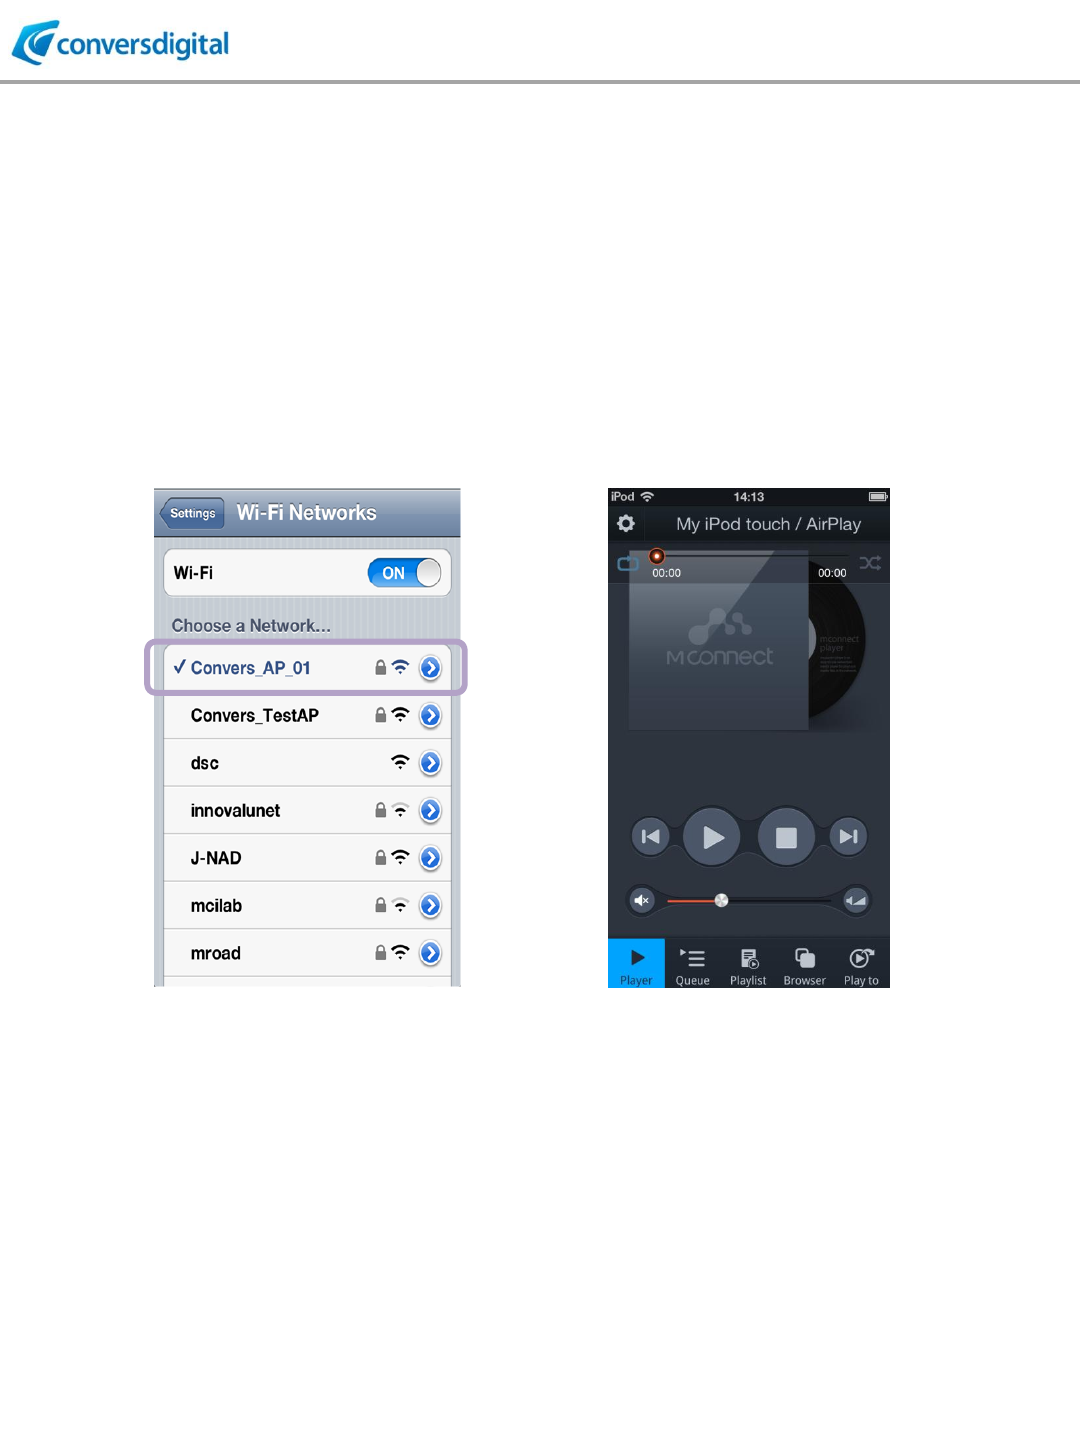
MAKE WiFi CONNECTION and OPEN MCONNECT CONTROL
Connect your mobile device to the same network that mconnect hardware is connected.
Select a Wi-Fi network on the setting menu of
your mobile device.
(Same network with other devices are
connected.)
Execute mconnect Control on your
mobile device.
CDMCS-110 User Guide
12
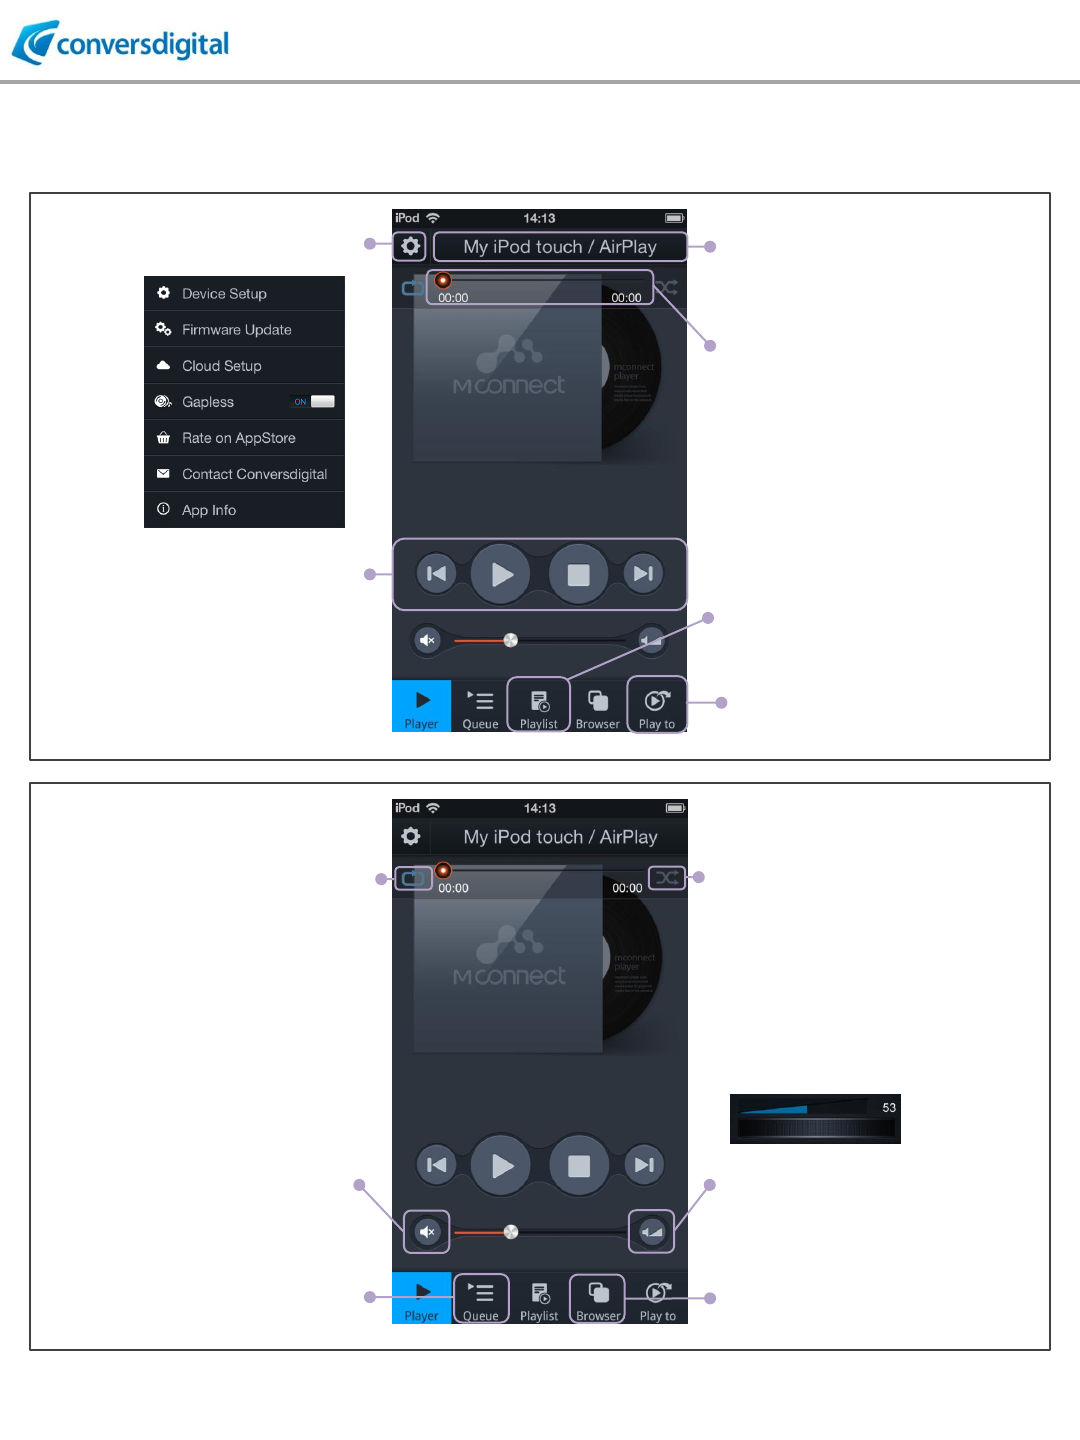
FUNCTIONAL DESCRIPTIONS
“play to”: To see remote playback
devices on the network. Multi-
room group is set in this menu.
“SEEK”: FIND and MOVE position in
a track.
“Playlist”: User created list of favorite
music,.
“Previous/Play/Stop/Next”:
Play & stop music,
next & previous music.
“Setup”:
Setup functions in below. “Device Information”:
Information of current playback
device by touching this bar.
“Browser”: To see server devices on
the network.
“micro volume control”: Control volume
with micro control bar.
“Mute”
“Random/ Sequential”: Option for
retrieving playlist.
“Repeat”:
To control repetition of music
playback. Continuous, once, and
current song.
“Queue”:
List of music currently playing.
CDMCS-110 User Guide
13
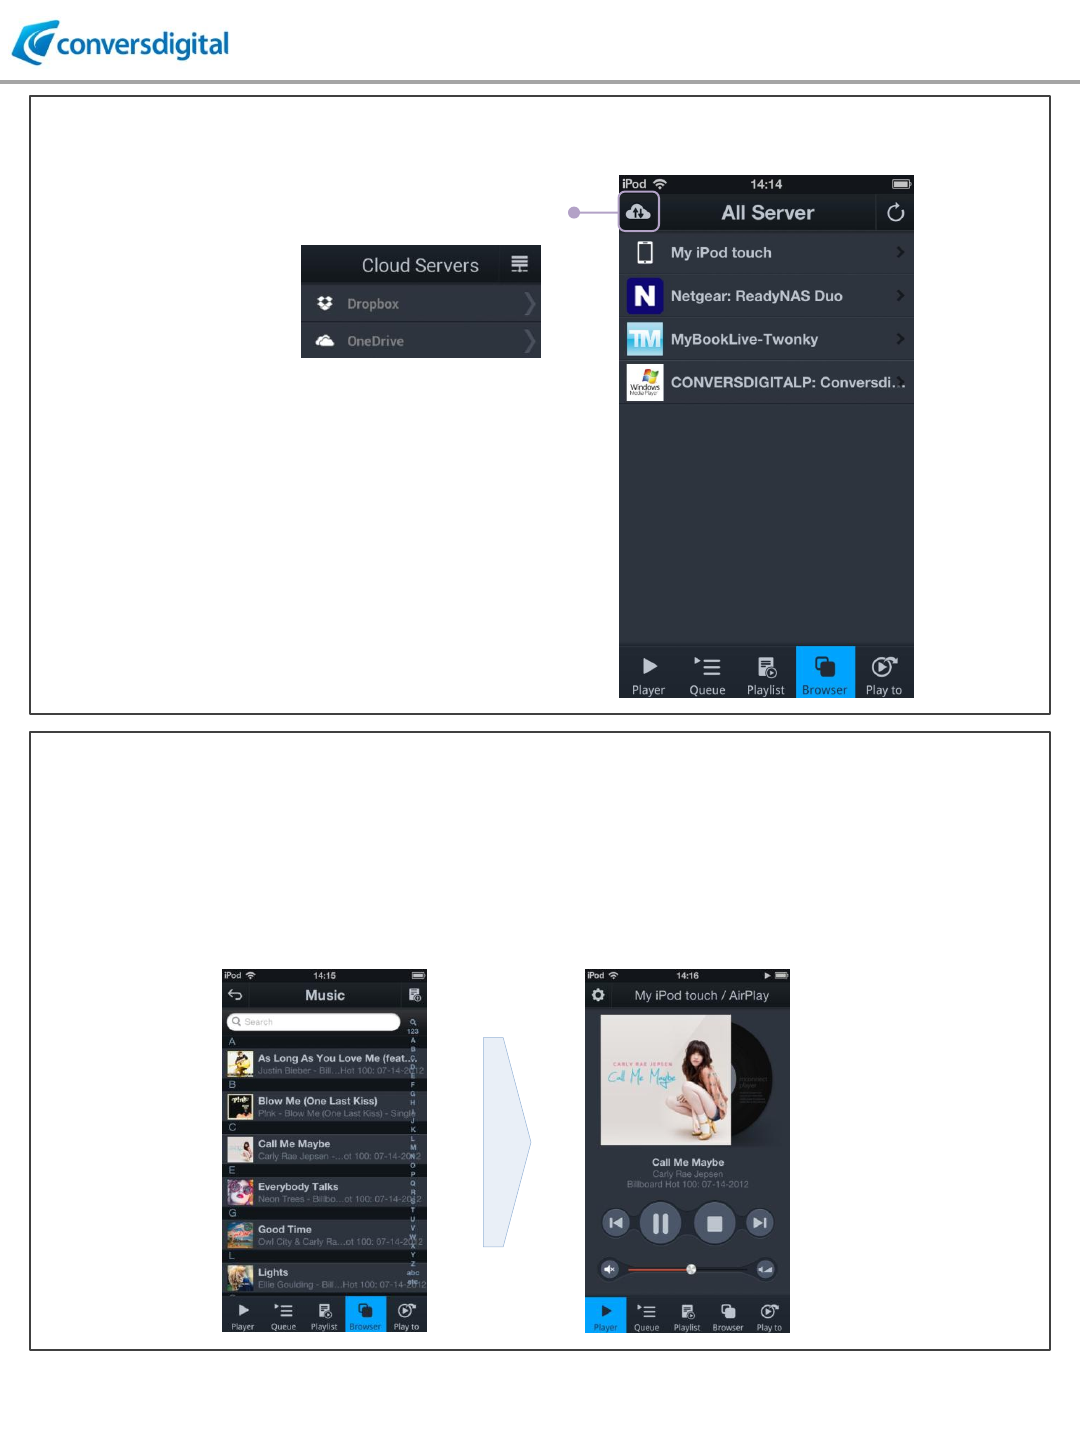
DISCOVER SERVER DEVICES
By touching the “Browser” button, you will see
the list of server devices on your local network.
mconnect Control finds DLNA/UPnP compatible
devices such as Network Storages and
Windows PCs.
“Cloud”: You will see Dropbox &
OneDrive storages.
SELECT MUSIC and PLAY
Select a server device in the server list. Then sub-categories are seen. The category and tree
structure may vary from devices.
Select a music in the list, then the music is played by selected playback device in “Play to” list.
All the music in selected folder is automatically listed on the “Queue”.

CDMCS-110 User Guide
14
SEND MUSIC TO MCONNECT HARDWARE
MULTI-ROOM Control: STREAMING MUSIC TO MULTIPLE SPEAKERS
To send music stream to mconnect hardware, touch “play to” button.
Then you will see available mconnect hardware and group of speakers in the network.
Select a device or a group to play music.
To see
mconnect hardware
mconnect solution supports Multi-room function to play music to multiple speakers simultaneously.
You can make group of speakers to play same music simultaneously.
Create
new group
Create new group Type in group name
Select devices
to include in the group

CDMCS-110 User Guide
15
CLOUD STORAGE ACCESS and REMOTE PLAYBACK
PLAYLIST MANAGEMENT ACROSS SERVERS
mconnect Control provides cloud storage access and playback to remote renderers.
If it is first time to access your cloud account with mconnect Control, you will see a screen of
authorization for account access.
Play with your
mobile device.
Go back to
Local Server List
Play to remote
playback device.
mconnect Control provides playlist management across servers. You can put music list stored in
different servers into a playlist. mconnect Control automatically detects whether server devices are on
the network, and makes the list available.
Create
new playlist
Manage playlist at “Playlist” Send to playlist at “Browser” Send current “Queue” to playlist

© 2013~2015 ConversDigital Co., Ltd. All rights reserved.
If you have further questions, please feel free to contact
ConversDigital’s Technical Support:
conversd@conversdigital.com
FCC Information to User
This equipment has been tested and found to comply with the limits for a Class B digital device,
pursuant to Part 15 of the FCC Rul es. These limits are de signed to pro vide reasonable
protection against harmful interference in a re sidential installation. This equipment generates,
uses and can radiate radio frequency energy and, if not installed and used in accordance with
the instructions, may cause harmful interference to radio communications. However, there is no
guarantee that interference will n ot occur in a particular installation. If this equipme nt does
cause harmful interference to radio or televi sion reception, which can be det ermined by turning
the equipment off and on, the user is encouraged to try to correct the interference by one of the
following measures:
• Reorient or relocate the receiving antenna.
• Increase the separation between the equipment and receiver.
• Connect the equipment into an outlet on a circuit different from that to which the receive r is
con-nected.
• Consult the dealer or an experienced radio/TV technician for help.
Caution
Modifications not expressl y approved b y the p arty responsible for compliance could void the
user’s authority to operate the equipment.
FCC Compliance Information : This device complies with Part 15 of the FCC Rul es.
Operation is subject to the following t wo conditions: (1) Thi s device may n ot cause harmful
interference, and (2) this device mu st accept any interfere nce received, including interference
that may cause undesired operation
IMPORTANT NOTE:
FCC RF Radiation Exposure Statement:
This equipment complies with FCC RF radiation e xposure limits set forth fo r an un controlled
environment. This equipment should be installed and operated with a minimum dist ance of 25
centimeters between the radiator and your body. This tra nsmitter must n ot be co -located or
operating in conjunction with any other antenna or transmitter.

1) Read these instructions.
2) Keep these instructions.
3) Heed all warnings.
4) Follow all instructions.
5) Do not use this equipment near water.
6) Do not u sing near any heat sources su ch as radiators, heat resi sters, stove, or other
equipment that produce heat.
European CE notice to users and product statements
This product is CE marked accordi ng to the provis ions of the R&TT E
Directive(99/5/EC). Hereby, CONVERSDIGITAL CO., LTD. declares that
this product is in compliance with the essential requirement s and other
relevant provisions of Directive 1999/5/EC.
For further information, please contact http:// www.conversdigital.com
CONVERSDIGITAL CO., LTD.
704 KSIA BD, 182 Pangyoyeok-ro, Bundang-gu, Seongnam,-si,
Gyeonggi-do, Korea 463-400
Tel: +82-31-759-5088
Fax: +82-31-759-5089
Web: http:// www.conversdigital.com
CONTACT INFORMATION
Manufacturer Address : 704 KSIA BD, 182 Pangyoyeok-ro, Bundang-gu, Seongnam,-si, Gyeonggi-do, Korea
463-400
To locate in-country CONVERSDIGITAL CO., LTD., distributors of the AUNNEX NETWORK DAC please refer
to the CONVERSDIGITAL CO., LTD. Website http://www.conversdigital.com
These distributor(s) represent local contacts for this product.
CORPORATE HEADQUARTERS:
CONVERSDIGITAL CO., LTD.
704 KSIA BD, 182 Pangyoyeok-ro, Bundang-gu, Seongnam,-si, Gyeonggi-do, Korea 463-400
Tel: +82-31-759-5088
Fax: +82-31-759-5089
Web: http:// www.conversdigital.com
This device complies with Industry Canada license-exempt RSS standard(s).
Operation is Subject to the following two condition: (1) this device may not cause interference
,and (2) this device must accept any interference, including interference that may cause undesired
operation of the device.

EUROPEAN UNION “DECLARATION OF CONFORMITY”
DECLARATION OF CONFORMITY
CONVERSDIGITAL CO., LTD.
704 KSIA BD, 182 Pangyoyeok-ro, Bundang-gu, Seongnam,-si, Gyeonggi-do, Korea 463-400
declare under our sole responsibility that the product(s)
AUNNEX NETWORK DAC– AUNNEX-110
to which this declaration relate(s) is in conformance with the following standards:
EN 301 489-1 V1.9.2:2011
EN 301 489-17 V2.2.1:2012
EN 60950-1:2006/A2:2013
EN 300 328 V1.8.1:2012
following the provisions of the 1999/5/EC Directives.