Conversor CONVERSOR-F3 LPRS Transmitting Audio Assistance Device User Manual User Guide US Version indd
Conversor Products Limited LPRS Transmitting Audio Assistance Device User Guide US Version indd
USERS MANUAL

Conversor Products Ltd.
Tel: +44 (0)800 037 6262
sales@conversorproducts.com
www.conversorproducts.com
MANUFACTURED UNDER LICENCE BY GLENTRONICS LTD.
64 Mallusk Road, Newtownabbey, Co. Antrim BT36 4QE
Your Distributor:
User Guide
The Conversor
®
• Reduces unwanted
background noise
• Enhances desired
sounds near and
at a distance
• Versatile for
everyday use
The Perfect
Hearing Aid
Companion
17
Intended Use
The Conversor
® is intended to be used as an Assistive
Listening Device by persons who are hard of hearing.
For sale in the following countries:
All countries in Europe and North America
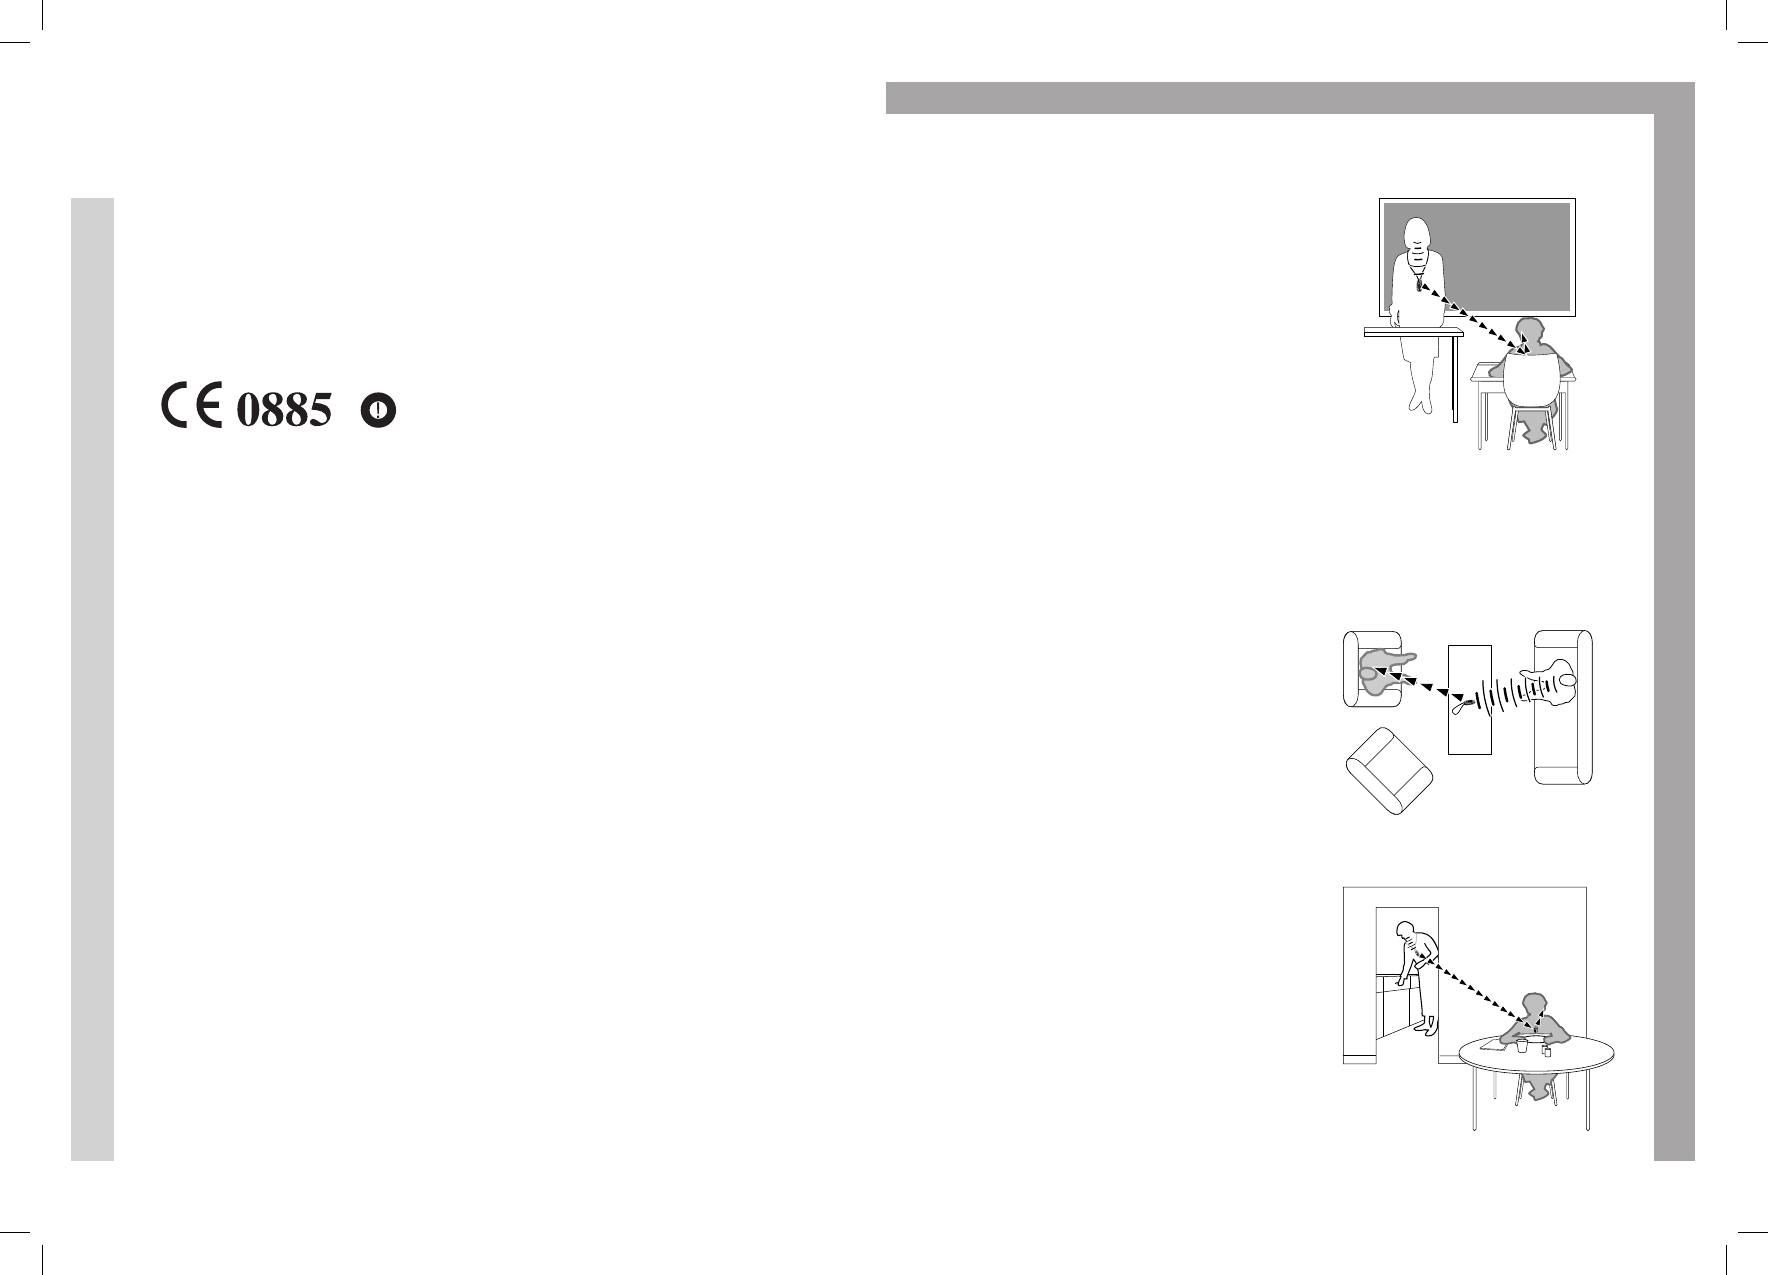
In the Classroom
Using the Neck Cord Attachment,
the teacher wears the Microphone
when instructing the whole class.
The teacher‘s conversation is trans-
mitted to the student wearing the
Pendant Receiver with enhanced
clarity up to 25 metres away.
During group discussions, the
student may wish to place the
Microphone on his or her desk,
and point it at whoever is speaking
at the time.
One-to-One Conversation
At home, most couples do not
spend all of their time together
in the same room. Have your
companion wear the Microphone
using the Neck Loop Attachment.
By wearing your Receiver, you will
hear the other person with clarity
and be able to converse at comfor-
table levels, despite being in
different rooms.
This mode of use can also be
employed when out and about,
whether shopping or simply
going for a walk, allowing
relaxed conversation.
Teacher wearing the
Microphone on the
Neck Cord
Relaxed one-to-one conversation
Remote listening
Glentronics Ltd. hereby declares that
the equipment specified above con-
forms to the essential requirements
of the EC DIRECTIVE 1999/5/EC for
Radio and Telecommunications Termi-
nal Equipment. Having applied the
following standards:
ETSI EN 300 422-1 V1.1.1 (2000-08)
Wireless microphones in the range
25MHz to 3GHz
ETS 300 445 1996
The ETS 300 445 1996 refers to the
EMC standard for wireless micropho-
nes and similar radio frequency (RF)
audio link equipment.
FCC ID: QA6 CONVERSOR-F3
This transmitter is authorized by
rule under the Low Power Radio
Service (47 C.F.R. Part 95) and must
not cause harmful interference to
TV reception or United States
Navy SPASUR installations.
You do not need an FCC license to
operate this transmitter. This trans-
mitter may only be used to provide:
auditory assistance to persons with
disabilities, persons who require
language translation, or persons in
educational settings; health care
services to the ill; law enforcement
tracking services under agreement
with a law enforcement agency; or
automated maritime telecommu-
nications system (AMTS); network
control communications. Two way
voice communications and all other
types of uses not mentioned above
are expressly prohibited.
This device may not interfere with
TV reception or federal government
radar and must accept any interfe-
rence received, including interference
that may cause undesired operation.
Declaration of Conformity
GLENTRONICS LTD.
64 Mallusk Road
Newtownabbey
Co. Antrim BT36 4QE
Type of Equipment: Radio
Microphone & Receiver
Model: Conversor
16 1
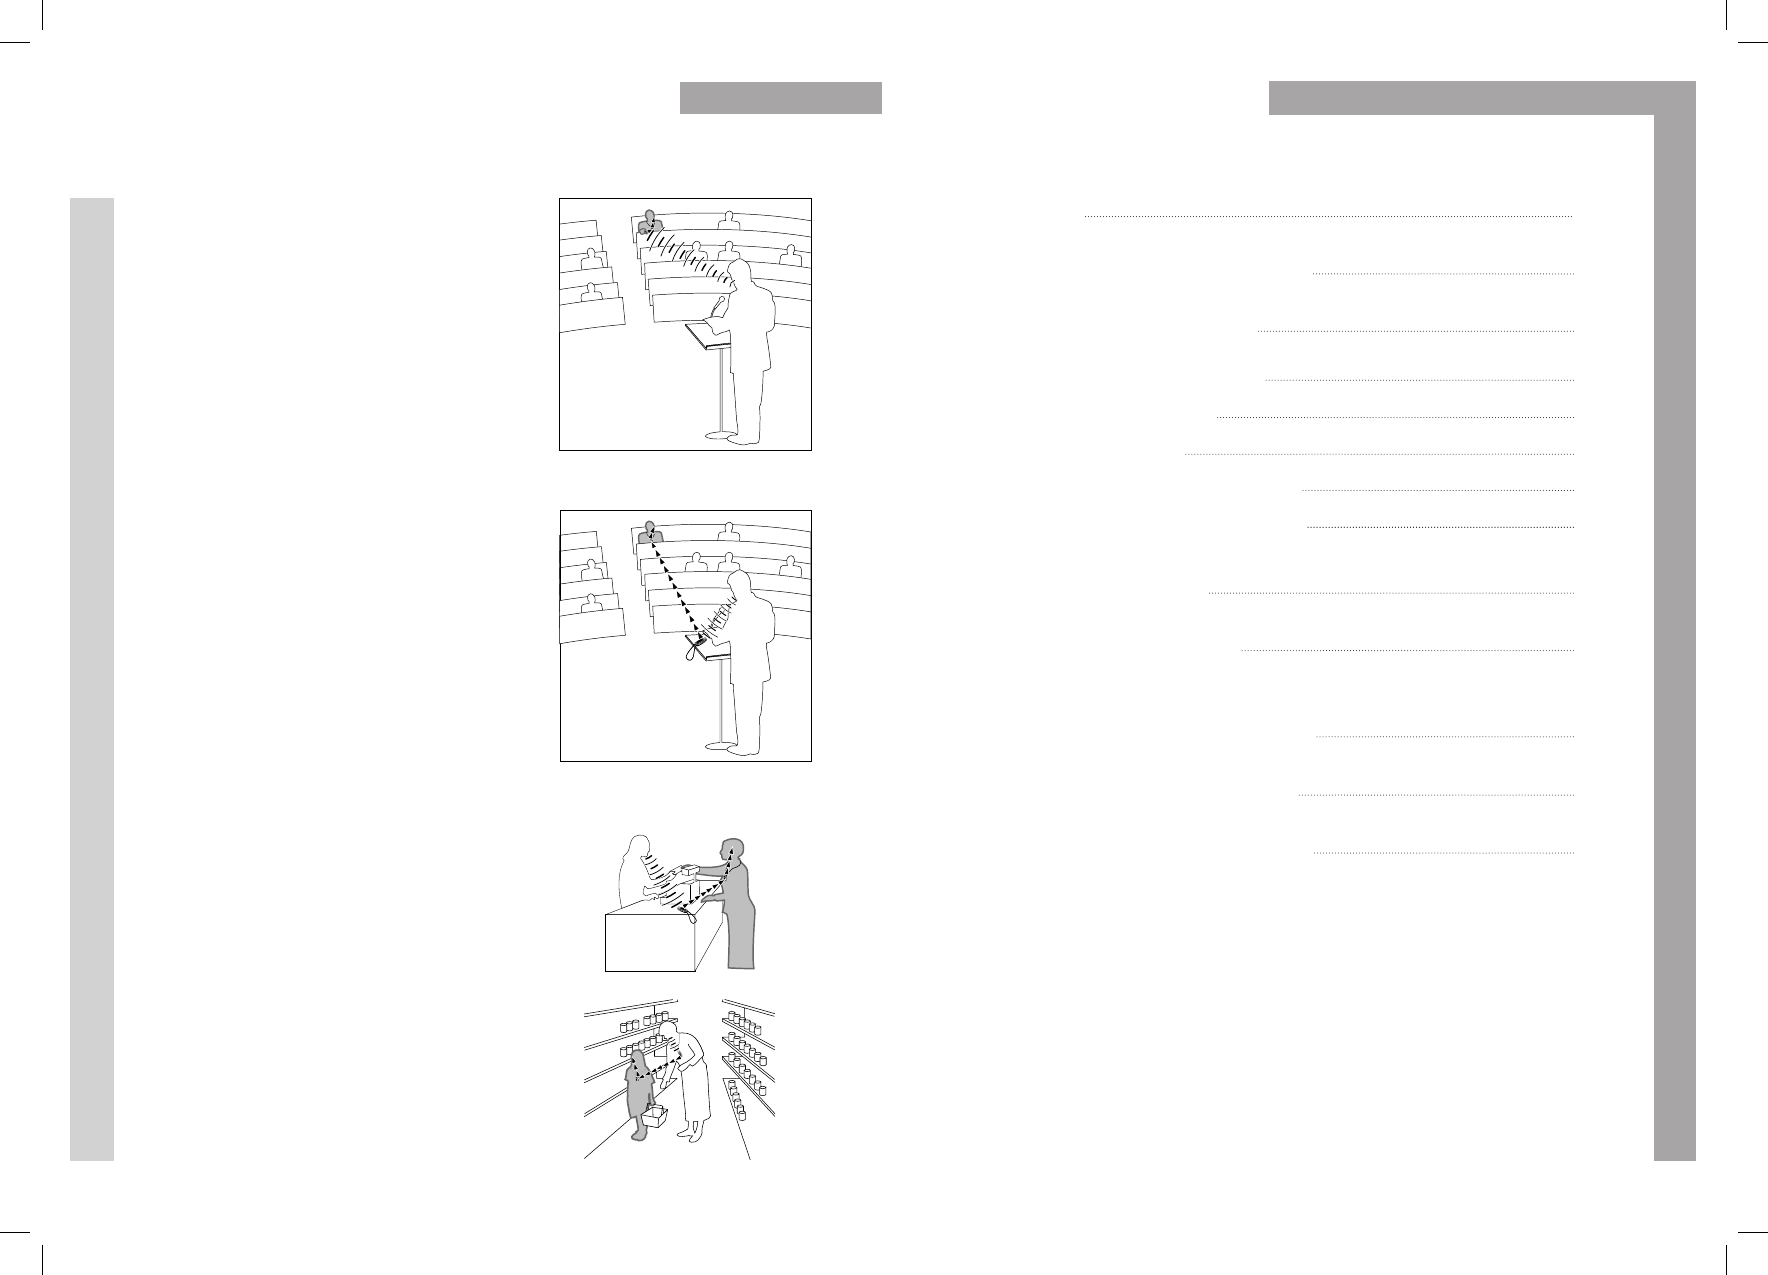
At a Lecture or
Conference
The Conversor has a unique tech-
nology that gives you the ability
to listen to speakers clearly from
a considerable distance. There are
two ways to achieve this:
Hold the Microphone in your hand
and point it at the source of desired
sound up to 15 metres away. In a
large quiet room, you can use the
Zoom setting at a high sound level
to focus on a distant speaker.
Or, place the Microphone on the
lectern, or ask the speaker to wear
it using the Neck Cord Attachment.
The Microphone will transmit the
speech up to 25 metres away with
enhanced sound level and clarity
to your hearing aid.
Out Shopping
Place the Microphone on the
countertop to hear the shop
assistant clearly.
Or, if you have a child who is hard of
hearing, you wear the Microphone
and your child wears the Pendant
Receiver. Your child will be able to
hear your voice loud and clear
anywhere in the store.
Held in your hand, pointed at
the speaker
Placed near or worn by
the speaker
Welcome!
How to Charge Your Conversor
Setting up Your Conversor
Check your Hearing Aid
Microphone Set-up
Receiver Set-up
Listening with The Conversor
Checking the Sound Balance
Switching between Omni-Directional
and Zoom Settings
Sockets and Connections
How to use the Neck Cord
with the Conversor Microphone
Taking Care of Your Conversor
The Conversor in Everyday Use
Table of Contents
2
4
6
6
6
7
7
8
9
10
12
13
14
© Copyright 2004. Conversor Products Ltd. All rights reserved.
Conversor is a registered trademark of Conversor Products Ltd.
The Conversor in Everyday Use
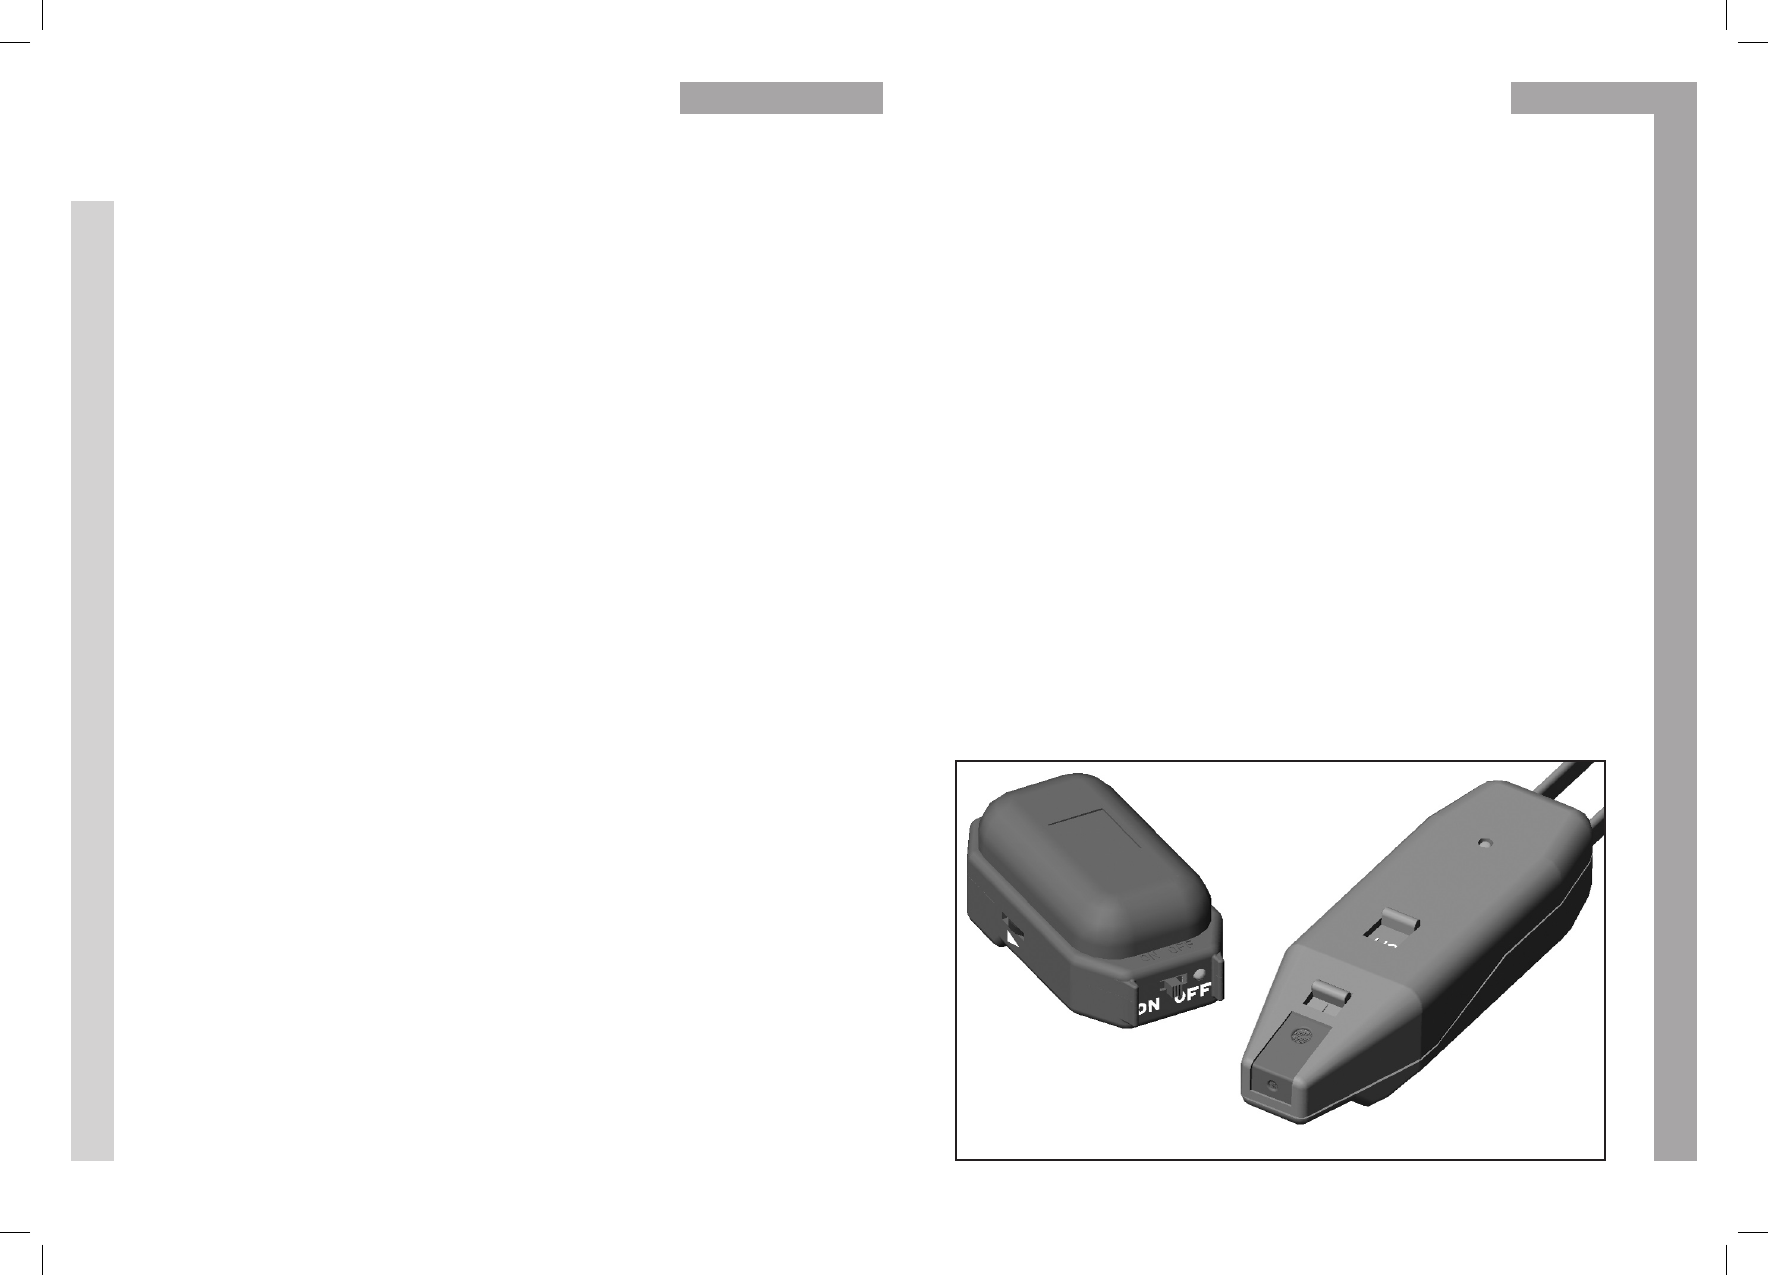
Microphone/Transmitter
Pendant Receiver
215
Welcome!
Thank you for your purchase of The Conversor, one of
the most versatile and enabling assistive listening devices available
on the market that greatly enhances the clarity of sound received
by your hearing aid in a variety of everyday situations.
The Conversor consists of two lightweight components:
A Microphone/Transmitter and a Pendant Receiver.
Also included in your package is a Power Supply Unit, a Battery
Charger and a Mains Lead for recharging the batteries.
A Neck Cord is also provided to enable the Microphone to
be worn optionally by a speaker around the neck.
The enclosed Carry Wallet allows you to protect and store
the Microphone and the Receiver when not in use.
If you are missing any of these items, please contact your
Distributor, or call the Conversor Customer Service Line
at 0800 037 6262.
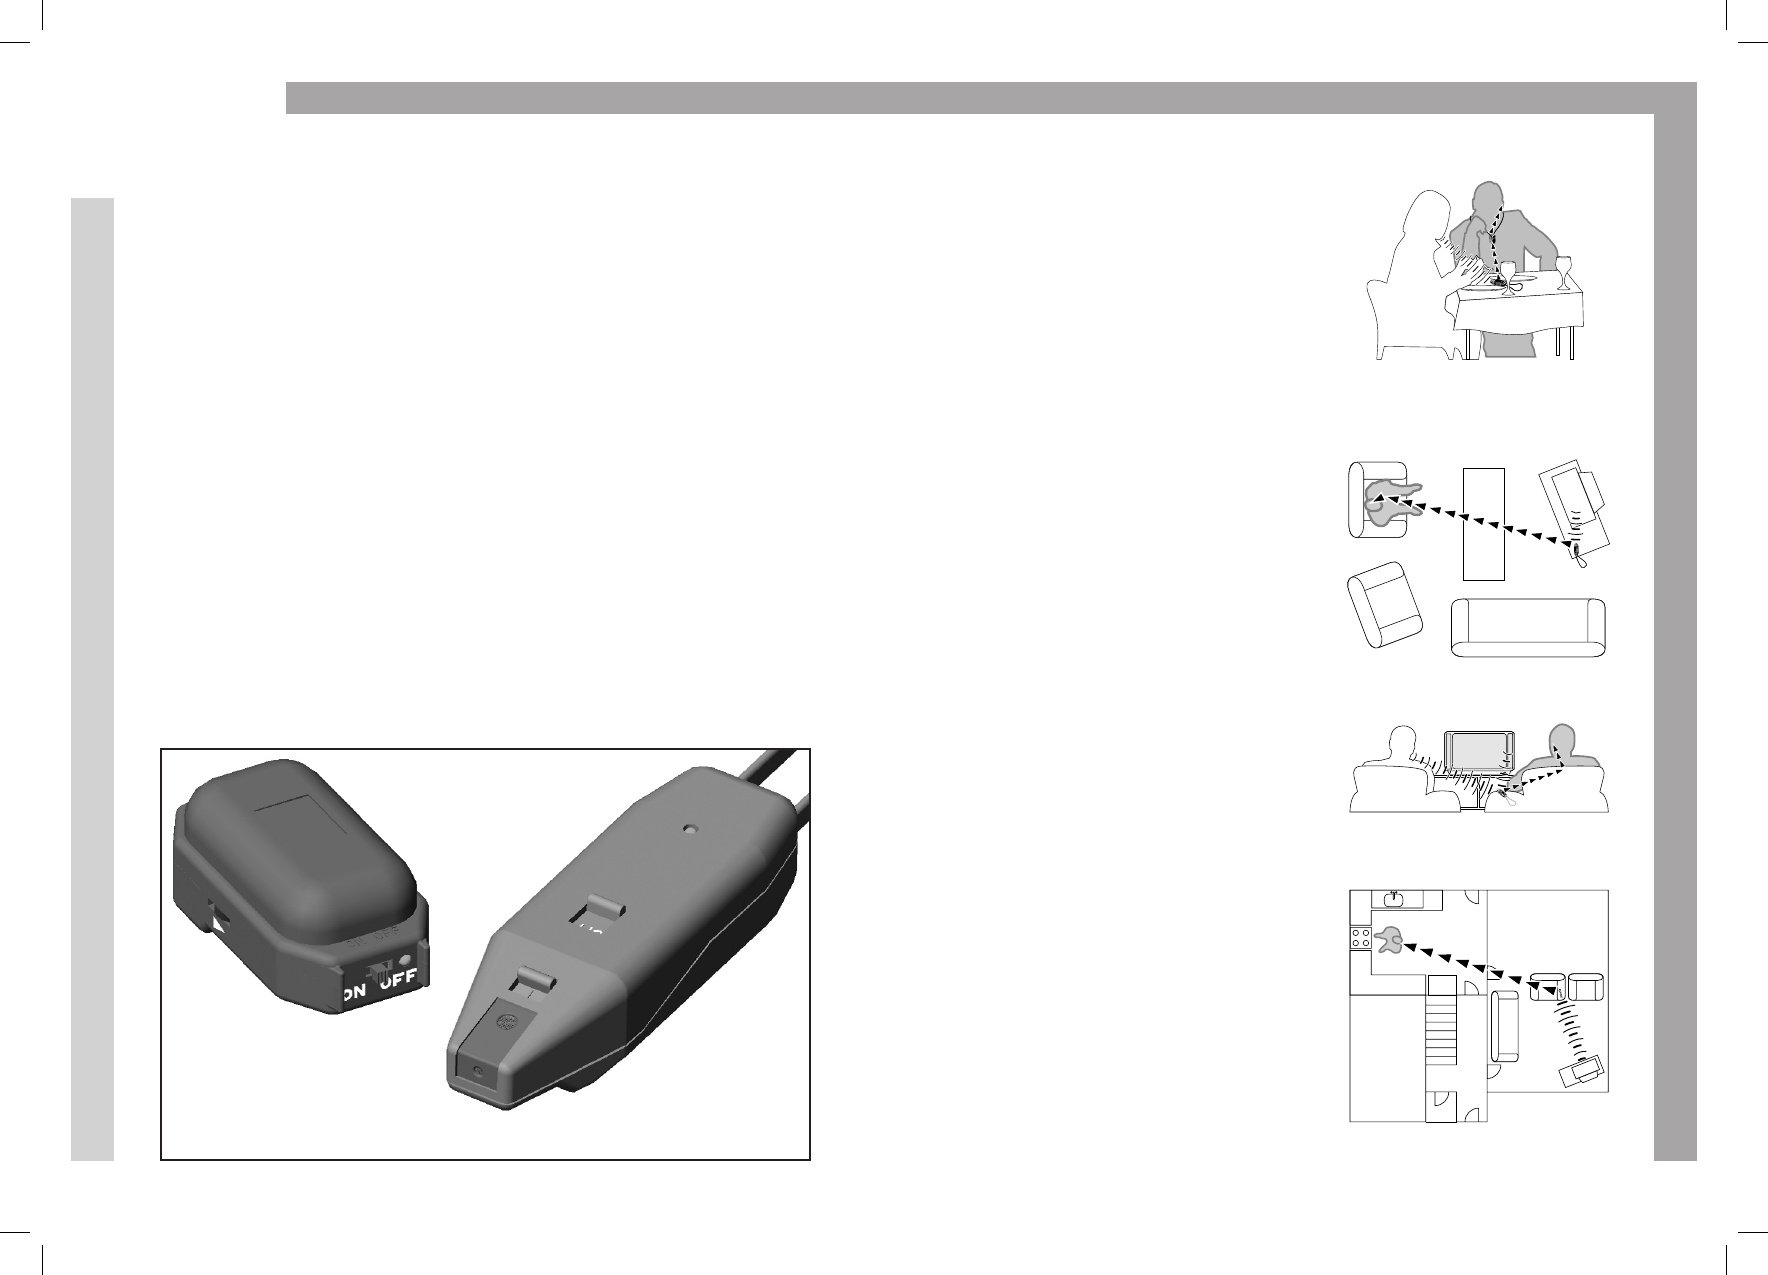
In a Café or Restaurant
Place the Microphone on the table
close to your companion and switch
it to the Zoom setting for relaxed
conversation despite loud back-
ground noises.
Watching Television
With the Conversor, there is no
need to purchase a separate TV
amplifier or room loop. Use the
Conversor to watch comfortably
at home or away.
Watching on Your Own
Place the Microphone next to
the TV for optimal sound level,
or connect the Microphone to the
TV audio output using an optional
accessory (See Page 10).
Watching and Conversing
with Another Person
Keep the Microphone on the arm of
your chair next to your companion.
This enables you to turn the Micro-
phone towards the other person
for relaxed conversation and easily
listen to the TV at the same time.
Remote Listening
Place the Microphone near the
TV and move about freely. Your
Receiver will pick up sound clearly
from the TV up to 25 metres away,
even if you are in another room.
Intimate conversation in a café
or busy restaurant
Watching on your own
Watching with another person
Remote listening
14 3
Your Conversor package
should include:
• Wireless Microphone
• Pendant Receiver
• Power Supply Unit
• Battery Charger
• Mains Lead
• Neck Cord
• Carry Wallet
Used together with your hearing aid*, The Conversor will
improve your ability to hear, select and focus on a particular
sound. You simply point the Microphone towards, or place it
close to, the sound that you wish to hear. The pendant receiver
is worn at all times during use around your neck, either above
or beneath clothing.
In order to set up The Conversor correctly and to familiarise
yourself with the controls, please read this user guide carefully.
*In order to receive the benefits of The Conversor, your hearing aid
must have a T Setting or Telecoil facility.
For use with non-behind-the-ear hearing aids, please refer to the
Conversor Website – www.conversorproducts.com, or contact
your hearing aid supplier for clarification and assistance.
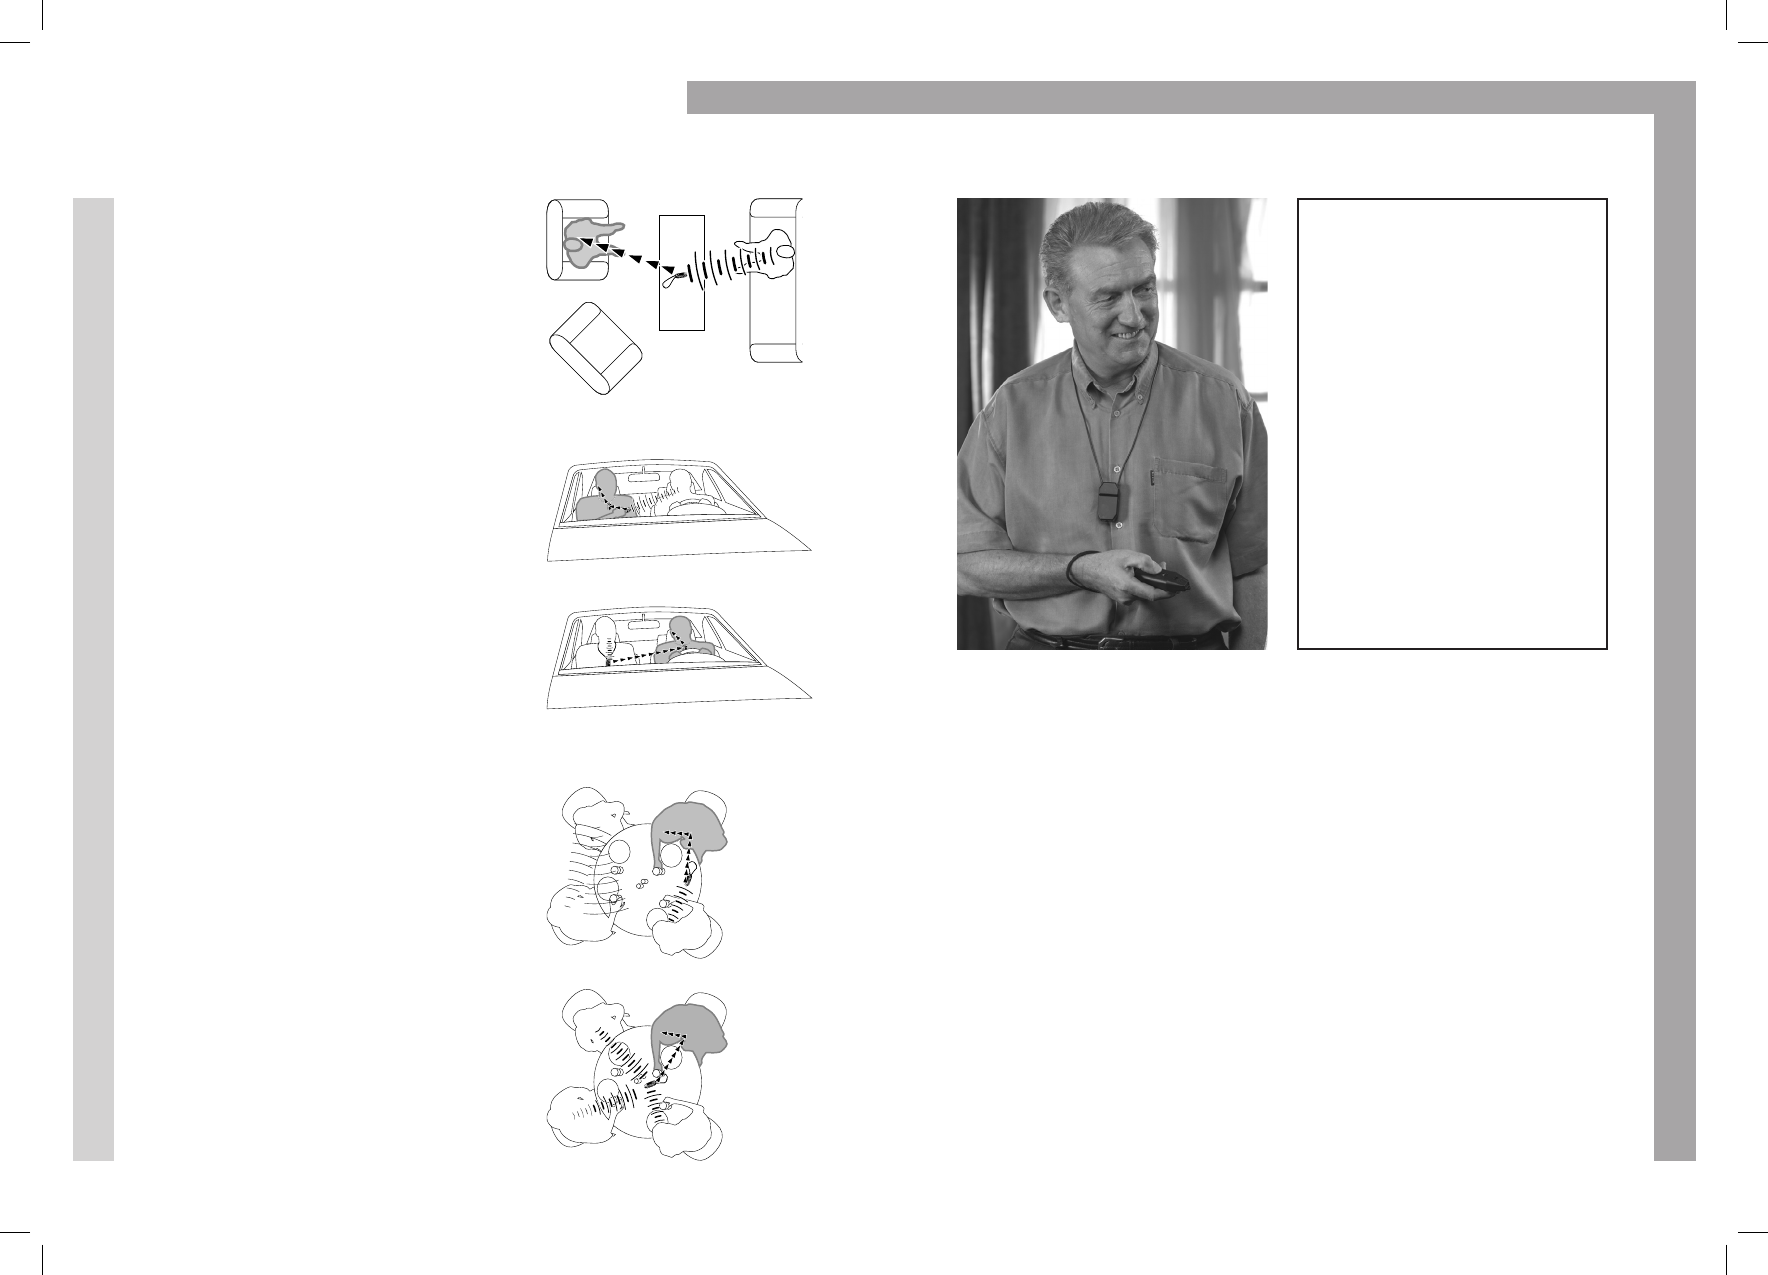
The Conversor in Everyday Use
Relaxed Conversation
Place the Microphone on a surface
facing your companion to enable
relaxed listening and conversation.
Since the Microphone is closer
than your hearing aid to the sound
you want to hear, the sound will be
received with greater clarity than
possible with the hearing aid alone.
In the Car
The inside of a moving car is a
noisy environment, creating listening
problems for hearing aid wearers.
Whether you are the driver or a
passenger, The Conversor enables
you to hear your driving compan-
ions clearly, even if your hearing
aid is in the ear farthest away from
those speaking.
At a Family Meal, Dinner
Party, or Group Discussion
For one-to-one conversation, set
the Microphone to the Zoom setting
and place it on the table between
you and the person you want to
converse with. Or to join in on
group discussions, switch the
Microphone to the Omni-
Directional setting and place it in
the middle of the table. You will
now pick up on voices around
the table at a similar level.
Relaxed one-to-one conversation
As a passenger (Holding Microphone)
One-to-one
conversation
Or driver (Driving companion
wears Microphone)
Group
discussion
The Conversor Microphone and Receiver are powered by
built-in rechargeable batteries. There may already be sufficient
charge left in each unit for short-term use when you take them
out of the box. However, it is our recommendation that you fully
charge each unit before trying them out. To do this, please follow
these instructions:
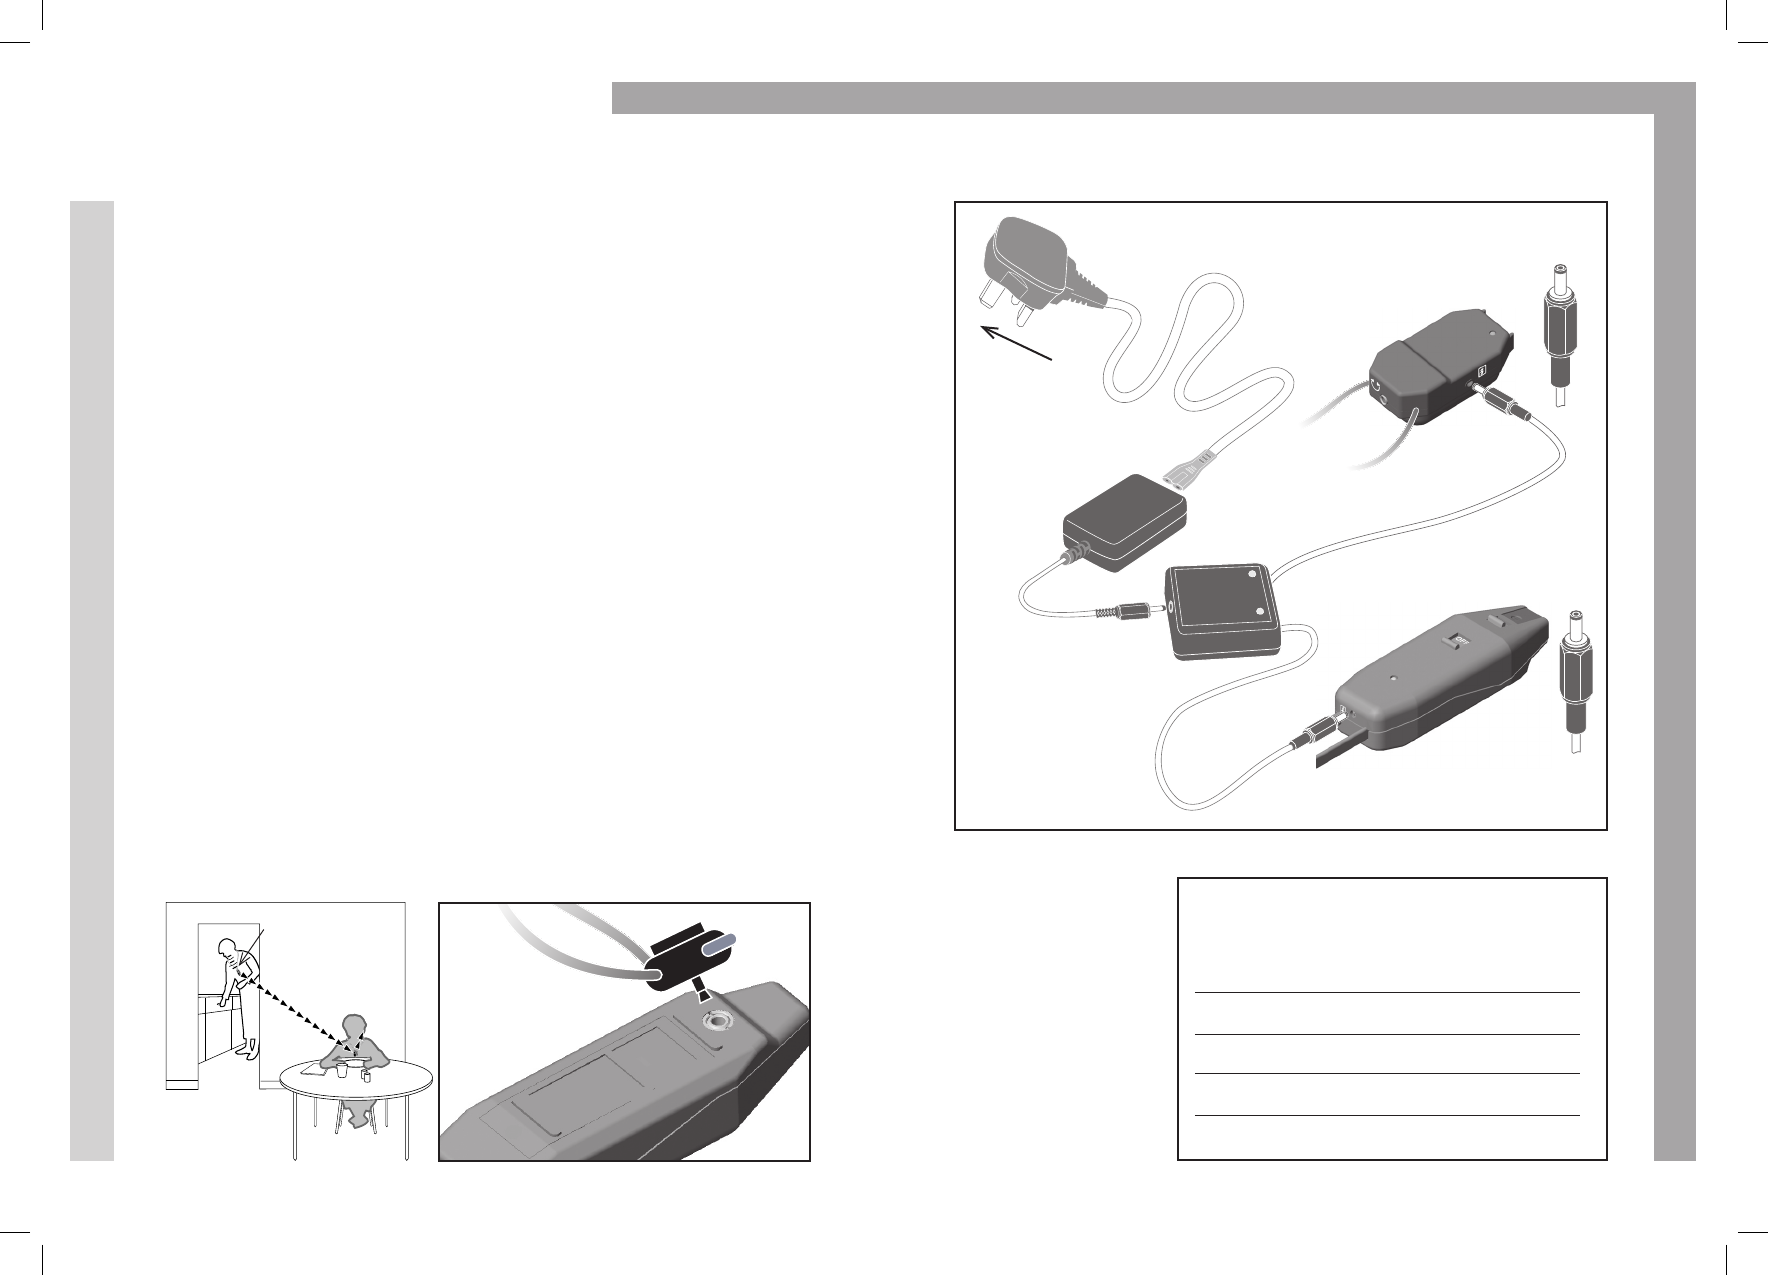
Plug the Mains Lead into the Power Supply Unit.
Connect the Power Supply Unit to the Battery Charger
using the single lead as shown.
Ensure that the Microphone and the Receiver are switched
off, then connect them to the Battery Charger using the
two leads as shown.
Plug the Mains Lead into an electrical outlet.
The green lights on the Battery Charger – (Mic) for the
Microphone and (Rec) for the Receiver – will flash
to indicate that the charging cycle has begun.
Charging time is approximately 2 1/2 hours for both the
Microphone and Receiver, providing you up to 8 hours of
continuous use.
Both green lights on the Battery Charger – (Mic) for the
Microphone and (Rec) for the Receiver – will stop flashing
and remain constant when the batteries are fully charged.
Repeat this procedure each time you recharge the
Microphone and the Receiver.
Please note that you do not need to wait until your batteries are
completely run down before you recharge them. You can top-up the
charge any time at your convenience. However it is recommended that
you fully discharge all batteries approximately once a month.
413
How to Charge Your Conversor Taking Care of Your Conversor
8.
7.
6.
5.
4.
3.
2.
1.
Do not subject the Microphone or the Receiver
to heavy shock.
Keep both units away from moisture and high
humidity – they are not waterproof.
Try to avoid long periods of exposure to
direct sunlight.
Gently coil the neck loop for storage rather than
tightly winding it around the Receiver. It contains a
wire which could be damaged.
Do not attempt to open the Microphone or the
Receiver casing. They contain no user-serviceable
parts. Opening either unit will invalidate the warranty.
If either the Microphone or the Receiver do not function as
described in this manual, please contact your Distributor or
call the Conversor Customer Service Line at 0800 037 62622.
5.
4.
3.
2.
1.
Microphone/Transmitter
Pendant Receiver
12 5
How to Use the Neck Cord
To the right is a
guide showing
you charge times
and corresponding
battery life.
The Neck Cord allows a speaking companion to wear
the Microphone around his or her neck for hands-free
convenience and greater mobility during conversation.
The Neck Cord is attached to the Microphone by inserting
the neck cord plug into the metal socket on the underside
of the Microphone.
To adjust the position of the Microphone on the Neck Cord,
simply press the button on the plug attachment. This releases
the grip and allows you to slide the Microphone up or down
on the neck cord.
Suggestions for Use:
Your speaking partner can wear the Microphone around
the house, enabling relaxed conversation, even when
moving from room to room.
Your speaking partner (either driver or passenger) can
wear the Microphone in the car, enabling hands-free use.
A speaker, such as a teacher in a classroom, a pastor
in a church, or a presenter at a meeting, can wear the
Microphone for clear transmission to your Receiver
up to 25 metres away.
3.
2.
1.
Mains Lead
Receiver
Microphone
Charger
Power
Supply
Unit
Approximate
battery life
1 Hour
2 Hours
4 Hours
6 Hours
8 Hours
Charge time on fully
discharged batteries
25 Minutes
40 Minutes
65 Minutes
90 Minutes
150 Minutes
Plug into
Mains Supply
Insert the Neck Loop
Plug into the metal
socket located on
the underside of
the Microphone.
Speaker wears
the Microphone
on the Neck Loop.
Sound is received
clearly up to 25
metres away.
611
Setting Up Your Conversor
Before you begin, please ensure that the
Microphone and the Receiver are fully
charged (Please see Page 4).
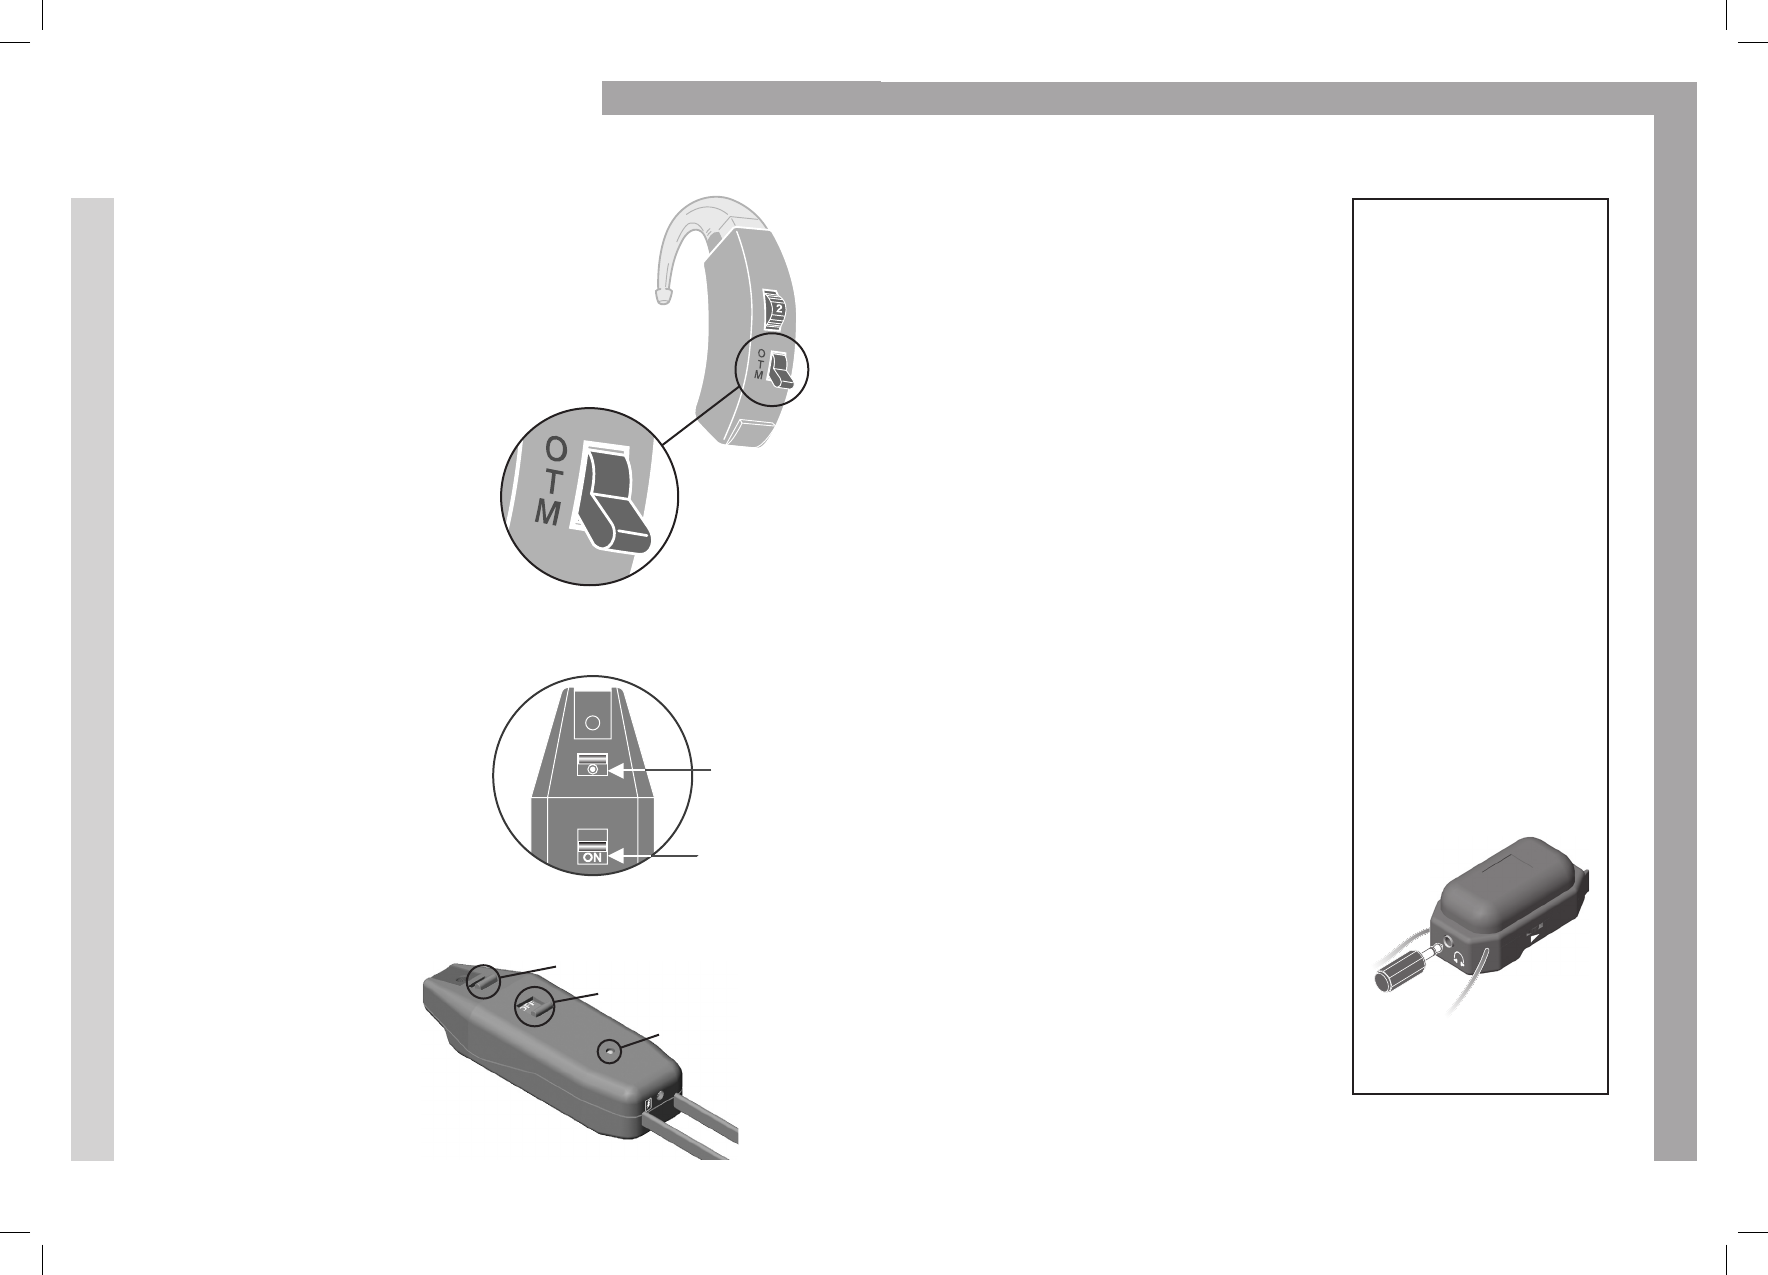
1. Check Your Hearing Aid
Make sure your hearing aid is working.
Turn on a radio or TV and select a
speech programme. Turn your
hearing aid to M (mic) and set
the volume control to a
comfortable level.
For use with non-behind-the-ear hearing aids,
please refer to the Conversor Website –
www.conversorproducts.com, or contact
your hearing aid supplier for clarification and assistance.
2. Microphone Set-up
Switch the Microphone to ON.
The green indicator light should
glow.
The ON setting is for normal
or noisy situations. ON HI is
for quiet conditions and where
the desired sound is quiet and/
or at a distance. (Do not use
ON HI just yet)
Set the Microphone
direction switch to the
Omni-Directional setting
(Move the switch
forward as shown to
reveal the white dot).
Switch hearing
aid to M
Direction
Switch
Set to Wide
ON / OFF /
ON HI Switch
Set to ON
Indicator Light
OFF / ON / ON HI Switch
Direction Switch
2. Via a SCART Socket
Optional Conversor Accessory:
SCART Adaptor
The SCART socket is a multi-pin
socket found on the rear of many
audio devices. An optional SCART
Adaptor, which is connected to
the Conversor Microphone, can be
plugged into this socket. Although
connection is not as easy as using the
headphone socket described previously,
it enables other people to listen as well.
3. Via Audio-Out Phono Socket
Optional Conversor Accessory:
SCART Adaptor
If your audio device does not have
a SCART socket on the rear, it will
most likely have an Audio-Out
Phono socket.
This is a small circular ring with a
white or red plastic insert and may
be located either on the front or
rear of the audio device (Please refer
to your audio device owner’s manual).
As with the SCART socket, connection
via the Audio-Out Phono socket does
not disconnect the speaker, allowing
others to listen at the same time.
You can conntect the Conversor
Microphone into this socket using
the SCART Adaptor Cable.
Use of the Receiver
with an Earpiece
or Binaural
Headphones
Optional Conversor
Accessory:
Stereo/Mono Adaptor
The Conversor can
also be used with an
earpiece or binaural
headphones instead
of your hearing aid.
Simply plug the ear
piece or headphone
jack into the optional
Stereo/Mono Adaptor,
which plugs into the
socket situated at the
top (pendant end)
of the Conversor
Receiver.
Plugging the Stereo/Mono
Adaptor into the Receiver.
Signal Indicator
Light Glows
Green
10 7
Sockets and Connections
The Conversor Microphone can be
connected to other audio devices as
described below. The following accessories
are not included in your package, but can
be purchased separately by contacting your
Distributor, or call the Conversor Customer
Service Line at 0800 037 6262.
Direct Audio Input
The socket on the underside base
of the Microphone is intended for
direct audio input. It is used for
direct connection to a television,
radio or stereo/HiFi.
This provides you a very high quality
amplified sound that will be trans-
mitted to your hearing aid, giving
you relaxed listening pleasure.
Connection to TV, Radio
or Stereo/HiFi
1. Via Headphone Socket
Optional Conversor Accessory:
Jack-to-Jack Lead
Most current TV, radio or stereo models
have a headphone socket on their front
panel. Plug the optional jack-to-jack lead
into this socket to connect the audio
device to the Conversor Microphone.
By plugging the jack into the headphone
socket, the speaker of the audio device
will be disconnected, so that other
people can not listen at the same time.
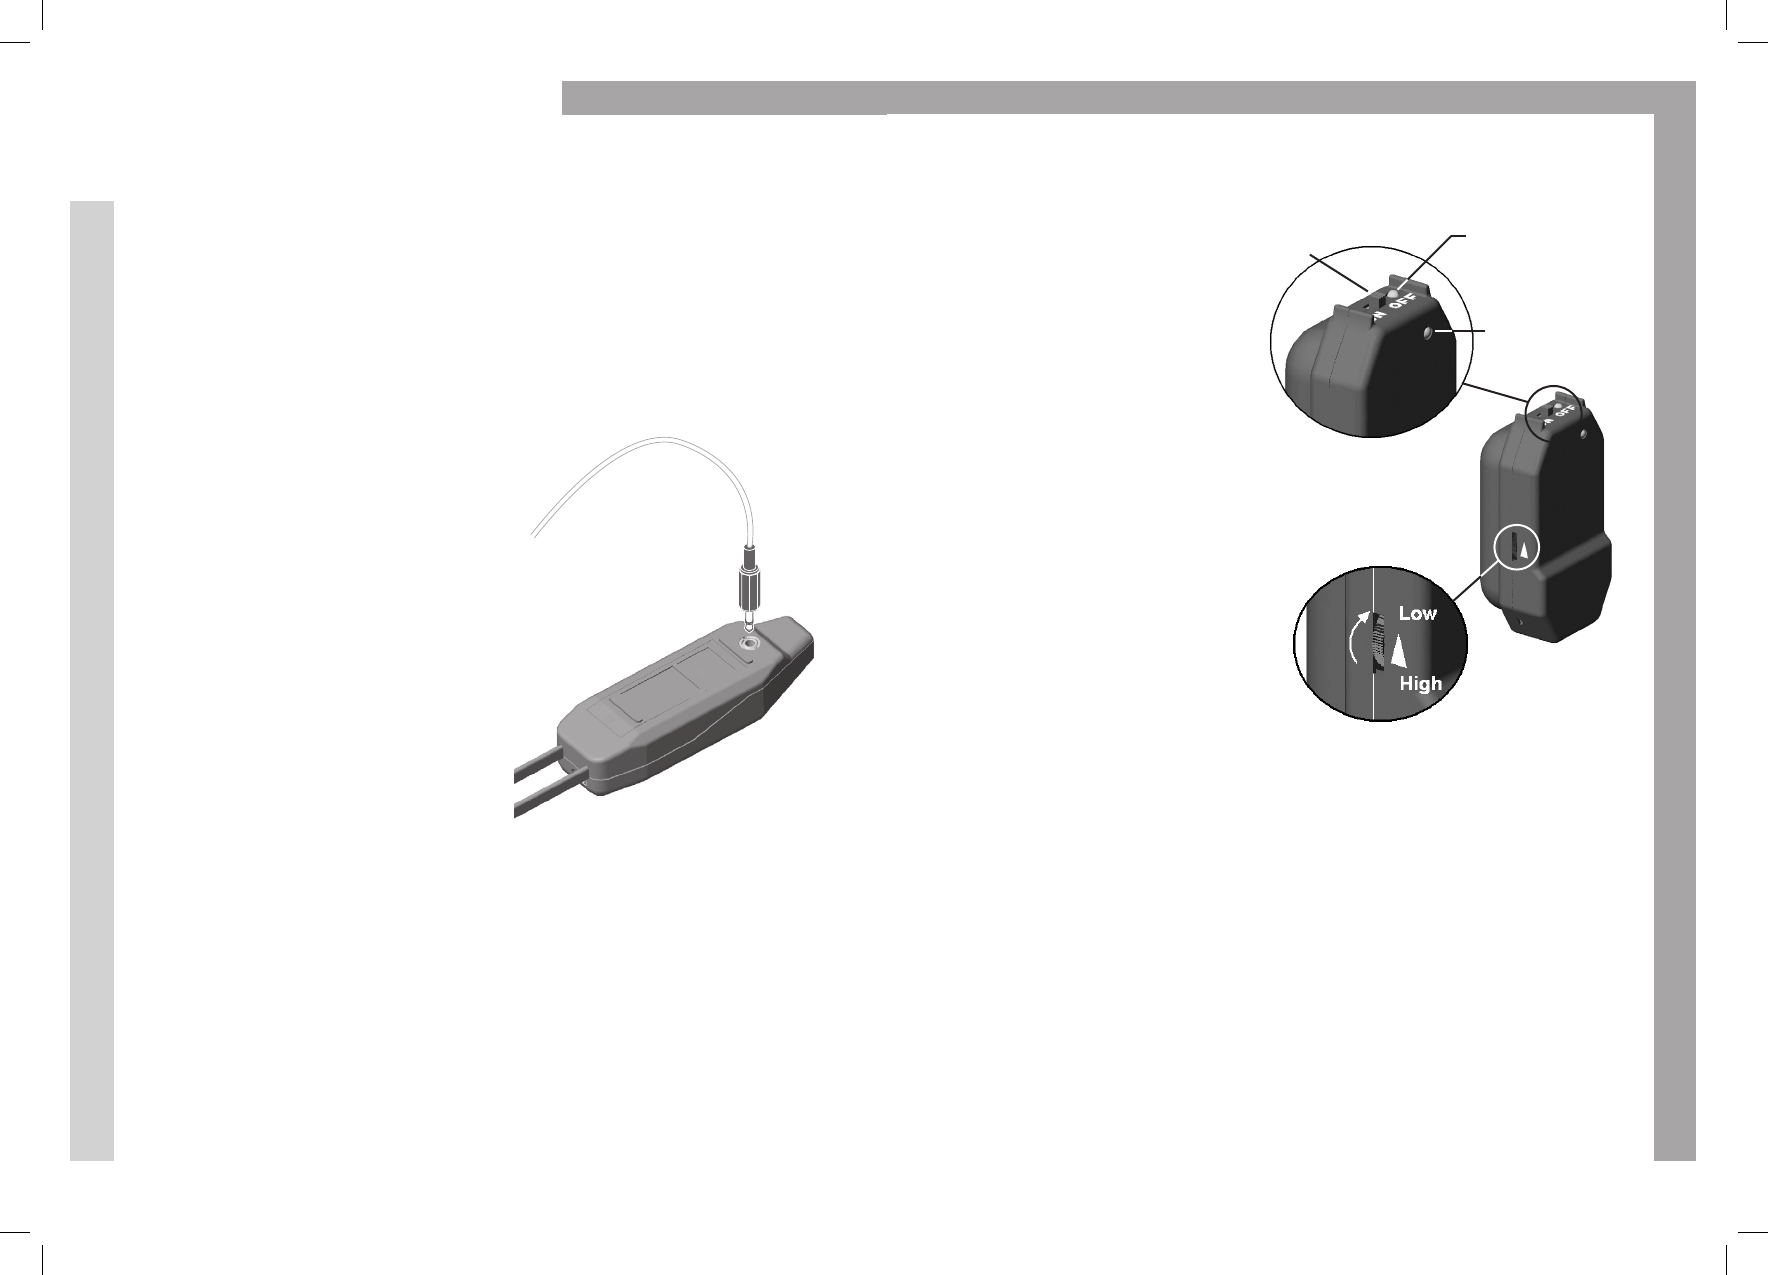
3. Receiver Set-up
Hang the Receiver around
your neck with the green
signal indicator light facing out.
Turn down the volume using
the volume control on the
left-hand side of the Receiver.
Then flip up the bottom of
the Receiver to turn it on using
the ON/OFF Switch.
The ON Indicator Light next
to this switch at the bottom
of the Receiver should now
glow green, indicating that
the unit is ON and that the
batteries are charged.
4. Listening with The Conversor
Select the T setting on your hearing aid, but do not adjust its
volume control.
Point the Microphone at a source of sound. As you turn up the
volume control on the Receiver, you should begin to hear sound
transmitted from the Microphone clearly.
The Conversor Microphone has now taken over from your Hearing Aid.
This is a bit like having the hearing aid microphone in your hand. When
the Microphone is set to the Omni-Directional setting, you will not yet
experience the full benefit of The Conversor, but this procedure will help
you to match the sound level of The Conversor with your hearing aid.
Volume Control to
Turn Down Volume
Direct Audio Input
ON / OFF
Switch
ON Indicator
Light Glows
Green
89
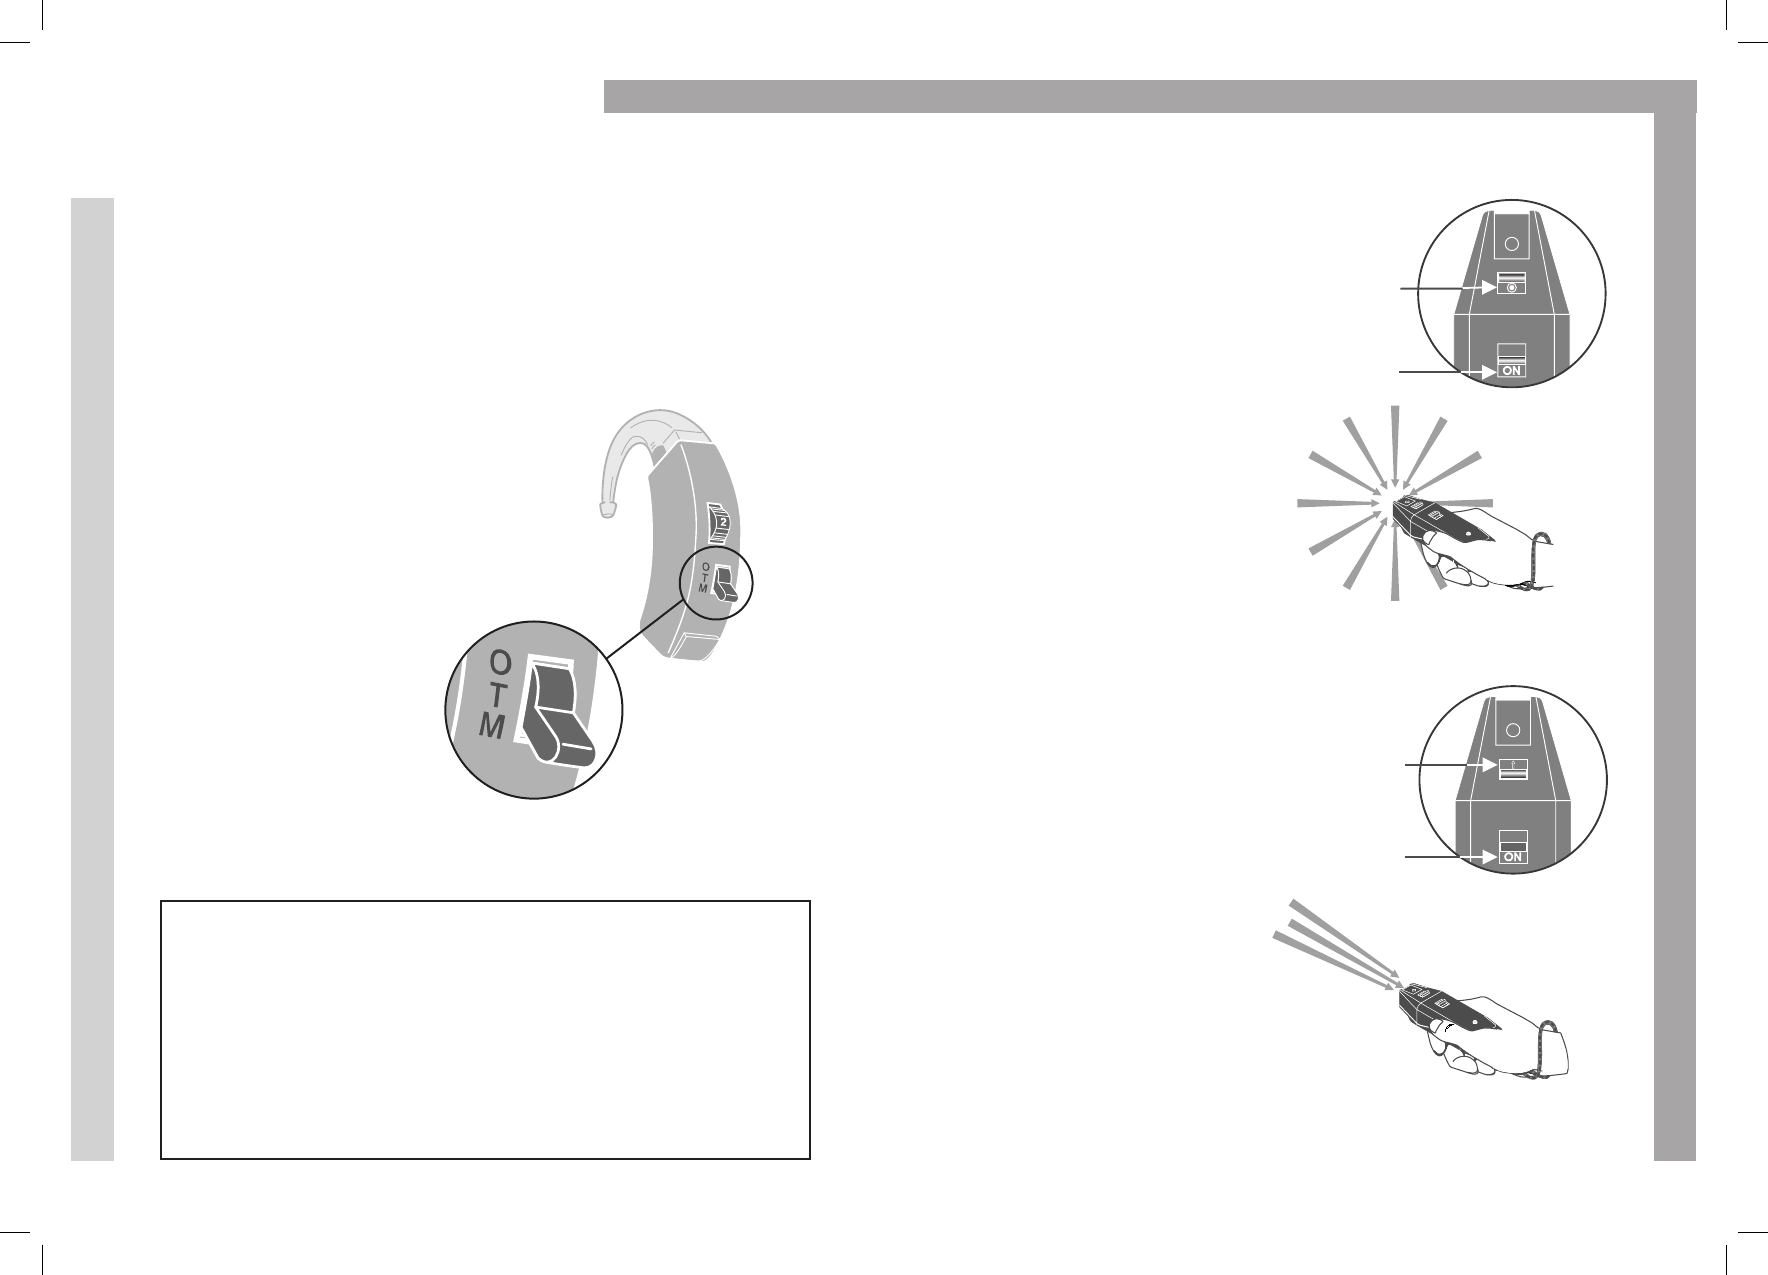
5. Checking the Sound Balance
Using the O/T/M selector on your hearing
aid, switch between the T and M setting,
adjusting the volume control on the
Conversor Receiver until the sound level
is matched with the hearing aid.
It is important to match the volume
levels of your hearing aid with the
Receiver, so that you can switch
between the two without any increase
or decrease in sound level. Once the
preferred sound level is achieved, you
are ready to try The Conversor in the
Zoom setting.
Eliminating the buzzing noise
in your hearing aid
When the hearing aid is set to T, a buzz may be heard if
the hearing aid is close to strip lighting, computers or TV
screens.To overcome this, turn down the volume on the
hearing aid until the buzz is gone. Then turn up the volume
on the Conversor Receiver to return the sound to the
desired level.
Switch your hearing
aid between M
and T to compare
sound level with the
Receiver
6. Switching Between
Omni-Directional and
Zoom Settings
The Microphone directional
switch should already be
switched forward (white
dot is visible) to the Omni-
Directional setting. Point the
Microphone at different
sources of sound, both near
and far, to experience the
way The Conversor picks
up surrounding sounds.
When the Microphone is set
to the Zoom setting (move the
switch back so that white dot
disappears), it will focus on
sounds from the front.
What you hear depends on
the direction in which the
Microphone is pointed. It
will also reduce the level of
sounds coming from other
directions, helping you to
focus on the sound you
have selected.
You should now be familiar
with the controls and ready
to try The Conversor in
everyday listening situations.
Directional
Switch Set
to Wide
OFF / ON / ON
HI Switch
Set to ON
Directional
Switch Set
to Zoom
OFF / ON / ON
HI Switch
Set to ON
Omni-Directional Setting
Zoom Setting
Setting Up Your Conversor