Conversor CONVERSPRO LPRS Transmitting Audio Assistive device User Manual 24pp Pro User Guide UK
Conversor Products Limited LPRS Transmitting Audio Assistive device 24pp Pro User Guide UK
User manual
The Assistive Listening Device
by Conversor Limited
User’s Manual

2

3
Table of Contents:
Welcome! 4
How to Charge Conversor Pro 6
Setting up Conversor Pro for the First Time 7
Make Sure Your Hearing Instrument
is/are Working 7
Setup the Microphone 7
Using the zoom and
Omni-Directional functions 7
Setting up Receiver 8
To use the Receiver on its own 8
How to Listen with Conversor Pro 9
Checking the Sound Balance 9
Sockets and Connections 9
How to use the Neck Cord with the Microphone 13
Care Instructions 14
Changing the Batteries 15
The Pro in Everyday Use 16
Troubleshooting 21
Manufacturer’s Warranty 22
Statements of Compliance and Conformity 23
© Copyright 2008 Conversor Limited. All rights reserved
4
Welcome!
Thank you for your purchase of Conversor Pro,one
of the most versatile and enabling Assistive Listening
Devices available on the market that greatly enhances
the clarity of sound received by your Hearing
Instrument(s) in a variety of everyday situations.
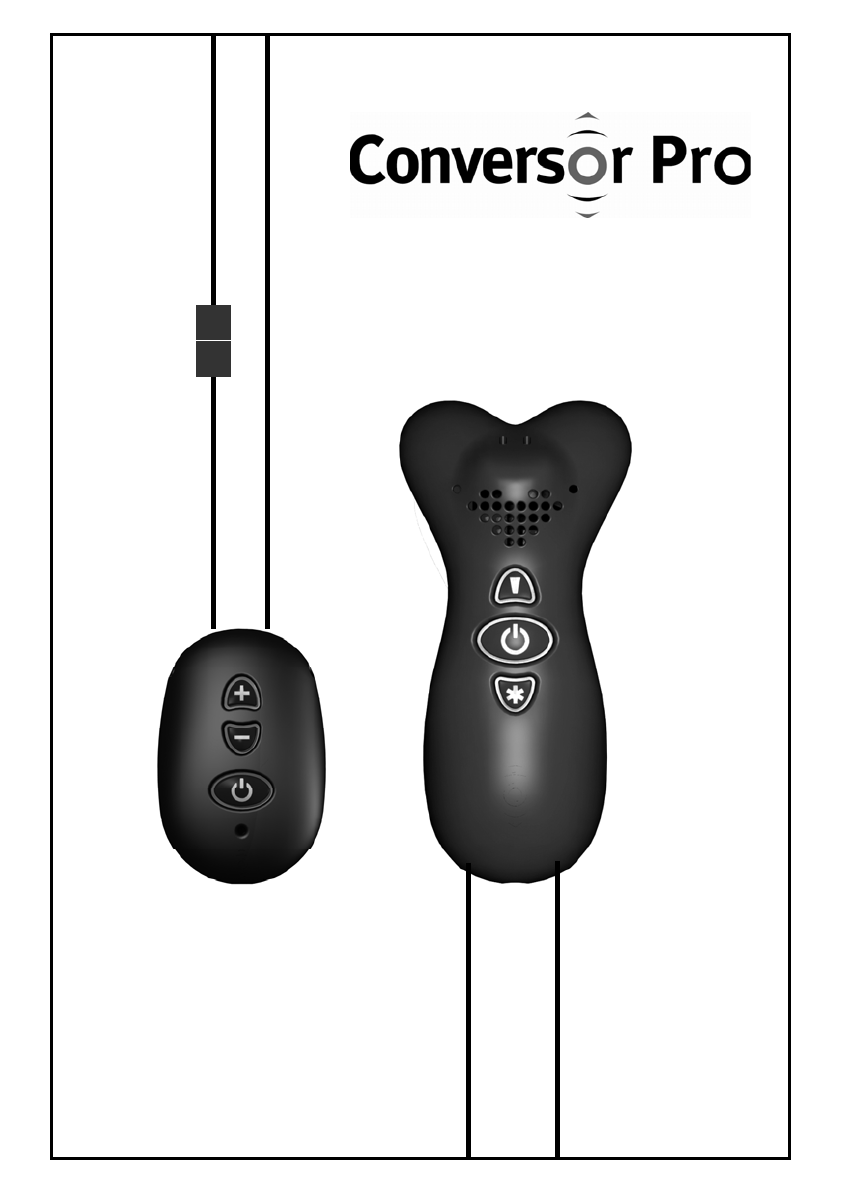
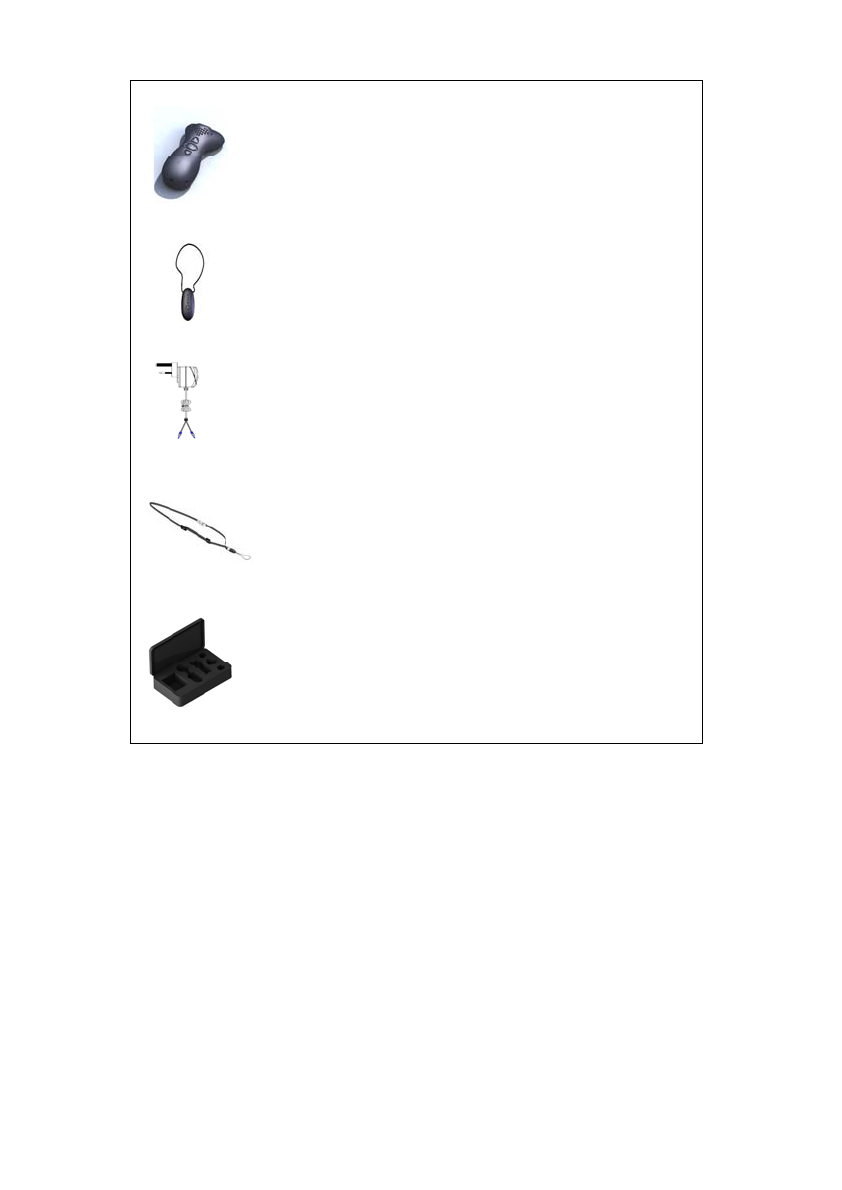
Conversor Pro consists of two lightweight components
and charging system, including:
• A Microphone Transmitter
• A Pendant Receiver
• A Power Supply Unit
• A Mains Lead
• International Plugs
All are enclosed in a padded carry case, which allows
you to protect and store your unit.
ANeck Cord is also supplied to enable the Microphone
Transmitter to be worn optionally by a speaker around
his or her neck.
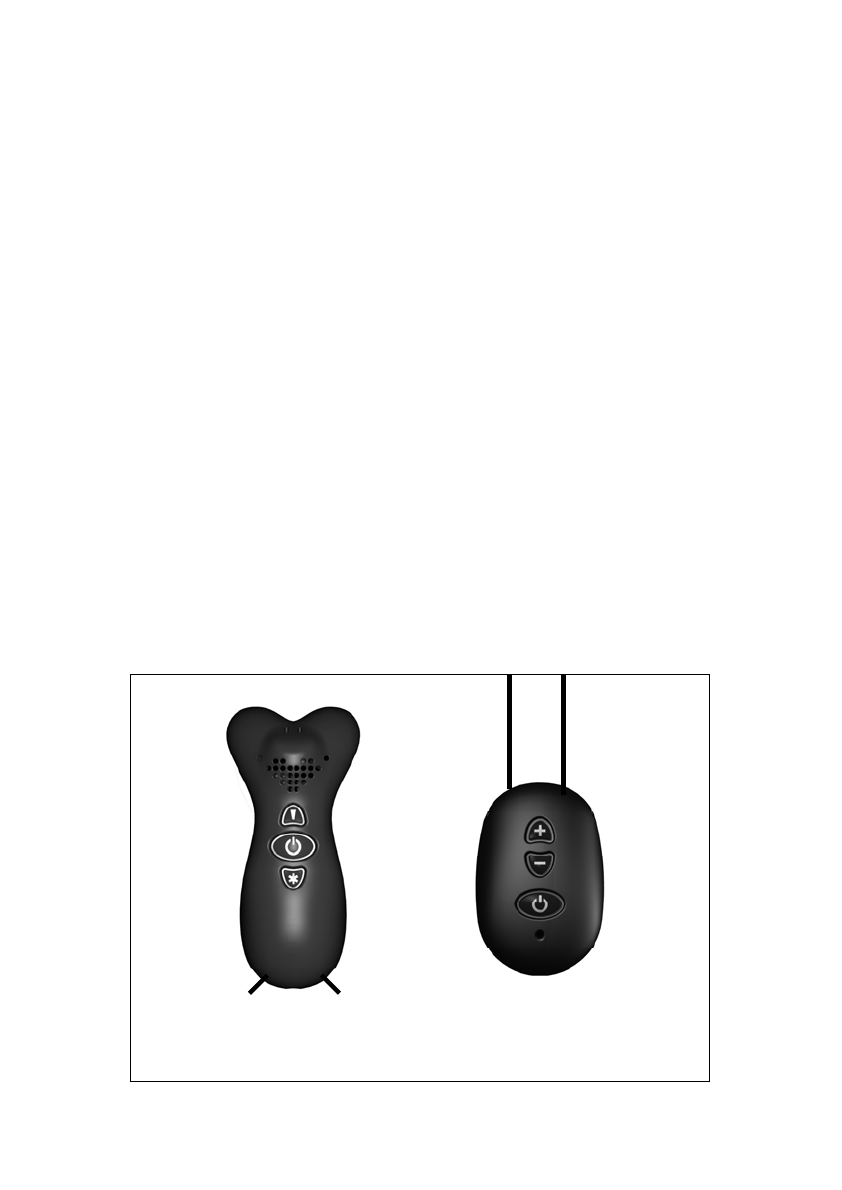
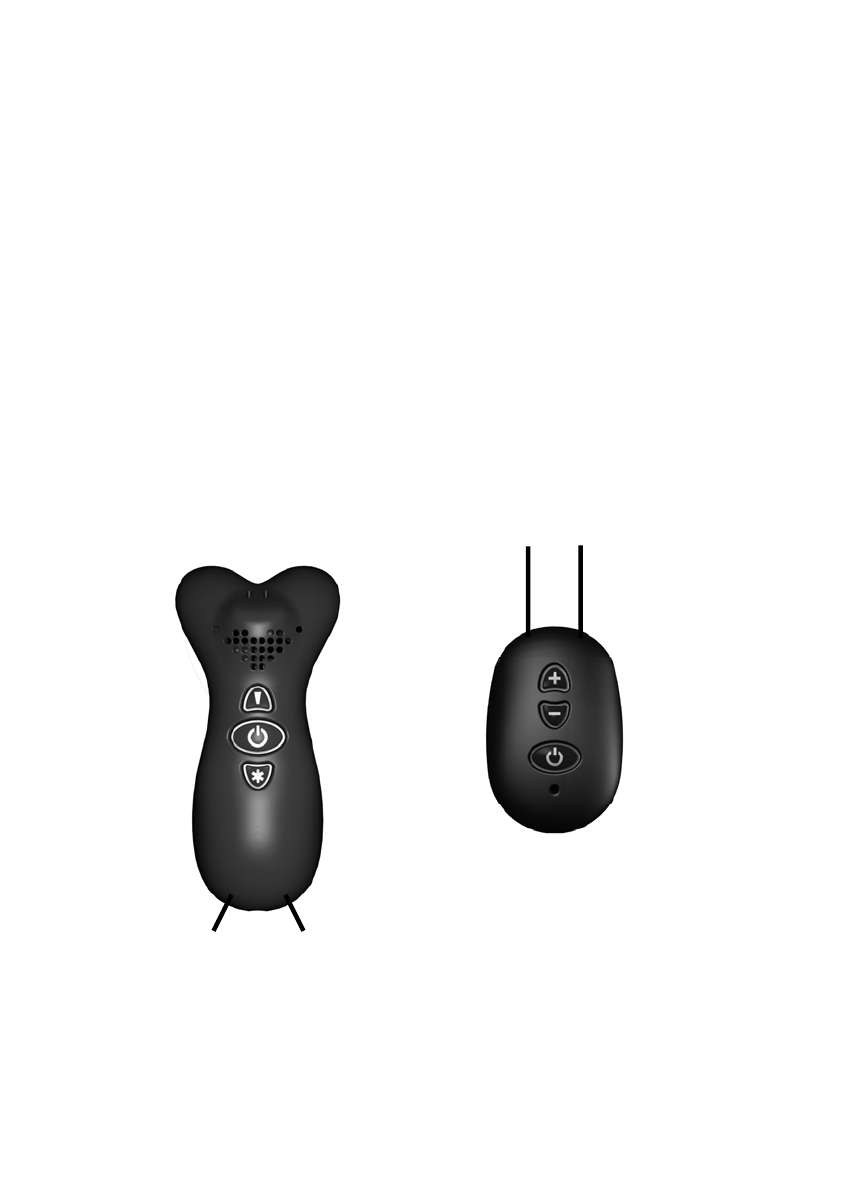
Conversor Pro Transmitter/
Microphone
Conversor Pro
Pendant Receiver
5
Wireless Microphone Transmitter
Pendant Receiver
Power Supply Unit
Neck Cord
Padded Carry Case
Used together with your Hearing Instrument(s),
Conversor Pro will greatly improve your ability to hear,
select and focus on a particular sound. You simply point
the Microphone Transmitter towards, or place it close to,
the sound that you wish to hear. The Pendant Receiver
is worn at all times during use around your neck, either
above or beneath clothing. In order to set up Conversor
Pro correctly and to familiarize yourself with the controls
and buttons, please read this User Guide carefully. *In
order to receive the benefits of Conversor Pro, your
Hearing Instrument(s) must have a “T” or Telecoil
setting.

6
How to Charge Conversor Pro:
Below is a guide showing you charge times
and corresponding battery life.
Charge time on
fully discharged
batteries*
Approximate
battery life
25 Minutes 1 Hour
40 Minutes 2 Hours
65 Minutes 4 Hours
90 Minutes 6 Hours
150 Minutes 8 Hours
* Please note that you do not need to wait until your
batteries are completely run down before you recharge
them. You can “top-up” the charge any time at your
convenience. However it is recommended you fully
discharge all batteries approximately once a month.
1. Attach the correct
mains adaptor to
the charger
2. Attach to the
Microphone and
Receiver using the
dual socket
3. Plug into mains
socket and charge
according to the
instructions below.
4. The lights on the
ON/OFF switch on
the microphone
and receiver will
stay red until the
unit is fully charged
when they will turn
green.
When the battery
indicator light turns red,
it indicates that only
25% charge remains.
The battery needs
recharging soon.
1
3
2
7
Setting up Conversor Pro for the First Time
Please ensure that the Microphone and the Receiver are
fully charged (see page 6).
1. Make sure your hearing instrument is working
Switch your Hearing Instrument to the Telecoil Mode.
(See your Hearing Instrument User Guide or Consult
your Audiologist.)
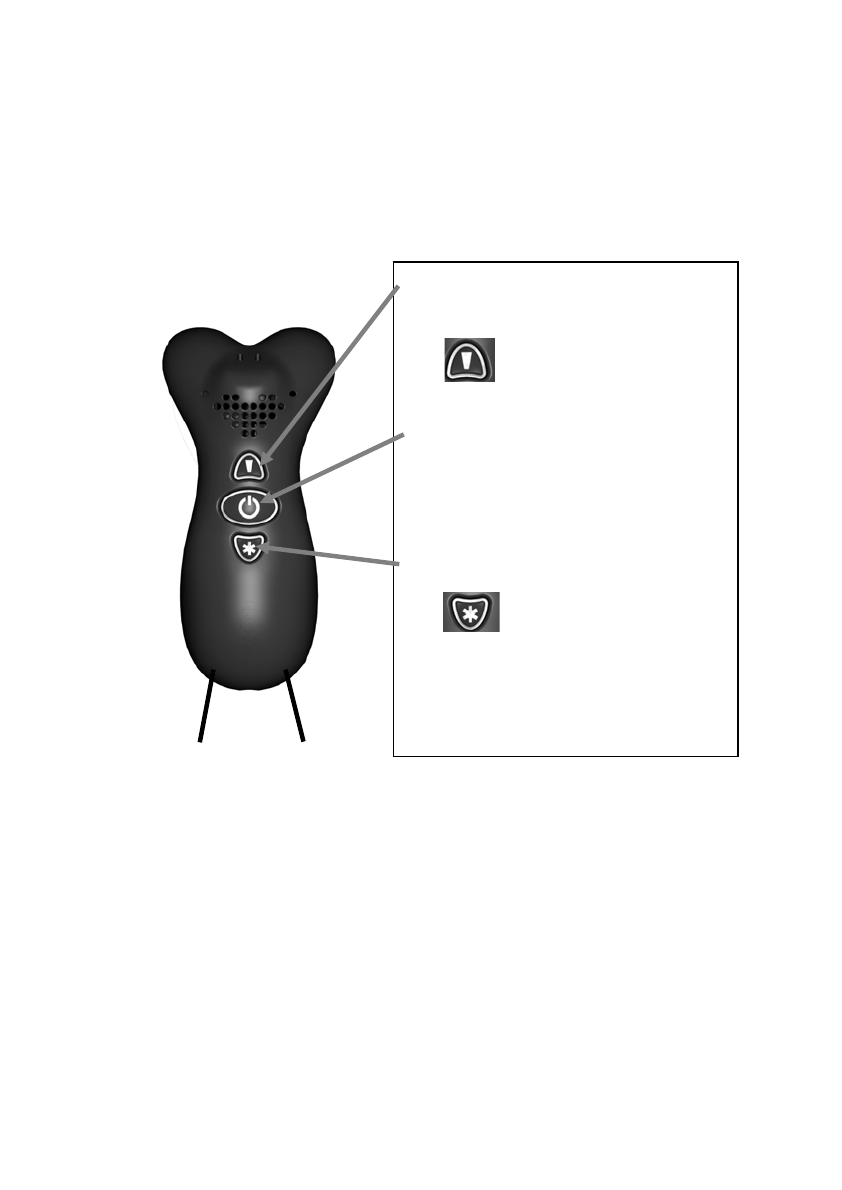
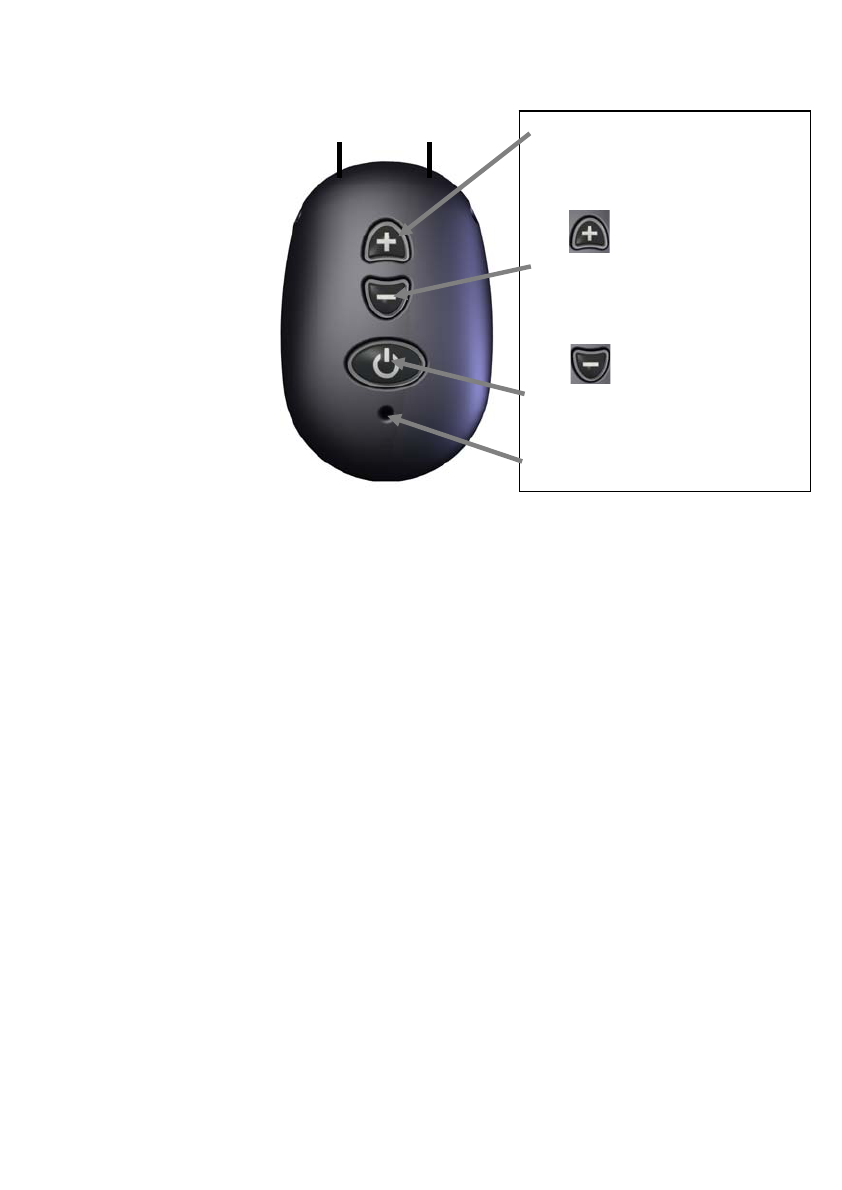
2. Microphone Set-up
3. Using the Zoom and Omni-Directional Functions
Select the boost button for additional amplification
when the speaker or sound source is too quiet.
Select the Zoom mode for one to one conversations
and when in a group listening to a speaker, lecturer
or teacher. Omni-Directional mode is used for family
or group situations where you wish to hear all the
sounds around you.
1. To switch between the zoom
and omni directional modes
press the button
A green light indicates
zoom mode is ON.
2. Switch the Microphone
ON/OFF by pressing the centre
button. A green light indicates
ON. A red light indicates
battery low.
3. To select the Boost mode
press the Button
A green light indicates
boost is ON.
4. A green light and audible
sound signals the selection of
a mode
8
Setting up Conversor Pro for the First Time
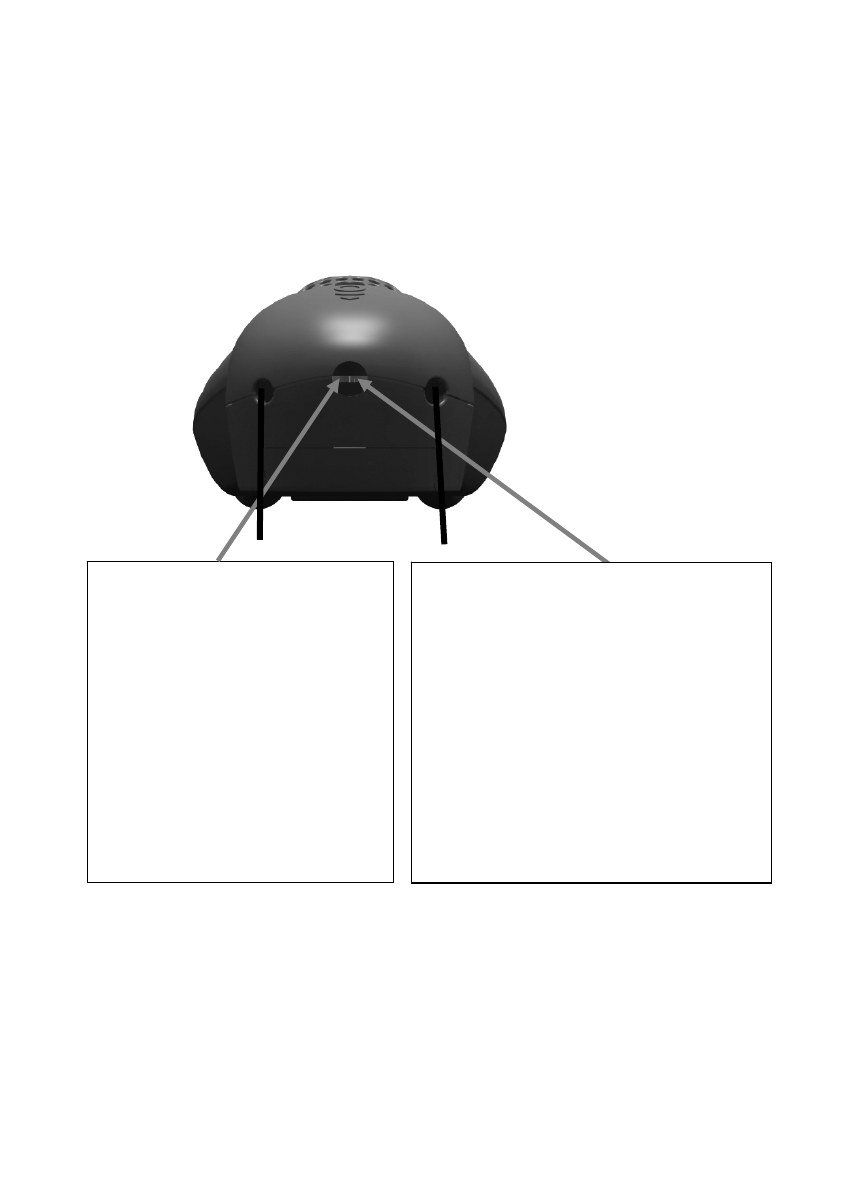
4. Setting up the Receiver
The Conversor Pro receiver has a green light when it is
“paired” correctly with the transmitter+.
If the light goes Red, the battery is low and operation
may stop within the hour. If the receiver’s light is half Red
and half Green the receiver is not paired with the
transmitter, and the receiver uses its interenal
microphone. To restore the connection between
transmitter and receiver, press the power button on the
transmitter twice (OFF then ON).
5. To use The Conversor Pro Receiver on its own
The Conversor Pro Receiver has an onboard
microphone which enables it to be used as an Assistive
Listening Device without the Transmitter. To use in this
mode, turn on only the Receiver.
+When the receiver is too far away from the transmitter, the receiver
automatically switches to the onboard microphone. The transmitter
has range of approximately 20 metres.
* Volume Memory — The Conversor Pro Receiver automatically
stores the most recent volume level selected before the unit was
switched off. This level remains selected until a new level is chosen.
Each level is indicated by a “beep” when the volume control is
pressed. When the top of the volume range is reached a higher pitch
“beep” can be heard.
1. To adjust the volume
between high and low
select the button to
increase the volume.
2. To adjust the volume*
between high and low
select the button to
decrease the volume.
3. Switch the Receiver
ON/OFF by pressing the
bottom button
4. Independent Microphone

9
Setting up Conversor Pro for the First Time
6. How to Listen with Conversor Pro
Switch your hearing instrument to 'T', but do not adjust
its volume control.
Point the Microphone at a source of sound.
As you turn up the volume control on the Receiver, you
should begin to hear sound transmitted from the
Microphone clearly.
Conversor Pro Microphone has now taken over from
your Hearing Instrument. This is a bit like having the
hearing instrument microphone in your hand. When
Conversor Pro Microphone is set to the Omni-Directional
setting, you will not yet experience the full benefit of
Conversor Pro, but this procedure will help you to match
the sound level of the Conversor Pro with your hearing
instrument.
7. Checking the sound balance
When the Hearing Instrument is set to the “T” Setting, a
buzz may be heard if the Hearing Instrument is close to
strip lighting, computers or TV Screens. Consult your
Audiologist for advice on adjusting or replacing the
Telecoil for optimum use.
It is important to match the volume levels of your hearing
instrument with Conversor Pro Receiver, so that you can
switch between the two without any increase or decrease
in sound level. Once the preferred sound level is
achieved, you are ready to try Conversor Pro in the
Zoom setting.
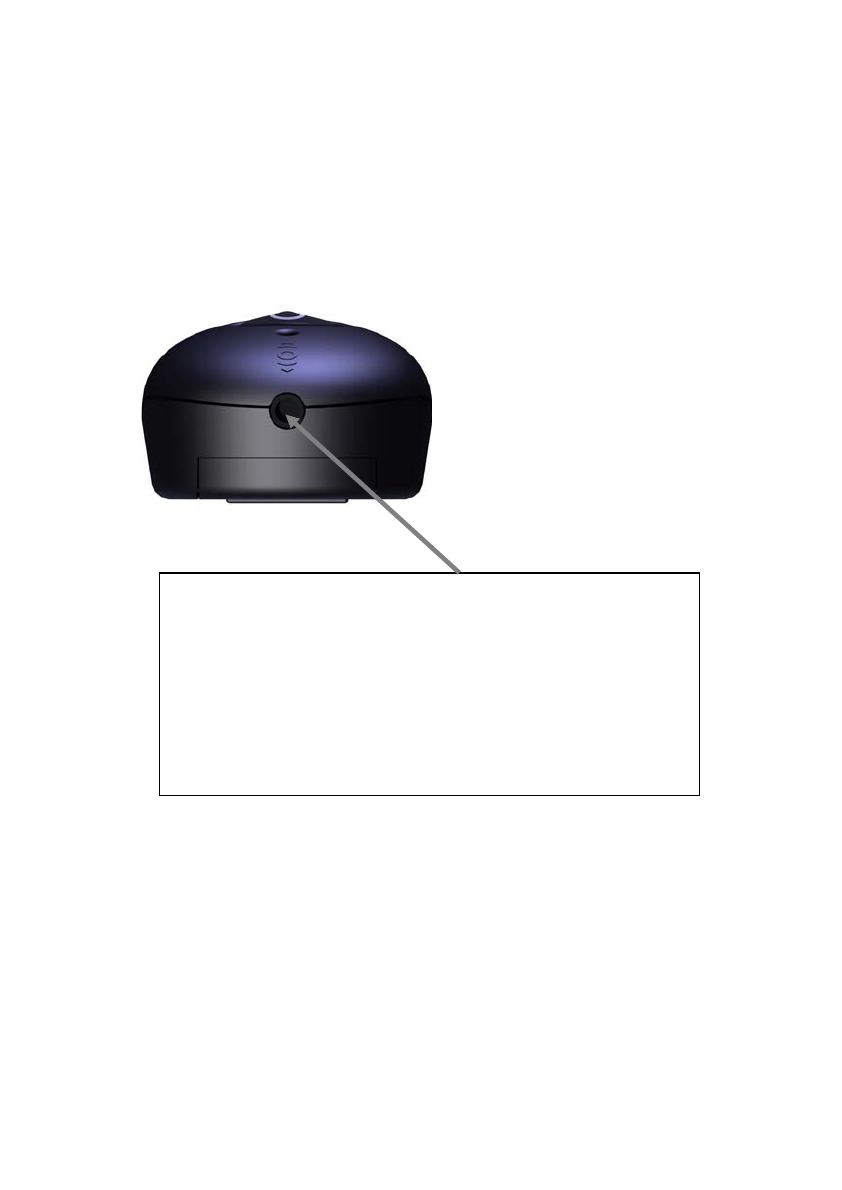
8. Sockets and Connections
Conversor Pro microphone and receiver each have one
3.5mm Jack Socket which is used for both battery
charging (see page 6) and for connection to the Audio
Jack Cable and TV Adaptor Cable (see page 10)
supplied.
10
Sockets and Connections – Microphone
The Conversor Pro Microphone can be connected to
other audio devices as described below. The following
Accessories are included in your package. Additional
units can be purchased by contacting your Distributor, or
Conversor Limited.
1. Connecting to Radio or
Stereo Hi-Fi Equipment
Use the enclosed Audio
Jack Cable supplied to
connect to the audio
devices. Plug one end into
The Conversor Pro
Microphone Audio Input
Socket and other end to the
audio device via the
headphone socket.
2. Connecting to the
Television, Sky or Cable box
Use the enclosed TV Adaptor
cable (SCART block not for use
in the USA). For connection to
the audio device, plug the Phono
cables supplied into the SCART
block and connect it to the
television, Sky or Cable box.
Connect the jack pin end to The
Conversor Pro Microphone.

11
1. Direct Audio Input (Audio Jack Cable)
Most current TV, Radio or Stereo models have a
headphone socket on the front panel. Plug the Audio
Jack Cable into this socket to connect the audio device
to The Conversor Pro Microphone.
By plugging the Audio Jack Cable into the
headphone socket on the TV or Audio Device, the
speaker of the audio device will be disconnected, so that
other people cannot listen at the same time.
2. Direct Audio Input (TV Scart Adaptor)
The SCART socket is a multi pin socket found on the
rear of many Televisions, Sky and Cable boxes. By
connecting the Scart Adaptor with the Phono Cables to
The Conversor Pro Microphone, connection to the device
is made simple and it allows other to listen to the device
as well.
3. Direct Audio Input (Phono Cables only)
If your audio device does not have a SCART socket on
the rear panel, it will most likely have Audio Phono
Sockets. These are small circular rings with a red or
white plastic insert, and they may be located on the front
or rear of the audio device (Please refer to your audio
device owner’s manual). As with the SCART Adaptor,
connection does not interrupt sound to the speakers,
allowing others to listen at the same time. You can
connect The Conversor Pro Microphone into these
sockets using the Phono Cables.
When an external sound source is connected to The
Conversor Pro, both the Zoom and Omni-Directional
microphones are switched off to eliminate surrounding
sounds. To activate the Microphone’s Omni-directional
function, simply press the Zoom / Omni-directional button
on the Microphone.
12
Sockets and Connections – Receiver
The Conversor Pro Receiver can also be used with an
earpiece or binaural headphones instead of using your
Hearing Instrument, as described below.
Simply plug the ear piece or headphones jack into
the socket located on the bottom of The Conversor
Pro Receiver.
This socket is an Audio Output Socket. It can
also be used to connect the output to desktop
speakers for added amplification. For further
information on how to use it in this way, please
contact your Distributor or Conversor Limited.
13
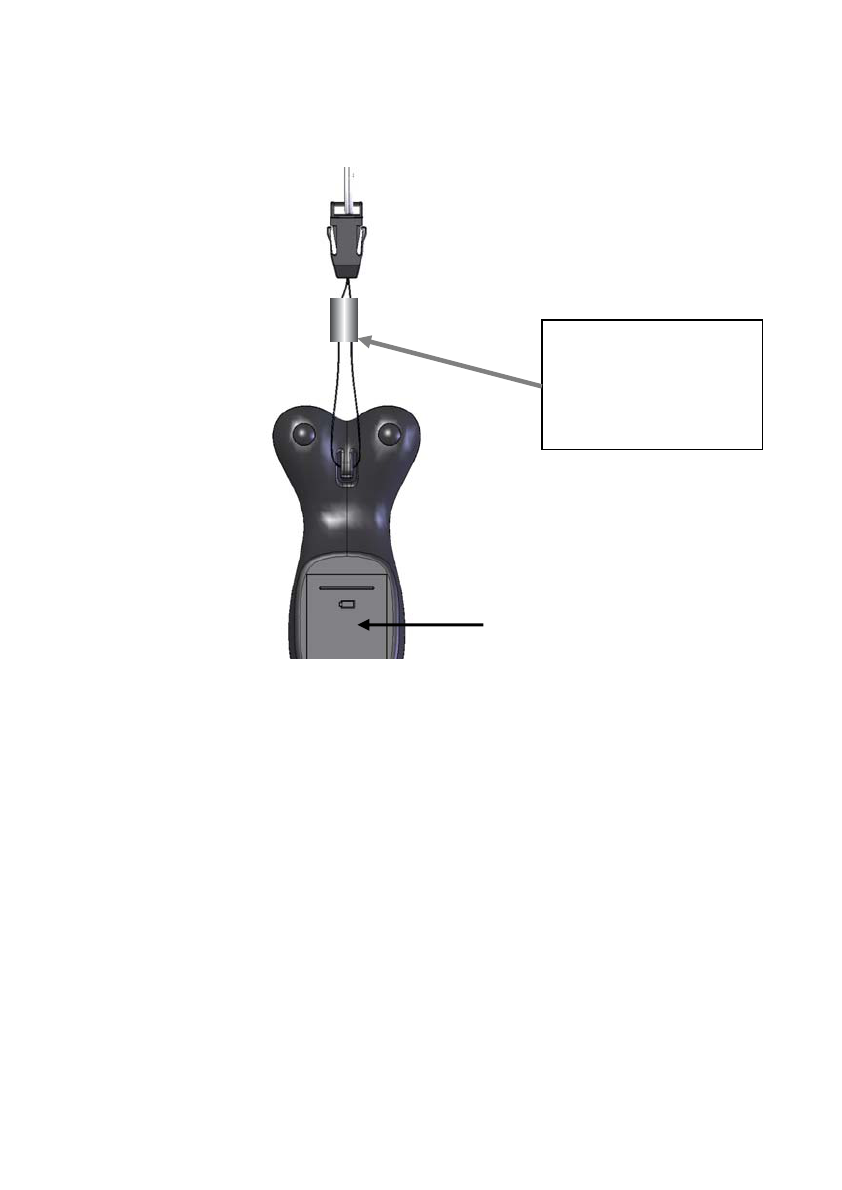
How to Use the Neck Cord with the
Conversor Pro Microphone
The Neck Cord allows the speaking companion to wear
The Conversor Pro Microphone around his or her neck
for hands-free convenience and greater mobility during
conversation, such as in the car.
The Neck Cord is attached to The Conversor Pro
Microphone by slipping it onto the tab on the back of the
Microphone, as shown above. Simply adjust the Neck
Cord length to suit.
Batter
y
cover
Slide down
sleeve to secure
the microphone
Slide up to release
14
Care Instructions
•The Pro has been calibrated for optimum use.
• Do not subject The Conversor Pro Microphone or
Receiver to heavy shock.
• Keep both units away from moisture and high
humidity – they are not waterproof.
• Try to avoid long periods of exposure to direct
sunlight.
• Gently coil the Receiver Neck Loop for storage
rather than tightly winding it around the unit. It
contains a wire and quick release connection,
which could be damaged.
• Do not attempt to open either The Conversor Pro
Microphone or Receiver casing (other than the
battery compartment to change the battery). They
contain no user-serviceable parts. Opening either
unit will invalidate the Manufacturer’s Warranty
(See page 22).
Conversor Pro Transmitter/
Microphone
The Conversor Pro
Pendant Receiver
15
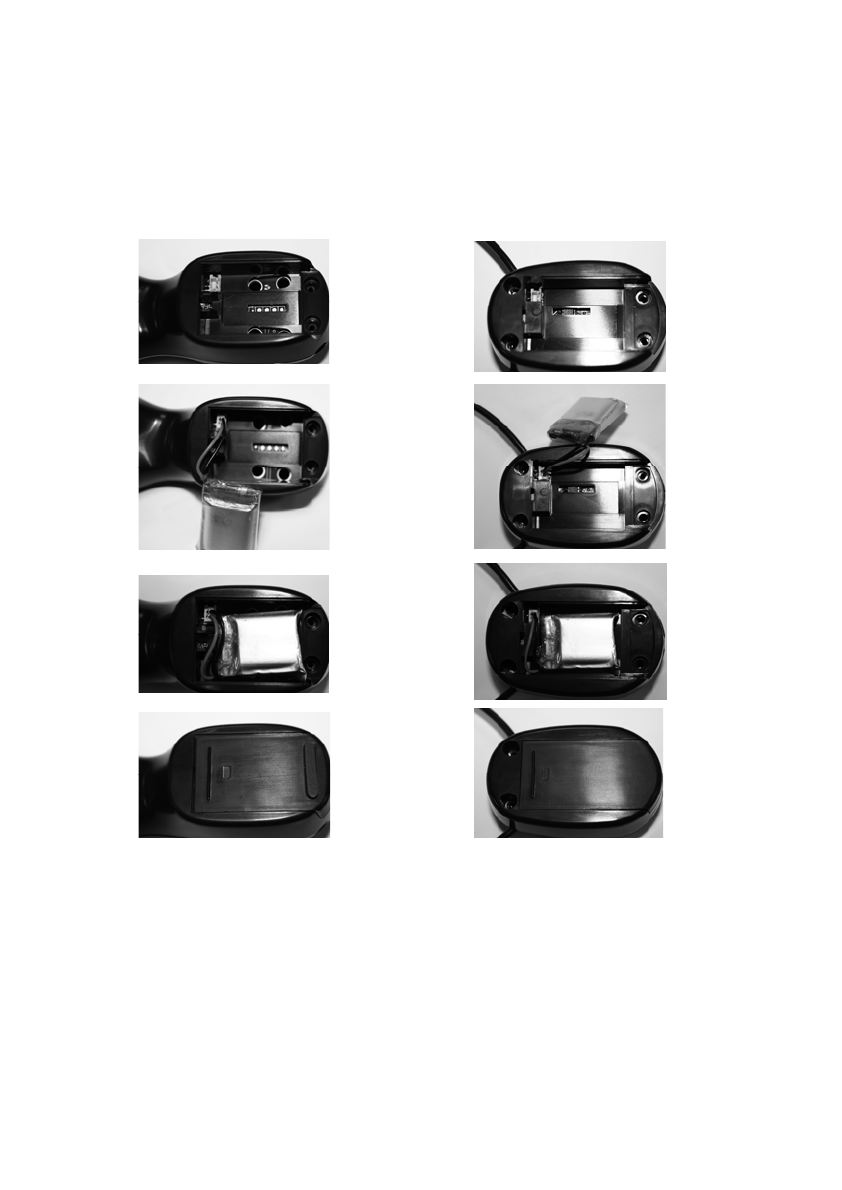
Changing the Battery
Lithium batteries are available from your distributor or
audiologist, and they can replace them for you. You can
also change them yourself, following these instructions:
Transmitter Receiver
1. Slide open the battery cover.
2. Remove the existing battery.
3. Pull out the connector.
4. Insert the new battery into the battery socket
as shown. Pay particular attention that the ridge
of the connector plug fits into the groove of
the fixed connector socket.
5. Tuck in the wires and replace the battery cover.
16
Conversor Pro in Everyday Use
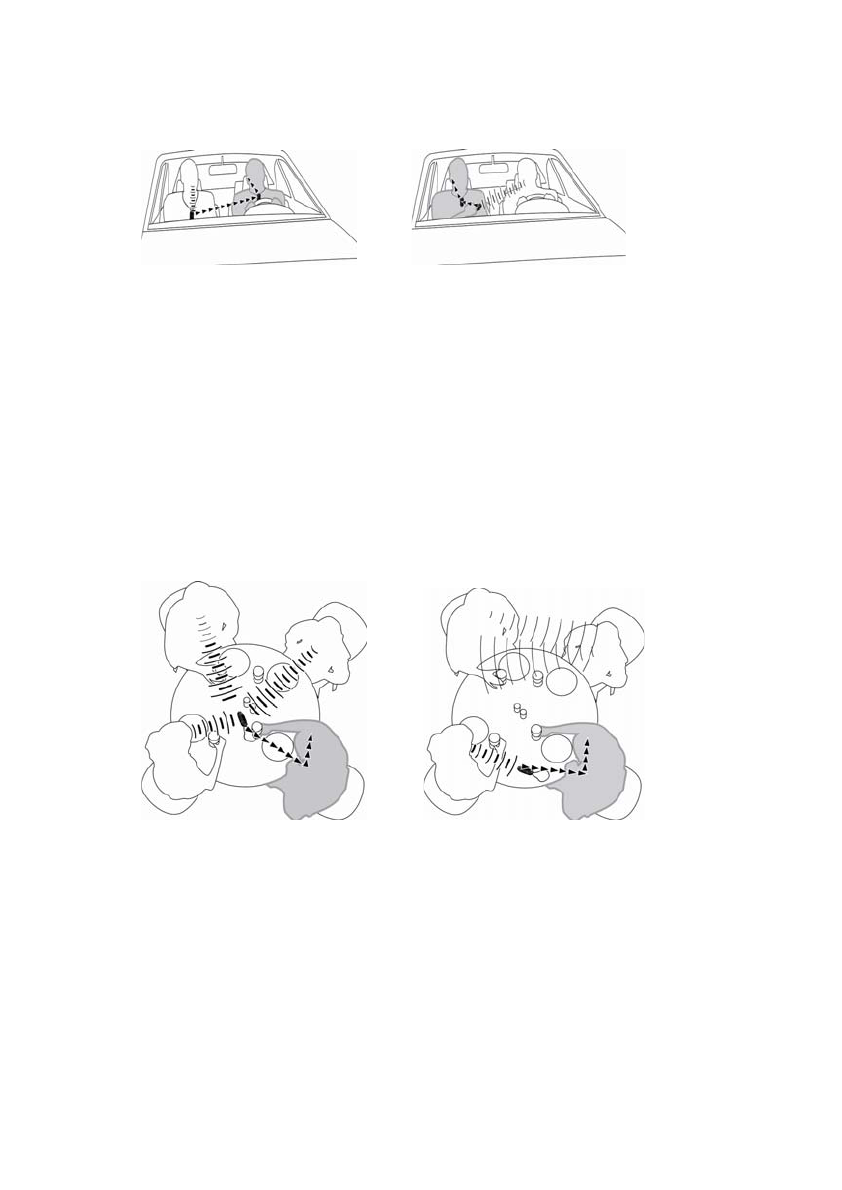
IN THE CAR
As a passenger or A driver
(Holding the (Passenger wears
Microphone) the Microphone)
The inside of a moving car can be a noisy environment,
creating listening problems for wearers of hearing
instruments. Whether you are the driver or a passenger,
Conversor Pro enables you to hear your driving
companion(s) clearly, even as a backseat passenger.
AT A FAMILY PARTY, MEAL, DINNER
OR GROUP DISCUSSION
Group Listening / or One-to-one
Discussion Conversation
For one-to-one conversation, set the Microphone to the
Zoom mode and place it on the table between you and
the person you want to converse with. Or to join in with
group discussions, select the Omni-Directional mode on
the Microphone and place it in the middle of the table.
17
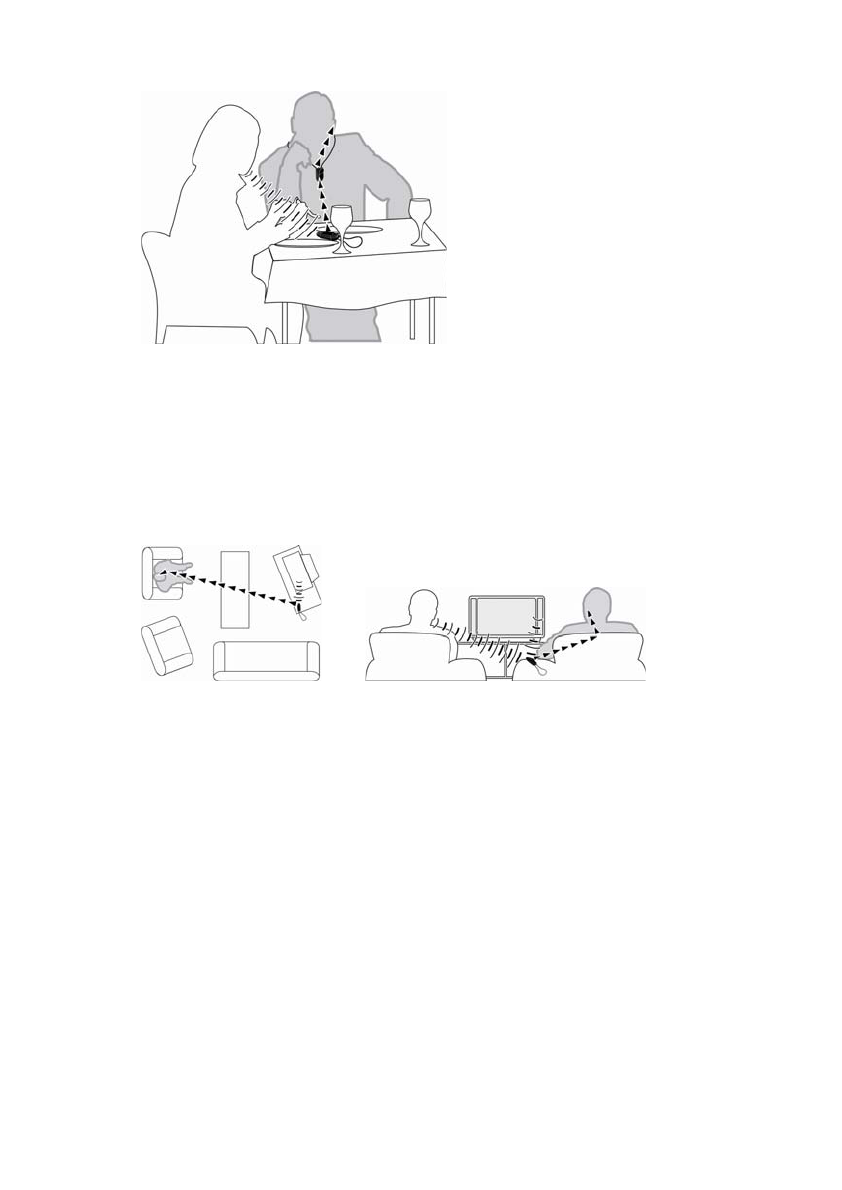
IN A CAFÉ OR RESTAURANT
Intimate conversation in a café or busy restaurant
Place the Microphone on the table close to your
companion and select the Zoom mode for relaxed
conversation, despite any loud background noises.
WATCHING TELEVISION
Watching on your own Watching with another person
With Conversor Pro there is no need to purchase a
separate TV Amplifier or Room Loop. Use Conversor Pro
to watch comfortably at home or away.
(1) Watching on your own: Place the Microphone
next to the TV for optimal sound level, or connect the
Microphone to the TV audio output or SCART connection
using the supplied accessory. (See page 11 for further
assistance on audio/visual connections).
(2) Watching with another person: Keep the
Microphone on the arm of the chair next to you and your
companion. This enables you to turn the Microphone
towards the other person for relaxed conversation, while
listening to the TV at the same time.
18
REMOTE LISTENING
Listening to the TV from another room
Place the Microphone near the TV and move about from
room to room. Your Receiver will pick up the sound
clearly from the TV up to 25 metres away, even if you
are in another room.
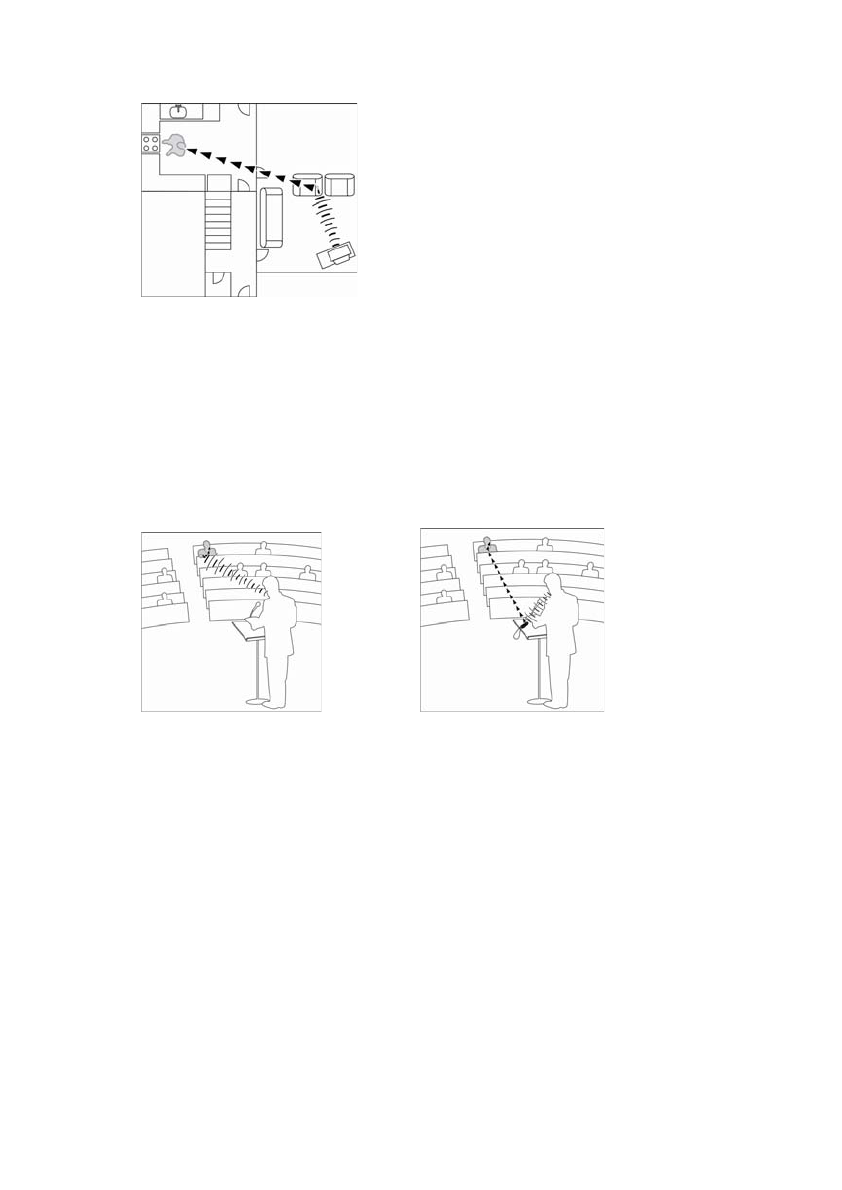
AT A LECTURE OR CONFERENCE
Held in your hand or Placed near or worn
by the speaker
Conversor Pro has been designed to give you the ability
to listen to speakers clearly from a distance. There are
two ways to achieve this:
(1) Hold the Microphone in your hand and point it at
the sound source up to 15 metres away. In a large quiet
room, select the Zoom mode in conjunction with the
Boost mode to focus on a distant speaker.
(2) Or, place the Microphone on the lectern, or ask
the speaker to wear it using the Neck Cord supplied. The
Microphone will transmit the speech up to 25 metres
away with enhanced clarity of sound to your Hearing Aid.
19
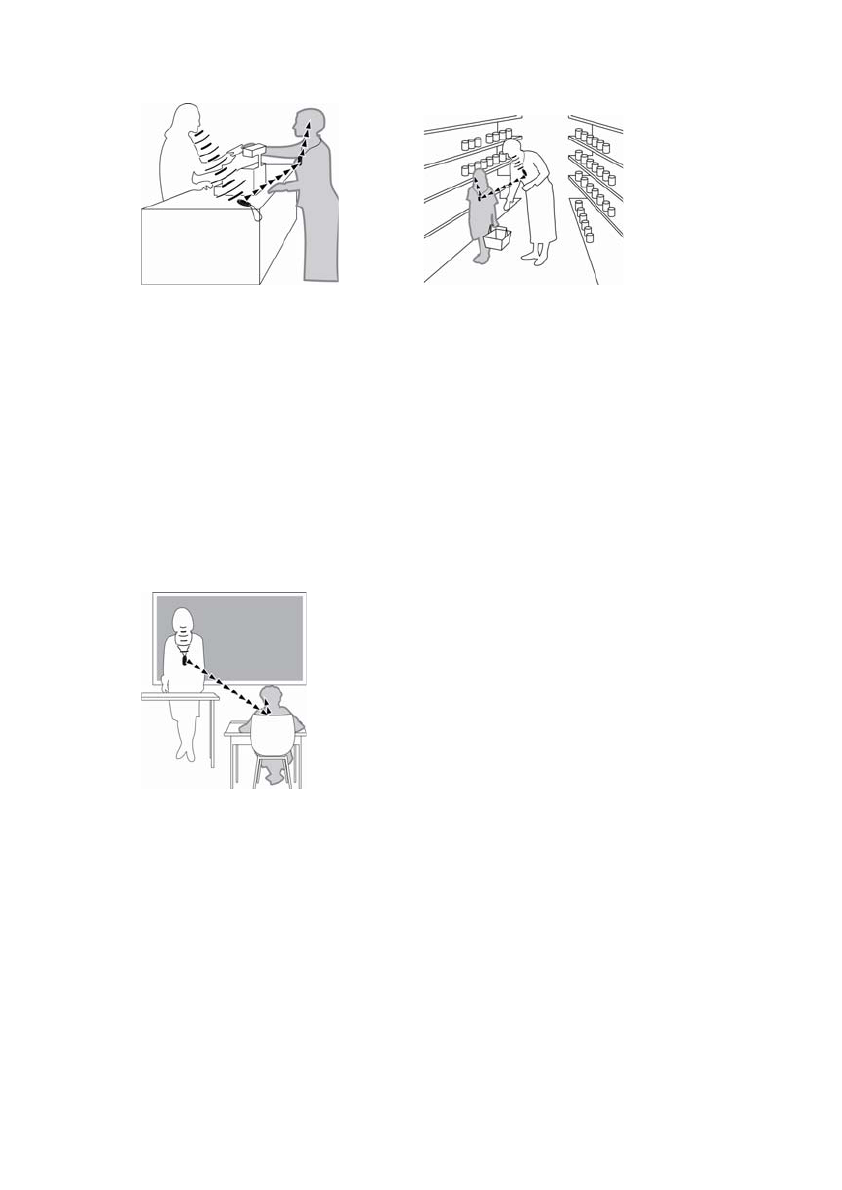
OUT SHOPPING
With a shop Assistant or With a family member or friend
Place the Microphone on the countertop to hear the shop
assistant clearly. Or, if you have a child or family
member who is Hearing Impaired, you wear the
Microphone and your hearing impaired companion wears
the Receiver. Your companion will be able to hear your
voice loud and clear in the store.
IN THE CLASSROOM
The teacher wears the Microphone on the Neck Cord supplied.
Using the Neck Cord supplied, the teacher wears the
Microphone when instructing the whole class. The
teacher’s voice is transmitted to the student(s) wearing
the Receiver(s) with enhanced clarity up to 25 metres
away.
During one-to-one sessions, the student may wish to
place the Microphone on his or her desk, or point it at the
teacher or other student when they are speaking.

20
ONE-TO-ONE CONVERSATION
Remote conversation or Single conversations
between rooms in a group
At home, most couples do not spend all their time
together in the same room. Have your companion wear
the Microphone using the Neck Cord supplied. By
wearing your Receiver, you will hear the other person
with clarity, and be able to converse at comfortable
levels despite being in different rooms. This mode of use
can also be employed when out and about – whether
shopping, going for a walk, or simply out with friends.

21
Troubleshooting
Transmitter & Receiver do not start:
Please ensure that the Transmitter and Receiver are
charged correctly. The ON/OFF buttons must be pressed
to operate both units. A green light will glow behind the
button to signal that the unit is on.
If it still does not work, please check that the charger
leads are connected properly as well as the connection
to the mains, then recharge. If this still does not solve the
problem, please contact your distributor for a battery
check / change.
Poor sound quality:
Please ensure that the range in which you are trying to
operate does not exceed the operating distance. Check
that the batteries are fully charged, as this can result in a
drop in sound quality and operating range. If the
batteries are low, the light will change from green to red.
Poor range and interference:
Conversor Pro has been designed for optimum sound
quality and range. In certain environments consisting of
iron / steel or metalwork frames, the range can be
reduced. There may also be some interfering equipment
close by such as strip lighting, PC equipment, fans or
motors. These items give off an electrical magnetic field,
which can interfere with radio equipment.
NOTE:
To identify if the environment you are in is likely to give
any interference, select the Telecoil setting on your
Hearing Instrument without Conversor Pro switched on,
and walk around the room to see if there are any unusual
sounds being picked up by the Hearing Instrument. If a
lot of interference is heard, please be aware that by
using Conversor Pro, these sounds will be amplified.

22
Manufacturer’s Warranty
The manufacturer, Conversor Limited, issues a two-year limited warranty to
the original consumer of this product. This warranty will go into effect upon the
date of original purchase of this equipment, and shall remain in effect for two
calendar years from that date.
What is covered by this warranty?
Any electronic component which, because of workmanship, manufacturing, or
design defects, fails to function properly under normal use during the life of this
warranty will be replaced or repaired at no charge for parts or labor when
returned to the point of purchase. Transportation costs shall be paid by the
customer. If it is determined that repair is not feasible, the entire unit may be
replaced with an equivalent unit upon mutual agreement of the Distributor and
the customer.
What is not covered by this warranty?
This two-year limited warranty does not apply to:
• Malfunctions resulting from abuse, neglect, or accident.
• Peripheral accessories as itemized within the product brochure, when
such items are returned after 90 days from the original purchase.
• Batteries, Transmitter Microphone Wrist Strap and Receiver Neck Loop.
• Instruments installed, connected, used, or adjusted in a manner
contrary to the instructions provided.
• Consequential damages and damages resulting from delay or loss of
this unit. The exclusive remedy under this warranty is strictly limited to
repair or replacement as herein provided.
• Products damaged in transit unless investigated by the shipper and
returned to the warrantor with the investigation report.
The manufacturer reserves the right to make changes in the design or
construction of any of its products at any time without incurring any obligation
to make any changes whatsoever on units previously purchased.
This warranty is in lieu of all other expressed warranties by the manufacturer.
No representative or person is authorized to represent or assume for the
manufacturer any liability in connection with the sales or use of this products
other than as set forth above.
If your unit requires service under the terms of this warranty, carefully package
the complete product to prevent damage in transit and return it to the point of
purchase. Include a detailed description of the problem, your full name, billing
and shipping address, and telephone number.
The above warranty does not affect any legal rights that you might have under
applicable national legislation governing the sale of consumer goods. Your point
of purchase may have issued a warranty that goes beyond the clauses of this
limited warranty. Please consult your point of purchase for further information.
FCC ID: QA6-CONVERSPRO
IC: 5529A-CONVERSPRO
This device complies with Part 15 of the
FCC Rules. Operation is subject to the
condition that this device does not cause
harmful interference.
Changes or modifications not expressly
approved by the party responsible for
compliance could void the user’s
authority to operate the equipment.
When the transmitter is operating, users
should ensure that no other radio
transmitters – such as cell phones – are
operating within 20 cm of it.

24
Contact Details:
Made in the EU for Conversor Limited
www.conversorproducts.com