Cooper Lighting HWAS1BLE40 HALO Home Anyplace Switch User Manual 72 SW1TCH MANB2 2
Cooper Lighting LLC HALO Home Anyplace Switch 72 SW1TCH MANB2 2
User manual
eaton.com/halohome
HWAS1BLE40AWH
Simple. Secure.
SMART ANYPLACE BLUETOOTH DIMMER SWITCH
2
Simple. Secure.
SMART ANYPLACE BLUETOOTH DIMMER SWITCH
Wirelessly control smart lights or smart switch
from anywhere in your home.
Indoor use only.
Must have Halo Home compatible lights installed
and powered to use switch.
*May also be used with non-dimmable devices.
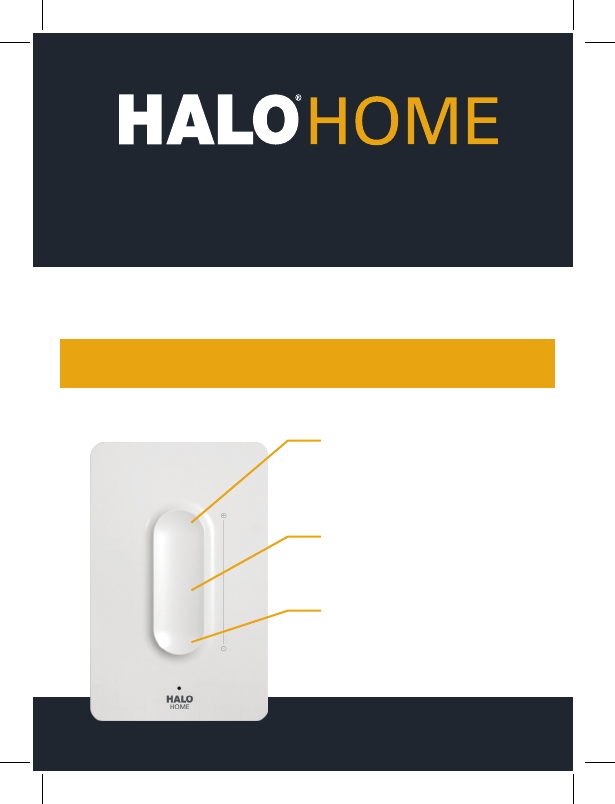
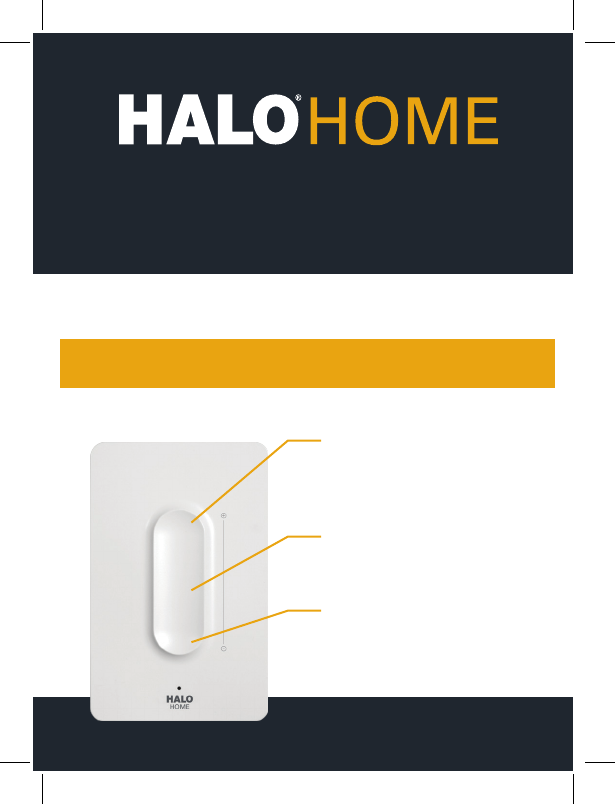
Press to turn on
Slide up/down for dimming*
Press to turn off
3
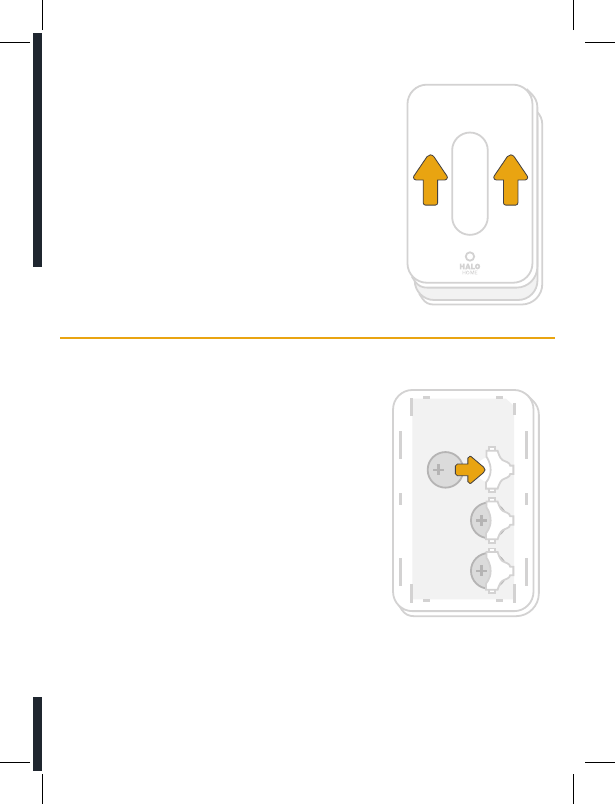
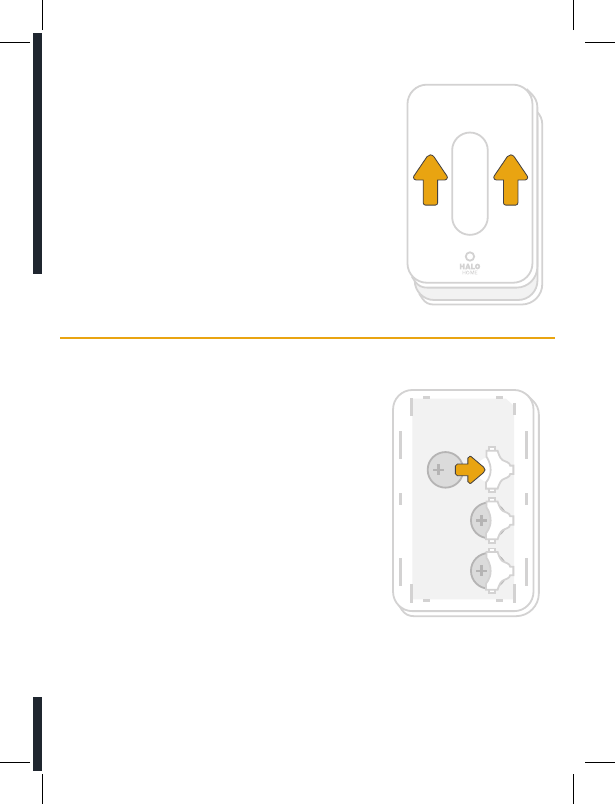
1Removing the back panel
Press thumbs forward on the front of the
switch, near the top. The back panel should
slide down opposite the switch. Lift the back
panel off.
2Once the back panel has been removed,
insert the 3 provided CR2032 Batteries
(Energizer Lithium recomended) in the
location shown with the “positive” side of
the battery facing you.
IMPORTANT: The red indicator light should
come on for about 1 second and go off. If the
light stays on permanently, it is necessary
to remove the batteries and reinstall them
again. The switch will not function if the light
is on permanently.
CAUTION: Danger of explosion if battery is
incorrectly replaced. Replace only with the
same or equivalent type.
WARNING: The battery (battery or batteries or battery pack) shall not be
exposed to excessive heat such as sunshine, fire or the like.

4
3
4
Adding the switch to the APP
• Go to the HALO Home app.
• Press the “ “ menu button in the upper left and navigate to
“controllers” and the press the “+” button on the screen.
• Next, Press the button on the Switch so that the red light is flashing
a double flash.
- At this point you should see the switch appear on the screen.
• If the switch does not appear in the screen before the flashing light
goes off, then press the button on the switch again and repeat the
process.
• Select the switch and press “Done.” It may take up to 30 seconds for
this process to complete.
Note: If the switch does not successfully add before the flashing light
goes off, then press the button on the switch again and repeat the
process.
• At that point the switch will be added and you will be ready to associate
it to a device.
Connect the switch to HALO Home devices
• If you want to associate to a single device, select the “Devices” tab
at the bottom.
- Swipe the device photos left or right until you find the device
you want.
• To associate to a group of devices, create a group if you have not
done so already. Then press the “Groups”
Note: You must create the group before you associate with the switch.
• Next swipe the group photos left or right until you find the group you
want.
5
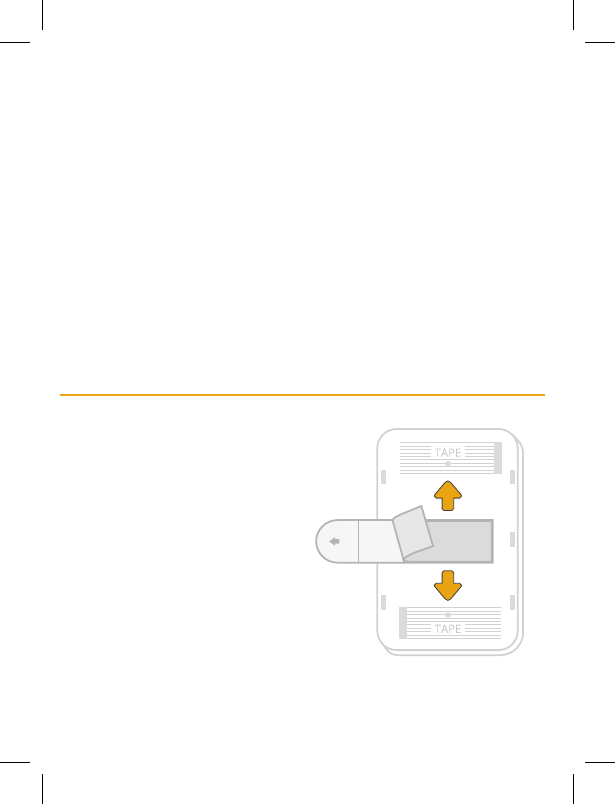
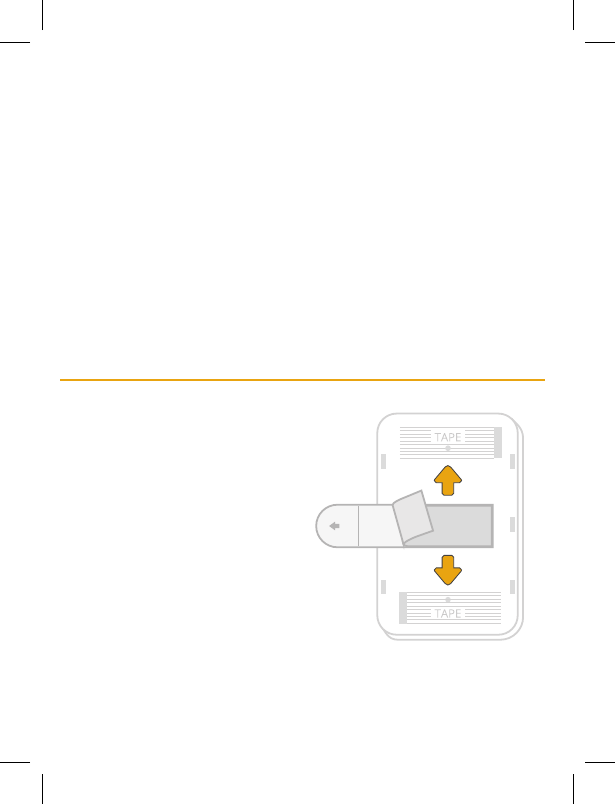
Mounting by tape
Attach using the provided screws,
or to mount with tape: Find the side
of the tape marked “Wall side” and
make sure it is facing you.
Remove the opposite side of the
tape and stick to the area on the
switch marked “Tape”. Push the tab
through the slot.
• If you like, you can give the switch a name and a photo by touching the
switch name or photo.
• Before your switch will work, it is necessary to save the configuration to
the switch. There are two steps to this process:
1) Hit “Save” in the upper right corner of the app screen.
2) Then, Press the button on the switch.
• Pressing the button on the switch is necessary because the switch
circuitry stays “asleep” unless someone is specifically touching it. This is
done to extend the battery life.
• You will know that the switch has properly saved when the app closes
the association screen and returns to the controller dashboard, and you
will also see the device or group name on the switch dashboard.
IMPORTANT: If you do not press the button on the switch and see the app
close the association screen, the changes will not be saved to the switch
and it will not work as expected.
6
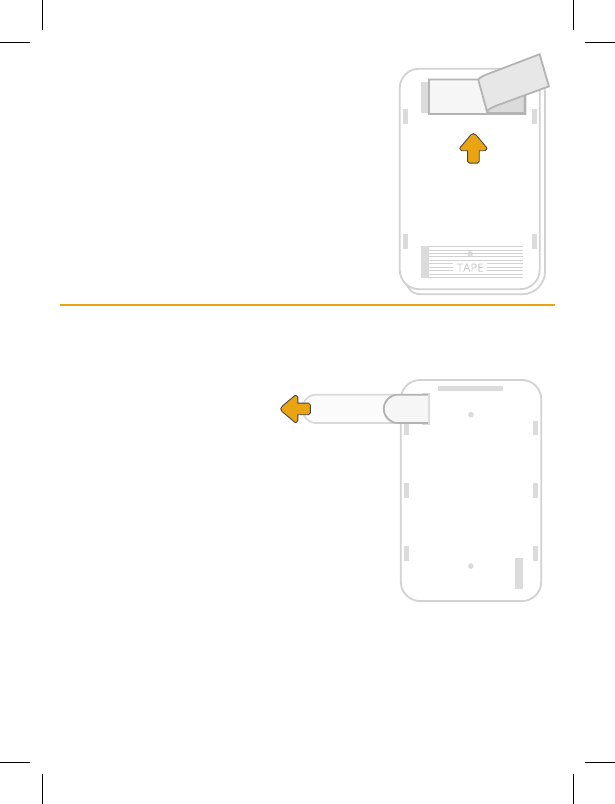
Remove the side of the tape marked
“Wall side”.
Make sure the area you want to mount the
switch is clean and free from dust. Stick in
place and press firmly for 10 seconds.
Note: Wall mounting is not required. Switch
can also be used as a hand held device.
Removing from the wall
If it is necessary to relocate the switch to a new location:
Remove the front plate and set aside.
If affixed with tape:
Hold the switch with
one hand, and pull
the tape tab sideways
with the other.
Be careful to pull evenly and slowly and as
sideways as possible (along the wall surface).
Remove one tape and then the other. If a
tape does not fully remove or breaks, twist
the back cover slowly and carefully to remove.
DO NOT PULL THE SWITCH OFF THE WALL
AS THIS WILL LIKELY DAMAGE THE WALL
SURFACE.
If affixed with screws: Simply remove the screws and replace in a
different location.
The Halo Home Switch uses tape specifically designed to be removed
without damaging wall surfaces. However, each surface is unique.
EATON ASSUMES NO LIABILITY FOR DAMAGE RESULTING FROM
REMOVING THE SWITCH.

7
FCC
This equipment has been tested and found to comply with the limits
for a Class B digital device, pursuant to part 15 of the FCC Rules. These
limits are designed to provide reasonable protection against harmful
interference in a residential installation. This equipment generates, uses
and can radiate radio frequency energy and, if not installed and used in
accordance with the instructions, may cause harmful interference to radio
communications. However, there is no guarantee that interference will
not occur in a particular installation. If this equipment does cause harmful
interference to radio or television reception, which can be determined by
turning the equipment off and on, the user is encouraged to try to correct
the interference by one or more of the following measures:
- Reorient or relocate the receiving antenna.
- Increase the separation between the equipment and receiver.
- Connect the equipment into an outlet on a circuit different from that to
which the receiver is connected.
- Consult the dealer or an experienced radio/TV technician for help.
This device complies with FCC radiation exposure limits set forth for an
uncontrolled environment. This equipment must be installed and operated
in accordance with provided instructions and the antenna(s) used for this
transmitter must be installed to provide a separation distance of at least
20 cm from all persons.
This device complies with Part 15 of the FCC Rules. Operation is subject to
the following two conditions:
(1) this device may not cause harmful interference, and
(2) this device must accept any interference received, including
interference that may cause undesired operation.
CAUTION!
Any changes or modifications not expressly approved by the party
responsible for compliance could void the user’s authority to operate the
equipment.
Bluetooth
The Bluetooth® word mark and logos are registered trademarks owned by
Bluetooth SIG, Inc. and any use of such marks by Eaton is under license.
Other trademarks and trade names are those of their respective owners.

8
Industry Canada
This device complies with Industry Canada’s licence-exempt RSSs.
Operation is subject to the following two conditions:
(1) This device may not cause interference; and
(2) This device must accept any interference, including interference that
may cause undesired operation of the device.
Le présent appareil est conforme aux CNR d’Industrie Canada applicables
aux appareils radio exempts de licence. L’exploitation est autorisée aux
deux conditions suivantes :
(1) l’appareil ne doit pas produire de brouillage, et
(2) l’utilisateur de l’appareil doit accepter tout brouillage radioélectrique
subi, même si le brouillage est susceptible d’en compromettre le
fonctionnement.
The device meets the exemption from the routine evaluation limits in
section 2.5 of RSS 102 and compliance with RSS-102 RF exposure, users
can obtain Canadian information on RF exposure and compliance.
This transmitter must not be co-located or operating in conjunction with
any other antenna or transmitter. This equipment should be installed and
operated with a minimum distance of 20 centimeters between the radiator
and your body.
5-Year Limited Warranty
THE FOLLOWING WARRANTY IS EXCLUSIVE AND IN LIEU OF ALL OTHER
WARRANTIES, WHETHER EXPRESS, IMPLIED OR STATUTORY INCLUDING,
BUT NOT LIMITED TO, ANY WARRANTY OF MERCHANTABILITY OR
FITNESS FOR ANY PARTICULAR PURPOSE.
Eaton warrants to customers that, for a period of five years from the date
of purchase, Eaton products will be free from defects in materials and
workmanship. The obligation of Eaton under this warranty is expressly
limited to the provision of replacement products. This warranty is extended
only to the original purchaser of the product. A purchaser’s receipt or other
proof of date of original purchase acceptable to Eaton. This is required
before warranty performance shall be rendered. This warranty does not
apply to Eaton products that have been altered or repaired that have
been subjected to neglect, abuse, misuse or accident (including shipping
damages). This warranty does not apply to products not manufactured
by Eaton which have been supplied, installed, and/or used in conjunction

9
with Eaton products. Damage to the product caused by replacement bulbs
or corrosion or discoloration of brass components are not covered by this
warranty.
LIMITATION OF LIABILITY:
IN NO EVENT SHALL EATON BE LIABLE FOR SPECIAL, INDIRECT,
INCIDENTAL, OR CONSEQUENTIAL DAMAGES (REGARDLESS OF THE
FORM OF ACTION, WHETHER IN CONTRACT, STRICT LIABILITY, OR IN
TORT INCLUDING NEGLIGENCE), NOR FOR LOST PROFITS; NOR SHALL
THE LIABILITY OF EATON FOR ANY CLAIMS OR DAMAGE ARISING OUT
OF OR CONNECTED WITH THESE TERMS OR THE MANUFACTURE, SALE,
DELIVERY, USE, MAINTENANCE, REPAIR OR MODIFICATION OF EATON
PRODUCTS, OR SUPPLY OF ANY REPLACEMENT PARTS THEREFORE,
EXCEED THE PURCHASE PRICE OF EATON PRODUCTS GIVING RISE TO
A CLAIM. NO LABOR CHARGES WILL BE ACCEPTED TO REMOVE OR
INSTALL FIXTURES.
To obtain warranty service, please contact Eaton, at 1-800-334-6871, press
option 2 for Customer Service, or via e-mail
ConsumerProducts@eaton.com and include the following information:
• Name, address and telephone number
• Date and place of purchase
• Catalog and quantity purchase
• Detailed description of problem
All returned products must be accompanied by a Return Goods
Authorization Number issued by the Company and must be returned
freight prepaid. Any product received without a Return Goods
Authorization Number from the Company will be refused. Eaton is not
responsible for merchandise damaged in transit. Repaired or replaced
products shall be subject to the terms of this warranty and are inspected
when packed. Evident or concealed damage that is made in transit should
be reported at once to the carrier making the delivery and a claim filed
with them. Reproductions of this document without prior written approval
of Eaton are strictly prohibited.
Changes or modifications not expressly approved by the party responsible
for compliance could void the user’s authority to operate the equipment.
NOTE: THE MANUFACTURER IS NOT RESPONSIBLE FOR ANY RADIO
OR TV INTERFERENCE CAUSED BY UNAUTHORIZED MODIFICATIONS
TO THIS EQUIPMENT.SUCH MODIFICATIONS COULD VOID THE USER’S
AUTHORITY TO OPERATE THE EQUIPMENT.
10
Sencillo. Seguro.
INTERRUPTOR DEL ATENUADOR INTELIGENTE
BLUETOOTH DE CUALQUIER LUGAR
Controle inalámbricamente las luces inteligentes o
interruptor inteligente desde cualquier lugar de su casa
Uso en el interior solamente.
Debe tener instaladas las luces compatibles con
Halo Home y encendido para usar el interruptor.
*También se puede usar con dispositivos
no atenuadores.
Presione para encender
Deslice hacia arriba / abajo
para atenuar*
Presione para apagar
11
1Extracción del panel posterior
Presione los pulgares hacia adelante en
el frente del interruptor, cerca de la parte
superior. El panel posterior debe deslizarse
hacia abajo frente al interruptor. Levante el
panel posterior.
2Una vez que se haya retirado el panel
posterior, inserte las 3 baterías CR2032
proporcionadas (se recomienda Energizer
Lithium) en la ubicación que se muestra con
el lado “positivo” de la batería hacia usted.
IMPORTANTE: La luz indicadora roja se
encenderá durante aproximadamente 1
segundo y se apagará. Si la luz permanece
encendida permanentemente, es necesario
quitar las baterías y volver a instalarlas.
El interruptor no funcionará si la luz está
encendida permanentemente.
Cuidado: peligro de explosión si la batería
es incorrectamente remplazada. reemplace
únicamente con la misma o tipo equivalente.
Aviso: La batería (batería o baterías o paquete de baterías) no deberá
ser expuesta a calor excesivo como luz del sol, fuego o algo parecido.

12
3
4
Agregar el interruptor a la APLICACIÓN
• Vaya a la aplicación HALO Home.
• Presione el botón de menú “ ” en la esquina superior izquierda y vaya
a “controladores” y presione el botón “+” en la pantalla.
• A continuación, presione el botón en el Interruptor para que la luz roja
parpadee dos veces.
- En este punto, debería ver el interruptor aparecer en la pantalla.
• Si el interruptor no aparece en la pantalla antes de que la luz
parpadeante se apague, vuelva a presionar el botón en el interruptor y
repita el proceso.
• Seleccione el interruptor y presione “Done” (Listo). El proceso puede
tardar hasta 30 segundos en completarse.
Nota: Si el interruptor no se agrega correctamente antes de que la luz
parpadeante se apague, vuelva a presionar el botón en el interruptor
y repita el proceso.
• En ese punto, se agregará el interruptor y estará listo para asociarlo a un
dispositivo.
Conecte el interruptor a los dispositivos HALO Home
• Si desea asociarse a un solo dispositivo, seleccione la pestaña
“Dispositivos” en la parte inferior.
- Deslice las fotos del dispositivo hacia la izquierda o hacia la derecha
hasta que encuentre el dispositivo que desea.
• Para asociarlo a un grupo de dispositivos, cree un grupo si aún no lo ha
hecho. Luego presione los “Grupos”
Nota: Debe crear el grupo antes de asociarlo con el interruptor.
• Luego deslice las fotos del grupo hacia la izquierda o hacia la derecha
hasta que encuentre el grupo que desea.
• Si lo desea, puede darle un nombre y una foto al interruptor tocando el
nombre o la foto del interruptor.
13
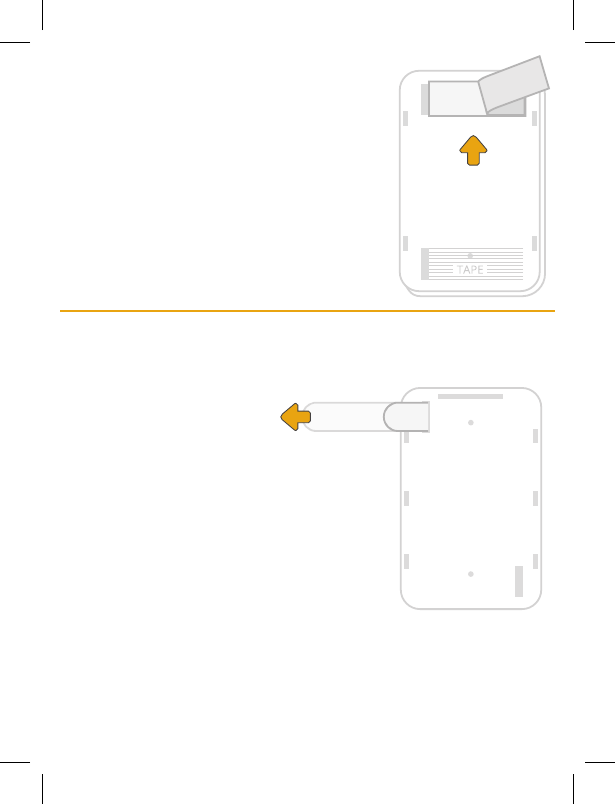
Montaje por cinta adhesiva
Móntelo usando los tornillos
proporcionados, o para montarlo
con cinta: Busque el lado de la cinta
marcado “Lado de la pared” y
asegúrese de que esté orientado
hacia usted.
Retire el lado opuesto de la cinta
y adhiérala al área en el interruptor
marcado “Cinta”. Empuja la pestaña
a través de la ranura.
• Antes de que su interruptor funcione, es necesario guardar la
configuración en el interruptor. Hay dos pasos para este proceso:
1) Presiona “Guardar” en la esquina superior derecha de la pantalla
de la aplicación.
2) Luego, presione el botón en el interruptor.
• Presionar el botón en el interruptor es necesario porque el circuito del
interruptor permanece “dormido” a menos que alguien lo toque. Esto se
hace para extender la vida útil de la batería.
• Sabrá que el interruptor se guardó correctamente cuando la aplicación
cierra la pantalla de asociación y regresa al tablero del controlador,
y también verá el nombre del dispositivo o grupo en el tablero del
interruptor.
IMPORTANTE: Si no presiona el botón en el interruptor y ve que la
aplicación cierra la pantalla de asociación, los cambios no se guardarán en
el interruptor y no funcionarán como se esperaba.
14
Retire el lado de la cinta marcado
“lado de la pared”.
Asegúrese de que el área donde desea
montar el interruptor esté limpia y libre
de polvo. Quédese en su lugar y presione
firmemente durante 10 segundos.
Nota: El montaje en la pared no es obligatorio.
El interruptor también se puede usar
como un dispositivo de mano.
Quitándose de la pared
Si es necesario reubicar el interruptor a una nueva ubicación:
Retire la placa frontal y póngala a un lado.
Si está pegado con
cinta: Mantenga el
interruptor con una
mano y tire la pestaña
de la cinta de lado con la otra.
Tenga cuidado de tirar de manera uniforme
y lenta y lo más hacia los lados posible (a lo
largo de la superficie de la pared).
Retire una cinta y luego la otra. Si una cinta
no se retira por completo o se rompe, gire la
cubierta posterior lentamente y con cuidado
para extraerla.
NO EXTRAIGA EL INTERRUPTOR DE LA
PARED, YA QUE ESTO PROBABLEMENTE DAÑARÍA
LA SUPERFICIE DE LA PARED.
Si está fijado con tornillos: Simplemente quite los tornillos y
reemplácelos en una ubicación diferente.
El interruptor Halo Home utiliza una cinta diseñada específicamente para

15
ser removida sin dañar las superficies de las paredes. Sin embargo, cada
superficie es única.
EATON NO ASUME RESPONSABILIDAD POR DAÑOS RESULTANTES DE
REMOVER EL INTERRUPTOR.
FCC
Se ha probado este equipo y se ha determinado que cumple con los límites
de un dispositivo digital Clase B, conforme a la Sección 15 de las normas
de la FCC. Estos límites están diseñados para proporcionar una protección
razonable contra las interferencias dañinas en una instalación residencial.
Este equipo genera, usa y puede irradiar energía de radiofrecuencia y, si no
se instala y usa de acuerdo con las instrucciones puede causar interferencias
dañinas en las comunicaciones de radio. No obstante, no hay garantía de
que no se produzcan interferencias en una instalación particular. Si este
equipo causa interferencias dañinas en la recepción de radio o televisión, lo
cual se puede comprobar si se enciende y apaga el equipo, se recomienda
al usuario que intente corregir la interferencia mediante una o más de las
siguientes medidas:
- Reorientar o reubicar la antena receptora.
- Aumentar la separación entre el equipo y el receptor.
- Conecte el equipo al tomacorriente de un circuito distinto de aquel al que
está conectado el receptor.
- Consulte al distribuidor o a un técnico de radio/televisión cualificado para
obtener ayuda.
Este equipo cumple con los límites de exposición a la radiación de la FCC
establecidos para un entorno no controlado. Este equipo debe instalarse y
operarse de acuerdo con las instrucciones proporcionadas y la(s) antena(s)
utilizada(s) para este transmisor deben instalarse para proporcionar una
distancia de separación de al menos 20 cm de todas las personas.
Este dispositivo cumple con la Sección 15 de las Reglas de la Comisión
Federal de Comunicaciones (FCC). Su funcionamiento está sujeto a las
siguientes dos condiciones:
(1) este dispositivo puede no provocar interferencias perjudiciales, y
(2) este dispositivo debe aceptar las interferencias recibidas, incluida la
interferencia que puede provocar un funcionamiento no deseado.
¡PRECAUCIÓN!
Cualquier cambio o modificación no aprobada expresamente por la parte
responsable del cumplimiento puede anular la autoridad del usuario para
operar el equipo.

16
Bluetooth
La palabra y los logotipos de Bluetooth® son marcas registradas propiedad
de Bluetooth SIG, Inc. y cualquier uso de tales marcas por parte de Eaton se
realiza bajo licencia. Otras marcas comerciales y nombres comerciales son
los de sus respectivos dueños.
Industria Canadá
Este dispositivo cumple con los estándares RSS exentos de licencia
de Industry Canada. Su funcionamiento está sujeto a las siguientes
dos condiciones:
(1) este dispositivo puede no provocar interferencias perjudiciales; y
(2) este dispositivo debe aceptar las interferencias recibidas, incluida la
interferencia que puede provocar un funcionamiento no deseado.
El dispositivo cumple con la exención de los límites de evaluación de
rutina en la sección 2.5 de RSS 102 y el cumplimiento con la exposición a
RF RSS-102; los usuarios pueden obtener información canadiense sobre la
exposición y el cumplimiento de RF.
Este transmisor no debe ubicarse ni funcionar conjuntamente con ninguna
otra antena o transmisor. Este equipo debe instalarse y operarse con una
distancia mínima de 20 cm entre el radiador y su cuerpo.
Garantía limitada de 5 años
LA SIGUIENTE GARANTÍA ES EXCLUSIVA Y REEMPLAZA A CUALQUIER
OTRA GARANTÍA, YA SEA EXPRESA, IMPLÍCITA O ESTABLECIDA
POR LA LEY, INCLUIDA, ENTRE OTRAS, CUALQUIER GARANTÍA DE
COMERCIALIZACIÓN O ADAPTACIÓN PARA UN OBJETIVO EN PARTICULAR.
Eaton garantiza a los clientes que, durante un período de cinco años a partir
de la fecha de compra, los productos de Eaton estarán libres de defectos en
materiales y mano de obra. La obligación de Eaton bajo esta garantía queda
expresamente limitada a la provisión de los productos de repuesto. Esta
garantía se extiende solo al comprador original del producto. Un recibo del
comprador u otra prueba de la fecha de la compra original aceptable para
Eaton. Esto es necesario antes de dar cuenta de un mal rendimiento bajo
garantía. Esta garantía no se aplica a los productos de Eaton que se hayan
modificado o reparado o que se hayan sometido a negligencia, abuso, mal
uso o accidentes (incluidos los daños en el envío). Esta garantía no se aplica
a productos no fabricados por Eaton que se hayan suministrado, instalado
y/o utilizado en conjunto con los productos de Eaton. Esta garantía no cubre
los daños al producto provocados por el reemplazo de bombillas, corrosión
o decoloración de los componentes de bronce.

17
LIMITACIÓN DE RESPONSABILIDAD:
BAJO NINGUNA CIRCUNSTANCIA EATON SERÁ RESPONSABLE POR
DAÑOS ESPECIALES, INDIRECTOS, INCIDENTALES O ACCIDENTALES
(INDEPENDIENTEMENTE DE LA FORMA DE ACCIÓN, YA SEA EN CONTRATO,
RESPONSABILIDAD ESTRICTA O EXTRACONTRACTUAL, INCLUIDA LA
NEGLIGENCIA), NI POR LAS PÉRDIDAS DE GANANCIAS; TAMPOCO EATON
SERÁ RESPONSABLE POR CUALQUIER RECLAMO O DAÑO QUE SURJA
EN RELACIÓN A ESTOS TÉRMINOS O CON LA FABRICACIÓN, VENTA,
ENTREGA, USO, MANTENIMIENTO, REPARACIÓN O MODIFICACIÓN DE
LOS PRODUCTOS, NI CON EL SUMINISTRO DE CUALQUIER PIEZA DE
REPUESTO QUE EXCEDA EL PRECIO DE COMPRA DEL PRODUCTO. NO SE
ACEPTARÁN CARGOS POR MANO DE OBRA PARA RETIRAR O INSTALAR
LOS ACCESORIOS.
Para obtener servicio de garantía, comuníquese con Eaton, al
1-800-334-6871, presione la opción 2 para Servicio al cliente, o por correo
electrónico a ConsumerProducts@eaton.com e incluya la
siguiente información:
• Nombre, dirección y número de teléfono
• Fecha y lugar de la compra
• Catálogo y cantidad comprada
• Descripción detallada del problema
Todos los productos devueltos deben estar acompañados por el Número de
autorización de bienes devueltos emitido por la compañía y debe pagarse
el transporte por anticipado. Cualquier producto recibido sin un Número
de autorización de bienes devueltos de la compañía será rechazado. Eaton
no es responsable de los daños en la mercadería durante el transporte.
Los productos reparados o reemplazados quedan sujetos a los términos de
esta garantía y se inspeccionan cuando se embalan. Los daños evidentes
u ocultos ocurridos durante el transporte deben informarse de inmediato
a la empresa transportista que realiza la entrega, y debe completarse un
reclamo. Las reproducciones de este documento sin previa aprobación por
escrito de Eaton están estrictamente prohibidas.
Cambios o modificaciones no expresamente aprobados por la parte
responsable por conformidad puede invalidar la autoridad del usuario para
operar el equipo.
NOTA: EL FABRICANTE NO ES RESPONSABLE POR CUALQUIER
INTERFERENCIA DE RADIO O TV CAUSADO POR MODIFICACIONES NO
AUTORIZADAS HACIA EL EQUIPO, DICHAS MODIFICACIONES PUEDE
INVALIDAR LA AUTORIDAD DEL USUARIO PARA OPERAR EL EQUIPO.
18
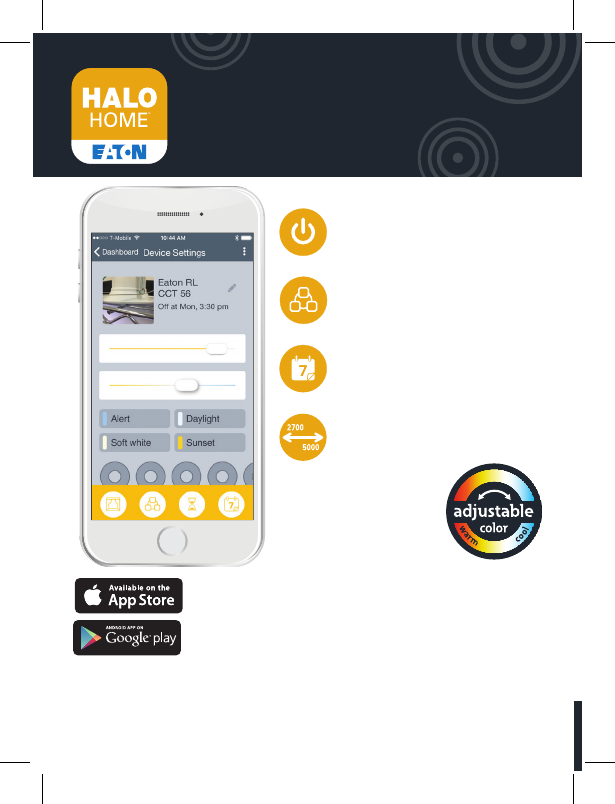
On/Off/Dim
Encendido / Apagado / Atenuado
Grouping
Agrupamiento
Scheduling
Programación
Adjustable Color Temperature
Temperatura de color ajustable
(2700K - 5000K)
Search for “Halo Home” in your app store.
Busque “Halo Home” en su tienda de aplicaciones.
Note: System limits user to 50 products, 10 scenes, 10 groups and
10 schedules.
Nota: El sistema limita al usuario a 50 productos, 10 escenas, 10 grupos
y 10 programas.
App Features
Características de la aplicación
19
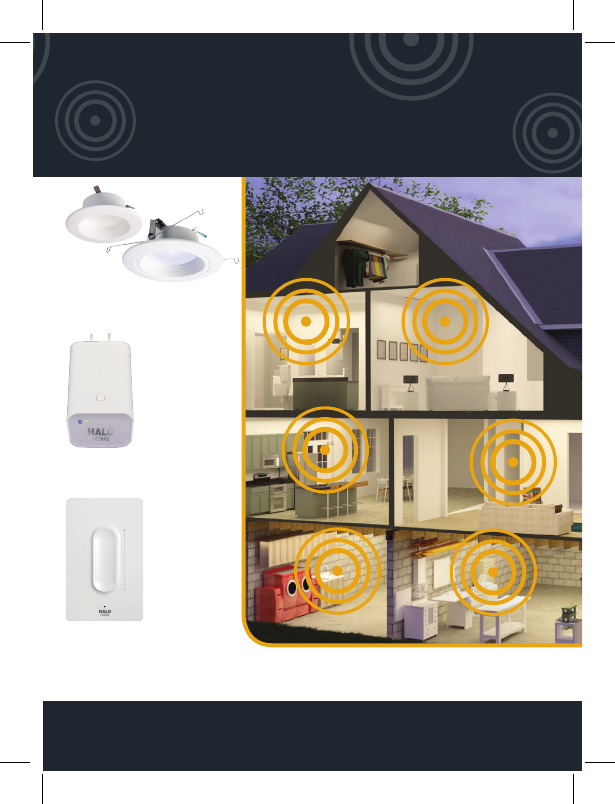
Mix and match Halo Home products
to personalize your lighting.
Mezcle y combine los productos de Halo Home
para personalizar la iluminación.
See more products at eaton.com/halohome
Vea más productos en eaton.com/halohome
internet access bridge
puente de acceso a internet
anyplace bluetooth
dimmer switch
interruptor del atenuador
bluetooth para cualquier lugar
Halo LED module
Módulo LED Halo
Eaton
1121 Highway 74 South
Peachtree City, GA 30269
P: 800-334-6871
www.eaton.com/lighting
© 2017 Eaton
All Rights Reserved
Printed in China
Publication No. IB518106EN
November 13, 2017 9:41 AM
Eaton is a registered trademark.
All trademarks are property
of their respective owners.
Product availability,
specifications, and compliances
are subject to change without
notice.