Cooper Wiring Devices RF9617 Z-Wave Plus Accessory Switch User Manual Users manual
Cooper Wiring Devices Inc Z-Wave Plus Accessory Switch Users manual
Users manual
INSTALLATION INSTRUCTIONS
WARNING:
• Turn OFF circuit breaker or remove fuse(s)
and test that power is off before wiring.
• Never wire any electrical device with power turned on. Wiring
Switch with power on may cause permanent damage to Switch
and void warranty.
• If you are not sure about any part of these
instructions, please contact a licensed
electrician.
IMPORTANT:
RF Switch will not work or will become damaged if wired incorrectly,
and warranty will be voided. Refer to wiring instructions provided on
reverse side.
CAUTION:
1. Use only with 120V AC 60 Hz.
2. Do not exceed maximum rating of the switch as indicated on
the device.
3. Must be installed and used in accordance with
electrical codes.
4. If a bare copper or green ground connection is not
available in the wallbox, contact a licensed electrician
for installation.
5. Use only #14 or #12 copper wire rated for at least
75°C with these devices. Do not use with Aluminum
wire.
NOTES:
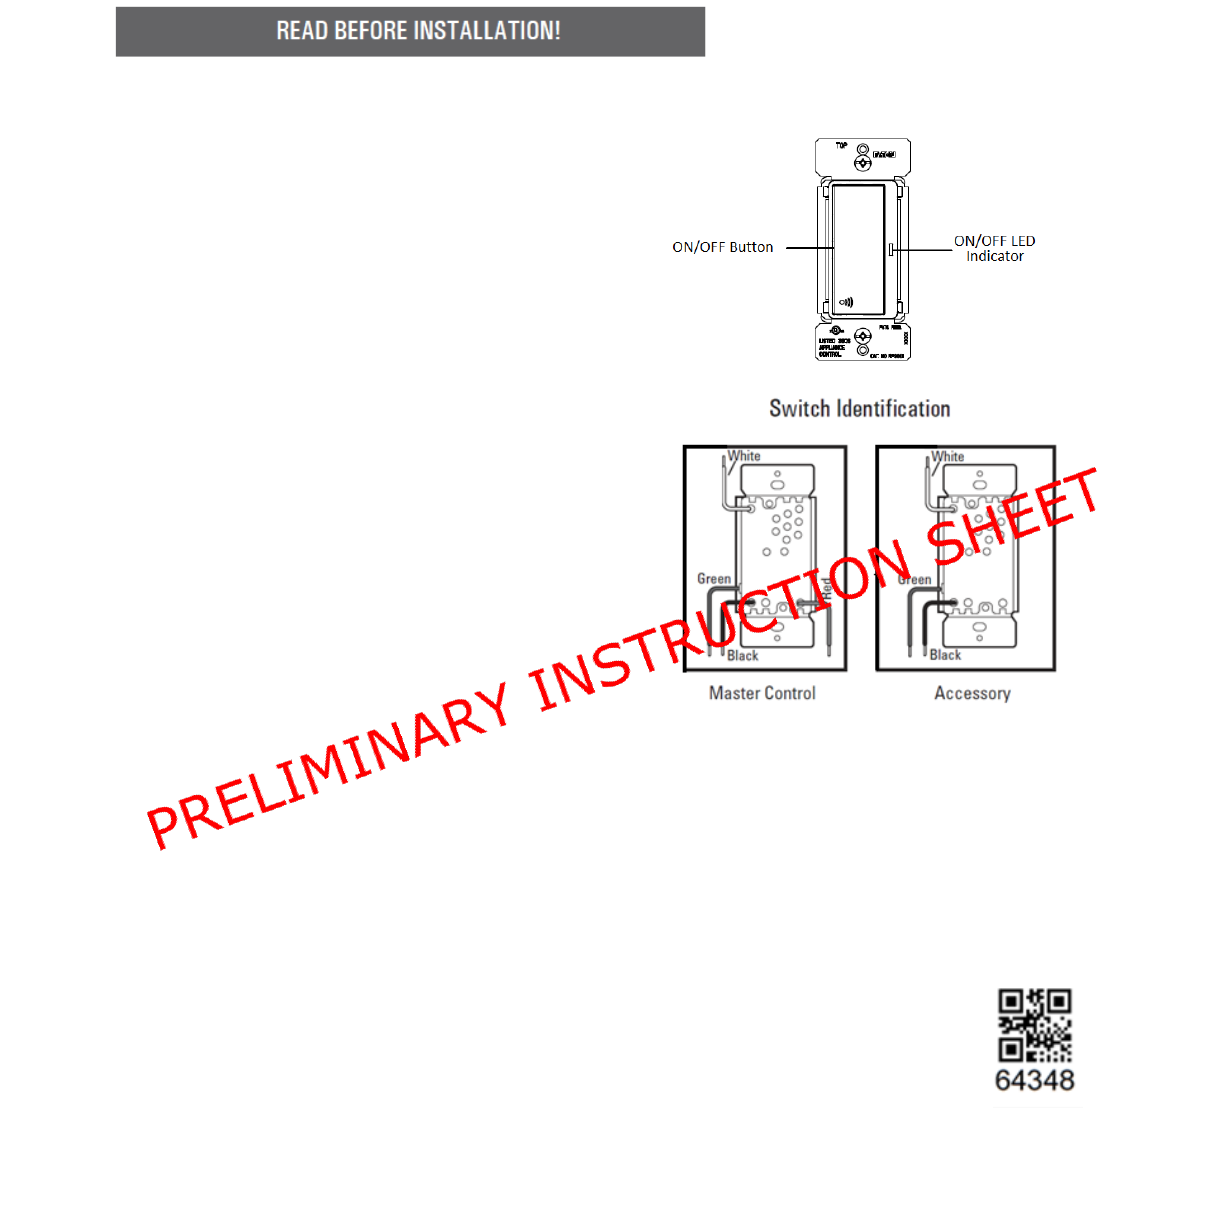
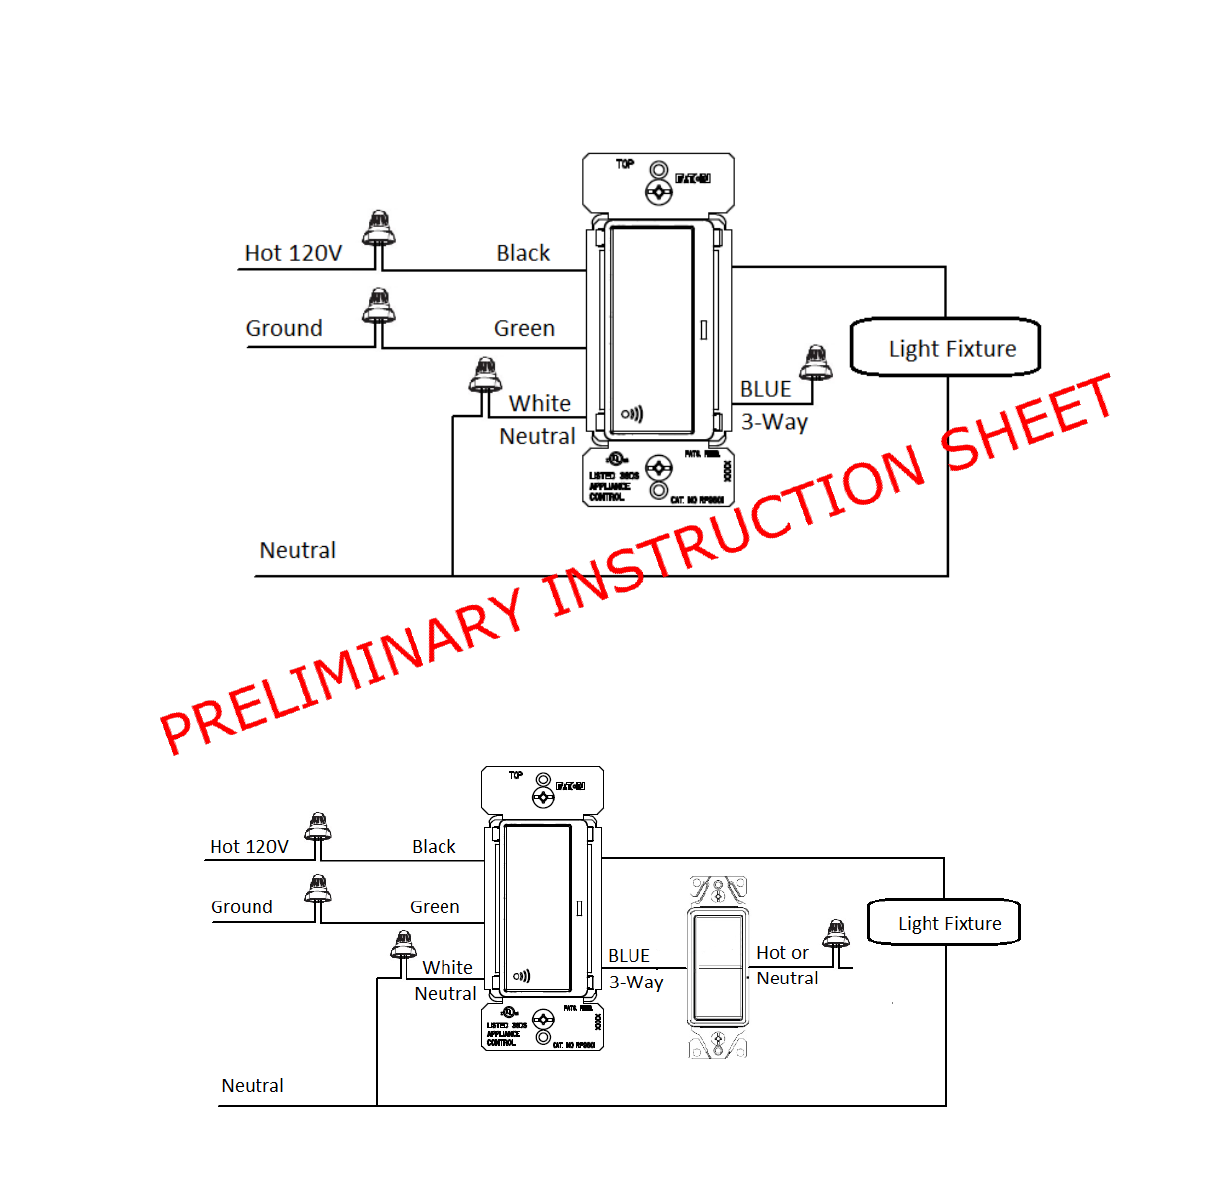
1. The RF Master Switch is wired directly to the light fixture.
2. The RF Smart Switch is not compatible with standard 3-
way switches.
3. For Multi-location applications (3-Way or 4-Way) the RF
Smart Accessory Switch (RF9617) or a regular toggle switch
could be used along with one RF Master Switch.
4. The RF Accessory Switch communicates via RF signals to
control the light from more than one location.
5. For multi-location control use RF Smart Dimmer Master
direct wired to the light along with RF Accessory (RF9642-
Z). The RF Accessory does not require direct
connection to the light (use Association function).
Z-Wave Device Network Installation Instructions
1. This product may be added to a new or existing Z-Wave
network. An Eaton Wiring Devices Z-Wave device has a blue
LED, which will blink when the device is not included in a Z-
Wave network. The LED stops blinking when the device is in a
network.
2.To include this device in a Z-Wave network, select the command
on your Z Wave controller for inclusion (Install, Add Device, Add
Node, Include Device, etc.). Then press the device switch one
time to include it in the network.
3.Based on the controller, the controller may ask to scan the QR
code or manually enter 5 digit code under the QR
code to install the device as a secured device
4. After the device is added to the network, the LED
will stop blinking.
5.To exclude this device from a Z-Wave network,
select the command on your Z-Wave controller for exclusion
(Uninstall, Remove Device, Remove Node, Exclude Device, etc.).
Then press the device switch one time to exclude it from the
network. The LED will start blinking.
6. This product works with other Z-Wave products from different
vendors and product categories as part of the same network.
OPERATION INSTRUCTIONS
• Press once to turn lights ON
• Press again to turn lights OFF.
• When lights are ON, press and hold for 2 seconds until the blue
LED blinks. After the preset delay, the lights will turn OFF (up to 4
minutes).
Change LED Indicator brightness
This feature allows the change of the brightness of the
LED indicator.
There are 5 levels (Off to Full brightness) to change the
LED indicator brightness level either while the device is
ON or OFF state.
Changing the LED indicator brightness when
the device is on ON state
o Turn the light on
o Press and hold the On/Off button for
15 seconds till the LED indicator
flashes for the second time.
o Release the button
o Single tap the ON/OFF button to
change the LED indicator level (it will
cycle between the five levels)
o Once the brightness level is chosen
then double tap on the On/Off button
and this value will be saved
Changing the LED indicator brightness when
the device is on OFF state
o Turn the light Off
o Press and hold the On/Off button for
15 seconds till the LED indicator
flashes.
o Release the button
o Use the dim button (UP/DOWN) to
change the LED indicator level (it will
cycle between the five levels)
o Once the brightness level is chosen
then double tap on the On/Off button
and this value will be saved
Local Reset
The device could be reset locally which means to be
excluded from its network and restore the default.
Before leaving the network the device will send a
notification to the controller indicating its departure.
Turn on the device
Press and hold for 20 second till the LED
flashes
Release the button
LED will flash fast and then LED will blink
indicating the switch is not part of the network
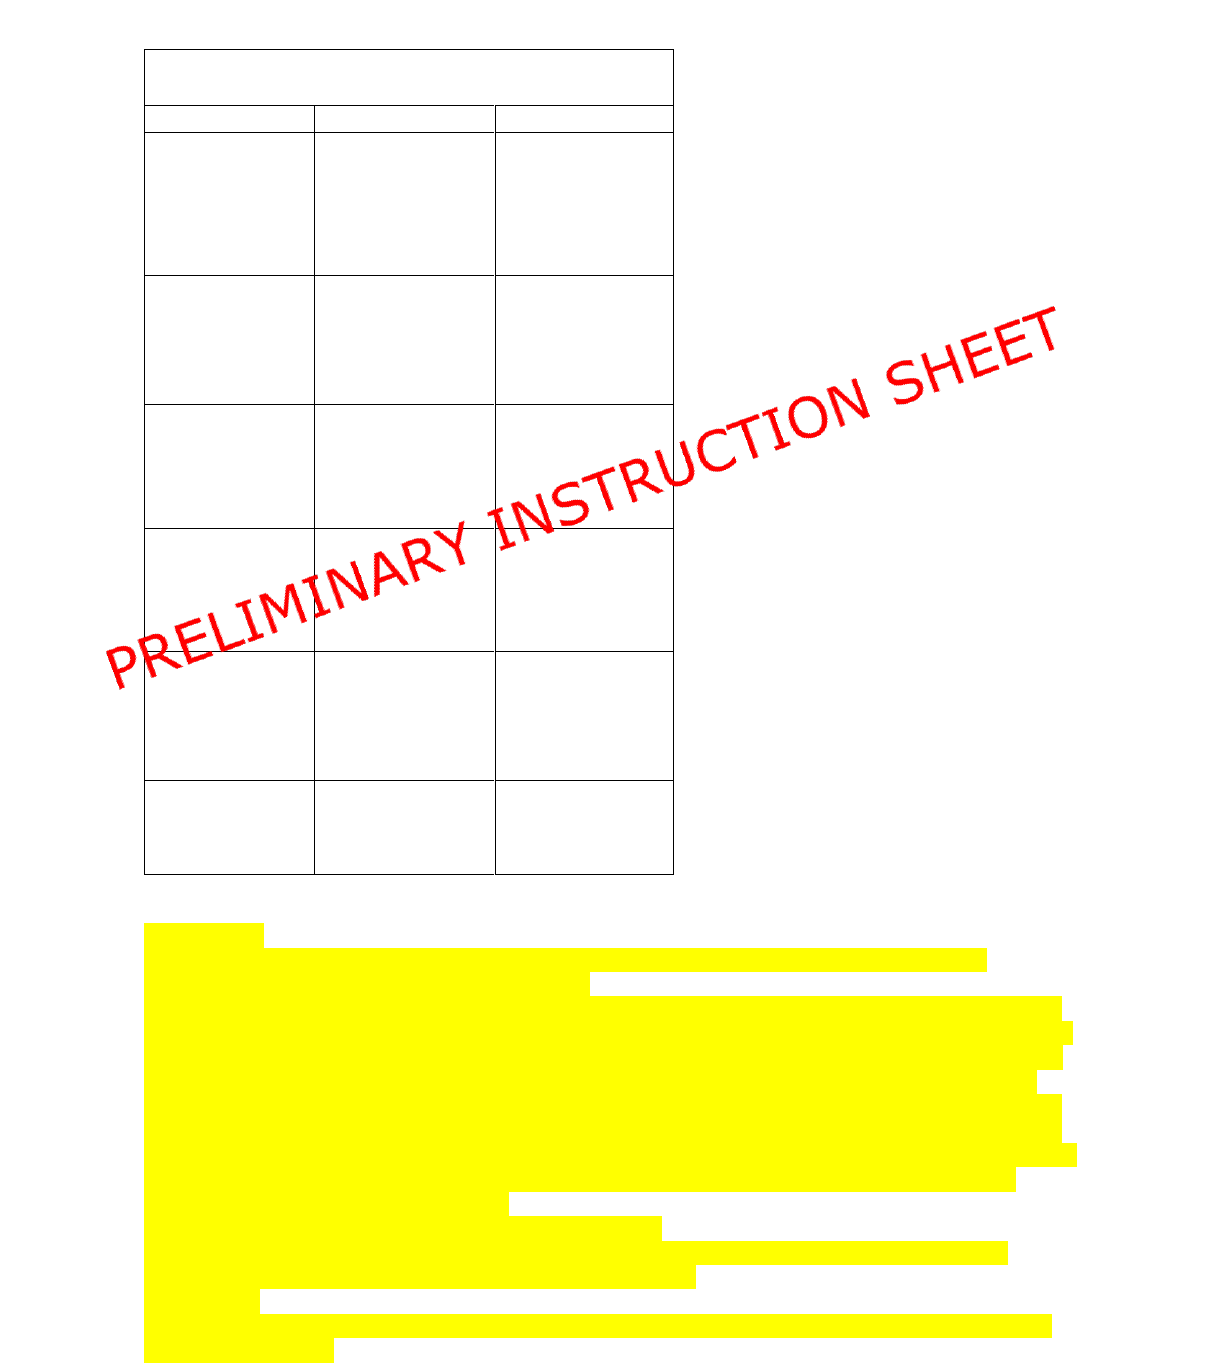
Configuration parameters
RF9601 & RF9617
Parameter
Description
Value
1
Delayed Off Time
0 to 255
2
Panic On Time
0 to 255
3
Panic Off Time
0 to 255
5
Power Up State
1=OFF 2= ON
3 = Last State
6
Panic Mode Enable
0=Off
1=On
13
BLUE LED Brightness
Level while the switch
is ON
0-4
14
BLUE LED Brightness
Level while the switch
is OFF
0-4
The following wiring diagrams are correct, but we need to change the graph to look better
Single Location (RF9601)
3-Way with an RF master switch (RF9601) and a toggle switch
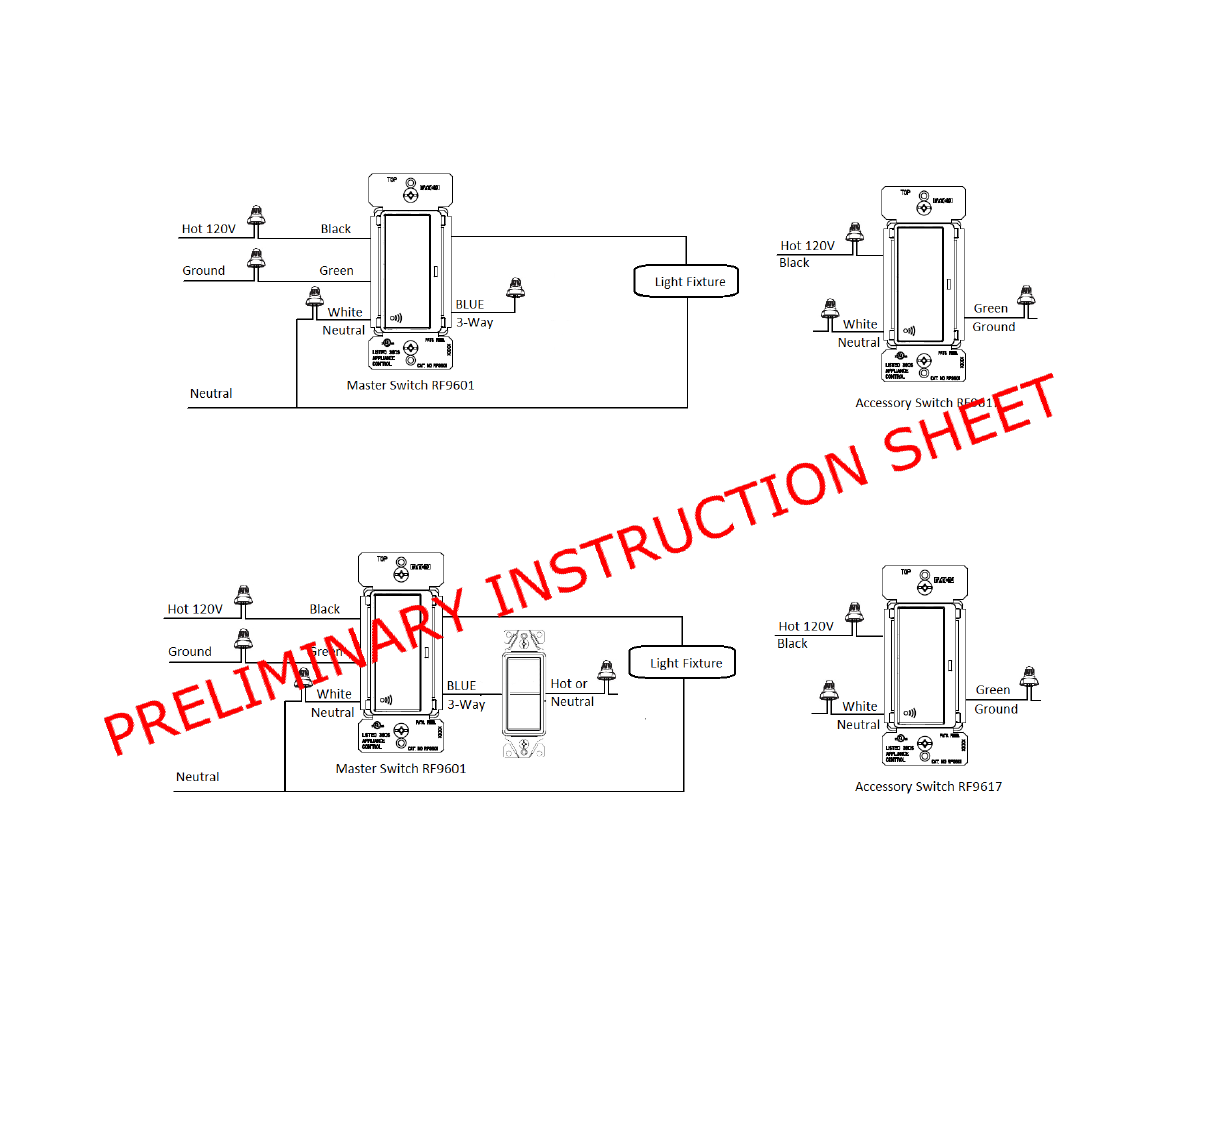
3-Way with a master switch (RF9601) and an Accessory switch (RF9617) through Z-Wave Association
3-Way with a master switch (RF9601) , Accessory switch (RF9617) through Z-Wave Association and toggle switch
FCC Statement
This device complies with Part 15 of the FCC Rules. Operation is subject to the following two conditions:
1: This device may not cause harmful interference, and
2: This device must accept any interference received, including interference that may cause undesired operation.
NOTE: This equipment has been tested and found to comply with the limits for a Class B digital device, pursuant to
Part 15 of the FCC Rules. These limits are designed to provide reasonable protection against harmful interference
in a residential installation. This equipment generates, uses and can radiate radio frequency energy and, if not
installed and used in accordance with the instructions, may cause harmful interference to radio communications.
However, there is no guarantee that interference will not occur in a particular installation. If this equipment does
cause harmful interference to radio or television reception, which can be determined by turning the equipment off
and on, the user is encouraged to try to correct the interference by one or more of the following measures:
• Reorient or relocate the receiving antenna.
• Increase the separation between the equipment and receiver.
• Connect the equipment into an outlet on a circuit different from that to which the receiver is connected.
• Consult the dealer or an experienced radio/TV technician for help.
FCC CAUTION:
Any changes or modifications not expressly approved by Eaton Wiring Devices could void the user’s authority to
operate the equipment
Troubleshooting Guide
Symptom
Possible Cause
Solution
No Function. All LEDs
are OFF
A) Light bulb(s) burned
out
B) Circuit breaker is off
or tripped
C) Improper wiring
D) Defective switch
A) Replace light bulb
B) Turn on the circuit
breaker
C) Check and correct
wiring
D) Replace switch
Functions normally
using the switch push
buttons but not from
Z-Wave controller and
the blue LEDs blinks
ON and OFF about
once per second
Device is not included
in Z-Wave network
Include device in a Z-
Wave network using a
Z-Wave controller.
Refer to Z-Wave
controller user manual
for details
Function normally but can’t
add the device to the
network and LED is blinking
A) The device is far from
controller
B) Not following the
instruction of how to add a
device to a network
A) start the installation
process with the devices
closer the controller first
B) Refer to the controller
manual
Functions normally
using the device but
not from Z-Wave
controller and no
LEDs are blinking
A) Controller can’t communicate
to the device
A) Go through Local Reset
procedure and re-add the
device to the network
Functions normally
both locally and from
a Z-Wave controller
but can’t be controlled
from an accessory
switch (RF9617) or
other Z-Wave device
The switch accessory
or other Z-Wave device
is not associated with
the Master device you
wish to control
Create an association
between the
accessory switch or
other device and the
master switch. Refer to
your Z-Wave controller
user manual for details
Functions normally
both locally and from
a Z-Wave controller
but can’t be controlled
from a toggle switch
The toggle switch is not
wired correctly to the
master switch
Check wiring
This device complies with Industry Canada’s licence-exempt RSSs. Operation is subject to the
following two conditions:
(1) This device may not cause interference; and
(2) This device must accept any interference, including interference that may cause undesired
operation of the device.
RSS-GEN Issue 4 French Version
Le présent appareil est conforme aux CNR d’Industrie Canada applicables aux appareils radio
exempts de licence. L’exploitation est autorisée aux deux conditions suivantes :
(1) l’appareil ne doit pas produire de brouillage;
(2) l’utilisateur de l’appareil doit accepter tout brouillage radioélectrique subi, même si le
brouillage est susceptible d’en compromettre le fonctionnement.
COOPER WIRING DEVICES LIMITED 2 YEAR WARRANTY –(Change for Eaton Version)