Corbin Russwin 80 9477 0782 001 (02 13) 782 Power Controller 00102 13782Power
User Manual: Corbin Russwin 782 Power Controller Wiring Diagrams and Instructions
Open the PDF directly: View PDF ![]() .
.
Page Count: 8

782 Electric Latch Retraction Controller
Installation Instructions
The 782 is designed to be used with UL Listed Yale® 7000P series (electric latch retraction) or Corbin
Russwin ED4000/ED5000 x M94 series (latch pullback) exit devices. Yale® and Corbin Russwin are
ASSA ABLOY Group brands.
INSTALLATION
The 782 Electric Latch Retraction Controller shall be installed in accordance with the National Electrical
Code (ANSI/NFPA70), local codes and the Authorities Having Jurisdiction (AHJ’s).
The 782 enclosure should be securely fastened to the wall using the four 1/4" diameter mounting
holes located in the back of the box. Position the enclosure so that the transformer is located on the
left-hand side. The 782 is intended to be installed indoors within the protected area only and wired to
a 15 Ampere branch circuit. Install the enclosure to the mounting surface using suitable hardware
for the application. Anchors should be capable of holding a 20 lb static load.
For the 120VAC power input, terminal block TB1 will accommodate up to 14 AWG wire. In order to
provide an adequate earth ground to the enclosure, the green grounding wire must be connected to
earth ground with a wire connector as shown.
Note: The maximum input current is 750mA (10A inrush) @ 120VAC.
Use the chart below to determine the correct wire gauge per given length of two- conductor cable
that will run from the 782 to each exit device. Do not exceed the maximum length listed with each
wire gauge.
WIRE GAUGE MAXIMUM LENGTH OF TWO-CONDUCTOR CABLE
16 AWG 40 FEET
14 AWG 60 FEET
12 AWG 100 FEET
80-9477-0782-001 (02-13)
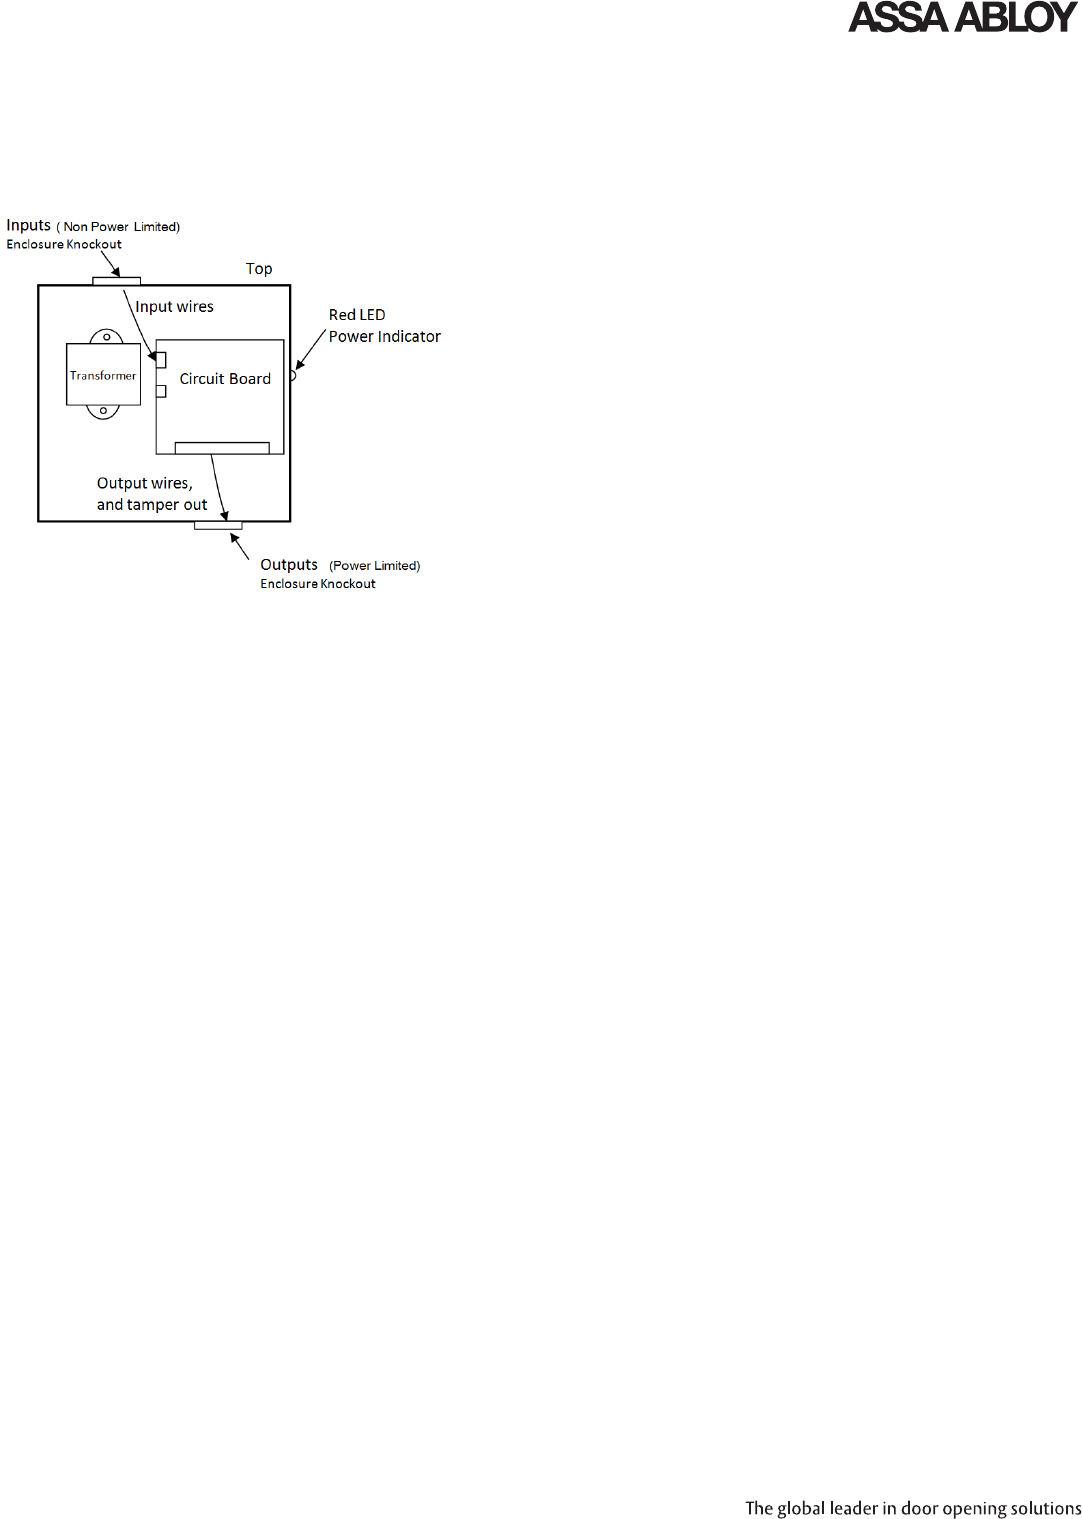
SEPARATION OF CIRCUITRY
Non power limited inputs and Class 2 outputs need to maintain a minimum 1/4" to comply with NEC
power separation requirements. See figure below for UL approved wire routing strategy.
Up to two latch retraction devices can be used with the 782. If only one device is to be used, wire to the
“DEVICE ONE” location at TB3, terminals 7 and 8.
Note: When using Yale® 7000P or Corbin Russwin ED4000/ED5000 x M94 series exit devices with
red and black leads, be sure to observe polarity when connecting “DEVICE ONE” and “DEVICE
TWO” to TB3. (Refer to the wiring diagram located on the lid of the controller.)
THEORY OF OPERATION
Yale® 7000P Series Exit Device (Electric Latch Retraction) or Corbin Russwin ED4000/ED5000
Series Exit Device x M94 (Latch Pullback)
This device operates at two states. The first, initial, state delivers a high energy retraction force to the
solenoid. This initial retraction force requires a high inrush current of several amps. Once the
solenoid is fully retracted, the device switches to a low power holding state requiring less than an
amp. The device stays in this holding state until power is removed and the device disengages.
- PAGE 280-9477-0782-001 (02-13)

STANDARD OPERATION
The 782 provides a choice of two methods of electric latch retraction: Paired or Independent
System.
PAIRED SYSTEM LATCH RETRACTION
This method allows one input to control two devices sequentially for use on double door
applications. A momentary switch closure across terminals 15 and 16 of TB3 will pull back DEVICE
ONE first, followed by DEVICE TWO. Use this method for a pair of doors using devices on both
leaves. The 782 comes from the factory already set up for this method. Jumper PJ1 should be set to
“Paired” for this mode of operation.
INDEPENDENT DOOR OPERATION
When configured for Independent Door Operation, DEVICE ONE and DEVICE TWO outputs are
controlled independently by their own separate input. A momentary switch closure across terminals
15 and 16 of TB3 will pull back DEVICE ONE only. A momentary switch closure across terminals 13
and 14 of TB3 will pull back DEVICE TWO. No more than one device can be used per output. Use
this option for applications requiring two single door systems or two pair door systems using one
device on each pair of doors. To change to the independent system latch retraction, move the
program jumper PJ1 from between the middle post and the end post, marked “Independent”.
NOTE: When using the Independent system, DEVICE ONE and DEVICE TWO can never be
activated at the same time in the event that both input switches are actuated simultaneously. If this
should occur, DEVICE ONE will always activate first, followed by DEVICE TWO.
When using a momentary, normally open switch for activating latch retraction, adjust potentiometer
DEV 1 (R36) or DEV 2 (R28) on the p.c. board to the desired latch retraction hold time from 10 to
30 seconds. Turn the potentiometer clockwise to increase the hold time.
When using normally open contacts from a keypad, card reader or a maintain switch, turn
potentiometer DEV 1 (R36) or DEV 2 (R28) fully counterclockwise to the minimum hold time. A
contact closure will activate latch retraction. Upon opening the contacts, the device will latch within
10 seconds.
OPERATION WITH AUTOMATIC DOOR OPERATION
The 782 is provided with two outputs (one output associated with DEVICE ONE and the other
output associated with DEVICE TWO) for controlling separate automatic door operators. Each
output consists of normally open relay contacts that are field wired directly to the “DOOR
ACTIVATION” input of the automatic door operator. These outputs are activated within a moment
after activation of their corresponding devices to allow time for the doors to be fully unlatched before
automatic opening begins.
- PAGE 380-9477-0782-001 (02-13)

Hold time potentiometers DEV 1 (R36) and DEV 2 (R28) are factory set to 10 seconds,
which is appropriate for using this controller with automatic door operators. When the
hold time expires, power is removed from the exit device and the signal to the auto door
operator input is terminated, thus allowing the operator’s “DOOR HOLD OPEN” delay to
time out and close the door.
NOTE: When using paired system latch retraction method with automatic door
operator interface and both devices are being used, the operator control
input must be wired to the 782 automatic door operator output for
DEVICE TWO (TB3, terminals 5 and 6).
OPERATION WITH FIRE ALARM
The 782 can be wired to the fire alarm relay normally closed contacts. When a fire alarm
occurs, any door this is currently unlatched, whether by momentary time delay or by
maintained switch, will immediately latch secure. During the time that the fire alarm is
active, electronic control of the automatic door opening system by wall switch, card reader,
keypad, etc., is disabled. The door then can only be opened manually.
The 782 comes from the factory set up for use with a fire alarm interface. If a fire alarm is
not to be used with the controller, move the program jumper PJ2 from between the middle
post and the end post, marked “ENABLE” (Fire Alarm Enabled), to the middle post and the
end post, marked “DISABLE” (Fire Alarm Disabled ) .
NOTE: Maximum current through fire alarm relay contacts is 120mA @ 25-38VDC
UL Note: The Operation with Fire Alarm feature has not been evaluated by UL.
- PAGE 480-9477-0782-001 (02-13)
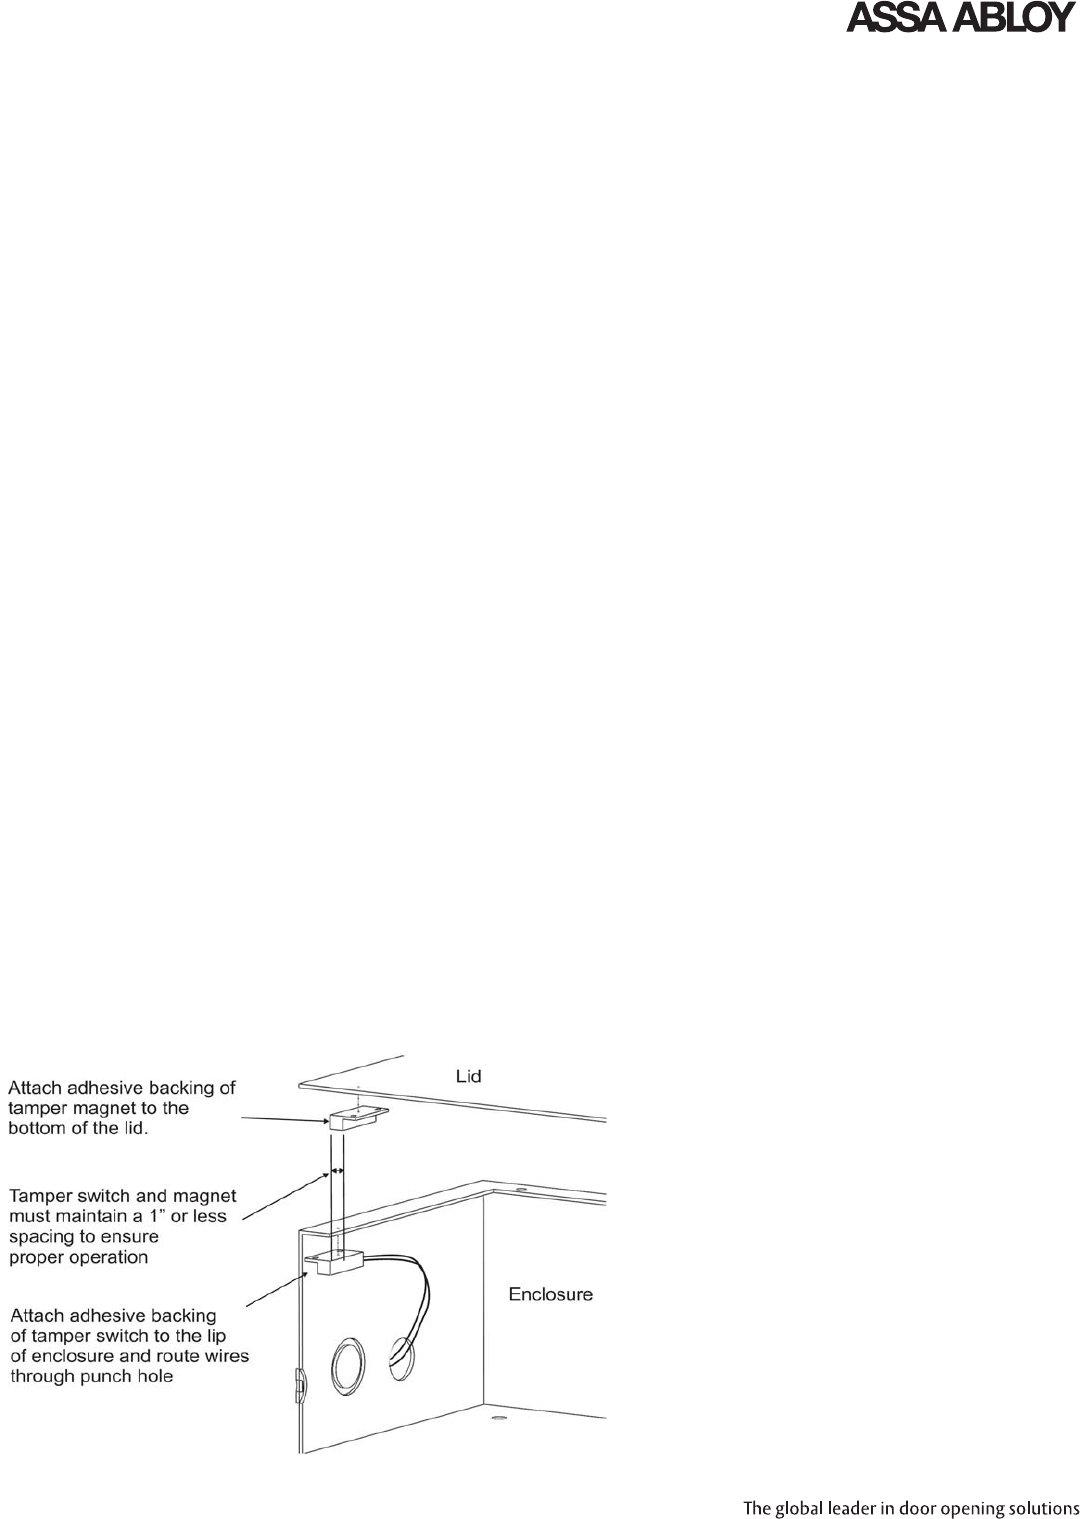
TAMPER SWITCH
Mount U.L. 634 Listed tamper switch (Honeywell, model 943WG or equivalent) at the lid of
the enclosure. See Figure 1 for wiring diagram. Connect tamper switch wiring to the Access
Control Panel input or the appropriate U.L. Listed reporting device. To activate alarm signal
open the door of the enclosure.
Figure 1
AUXILIARY POWER SOURCE OUTPUT
A single unregulated/unfiltered constant DC power source is provided for powering keypads,
motion sensors, annunciator panels, electromagnetic door holders, relays, LEDs, etc. All
interconnecting devices must be UL294 Listed.
Auxiliary Output: 24V VDC – 28 V VDC Nominal, 250mA (Max.)
WARNING: THIS AUXILIARY POWER SOURCE CANNOT BE USED WITH EQUIPMENT
REQUIRING A REGULATED OR FILTERED POWER SOURCE. TO DO SO MAY
CAUSE INADEQUATE OPERATION OF OR POSSIBLE DAMAGE TO THE
EQUIPMENT. ALWAYS CHECK THE MANUFACTURER’S SPECIFICATION FOR
THE TYPE OF POWER SOURCE REQUIRED FOR THE EQUIPMENT TO BE USED
WITH THE 782.
NORMALLY OPEN RELAY CONTACTS
Normally open relay contacts (OPER 1 and OPER 2) are to be used as dry contact switch read
backs to the host controller.
If PJ1 is set to paired use OPER 2
If PJ1 is set to single, use OPER 1 and OPER 2 to read back Dev 1 and Dev 2 respectively.
- PAGE 580-9477-0782-001 (02-13)

CLASS 2 OUTPUTS
All outputs from the 782 meet Class 2 outputs. Depending on the output, if a short circuit or
an overload condition should occur, the output will either shut off entirely or go into a safe
current limiting state until the short or overload condition is removed.
IMPORTANT! THE MAXIMUM RATED LOAD FOR ALL OUTPUTS COMBINED IS 2.0AMPS,
INCLUDING THE AUX. OUTPUT (250mA max).
The outputs to ELR Device One (TB3, terminals 7 & 8) and ELR Device Two (TB3, terminals
6 & 5) will completely shut down to 0 volts when a short circuit across the output occurs or
when the load exceeds 5 amps. To reset the output, the short circuit or overload must first
be located and removed. Next, momentarily switch off the outputs by opening the contacts
across input terminals 16 & 15 or 14 & 13. Before switching outputs back on, ensure the
load does not exceed the maximum current ratings.
If the auxiliary output load exceeds approximately 2.0 amps, or in the event of a short circuit,
a thermal fuse will open. This fuse will automatically reset once the fault has been removed.
MANUAL TEST METHOD
Set all device jumpers and timer potentiometers to the desired position. Next fully connect
the 782 UL Listed Yale 7000P Series or Corbin Russwin ED4000/ED5000 x M94 Series ELR
and a dry contact switch. Finally connect the 782 to 120VAC power. After power is applied,
the red power LED will turn on. Switch the desired dry contact switch and the device should
function as described in the Standard Operation section of the Installation Instructions. If this
does not happen consult the Troubleshooting section at the end of the Installation
Instructions.
Electrical ratings:
Input:
120VAC, 750mA (10A inrush), 60Hz
Outputs:
Aux Output (TB3: 4/3): 24VDC – 28VDC, 250mA
DEV 1 Output (TB3: 7/8): connects to UL Listed 7000P or
Corbin\Russwin ED4000/ED5000 x M94 series ELR
DEV 2 Output (TB3: 6/5): connects to UL Listed 7000P or
Corbin\Russwin ED4000/ED5000 x M94 series ELR
OPER 1 Output (TB3:12/11): Dry contact, normal open *
OPER 2 Output (TB3:10/9): Dry contact, normal open *
Fire Alarm input (TB3:1/2): 25 VDC - 38VDC, 120mA (Not evaluated by UL
* max contact rating 24VDC @ 250mA
ENVIRONMENTAL/OPERATING CONDITIONS
Operating temperature range: 0° - 49°C (32° - 120°F)
Humidity: up to 85% RH
- PAGE 680-9477-0782-001 (02-13)

TROUBLESHOOTING
Before proceeding through the troubleshooting section, ensure that all device latches are
not binding against their corresponding strikes. A bound latch can cause sluggish
electric retraction or prevent retraction entirely.
Symptom: Neither DEVICE ONE or DEVICE TWO pulls back after the control switch is
activated.
Possible Causes:
1. A short circuit in the output circuits. If either device output is shorted, an electronic
circuit breaker will trip and be indicated by a red LED indicator labeled “Fault” on the
circuit board. Locating and removing the short and recycling the input should clear
the fault. The most likely cause will be a short circuit in the solenoid wiring or a
defective solenoid assembly.
2. An open connection in the field wiring between the power supply and control switch
used for activating latch retraction.
3. A defective control switch.
4. An open connection in the field wiring between the power supply and exit device.
5. There may be no pulse. To check for pulses, prop the door open and connect a
voltmeter across the red and black leads coming from the exit device (red lead is
positive). Next, connect a jumper wire across terminals 16 and 15 of TB3 to keep
DEVICE ONE in a continuous pulled back state. If the voltmeter measures
approximately 24VDC at the moment the jumper wire was installed, but the latch did
not budge, then no initial pulse was generated. Check for a series of timed pulses
that will occur approximately every six seconds. (Make sure the control rod is not
positioned over the reflective sensor on the pulse module when making the next
check.) Wait for about 20 seconds to see if the latch pulls back. If it still does not
respond, then it indicates the pulse module is inoperative and the entire
solenoid/module assembly must be replaced.
- PAGE 780-9477-0782-001 (02-13)

Symptom: When 120 volts is applied to TB1, the exit devices immediately pull back, even though
the control switch had not been activated.
Possible Causes:
1. Field wiring between the power supply and control switch are shorted together against the
conduit or switch mounting box.
2. A maintain switch is being used and is in the closed position.
3. A defective control switch.
Symptom: A noticeable buzzing sound at equal intervals is coming from inside the exit Device
while in pulled back state.
Possible Causes:
1. The latch is binding against its corresponding strike and preventing it from pulling back fully,
due to misalignment between the latch and strike opening.
2. A defective pulse module.
- PAGE 8
Yale® is a registered trademark of Yale Security Inc., an ASSA ABLOY Group company.
Copyright © 2012, 2013 ASSA ABLOY Inc. All rights reserved. Reproduction in whole
or in part without the express written permission of ASSA ABLOY Inc. is prohibited. 80-9477-0782-001 (02-13)
