Corecess CORECESS3213 VDSL Modem User Manual
Corecess Inc. VDSL Modem
UserManual.wiki
>
Corecess
>
CORECESS3213 User Manual
User Manual
Navigation menu
Upload a User Manual
Namespaces
Wiki Guide
HTML
PDF
Info
Views
User Manual
Discussion / Help
Navigation
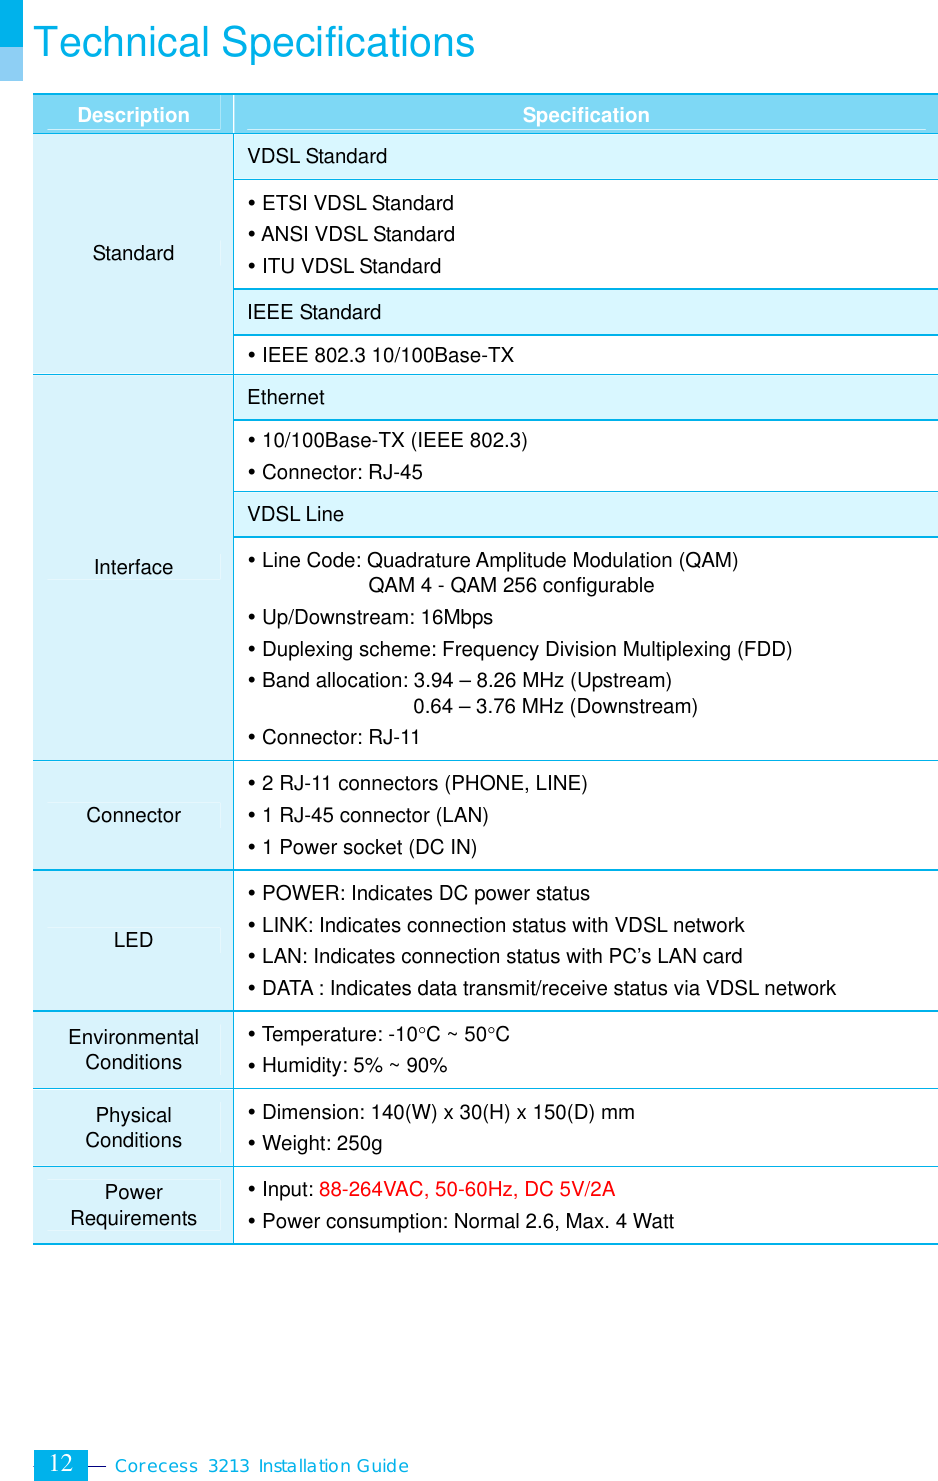
![7 English Configuring the TCP/IP After you install the Corecess 3213, next is to configure the TCP/IP network protocol. Caution: When you configure the TCP/IP, leave the default value of any other configuration that is not mentioned in the following description. Windows 95/98/ME 1. Click the Start button and select Settings ¼ Control Panel. (Figure 1) 2. Double-click the Network icon. 3. Select TCP/IP in the ‘The following network components are installed’ list and click Properties. (Figure 2) 4. Select the [IP Address] tab and click the Obtain IP address automatically. (Figure 3) 5. Select the [DNS Configuration] tab and click the Disable DNS. (Figure 4) 6. Select the [Gateway] tab and check there is no gateway installed. If there are installed gateways, delete them by clicking [Remove]. Click OK. (Figure 5) 7. At the <Network> dialog box, click OK. The system prompts you to restart. Click Yes. Figure 2 Figure 3 Figure 4 Figure 5 Figure 1](https://usermanual.wiki/Corecess/CORECESS3213/User-Guide-251255-Page-6.png)
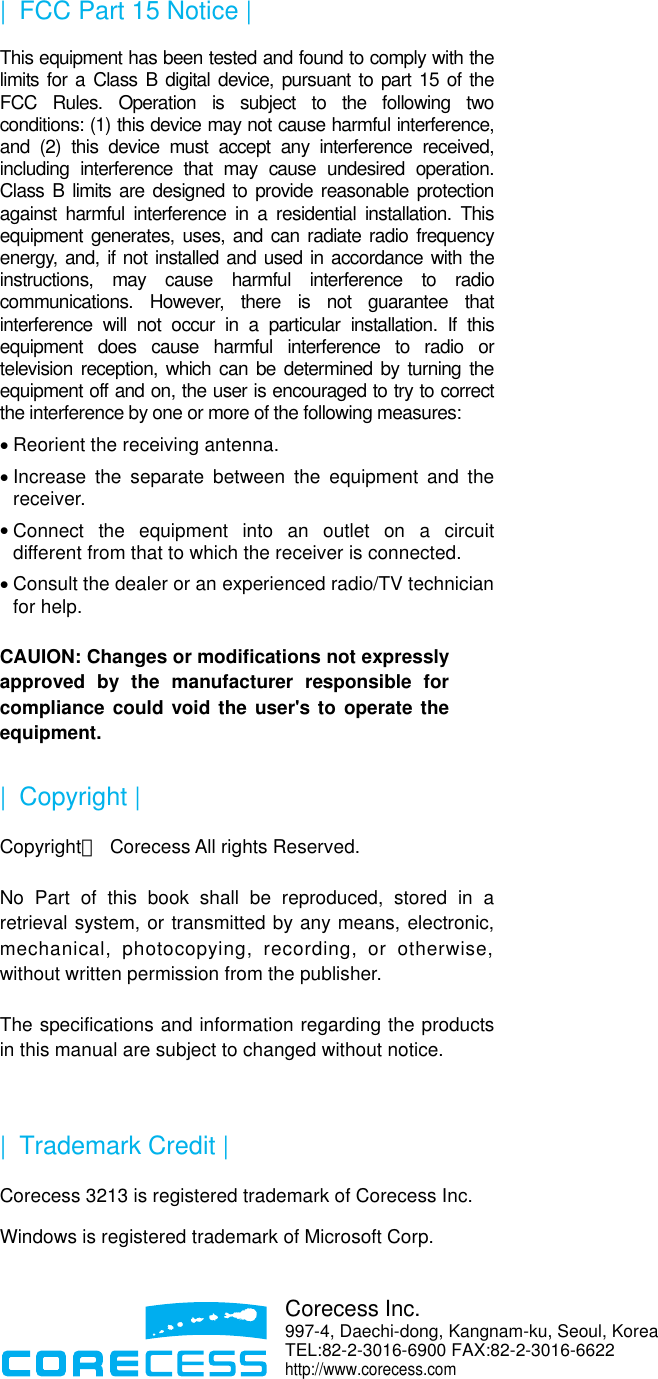
![Corecess 3213 Installation Guide 8 Windows 2000/NT 1. Click the Start button and select Settings ¼ Network and Dial-up Connections. (Figure 1) 2. Right-click the Local Area Connection icon at the <Network and Dial-up Connections> windows and select Properties menu. (Figure 2) 3. At the <Local Area Connection Properties> dialog box, select the Internet Protocol (TCP/IP) in the ‘Components checks are used by this connection’ list and click Properties. (Figure 3) 4. At the <Internet Protocol (TCP/IP Properties)> dialog box, click the Obtain an IP address automatically and the Obtain DNS server address automatically. Then click Advanced to check the TCP/IP settings for accuracy. (Figure 4) 5. The <Advanced TCP/IP Settings> dialog box appears. At the [IP Settings] tab, check that the IP Address is set to Enable DHCP. (Figure 5) 6. Select the [DNS] tab and check that the Append primary and connection specific DNS suffix is selected. Click OK. (Figure 6) Figure 3 Figure 4 Figure 1 Figure 2 Figure 5 Figure 6](https://usermanual.wiki/Corecess/CORECESS3213/User-Guide-251255-Page-7.png)
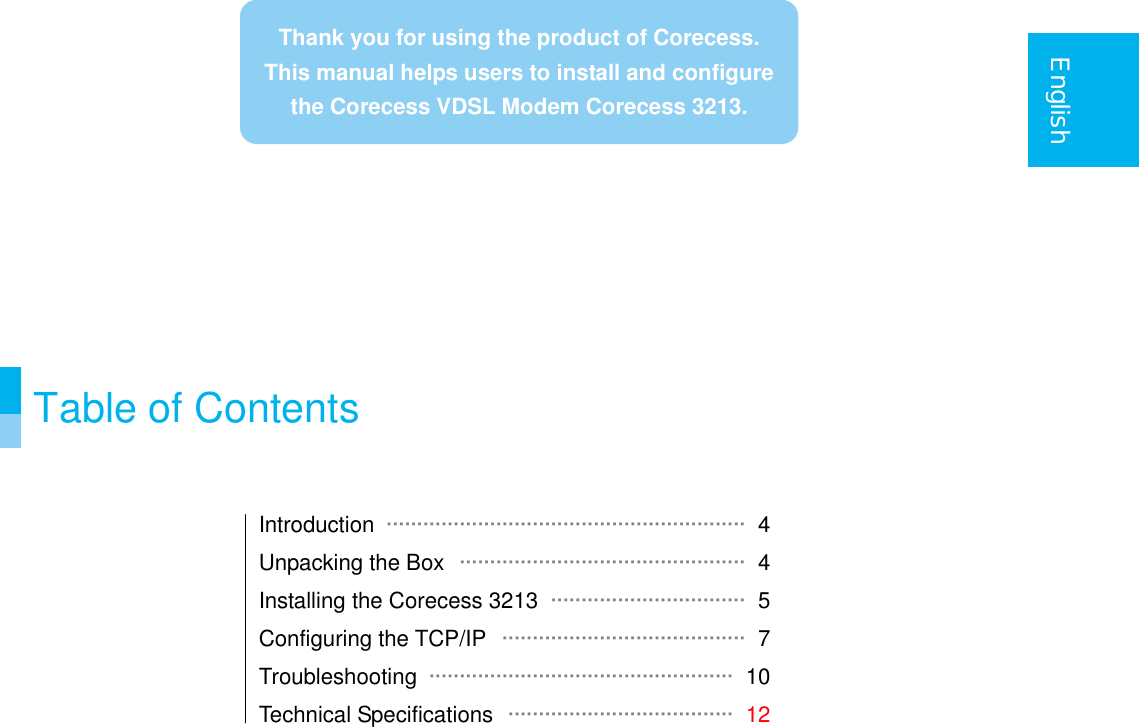
![9 English Windows XP 1. Click the Start button and select Settings menu. (Figure 1) 2. Double-click the Network icon at the <Control Panel> window. 3. Right-click the Local Area Connection icon at the <Network Connections> windows and select Properties menu. (Figure 2) 4. At the <Local Area Connection Properties> dialog box, select the Internet Protocol (TCP/IP) in the ‘This connection uses the following items’ list and click Properties. (Figure 3) 5. At the <Internet Protocol (TCP/IP) Properties)> dialog box, click the Obtain an IP address automatically and the Obtain DNS server address automatically. Then click Advanced to check the TCP/IP settings for accuracy. (Figure 4) 6. The <Advanced TCP/IP Settings> dialog box appears. At the [IP Settings] tab, check that the IP Address is set to Enable DHCP. (Figure 5) 7. Select the [DNS] tab and check that the Append primary and connection specific DNS suffix is selected. Click OK. (Figure 6) Figure 3 Figure 4 Figure 2 Figure 5 Figure 6 Figure 1](https://usermanual.wiki/Corecess/CORECESS3213/User-Guide-251255-Page-8.png)
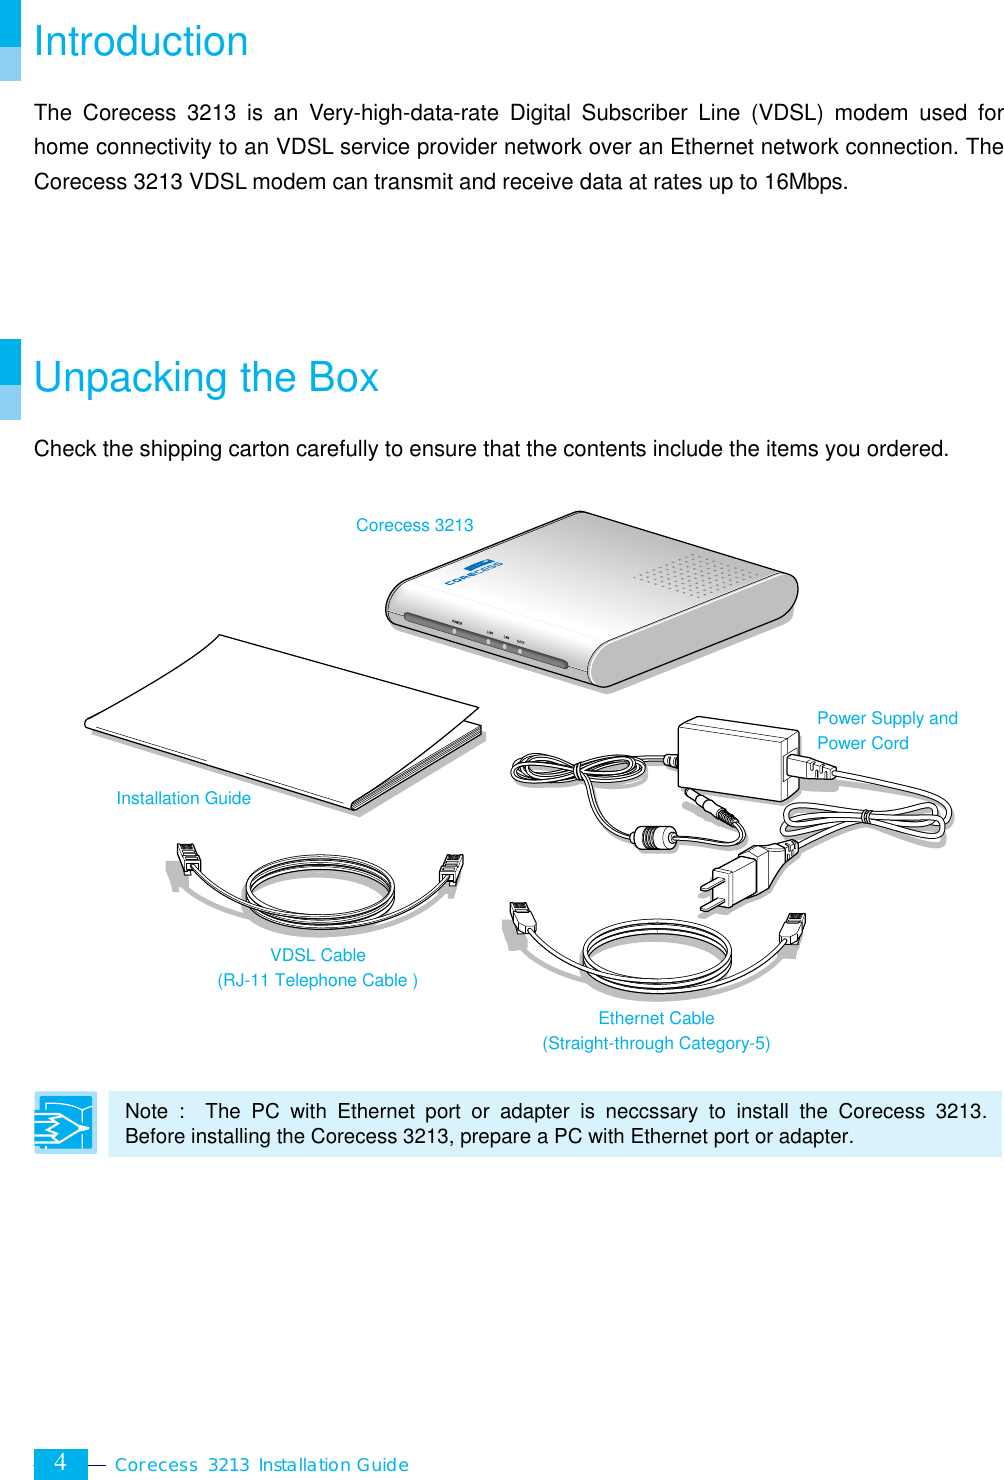
![Corecess 3213 Installation Guide 10 Troubleshooting If you cannot connect to VDSL network, please check the status of the LEDs on the front panel, and then ensure the following: 1. Check the LAN LED If the LAN LED goes off, ensure that the Ethernet cable is firmly connected both to the Ethernet port on the Corecess 3213 and LAN port on your PC. 2. Check the LINK LED If the LINK LED blinks continuously and never stays solid on, ensure that the VDSL cable is firmly connected to the LINE port on the Corecess 3213. If the LINK LED still blinks, contact your VDSL service provider. If the LINK LED goes off, turn off the power of the Corecess 3213 by pressing the power switch and turn on the power again. If LINK LED still goes off, contact your vendor. 3. Check your PC’s IP address If all LEDs operate normally and cables are firmly connected to the ports, ensure that your PC’s IP address is properly assigned. Otherwise assign a new IP address according to your operating system. Windows 95/98/ME n Click the Start button and select Run. o Input Winipcfg and press the [Enter] key. p Select Ethernet adapter connected with the Corecess 3213 and click Release All. q Click Renew All.](https://usermanual.wiki/Corecess/CORECESS3213/User-Guide-251255-Page-9.png)
![11 English Windows 2000/NT/XP n Click the Start button and select Run. o Input cmd and press the [Enter] key. p The DOS-prompt appears. Input ipconfig /release and press [Enter] key. q Input ipconfig /renew and press [Enter] key. 4. Restart your PC If new IP address is not assigned properly or you cannot solve the problem, ensure that the Corecess 3213 turns on and then restart your PC.](https://usermanual.wiki/Corecess/CORECESS3213/User-Guide-251255-Page-10.png)