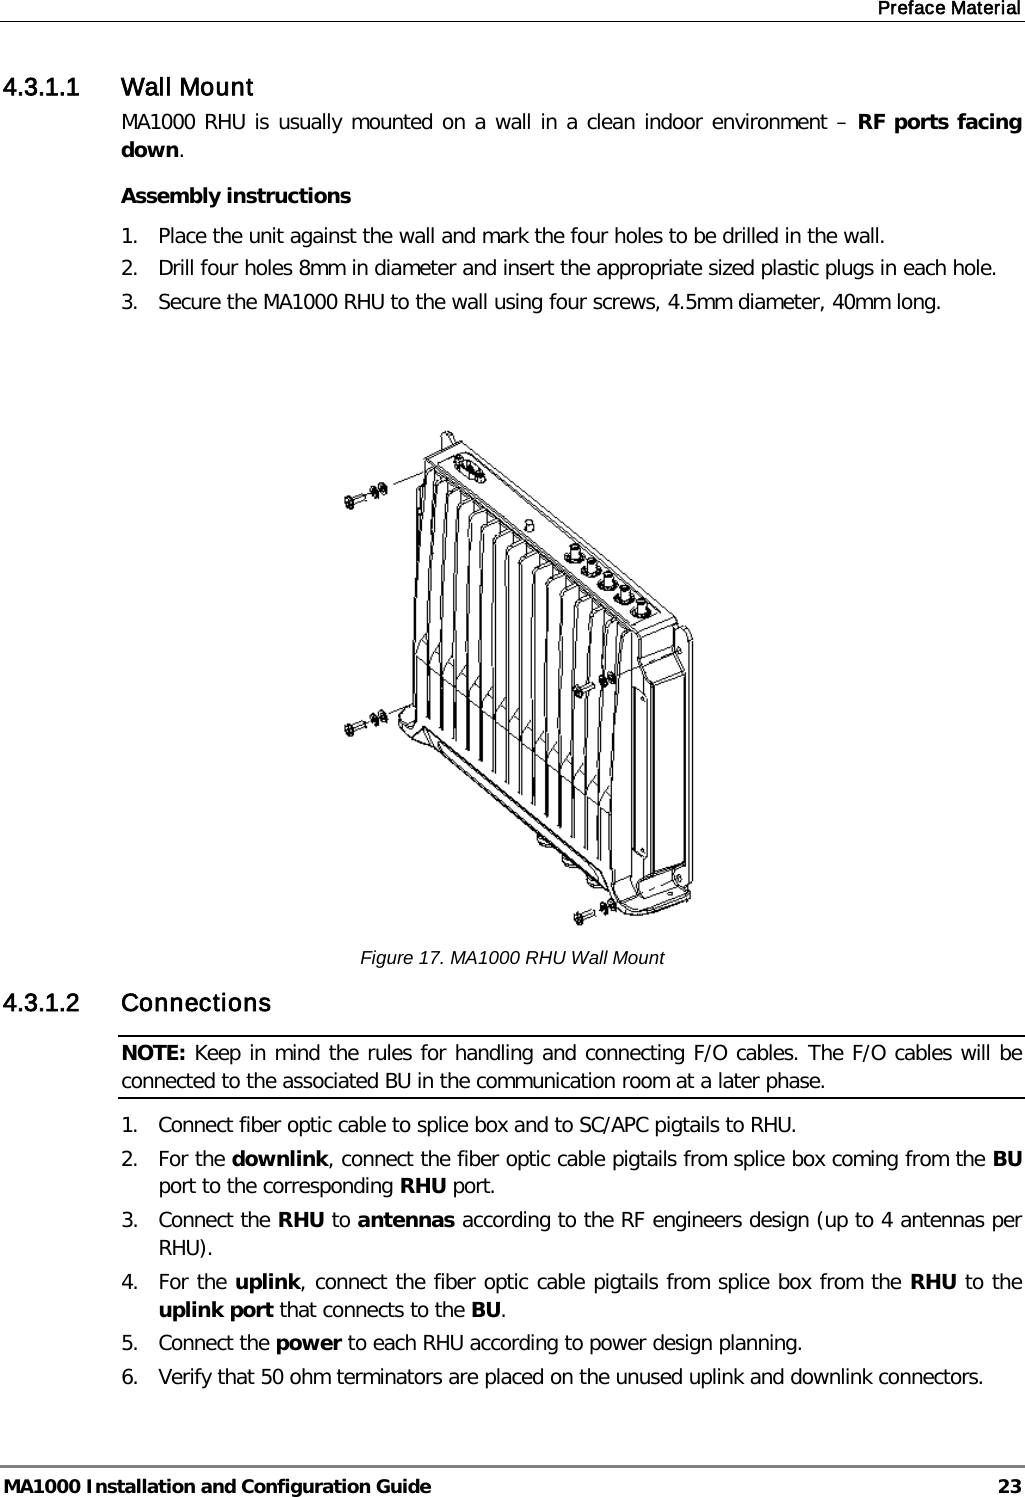
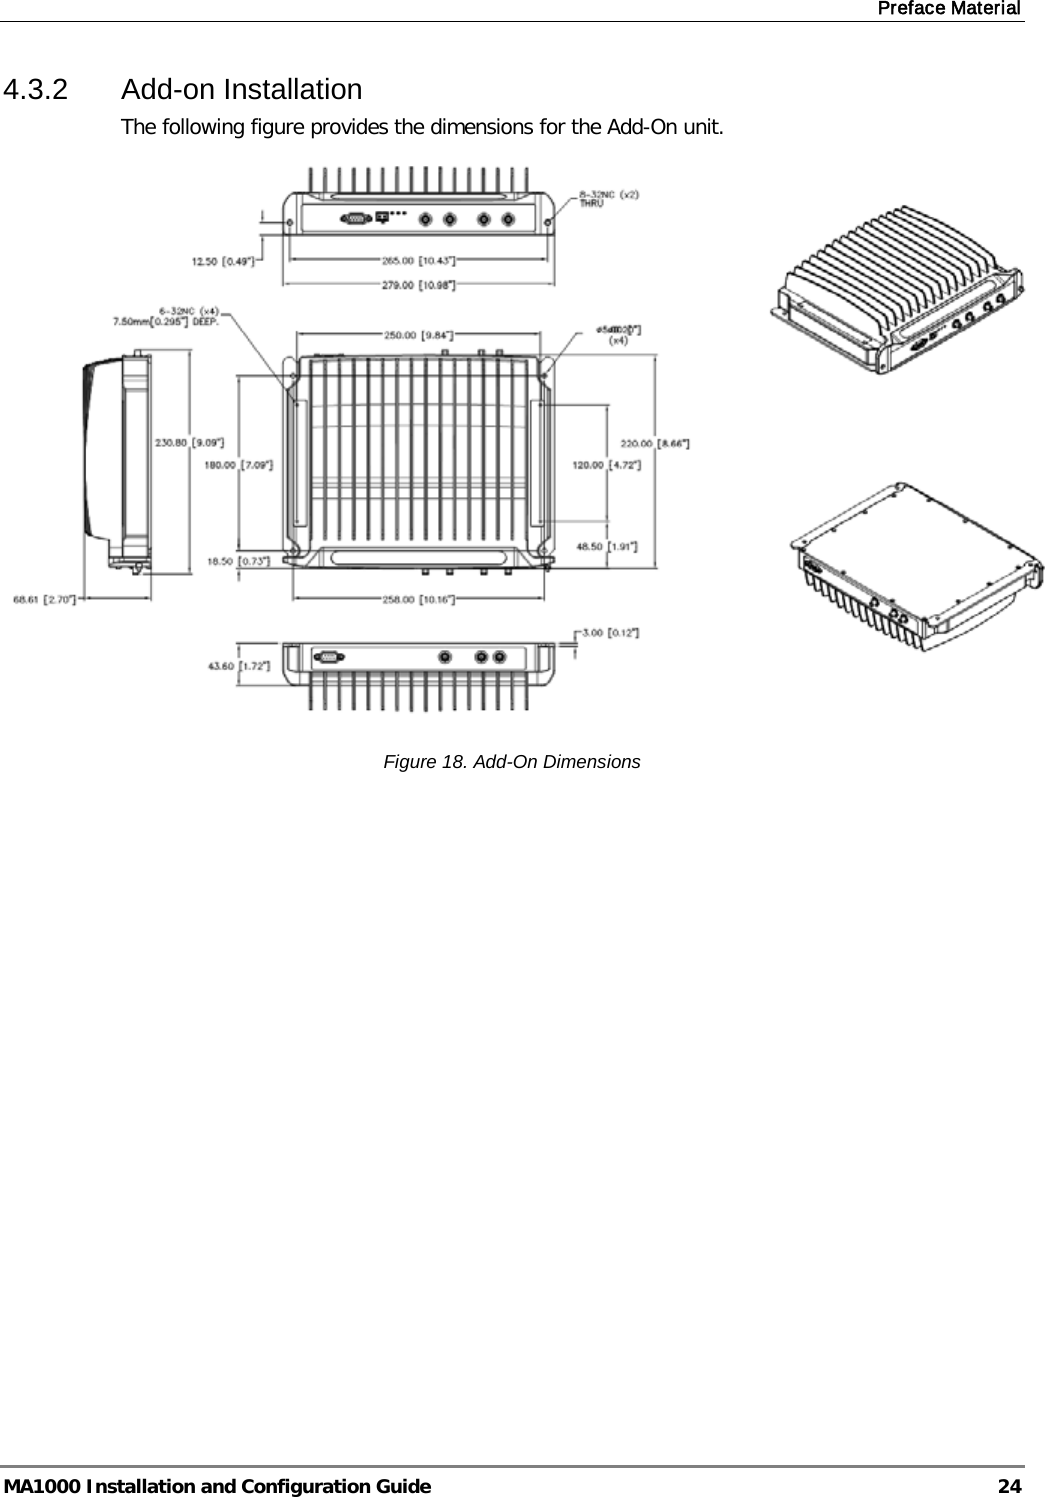
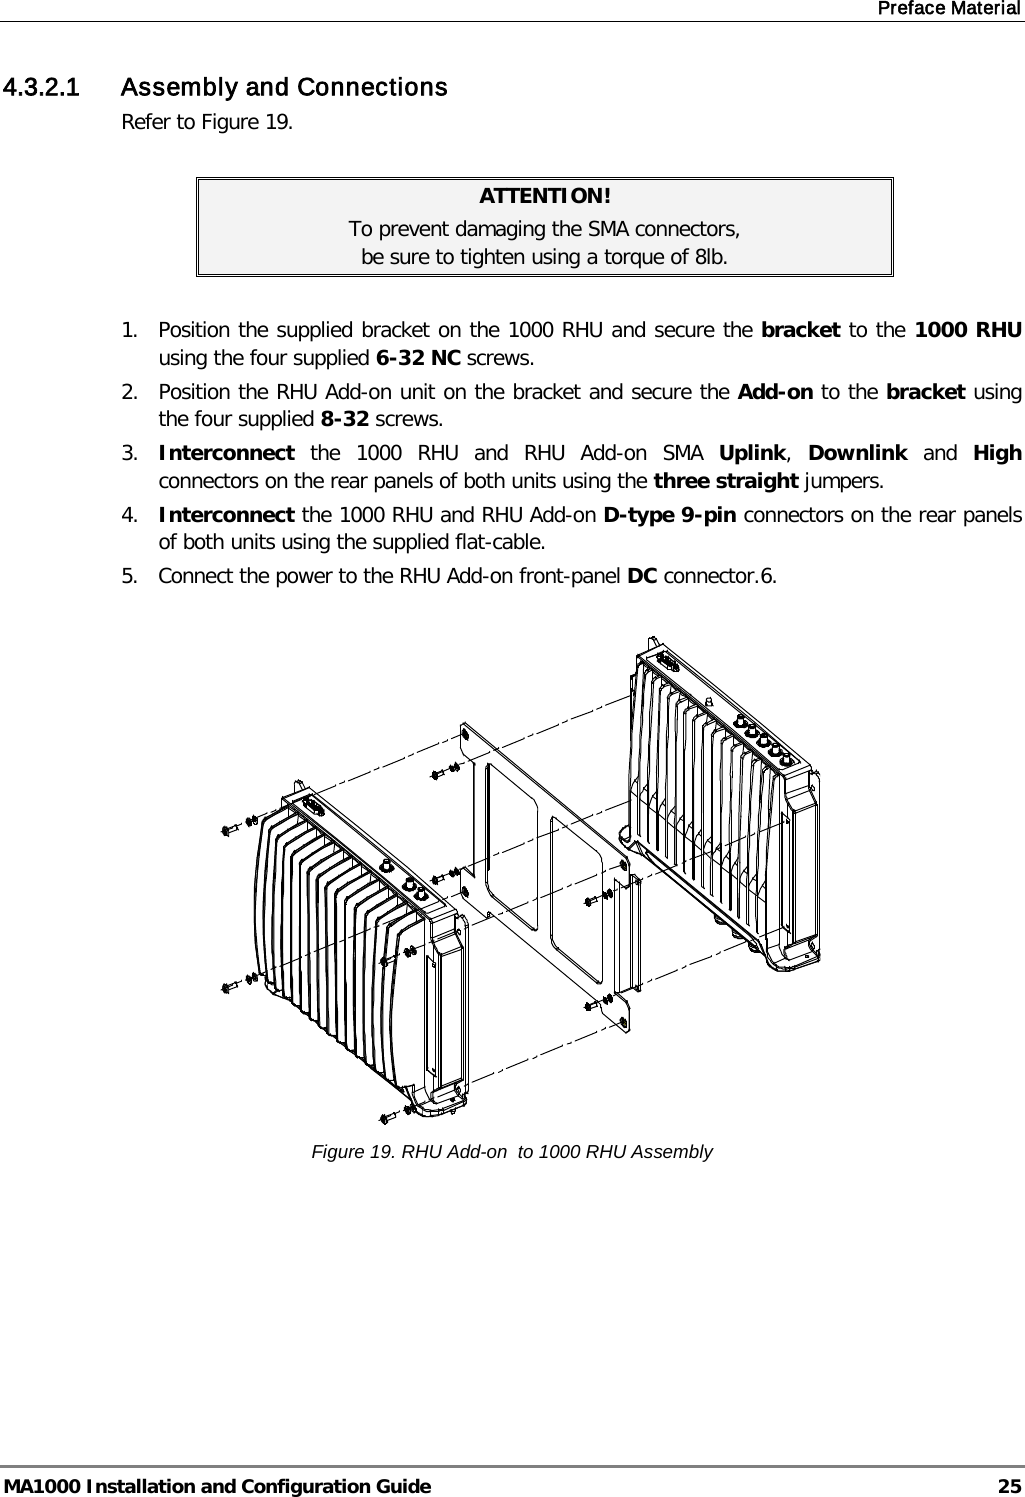
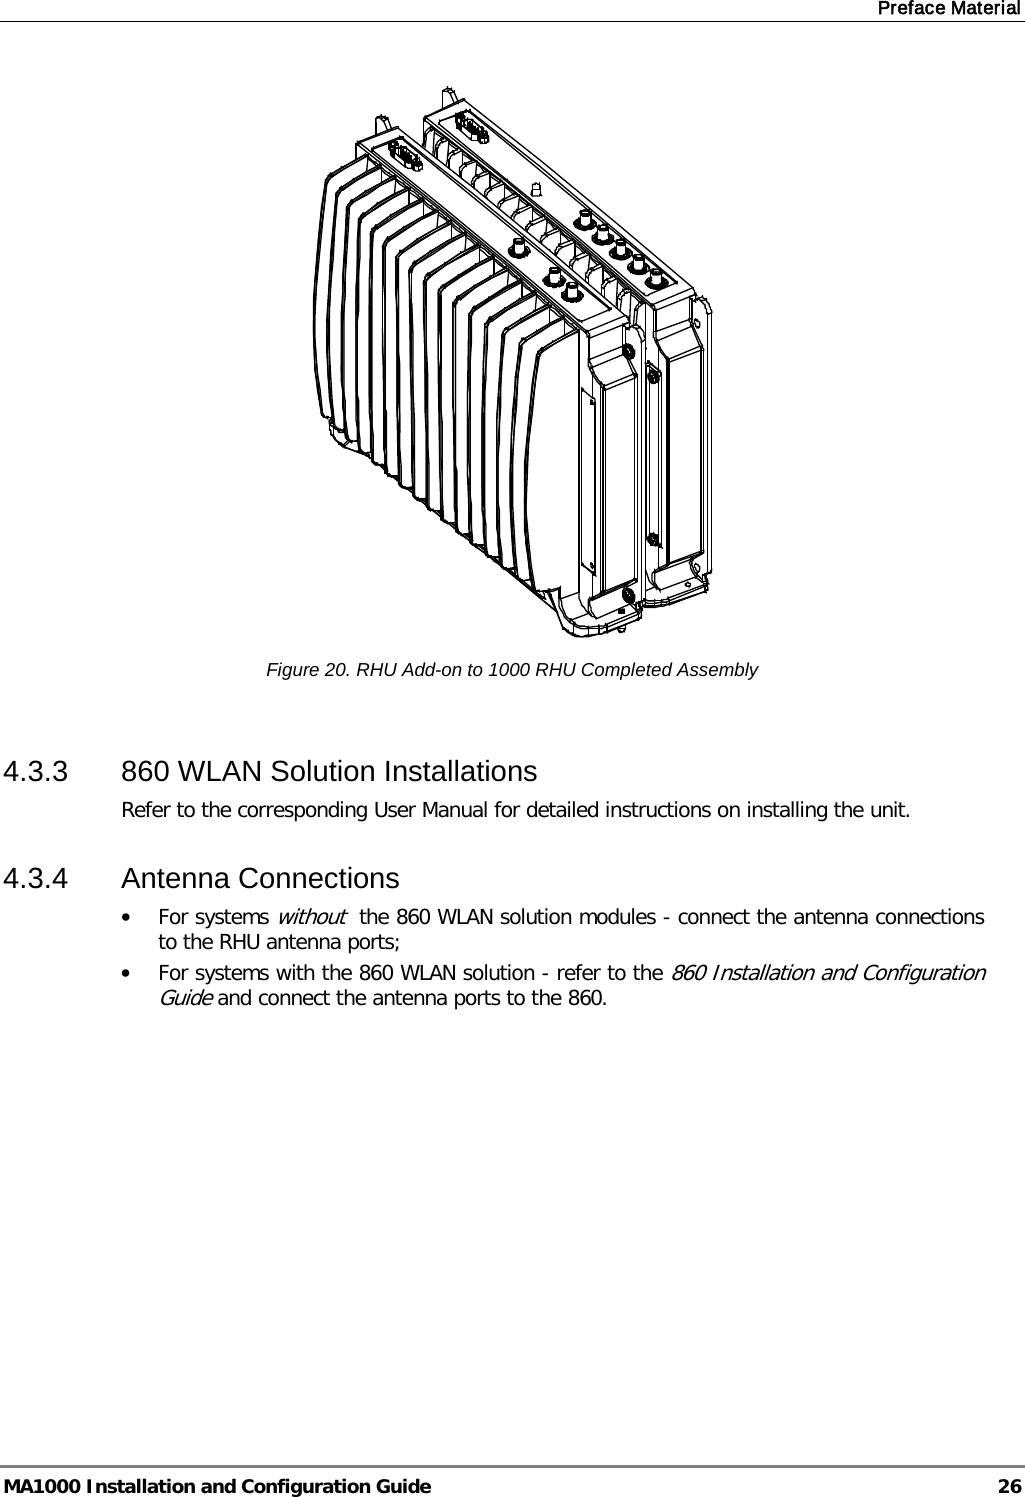
Corning Optical Communication MA1K-CP-HLN REMOTE HUB UNIT User Manual

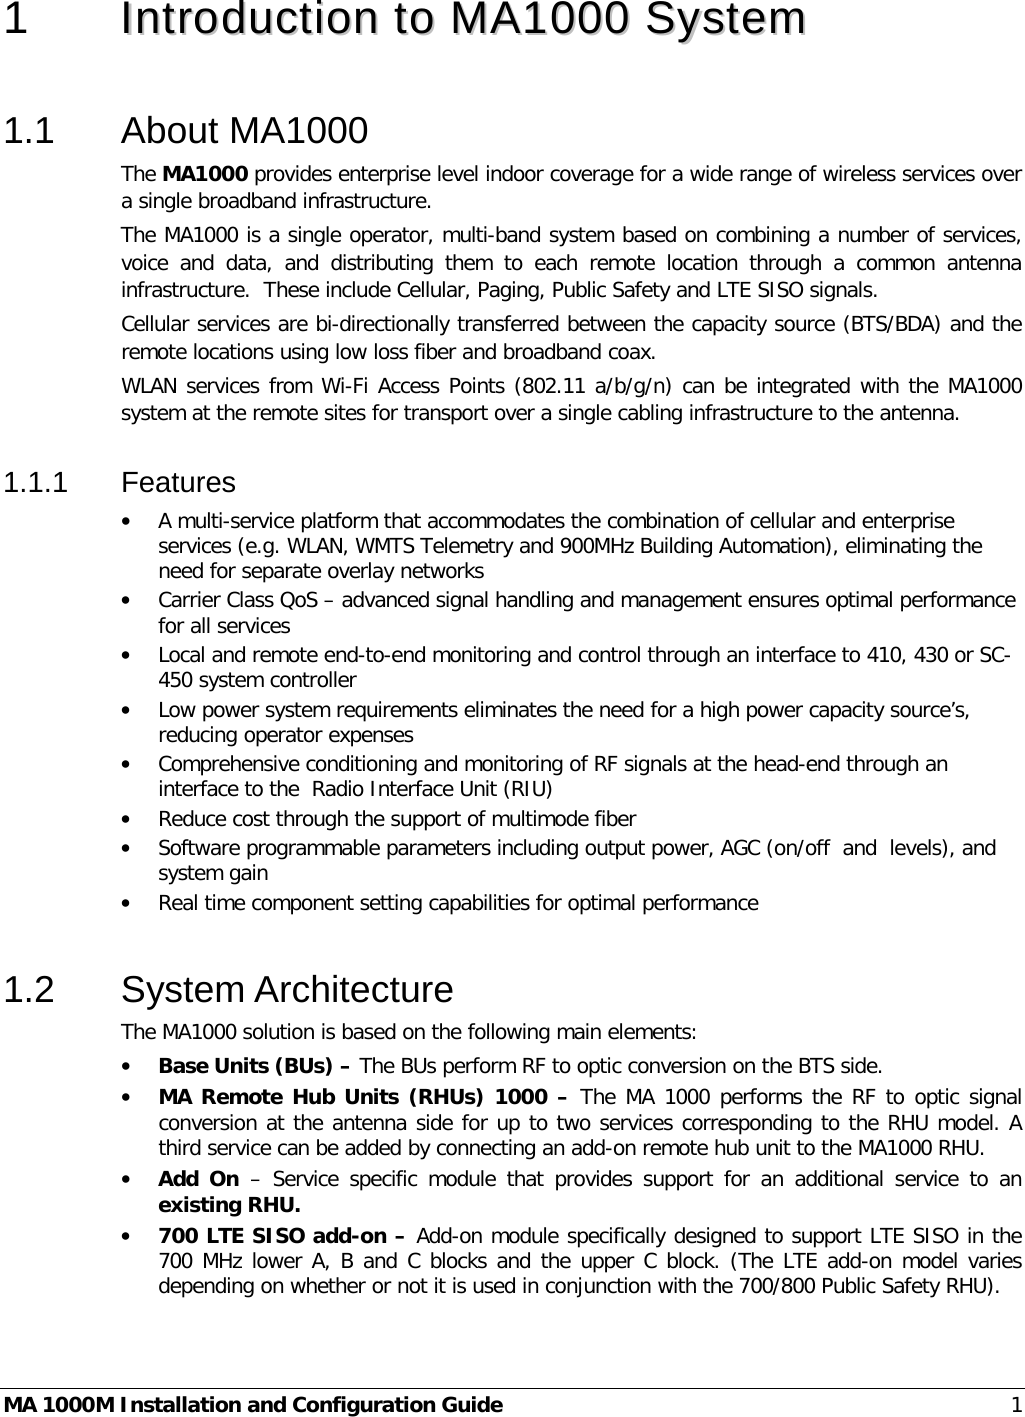
Corning Optical Communication Wireless REMOTE HUB UNIT

User Manual

                                                         MobileAccess1000  DAS System Installation and Configuration Guide P/N: 709C001504 REV: A0 Date: AUG, 2012
    Preface       MA1000 Installation and Configuration Guide    II Corning MobileAccess 8391 Old Courthouse Road, Suite 300, Vienna, VA 22182 Tel: +1(866)436-9266, +1(703)848-0200 TAC: +1(800)787-1266, Fax: +1(703)848-0280 www.corning.com/mobileaccess
    Preface       MA1000 Installation and Configuration Guide    III PPrreeffaaccee  MMaatteerriiaall  Installation Safety • Follow all safety regulations when installing the MA1000 system • Only qualified personnel are authorized to install and maintain the MA1000 system • The equipment is intended for installation in restricted access locations only RF Safety  To comply with FCC RF exposure compliance requirement, adhere to the following warnings: Warning! To comply with FCC RF exposure compliance requirements, antennas used for this product must be fixed mounted on indoor permanent structures, providing a separation distance of at least 40 cm from all persons during normal operation. Warning! Antenna gain should not exceed 12.5 dBi. Warning! Each individual antenna used for this transmitter must be installed to provide a minimum separation distance of 40 cm or more from all persons and must not be co-located with any other antenna for meeting RF exposure requirements. Warning! The design of the antenna installation needs to be implemented in such a way so as to ensure RF radiation safety levels and non-environmental pollution during operation. Caution! Use of controls or adjustments or performance of procedures other than those specified herein may result  in hazardous radiation exposure.  Compliance with RF Safety Requirements  • Corning MobileAccess products have no inherent significant RF radiation • The RF level on the down link is very low at the Remote Hub Unit (RHU) downlink ports. Therefore, there is no dangerous RF radiation when the antenna is not connected. Laser Safety • Fiber optic ports of the MA1000/2000 emit invisible laser radiation at the 1310 nm wavelength window. • To avoid eye injury never look directly into the optical ports, patchcords or optical cables. Do not stare into beam or view directly with optical instruments. Always assume that optical outputs are on. • Only technicians familiar with fiber optic safety practices and procedures should perform optical fiber connections and disconnections of the MA1000/2000 modules and the associated cables. • MA1000/2000 complies with 21 CFR 1040.10 and 1040.11 except for deviations pursuant to laser notice no. 50 (July 26, 2001) & IEC 60825-1, amendment 2 (Jan. 2001).
    Preface       MA1000 Installation and Configuration Guide    IV Care of Fiber Optic Connectors • Do not remove the protective covers on the fiber optic connectors until a connection is ready to be made. Do not leave connectors uncovered when not connected. • The tip of the fiber optic connector should not come into contact with any object or dust. • Refer to the cleaning procedure for information on the cleaning of the fiber tip. Power Requirements for DC Inputs Warning! • Only use a special DC supply cable with four connectors • Always keep DC IN connectors connected during the product operation • Disconnect all power from the equipment by means of an external circuit breaker before connecting or disconnecting the DC IN connectors.
    Preface       MA1000 Installation and Configuration Guide    V Standards and Certification Corning MobileAccess products have met the approvals of the following certifying organizations: Product Certifications US FCC 47 CFR part 15B, 22, 24, 90,27  NOTE: This equipment has been tested and found to comply with the limits for a Class A digital device, pursuant to Part 15 of the FCC Rules. These limits are designed to provide reasonable protection against harmful interference in a residential installation. This equipment generates, uses and can radiate radio frequency energy and, if not installed and used in accordance with the instructions, may cause harmful interference to radio or television reception, which can be determined  by turning the equipment off and on, the user is encouraged to try to correct the interference by one or more of the following measures: - Reorient or relocate the receiving antenna. - Increase the separation between the equipment and receiver. -Connect the equipment into an outlet on a circuit different from that to which the receiver is connected. -Consult the dealer or an experienced radio/TV technician for help. Warning! Changes or modifications to this equipment not expressly approved by Mobile Access could void the user’s authority to operate the equipment.  UL 60950-1 21CFR 1040.10 & 1040.11. Europe  EN 301502, EN 300609, EN 301489, EN 60950-1, IEC 60825-1, IEC 60825-2  Company Certification ISO 9001: 2000 and ISO 13485: 2003
    Preface       MA1000 Installation and Configuration Guide    VI About this Guide and Other Relevant Documentation This user guide describes how to perform the physical installation of the MA 1000 system. The installation procedures of other units (RIU, 860 WLAN solution) relevant to the system are detailed in their user manuals (see Additional Relevant Documentation below).   Additional Relevant Documents The following documents are required if the corresponding units are included in your system installation.  P/N Description 709C001503 1000 Installation and Configuration Guide 709C001205 2000 Installation and Configuration Guide 709C002502 RIU Installation and Configuration Guide 709C003003 330 Installation and Configuration Guide 709C001309 410/430 Installation and Configuration Guide 709C004401 SC-450 Installation and Configuration Guide List of Acronyms AGC Automatic Gain Control BDA Bi-Directional Amplifier BTS Base Transceiver Station BTSC Base Transceiver Station Conditioner BU Base Unit DL Downlink RHU Remote Hub Unit RIU Radio Interface Unit SNR Signal to Noise Ratio UL Uplink VDC  Volts Direct Current
    Preface       MA1000 Installation and Configuration Guide    VII Table of Contents Preface Material ....................................................................................................................... III Installation Safety ............................................................................................................................. III RF Safety ......................................................................................................................................... III Compliance with RF Safety Requirements ........................................................................................... III Laser Safety ..................................................................................................................................... III Care of Fiber Optic Connectors .......................................................................................................... IV Power Requirements for DC Inputs .................................................................................................... IV Standards and Certification ................................................................................................................. V Product Certifications ......................................................................................................................... V Company Certification ........................................................................................................................ V About this Guide and Other Relevant Documentation .......................................................................... VI Additional Relevant Documents .......................................................................................................... VI List of Acronyms ............................................................................................................................... VI Table of Contents............................................................................................................................. VII 1 Introduction to MA1000 System ........................................................................................ 1 1.1 About MA1000 ............................................................................................................................. 1 1.1.1 Features ............................................................................................................................ 1 1.2 System Architecture ..................................................................................................................... 1 1.3 Configuration Options .................................................................................................................. 3 1.4 Management ............................................................................................................................... 4 2 System Elements ............................................................................................................... 5 2.1 Remote Modules .......................................................................................................................... 5 2.1.1 MA1000 RHUs .................................................................................................................... 5 2.1.1.1 1000 RHU Front Panel ............................................................................................ 6 2.1.1.2 MA1000 RHU Rear Panel ......................................................................................... 7 2.1.2 Add-on .............................................................................................................................. 7 2.1.2.1 Add-on Front Panel................................................................................................. 8 2.1.2.2 Add-on Rear Panel ................................................................................................. 8 2.2 Base Units ................................................................................................................................... 9 2.2.1.1 BU Front Panel ..................................................................................................... 10 2.2.1.2 BU Rear Panel ...................................................................................................... 11 3 Site Preparation ................................................................................................................ 12 3.1 Infrastructure Preparation .......................................................................................................... 12 3.2 Installation Requirements ........................................................................................................... 12 3.3 Coaxial Cable Connections .......................................................................................................... 12 3.3.1 General Cable Installation Procedures ................................................................................ 12 3.3.2 Fiber Optic Rules .............................................................................................................. 13
    Preface       MA1000 Installation and Configuration Guide    VIII 3.3.3 RF Rules .......................................................................................................................... 14 3.4 Power Consumption, Connections and Power Supplies ................................................................. 14 3.4.1 Power Safety Instructions ................................................................................................. 14 3.4.2 Power Consumption of Units ............................................................................................. 15 3.4.3 Circuit Breakers ................................................................................................................ 15 3.4.4 Types of Power Supplies ................................................................................................... 15 3.5 Installation Conventions ............................................................................................................. 15 4 System Installation .......................................................................................................... 17 4.1 Overview ................................................................................................................................... 17 4.2 Communication Room Installation ............................................................................................... 17 4.2.1 Rack Installation General Instructions ................................................................................ 18 4.2.2 Rack Installation Safety Instructions .................................................................................. 19 4.2.3 Single Building Rack Installation ........................................................................................ 19 4.2.4 Multi-Building Rack Installation .......................................................................................... 20 4.2.5 RIU Connections ............................................................................................................... 21 4.2.6 BU Connections ................................................................................................................ 21 4.2.7 Controller Connections ...................................................................................................... 21 4.3 Remote Site Installation ............................................................................................................. 22 4.3.1 MA1000 RHU Installation .................................................................................................. 22 4.3.1.1 Wall Mount .......................................................................................................... 23 4.3.1.2 Connections ......................................................................................................... 23 4.3.2 Add-on Installation ........................................................................................................... 24 4.3.2.1 Assembly and Connections .................................................................................... 25 4.3.3 860 WLAN Solution Installations ........................................................................................ 26 4.3.4 Antenna Connections ........................................................................................................ 26 Appendix A: System Specifications ...................................................................................... 27 RF Frequency Ranges ........................................................................................................................ 27 RF Parameters per Service ................................................................................................................. 28 Low Band Services ..................................................................................................................... 28 High Band Services .................................................................................................................... 29 Absolute Maximum Rating ................................................................................................................. 29 Optical Specifications ........................................................................................................................ 30 Multimode Fiber Qualifications .................................................................................................... 30 Environmental ........................................................................................................................... 30 MA1000 Component Specifications ..................................................................................................... 31 Base Unit .................................................................................................................................. 31 RHU 31 Add-On ..................................................................................................................................... 32 Ordering Information ........................................................................................................................ 33 MA1000 QSX ............................................................................................................................. 33
    Preface       MA1000 Installation and Configuration Guide    IX MA1000 TSX .............................................................................................................................. 33 Base Units ................................................................................................................................. 33 Remote Hub Unit Modules .......................................................................................................... 34 Add-On Modules ........................................................................................................................ 34 Power Supply Accessories ........................................................................................................... 35 Mounting Bracket Accessories ..................................................................................................... 35
 MA 1000M Installation and Configuration Guide  1 1  IInnttrroodduuccttiioonn  ttoo  MMAA11000000  SSyysstteemm   1.1  About MA1000 The MA1000 provides enterprise level indoor coverage for a wide range of wireless services over a single broadband infrastructure. The MA1000 is a single operator, multi-band system based on combining a number of services, voice and data, and distributing them to each remote location through a common antenna infrastructure.  These include Cellular, Paging, Public Safety and LTE SISO signals. Cellular services are bi-directionally transferred between the capacity source (BTS/BDA) and the remote locations using low loss fiber and broadband coax.  WLAN services from Wi-Fi Access Points (802.11 a/b/g/n) can be integrated with the MA1000 system at the remote sites for transport over a single cabling infrastructure to the antenna. 1.1.1  Features • A multi-service platform that accommodates the combination of cellular and enterprise services (e.g. WLAN, WMTS Telemetry and 900MHz Building Automation), eliminating the need for separate overlay networks • Carrier Class QoS – advanced signal handling and management ensures optimal performance for all services • Local and remote end-to-end monitoring and control through an interface to 410, 430 or SC-450 system controller • Low power system requirements eliminates the need for a high power capacity source’s, reducing operator expenses • Comprehensive conditioning and monitoring of RF signals at the head-end through an interface to the  Radio Interface Unit (RIU)  • Reduce cost through the support of multimode fiber • Software programmable parameters including output power, AGC (on/off  and  levels), and system gain • Real time component setting capabilities for optimal performance  1.2  System Architecture The MA1000 solution is based on the following main elements:    • Base Units (BUs) – The BUs perform RF to optic conversion on the BTS side.   • MA Remote Hub Units (RHUs) 1000 – The MA 1000 performs the RF to optic signal conversion at the antenna side for up to two services corresponding to the RHU model. A third service can be added by connecting an add-on remote hub unit to the MA1000 RHU.  • Add On  –  Service specific module that provides support for an additional service to an existing RHU. • 700 LTE SISO add-on – Add-on module specifically designed to support LTE SISO in the 700 MHz lower A, B and C blocks and the upper C block. (The LTE add-on model varies depending on whether or not it is used in conjunction with the 700/800 Public Safety RHU).
Introduction to MA1000 System  MA1000 Installation and Configuration Guide    2 • 860 WLAN Solution – The 860 and WCE is a wireless LAN module that provides secure and centralized connections for 802.11a/b/g Access Points and distributes the wireless services over the same coax and broadband infrastructure as the voice services.   All services are combined and distributed through the same antenna broadband infrastructure.  To provide optimum coverage at all times and monitoring and control of all system elements from a central location MA provides the following devices: • Radio Interface Units (RIUs) – The RIUs provide interfaces for up to three BTS/BDA signals, and automatically adjusts the output signal in response to input signal level in order to provide optimal coverage.   • 410, 430 and SC-450 controllers – The controllers enable remote monitoring of the system elements from a single location via advanced intuitive GUI.  Figure 1. MA1000 System Overview    RadioInterfaceUnitNetwork ControllerBase UnitBTSService1BTSService2BTSService3Up To 8 Remote Hubs Per UnitRemoteHub UnitAdd-on ServiceWLAN Add-onRemoteHub UnitAdd-on ServiceWLAN Add-onRemoteHub UnitAdd-on ServiceWLAN Add-onRemoteHub UnitAdd-on ServiceWLAN Add-onOptional for Local Monitoring and Configuration
Introduction to MA1000 System  MA1000 Installation and Configuration Guide    3 1.3  Configuration Options  The MA1000/Add-on system includes three basic configuration options: A) Basic configuration The Base Unit drives a single or dual band, MA 1000 RHU. The dual band RHU consists of a low band service (cellular 800, iDEN, Paging, or GSM 900) and a high band service (PCS 1900 or DCS 1800).  Figure 2.  MA1000 Basic BU – RHU Configuration B) Using the Add-on unit to provide an additional service An Add-on unit can be connected to an MA1000/2000 RHU to provide a third service. The add-on unit can be PCS, UMTS, AWS, LTE700 MHZ or any future service.   Figure 3. MA1000  BU and  RHU Plus Add-On
Introduction to MA1000 System  MA1000 Installation and Configuration Guide    4 C) Using the 860 WLAN solution to provide access to high data-rate service An 860 WLAN solution may also be added in a configuration that includes both MA1000 RHU and Add-on RHU or only MA1000 RHU.    Figure 4.   BU and RHU Plus Add-on Plus WLAN Configuration 1.4  Management  The  Corning MobileAccess family of Element Management System (EMS) Controllers provide complete site coverage and management of the MA 1000 system. They can be used to provision coverage that can compensate for changing loads.  They also provide real-time monitoring, control and diagnostics capabilities for Corning MobileAccess devices from a single location.  • 410 – enables management of the 1000/2000 system components through a local RS-232 or dial-up connection.  It is also used as a slave controller to a 410, 430 or SC-450 controller to expand the management system on a site.  Management access is provided through the MCT GUI application. • 430 – enables management of the 1000/2000 system components through a local RS-232 or dial-up connection.  Management access is provided through the MCT GUI application or via the NMS Server Software Application which communicates via SNMP over a Ethernet TCP/IP connection.  The 430 may also be monitored via a 3rd party SNMP application for receipt of SNMP traps. • SC-450 - enables management of the 1000/2000 system devices through local or remote Ethernet TCP/IP connection.  Management access is provided through a local and remotely accessible web-GUI interface. The SC-450 may also be monitored via a third party SNMP application for receipt of SNMP traps. • MCT – a Java based GUI application provided with both controllers.  MCT is used with the 410 and 430 after the installation procedure to adjust Corning MOBILEACCESS devices according to the installation site characteristics in order to optimize coverage for the site. The application is installed and run from a computer that is connected either locally or via remote dial-up modem to the 410 or 430 at the site.  • MobileAccess Manager™  –  a Java based GUI software application that provides enhanced monitoring and control capabilities for all your 1000/2000 sites from a single location.  The MobileAccess Manager application is not supplied with the controller – it is purchased separately.
 MA 1000M Installation and Configuration Guide    5  2  SSyysstteemm  EElleemmeennttss    This chapter describes the MA1000 system basic elements: remote modules (1000 RHU and Add-on) and the Base Units. Your system may include additional elements such as 410, 430 and SC-450 controllers, RIUs and 860 WLAN solution units; these are described in the corresponding User Guides. 2.1  Remote Modules  The Optical to RF conversion of each service at the individual building floors is performed by remote units corresponding to the service types. These consist of 1000 RHUs and in addition, may include Add-on modules and 860 WLAN solution modules.  The configurations depend on the requirements of the site and the supported services. The following sections describe each of the system elements.  NOTE: The connections as they relate to the MA 1000 system are described in Chapter  4  - System Installation. 2.1.1  MA1000 RHUs  Each RHU supports two different services (one high-band and one low-band).  All RHUs are add-on ready, meaning that their optic interface and control functionality can support a third (high-power) service through the connections of an Add-on module (see section  4.3.2.1).  Each 1000 RHU is connected to the corresponding BU (located in the communication room) through a fiber optic connection. Remote monitoring is provided through the BU connections to the 410, 430 and SC-450 controller ( 1.4).   The 1000 RHU services, add-on service and data services (provided by 860 WLAN system) at each location are combined and then transmitted over a common infrastructure to strategically placed antennas.
Preface Material  MA1000 Installation and Configuration Guide  6 2.1.1.1 1000 RHU Front Panel The 1000 RHU front panel contains the fiber optic connections to the BU, four coax connections to the antennas, power connections and status indicators.  If 1000 RHU and Add-on units are installed, then the combined services are fed to the coax infrastructure through the 1000 RHU antenna ports. However, if 860 WLAN solution is also installed, the combined data and voice services are fed to the coax infrastructure through the 860 antenna ports. NOTE:  To provide alarms, the antenna must supply a DC resistance of up to 5K ohms.     Figure 5. 1000 RHU Front Panel Table  2-1. 1000 RHU Front Panel Indicators LED Description COMM Active communication detected LINK Optical link to BU detected PWR DC power connected    F/O BU connections   Power connector LEDs MA service connector RF ports 1 to 4
Preface Material  MA1000 Installation and Configuration Guide  7 2.1.1.2 MA1000 RHU Rear Panel The MA1000 RHU rear-panel provides the control, RF interface and optic interface ports that enable connecting an Add-on unit to the 1000 RHU module.   Figure 6. MA1000 RHU Rear Table  2-2. MA1000 RHU Rear Panel Connectors Add-on control Transmits the control signals from Add-on module to the 1000 RHU module. Connected to the Add-on Control From port.  High Band Connects to the Add-on High Band port. Provides the interface to the Add-on RF service which is combined with the RHU services and distributed through the common coax infrastructure.  Low Band Connects to the Add-on Low Band port.  Provides the interface to the Add-on RF service which is combined with the RHU services and distributed through the common coax infrastructure. DL, UL Transmit the RF signals to- and from- the Add-on module. These ports are connected to the corresponding ports on the ADD-ON rear panel: DL to DL, UL to UL. 2.1.2  Add-on The  Corning MOBILEACCESS Add-on module is a high power module, supporting a single frequency band (low or high). It is designed to be integrated with a host 1000 RHU module. The 1000 RHU module provides the following functionality for both units: • Optical interface (to the BU) and conversion • RF interface (to antennas) and conversion • Control signals  In addition, WLAN services can also be combined with Add-on and 1000 RHU services. (However, in this type of configuration the combined services interface to the coax infrastructure through the 860 ports.) NOTE:  The units are integrated through simple external cable connections between corresponding ports.
Preface Material  MA1000 Installation and Configuration Guide  8 2.1.2.1 Add-on Front Panel The RHU Add-on front panel contains the power connection and status LEDs. (The RS-232 connector is reserved for MA service personnel).      Figure 7. RHU Add-on Front panels Table  2-3. Corning MOBILEACCESS Add-on Front Panel Indicators LED  Description RUN When blinking, indicates that the RHU is in normal operating mode. PWR Power ON  2.1.2.2 Add-on Rear Panel The RHU Add-on rear panel contains the connections to the 1000 RHU and 860.    Figure 8. RHU Add-on Rear Panel MA service connector Power connector 1000 RHU Add-on control MA 860 Control To 1000 RHU High, DL and UL connectors. LEDs
Preface Material  MA1000 Installation and Configuration Guide  9 Table  2-4. RHU Add-on Rear Panel Connectors Add-on Control  Transmits the control signals between the Add-on module and the 860 and 1000 RHU modules:  • From – receives control signals from the 1000 RHU. Connected to the 1000 RHU Add-on Control connector. • To  –  for configurations that include 860. Transmits control signals to 860. Connected to the 860 Add-on Control connector. DL, UL Transmit the RF signals to- and from- the Add-on module. These ports are connected to the corresponding ports on the 1000 rear panel: DL to DL, UL to UL. High RF service output port connected to the 1000 RHU rear-panel High port.  2.2  Base Units  The BUs (Base Units) perform RF to optical conversion of the signal on the BTS/BDA side. Each can support up to two services (provided by the same operator). Two models of BUs are available: four-port unit – supporting four RHUs, and eight-port unit supporting up to eight RHUs.  The RHU models correspond to the services supplied through the BUs.   The BU (and all the corresponding remote units) may be remotely monitored and managed via the 410, 430 and SC-450.  The BUs are usually installed in the telecom room adjacent to the BTS/BDA signal source. RF ports on the rear panel provide interface to the BTS side (through connection to RIU or passive interface), while optic ports on the front panel provide interface to the RHUs (Remote Units). The following sections describe the BU front and rear panels, including indicators and connectors.
Preface Material  MA1000 Installation and Configuration Guide  10 2.2.1.1 BU Front Panel The front panel contains the optical connections and indicators. The BU is available in two configurations: Four-port  -  and Eight-port BUs. The eight-port BU consists of two four-port elements where each four-port element has a dedicated set of indicators (PWR, LSR and Link 1 to Link 4 or Link 5 to Link 8).   Figure 9. Eight-Port BU Front Panel   Figure 10. Four-Port BU Front Panel Table  2-5. BU Front Panel Indicators LED  Description PWR Power input detected for the corresponding unit. LSR ON - laser circuitry for the corresponding element (group of four ports) is functioning correctly. Link 1-4, 5-8  ON - the optical link to/from the connected remote functions within the specifications in both directions.  Blinking - optical power from remote is lower than expected by at least 2 dBm    Four ports and corresponding indicators Four ports and corresponding indicators
Preface Material  MA1000 Installation and Configuration Guide  11 2.2.1.2 BU Rear Panel The BU rear panel contains the RF, NMS, and power connections. Note that there are two uplink and two downlink RF connections to the BTS side (to an Interface Box or RIU) - each individual uplink and downlink connection corresponds to a four-port BU element. For a four-port BU, one uplink and one downlink port is connected; for an eight-port BU, two uplink and two downlink ports are connected.     Figure 11. BU Rear Panel (RF Connections) Table  2-6. BU  Rear Panel Connections Connector Description Uplink output Uplink connectors to be connected on BTS side. Downlink input Downlink connectors to be connected on the BTS side.  Com Port RS485 Connection to 410, 430, SC-450 controller.  PWR  Power connection Alarms  N/A      Pair of uplink and downlink RF  connections for interface to BTS  To 410/430/SC-450 controller Power
Preface Material  MA1000 Installation and Configuration Guide  12 3  SSiittee  PPrreeppaarraattiioonn    3.1  Infrastructure Preparation This following installation rules are based on the assumption that site survey and installation planning (including power requirements) have been completed.  3.2  Installation Requirements The infrastructure preparation consists of two main phases: A. Floor Planning: Planning the distribution of the antennas on each floor to provide the required coverage.  B. Telecom Closet Planning: Planning the layout of the devices and cables in the telecom closet or shaft. This includes the 860, 802.11 Access Points, cabling and other voice service distribution systems that are relevant to the specific installation. 3.3  Coaxial Cable Connections 3.3.1  General Cable Installation Procedures Observe the general cable installation procedures that meet with the building codes in your area. The building code requires that all cabling be installed above ceiling level (where applicable). Each length of cable from the risers to each antenna must be concealed above ceiling.  The cable must be properly supported and maintained straight using tie-wraps, cable trays and clamps or hangers every 10 feet (where practical above ceiling level). Where this is not practical, the following should be observed: • The minimum bending radius of the supplied ½” coax cable should be 7”. • Cable that is kinked or has a bending radius smaller than 7” must be replaced. • Cable runs that span less than two floors should be secured to suitably located mechanical structures. • The cables should be supported only from the building structure.
Preface Material  MA1000 Installation and Configuration Guide  13 3.3.2  Fiber Optic Rules • Either single mode or multimode fiber can be used with Corning MOBILEACCESS 1000M products, while Corning MOBILEACCESS 1000 products can only be used with  single mode fiber. • Only Multimode fiber, 50/125 or 62.5/125um complying with ANSI/TIA/EIA-568-B series, EN50173-1 or ISO/IEC 11801 can be used. The fiber length can be up to 300 meters assuming the following qualifications: § All fiber in a given length of fiber must be of the same core diameter.  § All Bulkhead adapters must be Single mode SC/APC (Green) adapters.  § All terminations cross connections or patches must be direct fusion splice or Corning MOBILEACCESS specified patch cords listed below.   900 microns pathcord for splicing, 2 Meters, 2xSC/APC Diamond p/n ENC/1045341   Beige boots, 62.5/125/900 MA# 500001057 Diamond p/n ENC/1045340   Black boots, 50/125/900 MA# 500001058  Zipcord patchcord, 4xSC/APC, 50/125/900/2000/4500 micron Diamond p/n ENC/1045342   Black/Brown boots, 1Meter MA# 50000105 Diamond p/n ENC/1045343   Black/Brown boots, 3 Meter MA# 500001060  Zipcord patchcord, 4xSC/APC, 62.5/125/900/2000/4500 micron Diamond p/n ENC/1045344   Beige/Brown boots, 1 Meter MA# 500001061 Diamond p/n ENC/1045345   Biege/Brown boots, 3 Meter MA# 500001062   • Use only 8-degree SC/APC connectors (green color). • Use only fusion splice for connecting two fibers. • Use minimum splicing/connectors to achieve minimum losses on the fibers (<0.5dB). • Use precaution while installing, bending, or connecting fiber optic cables. • Use an optical power meter and OTDR for checking the fiber optic cables. • Make sure the environment is clean while connecting/splicing fiber optic cables.  • All fiber optic connections should be cleaned prior to attaching to termination points using a dry cleaning device (i.e. Cletop or equivalent). • Fiber connector protective caps should be installed on all non-terminated fibers and removed just before they are terminated. • Verify the Fiber Optic connections using a suitable fiber optic test procedure. • Pay special attention while connecting the SC/APC connectors - you must hear the “click” when the connection is made.
Preface Material  MA1000 Installation and Configuration Guide  14  3.3.3  RF Rules • Use coax ½”, 50ohm, male-to-male N-type, (6-7dB for 1Ghz, 11dB for 2Ghz) for connecting to RHU and RHU ports. • Use coax RG223, 50ohm, male-to-male N-type for RF connections from the BUs to the BTS/RBS and to the RIU. • When using the Corning MOBILEACCESS system in an environment in which other indoor coverage systems are installed, it is recommended (where possible) that the antennas are placed at least two meters apart  • When bending coax cables, verify that the bending radius does not exceed the coax specifications. • Use wideband antennas supporting a range of 800Mhz to 2500Mhz  • Use a VSWR meter (i.e. Site Master or equivalent) for checking coax cables, including the antennas. (<2). The VSWR must be measured prior to terminating the RHUs in the remote communication rooms • Terminate all unused RHU and RIU ports with a 50 ohm load  3.4  Power Consumption, Connections and Power Supplies 3.4.1  Power Safety Instructions    SAFETY WARNINGS • When installing or selecting the power supplies:  • Be sure to disconnect all power sources before servicing. • Calculate the required power according to the requirements of the specific installation and then determine the configuration of the power supplies. The required DC cables will then be determined by the selected PS configuration. • Use only UL approved power supplies  • AC and DC power supply cables – use only the power cords supplied with the units  • Install external over-current protective devices for the system according to the requirements described in section  3.4.3.
Preface Material  MA1000 Installation and Configuration Guide  15 3.4.2  Power Consumption of Units Table  3-1. Corning MOBILEACCESS™ Power Requirements Unit Type Voltage Input Typical Power Consumption Maximum Current Consumption Remote Unit 1000 20 to 48VDC 25W 1.25A Remote Unit 1000E 20 to 48 VDC 29W 1.45A Add-on 25 to 48VDC 50W 2.0A RIU – 3 BTSCs 20 to 48VDC 12W 0.6A Base Unit 20 to 48VDC 14W 0.7A 410/430 Controller 20 to 48VDC 10W 0.5A 860 20 to 48VDC 20W 1.0A 3.4.3  Circuit Breakers Install fuse protections for the system according to the following criteria:  • The following system elements require external fuse protection: RIUs, BUs, 410, 430 and SC-450 Controllers. • Referring to Table  3-1, calculate the required fuse protection.  • Example: a set of three elements consisting of a BU, RIU and 410, 430 or SC-450 controller requires a 2A circuit breaker. 3.4.4  Types of Power Supplies Corning MobileAccess supplies various power supplies that can be installed in a rack or mounted on a wall, depending on your configuration.  3.5  Installation Conventions Some of the basic installation conventions are listed below for the 1000 system: • Base Units – are usually concentrated in the same location, most often in the main communication room.  • Remote Hub Units usually placed in the communication shaft or closet of a corresponding floor so they can be easily located.  Each RHU can typically cover a floor of up to 30,000 sq ft.  • Fiber optic cable  -  bundled fibers are terminated into the Base Units in the main communication room.  The fibers are then routed to each coverage location where individual fibers terminate into splice boxes.  The splice box couples the installed fiber into the remote units.  Enough spare fibers should be installed to take into account future expansion of the system.   For example, for three remote units, six fibers are required. However, to allow for future upgrades, it is recommended to install additional optic fibers to be connected to additional RHUs.  The following figure illustrates fiber optic routing sufficient to cover 21 floors: each group of strands can cover three floors as illustrated below, with two strands to spare. The first group
Preface Material  MA1000 Installation and Configuration Guide  16 of strands coves floors 1, 2 and 3; the next group will cover floors 4, 5 and 6 through an additional splice box.  Figure 12. Illustration of Fiber Optic Routing • For remote power supply configuration - cable bundles are routed from the main communication room and individual wire pairs are terminated into the power feed of individual units.   By providing power from a single distribution point, maintenance can be reduced and UPS backup can be easily provided. The maximum distance from the source to the termination spot is 1000 feet using 18 gauge wires.   In many locations local codes do not require power to be run through conduit if 100 watts or less is used.  Please consult the regulations in your local jurisdiction prior to deploying remote power.  When power cables require distances greater than 1000 feet 14 or 16 gauge wire may be used.    • On each floor - the antennas are connected to the RHUs using coax cables.
 MA 1000M Installation and Configuration Guide    17 4  SSyysstteemm  IInnssttaallllaattiioonn   4.1  Overview This chapter describes how the communication room and remote locations are installed. The individual system elements are described in Chapter 2.  In order to describe the installation process clearly, it will be described as consisting of two logical parts:  A. Telecommunications room – installing the RIUs, BUs, 410, 430 and SC-450 controllers, and the required passive equipment in the telecommunication room close to the RF signal source. This installation may differ between single and multi-building topologies. B. Remote locations – RHU  and Add-on installations and connections. These are usually wall mounts.  The installations for two basic topologies are described in detail: for single building and for multi-building. By understanding the two generic installations you will be able to address any variations in system deployment. 4.2  Communication Room Installation It is recommended to install the following Corning MOBILEACCESS system modules in a 19” rack in the communication room • RIU 3U • BU 1U  • 410, 430 and SC-450 controller 1U • Fiber Optic patch panel and splice tray • Power supply/supplies
Preface Material  MA1000 Installation and Configuration Guide  18 4.2.1  Rack Installation General Instructions Verify that the rack height can support all the units to be installed, where you may also want to consider future expansions.   Figure 13 shows the recommended physical location of the Corning MOBILEACCESS elements in the rack in order to facilitate and simplify the cabling connections.  The configuration is for a single operator. If the site is serviced by more than one operator, each operator often installs their equipment in a separate rack. NOTE: Note that the 410, 430 SC-450 Controller is at eye level to provide an easy view of the LED indicators and LCD display and easy access to the local and remote monitoring connections.              Figure 13: Recommended Order in the Communication Room Rack    MobileAccess Controller (1U)  MobileAccess RIU (3U)  MobileAccess  Power Supply (3U) Fiber Optic Patch Panel  and Tray (variable size) At eye level MobileAccess Base Unit 6 (1U) MobileAccess Base Unit 1 (1U) MobileAccess Base Unit 2 (1U)
Preface Material  MA1000 Installation and Configuration Guide  19 4.2.2  Rack Installation Safety Instructions Review the following guidelines to help ensure your safety and protect the equipment from damage during the installation. • Only trained and qualified personnel should be allowed to install or replace this equipment. • Verify that ambient temperature of the environment does not exceed 50°C (122°F) • To maintain a low center of gravity, ensure that heavier equipment is installed near the bottom of the rack and load the rack from the bottom to the top.   • Ensure that adequate airflow and ventilation within the rack and around the installed components so that the safety of the equipment is not compromised. It is recommended to allow for at least about 2 cm of airspace between devices in the rack. • Verify that the equipment is grounded as required – especially the supply connections. 4.2.3  Single Building Rack Installation This section provides an example of a single building main communication room installation for a 24-floor building with Cellular and PCS coverage. Since there are 24 floors, then 24 RHUs are required – one for each floor. In addition, the following equipment will be installed in the main communication room: • Three BUs – to support 24 RHUS • One 430 controller for monitoring  • One RIU with Cellular and PCS BTSCs – to interface to the BTS/BDA  Figure 14. Example of Single-building Topology Communication Room Installation
Preface Material  MA1000 Installation and Configuration Guide  20 4.2.4  Multi-Building Rack Installation The figure below provides an example of a multi-building solution which distributes two bands from a main site over two remote sites up to 20Km away. The 330 units extend the RF signal from the Main to the Remote buildings over a single strand of fiber. Uplink and downlink signal are placed on the single fiber at 1310 and 1550 respectively.   The 330 system provides flexible solutions for various site requirements. The figure below illustrates two types of installations: • Remote Building 1 – installation in a remote location with several Base Units. For clarity, the example shows two Base Units. However, the configuration applies to a maximum of four (8-port) Base Units that are supported using a 330 Expansion Box.  The 330 Remote unit forwards the signals as follows:  • Service signals to the Base Units • Control signals from Master Controller at the main site to the 410 Slave Controller at the remote site. The Base Units are controlled through the 410 controller. • Building 2 –  special installations in a remote location with a single Base Unit. The 330 Remote unit forwards both the service and the control signals from the main building directly to the Base Units. Note that a 410 Controller is not required in this type of installation.      Figure 15: 330 System Installation Examples
Preface Material  MA1000 Installation and Configuration Guide  21  4.2.5  RIU Connections Refer to the RIU Products Installation and Configuration Guide for detailed instructions on connecting the RIU model in your installation. 4.2.6  BU Connections NOTE:  It is assumed that the patch panel cabinet (SC/APC adaptors) for fiber optic cable connections is installed in the rack near the BUs.  1.  Connect (3/125/900) pigtail with SC/APC connectors between splice tray and patch panel cabinet. 2.  Connect (3/125/3000) SC/APC jumpers between the corresponding BU and patch panel. 3.  Connect the fiber optic cables from the BU to the RHUs through the patch panel cabinet. 4.  Connect the UL RF Output and DL RF Input connectors to the RIU or UL and DL connectors or to the passive interface (such as Interface Box) in topologies that do not include RIUs. 4.2.7  Controller Connections Refer to the NMS 410/430 or SC-450 Installation and Configuration Guide for connections.
Preface Material  MA1000 Installation and Configuration Guide  22 4.3  Remote Site Installation 4.3.1  MA1000 RHU Installation  Mount and install each RHU on the wall in the communication shaft or communication room. The following provides the dimensions for the RHU unit.   Figure 16: MA1000 RHU Dimensions
Preface Material  MA1000 Installation and Configuration Guide  23 4.3.1.1 Wall Mount MA1000 RHU is usually mounted on a wall in a clean indoor environment – RF ports facing down.  Assembly instructions 1.  Place the unit against the wall and mark the four holes to be drilled in the wall. 2.  Drill four holes 8mm in diameter and insert the appropriate sized plastic plugs in each hole. 3.  Secure the MA1000 RHU to the wall using four screws, 4.5mm diameter, 40mm long.     Figure 17. MA1000 RHU Wall Mount 4.3.1.2 Connections NOTE: Keep in mind the rules for handling and connecting F/O cables. The F/O cables will be connected to the associated BU in the communication room at a later phase.  1.  Connect fiber optic cable to splice box and to SC/APC pigtails to RHU. 2.  For the downlink, connect the fiber optic cable pigtails from splice box coming from the BU port to the corresponding RHU port. 3.  Connect the RHU to antennas according to the RF engineers design (up to 4 antennas per RHU). 4.  For the uplink, connect the fiber optic cable pigtails from splice box from the RHU to the uplink port that connects to the BU. 5.  Connect the power to each RHU according to power design planning. 6.  Verify that 50 ohm terminators are placed on the unused uplink and downlink connectors.
Preface Material  MA1000 Installation and Configuration Guide  24 4.3.2  Add-on Installation The following figure provides the dimensions for the Add-On unit.  Figure 18. Add-On Dimensions
Preface Material  MA1000 Installation and Configuration Guide  25 4.3.2.1 Assembly and Connections Refer to Figure 19.  ATTENTION! To prevent damaging the SMA connectors,  be sure to tighten using a torque of 8lb.  1.  Position the supplied bracket on the 1000 RHU and secure the bracket to the 1000 RHU using the four supplied 6-32 NC screws. 2.  Position the RHU Add-on unit on the bracket and secure the Add-on to the bracket using the four supplied 8-32 screws. 3.  Interconnect the  1000 RHU and RHU Add-on SMA  Uplink,  Downlink and  High connectors on the rear panels of both units using the three straight jumpers. 4.  Interconnect the 1000 RHU and RHU Add-on D-type 9-pin connectors on the rear panels of both units using the supplied flat-cable. 5.  Connect the power to the RHU Add-on front-panel DC connector.6.     Figure 19. RHU Add-on  to 1000 RHU Assembly
Preface Material  MA1000 Installation and Configuration Guide  26  Figure 20. RHU Add-on to 1000 RHU Completed Assembly  4.3.3  860 WLAN Solution Installations Refer to the corresponding User Manual for detailed instructions on installing the unit. 4.3.4  Antenna Connections • For systems without  the 860 WLAN solution modules - connect the antenna connections to the RHU antenna ports; • For systems with the 860 WLAN solution - refer to the 860 Installation and Configuration Guide and connect the antenna ports to the 860.
Appendix A: System Specifications  MA1000 Installation and Configuration Guide  27 AAppppeennddiixx  AA::  SSyysstteemm  SSppeecciiffiiccaattiioonnss  RF Frequency Ranges Band Uplink Downlink  Low Band Services LTE SISO* 698-716   777-787MHz 728-757MHz CELL 824-849 869-894 Telstra 850M 824-849 869-890 iDEN (SMR800) 806-824 851-869 GSM 890-915 935-960 E-GSM 880-915 925-960 iDEN SMR900/Paging 896-902  929-941  High Band Services DCS 1710-1785 1805-1880 PCS 1850-1910 1930-1990 G-PCS 1850-1915 1930-1995 UMTS  1920-1980 2110-2170 AWS 1710-1755 2110-2155 *700 LTE Lower A, B, C blocks 3GPP Band 13 and Upper C blocks
Appendix A: System Specifications  MA1000 Installation and Configuration Guide  28 RF Parameters per Service Low Band Services MA1000 RF Parameters - Low Band Services RF Parameter LTE 700 MHz CELL TDMA / CDMA / WCDMA / GSM800 SMR 8006 GSM /     E-GSM SMR 9006 DL UL DL UL DL UL DL UL DL UL Max Output Power / Antenna Port                      1 (Composite) 21    20  20  14  20    2 Carriers 18    17  17  11  17    4 Carriers 15    14  14  8  14    8 Carriers      11  11  5  11  12 Carriers      9  9  3  9  Mean Gain(dB)1 21    20  7  20  7  14  7  20  7 Pin (dBm)1  0    0  0  0  0  Input IP3 (dBm) AGC OFF Min    -10  -5   -5   -5   -5 Input IP3 (dBm) AGC ON Min       5   5   5   5 SFDR2 (dB)    55  68/69/73  72  68  74 Max Intermod Distortion (dBm) **    -13*  -13  -36  -13  Max NF (dB)    20  20  20  16  16 Gain Flatness / Ripple (dB)3 +/-1.05 +/-1.5 * WCDMA compiles with 3GPP TS 25.106 V5.0.0 (2002-03) table 9.4 spectrum emission mask. **Out of band and spurious emissions compliant with FCC standards. 1 Factory set mean gain BU-RHU without RIU.  May be field adjusted using controller system. 2 SFDR for CDMA services is calculated in 100KB/sec. 3 Gain Flatness/Ripple is specified for the non-duplexed port of the system. 4 Specifications include the 900 MHz UL filter.  The output power is limited on the downlink. 5 Gain Flatness/Ripple at any block of the spectrum. 6 The SMR 800/900 for Sprint are to be designed, per Sprint guidelines, with composite power levels per antenna port and mean gain values 3dB less than stated.   3
Appendix A: System Specifications  MA1000 Installation and Configuration Guide  29 High Band Services  MA1000 RHU RF Parameters - High Band Services MA1000 RHU RF Parameter DCS PCS5 CDMA / WCDMA PCS5  GSM / TDMA G-PCS6 CDMA/WCDMA G-PCS6 GSM/TDMA UMTS and AWS CDMA/WCDMA DL UL DL UL DL UL DL UL DL UL DL UL Max Output Power / Antenna Port                          1 (Composite) 16  20  20  20    21    21     2 Carriers 13  17  17  17    18    18     4 Carriers 10  14  14  14    15    15     8 Carriers  7  11  11  11    12    12   12 Carriers  5  9  9  9    10    10   Mean Gain(dB)1 16  3  20  3  20  3  20    20  3  21  3 Pin (dBm)1  0  0  0  0    1    0   Input IP3 (dBm) AGC OFF Min  -6   -6   -6    -7    -7    -7 Input IP3 (dBm) AGC ON Min  3   3   3             SFDR2 (dB)  65  67  70/65  66    64    66 Max Intermod Distortion (dBm) -30  -13*  -13  -13*    -13    *   Max NF (dB)  18  18  18             Gain Flatness / Ripple (dB)3 +/-2.0 * WCDMA compiles with 3GPP TS 25.106 V5.0.0 (2002-03) table 9.4 spectrum emission mask. 1Factory set mean gain BU-RHU without RIU.  May be field adjusted using controller system. 2SFDR for CDMA services is calculated in 100KB/sec. 3Gain Flatness/Ripple is specified for the non-duplexed port of the system. 5The PCS service RF specifications outlined is relevant only for the MA1000 CELL/PCS RHU, CELL/PCS/700LTE TSX, CELL/PCS/AWS TSX and CELL/PCS/700LTE/AWS QSX 6The PCS service RF specifications outlined is relevant only for the MA1000 PCS AO and IDEN/SMR/PCS TSX  Absolute Maximum Rating Total Input RF Power to BU   10dBm  Power Supply 60VDC
Appendix A: System Specifications  MA1000 Installation and Configuration Guide  30 Optical Specifications Optical Output Power <3.0mW Max. Optical Budget 2 dB for fiber + 1 dB for Connectors (assumed) = 3 dB total. 300 m Multi-mode Optical Loss per Mated-pair Connectors 0.5dB (max) Optical Connector SC APC Fiber Type Single-mode: 9/125um  Multi-mode: 50/125 um or 62.5/125um (Minimum qualifications with ANSI/TIA/EIA-568-B series, EN50173-1 or ISO/IEC 11801) Wavelength 1310±10nm Maximum Distance Between Base Unit and Remote Cabinet 2km  Multimode Fiber Qualifications 50/125 or 62.5/125um complying with ANSI/TIA/EIA-569-B series, EN50173-1 or ISO/IEC 11801, may be used up to 300 meters in length assuming the following qualifications:  • Both the Base Unit and Remote hub must be multimode capable • All fiber in a given length of fiber must be of the same core diameter • All Bulkhead adapters must be single mode SC/APC (Green) adapters • All terminations, cross connections or patches must be direct fusion splice or one of the Corning MOBILEACCESS cords listed below  900 micro patchcord for splicing, 2 meters, 2xSC/APC 62.5/125/900  Diamond p/n ENC/1045341 FiberNext p/n OEM-629002-MAN 50/125/900  Diamond p/n ENC/1045340 FiberNext p/n OEM-509002-MAN  Zipcord patchcord, 4xSC/APC, 50/125/900/2000/4500 micron 1 meter   Diamond p/n ENC/1045342 FiberNext p/n OEM-50ZIP1-MAN 3 meter   Diamond p/n ENC/1045343 FiberNext p/n OEM-50ZIP3-MAN  Zipcord patchcord, 4xSC/APC, 62.5/125/900/2000/4500 micron 1 meter   Diamond p/n ENC/1045344 FiberNext p/n OEM-62ZIP1-MAN 3 meter   Diamond p/n ENC/1045345 FiberNext p/n OEM-62ZIP3-MAN  Environmental   Operating 0°C to +50°C (32°F to 122°F) Storage -20°C to 85°C (-4°F to 185°F)
Appendix A: System Specifications  MA1000 Installation and Configuration Guide  31 MA1000 Component Specifications  Base Unit    Models:  4-port; 8-port model Supported Services:  Wideband device supporting all services supported by MA systems Power:  Input power 20 to 48V DC Power Consumption 14W (8-port BU) RF Connections: N-Type Female, 50 ohm – interface to RIU or to passive BTS Interface Optic Connections:  Four or eight (depending on the model) SC/APC optic connections Remote Management Controller: SNMP, NMS via connection to the MA-410, MA-430 or SC-450 Physical Characteristics Dimensions (WxDxH): 19” x 8” x 1.74” (482.6x203.2x17.4mm) Weight: 3 Kg (6.6 lb.) Mounting: Rack mountable in 19-in  rack (mounting brackets included)    RHU   Supported Services:  Two services corresponding to the model Power:  Input power:  20 to 48V DC Power Consumption:  29W RF Connections: To antennas:  N-type Female, 50 ohm To Add-On:  SMA 50 ohm Remote Management:  SNMP, NMS via Base Unit connection to the MA-410, MA-430 or SC-450 controller Physical Characteristics:  Dimensions (WxDxH): 10.98” x 9.5” x 1.74” (278.9x241.3x44.2mm) Weight: 2.8 kg (6.17 lb.)
Appendix A: System Specifications  MA1000 Installation and Configuration Guide  32 Add-On    Supported Services:  Single service corresponding to the  model Power:  Input power:  25-48VDC Power Consumption:  50W RF Connections: To RHU:  SMA 50 ohm Remote Management:  SNMP, NMS via RHU connection Physical Characteristics:  Dimensions (WxDxH): 10.98” x 8.66” x 2.71” (278.9x219.9x68.8mm) Weight: 2.8 kg (6.17 lb.)
Appendix A: System Specifications  MA1000 Installation and Configuration Guide  33 Ordering Information MA1000 QSX Supported Services Part Number Description CELL/PCS/700 LTE/AWS 1000-C85P19L70A17-A  MA1000 Quad-service package supporting CELL, PCS, 700 MHz LTE and AWS. 1000M-C85P19L70A17-A  MA1000 Quad-service package supporting CELL, PCS, 700 MHz LTE and AWS with MMF.  MA1000 TSX Supported Services Part Number Description CELL/PCS/700 LTE 1000-C85P19L70-A  MA1000 TSX tri-service CELL/PCS and 700 MHz LTE. 1000M-C85P19L70-A  MA1000 TSX tri-service CELL/PCS and 700 MHz LTE with MMF. CELL/PCS/AWS  1000-C85P19A17-A  MA1000 TSX tri-service CELL/PCS and AWS. 1000M-C85P19A17-A  MA1000 TSX tri-service CELL/PCS and AWS with MMF. IDEN/SMR/PCS 1000-IDEN-SMR-G-PCS MA1000 TSX tri-service iDEN/SMR and PCS with G-Block support. 1000M-IDEN-SMR-G-PCS MA1000 TSX tri-service iDEN/SMR and PCS with G-Block support with MMF. 1000-IDEN-SMR-G-PCSF MA1000 TSX tri-service iDEN/SMR and PCS with G-Block support and filter to provide additional guard band between iDEN DL and SMR UL. 1000M-IDEN-SMR-G-PCSF MA1000 TSX tri-service iDEN/SMR and PCS with G-Block support and filter to provide additional guard band between iDEN DL and SMR UL with MMF.   Base Units Part Number Description WB-B8U Wide Band Base 8 Unit supporting 8 RHUs WBM-B8U   Wide Band Base 8 Unit supporting 8 RHUs over MMF  WB-B4U Wide Band Base 4 Unit supporting 4 RHUs WBM-B4U Wide Band Base 4 Unit supporting 4 RHUs over MMF
Appendix A: System Specifications  MA1000 Installation and Configuration Guide  34 Remote Hub Unit Modules  Part Number Description 1000-CELL-4E Single band CELL, 4 ports, PCS Add-on support 1000-PCS-4E Single band PCS,  4 ports, AWS Add-on support 1000-DCS-4E Single band DCS, 4 ports, UMTS Add-on support 1000M-DCS MMF Single band DCS, 4 ports, UMTS Add-on support 1000-CELL-PCS4E-HL Dual band CELL/PCS, 4 ports, AWS Add-on support 1000M-CELL-PCS4E-HL MMF dual band CELL/PCS, 4 ports, AWS Add-on support 1000-CELL-DCS4E Dual band CELL/DCS, 4 ports, UMTS Add-on support 1000M-GSM-DCS MMF dual band GSM/DCS 4 ports, UMTS Add-on support 1000-GSM-DCS4E Dual band GSM/DCS, 4 ports, UMTS Add-on support 1000-GSMO-DCS4E Dual band GSM orange/DCS, 4 ports, UMTS Add-on support 1000M-iDEN-SMR MMF dual band iDEN(SMR800)/SMR900 Paging,4 ports, PCS Add-on support 1000-iDEN-SMR4 Dual band iDEN(SMR800)/SMR900, 4 ports, PCS Add-on support 1000-IDEN-SMR4F Dual band iDEN(SMR800)/SMR900, 4 ports with filter kit, PCS Add-on support 1000-SMR-FILTER Filter kit for SMR 900   Add-On Modules  Part Number Description 700LTE-AO-A-SCU Add-On kit for LTE 700 MHz service for use in upgrade situations with older MA1000 Cell/PCS RHUs (P/N 1000-CELL-PCS4E and 1000M-CELL-PCS). Includes 700 MHz service combiner unit (SCU-700) and applicable accessories for connecting to the Cell/PCS RHU. 700LTE-AO-B-HL Add-On for LTE 700 MHz service with MA1000 Cell/PCS RHUs (P/N 1000(M)-CELL-PCS4E-HL) 1200-G-PCS-AO Add-On RHU Supporting a PCS w/G-Block 1200-UMTSE-AO Add-On RHU - UMTS Service 1200-AWS-AO Add-On RHU Supporting AWS Service
Appendix A: System Specifications  MA1000 Installation and Configuration Guide  35 Power Supply Accessories  Part Number Description LPS-48V-66W Local AC/DC Converter 66W LPS-48V-100W Local AC/DC Converter 100W AK-PWR-CORD-EU AC Power Cord for 66W and 100W Power Supplies, European Connector AK-PWR-CORD-UK AC Power Cord for 66W and 100W Power Supplies, UK Connector  Mounting Bracket Accessories  Part Number Description BRKT-1200-STK  Bracket for stacking RHU/Add-On/860 module on top of an Add-On module BRKT-1RU-SHELF-2K Shelf for RHU/Add-On/860 or bracket for stacking on MA2000 MRC BRKT-RHU-800-STK    Bracket for stacking RHU/Add-On/860 module on top of a RHU/860 module (Note: Not on top of an Add-On)          98

Navigation menu