Corsair Memory SPB0002 Simple Audio Share User Manual SP B0002 x
Corsair Memory, Inc. Simple Audio Share SP B0002 x
User Manual
1
Simple Audio Share
SP-B0002
User Manual
2
Safety Information
IMPORTANT SAFETY
INSTRUCTIONS
1. Read these instructions.
2. Keep these Instructions.
3. Heed all Warnings.
4. Follow all instructions.
5. Do not use this apparatus near water.
6. Clean only with dry cloth.
7. Do not block any ventilation openings.
Install in accordance with the
manufacturer's instructions.
8. Do not install near any heat sources such
as radiators, heat registers, stoves, or other
apparatus (including amplifiers) that
produce heat.
9. Do not defeat the safety purpose of the
polarized or grounding - type plug. A
polarized plug has two blades with one
wider than the other. A grounding type plug
has two blades and a third grounding prong.
The wide blade or the third prong is
provided for your safety. If the provided plug
does not fit into your outlet, consult an
electrician for replacement of the obsolete
outlet.
10. Protect the power cord from being walked
on or pinched particularly at plugs,
convenience receptacles, and the point
where they exit from the apparatus.
11. Only use attachments/accessories
specified by the manufacturer.
12. Use only with the cart, stand, tripod, bracket
or table specified by the manufacturer, or
sold with the apparatus. When a cart is
used, use caution when moving the
cart/apparatus combination to avoid injury
from tip-over.
PORTABLE CART WARNING
(Symbol provided by RETAC)
13. Unplug this apparatus during lightning
storms or when unused for long periods of
time.
14. Refer all servicing to qualified service
personnel. Servicing is required when the
apparatus has been damaged in any way,
such as power-supply cord or plug is
damaged, liquid has been spilled or objects
have fallen into the apparatus, the
apparatus has been exposed to rain or
moisture, does not operate normally, or has
been dropped.
15. Apparatus shall not be exposed to dripping
or splashing and no objects filled with
liquids, such as vase,shall not be placed on
the apparatus.
16. The mains plug is used as disconnect
device and it shall remain readily operable
during intended use. In order to disconnect
the mains plug from the mains completely,
the mains plug should be disconnected
from the mains socket outlet completely.
17. The batteries (battery pack & batteries
installed) shall not be exposed to excessive
heat such as sunshine, fire or the like.
The exclamation point within an equilateral
triangle is intended to alert the user to the
presence of important operating and
maintenance (servicing) instructions in the
literature accompanying the appliance.
WARNINGS:
The lightning flash with arrowhead symbol,
within an equilateral triangle is intended to
alert the user to the presence of uninsulated
"dangerous voltage" within the product's
enclosure that may be of sufficient
magnitude to constitute a risk of electric
shock to persons.
TO REDUCE THE RISK OF FIRE OR ELECTRIC
SHOCK, DO NOT EXPOSE THIS APPLIANCE TO
RAIN OR MOISTURE.
DO NOT REMOVE COVER or OPEN THE CABINET.
Dangerous high voltages are present inside the
enclosure. No user serviceable parts inside. Leave all
servicing to qualified service personnel.

3
18. Do not place any naked flame sources,
such as lighted candles, on the apparatus.
19. The battery used in this product must be
properly recycled or disposed of. Please
contact your local recycling center for
proper battery handling and disposal
instructions.
FCC and IC Information:
This device complies with Part 15 of the FCC Rules
and RSS-210 of the IC Rules. Operation is subject
to the following two conditions: (1) This device may
not cause harmful interference, and (2) this device
must accept any interference received, including
interference that may cause undesired operation.
Canada IC statments
Le présent appareil est conforme aux CNR
d'Industrie Canada applicables aux appareils radio
exempts de licence. L'exploitation est autorisée aux
deux conditions suivantes: (1) l'appareil ne doit pas
produire de brouillage, et (2) l'utilisateur de
l'appareil doit accepter tout brouillage
radioélectrique subi, même si le brouillage est
susceptible d'en compromettre le fonctionnement.
Warning: Changes or modifications to this unit not
expressly approved by the party responsible for
compliance could void the user's authority to
operate the equipment.
Note: This equipment has been tested and found to
comply with the limits for a Class B digital device,
pursuant to Part 15 of the FCC Rules.
These limits are designed to provide reasonable
protection against harmful interference in a
residential installation. This equipment generates,
uses, and can radiate radio frequency energy and,
if not installed and used in accordance with the
instructions, may cause harmful interference to
radio communications. However, there is no
guarantee that interference will not occur in a
particular installation. If this equipment does cause
harmful interference to radio or television reception,
which can be determined by turning the equipment
off and on, the user is encouraged to try to correct
the interference by one or more of the following
measures:
y Reorient or relocate the receiving antenna.
y Increase the separation between the
equipment and receiver.
y Connect the equipment into an outlet on a
circuit different from that to which the
receiver is connected.
y Consult the dealer or an experienced radio
TV technician for help.
Warnings: The device meets the exemption from
the routine evaluation limits in section 2.5 of RSS
102 and users can obtain Canadian information on
RF exposure and compliance from the Canadian
Representative Burnport Holdings Ltd. 72MT
Belcher Pls, East, Calgary, Alberta, T2Z 2G1,
CANADA. Tel: 403-257-4961
Le dispositif rencontre l'exemption des limites
courantes d'évaluation dans la section 2.5 de RSS
102 et la conformité à l'exposition de RSS-102 rf,
utilisateurs peut obtenir l'information canadienne
sur l'exposition et la conformité de rf.
For compatibility between the system and another
device with Bluetooth technology, consult the
device's documentation and dealer. In some
countries, there may be restrictions on using
Bluetooth devices. Check with your local
authorities.
is a registered trademark of
Bluetooth SIG, Inc.
The N Mark is a trademark or registered trademark
of NFC Forum, Inc. in the United States and in
other countries.
Please read rating label at the bottom of system for
power input and other safety information.
4
CAUTION - Proper Installation
y Install the system in a place which is level,
dry and neither too hot nor too cold. The
appropriate temperature is between 5 oC
and 35oC.
y Install the system in a location with
adequate ventilation to prevent internal heat
from building up inside the unit.
y Leave sufficient distance between the
system and TV.
y Keep the system away from TV to avoid
interference with TV.
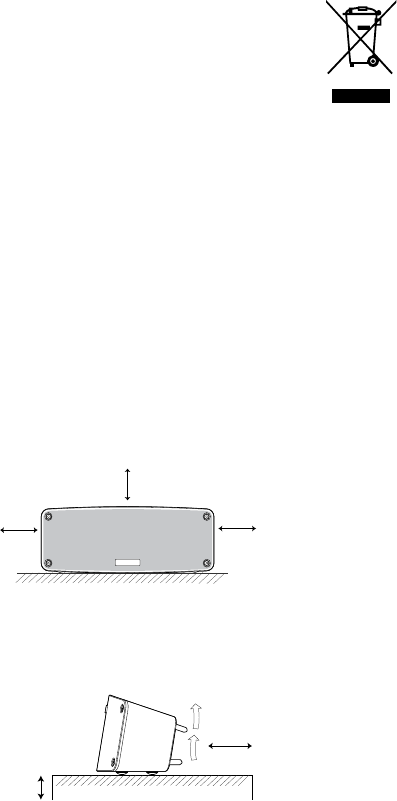
CAUTION - Proper Ventilation
To avoid risk of electric shock and fire, and to
prevent damage, locate the apparatus as follows:
Front: No obstructions and open spacing.
Sides / Top / Back: No obstructions should be
placed in the areas shown by the dimensions
below.
Bottom: Place on the level surface. Maintain an
adequate air path for ventilation by placing on a
stand with a height of 10 cm (3-15/16") or more.
Front View:
Side View:
Information for Users on
Disposal of Old Equipment
[European Union]
This symbol indicates that the
electrical and electronic equipment
should not be disposed as general
household waste at its end-of-life.
Instead, the product should be
handed over to the applicable
collection point for the recycling in
accordance with your national
legislation.
By disposing of this product correctly, you will help
to conserve natural resources and will help prevent
potential negative effects on the environment and
human health that could otherwise be caused by
inappropriate waste handling of this product. For
more information about collection point and
recycling of this product, please contact your local
municipal office, your household waste disposal
service or the shop where you purchased the
product. Penalties may be applicable for incorrect
disposal of this waste, in accordance with national
legislation.
[Other Countries outside the European
Union]
If you wish to dispose of this product, please do so
in accordance with applicable national legislation or
other rules in your country for the treatment of old
electrical and electronic equipment.
QDID: B021038
Attention:
This symbol is
only valid in
the European
Union.
15 cm
(5- 15/16")
15 cm
(5-15/
16")
15 cm
(5-15/
16")
10 cm
(3- 15
/
16")
15 cm
(5-15
/
16")
Fro nt si de Back si de

5
Contents
Getting Started .............................................................................................. 6
Package Contents ......................................................................................................................... 6
Connecting the AC Adaptor ........................................................................................................... 6
Charging the Built-in Battery ......................................................................................................... 7
System Overview .......................................................................................... 8
Front View ..................................................................................................................................... 8
Rear View ...................................................................................................................................... 8
Selecting the Sound Source ........................................................................ 9
Playing back via Bluetooth ........................................................................ 10
Establishing a Bluetooth Connection .......................................................................................... 10
Using Multiple Bluetooth Devices ................................................................................................ 11
Playing back from Macbook or Macbook Pro .............................................................................. 11
Playing back from PC/Notebook ................................................................................................. 11
Playing back by NFC .................................................................................. 12
Playing back from External Source .......................................................... 13
Using Hands-free Calling ........................................................................... 14
Making a Call............................................................................................................................... 14
Receiving a Call .......................................................................................................................... 14
Rejecting/Interrupting a Call ........................................................................................................ 14
Troubleshooting .......................................................................................... 15
Technical Specifications ............................................................................ 16
6
Getting Started
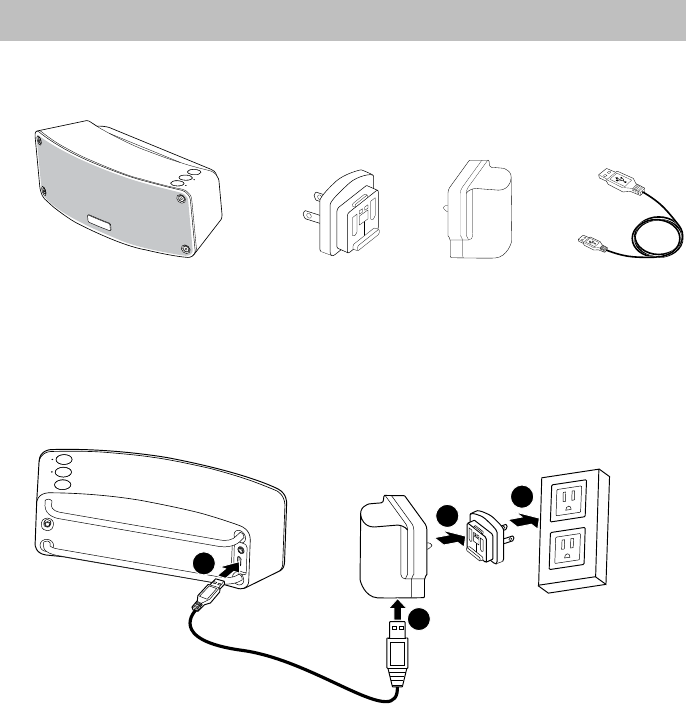
Package Contents
Examine whether the following package contents are all included:
Main Unit Adaptor Plug* Adaptor USB Cable
* Adaptor plug varies depending on different markets.
Connecting the AC Adaptor
WARNING! For optimal performance, use only the supplied AC adaptor and USB cable.
y Ensure that power supply outlet matches with the system AC's input 100-240V ~ 50/60Hz
before connection.
1. Install the Adaptor Plug to the AC adaptor.
2. Connect the standard USB plug of the USB cable to AC adaptor
3. Connect the micro plug of the USB cable to the USB power port on the back of the system.
4. Connect the AC adaptor (Using Adaptor plug matched with the market) to the Power outlet.
Power outlet
1
2
3
4
7
Charging the Built-in Battery
This system has a built in Lithium Ion battery to give you portable power when not using the AC
adaptor. When the adaptor is plugged in, the system will charge. During charging, the power
indicator next to the VOL+ button will blink as a breathing light in amber. When fully charged, it
will be turn green.
When operating the system in battery mode, a flashing red indicator means the battery is low,
and the system will power off automatically 30minutes later without charging.
Notes:
y The battery cannot be replaced by the user.
y It takes about 3 hours to charge the battery from empty to full.
y Do not dispose of system in fire; battery may explode or leak.
Type: Li-Polymer Battery
Rated Voltage: 3.7V
Capacity: 1800mAh
WARNING!
There is a danger of explosion if the battery is incorrectly replaced. Replace it only with the same
or equivalent type. Do not expose it to excessive heat such as sunshine, fire, etc., where it would
be exposed to high temperatures above 60°C.
8
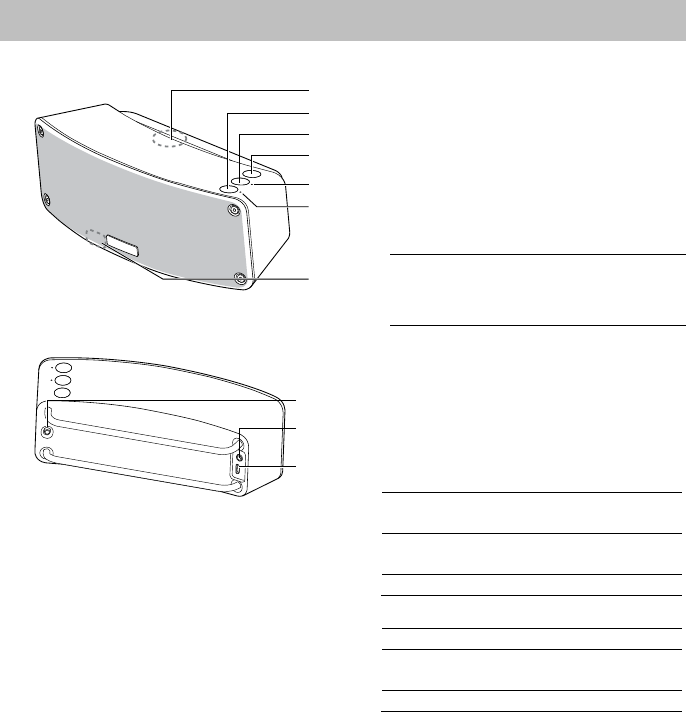
System Overview
Front View
Rear View
1. NFC field
Touch to make Bluetooth connection with
an NFC compatible smartphone.
2. VOL + button
In Bluetooth mode, tap to increase the
volume level.
3. Pair button
Tap to establish a Bluetooth connection
with Bluetooth-enabled device.
Play/Pause button
In Bluetooth mode, tap to start or pause
the music playback.
Call Answer/Hang up button
Tap to answer a incoming call; tap again
to hang up a call.
4. VOL – button
In Bluetooth mode, tap to decrease the
volume level.
5. Bluetooth indicator
Ready to pair Blinks in blue at a
slow rate
During pairing Blinks in blue at a fast
rate
Connected Lights in blue
6. Power indicator
Powering on Lights in green
Charging Blinks as a breathing
light in amber
Battery low Blinks in red
7. Microphone
Use to speak during a hands-free call.
8. Power Switch
Switch between powering on and off.
9. AUDIO IN jack
Connect to an external device.
10. USB power port
Connect to supply power to the system
and charge the built-in battery.
1
2
3
4
5
6
7
8
9
10

9
Selecting the Sound Source
This system enables you to access two sound sources – AUDIO IN and Bluetooth.
y If AUDIO IN jack has been inserted, the sound source will switch to AUDIO IN mode
automatically. Remove the audio cable from the AUDIO IN jack, the sound source will switch
to Bluetooth mode automatically.
y When a Bluetooth connection has been established and the system is in Bluetooth mode,
once you insert audio cable, the system will suspend the Bluetooth playback and switch to
AUDIO IN mode automatically.
To resume the Bluetooth playback, you need to remove the audio cable from the AUDIO IN
jack, and tap Play/Pause button.

10
Playing back via Bluetooth
Establishing a Bluetooth
Connection
Notes:
y If your mobile phone supports A2DP,
AVRCP profiles, its music will play
through the system.
y You can make a Bluetooth connection
with a mobile phone, an
iPhone/iPad/iPod touch or any other
Bluetooth-enabled devices.
1. Slide the Power Switch to ON to turn on
the system.
y The Power indicator next to VOL +
button illuminates in green.
2. Tap and hold Pair button on top of
system for about 3 seconds to put in
pairing mode.
y The Bluetooth indicator starts blinking in
blue at a fast rate.
y If you tap Pair button once again during
the process of pairing, the pairing
operation will be cancelled.
3. During this period, you can operate the
mobile phone, iPad or Bluetooth-enabled
device to pair with the system within a 33
feet (10m) range.
y Please check the user manual of the
iPad or Bluetooth-enabled device with
which you are initiating pair to learn
about Bluetooth connection with any
other devices.
4. Once the system is detected and its
name Simple Audio Share appears on
the display of your Bluetooth-enabled
device, key in the default password 0000
if a prompt requests it.
y The Bluetooth indicator starts blinking at
a fast rate to indicate that the system and
your device have entered into the
connection mode.
y After a Bluetooth connection is
established successfully, the Bluetooth
indicator will be solid in blue light.
5. Select the desired music and press Play
button on your device. The system
automatically starts playing back the
music.
Notes:
y Ensure that the audio cable has been
removed from the AUDIO IN jack of
Simple Audio Share when you want to
enjoy music from your Bluetooth-enabled
devices.
y The Bluetooth connection will be
disconnected if no device streams music
to the system within 60 minutes.
y Try again above steps 2 to 4 if the
Bluetooth indicator begins to blink slowly
after blinking quickly for 3 minutes, the
pair was unsuccessful.
y The system attempts to connect to the
latest played device after powering on. If
there is no device that has played, the
system will try to connect to the last
connected device.
y Once Bluetooth devices are paired
successfully, you don’t need to pair those
devices with the system again for next
time use. However, the system can be
paired with up to 8 Bluetooth devices,
once a new device is paired after 8
devices have been paired, the device
whose latest connection time is the
oldest among the 8 paired devices is
replaced by the new one. If you want to
establish Bluetooth connection with the
device that has been replaced, you need
to perform the pairing process above
steps 2 to 4.
y If no music streams to the system within
60 minutes, the Bluetooth connection will
disconnect automatically. You can restart
the system to resume the Bluetooth
connection again.
11
Using Multiple Bluetooth Devices
Only one device can be used at a time, but
you can switch between different Bluetooth
devices.
Make sure each device you want to use has
already been paired, to switch devices:
1. On Simple Audio Share, tap Pair button.
2. On Bluetooth device, select the
connection to Simple Audio Share.
This device is now the connected device to
Simple Audio Share, (the previous connected
device is now disconnected). Repeat those
steps to switch the connected device again.
Notes:
y If the system has no sound output,
please check if the volume level of your
Bluetooth device connected to the
system is set to the minimum, or the
Bluetooth device is muted.
y Ensure that the audio cable has been
removed from the AUDIO IN jack.
Playing back from Macbook or
Macbook Pro
1. In the desktop screen, select the Open
Bluetooth Preference.
2. If there is any old Simple Audio Share
records, remove them. Click the
Continue button to perform pairing
process.
3. Once completed, the pairing success
screen will come out.
Note:
y Don’t quit the page immediately. You
may notice that the previous dialog
screen still shows the device not
connected. Just ignore it. It’s confusing
to the user. In fact, it’s connected
already.
4. Open iTune, play a song. Then use the
mouse to click the Bluetooth icon at the
top right hand corner of the desktop
screen, select the Simple Audio Share
option and then select the Use as Audio
Device (Stereo). After a while (a few
seconds), the music will come out from
the Simple Audio Share. If not, select the
Use as Audio Device (Stereo) once
again. The Sound Quality should be
good.
Playing back from PC/Notebook
1. Press the Start button to open the
Device and Printers dialog box.
2. Turn on the Simple Audio Share system
and tap Pair button on the system to put
the system into the pair mode.
3. Select the Add a device in the Device
and Printer dialog box. The Simple
Audio Share icon will appear on the
display.
4. Double click the Simple Audio Share
icon and wait until the device has been
added successfully.
5. Click the Close button to close the
Device and Printer dialog box. A
Simple Audio Share icon appears in the
dialog box.
6. Double click the Simple Audio Share
icon and the device connection screen
will be shown.
7. Click the Connect button in the Music
and Audio option.
8. Once connected, the Bluetooth indicator
on the system will be solid on in red and
the connection success screen will be
shown.
12
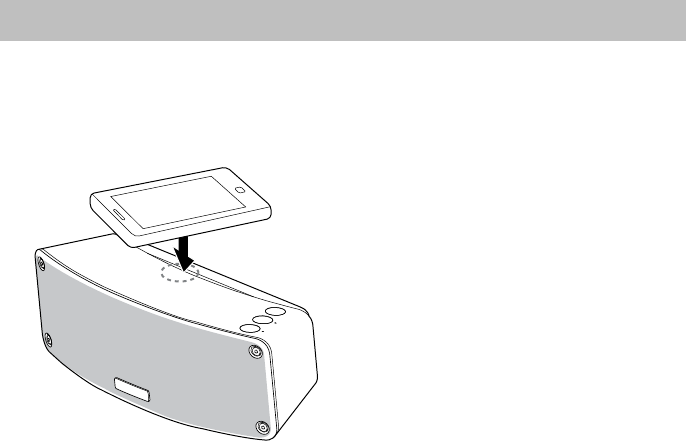
Playing back by NFC
You can establish a Bluetooth connection between the system and an NFC compatible
smartphone just by using the NFC compatible smartphone to touch the system.
1. Slide the Power Switch to ON to turn on the system.
2. Touch the NFC compatible smartphone on the NFC field of the system.
3. Follow the on-screen instructions to establish the connection.
Notes:
y For some smartphones, you may need to download a NFC Easy Connect App to establish
the NFC connection, so the operation and specifications may differ from the description
above. For details, refer to the operating instructions supplied with the smartphone.
y Ensure that the audio cable has been removed from the AUDIO IN jack of Simple Audio
Share when you want to enjoy music from your NFC compatible smartphone.
y Touch the system with the smartphone again to break the NFC connection.
NFC compatible
smartphone
13
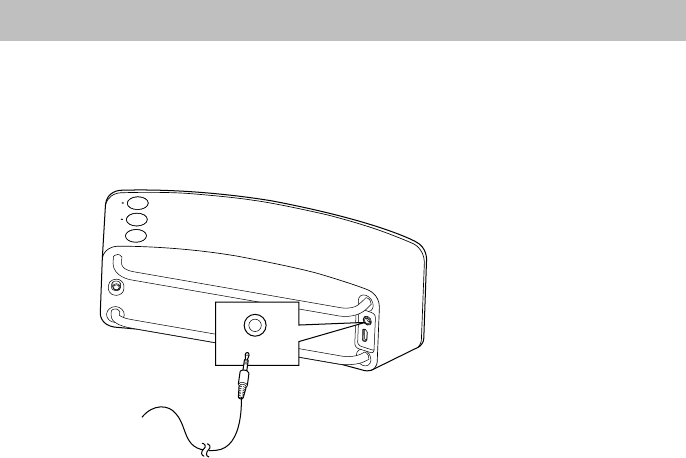
Playing back from External Source
You can enjoy the sound from an optional component such as a digital music player through the
speakers of this system. Be sure to turn off the power of each component before making any
connections. For details, refer to the instruction manual of the component to be connected.
Connect an external device to the AUDIO IN jack on the back panel of the system using a stereo
audio cable (not supplied).
Notes:
y When the stereo audio cable is connected to the AUDIO IN jack, the system will enter to the
AUDIO IN mode automatically.
y When the system is in AUDIO IN mode, you can adjust the music volume only using the
connected external device.
1. Slide the Power Switch to ON to turn on the system.
2. Set the volume of the connected external device to the minimum.
3. Start playback on the external device.
4. Adjust the volume of the connected external device to meet your listening requirement.
To audio input device,
such as earphone,
speaker, and Audio
amplifier, etc.
AUDIO IN
14
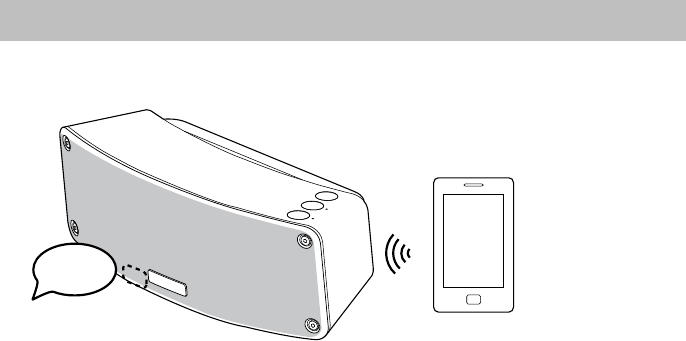
Using Hands-free Calling
You can enjoy hands-free calling via Bluetooth connection with a Bluetooth mobile phone that
supports the Bluetooth profile A2DP, and HFP.
1. Establish the Bluetooth connection between the system and the mobile phone.
2. Set the volume of the Bluetooth mobile phone to an appropriate level.
Making a Call
You can use the mobile phone to make a call, and the dialing tone is heard on the system while
the music playback is muted. After the call has been connected, you can speak using the
microphone of the system. Tap and hold Answer Call button for about 2 seconds to switch call
device between the system and mobile phone.
Notes:
y During the call, tap VOL -/+ buttons of the system to adjust the volume.
y The music playback will be resumed when the call has finished.
Receiving a Call
When an incoming call arrives, the music playback is muted and a ringtone is heard from the
system, whether the system is in AUDIO IN mode or Bluetooth mode. Then tap Answer Call
button on the system and speak using the microphone. Tap and hold Answer Call button for
about 2 seconds to switch call device between the system and mobile phone.
Notes:
y During the call, tap VOL -/+ buttons of the system to adjust the volume.
y The music playback will be resumed when the call has finished.
Rejecting/Interrupting a Call
When an incoming call arrives or during a call, you can tap Hang Up button of the system to
reject or interrupt the call.
...
15
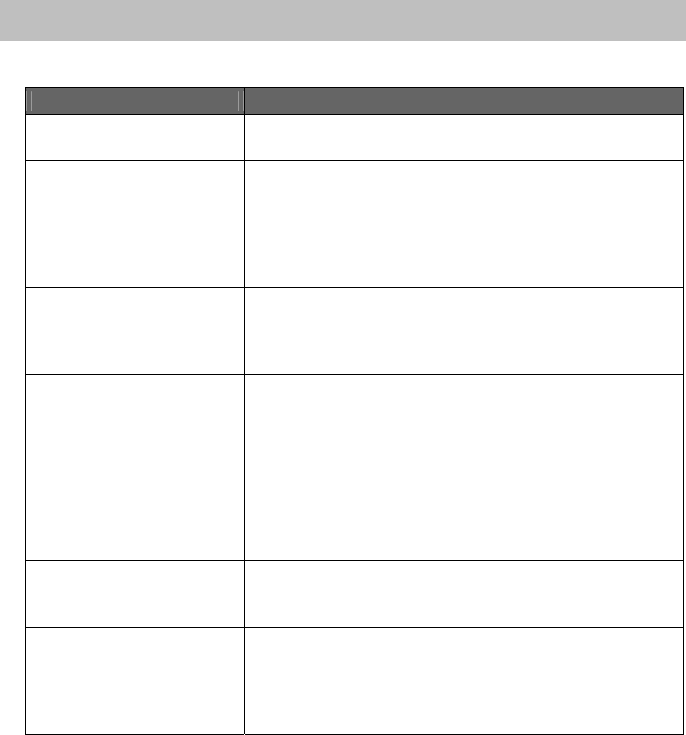
Troubleshooting
Check this list for a possible troubleshooting solution before calling for service.
In These Cases Check the Following Points
Power does not come on. y The built-in lithium battery is no power. Charge the
battery.
No sound output via
Bluetooth
y Check if the volume level is set to the minimum.
y Check if the volume level of your Bluetooth device
connected to the system is set to the minimum.
y Check to make sure your Bluetooth device is not muted.
y Check if your stereo audio cable is connected to the
AUDIO IN jack of the system. Unplug the cable.
No sound output in AUDIO
IN mode
y Check the connection via audio cable is successful and
available.
y Check if the volume level of the connected external
device is set to the minimum.
The system is powered off
automatically
y The system enters the saving energy mode. The system
does not connect with any audio source for more than 30
minutes. Tap Play/Pause button or restart the system to
wake up the system.
y The internal battery is exhausted. First, the Power
indicator on the top panel of the system starts blinking
for 30 minutes in red; then the system is powered off.
Charge the battery or connect the AC adapter and turn
on the system again.
No voice/Low voice from
caller while using Hands-free
calling
y Check if this system is powered on.
y Increase the volume of the connected mobile phone and
the system.
Bluetooth connection cannot
be established.
y When making a Bluetooth connection between the
system and your device for the first time, if the
connection is fail, you need to power off your device and
power on again to clear the device name, and make the
connection again.
16
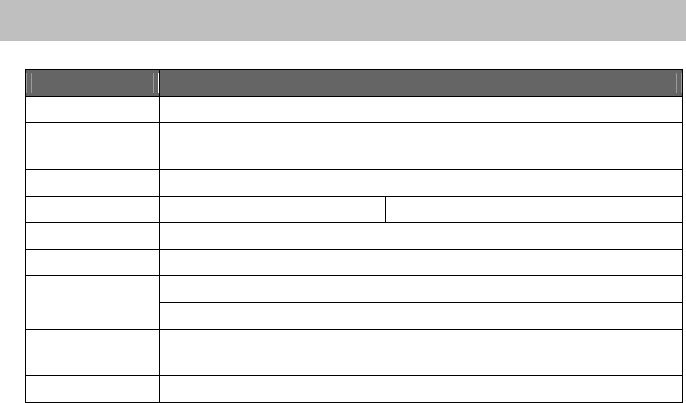
Technical Specifications
Model SP-B0002
Type Simple Audio Share
Support
Bluetooth
Bluetooth 1.2, 2.0 and 2.1 compliant
Support Profile A2DP, AVRCP, HFP
Input Sensitivity Audio Input TBD
Input Terminal External USB Power IN (for AC adapter), AUDIO IN
Power Source DC 5V/1.2A
AC Adapter Input: AC 100-240V, 50/60Hz
Output: DC 5V/1.2A
Dimensions
(Approx.)
200mm(L) x 80mm(H) x 87mm(D)
Weight 0.44kg
Design and specifications are subject to change without notice.
Save this manual