CowManager WIB910 Cow Wellness system User Manual Installation manual
CowManager B.V. Cow Wellness system Installation manual
Contents
- 1. Users manual
- 2. Installation manual
Installation manual

INSTALLATION MANUAL
Manual for installation of the CowManager System
2
Installation manual version 6.4 CowManager tel. 0031 348 443 840
FCC and IC Declarations
Compliance statement (part 15.19)
This device complies with part 15 of the FCC Rules and with the Industry Canada license-exempt RSS
standard(s).
Operation is subject to the following two conditions:
(1) this device may not cause harmful interference, and
(2) this device must accept any interference received, including interference that may cause undesired
operation.
Le présent appareil est conforme aux CNR d’Indrustrie Canada applicables aux appareils radio exempts
de licence. L’expoitation est autorisée aux deux conditions suivantes:
(1) l’appareil ne doit pas produire de de brouillage, et
(2) l’utilisateur de l’appareil doit accepter tout brouillage radioélectique subi, même si le brouillage est
susceptible d’en compromettre le fonctionnement.
Warning (part 15.21)
Changes or modifications not expressly approved by the party responsible for compliance could void the
user’s authority to operate the equipment.
This in particular is applicable for the antenna which has been delivered with starterpackage.
RF Exposure (OET Bulletin 65)
To comply with FCC RF exposure requirements for mobile transmitting devices, this transmitter should
only be used or installed at locations where there is at least 20cm separation distance between the
antenna and all persons
3
Installation manual version 6.4 CowManager tel. 0031 348 443 840
Introduction
In front of you, you have the installation manual for the CowManager system. In most cases
your sales representative will install CowManager. In this installation manual, you will get more
information about the CowManager system including the Sensors, coordinator, router and the different
interfaces. It is important to follow the installation manual in order to install CowManager as good as
possible.
4
Installation manual version 6.4 CowManager tel. 0031 348 443 840
Table of Contents
1 Conditions before installation............................................................................................. 5
2 Installation CowManager system ....................................................................................... 6
2.1 Installation CowManager on the PC .................................................................................. 6
2.2 Installation CowManager in the barn .............................................................................. 10
2.3 Linking cows to CowManager system ............................................................................. 12
2.4 Activate new Sensors ....................................................................................................... 14
2.5 Installation CowManager on Smartphone ...................................................................... 15
3 Additional information working devices ........................................................................... 16
4 Additional information CowManager system ................................................................... 17
5
Installation manual version 6.4 CowManager tel. 0031 348 443 840
1 Conditions before installation
For the optimal use of the CowManager system, the following is required:
➢ Availability of adequate internet access (Min. 5mp/s downloadspeed)
➢ Availability of a PC with Windows 7 or higher
➢ Eartags recommended by CowManager
➢ 5 GB space on the C drive. Go to ‘This PC’ C: Here you can see how much disk space is left.
Note: The communication software cannot be installed on any other drive except the C- drive. If there
is not enough space, CowManager can not be installed.
6
Installation manual version 6.4 CowManager tel. 0031 348 443 840
2 Installation CowManager system
The installation of the CowManager system contains different steps. First, we will explain the installation
of CowManager on the PC. The next step is the installation in the barn. The third step is to link the
Sensor to the right cow and the last, and additional step, is to install CowManager on your smartphone.
2.1 Installation CowManager on the PC
The installation of CowManager on your PC contains the installation of the software, interface with the
management system, coordinator, router and activating the Sensors.
1. Software CowManager
If the computer meets the conditions mentioned in chapter one, you can go ahead with the installation
of the CowManager software. Go to:
www.CowManager.com/download
➢ Click download CowManager Installation
➢ Click run
➢ Click open
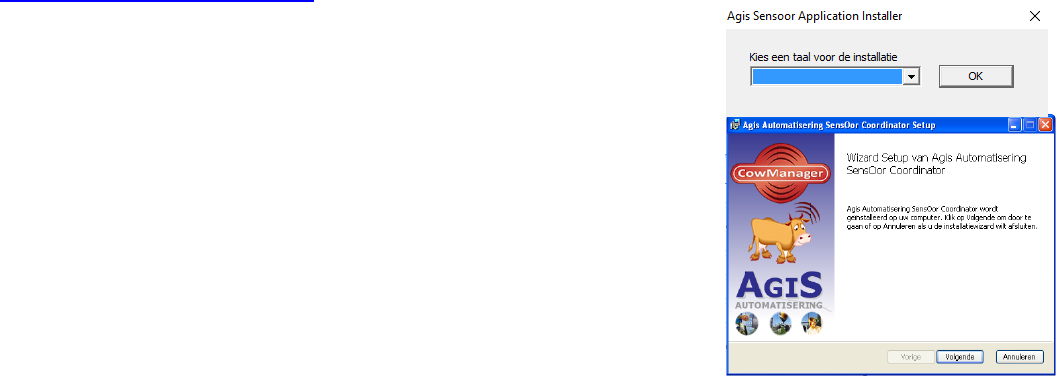
The installation wizard opens (see picture on the right)
➢ Choose the language for the installation
➢ Accept the ‘terms in the License Agreement’
➢ The installation wizard will automatically pick the following locations
for installation:
C:\Program Files (x86)\Agis Automatisering\Sensor Coordinator\
➢ Click next
➢ Click install Agis Automatisering Sensor Coordinator
➢ Click finish to finish the CowManager software installation and your
CowManager system is now successfully installed. The ‘SensOor
Configuration Wizard’ starts automatically.
After completing the installation of CowManager, two CowManager shortcuts will appear on your
desktop. The 2 new shortcuts are: ‘SensOor Configuration Wizard’ and ‘CowManager Website’. You can
configure the coordinator, router(s) and activate Sensors in the PC-application by double clicking on
‘SensOor Configuration Wizard’ and you can open the CowManager web-application by clicking on
‘CowManager Website’.
7
Installation manual version 6.4 CowManager tel. 0031 348 443 840
2. Register and activate
Now that the communication software is now installed on the PC, you have to register and
activate the system. You can do this by following the instructions below: Open the ‘SensOors
Configuration Wizard’. You can find it on your desktop and you can recognize it with this
icon.
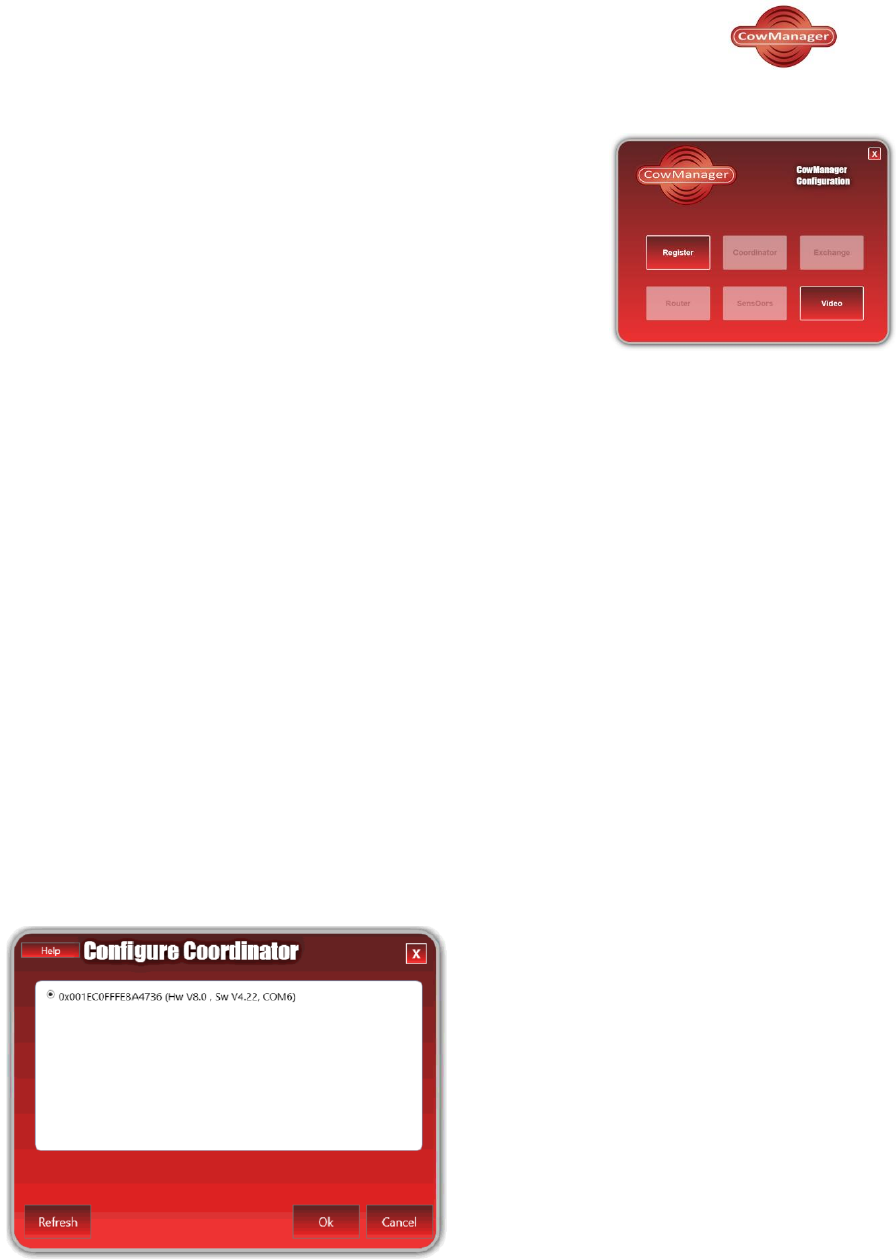
➢ Click on the button ‘Register’.
The login name master user is the email-address that is given to us
during the purchase. When the CowManager account is created, a
confirmation will be sent to this email-address.
The account number is mentioned on the quote and invoice. You
can use the test button to test if your account can connect to the
server on this PC. This will not have any other effect than just
testing it. Click the ‘login’ button confirm your account and login to
CowManager.
3. Interface with management system
In order to get all cow data into CowManager, CowManager can make an exchange with most
management programs. For information about other available connections, please contact your sales
representative or CowManager support.
4. Configure the coordinator
After registering the system, you are ready to configure the coordinator. To configure the coordinator, it
should be connected to the USB port of the PC. Connect the coordinator by using the 4,5 meter USB
cable (with the blue screw cap). Screw the antenna firmly on the device with pointed pliers.
CowManager recommends the antenna that was delivered at the starterpackage for an optimal working
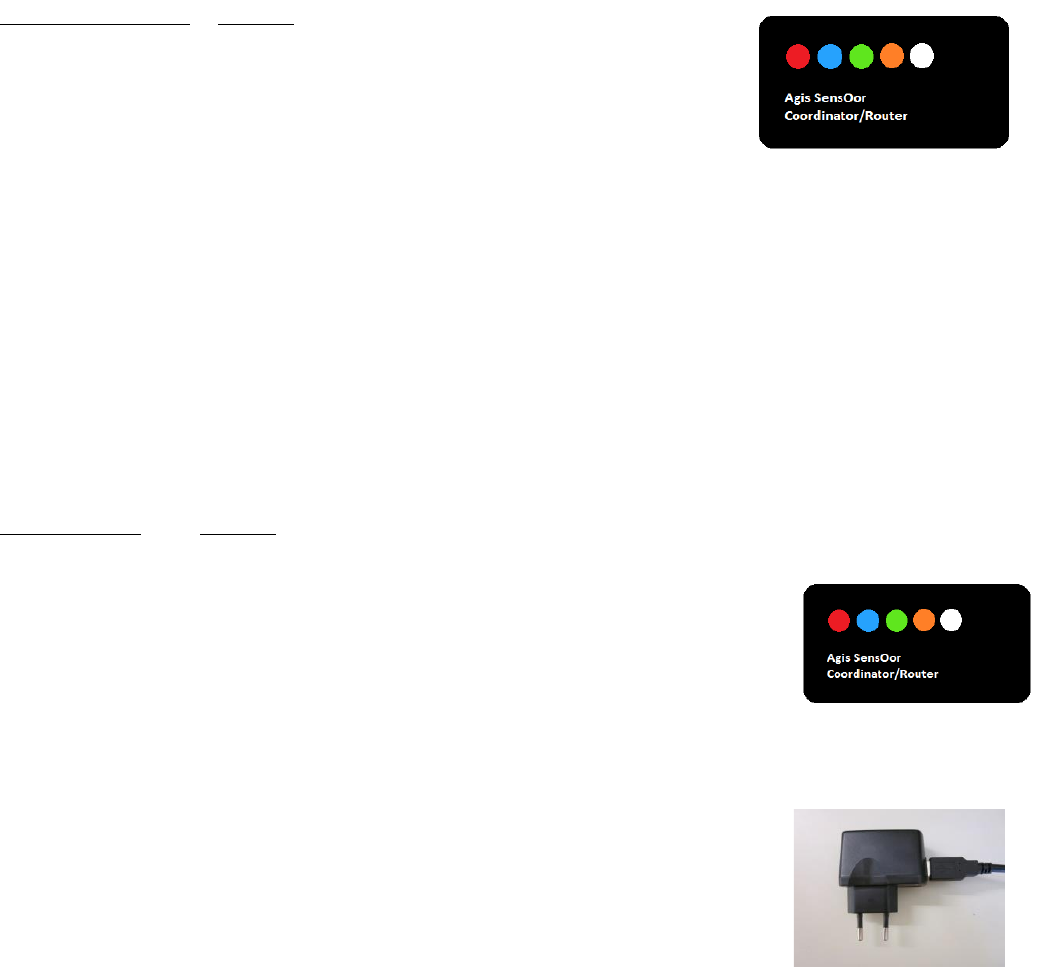
system. On the coordinator five lights are visible. A red light on the coordinator will turn on. See the
function of the other lights below.
Click the button ‘coordinator’ on the PC-application. The coordinator ID, hardware version, software
version and number of the COM port should appear. Select the coordinator by clicking on the
coordinator ID and confirm with clicking ‘OK’. During each configuration, the software will be flashed in
conformity with the country regulation law. No user is able to modify or adjust the transmitting power of
the router/coordinator device. You will automatically return back to the ‘SensOor Configuration Wizard’
and the red and orange light on the device are turned on.
Sensor Configuration Wizard
8
Installation manual version 6.4 CowManager tel. 0031 348 443 840
Lights on coordinator
Function
Red
On = Power
Blue
On = Registering of Sensors
Green
On = Active connection with a Router
Orange
On = Active connection with a PC
Blinking = connection is lost
White
On = Coordinator activated, but no active connection
blinking = sending through data
5. Configure the router
If necessary, connect the other device to a free USB port of the PC with the 3 meter USB cable. Also
screw the antenna firmly on the device. You have to use antenna of CowManager, for an optimal
working system. On the router, the same five lights are used as on the coordinator. See the function of
the other lights below. When you link the router to the computer a red light on the router will turn on.
Click the button ‘router’ in the PC-application and the router ID should appear on screen. Select the ID
and click ‘OK’. You will automatically return back to the ‘SensOor Configuration Wizard’. If there are no
more routers to register, the USB cable can be removed from the PC.
Lights on router
Function
Red
On = Power
Blue
Blinking = Trying to find another router or coordinator
Fast blinking = to much data received, possible data loss
Green
On = Another router is connected to this one
Orange
On = Active connection with a coordinator or other router
Blinking = connected to other router but not to coordinator
yet (via this router)
Fast blinking = connection lost, trying to reconnect
White
On = No active connection
Blinking = sending through data
After configuring the router, connect the antenna to the 3m cable. Connect the
adapter to an electrical outlet. Put tape around the adapter and USB connection to
protect it against water damage.
9
Installation manual version 6.4 CowManager tel. 0031 348 443 840
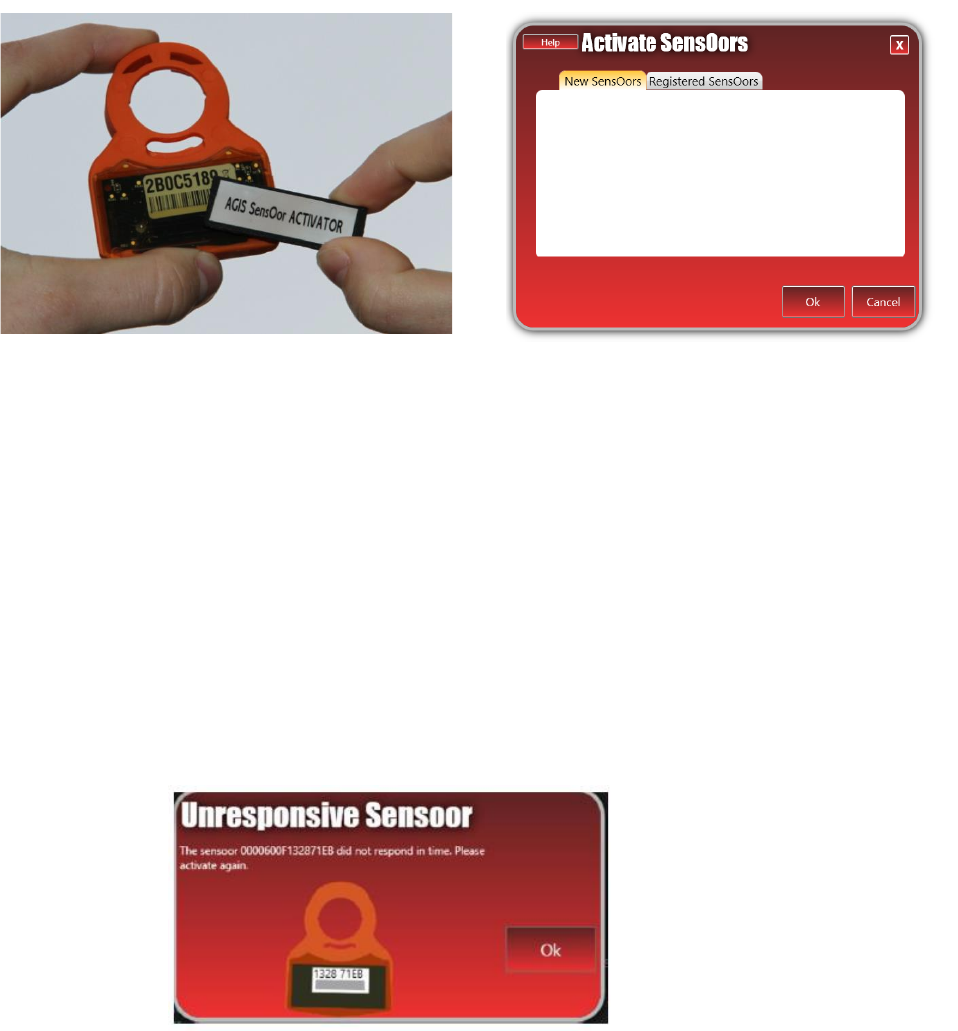
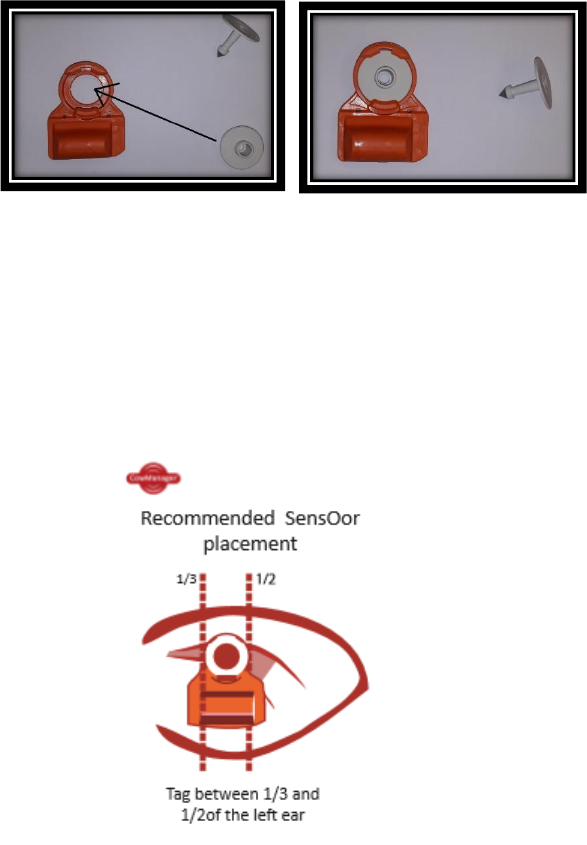
6. Activate Sensors
By clicking the button ‘SensOors’ in the PC-application the blue light on the coordinator will turn on. Now
the coordinator is active and Sensors can be registered. Place the magnet, which is also delivered, under
the Sensors to activate it. Move the magnet behind the Sensor like shown in the image below.
The Sensor IDs of the activated Sensors will appear on the screen. It is important that the Sensor ID
appears, if it doesn’t appear, the activation hasn’t been successful. If the ID appears, confirm with OK;
You will automatically return back to the ‘SensOor Configuration Wizard’. To activate more Sensors at
once, you can add more Sensors before clicking OK.
The following situations can occur:
➢ Green light on the Sensors -> registration successful
➢ Red light on the Sensors -> registration unsuccessful, check if the blue light on the coordinator is
on and try again with the magnet.
When registered, the Sensor IDs will appear on screen. When this does not happen the registration was
not successful. For Sensors with software version V6.35 or lower you can get a warning that it is not
activated right. If this happens, the Sensor is not active yet, you should activate it again.
10
Installation manual version 6.4 CowManager tel. 0031 348 443 840
2.2 Installation CowManager in the barn
Coordinator and router(s)
If you have a network plan, please make sure you will place the coordinator and router(s) on the marked
location on the networkplan. The coordinator and router(s) should be placed around 4 meters high, with
the antenna up. The position of the antenna can be fixed with a small red tie-rip. You can use the lights
to see whether the antennas are in range of each other. Tighten the antenna with pliers and make sure it
is tightened. The coordinator and router can connect with each other within a range of 800 meters free
line of sight. Please be aware that this range is less when there are buildings or (metal) objects in
between.
Sensors
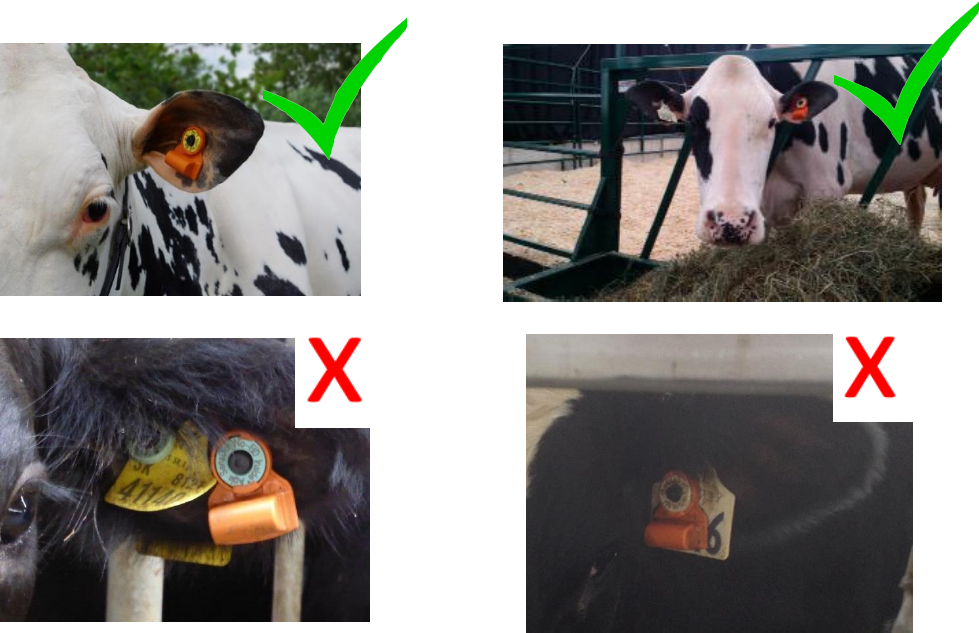
Before placing the Sensors in the ear it is important to know the perfect placement of the Sensors. We
recommend the following:
➢ Place the new EID or blanktag as you see in the picture below.
➢ Write the number of the cow next to the number of the Sensor. This is important for linking the
cow to the Sensor.
Place the Sensor in the left ear of the cow, in the middle of the ear, between the two cartilage
ribs. Note that this is a thicker part of the ear. Application may be more difficult than when
applying a normal tag. See the picture below for the perfect location. If there are more (other)
eartags in the ear, please make sure the Sensor is placed in the right spot and that the other
eartags are placed somewhere else in the ear. The Sensor should not be obstructed by other ear
tags.
11
Installation manual version 6.4 CowManager tel. 0031 348 443 840
Below you can see some examples of the correct and incorrect placing of the Sensor
Image: Sensor EID in the ear of a cow
12
Installation manual version 6.4 CowManager tel. 0031 348 443 840
2.3 Linking cows to CowManager system
Linking
The last step is to link the Sensor to the right cows. You can do this in the CowManager web-application.
➢ Open CowManager by double clicking on the icon ‘CowManager Web site’ on the desktop
➢ In your mailbox you should have received an email with a link to make a password for the
CowManager webpage.
➢ Log in with your username (e-mail address) and the password you have created. If you want the
computer to remember the password, check the box ‘Remember me next time’. In your internet
browser you should also indicate that you want to remember the username and password.
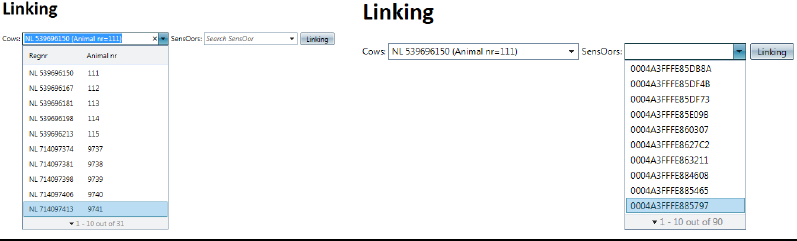
➢ Go to “input” and click ‘linking’ in CowManager (on the left side menu).
➢ A screen appears where you can search for animals and Sensors
➢ In the first list are cows with registration numbers and animal numbers.
Image: Linking of cows with Sensors.
➢ In the second list are the activated Sensor ID’s.
➢ In the bar above the lists you can type in which animal or Sensor you are looking for. In the first
bar you can type the cow number you are looking for and in the second bar you can type the
Sensor-ID. Then click on linking.
➢ You will see confirmation of the link between the cow and the Sensor.
If you want to change a cow’s Sensor, you must delink it first. See how to do this on the next
page.
13
Installation manual version 6.4 CowManager tel. 0031 348 443 840
Delinken
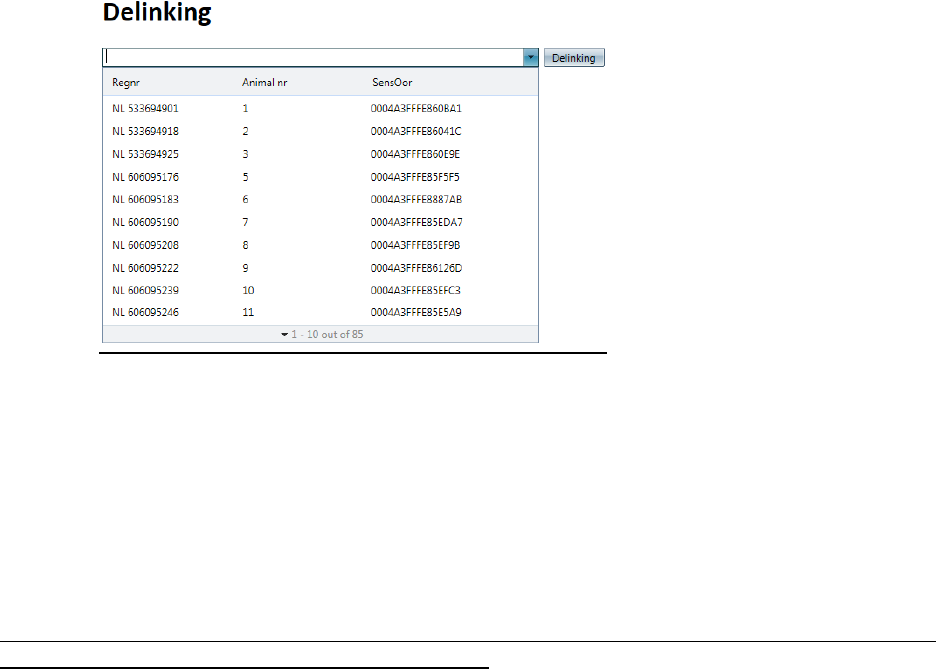
➢ Press the button delinking in CowManager.
Image: Delinking of Sensors
➢ A list of linked animals and Sensors will appear (Registration number, animal number and
Sensor ID).
➢ You can search on Sensor ID, animal number or registration number.
➢ Click delink to delink a cow from a Sensor.
➢ The Sensor and the cow are now successfully delinked.
➢ The Sensor is available again and returns to the list of available Sensors to link. When you go
to linking you can link the Sensor again.
Note: For the First 7 days after installation of the system, the attentions are not reliable. This is because a
reference period per animal should be established first.
When the Sensors are attached to the cows, the installation process is finished. For the best use of the
CowManager program we refer to the ‘User manual CowManager’. This user manual can be found in
your own CowManager program when you click on ‘instructions’ in the left menu.
14
Installation manual version 6.4 CowManager tel. 0031 348 443 840
2.4 Activate new Sensors
You can order new or additional Sensors. These must be activated in the ‘SensOor Configuration Wizard’.
You need to open the ‘SensOor Configuration Wizard’ again. You can find the icon ‘SensOor
Configuration Wizard’ on your desktop or you can find this at:
Click:
➢ Start
➢ All programs
➢ Agis Automatisering
➢ Sensor
➢ SensOor Configuration Wizard
To activate the new sensors, follow the same steps as explained in paragraph 2.1, step 6: Activate
Sensors.
15
Installation manual version 6.4 CowManager tel. 0031 348 443 840
2.5 Installation CowManager on Smartphone
Besides using CowManager on the computer, you can also use CowManager on your smartphone. This is
a free tool which is available for both iOS and Android smartphones.
You can install the CowManager application to do the following:
➢ Click on your Google PlayStore (Android) or app store (iOS)
➢ Search for ‘CowManager’
➢ Click on ‘Download’
You can login with the same email address and password you use for the CowManager website.

16
Installation manual version 6.4 CowManager tel. 0031 348 443 840
3 Additional information working devices
System
You can check if the devices are running by going to the web-application of CowManager by double
clicking on the ‘CowManager Website’
In the left menu in CowManager you will find the system status. The system status shows whether the
entire system or the coordinator, router(s) and Sensors are still working. You will also see whether the
synchronization of the Sensor data to CowManager still works properly.
➢ In front of the header ‘System information’ in the left menu there is a red cross X or a green tick
√. The red cross X means that there is a fault in the system. The green tick √ means that
everything is working properly.
➢ There is only a red cross for the heading ‘System status’ when either the synchronization of the
Sensor data to CowManager, or the coordinator and/or router(s) are not working.
Sensors
You can also check if the Sensors are working on two ways:
➢ Click on System Status -> SensOors
You can check status of the Sensors in the tab ‘all’ and the tab ‘not communicating’.
Behind the column ‘Last measurement’ is a green checkmark , a clock or a grey cross mark .
The green checkmark means that the Sensor forwarded information to the coordinator/router(s)
within the last 24 hours.
The clock sign shows that this Sensors has a latency in the data (last transmit date less than 24 hours
ago and last measurement more than 24 hours ago).
The grey cross mark shows that this Sensor needs attention, because it didn't communicate for more
than 24 hours (last transmit and last measurement are more than 24 hours ago).

17
Installation manual version 6.4 CowManager tel. 0031 348 443 840
4 Additional information CowManager system
Here you will find some general information about the CowManager system. For more information about
the CowManager program we refer to the user manual of CowManager.
Local PC:
- If there is no communication with the server at Agis, the PC saves the data from the Sensors for
14 days.
- CowManager needs 7 days to build up a reference period per cow. For these first 7 days there
will be no attentions calculated on activity.
- The PC connects with a central server at Agis Automatisering via the internet, every five minutes.
- The attentions will be calculated every hour.
Coordinator:
- With a free line of sight, the coordinator has a range of 800 meters to the router
- The coordinator receives data from the Sensors every 15 minutes, and every 15 seconds from
other routers.
- The coordinator sends the data directly to the PC.
Router:
- With a free line of sight, the router has a range to the coordinator or the next router of 800
meters.
- The router receives data from the Sensors every 15 minutes, or every 15 seconds from any other
router.
Sensors:
- The Sensors have a range of 100 meters to the coordinator or router.
- The Sensors send data to the coordinator or router every 15 minutes.
- When a Sensor is activated it takes 15 to 30 minutes until the Sensor is shown in CowManager.
- The Sensors can store the data for 7 days if the data cannot be forwarded to a router or
coordinator.