Coway Ba13 Ae Users Manual
BA13-BR to the manual ad07924b-535c-40d2-8408-0c69988629d1
2015-02-05
: Coway Coway-Ba13-Ae-Users-Manual-530750 coway-ba13-ae-users-manual-530750 coway pdf
Open the PDF directly: View PDF ![]() .
.
Page Count: 28
BA13-AR/AE
BA13-BR/BE
1210964 BA13 사용설명서_수출영문_(09.03.23).indd 1 2009.3.24 10:13:3 AM
1
PRODUCT FEATURES
PRODUCT FEATURES ..................................01
CONTENTS ....................................................01
SAFETY PRECAUTIONS ...............................02
PART NAMES ................................................. 07
Dimensions ..................................................07
Front / Rear view ..........................................08
Remote control .............................................08
Installation parts ........................................... 09
Check before using your product .................... 10
Please keep in mind! ....................................10
Configuring a special mode ......................... 11
Checking the control panel .............................12
Using your bidet ..............................................15
Using the rear nozzle ...................................15
Using the front nozzle ..................................16
INSTALLING YOUR BIDET .............................17
Removing existing toilet seat ....................... 17
Installing the product ....................................17
Installing the remote control wall mount
....... 19
Cleaning and maintaining your bidet ..............2 0
Cleaning the nozzles .................................... 20
Cleaning the pro duc t b ody ...........................20
Removing the pro duc t ..................................21
Cleaning the MESH filter .............................. 21
SPECIFICATIONS ..........................................23
TROUBLESHOOTING ....................................2 4
WARRANTY CARD .........................................2 5
1. Instant warm water system
The water is instantly heated when using the rear and front cleaning functions so that you
can immediately use water at your desired temperature.
2. Air+ function
The water stream with air bubbles provides softer, stronger cleansing.
3. MESH Filter
TheMESHlterisasemi-permanentitem.Youcanusethelterrepeatedlybycleaningit.
4. Eco mode
-Bidetecomode:Iftheseatsensordoesnotdetectsomeonesittingdownornopanelor
remote control button is pressed for approximately 10 minutes, the seat temperature is set
to ‘L’, so that power consumption is reduced. When bidet eco mode is activated, the eco
mode indicator on the front is turned on.
-Remotecontrolecomode:Ifnoremotecontrolbuttonispressedforapproximately5
seconds, the remote control display is turned off to reduce the power consumption of the
remote control battery.
BA13-AR/AE/BR/BE Common Functions
CONTENTS
5. Stainless steel twin nozzle adopted for enhanced hygiene
By adopting Stainless steel nozzles, you can use the product more hygienically. In addition,
the separation of the cleansing nozzle and the bidet nozzle ensures extra hygiene.
6. Wide Water Stream
A widely spread water stream applied to the cleaning water for smoother cleaning.
1. Wide function
Youcandirectlyselectthedegreeofspreadofthecleansingwaterfromastrongowof
watertoasoft,spread-outwaterowwhenusingrearandfrontcleansing.
2. Deodorization function
Once the seat sensor detects a person sitting, the deodorization function automatically
deodorizes odors for 1 minute. After using the bidet, the deodorization function will remain
on for 3minutes ensuring a refreshed feeling.
3. Sterilization function using oxidized silver
This bidet sterilizes the nozzle with oxidized silver sterilizing water.
Additional functions for the BA13-BR/BE
1210964 BA13 사용설명서_수출영문_(09.03.23).indd 1 2009.3.24 10:13:5 AM
2
SAFETY PRECAUTIONS
DANGER: If not observed, serious injury or even death may occur as a result of
electrocution.
DANGER:
WARNING: If these warnings are not observed, considerable physical injury or
property damage may occur as a result of burns, electrocution, fire, or injury.
CAUTION: If these cautions are not observed, slight physical injury or property
damage may occur.
IMPORTANT SAFETYGUARDS
SAVE THESE INSTRUCTIONS
READ ALL INSTRUCTIONS BEFORE USING.
Save these instructions for future reference.
When using electrical products, especially when children are present, basic safety precautions
shouldalwaysbefollowed:
•
Do not use a damaged power plug or loose electric outlet. This may result in electric shock or fire.
•
Make sure to use a dedicated electrical outlet. Failing to do so may result in electric shock or fire.
•Donotmovetheproductbypullingthepowercord.Thismayresultinelectricshockorfire.
•Donothandlethepowerplugwithwethands.Thismayresultinelectricshockorfire.
•Donotforcefullybendthepowercordorplaceheavyobjectsonittopreventitfrombeing
damaged or deformed. This may result in electric shock or fire.
•Donotconnectandpulloutthepowerplugrepeatedly.Thismayresultinelectricshockorfire.
•Unplugtheproductbeforerepairing,inspecting,orreplacingparts.Failingtodosomayresult
in electric shock or fire.
•
Remove any dust or water from the power plug. Failing to do so may result in electric shock or fire.
•Donotplugtheapplianceintoanelectricaloutletorpowerstripthatisbeingusedbyseveral
other appliances. Use an electrical outlet dedicated to the product. Failing to do so may result
in fire.
•Unplugthesystemifitisnotbeingusedforalongperiodoftime.Failingtodosomayresultin
electric shock or fire.
•Donotattempttorepairormodifythepowercord.Thismayresultinelectricshockorfire.
•Ifthepowercordisdamaged,donotreplacethecordyourself.CallaCowayServiceCenterto
have it replaced. Failing to do so may result in electric shock or fire.
1210964 BA13 사용설명서_수출영문_(09.03.23).indd 2 2009.3.24 10:13:5 AM
3
SAFETY PRECAUTIONS
DANGER:
SAVE THESE INSTRUCTIONS
•Iftheproductproducesastrangenoise,aburntsmell,oremitssmoke,unplugitimmediately
from the electrical outlet and call our service center. Failing to do so may result in electric
shock or fire.
•Donotinsertawireorsharpobjectinanyproductgapsorthewarmairoutlet.Thismayresult
in electric shock, fire, or product damage.
•Donotplaceanelectricheaterneartheproductordisposeofanyburningmaterialssuchasa
lit cigarette in the toilet. This may result in fire or product deformation.
•Donotplaceanycontainersfilledwithwater,medicine,food,anymetallicobjects,orany
flammable material on top of the product. If foreign material enters the product, this may result
in electric shock or fire.
•Donotusetheproductinlocationsexposedtoexcessivemoistureanddonotsplashwater
onto the product. This may result in electric shock or fire.
•Donotusetheproductifitisnotworkingproperly.
※Pleaseunplugtheproductimmediately,andcallourservicecenterafterclosingthemain
water supply valve. Failing to do so may result in electric shock or fire.
•Whiletakingashowerorcleaningthebathroom,pullthepowerplugoutoftheelectricaloutlet
and exercise caution that water or detergent does not splash onto the bidet. Failing to do so
may result in electric shock or fire.
※Ifforeignmaterialenterstheproduct,pullthepowerplugoutoftheelectricaloutlet,turnoff
the main water valve, and call the Coway Service Center.
•Donotdroptheremotecontrol.Thismayresultinproductdamageoramalfunction.
•Donotseparatetheseatfromthebidet.Thismayresultinelectricshock,fire,orproduct
damage.
•Donotdisassemble,repair,ormodifytheproductyourself.Thismayresultinelectricshock,
fire, or product damage.
•Donotusetheproductwhilebathing.
•Donotplaceorstoretheproductwhereitcanfallorbepulledintoatuborsink.
•Donotplaceinordroptheproductintowateroranyotherliquid.
•Donotreachfortheproductifithasfallenintowater.Unplugtheproductimmediately.
1210964 BA13 사용설명서_수출영문_(09.03.23).indd 3 2009.3.24 10:13:5 AM

4
SAFETY PRECAUTIONS
WARNING:
•Donotoperateorstoretheunitinlocationswhereflammableorcombustiblematerialsare
used. This may result in electric shock or fire.
•Usemainwatersupplyasthesuppliedwater.Industrialwaterorgraywater,ifusedassupply
water may cause skin damage or disease.
•Donotblockthewarmairoutletwithyourhand.Thismayresultinburnsorfire.
•Pleaseturnoffthemainwatersupplyvalvewhencleaningthefilter.Failingtodosomayresult
in electric shock or product damage.
•Forchildren,theelderly,andthosewhocannotadjustthetemperaturethemselvesorhave
sensitive skin, set the warm water temperature and seat temperature to ‘L.’ Failing to do so
may result in low temperature burns.
※About‘lowtemperatureburns’:Thisreferstoburnsinflictedbymakingcontactwith
temperaturesaround40℃foranextendedperiodoftime).
•Donotpressthebuttonsusingexcessiveforce.Thismayresultinproductdamageora
malfunction.
•Donotstandorplaceaheavyobjectontheseatcover.Thismayresultinproductdamageor
a malfunction.
•Closesupervisionisnecessarywhenthisproductisusedbychildrenorpersonsrequiring
general assistance.
•Usethisproductforitsintendeduseonly,asdescribedinthismanual.Donotuseattachments
not recommended by the manufacturer.
•Neveroperatethisproductifithasadamagedcordorplug,ifitisnotworkingproperly,ifithas
been dropped or damaged, or dropped into water. Return the product to a service center for
examination and repair.
•Keepthecordawayfromheatedsurfaces.
•Neverblocktheairopeningsoftheproductorplaceitonasoftsurface,suchasabedor
couch,wheretheairopeningsmaybeblocked.Keeptheairopeningsfreeoflint,hair,etc.
•Neverusetheproductwhilesleepingorwhendrowsy.
•Neverdroporinsertanyobjectintoanyopeningorhose.
•Donotusetheproductoutdoorsoroperatewhereaerosol(spray)productsarebeingusedor
where it could be exposed to oxygen.
•Connectthisproducttoaproperlygroundedoutletonly.RefertotheGroundingInstructions.
•Unplugthisproductbeforefilling.Fill(reservoir)withwateronlyunlessotherwisespecifiedby
themanufacturer.Donotoverfill(orspecifyfillinginstructions).
SAVE THESE INSTRUCTIONS
1210964 BA13 사용설명서_수출영문_(09.03.23).indd 4 2009.3.24 10:13:5 AM
5
SAFETY PRECAUTIONS
SAVE THESE INSTRUCTIONS
CAUTION:
•Donotconnectthemainwatertothehotwaterpipe.Thismayresultinamalfunctionor
accident(Makesuretoconnectittothecoldmainwatersupplypipe).
•Aftertheinstallation,makesuretocheckthewatersupplyconnectionsforleaks.Rubber
packing should be applied to the connection hose.
•Donotinstalltheairpurifierinalocationexposedtodirectsunlight.Thismayresultin
deformation or discoloration.
•Donotopen/closetheseatcoverusingexcessiveforceorleanonthecover.Thismayresultin
product damage or a malfunction or physical injury.
※Theseatcovercloses/opensslowlyusingthe‘softopening/closing’method.
•Exercisecautionthaturinedoesnotcomeintocontactwiththenozzles,airdryeroutlet,orthe
outside surface of the product. Failing to do so may result in bad odors or malfunctions.
•Iftheproductwillnotbeusedforalongperiodoftime,pullthepowerplugoutoftheelectrical
outlet, close the main water supply valve, and drain the water in the water tank.
•Donotpulloutthebidethoseorconnectionhoseusingexcessiveforce.Thismayresultina
leak or malfunction.
•Pullthepowerplugoutoftheelectricaloutletbeforecleaningtheunit.Donotsplashwater
directly onto the bidet, or use thinner, benzene, chemicals, or hydrochloric acid detergent.
This may result in corrosion to the metal parts or discoloration or scratches to the bidet body.
※Useasoftclothorspongetocleanthebidet.
•Thisapplianceisnotintendedforusebypersons[includingchildren]withreducedphysical,
sensory or mental capabilities, or lack of experience and knowledge, unless they have been
given supervision or instruction concerning use of the appliance by a person responsible for
their safety. Children should be supervised to ensure that they do not play with the appliance.
1210964 BA13 사용설명서_수출영문_(09.03.23).indd 5 2009.3.24 10:13:5 AM

6
SAFETY PRECAUTIONS
SAVE THESE INSTRUCTIONS
•Thisproductshouldbegrounded.Intheeventofanelectricalshortcircuit,groundingreduces
theriskofelectricshockbyprovidinganescaperoute(wire)fortheelectriccurrent.This
productisequippedwithacordconsistingofagroundingwirewithagroundingplug.The
plug must be plugged into an outlet that is properly installed and grounded.
Ifitisnecessarytouseanextensioncord,useonlyathreewireextensioncordwithathree-
bladegroundingplug,andathree-slotreceptaclethatwillaccepttheplugoftheproduct.
Replace or repair a damaged cord immediately.
•Iftherepairorreplacementofthecordorplugisnecessary,donotconnectthegrounding
wire to either flat blade terminal. The insulation wire with an outer green surface with or
without yellow stripes is the grounding wire.
•Checkwithaqualifiedelectricianorservicetechnicianifyoudonotunderstandthegrounding
instructions completely, or if in you are in doubt whether the product is properly grounded.
•Thisproductisforuseonanominal120Vcircuit,andhasa
grounding plug that looks like the plug illustrated in Figure 1.
Grounded
Outlet
Grounding
Pin
Figure 1
The improper use of the grounding plug can result in electric shock.
GROUNDING INSTRUCTIONS
Extension cord
1210964 BA13 사용설명서_수출영문_(09.03.23).indd 6 2009.3.24 10:13:6 AM
7
411 mm
(16.2 inch)
382 mm
(15 inch)
202 mm
(7.9 inch)
350 mm
(13.8 inch)
134 mm
(5.3 inch)
140 mm ~ 210 mm
(5.5 ~ 8.3 inch)
411 mm
(16.2 inch)
382 mm
(15 inch)
202 mm
(7.9 inch)
385 mm
(15.2 inch)
134 mm
(5.3 inch)
Rear fixing distance : 164 mm (6.5 inch)
49 mm
(1.9 inch)
140 mm ~ 210 mm
(5.5 ~ 8.3 inch)
411 mm
(16.2 inch)
382 mm
(15 inch)
202 mm
(7.9 inch)
350 mm
(13.8 inch)
134 mm
(5.3 inch)
140 mm ~ 210 mm
(5.5 ~ 8.3 inch)
411 mm
(16.2 inch)
382 mm
(15 inch)
202 mm
(7.9 inch)
385 mm
(15.2 inch)
134 mm
(5.3 inch)
Rear fixing distance : 164 mm (6.5 inch)
49 mm
(1.9 inch)
140 mm ~ 210 mm
(5.5 ~ 8.3 inch)
Dimensions
The bidet has the following dimensions.
Do not install the bidet when the dimensions of the bidet differ from those of the toilet.
>> BA13-AR/BR (Round shape)
>> BA13-AE/BE (Elongated shape)
>> Bottom view >> Distance between fixing holes
PART NAMES
1210964 BA13 사용설명서_수출영문_(09.03.23).indd 7 2009.3.24 10:13:7 AM
8
PART NAMES
Front / Rear view
Remote control
1
Seat cover
2
Warning sticker
3
IR sensor
4
Nozzle
5
Seat sensor
6
Bidet seat
7
Water tank hose
8
Bidet hose
9
Main water supply pipe
10 Main water supply valve
11 T-shapedconnector
12 Power cord
13 Product sticker
14 Drain plug
15 Button
16 Installation plate
17 MESHlter
2
4
5
6
7
11
10
9
3
1
12
13
17
16
BA13-A
BA13-B
BA13-A
BA13-B
BA13-AR/AE BA13-BR/BE
14 15
8
1210964 BA13 사용설명서_수출영문_(09.03.23).indd 8 2009.3.24 10:13:8 AM
9
PART NAMES
Installation parts
1
2xingscrews
2
2xingrubbers
3
2xingwashers
4
2xingnuts
5
Installation plate
6
2xingsliders
7
Rubber packing
8
T-shapedconnector
9
Bidet hose
10 Remote control wall mount
(includingthestickerfor
attachment)
11 2 screws
12 2 anchors
13 3batteries(AAA)
1
2
3
4
5
8
9
10 11 12 13
6
7
1210964 BA13 사용설명서_수출영문_(09.03.23).indd 9 2009.3.24 10:13:9 AM
10
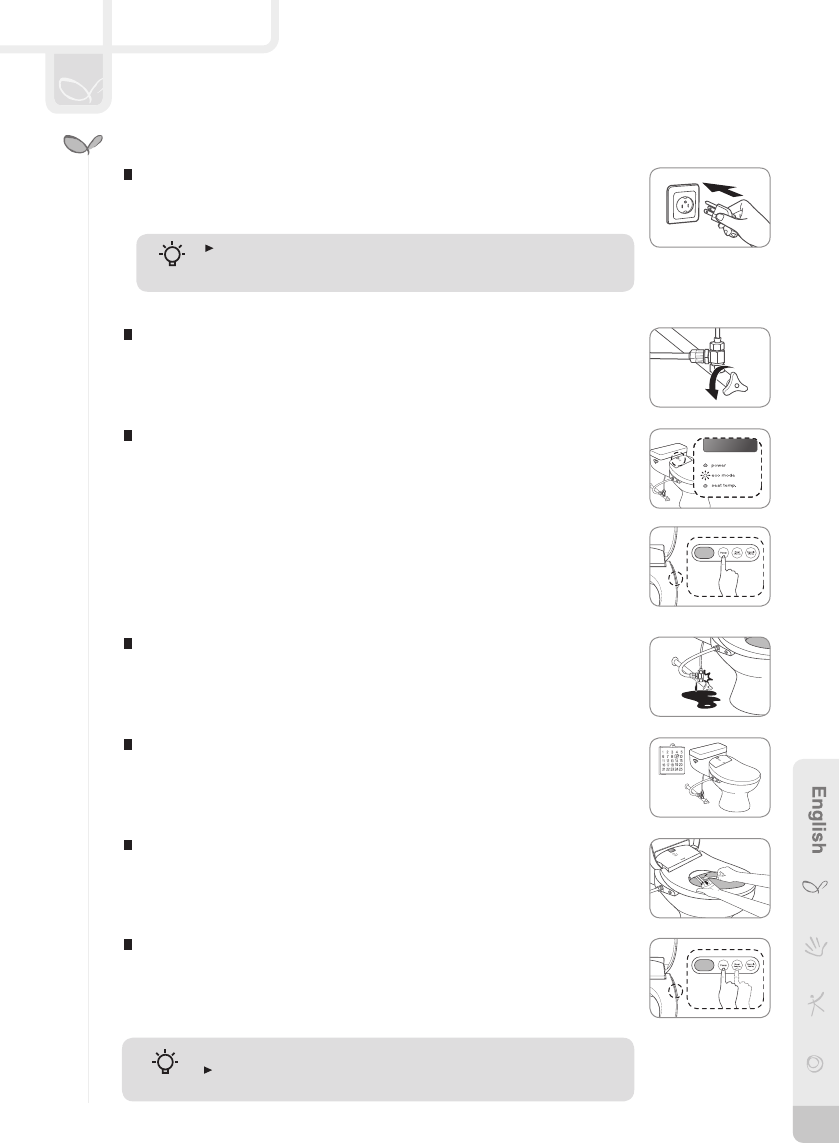
CHECK BEFORE USING YOUR PRODUCT
Remove the protective film from the operation part before using it.
Tips
Please keep in mind!
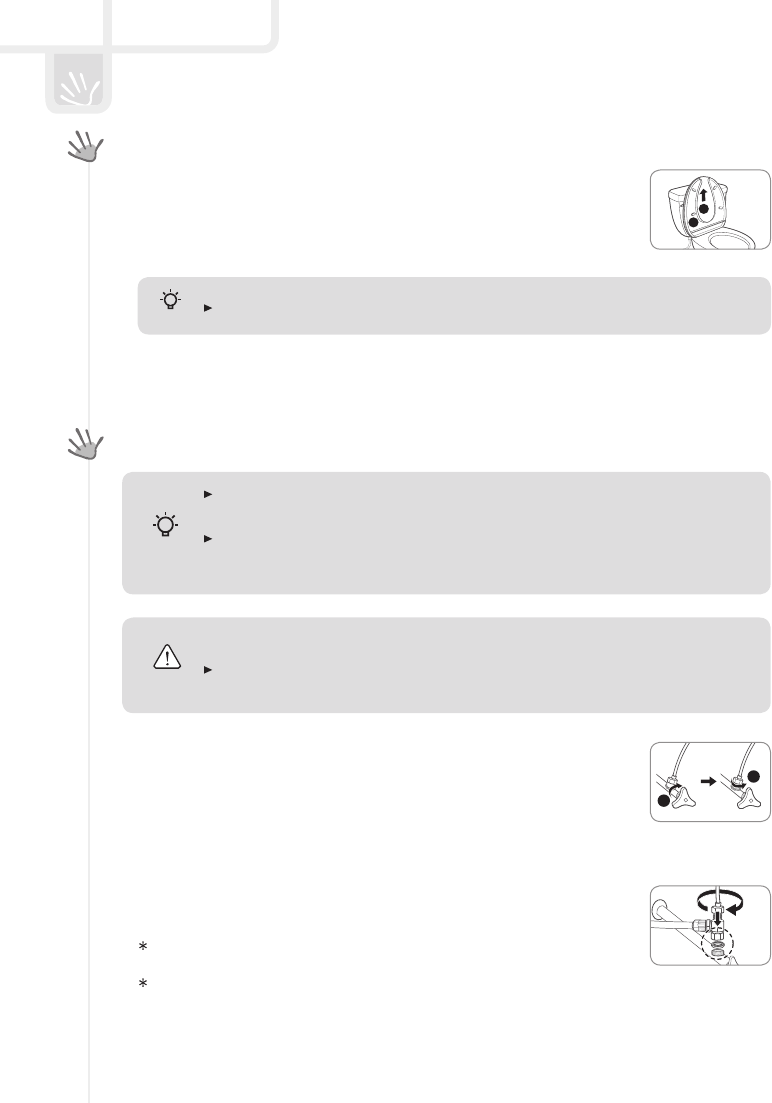
Open the main water supply valve.
The bidet only works normally when water is supplied.
After the installation
Check if water leaks from the main water supply valve or the connecting hose.
YoumustinserttherubberpackingbetweentheT-shapedconnectionpipeandthe
main water supply pipe.
Cleaning the filter on a regular basis
CleantheMESHfilteronaregularbasis(Thecleaningintervalmaydiffer
dependingonthewaterquility).IftheMESHfilteriscontaminatedbyforeign
substances,thefilterisblockedornon-filteredcleansingwatermaybeejected.
If the bidet has not been used for a long time
When the bidet has not been used for a long time, clean the filter and clean each part
ofthebidetsuchastheairdryeroutlet,thenozzleandtheseatbeforeuse(seep.16).
Check whether the product is in eco mode before using it.
-Iftheseatsensordoesnotdetectanyonesittingdownornopanelorremotecontrolbuttonis
pressed for approximately 10 minutes, bidet eco mode is activated, the eco mode indicator
is turned on, and the seat temperature is set to ‘L’ to reduce the power consumption of the
product.
-
When sitting down on the seat or pressing a panel button, the power indicator is turned on, the eco
mode indicator is turned off and the seat temperature returns to the last configured temperature.
-Evenifyousitdownontheseatorpressapanelbutton,thepowerindicatorisnotturned
on. This means that the power is turned off. In this case, press the power selection button to
turn the power on before using it.
Thisproductisfor120V~/60Hzonly.
Make sure to connect the power plug to a grounded electrical outlet
(120V~/60Hz)dedicatedtotheproduct.
Tips
Configure and use a special mode according to your preferences.
Youcanconfigureoneofthespecialmodes(ecomode,seatsensorlockmode,
silentmode)accordingtoyourpreferences(seep.11).
Connect the power.
Plug the power cord into the electrical outlet. The bidet only works normally when
the electricity is connected.
1210964 BA13 사용설명서_수출영문_(09.03.23).indd 10 2009.3.24 10:13:11 AM
11
CHECK BEFORE USING YOUR PRODUCT
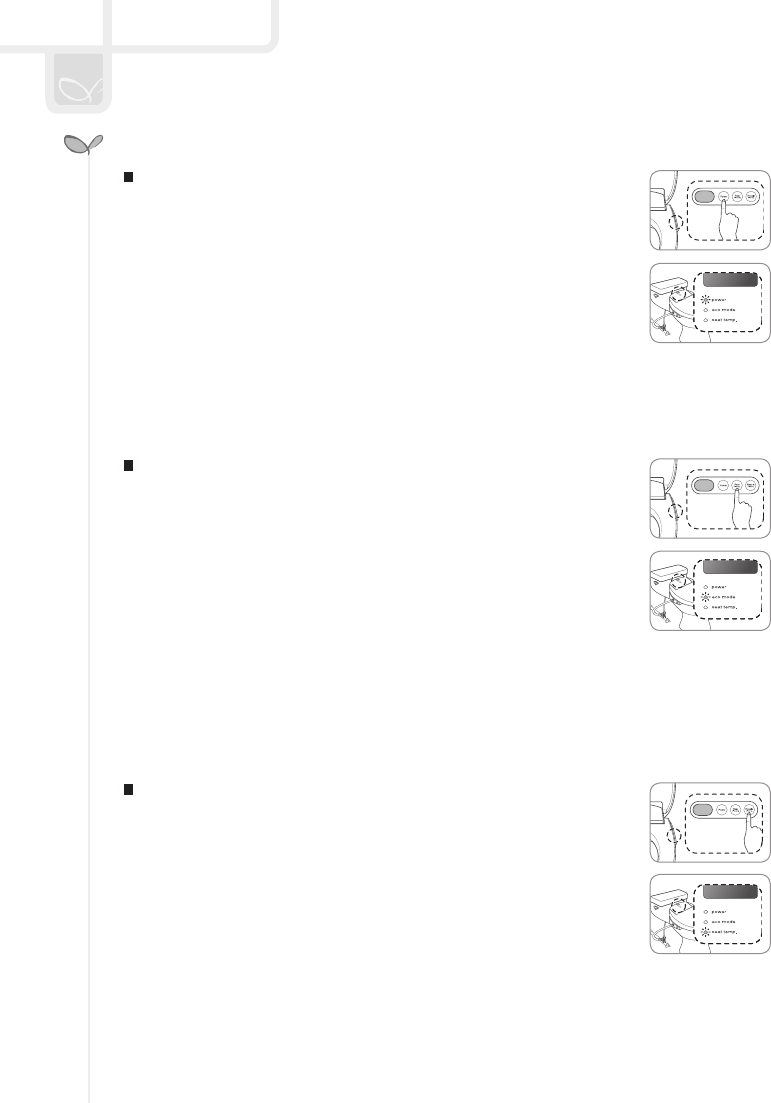
Selecting/cancelling silent mode
1. Press and hold down the ‘Power’ and ‘Rear Cleansing’ buttons
simultaneously for at least 1 second when the power cord is plugged into
the electrical outlet (an alarm sound is generated).
2. Set the mode by pressing the ‘Power’ button on the operation part.
-Ifthepowerindicatoristurnedonthisindicatesthatsilentmodehasbeenset.
-Ifthepowerindicatoristurnedoff,thisindicatesthatsilentmodehasbeen
canceled.
3. After setting silent mode, and pressing the ‘Power’ and ‘Rear Cleansing’
buttons simultaneously or no button is pressed for 10 seconds, the
setting is saved and the bidet changes to the standby state (an alarm
sound is generated).
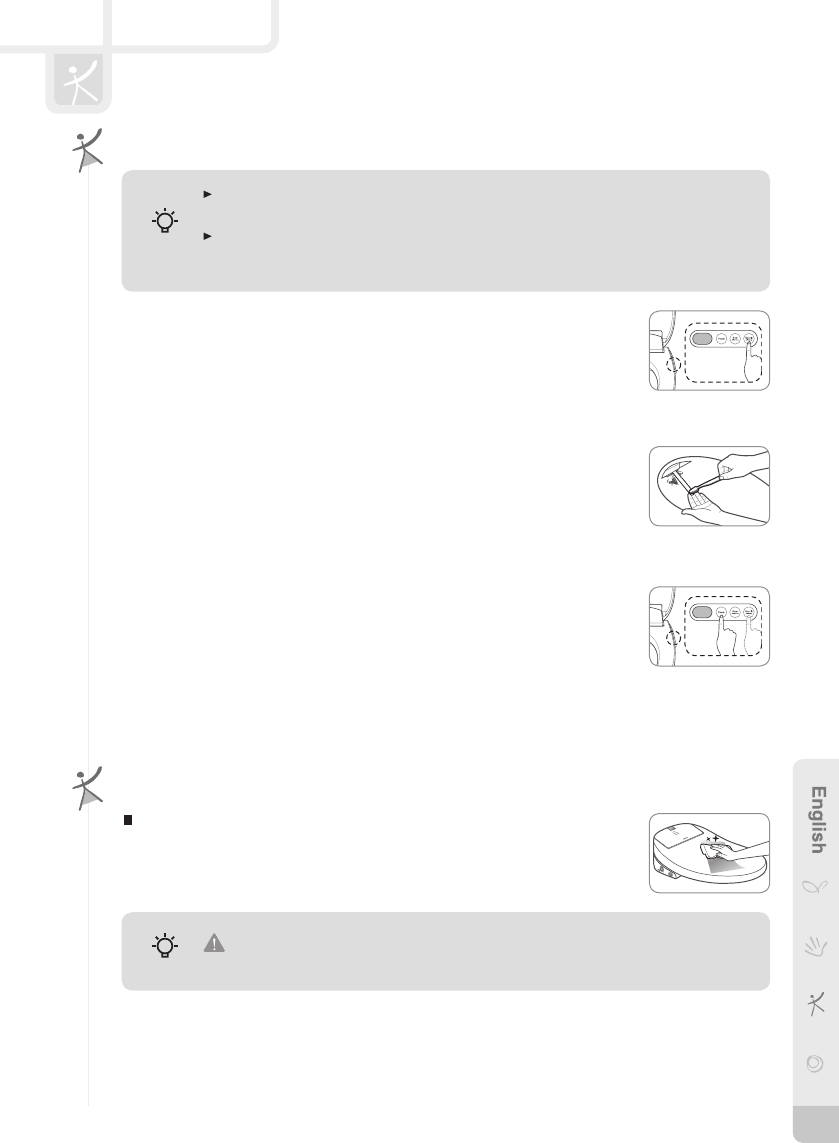
Conguring a special mode
Selecting/cancelling seat sensor lock mode
1. Press and hold down the ‘Power’ and ‘Rear Cleansing’ buttons
simultaneously for at least 1 second when the power cord is plugged into
the electrical outlet (an alarm sound is generated).
2. Set the mode by pressing the ‘Nozzle Cleaning’ button on the operation
part.
-Iftheseattemp.indicatoristurnedon,thisindicatesthatseatsensorlock
mode has been set.
-Iftheseattemp.indicatoristurnedoff,thisindicatesthatseatsensorlock
mode has been canceled.
3. After setting seat sensor lock mode, and pressing the ‘Power’ and
‘Rear Cleansing’ buttons simultaneously or no button is pressed for 10
seconds, the setting is saved and the bidet changes to the standby state
(an alarm sound is generated).
Selecting/cancelling bidet eco mode
1. Press and hold down the ‘Power’ and ‘Rear Cleansing’ buttons
simultaneously for at least 1 second when the power cord is plugged into
the electrical outlet (an alarm sound is generated).
2. Set the mode by pressing the ‘Rear Cleansing’ button on the operation
part.
-Iftheecomodeindicatoristurnedon,thisindicatesthatbidetecomodehas
been set.
-Iftheecomodeindicatoristurnedoff,thisindicatesthatbidetecomodehas
been canceled.
3. After selecting bidet eco mode, and you press the ‘Power’ and ‘Rear
Cleansing’ buttons simultaneously or no button is pressed for 10
seconds, the setting is saved and the bidet changes to the standby state
(an alarm sound is generated).
1210964 BA13 사용설명서_수출영문_(09.03.23).indd 11 2009.3.24 10:13:13 AM
12
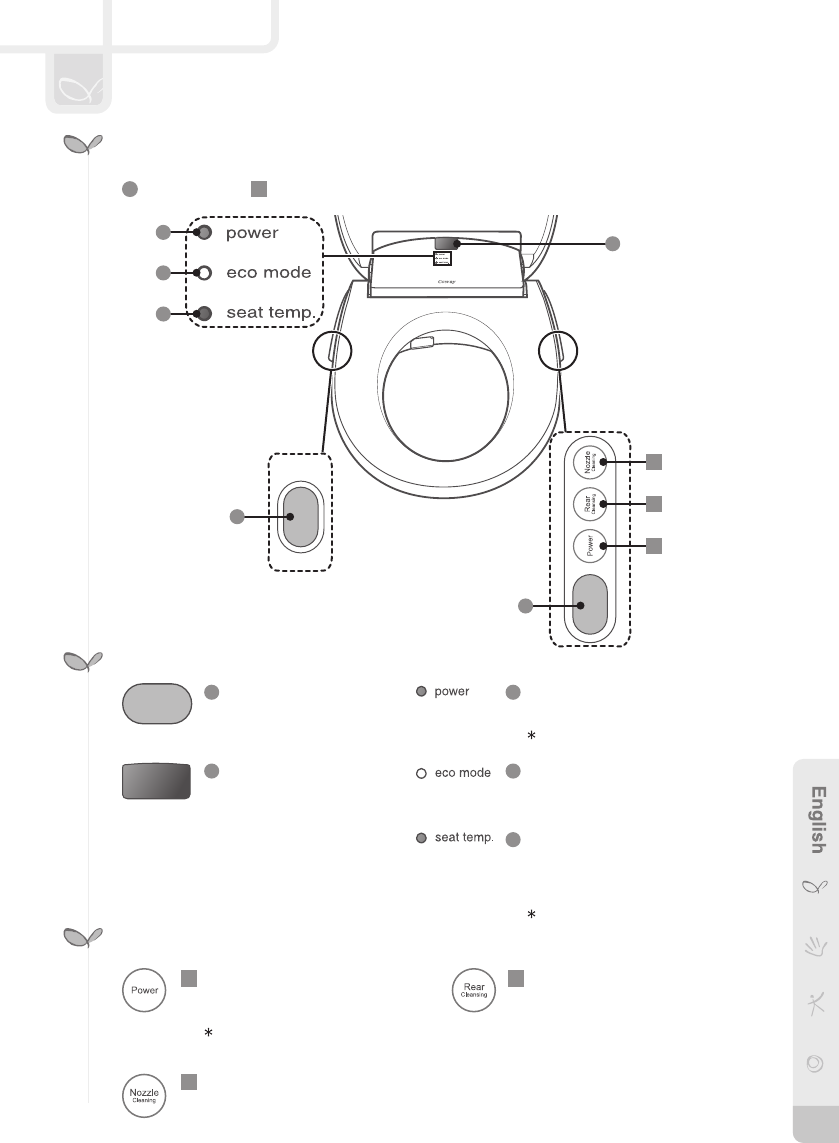
CHECKING THE CONTROL PANEL
Display Control panel
Display
Control panel
‘Power’ button
Turns the product ON/OFF.
Press and hold the button for more than
2 seconds when you turn it off.
If the ‘Power’ button is pressed while the front, rear
cleansing function is operating, the cleansing function
is stopped and the bidet changes to standby mode.
1
The ‘Nozzle Cleaning’ button
Cleans the nozzle. If you press ‘Nozzle cleaning’ button, the nozzle is extended fully,
and you can clean it conveniently.
3
‘Rear Cleansing’ button
Selects the rear cleansing function.
2
Remote control signal
receiver
This receives the signals
from the remote control.
1
1
1
1
1
1
3
2
1
1
5Remote control signal
receiver
This receives the signals
from the remote control.
1
2
1
3
1
4
1
5
1
2Power indicator
This indicator is turned on when the
bidet power is turned on.
This indicator is turned off when bidet eco
mode is activated.
1
3 Eco mode indicator
If you activate the eco function, this
indicator is turned on when eco mode
starts.
1
4Seat Temperature indicator
This indicator represents the seat
temperature.
Indicatoron-L/M/H
Indicatoroff-OFF
This indicator is turned off when bidet eco
mode is activated.
※Youcanusethebasicfunctionssuchasrearcleansingandnozzlecleaningfromthebidet’scontrolpanel
without using the remote control.
1210964 BA13 사용설명서_수출영문_(09.03.23).indd 12 2009.3.24 10:13:14 AM

13
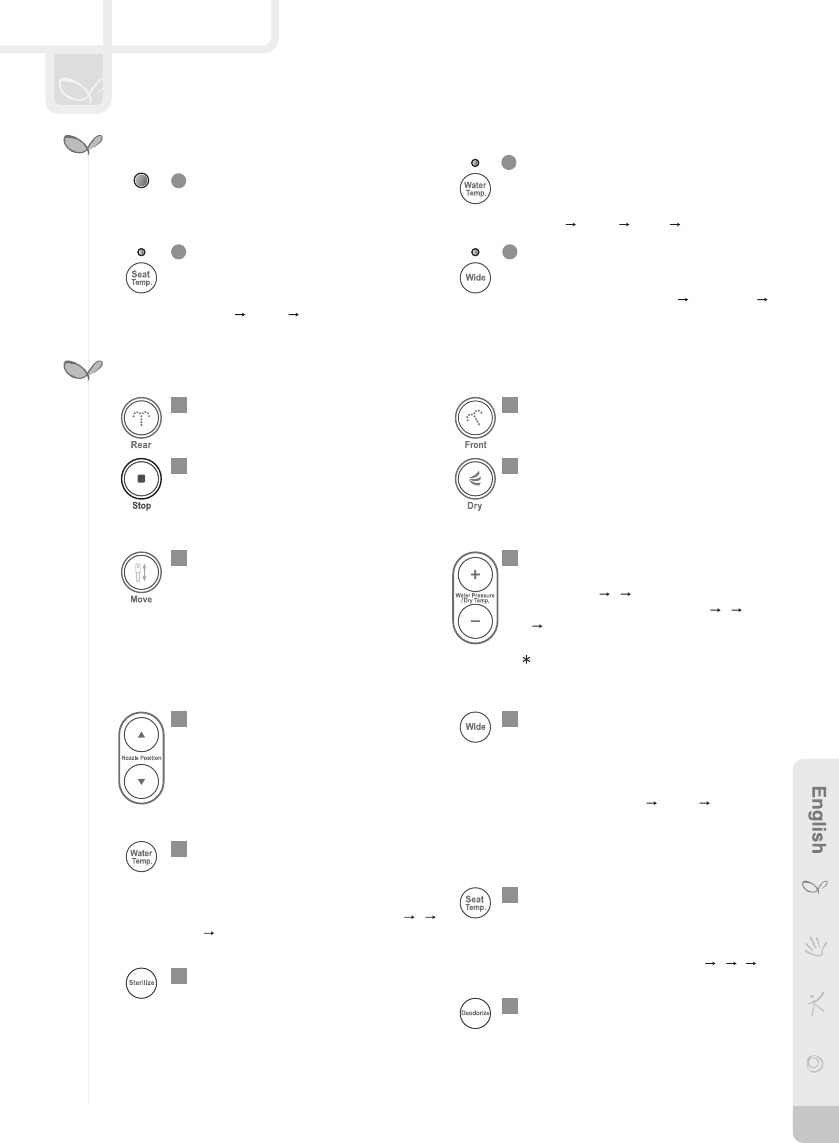
CHECKING THE CONTROL PANEL
Display Control panel
Display / Control panel
BA13-B
‘Seat Temp.’ button
‘Stop’ button
‘Water Pressure/Dry
Temp.’ button
‘Move’ button
‘Rear’ button
‘Wide’ button
‘Dry’ button
‘Front’ button
‘Water Temp.’ button
‘Deodorize’ button
‘Nozzle Position’
button
1
2
3
5
4
6
7
8
9
11
12
Remote control
signal transmitter 1
‘Sterilize’ button
10
‘Water Temp.’ indicator
‘Seat Temp.’ indicator
‘Wide’ indicator
2
3
4
FortheBA13-AR/AE,the‘Wide’,‘Sterilize’and
‘Deodorize’ are excluded.
1210964 BA13 사용설명서_수출영문_(09.03.23).indd 13 2009.3.24 10:13:14 AM
14
CHECKING THE CONTROL PANEL
‘Stop’ button
All currently operating functions will stop.
‘Nozzle Position’ button
Use this button to control the nozzle
position during the rear cleansing/front
cleansing operation. You can move
the nozzle in 5 levels using the ‘Nozzle
Position’ button.
‘Water Temp.’ button
Use this button to control the water
temperature. Whenever the ‘Water
Temp.’ button is pressed, you can control
thewatertemperaturein4levels(L M
HOff).
‘Sterilization’ button
Use this button to perform the
sterilization function. Sterilizing water is
ejected for 30 seconds to sterilize and
clean the nozzle.
‘Deodorization’ button
Use this button to perform the
deodorization function. When you press
this button, the deodorization function is
performed for approximately 1 minute.
※FortheBA13-BR/BEonly
3
7
9
11
12
※FortheBA13-BR/BEonly
Remote control signal transmitter
Transmits the signal when a remote control
button is pressed.
1
1
‘Wide’ indicator
Whenever the ‘Wide’ button is pressed,
the indicator cycles through the following
options:Straightline(Blue) Level1(Pink)
Level2(Red).
4
‘Seat Temp.’ button
Use this button to control the seat
temperature. Whenever the ‘Seat Temp.’
button is pressed. You can control the
seattemperaturein4levels(L M H
Off).
10
‘Wide’ button
Use this button to control the water
ejection range when using the cleansing
function. You can select the angle of the
water in 3 levels using the Wide function
button(StraightLine Level 1 Level2).
Whenever this button is pressed, the
Wide function indicator turns a different
color.
8
‘Move’ button
Use this button to use the move function.
If you press the ‘Move’ button, as the
nozzle is moved back and forth while
you operate the rear cleansing/front
cleansing function, you can clean a
wider area.
5
‘Dry’ button
Use this button to use the drying
function. It helps the drying process after
using the rear cleansing/front cleansing
function.
4
‘Water Pressure/Dry Temp.’ button
You can control the water pressure
in 3
levels(L MH)andcontroltheair
dryertemperaturein4levels(L M
HOFF)usingtheWater‘Pressure/Dry
Temp.’ button.
You can control the water pressure when
operating the rear cleansing/front cleansing
functions and control the air dryer temperature
when operating the drying function.
6
‘Water Temp.’ indicator
Whenever the ‘Water Temp.’ button is
pressed, the temperature control indicator
cyclesthroughthefollowingorder:
L(Blue) M(Pink) H(Red) Off.
1
2
Display
‘Seat Temp.’ indicator
Whenever the ‘Seat Temp.’ button is
pressed, the temperature control indicator
cyclesthroughthefollowingoptions:
L(Blue) M(Pink) H(Red)Off.
3
‘Rear’ button
Use this button to use the rear cleansing
function.
‘Front’ button
Use this button to use the front cleansing
function for women.
1 2
Control panel
※FortheBA13-BR/BEonly
※FortheBA13-BR/BEonly
1210964 BA13 사용설명서_수출영문_(09.03.23).indd 14 2009.3.24 10:13:15 AM

15
USING YOUR BIDET
Using the rear nozzle
Using the rear nozzle
1. Sit down on the seat and press the ‘Rear Cleansing’ button on the operation part.
2. Self-cleaning for the rear cleansing nozzle is performed, removing the cold water remaining
inside the nozzle before the water stream is ejected so that the water can be set to a desired
temperature for cleansing.
3. The cleansing water is ejected for approximately 1 minute and then stops automatically.
4. Self-cleaning for rear cleansing nozzle is performed for approximately 5 seconds after rear
cleansing. Then the nozzle retracts itself.
5. You can adjust the nozzle position by pressing the ‘Nozzle Position’ button.
6. You can adjust the water ejection angle by pressing the ‘Wide’ button (for the BA13-BR/BE
only).
Moving
Press the ‘Move’ button on the operation part.
-Thenozzlemovesbackandforth,providingawiderrangeofcleansing.
This will operate for as long as the rear cleansing function continues.
You can control the nozzle position by pressing the ‘Nozzle Position’ button.
To stop the move function, press the ‘Move’ button once again.
Drying
Press the ‘Dry’ button on the operation part.
-Warmairisemittedforapproximately2minutes.
If you wipe off the water lightly before turning on the air dryer, drying will finish faster.
You can control the air temperature by pressing the ‘Dry Temp.’ button.
If you press the ‘Dry’ button again during the operation, additional drying starts for another 2 minutes.
If you press the ‘Dry’ button while cleansing, cleansing is stopped and drying starts immediately.
Stopping
To stop the current operation, press the ‘Stop’ button.
-Thisstopsallcurrentlyoperatingfunctions.
The drying function stops 2 seconds after the ‘Stop’ button is pressed.
The cleansing water ejection time may be delayed while the above functions are performed.
Tips
If the ‘Rear Cleansing’ button is pressed again during the cleansing operation, the rear
cleansing function operates for another 1 minute.
While cleansing, users can adjust the water temperature, water pressure, and nozzle
position according to their preferences.
You can not increase the water pressure level higher than level 2 if your area is in the
following conditions.
-Mainwatersupplytemperatureunder10℃andratedpowersourceunder110V~.
If the seat sensor does not detect a human body, the bidet will not work.
Tips
1210964 BA13 사용설명서_수출영문_(09.03.23).indd 15 2009.3.24 10:13:15 AM
16
USING YOUR BIDET
Using the front nozzle
1. Sit down on the seat and press the ‘Front Cleansing’ button on the operation part.
2. Self-cleaning for the front cleansing nozzle is performed, removing the cold water remaining
inside the nozzle before the water stream is ejected so that the water can be set to a desired
temperature for cleansing.
3. The cleansing water is ejected for approximately 1 minute and then stops automatically.
4. Self-cleaning for rear cleansing nozzle is performed for approximately 5 seconds after front
cleansing. Then the nozzle retracts itself.
5. You can adjust the nozzle position by pressing the ‘Nozzle Position’ button.
6. You can adjust the water ejection angle by pressing the ‘Wide’ button (for the BA13-BR/BE
only).
Moving
Press the ‘Move’ button on the operation part.
-Thenozzlemovesbackandforth,providingawiderrangeofcleansing.
This will operate for as long as the front cleansing function continues.
You can control the nozzle position by pressing the ‘Nozzle Position’ button.
To stop the move function, press the ‘Move’ button once again.
Drying
Press the ‘Dry’ button on the operation part.
-Warmairisemittedforapproximately2minutes.
If you wipe off the water lightly before turning on the air dryer, drying will finish faster.
You can control the air temperature by pressing the ‘Dry Temp.’ button.
If you press the ‘Dry’ button again during the operation, additional drying starts for another 2 minutes.
If you press the ‘Dry’ button while cleansing, cleansing is stopped and drying starts immediately.
Stopping
To stop the current operation, press the ‘Stop’ button.
-Thisstopsallcurrentlyoperatingfunctions.
The drying function stops 2 seconds after the ‘Stop’ button is pressed.
Using the front nozzle
The cleansing water ejection time may be delayed while the above functions are performed.
Tips
If the ‘Front Cleansing’ button is pressed again during the cleansing operation, the front
cleansing function operates for another 1 minute.
While cleansing, users can adjust the water temperature, water pressure, and nozzle
position according to their preferences.
You can not increase the water pressure level higher than level 2 if your area is in the
following conditions.
-Mainwatersupplytemperatureunder10℃andratedpowersourceunder110V~.
If the seat sensor does not detect a human body, the bidet will not work.
Tips
1210964 BA13 사용설명서_수출영문_(09.03.23).indd 16 2009.3.24 10:13:15 AM
17
As the bidet should be installed on the toilet, ensure that water is not splashed onto
the bidet.
There may be some water remaining inside the filter which was used to test the product
during the inspection process at the factory. This does not mean that the product was
previously used.
Tips
INSTALLING YOUR BIDET
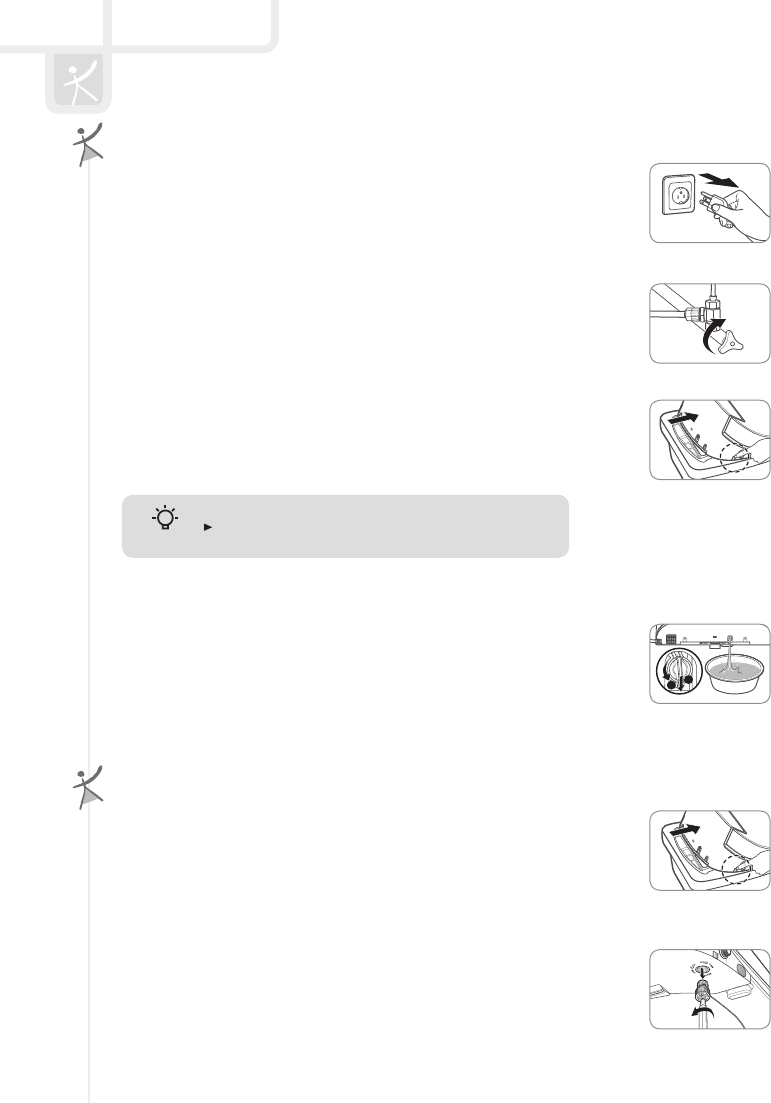
Removing existing toilet seat
Installing the product
Cold main water supply
Make sure that the bidet is connected to the cold water pipe.
(Iftheproductisconnectedtothehotwaterpipe,thismaydamagethefilterandhose).
Caution
2. Connect the rubber packing, T-shaped connector, and water tank hose in
this order to the existing water pipe. Please connect the bidet hose to the
T-shaped connector.
Please ensure that the rubber packing is inserted between the water pipe and
theT-shapedconnector.
FirmlytightenthenutsbelowandontopoftheT-shapedconnectoralltheway
to the end in a clockwise direction.
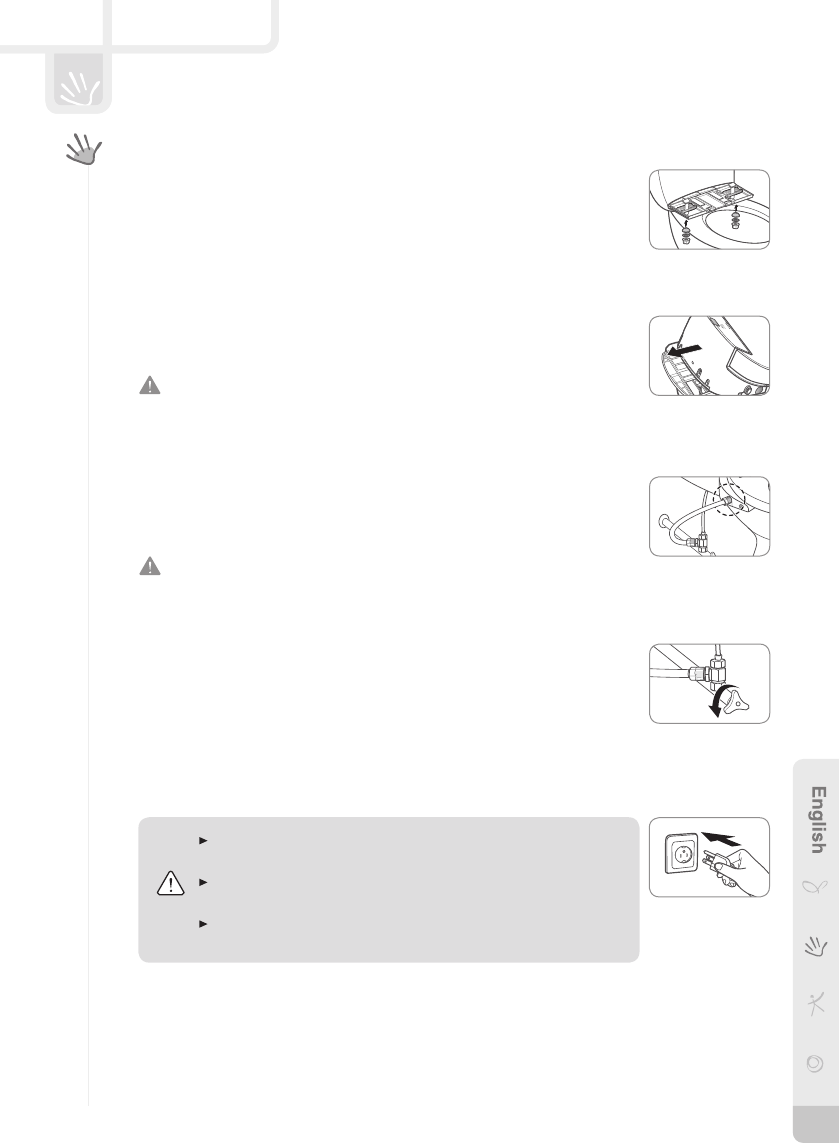
1. Turn off the main water supply valve ① and separate the existing water
tank hose ②.
1
2
1. Remove the existing toilet seat ① and seat cover ② by removing the fixing
nuts.
1
2
Keeptheremovedtoiletseatinashadedlocationtopreventitfrombeingdamaged.
Tips
1210964 BA13 사용설명서_수출영문_(09.03.23).indd 17 2009.3.24 10:13:16 AM
18
INSTALLING YOUR BIDET
4. Align the back of the bidet to the installation plate and push the bidet
backwards while pressing the button to the left of the bidet. (Hold the bidet
with both hands and push it backwards until it clicks into place).
Check if the bidet moves to the left or right. If it moves, fasten the fixing nuts
again.
5. Connect the bidet hose to the side of the bidet.
Make sure that the bidet hose is firmly connected. If the main water supply valve
is opened when the hose is not connected properly, the bidet hose may become
separated and cause water to splash, resulting in injury.
Take care that the bidet hose is not excessively bent by twisting it.
6. Open the main water supply valve.
7. Connect the power cord to the electrical outlet.
Make sure to use a grounded electrical outlet. In the case of a short
circuit, grounding prevents electric shock or injury.
Make sure to use a dedicated electrical outlet with grounding
terminals.
If using an extension cord is unavoidable, use one with grounding
terminalsfor120V~/60Hzorhigher.
Caution
Installing the product
3. Place the fixing slider over the installation plate on the toilet, insert the
fixing bolts, and fasten the nuts so that the installation plate is fixed.
1210964 BA13 사용설명서_수출영문_(09.03.23).indd 18 2009.3.24 10:13:18 AM
19
INSTALLING YOUR BIDET
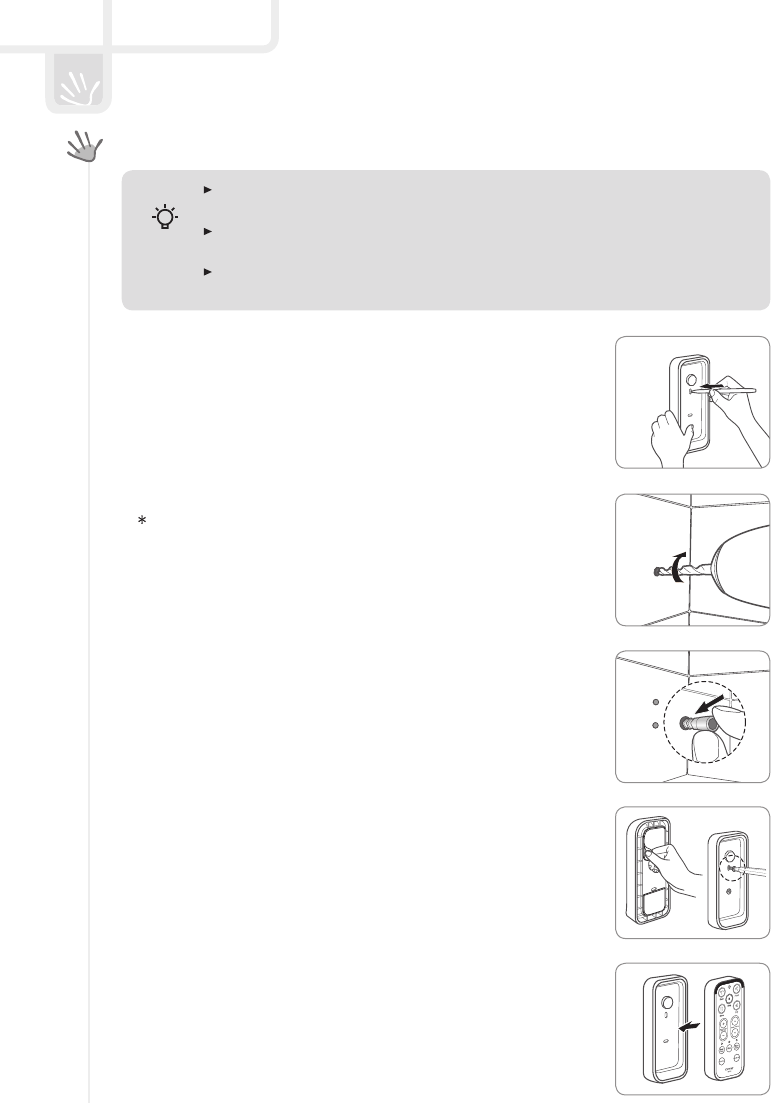
Installing the remote control wall mount
1. Place the remote control wall mount over the required position on
the wall and mark the 2 points for the anchors on the wall.
2. Drill 2 holes with a depth of approximately 35 mm at the marked points.
Use a drill bit with a diameter of ∅ 6.5 mm.
3. Insert the anchors into the holes and push them all the way in.
4. Remove the 2 pieces of protective film from the back of the remote
control wall mount, and attach the mount to the wall aligning the holes
with the anchors in the wall.
5. Place the remote control into the mount as shown by the figure.
Make sure to install the remote control wall mount on the wall using the supplied screws.
Failing to do so may result in the product falling and being damaged.
If the bathroom has 3 sides in a black or similar color, use the remote control while fixing
it to the wall holder.
Failing to do so may result in the product not working properly due to the remote control
signal reception ratio being too low.
Tips
1210964 BA13 사용설명서_수출영문_(09.03.23).indd 19 2009.3.24 10:13:19 AM
20
CLEANING AND MAINTAINING YOUR BIDET
Cleaning the nozzles
1. Press the ‘Nozzle Cleaning’ button on the operation part to the right of the
bidet.
-Nozzlecleaningwaterissprayedandthefrontnozzleisfullyextended.
-Cleanthefrontnozzle.
2. Press the ‘Nozzle Cleaning’ button on the operation part again.
-Nozzlecleaningwaterissprayed,thefrontnozzleretractsitself,andrearnozzle
is extended fully.
-Cleantherearnozzle.
3. If you press the ‘Power’ button or the ‘Nozzle Cleaning’ button on the operation
part again after cleaning the nozzles, nozzle cleaning water is sprayed, and the
rear nozzle retracts itself.
-Ifnobuttonispressedfor2minutesafterthenozzlecleaningstarts,thenozzle
retracts itself automatically.
If excessive force is exerted on the nozzles when cleaning them, the nozzles may no
longer work properly or break. Hold the nozzles lightly when cleaning them.
Whencleaningthenozzles,Nozzlecleaningwaterisemitted.(However,whenmain
watersupplyisnotsupplied(mainwatersupplystopstatus),nonozzlecleaningwateris
emittedandonlythenozzleisextended).
Tips
Cleaning the product body
Apply a neutral detergent to a soft cloth or sponge and clean the product.
-Failingtodosomayresultindeformationorproductdamage.
Do not use thinner or benzene.
Do not clean the product using a coarse scrub or abrasive detergent.
Tips
1210964 BA13 사용설명서_수출영문_(09.03.23).indd 20 2009.3.24 10:13:21 AM
21
CLEANING AND MAINTAINING YOUR BIDET
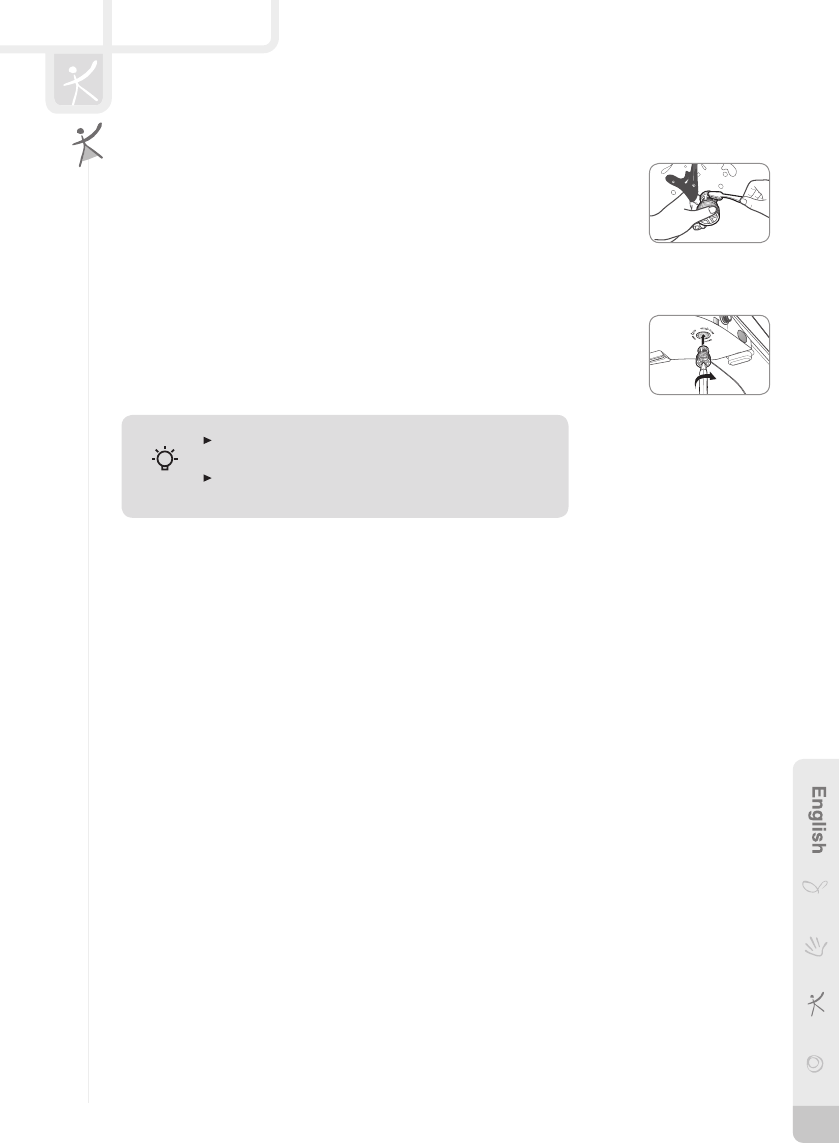
Removing the product
1. Unplug the power cord from the electrical outlet.
2. Close the main water supply valve.
3. Pull the product forwards by holding both sides of the product while
pressing the button at the bottom left of the product, to separate
the product from the installation plate.
Unplug the product if it will not be used for a long time.
Tips
2. Remove the MESH filter at the bottom left of the product.
-RemovetheMESHfilterbyturningitwitha‘+’screwdriver.
Cleaning the MESH lter
1. Separate the product from the installation plate.
-RefertoRemovingtheproduct(1~3).
4. Remove the drain plug at the back of the bidet by turning it
counterclockwise by 90 degrees ① and then pulling it forwards ② so that
the water in the hot water tank is drained into the toilet.
12
1210964 BA13 사용설명서_수출영문_(09.03.23).indd 21 2009.3.24 10:13:22 AM
22
CLEANING AND MAINTAINING YOUR BIDET
Cleaning the MESH lter
3. Clean the MESH filter by shaking it under flowing water.
-RemovingforeignsubstancesfromtheMESHfilterwithatoothbrushismore
effective.
-DonotcleantheMESHfilterexcessively,asitmaydamagetheMESH.
4. Reinstall the cleaned MESH filter into the product.
-CheckthattheMESHfilterisinstalledcorrectly.
-IfyouopenthemainwatersupplyvalvewhentheMESHfilterisnot
completely installed, water leakage may occur.
When not using the product for a long period of time,
clean the filter before using the product again.
The filter cleaning interval may differ depending on the
waterquality.
Tips
1210964 BA13 사용설명서_수출영문_(09.03.23).indd 22 2009.3.24 10:13:23 AM
23
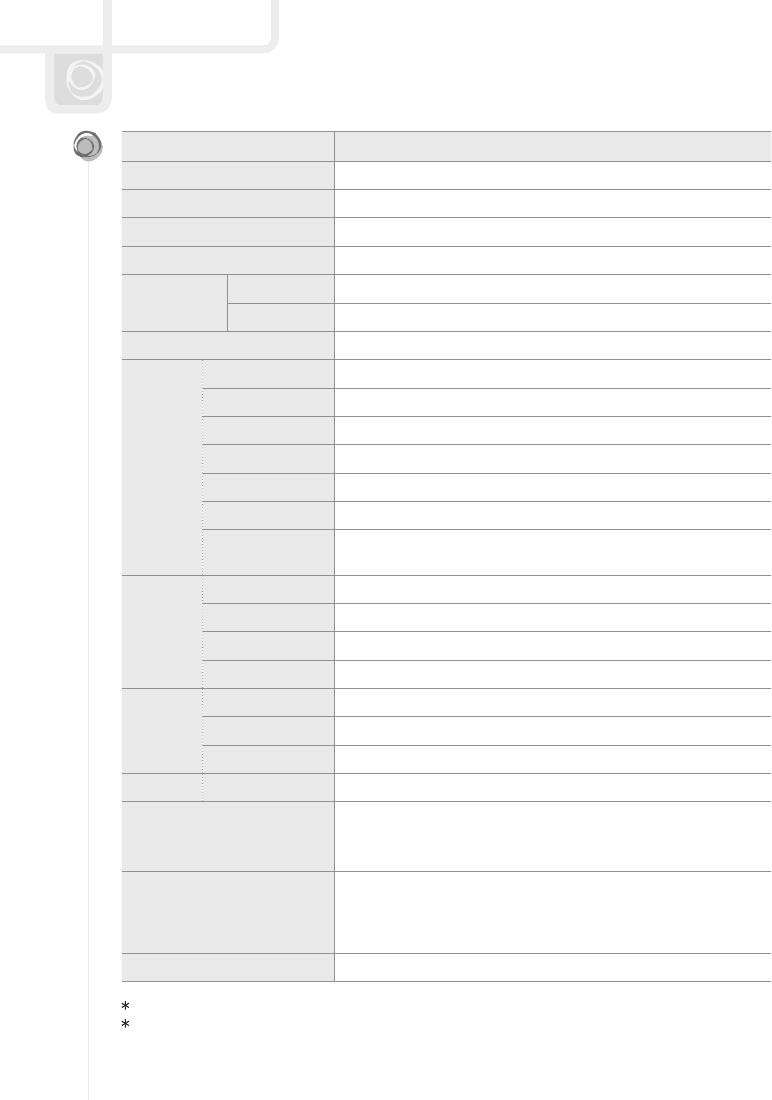
SPECIFICATIONS
Product name Coway Bidet
Model no. BA13-AR/AE/BR/BE
Standard power voltage 120V~60Hz
Power consumption 1 200 W
Supply water pressure 0.11MPa-0.68MPa
Dimensions
BA13-AR/BR 382mm(Width)×493mm(Depth)×144mm(Height)
BA13-AE/BE 382mm(Width)×528mm(Depth)×144mm(Height)
Weight 6kg-6.5kg
Warm water
cleansing
device
Rear cleansing Maximum0.5L/min,automaticnozzleself-cleaningfunction
Front cleansing Maximum0.5L/min,automaticnozzleself-cleaningfunction
Standard time Rear cleansing 1 minute, front cleansing 1 minute, drying 2 minutes
Water pressure control
3 levels Micom control
Warm water temperature control
4levels(Off:Roomtemperature,L:31.5℃,M:34.5℃,H:37.5℃)
Power consumption by heater
1 250 W
Safety devices Bimetal, temperature sensor,
temperaturefuse(overheatingprevention),microswitch
Air dryer
device
Warm air temperature control
4levels(Off:Roomtemperature,L,M,H)
Standard time Drying for 2 minutes
Power consumption by heater
180 W
Safety devices Bimetal,temperaturefuse(overheatingprevention)
Heated seat
Seat temperature control
4levels(Off:Roomtemperature,L:31℃,M:34℃,H:37℃)
Power consumption by heater
60 W
Safety devices Bimetal,temperaturefuse(overheatingprevention)
MESHlter Specications 25.2mm(Length)×19.8mm(Ø)
Installation parts
T-shapedconnector,Bidethose,Installationplate,2xingscrews,
2xingrubbers,2xingwashers,2xingnuts,2xingsliders,2screws,
2anchors,3batteries(AAA),Remotecontrolwallmount
Other functions
Instantwarmwatersystem,AIR+waterstream,MESHlter,
Eco mode, Stainless steel twin nozzle
(TheWide,DeodorizationandSterilizationfunctionsaresupported
for the BA13-BR/BEonly)
Operating temperature 0℃-40℃
Manufacturer:WoongjinCuchenCo.,Ltd.
The specifications are subject to change without prior notice for reasons of improving the product
performance.
1210964 BA13 사용설명서_수출영문_(09.03.23).indd 23 2009.3.24 10:13:23 AM
24
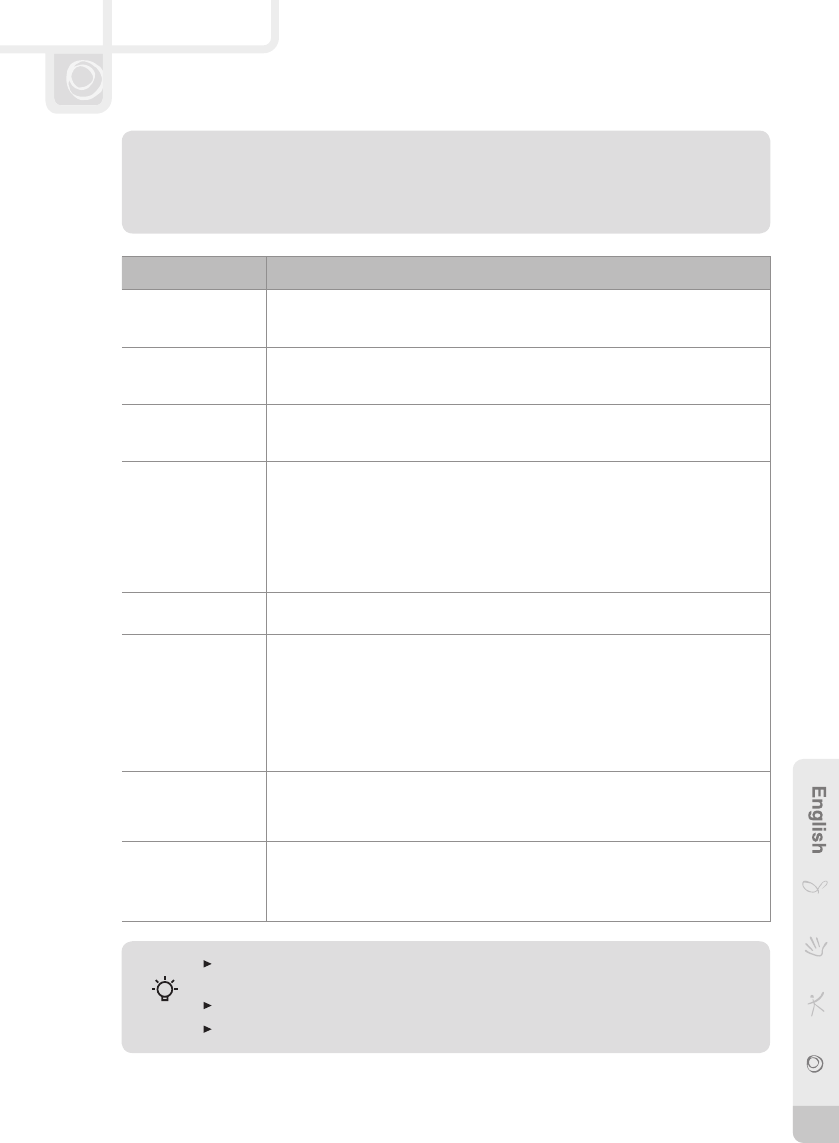
TROUBLESHOOTING
The bidet may operate abnormally due to minor causes not because of a product malfunction but
because the user is unfamiliar with using the product. In such a case, problems can be easily solved
even without the help of the Service Center by checking the following. If you cannot solve the problem
after checking the following items, please call the Service Center.
PROBLEM SOLUTION
The product is not
working.
•Makesurethebidetispluggedin.
•Checkiftherewasapowerfailure.
•Checkiftheremotecontrolbatteriesareat.Replacethemifnecessary.
No water is ejected.
•Makesurethewatervalveisopened.
•Cleanforeignmaterialfromthenozzleoutletholesusingatoothbrush.
•Makesurethewatersupplyisrunning.
The water pressure is
weak.
•Makesurethatthewaterpressureisnottoolow.
•Cleanforeignmaterialfromthenozzleoutletholeusingatoothbrush.
•Remove,cleanandthenreinstallthelter(refertop.21)
The seat or the water
is not warm.
•Makesurethattheseatandwatertemperaturecontrolbuttonsaresettothe‘ON’
status. Please adjust the setting to the correct temperature by pressing the seat
temperatre button or the water temperature button.
•Thisbidethasabimetalasoneofsafetydeviceforwaterheater.Thesafetydevice
may cycle ‘OFF’ if temperature exceeds over normal level. In the event of the safety
device operation, the bidet do not work and show error message until the appliance
cool down and then the bimetal will automatically reset. If the error message shows
up, you can restart the bidet by pressing any button of remote control.
The air from the air
dryer is cold.
•Duringthedryingoperation.Adjustthetemperaturebypressingtheairdryer
temperature control button.
Water leaks from
areas other than the
nozzles.
•IfwaterisleakingfromtheT-shapedconnector,makesurethattherubberpacking
isinsertedintotheT-shapedconnector,andrmlytightenthenutagain.
•Ifwaterisleakingfromthebidethoseconnection,makesurethatthebidethoseis
connected completely.
•Ifwaterisleakingfromthelter,checkifthereisanyforeignmaterialbetweenthe
lterandtheproduct.
•Inthiscase,installtheltercompletelyorreinstallthelteraftercleaningit.
Checkwhetherthelterisdamaged.Ifthelterisdamaged,callourservicecenter.
Water is emitted while
the bidet is not in use.
•Thewaterthatcomesoutbetweenthenozzlesaftercleansingisforcleaningthe
nozzles, and is not a malfunction.
•Insomecases,waterremainingaroundthenozzlesmaydripintothetoilet.Thisis
not a malfunction.
The bidet does
not work when
the buttons on the
operation part are
pressed.
•Iftheseatsensorcannotdetectthatyouareseatedbecauseyouaretoofaraway,
functions do not work.
When bidet eco mode is set, you may feel that the seat is relatively cold when taking a
seat. If bidet eco mode is cancelled, the last set temperature is maintained.
For cancelling bidet eco mode, see page 11.
If the bidet or remote control is flooded, it may cause a malfunction or other problem.
Tips
1210964 BA13 사용설명서_수출영문_(09.03.23).indd 24 2009.3.24 10:13:23 AM

WARRANTY CARD OR WARRANTY LETTER
ONE YEAR LIMITED WARRANTY
BIDET BA13-AR/AE/BR/BE (‘PRODUCT’)
Model:
Serial Number:
Customer Name: (‘OWNER’)
Date of Purchase:
What This Warranty Covers:
Commencing with the date of purchase of the
Product and continuing for a period of one year,
if manufacturing defects in the Product cause the
Product to not operate properly for its intended
use, then subject to the exclusions, conditions, and
limitations contained herein, COWAY at its sole
option will repair or replace the Product.
Decisions as to the extent of repair or replacement
requiredwillbemadesolelybyCOWAY.
The remedy under this Warranty is available only for
that portion of the Product exhibiting defects at the
time of the warranty claim. The replacement Product
as well as any remaining original Product will be
warranted only for the original one year warranty
period. This limited warranty applies only to Product
used for an application specified by COWAY for
the Product and applied in strict accordance with
COWAY published specifications in effect at the
time of application. IF PRODUCT IS USED FOR
OTHER THAN ITS INTENDED PURPOSE, IT
IS SOLD AS IS AND WITHOUT ANY EXPRESS
OR IMPLIED WARRANTIES, INCLUDING OF
MERCHANTABILITY OR FITNESS FOR A
PARTICULAR PURPOSE.
What This Warranty Does Not Cover:
This Warranty warrants that the Product will be free
from manufacturing defects which affect the ability
of the Product to operate for its intended use; it is
notawarrantythattheProductwillneverrequire
repairs or to undertake responsibilities, liabilities or
obligations other than those specifically identified in
the preceding section.
COWAY is not responsible or liable for personal
injury or property damage of any kind, even if
arising from a breach of this Warranty.
Limitations and Exclusions:
TO THE EXTENT PERMITTED BY APPLICABLE
LAW, COWAY DISCLAIMS ANY OTHER
WARRANTY EXPRESS OR IMPLIED, THAN THAT
PROVIDEDFORHEREIN.THISWARRANTY
IS IN LIEU OF AND EXCLUDES ALL OTHER
WARRANTIES, GUARANTEES, CONDITIONS
AND REPRESENTATIONS, EXPRESS OR
IMPLIED, ORAL OR WRITTEN, STATUTORY
OR OTHERWISE, INCLUDING BUT NOT
LIMITED TO ANY IMPLIED CONDITIONS OR
WARRANTIES AS TO THE MERCHANTABILITY
OR FITNESS FOR A PARTICULAR PURPOSE
OF THE COWAY PRODUCT. SOME STATES
DO NOT ALLOW LIMITATIONS ON HOW
LONG AN IMPLIED WARRANTY LASTS, SO
THEABOVELIMITATIONMAYNOTAPPLYTO
YOU. COWAY DOES NOT AUTHORIZE ANY
PERSONINCLUDINGITSREPRESENTATIVES,
TOMAKEANYREPRESENTATIONORTO
OFFER ANY WARRANTY, CONDITION OR
GUARANTY IN RESPECT OF THE PRODUCT
OTHER THAN THIS WARRANTY. THIS LIMITED
WARRANTY SHALL BE THE OWNER’S SOLE
ANDEXCLUSIVEREMEDYAGAINSTCOWAY
AND COWAY SHALL NOT BE LIABLE FOR ANY
CONSEQUENTIAL, EXEMPLARY, SPECIAL,
INCIDENTAL OR OTHER DAMAGES INCLUDING,
BUT NOT LIMITED TO, LOSS OF PROFITS, AND
LOSS OF USE. INCIDENTAL, CONSEQUENTIAL
AND EXEMPLARY DAMAGES SHALL NOT
BERECOVERABLEEVENIFTHEREMEDIES
ORTHEACTIONSPROVIDEDFORINTHIS
WARRANTY FAIL OF THEIR ESSENTIAL
PURPOSE. SOME STATES DO NOT ALLOW THE
EXCLUSION OR LIMITATION OF INCIDENTAL OR
CONSEQUENTIALDAMAGES,SOTHEABOVE
LIMITATION OR EXCLUSION MAY NOT APPLY
TO YOU. COWAY SHALL NOT BE LIABLE FOR
ANY DAMAGES WHICH ARE BASED UPON
NEGLIGENCE, BREACH OF WARRANTY, STRICT
LIABILITY OR ANY OTHER LEGAL THEORY
OFLIABILITYOTHERTHANTHEEXCLUSIVE
LIABILITY SET FORTH IN THIS WARRANTY.
25
1210964 BA13 사용설명서_수출영문_(09.03.23).indd 25 2009.3.24 10:13:23 AM
Limitations on Implied Warranties:
Any implied warranty of merchantability or fitness for
a particular purpose or use, shall be limited to the
duration of the foregoing express written warranty.
Conditions of Warranty:
COWAY’s continuing liability under this Warranty is
conditioneduponthefollowing:
a)Thedefectordamageisnotcausedbyoristhe
resultof:abnormaluseorconditions;improper
storage, unauthorized modifications or repair;
misuse, neglect, accident, alteration, improper
installation or other acts that are not the fault
of Coway or the manufacturer of the product
or that are not covered by the manufacturer’s
warranty;
b)TheProducthasnotbeenaltered,modified
or repaired without prior written approval of
COWAY;
c)TheOWNERhasnotifiedCOWAYinwriting
of any failure of the Product covered by this
Warrantywithinthirty(30)daysfollowingsuch
failure;
d)Therehasbeennomisuse,abuseor
negligence with respect to the Product on the
part of the OWNER.
Waiver:
COWAY’s failure at any time to enforce or rely upon
any of the terms or conditions stated herein shall not
be construed to be a waiver of its rights hereunder.
Obtaining Warranty Service and OWNER’S
Duties:
If the Product fails to operate for its intended
purpose,thennotifyCOWAYat(852)2334-5660,
within 48 hours or within the next business day after
discovery of any defect in the Product. The OWNER
must give written notice to COWAY no later than thirty
(30)daysafteradefectisdiscoveredorshouldby
reasonable diligence have been discovered. Claims
underthisWarrantywillrequireproofofpurchaseby
the OWNER.
COWAY is not responsible for any claims without
such proof of purchase. Should the alleged failure
or the remedy sought by the OWNER lie outside the
scope of this Warranty, OWNER agrees to promptly
reimburse COWAY for the cost of any investigation
requestedbyOWNER,includingremedycosts,plus
a COWAY administrative fee.
26
1210964 BA13 사용설명서_수출영문_(09.03.23).indd 26 2009.3.24 10:13:24 AM
Made in Korea www.coway.com
1210964
001
1210964 BA13 사용설명서_수출영문_(09.03.23).indd 27 2009.3.24 10:13:24 AM
