Craftsman 12432607 User Manual BAND SAW Manuals And Guides 1205002L
User Manual: Craftsman 12432607 12432607 CRAFTSMAN BAND SAW - Manuals and Guides View the owners manual for your CRAFTSMAN BAND SAW #12432607. Home:Tool Parts:Craftsman Parts:Craftsman BAND SAW Manual
Open the PDF directly: View PDF ![]() .
.
Page Count: 50

Operator's Manual
CRAFTSMH
14-in. BAND SAW
1 HP MOTOR
Model 124.32607
CAUTION: Before using this
product, read this manual and
follow all its Safety Rules
and Operating Instructions.
®Safety Instructions
®Assembly
® Operation
• Maintenance
•Troubleshooting
®Parts List
® Espanol (PG. 26)
Sears Brands Management Corporation,
Hoffman Estates, IL 60179 U.S.A
Warranty .......................................................................................................................................................................................... 2
Safety Instructions ..................................................................................................................................................................................... 2-3
Specifications ...................................................................................................................................................... 3
Assembly ................................................................................................................................................................................................... 4-6
Getting to Know Your Band Saw .................................................................................................................................................................... 7
Adjustments ............................................................................................................................................................................................. 7-10
Operation ................................................................................................................................................................................................... 11
Maintenance .............................................................................................................................................................................................. 12
Electrical Schematic ................................................................................................................................................................................... 12
Troubleshooting ......................................................................................................................................................................................... 13
Repair Protection Agreements .................................................................................................................................................................... 13
Parts Diagrams .............................................................................................................................................................. 14-24
Notes ..................................................................................................................................................................................................... 25
CRAFTSMAN ONE YEAR FULL WARRANTY
FOR ONE YEAR from the date of purchase, this product is warranted against any defects in material or workmanship. A defective
product will receive free repair or replacement if repair is unavailable.
For warranty coverage details to obtain free repair or replacement, visit the web site: www. craftsman, corn
This warranty does not cover the blade, which is an expendable part that can wear out from normal use within the warranty period.
This warranty is void if this product is ever used while providing commercial services or if rented to another person.
This warranty gives you specific legal rights, and you may also have other rights which vary from state to state.
Sears Brands Management Corporation, Hoffman Estates, IL 60179
GENERAL SAFETY WARNINGS
KNOW YOUR POWER TOOL. Read the owner's manual carefully. Learn the tool's applications, work capabilities, and its specific
potential hazards.
Always Ground All Tools.
If your tool is equipped with a three-pronged plug, you must plug it into a three-hole electric receptacle. If you use
an adapter to accommodate a two-pronged receptacle, you must attach the adapter plug to a known ground. Never
remove the third prong of the plug.
Always Avoid Dangerous Environments.
Never use power tools in damp or wet locations. Keep your work area well lighted and clear of clutter.
Always Remove the Adjusting Keys and Wrenches from Tools after Use.
Form the habit of checking to see that keys and adjusting wrenches are removed from the tool before turning it on.
Always Keep Your Work Area Clean. Cluttered areas and benches invite accidents.
Always Keep Visitors Away from Running Machines.
All visitors should be kept a safe distance from the work area.
Always make the Workshop Childproof.
Childproof with padlocks, master switches, or by removing starter keys.
Never operate a tool while under the influence of drugs, medication, or alcohol.
2
Always Wear Proper Apparel.
Never wear loose clothing or jewelry that might get caught in moving parts. Rubber-soled footwear is recommended
for the best footing.
Always Use Safety Glasses and Wear Hearing Protection.
Also use a face or dust mask if the cutting operation is dusty.
Never Overreach.
Keep your proper footing and balance at all times.
Never Stand on Tools.
Serious injurycould occur if the tool is tipped or if the cutting tool is accidentally contacted.
Always Disconnect Tools.
Disconnect tools before servicing and when changing accessories such as blades, bits, and cutters.
Always Avoid Accidental Staring.
Make sure switch is in "OFF" position before plugging in cord.
Never Leave Tools Running Unattended.
Always Check for Damaged Parts.
Before initial or continual use of the tool, a guard or other part that is damaged should be checked to assure that it
will operate properly and perform its intended function. Check for alignment of moving parts, binding of moving parts,
breakage of parts, mounting, and any other conditions that may affect its operation. A guard or other damaged parts
should immediately be properly repaired or replaced.
SPECIAL SAFETY RULES FOR BAND SAWS
1. Always stop the band saw before removing scrap pieces from table.
2. Always keep hands and fingers away from the blade.
3. Never attempt to saw stock that does not have a flat surface, unless a suitable support is used.
4. Always hold material firmly and feed it into the blade at a moderate speed.
5. Always turn off the machine if the material is to be backed out of an uncompleted cut.
6. Check for proper blade size and type for thickness and type of material being cut.
7. Make sure that the blade tension and blade tracking are properly adjusted.
8. Make "relief" cuts before cutting long curves.
9. Release blade tension when the saw will not be used for a long period of time.
10. Note and follow the safety warnings and instructions that appear on the lower door of this saw.
Blade Length ................................................ 99-3/4"
Blade Width ............................................ 1/4" to 3/4"
Throat Width ................................................. 13-1/2"
Cutting Depth ....................................................... 8"
Blade Speeds ............................... 1620/3340 ft/min
Dust Ports ........................................... 2-1/2" and 4"
Table Size ..................................... 15-3/4" x 20-3/8"
Table Tilt ............................................. 0-45 Degrees
Motor ................................................................ 1 HP
Motor Voltage ............................................. 120/240
Motor Amperage ........................................... 9/4.5 A
Net Weight ................................................. 160 LBS
SAVE THESE INSTRUCTIONS.
Refer to them often.
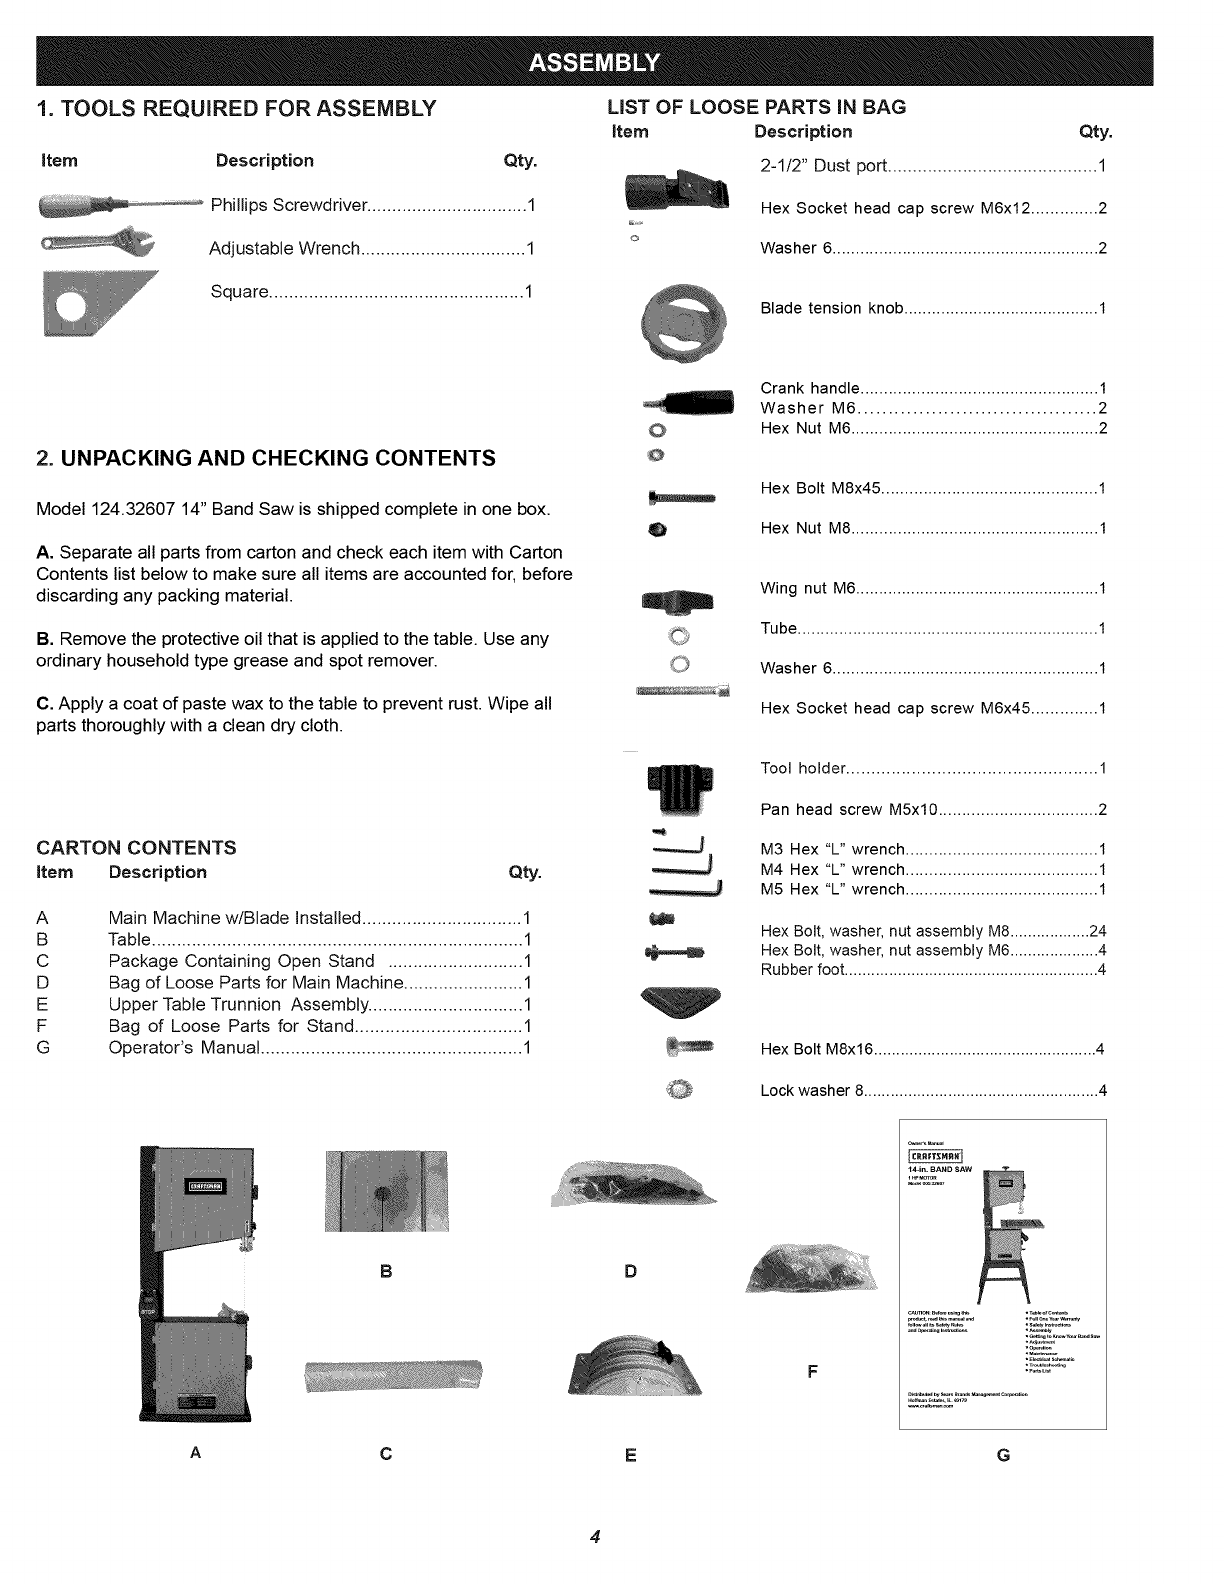
1. TOOLS REQUIRED FOR ASSEMBLY LIST OF LOOSE PARTS iN BAG
Item Description Qty.
_ Phillips Screwdriver ................................ 1
Adjustable Wrench ................................. 1
Item
Q
Description Qty.
2-1/2" Dust port .......................................... 1
Hex Socket head cap screw M6x12 .............. 2
Washer 6 ......................................................... 2
Square ................................................... 1 Blade tension knob .......................................... 1
2. UNPACKING AND CHECKING CONTENTS
Model 124.32607 14" Band Saw is shipped complete in one box.
A. Separate all parts from carton and check each item with Carton
Contents list below to make sure all items are accounted for, before
discarding any packing material.
B. Remove the protective oil that is applied to the table. Use any
ordinary household type grease and spot remover.
C. Apply a coat of paste wax to the table to prevent rust. Wipe all
parts thoroughly with a clean dry cloth.
CARTON CONTENTS
item Description Qty.
A
B
C
D
E
F
G
Main Machine w/Blade Installed ................................ 1
Table .......................................................................... 1
Package Containing Open Stand ........................... 1
Bag of Loose Parts for Main Machine ........................ 1
Upper Table Trunnion Assembly ............................... 1
Bag of Loose Parts for Stand ................................. 1
Operator's Manual .................................................... 1
©
@
Crank handle ................................................... 1
Washer M6 ....................................... 2
Hex Nut M6 ..................................................... 2
Hex Bolt M8x45 .............................................. 1
Hex Nut M8 ..................................................... 1
Wing nut M6 ..................................................... 1
Tube ................................................................. 1
Washer 6 ......................................................... 1
Hex Socket head cap screw M6x45 .............. 1
Tool holder .................................................. 1
Pan head screw M5xl0 .................................. 2
M3 Hex "L" wrench ......................................... 1
M4 Hex "L" wrench ......................................... 1
M5 Hex "L" wrench ......................................... 1
Hex Bolt, washer, nut assembly M8 .................. 24
Hex Bolt, washer, nut assembly M6 .................... 4
Rubber foot ......................................................... 4
Hex Bolt M8x16 .................................................. 4
Lock washer 8 ..................................................... 4
14-in. BAND SAW
D
,o_
AEG
3. iNiTiAL ASSEMBLY
The 124.32607 band saw is supplied partly assembled. Prior to use, the following items have to be assembled: Open Stand, 2-1/2" Dust
Port, Table, Blade Tension Knob, Tool Holder, and Crank Handle.
WARNING: To avoid injury, do not attempt to run or use this machine until all parts are assembled and working properly.
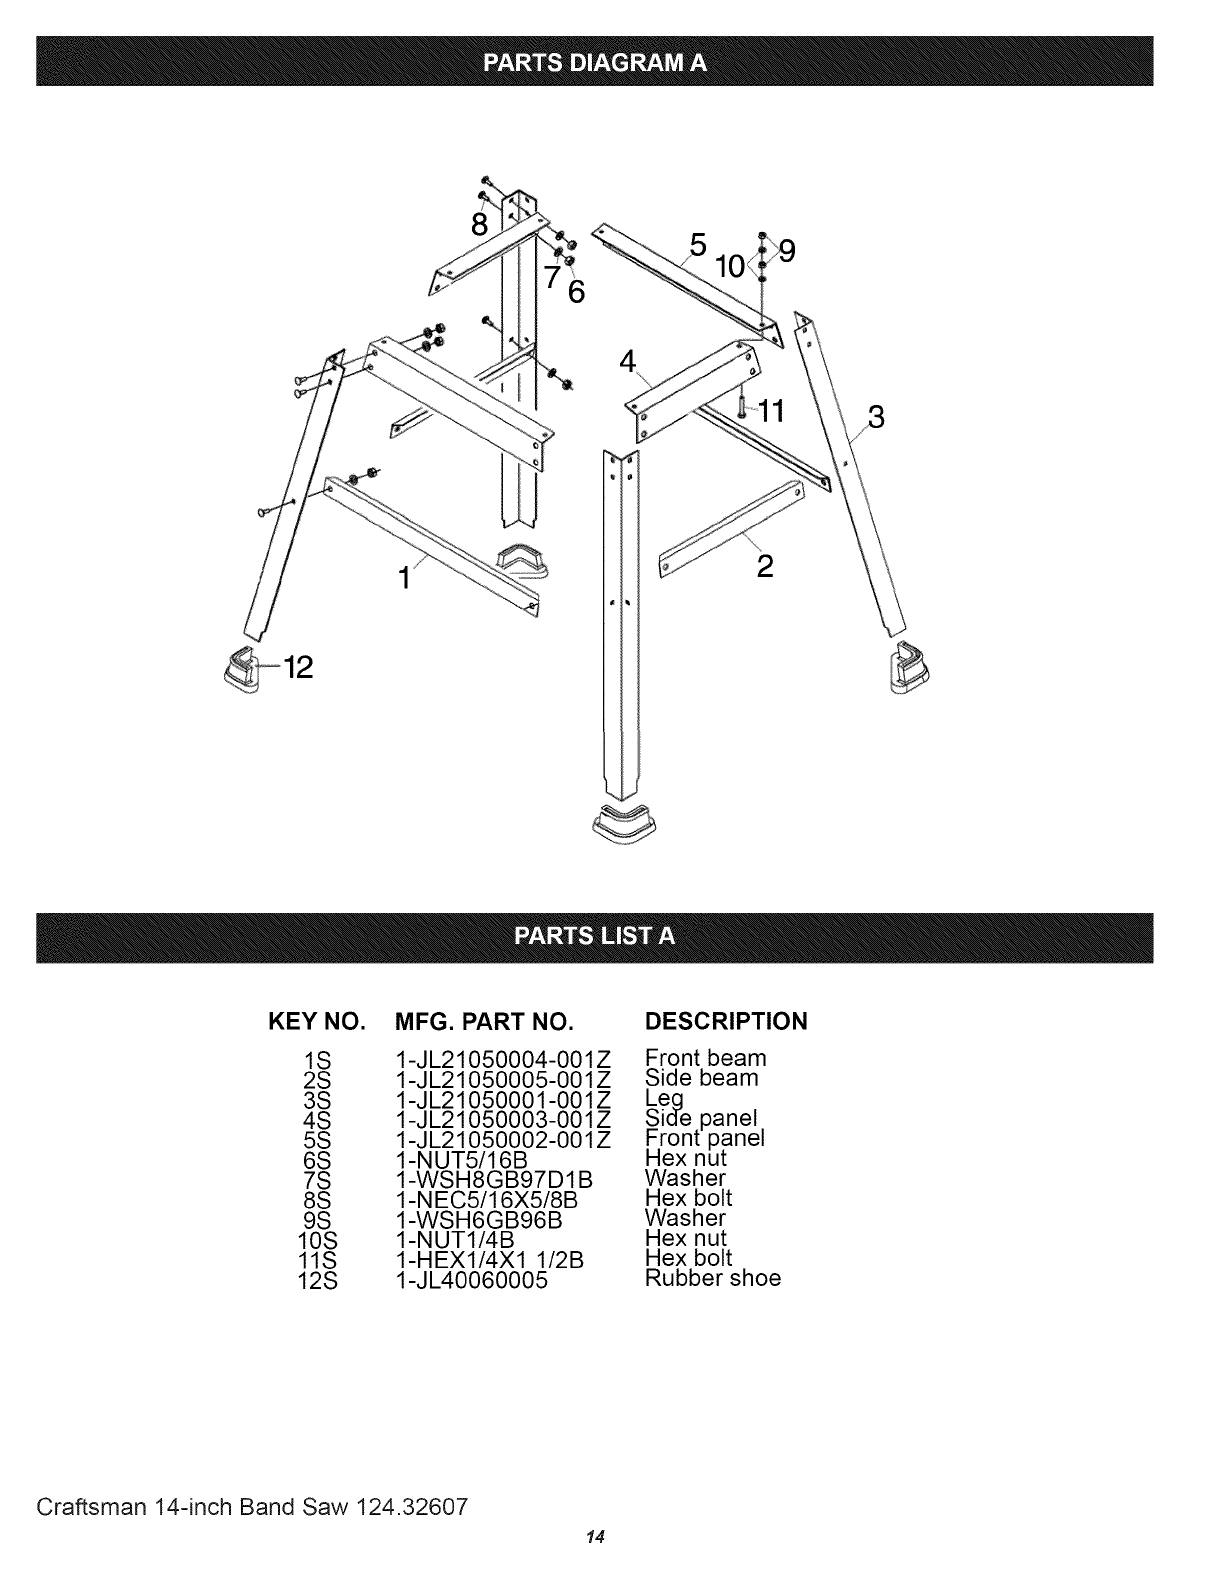
A. Open Stand Assembly
- Check contents against the parts list.
Hint: All front and side panels assemble behind (inside) leg pieces.
- Fasten front panel on to paired legs, using hex carriage bolts, washers and hex nuts. Do not fully tighten.
- Fasten side panel on to front panel and paired leg assemblies using remaining hex carriage bolts, washers and hex nuts.
- Fasten the front and side beams on the paired legs with hex carriage bolts, washers and hex nuts.
- Set stand in an upright position, ensuring that the holes on the top edge of the panels line up sufficiently to allow hex head screws to
pass through. Fully Tighten the hex carriage bolts and hex nuts.
- Press rubber feet onto the end of stand legs.
- With the aid of an assistant, lift band saw and carefully position in place on top of stand.
- Install base to stand using hex head screw (11) and washer (10) through stand and saw base, then washer (10) and hex nut (9) on top of
saw base. Repeat procedure for all four corners before tightening fully.
WARNING: To Avoid back injury, get help lifting the band saw. Bend your knees, and lift with your legs, not your back.
Parts List
Item No. Description Qty
1 Front beam 2
2 Side beam 2
3 Legs 4
4 Side panel 2
5 Front panel 2
6 Hex nut 24
7 Washer 24
8 Hex carriage bolt 24
9 Hex nut 4
10 Washer 8
11 Hex head screw 4
12 Rubber foot 4
12
Band Saw Open Stand
Parts Diagram ",4/
3
B. Assemble the 2-1/2" dust port to the band saw frame with Hex
socket head cap screw and washer. Place the 2-1/2" dust port onto
the side of the band saw frame.
Locate two Hex socket head cap screws and two washers from the
bag of loose parts. Mount the dust port to the band saw frame and
install a Hex socket head cap screw with washer in each hole, then
tighten with M5 Hex "L" wrench. (See FIG. 1)
FIG. 1
FIG, 2
_ge Bolt
D. Place the table onto the upper table trunnion. Carefully feed the
blade through the slot of the table. (See FIG. 2A)
C. Assemble the upper table trunnion to the lower table trunnion with
Carriage Bolt, Glide Piece, Washer and Wing Nut (See FIG. 2).
FIG, 2A
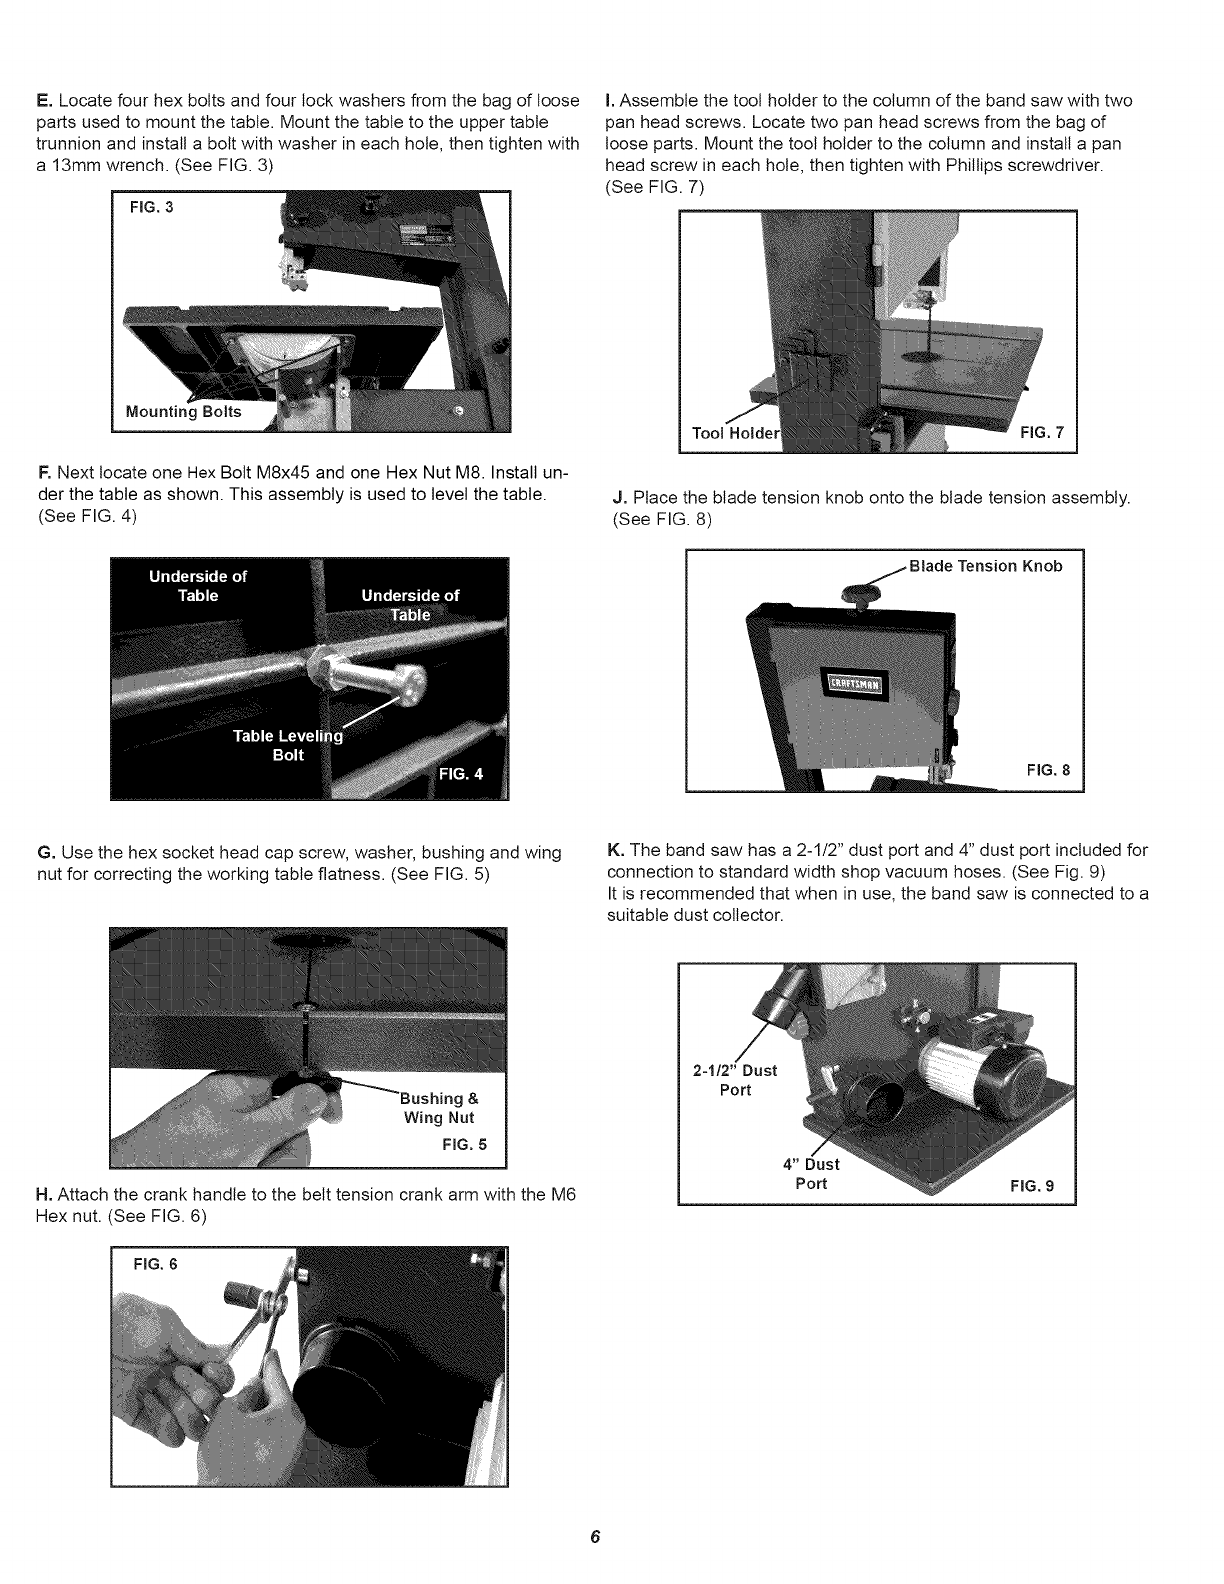
E. Locate four hex bolts and four lock washers from the bag of loose
parts used to mount the table. Mount the table to the upper table
trunnion and install a bolt with washer in each hole, then tighten with
a 13mm wrench. (See FIG. 3)
FIG. 3
Mounting Bolts
F. Next locate one Hex Bolt M8x45 and one Hex Nut M8. Install un-
der the table as shown. This assembly is used to level the table.
(See FIG. 4)
I. Assemble the tool holder to the column of the band saw with two
pan head screws. Locate two pan head screws from the bag of
loose parts. Mount the tool holder to the column and install a pan
head screw in each hole, then tighten with Phillips screwdriver.
(See FIG. 7)
Tool Holder .7
J. Place the blade tension knob onto the blade tension assembly.
(See FIG. 8)
Tension Knob
FIG. 8
G. Use the hex socket head cap screw, washer, bushing and wing
nut for correcting the working table flatness. (See FIG. 5)
K. The band saw has a 2-1/2" dust port and 4" dust port included for
connection to standard width shop vacuum hoses. (See Fig. 9)
It is recommended that when in use, the band saw is connected to a
suitable dust collector.
g&
Wing Nut
FIG. 5
H. Attach the crank handle to the belt tension crank arm with the M6
Hex nut. (See FIG. 6)
FIG. 6
2-1/2" Dust
Port
4" Dust
Port FIG. 9
6
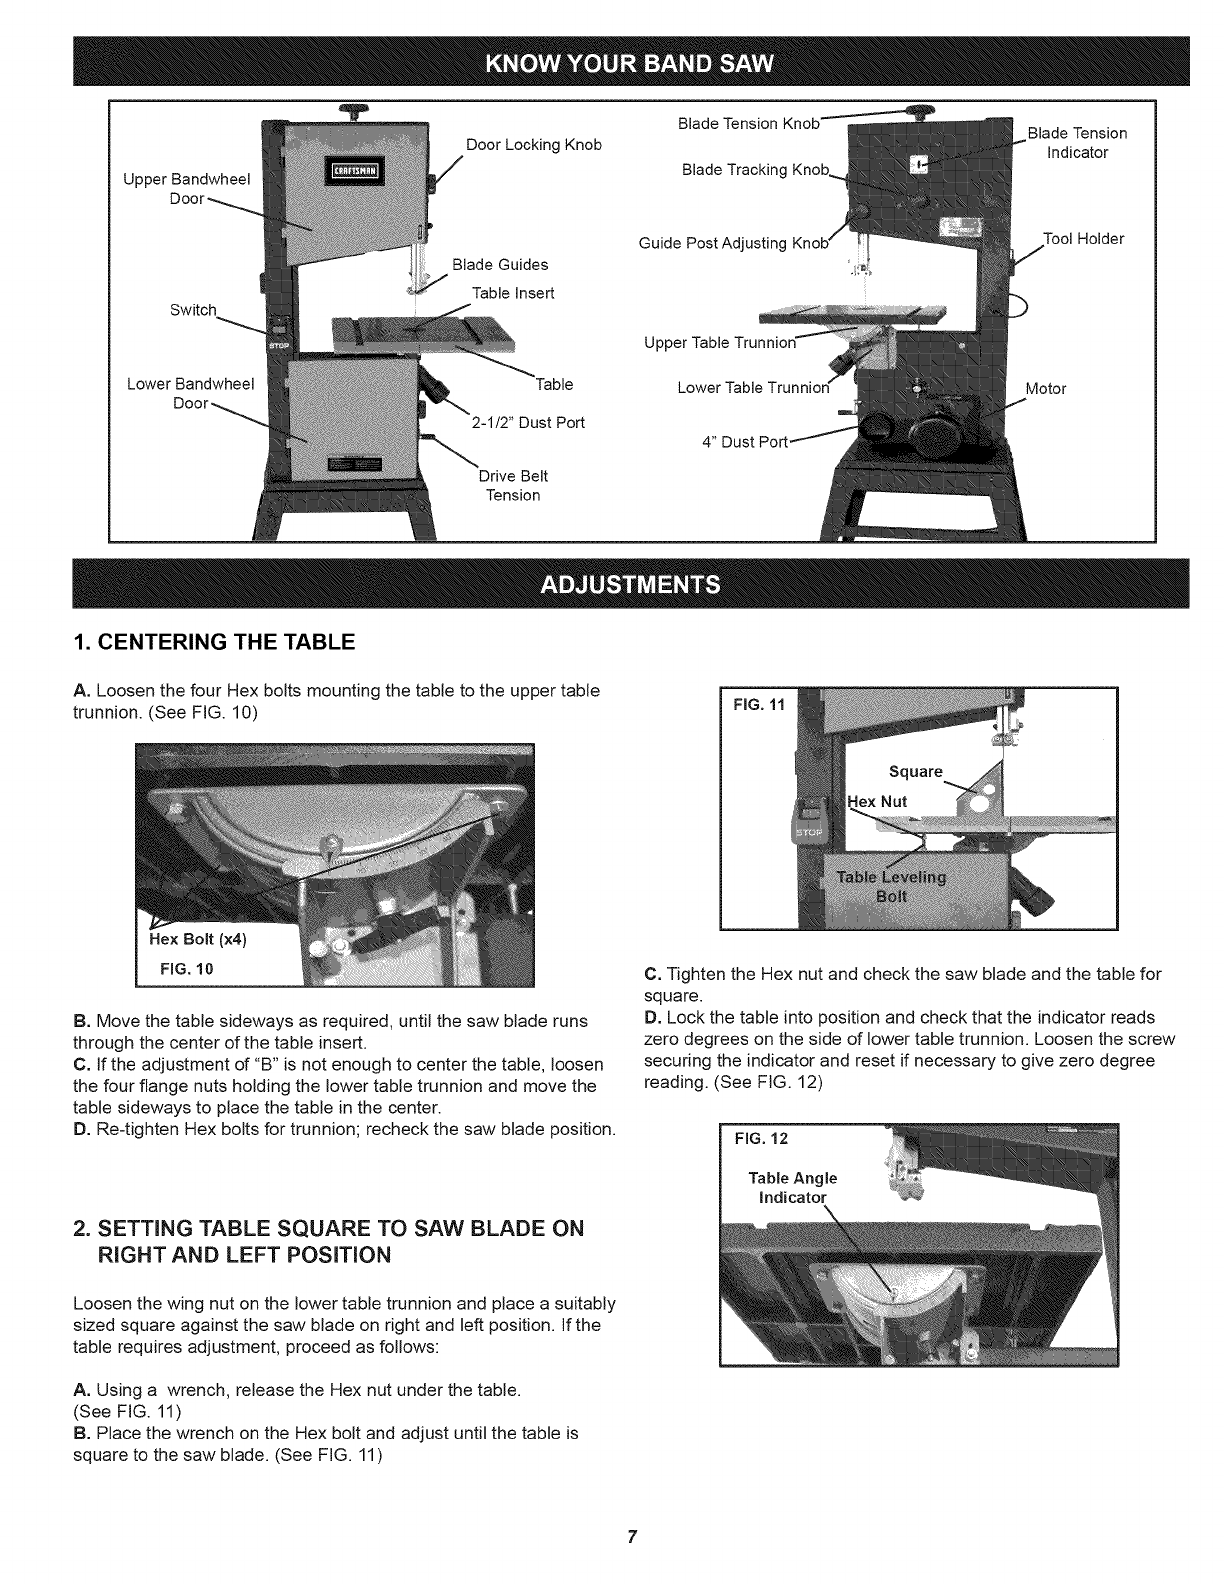
Upper Bandwheel
Switch
Lower Bandwheel
Door Locking Knob
Blade Guides
Table Insert
Table
2-1/2" Dust Port
Drive Belt
Tension
Blade Tension Knob"
Blade Tracking
Guide Post Adjusting
Upper Table Trunniori
Blade Tension
Indicator
Tool Holder
Motor
1. CENTERING THE TABLE
A. Loosen the four Hex bolts mounting the table to the upper table
trunnion. (See FIG. 10)
B. Move the table sideways as required, until the saw blade runs
through the center of the table insert.
C. If the adjustment d"B" is not enough to center the table, loosen
the four flange nuts holding the lower table trunnion and move the
table sideways to place the table in the center.
D. Re-tighten Hex bolts for trunnion; recheck the saw blade position.
2. SETTING TABLE SQUARE TO SAW BLADE ON
RIGHT AND LEFT POSITION
Loosen the wing nut on the lower table trunnion and place a suitably
sized square against the saw blade on right and left position. If the
table requires adjustment, proceed as follows:
A. Using a wrench, release the Hex nut under the table.
(See FIG. 11)
B. Place the wrench on the Hex bolt and adjust until the table is
square to the saw blade. (See FIG. 11)
C. Tighten the Hex nut and check the saw blade and the table for
square.
D. Lock the table into position and check that the indicator reads
zero degrees on the side of lower table trunnion. Loosen the screw
securing the indicator and reset if necessary to give zero degree
reading. (See FIG. 12)
FIG. 12
Table Angle
Indicator

3. SETTING TABLE SQUARE BACK OF BLADE 6. CHANGING AND ADJUSTING THE SAW BLADE
Place a square against the back (non-tooth) side of the saw blade. If
you find that the table runs up hill or down hill as you feed the
work piece, proceed as follows:
A. Using a wrench, release the flange nut on the lower table
trunnion. (See FIG. 13)
B. Place the M5 Hex "L" wrench on the Hex socket set screw and
adjust until the table is square to the saw blade on the back
(non-tooth) side of the saw blade.
FIG. 13
Hex Socket SetScrew
C. Tighten the flange nut and recheck the saw blade and the table
for square.
4. TILTING THE TABLE
For bevel cuts, the table tilts 0 through 45 degrees.
A. To tilt the table, loosen the wing nut on the table trunnion, set the
table to the required angle and tighten the wing nut again (See FIG.
14). FIG, 14
This band saw is factory-equipped with a general-purpose wood
cutting blade, the saw blade is set prior to delivery.
To change the saw blade; the following procedure must be followed:
WARNING: To avoid injury from unexpected starting, whenever
changing the saw blade or carrying out adjustments, switch the
band saw off and remove the power cord from the power outlet. To
avoid injury to hands when handling the saw blade, wear gloves
whenever necessary.
A. Open the upper and lower doors by turning the door locking
knobs.
B. Loosen the blade tension by turning the blade tension knob on
the top of the upper wheel housing counterclockwise until the saw
blade has slackened (viewed from above) (See FIG. 16).
C. Remove the saw blade from the upper and lower wheels.
D. When installing the new saw blade ensure the blade teeth are
pointing downwards and towards you at the position where the saw
blade passes through the table.
IBlade Tension
E. Re-tension the new saw blade and check the saw blade tracking
by turning the upper wheel by hand. The saw blade should run in the
center of the band saw wheels.
R If needed adjust the tracking dthe saw blade; proceed as
mentioned below" TRACKING THE BAND SAW BLADE"
G. Close the upper and lower doors by turning the door locking
knobs before reconnecting the power supply.
B. It is recommended to verify the correct angle setting using an
angle guide, or by making trial cuts in scrap wood. Adjust the
indicator accordingly by using a phillips head screwdriver.
5. ADJUSTING THE BLADE TENSION
To loosen the tension of the blade, turn the blade tension knob
counterclockwise and the tension indicator will lower. To tighten the
tension of the blade, turn the tension knob clockwise, and the
tension indicator wilt rise. (See FIG. 15)
FIG, 15 Knob
7. TRACKING THE BAND SAW BLADE
Set the tracking of the saw blade before setting the blade guides.
Once the saw blade is installed and tensioned, track the saw blade
by adjusting the tracking knob by hand (See FIG. 17). The saw
blade should run in the center of the band saw wheels. Use the
blade tracking window to check position on wheel. When the correct
adjustment is achieved lock the tracking knob with the wing nut.
FIG. 17
Wing Nut
Tracking Knob
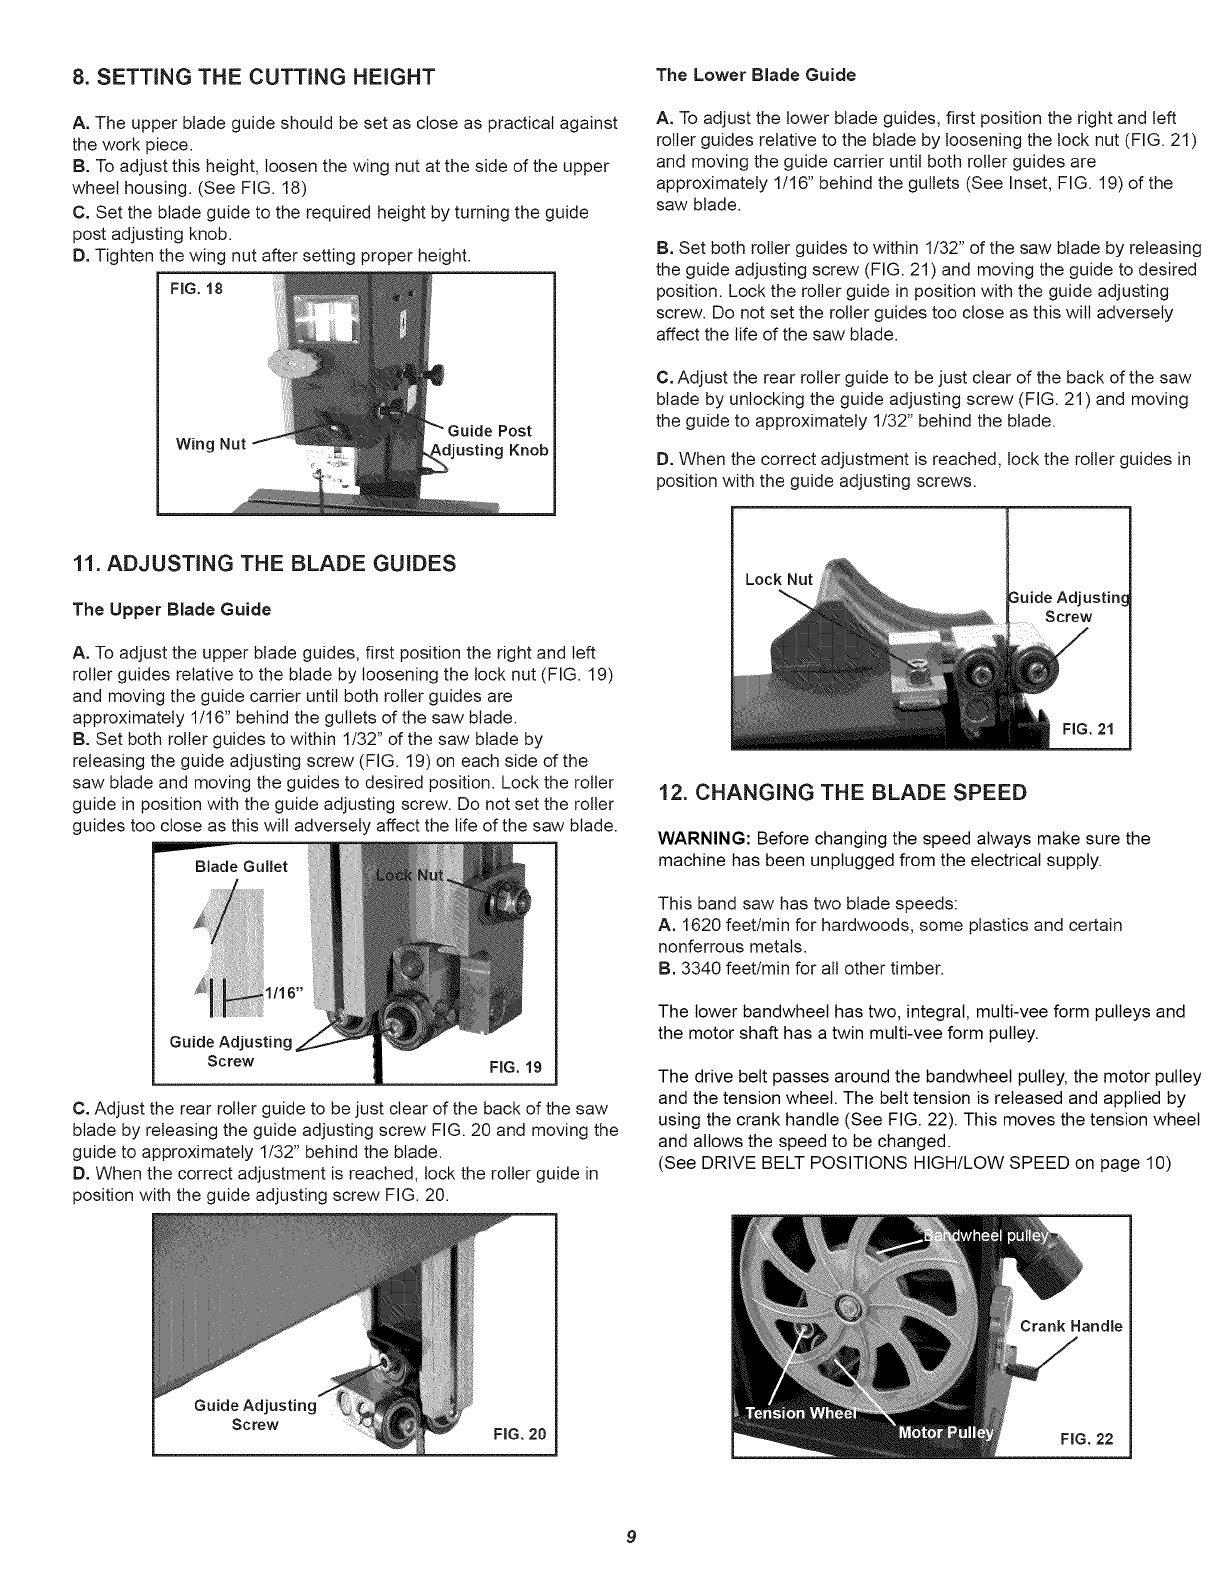
8. SETTING THE CUTTING HEIGHT The Lower Blade Guide
A. The upper blade guide should be set as close as practical against
the work piece.
B. To adjust this height, loosen the wing nut at the side of the upper
wheel housing. (See FIG. 18)
C. Set the blade guide to the required height by turning the guide
post adjusting knob.
D. Tighten the wing nut after setting proper height.
FIG, 18
Post
Wing Nut Knob
A. To adjust the lower blade guides, first position the right and left
roller guides relative to the blade by loosening the lock nut (FIG. 21 )
and moving the guide carrier until both roller guides are
approximately 1/16" behind the gullets (See Inset, FIG. 19) of the
saw blade.
B. Set both roller guides to within 1/32" of the saw blade by releasing
the guide adjusting screw (FIG. 21 ) and moving the guide to desired
position. Lock the roller guide in position with the guide adjusting
screw. Do not set the roller guides too close as this will adversely
affect the life of the saw blade.
C. Adjust the rear roller guide to be just clear of the back of the saw
blade by unlocking the guide adjusting screw (FIG. 21 ) and moving
the guide to approximately 1/32" behind the blade.
D. When the correct adjustment is reached, lock the roller guides in
position with the guide adjusting screws.
11. ADJUSTING THE BLADE GUIDES
The Upper Blade Guide
A. To adjust the upper blade guides, first position the right and left
roller guides relative to the blade by loosening the lock nut (FIG. 19)
and moving the guide carrier until both roller guides are
approximately 1/16" behind the gullets of the saw blade.
B. Set both roller guides to within 1/32" of the saw blade by
releasing the guide adjusting screw (FIG. 19) on each side of the
saw blade and moving the guides to desired position. Lock the roller
guide in position with the guide adjusting screw. Do not set the roller
guides too close as this will adversely affect the life of the saw blade.
Blade Gullet
Guide Adjusting
Screw FIG, 19
C. Adjust the rear roller guide to be just clear of the back of the saw
blade by releasing the guide adjusting screw FIG. 20 and moving the
guide to approximately 1/32" behind the blade.
D. When the correct adjustment is reached, lock the roller guide in
position with the guide adjusting screw FIG. 20.
Lock Nut
Adjustinc
12. CHANGING THE BLADE SPEED
WARNING: Before changing the speed always make sure the
machine has been unplugged from the electrical supply.
This band saw has two blade speeds:
A. 1620 feet/min for hardwoods, some plastics and certain
nonferrous metals.
B. 3340 feet/min for all other timber.
The lower bandwheel has two, integral, multi-vee form pulleys and
the motor shaft has a twin multi-vee form pulley.
The drive belt passes around the bandwheel pulley, the motor pulley
and the tension wheel. The belt tension is released and applied by
using the crank handle (See FIG. 22). This moves the tension wheel
and allows the speed to be changed.
(See DRIVE BELT POSITIONS HIGH/LOW SPEED on page 10)
Guide Ad
Screw FIG. 20
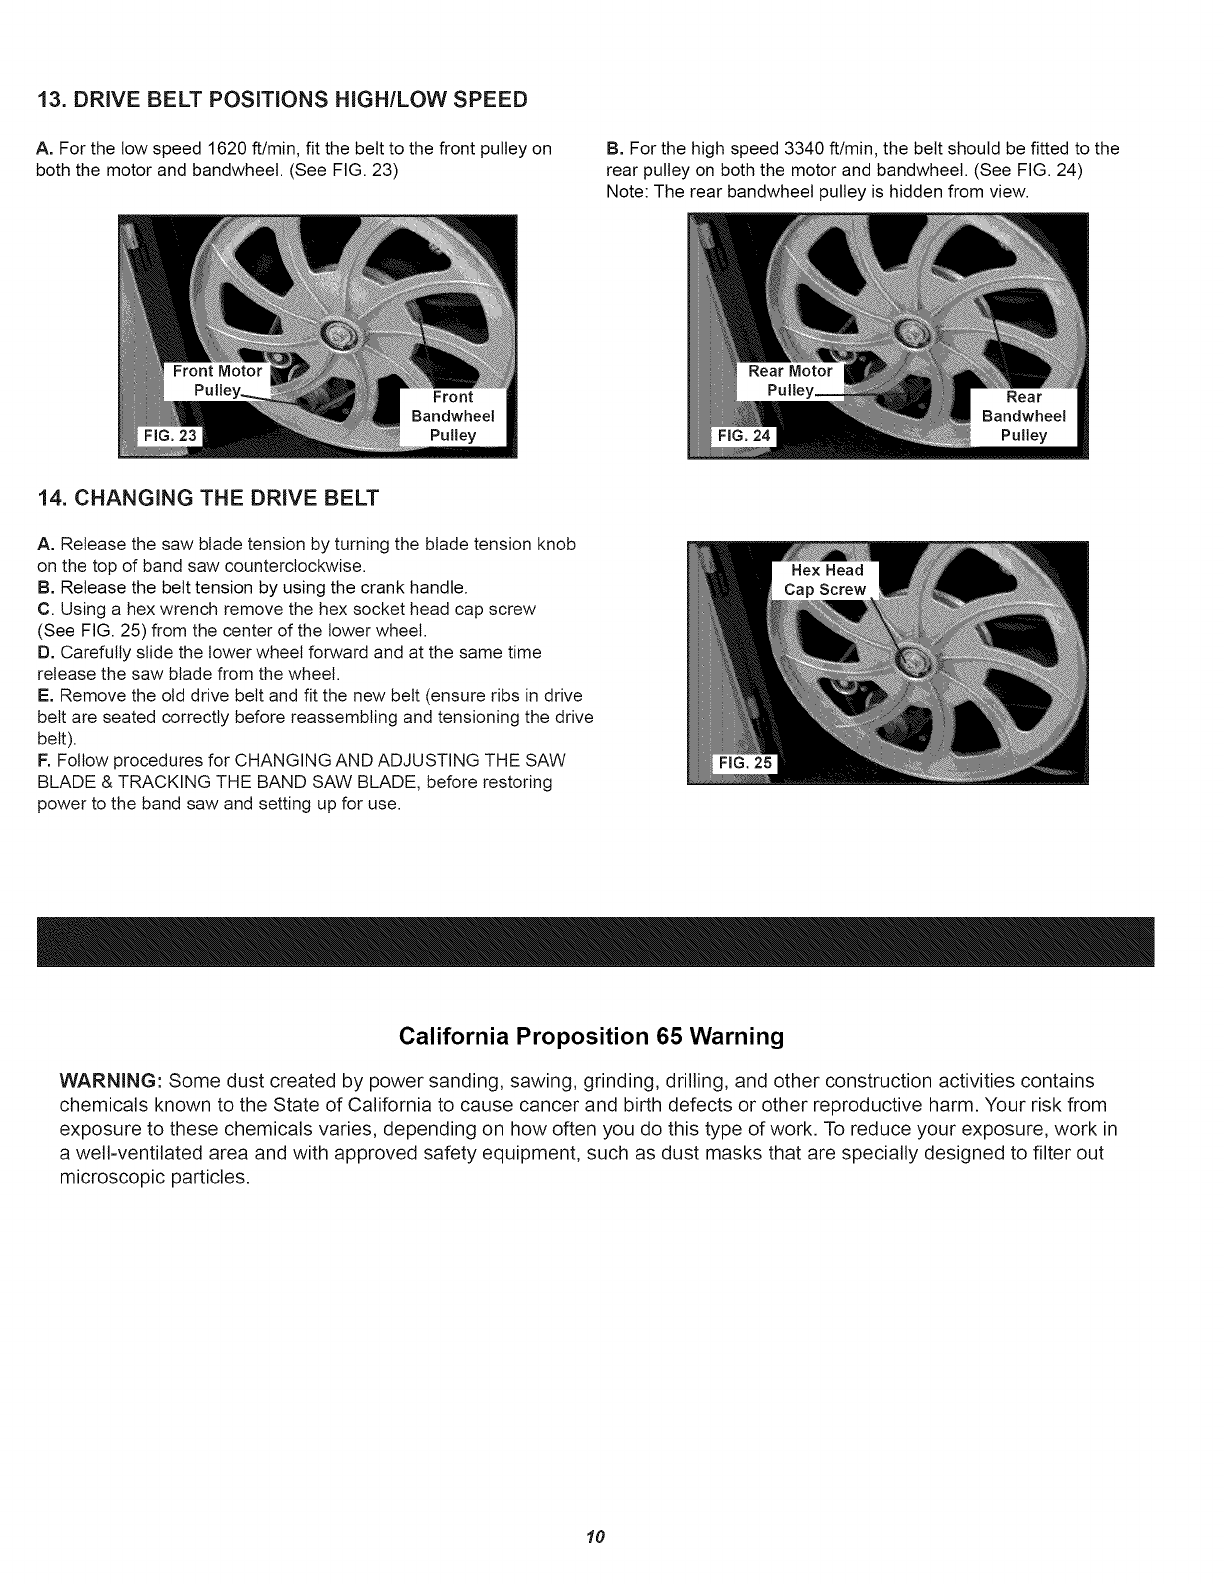
13. DRIVE BELT POSiTiONS HIGH/LOW SPEED
A. For the tow speed 1620 ft/min, fit the belt to the front pulley on
both the motor and bandwheel. (See FIG. 23)
B. For the high speed 3340 ft/min, the belt should be fitted to the
rear pulley on both the motor and bandwheel. (See FIG. 24)
Note: The rear bandwheel pulley is hidden from view.
14. CHANGING THE DRIVE BELT
A. Release the saw blade tension by turning the blade tension knob
on the top of band saw counterclockwise.
B. Release the belt tension by using the crank handle.
C. Using a hex wrench remove the hex socket head cap screw
(See FIG. 25) from the center of the lower wheel.
D. Carefully slide the lower wheel forward and at the same time
release the saw blade from the wheel.
E. Remove the old drive belt and fit the new belt (ensure ribs in drive
belt are seated correctly before reassembling and tensioning the drive
belt).
F. Follow procedures for CHANGING AND ADJUSTING THE SAW
BLADE & TRACKING THE BAND SAW BLADE, before restoring
power to the band saw and setting up for use.
Cap Screw
California Proposition 65 Warning
WARNING: Some dust created by power sanding, sawing, grinding, drilling, and other construction activities contains
chemicals known to the State of California to cause cancer and birth defects or other reproductive harm. Your risk from
exposure to these chemicals varies, depending on how often you do this type of work. To reduce your exposure, work in
a well-ventilated area and with approved safety equipment, such as dust masks that are specially designed to filter out
microscopic particles.
10
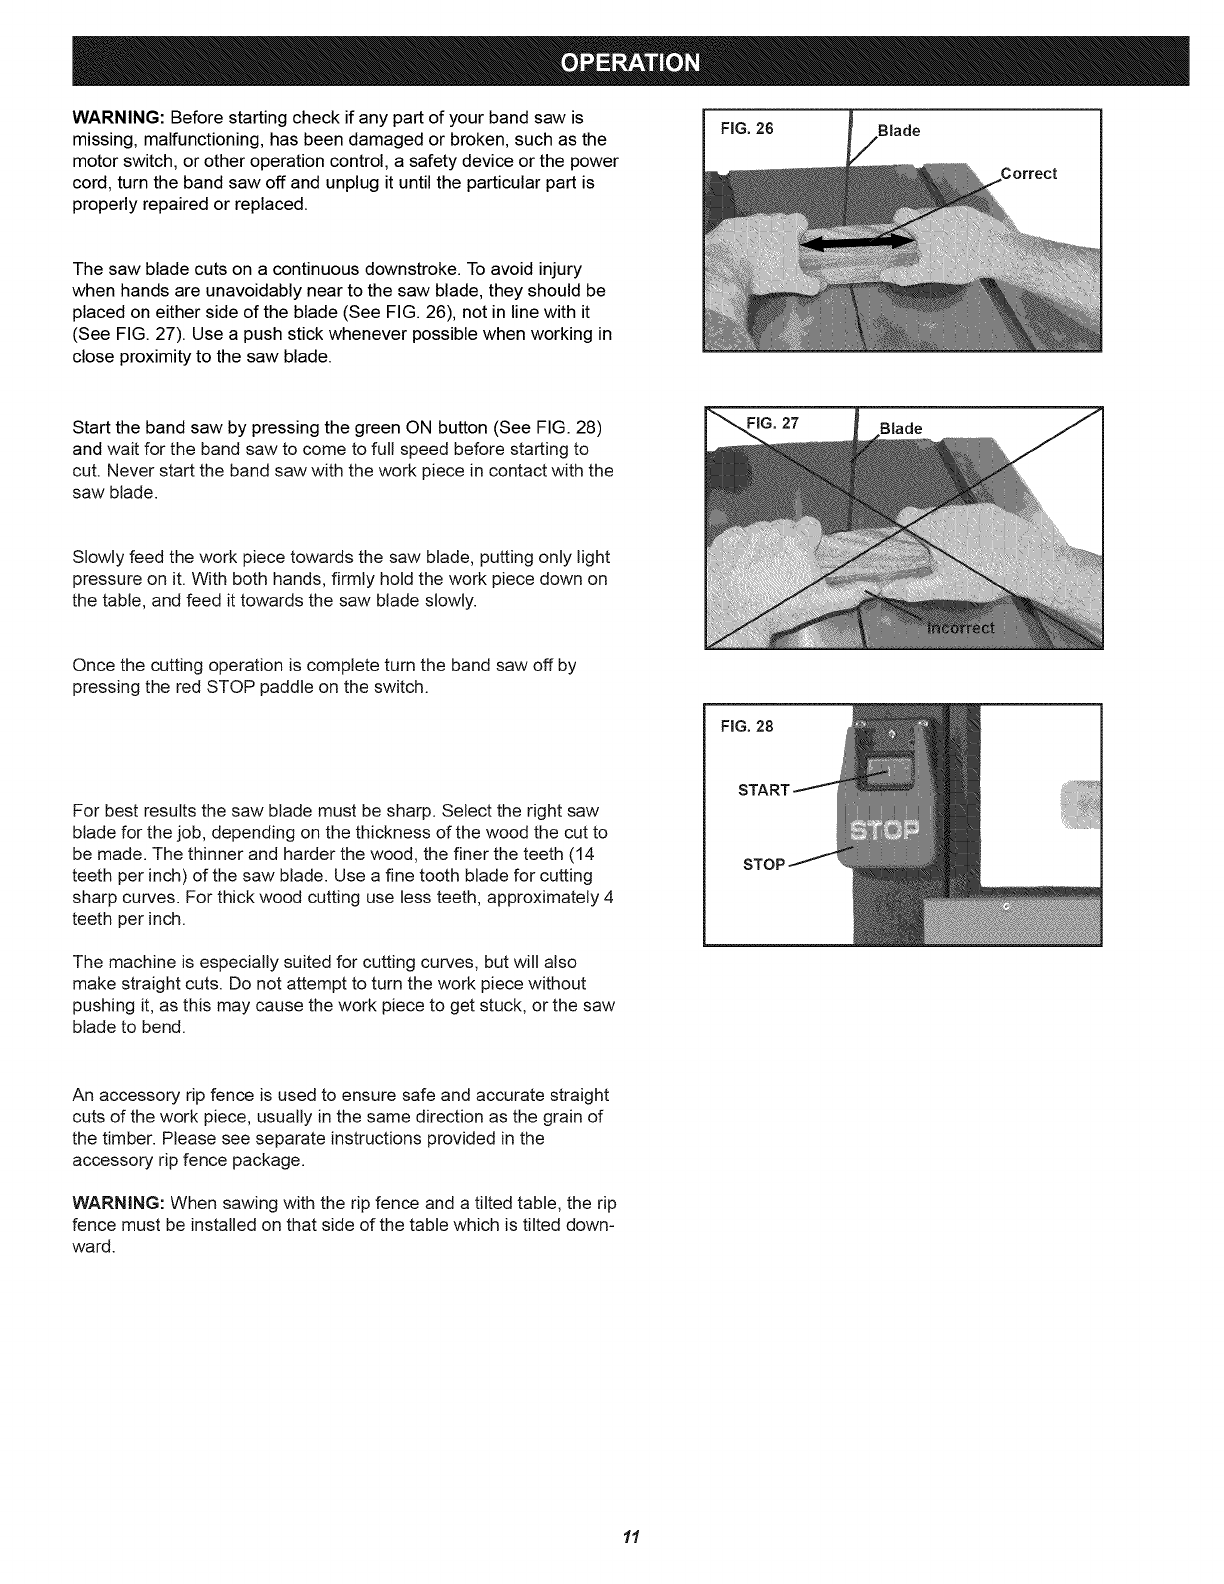
WARNING: Before starting check if any part of your band saw is
missing, malfunctioning, has been damaged or broken, such as the
motor switch, or other operation control, a safety device or the power
cord, turn the band saw off and unplug it until the particular part is
properly repaired or replaced.
The saw blade cuts on a continuous downstroke. To avoid injury
when hands are unavoidably near to the saw blade, they should be
placed on either side of the blade (See FIG. 26), not in line with it
(See FIG. 27). Use a push stick whenever possible when working in
close proximity to the saw blade.
FiG. 26 E31ade
Start the band saw by pressing the green ON button (See FIG. 28)
and wait for the band saw to come to full speed before starting to
cut. Never start the band saw with the work piece in contact with the
saw blade.
Slowly feed the work piece towards the saw blade, putting only light
pressure on it. With both hands, firmly hold the work piece down on
the table, and feed it towards the saw blade slowly.
Blade
Once the cutting operation is complete turn the band saw off by
pressing the red STOP paddle on the switch.
For best results the saw blade must be sharp. Select the right saw
blade for the job, depending on the thickness of the wood the cut to
be made. The thinner and harder the wood, the finer the teeth (14
teeth per inch) of the saw blade. Use a fine tooth blade for cutting
sharp curves. For thick wood cutting use less teeth, approximately 4
teeth per inch.
The machine is especially suited for cutting curves, but will also
make straight cuts. Do not attempt to turn the work piece without
pushing it, as this may cause the work piece to get stuck, or the saw
blade to bend.
An accessory rip fence is used to ensure safe and accurate straight
cuts of the work piece, usually in the same direction as the grain of
the timber. Please see separate instructions provided in the
accessory rip fence package.
WARNING: When sawing with the rip fence and a tilted table, the rip
fence must be installed on that side of the table which is tilted down-
ward.
11
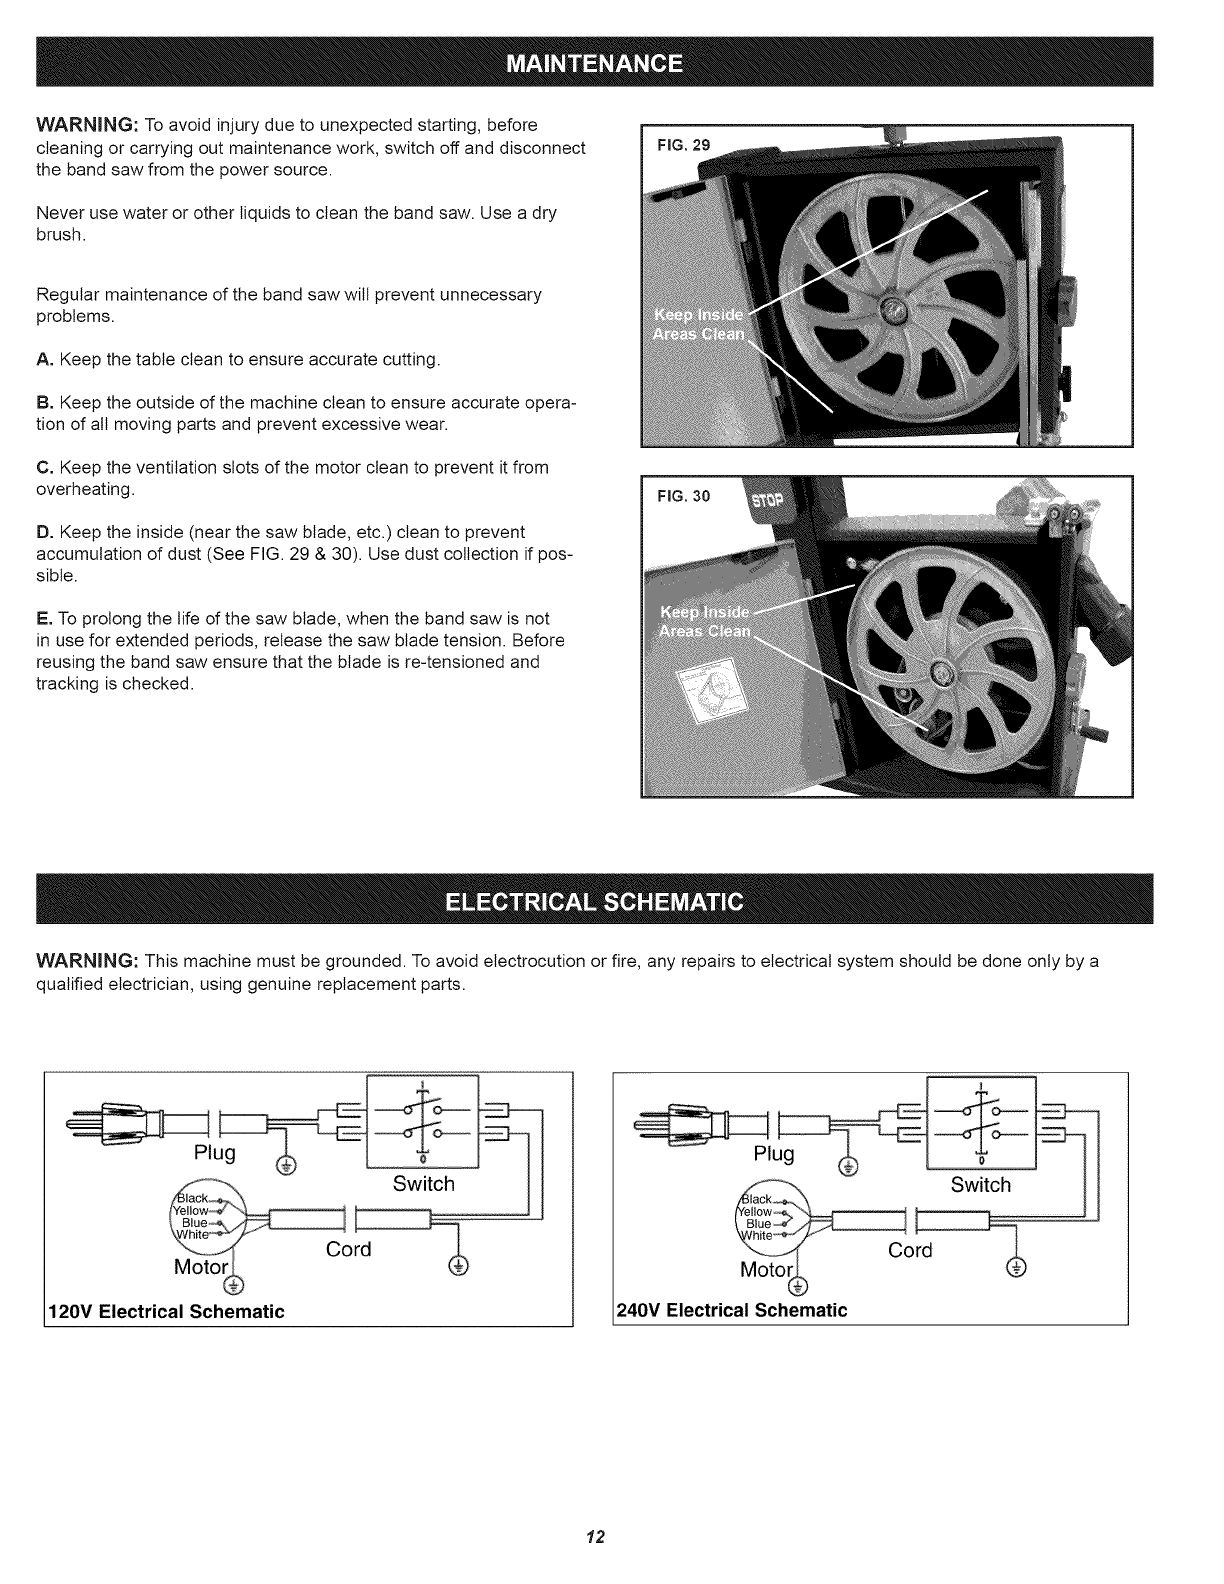
WARNING: To avoid injury due to unexpected starting, before
cleaning or carrying out maintenance work, switch off and disconnect
the band saw from the power source.
Never use water or other liquids to clean the band saw. Use a dry
brush,
Regular maintenance of the band saw wilt prevent unnecessary
problems,
A. Keep the table clean to ensure accurate cutting,
B. Keep the outside of the machine clean to ensure accurate opera-
tion of all moving parts and prevent excessive wear,
FIG. 29
C. Keep the ventilation slots of the motor clean to prevent it from
overheating,
D. Keep the inside (near the saw blade, etc.) clean to prevent
accumulation of dust (See FIG. 29 & 30). Use dust collection if pos-
sible,
E. To prolong the life of the saw blade, when the band saw is not
in use for extended periods, release the saw blade tension. Before
reusing the band saw ensure that the blade is re-tensioned and
tracking is checked.
FIG. 30
WARNING: This machine must be grounded. To avoid electrocution or fire, any repairs to electrical system should be done only by a
qualified electrician, using genuine replacement parts.
switch¸
oo
120V Electrical Schematic
Switch
Co
Moto_ _
240V Electrical Schematic
12
Problem Diagnosis Remedy
The machine does not work when switched 1. No power supply. 1. Check the cable for breakage.
on. 2. Defective switch. 2. Replace the lock switch.
3 Defective motor. 3. Defective motor.
The saw blade does not move with the
motor running.
1. The blade tension knob has not been
tightened.
2. The blade has come off one dthe
wheels.
3. The saw blade has broken.
4. The drive belt has snapped.
1. Switch off the motor, tighten the blade
tension knob.
2. Open the doors and check.
3. Replace the blade.
4. Replace the belt.
The saw blade does not cut in a straight
line.
1. Rip fence for cutting not used.
2. Feed rate too fast.
3. The blade teeth are dull or damaged.
4. Blade guides not suitably adjusted.
1. Use a rip fence.
2. Put light pressure on the work piece.
Make sure the saw blade does not bend.
3. Try a new saw blade.
4. Adjust the blade guides (see ADJUST-
MENT instructions).
The saw blade does not cut, or cuts very
slowly.
1. The teeth are dull, caused by cutting
hard material or long use.
2. The saw blade was fitted the wrong way
on the band saw.
1. Replace the saw blade, use a 6 T.P.I.
(Teeth Per Inch) saw blade for wood and
soft material. Use a 14 T.P.I. saw blade
for harder materials. A 14 T.RI. saw blade
always cuts slower due to the finer teeth
and the slower cutting performance.
2. Fit the saw blade correctly.
Sawdust builds up inside the machine. This is normal Clean the machine regularly. Open the
doors and remove the sawdust with a
vacuum cleaner.
Sawdust inside the motor housing. This is normal Clean the ventilating slots of the motor with
a vacuum cleaner. From time to time re-
move the sawdust to prevent it from being
drawn into the housing.
The machine does not cut at 45 or 90 de-
grees.
1. The table is not at right angles to the
blade.
2. The saw blade is dull or too much pres-
sure was put on the work piece.
1. Adjust the table.
2. Replace the saw blade or put less
pressure on the work piece.
The saw blade can not be properly posi-
tioned on the wheels.
1. The wheels are not in alignment or de-
fective bearing.
2. The blade tracking knob hasn't been
properly adjusted.
3. Inferior saw blade.
1. Replace bearing.
2. Adjust the blade tracking knob (See
ADJUSTMENT instructions).
3. Replace the saw blade.
Repair Protection Agreements
Congratulations on making a smart purchase. Your new
®
Craftsman product is designed and manufactured for years of
dependable operation. But like all products, it may require repair
from time to time. That's when having a Repair Protection
Agreement can save you money and aggravation.
Here's what the Repair Protection Agreement* includes:
I_ Expert service by our 10,000 professional repair specialists
I_ Unlimited service and no charge for parts and labor on alI
covered repairs
I_ Product replacement up to $1500 if your covered product
can't be fixed
I_ Discount of 25% from regular price of service and related
installed parts not covered by the agreement; also, 25% off
regular price of preventive maintenance check
I_ Fast help by phone - we caII it Rapid Resolution -
phone support from a Sears representative. Think of us
as a "talking owner's manual."
13
Once you purchase the Repair Protection Agreement, a
simple phone call is all that it takes for you to schedule service.
You can call anytime day or night, or schedule a service
appointment online.
The Repair Protection Agreement is a risk-free purchase. If
you cancel for any reason during the product warranty period,
we will provide a full refund. Or, a prorated refund anytime after
the product warranty period expires. Purchase your Repair
Protection Agreement today!
Some limitations and exclusions apply. For prices and
additional information in the U.S.A. call 1-800-827-6655.
*Coverage in Canada varies on some items. For full details
call Sears Canada at 1-800-361-6665.
Sears Installation Service
For Sears professional installation of home appliances, garage
door openers, water heaters, and other major home items, in the
U.S.A. or Canada call 1-800-4-MY-HOME®.
8
6
2
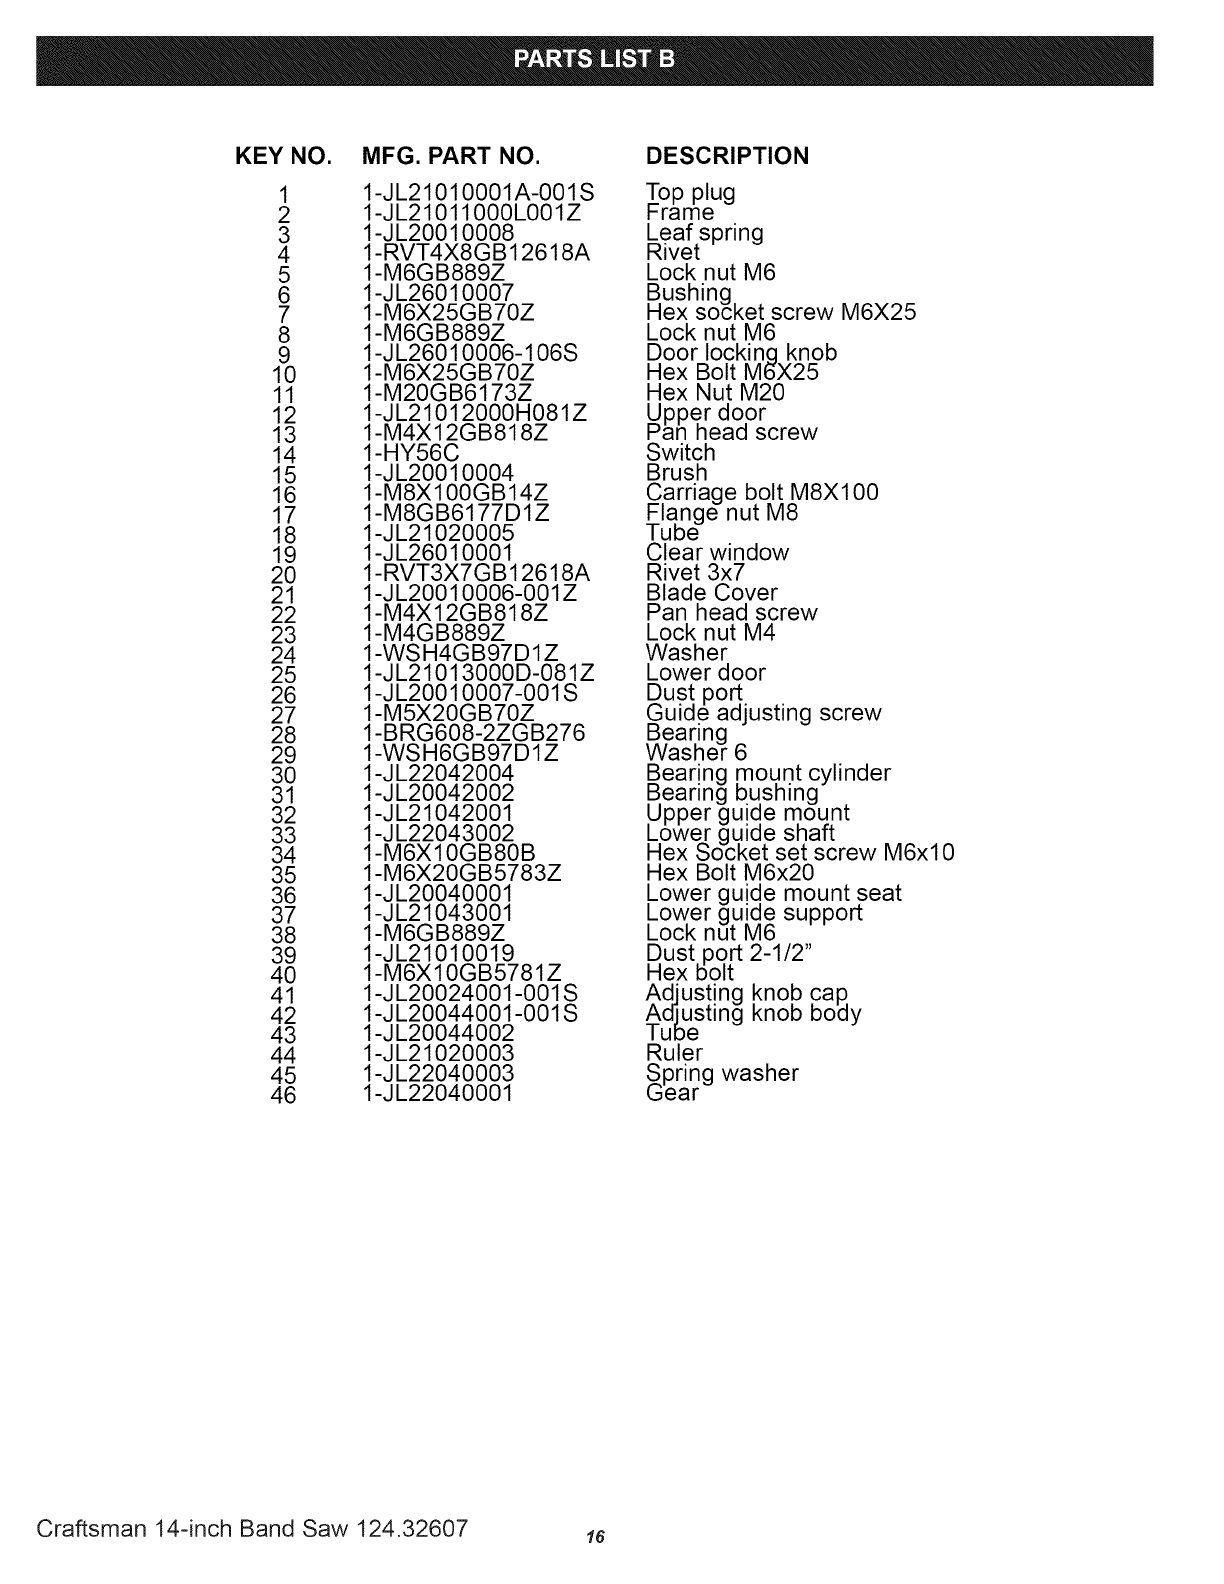
KEY NO. MFG. PART NO. DESCRIPTION
1S 1-JL21050004-001Z Front beam
2S 1-JL21050005-001Z Side beam
3S 1-JL21050001-001Z Le;.q
4S 1-JL21050003-001Z Side panel
5S 1-JL21050002-001Z Front panel
6S 1-NUT5/16B Hex nut
7S 1-WSH8GB97 D1B Washer
8S 1-NEC5/16X5/8B Hex bolt
9S 1-WSH6GB96B Washer
10S 1-NUT1/4B Hex nut
11S 1-HEX1/4X1 1/2B Hex bolt
12S 1-JL40060005 Rubber shoe
Craftsman 14-inch Band Saw 124.32607
14

144
5
6
7
12
t3
14
t5
4 3 2
11
45
46
10
43 42 41
38
20
37
36
35
39
21
-\
5 4
6
7
16 3
22 24 25
18
26
27
34
33
32
31
30
Craftsman 14-inch Band Saw 124.32607 is
KEY NO. MFG. PART NO. DESCRIPTION
1 1-JL21010001A-001S Top plug
2 1-JL21011000L001Z _-rame
3 1-JL20010008 Leaf spring
4 1- RVT4X8G B12618A Rivet
5 1-M6GB889Z Lock nut M6
6 1-J L26010007 Bushing
7 1-M6X25GB70Z Hex socket screw M6X25
8 1-M6GB889Z Lock nut M6
9 1-JL26010006-106S Door Iockinq knob
10 1-M6X25GB70Z Hex Bolt M6X25
11 1-M20GB6173Z Hex Nut M20
12 1-JL21012000H081Z Upper door
13 1-M4X12GB818Z Pan head screw
14 1-HY56C Switch
15 1-JL20010004 Brush
16 1-M8X100GB14Z Carriage bolt M8X100
17 1-M8GB6177D1Z Flange nut M8
18 1-JL21020005 Tube
19 1-JL26010001 Clear window
20 1-RVT3X7GB 12618A Rivet 3x7
21 1-JL20010006-001Z Blade Cover
22 1-M4X12GB818Z Pan head screw
23 1-M4GB889Z Lock nut M4
24 1-WSH4GB97D1Z Washer
25 1-JL21013000D-081Z Lower door
26 1-JL20010007-001S Dust port
27 1-M5X20GB70Z Guide adjusting screw
28 1-BRG608-2ZGB276 Bearing
29 1-WSH6GB97D1Z Washer 6
30 1-JL22042004 Bearing mount cylinder
31 1-JL20042002 Bearing bushing
32 1-JL21042001 Upper guide mount
33 1-JL22043002 Lower guide shaft
34 1-M6X10GB80B Hex Socket set screw M6xl0
35 1-M6X20GB5783Z Hex Bolt M6x20
36 1-JL20040001 Lower guide mount seat
37 1-JL21043001 Lower guide support
38 1-M6GB889Z Lock nut M6
39 1-JL21010019 Dust port 2-1/2"
40 1-M6X10GB5781Z Hex bolt
41 1-JL20024001-001S Adjusting knob cap
42 1-JL20044001-001S Adjusting knob body
43 1-JL20044002 /uDe
44 1-JL21020003 Ruler
45 1-JL22040003 Spring washer
46 1-JL22040001 L_ear
Craftsman 14-inch Band Saw 124.32607 16
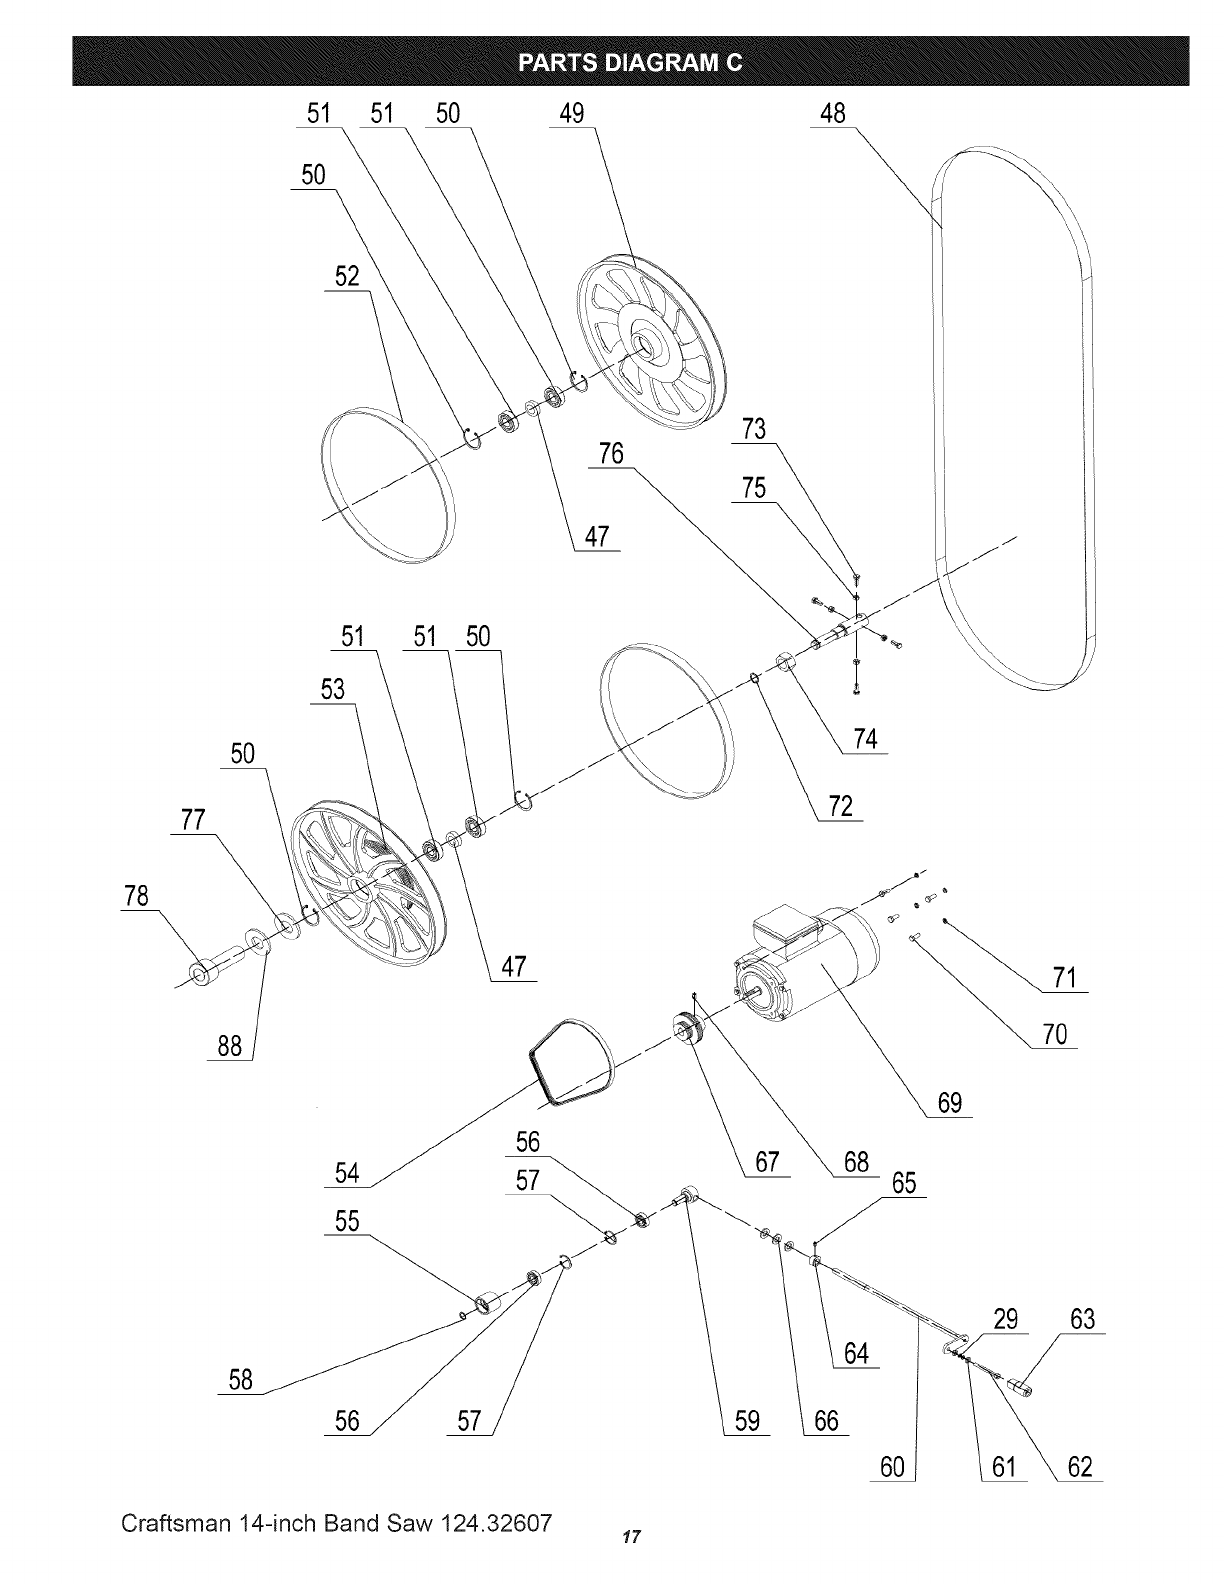
51 51 50 49 48
50 \
52
-\
76
47
73
75
--\ /
77
50
51
53
51 5O
74
72
78
88
58
47
56 57 66
69
65
60
29
71
70
63
62
Craftsman 14-inch Band Saw 124.32607 17
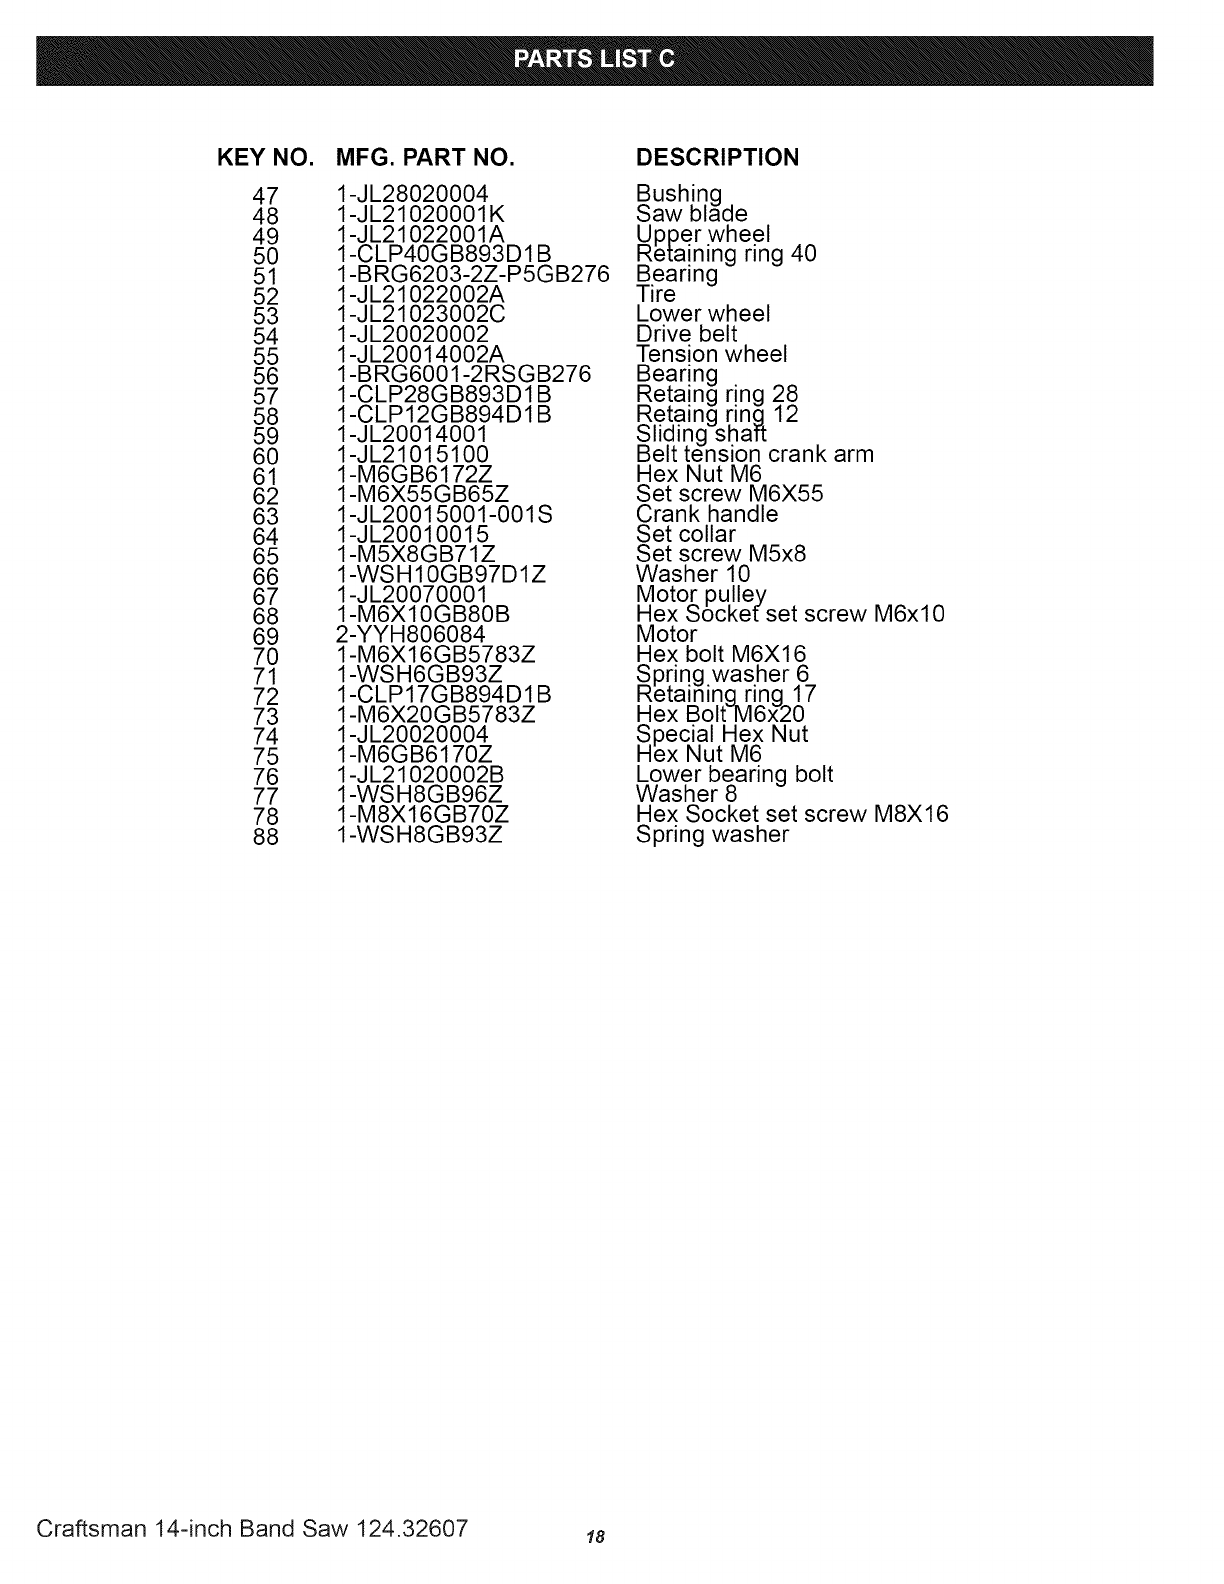
KEY NO. MFG. PART NO. DESCRIPTION
47 1-JL28020004 Bushing
48 1-JL21020001K Saw blade
49 1-JL21022001A Upper wheel
50 1-CLP40GB893D1B #etaining ring 40
51 1-BRG6203-2Z-P5GB276 _eanng
52 1-JL21022002A Tire
53 1-JL21023002C Lower wheel
54 1-JL20020002 Drive belt
55 1-JL20014002A Tension wheel
56 1-B RG6001-2 RS G B276 Bearing
57 1-CLP28GB893D1B Retaing ring 28
58 1-CLP12GB894D1B Retaing rin.q 12
59 1-JL20014001 Sliding shaft
60 1-JL21015100 Belt tension crank arm
61 1-M6GB6172Z Hex Nut M6
62 1-M6X55GB65Z Set screw M6X55
63 1-JL20015001-001S Crank handle
64 1-JL20010015 Set collar
65 1-M5X8GB71Z Set screw M5x8
66 1-WSH10GB97D1Z Washer 10
67 1-JL20070001 Motor pulley
68 1-M6X10GB80B Hex Sockefset screw M6xl0
69 2-YYH806084 Motor
70 1-M6X16GB5783Z Hex bolt M6X16
71 1-WSH6GB93Z Spring washer 6
72 1-CLP17GB894D1B Retaining ring 17
73 1-M6X20GB5783Z Hex Bolt M6x20
74 1-JL20020004 Special Hex Nut
75 1-M6GB6170Z Hex Nut M6
76 1-JL21020002B Lower bearing bolt
77 1-WSH8GB96Z Washer 8
78 1-M8X16GB70Z Hex Socket set screw M8X16
88 1-WSH8GB93Z Spring washer
Craftsman 14-inch Band Saw 124.32607 18
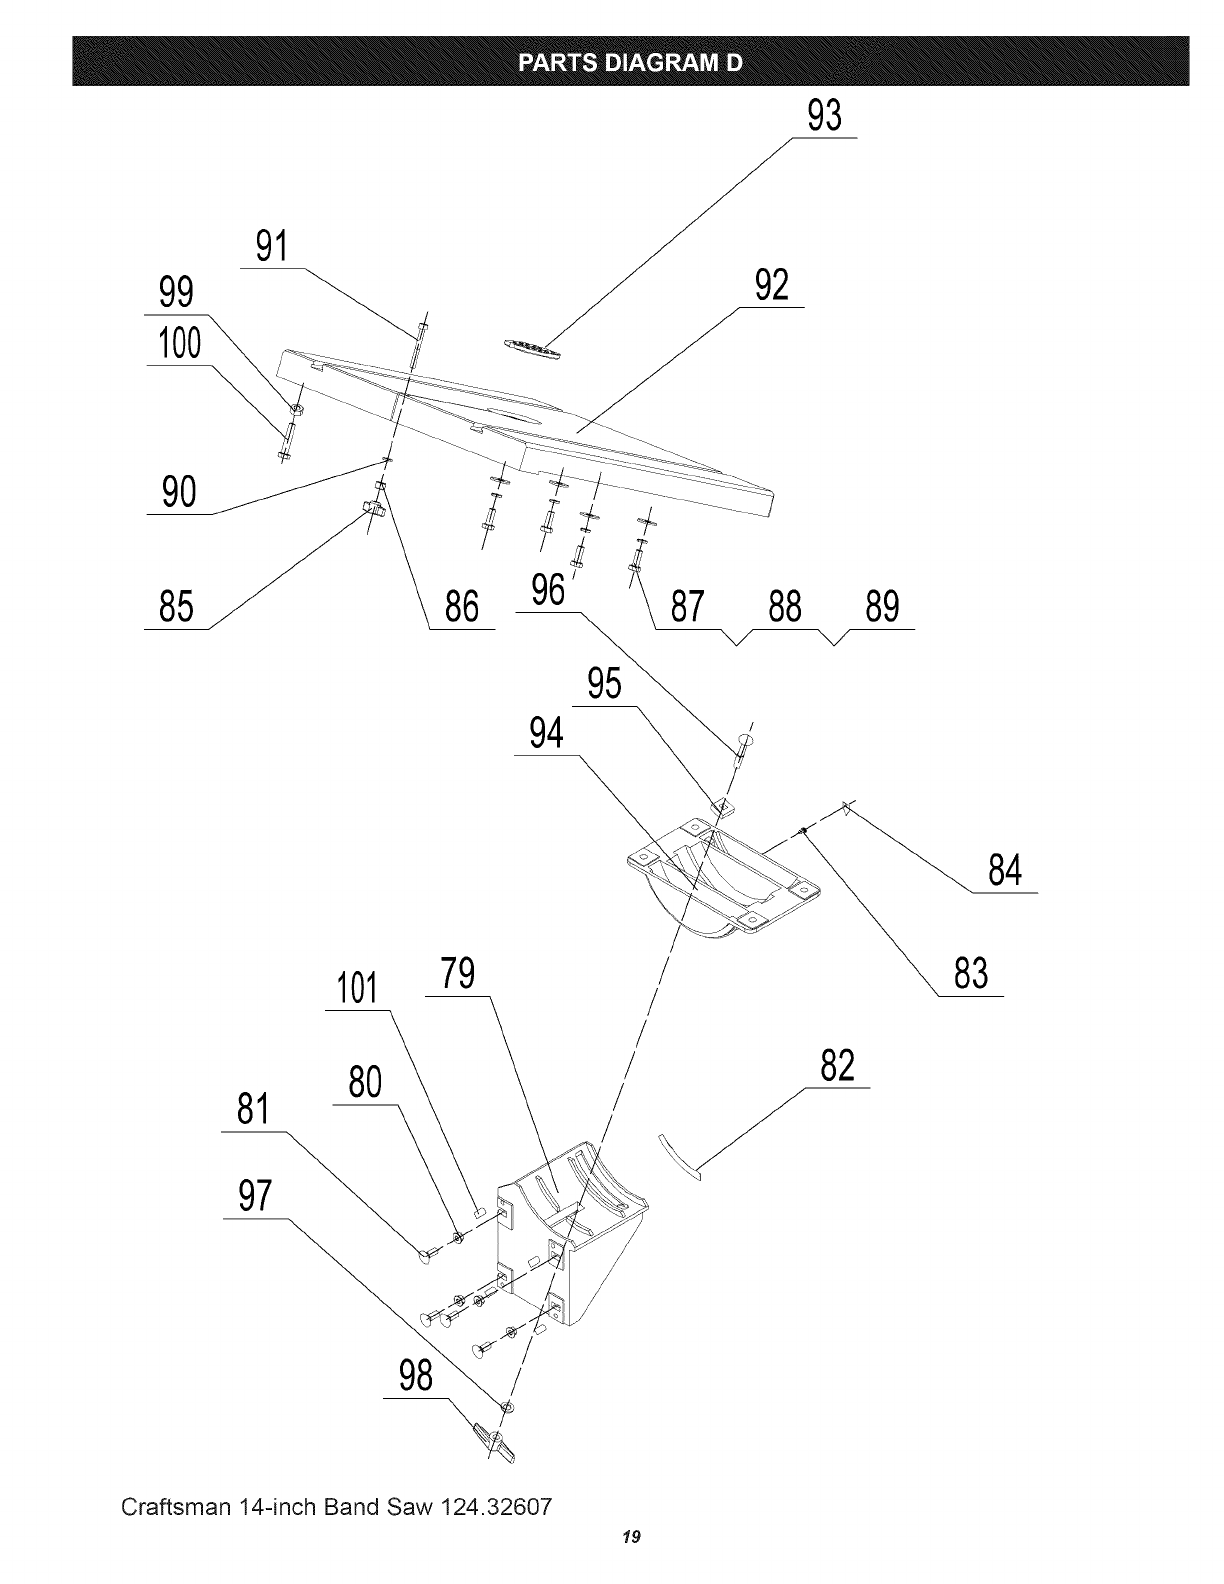
93
99
100
--\
91
85 86 96' _ 89
94
95
101 79
80
97
/
/
/
/
/82
83
98 /
Craftsman 14-inch Band Saw 124.32607
19

KEY NO.
79
80
81
82
83
84
85
86
87
88
89
90
91
92
93
94
95
96
97
98
99
100
101
MFG. PART NO.
1-JL20030001A
1-M8GB6177B
1-M8X20GB14Z
1-JL20030004
1-ST3D5X9D5GB845Z
1-1506003
1-JL22020002-001S
1-JL21031003
1-M8X20GB5783Z
1-WSH8GB93Z
1-WSH8GB96Z
1-WSH6GB97D1Z
1-M6X45GB70Z
1-JL21031001D001G
1-JL20031002-001S
1-JL20032001
1-WSH8GB96Z
1-M8X50GB14Z
1-WSH8GB97D1Z
1-JL20010016-001S
1-M8GB6 70Z
1-M8X45(_B5783Z
1-M6XIO(_B80B
DESCRIPTION
Lower table trunion
Flange nut M8
Carnage bolt M8x20
Turnning label
Tapping screw 3.5x9.5
Pointer
Knob
Tube
Hex bolt
ring washer
sher
Washer 6
Socket head bolt
Table
Table insert
vUaper table trunnion
sher 8
Carriage bolt M8x50
Washer 8
Wing nut M8
Nut
Bolt
Screw
Craftsman 14-inch Band Saw 124.32607 20

119 118
112
113
116
117
111
103
114
88
115
110
/109
122 108
j_
106
\
105 104 107
Craftsman 14-inch Band Saw 124.32607
21

KEY NO.
88
102
103
104
105
106
107
108
109
110
111
112
113
114
115
116
117
118
119
120
121
122
MFG. PART NO.
1-WSH8GB93Z
1-M16GB6171Z
1-WSH16GB93Z
1-JL20021005A001Z
1-JL20021006D
1-JL20021004
1-JL20021002
1-J L20024001-001S
1-J L20024002-001S
1-M8X70GB5781Z
1-JL21025000A- 106S
1-JL21021200A
1-JL20030002
1-WSH8GB96Z
1-M8X16GB70Z
1-JL21021010A
1-JL21020004-014T
1-JL20021100A001Z
1-J L20021001B001Z
1-JL20021009
1-JL20021004
1-J L20010016-001S
DESCRIPTION
Sprinq washer
Hex Nut M16
#hrin_ washer 16
carrier bracket
Upper bearing bolt
Stair lock
Mount shaft
Adjusting knob cap
Adjustinq knob body
Hex Bolt-Max70
Blade tension knob
Blade tensioner
Glide piece
Washer 8
Hex Socket set screw Max16
Spring
Pointer
Tension bracket
Blade tensioner
Adjusting nut
Star IocE
Wing nut M8
Craftsman 14-inch Band Saw 124.32607 22
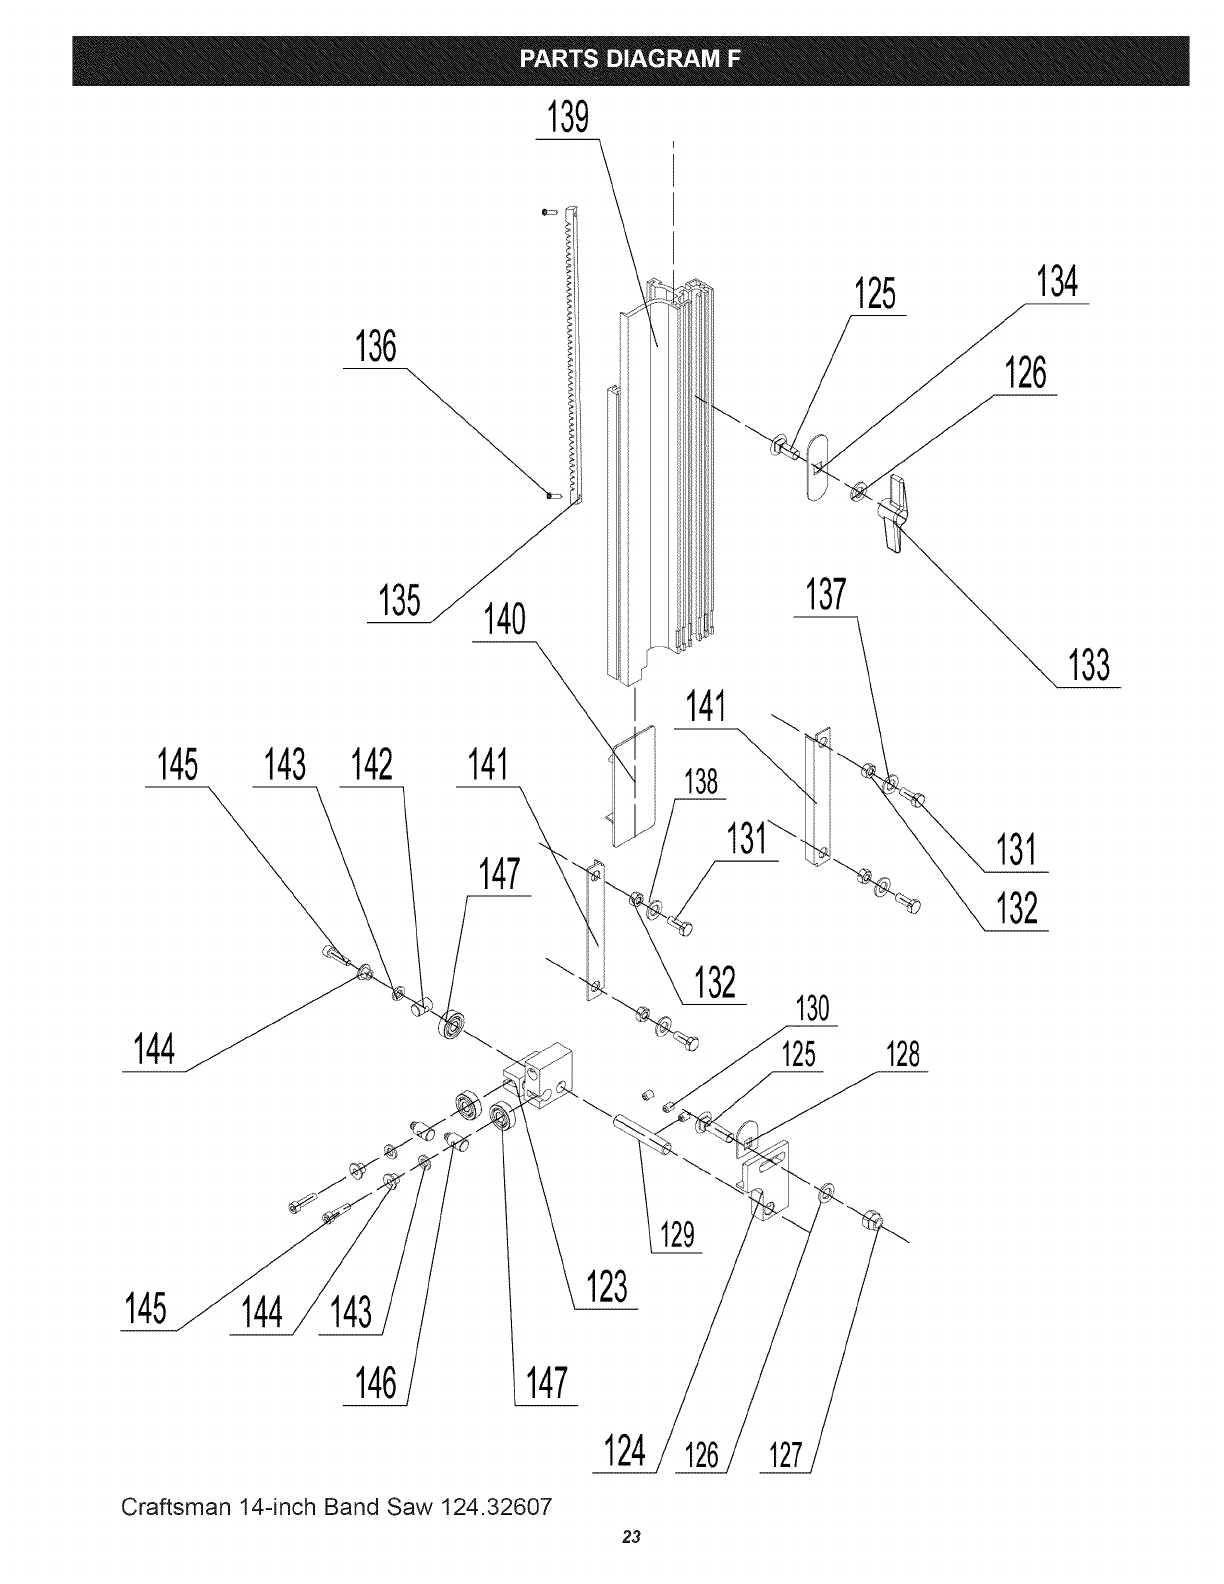
139
136
145 143 142
14i_4
135 140
14t
147
©
141
138
132
137
130
125
125
128
126
131
132
134
133
145 144 123
146
Craftsman 14-inch Band Saw 124.32607
124
23

KEY NO.
123
124
125
126
127
128
129
130
131
132
133
134
135
136
137
138
139
140
141
142
143
144
145
146
147
MFG. PART NO.
1-JL21042001
1-JL21042002
1-M8X20GB14Z
1-WSH8GB97D1Z
1-M8GB889Z
1-J L22041004
1-JL22042002
1-M6X10(_ B80 B
1-M6X16(} B5783Z
1-M6GB6170Z
1-J L20010016-001S
1-J L20041004
1-JL20044003
1-ST3 D5X 13G B846Z
1-WSH6GB862D2B
1-WSH6GB862D2B
1-JL21041001F
1-JL21041002-001S
1-J L20010005
1-JL22042004
1-WSH6GB97D1Z
1-JL20042002
1-M5X20GB70Z
1-JL22042003
1-BRG608-2ZGB276
DESCRIPTION
Upper guide body,
pper gulae mount
Carriage bolt M8x20
Washer 8
Hex nut
Special washer
Upper guide shaft
Hex Socket set screw M6xl0
Hex Bolt M6x16
Hex Nut M6
Wing nut M8
Bolt guide
Race
Tapping screw ST3.5x13
Washer 6
Washer 6
Blade guide
Slider
Guide bracket
Micro-adiusting knob
Washer 6
Bushing
Guide adjusting screw
Micro-adjusting knob
Bearing
Craftsman 14-inch Band Saw 124.32607
24

25
Garantia ......................................................................................................................................................................................... 26
Las instrucciones de seguridad ................................................................................................................................. 26-27
Especificationes ...................................................................................................................................................... 27
Asamblea ............................................................................................................................................................................................... 28-30
Conocer a su banda Vio ................................................................................................................................................................... 31
Ajuste ............................................................................................................................................................................................. 31-34
Operaci6n ................................................................................................................................................................................................... 35
Mantenimiento .............................................................................................................................................................. 36
Esquema Electrico ................................................................................................................................................................................... 36
Localizador de Averias .......................................................................................................................................................................... 37
Reparar los Acuerdos de Protecci6n ..................................................................................................................................................... 37
Partes Diagramas .............................................................................................................................................................. 38-48
CRAFTSMAN UN ANO DE GARANTiA
Durante un afio a partir de la fecha de compra, este producto esta garantizado contra defectos en los materiales o la mano. Un
producto defectuoso se reciben reparaci6n gratuita o reemplazo si la reparaci6n no este disponible. Para la cobertura de garantia
los detalles para conseguir reparaci6n gratuita o reemplazo, visite el sitio web: www. artesano, corn Esta garantia no cubre la
cuchilla, que es parte consumible que pueden desgastarse debido al uso normal dentro del periodo de garantia. Esta garantia es
valida si el producto es utilizado alguna vez proporcionando al mismo tiempo
Sears Brands Management Corporation, Hoffman Estates, IL 60179
PRECAUCIONES DE SEGURIDAD GENERAL
Conoce su herramienta ELI_CTRICA. Lea el manual de instrucciones cuidadosamente. Aprender las aplicaciones de la herramienta,
capacidades para el trabajo, y sus posibles peligros especificos.
Siempre Suelo Todas las herramientas.
Si el instrumento esta equipado con un triple plug, debe conectar en una de tres hoyos recipiente electrico.
Si utiliza un adaptador para acomodar un doble recipiente, debe adjuntar el adaptador a un terreno conocido.
Nunca elimine la tercera clavija del enchufe.
Siempre evitar situaciones peligrosas.
Nunca utitice herramientas electricas en lugares h_medos o mojados. Mantener su area de trabajo bien iluminado y
claro de desorden.
Siempre retire la adaptaci6n Ilaves y Ilaves de herramientas despues de su utilizaci6n.
Constituyen la costumbre de comprobar que las claves y el ajuste llaves se quitan de la herramienta antes de
encenderlo.
Siempre mantenga su &tea de trabajo limpia. Amontonado ambitos y bancos invitamos a accidentes.
Siempre mantenga los visitantes Lejos de maquinas para cotter.
Todoslos visitantes deben mantenerse una distancia segura de la zona de trabajo.
Siempre hacer el Taller Picaportes.
Picaportes con candados e interruptores maestros, o eliminando starter claves.
Nunca opere una herramienta bajo la influencia de las drogas, medicamentos o alcohol.
26
Siempre se debe usar vestimenta adecuada.
Nunca use ropa suelta o las joyas que puedan quedar atrapados en las piezas m6viles. Puestas unas chanclas de
goma esta recomendado para las mejores condiciones.
Siempre utilice gafas de seguridad y Use protecci6n para los oidos.
Tambienusa una cara o mascarilla si la operaci6n de corte es polvoriento.
Nunca Excederse.
Mantenga su calzado apropiado yen equilibrio en todo momento.
Nunca se pare sobre herramientas.
Lesiones graves pueden ocurrir si la herramienta se inclina o si la herramienta cortante es accidentalmente
contactados.
Siempre desconecte Herramientas.
Desconecte herramientas antes del servicio y al cambiar los accesorios como las cuchillas, brocas y cuchillas.
Evitar siempre ausencias Accidentales.
AsegL_resede interruptorse encuentra en la posici6n OFF antes de enchufar en cable.
Nunca deje Desatendida ejecutar Herramientas.
Siempre revise las partes daSadas.
Antes de ta primera o la continua utitizaci6n de ta herramienta, un guardia o en alguna otra parte que esta dafiada
debe verificarse para asegurar que funcione correctamente y realizar su funci6n prevista. Revise la alineaci6n de
los elementos m6vites, obligatorio de piezas m6viles, rotura de tas partes, el montaje, asi como cualesquiera otras
condiciones que puedan afectar a su funcionamiento. Un guardia u otras partes dafiadas debe inmediatamente ser
correctamente reparado o sustituido.
NORMAS ESPECIALES EN MATERIA DE SEGURIDAD DE SIERRAS
1. Siempre se detienen las sierras de cinta antes de quitar chatarra piezas de la tabla.
2. Siempre mantenga las manos y los dedos lejos de la cuchilla.
3. Nunca habia intentado stock que no tienen una superficie plana, a menos que un soporte adecuado es utilizada.
4. Siempre mantenga material con firmeza y alimentarla en la cuchilla a un ritmo moderado.
5. Siempre apague la maquina si el material se ha retirado de la instalaci6n incompleta.
6. Verifique las pala tamafio y tipo de espesor y el tipo de material cortado.
7. AsegOrese de que la tensi6n de la hoja y la cuchilla de seguimiento estan correctamente ajustado.
8. Hacer "alivio" cortes antes de cortar largas curvas.
9. Liberar la tensi6n de la hoja cuando vio no sera utilizado por un largo periodo de tiempo.
10. Nota y siga las instrucciones y advertencias de seguridad que aparecen en la parte baja puerta de esta sierra.
Longitude de la Hoja .................................... 99-3/4"
Ancho de la Hoja .................................... 1/4" to 3/4"
Ancho de la Garganta ................................... 13-1/2"
Profundidad de Corte ........................................... 8"
Las Velocidades de la Hoja .......... 1620/3340 ft/min
Puertos de Polvo ................................ 2-1/2" and 4"
Tamano de la Tabla ....................... 15-3/4" x 20-3/8"
La Tabla Basculante ........................... 0-45 Degrees
Motor ................................................................ 1 HP
Tension del Motor ....................................... 120/240
Amperaje del Motor ...................................... 9/4.5 A
Peso .......................................................... 160 LBS
GUARDAR estas instrucciones.
Referirse a ellos con frecuencia.
27
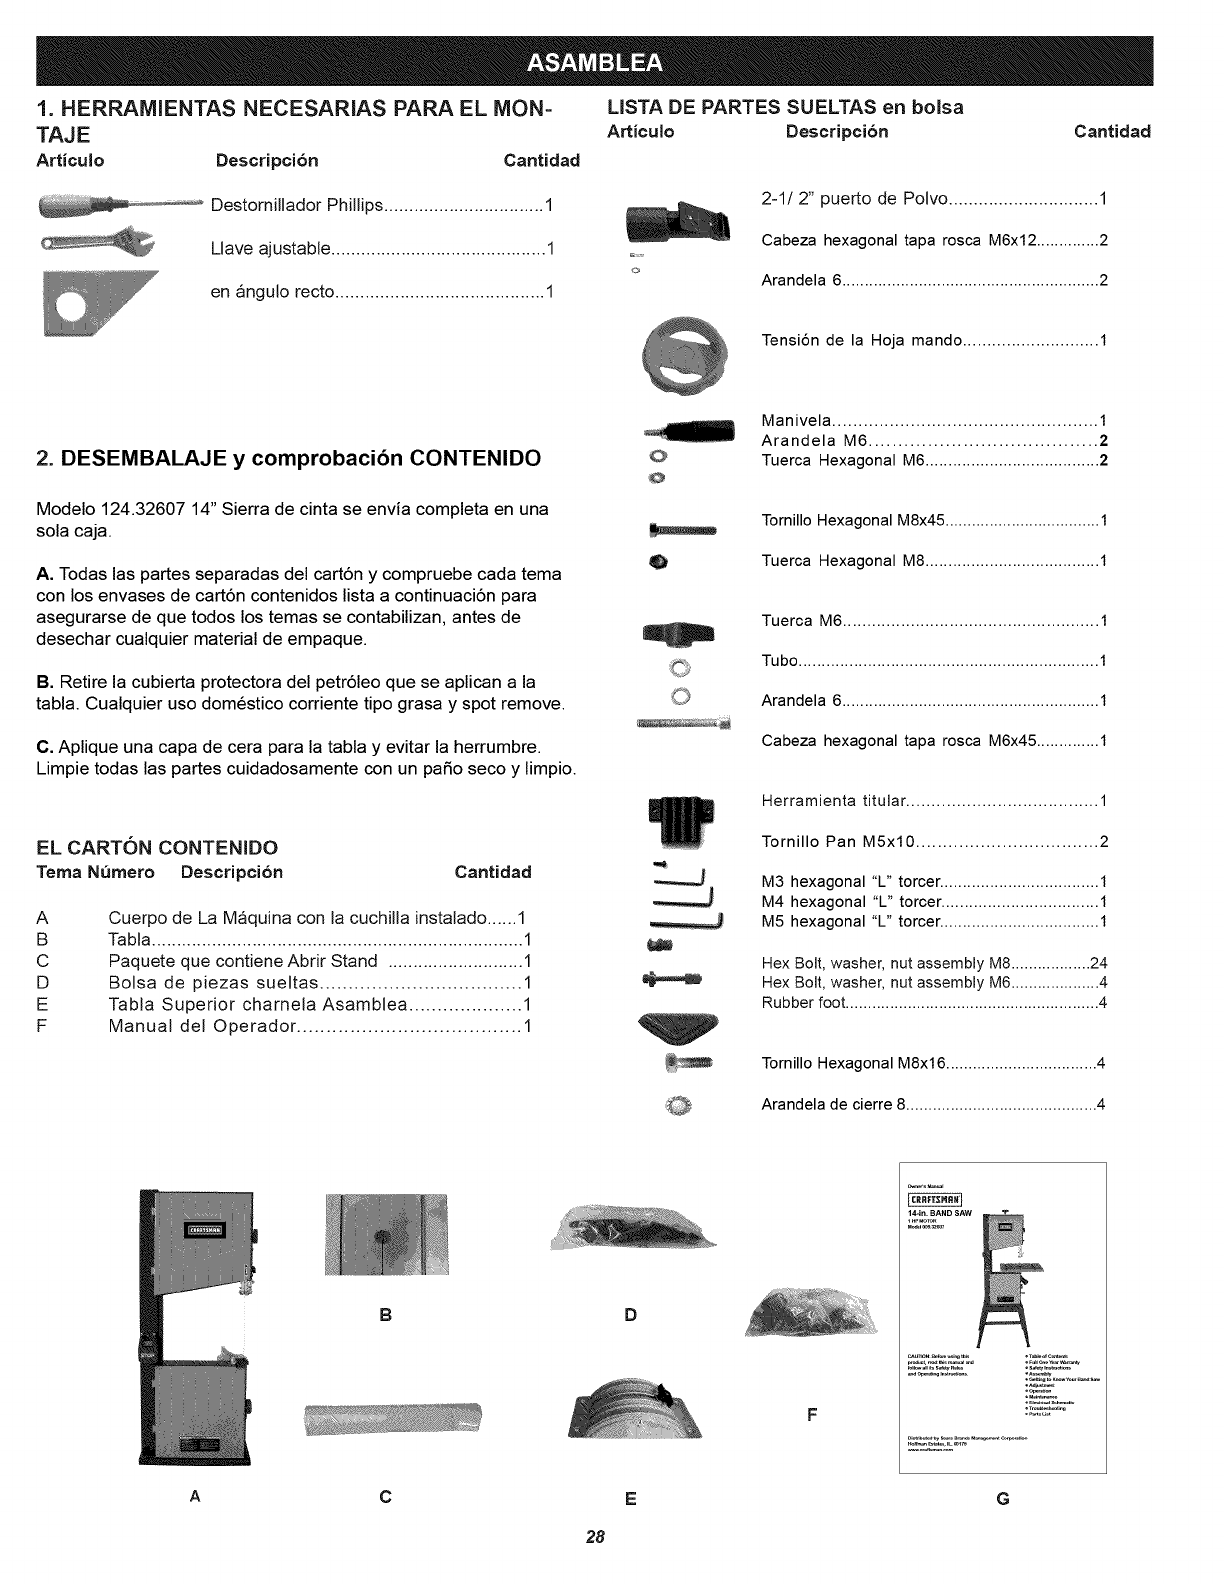
1. HERRAMIENTAS NECESARIAS PARA EL MON= LISTA DE PARTES SUELTAS en bolsa
TAJ EArticulo Descripcibn Cantidad
Articulo Descripcibn Cantidad
Destornillador Phillips ................................ 1
Llave ajustable ........................................... 1
en angulo recto .......................................... 1
o
2-1/2" puerto de Polvo .............................. 1
Cabeza hexagonal tapa rosca M6x12 .............. 2
Arandela 6 ......................................................... 2
Tensi6n de la Hoja mando ............................ 1
2. DESEMBALAJE y comprobacibn CONTENIDO
Modelo 124.32607 14" Sierra de cinta se envia completa en una
sola caja.
A. Todas las partes separadas del cart6n y compruebe cada tema
con los envases de cart6n contenidos lista a continuaci6n para
asegurarse de que todos los temas se contabilizan, antes de
desechar cualquier material de empaque.
B. Retire la cubierta protectora del petr61eo que se aplican a la
tabla. Cualquier uso domestico corriente tipo grasa y spot remove.
C. Aplique una capa de cera para la tabla y evitar la herrumbre.
Limpie todas las partes cuidadosamente con un paso seco y limpio.
EL CARTON CONTENIDO
Tema Numero Descripcibn Cantidad
A
B
C
D
E
F
Cuerpo de La Maquina con la cuchilla instalado ...... 1
Tabla .......................................................................... 1
Paquete que contiene Abrir Stand ........................... 1
Bolsa de piezas sueltas ................................... 1
Tabla Superior charnela Asamblea .................... 1
Manual del Operador ...................................... 1
O
@
Manivela ................................................... 1
Arandela M6 ....................................... 2
Tuerca Hexagonal M6 ...................................... 2
Tornillo Hexagonal M8x45 ................................... 1
Tuerca Hexagonal M8 ...................................... 1
Tuerca M6 ..................................................... 1
Tubo ................................................................. 1
Arandela 6 ......................................................... 1
Cabeza hexagonaltapa rosca M6x45 .............. 1
Herramienta titular ...................................... 1
Tornillo Pan M5xl0 .................................. 2
M3 hexagonal "L" torcer ................................... 1
M4 hexagonal "L" torcer .................................. 1
M5 hexagonal "L" torcer ................................... 1
Hex Bolt, washer, nut assembly M8 .................. 24
Hex Bolt, washer, nut assembly M6 .................... 4
Rubber foot ......................................................... 4
Tornillo Hexagonal M8x16 .................................. 4
Arandela de cierre 8 ........................................... 4
D
144n. BAND SAW
A C EG
28
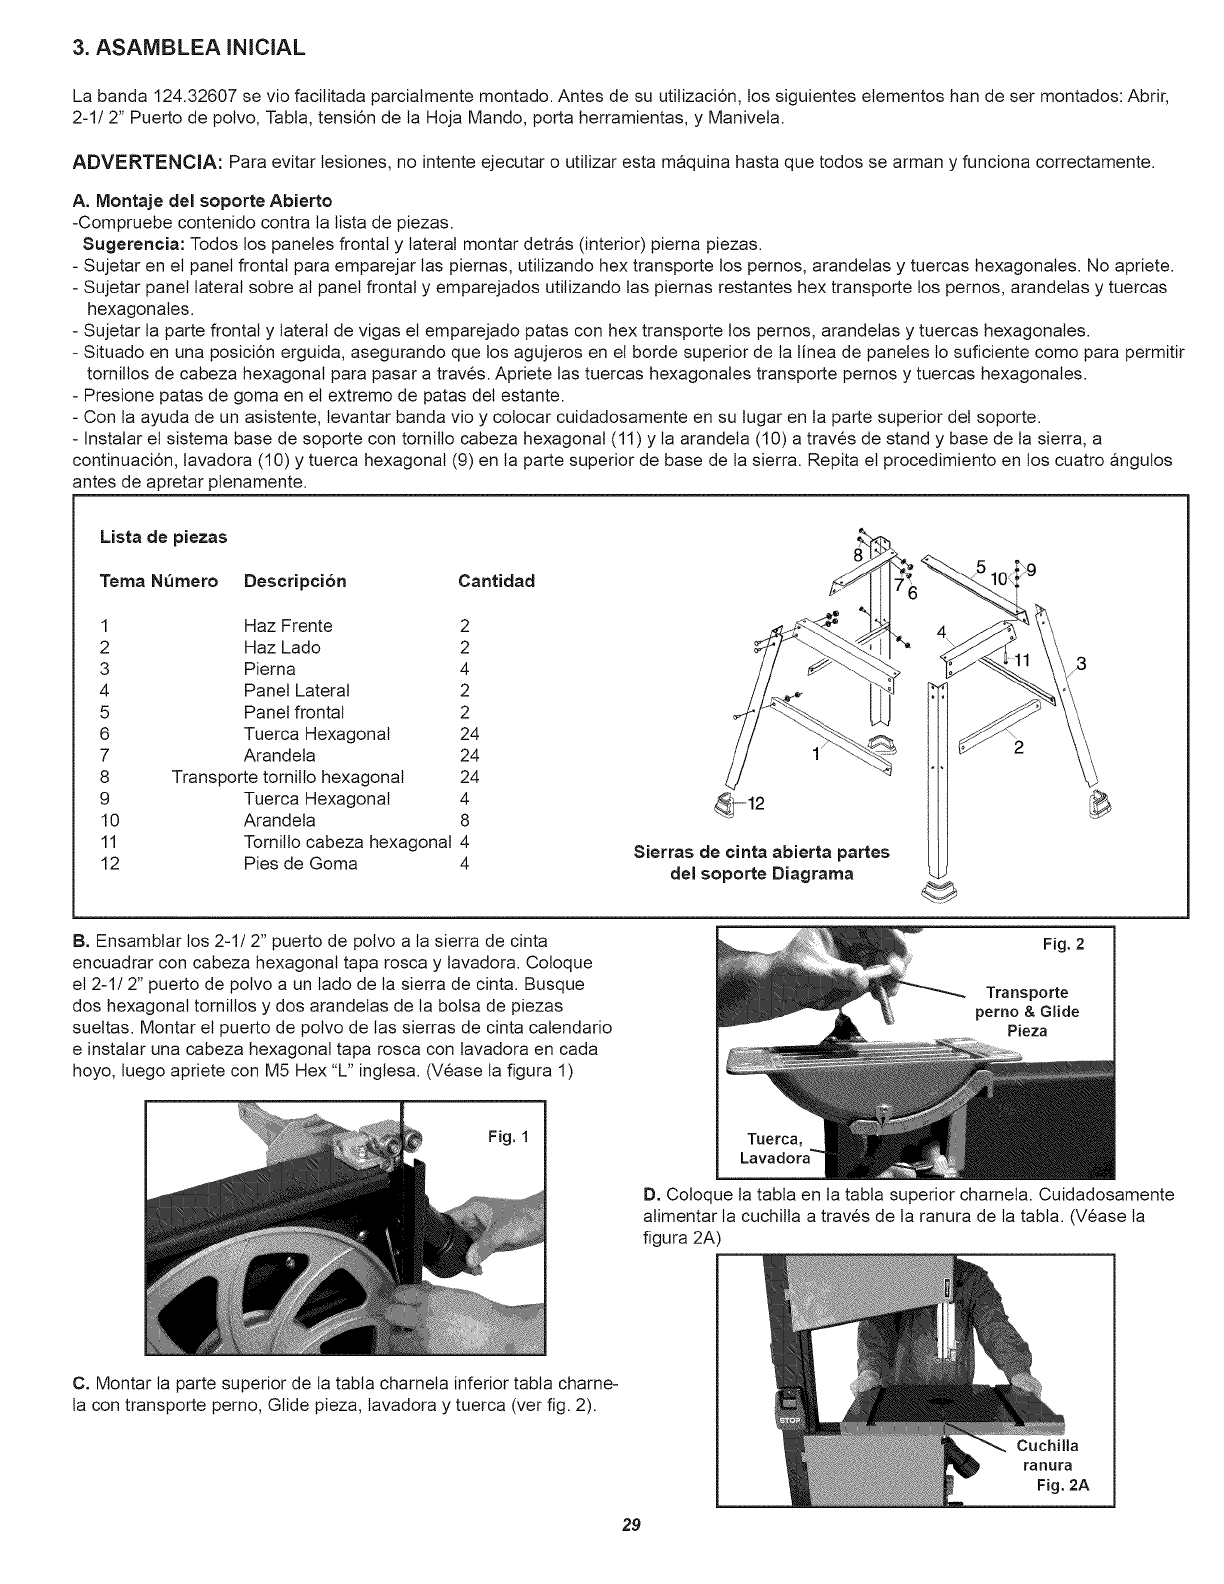
3. ASAMBLEA INIClAL
La banda 124.32607 se vio facititada parcialmente montado. Antes de su utitizaci6n, los siguientes etementos han de set montados: Abrir,
2-1/2" Puerto de polvo, Tabla, tensi6n de la Hoja Mando, porta herramientas, y Manivela.
ADVERTENCIA: Para evitar lesiones, no intente ejecutar o utitizar esta maquina hasta que todos se arman y funciona correctamente.
A. Montaje del soporte Abierto
-Compruebe contenido contra ta lista de piezas.
Sugerencia: Todos los panetes frontal y lateral montar detras (interior) piema piezas.
- Sujetar en et panel frontal para emparejar las piemas, utitizando hex transporte los pernos, arandetas y tuercas hexagonales. No apriete.
- Sujetar panel lateral sobre al panel frontal y emparejados utitizando tas piemas restantes hex transporte los pernos, arandetas y tuercas
hexagonales.
- Sujetar ta parte frontal y lateral de vigas el emparejado patas con hex transporte los pernos, arandetas y tuercas hexagonales.
- Situado en una posici6n erguida, asegurando que los agujeros en et borde superior de la linea de panetes to suficiente como para permitir
tomittos de cabeza hexagonal para pasar a traves. Apriete las tuercas hexagonales transporte pemos y tuercas hexagonales.
- Presione patas de goma en et extremo de patas del estante.
- Con ta ayuda de un asistente, levantar banda vio y colocar cuidadosamente en su tugar en ta parte superior det soporte.
- Instalar et sistema base de soporte con tomitlo cabeza hexagonal (11) y ta arandeta (10) a traves de stand y base de ta sierra, a
continuaci6n, tavadora (10) y tuerca hexagonal (9) en la parte superior de base de la sierra. Repita et procedimiento en los cuatro angulos
antes de apretar plenamente.
Lista de piezas
Tema Numero Descripci6n CantJdad
1 Haz Frente 2
2 Haz Lado 2
3 Pierna 4
4 Panel Lateral 2
5 Panel frontal 2
6 Tuerca Hexagonal 24
7 Arandeta 24
8 Transporte tornitto hexagonal 24
9 Tuerca Hexagonal 4
10 Arandeta 8
11 Tornitlo cabeza hexagonal 4
12 Pies de Goma 4
12
Sierras de cinta abierta partes
del soporte Diagrama
2
B. Ensamblar los 2-1/2" puerto de polvo a ta sierra de cinta
encuadrar con cabeza hexagonal tapa rosca y lavadora. Coloque
et 2-1/2" puerto de polvo a un tado de la sierra de cinta. Busque
dos hexagonal tornitlos y dos arandelas de la bolsa de piezas
suettas. Montar et puerto de polvo de las sierras de cinta calendario
e instalar una cabeza hexagonal tapa rosca con lavadora en cada
hoyo, luego apriete con M5 Hex "L" ingtesa. (Vease la figura 1)
Fig. 1
Fig. 2
Transporte
perno & Glide
Pieza
D. Coloque la tabta en ta tabla superior chameta. Cuidadosamente
alimentar la cuchitla a traves de la ranura de la tabla. (Vease la
figura 2A)
C. Montar la parte superior de ta tabla charneta inferior tabta charne-
la con transporte pemo, Glide pieza, lavadora y tuerca (vet fig. 2).
29

E. Busque cuatro pernos hexagonales y cuatro arandetas de la
bolsa de piezas sueltas usada para montar et cuadro. Montar ta
tabla en ta tabla superior charneta e instalar un perno con lavadora
en cada hoyo, luego apriete con una ltave hexagonal 13mm. (Vease
la figura. 3)
FIG. 3
I. Ensambtar la herramienta titular a ta columna de ta sierra de cinta
con dos tomitlos de cabeza pan. Busque dos tomitlos pan de la
bolsa de piezas suettas. Monte la herramienta titular a ta cotumna e
instalar un tornitlo pan en cada hoyo, luego apriete con destornitla-
dor Phillips. (Vease la figura. 7)
F. Siguiente tocalizar un tornillo hexagonal M8x45 y una tuerca hex-
agonal M8. Instalar pot debajo de la mesa como se muestra. Esta
asamblea se utitiza para nivelar la mesa. (Vease la figura. 4)
Titular FIG. 7
J. Siguiente tocalizar un tornilto hexagonal M8x45 y una tuerca
hexagonal M8. Instalar pot debajo de ta mesa Coloque la tensi6n de
la hoja mando a la tensi6n de la hoja asamblea. (Vease la figura. 8)
Tensi6n de la Hoja Mando
G. Utitice la cabeza hexagonal tapa rosca, lavadora, buje y tuerca
para corregir la mesa de trabajo planitud. (Vet Fig. 5)
K. €:sta tiene un 2-1/2" puerto de polvo y 4" puerto de polvo inctuido
para ta conexi6n de ancho estandar tienda tubos de vacio. (Vease
la figura. 9) Se recomienda que cuando se esta en uso, la sierra de
cinta esta conectado a un colector de polvo.
Buje & Tuerca
FiG. 5
H. Atribuimos ta maniveta de la tensi6n de la correa brazo articulado
con et M6 tuerca hexagonal. (Vease la figura. 6)
FIG. 6
2-1/2" Puerto
de Polvo
4" Puerto de
Polvo FIG. 9
3O
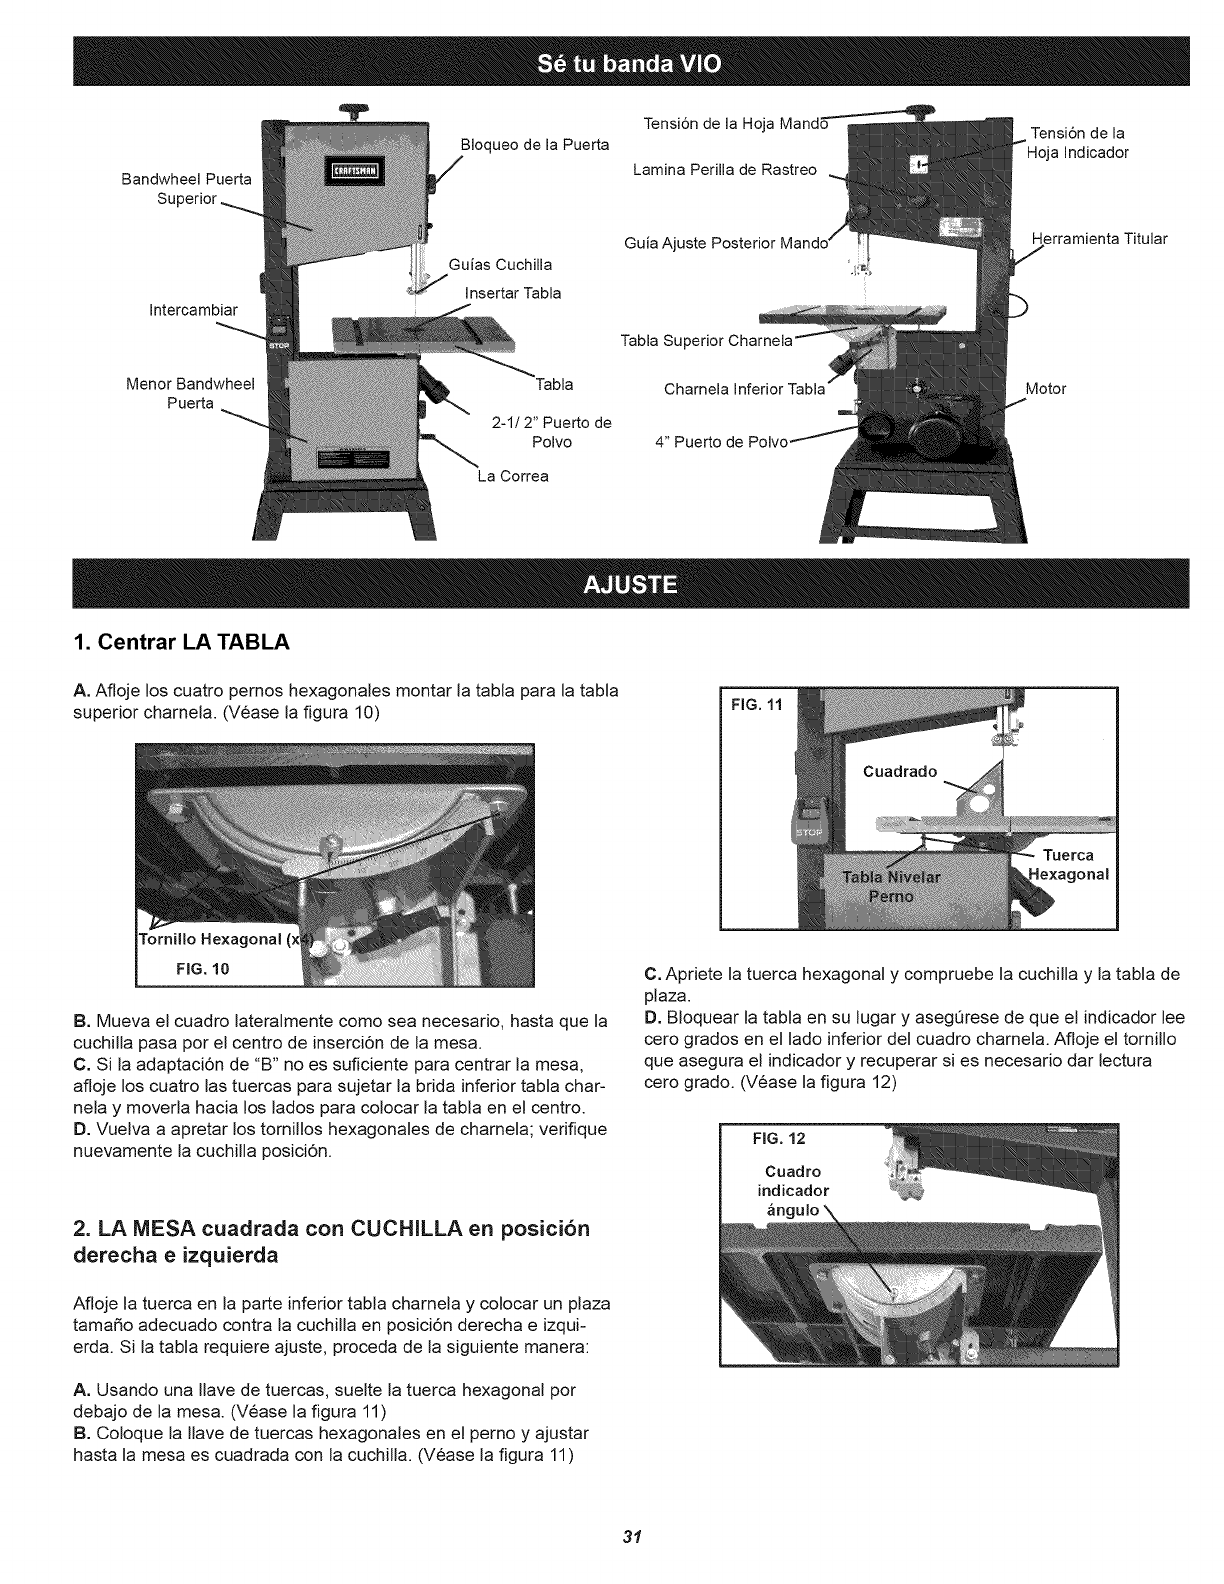
BandwheeIPuerta
Su
BIoqueo de la Puerta
Tensi6n de la Hoja
Lamina Perilla de Rastreo
Tensi6n de la
a Indicador
Intercambiar
Guia Ajuste Posterior
Guias Cuchilla
Insertar Tabla
Tabla Su
Herramienta Titular
Menor Bandwheel Tabla Charnela inferior Motor
Puerta
2-1/2" Puerto de
Polvo 4" Puerto
La Correa
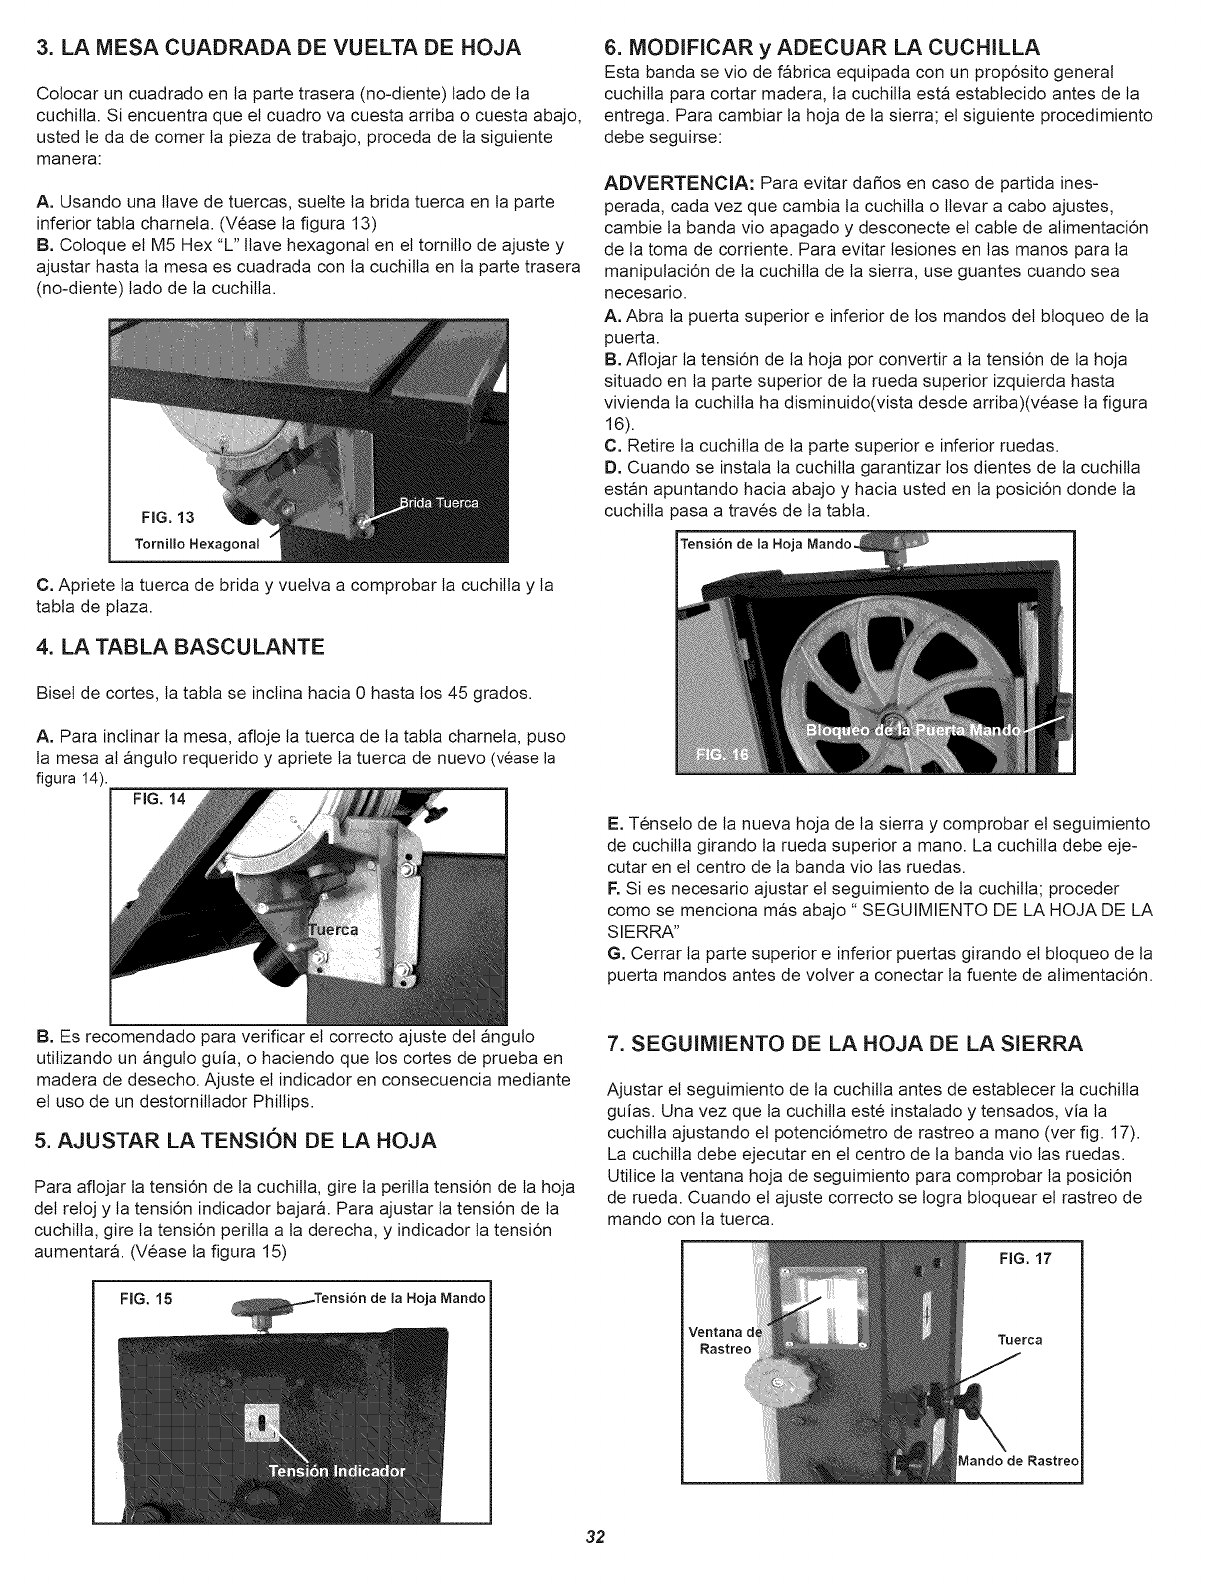
1. Centrar LA TABLA
A. Afloje los cuatro pernos hexagonales montar la tabla para la tabla
superior charnel& (Vease la figura 10)
Tornillo Hexagonal (:
FIG. 10
B. Mueva el cuadro lateralmente como sea necesario, hasta que la
cuchilla pasa por el centro de inserci6n de la mesa.
C. Si la adaptaci6n de "B" no es suficiente para centrar la mesa,
afloje los cuatro las tuercas para sujetar la brida inferior tabla char-
nela y moverla hacia los lados para colocar la tabla en el centro.
D. Vuelva a apretar los tornillos hexagonales de chamela; verifique
nuevamente la cuchilla posici6n.
2. LA MESA cuadrada con CUCHILLA en posici6n
derecha e izquierda
Afloje la tuerca en la parte inferior tabla charnela y colocar un plaza
tamafio adecuado contra la cuchilla en posici6n derecha e izqui-
erda. Si la tabla requiere ajuste, proceda de la siguiente manera:
_exagonal
C. Apriete la tuerca hexagonal y compruebe la cuchilla y la tabla de
plaza.
D. BIoquear la tabla en su lugar y aseg0rese de que el indicador lee
cero grados en el lado inferior del cuadro charnel& Afloje el tomillo
que asegura el indicador y recuperar si es necesario dar lectura
cero grado. (Vease la figura 12)
FIG. 12
Cuadro
indicador
_ngulo
A. Usando una Ilave de tuercas, suelte la tuerca hexagonal por
debajo de la mesa. (Vease la figura 11)
B. Coloque la Ilave de tuercas hexagonales en el pemo y ajustar
hasta la mesa es cuadrada con la cuchilla. (Vease la figura 11)
31
3. LA MESA CUADRADA DE VUELTA DE HOJA
Colocar un cuadrado en ta parte trasera (no-diente) tado de la
cuchitta. Si encuentra que et cuadro va cuesta arriba o cuesta abajo,
usted te da de comer la pieza de trabajo, proceda de la siguiente
manera:
A. Usando una llave de tuercas, suette ta brida tuerca en ta parte
inferior tabla chameta. (Vease la figura 13)
B. Coloque el M5 Hex "L" ttave hexagonal en et tomitlo de ajuste y
ajustar hasta ta mesa es cuadrada con la cuchitla en la parte trasera
(no-diente) lado de la cuchitta.
FIG. 13
Tornillo Hexagonal
C. Apriete la tuerca de brida y vuetva a comprobar la cuchitta y la
tabla de plaza.
4. LA TABLA BASCULANTE
Bisel de cortes, la tabla se inclina hacia 0 hasta los 45 grados.
A. Para inclinar ta mesa, afloje la tuerca de ta tabla charnel& puso
la mesa al angulo requerido y apriete la tuerca de nuevo (vease la
figura 14). FIG. 14
6. MODIFICAR y ADECUAR LA CUCHILLA
Esta banda se vio de fabrica equipada con un prop6sito general
cuchitla para cortar madera, ta cuchitta esta establecido antes de la
entrega. Para cambiar la hoja de la sierra; et siguiente procedimiento
debe seguirse:
ADVERTENCIA: Para evitar dafios en caso de partida ines-
perada, cada vez que cambia ta cuchitla o tlevar a cabo ajustes,
cambie la banda vio apagado y desconecte et cable de alimentaci6n
de la toma de corriente. Para evitar lesiones en las manos para ta
manipulaci6n de la cuchitla de la sierra, use guantes cuando sea
necesario.
A. Abra ta puerta superior e inferior de los mandos det bloqueo de la
puerta.
B. Aflojar ta tensi6n de la hoja por convertir a la tensi6n de la hoja
situado en ta parte superior de ta rueda superior izquierda hasta
vivienda ta cuchitta ha disminuido(vista desde arriba)(vease la figura
16).
C. Retire ta cuchitla de la parte superior e inferior ruedas.
D. Cuando se instala la cuchilla garantizar los dientes de la cuchitla
estan apuntando hacia abajo y hacia usted en la posici6n donde la
cuchitla pasa a traves de la tabla.
Tensi6n de la Hoja
E. Tenseto de la nueva hoja de ta sierra y comprobar et seguimiento
de cuchitla girando la rueda superior a mano. La cuchitla debe eje-
cutar en et centro de la banda vio tas ruedas.
F. Si es necesario ajustar et seguimiento de ta cuchitta; proceder
como se menciona mas abajo" SEGUIMIENTO DE LA HOJA DE LA
SIERRA"
G. Cerrar la parte superior e inferior puertas girando et btoqueo de la
puerta mandos antes de volver a conectar la fuente de alimentaci6n.
B. Es recomendado para verificar et correcto ajuste det angulo
utilizandoun anguloguia,o haciendoque loscortesde prueba en
madera de desecho.Ajusteelindicadoren consecuenciamediante
eluso de un destomilladorPhillips.
5. AJUSTAR LA TENSION DE LA HOJA
Para aflojar ta tensi6n de la cuchitla, gire ta peritla tensi6n de ta hoja
det retoj y ta tensi6n indicador bajar& Para ajustar la tensi6n de la
cuchitla, gire la tensi6n peritla a ta derecha, y indicador la tensi6n
aumentar& (Vease la figura 15)
Hoja Mando 1
7. SEGUIMIENTO DE LA HOJA DE LA SIERRA
Ajustar el seguimiento de ta cuchitta antes de establecer ta cuchitla
guias. Una vez que la cuchitla este instalado y tensados, via la
cuchitla ajustando et potenci6metro de rastreo a mano (ver fig. 17).
La cuchitla debe ejecutar en et centro de la banda vio tas ruedas.
Utitice la ventana hoja de seguimiento para comprobar la posici6n
de rueda. Cuando et ajuste correcto se logra bloquear et rastreo de
mando con la tuerca.
FIG. 17
Ventana Tuerca
Rastre
Vlando de Rastreo
32
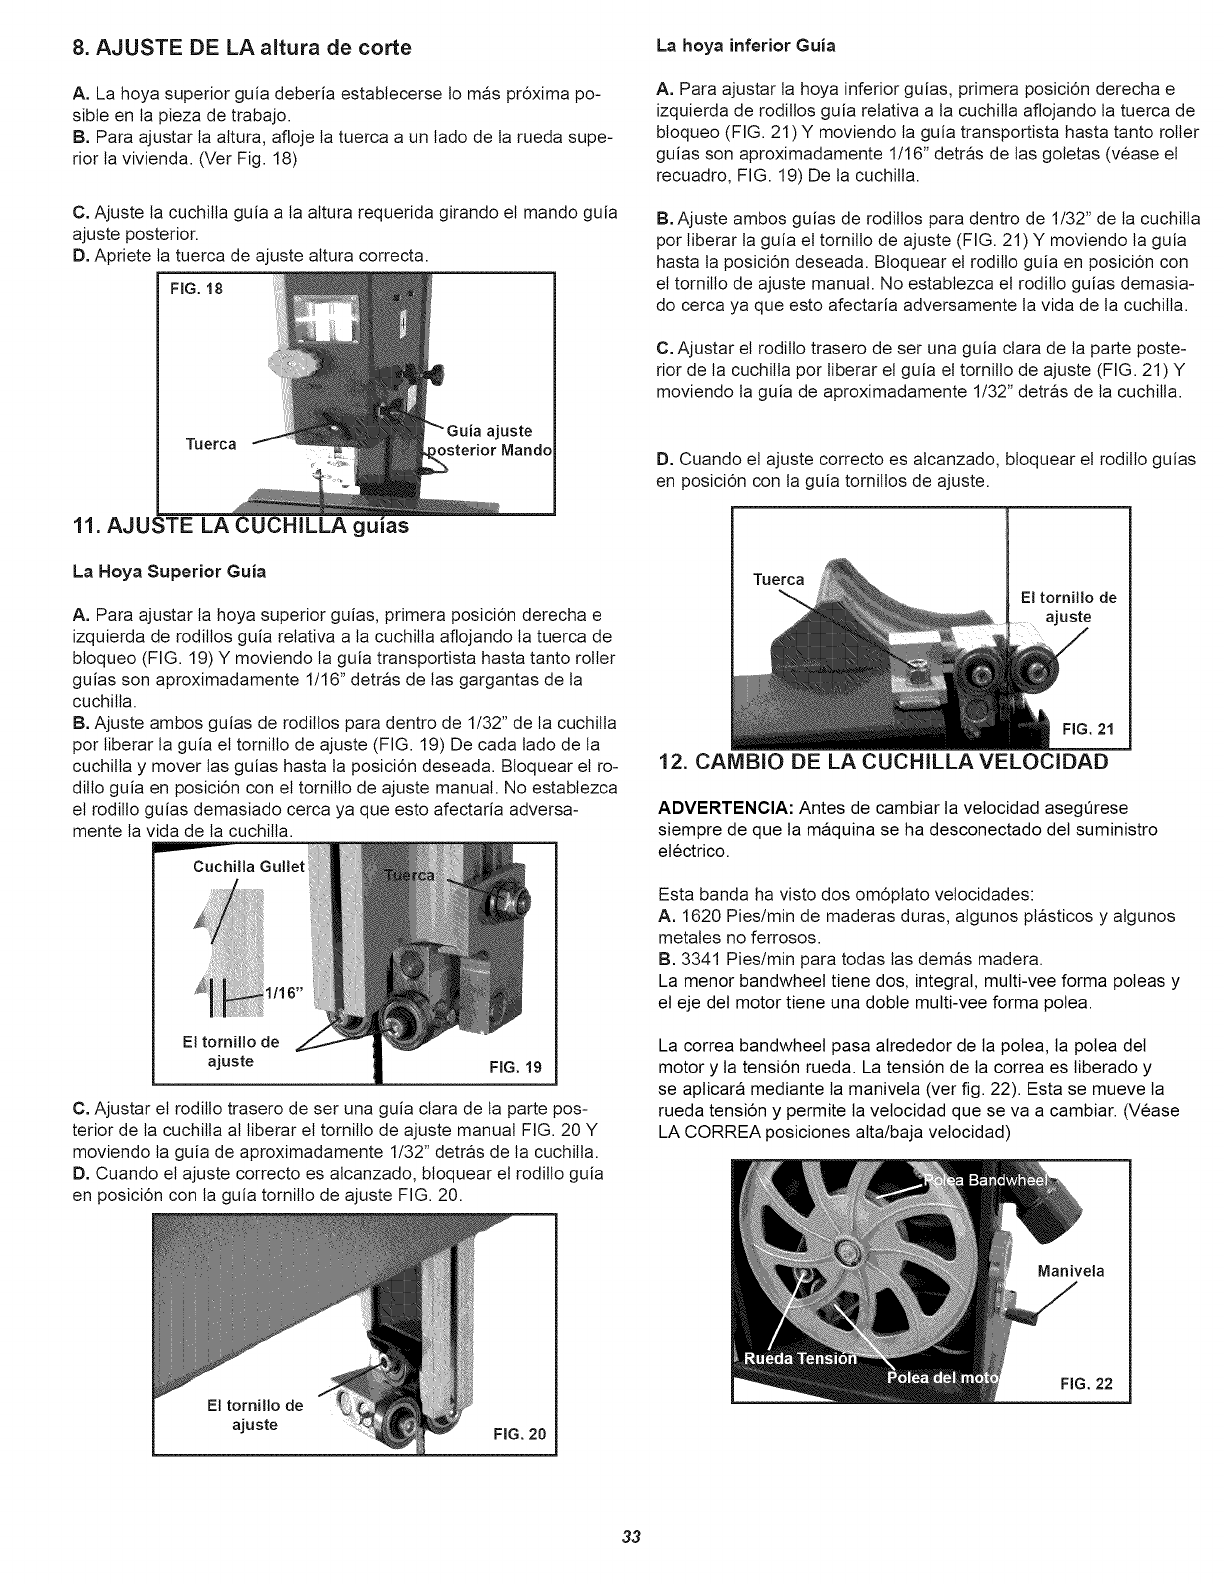
8. AJUSTE DE LA altura de corte La hoya inferior Guia
A. La hoya superior guia deberia establecerse 1omas pr6xima po-
sible en ta pieza de trabajo.
B. Para ajustar la altura, afloje la tuerca a un lado de la rueda supe-
rior la vivienda. (Ver Fig. 18)
C. Ajuste la cuchitla guia a la altura requerida girando et mando guia
ajuste posterior.
D. Apriete la tuerca de ajuste altura correcta.
Tuerca
11. AJUSTE LA CUCHILLA guias
La Hoya Superior Guia
A. Para ajustar la hoya superior guias, primera posici6n derecha e
izquierda de roditlos guia retativa a ta cuchilla aflojando ta tuerca de
bloqueo (FIG. 19) Y moviendo la guia transportista hasta tanto roller
guias son aproximadamente 1/16" detras de tas gargantas de la
cuchitla.
B. Ajuste ambos guias de roditlos para dentro de 1/32" de la cuchitla
por tiberar la guia et tornitto de ajuste (FIG. 19) De cada tado de ta
cuchitla y mover las guias hasta la posici6n deseada. Bloquear et ro-
ditlo guia en posici6n con et tomitlo de ajuste manual. No estabtezca
et roditlo guias demasiado cerca ya que esto afectaria adversa-
mente la vida de la cuchitla.
Cuchilla Gullet
El tornillo de
ajuste FIG. 19
C. Ajustar et roditlo trasero de ser una guia clara de la parte pos-
terior de la cuchitla al liberar el tornitlo de ajuste manual FIG. 20 Y
moviendo ta guia de aproximadamente 1/32" detras de ta cuchitla.
D. Cuando et ajuste correcto es alcanzado, bloquear et roditlo guia
en posici6n con la guia tornitlo de ajuste FIG. 20.
El tornillo de
ajuste FIG. 20
A. Para ajustar la hoya inferior guias, primera posici6n derecha e
izquierda de roditlos guia retativa a la cuchitla aflojando la tuerca de
bloqueo (FIG. 21) Y moviendo ta guia transportista hasta tanto roller
guias son aproximadamente 1/16" detras de las goletas (vease et
recuadro, FIG. 19) De la cuchitla.
B. Ajuste ambos guias de roditlos para dentro de 1/32" de la cuchitta
por liberar la guia el tornitlo de ajuste (FIG. 21) Y moviendo la guia
hasta ta posici6n deseada. Btoquear el roditlo guia en posici6n con
et tornitto de ajuste manual. No establezca el roditlo guias demasia-
do cerca ya que esto afectaria adversamente la vida de la cuchitla.
C. Ajustar et roditlo trasero de set una guia clara de ta parte poste-
rior de la cuchitla pot liberar el guia et tornitlo de ajuste (FIG. 21 ) Y
moviendo la guia de aproximadamente 1/32" detras de la cuchitla.
D. Cuando et ajuste correcto es atcanzado, bloquear et roditto guias
en posici6n con la guia tornittos de ajuste.
Tuerca
El tornillo de
ajuste
12. CAMBIO DE LA CUCHILLA VELOCIDAD
ADVERTENCIA: Antes de cambiar ta velocidad asegOrese
siempre de que la maquina se ha desconectado del suministro
electrico.
Esta banda ha visto dos om6plato vetocidades:
A. 1620 Pies/min de maderas duras, algunos plasticos y algunos
metates no ferrosos.
B. 3341 Pies/min para todas las demas madera.
La menor bandwheel tiene dos, integral, multi-vee forma poleas y
el eje del motor tiene una doble multi-vee forma polea.
La correa bandwheel pasa alrededor de ta polea, ta polea del
motor y ta tensi6n rueda. La tensi6n de la correa es tiberado y
se apticara mediante ta manivela (ver fig. 22). Esta se mueve ta
rueda tensi6n y permite ta velocidad que se va a cambiar. (Vease
LA CORREA posiciones alta/baja velocidad)
FIG. 22
33
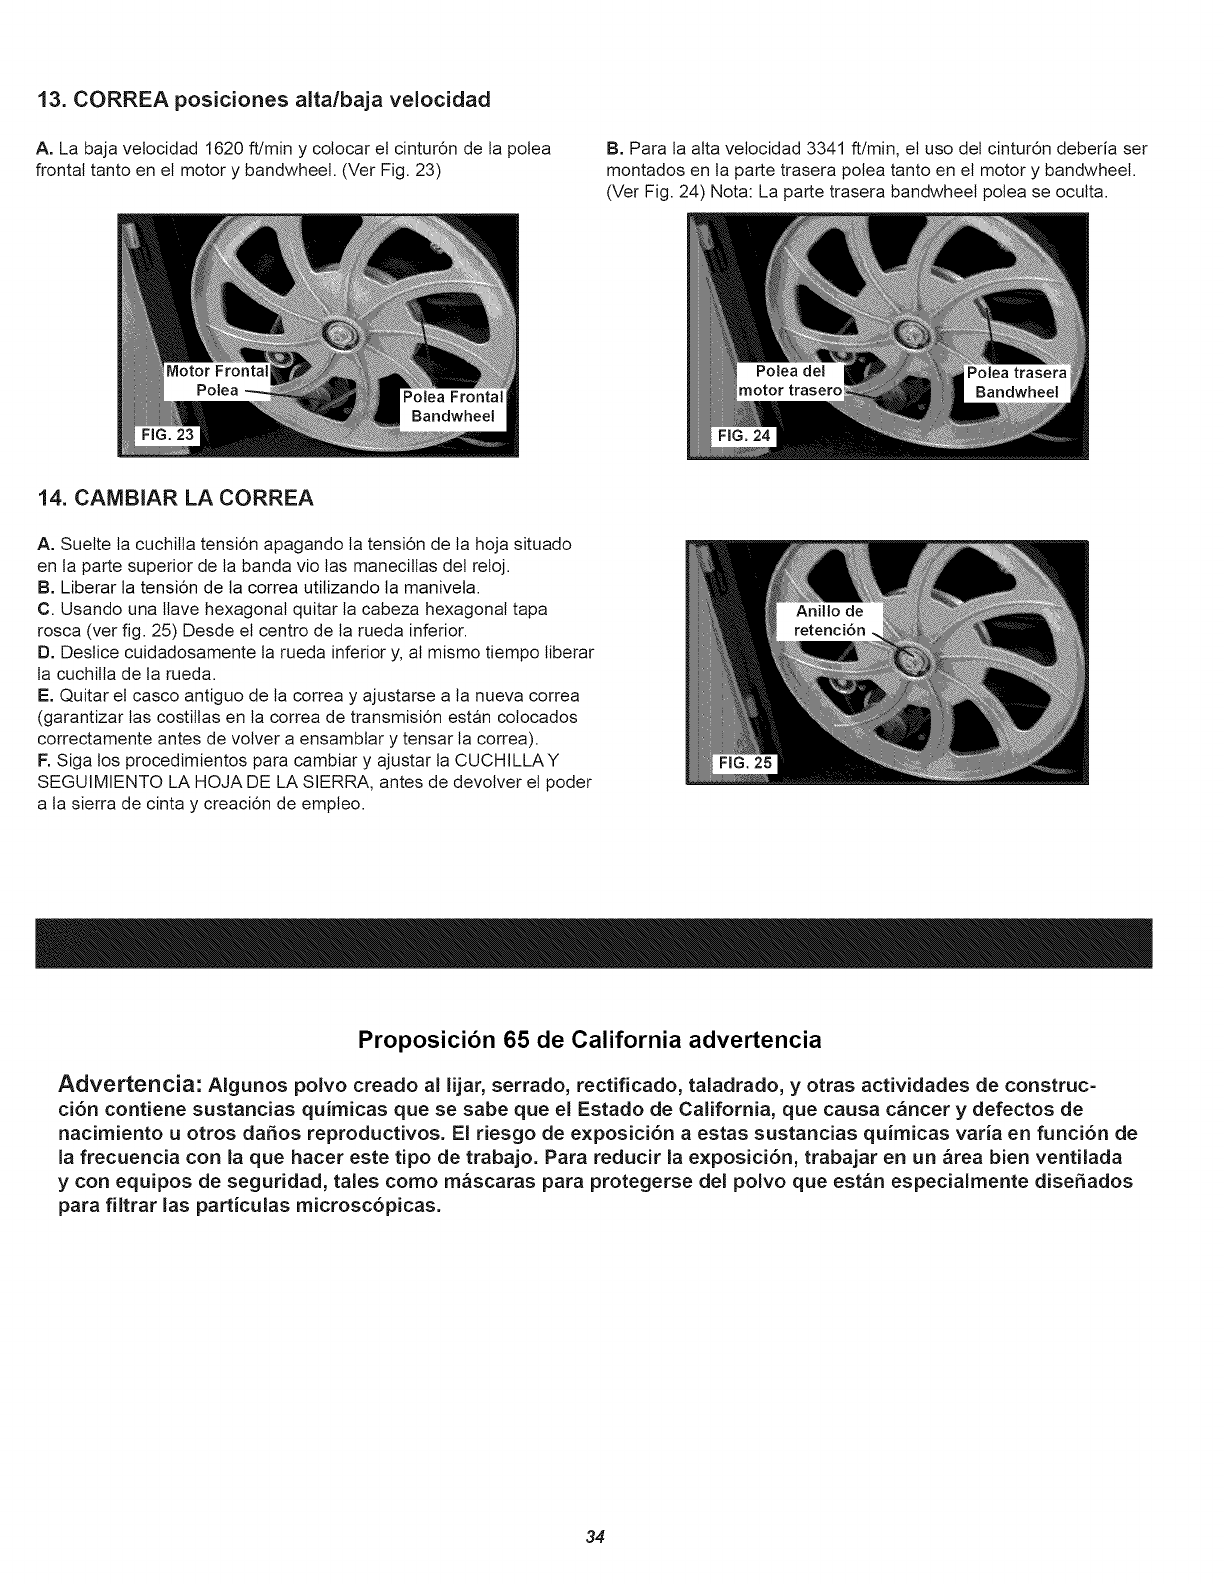
13. CORREA posiciones alta/baja velocidad
A. La baja vetocidad 1620 ft/min y colocar et cintur6n de la polea
frontal tanto en et motor y bandwheel. (Ver Fig. 23)
B. Para ta atta vetocidad 3341 ft/min, et uso del cintur6n deberia ser
montados en ta parte trasera polea tanto en et motor y bandwheel.
(Vet Fig. 24) Nota: La parte trasera bandwheel polea se oculta.
14. CAMBIAR LA CORREA
A. Suette ta cuchitla tensi6n apagando ta tensi6n de la hoja situado
en la parte superior de la banda violas manecittas det reloj.
B. Liberar ta tensi6n de ta correa utitizando ta manivela.
C. Usando una llave hexagonal quitar la cabeza hexagonal tapa
rosca (ver fig. 25) Desde el centro de ta rueda inferior.
D. Deslice cuidadosamente ta rueda inferior y, al mismo tiempo liberar
la cuchitta de la rueda.
E. Quitar el casco antiguo de la correa y ajustarse a la nueva correa
(garantizar las costitlas en la correa de transmisi6n estan colocados
correctamente antes de volver a ensambtar y tensar la correa).
F. Siga los procedimientos para cambiar y ajustar ta CUCHILLAY
SEGUIMIENTO LA HOJA DE LA SIERRA, antes de devolver et poder
a la sierra de cinta y creaci6n de empleo.
retenci6n
Proposicibn 65 de California advertencia
Advertencia: Algunos polvo creado al lijar, serrado, rectificado, taladrado, y otras actividades de construc=
ci6n contiene sustancias quimicas que se sabe que el Estado de California, que causa cancer y defectos de
nacimiento u otros dafios reproductivos. El riesgo de exposici6n a estas sustancias quimicas varia en funci6n de
la frecuencia con la que hacer este tipo de trabajo. Para reducir la exposici6n, trabajar en un _rea bien ventilada
y con equipos de seguridad, tales como m_scaras para protegerse del polvo que est_n especialmente disefiados
para filtrar las particulas microsc6picas.
34
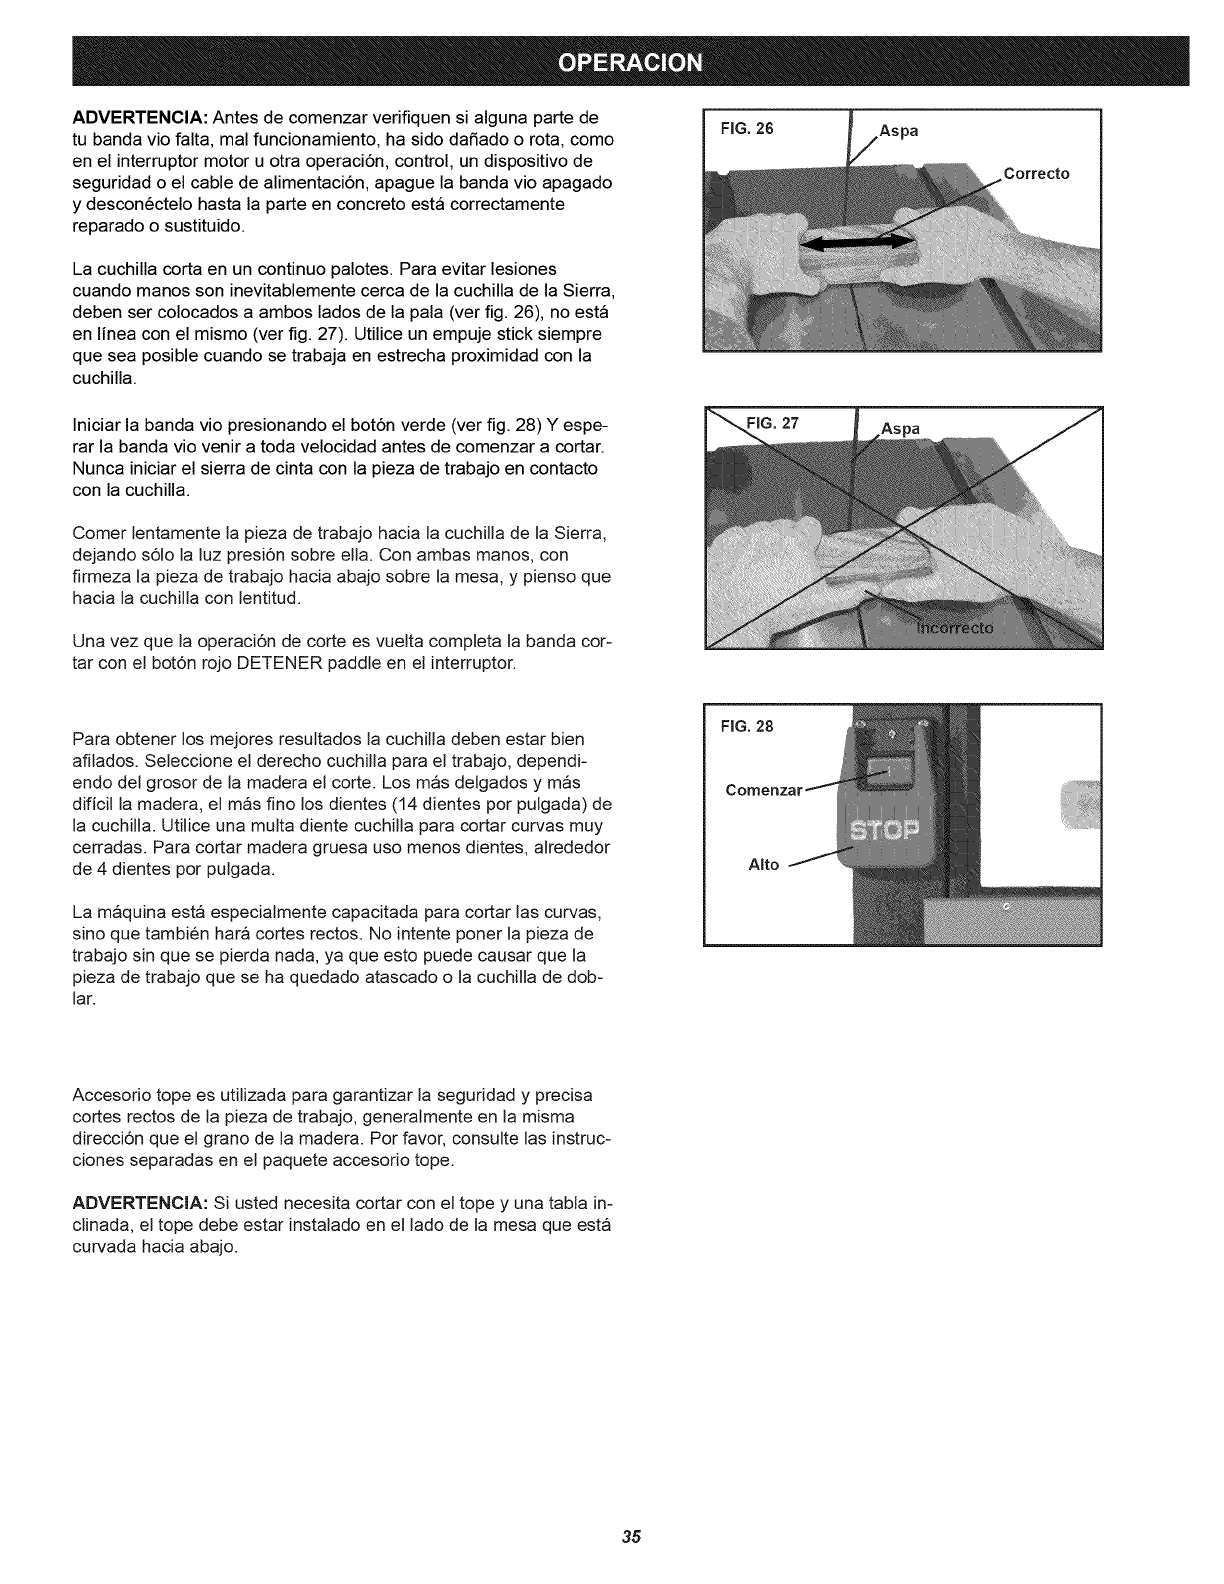
ADVERTENClA: Antes de comenzar verifiquen si alguna parte de
tu banda vio falta, mal funcionamiento, ha sido dafiado o rota, como
en el interruptor motor u otra operaci6n, control, un dispositivo de
seguridad o el cable de alimentaci6n, apague la banda vio apagado
y desconectelo hasta la parte en concreto esta correctamente
reparado o sustituido.
La cuchilla corta en un continuo palotes. Para evitar lesiones
cuando manos son inevitablemente cerca de la cuchilla de la Sierra,
deben ser colocados a ambos lados de la pala (ver fig. 26), no esta
en Iinea con el mismo (ver fig. 27). Utilice un empuje stick siempre
que sea posible cuando se trabaja en estrecha proximidad con la
cuchilla.
FIG. 26 Aspa
Correcto
Iniciar la banda vio presionando el bot6n verde (ver fig. 28) Y espe-
rar la banda vio venir a toda velocidad antes de comenzar a cortar.
Nunca iniciar el sierra de cinta con la pieza de trabajo en contacto
con la cuchilla.
Comer lentamente la pieza de trabajo hacia la cuchilla de la Sierra,
dejando s61o la luz presi6n sobre ella. Con ambas manos, con
firmeza la pieza de trabajo hacia abajo sobre la mesa, y pienso que
hacia la cuchiNa con lentitud.
Una vez que la operaci6n de corte es vuelta completa la banda cor-
tar con el bot6n rojo DETENER paddle en el interruptor.
FIG. 27
Para obtener los mejores resultados la cuchilla deben estar bien
afilados. Seleccione el derecho cuchilla para el trabajo, dependi-
endo del grosor de la madera el corte. Los m&s delgados y m&s
dificil la madera, el m&s fino los dientes (14 dientes por pulgada) de
la cuchilla. UtiNce una multa diente cuchilla para cortar curvas muy
cerradas. Para cortar madera gruesa uso menos dientes, alrededor
de 4 dientes por pulgada.
La m&quina esta especialmente capacitada para cortar las curvas,
sino que tambien hat& cortes rectos. No intente poner la pieza de
trabajo sin que se pierda nada, ya que esto puede causar que la
pieza de trabajo que se ha quedado atascado o la cuchilla de dob-
lar.
FIG. 28
Alto
Accesorio tope es utilizada para garantizar la seguridad y precisa
cortes rectos de la pieza de trabajo, generalmente en la misma
direcci6n que el grano de la madera. Por favor, consulte las instruc-
ciones separadas en el paquete accesorio tope.
ADVERTENClA: Si usted necesita cortar con el tope y una tabla in-
clinada, el tope debe estar instalado en el lado de la mesa que esta
curvada hacia abajo.
35
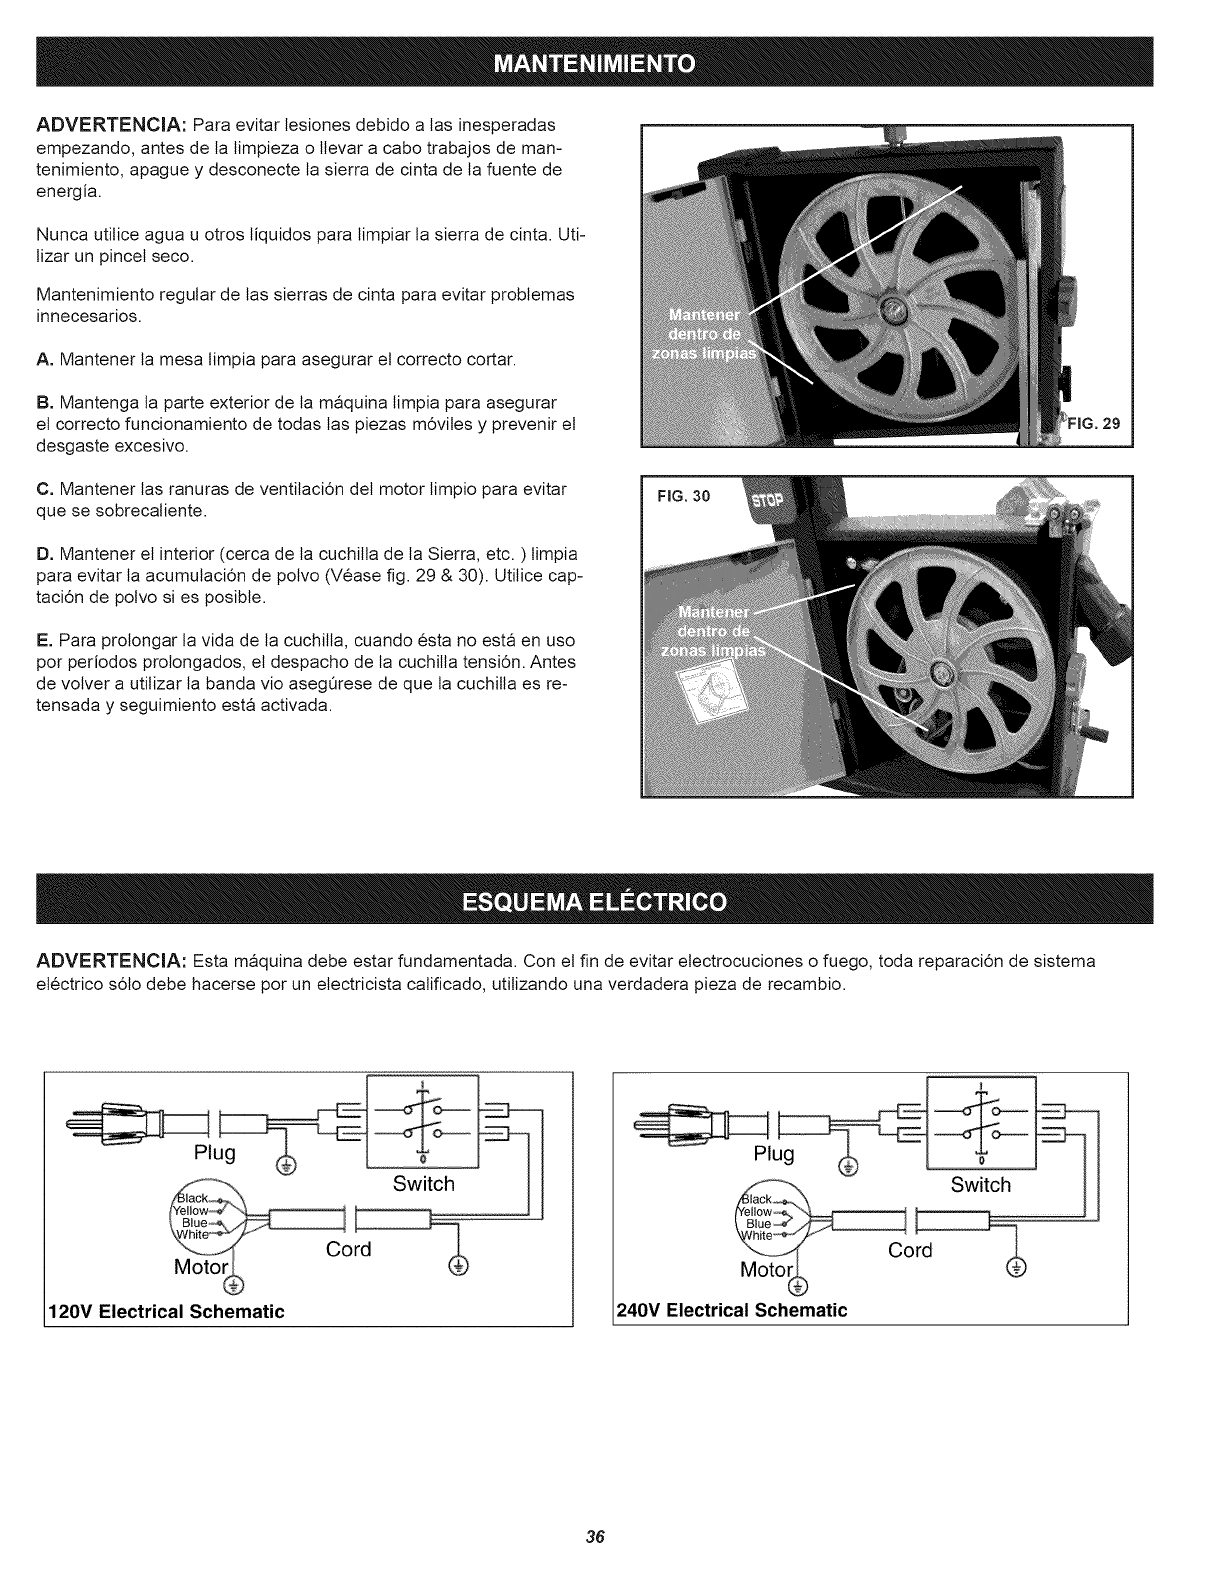
ADVERTENClA: Para evitar lesiones debido a tas inesperadas
empezando, antes de ta timpieza o llevar a cabo trabajos de man-
tenimiento, apague y desconecte la sierra de cinta de la fuente de
energia.
Nunca utitice agua u otros liquidos para limpiar la sierra de cinta. Uti-
lizar un pincet seco.
Mantenimiento regular de las sierras de cinta para evitar problemas
innecesarios.
A. Mantener la mesa limpia para asegurar et correcto cortar.
B. Mantenga la parte exterior de la maquina limpia para asegurar
et correcto funcionamiento de todas las piezas m6vites y prevenir et
desgaste excesivo.
C. Mantener las ranuras de ventitaci6n det motor limpio para evitar
que se sobrecaliente.
D. Mantener el interior (cerca de ta cuchitla de ta Sierra, etc. ) timpia
para evitar la acumulaci6n de polvo (Vease fig. 29 & 30). Utitice cap-
taci6n de polvo si es posible.
E. Para prolongar la vida de la cuchitta, cuando esta no esta en uso
pot periodos prolongados, et despacho de la cuchitla tensi6n. Antes
de volver a utitizar la banda vio asegQrese de que la cuchitla es re-
tensada y seguimiento esta activada.
FIG. 30
ADVERTENClA: Esta maquina debe estar fundamentada. Con el fin de evitar etectrocuciones o fuego, toda reparaci6n de sistema
etectrico s61o debe hacerse por un etectricista calificado, utitizando una verdadera pieza de recambio.
switch¸
co
120V Electrical Schematic
Switch
Co
Moto_ _
240V Electrical Schematic
36
Problema Diagn6stico Remedio
La maquina no funciona cuando son acti- 1. Ninguna fuente de alimentaci6n. 1. Compruebe el cable de rotura.
vados. 2. Interruptor Defectuoso. 2. Reemplazar et interruptor de bloqueo.
3 Motor Defectuoso. 3. Motor Defectuoso.
La cuchitla no se mueve con et motor en
marcha.
1. La tensi6n de ta hoja mando no se ha
endurecido.
2. La cuchitta se sali6 una de las ruedas.
3. La cuchilla ha roto.
4. La correa ha encajado.
1. Apague et motor, apriete et bot6n de
tensi6n cuchitla.
2. Abrir puertas y salir.
3. Reemplace la cuchitla.
4. Reemplazar et cintur6n.
La cuchitla no cortar en linea recta.
La cuchitla no cortar, o cortes muy lenta-
mente.
1. Tope para cortar no _os.
2. Velocidad de alimentaci6n demasiado
rapido.
3. Los dientes de ta cuchitla son aburridos
o dafiado.
4. Guias cuchitla no convenientemente
aiustada.
1. Los dientes son aburridos, causados por
cortar materiales duros o utitizaci6n a largo
plazo.
2. La hoja de ta sierra se coloc6 al reves
en la sierra de cinta.
_pe.
2. Poner tuz presi6n sobre ta pieza de
trabajo. AsegQrese de que la cuchitla no
dobtar.
3. Intente una nueva cuchitla.
4. Ajuste la cuchitla guias (ver instruccio-
nes ajuste).
1. Reemplace ta cuchitla, utitice un 6 T. R I.
(Dientes por pulgada) cuchitla de la sierra
para madera y materiales blandos. Utitice
un 14 T. R I. cuchitla materiales mas ardu-
amente.
2. Ajuste la cuchitla correctamente.
Aserrin se acumula dentro de la maquina. Esto es normal Limpie la maquina con regularidad. Abrir
puertas y quitar et aserrin con una aspira-
dora.
Serrin dentro de la carcasa det motor. Esto es normal Limpie las ranuras de ventitaci6n det motor
con una aspiradora. De vez en cuando
quitar et aserrin para evitar que se vieran
arrastradas a la vivienda.
La maquina no puede cortar a una tem-
peratura de 45 o 90 grados.
1. Et cuadro no esta formando angulos
rectos con la cuchitla.
2. La cuchitla es aburrida o demasiado
se ejercieron presiones sobre la pieza de
trabajo.
1. Ajustar la tabla.
2. Reemplace ta cuchitla o realizar menos
presi6n sobre la pieza de trabajo.
La cuchitla no pueden ser debidamente
ubicadas en las ruedas.
1. Las ruedas no estan armonizadas o
defectuoso teniendo.
2. Et rastreo de cuchilla mando no ha sido
debidamente ajustado.
3. Less Than cuchitla.
1. Reemplazar teniendo.
2. Ajuste ta cuchitla seguimiento de mando
(vea AJUSTE instrucciones).
3. Reemplace la cuchitla.
Reparar Protecci6n Acuerdo
Felicitaciones por hacer una compra inteligente. Su nuevo producto
artesanal esta disefiado y fabricado por afios de funcionamiento
confiable. Pero al igual que todos los productos, puede requerir
recono- cimiento de vez en cuando. Es entonces cuando habiendo
una reparaci6n acuerdo de protecci6n le puede ahorrar dinero y a la
agravaci6n.
Esto es Io que la reparaci6n acuerdo de protecci6n incluye:
-servicio de Expertos por nuestros 10.000 reparaci6n profesionales
especialistas
-servicio ilimitado y no te cobran pot piezas y mano de obra en todas
las reparaciones cubiertas.
-Producto de sustituci6n hasta un total de 1500 si su producto
amparado no pueden repararse.
-Descuento del 25% del precio de los servicios relacionados con
componentes instalados y no cubiertos pot el acuerdo; asimismo, 25%
descuento precio regular de mantenimiento preventivo. -Ayuda rapida
por telefono de Io Ilamamos una rapida resoluci6n de soporte telef6nico
de Sears representante, piense en nosotros como hablando manual
del propietario.
Una vez que usted compra la reparaci6n Protecci6n Acuerdo. una
simple Ilamada telef6nica es todo Io que se necesita para programar
servicio. La reparaci6n es un acuerdo de protecci6n riesgo compra libre.
Si usted cancela pot cualquier motivo durante el periodo de garantia,
que nos proporcionara un reembolso completo. O una devoluci6n
prorrateada anytime tras el periodo de garantia caduca.
AIgunas limitaciones y exclusiones se aplican. Para precios e
informaci6n adicional en los U.S.A. Ilame al 1-800 -827-6655. Cobertura
en Canada varia sobre algunos temas. Para conocer los detalles
completos en Sears Canada al 1-800-525-3243 (1-800-361-6665.
Sears Instalaci6n profesional servicio de instalaci6n de aparatos de uso
domestico, garaje garajes, calentadores de agua, y otros importantes
temas domesticos, en los U.S.A. o Canada Ilame al 1-800-4-MY-HOME.
37
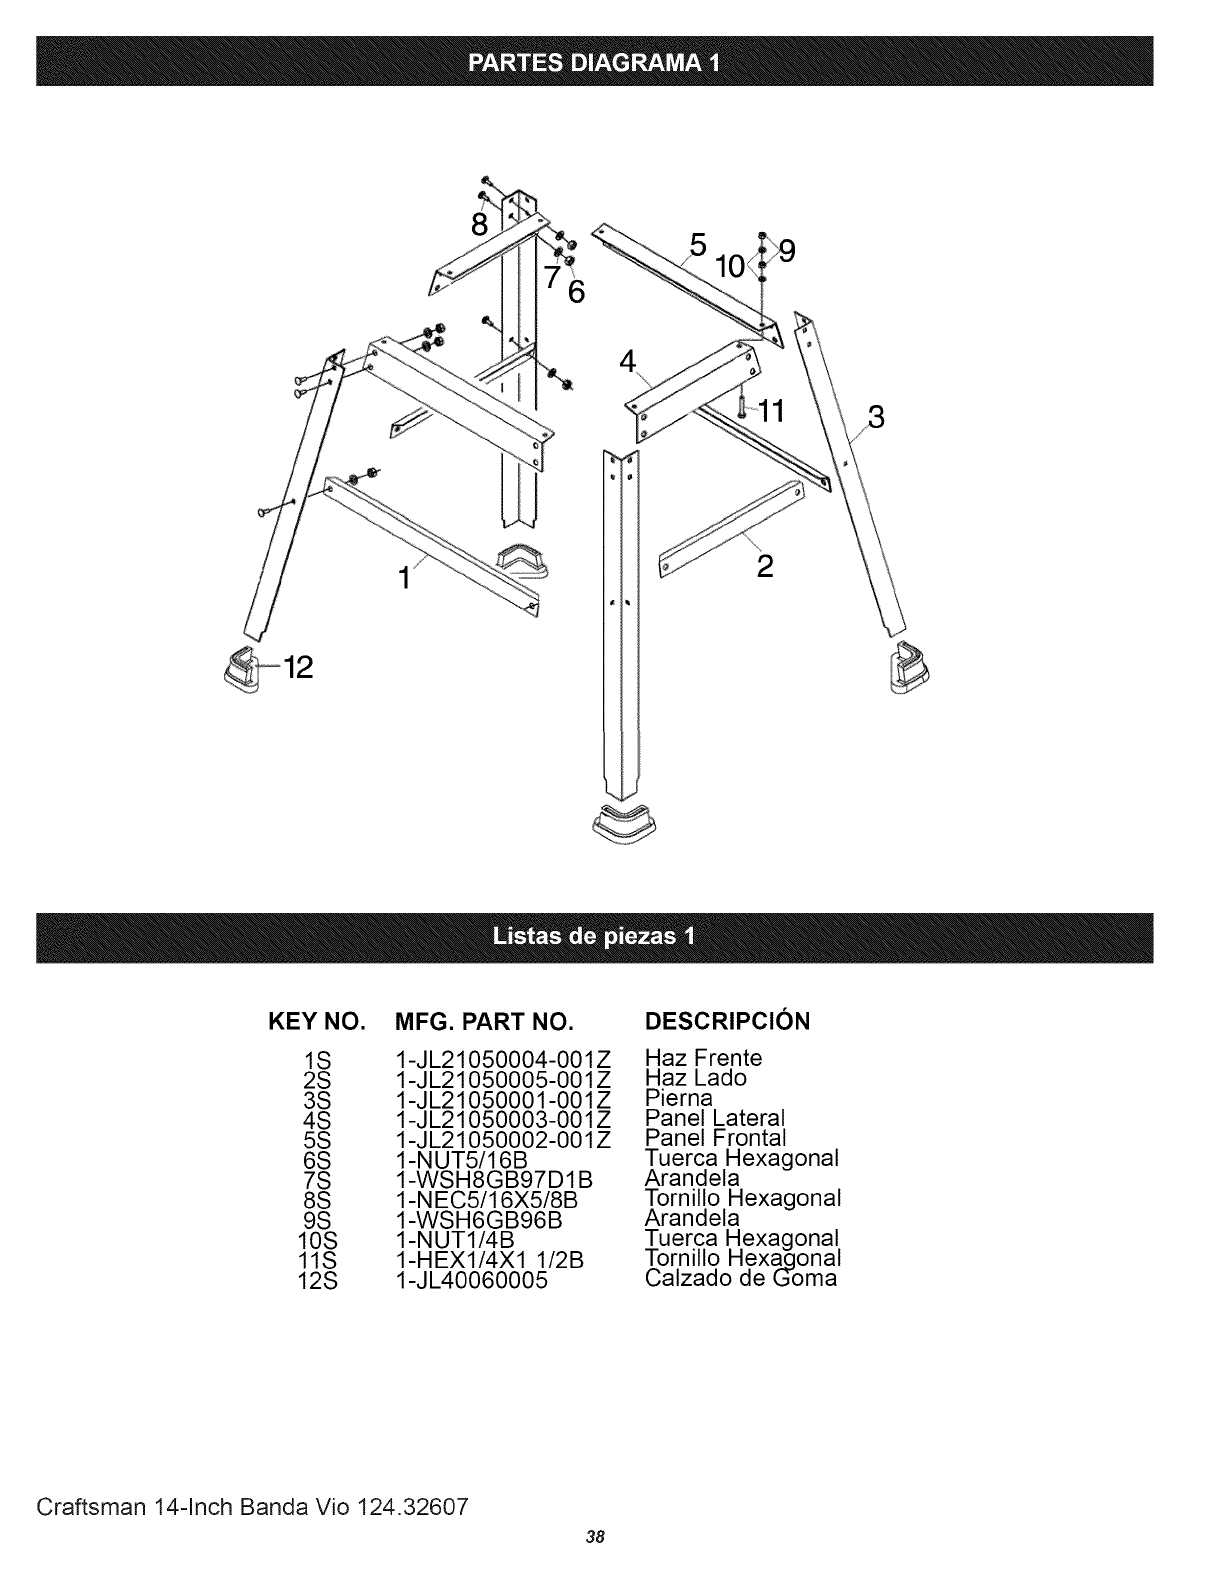
8
6
2
KEY NO. MFG. PART NO. DESCRIPCION
1S 1-JL21050004-001Z Haz Frente
2S 1-JL21050005-001Z Haz Lado
3S 1-JL21050001-001Z Pierna
4S 1-JL21050003-001Z Panel Lateral
5S 1-JL21050002-001Z Panel Frontal
6S 1-NUT5/16B Tuerca Hexagonal
7S 1-WSH8GB97 D1B Arandela
8S 1-NEC5/16X5/8B Tornillo Hexagonal
9S 1-WSH6GB96B Arandela
10S 1-NUT1/4B Tuerca Hexagonal
11S 1-HEX1/4X1 1/2B Tornillo Hexaqonal
12S 1-JL40060005 Calzado de G-oma
Craftsman 14-Inch Banda Vio 124.32607
38
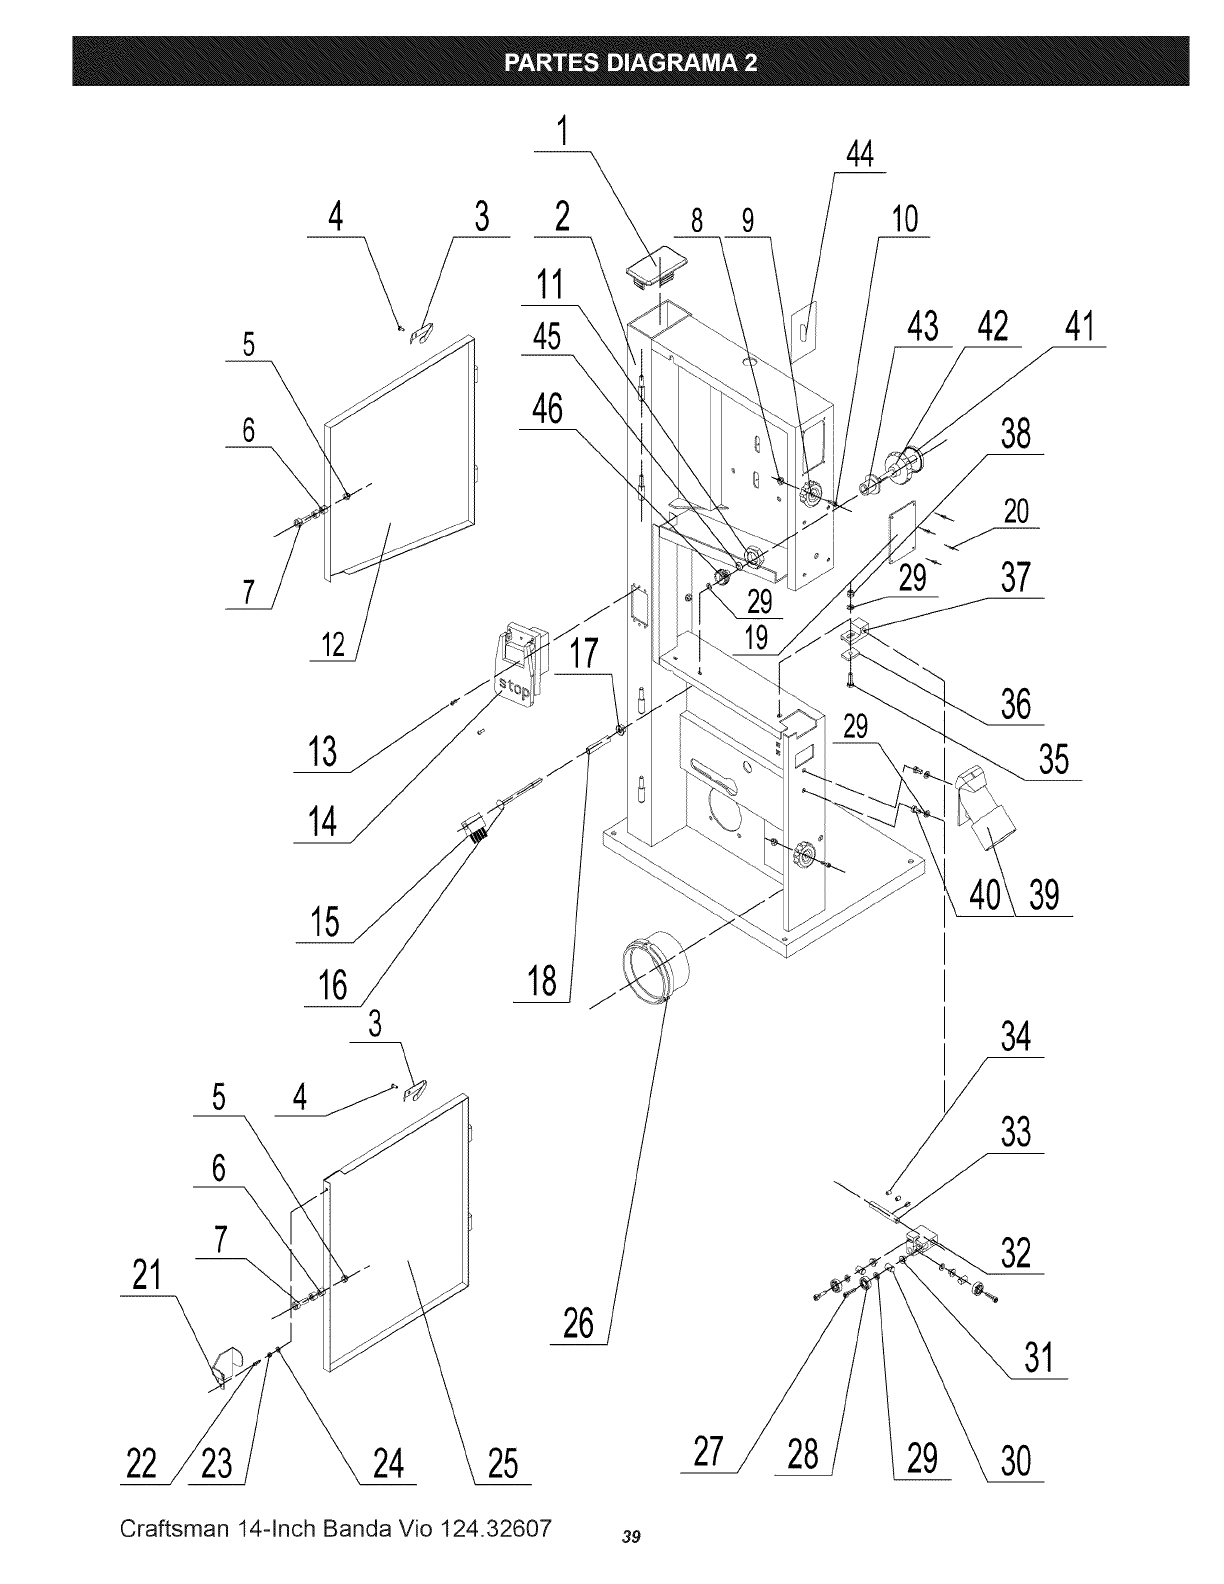
144
5
6
7
12
t3
14
t5
4 3 2
11
45
46
10
43 42 41
38
20
37
36
35
39
21
-\
5 4
6
7
16 3
22 24 25
18
26
27
34
33
32
31
30
Craftsman 14-Inch Banda Vio 124.32607 39
KEY NO. MFG. PART NO. DESCRIPCION
1
2
3
4
5
6
7
8
9
10
11
12
13
14
15
16
17
18
19
2O
21
22
23
24
25
26
27
28
29
30
31
32
33
34
35
36
37
38
39
40
41
42
43
44
45
46
1-JL21010001A-001S
1-JL21011000L001Z
1-J L20010008
1-RVT4X8GB12618A
1-M6GB889Z
1-J L26010007
1-M6X25GB70Z
1-M6GB889Z
1-J L26010006-106S
1-M6X25GB70Z
1-M20GB6173Z
1-JL21012000H081Z
1-M4X12GB818Z
1-HY56C
1-J L20010004
1-M8X100GB14Z
1-M8GB6177D1Z
1-JL21020005
1-J L26010001
1-RVT3X7GB12618A
1-JL20010006-001Z
1-M4X12GB818Z
1-M4GB889Z
1-WSH4GB97D1Z
1-JL21013000D-081Z
1-J L20010007-001S
1-M5X20GB70Z
1-BRG608-2ZGB276
1-WSH6GB97D1Z
1-JL22042004
1-JL20042002
1-JL21042001
1-JL22043002
1-M6X10G B80 B
1-M6X20GB5783Z
1-JL20040001
1-JL21043001
1-M6GB889Z
1-JL21010019
1-M6X10GB5781Z
1-J L20024001-001S
1-J L20044001-001S
1-JL20044002
1-JL21020003
1-JL22040003
1-JL22040001
Comienzo plug
Enmarcar
Hoja resorte
Remache
Tuerca M6
Buje
Tornillo hexagonal M6X25
Tuerca M6
Bloqueo de la Puerta mando
Tornillo Hexagonal M6X25
Tuerca Hexagonal M20
Puerta Superior
Tornillo Pan
Interruptor
Cepillo
Transporte perno M8X100
Brida tuerca M8
Tubo
Ventana Transparente
Remache3x7
Cuchilla Cubrir
Tornillo Pan
Tuerca M4
Arandela
Portezuela Inferior
Puerto de Polvo
El tornillo de ajuste
Soportar
Arandela 6
Teniendo monte cilindro
Teniendo buje
Guia Superior monte
Menor ele guia
Tornillo Hexagonal M6xl0
Tornillo Hexagonal M6x20
Guia inferior monte asiento
Guia menor apoyo
Tuerca M6
Puerto de Polvo 2-1/2"
Tornillo Hexagonal
.Ajuste mando pac
_A]uste mando cuerpo
Tubo
Regla
Arandela de tipo resorte
Engranar
Craftsman 14-Inch Banda Vio 124.32607 4O
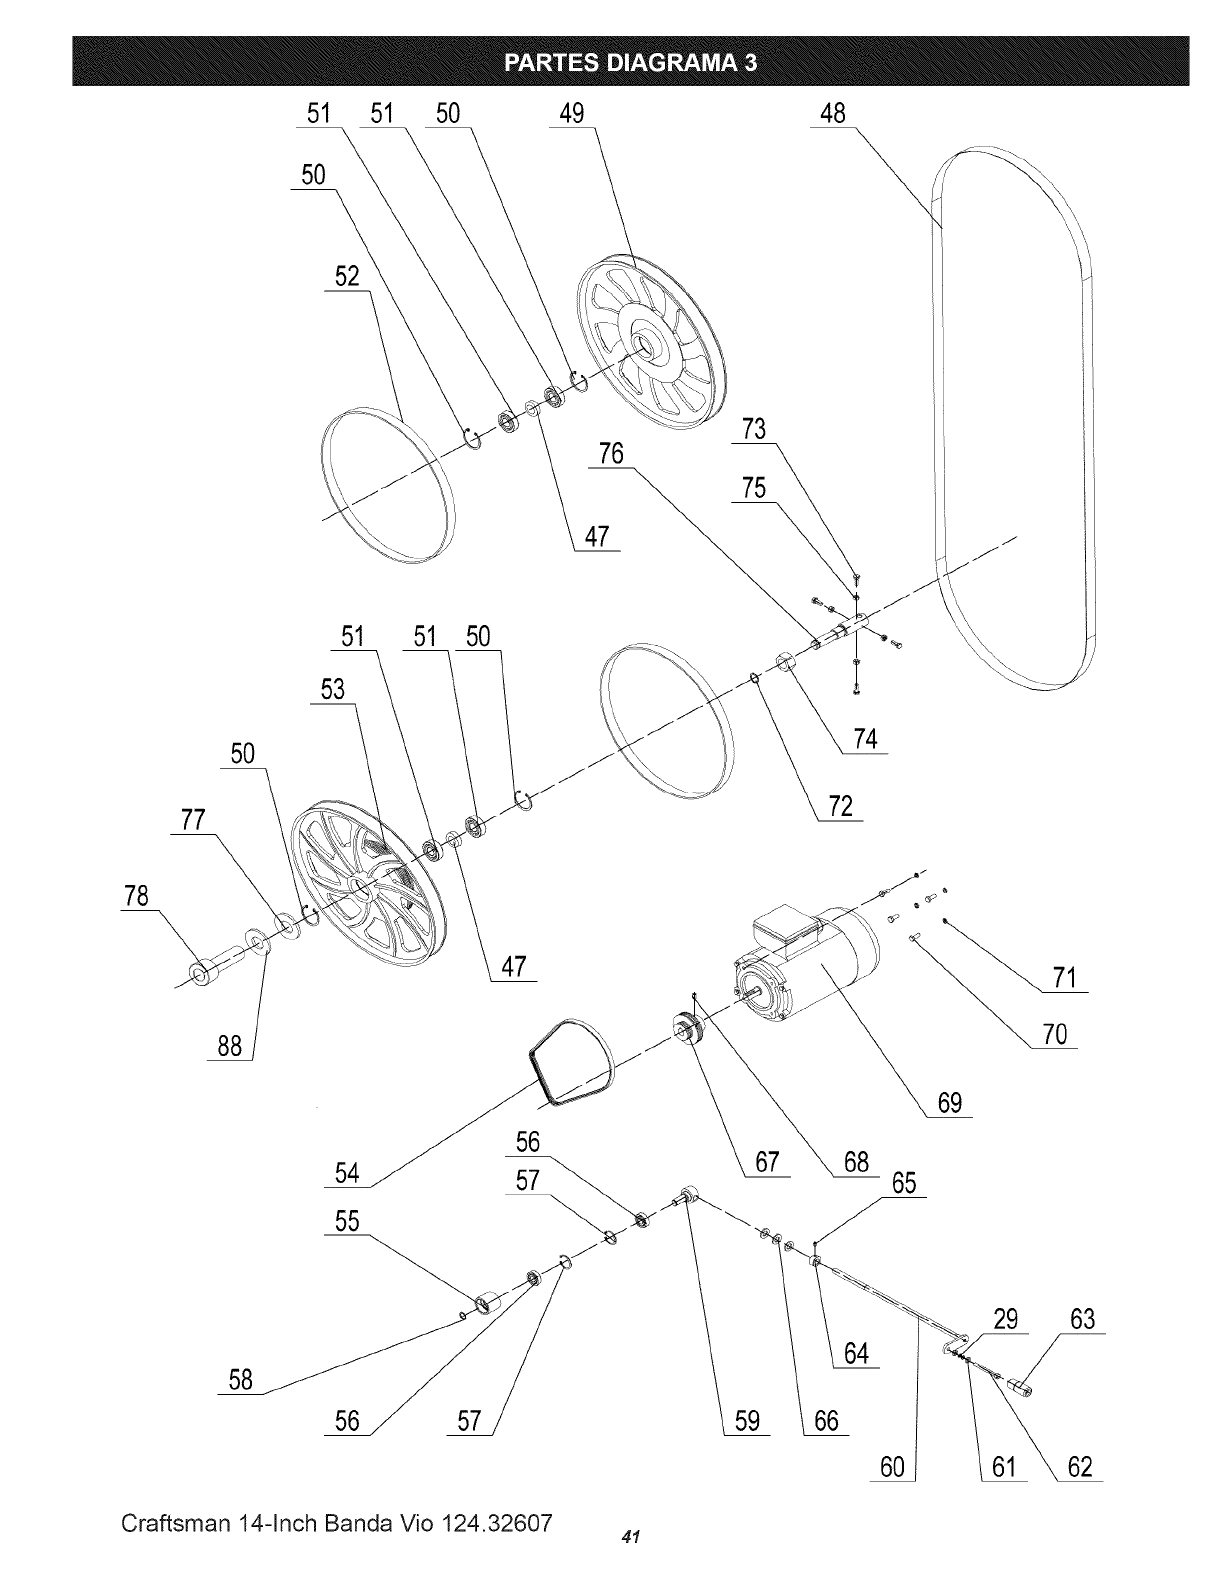
51 51 50 49 48
50 \
52
-\
76
47
73
75
--\ /
77
50
51
53
51 5O
74
72
78
88
58
47
56 57 66
69
65
60
29
71
70
63
62
Craftsman 14-Inch Banda Vio 124.32607 41
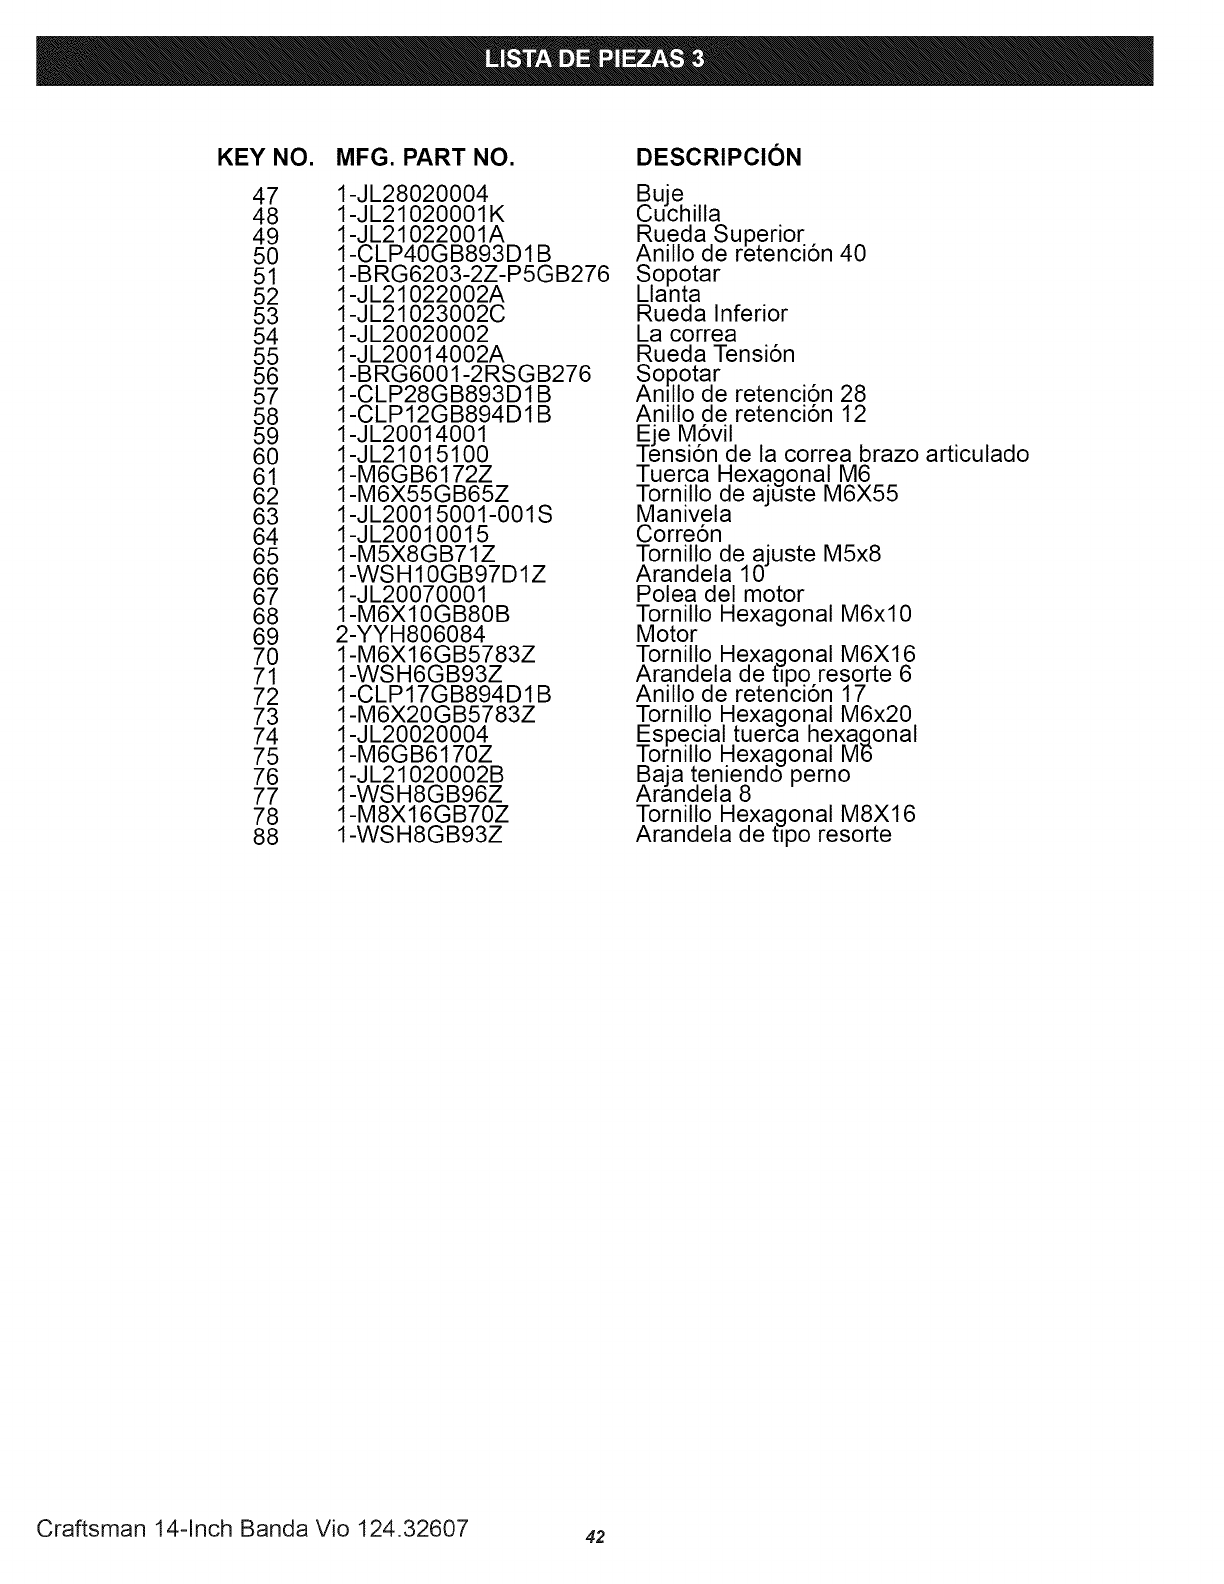
KEY NO. MFG. PART NO.
47 1-JL28020004
48 1-JL21020001K
49 1-JL21022001A
50 1-CLP40GB893D 1B
51 1-BRG6203-2Z-P5GB276
52 1-JL21022002A
53 1-JL21023002C
54 1-JL20020002
55 1-JL20014002A
56 1-B RG6001-2 RS G B276
57 1-CLP28GB893D 1B
58 1-CLP12GB894 D 1B
59 1-JL20014001
60 1-JL21015100
61 1-M6GB6172Z
62 1-M6X55GB65Z
63 1-JL20015001-001S
64 1-JL20010015
65 1-M5X8GB71Z
66 1-WSH10GB97D1Z
67 1-JL20070001
68 1-M6X10GB80B
69 2-YYH806084
70 1-M6X16GB5783Z
71 1-WSH6GB93Z
72 1-CLP17GB894 D 1B
73 1-M6X20GB5783Z
74 1-JL20020004
75 1-M6GB6170Z
76 1-JL21020002B
77 1-WSH8GB96Z
78 1-M8X16GB70Z
88 1-WSH8GB93Z
DESCRIPClON
Buje
Cuchilla
Rueda Superior
Anillo de retenci6n 40
Sopotar
Llanta
Rueda Inferior
La correa
Rueda Tensi6n
Sopotar
Anfllo de retenci6n 28
Anillo de retenci6n 12
Eje M6vil
Tensi6n de la correa brazo articulado
Tuerca Hexagonal M6
Tornillo de ajuste M6X55
Manivela
Corre6n
Tornillo de ajuste M5x8
Arandela 10
Polea del motor
Tornillo Hexagonal M6xl0
Motor
Tornillo Hexaqonal M6X16
Arandela de tipo resorte 6
Anillo de retenci6n 17
Tornillo Hexagonal M6x20
Especial tuerca hexaclonal
Tornillo Hexagonal M6
Baja teniendo perno
Arandela 8
Tornillo Hexaclonal M8X16
Arandela de tfpo resorte
Craftsman 14-Inch Banda Vio 124.32607 42
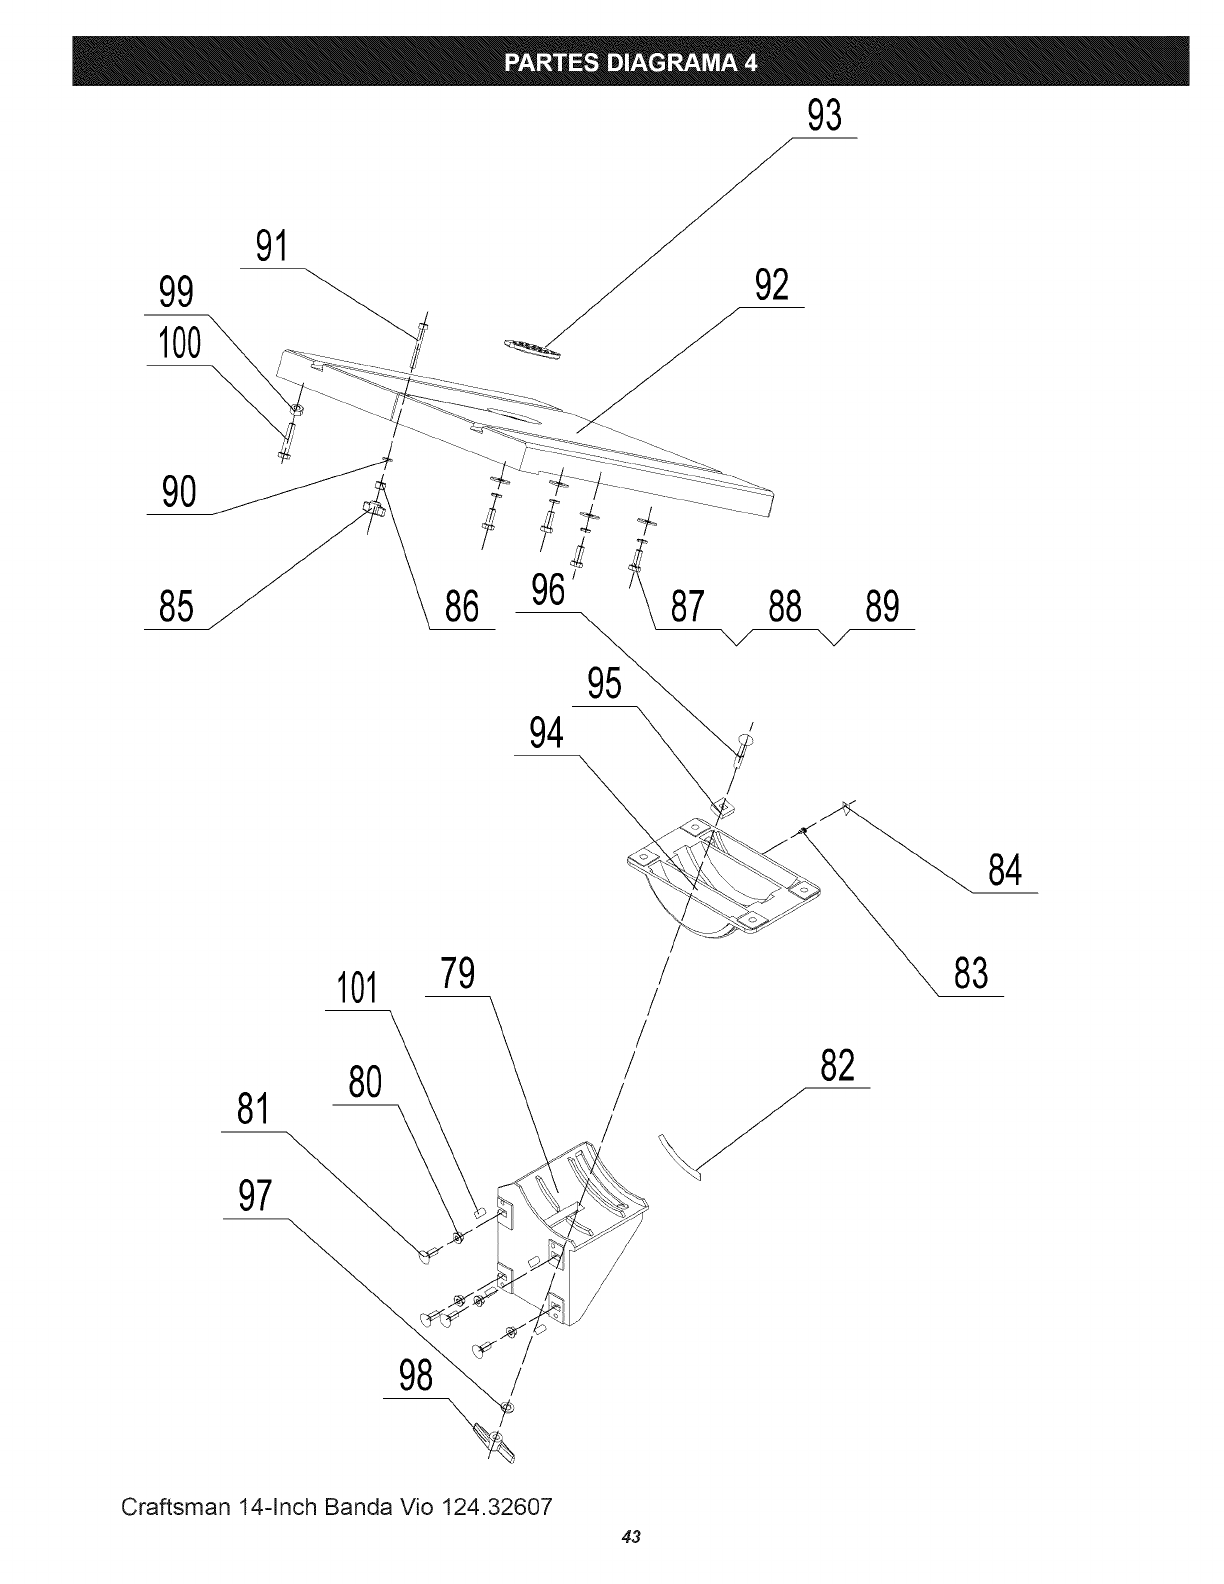
93
99
100
--\
91
85 86 96' _ 89
94
95
101 79
80
97
/
/
/
/
/82
83
98 /
Craftsman 14-Inch Banda Vio 124.32607
43

KEY NO.
79
80
81
82
83
84
85
86
87
88
89
90
91
92
93
94
95
96
97
98
99
100
101
MFG. PART NO.
1-JL20030001A
1-M8GB6177B
1-M8X20GB14Z
1-JL20030004
1-ST3D5X9D5GB845Z
1-1506003
1-JL22020002-001S
1-JL21031003
1-M8X20GB5783Z
1-WSH8GB93Z
1-WSH8GB96Z
1-WSH6GB97D1Z
1-M6X45GB70Z
1-JL21031001D001G
1-JL20031002-001S
1-JL20032001
1-WSH8GB96Z
1-M8X50GB14Z
1-WSH8GB97D1Z
1-JL20010016-001S
1-M8GB6 70Z
1-M8X45(_B5783Z
1-M6X10(_B80B
DESCRIPCION
CHARNELA inferior tabla
Brida tuerca M8
Transporte perno M8x20
Volviendo etiqueta
Tornillos 3.5x9.5
Puntero
Manija
Tubo
Tornillo Hexagonal
Arandela de t_po resorte
Arandela
Arandela 6
Socket tornillo de cabeza
Tabla
Insertar tabla
Tabla Superior charnela
Arandela 8
Transporte perno M8x50
Arandela 8
Tuerca M8
Nuez
Perno
Tornillo
Craftsman 14-Inch Banda Vio 124.32607 44
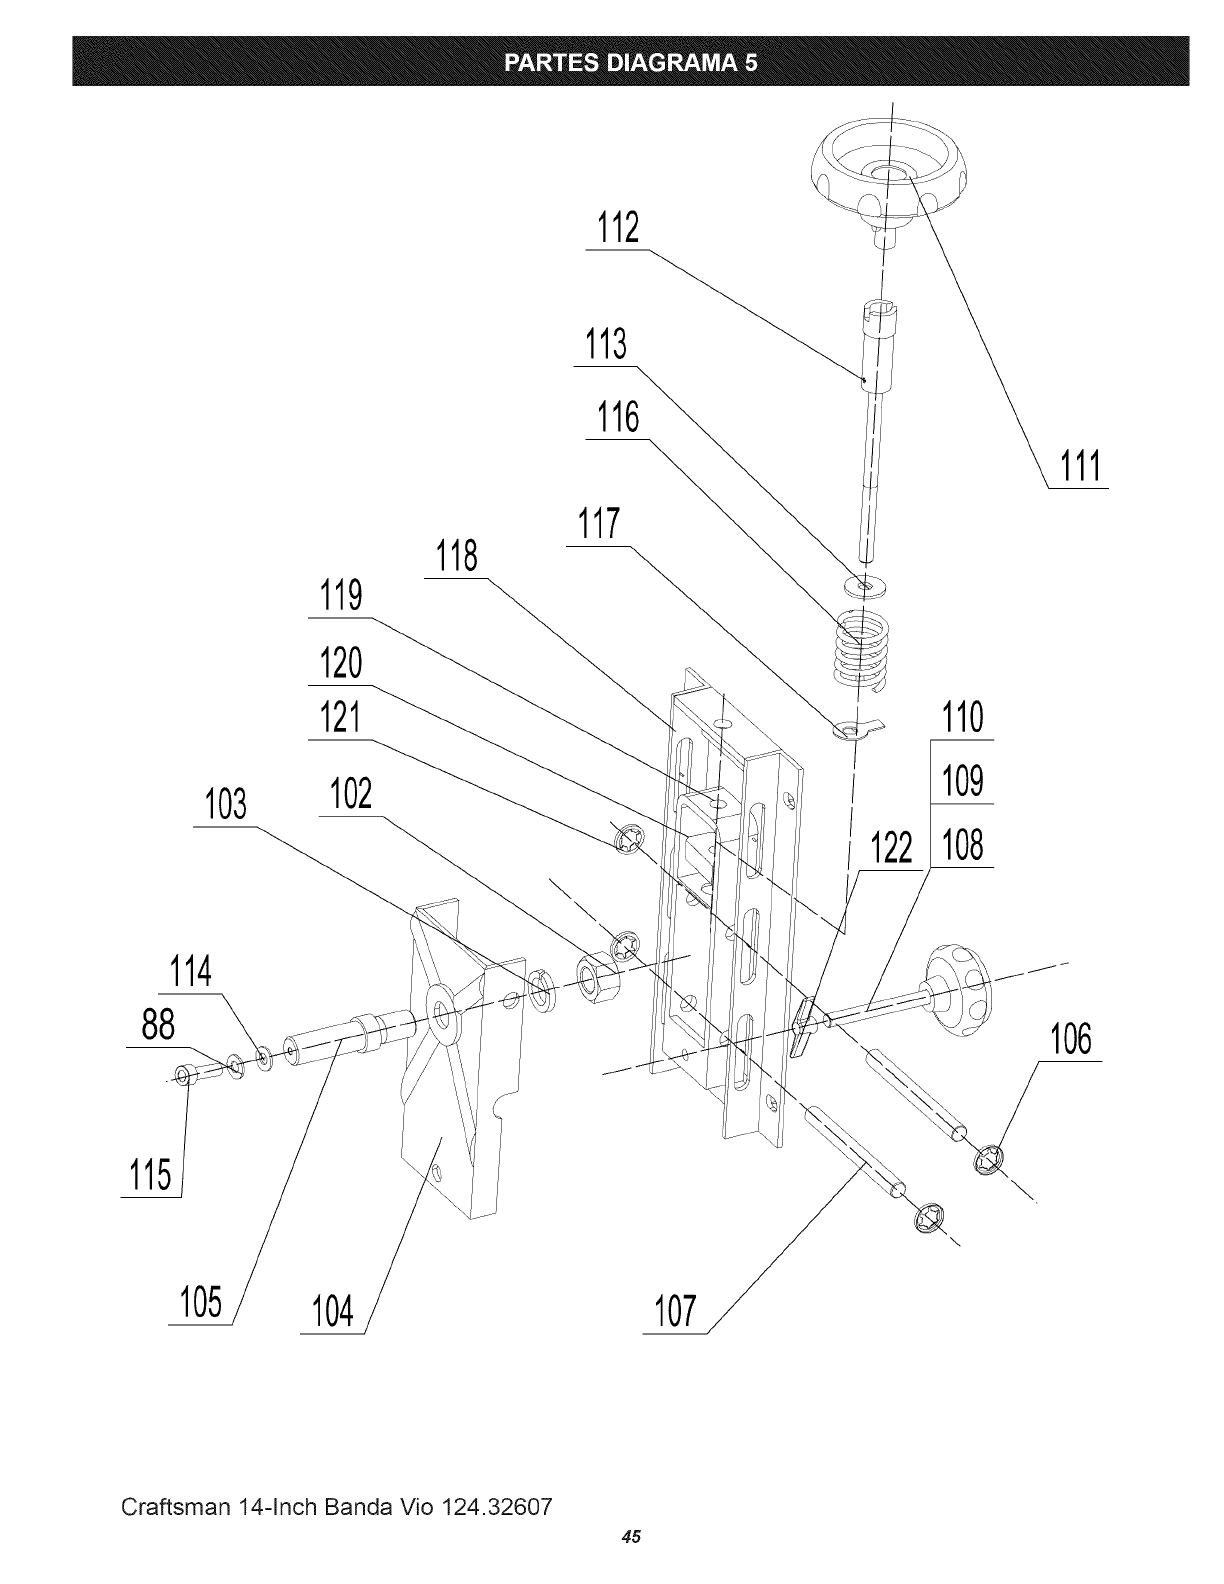
119 118
112
113
116
117
111
103
114
88
115
120
121
102__
\\
110
/109
122 108
j_
106
\
105 104 107
Craftsman 14-Inch Banda Vio 124.32607
45

KEY NO.
88
102
103
104
105
106
107
108
109
110
111
112
113
114
115
116
117
118
119
120
121
122
MFG. PART NO.
1-WSH8GB93Z
1-M16GB6171Z
1-WSH16GB93Z
1-JL20021005A001Z
1-JL20021006D
1-JL20021004
1-JL20021002
1-J L20024001-001S
1-J L20024002-001S
1-M8X70GB5781Z
1-JL21025000A- 106S
1-JL21021200A
1-JL20030002
1-WSH8GB96Z
1-M8X16GB70Z
1-JL21021010A
1-JL21020004-014T
1-JL20021100A001Z
1-J L20021001B001Z
1-JL20021009
1-JL20021004
1-J L20010016-001S
DESCRIPClON
Arandela de tipo resorte
Tuerca Hexaqonal M16
Arandela de tipo resorte 16
Rueda carro
C0jinete superior perno
Star cerradura
Montar el eje
.Ajuste manido pac
_A]uste mando cuerp.o
T6rnillo Hexagonal M8x70
Tensi6n de la Hoja mando
Cuchilla tensor
Glide pieza
Arandela 8
Tornillo Hexagonal M8X16
Brotar
Puntero
Tensi6n soporte
Cuchilla tensor
Tuerca de ajuste
Star cerraaura
Tuerca M8
Craftsman 14-Inch Banda Vio 124.32607 46

139
136
145 143 142
14i_4
135 140
14t
147
©
141
138
132
137
130
125
125
128
126
131
132
134
133
145 144 123
146
Craftsman 14-Inch Banda Vio 124.32607
124
47
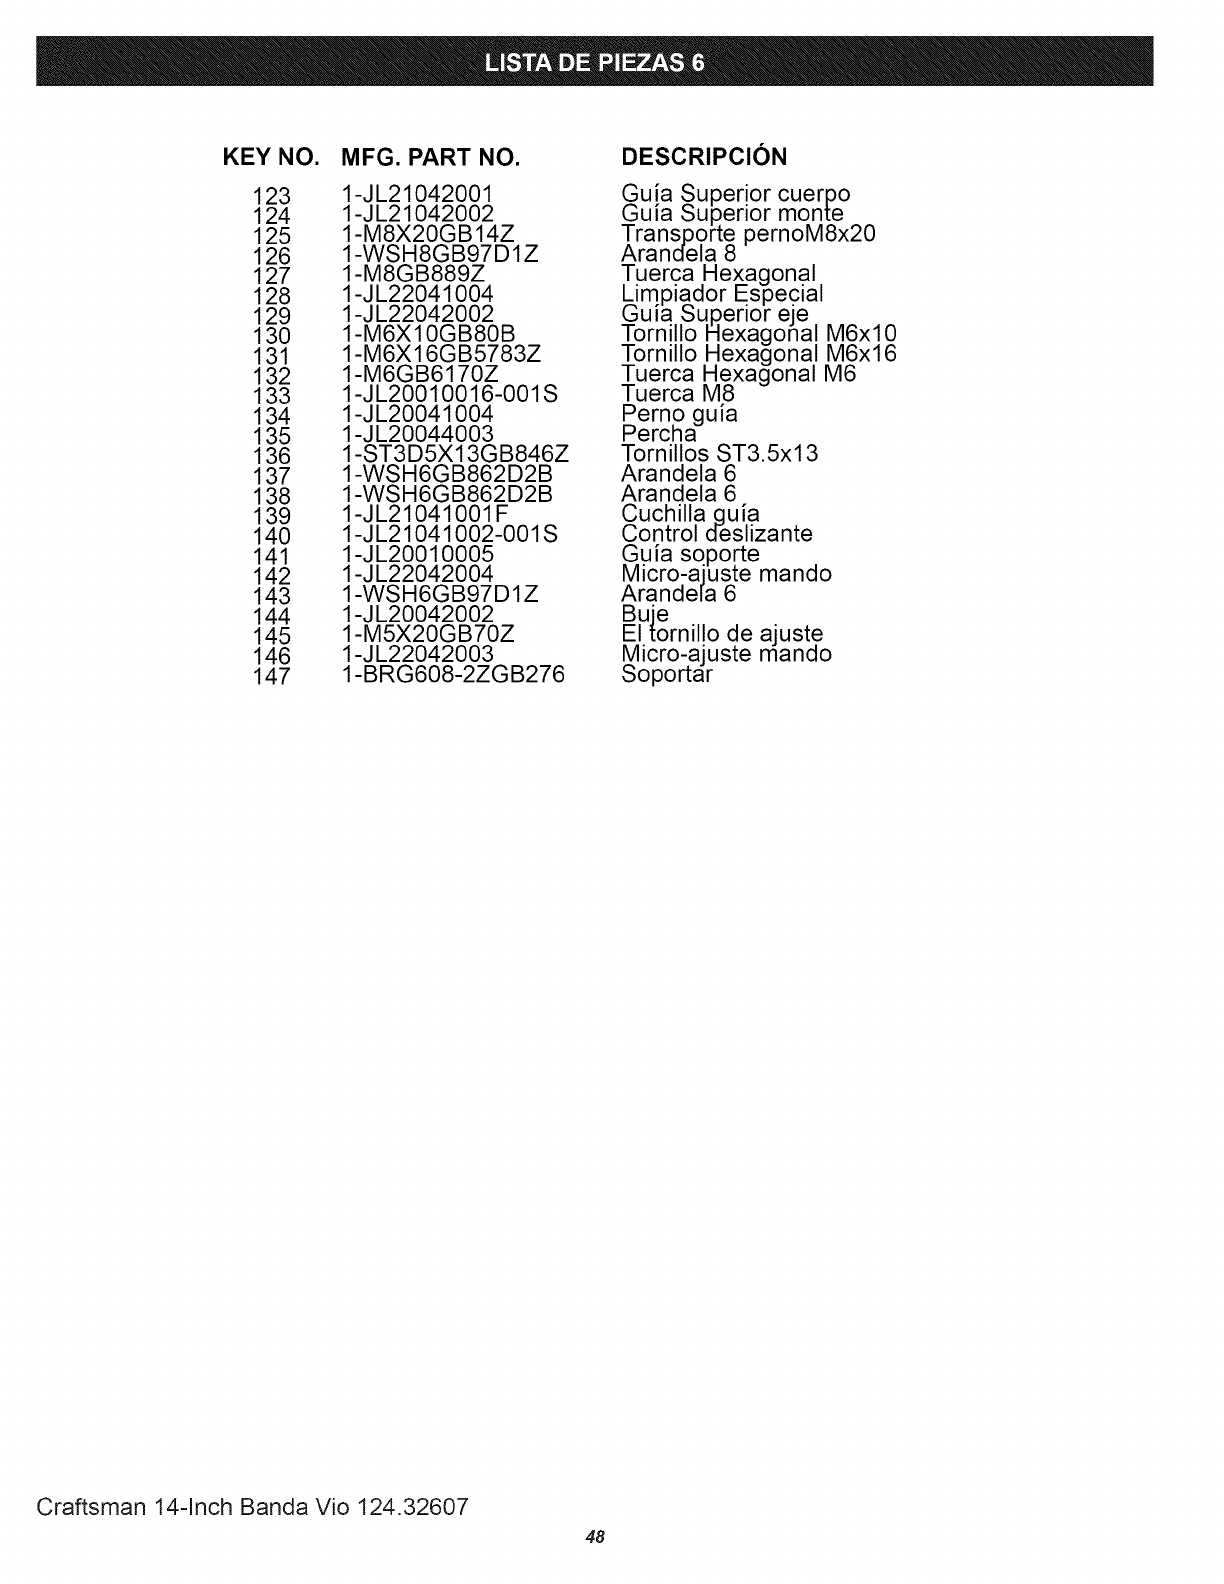
KEY NO.
123
124
125
126
127
128
129
130
131
132
133
134
135
136
137
138
139
140
141
142
143
144
145
146
147
MFG. PART NO.
1-JL21042001
1-JL21042002
1-M8X20GB14Z
1-WSH8GB97D1Z
1-M8GB889Z
1-J L22041004
1-JL22042002
1-M6X10(_ B80 B
1-M6X16(} B5783Z
1-M6GB6170Z
1-J L20010016-001S
1-J L20041004
1-JL20044003
1-ST3 D5X 13G B846Z
1-WSH6GB862D2B
1-WSH6GB862D2B
1-JL21041001F
1-JL21041002-001S
1-J L20010005
1-JL22042004
1-WSH6GB97D1Z
1-JL20042002
1-M5X20GB70Z
1-JL22042003
1-BRG608-2ZGB276
DESCRIPCION
Guia Superior cuerpo
Guia bupenor monte
Transporte pernoM8x20
Arandela 8
Tuerca Hexagonal
Limpiador Especial
Guia Superior eje
Tornillo Hexagonal M6xl0
Tornillo Hexagonal M6x16
Tuerca Hexagonal M6
Tuerca M8
Perno "
PerchagU la
Tornillos ST3.5x13
Arandela 6
Arandela 6
Cuchilla quia
Control d-eslizante
Guia soporte
Micro-aiuste mando
Arande[a 6
Buie
El tornillo de ajuste
Micro-ajuste manao
Soportar
Craftsman 14-Inch Banda Vio 124.32607
48

49

Your Home
For troubleshooting, product manuals and expert advice:
managemylife
www.managemylife.com
For repair - in your home - of all major brand appliances,
lawn and garden equipment, or heating and cooling systems,
no matter who made it, no matter who sold it!
For the replacement parts, accessories and
owner's manuals that you need to do-it-yourself.
For Sears professional installation of home appliances
and items like garage door openers and water heaters.
1-800-4-MY-HOME ®(1-800-469-4663)
Call anytime, day or night (U.S.A. and Canada)
www.sears.com www.sears.ca
Our Home
For repair of carry-in items like vacuums, lawn equipment,
and electronics, call anytime for the location of your nearest
Sears Parts & Repair Service Center
1-800-488-1222 (U.S.A.) 1-800-469-4663 (Canada)
www.sears.com www.sears.ca
To purchase a protection agreement on a product serviced by Sears:
1-800-827-6655 (U.S.A.) 1-800-361-6665 (Canada)
Para pedir servicio de reparaci6n
a domicilio, y para ordenar piezas:
1-888-SU-HOGAR ®
(1-888-784-6427)
www.sears.com
Au Canada pour service en fran(_ais:
1-800-LE-FOYER M°
(1-800-533-6937)
www.sears.ca
® Registered Trademark /TMTrademark of KCD IP, LLC in the United States, or Sears Brands, LLC in other countries
® Marca Registrada /TMMarca de Fabrica de KCD IP, LLC en Estados Unidos, o Sears Brands, LLC in otros paises
MCMarque de commerce /UDMarque deposee de Sears Brands, LLC
