Craftsman 129118010 User Manual HEAT GUN Manuals And Guides 1401110L
User Manual: Craftsman 129118010 129118010 CRAFTSMAN HEAT GUN - Manuals and Guides View the owners manual for your CRAFTSMAN HEAT GUN #129118010. Home:Tool Parts:Craftsman Parts:Craftsman HEAT GUN Manual
Open the PDF directly: View PDF ![]() .
.
Page Count: 7
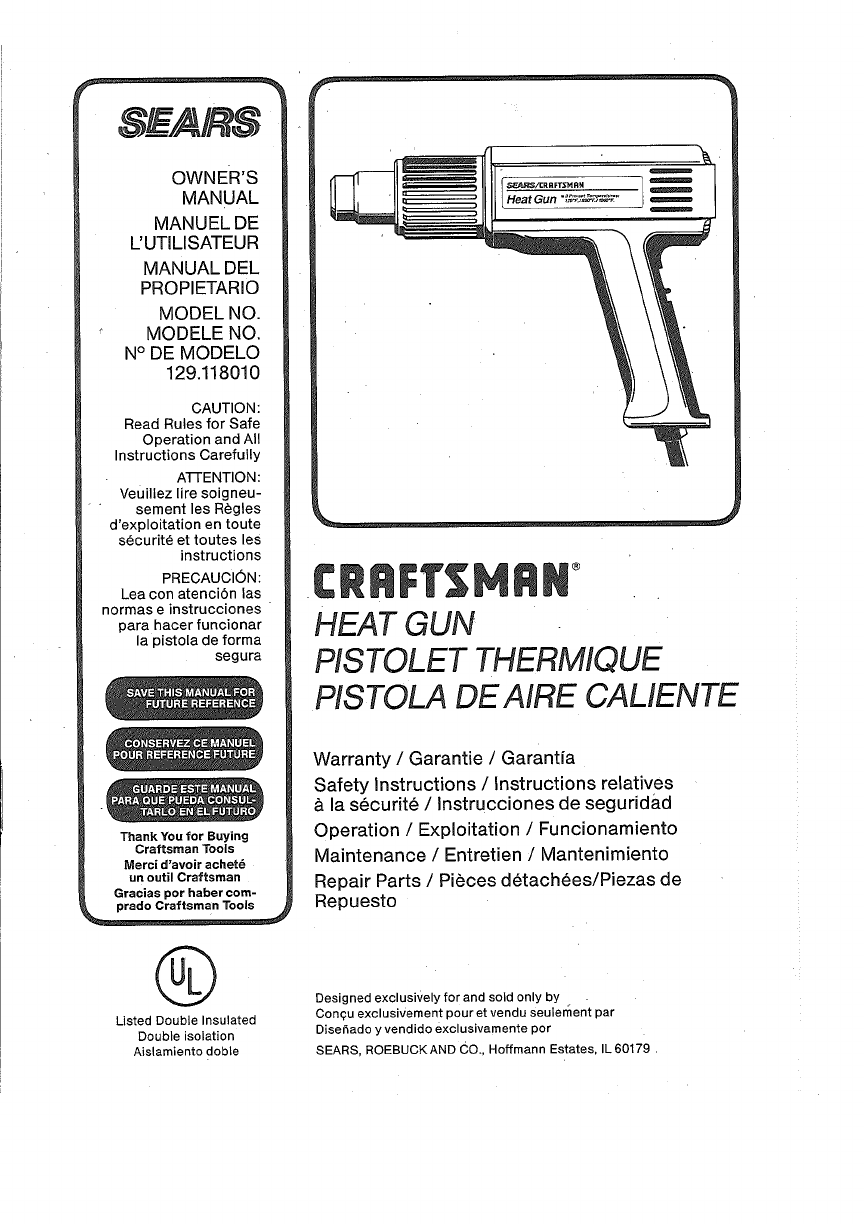
OWNER'S
MANUAL
MANUEL DE
L'UTILISATEUR
MANUAL DEL
PROPIETARIO
MODEL NO.
MODELE NO.
N° DE MODELO
129.118010
CAUTION:
Read Rules for Safe
Operation and All
Instructions Carefully
AFrENTION:
Veuillez lire soigneu-
sement les R¢gles
d'exploitation en toute
s6curite et toutes les
instructions
PRECAUCION:
Lea con atencidn las
normas e instrucciones
para hacer funcionar
la pistola de forma
segura
Thank You for Buying
Craftsman Tools
Merci d'avoir achet_
un outil Craftsman
Gracias por haber com-
_sman Tools :
Q
Listed Double Insulated
Double isolation
Aislamiento doble
L
CRAFTSMAN
HEAT GUN
PISTOLET THERMIQUE
PISTOLA DE A/RE CALENTE
Warranty /Garantie /Garant{a
Safety Instructions /Instructions relatives
& la securite /Instrucciones de seguridad
Operation /Exploitation /Funcionamiento
Maintenance /Entretien /Mantenimiento
Repair Parts /Pieces detachees/Piezas de
Repuesto
Designed exclusively for and sold only by
Concu exclusivement pour et vendu seulement par
DiseSado y vendide exclusivamente por
SEARS. ROEBUCKAND CO.. Hoffmann Estates, IL 60179
UL WARNING ! Read this instruction book using. To reduce risk of fire or electric shock, do not
expose to rain or moisture. Store indoors. When servicing, use only identical replacement
parts. When using electric tools, basic safety precautions should always be followed to re-
duce the risk of fire, electric shock and personal injury. This Heat Gun operates a 1050 ° F with
no visual indication of tern perature (no flame). The hot air stream at the outlet nozzle will BURN
FLESH. Do not turn on Heat Gun with hand in front of nozzle. DO NOT USE NEAR COMBUS-
TIBLE UQUIDS. DO NOT USE FOR: heating gas engines; heating car batteries; thawing refri-
gerator equipment.
FULL ONE YEAR WARRANTY ON
CRAFTSMAN HEAT GUN
If this Craftsman Heat Gun fails to give complete satisfaction within one year from the date
of purchase,
RETURN IT TO (OR CONTACT) THE NEAREST SEARS SERVICE CENTER/DEPARTMENT
IN THE UNITED STATES and Sears will repair it, free of charge.
If this Heat Gun is used for commercial or rental purposes, this warranty applies for only
90 days from the date of purchase.
This warranty gives you specific legal rights, and you may also have other rights which vary
from state to state.
Sears, Roebuck and Co., Dept. 817 WA, Hoffmann Estates, IL 60179
RULES FOR SAFE OPERATION
READ ALL INSTRUCTIONS
1. KNOW YOUR POWER TOOL - Read owner's
manual carefully. Learn its applications and
limitations as well as the specific potential
hazards related to this tool.
2. GUARD AGAINST ELECTRICAL SHOCK
BY PREVENTING BODY CONTACT WITH
GROUNDED SURFACES. For example:
Pipes, radiators, ranges, refrigerator enclo-
sures.
3. KEEP WORK AREA CLEAN. Cluttered areas
and benches invite accidents.
4. AVOID DANGEROUS ENVIRONMENT. Don't
use power tool in damp or wet locations or
expose to rain. Keep work area well lit.
5, KEEP CHILDREN AND VISITORS AWAY. All
visitors should wear safety glasses and be
kept a distance from work area. Do not let
visitors contact tool or extension cord,
6. STORE IDLE TOOLS, When not in use tools
should be stored in a dry, high or locked-up
place out of reach of children.
7. USE RIGHT TOOL. Don't use tool for pur-
Dose not intended.
8. WEAR PROPER APPAREL. No loose cloth-
ing or jewelry to get caught in moving parts.
Rubber gloves and non-skid footwear are_re-
commended when working outdoors. Also,
wear protective hair covering to contain long
hair and keep it from being drawn into air
vents.
9. USE SAFETY GLASSES with all tools.
Page 2
t
10. DON'T OVERREACH. Keep proper footing
and balance at all times.
11. MAINTAIN TOOLS WiTH CARE, Keep tools
clean.
12. KEEP HANDLES DRY, CLEAN, AND FREE
FROM OIL AND GREASE. Always use a
clean cloth when cleaning. Never use brake
fluids, gasoline, petroleum-based products,
or any strong solvents to clean your tool.
13. STAY ALERT. Watch what you are doing and
use common sense. Do not operate tool
when you are tired. Do not rush.
14. DO NOT USE TOOL IF SWITCH DOES NOT
TURN IT ON AND OFF, Have defective swit-
ches replaced by an authorized service cen-
ter.
15. DRUGS, ALCOHOL, MEDiCATiON. Do not
operate tool whild under the influence of
drugs, alcohol, or any medication.
19. COOL DOWN. Set tool in the upright posi-
tion to cool down. Do not lay on its side.
20. DO NOT STORE UNTIL COOL. Do not store
tool until nozzle and accessory tips have
cooled to room temperature. Place tool in a
clear area away from combustible materials
while cooling.
21. DO NOT CUT OFF AIR FLOW by placing
nozzle too close to workpiece. Keep the air
intake vents clean and clear of obstructions.
22. HANDS FREE OPERATION. Place tool on a
level surface when using in an upright posi-
tio_ Place cord in a position that won't
cause tool to tip over.
23. ATTEND THE TOOL. Do not leave tool unat-
tended while running or cooling down.
24. FIRE DANGER. Keep a fully charged fire
extinguisher nearby.
25. DO NOT DIRECT AIR FLOW directly on
glass.
IMPORTANT SAFETY RULES FOR HEAT GUNS 26.
16. FLAMELESS HEAT. This heat gun can pro- 27.
duce up to 1000 ° F of flameless heat at the
nozzle. Do not direct air stream at clothing,
hair or other body parts. Do not use as a hair 28.
dryer.
17. NEVER USE IN AN EXPLOSIVE ATMOS-
PHERE, Do not use near flammable liquids
or i_ an explosive environment (fumes,
gases or dust). Remove materials or debris,
that may become ignited, from work area.
18. DANGER OF BURNS. Always hold tool by
plastic enclosure. The metal nozzle requires
approximately 20 minutes to cool to where it
can be touched. Do not touch nozzle or
accessory tips until cool.
SHIELD MATERIALS around the heated
area to prevent heat damage or fire.
USE WITH 120 Volt, 60 Hz, AC only power
source.
DO NOT USE TOOL IN WET CONDITIONS.
Use only in dry conditions. Do not use in bath
or over water.
29. KEEP CHILDREN OUT OF WORK AREA.
This tool is not a toy and should be re-
spected. This tool burns flesh immediately.
30. PROTECTIVE CLOTHING. Leather gloves
must be worn at all times when using the
heat gun.
31. STRIPPING PAINT. See detailed instructions
in this manual.
WARNING: Some dust created by power sanding, sawing, grinding, drilling, and other construction activities
contains chemicals known (tothe State of California) to cause cancer, birth defects or other reproductive harm.
Some examples of these chemicals are:
•lead from lead-base(_ paints,
• crystalline silica from bricks and cement and other masonry products, and
•arsenic and chromium from chemically-treated lumber.
Your risk from these exposures varies, depending on how often you do this type of work. To reduce your expo-
sure to these chemicals: work in a well ventilated area, and work with approved safety equipment, such as tho-
se dust masks that are specially designed to filter out microscopic particles.
DOUBLE INSULATED TOOLS
Tools marked with the words "Double insulated" with applicable standards of both Underwriter's
are equipped with a two prong plug. These tools Laboratories, Inc. and Canadian Standard Asso-
have a special insulation system that complies ciation. They do not require grounding.
Page 3
J English I
EXTENSION CORDS
Double insulated tools, like this one, have two
prong cords, and can use either a two or three
prong extension cord. As the distance from the
supply outlet increases, however, heavier gauge
extension cords are required. The use of exten-
sion cords of inacfequate size wire causes a seri-
ous drop in voltage and loss of power. Protect
the cord from damage. Keep cords away from
excessive heat, sharp edges and damp or wet
areas. Repair or replace damaged extension
cords before using.
Ext. Cord Length
40 Ft.
85 Ft.
100 Ft.
170 Ft.
270 Ft.
400 Ft.
650 Ft.
Wire Size
16
14
12
10
8
6
4
WARNING!
This tool is capable of producting temperatures
up to 1000 ° F of flameless heat at the nozzle.
ALWAYS:
® Direct the heat away from yourself and.others.
@ Prevent ignition of combustible materials on
or near the workpiece.
® P[event blockage of intake and nozzle open-
ings.
® Keep a fully charged fire extinguisher on
hand.
• Allow the nozzle and accessory tips to cool to
room temperature before storage.
iMPORTANT SAFETY iNSTRUCTiONS.
READ THESE INSTRUCTIONS!
PAINT STRIPPING
Before beginning any paint removal process you local health department or by a professional
should determine whether the paint you are re- who Used a paint analyzer to check the lead con-
moving contains lead. This can be done by your tact of the paint to be removed.
LEAD-BASED PAINT SHOULD ONLY BE REMOVED
BY A PROFESSIONALAND SHOULD NOT BE REMOVED USING A HEAT GUN.
Page 4
English I
PERSONS REMOVING PAINT
SHOULD FOLLOW THESE GUIDELINES.
1. Move the work piece outdoors. If this
is not possible, keep the work area
well ventilated. Open the windows
and put an exhaust fan in one of
them. Be sure the fan is moving the
air from inside to outside.
2. Remove or cover any carpets, rugs,
furniture, clothing, cooking utensils
and air ducts.
3, Place drop cloths in the work area to
catch any paint chips or peelings.
Wear protective clothing such as
extra work shirts, overalls and hats.
4.
5.
6,,
Work in one room at a time. Furni-
shings should be removed or placed
in the center of the room and cover-
ed. Work areas should be sealed off
from the rest of the dwelling by seal-
ing doorways with drop cloths.
Children, pregnant or potentially
pregnant women and nursing moth-
ers should not be present in the work
area until the work is done and all
clean up is complete.
Wear a dust respirator mask or a dual
filter (dust and fume) respirator mask
which has been approved by the
Occupational Safety and Health Ad-
ministration (OSHA), the National In-
stitute of Safety and Health (NIOSH),
or the United States Bureau of
Mines. These masks and replace-
able filters-are readily available at
major hardware stores. Be sure the
mask-fits. Beards and facial hair may
keep masks from sealing properly.
Change filters often.
DISPOSABLE PAPER MASKS ARE
NOT ADEQUATE.
7. Use caution when operating the heat
gun. Keep the heat gun moving as
excessive heat will generate fumes
which can be inhaled by the opera-
tor.
8. Keep food and drink out of the work
area. Wash hands, arms and face
and rinse mouth before eating or
drinking. Do not smoke or chew gum
or tobacco in the work area.
9.
10.
Clean up all removed paint and dust
by wet mopping the floors. Use a wet
cloth to clean all walls, sills and any
other surface where paint or dust is
clinging. DO NOT SWEEP, DRY
DUST OR VACUUM. Use a high
phosphate detergent or trisodium
phosphate (TSP) to wash and mop
areas.
At the end of each work session put
the paint chips and debris in a dou-
ble plastic bag, close it with tape or
twist ties, and dispose of properly.
11. Remove protective clothing and
work shoes in the work area to avoid
carrying dust into the rest of the
dwelling. Wash work clothes separa-
tely. Wipe shoes off with a wet rag
that is then washed with the work
clothes. Wash hair and body thor-
oughly with soap and water.
SAVE THESE iNSTRUCTIONS!
Page 5
J English I
OPERATION
TECHNICAL SPECIEICATIONS
Voltage: 120 volts AC
Output: 1400 watts
Temperature:
Step 1 : 120 ° F
Step 2: 800 ° F
Step 3: 1000 ° F
Airflow:
Step 1 : 17.6 cfm
Step 2: 11.3 cfm
Step 3: 17.6 cfm
Weight: 29 oz.
with cord and plug
MAINTENANCE AND CARE
Always disconnect the power plug before
performing any work on the tool.
The air inlets on the rear sides of the tool must
be kept free of dust and dirt. Avoid using the tool
in a dusty environment as dust inside the tool will
cause the tool to malfunction.
The power cord will be damaged if touched by
the hot metal nozzle or accessories.
The tool requires no lubrication.
The operation of any power tool can result in foreign objects being thrown into ]
your eyes, which can result in severe eye damage. Before commencing power
tool operation, always wear safety goggles or safety glasses with slide shields
and a full face shield when needed. We recommend Wide Vision Safety Mask
for use over spectacles or standard safety glasses with side shields, available
at Sears Retail Stores.
Page 6
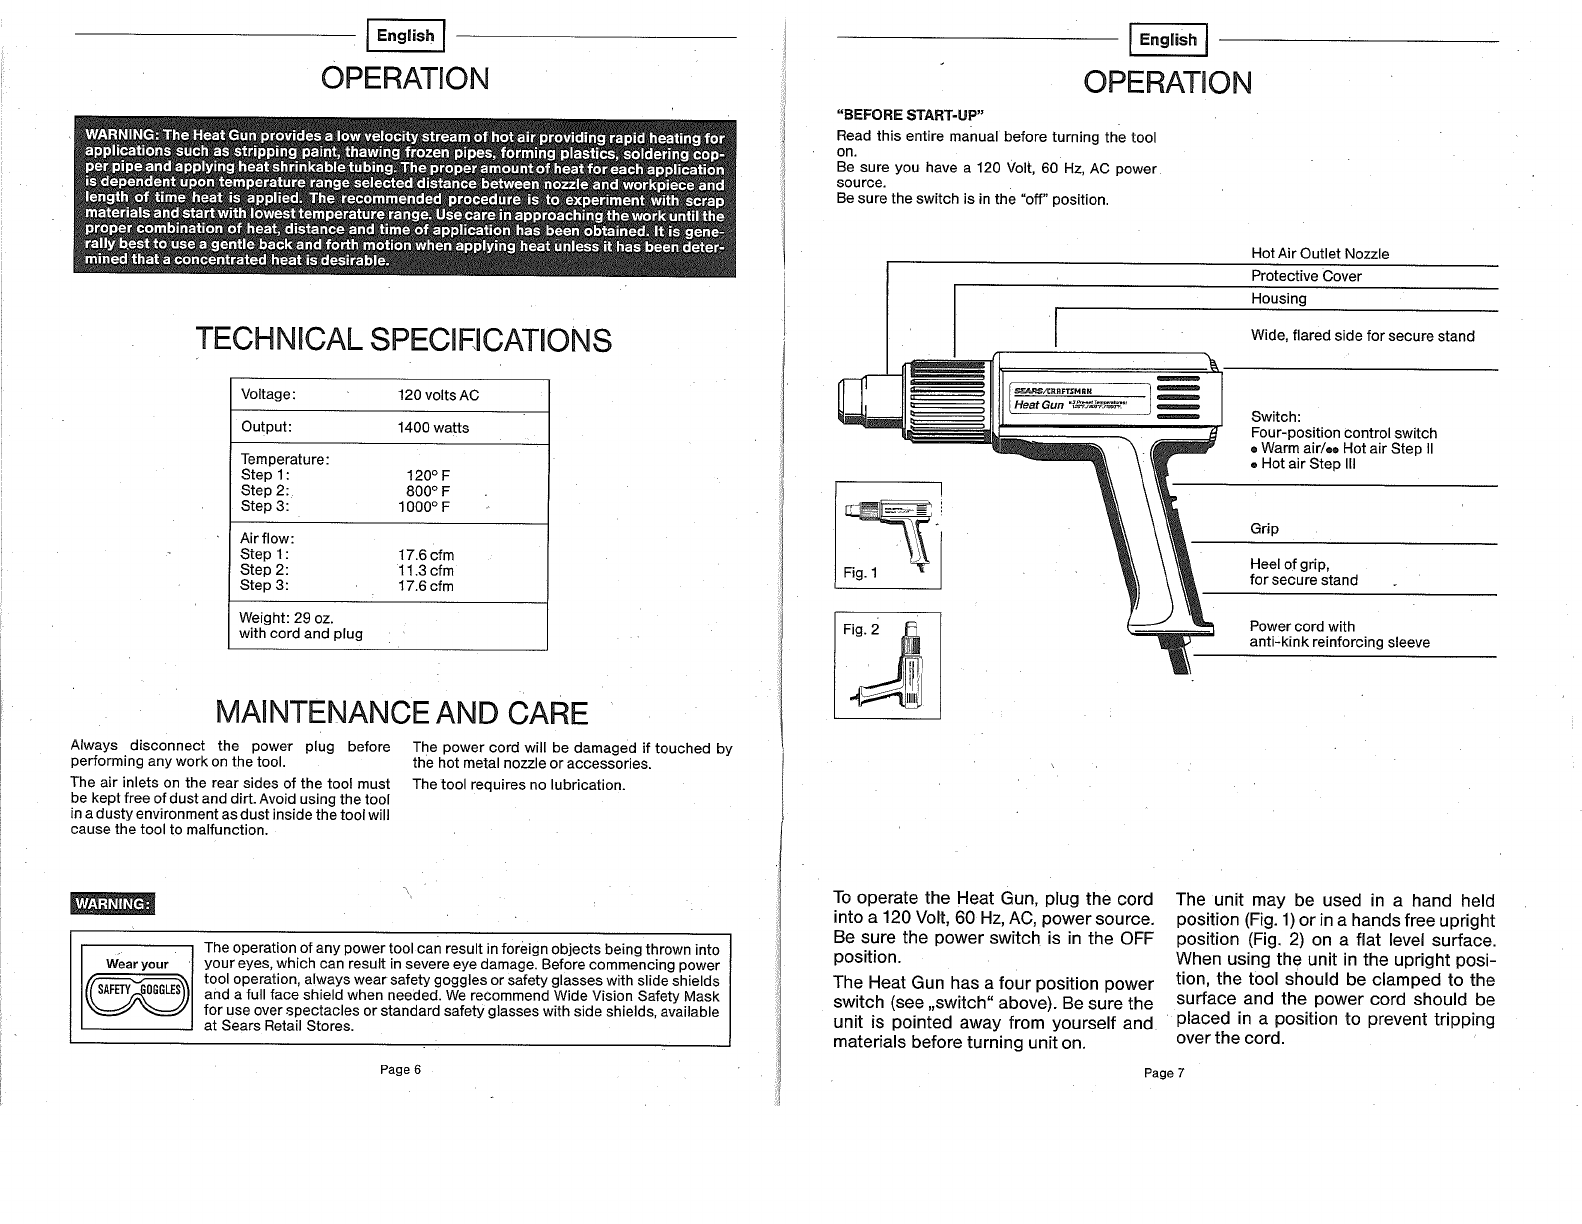
OPERATION
"BEFORE START-UP"
Read this entire manual before turning the tool
on.
Be sure you have a 120 Volt, 60 Hz, AC power
source.
Be sure the switch is in the "off" position.
!
Fig. 1
Hot Air Outlet Nozzle
Protective Cover
Housing
Wide, flared side for secure stand
Switch:
Four-position control switch
®Warm air/co Hot air Step II
• Hot air Step Ill
Grip
Heel of grip,
for secure stand
Power cord with
anti-kink reinforcing sleeve
To operate the Heat Gun, plug the cord The unit may be used in a hand held
into a 120 Volt, 60 Hz, AC, power source, position (Fig. 1)or in a hands free upright
Be sure the power switch is in the OFF position (Fig. 2) on a fiat level surface.
position. When using the unit in the upright posi-
The Heat Gun has a four position power tion, the tool should be clamped to the
switch (see ,,switch" above). Be sure the surface and the power cord should be
unit is pointed away from yourself and placed in a position to _revent tripping
materials before turning unit on. over the cord.
Page 7
IEnglish I
USES FOR YOUR:
S_ AlfltS/ CR F'FSH R °
3 Pre-set Temperatures:
Heat Gun 120°F./800°F../.lOOO°F.
Forming and shaping plastic,
plastic materiaNs
® Soften PVC pipe and other
plastic materials for bending and
shaping
® Soften vinyl floor coverings and
around mouldings
@Soften formica coverings
for shaping on rounded edges
Soldering
@Soldering copper pipe up to
3/4". Can use 90/10 solder
@Activate solder and wire connectors
Drying
• Quick drying of automotive body
fillers
® Drying paint samples
@Drying plaster filling compounds
Thawing
®Thaw frozen water pipes
•Thaw frozen locks
Shrinking
@Shrinking shrink tube insulators
@Heat shrink PVC tubes
®Heat shrink packaging wrap
Roofing
® Heating Modified Bitumen
®Welding Single Ply Material
Removal of adhesives
@Activating Heat sensitive adhesives
®Removalof pressure sensitive,
stickers
@Removalof flooring adhesives
Other Uses
@Fiberglasswork
®Wax removalon skies and
surfboards
@Apply hot patches
®Paintstripping
Q Softening hardened window
glazing
OPlasticwelding
I
ICAUTION: It is recommended that the user experiment
Ion scrap materials before using for aspecific task.
Page 8
ACCESSORIES
rTHE FOLLOWING RECOMMENDED ACCESSORIES ARE CURRENTAND --7
WERE AVAMLABLEAT THE TIME THiS MANUAL WAS PRINTED. !
/
9-11802; 3' inch Surface Nozzle
Provides an even distribution of hot air
over a large surface.
9-11803; 3" inch Window Nozzle
Designed with deflector to direct hot air away
from glass and other delicate surfaces to
prevent overheating.
9-11804; 1 3/16" inch Reflector Nozzle
Reflects hot air flow around surfaces of
small-diameter, heat-sensitive materials
for smooth, even heating.
9-11809; 3" inch Reflector Nozzle
Reflects hot air flow around surfaces of
large-diameter, heat-sensitive materials
for smooth, even heating.
9-11806; 3/4" inch Reduction Nozzle
Concentrates hot air flow and pinpoints it
onto a limited area.
CAUTION: This Heat Gun (9-11801)
not for use with 5/16-in, reduction nozzle, slit welding
nozzle or polystyrene foam cutting accessory (all sold
separately).
Use with these accessories will damage Heat Gun.
Page 9
I English I
, _ARS CRRFTSMRN °
HEAT GUN
HOW TO ORDER REPAIR PARTS
Now that you have purchased your HEAT GUN, should a need ever exist for repair
parts or service, sim r31ycontact anySears Service Center and most Sears, Roebuck
and Co. stores. Be sure to provide all pertinent facts when you call or visit.
The model number of this tool will be found on a label attached to the body of the tool.
"This appliance has a polarized plug (one blade is wider than
the other).
To reduce the risk of electric shock, this plug is intended to fit
in a polarized outlet only one way. If the plug does not fit fully
in the outlet, reverse the plug. If it still does not fit, contact a
qualified electrician.
Do not modify the plug in any way."
NOTES
WHEN ORDERING REPAIR PARTS, ALWAYS GIVE THE FOLLOWING INFORMATION:
@ PART NUMBER
@ MODEL NUMBER
@ PART DESCRIPTION
@ NAME OF ITEM HEAT GUN
All parts listed may be ordered from any Sears Service Center and most Sears Stores.
If the parts you need are not stocked locally, your order wilt be electronically
transmitted to a Sears Re _air Parts Distribution Center for handling.
Page 10 Page11
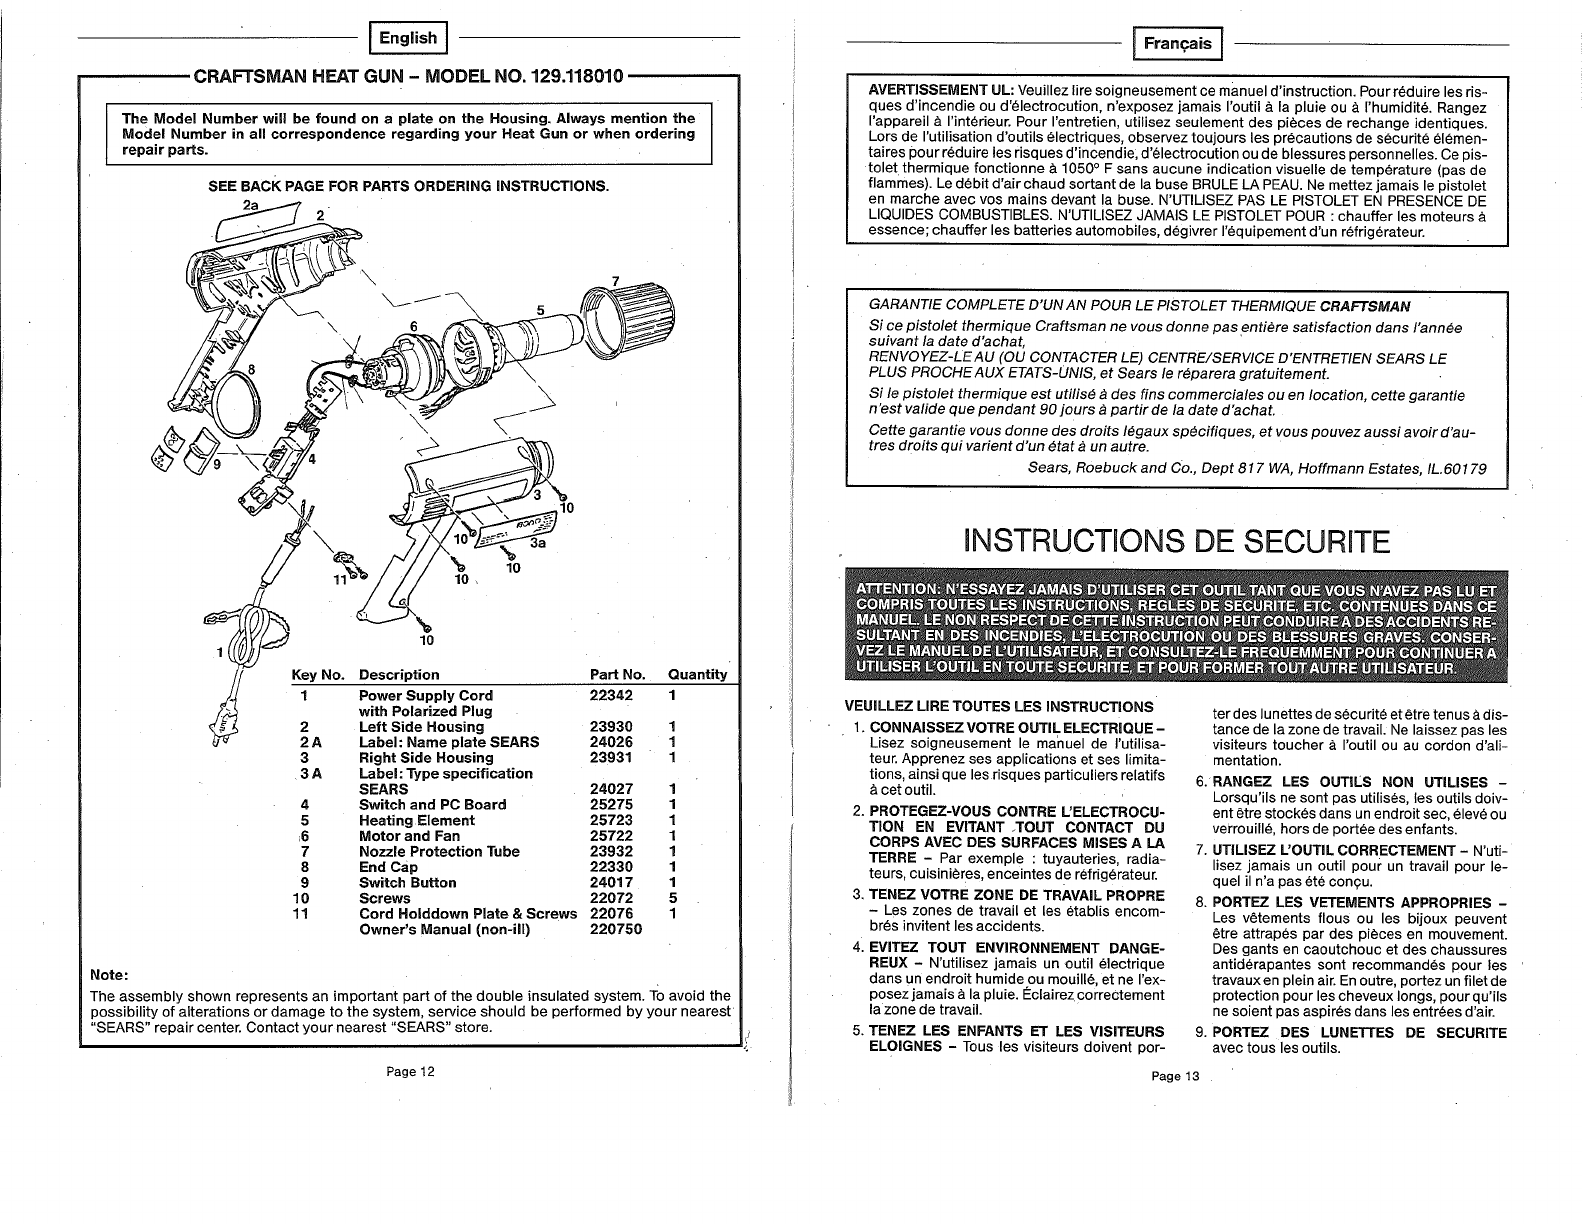
CRAFTSMAN HEAT GUN - MODEL NO. 129.118010
The Model Number will be found on a plate on the Housing. Always mention the
Model Number in all correspondence regarding your Heat Gun or when ordering
repair parts.
SEE BACK PAGE FOR PARTS ORDERING iNSTRUCTiONS.
2a 2
\
\6
10
Key No. Description Part No. Quantity
1Power Supply Cord 22342 1
with Polarized Plug
2 Left Side Housing 23930 1
2 A Label: Name plate SEARS 24026 1
3 Right Side Housing 23931 1
3 A Label: Type specification
SEARS 24027 1
4 Switch and PC Board 25275 1
5 Heating Element 25723 1
6 Motor and Fan 25722 1
7 Nozzle Protection Tube 23932 1
8 End Cap 22330 1
9 Switch Button 24017 1
10 Screws 22072 5
11 Cord Holddown Plate & Screws 22076 1
Owner's Manual (non-ill) 220750
Note:
The assembly shown represents an important part of the double insulated system. To avoid the
;)ossibility of alterations or damage to the system, service should be performed by your nearest
"SEARS" repair center. Contact your nearest "SEARS" store.
Page 12
IFran,cais I
AVERTISSEMENT UL: Veuillez lire soigneusement ce manuel d'instruction. Pour reduire les ris-
ques d'incendie ou d'electrocution, n'exposez jamais I'outil a la pluie ou _I'humidite. Rangez
I'appareil _I'interieur. Pour I'entretien, utilisez seulement des pieces de rechange identiques.
Lots de I'utilisation d'outils electriques, observez toujours les precautions de securite elemen-
taires pour reduire les risques d'incendie, d'electrocution ou de blessures personnelles. Ce pis-
tolet thermique fonctionne & 1050 °Fsans aucune indication visuelle de temperature (pas de
flammes). Le debit d'air chaud sortant de la buse BRULE LA PEAU. Ne mettez jamais le pistolet
en marche avec vos mains devant la buse. N'UTILISEZ PAS LE PISTOLET EN PRESENCE DE
LIQUIDES COMBUSTIBLES. N'UTILISEZ JAMAIS LE PISTOLET POUR : chauffer les moteurs _.
essence; chauffer les batteries automobiles, degivrer I'equipement d'un refrigerateur.
GARANTIE COMPLETE D'UN AN POUR LE PISTOLET THERMIQUE CRAFTSMAN
Si ce pistolet thermique Craftsman ne vous donne pas entiere satisfaction dans I'annee
suivant la date d'achat,
RENVOYEZ-LE AU (OU CONTACTER LE) CENTRE/SERVICE D'ENTRETIEN SEARS LE
PLUS PROCHE AUX ETATS-UNIS, et Sears le reparera gratuitement.
Si le pistolet thermique est utilis_ _des fins commerciales ou en location, cette garantie
n'est valide que pendant 90 jours a partir de la date d'achat.
Cette garantie vous donne des droits I_gaux specifiques, et vous pouvez aussi avoir d'au-
tres droits qui varient d'un _tat _ un autre.
Sears, Roebuck and Co., Dept 817 WA, Hoffmann Estates, IL.60179
INSTRUCTIONS DE SECURITE
VEUILLEZ LIRE TOUTES LES INSTRUCTIONS
1. CONNAISSEZ VOTRE OUTIL ELECTRIQUE -
Lisez soigneusement le manuel de !'utilisa-
teur. Apprenez ses applications et ses limita-
tions, ainsi que les risques particuliers relatifs
eet outil.
2. PROTEGEZ-VOUS CONTRE UELECTROCU-
TION EN EVITANT _TOUT CONTACT DU
CORPS AVEC DES SURFACES MISES A LA
TERRE - Par exemple : tuyauteries, radia-
teurs, cuisinieres, enceintes de refrigerateur.
3. TENEZ VOTRE ZONE DE TRAVAIL PROPRE
- Les zones de travail et les etablis encom-
bres invitent les accidents.
4. EVITEZ TOUT ENVIRONNEMENT DANGE-
REUX - N'utilisez jamais un outil electrique
dans un endroit humide ou mouille, et ne rex-
posez jamais _. la pluie. I_clairezcorrectement
la zone de travail.
5. TENEZ LES ENFANTS ET LES VISITEURS
ELOIGNES - Tousles visiteurs doivent pot-
ter des lunettes de securite et etre tenus & dis-
tance de la zone de travail. Ne laissez pas les
visiteurs toucher & I'outil ou au cordon d'ali-
mentation.
6. RANGEZ LES OUTILS NON UTILISES -
Lorsqu'ils ne sont pas utilises, les outils doiv-
ent etre stockes dans un endroit sec, eleve ou
verrouille, hors de portee des enfants.
7. UTILISEZ UOUTIL CORRECTEMENT - N'uti-
lisez jamais un outil pour un travail pour le-
quel il n'a pas ete con?u.
8. PORTEZ LES VETEMENTS APPROPRIES -
Les v_tements flous ou les bijoux peuvent
etre attrapes par des pieces en mouvement.
Des gants en caoutchouc et des chaussures
antiderapantes sont recommandes pour les
travaux en plein air. En outre, portez un filet de
protection pour les cheveux longs, pour qu'ils
ne soient pas aspires dans les entrees d'air.
9. PORTEZ DES LUNETTES DE SECURITE
avec tousles outils.
Page 13
